

Page 1

TDP0500 & TDP1000
500 MHz & 1 GHz High Voltage Differential Probes
Quick Start User Manual
www.tektronix.com
071-1974-00
Page 2

Copyright © Tektronix. All rights reserved. Licensed software products are owned by Tektronix or its subsidiaries or suppliers, and are protected by
national copyright laws and international treaty provisions.
Tektronix products are covered by U.S. and foreign patents, iss u ed and pending. Information in this publication supersedes that in all previously
published material. Specifications and price change privileges reserved.
TEKTRONIX and TEK are registered trademarks of Tektronix, Inc.
KlipChip, TekVPI, and TwinFoot are trademarks of Tektronix, Inc.
TwinTip is a registered trademark of Tektronix, Inc.
Contacting Tektronix
Tektronix, Inc.
14200 SW Karl Braun Drive
P.O . Bo x 5 00
Beaverton, OR 97077
USA
For product information, sales, service, and technical support:
In North America, call 1-800-833-9200.
Worldwide, visit www.tektronix.com to find contacts in your area.
Page 3

Warranty 2
Tektronix warrants that this product will be free from defects in materials and workmanship for a period of one (1) year from the date of shipmen t. If
any such product proves defective during this warranty period, Tektronix, at its option, either will repair the defective product without charge for parts
and labor, or will provide a replacement in exchange for the defective product. Parts, modules and replacement products used by Tektronix for
warranty work may be new or reconditioned to like new performance. All replaced parts, modules and products become the property of Tektronix.
In order to obtain service under this warranty, Customer must notify Tektronix of the defect before the expiration of the warranty period and make
suitable arrangements for the performance of service. Customer s hall be responsible for packaging and shipping the defective product to the service
center designated by Tektronix, with shipping charges prepaid. Tektronix shall pay for the return of the product to Customer if the shipment is to a
location within the c ountry in which the Tektronix service center is located. Customer shall be responsib le for paying all shipping charges, duties,
taxes, and any other charges for products returned t o any other locations.
This warra nty shall not apply to any defect, failure or damage caused by improper use or improper or inadequate maintenance and care. Tektronix
shall not be obligated to furnish service under this warranty a) to repair damage resulting from attempts by personnel other than Tektronix
representatives to install, repair or service the product; b) to repair damage resulting from improper use or connection to incompatible equipment; c) to
repair any damage or malfunction caused by the use of non-Tektronix supplies; or d) to service a product that has been modified or integrated with
other products when the effect of such modification or integration increases the time or difficulty of servicing the product.
THIS WARRANTY IS GIVEN BY TEKTRONIX WIT H RESPECT TO THE PRODUCT IN LIEU OF ANY OTHER WARRANTIES, EXPRESS OR
IMPLIED. TEKTRONIX AND ITS VENDORS DISCLAIM ANY IMPLIED WARRANTIES OF MERCHANTABILITY OR FITNESS FOR A PARTICULAR
PURPOSE. TEKTRONIX’ RESPONSIBILITY TO REPAIR OR REPLACE DEFECTIVE PRODUCTS IS THE SOLE AND EXCLUSIVE REMEDY
PROVIDED TO THE CUSTOMER FOR BREACH OF THIS WARRANTY. TEKTRONIX AND ITS VENDORS WILL NOT BE LIABLE FOR ANY
INDIRECT, SPECIAL, INCIDENTAL, OR CONSEQUENTIAL DAMAGES IRRESPECTIVE OF WHETHER TEKTRONIX OR THE VENDOR HAS
ADVANCE NOTICE OF THE POSSIBILITY OF SUCH DAMAGES.
Page 4

Page 5

Table of Contents
General Safe ty Summary . .. ............................................................................................................... iii
EnvironmentalConsiderations ............................................................................................................. vi
Preface..................................................................................................................................... viii
Documentation....................................................................................................................... viii
Conventions Used in this Manual ................................................................................................... viii
Returningthe Probe for Servicing .................................................................................................... ix
Key Features ............................................................................................................................... 1
Operating Considerations.................................................................................................................. 2
Installation .................................................................................................................................. 4
Connecting to the Host Instrument ................................................................................................... 4
Probe Controls and Indicators........................................................................................................ 5
Functional Check ........................................................................................................................... 9
Required Equipment.................................................................................................................. 9
Calibration ................................................................................................................................. 11
Prerequisites......................................................................................................................... 11
Required Equipment................................................................................................................. 11
Test Procedure....................................................................................................................... 12
Table of Contents
Basic Operation............................................................................................................................ 15
Probe Head Assembly ...............................................................................................................15
TDP0500 & TDP1000 Quick Start User Manua l i
Page 6

Table of Co ntents
Applications................................................................................................................................ 23
Accessories and Options.................................................................................................................. 27
Probing Principles ......................................................................................................................... 43
Maintenance ............................................................................................................................... 45
Index
Probe Input........................................................................................................................... 16
Probe Offset and AutoZero..........................................................................................................19
Using Standard Accessories . ....................................................................................................... 27
Optional Accessories ................................................................................................................ 37
Options............................................................................................................................... 42
Probe Grounding. . ................................................................................................................... 43
Input Impedance and Probe Loading. .. ............................................................................................. 44
Host Instrument Firmware ........................................................................................................... 45
Error Condition....................................................................................................................... 45
Replacement Parts .................................................................................................................. 46
Cleaning.............................................................................................................................. 46
ii TDP0500 & TDP1000 Quick Start User Manual
Page 7

General Safety Summary
Review the following safety precautions to avoid injury and prevent damage to this product or any products connected to it.
To avoid potential hazards, use this product only as specified.
Only qualified personnel should pe rform service procedures.
While using this product, you may need to access other parts of a larger system. Read the safety sections of the other component
manuals for warnings and cautions related to operating the system.
To Avoid Fire or Personal Injury
Connect and Disconnect Properly. Do not connect or disconnect probes or t est leads while they are connected to a voltage
source.
Ground the Product. This product is indirectly grounded through the grounding conductor of the mainframe power cord. To avoid
electric shock, the grounding conductor must be connected to earth ground. Before making connections to the input or output
terminals of the product, ensure that the product is properly grounded.
Observe All Terminal Ratings. To avoid fire or shock hazard, observe all rating s a nd markings on the product. Consult the
product manual for further ratings information before making connections to the product.
Connect the probe reference lead to earth ground only.
Do not apply a potential to any t erminal, including the common terminal, that exceeds the maximum rating of that terminal.
Do Not Operate Without Covers. Do not operate this product with covers or panels removed.
General Safety Summary
Do Not Operate With Suspected Failures. If you suspect that there is damage to this product, have it inspected by qualified
service personnel.
TDP0500 & TDP1000 Quick Start User Manua l iii
Page 8
General Safety Summary
Avoid Exposed Circuitry. Do not touch exposed connections and components when power is present.
Do Not Operate in Wet/Damp Conditions.
Do Not Operate in an Explosive Atmosphere.
Keep Product Surfaces Clean and Dry.
TermsinthisManual
These terms may appear in this manual:
WARNING. Warning statements ide ntify conditions or practices th at could result in injury or loss of life.
CAUTION. Caution statements identify conditions or practices that could result in damage to this product or other property.
Symbols and Terms on the Product
These terms may appear on the product:
DANGER indicates an injury hazard immediately accessible as you read the marking.
WARNING indicates an injury hazard not immediately accessible as you read the marking.
CAUTION indicates a hazard to property including the product.
iv TDP0500 & TDP1000 Quick Start User Manual
Page 9

The following symbols may appear on the product:
General Safety Summary
TDP0500 & TDP1000 Quick Start User Manua l v
Page 10

Environmental Considerations
Environmental Considerations
This section provides information about the environmental impact of the prod uct.
Product End-of-Life Handling
Observe the following guidelines when recycling an instrument or compo nent:
Equipment Recycling. Production of this equipment required the extraction and use o f natural resources. The equipment may
contain substances that could be harmful to the environment or human health if improperly handled at the product’s end of life. In
order to avoid release of such substances into the environment and to reduce the use of natural resources, we encourage you to
recycle this product in an appropriate system that will ensure that most of the materials are reused or recycled appropriately.
The symbol shown below indicates that this product complies with the European Union’s r equirements according to Directive
2002/96/EC on waste electrical and electronic equipment (W EEE). For information about recycling options, check the
Support/Service section of the Tektronix Web site (www.tektronix.com).
vi TDP0500 & TDP1000 Quick Start User Manual
Page 11

Environmental Considerations
Restriction of Hazardous Substances
This product has been classified as Monitoring and Control equipment, and is outside the scope of the 2002/95/EC RoHS Directive.
This product is known to contain lead, cadmium, mercury, and hexavalent chromium.
TDP0500 & TDP1000 Quick Start User Manua l vii
Page 12

Preface
Preface
This manual describes the installation and operation of the TDP0500 and TDP1000 High Voltage Differential probes. Basic probe
operations and concepts are presented in this manual. You can also check the Tektronix Web site for this document and other
related information.
Documentation
To read about Read these documents
First Time Operation, Functional Check, Operating Basics
Specifications, Performance Verification The Technical Reference Manual.
In-depth oscilloscope op eration, user interfa ce, GPIB co mmands The online help (from the Help menu on the
*
To access the documentation that is installed on your instrument, click Start in t he taskbar and select Programs > TekApplications.
This Manual.
host instrument).
*
Conventions Used in this Manual
The following icon is used throughout this manual to indicate a step sequence.
viii TDP0500 & TDP1000 Quick Start User Manual
Page 13
Returning the Probe for Servicing
If your probe requires servicing, yo u must return the probe to Tektronix. If the original packaging is unfit for use or not available, use
the following packaging guidelines:
Preparation for Shipment
1. Use a corrugated cardboard shipping
carton having inside dimensions at
least one inch greater than the probe
dimensions. The box should have a carton
test strength of at least 200 pounds.
2. Put the probe into an antistatic bag or wrap
it to protect it from dampness.
3. Place the probe into the box and stabilize it
with light packing material.
4. Seal the carton with shipping tape.
5. Refer to Contacting Tektronix at the
beginning of this manual for the shipping
address.
Preface
TDP0500 & TDP1000 Quick Start User Manua l ix
Page 14

Preface
x TDP0500 & TDP1000 Quick Start User Manual
Page 15
Key Features
The T DP0500 and TDP1000 High Voltage Differential probes enable you to make accurate differential me asurements from DC to
500 MHz (TDP0500), or 1 GHz (TDP1000), using oscilloscopes featuring the new Tektronix TekVPI oscilloscope interface.
Key features include:
DC to 500 MHz bandwidth (TDP0500) or
1 GHz (TDP1000)
Selectable±42Vor±4.25V(DC+
peak AC) differential input voltage ranges
±42 V DC offset range
100 Hz, 10 kHz, 1 MHz, and Full bandwidth
limiting filters
1MΩ differential input resistance
<1 pF differential input capacitance
>18 dB CMRR @ 250 MHz (42 V range)
Provides automatic units scaling on the
oscilloscope display
Large-signal performance verification
capability
Key Features
TDP0500 & TDP1000 Quick Start User Manua l 1
Page 16

Operating Considerations
Operating Considerations
Table 1: TDP0500 & TDP1000
Characteristic Description
Input Voltage
Temperature
Humidity
Altitude
Pollution Degree 2, Indoor use only
Differential:
±4.25 V (DC + peak AC), 3 V RMS
±42 V (DC + peak AC), 30 V RMS
Common Mode:
±35 V (DC + peak AC), 25 V RMS (Both ranges; input referenced to ground)
Operating: 0 to +40 °C (+32 °F to +104 °F)
Nonoperating: -55 °C to +75 °C (-67 °F to +167 °F)
Operating: +30 °C to +40 °C (+86 °F to +104 °F) 0-90% RH
Nonoperating: +30 °C to +60 °C (+86 °F to +140 °F) 0-90% RH
Operating: Up to 3000 meters (10,000 feet)
Nonoperating: Up to 12192 meters (40,000 feet)
2 TDP0500 & TDP1000 Quick Start User Manual
Page 17

Figure 1: Voltage versus freque ncy derating curve
Operating Considerations
TDP0500 & TDP1000 Quick Start User Manua l 3
Page 18
Installation
Installation
Connecting to the Host Instrument
WARNING. Your TekVPI instrument may
require a firmware upgrade to support full
functionality of the TDP0500 and TDP1000
probes. Before you connect the probe, check
the version re quirements. (See page 45, Host
Instrument Firmware.)
1. Slide the probe into the TekVPI receptacle.
The probe snaps when fully engaged.
When you connect the probe, the host
instrument reads information from the
probe and identifies the probe type.
2. To disconnect, press the latch release
button and pull away from the instrument.
4 TDP0500 & TDP1000 Quick Start User Manual
Page 19
Probe Controls and Indicators
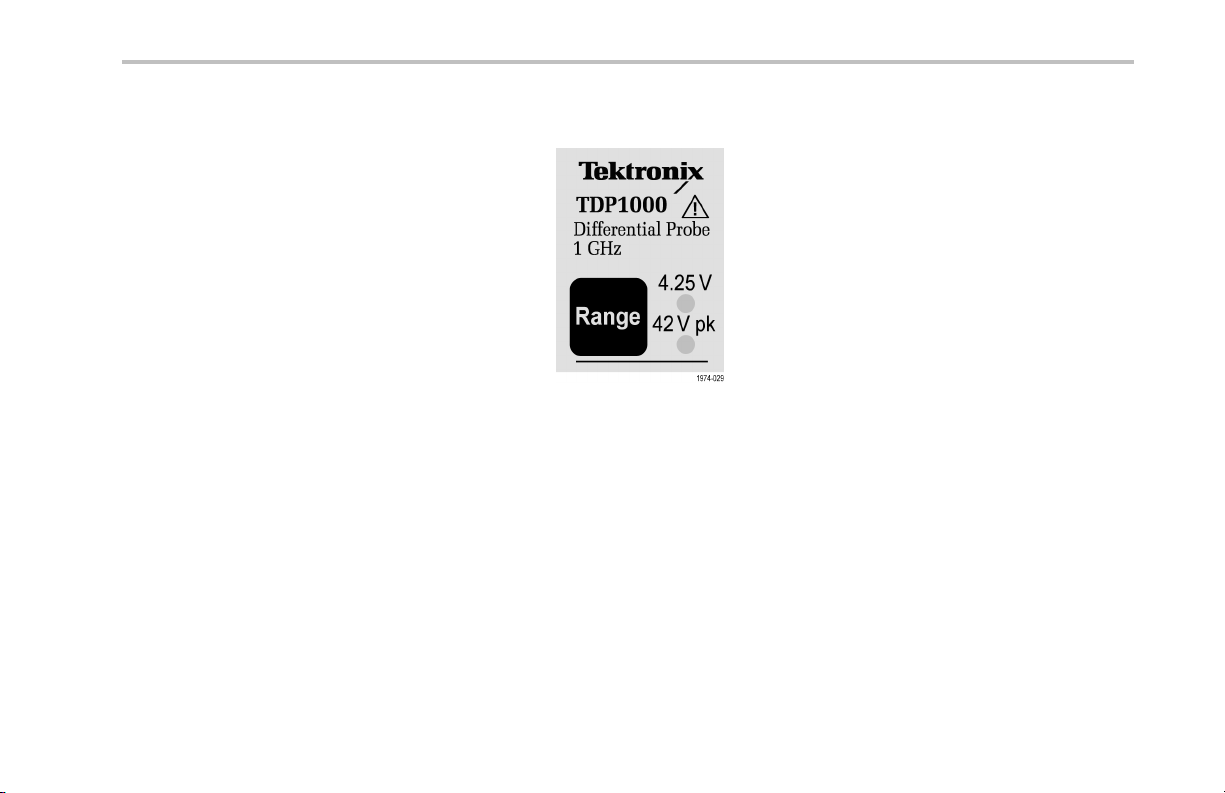
Range Button and LEDs
When the probe is powered on, all LEDs briefly
light d uring the power-on self test routine, and
then one of the Range LEDs remains lit. This
indicates that the probe is in normal operating
mode.
Press the Range button to toggle the range
selection. The corresponding LED lights to
indicate the selected range.
NOTE. The host instrument sets all probe
settings to the last known state for the
probe/channel combination. If none of the
Range LEDs are lit, the instrument may have
detected an error condition. Disconnect and
reconnect th e probe to clear the error.
Installation
TDP0500 & TDP1000 Quick Start User Manua l 5
Page 20

Installation
Bandwidth Limit Button and LEDs
Press the Bandwidth Limit button to select one
of four limit values. The corresponding LED
lights to indicate the selected bandwidth limit.
When no LED is lit, the probe is operating at
full bandwidth.
6 TDP0500 & TDP1000 Quick Start User Manual
Page 21

DC Reject Button
Press the DC Reject but ton to eliminate the DC
component of the measured signal from the
output of the probe. The LED lights to indicate
that the DC Reject is enabled.
DC reject is useful when you are measuring
small amplitude signals superimp osed on a
large differential offset component. DC reject
generates an internal offset that cancels the
DC component of the signal.
Because the input is always directly coupled,
the DC reject mode does not increase the
common and differential mode dynamic ranges
for DC components. The DC reject mode
also disables any capability of external offset
adjustment.
Press the button again to disable DC Reject
and return to DC coupling.
Installation
TDP0500 & TDP1000 Quick Start User Manua l 7
Page 22

Installation
Menu Button
1. Press the probe Menu button to display the
Probe Control screen on the oscilloscope.
NOTE. Probe menu screens vary slightly
between oscilloscope series; DPO7000 Series
screens are shown here.
This screen includes controls for probe
functions that are not accessible on the probe,
such as AutoZero and Offset. Other functions,
such as Bandwidth Limit, can be controlled
from both locations.
2. Use the touch-screen buttons on the
instrument to set the probe parameters.
3. Press the probe Menu buttonagainto
close the Probe C ontrol screen.
8 TDP0500 & TDP1000 Quick Start User Manual
Page 23

Functional Check
Use the following procedure to check that your probe is functioning properly. If you want to verify that your probe meets the warranted
specifications, refer to the Performance Verification procedures in the TDP0500 & TDP1000 Probes Technical Reference Manual.
Required Equipment
Functional Check
Description and quantity Performance requirement Recommended example
1
Oscilloscope Te kVPI Interface Tektronix DPO7000 Series
Y-lead adapter
0.25-in square pins for probe tip
196-3434-XX
2
connections
SMT KlipChip adapters (2)
1
Nine-digit part numbers (xxx-xxxx-xx) are Tektronix part numbers.
2
Standard probe accessory
0.25-in square pins-to-mini clips 206-0364-XX
2
TDP0500 & TDP1000 Quick Start User Manua l 9
Page 24

Functional Check
Signal
1. Connect the probe to any channel of the
oscilloscope and set the oscilloscope to
display that channel.
2. Use the Y-lead Adapter and two SMT
KlipChips to connect the probe tip to
the PROBE COMP terminals on the
oscilloscope.
3. Press AUTOSET (or adjust the
oscilloscope) to display the calibration
waveform. A stable waveform indicates
that your probe is functioning properly.
10 TDP0500 & TDP1000 Quick Start User Manual
Page 25

Calibration
The probe calibration routine minimizes your measurement errors by optimizing the gain and offset of the probe and oscilloscope
combination. We recommend that you repeat the probe calibration on each channel th at you use. Individual calibration constants
are stored for each probe on each channel.
NOTE. Probe calibration functions are not available on all oscilloscope mode ls.
Prerequisites
The e quipment must be warmed up for 20 minutes, and the calibration sta tus of the host instrument must be pass.
Required Equipment
The r equired equipment for calibration is the same as for the functional check. (See page 9, Required Equipment.)
Calibration
TDP0500 & TDP1000 Quick Start User Manua l 11
Page 26

Calibration
Test Procedure
Check the Calibration Status of the instrument:
1. From the Utilities menu, select Instrument
Calibration.
2. In the Sta tus box, check that pass is
displayed.
3. If the Instrument Calibration Status is not
pass, run the Signal Path Compensation
routine: Disconnect all probes and signal
sources from the oscilloscope, and select
Calibrate. When pass displays in the
status bo x, proceed to the next step.
12 TDP0500 & TDP1000 Quick Start User Manual
Page 27

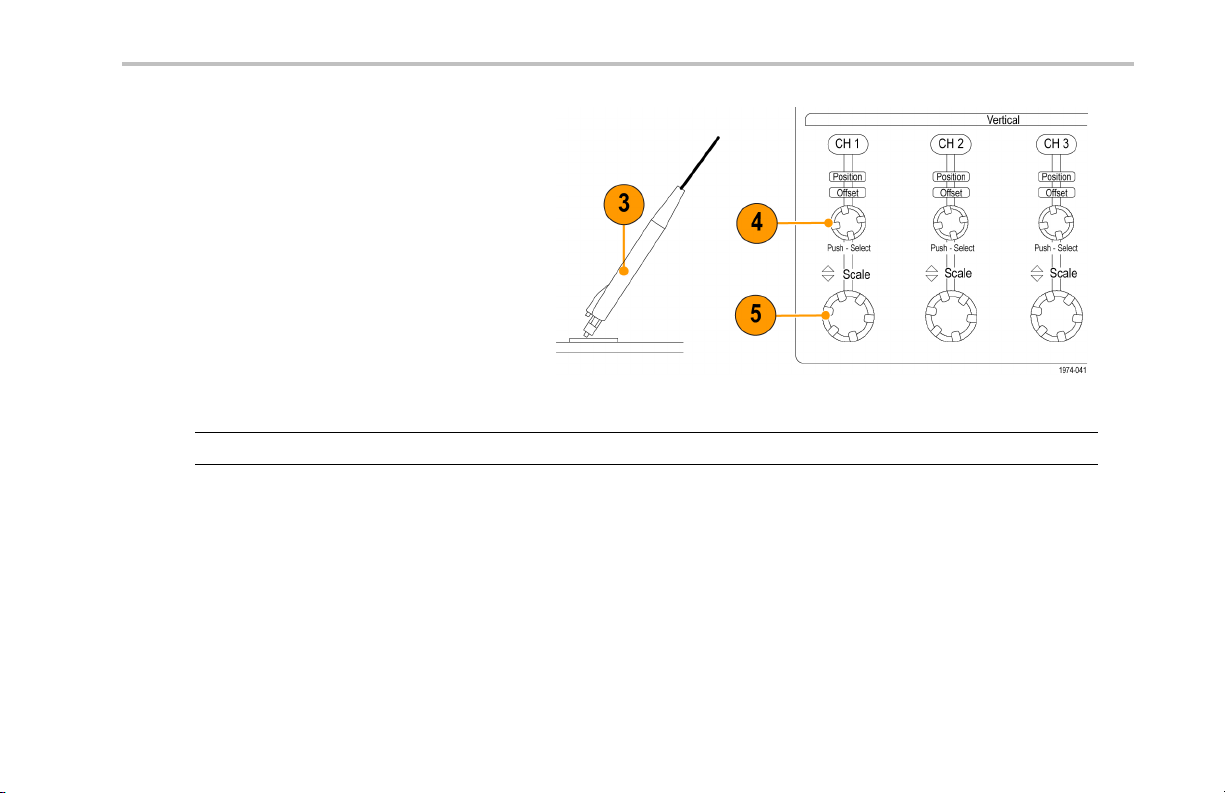
4. Connect the probe to the oscilloscope
PROBE COMP connector.
5. From the Vertical menu, select Probe Cal.
Calibration
TDP0500 & TDP1000 Quick Start User Manua l 13
Page 28
Calibration
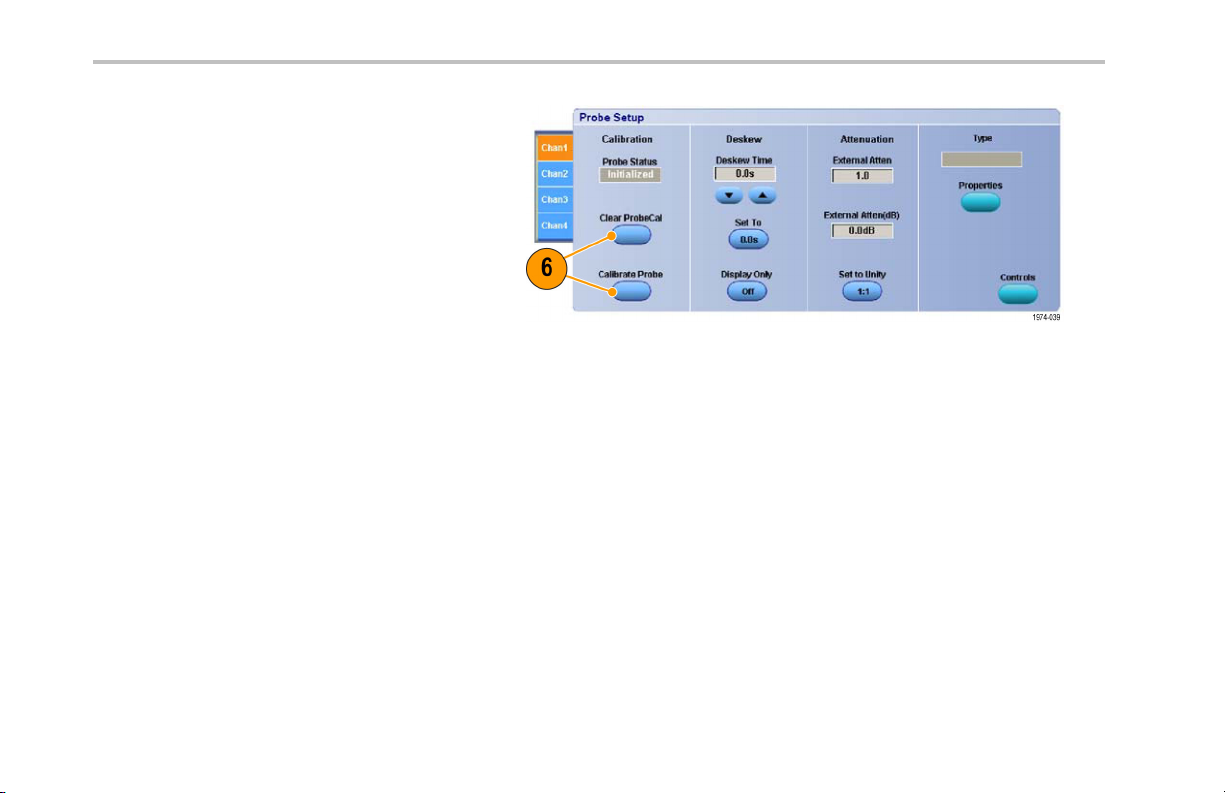
6. When the Probe Setup screen appears,
select Clear ProbeCal, and then select
Calibrate Probe.
The probe calibration routine begins.
When the ro utine completes, a notifier
appears. Close the notifier and begin using
your probe.
14 TDP0500 & TDP1000 Quick Start User Manual
Page 29

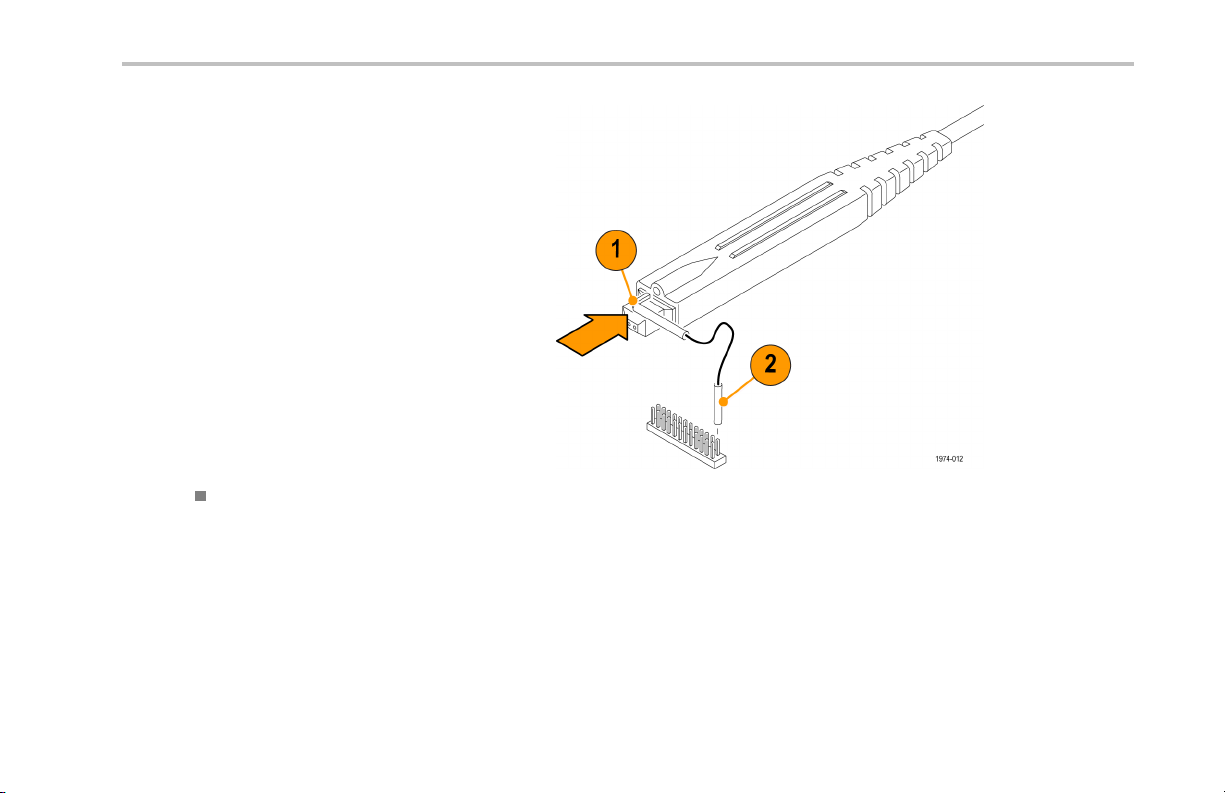
Basic Operation
Follow these operating guidelines to get optimum performa nce from your probe.
Probe Head Assembly
The probe head is de signed for ease of use
andhighperformance. Itssmallsizemakesit
easy to handle in tight areas.
1. The probe tip sockets are sized to press
onto two 0.025 inch pins spaced 0.100 inch
apart.
2. The ground socket provides a short
ground path for ground connection s. Most
differential measurements do not require a
ground connection, however.
More information on the ground connection is
available. (See page 43, Probe Grounding.)
Basic Operation
TDP0500 & TDP1000 Quick Start User Manua l 15
Page 30

Basic Operation
Probe Input
The prob e is electrically protected against static voltage. However, if you apply voltages above its design limits you may damage
the probe tip amplifier. The limits are shown in the 4.25 V and 42 V range graphs on the following pages. (See Figu re 2 on
page 17.) (See Figure 3 on page 18.)
Common-Mode Signal Range
The common-mode signal range is the maximum volta ge that you can apply to each input, with respect to earth ground, without
saturating the input circuitry of the probe. A common-mode voltage that exceeds the common-mode signal range may produce an
erroneous output waveform even when the differential-mode specification is met.
To verify the common-mode signal is within specification, set the probe to the 42 V range, temporarily connect one of the probe
inputs to ground, and connect the o ther probe input to one output of the differential signal. Repeat the procedure to test the
other output of t he differential signal.
Differential-Mode Signal Range
The differential-mode sign al range is the maximum voltage difference between the (+) and (-) inputs that the probe can accept
without disto rting the signal. The distortion from a voltage that is too large can result in an invalid measurement.
16 TDP0500 & TDP1000 Quick Start User Manual
Page 31

Figure 2: Dynam ic and Offset Limitations, 4.25 V Range
Basic Operation
TDP0500 & TDP1000 Quick Start User Manua l 17
Page 32

Basic Operation
Figure 3: Dynamic and Offset Limitations, 42 V Range
18 TDP0500 & TDP1000 Quick Start User Manual
Page 33

Probe Offset and AutoZero
The prob e offset is adjustable to permit operation within the linear range of the probe and to increase the sen sitivity of the probe at
higher DC measurement voltages. The AutoZero routine eliminates DC offset errors (drift) in the probe signal path, and aligns the
offset value of the probe to the oscilloscope. We recommend that you perform the AutoZero routine first (accessible through the
probe Menu button), and then adjust the offset to achieve optimal probe performance.
AutoZero
NOTE. For best accuracy, set the Volts/Div
that you intend to use before you execute the
AutoZero routine.
1. Press the Menu button on the probe to
display the Probe Control screen on the
oscilloscope.
2. Short the probe tips to ground.
3. Press the AutoZero buttononthe
instrument to execute the AutoZero routine.
Basic Operation
TDP0500 & TDP1000 Quick Start User Manua l 19
Page 34

Basic Operation
Offset
To set the probe offset, follow these steps:
NOTE. See your oscilloscope manual for
specific instructions on using the offset control.
1. Use the vertical position control to set a
2. Verify that the DC Reject LED on the probe
zero reference level on the oscilloscope
display.
is not lit (the oscilloscope coupling is set
to DC).
20 TDP0500 & TDP1000 Quick Start User Manual
Page 35
Basic Operation
3. Attach the probe to the circuit.
4. Adjust the offset to bring the trace to the
oscilloscope zero reference.
5. If you change the volts/division setting,
adjusttheoffsettokeepthetraceonthe
zero reference level.
NOTE. The probe has two linear operating ranges: ±4.25 V and ±42 V. The offset rang e is ±42 V for both operating ranges.
TDP0500 & TDP1000 Quick Start User Manua l 21
Page 36

Basic Operation
22 TDP0500 & TDP1000 Quick Start User Manual
Page 37

Applications
The following example shows a simplified AC/DC circuit diagram that uses the TDP0500 or TDP1000 probe and a DPO7000
oscilloscope. The oscilloscope is loaded with the DPOPWR power measurement software app lication to solve a typical test problem.
Measure Switching Loss
In this example, you want to minimize the power loss at the switching device to improve the efficiency of the power supply.
1. Connect the differential probe across t he switching device, and a current probe in series with the device. (See Figure 4.)
Applications
Figure 4: Power supply test points
TDP0500 & TDP1000 Quick Start User Manua l 23
Page 38

Applications
2. Run the DPOPWR application.
3. Select the Power Device tab.
4. Select Switching Loss option and press the Configure button.
5. In the Source Configuration Panel, set the appropriate I-Probe Settings.
6. Select the Deskew button to deskew probes and channels.
7. Select Switching Loss measurement.
8. Select Run to acquire data and display the results.
(See Figure 5 on page 25.)
24 TDP0500 & TDP1000 Quick Start User Manual
Page 39
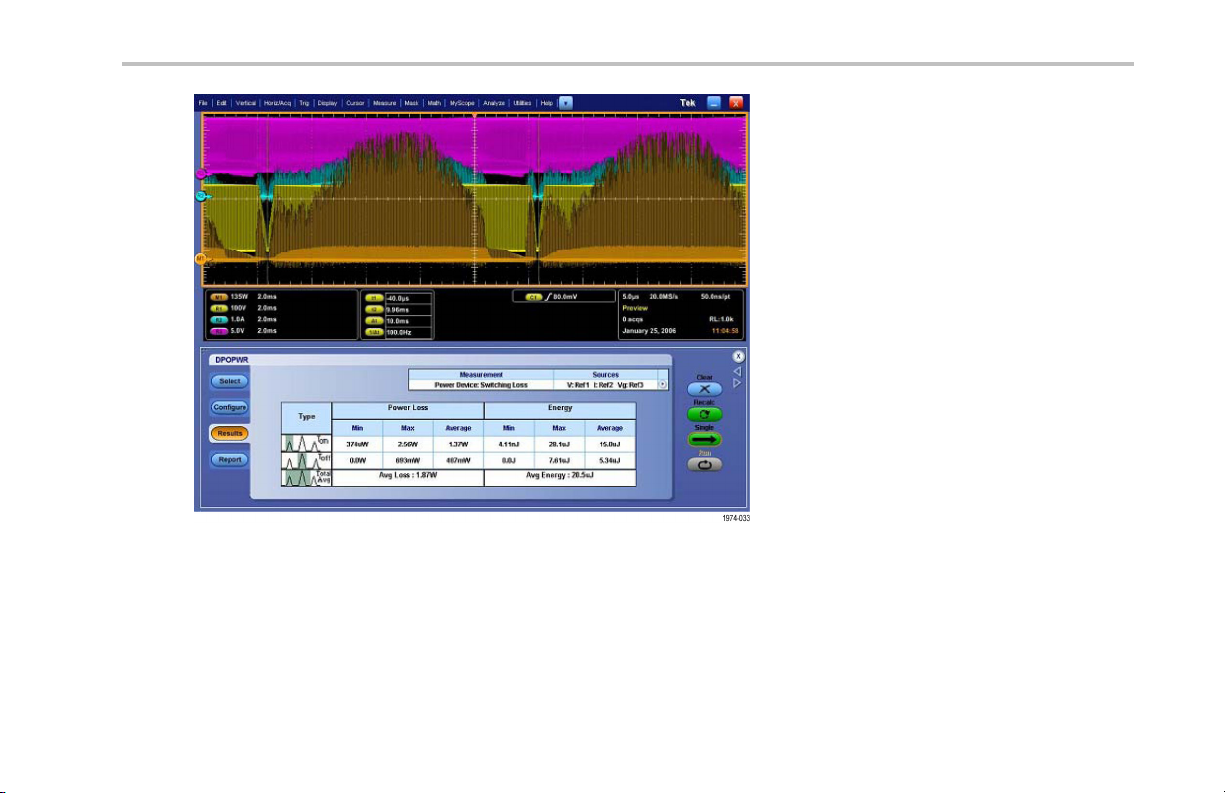
Figure 5: Switching loss result s display
Applications
TDP0500 & TDP1000 Quick Start User Manua l 25
Page 40

Applications
26 TDP0500 & TDP1000 Quick Start User Manual
Page 41
Accessories and Options
This section lists the standard accessories and provides informa tion on how to use the accessories. Specifications are provided
where appropriate so that you can choose the accessory that best fits your needs. In some cases, reorder kit quantities differ from
the actual number of accessories included with the probe.
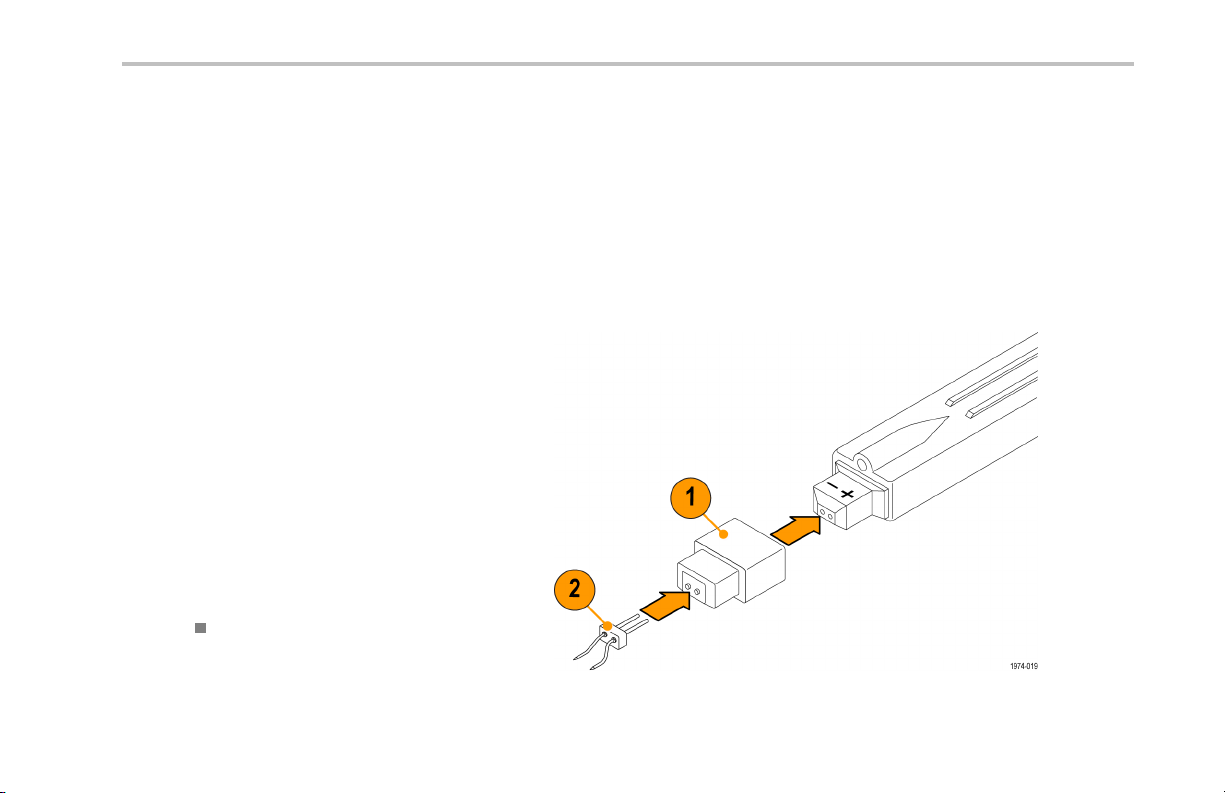
Using Standard Accessories
Tip Saver
Use the Tip Saver to prolong the life of your
probe tip contacts. The Tip Saver bears the
wear of repeated connections rather than the
probe tips.
1. Connect the Tip Saver to the probe.
2. Connect the probe tip accessory that y ou
want to use.
Two Tip Savers are included with the probe.
Reorder Tektronix part number:
016-1781-XX qty. 2
Accessories and Options
TDP0500 & TDP1000 Quick Start User Manua l 27
Page 42
Accessories and Options
Straight Pin Probe Tips
Use the straight pin probe tips for probing
100 mil-spaced components by hand. You can
also use the tips with the other socketed leads
and adapters.
WARNING. The tips have sharp points. To
prevent injury, use care when you handle the
tips.
1. Push the tip into the socket until it is
seated. You can use either end of the tip.
Do not force the tip.
2. Probe your circuit.
Eight probe tips are included with th e probe.
Reorder Tektronix part number:
016-1890-XX qty. 8
28 TDP0500 & TDP1000 Quick Start User Manual
Page 43

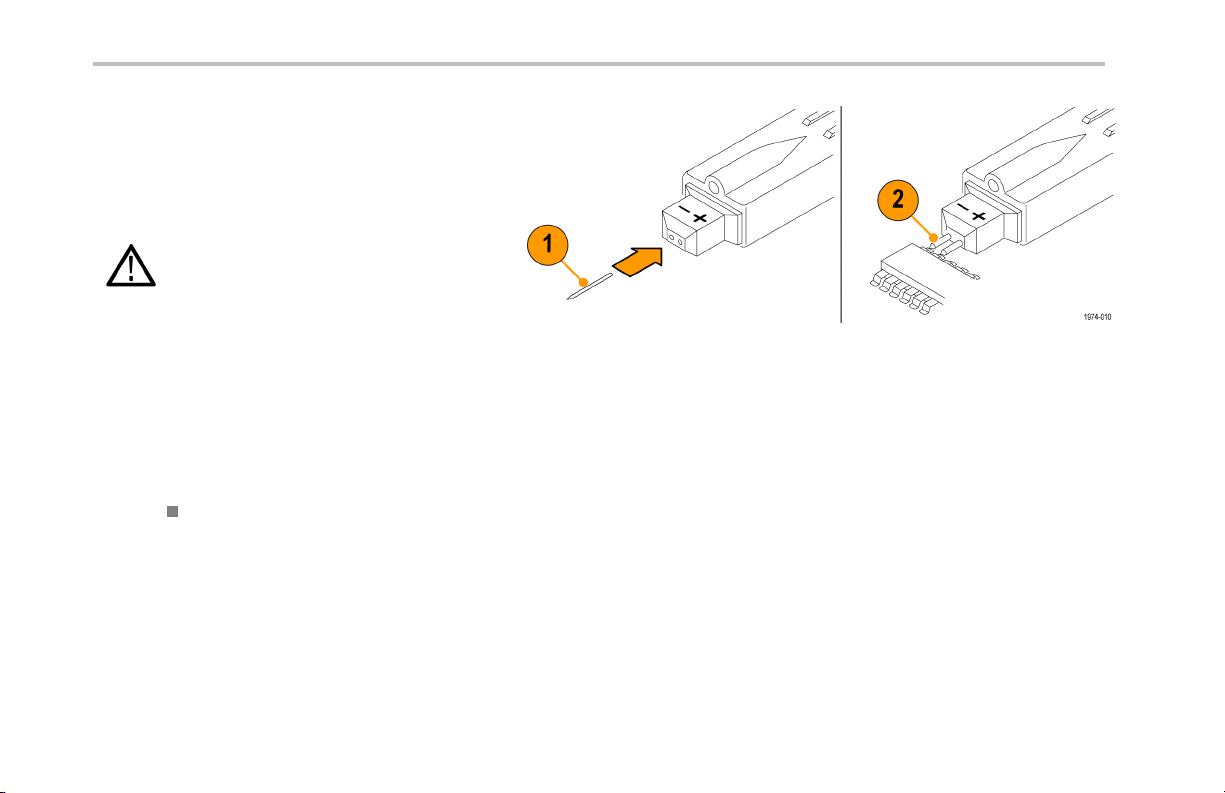
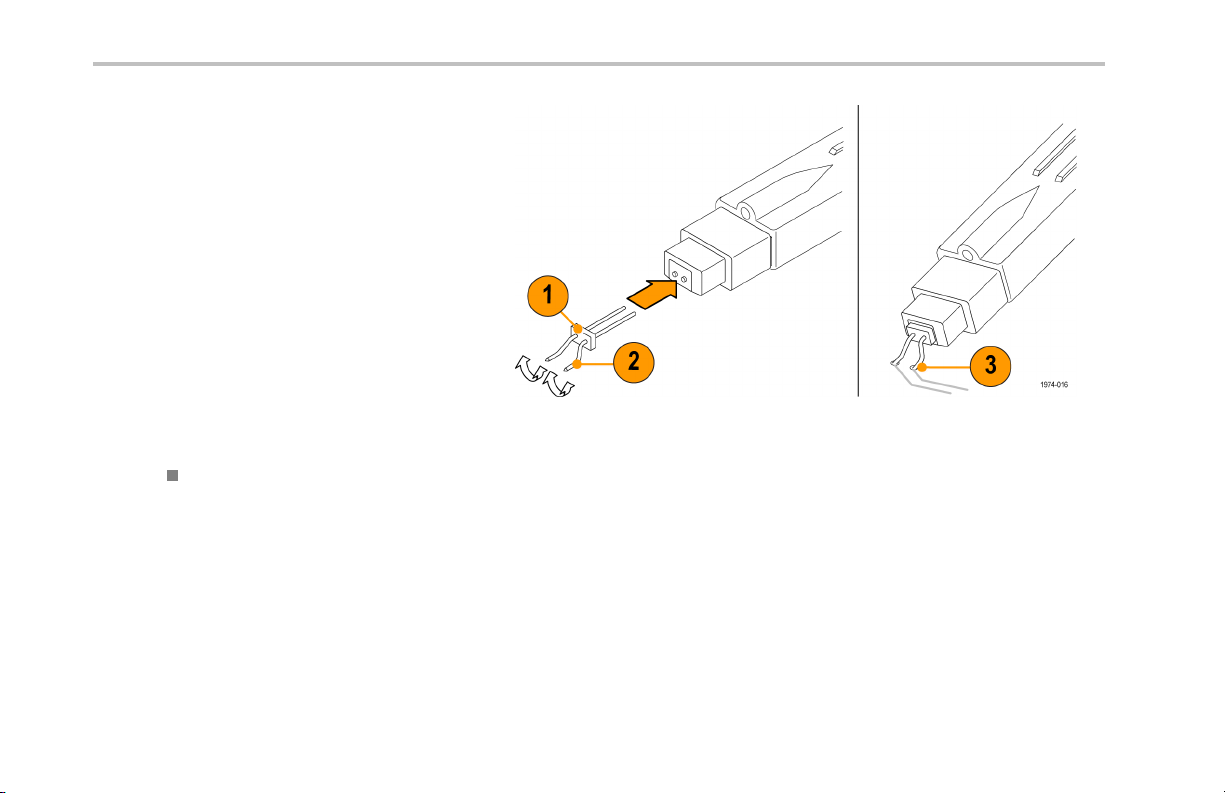
Longhorn Adapter
This accessory has fine pins for probing circuit
board through-holes (vias). The pin spacing
adjusts from 0 to 0.35 in.
WARNING. The pins have sharp points. To
prevent injury, use care when you handle the
adapter.
1. Push the adapter into the probe until it is
seated. Do not force the tip.
2. Adjust the spacing between the pins to suit
your needs.
3. Probe your circuit.
Two adapters are included with the probe.
Reorder Tektronix part number:
016-1780-XX qty. 5
Accessories and Options
TDP0500 & TDP1000 Quick Start User Manua l 29
Page 44

Accessories and Options
Solder-Down Adapter
Use the Solder-Down adapter to probe
common test points in your circuit. The
adapter is available in two lengths: 1 inch and
3 inches. One of each length is provided with
the probe.
The adapters include integral resistors for best
signal fidelity. The 1 inch adapter can span
up to 1.5 inches betwee n test points, and the
3 inch adapter can span up to 5.5 inches.
NOTE. The 3 inch adapter performance is
best below 500 MHz.
1. Solder the leads to the two test points.
2. Connect the adapter to the probe.
Reorder Tektronix part n umbers:
1 inch: 196-3504-XX qty. 1
3 inch: 196-3505-XX qty. 1
30 TDP0500 & TDP1000 Quick Start User Manual
Page 45
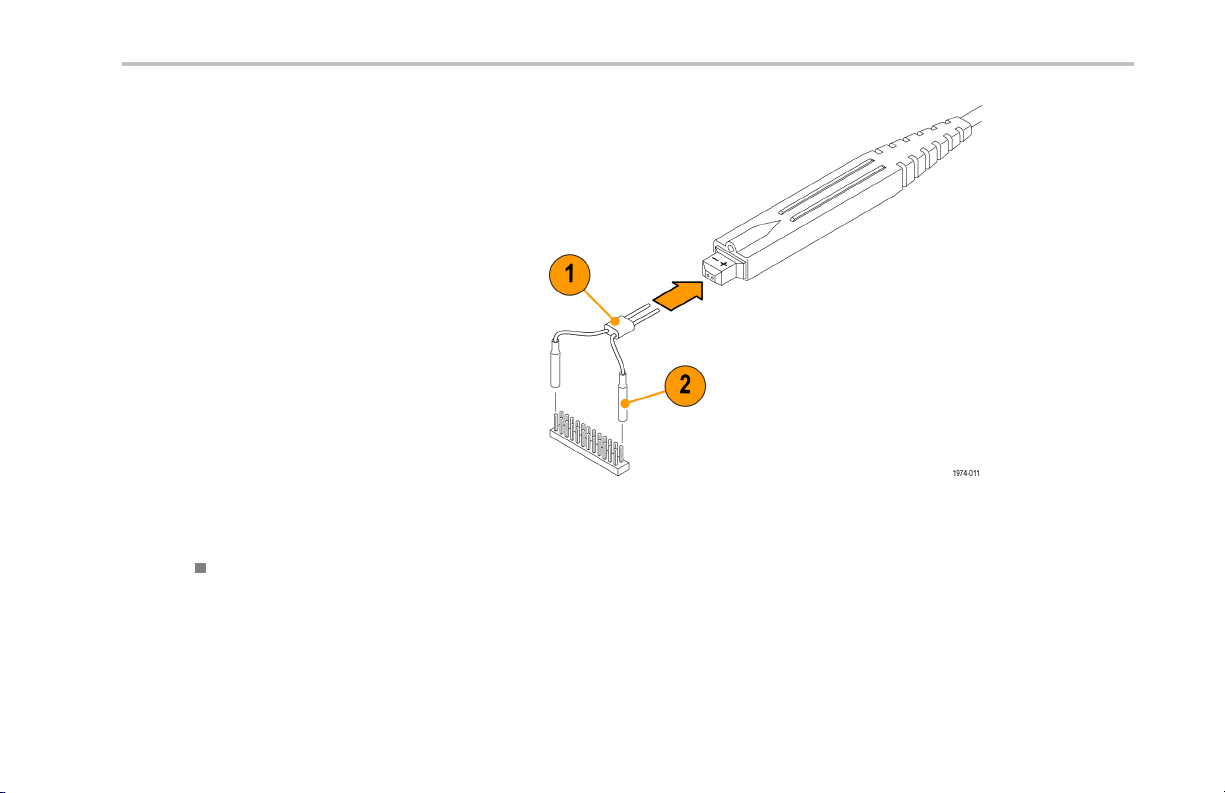
Y-Lead Adapter
Use the Y-lead adapter to extend the reach of
the probe and to connect to 0.025 inch squa re
pins spaced as far as 1.5 inches apart.
NOTE. This adapter performance is best
below 250 MHz. We recommend that you use
the 250 MHz bandwidth filter with this adapter.
The Y-lead adapter accepts any of the probe
tips or adapters.
1. Push the adapter into the probe until it is
seated.
2. Connect the adapter to your circuit or
to another adapter, such as the SMT
KlipChip.
Two adapters are included with the probe .
Reorder Tektronix part number:
196-3434-XX qty. 1
Accessories and Options
TDP0500 & TDP1000 Quick Start User Manua l 31
Page 46
Accessories and Options
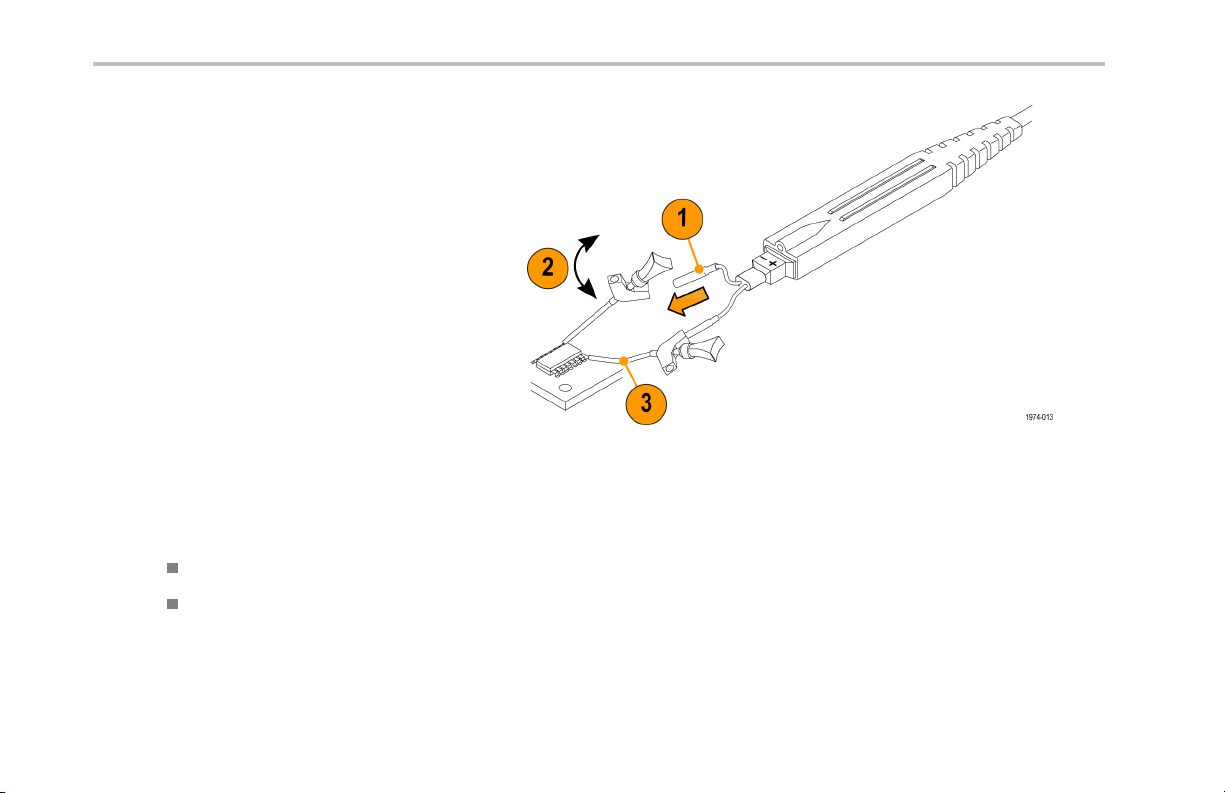
SMT KlipChip
Use the SMT KlipChip test clips to access
dense circuitry and IC leads spaced down to
10 mil-centers.
NOTE. This adapter performance is best
below 100 MHz. We recommend that you use
the 250 MHz bandwidth filter with this adapter.
1. Press the Y-lead into the handle of the
KlipChip test clip.
2. Turn the KlipChip body to allow better
probe orientation.
3. If necessary, bend the flexible sleeve of
the KlipChip up to a 35 ° angle to reduce
stress on the connection.
Three adapte rs are included with the probe.
Reorder Tektronix part numbers:
206-0364-XX qty. 1
SMG50 qty. 20
32 TDP0500 & TDP1000 Quick Start User Manual
Page 47
3” Ground Lead
Use the ground lead for general,
lower-frequency probing.
1. Connect the male end of the lead to the
ground socket on the probe.
2. Connect the socketed end of the lead to
any of the probe tips or adapters. You can
also connect to 0.025 inch square pins in
your circuit.
When selecting th e grounding connection,
maintain as short a ground path as possible.
(See page 43, Probe Grounding.)
Two ground leads are included with the probe.
Reorder Tektronix part number:
196-3437-10 qty. 2
Accessories and Options
TDP0500 & TDP1000 Quick Start User Manua l 33
Page 48
Accessories and Options
Color Band Kit
Use the color bands to help identify probes in a
multi-probe application.
1. Attach one band to the probe cable and
another one of the same color near the
probe compensation box.
2. Connect the probe to the channel that
matches the color of the band.
Five colored pairs are included w ith the probe.
Reorder Tektronix part number:
016-1315-XX qty. 5 colored pairs
34 TDP0500 & TDP1000 Quick Start User Manual
Page 49

Pouch, Nylon Carrying Case with
Inserts
Use the carrying case to hold the probe, the
accessories, and the manual.
1. Place the probe, accessories, and manual
in the carrying case.
2. Close th e carrying case to transport the
accessories to another location or for
storage.
Reorder Tektronix part number:
016-1952-XX
Accessories and Options
TDP0500 & TDP1000 Quick Start User Manua l 35
Page 50

Accessories and Options
Quick Start User Manual and
Documentation CD-ROM
The Quick Start User Manual provides
instructions for operating the TDP0500 and
TDP1000 p robes. Printed copies are available
in the languages listed below, and are also
included on the CD. Store the manual and CD
in the probe case for easy reference.
The documentation CD-ROM includes the
TDP0500 and TDP1000 Technical Reference
Manual, which provide s probing principles,
specifications, and performance verification
procedures for the probes. This manual is
provided in English language, PDF only.
Reorder Tektronix part numbers:
020-2722-XX (English)
020-2723-XX (Japanese)
020-2724-XX (S. Chinese)
36 TDP0500 & TDP1000 Quick Start User Manual
Page 51

Optional Accessories
This section lists the optional accessories that you can purchase to help you with your probing tasks.
IC Micro-Grabber
Use the IC Micro-Grabber to probe the leads
on integrated circuits that are surface-mounted.
The IC Micro-Grabbers are easiest to use with
the Y-Lead Adapter or Ground wires.
1. Push the IC M icro -Grabb er onto the wire
lead.
2. Press the lever to open the contacts.
3. Attach the IC Micro-Grabber to your circuit.
Order Tektronix part number:
SMK4 qty. 4
Accessories and Options
TDP0500 & TDP1000 Quick Start User Manua l 37
Page 52
Accessories and Options
TwinTip Adapter
This accessory provides two adjustable tips
for probing con nections that are close to
each other. The pin spacing adjusts from 0
to 0.31 in.
1. Push the ada pter into the probe tip until
it is seated. Do not force the adapter.
Also, be careful not to injure yourself on
the sharp points.
2. Adjust the spacing between the pins to
suit your needs.
3. Probe your circuit.
Order Tektronix part number:
016-1786-XX qty. 4
38 TDP0500 & TDP1000 Quick Start User Manual
Page 53

TwinFoot Adapter
Use the TwinFoot adapter to probe two
adjacent leads on a surface-mount integrated
circuit. The flexible fingers adapt to a range of
lead spacings.
1. Push the adapt er int o the probe tips until
it is seated.
2. Touch the adapter to your integrated circuit
leads. One side of the adapter pins are
insulated to prevent short-circuiting to
adjacent pins.
Order Tektronix part number:
016-1785-XX qty. 4
Accessories and Options
TDP0500 & TDP1000 Quick Start User Manua l 39
Page 54

Accessories and Options
Spring-Loaded Ground Pin
Use the spring-loaded ground pin when you
probe components that have a ne arby ground
point.
1. Connect the pin to the ground socket on
the probe.
2. Probe your circuit.
Order Tektronix part number:
016-1782-XX qty. 6
BNC-to-Probe Tip Adapter
Use this adapter for the performance verification
tests. The adapter provides connections for
signal sources, terminations, and probe test
points. Instructions for use are included in the
performance verification procedures.
Order Tektronix part number:
067-1734-XX
40 TDP0500 & TDP1000 Quick Start User Manual
Page 55
TekVPI Calibration Fixture
The calibration fixtureisrequiredtodoa
performance verification on the probe. It
provides an SMA con nector in the probe
signal path for internal probe measurements.
Instructions fo r use are included in the
performance v erification procedu res.
Order Tektronix part number:
067-1701-XX
Accessories and Options
TDP0500 & TDP1000 Quick Start User Manua l 41
Page 56

Accessories and Options
Options
Service Options
Option CA1. Provides coverage for a single calibration event
Option C3. Calibration service 3 years
Option C5. Calibration service 5 years
Option D1. Calibration data r eport
Option D3. Calibration data report, 3 years (with Option C3)
Option D5. Calibration data report, 5 years (with Option C5)
Option R3. Repair service 3 years
Option R5. Repair service 5 years
Manual Options
Option L0. English language instruction manual
Option L5. Japanese language instruction manual
Option L7. Simplified Chinese language instruction manual
42 TDP0500 & TDP1000 Quick Start User Manual
Page 57

Probing Principles
Read the helpful hints on the following pages to make probing easier and noise free.
Probe Grounding
In addition to the (+) and (-) inputs on the probe
head, there is also a ground (common) input.
You can use the probe to take a differential
measurement regardless of whether the ground
is connected.
CAUTION. To avoid damaging the circu itry
under test, connect the probe ground (common)
to a ground-reference point only.
See the technical reference manual on the CD
for more information.
Probing Principles
TDP0500 & TDP1000 Quick Start User Manua l 43
Page 58

Probing Principles
Input Impedance and Probe Loading
When yo u connect the probe inputs to a circuit, you are introducing new resistance, capacitance, and inductance into the circuit.
Each input of the differential probe has a characteristic input impedance of 500 kΩ to ground in parallel with less than 2 pF.
For signals with low source impedance and
frequency, the 500 kΩ input impedance on
each input is large enough to prevent the inputs
from loading the signal sources. The greater
the source impedances and the higher the
signal frequencies, the more you should take
these factors into account.
The more the impedance of the signal source
on an input increases, the more the probe loads
the source and reduces the signal amplitude.
The frequen cy of the signal also affects signal
measurement. As the frequency of the signal
increases, the input impedance of th e probe
decreases. The lower the impedance of the
probe relative to that of the source, the more
the probe loa ds the circuit under test and
reduces the signal amplitude.
44 TDP0500 & TDP1000 Quick Start User Manual
Page 59

Maintenance
This section contains maintenance and support inform ation for your probe.
Host Instrument Firmware
Some instruments may require a firmware upgrade to support full functionality of the TDP0500 and TDP1000 probes. Instruments
with lower version firmware may not display all probe controls and indicators on screen, and in some cases may require you to
power-cycle t he instrument to restore normal instrument operation. The following table lists the required versions of instrument
firmware.
Instrument Firmware Version
DPO7000 series
To check the firmware version on Windows-based instruments, from the menu bar, click Help/About TekScope. On
Linux-based instruments, press the Utilities button on the front panel. If you need to upgrade your instrument firmware, go to
www.tektronix.com/software to download the latest firmware.
Error Condition
If one of the Range LEDs does not remain lit after you connect the pro be, an internal probe diagnostic fault exists. Disconnect and
reconnect the probe to restart the power-on diagnostic sequence. If the symptoms continue, the probe is defective, and must
be returned to Tektronix for repair.
Maintenance
V2.0.0 or higher
TDP0500 & TDP1000 Quick Start User Manua l 45
Page 60

Maintenance
Replacement Parts
There are no user-replaceable parts within the probe. Refer to the accessory list for replaceable accessories for your probe.
Cleaning
Protect the probe from adverse weather conditions. The probe is not waterproof.
CAUTION. To prevent damage to the probe, do not expose it to sprays, liquids, or solvents. Avoid getting moisture inside
the probe during exterior cleaning.
Do not use chemical cleaning agents; they may damage the probe. Avoid using chemicals that contain benzine, benzene,
toluene, xylene, acetone, or similar solvents.
Clean the exterior surf aces of the probe with a d ry, lint-free cloth or a soft-bristle brush. If dirt remains, use a soft cloth or swab
dampened with a 75% isopropyl alcohol solution. A swab is useful for cleaning narrow spaces on the probe. Use only enough
solution to dampen the swab or cloth. Do not use abrasive compounds on any part of the probe.
46 TDP0500 & TDP1000 Quick Start User Manual
Page 61

Index
Index
A
Accessories
optional, 37
standard, 27
Adapter, fixed
BNC-to-probe tip, 40
straight pin tips, 28
tip saver, 27
TwinFoot, 39
Adapter, test
PV, 41
Adapter, variable
IC micro-grabber, 37
Longhorn, 29
SMT KlipChip, 32
solder-down, 30
TwinTip, 38
Y-lead, 31
Applications, 23
AutoZero, 19
C
Calibration, 11
Cleaning the probe, 46
Connecting the probe, 4
D
Documentation, viii, 36, 42
E
Environmental considerations, vi
Error condition, 45
F
Features, 1
Frequency derating graph, 3
Functional check, 9
G
Ground lead
3” lead, 33
inductance, 44
selecting length, 43
spring-loaded pin, 40
I
Input limitations, 16
Instrument Firmware, 45
M
Maintenance, 45
O
Offset, 19
Operating considerations, 2
Options, 42
P
Probe controls
Bandwidth limit, 6
DC Reject, 7
Menu, 8
Range, 5
Probe controls a nd indicators, 5
Probe head, 15
TDP0500 & TDP1000 Quick Start User Manua l 47
Page 62

Index
R
Range LED, 45
Related documentation, viii
Replacement parts, 46
Returning the probe, ix
S
Safety Summary, iii
Signal p ath comp ensation, 12
T
TekVP I , 4
48 TDP0500 & TDP1000 Quick Start User Manual
 Loading...