

Teka VT 2 1G AI AL TR CI E1, VT 2 2G AI AL CI E1 Instructions For The Installation And Advice For The Maintenance

Instructions for the installation
and advice for the maintenance
VT 2 1G AI AL TR CI E1
VT 2 2G AI AL CI E1
Instructions Manual
VT 2 1G AI AL TR CI E1
VT 2 2G AI AL CI E1
These instructions are only valid if the country symbol appears on the appliance. If the symbol does not
appear on the appliance, it is necessary to refer to the technical instructions which will provide the
necessary instructions concerning modification of the appliance to the conditions of use of the country.
COD. 04075GGTKE1LPG (04075ING) - 26.07.2013

DESCRIPTION OF THE HOT PLATES
MODELS: VT 2 1G AI AL TR CI E1 - VT 2 2G AI AL CI E1
1 “DUAL” burner 4200 W
2 Fast burner 2800 W
5 Auxiliary burner 1000 W
6 1F “DUAL” grill
7 2F grill
8 Burner no.1 control knob
9 Burner no.2 control knob
12 Burner no.5 control knob
Caution: this appliance has been designed for domestic use in domestic environments by
members of the general public. It must be used by fully aware adults. Children should not be
allowed to approach or play with the appliance. The easy-to-reach front areas of the appliance
may become extremely hot during use.
Supervise children and incapacitated people during use, making sure that they do not touch hot
surfaces and stay away from the appliance during operation.
This cook top was designed to be used exclusively as a cooking appliance: any other use (such
as heating rooms) is to be considered improper and dangerous.
20

USE
1) TRADITIONAL BURNERS
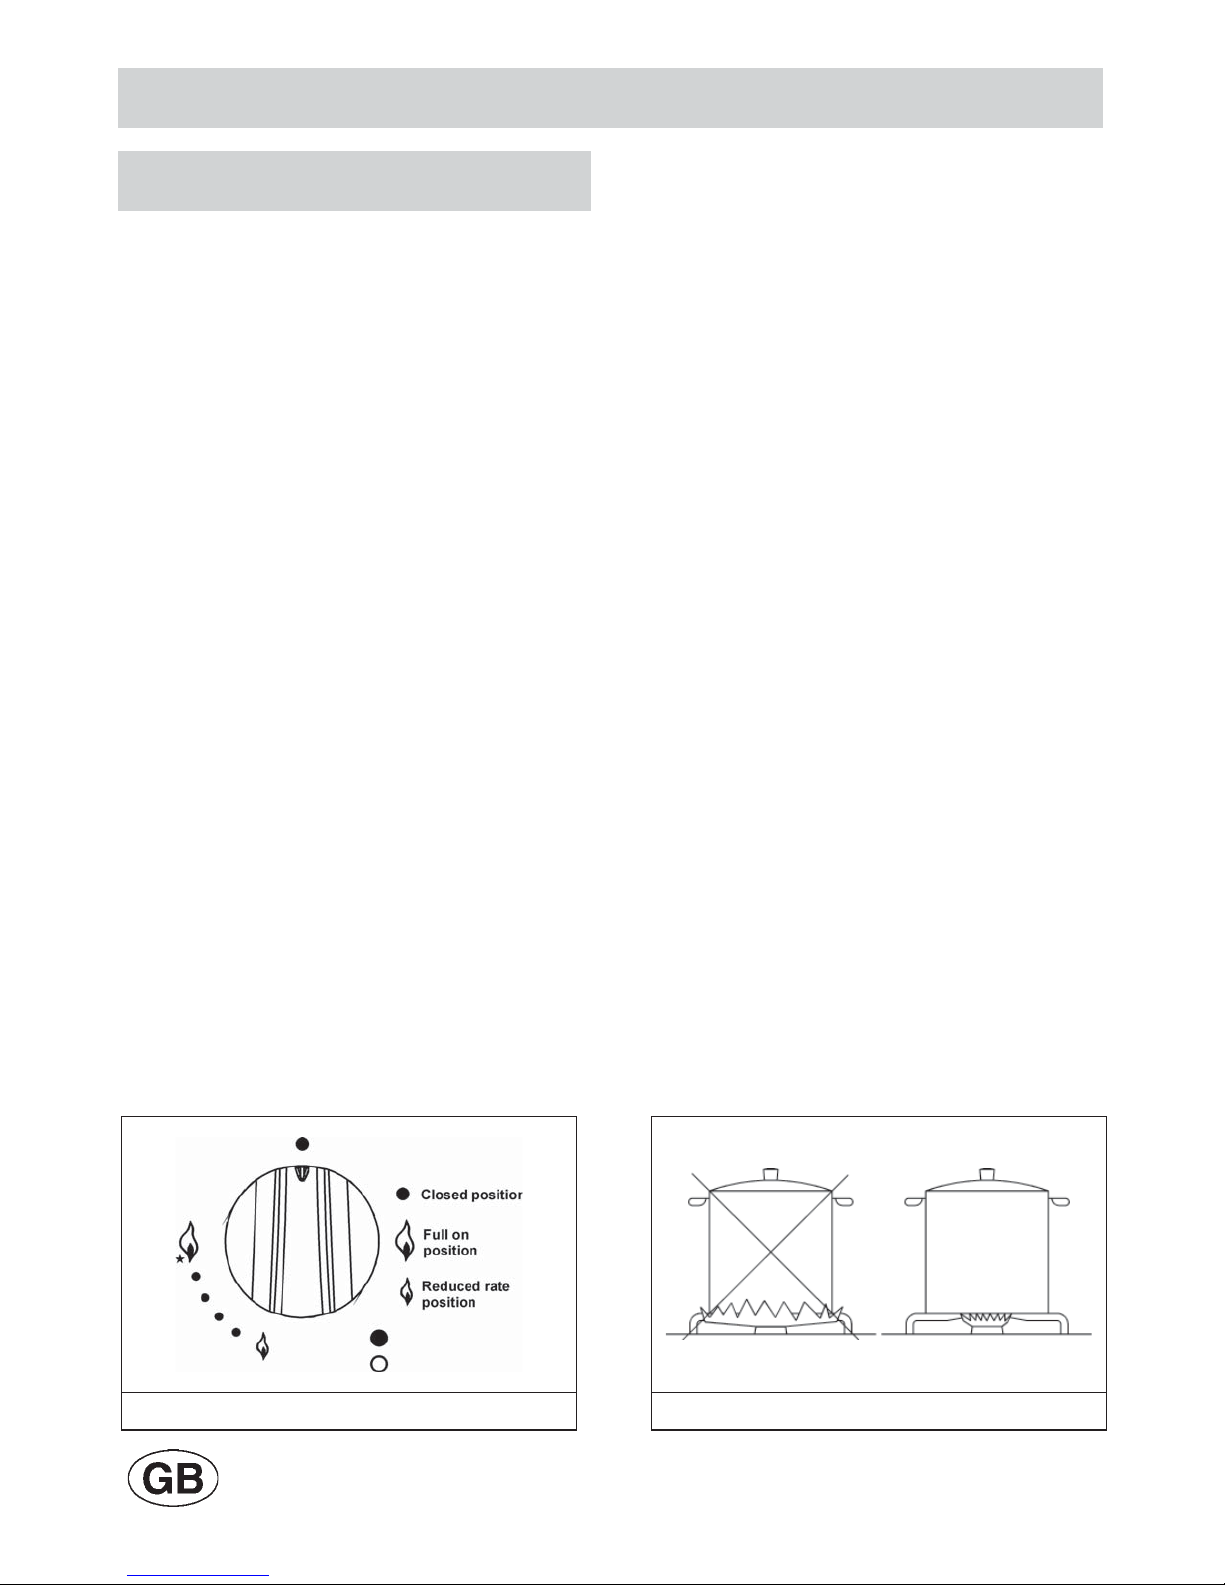
On the surface of the hob, there is a serigraphic
figure above each knob, indicating the burner to
which the knob refers. After turning on the gas at
the main or opening the valve on the gas bottle,
light the burners as indicated below:
- automatic electric ignition
Press the knob corresponding to the burner to use
and turn it clockwise to the “Maximum” position
(big flame fig. 1) pressing the knob right down.
- Lighting burners fitted with a safety cut-off
device
For burners fitted with a safety cut-off device, turn
the knob corresponding to the burner to use anticlockwise to the “Maximum” position (big flame
fig. 1) until it stops and then press the knob.
Continue pressing the knob for about 10 seconds
after the burner has been lit.
Should the flames accidentally go out, turn the
burner control knob off and wait at least 1 min befor
attempting to light it again.
How to use the burners
To obtain maximum performance with minimum gas
consumption, remember the following:
- use suitable pans for each burner (see the table
below and fig. 2).
- When boiling point is reached, turn the knob to the
“Minimum” position (small flame fig. 1).
- Always use pans with lids.
“DUAL” burner:
separate regulation of the inner and outer rings (in
practical terms, a dual burner controlled by a single
knob), offering very flexible use thanks to the
possibility to light either the inner flame only or the
whole burner (inner and outer flame at the same
time).
until the indicator points to the maximum delivery
position obtaining the maximum flow capacity of
both flames.
When the flames are lit, keep the knob pressed for
a few seconds, until the device automatically keeps
the burner lit.
It is now possible to regulate the intensity of the
flame by turning the knob anti-clockwise (from the
maximum flow capacity position of the inner and
outer flames to the maximum flow capacity of the
inner flame and the minimum of the outer flame.
To turn off the burner, turn the knob clockwise,
realigning the indicator with the ● off symbol.
B) - Using the inner flame only:
after lighting the burner and regulating the inner
flame to maximum flow capacity and the outer
flame to minimum flow capacity as described
above, turn the knob anti-clockwise until it clicks
once. The inner flame is now at maximum flow
capacity while the outer flame is turned off.
Continue turning anti-clockwise to regulate the inner
flame to the minimum flow capacity.
LIGHTING AND USING THE “DUAL” BURNER
Stand the pan on the burner before lighting.
Despite being controlled by a single knob, the
“DUAL” burner can be used in two different ways.
A) - Using the complete burner:
starting from the off position ● You must first press
the knob, simultaneously turning it anti-clockwise,
Turning off:
to turn off the burner, turn the knob clockwise,
realigning the indicator with the ● off symbol.
Once the “DUAL” burner is operating in either of the
two modes described, it is possible to swap from
one mode to the other by simply pressing and
turning the knob to the position required:
21
USE
Burners
complete DUAL
central DUAL
Fast 2800 20 ÷ 22
Auxiliary 1000 10 ÷ 14
WARNINGS:
- burners fitted with safety cut-off devices can
only be lit when the knob is in the “Maximum”
position (big flame fig. 1).
- In the absence of electricity, the burners can
be lit with matches.
- Never leave the appliance unattended while
the burners are in use and ensure that
children are kept at a safe distance. Make sure
that pan handles are correctly positioned and
supervise the cooking of foods in oil and fat,
as these are highly flammable.
Power
(W)
4200
Ø
Pan
(cm)
22 ÷ 27
8 ÷ 16
- The machine must not be used by people
(including children) with impaired mental or
physical capacities, or without experience of
using electrical devices, unless supervised or
instructed by an expert adult responsible for
their care and safety. Children should not be
allowed to play with the equipment.
- Do not use sprays near the appliance
during use.
- Do not drag pans across the glass hob as this
may scratch the surface.
- Should a crack appear on the surface of the
glass, disconnect the appliance from the
electricity supply immediately.
- Do not use the hob as a work surface.
- Do not place pans with an unstable or deformed
bottom on the burner, as these may tip or spill
their contents, causing accidents.
- The pans must not extend beyond the edge of
the hob.
-Containers wider than the unit are not
recommended.
FIG. 1 FIG. 2
22

USE
WARNINGS AND ADVICE FOR THE USER:
- the use of a gas hob produces heat and humidity in the room where it is installed. Consequently,
the room must be well aired, keeping natural ventilation openings free (fig. 3) and activating the
mechanical aeration device (suction hood or electric fan fig. 4 and fig. 5).
- Intensive and prolonged use of the appliance may require extra aeration, such as the opening of
a window, or more effective aeration, increasing the mechanical suction power where this exists.
- Do not attempt to change the technical characteristics of the product because it can be
dangerous.
- If you should not to use this appliance any more (or replace an old model), before disposing of it,
make it inoperative in conformity with current law on the protection of health and the prevention
of environmental pollution by making its dangerous parts harmless, especially for children who
might play on an abandoned appliance.
- Do not touch the appliance with wet or damp hands or feet.
- Do not use the appliance barefoot.
- The manufacturer will not be liable for any damage resulting from improper, incorrect or
unreasonable use.
- During, and immediately after operation, some parts of the cooktop are very hot: avoid touching
them.
- After using the cook top, make sure that the knob is in the closed position and close the main
tap of the gas supply or gas cylinder.
- If the gas taps are not operating correctly, call the Service Department.
Warning: during operation the work surfaces
of the cooking area become very hot: keep
children away!
CAUTION:
In case of hotplate glass breakage:
●shut immediately off all burners and any electrical
heating element and isolate the appliance from
the power supply;
●do not touch the appliance surface;
●do not use the appliance.
(*) AIR INLET: SEE INSTALLATION CHAPTER (PARAGRAPHS 5 AND 6)
FIG. 3 FIG. 4 FIG. 5
23

CLEANING
CAUTION:
before cleaning the appliance, disconnect it
from the gas and electricity supplies.
2) WORKTOP
If you wish to maintain the shine of the ceramic
surface, treat the glass with a silicon-based film
product before use to protect the surface against
water and dirt. This protective film is not durable,
so it is advisable to repeat the application of the
product frequently.
It is very important to clean the hob every time you
use it, while the glass is still warm.
Do not clean using abrasive metal scourers, powder
abrasives or corrosive sprays.
Depending on the degree of dirt, we recommend:
- for light stains, a damp sponge is sufficient.
- Tough, encrusted dirt is easily eliminated using a
scraper (fig. 6), not supplied with the hob, but
easy to find in local stores. Use the scraper
carefully to avoid damaging the hob.
- Traces of liquid spilled from pans can be
eliminated with vinegar or lemon juice.
- Never allow sugar or sugary foods to fall on the
hob while cooking. Should this occur, switch off
the hob and clean it immediately with hot water,
using a scraper on hot spills.
- As time goes by metallic reflections, colouring or
scratches may appear due to poor cleaning and
the incorrect movement of pans. Scratches are
hard to eliminate but do not affect the correct
operation of your hob.
- Do not use jets of steam to clean the appliance.
FIG. 6
24
 Loading...