

Page 1

INSTRUCTION MANUAL
EN
MANUAL DE INSTRUCCIONES
MANUAL DE INSTRUÇÕES
TKS1 710 C
ES
PT
SECADORA
Page 2

Contents
Safety information..............................................................................
Installation.........................................................................................
Part description.................................................................................
Attention and advice..........................................................................
Description of controls.......................................................................
Operation instruction.........................................................................
Programme table...............................................................................
Specialty drying function...................................................................
Cleaning and routine maintenance..................................................
Alarm function..................................................................................
Precautions......................................................................................
Technical specifications & ...........................................Product fiche
1
6
7
9
10
11
12
13
15
16
17
18
Page 3

Safety information
Dry care symbols
Please pay attention to use the drying machine if the
materials of your clothes can not be dried by it
the symbols as follows:
or contain
Dry
Line dry / hang to dry
Dry clean Do not dry clean
Normal
Drip dry
Not tumble dry normal
Dry flat
A
Dry clean normal cycle
with any solvent
Do not dry
In the shade
F
Dry clean normal cycle
petroleum solvent only
Safety notes
!
To prevent any damages to your and others' life or
property, you have to follow the safety notes.
This product belongs to Category I electrical
1.
appliances, and only for drying textiles which
have been washed with water in the household.
Please pay attention to the safety of power use
during the operation!
2.The power source with reliable earthing must be
used. Its earth wire must be buried under the
ground and shall not be connected with the
public utilities such as city water pipe or gas pipe
etc. The earth wire and null wire shall be
distinguished and shall not be connected
together.
3.The power wire shall be met national standard
and must be able to withstand the current above
16A. To ensure your and your family’s safety,
please make improvement immediately if any
power use at your home does not comply with the
above-mentioned requirements.
1
Page 4

Safety information
4.The maximum mass of dry textile material is 7
kilograms to be used in the appliance.
5.The tumble dryer is not to be used if industrial
chemicals have been used for cleaning.
6.The lint trap has to be cleaned frequently.
7.Lint must not to be allowed to accumulate around
the tumble dryer.
8.Adequate ventilation has to be provided to avoid
the back flow of gases into the room from
appliance burning other fuels, including open fires.
9.Do not dry unwashed items in the tumble dryer.
10.Items that have been soiled with substance such
as cooking oil, acetone, alcohol, petrol, kerosene,
spot removers, turpentine, waxes and wax
removers should be washed in hot water with a
extra amount of detergent before being dried in
the tumble dryer.
11.Items such as foam rubber (latex form), shower
caps,waterproof textiles, rubber backed articles
and clothes or pillows fitted with foam rubber pads
should not be dried in the tumble dryer.
12.Fabric softeners, or similar products, should be
used as specified by the fabric softener instructions.
13.The final part of a tumble dryer cycle occurs without
heat (cool down cycle) to ensure that the items are
left at a temperature the ensures that the items will
not be damaged.
14.WARNING: never stop a tumble dryer before the end
of the drying cycle unless all items are quickly
removed and spread out so that the heat is dissipated.
15.The exhaust air must not be discharged into a flue
which is used for exhausting fumes from appliance
burning gas or other fuels.
2
Page 5

Safety information
16.The appliance must not be install behind a lockable
door, a sliding door or a door with a hinge on the
opposite side to that of the tumble dryer. In such a
way that a full opening of the tumble dryer door is
restricted.
17.Oil-affected items can ignite spontaneously,
especially when exposed to heat sources such as in
a tumble dryer. The items become warm, causing an
oxidation reaction in the oil. Oxidation creates heat.
If the heat cannot escape,the items can become hot
enough to catch fire. Piling, stacking or storing
oil-affected items can prevent heat from escaping
and so create a fire hazard.
18.If it is unavoidable that fabrics that contain vegetable
or cooking oil or have been contaminated by hair care
products be placed in a tumble dryer they should first
be washed in hot water with extra detergent-this will
reduce, but not eliminate, the hazard.
19.The appliance should not be overturned during
normal use or maintenance.
20.Remove all objects from pockets such as lighters
and matches.
21.This appliance can be used by children aged from 8
years and above and persons with reduced physical,
sensory or mental capabilities or lack of experience
and knowledge if they have been given supervision
or instruction concerning use of the appliance in a
safe way and understand the hazards involved.
Children shall not play with the appliance. Cleaning
and user maintenance shall not be made by children
without supervision.
22.If the power cable is damaged, it must be replaced
by the manufacturer, its service agent or similarly
qualified persons in order to avoid a hazard.
3
Page 6

Safety information
23.This appliance is for indoor use only.
24.The openings must not be obstructed by a carpet.
25.Children of less than 3 years should be kept away
unless continuously supervised.
26.Keep pets away from this appliance.
27.If the appliance appear high temperature
please draw the mail plug immediately. abnormally ,
Correct Disposal of this product:
This marking indicates that this product should
not be disposed with other household wastes
throughout the EU. To prevent possible harm
to the environment or human health from
uncontrolled waste disposal, recycle it
responsibly to promote the sustainable reuse
of material resources. To return your used
device, please use the return and collection
systems or contact the retailer where the
product was purchased. They can take this
product for environmental safe recycling.
4
Page 7

Safety information
Electric shock hazard
1.Do not draw the power cord forcefully to pull out the
mains plug.
2.Please do not plug/draw the mains plug with wet hands.
3.Do not damage the power cord and the power plug.
Injury danger
1.Do not disassemble and install the dryer under no
instruction or supervision.
2.Do not stack this dryer on washing machine without
stacking kits.(if want stacking
please purchase the Independent parts and it must be
installed by the manufacturer, its service agent or
similarly qualified persons in order to avoid a hazard.)
3.Do not lean on the opened door of the dryer.
4.Do not put any pyrotoxin on the dryer, such as the
candle, electric cooker.
Damage danger
1.Do not dry over the rated capacity.
2.Do not operate the dryer without the filter door and
base
.
3.Do not dry the clothes before being spun.
4.Do not expose the dryer directly under the sun, and
indoor use only.
5.Do not install the dryer in the humid and drenching
environment.
6.At the cleaning and maintenance, please do remember
to pull out the power plug and do not directly wash the
dryer with water.
Explosion danger
Please do not dry the clothes with some flammable
substances such as the coal oil, alcohol
the explosion.
on washing machine ,
filter
or there will be
5
Page 8

Installation
Transport
Move cautiously. Do not grasp any salient parts of machine. The machine
door can
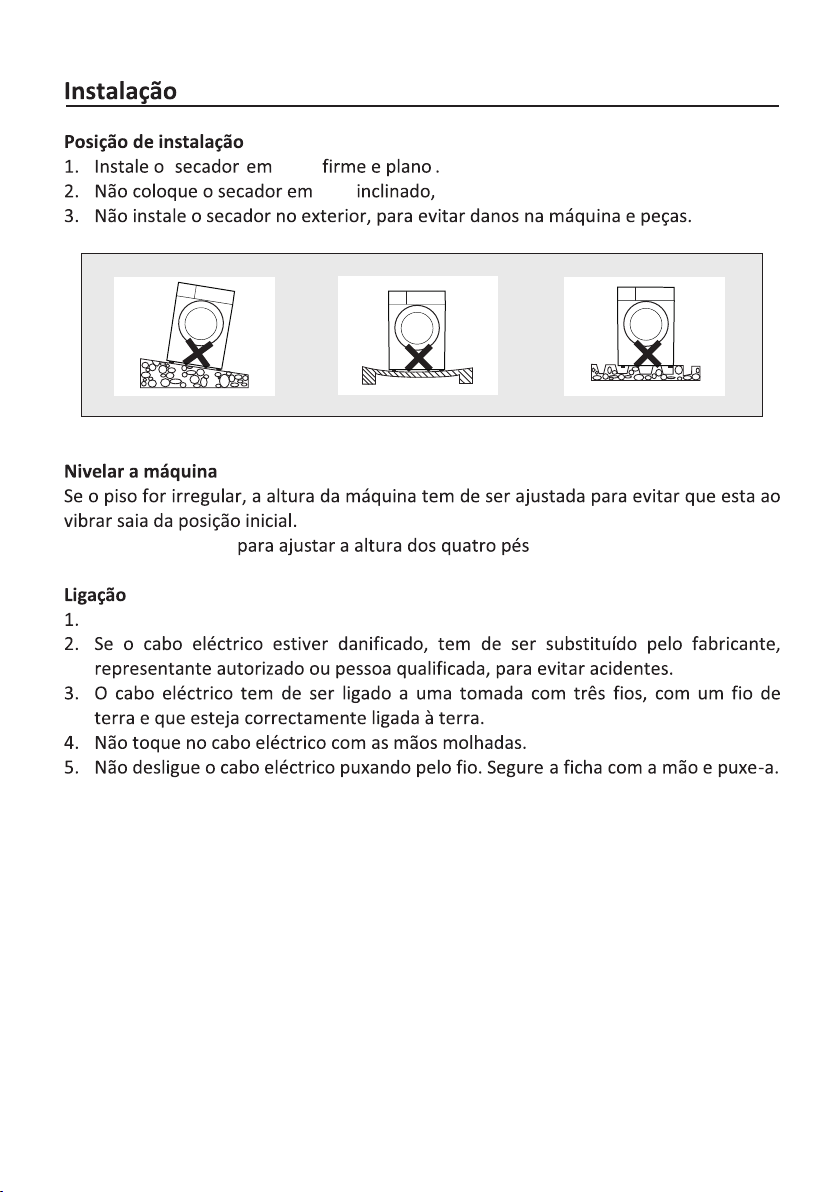
Installation position
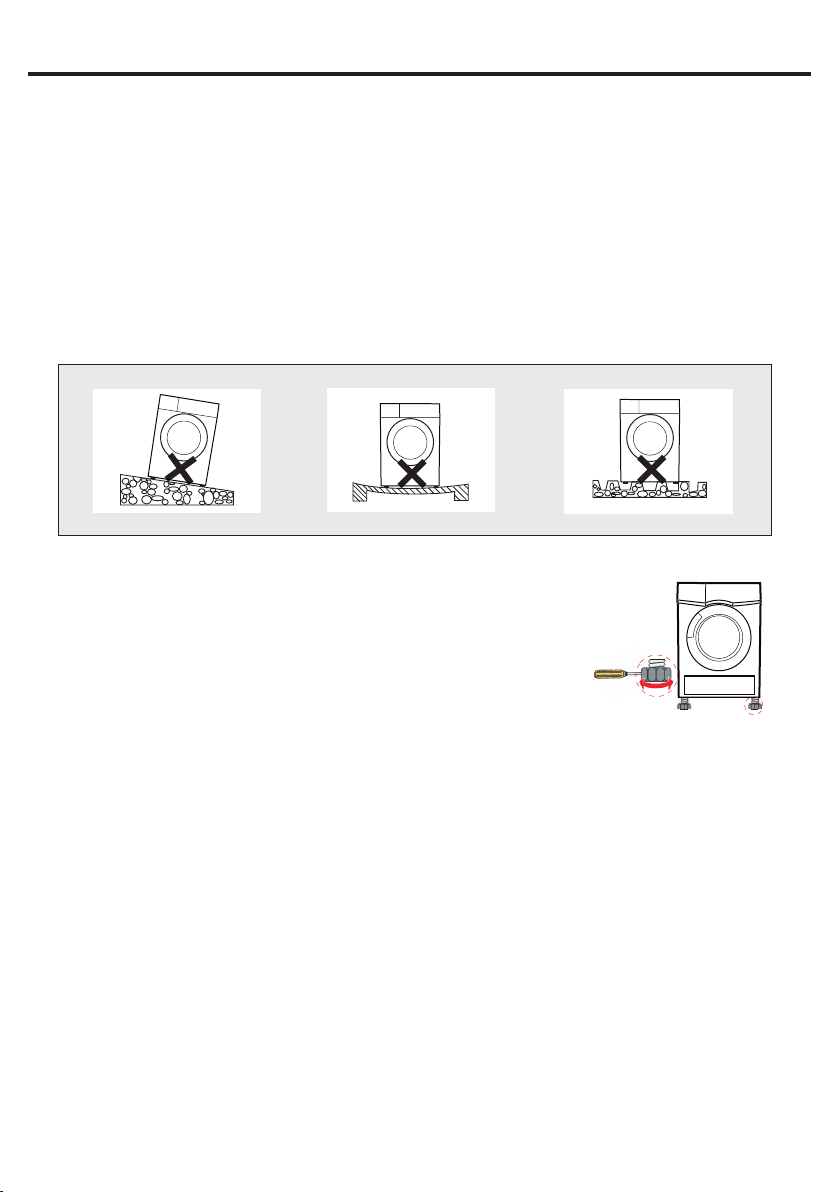
1.Please install the dryer on solid and flat ground.
2.Please do not place the dryer on the slope, soft carpet or wooden floor.
3.Please do not install the dryer outdoors, to prevent the dryer from being frozen to
damage of machine parts.
Level adjusting
If the floor is obviously uneven, it needs to be adjusted.
It vibrates the machine, causing machine to move from its position.
Using tools to adjust the height of four machine legs to
adjust the levelness of this dryer.
not be used as the handle for delivery.
Power supply connection
1.Make sure that the voltage of the power supply is the same as the electric
of the dryer.specification
2.Please do not connect it with the power connection board, the universal plug or
socket.
6
Page 9

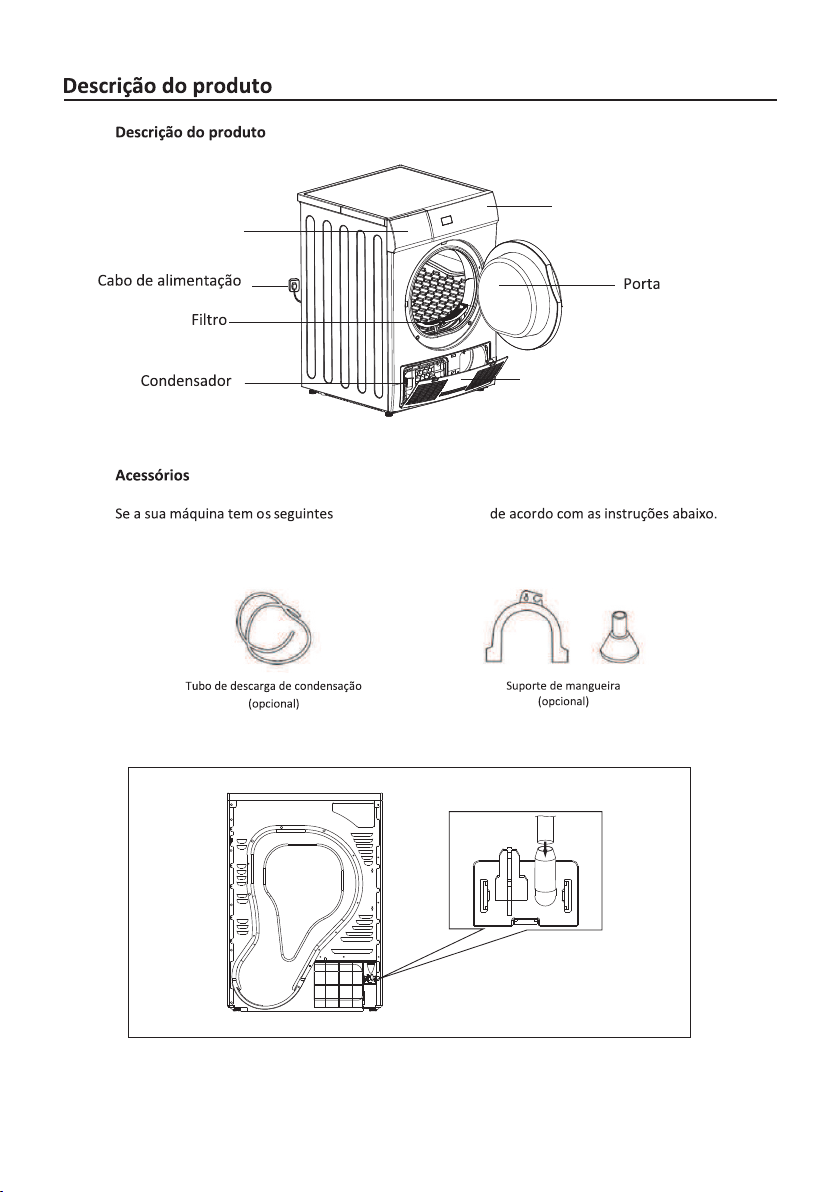
Part description
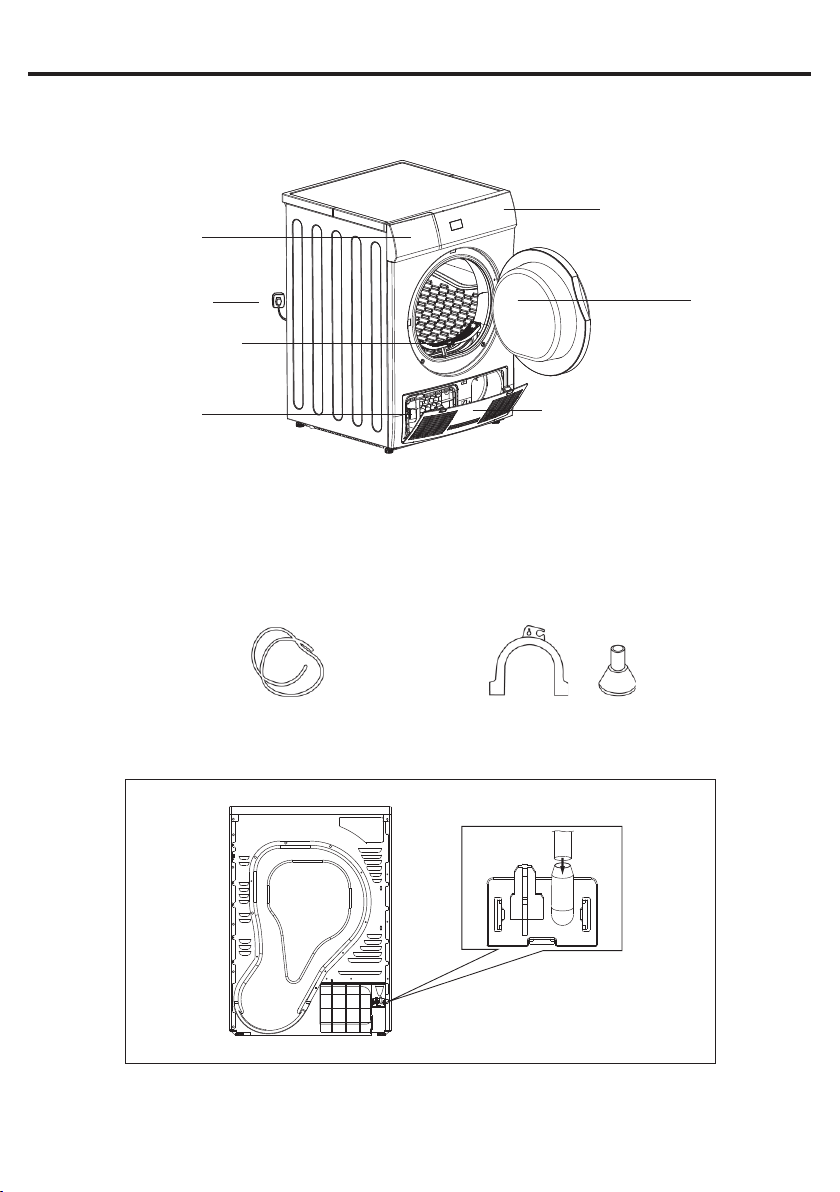
Part description
Container
Control Panel
Power Cord
Lint filter
Maintenance flap
Accessories
The following parts are optional for specific models.
If your dryer has following parts, please
them following the instruction below .
Installation step:
Step 1: removing the drain hose from the
hose connector using glove.
wear gloves and install
Hose holder(optional)
Condensing drain
hose(optional)
Door
Handle
Step 2: insert the external drainage hose.
7
Page 10

Part description
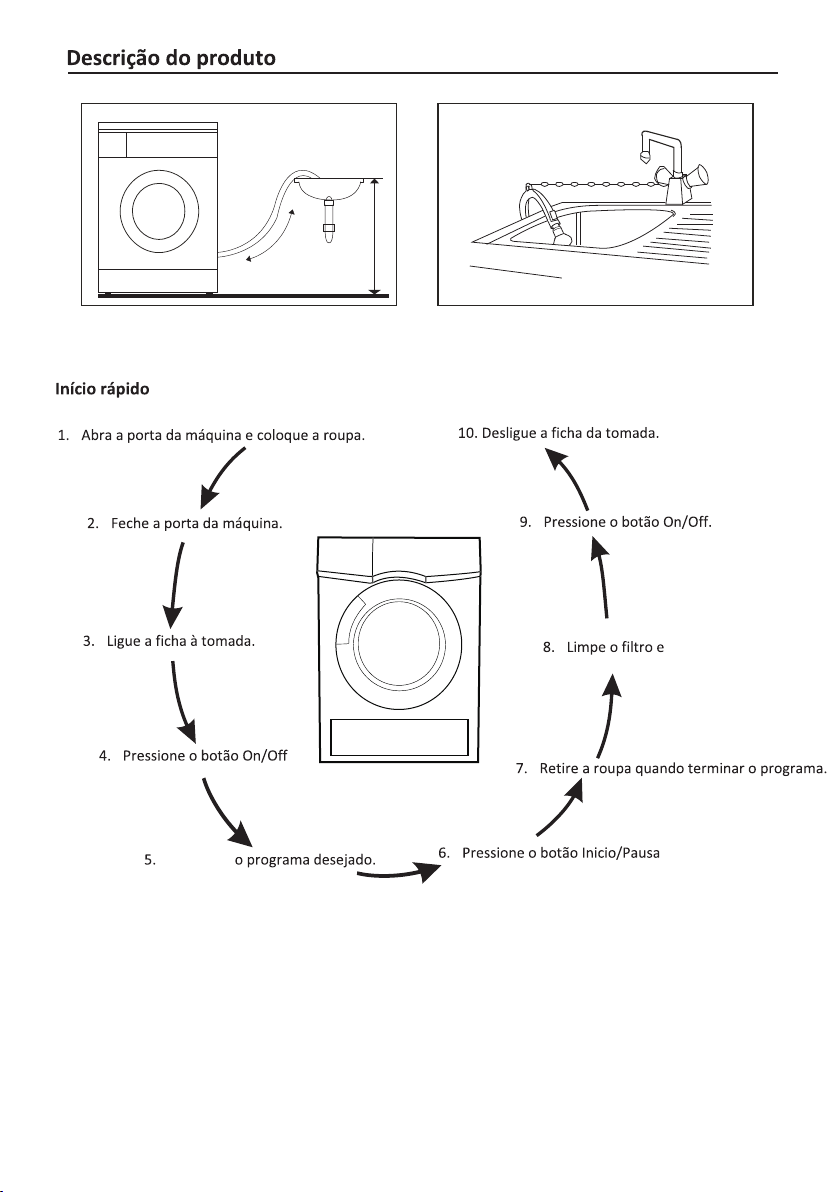
Step 3: put the hose holder on the washing basin or any other sink.
Quick start
2 Close the machine door
3 Plug the power cord
4.Press the 【On/Off】button
200 cm
1. Open the door and
load the laundry
Max .120 cm
10.Unplug the power cord
9.Press the 【On/Off】button
8. Clean the lint filter
and empty c ontainer
7. Take out the laundry when finished
5.Select the desired programme
6. Press the 【Start/Pause】button
8
Page 11

Attention & Advice
Attention
Before the first cycle, the dust and grease may remain in this dryer during the
!
transportation, to avoid contaminating your clothes,period of manufacture and
please follow these steps:
a)Put some clean rags into the drum.
b)Plug the power.
c)Press “On/Off” button, select the “Quick”programme, and press “Start/Pause” .
button.
d)After finishing this programme, please follow the “cleaning and routine
maintenance” to clean the lint filter and air condenser on page 14.
Advice
1.Before drying, thoroughly spin the laundry in washing machine. High spin
speed can reduce the drying time and save energy consumption.
2.For uniform drying result, sort the laundry according to fabric type and drying
programme.
3.Before drying, please close zips, hooks and eyelets, button up, tie fabric belts, etc.
4.Do not over dry the clothes, because over dried clothes can easily get creases
or shrinkage.
5.Do not dry the articles containing rubber or similar elastic materials such as
bicycle covers and feather products.raincoats,
6.The door can be opened only after the programme of the drying machine is
may be scalded by steam or hot surface.
7.Clean the lint filter and empty container after each use to avoid extension of
drying time and energy consumption.
8.Do not dry these clothes after dry-clean process.
9. The weight references as follows:
Do not open the door before the programme finished, as the skin completed.
Blended Coats
(about 800g)
Single Sheets
(about 600g in
cotton)
Undershirts
(about 180g in
cotton)
Jackets (about
800g in cotton)
Work Clothes
(upper and lower)
(about 1120g in
cotton)
Underpants
(about 70g in
cotton)
Socks (about 30g in
blended material)
9
Jeans Trousers
(about 800g)
Pajamas
(about 200g)
Towel Quilts
(about 900g
in cotton)
Shirts (about
300g in cotton)
Page 12

Description of controls
2
Digital tube display
Only light ( DELAY / REMAIN ) relevant to the phase that is currently
being carried out will remain display during the drying process.
When the drying procedure begins, REMAIN will display the remaining
The di splay “- ”means programm e in “Standby” status, you can
press any buttons or ope n the door to awaken pr ogramme.
time, that is, the drying procedure will finished in【x:xx】time.
Time
drying. 20-60minutes
this key continuously .
to adjusted the time of
by pressing
This function is used
Tank
after the dryer
the container
when the“ ”,
is flashing,
stops.
Time
CHILD
LOCKE D
Please empty
On
Off
Refresh
On/Off
When this button is
is switched between on
pressed,this machine
and off.
on and off function.
【On/Off】button,has the
Cycle
the clothes have more effective drying
result.
according to the user's needs to make
Different Dryer cycle can be selected
Gentle
textiles from high temperature.
This function will give
less heat to protect sensitive
Anti-Crease
care to protect sensitive
textiles from being creased.
This function will give more
Delay
this key continuously .
delay. You can get
1-24hour by pressing
drying process . to
This function is used
Fliter
Please clean the filter when
the“ ” , is flashing after the
dryer stops.
Delay
FILTER TANK
Start/pause
start and pause function. When this
button is pressed, this machine is
switched between start and pause.
【Start/Pause】button,has the
Status display
The four LED lights indicate
the status of the drying
procedure.
Note: This symbol means the energy efficiency test programme “standard cotton programme”, which is most suitable to dry
normal cotton load at rated load capacity.
10
Page 13

Operation instruction
Programme selector
1.Press the 【On/ Off】button.
2.Rotate the programme knob to select the desired programme.
3.Select the Delay , Anti-Crease or Gentle functions for additional option.【 】 【 】 【 】
4.Press the Start/Pause key.【 】
The Drying procedure stops
The buzzer will prompt from the dryer when finishing the cycle.
Press the On/Off button to turn down the power , and pull out the power
cable.
【 】
11
Page 14
Application/Properties
To dry cotton pieces of clothing.
To dry cotton pieces of clothing.
Drying level: .applicable to hang
Drying level: .applicable to iron
To dry cotton pieces of clothing.
To dry cotton pieces of clothing.
Drying level: .extra dry
Drying level: .cupboard dry
fabrics which are not ironed, such as easy care shirts, table linen,
To dry thin synthetic
To dry thin synthetic fabrics which are also to be hanged or ironed,sush as knitwear,shirts.
baby clothes, socks. Drying level: cupboard dry.
Drying level: applicable to hang or iron.
For machine-washable woollen textiles.Textiles are fluffer,but not dried.
To dry thick or multi-layered synthetic fabrics. Drying level: extra dry.
.【 】
time
m
ra
【 】
ust W
n to adj
o
i
t
c
n
u
e f
m
i
sing T
For washing which is to be dried quickly, e.g. made of acrylic fibres or for individual
For timer programme , delicate textiles made of acrylic fibres or small items.
U
Remove and hang up textiles when the programme ends.
For refreshing or gertly cleaning textiles with commercially available dry cleaning products.
small items. Also for subsequent drying.
Iron
7.0kg
Light
Cotton
(max)
Weight
For cottons and coloureds made of cotton or linen.
Programme
Programme table
Extra
Standard
3.5kg
Standard
Light
For non-iron washing made of synthetic and blended fabrics, cotton.
Synthetics
Extra
3.0kg
Delicate
3.0kg
Warm/Cool
(20min/30min)
3.0kg
Quick
1.0kg
Refresh
Note: The above programme is only recommended for use, the user can according to personal habits to choose the right programme.
Thick or multi-layered fabrics,e.g. bedl inen, jeans, jackets etc, are not easy to dry. You'd better choose Cotton Extra programme.
12
Page 15

Specialty drying function
Specialty drying function
1. Instruction of the moisture sensor
This function can automatically sense the moisture of clothes, and will
adjust the time of drying procedure according to how much clothes automatically
you put into the dryer.
This function will automatically activate during the drying procedure except the
“Cool” “Refresh”and programme.“Warm”
2. Additional time adjusting function
This function can set the time of drying procedure by your self; the time can be
adjusted from 20 to 60 minutes by press“Time” button. This function
few small clothes, for example, one facecloth or two pairs of socks.
designed for
to control drying process, but only for “Warm” It's like using timer
3. Instruction to the delay drying procedure
This function is used to delay clothes drying within 24 hours. You can press this
key continuously; it can be selected within 1-24 hours. The delay time means
drying procedure will start in x:xx hours.
When the delay procedure starts, the display will only show the delay start time
and flash DELAY icon. After 30s, the display will light DELAY icon and show “-”.
Steps in details
(1).Load your laundry and make sure the machine door is closed.
(2).Press the 【On/Off】button,then to turn the programme selector knob and select
a desired programme.
(3).You can select the 【Anti-Crease】 or 【Gentle】functions according to your
need.
(4).To press the 【Delay】 key.
(5).Continue to press the 【Delay】to select the delay time.
(6).After the 【Start/Pause】 key is pushed, the Dryer is at the run condition.
The drying procedure will be automatically performed when the delay time is over.
(7).If you push the【Start/Pause】button again, the delay function will be paused.
(8).If you want to cancel the “Delay” function, please press the 【On/Off】button.
special
programme.
4. Instruction of the child safety feature
(1).This machine incorporates a special child safety lock, which can prevent
from carelessly pressing keys or making the faulty operation.children
(2).When the dryer is at the operation state, press the【 】andAnti-Crease
【Gentle】buttons at the same time for over 3 seconds to start child lock
function. When child lock function is set, the display will light “Child Locked”
icon.
13
Page 16

Special drying function
and no key can effect to the dryer except button.【On/Off】
Under the start state of the child lock button, the【 】andAnti-Crease
【 】buttons shall be pressed at the same time for over 3 seconds to Gentle
release the child lock function.
5. Instruction of the Anti-Crease function【 】
At the end of the drying cycle, the “Anti-Crease” phase time is 30 minutes (default)
or 120 minutes (selected), when the anti-crease function is selected in all of the
and the drum willdrying programme, the LED of anti-crease shall illuminate,
give more care to intermittent rotate during the drying programme , in older to
ensure the sensitive textiles can not get crease.
6. Instruction of the Gentle function【 】
When the gentle function is selected except “Refresh”, “Cool” and “Warm”,
the display time shall be to add 20 minutes, the LED of gentle shall illuminate,
and the programme will give less heat to protect sensitive textiles from high
temperature which may harm to these textiles, such as acetate, elastane and
etc.
7. Instruction of the drum light
For your convenience, this function can help you to see clearly when you open the
machine door.
14
Page 17

Cleaning and routine maintenance
Clean the lint filter
Leave the dryer to cool down
1.Open the machine door.
2.Take out the lint filter, pull
upward to take it out.
3.Clean the lint filter; wipe off
the scrap threads accumulated
on the lint filter, with your hand or
rinse with water and dry thoroughly.
4.Reinstall the lint filter.
.
NOTE!
1.The lint filter accumulated on the filter will block the air circulation, which
will cause the extension of drying time and energy use; therefore, the scrap
thread filter shall be cleaned after each use.
2.Do disconnect the power cord before cleaning!
3.Do not operate the dryer without the lint filter !
4.Clean the lint filter after each use to prevent lint accumulation inside the dryer.
Wash air condenser
-Leave the dryer to cool down.
-Residual water may escape,place an absorbent
cloth under the maintenance flap.
1.Unlock the maintenance flap.
2.Completely open maintenace flap.
3.Screw both locking levers towardas each other.
4.Pool out the air condenser.
5.Clean the air condenser completely, drain thoroughly.
6.Clean the seals.
7.Re-insert the air condenser, handle at the button!
8.Unscrew both locking levers.
9.Cloth the maintenance flap until it locks into position.
Please clean the air condenser approx, once every 3
months if frequently used.
Do not damage the air condenser!
1.Clean with water only; do not use
!
hard/sharp-edged objects! Do not operate
the dryer without the air condenser!
2.During drying, water may collect between the window
and the seal, but this does not affect the function of your dryer!
15
Page 18

Cleaning and routine maintenance & Alarm function
Empty the water container
1.Hold and pull out the water container
with two hands.
2.Tilt the water container, pour out the
condensed water.
3.Insert the water container.
!
WARNING:
1.Empty the water container after each use, the programme will be
paused and the “ ” icon will flash if the water container is full during
the drying process. After the container emptyed, the dryer can be restarted
by pushing 【Start/Pause】 button.
2.Do not drink the condensed water.
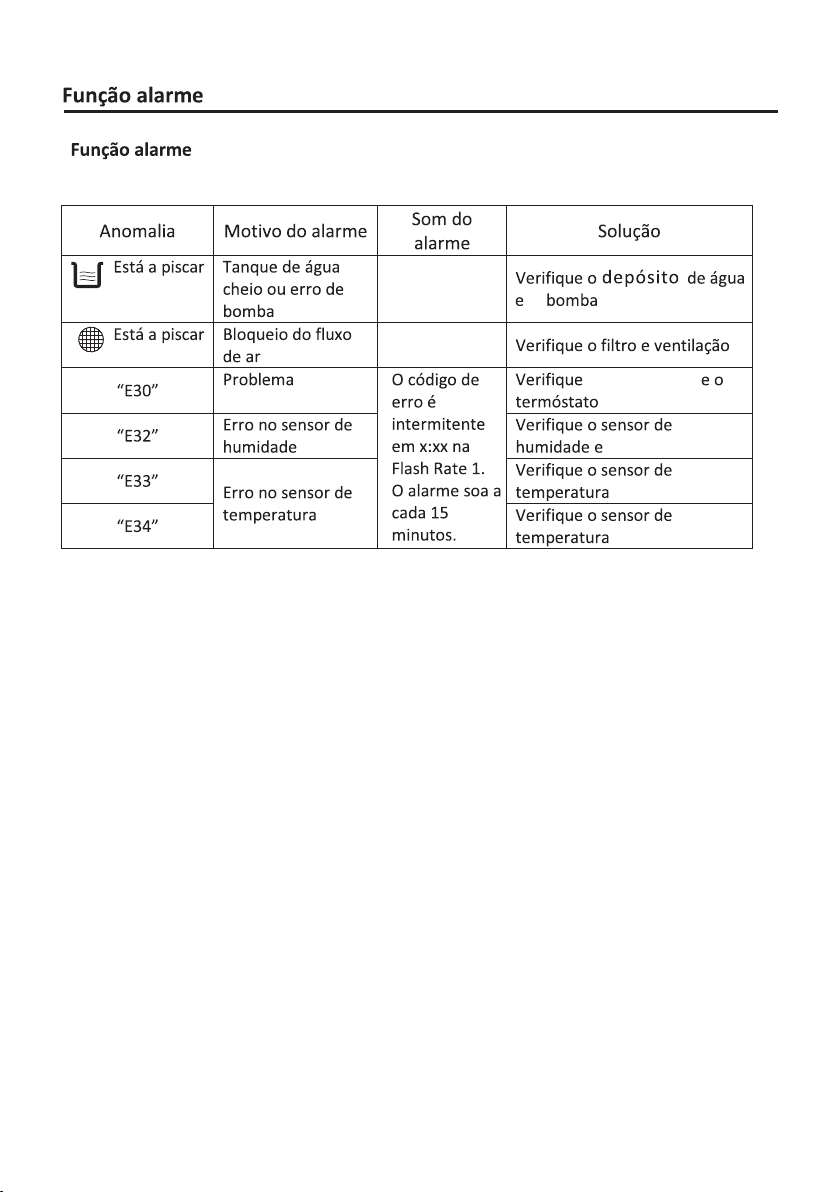
Alarm function
Alarm Problem Alarm Reason Buzzer Alarm Release
“ ”Is flashing
“ ”Is flashing
“ ”E30
“ ”E32
“ ”E33
“ ”E34
Water tank full or pump
error
Air flow block
Heater problem
Humidity sensor error
Temperature sensor error
The Error Code is
flashing on X:X X
at Flash Rate 1.
Meanwhile the
beep is sounded
every 15 minutes.
16
Check the water t ank and pump.
Check the filte r and the air folw
Check the heate r and the thermostat
Check the Humid ity sensor and PCB
Check the front t emperature sensor
Check the rear te mprature sensor
Page 19

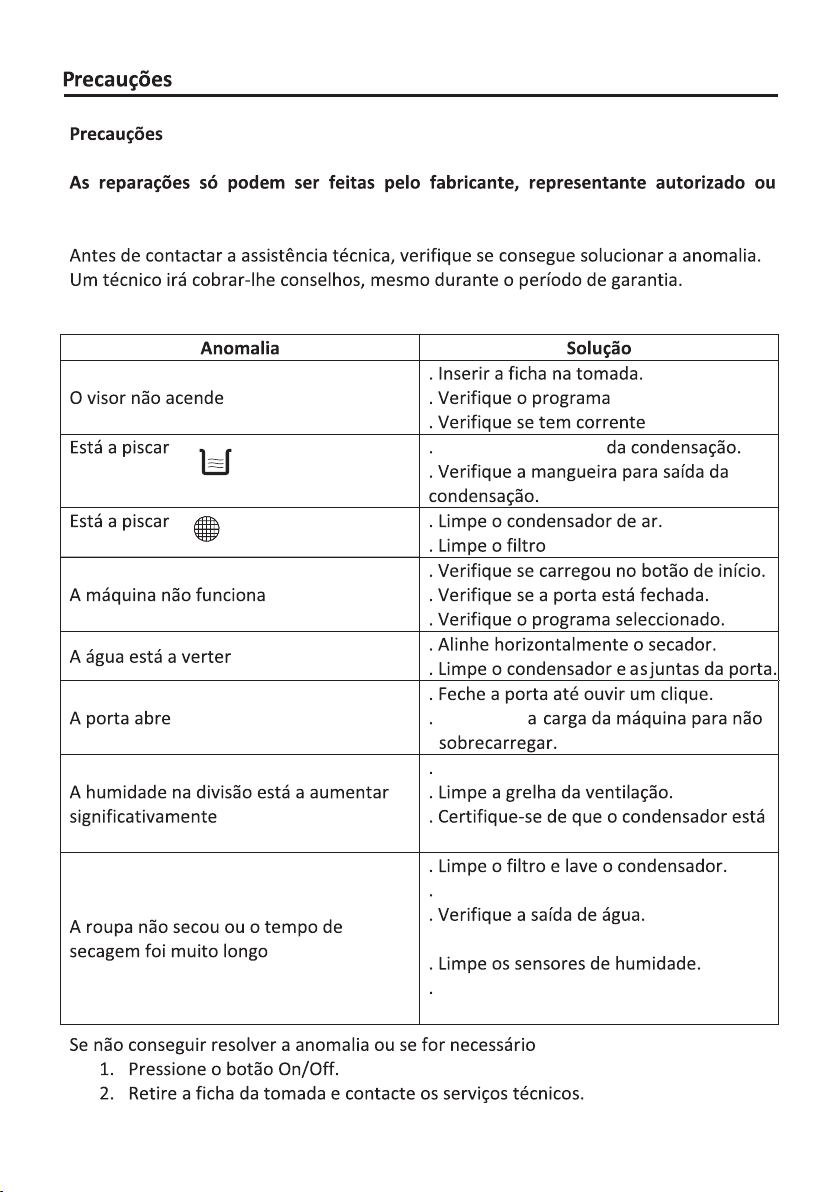
Precautions
Precautions
!
Only authorised technicans can carry out repairs.
Before you call customer service,
faulty by yourself or if you have follow the user instructions.
A technician will charge you for advice, even during the warranty period.
please check if you have deal with the
Problem
Display does not
come on
“ ”Is flashing “ ”Is flashing
“ ”Is flashing
Dryer does not start
Water is running out
Door is open by itself
Humidity in the room is
increase significantly
Degree of dryness was
not reached or drying
time too long
Solution
The mains plug is inserted.
Check the programme selected.
Check fuse in the house.
Empty condensation container.
If failure, check hose for condensation outlet.
Clean air cooler.
Clear lint filter.
Check the has selected
Check the the door has closed.
Check the programme has set.
Align dryer horizontally.
Clear air condenser and door seals.
Press door until it “clicks”into position.
Check the clothes is over load .
Ventilate room adequately.
Clean the cool grille.
Ensure that the air condenser has been inserted.
Clean lint filter and wash condenser.
Empty container.
Check water outlet.
Dryer installation too restricted.
Clean the moisture sensors.
Use next higher drying programme or using
Timer programme.
start button .
If you cannot deal with the fault by yourself and need help:
!
1.Press the 【On/Off】button.
2.Pull out the mains plug and call the service.
17
Page 20

Technical specification & Product fiche
Specification
Power supply voltage
Rated input Power
Rated Frenquency
Overall Size
Rated Drying Capacity
Net Weight
Product fiche
Brand: TEKA
TKS1 710 C
Model:
Rated capacity: 7kg
Dryer Type: Condenser
Energy efficiency class: B
Energy consumption 504.0kWh per year, based on 160 drying cycles of the standard cotton
programme at full and partial load, and the consumption of the low-power modes. Actual energy
consumption per cycle will depend on how the appliance is used.
Automatic or non-automatic:Automatic
EU Ecolabel: N/A
Energy consumption of the standard cotton programme at full load: 4.24 kWh
Energy consumption of the standard cotton programme at partial load: 2.30 kWh
Power consumption of the off-mode (Po): 0.28 W
Power consumption of the left-on mode (Pl): 1.72 W
Duration of the left-on mode: 10 min
220-240V~
2700W
50Hz
595×615×845(mm)
7.0kg
43kg
Note: The ra ted c apaci ty is the m axi mum cap acity,
make sure th at the dr y clothes wh ich are l oaded t o
the applia nce do no t exceed the r ated ca pacit y
each time.
The 'standard cotton programme' used at full and partial load is the standard drying
programme to which the information in the label and the fiche relates , that this programme
is suitable for drying normal wet cotton laundry and that it is the most efficient programme
in terms of energy consumption for cotton.
Weighted programme time of the standard cotton programme at full and partial load: 101 min
Programme time of the standard cotton programme at full load: 128 min
Programme time of the standard cotton programme at partial load: 80 min
Condensation efficiency class B on a scale from G (least efficient) to A (most efficient).
Average condensation efficiency of the standard cotton programme at full load: 80.1%
Average condensation efficiency of the standard cotton programme at partial load: 80.1%
Weighted condensation efficiency for the standard cotton programme at full and partial load: 80.1%
Sound power level for the standard cotton programme at full load: 69dB
18
Page 21

CONTENIDO
Información de seguridad..................................................................
Instalación.........................................................................................
Descripción de la partes....................................................................
Atención y asesoramiento..................................................................
Descripción de los controles.............................................................
Instrucción de la operación................................................................
Tabla de programas...........................................................................
Función especial de secado ............................................................
Limpieza y mantenimiento de rutina.................................................
Función de alarma............................................................................
Precauciones....................................................................................
Las especificaciones técnicas y ficha del producto..........................
20
25
26
28
29
30
31
32
34
35
36
37
Page 22

CONSEJOS DE SEGURIDAD
Símbolos de cuidado para el secado
Por favor, preste atención al uso de la máquina de
secado si los materiales de la ropa no se
o contener los símbolos de la siguiente manera:
secan por una
Secado
Línea seca / colgar
para secar
Limpieza en seco No lavar en seco
Normal
Escurrir
No caida secado normal
Secar en plano
A
Seco ciclo normal
limpio con cualquier
disolvente
No secar
En este tono
F
Seco ciclo normal limpio
con petróleo sólo
PRECAUCIONES DE SEGURIDAD
!
Para evitar cualquier daño a usted y otros usted debe
estas recomendaciones de seguridad y
de seguir
seguir estas indicaciones.
1. Este producto pertenece a la categoría I aparatos
eléctricos, y sólo para el secado de los textiles que
han sido lavadas con agua en el hogar. Por favor,
preste atención a la seguridad del
uso de energía
durante la operación!
2. Se debe utilizar la fuente de alimentación con
conexión a tierra confiable. Su cable de tierra debe
ser enterrado bajo el suelo, y no estar relacionado
con ningún otros servicios públicos como el tubo o
tubería de agua tubería de gas, etc. El cable de
tierra y el neutro se marcan y no deben conectarse
ebtre sí. Alambre de la energía
3. El cable de alimentación cumple las normas con el
estándar nacional y debe ser capaz de soportar la
corriente de 16A. Para asegurar su seguridad y la de
su familia, por favor haga mejora inmediatamente si
cualquier uso de energía en su casa no
cumple con
los anteriores requisitos.
20
Page 23

PRECAUCIONES DE SEGURIDAD
4. No deben de introducir tejidos que hayan sido
lavados con productos químicos industriales
5. El filtro de pelusa tiene que limpiarse con frecuencia
6. No se pueden acumular hilachas alrededor de la
secadora
7. Debemos de proporcionar una ventilación adecuada
para evitar que se acumulen flujo de gases en la
habitación y que
aparatos, incluyendo chimeneas.
8. No podemos secar artículos que no haya sido
lavados previamente.
9. Los elementos que se han ensuciado con sustancias
tales como petróleo, acetona, alcohol, gasolina,
queroseno, quitamanchas, aguarrás, ceras y
removedores de cera deben lavarse en agua caliente
y con agua y con una cantidad extra
antes de ser secado en la secadora.
10. Los elementos como goma espuma (forma de
látex), gorros de ducha, textiles impermeables,
artículos respaldo de goma y ropa o almohadas
equipados con almohadillas de goma
deben secar en secadora.
11. Suavizantes de ropa, o productos similares, deben
ser utilizados como son especificados en las
instrucciones de suavizantes de telas.
12. La parte final de un ciclo de secadora se produce sin
calor (ciclo de enfriamiento) para asegurarse que los
artículos se al enfriarse no serán dañados.
13. PRECAUCIÓN: no parar nunca la secadora antes de
que finalice el ciclo de secado a menos que todos los
elementos se sequen de forma rápida y que fuera se
les disipa el calor .
14. El aire de secado no debe de entrar en un conducto
que es utilizado para expulsar humos de gas ardiente
aparato o otros combustibles.
sea combustible para otros
de detergente
espuma no se
21
Page 24

PRECAUCIONES DE SEGURIDAD
15. El aparato no debe ser instalar detrás de una puerta
con llave, o una puerta con una bisagra deslizante
en el lado opuesto al del tambor de la secadora.
De manera que la apertura total de la puerta de la
secadora de tambor no esté restringida.
16. Productos como petróleo pueden inflamarse
espontáneamente, especialmente cuando se expone
a fuentes de calor como en una secadora. Los
artículos se calientan, causando una reacción de
oxidación en el aceite. La oxidación genera calor.
Si el calor no puede escapar, los elementos pueden
calentarse lo suficiente como para prenderse fuego.
No debemos almacenar objetos con aceites para
evitar el que el calor se escape y así crear un
peligro de incendio
17. Tenemos que evitar secar los tejidos que contienen
aceites vegetales o aceites de cocina y que han sido
utilizados para productos del cabello, en este caso
hay que lavarlos primero con agua caliente y
detergente adicional para poder secarlosen una
secadora de tambor, esto va a reducir el riesgo, pero
no eliminarlo.
18. El aparato no debe ser volcado durante el uso
normal o mantenimiento.
19. Revisar todos los objetos de los bolsillos, tales como
encendedores y objetos plásticos.
20. Este aparato puede ser utilizado por niños de 8 años
o más y personas con capacidades físicas,
sensoriales o capacidades mentales o falta de
experiencia y conocimiento, si son supervisados o
instruidos acerca del el uso del electrodoméstico en
una manera segura y entender los riesgos
implicados. Los niños no deben jugar con el aparato.
Su limpieza y mantenimiento no se hará nunca con
un niño sin supervisión.
22
Page 25

PRECAUCIONES DE SEGURIDAD
21. Si el cable de alimentación está dañado, debe ser
reemplazado por el fabricante, su agente de servicio
o por personal cualificado con el fin de evitar un
peligro.
22. Este aparato es sólo para uso en interiores.
23. Las salidas no deben de ser obstruidas por una
alfombra.
24. Los niños menores de 3 años deben mantenerse
alejados a menos continuamente supervisado.
25. Mantener a las mascotas a distancia.
Eliminación correcta de este producto:
Esta marca indica que este producto no debe
ser eliminarse junto con otros residuos
domésticos en todo el UE. Para evitar los
posibles daños al medio ambiente o la salud
humana que representa la eliminación
incontrolada de residuos, debemos de
reciclarlo correctamente para promover el
desarrollo sostenible de la reutilización de los
recursos materiales. Para devolver el usado,
por favor utilice los sistemas de devolución y
recolección o póngase en contacto con el
establecimiento donde el producto fue
comprado. Ellos pueden recogerlo para su
reciclaje y para el seguro ambiental.
23
Page 26

PRECAUCIONES DE SEGURIDAD
Peligro de electrocución
1. No tirar del cable de alimentación con energía para
sacar el enchufe de la red.
2. No conectar o retirar el enchufe de alimentación con
las manos mojadas
3. No dañe el cable de alimentación.
Peligro de lesiones
1. No desmontar e instalar la secadora sin ninguna
instrucción o supervisión.
2. No apilar la secadora en la lavadora sin el Kits de
apilamiento
3. No secar la ropa antes de darles la vuelta.
No ponga ningún objeto inflamable cera, como una
Peligro de daños
1. No seque sobre la capacidad nominal.
2. No haga funcionar la secadora sin el filtro de la
puerta y la base del filtro.
3. No secar la ropa antes de ser hilada.
4. No exponga la secadora directamente bajo el sol, y
sólo para uso en interiores.
5. No instale la secadora en el ambiente húmedo y
empapado.
6. La limpieza y mantenimiento, por favor, recuerde
que sacar el enchufe y no lave directamente el
aparato agua.
Peligro de explosión
Por favor, no secar la ropa con algunas sustancias
inflamables como el aceite de carbón,alcohol o podrá
dá lugar a una explosión.
24
Page 27
INSTALACIÓN
Transporte
Mueva con cautela. No sujete las piezas más destacadas de la máquina.
La puerta de la máquina no se puede utilizar como el mango para la entrega
POSICIÓN DE INSTALACIÓN
1.Por favor instale la secadora en una superficie solida
2.Por favor no colocar la secadora en posición de ladera, alfombra suave o en el piso de
madera.
3.Por favor no instale la secadora al aire libre para evitar que se dañen con las temperaturas
las piezas de la máquina.
AJUSTE DE NIVEL
Si el suelo es desigual, obviamente, necesita ser ajustado.
Si se hace vibrar la máquina, hace que se mueva de su posición.
Use las herramientas para ajustar la altura de cuatro patas de la
máquina y ajuste la nivelación de la secadora.
CONEXIÓN DE LA ALIMENTACIÓN ELÉCTRICA
1. Asegúrese de que el voltaje de la fuente de alimentación es la misma que se especifica en
este manual de la secadora.
2. Por favor no conectar con la conexión de la placa de alimentación, un enchufe universal o
zócalo.
25
Page 28
DESCRIPCION DE LAS PARTES
Descripción de la parte
Contenedor
Panel de control
Cable de
alimentación
Filtro de pelusa
Condensador
Tapa de mantenimiento
del condensador
Puerta
ACCESORIOS
Los siguientes accesorios son opcionales para los modelos
especificados.
Si su secadora dispone de los siguientes accesorios, por favor realice
la instalación como se indica en el dibujo de instrucciones que se
muestra en el gráfico.
Manguera de drenaje de condensación (opcional) Soporte de la manguera (opcional)
26
Page 29

DESCRIPCIÓN DE LAS PARTES
200cm
1.Abra la puerta e introduzca la ropa
2.Cierre la puerta de la máquina
3.Conecte el cable de alimentación
4.Presione el botón de inicio (On / Off)
Min.80cm
Max.120cm
10. Desconecte el cable de alimentación.
9.Presione el botón de apagado (On / Off)
8.Limpie el filtro de pelusas
7.Saque la ropa cuando haya finalizado
5.Seleccione el programa
6.Presione el botón de encendido ( Inicio/ Pausa)
27
Page 30

ATENCION Y ASESORAMIENTO
ATENCION
Antes de que el primer ciclo, el polvo y la grasa pueden permanecer en la
!
secadora durante el período de fabricación y transporte, para evitar la contaminación
de su ropa, por favor siga estos pasos
a) Poner algunos trapos limpios en el tambor.
b ) Conecte la fuente .
c ) Presione On / Off , selección el botón de inicio de programa “R pido”, y presione á
“Inicio / Pausa” d ) Al terminar este programa, por favor siga el la rutina y
mantenimiento, limpiar el filtro de pelusa y el condensador de aire .
ASESORAMIENTO
1. Antes del secado, centrifugar bien la ropa en la lavadora, esta velocidad del
centrifugado puede reducir el tiempo de secado y ahorrar consumo de energía.
2. Para un resultado de secado uniforme, debemos de clasificar la ropa según el tipo
de tejido y el programa de secado.
3. Antes del secado, cierre las cremalleras, ganchos y ojetes, botones juntar, unir
cinturones de tela , etc
4. No sobre cargar la maquina, porque con la ropa seca puede conseguir fácilmente
las arrugas
5. No seque los artículos que contienen goma o materiales elásticos similares, como
impermeables, cubiertas de bicicletas y productos de plumas.
6. La puerta sólo se puede abrir después de que el programa de la máquina de secado
ha finalizado. Si abre la puerta antes de que el final del programa, corre el riesgo de
quemarse con el vapor o las superficies caliente.
7. Debemos de vaciar el filtro de pelusas de cada uso de secado para evitar el exceso
de consumo de tiempo y energía.
8. No seque la ropa después del proceso de secado limpia
9. Las referencias de peso, según se indica:
Chaquetas
( sobre 800g
de algodón )
Jackets (about
800g in cotton)
Pantalones
vaqueros
(aproximadamente
800 g )
Edredones toallas
(aproximadamente
900g en el algodón)
Sábanas
(alrededor de
600 g en
algodón )
Camisetas
(alrededor de
180 g en
algodón)
Ropa de trabajo
( superior e inferior)
(alrededor de
1120 g en algodón)
Calzoncillos
(alrededor de
70 g en algodón)
28
Pijamas
( unos 200 g )
Calcetines (unos
30 g de material
mezclado )
Camisetas
( sobre 300g de
algodón )
Page 31

Panel de Control
2
PERMANECER
On
Off
Pantalla digital de tubo
Sólo la luz de( RETRASO / PERMANECER ,siguen siendo pertinentes a la fase que se
está llevando a cabo actualmente permanecerá durante el proceso de secado
Cuando se inicia el procedimiento de secado, se mostrará el tiempo
Esta pantalla “---“ significa que estando el programa en estado
restante, es decir, el procedimiento de secado finaliza en el tiempo programado.
de hibernación, se puede pulsar cualquier botón o abrir la puerta para comenzarlo.
Tiempo
Esta función se utiliza
para ajustar el tiempo
de secado. 20-60
minutos presionando la
tecla continuamente
Refresh
Este botón tiene la
función de encendido y
apagado. Cuando se
pulsa este botón, la
máquina cambia entre
Botón On / Off
encendido y apagado
Ciclo
Los diferentes ciclos de la secadora
se puede seleccionar de acuerdo con l
as necesidades del usuario para hacer
que el secado de la ropa obtenga un
resultado más eficaz
Suave
Esta función da menos calor
para proteger los tejidos
sensibles de las altas
temperaturas
Anti arrugas
Esta función le dará más
cuidado al programa de
secado para la protección
de los textiles delicados.
Depósito
Por favor, vaciar
el recipiente
cuando el
parpadea
después se
detiene la
secadora
Retraso
Esta función se
utiliza para retrasar
el proceso de
secado. Usted puede
obtener 1-24 horas
pulsando esta tecla
continuamente.
Filtro
Limpie el filtro cuando el
comience a parpadear,
después se detiene la
secadora
Time
Delay
CHILD
LOCKE D
FILTER TANK
Inicio / Pausa
Este botón tiene la función de inicio
o pausa. Cuando se pulsa este
botón, la máquina se enciende y
entra en el inicio, al presionar hace
la pausa
Las cuatro luces LED indican
el estado del procedimiento
de secado
Indicador de Estado
29
Page 32

INSTRUCCIONES DE FUNCIONAMIENTO
1.Pulse el botón 【On / Off】.
2.Gire la perilla de programa para seleccionar el programa deseado.
3.Seleccione el 【 】 , 【Antiarrugas】 o 【 】RETRASO SUAVE
funciones para la opción adicional.
4.Presione la tecla 【Inicio / Pausa】
El procedimiento de secado se detiene
La alarma le indicará de la secadora al terminar el ciclo.
Pulse el botón On / Off para para el encendido y retire el cable de 【 】
alimentación.
30
Page 33

Definición de programa
Para secar prendas de algodón
Para secar prendas de algodón.
Nivel de Secado: listo para planchar.
Para secar prendas de algodón
Nivel de secado: listo para colgar
Nivel de secado: listo para guardar
Para prendas de Lana aptas para lavadora. Las prendas no quedan totalmente secas.
Para secar prendas de algodón
Nivel de secado: secado extra
Para secar prendas sintéticas que no necesitan planchado como camisas delicadas, lino,
Para secar prendas sintéticas para que colgarlas o planchar, como camisetas o punto.
ropa de bebe o calcetines Nivel de Secado: Listo para guardar
Nivel de Secado: Listo para colgar o planchar
Sáquelas de la secadora y cuélguelas cuando termine el programa
Para Secar prendas gruesas o como múltiples capas.
nivel de secado: Extra seco
Para Prendas acrílicas o poca carga que necesitan un secado rápido
Para Secado por tiempo. Prendas delicadas acrílicas o pequeñas prendas. Se utiliza
junto al botón tiempo para ajustar el tiempo de secado
Para Airear las prendas o lavar prendas en seco
Peso
(max)
Para prendas de algodón y lino.
PROGRAMA
7.0kg
Planchar
Ligero
Normal
ALGODÓN
TABLA DE PROGRAMAS
Extra
Para Prendas acrílicas o poca carga que necesitan un secado rápido
31
3.5kg
Normal
Ligero
Extra
SINTÉTICO
3.0kg
Delicado
3.0kg
Frio/caliente
3.0kg
1.0kg
Rápido
(20min/30min)
Airear
Nota: Los programas descritos son recomendaciones de uso. El usuario puede elegir distintos programas según sus
hábitos y experiencia. Prendas gruesas con múltiples capas como edredones, jeans, chaquetas, etc no son fáciles de secar.
Utilice el programa Extra Algodón
Page 34
FUNCIONES ESPECIALES DE SECADO
Especial función de secado
1. Instrucción del sensor de humedad
Esta función puede detectar automáticamente la humedad de la ropa , y ajustar
automáticamente el tiempo de secado de acuerdo con la cantidad de ropa Esta
función se activará automáticamente durante el proceso de secado , excepto el
"Warm" "Cool " y " programa de actualización " .
2. Función adicional de ajuste tiempo
Esta función se puede ajustar el tiempo de secado procedimiento por su cuenta
propia, el tiempo se puede ajustar de 20 a 60 minutos presione el botón "Time"
Esta función para poca ropa o ropa pequeña, por ejemplo, un calzoncillo o dos
pares de calcetines.Es como usar el temporizador para controlar el proceso de
secado, pero sólo para "Warm"
3. Instrucción del procedimiento de secado demora
Esta función se utiliza para retrasar el secado de ropa dentro de las 24 horas.
Puede pulsar este botón clave de forma continua, puede ser seleccionado dentro
de 1-24 horas. Significa el tiempo de retraso, el procedimiento de secado se iniciará
en x: xx horas Cuando el procedimiento de demora se inicia, la pantalla sólo
mostrará el tiempo de retraso de arranque y parpadeará el icono RETRASO
. Después de 30 segundos, en la pantalla se iluminará el icono
demora y mostrará "-".
Pasos en detalles
. Cargue la ropa y asegurarse de que la puerta de la máquina está cerrada.
( 1 )
( 2 ) . Pulse el botón 【 On / Off 】 , luego gire el mando selector de programas y
seleccione
. Puede seleccionar las funciones【 antiarrugas 】 o 【suave 】 según su
( 3 )
necesidad
. Presionar la tecla 【Retraso】.
( 4 )
. Continúe presionando el retardo 【 】 para seleccionar el tiempo de retrasoRetraso
( 5 )
( 6 ) . Después se presiona la tecla de 【 Inicio / Pausa 】 , la secadora se encuentra
en el estado de ejecución.El procedimiento de secado se lleva a cabo
automáticamente cuando el tiempo de retraso ha terminado.
( 7 ) . Si se presiona el botón 【 Inicio / Pausa 】 de nuevo, se detendrá la función de
retraso.
( 8 ) . Si desea cancelar la función " Delay" , pulse el botón 【 On / Off 】
4 . Instrucción de la función de seguridad para niños
( 1 ) . Esta máquina incorpora un bloqueo especial de seguridad para niños, que puede
prevenir que en un descuido el niño pueda presionar las teclas haciendo un
funcionamiento defectuoso del aparato.
( 2 ) . Cuando la secadora está en el estado de funcionamiento, presione el
【antiarrugas 】y【suave 】al mismo tiempo durante 3 segundos para iniciar la
función del bloqueo para niños. Cuando se establece la función de bloqueo para
niños, en la pantalla se iluminará el icono "Bloqueo para niños ".
32
Page 35

Función de secado especial
Y ninguna clave puede afectar a la secadora, excepto el botón 【On / Off】.
En el estado inicial del botón de bloqueo para niños, el 【antiarrugas】y 【suave】
si se pulsan al mismo tiempo estos dos botones durante 3 segundos se desactiva
la función de bloqueo para niños.
5 . Función antiarrugas 【 antiarrugas 】
Cuando se selecciona la función antiarrugas, el LED de la pantalla se iluminará,
y será intermitente girar durante el programa de secado , este programa presta
mayor atención para garantizar que en los tejidos sensibles no se produzcan
pliegues.
6 . Función SUAVE 】【
Cuando se selecciona la función suave, el LED de la pantalla en esta función se
ilumina, este programa dará menos calor para proteger los tejidos sensibles a las
altas temperaturas que pueda perjudicarlos, tales como acetato, elastán, etc.
7 . Función de luz en el tambor
Para su comodidad, esta función le ayuda a ver con claridad cuando abre la
puerta de la secadora.
8. Función de aintiarrugas automática
Para evitar las arrugas de la ropa cuando termina el programa de secado,
la máquina gira de manera automática alrededor de 2 horas .
33
Page 36

LIMPIEZA Y MANTENIMIENTO DE RUTINA
Limpie el filtro de pelusas
Deje la secadora se enfríe.
1.Abra la puerta de carga
2.Saque el filtro de pelusas, tire hacia arriba
para sacarlo
3. Limpie filtro de pelusas
4. Reinstale de nuevo el filtro de pelusa
NOTA !
1.Los residuos acumuladas en el filtro bloquearán la circulación de aire, que lo
se ampliará el tiempo de secado y más gasto de energía, por lo tanto, la rejilla
del filtro debe de limpiarse después de cada uso de secado.
2.No desconecte el cable de alimentación antes de limpiar !
3.NO ponga a funcionar la secadora sin el filtro de pelusa !
4.Limpie el filtro de pelusa después de cada uso para evitar la acumulación de
pelusa en el interior de la secadora.
Lave condensador de aire
-Deje que la secadora se enfríe
Puede que salga un poco de agua, colocar un paño o papel
absorbente
1. Abra la tapa de mantenimiento.
2. Deje completamente la solapa abierta.
3. Atornille las dos palancas de bloqueo
4. Meta en agua el condensador de aire
5. Limpie bien el condensador de aire y lo escurre bien.
6. Limpie y seque las juntas.
7. Vuelva a insertarlo, maneje en el botón!
8. Afloje las dos palancas de bloqueo.
9. Cierre la tapa de mantenimiento hasta que encaje en
su posición.
No dañe el condensador aire!
Limpie el condensador de aire si se usan con frecuencia.
1.Limpie con agua tibia solamente; no use objetos duros y con
!
aristas vivas.la secadora sin el condensador de aire!
2. Durante el secado, se puede acumular agua entre la ventana y
el sello, pero esto no afecta a la función de la secadora!
34
Page 37

Limpieza y mantenimiento de rutina y Función de alarma
Vacíe el depósito de agua
1. Sujete y tire del contenedor de agua con las
dos manos
2. Extraiga el tubo de drenaje
3. Incline el depósito de agua, verter el agua
de condensación
4. Empuje el tubo de drenaje posterior, ponga
el recipiente de agua
ADVERTENCIA:
!
1. Vacíe el depósito de agua después de cada
uso, se detendrá el programa y el icono "" parpadeará si el depósito de agua
está lleno durante el proceso de secado. Después de que el recipiente haya
sido vaciado, la secadora se puede reiniciar pulsando el botón 【Inicio / Pausa】.
2. No beber el agua condensada
Función Alarma
Problema
Alarma
“ ”Parpadea
“ ”Parpadea
“ ”E30
“ ”E32
“ ”E33
“ ”E34
Razón de Alarma
El agua del tanque esta
Llena
Bloqueo de flujo de aire
No calienta
Error de Humedad
Error en la Temperatura
Zumbador de
Alarma
El código de error
es parpadeando en
X : XX Cambio en
flash 1 .
Mientras tanto, el
pitido suena 1 cada
5 minutos.
35
Soluci n ó
Revise el tanque de agua y bomba
Revise el filtro de aire y condensador
Compruebe el calentador y
termostato
Compruebe el sensor de humedad
y PCB
Compruebe el sensor de
temperatura frontal
Compruebe el sensor de
temperatura trasera
Page 38

PRECAUCIONES
Precauciones
!
Sólo los técnicos autorizados pueden llevar a cabo las
reparaciones.
Antes de llamar al servicio al cliente, debemos por nuestra propia cuenta seguir las
instrucciones del usuario. Un técnico le cobrará por consejo, incluso durante el
período de garantía.
“ ”Parpadea “ ”
“ ”Parpadea
Problema
La pantalla no
enciende
Secadora no enciende
El agua se está
acabando
La puerta se abre sola
Ha aumentado la
humedad en el
ambiente
No seca correctamente
o tarda mucho Tiempo
Solución
El cable no está conectado a la red eléctrica
Cambia el programa seleccionado
No hay corriente en la vivienda
El recipiente de condensación está vacío
Si falla, revisa la manguera de salida de
condensación
Limpiar el condensador de aire
Limpiar el filtro de aire
Compruebe el programa seleccionado
Compruebe que la puerta está bien cerrada.
Compruebe que ha presionado el botón de inicio
Alinear la secadora en horizontal
Esta bien cerrada la puerta y el condensador de aire
Cambie la carga de la ropa puede que tenga demasiada
Compruebe que el cierre “click” de la puerta esté en
su posición
Ventile la habitación adecuadamente
Limpie la rejilla de enfriar.
Asegúrese de que el condensador de aire está
puesto
Compruebe que el recipiente está vacio
Compruebe la toma de agua
La secadora esta ubicada en un sitio muy
pequeño
Limpie los sensores de humedad
Use el programa de secado superior
Revise el programa del temporizador
Si usted no puede hacer soluciones por su cuenta este problema y
!
necesita ayuda :
1. Pulse el botón 【On / Off】.
2.Deconecte el enchufe de la red eléctrica y llame al Servicio Técnico.
36
Page 39
ESPECIFICACIONES TECNICAS Y FICHA DEL PRODUCTO
Especificaciones
Voltaje de fuente de alimentación
Potencia nominal
Frecuencia nominal
Tamaño global
Capacidad nominal de secado
Peso neto
Ficha del Producto
Marca: TEKA
Modelo: TKS1 710 C
Capacidad nominal: 7kg
Tipo de Secadora: Condensación
Clasificación energética : B
Conusmo de energía por año 504.0kWh, sobre la base de 160 ciclos de secado del algodón
programa estándarcarga completa y parcial , y el consumo de los modos de bajo consumo .
energía real. El consumo por ciclo depende de cómo se utilice el aparato.
Automático o no automático : Automático
Etiqueta ecológica comunitaria : N / A
El consumo de energía del programa normal de algodón con carga completa : 4,24 kWh
El consumo de energía del programa normal de algodón con carga parcial : 2,30 kWh
El consumo de energía del modo apagado ( Po) : 0,28 W
El consumo de energía del modo sin apagar ( Pl ) : 1,72 W
La duración del modo sin apagar : 10 min
220-240V~
2700W
50Hz
595*615*845(mm)
7.0kg
43kg
Nota: La capacidad nominal es la capacidad
máxima,asegurarse de que la ropa seca que
se cargan ael aparato no exceda la capacidad
nominal cada vez
El " programa normal de algodón " usado en carga plena y parcial es el programa de secado estándar
en la información contenida en la etiqueta y en la ficha y a la que hace referencia, que es este
programa el adecuado para el secado de ropa de algodón húmeda normal y que es el programa más
eficiente en términos de consumo de energía para el algodón
Duración ponderada del programa del programa normal de algodón con carga plena y parcial : 101 min
Duración del programa del programa normal de algodón con carga completa : 128 min
Duración del programa del programa normal de algodón con carga parcial : 80 min
La condensación Clase de eficiencia B en una escala de G (la menos eficiente) a A ( más eficiente) .
Eficiencia de la condensación medio del programa normal de algodón con carga completa : 80.1%
Eficiencia de la condensación medio del programa normal de algodón con carga parcial : 80,1 %
Eficiencia de la condensación ponderada para el programa normal de algodón con carga plena y
parcial : 80,1 %
Nivel de potencia sonora para el programa normal de algodón con carga completa : 69dB
37
Page 40

39
43
44
46
47
48
49
50
52
53
54
&
55
Page 41

o funcionamento.
acima mencionados.
da roupa.
A
F
eletrodomésticos
volta do secador.
É necessário uma ventilação adequada para evitar a acumulação de
gases no compartimento.
39
Page 42

sem estar previamente lavada.
está
adequada de modo a não danificar-se.
limitada.
de cozinha
40
Page 43

inclinado
a utilização
41
Page 44

Perigo de elétrico
elétrico
elétrico
Perigo de lesão
1. Não desmontar ou instalar a máquina de secar roupa sem
instrução ou supervisão.
2. Não instalar a máquina de secar roupa sobre a máquina de
lavar roupa sem o kit de coluna.
3. Não se incline sobre a porta aberta da máquina de secar.
4. Não coloque objetos inflamáveis na máquina de secar tais
como velas ou material elétrico.
Perigo
de secagem
filtro da porta e o filtro da base.
direta e utilize-o apenas no
interior.
Durante a limpeza e manutenção, por favor desligue a máquina de
secar da corrente elétrica e não lave o aparelho diretamente com
água.
Perigo
pois pode provocar
42
Page 45
piso
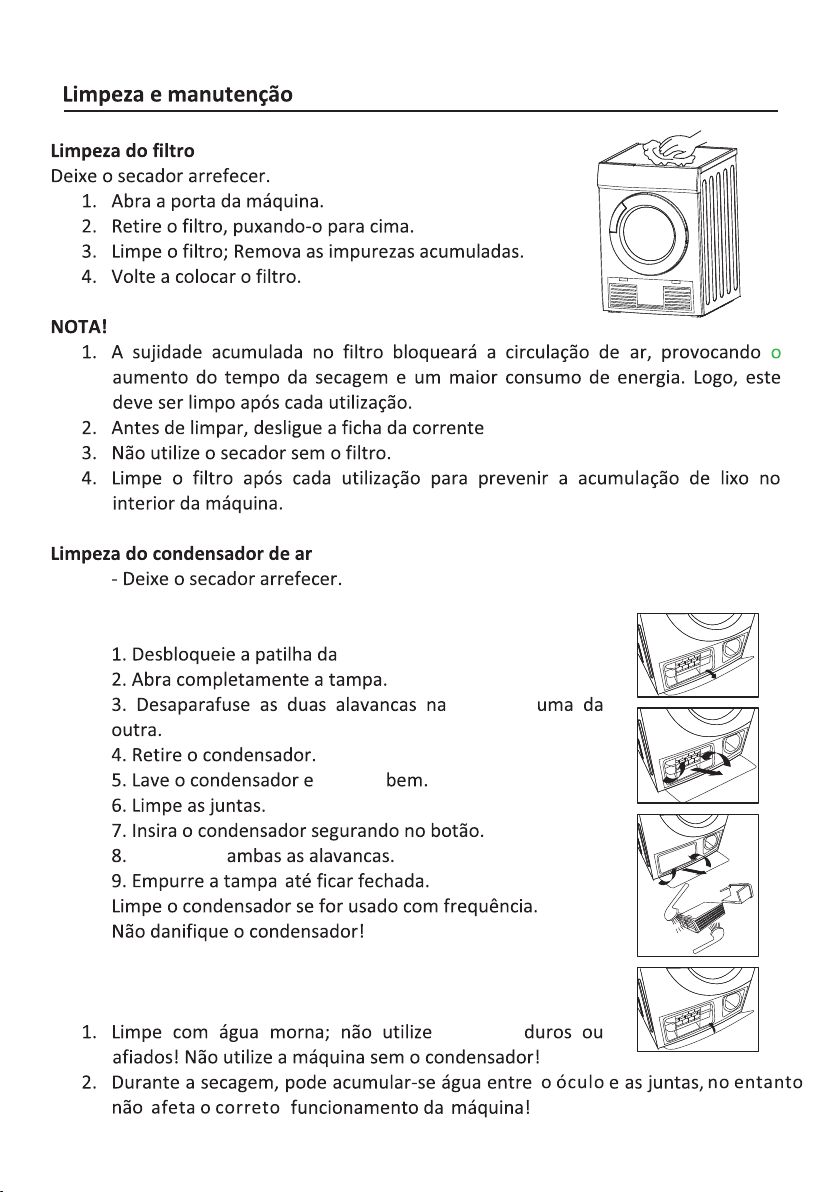
piso nem sobre carpetes ou piso de madeira.
Utilize ferramentas
de secar roupa.
elétrica
Assegure-se de que a tensão da rede é a indicada nas especificações do aparelho.
de modo a nivelar a máquina
43
Page 46
Depósito
comandos
Tampa do co ndensad or
Os seguintes acessórios são opcionais para os mode los esp ecifi cos
acessórios, instale-os
44
Page 47
200cm
Min.80cm
Max.120cm
esvazi e o depósito.
Selecione
45
Page 48

Após
selecione
selecione
demasiado a roupa, pois quanto mais seca mas facilmente fica com vincos.
esvazie o depósito
tecidos
o aumento
46
Page 49

f
Algodão
Display digital
Delicados
being carried out will remain display during the drying process.
When the drying procedure begins, REMAIN will display the remaining
The display “- - -”means programme in “hibernation” status, you can
press any buttons or open the door to awaken programme.
time, that is, the drying procedure will finished in【x:xx】time.
- Só os indicadores "Programação diferida"/ "stand-by" relevantes para o programa que
está a decorrer permanecerão acesos durante a secagem
- Quando a secagem inicia, o indicador "stand-by" vai mostrar o tempo restante, ou seja,
a secagem finalizará no tempo programado.
- A indicação "----" no visor, significa que o programa está em stand-by, pode pressionar
qualquer botão ou abrir a porta para o iniciar.
Sintéticos
Tempo
Esta função é utilizada
para ajustar o tempo
de secagem, que pode
ser de 20-60 minutos
pressionando esta
tecla continuamente.
Depósito
esvazie o
depósito
Por favor,
quando ” “
piscar, depois
da máquina
parar.
Suave
Suave
Engomar
Fácil
Standard
Função Extra
Standard
Extra
Extra
Quente
Bloqueio Infantil
On
Off
Rápido
Refrescar
Frio
Anti-Vincos Delicado
On/Of
Quando pressiona este
botão a máquina liga ou
desliga.
Programa
Os diferentes programas podem ser
selecionados de acordo com as
necessidades do utilizador de modo
a obter uma secagem mais eficaz.
Delicado
Este programa permite uma
temperatura inferior para
proteger os tecidos sensíveis
às altas temperaturas.
Antirrugas
Esta função permite um
maior cuidado durante o
programa de secagem
para a proteção dos
tecidos delicados.
Programação
diferida
Esta função é
utilizada para atrasar
o inicio do processo
de secagem. Pode
selecionar de
Filtro
Limpe o filtro quando ”“
piscar, depois da máquina
parar.
1-24horas premindo
esta tecla
continuamente.
Tempo ajustável
Diferido Tempo
Secar
47
Normal
Engomar
Fácil
Inicio/
Pausa
Ventilação
Digital Display
Inicio/pausa
Quando este botão é pressionado
a máquina inicia, ao pressionar
novamente faz a pausa.
Os quatro indicadores LED
indicam o estado do
processo de secagem.
Indicador de estado
Page 50
Selecionar
Selecione as funções "Programação diferida", "Antirrugas"
de
sonoro indica
48
Page 51

Definição de programa
Para secar tecidos de algodão
Para secar tecidos de algodão
Para secar tecidos de algodão
Nível de secagem:para pendurar
Nível de secagem:para passar a ferro
Para tecidos de lã laváveis na máquina de lavar roupa. Os tecidos não ficam totalmente
Para secar tecidos de algodão
Nível de secagem: secagem extra
Nível de secagem: para guardar
Para secar roupas sintéticas que não necesitam de ser passadas a ferro tais como
Para secar tecidos sintéticos para pendurar ou passar a ferro, como camisas.
Nível de Secagem: para pendurar ou passar a ferro
camisas delicadas, linho, roupa de bébé ou meias
Nível de secagem: para guardar
secos. Retire-as da máquina de secar e pendure-as quando terminar o programa
Para secar tecidos grossos ou com múltiplas capas.
Nível de secagem: secagem extra
Para secagem por tempo. Tecidos delicados em fibra ou de pequeno tamanho. Utilize o
Para tecidos em fibra ou pouca carga que necessitam de uma secagem rápida.
botão "tempo" para ajustar o tempo de secagem.
Para refrescar ou lavar tecidos a seco
Ferro
7.0kg
Ligeiro
Normal
Algodão
(máx.)
Capacidade
Para tecidos de algodão e linho
Tabela de Programas
Programa
Extra
Para tecidos que não necessitam de ser passados a ferro tais como sintéticos e mistos.
49
3.5kg
Ligeiro
Normal
Extra
Sintéticos
3.0kg
3.0kg
Delicado
Quente/Frio
3.0kg
1.0kg
(20min/30min)
Rápido
Ventilação
Nota: Os programas descritos são recomendações de utilização. O utilizador pode selecionar diferentes programas segundo
os seus hábitos e experiência. Tecidos grossos com múltiplas capas como edredões, jeans, casacas, etc não são fáceis de
secar. Utilize o programa Extra Algodão.
Page 52

detetar
ativada
“Ventilação”.
Programação diferida
selecionar
da programação diferida.
da programação diferida.
selecione o programa desejado.
selecionar
"Programação diferida".
tempo de atraso.
Antirrugas
de "Programação diferida" para selecionar o
exceto
pressionar
diferida será interrompida.
programação diferida,
Segurança para crianças
previne a ativação acidental das teclas e o consequente mau funcionamento
da máquina.
programação
50
Page 53

simultaneamente "Antirrugas"
para crianças.
para crianças" e nenhuma tecla afeta o funcionamento da máquina, exceto o
botão On/Off.
Antirrugas
Antirrugas é selecionada,
acende,
das temperaturas altas,
poliéster
Antirrugas automática
o tambor da máquina roda automaticamente durante aproximadamente duas horas
51
Page 54
elétrica.
-Coloque um pano absorvente por baixo da tampa do
condensador pois pode sair água residual.
tampa do condensador.
direção
seque
Aparafuse
52
objetos
Page 55
a
resistência
na
a resistência
a placa eletrónica
da frente
traseiro
53
Page 56
pessoal qualificado
“ ”
“ ”
selecionado.
elétrica.
Esvazie o depósito
Verifique
Ventile adequadamente o compartimento
corretamente colocado.
Esvazie o depósito
. A máquina está colocada num local
com pouco espaço.
Utilize um programa de secagem superior.
. Verifique a programação do temporizador
uma reparação:
54
Page 57

Tensão
220-240V~
2700W
Capacidade máxima
50Hz
595×615×845(mm)
7.0kg
Nota: verifique se a roupa colocada
não excede a capacidade máxima
43kg
Marca: TEKA
Modelo: TKS1 710 C
Condensação
Consumo de energia de 504.0kWh por ano, com base em 160 ciclos de secagem do
programa standard com carga total e carga parcial em modos de baixo consumo. O
consumo real de energia depende das condições de utilização do equipamento.
não automática
80,1%
80,1%
off
55
com carga completa
2,30
com carga completa
completa
4,24
80,1%
Page 58

 Loading...