

Page 1
FICHA / FICHA / BROCHURE / FICHE / DATENBLATT
Fabricante Fabricante Manufacturer Fabricant Hersteller TEKA
Modelo Modelo Model Modèle Modell
Clase de
efi ciencia
energética,
en una escala
que abarca
de A (más
efi ciente)
a G (menos
efi ciente).
Función de calentamiento.
Calentamiento
convencional.
Convección
forzada.
Consumo
de energía.
Calentamiento
convencional.
Convección
forzada.
Volumen neto
(litros).
Tipo:
Pequeño
Medio
Grande
Tiempo de
cocción con
carga normal.
Calentamiento
convencional.
Convección
forzada.
Superfi cie de
cocción.
Ruido (dB (A)
re 1 pW).
Classe de
efi ciência
energética,
numa escala
de A (efi ciente)
a G
(inefi ciente).
Função de
aquecimento.
Convencional.
Convecção
forçada de ar.
Consumo
de energia.
Convencional.
Convecção
forçada de ar.
Volume útil
(litros).
Tipo:
Pequeno
Médio
Grande
Tempo de
cozedura da
carga-padrão.
Convencional.
Convecção
forçada de ar.
Zona de
cozedura.
Nível de ruído
dB(A) re 1 pW.
Energy
effi ciency
class on a
scale of A
(more effi cient)
to G (less
effi cient).
Heating
function.
Conventional.
Forced air
convection.
Energy
consumption.
Conventional.
Forced air
convection.
Usable volume
(litres).
Size:
Small
Medium
Large
Time to cook
standard load.
Conventional.
Forced air
convection.
Baking area.
Noise (dB (A)
re 1 pW).
Classement
selon son
effi cacité
énergétique
sur une
échelle allant
de A (économe)
à G (peu
économe).
Fonction chauffage.
Classique.
Convection
forcée.
Consommation
d´énergie.
Classique.
Convection
forcée.
Volume utile
(litres).
Type:
Faible volume
Volume moyen
Grand volume
Temps de
cuisson en
charge normale.
Classique.
Convection
forcée.
Surface de
cuisson.
Bruit (dB (A)
re 1 pW).
Energieeffi zienzklasse auf
einer Skala
von A
(niedriger
Verbrauch)
bis G (hoher
Verbrauch).
Beheizung.
Konventionelle
Beheizung.
Umluft /
Heißluft.
Energieverbrauch.
Konventionelle
Beheizung.
Umluft /
Heißluft.
Netto-volumen
(liter).
Typ:
Klein
Mittel
Groß
Kochzeit bei
Standardbeladung.
Konventionelle
Beheizung.
Umluft /
Heißluft.
Backfl äche
Geräusch (dB
(A) re 1 pW).
HR-550
A
0,78
Kwh
0,84
Kwh
53
41 min.
40 min.
1250
40
Hoja de Características
Folha de Caracteristicas
Feature List
Feuille de Caractéristiques
Datenblatt
HR-550
TRADITIONAL
cm2
Nuestra aportación a la protección del medio-ambiente: utilizamos papel reciclado.
A nossa contribução para a protecção do ambiente: utilizamos papel reciclado.
Our contribution to enviromental protection: we use recycled paper.
Notre contribution à la protection de l’environnement : nous utilisons du papier recyclé.
Unser Beitrag zum Umweltschutz: wir verwenden umweltfreundliches Papier.
Cod.: 83172355/3172355-000
Page 2
HR-550
1
1
2
2
3
3
4
4
5
5
6
6
7
7
8
8
Modelo HR-550
9
10
9
10
11
11
12
12
13
13
14
14
15
15
Frontal de Mandos
23 1 4
12 3 4
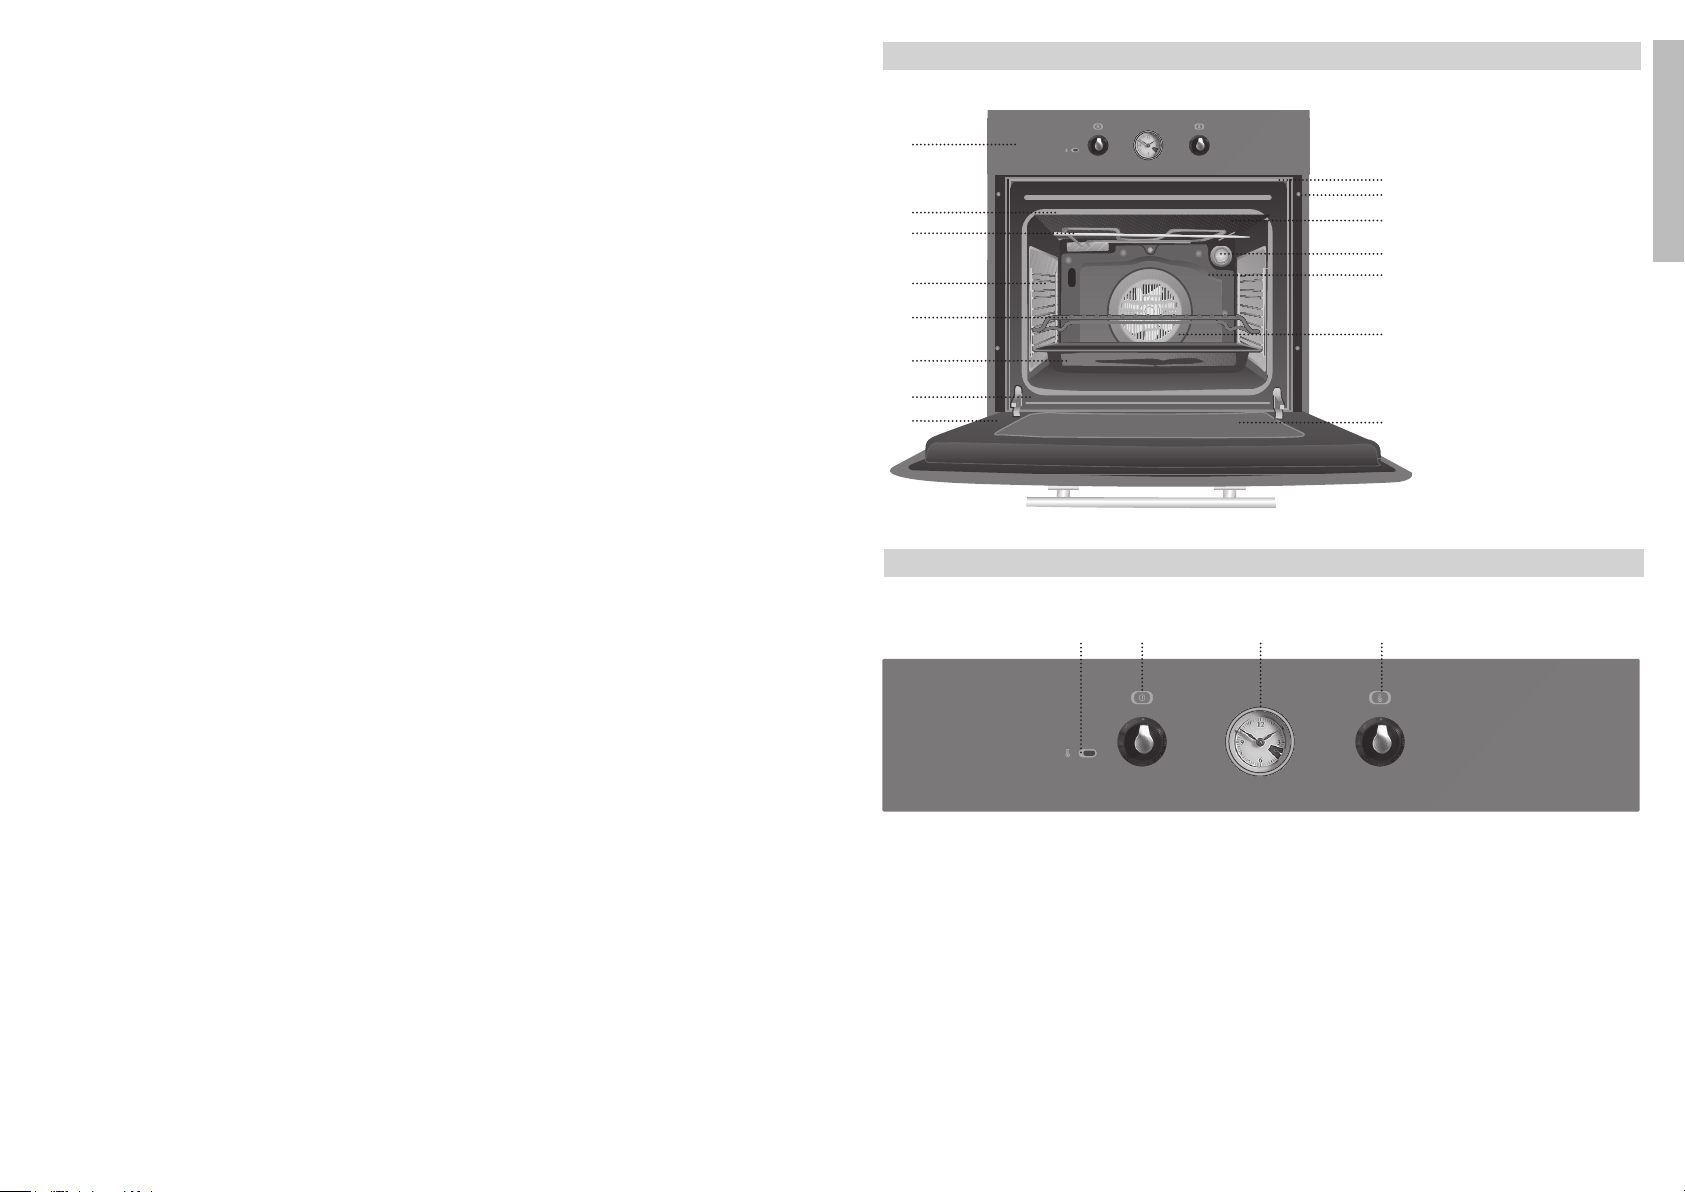
1 Frente de Mandos
2 Junta de Horno
3 Resistencia de Grill
4 Soporte Cromado
5 Parrilla
6 Bandeja con Esmalte
de Fácil Limpieza
7 Bisagra
8 Puerta
9 Salida de Aire de
Refrigeración
10 Fijación al Mueble
11 Pantalla de Grill
12 Lámpara
13 Panel Trasero
14 Turbina
15 Cristal Interior Gran
Tamaño
ESPAÑOL
1 Reloj analógico.
2 Piloto de calentamiento. Indica la transmi-
sión de calor al alimento y se apaga al
alcanzar la temperatura seleccionada.
3 Selector de funciones.
4 Selector de temperaturas.
3
Page 3
Funciones del Horno
Manejo del Horno
Desconexión del horno
Grill y Solera
Especial para asados. Puede usarse para cualquier pieza, independiente de su tamaño.
Convencional con Turbina
Adecuado para asados y pastelería. El ventilador reparte de forma uniforme el calor en el
interior del horno, reduciendo el tiempo y la
temperatura de cocinado.
Grill
Gratinado y asado superficial. Permite el dorado de la capa exterior sin afectar al interior del
alimento. Indicado para piezas planas como
bistec, costillas, pescado, tostadas.
Atención
Durante el uso de la función Grill la puerta
debe mantenerse cerrada.
Solera
Calor sólo desde la parte inferior. Apropiado
para calentar platos o levantar masas de
repostería y afines.
Descongelación
Esta función es apropiada para descongelaciones suaves de alimentos. En especial aquellos que son consumidos sin calentar, por
ejemplo cremas, pastas, tartas, pasteles, etc.
Nota
La lámpara permanece encendida en cualquier
función de cocinado.
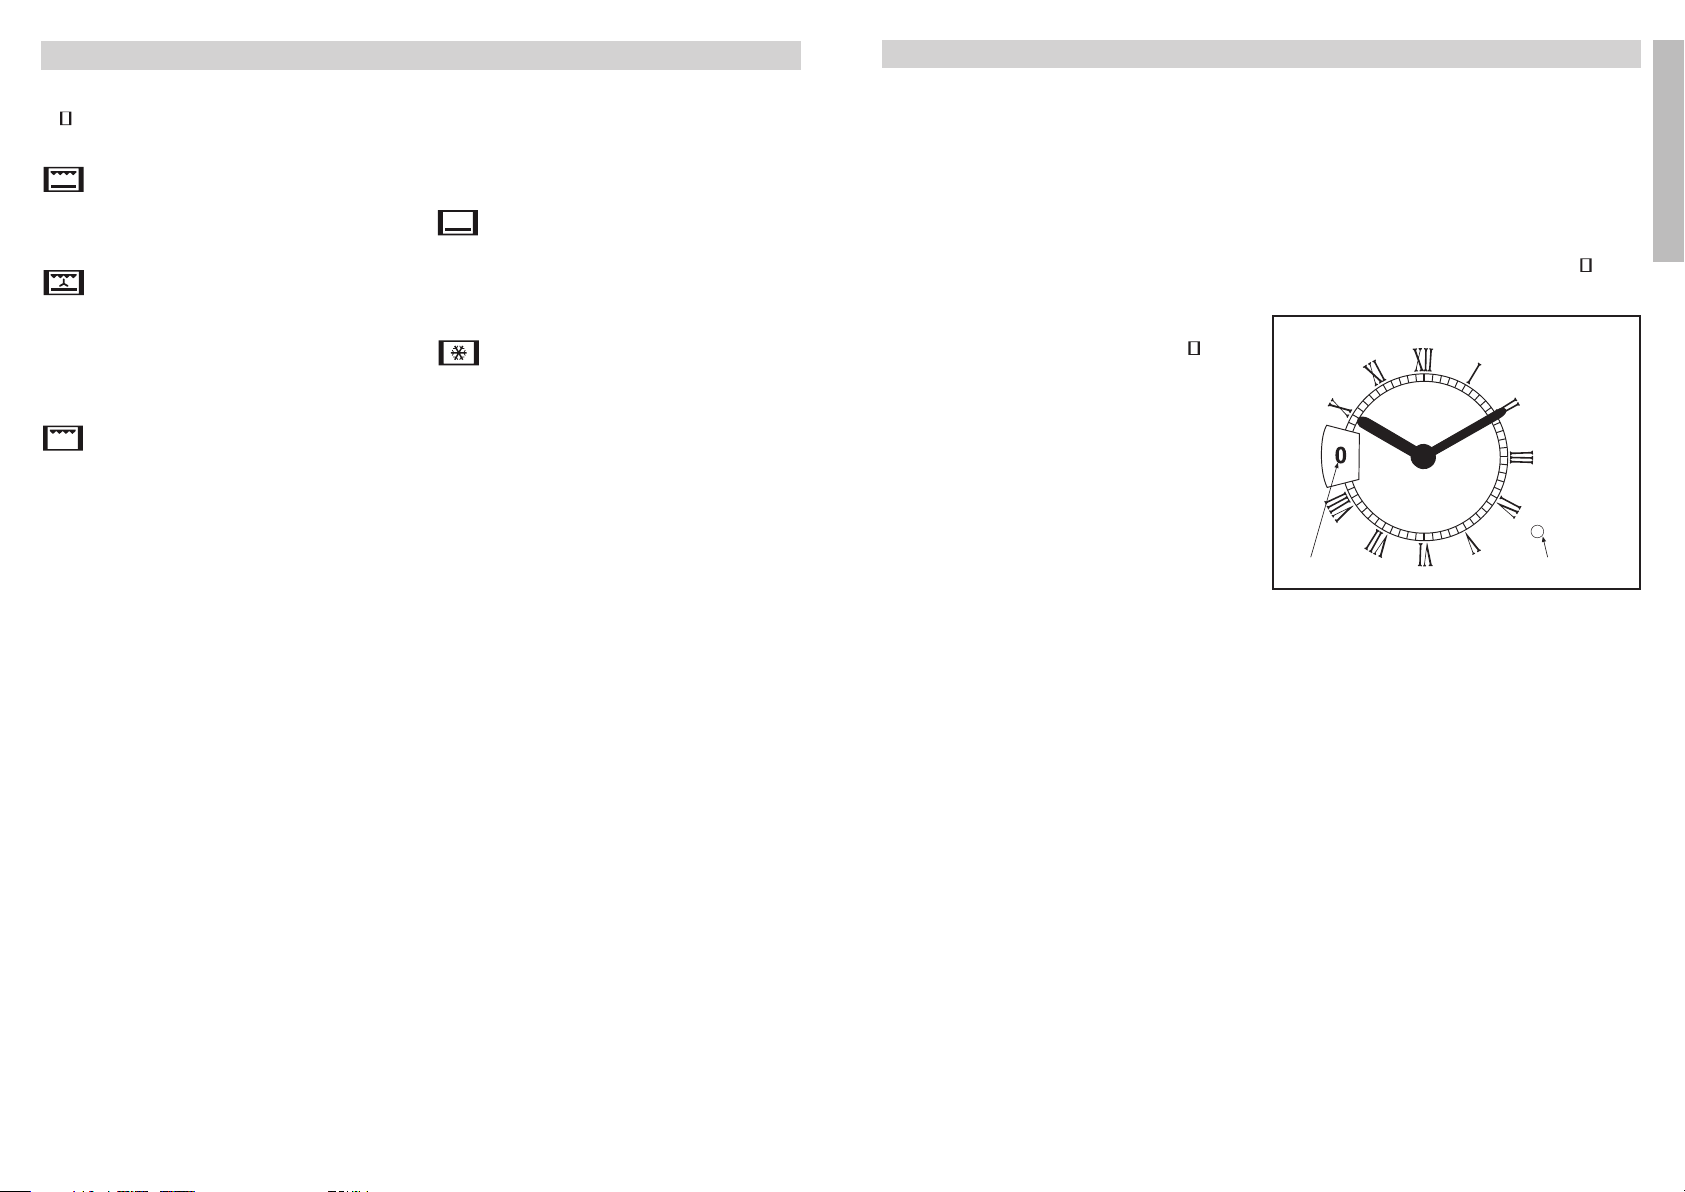
Puesta en hora del reloj
Estire y gire simultáneamente el mando del
reloj hacia la derecha, hasta que las agujas
señalen la hora deseada.
Funcionamiento Manual
Gire el mando del reloj hacia la derecha 1
hasta que vea en el visor la indicación “I”.
Seleccione una temperatura y una función 2
de cocinado.
Ponga los mandos en posición 3
apagar el horno.
Programación de la Duración del Cocinado
Permite cocinar durante un tiempo
previamente seleccionado. Siga las siguientes
instrucciones:
Gire el mando del reloj hacia la derecha, 1
hasta que se alcance el tiempo de cocinado
deseado en minutos.
para
Seleccione una función y una temperatura 2
de cocinado.
Al finalizar el tiempo programado, el horno 3
se apagará y sonará una señal acústica.
Gire el mando del reloj hacia la derecha 4
hasta que vea la indicación “0” en el visor,
para hacer desaparecer la señal acústica.
Ponga los mandos en posición 5
apagar el horno.
VISOR DEL RELOJ
MANDO DEL RELOJ
ESPAÑOL
para
4
5
Page 4

HR-550
Funções do Forno
1
1
2
2
3
3
4
4
5
5
6
6
7
7
8
8
Modelo HR-550
9
9
10
10
11
11
12
12
13
13
14
14
15
15
Painel de Comandos
23 1 4
12 3 4
1 Painel de Comandos
2 Junta de Forno
3 Resistência do Grill
4 Suporte Cromado
5 Grelha
6 Bandeja com Esmalte
de Fácil Limpeza
7 Dobradiça
8 Porta
9 Saída de ar da
Refrigeração
10 Fixação ao Móvel
11 Ecran do Grill
12 Làmpada
13 Painel do Fundo
14 Turbina
15 Vidrio Interior de gran-
de dimensão
Desconexão do forno
Grill e Resistência Inferior
Especial para assados. Pode ser usado para
qualquer porção, independente do seu tamanho.
Convencional com Turbina
Adequado para assados e pastelaria. O ventilador reparte de forma uniforme o calor no
interior do forno.
Grill
Gratina e assa superficialmente. Permite alourar a camada exterior sem afectar o interior
do alimento. Indicado para pedaços planos
como filetes, costelas, peixe, tostas.
Atenção
Durante o uso da função Grill deve-se manter
a porta fechada.
Resistência Inferior
Calor somente na parte inferior. Apropriado
para aquecer pratos ou levantar massas de
confeitaria e semelhantes.
Descongelação
Esta função é apropriada para a descongelação leve de alimentos. En especial alimentos
sem aquecer, por exemplo, cremes, natas,
pastas, tartes, biscoitos, frutas...
Nota
A lâmpada permanece acesa em qualquer função de cozinhado.
PORTUGUÉS
1 Relógio anológico.
2 Piloto de aquecimento. Indica a transmisão
de calor ao alimento e desliga-se quando o
forno atinge a temperatura seleccionada.
6
3 Selector de funções.
4 Selector de temperatura.
7
Page 5

g
Uso do Forno
HR-550
Acertar a hora do relógio
Puxe e gire simultaneamente o comando do
relógio para a direita, até que as agulhas
assinalem a hora desejada.
Funcionamento Manual
Gire o comando do relógio para a direita 1
até que apareça no visor a indicação “I”.
Seleccione uma temperatura e uma função 2
de cozinhado.
Coloque os comandos na posição 3
para
apagar o forno.
Programação da Duração do Cozinhado
Permite cozinhar durante um tempo previamente
seleccionado. Siga as seguintes instruções:
Gire o comando do relógio para a direita, 1
até que se alcance o tempo de cozinhado
desejado em minutos.
Seleccione uma função e uma temperatura 2
de cozinhado.
Ao finalizar o tempo programado, o forno 3
apagar-se-á e soará um sinal sonoro.
Gire o comando do relógio para a direita 4
até que apareça a indicação “0” no visor,
para fazer desaparecer o sinal sonoro.
Coloque os comandos na posição 5
apagar o forno.
VISOR DO RELÓGIO
COMANDO DO RELÓGIO
para
1
1
2
2
3
3
4
4
5
5
6
6
7
7
8
8
Model HR-550
9
9
10
10
11
11
12
12
13
13
14
14
15
15
Control Panel
23 1 4
12 3 4
1 Control Panel
2 Oven Seal
3 Grill Element
4 Chrome Support
5 Grid
6 Tray with Easy-cleanin
Enamel
7 Hinge
8 Door
9 Air Outlet
10 Fixing to Unit
11 Grill Screen
12 Light
13 Back Wall Panel
14 Fan
15 Large Interior Glass
Door
ENGLISH
1 Analogue clock.
2 Heating indicator light. Indicates that the
3 Function selector.
4 Temperature selector.
heat is going to the food and it goes out
when the set temperature is reached.
8
9
Page 6

Oven Functions
Use of the Oven
Switch off oven
Grill and Lower element
Special for roasts. It can be used for any
piece, whatever its size.
Conventional with fan
Appropriate for roasts and cakes. The fan
spreads the heat uniformly inside the oven.
Grill
For preparing dishes with superficial roasting.
It allows the outer layer to be browned without
affecting the inside of the food. Ideal for flat
food, such as steaks, ribs, fish, toast.
Caution
While using the Grill the door must be kept
closed.
Lower element
Heats only from beneath. Suitable for heating
dishes and raising pastry and similar.
Defrosting
This cooking mode is suitable for gently
defrosting of food. In special food to be
consumed unwarmed, e.g.: cream, custard,
pastry, tarts, cakes, fruit,...
Note
The pilot light remains on in any cooking
function.
Setting the clock time
Pull and turn the clock control at the same time
in counter - clockwise direction until the clock
hands mark the correct time.
Manual Operation
Turn the clock control in counter - clockwise 1
direction until you see “I” in the display.
Select a temperature and a cooking 2
function.
Set the controls to 3
Programming Cooking Time
This function allows the cooking time to be preset. Instructions:
Turn the clock control in counter - clockwise 1
direction until the desired cooking time in
minutes is reached.
to turn off the oven.
Select a cooking function and temperature.2
When the set time ends, the oven will turn 3
off and an alarm will sound.
To turn off the alarm, turn the clock control 4
in counter - clockwise direction until you
see “0” in the display.
Set the controls to 5
CLOCK DISPLAY
to turn off the oven.
CLOCK CONTROL
ENGLISH
10
11
Page 7

HR-550
Fonctions du Four
1
1
2
2
3
3
4
4
5
5
6
6
7
7
8
8
Modèle HR-550
9
9
10
10
11
11
12
12
13
13
14
14
15
15
Panneau Frontal de Commande
23 1 4
12 3 4
1 Panneau de
Commande
2 Joint de four
3 Résistance du Grill
4 Support Chromé
5 Grille
6 Plateau avec Émail de
Nettoyage Facile
7 Charnière
8 Porte
9 Sortie de l’air de
Réfrigération
10 Fixation au Meuble
11 Ecran du Grill
12 Lampe
13 Panneau du Fond
14 Turbine
15 Vitre intérieure de
grande taille
Arrêt du four
Grill et résistance inférieure
Spécial pour les rôtis. Peut être utilisé pour
toutes sortes de pièces, indépendamment de
leur volume.
Conventionnel avec turbine
Recommandé pour les rôtis et la pâtisserie. Le
ventilateur répartit la chaleur de façon
uniforme à l'intérieur du four.
Grill
Pour gratiner et rôtir superficiellement. Permet
de dorer la couche extérieure sans affecter
l'intérieur de l'aliment. Indiqué pour les pièces
plates telles que les beefsteaks, les côtelettes,
les poissons, les toasts.
Attention
Quand on utilise la fonction Grill la porte doit
rester fermée.
Résistance inférieure
La chaleur provient seulement de la partie
inférieure. Approprié pour réchauffer des plats
ou faire lever des pâtes pour pâtisseries et
analogues.
Décongeler
Cette fonction permet de décongeler
doucement des mets. Spécialement mets qui
ne doivent pas être chauffés, comme p.ex.
crème chantilly, crème vanille, pâtes, gâteaux,
fruits,...
Attention
La lampe reste allumée pendant toutes les
fonctions de cuisson.
1 Horloge analogique.
2 Voyant lumineux de chauffage. Il indique
que la chaleur est transmise à l’aliment et
s’éteint quand la température choisie est
atteinte.
12
3 Sélecteur de fonctions.
4 Sélecteur de températures.
FRANÇAIS
13
Page 8

Maniement du Four
Réglage de l’heure
Tirez et tournez en même temps la commande
de l’horloge vers la droite, jusqu’à ce que les
aiguilles indiquent l’heure souhaitée.
Mode manuel
Tirez la commande de l’horloge vers la droite 1
jusqu’à ce que l’indication “I” s’affiche sur
le viseur.
Sélectionnez une température et un mode 2
de cuisson.
Placez les commandes sur la position 3
pour éteindre le four.
Programmation de la durée de cuisson
Cette fonction permet de prédéterminer la
durée de la cuisson. Pour cela, procédez
comme suit :
Tournez la commande de l’horloge vers la 1
droite, jusqu’à obtenir le temps de cuisson
souhaité en minutes.
Sélectionnez un mode et une température 2
de cuisson.
Lorsque la durée programmée est écoulée, 3
le four s’éteint et un signal sonore retentit.
Tournez la commande de l’horloge vers 4
la droite jusqu’à ce que l’indication “0”
s’affiche sur le viseur, pour arrêter le signal
sonore.
Placez les commandes sur la position 5
pour éteindre le four.
VISEUR DE L’HORLOGE
COMMANDE DE L’HORLOGE
1
1
2
2
3
3
4
4
5
5
6
6
7
7
8
8
Modell HR-550
HR-550
9
9
10
10
11
11
12
12
13
13
14
14
15
15
Bedienfeld
23 1 4
12 3 4
1 Frontteil mit
Bedienelementen
2 Herddichtung
3 Grillwiderstand
4 Verchromte Halterung
5 Rost
6 Auffangschale mit
einen veinfaches
Reinigungsemail
7 Scharnier
8 Tür
9 Kühlluftaustritt
10 Befestigung am
Küchenmöbel
11 Grillschale
12 Beleuchtung
13 Rückwand
14 Lüfter
15 Grosse Innenscheibe
der Herdtür
14
1 Analogue Schalthur.
2 Kontrolleuchte Heizen zeigt die Einschaltung
der Heizelemente an und verlischt, wenn die
eingestellte Temperatur erreicht ist.
3 Funktionswahl.
4 Temperaturregler.
DEUTSCH
15
Page 9

Funktionen des Herds
Bedienung des Herds
Ausschalten des Herds
Grill und Unterhitze
Besonders geeignet zum Braten. Kann für
Stücke mit beliebiger Größe eingesetzt werden.
Normal mit Umluft
Geeignet zum Braten und für Gebäck. Der
Lüfter verteilt die Wärme gleichmäßig im Herd.
Grill
Gratinieren und Anbräunen. Gestattet das
Anbräunen der Außenschicht, ohne das Innere
der Nahrungsmittel zu beeinflussen. Geeignet
für flache Stücke wie Beefsteak, Rippchen,
Fisch, Toastbrot.
Achtung
Bei Benutzung der Funktionen Grill muß die
Herdtür geschlossen sein.
Unterhitze
Es wird nur von der Unterseite Wärme
zugeführt. Geeignet zum Anwärmen von
Tellern, zum Aufgehen von Teigmassen oder
für ähnliche Anwendungen.
Auftauen
Ideal für schonendes Auftauen von feinen
Speisen, die kalt verwendet werden, wie z. B.
Sahne, Vanillesoße, Teig, Kuchen, Obst...
Achtung
Die Beleuchtung ist bei allen Kochfunktionen
eingeschaltet.
Einstellen der Uhrzeit
Ziehen Sie am Stellknopf der Uhr und drehen
Sie ihn gleichzeitig nach rechts, bis die Zeiger
die gewünschte Uhrzeit anzeigen.
Manueller Betrieb
Drehen Sie den Stellknopf nach rechts, bis 1
die Anzeige „I“ im Sichtfenster erscheint.
Wählen Sie eine Temperatur und eine 2
Garfunktion.
Drehen Sie den Stellknopf auf 3
Ofen auszuschalten.
Programmierung der Gar-Dauer
Ermöglicht das Garen während eines
voreingestellten Zeitraums. Gehen Sie wie folgt
vor:
Drehen Sie den Stellknopf nach rechts, bis 1
die gewünschte Garzeit in Minuten erreicht
ist.
Wählen Sie eine Funktion und eine Gar-2
Temperatur.
, um den
Nach Ablauf der programmierten Zeit 3
schaltet sich der Backofen ab und es ertönt
ein Signal.
Drehen Sie den Stellknopf nach rechts, 4
bis die Anzeige „0“ im Sichtfenster
erscheint, um somit das akustische Signal
auszuschalten.
Drehen Sie den Stellknopf auf 5
Ofen auszuschalten.
SICHTFENSTER
, um den
STELLKNOPF
16
DEUTSCH
17
 Loading...