

Page 1
User Manual
HLC 844 C
EN
EL
PT ES DE FR NL
www.teka.com
Page 2
ENGLISH
Before using your oven for the first time, please carefully read the installation and
maintenance instructions that come with it.
Depending on the model, the accessories included in your oven may vary from those
shown in the pictures.
PORTUGUÊS
Antes de utilizar o forno pela primeira vez, leia atentamente as instruções de
instalação e manutenção fornecidas juntamente com o forno.
Dependendo do modelo, os acessórios incluídos no forno podem variar em relação
às imagens apresentadas.
ESPAÑOL
Por favor, antes de utilizar su horno por primera vez, lea atentamente las
instrucciones de instalación y mantenimiento incluidas en su horno.
Dependiendo del modelo, los accesorios incluidos en su horno pueden variar
respecto a los mostrados en las imágenes.
FRANÇAIS
Avant la première utilisation de votre four, veuillez lire attentivement les instructions
Selon les modèles, il est possible que les accessoires fournis avec votre four soient
différents de ceux indiqués sur les images.
DEUTSCH
Bevor Sie den Backofen zum ersten Mal verwenden, lesen Sie bitte die zu Ihrem
Backofen gehörenden Einbau- und Wartungsanweisungen aufmerksam durch.
Je nach Modell können die Zubehörteile Ihres Backofens von den auf den
Abbildungen dargestellten Teilen abweichen.
NEDERLANDS
Lees zorgvuldig de meegeleverde instructies voor installatie en gebruik van het
apparaat.
Afhankelijk van het model, de accessoires kunnen verschillen van die in de beelden.
2
Page 3

ΕΛΛΗΝΙΚΑ
Προτού χρησιμοποιήσετε τον φούρνο σας για πρώτη φορά, διαβάστε προσεκτικά τις
οδηγίες εγκατάστασης και συντήρησης που τον συνοδεύουν.
Ανάλογα με το μοντέλο, τα εξαρτήματα που περιέχει ο φούρνος σας ενδέχεται να
διαφέρουν σε σχέση με αυτά που απεικονίζονται.
3
Page 4

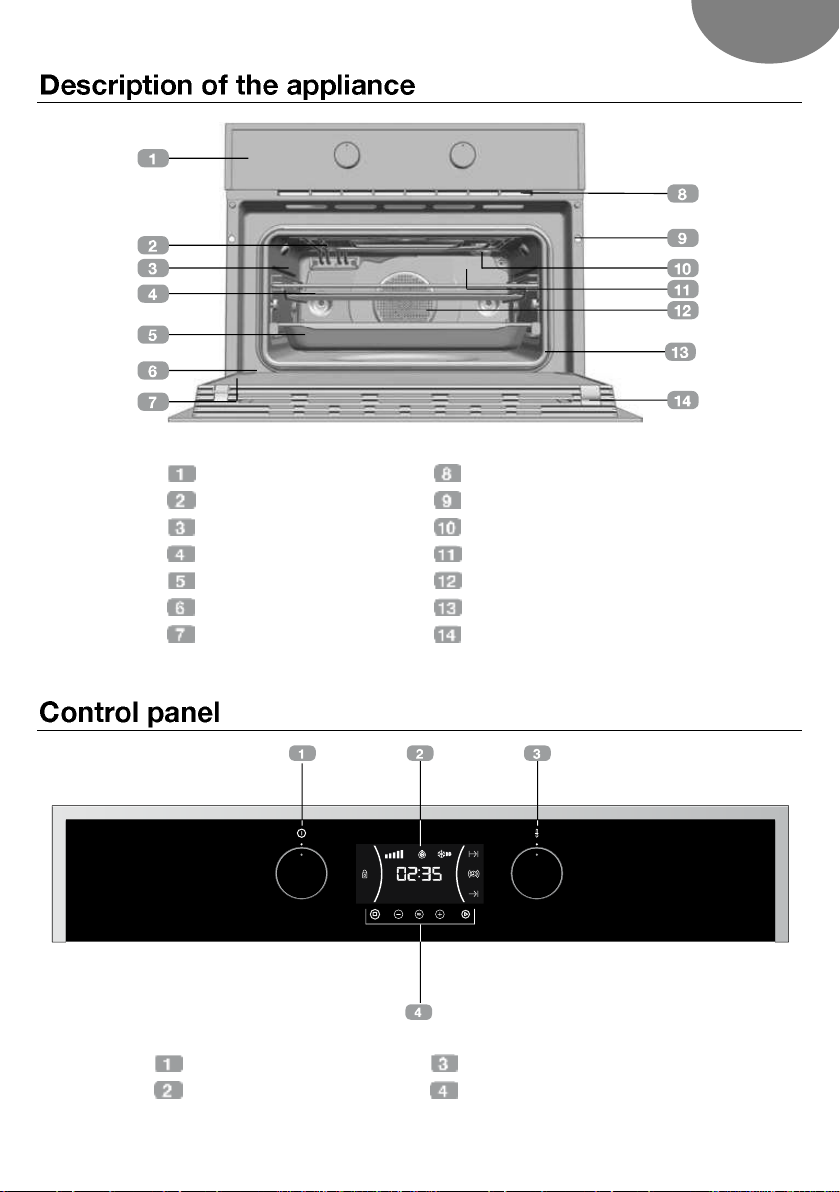
Description of the appliance ................... 5
Control panel ............................................ 5
Function selector symbols ...................... 6
Oven Functions ........................................ 6
Oven Functions ........................................ 6
Display description .................................. 7
Setting the time ..................................... 7
Hiding and un-hiding the clock ............. 8
Oven use ................................................... 8
Oven functions ...................................... 8
Oven timer operation ............................. 8
Microwave ............................................. 10
Quick start ............................................. 10
Defrost by time ...................................... 10
Defrost by weight .................................. 11
Combined functions .............................. 11
Safety instructions ................................... 12
Safety block ........................................... 12
Showroom mode ................................... 12
TEKA HYDROCLEAN® FUNCTION .......... 12
Programing the Teka Hydroclean®
function .................................................. 12
Modo Showroom ................................... 22
Mode démonstration ............................. 42
Ausstellungs-Modus .............................. 52
4
Page 5
EN
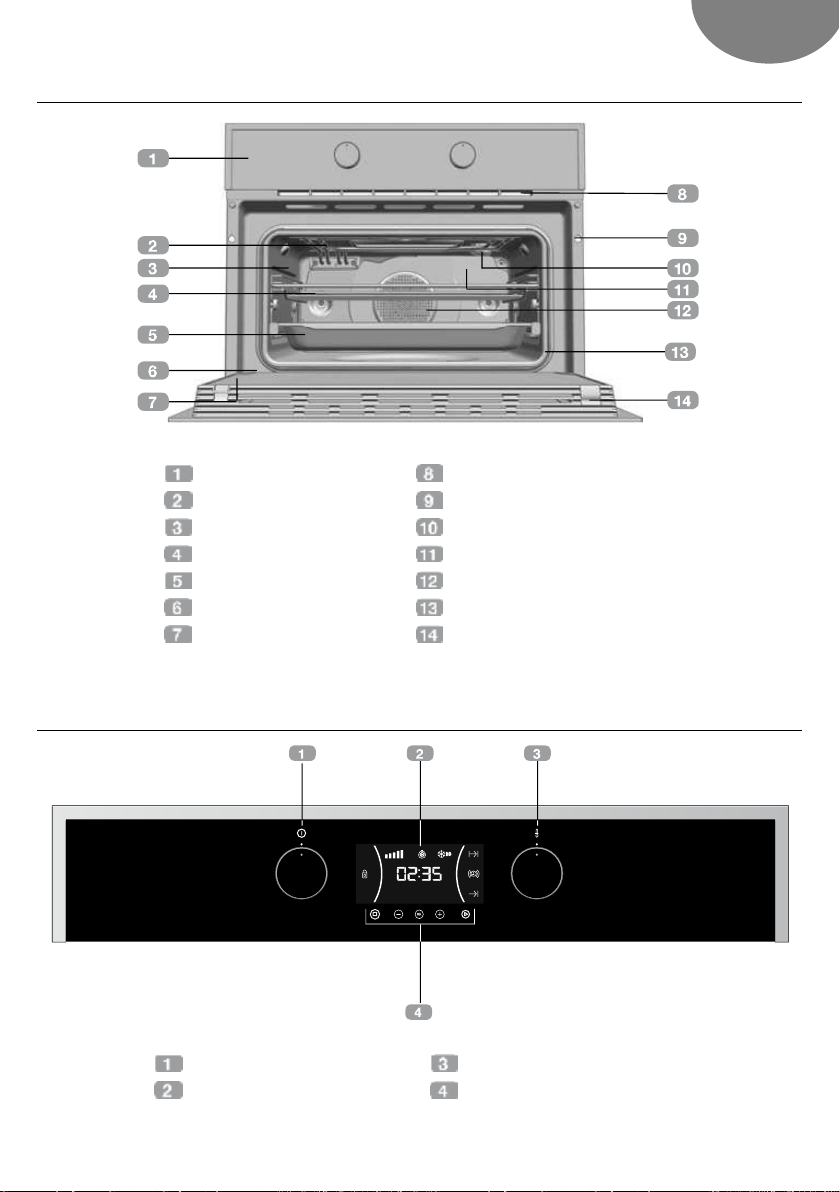
Control panel
Air cooling outlet
Grill element
Unit mounting
Tray supports
Lamp
Grid shelf
Back Wall Panel
Tray Fan Hinge
Oven Seal
Inner Glass
Door
Function control dial
Temperature control dial
Display
Touch keys
5
Page 6
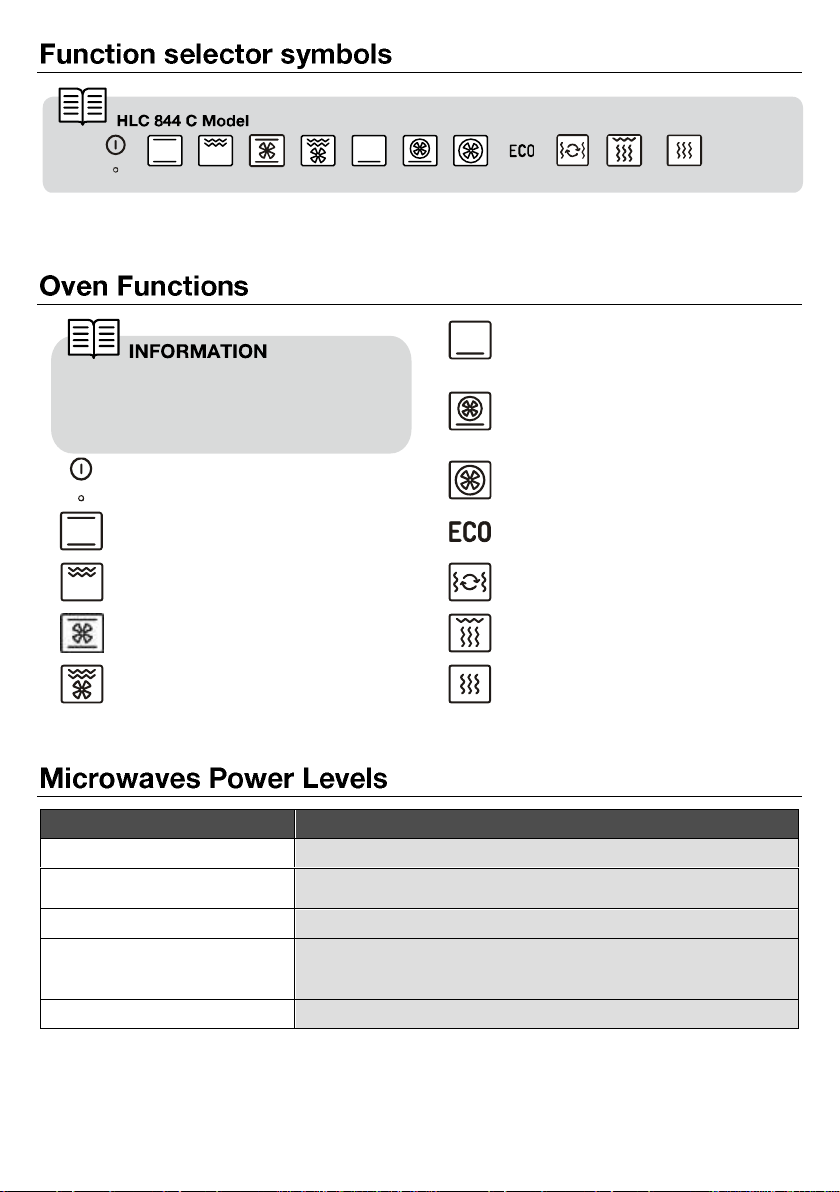
LOWER ELEMENT
TURBO + LOWER ELEMENT
OVEN SWITCH-OFF
TURBO
CONVENTIONAL
ECO
MAXIGRILL
MICROWAVE + HOT AIR
CONVENTIONAL WITH FAN
MICROWAVE + GRILL
MAXIGRILL WITH FAN
MICROWAVE
Microwave power output
Foods
200
Slow defrosting for delicate foods; keeping food hot
400
Cooking with little heat; boiling rice
Rapid defrosting, heating baby food
600
Heating and cooking food
800
Cooking vegetables and food
Cooking and heating carefully,
Heating and cooking small portions of food
1000
Rapidly heating liquids
For a description of how to use each of
the features, see the cooking guide that
comes with your oven.
6
Page 7

EN
The sensitivity of the touch keys adapts
continually to environmental conditions.
Make sure the surface of the control panel
is clean and free of obstacles when
plugging in the oven.
If the display does not respond correctly
when you touch the keys, unplug the oven
for a few seconds and then plug it in
again. Doing this causes the sensors to
adjust automatically so that they will react
once more to fingertip control.
KEYS
, and : Enable you to program the
functions.
: Enable you to start the cooking
functions.
: Enable you to stop the cooking
functions.
and Cooking Time and Cooking
Stop Time: This setting allows you to
program the cooking time and cooking
stop time. The oven switches on
automatically at the set time and
operates for the selected cooking time
(Cooking Time). It then switches off
automatically at the indicated time
(Cooking Stop Time).
SAFETY BLOCK: Indicates that the touch
keys are blocked, preventing modifications
by small children.
Other functions
HEATING: Indicates that the oven is
transmitting heat to the food.
DEFROSTING BY TIME: Lights up while
the defrosting by time function is on.
DEFROSTING BY WEIGHT: Lights up
while the defrosting by weight function is on.
SYMBOLS
WARNING TIMER: Lights up when the
clock/timer is selected. Generates an
acoustic signal when the time is up. The
oven does not turn off at the end of the timer
period. This function can also be used while
the oven is cooking.
and PROGRAMING: Lights up to
indicate that the oven is programed (cooking
time, stop time or total).
Cooking Time: This program allows
you to program the cooking time, after
which the oven will turn off automatically.
Cooking Stop Time: This setting
allows you to program the time for
cooking to stop, after which the oven will
turn off automatically.
SETTING THE TIME
When you plug the oven, you will see the
clock flashing 12:00.
Press or to adjust the hours.
7
Page 8
Press to confirm the hours.
In the event of power failure, the clock
settings will be erased and 12:00 will flash
on the clock display. Reset it and program
again.
In models with an electronic temperature
control, when the selector switch is
turned, the display will show the
temperature.
After selecting the temperature, the clock
will automatically reappear.
When a cooking cycle begins, the oven
will automatically display the total the
time for the cycle progress, if the cooking
time or cooking stop time have not been
set.
Press or to adjust the minutes.
Press to confirm the minutes.
If you wish to modify the time, press
or until the time starts flashing. Press
and follow the instructions in the
previous points.
OVEN FUNCTIONS
After setting the clock, the oven is ready
for use. Select a cooking function with
the function selector dial and
temperature with the temperature control
dial.
HIDING AND UN-HIDING THE CLOCK
If you wish to hide the clock press for
5 seconds.
If you wish to see the clock on the
display again, press for 5 seconds.
You will notice that the symbol lights
up during cooking to indicate that heat is
being transmitted to the food. This
symbol disappears when the selected
temperature has been reached.
Set the controls to to turn off the oven.
8
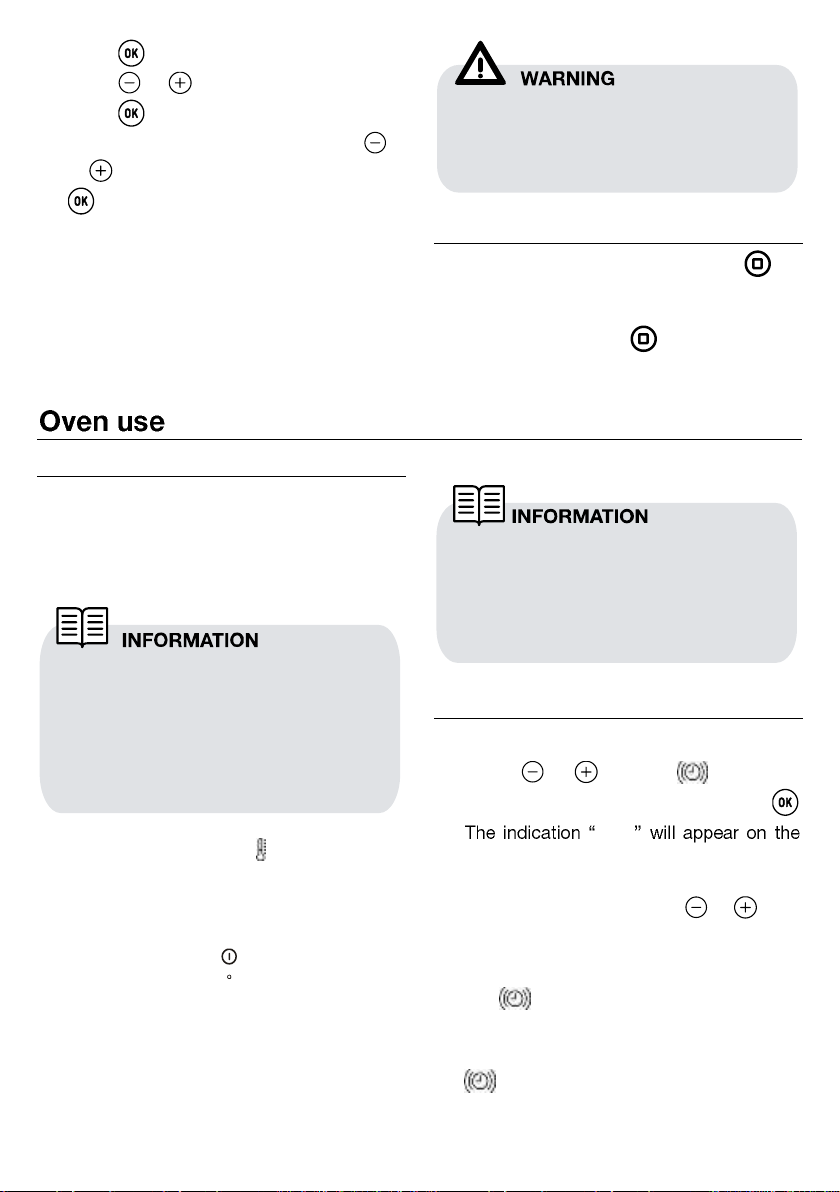
OVEN TIMER OPERATION
Programing the buzzer
1. Touch or until the symbol on
the display starts flashing, then press
0_00
display.
2. Select the time after which you want the
alarm to sound by pressing or . You
will hear 2 beeps to confirm that the time
has been set and the clock will start
counting down from the selected time.
The symbol will flash slowly.
3. Once the time has expired, an acoustic
signal will sound for 90 seconds and the
symbol will flash quickly.
Page 9
EN
With the Buzzer function, the oven will not
turn off when the time expires.
With the Buzzer function, the remaining
time will show permanently on the
display. With this programed function, it is
not possible to view the time or the total
programed cooking time.
4. Touch any key to stop the alarm. The
symbol will then disappear.
If you wish to modify the time on the buzzer,
press or until the flash and the
hours are not flashing; then press and
repeat the steps shown. Upon entering the
timer control, the time currently remaining will
appear which you will be able to adjust.
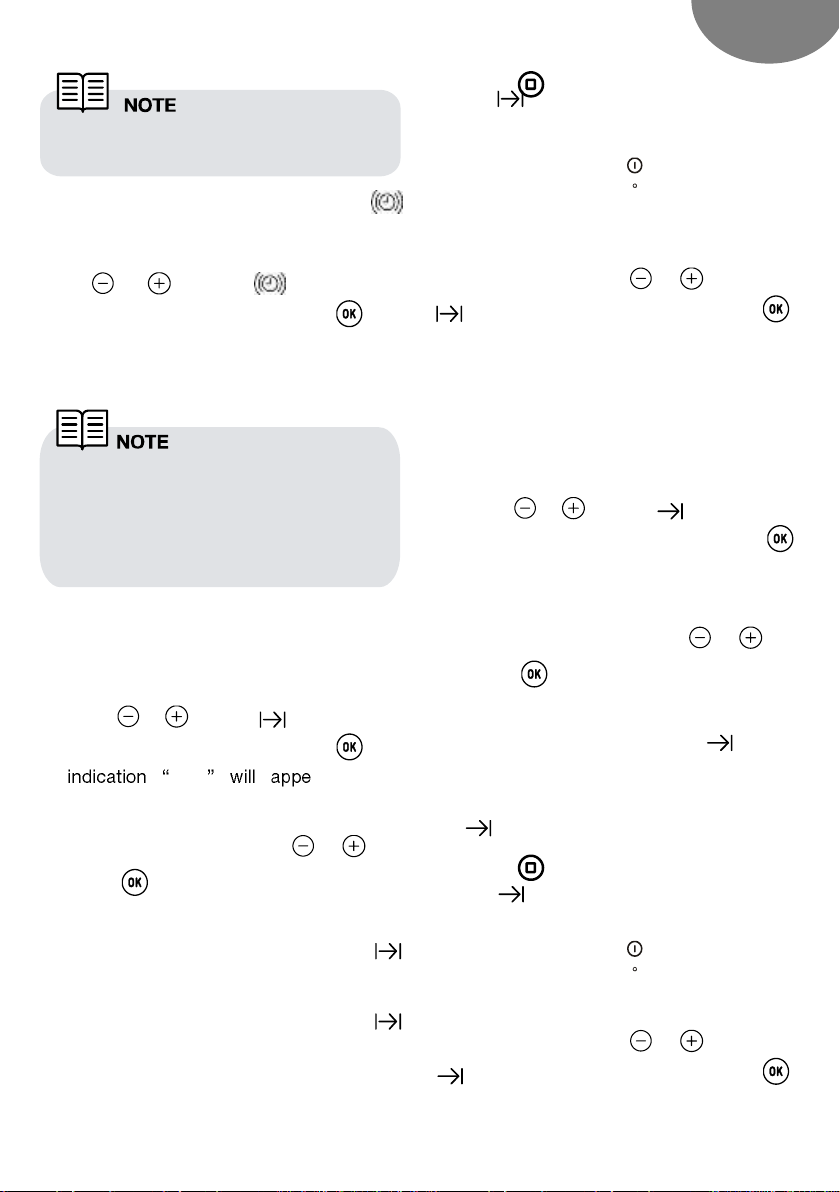
Programing Cooking Time
1. Select a function and a cooking
temperature using the oven commands.
2. Press or until the symbol on the
display starts flashing, then press . The
0_00 ar on the
display.
3. Select the time after which you want the
alarm to sound by pressing or .
4. Press to select the option. You will
hear 2 beeps to confirm that the time has
been set and the clock will start counting
down from the selected time. The
symbol will flash slowly.
5. Once the cooking time is up, the oven will
turn off, an alarm will sound and the
symbol will flash.
6. Press to stop the alarm and turn off
the symbol. The oven will switch on
again.
7. Set the controls to position to turn off
the oven.
You can change the remaining cooking time
at any time by touching or until the
symbol starts to flash quickly. Press
to change the time.
Programing the Cooking Stop Time
1. Select a cooking function and a
temperature.
2. Press or until the symbol on the
display starts flashing, then press .
The current time will appear on the
display.
3. Select the time after which you want the
alarm to sound by pressing or .
4. Press to confirm. You will hear 2
beeps to confirm that the time has been
set and the selected cooking stop time
appears on the display. The symbol
will flash slowly.
5. When the cycle is finished, the oven will
turn itself off, an alarm will sound and the
symbol will flash quickly.
6 Press to stop the alarm and turn off
the symbol. The oven will switch on
again.
7. Set the controls to position to turn off
the oven.
You can change the remaining cooking time
at any time by touching or until the
symbol starts to flash quickly. Press
to change the time.
9
Page 10
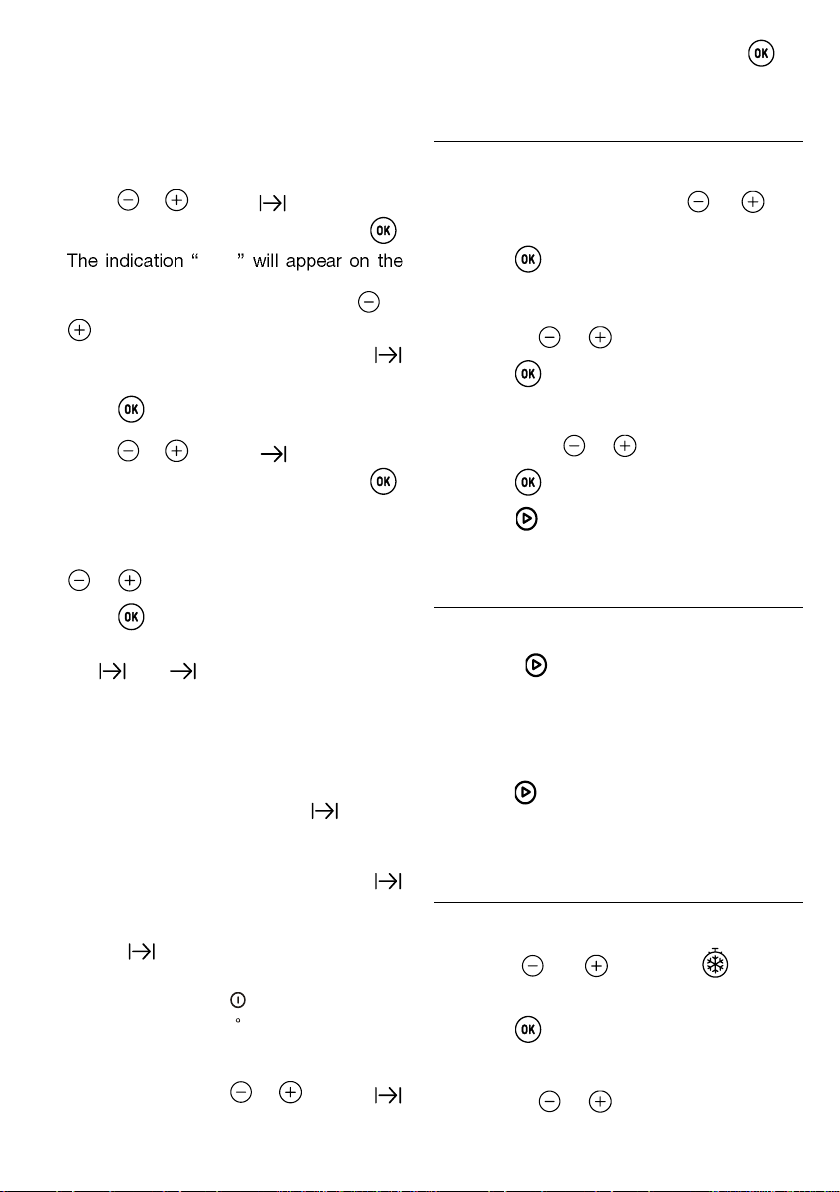
Programing the Cooking Time and
Cooking Stop Time
1. Select a cooking function and a
temperature.
2. Press or until the symbol on the
display starts flashing, then press .
0_00
display.
3. Select the cooking time by touching or
. You will hear 2 beeps, the remaining
time will appear on the display and the
symbol will flash.
4. Press to select the option.
5. Press or until the symbol on the
display starts flashing, then press .
The current time will appear on the
display.
6. Select the cooking end time by pressing
or .
7. Press to select the option.
8. The oven will remain disconnected with
the and symbols lit up. The oven
is now programed.
9. When it is time to start cooking, the oven
will turn on and will operate for the
programed time.
10. While cooking, the remaining cooking
time will be displayed and the symbol
will flash.
11. When the cooking time is up, the oven will
turn off, a buzzer will sound, and the
symbol will flash.
12. Press any key to stop the buzzer and turn
off the symbol. The oven will switch
on again.
13. Set the controls to position to turn off
the oven.
You can change the remaining cooking time
at any time by touching or until the
10
symbol starts to flash quickly. Press to
change the time.
MICROWAVE
1. Select the microwave function.
2. The display shows 00:30 (Quick start
function) by default. Press or until
the display shows 1:00.
3. Press to confirm.
4. The display shows the default cooking
time. Select the desired cooking time by
pressing or .
5. Press to confirm.
6. The display shows the default Power
setting. Select the desired power setting
by pressing or .
7. Press to confirm.
8. Press to start the microwave function
with the desired parameters.
QUICK START
1. Select the microwave function.
2. Press and the microwave starts
immediately to operate in the Microwave
function at maximum power for 30
seconds.
3. If you want to increase the operating time
press again. Each time you press this
key the operating time will be increased
by 30 seconds.
DEFROST BY TIME
1. Select the microwave function.
2. Press or until the symbol
appears on the display.
3. Press to select the option.
4. The display shows the default defrost
time. Select the desired cooking time by
pressing or .
Page 11
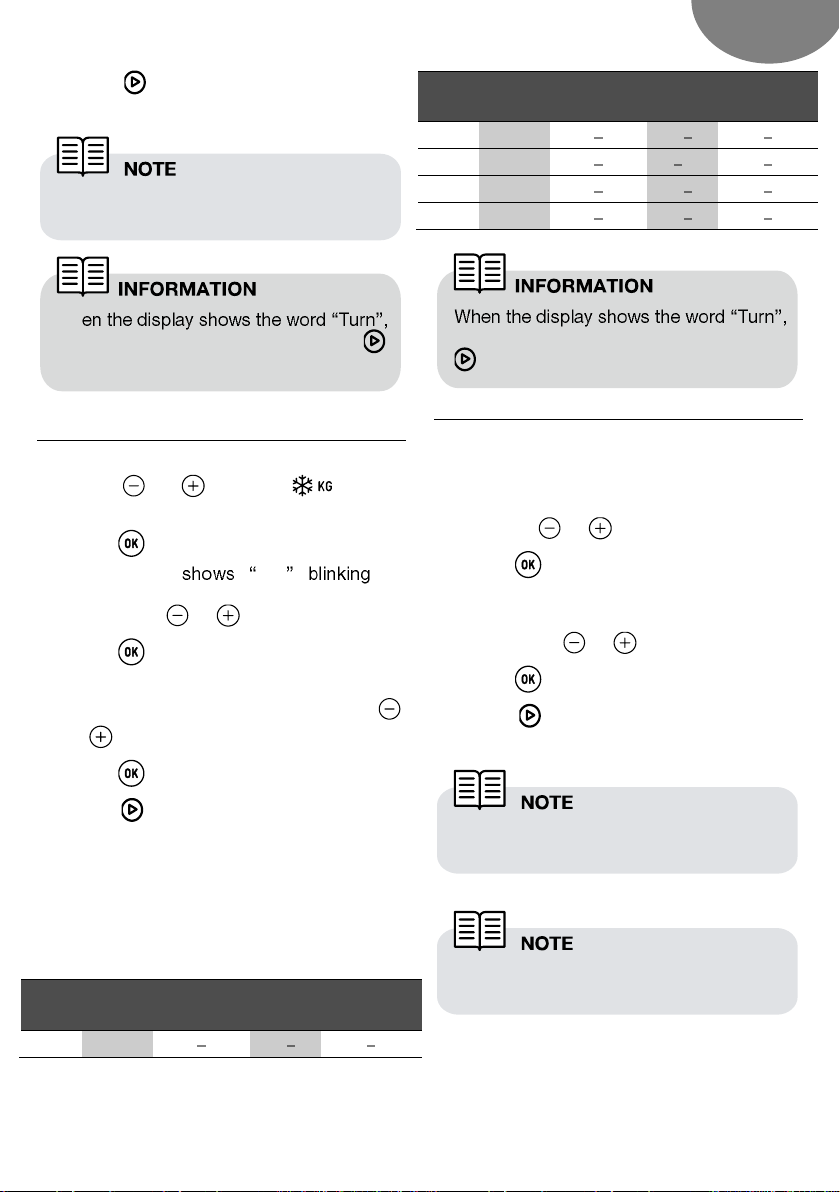
EN
Prog.
Food
Weight
(kg)
Time
(min)
Standing
time (min)
F01
Meat
0.10 2.00
2:10 43
20 30
Prog.
Food
Weight
(kg)
Time
(min)
Standing
time (min)
F02
Poultry
0.10 2.50
2:20 58
20 30
F03
Fish
0.10 2.00
2 40
20 30
F04
Fruit
0.10 0.50
2:36 13
10 20
F05
Bread
0.10 0.80
2:25 19
10 20
The temperature can be changed anytime
rotating the temperature control dial.
See Cooking Guide for advice on
defrosting times.
The maximum power that can be selected
is 600 W.
Wh
open the door, turn the food and press
to continue.
open the door, turn the food and press
to continue.
5. Press to start the defrost by time
function with the desired parameters.
DEFROST BY WEIGHT
1. Select the microwave function.
2. Press or until the symbol
appears on the display.
3. Press to select the option.
4. The display F01 as
default. Select the desired defrost option
by pressing or .
5. Press to confirm.
6. The display shows default weight blinking.
Select the desired weight by pressing
or .
7. Press to confirm.
8. Press to start the defrost by weight
function with the desired parameters.
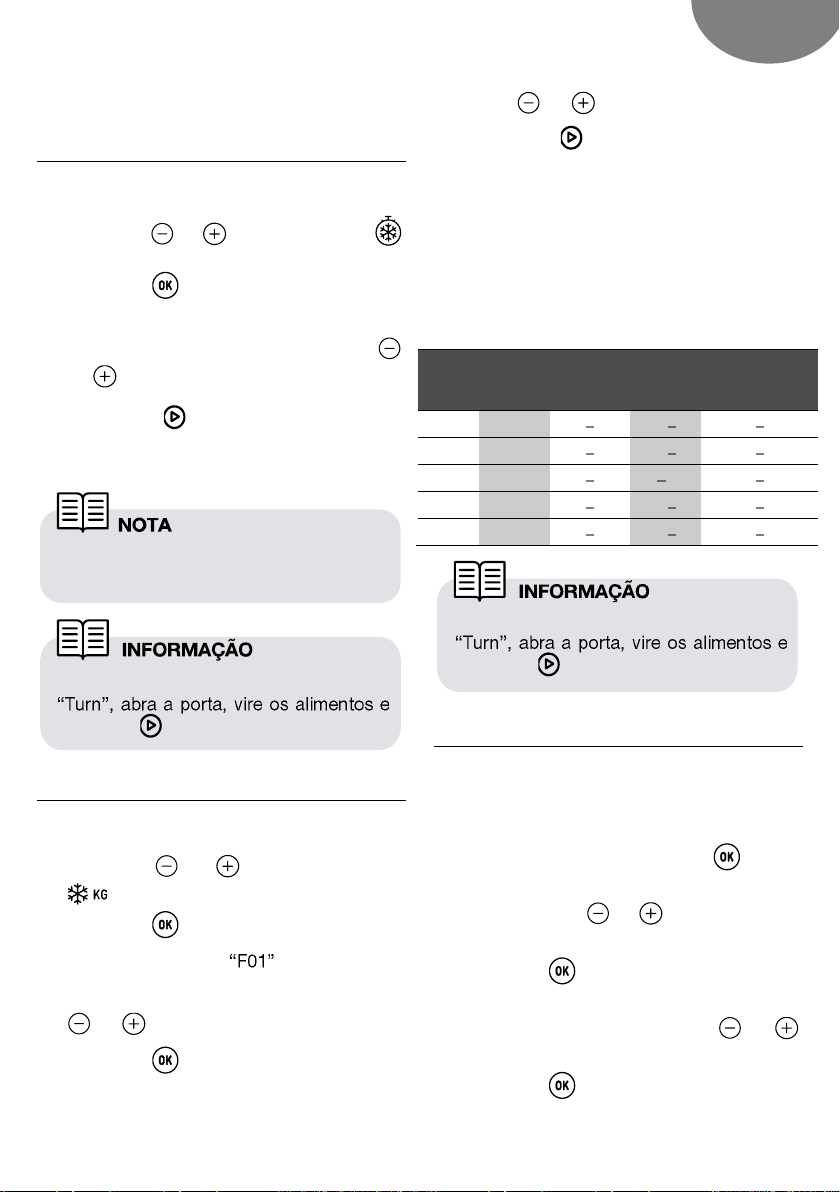
The following table shows the defrosting by
weight function programs, indicating weight
intervals, and defrosting and standing times
(in order to ensure the food is of a uniform
temperature):
COMBINED FUNCTIONS
1. Select a microwave + conventional oven
function with the function selector.
2. The display shows the default cooking
time. Select the desired cooking time by
pressing or .
3. Press to confirm.
4. The display shows the default Power
setting. Select the desired power setting
by pressing or .
5. Press to confirm.
6. Press to start the function with the
desired parameters.
11
Page 12
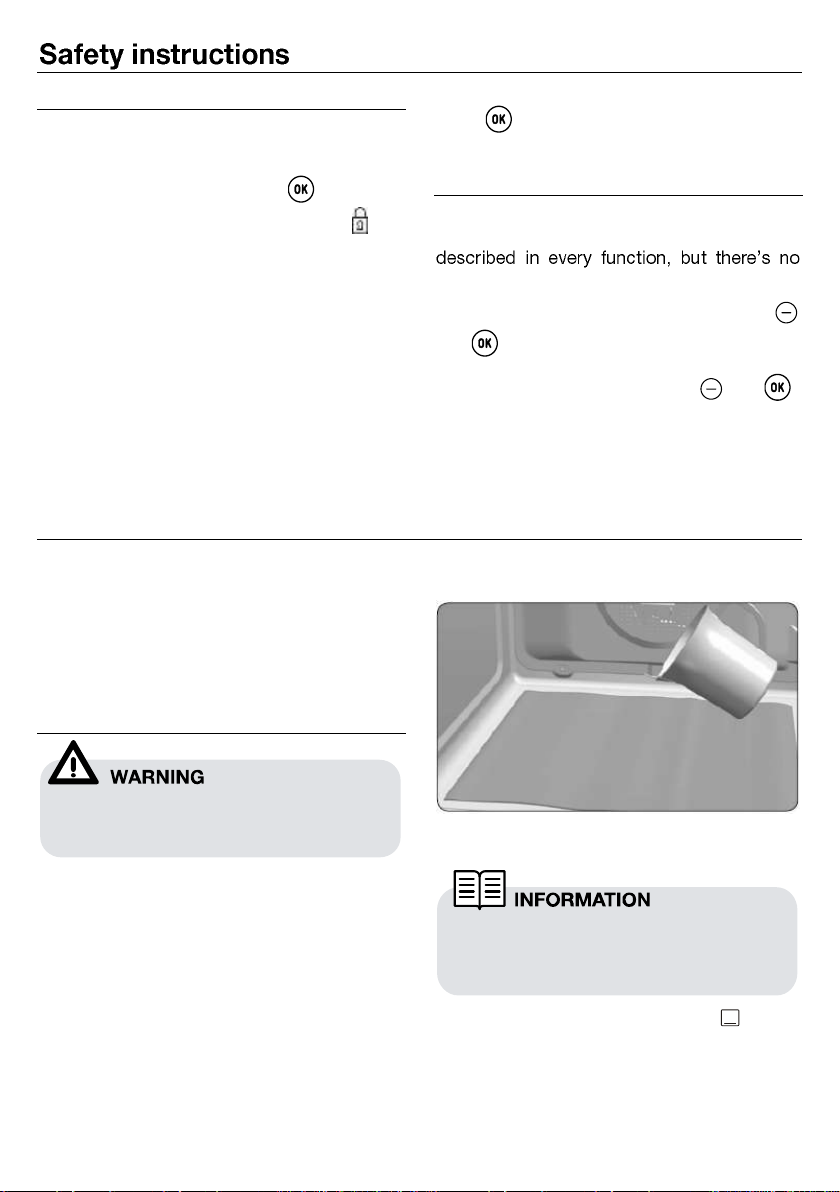
Do not pour water into a hot oven as this
can damage the enamel of the oven.
For best results, add a teaspoon of mild
washing up detergent to the glass of
water before pouring onto the cloth
SAFETY BLOCK
This function can be selected at any time
while using the oven.
To activate the function, press for a few
seconds until you hear a beep and the
symbol appears on the display. The oven is
locked.
If the oven is off and you activate the safety
block function, the oven will not work even if
a cooking function is selected.
If this function is activated while you are
cooking, it will only lock the display and
keys.
Teka Hydroclean
This function makes it easy to remove grease
and other food debris that may have stuck to
the sides of the oven.
For easier cleaning, do not allow dirt to
accumulate. Clean the oven frequently.
PROGRAMING THE TEKA HYDROCLEAN®
FUNCTION
®
function
To deactivate the safety block function,
press for a few seconds until you hear a
beep.
SHOWROOM MODE
The showroom mode is used in showrooms,
to show the clients how the oven works as
activation of the heating loads.
To activate the showroom mode press
and .
To deactivate the function press and
again.
1. With the oven cold, spread a cloth out on
the bottom of the oven.
Always run the cycle on a cold oven. The
result could be affected and the varnish
damaged if it is run when the oven is too hot.
First remove the trays and all accessories
from the oven interior, including the tray
supports and telescopic guide rails.
To do this, follow the instructions in the
installation and maintenance guide
accompanying the oven.
12
2. Gently pour 200 ml of water into the
bottom of the oven cavity.
3. Turn the control dial to position .
4. Set the temperature to 90º C.
5. Program a duration of 4 minutes on the
timer.
Page 13

PT
Do not open the oven until the cooling
phase is complete.
This is necessary for the Hydroclean®
function to work properly.
Before touching the inside surface of the
oven, make sure that it has cooled
properly.
6. After 4 minutes, an alarm will sound and
the oven will stop heating.
7. Turn the control dial to position .
8. Wait for about 20 minutes for the interior
of the oven to cool.
9. Any traces of dirt and excess water can
now be removed from the oven with the
damp cloth.
The Hydroclean® function takes place at a low
temperature. However, cooling times can
vary depending on the room temperature.
If a deeper clean is required after using the
Hydroclean® function, use neutral detergents
and non-abrasive sponges.
13
Page 14

Descrição do forno ................................ .. 15
Painel de comandos ................................ 15
Símbolos do seletor de funções ............. 16
Funções do forno ..................................... 16
Níveis de Potências das Micro-ondas ... 16
Descrição do visor ................................... 17
Acertar a hora ........................................ 17
Ocultar o relógio .................................... 18
Manuseamento do forno ......................... 18
Funcionamento manual ......................... 18
Funcionamento do temporizador do forno
.............................................................. 18
Microondas ............................................ 20
Inicio rápido ........................................... 20
Descongelação por tempo .................... 21
Descongelação por peso ....................... 21
Funções combinadas ............................ 21
Funções de segurança ............................ 22
Bloqueio de segurança .......................... 22
FUNÇÃO TEKA HYDROCLEAN® ............. 22
programar a função teka Hydroclean® . 22
14
Page 15
PT
Painel de comandos
Saída de ar de refrigeração
Resistência do grill
Fixação ao móvel
Apoio dos tabuleiros
Lâmpada
Grelha
Painel traseiro
Tabuleiro
Turbina
Dobradiça
Junta de forno
Vidro interior
Porta
Seletor de funções
Seletor de temperatura
Visor
Teclas touch
Descrição do forno
Painel de comandos
15
Page 16
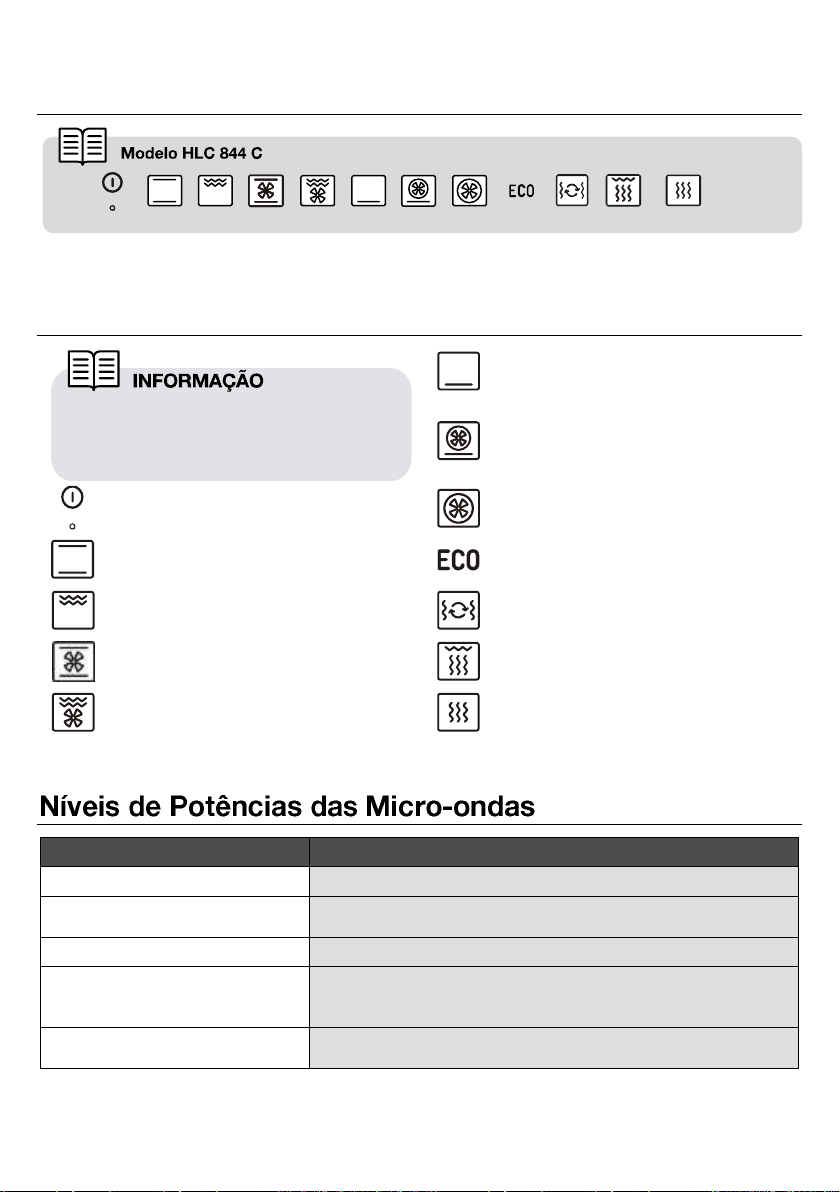
RESISTÊNCIA INFERIOR
TURBO + RESISTÊNCIA
INFERIOR
DESLIGAR O FORNO
TURBO
CONVENCIONAL
MODO ECOLÓGICO
MAXIGRILL
MICROONDAS + AR QUENTE
CONVENCIONAL COM TURBINA
MICROONDAS + GRILL
MAXIGRILL COM TURBINA
MICROONDAS
Potência das micro-ondas
Alimentos
200
Descongelação lenta para alimentos delicados; manter quente.
400
Cozinhar com pouco calor; refogar arroz.
Descongelação rápida.
600
Aquecer e cozinhar alimentos.
800
Cozinhar legumes e alimentos. Cozinhar e aquecer cuidadosamente.
Aquecer e cozinhar pequenas quantidades. Aquecer alimentos
delicados.
1000
Cozinhar e aquecer rapidamente líquidos e alimentos pré
confeccionados.
Para uma descrição da utilização de cada
uma das funções, consulte o guia de
cozinhados fornecido com o seu forno.
Símbolos do seletor de funções
Funções do forno
16
Page 17
PT
A sensibilidade das teclas touch adaptase continuamente às condições
ambientais. Ao ligar o forno à corrente, é
necessário ter o cuidado de garantir que
a superfície do vidro da parte da frente
dos comandos está limpa e livre de
qualquer obstáculo.
Se, ao tocar nas teclas, o relógio não
responder corretamente, é necessário
desligar o forno da rede elétrica e voltar a
ligá-lo algum tempo depois. Desta forma
os sensores ajustar-se-ão
automaticamente e reagirão novamente
ao tocar com o dedo.
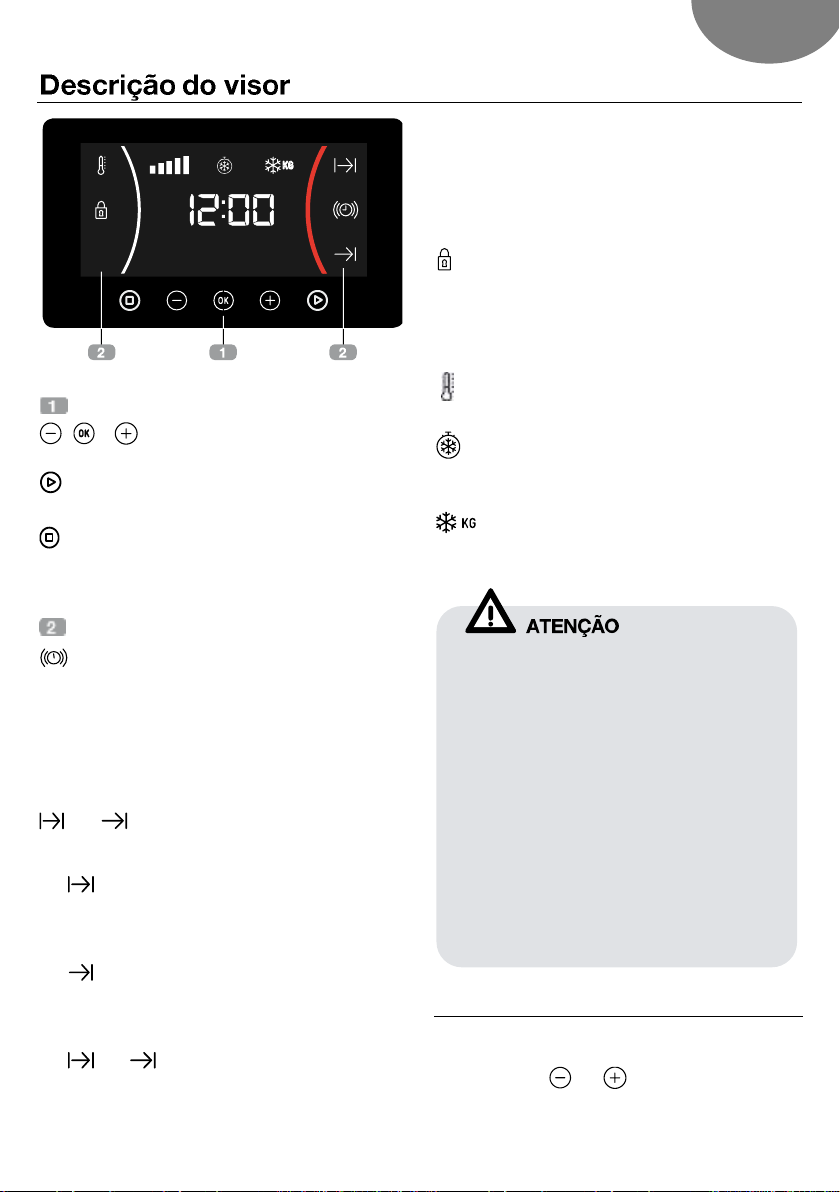
TECLAS
, e : Permitem a programação das
funções.
: Permite iniciar as funções de
cozinhado.
: Permite parar as funções de cozinhado.
SÍMBOLOS
AVISADOR: Ilumina-se quando é
selecionada função de avisador do relógio.
Gera um sinal acústico no final do tempo
programado. O forno não se desligará
quando termina o tempo. Esta função
também pode ser utilizada quando o forno
estiver a cozinhar.
e PROGRAMAÇÃO: Iluminam-se
para indicar que o forno está programado
(duração, fim ou total).
Duração do cozinhado: Permite
cozinhar durante um tempo selecionado e
a seguir o forno desligar-se-á de forma
automática.
Hora de finalização do cozinhado:
Permite cozinhar até uma hora
estabelecida e a seguir o forno desligarse-á de forma automática.
e Duração e finalização do
cozinhado: Permite programar a duração
e a hora de finalização do cozinhado. O
forno ligar-se-á de forma automática para
cozinhar durante o tempo selecionado
(Duração) e desligar-se-á
automaticamente na hora indicada
(Finalização do cozinhado).
Bloqueio de segurança: Indica que as
teclas touch do relógio estão bloqueadas,
evitando a sua manipulação por parte de
crianças pequenas.
Outras funções
AQUECIMENTO: Indica que o forno
está a transmitir calor ao alimento.
DESCONGELAÇÃO POR TEMPO:
Ilumina-se durante a função de
descongelação por tempo
DESCONGELAÇÃO POR PESO:
Ilumina-se durante a função de
descongelação por peso.
Acertar a hora
Ao ligar o forno, observará que no relógio
aparece a piscar a indicação 12:00.
Pressione ou para acertar as
horas.
17
Page 18

Pressione para confirmar as horas.
No caso de um corte de corrente elétrica,
será apagada toda a programação do
relógio eletrónico e aparecerá a piscar no
relógio a indicação 12:00. Deverá acertar
a hora e programá-lo de novo.
Em modelos com regulação eletrónica de
temperatura, a temperatura é
apresentada no ecrã do relógio ao rodar
o seletor.
Assim que a temperatura for selecionada,
o relógio volta a ser apresentado
automaticamente no ecrã.
Quando inicia um cozinhado, por defeito
o forno irá mostrar o tempo total do
cozinhado em curso., caso não tenha
sido selecionado um tempo de cozinhado
ou tempo de final de cozinhado.
Pressione ou para ajustar os
minutos.
Pressione para confirmar os minutos.
Se pretender alterar a hora, pressione ou
até que a indicação da hora fique
intermitente. Pressione e siga os passos
descritos no ponto anterior.
FUNCIONAMENTO MANUAL
Após acertar a hora do relógio, o seu
forno está pronto para cozinhar.
Selecione uma função de cozinhado e
uma temperatura.
OCULTAR O RELÓGIO
Para ocultar o relógio pressione a tecla
durante 5 segundos.
Para voltar a mostrar o relógio pressione
novamente a tecla durante 5
segundos.
Poderá verificar que o símbolo se
ilumina durante o cozinhado para indicar
a transmissão de calor ao alimento. Este
símbolo apaga-se quando é atingida a
temperatura selecionada.
Para desligar o forno, coloque os
comandos na posição .
18
FUNCIONAMENTO DO TEMPORIZADOR
DO FORNO
Programação do avisador
1. Pressione ou até que o símbolo
fique intermitente no visor e
pressione . No visor será exibida a
indicação 00_00.
2. Selecione o tempo, após o qual pretende
que o relógio avise, pressionando em
ou . Ouvirá 2 beeps seguidos como
confirmação e será exibida a contagem
decrescente do tempo definido. O
símbolo piscará lentamente.
Page 19
PT
Com a função Avisador, o forno não se
desligará quando terminar o tempo
Com a função Avisador, o tempo restante
será permanentemente exibido no visor.
Com esta função ativada, não é possível
visualizar a hora nem o tempo total
programado para o cozinhado.
3. Quando terminar o tempo, será emitido
um sinal acústico durante 90 segundos e
o símbolo piscará mais rapidamente.
4. Pressione qualquer tecla para parar o
sinal sonoro, nesse momento o símbolo
apagar-se-á.
Caso pretenda alterar o tempo do avisador,
pressione ou até que no visor o
simbolo fique intermitente e as horas
paradas, de seguida pressione e siga
novamente os passos descritos. Ao aceder
ao temporizador, será exibido o tempo
restante atual, que poderá ser alterado.
Programação da Duração do Cozinhado
1. Selecione uma função e uma temperatura
de cozinhado através dos comandos do
forno.
2. Pressione ou até que o símbolo
fique intermitente no visor e pressione
. No visor será exibida a indicação 0_00.
3. Selecione o tempo, após o qual pretende
que o relógio avise, pressione ou .
5. Decorrida a duração do cozinhado, o
forno desligar-se-á, soará um sinal sonoro
e o símbolo piscará mais depressa.
6. Pressione para parar o sinal sonoro e
apagar o símbolo ligando de novo o
forno.
7. Coloque os comandos na posição para
desligar o forno.
Pode alterar o tempo de cozinhado restante
a qualquer momento, bastando para tal
premir ou até que o símbolo
comece a piscar rapidamente. De seguida,
pressione para alterar o tempo.
Programação da Hora de Finalização do
Cozinhado
1. Selecione uma função e uma temperatura
de cozinhado.
2. Pressione ou até que o símbolo
fique intermitente no visor e prima . No
visor será exibida a hora atual.
3. Selecione o tempo, após o qual pretende
que o relógio avise, pressione ou .
4. Pressione para confirmar. Ouvirá 2
beeps seguidos como confirmação e será
exibida a hora de finalização do
cozinhado. O símbolo piscará.
5. Assim que for atingida a hora de
finalização programada, o forno desligarse-á, será emitido um sinal sonoro e o
símbolo piscará.
6. Prima para parar o sinal sonoro e
apagar o símbolo , ligando de novo o
forno.
4. Pressione para confirmar. Ouvirá 2
beeps seguidos como confirmação e será
exibida a contagem decrescente do
tempo definido. O símbolo piscará
lentamente.
7. Coloque os comandos na posição para
desligar o forno.
Pode alterar o tempo de cozinhado restante
a qualquer momento, bastando para tal
pressionar ou até que o símbolo
19
Page 20
comece a piscar rapidamente. De seguida,
prima para alterar o tempo.
Programação da Duração e Finalização
do Cozinhado
1. Selecione uma função e uma temperatura
de cozinhado.
2. Pressionando ou até que o símbolo
fique intermitente no visor e prima
. No visor será exibida a indicação 0_00.
3. Selecione a duração do cozinhado,
tocando em ou . Posteriormente,
soarão 2 beeps seguidos e será exibido o
tempo restante no visor e o símbolo
piscará lentamente.
4. Pressione para confirmar.
5. Pressione ou até que o símbolo
fique intermitente no visor e prima . No
visor será exibida a hora atual.
6. Selecione a hora de finalização do
cozinhado, premindo ou .
7. Pressione para confirmar.
Posteriormente soarão 2 beeps seguidos,
será mostrada a hora atual no visor.
8. Selecione uma função e uma temperatura
de cozinhado. O forno permanecerá
desligado e com os símbolos e
iluminados. O seu forno está programado.
9. Quando for alcançada a hora de início do
cozinhado, o forno entrará em
funcionamento e o cozinhado decorrerá
durante o tempo selecionado.
10. Durante o cozinhado será exibido o
tempo de cozinhado restante e o símbolo
piscará lentamente.
11. Assim que for atingida a hora de
finalização programada, o forno desligarse-á, será emitido um sinal sonoro e o
símbolo piscará mais depressa.
12. Prima para parar o sinal sonoro e
apagar o símbolo , ligando de novo o
forno.
13. Coloque os comandos na posição para
desligar o forno.
Pode alterar o tempo de cozinhado restante
a qualquer momento, bastando para tal
premir ou até que o símbolo
comece a piscar rapidamente. De seguida,
prima para alterar o tempo.
MICROONDAS
1. Rode o seletor de funções para a posição
Micro-ondas.
2. No visor é exibido 0_30 (função de inicio
rápido) por padrão de funcionamento.
Pressione ou até ser exibido 1_00
no visor.
3. Pressione para confirmar.
4. No visor é exibido o tempo padrão de
funcionamento. Com as teclas ou
ajuste a duração desejada.
5. Pressione para confirmar.
6. No visor é exibida a potência padrão de
funcionamento. Com as teclas ou
ajuste a potência desejada.
7. Pressione para confirmar.
8. Pressione para iniciar a função micro-
ondas com os parâmetros desejados.
INICIO RÁPIDO
1. Rode o seletor de funções para a posição
Micro-ondas.
2. Pressione e o forno começa a
funcionar na função Micro-ondas à
potência máxima durante 30 segundos.
3. Caso pretenda aumentar o tempo de
funcionamento pressione novamente a
tecla . Cada vez que esta tecla for
20
Page 21
PT
Prog.
Alimen-
to
Peso
(kg)
Tempo
(min.)
Tempo de
conservação
(min.)
F01
Carne
0.10 2.00
2:10 43
20 30
F02
Aves
0.10 2.50
2:20 58
20 30
F03
Peixe
0.10 2.00
2 40
20 30
F04
Fruta
0.10 0.50
2:36 13
10 20
F05
Pão
0.10 0.80
2:25 19
10 20
Consulte o Guia de cozinhados para
sugestões de tempos de descongelação.
Quando no visor mostrar a palavra
pressione para continuar.
Quando no visor mostrar a palavra
pressione para continuar.
premida o tempo de funcionamento será
aumentado em 30 segundos.
6. No visor é exibido o peso padrão. Com as
teclas ou ajuste o peso desejado.
DESCONGELAÇÃO POR TEMPO
1. Rode o seletor de funções para a posição
Micro-ondas.
2. Pressione ou até que o símbolo
apareça no display.
3. Pressione para confirmar.
4. No visor é exibido o tempo de
descongelação padrão. Com as teclas
ou ajuste a duração desejada.
5. Pressione para iniciar a função
descongelação por tempo com os
parâmetros desejados.
DESCONGELAÇÃO POR PESO
1. Rode o seletor de funções para a posição
Micro-ondas.
2. Pressione ou até que o símbolo
apareça no visor.
3. Pressione para confirmar.
4. No visor é exibido a piscar como
padrão. Selecione a opção de
descongelação desejada, pressionando
ou .
5. Pressione para confirmar.
7. Pressione para iniciar a função
descongelação por peso com os
parâmetros desejados.
A tabela seguinte mostra os programas para
descongelar por peso, indicando os
intervalos de peso e tempos de
descongelação e de conservação (para
assegurar que os alimentos mantêm uma
temperatura uniforme):
FUNÇÕES COMBINADAS
1. Selecione a função de micro-ondas +
função convencional com o seletor de
funções.
2. No visor é exibido o tempo padrão de
funcionamento. Pressione para
selecionar.
3. Com as teclas . ou ajuste a duração
desejada.
4. Pressione para confirmar.
5. No visor é exibida a potência padrão de
funcionamento. Com as teclas ou
ajuste a potência desejada.
6. Pressione para confirmar.
21
Page 22
7. Pressione para iniciar a função com os
A temperatura pode ser alterada a
qualquer altura ao rodar o seletor de
temperatura.
A potência máxima que pode ser
selecionada é de 600 W.
Não verta água no interior do forno
enquanto este ainda estiver quente, pois
poderá danificar o esmalte do mesmo.
parâmetros desejados.
BLOQUEIO DE SEGURANÇA
Esta função pode ser selecionada a qualquer
momento durante a utilização do forno.
Para ativar a função, prima a tecla
durante alguns segundos até que soe 1 sinal
sonoro e o símbolo seja exibido no visor. O
forno está bloqueado.
Se o forno estiver desligado e a segurança
para crianças estiver ativa, o forno não
cozinhará mesmo que selecione uma função
de cozinhado.
Caso ative esta função enquanto estiver a
utilizar o forno, apenas bloqueará a
manipulação do relógio eletrónico.
Função Teka Hydroclean®
Esta função facilita a limpeza da gordura e
restos de sujidade que tenham aderido às
paredes do forno.
Para facilitar a limpeza, evite a acumulação
de sujidade. Limpe frequentemente o forno.
PROGRAMAR A FUNÇÃO TEKA
HYDROCLEAN®
Para desativar a função, pressione a tecla
durante alguns segundos até que soe 1 sinal
sonoro.
MODO SHOWROOM
O modo showroom é utilizado em
showrooms, para demonstrar aos clientes
como funciona o forno tal como descrito em
todas as funções, mas não são ativadas as
cargas de aquecimento.
Para ativar o modo showroom pressione
e em simultâneo.
Para desativar a função pressione e
novamente.
demasiado quente, poderá haver alterações
no resultado e poderá danificar o esmalte.
Retire previamente os tabuleiros e todos os
acessórios do interior do forno, incluindo os
suportes dos tabuleiros ou as guias
telescópicas.
Para tal, siga as instruções presentes no
manual de instalação e manutenção
fornecido com o forno.
1. Com o forno frio, coloque um pano
estendido na base do forno.
Realize sempre o ciclo com o forno frio. Se o
procedimento for efetuado com o forno
22
Page 23

PT
Para melhores resultados, adicione uma
colher pequena de detergente suave para a
loiça no copo de água antes de o verter no
pano.
Não abra a porta do forno até que a fase
de arrefecimento termine.
A fase de arrefecimento é necessária para
o correto funcionamento da função
Hydroclean®.
Antes de tocar diretamente na superfície
interior do forno, certifique-se de que este
se encontra a uma temperatura adequada.
8. Espere 20 minutos aproximadamente até
que o interior do forno arrefeça.
2. Verta lentamente 200 ml de água na parte
inferior da cavidade do forno.
3. Rode o selector de funções para a posição
.
4. Regule o selector de temperatura para 90
ºC.
5. Programe uma duração de 4 minutos no
temporizador.
6. Decorridos os 4 minutos, será emitido um
sinal sonoro e o forno deixará de aquecer.
7. Coloque o selector de funções na posição
.
9. O forno está pronto para retirar os restos
de sujidade e a restante água com o pano.
A função Hydroclean® é realizada a baixa
temperatura. No entanto, o tempo de
arrefecimento pode variar de acordo com a
temperatura ambiente.
Se após a realização da função Hydroclean®
for necessária uma limpeza mais profunda,
utilize detergentes neutros e esponjas não
abrasivas.
23
Page 24

Índice
Descripción del horno ............................. 25
Frontal de mandos ................................... 25
Símbolos del selector de funciones ....... 26
Funciones del horno ................................ 26
Niveles de Potencia de las microondas . 26
Descripción del display ........................... 27
Ocultar/Mostrar el Reloj ........................ 28
Manejo del horno ..................................... 28
Funcionamiento manual ........................ 28
Funcionamiento temporizado del horno 28
Microondas ........................................... 30
Inicio Rápido ......................................... 30
Descongelación por tiempo................... 31
Descongelación por peso ...................... 31
Funciones combinadas ......................... 31
Funciones de seguridad .......................... 32
Bloqueo de seguridad ........................... 32
Modo Showroom ................................... 32
FUNCIÓN TEKA HYDROCLEAN® ........... 32
Programar la función Teka Hydroclean®
............................................................... 32
24
Page 25

ES
Frente de mandos
Salida de aire de refrigeración
Resistencia de grill
Fijación al mueble
Soporte bandejas
Lámpara
Parrilla
Panel trasero
Bandeja
Turbina
Bisagra
Junta de horno
Cristal interior
Puerta
Selector de funciones
Selector de temperaturas
Display
Teclas touch
Descripción del horno
Frontal de mandos
25
Page 26

SOLERA
TURBO + SOLERA
DESCONEXIÓN DEL HORNO
TURBO
CONVENCIONAL
ECO
MAXIGRILL
MICROONDAS + AIRE
CALIENTE
CONVENCIONAL CON TURBINA
MICROONDAS + GRILL
MAXIGRILL CON TURBINA
MICROONDAS
Potencia Salida Microondas
Alimentos
200
Descongelación lenta para alimentos delicados; mantener
caliente
400
Cocinar con poco calor; rehogar arroz
Descongelación rápida
600
Derretir mantequilla
Calentar alimento para bebé
800
Cocinar verduras y alimentos
Cocinar y calentar cuidadosamente,
Calentar y cocinar pequeñas cantidades
Calentar alimentos delicados
1000
Cocinar y calentar rápidamente líquidos y alimentos
precocinados,
For a description of how to use each of the
features, see the cooking guide that
comes with your oven.
Símbolos del selector de funciones
Funciones del horno
26
Page 27

ES
La sensibilidad de las teclas se adapta
continuamente a las condiciones
ambientales. Al conectar el horno a la red
tenga la precaución que la superficie del
frontal de mandos esté limpia y libre de
cualquier obstáculo.
Si al tocar las teclas, el reloj no responde
correctamente entonces es necesario
que desconecte el horno de la red
eléctrica y tras un instante vuelva a
conectarlo. De esta forma los sensores se
habrán ajustado automáticamente y
reaccionarán de nuevo al tocar con el
dedo.
TECLAS
, y : Permiten la programación de
las funciones del reloj electrónico.
: Permite empezar las funciones de
cocinados.
: Permite detener las funciones de
cocinados.
SÍMBOLOS
y Duración y Fin del Cocinado:
Permite programar la duración y la hora
de finalización del cocinado. El horno se
pondrá en marcha de forma automática
para cocinar durante el tiempo
seleccionado (Duración) y se apagará de
forma automática a la hora que le haya
indicado (Fin del Cocinado).
BLOQUEO DE SEGURIDAD: Indica que
las teclas del display están bloqueadas,
evitando la manipulación por parte de niños
pequeños.
Otras funciones
CALENTAMIENTO: Indica que el horno
está transmitiendo calor al alimento.
DESCONGELACIÓN POR TIEMPO: Se
ilumina mientras la función de
descongelación por tiempo está en
funcionamiento.
DESCONGELACIÓN POR PESO: Se
ilumina mientras la función de
descongelación por peso está en
funcionamiento.
AVISADOR: Iluminado al seleccionar la
función avisador del reloj. Genera una señal
acústica al cabo del tiempo. El horno no se
apagará cuando acabe el tiempo. Esta
función también se puede utilizar cuando el
horno esté cocinando.
y PROGRAMACIÓN: Iluminados
para indicar que el horno está programado
(duración, fin o total).
Duración del Cocinado: Permite
cocinar durante un tiempo seleccionado,
a continuación el horno se apagará de
forma automática.
Hora de Finalización del Cocinado:
Permite cocinar hasta una hora
establecida, a continuación el horno se
apagará de forma automática.
27
Page 28

AJUSTE DEL RELOJ
En caso de un corte de suministro
eléctrico, se borrará toda la programación
de su reloj electrónico y aparecerá
parpadeando la indicación 12:00 en el
reloj. Deberá ponerlo en hora y
programarlo de nuevo.
En modelos con regulación electrónica de
temperatura, al girar el selector, se
mostrará la temperatura en la pantalla del
reloj.
Una vez seleccionada la temperatura, la
pantalla volverá automáticamente a
mostrar el reloj.
Cuando inicie un cocinado, por defecto
su horno mostrará el tiempo que el horno
lleva cocinando, si se ha ajustado la
duración del cocinado o la hora de
finalización del cocinado.
Al conectar su horno, observará que en el
reloj aparece parpadeando la indicación
12:00.
Pulse o para ajustar las horas
Pulse para validar las horas.
Pulse o para ajustar los minutos.
Pulse para validar los minutos.
Si desea modificar la hora, pulse o
hasta que la hora empiece a parpadear.
Pulse y siga las instrucciones de los
puntos anteriores.
Manejo del horno
FUNCIONAMIENTO MANUAL
Tras poner el reloj en hora, su horno está
listo para cocinar. Seleccione una
función de cocinado y una temperatura.
OCULTAR/MOSTRAR EL RELOJ
Si no desea ver la hora en la pantalla
pulse durante 5 segundos.
Si desea volver a mostrar el reloj, pulse
durante 5 segundos.
Observará que el símbolo se ilumina
durante el cocinado para indicar la
transmisión de calor al alimento. Este
símbolo se apaga cuando se alcanza la
temperatura seleccionada.
Para apagar el horno, ponga los mandos
en posición .
28
FUNCIONAMIENTO TEMPORIZADO DEL
HORNO
Programación del avisador
1. Toque o hasta que parpadee el
símbolo en la pantalla y pulse . En
la pantalla se verá la indicación 0_00.
2. Seleccione el tiempo tras el cual desea
que el reloj avise, tocando o .
Sonarán 2 beep seguidos como
confirmación y se mostrará la cuenta
atrás a partir del tiempo elegido. El
símbolo parpadeará.
3. Cuando finalice el tiempo, sonará una
señal acústica durante 90 segundos y el
símbolo parpadeará.
Page 29

ES
Con la función Avisador, al finalizar el
tiempo programado el horno no se
apagará.
Con la función Avisador, el tiempo
restante se mostrará en la pantalla de
forma permanente. Con esta función
programada, no es posible visualizar la
hora ni el tiempo total de cocinado
programado.
4. Toque cualquier tecla para detener la
señal acústica, en ese momento el
símbolo se apagará.
Si desea modificar el tiempo del avisador,
presione o hasta que parpadee el
símbolo y las horas no estén
parpadeando, después pulse y realice los
pasos mostrados nuevamente. Al acceder al
temporizador, aparecerá el tiempo restante
actual el cual podrá modificar.
Programación de la Duración del
Cocinado
1. Seleccione una función y una temperatura
de cocinado mediante los mandos del
horno.
2. Toque o hasta que parpadee el
símbolo en la pantalla y pulse . En
la pantalla se verá la indicación 0_00.
3. Seleccione el tiempo tras el cual desea
que el reloj avise, tocando o .
4. Pulse la tecla para validar.Sonarán 2
beep seguidos como confirmación y se
mostrará la cuenta atrás a partir del
tiempo elegido. El símbolo
parpadeará lentamente.
5. Transcurrida la duración del cocinado, el
horno se desconectará, sonará una señal
acústica y el símbolo parpadeará.
6. Toque en para detener la señal
acústica y apagar el símbolo
encendiéndose el horno de nuevo.
7. Ponga los mandos en posición para
apagar el horno.
En cualquier momento usted puede modificar
el tiempo restante de cocinado, tocando
o hasta que el símbolo parpadee
rápidamente. A continuación toque para
modificar el tiempo.
Programación de la Hora de Finalización
del Cocinado
1. Seleccione una función y una temperatura
de cocinado.
2. Toque o hasta que parpadee el
símbolo en la pantalla y pulse . En
la pantalla se verá la hora actual.
3. Seleccione el tiempo tras el cual desea
que el reloj avise, tocando o .
4. Pulse la tecla para validar. Sonarán 2
beep seguidos como confirmación y se
mostrará la la hora de finalización del
cocinado elegida. El símbolo
parpadeará lentamente
5. Seleccione una función y una temperatura
de cocinado.
6. Alcanzada la hora de finalización
programada, el horno se desconectará,
sonará una señal acústica y el símbolo
parpadeará rápidamente.
7. Toque en para detener la señal
acústica y apagar el símbolo ,
encendiéndose el horno de nuevo.
8. Ponga los mandos en posición para
apagar el horno.
En cualquier momento usted puede modificar
el tiempo restante de cocinado, tocando
o hasta que el símbolo parpadee
29
Page 30

rápidamente. A continuación toque para
modificar el tiempo.
Programación de la Duración y Fin del
Cocinado
1. Seleccione una función y una temperatura
de cocinado.
2. Toque o hasta que parpadee el
símbolo en la pantalla y pulse . En
la pantalla se verá la indicación 0_00.
3. Seleccione el tiempo tras el cual desea
que el reloj avise, tocando o .
Sonarán 2 beep seguidos como
confirmación y se mostrará la cuenta
atrás a partir del tiempo elegido. El
símbolo parpadeará.
4. Pulse la tecla para validar.
5. Toque o hasta que parpadee el
símbolo en la pantalla y pulse . En
la pantalla se verá la hora actual.
6. Ajuste la hora de finalización del
cocinado, tocando o .
7. Pulse la tecla para validar.
8. El horno permanecerá desconectado y
con los símbolos y iluminados. Su
horno está programado.
9. Cuando se alcance la hora de comienzo
del cocinado, el horno se pondrá en
marcha y se realizará el cocinado durante
el tiempo seleccionado.
10. Durante el cocinado se mostrará el tiempo
restante de cocinado y el símbolo
parpadeará lentamente.
11. Alcanzada la hora de finalización que se
había programado, el horno se
desconectará, sonará una señal acústica
y el símbolo parpadeará rápidamente.
12. Toque cualquier sensor para detener la
señal acústica y apagar el símbolo
encendiéndose el horno de nuevo.
En cualquier momento usted puede modificar
el tiempo restante de cocinado, tocando
o hasta que el símbolo parpadee
rápidamente. A continuación toque para
modificar el tiempo.
MICROONDAS
1. Gire el selector de funciones y colóquelo
en la posición de microondas
2. El display muestra 0_30 (Función de inicio
rápido) por defecto. Pulse o hasta
que parpadee 1_00.
3. Pulse la tecla para validar.
4. El display muestra la duración del
cocinado por defecto. Con los botones
o seleccione en la duración
deseada.
5. Pulse la tecla para validar.
6. El display muestra la potencia por
defecto. Con los botones o
seleccione la potencia deseada.
7. Pulse la tecla para validar.
8. Pulse la tecla para empezar la función
microondas con los parámetros
seleccionados.
INICIO RÁPIDO
1. Gire el selector de funciones y colóquelo
en la posición de microondas
2. Pulse el microondas empezará
inmediatamente a funcionar en la función
de microondas a la máxima potencia
durante 30 segundos.
3. Si desea aumentar el tiempo de
funcionamiento, vuelva a pulsar la tecla
. El tiempo de funcionamiento aumenta
en 30 segundos todas las veces que
pulsar la tecla .
13. Ponga los mandos en posición para
apagar el horno.
30
Page 31

ES
Prog.
Alimento
Peso (kg)
Tiempo
(min)
Tiempo de
cocción
(min)
F01
Carne
0.10 2.00
2:10 43
20 30
F02
Aves
0.10 2.50
2:20 58
20 30
F03
Pescado
0.10 2.00
2 40
20 30
F04
Frutas
0.10 0.50
2:36 13
10 20
F05
Pan
0.10 0.80
2:25 19
10 20
Consulte el Guía de cocinados para
obtener consejos de tiempos de
descongelación.
La potencia máxima que se puede
seleccionar es 600 W.
Cuando la pantalla muestre la palabra
alimentos y presionar para continuar.
Cuando la pantalla muestre la palabra
alimentos y presionar para continuar.
DESCONGELACIÓN POR TIEMPO
1. Gire el selector de funciones y colóquelo
en la posición de microondas
2. Toque o hasta que parpadee el
símbolo en la pantalla.
3. Pulse la tecla para validar.
4. La pantalla muestra la duración por
defecto de la descongelación por tiempo.
Con los botones o seleccione la
duración deseada.
5. Pulse la tecla para empezar la función
descongelación por tiempo con los
parámetros seleccionados.
6. La pantalla muestra parpadeando por
defecto el peso. Con los botones o
seleccione el peso deseado.
7. Pulse la tecla para empezar la función
descongelación por peso con los
parámetros seleccionados.
La tabla siguiente muestra los programas de
Descongelar por peso, indicando rangos de
peso y tiempos de cocción y
descongelamiento (para garantizar que la
temperatura de la comida sea uniforme):
DESCONGELACIÓN POR PESO
1. Gire el selector de funciones y colóquelo
en la posición de microondas
2. Toque o hasta que parpadee el
símbolo en la pantalla.
3. Pulse la tecla para validar.
4. La pantalla muestra «F01» parpadeando
por defecto. Con los botones o
seleccione la opción de descongelación
deseada.
5. Pulse la tecla para validar.
FUNCIONES COMBINADAS
1. Gire el selector de funciones y colóquelo
en la posición de al función microondas +
horno convencional.
2. El display muestra la duración del
cocinado por defecto.
3. Pulse la tecla para selecionar.
4. Con los botones o seleccione en la
duración deseada.
5. Pulse la tecla para validar.
6. El display muestra la potencia por
defecto. Con los botones o
seleccione la potencia deseada.
31
Page 32

7. Pulse la tecla para validar.
La temperatura se puede cambiar en
cualquier momento girando el Selector de
temperaturas.
No vierta agua en el interior del horno
caliente, puede dañar el esmalte de su
horno.
La potencia máxima que se puede
seleccionar es 600 W.
8. Pulse la tecla para empezar la función
con los parámetros seleccionados.
Funciones de seguridad
BLOQUEO DE SEGURIDAD
Esta función se puede seleccionar en
cualquier momento durante el uso del horno.
Para activar la función, toque en la tecla
de forma prolongada hasta que escuche 1
beep sonoro y el símbolo aparezca en la
pantalla. El reloj está bloqueado.
Si el horno está apagado y activa la seguridad
niños, el horno no cocinará aunque
seleccione una función de cocinado.
Si mientras cocina con el horno, activa esta
función, sólo bloqueará la manipulación del
reloj electrónico.
Función Teka Hydroclean®
Esta función facilita la limpieza de la grasa y
los restos de suciedad que han quedado
adheridos en las paredes del horno.
Para una mayor facilidad de limpieza, evite
que se acumule la suciedad. Limpie el horno
con frecuencia.
Para desactivar la función, toque en la tecla
de forma prolongada hasta que escuche
1 beep sonoro.
MODO SHOWROOM
El modo showroom se utiliza en las
presentaciones para enseñar a los clientes el
funcionamiento de cada una de las funciones
del horno, pero sin activar los ciclos de
calentamiento.
Para activar el modo showroom pulse y
en simultáneo.
Para desactivar la función pulse y de
nuevo.
PROGRAMAR LA FUNCIÓN TEKA
HYDROCLEAN®
32
Page 33

ES
Para un mejor resultado añada una
cucharadita de detergente suave para
vajilla en el vaso de agua antes de verterlo
sobre la bayeta.
No abra la puerta del horno hasta que no
finalice la fase de enfriamiento.
Ésta es necesaria para el correcto
funcionamiento de la función
Hydroclean®.
Asegúrese antes de tocar directamente la
superficie interior del horno, de que la
temperatura es adecuada.
Realice siempre el ciclo con el horno frío. Si
lo hace con el horno demasiado caliente, el
resultado puede verse afectado además de
dañar el esmalte.
Retire previamente las bandejas y todos los
accesorios del interior del horno, incluidos los
soportes para bandejas o guías telescópicas.
Siga para ello las instrucciones que
aparecen en el libro de instalación y
mantenimiento que se entrega con su
horno.
1. Con el horno frío, coloque una bayeta
extendida sobre el suelo del horno
2. Vierta lentamente 200 ml de agua en la
parte inferior de la cavidad del horno.
4. Regule el selector de temperatura a 90º C.
5. Programe una duración de 4 minutos en el
temporizador.
6. Transcurridos los 4 minutos, se oirá una
señal sonora y el horno dejará de calentar.
7. Ponga el selector de funciones en
posición .
8. Espere 20 minutos aproximadamente
hasta que se enfríe el interior del horno.
9. El horno está listo para retirar los restos de
suciedad y agua sobrante con la bayeta.
La función Hydroclean® se realiza a baja
temperatura. No obstante, los tiempos de
enfriamiento pueden variar según la
temperatura ambiente.
3. Gire el selector de funciones a la posición
.
Si tras realizar la función Hydroclean®
requiere de una limpieza con más
profundidad, utilice detergentes neutros y
esponjas no abrasivas.
33
Page 34

Description du four .................................. 35
Panneau frontal des commandes........... 35
Symboles du sélecteur de fonctions ...... 36
Fonctions du four ..................................... 36
Puissance Micro-ondes .......................... 36
.......................... 37
................................ 38
Masquer/Afficher l'horloge .................... 38
Fonctionnement du four .......................... 38
Fonctionnement manuel ........................ 38
Fonctionnement minuterie du four ........ 38
Micro-ondes .......................................... 40
Lancement rapide .................................. 41
Décongélation en fonction du temps ..... 41
Décongélation en fonction du poids ...... 41
Fonctions combinées ............................ 42
Fonctions de sécurité .............................. 42
Blocage de sécurité ............................... 42
FONCTION TEKA HYDROCLEAN® ........ 42
Programmer la fonction Teka
Hydroclean® ......................................... 42
34
Page 35

FR
Panneau de commande
Sortie de refroidissement
Résistance du gril
Fixation au meuble
Support plaques
Ampoule
Grille
Panneau du fond
Plaque
Turbine
Charnière
Joint de four
Vitre intérieure
Porte
Sélecteur de fonctions
Sélecteur de températures
Afficher
Touches tactiles
35
Page 36

SOLE
TURBO + SOLE (PIZZA)
ARRÊT DU FOUR
TURBO
CUISSON TRADITIONNELLE
ECO
MAXI GRIL
MICRO-ONDES + AIR CHAUD
CUISSON TRADITIONNELLE
AVEC TURBINE
MICRO-ONDES + GRIL
MAXI GRIL AVEC TURBINE
MICRO-ONDES
Puissance Micro-ondes
Aliments
200
Décongeler lentement les aliments délicats ; pour décongeler et continuer
de cuire à faible puissance.
400
Cuire de la viande, du poisson et du riz.
Décongeler rapidement de petites quantités et aliments pour bébés,
comme par exemple les biberons.
600
Chauffer et cuire les aliments.
800
Cuire des légumes et pommes de terre.
Cuire des gratins et des plats cuisinés.
Décongeler et cuire de petites quantités.
1000
Chauffer des liquides.
Consultez le guide de cuisson fourni avec
votre four pour lire la description des
usages de chacune des fonctions.
36
Page 37

FR
La sensibilité des touches tactiles
permanence. Veillez à ce que la surface
du panneau de commandes frontal soit
propre et libre de tout obstacle lorsque
vous branchez le four au secteur
électrique.
Il est nécessaire de débrancher le four du
secteur électrique et de le rebrancher
répond pas correctement lorsque vous
appuyez sur les touches. Ce procédé
permet de régler automatiquement les
commandes tactiles qui répondront de
nouveau lorsque vous les toucherez avec
le doigt.
TOUCHES
, et : Permettent de programmer
les fonctions.
: Permettent de démarrer les fonctions
de cuisson.
: Permettent d'arrêter les fonctions de
cuisson.
SYMBOLES
de fin de cuisson. Le four se met en
marche automatiquement afin que celuici fonctionne pendant le temps de cuisson
e (fin
de cuisson).
BLOCAGE DE SÉCURITÉ: Il indique que
les touches tactiles de l'afficher sont
bas âge ne puissent les utiliser.
Fonctions supplémentaires
CHAUFFAGE: Indique que le four
transmet actuellement de la chaleur à
DÉCONGÉLATION EN FONCTION DU
TEMPS: Allumé pendant la fonction de
décongélation en fonction du temps.
DÉCONGÉLATION EN FONCTION
DU POIDS: Allumé pendant la fonction de
décongélation en fonction du poids.
AVERTISSEUR: Allumé lorsque la
sélectionnée. Il émet un signal sonore lorsque
la durée programmée est écoulée. Le four ne
Cette fonction peut également être utilisée en
cours de cuisson.
et PROGRAMMATION: Allumé pour
indiquer que le four a été programmé (durée,
fin ou les deux).
Durée de cuisson: Permet de régler
le
automatiquement au terme de la durée
sélectionnée.
Heure de fin de cuisson: Permet de
automatiquement.
et Durée et fin de cuisson:
37
Page 38

RÉGLAGE DE L
En cas de coupure de courant, toute la
oge électronique
une nouvelle programmation.
Dans les modèles avec régulation
électronique de la température, lorsque
vous tournez le sélecteur, la température
Une fois la température sélectionnée,
Lorsque vous démarrez une cuisson,
votre four affiche par défaut la durée
totale de la cuisson en cours, si le durée
de cuisson ou l'heure de fin de cuisson
n'ont pas été réglés.
Lorsque vous branchez le four,
Appuyez sur ou
Appuyez sur .
Appuyez sur ou pour régler les
minutes.
Appuyez sur pour confirmer les
minutes.
appuyez sur ou
sur et suivez les mêmes étapes
décrites ci-dessus.
FONCTIONNEMENT MANUEL
prêt à fonctionner. Sélectionnez une
fonction de cuisson et une température.
MASQUER/AFFICHER L'HORLOGE
Vous pouvez masquer l'horloge, en
appuyant pendant 5 secondes sur .
.
Vous remarquerez que le symbole
que la cha
température sélectionnée est atteinte.
Pour éteindre le four, placez les
commandes sur la position .
38
FONCTIONNEMENT MINUTERIE
Programmati
1. Appuyez sur ou
symbole se mette à clignoter sur
. ran affiche
0_00.
2. Sélectionnez le temps après lequel vous
appuyant sur ou . 2 bips sonores
consécutifs sont alors émis à titre de
confirmation et le compte à rebours
clignoter lentement.
se met à
Page 39

FR
programmé lorsque la fonction
Avertisseur est activée.
Avec la fonction Avertisseur, le temps
de manière
permanente.
Lorsque cette fonction est programmée, il
la durée de cuisson totale programmée.
3. Une fois terminé, un signal sonore retentit
pendant 90 secondes et le symbole
se met à clignoter rapidement.
4.
couper le signal sonore. Le symbole
4. Appuyez sur pour confirmer.2 bips
sonores consécutifs sont alors émis à titre
de confirmation et le compte à rebours
met à clignoter lentement.
5. Une fois la durée de cuisson écoulée, le
n signal sonore retentit et le
symbole se met à clignoter
rapidement.
6. Appuyez sur pour couper le signal
sonore et éteindre le symbole . Le four
se remet alors sous tension.
se
appuyant sur ou
symbole se mette à clignoter et les
heures ne clignotent pas, alors appuyez sur
et effectuez à nouveau les étapes
le temps restant actuel que vous pouvez
modifier.
Programmation de la durée de cuisson
1. Sélectionnez une fonction et une
température de cuisson au moyen des
commandes du four.
2. Appuyez sur ou
symbole se mette à clignoter sur
. ran affiche
0_00.
3. Sélectionnez le temps après lequel vous
appuyant sur ou .
7. Placez les commandes sur la position
pour éteindre le four.
Vous pouvez modifier à tout moment le temps
de cuisson restant en appuyant sur ou
se mette à
clignoter rapidement. Ensuite, appuyez sur
pour modifier la durée.
cuisson
1. Sélectionnez une fonction et une
température de cuisson.
2. Appuyez sur ou
symbole se mette à clignoter sur
l'heure actuelle.
. ran affiche
3. Sélectionnez le temps après lequel vous
appuyant sur ou .
4. Appuyez sur pour confirmer. 2 bips
sonores consécutifs sont alors émis à titre
de confirmation et
cuisson Le symbole
se met à clignoter lentement.
5. Une fois la durée de cuisson écoulée, le
teint, un signal sonore retentit et le
39
Page 40

symbole se met à clignoter
rapidement.
6. Appuyez sur pour couper le signal
sonore et éteindre le symbole . Le four
se remet alors sous tension.
sélectionnée.
10. Pendant la cuisson, le temps de cuisson
clignote lentement.
11.
7. Placez les commandes sur la position
pour éteindre le four.
Vous pouvez modifier à tout moment le temps
de cuisson restant en appuyant sur ou
se mette à
clignoter rapidement. Ensuite, appuyez sur
pour modifier la durée.
Programmation de la durée et fin de
cuisson
1. Sélectionnez une fonction et une
température de cuisson.
2. Appuyez sur ou
symbole
appuyez sur . ran affiche alors
0_00.
3. Sélectionnez la durée de cuisson en
appuyant sur ou . 2 bips
consécutifs sont alors émis, le temps
se met à clignoter lentement.
4. Appuyez sur pour confirmer.
5. Appuyez sur ou
symbole se mette à clignoter sur
. ran affiche
l'heure actuelle.
6.
appuyant sur ou .
7. Appuyez sur pour confirmer.
8. Le four restera éteint et les symboles
et allumés. Votre four est programmé.
9.
programmée, le four se met en marche et
retentit et le symbole se met à
clignoter rapidement.
12. Appuyez sur pour couper le signal
sonore et éteindre le symbole . four se
remet alors sous tension.
13. Placez les commandes sur la position
pour éteindre le four.
Vous pouvez modifier à tout moment le temps
de cuisson restant en appuyant sur ou
ou se mette
à clignoter rapidement. Ensuite, appuyez sur
pour modifier la durée.
MICRO-ONDES
1. Tournez la
position Micro-ondes.
2. L'affichage indique 0:30 (Lancement
rapide) par défaut. Appuyez sur ou
jusqu'à ce que l'écran affiche 1_00.
3. Appuyez sur pour confirmer.
4. L'affichage indique le temps de cuisson
par défaut. Sélectionnez le temps de
cuis ou .
5. Appuyez sur pour confirmer.
6. L'affichage indique le puissance par
défaut. Sélectionnez le puissance de
ou .
7. Appuyez sur pour confirmer.
8. Appuyez sur et le four commencera à
fonctionner.
40
Page 41

FR
Progra
mme
Aliment
Poids
(kg)
Temps
(min.)
Temps de
repos
(min.)
F01
Viande
0.10 2.00
2:10 43
20 30
F02
Volailles
0.10 2.50
2:20 58
20 30
F03
Poisson
0.10 2.00
2 40
20 30
F04
Fruit
0.10 0.50
2:36 13
10 20
F05
Pain
0.10 0.80
2:25 19
10 20
Consultez le Guide de cuisson pour
obtenir des conseils sur les temps
décongélation.
Lorsque l'écran affiche le mot « Turn »,
ouvrez la porte, tournez la nourriture et
appuyez sur pour continuer.
Lorsque l'écran affiche le mot « Turn »,
ouvrez la porte, tournez la nourriture et
appuyez sur pour continuer.
LANCEMENT RAPIDE
1. Tournez le sélecteur de fonction
la position Micro-ondes.
2. Appuyez sur la touche . Le four se met
en marche en fonction Micro-ondes, à la
puissance maximum, pendant 30
secondes.
3. Si vous souhaitez prolonger le
fonctionnement du four, appuyez de
nouveau sur la touche , ce qui a pour
effet d'augmenter le temps de
fonctionnement de 30 secondes.
DÉCONGÉLATION EN FONCTION DU
TEMPS
1.
position Micro-ondes.
2. Appuyez sur ou jusqu'à ce que le
symbole apparaisse sur l'affichage.
3. Appuyez sur pour confirmer.
4. L'affichage indique le temps de
décongélation par défaut. Sélectionnez le
DÉCONGÉLATION EN FONCTION DU
POIDS
1. Tournez le sélecteur de fonction
la position Micro-ondes.
2. Appuyez sur ou jusqu'à ce que le
symbole apparaisse sur l'affichage.
3.
clignote. Appuyez sur ou pour
sélectionnez l'option de décongélation
souhaitée.
4. Appuyez sur pour confirmer.
5. L'affichage indique le puissance par
défaut. Sélectionnez le puissance de
ou .
6. Appuyez sur pour confirmer.
7. Appuyez sur et la fonction
décongélation en fonction du poids
commencera à fonctionner.
Le tableau suivant indique les programmes
de décongélation par poids, avec intervalles
de poids, et les temps de cuisson et de repos
(pour que la température des aliments soit
bien répartie) :
touches ou .
5. Appuyez sur et la décongélation en
fonction du temps en fonction du poids
commencera à fonctionner.
41
Page 42

FONCTIONS COMBINÉES
La température peut être modifiée en
tournant à tout moment le sélecteur de
températures.
Pour cette fonction, la puissance
maximale est de 600 W.
chaud : cette opération peut endommager
1. Tournez le sélecteur de fonction
la position Micro-ondes + cuisson
traditionnelle.
2. L'affichage indique le temps de cuisson
par défaut. Appuyez sur .
3. de
des touches ou .
4. Appuyez sur pour confirmer.
5. L'affichage indique le puissance par
défaut. Sélectionnez le puissance de
ou .
6. Appuyez sur pour confirmer.
7. Appuyez sur et le four commencera à
fonctionner.
BLOCAGE DE SÉCURITÉ
Cette fonction peut être sélectionnée à tout
Pour activer la fonction, appuyez de façon
prolongée sur la touche
bip sonore retentisse et que le symbole
Si la fonction de sécurité enfants est activée
fonctionne pas même si une fonction de
cuisson est sélectionnée.
Si cette fonction est activée pendant que
vous cuisinez avec le four, seule la
verrouillée.
Fonction Teka Hydroclean®
Cette fonction facilite le nettoyage des traces
de graisse et de saleté pouvant rester collées
aux parois du four.
Pour un nettoyage plus efficace, évitez que
lasaleté
régulièrement le four.
Pour désactiver la fonction, maintenez la
touche
sonore retentisse.
MODE DEMONSTRATION
Le mode démonstration est utilisé dans les
salles d'exposition pour montrer aux clients
comment marche el four avec toutes ses
fonctions, mais sans activation des charges
de chauffage.
Pour activer le mode démonstration, appuyez
sur et simultanément.
Pour désactiver la fonction, appuyez sur
et encore.
PROGRAMMER LA FONCTION TEKA
HYDROCLEAN®
42
Page 43

FR
Pour un meilleur résultat, ajoutez une
cuillère de produit nettoyant doux pour
verser sur le chiffon.
Laissez la porte du four fermée jusqu’à ce
que la phase de refroidissement soit
terminée.
Celle-ci est nécessaire pour le bon
fonctionnement de la fonction
Hydroclean®.
Avant de toucher directement la surface
intérieure du four, veillez à ce que la
température soit appropriée.
Effectuez systématiquement le cycle de
nettoyage lorsque le four est froid. Si le cycle
est lancé avec un four trop chaud, il est
possible que le résultat ne soit pas celui
Retirez préalablement les plaques et tous les
compris les supports de plaques ou les rails
télescopiques.
Pour ce faire, suivez les instructions
1. Lorsque le four est froid, placez un chiffon
au fond de celui-ci.
2.
cavité inférieure du four.
5. Programmez le minuteur pour une durée
de 4 minutes.
6. Une fois les 4 minutes écoulées, un signal
sonore retentit et le four cesse de
chauffer.
7. Placez le sélecteur de fonctions sur la
position .
8. Attendez une vingtaine de minutes afin
9. Le four est prêt pour retirer les restes de
La fonction Hydroclean® est réalisée à basse
température. Les durées de refroidissement
peuvent néanmoins varier en fonction de la
température ambiante.
.
3. Placez le sélecteur de fonctions sur la
position .
4. Réglez le sélecteur de température sur 90
ºC.
Si un n
Hydroclean®, utilisez des détergents neutres
et des éponges douces non abrasives.
43
Page 44

Backofenbeschreibung ........................... 45
Bedienfeld ................................................ 45
Funktionswahlschaltersymbole .............. 46
Backofenfunktionen ................................ 46
Ausgangsleistung Mikrowelle ................. 46
Anzeige Beschreibung ............................ 47
Zeiteinstellung ....................................... 47
Uhr ausblenden/anzeigen...................... 48
Bedienung des Backofens ...................... 48
Manueller betrieb................................... 48
Backofenfunktion mit zeitschaltung ...... 48
Mikrowelle ............................................. 50
Schnellstart ............................................ 51
Auftauen nach zeit ................................. 51
Auftauen nach gewicht .......................... 51
Kombinierte Funktionen ........................ 52
Sicherheitsfunktionen .............................. 52
Sicherheitsverriegelung ......................... 52
TEKA HYDROCLEAN® FUNKTION .......... 52
Programmierung der Teka Hydroclean®
funktion .................................................. 53
44
Page 45

DE
Bedienblende
Kühlluftaustritt
Grillwiderstand
Befestigung am Einbauschrank
Blechhalterungen
Lampe
Rost Rückwand
Backblech
Umluft
Scharnier
Backofendichtung
Innenscheibe
Tür
Funktionswahlschalter
Temperaturwahlschalter
Anzeige
Tasten
45
Page 46

Funktionswahlschaltersymbole
UNTERHITZE
TURBO + UNTERHITZE
AUSSCHALTEN DES BACKOFENS
TURBO
NORMAL
ECO
MAXIGRILL
MICROWELLE + HEISSLUFT
NORMAL MIT UMLUFT
MICROWELLE + GRILL
MAXIGRILL MIT UMLUFT
MICROWELLE
Ausgangsleistung Mikrowelle
Lebensmittel
200
Langsames Auftauen von empfindlichen Speisen, zum Auftauen und
Weitergaren.
400
Garen von Fleisch, Fisch und Reis
Schnelles Auftauen kleiner Mengen, Babykost z.B. Milchfläschchen.
600
Erhitzen und Garen von Gerichten.
800
Garen von Gemüse und Kartoffeln.
Garen von Aufläufen und Fertiggerichten.
Kleine Mengen erhitzen und garen.
1000
Flüssigkeiten erhitzen.
In der zu Ihrem Backofen gehörenden
Anleitung zum Garen finden Sie eine
Beschreibung der einzelnen Funktionen.
Backofenfunktionen
46
Page 47

DE
Die Empfindlichkeit der Touch-Tasten
passt sich ständig den
Umgebungsbedingungen an. Wenn Sie
den Ofen an das Stromnetz anschließen,
müssen Sie darauf achten, dass die
Oberfläche des Bedienfeldes sauber und
frei von Hindernissen ist.
Sollte die Uhr bei Berührung der Tasten
nicht richtig reagieren, ist der Ofen vom
Stromnetz zu trennen und nach einem
Augenblick wieder anzuschließen. Auf
diese Weise stellen sich die Sensoren
automatisch richtig ein und reagieren
wieder auf Berührung mit dem Finger.
Backofen schaltet sich automatisch für
die vorab eingestellte Garzeit (Dauer) ein
und schaltet sich automatisch beim
Erreichen der eingestellten Zeit (GarzeitEnde) ab.
SICHERHEITSVERRIEGELUNG: Zeigt
an, dass die Touch-Tasten der Schaltuhr
gesperrt sind, um zu verhindern, dass sie
von Kleinkindern manipuliert werden können.
Sonstige Funktionen
TASTEN
, und : Ermöglichen das
Programmieren der Funktionen
: Ermöglichen der Funktionen zu starten.
: Ermöglichen der Funktionen zu stoppen.
SYMBOLE
TIMER: Leuchtet, wenn die Timer-
Funktion gewählt wird. Nach einer gewissen
Zeit erzeugt er ein akustisches Signal. Der
Backofen wird nicht ausgeschaltet, wenn die
Zeit abgelaufen ist. Diese Funktion kann auch
genutzt werden, wenn der Backofen am
Garen ist.
und PROGRAMMIERUNG: Sie
leuchten, um anzuzeigen, dass der Backofen
programmiert ist (Dauer, Ende oder gesamt).
Garzeit-Dauer: Ermöglicht das
Garen während einer gewählten Zeit.
Danach schaltet sich der Backofen
automatisch aus.
Garzeit-Ende: Ermöglicht das Garen
bis zu einer vorab eingestellten Uhrzeit.
Danach schaltet sich der Backofen
automatisch aus.
und Garzeit-Dauer und Garzeit-
Ende: Ermöglicht die Einstellung der
Dauer und Endzeit des Garvorgangs. Der
HEIZEN: Zeigt an, dass der Ofen Wärme
auf die Speisen überträgt.
AUFTAUEN NACH ZEIT: Leuchtet
während der auftauen nach zeit funktion.
AUFTAUEN NACH GEWICHT:
Leuchtet während der auftauen nach
gewicht funktion.
ZEITEINSTELLUNG
Wenn Sie den Backofen an das Netz
anschließen, blinkt auf der Uhr die
Anzeige 12:00.
47
Page 48

Drücken oder um die Stunden
Im Falle eines Stromausfalls wird die
gesamte Programmierung der
elektronischen Uhr gelöscht und auf der
Uhr blinkt die Anzeige 12:00. Sie müssen
die Uhr dann wieder einstellen und erneut
programmieren.
Bei Modellen mit elektronischer
Temperatureinstellung erscheint die
Temperatur auf der Uhranzeige, sobald
der Wahlschalter gedreht wird.
Nachdem die Temperatur ausgewählt
wurde, erscheint wieder automatisch die
Uhrzeit auf der Anzeige.
Wenn Sie mit dem Garen beginnen, zeigt
Ihr Backofen als Defaultwert die
Gesamtdauer des laufenden
Garvorgangs an, wenn die Gardauer oder
die Garzeit-Endes nicht eingestellt ist.
einzustellen.
Drücken Sie um die Stunden zu
bestätigen.
Drücken oder um die Minuten
einzustellen
Drücken Sie um die Minuten zu
bestätigen.
Wenn Sie die Uhrzeit ändern möchten,
müssen Sie oder berühren, bis die
Uhrzeit blinkt. Berühren Sie und
folgen Sie den im obigen Punkt
beschriebenen Schritten.
MANUELLER BETRIEB
Nach Einstellung der Uhrzeit ist der
Backofen funktionsbereit. Wählen Sie
eine Garfunktion und eine Temperatur.
UHR AUSBLENDEN/ANZEIGEN
Wenn du die Uhr verstecken willst
drücken Sie 5 Sekunden lang
gedrückt halten.
Wenn Sie die Uhr wieder sehen möchten,
halten Sie die nochmals 5 Sekunden
lang gedrückt.
Sie sehen, dass das Symbol während
des Garens leuchtet, um die
Wärmeübertragung auf das Essen
anzuzeigen. Dieses Symbol erlischt, wenn
die gewählte Temperatur erreicht ist.
Zum Ausschalten des Backofens müssen
Sie die Schalter auf die Position auf die
Position stellen.
48
BACKOFENFUNKTION MIT
ZEITSCHALTUNG
Programmierung des Timers
1. Berühren Sie oder , bis das Symbol
auf dem Display blinkt, und drücken
Sie . Auf dem Display erscheint 0_00.
2. Wählen Sie die Zeitdauer, nach deren
Ablauf der Timer ertönen soll, indem Sie
oder drücken. Danach ertönen zur
Bestätigung 2 aufeinander folgende
Pieptöne und der Countdown ab dem
Page 49

DE
Bei der Timerfunktion schaltet sich der
Backofen nach Ablauf der
programmierten Dauer nicht ab.
Bei der Timerfunktion wird die
verbleibende Zeit permanent auf dem
Display angezeigt. Wenn diese Funktion
programmiert ist, kann weder die Uhrzeit
noch die Gesamtzeit des programmierten
Garvorgangs angezeigt werden.
gewählten Zeitpunkt wird angezeigt. Das
Symbol blinkt langsam.
3. Wenn die Zeit zu Ende ist, ertönt 90
Sekunden lang ein akustisches Signal und
das Symbol blinkt schnell.
4. Berühren Sie eine beliebige Taste, um das
akustische Signal zu stoppen. Im selben
Moment schaltet sich das Symbol
aus.
Wenn Sie die Timer-Zeit ändern möchten, Sie
die Touchtaste oder , bis das Symbol
auf dem Display blinkt und die Stunden
nicht blinken, dann drücken Sie und
müssen Sie die gezeigten Schritte erneut
ausführen. Wenn Sie auf den Timer zugreifen,
erscheint die aktuell verbleibende Zeit. Diese
kann geändert werden.
3. Wählen Sie die Zeitdauer, nach deren
Ablauf der Timer ertönen soll, indem Sie
oder drücken.
4. Bestätigen Sie die Eingabe durch Drücken
. Danach ertönen zur Bestätigung 2
aufeinander folgende Pieptöne und es
wird der Countdown ab dem gewählten
Zeitpunkt angezeigt. Das Symbol
blinkt.
5. Nach Ablauf der Garzeit schaltet sich der
Backofen aus, es ertönt ein akustisches
Signal und das Symbol blinkt.
6. Berühren Sie , um das akustische
Signal zu stoppen und das Symbol
auszuschalten. Der Backofen schaltet
sich wieder ein.
7. Stellen Sie die Schalter auf die
Ausschaltstellung des Backofens.
Sie können jederzeit die restliche Gardauer
ändern, indem Sie oder berühren, bis
das Symbol schnell blinkt. Berühren Sie
anschließend , um die Zeit zu ändern.
Programmierung des Garzeit-Endes
Programmierung der Gardauer
1. Wählen Sie mit den Backofenschaltern
eine Funktion und eine Gartemperatur.
2. Berühren Sie oder , bis das Symbol
auf dem Display blinkt, und drücken
Sie . Auf dem Display erscheint 0_00.
1. Wählen Sie eine Garfunktion und temperatur.
2. Berühren Sie die Touchtaste oder ,
bis das Symbol auf dem Display blinkt,
und drücken Sie . Auf dem Display
erscheint die aktuelle Zeit.
3. Wählen Sie die Zeitdauer, nach deren
Ablauf der Timer ertönen soll, indem Sie
oder drücken.
4. Bestätigen Sie die Eingabe durch Drücken
. Danach ertönen zur Bestätigung 2
aufeinander folgende Pieptöne und
programmierung des Garzeit-Endes
Zeitpunkt angezeigt. Das Symbol
blinkt.
49
Page 50

5. Nach Ablauf der programmierten Zeit
schaltet sich der Backofen aus, es ertönt
ein akustisches Signal und das Symbol
blinkt.
6. Berühren Sie , um das akustische
Signal zu stoppen und das Symbol
auszuschalten. Der Backofen schaltet
sich wieder ein.
7. Stellen Sie die Schalter uf die
Ausschaltstellung des Backofens.
Sie können jederzeit die restliche Gardauer
ändern, indem Sie oder berühren, bis
das Symbol schnell blinkt. Berühren Sie
anschließend , um die Zeit zu ändern.
Programmierung der Gardauer und des
Garzeit-Endes
1. Wählen Sie eine Garfunktion und -
temperatur.
2. Berühren Sie oder bis das Symbol
auf dem Display blinkt , bis das
Symbol auf dem Display blinkt . Auf
dem Display erscheint 0_00.
3. Wählen Sie die Gardauer, indem Sie
oder berühren. Anschließend ertönen
2 aufeinanderfolgende Pieptöne und die
ver bleibende Garzeit wird auf dem
Display angezeigt und das Symbol
blinkt langsam.
4. Bestätigen Sie die Eingabe durch Drücken
.
5. Berühren Sie oder , bis das Symbol
auf dem Display blinkt, und drücken
Sie . Auf dem Display erscheint die
aktuelle Zeit.
6. Wählen Sie die Endzeit des Garens, indem
Sie oder berühren.
7. Bestätigen Sie die Eingabe durch Drücken
. Anschließend ertönen 2
aufeinanderfolgende Pieptöne und die
aktuelle Uhrzeit wird auf dem Display
angezeigt.
8. Der Backofen bleibt ausgeschaltet und
die Symbole und leuchten weiter.
Ihr Backofen ist nun programmiert.
9. Wenn die eingestellte Uhrzeit des
Garbeginns erreicht ist, schaltet sich der
Backofen ein und führt den Garvorgang
während der vorgewählten Zeit durch.
10. Während des Garvorgangs wird die
Restgarzeit angezeigt und das Symbol
blinkt langsam.
11. Nach Ablauf der programmierten Zeit
schaltet sich der Backofen aus, es ertönt
ein akustisches Signal und das Symbol
blinkt schnell.
12. Berühren Sie , um das akustische
Signal zu stoppen und das Symbol
auszuschalten. Der Backofen schaltet
sich wieder ein.
13. Stellen Sie die Schalter auf Position um
den Ofen auszuschalten.
Sie können jederzeit die restliche Gardauer
ändern, indem Sie oder berühren, bis
das Symbol schnell blinkt. Berühren Sie
anschließend , um die Zeit zu ändern.
MIKROWELLE
1. Drehen Sie den Betriebswahlschalter in
die Position Mikrowelle.
2. Das Anzeige zeigt die 0_30 (SchnellstartFunktion) standardmäßig. Drücken Sie
oder bis das Anzeige 1_00 anzeigt.
3. Bestätigen Sie die Eingabe durch Drücken
.
4. Das Anzeige zeigt die Standard-Kochzeit
an. Drücken Sie oder um die
gewünschte Betriebsdauer zu
bestimmen.
5. Bestätigen Sie die Eingabe durch Drücken
.
50
Page 51

DE
Prog.
Lebens-
mittel
Gewicht
(Kg)
Zeit
(Min.)
Warte-zeit
(Min.)
F01
Fleisch
0.10 2.00
2:10 43
20 30
F02
Geflügel
0.10 2.50
2:20 58
20 30
F03
Fisch
0.10 2.00
2 40
20 30
F04
Obst
0.10 0.50
2:36 13
10 20
F05
Brot
0.10 0.80
2:25 19
10 20
Siehe Kochen Guide für Beratung über
Abtauzeiten.
Wenn das Display das Wort "Turn"
anzeigt, die Tür öffnen, das Essen drehen
und drücken, um fortzufahren.
6. Das Anzeige zeigt die Standard-PowerEinstellung an. Stellen Sie mit den Tasten
oder die benötigte Leistungsstufe
ein.
7. Bestätigen Sie die Eingabe durch Drücken
.
8. Betätigen Sie die . Das Gerät beginnt
zu arbeiten.
SCHNELLSTART
1. Drehen Sie den Betriebswahlschalter in
die Position Mikrowelle.
2. Drücken Sie die . Das Gerät setzt sich
sofort in Betrieb für 30 Sekunden in der
Mikrowellenfunktion bei der maximalen
Leistung.
3. Wenn Sie die Dauerzeit erhöhen möchten,
drücken Sie wieder die . Jedes Mal,
wenn die taste gedrückt wird, wird die
Laufzeit in 30 Sekunden erhöht.
AUFTAUEN NACH ZEIT
1. Drehen Sie den Betriebswahlschalter in
die Position Mikrowelle.
2. Drücken Sie oder bis das Symbol
auf dem Anzeige erscheint.
3. Bestätigen Sie die Eingabe durch Drücken
.
4. Das Anzeige zeigt die Standard-Auftauen
zeit an. Drücken Sie die oder um
die gewünschte Betriebsdauer zu
bestimmen.
5. Betätigen Sie die . Das Gerät beginnt
zu arbeiten
AUFTAUEN NACH GEWICHT
1. Drehen Sie den Betriebswahlschalter in
die Position Mikrowelle.
2. Drücken Sie oder bis das Symbol
auf dem Anzeige erscheint.
3. Auf der Anzeige blinkt nun das Symbol für
die Nahrungsmittelart F01. Drücken Sie
oder um die Nahrungsmittelart
einzustellen.
4. Bestätigen Sie die Eingabe durch Drücken
.
5. Nun blinkt der Gewichtswert auf der
Anzeige. Drücken Sie oder um das
Gewicht einzustellen.
6. Bestätigen Sie die Eingabe durch Drücken
.
7. Betätigen Sie die . Das Gerät beginnt
zu arbeiten
Die nachfolgende Tabelle beschreibt die
hinterlegten Programme der Funktion
Auftauen nach Gewicht, mit Angabe der
Gewichtsintervalle, Auftauzeitintervalle und
Wartezeiten (um eine einheitlichere
Temperatur des Auftaugutes zu
gewährleisten):
51
Page 52

Kombinierte Funktionen
Die temperatur können gerändert werden
jederzeit durch drehen
Temperaturwahlschalter.
Die maximale Leistung, die ausgewählt
werden kann, beträgt 600 W.
Wenn das Display das Wort "Turn"
anzeigt, die Tür öffnen, das Essen drehen
und drücken, um fortzufahren.
1. Drehen Sie den Betriebswahlschalter in
die Position Mikrowelle + herkömmliche
Funktion.
2. Das Anzeige zeigt die Standard-Kochzeit
an. Drücken Sie die Tasten oder
um die gewünschte Betriebsdauer zu
bestimmen.
3. Bestätigen Sie die Eingabe durch Drücken
.
4. Das Anzeige zeigt die Standard-PowerEinstellung an. Stellen Sie mit den Tasten
oder die benötigte Leistungsstufe
ein.
5. Bestätigen Sie die Eingabe durch Drücken
.
6. Betätigen Sie die . Das Gerät beginnt
zu arbeiten.
SICHERHEITSVERRIEGELUNG
Diese Funktion kann während des
Backofenbetriebs jederzeit gewählt werden.
Um die Funktion zu aktivieren, berühren Sie
die Taste und halten diese gedrückt, bis
Sie 1 Piepton hören und auf dem Anzeige das
Symbol erscheint. Die Uhr ist blockiert.
Wenn der Backofen ausgeschaltet ist und
Sie die Kindersicherung aktivieren, gart der
Backofen auch dann nicht, wenn Sie eine
Garfunktion wählen.
Wenn Sie diese Funktion aktivieren, während
Sie mit dem Ofen backen oder braten,
blockieren Sie nur die Handhabung des
elektronischen Timers.
Teka Hydroclean® Funktion
Mit dieser Funktion wird die Reinigung der
Fettund Schmutzreste, die an den
Backofenwänden haften, erleichtert.
52
Um die Funktion auszuschalten, berühren Sie
die Taste und halten diese gedrückt, bis
Sie 1 Piepton hören.
AUSSTELLUNGS-MODUS
Der Ausstellungs-Modus wird in
Ausstellungsräumen verwendet, wo den
Kunden die Funktion der Ofen gemäß der
Beschreibung von jeder Funktion präsentiert
wird, ohne aber die Heizfunktionen zu
aktivieren.
Um die Ausstellungs-Modus zu aktivieren,
berühren Sie und . gleichzeitig.
Um die Funktion auszuschalten, berühren Sie
und nochmals.
Verhindern Sie die Ansammlung von
Schmutz, damit die Reinigung leichter
erfolgen kann. Reinigen Sie den Backofen
regelmäßig.
Page 53

DE
Gießen Sie kein Wasser in den heißen
Backofen. Dadurch könnte die
Emaillierung beschädigt werden.
Um das Ergebnis zu verbessern, können
Sie dem Glas Wasser einen Teelöffel
mildes Geschirrspülmittel hinzufügen,
bevor sie es über das Tuch gießen.
Öffnen Sie die Backofentür erst, wenn die
Abkühlphase abgelaufen ist.
Das ist für den ordnungsgemäßen Betrieb
der Hydroclean® Funktion erforderlich.
Vergewissern Sie sich, dass die
Temperatur der Ofeninnenflächen
geeignet ist, bevor Sie sie berühren.
PROGRAMMIERUNG DER TEKA
HYDROCLEAN® FUNKTION
Führen Sie den Reinigungszyklus immer bei
kaltem Ofen aus. Wenn Sie ihn bei zu heißem
Backofen durchführen, kann das Ergebnis
beeinträchtigt und sin außerdem die
Emaillierung beschädigt werden.
Nehmen Sie vorher die Bleche und alle
Zubehörteile inkl. die Blechhalterungen oder
ausziehbaren Schienen aus dem
Backofeninneren.
Befolgen Sie dafür die anweisungen, die im
Einbau- und Wartungshandbuch, das zum
lieferumfang des Backofens gehört,
angegeben sind.
1. Legen Sie bei kaltem Backofen ein
geöffnetes Tuch auf den Backofenboden.
3. Drehen Sie den Funktionswahlschalter auf
Position .
4. Stellen Sie den Temperaturwahlschalter
auf 90 °C.
5. Stellen Sie am Zeitschalter 4 Minuten
Dauer ein.
6. Nach Ablauf der 4 Minuten ertönt ein
akustisches Signal und der Backofen
beendet die Heizfunktion.
7. Drehen Sie den Funktionswahlschalter auf
Position .
8. Warten Sie etwa 20 Minuten ab, bis sich
der Backofen innen abgekühlt hat.
9. Der Backofen ist bereit, um die
Schmutzreste und das übrige Wasser mit
dem Tuch entfernen zu können.
Die Hydroclean® Funktion erfolgt bei niedriger
Temperatur. Allerdings kann die Abkühlzeit je
nach Außentemperatur unterschiedlich sein.
2. Gießen Sie langsam 200 ml Wasser in den
unteren Teil der Backofenröhre.
Sollte nach der Hydroclean® Funktion eine
gründlichere Reinigung erforderlich sein,
müssen Sie neutrale Reinigungsmittel und
nicht scheuernde Schwämme verwenden.
53
Page 54

Beschrijving van de oven ........................ 55
Bedieningspaneel .................................... 55
Symbolen van de functieschakelaar ...... 56
Functies van de oven ............................... 56
Vermogensstanden Magnetron .............. 56
Beschrijving van de display .................... 57
De tijdsduur instellen ............................. 58
De klok verbergen en opnieuw weergeven
.............................................................. 58
Het gebruik van de oven ......................... 58
Ovenfuncties ......................................... 58
Werking van de timing van de oven ...... 59
Magnetron ............................................. 60
Snel starten ........................................... 61
Ontdooien volgens tijdsduur.................. 61
Gecombineerde functies ....................... 61
Veiligheidsinstructies ............................... 62
Veiligheidsblok ....................................... 62
Showroom modus ................................. 62
TEKA HYDROCLEAN® FUNCTIE ............. 62
De Teka Hydroclean® functie
programmeren ....................................... 62
54
Page 55

NL
Bedieningspaneel
Koelluchtuitlaat
Grillweerstand
Bevestiging aan meubel
Plaathouder
Lamp
Braadrooster
Achterpaneel
Plaat
Turbine
Scharnier
Ovendichting
Binnenglas
Deur
Functieschakelaar
Temperatuurschakelaar
Display
Aanraken toetsen
Beschrijving van de oven
Bedieningspaneel
55
Page 56

Symbolen van de functieschakelaar
ONDERSTE ELEMENT
TURBO + ONDERSTE
ELEMENT
OVEN UITSCHAKELING
TURBO
CONVENTIONEEL
ECO
MAXIGRILL
MAGNETRON + WARME
LUCHT
CONVENTIONEEL MET
VENTILATOR
MAGNETRON + GRILL
MAXIGRILL MET VENTILATOR
MAGNETRON
Vermogensstanden Magnetron
Voedsel
200
Langzaam ontdooien van delicaat voedsel; warm houden.
400
Koken met weinig hitte; rijst opstoven.
Snel ontdooien.
600
Boter smelten.
Babyvoeding opwarmen.
800
Groente en voedsel koken.
Zorgvuldig koken en opwarmen.
Kleine hoeveelheden opwarmen en koken.
Delicaat voedsel opwarmen.
1000
Snel vloeistoffen en vooraf bereid voedsel koken en opwarmen.
Kijk voor een beschrijving van het gebruik
van alle functies in de bij uw oven
meegeleverde bakgids.
Functies van de oven
Vermogensstanden Magnetron
56
Page 57

NL
Beschrijving van de display
TOETSEN
, en : Bieden u de mogelijkheid de
volgende functies te programmeren.
Eindtijd van het bakproces: Om tot
het ingestelde tijdstip te bakken. Daarna
gaat de oven automatisch uit.
en Duur en einde van het
bakproces: Om de baktijd en de eindtijd
van het bakproces te programmeren. De
oven gaat automatisch aan om te bakken
gedurende de ingestelde tijd (baktijd).
Vervolgens gaat hij automatisch uit op het
aangeduide tijdstip (eindtijd).
VERGRENDELING VAN DE KLOK: Geeft
aan dat de touchtoetsen van de klok zijn
geblokkeerd zodat ze niet door kleine
kinderen kunnen worden ingedrukt.
Andere functies
: Bieden u de mogelijkheid de volgende
functies te starten.
: Bieden u de mogelijkheid de volgende
functies te stoppen.
SYMBOLEN
KOOKWEKKER: Licht op als de
kookwekkerfunctie van de klok wordt
geselecteerd. Geeft een geluidssignaal na
afloop van de ingestelde tijd. De oven gaat
niet uit nadat de tijd is afgelopen. Deze functie
kan ook gebruikt worden wanneer de oven
niet in gebruik is.
en PROGRAMMERING: Lichten op
om aan te geven dat de oven is
geprogrammeerd (duur, eind of totaal).
Baktijd: Om gedurende de ingestelde
tijd te bakken. Daarna gaat de oven
automatisch uit.
VERWARMING: Geeft aan dat de oven
warmte naar het voedsel overbrengt.
ONTDOOIEN VOLGENS TIJDSDUUR:
Licht op wanneer de ontdooifunctie volgens
tijdsduur ingeschakeld is.
ONTDOOIEN VOLGENS GEWICHT:
Licht op wanneer de ontdooifunctie volgens
gewicht ingeschakeld is.
57
Page 58

DE TIJDSDUUR INSTELLEN
De gevoeligheid van de touchtoetsen past
zich continu aan de
omgevingsomstandigheden aan.
Wanneer u de oven op het elektriciteitsnet
aansluit, dient u erop te letten dat het
oppervlak van het bedieningspaneel
schoon en obstakelvrij is.
Als u de toetsen met uw vinger aanraakt
maar de oven niet op juiste wijze reageert,
koppel dan de oven van het
elektriciteitsnet los en sluit hem na een
tijdje opnieuw aan. Op deze manier
worden de sensoren automatisch
ingesteld en reageren zij opnieuw nadat
ze met de vinger worden aangeraakt.
In het geval van een stroompanne worden
de klokinstellingen gewist en 12:00
knippert op het scherm van de klok. Reset
ze en programmeer opnieuw.
In modellen met een elektronische
temperatuurregelaar verschijnt de
temperatuur op het scherm als u draait
aan de selectieschakelaar.
Nadat u de temperatuur hebt
geselecteerd, verschijnt de klok
automatisch opnieuw.
Bij de start van een bereidingscyclus geeft
de oven automatisch de totale tijdsduur
weer van de vooruitgang van de cyclus als
de bereidingstijd of de eindtijd niet is
ingesteld.
Wanneer u de oven inschakelt, knippert
12:00 op het scherm.
Druk op of om de uren aan te
passen.
Druk op om de uren te bevestigen.
Druk op of om de minuten aan te
passen.
Druk op om de minuten te bevestigen.
Als u het tijdstip wilt wijzigen, drukt u op
of tot de tijd begint te knipperen.
Druk op en volg de instructies in de
vorige punten.
DE KLOK VERBERGEN EN OPNIEUW
WEERGEVEN
Als u de klik wilt verbergen, drukt u
gedurende 5 seconden in.
Als u de klik opnieuw wilt weergeven,
drukt u gedurende 5 seconden in.ç
Het gebruik van de oven
OVENFUNCTIES
Na het instellen van de klok is de oven
klaar voor gebruik. Selecteer een
bereidingsfunctie met de functie
selectieschakelaar en de temperatuur met
de temperatuurregelaar.
58
U zult zien dat het symbool tijdens het
bakproces gaat branden om aan te geven
dat warmte wordt overgebracht naar de
etenswaren. Dit symbool gaat uit wanneer
de geselecteerde temperatuur is bereikt.
Om de oven uit te zetten, de knoppen in
stand zetten .
Page 59

NL
Met de kookwekkerfunctie gaat de oven
na afloop van de geprogrammeerde tijd
niet uit.
Met de Zoemerfunctie wordt de
resterende tijdsduur permanent
weergegeven op het scherm. Met deze
geprogrammeerde functie is het niet
mogelijk de tijdsduur of de totale
geprogrammeerde bereidingstijd weer te
geven.
WERKING VAN DE TIMING VAN DE OVEN
De kookwekker programmeren
1. Druk op of totdat het symbool
op het scherm gaat knipperen en druk op
. Op het scherm verschijnt de
aanduiding “0_00”.
2. Selecteer de tijd waarna de kookwekker
moet afgaan door te drukken op of
. Er klinken 2 pieptonen ter bevestiging en
de aftelling vanaf de geselecteerde tijd
wordt weergegeven. Het symbool
gaat traag knipperen.
3. Wanneer de tijd voorbij is, klinkt er 90
seconden lang een geluidssignaal en gaat
het symbool snel knipperen.
4. Druk een willekeurige toets in om het
geluidssignaal uit te schakelen. Op dat
moment gaat het symbool uit.
Als u de tijdsduur wilt wijzigen op de zoemer,
drukt u op of tot knippert en de
uren niet meer knipperen; druk daarna op
en herhaal de stappen. Wanneer u naar de
timerbediening gaat, verschijnt de momenteel
resterende tijd die u kunt aanpassen.
Bereidingstijd programmeren
1. Selecteer een functie en een
bereidingstemperatuur via de oven
bedieningspaneel.
2. Druk op of tot het symbool op
het scherm begint te knipperen en druk
daarna op . De “0_00” indicatie
verschijnt op het scherm.
3. Selecteer de tijdsduur waarna u wilt dat
het alarm inschakelt door te drukken op
of . U hoort 2 geluidssignalen om te
bevestigen dat de tijdsduur werd ingesteld
en dat de klok begint af te tellen vanaf de
geselecteerde tijdsduur. Het symbool
knippert.
4. Zodra de bereidingstijd afgelopen is,
schakelt de oven uit en weerklinkt een
alarm en het symbool begint te
knipperen.
5. Druk op om het alarm te stoppen en
schakel het symbool uit. De oven
schakelt opnieuw in.
6. Zet de knoppen in stand om de oven uit
te zetten.
U kunt de resterende baktijd op elk moment
wijzigen door op of te drukken totdat
het symbool snel gaat knipperen. Druk
vervolgens op om de tijd te wijzigen.
De eindtijd van de bereiding
programmeren
1. Selecteer een bereidingsfunctie en een
temperatuur.
2. Druk op of tot het symbool op
het scherm begint te knipperen en druk
daarna op . De “0_00” indicatie
verschijnt op het scherm.
3. Selecteer de tijdsduur waarna u wilt dat
het alarm inschakelt door te drukken op
59
Page 60

of . U hoort 2 geluidssignalen om te
bevestigen dat de tijdsduur werd ingesteld
en dat de klok begint af te tellen vanaf de
geselecteerde tijdsduur. Het symbool
knippert.
4. Aan het einde van de cyclus schakelt de
oven automatisch uit en weerklinkt een
alarm en het symbool begint te
knipperen.
5. Druk op om het alarm te stoppen en
schakel het symbool uit. De oven
schakelt opnieuw in.
7. De oven blijft losgekoppeld en de en
symbolen lichten op. De oven is nu
geprogrammeerd.
8. Wanneer het moment is aangebroken om
te beginnen koken, schakelt de oven in en
blijft hij werken gedurende de
geprogrammeerde tijdsduur.
9. Tijdens de bereiding blijft de resterende
bereidingstijd op het scherm en het
symbool knippert langzaam.
10. Als de bereidingstijd afgelopen is, schakelt
de oven uit, er weerklinkt een alarm en het
symbool begint te snel knipperen.
6. Zet de knoppen in stand om de oven uit
te zetten.
U kunt de resterende baktijd op elk moment
wijzigen door op of te drukken totdat
het symbool snel gaat knipperen. Druk
vervolgens op om de tijd te wijzigen.
De bereidingstijd en eindtijd te
programmeren
1. Selecteer een bereidingsfunctie en een
temperatuur.
2. Druk op of tot het symbool op
het scherm begint te knipperen en druk
daarna op . De “0_00” indicatie
verschijnt op het scherm.
3. Selecteer de bereidingstijd door of
aan te raken. U hoort 2 pieptonen, de
resterende tijdsduur verschijnt op het
scherm en het symbool knippert.
4. Druk op om de optie te selecteren.
5. Druk op of tot het symbool op
het scherm begint te knipperen en druk
daarna op . De “0_00” indicatie
verschijnt op het scherm.
6. Selecteer de eindtijd van de bereiding
door te drukken op of .
11. Druk op om de zoemer te stoppen en
schakel het symbool uit. De oven
schakelt opnieuw in.
12. Zet de knoppen in stand om de oven uit
te zetten.
U kunt de resterende baktijd op elk moment
wijzigen door op of te drukken totdat
het symbool snel gaat knipperen. Druk
vervolgens op om de tijd te wijzigen.
MAGNETRON
1. Selecteer de magnetronfunctie.
2. Het scherm geeft standaard 00:30 (Snel
starten functie) weer. Druk op of tot
het scherm 1:00 weergeeft.
3. Druk op om te bevestigen.
4. Het scherm geeft de standaard
bereidingstijd weer. Selecteer de
gewenste bereidingstijd door te drukken
op of .
5. Druk op om te bevestigen.
6. Het scherm geeft de standaard
Vermogensinstelling weer. Selecteer de
gewenste vermogensinstelling door te
drukken op of .
7. Druk op om te bevestigen.
8. Druk op om de magnetron functie te
starten met de gewenste parameters.
60
Page 61

NL
Progra
mma
Voedsel
Gewicht
(g)
Tijd
(min)
Rusttijd
(min)
F01
Vlees
0.10 – 2.00
2:10 – 43
20 – 30
F02
Gevogelt
e
0.10 – 2.50
2:20 – 58
20 – 30
F03
Vis
0.10 – 2.00
2 – 40
20 – 30
F04
Frui
0.10 – 0.50
2:36 – 13
10 – 20
F05
Brood
0.10 – 0.80
2:25 – 19
10 – 20
Raadpleeg de Bereidingsgids voor advies
bij de ontdooien tijdsduur.
Wanneer “Turn” op het scherm verschijnt,
opent u de deur, draait u de etenswaren
en druk u op om door te gaan.
Wanneer “Turn” op het scherm verschijnt,
opent u de deur, draait u de etenswaren
en druk u op om door te gaan.
SNEL STARTEN
1. Selecteer de magnetronfunctie.
2. Druk op en de magnetron begint
onmiddellijk te werken in de Magnetron
functie aan het maximum vermogen
gedurende 30 seconden.
3. Als de werkduur wilt verhogen, drukt u
opnieuw op . Elke maal u deze toets
indrukt, wordt de werkduur verhoogd met
30 seconden.
2. Druk op of tot het symbool
verschijnt op het scherm.
3. Druk op om de optie te selecteren.
4. "F01" begint standaard te knipperen.
Selecteer de gewenste ontdooioptie door
te drukken op of .
5. Druk op om te bevestigen.
6. Het scherm geeft het standaardgewicht
knipperend weer. Selecteer het gewenste
gewicht door te drukken op op .
ONTDOOIEN VOLGENS TIJDSDUUR
1. Selecteer de magnetronfunctie.
2. Druk op of tot het symbool
verschijnt op het scherm.
3. Druk op om de optie te selecteren.
4. Het scherm geeft de standaard
ontdooitijd weer. Selecteer de gewenste
bereidingstijd door te drukken op of
.
5. Druk op om de ontdooien volgens
tijdsduur functie te starten met de
gewenste parameters.
ONTDOOIEN VOLGENS GEWICHT
1. Selecteer de magnetronfunctie.
7. Druk op om te bevestigen.
8. Druk op om de ontdooien volgens
gewicht functie te starten met de
gewenste parameters.
In de volgende tabel treft u de
functieprogramma's voor het ontdooien op
gewicht aan, met de betreffende
gewichtsbereiken en ontdooi- en rusttijden
(om ervoor te zorgen dat het voedsel een
gelijkmatige temperatuur heeft).
GECOMBINEERDE FUNCTIES
1. Selecteer een magnetron + conventionele
ovenfunctie met de functie
selectieschakelaar.
61
Page 62

2. Het scherm geeft de standaard
Giet geen water in de warme oven. Dit kan
het email van uw oven beschadigen.
Het maximumvermogen dat kan worden
geselecteerd is 600W.
De temperatuur kan op elk moment
worden gewijzigd door te draaien aan de
temperatuur bedieningsknop.
bereidingstijd weer. Druk op om te
selecteren.
3. Selecteer de gewenste bereidingstijd door
te drukken op of .
7. Druk op om de functie te starten met
de gewenste parameters.
4. Druk op om te bevestigen.
5. Het scherm geeft de standaard
Vermogensinstelling weer. Selecteer de
gewenste vermogensinstelling door te
drukken op of .
6. Druk op om te bevestigen.
VEILIGHEIDSBLOK
Deze functie kan op elk moment tijdens het
gebruik van de oven worden ingeschakeld.
Druk hiervoor een tijdje op de toets totdat
u een pieptoon hoort en het symbool op
het scherm verschijnt. De klok is vergrendeld.
Als de oven is uitgeschakeld en u zet de
kinderbeveiliging aan, dan zal de oven niet
werken ook al selecteert u een bakfunctie.
Als u deze functie aanzet terwijl de oven in
werking is, wordt alleen de bediening van de
elektronische klok vergrendeld.
Om de functie uit te schakelen dient u een
tijdje op de toets te drukken totdat u een
pieptoon hoort.
SHOWROOM MODUS
De showroom modus wordt gebruikt om
klanten te tonen hoe de oven werkt zoals
beschreven in elke functie, maar er is geen
activering of verwarming belastingen.
Druk op en om de showroom modus
in te schakelen.
Om de functie uit te schakelen, drukt u
opnieuw op en Als de oven is
uitgeschakeld en u zet de kinderbeveiliging
aan, dan zal de oven niet werken ook al
selecteert u een bakfunctie.
Teka Hydroclean
Met deze functie kunnen vet- en vuilresten die
aan de ovenwanden zijn blijven kleven
gemakkelijk worden schoongemaakt
Laat vuil niet ophopen. Op die manier kan de
oven gemakkelijker worden schoongemaakt
Maak de oven regelmatig schoon.
62
®
functie
DE TEKA HYDROCLEAN® FUNCTIE
PROGRAMMEREN
Page 63

NL
Doe voor een beter resultaat een lepeltje
mild afwasmiddel in het glas water voordat
u het over het keukendoekje uitgiet.
Open de ovendeur pas als de
Hydroclean® functie is afgelopen.
De afkoelfase is nodig voor de juiste
werking van de Hydroclean® functie.
Zorg ervoor dat de temperatuur veilig is
voordat u de binnenwanden van de oven
direct aanraakt.
Voer de cyclus altijd met afgekoelde oven uit.
Als u dit met een te warme oven doet, kan het
resultaat minder goed zijn en kan bovendien
het email worden beschadigd.
Verwijder eerst de platen en alle accessoires
uit de oven, ook de steunen voor de
bakplaten of de uitschuifbare rails.
Volg hiervoor de instructie in de installatie
en onderhoudshandleiding die bij uw oven
wordt meegeleverd.
1. Spreid, als de oven is afgekoeld, een
doekje uit op de ovenvloer.
2. Giet langzaam 200 ml water in de opening
van de oven.
5. Programmeer een tijdsduur van 4 minuten
op de timer.
6. Na 4 minuten klinkt er een alarm en stopt
de oven met verwarmen.
7. Zet de knoppen in stand .
8. Wacht ongeveer 20 minuten totdat de
binnenkant van de oven is afgekoeld.
9. De oven is klaar om de vuilresten en het
overtollige water met een keukendoekje te
verwijderen.
De Hydroclean® functie wordt op lage
temperatuur uitgevoerd. De afkoeltijden
kunnen echter variëren naargelang de
omgevingstemperatuur.
3. Zet de knoppen in stand .
4. Stel de temperatuur in op 90º C.
Als het na de Hydroclean® functie nodig is
om de oven nog grondiger schoon te maken,
gebruik dan neutrale reinigingsmiddelen en
niet-schurende sponzen.
63
Page 64

Περιεχόμενα
Περιγραφή της συσκευής ........................ 65
Πίνακας Χειρισμού ................................... 65
Σύμβολα του διακόπτη επιλογής
λειτουργίας ............................................... 66
Λειτουργίες του φούρνου ........................ 66
Επίπεδα Ισχύος Μικροκυμάτων ............. 66
Περιγραφή οθόνης ................................... 67
Ρυθμιση ωρασ ....................................... 68
Εμφανιση και αποκρυψη του ρολογιου .. 68
Χρήση του φούρνου ................................ 68
Λειτουργιες φουρνου ............................. 68
Λειτουργια με χρονοδιακοπτη ................ 68
Μικροκυματα ......................................... 70
Γρηγορη εναρξη ..................................... 70
Αποψυξη με βαση το βαρος .................. 71
Συνδιαστικεσ λειτουργιεσ ....................... 71
Οδηγίες Ασφαλείας .................................. 72
ΚΛΕΙΔΩΜΑ ΑΣΦΑΛΕΙΑΣ ....................... 72
Ρυθμιση επιδειξης .................................. 72
Λειτουργία Teka Hydroclean® ................ 72
Προγραμματισμος λειτουργιας TEKA
HYDROCLEAN® ................................... 72
64
Page 65

EL
Πίνακας χειρισμού
Έξοδος αέρα ψύξης
Αντίσταση γκριλ
Στερέωση στο έπιπλο
Στήριγματα ταψιών
Λαμπτήρας
Σχάρα
Πίσω πάνελ
Ταψί
Μοτέρ με φτερωτή
παραγωγής αέρα
Μεντεσές
Λάστιχο φούρνου
Εσωτερικό κρύσταλλο
Πόρτα
Διακόπτης επιλογής λειτουργίας
Διακόπτης επιλογής θερμοκρασίας
Οθόνη
Αισθητήρες αφής
Περιγραφή της συσκευής
Πίνακας Χειρισμού
65
Page 66

ΚΑΤΩ ΑΝΤΙΣΤΑΣΗ
ΘΕΡΜΟΣ ΑΕΡΑΣ +
ΚΑΤΩ ΑΝΤΙΣΤΑΣΗ
ΑΠΕΝΕΡΓΟΠΟΙΗΜΕΝΟΣ
ΦΟΥΡΝΟΣ
ΘΕΡΜΟΣ ΑΕΡΑΣ
ΣΥΜΒΑΤΙΚΗ
ECO
ΜΑΞΙ ΓΚΡΙΛ
ΜΙΚΡΟΚΥΜΑΤΑ +
ΘΕΡΜΟΣ ΑΕΡΑΣ
ΣΥΜΒΑΤΙΚΗ ΜΕ ΑΕΡΑ
ΜΙΚΡΟΚΥΜΑΤΑ + ΓΚΡΙΛ
ΜΑΞΙ ΓΚΡΙΛ ΜΕ ΑΕΡΑ
ΜΙΚΡΟΚΥΜΑΤΑ
Έξοδος Ισχύος Μικροκυμάτων
Τρόφιμα
200
Αργό ξεπάγωμα για ευαίσθητα τρόφιμα. Διατήρηση ζεστού
φαγητού.
400
Μαγείρεμα με μικρή θέρμανση. Βράσιμο ρυζιού
Γρήγορη απόψυξη, θέρμανση παιδικών τροφών
600
Ζέσταμα και μαγείρεμα τροφίμων
800
Μαγείρεμα λαχανικών και φαγητού.
Μαγείρεμα και προσεκτικό ζέσταμα
Ζέσταμα και μαγείρεμα μικρών μερίδων φαγητού.
1000
Γρήγορο ζέσταμα υγρών.
Για την περιγραφή της χρήσης κάθε
λειτουργίας, συμβουλευτείτε τον οδηγό
μαγειρέματος που συνοδεύει τον φούρνο σας.
Σύμβολα του διακόπτη επιλογής λειτουργίας
Λειτουργίες του φούρνου
Επίπεδα Ισχύος Μικροκυμάτων
66
Page 67

EL
Η ευαισθησία των πλήκτρων αφής
προσαρμόζεται διαρκώς στις περιβαλλοντικές
συνθήκες. Όταν συνδέετε τον φούρνο στο
ρεύμα, φροντίζετε ώστε η επιφάνεια του
πίνακα χειρισμού να είναι καθαρή και
χωρίς εμπόδια.
Αν η οθόνη δεν ανταποκρίνεται σωστά
όταν αγγίζετε τα πλήκτρα αφής, θα πρέπει
να αποσυνδέσετε τον φούρνο από το ρεύμα
και να τον συνδέσετε ξανά μετά από λίγο. Με
τον τρόπο αυτό, οι αισθητήρες θα
ρυθμιστούν αυτόματα και θα ανταποκριθούν
πάλι κατάλληλα όταν τους αγγίξετε.
Περιγραφή οθόνης
ΠΛΗΚΤΡΑ
, και : καθιστούν δυνατό τον
προγραμματισμό των λειτουργιών.
: Σας επιτρέπει να ξεκινήσετε τις
λειτουργίες μαγειρέματος.
: Σας επιτρέπει να σταματήσετε τις
λειτουργίες μαγειρέματος.
ώρα και, στη συνέχεια, ο φούρνος σβήνει
αυτόματα.
και Διάρκεια και λήξη μαγειρέματος:
Προγραμματισμός της διάρκειας και της
ώρας τερματισμού του μαγειρέματος. Με
τη λειτουργία αυτή, ο φούρνος θα τεθεί σε
λειτουργία αυτόματα και θα μαγειρέψει
κατά τη διάρκεια του επιλεγμένου χρονικού
διαστήματος (Διάρκεια μαγειρέματος), ενώ
θα σβήσει αυτόματα την ώρα που έχετε
καθορίσει (Λήξη μαγειρέματος).
ΚΛΕΙΔΩΜΑ ΑΣΦΑΛΕΙΑΣ: Αποτελεί
ένδειξη ότι τα πλήκτρα αφής είναι κλειδωμένα
προς αποφυγή χειρισμού τους από μικρά
παιδιά.
Άλλες λειτουργίες
ΘΕΡΜΑΝΣΗ: Αποτελεί ένδειξη ότι ο
φούρνος μεταδίδει θερμότητα στα τρόφιμα.
ΞΕΠΑΓΩΜΑ ΜΕ ΒΑΣΗ ΤΟΝ ΧΡΟΝΟ:
Φωτίζεται όταν έχει επιλεγεί η λειτουργία
ξεπαγώματος με βάση τον χρόνο.
ΣΥΜΒΟΛΑ
ΒΟΜΒΗΤΗΣ: Φωτίζεται όταν επιλεχθεί η
λειτουργία βομβητή του ρολογιού. Εκπέμπει
ένα ηχητικό σήμα με την παρέλευση του
χρόνου. Ο φούρνος δεν θα σβήσει όταν λήξει
ο χρόνος. Η λειτουργία αυτή μπορεί επίσης να
χρησιμοποιηθεί ακόμα και εάν ο φούρνος
βρίσκεται σε λειτουργία.
και ΠΡΟΓΡΑΜΜΑΤΙΣΜΟΣ:
Φωτίζονται ως ένδειξη ότι ο φούρνος έχει
προγραμματιστεί (διάρκεια, λήξη ή διάρκεια
και λήξη).
Διάρκεια μαγειρέματος: Σας δίνει τη
δυνατότητα να μαγειρέψετε για ένα
καθορισμένο χρονικό διάστημα. Όταν
αυτό λήξει, ο φούρνος σβήνει αυτόματα.
Ώρα λήξης μαγειρέματος: Το
μαγείρεμα διαρκεί μέχρι μια προκαθορισμένη
ΞΕΠΑΓΩΜΑ ΜΕ ΒΑΣΗ ΤΟ ΒΑΡΟΣ:
Φωτίζεται όταν έχει επιλεγεί η λειτουργία
ξεπαγώματος με βάση το βάρος.
67
Page 68

ΡΥΘΜΙΣΗ ΩΡΑΣ
Σε περίπτωση διακοπής ρεύματος, οι
ρυθμίσεις του ρολογιού θα χαθούν και θα
αναβοσβήνει στην οθόνη η ένδειξη 12:00.
Προγραμματίστε το ξανά.
Στα μοντέλα με ηλεκτρονική ρύθμιση
θερμοκρασίας, όταν γυρίζετε τον διακόπτη
επιλογής εμφανίζεται στην οθόνη η
θερμοκρασία.
Αφού επιλεχθεί η θερμοκρασία, θα
επιστρέψει αυτόματα στην οθόνη η
ένδειξη της ώρας.
Όταν ένας κύκλος μαγειρέματος ξεκινά,
στην οθόνη του φούρνου θα εμφανίζεται
αυτόματα ο συνολικός χρόνος της εξέλιξης
του κύκλου, εάν δεν έχει προγραμματιστεί
διάρκεια μαγειρέματος ή ώρα ληξης
μαγειρέματος.
Μόλις συνδέσετε τον φούρνο σας στο
ρεύμα, θα παρατηρήσετε ότι στο ρολόι
αναβοσβήνει η ένδειξη 12:00.
Πατήστε ή για να ρυθμιστούν
πρώτα οι ώρες.
Πατήστε για να επιβεβαιώσετε ότι
έχετε ρυθμίσει τις ώρες.
Πατήστε ή για να ρυθμισετε τα
λεπτά.
Πατήστε για να επιβεβαιώσετε ότι
έχετε ρυθμίσει τα λεπτά.
Αν θέλετε να αλλάξετε την ώρα, πατήστε
ή ώσπου να αρχίσει η ώρα να
αναβοσβήνει. Πατήστε και ακολουθήστε
τα βήματα που περιγράφονται παραπάνω.
Χρήση του φούρνου
ΛΕΙΤΟΥΡΓΙΕΣ ΦΟΥΡΝΟΥ
Αφού ρυθμίσετε την ώρα στο ρολόι, ο
φούρνος είναι έτοιμος για χρήση. Επιλέξτε
λειτουργία και θερμοκρασία ψησίματος
από τους αντίστοιχους διακόπτες.
ΕΜΦΑΝΙΣΗ ΚΑΙ ΑΠΟΚΡΥΨΗ ΤΟΥ
ΡΟΛΟΓΙΟΥ
Εάν επιθυμείτε να μην εμφανίζεται το
ρολόι, πιέστε για 5 δευτερόλεπτα το
πλήκτρο .
Εάν επιθυμείτε να εμφανιστεί στην οθόνη
πάλι το ρολόι, πιέστε για 5 δευτερόλεπτα
το πλήκτρο .
Θα παρατηρήσετε ότι το σύμβολο ανάβει
κατά τη διάρκεια του μαγειρέματος,
ένδειξη ότι μεταφέρεται θερμότητα στο
φαγητό. Το σύμβολο αυτό σβήνει όταν ο
φούρνος φτάσει στην επιλεγμένη
θερμοκρασία.
Για να σβήσετε τον φούρνο, γυρίστε τους
διακόπτες στη θέση .
68
ΛΕΙΤΟΥΡΓΙΑ ΜΕ ΧΡΟΝΟΔΙΑΚΟΠΤΗ
Προγραμματισμός βομβητή
1. Πατήστε ή ώσπου το σύμβολο
στην οθόνη να αρχίσει να αναβοσβήνει και
μετά πατήστε . Στην οθόνη θα
εμφανιστεί η ένδειξη 0_00.
2. Επιλέξτε το χρονικό διάστημα μετά την
παρέλευση του οποίου θέλετε να ηχήσει η
ειδοποίηση πατώντας ή . Θα ηχήσουν
2 συνεχόμενοι χαρακτηριστικοί ήχοι ως
επιβεβαίωση και θα ξεκινήσει η αντίστροφη
μέτρηση από το επιλεγμένο χρονικό διάστημα.
Το σύμβολο θα αναβοσβήνει αργά.
3. Όταν περάσει ο προγραμματισμένος
χρόνος, θα ακουστεί ένα ηχητικό σήμα για
Page 69

EL
Με τη λειτουργία του βομβητή ενεργοποιημένη, ο φούρνος δεν θα σβήσει με την
παρέλευση του προγραμματισμένου χρόνου.
Με την λειτουργία του βομβητή ενεργοποιημένη, θα εμφανίζεται μόνιμα στην οθόνη,
ο υπολειπόμενος χρόνος. Έχοντας προγραμματισμένη αυτή τη λειτουργία, δεν είναι
μπορείτε να δείτε την τρέχουσα ώρα ή τον
συνολικό προγραμματισμένο χρόνο.
90 δευτερόλεπτα και το σύμβολο θα
αναβοσβήνει γρήγορα.
4. Για να διακόψετε την ηχητική ειδοποίηση,
πατήστε οποιοδήποτε πλήκτρο. Εκείνη τη
στιγμή, το σύμβολο θα σβήσει.
Αν θέλετε να αλλάξετε τον χρόνο στον βομβητή,
ακολουθήστε πάλι τα προαναφερόμενα βήματα.
Όταν μεταβείτε στον χρονοδιακόπτη, θα
εμφανιστεί ο υπολειπόμενος χρόνος τον οποίο
μπορείτε να τροποποιήσετε.
Προγραμματισμός της διάρκειας
μαγειρέματος
1. Επιλέξτε λειτουργία και θερμοκρασία
μαγειρέματος με τους διακόπτες του φούρνου.
2. Πατήστε ή ώσπου να αρχίσει να
αναβοσβήνει στην οθόνη το σύμβολο
και μετά πατήστε . Στην οθόνη θα
εμφανιστεί η ένδειξη 0_00.
3. Επιλέξτε το χρονικό διάστημα μετά την
παρέλευση του οποίου θέλετε να ηχήσει η
ειδοποίηση πατώντας ή .
4. Πατήστε για να επιβεβαιώσετε. Θα
ηχήσουν 2 συνεχόμενοι χαρακτηριστικοί
ήχοι ως επιβεβαίωση και θα ξεκινήσει η
αντίστροφη μέτρηση από το επιλεγμένο
χρονικό διάστημα. Το σύμβολο θα
αναβοσβήνει αργά.
5. Μόλις παρέλθει η διάρκεια ψησίματος, ο
φούρνος θα σβήσει, θα ακουστεί μια
ηχητική ειδοποίηση και το σύμβολο θα
αναβοσβήνει γρήγορα.
6. Πατήστε για να σταματήσετε τον
συναγερμό και απενεργοποιήστε το
σύμβολο . Ο φούρνος θα ανάψει ξανά.
7. Φέρετε τους διακόπτες στη θέση για να
σβήσετε τον φούρνο.
Μπορείτε να αλλάξετε τον υπολειπόμενο
χρόνο μαγειρέματος οποιαδήποτε στιγμή
πατώντας ή ώσπου να αρχίσει να
αναβοσβήνει γρήγορα το σύμβολο . Στη
συνέχεια, πατήστε για να αλλάξετε τον χρόνο.
Ρύθμιση της ώρας λήξης μαγειρέματος
1. Επιλέξτε λειτουργία και θερμοκρασία
ψησίματος.
2. Πατήστε το πλήκτρο ή ώσπου το
σύμβολο στην οθόνη να αρχίσει να
αναβοσβήνει και μετά πατήστε . Στην
οθόνη θα εμφανιστεί η ένδειξη την
τρέχουσα ώρα.
3. Επιλέξτε την ώρα λήξης που θέλετε να ηχήσει
η ειδοποίηση πατώντας ή .
4. Πατήστε για να επιβεβαιώσετε. Θα
ηχήσουν 2 συνεχόμενοι χαρακτηριστικοί
ήχοι ως επιβεβαίωση και ότι στην οθόνη
εμφανίζεται ο επιλεγμένος χρόνος
διακοπής της ψησίματος.Το σύμβολο
θα αναβοσβήνει αργά.
5. Όταν φτάσει η ώρα λήξης του προγράμματος, ο φούρνος θα σβήσει, θα ακουστεί ένα
ηχητικό σήμα και το σύμβολο θα
αναβοσβήνει γρήγορα.
6. Πατήστε για να σταματήσετε τον
συναγερμό και απενεργοποιήστε το
σύμβολο . Ο φούρνος θα ανάψει ξανά.
7. Φέρετε τους διακόπτες στη θέση για να
σβήσετε τον φούρνο.
69
Page 70

Μπορείτε να αλλάξετε την ώρα λήξης
μαγειρέματος οποιαδήποτε στιγμή πατώντας
ή ώσπου να αρχίσει να αναβοσβήνει
γρήγορα το σύμβολο . Στη συνέχεια,
πατήστε για να αλλάξετε την ώρα.
εκτός λειτουργίας, θα ηχήσει ένα
προειδοποιητικό σήμα και το σύμβολο
θα αναβοσβήνει γρήγορα.
12. Πατήστε οποιονδήποτε αισθητήρα για να
διακόψετε την ηχητική ειδοποίηση και για
να σβήσει το σύμβολο . Ο φούρνος θα
ανάψει ξανά.
Προγραμματισμός Διάρκειας και Λήξης
μαγειρέματος
1. Επιλέξτε λειτουργία και θερμοκρασία
ψησίματος.
2. Πατήστε ή ώσπου το σύμβολο
στην οθόνη να αρχίσει να αναβοσβήνει και
μετά πατήστε . Στην οθόνη θα
εμφανιστεί η ένδειξη 0_00.
3. Επιλέξτε διάρκεια μαγειρέματος πατώντας
ή . Στη συνέχεια, θα ακουστούν 2
συνεχόμενοι προειδοποιητικοί ήχοι, θα
εμφανιστεί στην οθόνη ο υπολειπόμενος
χρόνος μαγειρέματος και το σύμβολο
θα αναβοσβήνει αργά.
4. Πατήστε για να επιβεβαιώσετε.
5. Πατήστε ή ώσπου το σύμβολο
στην οθόνη να αρχίσει να αναβοσβήνει και
μετά πατήστε . Στην οθόνη θα
εμφανιστεί η ένδειξη την τρέχουσα ώρα.
6. Ρυθμίστε την ώρα λήξης μαγειρέματος
πατώντας ή .
7. Πατήστε για να επιβεβαιώσετε.
8. Ο φούρνος θα παραμείνει σβησμένος με
τα σύμβολα και φωτισμένα. Ο
φούρνος σας έχει προγραμματιστεί.
9. Όταν φτάσει η ώρα έναρξης του
ψησίματος, ο φούρνος θα ανάψει και θα
λειτουργήσει για το διάστημα της
προεπιλεγμένης διάρκειας.
10. Κατά τη διάρκεια μαγειρέματος, θα
εμφανίζεται ο υπολειπόμενος χρόνος
μαγειρέματος και το σύμβολο θα
αναβοσβήνει αργά.
11. Με την έλευση της προγραμματισμένης
ώρας τερματισμού, ο φούρνος θα τεθεί
70
13. Φέρετε τους διακόπτες στη θέση για να
σβήσετε τον φούρνο.
Μπορείτε να αλλάξετε τον υπολειπόμενο χρόνο
μαγειρέματος οποιαδήποτε στιγμή πατώντας
ή ώσπου να αρχίσει να αναβοσβήνει
γρήγορα το σύμβολο . Στη συνέχεια,
πατήστε για να αλλάξετε τον χρόνο.
ΜΙΚΡΟΚΥΜΑΤΑ
1. Επιλέξτε την λειτουργία μικροκυμάτων.
2. Στην οθόνη θα εμφανιστεί η ένδειξη 0_30
(Γρηγορη εναρξη λειτουργία) από
προεπιλογή. Πατήστε ή μέχρι να
εμφανιστεί στην οθόνη το 1_00.
3. Πατήστε για να επιβεβαιώσετε.
4. Στην οθόνη θα εμφανιστεί ο εργοστασιακά
ρυθμισμένος χρόνος μαγειρέματος.
Επιλέξτε τον επιθυμητό χρόνο
μαγειρέματος πατώντας ή .
5. Πατήστε για να επιβεβαιώσετε.
6. Στην οθόνη θα εμφανιστεί η εργοστασιακά
ρυθμισμένη ισχύς. Επιλέξτε την επιθυμητή
ισχύ πατώντας ή .
7. Πατήστε για να επιβεβαιώσετε.
8. Πατήστε για να ξεκινήσει η λειτουργία
των μικροκυμάτων με τις επιθυμητές
παραμέτρους.
ΓΡΗΓΟΡΗ ΕΝΑΡΞΗ
1. Επιλέξτε την λειτουργία μικροκυμάτων.
2. Πατήστε και θα ξεκινήσει άμεσα η
λειτουργία των μικροκυμάτων στην
μέγιστη ισχύ για 30 δευτερόλεπτα.
Page 71

EL
Πρόγρ.
Τρόφιμα
Βάρος
(g)
Χρόνος
(λεπτά)
Χρόνος
αναμονής
(λεπτά)
F01
Κρέας
0.10 2.00
2:10 43
20 30
F02
Πουλερικ
ά
0.10 2.50
2:20 58
20 30
F03
Ψάρι
0.10 2.00
2 40
20 30
F04
Φρούτα
0.10 0.50
2:36 13
10 20
F05
Ψωμί
0.10 0.80
2:25 19
10 20
Συμβουλευτείτε τον Οδηγό Μαγειρέματος
σχετικά με τους χρόνους απόψυξης.
Όταν στην οθόνη εμφανίζεται η λέξη
"TURN", ανοίξτε την πόρτα, γυρίστε το
φαγητό και πατήστε για να συνεχίσετε.
Όταν στην οθόνη εμφανίζεται η λέξη
"TURN", ανοίξτε την πόρτα, γυρίστε το
φαγητό και πατήστε για να συνεχίσετε.
3. Εάν επιθυμείτε να αυξήσετε την ώρα
λειτουργίας, πατήστε ξανά το . Κάθε
φορά που πατάτε αυτό το πλήκτρο, η ώρα
λειτουργίας θα αυξάνεται κατά 30
δευτερόλεπτα.
ΑΠΟΨΥΞΗ ΜΕ ΒΑΣΗ ΤΟΝ ΧΡΟΝΟ
1. Επιλέξτε την λειτουργία μικροκυμάτων.
2. Πατήστε ή μέχρι να εμφανιστεί στην
οθόνη το σύμβολο .
3. Πατήστε για να επιβεβαιώσετε.
4. Στην οθόνη θα εμφανιστεί ο εργοστασιακά
ρυθμισμένος χρόνος για την απόψυξη.
Επιλέξτε τον επιθυμητό χρόνο
μαγειρέματος πατώντας ή .
5. Πατήστε για να ξεκινήσει η λειτουργία
απόψυξης με βάση τον χρόνο με τις
επιθυμητές παραμέτρους.
5. Πατήστε για να επιβεβαιώσετε.
6. Στην οθόνη θα αναβοσβήνει το
εργοστασιακά ρυθμισμένο βάρος.
Επιλέξτε το επιθυμητό βάρος πατώντας
ή .
7. Πατήστε για να επιβεβαιώσετε.
8. Πατήστε για να ξεκινήσει η λειτουργία
απόψυξης με βάση το βάρος, με τις
επιθυμητές παραμέτρους.
Στον πίνακα που ακολουθεί παρατίθενται τα
προγράμματα της λειτουργίας απόψυξης με
βάση το βάρος, υποδεικνύοντας διαστήματα
βάρους και χρόνους απόψυξης και αναμονής
(προκειμένου να διασφαλίζεται ομοιόμορφη
θερμοκρασία του φαγητού):
ΑΠΟΨΥΞΗ ΜΕ ΒΑΣΗ ΤΟ ΒΑΡΟΣ
1. Επιλέξτε την λειτουργία μικροκυμάτων.
2. Πατήστε ή μέχρι να εμφανιστεί στην
οθόνη το σύμβολο .
3. Πατήστε για να επιβεβαιώσετε.
4. Στην οθόνη θα αναβοσβήνει η
εργοστασιακά ρυθμισμένη ένδειξη “F01”.
Επιλέξτε την επιθυμητή επιλογή
απόψυξης πατώντας ή .
ΣΥΝΔΙΑΣΤΙΚΕΣ ΛΕΙΤΟΥΡΓΙΕΣ
1. Επιλέξτε μία συνδυαστική λειτουργία
μικροκυμάτων + συμβατικού φούρνου
από τον διακόπτη επιλογής λειτουργίας.
2. Στην οθόνη θα εμφανιστεί ο εργοστασιακά
ρυθμισμένος χρόνος μαγειρέματος.
Επιλέξτε τον επιθυμητό χρόνο
μαγειρέματος πατώντας ή .
3. Πατήστε για να επιβεβαιώσετε.
71
Page 72

4. Στην οθόνη θα εμφανιστεί η εργοστασιακά
Μπορείτε να αλλάξετε την θερμοκρασία
οποιαδήποτε στιγμή, περιστρέφοντας τον
διακόπτη επιλογής θερμοκρασίας.
Η μέγιστη ισχύς που μπορεί να επιλεγεί
είναι 600 W.
Μη ρίχνετε νερό στο εσωτερικό του
φούρνου όταν είναι ζεστός γιατί μπορεί να
υποστεί φθορά το εμαγιέ.
ρυθμισμένη ισχύς. Επιλέξτε την επιθυμητή
ισχύ πατώντας ή .
5. Πατήστε για να επιβεβαιώσετε.
6. Πατήστε για να ξεκινήσει η λειτουργία
με τις επιθυμητές παραμέτρους.
Οδηγίες Ασφαλείας
ΚΛΕΙΔΩΜΑ ΑΣΦΑΛΕΙΑΣ
Μπορείτε να επιλέξετε αυτή τη λειτουργία
οποιαδήποτε στιγμή κατά τη διάρκεια χρήσης
του φούρνου σας.
Για να ενεργοποιήσετε τη λειτουργία αυτή,
πατήστε το πλήκτρο για μερικά
δευτερόλεπτα έως ότου ακούσετε 1
χαρακτηριστικό ήχο και εμφανιστεί στην
οθόνη η ένδειξη . Ο φούρνος είναι τώρα
κλειδωμένο.
Αν ενεργοποιήσετε τη λειτουργία κλειδώματος
ασφαλείας ενώ ο φούρνος είναι σβησμένος, ο
φούρνος δεν θα λειτουργήσει ακόμα και αν
επιλέξετε μία λειτουργία μαγειρέματος.
Αν ενεργοποιήσετε τη λειτουργία αυτή ενώ
μαγειρεύετε, θα κλειδώσει μόνο την οθόνη και
τους αισθητήρες.
Για να απενεργοποιήσετε τη λειτουργία αυτή,
πατήστε το πλήκτρο για μερικά δευτερόλεπτα
έως ότου ακούσετε 1 χαρακτηριστικό ήχο.
ΡΥΘΜΙΣΗ ΕΠΙΔΕΙΞΗΣ
Η ρύθμιση Επίδειξης χρησιμοποιείται σε
Εκθεσιακούς χώρους για να δουν οι πελάτες
πως λειτουργεί ο φούρνος, καθώς περιγράφει
κάθε λειτουργία αλλά δεν υπάρχει
ενεργοποίηση των θερμαντικών στοιχείων.
Για ενεργοποιήσετε την ρύθμιση επίδειξης,
πιέστε και .
Για να απενεργοποιήσετε την ρύθμιση
επίδειξης, πιέστε ξανά και .
Λειτουργία Teka Hydroclean®
Η λειτουργία αυτή διευκολύνει τον καθαρισμό
λιπαρών και λοιπών υπολειμμάτων τροφών
που έχουν προσκολληθεί στα τοιχώματα του
φούρνου.
Για ευκολία στον καθαρισμό, αποφεύγετε τη
συσσώρευση ρύπων. Καθαρίζετε τακτικά τον
φούρνο.
72
ΠΡΟΓΡΑΜΜΑΤΙΣΜΟΣ ΛΕΙΤΟΥΡΓΙΑΣ TEKA
HYDROCLEAN®
Ο κύκλος καθαρισμου πρέπει να
πραγματοποιείται πάντα με τον φούρνο κρύο.
Page 73

EL
Για καλύτερα αποτελέσματα, προσθέστε
ένα κουταλάκι ήπιο απορρυπαντικό για
πιάτα στο νερό προτού το ρίξετε πάνω
στο πανί κουζίνας
Μην ανοίγετε την πόρτα του φούρνου
μέχρι να ολοκληρωθεί η φάση ψύξης.
Είναι απαραίτητη για να έχει σωστά
αποτελέσματα η λειτουργία Hydroclean®.
Πριν αγγίξετε απευθείας την εσωτερική
επιφάνεια του φούρνου, βεβαιωθείτε ότι η
θερμοκρασία είναι ανεκτή.
Εάν ο φούρνος είναι πολύ ζεστός, ενδέχεται
να μην έχετε τα ίδια αποτελέσματα και να
υποστεί φθορά το εμαγιέ.
Αφαιρέστε πρώτα τα ταψιά και όλα τα
εξαρτήματα από το εσωτερικό του φούρνου,
καθώς και τα στηρίγματα για τα ταψιά ή τους
τηλεσκοπικούς οδηγούς.
Για να το κάνετε, ακολουθήστε τις οδηγίες
που περιέχονται στο εγχειρίδιο
εγκατάστασης και συντήρησης που σας
παραδίδεται μαζί με τον φούρνο σας.
1. Σε κρύο φούρνο, απλώστε ένα
απορροφητικό πανί κουζίνας
(σπογγοπετσέτα) πάνω στον πυθμένα του
φούρνου.
2. Ρίξτε αργά 200 ml νερό στον πυθμένα του
θαλάμου του φούρνου.
7. Στρέψτε τον διακόπτη επιλογής
λειτουργίας στη θέση .
8. Περιμένετε 20 λεπτά περίπου ώσπου να
κρυώσει το εσωτερικό του φούρνου.
9. Τώρα μπορείτε με ένα υγρό πανί να
απομακρύνετε όποια υπολείμματα ρύπων
και το νερό που περισσεύει.
Η λειτουργία Hydroclean® πραγματοποιείται
σε χαμηλή θερμοκρασία. Ωστόσο, το χρονικό
διάστημα που απαιτείται για να κρυώσει ο
φούρνος, μπορεί να διαφέρει ανάλογα με τη
θερμοκρασία περιβάλλοντος.
Αν, αφού πραγματοποιηθεί η λειτουργία
Hydroclean
®
, απαιτείται βαθύτερος
καθαρισμός του φούρνου, χρησιμοποιήστε
ουδέτερα απορρυπαντικά και σφουγγάρια
που δεν προκαλούν διάβρωση.
3. Στρέψτε τον διακόπτη επιλογής
λειτουργίας στη θέση .
4. Ρυθμίστε τον διακόπτη επιλογής
θερμοκρασίας στους 90º C.
5. Προγραμματίστε διάρκεια λειτουργίας 4
λεπτών στον χρονοδιακόπτη.
6. Όταν περάσουν τα 4 λεπτά, θα ακουστεί
ένα ηχητικό σήμα και ο φούρνος θα
σταματήσει να θερμαίνεται.
73
Page 74

Page 75

Page 76

www.teka.com
1632136-f
 Loading...