


User Manual
EN PT
FR IT
DE PL
ES
www.teka.com

Fig. 1
Fig. 2
2

Fig. 3
Fig. 4
3

X4
LAMP CABLE DISCONNECTION
Fig. 5
Fig. 6
4

X4
MOTOR CABLE DISCONNECTION
Fig. 7
Fig. 8
5

x8
Fig. 9
Fig. 10
6

Fig. 11
Fig. 12
7

X
12
MOTOR CABLE CONNECTION
Fig. 13
Fig. 14
8

X4
Fig. 15
Fig. 16
LAMP CABLE CONNECTION
9

Fig. 17
Fig. 18
10

Fig. 19
INSTALLATION
CEILING HOOD - EN
INSTALLATION
CEILING - ES
Fig. 20
INSTALLATION KIT
RECIRCULATION - EN
INSTALLATION KIT
RECIRCULATION - ES
11

ENGLISH
SAFETY WARNING
- This appliance has been designed for domestic use in the
household environment. Never use the appliance for
professional or industrial use.
- This appliance can be operated by children over the age of 8
and by people with impaired physical, sensorial and mental
faculties or without the necessary experience and competence
only if properly supervised and if they had been duly provided
with the necessary instructions concerning the safe use of the
appliance and informed of the potential associated risks and
warnings.
- Children shall not be allowed to play with the appliance.
- Safety and warning instructions specified in the user manual
shall be strictly followed.
- Caution: Failure to use screws and fixing devices according to
instructions specified in this manual, may result in electrical
risk.
- The appliance shall not be used by persons (children included)
with impaired physical, sensorial and mental faculties or
without the necessary experience and competence unless they
have been properly supervised and instructed.
- Cleaning the appliance carefully after each use is very
important, as failure to perform regular cleaning
may result in fire risk.
12

- Make sure all of the appliance components are not damaged.
In such a case, do not carry out installation and contact a
qualified technical assistance center.
- Qualified installers shall make any necessary carpentry and
installation works in full compliance with directives in force.
- Do not connect the appliance to the electrical network during
installation.
- Disconnect the appliance from power supply before carrying
out any cleaning or maintenance operation.
- Need to allow the disconnection of the appliance from the
mains supply after the installation, through an accessible plug
or main switch.
- Steam cleaner should not be used.
- Do not use harsh abrasives or sharp metal scrapers to clean
glass since they can scratch the surface, which can cause the
glass to break.
- CAUTION: Ensure that the appliance is disconnected (OFF)
before replacing the lamp to avoid the possibility of electric
shock.
- Do not remove the protective plastic from the hood until it is
completely installed, if this plastic is not present in areas that
could have a risk of damage during installation. This will avoid
damage to the outside of the appliance, something that will not
be covered by the guarantee.
13

WARNINGS FOR ELECTRICAL CONNECTION
- Electrical connections shall be approved by a qualified
electrician before using the appliance.
- Electrical connection shall be performed by just one qualified
electrician, who will be responsible for proper electrical
connection of the appliance to power supply.
- Before connecting the appliance to the electrical network,
check if voltage, frequency and power values specified in the
rating label of the appliance are compatible with home power
supply and socket.
- The power cord shall be connected to an omnipolar magnetothermal breaker with a switch-contact gap of at least 3 mm.
- In case the power cord is damaged, it shall be replaced either
by the manufacturer or the technical assistance service or by
specialized personnel.
- The power cord shall not enter into contact with surfaces
whose
temperature exceeds 50° C once the appliance has been
installed.
WARNINGS FOR OPERATION
- Ventilation must be provided conveniently in the room if a
range hood and appliances powered by gas or other fuel used
simultaneously.
- If the hood is used simultaneously with appliances that burn
gas or other fuels, the room must have sufficient ventilation
14

(this warning is not applicable for hoods installed in the filtering
version).
- Comply with any local standard in force on air exhaust
operations.
- If the appliance is used in the recirculation mode, make sure
the exhaust dust is in good conditions in case it was not used
for long.
- It is not allowed to cook food over open flames (flambe) under
the hood.
- Never leave pots unattended when the hob is on: oil contained
in the pot might overheat and burn. Fire risk is quite higher
when oil is used.
- Grease filters proper maintenance and accurate cleaning are
extremely important.
- Clean the hood and the other surfaces regularly in order to
avoid any fire risk.
- CAUTION: when the hob is on, accessible parts of the hood
might become hot.
- Connection of the exhaust device to exhaust ducts or channels
and pipes for room ventilation is not allowed.
- Extracted air shall not be conveyed into a hot air circulation
duct.
- Air shall not be discharged into a chimney flue used for fumes
from household appliances powered by gas or other fuels (this
15

is not applicable in case of hoods working in the recirculation
mode).
- Adequately ventilate the room when a cooker hood and other
- Maximum negative pressure in the room shall not exceed 4 Pa
(4x10⁻⁵ bar).
- The room where the hood is being installed shall be provided
with an air intake whose capacity shall be greater than the
hood exhaust device one. It is strictly forbidden to place the
limbs or any other part of the
human body, as well as cooking objects or other objects, near
the extractable unit of the hood (if your appliance is equipped
with it).
- Range hoods and other cooking fume extractors may adversely
affect the safe operation of appliances burning gas or other fuels
(including those in other rooms) due to back flow of combustion
gases. These gases can potentially result in carbon monoxide
poisoning. After installation of a range hood or other cooking
fume extractor, the operation of open flued gas appliances
should be tested by a competent person to ensure that back flow
of combustion gases does not occur.
For a safe use of the product and to know all the features and
performances:
- Carefully read this instruction manual for use before
installation and commissioning.
16

- Attention especially to safety warnings!
- The appliance may only be used as described in this
instruction manual.
- Keep the instruction manual.
- If you give the appliance to a third party, also give the
instruction manual.
Dear Customer,
thank you for choosing us!
Congratulations for having purchased your new kitchen hood.
In order to use the appliance safely and to better know all of its features and performances:
- Read this instructions manual carefully before installing and switching the appliance on.
- Special attention shall be paid to safety warnings!
- The appliance shall only be used according to instructions given in this user manual.
- Keep this instruction manual for further reference.
- In case the appliance is given to third party, the instructions manual shall also be given.
GENERAL INFORMATION
When exchanging information with the appliance MANUFACTURER, please refer to the serial
number and identification data specified in the rating label.
This appliance has been designed, tested and manufactured in full compliance with any relevant
standards on:
•
Safety: CEI/EN 60335-1; CEI/EN 60335-2-31;
•
Performance: CEI/EN 61591; CEI/EN 60704-1; CEI/EN 60704-2-13; EN 50564; CEI 62301.
EMC: EN 55014-1; EN 55014-2; CEI/EN 61000-3-2; CEI/EN 61000-3-3.
Recommendations for proper use of the appliance aimed at reducing environmental impact:
when you start cooking, switch the hood on at minimum speed and switch it off only few minutes
after you finished cooking. Increase the hood speed only in case of large amounts of vapours
and fumes, and use the booster function only when absolutely necessary. Clean the grease filter
only when necessary, in order to keep its efficiency over time. Use a piping system having the
maximum diameter specified in this manual, in order to increase efficiency and reduce noise
levels.
The symbol on the appliance or on its documentation indicates that this product shall
not be treated as household waste, but it shall be handed over to a specific collection
point for the recycling of electrical and electronic equipment. Proper disposal of this
appliance will help reduce raw materials consumption and environmental pollution.
For more detailed information about recycling of this appliance, please contact your
local city office, your household waste disposal service or the shop where you
purchased the appliance.
17

Spare Parts
Use original spare parts only.
Replace components before they are worn out. Perform regular maintenance checks, as
detailed in the “MAINTENANCE” section.
Warranty
In order to enjoy the MANUFACTURER’S warranty, users shall strictly follow all the instructions
specified in this manual, in particular they shall:
- use the hood only for its intended purposes;
- perform continuous and scrupulous maintenance 0perations;
- allow the use of the hood only to persons with proven skills and know-how.
Failure to comply with the instructions contained in this manual will immediately void the
manufacturer’s warranty.
INSTALLATION INSTRUCTIONS
- Installation and electrical connection operations shall be performed according to these
instructions and by qualified and specialized personnel.
- Wear protective gloves before and during installation.
- Check that no accessory material provided with the appliance (manuals, accessories,
etc) is placed inside the hood: in such a case remove and keep them.
- Figures shown in this installation manual might also refer to different aesthetics of the
appliance: in any case use, installation and maintenance instructions remains the same.
Minimum installation safety distance
The distance between an electric hob and the lower part of the hood must be at least 550 mm,
while between a gas hob and the lower part of the hood must be minimum 650 mm.
The recommended installation distance between the ceiling hood and the hob is between 1300
and 1500mm, while the maximum distance is 2000mm.
This hood is designed to be installed on the ceiling both in the ASPIRATING version with
evacuation of fumes to the outside and in the FILTERING version by purchasing the appropriate
kit (E750000148).
18

CONTROL INSTRUCTION
The remote control will arrive already programmed with the hood, if for any reason the remote
control loses communication with the hood, perform the following procedure:
· Disconnect the hood from the power supply;
· Wait a few seconds and restore the power and within 10 seconds press the “P1” and “PT”
buttons at the same time for about 3 seconds.
The remote control will be operational again.
FUNCTIONS
P0: MOTOR ON / OFF key.
If selected with the engine off, the display shows a zero “0” for about 1 second.
P1: key to decrease the motor speed, if the hood is in 1st speed it switches off the motor.
P2: key to increase the motor speed, if the hood is off it switches on the 1st speed, pressing a
second time activates the 2nd speed, pressing a third time activates the 3rd speed, pressing a
fourth time activates the 4th speed, pressing a fifth time activates the 5th speed (1st speed
intensive) (**), pressing a sixth time activates the 6th speed (2nd speed intensive) (**).
The numbers of the selected speeds appear on the display (“1”, “2”, “3”, “4”, “5”, “6”).
19

(**) Intensive speeds: the duration of the intensive speeds is 6 minutes after which the
electronics automatically return to 4th speed.
PL: LIGHTS ON / OFF key
Light intensity: by pressing the "PL" button for a long time with the lights on, the intensity of
the light will begin to decrease until it reaches the minimum value; releasing the button
interrupts the descent of the light intensity. Once the minimum value is reached and by
pressing the "PL" key again for a long time, the light intensity will begin to increase until it
reaches the maximum value; if released, it stops at the brightness reached.
Light Color: with the hood off and the lights off, press and hold the "PL" button until the LED
on the hood comes on to enter the dynamic light menu. With single presses of the “PL” key
you will have the variation of the color tone of the light from 2700 ° K to 4000 ° K in 10 steps.
Once the desired tone has been reached, you will have to wait 10 seconds, the LED on the
hood will stop flashing and the function will be memorized.
PC: FRESH AIR ON/OFF key
Fresh Air Activation / Deactivation: pressing the “PC” button for a long time with the hood
off. This function allows the engine to be switched on at 1st speed for 10 minutes followed
by 50 minutes of stand-by. This option remains active during a period of 24
hours. To deactivate the Fresh Air function, press the "PC" or "P0" key again. While the
function is active, both with the engine running and in stand-by, the hood LED will flash
every 5 seconds.
Clean Air Activation / Deactivation: pressing the “PC” (a “C” appears on the display).
When this function is activated, the motor is set at maximum speed for about 6 minutes,
at the end of the 6 minutes the motor will switch off automatically.
To deactivate this function, press the “PC” key or the “P0” key.
Note: this function can only be activated with the hood on and has priority over all the other
active motor functions.
PT: TIMER button (a "T" appears on the display)
The timer performs a 15-minute countdown and can only be activated with the engine running.
The duration of 15 minutes does not change even if the speeds are changed during the
countdown.
At the end of the 15 minutes the engine stops.
PD: Display
Buzzer activation / deactivation: by defoult the hood is supplied with the buzzer active, if you
want to deactivate, with the hood off, turn on the lights by pressing the "PL" key, then press
and hold the "PT" and "P1" keys until the switching on of the hood led without acoustic signal.
If you want to reactivate, repeat the operation described above, the LED will light up and the
acoustic signal will be emitted to confirm.
Note: To save battery power, the display remains active for about 4 seconds, after which it
turns off, to view the active functions select any key and the display is reactivated.
20

HOOD LED INDICATION
In the hood body there is a LED that indicates the operating status of the motor running at
speed according to these criteria:
Engine OFF: LED off;
1st speed motor Blue LED color;
2nd speed motor Green LED color;
3rd speed motor Yellow LED color;
4th speed motor Red LED color;
5th Speed Motor (Intensive) Magenta LED color (Flashes intermittently for 1 second for 6
minutes and then returns to 4th speed).
6th Speed Motor (Intensive) Pink LED color (Flashes intermittently for 1 second for 6 minutes
and then returns to 4th speed).
By activating the timer, the corresponding color LED, depending on the set speed, flashes
intermittently for 1 second, at the end of 15 minutes, in non-intensive speeds, the engine turns
off and not the lighting. As for the intensive speeds, when the timer is activated, it remains at
the set speed for the first 6 minutes and then ends the remaining 9 minutes at the 4th speed.
In the Clean Air function, the light blue LED remains steady, the motor switches to 6th speed
and after 6 minutes the motor and not the lighting switches off.
In the Fresh Air function, the Blue LED flashes intermittently for 5 seconds, with the hood off,
the engine starts at 1st speed for 10 minutes and then remains off for 50 minutes and so on
until the function is switched off.
Metal grease filter cleaning signal
After 30 hours of operation, the Green LED will start flashing for 20 seconds indicating to clean
the filters. To reset the filters, with the hood off, press the “P0” key for 3 seconds while the LED
is flashing.
Long-life or ceramic filter cleaning signal
After 120 hours of operation, the Red LED will start flashing for 20 seconds indicating to clean
the filters. To reset the filters, with the hood off, press the “P0” key for 3 seconds while the LED
is flashing.
Each time a button on the remote control is pressed, the hood will emit an acoustic signal to
confirm the reception of the signal.
21

MAINTENANCE
WARNING! Before any cleaning or maintenance operation, remove the hood power supply by
removing the cable or disconnecting the main switch in the home. Cleaning and ordinary
maintenance must not be done by children without supervision.
Cleaning
The product should frequently be cleaned both internally and externally using a cloth
dampened with lukewarm water and neutral non-abrasive liquid detergent.
The metallic grease filters
It has the task of retaining the fat particles from the cooking fumes and preserving the motor of
the aspirator, so it is subject to clogging in variable times in relation to the use of the appliance.
The filters can be washed in the dishwasher with short wash cycles and at low temperatures,
at the latest every 2 months to avoid the risk of fire. After some washes the filter could change
color, due to dishwasher salts and detergents. The color change does not affect the
functionality of the grease filter.
Ceramic filters
They have the task of retaining odors and purifying the air that is returned to the environment.
The ceramic filters can be cleaned in the oven at a temperature of 180/200 ° C for about 45/60
minutes. It is recommendable to replace the ceramic filters every 5 years to assure the best
odor elimination.
Lighting
The hood is equipped with lighting based on high efficiency LED technology, low power
consumption and very high durability under normal conditions of use.
For replacement, contact the service department.
THE COMPANY MANUFACTURER can’t be held responsible for any damage caused by
an improper installation or use of this appliance.
TROUBLESHOOTING
PROBLEM POSSIBLE CAUSES SOLUTIONS
Hook up the lamp connector as shown
on page 5, Fig. 5 of the manual.
Set the on/off switch to position 1 as
shown on page 4, Picture 4 of the
instruction manual.
The lights of the cooker
hood do not turn on
Lamp connector is disconnected
On/off switch is in position 0
No electricity Check the Lighting Driver.
Synchronise the remote control as
Remote control is not synchronised
22
described in the instruction manual
from page 20.

The motor does not work
described in the user manual from page
Hook up the motor connector as shown
Disconnected connector
No electricity Check the motor driver.
on page 6, Picture 7 of the instruction
manual.
Electricity arrives but the motor does
not work
Low remote control battery
The Remote Control is not
working
Hood is not working
Hood aspirates little air Soiled aluminium filters
Green LED flashes for 20
seconds
Red LED flashes for 20
seconds
Remote control is not synchronised
with the hood
On/off switch is in position 0
No electricity Check the power cable.
Remote control is not synchronised
with the hood
Electrical system problems
On/off switch is in position 0
Metal grease filter cleaning indicator
Long-life or ceramic filter cleaning
indicator
Replace the motor.
Replace battery as shown on page 12,
Picture 20 of the instruction manual.
Make sure that the battery is inserted
with the correct polarity.
Synchronise the remote control as
described in the instruction manual
from page 20.
Set the on/off switch to position 1 as
shown on page 4, Picture 4 of the
instruction manual.
Synchronise the remote control as
20.
Check the power supply on the
electronic board.
Set the on/off switch to position 1 as
shown on page 4, Picture 4 of the
instruction manual.
Remove the filters as shown on page
11, Picture 17 of the operating manual
and wash the filters.
Reset the filters when the hood is
turned off pressing the "P0" button on
the remote control for 3 seconds while
the LED flashes as shown on page 22 of
the instruction manual.
Reset the filters when the the hood is
turned off pressing the button “P0” on
the remote control for 3 seconds while
the LED flashes as shown on page 22 of
the user manual.
23

FRANÇAIS
ALERTE DE SÉCURITÉ
- Cet appareil a été conçu pour un usage domestique dans un
environnement domestique. N'utilisez jamais l'appareil à des
fins professionnelles ou industrielles.
- Cet appareil ne peut être utilisé par des enfants de plus de 8
ans et par des personnes ayant des facultés physiques,
sensorielles et mentales réduites ou sans l'expérience et les
compétences nécessaires que s'ils sont correctement
surveillés et s'ils ont reçu les instructions nécessaires
concernant l'utilisation en toute sécurité de l'appareil et informé
des risques potentiels associés et des avertissements.
- Les enfants ne doivent pas être autorisés à jouer avec
l'appareil.
- Les consignes de sécurité et d'avertissement spécifiées dans
le manuel d'utilisation doivent être strictement suivies.
- Attention: Ne pas utiliser les vis et dispositifs de fixation selon
instructions spécifiées dans ce manuel, peut entraîner un
risque électrique.
- L'appareil ne doit pas être utilisé par des personnes (y
compris les enfants) ayant des facultés physiques, sensorielles
et mentales réduites ou sans l'expérience et les compétences
nécessaires, sauf si elles ont été correctement surveillées et
instruites.
24

- Il est très important de nettoyer soigneusement l'appareil
après chaque utilisation, car le fait de ne pas effectuer de
nettoyage régulier peut entraîner un risque d'incendie.
- Assurez-vous que tous les composants de l'appareil ne sont
pas endommagés. Dans ce cas, n'effectuez pas l'installation et
contactez un centre d'assistance technique qualifié.
- Les installateurs qualifiés doivent effectuer tous les travaux
de menuiserie et d'installation nécessaires en pleine
conformité avec les directives en vigueur.
- Ne raccordez pas l'appareil au réseau électrique lors de
l'installation.
- Débranchez l'appareil de l'alimentation électrique avant
d'effectuer toute opération de nettoyage ou d'entretien. Nécessité de permettre la déconnexion de l'appareil de
l'alimentation secteur après l'installation, via une prise
accessible ou un interrupteur principal.
- Le nettoyeur à vapeur ne doit pas être utilisé.
- N'utilisez pas d'abrasifs durs ou de grattoirs métalliques
pointus pour nettoyer le verre car ils peuvent rayer la surface,
ce qui peut provoquer la rupture du verre.
- ATTENTION: Assurez-vous que l'appareil est déconnecté
(OFF) avant de remplacer la lampe pour éviter la possibilité
d'un choc électrique.
- Ne retirez pas le plastique de protection de la hotte tant
qu'elle n'est pas complètement installée, si ce plastique n'est
25

pas présent dans des zones qui pourraient présenter un risque
de dommages lors de l'installation. Cela évitera d'endommager
l'extérieur de l'appareil, ce qui ne sera pas couvert par la
garantie.
AVERTISSEMENTS POUR LE RACCORDEMENT
ÉLECTRIQUE
- Les connexions électriques doivent être approuvées par un
électricien qualifié avant d'utiliser l'appareil.
- Le raccordement électrique doit être effectué par un seul
électricien qualifié, qui sera responsable du raccordement
électrique correct de l'appareil à l'alimentation électrique.
- Avant de brancher l'appareil au réseau électrique, vérifiez si
les valeurs de tension, de fréquence et de puissance indiquées
sur la plaque signalétique de l'appareil sont compatibles avec
l'alimentation et la prise du domicile.
- Le cordon d'alimentation doit être connecté à un disjoncteur
magnétothermique omnipolaire avec un écart entre les
contacts de l'interrupteur d'au moins 3 mm.
- Si le cordon d'alimentation est endommagé, il doit être
remplacé soit par le fabricant, soit par le service d'assistance
technique, soit par du personnel spécialisé.
- Le cordon d'alimentation ne doit pas entrer en contact avec
des surfaces dont température dépasse 50°C une fois
l'appareil installé.
26

AVERTISSEMENTS POUR LE FONCTIONNEMENT
- La ventilation doit être prévue de manière pratique dans la
pièce si une hotte de cuisine et des appareils alimentés au gaz
ou à un autre combustible sont utilisés simultanément.
- Si la hotte est utilisée simultanément avec des appareils
brûlant du gaz ou d'autres combustibles, la pièce doit avoir une
ventilation suffisante (cet avertissement ne s'applique pas aux
hottes installées dans la version filtrante).
- Se conformer à toute norme locale en vigueur sur les
opérations d'extraction d'air.
- Si l'appareil est utilisé en mode recirculation, assurez-vous
que la poussière d'évacuation est en bon état au cas où elle
n'aurait pas été utilisée pendant longtemps.
- Il est interdit de cuire des aliments sur des flammes nues
(flambe) sous la hotte.
- Ne laissez jamais de casseroles sans surveillance lorsque la
table de cuisson est allumée: l'huile contenue dans la
casserole pourrait surchauffer et brûler. Le risque d'incendie
est bien plus élevé lorsque le pétrole est utilisé.
- Un bon entretien et un nettoyage précis des filtres à graisse
sont extrêmement importants.
- Nettoyez régulièrement la hotte et les autres surfaces afin
d'éviter tout risque d'incendie.
- ATTENTION: lorsque la table de cuisson est allumée, les
parties accessibles de la hotte peuvent devenir chaudes.
27

- Le raccordement du dispositif d'évacuation aux conduits
d'évacuation ou aux canaux et tuyaux pour la ventilation de la
pièce n'est pas autorisé.
- L'air extrait ne doit pas être envoyé dans un conduit de
circulation d'air chaud.
- L'air ne doit pas être rejeté dans un conduit de cheminée
utilisé pour les fumées d'appareils électroménagers alimentés
au gaz ou à d'autres combustibles (ceci n'est pas applicable en
cas de hottes fonctionnant en mode de recirculation).
- Ventiler adéquatement la pièce lorsqu'une hotte aspirante et
d'autres.
- La dépression maximale dans la pièce ne doit pas dépasser
4 Pa (4x10⁻⁵ bar).
- Le local où est installée la hotte doit être pourvu d'une entrée
d'air dont la capacité doit être supérieure à celle du dispositif
d'évacuation de la hotte. Il est strictement interdit de placer les
membres ou toute autre partie du corps humain, ainsi que des
objets de cuisine ou autres, à proximité de l'unité extractible de
la hotte (si votre appareil en est équipé).
- Les hottes de cuisine et autres extracteurs de fumées de
cuisson peuvent nuire au fonctionnement sécuritaire des
appareils brûlant du gaz ou d'autres combustibles (y compris
ceux des autres pièces) en raison du reflux des gaz de
combustion. Ces gaz peuvent potentiellement entraîner une
intoxication au monoxyde de carbone. Après l'installation d'une
28

hotte ou d'un autre extracteur de fumées de cuisson, le
fonctionnement des appareils à gaz à conduit ouvert doit être
testé par une personne compétente pour s'assurer qu'il n'y a
pas de reflux des gaz de combustion.
Pour une utilisation en toute sécurité du produit et pour en
connaître toutes les caractéristiques et performances:
- Lisez attentivement ce mode d'emploi avant l'installation
et la mise en service.
- Attention surtout aux avertissements de sécurité!
- L'appareil ne peut être utilisé que comme décrit dans ce
mode d'emploi.
- Conservez le mode d'emploi.
- Si vous donnez l'appareil à un tiers, donnez également le
mode d'emploi.
Cher client,
Merci de nous avoir choisi!
Félicitations pour l'achat de votre nouvelle hotte de cuisine.
Afin d'utiliser l'appareil en toute sécurité et de mieux connaître l'ensemble de ses
caractéristiques et performances :
- Lisez attentivement ce mode d'emploi avant d'installer et d'allumer l'appareil.
- Une attention particulière doit être portée aux avertissements de sécurité !
- L'appareil ne doit être utilisé que conformément aux instructions données dans ce manuel
d'utilisation.
- Conservez ce mode d'emploi pour référence ultérieure.
- Si l'appareil est donné à un tiers, le manuel d'instructions doit également être fourni.
INFORMATIONS GÉNÉRALES
Lors de l'échange d'informations avec le FABRICANT de l'appareil, veuillez vous référer au
numéro de série et aux données d'identification spécifiés sur la plaque signalétique.
Cet appareil a été conçu, testé et fabriqué en totale conformité avec toutes les normes
pertinentes concernant :
• Sécurité : CEI/EN 60335-1 ; CEI/EN 60335-2-31 ;
29

• Performances : CEI/EN 61591 ; CEI/EN 60704-1 ; CEI/EN 60704-2-13 ; EN 50564; CEI
62301.
CEM : EN 55014-1 ; EN 55014-2 ; CEI/EN 61000-3-2 ; CEI/EN 61000-3-3.
Recommandations pour une bonne utilisation de l'appareil visant à réduire l'impact sur
l'environnement : lorsque vous commencez à cuisiner, allumez la hotte à vitesse minimale et
éteignez-la quelques minutes seulement après la fin de la cuisson. N'augmentez la vitesse de
la hotte qu'en cas de grandes quantités de vapeurs et de fumées et n'utilisez la fonction
booster qu'en cas d'absolue nécessité. Nettoyez le filtre à graisse uniquement lorsque cela est
nécessaire, afin de conserver son efficacité dans le temps. Utilisez un système de tuyauterie
ayant le diamètre maximum spécifié dans ce manuel, afin d'augmenter l'efficacité et de réduire
les niveaux de bruit.
Le symbole présent sur l'appareil ou sur sa documentation indique que ce produit
ne doit pas être traité comme un déchet ménager, mais qu'il doit être remis à un
point de collecte spécifique pour le recyclage des équipements électriques et
électroniques. L'élimination appropriée de cet appareil contribuera à réduire la
consommation de matières premières et la pollution de l'environnement. Pour plus
d'informations sur le recyclage de cet appareil, veuillez contacter votre mairie,
votre service d'élimination des déchets ménagers ou le magasin où vous avez
acheté l'appareil.
Pièces de rechange
Utilisez uniquement des pièces de rechange d'origine.
Remplacez les composants avant qu'ils ne soient usés. Effectuez des vérifications d'entretien
régulières, comme détaillé dans la section « ENTRETIEN ».
Garantie
Afin de bénéficier de la garantie du FABRICANT, les utilisateurs doivent suivre strictement
toutes les instructions spécifiées dans ce manuel, en particulier ils doivent :
- utiliser la hotte uniquement aux fins pour lesquelles elle a été conçue ;
- effectuer des opérations de maintenance continues et scrupuleuses ;
- n'autoriser l'utilisation de la hotte qu'à des personnes ayant des compétences et un savoirfaire avérés.
Le non-respect des instructions contenues dans ce manuel annulera immédiatement la
garantie du fabricant.
INSTRUCTIONS D'INSTALLATION
- Les opérations d'installation et de raccordement électrique doivent être effectuées
conformément à ces instructions et par du personnel qualifié et spécialisé.
- Porter des gants de protection avant et pendant l'installation.
- Vérifiez qu'aucun accessoire fourni avec l'appareil (manuels, accessoires, etc.) n'est placé à
l'intérieur de la hotte : dans ce cas, retirez-le et conservez-le.
- Les chiffres indiqués dans ce manuel d'installation peuvent également se référer à
différentes esthétiques de l'appareil : dans tous les cas, les instructions d'utilisation,
d'installation et d'entretien restent les mêmes.
30

Distance minimale de sécurité d'installation
La distance entre une plaque de cuisson électrique et la partie inférieure de la hotte doit être
d'au moins 550 mm, tandis qu'entre une plaque de cuisson à gaz et la partie inférieure de la
hotte doit être d'au moins 650mm.
La distance d'installation recommandée entre la hotte de plafond et la table de cuisson est
comprise entre 1300 et 1500 mm, tandis que la distance maximale est de 2000mm.
Cette hotte est conçue pour être installée au plafond à la fois dans la version ASPIRATION
avec évacuation des fumées vers l'extérieur et dans la version FILTRATION en achetant le kit
approprié (E750000148).
31

INSTRUCTIONS DE CONTRÔLE
La télécommande arrivera déjà programmée avec la hotte, si pour une raison quelconque la
télécommande perd la communication avec la hotte, effectuez la procédure suivante :
· Débranchez la hotte de l'alimentation électrique;
· Attendez quelques secondes et rétablissez l'alimentation et dans les 10 secondes, appuyez
simultanément sur les boutons «P1» et «PT» pendant environ 3 secondes.
La télécommande sera à nouveau opérationnelle.
LES FONCTIONS
P0: Touche MARCHE/ARRÊT DU MOTEUR.
S'il est sélectionné avec le moteur éteint, l'écran affiche un zéro «0» pendant environ 1
seconde.
P1: Touche pour diminuer la vitesse du moteur, si la hotte est en 1ère vitesse, elle éteint le
moteur.
P2: Touche pour augmenter la vitesse du moteur, si la hotte est éteinte elle allume la 1ère
vitesse, un deuxième appui active la 2ème vitesse, un troisième appui active la 3ème vitesse,
un quatrième appui active la 4ème vitesse, un appui sur a cinquième fois active la 5ème
vitesse (1ère vitesse intensive) (**), un sixième appui active la 6ème vitesse (2ème vitesse
intensive) (**).
32

Les numéros des vitesses sélectionnées apparaissent sur l'afficheur («1», «2», «3», «4», «5»,
«6»).
(**) Vitesses intensives : la durée des vitesses intensives est de 6 minutes après quoi
l'électronique revient automatiquement en 4ème vitesse.
PL: Touche ALLUMER / ÉTEINDRE LUMIÈRES
Intensité lumineuse: En appuyant longuement sur le bouton "PL" avec les lumières allumées,
l'intensité de la lumière commencera à diminuer jusqu'à atteindre la valeur minimale ; le
relâchement du bouton interrompt la descente de l'intensité lumineuse. Une fois la valeur
minimale atteinte et en appuyant à nouveau longuement sur la touche "PL", l'intensité
lumineuse commencera à augmenter jusqu'à atteindre la valeur maximale ; s'il est relâché, il
s'arrête à la luminosité atteinte.
Couleur de la lumière: avec la hotte éteinte et les lumières éteintes, maintenez enfoncé le
bouton "PL" jusqu'à ce que la LED de la hotte s'allume pour entrer dans le menu d'éclairage
dynamique. Avec des pressions simples sur la touche "PL", vous aurez la variation de la
tonalité de couleur de la lumière de 2700 ° K à 4000 ° K en 10 étapes. Une fois la tonalité
souhaitée atteinte, vous devrez attendre 10 secondes, la LED de la hotte s'arrêtera de
clignoter et la fonction sera mémorisée.
PC: Touche MARCHE/ARRÊT AIR FRAIS
Activation / Désactivation de l'air frais: appui prolongé sur le bouton « PC » avec la hotte
éteinte. Cette fonction permet de démarrer le moteur en 1ère vitesse pendant 10 minutes
suivi de 50 minutes de veille. Cette option reste active pendant une période de 24
les heures. Pour désactiver la fonction Fresh Air, appuyez à nouveau sur la touche "PC" ou
"P0". Tandis que le
fonction est active, aussi bien avec le moteur en marche qu'en stand-by, la LED du capot
clignotera toutes les 5 secondes.
Activation / Désactivation Clean Air: appui sur le « PC » (un « C » apparaît sur l'afficheur).
Lorsque cette fonction est activée, le moteur est réglé à la vitesse maximale pendant
environ 6 minutes, à la fin des 6 minutes le moteur s'éteindra automatiquement.
Pour désactiver cette fonction, appuyez sur la touche « PC » ou sur la touche « P0 ».
Remarque: cette fonction ne peut être activée que lorsque la hotte est allumée et est
prioritaire sur toutes les autres fonctions actives du moteur.
PT: Bouton TIMER (un "T" apparaît sur l'affichage)
La minuterie effectue un compte à rebours de 15 minutes et ne peut être activée que lorsque
le moteur tourne.
La durée de 15 minutes ne change pas même si les vitesses sont modifiées pendant le
compte à rebours.
A la fin des 15 minutes le moteur s'arrête.
PD: Affichage
Activation / désactivation du buzzer: par défaut la hotte est alimentée avec le buzzer actif,
si vous souhaitez désactiver, avec la hotte éteinte, allumez les feux en appuyant sur la touche
"PL", puis appuyez et maintenez les touches "PT" et "P1 " jusqu'à l'allumage de la led de la
hotte sans signal sonore. Si vous souhaitez réactiver, répétez l'opération décrite ci-dessus, la
LED s'allumera et le signal acoustique sera émis pour confirmer.
Remarque : Pour économiser la batterie, l'écran reste actif pendant environ 4 secondes, après
quoi il s'éteint, pour visualiser les fonctions actives, sélectionnez n'importe quelle touche et
l'écran est réactivé.
33

INDICATION LED CAPOT
Dans le corps de la hotte se trouve une LED qui indique l'état de fonctionnement du moteur
tournant à vitesse selon ces critères :
Moteur éteint: LED éteinte ;
Moteur 1ère vitesse Couleur LED bleue;
Moteur 2ème vitesse Couleur LED verte;
Moteur 3ème vitesse Couleur LED jaune;
Moteur 4ème vitesse Couleur LED rouge;
Moteur de 5e vitesse (intensif) Couleur de la DEL magenta (clignote par intermittence pendant
1 seconde pendant 6 minutes, puis revient à la 4e vitesse).
Moteur 6ème vitesse (Intensif) Couleur LED rose (Clignote par intermittence pendant 1
seconde pendant 6 minutes puis revient à la 4ème vitesse).
En activant la minuterie, la LED de couleur correspondante, en fonction de la vitesse réglée,
clignote par intermittence pendant 1 seconde, au bout de 15 minutes, en régime non intensif,
le moteur s'éteint et non l'éclairage. Quant aux vitesses intensives, lorsque la minuterie est
activée, elle reste à la vitesse réglée pendant les 6 premières minutes puis termine les 9
minutes restantes à la 4ème vitesse.
En fonction Clean Air, la LED bleu clair reste fixe, le moteur passe en 6ème vitesse et au bout
de 6 minutes le moteur et non l'éclairage s'éteint.
Dans la fonction Fresh Air, la LED bleue clignote par intermittence pendant 5 secondes,
capote éteinte, le moteur démarre en 1ère vitesse pendant 10 minutes puis reste éteint
pendant 50 minutes et ainsi de suite jusqu'à l'arrêt de la fonction.
Signal de nettoyage du filtre à graisse métallique
Après 30 heures de fonctionnement, la LED verte commencera à clignoter pendant 20
secondes indiquant de nettoyer les filtres. Pour réinitialiser les filtres, avec la hotte éteinte,
appuyez sur la touche « P0 » pendant 3 secondes pendant que la LED clignote.
Signal de nettoyage du filtre longue durée ou céramique
Après 120 heures de fonctionnement, la LED rouge commencera à clignoter pendant 20
secondes indiquant de nettoyer les filtres. Pour réinitialiser les filtres, avec la hotte éteinte,
appuyez sur la touche « P0 » pendant 3 secondes pendant que la LED clignote.
Chaque fois qu'un bouton de la télécommande est appuyé, la hotte émet un signal acoustique
pour confirmer la réception du signal.
34

MAINTENANCE
AVERTISSEMENT! Avant toute opération de nettoyage ou d'entretien, coupez l'alimentation
de la hotte en retirant le câble ou en débranchant l'interrupteur général du logement. Le
nettoyage et l'entretien ordinaire ne doivent pas être effectués par des enfants sans
surveillance.
Nettoyage
Le produit doit être fréquemment nettoyé à l'intérieur et à l'extérieur à l'aide d'un chiffon imbibé
d'eau tiède et d'un détergent liquide neutre non abrasif.
Les filtres à graisse métalliques
Il a pour mission de retenir les particules de graisse des fumées de cuisson et de préserver le
moteur de l'aspirateur, il est donc sujet à un colmatage dans des temps variables en fonction
de l'utilisation de l'appareil. Les filtres peuvent être lavés au lave-vaisselle avec des cycles de
lavage courts et à basse température, au plus tard tous les 2 mois pour éviter les risques
d'incendie. Après quelques lavages, le filtre peut changer de couleur à cause des sels de lavevaisselle et des détergents. Le changement de couleur n'affecte pas la fonctionnalité du filtre à
graisse.
Filtres en céramique
Ils ont pour tâche de retenir les odeurs et de purifier l'air qui est renvoyé dans l'environnement.
Les filtres en céramique peuvent être nettoyés au four à une température de 180/200°C
pendant environ 45/60 minutes. Il est recommandé de remplacer les filtres en céramique tous
les 5 ans pour assurer la meilleure élimination des odeurs.
Éclairage
La hotte est équipée d'un éclairage basé sur la technologie LED à haut rendement, à faible
consommation d'énergie et à très haute durabilité dans des conditions normales d'utilisation.
Pour le remplacement, contactez le service après-vente.
LA SOCIÉTÉ FABRICANT ne peut être tenue responsable de tout dommage causé par
une mauvaise installation ou utilisation de cet appareil.
DEPANNAGE
PROBLÈME CAUSES POSSIBLES SOLUTIONS
Les lumières de la hotte
aspirante ne s'allument pas
Le connecteur de la lampe est
déconnecté
35
Branchez le connecteur de la lampe
comme indiqué à la page 5, Fig. 5 du
manuel d'instructions

Réglez l'interrupteur On/Off sur la
L'interrupteur On/Off est en position 0
position 1 comme indiqué à la page 4,
image 4 du manuel d'instructions
Pas d'électricité Vérifier la carte électronique
Le moteur ne fonctionne
pas
La télécommande ne
fonctionne pas
La télécommande n'est pas
synchronisée
Synchroniser la télécommande comme
dans le manuel d'instructions à partir
de la page 20
Branchez le connecteur du moteur
Connecteur déconnecté
comme indiqué à la page 6, image 7 du
manuel d'instructions
Pas d'électricité Vérifier la carte électronique
Il y a de l'électricité mais le moteur ne
fonctionne pas
Remplacer le moteur
Remplacer la batterie comme indiqué à
la page 12, Image 20 du manuel
Batterie de la télécommande faible
d'instructions.
Assurez-vous que la batterie est
insérée avec la bonne polarité!
La télécommande n'est pas
synchronisée
Synchroniser la télécommande comme
dans le manuel d'instructions à partir
de la page 20
Réglez l'interrupteur On/Off sur la
L'interrupteur On/Off est en position 0
position 1 comme indiqué à la page 4,
image 4 du manuel d'instructions
Pas d'électricité Vérifiez le câble d'alimentation
La télécommande n'est pas
synchronisée
La hotte ne fonctionne pas
Problèmes au système électrique
Synchroniser la télécommande comme
dans le manuel d'instructions à partir
de la page 20
Vérifier l'alimentation de la carte
électronique
Réglez l'interrupteur On/Off sur la
L'interrupteur On/Off est en position 0
position 1 comme indiqué à la page 4,
image 4 du manuel d'instructions
Retirer les filtres comme indiqué à la
La hotte aspire peu d'air Filtres en aluminium souillés
page 11, image 17 du manuel
d'utilisation et lavez les filtres.
Réinitialisez les filtres lorsque la hotte
est éteinte en appuyant sur le bouton
La LED verte clignote
pendant 20 secondes
Indicateur de nettoyage du filtre à
graisse métallique
"P0" de la télécommande pendant 3
secondes pendant que la LED clignote
comme indiqué à la page 22 du manuel
d'instructions.
Réinitialisez les filtres lorsque la hotte
est éteinte en appuyant sur le bouton
La LED rouge clignote
pendant 20 secondes
Indicateur du besoin nettoyage de
filtre longue durée ou en céramique
"P0" de la télécommande pendant 3
secondes pendant que la LED clignote
comme indiqué à la page 22 du manuel
d'instructions.
36

DEUTSCH
SICHERHEITSWARNUNG
- Dieses Gerät ist für den häuslichen Gebrauch in häuslicher
Umgebung bestimmt. Verwenden Sie das Gerät niemals für
den professionellen oder industriellen Gebrauch.
- Dieses Gerät darf von Kindern über 8 Jahren und von
Personen mit eingeschränkten körperlichen, sensorischen und
geistigen Fähigkeiten oder ohne die erforderliche Erfahrung
und Kompetenz nur bedient werden, wenn sie ordnungsgemäß
beaufsichtigt und mit den erforderlichen Anweisungen zur
sicheren Verwendung versehen wurden des Geräts und
informiert über die damit verbundenen Risiken und
Warnungen.
- Kinder dürfen nicht mit dem Gerät spielen.
- Die in der Bedienungsanleitung angegebenen Sicherheitsund Warnhinweise müssen strikt befolgt werden.
- Achtung: Nichtverwendung von Schrauben und
Befestigungsmitteln gem Anweisungen, die in diesem
Handbuch angegeben sind, können zu elektrischen Risiken
führen.
- Das Gerät darf nicht von Personen (einschließlich Kindern)
mit eingeschränkten körperlichen, sensorischen und geistigen
Fähigkeiten oder ohne die erforderliche Erfahrung und
Kompetenz benutzt werden, es sei denn, sie wurden
ordnungsgemäß beaufsichtigt und eingewiesen.
37

- Eine sorgfältige Reinigung des Geräts nach jedem Gebrauch
ist sehr wichtig, da keine regelmäßige Reinigung durchgeführt
wird kann zu Brandgefahr führen.
- Stellen Sie sicher, dass alle Gerätekomponenten nicht
beschädigt sind. Führen Sie in einem solchen Fall keine
Installation durch und wenden Sie sich an ein qualifiziertes
technisches Kundendienstzentrum.
- Qualifizierte Installateure führen alle erforderlichen Zimmererund Installationsarbeiten in voller Übereinstimmung mit den
geltenden Richtlinien durch.
- Schließen Sie das Gerät während der Installation nicht an
das Stromnetz an.
- Trennen Sie das Gerät von der Stromversorgung, bevor Sie
Reinigungs- oder Wartungsarbeiten durchführen.
- Das Gerät muss nach der Installation über einen
zugänglichen Stecker oder Hauptschalter vom Stromnetz
getrennt werden können.
- Dampfreiniger sollten nicht verwendet werden.
- Verwenden Sie zum Reinigen von Glas keine scharfen
Scheuermittel oder scharfen Metallschaber, da diese die
Oberfläche zerkratzen können, wodurch das Glas brechen
kann.
- ACHTUNG: Stellen Sie sicher, dass das Gerät ausgeschaltet
ist (OFF), bevor Sie die Lampe austauschen, um die
Möglichkeit eines Stromschlags zu vermeiden.
38

- Entfernen Sie den Schutzkunststoff nicht von der Haube, bis
sie vollständig installiert ist, wenn dieser Kunststoff nicht in
Bereichen vorhanden ist, die während der Installation
beschädigt werden könnten. Dadurch werden Schäden an der
Außenseite des Geräts vermieden, die nicht durch die
Garantie abgedeckt sind.
WARNINGS FOR ELECTRICAL CONNECTION
- Electrical connections shall be approved by a qualified
electrician before using the appliance.
- Electrical connection shall be performed by just one qualified
electrician, who will be responsible for proper electrical
connection of the appliance to power supply.
- Before connecting the appliance to the electrical network,
check if voltage, frequency and power values specified in the
rating label of the appliance are compatible with home power
supply and socket.
- The power cord shall be connected to an omnipolar magnetothermal breaker with a switch-contact gap of at least 3 mm.
- In case the power cord is damaged, it shall be replaced either
by the manufacturer or the technical assistance service or by
specialized personnel.
- The power cord shall not enter into contact with surfaces
whose
temperature exceeds 50° C once the appliance has been
installed.
39

WARNINGS FOR OPERATION
- Ventilation must be provided conveniently in the room if a
range hood and appliances powered by gas or other fuel used
simultaneously.
- If the hood is used simultaneously with appliances that burn
gas or other fuels, the room must have sufficient ventilation
(this warning is not applicable for hoods installed in the filtering
version).
- Befolgen Sie alle geltenden örtlichen Normen für den Betrieb
der Luftabsaugung.
- Wenn das Gerät im Umluftmodus verwendet wird,
vergewissern Sie sich, dass der Abluftstaub in gutem Zustand
ist, falls es längere Zeit nicht verwendet wurde.
- Das Garen von Speisen über offenem Feuer (Flambe) unter
der Haube ist nicht gestattet.
- Lassen Sie Töpfe niemals unbeaufsichtigt, wenn das Kochfeld
eingeschaltet ist: Im Topf enthaltenes Öl kann überhitzen und
verbrennen. Bei Verwendung von Öl ist die Brandgefahr
deutlich höher.
- Fettfilter Die ordnungsgemäße Wartung und sorgfältige
Reinigung sind äußerst wichtig.
- Reinigen Sie die Haube und die anderen Oberflächen
regelmäßig, um Brandgefahr zu vermeiden.
- ACHTUNG: Bei eingeschaltetem Kochfeld können zugängliche
Teile der Dunstabzugshaube heiß werden.
40

- Der Anschluss des Abluftgerätes an Abluftkanäle oder Kanäle
und Rohre zur Raumbelüftung ist nicht zulässig.
- Abluft darf nicht in einen Warmluftumwälzkanal geleitet
werden.
- Luft darf nicht in einen Schornstein geleitet werden, der für
Abgase von Haushaltsgeräten verwendet wird, die mit Gas
oder anderen Brennstoffen betrieben werden (dies gilt nicht für
Dunstabzugshauben, die im Umluftmodus arbeiten).
- Lüften Sie den Raum ausreichend, wenn eine
Dunstabzugshaube und andere vorhanden sind
- Der maximale Unterdruck im Raum darf 4 Pa (4x10⁻⁵ bar)
nicht überschreiten.
- Der Raum, in dem die Dunstabzugshaube installiert wird, muss
mit einem Lufteinlass ausgestattet sein, dessen Kapazität
größer sein muss als die der Dunstabzugsvorrichtung. Es ist
strengstens verboten, die Gliedmaßen oder andere Teile des
zu platzieren menschliche Körper sowie Kochgegenstände
oder andere Gegenstände in der Nähe der ausziehbaren
Einheit der Haube (falls Ihr Gerät damit ausgestattet ist).
- Dunstabzugshauben und andere Dunstabzugshauben können
den sicheren Betrieb von Geräten, die Gas oder andere
Brennstoffe verbrennen (auch in anderen Räumen), aufgrund
des Rückströmens von Verbrennungsgasen beeinträchtigen.
Diese Gase können möglicherweise zu einer
Kohlenmonoxidvergiftung führen. Nach der Installation einer
41

Dunstabzugshaube oder eines anderen Kochdunstabzugs
sollte der Betrieb von offenen Gasgeräten von einer
kompetenten Person getestet werden, um sicherzustellen,
dass kein Rückströmen von Verbrennungsgasen auftritt.
Für eine sichere Verwendung des Produkts und um alle
Funktionen und Leistungen zu kennen:
- Lesen Sie diese Gebrauchsanweisung vor der
Installation und Inbetriebnahme sorgfältig durch.
- Sicherheitshinweise besonders beachten!
- Das Gerät darf nur wie in dieser Bedienungsanleitung
beschrieben verwendet werden.
- Bewahren Sie die Bedienungsanleitung auf.
- Wenn Sie das Gerät an Dritte weitergeben, geben Sie
auch die Bedienungsanleitung mit.
Lieber Kunde,
Danke, daß Sie uns gewählt haben!
Herzlichen Glückwunsch zum Kauf Ihrer neuen Dunstabzugshaube.
Um das Gerät sicher zu verwenden und alle seine Funktionen und Leistungen besser
kennenzulernen:
- Lesen Sie diese Bedienungsanleitung sorgfältig durch, bevor Sie das Gerät installieren und
einschalten.
- Sicherheitshinweise sind besonders zu beachten!
- Das Gerät darf nur gemäß den Anweisungen in dieser Bedienungsanleitung verwendet
werden.
- Bewahren Sie diese Bedienungsanleitung zum späteren Nachschlagen auf.
- Bei Weitergabe des Gerätes an Dritte ist auch die Bedienungsanleitung mitzugeben.
42

ALLGEMEINE INFORMATIONEN
Beim Informationsaustausch mit dem Gerätehersteller beziehen Sie sich bitte auf die
Seriennummer und Identifikationsdaten, die auf dem Typenschild angegeben sind.
Dieses Gerät wurde in voller Übereinstimmung mit allen relevanten Normen zu folgenden
Themen entwickelt, getestet und hergestellt:
• Sicherheit: CEI/EN 60335-1; CEI/EN 60335-2-31;
• Leistung: CEI/EN 61591; CEI/EN 60704-1; CEI/EN 60704-2-13; EN50564; CEI 62301.
EMV: EN 55014-1; EN 55014-2; CEI/EN 61000-3-2; CEI/EN 61000-3-3.
Empfehlungen für den sachgerechten Gebrauch des Gerätes zur Reduzierung der
Umweltbelastung: Schalten Sie die Haube zu Beginn des Kochvorgangs mit minimaler
Geschwindigkeit ein und schalten Sie sie erst wenige Minuten nach Beendigung des
Kochvorgangs aus. Erhöhen Sie die Haubengeschwindigkeit nur bei großen Mengen an
Dämpfen und Rauch und verwenden Sie die Booster-Funktion nur, wenn es unbedingt
erforderlich ist. Reinigen Sie den Fettfilter nur bei Bedarf, um seine Leistungsfähigkeit
langfristig zu erhalten. Verwenden Sie ein Rohrsystem mit dem in diesem Handbuch
angegebenen maximalen Durchmesser, um die Effizienz zu steigern und den Geräuschpegel
zu reduzieren.
Das Symbol auf dem Gerät oder seiner Dokumentation weist darauf hin, dass
dieses Produkt nicht als Haushaltsabfall zu behandeln ist, sondern an einer
speziellen Sammelstelle für das Recycling von elektrischen und elektronischen
Geräten abgegeben werden muss. Die ordnungsgemäße Entsorgung dieses
Geräts trägt dazu bei, den Rohstoffverbrauch und die Umweltverschmutzung zu
reduzieren. Ausführlichere Informationen zum Recycling dieses Geräts erhalten
Sie bei Ihrer örtlichen Stadtverwaltung, Ihrem Entsorgungsdienst für
Haushaltsabfälle oder dem Geschäft, in dem Sie das Gerät gekauft haben.
Ersatzteile
Verwenden Sie nur Original-Ersatzteile.
Ersetzen Sie Komponenten, bevor sie verschlissen sind. Führen Sie regelmäßige
Wartungsprüfungen durch, wie im Abschnitt „WARTUNG“ beschrieben.
Garantie
Um in den Genuss der HERSTELLERGARANTIE zu kommen, müssen Benutzer alle
Anweisungen in diesem Handbuch strikt befolgen, insbesondere:
- Verwenden Sie die Haube nur für den vorgesehenen Zweck;
- kontinuierliche und gewissenhafte Wartungsarbeiten durchführen;
- die Benutzung der Haube nur Personen mit nachgewiesenen Fähigkeiten und Kenntnissen
gestatten.
Die Nichtbeachtung der in diesem Handbuch enthaltenen Anweisungen führt zum sofortigen
Erlöschen der Herstellergarantie.
43

INSTALLATIONSANLEITUNG
- Installations- und elektrische Anschlussarbeiten müssen gemäß dieser Anleitung und
von qualifiziertem und spezialisiertem Personal durchgeführt werden.
- Tragen Sie vor und während der Installation Schutzhandschuhe.
- Vergewissern Sie sich, dass sich kein mit dem Gerät geliefertes Zubehörmaterial
(Handbücher, Zubehör usw.) in der Haube befindet: Entfernen Sie es in einem solchen
Fall und bewahren Sie es auf.
- Die in dieser Installationsanleitung gezeigten Abbildungen können sich auch auf eine
andere Ästhetik des Geräts beziehen: In jedem Fall bleiben die Gebrauchs-,
Installations- und Wartungsanweisungen gleich.
Mindestsicherheitsabstand bei der Installation
Der Abstand zwischen einem Elektrokochfeld und dem unteren Teil der Abzugshaube muss
mindestens 550 mm betragen, während zwischen einem Gaskochfeld und dem unteren Teil
der Abzugshaube mindestens 650 mm betragen muss.
Der empfohlene Installationsabstand zwischen Deckenhaube und Kochfeld liegt zwischen
1300 und 1500 mm, der maximale Abstand beträgt 2000 mm.
Diese Haube ist für die Installation an der Decke sowohl in der ASPIRIERENDEN Version mit
Rauchabzug nach außen als auch in der FILTERNDEN Version durch den Kauf des
entsprechenden Kits (E750000148) vorgesehen.
44

STEUERUNGSANLEITUNG
Die Fernbedienung wird bereits mit der Dunstabzugshaube programmiert geliefert. Wenn die
Fernbedienung aus irgendeinem Grund die Kommunikation mit der Dunstabzugshaube
verliert, gehen Sie wie folgt vor:
· Trennen Sie die Haube von der Stromversorgung;
· Warten Sie einige Sekunden und stellen Sie die Stromversorgung wieder her und drücken
Sie innerhalb von 10 Sekunden gleichzeitig die Tasten „P1“ und „PT“ für etwa 3 Sekunden.
Die Fernbedienung ist wieder betriebsbereit.
FUNKTIONEN
P0: MOTOR EIN / AUS-Taste.
Bei Auswahl bei ausgeschaltetem Motor zeigt das Display etwa 1 Sekunde lang eine Null “0”
an.
P1: Taste zum Verringern der Motorgeschwindigkeit, wenn sich die Dunstabzugshaube in der
1. Geschwindigkeit befindet, schaltet sie den Motor aus.
P2: Taste zum Erhöhen der Motorgeschwindigkeit, wenn die Haube ausgeschaltet ist, schaltet
sie die 1. Geschwindigkeit ein, ein zweites Drücken aktiviert die 2. Geschwindigkeit, ein drittes
Drücken aktiviert die 3. Geschwindigkeit, ein viertes Drücken aktiviert die 4. Geschwindigkeit,
ein Drücken von a fünftes Mal aktiviert die 5. Geschwindigkeit (1. Geschwindigkeit intensiv)
(**), sechstes Drücken aktiviert die 6. Geschwindigkeit (2. Geschwindigkeit intensiv) (**).
Auf dem Display erscheinen die Nummern der gewählten Geschwindigkeiten (“1“, “2“, “3“, “4“,
45

“5“, “6“).
(**) Intensivgeschwindigkeiten: Die Dauer der Intensivgeschwindigkeiten beträgt 6 Minuten,
danach schaltet die Elektronik automatisch auf die 4. Geschwindigkeit zurück.
PL: LICHTER EIN / AUS-Taste
Lichtintensität: Durch langes Drücken der Taste “PL” bei eingeschaltetem Licht beginnt die
Lichtintensität abzunehmen, bis sie den Mindestwert erreicht; das Loslassen der Taste
unterbricht das Absenken der Lichtintensität. Sobald der Mindestwert erreicht ist und durch
erneutes langes Drücken der Taste “PL“ beginnt die Lichtintensität zuzunehmen, bis sie den
Höchstwert erreicht; wird sie losgelassen, stoppt sie bei der erreichten Helligkeit.
Lichtfarbe: Halten Sie bei ausgeschalteter Motorhaube und ausgeschaltetem Licht die Taste
“PL“ gedrückt, bis die LED an der Motorhaube aufleuchtet, um das dynamische Lichtmenü
aufzurufen. Durch einmaliges Drücken der Taste „PL“ haben Sie die Variation des Farbtons
des Lichts von 2700 ° K bis 4000 ° K in 10 Schritten. Sobald der gewünschte Ton erreicht ist,
müssen Sie 10 Sekunden warten, die LED auf der Haube hört auf zu blinken und die Funktion
wird gespeichert.
PC: Taste FRISCHLUFT EIN/AUS
Frischluft-Aktivierung/Deaktivierung: langes Drücken der “PC”-Taste bei
abgenommener Haube. Mit dieser Funktion kann der Motor 10 Minuten lang mit der 1.
Geschwindigkeit eingeschaltet werden, gefolgt von 50 Minuten Standby. Diese Option
bleibt während eines Zeitraums von 24 aktiv
Std. Um die Frischluftfunktion zu deaktivieren, drücken Sie erneut die Taste “PC” oder
“P0”. Während: Funktion aktiv ist, sowohl bei laufendem Motor als auch im Stand-by,
blinkt die Motorhauben-LED alle 5 Sekunden.
Clean Air Aktivierung / Deaktivierung: Drücken Sie die Taste “PC” (ein “C” erscheint
auf dem Display).
Wenn diese Funktion aktiviert ist, wird der Motor für etwa 6 Minuten auf maximale
Geschwindigkeit eingestellt, am Ende der 6 Minuten schaltet sich der Motor
automatisch ab. Um diese Funktion zu deaktivieren, drücken Sie die “PC”-Taste oder die
“P0”-Taste.
Hinweis: Diese Funktion kann nur bei eingeschalteter Haube aktiviert werden und hat
Vorrang vor allen anderen aktiven Motorfunktionen.
PT: TIMER-Taste (auf dem Display erscheint ein “T”)
Der Timer führt einen 15-Minuten-Countdown durch und kann nur bei laufendem Motor
aktiviert werden. Die Dauer von 15 Minuten ändert sich nicht, auch wenn die
Geschwindigkeiten während des Countdowns geändert werden. Am Ende der 15 Minuten
stoppt der Motor.
PD: Anzeige
Aktivierung / Deaktivierung des Summers: Standardmäßig wird die Haube mit aktivem
Summer geliefert, wenn Sie ihn deaktivieren möchten, schalten Sie bei ausgeschalteter Haube
das Licht ein, indem Sie die Taste “PL” drücken, dann drücken und halten Sie die Tasten “PT”
und “P1” Tasten bis zum Einschalten der Dunstabzugshaube ohne akustisches Signal. Wenn
Sie wieder aktivieren möchten, wiederholen Sie den oben beschriebenen Vorgang, die LED
leuchtet auf und das akustische Signal ertönt zur Bestätigung.
Hinweis: Um Batteriestrom zu sparen, bleibt das Display etwa 4 Sekunden lang aktiv, danach
schaltet es sich aus, um die aktiven Funktionen anzuzeigen, wählen Sie eine beliebige Taste
und das Display wird wieder aktiviert.
46

HAUBEN-LED-ANZEIGE
Im Haubenkörper befindet sich eine LED, die den Betriebszustand des auf Drehzahl laufenden
Motors nach folgenden Kriterien anzeigt:
Motor AUS: LED aus;
Motor der 1. Geschwindigkeitsmotor Blaue LED-Farbe;
Motor der 2. Geschwindigkeit Grüne LED-Farbe;
Motor der 3. Geschwindigkeit Gelbe LED-Farbe;
Motor der 4. Geschwindigkeit Rote LED-Farbe;
Motor der 5. Geschwindigkeitsmotor (Intensiv) Magenta LED-Farbe (Blinkt intermittierend für 1
Sekunde für 6 Minuten und kehrt dann zur 4. Geschwindigkeit zurück).
Motor der 6. Geschwindigkeitsmotor (Intensiv) Rosa LED-Farbe (Blinkt intermittierend für 1
Sekunde für 6 Minuten und kehrt dann zur 4. Geschwindigkeit zurück).
Durch Aktivieren des Timers blinkt die entsprechende Farb-LED je nach eingestellter
Geschwindigkeit intermittierend für 1 Sekunde, nach Ablauf von 15 Minuten schaltet sich bei
nicht intensiven Geschwindigkeiten der Motor aus und nicht die Beleuchtung. Was die
intensiven Geschwindigkeiten betrifft, so bleibt sie bei aktiviertem Timer die ersten 6 Minuten
auf der eingestellten Geschwindigkeit und endet dann die restlichen 9 Minuten mit der 4.
Geschwindigkeit.
In der Clean Air-Funktion bleibt die hellblaue LED konstant, der Motor schaltet auf 6.
Geschwindigkeit und nach 6 Minuten schaltet der Motor und nicht die Beleuchtung ab.
In der Frischluftfunktion blinkt die blaue LED 5 Sekunden lang intermittierend, bei
abgenommener Motorhaube startet der Motor 10 Minuten lang mit der 1. Geschwindigkeit und
bleibt dann 50 Minuten lang ausgeschaltet und so weiter, bis die Funktion ausgeschaltet wird.
Metallfettfilter-Reinigungssignal
Nach 30 Betriebsstunden beginnt die grüne LED 20 Sekunden lang zu blinken, um
anzuzeigen, dass die Filter gereinigt werden müssen. Um die Filter zurückzusetzen, drücken
Sie bei ausgeschalteter Haube 3 Sekunden lang die Taste „P0“, während die LED blinkt.
Longlife- oder Keramikfilter-Reinigungssignal
Nach 120 Betriebsstunden beginnt die rote LED 20 Sekunden lang zu blinken, um anzuzeigen,
dass die Filter gereinigt werden müssen. Um die Filter zurückzusetzen, drücken Sie bei
ausgeschalteter Haube 3 Sekunden lang die Taste „P0“, während die LED blinkt.
Jedes Mal, wenn eine Taste auf der Fernbedienung gedrückt wird, gibt die Dunstabzugshaube
ein akustisches Signal ab, um den Empfang des Signals zu bestätigen.
WARTUNG
WARNUNG! Trennen Sie vor jedem Reinigungs- oder Wartungsvorgang die Stromversorgung
der Dunstabzugshaube, indem Sie das Kabel entfernen oder den Hauptschalter in der
Wohnung ausschalten. Reinigung und normale Wartung dürfen nicht von Kindern ohne
Aufsicht durchgeführt werden.
Reinigung
Das Produkt sollte sowohl innen als auch außen regelmäßig mit einem mit lauwarmem
Wasser und einem neutralen, nicht scheuernden flüssigen Reinigungsmittel angefeuchteten
Tuch gereinigt werden.
47

Die metallischen Fettfilter
Es hat die Aufgabe, die Fettpartikel aus den Kochdämpfen zurückzuhalten und den Motor des
Absaugers zu schonen, sodass er je nach Gebrauch des Geräts zu unterschiedlichen Zeiten
verstopfen kann. Die Filter können in der Spülmaschine mit kurzen Waschgängen und bei
niedrigen Temperaturen gewaschen werden, spätestens alle 2 Monate, um Brandgefahr zu
vermeiden. Nach einigen Wäschen kann sich der Filter aufgrund von Spülmaschinensalzen
und Reinigungsmitteln verfärben. Der Farbumschlag hat keinen Einfluss auf die Funktion des
Fettfilters.
Keramische Filter
Sie haben die Aufgabe, Gerüche zurückzuhalten und die an die Umgebung zurückgegebene
Luft zu reinigen. Die Keramikfilter können im Backofen bei einer Temperatur von 180/200 °C
für ca. 45/60 Minuten gereinigt werden. Es wird empfohlen, die Keramikfilter alle 5 Jahre
auszutauschen, um die beste Geruchsbeseitigung zu gewährleisten.
Beleuchtung
Die Haube ist mit einer Beleuchtung ausgestattet, die auf hocheffizienter LED-Technologie,
geringem Stromverbrauch und sehr hoher Lebensdauer unter normalen
Nutzungsbedingungen basiert.
Wenden Sie sich für den Austausch an die Serviceabteilung.
DAS UNTERNEHMEN HERSTELLER kann nicht für Schäden verantwortlich gemacht
werden, die durch eine unsachgemäße Installation oder Verwendung dieses Geräts
verursacht werden.
FEHLERBEHEBUNG
PROBLEM MÖGLICHE URSACHEN LÖSUNGEN
Schließen Sie den Lampenstecker an,
Die Lichter der
Dunstabzugshaube
schalten sich nicht ein
Lampenstecker ist getrennt
Ein-/Ausschalter steht auf Position 0
Keinen Strom
Fernbedienung ist nicht synchronisiert
wie auf Seite 5, Abb. 5 des Handbuchs
gezeigt
Stellen Sie den Ein-/Ausschalter auf
Position 1, wie auf Seite 4, Bild 4 der
Bedienungsanleitung gezeigt
Überprüfen Sie den
Beleuchtungstreiber
Synchronisieren Sie die Fernbedienung
wie in der Bedienungsanleitung ab
Seite 20 beschrieben
Schließen Sie den Motorstecker wie auf
Getrennter Stecker
Der Motor funktioniert
nicht
Keinen Strom Überprüfen Sie den Motortreiber
Strom kommt an, aber der Motor
funktioniert nicht
48
Seite 6, Bild 7 der Bedienungsanleitung
gezeigt an
Ersetzen Sie den Motor

Die Fernbedienung
wie auf Seite 11,
Reinigungsanzeige für langlebigen oder
funktioniert nicht
Ersetzen Sie die Batterie wie auf Seite
12, Bild 20 der Bedienungsanleitung
Batterie der Fernbedienung schwach
gezeigt.
Achten Sie darauf, dass die Batterie
mit der richtigen Polarität eingelegt
wird.
Fernbedienung ist nicht mit der
Dunstabzugshaube synchronisiert
Synchronisieren Sie die Fernbedienung
wie in der Bedienungsanleitung ab
Seite 20 beschrieben
Stellen Sie den Ein-/Ausschalter auf
Ein-/Ausschalter steht auf Position 0
Position 1, wie auf Seite 4, Bild 4 der
Bedienungsanleitung gezeigt
Keinen Strom Überprüfen Sie das Netzkabel
Fernbedienung ist nicht mit der
Dunstabzugshaube synchronisiert
Hood is not working
Probleme mit dem elektrischen System
Ein-/Ausschalter steht auf Position 0
Hood saugt wenig Luft an Verschmutzte Aluminiumfilter
Grüne LED blinkt für 20
Sekunden
Fettfilter-Reinigungsanzeige aus Metall
Rote LED blinkt 20
Sekunden lang
keramischen Filter
Synchronisieren Sie die Fernbedienung
wie in der Bedienungsanleitung ab
Seite 20 beschrieben
Überprüfen Sie die Stromversorgung
auf der Elektronikplatine
Stellen Sie den Ein-/Ausschalter auf
Position 1, wie auf Seite 4, Bild 4 der
Bedienungsanleitung gezeigt
Entfernen Sie die Filter
Bild 17 der Bedienungsanleitung
gezeigt und waschen Sie die Filter.
Setzen Sie die Filter zurück, wenn die
Dunstabzugshaube ausgeschaltet ist,
indem Sie die Taste „P0“ auf der
Fernbedienung 3 Sekunden lang
drücken, während die LED blinkt, wie
auf Seite 22 der Bedienungsanleitung
gezeigt.
Setzen Sie die Filter zurück, wenn die
Dunstabzugshaube ausgeschaltet ist,
indem Sie die Taste „P0“ auf der
Fernbedienung 3 Sekunden lang
drücken, während die LED blinkt, wie
auf Seite 22 der Bedienungsanleitung
gezeigt.
49

ESPAÑOL
ADVERTENCIA DE SEGURIDAD
- Este aparato ha sido diseñado para uso doméstico en el
entorno doméstico. Nunca utilice el aparato para uso
profesional o industrial.
- Este aparato puede ser utilizado por niños mayores de 8
años y por personas con facultades físicas, sensoriales y
mentales disminuidas o sin la experiencia y competencia
necesarias solo si están debidamente supervisados y si se les
han proporcionado las instrucciones necesarias sobre el uso
seguro. del aparato e informado de los posibles riesgos y
advertencias asociados.
- No se debe permitir que los niños jueguen con el aparato.
- Se seguirán estrictamente las instrucciones de seguridad y
advertencia especificadas en el manual del usuario.
- Atención: No utilizar tornillos y dispositivos de fijación según
instrucciones especificadas en este manual, puede resultar en
un riesgo eléctrico.
- El aparato no debe ser utilizado por personas (niños
incluidos) con facultades físicas, sensoriales y mentales
disminuidas o sin la experiencia y competencia necesarias a
menos que hayan sido debidamente supervisadas e
instruidas.
- La limpieza cuidadosa del aparato después de cada uso es
muy importante, ya que la falta de limpieza regular
50

puede resultar en riesgo de incendio.
- Asegúrese de que todos los componentes del aparato no
estén dañados. En tal caso, no realice la instalación y póngase
en contacto con un centro de asistencia técnica cualificado.
- Los instaladores cualificados deberán realizar los trabajos de
carpintería e instalación necesarios respetando plenamente
las directivas vigentes.
- No conecte el aparato a la red eléctrica durante la
instalación.
- Desconecte el aparato de la red eléctrica antes de realizar
cualquier operación de limpieza o mantenimiento.
- Necesidad de permitir la desconexión del aparato de la red
eléctrica después de la instalación, a través de un enchufe
accesible o interruptor principal.
- No se debe utilizar un limpiador a vapor.
- No utilice abrasivos fuertes ni rascadores metálicos afilados
para limpiar el cristal, ya que pueden rayar la superficie y
hacer que el cristal se rompa.
- PRECAUCIÓN: Asegúrese de que el aparato esté
desconectado (APAGADO) antes de reemplazar la lámpara
para evitar la posibilidad de descarga eléctrica.
- No retire el plástico protector de la campana hasta que esté
completamente instalada, si este plástico no está presente en
áreas que podrían tener riesgo de daño durante la instalación.
51

Esto evitará daños en el exterior del aparato, algo que no
estará cubierto por la garantía.
ADVERTENCIAS PARA LA CONEXIÓN ELÉCTRICA
- Las conexiones eléctricas deben ser aprobadas por un
electricista calificado antes de usar el aparato.
- La conexión eléctrica debe ser realizada por un solo
electricista calificado, quien será responsable de la correcta
conexión eléctrica del aparato a la red eléctrica.
- Antes de conectar el aparato a la red eléctrica, compruebe si
los valores de tensión, frecuencia y potencia especificados en
la etiqueta de características del aparato son compatibles con
el suministro eléctrico y la toma de corriente domésticos.
- El cable de alimentación se conectará a un disyuntor
magnetotérmico omnipolar con un espacio de contacto del
interruptor de al menos 3 mm.
- En caso de que el cable de alimentación esté dañado,
deberá ser reemplazado por el fabricante o por el servicio de
asistencia técnica o por personal especializado.
- El cable de alimentación no debe entrar en contacto con
superficies cuyas
la temperatura supera los 50° C una vez instalado el aparato.
ADVERTENCIAS PARA EL FUNCIONAMIENTO
- La ventilación debe estar convenientemente en la habitación
si se utilizan simultáneamente una campana extractora y
aparatos alimentados por gas u otro combustible.
52

- Si la campana se utiliza simultáneamente con aparatos que
queman gas u otros combustibles, la habitación debe tener
suficiente ventilación (esta advertencia no se aplica a las
campanas instaladas en la versión filtrante).
- Cumplir con cualquier norma local vigente sobre operaciones
de extracción de aire.
- Si el aparato se usa en el modo de recirculación, asegúrese
de que el polvo de escape esté en buenas condiciones en
caso de que no se use por mucho tiempo.
- No está permitido cocinar alimentos sobre llamas abiertas
(flambeado) debajo de la campana.
- Nunca deje las ollas sin vigilancia cuando la placa esté
encendida: el aceite contenido en la olla podría
sobrecalentarse y quemarse. El riesgo de incendio es bastante
mayor cuando se utiliza aceite.
- El mantenimiento adecuado de los filtros de grasa y la
limpieza precisa son extremadamente importantes.
- Limpiar periódicamente la campana y las demás superficies
para evitar cualquier riesgo de incendio.
- ATENCIÓN: cuando la placa está encendida, las partes
accesibles de la campana pueden calentarse.
- No se permite la conexión del dispositivo de escape a
conductos o canales de escape y tuberías para la ventilación
de la habitación.
53

- El aire extraído no debe ser conducido a un conducto de
circulación de aire caliente.
- No debe descargarse aire en un conducto de chimenea
destinado a humos de aparatos electrodomésticos
alimentados con gas u otros combustibles (esto no es
aplicable en el caso de campanas que funcionen en modo de
recirculación).
- Ventile adecuadamente la habitación cuando una campana
extractora y otros
- La presión negativa máxima en la sala no debe superar los 4
Pa (4x10⁻⁵ bar).
- El local donde se vaya a instalar la campana deberá estar
provisto de una toma de aire cuya capacidad deberá ser
superior a la del dispositivo de extracción de la campana.
Queda terminantemente prohibido colocar las extremidades o
cualquier otra parte del
cuerpo humano, así como objetos para cocinar u otros
objetos, cerca de la unidad extraíble de la campana (si su
aparato está equipado con ella).
- Las campanas extractoras y otros extractores de humos de
cocina pueden afectar negativamente el funcionamiento
seguro de los aparatos que queman gas u otros combustibles
(incluidos los que se encuentran en otras habitaciones) debido
al reflujo de los gases de combustión. Estos gases pueden
potencialmente resultar en envenenamiento por monóxido de
54

carbono. Después de la instalación de una campana
extractora u otro extractor de humos de cocina, una persona
competente debe probar el funcionamiento de los aparatos de
gas de tiro abierto para asegurarse de que no se produzca un
reflujo de los gases de combustión.
Para un uso seguro del producto y conocer todas las
características y prestaciones:
- Lea atentamente este manual de instrucciones de uso
antes de la instalación y puesta en marcha.
- ¡Atención especialmente a las advertencias de
seguridad!
- El aparato sólo puede utilizarse como se describe en
este manual de instrucciones.
- Conservar el manual de instrucciones.
- Si entrega el aparato a un tercero, entregue también el
manual de instrucciones.
Estimado cliente,
Gracias por elegirnos!
Felicitaciones por haber adquirido su nueva campana de cocina.
Para utilizar el aparato con seguridad y conocer mejor todas sus características y
prestaciones:
- Lea atentamente este manual de instrucciones antes de instalar y encender el aparato.
- Se debe prestar especial atención a las advertencias de seguridad!
- El aparato solo se debe utilizar de acuerdo con las instrucciones proporcionadas en este
manual de usuario.
- Conserve este manual de instrucciones para futuras consultas.
- En caso de entrega del aparato a un tercero, se entregará también el manual de
instrucciones.
55

INFORMACIÓN GENERAL
Cuando intercambie información con el FABRICANTE del aparato, consulte el número de
serie y los datos de identificación especificados en la etiqueta de clasificación.
Este aparato ha sido diseñado, probado y fabricado en pleno cumplimiento de las normas
pertinentes sobre:
• Seguridad: CEI/EN 60335-1; CEI/EN 60335-2-31;
• Rendimiento: CEI/EN 61591; CEI/EN 60704-1; CEI/EN 60704-2-13; EN 50564; CEI 62301.
CEM: EN 55014-1; EN 55014-2; CEI/EN 61000-3-2; CEI/EN 61000-3-3.
Recomendaciones para un uso correcto del aparato con el fin de reducir el impacto ambiental:
cuando comience a cocinar, encienda la campana a la velocidad mínima y apáguela solo unos
minutos después de terminar de cocinar. Aumente la velocidad de la campana solo en caso
de grandes cantidades de vapores y humos, y use la función de refuerzo solo cuando sea
absolutamente necesario. Limpiar el filtro antigrasa sólo cuando sea necesario, para mantener
su eficacia a lo largo del tiempo. Utilice un sistema de tuberías con el diámetro máximo
especificado en este manual para aumentar la eficiencia y reducir los niveles de ruido.
El símbolo en el aparato o en su documentación indica que este producto no debe
tratarse como residuo doméstico, sino que debe entregarse en un punto de
recogida específico para el reciclaje de aparatos eléctricos y electrónicos. La
eliminación adecuada de este aparato ayudará a reducir el consumo de materias
primas y la contaminación ambiental. Para obtener información más detallada
sobre el reciclaje de este electrodoméstico, comuníquese con la oficina local de
su ciudad, el servicio de eliminación de desechos domésticos o la tienda donde
compró el electrodoméstico.
Piezas de repuesto
Utilice únicamente repuestos originales.
Reemplace los componentes antes de que se desgasten. Realice revisiones regulares de
mantenimiento, como se detalla en la sección “MANTENIMIENTO”.
Garantía
Para disfrutar de la garantía del FABRICANTE, los usuarios deberán seguir estrictamente
todas las instrucciones especificadas en este manual, en particular deberán:
- utilizar la campana únicamente para los fines previstos;
- realizar operaciones de mantenimiento continuas y escrupulosas;
- permitir el uso de la campana solo a personas con habilidades y conocimientos probados.
El incumplimiento de las instrucciones contenidas en este manual anulará inmediatamente la
garantía del fabricante.
INSTRUCCIONES DE INSTALACIÓN
- Las operaciones de instalación y conexión eléctrica deben ser realizadas de acuerdo
con estas instrucciones y por personal calificado y especializado.
- Use guantes protectores antes y durante la instalación.
- Controlar que no se coloque en el interior de la campana ningún material accesorio
suministrado con el aparato (manuales, accesorios, etc.): en tal caso, quítelo y
consérvelo.
56

- Las figuras que se muestran en este manual de instalación también pueden referirse a
una estética diferente del aparato: en cualquier caso, las instrucciones de uso,
instalación y mantenimiento siguen siendo las mismas.
Distancia mínima de seguridad de instalación
La distancia entre una placa eléctrica y la parte inferior de la campana debe ser como mínimo
de 550 mm, mientras que entre una placa de gas y la parte inferior de la campana debe ser
como mínimo de 650 mm.
La distancia de instalación recomendada entre la campana de techo y la placa de cocción es
de 1300 a 1500 mm, siendo la distancia máxima de 2000 mm.
Esta campana está diseñada para ser instalada en el techo tanto en la versión ASPIRANTE
con evacuación de humos al exterior como en la versión FILTRANTE adquiriendo el kit
correspondiente (E750000148).
57

INSTRUÇÃO DE CONTROLE
El control remoto llegará ya programado con la campana, si por alguna razón el control
remoto pierde la comunicación con la campana, realice el siguiente procedimiento:
· Desconecte la campana de la fuente de alimentación;
· Espere unos segundos y restaure la energía y dentro de 10 segundos presione los botones
"P1" y "PT" al mismo tiempo durante unos 3 segundos.
El mando a distancia volverá a estar operativo.
FUNCIONES
P0: Tecla ENCENDIDO/APAGADO DEL MOTOR.
Si se selecciona con el motor apagado, la pantalla muestra un cero “0” durante
aproximadamente 1 segundo.
P1: tecla para disminuir la velocidad del motor, si la campana está en 1ª velocidad apaga el
motor.
P2: tecla para aumentar la velocidad del motor, si la campana está apagada se enciende la 1ª
velocidad, al pulsar una segunda vez se activa la 2ª velocidad, al pulsar una tercera vez se
activa la 3ª velocidad, al pulsar una cuarta vez se activa la 4ª velocidad, al pulsar una la quinta
vez activa la 5ª velocidad (1ª velocidad intensiva) (**), la sexta pulsación activa la 6ª velocidad
(2ª velocidad intensiva) (**).
58

Los números de las velocidades seleccionadas aparecen en la pantalla (“1”, “2”, “3”, “4”, “5”,
“6”).
(**) Velocidades intensivas: la duración de las velocidades intensivas es de 6 minutos,
transcurridos los cuales la electrónica vuelve automáticamente a la 4ª velocidad.
PL: tecla ENCENDIDO/APAGADO DE LUCES
Intensidad de la luz: al presionar prolongadamente el botón "PL" con las luces encendidas,
la intensidad de la luz comenzará a disminuir hasta alcanzar el valor mínimo; al soltar el botón
se interrumpe el descenso de la intensidad luminosa. Una vez alcanzado el valor mínimo y
pulsando de nuevo la tecla "PL" durante un tiempo prolongado, la intensidad de la luz
comenzará a aumentar hasta alcanzar el valor máximo; si se suelta, se detiene en la
luminosidad alcanzada.
Color de luz: con la campana apagada y las luces apagadas, presione y mantenga
presionado el botón "PL" hasta que se encienda el LED en la campana para ingresar al menú
de luz dinámica. Con pulsaciones simples de la tecla “PL” tendrás la variación del tono de
color de la luz desde 2700°K hasta 4000°K en 10 pasos. Una vez alcanzado el tono deseado,
deberá esperar 10 segundos, el led de la campana dejará de parpadear y la función quedará
memorizada.
PC: Tecla ON/OFF AIRE FRESCO
Activación / Desactivación Aire Fresco: presionando prolongadamente el botón “PC”
con la campana apagada. Esta función permite encender el motor a 1ª velocidad
durante 10 minutos seguidos de 50 minutos en stand-by. Esta opción permanece
activa durante un periodo de 24 horas. Para desactivar la función Fresh Air, vuelva a
pulsar la tecla "PC" o "P0". Mientras que la función está activa, tanto con el motor en
marcha como en stand-by, el led del capó parpadeará cada 5 segundos.
Activación / Desactivación de Aire Limpio: pulsando el “PC” (aparece una “C” en el
display).
Cuando esta función está activada, el motor se ajusta a la velocidad máxima durante
unos 6 minutos, al final de los 6 minutos, el motor se apagará automáticamente.
Para desactivar esta función, presione la tecla “PC” o la tecla “P0”.
Nota: esta función solo se puede activar con la campana encendida y tiene prioridad
sobre todas las demás funciones activas del motor.
PT: botón TIMER (aparece una "T" en la pantalla)
El temporizador realiza una cuenta regresiva de 15 minutos y solo se puede activar con el
motor en marcha.
La duración de 15 minutos no cambia incluso si se cambian las velocidades durante la cuenta
regresiva. Al final de los 15 minutos, el motor se detiene.
PD: Pantalla
Activación / desactivación del zumbador: por defecto la campana se entrega con el
zumbador activo, si desea desactivar, con la campana apagada, encienda las luces
presionando la tecla "PL", luego presione y mantenga presionadas las teclas "PT" y "P1". "
hasta el encendido del led de la campana sin señal acústica. Si desea reactivar, repita la
operación descrita anteriormente, el LED se encenderá y se emitirá la señal acústica para
confirmar.
Nota: Para ahorrar energía de la batería, la pantalla permanece activa durante
aproximadamente 4 segundos, después de lo cual se apaga, para ver las funciones activas,
seleccione cualquier tecla y la pantalla se reactiva.
59

INDICACIÓN LED DE CAMPANA
En el cuerpo de la campana hay un LED que indica el estado de funcionamiento del motor
funcionando a velocidad según estos criterios:
Motor APAGADO: LED apagado;
Motor 1ª velocidad Color LED azul;
Motor 2ª velocidad Color LED verde;
Motor 3ª velocidad Color LED amarillo;
Motor 4ª velocidad Color LED rojo;
Motor 5ª Velocidad (Intensivo) Color LED magenta (Parpadea intermitentemente durante 1
segundo durante 6 minutos y luego vuelve a 4ª velocidad).
Motor 6ª Velocidad (Intensivo) Color LED rosa (Parpadea intermitentemente durante 1
segundo durante 6 minutos y luego vuelve a 4ª velocidad).
Al activar el temporizador, el LED de color correspondiente, dependiendo de la velocidad
establecida, parpadea de forma intermitente durante 1 segundo, al final de 15 minutos, en
velocidades no intensivas, el motor se apaga y no la iluminación. En cuanto a las velocidades
intensivas, cuando se activa el temporizador, se mantiene en la velocidad configurada durante
los primeros 6 minutos y luego finaliza los 9 minutos restantes en la 4ª velocidad.
En la función Clean Air, el LED azul claro permanece fijo, el motor pasa a la 6ª velocidad y
después de 6 minutos se apaga el motor y no la iluminación.
En la función Fresh Air, el LED azul parpadea de forma intermitente durante 5 segundos, con
la capota apagada, el motor arranca a 1ª velocidad durante 10 minutos y luego permanece
apagado durante 50 minutos y así sucesivamente hasta que se apaga la función.
Señal de limpieza del filtro antigrasa metálico
Después de 30 horas de funcionamiento, el LED verde comenzará a parpadear durante 20
segundos indicando que se deben limpiar los filtros. Para restablecer los filtros, con la
campana apagada, presione la tecla “P0” durante 3 segundos mientras el LED parpadea.
Señal de limpieza de filtro cerámico o de larga duración
Después de 120 horas de funcionamiento, el LED rojo comenzará a parpadear durante 20
segundos indicando que se deben limpiar los filtros. Para restablecer los filtros, con la
campana apagada, presione la tecla “P0” durante 3 segundos mientras el LED parpadea.
Cada vez que se pulsa un botón del mando a distancia, la campana emitirá una señal acústica
para confirmar la recepción de la señal.
60

MANTENIMIENTO
ADVERTENCIA! Antes de cualquier operación de limpieza o mantenimiento, desconecte la
alimentación de la campana quitando el cable o desconectando el interruptor general de la
vivienda. La limpieza y el mantenimiento ordinario no deben ser realizados por niños sin
supervisión.
Limpieza
El producto debe limpiarse con frecuencia tanto interna como externamente con un paño
humedecido con agua tibia y detergente líquido neutro no abrasivo.
Los filtros de grasa metálicos
Tiene la función de retener las partículas grasas de los humos de cocción y preservar el motor
del aspirador, por lo que está sujeto a obstrucciones en tiempos variables en relación al uso
del aparato. Los filtros se pueden lavar en el lavavajillas con ciclos de lavado cortos y a baja
temperatura, como máximo cada 2 meses para evitar el riesgo de incendio. Después de
algunos lavados, el filtro podría cambiar de color debido a las sales y detergentes del
lavavajillas. El cambio de color no afecta la funcionalidad del filtro de grasa.
Filtros Cerámicos
Tienen la función de retener los olores y purificar el aire que se devuelve al ambiente.
Los filtros cerámicos se pueden limpiar en el horno a una temperatura de 180/200 °C durante
unos 45/60 minutos. Es recomendable reemplazar los filtros cerámicos cada 5 años para
asegurar la mejor eliminación de olores.
Encendiendo
La campana está equipada con iluminación basada en tecnología LED de alta eficiencia, bajo
consumo y muy alta durabilidad en condiciones normales de uso.
Para el reemplazo, comuníquese con el departamento de servicio.
LA EMPRESA FABRICANTE no se hace responsable de los daños causados por una
instalación o uso inadecuado de este aparato.
PROBLEMA POSIBLES CAUSAS SOLUCIONES
Las luces de la campana
extractora no se encienden
SOLUCIÓN DE PROBLEMAS
El conector de la lámpara está
desconectado
El interruptor de encendido / apagado
está en la posición 0
61
Conecte el conector de la lámpara
como se muestra en la página 5, Fig.5
del manual
Coloque el interruptor de encendido /
apagado en la posición 1 como se
muestra en la página 4, Imagen 4 del
manual de instrucciones

El motor no funciona
Sin electricidad
Compruebe el controlador de
iluminación
Sincronice el control remoto como se
El control remoto no está sincronizado
describe en el manual de instrucciones
de la página 20
Conecte el conector del motor como se
Conector desconectado
muestra en la página 6, Imagen 7 del
manual de instrucciones
Sin electricidad Verifique el controlador del motor
El control remoto no
funciona
La campana no funciona
La campana aspira poco
aire
El LED verde parpadea
durante 20 segundos
El LED rojo parpadea
durante 20 segundos
Llega la electricidad pero el motor no
funciona
Reemplazar el motor
Reemplace la batería como se muestra
en la página 12, Imagen 20 del manual
Batería baja del control remoto
de instrucciones.
Asegúrese de que la batería esté
insertada con la polaridad correcta.
El control remoto no está sincronizado
con la campana
Sincronice el control remoto como se
describe en el manual de instrucciones
de la página 20
Coloque el interruptor de encendido /
El interruptor de encendido / apagado
está en la posición 0
apagado en la posición 1 como se
muestra en la página 4, Imagen 4 del
manual de instrucciones
Sin electricidad Verifique el cable de alimentación
El control remoto no está sincronizado
con la campana
Problemas del sistema eléctrico
Sincronice el control remoto como se
describe en el manual de usuario de la
página 20
Verifique la fuente de alimentación en
la placa electrónica
Coloque el interruptor de encendido /
El interruptor de encendido / apagado
está en la posición 0
apagado en la posición 1 como se
muestra en la página 4, Imagen 4 del
manual de instrucciones
Retire los filtros como se muestra en la
Filtros de aluminio sucios
página 11, Imagen 17 del manual de
operación y lave los filtros.
Reinicie los filtros cuando la campana
esté apagada presionando el botón
Indicador de limpieza del filtro de
grasa de metal
"P0" en el control remoto durante 3
segundos mientras el LED parpadea
como se muestra en la página 22 del
manual de instrucciones.
Reinicie los filtros cuando la campana
esté apagada presionando el botón
Indicador de limpieza de filtro
cerámico o de larga duración
“P0” en el control remoto durante 3
segundos mientras el LED parpadea
como se muestra en la página 22 del
manual del usuario.
62

PORTUGUÊS
AVISO DE SEGURANÇA
- Este aparelho foi concebido para uso doméstico no ambiente
doméstico. Nunca use o aparelho para uso profissional ou
industrial.
- Este aparelho pode ser operado por crianças com mais de 8
anos e por pessoas com deficiências físicas, sensoriais e
mentais ou sem a experiência e competência necessárias
apenas se devidamente supervisionadas e se tiverem
recebido as instruções necessárias para o uso seguro do
aparelho e informados dos potenciais riscos e avisos
associados.
- As crianças não devem brincar com o aparelho.
- As instruções de segurança e advertência especificadas no
manual do usuário devem ser rigorosamente seguidas.
- Atenção: Não utilizar parafusos e dispositivos de fixação
conforme
instruções especificadas neste manual, pode resultar em risco
elétrico.
- O aparelho não deve ser utilizado por pessoas (incluindo
crianças) com deficiências físicas, sensoriais e mentais ou
sem a experiência e competência necessárias, a menos que
tenham sido devidamente supervisionadas e instruídas.
- A limpeza cuidadosa do aparelho após cada utilização é
muito importante, pois a falta de limpeza regular
63

pode resultar em risco de incêndio.
- Certifique se de que todos os componentes do aparelho não
estão danificados. Nesse caso, não faça a instalação e entre
em contato com um centro de assistência técnica qualificado.
- Os instaladores qualificados devem realizar os trabalhos de
carpintaria e instalação necessários em plena conformidade
com as directivas em vigor.
- Não conecte o aparelho à rede elétrica durante a instalação.
- Desligue o aparelho da alimentação eléctrica antes de
efectuar qualquer operação de limpeza ou manutenção.
- Necessidade de permitir a desconexão do aparelho da rede
eléctrica após a instalação, através de uma ficha acessível ou
interruptor geral.
- O limpador a vapor não deve ser usado.
- Não use abrasivos fortes ou raspadores de metal afiados
para limpar o vidro, pois podem arranhar a superfície, o que
pode causar a quebra do vidro.
- CUIDADO: Certifique-se de que o aparelho esteja
desconectado (OFF) antes de substituir a lâmpada para evitar
a possibilidade de choque elétrico.
- Não remova o plástico protetor do exaustor até que esteja
completamente instalado, se este plástico não estiver presente
em áreas que possam ter risco de danos durante a instalação.
Isso evitará danos à parte externa do aparelho, algo que não
será coberto pela garantia.
64

AVISOS PARA CONEXÃO ELÉTRICA
- As conexões elétricas devem ser aprovadas por um
eletricista qualificado antes de usar o aparelho.
- A ligação eléctrica deve ser efectuada por apenas um
electricista qualificado, que será responsável pela correcta
ligação eléctrica do aparelho à rede eléctrica.
- Antes de conectar o aparelho à rede elétrica, verifique se os
valores de tensão, frequência e potência especificados na
etiqueta de classificação do aparelho são compatíveis com a
fonte de alimentação e tomada doméstica.
- O cabo de alimentação deve ser conectado a um disjuntor
magnetotérmico omnipolar com uma distância entre contatos
de comutação de pelo menos 3 mm.
- Caso o cabo de alimentação esteja danificado, deverá ser
substituído pelo fabricante ou pelo serviço de assistência
técnica ou por pessoal especializado.
- O cabo de alimentação não deve entrar em contato com
superfícies cuja
temperatura superior a 50°C após a instalação do aparelho.
AVISOS PARA OPERAÇÃO
- A ventilação deve ser fornecida convenientemente na sala se
um exaustor e aparelhos movidos a gás ou outro combustível
forem usados simultaneamente.
- Se o exaustor for utilizado simultaneamente com aparelhos
que queimam gás ou outros combustíveis, o local deve ter
65

ventilação suficiente (este aviso não é aplicável para
exaustores instalados na versão filtrante).
- Cumpra qualquer norma local em vigor sobre operações de
exaustão de ar.
- Se o aparelho for usado no modo de recirculação, certifiquese de que o pó de exaustão esteja em boas condições, caso
não tenha sido usado por muito tempo.
- Não é permitido cozinhar alimentos em chamas abertas
(flambe) sob o exaustor.
- Nunca deixe panelas sem vigilância com a placa ligada: o
óleo contido na panela pode sobreaquecer e queimar. O risco
de incêndio é bastante maior quando o óleo é usado.
- Filtros de gordura manutenção adequada e limpeza precisa
são extremamente importantes.
- Limpe regularmente o exaustor e as outras superfícies para
evitar qualquer risco de incêndio.
- ATENÇÃO: com a placa ligada, as partes acessíveis do
exaustor podem ficar quentes.
- Não é permitida a conexão do dispositivo de exaustão a
dutos ou canais de exaustão e tubos para ventilação do
ambiente.
- O ar extraído não deve ser conduzido para um duto de
circulação de ar quente.
- O ar não deve ser descarregado em uma chaminé utilizada
para fumos de electrodomésticos movidos a gás ou outros
66

combustíveis (isto não é aplicável no caso de exaustores que
funcionem no modo de recirculação).
- Ventile adequadamente o ambiente quando um exaustor e
outros.
- A pressão negativa máxima na sala não deve exceder 4 Pa
(4x10⁻⁵ bar).
- O local onde será instalado o exaustor deverá ser dotado de
uma tomada de ar cuja capacidade seja superior à do
exaustor do exaustor. É estritamente proibido colocar os
membros ou qualquer outra parte do
corpo humano, bem como objetos de cozinha ou outros
objetos, perto da unidade extraível do exaustor (se o seu
aparelho estiver equipado com ele).
- Exaustores e outros exaustores de fumaça de cozinha
podem afetar adversamente a operação segura de aparelhos
que queimam gás ou outros combustíveis (incluindo aqueles
em outras salas) devido ao refluxo dos gases de combustão.
Esses gases podem potencialmente resultar em
envenenamento por monóxido de carbono. Após a instalação
de um exaustor ou outro exaustor de fumaça de cozinha, o
funcionamento de aparelhos de gás de combustão aberta
deve ser testado por uma pessoa competente para garantir
que não ocorra refluxo de gases de combustão.
67

Para um uso seguro do produto e conhecer todas as
características e desempenhos:
- Leia atentamente este manual de instruções para uso
antes da instalação e comissionamento.
- Atenção especialmente aos avisos de segurança!
- O aparelho só pode ser utilizado conforme descrito neste
manual de instruções.
- Guarde o manual de instruções.
- Se entregar o aparelho a terceiros, entregue também o
manual de instruções.
Estimado cliente,
Obrigado por nos escolher!
Parabéns por ter adquirido o seu novo exaustor de cozinha.
Para utilizar o aparelho com segurança e conhecer melhor todas as suas características e
desempenhos:
- Leia atentamente este manual de instruções antes de instalar e ligar o aparelho.
- Atenção especial deve ser dada aos avisos de segurança!
- O aparelho só deve ser usado de acordo com as instruções fornecidas neste manual do
usuário.
- Guarde este manual de instruções para referência futura.
- Caso o aparelho seja cedido a terceiros, o manual de instruções também deverá ser
fornecido.
INFORMAÇÕES GERAIS
Ao trocar informações com o FABRICANTE do aparelho, consulte o número de série e os
dados de identificação especificados na etiqueta de classificação.
Este aparelho foi concebido, testado e fabricado em total conformidade com todas as normas
relevantes sobre:
• Segurança: CEI/EN 60335-1; CEI/EN 60335-2-31;
• Desempenho: CEI/EN 61591; CEI/EN 60704-1; CEI/EN 60704-2-13; EN 50564; CEI 62301.
EMC: EN 55014-1; EN 55014-2; CEI/EN 61000-3-2; CEI/EN 61000-3-3.
Recomendações para o uso adequado do aparelho visando a redução do impacto ambiental:
ao começar a cozinhar, ligue o exaustor na velocidade mínima e desligue-o apenas alguns
minutos depois de terminar de cozinhar. Aumente a velocidade do exaustor somente em caso
de grandes quantidades de vapores e fumaças e use a função booster somente quando for
absolutamente necessário. Limpe o filtro de gordura somente quando necessário, para manter
68

sua eficiência ao longo do tempo. Use um sistema de tubulação com o diâmetro máximo
especificado neste manual, a fim de aumentar a eficiência e reduzir os níveis de ruído.
O símbolo no aparelho ou em sua documentação indica que este produto não
deve ser tratado como lixo doméstico, mas deve ser entregue em um ponto de
coleta específico para reciclagem de equipamentos elétricos e eletrônicos. A
eliminação adequada deste aparelho ajudará a reduzir o consumo de matériasprimas e a poluição ambiental. Para obter informações mais detalhadas sobre a
reciclagem deste aparelho, entre em contato com a prefeitura local, o serviço de
coleta de lixo doméstico ou a loja onde você comprou o aparelho.
Partes separadas
Use apenas peças de reposição originais.
Substitua os componentes antes que eles se desgastem. Realize verificações regulares de
manutenção, conforme detalhado na seção “MANUTENÇÃO”.
Garantia
Para usufruir da garantia do FABRICANTE, os usuários devem seguir rigorosamente todas as
instruções especificadas neste manual, em particular devem:
- utilize o exaustor apenas para os fins a que se destina;
- realizar operações de manutenção contínuas e escrupulosas;
- permitir a utilização do exaustor apenas a pessoas com competências e conhecimentos
comprovados.
O não cumprimento das instruções contidas neste manual anulará imediatamente a garantia
do fabricante.
INSTRUÇÕES DE INSTALAÇÃO
- As operações de instalação e conexão elétrica devem ser realizadas de acordo com
estas instruções e por pessoal qualificado e especializado.
- Use luvas de proteção antes e durante a instalação.
- Certifique-se de que nenhum material acessório fornecido com o aparelho (manuais,
acessórios, etc.) seja colocado dentro do exaustor: neste caso, retire-os e guarde-os.
- As figuras apresentadas neste manual de instalação também podem referir-se a
diferentes estéticas do aparelho: em qualquer caso, as instruções de uso, instalação e
manutenção permanecem as mesmas.
Distância mínima de segurança de instalação
A distância entre uma placa elétrica e a parte inferior do exaustor deve ser de pelo menos 550
mm, enquanto entre uma placa a gás e a parte inferior do exaustor deve ser de, no mínimo,
650 mm. A distância de instalação recomendada entre o exaustor e a placa é entre 1300 e
1500mm, enquanto a distância máxima é de 2000mm.
Este exaustor foi concebido para ser instalado no tecto tanto na versão ASPIRAÇÃO com
evacuação de fumos para o exterior como na versão FILTRANTE mediante a aquisição do
respectivo kit (E750000148).
69

INSTRUÇÃO DE CONTROLE
O controle remoto chegará já programado com o exaustor, se por algum motivo o controle
remoto perder a comunicação com o exaustor, execute o seguinte procedimento:
· Desconecte o exaustor da rede elétrica;
· Aguarde alguns segundos e restaure a energia e dentro de 10 segundos pressione os
botões “P1” e “PT” ao mesmo tempo por cerca de 3 segundos.
O controle remoto estará operacional novamente.
70

FUNÇÕES
P0: Tecla LIGA/DESLIGA MOTOR.
Se selecionado com o motor desligado, o display mostra um zero “0” por cerca de 1 segundo.
P1: tecla para diminuir a velocidade do motor, se o exaustor estiver na 1ª velocidade desliga o
motor.
P2: tecla para aumentar a velocidade do motor, se o exaustor estiver desligado liga a 1ª
velocidade, pressionando uma segunda vez ativa a 2ª velocidade, pressionando uma terceira
vez ativa a 3ª velocidade, pressionando uma quarta vez ativa a 4ª velocidade, pressionando
um quinta vez ativa a 5ª velocidade (1ª velocidade intensiva) (**), pressionando uma sexta vez
ativa a 6ª velocidade (2ª velocidade intensiva) (**).
Os números das velocidades selecionadas aparecem no display (“1”, “2”, “3”, “4”, “5”, “6”).
(**) Velocidades intensivas: a duração das velocidades intensivas é de 6 minutos, após os
quais a electrónica regressa automaticamente à 4ª velocidade.
PL: Tecla LIGAR/DESLIGAR LUZ
Intensidade da luz: pressionando o botão "PL" por muito tempo com as luzes acesas, a
intensidade da luz começará a diminuir até atingir o valor mínimo; soltar o botão interrompe a
descida da intensidade da luz. Uma vez atingido o valor mínimo e pressionando novamente a
tecla "PL" por muito tempo, a intensidade da luz começará a aumentar até atingir o valor
máximo; se liberado, ele para no brilho alcançado.
Cor da luz: com o exaustor e as luzes apagadas, pressione e segure o botão "PL" até que o
LED do exaustor se acenda para entrar no menu de luz dinâmica. Apertando uma única vez a
tecla “PL” você terá a variação do tom de cor da luz de 2700°K a 4000°K em 10 passos. Uma
vez alcançado o tom desejado, deverá aguardar 10 segundos, o LED da coifa deixará de
piscar e a função será memorizada.
PC: Tecla ON/OFF AR FRESCO
Ativação / Desativação do Ar Fresco: pressionar o botão “PC” por um longo tempo
com o capô desligado. Esta função permite ligar o motor na 1ª velocidade durante 10
minutos seguidos de 50 minutos em stand-by. Esta opção permanece ativa durante
um período de 24 horas. Para desativar a função Fresh Air, pressione novamente a tecla
"PC" ou "P0". Enquanto o função estiver ativa, tanto com o motor em funcionamento
quanto em stand-by, o LED do capô piscará a cada 5 segundos.
Ativação / Desativação do Ar Limpo: pressionando o “PC” (aparece um “C” no
display).Quando esta função é ativada, o motor é ajustado na velocidade máxima por
cerca de 6 minutos, ao final dos 6 minutos o motor desliga automaticamente.
Para desativar esta função, pressione a tecla “PC” ou a tecla “P0”.
Nota: esta função só pode ser ativada com a coifa ligada e tem prioridade sobre todas
as outras funções ativas do motor.
PT: Botão TIMER (aparece um "T" no visor)
O temporizador realiza uma contagem regressiva de 15 minutos e só pode ser ativado com o
motor em funcionamento.
A duração de 15 minutos não muda mesmo se as velocidades forem alteradas durante a
contagem regressiva. Ao final dos 15 minutos o motor para.
PD: Exibir
Ativação / desativação do buzzer: por defeito o exaustor é fornecido com o buzzer ativo, se
desejar desativar, com o exaustor desligado, acenda as luzes pressionando a tecla "PL",
depois pressione e segure as teclas "PT" e "P1 " até o acendimento do led da coifa sem sinal
71

acústico. Se desejar reativar, repita a operação descrita acima, o LED acenderá e será
emitido um sinal acústico para confirmar.
Nota: Para economizar bateria, o display permanece ativo por cerca de 4 segundos, após o
que desliga, para visualizar as funções ativas selecione qualquer tecla e o display é reativado.
INDICAÇÃO DE LED DO CAPÔ
No corpo da coifa existe um LED que indica o estado de funcionamento do motor funcionando
em velocidade de acordo com estes critérios:
Motor DESLIGADO: LED apagado;
Cor do LED azul do motor de 1ª velocidade;
Cor do LED verde do motor de 2ª velocidade;
Cor do LED amarelo do motor de 3ª velocidade;
Cor do LED vermelho do motor de 4ª velocidade;
Motor de 5ª velocidade (Intensivo) LED de cor magenta (pisca intermitentemente por 1
segundo por 6 minutos e depois retorna para a 4ª velocidade).
Motor de 6ª velocidade (Intensivo) LED cor-de-rosa (pisca intermitentemente por 1 segundo
por 6 minutos e depois retorna à 4ª velocidade).
Ao acionar o timer, o LED de cor correspondente, dependendo da velocidade definida, pisca
intermitentemente por 1 segundo, ao final de 15 minutos, em velocidades não intensivas, o
motor desliga e não a iluminação. Quanto às velocidades intensivas, quando o timer é
ativado, ele permanece na velocidade definida nos primeiros 6 minutos e depois termina os 9
minutos restantes na 4ª velocidade.
Na função Clean Air, o LED azul claro permanece fixo, o motor passa para 6ª velocidade e
após 6 minutos o motor e não a iluminação desliga.
Na função Fresh Air, o LED Azul pisca intermitentemente por 5 segundos, com o capô
desligado, o motor arranca em 1ª marcha por 10 minutos e depois permanece desligado por
50 minutos e assim sucessivamente até que a função seja desligada.
Sinal de limpeza do filtro de gordura de metal
Após 30 horas de operação, o LED Verde começará a piscar por 20 segundos indicando a
limpeza dos filtros. Para zerar os filtros, com a coifa desligada, pressione a tecla “P0” por 3
segundos enquanto o LED estiver piscando.
Sinal de limpeza do filtro de longa duração ou cerâmica
Após 120 horas de operação, o LED Vermelho começará a piscar por 20 segundos indicando
a limpeza dos filtros. Para zerar os filtros, com a coifa desligada, pressione a tecla “P0” por 3
segundos enquanto o LED estiver piscando.
Cada vez que um botão do controle remoto for pressionado, o exaustor emitirá um sinal
acústico para confirmar a recepção do sinal.
72

MANUTENÇÃO
AVISO! Antes de qualquer operação de limpeza ou manutenção, retire a alimentação do
exaustor retirando o cabo ou desligando o interruptor geral da casa. A limpeza e a
manutenção ordinária não devem ser feitas por crianças sem supervisão.
Limpeza
A limpeza interna e externa do produto deve ser frequente com pano umedecido em água
morna e detergente líquido neutro não abrasivo.
Os filtros metálicos de gordura
Tem a função de reter as partículas de gordura dos fumos da cozedura e preservar o motor
do aspirador, pelo que está sujeito a entupimentos em tempos variáveis em relação à
utilização do aparelho. Os filtros podem ser lavados na máquina de lavar louça com ciclos de
lavagem curtos e a baixas temperaturas, o mais tardar a cada 2 meses para evitar o risco de
incêndio. Após algumas lavagens, o filtro pode mudar de cor, devido aos sais e detergentes
da máquina de lavar louça. A mudança de cor não afeta a funcionalidade do filtro de gordura.
Filtros de cerâmica
Eles têm a função de reter odores e purificar o ar que é devolvido ao ambiente.
Os filtros cerâmicos podem ser limpos no forno a uma temperatura de 180/200°C durante
cerca de 45/60 minutos. É recomendável substituir os filtros cerâmicos a cada 5 anos para
garantir a melhor eliminação de odores.
Iluminação
O exaustor está equipado com iluminação baseada na tecnologia LED de alta eficiência, baixo
consumo de energia e altíssima durabilidade em condições normais de uso.
Para substituição, contacte o departamento de assistência.
O FABRICANTE DA EMPRESA não pode ser responsabilizado por quaisquer danos
causados por uma instalação ou uso inadequado deste aparelho.
SOLUÇÃO DE PROBLEMAS
PROBLEMA CAUSAS POSSÍVEIS SOLUÇÕES
O conector da lâmpada está
desconectado
Conecte o conector da lâmpada
conforme mostrado na página 5, Fig. 5
do manual
Coloque o interruptor liga/desliga na
O interruptor liga/desliga está na
As luzes do exaustor não
acendem
posição 0
Sem eletricidade Verifique o driver de iluminação
O controle remoto não está
sincronizado
73
posição 1 conforme mostrado na
página 4, Figura 4 do manual de
instruções
Sincronize o controle remoto conforme
descrito no manual de instruções da
página 20

O motor não funciona
Ligue o conector do motor conforme
Conector desconectado
Sem eletricidade Verifique o driver do motor
mostrado na página 6, Figura 7 do
manual de instruções
A eletricidade chega, mas o motor não
funciona
Bateria baixa do controle remoto
O controle remoto não
está funcionando
Capuz não está
funcionando
Capô aspira pouco ar Filtros de alumínio sujos
LED verde pisca por 20
segundos
LED vermelho pisca por 20
segundos
O controle remoto não está
sincronizado com o capô
O interruptor liga/desliga está na
posição 0
Sem eletricidade Verifique o cabo de alimentação
O controle remoto não está
sincronizado com o capô
Problemas no sistema elétrico
O interruptor liga/desliga está na
posição 0
Indicador de limpeza do filtro de
gordura de metal
Indicador de limpeza do filtro de longa
duração ou cerâmica
Substitua o motor
Substitua a bateria conforme mostrado
na página 12, Figura 20 do manual de
instruções.
Certifique-se de que a bateria esteja
inserida com a polaridade correta.
Sincronize o controle remoto conforme
descrito no manual de instruções da
página 20
Coloque o interruptor liga/desliga na
posição 1 conforme mostrado na
página 4, Figura 4 do manual de
instruções
Sincronize o controle remoto conforme
descrito no manual do usuário a partir
da página 20
Verifique a alimentação na placa
eletrônica
Coloque o interruptor liga/desliga na
posição 1 conforme mostrado na
página 4, Figura 4 do manual de
instruções
Remova os filtros conforme indicado na
página 11, Figura 17 do manual de
operação e lave os filtros.
Reajuste os filtros quando o exaustor
estiver desligado pressionando o botão
"P0" no controle remoto por 3
segundos enquanto o LED pisca
conforme mostrado na página 22 do
manual de instruções.
Reajuste os filtros quando o exaustor
estiver desligado pressionando o botão
“P0” no controle remoto por 3
segundos enquanto o LED pisca
conforme mostrado na página 22 do
manual do usuário.
74

ITALIANO
AVVERTENZA DI SICUREZZA
- L'apparecchio è destinato ad essere utilizzato
esclusivamente per uso domestico e non per uso
professionale.
- Questo apparecchio può essere utilizzato da bambini di età
superiore agli 8 anni e da persone con facoltà fisiche,
sensoriali e mentali ridotte o prive della necessaria esperienza
e competenza solo se adeguatamente sorvegliati e se sono
state fornite loro le necessarie istruzioni per l'uso sicuro
dell'apparecchio e informato dei potenziali rischi e avvertenze
associati.
- I bambini non devono giocare con l'apparecchio.
- Le istruzioni di sicurezza e di avvertenza specificate nel
manuale dell'utente devono essere rigorosamente seguite.
- Attenzione: mancato utilizzo di viti e dispositivi di fissaggio
secondo istruzioni specificate in questo manuale, può
comportare rischi elettrici.
- L'apparecchio non deve essere utilizzato da persone
(bambini compresi) con facoltà fisiche, sensoriali e mentali
compromesse o prive della necessaria esperienza e
competenza, a meno che non siano state adeguatamente
controllate e istruite.
- È importante effettuare una pulizia adeguata del prodotto
75

dopo ogni utilizzo, poiché la mancanza di pulizia può generare
pericoli di incendio.
- Assicurarsi che tutti i componenti dell’apparecchio non siano
danneggiati. In caso contrario non proseguire con
l’installazione e contattare un centro di assistenza qualificato.
- L'installatore specializzato deve eseguire tutti i necessari
lavori di carpenteria e montaggio tenendo conto delle direttive
esistenti.
- Durante l'installazione non collegare l'apparecchio alla rete
elettrica.
- Prima di qualsiasi operazione di pulizia o manutenzione,
disconnettere l’apparecchio dalla rete di alimentazione.
- Consentire lo scollegamento dell’apparechiuo alla rete
elettrica dopo l’installazione tramite una spina accessibile o
interruttore generale.
- Non utilizzare pulitore a vapore.
- Non utilizzare abrasivi aggressivi o raschietti metallici affilati
per pulire il vetro poiché possono graffiare la superficie,
causando la rottura del vetro.
- ATTENZIONE: Assicurarsi che l'apparecchio sia scollegato
(OFF) prima di sostituire la lampada per evitare la possibilità di
scosse elettriche.
- Non rimuovere la plastica protettiva dalla cappa fino a
quando non è completamente installata, se questa plastica
non è presente in queste aree si potrebbero avere rischi di
76

danneggiamento durante l'installazione. Ciò eviterà danni
estetici dell'apparecchio, cosa che non sarà coperta dalla
garanzia.
AVVERTENZE PER IL COLLEGAMENTO ELETTRICO
- I collegamenti elettrici devono essere approvati per il sistema
in uso da un elettricista qualificato prima dell'uso.
- Il collegamento elettrico deve essere eseguito solo da un
elettricista qualificato il quale si assume la responsabilità della
corretta installazione elettrica del prodotto alla rete di
alimentazione.
- Prima di collegare l'apparecchio all'alimentazione elettrica:
verificare che i valori di tensione, frequenza e potenza elettrica
indicati sull'etichetta dati dell’apparecchio siano compatibili con
l'alimentazione elettrica e la presa.
- Il cavo di alimentazione deve essere collegato ad un
interruttore magnetotermico omnipolare con una distanza tra i
contatti di almeno 3 mm.
- Se il cavo di alimentazione danneggiato, deve essere sostituito
dal costruttore, dal servizio di assistenza o da personale
specializzato.
- Quando il prodotto è installato il cavo di alimentazione non
deve essere in contatto con superfici con temperatura superiore
a 50°C.
AVVERTENZE PER IL FUNZIONAMENTO
- Assicurare una ventilazione sufficente all’interno della stanza
77

se la cappa viene utilizzata contemporaneamente con
apparrecchi alimentati a gas o altro combustibile.
- Se la cappa viene utilizzata contemporaneamente ad
apparecchi che bruciano gas o altri combustibili, il locale deve
avere una sufficiente aereazione (tale avvertenza non è
applicabile per cappe istallate in versione filtrante).
- Rispettare tutte le normative locali sulle operazioni di scarico
dell'aria.
- Se il prodotto viene utilizzato in modalità di ricircolo, assicurarsi
della buona condizione del condotto di scarico nel caso in cui
sia rimasto fermato per lungo tempo.
- Non è consentito cuocere cibi su fiamme libere (flambe) sotto
la cappa. Quando il piano cottura è in funzione non lasciare mai
la pentola incustodita: l'olio contenuto nella pentola può
surriscaldarsi e infiammarsi. Quando si utilizza l’olio, il rischio di
incendi è più elevato.
- È importante eseguire una corretta manutenzione e pulire i filtri
antigrasso.
- Per evitare il pericolo di incendio è necessario pulire
frequentemente la cappa e le altre superfici.
- ATTENZIONE: quando il piano di cottura è in funzione le parti
accessibili della cappa possono diventare calde.
- È vietato collegare lo scarico a condotti o canali di scarico e
tubi per la ventilazione delle stanze.
- L'aria evacuata non deve essere convogliata in un condotto
78

di circolazione ad aria calda.
- L'aria non deve essere scaricata in una canna fumaria usata
per l'esaurimento di fumi dagli elettrodomestici che bruciano gas
o altri combustibili (tale avvertenza non è applicabile per cappe
istallate in versione filtrante).
- Garantire una corretta aereazione della stanza se la cappa e
altri apparecchi non alimentati da elettricità vengono utilizzati
contemporaneamente.
- La pressione negativa massima nel locale non deve superare
i 4 Pa (4x10⁻⁵ bar).
- La stanza in cui deve essere installata la cappa deve avere un
ingresso di aria avente una portata maggiore a quella di scarico
dalla cappa. È assolutamente vietato collocare gli arti o qualsiasi
altra parte del corpo o del corpo umano, oggetti per la cottura o
altri oggetti in prossimità dell'unità estraibile della cappa (se
presente nella versione del prodotto).
- Le cappe aspiranti e altri aspiratori di fumi di cottura possono
influire negativamente sul funzionamento sicuro degli
apparecchi a gas o altri combustibili (compresi quelli in altre
stanze) a causa del riflusso dei gas di combustione. Questi gas
possono potenzialmente provocare avvelenamento da
monossido di carbonio. Dopo l'installazione di una cappa
aspirante o di un altro aspiratore di fumi di cottura, il
funzionamento degli apparecchi a gas di scarico aperti deve
essere testato da una persona competente per garantire che
79

non si verifichi il riflusso dei gas di combustione.
Per un impiego sicuro del prodotto e per conoscere tutte le
caratteristiche e prestazioni:
- Leggere attentamente il presente libretto di istruzione per
l’uso prima dell’istallazione e della prima messa in funzione.
- Attenzione soprattutto alle avvertenze per la sicurezza!
- E’ consentito utilizzare l’apparecchio solo come descritto
in questo libretto di istruzioni per l’uso.
- Conservare il manuale di istruzione.
- Se cedi l’apparecchio a terzi, consegnare anche il libretto
di istruzione.
Caro Cliente,
Vi ringraziamo per la vostra fiducia!
Congratulazioni per l’acquisto di questa nuova Cappa.
Per un impiego sicuro del prodotto e per conoscere tutte le caratteristiche e prestazioni:
- Leggere attentamente il presente libretto di istruzione per l’uso prima dell’installazione e della
prima messa in funzione.
- Attenzione soprattutto alle avvertenze per la sicurezza!
- E’ consentito utilizzare l’apparecchio solo come descritto in questo libretto di istruzioni per
l’uso.
- Conservare il manuale di istruzione.
- Se cedi l’apparecchio a terzi, consegnare anche il libretto di istruzione.
INFORMAZIONI GENERALI
In caso di scambio di informazioni con il Costruttore dell’apparecchiatura fare riferimento al
numero di serie ed ai dati identificativi riportati sulla targa dati del prodotto.
Apparecchiatura progettata, testata e realizzata nel rispetto delle norme sulla:
· Sicurezza: CEI/EN 60335-1; CEI/EN 60335-2-31;
· Prestazione: CEI/EN 61591; CEI/EN 60704-1; CEI/EN 60704-2-13; EN 50564; CEI 62301.
EMC: EN 55014-1; EN 55014-2; CEI/EN 61000-3-2; CEI/EN 61000-3-3.
Suggerimenti per un corretto utilizzo al fine di ridurre l’impatto ambientale: quando iniziate a
cuocere, accendere la cappa a velocita minima, lasciandola accesa per alcuni minuti anche
80

dopo il termine della cottura. Aumentare la velocita solo in caso di grandi quantità di vapore e
fumo, utilizzando la funzione booster solo in casi estremi. Per mantenere ben efficiente il filtro
antigrasso, pulirlo in caso di necessita. Per ottimizzare l’efficienza e minimizzare i rumori,
utilizzare il diametro massimo del sistema di canalizzazione indicato in questo manuale.”
Il simbolo sul prodotto o sulla documentazione di accompagnamento indica che
questo prodotto non deve essere trattato come rifiuto domestico ma deve essere
conferito presso un apposito centro di raccolta per il riciclaggio di apparecchiature
elettriche ed elettroniche. Lo smaltimento corretto contribuisce a ridurre il consumo
di materie prime e l’inquinamento ambientale. Per informazioni più dettagliate per il
recupero e riciclaggio di questo prodotto, contattare l’idoneo ufficio locale, il servizio
di raccolta dei rifiuti domestici o il negozio dove è stato acquistato il prodotto.
Parti di ricambio
Impiegare esclusivamente parti di ricambio originali.
Non attendere che i componenti siano logorati dall’uso prima di procedere alla loro sostituzione.
Eseguire i controlli periodici di manutenzione come indicato nel capitolo “MANUTENZIONE”.
Garanzia
L'Utente, per poter usufruire della garanzia fornita dal Costruttore, deve osservare
scrupolosamente le prescrizioni indicate nel presente manuale, ed in particolare:
- operare sempre nei limiti d'impiego della cappa;
- effettuare sempre una costante e diligente manutenzione;
- autorizzare all’uso della cappa persone di provata capacità e attitudine.
L'inosservanza delle prescrizioni contenute in questo manuale implicherà l’immediata
decadenza della garanzia.
ISTRUZIONI PER L’INSTALLAZIONE
- Le operazioni di montaggio e collegamento elettrico devono essere effettuate
secondo queste istruzioni e da personale professionale specializzato.
- Prima di iniziare e per tutta la durata dell’istallazione utilizzare guanti protettivi.
- Controllare che all’interno della cappa non ci siano materiali di corredo (libretti,
dotazioni ect.), eventualmente toglierli e conservarli.
- Le illustrazioni riportate in questo libretto possono raffigurare un’estetica diversa del
prodotto, comunque le istruzioni per l’istallazione, l’uso e la manutenzione sono le
stesse.
Distanza minima di sicurezza di installazione
La distanza tra un piano cottura elettrico e la parte inferiore della cappa deve essere di almeno
550 mm, mentre tra un piano cottura a gas e la parte inferiore della cappa deve essere di almeno
650 mm. La distanza di installazione consigliata tra cappa a soffitto e piano cottura è compresa
tra 1300 e 1500 mm, mentre la distanza massima è 2000 mm.
81
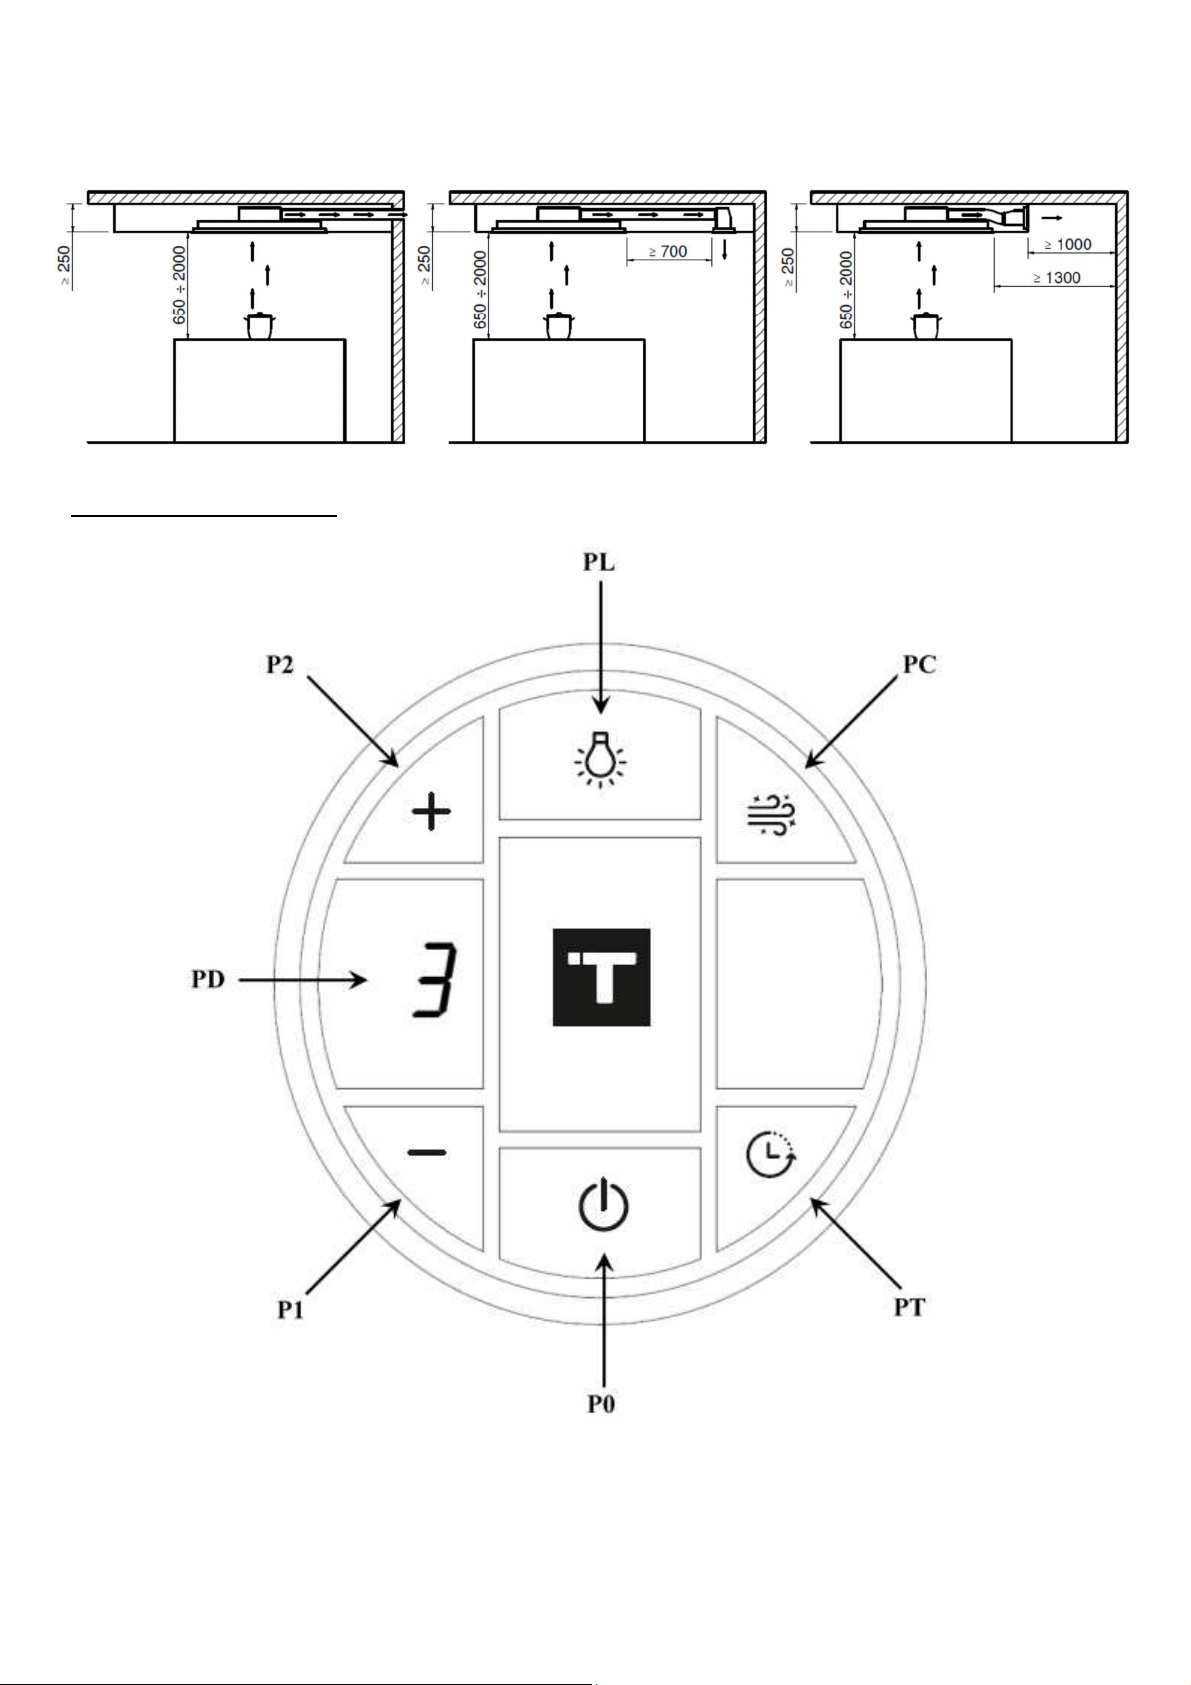
Questa cappa è predisposta per essere installata a soffitto sia nella versione ASPIRANTE con
evacuazione dei fumi all'esterno, sia nella versione FILTRANTE acquistando l'apposito kit
(E750000148).
ISTRUZIONE COMANDI
Il telecomando arriverà già programmato con la cappa, se per qualsiasi motivo il telecomando
dovesse perdere la comunicazione con la cappa, eseguire la seguente procedura:
· togliere corrente alla cappa;
· attendere qualche secondo e ripristinare la corrente ed entro 10 secondi premere
contemporaneamente il tasto “P1” e PT” per circa 3 secondi.
Il telecomando sarà di nuovo operativo.
82

FUNZIONI
P0: tasto ON/OFF MOTORE.
Se selezionato a motore spento il display visualizza uno zero “0” per circa 1 secondo.
P1: tasto per diminuire la velocità motore, se la cappa si trova in 1° velocità spegne il motore.
P2: tasto per aumentare la velocità motore, se la cappa è spenta accende la 1° velocità,
premendo una seconda volta si attiva la 2° velocità, premendo una terza volta si attiva la 3°
velocità, premendo una quarta volta si attiva la 4° velocità, premendo una quinta volta si attiva
la 5° velocità (1° velocità intensiva) (**), premendo una sesta volta si attiva la 6° velocità (2°
velocità intensiva) (**).
Sul display compaiono i numeri delle velocità selezionate (“1”, “2”, “3”, “4”, “5”, “6”).
(**) Velocità intensive: la durata delle velocità intensive è di 6 minuti al termine del quale
l’elettronica torna in automatico in 4° velocità.
PL: tasto ON/OFF LUCI
Intensità Luminosa: premendo in maniera prolungata il tasto “PL” a luci accese, l’intensità della
luce inizierà a scendere fino a raggiungere il valore minimo; rilasciando il pulsante s’interrompe
la discesa dell’intensità luminosa. Una volta raggiunto il valore minimo e premendo nuovamente
il tasto “PL” in maniera prolungata l’intensità luminosa inizierà ad aumentare fino a raggiungere
il valore massimo; se rilasciato, si arresta, alla luminosità raggiunta.
Colore Luce: a cappa spenta e luci spente, premere in maniera prolungata il tasto “PL” fino
all’accensione del led sulla cappa per entrare nel menù della luce dinamica. Con le singole
pressioni del tasto “PL” si avrà la variazione della tonalità di colore della luce da 2700°K a
4000°K in 10 step. Una volta raggiunta la tonalità desiderata si dovrà attendere 10 secondi, il
led sulla cappa smetterà di lampeggiare e la funzione verrà memorizzata.
PC: Tasto ON/OFF FRESH AIR
Attivazione/Disattivazione Fresh Air: pressione prolungata del tasto “PC” a cappa
spenta. Questa funzione permette di accendere il motore alla 1° velocità per 10 minuti
seguiti da 50 minuti di stand-by. Questa opzione rimane attiva per un periodo di 24
ore. Per disattivare la funzione Fresh Air, premere nuovamente il tasto "PC" o "P0".
Mentre il la funzione è attiva, sia a motore acceso che in stand-by, il led cofano
lampeggerà ogni 5 secondi.
Attivazione/Disattivazione Clean Air: premendo il tasto “PC” (sul display compare una
“C”). Quando questa funzione è attivata, il motore si porta alla velocità massima per
circa 6 minuti, al termine dei 6 minuti il motore si spegnerà automaticamente. Per
disattivare questa funzione, premere il tasto “PC” o il tasto “P0”. Nota: questa funzione è
attivabile solo a cappa accesa ed ha priorità su tutte le altre funzioni motorie attive.
PT: tasto TIMER (sul display appare una “T”)
Il timer esegue un countdown di 15 minuti ed è attivabile solo con il motore in funzione.
La durata di 15 minuti non cambia anche se durante il countdown si cambiano le velocità.
Al termine dei 15 minuti il motore si spegne.
PD: Display
Attivazione/Disattivazione Buzzer: per default la cappa viene fornita con il buzzer attivo,
qualora si voglia disattivare, a cappa spenta, accendere le luci premendo il tasto “PL”, poi
premere prolungatamente i tasti “PT” e “P1” fino all’accensione del led cappa senza segnale
acustico. Qualora si voglia riattivare ripetere l’operazione sopra descritta, per conferma si avrà
l’accensione del led e l’emissione del segnale acustico.
83

Nota: Per il risparmio energetico della batteria, il display rimane attivo circa 4 secondi
dopodiché si spegne, per visualizzare le funzioni attive selezionare qualsiasi tasto e il display
si riattiva.
INDICAZIONE LED CAPPA
Nella scocca della cappa è presente un led che indica lo stato di funzionamento del motore in
funzione alla velocità secondo questo criterio:
Motore OFF: LED spento;
Motore 1° Velocità colore LED Blu;
Motore 2° Velocità colore LED Verde;
Motore 3° Velocità colore LED Giallo;
Motore 4° Velocità colore LED Rosso;
Motore 5° Velocità (Intensiva) colore LED Magenta (Lampeggia con intermittenza di 1 secondo
per 6 minuti per poi ritornare alla 4° velocità).
Motore 6° Velocità (Intensiva) colore LED Rosa (Lampeggia con intermittenza di 1 secondo
per 6 minuti per poi ritornare alla 4° velocità).
Con l’attivazione del timer il LED del relativo colore, in funzione alla velocità impostata,
lampeggia con intermittenza di 1 secondo, allo scadere dei 15 minuti, nelle velocità non
intensive, si spegne il motore e non l’illuminazione. Per quanto riguarda invece le velocità
intensive, all’attivazione del timer, per i primi 6 minuti rimane nella velocità impostata per poi
terminare i restanti 9 minuti alla 4° velocità.
Nella funzione Clean Air il LED di colore Celeste rimane fisso, il motore passa alla 6° velocità
e dopo 6 minuti si spegne il motore e non l’illuminazione.
Nella funzione Fresh Air il LED di colore Blu lampeggia con intermittenza di 5 secondi, a cappa
spenta si accende il motore alla 1° velocità per 10 minuti per poi rimanere spento per 50 minuti
e così di seguito fino al disinserimento della funzione.
Segnalazione pulizia filtri antigrasso metallici
Dopo 30 ore di funzionamento, il LED di colore Verde inizierà a lampeggiare per 20 secondi
indicando di eseguire la pulizia dei filtri. Per eseguire il reset dei filtri, a cappa spenta, premere
per 3 secondi il tasto “P0” durante il lampeggio del led.
Segnalazione pulizia filtri long-life o ceramici
Dopo 120 ore di funzionamento, il LED di colore Rosso inizierà a lampeggiare per 20 secondi
indicando di eseguire la pulizia dei filtri. Per eseguire il reset dei filtri, a cappa spenta, premere
per 3 secondi il tasto “P0” durante il lampeggio del led.
Ogni volta che viene premuto un tasto del telecomando la cappa emetterà un segnale acustico
per confermare la ricezione del segnale.
84

MANUTENZIONE
ATTENZIONE! Prima di qualsiasi operazione di pulizia o manutenzione, togliere l'alimentazione
alla cappa togliendo il cavo o scollegando l'interruttore generale dell'abitazione. La pulizia e la
manutenzione ordinaria non devono essere eseguite da bambini senza sorveglianza.
Pulizia
Il prodotto va pulito frequentemente sia internamente che esternamente utilizzando un panno
inumidito con acqua tiepida e detersivo liquido neutro non abrasivo.
I filtri antigrasso metallici
Ha il compito di trattenere le particelle di grasso dai fumi di cottura e preservare il motore
dell'aspiratore, quindi è soggetto ad intasamento in tempi variabili in relazione all'utilizzo
dell'apparecchio. I filtri possono essere lavati in lavastoviglie con cicli di lavaggio brevi e a basse
temperature, al più tardi ogni 2 mesi per evitare il rischio di incendio. Dopo alcuni lavaggi il filtro
potrebbe cambiare colore, a causa dei sali e dei detersivi della lavastoviglie. Il cambiamento di
colore non pregiudica la funzionalità del filtro antigrasso.
Filtri Ceramici
Hanno il compito trattenere gli odori e di depurare l’aria che viene rimessa nell’ambiente.
I filtri ceramici possono essere puliti in forno ad una temperatura di 180/200°C per circa 45/60
minuti. Sostituire i filtri ogni 5 anni oppure ogni volta che risultino danneggiati.
Illuminazione
La cappa è dotata di illuminazione basato su tecnologia LED ad alta efficienza, basso consumo
e durata molto elevata in condizioni normali di utilizzo.
Per la sostituzione rivolgersi al servizio di assistenza.
LA DITTA PRODUTTRICE non potrà ritenersi responsabile per eventuali danni provocati
da un’installazione o un utilizzo improprio di questo apparecchio.
RISOLUZIONE DEI PROBLEMI - TROUBLESHOOTING
PROBLEMA POSSIBILI CAUSE SOLUZIONI
Agganciare il connettore delle lampade
Connettore lampade staccato
come riportato a pag. 5, Fig. 5 del
manuale d’uso
Le luci della cappa non si
accendono
L’interruttore on/off è in posizione 0
Non arriva corrente Controllare il Driver delle luci
Il telecomando non è sincronizzato
85
Portare l’interruttore on/off su
posizione 1 come riportato a pag.4,
Fig. 4 del manuale d’uso
Sincronizzare il telecomando come
riportato nel manuale d’uso da pag. 20

Non funziona il motore
Agganciare il connettore del motore
Connettore staccato
Non arriva corrente Controllare il Driver del motore
come riportato a pag. 6, Fig. 7 del
manuale d’uso
Non funziona il
telecomando
La cappa non funziona
Arriva corrente ma il motore non
funziona
Batteria telecomando scarica
Il telecomando non è sincronizzato alla
cappa
L’interruttore on/off è in posizione 0
Non arriva corrente Controllare il cavo di alimentazione
Il telecomando non è sincronizzato alla
cappa
Problemi all’impianto elettrico Controllare l’alimentazione sulla scheda
L’interruttore on/off è in posizione 0
Sostituire il motore
Sostituire batteria come riportato a
pag. 12, Fig. 20 del manuale d’uso
Fare attenzione ad inserire la batteria
nella giusta polarità.
Sincronizzare il telecomando come
riportato nel manuale d’uso da pag. 20
Portare l’interruttore on/off su
posizione 1 come riportato a pag.4,
Fig. 4 del manuale d’uso
Sincronizzare il telecomando come
riportato nel manuale d’uso da pag. 20
Portare l’interruttore on/off su
posizione 1 come riportato a pag.4,
Fig. 4 del manuale d’uso
La cappa aspira poca aria Filtri allumino sporchi
Il Led verde lampeggia per
20 secondi
Il Led rosso lampeggia per
20 secondi
Segnale di pulizia filtri antigrasso
metallici
Segnale di pulizia filtri a long-life o
ceramici
Togliere i filtri come riportato a pag. 11,
Fig. 17 del manuale d’uso e lavare i filtri
Per resettare i filtri, a cappa spenta,
premere il tasto “P0” del telecomando
per 3 secondi mentre il led lampeggia
come riportato a pag. 22 del manuale
d’uso.
Per resettare i filtri, a cappa spenta,
premere il tasto “P0” del telecomando
per 3 secondi mentre il led lampeggia
come riportato a pag. 22 del manuale
d’uso.
86

POLSKIE
OSTRZEŻENIE DOTYCZĄCE BEZPIECZEŃSTWA
- To urządzenie zostało zaprojektowane do użytku domowego
w środowisku domowym. Nigdy nie używaj urządzenia do
użytku profesjonalnego lub przemysłowego.
- To urządzenie może być obsługiwane przez dzieci powyżej 8
roku życia oraz przez osoby z upośledzonymi zdolnościami
fizycznymi, sensorycznymi i umysłowymi lub bez niezbędnego
doświadczenia i kompetencji tylko pod odpowiednim nadzorem
i po otrzymaniu odpowiednich instrukcji dotyczących
bezpiecznego użytkowania urządzenia i poinformowany o
potencjalnych zagrożeniach i ostrzeżeniach.
- Dzieci nie mogą bawić się urządzeniem.
- Należy ściśle przestrzegać instrukcji bezpieczeństwa i
ostrzeżeń zawartych w instrukcji obsługi.
- Uwaga: niestosowanie śrub i urządzeń mocujących zgodnie z
instrukcji określonych w niniejszej instrukcji, może
spowodować ryzyko porażenia prądem elektrycznym.
- Urządzenie nie powinno być używane przez osoby (w tym
dzieci) z upośledzonymi zdolnościami fizycznymi,
sensorycznymi i umysłowymi lub bez niezbędnego
doświadczenia i kompetencji, chyba że zostały odpowiednio
nadzorowane i poinstruowane.
- Dokładne czyszczenie urządzenia po każdym użyciu jest
bardzo ważne, ponieważ brak regularnego czyszczenia
87

może spowodować ryzyko pożaru.
- Upewnij się, że wszystkie elementy urządzenia nie są
uszkodzone. W takim przypadku nie przeprowadzaj instalacji i
skontaktuj się z wykwalifikowanym centrum pomocy
technicznej.
- Wykwalifikowani instalatorzy wykonają wszelkie niezbędne
prace ciesielskie i instalacyjne w pełnej zgodności z
obowiązującymi dyrektywami.
- Nie podłączać urządzenia do sieci elektrycznej podczas
instalacji.
- Odłącz urządzenie od zasilania przed przystąpieniem do
jakichkolwiek czynności związanych z czyszczeniem lub
konserwacją.
- Konieczność odłączenia urządzenia od zasilania sieciowego
po instalacji za pomocą dostępnej wtyczki lub wyłącznika
głównego.
- Nie należy używać odkurzacza parowego.
- Nie używaj ostrych materiałów ściernych ani ostrych
metalowych skrobaków do czyszczenia szkła, ponieważ mogą
zarysować powierzchnię, co może spowodować pęknięcie
szkła.
- UWAGA: Przed wymianą lampy upewnij się, że urządzenie
jest odłączone (OFF), aby uniknąć porażenia prądem.
- Nie zdejmuj ochronnego plastiku z okapu, dopóki nie
zostanie on całkowicie zainstalowany, jeśli ten plastik nie
88

znajduje się w obszarach, które mogą stwarzać ryzyko
uszkodzenia podczas instalacji. Pozwoli to uniknąć
uszkodzenia zewnętrznej części urządzenia, co nie jest objęte
gwarancją.
OSTRZEŻENIA DOTYCZĄCE POŁĄCZENIA
ELEKTRYCZNEGO
- Połączenia elektryczne powinny być zatwierdzone przez
wykwalifikowanego elektryka przed użyciem urządzenia.
- Podłączenie elektryczne powinien wykonać tylko jeden
wykwalifikowany elektryk, który będzie odpowiedzialny za
prawidłowe podłączenie elektryczne urządzenia do zasilania.
- Przed podłączeniem urządzenia do sieci elektrycznej należy
sprawdzić, czy wartości napięcia, częstotliwości i mocy podane
na tabliczce znamionowej urządzenia są kompatybilne z
domowym zasilaniem i gniazdkiem.
- Przewód zasilający należy podłączyć do wielobiegunowego
wyłącznika magnetotermicznego z przerwą między stykami co
najmniej 3 mm.
- W przypadku uszkodzenia przewodu zasilającego, powinien
on zostać wymieniony przez producenta, serwis techniczny lub
wyspecjalizowany personel.
- Przewód zasilający nie może stykać się z powierzchniami,
których
temperatura przekracza 50°C po zainstalowaniu urządzenia.
89

OSTRZEŻENIA DOTYCZĄCE OBSŁUGI
- W pomieszczeniu musi być zapewniona dogodna wentylacja,
jeśli jednocześnie używany jest okap nadkuchenny i
urządzenia zasilane gazem lub innym paliwem.
- Jeżeli okap jest używany jednocześnie z urządzeniami
spalającymi gaz lub inne paliwa, pomieszczenie musi mieć
odpowiednią wentylację (to ostrzeżenie nie dotyczy okapów
montowanych w wersji filtrującej).
- Przestrzegać wszelkich obowiązujących norm lokalnych
dotyczących operacji wywiewu powietrza.
- Jeśli urządzenie jest używane w trybie recyrkulacji, upewnij
się, że kurz wylotowy jest w dobrym stanie na wypadek, gdyby
nie był używany przez długi czas.
- Nie wolno gotować potraw na otwartym ogniu (flambe) pod
okapem.
- Nigdy nie zostawiaj garnków bez nadzoru, gdy płyta jest
włączona: olej zawarty w garnku może się przegrzać i spalić.
Ryzyko pożaru jest znacznie wyższe, gdy używany jest olej.
- Właściwa konserwacja filtrów tłuszczu i dokładne czyszczenie
są niezwykle ważne.
- Regularnie czyścić okap i inne powierzchnie, aby uniknąć
ryzyka pożaru.
- UWAGA: gdy płyta jest włączona, dostępne części okapu
mogą się nagrzewać.
90

- Niedopuszczalne jest podłączanie urządzenia wywiewnego
do kanałów lub kanałów wywiewnych i rur do wentylacji
pomieszczeń.
- Wywiewane powietrze nie może być kierowane do kanału
cyrkulacji gorącego powietrza.
- Powietrze nie powinno być odprowadzane do przewodu
kominowego, w którym odprowadzane są spaliny z urządzeń
AGD zasilanych gazem lub innymi paliwami (nie dotyczy to
okapów pracujących w trybie recyrkulacji).
- Odpowiednio przewietrzyć pomieszczenie przy okapie
kuchennym i innych
- Maksymalne podciśnienie w pomieszczeniu nie powinno
przekraczać 4 Pa (4x10⁻⁵ bar).
- Pomieszczenie, w którym montowany jest okap, powinno być
wyposażone w czerpnię powietrza o przepustowości większej
niż wyrzutnia okapu. Surowo zabrania się umieszczania
kończyn lub jakiejkolwiek innej części
ciała ludzkiego, a także przedmiotów do gotowania lub innych
przedmiotów w pobliżu wyciąganej części okapu (jeśli Twoje
urządzenie jest w nią wyposażone).
- Okapy nadkuchenne i inne wyciągi oparów kuchennych
mogą niekorzystnie wpływać na bezpieczną pracę urządzeń
spalających gaz lub inne paliwa (w tym znajdujących się w
innych pomieszczeniach) z powodu wstecznego przepływu
spalin. Gazy te mogą potencjalnie spowodować zatrucie
91

tlenkiem węgla. Po zainstalowaniu okapu nadkuchennego lub
innego wyciągu oparów kuchennych, kompetentna osoba
powinna przetestować działanie urządzeń z otwartymi
spalinami, aby upewnić się, że nie występuje przepływ
wsteczny gazów spalinowych.
Aby zapewnić bezpieczne użytkowanie produktu i poznać
wszystkie funkcje i właściwości:
- Przed instalacją i uruchomieniem należy uważnie
przeczytać niniejszą instrukcję obsługi.
- Zwróć szczególną uwagę na ostrzeżenia dotyczące
bezpieczeństwa!
- Urządzenie może być używane wyłącznie w sposób
opisany w niniejszej instrukcji obsługi.
- Zachowaj instrukcję obsługi.
- Jeśli przekazujesz urządzenie osobie trzeciej, przekaż
również instrukcję obsługi.
Szanowny Kliencie,
Dziękujemy za wybranie nas!
Gratulujemy zakupu nowego okapu kuchennego.
Aby bezpiecznie korzystać z urządzenia i lepiej poznać wszystkie jego funkcje i możliwości:
- Przeczytaj uważnie niniejszą instrukcję obsługi przed zainstalowaniem i włączeniem
urządzenia.
- Należy zwrócić szczególną uwagę na ostrzeżenia dotyczące bezpieczeństwa!
- Urządzenie powinno być używane wyłącznie zgodnie z instrukcjami podanymi w niniejszej
instrukcji obsługi.
- Zachowaj tę instrukcję obsługi do dalszego użytku.
- W przypadku przekazania urz
obsługi.
ądzenia osobie trzeciej należy również przekazać instrukcję
92

INFORMACJE OGÓLNE
W przypadku wymiany informacji z PRODUCENTEM urządzenia należy kierować się
numerem seryjnym i danymi identyfikacyjnymi podanymi na tabliczce znamionowej.
To urządzenie zostało zaprojektowane, przetestowane i wyprodukowane w pełnej zgodności z
odpowiednimi normami dotyczącymi:
• Bezpieczeństwo: CEI/EN 60335-1; CEI/EN 60335-2-31;
• Wydajność: CEI/EN 61591; CEI/EN 60704-1; CEI/EN 60704-2-13; EN 50564; CEI 62301.
EMC: EN 55014-1; EN 55014-2; CEI/EN 61000-3-2; CEI/EN 61000-3-3.
Zalecenia dotyczące prawidłowego użytkowania urządzenia w celu zmniejszenia wpływu na
środowisko: po rozpoczęciu gotowania włącz okap na minimalnej prędkości i wyłącz go
dopiero po kilku minutach od zakończenia gotowania. Zwiększaj prędkość okapu tylko w
przypadku dużej ilości oparów i oparów, a funkcji booster używaj tylko wtedy, gdy jest to
absolutnie konieczne. Filtr przeciwtłuszczowy należy czyścić tylko wtedy, gdy jest to
konieczne, aby zachować jego skuteczność przez długi czas. Użyj systemu rur o maksymalnej
średnicy określonej w niniejszej instrukcji, aby zwiększyć wydajność i zmniejszyć poziom
hałasu.
Symbol na urządzeniu lub w jego dokumentacji wskazuje, że produkt ten nie
powinien być traktowany jako odpad domowy, ale należy go przekazać do
określonego punktu zbiórki sprzętu elektrycznego i elektronicznego. Właściwa
utylizacja tego urządzenia pomoże zmniejszyć zużycie surowców i
zanieczyszczenie środowiska. Aby uzyskać bardziej szczegółowe informacje na
temat recyklingu tego urządzenia, skontaktuj się z lokalnym urzędem miasta, firmą
zajmującą się utylizacją odpadów domowych lub sklepem, w którym zakupiono
urządzenie.
Części zamienne
Używaj tylko oryginalnych części zamiennych.
Wymień elementy, zanim się zużyją. Przeprowadzaj regularne kontrole konserwacyjne, jak
opisano w rozdziale „KONSERWACJA”.
Gwarancja
W celu skorzystania z Gwarancji PRODUCENTA użytkownicy zobowiązani są do ścisłego
przestrzegania wszystkich instrukcji zawartych w niniejszej instrukcji, w szczególności do:
- używać okapu tylko zgodnie z jego przeznaczeniem;
- wykonywać ciągłe i skrupulatne czynności konserwacyjne;
- zezwalaj na użytkowanie okapu tylko osobom o sprawdzonych umiejętnościach i know-how.
Nieprzestrzeganie instrukcji zawartych w niniejszej instrukcji spowoduje natychmiastowe
unieważnienie gwarancji producenta.
93

INSTRUKCJE INSTALACJI
- Czynności instalacyjne i podłączenia elektryczne powinny być wykonywane zgodnie z
niniejszą instrukcją oraz przez wykwalifikowany i wyspecjalizowany personel.
- Przed i podczas instalacji nosić rękawice ochronne.
- Sprawdź, czy żadne akcesoria dostarczone z urządzeniem (instrukcje, akcesoria itp.)
nie znajdują się wewnątrz okapu: w takim przypadku usuń je i zachowaj.
- Liczby przedstawione w niniejszej instrukcji instalacji mogą również odnosić się do
innej estetyki urządzenia: w każdym przypadku instrukcje użytkowania, instalacji i
konserwacji pozostają takie same.
Minimalna bezpieczna odległość instalacji
Odległość między płytą elektryczną a dolną częścią okapu musi wynosić co najmniej 550 mm,
natomiast między płytą gazową a dolną częścią okapu musi wynosić co najmniej 650 mm.
Zalecana odległość montażowa między okapem sufitowym a płytą grzewczą wynosi od 1300
do 1500 mm, natomiast maksymalna odległość to 2000 mm.
Okap ten przeznaczony jest do montażu na suficie zarówno w wersji ZASYSAJĄCEJ z
odprowadzaniem spalin na zewnątrz jak iw wersji FILTRUJĄCEJ po dokupieniu
odpowiedniego zestawu (E750000148).
94

INSTRUKCJA STEROWANIA
Pilot dotrze już zaprogramowany z okapem, jeśli z jakiegoś powodu pilot utraci komunikację z
okapem, wykonaj następującą procedurę:
· Odłączyć okap od zasilania;
· Odczekaj kilka sekund i przywróć zasilanie iw ciągu 10 sekund naciśnij jednocześnie
przyciski “P1” i “PT” na około 3 sekundy.
Pilot znów będzie działał.
FUNKCJE
P0: klawisz WŁ./WYŁ. SILNIKA.
W przypadku wyboru przy wyłączonym silniku wyświetlacz pokazuje zero „0” przez około 1
sekundę.
P1: przycisk do zmniejszania prędkości silnika, jeśli okap jest na 1. prędkości, wyłącza silnik.
P2: przycisk do zwiększania prędkości silnika, jeśli okap jest wyłączony włącza 1 prędkość,
drugie naci
śnięcie włącza 2 prędkość, trzecie naciśnięcie włącza 3 prędkość, czwarte
naciśnięcie włącza 4 prędkość, naciśnięcie a piąty raz aktywuje 5 prędkość (1. prędkość
intensywna) (**), szóste naciśnięcie aktywuje 6 prędkość (2. prędkość intensywna) (**).
Numery wybranych prędkości pojawiają się na wyświetlaczu (“1”, “2”, “3”, “4”, “5”, “6”).
95

(**) Prędkości intensywne: czas trwania prędkości intensywnych wynosi 6 minut, po czym
elektronika automatycznie powraca do 4. prędkości.
PL: klawisz WŁĄCZ / WYŁĄCZ ŚWIATŁA
Intensywność światła: po długim naciśnięciu przycisku „PL” przy włączonych światłach
intensywność światła zacznie się zmniejszać, aż osiągnie wartość minimalną; zwolnienie
przycisku przerywa opadanie natężenia światła. Po osiągnięciu wartości minimalnej i
ponownym naciśnięciu przycisku „PL” przez dłuższy czas, intensywność światła zacznie
rosnąć, aż osiągnie wartość maksymalną; jeśli zostanie zwolniony, zatrzymuje się na
osiągniętej jasności.
Kolor światła: przy wyłączonym kapturze i wyłączonych światłach naciśnij i przytrzymaj
przycisk „PL”, aż dioda LED na osłonie zaświeci się, aby wejść do menu dynamicznego
światła. Pojedynczymi naciśnięciami klawisza „PL” będziesz mieć zmianę odcienia koloru
światła od 2700 ° K do 4000 ° K w 10 krokach. Po osiągnięciu żądanego sygnału należy
odczekać 10 sekund, dioda LED na okapie przestanie migać, a funkcja zostanie zapamiętana.
PC: klawisz WŁ./WYŁ. ŚWIEŻEGO POWIETRZA
Aktywacja/dezaktywacja świeżego powietrza: długie naciśnięcie przycisku „PC” przy
wyłączonym okapie. Ta funkcja pozwala na włączenie silnika na 1. prędkości na 10 minut, a
następnie na 50 minut czuwania. Ta opcja pozostaje aktywna przez okres 24
godziny. Aby dezaktywować funkcję Fresh Air, ponownie naciśnij przycisk „PC” lub „P0”.
Podczas funkcja jest aktywna, zarówno przy pracującym silniku, jak iw stanie czuwania, dioda
LED na masce będzie migać co 5 sekund.
Aktywacja/dezaktywacja czystego powietrza: naciśnięcie przycisku „PC” (na wyświetlaczu
pojawi się „C”).
Gdy ta funkcja jest aktywna, silnik jest ustawiony na maksymalną prędkość przez około 6
minut, po upływie 6 minut silnik wyłączy się automatycznie.
Aby wyłączyć tę funkcję, naciśnij klawisz „PC” lub „P0”.
Uwaga: ta funkcja może być aktywowana tylko przy włączonym okapie i ma pierwszeństwo
przed wszystkimi innymi aktywnymi funkcjami silnika.
PT: przycisk TIMER (na wyświetlaczu pojawi się „T”)
Timer odlicza 15 minut i można go aktywować tylko przy pracującym silniku.
Czas trwania 15 minut nie zmienia się, nawet jeśli prędkości zostaną zmienione podczas
odliczania. Pod koniec 15 minut silnik zatrzymuje się.
PD: Wyświetlacz
Aktywacja / dezaktywacja brzęczyka: domyślnie okap jest dostarczany z aktywnym
brzęczykiem, jeśli chcesz dezaktywować, przy wyłączonym okapie, włącz światła, naciskając
przycisk „PL”, a następnie naciśnij i przytrzymaj „PT” i „P1 " aż do włączenia się diody okapu
bez sygnału akustycznego. Jeśli chcesz reaktywować, powtórz czynność opisaną powyżej,
dioda LED zaświeci się i wyemitowany zostanie sygnał dźwiękowy potwierdzający.
Uwaga: Aby oszcz
ędzać baterię, wyświetlacz pozostaje aktywny przez około 4 sekundy, po
czym wyłącza się, aby wyświetlić aktywne funkcje należy wybrać dowolny klawisz i
wyświetlacz zostanie ponownie włączony.
96

SYGNALIZACJA LED OKAPU
W korpusie okapu znajduje się dioda LED, która wskazuje stan pracy silnika pracującego z
prędkością zgodnie z następującymi kryteriami:
Silnik wyłączony: dioda wyłączona;
1. prędkość silnika Kolor niebieskiej diody LED;
2 bieg silnika Zielony kolor diody LED;
Silnik 3. prędkości Żółty kolor diody LED;
4-ta prędkość silnika Kolor czerwonej diody LED;
Silnik 5-tej prędkości (Intensywny) Kolor diody Magenta (Miga z przerwami przez 1 sekundę
przez 6 minut, a następnie powraca do 4-tej prędkości).
Silnik 6-tej prędkości (intensywny) Różowy kolor diody LED (miga z przerwami przez 1
sekundę przez 6 minut, a następnie powraca do 4-tej prędkości).
Po włączeniu timera odpowiednia kolorowa dioda LED, w zależności od ustawionej prędkości,
miga z przerwami przez 1 sekundę, pod koniec 15 minut, przy nieintensywnych prędkościach
wyłącza się silnik, a nie oświetlenie. Jeśli chodzi o prędkości intensywne, gdy timer jest
włączony, pozostaje on na ustawionej prędkości przez pierwsze 6 minut, a następnie kończy
pozostałe 9 minut na 4 prędkości.
W funkcji Clean Air jasnoniebieska dioda LED świeci światłem ciągłym, silnik przełącza się na
6. prędkość i po 6 minutach wyłącza się silnik, a nie oświetlenie.
W funkcji Fresh Air niebieska dioda LED miga z przerwami przez 5 sekund, przy wyłączonej
masce silnik uruchamia się na 1. prędkości przez 10 minut, a następnie pozostaje wyłączony
przez 50 minut i tak dalej, aż funkcja zostanie wyłączona.
Sygnał czyszczenia metalowego filtra przeciwtłuszczowego
Po 30 godzinach pracy zielona dioda LED zacznie migać przez 20 sekund, wskazując
konieczność wyczyszczenia filtrów. Aby zresetować filtry, przy wyłączonym okapie, naciśnij
przycisk „P0” przez 3 sekundy, podczas gdy dioda LED miga.
Sygnał czyszczenia filtra o przedłużonej żywotności lub ceramiczny
Po 120 godzinach pracy czerwona dioda zacznie migać przez 20 sekund, wskazując
konieczność wyczyszczenia filtrów. Aby zresetować filtry, przy wyłączonym okapie, naciśnij
przycisk „P0” przez 3 sekundy, podczas gdy dioda LED miga.
Po każdym naciśnięciu przycisku na pilocie, okap wyemituje sygnał dźwiękowy potwierdzający
odbiór sygnału.
97

UTRZYMANIE
OSTRZEŻENIE! Przed jakimkolwiek czyszczeniem lub konserwacją należy odłączyć okap od
zasilania poprzez odłączenie kabla lub odłączenie głównego wyłącznika w domu. Dzieci nie
mogą bez nadzoru czyścić i konserwować.
Czyszczenie
Produkt należy często czyścić zarówno od wewnątrz, jak i od zewnątrz za pomocą ściereczki
zwilżonej letnią wodą i neutralnym, nieściernym płynnym detergentem.
Metalowe filtry przeciwtłuszczowe
Ma za zadanie zatrzymywanie cząstek tłuszczu z oparów kuchennych oraz zachowanie silnika
aspiratora, dzięki czemu podlega zapychaniu w różnych czasach w zależności od użytkowania
urządzenia. Filtry można myć w zmywarce przy krótkich cyklach zmywania iw niskich
temperaturach, najpóźniej co 2 miesiące, aby uniknąć ryzyka pożaru. Po kilku praniach filtr
może zmienić kolor z powodu soli do zmywarek i detergentów. Zmiana koloru nie wpływa na
funkcjonalność filtra tłuszczu.
Filtry ceramiczne
Mają za zadanie zatrzymywanie zapachów i oczyszczanie powietrza, które powraca do
otoczenia. Filtry ceramiczne można czyścić w piekarniku w temperaturze 180/200°C przez
około 45/60 minut. Zaleca się wymianę filtrów ceramicznych co 5 lat, aby zapewnić najlepszą
eliminację zapachów.
Oświetlenie
Okap wyposażony jest w oświetlenie oparte na wysokowydajnej technologii LED, niskim
zużyciu energii i bardzo wysokiej trwałości w normalnych warunkach użytkowania.
W celu wymiany skontaktuj się z działem serwisu.
PRODUCENT FIRMY nie ponosi odpowiedzialności za jakiekolwiek szkody
spowodowane nieprawidłową instalacją lub użytkowaniem tego urządzenia.
ROZWIĄZYWANIE PROBLEMÓW
PROBLEM MOŻLIWE PRZYCZYNY ROZWIĄZANIA
Złącze lampy jest odłączone
Oświetlenie okapu
kuchennego nie włącza się
Włącznik/wyłącznik jest w pozycji 0
Brak elektryczności Sprawdź sterownik oświetlenia
Pilot nie jest zsynchronizowany
98
Podłączyć złącze lampy, jak pokazano
na stronie 5, rys. 5 instrukcji
Ustaw włącznik/wyłącznik w pozycji 1,
jak pokazano na stronie 4, Zdjęcie 4
instrukcji obsługi
Zsynchronizuj pilota zgodnie z opisem
w instrukcji obsługi od strony 20

Silnik nie działa
oda LED miga,
3 sekundy, podczas gdy dioda LED miga,
Odłączone złącze
Podłącz złącze silnika, jak pokazano na
stronie 6, Zdjęcie 7 instrukcji obsługi
Brak elektryczności Sprawdź sterownik silnika
Dopływa prąd, ale silnik nie działa Wymień silnik
Wymień baterię jak pokazano na
Niski poziom naładowania baterii
pilota
stronie 12, Zdjęcie 20 instrukcji obsługi.
Upewnij się, że bateria jest włożona z
właściwą polaryzacją.
Pilot nie działa
Kaptur nie działa
Kaptur zasysa mało
powietrza
Zielona dioda LED miga
przez 20 sekund
Czerwona dioda LED miga
przez 20 sekund
Pilot nie jest zsynchronizowany z
okapem
Zsynchronizuj pilota zgodnie z opisem
w instrukcji obsługi od strony 20
Ustaw włącznik/wyłącznik w pozycji 1,
Włącznik/wyłącznik jest w pozycji 0
jak pokazano na stronie 4, Zdjęcie 4
instrukcji obsługi
Brak elektryczności Sprawdź kabel zasilający
Pilot nie jest zsynchronizowany z
okapem
Problemy z układem elektrycznym
Zsynchronizuj pilota zgodnie z opisem
w instrukcji obsługi od strony 20
Sprawdź zasilanie na płytce
elektronicznej
Ustaw włącznik/wyłącznik w pozycji 1,
Włącznik/wyłącznik jest w pozycji 0
jak pokazano na stronie 4, Zdjęcie 4
instrukcji obsługi
Wyjąć filtry jak pokazano na stronie 11,
Zabrudzone filtry aluminiowe
Zdjęcie 17 instrukcji obsługi i umyć
filtry.
Zresetuj filtry, gdy okap jest wyłączony,
Wskaźnik czyszczenia metalowego
filtra przeciwtłuszczowego
naciskając przycisk „P0” na pilocie przez
3 sekundy, podczas gdy di
jak pokazano na stronie 22 instrukcji
obsługi.
Zresetuj filtry, gdy okap jest wyłączony,
Wskaźnik trwałego lub ceramicznego
czyszczenia filtra
naciskając przycisk „P0” na pilocie przez
jak pokazano na stronie 22 instrukcji
obsługi.
99

www.teka.com
E461000129 Rev.1
100
 Loading...