

TEFAL IS8300 User Manual

1800133082/03 - 48/14
8
4
6
9
2
2
2
EN
FR
TH
MS
ZH
AR
RU
UK
TR
IS8300
1
2
3*
8
4
5
6
18
19
9
17
21
20
22
7
10
11
12
16
13
14
15
* EN Depending on model / FR Selon modèle / TH
定
/ AR / RU В зависимости от модели / UK
•ºV «∞Luœ¥q
แตกต่างกันไปในแต่ละรุ่น
Залежно від моделі
/ MS Mengikut model / ZH 根據型號而
/ TR modele göre değişir
23*
24*
27*
28*
29*
25*
26*
* EN Depending on model / FR Selon modèle / TH
定
/ AR / RU В зависимости от модели / UK
•ºV «∞Luœ¥q
แตกต่างกันไปในแต่ละรุ่น
Залежно від моделі
30*
/ MS Mengikut model / ZH 根據型號而
/ TR modele göre değişir
34
31
3332
35
36
* EN Depending on model / FR Selon modèle / TH
定
/ AR / RU В зависимости от модели / UK
•ºV «∞Luœ¥q
แตกต่างกันไปในแต่ละรุ่น
Залежно від моделі
/ MS Mengikut model / ZH 根據型號而
/ TR modele göre değişir
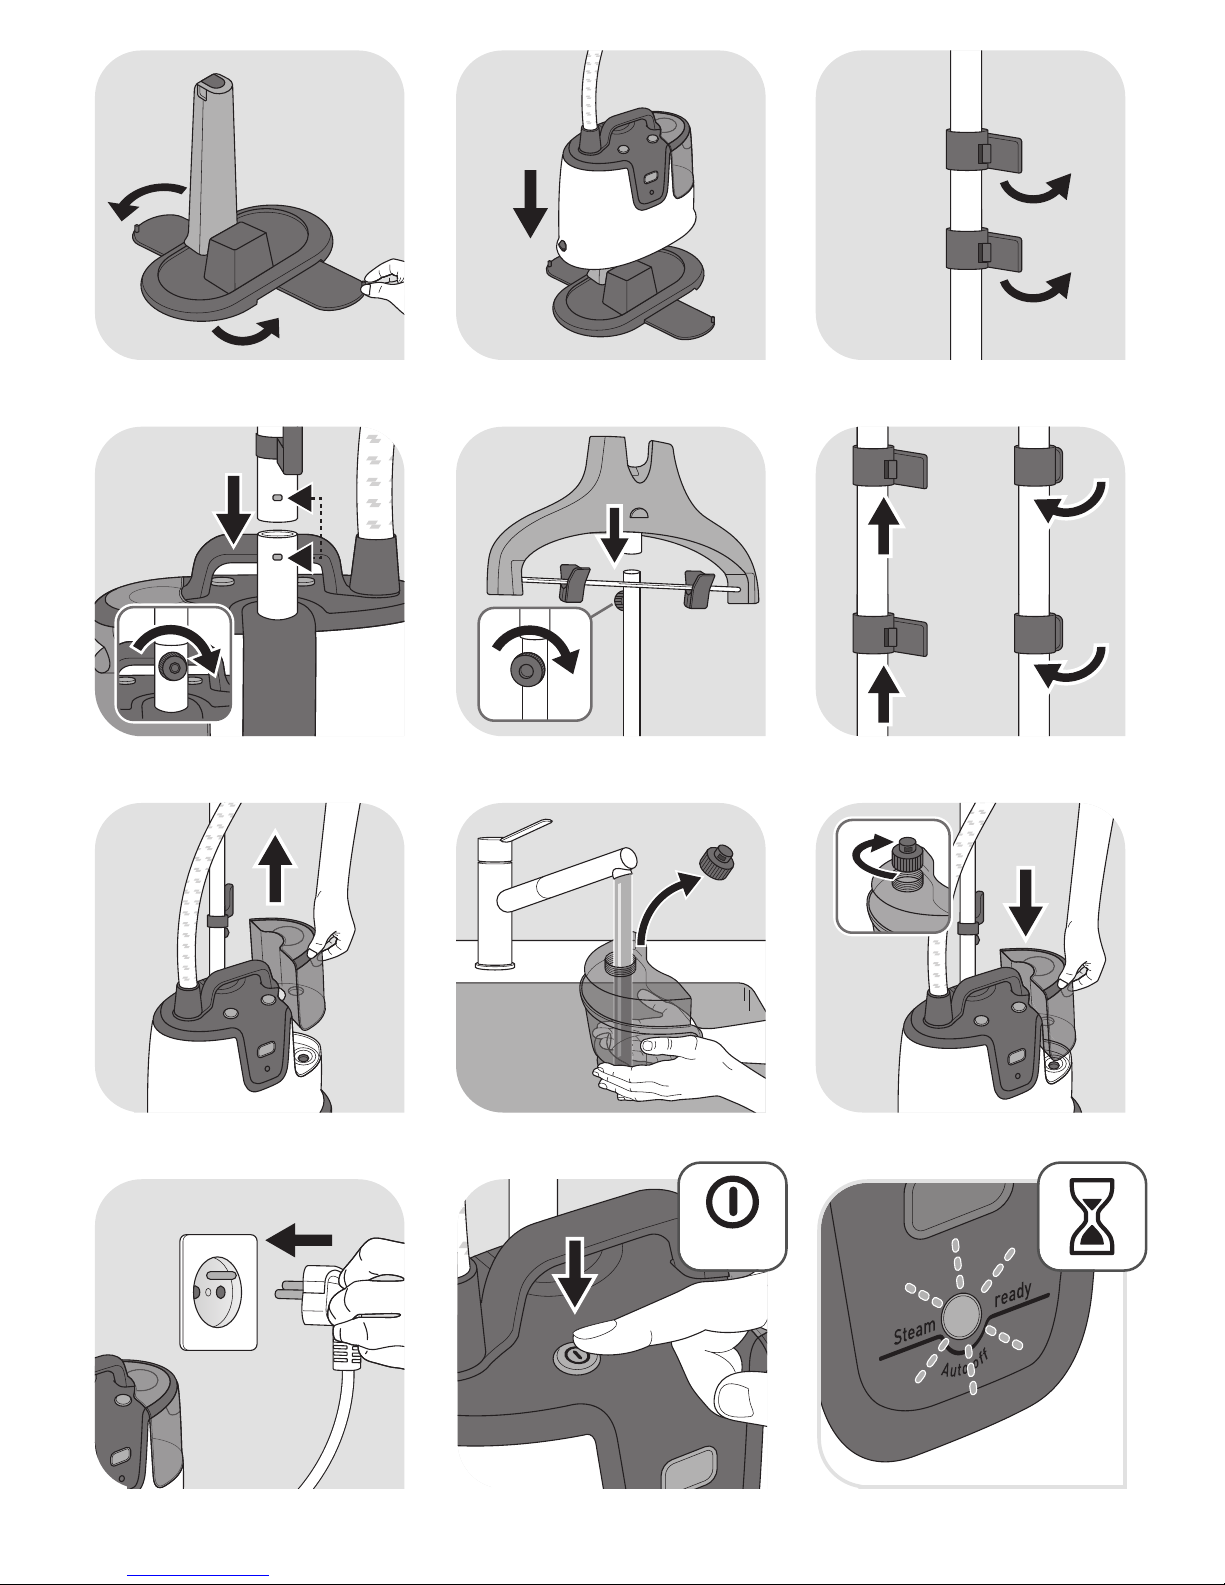
fig. 1 fig. 2
CLICK
2
111
1
2
1 2
2
1
fig. 3
fig. 4
fig. 7
fig. 5
fig. 6
fig. 8 fig. 9
ON
fig. 10
fig. 11
fig. 12
OK
fig. 13
fig. 16
fig. 14 fig. 15
fig. 17 fig. 18
fig. 19
fig. 22
fig. 20 fig. 21
fig. 23 fig. 24
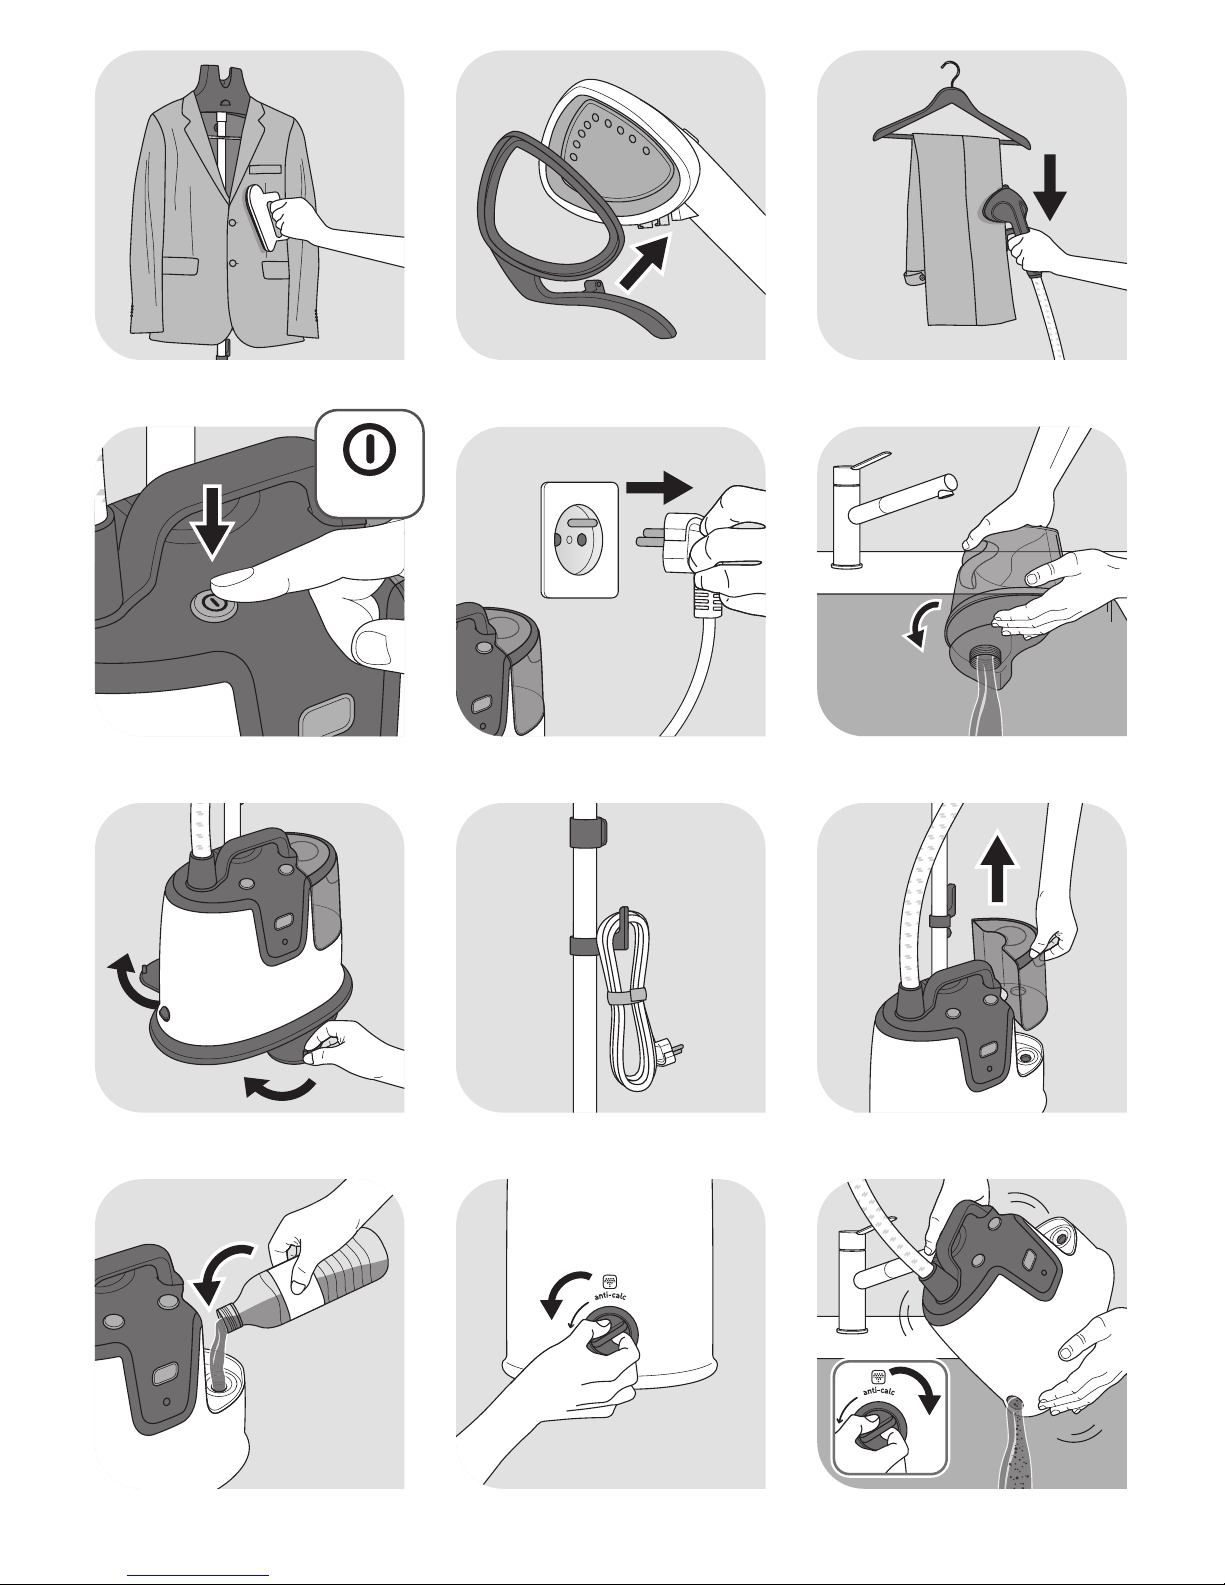
fig. 25 fig. 26 fig. 27
0.5 L
2
111
OFF
fig. 28
fig. 31
fig. 29
fig. 32
fig. 30
fig. 33
fig. 34
fig. 35
fig. 36

SAFETY INSTRUCTIONS
Please read these instructions carefully before first use
and keep them in a safe place.
• Never leave the appliance unattended whilst connected to
the power supply, even if for a few moments, especially
where children are present.
• Always unplug your appliance: before filling, or rinsing the
water tank, before cleaning it, after each use.
• Care should be taken when using the appliance due to the
emission of steam.
• This appliance is not intended to be used by persons
(including children) with reduced or impaired physical,
sensory or mental capacities or persons lacking appropriate
knowledge or experience, unless a person responsible for
their safety provides either supervision or appropriate
instructions concerning use of the appliance prior to its use.
• This appliance can be used by children aged from 8 years
and above and persons with reduced physical, sensory or
mental capabilities or lack of experience and knowledge if
they have been given supervision or instruction concerning
use of the appliance in a safe way and understand the
hazards involved.
• Children must be supervised to ensure that they do not play
with the appliance.
• Cleaning and user maintenance shall not be made by
children without supervision.
• The appliance must not be used if it has fallen to the floor,
shows evident of damaged, leaks or fails to function
correctly. Never dismantle your appliance. To avoid any
danger, have it inspected in an approved service centre.
RECOMMENDATIONS
8
IMPORTANT

• This product has been designed for domestic and indoor use only. Any
commercial use, inappropriate use or failure to comply with the instructions, the
manufacturer accepts no responsibility and the guarantee will not apply.
• This is a floor appliance, never carry it while in use.
• This appliance is designed to function on AC current only. Before using it for the
first time, check that your mains supply voltage matches that indicated on the
appliance data plate.
• Any connection error will invalidate your guarantee.
• Always plug the appliance into a socket outlet with an earth connection.
• Given the diverse standards in effect, if the appliance is used in a country other
than that in which it is purchased, have it checked by an Approved Service Centre.
• Always keep the hose and nozzle elevated above the water tank.
• For your safety, this appliance conforms to the applicable standards and
regulations (Low Voltage, Electromagnetic Compatibility, and Environmental
Directives).
• The surfaces which are marked or close to with this sign are very hot during
the use of the appliance. Do not touch these surfaces before the appliance has
cooled down.
• To reduce the risk of contact with hot water or steam emitting from steam vents,
check the appliance before each use by holding it away from your body and
EN
operating.
• Steam only in an up and down vertical motion. Never use the steam head in a
horizontal position or tilt into a backward position, this may result in hot water
discharge.
• To reduce the risk of electric shock, do not immerse the appliance or the steam
head in water or any other liquids.
• The appliance should always be switched «OFF» before plugging or unplugging
from socket outlet. Never pull the cord to disconnect it from the socket outlet,
instead grasp the plug and pull to disconnect.
• Do not allow the cord to touch hot surfaces. After each use, unplug and let the
appliance cool down completely before storing it away. Loop the cord loosely
around the appliance when storing.
• Never place the appliance or its power cord near, or allow to come into contact
with, sources of heat or sharp edges.
• Do not fasten the hose during operation. Scalding may occur if the hose adapter
is removed while using the appliance.
• Do not attempt to hang up the unit using the hose.
• The use of accessory attachments other than those provided by Tefal is not
recommended and may result in fire, electric shock or personal injury.
9

• Use caution when changing accessories or attachments, as they may contain hot
water from condensation. Ensure the attachments are cooled off to avoid contact
with hot water.
• Burns could occur from touching hot parts, hot water or steam. Use care when
you empty a steam appliance. There may be hot water in the tank or from the
inside the appliance.
• Do not direct steam at people, animals or steam clothes while they are being worn.
• Do not cut or attempt to extend the steam hose.
• If you are using a main extension lead, ensure that it is correctly rated to the
required amperage with an earthed socket, and fully extended.
• Unwind the power cord fully before use and inspect the appliance and power cord
for signs of wear or damage prior to connecting to the power supply.
• Any intervention other than normal cleaning and maintenance by the customer
must be performed by an Approved Service Centre.
• Never drop or insert any object into any opening or hose.
• The glove should be only used with this garment steamer (*dependingon model).
The manufacturer accepts no responsibility for anyinappropriate use.
• Remove all packaging materials, stickers and accessories from inside and outside
of the appliance.
• Inspect the appliance and power cord for signs of wear or damage prior to
connecting to the power supply.
• Do not use your appliance if it does not operate correctly, if it has been damaged
or if the power cord or plug is damaged. To maintain safety, these parts must be
replaced by an Approved Service Centre.
• Any intervention other than normal cleaning and maintenance by the customer
must be performed by an Approved Service Centre.
• This unit is for indoor use only.
• Unwind the power cord fully before use and inspect the appliance and power cord
for signs of wear or damage prior to connecting to the power supply.
ENVIRONMENT PROTECTION FIRST!
i Your appliance contains valuable materials which can be recovered or recycled.
‹ Leave it at a local civic waste collection point.
10

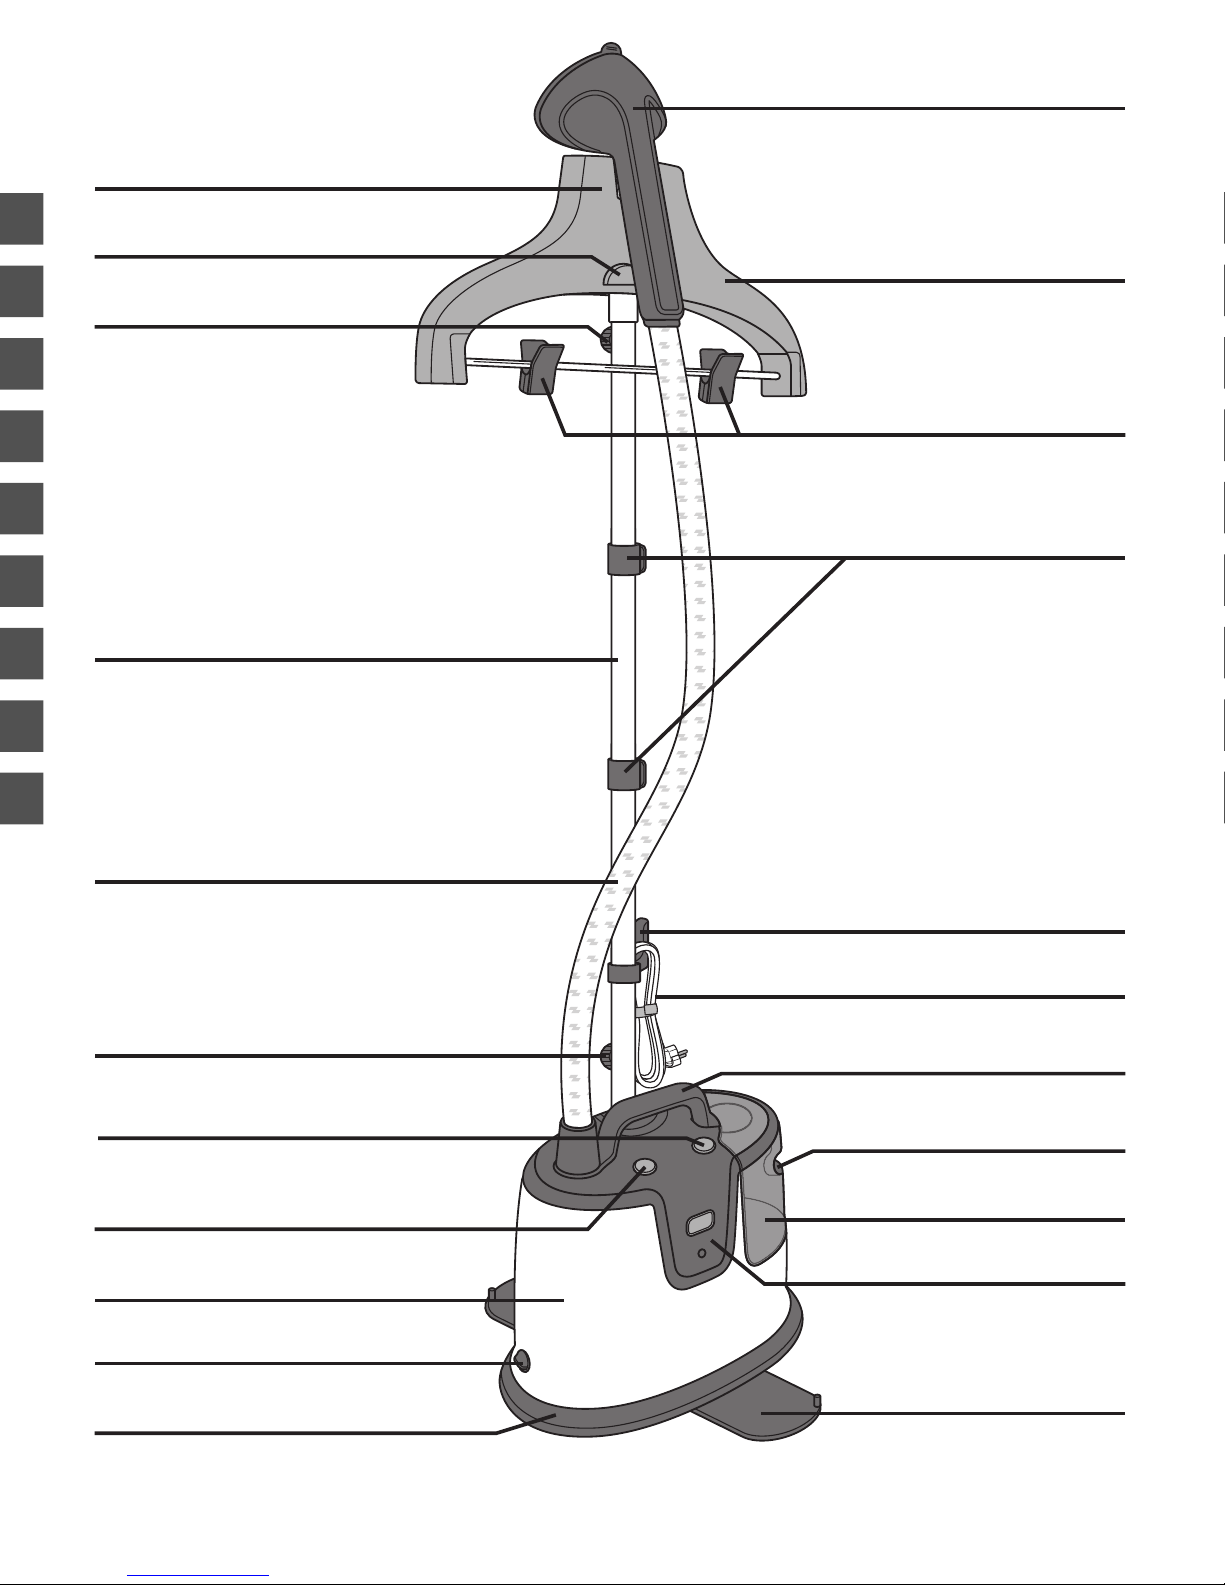
DESCRIPTION
1. Steam head
2. Integrated hanger
3. Trouser clips*
4. Steam head hook
5. Hanger holder
6. Hanger fastening screw
7. Pole locking clips
8. Telescopic pole
9. Steam hose
10. Electrical cord hook
11. Electrical cord
12. Transport handle
13. Water tank handle
14. Removable water tank
15. Control panel
16. Stability leg (x2)
17. Pole fastening screw
19. ON/OFF switch
20. Appliance
21. "Anti calc" cap
22. Base
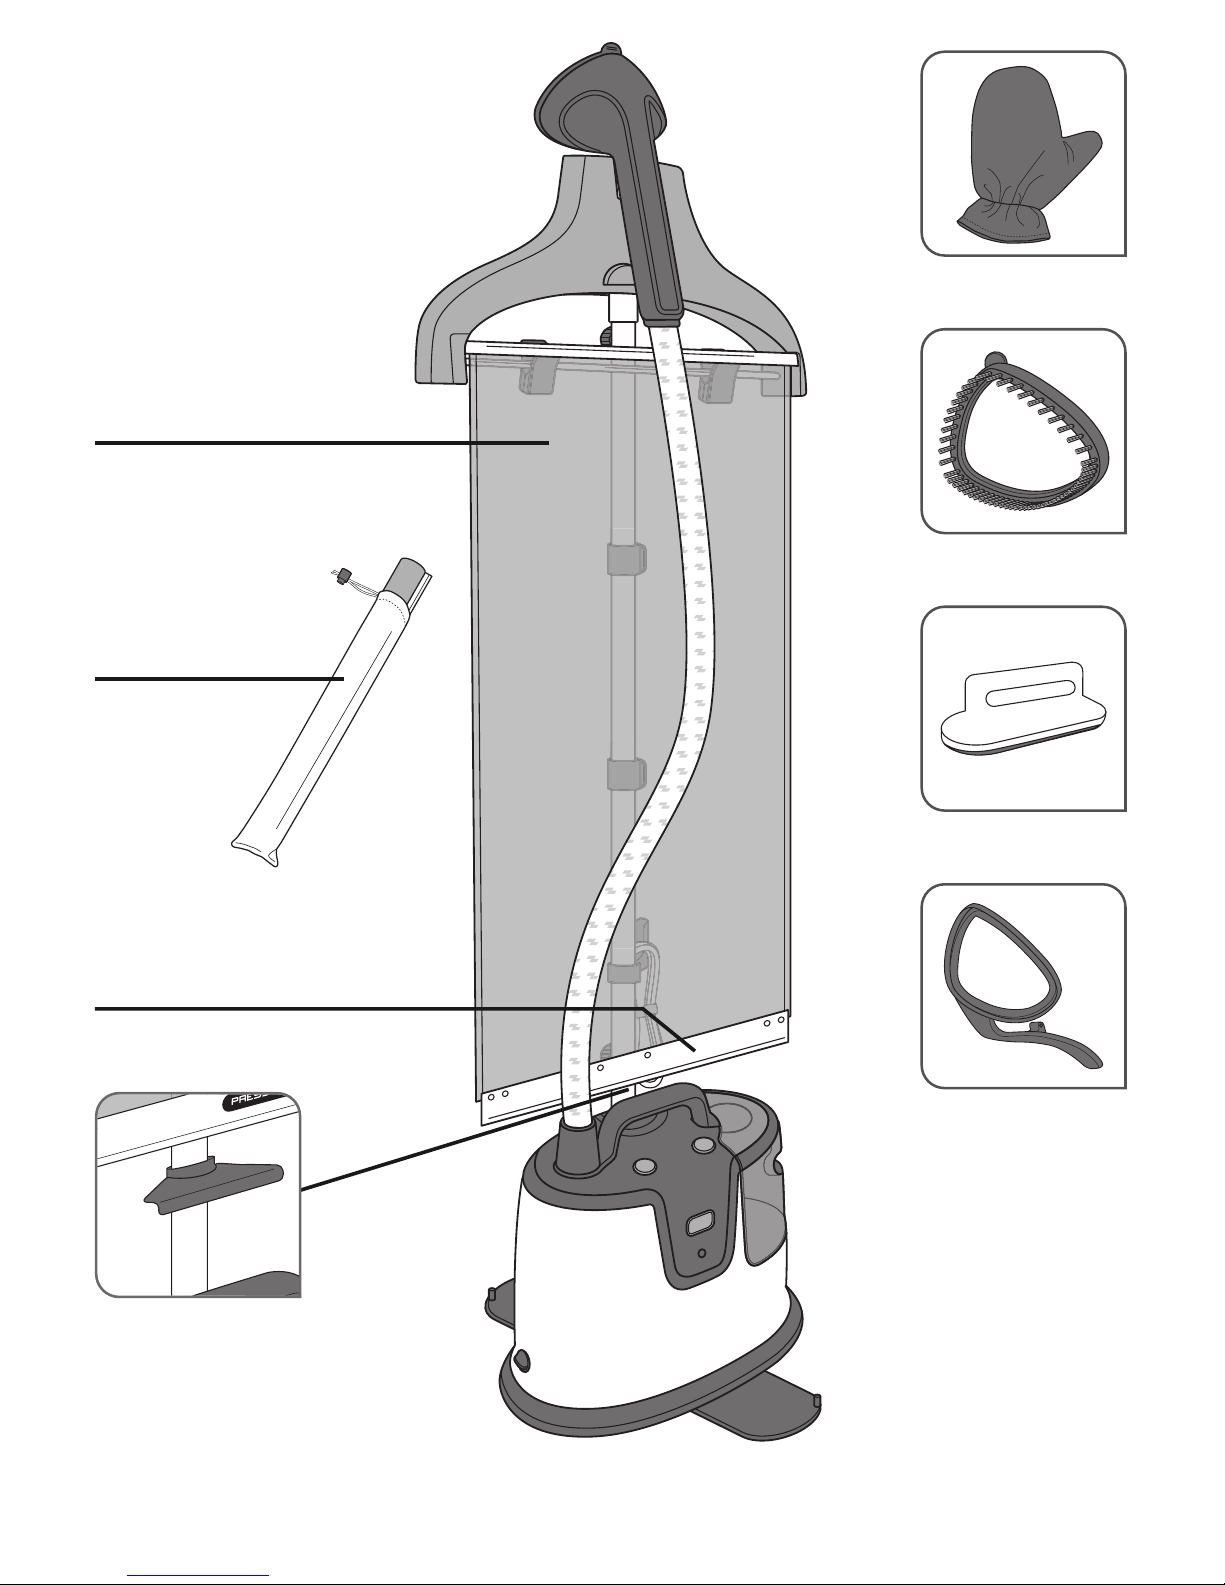
23. Press & Steam vertical support*
24. Press & Steam pouch*
25. Press & Steam locking handle*
26. Press & Steam locking hook*
27. Glove*
28. Fabric brush*
29. Lint pad*
30. Crease attachment*
31. Variable steam settings*
32. "Anti calc" indicator*
33. Empty tank indicator*
34. Steam ready indicator / auto off indicator
35. Variable steam setting button*
EN
18. Base unlocking button
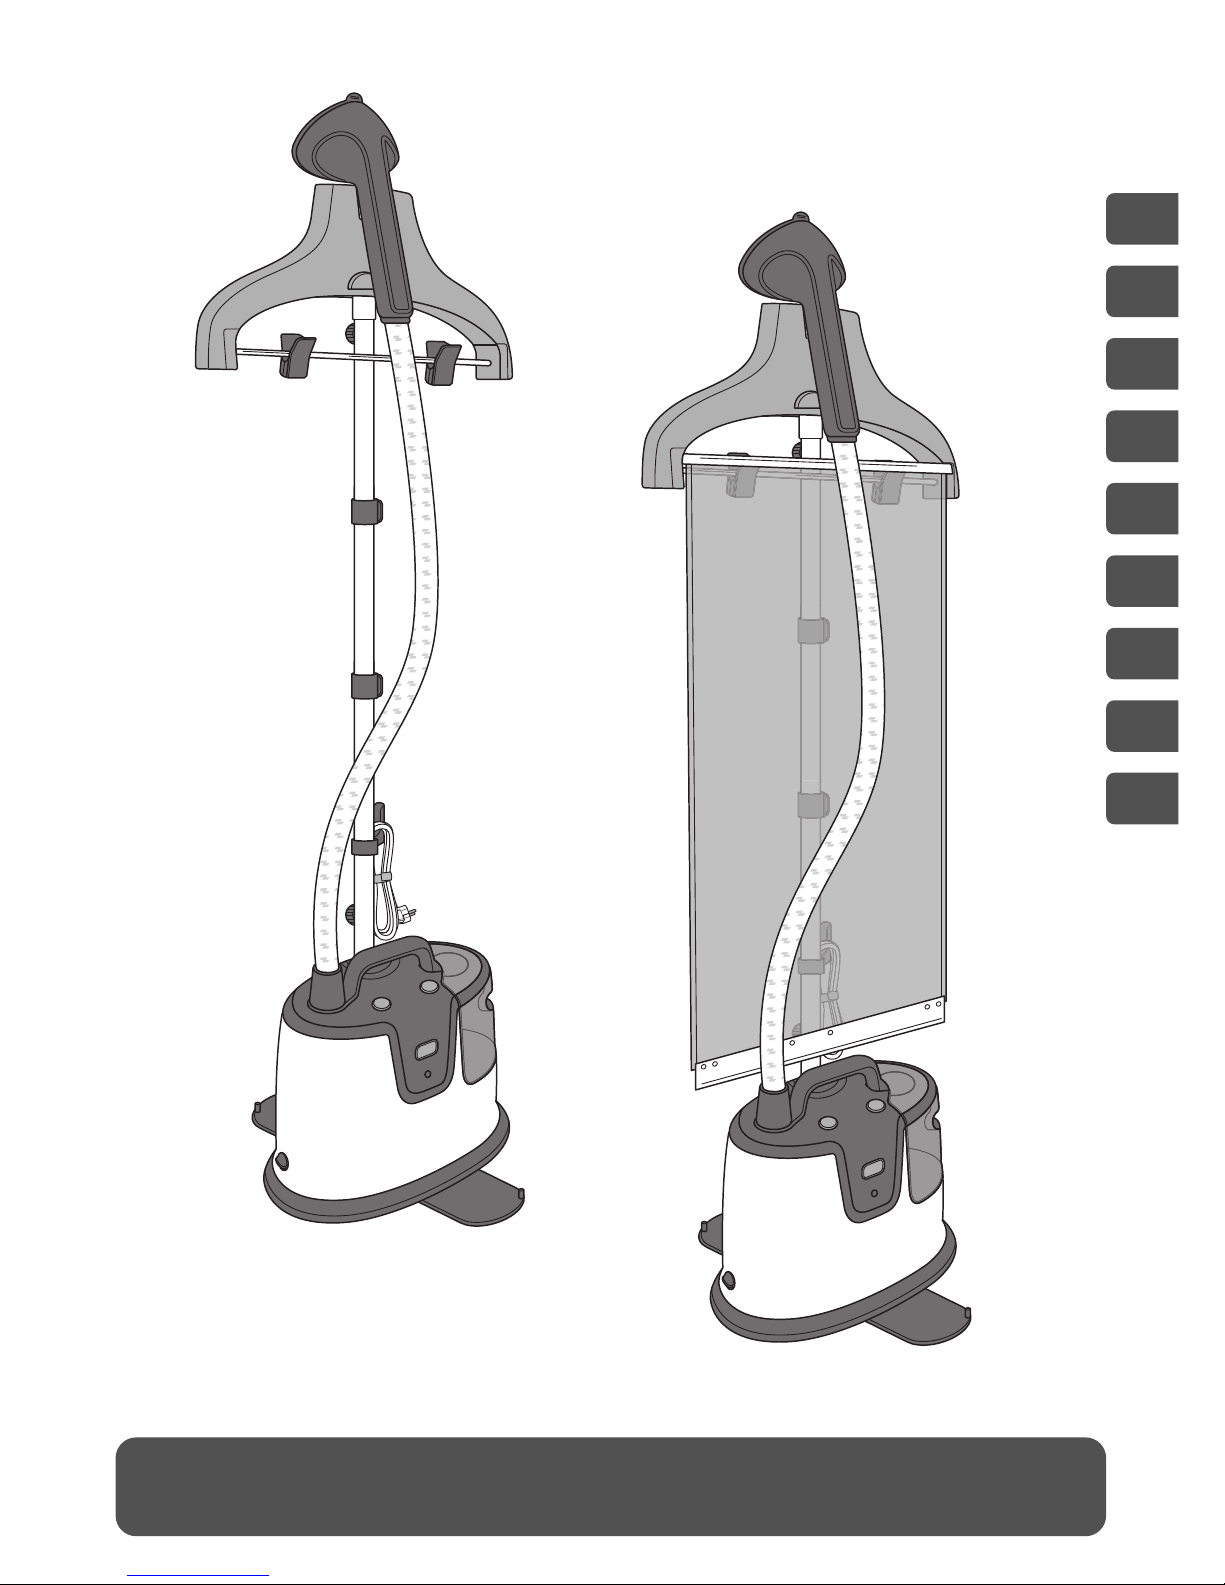
BEFORE USE
1 • Garment steamer assembly
Pole assembly
1. Pull and rotate the 2 stability legs until you hear a "click" sound. (fig. 1)
2. Unscrew the pole’s fastening screw on the base of the pole.
3. Hold the pole such that the electrical cord hook is at the back. Check that the 2 pole clips
are unlocked. (fig. 3)
4. Insert the pole into the base by pressing downwards until the holes of the pole and base are
at the same level, so that you can put the screw back. If the holes are not aligned, check that
the clips of the pole are well and truly unlocked. (fig. 4)
5. Screw the pole fastening screw back in as far as it will go so that the pole is firmly fixed to
the base.
6. Adjust the pole to its maximum height by sliding it upwards. Make sure the 3 segments of
the pole are fully extended then lock the 2 clips. (fig 6)
Integrated Hanger assembly
1. Unscrew the hanger fastening screw at the bottom of the hanger.
2. Hold the hanger such that the hanger holder is on the same side as the appliance control
panel.
3. Insert vertically the hanger on the top of the pole. The holes at the bottom of the hanger
and in the pole should be at the same level. (fig. 5)
4. Put the screw back and screw in as far as it will go so that the hanger is firmly fixed to the
pole.
5. Install the steam head on top of the integrated hanger.
* depending on model
36. Steam level indicator*
11

2 • Filling the water tank
IMPORTANT: Your product is designed to operate using untreated tap water. If your water is
very hard (check with your local water authority) it is possible to mix untreated tap water with
store-bought distilled water in the following proportions 50% untreated tap water with 50%
distilled water. Heat concentrates the elements contained in water during evaporation. The
types of water listed below may contain organic waste, mineral or chemical elements that can
cause spitting, brown staining or premature wear of the appliance: water from clothes dryers,
scented or softened water, water from refrigerators, batteries, air conditioners, rain water,
boiled, filtered or bottled water. These types of water should not be used. Only use store bought
distilled water as advised above.
• Ensure that the steamer is unplugged. Remove the water tank from the base of the appliance
by pulling the handle upwards (fig. 7). Unscrew the tank cap and fill the tank. (fig. 8)
• The steamer must be used with TAP WATER. If the water in your area is hard, we recommend
that you mix half tap water and half distilled water, which reduces the hardness.
• After screwing back the water tank cap, turn the tank down and hold it by the handle. Check out
that no water is leaking through the cap.
• Place vertically the water tank back on the appliance (fig. 9)
USE
Warning: Never steam a garment while it is being worn.
1 • Setting up
The flexible hose and the end of the steam head can become extremely hot during
use. This is perfectly normal. Be careful and avoid any prolonged contact.
• Only operate the steamer on a floor clear of any materials which may obstruct the base of the
steamer (flat and horizontal surface). Do not obstruct the openings on the lower part of the
appliance. This device should not be used on very thick carpets or rugs.
TM
• Undo the Velcro
• Plug in to power socket. (fig.10)
• Switch on by pressing the ON/OFF button located on top of the appliance. (fig. 11) The steam
ready indicator will flash approximately for 45 seconds then the light is fixed: your appliance is
ready to use with maximum steam output. (fig. 12-13)
• The appliance device will begin producing steam after approximately 30 seconds.
strip and completely unwind the electrical cord.
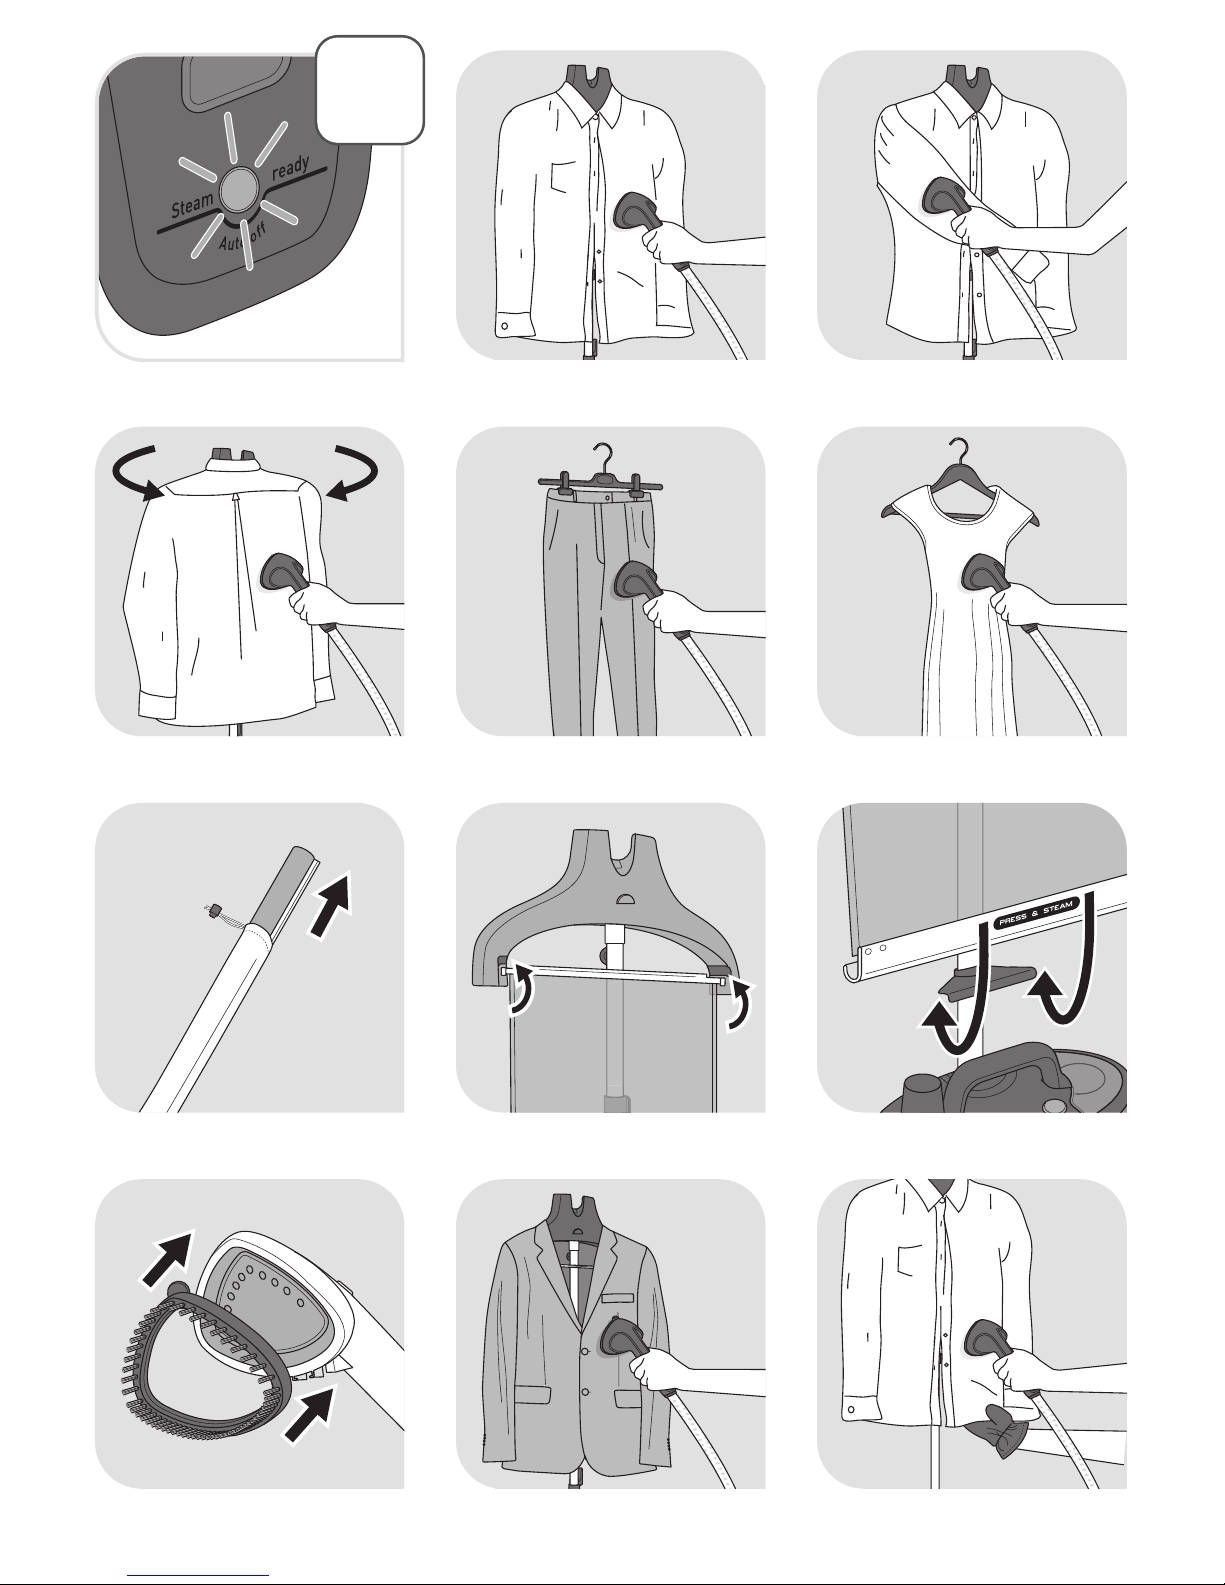
2 • Using the appliance
• Hang the garments on the integrated hanger or on separated hanger which may be suspended
on the hanger holder.
• To steam trousers, we recommend that you also use the support with clips*.
• Grasp the steam head with the steam vents pointing away from you.
• Start steaming by brushing material lightly following the grain of the garment fabric.
• Start at the top of the garment and gradually move downward.
• Always use the steam head in a vertical position.
Always be careful not to touch the hot steam.
• Always hang the steam head in an upright position on the steam head hook when not in use.
12
* depending on model

• During use, the hose may make a gurgling noise. This is a normal occurrence due to
condensation. If the appliance begins to gurgle, rest the steam head on its support for a
few moments in order to direct the condensation into the appliance once again.
• During use, some water drips may appear on the telescopic pole. This is also a normal
occurrence due to condensation.
Tips for better results with your garment steamer
• We recommend checking the garment care label for manufacturer recommendations before
steaming. We also recommend testing the garment and effect on the garment on an
unobtrusive area such as an inner seam.
• Button up the shirt’s collar to prevent them slipping on the hanger during steaming (fig.14).
• Gently press steamer brush into fabric while making slow passes.
• Avoid direct contact between the steam head and silk or velvet.
• Some garments are smoothed more easily on the reverse side.
• Heavy fabrics may need to be steamed for longer.
• If you are using the steam head at a position close to the ground, raise the hose frequently in
order to avoid the formation of condensation. A gurgling noise may be heard if the flexible
hose is pinched.
• If no steam is produced, if a gurgling sound is heard or if water is dripping through the holes
of the steam head, raise the steam hose occasionally to remove condensation inside the hose.
EN
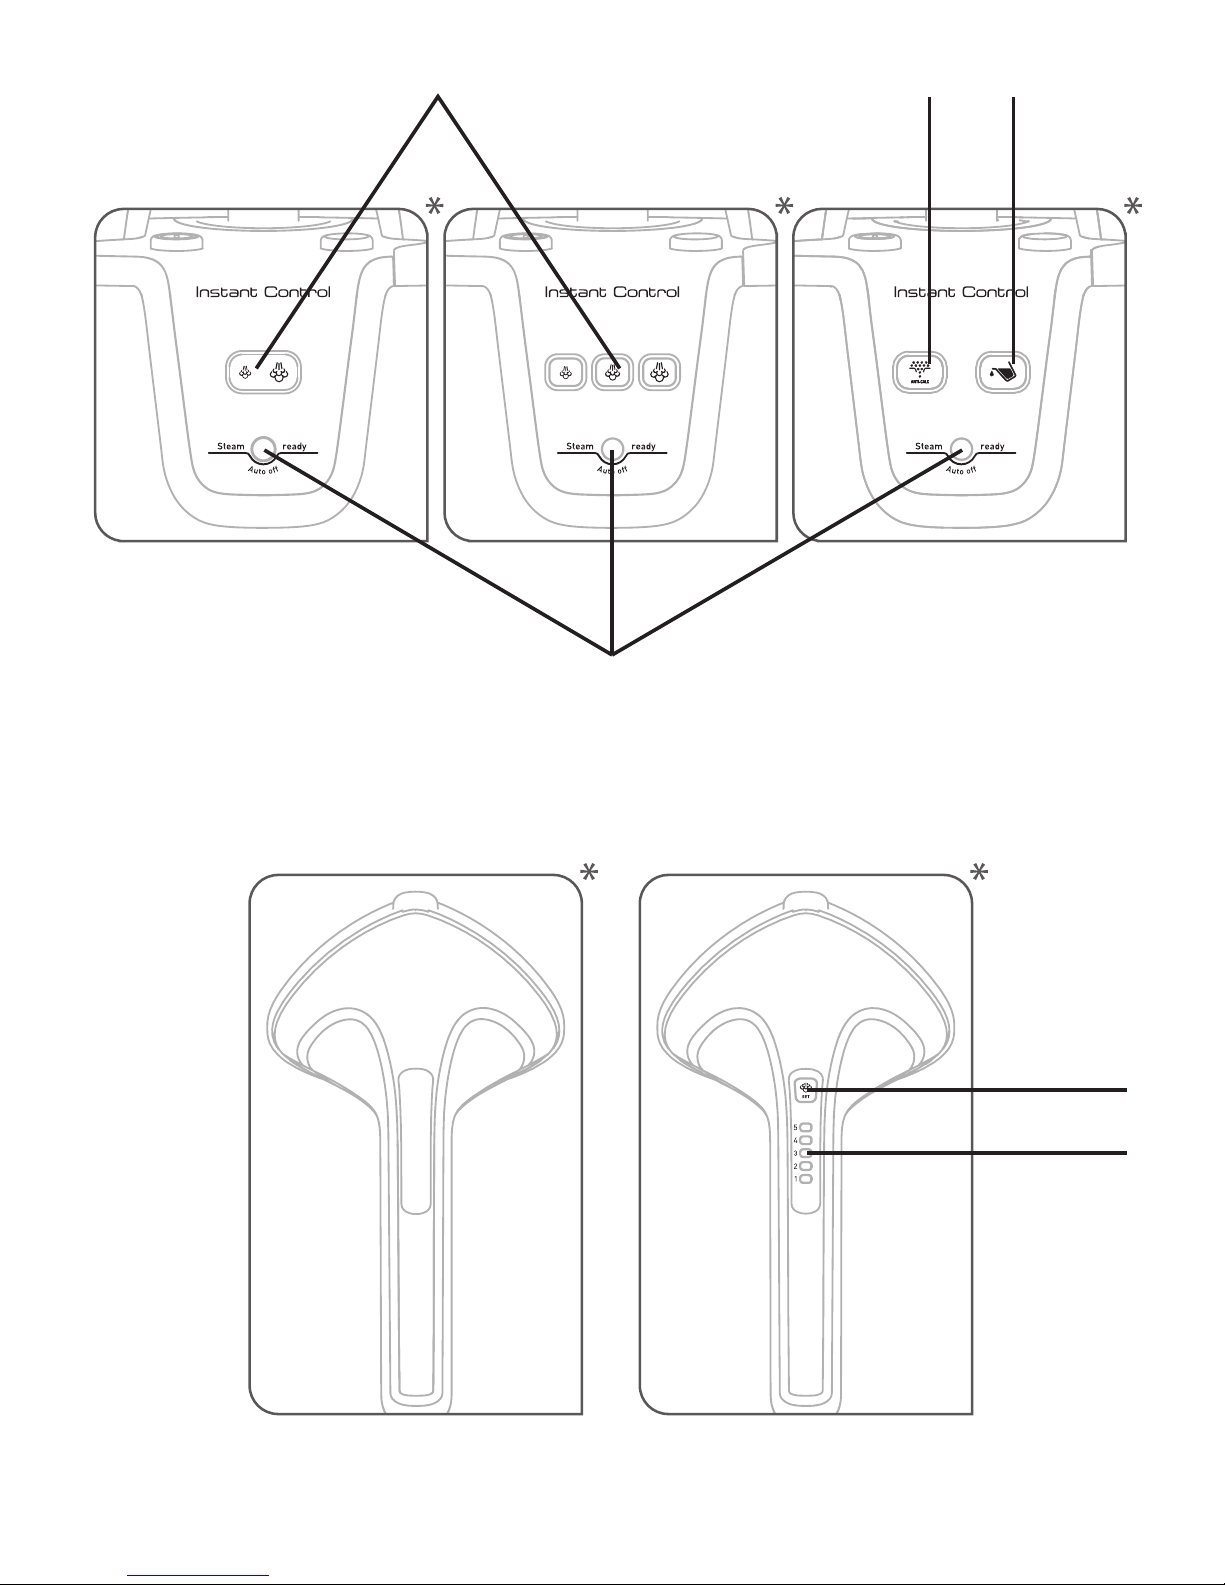
Steam setting*
Your appliance is fitted with 2 to 5 steam settings that you can set according to the fabric you
are steaming, from delicate to thick ones.
• Models with 2 settings: set by successively pressing the steam setting button on the
appliance's control panel.
LIGHT COLOR STEAM OUTPUT
Orange Mini
Green Maxi
• Models with 3 settings: set by pressing on one of the buttons on the appliance's control
panel.
• Models with 4 or 5 settings in the steam handle: set by successively pressing on the "SET"
button located on the steam handle. The light indicators will show the steam level selected.
Empty tank detector*
This appliance is equipped with an empty tank detector. When the water tank is empty, the
light indicator on the appliance's control panel will blink to alert you to fill the water tank. Turn
off the appliance and fill the water tank.
Electronic auto off*
Your appliance is fitted with an “auto-off” system which places it on standby once the water
tank has been empty for more than 10 minutes.
• The "Auto off" indicator on the control panel flashes slowly to indicate that the appliance is
on standby.
• To reactivate the appliance: fill the water tank and select the desired steam level on
* depending on model
13

appliance's control panel or steam handle (depending on model).
ACCESSORIES
Be sure the unit is unplugged and completely cool before attaching accessories.
Before using an accessory, check the manufacturer recommendations.
It is also recommended that you carry out a test on part of the fabric which cannot
be seen.
1 • Press & Steam vertical support*
The Press & Steam system set in the hanger provides a vertical support while
steaming, to help remove "creases" more easily and efficiently.
Assembly:
• Remove the Press & Steam vertical support from its pouch. (fig. 19)
• Make sure the telescopic pole is fully extended.
• Hold the Press & Steam vertical support such as the handle is located downward and its
"Press & Steam" logo is in front.
• Insert the upper part inside the integrated hanger, then pull down slightly until hooking the
handle on the Press & Steam vertical support hook located on the pole. (fig. 20-21)
• The Press & Steam vertical support helps keep the garment in place while steaming.
• When steaming a shirt, begin with steaming the sleeves. Get hold of one sleeve and cross it
over the garment using the Press & Steam for vertical support.
2 • Fabric brush*
The fabric brush opens the weave of the fabrics
for better steam penetration.
• Attach the fabric brush to the steam head by
lining up the bottom of the brush with the
bottom of the steam head. Gently push the top
of the brush onto the steam head until it clicks
into place. (fig. 22)
• Gently brush the area to be steamed following
the grain or nap of the fabric. (fig. 23)
• Remove the fabric brush once unit is unplugged and completely cool. Remove it by pressing
on the release tab on top of brush while pulling it forward.
3 • Lint pad*
The lint pad is a separate accessory and cannot be attached to
the steam head.You can use the lint pad independently from the
steamer.
The lint pad removes hair, lint and animal fur for a professional finish.
14
* depending on model

• To use the lint pad, slowly brush the clothing with the grain or nap of the fabric. (fig. 25)
• The pad can be cleaned by brushing it in the opposite direction. We recommend cleaning the
pad on an old cloth that can be discarded.
• We recommend to use the lint pad before steaming your clothes for perfect results.
4 • Crease attachment*
• Remove the fabric brush. Completely slide the
hook of the accessory into the slot located in the
lower part of the steam head. (fig. 26)
• Push on the handle to open the crease
attachment.
• Place the garment between the crease
attachment and steam head.
• Release the handle.
• Starting at the top of the garment, move the crease
attachment in a downwards motion. (fig. 27)
• Once the unit is unplugged and completely cooled down, remove the crease attachment by
sliding it off of the steam head.
5 • Glove*
• The glove protects your free hand from the steam during use.
• To use the glove, put it on the hand you use to hold or pull the garment.
(fig. 24)
The glove should be only used with this garment steamer and not
for other purpose. Do not wash or iron the glove.
EN
AFTER USE
• Switch off the appliance by pressing the ON/OFF button. (fig. 28)
• The light indicators on the control panel will go off, and you can then unplug the appliance.
(fig. 29)
• Hang the steam head in an upright position on the hook steam head.
Warning: never remove the Press & Steam accessory for storage before it has completely
dried. Always roll the Press & Steam vertical support for storage. Do not crease it.
• Empty and rinse the water tank each time before storage in order to flush out any scale
particles. (fig. 30)
• Loosely wind up the electrical cord and close with the Velcro™ strip, then hang it on the cord
hook on the pole. (fig. 32)
Warning: Never touch the steam head until it has cooled down completely.
1 • Transport
• Push back the 2 stability legs until locked in the appliance base. (fig. 31)
• You can transport your appliance by lifting it up by the telescopic pole or by the appliance's
* depending on model
15

handle.
Do not attempt to lift up or transport the appliance holding the integrated hanger.
Always make sure the appliance and the pole are firmly fixed to the base before
lifting up the appliance (see assembly instructions).
2 • Maintenance and cleaning
Do not use any descaling substances (vinegar, industrial descaling products, etc.)
when rinsing the appliance: they could damage it.
Before emptying your appliance, it must always be left to cool for 2 hours to avoid any
risks of scalding.
Cleaning
• Clean the main unit with a damp cloth.
• Clean the Press & Steam fabric with a damp cloth or non abrasive sponge.
Do not use any cleaning products such as soap or detergents.
Easy descaling
Warning: Never try to separate the hose from the appliance.
Make sure to avoid any shock on the steam head during descaling operation.
• To maintain maximum performance, your steamer must be descaled.
The time between descaling operations depends on the appliance use. The appliance must
be descaled at least once a year or after 30 hours of use.
• For models with "Anti calc" indicator*:
- To extend the life of your appliance and prevent the scaling, your appliance is fitted with an
orange "Anti-calc” light that flashes on the control panel when you need to drain the
appliance.
- If the orange “Anti-calc” warning light flashes, you can continue steaming normally but
remember to rinse the boiler before you use it again.
• To carry out a descaling operation, follow these steps:
- Ensure that the appliance has cooled down completely (2 hours minimum).
- Separate the appliance from the base, using the base unlocking button.
- Remove the steam head from the steam head hook. Remove also the electrical cord from the
electrical cord hook.
- Take out the water tank (fig. 33).
- Place the appliance flat on the edge of your sink.
- Fill ½ litre of fresh water directly in the water inlet location located on the appliance, allowing
water to fill the boiler (fig. 34). Pay attention not to overflow.
- Unscrew the "Anti calc" cap by turning it anti clockwise (fig. 35).
- Holding the appliance in a tilted position, help the scale particles to flow out with the water
by soft movements (fig. 36).
- Insert the "Anti calc" cap and screw it back.
- Repeat above procedure as many times as needed to remove all the scale particles.
- For models with "Anti calc" indicator*: the next time you use your garment steamer, press the
"Anti calc" button for 5 sec on the control panel to turn off the indicator.
CAUTION:
16
* depending on model

• Do not fill the boiler by the steam head holes or by the "Anti calc" draining outlet!
• Never immerse the steam head in water or any other liquid!
TROUBLESHOOTING
Problems Possible causes Solutions
EN
There is no steam. The appliance has not
been switched on.
The hose has been
obstructed.
There is no water left in
the water tank.
The auto off system is
activated.
The steam flow is low. Your steamer has a build-
up of scale because it has
not been rinsed out
regularly.
The hose has been
obstructed.
Check that the appliance has been plugged
in correctly. Press the On/Off button, the
indicator light located at the front of the
appliance will come on.
The appliance will begin producing steam
after approximately 30 seconds.
Check that the hose is not bent or twisted.
Switch off the appliance and fill the water
tank.
To reactivate the appliance: fill the water
tank and select the desired steam level.
See descaling process.
Check that the hose is not bent or twisted.
Water runs through the
holes of the steam
head.
The steamer takes a
long time to heat
and/or ejects white
particles.
The Press & Steam
accessory is crooked.
There is condensation in
the hose.
Your steamer has a buildup of scale because it has
not been descaled
regularly.
The Press & Steam
accessory has not been
installed properly.
The Press & Steam
accessory has not been
rolled properly.
Never use the steamer in the horizontal
position. Hold the hose vertically
outstretched and wait for the condensed
water to return to the steamer.
See descaling process.
Install again the Press & Steam accessory
inside the integrated hanger.
Make sure it is well hooked, following the
instructions.
Make sure the Press & Steam accessory is
always dry then rolled with care when stored.
Do not crease it for storage.
17

The Press & Steam
accessory detaches
while in use.
The Press & Steam
accessory was not locked
correctly in the hook.
Make sure the Press & Steam accessory
handle is firmly locked in the hook. It should
not be moving horizontally or vertically.
Make sure the 3 segments of the pole are
fully extended and that the 2 clips are firmly
locked.
The hose makes a
gurgling noise.
Water is overflowing
from water tank.
The orange "Anti calc"
light is flashing.
Steam escapes from
the "Anti calc" cap.
You are using the steam
head in a position close
to the ground and some
condensation occurs in
the hose.
You are using the steam
head in a position close
to the ground and some
condensation occurs in
the hose.
You did not press the "Anti
calc" restart button after
your descaling operation.
The "Anti calc" cap has not
been tightened correctly.
The "Anti calc" cap is
damaged.
Raise the hose frequently during use and
adjust the pole to its maximum height in
order to avoid the formation of
condensation.
Raise the hose frequently during use and
adjust the pole to its maximum height in
order to avoid the formation of
condensation.
Press the "Anti calc" restart button located
on the control panel.
Tighten the "Anti calc" cap after having let
the appliance cool down for 2 hours.
Contact an Approved Service Centre (see
contact information at the end of this page).
If you have any further problems or queries please contact the Customer
Relations Helpline - see details at the end of this leaflet.
18

CONSIGNES DE SÉCURITÉ
Veuillez lire attentivement les instructions qui
suivent avant la première utilisation et
conservez-les dans un endroit sûr.
• Ne laissez jamais l'appareil branché à la source
d'alimentation sans surveillance, même pendant
quelques instants, surtout en présence des enfants.
• Pensez à toujours débrancher votre appareil : avant
de remplir ou de rincer le réservoir d'eau, avant de
le nettoyer, après chaque utilisation.
• Il faut rester vigilant lors de l'utilisation de
l'appareil en raison d'émission de la vapeur.
• Cet appareil n’est pas prévu pour être utilisé par
des personnes (y compris les enfants) dont les
capacités physiques, sensorielles ou mentales sont
réduites, ou des personnes dénuées d’expérience
FR
ou de connaissance, sauf si elles ont pu bénéficier,
par l’intermédiaire d’une personne responsable de
leur sécurité, d’une surveillance ou d’instructions
préalables concernant l’utilisation de l’appareil.
• Cet appareil peut être utilisé par des enfants âgés
de 8 ans et plus et des personnes ayant des
capacités physiques, sensorielles ou mentales
réduites ou un manque d'expérience et de
connaissances, s'ils ont reçu un encadrement ou
des instructions concernant l'utilisation de
l'appareil en toute sécurité et comprennent les
risques encourus.
19

• Il convient de surveiller les enfants pour s'assurer
qu'ils ne jouent pas avec l'appareil.
• Les enfants ne doivent ni nettoyer l’appareil ni
s'occuper de son entretien sans surveillance.
• L'appareil ne doit pas être utilisé s'il est tombé,
comporte des traces de dommages, de fuites ou ne
fonctionne pas correctement. Ne démontez jamais
votre appareil. Pour éviter tout danger, faites-le
examiner par un centre service agréé.
RECOMMANDATIONS
IMPORTANTES
• Ce produit a été conçu pour un usage domestique en intérieur
uniquement. En cas d’utilisation commerciale, inappropriée ou non
conforme au mode d’emploi, le fabricant décline toute responsabilité
et la garantie ne s’applique pas.
• Il s'agit d'un appareil qui repose au sol et qui ne doit pas être transporté
lorsqu'il est utilisé.
• Veillez à toujours garder le tuyau et la tête vapeur élevés au-dessus du
réservoir d'eau.
• Pour votre sécurité, cet appareil est conforme aux normes et
réglementations (basse tension, compatibilité électromagnétique, et
aux directives environnementales en vigueur).
• La température des surfaces portant le marquage ou des surfaces
autour du marquage est très élevée pendant l'utilisation de l'appareil.
Ne touchez pas ces surfaces avant que l'appareil n'ait refroidi.
• Pour réduire le risque de contact avec de l'eau chaude ou de la vapeur
émise par les trous de sortie de vapeur, faites fonctionner l'appareil
avant chaque utilisation en le tenant éloigné de vous.
• Ne défroissez que dans un mouvement vertical de haut en bas. Veillez
à ne jamais utiliser la tête vapeur de manière horizontale ou à l’incliner
vers l’arrière, afin d’éviter toute projection d’eau chaude.
• Pour réduire le risque de choc électrique, ne pas immerger l'appareil ou
la tête de vapeur dans de l'eau ou dans d'autres liquides.
20

• L'appareil doit toujours être éteint avant de le brancher ou de le
débrancher. Ne jamais tirer sur le cordon pour le débrancher de la prise
de courant mais saisir la fiche et tirer pour le débrancher.
• Laissez l'appareil refroidir complètement avant de le ranger.
• Ne laissez pas le cordon d'alimentation en contact avec des arêtes vives
ou des surfaces chaudes.
• Ne pas attacher le tuyau en cours de fonctionnement. Au risque de se
brûler, ne jamais retirer l'adaptateur de tuyau pendant l'utilisation de
l'appareil.
• Ne pas essayer d'accrocher l'appareil lorsque vous utilisez le tuyau.
• L'utilisation d'accessoires étrangers qui ne sont pas fournis par TEFAL
n'est pas recommandée et peut entraîner des incendies, des chocs
électriques ou des blessures corporelles.
• Soyez prudent lors du changement d'accessoires ou d'équipements car
ils peuvent contenir de l'eau chaude du à la condensation. Assurez-vous
FR
que les accessoires aient refroidis afin d'éviter tout contact avec de l'eau
chaude.
• Des brûlures peuvent être occasionnées au contact des pièces chaudes,
de l'eau chaude ou de la vapeur. Soyez prudent lorsque vous videz un
appareil à vapeur. Le réservoir ou l'intérieur de l'appareil peuvent
contenir de l'eau chaude.
• Ne pas diriger la vapeur sur des personnes, des animaux ou des
vêtements lorsqu'ils sont portés.
• Ne pas couper ou tenter de prolonger le tuyau de vapeur.
• Si vous utilisez une rallonge, vérifiez qu'elle est adaptée à l'intensité de
courant avec une prise de terre et qu'elle est entièrement dépliée.
• N’insérez ou ne laissez tomber aucun objet dans les orifices ou le tuyau
de l’appareil.
• Le gant (selon le modèle) doit être utilisé uniquement avec ce
défroisseur. Le fabricant décline toute responsabilité en cas de tout
usage inapproprié.
PRIORITÉ À LA PROTECTION DE L'ENVIRONNEMENT!
i Votre appareil contient de nombreux matériaux qui peuvent être récupérés ou
recyclés.
‹ Déposez-le dans un point municipal de collecte des déchets.
21

DESCRIPTION
1. Tête vapeur
2. Cintre intégré
3. Pince pour pantalons*
4. Crochet pour la tête vapeur
5. Accroche cintre
6. Vis de fixation du cintre
7. Clips de verrouillage du mât
8. Mât télescopique
9. Tuyau vapeur
10. Crochet pour cordon électrique
11. Cordon électrique
12. Poignée de transport
13. Poignée de réservoir d'eau
14. Réservoir d’eau amovible
15. Panneau de commande
16. Pieds (x2)
17. Vis de fixation du mât
18. Bouton de déverrouillage de la base
19. Bouton Marche/Arrêt
20. Appareil
21. Bouchon « Anti-calc »
22. Base
23. Support vertical Press & Steam*
24. Housse Press & Steam*
25. Poignée de verrouillage Press & Steam*
26. Crochet de verrouillage Press & Steam*
27. Gant*
28. Brosse à tissus*
29. Brosse anti-peluche*
30. Pince pour plis de pantalons*
31. Réglage de vapeur*
32. Voyant « Anti-calc »*
33. Voyant réservoir vide*
34. Voyant vapeur prête / arrêt automatique
35. Commande du débit vapeur*
36. Indicateur du niveau de vapeur*
INSTRUCTIONS AVANT UTILISATION
1 • Assemblage du défroisseur vapeur
Assemblage des mâts
1. Tirez et faites pivoter les deux pieds de support jusqu'à ce que vous entendiez un « clic ».
(schéma 1)
2. Dévissez la vis de fixation du mât située sur la base de celui-ci.
3. Maintenir le mât de telle sorte que le crochet pour cordon électrique soit situé à l'arrière.
Vérifiez que les deux clips des mâts soient déverrouillés. (schéma 3)
4. Insérez le mât dans la base en exerçant une pression vers le bas jusqu'à ce que les trous du
mât et la base soient au même niveau, de sorte que vous puissiez remettre la vis. Si les trous
ne sont pas alignés, vérifiez que les clips du mât soient déverrouillés. (schéma 4)
5. Vissez la vis de fixation du mât autant que possible de sorte que le mât soit fermement fixé
à la base.
6. Réglez le mât à sa hauteur maximale en le faisant glisser vers le haut. Assurez-vous que les 3
segments du mât soient entièrement dépliés, puis verrouillez les deux clips. (schéma 6)
Assemblage du cintre intégré
1. Dévissez la vis de fixation située en bas du cintre.
2. Maintenez le cintre de telle sorte que l'accroche cintre soit placé du même côté que le
panneau de commande de l'appareil.
3. Insérez verticalement le cintre sur la partie supérieure du mât. Les trous dans la partie
inférieure du cintre et du mât doivent être au même niveau. (schéma 5)
4. Vissez la vis de fixation du mât autant que possible de sorte que le cintre soit fermement fixé
à la base.
5. Installez la tête vapeur au-dessus du cintre intégré.
22

2 • Remplissage du réservoir d'eau
IMPORTANT : Ne jamais utiliser d'eau qui contienne des additifs (amidon, parfum, substances
aromatiques, adoucissant, etc.) dans le défroisseur. De tels additifs peuvent affecter les
propriétés de la vapeur d'eau et conduire à la formation de dépôts.
• Assurez-vous que l'appareil est débranché. Retirez le réservoir d'eau de la base de l'appareil
en tirant sur la poignée vers le haut (schéma 7). Dévissez le bouchon du réservoir et
remplissez-le réservoir. (schéma 8)
• Utilisez l'EAU DU ROBINET. Si dans votre région l'eau est dure, nous vous recommandons
de mélanger, une moitié d'eau du robinet et une moitié d'eau déminéralisée pour réduire
la dureté.
• Après avoir revissé le bouchon du réservoir d'eau, retournez le réservoir et maintenez-le par
la poignée. Vérifiez que l'eau ne coule pas à travers le bouchon.
• Placez verticalement le réservoir d'eau sur l'appareil. (schéma 9)
UTILISATION
Avertissement : Ne jamais utiliser le défroisseur sur un vêtement porté.
FR
1 • Mise en place
Le tuyau flexible et l'extrémité de la tête vapeur peuvent devenir extrêmement chauds pendant
l'utilisation. Ceci est parfaitement normal. Soyez prudent et évitez tout contact prolongé.
• Faites fonctionner le défroisseur uniquement sur un sol dégagé de tous objets qui peuvent
obstruer la base (surface plane et horizontale). Ne pas obstruer les orifices de la partie inférieure
de l'appareil. L'appareil ne doit pas être utilisé sur les tapis ou moquettes très épaisses.
• Desserrez la bande Velcro
• Branchez-le à la prise d'alimentation. (schéma 10)
• Allumez-le en appuyant sur le bouton marche/arrêt situé sur le dessus de l'appareil. (schéma
1) Le voyant vapeur prête clignote pendant environ 45 secondes, puis devient fixe : l'appareil
est prêt à l'emploi et le débit de la vapeur est au niveau maximal. (schéma 12-13)
• L'appareil commencera à produire de la vapeur après environ 30 secondes.
TM
et dépliez complètement le cordon électrique.
2 • Utilisation de l'appareil
• Suspendez les vêtements sur le cintre intégré ou sur un cintre séparé qui peut être suspendu
sur l'accroche cintre.
• Pour défroisser les pantalons, nous vous recommandons d'utiliser également le support avec
pinces*.
• Saisissez la tête vapeur en prenant soin de diriger les orifices de diffusion de vapeur à
l'opposé de vous.
• Commencez à brosser légèrement le tissu dans le sens des fibres.
• Commencez par le haut du vêtement en descendant progressivement vers le bas.
• Utilisez toujours la tête de vapeur en position verticale.
Veillez à ne jamais toucher la vapeur chaude.
• Accrochez toujours la tête de vapeur en position verticale sur le crochet prévu à cet effet
lorsque vous n'utilisez pas l'appareil.
* Selon modèle
23

• Pendant l'utilisation, le tuyau peut produire un bruit de gargouillement. Il s'agit d'un
phénomène normal dû à la condensation. Si l'appareil commence à gargouiller, reposez la
tête de vapeur sur son support pendant quelques instants afin de diriger à nouveau la
condensation dans l'appareil.
• Lors de l'utilisation, des gouttes d'eau peuvent apparaître sur le mât télescopique. Il s'agit
également d'un phénomène normal dû à la condensation.
Conseils pour un résultat optimal avec votre défroisseur
• Nous vous recommandons de vérifier l'étiquette d'entretien des vêtements pour les
recommandations du fabricant avant le défroissage Nous vous recommandons également de
faire un test sur une partie du vêtement, par exemple sur une couture intérieure.
• Boutonnez le col de la chemise pour éviter que celle-ci ne glisse sur le cintre pendant le
défroissage.
• Appuyez doucement sur la brosse à tissu en la faisant passer lentement sur le vêtement.
• Évitez le contact direct entre la tête de vapeur et la soie ou le velours.
• Certains vêtements sont plus faciles à défroisser à l'envers.
• Le temps de défroisssage des tissus épais peut être plus long.
• Afin d'éviter la formation de la condensation lorsque vous utilisez la tête de vapeur à une
hauteur proche du sol, pensez à soulever le tuyau fréquemment. Un bruit de gargouillement
peut être perceptible si le tuyau flexible est plié.
•
Si l'appareil ne produit pas de vapeur, si un bruit de gargouillement se fait entendre ou si de
l'eau coule à travers les orifices de la tête de vapeur, soulevez le tuyau de vapeur de temps en
temps pour enlever la condensation accumulée à l'intérieur.
Réglage de la vapeur*
Votre appareil dispose de 2 à 5 niveaux de vapeur que vous pouvez régler selon la nature du
tissu, allant de délicat à épais.
• Modèles avec 2 niveaux de vapeur : vous pouvez régler l'appareil en appuyant successivement
sur le bouton de réglage de la vapeur sur le panneau de commande de l'appareil.
COULEUR DU VOYANT LUMINEUX NIVEAU DE VAPEUR
Orange Mini
Vert Maxi
• Modèles avec 3 niveaux de vapeur : vous pouvez régler l'appareil en appuyant sur l'un des
boutons de réglage sur le panneau de commande de l'appareil.
• Modèles avec 4 ou 5 niveaux de vapeur dans la poignée vapeur : vous pouvez régler l'appareil
en appuyant successivement sur le bouton « SET » situé sur la poignée vapeur. Les voyants
indiquent le niveau de vapeur sélectionné.
Détecteur de réservoir vide*
Cet appareil est équipé d'un détecteur de réservoir vide. Lorsque le réservoir d'eau est vide, le
voyant sur le panneau de commande de l'appareil clignote pour vous avertir qu'il faut remplir
le réservoir d'eau. Éteignez l'appareil et remplissez le réservoir d'eau.
Système électronique d'arrêt automatique*
Votre appareil est équipé d'un système d'arrêt automatique qui met l'appareil en veille une
fois que le réservoir d'eau est vide pendant plus de 10 minutes.
• L'indicateur d'arrêt automatique sur le panneau de commande clignote lentement pour
indiquer que l'appareil est en veille.
24
* Selon modèle

• Pour réactiver l'appareil : remplir le réservoir d'eau et sélectionnez le niveau de vapeur souhaité
sur le panneau de commande de l'appareil ou sur la poignée vapeur (selon le modèle).
ACCESSOIRES
Assurez-vous que l'appareil est débranché et complètement froid avant de fixer les accessoires.
Avant d'utiliser un accessoire, vérifiez les recommandations du fabricant.
Il est également recommandé d'effectuer un test surune partie dissimulée du tissu.
1 • Support vertical Press & Steam*
Le système Press & Steam fixé dans le cintre fournit un support vertical pendant le défroissage,
permettant d'éliminer les plis de manière plus facile et plus efficace.
Assemblage :
• Retirez le support vertical Press & Steam de sa housse. (schéma 19)
• Assurez-vous que le mât télescopique soit entièrement déployé.
• Tenez le support vertical Press & Steam de manière à diriger la poignée vers le bas et de
positionner le logo « Press & Steam » à l'avant.
• Insérez la partie supérieure à l'intérieur du cintre intégré, puis tirez légèrement vers le bas
jusqu'à ce que la poignée s'accroche sur le crochet de verrouillage Press & Steam situé sur le
mât. (schéma 20-21)
• Le support vertical Press & Steam permet de garder le vêtement en place pendant le défroissage.
• Lorsque vous défroissez une chemise, commencez par les manches. Faites passer une manche
devant le vêtement, en biais, en utilisant le support vertical Press & Steam.
FR
2 • Brosse à tissus*
La brosse à tissus écarte les fibres des tissus pour
une meilleure pénétration de la vapeur.
• Fixez la brosse à tissus sur la tête vapeur en
alignant la partie inférieure de la brosse avec la
partie inférieure de la tête. Appuyez doucement sur
le haut de la brosse pour l'enfoncer sur la tête
vapeur jusqu'à ce qu'elle s'enclenche. (schéma 22)
• Brossez doucement la zone à traiter en suivant le
sens ou le grain du tissu. (schéma 23)
• Retirez la brosse à tissus une fois l'appareil débranché et complètement refroidi. Retirez-la en
appuyant sur la languette au-dessus de la brosse tout en tirant vers l'avant.
3 • Brosse anti-peluches*
La brosse anti-peluches est un accessoire séparé qui ne peut pas
être fixé sur la tête vapeur. Vous pouvez l'utiliser
indépendamment de l'appareil.
* Selon modèle
25

La brosse anti-peluches enlève les cheveux, les peluches et les poils d'animaux pour un fini
professionnel !
• La brosse anti-peluches s'utilise en brossant doucement les vêtements en suivant le sens ou
le grain du tissu. (schéma 25)
• Elle peut être nettoyée par brossage dans le sens opposé. Nous vous recommandons de
nettoyer la brosse avec un vieux chiffon qui peut ensuite être jeté.
• Nous vous recommandons d'utiliser la brosse anti-peluche avant le défroissage de vos
vêtements pour un résultat parfait.
4 • Pince pour plis de pantalon*
• Retirez la brosse à tissus. Faites coulisser le crochet
de l'accessoire dans la rainure située dans la
partie inférieure de la tête vapeur. (schéma 26)
• Appuyez sur la poignée pour ouvrir l'accessoire
pour pli.
• Placez le vêtement entre la pince à pli et la tête
vapeur.
• Relâchez la poignée.
• En partant du haut du vêtement, déplacez l'accessoire à pli vers le bas. (schéma 27)
• Une fois l'appareil débranché et complètement refroidi, retirez l'accessoire à pli en le faisant
glisser sur la tête vapeur.
5 • Gant*
• Le gant protège votre main libre de la vapeur lors de l'utilisation.
• Pour utiliser le gant, le mettre sur la main que vous utilisez pour tenir ou
tirer sur le vêtement. (schéma 24)
Le gant doit être utilisé uniquement avec ce défroisseur et non à
d'autres fins. Ne pas laver ou repasser le gant.
APRÈS UTILISATION
• Éteignez l'appareil en appuyant sur le bouton marche/arrêt. (schéma 28)
• Les indicateurs lumineux sur le panneau de contrôle s'éteignent, vous pouvez alors débrancher
l'appareil. (schéma 29)
• Accrochez la tête vapeur en position verticale sur le crochet.
Attention: ne retirez jamais l'accessoire Press & Steam pour le ranger avant qu'il ne soit
complètement sec. Avant de le ranger, enroulez toujours le support vertical Press &
Steam. Ne le pliez pas.
• Afin d'éliminer les particules de calcaire, videz et rincez le réservoir d'eau à chaque fois avant
de le ranger. (schéma 30)
• Enroulez sans serrer le cordon électrique et l'attacher avec la bande Velcro™, puis accrochezle sur le crochet prévu à cet effet sur le mât. (schéma 32)
Avertissement : Ne jamais toucher la tête vapeur avant qu'elle n'ait complètement refroidie.
26

1 • Transport
• Repoussez les deux pieds de stabilité jusqu'au verrouillage dans la base de l'appareil. (schéma
31)
• Vous pouvez transporter votre appareil en le soulevant par le mât télescopique ou par la
poignée de l'appareil.
Ne tentez pas de soulever ou de transporter l'appareil en le tenant par le cintre
intégré. Assurez-vous toujours que l'appareil et le mât soient solidement fixés à la
base avant de soulever l'appareil (voir les instructions de montage).
2 • Entretien et nettoyage
Ne pas utiliser de substances de détartrage (vinaigre, produits détartrants industriels,
etc.) lors du rinçage de l'appareil : elles pourraient l'endommager.
Avant de vider votre appareil, il faut toujours le laisser refroidir pendant 2 heures pour
éviter les risques de brûlures.
Nettoyage
• Nettoyez l'unité principale avec un chiffon humide.
• Nettoyez le tissu du Press & Steam avec un chiffon humide ou une éponge non abrasive. Ne
pas utiliser de produits de nettoyage tels que du savon ou des détergents.
FR
Détartrage facile
Avertissement : Ne jamais essayer de séparer le tuyau de l'appareil.
Assurez vous d'éviter les chocs sur la tête vapeur pendant l'opération de détartrage.
• Pour préserver une performance optimale, votre défroisseur doit être détartré. La fréquence
de détartrage dépend de l'utilisation de l'appareil. L'appareil doit être détartré au moins une
fois par an ou après 30 heures d'utilisation.
• Pour les modèles avec indicateur « Anti calc »
- Pour prolonger la vie de votre appareil et empêcher le dépôt de tartre, l'appareil est équipé
d'un voyant « Anti calc » orange qui clignote sur le panneau de commande lorsque vous avez
besoin de détartrer l'appareil.
- Si le voyant « Anti calc » clignote, vous pouvez continuer le défroissage normalement mais
n'oubliez pas de rincer la chaudière avant de l'utiliser à nouveau.
• Pour mener à bien une opération de détartrage, procédez comme suit :
- Assurez-vous que l'appareil ait complètement refroidi (2 heures minimum).
- Séparez l'appareil de la base, en utilisant le bouton de déverrouillage.
- Enlevez la tête vapeur de son crochet. Enlevez également le cordon électrique de son crochet.
- Retirez le réservoir d'eau (schéma 33).
- Placez l'appareil sur une surface plane sur le rebord de l'évier.
- Remplissez-le d'un demi-litre d'eau directement à l'emplacement d'entrée d'eau situé sur
l'appareil, afin de remplir la chaudière (schéma 34). Faites attention à ne pas déborder.
- Dévissez le bouchon « Anti calc » en le tournant dans le sens contraire de l'aiguille d'une
montre (schéma 35).
- Tenez l'appareil en position inclinée, faites des mouvements lents pour permettre d'éliminer
les particules de calcaire avec l'eau (schéma 36).
- Remettez le bouchon « Anti calc » et revissez.
- Répétez la procédure autant de fois que nécessaire pour éliminer toutes les particules de calcaire.
* Selon modèle
27

- Pour les modèles avec indicateur « Anti calc »* : la prochaine fois que vous utilisez votre
défroisseur pour vêtements, appuyez sur le bouton « Anti calc » pendant 5 secondes sur le
panneau de commande pour éteindre le voyant lumineux.
ATTENTION :
• Ne pas remplir la chaudière par les orifices de la tête vapeur ou l'orifice de vidange de
l'« Anti calc » !
• Ne jamais plonger la tête vapeur dans l'eau !
DÉPANNAGE
Problèmes Causes possibles Solutions
L'appareil ne produit
pas de vapeur.
Le débit de vapeur est
faible.
L'eau coule à travers
les orifices de la tête de
vapeur.
L'appareil n'est pas mis
sous tension.
Le tuyau est obstrué. Vérifiez que le tuyau n'est pas plié ou tordu.
Le réservoir d'eau est vide. Éteignez l'appareil et remplissez le réservoir
Le système d'arrêt
automatique est activé.
Le tartre s'est accumulé
dans votre appareil à
vapeur car il n'a pas été
rincé régulièrement.
Le tuyau est obstrué. Vérifiez que le tuyau n'est pas plié ou tordu.
Il y a de la condensation
dans le tuyau.
Vérifiez que l'appareil est branché
correctement à une prise. Appuyez sur le
bouton Marche/Arrêt, le voyant situé à
l'avant de l'appareil va s'allumer. L'appareil
commence à produire de la vapeur après
environ 30 secondes.
d'eau.
Pour réactiver l'appareil : remplir le réservoir
d'eau et sélectionner le niveau de vapeur
souhaité.
Voir la procédure de détartrage.
Ne jamais utiliser la vapeur dans la position
horizontale. Maintenez le tuyau tendu en
position verticale et attendez que l'eau
condensée se redirige dans l'appareil.
L'appareil est long à
chauffer et/ou des
particules blanches se
dégagent de celui-ci.
L'accessoire Press &
Steam est tordu.
28
Le tartre s'est accumulé
dans votre appareil à
vapeur car il n'a pas été
détartré régulièrement.
L'accessoire Press & Steam
n'a pas été correctement
fixé.
L'accessoire Press & Steam
n'a pas été correctement
roulé.
Voir la procédure de détartrage.
Installez à nouveau l'accessoire Press &
Steam à l'intérieur du cintre intégré.
Assurez-vous qu'il est bien accroché, en
suivant les instructions.
Assurez-vous que l'accessoire Press & Steam
est toujours sec puis enroulez-le avec
précaution pour le ranger. Ne le pliez pas
pour le ranger.

L'accessoire Press &
Steam se détache
pendant l'utilisation.
L'accessoire Press & Steam
n'a pas été accroché
correctement sur le
crochet.
Assurez-vous que la poignée de l'accessoire
Press & Steam est fermement accrochée
dans le crochet. Elle ne doit pas se déplacer
horizontalement ou verticalement. Assurezvous que les 3 segments du mât soient
entièrement déployés et que les deux clips
soient solidement fermés.
Le tuyau génère un
bruit de
gargouillement.
L'eau déborde du
réservoir d'eau.
Le voyant orange « Anti
calc » clignote.
De la vapeur s'échappe
par le bouchon « Anticalc ».
Vous utilisez la tête vapeur
dans une position proche
du sol et de la
condensation se produit
dans le tuyau.
Vous utilisez la tête dans
une position proche du sol
et de la condensation se
produit dans le tuyau.
Vous n'avez pas appuyé
sur le bouton de
redémarrage « Anti calc »
après l'opération de
détartrage.
Le bouchon « Anti-calc »
n'a pas été correctement
serré.
Le bouchon « anti-calc »
est endommagé.
Soulevez le tuyau fréquemment pendant
l'utilisation et réglez le mât à sa hauteur
maximale, afin d'éviter la formation de la
condensation.
Soulevez le tuyau fréquemment pendant
l'utilisation et réglez le mât à sa hauteur
maximale, afin d'éviter la formation de la
condensation.
Appuyez sur le bouton de redémarrage «
Anti calc » situé sur le panneau de
commande.
Serrez le bouchon « Anti-calc » après avoir
laissé refroidir l'appareil pendant 2 heures.
Contactez le centre de service agréé (voir les
coordonnées à la fin de cette page).
FR
Si la cause du problème ne peut être établie, veuillez demander l'assistance
d'un centre de service agréé www.tefal.com
* Selon modèle
29
 Loading...