


TECSUN
R A D I O S A U S T R A L I A
PL-600
FM STEREO/LW/MW/SW SSB
SSB
PLL SYNTHESIZED DUAL CONVERSION RECEIVER
OWNER'S MANUAL
PLEASE READ THIS MANUAL BEFORE OPERATION
TECSUN RADIOS AUSTRALIA
|
|
|
24/9 Powells Road, Brookvale, NSW 2100 Australia |
|
|
|
Ph: +61 2 9939 4377 |
|
Email: info@tecsunradios.com.au |
|
www.tecsunradios.com.au |

www.tecsunradios.com.au
TABLE OF CONTENTS |
|
|
1 |
MAJOR FEATURES OF THE PL-600 ............................................................................. |
2 |
2 |
DIAGRAMS ..................................................................................................................... |
3 |
3 |
GETTING STARTED ....................................................................................................... |
5 |
|
WHAT THE PL-600 INCLUDES ................................................................................ |
5 |
|
INSTALLING BATTERIES ......................................................................................... |
5 |
|
PREVENTING BATTERYACID LEAKAGE ............................................................... |
5 |
|
USING THE INCLUDED AC ADAPTOR/CHARGER ................................................. |
5 |
|
CHARGING BATTERIES IN THE PL-600................................................................. |
5 |
4 |
BASIC RADIO OPERATION ........................................................................................... |
7 |
5 |
CLOCK AND TIMER FEATURES ................................................................................. |
10 |
|
SETTING THE CLOCK ............................................................................................ |
10 |
|
SETTING THE TIMERS ......................................................................................... |
10 |
|
STORING A RADIO STATION INTO TIMER MEMORY........................................... |
11 |
|
ACTIVATING/DEACTIVATING THE TIMER.............................................................. |
11 |
|
USING THE SNOOZE FEATURE ............................................................................ |
11 |
6 |
WORKING WITH MEMORY........................................................................................... |
12 |
|
STORING STATIONS INTO MEMORY.................................................................... |
12 |
|
SELECTING/CHANGING MEMORY PAGES .......................................................... |
12 |
|
ACCESSING WHAT IS STORED INTO MEMORY.................................................. |
12 |
|
DIRECT MEMORYACCESS .................................................................................. |
12 |
|
MANUAL MEMORY SEARCH ................................................................................. |
12 |
|
MEMORYAUTO-SCAN ........................................................................................... |
13 |
|
DELETINGA MEMORY'S CONTENTS ................................................................... |
13 |
|
DELETINGALL MEMORY PAGE CONTENTS ....................................................... |
13 |
|
MOVINGA STORED FREQUENCY........................................................................ |
13 |
|
CUSTOMIZING MEMORY PAGES ......................................................................... |
13 |
7 |
SYSTEM SET CODES .................................................................................................. |
14 |
|
SYSTEM SET CODE TABLE................................................................................... |
14 |
|
CHANGING SYSTEM SET CODES ........................................................................ |
15 |
|
DEFAULT FACTORY SYSTEM SET CODES ......................................................... |
15 |
|
MONITORING THE CURRENT STATUS OF SET |
|
|
CODESAND OTHER SETTINGS ............................................................................ |
15 |
8 |
ADDITIONAL PL-600 CONTROLS ................................................................................ |
15 |
9 |
LISTENING TO SHORTWAVE STATIONS ..................................................................... |
16 |
10 |
TROUBLESHOOTING ................................................................................................... |
18 |

www.tecsunradios.com.au |
PL-600 OWNER'S MANUAL |
|
|
1 MAJOR FEATURES OF THE PL-600
 FM Frequency Range: 87-108 MHz or 76-108 MHz (For Japan)
 Shortwave Frequency Range: 171129999 KHz
 9/10KHz tuning step selector for Medium Wave (MW) reception
 1 kHz tuning step for the display of Medium wave and Shortwave
 AM (LW/MW/SW) dual conversion.
 SSB (SINGLE SIDE BAND) signal reception
 ATS (Auto tuning system) for the memory storage of FM/MW reception
 Manual Tuning
 Auto Scan Tuning
 Direct Keypad Frequency Entry
 Digital Tuning Knob
 600 Programmable Memories
 Memory Page Customization
 Auto-Scan and manually scan stations stored into memory
 Direct Memory Access
 Fast/Slow tuning rate selection for manual tuning
 Sleep Function
 Two Turn-on Timers with station memory
 Snooze Function: 10 minutes, repeated three times
 FM Stereo/Mono selection
 High/Low Tone Control
 LCD Backlight
 Key Lock
 Built-in Ni-MH battery charger
  System set codes

www.tecsunradios.com.au
2 DIAGRAMS |
|
|
|
|
1. |
Power/ Sleep |
5. FM/Shortwave |
|
2. |
Clock Button |
|
|
Telescopic Antenna |
||
|
3. |
Timer A Button |
|
|
|
||
|
4. |
Timer B Button |
|
|
|
|
6. LCD Display |
TIMER |
TIMER |
|
|
A |
B |
|
|
0 |
1 |
2 |
3 |
4 |
5 |
|
7.Light / Snooze Button |
|
|
||||||
Ni-MH |
|
|
|
|
|
|
|
Battery |
|
|
|
|
|
FAST |
8.Tuning Fast/Slow / Lock Button |
|
|
|
|
|
|
kHz |
|
|
|
|
|
Shortwave |
Bandwidth N |
9.Up / Auto-Scan Button |
|
1 |
|
|
|
2 |
|
3 |
10.Down / Auto-Scan Button |
4 |
|
|
|
5 |
|
6 |
11.Frequency / Preset Button |
7 |
|
|
|
8 |
|
9 |
12.Page Button |
|
|
|
|
0 |
|
|
13.SSB Button |
|
|
|
|
|
|
|
14.FM. ST & AM Bandwidth Button |
|
|
|
|
|
|
|
15.FM / MW / LW Band & |
18.Memory / Sys. Set Button |
|
|
|
|
|
|
FM / MWATS Button |
|
|
|
|
|
|
16.SW(SW Meter) Band Button |
|
19.Charge On / Off Button |
|
|
|
|
|
|
|
|
|
|
|
|
|
|
|
20.Enter / Delete Button |
|
|
|
|
|
|
17.Numeric Keypad |
21. |
Hand Carry Belt |
|
22. |
FM / SW ANT. Jack |
TECSUN |
|
||
23. |
ANT. Gain |
|
|
(DX / Normal / Local) |
|
24. |
Tone Control |
|
25. |
Earphone Socket |
|
26. |
DC 6V Jack |
|
27.Vertical Stand |
|
|
28. Tuning Knob |
|
29. |
Stand |
30. |
SSB BFO Knob |
31. |
Volume Knob |
32. |
Reset Button |
www.tecsunradios.com.au |
PL-600 OWNER'S MANUAL |
|
|
DIAGRAMS continued
RADIO OFF DISPLAY |
|
|
RADIO ON DISPLAY |
|
|
|
|
|||||||||||||||||||||||||||||||||||||
33. Battery Symbol |
|
|
33. Battery Symbol |
|
|
40. Clock |
||||||||||||||||||||||||||||||||||||||
|
|
|
|
34. Clock Digits |
|
|
|
|
|
38. Antenna Symbol |
|
|
|
|
Digits |
|||||||||||||||||||||||||||||
|
|
|
|
|
|
|
|
|
|
|||||||||||||||||||||||||||||||||||
|
|
|
|
|
|
|
|
|
|
39. 1-5 Scale |
|
Sleep Timer Symbol |
|
|
|
|||||||||||||||||||||||||||||
|
|
|
|
|
|
35. Timer Digits |
|
|
|
|
|
|
|
|
|
|||||||||||||||||||||||||||||
|
|
|
|
|
|
|||||||||||||||||||||||||||||||||||||||
|
|
|
|
|
|
|
|
|
|
|
|
|
|
|
|
|
|
|
|
|
|
|
|
|
|
|
|
|
|
|
|
|
|
|
|
|
|
|
|
|
|
|
|
|
|
|
|
|
|
|
Timer A |
|
|
|
|
|
|
|
|
|
|
|
|
|
|
|
|
|
|
|
|
|
|
|
|
|
SL EEP Timer A |
|
|
|
|
||||||||
|
|
|
|
|
|
Timer B |
|
|
|
|
|
|
|
|
|
|
|
|
|
|
|
|
|
|
|
|
|
|
|
|
|
|
|
|
|
Timer B |
|
|
|
|
||||
|
|
|
|
|
|
|
|
|
|
|
|
|
|
|
0 |
1 |
2 |
3 |
4 |
|
5 |
|
|
|
|
|
|
|
|
|
|
|
|
|||||||||||
Ni-MH |
|
|
|
|
|
|
|
Ni-MH |
|
|
|
|
|
|
|
|
|
|
|
|
|
|
|
|
|
|
|
|
|
|
|
|
|
|
|
|||||||||
|
|
|
|
|
|
|
|
|
|
|
|
|
|
|
|
|
|
|
|
|
|
|
|
|
|
|
|
|
||||||||||||||||
Battery |
|
|
|
Battery |
|
|
|
|
|
|
|
|
|
|
|
|
|
|
|
|
|
|
|
|
|
SLOW |
|
|
|
|
||||||||||||||
|
|
|
|
|
|
|
|
|
|
|
|
|
|
|
|
|
|
|
|
|
|
|
|
|
|
|
|
|
|
|
|
|
|
|
|
|
|
|
|
|
|
|
||
|
|
|
|
|
|
A B |
|
|
|
|
|
|
|
|
|
|
|
|
|
|
|
|
|
|
|
|
|
|
|
|
|
|
|
|
|
|
kHz A |
B |
|
|||||
|
|
|
|
|
|
|
|
|
|
|
|
|
|
|
FM |
|
|
|
MW LW Shortwave SSB |
Bandwidth |
N |
|
|
|||||||||||||||||||||
|
|
|
|
|
|
|
|
|
|
|
|
|
|
|
|
|
|
|
|
|||||||||||||||||||||||||
|
|
|
|
|
|
|
|
|
|
|
|
|
|
|
|
|
|
|
|
|
|
|
|
|
|
|
|
|
|
|
|
|
|
|
|
|
|
|
|
|
|
|
|
|
|
|
|
|
|
|
|
|
|
|
|
|
|
|
|
|
|
|
|
|
|
|
|
|
|
|
|
|
|
|
|
|
|
|
|
|
|
|
|
|
|
36. |
|
||
|
|
|
|
|
|
36. Timer Activation Symbol |
44. FM, |
|
|
|
|
|
|
|
|
|
|
|
|
|
|
|
|
42. SSB |
|
Timer |
||||||||||||||||||
|
|
37. Ni-MH Battery Symbol |
MW, LW, |
|
|
|
|
|
|
|
|
|
|
|
|
|
|
|
|
|
|
|
|
|
|
|
Activation |
|||||||||||||||||
|
|
|
|
|
|
|
|
|
|
Shortwave |
|
|
|
|
|
|
|
|
|
|
|
|
|
|
|
|
|
|
|
|
|
|
|
Symbol |
||||||||||
|
|
|
|
|
|
|
|
|
|
43. Frequency Digits |
|
|
|
|
|
|
||||||||||||||||||||||||||||
|
|
|
|
|
|
|
|
|
|
Indicators |
41. Bandwidth |
|||||||||||||||||||||||||||||||||
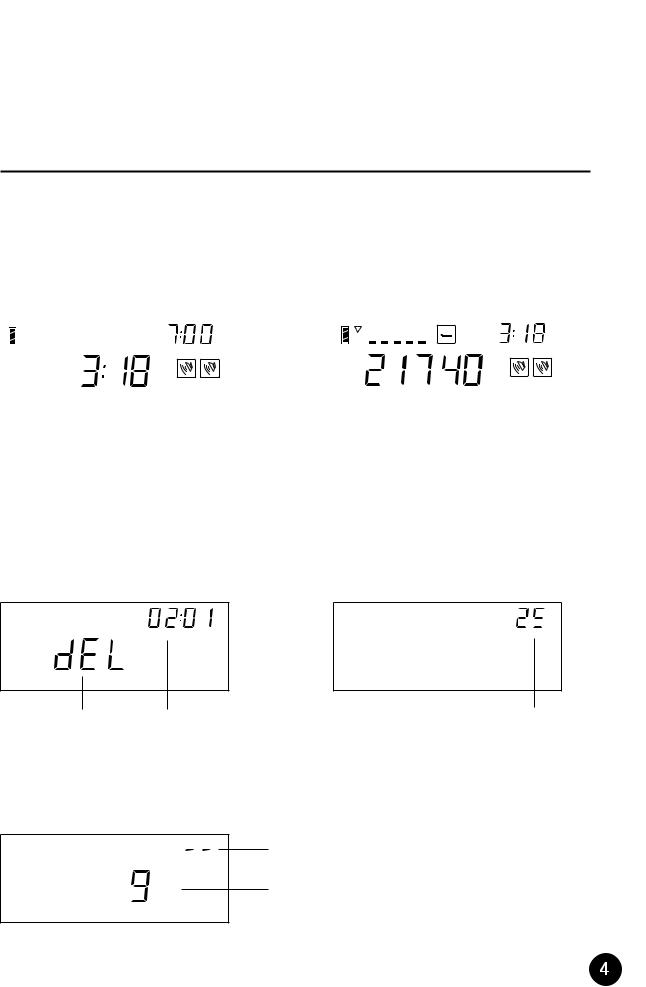
MEMORY DISPLAY
Refers only to the display's upper right corner.
SHORTWAVE METER BAND DISPLAY
Refers only to the display's upper right corner.
 mb
mb
 PAGE
PAGE
 PRESET
45. Delete Indicator |
46. Memory Display |
47. Shortwave Meter Band Display |
SYSTEM SET CODE DISPLAY
|
48 |
kHz |
49 |

www.tecsunradios.com.au
3 GETTING STARTED
WHAT THE PL-600 INCLUDES
●Earbud style earphones
●External antenna
●Carrying pouch
●AC adaptor/charger
●4 - 1000 mAh, Ni-MH rechargeable batteries.
●Owner's manual
NOTE: In the instructions below, numbers in parenthesis ( ), refer to the diagrams.
INSTALLING BATTERIES
The battery compartment is located on the back of the PL-600. Its cover is on the lower right corner of the back. To remove the battery compartment cover, apply thumb pressure and slide it towards the bottom of the radio. Install 4 AA alkaline batteries into the battery compartment, observing the battery polarity diagram on the back of the radio.
NOTE: If you don't plan to use rechargeable batteries at all, then it's a good idea to set SYSTEM SET CODE 29. To do this, see the section titled SYSTEM SET CODES. This assures that the battery strength indicator will display correctly for your non-rechargeable batteries. This is not a mandatory
procedure and the PL-600 will function if it is not done.
PREVENTING BATTERY ACID
LEAKAGE
To avoid battery acid leakage, only use high quality alkaline, lithium or rechargeable nickel-metal-hydride batteries. Never intermix old with new, or different brands or types of batteries. Damage caused by battery acid leakage is not covered by this product's warranty. If the batteries leak, don't throw them
away and immediately contact the manufacturer of the batteries to inquire about their battery leakage warranty program.
USING THE INCLUDED AC
DAPTOR/CHARGER
To power the PL-600 with the included AC Adaptor/Charger, plug it into a wall outlet first, and then into the socket on the left side of the PL-600, labeled DC 6 V. Batteries can be in the radio while using the AC Adaptor/Charger.
CHARGING BATTERIES IN THE PL-600
The PL-600 will play using whatever type of AA batteries are in the battery compartment, but only nickel-metal- hydride batteries can be charged within it. If non-rechargeable batteries are installed, the PL-600 as a built-in safeguard system that will prevent them from being charged.
This safeguard system works with the PL-600 set to either SYSTEM SET CODE
28 or 29, as described below, and only with he included AC Adaptor/Charger.
WARNING: Use only the included AC Adaptor/Charger to recharge Ni-MH batteries. Use of any other device may cause the rechargeable batteries to overheat, become damaged and possibly damage the PL-600. The built-in safeguard system, described above, works only with the included AC Adaptor/Charger. Damage caused to the PL-600 resulting from failure to observe this warning is not covered by the warranty and voids the warranty.
 Loading...