

Page 1

www.tecsunradios.com.au
DRM
AM/FM
Digital Radio
INSTRUCTION MANUAL
Page 2

www.tecsunradios.com.au
Important safety instructions ............................................................................ 1
Location of parts and controls ......................................................................... 3
Display ......................................................................................................................... 6
Power your radio .................................................................................................... 7
Antenna setup ......................................................................................................... 8
Setting the clock time .......................................................................................... 9
Setting the date ................................................................................................... 10
Setting display backlight ................................................................................... 11
Changing MW channel step ............................................................................12
Setting display contrast ................................................................................... 13
Checking version ................................................................................................. 14
DRM memory ....................................................................................................... 15
Setting the alarm timer ................................................................................... 16
Setting snooze ...................................................................................................... 18
Setting sleep timer ............................................................................................. 19
Setting confirmation beep .............................................................................. 20
Page 3

www.tecsunradios.com.au
Performing factory reset ................................................................................ 21
Switching between DRM/AM/FM modes............................................... 22
Volume and Tone control ................................................................................ 22
Manual tuning ..................................................................................................... 24
Auto scan tuning ................................................................................................ 26
Presetting stations ........................................................................................... 27
Recalling a preset station .............................................................................. 28
Line out .................................................................................................................. 29
Headphone socket ............................................................................................ 29
DRM memory tuning ........................................................................................ 30
DRM service selection ..................................................................................... 31
Firmware update ............................................................................................... 32
Troubleshooting .................................................................................................. 34
Specifications....................................................................................................... 36
What is a metre band ..................................................................................... 38
Warranty information ...................................................................................... 39
Page 4

www.tecsunradios.com.au
Thank you for choosing Tecsun Radios Australia product. Please
read this manual carefully before operating the radio and keep it for
future reference.
Do not leave the radio near heat sources, such as heaters or hot air ducts, or in
a place subject to direct sunlight, excessive dust, humidity, rain, mechanical
vibration or shock.
Use the radio within a temperature range of 0°C to 40°C. If it is used in
temperatures outside this range, an irregular display may appear. If it is used in
temperatures below this range, the display may change very slowly. The radio will
return to its normal condition when the radio is used in its recommended
temperature range once again.
The ventilation should not be impeded by covering the ventilation openings with
items such as newspapers, table-cloths, curtains, etc. Ensure a
minimum distance of 5cm around the radio for sufficient ventilation.
Do not expose to water. Do not place objects filled with liquids, such as vases, on
the radio.
This receiver is a sensitive electronic device and may malfunction and require
the user to power reset, if power is momentarily interrupted.
Disconnect the AC cord from the wall outlet completely when the radio is not to
be used for a long period of time.
The name plate indicating operating voltage, etc., is located at the rear of the
radio
Since a strong magnet is used for the speaker, keep personal credit cards using
magnetic coding or spring-wound watches away from the radio to prevent them
from possible damage caused by the magnetic field.
Never connect a ground wire to a gas pipe.
Do not drop or apply excessive force to the radio. Malfunction may occur as a
result
1
Page 5

www.tecsunradios.com.au
To avoid electrical shock, do not open the cabinet. Refer servicing to qualified
personnel only.
Never use an AC power cord that is damaged, route the power cord in a safe
manner and make sure it is not exposed to sharp surfaces or the possibility
of pinching.
Damage to hearing can occur with consistent exposure to high volume when
using headphones.
Before cleaning, disconnect the radio from the mains power supply. Do not use
any liquid cleaners which may damage the radio. Use a soft and dust free cloth.
When you unpack your new radio, be sure you have removed all the accessories
and information papers.
The items below should have been packed in the box with your radio.
· Digital radio
· AC cord
· Instruction manual
2
Page 6

www.tecsunradios.com.au
□ Controls□ Display
□ Speaker
3
Page 7

www.tecsunradios.com.au
□ Whip antenna
□ FM external antenna jack Line out jack
□ AM external antenna jack DC power jack
□ Antenna switch
□ Headphone socket
□ AC power jack
4
Page 8

www.tecsunradios.com.au
□ BAND selection button TUNING control rotary
□ MODE switch
□ Volume/Tone control
rotary
□ USB port
□ SERVICE selection
button
□ VF/VM button
□ MENU, INFO button
□ POWER ON/OFF button MANUAL TUNE buttons
□ PRESET buttons
5
Page 9

www.tecsunradios.com.au
□ Timer indicator
□ Sleep indicator
□ Antenna indicator
□ Signal strength
□
□ DRM SERVICE indicator
Stereo indicator
Tuning indicator
□ Frequency display
□ Metre band indicator
□ Time indicator
□ Mode indicator
□ Preset group-number
□ VF/VM indicator
□ Frequency dial
6
Page 10

www.tecsunradios.com.au
AC operation
Before plugging the AC cord into the radio, make sure the AC voltage is correct.
Insert the plug on the end of the supplied power cord into the AC power socket
on the back of the radio.
DC operation
The radio can also be operated by connecting a 9V DC power adaptor with 2.5
Amp capacity and center positive polarity to the DC 9V jack on the rear panel.
Using AC power adaptors with different specifications (polarity of the plug, etc.)
will result in malfunction and damage to the radio.
Tips:
When an AC cord is connected, the radio automatically switches to the AC cord
power source, regardless of whether the DC power adaptor is connected.
7
Page 11

www.tecsunradios.com.au
The radio comes with built-in AM/FM antenna and external antenna.
To use internal antenna, make sure to switch external/internal switch on the
back of your radio to internal antenna position (i.e. Int.). As for external
antenna, you can connect a coaxial cable of outdoor antenna (not supplied) to
the BNC type antenna terminal. Make sure to switch external/internal
antenna switch to the external position (i.e. Ext.) while connecting the
outdoor / rooftop antenna.
The current antenna selection status can be confirmed by reading the
indicator on the display.
8
Page 12

www.tecsunradios.com.au
1. Press MENU/INFO button to enter the menu settings.
2. Rotate the TUNING control rotary until the ‘Time Set’ entry is shown on the
display, then press it to enter the setting.
3. An underline will be shown under the hour setting. Rotate the TUNING control
rotary to select the desired hour, and press the rotary to confirm the setting.
Then rotate the rotary to select the desired minute, and then press it to
confirm the setting.
4. The clock display used in stand-by mode and the receiving mode screen can be
set to 12 or 24 hour format.
5. Rotate the TUNING control rotary to select the desired either 12 or 24 hour
format.
6. Press the MENU/INFO button to confirm your choice of clock time settings.
The display will then revert to the previous menu.
9
Page 13

www.tecsunradios.com.au
1. Press MENU/INFO button to enter the menu settings.
2. Rotate the TUNING control rotary until the ‘Date Set’ entry is shown on the
display, then press it to enter the setting.
3. An underline will be shown under the month setting. Rotate the TUNING
control rotary to select the desired month and press the rotary to confirm
the setting and proceed to day setting.
4. An underline symbol will be shown under the date setting. Rotate the
TUNING control rotary to select the desired date and press the rotary to
confirm the setting and proceed to year setting.
5. An underline will be shown under the year setting. Rotate the TUNING
control to select the desired year and press it to confirm the setting.
Press the MENU/INFO button to confirm your choice of date settings. The
display will then revert to the previous menu.
10
Page 14
www.tecsunradios.com.au
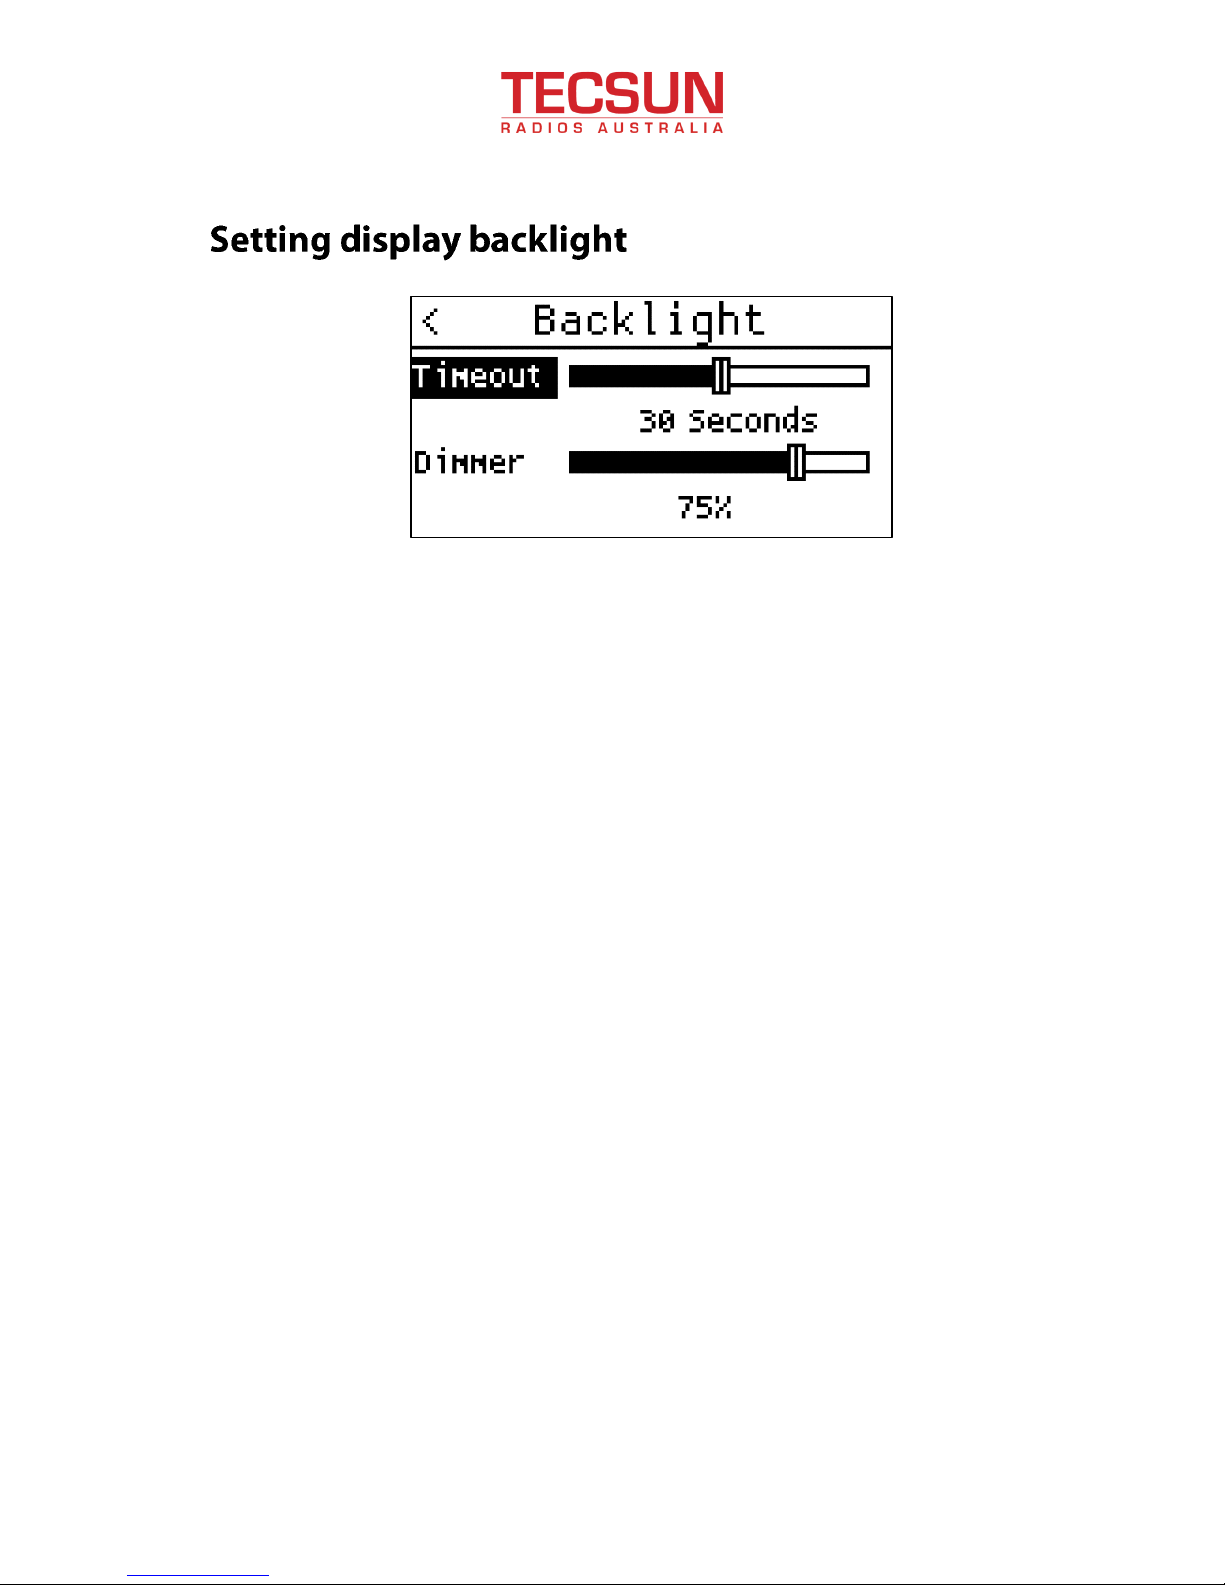
1. Press MENU/INFO button to enter the menu settings.
2. Rotate the TUNING control rotary until the ‘Backlight’ entry is shown on the
display, then press it to enter the setting.
3. Rotate the TUNING control rotary to adjust the backlight timeout between
always off, 10 seconds, 30 seconds, 60 seconds and always on.
4. Press the TUNING control rotary to proceed to dimmer setting. Rotate the
rotary to adjust LCD backlight brightness between 25% (dark), 50%, 75%
and full (bright).
Press the MENU/INFO button to confirm your choice of backlight settings.
The display will then revert to the previous menu.
11
Page 15

www.tecsunradios.com.au
1. Press MENU/INFO button to enter the menu settings.
2. Rotate the TUNING control rotary until the ‘MW Step’ entry is shown on the
display, then press it to enter the setting.
3. Rotate the TUNING control rotary to adjust the MW channel step between
9 kHz and 10 kHz.
4. Relevant MW channel frequency range will be shown on the display. Press
the MENU/INFO button to confirm your choice of MW channel step
settings. The display will then revert to the previous menu.
12
Page 16

www.tecsunradios.com.au
1. Press MENU/INFO button to enter the menu settings.
2. Rotate the TUNING control rotary until the ‘Contrast’ entry is shown on the
display, then press it to enter the setting.
3. Rotate the TUNING control rotary to adjust the LCD contrast from 1 to 4.
Press the MENU/INFO button to confirm your choice of LCD contrast
settings. The display will then revert to the previous menu.
13
Page 17

www.tecsunradios.com.au
1. Press MENU/INFO button to enter the menu settings.
2. Rotate the TUNING control rotary until the ‘Version’ entry is shown on the
display, then press it to enter the setting.
3. The hardware and software version of the radio will appear on the display.
The version display cannot be altered in this setting entry and is just for your
reference. Firmware updating may alter the version display. Press the
MENU/INFO button to revert to the previous menu.
14
Page 18

www.tecsunradios.com.au
1. Press MENU/INFO button to enter the menu settings.
2. Rotate the TUNING control rotary until the ‘DRM Memory’ entry is shown on
the display, then press it to enter the setting.
3. Rotate the TUNING control rotary to scroll between different memory entries.
Each entry consists of DRM memory name and frequency.
4. Rotate the TUNING control rotary to scroll to the entry you want to delete and
press the rotary to delete this entry.
5. Rotate the TUNING control rotary to the bottom and select ‘Delete All’ by
pressing the rotary to delete all entries in DRM memory.
The delete operation takes effect immediately. Press the MENU/INFO button
to revert to the previous menu.
15
Page 19

www.tecsunradios.com.au
There are two alarm timers which can be set to wake up to your favorite radio
program or buzzer.
Make sure the clock is set correctly before using the alarm timer function.
1. Press MENU/INFO button to enter the menu settings.
2. Rotate the TUNING control rotary until the ‘Alarm Clock 1’ entry is shown on
the display. Press the rotary to enter the setting.
3. The on/off switch of alarm clock 1 will be highlighted. Rotate the TUNING
control rotary to switch between On and Off state, then press it to proceed to
time setting.
4. The hour setting of alarm 1 will be highlighted.
Rotate the TUNING control
rotary to select the required alarm hour, and press the rotary to confirm and
proceed to minute setting. Rotate the rotary to select the required alarm
minute and press the rotary to confirm and proceed to alarm type setting.
16
Page 20

www.tecsunradios.com.au
5. Rotate the TUNING control rotary to choose the required alarm type and the
press the rotary to choose the desired option. The alarm type can be set to
buzzer or radio.
6. Then the alarm repeat frequency option will be highlighted, rotate the TUNING
control rotary to choose the desired option and press the rotary to confirm
the setting.
The alarm repeat frequency options are as follows:
ONCE: the alarm will sound once
DAILY: the alarm will sound everyday
WEEKDAY: the alarm will sound on weekdays
WEEKEND: the alarm will sound at weekends
Press the MENU/INFO button to confirm your choice of alarm timer settings. The
display will then revert to the previous menu.
Tips:
• T o cancel a sounding alarm, press POWER ON/OFF button to cancel a
sounding alarm.
• When the alarm sounds, press any button other than the POWER ON/
OFF button will silence the alarm for a selected period. To adjust the
silence time for the snooze timer, go to ‘Snooze’ settings.
• When the buzzer alarm activates, the alarm will start softly and
gradually increase in level. It will sound for 1 minute and silence for 1
minute in repetition for about 60 minutes unless cancelled. When the
alarm type is set to radio, the radio will sound non-stop at the selected
time for about 60 minutes.
Notes:
• If radio is selected as your alarm type, when the alarm is sounding, the
last tuned station will be played.
• The alarm volume cannot be adjusted with the volume control.
17
Page 21

www.tecsunradios.com.au
1. Press MENU/INFO button to enter the menu settings.
2. Rotate the TUNING control rotary until the ‘Snooze Time’ entry is shown on
the display, then press it to enter the setting.
3. Rotate the TUNING control rotary to adjust the silence time. There are 5, 10,
15 and 20 minutes for the snooze timer. Press the rotary to confirm the
setting.
Press the MENU/INFO button to confirm your choice of snooze time settings.
The display will then revert to the previous menu.
18
Page 22

www.tecsunradios.com.au
Your radio can be set to turn off automatically after a preset time has passed.
The sleep timer setting can be adjusted between 5, 10, 15, 30, 45 and 60
minutes.
1. Press MENU/INFO button to enter the menu settings.
2. Rotate the TUNING control rotary until the ‘Sleep Timer ’ entry is shown on
the display. Press the rotary to enter the setting.
3. Rotate the TUNING control rotary to adjust the desired time. There are 5, 10,
15, 30, 45 and 60 minutes for the sleep timer. Press the rotary to confirm
the setting.
Press the MENU/INFO button to confirm your choice of sleep timer settings.
The display will then revert to the previous menu.
Tips:
· Hold down POWER ON/OFF button for about 2 seconds to enable or disable
sleep timer function.
19
Page 23

www.tecsunradios.com.au
You will hear short beep when presetting and recalling a station or performing
auto scan tuning. The confirmation beep function can be enabled or disabled.
1. Press MENU/INFO button to enter the menu settings.
2. Rotate the TUNING control rotary until the ‘Beep Set’ entry is shown on the
display. Press the rotary to enter the setting.
3. Rotate the TUNING control rotary to enable or disable the confirmation beep.
Press the MENU/INFO button to confirm your choice of confirmation beep
settings. The display will then revert to the previous menu.
20
Page 24

www.tecsunradios.com.au
If your radio fails to operate correctly or you just want to restore to original
factory setting, carry out the following procedure.
1. Press MENU/INFO button to enter the menu settings.
2. Rotate the TUNING control rotary until the
‘Factory Reset’ entry is shown on the display. Press the rotary to enter the
setting.
3. Rotate the TUNING control rotary to select ‘Yes’ and press the rotary to
perform the reset.
The station presets and DRM memory will be set to empty. Alarm timers and
sleep timers will be set to their default values.
21
Page 25

www.tecsunradios.com.au
Rotate the MODE switch to select between DRM, AM and FM modes.
Relevant on-screen mode indicator will change accordingly.
Rotate the rotary to set the required volume level, display will show volume
level (maximum to 18).
22
Page 26

www.tecsunradios.com.au
If you find the preset equalizer functions not to your taste, you may set up a
custom bass, mid and treble settings as follows:
1. Press the Volume/Tone control rotary once to get into Bass control setting.
Rotate the rotary until desired bass level is reached.
2. Press the Volume/Tone control rotary again to enter Mid control setting.
Rotate the rotary until desired mid level is reached.
3. Press the Volume/Tone control rotary again to enter Treble control setting.
Rotate the rotary until desired treble level is reached. Press the rotary to
confirm the settings.
23
Page 27

www.tecsunradios.com.au
1. Press POWER ON/OFF to turn on the radio.
2. Rotate the MODE switch to select either AM, DRM or FM mode. Select ‘VF’
mode by pre ssing VF/VM button.
3. For AM and DRM modes, press BAND button to select MW (medium wave) or
metre band (short wave). The lowest frequency of the band (metre band) will
appear in the display each time the button is pressed, a relevant frequency dial
of the band will appear too. For FM, skip this step.
4. Rotate the TUNING control rotary to change the frequency, or press MANUAL
TUNE buttons |<<, >>| repeatedly to tune in to the desired station. The frequency
changes in the channel steps shown below each time the button is pressed,
and the ‘tuning’ appears when a station is tuned in.
24
Page 28

www.tecsunradios.com.au
FM 0.1 MHz
SW 5 kHz
MW 9 kHz or 10 kHz
Tips:
· The radio will perform auto scan when |<< or >>|is held down (see ‘Auto scan
tuning’).
· During tuning, pressing the TUNING control rotary can switch between fast
tuning mode and slow tuning mode. A tuning speed indicator will appear on
the display. Manual tuning works faster or slower depending on the setting.
25
Page 29

www.tecsunradios.com.au
Tips:
· The radio scans the frequencies in descending order when holding down
|<<,and in ascending order when holding down >>|.
· To cancel a progressing auto scan tuning, press |<< or >>|.
1. Press POWER ON/OFF to turn on the radio.
2. Rotate the MODE switch to select either AM, DRM or FM mode. Select ‘VF’
mode by pressing VF/VM button.
3. For AM and DRM modes, press BAND button to select MW (medium wave) or
meter band (short wave). The lowest frequency of the band (meter band) will
appear in the display each time the button is pressed, a relevant frequency dial
of the band will appear too. For FM, skip this step.
4. Hold down MANUAL TUNE buttons |<<, >>| for about 2 seconds. Release when
radio starts scanning. Station will be searched automatically. The radio will
stop at each reception. The radio will scan within the frequency range of meter
band.
26
Page 30

www.tecsunradios.com.au
1. Press POWER ON/OFF to turn on the radio.
2. Rotate the MODE switch to select either AM, DRM or FM mode. Tune in to the
station you want to preset. For details concerning tuning, see ‘Manual tuning’
or ‘Auto scan tuning’.
3. Hold down a PRESET button between 1 and 5 for about 2 seconds to select a
preset group.
4. Repeatedly press the PRESET button quickly to select a preset number. The
number will change from flashing display to constant display and the preset
number will be determined. A short beep will be heard and the PRESET
indicator will be shown on the display. The example below shows DRM 9415
kHz is stored in preset number 1 of group 1.
There are a total of 5 groups available for presets (group 1 to group 5) in
each mode and you can preset up to 4 stations per group for a maximum
of 20 preset stations for each mode. By presetting, you can tune in to the
stations simply by using the PRESET buttons (1-5).
27
Page 31

www.tecsunradios.com.au
Notes:
If a station has already been stored to the position you chose, it will be
overwritten by the new preset.
1. Press POWER ON/OFF to turn on the radio.
2. Rotate the MODE switch to select either AM, DRM or FM mode.
3. Press a PRESET button between 1 and 5 where the desired preset station is
stored.
4. Repeatedly press the PRESET button quickly to select the preset number. The
radio will tune in to the station assigned to the position selected. A PRESET
indicator will be shown on the display.
28
Page 32

www.tecsunradios.com.au
You can connect the radio to your Hi-Fi system by connecting the line out (red/
white) socket located on the rear side of your radio. The output signal level is
fixed and unaffected by the volume control.
A 3.5mm headphone socket located on the rear of your radio is provided for
use with either headphones or earpieces. You can enjoy the DRM or FM
broadcast in stereo by using the optional stereo headphones. When using
headphones, sound from the speaker will be muted.
Excessive sound pressure from headphones can cause hearing loss.
29
Page 33

www.tecsunradios.com.au
Every time when a DRM program is successfully received, its station label and
frequency will be stored in to an internal database called ‘memory’. The process
of tuning within DRM memory entries is called ‘View Memory’ or ‘VM’. By storing
the DRM listening history automatically, you can tune into a DRM station in a
quick and convenient way.
1. Press POWER ON/OFF to turn on the radio.
2. Rotate the MODE switch to select DRM mode and press VF/VM to select VM
mode. Current tuning mode can be identified by VF/VM indicator.
Rotate the TUNING control rotary or press the MANUL TUNE buttons |<<, >>|
to tune within previously stored DRM memory entries. Entry number, station
label and frequency will appear on the display.
30
Page 34

www.tecsunradios.com.au
Notes:
· VM mode is only applies to DRM mode, VF mode applies to all modes.
· Once the station is successfully received, this DRM listening history is
automatically stored into DRM memory.
A DRM program can carry multiple services (up to 4 services within 1 program),
you can select different services by pressing the SERVICE selection button.
1. Press POWER ON/OFF to turn on the radio.
2. Rotate the MODE switch to select DRM mode and tune to a DRM station.
3. A DRM SERVICE indicator will appear on the display in case the program
carries multiple (more than 1) DRM services.
4. Press the SERVICE selection button repeatedly to switch between different
services.
31
Page 35

www.tecsunradios.com.au
Installing the new firmware on your radio is simple, just download the firmware
file and perform the following steps:
1. Download the GR-216_firmware_[ver].zip (‘ver ’ refers to version) file to a
temporary or download directory (please note this directory for reference)
on your computer.
2. Go to the directory where the file was downloaded and extract the update
files from the GR-216_firmware_[ver].zip file.
Connect a compatible USB storage device to your computer. Please note
that not all USB storage devices are compatible with the radio. If the
software update is not successful after following the instructions, you may
need to format your device to the FAT32 file system, or use a different
device.
3. Go to the extracted directory and copy all files onto the root directory (top
level) of your USB device.
32
Page 36

www.tecsunradios.com.au
4. Remove the USB device from your computer.
5. Turn the radio off by disconnecting all power supply.
6. Insert the USB storage device into the USB port on the front of the radio.
Please note that the USB storage device can only be inserted into the USB
port slot one way.
7. Turn your radio on by connecting AC cord or AC power adaptor to the radio.
Once the USB storage device has been detected, a message appears
confirming your radio model name and firmware version number, the firmware
will automatically begin to update.
8. A progress information will be displayed on the screen during the update
process.
When the firmware update is complete, a message will be displayed indicating
the update is successfully completed.
9. Remove the USB device from the USB port on the front of the radio. Please
note the firmware file extension has been renamed to ‘bak’, you can delete the
update file from the USB device.
10. The update process is now complete.
33
Page 37

www.tecsunradios.com.au
If you have any trouble with the radio, read the instruction manual once more
and check the following before requesting for repair.
The power does not
turn on when POWER
ON/OFF is pressed.
The AC power adaptor or AC cord is
disconnected.
→ Properly connect the AC power
adaptor or AC cord.
The display is dim Improper display backlight setting
→ Check display backlight setting in settings
menu.
The display is slow
The radio is being used in extremely low
temperature or in high humidity.
→ Use the radio under appropriate
conditions.
There’s no sound
output
The volume is turned down completely.
→ Adjust the volume.
The headphones are plugged in.
→ Unplug the headphones.
34
Page 38

www.tecsunradios.com.au
There’s noise, bad
reception or weak
sensitivity.
Improper tuning or antenna adjustment
→ Adjust tuning and antenna properly. Weak radio
signal.
→ Listen to the radio near a window when in a
building.
Improper antenna switch position
→ Adjust the antenna switch position in
accordance to the antenna in use.
Cannot preset a
station
Incorrect procedure
→ Hold down for 2 seconds and then
repeatedly press the number button to preset
a station.
Cannot recall a
preset station
You pressed an incorrect number button for the
desired station.
→ Press the correct number. The preset
setting was accidentally overwritten.
→ Preset the station again.
The radio does not turn
on at the alarm time.
You forgot to enable alarm timer.
→ Enable the alarm timer in settings menu.
The date and time was not set correctly.
→ Set the date and time correctly.
Cannot perform
DRM memory
tuning
There is no station memory stored.
→ Tune to 2 or more DRM stations before
using VM mode.
Auto scan tuning will
not stop
Improper antenna switch position
→ Adjust the antenna switch position in
accordance to the antenna in use.
35
Page 39

www.tecsunradios.com.au
Frequency Range FM: 87.5 – 108 MHz
MW: 530 – 1620 kHz
SW: 2.3 – 26.1 MHz
Tuning Step FM: 0.05 MHz
MW: 9/10 kHz or 1 kHz
SW: 5 kHz or 1 kHz
Built-in Antenna FM/SW: Whip Antenna
MW: Internal Ferrite Bar Antenna
External Antenna FM: 50Ω (BNC)
AM: 50Ω (BNC)
External or Internal FM / AM Antenna Switch
Station Presets 60
Tuning System Auto Scan Tuning / Manual Tuning /
Preset Tuning / DRM Memory Tuning
Stereo via Headphones or Line Out
Bass, Mid, Treble Tone Control
24 Hours Clock & Dual Alarm Clock (Buzzer or Radio)
Sleep Timer
Display Easy to Read LCD Display
Power Requirements DC 9V/2.5A
AC 220V/50Hz
Output Power 4W (10% THD)
36
Page 40

www.tecsunradios.com.au
Speaker Dimension 77mm
Speaker Type Mono
DC Jack
2 pole AC Inlet
BNC socket 50Ω x 2
RCA Jack x 2
3.5mm Stereo Jack
USB type A Port
DC-in
AC-in
External Antenna Line
Line Out
Headphone
USB
Product Dimensions
(W x H x D)
24 x 12 x 15 cm
Product Weight 2 Kg
AC Power Cord
AC Power Adaptor
Instruction Manual
Notes:
· The AC power adaptor’s operating voltage varies depending upon the country
in which it is sold.
· Design and specification are subject to change without notice.
37
Page 41

www.tecsunradios.com.au
The international shortwave bands are commonly divided into “metre bands”. This
refers to the wavelength of the signal. It is a generalised method of describing the
various frequency ranges. This receiver covers 14 different “metre bands”. Specific
frequencies within a specified band are measured in Kilohertz (kHz).
Unit: kHz for AM/DRM, MHz for FM
Band Frequency Range Scan Frequency Range Metre Band
MW 530-1620
(10kHz) 530-1620 -
(9kHz) 531-1620 -
SW 2300-26100
2300-2495
120 metre band
3200-3400 90 metre band
3900-4000 75 metre band
4700-5100 60 metre band
5900-6200 49 metre band
7200-7450 41 metre band
9400-9900 31 metre band
11600-12100 25 metre band
13570-13870 22 metre band
15100-15800 19 metre band
17480-17900 16 metre band
18900-19020 15 metre band
21450-21850 13 metre band
25600-26100 11 metre band
FM 87.5-108 87.5-108 -
Frequency range of Metre bands
38
Page 42

24/9 Powells Road, Brookvale, NSW 2100 Australia
Ph: +61 2 9939 4377
Email: info@tecsunradios.com.au
www.tecsunradios.com.au
Please keep your receipt as proof of purchase. Tecsun Radios Australia
warrants the end user that this product will be free from defects in materials
or workmanship in the course of normal use for one year from the original date
of purchase. This guarantee covers defects due to manufacturing faults.
The warranty DOES NOT apply to accidental damage, negligence, excessive
voltage (including lightning, static electricity or power surges) or any
modifications or repairs not authorized by us or that the case has been
removed, or general wear & tear.
When taking your radio for service or repair, take note of important preset
settings. They may be deleted depending on the type of necessary repair.
If you have any questions or problems concerning your radio, please consult
Tecsun Radios Australia.
39
 Loading...