

Page 1

2012-01-03
FeiyueGroup Europé Aps
Sundsholmen 14
DK 9440 Norresundby, Denmark
Manual
TPA-2000
Portabel Luftkonditionering
Portable Air Conditioning
SE ANVÄNDARHANDBOK
GB USER MANUAL
Page 2
Bruksanvisning (SE)..................................................................................................................................................................... 3
1. Specifikation ....................................................................................................................................................................... 3
2. Konstruktion ....................................................................................................................................................................... 3
3. Installation .......................................................................................................................................................................... 4
4. Viktiga säkerhetsregler ................................................................................................................................................... 5
5. Kontroller och användning ............................................................................................................................................. 5
Kontrollpanel: ................................................................................................................................................................... 5
Användning ....................................................................................................................................................................... 6
6. Dränering ............................................................................................................................................................................. 6
7. Felsökning ........................................................................................................................................................................... 6
8. Underhåll ............................................................................................................................................................................. 7
9. Garantivillkor ..................................................................................................................................................................... 7
10. Miljöskydd ........................................................................................................................................................................... 7
USER MANUAL (GB) ...................................................................................................................................................................... 8
1. Specification ........................................................................................................................................................................ 8
2. Design ................................................................................................................................................................................... 8
3. Installation .......................................................................................................................................................................... 9
4. Safety warnings ............................................................................................................................................................... 10
5. Control panel and use .................................................................................................................................................... 10
Operation ......................................................................................................................................................................... 11
6. Drainage ............................................................................................................................................................................ 11
7. Troubleshooting ............................................................................................................................................................. 11
8. Maintenance ..................................................................................................................................................................... 12
9. Warranty Provisions ...................................................................................................................................................... 12
10. Environmental Protection ............................................................................................................................................ 12
SE Funktionerna i denna bruksanvisning publiceras med reservation för ändringar.
GB The features described in this manual are published with reservation to modifications.
2
Page 3
Bruksanvisning (SE)
Modell
TecLime TPA-2000
Kylkapacitet
2,05kW
Kylmedel/mängd
R410A/400g
Spänning
220-240 V , 50 Hz
Effekt in
1020W
Luftflöde
360m3/h
Ljudnivå
55dB(A)
Vikt
25 kg
Mått (BxHxD)
330x433x795 mm
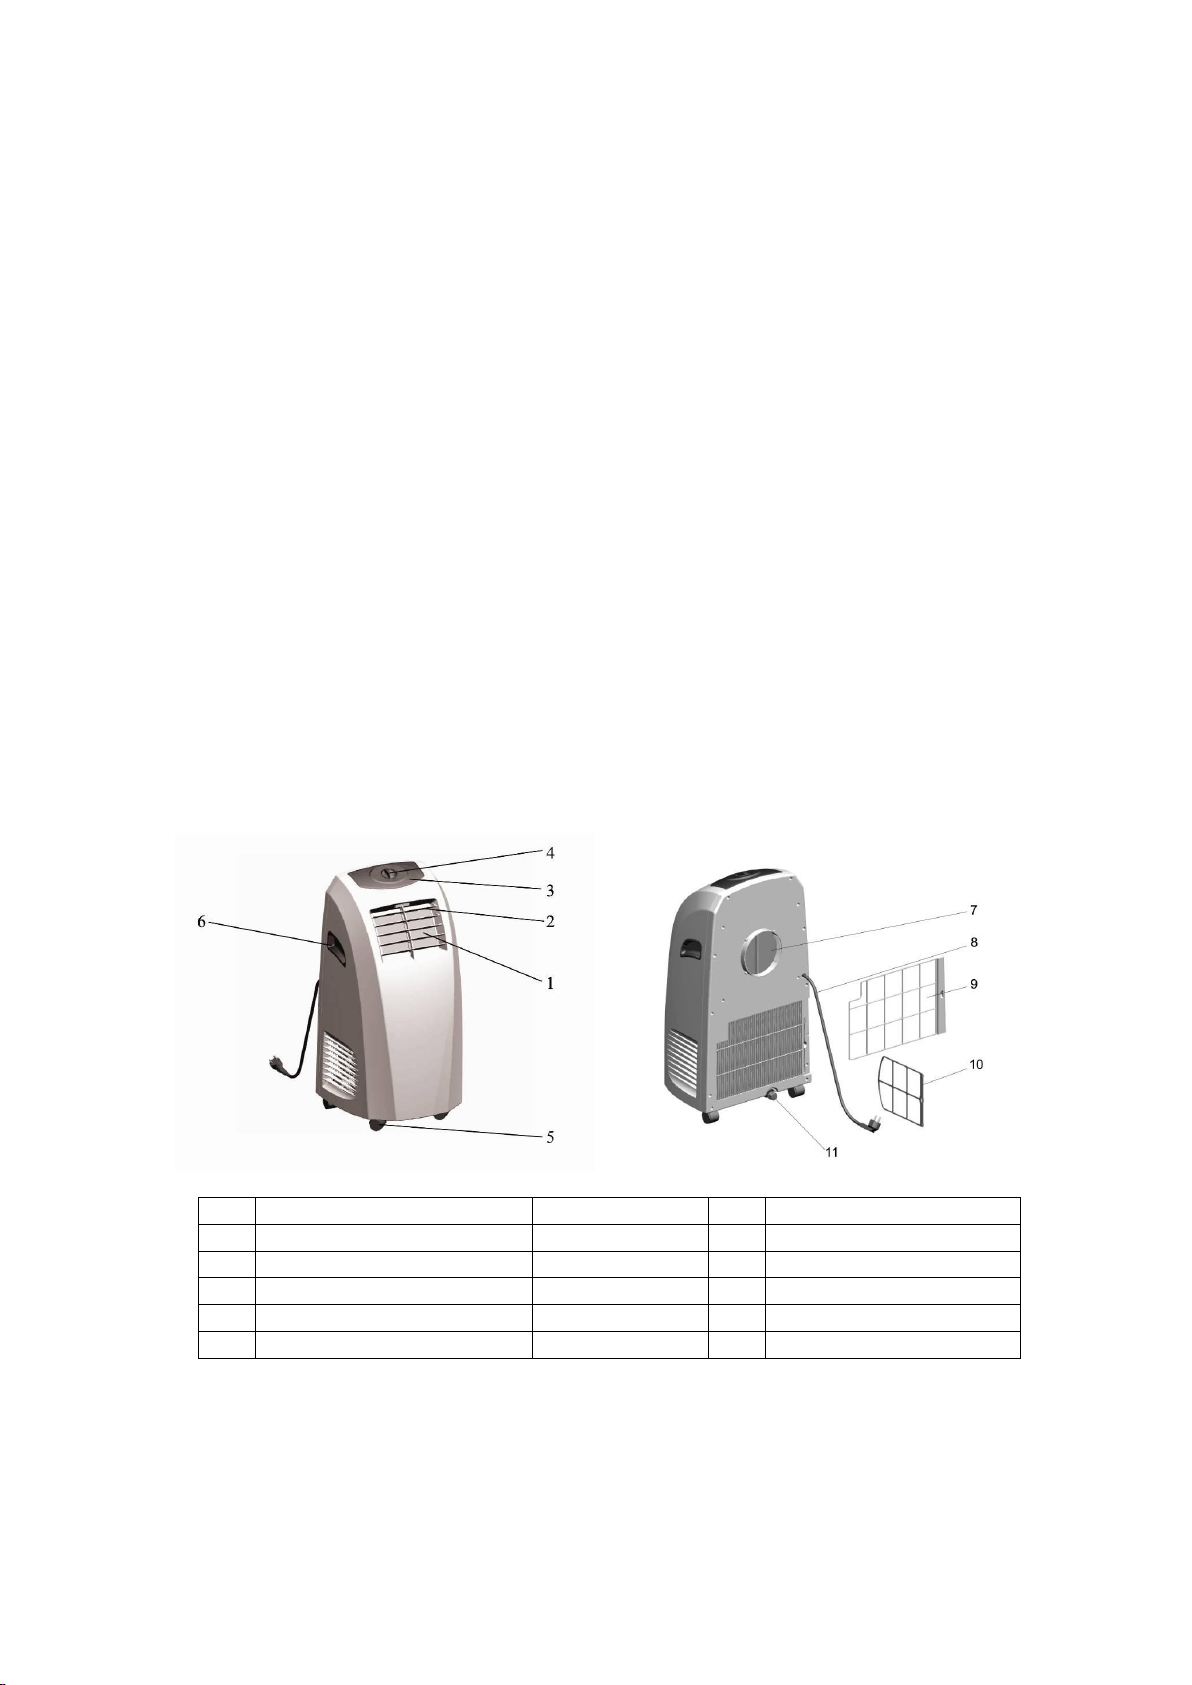
1
Luftutblås
7 Luftutblås
2
Jalusi för riktning av blås
8 Nätkabel
3
Kontrollpanel
9 Stort filter
4
Manövervred
10
Litet filter
5
Hjul
11
Dräneringspip
6
Handtag
Tack för att du valt den här nya modellen portabel luftkonditionering.
Denna produkt är endast avsedd för inomhus användning i hushållet.
Läs denna bruksanvisning noggrant innan du använder produkten.
Spara bruksanvisningen för framtida behov.
1. Specifikation
2. Konstruktion
3
Page 4
Tillbehör
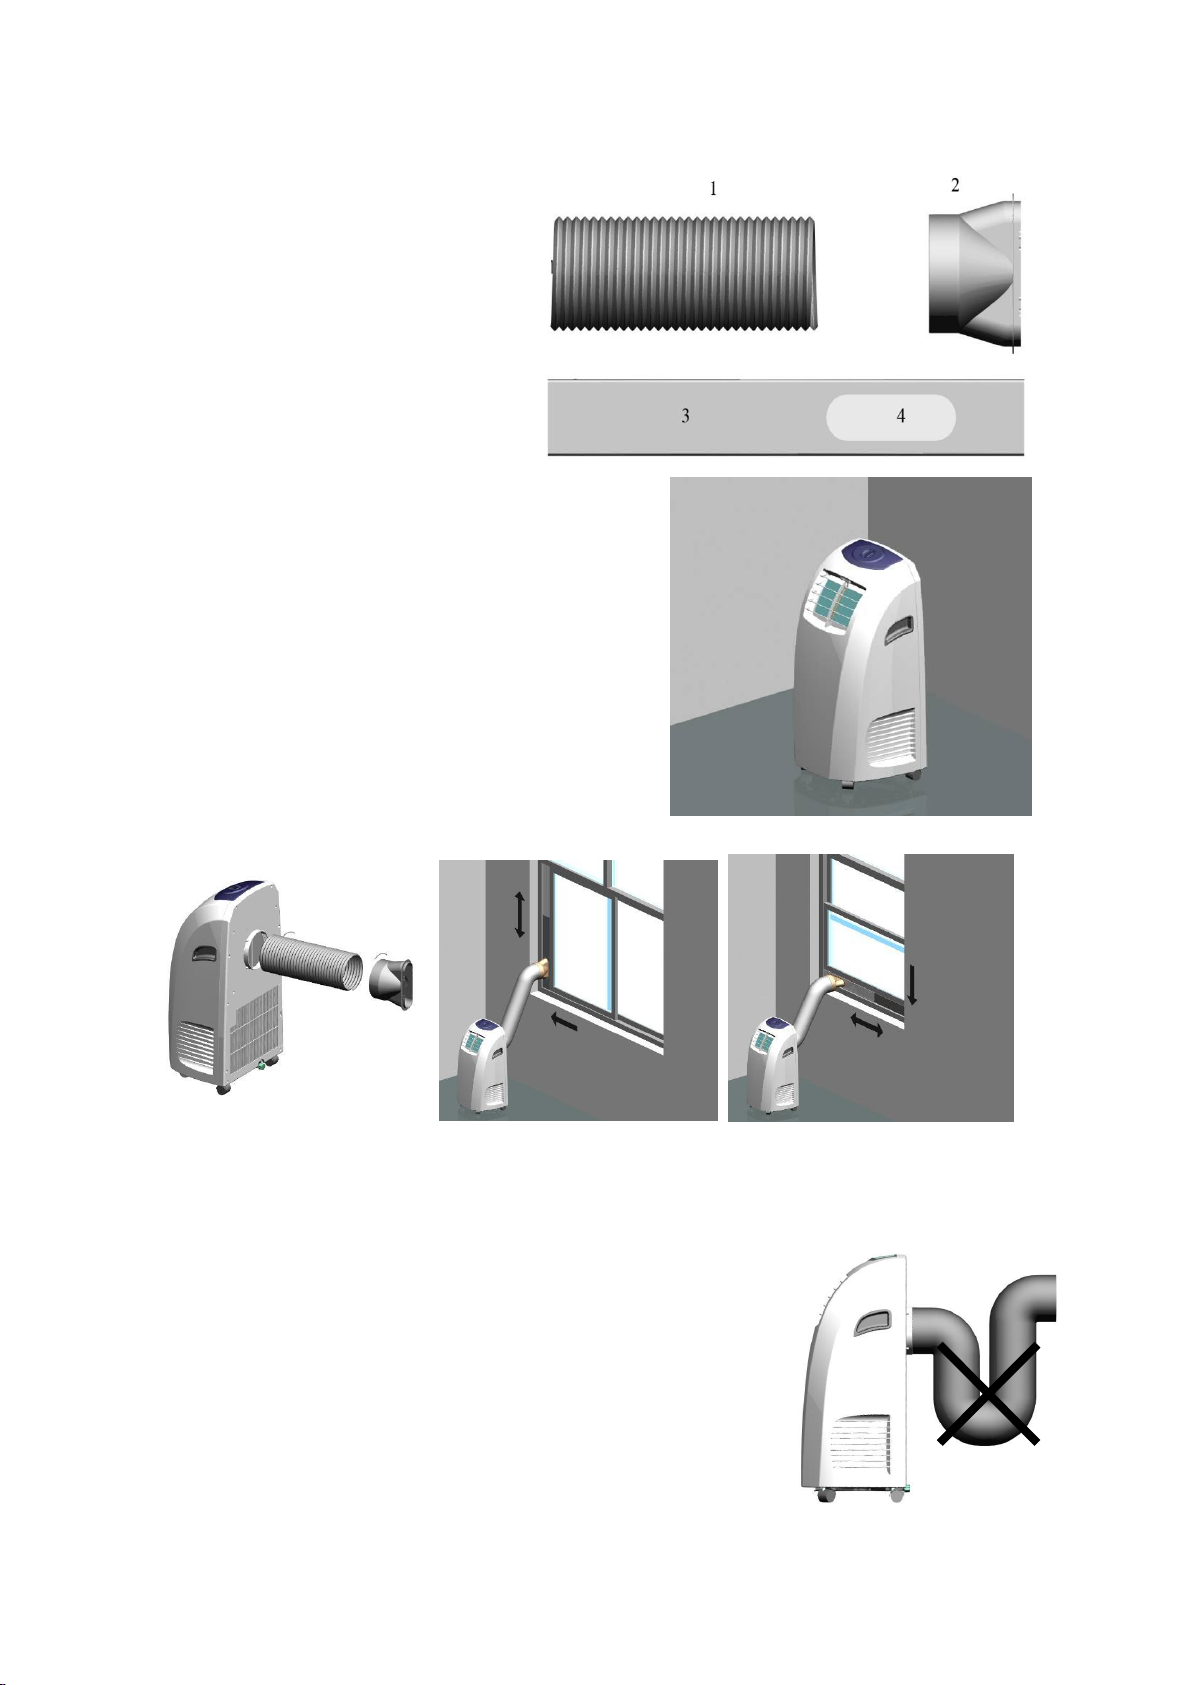
Kontrollera att alla tillbehör finns med i
paketet och läs anvisningarna för deras
användning.
1. Slang för utblås
2. Munstycke
3. Fönsterskena
4. Fönsterskena för munstycke
3. Installation
Placering
Innan du använder apparaten, låt den
stå upprätt i minst 2 timmar.
Placera apparaten så att den har minimum 50 cm fritt
utrymme runt om.
Montera slangen
Dra ut en ända på slangen, skruva in den i enheten
motsols. Skruva in den till stopp ca. tre varv
Anslut slangadaptern till andra ändan av slangen på
samma sätt.
Installation av fönster kit
Öppna fönstret så mycket som behövs och fixera sedan fönsterskenan i fönstret.
Fönstersatsen kan installeras på de flesta skjutbara och vertikala fönster och är justerbar i
längd
Fäst andra änden av utloppsslangen till fönsterbrickan.
Viktigt!
Längden på utloppsslangen är speciellt anpassad till denna
produkts specifikation. Byt inte ut den mot annan slang eller
förläng den, det kan orsaka funktionsproblem.
Observera: Böj inte slangen i skarpa vinklar utan försök ha
slangen i horisontell position. Använd kortast möjliga längd på
slangen. Utloppsluften skall ha så lite hinder som möjligt för
bästa funktion.
4
Page 5
4. Viktiga säkerhetsregler
Läs DESSA noggrant innan du använder apparaten.
Använd endast apparaten för hushållsändamål och på det sätt som anges i dessa
anvisningar. Använd den aldrig för något annat ändamål.
Använd inte apparaten utomhus och placera den alltid i en torr miljö.
Kontrollera regelbundet sladden. Använd aldrig apparaten om sladden eller kontakten visar
några tecken på skador. Denna produkts sladdlängd har valts för att minska risken för
skador. Använd inte apparaten med en förlängningssladd som inte har samma elektriska
specifikation som apparaten. Vid tveksamhet rådfråga en kvalificerad elektriker eller
leverantören.
Håll applikationen borta från varma källor och direkt solljus.
Stäng alltid av maskinen med strömbrytaren innan du drar ur stickkontakten.
Koppla alltid ur apparaten innan rengöring eller ändring av några delar av apparaten, samt
när den inte används.
Se till att spänningen på typskylten överensstämmer med nätspänningen. Eventuella fel i
hur apparaten ansluts ogiltigförklarar garantin.
Barn bör hållas under uppsikt så att de inte leker med apparaten.
Lämna aldrig apparaten utan uppsikt när den används. Stäng av apparaten om du måste gå
iväg även för en kort stund.
Dra aldrig i sladden för att koppla bort eller flytta apparaten.
Doppa aldrig apparaten i vatten eller annan vätska av någon anledning.
Håll apparaten borta från vatten eller fettstänk.
Respektera anvisningarna för rengöring.
Stoppa inte in vassa metallföremål eller fingrar i öppningar eller svängande fenor av
apparaten.
Reparera aldrig apparaten själv. Alla insatser som görs av en icke-kvalificerad person kan
vara farliga. Eventuellt utbyte av nätkabeln måste utföras av en behörig elektriker.
Använd aldrig tillbehör som inte levererats av leverantören. Detta kan vara farligt och kan
skada apparaten.
Särskilda rekommendationer:
Installera den portabla luftkonditioneringen på en plan plats med ett stort utrymme, utan
hinder. Lämna 50cm minsta utrymme mellan enheten och väggen.
Kontakten ska alltid vara åtkomlig efter installationen.
Placera alltid apparaten i vertikalt läge, för att kompressorn inte skall skadas.
Använd inte apparaten i närheten av gas eller andra brännbara vätskor.
Blockera inte luftutsläppet och inloppsventilationen.
Använd inte spray (insektsmedel, målning) eller andra brandfarliga produkter nära
apparaten då plastdelar kan deformeras. Enhetens elektronik kan också skadas.
Strömkällor
Kontakten måste vara väl isatt och får inte skadas.
Anslut inte apparaten med en adapter.
Sätt i vägguttaget innan du slår på apparaten och tryck sedan på ON/OFF knappen.
TILLVERKAREN åtar sig inget ansvar vid bristande följsamhet till DESSA INSTRUKTIONER.
5. Kontroller och användning
Kontrollpanel:
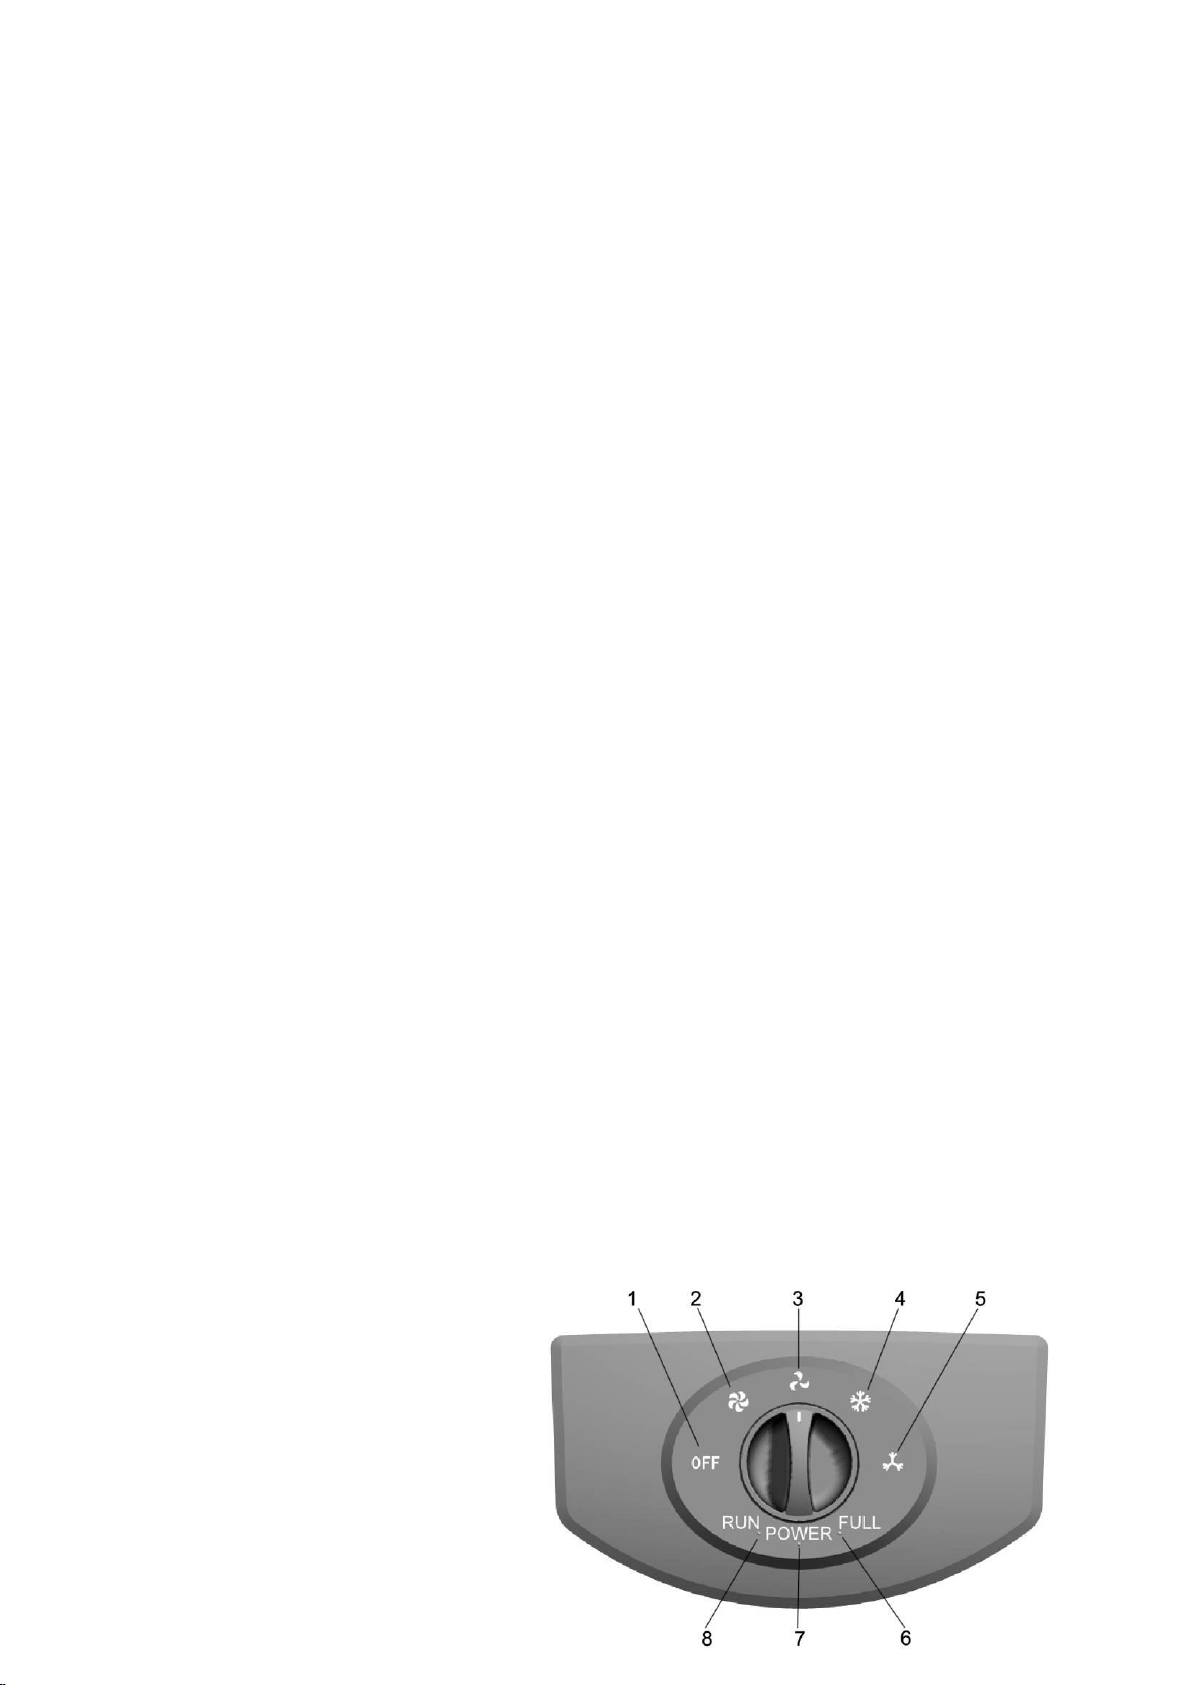
1. Avstängd
2. Fläkthastighet (Hög)
3. Fläkthastighet (Låg)
4. Kylning (hög)
5. Kylning (låg)
5
Page 6
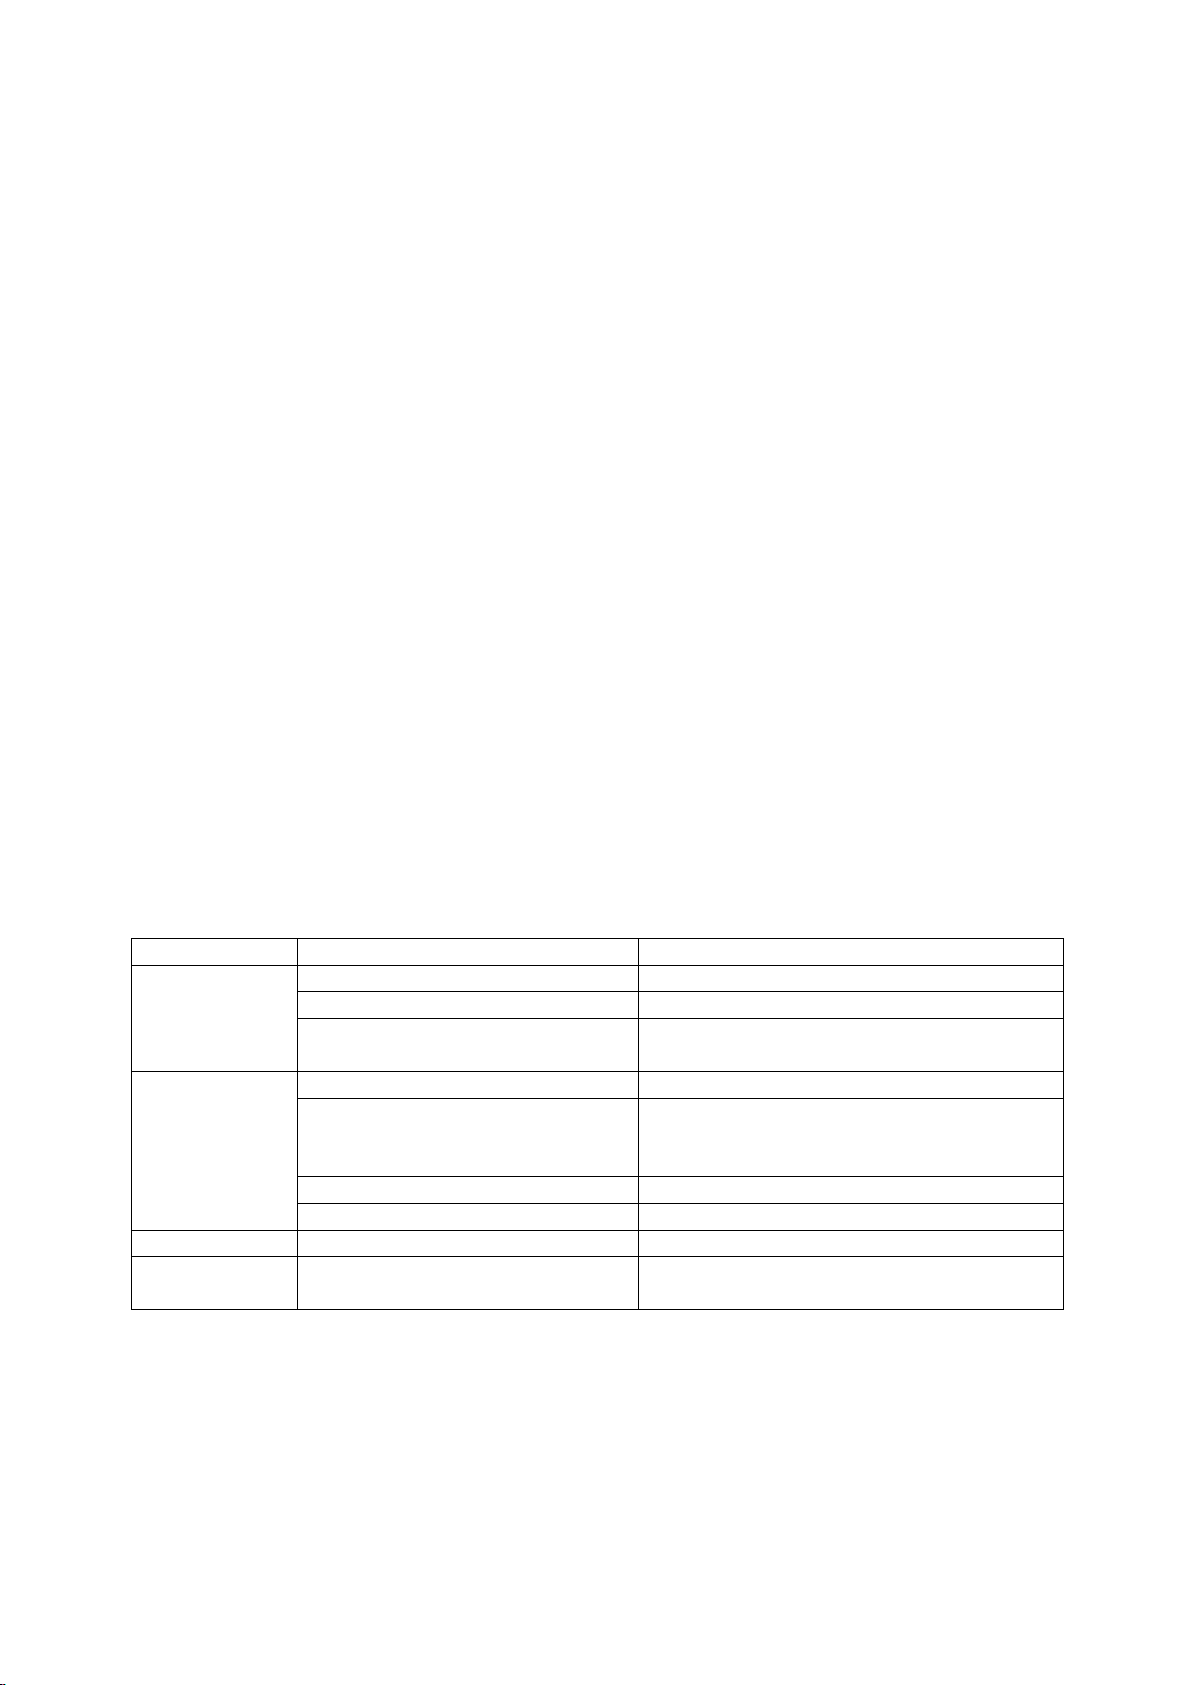
6. Indikator, Vattentank full
Fel
Orsak
Åtgärd
Enheten
fungerar inte
Ingen strömförsörjning
Kontrollera att spänning finns, starta igen
Lampan för vattennivå lyser
Tappa ut vattnet
Timer-off är aktiv
Vänta i 3 minuter och sätt sedan på
apparaten igen
Apparaten
startar om ofta
Apparaten står i direkt solljus
Dra för gardinerna
Fönster eller dörr öppen, många
människor eller en värmekälla i
rummet.
Stäng fönster och avlägsna värmekällan
Filtren är igensatta
Rengör eller byt luftfilter
Luftintag eller utblås är blockerat
Kontrollera och åtgärda
Hög ljudnivå
Apparaten står inte stadigt
Ställ enheten på hårt jämt underlag
Kompressorn
går inte
Överhettningsskydd aktivt
Starta om efter 3 min eller när
temperaturen sänkts
7. Indikator, Spänning på
8. Indikator, Apparaten i funktion
Användning
1. Vredet skall stå på "OFF" innan kontakten sätts i vägguttaget.
2. När kontakten sätt i kommer ”POWER” att lysa röd.
3. Vrid kontrollvredet till önskad funktion, "RUN" lyser grön.
4. Stäng av genom att vrida tillbaka till ”OFF”.
Observera!
Om du stänger av maskinen när den gått på kylning är det inte tillåtet att använda kylningsfunktionen igen inom 3 minuter
6. Dränering
Denna produkt är försett med ett avdunstningssystem. Kondensvattnet används för att kyla
kondensorn. Detta förbättrar inte bara kylning, utan sparar också energi för dig.
• Om det blir för mycket kondensvatten i apparaten kommer indikatorlampan ”FULL” att lysa
och kompressorn kommer att stanna.
• Stäng av maskinen och flytta maskinen till den plats där vattnet kan tömmas, öppna
vattenpluggen och töm apparaten. Efter dränering kan du slå på den och apparaten kommer att
fungera igen.
7. Felsökning
Reparera inte eller ta isär enheten själv. Felaktig reparation kan sätta inbyggda
skyddsfunktioner ur funktion och även orsaka skada för användaren. Garantin på produkten
upphör också att gälla.
Om lösningarna ovan inte fungerar för störningarna, vänligen kontakta service agent för hjälp.
6
Page 7
8. Underhåll
Rengöring.
Stäng av enheten och dra ur kontakten före rengöring eller underhåll
Yttre ytor
Rengör höljet med en dammtrasa eller en mjuk fuktig trasa. Använd inte kemiska lösningsmedel
(såsom bensen, alkohol, bensin) inte heller några slipande medel. Ytan kan skadas.
Spruta inte vatten på apparaten.
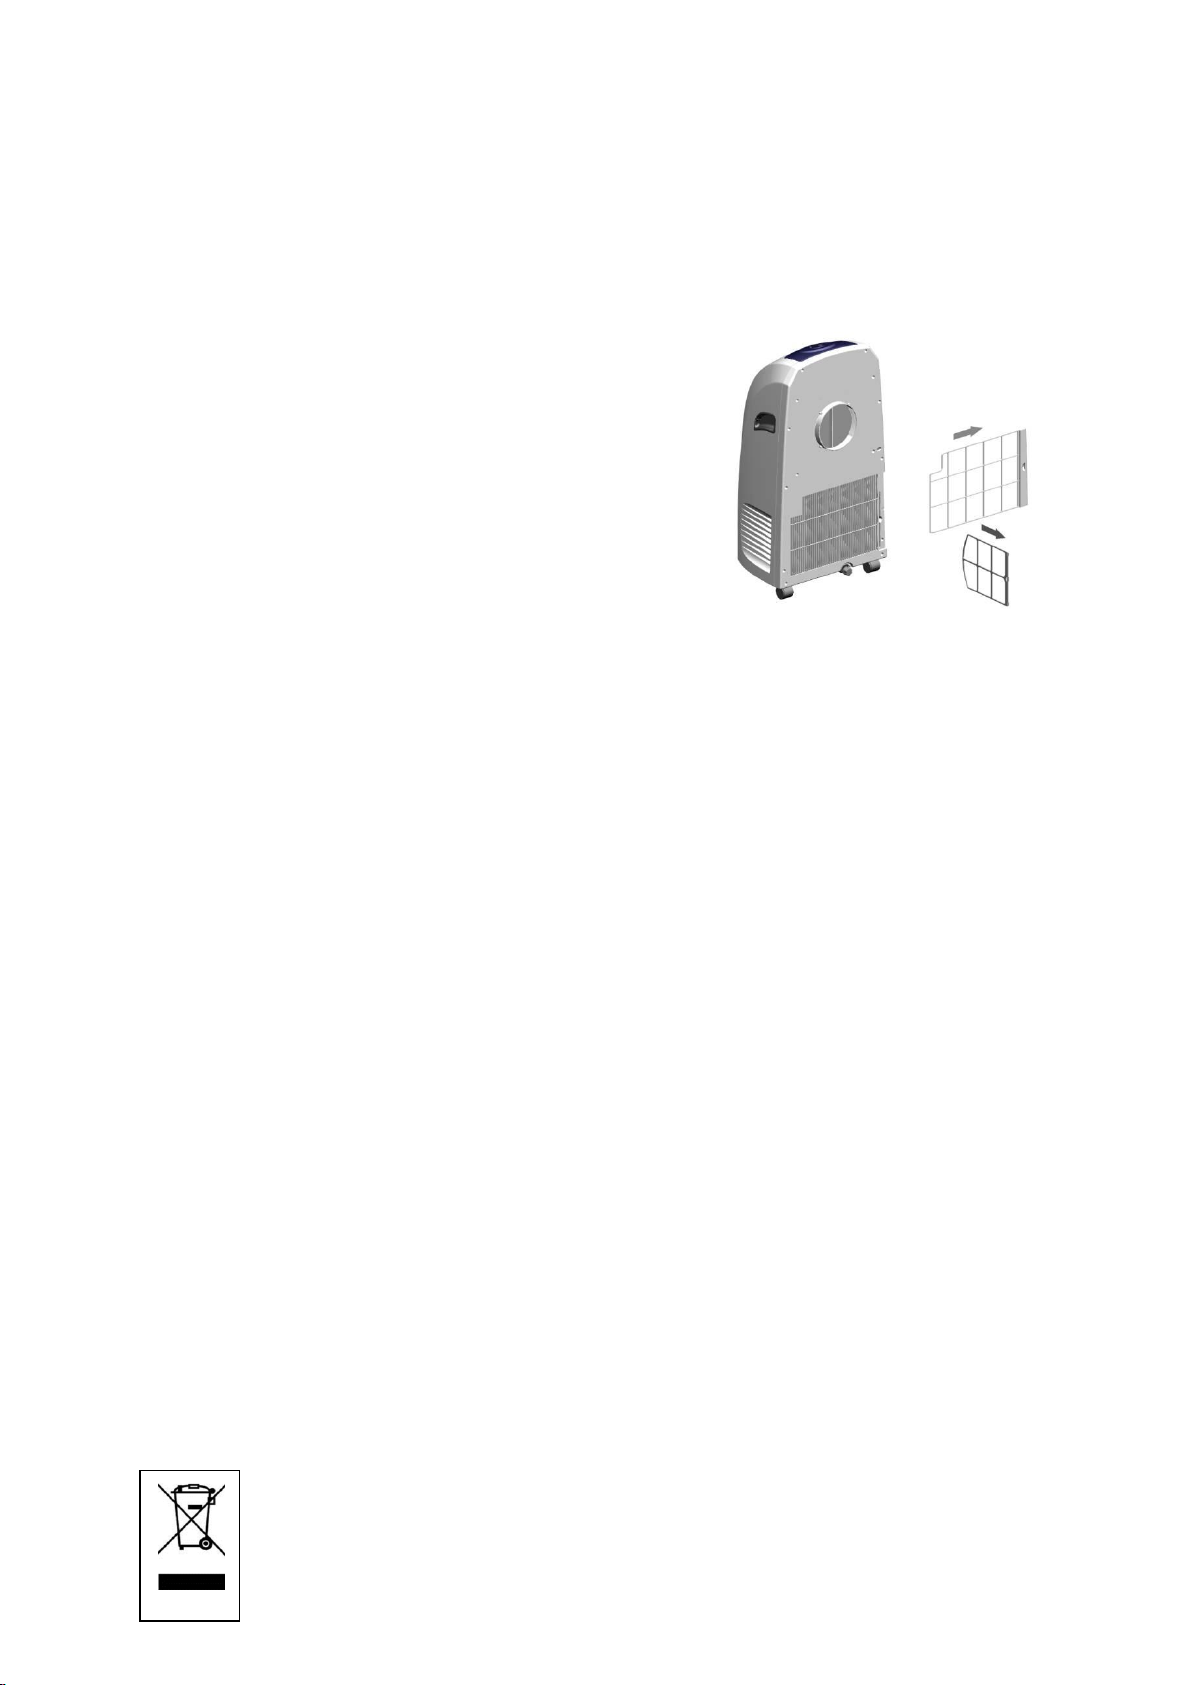
Rengöring av luftfilter
Rengör luftfiltren varannan vecka. Om luftfiltret är
igensatt med damm, kommer effektiviteten att minska.
1. Öppna luftfilterlocket uppåt, sedan ta ut luftfiltret.
2. Tvätta luftfiltret genom att sänka ned den försiktigt i
varmt (ca 40 ℃) vatten med ett neutralt
rengöringsmedel, skölj den och torka den ordentligt
på en skuggig plats.
Efter säsongen:
1. Öppna pluggen för dräneringen och töm ut ev. vatten.
2. Kör sedan enheten i Fläkt-läge. Kör i detta läge i flera
timmar tills innanmätet torkat.
3. Stäng av enheten och dra ur kontakten.
4. Gör rent luftfiltren och sätt tillbaka dem när de torkat.
5. Lossa luftslangen och fönsterbrickan och lägg undan för förvaring.
6. Sätt in enheten i en plastpåse och förvara den på ett torr plats.
9. Garantivillkor
Garantitiden för denna produkt är 1 år från och med inköpsdatum. Under denna period
repareras alla defekter i material eller utförande kostnadsfritt. Följande villkor gäller rörande
denna garanti:
1. Vi tillbakavisar uttryckligen alla övriga ersättningskrav, inklusive ersättning för följdskador.
2. Garantin förlängs inte i samband med reparationer eller byten av delar som sker inom
garantiperioden.
3. Om produkten modifieras, tillförs delar som inte är original eller repareras av en tredje part
gäller inte garantin längre.
4. Garantin gäller endast om daterat köpebevis i original visas upp och om detta köpebevis inte
innehåller några ändringar.
5. Garantin täcker inte skador som uppstått genom hantering som inte är i enlighet med
bruksanvisningen, försummelse eller skadegörelse
6. Köparen står för transportkostnader och ansvarar för eventuella risker i samband med att
produkten eller dess delar förflyttas.
För att undvika onödiga kostnader rekommenderar vi att du alltid först läser igenom
bruksanvisningen noga. Om denna inte erbjuder någon lösning bör du ta med produkten till
återförsäljaren för reparation.
10. Miljöskydd
När apparaten inte längre fungerar måste den kasseras på ett sådant sätt att
den skadar miljön i minsta möjliga mån och i enlighet med de regler som
gäller i din kommun.
7
Page 8
USER MANUAL (GB)
Model
TecLime TPA-2000
Cooling capacity
2,05kW
Refrigerant/charge
R410A/400g
Voltage
220-240 V , 50 Hz
Power in
1020W
Air flow
360m3/h
Noise
55dB(A)
Weight
25 kg
Dimension (WxHxD)
330x433x795 mm
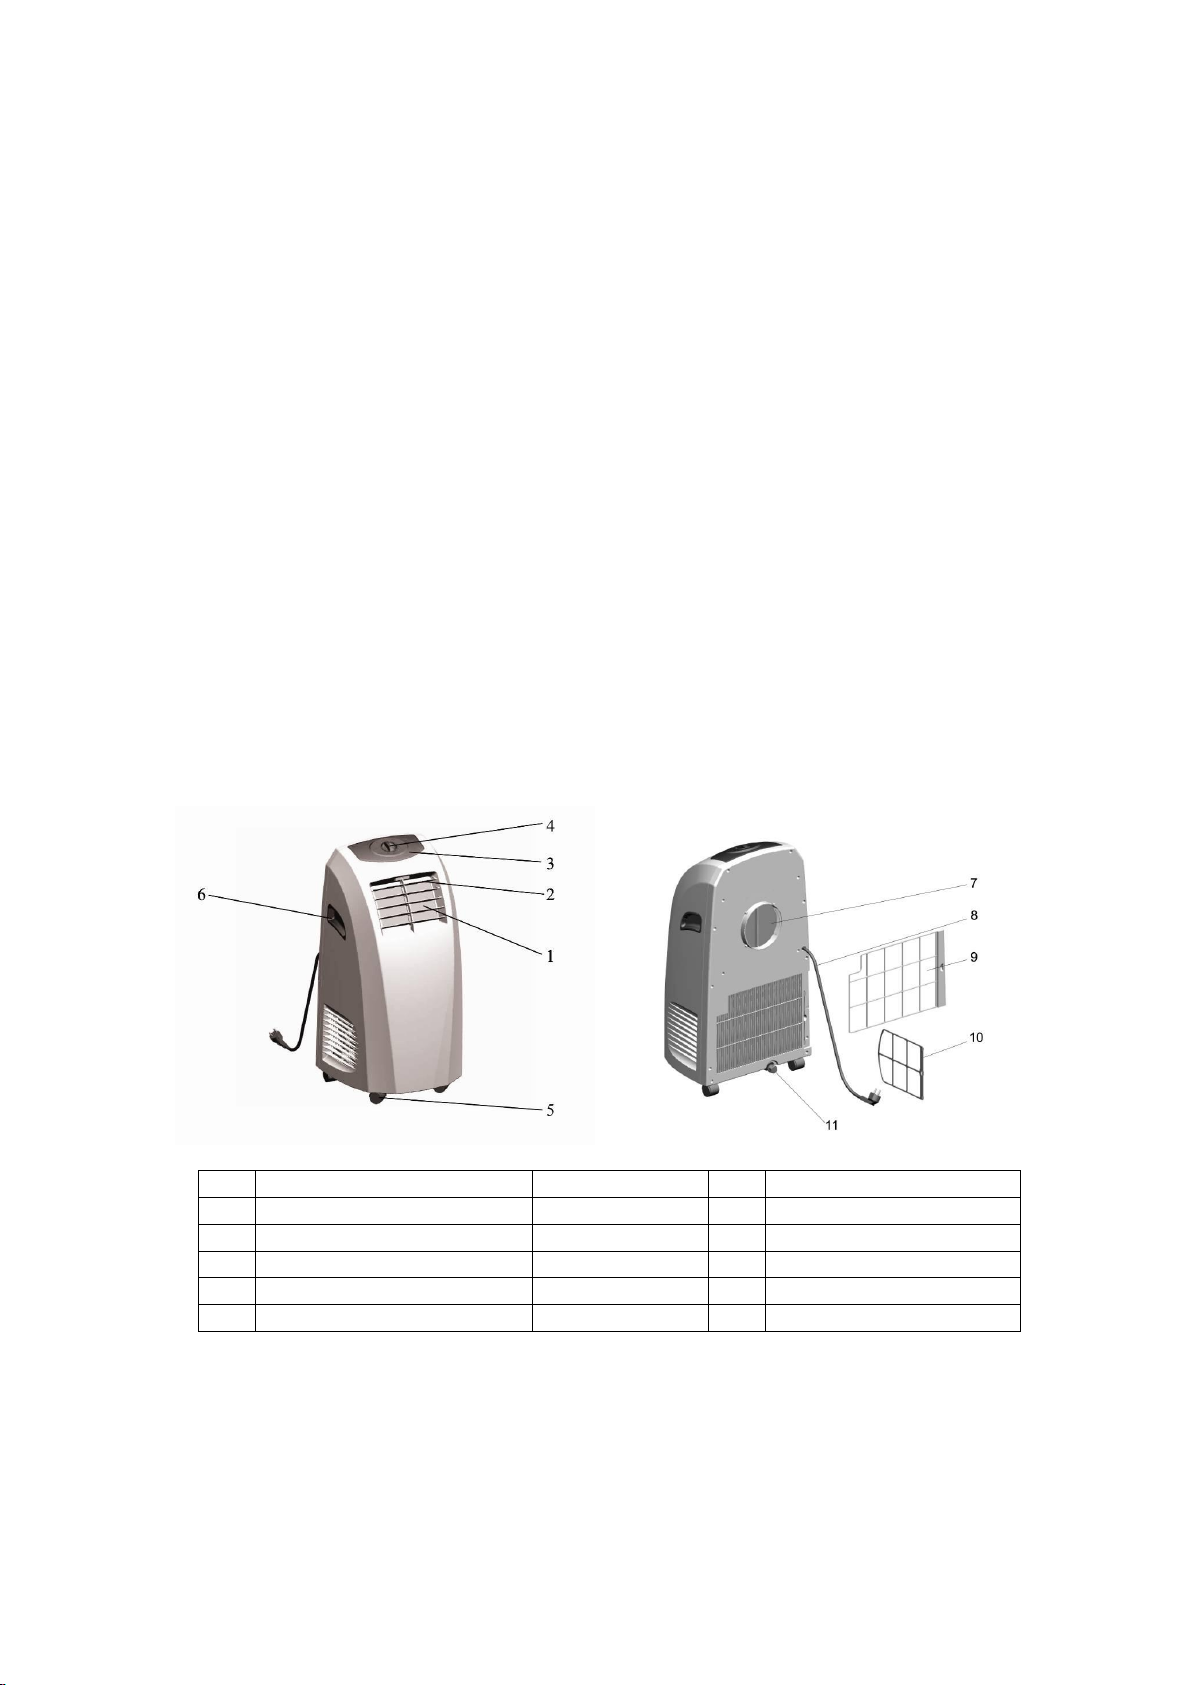
1
Air outlet vent
7 Exhaust air outlet vent
2
Louver
8 Power cord
3
Control panel
9 Big filter
4
Knob
10
Small filter
5
Castor
11
Draining hole
6
Handle
Thank you for selecting this super quality air conditioner. The air-conditioner is intended for
domestic uses and not recommended for commercial usage.
Read this manual carefully before you are using the appliance and keep it for future
reference.
1. Specification
2. Design
8
Page 9
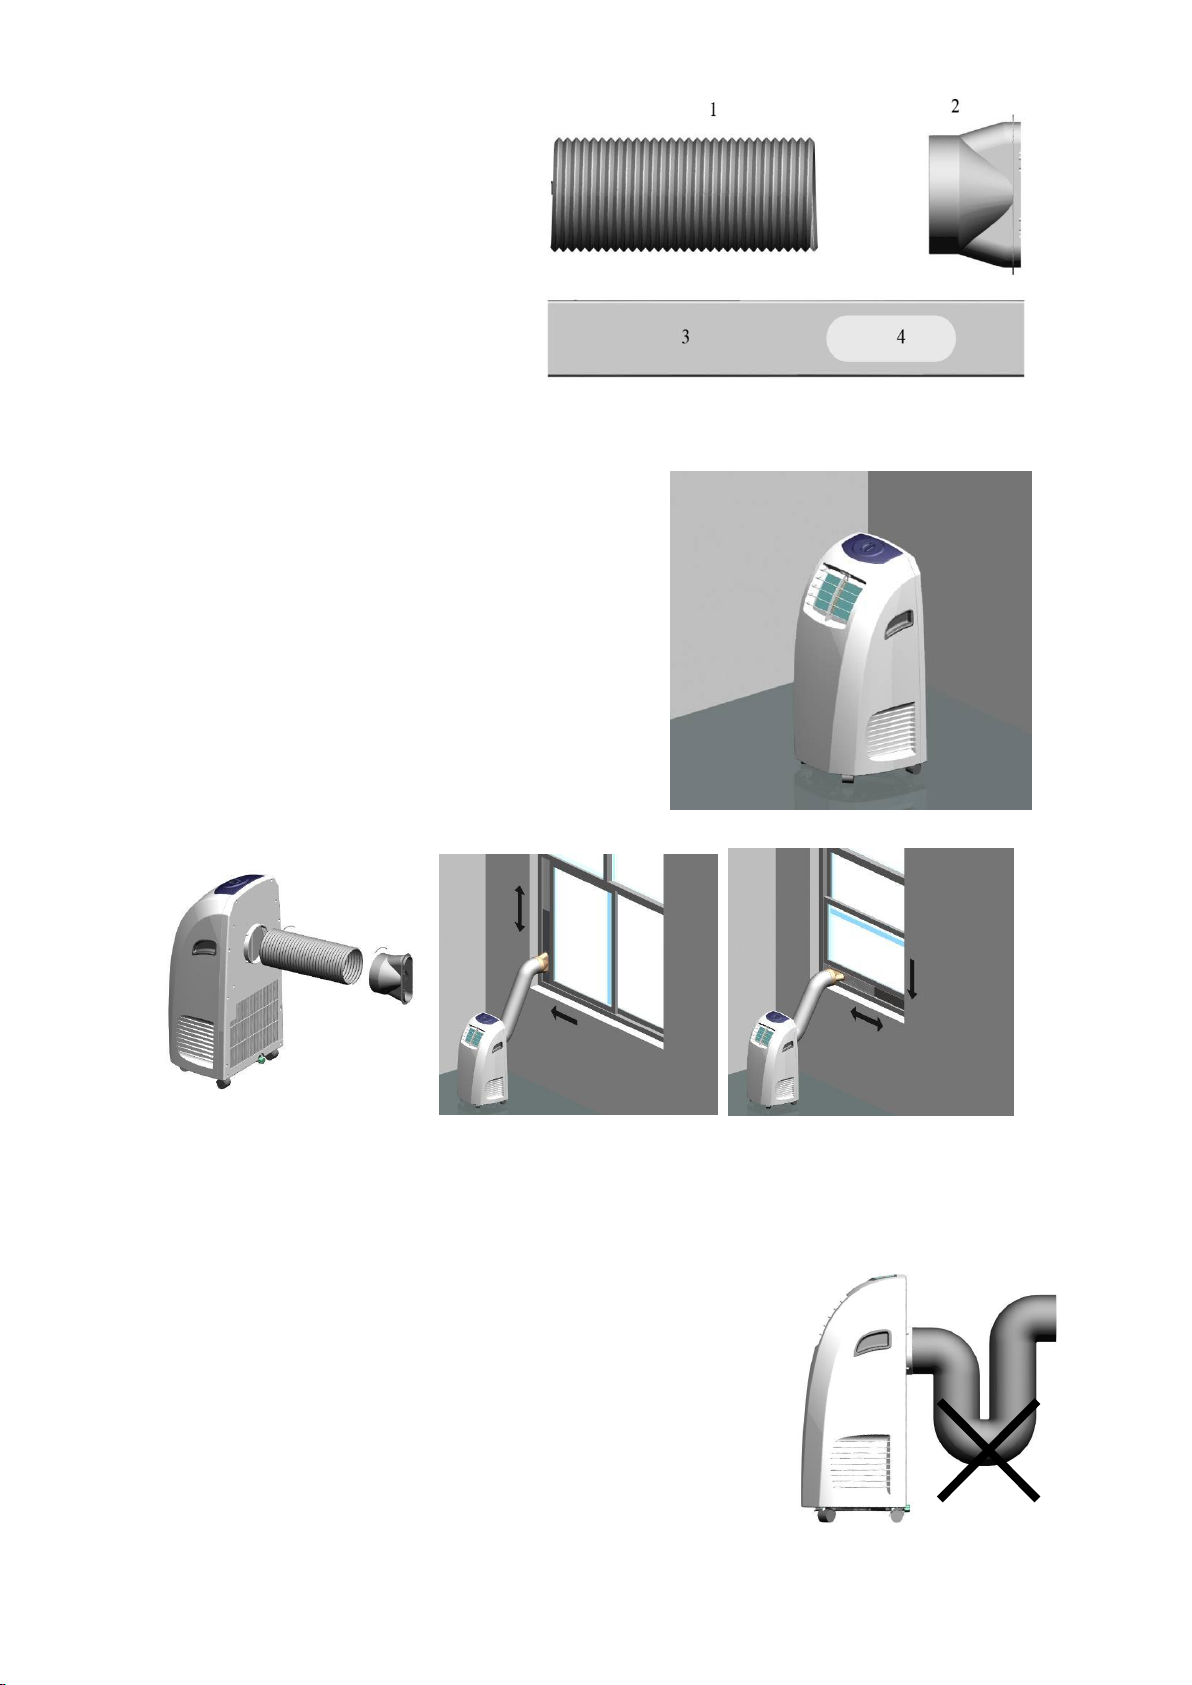
Accessories
Check that all the accessories are
included in the package and please refer
to the installation instructions for their
usage.
1. Exhaust hose
2. Adapter
3. Window slider
4. Window slider for adapter
3. Installation
Select location
Keep the unit on a flat stable surface and dry place.
Leave at least 50cm space all around the unit.
Before you are using the unit let it be standing upright
for minimum 2 hours.
Assemble the hose
Pull out the end of the hose and fasten it to the unit by
screwing it anticlockwise. Fasten the adapter to the
other end of the hose using same method.
Installation of window kit
Partially open the window and then fix the window kits to the window
The window kits can be installed on most normal and vertical windows, and it is adjustable
Fasten the adapter to the window kit
Important!
The length of the exhaust pipe is specially designed according to
the specification of this product. Do not replace or prolong it
with your own private hose as this could cause mal-function.
Bending of the exhaust pipe is very critical. Incorrect mounting
can prevent the machine from working correctly.
Take care to prevent any sharp bows or bends of the exhaust
pipe. The exhaust air must flow freely
9
Page 10
4. Safety warnings
Read them carefully before using the appliance.
Use only for domestic purposes and in the manner specified in these instructions. Never use
for any other purpose.
Do not use outdoors and place it always in a dry environment.
Check the cord regularly. Never use the appliance if the cord or plug is showing no signs of
damage. This product's cord length is selected to reduce the risk of injury. Do not use an
extension cord that does not have the same electrical specifications as the unit. If in doubt
consult a qualified electrician or service provider.
Keep the appliance away from heat sources and direct sunlight.
Always switch off the machine with the power switch before unplugging.
Always unplug the appliance before cleaning or modification of some parts of the apparatus,
and when not in use.
Ensure that the voltage on the rating plate match the supply voltage. Any error in how the
apparatus is connected voids your warranty.
Children should be supervised so they do not play with the appliance.
Never leave the appliance unattended when in use. Turn the unit off if you have to go away
even for a short while.
Never pull the cord to disconnect or move the unit.
Never immerse the appliance in water or other liquid, for any reason.
Keep the unit away from water or grease splashes.
Read the instructions for cleaning.
Do not insert sharp metal objects or fingers into openings or oscillating fins of the device.
Never repair the unit yourself. Any action taken by a non-qualified person can be
dangerous. Any replacement of the power cord must be performed by a qualified
electrician.
Do not use accessories not supplied by the supplier. This can be dangerous and can damage
the unit.
Special recommendations:
Install the portable air conditioner on a flat site with a lot of room, notwithstanding. Leave
50cm minimum space to the walls.
The plug must always be accessible after installation.
Always place the unit in a vertical position, to give the compressor good working condition.
Do not use near gas or other flammable liquids.
Do not block the air outlet and inlet ventilation.
Do not use aerosol spray (insecticides, paint) or other flammable products near the
appliance as plastic parts can be deformed. The unit's electronics can also be damaged.
Power sources
The plug must be properly installed and not damaged.
Do not connect the device with an adapter.
Insert the wall jack before switching on the unit.
The manufacturer will not assume any responsibility in case of non-adherence to these
instructions.
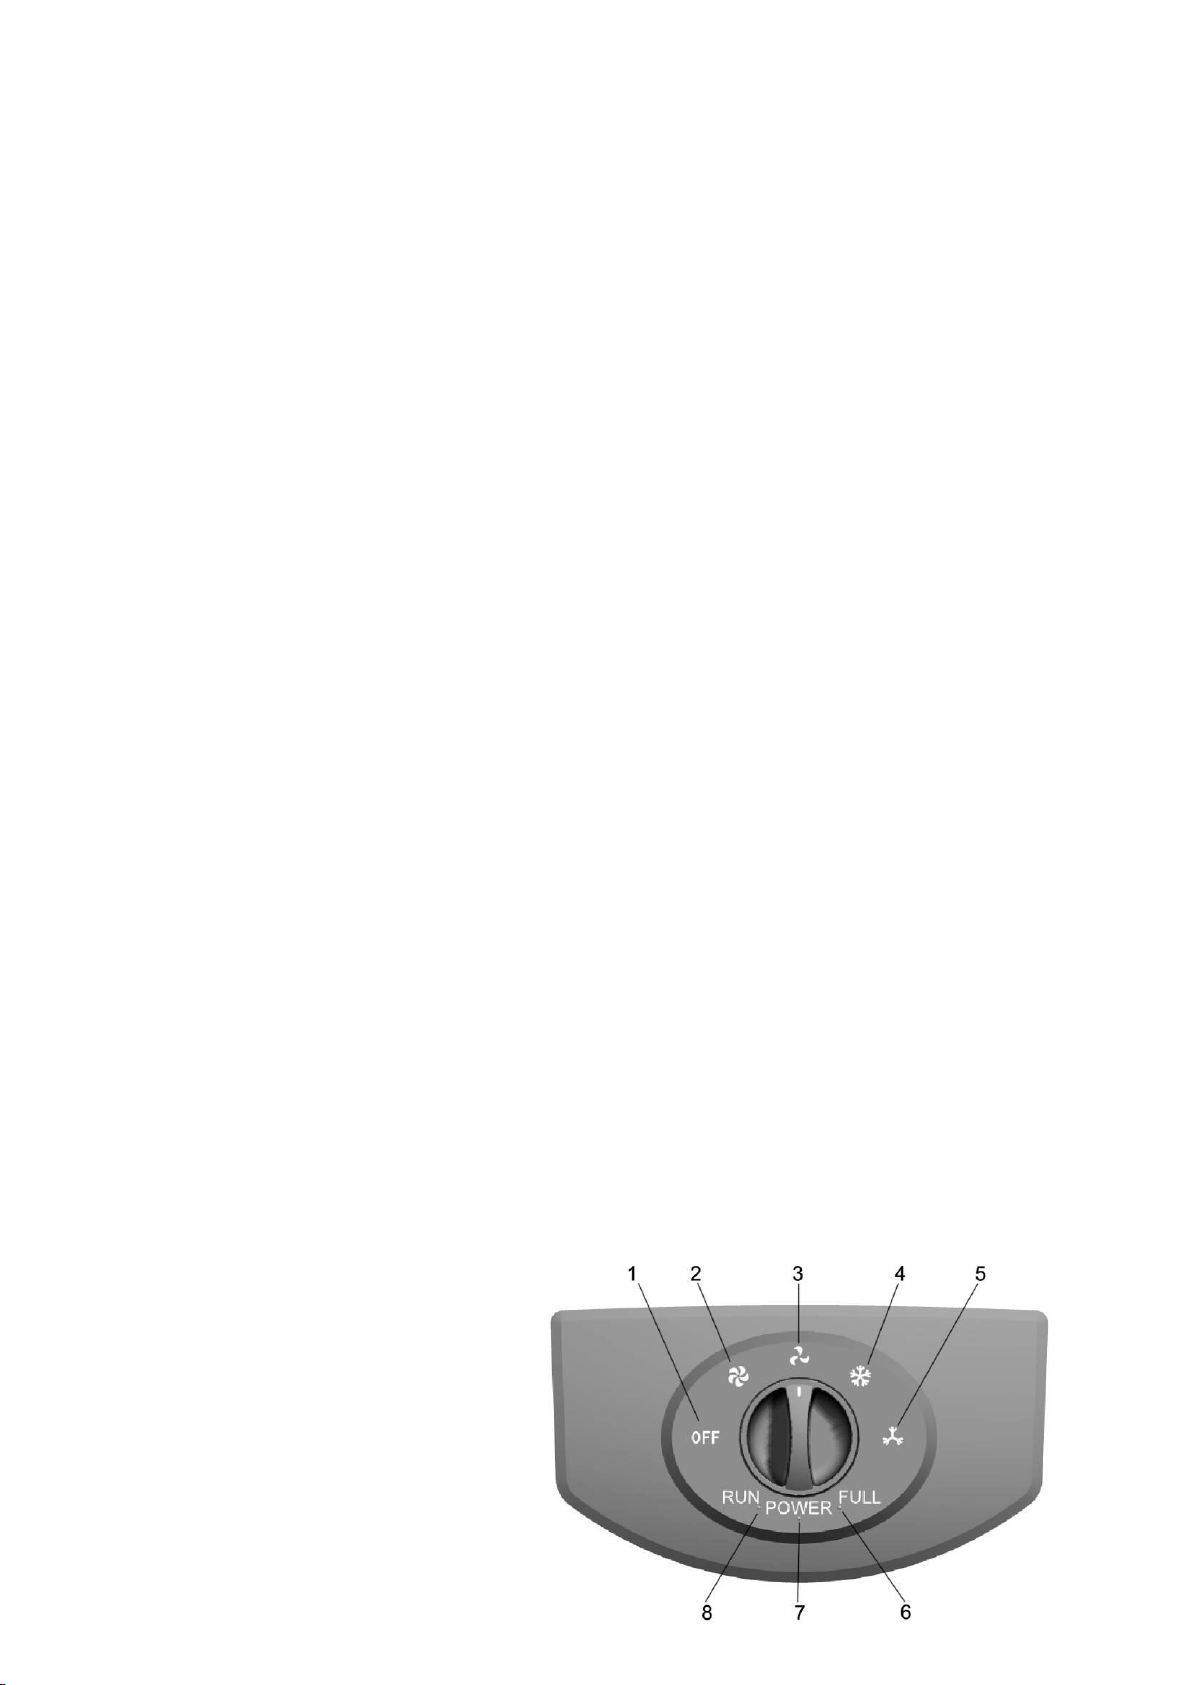
5. Control panel and use
1. OFF
2. Fan speed(High)
3. Fanspeed(low)
4. Cool(high)
5. Cool(low)
6. Water full indicator
7. Power indicator
8. Running indicator
10
Page 11
Operation
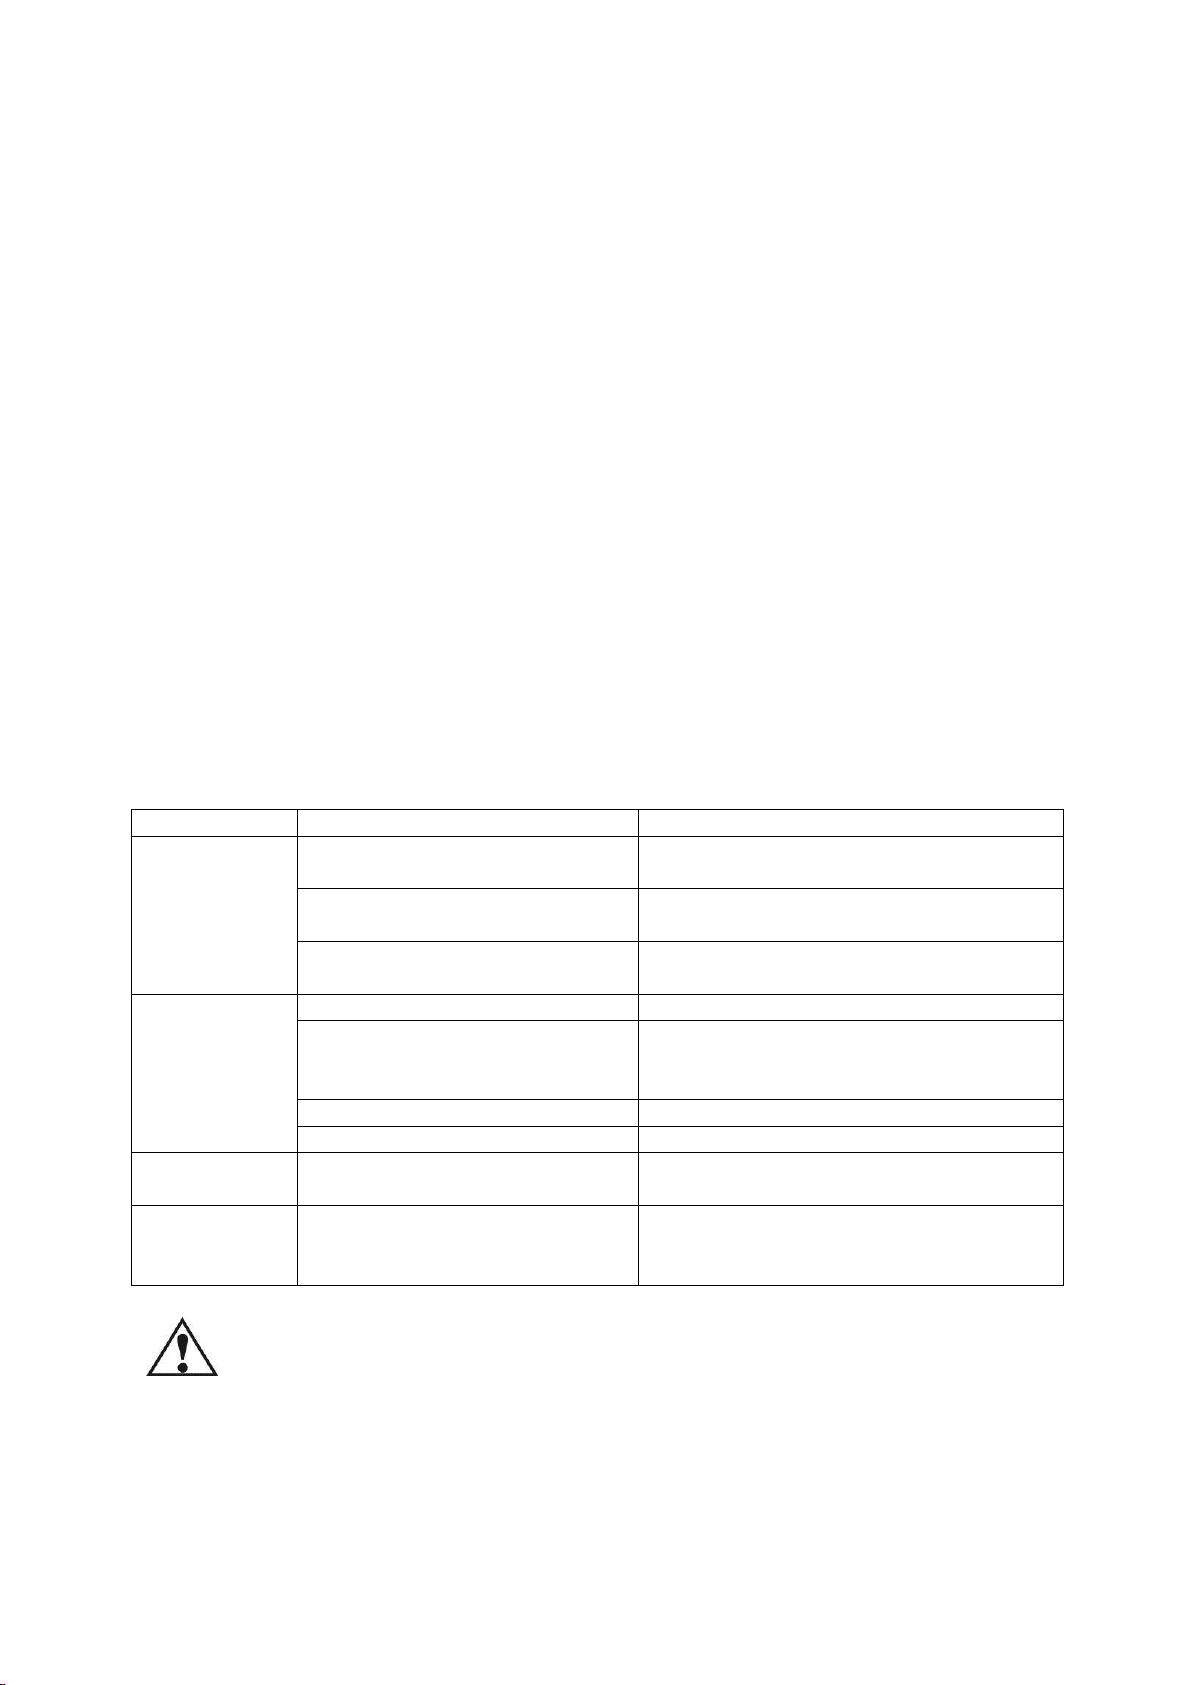
Problem
Cause
Solution
The air
conditioner
does not
function
No power supply.
Connect to power supply outlet and switch
on.
“Water full” flashes on the display
screen
Drain water.
Timer-off is running.
You can turn on the unit three minutes
later.
The air
conditioner
restart
frequently
In direct sunlight.
Close curtains.
Windows or doors open, many
people or a heat source in the
room.
Close doors and windows, remove the heat
source.
Dirty filter.
Clean or replace the filter(s).
Air inlet or air outlet blocked.
Remove the blockage.
The unit is too
noisy
Unit stands uneven.
Place on an even, solid surface (less
vibration).
No work of
compressor
Self-protect of compressor
Wait for 3 minute and restart again after
the descend of temperature
1. The knob should be in the "OFF" position before the plug is inserted into the wall outlet.
2. When the plug is inserted the "POWER" indicator will light red.
3. Turn the control knob to desired function and "RUN" indicator will light green.
4. Shut down by turning the knob back to "OFF".
Note!
If you turn off the machine when it has been running in cooling mode it is not allowed to use
the cooling function again within 3 minutes.
6. Drainage
This product is equipped with an evaporation system. The condensate is used to cool the
condenser. This not only improves cooling but also saves energy for you.
• If it becomes too much condensation in the apparatus, the LED "FULL" will light and the
compressor will stop working.
• Stop the machine and move the machine to where the water can be drained, open water
plug and drain the unit. After draining, you can turn it on and the device will work again.
7. Troubleshooting
Do not repair or disassemble the device yourself. Improper repairs can put built-in
safeguards to fail and even cause injury to the user. The warranty will also be void.
If the solutions above not solve the problem please call the service center.
Cautions: Switch off the unit and unplug it immediately if anything
abnormal happens. Then contact a qualified electrician.
11
Page 12
8. Maintenance
Cleaning.
1. Unplug the unit before any cleaning.
2. Clean the housing with a soft moisture cloth. Do not use chemical solvent (such as benzene,
alcohol, gasoline). The surface may be damaged or even the whole case may be deformed.
3. Do not sprinkle water on the unit.
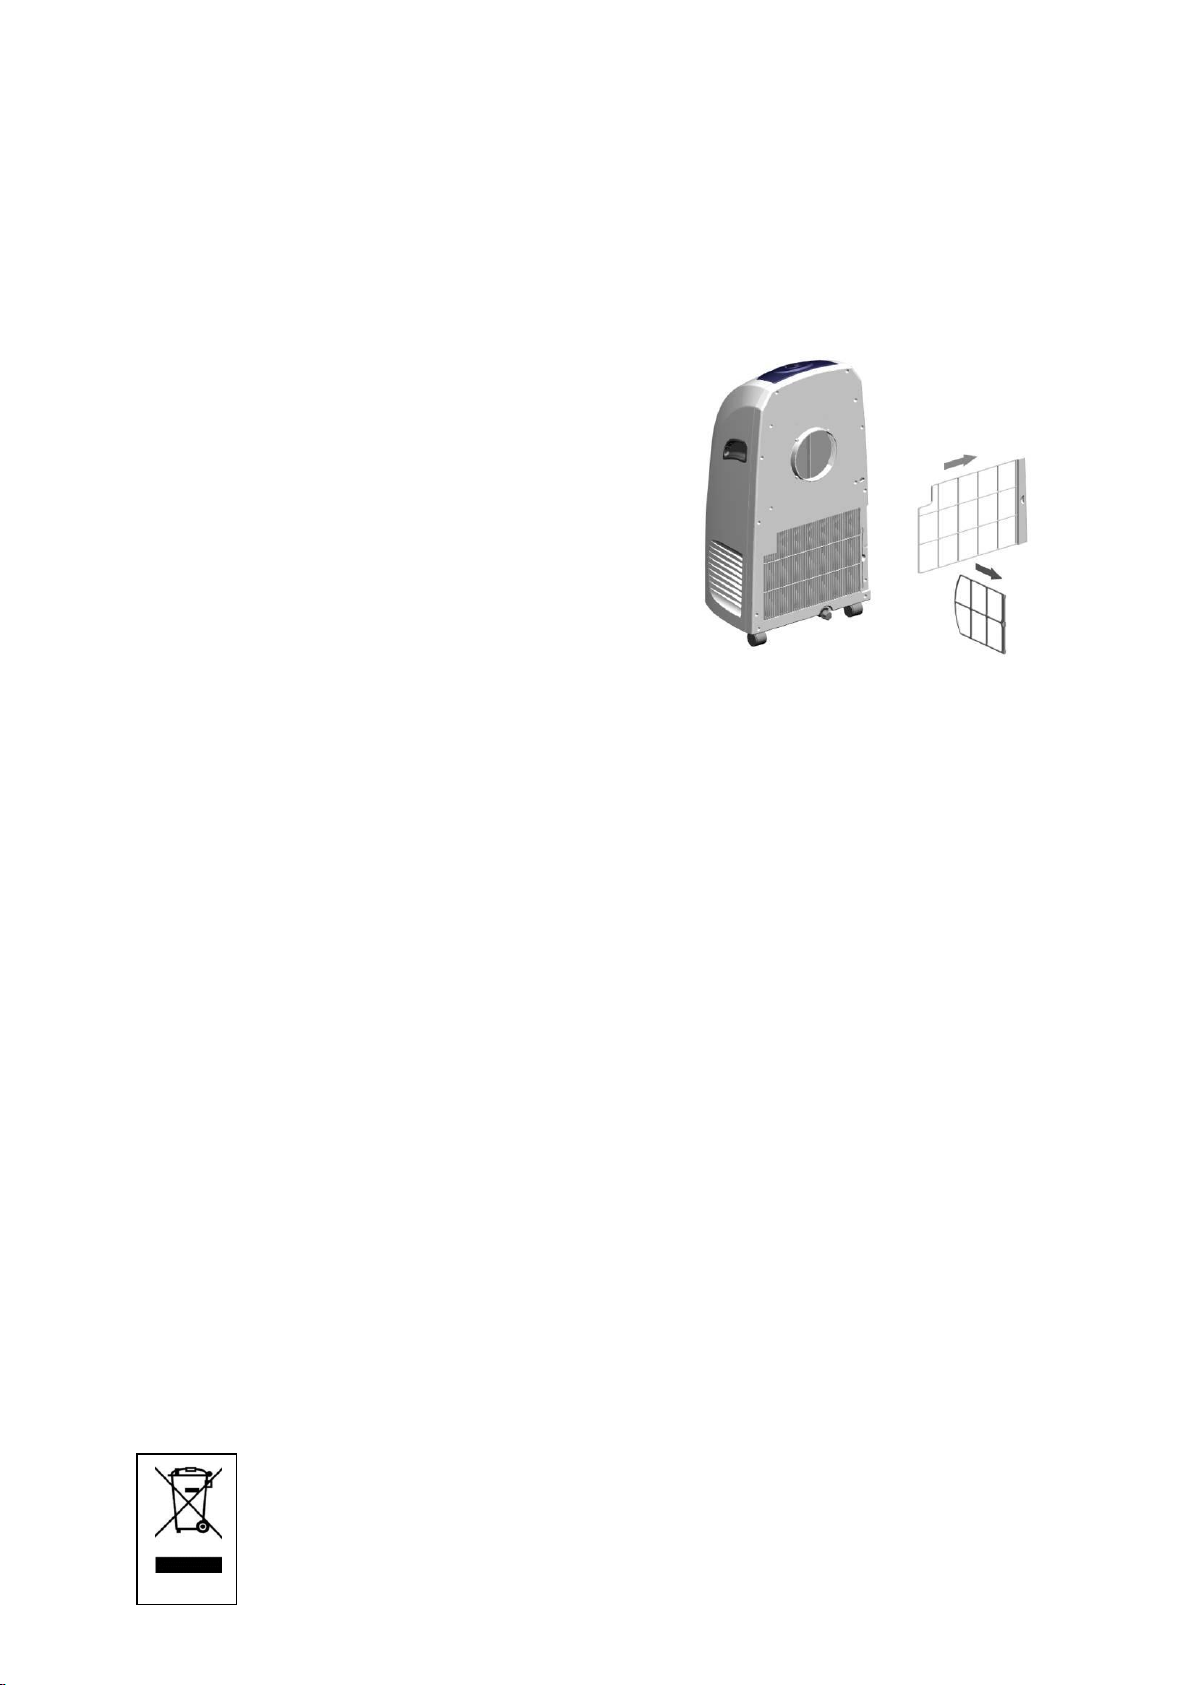
Cleaning of the filters
1. Clean the air filter every 2 weeks. If the air filter is
blocked with dust, the efficiency will be reduced.
2. Open the air filter cover upwards, then take out
the air filter.
3. Wash the air filter by immersing it gently into
warm (about 40℃) water with a neutral
detergent, rinse it and dry it thoroughly in a
shaded place.
End of season:
1. Please drain the water.
2. Keep the unit running in Fan mode for several
hours until the inside of the unit is dry.
3. Turn off the unit and unplug it.
4. Clean the air filter and after dry it thoroughly, reinstall it.
5. Remove the exhaust pipes and store them carefully.
6. Wrap the unit with the plastic bag and keep it in a dry place.
9. Warranty Provisions
This product comes with a 12-month warranty starting on the date of purchase. Within this
period any defects in material or workmanship will be repaired without any charge. The
following provisions shall apply regarding this warranty:
1. We expressly dismiss all other claims for damage, including consequential damages;
2. Any repairs or replacements of components within the term of the warranty will not
result in an extension of the term of the warranty;
3. The warranty will no longer apply if the product has been modified, non-original parts
have been used, or if it has been repaired by third parties;
4. The warranty will only apply, when you present the original, dated proof of purchase,
provided no changes have been made to it;
5. The warranty will not apply to damage caused by actions not in compliance with the
Directions for Use, neglect, vandalism;
6. Transportation costs and the risk involved during the transportation of the product or its
components will always be the responsibility of the purchaser.
In order to avoid unnecessary costs, we recommend that you always read the Directions for Use
carefully first. If they offer no solution, please take the product to your dealer for repair.
10. Environmental Protection
Waste electrical products should not be disposed of with household waste.Please
recycle where facilities exist. Check with your Local Authority or retailer for
recycling advice.
12
 Loading...