

Page 1
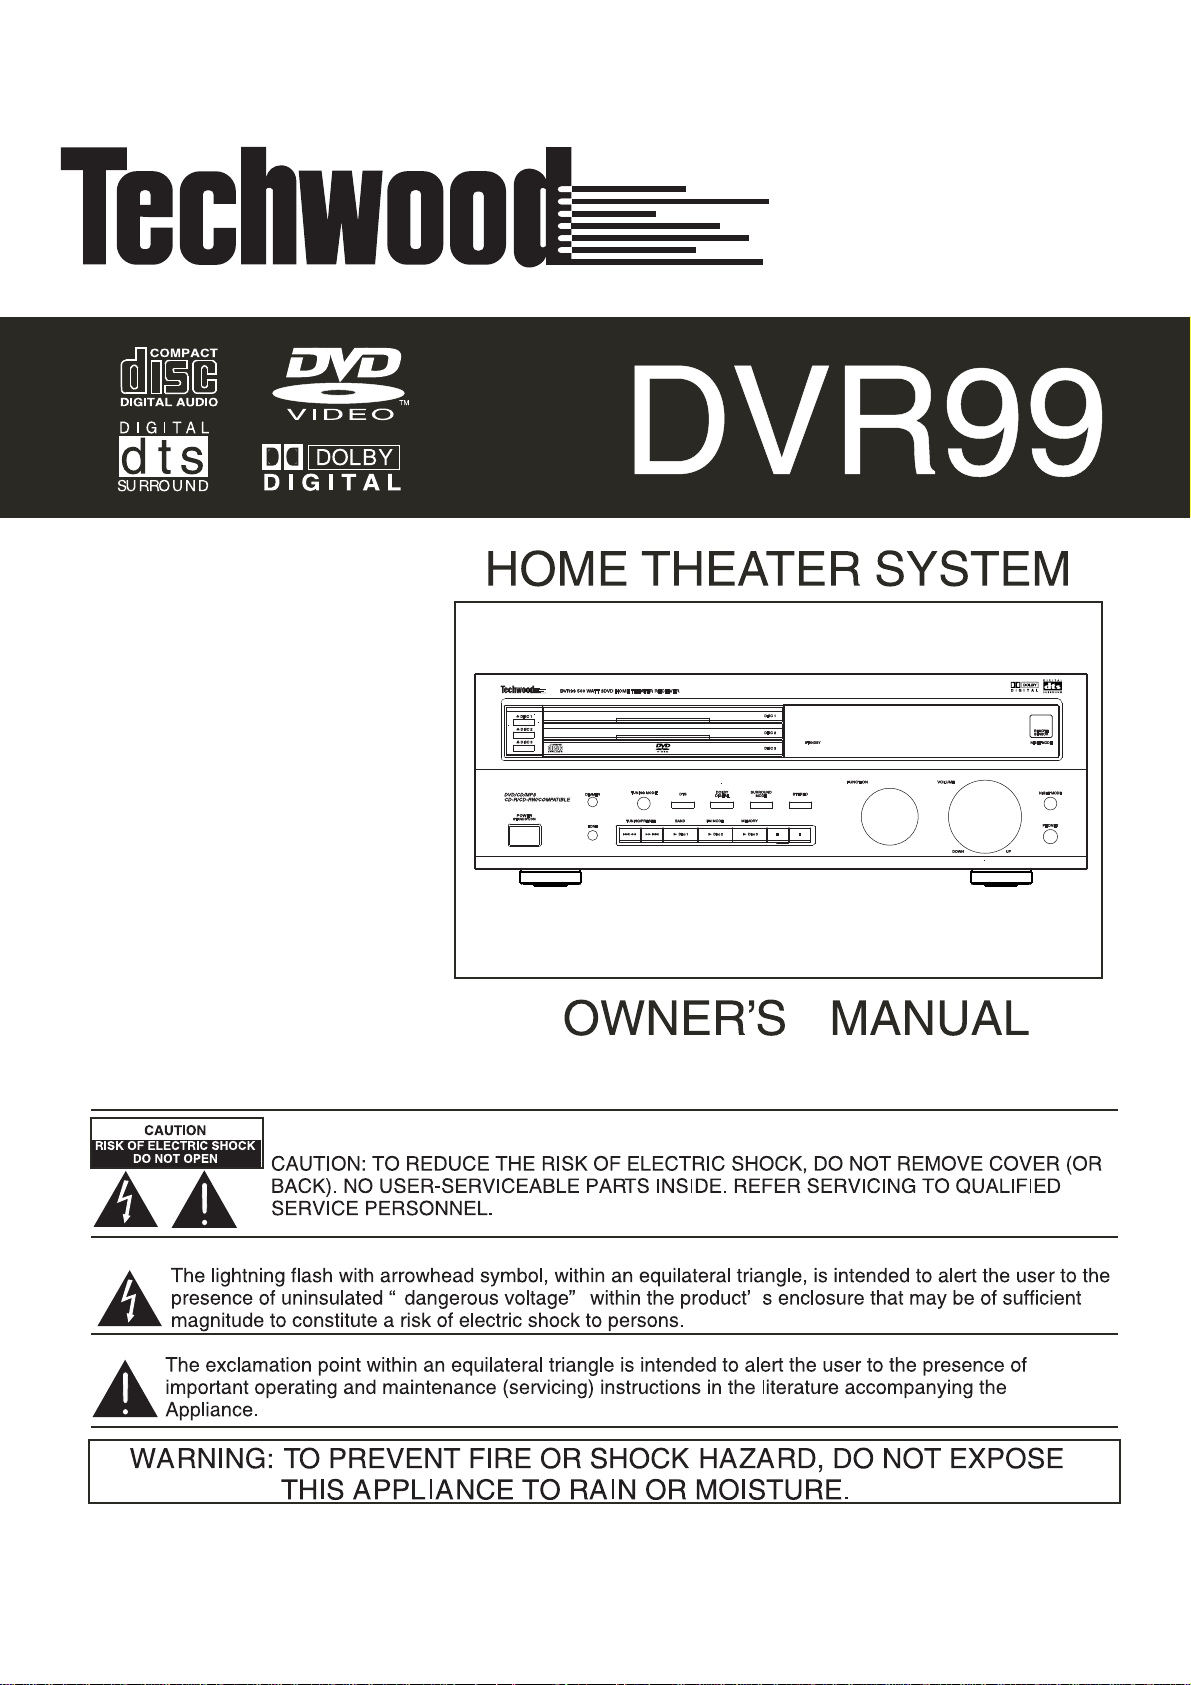
DVR99
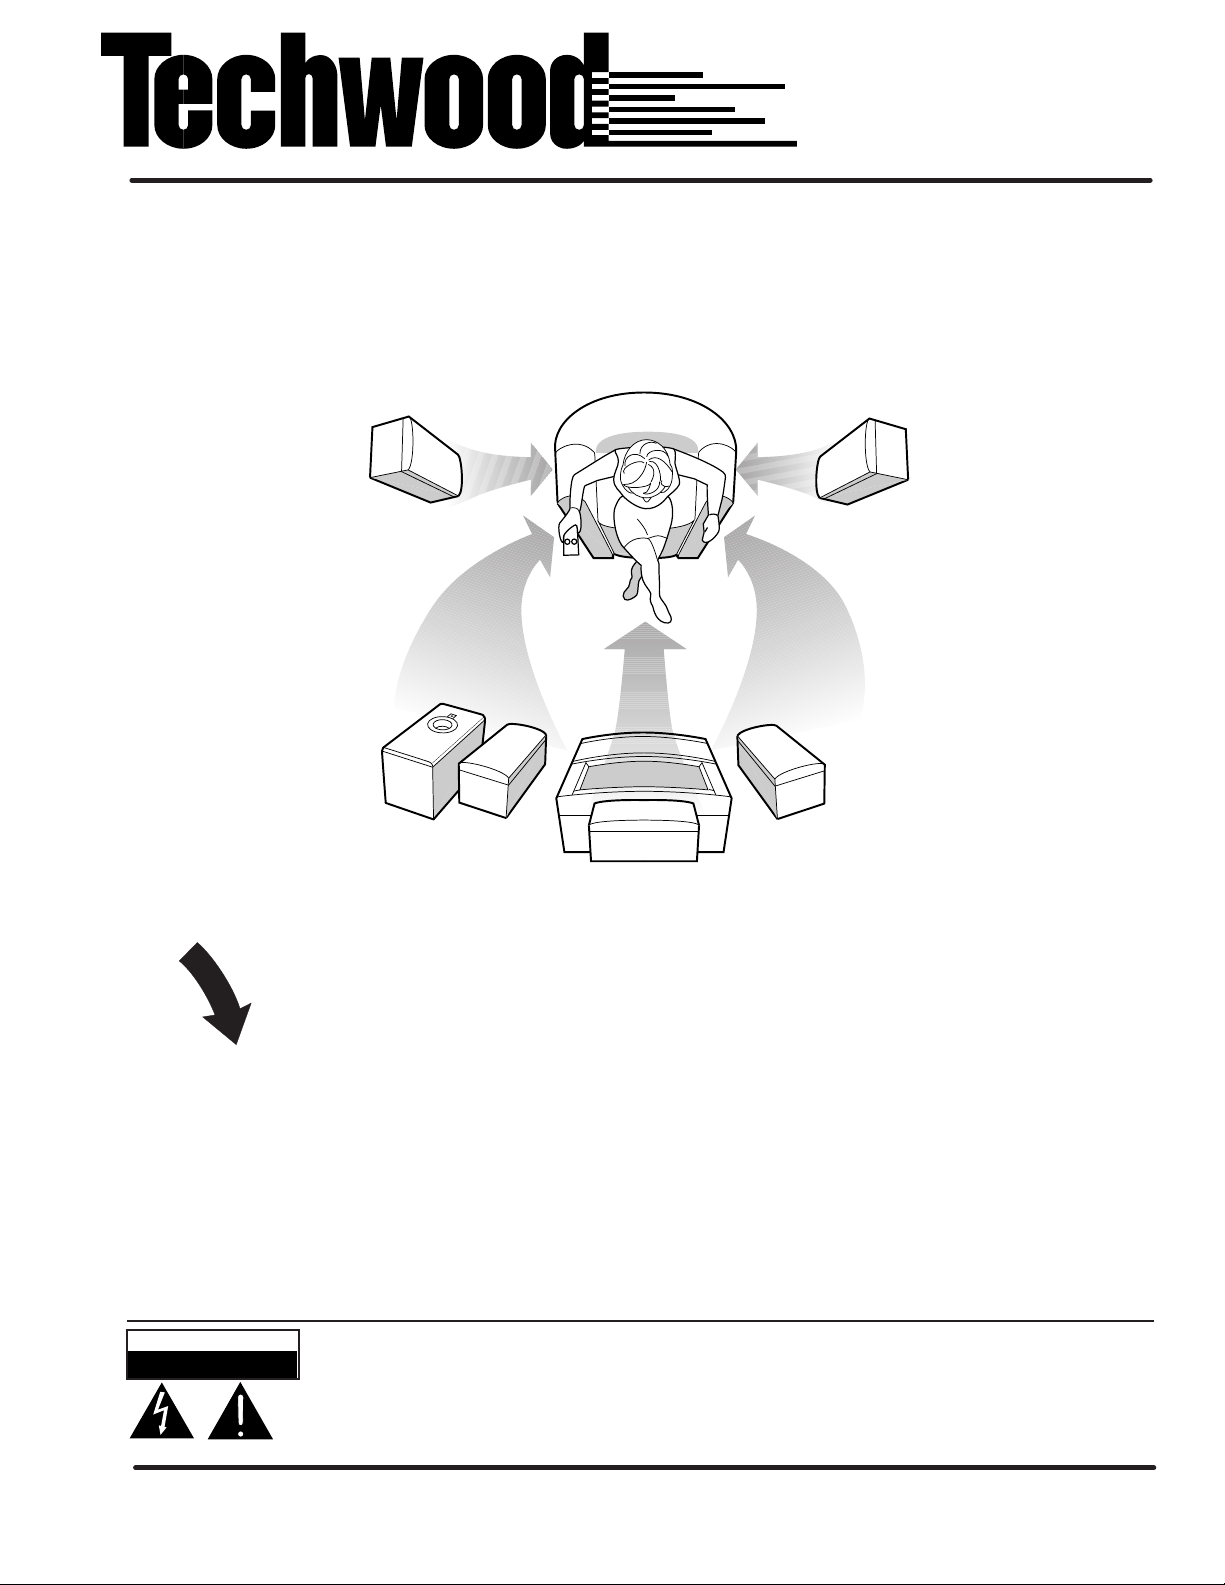
HOME THEATER
SYSTEM
!
D
A
E
R
P
L
E
A
SE
QUICK-START
GUIDE
This "QUICK-START GUIDE" will get you started without reading the complete owner's manual. However, we recommend you take time to read the owner's manual
completely to learn about all of the features and operating instructions for the
DVR99. The Quick Guide covers only basic connections and operating instructions.
The owner's manual includes important safety information and describes in detail,
the advanced features and operating instructions of the DVR99.
CAUTION
RISK OF ELECTRIC SHOCK
CAUTION: TO REDUCE THE RISK OF ELECTRIC SHOCK, DO NOT REMOVE COVER (OR
BACK). NO USER-SERVICEABLE PARTS INSIDE. REFER SERVICING TO QUALIFIED
SERVICE PERSONNEL.
DO NOT OPEN
WELTON U.S.A. 11625 Columbia Center Drive Suite 100 Dallas, Texas 75229 972-243-5602 weltonusa.com
Page 2
Page 3

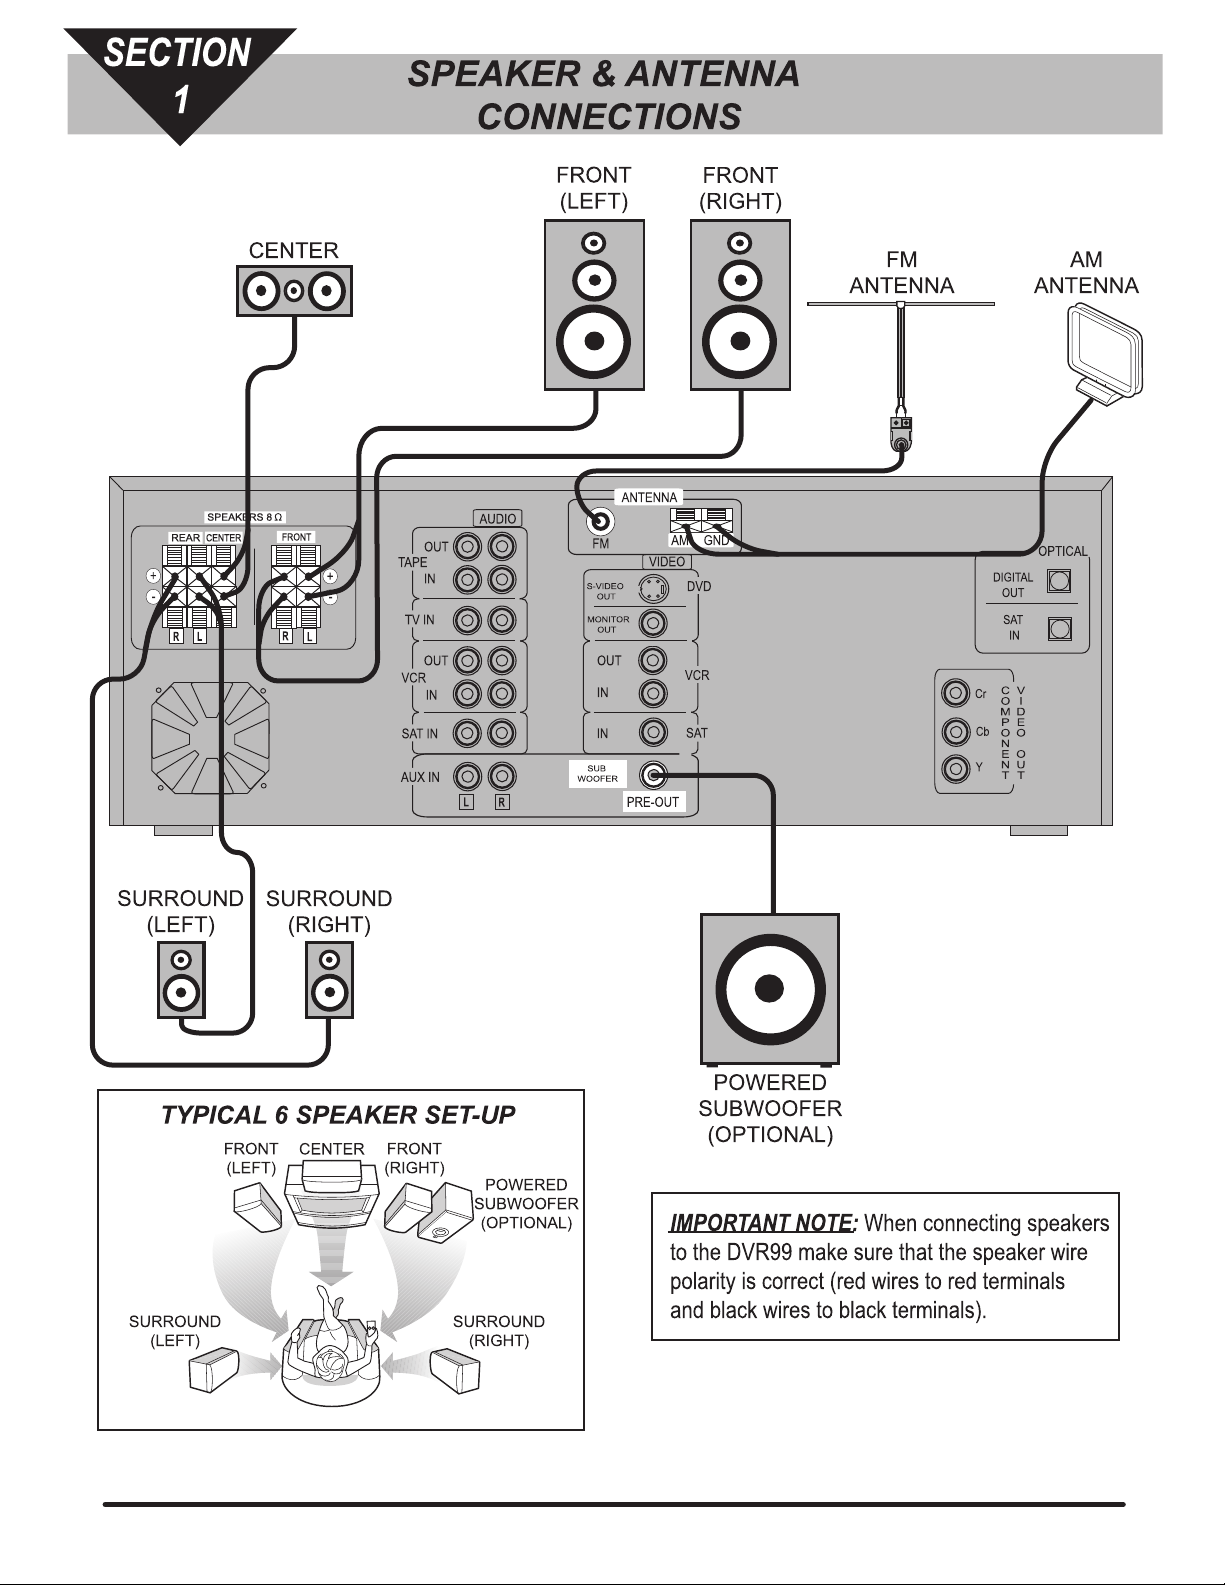
SECTION
2
NOTE: Solid lines = suggested method of connection
Dotted lines = alternate method of connection
AUDIO & VIDEO
CONNECTIONS
TV
CABLE BOX
ANTENNA OUT
SPEAKERS 8
CENTER
REAR
+
-
L
R
FRONT
R
L
COMPONENT VIDEO IN
CD
ANTENNA IN
VIDEO IN
RECORDER
S-VIDEO IN
AUDIO OUT
FM
S-VIDEO
OUT
MONITOR
OUT
OUT
IN
IN
SUB
WOOFER
ANTENNA
GNDAM
VIDEO
DVD
VCR
SAT
PRE-OUT
AUDIO
OUT
+
-
TAPE
TV IN
VCR
SAT IN
AUX IN
IN
OUT
IN
L
R
OPTICAL AUDIO IN
OPTICAL
DIGITAL
OUT
SAT
IN
V
C
Cr
I
O
D
M
E
P
Cb
O
O
N
O
E
U
N
Y
T
T
AUDIO OUT
OPTICAL AUDIO OUT
SATELLITE
SYSTEM
VIDEO OUT
IMPORTANT NOTE: When connecting components
to the DVR99 make sure that the AUDIO/VIDEO
cables are properly connected (white audio plugs
to white audio jacks, red audio plugs to red audio
jacks and yellow video plugs to yellow video jacks).
AUDIO IN
AUDIO OUT
VIDEO OUT
VIDEO IN
VCR
Page 4
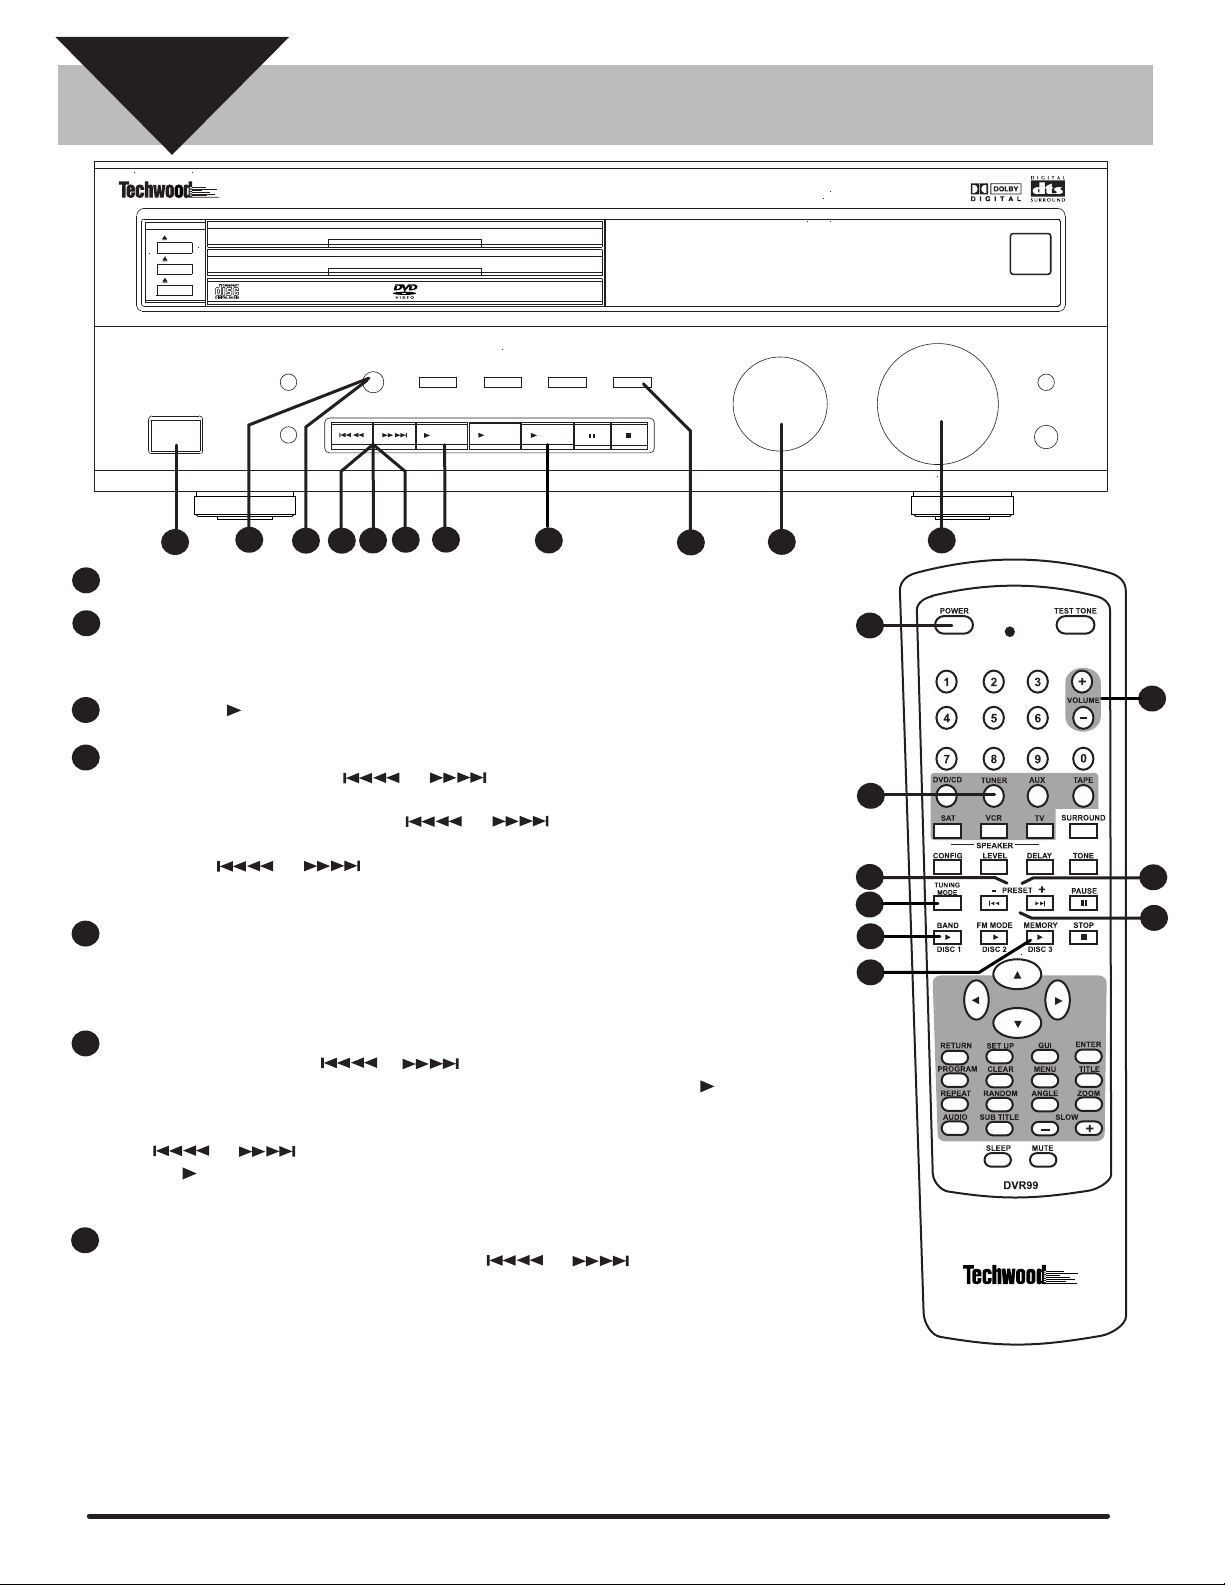
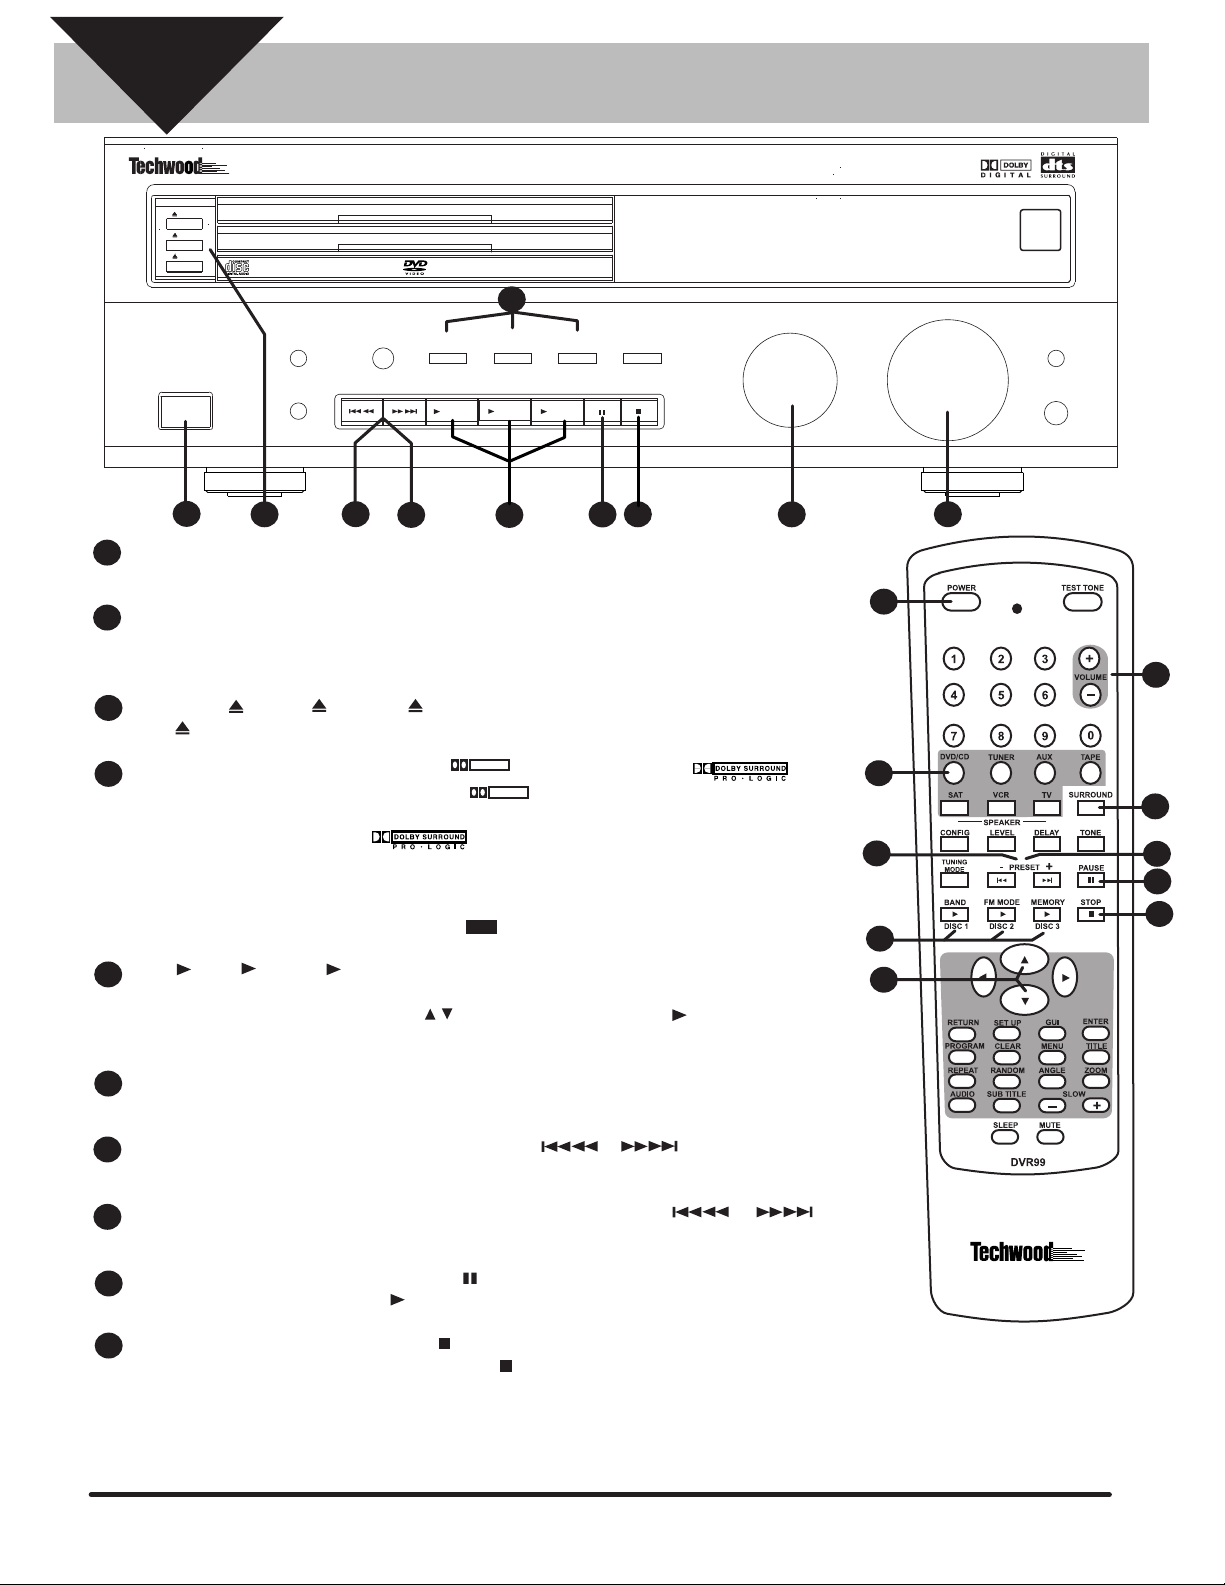
SECTION
3
DVR99 500 WATT 3 DVD HOME THEATER RECEIVER
DISC 1
DISC 2
DISC 3
4
TUNING MODE
TUNING/PRESET
7
DVD/CD/MP3
CD-R/CD-RW/COMPATABLE
POWER
STANDBY/ON
STEPS
1
2
1
Press the power button on the front of the DVR99 or on the remote.
Turn the FUNCTION knob on the front of the DVR99 until AM or FM appears on the display or press
DIMMER
TONE
6
PLAYING THE RADIO
DISC 1
DISC 2
DISC 3
DTS
FM MODEBAND
Disc 1
6
4
3
DOLBY
DIGITAL
Disc 2
SURROUND
MEMORY
Disc 3
6
MODE
STAND BY
STEREO
the TUNER button on the remote. NOTE: The TUNER button on the remote must be pressed in or-
der to control the TUNER functions with the remote.
3
Press the BAND button on the front of the DVR99 or on the remote to select AM or FM.
FUNCTION
5
REMOTE
SENSOR
NIGHT MODE
VOLUME
NIGHT MODE
PHONES
DOWN
2
UP
5
1
5
Press the TUNING MODE button on the front of the DVR99 until TUNING appears in the display,
4
then press the TUNING/PRESET or buttons on the front of the DVR99 or on the
remote repeatedly until the desired station appears in the display. NOTE: Pressing for about a sec-
ond and releasing the TUNING/PRESET or buttons activates the auto tuning
function allowing the tuner to automatically scan to the next clear station. Pressing the TUN-
ING/PRESET ..................or buttons for less than a half of a second changes the frequency
by one step.
To adjust the volume use the VOLUME knob on the front of the DVR99 or the VOLUME +/- buttons
5
on the remote. IMPORTANT NOTE: All radio stations are broadcast in mono or 2 channel stereo so
it is recommended that when the DVR99 is in the TUNER mode that you select the STEREO button
on the front of the DVR99.
To memorize a station, press the TUNING MODE button until TUNING appears in the display, then
6
press the TUNING/PRESET or buttons on the front of the DVR99 or on the remote repeatedly until the desired station appears in the display. Press the MEMORY button on
the front of the DVR99 or on the remote and MEMO will appear and flash in the display for 5 seconds. While MEMO is flashing in the display select a preset number by pressing the TUNING/PRE-
SET ..................or buttons on the front of the DVR99 or on the remote then press then
MEMORY button again to store the station . Repeat this step to store additional stations.
NOTE: You can store up to 30 stations for each band.
To listen to a radio station stored in memory press the TUNING MODE button until PRESET ap-
7
pears in the display, then press the TUNING/PRESET or buttons on the front of
the DVR99 or on the remote control to select the desired preset station.
2
7
4
4
6
3
6
Again this is only a “QUICK-START GUIDE” that
covers basic connection and operation. The
DVR99 has many advanced features and operating functions that are covered in detail in the
complete owner’s manual
Page 5
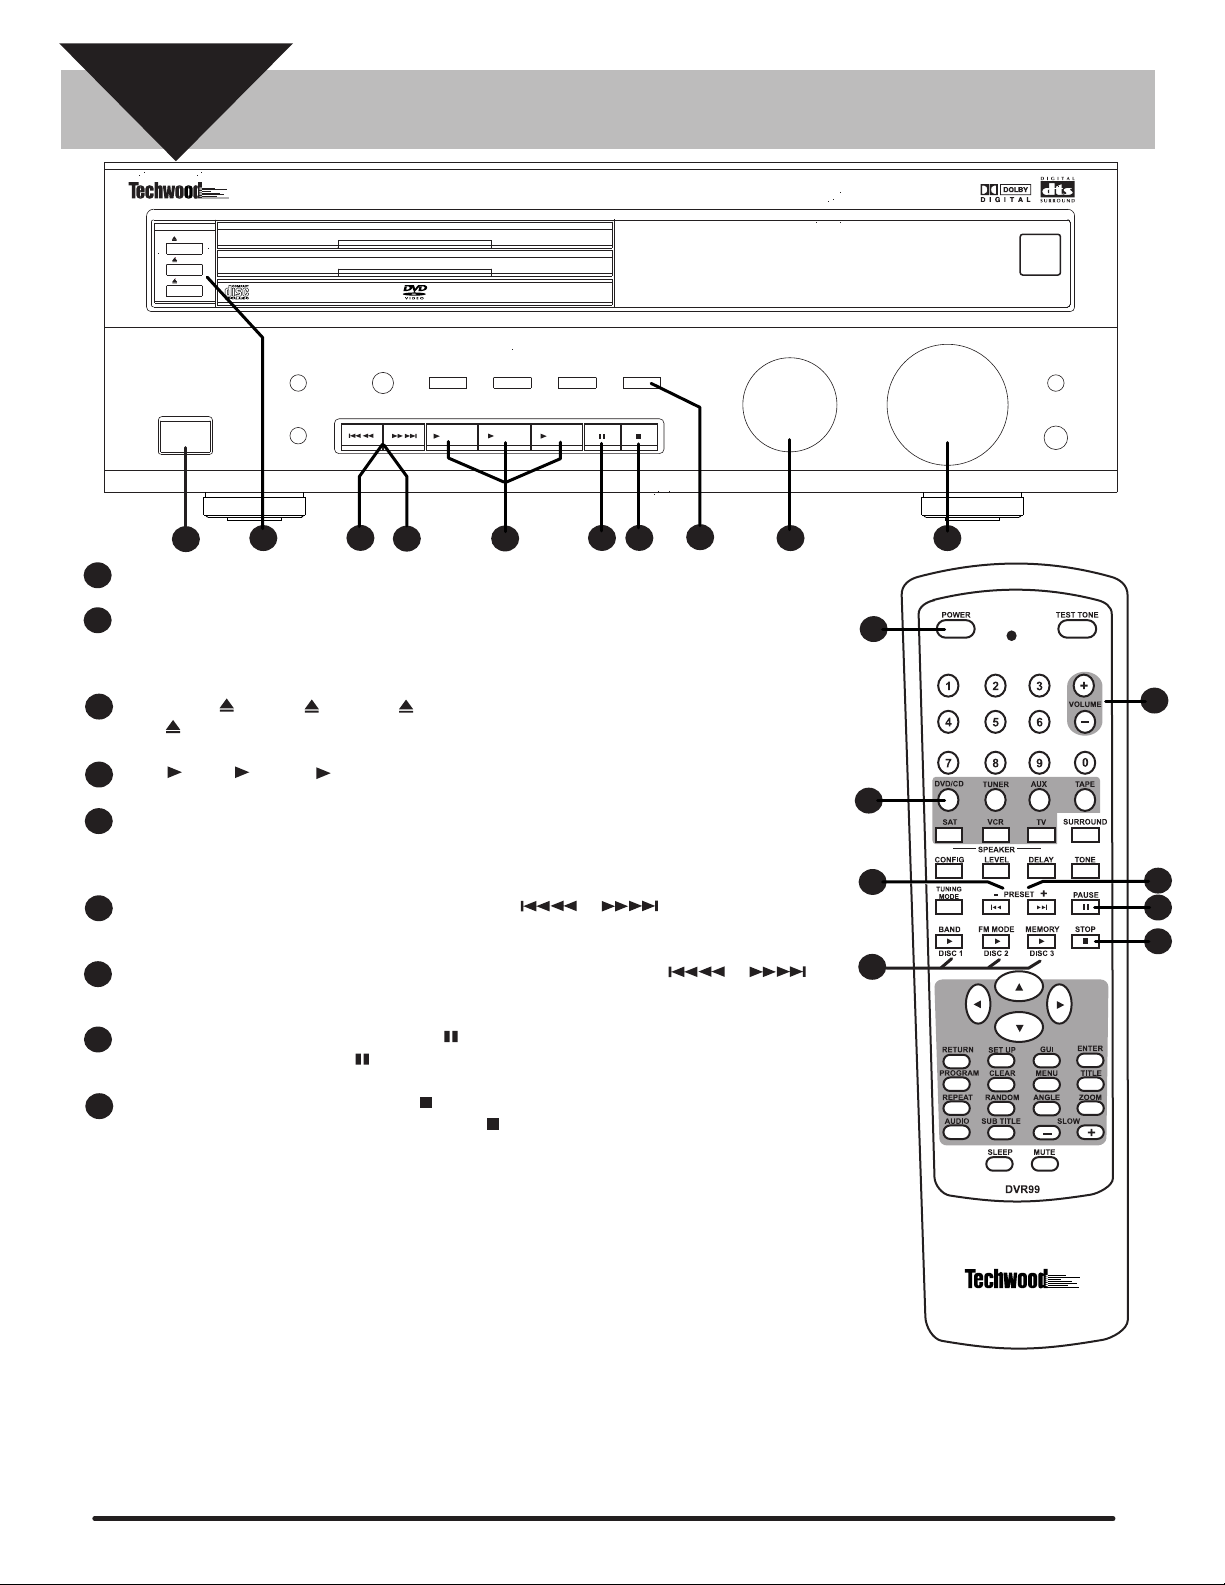
SECTION
4
DVR99 500 WATT 3 DVD HOME THEATER RECEIVER
DISC 1
DISC 2
DISC 3
DVD/CD/MP3
CD-R/CD-RW/COMPATABLE
POWER
STANDBY/ON
STEPS
1
2
1
Press the power button on the front of the DVR99 or on the remote.
Turn the function knob on the front of the DVR99 until DVD/CD appears on the display or press the
DIMMER
TONE
3
TUNING MODE
TUNING/PRESET
7
6
PLAYING A CD
DISC 1
DISC 2
DISC 3
DTS
FM MODEBAND
Disc 1
DOLBY
DIGITAL
Disc 2
4
SURROUND
MEMORY
Disc 3
MODE
STEREO
9
8
STAND BY
DVD/CD button on the remote. NOTE: The DVD/CD button on the remote must be pressed in order to
control DVD/CD playback with the remote.
FUNCTION
5
REMOTE
SENSOR
NIGHT MODE
VOLUME
NIGHT MODE
PHONES
DOWN
2
UP
5
1
Press DISC 1 , DISC 2 or DISC 3 to open a disc tray. Insert a CD and press the appropriate
3
DISC button to close the tray.
Press Disc 1, Disc 2 or Disc 3 on the front of the DVR99 or on the remote to begin playback.
4
To adjust the volume use the VOLUME knob on the front of the DVR99 or the VOLUME +/- buttons
5
on the remote . IMPORTANT NOTE: Most CD’s are recorded in 2 channel stereo so it is recommend-
ed that when you are playing a CD that you select the STEREO button on the front of the DVR99.
To skip to a specific track on a disc, press the UP/DOWN or buttons on the front of
6
the DVR99 or on the remote repeatedly until the desired track appears in the display.
To search for a specific location on a track press and hold down the UP /DOWN or U
7
buttons on the front of the DVR99 or on the remote until you find the desired location on the track.
To pause playback of a CD press the PAUSE button on the front of the DVR99 or on the remote.
8
To resume play press the PAUSE button again.
To stop playback of a CD press the STOP button on the front of the DVR99 or on the remote and
9
RESUME will appear in the display. Press the STOP button again and the CD will stop playing.
5
2
6
7
8
9
4
This is only a “QUICK-START GUIDE” that
covers basic connection and operation.
The DVR99 has many advanced features
and operating functions such as program
play, repeat play, random play, etc. Please
refer to the appropriate section in the complete DVR99 owner’s manual.
Page 6
SECTION
5
DVR99 500 WATT 3 DVD HOME THEATER RECEIVER
DISC 1
DISC 2
DISC 3
PLAYING A DVD
DISC 1
DISC 2
STAND BY
DISC 3
4
DVD/CD/MP3
CD-R/CD-RW/COMPATABLE
POWER
STANDBY/ON
1
1
Press the power button on the front of the DVR99 or on the remote. Turn on your TV and select the vid-
DIMMER
TONE
3
TUNING MODE
TUNING/PRESET
7
DTS
FM MODEBAND
Disc 1
8
DOLBY
DIGITAL
Disc 2
5
SURROUND
MEMORY
Disc 3
MODE
STEREO
10
9
FUNCTION
eo input on your TV that is connected to the DVR99.
2
Turn the function knob on the front of the DVR99 until DVD/CD appears on the display or press the
DVD/CD button on the remote. NOTE: The DVD/CD button on the remote must be pressed in order to
control DVD/CD playback operation with the remote.
Press DISC 1 , DISC 2 or DISC 3 to open a disc tray. Insert a DVD and press the appropriate
3
DISC button to close the tray.
DOLBY
D
Most DVD’s are recorded in DOLBY DIGITAL or DOLBY PRO LOGIC . If the
4
DVD you want to watch has the DOLBY DIGITAL logo on it, we recommend pressing the DOL-
BY DIGITAL button on the front of the DVR99 until DOLBY DIGITAL scrolls across the display. If the
D
D I G I T A L
DOLBY
D
D
D I G I T A L
DVD has the DOLBY PRO LOGIC ................... ...logo on it, we recommend pressing the SURROUND
MODE button on the front of the DVR99 repeatedly until PRO LOGIC scrolls across the display or
press the SURROUND button on the remote repeatedly until PRO LOGIC scrolls across the display.
NOTE: Please refer to "SELECTING DIGITAL AUDIO OUT" section of the complete DVR99 owner's
manual if the DVD you want to play has the DTS logo on it.
Press Disc 1, Disc 2 or Disc 3 on the front of the DVR99 or on the remote. The display will read
5
D I G I T A L
dts
SURROUND
PLAY followed by LOADING . A DVD menu will appear on the TV screen. Select the desired
menu option using the remote UP/DOWN buttons. Press the appropriate Disc button to begin
playback.
To adjust the volume use the VOLUME knob on the front of the DVR99 or the VOLUME +/- buttons
6
on the remote.
REMOTE
SENSOR
NIGHT MODE
VOLUME
NIGHT MODE
PHONES
DOWN
2
UP
6
1
6
2
4
8
7
9
10
5
5
10
To skip to a specific chapter on a disc, press the UP/DOWN or buttons on the front of
7
the DVR99 or on the remote repeatedly until the desired chapter appears in the display.
To search for a specific location on a disc press and hold down the UP /DOWN or
8
buttons on the front of the DVR99 or on the remote until you find the desired location.
To pause playback of a DVD press the PAUSE button on the front of the DVR99 or on the remote.
9
To resume play press the appropriate Disc play button.
To stop playback of a DVD press the STOP button on the front of the DVR99 or on the remote and
10
RESUME will appear in the display. Press the STOP button again and the DVD will stop playing.
This is only a “QUICK-START GUIDE” that
covers basic connection and operation.
The DVR99 has many advanced features
and operating functions such as zoom, repeat play, slow-motion, etc. Please refer to
the appropriate section in the complete
DVR99 owner’s manual.
Page 7

SECTION
6
DVR99 500 WATT 3 DVD HOME THEATER RECEIVER
DISC 1
DISC 2
DISC 3
DVD/CD/MP3
CD-R/CD-RW/COMPATABLE
POWER
STANDBY/ON
STEPS
1
Press the power button on the front of the DVR99 or on the remote. Turn on your TV and select the vid-
1
DIMMER
TONE
TUNING MODE
TUNING/PRESET
PLAYING A VCR
DISC 1
DISC 2
STAND BY
DISC 3
DTS
FM MODEBAND
Disc 1
DOLBY
DIGITAL
Disc 2
SURROUND
MEMORY
Disc 3
MODE
STEREO
FUNCTION
3
eo input on your TV that is connected to the DVR99.
Turn the function knob on the front of the DVR99 until VCR appears on the display or press the VCR but-
2
ton on the remote. NOTE: The VCR button on the remote must be pressed in order to control VCR Au-
dio functions on the DVR99 with the remote.
REMOTE
SENSOR
NIGHT MODE
VOLUME
NIGHT MODE
PHONES
DOWN
2
UP
5
1
5
If the VHS tape you want to play has the DOLBY PRO LOGIC logo on it we recommend
3
that you press the SURROUND MODE button on the front of the DVR99 repeatedly until PRO LOGIC
scrolls across the display or press the SURROUND button on the remote repeatedly until PRO LOGIC
scrolls across the display. If the VHS tape does not have the DOLBY PRO LOGIC l
logo on it you can get a simulated surround effect by selecting THEATER, HALL or STADIUM. To do this
press the SURROUND MODE button on the front of the DVR99 repeatedly until the desired surround ef-
fect scrolls across the display (THEATER, HALL or STADIUM) or press the SURROUND button on
the remote repeatedly until the desired surround effect scrolls across the display (THEATER, HALL or
STADIUM).
Turn on your VCR, insert the tape and press play.
4
To adjust the volume use the VOLUME knob on the front of the DVR99 or the VOLUME +/- buttons on
5
the remote.
2
3
This is only a “QUICK-START GUIDE” that
covers basic connection and operation.
The DVR99 has many advanced features
and operating functions that are covered
in detail in the complete owner’s manual.
Page 8
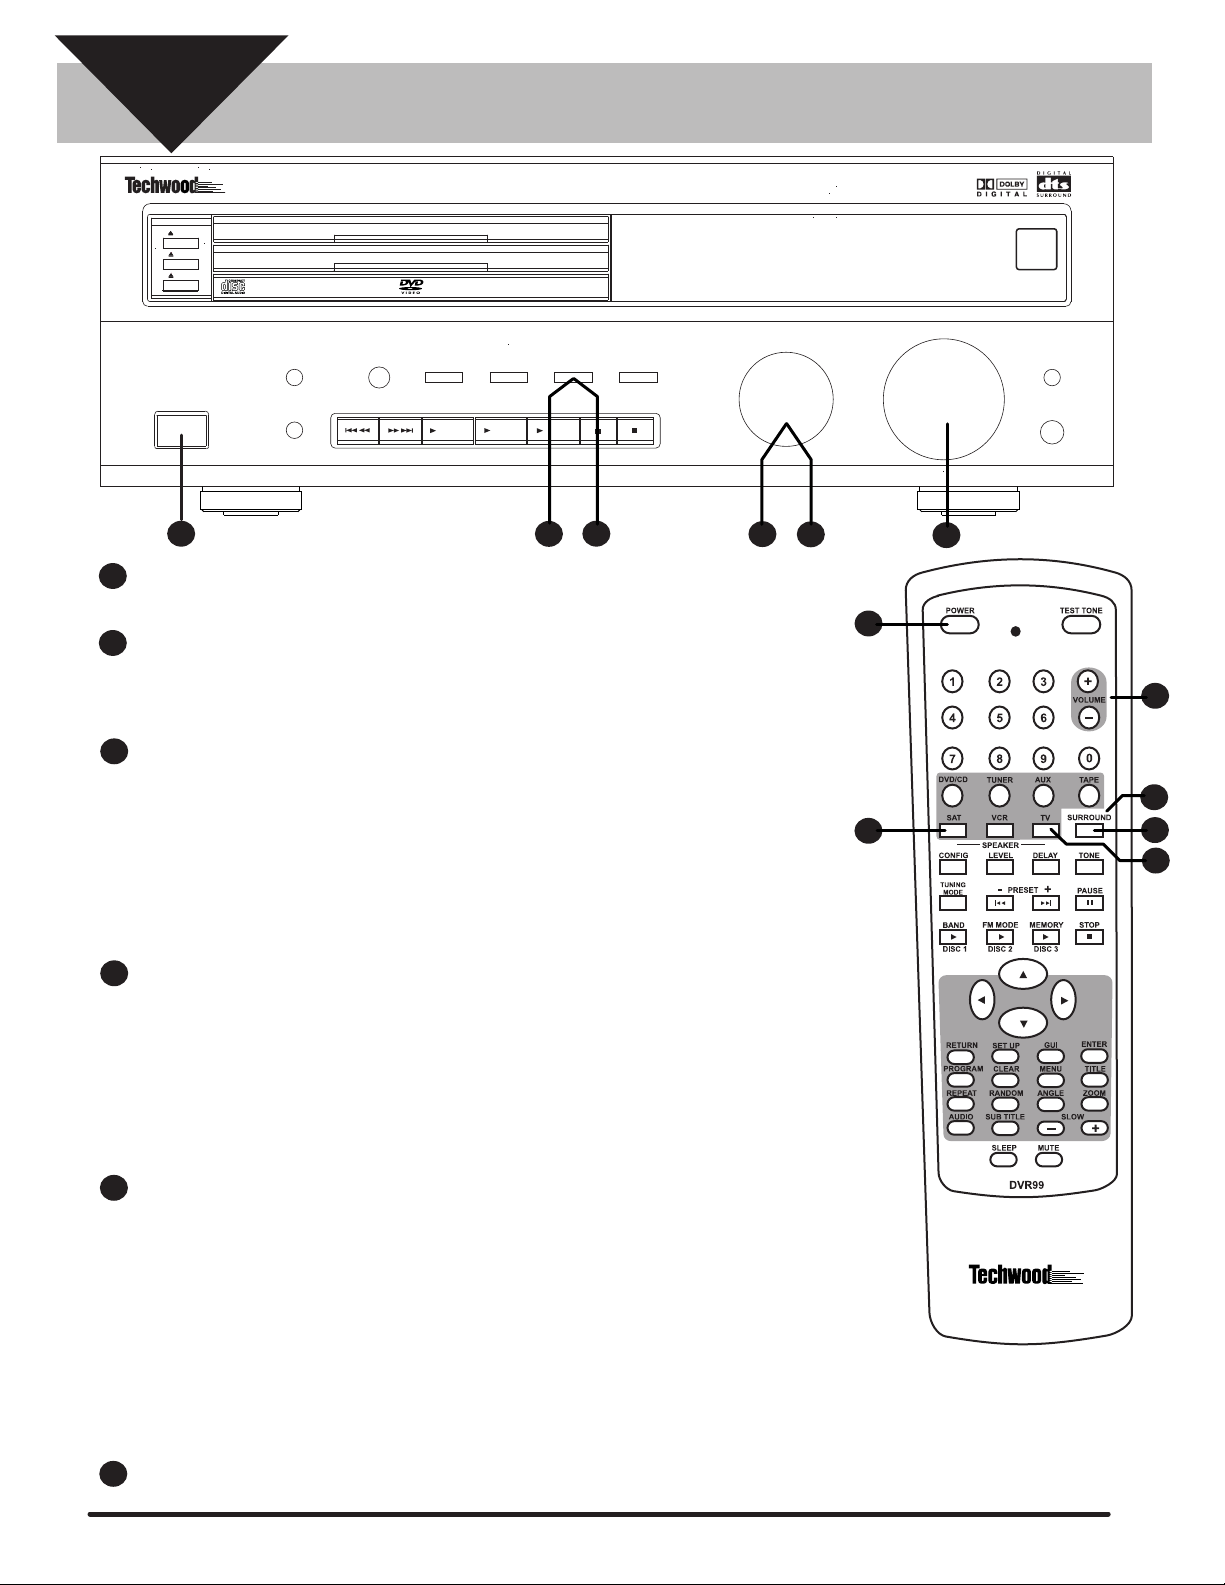
SECTION
7
PLAYING A TV, CABLE BOX
OR SATELLITE SYSTEM
DVR99 500 WATT 3 DVD HOME THEATER RECEIVER
SURROUND
MEMORY
Disc 3
3
MODE
DISC 1
DISC 2
DISC 3
STAND BY
FUNCTION
STEREO
5
DISC 1
DISC 2
DISC 3
DTS
Disc 1
FM MODEBAND
DOLBY
DIGITAL
Disc 2
DVD/CD/MP3
CD-R/CD-RW/COMPATABLE
POWER
STANDBY/ON
STEPS
1
1
Press the power button on the front of the DVR99 or on the remote. Turn on your TV and select the vid-
DIMMER
TONE
TUNING MODE
TUNING/PRESET
eo input on your TV that is connected to the DVR99.
If you want to watch a TV or cable program and you used the suggested method of connection under
2
section 2 turn the function knob on the front of the DVR99 until TV appears on the display or press the
TV button on the remote. NOTE: The TV button on the remote must be pressed in order to control TV
audio functions on the DVR99 with the remote.
If the program you want to watch on TV or cable is broadcast in DOLBY SURROUND we recommend
3
that you press the SURROUND MODE button on the front of the DVR99 repeatedly until PRO LOGIC
scrolls across the display or press the SURROUNDbutton on the remote repeatedly until PRO LOGIC
scrolls across the display. If the program you want to watch is not broadcast in DOLBY SURROUNDl
you can get a simulated surround effect by selecting THEATER, HALL or STADIUM. To do this press
the SURROUND MODE button on the front of the DVR99 repeatedly until the desired surround effect
scrolls across the display (THEATER, HALL or STADIUM) or press the SURROUND button on the
remote repeatedly until the desired surround effect scrolls across the display (THEATER, HALL or
STADIUM).
REMOTE
SENSOR
NIGHT MODE
VOLUME
NIGHT MODE
PHONES
DOWN
2
4
UP
6
1
6
5
4
3
2
If you want to watch a satellite program and you used the suggested method of connection under sec-
4
tion 2 turn the function knob on the front of the DVR99 until SAT appears on the display or press the
SAT button on the remote. NOTE: The SAT button on the remote must be pressed in order to control
SAT audio functions on the DVR99 with the remote. If you want to watch a satellite program and you
used the alternate method of connection under section 2 using an optical cable turn the function knob
on the front of the DVR99 until SAT OPT appears on the display or press the SAT button on the remote control until SAT OPT appears. NOTE: The SAT button on the remote must be pressed and
SAT OPT must appear in the display in order to control SAT OPT audio functions on the DVR99 with
the remote.
5
If you used the suggested method of connection under section 2 and the program you want to watch
on a satellite system is broadcast in DOLBY SURROUND we recommend that you press the SUR-
ROUND MODE button on the front of the DVR99 repeatedly until PRO LOGIC scrolls across the display or press the SURROUNDbutton on the remote repeatedly until PRO LOGIC scrolls across the
display. If the program you want to watch is not broadcast in DOLBY SURROUNDl you can get a simulated surround effect by selecting THEATER, HALL or STADIUM. To do this press the SURROUND
MODE button on the front of the DVR99 repeatedly until the desired surround effect scrolls across the
display (THEATER, HALL or STADIUM) or press the SURROUND button on the remote repeatedly
until the desired surround effect scrolls across the display (THEATER, HALL or STADIUM).
NOTE: If you used the alternate method of connection using an optical cable and the satellite program
is broadcast in DOLBY DIGITAL we recommend pressing the DOLBY DIGITAL button on the front of
the DVR99.
6
To adjust the volume use the VOLUME knob on the front of the DVR99 or the VOLUME +/- buttons
on the remote.
This is only a “QUICK-START GUIDE” that
covers basic connection and operation.
The DVR99 has many advanced features
and operating functions that are covered
in detail in the complete owner’s manual.
Page 9
Page 10
READ THIS FIRST
This audio system is made and tested to meet exacting safety
standards. It meets both UL and FC C requirements.
WWWWAAAARRRRNNNNIIIINNNNGGGG:::: To reduce the risk of fire or shock hazard, do not
expose this product to rain or moisture.
C AUT ION
R IS K OF E LE C TR IC S H OC K. DO NO T
CCCCAAAAUUUUTTTTIIIIOOOONNNN::::
NO T R E MOV E C OV E R O R B AC K . NO U S E R -S E R VIC E AB L E
PAR TS IN S IDE . R E F E R S E R V IC ING T O QUAL IF IE D P E R S ON NE L.
!
WWWWaaaarrrrnnnniiiinnnnggggssss::::
T O R E DUC E T HE R IS K O F E LE C T R IC S HO CK , DO
This symbol is intended to alert you to the
presence of uninsulated dangerous voltage
within the product’s enclosure that might
be of sufficient magnitude to constitute a
risk of electric shock. Do not open the
product’s case.
This symbol is intended to inform you that
important operating and maintenance
instructions are included in the literature
accompanying this product.
OP E N.
!
be determined by turning the equipment off and on, the user is
encouraged to try to correct the interference by one or more of
the following measures:
• Reorient or relocate the receiving antenna.
• Increase the separation between the equipment and
receiver.
• Connect the equipment into an outlet on a circuit different
from that to which the receiver is connected.
• Consult your local store or an experienced radio/TV
technician for help.
• If you cannot eliminate the interference, the FCC requires
that you stop using your system.
Changes or modifications not expressly approved may cause
interference and void the user’s authority to operate the
equipment.
REGION MANAGEMENT INFORMATION
Region Management Information: This DVD Player is designed
and manufactured to respond to the Region Management
Information that is recorded on a DVD disc. If the Region
number described on the DV D disc does not correspond to the
Region number of this DVD player, this DVD player cannot
play that disc.
• This system employs a laser light beam. Only a qualified
service person should remove the cover or attempt to
service this device, due to possible eye injury.
• The use of controls, adjustments, or procedures other than
those specified herein might result in hazardous radiation
exposure.
THE FCC WANTS YOU TO KNOW
This equipment has been tested and found to comply with the
limits for a Class B digital device, pursuant to Part 15 of the
FCC Rules
protection against harmful interference in a residential
installation. This equipment generates, uses and can radiate
radio frequency energy and, if not installed and used in
accordance with the instructions, may cause harmful
interference to radio communications.
However, there is no guarantee that interference will not occur
in a particular installation. If this equipment does cause
harmful interference to radio or television reception, which can
. These limits are designed to provide reasonable
The Region number of this DVD player is 1 (USA/CANADA).
Notes on Unauthorized Discs
You may not be able to play back some DVD video discs on
this player if they were purchased from outside your
geographic area or made for business purposes. W hen you try
to play back an unauthorized disc, “C heck Regional C ode”
appears on the TV screen.
NOTES ON COPYRIGHT
It is forbidden by law to copy, broadcast, show, broadcast on
cable, play in public, and rent copyrighted material without
permission. DVD video discs are copy protected, and any
recordings made from these discs will be distorted.
This product incorporates copyright protection technology
that is protected by method claims of certain U.S. patents and
other intellectual property rights owned by Macrovision
Corporation and other rights owners. Use of this copyright
2
Page 11

protection technology must be authorized by Macrovision
Corporation, and is intended for home and other limited
viewing uses only, unless otherwise authorized by Macrovision
Corporation. Reverse engineering or disassembly is prohibited.
PLACING THE RECEIVER
Do not place objects directly on top of the receiver as it could
prevent proper heat dispersal.
This section lists important information that will help you
properly use and enjoy your system. Read all the included
safety and operating instructions before using your system.
Follow them closely, and retain them for future reference.
1. Heed Warnings — Follow all warnings on the product and
in the operating instructions.
2. Cleaning — Unplug this product from the wall outlet
before cleaning. Use only a damp cloth for cleaning. Do
not use liquid or aerosol cleaners.
When installing in a rack or shelf, be sure to leave more than 8
inches of space above and behind the receiver.
MAKING CABLE CONNECTIONS
Be careful not to bend cables over the top of the receiver. If
cables are placed on top of the receiver, the magnetic field
produced by the receiver’s transformers can cause the speakers
to produce a humming noise.
USING DISCS
When using discs, you must always take the following
precautions:
• Do not touch the playback side of the disc.
• Do not attach paper or tape to discs.
• Do not store discs in a place subject to direct sunlight or
near heat sources.
• Do not store discs in places subject to moisture and dust
such as a bathroom or near a humidifier.
• Store discs vertically in a case. Stacking or placing objects
on discs outside of their case may cause warping.
Cleaning Discs
Fingerprints and dust on the disc cause picture and sound
deterioration. Wipe the disc from the center outward with a
soft cloth. Always keep the disc clean.
If you cannot wipe off the dust with a soft cloth, wipe the disc
lightly with a slightly moistened soft cloth and finish with a dry
cloth.
3. Attachments — Do not use attachments/accessories not
recommended by the product manufacturer, as they might
create a hazard.
4. Water and Moisture — Do not use this product near water
(for example, near a bathtub, washbowl, kitchen sink, or
laundry tub; in a wet basement; or near a swimming pool).
5. Accessories — Do not place this product on an unstable
cart, stand, tripod, bracket, or table. T he product may fall,
causing serious injury to a child or adult, and serious
damage to the product. Use only with a cart, stand, tripod,
bracket, or table recommended by the manufacturer or
sold with the product. Follow the manufacturer's
instructions for mounting, and use a recommended
mounting accessory.
• Carts — Move the product on a cart carefully. Quick
stops, excessive force, and uneven surfaces may cause
the product/cart to overturn.
6. Disc Tray — Keep your fingers well clear of the disc tray as
it is closing. I t may cause serious personal injury.
7. Burden — Do not place a heavy object on or step on the
product. The object may fall, causing serious personal
injury and serious damage to the product.
8. Connecting — When you connect the product to other
equipment, turn off the power and unplug all the
equipment from the wall outlet. Failure to do so may cause
an electric shock and serious personal injury. Read the
owner’s manual of the other equipment carefully and
follow the instructions when making any connections.
9. Sound Volume — Reduce the volume to the minimum
level before you turn on the product. Otherwise, sudden
high volume sound may cause hearing or speaker damage.
10. Sound Distortion — Do not allow the product to output
distorted sound for a longtime. It may cause speaker
overheating and fire.
Do not use any type of solvents such as thinner, benzene,
commercially available cleaners or anti-static spray for vinyl
LPs. They might damage the disc.
IMPORTANT SAFETY INSTRUCTIONS
Careful attention is devoted to quality standards in the
manufacture of your system, and safety is a major factor in its
design. However, safety is also your responsibility.
11. Headphones — W hen you use headphones, keep the
volume at a moderate level. I f you use headphones
continuously with high volume sound, it may cause
hearing damage.
12. Laser Beam — Do not look into the opening of the disc
tray or ventilation opening of the product to see the source
of the laser beam. I t may cause sight damage.
13. Disc — Do not use a cracked, deformed, or repaired disc.
These discs are easily broken and may cause serious
personal injury and product malfunction.
3
Page 12

14. Ventilation — Slots and openings in the cabinet provide
ventilation, ensure reliable operation, and protect from
overheating. Do not block or cover these openings, and do
not place the product on a bed, sofa, rug, or other similar
surface. Do not place the product in a built-in installation
such as a bookcase or rack unless it provides proper
ventilation as specified by the manufacturer.
damage and will often require extensive work by a qualified technician to restore the product to normal operation.
• If the product has been dropped or damaged in any way.
• When the product exhibits a distinct change in
performance.
15. Power Sources — Operate this product using only the
power source indicated on its marking label. I f you are not
sure of your home's power type, consult your product
dealer or local power company.
16. Polarization — This product is equipped with a polarized
AC line plug (a plug having one blade wider than the
other). This plug will fit in the power outlet only one way.
This is a safety feature. If you cannot insert the plug fully
into the outlet, try reversing the plug. If the plug still
doesn't fit, contact your electrician to replace your
obsolete outlet. Do not defeat the safety purpose of the
polarized plug. I f you need an extension, use a polarized
cord.
17. Power-Cord Protection — Route power-supply cords so
they are not likely to be walked on or pinched by items
placed on or against them, paying particular attention to
cords at plugs, convenience receptacles, and the point
where they exit from the product.
18. Lightning — For added protection for this product during
a lightning storm, or when it is left unattended and
unused for long periods of time, unplug it from the wall
outlet and disconnect the antenna or cable system. T his
will prevent damage to the product due to lightning and
power-line surges.
19. Overloading — Do not overload wall outlets, extension
cords, or integral convenience receptacles, as this can
result in a risk of fire or electric shock.
20. Objects and Liquids — Never push objects of any kind
into this product through openings, as they may touch
dangerous voltage points or short out parts that could
result in a fire or electric shock. Never spill liquid of any
kind on the product.
21. Servicing — Do not attempt to service this product
yourself, as opening or removing covers may expose you
to dangerous voltage or other hazards. Refer all servicing
to qualified service personnel.
22. Damage Requiring Service — Unplug this product from
the wall outlet and refer servicing to qualified service
personnel under the following conditions:
• When the power-supply cord or plug is damaged.
• If liquid has been spilled or objects have fallen into the
product.
• If the product has been exposed to rain or water.
23. Replacement Parts — W hen replacement parts are
required, be sure the service technician uses replacement
parts specified by the manufacturer or having the same
characteristics as the original part. Unauthorized
substitutions may result in fire, electric shock, or other
hazards.
24. Safety Check — Upon completion of service or repairs to
this product, ask the service technician to perform safety
checks to determine that the product is in proper
operating condition.
25. Wall or Ceiling Mount — T he product should be mounted
to a wall or ceiling only as recommended by the
manufacturer.
26. Heat — The product should be situated away from heat
sources such as radiators, heat registers, stoves, or other
products (including amplifiers) that produce heat.
27. Non-use Periods — Unplug the system’s power cord when
you will not use it for extended periods.
28. Outdoor Antenna Grounding — If an outside antenna or
cable system is connected to the product, be sure the
antenna or cable system is grounded so as to provide some
protection against voltage surges and built-up static
charges. Article 810 of the National E lectrical Code, ANSI/
NF PA 70, provides information with regard to proper
grounding of the mast and supporting structure,
grounding of the lead-in wire to an antenna discharge unit,
size of grounding conductors, location of antennadischarge unit, connection to grounding electrodes, and
requirements for the grounding electrode.
Note to CATV System Installer
This reminder is provided to call the CATV system installer’s
attention to Section 820-40 of the NEC which provides
guidelines for proper grounding and, in particular, specifies
that the cable ground shall be connected to the grounding
system of the building, as close to the point of cable entry as
practical.
Power Lines — An outside antenna system should not be
located in the vicinity of overhead power lines or other electric
light or power circuits, or where it can fall into such power
lines or circuits. When installing an outside antenna system,
extreme care should be taken to keep from touching such
power lines or circuits as contact with them might be fatal.
• If the product does not operate normally by following
the operating instructions. Adjust only those controls
that are covered by the operating instructions, as an
improper adjustment of other controls may result in
4
Page 13

CONTENTS
Features 6
Preparation 7
Connecting Components .................................................. 7
Connecting a TV .......................................................... 7
Connecting a Cassette Deck .................... ........ ............. 8
Connecting a VCR ........................................................ 8
Connecting a Satellite Receiver or Cable Box ................ 8
Connecting a Digital (Optical) Audio Component .. ...... 8
Connecting an Auxiliary Audio Component ................. 8
Connecting a Sub Woofer ............. ........................ ....... 8
Connecting Antennas . .... ............ ............ .......................... 8
FM Indoor Antenna . ............ ........................................ 8
FM Outdoor Antenna .... ............................................... 8
AM I ndoor Loop Antenna .... .... ............ ............ ............ 8
AM Outdoor Antenna ... ........ ....................................... 9
Connecting the Speakers .......... ........................................ 9
Placing the Speakers ................. ........................................ 9
Installing Batteries in the Remote Control ......................... 9
Receiver Operation 10
A Quick Look at the Receiver’s Controls ............. ........ .... 10
Using the Tuner ............................... .................... ........... 11
Listening To FM Stereo Broadcasts ............................. 11
Presetting Radio Stations ............................................ 11
Manual Preset ............................................................. 11
Auto Preset ........................................ ........ ................. 11
Listening to Preset Stations .......... .................... ........... 11
Switching Between Preset Stations and
Manual Tuning ........................................................... 11
Using the C D Player ....................................................... 11
Continuous Play ......................................................... 12
Using N ight Mode .......................................................... 12
Using the Sleep T I mer ................................... ................. 12
How to adjust the Tone .................................................. 12
Remote Control Operation 13
A Quick Look at the Remote C ontrol .............................. 13
Operating Range of the Remote Control ......................... 13
Setting up the Surround Sound System .......................... 14
Changing the Speaker Size ......................................... 14
Changing the Channel Level ...................................... 14
Changing the Speaker Distance .................................. 14
Surround Effects ................... ...................................... 15
Changing System Settings – Special
Circumstances . ............ ............ .... ........ ............ ........... 15
Using the Remote C ontrol to Control
Additional Components ................................ .... ............. 15
Changing the Sound Mode ........... .... ........ ............ ........... 15
Using GUI Menu Icons .................................................... 15
Repeat Play .. ............ ...................................................... 16
Programming Tracks .................................................. .... 16
Modifying the Program and Adding a Track ................... 16
Random Play ............................................ ...................... 16
DVD Player Operation 18
Basic Playback .................. ............................ .................. 17
Stopping Play ............................. ............ ................ .... 17
Pausing Play ... ........ .................... ................................ 17
Advancing by Frames ..................................... ........ .... 17
Playing in Slow-Motion .............. ............................ .... 18
Skipping Chapters ..................................................... 18
Scanning ......... .................... ....................................... 18
Advanced Features ..................................... ............ .... .... 18
Using GUI Menu I cons ............. ........ ......................... 18
Using a Title Menu . .................................................... 19
Using a DVD Menu .......... ............ .............................. 19
Changing Subtitle Language ..................... .................. 19
Changing Soundtrack Language ....... ........ .................. 19
Viewing from Another Angle ...................................... 19
Using Repeat Play ....................................... .... ........ ... 19
Zooming In .............................................. ................ .. 20
Setting rating level and password ........................ ........... 20
Selecting a Rating Level . .................... ........ ................. 20
Setting a Password ..................................................... 20
Clearing Your Password .................... ......................... 20
Selecting TV Aspect ....................................................... 20
Selecting Digital Audio Out ..... .... ............ ............ ........... 21
Troubleshooting 23
Care ...... ......................................................................... 24
Manufacturer’s Codes 25
TV Codes ............................................... ............ .... .... 24
VC R C odes .............................................. .................. 25
Cable C odes ............................................................... 27
SAT Codes ................................................................. 28
5
Page 14

FEATURES
Dolby Digital, Dolby Pro Logic and DTS Surround Settings
Lets you use the Home Theater Audio System for a movie-theater
surround sound experience when viewing DVD's.
Built-in, 3-Disc DVD/CD Changer
Plays audio and video discs including CD, CD-R, MP3 AND DVD.
Adjustable Speaker Size, Channel Level and Distance
Lets you customize your setup for a true surround sound
experience.
Additional Component Connectors
Lets you connect other audio/video components to the receiver.
Night Mode
Lets you compress the dynamic range of audio when operating the
unit in Dolby Digital mode.
Parental Lock (Rating Level)
Lets you set a rating level so that your children cannot watch a DVD
that has a rating level higher than you set.
Sleep Timer
Lets you program the receiver to turn off after a set period of time.
S-Video and Component Video Outputs
For superior picture when viewing DVD's.
Subwoofer Output
Lets you add an optional powered Subwoofer for improved bass output.
Digital SAT-IN Audio input
Allows digital connection of satellite or cable boxes equipped with
digital audio outputs.
Digital Audio Output
Allows connection of digital audio recorders ( ie: MD, DAT or CD recorder)
to record from CD.
6
Page 15

PREPARATION
CONNECTING COMPONENTS
S p e a k e r T e rm in a l s — Us e the c o l o r -c ode d w i r es (s u pp l ie d ) to c o n n e c t e a c h
s pe ak er to th e ap pr opr iate term in al.
No te : B e s u r e to c o n n e c t th e bl a c k wi r e s to th e bl a c k ter m i n a l s , an d th e
re d wires to the othe r te rmin als .
C onn ect A M and F M a nten nas
here (s ee pa ge 8).
To an aux ilia ry ana log
com pone nt' s aud io ou t
ja c k s (s e e “ C o n n e c ti n g
an A uxi liar y Aud io
C ompo nent o n P age 8" ).
T o y our V CR ’ s IN and O UT
au dio ja ck s (s ee “ C onne cting a VC R ” o n P ag e 8).
To y ou r T V’ s audio OU T jac ks
(s ee “ C on nec ting a T V” ).
T o y our c as s ette de ck ’ s IN a nd OUT j acks
(s ee “ C onne c tin g a C as sette De ck” ) .
T o y our s ate llite
re ceive r o r ca ble
box’ s analog au di o
IN an d O UT ja ck s
(s ee “ C on nec ting
a S ate llite R ec eiv er or C abl e B o x”
on P age 8) .
C onn ec t a s ubwo ofer he re (s ee
“ C on nec tin g a S ub
Woo fer” on
P age 8) .
T o y our s ate llite re ceive r or c able
box’ s an alo g v ideo
OU T ja ck (s ee
“ C on nec ting a S atellite R ec eiver or
C able B ox ” on
P age 8).
DIG ITA L O UT — To c onn ect a T os link o ptic al cab le
if y ou h ave a d igi tal a udi o co mpo ne nt s uc h as a
MD, DA T or C D rec order.
S ee " Co nnec ting a Di gital (O ptical ) A udio
C ompo nent" o n P age 8 ).
DV D/TV
C onnec tion
Op tion 2
(s ee below)
DV D/VC R /T V
C onnec tion
Op tion 3
(s ee below)
DV D/TV
C onnec tion
Op tion 1
(s ee below)
T o yo u r V C R ’ s IN an d
OU T v ide o jac k s ( se e
“ C onne c tin g a VC R”
on P age 8).
S A T I N — T o y o u r
s atel lite re cei ver
or cab le box ’ s
digita l au dio output jac k (s ee
“ C on nec ting a
Dig ital (O ptical )
A u di o C omp o n e n t”
on P age 8) .
You must connect a TV to the receiver in order to use the
receiver’s DVD player. You can connect other audio and audio/
visual components to the receiver in order to use the Home
Theater Audio System’s surround sound capabilities.
CONNECTING A TV
Use RCA type audio cables to connect from the T V’s
Audio Out jacks, to the DVR99’s TV In jacks. Connect
Red to Red and W hite to White.
FOR DVD VIDEO PLAYBACK:
OPTI ON 1: I f your TV has Component Video jacks,
connect to the Component Video Out jacks on the rear
of the DVR99 using a three wire (R,G,B) component
video cable. (This option will give the highest picture
playback quality available.)
OPTI ON 2: I f your TV has an S-Video jack, connect
to the [DVD] S-video Out jack on the rear of the DVR99.
OPTI ON 3: I f your TV only has a Composite Video
jack (RCA Type Jack) use a single RCA type coaxial cable
(yellow plug) and connect to the [DVD] Monitor Out jack
on the rear of the DVR99.
FOR VCR, SATELLITE OR CABLE BOX VIDEO PLAYBACK:
The [DVD] Monitor Out jack on the DVR99 MUST be con-
nected to the T V using a single RC A Type coaxial cable
(yellow plug). Or you can connect the VCR, Satellite or cable
box video output directly to the TV if the TV is equipped with
more than one video input.
7
Page 16

Connecting a Cassette Deck
Connecting an Auxiliary Audio Component
Use audio cables (not supplied) to connect a cassette
and
AUDIO
T A P E OUT
deck to the receiver. Connect red plugs to the right
jacks and white plugs to the left
connect the cassette deck to both the
AUDIO
jacks. Make sure you
T A P E IN
sets of jacks.
NNNNooootttteeee:::: If the cassette deck is placed too close to the receiver,
noise might occur during cassette playback. If this happens,
move the cassette deck farther away from the receiver.
Connecting a VCR
Use audio/video cables (not supplied) to connect a VC R to the
receiver. Connect red plugs to the right
plugs to the left
Connect yellow plugs to the
AUDIO
jacks marked VCR.
VIDE O
A UDI O
jacks and white
jacks marked VCR or dir-
ectly to the TV if the T V has more than one video input.
IN
NNNNooootttteeee:
: Make sure you connect the VC R to both the
: :
and
OUT
sets of jacks.
Connecting a Satellite Receiver
or Cable Box
Use audio/video cables (not supplied) to connect a satellite
receiver or cable box to the receiver. Connect the yellow plug
VID E O
to the
If your satellite receiver or cable box has analog audio connections,
connect red plugs to the right
the left
(or cablebox), select the SAT function (see “Using a Satellite
Receiver or Cable Box” on Page 12).
jack marked SAT.
AUDIO
jacks and white plugs to
AUDIO
jacks marked SAT. To use your satellite receiver
You can also connect an audio Component that does not require
a Toslink Optical cable (such as an MP3 player, playback cassette
deck, or portable CD player) to the Home Theater Audio System.
Use audio cables to connect the desired Component to the receiver’s
jacks. C onnect red plugs to the right
A UX
plugs to the left
AUDIO
jacks.
AUDIO
jacks and white
Connecting a Subwoofer
You can connect an optional powered subwoofer to the receiver.
Connect the subwoofer to the receiver’s
S UB WO OF E R P R E -O UT
jack using shielded audio cable (not supplied).
CONNECTING ANTENNAS
When connecting equipment, always make sure the power is
switched off and the power cord is disconnected from the wall
outlet.
FM Indoor Antenna
In an area with strong FM signals, the T -type FM antenna
(supplied) is sufficient.
1. Use a flat or Phillips screwdriver to loosen the screws on
the supplied transformer.
2. Place the metal connectors on the end of theT-type
antenna’s base on the transformer’s metal contacts
(underneath the screw heads) then tighten the screws.
3. Plug the transformer into
ANT E NNA F M 75 .
If your satellite receiver or cable box has digital audio output, use
an optical cable to connect the satellite receiver to the home
theater receiver’s
S AT IN
optical jack. T o use your satellite
receiver or cable box, select the SAT-OPT function (see “Using
a Satellite Receiver or C able Box” on Page 12).
NNNNooootttteeee:::: Your cable box or satellite receiver must use audio/video
cables or a Toslink optical cable to connect to the receiver. If
your equipment only uses coaxial cable, you cannot connect it
to the receiver.
Connecting a Digital (Optical) Audio
Component
You can connect a digital audio C omponent such as an
MD (Mini Disc) or DAT (Digital Audio Tape) recorder to the
receiver’s DIG ITA L O UT
Use a T oslink optical cable to connect the MD or DAT recorder
to the receiver’s
DIG ITAL OU T
You can also connect a satellite receiver, portable CD player,
MD or DAT recorder, or other components with digital output
to the receiver’s
S AT IN
to connect the desired Component to the receiver.
to record audio from the receiver.
optical jack.
optical jack. Use a Toslink optical cable
4. Extend the T-antenna’s other two wires and attach them to
a wall or window frame for the best possible reception.
NNNNooootttteeee:::: I f you have a FM antenna that uses coaxial cable, connect
it directly to
ANT E NN A FM 75 .
FM Outdoor Antenna
In an area where FM signals are weak, you must use a 75-ohm
unbalanced-type outdoor FM antenna (not supplied).
Generally, a 3-element antenna will be sufficient. I f you live in
an area where the FM signals are particularly weak, it may be
necessary to use one with 5 or more elements.
If you have a FM antenna that uses coaxial cable, connect it
directly to
ANTE NN A F M 75 .
If you have a twin-lead FM antenna, connect it to the supplied
transformer, then plug the transformer into
A NT E NN A F M 75 .
(see Steps 1–3 of “FM I ndoor Antenna”).
AM Indoor Loop Antenna
The supplied high-performance AM loop antenna is sufficient
for good reception in most areas.
8
Page 17

Connect the loop antenna’s wires to
antenna in a location (for example, on a shelf or window
frame) that gives the best reception.
Keep the antenna as far away as possible from the entire
system, speaker cords and the power cord to prevent
unwanted noise.
AM
and
GND
. Place the
AM Outdoor Antenna
If the supplied AM loop antenna does not deliver sufficient
reception, use an outdoor AM antenna (not supplied).
PLACING THE SPEAKERS
1. Place the front left and right speakers at equal distances
from the T V.
2. Install the center speaker above or below the TV so the
center channel’s sound is localized at the TV screen.
CCCCaaaauuuuttttiiiioooonnnn:::: If you choose to install the center speaker on top
of the TV, be sure to secure it to reduce the risk of damage
or injury resulting from the speaker falling from the T V in
the event of the TV being bumped.
3. Install the rear speakers slightly above ear level.
Use an insulated wire more than 15 feet (5 m) long. Strip one
end, and connect that end to
String the antenna wire outdoors or indoors near a window.
For better reception, connect the
ground.
AM
.
GND
terminal to a reliable
CONNECTING THE SPEAKERS
When connecting equipment, always make sure the power is
switched off and the power cord is disconnected from the wall
outlet.
NNNNooootttteeee:::: Use speakers with a nominal impedance of 6 Ohms or
more.
Follow these steps to connect the speakers.
1. Press up (or down) the speaker’s terminal and insert the
appropriate wire ends. Black wires to black terminals
and red wires to other terminals
NNNNooootttteeee:::: Be sure to connect each speaker to the appropriate
speaker terminal, connecting positive to positive (+ to +)
and negative to negative (– to –).
2. Connect the front speakers wires to the receiver’s
SPEAKERS FRONT L
Connect the surround speakers’ wires to the receiver’s
SPEAKERS REAR L
Connect the center speaker’s wire to the receiver’s
SPEAKERS CENTER
3. Plug the AC power cord into an AC wall socket.
R
and
terminals.
R
and
terminals.
terminal.
NNNNooootttteeee:::: Try not to install the rear speakers farther away
from the listening position than the front and center
speakers. Doing so can weaken the surround effect.
4. Place the optional subwoofer on the floor near the L or R
front speakers.
Caution: Be sure all speakers are installed securely to prevent
accidents and improve sound quality.
INSTALLING BATTERIES IN THE
REMOTE CONTROL
Your remote control requires two AAA batteries (supplied)
for power. For the best performance and longest life, we
recommend alkaline batteries.
CCCCaaaauuuuttttiiiioooonnnnssss::::
• Use only fresh batteries of the required size and
recommended type.
• Do not mix old and new batteries or different types of
batteries.
Follow these steps to install batteries.
1. Slide the battery compartment cover in the direction of the
arrow to remove it.
2. Place the batteries in the compartment as indicated by the
polarity symbols (+ and –) marked inside.
3. Replace the cover.
When the remote control stops operating properly, replace the
batteries.
WWWWaaaarrrrnnnniiiinnnngggg:
not burn or bury them.
: Dispose of old batteries promptly and properly. Do
: :
CCCCaaaauuuuttttiiiioooonnnn:::: If you do not plan to use the remote control for a
month or longer, remove the batteries. Batteries can leak
chemicals that can destroy electronic parts.
9
Page 18

RECEIVER OPERATION
A QUICK LOOK AT THE RECEIVER’S CONTROLS
T UNI NG MODE
In tun er mo de, p res s to s wi tch b etwe en pr es et a nd ma nu al tu ning
(s ee “ S witc hing B etwe en P res et S tati ons an d Ma nua l T uning” on
P age 11) .
DIMME R
on ce to dim the
dis play pan el. P res s
ag ain to return it to nor mal.
DIS C 1, 2, 3
c los e the dis c tra ys .
No te: You c ann ot u se the se bu tton s in tu ner m ode.
– P re ss to op en or
– P re ss
– P r es s to s w itc h
DT S
to 5. 1 C hann el DT S
from s tere o mode.
DO LB Y DIG ITA L
s witc h to 5. 1 C ha nne l D olby
Digital fr om s tere o mode.
– Pre ss to
S UR R OUND MODE
P res s to s w itc h s u rro un d
mo des b etwee n P R O
L O G IC , THE ATE R , HA L L ,
an d S TA DIU M fo r a na l og
equipmen t.
S TE R E O
P re s s to s witc h
from s urrou nd
mo de to s ter eo
mode .
In D olby D igi tal
mo de, pre ss to
do w n m i x to s ter e o.
–
F UNC TIO N
des ire d a udio or a udio /v ideo
s o u rc e . T h e s ele c te d s o u rc e na m e
ap pear s on the d is play pa nel .
– R ota te to s e lec t th e
V OL UME — R ota te
to s et the d es ired
vo lume .
T ONE
-P r e s s to tur n to n e o n
an d o f f a n d to a d j u s t
bas s a n d tr e bl e .
(s e e pa ge 12 H O W
TO A D J US T T O N E ).
TUNING /P RE S ET
pres s to tun e to A M o r FM s tatio ns
an d s ele ct pre se t s tations i n tune r
mode . (S K IP +/-, S CA N +/-)
– Us e to ad jus t b as s an d tr eble
when in tone c ontr ol mode.
B A ND/
DIS C 1 P L AY
-P res s to s elect
AM or FM ba nd
in tune r m ode.
-P re ss to pla yba c k d is c 1
in DV D /C D mo d e.
– R e peatedl y
Dis pla y P an el
ME MOR Y/
DIS C 3 P L AY
-s tor es a s tati on
in m emor y in
tun er mo de .
-P res s to pla yback
dis c 3 i n D VD/CD
mo de.
S TOP
-IN D V D /C D m o de ,
pr e s s twi c e to s top
the di s c .
P AU S E
F M MOD E / DIS C 2 PL AY
-P a u s es th e d i s c i n D V D /C D m o de .
-In tu n e r mo d e , p r e s s to s ele c t s te r e o
o r mo n a u r a l m o d e fo r F M.
-P r e s s to pl a y b a c k di s c2 in D V D /C D m o d e .
NIG HT MODE
– W hen the
s o un d s our c e i s
Do lby D igita l
pres s to c ompres s th e d yna mic ra nge
of audio.
(s ee “ Us ing
Ni ght Mo de” o n
P age 12 ).
P HO NE S
ja ck is c om patible
with ma ny c onv en tiona l dyn amic
head phon e ty pes .
Whe n y ou c onnec t
head phon es , the
un it a utomati cal ly
s elec ts s ter eo
mo de.
– T his
10
Page 19

USING THE TUNER
1. Press
. The receiver defaults to the last selected
POWER
function.
2. Rotate
3. Press
FUNCTION
BAND AM
4. Press the TUNING MODE button on the front of the DV R99
until tuning appears in the display, then press the
PRESET or buttons on the front of the DVR99
knob until the TUNER function appears.
to select the desired band ( or ).
FM
TUNING/
or on the remote repeatedly until the desired station appears
in the display. NOTE : Pressing for about a second and re leasing the TUNING/PRESET or buttons activ ates the auto tuning function allowing the tuner to automa tically scan to the next clear station. Pressing the TUNING/
PRESET or for less than a half second chan-
ges the frequency by one step.
Listening To FM Stereo Broadcasts
In FM mode, press the STEREO
DVD99 until appears to the right of
S T
When you listen to very weak FM stereo stations, you might
hear higher-than-normal background hiss. Switching to
mono (no ST indicator) may eliminate the hiss.
button on the front of the
Tuned.
Presetting Radio Stations
Auto Preset
1. Press
2. Hold down
3. The tuner automatically begins scanning, and stores the
first 30 strong signals it receives.
4. Scanning stops automatically after radio stations are stored
in the auto preset memory.
NNNNooootttteeee:
To store stations on the other band, repeat Steps 1–4,
substituting the other band in Step 1.
to select or
BAND
: Press
: :
MEMORY
MEMORY
AM FM.
button for about 3 seconds.
again to stop auto scanning earlier.
Listening to Preset Stations
To listen to a radio station stored in the station memory,
press the
TUNING/PRESET
or to go to the
desired preset station.
Switching Between Preset Stations and
Manual Tuning
If you store preset stations, pressing
scrolls through the preset stations, rather than changing
the frequency station by station.
TUNING/PRESET
You can preset up to 30 AM and 30 FM stations regardless of
the reception. Tune in the desired stations using auto or
manual tuning.
Manual Preset
To memorize a station press the TUNING MODE button
until TUNING appears in the display, then press the
TUNING/PRESET or buttons on the front of
the DVR99 or on the remote repeatedly until the desired
station appears in the display. Press the MEMORY button on the front of the DVR99 or on the remote and MEMO
will appear and flash in the display for 5 seconds. W hile
MEMO is flashing in the display select a preset number by
pressing the TUNING/PRESET or buttons on
the front of the DVR99 or on the remote then press the
MEMORY button again to store the station. Repeat this
step to store additional stations.
NOTE: You can store up 30 stations for each band.
To switch to scrolling by individual stations, press the
MODE button
press the
the frequency by one step. Or hold down
or
until TUNING appears in the display. T hen,
TUNING/PRESET
or buttons to change
TUNING/
buttons to tune to the next clear station.
To switch back to scrolling through the preset stations, press
TUNING MODE
press the buttons until you
reach the desired preset station.
, until PRESET appears in the display. T hen,
TUNING/PRESET
or
USING THE CD PLAYER
You can use the receiver’s 3-DVD changer to listen to audio
CDs.
IIIImmmmppppoooorrrrttttaaaannnntttt:::: You can only use audio CDs with the receiver.
CD-ROM, CD-G, photo CD, and CD-i discs cannot be
played on this player.
1. Press
2. Rotate
3. Press
drawer.
POWER
. The last selected function appears.
FUNCTION DVD/CD
DISC1, DISC2
until appears.
, or
DISC3
to open the desired
TUNING
PRESET
11
Page 20

4. Place a C D in the tray, then press the appropriate
DISC button again to close the drawer.
NNNNooootttteeee:::: If you want to load more than one CD, you can
press another DI SC button. T he receiver closes the open
drawer and opens the drawer of the DISC button you
pressed. The disc number to be played flashes.
5. To play select
DISC1, DISC2, DISC3
The disc icon (at the far left) begins to rotate.
To pause playback, press
rapidly. To resume playback, press
.
PLAY
To scan forward through a track , hold down
. The disc icon flashes
PAU SE
PAU SE
again or press
PRESET
for about 2 seconds. Repeat up to two times to
increase the fast-forward speed. To resume playback,
press
PLAY
.
NNNNooootttteeee:::: At the beginning or end of a track on an audio C D,
the scan speed returns to normal.
USING NIGHT MODE
When watching DVD movies encoded in Dolby Digital
Surround Sound, you can use N ight Mode to compress
large dynamic audio ranges, resulting in "quieter" explosions and other loud sounds in movies. The Night Mode
feature adjusts the dynamic audio range so that there is
less difference in the output of all sounds in a movie
(explosions, music, dialogue and so on).
While in Dolby Digital or Dolby Digital Stereo mode, press
NIGHT MODE
to turn Night Mode on. Press NIGHT MODE
again to turn it off.
Nooootttteeee:::: Night Mode is not available for movies using DTS mode.
USING THE SLEEP TIMER
You can set the sleep timer to turn off the receiver after a set
period of time.
To scan backward through a track , hold down
for about 2 seconds. Repeat up to two times to
PRESET
increase the rewind speed. To resume playback, press
.
PLAY
To skip to the next track on the CD, press
PRESET
once.
To return to the beginning of the current track, press
PRESET
To return to the previous track, press
To stop playback, press
and
RESUME
iate play button . T o
stop playback completely, press again.
::
NNNNooootttteeee:
If you are playing an MP-3 disc that has multiple folders
appears. To resume playback, press the appr-
DISC1, DISC2, DISC3
. The disc icon stops rotating,
STOP
PRESET
STOP
twice.
on it you must have your TV on and connected to the DVR99.
Use the on screen display on your TV and use the
buttons on the remote to navigate to the desired folder and
song title and then press play.
NNNNooootttteeee::: W hen the DVR99 finishes playing an audio CD, it
automatically plays the disc in the next drawer until the disc
in drawer 3 is finished. Playback will then stop.
Changing the Sound Mode
You can listen to your CDs using Stereo or Surround modes.
For stereo, press the button once.
For a surround mode
button until
STADIUM, or PRO LOGIC)
NNNNooootttteeee:::: Dolby Digital and DTS modes only operate when playing
DVD's encoded in Dolby Digital or DTS.
S TE R E O
, repeatedly press
SURROUND
the desired mode (THEATER, HALL,
appears.
MODE
Repeatedly press
on the remote control to set the
SLEEP
sleep timer to the desired length of time
( , or 90 minutes).
10, 20, 30, 40, 50, 60, 70, 80
The receiver turns off when the selected time has expired.
HOW TO ADJUST THE TONE
To adjust the tone with the receiver press the TONE button
on the DVR99 until TONE ON appears in the display.
Press the TONE button again and BAS 0dB will appear in the
display. While BAS 0dB is displayed use the or
buttons on the receiver to increase or decrease the bass
level. After you have set the bass level press the TONE button
again and TRE 0dB will appear in the display. W hile TRE 0dB
is displayed use the or buttons on the receiver to
increase or decrease the treble level. Press the TONE button again
until TONE ON appears in the display and wait until TONE ON
is no longer displayed. Your bass and treble levels are now set.
To adjust the tone with the remote press the TONE button
on the remote until TONE ON appears in the display. Press
the TONE button again and BAS 0dB will appear in the display.
While BAS 0dB is displayed use the or buttons on
the remote to increase or decrease the bass level. After you
have set the bass level press the TONE button again and
TRE 0dB will appear in the display. W hile TRE 0dB is disp-
layed use the or buttons on the remote to increase or
decrease the treble level. Press the TONE button again until
TONE ON appears in the display and wait until T ONE O N
is no longer displayed. Your bass and treble levels are now set.
To set the bass and treble levels to 0dB press the tone button
on the receiver or on the remote until TONE OFF appears in the
display. Your bass and treble levels are now set at 0dB.
12
Page 21

REMOTE CONTROL OPERATION
A QUICK LOOK AT THE REMOTE CONTROL
S PE AK E R C ONF IG/LE V EL /D EL AY —
U se to c han ge s peak er s ettin gs
a nd ad jus t lev el and de lay.
TUNING MODE
to pr es et m od e.
P RE S ET –
When in tun er mo de , us e + o r to c hange fre quen c y o ne s tep at
a tim e o r to s elec t pre s et s tations .
When in DV D/CD mo de , u s e to
s elec t tr acks .
/
B AND
while in tuner mode. T his b utton als o beg ins
pla yba ck of Dis c1 whe n i n D VD/C D mode.
F M MOD E
/
— S ele cts AM or F M ban d
— S witc hes f ro m tu ning
— S elects F M mono or s ter eo mo de.
T his butto n a ls o beg ins p lay bac k
of Di sc 2 whe n i n D VD/CD mo de.
T E S T TO NE
tion in DT S , DOL B Y D IG I T A L , or P R O L OG I C mo de.
T he tes t tone is ou tput fro m F ront L s peak er, C en ter s p e a k er , F r o n t R s pea k e r , S ur r ou n d R s pea k e r ,
S urr ound L s pea ker , (optio na l s ubwoofer s peak er
when s ubwo of er is on) .
F UNC TIO NS — Us e to s elec t th e des ired fun ctio n.
S UR R OUN D
cha nge the s urr ound mo de to
T HE A T E R , HA L L , S T A DIU M o r S T E R E O .
L EVE L A ND NA VIG AT IO N — U se to ma ke men u
— T urn s on o r o ff the tes t ton e fu nc -
VOL UME — Us e to a djus t v olume .
— R epe ate dly pre ss to
— P res s to us e to ne on ,
T ON E
bas s adjus t, treble ad jus t or tone off .
Us e or wh en ad jus ting B AS S and TR E BL E .
ME MOR Y
s tatio n f requ enc y. Th is bu tton al so be gins
pla yba ck of Dis c3 whe n i n D VD/C D mode.
— P res s to me mo rize the des ir ed
/
P R O L O G IC ,
s elec tion s a nd to
ad jus t lev els .
DV D F UNC TIO NS —
— P res s to s et the s lee p time.
S LE E P
Important: I f you change functions using the
function knob on the front of the receiver, you
must also press the corresponding function
button on the remote control to operate the
unit with the remote control.
OPERATING RANGE OF THE
REMOTE CONTROL
The remote control may not work properly if:
• There are obstacles between the remote control and the
receiver’s remote sensor.
— P res s to
MUT E
tur n o ff the s ou nd
leve l.
MU TE
ap pear s on the r eceive r’ s d is play . To
res tore the s ound ,
pres s aga in.
• Direct sunlight or fluorescent light is shining onto the
remote sensor.
• The receiver is located near a device that is emitting
infrared rays.
• The receiver is operated simultaneously with another
infrared remote control.
13
Page 22

SETTING UP THE SURROUND
SOUND
If you purchased the DVR99 with mini or bookshelf speakers
and a powered subwoofer, you do not have to set the speaker
sizes. The DVR99 comes from the factory pre-set for use with
small front, center and rear speakers and a powered subwoofer.
If you purchased the DVR99 with large floor standing speakers
or change your speakers at a later date, you must set speaker
sizes using the SPEAKER CONFIG function on the remote control as described below.
You can also adjust the channel output levels and speaker
distances as described below.
Setting the Speaker Size
1. Press
2. Set the surround mode to
Press on the remote, and
appears. This function allows you to configure the re ceiver for your Front, Center, Rear Surround and for a
Subwoofer (SW).
3. Press
To change to
NNNNooootttteeee: If floor standing speakers are used,choose
F-LARGE. If bookshelf or small satellite speakers are
used, choose
a powered subwoofer must be added to play low
frequencies.
4. Press again and . appears.
To change to , press
To change to , press or again.
5. Press again and .
To change to
To change to , press or again.
6. Press again and SW-YES appears.
If you are not using a subwoofer, press
change to SW-NO.
7. Press
settings.
NNNNooootttteeee:::: If front speaker is set at F-SMALL, subwoofer
cannot be set to SW-NO.
Changing the Channel Level
The default channel level settings for each speaker is set to
0 dB . You can adjust the sound level for each speaker to
suit the listening area in your home. For example, if you are
closer to the left front speaker than to the right front speaker, the
left front speaker might seem “louder” than the right one. T o
adjust it, you must change the channel level for one or both
speakers until the proper balance is achieved
Follow these steps to change the channel level using the remote.
1. Press
2. Press SPEAKER LEVEL again and FL 0dB(front left)appears.
To change the front left speaker’s level, repeatedly press
SYSTEM
POWER
SPEAKER CONFIG
::
SPEAKER CONFIG
SPEAKER CONFIG
or
.
PRO LOGIC.
SPEAKER CONFIG.
again and appears.
F -LARGE,
F-SMALL. W hen using small speakers
C-LARGE
C-NONE
S-LARGE
S-NONE
SPEAKER CONFIG
SPEAKER CONFIG
SPEAKER LEVEL CH LEVEL
until you reach
press or .
, press
again to finish
, and appears.
the desired level ( to ).
F -S MA LL
C-SMALL
or .
S-SMALL
or .
SP SIZE
appears.
or to
SPEAKER SIZE
-10 +10dB
3. Press SPEAKER LEVEL again and C 0dB
(center)
appears.
To change the center speaker’s level, repeatedly press
or until you reach the
desired level (
4. Press SPEAKER LEVEL again and FR 0dB
-10 +10dB
to ).
(front right)
appears.
To change the front right speaker’s level, repeatedly press
or until you reach
5. Press SPEAKER LEVEL
the desired level (
. again and SR 0dB (surround right)
-10 +10dB
to ).
appears.
To change the rear right speaker’s level, repeatedly press
or until you reach the
6. Press SPEAKER LEVEL
desired level (
again and SL 0dB (surround left)
-10 +10dB
to ).
appears.
To change the rear left speaker’s level, repeatedly press
or until you reach the
7. Press SPEAKER LEVEL
desired level (
. again and SW 0dB (subwoofer)
-10 +10dB
to ).
appears. If the subwoofer has been turned on,
to change the subwoofer’s level, repeatedly press
-10 +10dB
(
or until you reach the desired level
to ).
8. Press SPEAKER LEVEL again to exit.
Setting the Speaker Distance
When you have arranged your home theater (speakers,
receiver, and any components), you can change the speaker
distance entered in the receiver’s memory. The default setting
is 20 feet.
1. Imagine a straight line from the front left speaker to the
front right speaker.
2. Measure the distance in a perpendicular line from your
listening position (for example, your couch) to the
imaginary line.
NNNNooootttteeee:::: Do not meaure the distance to the speakers, just the
line.
3. Repeat Steps 1–2 for the rear (surround) speakers.
4. Measure the distance in a perpendicular line from your
listening position (for example, your couch) to the center
speaker.
5. Press
SPEAKER DELAY on the remote
6. Press SPEAKER DELAY again and F 20FT (front) appears.
To change the distance between the listening position and
the front speakers, repeatedly press or until you reach
the desired level (
7. Press SPEAKER DELAY
0 30 FT
to ).
. again and C 20dB
To change the distance between the listening position and
the center speaker, repeatedly press or until you reach
the desired level (
8. Press SPEAKER DELAY
0 30 FT
to ).
again and S 20dB
To change the distance between the listening position and
the surround speakers, repeatedly press or until you
reach the desired level (
9. Press SPEAKER DELAY
0 30 FT
to ).
again to exit.
SP DIST appears.
(center) appears.
(surround)appears.
14
Page 23

Surround Effects
CCCCaaaauuuuttttiiiioooonnnnssss::::
IIIImmmmppppoooorrrrttttaaaannnntttt:::: T he center and rear speakers only operate when the
unit is set to a surround sound mode and the source material
being played is recorded or broadcast in Dolby Digital, DTS or
Dolby Pro Logic surround sound.
Stereo broadcasts or recordings will produce some rear
channel effects when played in a surround mode. H owever,
mono sources will not produce any sound from the rear
speakers.
Changing the Sound Mode with the
Remote Control
When selecting a surround mode using the remote control
repeatedly press the button until the desired
mode
(THEATER, HALL, STADIUM, PRO LOGIC,
or STEREO) appears.
NNNNooootttteeee::::
Playback in Dolby Digital and DT S modes will only
occur with disc encoded with Dolby Digital or DTS.
SURROUND
USING THE REMOTE CONTROL
TO CONTROL ADDITIONAL
COMPONENTS
You can set your remote control to control other components
such as a VC R, T V, satellite receiver or cable box.
1. Turn on the component to be programmed.
2. Look up the brand and corresponding code(s) in the code
list (see “Manufacturer’s Codes” on Page 25).
3. While holding down the appropriate source button (
, or
TV
enter the first code from the code list.
4. Release the source button, then press
If you have entered the correct code, the component turns
off.
) on the remote control, use the number keys to
SAT
.
POWER
VCR
• This remote control may not operate on all models of the
brands shown in the “Manufacturer’s Codes” on Page 25.
• If batteries are removed from the battery compartment of
the remote, replace the batteries within 30 minutes or all
preset codes will be lost.
• The buttons on the DVR99 remote control may not work
correspondingly with those on the components.
• Experiment with the remote control and your components
to see which buttons work. If only a few functions operate,
repeat Step 4 to see if another code operates more buttons.
USING ADVANCED CD
PLAYBACK FEATURES
Accessing GUI (Graphic User Interface)
Menu Icons for CD Mode
1. Turn on the T V and switch it to the video input source
you have selected for your DVR99 receiver.
2. Using the DVR99 remote control, press the DVD/CD
function button.
3. Insert a CD into one of the three DVD/CD trays on the
DVR99 receiver and press the play button for the tray
you have put the CD in.
4. Press the remote's button during CD playback and
icons will appear on the TV showing a display of the
,
current track number and the elapsed time.
5. To change the track number of the C D currently playing,
using the remote control, press the number button of the
desired track and then press enter or press the or
buttons to scan or skip to a desired track.
G UI
If the component does not turn off, repeat Steps 3 and 4
and use the next code (if applicable) listed for the brand of
your component until the component responds to the
remote command.
Note 1
:
T o turn on or off the receiver when you select the VC R,
Note 2:
SAT, or T V function, press
W hen TV mode is set and selected, only Volume + / and mute operate.
POWER
twice.
6. Pressing either the button again or another function
button will cause the display to disappear immed iately. The display will automatically disappear after
approximately ten (10) seconds.
15
G UI
G UI
Page 24

Using GUI to Set a CD to Repeat Play
1. Turn on the T V and switch it to the video input source you
have selected for your DVR99 receiver.
2. Using the DVR99 remote control, press the DVD/CD fun ction button.
3. Insert a CD into one of the three DVD/CD trays on the
DV R99 receiver and press the play button for the tray you
have put the C D in.
4. Press REPEAT on the remote control during CD playback.
T he TV screen displays the repeat mode setting.
5. The repeat mode changes between REPEAT ONE (repeat
one track only), REPEAT ALL (repeats all tracks on the
selected disc), REPEAT ALL DI SC’S (repeats all disc’s
loaded in trays) AND REPEAT OFF (turns repeat play
off) as you press the REPEAT button.
Programming Tracks with Remote
Control
You may program up to 32 tracks for playback in any desired
order. This function only operates with audio CDs (not DVDs).
Select the disc that you want to program then
NNNNooootttteeee:::
press play to start playback and follow the procedures
below
to start programming.
Modifying the Program and Adding
a Track
1. While in the program mode, repeatedly press or to
select the programmed position (1 through 32) that you
wish to change.
2. To change the selected programmed position to another
track, use the remote’s number keypad. Enter the desired
track number and press the ENTER button.
3. To change the selected programmed position to a track on
P RE S E T
another disc, press the PRESET and select the
desired . Then, using
DIS C 1 D IS C 2
the remote’s keypad, enter the number of the desired
track on this disc and press the ENTER button.
4. To clear a selected programmed position, press the CLEAR
button on the remote control. By clearing a position, all
tracks with a position number higher than the cleared
position will be moved down by one position number.
Note: T he programmed contents are LOST if:
a. You change functions on the receiver.
b. You open the tray of the disc playing.
c. You turn the power off.
, and
DIS C 3
1. Press
2. Press and
3. Press to select
PROGRAM
PRESET
STOP
twice.
01- -
appears.
the desired CD (if necessary).
The CD number appears to the far right of the display.
4. Use the number keypad to enter the desired track number,
then press
to program the first desired track.
ENTER
After the first program track has been entered
appears.
5. Repeat Steps 3–4 to program more tracks.
6. Once you have completed programming, press
DISC 1, DISC 2 DISC 3
or to start your
program playback.
NOTES:
To check the programmed order, press
Repeatedly
press or to view the programmed order.
To clear the programming, press
CLEAR.
If you try to select more than 32 tracks,
STOP
twice.
STOP
twice, then press
appears in the
FULL
display. You cannot program any more tracks.
02- -
Random Play
Press
RANDOM
NNNNooootttteeee:::: Pressing
. The unit randomly selects tracks.
RANDOM
also clears any existing programming.
If you press
PROGRAM
programming, the programming stops and appears.
twice successively while
P-OFF
16
Page 25

DV D P L AY E R OP E R A T ION
B AS IC O P E R AT ION
1. Press the P OW E R button. The last selected function
appears in the display.
2. Rotate the receiver’s FUNC T ION knob, or from the remote
control press D V D/CD , until DV D/CD appears on the display.
Note: I f the DVD/CD function is selected using the function
knob on the front of receiver, the D VD/CD button must be
pressed on the remote control in order for remote DVD/CD
functions to operate.
3. Press to open the desired disc
DIS C1 , DIS C2
tray. O pen appears and the corresponding disc indicator (1,
2 or 3) flashes.
4. Place a disc on the open tray with the playback side down.
Make sure that the disc is properly seated on the tray. Failure
to do so may cause damage to the disc or to the DVD/CD
player.
5. Press the receiver’s proper P L AY button or the remote control’s
or play button. T he disc tray
DIS C1, DIS C2 DIS C3
closes and the receiver loads the disc and starts playback.
6. When the DVD’s menu screen appears on your TV screen press
the remote’s to select the Play Movie option. T hen, press
the receiver or remote's or play
button to begin DVD playback.
No tes : The disc indicators light even if there is no disc in the
tray. The unit checks the tray after you press the receiver or
remote's or play button.
DIS C1, DIS C2 DIS C3
Only the indicators for trays that have disc’s remain lit.
I f you leave the disc tray open for more than 8 minutes,
the disc tray automatically closes.
I f you leave the disc tray open, the disc tray automatically
closes when the function mode is changed.
I f you close the tray by pressing
, the receiver does not load the disc. Press proper
DIS C 3
key to load the disc.
P LAY
After playing back all of the chapters in the title, the
DVD player automatically stops and returns to the menu
screen.
CCCCaaaauuuuttttiiiioooonnnnssss::::
• Do not move the DVD player during playback. Doing so
might damage the disc and the receiver.
, or
DIS C3
DIS C1, DIS C2 DIS C3
DIS C 1, DIS C 2
or
• Keep your fingers well clear of the disc tray as it is closing.
Keep children’s fingers away from the closing disc tray as
there is a risk of personal injury.
• If the inhibit icon " "appears on the TV screen when
a button is pressed, it means the function is not available on
the disc you are playing.
• .Depending on the DVD disc, some operations may be
different or restricted. Refer to the jacket or case of the disc
you are playing.
S topping Pla y
To stop DVD playback press the S T OP button twice on
the receiver or on the remote control. Pressing the S T OP
button once will pause the DVD playback. (Resume appears
in the receiver’s display and DVD video is interrupted on
the TV.) T o resume playback, press the appropriate
DIS C1, DIS C2 DIS C3
or play button on the remote
control or on the DVR99 receiver.
NNNNooootttteeeessss:
:
: :
• The resume option works only with discs for which the
elapsed playing time appears on the window display
during playback.
• Opening the disc tray cancels the resume option.
• The resume option may not be available on some DVD
discs.
Pa us ing P lay
Press the receiver’s or the remote’s button.
To resume normal playback, press the receiver’s proper
button or the remote’s
DIS C 1, DIS C 2
P AUS E
or button.
DIS C 3
P LAY
Advanc ing by Frames
Press the receiver’s or the remote’s button while the
DVD is paused. Each time you press the receiver’s or the
remote's button the picture advances one frame.
P AUS E
To resume normal playback, press the receiver’s proper
button or the remote’s
DIS C 1, DIS C 2
button.
P AUS E
or
P LAY
DIS C 3
• Use
DIS C1 , DIS C2
or
on the main unit to
DIS C3
open or close the disc trays.
Do not push the disc tray while it is moving.
Doing so may cause the DVD player to malfunction.
• Do not push on the disc tray or put any objects other than
discs on the disc tray. Doing so may cause the DVD player
to malfunction.
17
Page 26

Playing in Slow-Motion
Press the remote’s
SLOW – /+
To decrease the playback speed, repeatedly press
you press
SLOW –
the playback speed slows (1/2X, 1/4X, 1/8X).
To reverse the playback direction, press
during playback.
SLOW +
SLOW –
.
. As
Using GUI Menu Icons
For DVD Mode
GUI menu icons show disc information (for example, title or
chapter number, elapsed playing time, audio/subtitle language,
angle) and player information (for example, repeat play, play
mode). Some icons only allow you to view the indicated
information. Other icons allow you to change the settings.
To return to normal playback, press the proper button
on the receiver or remote control
DISC 1, DISC 2
PLAY
or
DISC 3.
Skipping Chapters
To skip forward, press
PRESET
one chapter each time the button is pressed.
To skip backward, press
PRESET
once midway through a chapter, the receiver returns to the
beginning of that chapter. T he receiver then skips backward
one chapter each subsequent time you press
. The receiver skips forward
. If you press
PRESET
PRESET .
.
Scanning
To scan forward through a DVD , hold down the remote’s
PRESET
or the receiver’s
PRESET
second. Repeat up to three times to increase the fast-forward
speed (2X on the first press, then 4X, then 16X, and finally
100X). T o resume playback, press the proper
the receiver or remote control
To scan backward through a DVD, hold down the remote’s
PRESET
or the receiver’s
PRESET
second. Repeat up to three times to increase the fast-reverse
speed (2X on the first press, then 4X, then 16X, and finally
100X). T o resume playback, press the proper
the receiver or remote control
NNNNooootttteeeessss::::
for more than 1
PLAY
DISC 1
,
DISC 2
or
for more than 1
PLAY button on
DISC 1, DISC 2
or
button on
DISC 3.
DISC 3.
NNNNooootttteeee:::: All GUI functions are only available through your remote
control. You cannot use the receiver to access GUI menus.
Follow these steps to view or change GUI information.
1. Press
during playback.
GUI
Icons of the current title number, current chapter number,
elapsed time, the current audio soundtrack language,
current subtitle language, and current angle number
appear.
Below each icon is the current information for that menu
2
(for example
are watching the movie’s second chapter).
appears under the chapter icon when you
NNNNooootttteeee:::: Some DVDs might not provide all of the above GUI
menu icons.
2. Press the remote’s
or to select the desired item. The
currently selected item is highlighted.
The first icon is the title icon. W hen you select it , you can
jump to the desired title number by pressing the remote’s
number keys, then
ENTER
.
The second icon is the chapter icon. When you select it, you
can jump to the desired chapter number by pressing the
remote’s number keys, then
, or by pressing or
ENTER
.
The third icon is the time icon. W hen you select it, you can
move to a desired time in the movie by pressing the
number keys, then
ENTER
.
• The DVD player does not play back sound during slowmotion, high-speed-reverse, or high-speed-forward
playback of DV Ds.
• Subtitles do not appear on the screen during slow motion
or scan playback.
• The DVD player provides four scan speeds in each
direction for DVD movie play.
• Audio C D's do not play back in slow-motion.
18
The fourth icon is the audio icon. W hen you select it, you can
change the soundtrack language by repeatedly pressing
until the desired language appears. To select the
AUDIO
current setting, press
ENTER
.
The fifth icon is the subtitle icon. When you select it, you can
change the subtitle language by repeatedly pressing
until the desired language appears. To select the
TITLE
current setting, press
ENTER
.
SUB
The last icon is the angle icon. W hen you select it, you can
change the angle by repeatedly pressing
ANGLE
until the
desired number appears. To select the current setting,
press
ENTER
.
Page 27

Using a Title Menu
Some DVDs may contain two or more titles. I f the disc has a
title menu recorded on it, you can use
title.
NNNNooootttteeeessss::::
to select the movie
TITLE
NOT ES:
• When the desired language is not shown even after
pressing the button several times, it means the language
is not available on the disc.
• When the power is turned off or the DVD player is
stopped, the subtitle language selected at the initial
settings appears.
• The details of operation might differ depending on the
DVD.
• Selecting a title might not be possible on certain DVD
discs.
Follow these steps to select a movie title.
1. Press
2. Press
from the scene when
3. Press
or
or press the numeric button(s), to select the
. A list of the DVD’s titles appears during playback.
TITLE
DISC 1, DISC 2
, , , or , then
DISC 3
or
DISC 3
was first pressed.
TITLE
ENTER
or
ENTER
or
DISC 1, DISC 2
to resume play
desired title. The selected title starts playing.
Using a DVD Menu
Some DVDs have unique DVD menus. For example, DVDs
programmed with complex contents provide guide menus, and
those recorded with various languages provide menus for
audio and subtitle language.
The DVD menu’s contents and operation differ from disc to
disc. T he following procedure explains the basic operation
when this feature is used.
Changing Soundtrack Language
NNNNooootttteeee:::: This operation works only with DVDs with multiple
soundtrack languages.
Press
language appears. Repeatedly press
during play. The currently selected soundtrack
AUDIO
until the desired
AUDIO
language is selected.
NNNNooootttteeeessss::::
• When the desired language is not shown even after
pressing the button several times, it means the language
is not available on the disc.
• When the power is turned off or the DVD player is
stopped, the language heard is the one selected at the
initial settings.
Viewing from Another Angle
Some DVDs may contain scenes shot simultaneously from
different angles. For these discs, the same scene can be viewed
from each of these different angles using
angles differ depending on the disc.
ANGLE
. The recorded
Press
now appears. Pressing
when
during play. The DVD menu available on the disc
MENU
resumes play from the scene
was first pressed.
MENU
RETURN
NNNNooootttteeee:::: The resume play option might not be possible on certain
discs.
Press the remote’s
, , , or , then
ENTER
. Or press the
numeric button(s) to select the desired item. The selected item
is now executed.
Changing Subtitle Language
NNNNooootttteeee:::: This operation works only with DVDs with multiple
subtitle languages.
Press
SUB TITLE
recorded, appears instead of the language number.
Repeatedly press
selected.
To eliminate subtitles, repeatedly press
.
OFF
during playback. W hen no subtitles are
OFF
SUB TITLE
until the desired language is
SUB TITLE
and select
Press
appears. Repeatedly press
during playback. The currently selected angle
ANGLE
until the desired angle is
ANGLE
selected.
NNNNooootttteeee:::: This function only works for discs with scenes recorded
at different angles.
Using Repeat Play
Press
REPEAT
button, the T V screen displays the repeat mode setting and the
disc repeats a chapter or title.
The repeat mode changes between
REPEAT, and REPEAT OFF as you press the button .
To return to normal play, press
appears.
NNNNooootttteeeessss::::
• Repeat Play works only with discs for which the elapsed
playing time appears in the DVD display window during
playback.
• Repeat Play might not work correctly with some DVDs.
during playback. Each time you press this
C HAP TE R R E PE AT , T IT L E
REPEAT
REPEAT
several times until OFF
19
Page 28

Zooming In
Zoom allows you to zoom in and enlarge the picture on the
screen to either 4 times (4X) or 16 times (16X) its normal size.
may be used during normal or paused playback.
ZOOM
• If you change the level and enter a password, playback of
all DVDs with ratings higher than your selection will be
blocked, unless you enter the correct password again. For
example: if you change the level to 5, the DVD player will
not play discs with ratings of 6, 7, or 8 unless the correct
password is entered from the remote control.
To resume normal size, press
until ZOOM OFF appears.
ZOOM
and resume normal playback or still playback.
NNNNooootttteeeessss::::
• Some DVDs might not respond to Zoom.
• Zoom does not work on subtitles or menus included on
DVD video discs.
SETTING RATING LEVEL AND
PASSWORD
You can prohibit the playing of specified DVDs which are
unsuitable for children. Some DVD discs contain a restriction
level which enables parents to remove scenes or prevent
playback of discs by children. Your DVD player has a password
device designed to prevent children from changing the level.
Selecting a Rating Level
1. Press
S E T U P
2. At the setup screen, press or to select
, then press
NNNNooootttteeee:::: The password is preset to 1,2,3,4. T he rating is
preset to unlock.
.
ENTER
RATING
.
Setting a Password
If you change the rating level to 7 or lower, you must enter a 4digit password to access playback of discs with higher ratings.
To set this password, follow these steps.
1. Press
SET UP
2. At the setup screen, press
press
ENTER
.
to select PASSWORD , then
.
3. Type a 4-digit password into OLD. (For example, 1234).
IIIImmmmppppoooorrrrttttaaaannnntttt:
: Do not forget your password.
: :
4. Type the same 4-digit password into NEW , then press
.
ENTER
Clearing Your Password
If you forget your password, you can clear the current
password.
At the SET UP screen, press
.
ENTER
Enter the following 4-digit number 2580, then press
The 4-digit password is cleared.
to select PASSWORD , then press
.
ENTER
3. Enter a password and press
4. Repeatedly press
to select the desired level.
ENTER
ENTER
.
You cannot play DVD video discs rated higher than the
level you selected unless you cancel the parental lock
function. For example, when you select level 7, discs rated
higher than level 7 are blocked and cannot be played.
The parent lock level is equivalent to the following USA
movie ratings.
Level Movie Rating
7 NC-17
6 R
4 PG-13
3 PG
1 G
5. Press
SET UP
to exit.
NNNNooootttteeeessss::::
• Some titles do not match with the above rating levels.
SELECTING TV ASPECT
Select the appropriate screen type according to your T V set.
Conventional size screens use a 4:3 aspect ratio, and widescreens use a 16:9 ratio.
1. Press
SET UP
2. At the setup screen, press
then press
3. Repeatedly press
press
SET UP
(aspect ratio) that corresponds to the type of TV you are
connecting to the DVD unit.
4:3 PS
and your DVD is not formatted for widescreen viewing,
use this setting.
4:3 LB
your DVD is formatted for widescreen viewing, use this
setting. All video material not formatted in the Pan and
Scan style is played back in the letterbox style. Black
bands appear at the top and bottom of the screen.
.
or to select TV DISPLAY,
.
ENTER
to select the desired aspect, then
ENTER
. You must select the type of TV picture
(Pan and Scan) — I f you have a conventional TV set
(Letterbox) — If you have a conventional TV set and
20
Page 29

16:9 WIDE (Widescreen) — I f you have a widescreen T V set,
use this setting. The DVD plays in full size. (You must also
set your widescreen T V to “full size”).
SELECTING DIGITAL AUDIO OUT
Each DVD has a variety of audio output options. If you
connected a Component to the receiver’s digital optical jacks
(see “C onnecting a Digital (Optical) Audio Component” on
Page 7), you might have to change the digital audio output
setting. Set the player’s Digital Audio Output according to the
type of audio component you use.
1. Press
SET UP
2. At the setup screen, press
3. Repeatedly press
or BITSTREAM) , then press
BITSTREAM — Select BITSTREAM if you have an amplifier
.
or to select DIGITAL OUT
to select the desired output (PCM
ENTER
.
ENTER
or other equipment with DTS decoder or Dolby Digital
decoder connected to the receiver.
PCM — Select PCM if you have an amplifier or other
equipment with linear PC M only (or an MD recorder or a
DAT deck) connected to the receiver.
CCCCaaaauuuuttttiiiioooonnnn:
: If an active digital audio output signal is supplied to a
: :
receiver or other equipment without a corresponding digital
decoding capability, a very loud noise might be produced
which could permanently damage your speakers.
NNNNooootttteeee:::: W hen you make a digital recording from a CD to your
audio CD receiver, entire CD tracks are recorded as one track
because there is no track information.
21
Page 30

TROUBLESHOOTING
To determine any problem with your receiver, always check the most obvious possible causes first. I f any problem still remains
after your have checked the items below, consult your nearest T E C HW OOD dealer.
Incorrect operation is often mistaken for trouble and malfunctions. If you think that there is something wrong with this
component, check the points below. Sometimes the trouble may lie in another component. Investigate the other components and
electrical appliances being used.
Symptom Cause Remedy
No power. The power cord is disconnected. Plug the power cord into the wall outlet securely.
The power is on, but
the DVD player does
not work.
No picture. The T V is not set to receive DVD signal
The playback picture is
poor.
The DVD player does
not start playback.
The remote control
does not work
properly.
The receiver does not
respond when the
buttons are pressed.
No sound is output
when a function is
selected.
No image is output
when a function is
selected.
No disc is inserted. Insert a disc. (Check that the DVD or audio CD indicator in
the DVD display is lit.)
Select the appropriate video input mode on the T V so the
output.
The video cable is not connected securely. Connect the video cable into the jacks securely.
The connected T V power is turned off. Turn on the TV.
The disc is dirty. Clean the disc.
No disc is inserted. Insert a disc. (Check that the DVD or audio CD indicator in
An unplayable disc is inserted. Insert a playable disc. (Check the disc type, color system
The disc is placed upside down. Place the disc with the playback side down.
The disc is not placed within the tray. Place the disc on the disc tray correctly.
The disc is dirty. Clean the disc.
A menu is on the TV screen. Press
The rating level is set. Cancel the rating function or change the rating level.
The remote control is not pointed at the
remote sensor of the unit.
The remote control is too far from the
unit.
There is an obstacle in the path of the
remote control and the DVD player.
The remote’s batteries are exhausted. Replace the batteries with new ones.
Static electricity caused by dry air. Disconnect the power plug from the outlet, and insert
Improper connections Make sure the component is connected correctly.
Sound is muted. Press the remote’s
The volume is turned down. Adjust
Improper connections. Make sure the component is connected correctly.
The input source is not properly selected. Press the correct function button.
picture from the DVD player appears on the T V screen.
the DVD display is lit.)
and regional code.)
to turn off the menu screen.
SETUP
Point the remote control at the remote sensor of the unit.
Operate the remote control within about 23 feet (7 m).
Remove the obstacle.
again.
.
MUTE
VOLUME
.
22
Page 31

Symptom Cause R emedy
Considerable noise in
radio broadcasts.
Incorrect frequency. Tune in the correct frequency.
The antenna is not connected. Connect the antenna.
RF (AC-3) and/or digital cables are
near the antenna terminals and wires.
(For FM) The FM antenna is not fully
extended or is poorly positioned.
Route RF (AC-3) and digital cables away from the
antenna terminals and wires.
Fully extend the FM wire antenna, position for best
reception, and secure to a wall.
(For FM) The signal is weak. C onnect an outdoor FM antenna.
(For AM) The AM antenna is poorly
Adjust the direction and position for best reception.
positioned.
(For AM) The signal is weak. Connect an additional internal or external AM antenna.
Interference caused by other equipment
(for example, fluorescent lights, motors).
Turn off the equipment causing the noise or move it away
from the receiver.
Place the antenna farther away from the equipment causing
the noise.
Broadcast stations
The signals are weak. Connect an outdoor antenna.
cannot be selected
automatically.
The display is dark or
The dimmer is on. Press
DIMMER
repeatedly to return to the default setting.
off.
When listening to the
Speakers are connected wrong. After checking, if needed, reconnect.
music in stereo, left/
right speakers sounds
are reversed.
Low hum or buzz
sound.
Sound is only heard
from one channel.
Sound cuts off or there
is no sound even
though power is on.
Power line of a fluorescent light is
installed near this product.
Place this product as far away as possible from electric
devices with interference.
One of the input cords is disconnected. Connect the input cords securely.
The speaker level is set to one side. Adjust the speaker level.
Speaker impedance is less than prescribed
for this unit.
After turning off the power and then turning it on again,
reduce the volume or change to the correct 6-ohm
or higher speakers.
Low bass response. Speaker polarity(+/–) is reversed. Check all speakers for correct polarity.
No sound from the rear
speakers.
Surround Mode is set to
STEREO
. Set the mode to the desired surround mode position.
Source being played is not recorded or
Use surround or stereo source.
broadcast in surround sound or stereo.
One or more rear speaker wires is not
Check all rear speaker wires for good connection.
making good contact,
No sound from the
center speaker.
Surround Mode is not set to
,
DIGITAL
DOLBY PRO LOGIC
DTS, DOLBY
Set Surround Mode to
LOGIC
DTS, DOLBY DIGITAL, DOLBY PRO
If the receiver does not operate normally due to external effects such as static electricity, disconnect the power plug from the outlet
and insert again to return to normal operating conditions.
23
Page 32

CARE
Keep the receiver dry; if it gets wet, wipe it dry immediately.
Use and store the receiver only in normal temperature
environments. Handle the receiver carefully; do not drop it.
Keep the receiver away from dust and dirt, and wipe it with a
damp cloth occasionally to keep it looking new.
MANUFACTURER’S CODES
Modifying or tampering with the receiver’s internal
components can cause a malfunction and might invalidate its
warranty and void your F CC authorization to operate it. If your
receiver is not performing as it should, take it to your local
store for assistance.
CCCCaaaauuuuttttiiiioooonnnn:::: You might permanently damage your speakers by
cleaning them with a vacuum cleaner. Use a feather duster or a
soft loose cloth instead.
TV Codes
Brand Codes
ABEX 272
ADMIRAL 101
AKAI 102
ALLERON 146
AMTRON 138
AOC 104,105,106,107
AUDI OVOX 138
BELCOR 104
BELL & HOWELL 101, 262
BRADFORD 138
BROKW OOD 104
CANDLE 104, 106, 108
CELEBRITY 102
CITIZEN 104, 106, 108, 138, 205, 271
COLORT YME 104, 106
CON CERTO 104, 106
CON T E C /CONY 112, 113, 138
CRAIG 138
CROWN 138, 271
CURTIS MATHES 104, 106, 115, 185, 205, 262, 271
CXC 138
DAEWOO 104, 105, 106, 117, 118, 271
DAYTRON 104, 106, 271
DIMENSIA 185
DUMONT 104
ELECTROBAND 102
ELECT ROHOME 103, 104, 106, 119, 122
EMERSON 104, 106, 112, 124, 125, 126, 127,
128, 129, 130, 131, 132, 134, 135,
136, 138, 139, 141, 142, 146, 262,
271, 279
ENVI SI ON 104, 106
FI SH E R 148, 149, 151, 262, 280
Brand Codes
FUJITSO 146
FUNAI 138, 146
FUTURETEC 138
GE 103, 104, 106, 110, 119, 121, 122,
152, 154, 155, 185, 187, 200, 221,
230, 264, 265, 281
GI BRALT ER 104
GRUNDY 138, 146, 271
HALLMARK 104, 106
HARVARD 138
HITACHI 104, 106, 110, 112, 113, 119, 140,
159, 160, 214, 235, 236, 237, 238,
239, 240, 242, 243, 244, 245, 246,
248, 279
IMA 138
INFI NITY 162
JBL 162
JC PENNY 104, 105, 106, 108, 122, 152, 154,
158, 163, 172, 185, 187, 205, 228,
271, 272, 281
JCB 102
JENSEN 104, 106
JVC 112, 113, 154, 156, 160, 165, 166,
167, 189, 257, 258, 259
KAWASHO 102, 104, 106
KENWOOD 104, 106, 119
KLOSS
NOVABEAM
KTV 138, 271
LG (GOLDSTAR) 104, 105, 106, 112, 119, 156, 158,
LOEWE 162
LUXMAN 104, 106
LXI 106, 149, 162, 172, 185, 262, 281
169, 283
255, 256, 271, 272
24
Page 33

Brand C odes
Brand Codes
MAGN AVOX 104, 106, 108, 119, 162, 169, 174,
175, 176, 177, 188, 189, 226, 230,
231, 232, 233, 234, 254, 283, 284
MARANT S 162
MARAN T Z 104, 106, 162
MEGAT RON 106, 159
MEMOREX 101, 106, 182, 262
MGA 104, 105, 106, 119, 122, 151, 179,
180, 182
MIDLAND 154, 271, 272, 281
MINUT Z 152
MITSUBI SH I 104, 105, 106, 119, 122, 151, 179,
180, 181, 182, 210, 221, 225
MOT ORO LA 103
MTC 104, 105, 106, 205
MULTITECH 138
MULTIVISION 184
NAD 106, 172
NE C 103, 104, 105, 106, 189
NI KK O 106
ON W A 138
ORION 135
PANASONI C 103, 154, 162, 230, 270
PHI LCO 103, 104, 105, 106, 108, 112, 119,
162, 169, 174, 175, 177, 283, 284
PHI LIPS 103, 104, 108, 112, 119, 162, 169,
174, 175, 176, 186, 187, 188, 189,
230
PILOT 104, 271
PION E E R 104, 106, 190, 191, 192, 279
PORTLAND 104, 105, 106, 271
PRICE C LUB 205
PRISM 154
PROSCAN 185, 281
PROTON 104, 106, 112
PULSER 104
QUASAR 103, 154
RADI O SHACK /
REALISTI C
RC A 103, 104, 105, 106, 107, 110, 119,
SAMPO 104, 106, 271, 272
SAMSUNG 104, 105, 106, 112, 115, 119, 204,
SAMSUX 271
104, 106, 112, 138, 149, 185, 262,
271, 272
120, 121, 135, 156, 185, 198, 199,
200, 201, 202, 210, 221, 279, 281,
287, 290
205, 206, 271, 272
SANYO 104, 109, 148, 149, 180, 207, 208,
210, 262, 280
SCOT CH 106
SCO T T 104, 106, 112, 124, 135, 138, 146
SEARS 104, 106, 113, 119, 146, 148, 149,
151, 166, 172, 185, 209, 210, 262,
280, 281
SHARP 104, 106, 112, 129, 211, 212, 213,
221, 222, 271
SHO GUN 104
SIGNAT URE 101
SIMPSON 108
SONY 102
SOUNDESIGN 104, 106, 108, 138, 146
SSS 104, 138
STARLI T E 138
SUPRE ME 102
SYLVANIA 104, 106, 108, 119, 162, 169, 174,
175, 176, 177, 188, 283, 284
SYMPHO N I C 138
TATUN G 103
TECHNI C S 154
TECHWOOD 104, 106, 154
TEKNIK A 104, 105, 106, 108, 112, 113, 138,
146, 176, 182
TELE C APT I O N 205, 270, 271
TOSH I BA 149, 172, 189, 205, 209, 210, 217,
218, 221, 260, 262
UN I VERSAL 152, 187
VI C T O R 166
VI DTECH 104, 105, 106
W ARDS 101, 104, 105, 106, 107, 124, 146,
152, 162, 169, 174, 175, 176, 185,
187, 188, 219, 220, 284
YANAH A 104, 105, 106, 119
ZENITH 104, 247, 253, 254
V C R C odes
Brand C odes
ADMIRAL 531
ADVEN T URA 426
AIWA 426
AKAI 403, 404, 512, 513
AMERI C AN HIGH 421
ASHA 413
25
Page 34

Brand C odes
Brand C odes
AUDI O DYNAMICS 409, 410
AUDI OVOX 414
BEAUMARK 413
BEL L& HOW E LL 411
CALI X 414
CANDLE 413, 414, 423, 461
CANO N 421
CARVER 462
CCE 461
CITIZEN 413, 414, 415, 416, 417, 418
COLORT YME 409
COLT 461
CRAI G 413, 414, 423, 461
CURTIS-MAT H E S 409, 412, 413, 416, 418, 421, 515
CYBERNEX 413
DAEWOO 415, 417, 426, 428
DBX 409, 410
DIMENSIA 412
DYNATECH 426
EL E C T ROHOME 414, 429
EL ECTRO PHONIC 414
EMERSON 414, 415, 421, 426, 429, 430, 432,
433, 435, 436, 437, 438, 439, 440,
441, 442, 444, 445, 465, 513, 516,
517, 530
FI SH E R 405, 411, 419, 423, 448, 449, 450,
451, 518
FUJI 421, 519
FUNAI 426
GARRARD 426
GE 401, 412, 413, 421, 453, 515, 520
GRADIENTE 426
HARLEY DAV I DSON 426
HARMAN KARDON 409
HARW OOD 461
HEADQUARTER 411
HI-Q 423
HITACHI 421, 455, 456, 457, 489, 497, 507,
511, 520, 522
INST AN T RE PLAY 421
JC PENNEY 409, 410, 411, 413, 414, 421, 455,
456, 458, 459, 460, 507, 518
JCI 421
JENSEN 455, 456, 511
JVC 409, 410, 411, 418, 420, 421, 458,
462, 468, 477, 511, 523
KENW OOD 409, 410, 411, 416, 418, 456, 511,
523
KLH 461
KODAK 414, 421
LG (GOLDSTAR) 409, 414, 418, 454, 506
LLOYD 426
LO GIK 461
LXI 414
MAGN AV OX 421, 462, 463, 504, 508, 524
MAGN I N 413
MARAN T Z 409, 410, 411, 416, 418, 421, 458,
462
MART A 414
MASUSHITA 421
MEI 421
MEMORE X 411, 413, 414, 421, 423, 426, 504,
531
MGA 429, 465, 513
MGGNAVOX 421, 449, 462, 504
MGN TECHOL OGY 413
MIDLAND 453
MINOLT A 455, 456, 507
MITSUBI SH I 406, 407, 419, 421, 424, 429, 455,
456, 465, 466, 467, 469, 470, 471,
472, 473, 474, 506, 513, 523
MON T GOMERY
WARD
MOT ORO LA 421, 531
MTC 413, 426
MULT I T E C H 413, 416, 426, 453, 461
NE C 409, 410, 411, 416, 418, 458, 511,
NI KK O 414
NO BLEX 413
OL YMPUS 421
OPT I MUS 414, 421, 431, 446, 494, 509, 531
OPT O NI C A 496
ORION 435
PANASONIC 421, 446, 509, 525, 526, 531
PEN T AX 416, 455, 456, 507, 520
PEN T E X RESEARCH 418
PHI LCO 421, 462, 463
PHI LIPS 421, 462, 496, 524
PILOT 414
PION E E R 410, 443, 455, 480, 481, 523
PORTLAND 416, 417
531
523
26
Page 35

Brand C odes
Brand C odes
PROSCAN 401, 412
PROTEC 461
PULSAR 504
QUART E R 411
QUART Z 411
QUASAR 421, 525
RADI O SHACK /
RE ALISTI C
RADI X 414
RANDE X 414
RCA 401, 403, 412, 413, 415, 421, 431,
RI C H O 528
RUNCO 504
SAMSUNG 413, 415, 433, 453
SANK Y 504, 531
SANSUI 410, 511, 523
SANYO 405, 411, 413, 423
SCO T T 415, 432, 435, 438, 465, 493, 516
SEARS 401, 414, 421, 423, 448, 449, 450,
SHARP 417, 429, 431, 494, 495, 496, 531
SHI NT OM 404, 456, 46, 498
SHO GUN 413
SIGNAT URE 531
SIN G ER 421, 461, 528
SONY 404, 421, 425, 427, 434, 498, 499,
STS 421, 507
SYLVANIA 421, 426, 462, 463, 465, 524
SYMPHO NI C 426
TANDY 411, 106
TASHI KO 414, 113, 138
TATUN G 458, 511
TEAC 426, 458, 511
TECHINICS 421, 409
TEKNIK A 414, 421, 426
TMK 413
TOSH I BA 415, 449, 451, 455, 465, 493, 506,
TOT EVSION 413, 414
UNI T E C H 413
VE C T O R RESEARC H 409, 410, 415, 416, 513
411, 413, 414, 421, 423, 426, 429,
449, 450, 496, 531
446, 448, 453, 454, 455, 456, 462,
482, 483, 484, 486, 487, 488, 489,
490, 491, 494, 507, 509, 515, 520,
525, 531
451, 455, 456, 507, 518
519, 528
516
VI DEOSONIC 413
WARDS 413, 414, 415, 421, 423, 426, 429,
455, 456, 461, 496, 501, 502, 503,
507, 516, 531
XR-1000 421, 426, 461
YAMAHA 409, 410, 411, 418, 458, 511
ZENI TH 404, 498, 504, 519, 528
C able C odes
Brand C odes
ABC 702, 703, 704, 705, 706, 709, 753
ANT RONI X 708, 709
ARCHER 708, 709, 710, 711
CABLETENNA 708
CABLEVIEW 708
CEN T URY 711
CITIZEN 711
COLOUR VOICE 712, 713
COMT RONI C S 714, 715
CON T E C 716
EASTE RN 717
GARRARD 711
GC ELE C T RONI CS 709
GEMI N I 718, 719, 749
GENERAL
INST RUME N T S
GRADIENT 781
HAMLI N 720, 721, 722, 735, 745
HITACHI 703
HYTEX 702
JASCO 711
JERROLD 703, 705, 707, 714, 718, 723, 724,
LG (GOLDST AR) 770, 771, 779, 780
MAGN AV OX 725
MEMOREX 726
MOV I E TIME 702, 727, 728
NSC 702, 727, 728
OAK 702, 727, 728
PANASONIC 748, 752
PARAGO N 726
PHI LIPS 711, 712, 713, 714, 725, 730, 731,
PIONEER 701, 733, 734, 742
703
746, 753, 782, 783, 784, 785, 788,
789, 790, 791, 792
732
27
Page 36

Brand Codes
Brand C odes
PULSAR 726
RADI O SH AC K 770, 771, 779, 780
RC A 747, 749, 752
RE ALISTI C 709, 749
RE GAL 722, 735
REGEN C Y 717
REMBRAN DT 703
RUNCO 726
S.A 737, 738, 786, 787
SAMSUNG 714, 734
SCIENT IFI C
ATALAN T A
SIGNAL 714, 718
SIG NATURE 703
SL MARX 714, 525
SPRUC ER 752
STARC OM 707, 718, 753
STARGAT E 714, 718
STARQUEST 718
TANDY 740
TELE VIEW 714
TOCOM 704, 723, 741
TOSH I BA 726
TSUA 718
TV86 727
UN I K A 708, 709, 711
UNITED ART I ST S 702
UN I T E D C ABLE 753, 713
UN I VERSAL 708, 709, 710, 711
VI DEO W AY 744
VI E W STAR 715, 725, 727, 740
ZENITH 726, 750, 751, 774, 777
706, 736, 737, 738
PROSCAN
RCA 754, 755, 778
RE ALISTI C 763
SONY 772, 725, 727, 740
STS1 764
STS2 765
STS3 766
STS4 767
TODHIBA 768
UNI DE N 769
778
S AT C odes
Brand C odes
CHAPPARAL 756, 757
DRAK E 758, 759
EC H O ST AR 743
GE 778
GENERAL
INSTRUMENT S
PANASONIC 757
PIO NEER 739
PRI ME ST AR DBS 776
760, 761, 762
28
Page 37

ONE-YEAR LIMITED WARRANTY
WHO PROVIDES WARRANTY
This warranty is provided by W elton Sound Systems U.S.A. LTD.
WHO IS PROTECTED
This warranty is extended to the first original owner.
NOTE: RENT-TO-OWN DEALERS ARE CONSIDERED TO BE THE FIRST ORI GINAL OWNER
WHAT IS COVERED AND HOW LONG
This warranty covers the electronics -including electronic parts, electronic circuit assemblies and electronic
mechanical assemblies - from date of origi nal purchase. Replacement parts and assemblies supplied under this
warranty are warranted only for the remaining portion of the original warranty period.
WHAT IS NOT COVERED
This Limited W arranty does not cover (a) install ation or operating instructions, (b) dam age caused in shipment,
accidents, misuse or negligence, (c) damage to cabinet or any cosmetic item , (d) accessories, (e) normal owner
maintenance, (f) failure due to consumer abuse, (g) insect infestati on. We reserve the right to modif y our products
without incurring any obl igation to make the same changes or modifications on products which we have previously
manufactured or sold.
The Warranty does not apply if model or serial number was rem oved, altered, replaced or rendered illegible.
Warranty does not apply if equipment was modified or serviced by anyone other than an authorized Welton Sound
Systems Service Center. The manufacturer is not responsible for trip or transportat ion charges during warranty.
WHAT WELTON SOUND SYSTEMS WILL DO
Welton Sound Systems will supply at no charge to the owner for one year, new or remanufactured replacement
parts to replace those which fail under normal use and service. The manufacturer will also s upply free labor for a
period of one year from date of original purchase to replace defective parts covered under warranty if service is
performed by an authorized Welton Sound Systems Service Center.
WHAT DEALER OR CONSUMER M UST DO
To obtain service, the dealer or consumer is to cont act their local W elton Service Center who will process warranty.
Dealer or consumer must present proof of purchase (dated sales receipt) to Service Center.
Dealer or consumer is responsible to Service Center for any trip and transportation charges incurred.
If a local authorized Service Center cannot be located, contact Welt on Sound Systems directly.
MODEL NO. SERIAL NO. .
WELTON USA SERVICE DEPARTMENT
11625 COLUMBIA CENTER DRIVE
SUITE 100
DALLAS, TX. 75229
Phone (972) 243-5602
Page 38

WELT
11625 Columbia Center Drive
Suite 100
Dallas, Texas 75229
(972) 243-5602
FAX: (972) 243-5958
weltonusa.com
ON SOUND SYSTEMS, U.S.A.
 Loading...