

Page 1
CAUTION: TO REDUCE THE RISK OF ELECTRIC SHOCK, DO NOT REMOVE
COVER (OR BACK). NO USER-SERVICEABLE PARTS INSIDE. REFER
SERVICING TO QUALIFIED SERVICE PERSONNEL.
The lightning flash with arrowhead symbol,within an equilateral triangle, is intended to alert the user to the
presence of uninsulated “dangerous voltage” within the product’s enclosure that may be of sufficient
magnitude to constitute a risk of electric shock to persons.
The exclamation point within an equilateral triangle is intended to alert the user to the presence of
important operating and maintenance (servicing) instructions in the literature accompanying the
appliance.
WARNING:
TO PREVENT FIRE OR SHOCK HAZARD, DO NOT EXPOSE
THIS APPLIANCE TO RAIN OR MOISTURE.
CAUTION
RISK OF ELECTRIC SHOCK
DO NOT OPEN
VCR/DVD Digital Home Theater Receiver
OWNER'S MANUAL
DVR-120
Page 2
15) Lightning —
For added
protection for this
product during a
lightning storm, or
when it is left
unattended and
unused for long
periods of time,
unplug it from the
wall outlet and
disconnect the
antenna or cable
system. This will prevent damage to the product due to lightning
and power-line surges.
16) Power Lines — An outside antenna system should not be
located in the vicinity of overhead power lines or other electric
light or power circuits, or where it can fall into such power lines
or circuits. When installing an outside antenna system, extreme
care should be taken to keep from touching such power lines or
circuits as contact with them might be fatal.
17) Overloading — Do not overload wall outlets, extension
cords, or integral convenience receptacles as this can result in
risk of fire or electric shock.
18) Object and Liquid Entry — Never push objects of any kind
into this product through openings as they may touch dangerous
voltage points or short-out parts that could result in a fire or
electric shock. Never spill liquid of any kind on the product.
19) Servicing — Do not attempt to service this product yourself
as opening or removing covers may expose you to dangerous
voltage or other hazards. Refer all servicing to qualified service
personnel.
20) Damage Requiring Service — Unplug this product from the
wall outlet and refer servicing to qualified service personnel
under the following conditions:
a) when the power-supply cord or plug is damaged.
b) if liquid has been spilled, or objects have fallen into the
product.
c) if the product has been exposed to rain or water.
d) if the product does not operate normally by following the
operating instructions. Adjust only those controls that are
covered by the operating instructions as an improper adjustment
of other controls may result in damage and will often require
extensive work by a qualified technician to restore the product to
its normal operation.
e) if the product has been dropped or damaged in any way.
f ) when the product exhibits a distinct change in performance
_
this indicates a need for service.
21) Replacement Parts — When replacement parts are
required, be sure the service technician has used replacement
parts specified by the manufacturer or have the same
characteristics as the original part. Unauthorized substitutions
may result in fire, electric shock, or other hazards.
22) Safety Check — Upon completion of any service or repairs
to this product, ask the service technician to perform safety
checks to determine that the product is in proper operating
condition.
23) Wall or Ceiling Mounting — The product should be
mounted to a wall or ceiling only as recommended by the
manufacturer.
24) Heat — The product should be situated away from heat
sources such as radiators, heat registers, stoves, or other
products (including amplifiers) that produce heat.
10) Ventilation — Slots
and openings in the
cabinet are provided for
ventilation and to ensure
reliable operation of the
product and to protect it
from overheating, and
these openings must not
be blocked or covered.
The openings should
never be blocked by placing the product on a bed, sofa, rug, or
other similar surface. This product should not be placed in a
built-in installation such as a bookcase or rack unless proper
ventilation is provided or the manufacturer’s instructions have
been adhered to.
11) Power Sources — This product should be operated only
from the type of power source indicated on the marking label. If
you are not sure of the type of power supply to your home,
consult your product dealer or local power company. For
products intended to operate from battery power, or other
sources, refer to the operating instructions.
12) Grounding or Polarization — This product may be
equipped with a polarized alternating-current line plug (a plug
having one blade wider than the other). This plug will fit into the
power outlet only one way. This is a safety feature. If you are
unable to insert the plug fully into the outlet, try reversing the
plug. If the plug should still fail to fit, contact your electrician to
replace your obsolete outlet. Do not defeat the safety purpose of
the polarized plug.
13) Power-Cord Protection — Power-supply cords should be
routed so that they are not likely to be walked on or pinched by
items placed upon or against them, paying particular attention to
cords at plugs, convenience receptacles, and the point where
they exit from the product.
14) Outdoor Antenna Grounding — If an outside antenna or
cable system is connected to the product, be sure the antenna
or cable system is grounded so as to provide some protection
against voltage surges and built-up static charges. Article 810 of
the National Electrical Code, ANSI/NFPA 70, provides
information with regard to proper grounding of the mast and
supporting structure, grounding of the lead-in wire to an antenna
discharge unit, size of grounding conductors, location of
antenna-discharge unit, connection to grounding electrodes, and
requirements for the grounding electrode.
2
Important Safety Instructions
CAUTION:
< Read all of these Instructions.
< Save these Instructions for later use.
< Follow all Warnings and Instructions marked on the
audio equipment.
1)Read Instructions — All the safety and operating instructions
should be read before the product is operated.
2)Retain Instructions — The safety and operating instructions
should be retained for future reference.
3)Heed Warnings — All warnings on the product and in the
operating instructions should be adhered to.
4)Follow Instructions — All operating and use instructions
should be followed.
5)Cleaning — Unplug this product from the wall outlet before
cleaning. Do not use liquid cleaners or aerosol cleaners. Use a
damp cloth for cleaning.
6)Attachments — Do not use attachments not recommended
by the product manufacturer as they may cause hazards.
7)Water and Moisture — Do not use this product near water
_
for example, near a bath tub, wash bowl, kitchen sink, or laundry
tub; in a wet basement; or near a swimming pool; and the like.
8)Accessories — Do not place this product on an unstable cart,
stand, tripod, bracket, or table. The product may fall, causing
serious injury to a child or adult, and serious damage to the
product. Use only with a cart, stand, tripod, bracket, or table
recommended by the manufacturer, or sold with the product.
Any mounting of the product should follow the manufacturer’s
instructions, and should use a mounting accessory
recommended by the manufacturer.
9)A product and cart combination should be moved with care.
Quick stops, excessive force, and uneven surfaces may cause
the product and cart combination to overturn.
"Note to CATV system installer:
This reminder is provided to call the CATV system installer’s
attention to Section 820-40 of the NEC which provides
guidelines for proper grounding and, in particular, specifies
that the cable ground shall be connected to the grounding
system of the building, as close to the point of cable entry as
practical."
Example of Antenna Grounding as per
National Electrical Code, ANSI/NFPA 70
ELECTRIC
SERVICE
EQUIPMENT
NEC - NATIONAL ELECTRICAL CODE
GROUND
CLAMP
ANTENNA
LEAD IN
WIRE
ANTENNA
DISCHARGE UNIT
(NEC SECTION 810-20)
GROUNDING CONDUCTORS
(NEC SECTION 810-21)
GROUND CLAMPS
POWER SERVICE GROUNDING
ELECTRODE SYSTEM
(NEC ART 250. PART H)
Page 3

3
E
R
The lightning flash with arrowhead symbol,
within an equilateral triangle, is intended to
alert the user to the presence of
uninsulated "dangerous voltage" within the
product’s enclosure that may be of
sufficient magnitude to constitute a risk of
electric shock to persons.
The exclamation point within an equilateral
triangle is intended to alert the user to the
presence of important operating and
maintenance (servicing) instructions in the
literature accompanying the appliance.
WARNING : TO PREVENT FIRE OR SHOCK
HAZARD, DO NOT EXPOSE THIS
APPLIANCE TO RAIN OR MOISTURE.
AC POWER CORD CONNECTION
CAUTION:
TO PREVENT ELECTRIC SHOCK, MATCH WIDE BLADE
OF PLUG TO WIDE SLOT, FULLY INSERT.
CORDE DE CONNEXION CA
ATTENTION:
POUR ÉVITER LES CHOCS ÉLECTRIQUES, INTRODUIRE
LA LAME LA PLUS LARGE DE LA FICHE DANS LA
BORNE CORRESPONDANTE DE LA PRISE ET POUSSER
JUSQU’AU FOND.
CAUTION: Any changes or modifications in
construction df this device with are not expressly
approved by the party responsible for compliance,
could void the user's authority to operate the
equipment.
For CANADA
Pour le CANADA
This equipment has been tested and found to comply
with the limits for a Class B digital device, pursuant to
Part 15 of the FCC Rules. These limits are designed to
provide reasonable protection against harmful
interference in a residential installation. This
equipment generates, uses, and can radiate radio
frequency energy and, if not installed and used in
accordance with the instructions, may cause harmful
interference to radio communications. However,
there is no guarantee that interference will not occur
in a particular installation. If this equipment does
cause harmful interference to radio or television
reception, which can be determined by turning the
equipment off and on, the user is encouraged to try to
correct the interference by one or more of the
following measures:
• Reorient or relocate the equipment and/or the
receiving antenna.
• Increase the separation between the equipment
and receiver.
• Connect the equipment into an outlet on a circuit
different from that to which the receiver is
connected.
• Consult the dealer or an experienced radio/TV
technician for help.
For U.S.A.
CAUTION
< DO NOT REMOVE THE PROTECTIVE HOUSING
USING SCREWDRIVER.
< USE OF CONTROLS OR ADJUSTMENTS OR
PERFORMANCE OF PROCEDURES OTHER THAN
THOSE SPECIFIED HEREIN MAY RESULT IN
HAZARDOUS RADIATION EXPOSURE.
< IF THIS PRODUCT DEVELOPS TROUBLE, MAKE A
CONTACT WITH OUR SERVICEMAN, AND DO NOT
USE THE PRODUCT IN A TROUBLED STATE.
This product has been designed and manufactured
according to FDA regulations “title 21, CFR, chapter 1,
subchapter J, based on the Radiation Control for Health
and Safety Act of 1968“, and is classified as class 1
laser product. There is not hazardous invisible laser
radiation during operation because invisible laser
radiation emitted inside of this product is completely
confined in the protective housings.
The label required in this regulation is shown .
Optical pickup :
Type : SF-HD60
Laser output : Less than 0.3 mW
on the objective lens
Wavelength : 650±15 nm (CD), 780±25 nm (DVD)
1
Y
CAUTION: TO REDUCE THE RISK OF ELECTRIC
SHOCK, DO NOT REMOVE COVER (OR BACK). NO
USER-SERVICEABLE PARTS INSIDE. REFER SERVICING
TO QUALIFIED SERVICE PERSONNEL.
Page 4

4
Table of Contents
INTRODUCTION
Contents...................................................................................4
Before Use .............................................................................5
Discs.........................................................................................6
Remote Control Unit ............................................................10
Connection............................................................................11
Connecting Antennas..........................................................17
Names of Each Control .......................................................18
DVD PART
DVD Settings.........................................................................23
Surround Mode ....................................................................26
Speaker Configuration ........................................................27
Night Mode ...........................................................................30
Setting a Rating Level and Password ..............................31
Basic Operation ...................................................................32
Playback................................................................................33
Resume Playback ................................................................34
Playback from a specific chapter/track...........................35
Slow-Motion Playback........................................................36
Single Stepping Playback...................................................36
Direct playback ....................................................................36
Repeat Playback .................................................................37
Shuffle Playback of CD, MP3 .............................................38
Programmed playback (CD) ...............................................39
GUI(Graphical User Interface) ..........................................41
Title Select ............................................................................42
Time Select ..........................................................................42
Picture Zoom.........................................................................43
JPEG ....................................................................................43
Change the Angle ................................................................43
Select a Subtitle Language ..............................................44
Select an Audio Language .................................................44
TUNER PART
Tuner .....................................................................................45
Preset Tuning .......................................................................46
VCR PART
Menu Screen Operation .....................................................47
Setting the Clock .................................................................48
Channel Setting ..............................................................49-50
'INITIAL SET' menu ........................................................51-52
Language Selection.............................................................52
Video Cassette ................................................................53-54
Basic Playback.....................................................................55
Special Operation ................................................................56
Digital Shuttle Function.......................................................57
Recording TV Programs ................................................58-59
Duplicating a Video Tape....................................................60
One Touch Timer Recording (OTR) ...................................61
Normal Timer Programming .........................................62-65
Checking and Cancelling Timer Recording ....................66
VISS (VHS Index Search System) ...............................67-68
Clock/Count Display.............................................................68
Closed Captions....................................................................69
Copying from DVD to VHS...................................................70
MTS Broadcast / TV Stereo System.................................71
Select Audio Mode for Playback.......................................71
Select Audio Mode for Recording.....................................71
Reference
Glossary ................................................................................72
Remote Programming .........................................................73
Troubleshooting ...................................................................79
Specifications.......................................................................80
Page 5

Before Use
Conventions about This User Guide
< Instructions in this User Guide describe the controls
on the remote control. You can also use the buttons
on the front panel if they have the same or similar
names as those on the remote.
< The types of functions and operations that can be
used for a particular disc vary depending on the
features of that disc. In some cases, these functions
and operations may differ from the descriptions given
in this User Guide. In this event, follow the
instructions given on the screen. This User Guide
only covers basic disc operations.
< For some operations, the PROHIBIT icon "A" may
appear on the screen. This indicates that the
operation described in this User Guide is not
permitted for the current disc.
< The drawings about the TV screen and front panel
display used in this User Guide are purely for the
purposes of explanation. The actual displays may
differ slightly from what are shown here.
Read this before operation
< As the unit may become warm during operation,
always leave sufficient space around the unit for
ventilation.
< The voltage supplied to the unit should match the
voltage as printed on the rear panel. If you are in any
doubt regarding this matter, consult an electrician.
< Choose the installation location of your unit carefully.
Avoid placing it in direct sunlight or close to a source
of heat. Also avoid locations subject to vibrations and
excessive dust, heat, cold or moisture.
< Do not place the unit on an amplifier or receiver.
< Do not open the cabinet as this might result in
damage to the circuitry or electrical shock. If a
foreign object should get into the unit, contact your
dealer or service company.
< When removing the power plug from the wall outlet,
always pull directly on the plug, never yank the cord.
< To keep the laser pickup clean, do not touch it, and
always close the disc tray.
< Do not attempt to clean the unit with chemical
solvents as this might damage the finish. Use a clean,
dry cloth.
< Keep this User Guide in a safe place for future
reference.
5
“DTS” and “DTS Digital Surround” are trademarks of Digital
Theater Systems, Inc. ©1996 Digital Theater Systems, Inc. All
rights reserved.
Manufactured under license from Dolby Laboratories. “Dolby”,
“Pro Logic” and the double-D symbol are trademarks of Dolby
Laboratories. Confidential Unpublished Works. ©1992-1997
Dolby Laboratories, Inc. All rights reserved.
This product incorporates copyright protection technology that
is protected by method claims of certain U.S. patents and other
intellectual property rights owned by Macrovision Corporation
and other rights owners. Use of this copyright protection
technology must be authorized by Macrovision Corporation, and
is intended for home and other limited viewing uses only, unless
otherwise authorized by Macrovision Corporation. Reverse
engineering or disassembly is prohibited.
Page 6
Discs 1
Type of Discs That Can be Played on
This System
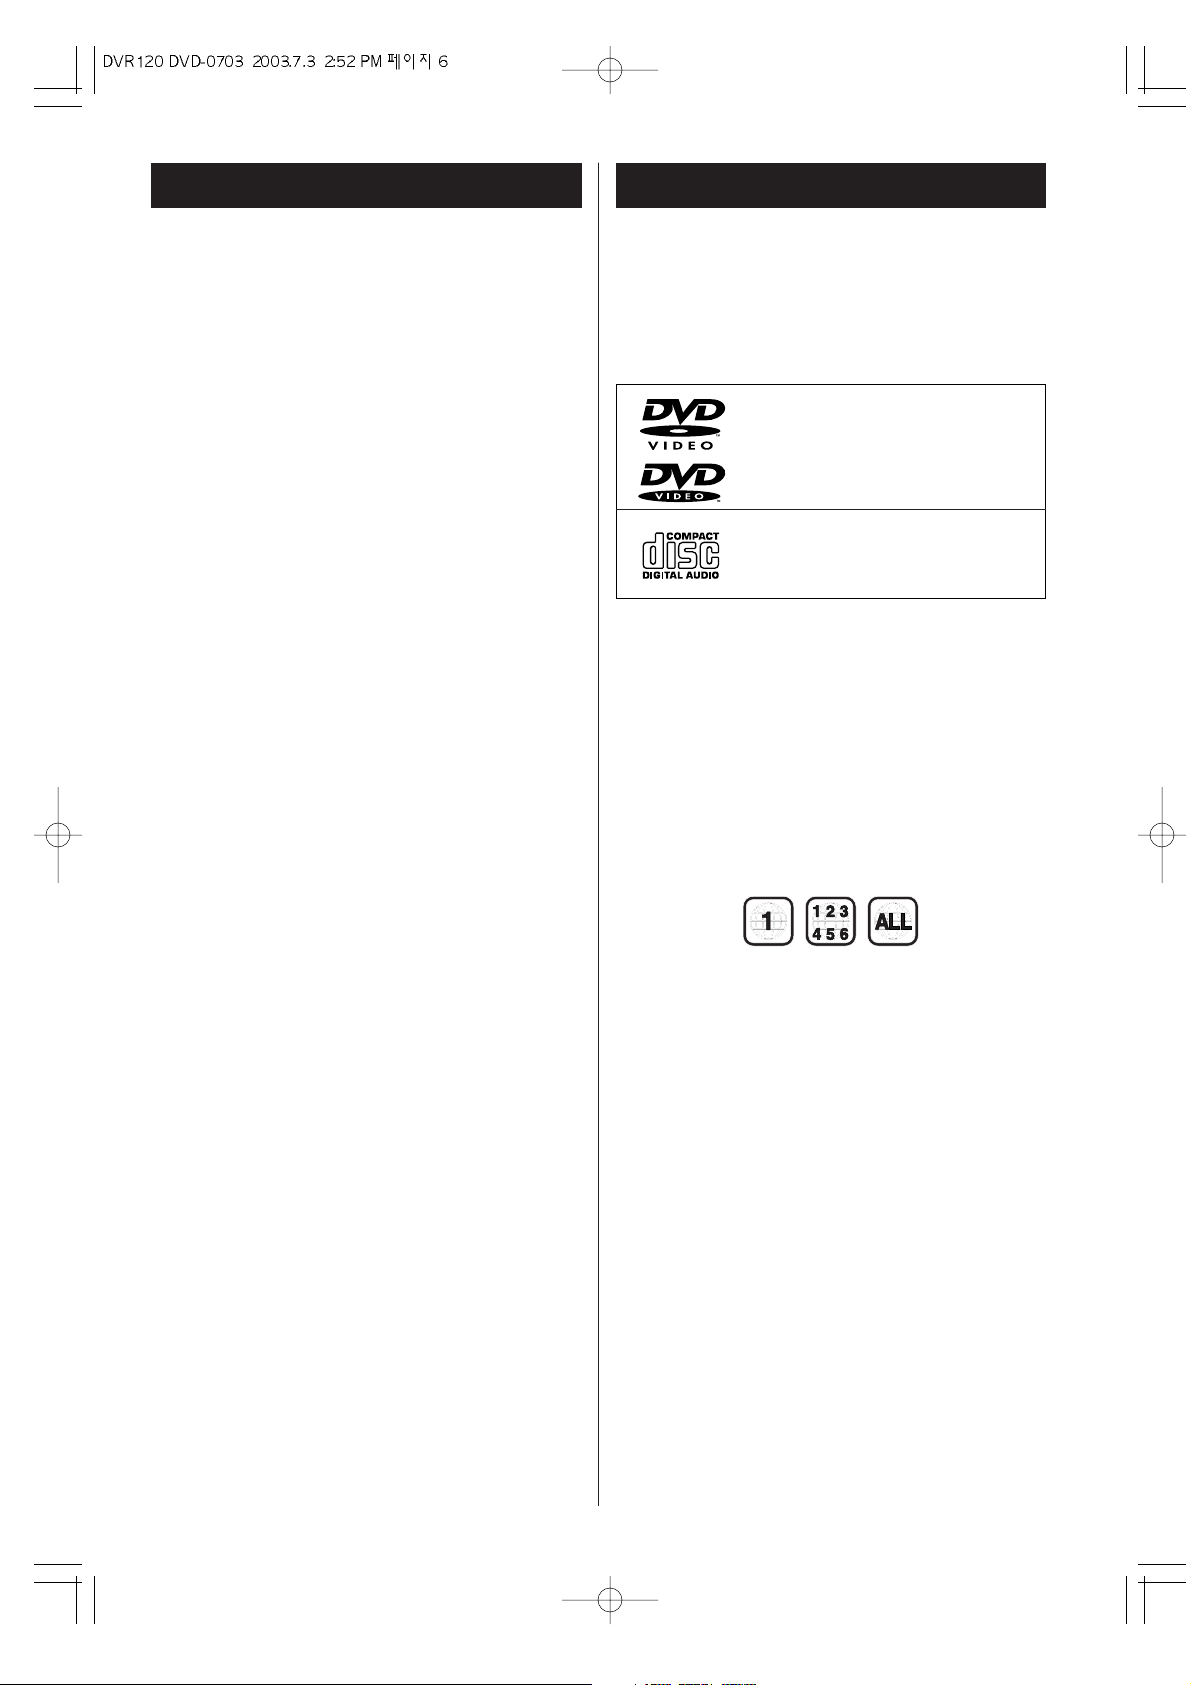
This player can playback discs bearing any of the
following marks:
Note 2
The specific playback functionality for some DVD
and video CD discs is determined by the disc
manufacturer. Because this DVD player plays disc
data in accordance with the disc manufacturer’s
guidelines, some functions may not be available on
some discs. Be sure to read the instructions provided
with the disc.
The PROHIBIT icon "
A" displayed during DVD player
operation indicates that such manufacturer imposed
restrictions apply.
Note 1
DVD players and discs are designed with region
numbers that dictate the regions in which a disc can
be played. If the region number on the disc you want
to play does not match the region number of your
DVD player, you will not be able to play the disc. In
that case, an error message will appear on the
screen.
The region code is printed on the rear panel of this
unit. Discs having the following region codes can be
played on this unit :
DVDs
12cm or 8cm disc
See Note 1, 2, 3.
Audio CDs, MP3
12cm or 8cm disc
See Note 4.
6
DO NOT MOVE THE UNIT DURING PLAYBACK
During playback, the disc rotates at high speed. Do
NOT lift or move the unit during playback. Doing so
may damage the disc or the unit.
WHEN MOVING THIS UNIT
When changing places of installation or packing the
unit for moving, be sure to remove the disc and
return the disc tray to its closed position in the
player. Then, press the power switch to turn the
power off, and disconnect the power cord. Moving
this unit with the disc loaded may result in damage to
this unit.
Before Use
Page 7

Note 3
The audio on a DVD disc recorded in MPEG version
2.0 format cannot be played (MPEG-2 is an image
only format).
Note 4
File names of MP3 should be alphanumeric
characters. This unit cannot display symbols and fullsize or 2 bytes-wide characters (such as Japanese,
Chinese, etc.) correctly.
Also, be sure to use the extension ".mp3".
When more than 200 MP3 files are recorded on the
disc, the unit might not be able to play it correctly.
About CD-R/CD-RW
CD-R/RW discs recorded in Audio CD format and
finalized correctly are playable. But depending on
the quality of the disc and/or the condition of the
recording, some CD-R & CD-RW discs may not be
playable.
Discs 2
The Following discs cannot be played
with this unit:
CD-G, CD-EXTRA, PHOTO CD, CD-ROM and DVDROM discs.
Discs recorded in a color system other than PAL or
NTSC.
Illegally produced discs.
Scratched discs.
Discs that are dusty, soiled or marked with
fingerprints.
Warning:
If you attempt to play back such discs, there is a risk
that a sudden loud noise can blast over the speakers
at full volume and cause damage to the speakers and
your hearing.
< Copy-protected discs and other discs which do not
conform to the CD standard may not play back
correctly in this player. If you use such discs in this
unit, we cannot be responsible for any
consequences or guaranteed quality of playback. If
you experience problems with such non-standard
discs, you should contact the producers of the disc.
7
Page 8
8
Discs 3
Glossary of Disc Terms
Title (DVD)
The longest sections of a picture or a music piece on
a DVD; a movie, etcetera for a picture piece on a
video software; or an album, etc., for a music piece
on an audio disc. Each title is assigned a title number
enabling you to locate the title you want. On most
DVD movies, there will be only one title.
Chapter (DVD)
Sections of a picture or a music piece that are
smaller than titles. A title is composed of several
chapters. Each chapter is assigned a chapter
number enabling you to locate the chapter you want.
Depending on the disc, there may be only one
chapter per title recorded.
Track (audio CD)
Sections of a music piece on an audio CD. Each track
is assigned a track number enabling you to locate
the track you want. On most audio CD's, one track is
equal to one song.
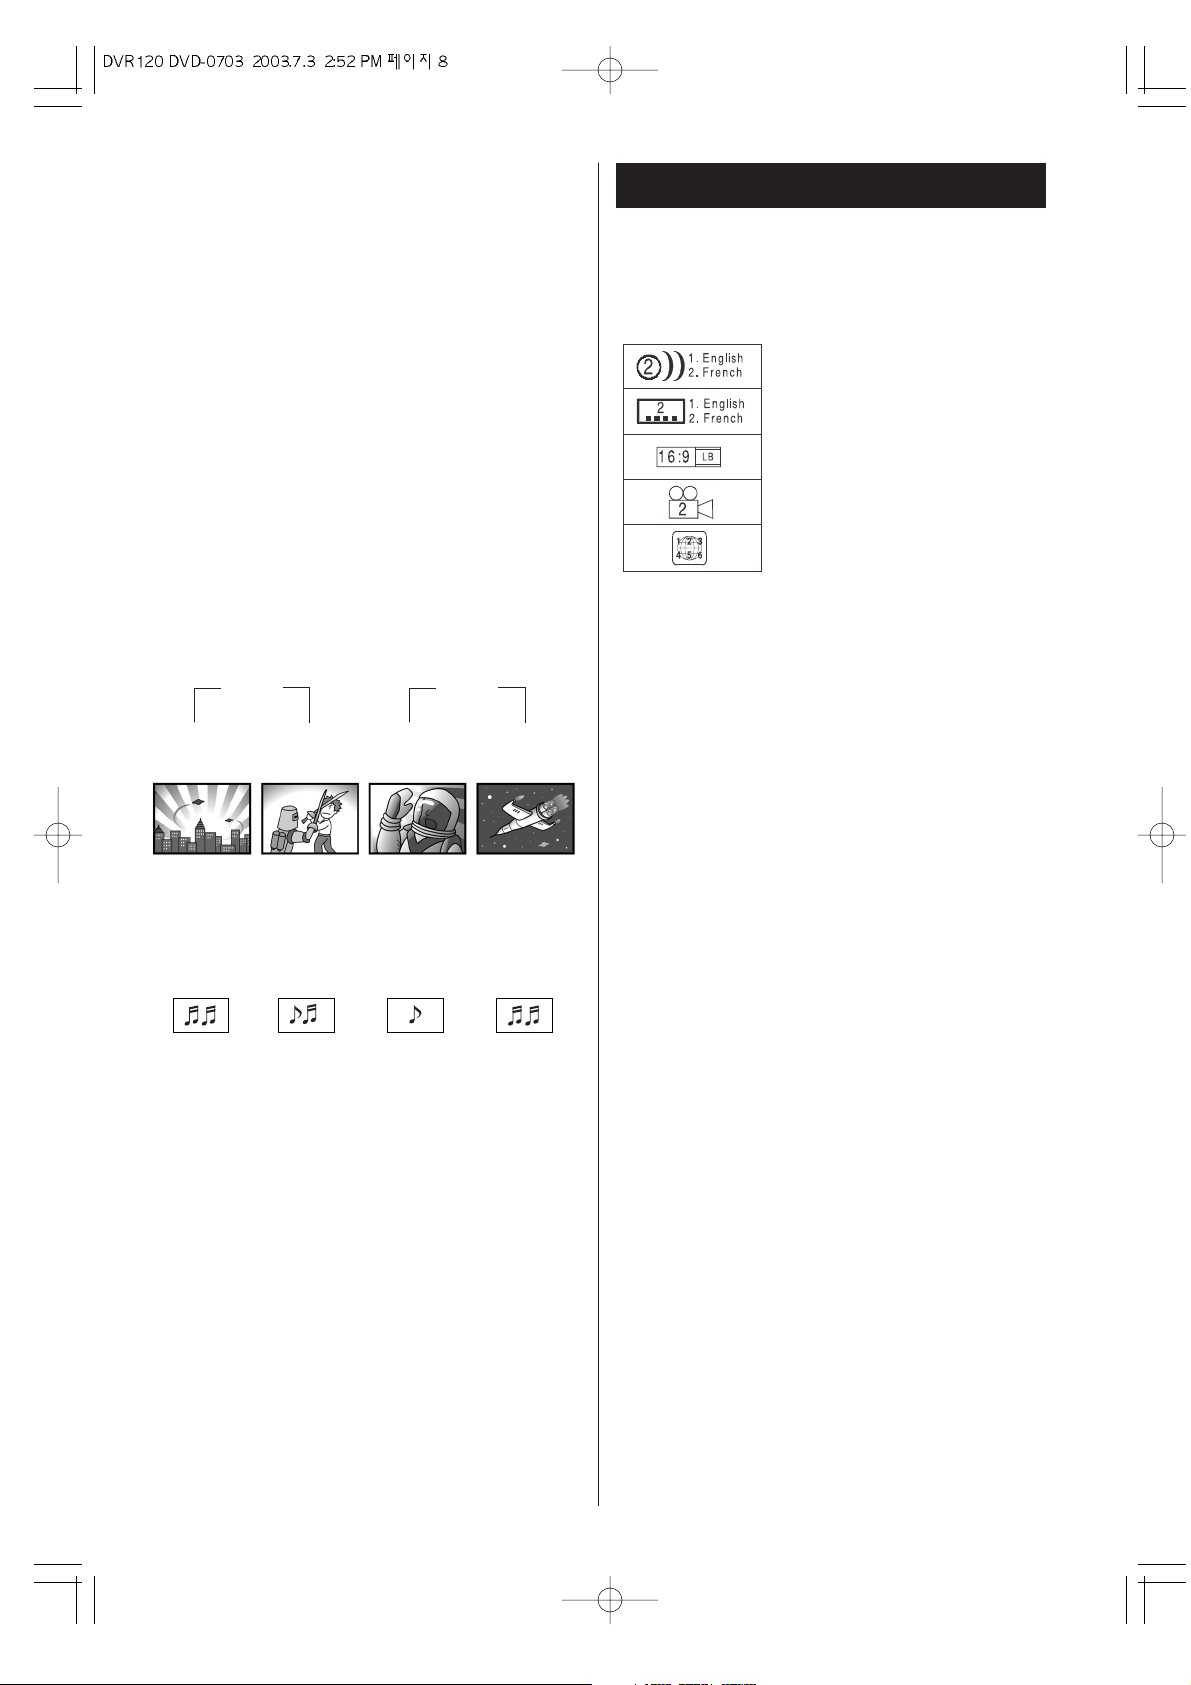
number of audio tracks recorded
on the disc
number of subtitles recorded on
the disc
screen aspect ratio
disc recorded with multiple
camera angles
region code
CD
Track 1 Track 2 Track 3 Track 4
Piste 1 Piste 2 Piste 3 Piste 4
Pista 1 Pista 2 Pista 3 Pista 4
DVD
Chapter 1 Chapter 2 Chapter 1 Chapter 2
Chapitre 1 Chapitre 2 Chapitre 1 Chapitre 2
Capitulo 1 Capitulo 2 Capitulo 1 Capitulo 2
Title 1
Titre 1
Titulo 1
Title 2
Titre 2
Titulo 2
Example of Icons used on DVD discs:
Page 9
9
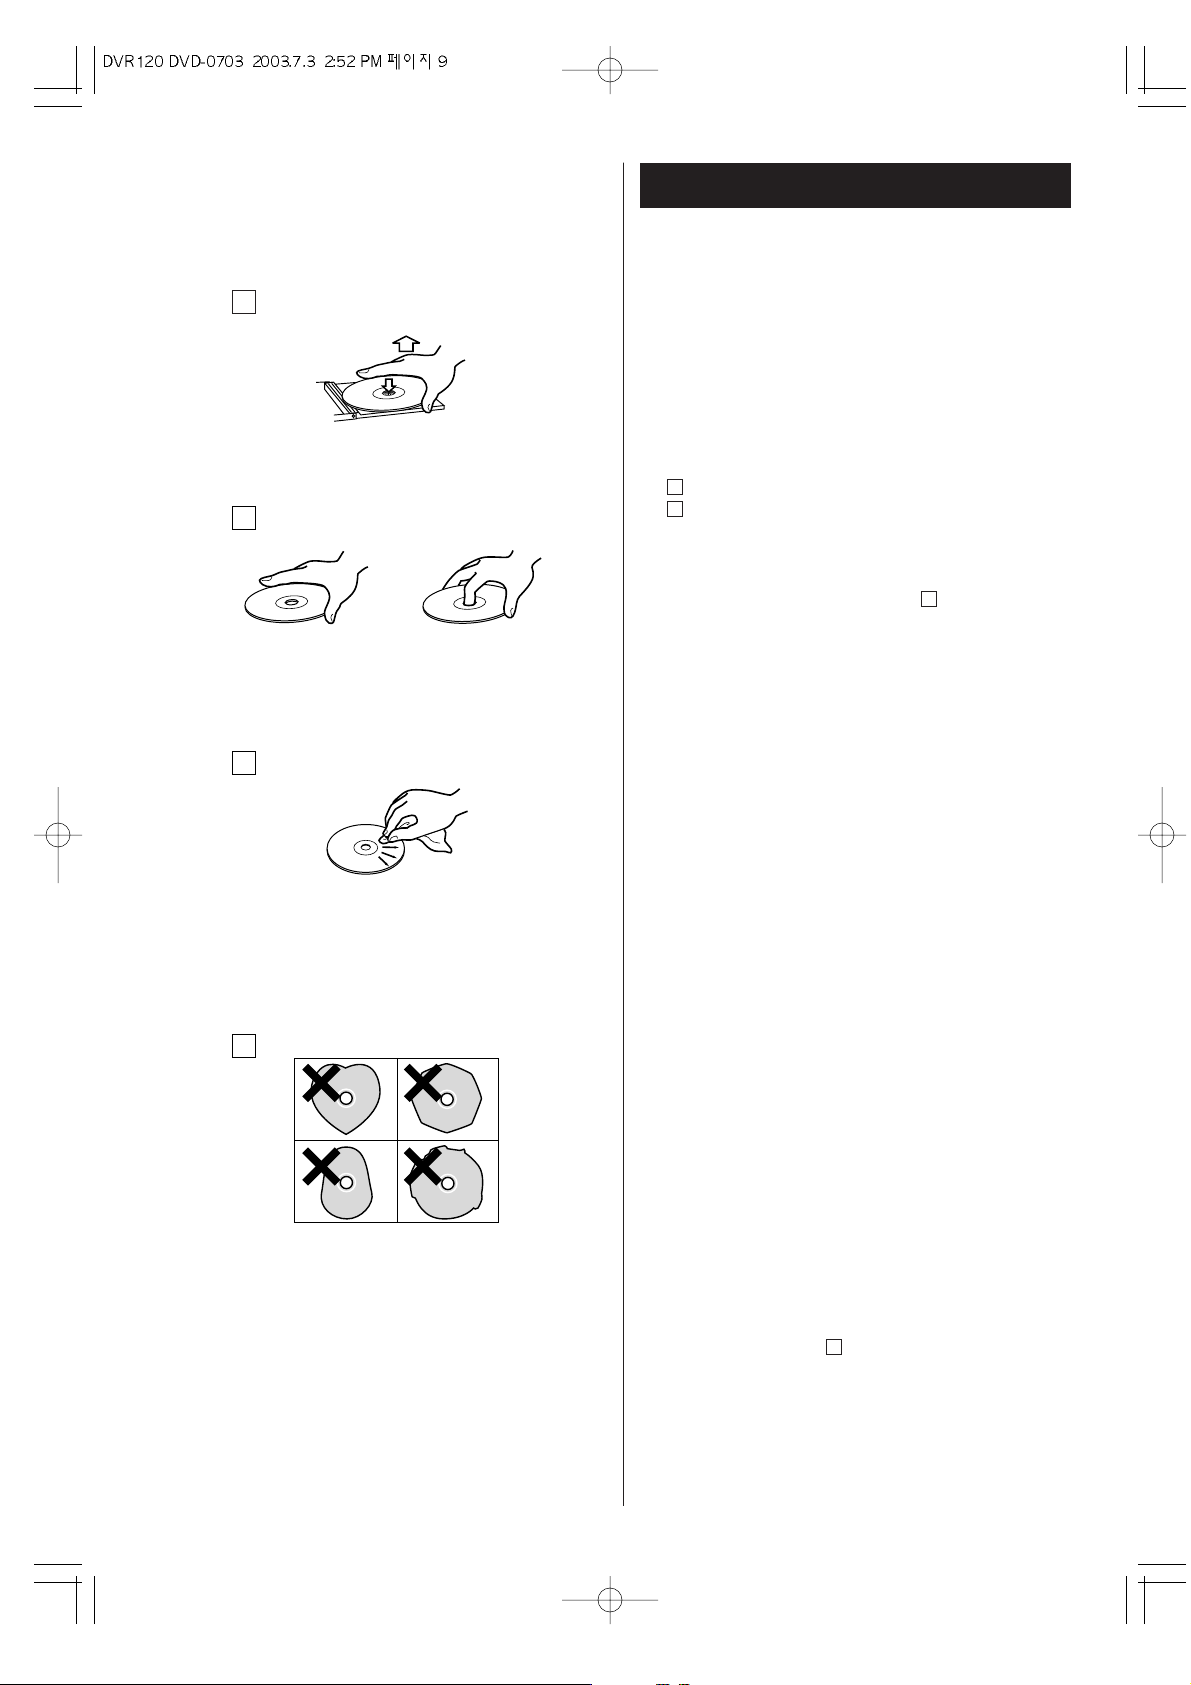
Notes on Discs
A
This section shows you how to handle, clean, and store
discs.
< Always place the disc on the disc tray with the label
side up. (Compact discs can be played or recorded
only on one side.)
< To remove a disc from its storage case, press down
on the center of the case and lift the disc out, holding
it carefully by the edges.
How to remove the disc
How to hold the disc
< Should the disc become dirty, wipe the surface
radially (from the center hole outward towards the
outer edge) with a soft, dry cloth :
< Never use such chemicals as record sprays,
antistatic sprays or fluid, benzine or thinner to clean
the discs. Such chemicals will do irreparable
damage to the disc's plastic surface.
< Discs should be returned to their cases after use to
avoid dust and scratches that could cause the laser
pickup to "skip."
< Do not expose discs to direct sunlight or high
humidity and temperature for extended periods. Long
exposure to high temperatures will warp the disc.
< Do not play any disc that is warped, deformed or
damaged. Playing such discs may cause irreparable
harm to the playing mechanisms.
< CD-R and CD-RW discs are more sensitive to the
effects of heat and ultraviolet rays than ordinary CDs.
It is important that they are not stored in a location
where direct sunlight will fall on them, and which is
away from sources of heat such as radiators or heatgenerating electrical devices.
< Printable CD-R and CD-RW discs aren't
recommended, as the label side might be sticky and
damage the unit.
< Do not stick papers or protective sheets on the discs
and do not use any protective coating spray.
< Use a soft oil-based felt-tipped pen to write the
information on the label side. Never use a ball-point
or hard-tipped pen, as this may cause damage to the
recorded side.
< Never use a stabilizer. Using commercially available
CD stabilizers with this unit will damage the
mechanisms and cause them to malfunction.
< Do not use irregular shape CDs (octagonal, heart
shaped, business card size, etc.). CDs of this sort
can damage the unit:
< If you are in any doubt as to the care and handling of
a CD-R/CD-RW disc, read the precautions supplied
with the disc, or contact the disc manufacturer
directly.
D
C
B
A
C
B
D
Page 10
10
Remote Control Unit
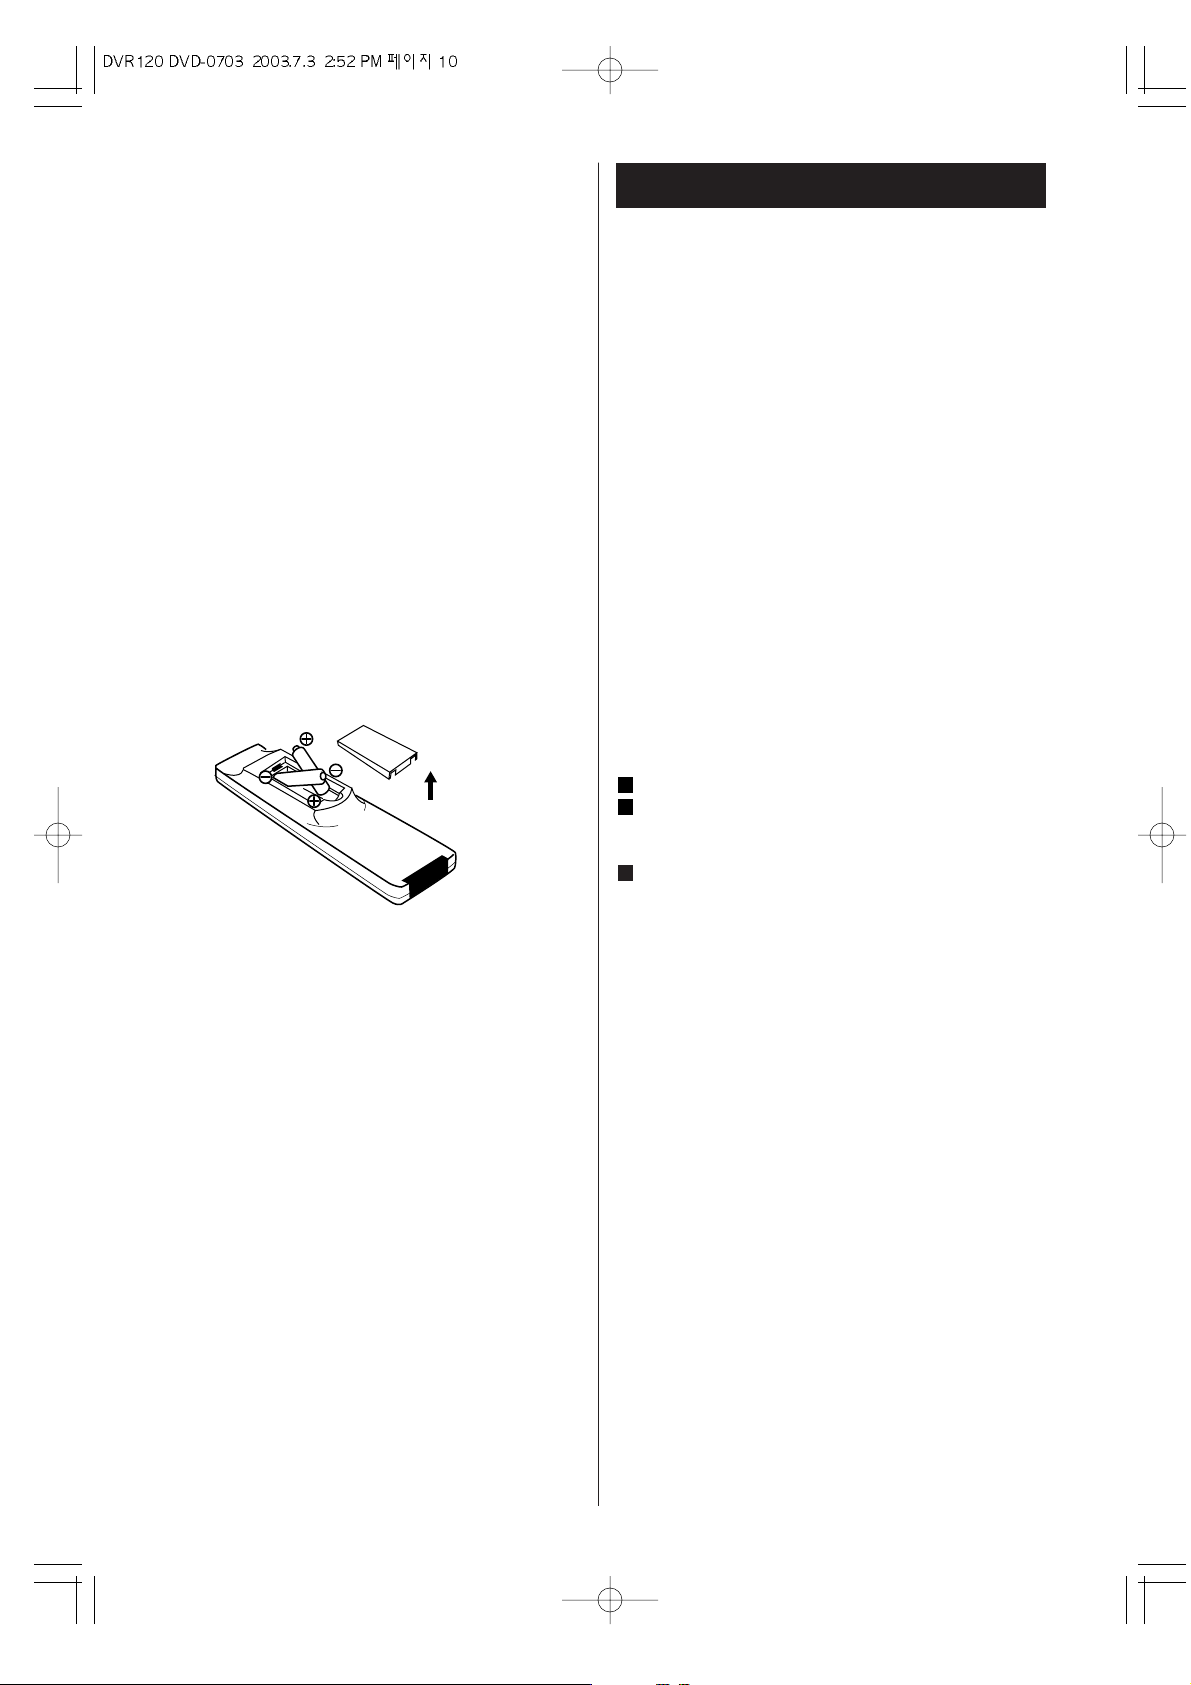
Remote Control Battery Installation
Remove the battery compartment cover.
Insert two “AAA“ dry batteries. Make sure that the
batteries are inserted with their positive “
+“ and
negative “
_“ poles positioned correctly.
Close the cover.
Battery Replacement
If the distance required between the remote control unit
and main unit decreases, the batteries are exhausted. In
this case replace the batteries with new ones.
Precautions concerning batteries
< Be sure to insert the batteries with correct positive
“
+“ and negative “_“ polarities.
< Use batteries of the same type. Never use different
types of batteries together.
< Rechargeable and non-rechargeable batteries can
be used. Refer to the precautions on their labels.
< When the remote control unit is not to be used for a
long time (more than a month), remove the batteries
from the remote control unit to prevent them from
leaking. If they leak, wipe away the liquid inside the
battery compartment and replace the batteries with
new ones.
< Do not heat or disassemble batteries and never
dispose of old batteries by throwing them in a fire.
3
2
1
Remote Control Operation Range
The provided Remote Control Unit allows the unit to be
operated from a distance.
When operating the remote control unit, point it towards
the REMOTE SENSOR on the front panel of the unit.
< Even if the remote control unit is operated within the
effective range, remote control operation may be
impossible if there are any obstacles between the
unit and the remote control.
< If the remote control unit is operated near other
products which generate infrared rays, or if other
remote control devices using infrared rays are used
near the unit, it may operate incorrectly. Conversely,
the other products may operate incorrectly.
Page 11
11
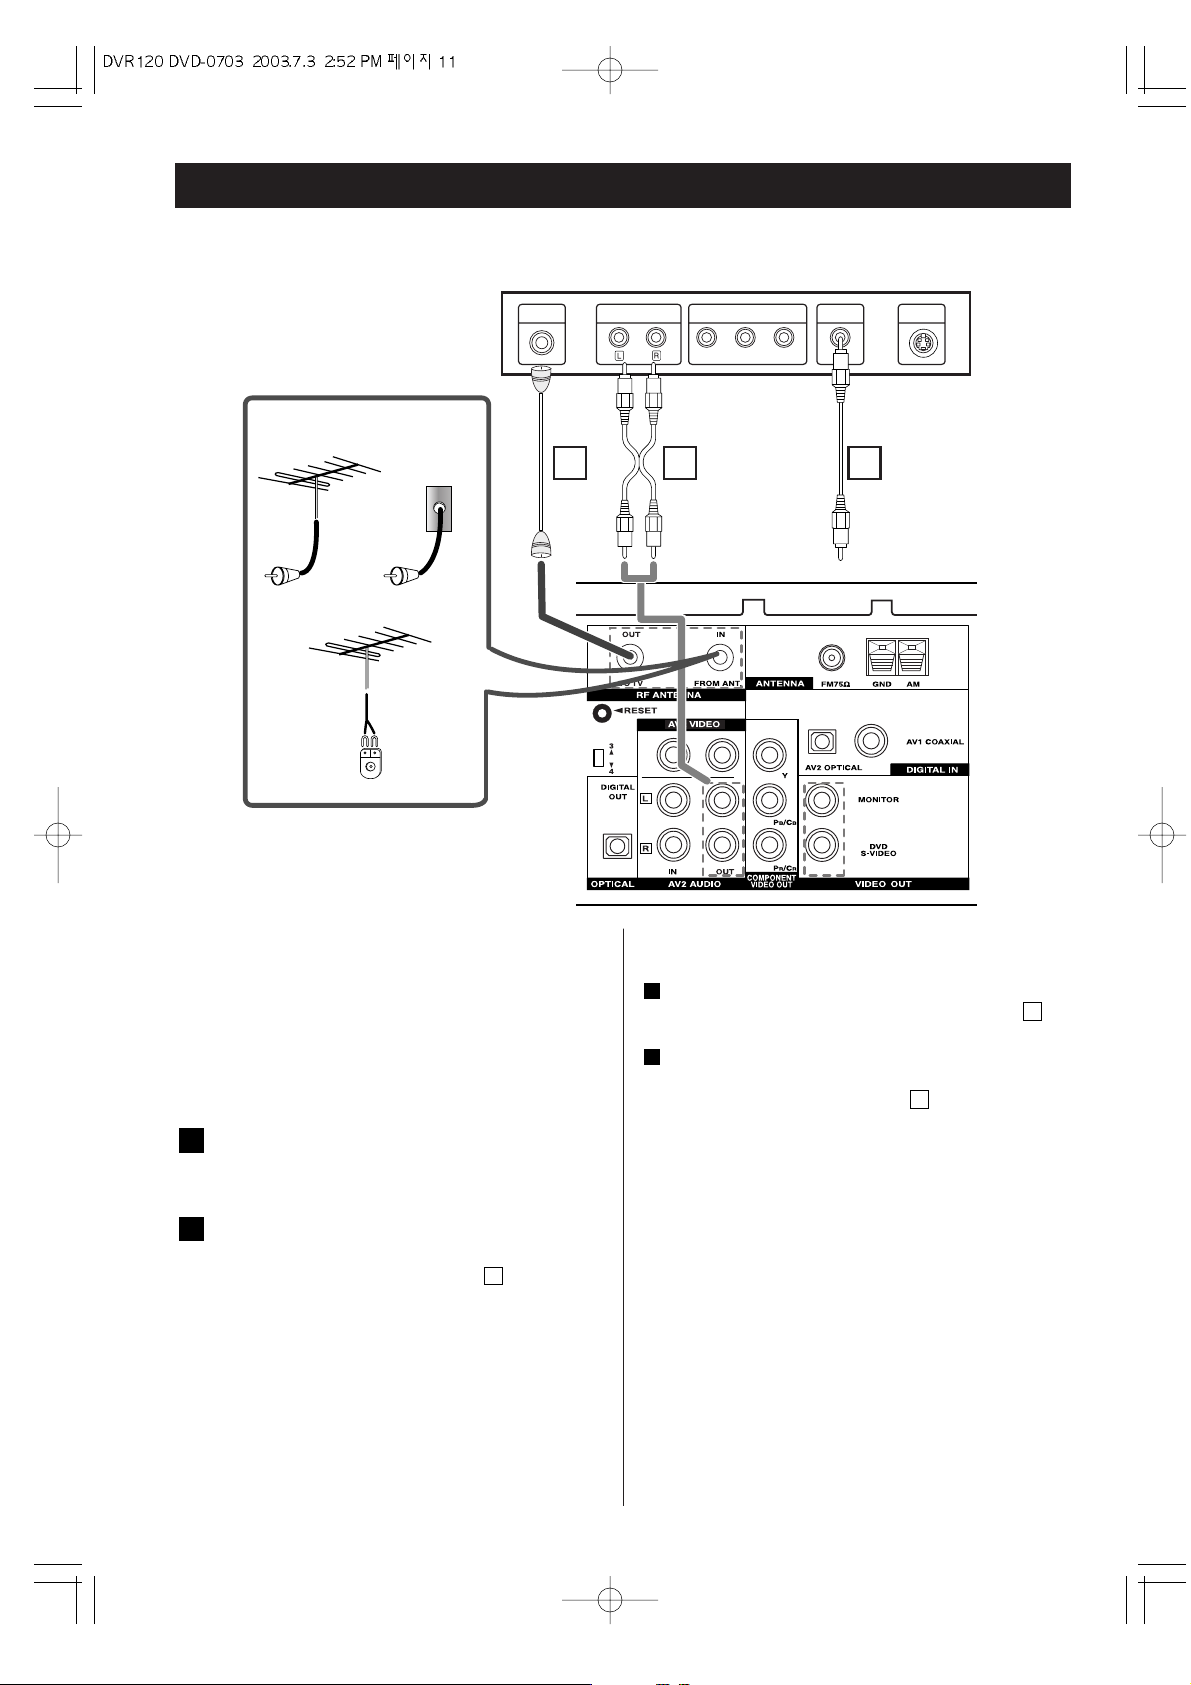
Connection 1
Basic TV Connections
Make one of the following connections, depending on
the capabilities of your existing equipment. The
connections are listed in order of quality of picture with
the best possible last. Additional information on each
connection type is provided below:
RF coaxial connection
ANTENNA to DVD/VCR.
Connect the Antenna to the RF ANTENNA IN jack
on the DVD/VCR.
Connect the RF ANTENNA OUT jack on the
DVD/VCR to the antenna in jack on the TV using
the 75-ohm Coaxial Cable supplied .
Note:
If you use this connection, tune the TV to the
DVD/VCR’s RF output channel (CH 3 or 4).
The RF output channel is changed between CH 03
and CH 04 by switching the channel switch on the
back of the unit.
A
B
A
Audio/Video Connections
Connect the VIDEO OUT MONTOR jack on the VIDEO
INPUT jack on the TV using the video cable supplied .
Connect the Left and Right AV2 AUDIO OUT jacks. on
the DVD/VCR to the AUDIO INPUT jacks on the TV
using the supplied audio cables .
CAUTION:
< Switch off the power to all equipment before making
connections.
< Read the instructions of each component you intend
to use with this unit.
< Be sure to insert each plug securely. To prevent hum
and noise, avoid bundling the signal interconnection
cables together with the AC power cord or speaker
cables.
B
2
C
1
ANTENNA
INPUT
VIDEO
INPUT
Pr Pb Y
S-VIDEO
INPUT
COMPONENT/PROGRESSIVE
SCAN VIDEO OUT
AUDIO INPUT
TV
REAR PANEL
A B C
OR
Antenna
Cable TV
Wall Jack
Antenna
Flat Wire
(300 ohm)
300/75 ohm
Adaptor
(Not supplied)
Page 12
12
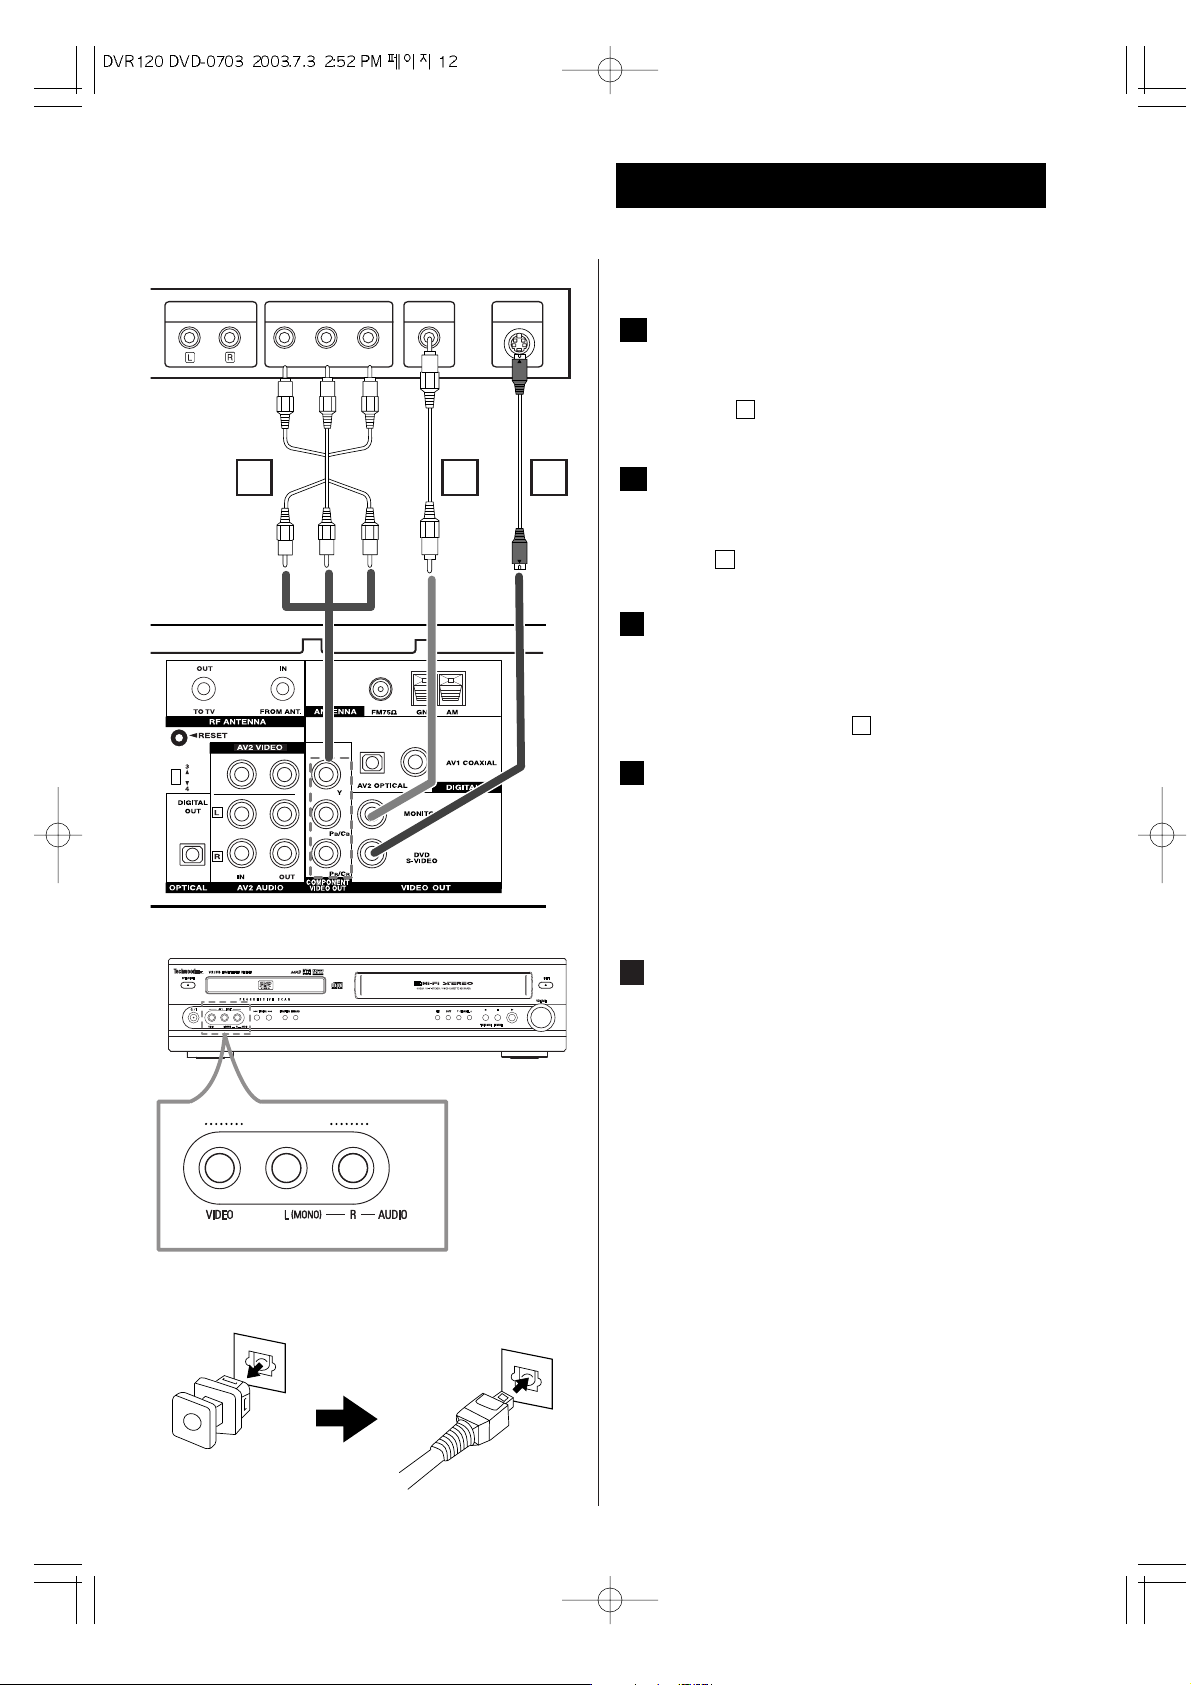
You can ONLY watch and listen to DVD playback through
the connections shown below.
Audio/Video connection
Connect the VIDEO OUT. MONITOR jack on the
DVD/VCR to the video in jack on the TV using the video
cable supplied .
DVD S-Video connection
Connect the VIDEO OUT. DVD S-VIDEO jack on the
DVD/VCR to the S-VIDEO INPUT on the TV using the SVideo cable .
Component Video connection
Connect the COMPONENT VIDEO. OUT Y, PB/CB, PR/CR
jacks on the DVD/VCR to the COMPONENT
/PROGRESIVE SCAN VIDEO IN jacks on the TV using an
optional Y, P
B/CB, PR/CR cable .
Accessory Audio/Video (A/V)
Connections to DVD/VCR
Connect the AV1 or AV2 jacks on the DVD/VCR to the
audio/video out jacks on your accessory component,
using optional audio/video cables.
( Accessory Component: : VCR, Camcorder, Video
Camera, Satellite Receiver, Laser Disc Player )
OPTICAL DIGITAL AUDIO OUT jack
Remove the dust protection cap from the connector
and connect the optical digital cable (not supplied)
firmly so that the configurations of both the cable and
the connector match. Keep the dust protection cap and
always reattach the cap when not using the connector
to protect against dust.
E
D
E
C
D
B
B
A
Connection 2
OPTICAL
OUT
VIDEO
INPUT
Pr Pb Y
S-VIDEO
INPUT
COMPONENT/PROGRESSIVE
SCAN VIDEO OUT
AUDIO INPUT
E B D
REAR PANEL
TV
AV 1
INPUT
Page 13
13
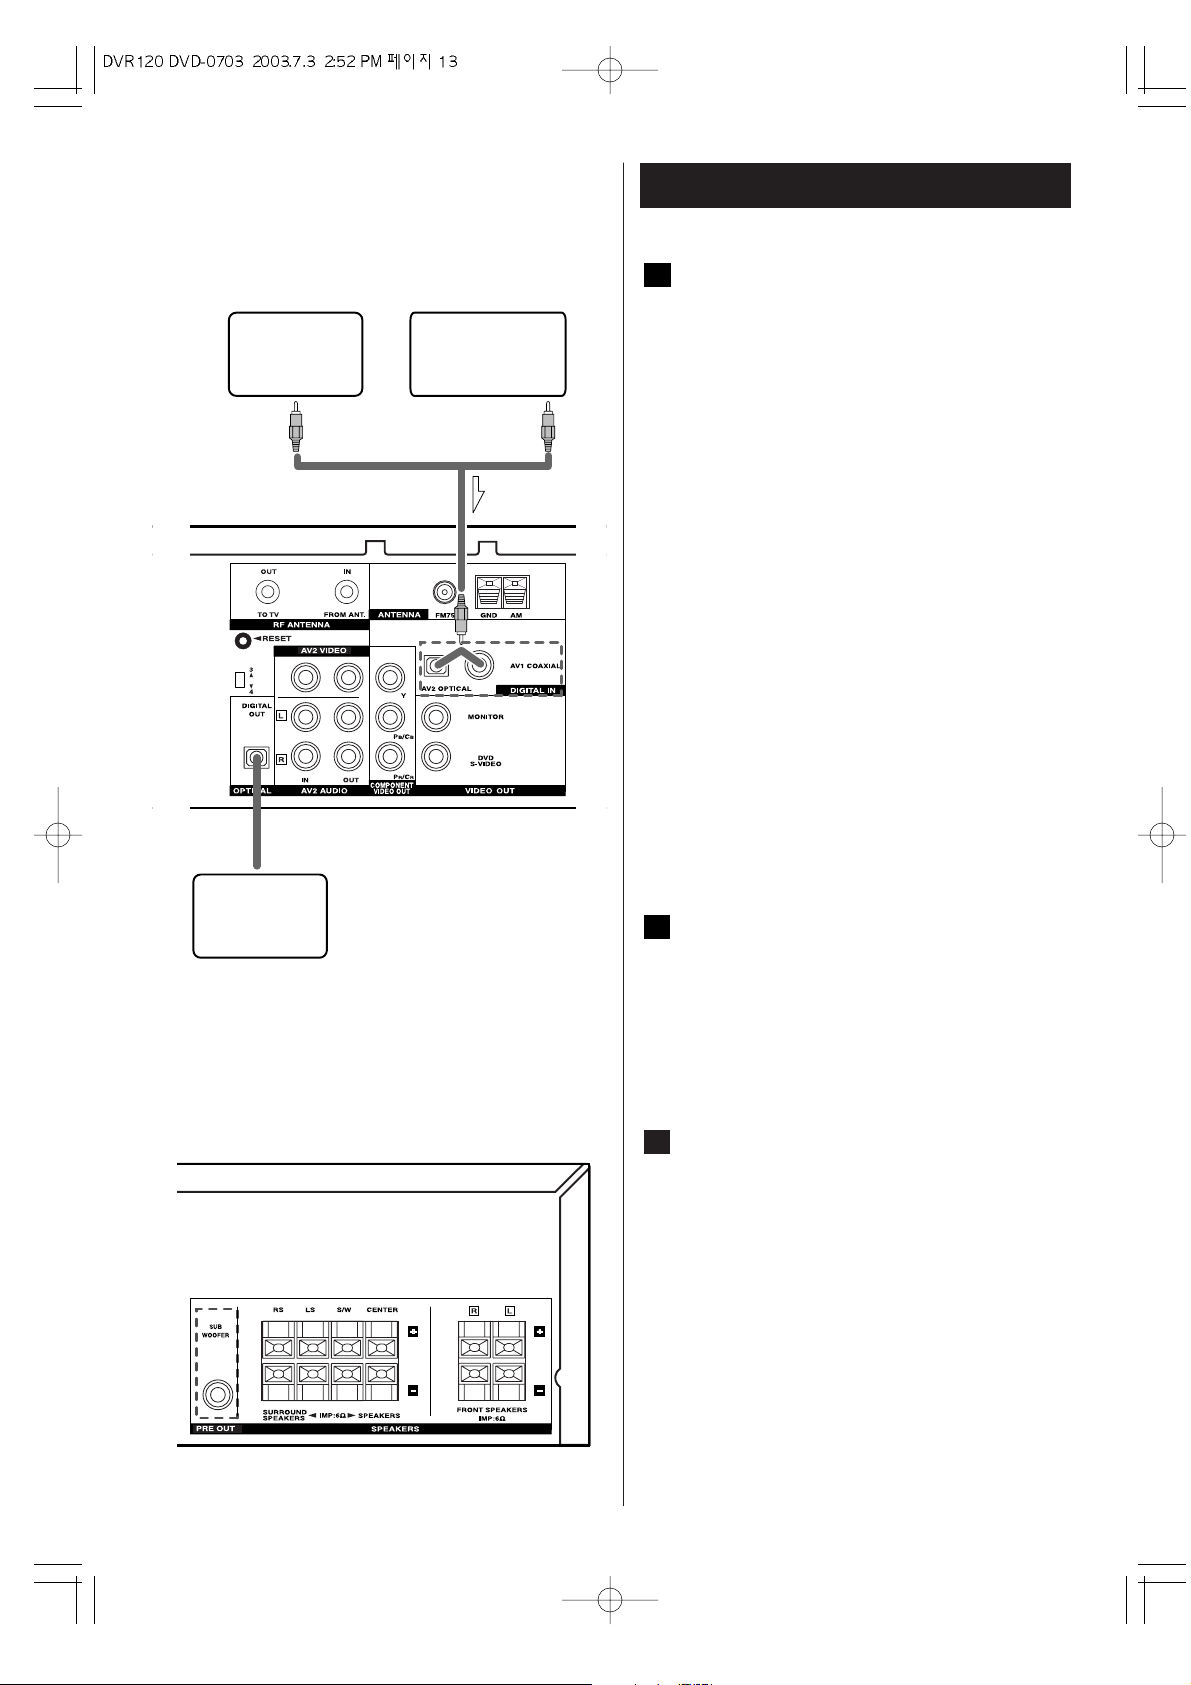
Connection 3
GAME DEVICE
OR
DIGITAL OUT
DIGITAL IN
MD,CD-R,etc
HDTV RECEIVER
REAR PANEL
DIGITAL IN jacks
< If the Accessory Component is provided with a
DIGITAL OUTPUT jack, connect it to the DIGITAL IN
jack on the DVD/VCR. (Use the optional coaxial cord
or optical fiber cable.)
< Connect any one of the DIGITAL IN terminals.
< When an optical fiber cable is used for connection,
remove the caps protecting both ends of the optical
cable and the connectors.
DIGITAL IN/OUT terminals
Connect the component with optional coaxial cables
or optical cables.
DIGITAL IN w DIGITAL OUT(CD, etc.)
DIGITAL OUT
w DIGITAL IN(CD-R, MD, etc.)
< Connect any one of the DIGITAL IN terminals.
(OPTICAL or COAXIAL)
< When using DIGITAL OPTICAL IN terminals, remove
the caps from the terminals. When you do not use
them, leave the caps in place.
< To record digitally, connect the source(CD player,
etc.) to DIGITAL IN and the recorder(CD-R, MD, etc.)
to DIGITAL OUT.
PRE OUT jack
Use Subwoofer jack to connect addtional powered
subwoofer.
You can connect a larger powered subwoofer to
the system.
Connect the subwoofer to the PREOUT.
SUBWOOFER jack using a shielded audio cable.
AC Power Cord
When all the connections have been finished, plug
the AC power cord into an AC wall socket.
CAUTION:
Connect either OPTICAL or COAXIAL with suitable jack.
C
B
A
REAR PANEL
Page 14
14
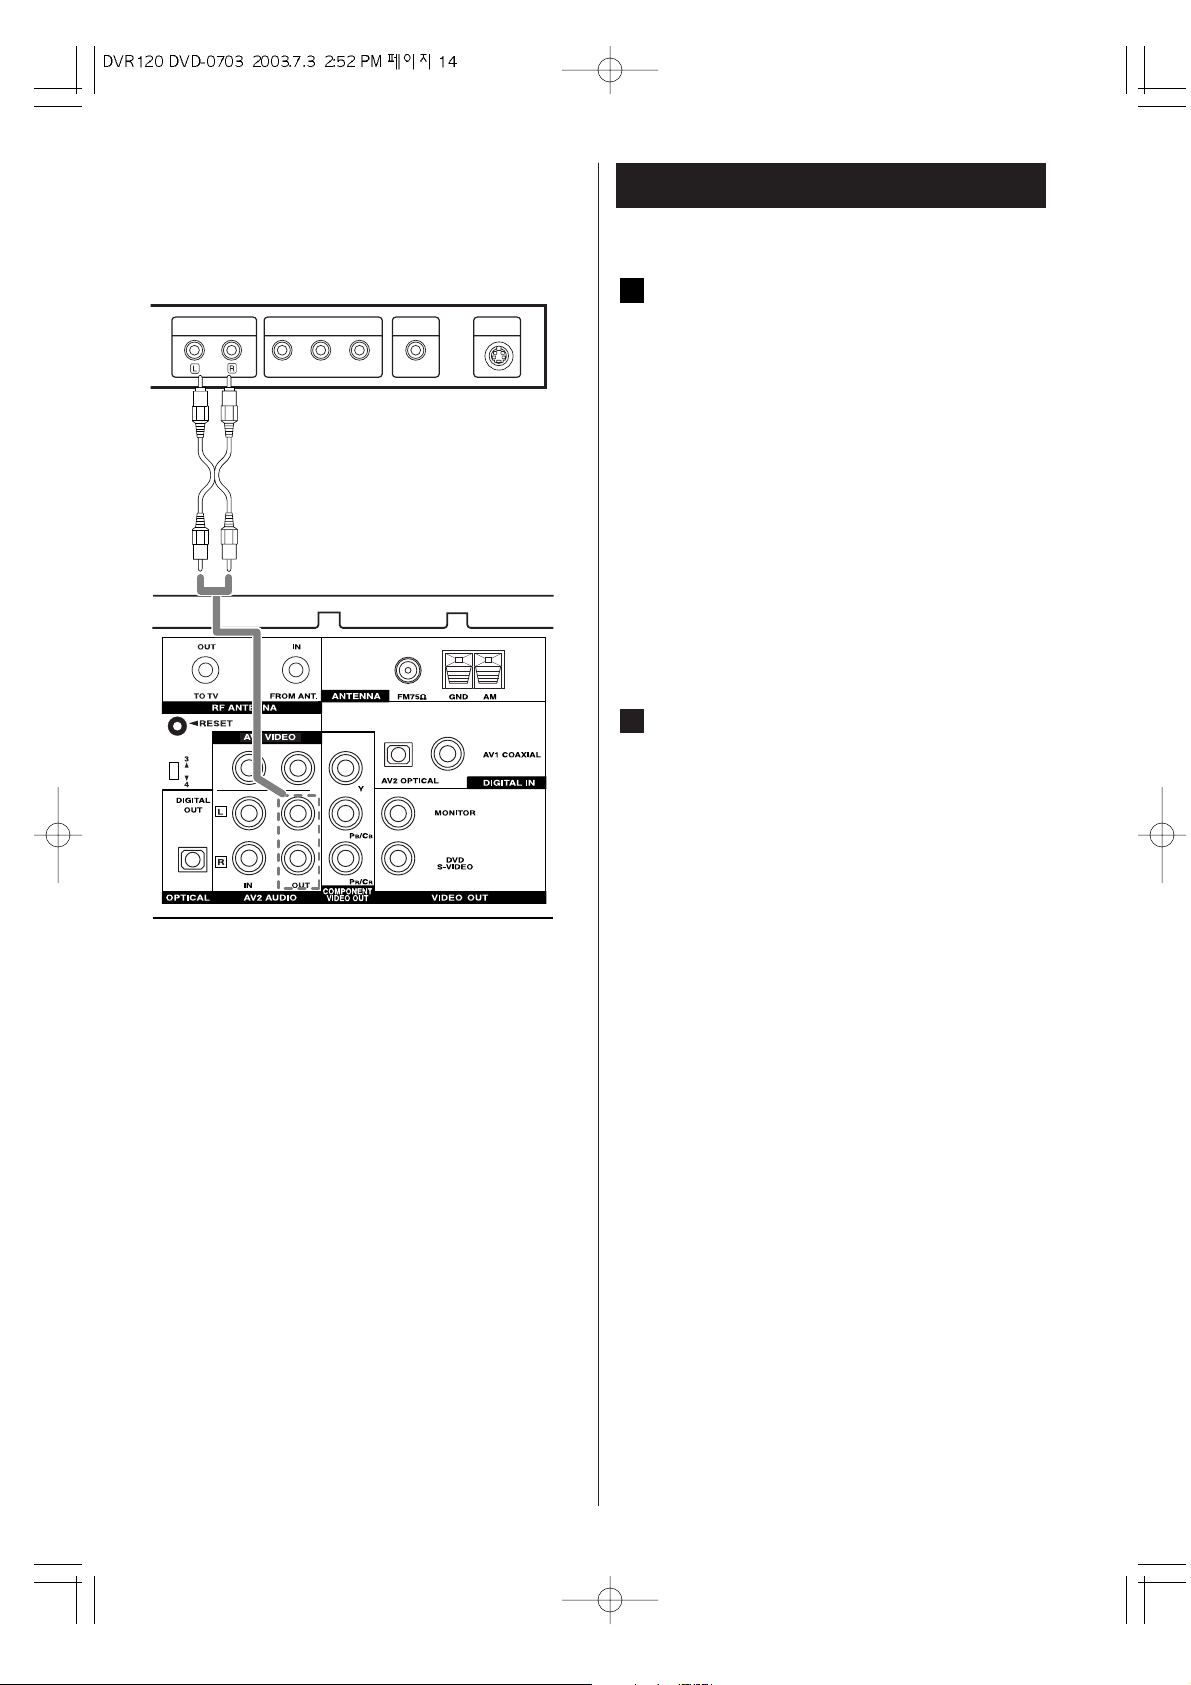
Connection 4
AUDIO IN/OUT jacks (AV2 AUDIO)
Analog 2-channel audio signal is input or output
from these jacks. Connect the component with an
RCA pin cable.
Make sure to connect :
white plug
q white jack (L: left channel)
red plug
q red jack (R: right channel)
< If you don't have speakers and want to hear sound
from a TV, connect AV2 AUDIO OUT jacks to the
LINE IN jacks of TV.
AC Power Cord
When all the connections have been finished, plug
the AC power cord into an AC wall socket.
B
A
VIDEO
INPUT
Pr Pb Y
S-VIDEO
INPUT
COMPONENT/PROGRESSIVE
SCAN VIDEO OUT
AUDIO INPUT
REAR PANEL
TV
Page 15
15
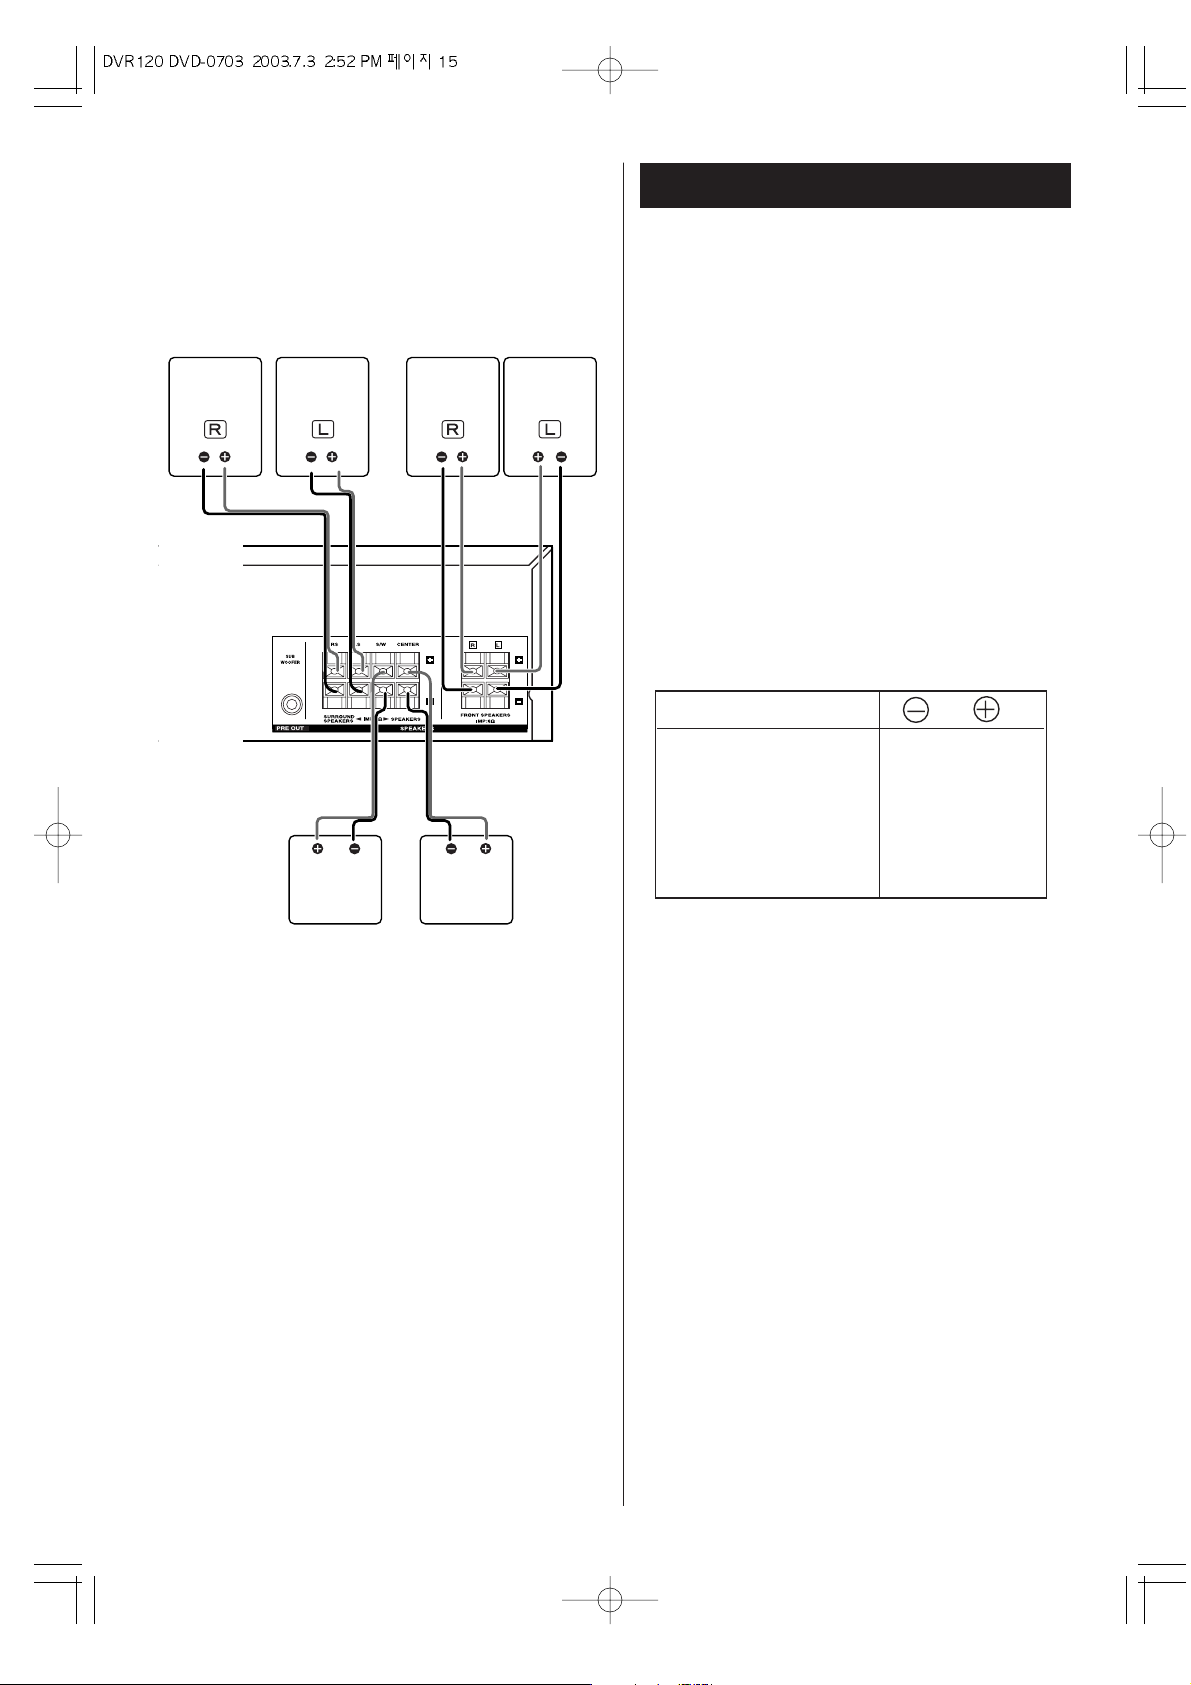
Connection 5
FRONT
SPEAKER
FRONT
SPEAKER
CENTER
SPEAKER
REAR
SPEAKER
REAR
SPEAKER
SUB-
WOOFER
REAR PANEL
Speaker Connections
Caution:
To avoid damaging the speakers with a sudden highlevel signal, be sure to switch the power off before
connecting the speakers.
Check the impedance of your speakers. Connect
speakers with an impedance of 6 ohms or more.
The red speaker terminals are + (positive), and the black
terminals are - (negative).
The + side of the speaker cable is marked to make it
distinguishable from the - side of the cable. Connect this
marked side to the red + terminal and the unmarked
side to the black terminal.
Prepare the speaker cords for connection by stripping
off approximately 3/8" (10 mm) or less (no more as this
could cause a short-circuit) of the outer insulation.
CAUTION:
The metal portions of the two separate wires should not
touch or an electrical short can occur. Shorted wires
can create a fire hazard or induce a failure in your
equipment.
SPEAKERS
BLACK
BLACK
BLACK
BLACK
RED
RED
RED
RED
BLACK RED
FRONT (L/R)
CENTER
REAR (SURROUND)(L/R)
SUBWOOFER
BACK SURROUND
Page 16
16
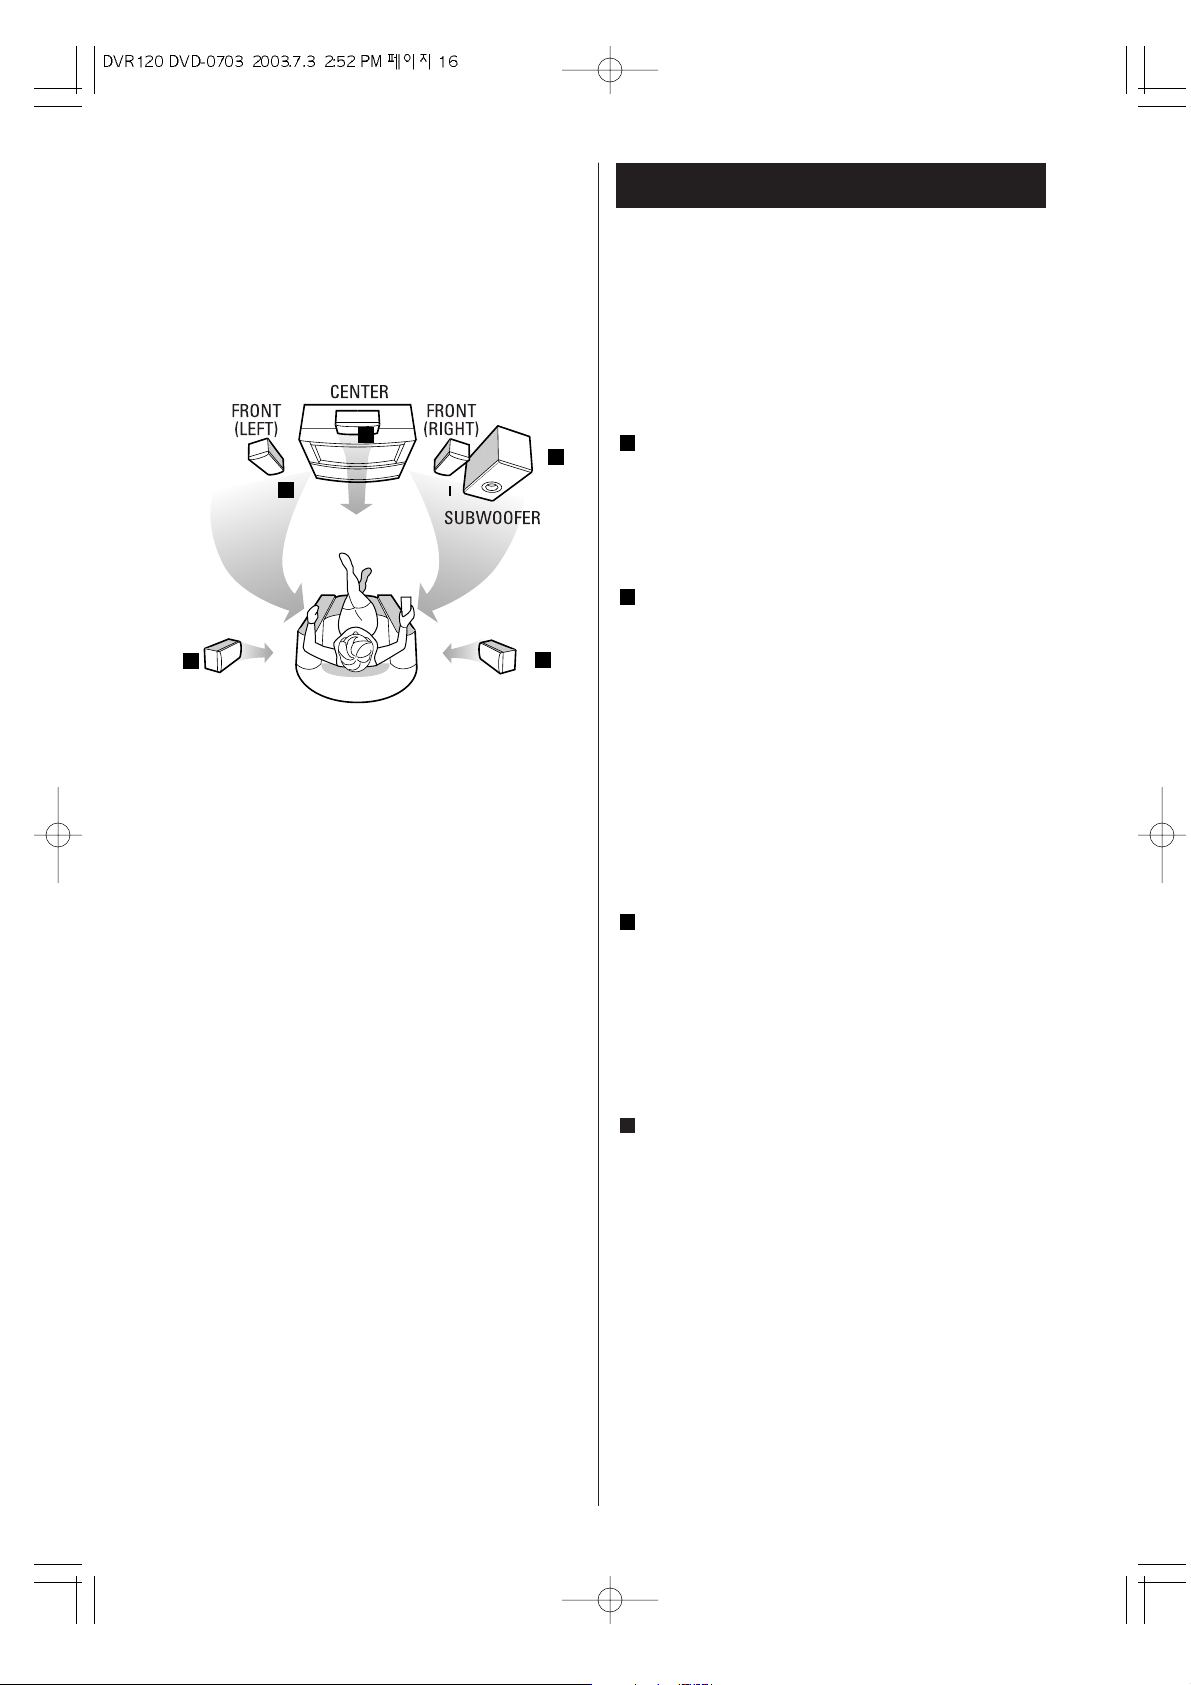
Hints on Speaker Placement
Speakers are usually designed with a partcular
placement in mind. Some are designed to be
floorstanding, while others should be placed on stands
to sound their best. Some should be placed near a wall,
others should be placed away from walls. Follow the
guidelines on placement that the speaker manufacturer
provided with your speakers.
Front speakers
Use magnetically shielded speakers, if you are using
them near your TV.
Place the front speakers in front of the listening
position, to the left and right of the TV.
Front speakers are required for all surround modes.
Center speaker
Use a magnetic shielded speaker, if you are using it
near your TV. Place the center speaker between the
front speakers, on or below the TV. This speaker
stabilizes the sound image.
Be sure to connect a center speaker when using the
DOLBY 3 STEREO mode.
If you choose to install the center speaker on top of
the TV, be sure to secure it with putty, or by other
suitable means, to reduce the risk of damage or
injury resulting from the speaker falling from the TV
in the event of external shocks such as earthquakes.
Rear speakers
Install these speakers above the level of the
listener's ears, to the left and right.
Do not install the surround speakers too far behind
the listening position. It might be effective to direct
the rear speakers towards a wall or ceiling to further
disperse the sound.
Subwoofer
Reproduces powerful and deep bass sounds.
Use a subwoofer with built-in amplifier referred to as
a “powered sub-woofer”. Subwoofers are most
effective when placed on or near the floor and in a
corner of the room. Refer to the instructions that
came with your sub-woofer for placement
suggestions.
D
C
B
A
REAR
(LEFT)
REAR
(RIGHT)
C
C
D
A
B
To achieve the best possible surround, install your
speakers as shown below. Be sure all speakers
are installed securely to prevent accidents and to
improve sound quality.
3-D View of speaker Set up
Page 17
17
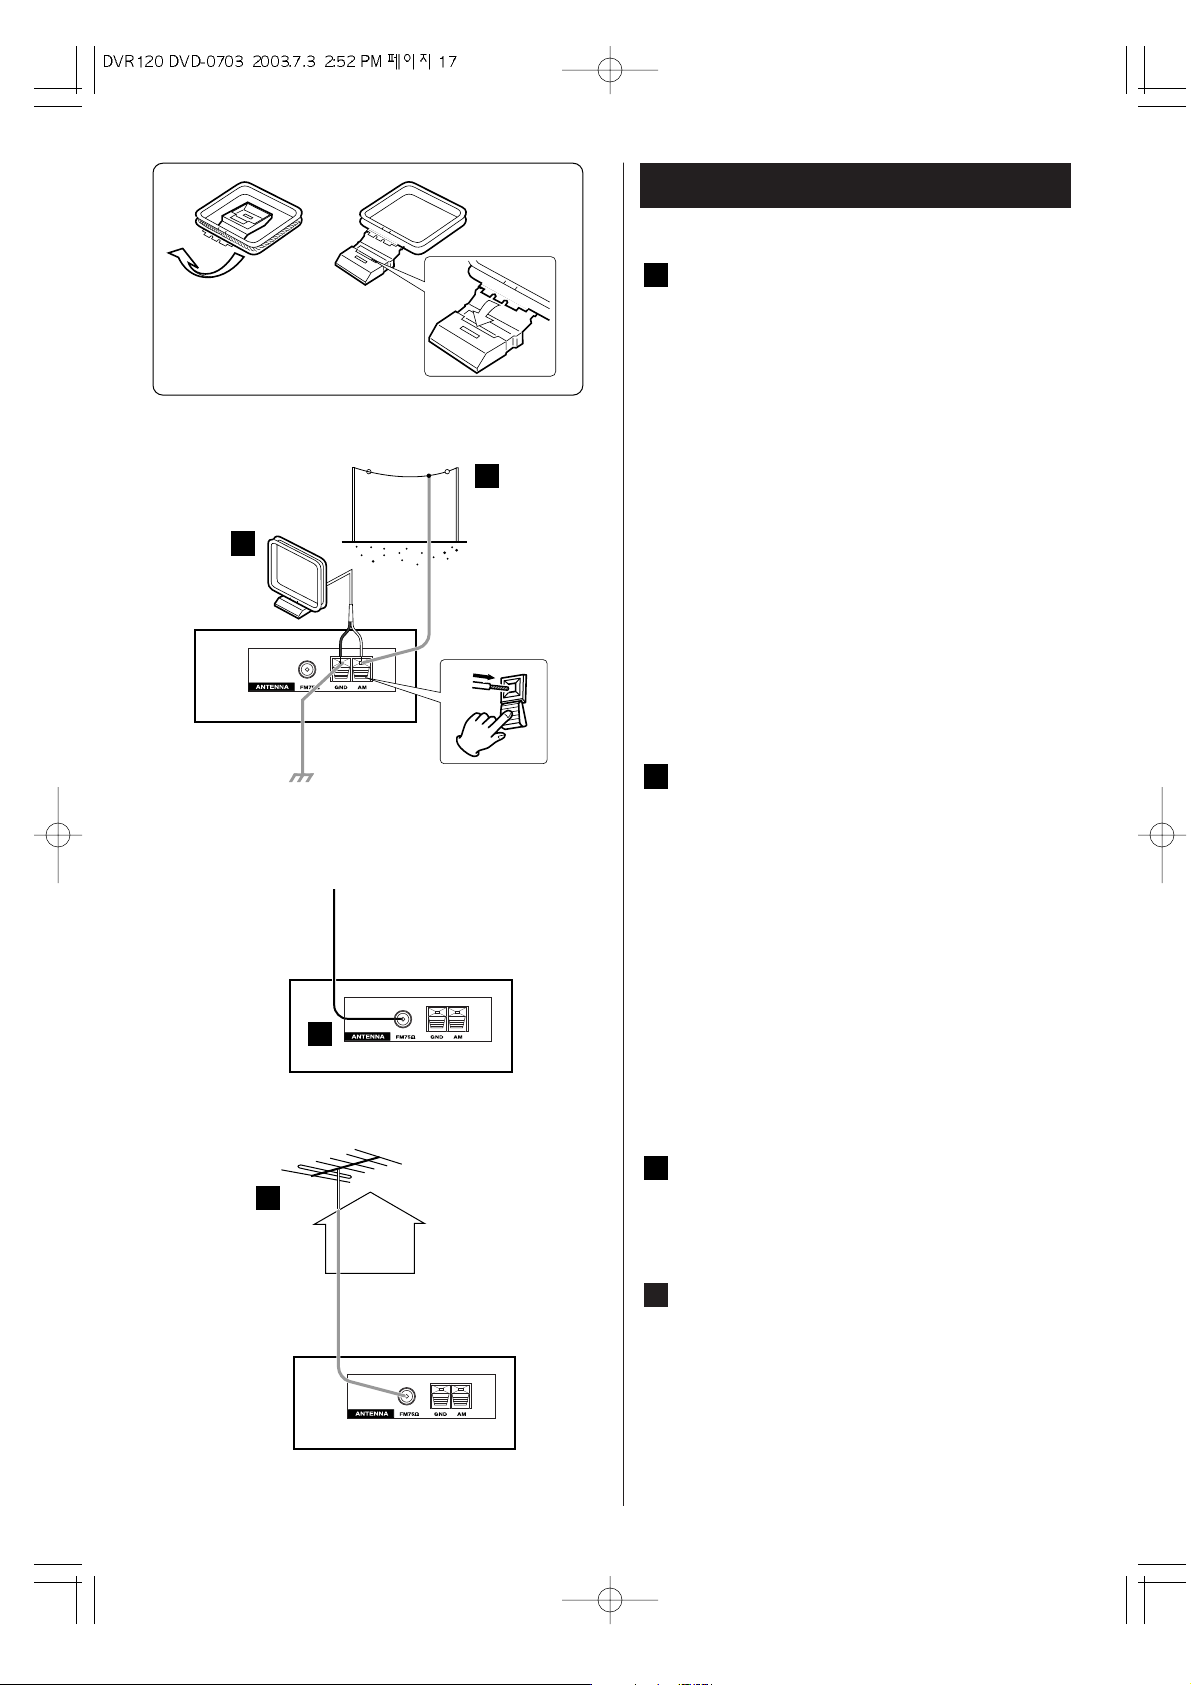
Connecting Antennas
AM Indoor Loop Antenna
The high-performance AM loop antenna provided
with this unit is sufficient for good reception in
most areas.
To stand the loop antenna on a surface, fix the
claw to the slot.
Connect the loop antenna's wires to the AM
antenna terminals as shown.
(Connect the white wire to the right terminal, and
the black wire to the left terminal.)
Place the antenna on a shelf, for example, or hang
it on a window frame, etc., in the direction which
gives the best reception, as far away as possible
from the entire system, speaker cords and the
power cord, to prevent unwanted noise.
If there is no room for the AM loop antenna, you
may mount it on the wall using screws (not
supplied).
AM Outdoor Antenna
If the AM loop antenna provided does not deliver
sufficient reception (often due to being too far
from the transmitter or in a concrete building, etc.),
it may be necessary to use an outdoor AM
antenna.
Use an insulated wire more than 15 ft (5 m) long,
strip one end, and connect this to the terminal as
shown.
The antenna wire should be strung outdoors or
indoors near a window. For better reception,
connect the GND terminal to a reliable ground.
Note:
Even when using an outdoor AM antenna, do not
disconnect the AM loop antenna.
FM Indoor Antenna
Connect the FM antenna supplied to the FM 75
socket, and position so that a good reception
is received.
FM Outdoor Antenna
In an area where FM signals are weak, it may be
necessary to use an outdoor FM antenna.
Generally, a 3-element antenna will be sufficient; if
you live in an area where the FM signals are
particularly weak, it may be necessary to use one
with 5 or more elements.
D
C
B
A
12
B
D
C
A
BLACK WHITE
Page 18

18
Names of Each Control 1
1
18
8 7 6 5
2 3 4
9
17 16 15 14 13 12 11 10
Front Panel Overview
DVD OPEN/ CLOSE
DISC TRAY (DVD DECK)
Cassette compartment (VCR DECK)
VCR EJECT
VOLUME
PLAY
STOP
PAUSE
CHANNEL
b/5
COPY
REC
Display Window
Remote Sensor
SURROUND
FUNCTION
SKIP/ TUNING
VIDEO IN / AUDIO IN
Connect the audio/video output of an external
source (Audio system, TV/Monitor Auother VCR)
POWER
18
17
16
15
14
13
12
11
10
9
8
7
6
5
4
3
2
1
Page 19
19
DVD SLEEP MUTE
P.SCAN
EX
STEREO
VCD MP3
DVD RA.
PRGM
TITLE TRK CHP S L P
DIGITAL ANALOG SAP COPY REC
Tuned ALL PRESET VCR HI-FI
1 2 3 4 5 6 7 8
20
2526 24 23 22 21 19 18
10
17 16 15 14
13
11 12
9
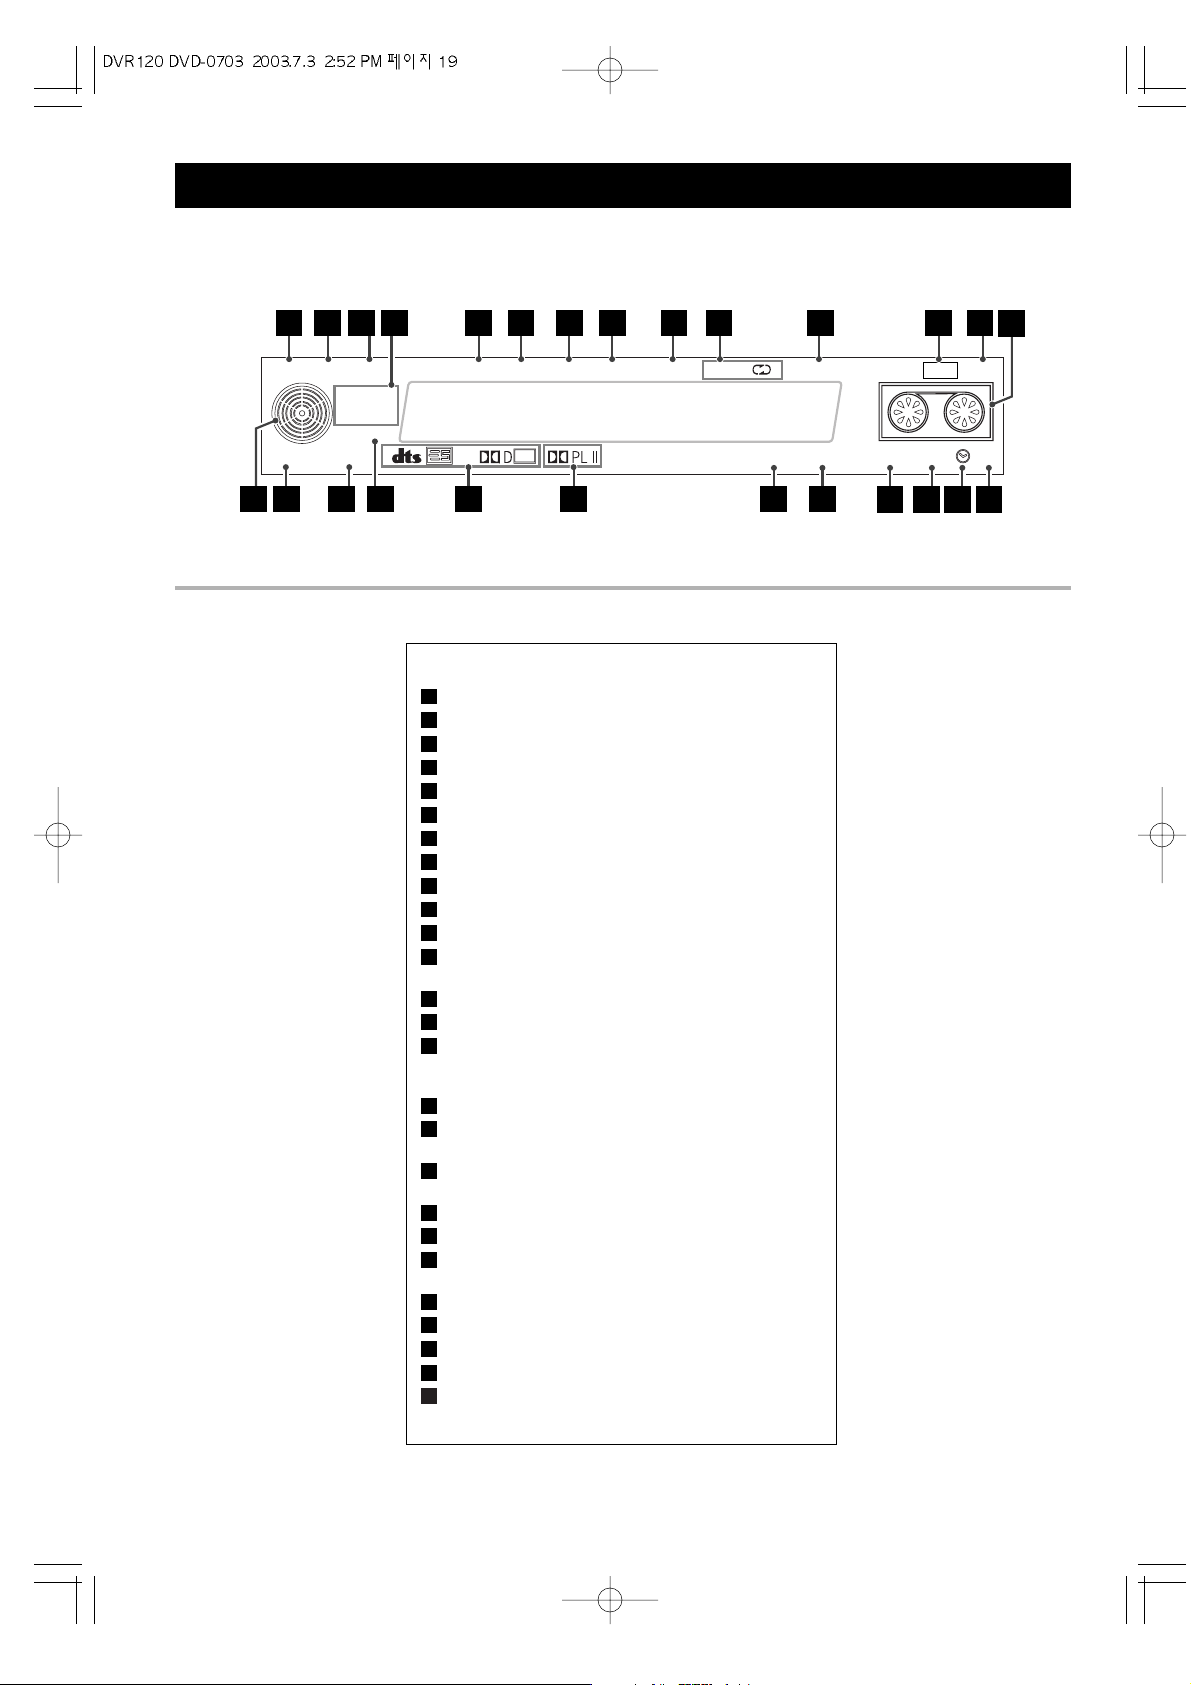
Names of Each Control 2
Front Panel Display
Indicates when the DVD FUNCTION is on.
SLEEP timer indicator.
MUTE.
Indicates current title number.
Indicates current track number.
Indicates current chapter number.
SLP(SP) indicates recording and playback speed.
Illuminates when a station is tuned.
ALL Indicates repeat all mode.
p
PRESET indicator.
Indicates when the VCR FUNCTION is on.
Hi-Fi indicates the unit is playing back a tape
recorded in Hi-Fi.
indicates a cassette is in the VCR deck .
REC indicates VCR deck is recording.
Indicates when a timer Recording is programmed or in
progress. If blinking is an error. It also blinks when you
pause the VCR.
COPY indicates DVD to VCR copy is in progress.
Indicates a SAP (Secondary Audio program) is
being received.
Indicates when the AV1, 2 ANALOG input function
has been selected.
Indicates the AV1, 2 DIGITAL input is selected.
Indicates Current disc format.
Indicates the sound mode is Pro Logic or Pro
LogicII.
Indicates the encoding format of the current disc.
PRGM indicates programmed playback is active.
P.SCAN indicates progressive scan mode.
STEREO indicates in the tuner mode.
Indicates a DVD is in the DVD player.
26
25
24
23
22
21
20
19
18
17
16
15
14
13
12
11
10
9
8
7
6
5
4
3
2
1
Page 20
20
Names of Each Control 3
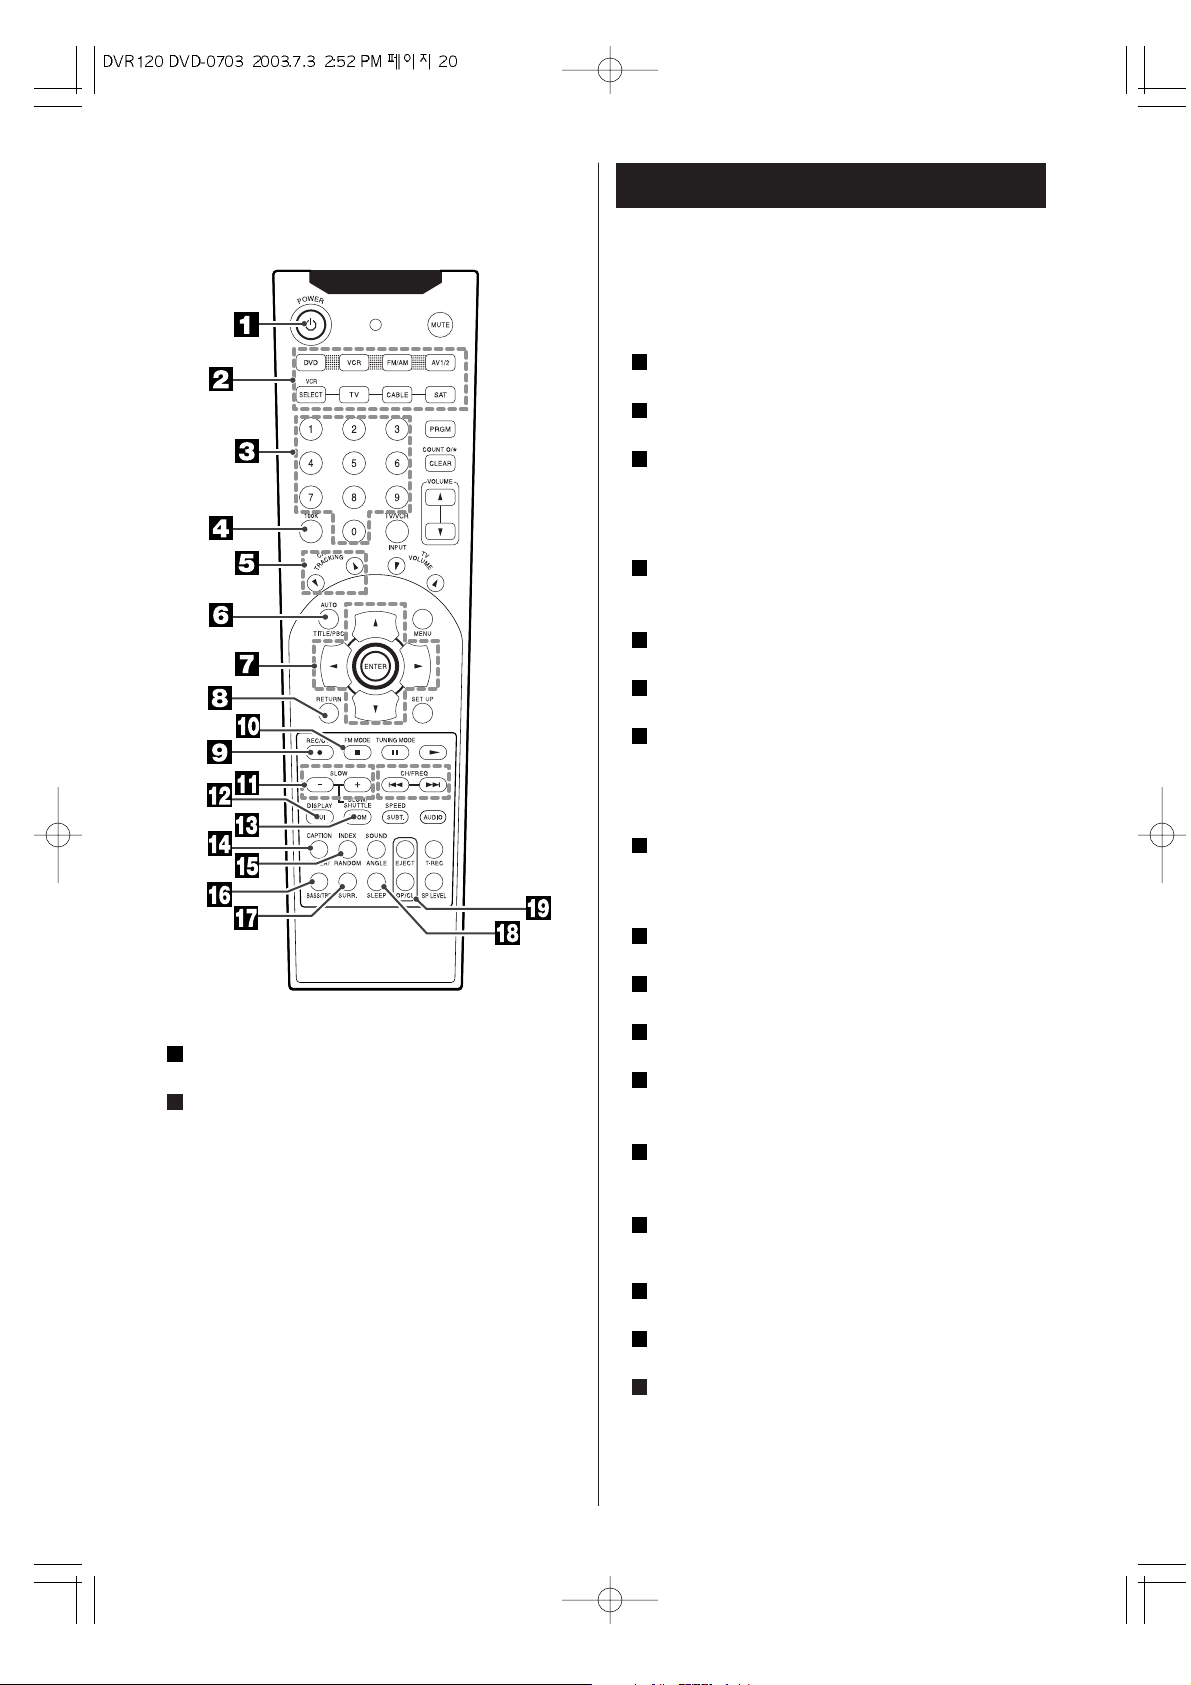
CABLE : Find your CABLE code(see page 73). Press TV button
and your CABLE code.(correct input: : LAMP LED blinks twice).
SAT : Find your SAT code(see page 73). Press TV button and
your SAT code.(correct input: : LAMP LED blinks twice).
Direct Channel Selection Buttons (0-9)
Allows direct access to any channel..
100k.
Press to select a channel over 99.
CH TRACKING .
Press to select a channel for viewing or recording.
Manual adjustment of tracking to minimize picture noise
during playback and to adjust slow motion/still playback for
minimum noise in picture.
TITLE/PBC .
- Sets the VCR so it will automatically adjust the tracking.
- Displays the title menu when playing a DVD.
DIRECTION(gg/tt/55/bb) buttons.
Press the cursor on the On-Screen menus.
RETURN .
To return to the previous menu level during playback
REC/OTR .
Press the REC/OTR button once to start nomal recording.
Press REC/OTR button twice activate OTR mode, then
press the cursor(
t) button to set the desired record
length.
FM MODE / STOP (HH) .
- Press this button to select stereo or monoral mode, while
listening to FM broadcasts.
- Stops playback.
SLOW ( -,+) / SHUTTLE buttons.
- To watch a disc at a slower speed.
GUI / DISPLAY .
Brings up the ON-SCREEN display.
ZOOM .
Enlarges the DVD video image.
REPEAT / CAPTION .
- To repeat chapter, track, title, disc(s).
- To repeat a specific section on a disc.
RANDOM / INDEX .
- Plays tracks in random order
- Press to search for index Marks recorded on the TAPE.
BASS / TRE .
The bass control adjusts low frequencies and the treble
control adjusts the high frequencies.
SURR. .
Use this button to select a surround mode.
SLEEP .
Use this button to set sleep timer
OP / CL , EJECT
- Opens and closes the disc tray.
- Ejects the tape in the VCR deck..
19
18
17
16
15
14
13
12
11
10
9
8
7
6
5
4
3
Remote control buttons
POWER .
System power on and off.
FUNCTION buttons.
To select the desired source or external input source.
DVD : when this button is pushed the input of DVD is selected.
VCR : Puts the remote in VCR mode so you can control the VCR
Deck. The VCR indicator will light on the front panel display,
showing that the VCR deck is selected,
FM/AM : when this button is pushed the input of TUNER is
selected.
AV 1/2 button : when this button is pushed the input of AV1/2 is
selected.
VCR SELECT : When in VCR mode, press to select the device
connected to the A/V INPUT jacks on the front and the rear of
the DVD/VCR. AV1, then AV2 will appear on the screen. Press
the VCR SELECT button again to return to the antenna
connected to the VHF/UHF in jack”.
The following buttons allow the remote to be programmed to
control other devices such as your TV, Cable box or Satellite.
TV : Find your TV code(see page 73). Press TV button and your
TV code.(correct input: : LAMP LED blinks twice)
2
1
Page 21
21
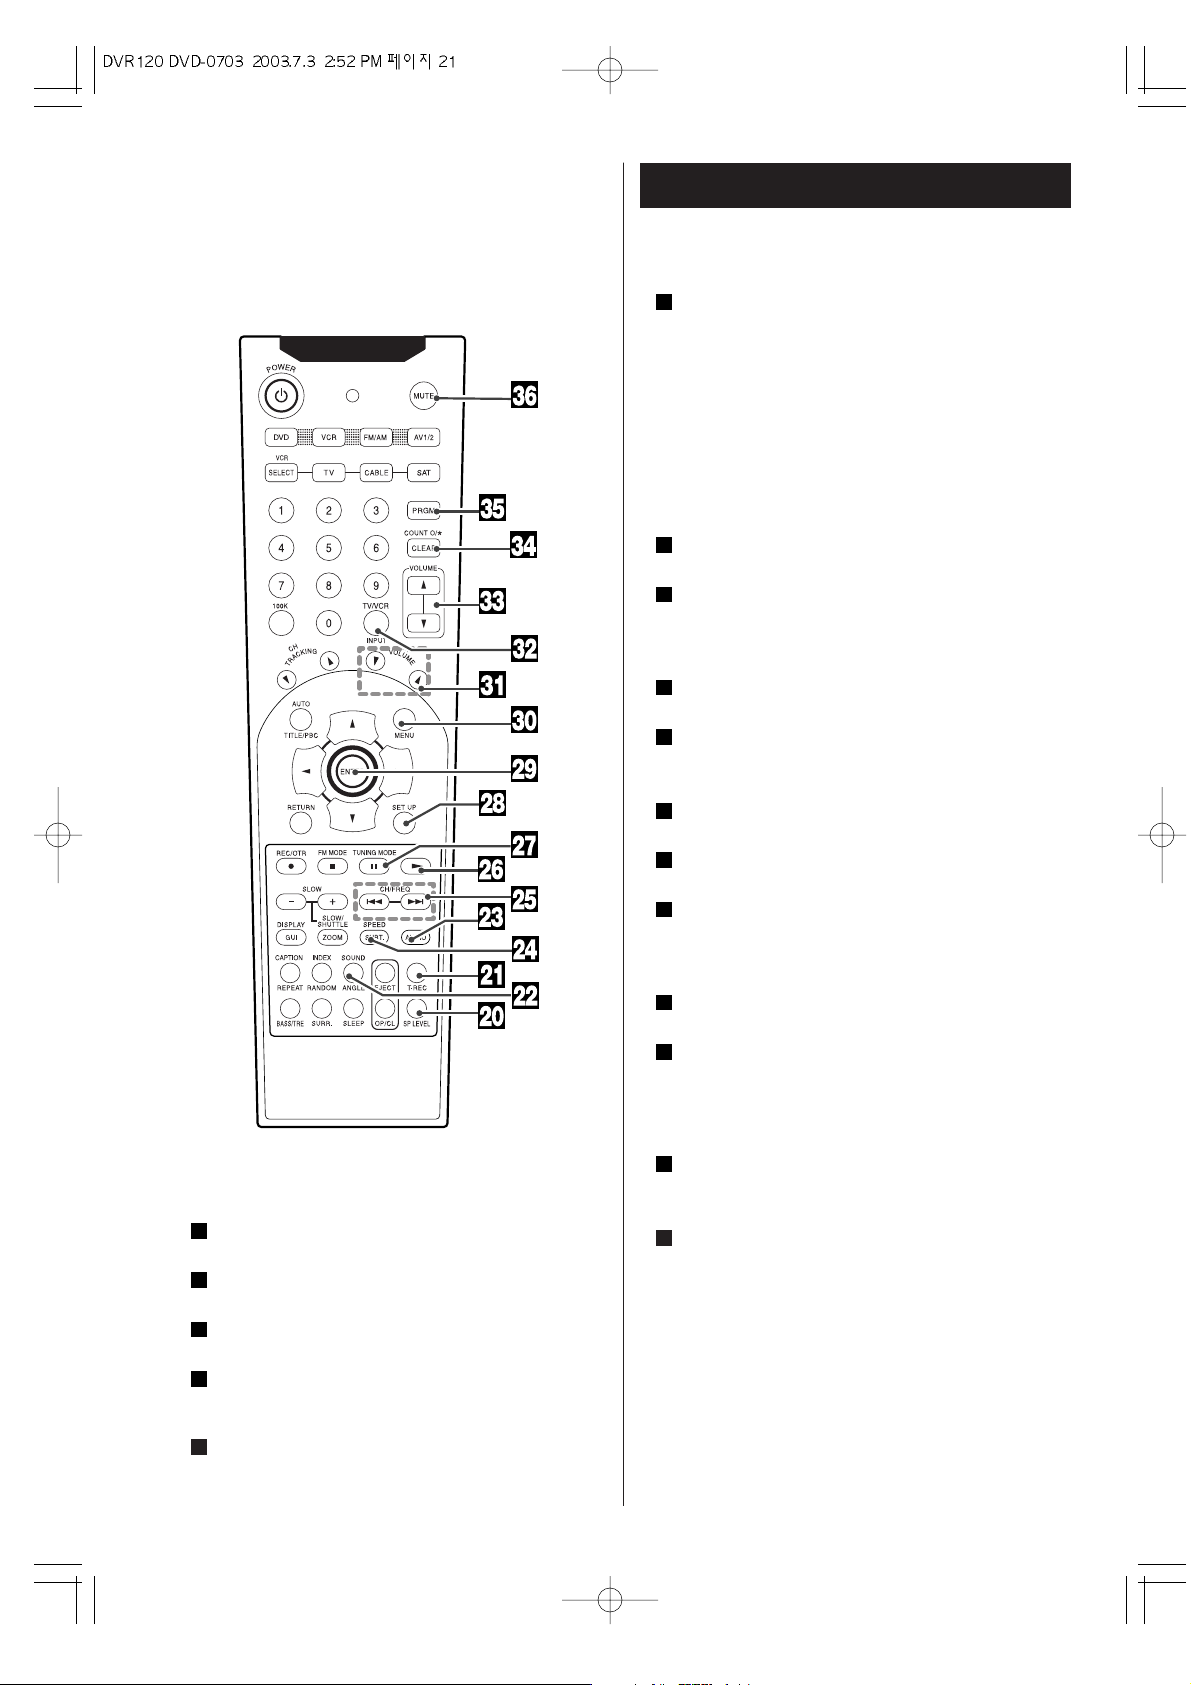
Names of Each Control 4
SP LEVEL .
Use this button to adjust the speaker level.
T-REC .
Sets the DVD/VCR ready to start recording at a preset time.
ANGLE / SOUND.
Selects a DVD camera angle if available.
AUDIO .
Selects different audio languages available in the DVD
disc.
SUBT./SPEED .
- Selects a subtitle language.
24
23
22
21
20
- Sets the tape speed for recording.
BACKWARD(
..
).
DVD : Search backward , go to beginning of current
chapter or track or go to previous chapter or track.
VCR : In the Stop mode, this button rapidly winds the
tape backwards. In the Play mode, this button activates
reverse search.
FORWARD(
//
).
DVD : Search forward , go to next chapter or track.
In the Stop mode, this button rapidly winds the tape
forward. In the Play mode, this button activates forward
search.
tt
(PLAY) .
Starts playback.
TUNING MODE( JJ).
- Switches from tuning to preset mode.
- Pause playback or recording temporarily / press
repeatedly for frame-by-frame playback.
SET UP ( DVD mode only).
Enter or exit the system setup menu.
ENTER .
- Acknowledges menu selection.
- Displays functions on the TV screen.
MENU .
Accesses the menu on a DVD disc.
TV VOLUME(bb/55) buttons.
Adjusts the volume level in TV mode.
TV/VCR , INPUT .
- Switches the picture signal source between the VCR
and cable/antenna system
- To select the VCR deck’s source
VOLUME(55/bb) buttons.
- To adjust the master volume.
CLEAR/COUNT 0/ * .
- Removes a track number on the program menu.
- Press to clear the linear time tape counter to 0:00:00.
Press when setting Timer Recording programs to clear
the selected program.
PRGM.
- In DVD/CD mode, to program disc tracks.
- In Tuner mode, to program preset radio stations.
MUTE .
Pressing this button immediately decreases the sound
level(The MUTE display in display panel)
To restore the sound, press this button again.
Note:
The red keys on the Remote control are used only in
the VCR mode.
To activate these keys, press the VCR key.
36
35
34
33
32
31
30
29
28
27
26
25
Page 22
22
Names of Each Control 5
1
2 3 4
5 6 7 8 9
10 11
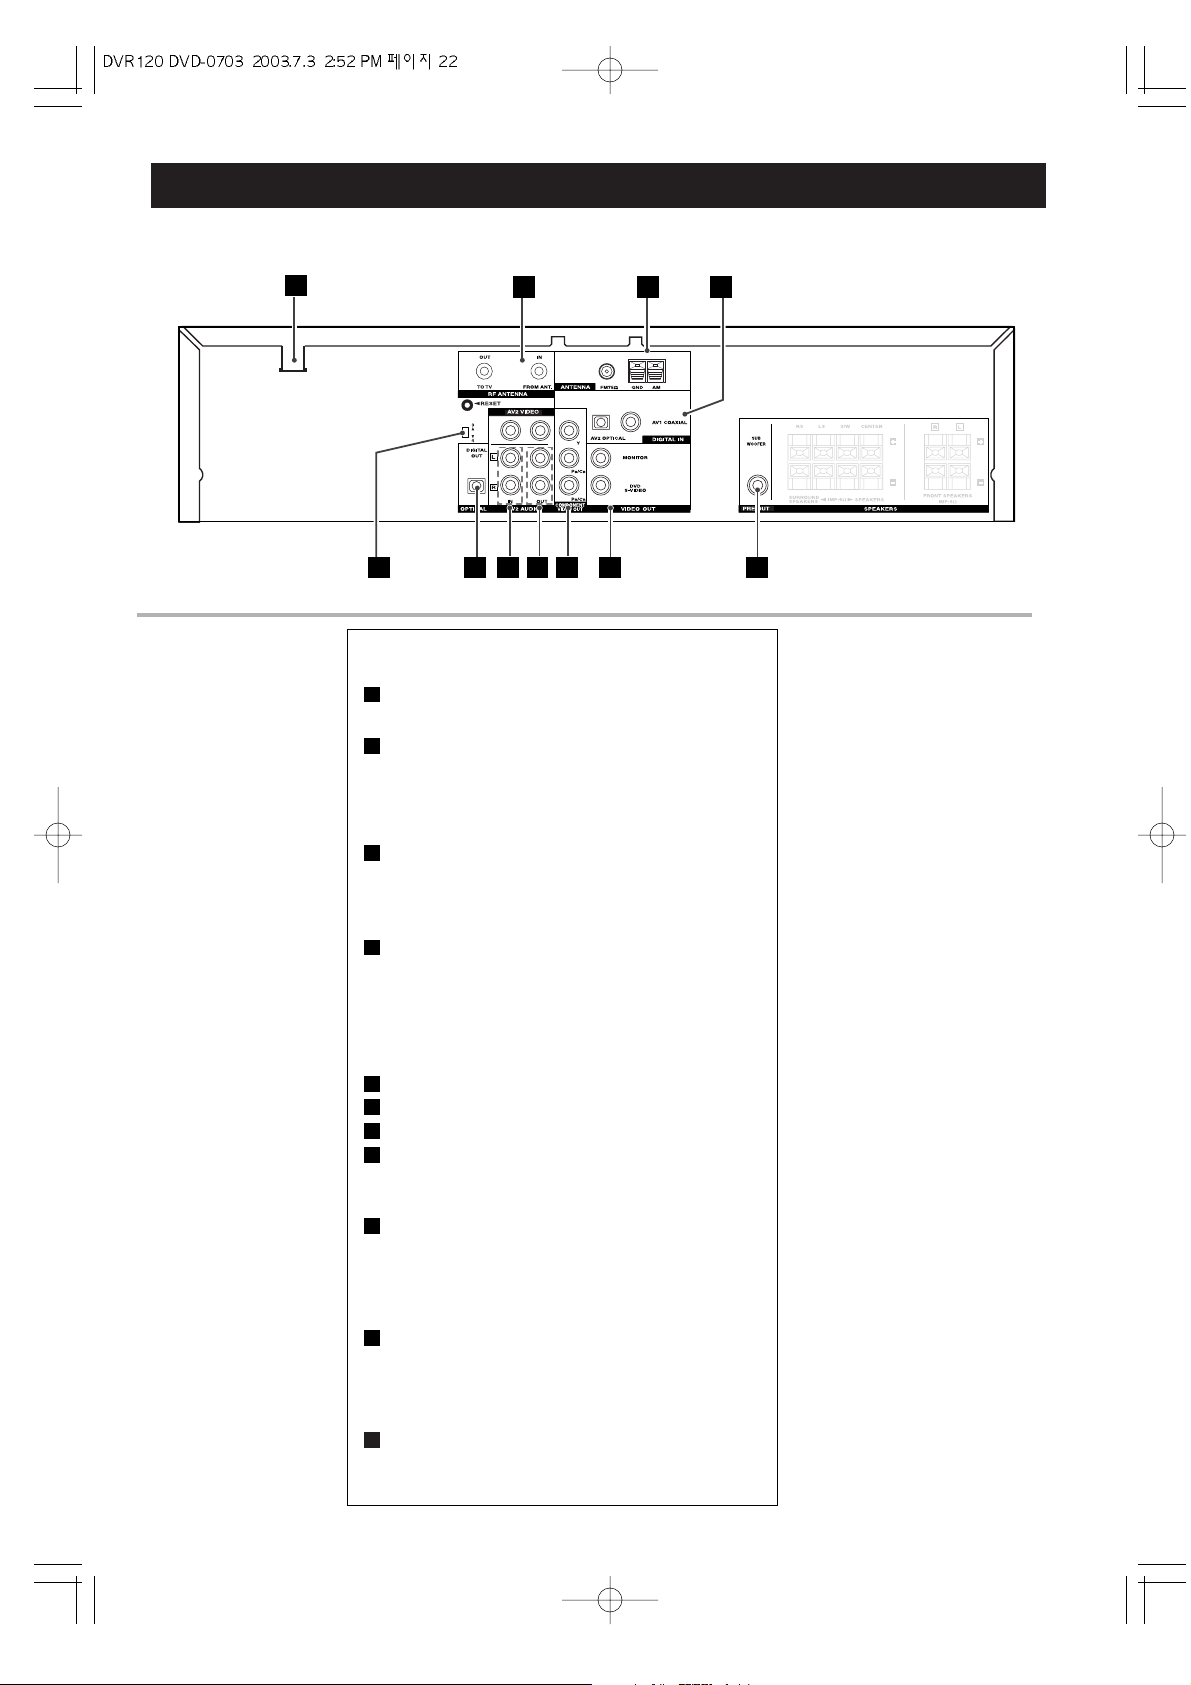
Rear Panel Jacks
AC POWER Cord.
Plug into the power source
RF ANTENNA
RF OUT (TO TV) : Connect to a TV with an RF
coaxial input.
RF IN (FROM ANT.) : Connect the UHF/VHF/CATV
antenna to this terminal.
FM ANTENNA CONNECTORS
Connect the FM antenna to this terminal.
AM ANTENNA CONNECTORS
Connect the AM antenna to this terminal
DIGTAL AUDIO IN (OPTICAL)
Connect to the digital audio output of an external
digital device.
DIGTAL AUDIO IN(COAXIAL)
Connect to the digital audio output of an external
digital device.
OPTICAL DIGITAL OUT jack
AV2 AUDIO/VIDEO IN
AV2 AUDIO/VIDEO OUT
COMPONENT VIDEO OUT
Connect to a TV with Y, P
b, Pr inputs.
For DVD viewing only.
S-VIDEO OUT
Connect to the TV's S-VIDEO input. This jack
functions during DVD playback only.
COMPOSITE OUT
Connect to a TV a composite input.
CH 3/4 SELECTOR
Move this switch to the channel that does not
carry a broadcast. This will be the channel that
the TV must be tuned to in order to see the
DVD/VCR's picture (viewing channel).
SUB-WOOFER PRE OUT
Connect to a powered sub-woofer.
11
10
9
8
7
6
5
4
3
2
1
Page 23
23
D
V
D
P
A
R
T
DVD
DVD Settings 1
DVD
SETUP
1
2
AV 1
INPUT
TUNING FUNCTION
REC COPY CHANNEL
4
5
AV 1
INPUT
TUNING FUNCTION
REC COPY CHANNEL
DVD SETUP
Sub - title
TV Type
TV System
4:3/PS
OFF
NTSC
Video Output
S-Video
S E T U P
Set Language
DVD Setup
Audio Setup
Lock
English
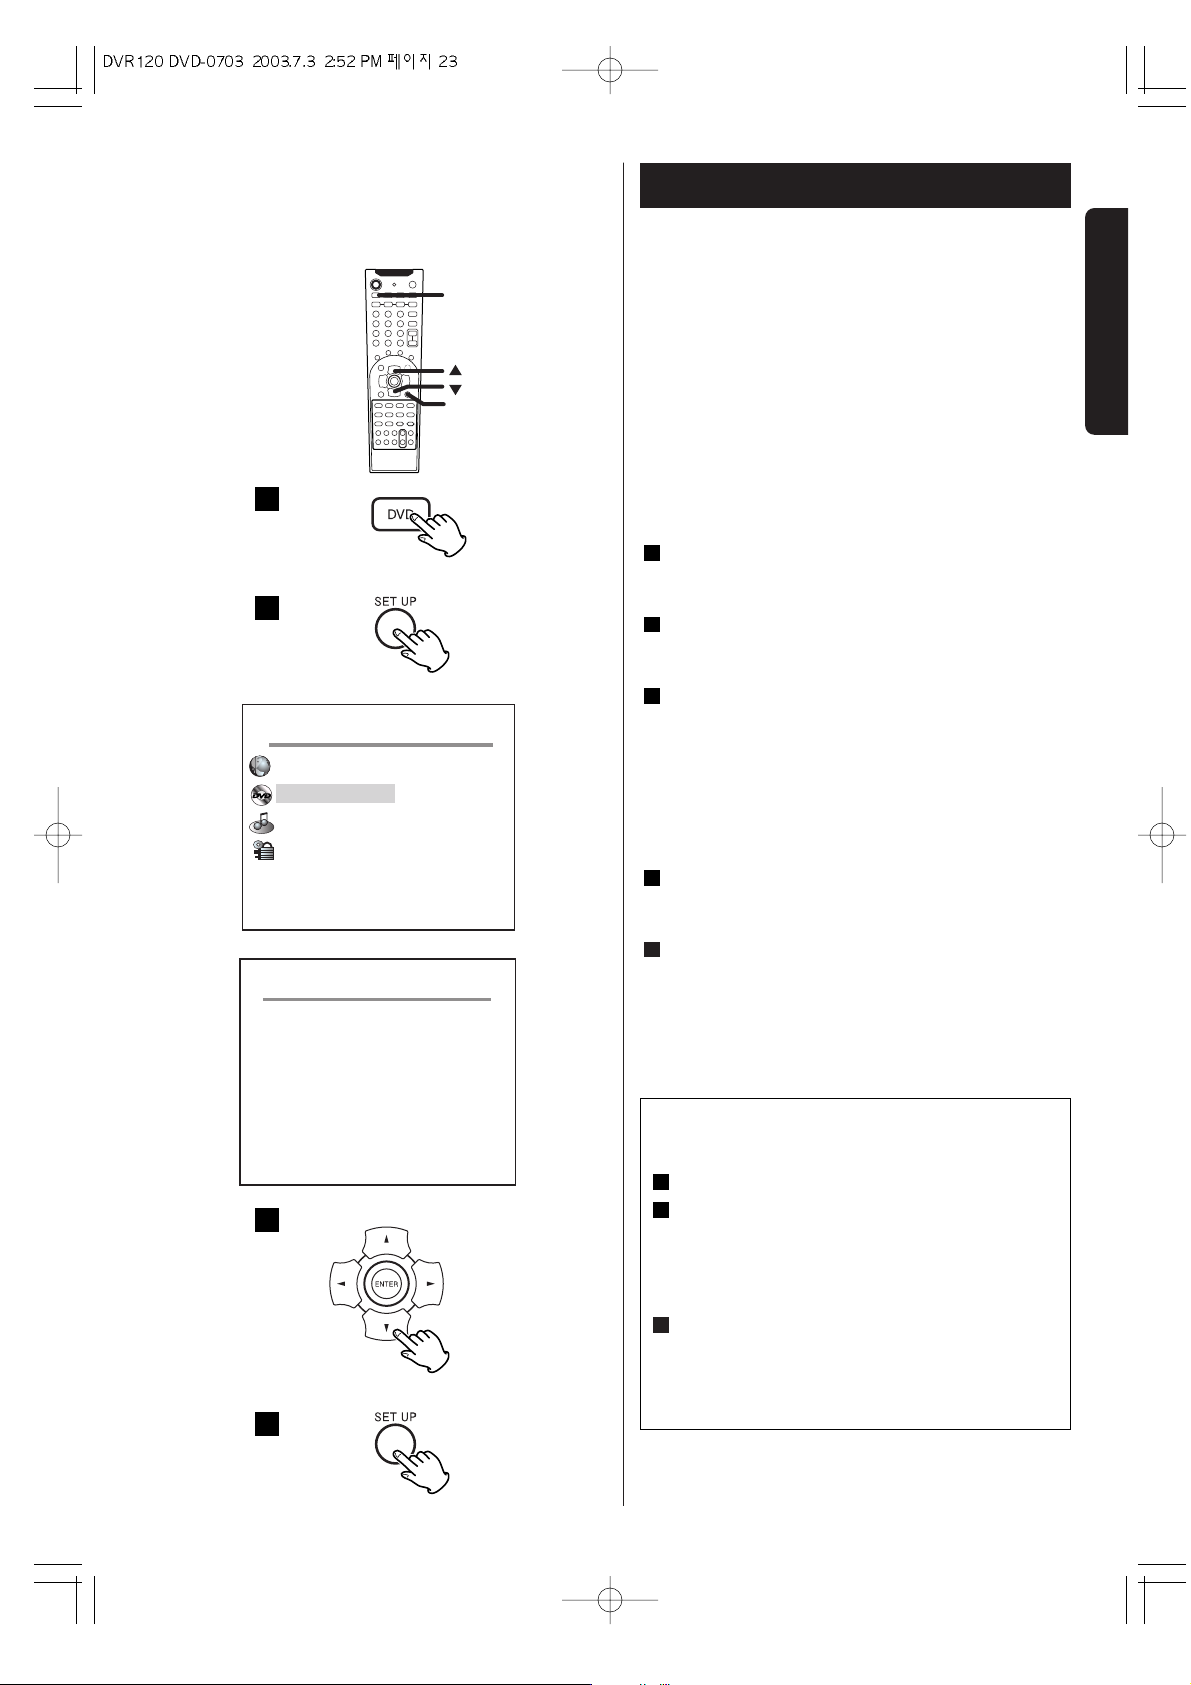
This chapter describes how to use the DVD SETUP
menu. Most settings and adjustments are required to be
set when you first use the system.
Using the DVD SETUP menu, you can adjust the picture
size, set a language for the OSD (on screen displays),
limit playback by children, etc.
MAKE SURE YOUR TV IS CONNECTED TO THE DVD
PLAYER AND TURNED ON. SET UP USES ON-SCREEN
MENUS TO PROGRAM.
If another function is selected, press the DVD button
to select DVD.
Press the SETUP button.
The setup menu appears on the TV screen.
Select DVD Setup and press the ENTER button.
To change the setting, press the ENTER button
repeatedly until the setting you want to select
appears.
Use the
5/b
buttons and the ENTER button to
select and set other items.
Select an item you want to change using the 5/
b
buttons.
When all the settings have been finished, press the
SETUP button to exit the SETUP menu.
5
4
3
2
1
How to re-initialize the DVD settings
back to the Factory defaults
Press the SETUP button.
Enter "2580" using the numeric buttons.
FACTORY RESET appears on the screen.
< If you don't want to initialize the settings, press
any button except ENTER button.
Press the ENTER button.
All the settings in the DVD SETUP menu will be
reset to the default settings.
3
2
1
Page 24
24
D
V
D
P
A
R
T
DVD
Selecting the OSD Menu Languages
You can select the language for OSD (On Screen Display).
This setting allows you select a preferred language for the
DVD SETUP menu operating messages and sound track
language. The default language is ENGLISH.
If you change the OSD Language while DVD DISK is in
the DVD/VCR, the language will change after the DVD
door is opened and closed.
Note:
In case of Resume playing, the Language setting you
selected previously, will appear.
Languages on DVD Movies
You can select a preferred language for audio,
subtitle and disc menu respectively.
< When you select a preferred language that is not
recorded on the DVD, one of the actual recorded
languages is automatically selected.
< You can override the AUDIO and the SUBTITLE
language settings in the SET UP menu simply by
pressing the AUDIO and the SUBTITLE button
respectively on the remote control unit while a
DVD disc is playing.
Note:
This may not be possible on some DVD discs. Some
DVD discs will only allow language and subtitle
changes to be made through the DVD menu.
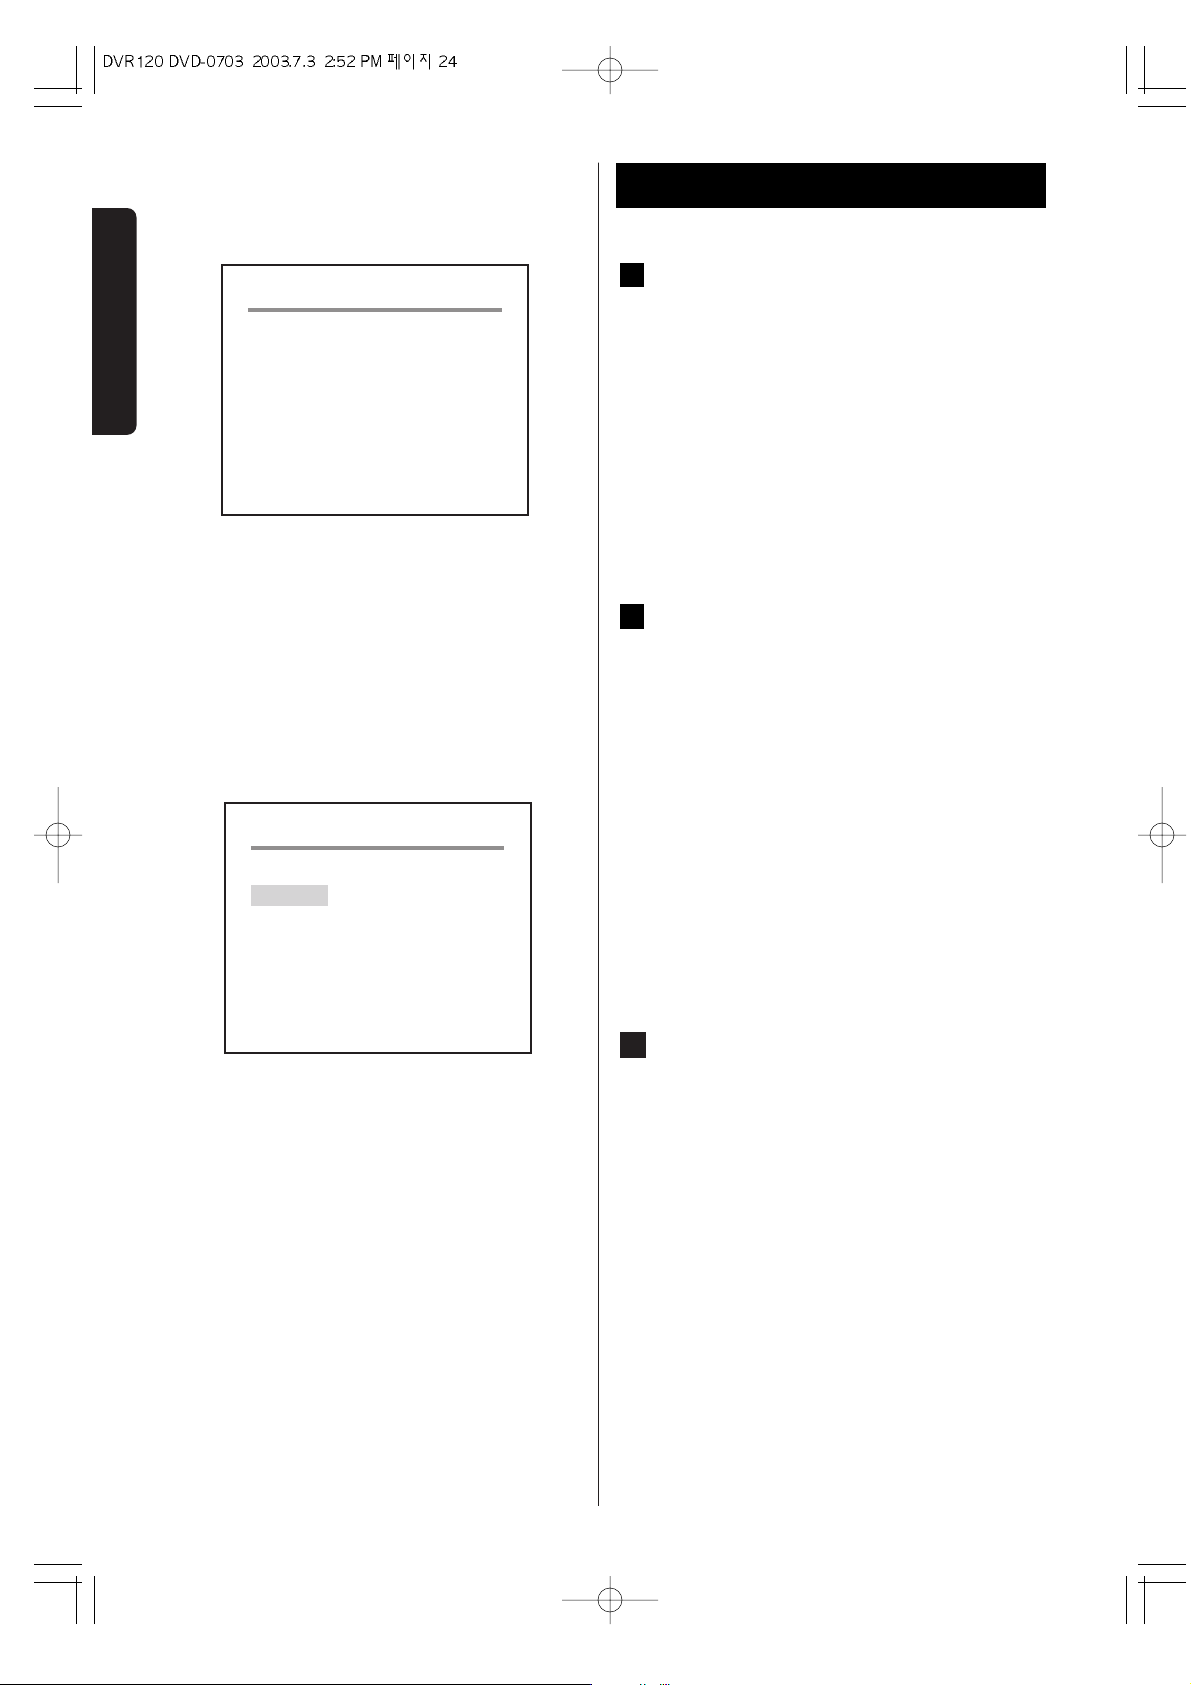
TV TYPE
Select the aspect ratio to match your TV.
4:3 PS (Pan & Scan mode)
When you connect a normal TV to the system, this
setting displays a wide picture on the whole TV screen
with a portion (right and left sides of the picture)
automatically cut off.
4:3 LB (Letterbox mode)
When you connect a normal TV to the system, this
setting displays a wide picture with bands displayed on
the upper and lower portions of the screen.
16:9 WIDE (Wide-screen mode)
Use this setting when you connect a wide-screen TV to
the system.
Note:
Results will vary depending on disc format and TV type.
C
B
A
DVD Settings 2
DVD SETUP
Sub - title
TV Type
TV System
4:3/PS
OFF
NTSC
Video Output
S-Video
OFF
NTSC
DVD SETUP
Sub - title
TV Type
TV System
S-Video
Video Output
4:3/PS
Page 25

25
D
V
D
P
A
R
T
DVD Settings 3
TV System
You may need to change the color system to match
your TV. Most TVs in the United Sates and Canada use
the NTSC color system. If your television should
happen to use PAL or MULTI, you need to change this
setting.
MULTI :
Select MULTI when a MULTI TV is connected.
PAL :
Select PAL when a PAL TV is connected.
NTSC:
Select NTSC When a NTSC TV is connected.
Notes
When your TV system isn't PAL, don't select "PAL".
In case you select "PAL" by mistake. press SETUP and
GUI button one or two times to select MULTI or NTSC.
Video output
The video signal will always be available through
the composite video jacks and cable .
Additionally, better video quality is selectable
through the video output settings when selecting
the S-Video jacks and cable , or the Y P
B/CB
PR/CR jacks and cable .
S-VIDEO
Y : Intensity (Luminance)
C : Color (Chrominance)
R, G, B (Y, Pb, Pr)
< Progressive scan (DVD)
Progressive scan video provides the highest quality
pictures with less flickering.
If you are using the component jacks, but are
connecting the DVD/VCR to a standard television,
set progressive scan to off.
If you are using the component jacks for connection
to a TV or monitor that is compatible with a progressive
scan signal, set progressive scan to on.
Notes
When your TV or Monitor is compatible with
progressive scan, select "progressive scan" by
pressing SETUP and ZOOM button. If your TV or
Monitor isn't compatible with progressive scan no
picture will be shown on the monitor. In case you
select "Progressive scan" by mistake, press SETUP and
ZOOM button one or two times to select S-VIDEO or Y,
P
b, Pr
C
B
A
F
E
OFF
NTSC
S-Video
Video Output
DVD SETUP
Sub - title
TV Type
TV System
4:3/PS
C
A
B
DVD
Page 26
26
D
V
D
P
A
R
T
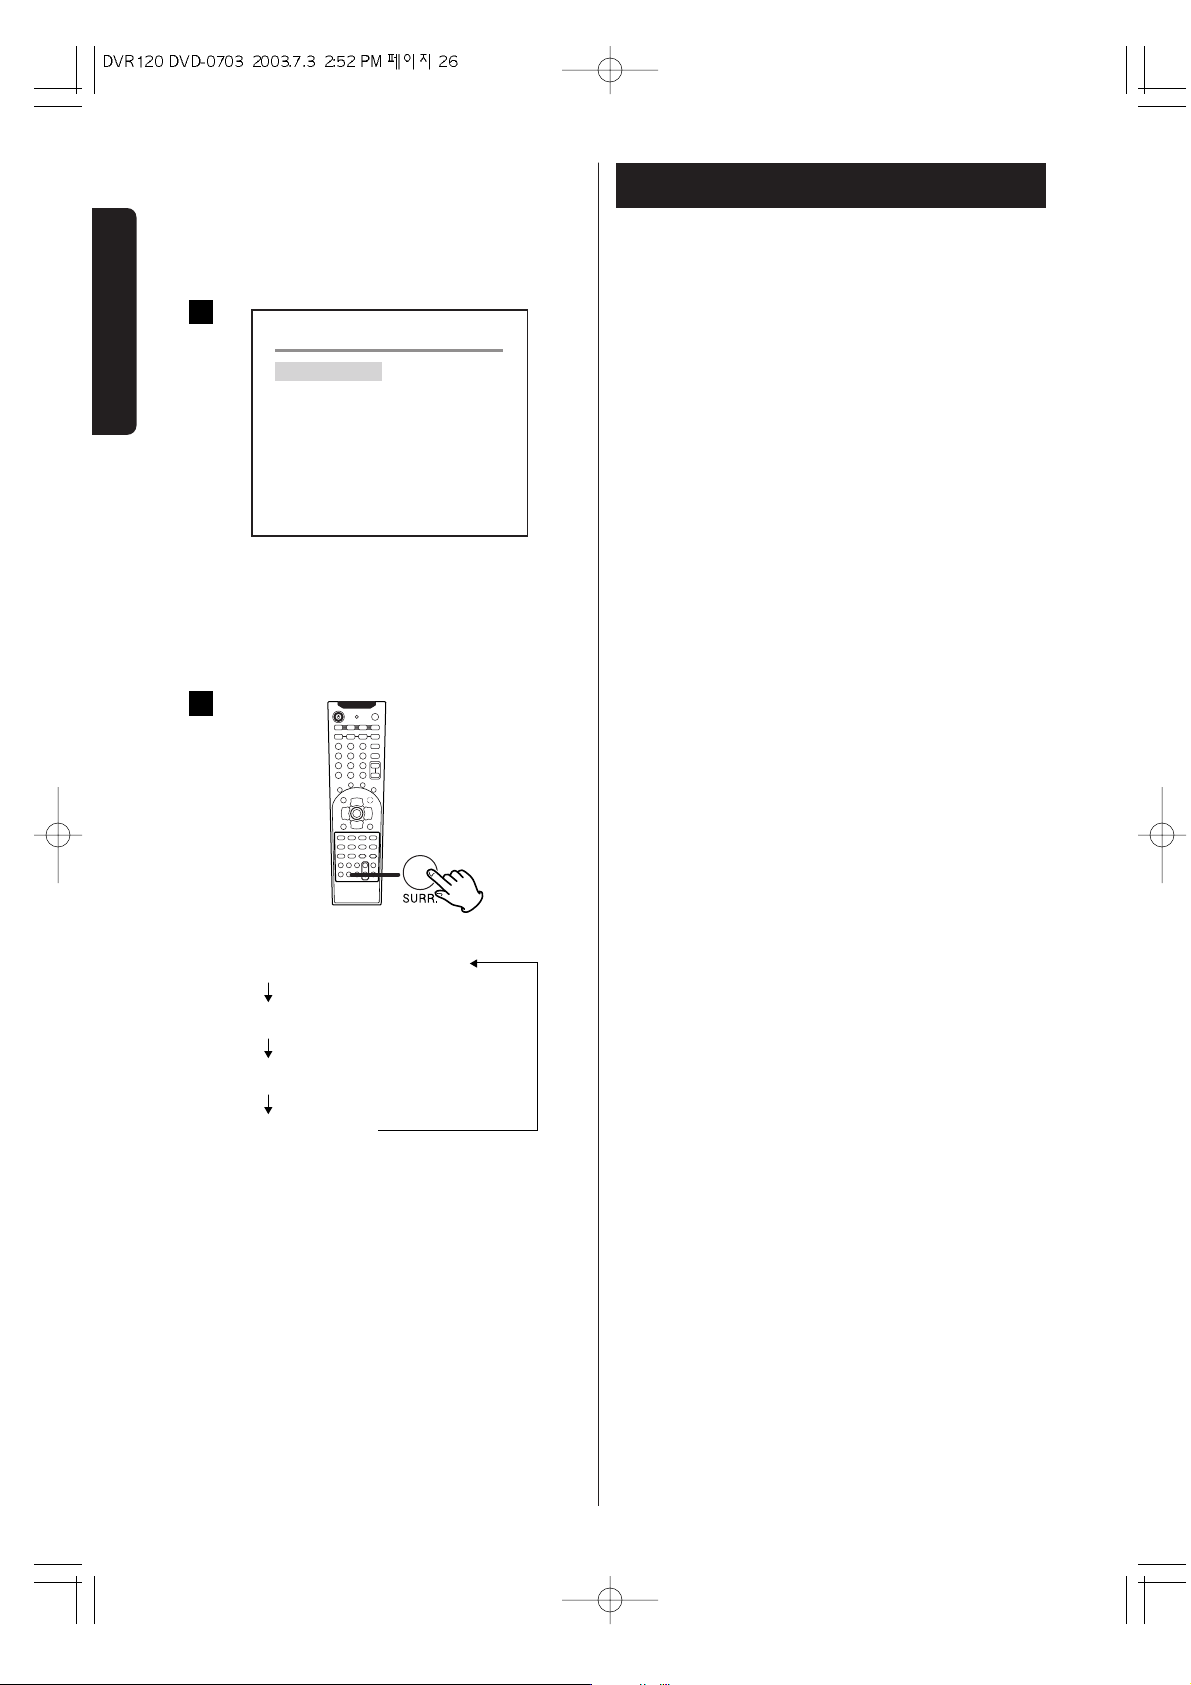
Selecting the Surround Mode
You can select the surround mode in the AUDIO SETUP
menu, and by pressing the SURR(SURROUND) button.
Each time the SURR.(SURROUND) button is pressed, the
surround mode is changed as follows :
< Select the appropriate surround mode according to
the program source.
< When you press the SURR. button, the sound is cut
off for a moment.
< Note that surround speakers are necessary for
DOLBY DIGITAL/DTS/DOLBY PRO LOGIC II mode to
function, and a center speaker is indispensable for
Dolby 3 Stereo mode to function.
DOLBY PRO LOGIC II gives you multichannel surround
sound from any stereo source.
< DOLBY PRO LOGIC II will not work when using
a mono signal.
Note:
On some Dolby Digital encoded DVD's, the disc may
not allow you to select the Dolby Pro Logic modes.
DOLBY PRO LOGIC
Use this mode when playing movie or music video
software which carries the "DOLBY SURROUND" mark.
This mode provides the effect of being in a movie
theater or live concert house-an effect with an intensity
which can only be obtained through "Dolby Pro Logic
Surround".
The main feature of "Dolby Pro Logic Surround" is that
the separation between the various channels is
significantly improved from the 3 dB of previous
systems to 26-40 dB.
As a result, the effect of the front/back/ left/right
movement of the sound image, as well as the sense of
fixed position in the sound image, is much clearer and
more dynamic than before.
In addition, movie dialogue and other sounds which
should naturally be heard from the center are output
through an independent center channel, providing a
high degree of focus for dialogue.
DOLBY PRO LOGIC II MUSIC
The Music mode creates a rich and enveloping
surround ambience from stereo sources such as CDs.
DOLBY PRO LOGIC II MOVIE
The Movie mode is optimized for movies or programs
with Dolby Surround soundtracks. This mode is also
appropriate for use with video games.
SURROUND OFF
Surround Mode
DOLBY PROLOGIC
DOLBY PROLOGIC II MUSIC
DOLBY PROLOGIC II MOVIE
SURROUND OFF
AUDIO SETUP
Surround Mode
SPEAKER
Night Mode
OFF
OFF
1
2
AUDIO
Page 27

27
D
V
D
P
A
R
T
This unit provides connections for five full range
speakers and one subwoofer speaker.
<Frequency Response
< Front Speakers
180Hz~20kHz (-10dB)
< Center Speaker
180Hz~20kHz (-10dB)
< Rear Speakers
180Hz~20kHz (-10dB)
< Subwoofer
25Hz~220Hz (-10dB)
Speaker Configuration 1
POWER
S E T U P
Set Language
DVD Setup
Audio Setup
Lock
English
AUDIO SETUP
Surround Mode
SPEAKER
Night Mode
OFF
OFF
SPEAKER
Cntr Delay O
Rear Delay O
Test Tone OFF
AUDIO
Page 28

28
D
V
D
P
A
R
T
1
2
3
4
5
Changing the Speaker Distance
When you have arranged your home theater(speakers,
receiver, and any components).
You can change the speaker distance entered in the
receiver's memory.
Press the SETUP button on the remote control.
Select AUDIO Setup and press the ENTER button.
Press the
b
button to select SPEAKER and press the
ENTER button.
To change the distance between the listening
position and the rear speaker, select rear Delay.
Press the ENTER buttons repeatedly until you reach
the desired distance.(0,3,6,9,12,15ms)
To change the distance between the listening
position and the center speaker(0, 1, 2, 3, 4, 5ms),
repeat step , .
Press the SET UP button again to exit.
Test Tone.
This feature enables you to check the sound level of the
respective front, left, right, center and surround
speakers in any mode, except stereo mode.
LEFT
w CENTER w RIGHT w RIGHT SUR wLEFT SUR
w SUBWOOFER
7
5
4
6
5
4
3
2
1
Speaker Configuration 2
S E T U P
Set Language
DVD Setup
Audio Setup
Lock
English
AUDIO SETUP
Surround Mode
SPEAKER
Night Mode
OFF
OFF
SPEAKER CONGIGURATION
Center Delay
Rear Delay
Test Tone
O
O
OFF
AUDIO
Page 29

29
D
V
D
P
A
R
T
Balancing relative volume between
speakers using SP LEVEL
The SP LEVEL function is useful to adjust the relative
volume between speakers.
Once the balance is set, you don't have to change the
balance as long as the speakers aren't moved.
< It is also possible to adjust the relative volume during
playback of DVD.
< Use the remote control from your listening position.
Press the SP LEVEL button.
Each time the SP LEVEL button is pressed, the mode
is changed as follows:.
Adjust the master volume to the normal listening
level.
Adjust the volume of each speakers so that the
SP
LEVEL
from each speakers sounds the same.
The level of the speaker which is emitting the SP
LEVEL can be changed by pressing the
5/b
buttons.
< The level can be adjusted in 1 dB steps from -6 dB to
+6 dB
.
3
2
1
SW(Sub woofer) SR(Surround Right) SL
FL(Front Left) CNT(Center) FR(Front Right)
Speaker Configuration 3
VOLUME
SP LEVEL
1
2
3
4
AV 1
INPUT
TUNING FUNCTION
REC COPY CHANNEL
SURROUND
AV 1
INPUT
TUNING FUNCTION
REC COPY CHANNEL
SURROUND
AUDIO
Page 30

30
D
V
D
P
A
R
T
AUDIO
Night Mode
(Dynamic Range Compression)
In many listening situations, you may find loud
passages objectionable. Adjusting this setting
allows you to compress the sounds into a range that
you may find more suitable for a particular listening
situation. "
U
Digital" satisfies these needs through
the dynamic range control.
Select one of the following to fit the individual
listening situation of the audience.
During playback of DVD, press the SET UP button and in
the Audio SETUP mode, press
b
button to select Night
Mode.
Each time the ENTER button is pressed, the mode is
changed as follows:
MIN :
Dynamic range compression 1/4
MID :
Dynamic range compression 5/8
MAX :
Audio with fully compressed dynamic range.
OFF :
Audio with uncompressed dynamic range. Select
this when you don't want to use the night mode.
< This function is effective only when playing back a
DVD disc recorded with "
U
Digital". This control
has no effect on other discs.
MIN MID MAX OFF
AUDIO SETUP
Surround Mode
SPEAKER
Night Mode
OFF
OFF
Page 31

31
D
V
D
P
A
R
T
Setting a Rating Level and Password
How to use the Lock.
You can prohibit the playing of specified DVDs which
are unsuitable for children. Some DVD discs contain a
restriction level which enables parents to remove
scenes or prevent playback of discs by children. Your
DVD player has a password device designed to prevent
children from changing the level.
Notes
Remove this page and store it in a safe location where
children cannot find it.
Press the SETUP to change the Rating Level.
Press the
bbutton to select Lock and press the
ENTER button.
Select the password use and press ENTER.
Notes
The password is preset to 1234. The rating is preset
to NO LOCK.
Press the b button to select parental Lock and
repeatedly press ENTER to select desired Level.
Press SETUP to exit.
Notes
< Some DVD discs are not encoded with a rating
though the movie rating is printed on the disc jacket.
The rating level feature does not work for such discs.
< If you change the level and enter a password,
playback of all DVDs with ratings higher than your
selection will be blocked, unless you enter the
correct password again. For example: if you change
the level to 5, the DVD player will not play discs with
ratings of 6, 7, or 8 unless the correct password is
entered from the remote control.
How to set and change the password for
LOCK
If you change the password, you must enter a 4-digit
password.
Press theb button to select Password Change and
press the Enter button.
Type a 4-digit password into OLD PASSWORD.
Type a new 4-digit password into NEW PASSWORD
and CONFIRM PWD, then press ENTER.
Important : Do not forget your password
3
2
1
5
4
3
2
1
S E T U P
Set Language
DVD Setup
Audio Setup
Lock
English
LOCK
Password Use OFF
Parental Lock UNLOCK
Password Change
PASSWORD VERIFY PAGE
INPUT PASSWORD :
LOCK
Password Use OFF
Parental Lock UNLOCK
LEVEL 1
LEVEL 7
8 ADULT
Password Change
PASSWORD CHANGE PAGE
OLD PASSWORD :
NEW PASSWORD :
CONFIRM PWD :
LOCK
Page 32

32
D
V
D
P
A
R
T
A
Tone Control
1. Press the BASS/TRE button to select "BASS" or
"TRE (treble)".
Each time the TONE button is pressed, the mode is
changed as follows :
To adjust the level of low frequency sound range,
select "BASS".
To adjust the level of high frequency sound range,
select "TRE (treble)".
2. Press the 5,bbuttons of the remote control unit
to change the setting.
The level can be adjusted in 2 dB steps from -6 to
+6.
BASS TRE OFF
A
Basic Operation
MUTE
To mute the sound temporarily, press the MUTE
button. Press the MUTE button again to restore the
sound. If you change the volume during the
muting, the muting will be cancelled.
< While muting is engaged, the MUTE indicator
lights on the display.
SLEEP
The power can be switched off after a specified
amount of time.
Press the SLEEP button repeatedly until desired
time appears on the display.
The sleep time can be changed by 10 minutes'
step.
SLEEP- 90 (80, 70...or 10)-SLEEP OFF
The SLEEP indicator lights, and the power will be
switched off 90 (80, 70...or 10) minutes later.
Normal display
Sleep timer is off.
< When you set the sleep timer, the dimmer function
is turned on automatically.
< If you want to check the remaining time, press the
SLEEP button once. The remaining time will be
displayed for 4 seconds, and return to the normal
display.
C
B
B
C
Page 33

33
D
V
D
P
A
R
T
CD/MP3
MP3
When a MP3 disc is loaded, the recorded directories
will be shown on the left side of the screen.
Select a directory by pressing the
5/b
/g/
t
buttons and press the ENTER or PLAY(y) button.
A list of track numbers and titles(file names) will be
shown on the right side of the screen. Select a track
and press the ENTER button or the PLAY button.
Playback will start from the selected track.
<5/b/g/tbuttons don't work during playback.
< If you want to select another directory, select [..] by
pressing the ENTER button to the ROOT directory.
< Depending on the disc, invisible directories such as
"TRASH" might be shown on the screen.
Please disregard directories which do not contain
MP3 files.
To start playback
In the stop mode, press the PLAY(y )or ENTER
button.
To suspend playback temporarily (pause mode)
Press the PAUSE button (J) during playback.
The video will stop on a single frame on DVD discs,
and music will interrupt on MP3 and CD discs.
To resume playback, press the PLAY button (
y).
Play will continue from where you paused the
playback.
To open the disc tray
Press the OPEN/CLOSE button (L) to open and close
the disc tray.
< If the disc tray is left open for 1 minute, it will close
automatically.
< Even when another function is selected, this button
works, and the function will change into the function
what you selected.
To stop playback of CD and MP3
Press the STOP button (H).
D
C
B
A
Playback
A
B
C
D
A
B
D
C
C B A
D
.. 0
1
2
3
4
5
6
7
ROOT
DIR
DIR
DIR
001
001
002
003
004
005
006
007
002
003
MP3
SURROUND
TUNING FUNCTION
SURROUND
SURROUND
Page 34

34
D
V
D
P
A
R
T
DVD
Resume Playback
To stop and resume playback of DVD
If you press the STOP button during playback of DVD,
"RESUME" briefly appears on the screen, and the unit
enters RESUME mode.
If you want to cancel the RESUME mode and stop
playback completely, press the STOP button again.
How to resume playback
During playback of DVD, press the STOP button at
the point where you want to interrupt playback.
"RESUME" briefly appears on the screen, and the
time counter on the front panel display stops.
Press the PLAY button to start playback from the
interrupted point.
or
During playback of DVD, press one of the following
buttons at the point where you want to interrupt
playback :
POWER, OPEN/CLOSE,
FUNCTION (VCR, FM, AV1/2)
< Up to 5 latest discs can be memorized.
< If the STOP button is pressed in the stop mode,
resume function will be cancelled and all the
memorized points will be cleared.
< This function may not work with some discs.
Page 35

35
D
V
D
P
A
R
T
DVD/ CD/MP3
Playback from a specific chapter/track
To skip to a specific chapter/track
During playback, press the SKIP button(.or/)
repeatedly until the desired chapter or track is found.
The selected chapter/track will be played from the
beginning.
When the
. button is pressed during playback of
a CD, the track being played will be played from the
beginning. To return to the beginning of the previous
track, press the
. button twice.
TUNING
Search for a part of a chapter/track
During playback, press and hold the SKIP button
(
.or/ ) for more than 0.5 second until the
search function is activated.
Press the PLAY button (
y) when the part you want
to listen to is found.
Each time the SKIP button (
.or/) is pressed
for more than 0.5 seconds during search, the search
speed is incremented.
< The sound is muted during playback of DVD. The
sound skips during playback of MP3.
< When the search speed of a DVD is x4 or faster,
subtitles will not appear on the screen.
< This function may not work with some discs.
Page 36

36
D
V
D
P
A
R
T
DVD
Slow-Motion Playback
DVD only
To play a disc in slow-motion, press the SLOW buttons
during playback.
+SLOW : slow forward playback(+SLOW 1/2, 1/4, 1/8)
-SLOW : slow reverse playback(-SLOW 1/2, 1/4, 1/8)
Each time the SLOW button is pressed, the speed is
changed.
To resume normal playback, press the PLAY button
(
y).
< The sound is muted during slow-motion playback.
< Subtitles don't appear on the screen during slow-
motion playback.
< This function is not available for CD and MP3.
Single Stepping Playback
To play a disc frame by frame, press the PAUSE/STEP
button during playback. Each time the PAUSE/STEP
button is pressed, the picture advances by one frame.
To resume normal playback, press the PLAY button
(
y).
< This function is not available for CD and MP3.
Direct playback (except DVD)
Select a track by pressing the numeric buttons.
Playback starts from the selected track.
example : To select track No.8
To select a track number below 10, press "0" and a
number button corresponding to the track (1 to 9).
When a number button is pressed without pressing
"0", it will take a few seconds to start playback.
example : To select track No.18
Press "1", and press "8" within 2 seconds.
No. 8 :
No.18 :
DVD
CD
Page 37

37
D
V
D
P
A
R
T
DVD/ CD/MP3
Repeat Playback
Repeat Playback of DVD
Each time the REPEAT button is pressed during
playback, the mode is changed as follows :
Chapter Repeat
The chapter being played will be played repeatedly.
If you select another chapter in CHAPTER REPEAT
mode, the chapter you selected will be played
repeatedly.
< REPEAT indicator lights, and "CHP" blinks on the front
panel display.
Title Repeat
All the chapters of the current title will be played
repeatedly.
During programmed playback, programmed chapters
will be played repeatedly.
< REPEAT indicator lights, and "TITLE" blinks on the
front panel display.
< The REPEAT button does not work in the stop mode.
< If one of the following buttons is pressed, repeat
mode will be cancelled:
STOP in the stop mode, OPEN/CLOSE, POWER
FUNCTION
A
A
CHAPTER REPEAT ON TITLE REPEAT ON
REPEAT OFF
REPEAT ONE REPEAT ALL
REPEAT OFF
Repeat Playback of CD,MP3
Each time the REPEAT button is pressed, the mode is
changed as follows :
Repeat One
The tracks being played will be played repeatedly. If
you select another track in REPEAT ONE mode, the
track you selected will be played repeatedly.
It is also possible to select a track in the stop mode.
Press the REPEAT button and then select the track
number by pressing the numeric buttons.
< REPEAT indicator lights, and "TRK" appears on the
front panel display.
Repeat All
All the tracks of the disc (or all the MP3 files of the
current directory) will be played repeatedly.
During programmed playback, programmed tracks
will be played repeatedly.
< REPEAT indicator and "ALL" lights on the front panel
display.
< If one of the following buttons is pressed, repeat
mode will be cancelled:
STOP, OPEN/CLOSE, POWER, FUNCTION
B
B
Page 38

38
D
V
D
P
A
R
T
CD
Shuffle Playback of CD, MP3
Tracks of a disc can be played randomly.
Press the RANDOM button in the stop mode.
"RANDOM ON" appears on the screen.
Press the PLAY button (y) to start shuffle playback.
< If you press the / button during shuffle playback,
the next track will be randomly selected and played.
A track cannot be replayed during shuffle playback.
To stop shuffle playback, press the RANDOM button.
"RANDOM ON" appears on the screen.
< If one of the following buttons is pressed, shuffle
mode will be cancelled. OPEN/CLOSE, POWER,
FUNCTION
3
2
1
INDEX
2
1
Page 39

39
D
V
D
P
A
R
T
CD
Programmed Playback (CD)
Up to 32 tracks can be programmed in the desired
order.
Note that the total time of the programmed tracks
cannot exceed "99 minutes 59 seconds".
Press the PROGRAM button in the stop mode.
"PRGM" lights on the front panel display.
1
When the selection of track numbers has been
finished, press the PLAY button to start
programmed playback.
< If you press the REPEAT button and select
"REPEAT ALL", the programmed tracks will be
played repeatedly.
< During programmed playback, the numeric buttons
don't work.
4
Press the numeric button to select a track.
Press the ENTER button.
The track is programmed.
3
2
Repeat step and to program more tracks.
< When the total time of the programmed tracks
exceeds 99 minutes 59 seconds, "--:--" will be
displayed instead of time.
< To cancel the program mode, press the PROGRAM
button.
32
DVD SLEEP MUTE
P.SCAN
EX
STEREO
CD MP3
DVD R.
PRGM
TITLE TRK CHP S L P
5 3 SETREO DIGITAL ANALOG SAP COPY REC
Tuned ALL A B PRESET VCR HI-FI
DVD SLEEP MUTE
P.SCAN
EX
STEREO
CD MP3
DVD R.
PRGM
TITLE TRK CHP S L P
5 3 SETREO DIGITAL ANALOG SAP COPY REC
Tuned ALL A B PRESET VCR HI-FI
total time of the programmed tracks
next program number
1
2
4
3
program number
Page 40

40
D
V
D
P
A
R
T
CD
Programmed Playback (CD) 2
Checking the programmed content
In the stop mode, press the 5/b buttons repeatedly.
Track number, program number and the total playback
time is displayed in order.
How to delete tracks from a program
In the stop mode, press the 5/b buttons repeatedly
until the programmed track to be deleted is displayed.
Then press the CLEAR button. The selected track is
deleted from the program and the track programmed
next is moved to take its place and shown on the
display.
Clearing program mode
With the unit stopped and "PROG." indicator lights, press
the CLEAR button to clear program playback mode and
the programmed content.
If you are checking the programmed content, press the
STOP button and the CLEAR button.
If one of the following buttons is pressed, program
mode will also be cancelled:
OPEN/CLOSE, POWER, FUNCTION
Page 41

41
D
V
D
P
A
R
T
DVD
GUI (Graphical User Interface)
current track number
elapsed time of the track
current title number
current chapter number
elapsed time of the title
sound track Language and sound
system.
subtitle language
angle mark and angle number
H
G
F
E
D
C
B
A
CD
If you press the GUI button during playback, specific
information will appear on the screen.
GUI
TIME
01
1/1
35 ENG1:15:20
Abc
AUDIO
1 ENG
C D E F G H
01
A B
Page 42

42
D
V
D
P
A
R
T
DVD
1, 2, 3
ENTER
GUI
DVD
1, 2, 3
ENTER
GUI
1, 2, 3
ENTER
GUI
DVD/ CD
Title Select
Title Select (DVD only)
Press the GUI button.
The current title number will be highlighted.
Within 5 seconds, select a title number by pressing
the numeric buttons.
EXAMPLE : To select title No. 3
Press the ENTER button.
Playback starts from the selected title.
< If you select titles which don't exist on the disc, the
PROHIBIT icon A will be displayed.
Chapter/Track Select (DVD/CD)
Press the GUI button during playback.
The current title number (or track number) will be
highlighted.
< During playback of CD, go to step .
< When no button is pressed for 10 seconds, chapter
select mode will be cancelled.
Press the tbutton to highlight the chapter number.
Within 10 seconds, select a chapter number (or
track number) by pressing the numeric buttons.
EXAMPLE : To select title No. 3
EXAMPLE : To select No. 30
Press the ENTER button.
Playback starts from the selected chapter or track.
< If you select a number that doesn't exist on the disc,
the PROHIBIT icon A will be displayed.
4
3
2
3
1
3
2
1
Time Select (DVD only)
Press the GUI button.
The current title number will be highlighted.
< When no button is pressed for 10 seconds, chapter
select mode will be cancelled.
Press the tbutton twice to highlight the time.
Input the time by pressing the numeric buttons.
example:
To select a scene 2 hours 30 minutes 10 seconds
from the beginning of the selected title, press 23010.
Press the ENTER button.
Playback starts from the selected part.
< If you select a time that doesn't exist on the disc, the
PROHIBIT icon
A will be displayed.
4
3
2
1
Time Select
GUI
Page 43

43
D
V
D
P
A
R
T
DVD
GUI
DVD
Picture Zoom
JPEG
Zoom allows you to zoom in and enlarge the picture on
the screen to either 2 times(x2) or 4 times(x4) or 16 times
(x16) or normal size.
To zoom the picture, press the ZOOM button during
playback.
Each time the ZOOM button is pressed, the
magnification level changes from x2, to x4, to x16, to off
< You can shift the zoom point by pressing the
5/b
/g/tbuttons during zoom playback.
< Zooming does not work on subtitles or menu
screens.
< Some DVD's might not respond to zoom.
< Turn around
t
: Toward the right
g
: Toward the left
< Turn over
5
: Up and down
b
: Left and Light
Change the Angle
When a scene recorded with multiple angles is played,
the angle icon appears on the screen. Each time you
press the ANGLE button while the angle icon is
displayed, the camera angle changes.
< When no other angle is recorded, the PROHIBIT icon
A will be displayed.
< You can change the setting so that the angle icon
isn't displayed even when a scene recorded with
multiple angles is played.
< The maximum number of angles stipulated by the
manufacturer is 9/9.
Page 44

44
D
V
D
P
A
R
T
Select an Audio Language
To select an audio language, press the AUDIO button
during playback.
Each time you press the AUDIO button,a language and
its sound recording system included on the disc
appears on the screen.
Select a Subtitle Language
To select a subtitle language, press the SUBTITLE
button during playback.
Each time you press the SUBTITLE button, the subtitle
languages included on the disc appear on the display.
< The default subtitle value is "OFF".
< It may take a few seconds untill a selected subtitle
appears on the screen.
< When no subtitles are recorded on the disc, "OFF"
will be displayed.
< In some cases, a subtitle cannot be turned off even if
you select "OFF". Movies recorded in a foreign
language for the region being played often have
“permanent” subtitles.
< Some discs allow you to change subtitles only via the
disc menu. In that case, press the MENU button and
change the settings.
< The maximum number of subtitle languages
stipulated by the manufacturer is 32/32.
< You can also change the subtitle in the DVD setup.
(see page 22)
DVD
< Some discs allow you to change audio language only
via the disc menu. In that case, press the MENU
button and change the settings.
AUDIO
1 ENG
Channel Numbers
Audio Formats
A language
1, 2, 3 ...
: Number of languge
ENG, DEU
: Language
: 5.1ch
: 5.0ch
: 2ch (STEREO)
: Digital
: AC-3
: dts
AC-3
1 ENG
Abc
Kind of subtitle
Number of subtitle
1, 2, 3...
:Number of language
ENG, DEU...
DVD
GUI
Page 45

45
D
V
D
P
A
R
T
Tuner
Select TUNER by pressing the FUNCTION button
repeatedly (or press the FM/AM button of the
remote control unit).
Make sure the antenna(s) have been connected (see
page 17).
Select AM or FM by pressing the FM/AM button
repeatedly.
If "PRESET" indicator is lit, press the TUNING MODE
button to select the manual tuning mode.
The "PRESET" indicator disappears from the display.
This button is used to change the tuning mode.
Select the station you want to listen to (auto
selection).
Hold down the TUNING button for 0.5 to 2 seconds.
When a station is tuned in, the tuning process will
stop automatically.
If you want to stop the tuning process, press the
TUNING/PRESET button.
Selecting stations which cannot be tuned
automatically (manual selection)
When the TUNING/PRESET button is pressed
momentarily (0.5 second or less), the frequency
changes by a fixed step.
FM : 100 kHz steps
AM : 10 kHz steps
Press the TUNING button repeatedly until the station
you want to listen to is found.
< "ST" is displayed when a stereo broadcast is tuned in.
< "Tuned" is displayed when a broadcast is correctly
tuned in.
FM MODE Button
Pressing this button alternates between Stereo mode
and Mono mode.
Stereo
FM stereo broadcasts are received in stereo and
the "ST" indicator lights in the display.
Mono
To compensate for weak FM stereo reception,
select this mode.
4
3
2
1
3
2
14
FM/AM
3
1
FUNCTION
FUNCTION
FUNCTION
TUNING
TUNING
2
3
4
Page 46

46
D
V
D
P
A
R
T
Preset Tuning
Preset Tuning
You can store FM/AM stations from Channel 1 to 30
respectively.
Automatic Memory Presetting
Select FM/AM by pressing the FUNCTION button
repeatedly (or press the FM/AM button of the remote
control unit).
Press the PRGM button for more than 2 second.
Up to 30 of the best received stations in your area
will be stored automatically. Then you can select
each stations easily.
You can select each station by pressing CH
UP/DOWN buttons.
How to delete preset stations
Select the stations you want to delete by pressing
the CH UP/DOWN buttons.
Press the CLEAR button to delete station.
Manual Memory Presetting
Select FM/AM by pressing the FUNCTION button
repeatedly (or press the FM/AM button of the remote
control unit).
If "PRESET" indicator is lit, press the TUNING MODE
button to select the manual tuning mode.
The "PRESET" indicator disappears from the display.
Select the station by pressing the CH UP/DOWN
buttons.
Press the PRGM button briefly.
While the PRGM indicator is on, select the station to
be preset by using the CH UP/DOWN buttons, then,
store the station in the desired preset position by
entering the preset number (ex. 01,02 … 30 etc.).
To store more stations, repeat steps to .
How to select preset stations
Press a preset number.
To select a station stored in preset 2 for example, press
0, followed by 2. You could directly press 2 to select
preset 2. But when you do this and then press 6 for
example, the unit understands that you entered "26".
Preset stations can also be selected by the TUNING
button. Press the TUNING button repeatedly until the
desired preset station is found.
< If the PRESET indicator isn't lit, press the TUNING
MODE button before hand.
53
5
4
3
2
1
2
1
3
2
1
1
2
13
5
6
2
1
4
3
Page 47

47
V
C
R
P
A
R
T
VCR Menu Screen Operation
1. Turn on the TV and DVD/VCR.
2. Tune the TV to the channel that receives the
DVD/VCR signal (usually channels 3, 4 or the video
input ).
3. Set the DVD/VCR to VCR mode by pressing the VCR
button on the remote control if the VCR indicator is
not on the display panel.(When you insert the tape
into the VCR deck, the DVD/VCR will automatically be
placed in VCR mode.)
4. Press the MENU button, the VCR MENU screen will
then appear.(Pressing this button once more makes
the VCR MENU screen disappear.)
Select the 'CLOCK SET' menu by pressing the
bb/55
buttons, then press the ttbutton.
Select the 'TIMER RECORDINGS' menu by pressing
the
bb/55
buttons, then press the ttbutton.
Select the 'CH SET' menu by pressing the
bb/55
buttons, then press the ttbutton.
Select the 'INITIAL SET' menu by pressing the
bb/55
buttons, then press the ttbutton.
Select the 'LANGUAGE' menu by pressing the
bb/55
buttons, then press the ttbutton.
E
D
C
B
A
VCR MENU
MOVE: SELECT: EXIT:
CLOCK SET
TIMER RECORDINGS
CH SET
INITIAL SET
LANGUAGE<ENG>
CLOCK SET
REVISE :
SELECT: 0-9
EXIT:
DATE : / / < >
TIME : < > :
<dd/mm/yy>
<hh/mm>
SELECT: 1-8
DATE CH START END
1 /
:
EXIT:
:
2 /
:
:
3 /
:
:
4 /
:
:
5 /
:
:
6 /
:
:
7 /
:
:
8 /
:
:
CH SET
MOVE: SELECT: EXIT:
TV/CATV <TV>
AUTO CHANNEL SEARCH
ADD/REMOVE CHANNELS
INITIAL SET
MOVE: SELECT: EXIT:
TAPE
REPEAT PLAY
AUTO CLOCK
STANDARD TIME
DAYLIGHT SAVING
TIME
<T120>
<OFF>
<ON>
<0FF>
LANGUAGE
SELECT : EXIT:
ENGLISH
FRANÇIAS
ESPANOL
A
B
C
D
E
VCR button
MENU button
Direction
buttons
Page 48

48
V
C
R
P
A
R
T
< If you cannot set the DVD/VCR using Auto Clock, set
the clock manually as follows :
< This clock is based on a 12-hour digital display.
The clock not only serves as a digital display of your
current local time, but is essential to the successful
operation of the VCR's Programmable Timer
Recording used for unattended recording. Therefore
it is of the utmost importance that the clock be set
accurately.
< When the DVD/VCR and TV are turned on for the first
time, --:-- will appear on the display panel.
Example: Setting the clock to the imaginary current
date and time : AM 10:30 June, 25, 2003.
Press the MENU button, then the VCR MENU screen
will appear.
Select the 'CLOCK SET' menu by pressing the
b/5buttons, then press the t button.
Input the DATE by pressing the numeric buttons.
1. Press the 2 & 5 buttons to set DAY.
2. Press the 0 & 6 buttons to set MONTH.
3. Press the 0 & 3 buttons to set YEAR.
Input the TIME by pressing the numeric buttons.
1. Press the 1 or 2buttons to set AM/PM(Number
button 1 in this case).
2. Press the 1 & 0 buttons to set HOUR.
3. Press the 3 & 0 buttons to set MINUTE.
Note:
Press the MENU button two times to erase the
MENU screen.
C
B
A
Setting the Clock Manually
CLOCK SET
REVISE :
SELECT: 0-9
EXIT:
DATE : / / < >
TIME : < > :
<dd/mm/yy>
<hh/mm>
REVISE :
CLOCK SET
SELECT: 0-9
EXIT:
DATE : 25 / 06 / 2003<WED>
TIME : < > :
<dd/mm/yy>
<hh/mm>
<AM->1 PM->2>
REVISE :
CLOCK SET
SELECT: 0-9
EXIT:
DATE : 25 / 06 / 2003 <WED>
TIME : <AM> 10 : 30
<dd/mm/yy>
<hh/mm>
A
B
C
MENU button
Direction
buttons
Numeric buttons
VCR MENU
MOVE: SELECT: EXIT:
CLOCK SET
TIMER RECORDINGS
CH SET
INITIAL SET
LANGUAGE<ENG>
(VCR MENU SCREEN)
Page 49

49
V
C
R
P
A
R
T
< Press the MENU button, then VCR MENU screen will
appear.
< Select the 'CH SET' menu by pressing the
b/5buttons, then press the t button.
< 'CH SET' menu screen will appear.
TV/CATV MODE SELECTION
Press the
t button, then TV(CATV) mode will be
changed to the CATV(TV) mode.
TO SET TV CHANNELS AUTOMATICALLY
1. Select the 'AUTO CHANNEL SEARCH' menu by
pressing the
b /5 buttons, then press the t
button.
2. The AUTO CHANNEL SEARCH indication appears
on the TV screen.
3. After finishing the AUTO CHANNEL SEARCH
Process, the menu screen is automatically
resumed.
4. Press the MENU button to erase the MENU
screen.
Note:
< Auto memory of channels by the AUTO CHANNEL
SEARCH function is possible only during broadcast.
< Broadcasting channels are automatically memorized
while the channel No. is changed from 02 up to 69 in
order
< When the CATV indicator appears on the display
panel, the channel No. is changed from 01 up 125 in
order.
B
A
Channel Setting 1
<CATV>
CH SET
MOVE: SELECT: EXIT:
TV/CATV <TV>
AUTO CHANNEL SEARCH
ADD/REMOVE CHANNELS
CH SET
MOVE: SELECT: EXIT:
TV/CATV <TV>
AUTO CHANNEL SEARCH
ADD/REMOVE CHANNELS
EXIT:
AUTO CHANNEL SEARCH
CH <02>
A
B
MENU button
Numeric
button
Direction
buttons
VCR MENU
MOVE: SELECT: EXIT:
CLOCK SET
TIMER RECORDINGS
CH SET
INITIAL SET
LANGUAGE<ENG>
(VCR MENU SCREEN)
Page 50

50
V
C
R
P
A
R
T
Channel Setting 2
TO SET A CHANNEL MANUALLY(CHANNEL
ADD/REMOVE)
This is to memorize channels that could not
be memorized by the AUTO CH PROGRAMMING
function, or to delete unwanted channels.
Select the 'ADD/REMOVE CHANNELS' menu by
pressing the
bb/55
buttons, then press the ttbutton.
Select a channel No. to add or erase by pressing the
CH
bb/55
buttons or the channel direct access
buttons. (Press 0 and 7)
Example : To set channel 7.
CHANNEL ADD
Press the
g button to add the channel.
CHANNEL REMOVE
Press the
t button to erase the channel.
Note:
Press the MENU button three times to erase the
MENU screen.
3
2
1
C
1
3
2
ADD/REMOVE CHANNELS
ADD: REMOVE: EXIT:
CH <07>
CH SET
MOVE: SELECT: EXIT:
TV/CATV
AUTO CHANNEL SEARCH
ADD/REMOVE CHANNELS
<TV>
ADD/REMOVE CHANNELS
ADD: REMOVE: EXIT:
CH <07>
ADDED
ADD/REMOVE CHANNELS
ADD: REMOVE: EXIT:
CH <07>
REMOVED
C
Page 51

51
V
C
R
P
A
R
T
"INITIAL SET" Menu 1
< Press the MENU button, then VCR MENU screen will
appear.
< Select the 'INITIAL SET' menu by pressing the
b/5buttons, then press the t button.
< 'INITIAL SET' menu screen will appear.
TAPE (Recording/Playback Time of video Tape)
Press the
t button to choose the type of video
cassete.
REPEAT PLAY
To watch a tape over and over until the
H(STOP)button is
pressed, set the REPEAT PLAY option to ON as follows:
1. Select the 'REPEAT PLAY' menu by pressing
the
b/5buttons.
2. Press the
t button to select the REPEAT
PLAY(ON) or the REPEAT PLAY(OFF).
At REPEAT PLAY(ON), the tape will play over and
over until the repeat mode is cancelled.
AUTO CLOCK SETTING
1. Select the 'AUTO CLOCK' menu by pressing
the
b/5buttons.
2. When shipped from the factory, the AUTO CLOCK
setting is set to ON. If you do not want the clock to
be automatically set, press the
tbutton to set this
option to OFF.
Note:
The Auto Clock Adjustment will automatically adjust the
clock after approximately 3 minutes after a power
outage or when the unit is unplugged and then plugged
back in as long as the following criteria is met:
< The Auto Clock Adjustment will not work if Timer
Recording is in the Standby mode (T-REC indicator is lit).
< The Auto Clock Adjustment will not work when the VHF
reception is poor.
< The Auto Clock Adjustment will only work with some
Cable, Satellite or local antenna systems.
< The Auto Clock Adjustment will be disabled when Auto
Clock Setting is set to OFF, see section above.
< If the DVD/VCR is unplugged, the clock must be set
again.
< If the clock does not automatically adjust, SET THE
CLOCK MANUALLY AS DESCRIBED ON PAGE 48.
SETTING THE STANDARD TIME
If you live in an area that has broadcast stations in 2
different time zones, the product may recognize the
wrong time zone when auto Setting the clock/date.
1. In the 'INITIAL SET' menu, select the 'STANDARD
TIME' menu by pressing the
b/5buttons and then
press the
t button.
2. Select your time zone by pressing the
b /5 buttons, or select "AUTO", which will
automatically set the time zone.
D
C
B
A
INITIAL SET
MOVE: SELECT: EXIT:
TAPE
REPEAT PLAY
AUTO CLOCK
STANDARD TIME
DAYLIGHT SAVING
TIME
<T120>
<OFF>
<ON>
<OFF>
<T160>
INITIAL SET
MOVE: SELECT: EXIT:
TAPE
REPEAT PLAY
AUTO CLOCK
STANDARD TIME
DAYLIGHT SAVING
TIME
<T120>
<OFF>
<ON>
<OFF>
<ON>
INITIAL SET
MOVE: SELECT: EXIT:
TAPE
REPEAT PLAY
AUTO CLOCK
STANDARD TIME
DAYLIGHT SAVING
TIME
<T120>
<OFF>
<ON>
<OFF>
<OFF>
A
B
C
STANDARD TIME
SELECT: EXIT:
EASTERN TIME
CENTRAL TIME
MOUNTAIN TIME
PACIFIC TIME
AUTO CLOCK
MOVE: SELECT: EXIT:
TAPE
REPEAT PLAY
AUTO CLOCK
STANDARD TIME
DAYLIGHT SAVING
TIME
<T120>
<OFF>
<ON>
<0FF>
INITIAL SET
D
VCR MENU
MOVE: SELECT: EXIT:
CLOCK SET
TIMER RECORDINGS
CH SET
INITIAL SET
LANGUAGE<ENG>
(VCR MENU SCREEN)
TAPE<T120> TAPE<T160>
Note:
< EASTERN : GMT - 5 hours
< CENTRAL : GMT - 6 hours
< MOUNTAIN : GMT - 7 hours
< PACIFIC : GMT - 8 hours
< AUTO : AUTO SET (GMT : Greenwich Mean Time)
Page 52

52
V
C
R
P
A
R
T
"INITIAL SET" Menu 2
SETTING DAYLIGHT SAVINGS TIME(DST)
Daylight Savings Time(DST) can be set automatically, or
manually as follows:
1. In the 'INITIAL SET' menu, select the 'DAYLIGHT
SAVINGS TIME' menu by pressing the
b /5
buttons.
2. Repeatedly press the
tbutton to cycle through
the Daylight savings Time options.
ON : To turn DST on (forward one hour)
OFF : To turn DST off (back one hour)
AUTO : Unit will auto set DST
Note:
< When setting DST manually, set it to ON during the
first Sunday in April and OFF during the last Sunday
in October.
< When shipped from the factory, the DST option is set
to OFF.
< When the clock is not set, DST setting is not
available.
< If there is no DST in your area, set DST to OFF.
E
Language Selection
SELECT THE 'LANGUAGE' MENU
1. Press the MENU button, then VCR MENU screen
will appear.
2 Select the 'LANGUAGE' menu by pressing the
b/5 buttons, then press the t button.
The LANGUAGE menu will appear.
ON-SCREEN LANGUAGE SELECTION
Press the
b/5buttons to select the desired
language : ENGLISH, FRANÇIAS, ESPANOL
B
A
MOVE: SELECT: EXIT:
TAPE
REPEAT PLAY
AUTO CLOCK
STANDARD TIME
DAYLIGHT SAVING
TIME
<T120>
<OFF>
<ON>
<OFF>
INITIAL SET
E
VCR MENU
MOVE: SELECT: EXIT:
CLOCK SET
TIMER RECORDINGS
CH SET
INITIAL SET
LANGUAGE<ENG>
A
LANGUAGE
SELECT: EXIT:
ENGLISH
FRANÇIAS
ESPANOL
B
OFF ON AUTO
Page 53

53
V
C
R
P
A
R
T
Video Cassette 1
LOADING
< Push the cassette into the cassette compartment
smoothly with label up.
< If the power is off prior to loading the tape,
loading the tape will turn the power on
automatically if the AC power cord is plugged in.
< Insert the tape into the VCR deck. The DVD/VCR
will automatically be placed in VCR mode.
The TAPE IN indicator is on.
UNLOADING
Press the
H(STOP) button on the remote control or
the front panel. The tape will stop, but remain fully
loaded and ready to play. Press the EJECT button
on the front of DVD/VCR (in the STOP mode).
The TAPE IN indicator will be off.
Pull the cassette out smoothly
When you press the EJECT key, even if the power
is off, the cassette will be ejected.
Notes:
< Inserting a cassette with its safety tab in place turns
the recorder on automatically.
w
<
Due to the new auto-play function, when a cassette
with its safety tab removed is inserted, the VCR turns
on and begins to play back automatically.
ww
<
An inverted cassette cannot be inserted.
< Be sure to insert the cassette firmly into the slot,
otherwise, it will be ejected automatically.
< The automatic loading mechanism will operate only
when the cassette is inserted correctly.
< When the unit is unplugged from the power outlet, do
not insert cassette.
CAUTION :
< When the TIMER REC indicator, , is on the front
panel display, it is impossible to unload the cassette.
To remove the cassette, press the T-REC button on
the remote control, the TIMER REC indicator will turn
off and the cassette can then be removed.
< Do not attempt to pull out the cassette, once an
automatic loading has started.
< Do not insert fingers or any foreign object beyond the
door flaps of the cassette loading slot, as this could
lead to injury or damage to the mechanism. Use
special caution with children.
PLAYPOWER ONLOADING
POWER ONLOADING
2
1
B
2
1
A
SURROUND
A
LOADING
2
1
B
UNLOADING
2
1
Page 54

54
V
C
R
P
A
R
T
Video Cassette 2
CASSETTE FORWARDING DIRECTION
Note:
< Keep cassettes away from direct sunlight, heat or
extreme cold.
< Avoid extreme humidity, violent vibrations or shocks,
strong magnetic fields (near a motor, transformer or
magnet) and dusty places.
< Store cassettes vertically in their protective cases at
normal room temperature.
TYPES OF VIDEO CASSETTE
Use tape with the mark in this unit.
ERASE PROTECTION
Video cassette is equipped with a safety tab to prevent
accidental erasure. When the tab is removed,
recording can not be performed. If you wish to record
on a cassette where the tab has already been
removed, use adhesive tape to cover the hole.
Cassette with the safety tab intact .
To prevent accidental erasure.
After recording, break off the safety tab with a
screwdriver if you don't wish to record over the tape.
To record again.
Cover the hole with cellophane tape.
3
2
1
E
VHS
D
C
(BEGINNING)
(ENDING)
PLAY
C
Type
T-60 1 hour 3 hours
T-90 1 hour 30min 4 hours 30min
2 hours 40min
T-120 2 hours 6 hours
T-160 8 hours
SP Mode
(Standard Play)
SLP Mode
(Super Long Play)
Maximum Recording / Playback Time
D
Safety tab
E
ERASE PROTECTION
1
2
3
Page 55

55
V
C
R
P
A
R
T
Basic Playback
< Turn on the TV and DVD/VCR.
< Tune the TV to the channel that receives the
DVD/VCR signal (usually channels 3, 4 or the video
input ).
< Set the DVD/VCR to VCR mode by pressing the VCR
button on the remote control if the VCR indicator is
not on the front panel display.
LOADING PRE-RECORDED TAPES
Prior to loading a pre-recorded tape, if the power is off,
inserting the tape will turn the power on automatically
if AC power is plugged in. When loading a cassette
without the erase prevention tab, playback starts
automatically.
PLAY BACK
Press the
t(PLAY) button, then picture will appear.
The tape is rewound automatically to the beginning
after playing to the end of recorded part.
STOP
Press the
H (STOP) button. The tape will stop but
remain fully loaded and ready to play.
FAST FORWARDING
Press the
/(FF) button in the STOP mode. The tape
advances at the high speed without picture and sound.
REWINDING
Press the
.(REW) button in the STOP mode. The
tape is rewound at the high speed without picture and
sound.
EJECTING
Press the EJECT button on the front of DVD/VCR (in the
STOP mode).
TRACKING
< Press the TRACKING b,5 buttons to minimize
picture noise during playback.
< When a tape is played, the Digital Auto Tracking
system automatically adjusts the tracking to obtain
the best possible picture.
7
6
5
4
3
2
1
H OPERATION
1
2
TUNING FUNCTION REC COPY CHANNEL
SURROUND
3
TUNING
4
TUNING
5
6
7
2 6
7
345
Page 56

56
V
C
R
P
A
R
T
Special Operation
TO VISUALLY SEARCH FORWARD (CUE)
Press the
/ button once in the PLAYBACK mode.
The tape will advance rapidly with picture, and the
CUE indicator will blink on the display panel.
When pressed once more, the tape speed will
increase.
TO VISUALLY SEARCH REVERSE (REVIEW)
Press the
. button once in the PLAYBACK mode.
The tape will rewind rapidly with picture, and the
REV indicator will blink on the display panel.
When pressed once more, the tape speed will
increase.
TO WATCH SLOW PICTURE
Press the SLOW button during playback, and then
press the SLOW(+) or SLOW(-) button.
You can watch the desired frame in detail.
The SLOW indicator appears on the display panel.
TO WATCH STILL PICTURE
Press the
J button during playback.
< If this button is pressed continuously, the picture wil
advance frame by frame. The STILL indicator
appears on the display panel.
< Adjust the vertical locking for the best picture
condition by using traking(
5 )and tracking (b )
buttons.
Notes:
< Press the PLAY button to resume PLAYBACK mode.
< Noise bars may appear in the picture in the SLOW
mode. To reduce the noise bars, press the
TRACKING
b/5 or AUTO buttons on the remote
control.
< No sound will be heard in the SEARCH, SLOW or
STILL mode.
< The SLOW mode will be released automatically after
5 minutes.
< Squeezed picture could be seen while switching
from the SEARCH mode to the PLAYBACK mode. This
is NOT a sign of malfunction.
< OSD indication is not displayed on the TV screen in
4
3
2
1
TUNING
1
TUNING
2
3
4
4
4
12
21
CH/FREQ
buttons
TUNING MODE
buttons
3
Page 57

57
V
C
R
P
A
R
T
Digital Shuttle Function
Various speeds can be selected by pressing the
SHUTTLE (+,-) buttons on the remote control.
When the SHUTTLE(+) button is pressed once
every time, the speed will change as follows:
When the SHUTTLE(-) button is pressed once
every time, the speed will change as follows:
2
1
SEARCH FORWARD (SLOW)
SEARCH FORWARD (MID)
SEARCH FORWARD (FAST)
NORMAL PLAYBACK
REVERSE SEARCH (SLOW)
REVERSE SEARCH (MID)
REVERSE SEARCH (FAST)
REVERSE NORMAL PLAYBACK
SHUTTLE
buttons
Page 58

58
V
C
R
P
A
R
T
Recording TV Programs 1
PREPARATION
< Turn on the TV and DVD/VCR.
< Tune the TV to the channel that receives the
DVD/VCR signal (usually channels 3,4 or the video
input ).
LOADING
Load a cassette tape with the safety tab intact. The
power will come on automatically and the TAPE IN
indicator will light.
VCR MODE
Set the DVD/VCR to the VCR mode by pressing the VCR
button on the remote control.This is only needed if the
VCR indicator is not displayed on the front panel.
CHANNEL SELECTION
Press the channel direct access buttons or the
CHANNEL UP/DOWN buttons to select the channel to
be recorded. (From 02 to 69)
SPEED SELECTION
Press the SPEED button to select the desired tape
speed (SP or SLP).
SP or SLP will be displayed.
5
4
3
2
1
1
2
3
3 or 4
VIDEO
SURROUND
INDEX
4
3
5
FM/AM
TV/VCR
4
5
&
Page 59

59
V
C
R
P
A
R
T
Recording TV Programs 2
RECORDING
Press the REC button and recording will start.(The REC
indicator appears)
TO STOP RECORDING TEMPORARILY
< Press the J button to avoid recording unwanted
material. Press the REC button to continue the
recording.
< The pause function will be released after 5 minutes
to prevent damage to the tape or the DVD/VCR,
and then the STOP mode will be automatically
entered.
TO STOP RECORDING
Press the
H(STOP)button (or the H button on the front
of DVD/VCR) to stop recording.
RECORDING ONE PROGRAM WHILE WATCHING
ANOTHER
You can record one program while watching another.
1. Follow Step through of page 58, 59.
2. Set the DVD/VCR to the TV mode by pressing the
TV/VCR button.
3. Select the TV channel you want to watch by using
the channel selector of TV receiver.
Note:
< Since the DVD/VCR has its own TV tuner, it is not
necessary to turn on the TV in order to make a
recording. Turning on the TV merely allows
confirmation of proper channel settings on your
DVD/VCR.
< You can choose the DVD/FM/AV1,2 function during
VCR recording.
62
9
8
7
6
6
7
8
INDEX
6
8
7
TV/VCR
button
FM/AM
TV/VCR
Page 60

60
V
C
R
P
A
R
T
Duplicating a Video tape
A
Front of DVD/VCR
AV 1
INPUT
"VIDEO IN""VIDEO OUT"
"AUDIO OUT"
"AUDIO IN"
DVD/VCR TO VCR CONNECTION
If you connect the DVD/VCR to another VCR, you can
duplicate a previously recorded tape.
OPERATION
Load a blank cassette tape with the safety tab
intact into the Recording DVD/VCR.
Load a previously recorded tape into the playback
VCR.
Press the REC button on the recording DVD/VCR,
then press the
J(PAUSE) button.
Press the
t(PLAY) button on the playback VCR,
then press the
J(PAUSE) button.
Press the
t(PLAY) button on the playback VCR and
the REC button on the recording DVD/VCR
simultaneously to begin duplication.
Note:
< When recording from another VCR, you must press
the SELECT (VCR INPUT SELECT) button on the
remote control to select AV1 or AV2 depending
on which input the other VCR is connected to, then,
press the record button as in step 5.
< It is recommended you set the tape speed to the SP
mode on the recording DVD/VCR for best results.
< Unauthorized recording of copyrighted television
programs, films, video tapes and other materials may
infringe on the rights of copyright owners and be
contrary to copyright laws.
< Many pre-recorded tapes contain Macrovision copy
protection and cannot be duplicated properly.
5
4
3
2
1
B
A
SURROUND
B
1
RECORD
PLAY
STOP/EJECT
F.FWDREWIND
CH
POWER
4 HEADS DIGITAL AUTO TRACKING
2
3
OPERATION
RECORDING DVD/VCR
PLAYBACK VCR
RECREC COPY CHANNEL
4
PLAY
5
PLAY
PAUSE
RECREC COPY CHANNEL
(Playback VCR)
(Recording DVD/VCR)
(Playback VCR)
(Recording DVD/VCR)
Page 61

61
V
C
R
P
A
R
T
One Touch Timer Recording (OTR)
OTR is simple and convenient way to make a timed
recording without programming to the Timer.
When the OTR is completed,the DVD/VCR automatically
enters the STOP mode.
PREPARATION
< Turn on the TV and DVD/VCR.
< Tune the TV to the channel that receives the DVD/VCR
signal.
< Set the DVD/VCR to the VCR mode by pressing the VCR
button when the VCR indicutor is not on the front panel
display.
MAKE SURE THAT
< The clock is adjusted to the current time.
< The safety tab is not removed from the cassette.
< The tape is long enough to record the program.
CHANNEL SELECTION
Press the channel direct access buttons or CH buttons
to select the channel to be recorded.
SPEED SELECTION
Press the SPEED button to select the desired tape
speed (SP/SLP).
If you don't press the SPEED button, SPEED mode sets
to the current speed, automatically.
PRESS THE REC/OTR BUTTON
Press the REC/OTR button twice on the remote control.
END TIME SELECTION
< Press the t button to increase the END TIME
< The recording length progress with each press of the
(
t) button is according to the following schedule.
10
w 20 w 30 w 40 w 50 w 1:00 w 1:30 w
2:00 w 2:30 w 3:00 w 4:00 w 5:00 w 6:00 w
7:00 w 8:00 w 9:00 w 0:00
"10" means 10 minutes
"1:00" means one hour
< To cancel OTR, press the t button repeatedly until
"OTR
w 0:00" appears ( in the OTR mode)
Note:
< OTR is convenient, especially;
-When you have an unexpected visitor.
-When you receive a call.
-When you are called away unexpectedly.
< You can choose the DVD/FM/AV1,2 function during
VCR recording.
4
3
2
1
OTR 0 : 00 SP
PRESS TO SET LENGTH
02
3
1
2
OTR 0 : 10 SP
PRESS TO SET LENGTH
02
4
VCR button
Numeric
buttons
CH b/5
buttons
Direction
buttons
REC/OTR
buttons
Page 62

62
V
C
R
P
A
R
T
Normal Timer Programming 1
With the NORMAL TIMER RECORDING feature, you can
set the DVD/VCR so that it automatically comes on and
records programs whenever you like without your
being around!
You can record a program one time only, or you can
automatically record a show every weekday or every
week at the same time. You can preset as many as 8
timed recordings at once.
PREPARATION
1. Turn on the TV and set it to CH 3 or 4.
2. Load a cassette tape with safety tab intact.
The power will be automatically on and the TAPE IN
indicator will light.
3. Set the DVD/VCR to VCR mode by pressing the VCR
button on the remote control if the VCR indicator is
not on the display panel.(When you insert the tape
into the VCR deck, the DVD/VCR will automatically
be placed in VCR mode.)
MAKE SURE THAT
< The clock is adjusted to the current time.
< The safety tab is not removed from the cassette.
< The tape is long enough to record the desired
program.
PROGRAM MODE
< ONE TIME: Record a program on any day you choose
within 1 year (One time recording of a single program).
< WEEKDAY: Record a program at the same time
everyday as you have preset(Daily recording).
< WEEKLY: Record a program on one certain day of
every week (weekly recording).
EXAMPLE:
Program the TIMER as follows ;
Current Time: AM 10:30 June,25th,2003.
The recording time: OCT 2nd, AM 9:30~AM 11:30
Recording content : TV CH 7 at SP/ONE TIME mode
on PROGRAM NO.1
INDEX
VCR button
The step
3~10
FM/AM
MENU button
Direction
buttons
T-REC button
Page 63

63
V
C
R
P
A
R
T
Normal Timer Programming 2
OPERATION
MENU MODE
< Press the MENU button on the remote control.
< VCR MENU screen appears.
PROGRAMMING MODE
< To enter the PROGRAMMING mode in the MENU
screen, select the 'TIMER RECORDINGS'menu by
pressing the
bb/55
buttons. Then press the ttbutton.
< PROGRAMMING screen appears.
PROGRAM NO. SELECTION
Press a number button to select one of the blank
programs (number button 1 in this case).
DATE (DAY) SETTING
Press the number buttons to set DAY,0,2.
MONTH SETTING
Press the number buttons to set MONTH,1,0.
CHANNEL SELECTION
Press the number buttons to set CH,0,7.
ON TIME SETTING
< Press the number buttons to select AM or PM.
(Number botton 1 in this case)
< Press the number buttons to set HOUR,0,9.
< Press the number buttons to set MINUTE,3,0.
OFF TIME SETTING
< Press the number buttons to select AM or PM.
(Number button 1 in this case)
< Press the number buttons to set HOUR,1,1.
< Press the number buttons to set MINUTE,3,0.
8
7
6
5
4
3
2
1
VCR MENU
MOVE: SELECT: EXIT:
CLOCK SET
TIMER RECORDINGS
CH SET
INITIAL SET
LANGUAGE<ENG>
1
SELECT: 1-8
DATE CH START END
1 /
:
EXIT:
:
2 /
:
:
3 /
:
:
4 /
:
:
5 /
:
:
6 /
:
:
7 /
:
:
8 /
:
:
2
/
: :
PROGRAM 1
REVISE:
SELECT: 0~9 <DAY>
CLEAR:
EXIT:
DATE CH START
TAPE SPEED SP
TYPE ONE TIME
END
3
REVISE:
SELECT: 0~9 <MONTH>
CLEAR:
EXIT:
/
: :
PROGRAM 1
DATE CH START
TAPE SPEED SP
TYPE ONE TIME
END
02
4
START
REVISE:
CLEAR:
EXIT:
/ 10 02
<2003>
: :
PROGRAM 1
DATE CH
TAPE SPEED SP
TYPE ONE TIME
END
5
START
REVISE:
CLEAR:
EXIT:
:
/ 10 0702
<2003>
:
PROGRAM 1
DATE CH
TAPE SPEED SP
TYPE ONE TIME
END
6
REVISE:
START
CLEAR:
EXIT:
/ 10 0702
<2003>
AM09:30 :
PROGRAM 1
DATE CH
TAPE SPEED SP
TYPE ONE TIME
END
7
REVISE:
CLEAR:
EXIT:
START
/ 10 0702
<2003>
AM09:30 AM11:30
PROGRAM 1
DATE CH
TAPE SPEED SP
TYPE ONE TIME
END
< SP 1 SLP 2 AUTO 3 >
8
Page 64

64
V
C
R
P
A
R
T
Normal Timer Programming 3
SPEED SELECTION
Press the number button 1,2 or 3 to select the desired
tape speed, SP,SLP or AUTO.
TYPE SELECTION
Press the number button 1,2 or 3 to select the desired
type of recording, ONE TIME, WEEKDAY or WEEKLY.
MEMORIZE
Press the MENU button then the following will be
displayed.
ADDITIONAL PROGRAMMING
< For additional programming on PROGRAM NO.2 ,
repeat the step 3~10.
PROGRAM No.3~8 can be set in the same way.
TIMER STAND-BY MODE
< Press the T-REC button
< The TIMER REC indicator will light up, and the VCR
mode will be changed of DVD mode.
< When the actual time reaches the Timer Record time,
the unit will start recording and the red "REC" indicator
will light.
< In the TIMER REC stand-by mode, the DVD/VCR cannot
be changed from the VCR mode.
If you want to select the VCR mode, press the T-REC
button.
Note:
< You can correct the preset contents by or
button, cursor will move left or right,to
previous or next step.
< If you select the PROGRAMMING mode when the
current time is not adjusted, CLOCK SET MENU
appears.
< We suggest you try all the different ways of
programming the VCR when you have some leisure
time, so you can learn how it works. That way, when
an important show is going to be on that you really
want to record, you'll be confident that your timed
recording setup will work.
Types of Timed Recordings
ONE TIME Records one show at a particular date and time.
WEEKDAY Records a show at the same time every day of the
week, monday through Friday.
WEEKLY Records a show at the same day and time every week.
Your DVD/VCR can record up to 8 programs at different
days and times,or up to 8 programs on the same day.
tg
tg
13
12
11
10
9
REVISE:
CLEAR:
EXIT:
START
/ 10 0702
<2003>
AM09:30 AM11:30
PROGRAM 1
DATE CH
TAPE SPEED SP
TYPE ONE TIME
END
< SP 1 SLP 2 AUTO 3 >
9
REVISE:
CLEAR:
EXIT:
AM09:30
START
/ 10 0702
<2003>
ONE TIME 1 WEEKDAY 2
WEEKLY 3
AM11:30
PROGRAM 1
DATE CH
TAPE SPEED SP
TYPE ONE TIME
END
10
SELECT: 1-8
DATE CH START END
1
EXIT:
2 /
:
:
3 /
:
:
4 /
:
:
5 /
:
:
6 /
:
:
7 /
:
:
8 /
:
:
/ 10 0702
AM09:30 AM11:30
11
13
(Remote control)
(Front panel display)
Page 65

65
V
C
R
P
A
R
T
Normal Timer Programming 4
WHEN RECORD TIME OVERLAPS
When you have set up several timed recordings, it
may occur that some of their times overlap.
For example, this can happen if you are set up to
record shows on a daily or weekly basis, and a
special show comes on that you try to record during
the same time slot.
AT THIS TIME .....
< The program that has the earlier start time than
others, has the priority.
< The next one doesn't start untill the first program
is completed.
19:00 20:00 21:00 22:00
- NOT RECORDED
PROGRAM 1
PROGRAM 2 PROGRAM 3
PROGRAMMING
RECORDING
PROGRAM 1
PROGRAM 2
PROGRAM 3
Page 66

66
V
C
R
P
A
R
T
Checking and Cancelling Timer Recording
TO CHECK TIMER PROGRAMS
Example: To check PROGRAM 1 which has been already
preset.
Programmed Example
< Press the MENU button and select the TIMER
RECORDINGS menu. Then REC PROGRAMMING
screen will appear.
< Select the PROGRAM No.1 in the programming
mode.
Unprogrammed Example
When you select the unprogrammed PROGRAM No. in
the programming mode, no content will appear.
TO USE VCR FUNCTION DURING TIMER
RECORD STAND-BY
Press the T-REC button (The TIMER REC indicator will
disappear).
Press the VCR button.
Follow the normal procedures for recording and
playback.
(For playback:See page 55.)
(For recording:See page 58.)
When you have finished using the DVD/VCR for
normal purposes, press the T-REC button again and
the DVD/VCR will return to the TIMER REC stand-by
mode.
TO CANCEL TIMER RECORDINGS
Press the MENU button.
Select the TIMER RECORDING mode, then all timer
recordings will appear on the screen.
To cancel, select the desired program using the
numeric buttons, then press the CLEAR button.
3
2
1
4
3
2
1
B
A
A
B
REVISE:
CLEAR:
START
/ 10
07
02
<2003>
AM09:30 AM11:30
PROGRAM 1
SELECT: 0~9 <DAY>
EXIT:
DATE CH
TAPE SPEED SP
TYPE ONE TIME
END
/
: :
PROGRAM 1
REVISE:
SELECT: 0~9 <DAY>
CLEAR:
EXIT:
DATE CH START
TAPE SPEED SP
TYPE ONE TIME
END
INDEX
MENU
button
T-REC
button
NUMERIC
buttons
FM/AM
TV/VCR
VCR
button
CLEAR
button
Page 67
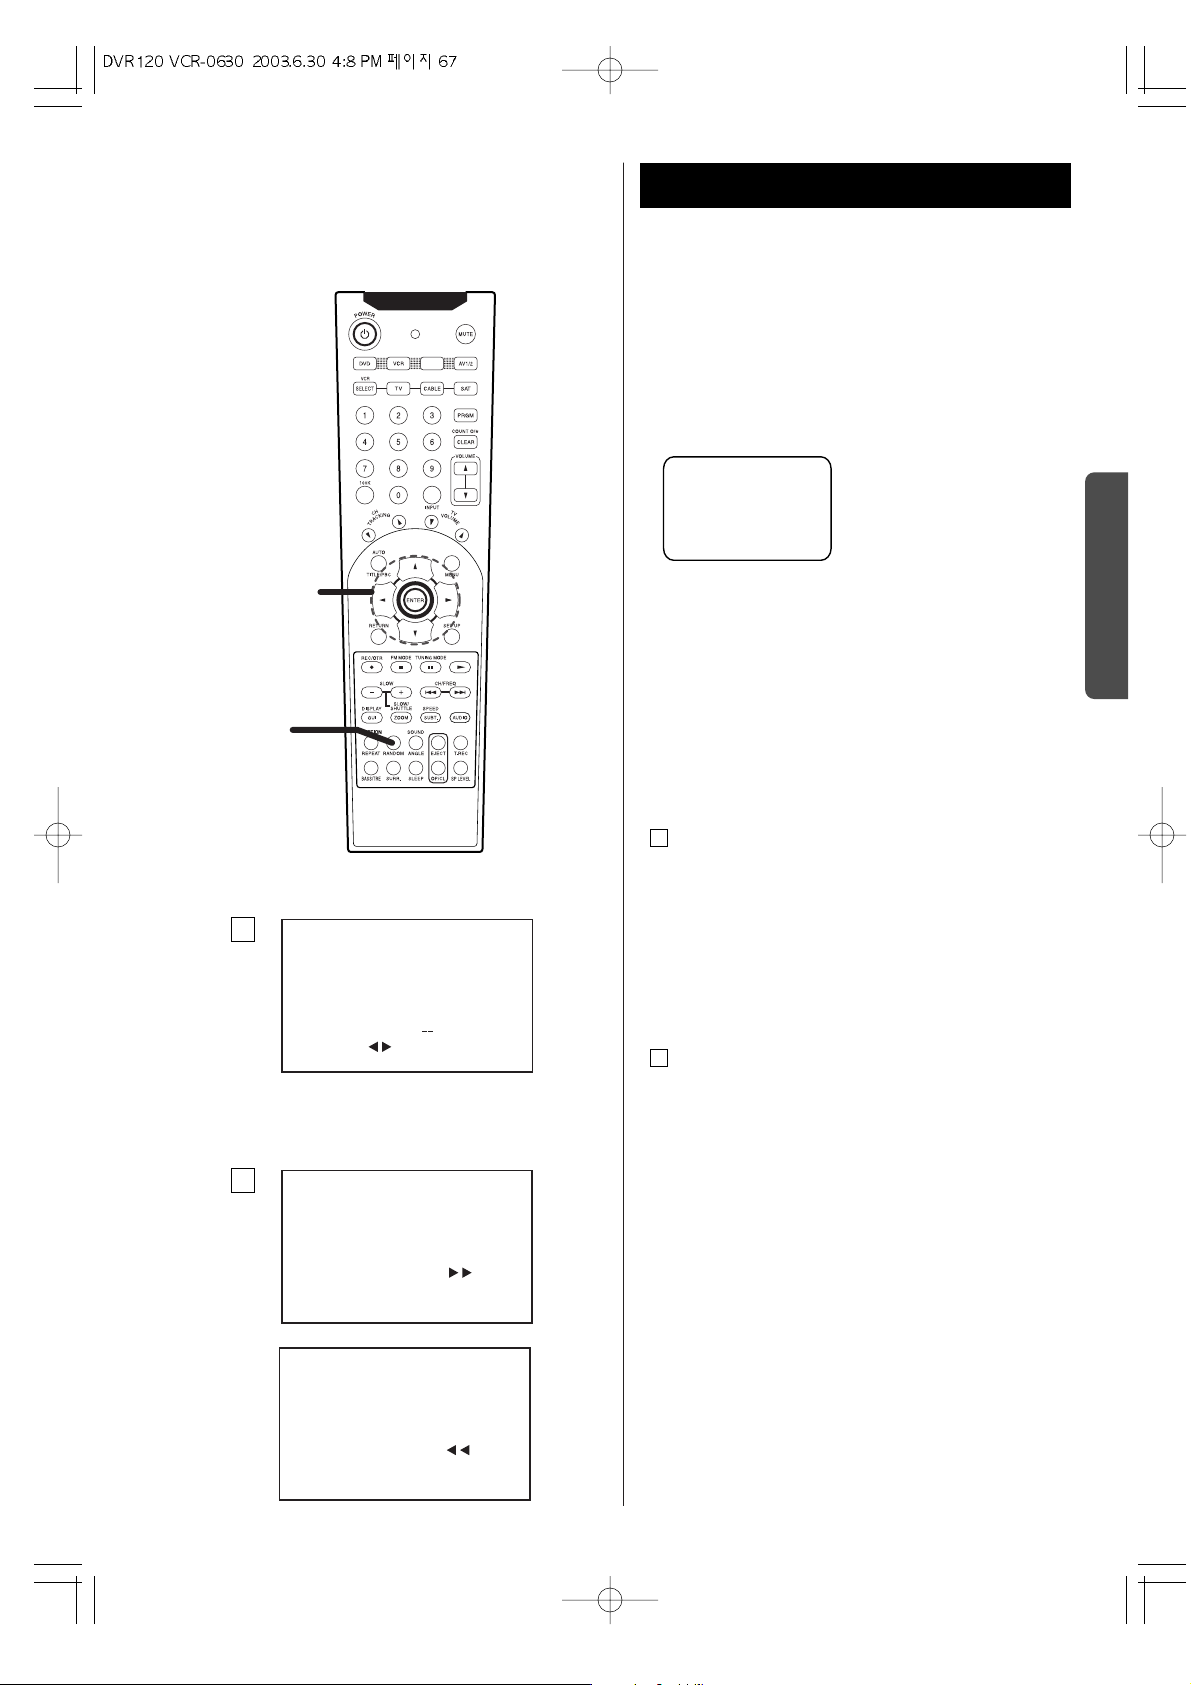
67
V
C
R
P
A
R
T
VISS (VHS Index Search System) 1
The VHS index search function gives you automatic
access to locations where index marks were recorded
on the tape. It can perform index searching and skip
searching when using the recorded tape containing
index marks. The index marks are automatically recorded
on the tape at the start time of normal recording and
timer recording.
Note:
< Index marks cannot be recorded on a tape with its
safety tab remove.
< A program must be recorded for more than five
minutes at least to operate VISS
INDEX SEARCH
When you press the INDEX button on the remote
control, index search menu is displayed.
When you directly press the search button (
h or t),
the next screen is displayed and the VCR will
forward/rewind to search the index mark.
2
1
INDEX MARKING
"INDEX MARK"indicator
will be displayed on the
screen for three seconds.
SEARCH :
INDEX NUMBER :
SELECT: 0-9
1
CANCEL : STOP
SERCHING FOR
INDEX MARKS . . .
INDEX NUMBER : 01 < >
CANCEL : STOP
SERCHING FOR
INDEX MARKS . . .
INDEX NUMBER : 01 < >
2
INDEX
INDEX
button
Direction
button
FM/AM
TV/VCR
Page 68

68
V
C
R
P
A
R
T
VISS (VHS Index Search System) 2
INDEX SKIP
INDEX function also permits skipping to locate a
particular section.
By using the numeric buttons, enter the index number of
the program you would like to watch. The VCR deck will
then locate the desired program automatically.
WATCHING BASKETBALL GAME NOW
Index Search(+)
EXAMPLE: To watch special show from basketball game.
< Enter the number 2 and press the t button.
< The VCR will fast forward and play from the beginning
of the special show.
Index Search (-)
EXAMPLE: To watch News from basketball game.
< Enter the number 2 and press the g button.
< The VCR will rewind and play from the beginning of the
news.
Note:
< The index search function will not function on tapes
that where recorded on VCR's without the VHS
Index Search System.
< The index search function will operate on tapes
recorded by VCR's with the VHS index search function.
2
1
Clock/Count Display
The counter counts in real time from the point you load
the cassette.
This does not have to be its beginning. The counter does
not count unrecorded parts of the tape.
CLOCK/COUNTER DISPLAY
Each press of the DISPLAY button changes the onscreen display in the following sequence.
1X : Tape mode, Tape speed, channel
2X : Time and Date
3X : Count
4X : Remain
5X : Remain OSD disappears
To ensure the REMAIN time display is accurate, the
length of the cassette (T120,T160 etc.) currently loaded
must be set. This is done by pressing the MENU button.
1
CANCEL : STOP
SERCHING FOR
INDEX MARKS. . .
INDEX NUMBER : 02 < >
2
Example : When you insert the tape into
the VCR deck.
SERCHING FOR
INDEX MARKS . . .
INDEX NUMBER : 02 < >
Press one time Press two times
STOP
SP 02
CANCEL : STOP
STOP SP 02
-2 -1 +1 +2 +3
News
Basketball
Game
Movie Special Show
Press three times Press four times
25/06/2003<WED> AM10:30
COUNT 0:00:00 REMAIN - :---
Page 69

69
V
C
R
P
A
R
T
Closed Captions
WHAT IS CLOSED CAPTIONING?
This DVD/VCR has the capability to decode and display
Closed Captioned television programs. Closed Captioning
will display text on the screen for hearing impaired
viewers or it will translate and display text in another
language.
OPERATION
Press the CAPTION button to cycle between caption 1,
caption 2,Text 1, and Text 2. Closed Captioning will
display text on the screen for the hearing impaired
viewers.
Closed Caption Modes you can Choose
1. Caption Mode: CAPTION1 or CAPTION 2
A narration of selected TV programs is displayed.
Check TV program listings for C. C.(Closed Caption)
broadcasts.
2.
Caption Mode : TEXT 1 or TEXT2
The lower half of the screen will be blocked out. When
the TV station broadcasts
information, such as program listings, it will appear in
this space.
3.
Caption Mode: OFF
Closed Caption/Text narration will not be displayed.
Note:
< When selecting Closed Captions, the captioning will be
delayed approximately 10 seconds.
< If no caption signal is received, no captions will
appear, but the television will remain in the Caption
Mode.
< Misspellings or unusual characters may occasionally
appear during Closed Captioning. This is normal with
Closed Captioning, especially with live programs. This
is because during live programs, captions are also
entered live. These transmissions do not allow time for
editing.
< When Captions are being displayed, on-screen
displays, such as volume and mute may not be seen or
may interfere with Closed Captions.
< Some cable systems and copy protection systems may
interfere with the Closed Captioned signal.
< If using an indoor antenna or if TV reception is very
poor, the Closed Captions may not appear or may
appear with strange characters or misspelled words.
In this case, adjust the antenna for better reception or
use an outdoor antenna.
CAPTION 1
CAPTION 2
CAPTION 1
TEXT 1
TEXT 2
CAPTION OFF
Page 70

70
V
C
R
P
A
R
T
Copying from DVD to VHS
OPERATION
Insert a blank tape into the VCR deck. Make sure
the record safety tab is attached to the tape.
Select DVD Mode
Press the DVD button on the remote control.
INSERT THE DISC
1). Press the OPEN/CLOSE button on the front of
DVD/VCR.
2). Insert the disc you wish to copy into the DVD deck.
TO CLOSE THE DISK TRAY
Press the OPEN/CLOSE button on the front of DVD/VCR.
TO STOP PLAYBACK.
Press the
H (STOP) button.
TO COPY
Press the COPY button on the front of DVD/VCR.
< DVD - The disc starts playing.
< VCR - The tape starts recording.
TO STOP COPYING
Press the
H (STOP) button to end recording.
Note:
< You must stop the copying process manually when the
DVD ends or the DVD/VCR may replay and record over
again.
< You can't operate other functions during DVD COPY.
< Many DVD's are copy protected. Attempting to copy
DVD's encoded with the copy protection system
Macrovision, will result in a poor quality copy.
7
6
5
4
3
2
1
1
2
3
4
5
6
7
H OPERATION
TUNING FUNCTION REC COPY CHANNEL
SURROUND
3 4
2
6 5 7
TUNING FUNCTION REC COPY CHANNEL
SURROUND
Page 71

71
V
C
R
P
A
R
T
1
2
TUNING FUNCTION REC COPY CHANNEL
SURROUND
MTS Broadcast / TV stereo system
Select Audio Mode For Playback
While watching TV, press the SOUND button on the
remote.
The current tuner audio status will be displayed on
the screen.
Press the SOUND button repeatedly to select from the
following options:
< stereo - Two - channel MTS stereo sound split into left
and right channels. When a show is not broadcast in
stereo, the sound reverts to mono.
< SAP(Second Audio Program) - An optional audio signal
often used to transmit a second language, news, or
weather broadcasts.
< TV + SAP - Delivers mono sound from the left channel
and a SAP from the right channel.
This is useful if you want to listen to a second
language with headphones while the primary language
is playing through your TV speakers.
< Mono - Monaural (single channel) audio that combines
the left and right audio signals into one channel.
B
A
Choose the type of sound track for playback.
Playback the tape
Insert the tape into the VCR deck. The DVD/VCR will
automatically be placed in VCR mode.
Press the
t(PLAY) button on the remote or front panel.
If the tape does not have the Record safety Tab attached,
the tape will begin to play automatically.
Select Audio Mode
< Press the SOUND button repeatedly.
Hi-Fi
w Hi-Fi w Hi-Fi w MONO
STEREO LEFT RIGHT
< Please select "Hi-Fi (STEREO)", "Hi-Fi (LEFT)" or "Hi-Fi
(RIGHT)" to listen to stereo recordings in stereo sound.
Select "MONO" for monaural sound.
2
1
Select Audio Mode for Recording
Choose the type of broadcast to be recoded.
Select sound Mode for Recording
Press the SOUND button on the remote control.
Recording
Press the REC/OTR button.
(See the pages 58~59)
2
1
1
2
Hi-Fi
STEREO
Page 72

72
Glossary
Bit rate
Value indicating the amount of video data
compressed in a DVD per second. The unit is Mbps
(mega bit per second). 1 Mbps indicates that the data
per second is 1,000,000 bits. The higher the bit rate is,
the larger the amount of data. However, this does not
always mean that you can get higher quality
pictures.
Chapter
Sections of a picture or a music piece on a DVD that
are smaller than titles. A title is composed of several
chapters. Each chapter is assigned a chapter
number enabling you to locate the chapter you want.
Dolby Digital
This sound format for movie theaters is more
advanced than Dolby Pro Logic Surround. In this
format, the rear speakers output stereo sound with
an expanded frequency range and a subwoofer
channel for deep bass is independently provided.
This format is also called "5.1" because the
subwoofer channel is counted as 0.1 channel (since
it functions only when a deep bass effect is needed).
All six channels in this format are recorded
separately to realize superior channel separation.
Furthermore, since all the signals are processed
digitally, less signal degradation occurs. The name
"AC-3" comes from the fact that it is the third audio
coding method to be developed by the Dolby
Laboratories.
Dolby Pro Logic Surround
As one method of decoding Dolby Surround, Dolby
Pro Logic Surround produces four channels from
two-channel sound. Compared with the former Dolby
Surround system, Dolby Pro Logic Surround
reproduces left-to-right panning more naturally and
localizes sounds more precisely. To take full
advantage of Dolby Pro Logic Surround, you should
have one pair of rear speakers and a center speaker.
The rear speakers output monaural sound.
DTS
Digital audio compression technology that the Digital
Theater Systems, Inc. developed. This technology
conforms to 5.1-channel surround. The rear channel
is stereo and there is discrete subwoofer channel in
this format. DTS provides the same 5.1 discrete
channels of high quality digital audio. The good
channel separation is realized because the all
channel data is recorded discretely and digitally
processed.
MPEG AUDIO
International standard coding system to compress
audio digital signals authorized by ISO/IEC. MPEG 1
conforms to up to 2-channel stereo. MPEG 2 used on
DVDs conforms to up to 7.1-channel surround.
DVD
A disc that contains up to 8 hours of moving pictures
even though its diameter is the same as a CD.
The data capacity of a single-layer and single-sided
DVD, at 4.7 GB (Giga Byte), is 7 times that of a CD.
Furthermore, the data capacity of a dual-layer and
single-sided DVD is 8.5 GB, a single-layer and
double-sided DVD 9.4 GB, and a dual-layer and
double-sided DVD 17 GB. The picture data uses the
MPEG 2 format, one of the worldwide standards of
digital compression technology. The picture data is
compressed to about 1/40 of its original size. The
DVD also uses the variable rate coding technology
that changes the data to be allocated according to
the status of the picture.
The audio data is recorded in Dolby Digital as well as
in PCM, allowing you to enjoy more real audio
presence.
Furthermore, various advanced functions such as the
multi-angle, multilingual, and Parental Control
functions are provided with the DVD.
Multi-angle function
Various angles, or viewpoints of the video camera,
for a scene are recorded on some DVDs
Multilingual function
Several languages for the sound or subtitles in a
picture are recorded on some DVDs.
Parental Control
A function of the DVD to limit playback of the disc by
the age of the users according to the limitation level
in each country. The limitation varies from disc to
disc; when it is activated, playback is completely
prohibited, violent scenes are skipped or replaced
with other scenes and so on.
Title
The longest sections of a picture or a music piece on
a DVD; a movie, etc., for a picture piece on video
software; or an album, etc., for a music piece on an
audio software disc. Each title is assigned a title
number enabling you to locate the title you want.
Track
Sections of a picture or a music piece on a CD or
Video CD. Each track is assigned a track number
enabling you to locate the track you want.
Page 73

73
Programming of remote
Using the TV,CABLE and SAT Buttons on
the Remote Control
Your Unit remote control will work with ANAM
televisions and compatible brands.
To determine whether your TV,CABLE and SAT
arecompatible, follow the instructions below.
Switch yourTV or CABLE or SAT on.
Look up the brand and corresponding code number
in the code list following pages.
Point the remote control towards the television.
While keeping the corresponding Source Button (like
VCR,TV,SAT)on the remote pressed,enter the code
from the code list through the Number Buttons.
(Correct input : LED blinks twice , Incorrect input :
LED blinks five times.)
Result: If your television is compatible with the
remote control, it will switch off.
It is now programmed to operate with re mote
control.
If several codes are indicated for your TV,CABLE and
SAT's brand, try each one in turn until you find one that
works.
4
3
2
1
CAUTIONS :
< This remote unit may not operate all models of the
brands shown.
< If batteries are removed from the battery
compartment of the remote unit, all memory
will be lost. You need to re-enter all previously
programmed codes again.
< The buttons on the remote unit may not work
correspondingly with those on the components
brands.
Experiment with the remote unit and your
components to see which buttons work.If only a
few functions operate, check to see if another
code set will work with more buttons.
< Only use alkaline battery.
TV Brand List
Brand CODE No.
ANAM1 000
ANAM2 001
ANAM3 002
ANAM4 003
ANAM5 004
ADMIRAL 050 134
AKAI 093 049 123
ALBA 068
ALBIRAL 116
ALCATEL 022
AMSTRAD 159 021
ARC EN CIEL 028 039 043 145 081
ARISTONA 099 049 050 019 142
149 078
ARTHUR MARTIN 053 139 117 120 122
123 125 128
ASA 050 055 057 113 134
ATLANTIC 099 111
AUDIOSONIC 054
AUSIND 053
AUTOVOX 099 144 055 019 057
069
BAIRD 083
BASICLINE 006
Brand CODE No.
BAUR 011
BEKO 023 049
BLAUPUNKT 094 100 102 111 114
BRANDT 028 039 040 043 145
081
BRION VEGA 050
BRUNS 048 050
BSR 059 110 132
BUSH 033 068 124 074
CENTURY 098 101 050 079 136
CGE 016 101 124 079 132
136
CIHAN 065
CLARIVOX 048 116
CONDOR 099 111
CONTEC 087
CONTINENTAL EDITION 028 039 040 043 145
081
CROSLEY 101 050 109
CROWN 147
CTC CLATRONIC 046
DAEWOO 089
DECCA 099 060 063 115 118
DEGRAAF 036
Page 74

74
Programming of remote
TV Brand List
Brand CODE No.
DIXI 049 090
DRYNATRON 049
DUAL 099 141
DUAL-TEC 096 099 132
DUMONT 046 050 057 073
ELBE 016 116
ELBIT 065
ELCIT 046 097 103 050 109
127 132
ELMAN 046 132
ELTA 090
EMERSON 159 098 050
ERRES 049 142
EUROPHON 098 046 097 099 051
115 132
FERGUSON 146 040 041 150 057
061 116 149
FIDELITY 099 149
FINLUX 034 046 053 055 057
109 113 073 074 079
FISHER 015 048 050 052 109
136
FORGESTONE 149
FORMENTI 099 053 109 111 125
FORTRESS 137
FRABA 075
FRONTECH 054
FUJITSU 025
FUNAI 054 059
GBC 109 132
GEC 099 060 109 115 134
088
GELOSO 103 109 132 134 090
GOLDSTAR 092 162 017 099 049
075 076 077 090
GOODMANS 033 049 060 077
GORENJE 066 136
GREATZ 160 058 109 122 123
128 129 130 134
GRANADA 033 099 049 058 060
142 115 125 134
GRUNDIG 094 100 057 058 108
112 114 082
HANSEATIC 033 164 099 049 109
139 111
HANTAREX 097
HEMMERMANN 127
HIFIVOX 028 039 043 145 081
Brand CODE No.
HINARI 159 033 045 143 090
HITACHI 014 033 034 036 099
145 056 109 139 110
067 117 132 134 084
091 081 088
HYPER 093 099
IMPERIAL 016 101 124 079 132
133
INGELEN 160 058 109 122 128
129 130 134
INNO HIT 093 098 097 099 143
077 090
INTERFUNK 164 049 050 145 058
109 142 123 128 129
091
IRRADIO 093 143 053 077 090
ITT 160 140 058 105 109
122 123 128 148 129
130 134 135 083 089
JVC 033
KTV 099
KAISUI 006
KARCHER 006
KENDO 098
KENNEDY 144 019 109
KORTING 050 059 111
KRIESLER 099 049 050 019 142
149 078
LENOIR 099
LOEWE OPTA 008 097 164 049 050
115 072
LOGIK 118 149
LUMA 049 120 134
LUXOR 058 139 117 120 123
129 135 083
MAGNADYNE 046 097 103 050 109
115 127 132
MAGNAFON 046 097 099 051 053
115
MARANTZ 049
MATSUI 159 099 106 060 118
068 134 090
McMICHAEL 088
MEMOREX 090
METZ 094 050 114 133
MINERVA 094 100 057 058 114
MISTRAL 149
Page 75

75
Programming of remote
TV Brand List
Brand CODE No.
MITSUBISHI 033 035 164 049 050
062 118 119 148 080
138
MIVAR 097 099 115 077
MULTITECH 046 099 115 136
MURPHY 134
MAONIS 096 144 019 110 134
NATIONAL 042 104 109
NEC 033 085
NECKERMANN 099 050 139 120 136
NEI 049
NIKKAI 060
NOBLEX 015
NOBLIKO 098 046 099 053 057
NOGAMATIC 028 039 043 145 081
NOKIA 160 140 058 105 109
122 123 128 148 129
130 134 135 083 089
NORDMENDE 028 032 039 043 145
131 091 081
OCEANIC 109 064 123
ONCEAS 099
OPTONICA 137
ORION 159 059 118 068 127
090
OSAKI 060
OSIO 077
OSUME 087
OTTO VERSAND 033 164 049 109 139
P.T ACTTRON 065
PAEL 099 053
PANASONIC 030 042 095 104 107
109 121 126
PATHE CINEMA 099 111 116 132
PERDIO 060
PHILCO 016 030 101 050 109
124 079 132 136
PHILIPS 009 010 013 018 024
099 049 050 019 142
148 149 078 088
PHOENIX 099 053 109 111 125
PHONOLA 099 049 050 019 142
149 078
PIONEER 020 049 145 091
PRANDONI-PRINCE 098 097 053 115 134
PREMIER 124
PRINCE 098 097 053 134
PROTECH 049 054
Brand CODE No.
PYE 099 049 050 019 142
148 149 078
QUASAR 046 097 051 053 077
QUELLE 047 099 100 049 053
055 057 058 111 112
113 114 118 123 073
074 128 164
RADIOLA 099 049 050 019 142
149 078
RADIOMARELLI 046 097 103 050 109
062 127 132
RANK 074
RBM 074
REDIFFUSION 062 123 134
REX 096 144 019 141 110
069 134
ROBOTRON 048 050
RTF 048 050
SABA 028 031 032 037 039
040 043 097 050 145
115 120 086 091 081
SAISHO 159 099 118 119 068
090
SALORA 053 139 117 120 122
123 125 128 135 083
SAMBERS 046 097 051 053 115
077
SAMPO 121
SAMSUNG 015 026 099 054 077
136 090
SANYO 160 161 005 033 044
048 060 113 118 071
054 136
SBR 049 142 148 149 088
SCHAUB LORENZ 160 058 109 122 123
128 129 130 134
SCHNEIDER 096 099 049 050 052
019 141 109 142 125
149 078 132
SEG 046
SEI 159 059
SELECO 016 096 144 019 141
110 069 134
SHARP 033 087 137
SIAREM 046 097 050 109 115
SICATEL 116
SIEMENS 005 094 036 100 111
114 087
Page 76

Brand CODE No.
ZANUSSI 096 144 019 110 069
134
ZOPPAS 096 144 019 110 134
Brand CODE No.
SIERA 099 049 050 019 142
149 078
SILVER 054
SINGER 016 046 050 109
SINUDYNE 159 046 050 059 109
127
SONOKO 049 090
SONY 146 007 027 033 038
118
STERN 096 144 019 110 069
134
TANDBERG 133
TANDY 099 060 137
TASHIKO 161 033
TATUNG 099 060 063 065 115
118
TEC 096 099 132
TELEAVIA 028 039 040 043 145
091 081
TELEFUNKEN 028 041 145 150 086
091
TELETECH 090
TELEVIDEON 099 053 109 111 125
TENSAI 049
THOMSON 012 028 032 039 040
043 145 091 081
THORN-FERGUSON 014 040 041 054 150
057 061 116 149 086
TOCOM 029
TOSHIBA 163 016 033 070 074
TRANS CONTINENTS 098 097 053 134
TRIUMPH 159
UHER 052 111 125
ULTRA VOX 098 046 099 050 109
120
UNIVERSUM 092 034 054 077
UNIVOX 116
VEGAVOX 079
VOXSON 050 134
WATSON 111
WATT RADIO 046 099 051 109 116
127
WEGA 033
WHITE WESTINGHOUSE 099 111
YOKO 099
76
Programming of remote
TV Brand List
Page 77

77
Brand CODE No.
Sprucer 031
Starcom 002 010
Stargate 010 014 026
Starquest 010
TV86 015
Teleview 014
TOCOM 007 008
TOSHIBA 000
TUSA 010
UNIKA 018
UNITED ARTISTS 007
UNIVERSAL 019
VIEWSTAR 015
ZENITH 000 024
ZENTECK 022
Brand CODE No.
ABC 002 003 009 030 007
006 008
ALLEGRO 018 021
ARCHER 018 026
Bell&Howell 009
Century 018
Citizen 018 021
Comtronics 014
Contec 011
Easten 001
Emerson 026
Everquest 010 014
Focus 022
Garrard 018
Gemini 010
General Instrument 033 006 034
GoldStar 017 040
Goodmind 026
Hamlin 012 020 004 013
Hitachi 006
Hytex 007
Jasco 010 018 021
Jerrold 002 007 033 032 009
010 006 034
Memolex 000
Movie Time 015
NSC 015
OAK 011 007
OPTIMUS 031
PANASONIC 000 016 031
PARAGON 000
PHILIPS 018
PIONEER 017 025
Popular Mechanics 022
PULSAR 000
QUASAR 000
RCA 031
RADIO SHACK 010 021 026 028
RECOTON 022
REGAL 012 020
Regency 001
Rembrandt 006
Runco 000
SL Marx 014
Samsung 017 014
Scientific Atlanta 003 023 030 027
Signal 010 014
Signature 006
Programming of remote
CABLE Brand List
Page 78

78
Brand CODE No.
PANASONIC 032
PHILIPS 003 011 012 029
PHONOLA 016
PROSAT 030
PYE 016
QUADRAL 030
QUELLE 036
RADIOLA 016
REDIFFUSION 015
SABA 035
SALORA 026
SAMSUNG 003 022
SAT PARTNER 004
SATPORTNER 021
SCHAUB LORENZ 026 037
SCHNEIDER 005 016
SIEMENS 033 036
SIERA 016
SILVA 004 021
SKY 039
STARCOM 038
STARSAT 022
TECHNISAT 003
TELEFUNKEN 025
TELESYSTEM 005
THORN-FERGUSON 010 01 4 041 0 16 017
018 043
TRIAD 004
UNIDEN 022
UNITED CABLE 038
V TECHNOLOGY 004
VORTEC 003 024 025
ZENDER 022
Brand CODE No.
ALBA 030
AMSTRAD 008 019 027
ARCON 021
ARISTONA 016
ASTRA 028
BLAUPUNKT 033
BUSH 016
CH.MASTER 030
CITY COM 005
DDC 030
DYNASAT 005
ECHOSTAR 002 009 032 020
EMME ESSE 005
FAIT 005
FERGUSON 014 041 016 017 018
FINLUX 006 007 013
FRACARRO 005
FTE 022
GOLDSTAR 004 021
GRAETZ 026 037
GROTHUSEN 004
GRUNDIG 033 016 018 036
HINARI 030
HIRSCHMANN 003 006
HITACHI 013
INGELEN 026 037
ITT 034
ITT-NOKIA 032 018 026 037
JERROLD 038 014
KATHREIN 005 022 023
KOSMOS 004
KRIESLER 016
LENCO 004 021
LUXOR 026 037
MAGAI 022
MARANTZ 012
MASPRO 016
MATSUSHITA 000
METZ 036
MINERVA 036
MULTISTAR 022
MURATO 004
NEC 040
NEIRU 021
NOKIA 026 037
NORSAT 015
PACE 001 042 016 017 018
044
Programming of remote
SAT Brand List
Page 79

79
Press the PLAY button to resume normal playback.
Severe hum or noise is heard.
eCheck that the speakers and components are
connected securely.
eMake sure the line cords and speaker cables are
as far away from the AC supply as possible.
eThis unit cannot play such discs as CD-ROMs. Use
a playable disc.
Remote control doesn't work.
eWhen the function selected by the main unit and remote
control unit differs, remote control doesn't work. Press
the FUNCTION buttons (DVD, TUNER, MD/CD-R, TAPE,
AUX) of the remote control unit to select correct function.
(Even when the FUNCTION buttons are pressed without
pointing at the main unit, the function of the remote
control unit will be changed.)
eIf the batteries are dead, change the batteries.
eUse remote control unit within the range (5m /15ft)
and point at the front panel.
eClear obstacles between the remote control unit
and the main unit.
eIf a strong light is near the unit, turn it off.
Cannot play.
eLoad a disc with the playback side facing down.
If the disc is dirty, clean the surface of the disc.
eA blank disc has been loaded. Load a prerecorded disc.
eCheck the region code of the DVD.
Sound skips.
ePlace the unit on a stable place to avoid vibration
and shock.
eIf the disc is dirty, clean the surface of the disc.
eDon't use scratched, damaged or warped discs.
Noise bars appear on the screen
eReplace the tape.
eAdjust tracking manually using the TRACKING UP
and DOWN buttons on the remote control (see
page 57.)
eDon't forget to pick-up a VCR cleaning tape to
maintain like new performance of your DVD/VCR.
TV recording does not work
ePlace a piece of vinyl tape over the hole (see page 54.)
One touch timer recording does not work
eSet the present time (see page 48).
Timer recording does not work
eReset the present time (see page 48).
eReset the start/end time (see pages 62-65).
e The TIMER REC button has not been pressed
(Press the T-REC).
If normal operation cannot be recovered, unplug the
power cord from the outlet and plug it in again. This
resets the internal micro-computer which can be
disturbed during electrical storms, power
interruptions, etcetera.
Troubleshooting
In case you experience any problem with this unit,
please take the time to look through this chart and see if
you can solve the problem yourself before you call your
dealer or a WELTON service center.
No power
eCheck the connection to the AC wall outlet. Make
sure the outlet is not switched by a lamp switch by
plugging in another electrical device to see if the
outlet is “live”.
Playback does not start
eReload the disc with the label side UP.
eClean the disc.
PROHIBIT icon A appears on the screen
eThe operation is not permitted by the disc or the unit.
eNote that during playback of a title part (cautions,
software maker's logo, etc.), most operations are
prohibited by the disc.
eIf another operation is still in process, wait a
moment and try again.
Picture playback stops and operation buttons do not
work.
eTurn the unit off and back on again and restart the
playback.
No picture.
eTurn on the TV.
eCheck that the system is connected properly.
eMake sure you have selected the proper video
input on the TV so that you can view the pictures
from the DVD/VCR.
eWhen your TV isn't compatible with Progressive scan,
never set the progressive mode on.
Picture noise.
eIf video from this system has to go through your
VCR to get to your TV, the copy-protection applied
to some DVD programs could affect picture
quality. Please connect the unit directly to your TV.
The image is distorted or monochromatic.
eThe color system selected does not match your
TV. Press the PAL/NTSC button of the remote
control unit once or twice.
eSelect the aspect ratio to match your TV.
The aspect ratio of the screen cannot be changed.
eThe aspect ratio might be fixed by the disc.
eDepending on the TV, you may not be able to
change the aspect ratio.
There is no sound or only a very low-level sound is
heard.
eCheck that the speakers and components are
connected securely.
eCheck the operation of the connected component.
eCheck the audio output setting.
eThe sound is muted during pause, slow-motion,
fast forward/reverse, and stepping playback.
Page 80

80
Specifications
DVD Specifications
DVD Player
Pickup ....... Semiconductor laser, Wavelength 650 nm
Signal system ........................................................... NTSC
Video signal horizontal resolution
More than 480 lines (DVD)
Video signal-to-noise ratio...... More than 55 dB (DVD)
Audio frequency response (at 2 CH stereo mode)
20 Hz ~ 20 kHz (+1/-3 dB)
Audio signal-to-noise ratio................. More than 80 dB
Total harmonic distortion..................... Less than 0.01%
TUNER Specifications
FM Tuner
System...PLL quartz-locked digital synthesizer system
Tuning range ........... 87.50 ~ 108.00 MHz (100 kHz step)
Antenna terminals ....................... 75 ohms, unbalanced
Intermediate frequency.................................... 10.7 MHz
AM Tuner
System...PLL quartz-locked digital synthesizer system
Tuning range ................ 120~ 1720 kHz (10 kHz interval)
VCR Specifications
System.............................................VHS Hi-Fi Audio system
Video Signal ...................................................................NTSC
Channel Coverage...............................VHF Channel : 02~13
UHF Channel :14~69
CATV Channel : 01~125
Channel 3 or 4 (Selectable)
Tape Width............................................................... 12.65mm
Tape Speed .............................................. SP : 33.35mm/sec
SLP : 11.12mm/sec
General
Power requirements ................................ 120V AC, 60Hz
Power consumption........... 110 W (STANDBY : 14.5 W)
Dimensions (WxHxD)...................... 430 x 100 x 410 mm
(16.9 x 3.9 x 16.1 inch)
Weight ........................................................................ 11 kg
Operating temperature ......... 5 ˚C ~ 35 ˚C (40 ˚F ~ 95 ˚F)
Operating humidity........................................... 5% ~ 90%
Storage temperature........ -20 ˚C ~ 55 ˚C (-4 ˚F ~ 131 ˚F)
Video outputs
CVBS Video.............................................. 1 Vp-p 75 ohms
S-video ................................................. Y: 1 Vp-p 75 ohms
C: 0.286 Vp-p 75 ohms
Audio Outputs
Line outputs............................. 300mVrms, 2.2 kilo ohms
Power outputs ............................ 50W(1ch driven) x 6ch
(6 ohms, 1 kHz, THD 10%)
Accessories:
AM loop antenna x 1
FM antenna x 1
RCA video cable x 1
Remote control unit x 1
• Design and specifications are subject to change
without notice.
• Weight and dimensions are approximate.
• Illustrations may differ slightly from production models.
Page 81

81
MEMO
Page 82

82
MEMO
Page 83

83
MEMO
Page 84

11625 Columbia Center Drive
Suite 100
Dallas, Texas 75229
(972) 243-5602
FAX: (972) 243-5958
weltonusa.com
WELTON SOUND SYSTEMS, U.S.A.
 Loading...