

Page 1

NOTE:
The CDC86 may be operated
with the following TECHWOOD
remote controls.
DDR94
DDR95
NT76
NT77
PLR85
STR84
CDC86
COMPACT DISC CHANGER
POWER
STANDBY
COMPACT DISC CHANGER CDC86
OPEN/
12
CLOSE
DISC SKIP
EX-CHANGER
543
DISPLAY
OWNER’S MANUAL
RANDOM REPEAT
SKIP/SCAN
PROGRAM CANCEL
CAUTION
RISK OF ELECTRIC SHOCK
CAUTION: TO REDUCE THE RISK OF ELECTRIC SHOCK, DO NOT REMOVE COVER (OR
BACK). NO USER-SERVICEABLE PARTS INSIDE. REFER SERVICING TO QUALIFIED
SERVICE PERSONNEL.
The lightning flash with arrowhead symbol, within an equilateral triangle, is intended to alert the user to the
presence of uninsulated “dangerous voltage” within the product’s enclosure that may be of sufficient
magnitude to constitute a risk of electric shock to persons.
The exclamation point within an equilateral triangle is intended to alert the user to the presence of
important operating and maintenance (servicing) instructions in the literature accompanying the
Appliance.
DO NOT OPEN
WARNING: TO PREVENT FIRE OR SHOCK HAZARD, DO NOT EXPOSE
THIS APPLIANCE TO RAIN OR MOISTURE.
Page 2
IMPORTANT SAFETY INSTRUCTIONS
CAUTION: “Note to CATV system installer:
> Read all of these Instructions. This reminder is provided to call the CATV system installer’s
> Save these Instructions for later use. attention to Section 820-40 of the NEC which provides guidelines
> Follow all Warnings and Instructions marked on the audio for proper grounding and, in particular, specifies that the cable
equipment. ground shall be connected to the grounding system of the building,
1) Read Instructions — All the safety and operating instructions
should be read before the product is operated.
2) Retain Instructions — The safety and operating instructions
should be retained for future reference.
3) Heed Warnings — All warnings on the product and in the
operating instructions should be adhered to.
4) Follow Instructions — All operating and use instructions
should be followed.
5) Cleaning — Unplug this product from the wall outlet before
cleaning. Do not use liquid cleaners or aerosol cleaners. Use a
damp cloth for cleaning.
6) Attachments — Do not use attachments not recommended by
the product manufacturer as they may cause hazards.
7) Water and Moisture — Do not use this product near water _ for
example, near a bath tub, wash bowl, kitchen sink, or laundry tub; in
a wet basement; or near a swimming pool; and the like.
8) Accessories — Do not place this product on an unstable cart,
stand, tripod, bracket, or table. The product may fall, causing
serious injury to a child or adult, and serious damage to the product.
Use only with a cart, stand, tripod, bracket, or table recommended
by the manufacturer, or sold with the product. Any mounting of the
product should follow the manufacturer’s instructions, and should 15) Lightning — For added protection for this product during a
use a mounting accessory recommended by the manufacturer. lightning storm, or when it is left unattended and unused for long
9) A product and cart combination should be moved with care. periods of time, unplug it from the wall outlet and disconnect the
Quick stops, excessive force, and uneven surfaces may cause the antenna or cable system. This will prevent damage to the product
product and cart combination to overturn. due to lightning and power-line surges.
10) Ventilation — Slots and openings in the cabinet are provided or electric shock.
for ventilation and to ensure reliable operation of the product and to 18) Object and Liquid Entry — Never push objects of any kind
protect it from overheating, and these openings must not be into this product through openings as they may touch dangerous
blocked or covered. The openings should never be blocked by voltage points or short-out parts that could result in a fire or electric
placing the product on a bed, sofa, rug, or other similar surface. shock. Never spill liquid of any kind on the product.
This product should not be placed in a built-in installation such as a 19) Servicing — Do not attempt to service this product yourself as
bookcase or rack unless proper ventilation is provided or the opening or removing covers may expose you to dangerous voltage
manufacturer’s instructions have been adhered to. or other hazards. Refer all servicing to qualified service personnel.
11) Power Sources — This product should be operated only from 20) Damage Requiring Service — Unplug this product from the
the type of power source indicated on the marking label. If you are wall outlet and refer servicing to qualified service personnel under
not sure of the type of power supply to your home, consult your the following conditions:
product dealer or local power company. For products intended to a) when the power-supply cord or plug is damaged.
operate from battery power, or other sources, refer to the operating b) if liquid has been spilled, or objects have fallen into the product.
instructions. c) if the product has been exposed to rain or water.
12) Grounding or Polarization — This product may be equipped d) if the product does not operate normally by following the
with a polarized alternating-current line plug (a plug having one operating instructions. Adjust only those controls that are covered
blade wider than the other). This plug will fit into the power outlet by the operating instructions as an improper adjustment of other
only one way. This is a safety feature. If you are unable to insert the controls may result in damage and will often require extensive work
plug fully into the outlet, try reversing the plug. If the plug should by a qualified technician to restore the product to its normal
still fail to fit, contact your electrician to replace your obsolete outlet. operation.
Do not defeat the safety purpose of the polarized plug. e) if the product has been dropped or damaged in any way.
13) Power-Cord Protection — Power-supply cords should be f ) when the product exhibits a distinct change in performance
routed so that they are not likely to be walked on or pinched by this indicates a need for service.
items placed upon or against them, paying particular attention to 21) Replacement Parts — When replacement parts are required,
cords at plugs, convenience receptacles, and the point where they be sure the service technician has used replacement parts specified
exit from the product. by the manufacturer or have the same characteristics as the original
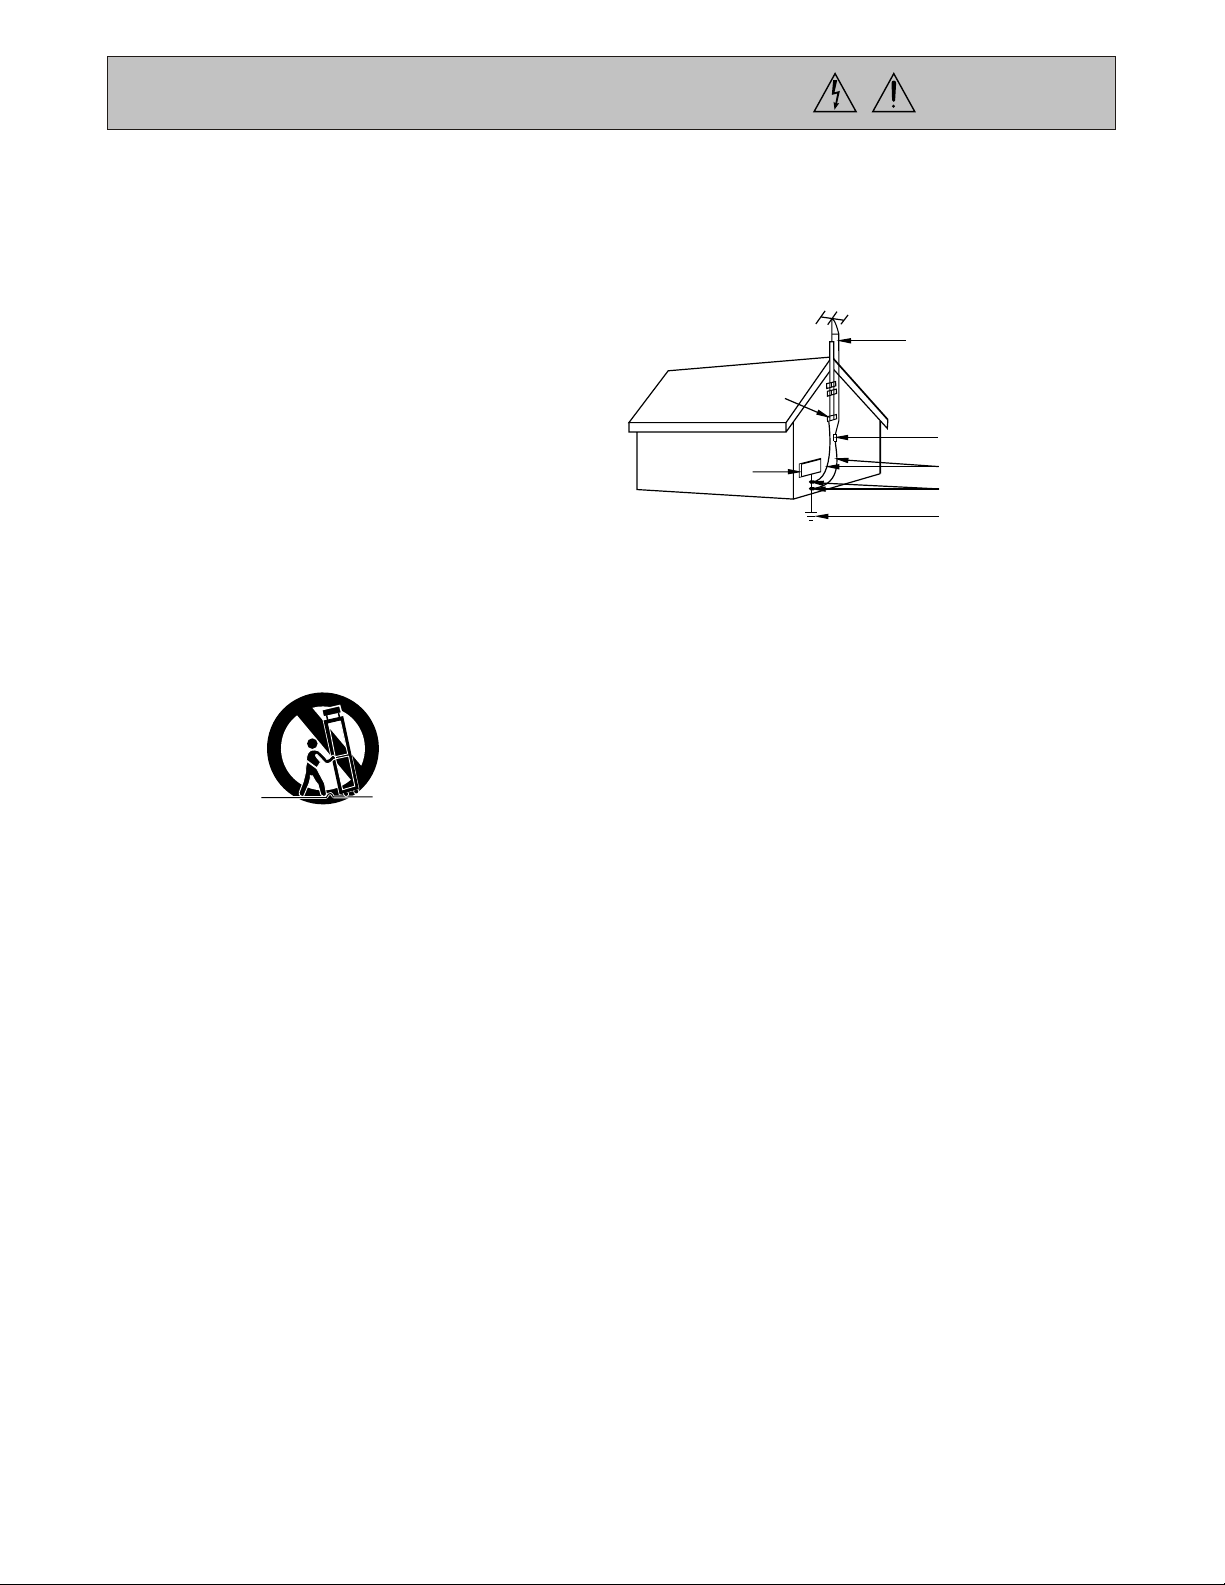
14) Outdoor Antenna Grounding — If an outside antenna or part. Unauthorized substitutions may result in fire, electric shock, or
cable system is connected to the product, be sure the antenna or other hazards.
cable system is grounded so as to provide some protection against 22) Safety Check — Upon completion of any service or repairs to
voltage surges and built-up static charges. Article 810 of the this product, ask the service technician to perform safety checks to
National Electrical Code, ANSI/NFPA 70, provides information with determine that the product is in proper operating condition.
regard to proper grounding of the mast and supporting structure, 23) Wall or Ceiling Mounting — The product should be mounted
grounding of the lead-in wire to an antenna discharge unit, size of to a wall or ceiling only as recommended by the manufacturer.
grounding conductors, location of antenna-discharge unit, 24) Heat — The product should be situated away from heat sources
connection to grounding electrodes, and requirements for the such as radiators, heat registers, stoves, or other products
grounding electrode. (including amplifiers) that produce heat.
as close to the point of cable entry as practical.”
ANTENNA
LEAD IN
WIRE
GROUND
CLAMP
ANTENNA
DISCHARGE UNIT
(NEC SECTION 810-20)
ELECTRIC
SERVICE
EQUIPMENT
NEC-NATIONAL ELECTRICALCODE
16) Power Lines — An outside antenna system should not be
located in the vicinity of overhead power lines or other electric light
or power circuits, or where it can fall into such power lines or
circuits. When installing an outside antenna system, extreme care
should be taken to keep from touching such power lines or circuits
as contact with them might be fatal.
17) Overloading — Do not overload wall outlets, extension cords,
or integral convenience receptacles as this can result in risk of fire
GROUNDING CONDUCTORS
(NEC SECTION 810-21)
GROUND CLAMPS
POWER SERVICE GROUNDING
ELECTRODE SYSTEM
(NEC ART 250, PARTH)
1
Page 3

IMPORTANT SAFETY INSTRUCTIONS
CAUTION : Any changes or modifications in construction of this device which are not expressly approved by the party responsible
for compliance, could void the user’s authority to operate the equipment.
NOTE : This equipment has been tested and found to comply with
the limits for a Class B digital device, pursuant to Part 15 of the
FCC Rules. These limits are designed to provide reasonable
protection against harmful interference in a residential installation.
This equipment generates, uses and can radiate radio frequency
energy and, if not installed and used in accordance with the
instructions, may cause harmful interference to radio
communications. However, there is no guarantee that interference
to radio or television reception, which can be determined by turning
the equipment off and on the user is encouraged to try to correct
the interference by one or more of the following measures:
- Reorient or relocate the receiving antenna.
- Increase the separation between the equipment
and receiver.
- Connect the equipment into an outlet on a circuit
different from that to which the receiver is connected.
- Consult the dealer or an experienced radio/ TV
technician for help.
CAUTION : TO PREVENT ELECTRIC SHOCK, MATCH
WIDE BLADE OF PLUG TO WIDE SLOT, FULLY
INSERT.
ATTENTION : POUR ÉVITER LES CHOCS ÉLECTRIQUES,
INTRODUIRE LA LAME LA PLUS LARGE DE LA
BORNE CORRES PONDANTE DE LA PRISE ET
POUSSER JUSQU’AU FOND.
CAUTION
- Use of controls, adjustments or the performance of procedures
other than those spedified may result in hazardous radiation
exposure.
- To prevent direct exposure to laser beam, do not try to
open the enclosure.
DO NOT STARE INTO BEAM.
CONTENTS
PRECAUTIONS..................................................................................................3
Read This Before Operating...........................................................................3
Handling the Disc.............................................................................................3
CONNECTIONS.................................................................................................4
CONTROLS........................................................................................................5
DISPLAY..............................................................................................................6
CD PLAYBACK...................................................................................................7
Basic Operations...............................................................................................7
Repeat Play.......................................................................................................7
Program Play.................................................................................................8-9
Time Display.......................................................................................................9
Search Function...............................................................................................10
Direct Access to a Track...................................................................................10
Random Playback............................................................................................10
TROUBLESHOOTING........................................................................................11
WARRANTY INFORMATION...............................................................................12
2
Page 4

PRECAUTIONS
Read This Before Operating Handling the Discs
Choose the installation location of your unit carefully.
Avoid placing it in direct sunlight or close to a source of
heat. Also avoid locations subject to vibrations and
excessive dust, heat, cold or moisture.
Do not open the cabinet as this might result in damage
to the circuitry or electrical shock. If a foreign object
should get into the set, contact your dealer.
When removing the power plug from the wall outlet,
always pull directly on the plug, never pull the cord.
Do not attempt to clean the unit with chemical solvents
as this might damage the finish. Use a clean, dry cloth.
Keep this manual in a safe place for future reference.
Remove all of the discs in the drawer when you move this
system, to prevent discs from becoming stuck.
This unit has been designed specifically for playback of CDs,
recordable Cds and re-writable Cds bearing the mark.
Always place the compact disc in the disc drawer with the
label facing upward.(compact discs can be played only on
one side.)
To remove a disc from its storage case, press down on
the center of the case and lift the disc out, holding it carefully by the edges.
Finger marks and dust should be carefully wiped off the
disc’s recorded surface with a soft cloth.
Never use chemicals such as record sprays, antistatic
sprays or fluid, benzine or thinner to clean compact discs.
Such chemicals will do irreparable damage to the disc’s
plastic surface.
Discs should be returned to their cases after use to avoid
serious scratches that could cause the laser pickup to skip.
Do not expose discs to direct sunlight or high humidity
and temperature for extended periods. Long exposure
To high temperatures can warp the disc.
Do not stick paper or write anything with a ballpoint pen
on the surface of the label side.
3
Page 5
CONNECTIONS
NOTE: Solid lines = suggested method of connection
Dotted lines = alternate method of connection
1
CD RECORDER
OPTICAL
NOTE: When making a digital connection
remove the cap from the jack. When you
don’t use the jack, leave the cap in place.
RECEIVER/AMPLIFIER
OPTICAL
2 3
OPTICAL
DIGITAL
AUDIO OUT
R
L
R
L
ANALOG
AUDIO OUT
OPTICAL
AUDIO
IN
NOTE: You may record audio to a CD
by connecting an optical audio cable
from the OPTICAL DIGITAL AUDIO OUT
on the CDC86 to an optical audio in
of a CD recorder.
1. AC power cord
2. OPTICAL DIGITAL AUDIO OUT jack
3. ANALOG AUDIO OUT jacks
CAUTION: When you pull the power cord out of a wall
outlet, make sure that the unit has been turned off.
4
OPTICAL
AUDIO
IN
CD
INPUTS
Page 6

CONTROLS
POWER
STANDBY
1
10
COMPACT DISC CHANGER CDC86
OPEN/
12
CLOSE
543
2
DISC SKIP
EX-CHANGER
18
6 8
DISPLAY
12
19
3
RANDOM REPEAT
9
13 14 15 161711
SKIP/SCAN
PROGRAM CLEAR
547
1. POWER STANDBY / ON button and Indicator 11. Disc Skip button
Rotates the disc tray to it’s next disc playing position.
2. Disc Select buttons (1~5)
There are five Disc Selection buttons numbered 1
through 5, each one corresponding to a numbered disc 12. Play button ( )
position on the disc drawer. When your disc player is in Pressing the Play button will start playback of all discs
playback mode, you can press one of these buttons to loaded onto the disc tray. They will be played in sequen stop playback of the current disc and start playback of tial order starting with the disc loaded into position one
the disc which number corresponds to the button you on the tray. Playback in this manner is called
have pressed. Continuous Play.
3. Repeat button 13. Search Forward button ( )
This button is used for repeating one track, one disc or When pressed and held down, the Search Forward but all discs. ton allows the listener to fast forward to a particular
musical passage on a disc. When fast forwarding,
4. Program button sound will be heard and the appropriate track and time
Use this button to program the order in which the information will be displayed.
selections are played (see pages 8 and 9 under
the Program Play section for detailed information). 14. Search Reverse button ( )
When pressed and held down, the Search Reverse but-
5. Clear button ton allows the listener to fast reverse to a particular
Use this button to clear programmed playback. musical passage on a disc. As the disc is spinning in
reverse, sound will be heard and the appropriate track
6. Display button and time information will be displayed.
The Display button allows any one of four different types
of tracking and time information to be displayed. Each 15. Skip Forward button ( )
press of the Display button advances the display once. With each press of the Skip Forward button, the disc
currently being played will advance to the beginning of
7. Disc Drawer its next track and resume playing.
Load a disc into the drawer with its label side up while
it is open. 16. Skip Reverse button ( )
With one press of the Skip Reverse button, the disc
8. Pause button ( ) being played will reverse its direction to the beginning
Pressing the Pause button will stop playback of a disc of its current track and resume playing. With two
temporarily with the display showing the Pause indicator presses of the Skip Reverse button, the disc will reverse
and current track and time. its direction to the beginning of its previously recorded
track and resume playing.
9. Stop button ( )
Pressing the Stop button will stop playback of a disc and 17. Display
advance the disc to its end. The last track and total time This display shows the current operating status of the
of the disc will be displayed. Pressing the Play button will CDC86.
resume playback of the disc starting at its first track.
18. EX-CHANGE
10. Open/Close button ( ) This allows you to ex-change a disc while another is
With one press of this button the disc drawer opens for playing.
disc loading. With another press the drawer closes.
IMPORTANT NOTE: Do not push the drawer closed ! 19. RANDOM
This could damage the drawer mechanism and result Press the RANDOM button to shuffle play all tracks
in non-warrantable repair. on all discs that are inserted in the disc drawer.
5
Page 7

88 88 88.88
DISPLAY
1
2
3
54 7
6
1 2
3 4
5
12
1. Play indicator 7. REPEAT play indicator
The play indicator will appear in the display when the ONE : This lights up when repeat play of a single track is
Play button is pressed and a disc is playing. selected.
2. Pause indicator is selected.
When the Pause button is pressed and the disc player is TTL : This lights up when repeat play of all discs in the
in it’s pause mode, the pause indicator will be visible in tray is selected.
the display.
3. Track Number indicator This indicator lights up when the total number of tracks
During playback of a disc, the Track Number indicator on the disc is 16 or more.
will display the number of the track being played.
4. Index Number indicator Indicates the number of tracks on the disc being played
This indicator applies to recordable CDs and re-writable and which track is playing.
CDs that have been recorded with multiple indexes.
Standard pre-recorded CDs have only one index. 10. Program Play indicator
5. Time mode indicator when the disc player is in the program play mode and
The time mode indicator will change each time the display disc selections have been programmed to play in a
button is pressed (see page 9 under the Time Display specific order.
section for detailed information).
6. Time indicator This indicates the random button has been pressed
The time indicator will show the elapsed time of the track (see page 10 under the Random Play section for
being played, track time remaining on the disc or total detailed information) .
time of the disc being played (see page 9 under the Time
Display section for detailed information). 12. Disc Number indicator
PROGRAM
11
SHUFFLE
10
88 88 88.88
]
]
1
2
]
]
NO INDEX
]
]
3
4
]
]
TOTAL
REMAIN
]
]
]
]
]
]
]
5
6
7
8
]
]
: This lights up when repeat play of one entire disc
8. MORE indicator
9. Track display
The program Play indicator will appear in the display
11. SHUFFLE
This indicates whether a disc is in a tray slot or not and
which disc is playing.
Example: means there is a disc in Tray No. 1.
9
]
]
]
]
10
9
1
11
]
]
]
12
13
]
]
14
REPEAT
ONE
A-B
]
]
]
]
15
TTL
8
means the disc in Tray No. 1 is selected.
NOTE : If a disc tray is empty the disc number will not
appear on the display.
6
1
Page 8

CD PLAYBACK
Basic Operations Repeat Play
STEPS 1 THROUGH 10 STEPS 1 THROUGH 3
9 73 & 6 1,2 & 3
COMPACT DISC CHANGER CDC86
12
543
EX-CHANGER
DISC SKIP
2 & 41 & 5
MENU
SHUFFLE REPEAT
PROGRAM CANCEL
8 10
OPEN
CLOSE
POWER
STANDBY
STEP 1. Press the OPEN/CLOSE( ) button.
The disc drawer will slide out.
STEP 2. Load a disc with its label side facing up.
STEP 3. Press DISC SKIP ( ) button to select
DISC SKIP
another tray.
STEP 4. Load another disc into the tray.
Repeat as desired for up to 5 discs.
STEP 5. Press the OPEN/CLOSE ( ) button to
close the disc drawer.
STEP 6. Press the DISC SKIP ( ) button to
DISC SKIP
select disc or select disc 1 through 5 on the
numbered buttons.
STEP 7. Select the track you want by pressing the
track skip ( or ) button.
STEP 8. Press the play ( ) button, and the CD will
start playing.
STEP 9. Press the pause ( ) button when you want
to pause playing.
STEP 10. Press the stop ( ) button when you want
to stop playing.
COMPACT DISC CHANGER CDC86
12
543
DISC SKIP
EX-CHANGER
SHUFFLE REPEAT
MENU
PROGRAM CANCEL
OPEN
CLOSE
POWER
STANDBY
Repeat one track play function
STEP 1. Press the repeat ( ) button .
REPEAT
Only the current track is played repeatedly.
REPEAT
ONE
* If you select other tracks during one-repeat play,
only the track selected last will be repeated.
Repeat one disc play function
STEP 2. Press the repeat ( ) button once more.
REPEAT
All the tracks on the selected disc are played
repeatedly.
REPEAT
* When the tracks are programmed, only the pro grammed tracks will be repeated.(Refer to the
program play section on next page.)
Repeat all disc play function
STEP 3. Press the repeat ( ) button once more
and all of the disc inserted in the disc drawer
continue to play repeatedly.
REPEAT
REPEAT
TTL
* Press the button once more to cancel the repeat
play function.
7
Page 9

CD PLAYBACK
Program Play
STEPS 1 THROUGH 5
2
POWER
STANDBY
COMPACT DISC CHANGER CDC86
OPEN
CLOSE
12
543
DISC SKIP
EX-CHANGER
SHUFFLE REPEAT
MENU
5
With this program play function, you can program up to 32
tracks in any desired order.
Before beginning:
Programming can be done only in the stop mode.
Programming with music skip button
STEP 1. Press the program ( ) button in the stop mode.
STEP 2. Select a DISC by using the DISC SKIP ( )
button.
STEP 3. Select the desired track by using the music skip
( or )button.
Example :
Select disc 5, next select track 5.
1 2
5
PROGRAM 05 P-01
PROGRAM
3
PROGRAM CANCEL
1 & 4
DISC SKIP
For your reference:
“FULL” appears on the display when the 33rd track has
been programmed (no further programming is possible).
Only track numbers actually on the disc can be
programmed.
The CDC86 will store all programs in memory even
when it is turned off.
If the unit is unplugged all programs will be cleared
from memory.
The unit will stop automatically when all programmed
tracks have finished playing, and the programmed
contents disappear from the display.
It is possible to program with the disc drawer open.
If you stop playback, the programmed contents will
disappear from the display, but they are still stored
in memory.
If you press the program button twice while pro gramming, programming will cease and change
into the program recall mode (see the section
below for details on recalling a program ).
Recalling the program
1. Press the program ( ) button.
- The first programmed track will appear on the display.
PROGRAM
STEP 4. Press the program ( ) button again.
PROGRAM
- Track 5 on disc 5 has been programmed as
program No.1.
NOTE: Repeat step 2, step 3 and step 4 to continue
programming other tracks.
STEP 5. Press the play ( ) button.
- The program play will start in the programmed
order.
2. Press the button repeatedly if you want to check
the programmed contents.
- Each time the button is pressed, the next program and
contents will appear on the display in the programmed
order.
3. Press the play ( ) button at any time if you want to play
the disc in the programmed order.
8
Page 10

CD PLAYBACK
Erasing all the programmed contents
1. Press the program ( ) button .
2. Press the clear ( ) button and hold it for longer than 2
seconds.
- All the programmed contents will be cleared
from memory.
Note:
The Program button and the clear button can work only in
the stop mode.
* Changing the programmed contents
Deleting:
Undesired tracks can be deleted from the originally pro grammed contents.
1. Press the program ( ) button repeatedly until the track
number that you want to delete appears on the display.
2. Press the clear ( ) button.
- The track number will be deleted from the programmed
contents.
- If you press the button repeatedly, the next programmed
tracks will be deleted one by one each time the button is
pressed.
Adding after the last track:
1. Press the program button repeatedly until “END” appears
on the display.
2. Enter new tracks using the programming procedures
after “END” disappears from the display.
Adding to any position:
PROGRAM
CLEAR
PROGRAM
CLEAR
Time Display
STEPS 1 THROUGH 4
1
SHUFFLE REPEAT
MENU
PROGRAM CANCEL
POWER
STANDBY
COMPACT DISC CHANGER CDC86
OPEN
12
CLOSE
2,3 & 4
DISC SKIP
EX-CHANGER
543
Status of the display
This unit can display four types of time mode on the time
counter in the display.
STEP 1. The elapsed time of the current track is
automatically displayed when playback begins.
INDEX
02 1 0.26
STEP 2. During playback, press the display button once and
the time remaining on the track is displayed.
INDEX
02 1 3.14
STEP 3. Press the display button again and the total elapsed
time of the disc being played is displayed.
02 1 5.47
REMAIN
INDEX
TOTAL
1. Select the program number which you want to add a new
track to by pressing the program button.
2. Enter the new track by using the programming
procedures.
STEP 4. Press the display button once more and the total
remaining time of the entire disc display will be
displayed.
INDEX
02 1 48.25
TOTAL
REMAIN
Notes:
Time will not be displayed during programmed play if the
programmed contents exceed 100 minutes. In this case,
“--,--” will be shown instead.
If you press the display button in the stop mode, the total
track number and the total playing time of the current disc
will be displayed.
9
Page 11

CD PLAYBACK
SEARCH function
Track Search
1. Press and release the ( ) button to advance to the
beginning of the next track.
Press and hold down the ( ) button to advance to a
subsequent track.
2. Press and release the ( ) button to return to the
beginning of the currently playing track.
Press and hold down the ( ) button to return to
previous tracks.
Manual Search
1. Press and hold down either Search button to quickly
search the disc in the forward or reverse direction.
- The volume is lowered to about 1/4 of the current volume.
- Search is possible during pause mode, but no sound is
heard.
- The CD changer will not search beyond the beginning
or the end of the disc.
2. Press the stop button to end normal play.
- The play indicator goes off.
- The time display shows total time of the disc.
Direct access to a Track
Select a disc number using the Disc No. buttons.
Select a track number using the Disc Skip bottons and
then press the play button.
Note:
Track numbers can be designated from “1” to “99”.
When a track number which is not contained on a disc is
designated, the last track of the disc will be played.
RANDOM Play
Press the Random ( ) button to shuffle play all tracks on
all discs that are inserted in the disc drawer.
If you press the skip button ( )during shuffle playback,
the next track will be randomly selected and played.
If you press the skip button ( ), the track that is
currently being played will start again from the
beginning. A track cannot be replayed during shuffle
playback. To stop shuffle playback, press the
random ( ) button or stop ( ) button.
RANDOM
RANDOM
Note :
The unit will stop when the last track on disc number 5 has
finished playing.
10
Page 12

TROUBLESHOOTING
To determine any problem with your CD changer, always check the most obvious possible causes first. If any problem still
remains after you have checked the items below, consult your nearest TECHWOOD dealer.
Problem Probable Cause Remedy
No power when the POWER button is
set to ON.
No sound.
Programmed play does not function. The CD changer is in the normal play
A “Hum” sound can be heard. Loose cable connections. Firmly connect all the cables.
Power plug not connected in the AC
outlet.
The disc is loaded upside down. Reload the disc with the label side up.Disc play does not start.
The disc is too dirty. Clean the disc.
Incorrect audio cable connections. Correctly connect the CD changer to
Incorrect amplifier operation. Make sure that the amplifier controls
The CD changer is subject to vibration
or physical shock.
Defective or deeply scratched disc. Play another disc.
mode.
Insert the power plug firmly into the AC
outlet.
the amplifier.
are set correctly.
Change the installation location.Sound skips.
Press the stop button, then enter a program.
11
Page 13

ONE-YEAR LIMITED WARRANTY
WHO PROVIDES WARRANTY
This warranty is provided by W elton Sound Systems U.S.A. LTD.
WHO IS PROTECTED
This warranty is extended to the first original owner.
NOTE: RENT-TO-OWN DEALERS ARE CONSIDERED TO BE THE FIRST ORI GINAL OWNER
WHAT IS COVERED AND HOW LONG
This warranty covers the electronics -including electronic parts, electronic circuit assemblies and electronic
mechanical assemblies - from date of origi nal purchase. Replacement parts and assemblies supplied under this
warranty are warranted only for the remaining portion of the original warranty period.
WHAT IS NOT COVERED
This Limited W arranty does not cover (a) install ation or operating instructions, (b) dam age caused in shipment,
accidents, misuse or negligence, (c) damage to cabinet or any cosmetic item , (d) accessories, (e) normal owner
maintenance, (f) failure due to consumer abuse, (g) insect infestati on. We reserve the right to modif y our products
without incurring any obligation to make the same changes or modifications on products which we have previously
manufactured or sold.
The Warranty does not apply if model or serial number was rem oved, altered, replaced or rendered illegible.
Warranty does not apply if equipment was modified or serviced by anyone other than an authorized Welton Sound
Systems Service Center. The manufacturer is not responsible for trip or transportat ion charges during warranty.
WHAT WELTON SOUND SYSTEMS WILL DO
Welton Sound Systems will supply at no charge to the owner for one year, new or remanufactured replacement
parts to replace those which fail under normal use and service. The manufacturer will also s upply free labor for a
period of one year from date of original purchase to replace defective parts covered under warranty if service is
performed by an authorized Welton Sound Systems Service Center.
WHAT DEALER OR CONSUMER M UST DO
To obtain service, the dealer or consumer is to cont act their local Welton Service Center who will process warranty.
Dealer or consumer must present proof of purchase (dated sales receipt) to Service Center.
Dealer or consumer is responsible to Service Center for any trip and transportation charges incurred.
If a local authorized Service Center cannot be located, contact Welt on Sound Systems directly.
MODEL NO.
WELTON USA SERVICE DEPARTMENT
11625 COLUMBIA CENTER DRIVE
SERIAL NO. .
SUITE 100
DALLAS, TX. 75229
Phone (972) 243-5602
12
Page 14

WELTON SOUND SYSTEMS, U.S.A.
11625 Columbia Center Drive
Suite 100
Dallas, Texas 75229
(972) 243-5602
FAX: (972) 243-5958
weltonusa.com
 Loading...