

Page 1
DIGITRADIO 370 CD IR
DIGITRADIO 371 CD IR
Page 2

45-
CONTENTS
DEUTSCH ........................................................................................3-44
ENGLISH ........................................................................................45-86
FRANÇAIS. ...................................................................................87-128
NEDERLANDS. ......................................................................... 129-170
2
Page 3
Bedienungsanleitung
DIGITRADIO 370 CD IR
DIGITRADIO 371 CD IR
Page 4
1 Abbildungen
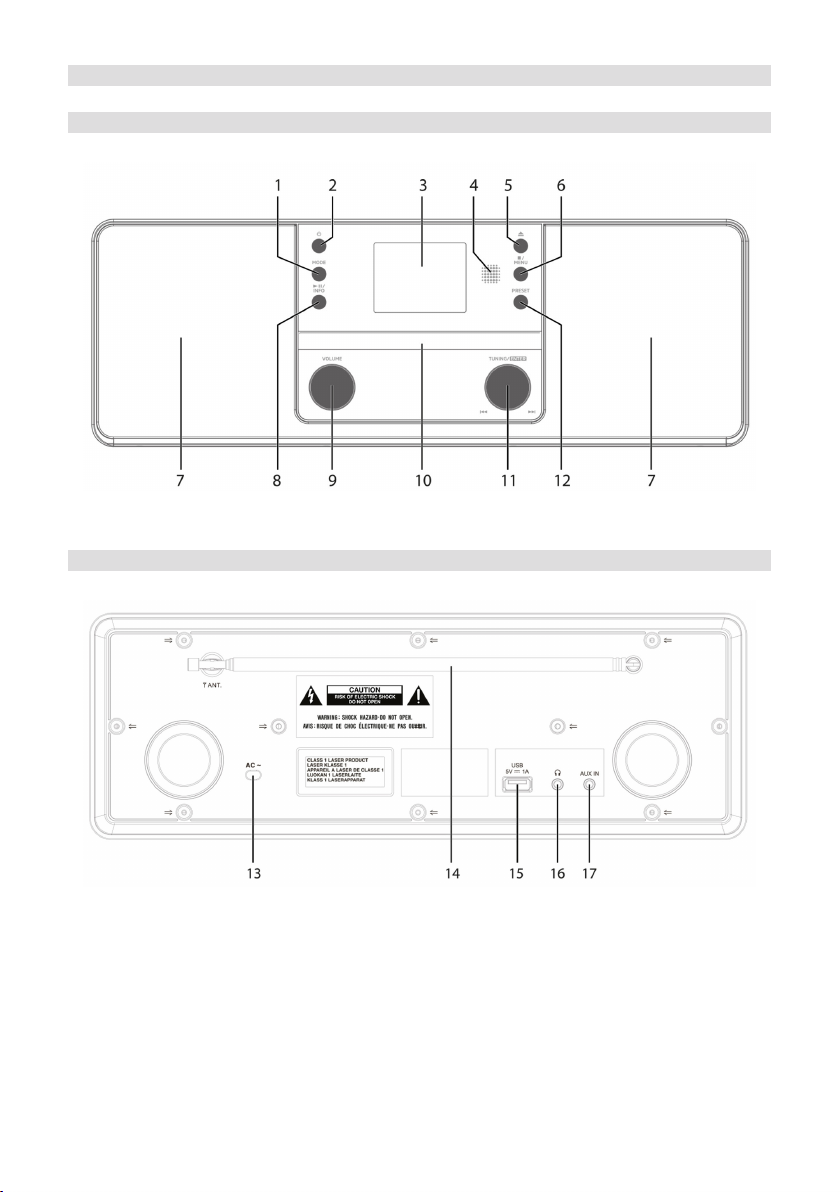
1.1 Ansicht von vorne
1.2 Rückansicht
4
Page 5
1 MODE Quellenwahl/Modusumschaltung
2 Ein/Standby
3 Farb-Display
4 Infrarot-Empfänger
5 Eject CD-Auswuraste
6 Stopp/MENU Wiedergabe stoppen, Hauptmenü aufrufen (gedrückt halten)
7 Stereo-Lautsprecher
8 Wiedergabe/Pause/INFO
9 Lautstärke laut/leise
10 CD-Lade
11 TUNING/ENTER Drehregler
12 PRESET Favoritenspeicher
13 Stromkabel
14 Teleskopantenne
15 USB-Anschluss 5 V, 1 A
16 Kopöreranschluss 3,5mm Klinke
17 AUX-IN 3,5mm Klinke
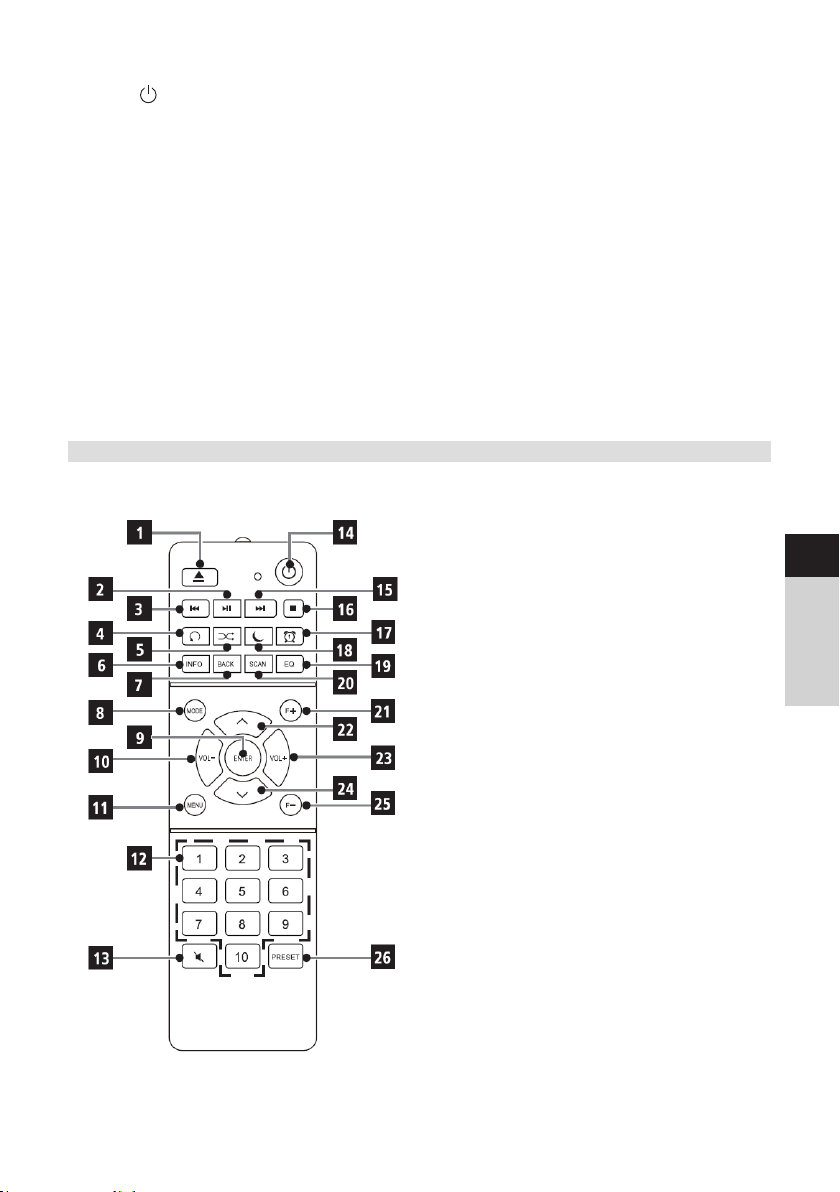
1.3 Fernbedienung
1 Eject CD-Auswuraste
2 Wiedergabe/Pause
3 Vorheriger Titel/Suchlauf
4 Wiederholung
5 Zufallswiedergabe
6 INFO
7 BACK (Zurück/Abbrechen)
8 Mode (Quellenumschaltung)
9 ENTER (Bestätigen)
10 Lautstärke 11 MENÜ
12 Zierntasten/
Direktwahltasten
13 Mute/Stumm
14 Ein/Standby
15 Nächster Titel/Suchlauf
16 Stopp
17 Wecker 1 / 2
18 Sleeptimer
19 Equalizer/EQ
20 SCAN (Sendersuche)
21 F+ (Ordnerwahl CD-Betrieb)
22 Programm + /
*Bei diesem Gerät ohne Funktion.
23 Lautstärke +
24 Programm - /
25 F- (Ordnerwahl CD-Betrieb)
26 PRESET (FAV-Speicher)
DE
EN
FR
NL
5
Page 6

2 Inhaltsverzeichnis
1 Abbildungen ............................................................................................................... 4
1.1 Ansicht von vorne ....................................................................................................................... 4
1.2 Rückansicht .................................................................................................................................... 4
1.3 Fernbedienung ..............................................................................................................................5
2 Inhaltsverzeichnis ..................................................................................................... 6
3 Sicherheitshinweise ................................................................................................. 9
3.1 Vorwort ............................................................................................................................................ 9
3.2 Verwendete Zeichen und Symbole .................................................................................... 9
3.3 Bestimmungsgemäßer Gebrauch ..................................................................................... 10
3.4 Sicherer Umgang mit dem Produkt .................................................................................10
3.4.1 Rechtliche Hinweise ................................................................................................................. 12
3.4.2 Servicehinweise...........................................................................................................................31
4 Beschreibung des DIGITRADIO 370/371 CD IR ............................................... 14
4.1 Der Lieferumfang ...................................................................................................................... 14
4.2 Die besonderen Eigenschaen des DIGITRADIO 370/371 CD IR ........................ 14
4.3 DIGITRADIO 370/371 CD IR zum Betrieb vorbereiten ............................................. 14
4.3.1 Teleskopantenne ausrichten ................................................................................................ 14
4.3.2 An das Stromnetz anschließen ..........................................................................................14
4.3.3 Baerien in Fernbedienung einlegen ...............................................................................15
4.3.4 Kopörer benutzen ................................................................................................................. 16
4.4 Allgemeine Geräte-Funktionen .......................................................................................... 16
4.4.1 Gerät einschalten ...................................................................................................................... 16
4.4.2 Gerät ausschalten ..................................................................................................................... 16
4.4.3 Quellenwahl ..................................................................................................................................17
4.4.4 Lautstärke einstellen ................................................................................................................ 18
4.4.5 Display ............................................................................................................................................ 18
5 Menübedienung ....................................................................................................... 19
6 Ersteinrichtung.........................................................................................................20
7 Die DAB+ (Digital Radio)-Funktion ..................................................................... 21
7.1 Was ist DAB+ ............................................................................................................................. 21
7.2 DAB+ (Digital Radio) Empfang ........................................................................................... 21
7.2.1 Vollständigen Suchlauf durchführen .............................................................................. 21
7.2.2 Sender wählen ........................................................................................................................... 21
7.2.3 DAB+ -Sender auf einem Speicherplatz ablegen ......................................................22
7.2.4 DAB+ -Sender von einem Speicherplatz abrufen .....................................................22
7.2.5 Überschreiben/Löschen einer Programmplatz-Speicherung...............................22
7.2.6 Signalstärke ..................................................................................................................................22
7.2.7 Manuell einstellen .....................................................................................................................23
7.2.8 Lautstärkeanpassung (DRC) .................................................................................................23
7.2.9 Inaktive Sender löschen .........................................................................................................23
8 FM (UKW)-Betrieb ...................................................................................................24
8.1 UKW-Radiobetrieb einschalten ......................................................................................... 24
6
Page 7

8.2 FM (UKW)-Empfang mit RDS-Informationen .............................................................. 24
8.3 Automatische Sendersuche ................................................................................................ 24
8.4 Manuelle Sendersuche .......................................................................................................... 24
8.5 Suchlauf-Einstellung ............................................................................................................... 24
8.6 Audio-Einstellung ...................................................................................................................... 25
8.7 UKW-Sender auf einem Speicherplatz ablegen .........................................................25
8.8 UKW-Sender von einem Speicherplatz abrufen ........................................................25
8.9 Überschreiben/Löschen einer Programmplatz-Speicherung...............................26
9 Internetradio ............................................................................................................26
9.1 Senderliste ....................................................................................................................................26
9.2 Zuletzt gehört .............................................................................................................................26
9.3 Favoriten hinzufügen ..............................................................................................................26
9.4 Favoriten abrufen......................................................................................................................27
10 Podcasts ....................................................................................................................27
11 Bluetooth ................................................................................................................... 27
11.1 Bluetooth-Betrieb einschalten ...........................................................................................27
11.2 Externes Gerät koppeln ..........................................................................................................28
11.3 Koppelung aueben ...............................................................................................................28
12 CD-Player ...................................................................................................................29
12.1 Allgemeine Informationen zu CD’s/MP3 CD’s ............................................................. 29
12.2 Welche Discs Sie verwenden können ............................................................................ 29
12.3 CD abspielen ...............................................................................................................................30
12.4 Titel einstellen .............................................................................................................................30
12.5 Schneller Suchlauf .....................................................................................................................31
12.6 Wiederholen Funktion .............................................................................................................31
12.7 Zufällige Wiedergabe ...............................................................................................................31
12.8 Programmierfunktion ...............................................................................................................31
12.9 CD Auswerfen .............................................................................................................................32
DE
EN
FR
NL
13 USB-Musikwiedergabe .......................................................................................... 32
13.1 USB Wiedergabe steuern .....................................................................................................32
13.2 Titel einstellen ............................................................................................................................. 33
13.3 Schneller Suchlauf .................................................................................................................... 33
13.4 Wiederholen Funktion ............................................................................................................ 33
13.5 Zufällige Wiedergabe ..............................................................................................................33
14 Audioeingang ........................................................................................................... 33
15 Weitere Funktionen ................................................................................................34
15.1 Sleep-Timer ..................................................................................................................................34
15.2 Wecker ...........................................................................................................................................34
15.2.1 Wecker einrichten .....................................................................................................................34
15.2.2 Wecker nach Alarm ausschalten .......................................................................................35
16 Systemeinstellungen .............................................................................................. 36
16.1 Equalizer ........................................................................................................................................ 36
7
Page 8

16.2 Audiostream-Qualität ..............................................................................................................36
16.3 Interneteinstellungen ..............................................................................................................36
16.3.1 Verbindung per WLAN ...........................................................................................................36
16.3.2 Einstellungen anzeigen ..........................................................................................................38
16.3.3 TechniSat Connect PIN ...........................................................................................................38
16.3.4 Netzwerkprofil löschen ...........................................................................................................38
16.3.5 WLAN-Verbindung in Standby ...........................................................................................39
16.4 Uhrzeit- und Datumseinstellungen ...................................................................................39
16.4.1 Zeit/Datum manuell einstellen ...........................................................................................39
16.4.2 Aktualisierung ............................................................................................................................. 39
16.4.3 Uhrzeitformat einstellen ....................................................................................................... 40
16.4.4 Standby Uhr ................................................................................................................................40
16.5 Auto-Standby ............................................................................................................................. 40
16.6 Sprache .......................................................................................................................................... 41
16.7 Werkseinstellung ....................................................................................................................... 41
16.8 Sowareupdate ......................................................................................................................... 41
16.9 Einrichtungsassistent ............................................................................................................... 41
16.10 Soware-Version ...................................................................................................................... 42
16.11 Datenschutz ................................................................................................................................ 42
16.12 Beleuchtung ............................................................................................................................... 42
17 Reinigen .....................................................................................................................42
18 Fehler beseitigen ....................................................................................................43
19 Technische Daten / Herstellerhinweise ........................................................... 44
8
Page 9
3 Sicherheitshinweise
3.1 Vorwort
Sehr geehrte Kunden,
vielen Dank, dass Sie sich für ein Digitalradio von TechniSat entschieden haben.
Die vorliegende Bedienungsanleitung soll Ihnen helfen, die umfangreichen
Funktionen Ihres neuen Gerätes kennen zu lernen und optimal zu nutzen. Sie hil
Ihnen beim bestimmungsgemäßen und sicheren Gebrauch. Sie richtet sich an jede
Person, die das Gerät installiert, bedient, reinigt oder entsorgt.
Bewahren Sie die Bedienungsanleitung für einen späteren Gebrauch sorgfältig auf.
Eine aktuelle Version der Bedienungsanleitung finden Sie im Downloadbereich Ihres
Produktes auf der TechniSat-Webseite
www.technisat.de.
Wir wünschen Ihnen viel Freude mit Ihrem
TechniSat Digitalradio!
Ihr
TechniSat Team
3.2 Verwendete Zeichen und Symbole
In dieser Bedienungsanleitung:
DE
Kennzeichnet einen Sicherheitshinweis, der bei Nichtbeachtung zu schweren
Verletzungen oder zum Tod führen kann. Beachten Sie die folgenden
Signalwörter:
GEFAHR - Schwere Verletzungen mit Todesfolge
WARNUNG - Schwere Verletzungen, eventuell mit Todesfolge
ACHTUNG - Verletzungen
Kennzeichnet einen Hinweis, den Sie zur Vermeidung von Gerätedefekten,
Datenverlusten/-missbrauch oder ungewolltem Betrieb unbedingt beachten
sollten. Des Weiteren beschreibt er weitere Funktionen zu Ihrem Gerät.
Warnung vor elektrischer Spannung. Befolgen Sie alle Sicherheitshinweise, um
einen elektrischen Schlag zu vermeiden. Önen Sie niemals das Gerät.
Auf dem Gerät:
Benutzung in Innenräumen - Geräte mit diesem Symbol sind nur für die
Verwendung in Innenräumen geeignet.
EN
FR
NL
9
Page 10
Schutzklasse II - Elektrogeräte der Schutzklasse II sind Elektrogeräte die
durchgehende doppelte und/oder verstärkte Isolierung besitzen und keine
Anschlussmöglichkeiten für einen Schutzleiter haben. Das Gehäuse eines
isolierstoumschlossenen Elektrogerätes der Schutzklasse II kann teilweise
oder vollständig die zusätzliche oder verstärkte Isolierung bilden.
Ihr Gerät trägt das CE-Zeichen und erfüllt alle erforderlichen EU-Normen.
Elektronische Geräte gehören nicht in den Hausmüll, sondern müssen - gemäß
Richtlinie 2002/96/EG des Europäischen Parlaments und Rates vom 27.
Januar 2003 über Elektro- und Elektronik-Altgeräte - fachgerecht entsorgt
werden. Bie geben Sie dieses Gerät am Ende seiner Verwendung zur
Entsorgung an den dafür vorgesehenen öentlichen Sammelstellen ab.
3.3 Bestimmungsgemäßer Gebrauch
Das DIGITRADIO 370/371 CD IR ist für den Empfang von DAB+/UKW/Internet
Radiosendungen entwickelt. Des Weiteren können Sie Digitale Audio und MP3 CDs
wiedergeben.
Das Gerät ist für den privaten Gebrauch konzipiert und nicht für gewerbliche Zwecke
geeignet.
3.4 Sicherer Umgang mit dem Produkt
Bie beachten Sie die nachfolgend aufgeführten Hinweise, um Sicherheitsrisiken
zu minimieren, Beschädigungen am Gerät zu vermeiden, sowie einen Beitrag zum
Umweltschutz zu leisten.
Lesen Sie bie alle Sicherheitshinweise sorgfältig durch und bewahren Sie diese
für spätere Fragen auf. Befolgen Sie immer alle Warnungen und Hinweise in dieser
Bedienungsanleitung und auf der Rückseite des Gerätes.
WARNUNG!
Önen Sie niemals das Gerät!
Das Berühren Spannung führender Teile ist lebensgefährlich!
WARNUNG!
Erstickungsgefahr! Verpackung und deren Teile nicht Kindern überlassen.
Erstickungsgefahr durch Folien und andere Verpackungsmaterialien.
Beachten Sie alle nachfolgenden Hinweise zur bestimmungsgemäßen
Nutzung des Gerätes und um Gerätedefekten und Personenschäden
vorzubeugen.
- Reparieren Sie das Gerät nicht selbst. Eine Reparatur darf nur von
geschultem Fachpersonal durchgeführt werden. Wenden Sie sich an unsere
Kundendienststellen.
10
Page 11

- Das Gerät darf nur in den dafür angegebenen Umgebungsbedingungen
betrieben werden.
- Setzen Sie das Gerät nicht Tropf- oder Spritzwasser aus. Ist Wasser in das
Gerät gelangt, schalten Sie es aus und verständigen Sie den Service.
- Setzen Sie das Gerät nicht Heizquellen aus, die das Gerät zusätzlich zum
normalen Gebrauch erwärmen.
- Bei auälligem Gerätedefekt, Geruchs- oder Rauchentwicklung, erheblichen
Fehlfunktionen, Beschädigungen an Gehäuse unverzüglich den Service
verständigen.
- Das Gerät darf nur mit der vorgeschriebenen Netzspannung betrieben
werden. Versuchen Sie niemals, das Gerät mit einer anderen Spannung zu
betreiben.
- Wenn das Gerät Schäden aufweist, darf es nicht in Betrieb genommen
werden.
- Nehmen Sie das Gerät nicht in der Nähe von Badewannen, Duschen,
Swimmingpools oder fließendem/spritzendem Wasser in Betrieb. Es besteht
die Gefahr eines elektrischen Schlages und/oder Gerätedefekten.
- Fremdkörper, z.B. Nadeln, Münzen, etc., dürfen nicht in das Innere des Gerätes
fallen. Die Anschlusskontakte nicht mit metallischen Gegenständen oder den
Fingern berühren. Die Folge können Kurzschlüsse sein.
- Dieses Gerät ist nicht dafür bestimmt, durch Personen (einschließlich Kinder)
mit eingeschränkten physischen, sensorischen oder geistigen Fähigkeiten oder
mangels Erfahrung und/oder mangels Wissen benutzt zu werden, es sei denn,
sie werden durcheine für ihre Sicherheit zuständige Person beaufsichtigt oder
erhielten von ihr Anweisungen, wie das Gerät zu benutzen ist.
- Es ist verboten Umbauten am Gerät vorzunehmen.
- Der CD-Player verwendet einen unsichtbaren Laserstrahl. Dieser kann Ihre
Augen bei falscher Handhabung verletzten. Schauen Sie niemals in das
geönete CD-Fach.
DE
EN
FR
NL
• Dieses Gerät wurde als Laser-Gerät der Klasse 1 (CLASS 1 LASER) eingestu.
11
Page 12
3.4.1 Rechtliche Hinweise
Hiermit erklärt TechniSat, dass der Funkanlagentyp DIGITRADIO 370/371
CD IR der Richtlinie 2014/53/EU entspricht. Der vollständige Text der EUKonformitätserklärung ist unter der folgenden Internetadresse verfügbar:
DIGITRADIO 370 CD IR: hp://konf.tsat.de/?ID=22628
DIGITRADIO 371 CD IR: hp://konf.tsat.de/?ID=22630
TechniSat ist nicht für Produktschäden auf Grund von äußeren Einflüssen,
Verschleiß oder unsachgemäßer Handhabung, unbefugter Instandsetzung,
Modifikationen oder Unfällen habar.
Änderungen und Druckfehler vorbehalten. Stand 6/20. Abschri und
Vervielfältigung nur mit Genehmigung des Herausgebers. Die jeweils aktuelle
Version der Anleitung erhalten Sie im PDF-Format im
Downloadbereich der TechniSat-Homepage unter
www.technisat.de.
TechniSat und DIGITRADIO 370/371 CD IR sind eingetragene Warenzeichen
der:
TechniSat Digital GmbH
TechniPark
Julius-Saxler-Straße 3
D-54550 Daun/Eifel
www.technisat.de
Namen der erwähnten Firmen, Institutionen oder Marken sind Warenzeichen oder
eingetragene Warenzeichen der jeweiligen Inhaber.
In den nachfolgend aufgeführten Ländern darf das Gerät im 5GHz WLAN-
Bereich nur in geschlossenen Räumen betrieben werden.
BE CY FI FR HU LV LI
LU NL ES SE UK CH DE
12
Page 13

3.4.2 Servicehinweise
Dieses Produkt ist qualitätsgeprü und mit der gesetzlichen
Gewährleistungszeit von 24 Monaten ab Kaufdatum versehen.
Bie bewahren Sie den Rechnungsbeleg als Kaufnachweis auf. Bei
Gewährleistungsansprüchen wenden Sie sich bie an den Händler des
Produktes.
Für Fragen und Informationen oder wenn es mit diesem Gerät zu einem
Problem kommt, ist unsere Technische Hotline:
Mo. - Fr. 8:00 - 18:00 unter Tel.:
03925/9220 1800 erreichbar.
Reparaturauräge können auch direkt online unter
www.technisat.de/reparatur, beauragt werden.
Für eine eventuell erforderliche Einsendung des Gerätes verwenden Sie bie
ausschließlich folgende Anschri:
TechniSat Digital GmbH
Service-Center
Nordstr. 4a
39418 Staßfurt
DE
EN
FR
13
NL
Page 14
4 Beschreibung des DIGITRADIO 370/371 CD IR
4.1 Der Lieferumfang
Bie überprüfen sie vor Inbetriebnahme, ob der Lieferumfang vollständig ist:
1x DIGITRADIO 370/371 CD IR
1x Fernbedienung
1x Baerien für Fernbedienung
1x Bedienungsanleitung
4.2 Die besonderen Eigenschaen des DIGITRADIO 370/371 CD IR
Das DIGITRADIO 370/371 CD IR besteht aus einem DAB+/UKW/InternetradioEmpfänger, mit folgend aufgeführten Funktionen:
- Sie können bis zu 20 DAB+ / UKW / Internet-Sender speichern.
- Das Radio empfängt auf den Frequenzen UKW 87,5–108 MHz (analog) und
DAB+ Band III 174,9–239,2 MHz (digital Antenne).
- Internetradio
- Bluetooth Musik-Streaming
- Das Gerät verfügt über eine Zeit- und Datumsanzeige.
- MP3 Musikwiedergabe über USB-Sticks oder MP3 CDs.
- Farb-Display
4.3 DIGITRADIO 370/371 CD IR zum Betrieb vorbereiten
4.3.1 Teleskopantenne ausrichten
Die Anzahl und Qualität der zu empfangenden Sender hängt von den
Empfangsverhältnissen am Aufstellort ab. Mit der Teleskopantenne kann ein
ausgezeichneter Empfang erzielt werden.
> Richten Sie die Teleskopantenne auf und ziehen Sie sie der Länge nach aus.
Wichtig ist o die exakte Ausrichtung der Teleskopantenne, insbesondere in
den Randgebieten des DAB+ -Empfangs. Im Internet kann man z. B. unter
„www.dabplus.de“ die Lage des nächstgelegenen Sendemastes schnell
ausfindig machen.
Starten Sie den ersten Suchlauf an einem Fenster in Richtung des
Sendemastes. Bei schlechtem Weer kann der DAB+ -Empfang nur
eingeschränkt möglich sein.
Fassen Sie die Teleskopantenne während der Wiedergabe eines Senders nicht
an. Dies kann zu Empfangsbeeinträchtigungen und Tonaussetzern führen.
4.3.2 An das Stromnetz anschließen
WARNUNG!
Netzstecker nicht mit nassen Händen anfassen, Gefahr eines elektrischen
Schlages!
ACHTUNG!
Verlegen Sie das Netzkabel so, dass niemand darüber stolpern kann.
14
Page 15
> Stecken Sie den Netzstecker des DIGITRADIO 370/371 CD IR in eine
Netzsteckdose (AC 100 - 240 V ~, 50/60 Hz)
> Vergewissern Sie sich, dass die Betriebsspannung des Gerätes mit der
örtlichen Netzspannung übereinstimmt, bevor Sie es in die Wandsteckdose
stecken.
Ziehen Sie bei Nichtverwendung den Stecker aus der Steckdose. Ziehen Sie
am Stecker und nicht am Kabel. Ziehen Sie vor Ausbruch eines Gewiers
den Netzstecker. Wenn das Gerät längere Zeit nicht benutzt wird, z.B. vor
Antri einer längeren Reise, ziehen Sie den Netzstecker. Die beim Betrieb
entstehende Wärme muss durch ausreichende Luzirkulation abgeführt
werden. Deshalb darf das Gerät nicht abgedeckt oder in einem geschlossenen
Schrank untergebracht werden. Sorgen Sie für einen Freiraum von mindestens
10 cm um das Gerät.
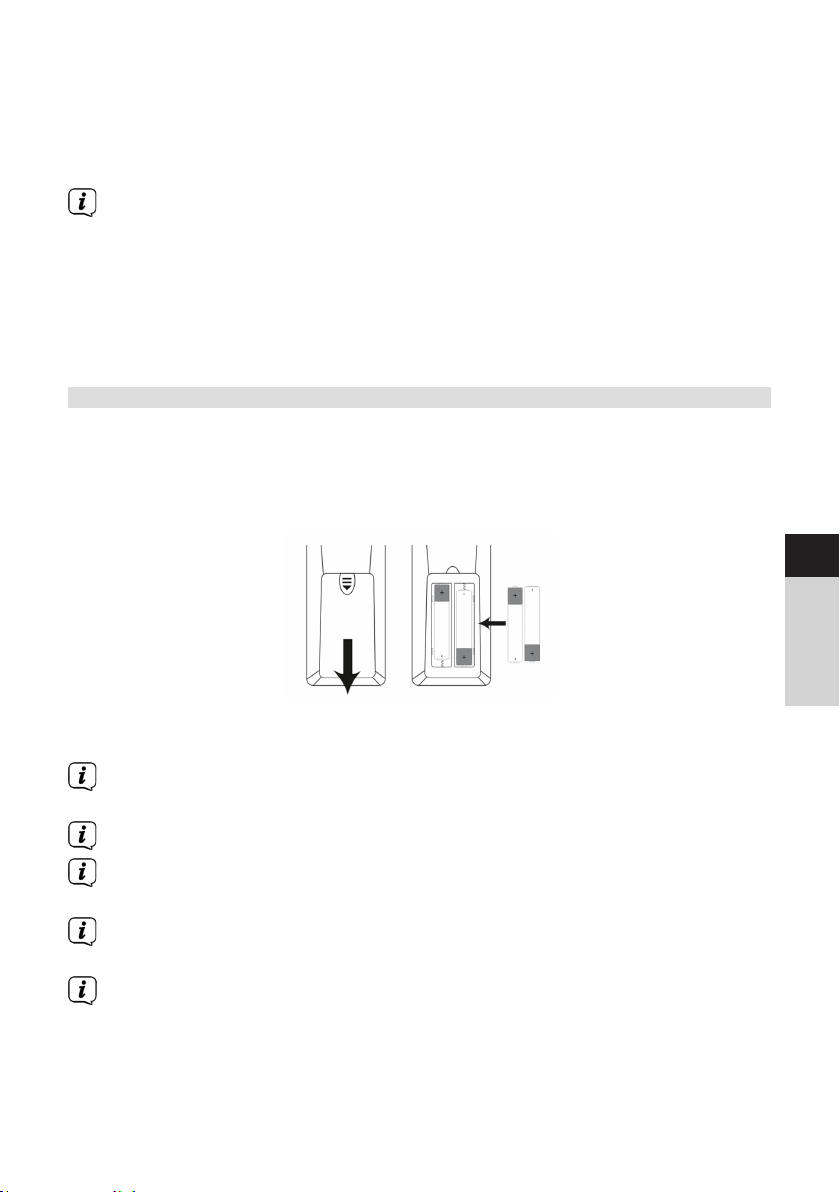
4.3.3 Baerien in Fernbedienung einlegen
> Önen Sie das Baeriefach auf der Rückseite der Fernbedienung, indem Sie
es in Pfeilrichtung schieben.
> Legen Sie die Baerien (2x AAA 1,5V) gemäß der im Baeriefach
abgebildeten Polung in das Baeriefach ein.
DE
EN
FR
> Schließen Sie den Baeriefachdeckel wieder sorgfältig, so dass die
Haltelaschen des Deckels im Gehäuse einrasten.
Zum Betrieb der Fernbedienung benötigen Sie eine alkalische Baerie, Typ
Micro, 1,5 V, LR03/AAA. Achten Sie beim Einlegen auf die richtige Polung.
Wechseln Sie eine schwächer werdende Baerie rechtzeitig aus.
Auslaufende Baerien können Beschädigungen an der Fernbedienung
verursachen.
Wenn das Gerät längere Zeit nicht benutzt wird, nehmen Sie die Baerie aus
der Fernbedienung.
Wichtiger Hinweis zur Entsorgung: Baerien können Gistoe enthalten,
die die Umwelt schädigen. Entsorgen Sie die Baerien deshalb unbedingt
entsprechend der geltenden gesetzlichen Bestimmungen. Werfen Sie die
Baerie niemals in den normalen Hausmüll.
NL
15
Page 16
4.3.4 Kopörer benutzen
Gehörschäden!
Hören Sie Radio nicht mit großer Lautstärke über Kopörer. Dies kann zu bleibenden
Gehörschäden führen. Regeln Sie vor der Verwendung von Kopörern die
Gerätelautstärke auf minimale Lautstärke.
Verwenden Sie nur Kopörer mit 3,5 Millimeter Stereo-Klinkenstecker.
> Stecken Sie den Stecker des Kopörers in die Kopörerbuchse (16) des
Gerätes. Die Klangwiedergabe erfolgt jetzt ausschließlich über den Kopörer,
der Lautsprecher ist stumm geschaltet.
> Wenn Sie wieder über die Lautsprecher hören möchten, ziehen Sie den
Stecker des Kopörers aus der Kopörerbuchse des Gerätes.
4.4 Allgemeine Geräte-Funktionen
4.4.1 Gerät einschalten
> Um einen guten DAB+/FM(UKW)-Empfang zu gewährleisten, ziehen Sie bie
die Teleskopantenne (14), die sich an der Rückseite des Gerätes befindet,
ganz aus. Beachten Sie hierzu auch Punkt 4.3.1.
> Bereiten Sie das DIGITRADIO 370/371 CD IR zunächst wie unter Punkt 4.3.1
und 4.3.3 beschrieben, zum Betrieb vor.
> Durch Drücken der Taste Ein/Standby (2) am Gerät oder auf der
Fernbedienung (14), schalten Sie das DIGITRADIO 370/371 CD IR ein.
Nach dem erstmaligen Einschalten müssen Sie zuerst die Bediensprache und
den Erstinstallationsassistenten Konfigurieren.
4.4.2 Gerät ausschalten
> Durch Drücken der Taste Ein/Standby können Sie das Gerät in den
Standby-Modus schalten. Im Display erscheint kurz der Hinweis [Standby].
Datum und Uhrzeit werden im Display angezeigt. Die Displayhelligkeit im
Standby-Modus können Sie wie unter Punkt 16.12 beschrieben ändern.
16
Page 17
4.4.3 Quellenwahl
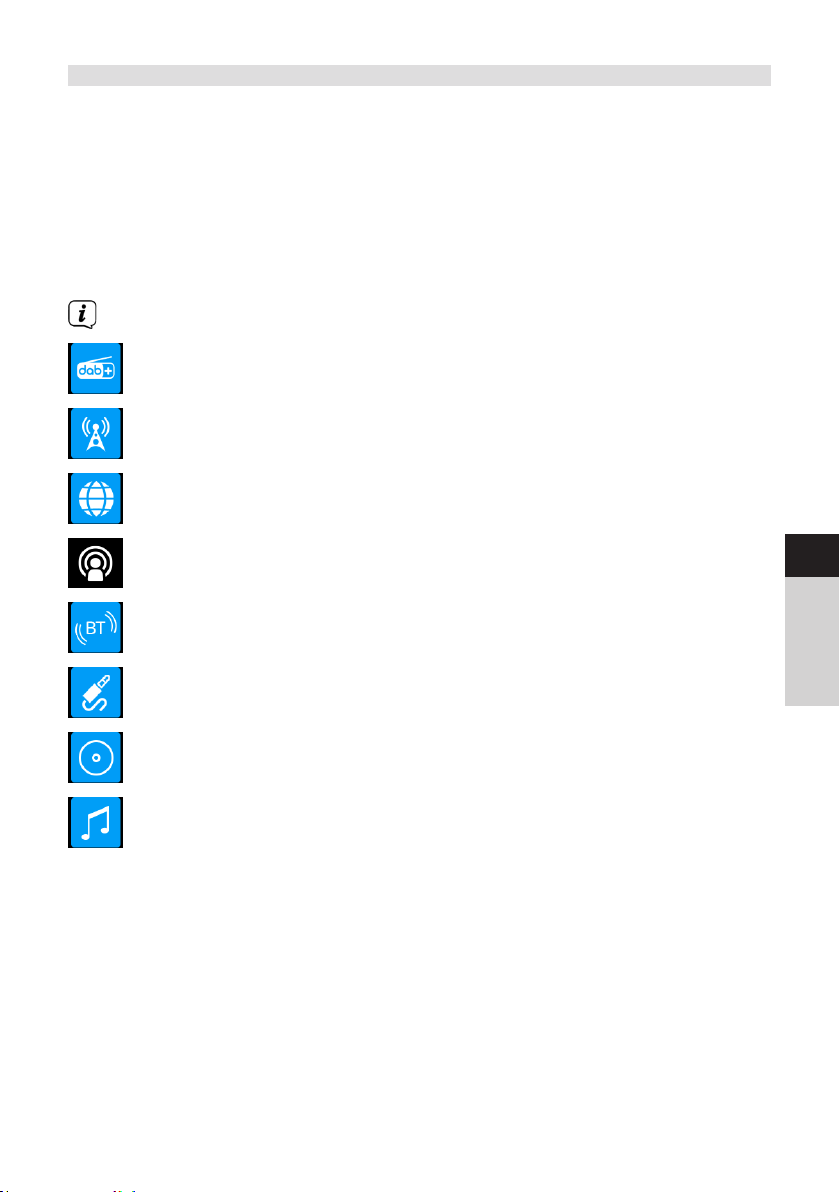
> Mit der Taste MODE (1) am Gerät oder (8) auf der Fernbedienung, kann
zwischen den Quellen DAB+ (Digital Radio), FM (UKW), Internetradio/
Podcasts, Bluetooth, CD, AUX und USB-Wiedergabe umgeschaltet werden.
Alternativ:
> Önen Sie das Menü durch Drücken der Taste MENU. Wählen Sie anschließend
mit / > Hauptmenü und drücken Sie ENTER. Wählen Sie die Quelle mit
dem TUNING/ENTER Drehregler (11) am Gerät oder mit / (22, 24) auf
der Fernbedienung. Drücken Sie anschließend ENTER (9).
Die Quellen werden anhand eines Symbols dargestellt.
DAB+
FM (UKW)
Internetradio
Podcast
DE
EN
Bluetooth
AUX-Analog
CD-Player
USB-Wiedergabe
FR
NL
17
Page 18
4.4.4 Lautstärke einstellen
> Stellen Sie die Lautstärke mit den Tasten VOL +/- (23, 10) der Fernbedienung
oder durch drehen des VOLUME Drehreglers (9) am Gerät ein.
- Im Uhrzeigersinn drehen – lauter
- Gegen den Uhrzeigersinn drehen – leiser.
Die eingestellte Lautstärke wird im Display anhand eines Balkendiagrammes gezeigt.
Beachten Sie auch Punkt 4.3.4 zum Betrieb mit angeschlossenen Kopörern.
> Drücken Sie die Taste Mute/Stummschaltung (13) auf der Fernbedienung, um
den Ton direkt stummzuschalten. Drücken Sie die Taste erneut, um die zuletzt
eingestellte Lautstärke wiederzugeben.
Wird die Lautstärke komple heruntergeregelt (Stumm), schaltet das Gerät
nach ca. 15 Minuten in den Standby-Modus.
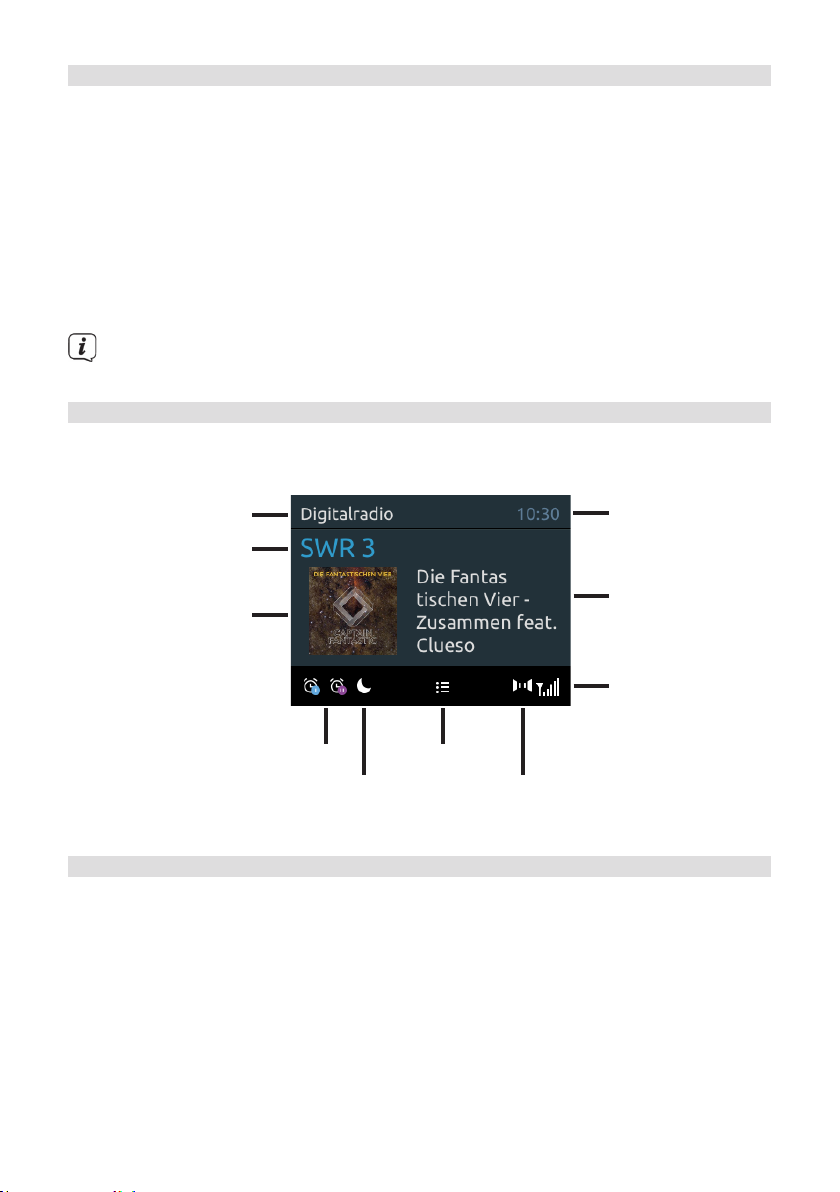
4.4.5 Display
Je nach gewählter Funktion oder Option, werden im Display folgende Informationen
angezeigt:
Quelle
Uhrzeit
Sendername
Titelname/
Albumcover/
Zusatinfos
Slideshow
Empfangsstärke
Aktive Wecker
Aktiver
Favoritenliste
Stereo-Ton
Sleeptimer
4.4.5.1 Displayanzeigen aufrufen
> Drücken Sie mehrmals die Taste INFO (6) auf der Fernbedienung. Sie haben
die Wahl, sich folgende Infos anzeigen zu lassen:
Im Internetradio -Betrieb (gewählte Funktion wird mit einem “*” gekennzeichnet):
[Titel, Interpret], [Beschreibung], [Genre], [Zuverlässigkeit], [Bit-Rate],
[Tonformat], [Abspiel-Puer], und [Datum].
Im DAB+ -Betrieb:
[Lauext] (DLS - durchlaufender Text mit zusätzlichen Informationen, die die
Sender u. U. Bereitstellen), [Signalqualität], [Programmtyp], [Ensemble],
[Frequenz], [Bitrate und Codec] und [Datum].
18
Page 19

Im FM/UKW-Betrieb:
[Radiotext] (falls ausgesendet), [Frequenz], [Programmtyp] (PTY),
[Audioinformation] und [Datum].
Im Bluetooth-Betrieb:
[Koppelstatus] und [Datum].
Im CD/USB-Betrieb (nur wenn entsprechende Daten vorhanden):
[Datum], [Titel], [Album], [Interpret], [Wochentag].
4.4.5.2 Slideshow
Einige DAB+ Sender übertragen Zusätzliche Informationen wie z. B. Albumcover des
Aktuellen Titels, Werbung oder Weerdaten. Die Größe des Fensters kann mit der
Taste ENTER bzw. TUNING/ENTER eingestellt werden.
5 Menübedienung
Über das Menü gelangen Sie zu allen Funktionen und Einstellungen des DIGITRADIO
370/371 CD IR. Die Menü-Navigation erfolgt mit den Tasten MENU, BACK, /
und ENTER der Fernbedienung. Das Menü ist aufgeteilt in Untermenüs und enthält
je nach gewählter Quelle unterschiedliche Menüpunkte bzw. aktivierbare Funktionen.
Zum Önen des Menüs, einfach die Taste MENU kurz drücken. Um in Untermenüs
zu wechseln, drücken Sie zuerst die Tasten / , um ein Untermenü anzuzeigen
und anschließend die Taste ENTER, um das Untermenü aufzurufen. Ein Sternchen (*)
Markiert die aktuelle Auswahl.
Menü schließen: Taste MENU mehrmals drücken (je nachdem, in welchem
Untermenü Sie sich befinden), bis das aktuelle Radioprogramm wieder
angezeigt wird.
Einstellungen werden erst durch Drücken der Taste ENTER gespeichert. Wird
stadessen die Taste MENU oder BACK gedrückt, wird die Einstellungen nicht
übernommen und gespeichert. Mit der Taste BACK gelangen Sie einen Schri
zurück.
DE
EN
FR
NL
Funktionen und zu drückende Tasten werden in dieser Bedienungsanleitung in
fe dargestellt. Displayanzeigen in [eckigen Klammern].
Einige Textdarstellungen (z. B. Menüeinträge, Senderinformationen) sind
eventuell für die Anzeige im Display zu lang. Diese werden dann nach kurzer
Zeit als Lauext dargestellt.
Hinweis zur Bedienung am Gerät:
Der TUNING/ENTER Drehregler kann sowohl gedreht, als auch gedrückt
werden.
Drücken des TUNING/ENTER Drehregler : Bestätigen / ENTER / Schlummern.
Drehen des TUNING/ENTER Drehregler : P+/- bzw. / / Titelsuche.
Alle nachfolgenden Bedienschrie werden anhand der Tasten auf der
Fernbedienung erklärt. Drücken Sie die entsprechenden Tasten am Gerät,
wenn Sie die Funktion am Gerät ausführen möchten.
19
Page 20
6 Ersteinrichtung
Nach dem erstmaligen Einschalten des DIGITRADIO 370/371 CD IR startet der
Ersteinrichtungsassistent.
Alle Einstellungen können auch zu einem späteren Zeitpunkt jederzeit
geändert werden.
> Wählen Sie mit / die Bediensprache und bestätigen Sie mit ENTER.
> Um den Ersteinrichtungsassistent zu starten, wählen Sie mit / der
Fernbedienung das Feld [JA] und drücken Sie die Taste ENTER.
> Im nächsten Schri können Sie das Uhrzeitformat wählen. Wählen Sie die
gewünschte Einstellung [12] oder [24] und drücken Sie die Taste ENTER, um
zum nächsten Schri zu gelangen.
> Hier kann gewählt werden, über welche Quelle (DAB+, FM oder Internet) das
DIGITRADIO 370/371 CD IR die Uhrzeit und das Datum bezieht und aktualisiert.
Haben Sie Aktualisierung von NET gewählt, müssen Sie im nächsten Schri
noch die Zeitzone wählen, damit die Uhrzeit korrekt dargestellt wird. Legen Sie
anschließend fest, ob zum Zeitpunkt der Einstellung die Sommerzeit oder die
Winterzeit aktuell ist.
> Im nächsten Schri können Sie festlegen, ob das DIGITRADIO 370/371 CD
IR auch im Standby mit dem Internet verbunden bleiben soll. Dies kann z.
B. für die App-Steuerung von Vorteil sein. Jedoch erhöht sich dadurch der
Stromverbrauch im Standby-Modus.
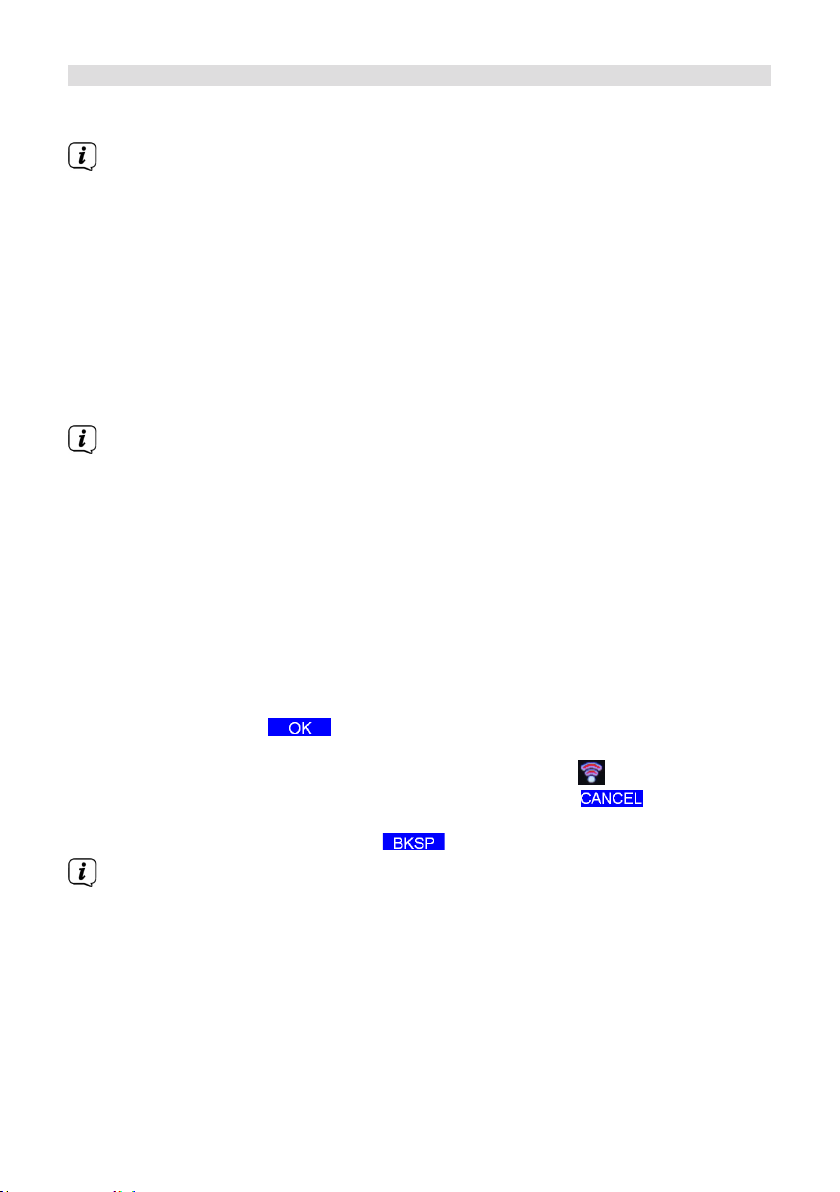
> Anschließend startet der Netzwerkassistent und Sie können eine
Internetverbindung einrichten. Wählen Sie das Ihnen bekannte WLAN-Netz
mit den Tasten / und ENTER aus, und geben Sie das entsprechende
Passwort über die eingeblendete Tastatur ein (WPS überspringen). Wählen
Sie anschließend und drücken Sie die Taste ENTER. War das Passwort
korrekt, wird nun eine Verbindung zu diesem Netzwerk hergestellt. Ob eine
Verbindung besteht, erkennen Sie an den Signalbalken in der Statusleiste
des Displays. Um die Eingabe abzubrechen, wählen Sie und drücken
Sie die Taste ENTER. Haben Sie sich vertippt, können sie den zuletzt
eingegebenen Buchstaben mit löschen.
Während die virtuelle Tastatur im Display dargestellt wird, können Sie mit /
der Fernbedienung navigieren. Die Tasten / bewegen die Markierung
auf- und abwärts, die Tasten / bewegen die Markierung nach rechts und
links.
> Bestätigen Sie nach Abschluss der Netzwerkkonfiguration den Hinweis, das die
Ersteinrichtung abgeschlossen ist, durch Drücken der Taste ENTER.
20
Page 21

7 Die DAB+ (Digital Radio)-Funktion
7.1 Was ist DAB+
DAB+ ist ein digitales Format, durch welches Sie kristallklaren Sound ohne Rauschen
hören können. Anders als bei herkömmlichen Analogradiosendern werden bei DAB+
mehrere Sender auf derselben Frequenz ausgestrahlt. Weitere Infos erhalten z. B.
unter www.dabplus.de oder www.dabplus.ch.
7.2 DAB+ (Digital Radio) Empfang
> Drücken Sie die Taste MODE bis [DAB] im Display angezeigt wird.
Wird DAB+ zum ersten Mal gestartet, wird ein kompleer Sendersuchlauf
durchgeführt. Nach Beendigung des Suchlaufes wird der erste Sender in
alphanumerischer Reihenfolge wiedergegeben.
7.2.1 Vollständigen Suchlauf durchführen
Der automatische Suchlauf Vollständiger Suchlauf scannt alle DAB+ Band
III - Kanäle und findet somit alle Sender, die im Empfangsgebiet ausgestrahlt
werden.
Nach Beendigung des Suchlaufes wird der erste Sender in alphanumerischer
Reihenfolge wiedergegeben.
> Um einen vollständigen Suchlauf durchzuführen, drücken Sie die Taste SCAN
(20) auf der Fernbedienung.
Alternativ:
> Önen Sie das MENÜ > [Vollständiger Suchlauf] und drücken Sie die Taste
ENTER.
> Im Display erscheint [Suchlauf...].
DE
EN
FR
NL
Während des Suchlaufs wird ein Fortschrisbalken und die Anzahl an
gefundenen Sendern angezeigt.
Wird keine Station gefunden, prüfen Sie die Teleskopantenne und verändern
Sie ggf. den Aufstellort (Punkt 4.3.1).
7.2.2 Sender wählen
> Durch Drücken der Tasten / kann die Senderliste aufgerufen und
zwischen den verfügbaren Sendern umgeschaltet werden. Drücken Sie die
Taste ENTER, um den Sender wiederzugeben.
Alternativ:
> Önen Sie das MENÜ > [Senderliste] und drücken Sie die Taste ENTER.
21
Page 22
7.2.3 DAB+ -Sender auf einem Speicherplatz ablegen
Der Programm-Speicher kann bis zu 20 Stationen im DAB+ -Bereich
speichern.
> Wählen Sie zunächst den gewünschten Sender aus (siehe Punkt 7.2.2).
> Um diesen Sender auf einem Speicherplatz abzulegen, halten Sie während
der Wiedergabe die Taste PRESET gedrückt, bis [Progr. Speichern] im
Display erscheint. Wählen Sie anschließend mit den Tasten / einen
Favoritenspeicher (1...20). Drücken Sie die Taste ENTER zum Speichern.
> Zum Speichern weiterer Sender wiederholen Sie diesen Vorgang.
Sie können Sender auch direkt auf eine der Direktwahltasten 1...10 auf der
Fernbedienung speichern, indem Sie die entsprechende Taste länger gedrückt
halten.
7.2.4 DAB+ -Sender von einem Speicherplatz abrufen
> Um einen Sender abzurufen, den Sie zuvor im FAV-Speicher abgelegt haben,
drücken Sie kurz die Taste PRESET und wählen Sie mit den Tasten /
einen Senderspeicher (1...20). Drücken Sie die Taste ENTER, zur Wiedergabe
des Senders.
Ist kein Sender auf dem gewählten Programmplatz gespeichert, erscheint im
Display [(leer)].
Alternativ kann auch die entsprechende Direktwahltaste 1...10 auf der
Fernbedienung genutzt werden.
7.2.5 Überschreiben/Löschen einer Programmplatz-Speicherung
> Speichern Sie wie beschrieben einfach einen neuen Sender auf einen
Favoritenspeicherplatz ab.
Beim Aufruf der Werkseinstellungen werden alle Speicherplätze gelöscht.
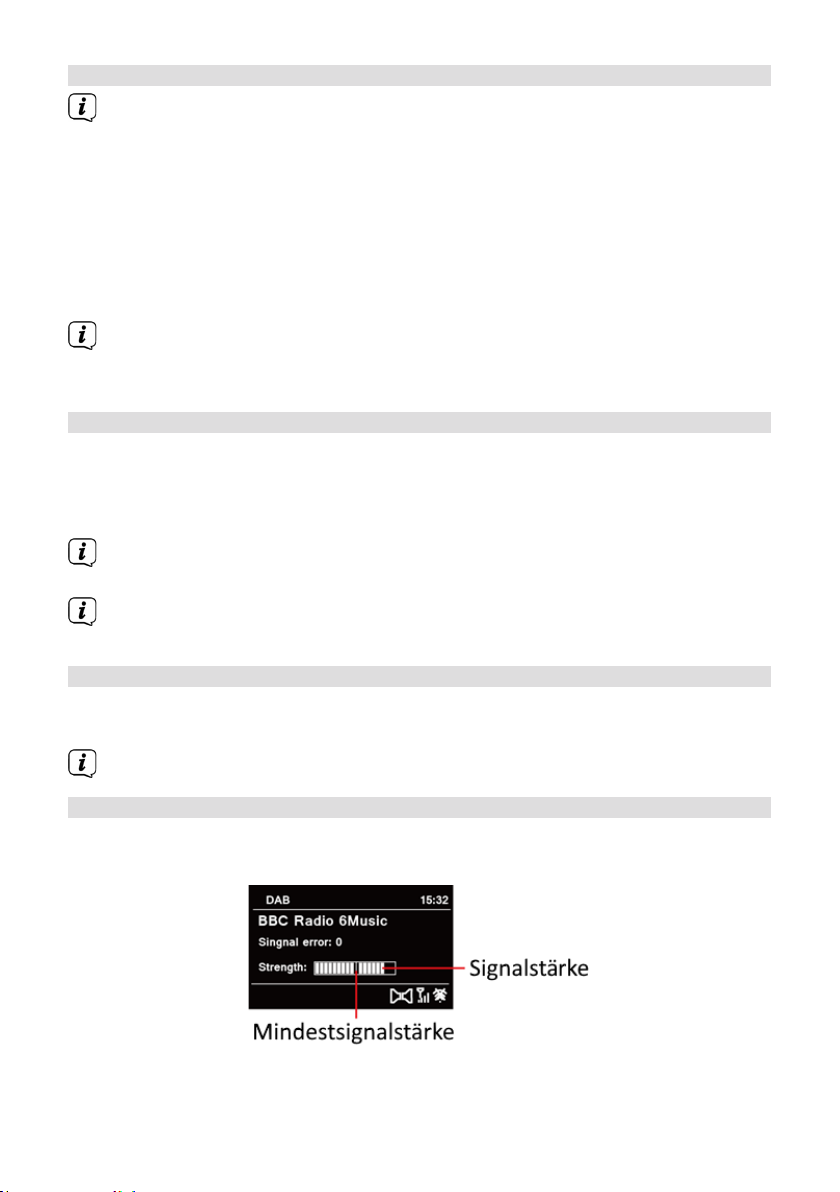
7.2.6 Signalstärke
> Drücken Sie mehrmals die Taste INFO, bis der Signalstärkebalken angezeigt
wird.
> Im Display wird die Signalstärke anhand eines Balkendiagrammes dargestellt.
Die Markierung zeigt die Mindestsignalstärke.
22
Page 23

Sender, deren Signalstärke unterhalb der erforderlichen Mindestsignalstärke
liegt, senden kein ausreichendes Signal. Richten Sie die Teleskopantenne ggf.
wie unter Punkt 4.3.1 beschrieben aus.
7.2.7 Manuell einstellen
Dieser Menüpunkt dient der Überprüfung der Empfangskanäle und kann zur
Ausrichtung der Antenne dienen. Des Weiteren können Sender manuell hinzugefügt
werden.
> Drücken Sie die Taste MENU und wählen Sie mit den Tasten / den
Eintrag > [Manuell einstellen] und drücken Sie die Taste ENTER.
> Wählen Sie mit den Tasten / und ENTER einen Kanal (5A bis 13F). Im
Display wird nun dessen Signalstärke angezeigt. Wird auf einem Kanal ein
DAB+ -Sender empfangen, wird der Ensemblename des Senders angezeigt.
Die Antenne kann nun auf maximale Signalstärke ausgerichtet werden.
Sender, deren Signalstärke unterhalb der erforderlichen Mindestsignalstärke
liegt, senden kein ausreichendes Signal. Richten Sie die Teleskopantenne ggf.
wie unter Punkt 4.3.1 beschrieben aus.
Befinden sich Sender auf der eingestellten Frequenz bzw Kanal, die noch nicht
in der Senderliste gespeichert wurden, werde diese nun ebenfalls gespeichert.
7.2.8 Lautstärkeanpassung (DRC)
Mit dem Menüpunkt DRC wird die Kompressionsrate, welche Dynamikschwankungen
und damit einhergehende Lautstärkevariationen ausgleicht, eingestellt.
> Drücken Sie die Taste MENU und wählen Sie mit den Tasten / den
Eintrag [Lautstärkeanpassung].
> Drücken Sie die Taste ENTER.
DRC hoch - Hohe Kompression
DRC tief - Niedrige Kompression
DRC aus - Kompression abgeschaltet.
> Bestätigen Sie die Einstellung mit ENTER.
DE
EN
FR
NL
7.2.9 Inaktive Sender löschen
Dieser Menüpunkt dient der Entfernung alter und nicht mehr empfangbarer Sender
aus der Senderliste.
> Drücken Sie die Taste MENU und wählen Sie mit den Tasten / den
Eintrag > [Inaktive Sender löschen].
> Drücken Sie die Taste ENTER.
Es erfolgt die Abfrage [Löschen], ob die inaktiven Sender gelöscht werden sollen.
> Wählen Sie mit / den Eintrag [Ja] und bestätigen Sie durch Drücken der
Taste ENTER.
23
Page 24
8 FM (UKW)-Betrieb
8.1 UKW-Radiobetrieb einschalten
> Wechseln Sie durch Drücken der Taste MODE in den FM-Modus.
> Im Display wird [FM] angezeigt.
Beim erstmaligen Einschalten ist die Frequenz 87,50 MHz eingestellt.
Haben Sie bereits einen Sender eingestellt oder gespeichert, spielt das Radio
den zuletzt eingestellten Sender.
Bei RDS-Sendern erscheint der Sendername.
Um den Empfang zu verbessern, richten Sie die Teleskopantenne aus (Punkt
4.3.1).
8.2 FM (UKW)-Empfang mit RDS-Informationen
RDS ist ein Verfahren zur Übertragung von zusätzlichen Informationen über
UKW-Sender. Sendeanstalten mit RDS senden z. B. ihren Sendernamen oder
den Programmtyp. Dieser wird im Display angezeigt. Das Gerät kann die RDSInformationen RT (Radiotext), PS (Sendername), PTY (Programmtyp) darstellen.
8.3 Automatische Sendersuche
> Drücken Sie die Taste SCAN (20), um automatisch den nächsten Sender mit
ausreichendem Signal zu suchen.
Wird ein UKW-Sender mit ausreichend starkem Signal gefunden, stoppt
der Suchlauf und der Sender wird wiedergegeben. Wird ein RDS-Sender
empfangen erscheint der Sendername und ggf. der Radiotext.
Für die Einstellung schwächerer Sender benutzen Sie bie die manuelle
Sendersuche.
8.4 Manuelle Sendersuche
> Drücken Sie mehrmals die Tasten / , um den gewünschten Sender, bzw.
die Frequenz einzustellen.
Das Display zeigt die Frequenz in Schrien von 0,05 MHz an.
Das gedrückt Halten einer Taste startet ebenfalls den Sendersuchlauf.
8.5 Suchlauf-Einstellung
In diesem Menüpunkt kann die Empfindlichkeit des Suchlaufs eingestellt werden.
> Drücken Sie die Taste MENU und wählen Sie den Eintrag [Suchlauf-
Einstellungen].
> Wählen Sie aus, ob der Suchlauf nur bei starken Sendern [Nur kräige
Sender] > [JA] stoppen soll oder bei allen Sendern [Nur kräige Sender] >
[NEIN].
24
Page 25

Bei der Einstellung [NEIN] stoppt der automatische Suchlauf bei jedem
verfügbaren Sender. Das kann dazu führen, dass schwache Sender mit einem
Rauschen wiedergegeben werden.
> Drücken Sie zum Speichern die Taste ENTER.
8.6 Audio-Einstellung
> Drücken Sie die Taste MENU und wählen Sie mit den Eintrag > [Audio-
Einstellung].
> Wählen Sie mit / den Eintrag [Nur Mono] > [NEIN], um die Ton-
Wiedergabe in Stereo wiederzugeben oder [Nur Mono] > [JA] (bei
schwachem FM-Empfang).
> Bestätigen Sie die Einstellung durch Drücken der Taste ENTER.
8.7 UKW-Sender auf einem Speicherplatz ablegen
Der Programm-Speicher kann bis zu 20 Stationen im FM/UKW-Bereich
speichern.
> Stellen Sie zunächst die gewünschte Senderfrequenz ein (Punkt 8.3, 8.4)
> Um diesen Sender auf einem Speicherplatz abzulegen, halten Sie während
der Wiedergabe die Taste PRESET gedrückt, bis [Progr. Speichern] im
Display erscheint. Wählen Sie anschließend mit den Tasten / einen
Favoritenspeicher (1...20). Drücken Sie die Taste ENTER zum Speichern.
> Zum Speichern weiterer Sender wiederholen Sie diesen Vorgang.
Sie können Sender auch direkt auf eine der Direktwahltasten 1...10 auf der
Fernbedienung speichern, indem Sie die entsprechende Taste länger gedrückt
halten.
DE
EN
FR
NL
8.8 UKW-Sender von einem Speicherplatz abrufen
> Um einen Sender abzurufen, den Sie zuvor im FAV-Speicher abgelegt haben,
drücken Sie kurz die Taste PRESET und wählen Sie mit den Tasten /
einen Senderspeicher (1...20). Drücken Sie die Taste ENTER, zur Wiedergabe
des Senders.
Ist kein Sender auf dem gewählten Programmplatz gespeichert, erscheint im
Display [(leer)].
Alternativ kann auch die entsprechende Direktwahltaste 1...10 auf der
Fernbedienung genutzt werden.
25
Page 26
8.9 Überschreiben/Löschen einer Programmplatz-Speicherung
> Speichern Sie wie beschrieben einfach einen neuen Sender auf dem
jeweiligen Speicherplatz ab.
Beim Aufruf der Werkseinstellungen werden alle Speicherplätze gelöscht.
9 Internetradio
Das DIGITRADIO 370/371 CD IR ist mit einem Internet-Radio Empfänger ausgestaet.
Um Internet-Radio Stationen/Sender empfangen zu können, benötigen Sie eine
Internetverbindung über einen WLAN-Router zu einem Drahtlosnetzwerk.
> Drücken Sie die Taste MODE so o, bis [Internet Radio] im Display angezeigt
wird.
Starten Sie zum ersten Mal den Internet-Radio Betrieb, ohne dass eine WLAN-
Verbindung bei der Erstinstallation konfiguriert wurde, erscheint der Suchlauf
Assistent, welcher Ihnen alle in Reichweite befindlichen WLAN-Stationen
anzeigt. Wählen Sie das Ihnen bekannte WLAN-Netz mit der Taste ENTER aus,
und geben Sie das entsprechende Passwort über die eingeblendete Tastatur
ein (WPS überspringen). Wählen Sie anschließend und drücken
Sie die Taste ENTER. War das Passwort korrekt, wird nun eine Verbindung
zu diesem Netzwerk hergestellt. Ob eine Verbindung besteht, erkennen Sie
an den Signalbalken in der Statusleiste des Displays. Um die Eingabe
abzubrechen, wählen Sie und drücken Sie die Taste ENTER. Haben Sie
sich vertippt, können sie den zuletzt eingegebenen Buchstaben mit
löschen.
9.1 Senderliste
> Drücken Sie die Taste MENU und wählen Sie > Senderliste.
Unter Senderliste werden alle Internet-Radiostationen in verschiedenen
Kategorien unterteilt angezeigt.
> Wählen Sie anhand einer Kategorie/Land/Genre einen Sender und drücken Sie
die Taste OK.
9.2 Zuletzt gehört
> Wählen Sie MENU > Senderliste > Verlauf, um eine Liste mit den zuletzt
wiedergegebenen Sendern anzuzeigen.
> Wählen Sie mit / einen Sender und geben Sie ihn mit ENTER wieder.
9.3 Favoriten hinzufügen
Der Programm-Speicher kann bis zu 20 Stationen im Internetradio-Bereich
speichern.
> Um einen Sender auf einem Speicherplatz abzulegen, halten Sie während
der Wiedergabe die Taste PRESET gedrückt, bis [Progr. Speichern] im
26
Page 27
Display erscheint. Wählen Sie anschließend mit den Tasten / einen
Favoritenspeicher (1...20). Drücken Sie die Taste ENTER zum Speichern.
> Zum Speichern weiterer Sender wiederholen Sie diesen Vorgang.
Sie können Sender auch direkt auf eine der Direktwahltasten 1...10 auf der
Fernbedienung speichern, indem Sie die entsprechende Taste länger gedrückt
halten.
9.4 Favoriten abrufen
> Um einen Sender abzurufen, den Sie zuvor im FAV-Speicher abgelegt haben,
drücken Sie kurz die Taste PRESET und wählen Sie mit den Tasten /
einen Senderspeicher (1...20). Drücken Sie die Taste ENTER, zur Wiedergabe
des Senders.
Ist kein Sender auf dem gewählten Programmplatz gespeichert, erscheint im
Display [(leer)].
Alternativ kann auch die entsprechende Direktwahltaste 1...10 auf der
Fernbedienung genutzt werden.
10 Podcasts
Podcasts werden wie Internetradio-Sender über das Internet abgerufen. Die
Grundsätzliche Bedienung erfolgt wie unter Punkt „9 Internetradio“ auf Seite 26
beschrieben.
11 Bluetooth
Im Bluetooth-Modus können Sie Musik von einem verbundenen Smartphone oder
Tablet über die Lautsprecher des DIGITRADIO 370/371 CD IR wiedergeben. Hierzu
müssen zuerst beide Geräte miteinander „gekoppelt“ werden.
Die USB-Buchse am DIGITRADIO 370/371 CD IR kann zum Aufladen oder als
Stromversorgung externer Geräte genutzt werden. Der maximale Ladestrom
beträgt DC 5 V, 1 A.
11.1 Bluetooth-Betrieb einschalten
> Wechseln Sie durch Drücken der Taste MODE in den Bluetooth-Modus.
> Im Display wird [Bluetooth] angezeigt.
Beim erstmaligen Einschalten muss zuerst ein externes Gerät (Smartphone/
Tablet) gekoppelt werden.
Wurde bereits ein externes Gerät gekoppelt, welches sich in Reichweite
befindet, wird die Verbindung automatisch hergestellt. Je nach verbundenem
Gerät, startet die Musikwiedergabe eventuell automatisch.
DE
EN
FR
NL
27
Page 28
11.2 Externes Gerät koppeln
Um ein externes Gerät, z. B. ein Smartphone oder Tablet mit dem DIGITRADIO
370/371 CD IR zu koppeln, gehen Sie folgendermaßen vor:
> Starten Sie den Bluetooth-Modus, wie unter Punkt 11.1 beschrieben.
> Im Display erscheint [Bluetooth] und [Bie koppeln].
> Starten Sie nun an Ihrem externen Gerät die Suche nach Bluetooth-Geräten
in der Nähe. Eventuell müssen Sie die Bluetooth-Funktion an Ihrem externen
Gerät erst aktivieren.
Wie Sie die Bluetooth-Funktion an Ihrem externen Gerät aktivieren und eine
Suche durchführen, entnehmen Sie bie der Bedienungsanleitung Ihres
externen Gerätes.
Während des Koppel-Vorganges sollten sich beide Geräte innerhalb von 10cm
befinden.
> In der Liste der gefundenen Bluetooth Geräte an Ihrem externen Gerät sollte
nun der Eintrag DIGITRADIO 370/371 CD IR erscheinen. Tippen Sie darauf,
um den Koppel-Vorgang abzuschließen. Ist der Koppelvorgang erfolgreich
abgeschlossen, erscheint Verbunden im Display.
> Sie können nun die Musikwiedergabe an Ihrem externen Gerät starten.
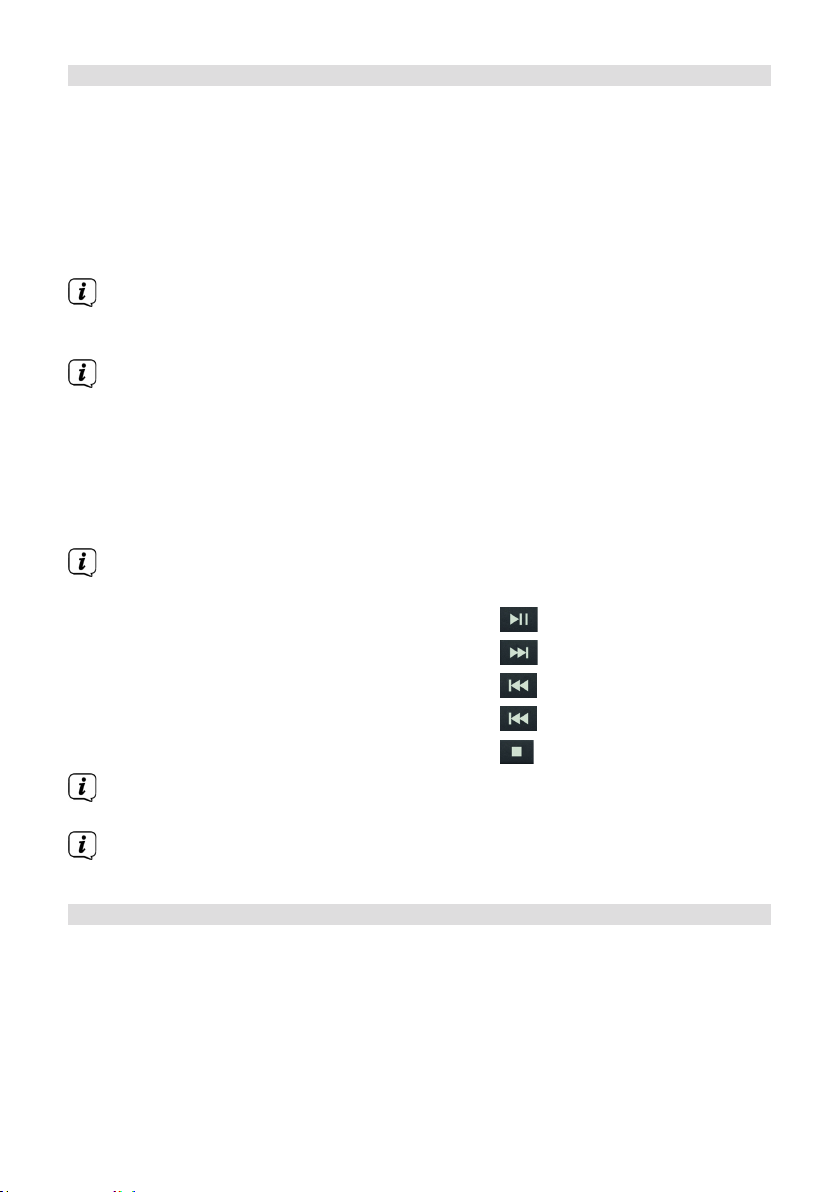
Je nach Bluetooth-Protokoll Ihres externen Gerätes, können Sie die
Musikwiedergabe über die Wiedergabetasten auf der Fernbedienung steuern.
Wiedergabe/Pause - Taste
Nächster Titel - Taste
Vorheriger Titel - 2x Taste
Titel von Anfang - Taste
Wiedergabe beenden - Taste
Alternativ können Sie die Wiedergabesteuerung der Musik-App Ihres externen
Gerätes verwenden.
Wenn keine Wiedergabe erfolgt bzw. kein Gerät gekoppelt wird, schaltet das
DIGITRADIO 370/371 CD IR nach ca. 15 Minuten in den Standby-Modus.
11.3 Koppelung aueben
> Halten Sie die Taste PRESET (12) am DIGITRADIO 370 CD BT gedrückt, um
eine aktive Koppelung aufzuheben.
> Alternativ können Sie die Koppelung an Ihrem externen Gerät aueben.
Beachten Sie hierbei die Hinweise in der Bedienungsanleitung Ihres externen
Gerätes.
28
Page 29

12 CD-Player
12.1 Allgemeine Informationen zu CD’s/MP3 CD’s
Das Gerät ist für Musik-CDs geeignet, die mit Audio-Daten (CD-DA oder MP3 für CD-R
und CD-RW) bespielt sind. MP3-Formate müssen mit ISO 9660 Level 1 oder Level 2
erstellt werden. Multisession-CDs können nicht gelesen werden.
Im MP3-Betrieb sind die Begrie „Folder“ = Album und „Titel“ ausschlaggebend.
„Album“ entspricht dem Ordner am PC, „Titel“ der Datei am PC oder einem CD-DATitel.
Das Gerät sortiert die Alben bzw. die Titel eines Albums nach Namen in
alphabetischer Reihenfolge. Wenn Sie eine andere Reihenfolge bevorzugen sollten,
ändern Sie den Namen des Titels bzw. Albums und stellen Sie eine Nummer vor den
Namen.
Beim Brennen von CD-R und CD-RW mit Audio-Daten können verschiedene
Probleme aureten, die eine störungsfreie Wiedergabe bisweilen beeinträchtigen.
Ursache hierfür sind fehlerhae Soware- und Hardware-Einstellungen oder der
verwendete Rohling. Falls solche Fehler aureten, sollten Sie den Kundendienst Ihres
CD-Brenner/
Brennersoware-Herstellers kontaktieren oder entsprechende Informationen – z.B. im
Internet – suchen.
Wenn Sie Audio-CDs anfertigen, beachten Sie die gesetzlichen Grundlagen
und verstoßen Sie nicht gegen die Urheberrechte Drier.
Das Gerät kann CDs mit MP3 Daten (.mp3) und normale Audio CDs (.wav)
abspielen. Keine anderen Erweiterungen, wie z.B. *.doc, *.txt, *.pdf usw.
benutzen, wenn Audiodateien zu MP3 gewandelt werden.
Aufgrund der Vielfalt an unterschiedlicher Encodersoware kann nicht
garantiert werden, dass jede MP3 Datei störungsfrei abgespielt werden kann.
Bei fehlerhaen Titeln/Files wird die Wiedergabe beim nächsten Titel/File
fortgesetzt.
Es ist von Vorteil beim Brennen der CD mit niedriger Geschwindigkeit zu
brennen und die CD als Single-Session und finalisiert anzulegen.
12.2 Welche Discs Sie verwenden können
Der CD-Player ist mit CD-, CD-R/RW- und MP3-CD Medien kompatibel.
Wenn Sie das Gerät transportieren, entfernen Sie die Disc aus dem Laufwerk.
Damit vermeiden Sie Beschädigungen am CD-Player und der Disc.
Die Wiedergabequalität bei MP3-CDs ist von der Einstellung der Bitrate und
der verwendeten Brenn-Soware abhängig.
DE
EN
FR
NL
29
Page 30
12.3 CD abspielen
> Wechseln Sie durch Drücken der Taste MODE in den CD-Player -Modus.
> Im Display wird [CD] angezeigt.
> Drücken Sie die Taste EJECT, um die CD-Lade zu önen.
> Legen Sie eine CD mit der bedruckten Seite nach oben vorsichtig ein.
Vergewissern Sie sich, dass die CD nicht schief sitzt.
> Drücken Sie die Taste EJECT, um die CD-Lade wieder zu schließen.
> Die Daten auf der CD werden geprü. Im Display erscheint [Einlesen].
Warten Sie mit der Bedienung, bis der CD Inhalt komple eingelesen wurde,
um sicherzustellen, dass alle benötigten Informationen von der CD gelesen
wurden. Besonders bei MP3-CDs kann dieser Vorgang einige Zeit in Anspruch
nehmen.
Zum Einlegen/Entfernen der CD, diese bie am Rand anfassen.
> Durch Drücken der Taste Wiedergabe/Pause können Sie die Wiedergabe
pausieren (im Display blinkt die Spielzeit), bzw. durch erneutes Drücken weiter
fortsetzen.
> Mit der Taste Stopp stoppen Sie die Wiedergabe. Im Display erscheint die
Gesamtzahl der Titel.
Stoppen Sie stets vor der Entnahme der CD die Wiedergabe.
Wenn keine Wiedergabe erfolgt, schaltet DIGITRADIO 370/371 CD IR nach 15
Minuten in Standby.
12.4 Titel einstellen
> Mit Hilfe der Tasten Vorheriger Titel oder Nächster Titel springen
Sie zum jeweils nächsten bzw. vorherigen Titel.
Das Display zeigt bei MP3-CDs den jeweils wiedergegebenen Ordner [F] und
Titel [T] -Nummer.
> Alternativ können Sie die Zierntasten drücken, um direkt zu einer
Titelnummer zu springen.
Befinden sich mehrere Order/Alben auf der MP3-CD, können Titel nur
nacheinander angewählt werden. Um einen Ordner gezielt zu wählen,
benutzen Sie die Tasten F+ und F-.
30
Page 31

12.5 Schneller Suchlauf
Sie können im laufenden Titel einen schnellen Suchlauf vorwärts oder rückwärts
durchführen, um eine bestimmte Stelle zu suchen.
> Halten Sie die Tasten Vorheriger Titel oder Nächster Titel
gedrückt, um einen schnellen Vor- bzw. Rücklauf innerhalb des Titels für die
Dauer des Gedrückthaltens durchzuführen.
12.6 Wiederholen Funktion
Sie können auswählen, ob Sie einen Titel, den ganzen Ordner/Album (nur bei MP3
CDs) oder alle Stücke der CD wiederholen möchten.
> Drücken Sie hierzu mehrmals die Taste Wiederholung .
Der angewählte Modus wird im Display angezeigt (Wiederholen 1x,
Wiederholen Album, Wiederholen Alles).
> Um die Funktion wieder Auszuschalten, drücken Sie die Taste Wiederholung
erneut, bis das Wiederholen-Icon im Display verschwindet.
12.7 Zufällige Wiedergabe
Mit dem Zufallsgenerator können Sie die Titel einer CD in einer beliebig gemischten
Reihenfolge abspielen.
> Drücken Sie bei laufender Wiedergabe die Taste SHUFFLE , im Display
erscheint das Shue-Icon
> Um die Funktion wieder Auszuschalten, drücken Sie die Taste SHUFFLE erneut.
DE
EN
12.8 Programmierfunktion
Mit der Programm-Funktion können Sie Titel (bis zu 20) einer Musik-CD einer MP3-CD
in einer von Ihnen festgelegten Reihenfolge abspielen.
Die Programmierung können Sie nur vornehmen, wenn eine Disc eingelegt ist
und wenn sich das Gerät im Stopp-Modus befindet.
> Drücken Sie die Taste PRESET auf der Fernbedienung.
> Im Display blinkt nun die Titelnummer (T). Links davon erscheint [P01]. P01 ist
der erste Programmplatz. Es können nun nacheinander beliebige Titel auf die
Programmplätze gelegt werden. Bei MP3 CDs können Sie den Ordner mit F+
und F- wechseln.
> Wählen Sie mit den Tasten Vorheriger Titel oder Nächster Titel
den ersten zu programmierenden Titel aus.
> Drücken Sie zum übernehmen des Titels die Taste ENTER.
> Anschließen ist der Programmplatz 2 aktiv (P02). Gehen Sie zum Speichern
eines Titel auf den Programmplatz 2 wie zuvor beschrieben vor. Auf diese
Weise belegen Sie alle Programmplätze mit beliebigen Titeln.
> Drücken Sie die Taste Wiedergabe/Pause , um die Programmierten Titel
abzuspielen.
31
FR
NL
Page 32

Drücken Sie Stopp, Wechseln Sie die Quelle oder wird die CD entfernt, wird
die Programmierung gelöscht.
12.9 CD Auswerfen
> Drücken Sie zum Auswerfen der CD die Taste EJECT.
Stoppen Sie stets vor der Entnahme der CD die Wiedergabe.
13 USB-Musikwiedergabe
Sie haben die Möglichkeit MP3-Audiodateien, die sich auf einem USB-Datenträger
befinden, über das DIGITRADIO 370/371 CD IR abzuspielen.
Zur Wiedergabe von einem USB-Datenträger, muss dieser an dem USB-
Anschluss (15) angeschlossen sein.
Das Gerät unterstützt nicht den Anschluss von USB-Medien (Hubs ...) über
USB-Verlängerungskabel.
Nicht zu direktem Anschluss an PCs geeignet!
Das Gerät unterstützt USB-Medien (USB 1.1, 2.0) bis 32 GB, die im FAT16
oder FAT32 Dateiformat formatiert sind. Die maximale Dateigröße einer
Mediendatei beträgt max. 4 GB.
> Wechseln Sie durch Drücken der Taste MODE in den USB-Modus.
> Im Display wird [USB] angezeigt.
Die Wiedergabe startet mit dem ersten Titel, des ersten Ordners automatisch.
Die Anzeige der Kategorisierung/Ordner ist abhängig von der Struktur auf
Ihrem USB-Medium. Achten Sie daher auf die Angaben im Display.
Die MP3/Audio-Dateien werden eingelesen und im Display in Form von
Gesamtanzahl der Titel [T] und Ordner/Alben [F] angezeigt. Warten Sie mit
der Bedienung, bis der Inhalt komple eingelesen wurde, um sicherzustellen,
dass alle benötigten Informationen vom Speichermedium gelesen wurden.
Wenn kein Speichermedium angeschlossen ist oder nicht gelesen werden
kann, erscheint die Anzeige [No USB] im Display.
Wenn keine Wiedergabe erfolgt, schaltet das DIGITRADIO 370/371 CD IR nach
15 Minuten in Standby.
13.1 USB Wiedergabe steuern
> Durch Drücken der Taste Wiedergabe/Pause können Sie die Wiedergabe
pausieren (im Display blinkt die Spielzeit), bzw. durch erneutes Drücken weiter
fortsetzen.
> Mit der Taste Stopp stoppen Sie die Wiedergabe. Im Display erscheint die
Gesamtzahl der Titel.
32
Page 33

13.2 Titel einstellen
> Mit Hilfe der Tasten Vorheriger Titel oder Nächster Titel springen
Sie zum jeweils nächsten bzw. vorherigen Titel.
Das Display zeigt den jeweils wiedergegebenen Ordner [F] und Titel [T]
-Nummer.
> Alternativ können Sie die Zierntasten drücken, um direkt zu einer
Titelnummer zu springen.
Befinden sich mehrere Order/Alben auf dem USB-Medium, können Titel
nur nacheinander angewählt werden. Um einen Ordner gezielt zu wählen,
benutzen Sie die Tasten F+ und F-.
13.3 Schneller Suchlauf
Sie können im laufenden Titel einen schnellen Suchlauf vorwärts oder rückwärts
durchführen, um eine bestimmte Stelle zu suchen.
> Halten Sie die Tasten Vorheriger Titel oder Nächster Titel
gedrückt, um einen schnellen Vor- bzw. Rücklauf innerhalb des Titels für die
Dauer des Gedrückthaltens durchzuführen.
13.4 Wiederholen Funktion
Sie können auswählen, ob Sie einen Titel, den ganzen Ordner/Album oder alle Stücke
wiederholen möchten.
> Drücken Sie hierzu mehrmals die Taste Wiederholung .
Der angewählte Modus wird im Display angezeigt (Wiederholen 1x,
Wiederholen Album, Wiederholen Alles).
> Um die Funktion wieder Auszuschalten, drücken Sie die Taste Wiederholung
erneut, bis das Wiederholen-Icon im Display verschwindet.
13.5 Zufällige Wiedergabe
Mit dem Zufallsgenerator können Sie die Titel in einer beliebig gemischten
Reihenfolge abspielen.
> Drücken Sie bei laufender Wiedergabe die Taste SHUFFLE , im Display
erscheint das Shue-Icon
> Um die Funktion wieder Auszuschalten, drücken Sie die Taste SHUFFLE erneut.
14 Audioeingang
Sie können den Ton eines externen Gerätes über den Lautsprecher des DIGITRADIO
370/371 CD IR wiedergeben.
> Verbinden Sie das externe Gerät mit dem AUDIO IN-Anschluss (17, 3,5mm
Stereo-Klinke) an der Rückseite
> Wählen Sie mit der Taste MODE den Audioeingang. Im Display wird [AUX-
Eingang] angezeigt.
DE
EN
FR
NL
33
Page 34

Die Steuerung und Wiedergabe erfolgt am externen Gerät. Stellen Sie die
Lautstärke nicht zu leise ein, um Störgeräusche zu vermeiden.
Im Betriebsfall AUX-Eingang bleibt das Gerät, auch im Fall dass die
angeschlossene Audioquelle kein Signal liefert, eingeschalten.
Die USB-Buchse am DIGITRADIO 370/371 CD IR kann zum Aufladen oder als
Stromversorgung externer Geräte genutzt werden. Der maximale Ladestrom
beträgt DC 5 V, 1 A.
15 Weitere Funktionen
15.1 Sleep-Timer
Durch den Sleep-Timer schaltet das DIGITRADIO 370/371 CD IR nach der eingestellten
Zeit automatisch in den Standby.
> Drücken Sie die Taste MENU und wählen Sie mit den Tasten / den
Eintrag [Hauptmenü] > [Sleep].
> Drücken Sie die Taste ENTER.
> Wählen Sie mit / einen Zeitraum, nach dem das DIGITRADIO 370/371
CD IR ausschalten soll. Sie haben die Wahl zwischen Aus, 15, 30, 45 und 60
Minuten.
> Drücken Sie zum Übernehmen der Einstellung die Taste ENTER.
Alternativ kann auch die Taste SLEEP (18) genutzt werden. Drücken Sie sie
mehrmals, um die Zeiten durchzuschalten.
Bei aktivem Sleeptimer erscheint im Display ein Mond-Symbol mit der noch
zur Verfügung stehenden Zeit.
15.2 Wecker
Der Wecker schaltet das DIGITRADIO 370/371 CD IR zur eingestellten Weckzeit ein.
Es können 2 Weckzeiten programmiert werden. Als Beispiel erfolgt die Beschreibung
der Programmierung von Wecker 1.
15.2.1 Wecker einrichten
> Drücken Sie die Taste Wecker 1/2 (17) auf der Fernbedienung.
Alternativ:
> Drücken Sie die Taste MENU und wählen Sie mit den Tasten / den
Eintrag [Hauptmenü] > [Wecker] und drücken Sie die Taste ENTER.
> Wählen Sie mit / einen Wecker, den Sie Einrichten möchten und drücken
Sie die Taste ENTER.
> Anschließend können die einzelnen Weckerparameter eingestellt werden.
34
Page 35

Wiederholung
> Sie können hier zwischen Aus (Wecker ausgeschaltet), Täglich (jeden Tag
in der Woche), Einmal, Werktage (Mo. - Fr.) oder Wochenende (Sa. u. So.)
wählen. Drücken Sie zum Übernehmen der Einstellung die Taste ENTER.
Uhrzeit
> Hier können Sie die Weckzeit und ggf. das Datum eingeben.
Wählen Sie zuerst mit den Tasten / die Stunden und drücken Sie zum
Übernehmen die Taste ENTER. Es folgt die Eingabe der Minuten. Übernehmen
Sie diese ebenfalls mit der Taste ENTER.
Wurde unter Wiederholung > [Einmal] gewählt, müssen Sie neben der
Uhrzeit auch das Datum eingeben.
Modus
> Anschließend erfolgt die Eingabe der Quelle. Es stehen SUMMER,
Internetradio, DAB, FM, CD oder USB zur Verfügung. Drücken Sie die Taste
ENTER zum Übernehmen der Einstellung.
Programm
Haben Sie Internetradio, DAB oder FM gewählt, können Sie anschließend
angeben, ob Sie mit dem zuletzt gehörten Sender geweckt werden wollen,
oder mit einem aus Ihrer Favoritenliste (falls Favoriten gespeichert wurden).
Drücken Sie die Taste ENTER zum Übernehmen der Einstellung.
Lautstärke
> Zuletzt können Sie die Weckton-Lautstärke mit den Tasten / festlegen.
Drücken Sie zum Übernehmen die Taste ENTER.
Speichern
Drücken Sie die Taste ENTER zum Speichern des Wecker.
DE
EN
FR
NL
Damit der Wecker ordnungsgemäß funktioniert, muss die Uhrzeit eingelesen
werden. Näheres hierzu unter Punkt 16.4.2.
Bei aktivem Wecker erscheint ein Wecker-Symbol im Display.
15.2.2 Wecker nach Alarm ausschalten
> Drücken Sie die Taste Ein/Standby auf der Fernbedienung oder am Gerät, um
den Wecker auszuschalten.
35
Page 36

16 Systemeinstellungen
Alle unter diesem Punkt erläuterten Einstellungen gelten für alle Quellen
gleichermaßen.
> Önen Sie das MENU und wählen Sie mit den Tasten / >
[Systemeinstellungen]. Drücken Sie die Taste ENTER, um die
Systemeinstellungen zu önen.
16.1 Equalizer
Mit dem Equalizer können Sie den Ton Ihren Wünschen entsprechend anpassen.
> Drücken Sie die Taste EQ (19) auf der Fernbedienung.
> Wählen Sie mit / eine Equalizer-Voreinstellung. Drücken Sie zum
Übernehmen der Auswahl die Taste ENTER.
Alternativ:
> Drücken Sie die Taste MENU und wählen Sie mit den Tasten / den
Eintrag [Systemeinstellungen] > [Equalizer].
> Drücken Sie die Taste ENTER.
16.2 Audiostream-Qualität
Hier kann die Internetradio Audiostream-Qualität voreingestellt werden. Einige
Internetradio-Sender bieten unterschiedliche Streams ihrer Sender an. Je nach
vorhandener Bandbreite der Internetverbindung kann es erforderlich sein, diese
Einstellungen anzupassen.
> Drücken Sie die Taste MENU und wählen Sie mit den Tasten / den
Eintrag [Systemeinstellungen] > [Audiostream-Qualität].
> Drücken Sie die Taste ENTER.
> Wählen Sie mit / eine Stream-Qualitätsstufe und drücken Sie zum
Übernehmen ENTER.
16.3 Interneteinstellungen
> Drücken Sie die Taste MENU und wählen Sie mit den Tasten / den
Eintrag [Systemeinstellungen] > [Interneteinstellungen].
> Drücken Sie die Taste ENTER.
16.3.1 Verbindung per WLAN
Zur Konfiguration der Netzwerkverbindung per WLAN haben Sie die Möglichkeit den
Netzwerkassistenten zu nutzen oder diese manuell vorzunehmen.
16.3.1.1 Konfiguration per Netzwerkassistent
> Wählen Sie [Netzwerkassistent], um diesen zu starten.
Der Netzwerkassistent sucht nun alle in Reichweite befindlichen WLAN-Netze
und zeigt Ihnen diese an.
36
Page 37

> Wählen Sie anschließend Ihr WLAN-Netz aus.
Nun können Sie wählen, ob Sie die WPS-Funktion nutzen oder Ihr WLAN-
Passwort manuell eingeben möchten.
> Wenn Sie die WPS-Funktion nutzen möchten, starten Sie diese zunächst
an Ihrem Router gemäß dessen Bedienungsanleitung und wählen Sie
anschließend im Netzwerkassistenten [WPS Taste drücken] aus.
Bie beachten Sie die Displayeinblendungen. Der Verbindungsvorgang ist im
Regelfall nach einigen Sekunden abgeschlossen und die WLAN-Verbindung
kann nun genutzt werden.
> Wenn Sie Ihr WLAN-Passwort manuell eingeben möchten oder Ihr Router die
WPS-Funktion nicht unterstützt, so wählen Sie [WPS überstpringen] aus.
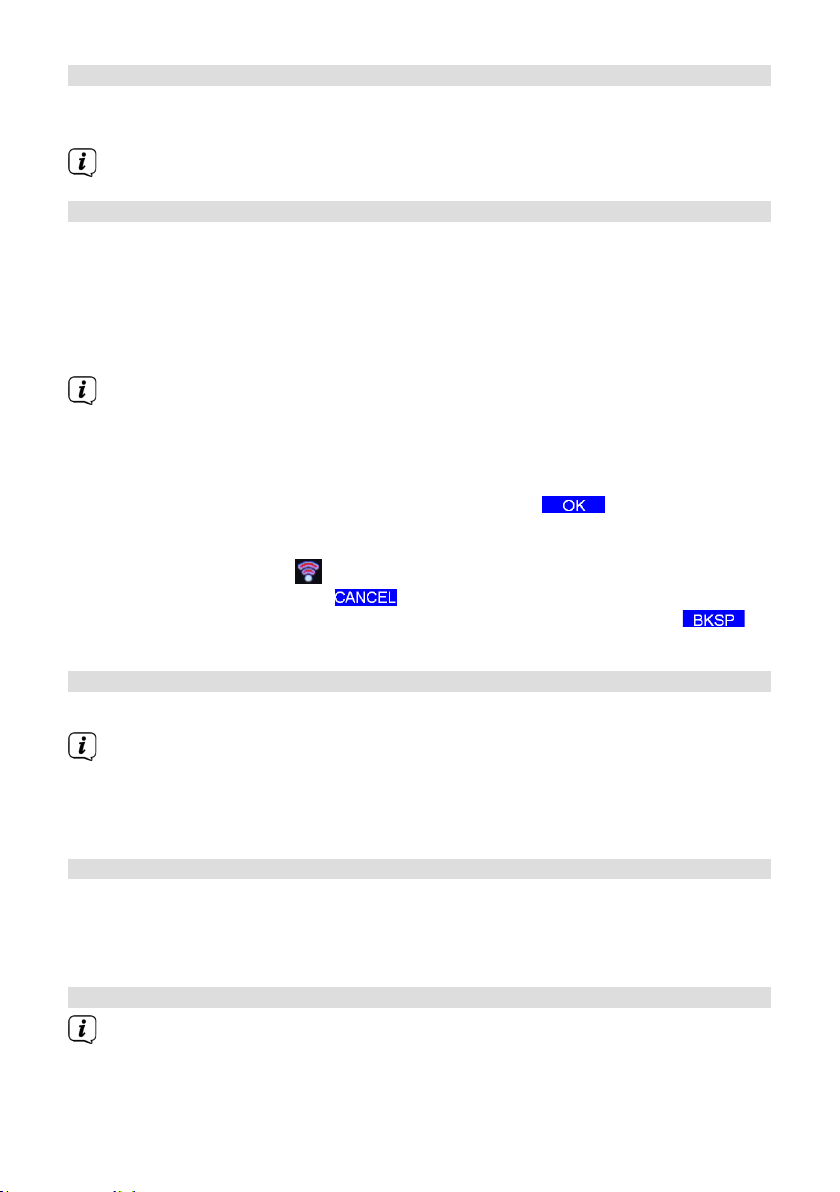
> Geben Sie das Passwort über die eingeblendete virtuelle Tastatur ein. Wählen
Sie anschließend und drücken Sie die Taste ENTER. War das Passwort
korrekt, wird nun eine Verbindung zu diesem Netzwerk hergestellt. Um die
Eingabe abzubrechen, wählen Sie und drücken Sie die Taste ENTER.
Haben Sie sich vertippt, können sie den zuletzt eingegebenen Buchstaben mit
löschen.
Während die virtuelle Tastatur im Display dargestellt wird, können Sie mit /
der Fernbedienung navigieren. Die Tasten / bewegen die Markierung
auf- und abwärts, die Tasten / bewegen die Markierung nach rechts und
links.
Das eingegebene Passwort wird nun überprü. Dieser Vorgang ist im Regelfall
nach einigen Sekunden abgeschlossen und die WLAN-Verbindung kann
dann genutzt werden. Ob eine Verbindung besteht, erkennen Sie an den
Signalbalken in der Statusleiste des Displays.
DE
EN
FR
NL
16.3.1.2 Konfiguration per WPS-Funktion
Hierdurch wird eine direkte Verbindung zum Router hergestellt. Eine Auswahl und/
oder Eingabe von WLAN-Netz (SSID) und Passwort ist nicht nötig.
> Starten Sie die WPS-Funktion an Ihrem Router gemäß dessen
Bedienungsanleitung.
> Wählen Sie anschließend [PBC WLAN Auau], um den Verbindungsvorgang
zu starten.
Bie beachten Sie die Displayeinblendungen. Der Verbindungsvorgang ist im
Regelfall nach einigen Sekunden abgeschlossen und die WLAN-Verbindung
kann nun genutzt werden. Alternativ kann auch die Funktion [PIN] genutzt
werden, wenn diese Funktion vom Router unterstützt wird.
16.3.1.3 Manuelle Konfiguration
> Wählen Sie [Manuelle Einstellungen] und anschließend [Drahtlos] um die
manuelle Konfiguration zu starten.
37
Page 38

> Wählen Sie nun aus, ob Sie die IP-Adresse, Gateway usw. von Ihrem Router
automatisch abrufen lassen (DHCP aktiv) oder diese manuell eingeben (DHCP
inaktiv) möchten.
Bie beachten Sie, dass das automatische Abrufen der IP-Adresse, Gateway,
Subnetzmaske nur funktioniert, wenn die DHCP-Funktion in Ihrem Router
aktiviert ist.
> Geben Sie nacheinander die IP-Adresse, Subnetzmaske, Gateway-Adresse,
Primärer DNS und ggf. Sekundärer DNS mit Hilfe der Pfeiltasten auf der
Fernbedienung ein. Bestätigen Sie jeden eingestellten Wert mit der Taste
ENTER.
> Geben Sie nun den Namen (SSID) Ihres WLAN-Netzes mit der virtuellen
Tastatur ein und bestätigen Sie durch Auswahl von OK.
> Wählen Sie aus, ob Ihr WLAN-Netz keine Verschlüsselung, per WEP oder per
WPA/WPA2 verschlüsselt ist und bestätigen Sie den nachfolgenden Punkt.
> Geben Sie abschließend nun noch mit der virtuellen Tastatur Ihr WLAN-
Passwort ein und bestätigen Sie durch Auswahl von OK, um den
Verbindungsvorgang zu starten.
Im Regelfall kann nach einigen Sekunden die WLAN-Verbindung genutzt
werden.
16.3.2 Einstellungen anzeigen
> Wählen Sie [Einstellungen anzeigen] aus, um sich die aktuellen
Netzwerkeinstellungen anzeigen zu lassen.
16.3.3 TechniSat Connect PIN
Sie können das DIGITRADIO 370/371 CD IR mit der TechniSat CONNECT App steuern.
Hierzu muss in der App die PIN des DIGITRADIO 370/371 CD IR eingetragen werden.
Die PIN können Sie hier wie folgt ändern.
> Geben Sie unter [NetRemote PIN] eine 4 stellige PIN ein und wählen OK zum
Speichern.
16.3.4 Netzwerkprofil löschen
Verwenden Sie die Menüpunkte [Alle inaktive Netzwerke löschen ] oder [Alle
Netzwerkverbindungen löschen] um alle bestehende Verbindung zu einem WLAN-
Netzwerk oder allen konfigurierten Netzwerken zu löschen und die vorgenommenen
Einstellungen zu löschen. Wenn Sie das Gerät erneut mit diesen Netzwerken
verbinden möchten, müssen Sie alle Einstellungen erneut vornehmen.
38
Page 39

16.3.5 WLAN-Verbindung in Standby
> Wählen Sie unter [WLAN Verbindung im Standby] aus, ob auch im Standby-
Betrieb die WLAN-Verbindung aufrecht erhalten bleiben soll (JA) oder nicht
(NEIN).
Beachten Sie, für den uneingeschränkten und reibungslosen Betrieb und
Bedienung per TechniSat CONNECT-App, muss diese Funktion eingeschaltet
bleiben.
Die TechniSat CONNECT-App kann in den App-Stores Ihres Smartphones
heruntergeladen werden.
16.4 Uhrzeit- und Datumseinstellungen
16.4.1 Zeit/Datum manuell einstellen
Je nach Einstellung der Zeitaktualisierung (Punkt 16.4.2), müssen Sie Uhrzeit und das
Datum manuell einstellen.
> Drücken Sie die Taste MENU und wählen Sie mit den Tasten / den
Eintrag [Systemeinstellungen] > [Zeit und Datum].
> Drücken Sie die Taste ENTER.
> Wählen Sie mit den Tasten / Eintrag [Zeit/Datumseinstellung] und
drücken Sie ENTER.
> Die ersten Ziern (Tag) des Datums blinken und können mit den Tasten /
abgeändert werden.
> Drücken Sie zum Übernehmen der Einstellung ENTER.
> Anschließend blinken die nächsten Ziern (Monat) des Datums und können
ebenfalls wie zuvor beschrieben abgeändert werden.
> Drücken Sie nach jeder weiteren Einstellung die Taste ENTER, um zur nächsten
Einstellung zu springen.
> Verfahren Sie bei der Uhrzeit wie zuvor beschrieben.
> Nachdem alle Einstellungen vorgenommen wurden und letztmalig ENTER
gedrückt wurde, erscheint [Uhrzeit Gespeichert] im Display.
DE
EN
FR
NL
16.4.2 Aktualisierung
Hier können Sie festlegen, ob die Zeitaktualisierung automatisch über Internet, DAB+
oder FM (UKW) erfolgen soll oder ob Sie sie manuell eingeben möchten (Punkt
16.4.1).
> Drücken Sie die Taste MENU und wählen Sie mit den Tasten / den
Eintrag [Systemeinstellungen] > [Zeit und Datum] > [Aktualisierung] und
drücken Sie ENTER.
> Wählen Sie mit den Tasten / folgende Optionen:
[Aktualisieren von DAB] (Aktualisierung nur über DAB+)
[Aktualisieren von FM] (Aktualisierung nur über UKW)
39
Page 40

[Aktualisieren von NET] (Aktualisierung nur über Internetradio)
[Keine Aktualisierung] (Uhrzeit/Datum muss manuell eingegeben werden,
siehe Punkt 16.4.1).
> Drücken Sie zum Speichern der Einstellung die Taste ENTER.
Haben Sie [Aktualisieren von NET] gewählt, müssen Sie auch die Zeitzone
und die Sommer/Winterzeiteinstellung konfigurieren. Dies geschieht unter
[Systemeinstellungen] > [Zeit und Datum] > [Zeitzone einstellen] und
[Systemeinstellungen] > [Zeit und Datum] > [Sommerzeit?].
16.4.3 Uhrzeitformat einstellen
Unter Zeitformat können Sie das 12 oder 24 Stunden Format aktivieren.
> Drücken Sie die Taste MENU und wählen Sie mit den Tasten / den Eintrag
[Systemeinstellungen] > [Zeit und Datum] > [Zeitformat] und drücken Sie
ENTER.
> Wählen Sie mit / eine der folgenden Optionen:
[24 Stunden]
[12 Stunden]
> Drücken Sie zum Speichern die Taste ENTER.
16.4.4 Standby Uhr
Hier kann die Optik der Uhrzeitanzeige im Standby-Modus konfiguriert werden. Sie
haben die Wahl zwischen der Analogen anzeige oder der Digitalen Anzeige.
> Drücken Sie die Taste MENU und wählen Sie mit den Tasten / den Eintrag
[Systemeinstellungen] > [Zeit und Datum] > [Standby Uhr] und drücken Sie
ENTER.
> Wählen Sie mit / eine der Optionen.
> Drücken Sie zum Speichern die Taste ENTER.
16.5 Auto-Standby
Das DIGITRADIO 370/371 CD IR kann nach einer festgelegten Zeit, in der es nicht
bedient wurde, automatisch in den Standby-Modus wechseln.
> Drücken Sie die Taste MENU und wählen Sie mit den Tasten / den
Eintrag [Systemeinstellungen] > [Auto-Standby] und drücken Sie ENTER.
> Wählen Sie mit / eine Zeit, nach der das Gerät in den Standby schalten
soll.
> Drücken Sie zum Speichern die Taste ENTER.
In den Modi Bluetooth, CD, AUX, und USB wird das Gerät, wenn keine
Wiedergabe staindet, automatisch nach ca. 15 Minuten in den Standby-
Modus geschaltet.
40
Page 41

16.6 Sprache
> Drücken Sie die Taste MENU und wählen Sie mit den Tasten / den
Eintrag [Systemeinstellungen] > [Sprache] und drücken Sie ENTER.
> Wählen Sie mit / eine der zur Verfügung stehenden Sprachen und
bestätigen Sie die Auswahl durch Drücken der Taste ENTER.
16.7 Werkseinstellung
Wenn Sie den Standort des Gerätes verändern, z. B. bei einem Umzug, sind
möglicherweise die gespeicherten Sender nicht mehr zu empfangen. Mit dem
Zurücksetzen auf Werkseinstellungen können Sie in diesem Fall alle gespeicherten
Sender löschen, um anschließend einen neuen Sendersuchlauf zu starten.
> Drücken Sie die Taste MENU und wählen Sie mit den Tasten / den
Eintrag [Systemeinstellungen] > [Werkseinstellung] und drücken Sie ENTER.
> Wählen Sie mit / zum Ausführen der Werkseinstellung den Eintrag [Ja]
und drücken Sie ENTER.
Alle zuvor gespeicherten Sender und Einstellungen werden gelöscht. Das
Gerät befindet sich nun im Auslieferungszustand.
> Im Display erscheint [Neustart...].
Nach erfolgreicher Zurücksetzung auf die Werkseinstellungen befindet sich
das Gerät im Standby. Anschließend müssen Sie erneut den Erstinstallations-
Assistenten durchlaufen.
16.8 Sowareupdate
Der Punkt Sowareupdate dient der Aktualisierung der Gerätesoware.
> Drücken Sie die Taste MENU und wählen Sie mit den Tasten / den
Eintrag [Systemeinstellungen] > [Sowareupdate] und drücken Sie ENTER.
Auto-Update
> Aktivieren Sie diese Funktion, damit das DIGITRADIO 370/371 CD IR
automatisch im Betrieb nach neuen Sowareversionen sucht. Wird eine neue
Soware gefunden, erhalten Sie einen Hinweis auf dem Display. Beachten Sie
die Hinweise auf dem Bildschirm und schalten Sie das Gerät während dem
Sowareupdate nicht aus.
Jetzt prüfen
> Wählen Sie [Jetzt prüfen], um sofort eine neue Soware-Version über das
Internet zu suchen. Beachten Sie die Hinweise auf dem Bildschirm und
schalten Sie das Gerät während dem Sowareupdate nicht aus.
16.9 Einrichtungsassistent
Hier kann der Ersteinrichtungsassistent erneut aufgerufen werden. Näheres hierzu
unter Punkt „6 Ersteinrichtung“ auf Seite 20.
DE
EN
FR
NL
41
Page 42

16.10 Soware-Version
Unter Info können Sie die aktuell installierte SW-Version abfragen.
> Drücken Sie die Taste MENU und wählen Sie mit den Tasten / den
Eintrag [Systemeinstellungen] > [Info] und drücken Sie ENTER.
> Es wird die aktuelle SW-Version angezeigt.
16.11 Datenschutz
Unter diesem Punkt finden Sie Datenschutzinformationen.
16.12 Beleuchtung
Sie können die Displayhelligkeit sowohl für den Betrieb als auch für Standby
einstellen. Außerdem stehen verschiednen Farbschemas zur Verfügung.
> Drücken Sie die Taste MENU und wählen Sie mit den Tasten / den
Eintrag [Systemeinstellungen] > [Beleuchtung] und drücken Sie ENTER.
[Betrieb] regelt die Helligkeit im normalen, eingeschalteten Zustand. Sie
können hier zwischen den Helligkeitsstufen [Hoch], [Miel] und [Niedrig]
wählen. Wählen Sie mit / eine Helligkeitsstufe und drücken Sie zum
Speichern ENTER.
[Standby] regelt die Helligkeit im Standby-Modus. Sie können hier zwischen
den Helligkeitsstufen [Miel] und [Niedrig] wählen. Wählen Sie mit dem /
eine Helligkeitsstufe und drücken Sie zum Speichern ENTER.
[Auto-Dimm] dimmt das Display automatisch nach der eingestellten Zeit ohne
Bedienung des Radios, auf den Helligkeitswert Niedrig.
Wird die Option [Aus] gewählt, leuchtet das Display mit der unter der
Funktion [Betrieb] gewählten Helligkeit dauerha. Drücken Sie zum Speichern
einer Einstellung ENTER.
17 Reinigen
Um die Gefahr eines elektrischen Schlags zu vermeiden, dürfen Sie das Gerät
nicht mit einem nassen Tuch oder unter fließendem Wasser reinigen. Vor der
Reinigung den Netzstecker ziehen und Gerät ausschalten!
Sie dürfen keine Scheuerschwämme, Scheuerpulver und Lösungsmiel wie
Alkohol oder Benzin verwenden.
Keine der folgenden Substanzen verwenden: Salzwasser,
Insektenvernichtungsmiel, chlor- oder säurehaltige Lösungsmiel (Salmiak).
Reinigen Sie das Gehäuse mit einem weichen, mit Wasser angefeuchteten
Tuch. Kein Spiritus, Verdünnungen usw. verwenden; sie könnten die Oberfläche
des Gerätes beschädigen.
42
Page 43

Das Display nur mit einem weichen Baumwolltuch reinigen. Baumwolltuch
gegebenenfalls mit geringen Mengen nicht-alkalischer, verdünnter Seifenlauge
auf Wasser- oder Alkoholbasis verwenden.
Mit dem Baumwolltuch san über die Oberfläche reiben.
18 Fehler beseitigen
Wenn das Gerät nicht wie vorgesehen funktioniert, überprüfen Sie es anhand der
folgenden Tabelle.
Symptom Mögliche Ursache/Abhilfe
Gerät lässt sich nicht einschalten. Das Gerät wird nicht mit Strom versorgt.
Es ist kein Ton zu hören. Erhöhen Sie die Lautstärke.
Das Display schaltet sich nicht ein. Gerät vom Stromnetz trennen und Gerät
wieder mit Strom versorgen.
Empfang über DAB+/FM ist
schlecht.
Gerät lässt sich nicht bedienen. Gerät vom Stromnetz trennen und Gerät
Schlechte Bluetooth-Verbindung
und Aussetzer
Ziehen Sie die Antenne ganz aus. Ändern Sie
die Position der Antenne oder des DIGITRADIO
370/371 CD IR.
wieder mit Strom versorgen.
Die maximale Reichweite über Bluetooth von
10m nicht überschreiten.
DE
EN
Kein Ton vom externen Eingang
(AUX).
Gerät schaltet selbstständig in
Standby
Es ist ein Störgeräusch zu hören. In der Nähe des Gerätes sendet ein
Es treten andere
Bedienungsstörungen, laute
Geräusche oder eine gestörte
Display-Anzeige auf.
Ist das externe Gerät korrekt Verbunden?
Ist AUX als Eingangsquelle angewählt?.
Wurde die Wiedergabe am externen
Gerät gestartet und wurde die
Ausgangslautstärke eingestellt?
Die Auto-Standby-Funktion schaltet das Gerät
selbstständig nach ca. 15 Minuten in Standby,
wenn keine Wiedergabe in den Modi DAB, CD,
Bluetooth und USB staindet.
Mobiltelefon oder ein anderes Gerät
störende Radiowellen aus. Entfernen
Sie das Mobiltelefon oder das Gerät
aus der Umgebung des Gerätes.
Elektronische Bauteile des Gerätes
sind gestört. Ziehen Sie den
Netzstecker. Lassen Sie das Gerät ca.
10 Sek. von der Stromquelle getrennt.
Schließen Sie das Gerät erneut an.
FR
NL
43
Page 44

Symptom Mögliche Ursache/Abhilfe
CD oder MP3-CD wird nicht
erkannt oder Musikwiedergabe
Reinigen Sie vorsichtig die Unterseite der CD.
Benutzen Sie eine andere CD.
„Springt“.
Wenn Sie die Störung auch nach den beschriebenen Überprüfungen nicht beheben
können, nehmen Sie bie Kontakt mit der technischen Hotline auf.
19 Technische Daten / Herstellerhinweise
Technische Änderungen und Irrtümer vorbehalten.
Empfangswege DAB/DAB+, Internetradio, FM,
Bluetooth, AUX, USB, CD
Stromversorgung AC Input: 100-240 V, 50/60 Hz
DC output (USB-Buchse): 5 V, 1 A
Frequenzen UKW: 87,5 - 108 MHz
DAB/DAB+: 174 - 240 MHz
Bluetooth: 2,402 - 2,480 GHz
Sendeleistung: 2 dBm ERIP
WLAN: 2,471 - 2,472 Mhz
Sendeleistung: 19 dBm ERIP
Bluetooth-Version V4.2
Display TFT-Color Display
Stromverbrauch im Betrieb max.: 28 W
Standby: < 1 W (ohne WLAN-
Verbindung)
< 2 W (mit WLAN-Verbindung)
Verbrauchsminimierung (automatisches
Abschalten nach 15 Minuten in Standby)
Wenn keine Wiedergabe:
DAB, Bluetooth, CD, USB.
AUX nach 4 Stunden.
Audio Ausgangsleistung 2x5 W RMS
Umgebungsbedingung Betrieb: 0 ~ 35 °C
Gewicht (kg) ~2,73
Abmessungen (BxHxT) cm 35,1 x 12,3 x 21,2
44
Page 45

Instruction Manual
DIGITRADIO 370 CD IR
DIGITRADIO 371 CD IR
Page 46

1 Illustrations
1.1 Front view
1.2 Rear view
46
Page 47

1 MODE Select source/Switch mode
2 On/Standby
3 Colour display
4 Infrared receiver
5 Eject CD eject buon
6 Stop/MENU Stop playing/Access main menu (hold down)
7 Stereo speaker
8 Play/Pause/INFO
9 Volume loud/quiet
10 CD tray
11 TUNING/ENTER control knob
12 PRESET Favourites slots
13 Power cable
14 Telescopic antenna
15 USB port 5 V, 1 A
16 Headphone connection 3.5 mm jack
17 AUX IN 3.5 mm jack
1.3 Remote control
1 CD eject buon
2 Playback / pause
3 Previous track/Scan
4 Repeat
5 Random play
6 INFO
7 BACK (Back/Cancel)
8 Mode (switch source)
9 ENTER (Confirm)
10 Volume 11 MENU
12 Numeric keys/
One-touch buons
13 MUTE
14 On/Standby
15 Next track/Scan
16 Stop
17 Alarm 1/2
18 Sleep timer
19 Equaliser/EQ
20 SCAN
21 F+ (folder selection in CD mode)
22 Channel +/
*Not functional on this device.
23 Volume +
24 Channel -/
25 F- (folder selection in CD mode)
26 PRESET (FAV memory)
DE
EN
FR
NL
47
Page 48

2 Contents
1 Illustrations ...............................................................................................................46
1.1 Front view .................................................................................................................................... 46
1.2 Rear view ..................................................................................................................................... 46
1.3 Remote control ..........................................................................................................................47
2 Contents .....................................................................................................................48
3 Safety instructions .................................................................................................. 51
3.1 Preface ............................................................................................................................................51
3.2 Signs and symbols used .........................................................................................................51
3.3 Intended use ...............................................................................................................................52
3.4 Using the product safely .......................................................................................................52
3.4.1 Legal notices ...............................................................................................................................54
3.4.2 Service instructions ..................................................................................................................55
4 Description of the DIGITRADIO 370/371 CD IR ............................................... 56
4.1 Scope of delivery .......................................................................................................................56
4.2 Special features of the DIGITRADIO 370/371 CD IR ..................................................56
4.3 Preparing the DIGITRADIO 370/371 CD IR for use ....................................................56
4.3.1 Aligning the telescopic antenna ........................................................................................56
4.3.2 Connecting to the mains .......................................................................................................56
4.3.3 Inserting the baeries into the remote control ..........................................................57
4.3.4 Using headphones ...................................................................................................................58
4.4 General device functions .......................................................................................................58
4.4.1 Switching on the device ........................................................................................................58
4.4.2 Switching o the device ........................................................................................................58
4.4.3 Source selection.........................................................................................................................59
4.4.4 Adjusting the volume ............................................................................................................. 60
4.4.5 Display ........................................................................................................................................... 60
5 Menu operation ....................................................................................................... 61
6 Initial set-up..............................................................................................................62
7 DAB+ (digital radio) function ............................................................................... 63
7.1 What is DAB+? ..........................................................................................................................63
7.2 DAB+ (digital radio) reception ............................................................................................63
7.2.1 Performing a complete scan ..............................................................................................63
7.2.2 Selecting stations ......................................................................................................................63
7.2.3 Saving DAB+ stations to a memory slot ....................................................................... 64
7.2.4 Retrieving DAB+ stations from a memory slot .......................................................... 64
7.2.5 Overwriting/deleting a station memory slot ............................................................... 64
7.2.6 Signal strength .......................................................................................................................... 64
7.2.7 Manual seing ............................................................................................................................65
7.2.8 Volume adjustment (DRC) ....................................................................................................65
7.2.9 Deleting inactive stations ......................................................................................................65
8 FM mode .................................................................................................................... 66
8.1 Switching on FM radio mode ............................................................................................. 66
48
Page 49

8.2 FM reception with RDS information ................................................................................ 66
8.3 Automatic station scan ......................................................................................................... 66
8.4 Manual station scan ................................................................................................................ 66
8.5 Scan seing ................................................................................................................................ 66
8.6 Audio seings ............................................................................................................................. 67
8.7 Saving FM stations to a memory slot ..............................................................................67
8.8 Retrieving FM stations from a memory slot ................................................................. 67
8.9 Overwriting/deleting a station memory slot ................................................................68
9 Internet radio ...........................................................................................................68
9.1 Station list .....................................................................................................................................68
9.2 Last listened to ...........................................................................................................................68
9.3 Adding favourites ......................................................................................................................68
9.4 Retrieving favourites ................................................................................................................69
10 Podcasts ....................................................................................................................69
11 Bluetooth ...................................................................................................................69
11.1 Switching on Bluetooth mode ............................................................................................69
11.2 Pairing an external device ....................................................................................................70
11.3 Cancel pairing .............................................................................................................................70
12 CD player ....................................................................................................................71
12.1 General information on CDs/MP3 CDs .............................................................................71
12.2 The discs you can use ..............................................................................................................71
12.3 Playing CDs .................................................................................................................................. 72
12.4 Seing the track ........................................................................................................................ 72
12.5 Quick search ................................................................................................................................ 73
12.6 Repeat function ......................................................................................................................... 73
12.7 Random playback ..................................................................................................................... 73
12.8 Programming function ........................................................................................................... 73
12.9 Ejecting the CD ........................................................................................................................... 74
DE
EN
FR
NL
13 Playing music from a USB device ....................................................................... 74
13.1 Controlling USB playback ...................................................................................................... 74
13.2 Seing the track ........................................................................................................................ 75
13.3 Quick search ................................................................................................................................75
13.4 Repeat function ......................................................................................................................... 75
13.5 Random playback ..................................................................................................................... 75
14 Audio input ............................................................................................................... 75
15 Other functions ........................................................................................................ 76
15.1 Sleep timer ................................................................................................................................... 76
15.2 Alarm ..............................................................................................................................................76
15.2.1 Seing the alarm .......................................................................................................................76
15.2.2 Switching o the alarm aer being woken up ........................................................... 77
16 System seings ........................................................................................................ 78
16.1 Equaliser ........................................................................................................................................ 78
49
Page 50

16.2 Audio stream quality ...............................................................................................................78
16.3 Internet seings .........................................................................................................................78
16.3.1 Connection via WLAN ............................................................................................................. 78
16.3.2 Display seings ......................................................................................................................... 80
16.3.3 TechniSat Connect PIN .......................................................................................................... 80
16.3.4 Deleting network profile ....................................................................................................... 80
16.3.5 WLAN connection on standby ............................................................................................ 81
16.4 Time and date seings ........................................................................................................... 81
16.4.1 Manually seing the date/time .......................................................................................... 81
16.4.2 Updating ....................................................................................................................................... 81
16.4.3 Seing the time format ..........................................................................................................82
16.4.4 Standby clock ..............................................................................................................................82
16.5 Auto Standby ..............................................................................................................................82
16.6 Language ...................................................................................................................................... 83
16.7 Factory seings .......................................................................................................................... 83
16.8 Soware update ........................................................................................................................83
16.9 Set-up wizard ..............................................................................................................................83
16.10 Soware version ....................................................................................................................... 84
16.11 Data protection ......................................................................................................................... 84
16.12 Brightness ................................................................................................................................... 84
17 Cleaning .....................................................................................................................84
18 Troubleshooting ......................................................................................................85
19 Technical specifications / manufacturer's instructions ................................86
50
Page 51

3 Safety instructions
3.1 Preface
Dear Customer,
Thank you for choosing a TechniSat digital radio.
This instruction manual is intended to help you get to know the extensive functions
that your new unit oers and to make the best use of them. It will help you to use
the product as intended and safely. It is intended for anyone installing, operating,
cleaning or disposing of the unit.
Store the instruction manual in a safe place for later use.
A current version of the instruction manual can be found in the download area for
your product on the TechniSat website at www.technisat.de.
We hope you enjoy your
TechniSat digital radio!
The TechniSat Team
3.2 Signs and symbols used
In this instruction manual:
Indicates a safety instruction which can lead to serious injuries or death if not
observed. Note the following signal words:
DANGER - Serious / fatal injury
WARNING - Serious injury, possibly fatal
CAUTION - Injury
This identifies information that must always be observed to prevent defects,
data loss/misuse and undesired operation. It also describes additional
functions of your unit.
Beware of electrical voltage. Follow all safety instructions to avoid electric
shock. Do not open the device under any circumstances.
On the unit:
Indoor use - Devices with this symbol are only suitable for indoor use.
DE
EN
FR
NL
51
Page 52

Protection class II - Electrical devices of protection class II are electrical devices
with continuous double and/or reinforced insulation and no connection
options for a protective conductor. The casing of an electrical device of
protection class II, which is enclosed in an insulating material, can form part or
all of the additional or reinforced insulation.
Your device bears the CE symbol and complies with all requisite EU standards.
Electronic devices do not belong in the household waste and must be
disposed of properly in accordance with Directive 2002/96/EC of the
European Parliament and of the Council dated January 27, 2003 concerning
waste electrical and electronic equipment. Please return this unit to the
designated public collection point for disposal at the end of its service life.
3.3 Intended use
The DIGITRADIO 370/371 CD IR is designed to receive DAB+/FM/Internet radio
broadcasts. You can also use it to play digital audio and MP3 CDs.
The device has been designed for private use and not for commercial purposes.
3.4 Using the product safely
Please take note of the following information to minimise safety risks, to prevent
damage to the device, and to make a contribution to environmental protection.
Please read all of the safety information carefully and keep it for future reference.
Always follow all warnings and instructions in this instruction manual and on the back
of the device.
WARNING!
Never open the device!
Touching live parts can be fatal!
WARNING!
Risk of suocation! Keep packaging and parts thereof away from children. Risk
of suocation from films and other packaging materials.
Observe all of the following instructions for the intended use of the device and
to prevent damage to the device and injury to persons.
- Do not repair the device yourself. Repairs should only be carried out by trained
experts. Contact our customer service department.
52
Page 53

- The device should only be operated under the intended environmental
conditions.
- Do not expose the device to dripping or splashing water. If water has
penetrated the device, switch it o and inform the Service department.
- Do not expose the device to heat sources which could heat it up more than
normal use will.
- If you detect a device defect, odour or smoke, a major malfunction, or damage
to the housing, inform the Service department immediately.
- The device must only be operated using the prescribed mains voltage. Never
try to operate the device at any another voltage.
- If the device shows signs of damage, it must not be put into operation.
- Do not put the device into operation in the vicinity of bath tubs, showers,
swimming pools or running/splashing water. There is a risk of electric shock
and/or device defects.
- Foreign bodies, e.g. nails, coins, etc., must not be allowed to fall inside the
device. Do not touch the connection contacts with metal objects or your
fingers. This could lead to short-circuits.
- This device is not intended to be used by people (including children) with
limited physical, sensoryormentalcapacities or lackof experienceand/or
knowledge,unless they are supervised by a person responsible for their safety
or they are instructed by them as to how to use the device.
- Modifications to the device are prohibited.
- The CD player uses an invisible laser beam. If used incorrectly, this can injure
your eyes. Never look directly into the open CD compartment.
DE
EN
FR
NL
• This devices has been classified as a CLASS 1 LASER.
53
Page 54

3.4.1 Legal notices
TechniSat herewith declares that the radio system model DIGITRADIO 370/371
CD IR corresponds with Directive 2014/53/EU. The complete text of the EU
Declaration of Conformity is available at the following web address:
DIGITRADIO 370 CD IR: hp://konf.tsat.de/?ID=22628
DIGITRADIO 371 CD IR: hp://konf.tsat.de/?ID=22630
TechniSat accepts no liability for product damage as a result of external
influences, wear or improper handling, unauthorised repairs, modifications or
accidents.
Changes and printingerrors reserved. Version 06/20. Copying and
reproduction are subject to the publisher's consent. The respective current
version of the instructions can be downloaded in pdf format from the
download area of the TechniSat Homepage at www.technisat.de.
TechniSat and DIGITRADIO 370/371 CD IR are registered trademarks of:
TechniSat Digital GmbH
TechniPark
Julius-Saxler-Strasse 3
D-54550 Daun/Eifel, Germany
www.technisat.de
The names of the companies, institutions or makes referred to are trademarks or
registered trademarks of the respective owners.
The device may only be operated in enclosed rooms in the 5 GHz WLAN
range in the countries listed below.
BE CY FI FR HU LV LI
LU NL ES SE UK CH DE
54
Page 55

3.4.2 Service instructions
This product is quality-tested and provided with the legally-specified warranty
period of 24 months from the date of purchase. Please keep your receipt as
proof of purchase. In the event of warranty claims, please contact the product
dealer.
Should you experience a problem with this unit, or for queries and
information, our Technical Hotline is available:
Mon. - Fri. 8:00 am - 6:00 pm on:
+49 (0) 3925 9220 1800.
Repairs can also be ordered directly online at www.technisat.de/reparatur.
If the device needs to be returned, please use the following address only:
TechniSat Digital GmbH
Service-Center
Nordstr. 4a
39418 Stassfurt, Germany
DE
EN
FR
55
NL
Page 56

4 Description of the DIGITRADIO 370/371 CD IR
4.1 Scope of delivery
Before start-up, please check whether everything has been delivered:
1 x DIGITRADIO 370/371 CD IR
1 x remote control
1 x baeries for the remote control
1 x instruction manual
4.2 Special features of the DIGITRADIO 370/371 CD IR
The DIGITRADIO 370/371 CD IR is comprised of a DAB+/FM/Internet radio receiver
with the following functions:
- You can store up to 20 DAB+/FM/Internet radio stations.
- The radio receives on the FM 87.5–108 MHz (analogue) frequencies and
DAB+ band III 174.9–239.2 MHz (digital antenna).
- Internet radio
- Bluetooth music streaming
- The device has a time and date display.
- MP3 music playback via USB stick or MP3 CD.
- Colour display
4.3 Preparing the DIGITRADIO 370/371 CD IR for use
4.3.1 Aligning the telescopic antenna
The number and quality of the stations to be received depend on the reception
conditions at the installation location. Excellent reception can be achieved using the
telescopic antenna.
> Align the telescopic antenna and extend it.
The exact alignment of the telescopic antenna is oen important, in particular
at the outskirts of the DAB+ reception area. On the Internet you can quickly
find the location of the nearest transmission tower by visiting www.dabplus.
de.
Start the first scan at a window pointing in the direction of the transmission
mast. If the weather conditions are poor, DAB+ reception may be limited.
Do not touch the telescopic antenna during station playback. This could
reduce the reception and lead to sound dropouts.
4.3.2 Connecting to the mains
WARNING!
Do not touch the mains plug with wet hands; electric shock hazard!
WARNING!
Route the mains cable in such a way that nobody can trip over it.
56
Page 57

> Insert the DIGITRADIO 370/371 CD IR mains plug into a mains socket (AC 100 -
240 V ~, 50/60 Hz)
> Ensure that the operating voltage of the power adapter matches the mains
voltage before you insert it into the wall socket.
When the device is not being used, remove the plug from the socket. Pull the
plug and not on the cable. Remove the plug before a storm starts. Remove
the plug if the device is not going to be used for a prolonged period, e.g.
before going away on a long trip. The heat generated during operation must
be dissipated by adequate air circulation. Therefore the device must not be
covered or installed in a closed cabinet. Ensure there is a free space of at least
10 cm around the device.
4.3.3 Inserting the baeries into the remote control
> Open the baery compartment on the back of the remote control by pushing
it in the direction of the arrow.
> Insert the baeries (2 x AAA 1.5 V) in accordance with the polarity indicated in
the baery compartment.
DE
EN
FR
> Close the baery compartment lid carefully againto ensure that the lid
retaining tabs engage in the housing.
To operate the remote control, you will need an alkaline baery (type Micro,
1.5 V, LR03/AAA). Ensure that the polarity is correct when inserting.
Change a baery that is losing power promptly.
Leaking baeries can cause damage to the remote control.
If the device is not to be used over a prolonged period, remove the baery
from the remote control.
Important information concerning disposal: baeries can contain toxic
substances which harm the environment. Therefore, it is imperative to dispose
of the baeries according to the legal provisions in force. Never dispose of
baeries in normal household waste.
NL
57
Page 58

4.3.4 Using headphones
Hearing impairment!
Do not listen to the radio at a high volume with headphones. Doing so can cause
permanent hearing impairment. Turn down the radio volume to the lowest volume
before using headphones.
Only use headphones with a 3.5 mm stereo jack plug.
> Insert the headphone plug into the headphone jack (16) on the device.
Sound will now only be heard via the headphones, the speaker is switched to
mute.
> If you would like to use the speakers again, unplug the headphones from the
headphone jack on the radio.
4.4 General device functions
4.4.1 Switching on the device
> In order to guarantee good DAB+/FM reception, please fully extend the
telescopic antenna (14) located on the back of the device. To do so, please
refer to Section 4.3.1.
> First prepare the DIGITRADIO 370/371 CD IR for operation as described in
Sections4.3.1 and 4.3.3.
> Press the On/Standby buon on the device (2) or the remote control (14)
to switch on the DIGITRADIO 370/371 CD IR.
Aer switching on the device for the first time, you must first configure the
operating language and the initial installation wizard.
4.4.2 Switching o the device
> By briefly pressing the On/Standby buon you can switch the device to
standby mode. [Standby] appears briefly on the display. The date and time
are shown on the display. The display brightness in standby mode can be
adjusted by following the instructions in Section 16.12.
58
Page 59

4.4.3 Source selection
> You can use the MODE buon (1) on the device or (8) on the remote control
to switch between the sources: DAB+ (Digital Radio), FM, Internet radio/
podcasts, Bluetooth, CD, AUX and USB playback.
Alternatively:
> Press the MENU buon to open the menu. Then use / > Main Menu to
make a selection and press ENTER. Select the source using the TUNING/
ENTER control knob (11) on the device or using / (22, 24) on the
remote control. Then press ENTER (9).
The modes are displayed using a symbol.
DAB+
FM
Internet radio
Podcast
DE
EN
Bluetooth
AUX analogue
CD player
USB playback
FR
NL
59
Page 60

4.4.4 Adjusting the volume
> Adjust the volume using the VOL -/+ (23, 10) buons on the remote control or
by rotating the VOLUME knob (9) on the device.
- Clockwise = louder
- Anti-clockwise = quieter.
The set volume is shown on the display by way of a bar chart. Also refer to Section
4.3.4 for operation when headphones are connected.
> Press the Mute buon (13) on the remote control to immediately mute the
sound. Press the buon again to return to the previously set volume.
When the volume is completely turned down (Mute), the device will switch to
standby mode aer approx. 15 minutes.
4.4.5 Display
Depending on the selected function or option, the display will show the following
information:
Source
Time
Station name
Track name/
Album cover/
Additional info
Slideshow
Reception
strength
Active alarm
Active sleep
Favourites list
Stereo sound
timer
4.4.5.1 Retrieving displays
> Press the INFO buon (6) on the remote control repeatedly. You have the
choice of viewing the following information:
In Internet radio mode (the selected function is identified with an “*”):
[Track, Artist], [Description], [Genre], [Reliability], [Bit rate], [Sound
format], [Playback buer] and [Date].
In DAB+ mode:
[Running text] (continuous text with additional information provided by
broadcasters etc.), [Signal quality], [Channel type], [Ensemble], [Frequency],
[Bit rate and Codec] and [Date].
60
Page 61
In FM mode:
[Radio text] (where broadcast), [Frequency], [Channel type] (PTY), [Audio
information] and [Date].
In Bluetooth mode:
[Pairing Status] and [Date].
In CD/USB mode (only where the relevant data is available):
[Date], [Track], [Album], [Artist], [Weekday].
4.4.5.2 Slideshow
Some DAB+ broadcasters broadcast additional information such as the album cover
of the current track, adverts or weather information. The size of the window can be
set using the ENTER or TUNING/ENTER buon.
5 Menu operation
All the DIGITRADIO 370/371 CD IR functions and seings are accessed via the menu.
Menu navigation takes place using the MENU, BACK, / and ENTER buons on the
remote control. The menu is divided into submenus and, depending on the selected
source, contains dierent menu items or functions that can be enabled. To open the
menu, simply press the MENU buon briefly. To change to submenus, first of all press
the / buons to display a submenu, then press the ENTER buon to retrieve the
submenu. An asterisk (*) highlights the current selection.
To close the menu: Press the MENU buon several times (depending on which
submenu you are in) until the current radio channel is displayed again.
Seings are not saved until the ENTER buon is pressed. If the MENU or BACK
buon is pressed instead, the seings will not be accepted and saved. Use the
BACK buon to go back one step.
DE
EN
FR
NL
The functions and buons to be pressed are shown in bold in this instruction
manual. Displays in [square brackets].
Some text (e.g. menu items, station information) may be too long to show on
the display. These will be then shown as running text shortly thereaer.
Advice on using the device: The TUNING/ENTER knob can be either turned or
pressed.
Press the TUNING/ENTER knob to Confirm/ENTER/Snooze.
Turn the TUNING/ENTER knob for P+/- or / / track search.
The following operations are all explained using the buons on the remote
control. Press the relevant buons on the device if you want to carry out the
function on the device.
61
Page 62

6 Initial set-up
Aer switching on the DIGITRADIO 370/371 CD IR for the first time, the initial set-up
wizard launches.
Seings can all be changed at any time in the future.
> Use / to select the operating language and confirm with ENTER.
> To launch the initial set-up wizard, use / on the remote control to select
the [YES] field and press the ENTER buon.
> In the next step you can select the time format. Select the desired seing [12]
or [24] and press the ENTER buon to move on to the next step.
> Here you can select which source (DAB+, FM or the Internet) the DIGITRADIO
370/371 CD IR uses to obtain and update the time and date.
If you have selected Update from the NET, you must then select the time
zone so that the time is displayed correctly. Proceed to specify whether
summertime or wintertime is applicable at the time of seing.
> In the next step you can specify whether the DIGITRADIO 370/371 CD IR
should remain connected to the Internet when on standby. This can, for
example, be useful for App control. Power consumption is, however, increased
by using the standby mode.
> The network wizard then starts and you can set up an Internet connection.
Use the / and ENTER buons to select the WiFi network you recognise
and enter the relevant password using the displayed keyboard (skip WPS).
Then select and press the ENTER buon. If the password entered is
correct a connection to the network is now established. The signal bar
in the status bar of the display indicates whether the connection has been
established. To cancel the entry, select and press the ENTER buon. If
you make a typing error you can delete the last leer entered using .
When the virtual keyboard is displayed, you can use / on the remote
control for navigation. The / buons move the highlight upwards and
downwards, the / buons move the highlight to the right and le.
> Aer completing the network set-up, confirm the message that the initial set-
up has been completed by pressing the ENTER buon.
62
Page 63

7 DAB+ (digital radio) function
7.1 What is DAB+?
DAB+ is a digital format through which crystal clear sound with no noise can be
heard. In contrast to conventional analogue radio stations, DAB+ can be used to
broadcast multiple stations on the same frequency. For further information go to
www.dabplus.de or www.dabplus.ch.
7.2 DAB+ (digital radio) reception
> Press the MODE buon until [DAB] is shown on the display.
If DAB+ is being started for the first time, a complete scan will be performed.
Aer the scan is complete, the first station is played back in alphanumeric
order.
7.2.1 Performing a complete scan
The automatic scan (Complete scan) scans all DAB+ band III channels and
thereby finds all stations being broadcast within the reception area.
Aer the scan is complete, the first station is played back in alphanumeric
order.
> In order to perform a complete scan, press the SCAN buon (20) on the
remote control.
Alternatively:
> Open MENU > [Complete Scan] and press the ENTER buon.
> [Scanning...] appears on the display.
During the scan a progress bar and the number of stations found is displayed.
DE
EN
FR
NL
If no station is detected, check the telescopic antenna and, if required, change
the installation location (Section 4.3.1).
7.2.2 Selecting stations
> By pressing the / buons, the station list can be called up and you can
switch between the available stations. Press the ENTER buon to play the
station.
Alternatively:
> Open MENU > [Station List] and press the ENTER buon.
63
Page 64
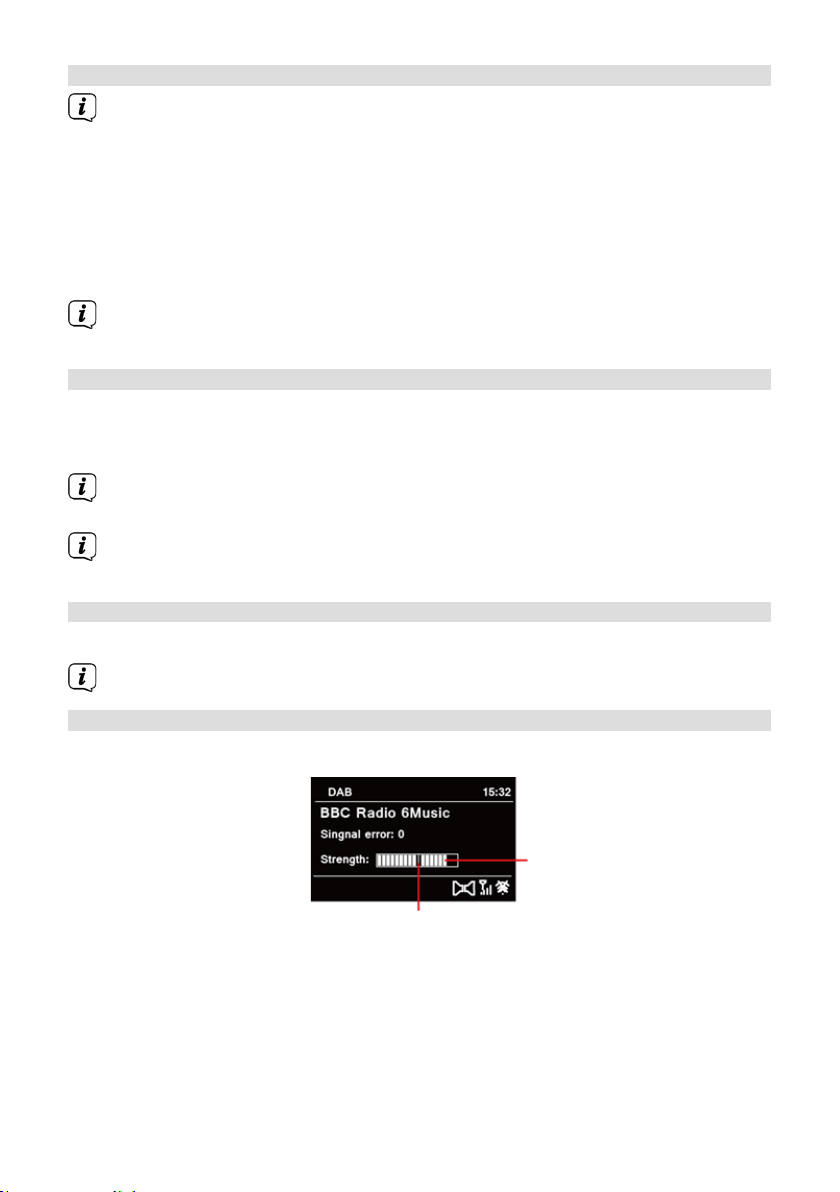
7.2.3 Saving DAB+ stations to a memory slot
The programme memory can save up to 20 stations in the DAB+ range.
> First select the desired station (see Section 7.2.2).
> In order to store this station in a memory slot, hold down the PRESET buon
while playing until [Save Channel] appears in the display. Then use the /
buons to select a favourites memory slot (1 - 20). Press the ENTER buon to
save.
> Repeat this process to save additional stations.
You can also save stations to one of the One-Touch buons (1 - 10) by
holding down the corresponding buon a lile longer.
7.2.4 Retrieving DAB+ stations from a memory slot
> To retrieve a station that you have stored in the FAV memory slots, briefly
press the PRESET buon and select a station slot (1 - 20) using the /
buons. Press the ENTER buon to play the station.
If no station is saved in the selected station slot, [(empty)] appears on the
display.
Alternatively, the corresponding One-touch buon (1 - 10) on the remote
control can be used.
7.2.5 Overwriting/deleting a station memory slot
> Simply save a new station in a favourite memory slot as described.
When retrieving the factory seings all memory slots are deleted.
7.2.6 Signal strength
> Press the INFO buon repeatedly until the signal strength bar is displayed.
Signal strength
Minimum signal strength
> The display shows the signal strength using a bar graph. The mark shows the
minimum signal strength.
64
Page 65

Stations with a signal intensity below the required minimum signal intensity
are not transmiing a strong enough signal. Align the telescopic antenna as
described in section 4.3.1 if required.
7.2.7 Manual seing
This menu item is used to check the reception channels and can be used to align the
antenna. Furthermore, stations can be added manually.
> Briefly press the MENU buon and use the / buons to select the >[Set
Manually] item. Then press the ENTER buon.
> Use the / and ENTER buons to select a channel (5A to 13F). The signal
intensity will now be shown on the display. If a DAB+ station is being received
on a channel, the station ensemble name is displayed. The antenna can now
be aligned to the maximum signal intensity.
Stations with a signal intensity below the required minimum signal intensity
are not transmiing a strong enough signal. Align the telescopic antenna as
described in Section 4.3.1 if required.
If there are stations on the set frequency or channel that have not yet been
stored in the station list, they will now also be saved.
7.2.8 Volume adjustment (DRC)
The DRC menu item is used to set the compression rate, which compensates for
dynamic fluctuations and the associated volume variations.
> Press the MENU buon and use the / buons to select the [Volume
Adjustment] item.
> Press the ENTER buon.
DRC high - High compression
DRC low - Low compression
DRC o - Compression switched o.
> Confirm the seing with ENTER.
7.2.9 Deleting inactive stations
This menu item is for removing old stations and those no longer being received from
the station list.
> Press the MENU buon and use the / buons to select the [Remove
Inactive Stations] item.
> Press the ENTER buon.
This is followed by the [Delete] prompt asking if the inactive stations are to be
deleted.
> Use / to select the [Yes] item and confirm by pressing the ENTER buon.
DE
EN
FR
NL
65
Page 66

8 FM mode
8.1 Switching on FM radio mode
> Switch to FM mode by pressing the MODE buon.
> [FM] is shown on the display.
When switching on for the first time, the frequency 87.50 MHz is set.
If you have already set or saved a station, the radio plays the last station set.
In the case of RDS stations, the station name appears.
Align the telescopic antenna to improve reception (Section 4.3.1).
8.2 FM reception with RDS information
RDS is a procedure for broadcasting additional information via FM stations.
Broadcasters with RDS broadcast their station name or the programme type, for
example. This is shown on the display. The device can show the RDS information RT
(Radio text), PS (Station name), PTY (Programme type).
8.3 Automatic station scan
> Press the SCAN buon (20) to automatically search for the next station with
sucient signal intensity.
If an FM station with sucient signal intensity is found, the scan stops and the
station is played. If an RDS station is being received, the station name appears
and, possibly, radio text.
Please use the manual station scan for seing weaker stations.
8.4 Manual station scan
> Press the / buons repeatedly to set the desired stations or frequency.
The display shows the frequency in steps of 0.05 MHz.
Holding down a buon also launches the station scan.
8.5 Scan seing
In this menu item it is possible to set the sensitivity of the scan.
> Press the MENU buon and select the [Scan Seings] item.
> Select whether the scan should only stop for stations having a strong signal
[Strong Stations Only] > [YES] or for all stations [Strong Stations Only] >
[NO].
66
Page 67

With the [NO] seing, the scan stops automatically upon detecting
each available station. This can result in weak stations being played with
background noise.
> Press the ENTER buon to save.
8.6 Audio seings
> Press the MENU buon and select the > [Audio Seing] item.
> Use / to select the [Mono Only] > [NO] item to play the sound in stereo,
or [Mono Only] > [YES] (if the FM signal is weak).
> Confirm the seing by pressing the ENTER buon.
8.7 Saving FM stations to a memory slot
The station memory can save up to 20 stations in the FM range.
> First set the desired station frequency (Section 8.3, 8.4)
> In order to store this station in a memory slot, hold down the PRESET buon
while playing until [Save Channel] appears in the display. Then use the /
buons to select a favourites memory slot (1 - 20). Press the ENTER buon to
save.
> Repeat this process to save additional stations.
DE
You can also save stations to one of the One-Touch buons (1 - 10) by
holding down the corresponding buon a lile longer.
8.8 Retrieving FM stations from a memory slot
> To retrieve a station that you have stored in the FAV memory slots, briefly
press the PRESET buon and select a station slot (1 - 20) using the /
buons. Press the ENTER buon to play the station.
If no station is saved in the selected station slot, [(empty)] appears on the
display.
Alternatively, the corresponding One-touch buon (1 - 10) on the remote
control can be used.
EN
FR
NL
67
Page 68

8.9 Overwriting/deleting a station memory slot
> Simply save a new station in the respective memory slot as described.
When retrieving the factory seings all memory slots are deleted.
9 Internet radio
The DIGITRADIO 370/371 CD IR is equipped with an Internet radio receiver. In order
to receive Internet radio stations/channels, you need an Internet connection using a
connection to a wireless network via a WLAN router.
> Press the MODE buon as oen as required until [Internet Radio] is shown on
the display.
If you start the Internet radio mode for the first time without having
configured a WLAN connection during the initial set-up, the search wizard
appears showing you all the WLAN stations within range. Use the ENTER
buon to select the WiFi network you recognise and enter the relevant
password using the displayed keyboard (skip WPS). Then select and
press the ENTER buon. If the password entered is correct a connection to the
network is now established. The signal bar in the status bar of the display
indicates whether the connection has been established. To cancel the entry,
select and press the ENTER buon. If you make a typing error you can
delete the last leer entered using .
9.1 Station list
> Press the MENU buon and select the >Station list item.
Under Station list, all Internet radio stations are displayed, sub-divided into
dierent categories.
> Based on a category/country/genre, select a station and press the OK buon.
9.2 Last listened to
> Select MENU > Station list > Timeline, to display a list of the last stations
listened to.
> Select a station using/ and play it by pressing ENTER.
9.3 Adding favourites
The station memory can save up to 20 stations in the Internet radio range.
> In order to store this station in a memory slot, hold down the PRESET buon
while playing until [Save Channel] appears in the display. Then use the /
buons to select a favourites memory slot (1 - 20). Press the ENTER buon to
save.
68
Page 69

> Repeat this process to save additional stations.
You can also save stations to one of the One-Touch buons (1 - 10) by
holding down the corresponding buon a lile longer.
9.4 Retrieving favourites
> To retrieve a station that you have stored in the FAV memory slots, briefly
press the PRESET buon and select a station slot (1 - 20) using the /
buons. Press the ENTER buon to play the station.
If no station is saved in the selected station slot, [(empty)] appears on the
display.
Alternatively, the corresponding One-touch buon (1 - 10) on the remote
control can be used.
10 Podcasts
Podcasts are retrieved from the Internet in the same way as Internet radio stations.
This basic procedure is as described in Section „9 Internetradio“ auf Seite 68.
11 Bluetooth
In Bluetooth mode, you can enjoy music from a connected smartphone or tablet via
the DIGITRADIO 370/371 CD IR's speakers. For this purpose, the two devices must first
be "paired" to each other.
The USB port on the DIGITRADIO 370/371 CD IR can also be used to charge or
power external devices. The maximum charging current is DC 5V, 1A.
11.1 Switching on Bluetooth mode
> Change to Bluetooth mode by pressing the MODE buon.
> [Bluetooth] is shown on the display.
When switching on for the first time, an external device (smartphone / tablet)
must first be paired.
If the radio has already been paired with another device which is within range,
the connection is automatically established. Depending on the connected
device, music playback may start automatically.
DE
EN
FR
NL
69
Page 70

11.2 Pairing an external device
To pair an external device, for example a smartphone or tablet, with the DIGITRADIO
370/371 CD IR, follow these steps:
> Start Bluetooth mode as described in Section 11.1.
> The display will show [Bluetooth] and [Please pair].
> Now start the search for Bluetooth devices nearby on your external device.
You may need to enable the Bluetooth feature on your external device first.
Please refer to the operating instructions for your external device to activate
the Bluetooth function and perform a search on your external device.
During the pairing process, both devices should be within 10 cm of each other.
> The entry DIGITRADIO 370/371 CD IR should now appear in the list of
Bluetooth devices found on your external device. Tap on the name of the
radio to complete the pairing process. If the pairing process has completed
successfully, Connected appears in the display.
> You can now start playing music on your external device.
Depending on the Bluetooth protocol of your external device, you can control
the music playback using the playback buons on the remote control.
Playback / pause - buon
Next track - buon
Previous track - 2 x buon
Track from beginning - buon
Stopping playback - buon
Alternatively, you can use the playback control for the music App on your
external device.
If no sound is being played, or no device is paired, the DIGITRADIO 370/371 CD
IR switches to standby mode aer approx. 15 minutes.
11.3 Cancel pairing
> Hold down the PRESET buon (12) on the DIGITRADIO 370 CD IR to cancel an
active pairing.
> Alternatively, you can cancel the pairing on your external device. Follow the
instructions in the device manufacturer's instruction manual.
70
Page 71

12 CD player
12.1 General information on CDs/MP3 CDs
The device is designed for music CDs that are played with audio data (CD-DA or MP3
for CD-R and CD-RW). MP3 formats must be created with ISO 9660 Level 1 or Level
2. Multi-session CDs cannot be read.
In MP3 mode, the terms "Folder" = Album and "Track" are critical. "Album"
corresponds to the folder on the PC, "track" to the PC file or a CD-DA track.
The device sorts the albums or the tracks of an album into alphabetical order by
name. If you prefer a dierent order, change the name of the track or album and
place a number in front of the name.
When burning a CD-R and CD-RW with audio data, various problems can arise which
could occasionally compromise smooth playback. This is caused by faulty soware
and hardware seings or the blank disc being used. If faults occur, you should
contact your CD burner's/
burner soware provider's customer service department or search for relevant
information - e.g. on the Internet.
If you create audio CDs, observe the legal requirements and do not breach
third-party copyrights.
The device can play CDs with MP3 data (.mp3) and normal audio CDs (.wav).
Do not use any other extensions such as *.doc, *.txt, *.pdf, etc. if audio files are
being converted to MP3.
Given the variety of dierent encoder sowares, it cannot be guaranteed that
every MP3 file can be played without a problem.
In the event of tracks/files being faulty, playback will continue with the next
track/file.
When burning the CD, it is worth doing so at low speed and creating the CD
as a single session and finalised.
12.2 The discs you can use
The CD player is compatible with CD, CD-R/RW and MP3 CD media.
If you transport the device, remove the discs from the drive. This prevents
damage to the CD player and the disc.
The playback quality with MP3 CDs depends on the bit rate seing and the
burning soware used.
DE
EN
FR
NL
71
Page 72

12.3 Playing CDs
> Switch to CD player mode by pressing the MODE buon.
> [CD] is shown on the display.
> Press the EJECT buon to open the CD tray.
> Insert the CD with the labelled side facing upwards. Ensure that the CD is not
positioned at an angle.
> Press the EJECT buon to close the CD tray again.
> The data on the CD is scanned. [Reading] appears in the display.
Do not perform any operation until the CD content has been completely read,
to ensure that all the required information on the CD has been read. With MP3
CDs in particular, this process can take some time.
To insert/remove the CD, please hold it by the edge.
> By pressing the Play/Pause buon, you can pause playback (the playing
time appears on the display), or continue playback by pressing it again.
> Use the Stop buon to stop playback. The total number of tracks appears
on the display.
Always stop the playback prior to removing the CD.
If there is no playback, the DIGITRADIO 370/371 CD IR switches to standby
aer 15 minutes.
12.4 Seing the track
> Use the Previous Track or Next Track buons to skip to the next or
previous track.
With MP3 CDs the display shows the relevant folder [F] and track [T] number
being played.
> Alternatively you can press the numeric keys to jump straight to a track
number.
If there are multiple folders/albums on the MP3 CD, tracks can only be
selected in sequence. Use the F+ and F- buons to select a specific folder.
72
Page 73

12.5 Quick search
While the track is playing, you can perform a quick search forwards or backwards to
find a specific section.
> Hold down the Previous Track or Next Track buons to quickly skip
forwards or backwards within a track for as long as the buon is held down.
12.6 Repeat function
You can select whether a track, the entire folder/album (only for MP3 CDs) or all of
the tracks on the CD are to be repeated.
> Press the Repeat buon multiple times.
The selected mode appears on the display (Repeat Track, Repeat Album,
Repeat All).
> To switch the function o again, press the Repeat buon again until the
repeat icon on the display disappears.
12.7 Random playback
With the random generator, the CD tracks can be played back in random order.
> If you press the SHUFFLE buon while playing, the shue icon appears
on the display
> To switch the function o again, press the SHUFFLE buon again.
DE
12.8 Programming function
With the programming function, you can play up to 20 tracks on a music CD or an
MP3 CD in an order determined by you.
You can only undertake the programming if there is a disc inserted and the
device is in stop mode.
> Press the PRESET buon on your remote control.
> The track number (T) now flashes in the display. [P01] appears to the le of
this. P01 is the first programming slot. Any tracks you want can then be set up
in sequence in the programming slots. With MP3 CDs you can select the folder
using F+ and F-.
> Use the Previous track or Next track to select the first track to be
programmed.
> Press the ENTER buon to accept the track.
> The second programming slot (P02) is then active. Proceed as described
above to save a track to programming slot 2. Do this to save the tracks you
want to all the programming slots.
> Press the Play/Pause buon to play the programmed tracks.
EN
FR
NL
73
Page 74

If you press Stop, change the source or remove the CD, the programming is
deleted.
12.9 Ejecting the CD
> Press the EJECT buon to eject the CD.
Always stop the playback prior to removing the CD.
13 Playing music from a USB device
You can play MP3 audio files stored on a USB data medium via the
DIGITRADIO370/371 CD IR.
To play from a USB data medium, this must be connected to the USB port
(15).
The device does not support the connection of USB media (hubs, etc.) via a
USB extension cable.
Not suitable for direct connection to PCs!
The device supports USB media (USB 1.1, 2.0) of up to 32 GB, formaed in the
FAT16 or FAT32 file format. The maximum file size for a media file is 4 GB.
> Press the MODE buon to switch to USB mode.
> [USB] appears in the display.
Playback starts automatically with the first track in the first folder.
The display for the categorisation/folder depends on the structure on your
USB medium. As such, pay aention to the information on the display.
The MP3 audio files are read and shown on the display in the form of the total
number of tracks ([T]) and folders/albums ([F]). Do not start the operation
until the content has been read completely, to ensure that all the required
information on the memory medium has been read.
If no memory medium has been connected or it cannot be read, [No USB]
appears on the display.
If there is no playback, the DIGITRADIO 370/371 CD IR switches to standby
aer 15 minutes.
13.1 Controlling USB playback
> By pressing the Play/Pause buon, you can pause playback (the playing
time appears on the display), or continue playback by pressing it again.
> Use the Stop buon to stop playback. The total number of tracks appears
on the display.
74
Page 75

13.2 Seing the track
> Use the Previous Track or Next Track buons to skip to the next or
previous track.
The display shows the respective folder ([F]) and track ([T]) number.
> Alternatively you can press the numeric keys to jump straight to a track
number.
If there are multiple folders/albums on the USB medium, tracks can only be
selected in sequence. Use the F+ and F- buons to select a specific folder.
13.3 Quick search
While the track is playing, you can perform a quick search forwards or backwards to
find a specific section.
> Hold down the Previous Track or Next Track buons to quickly skip
forwards or backwards within a track for as long as the buon is held down.
13.4 Repeat function
You can select whether a track, the entire folder/album or all of the tracks are to be
repeated.
> Press the Repeat buon multiple times.
The selected mode appears on the display (Repeat Track, Repeat Album,
Repeat All).
> To switch the function o again, press the Repeat buon again until the
repeat icon on the display disappears.
13.5 Random playback
With the random generator, the tracks can be played back in a randomly mixed
order.
> If you press the SHUFFLE buon while playing, the shue icon appears
on the display
> To switch the function o again, press the SHUFFLE buon again.
DE
EN
FR
NL
14 Audio input
You can play sound on an external device via theDIGITRADIO 370/371 CD IR speaker.
> Connect the external device to the AUDIO IN port (17, 3.5 mm jack) on the
back of the device
> Use the MODE buon to select the audio input. [AUX In] appears on the
display.
75
Page 76

The playback is controlled on the external device.
Do not set the volume too low to prevent interference.
During AUX input operation, the device remains switched on, even if the
connected audio source is not providing any sound.
The USB port on the DIGITRADIO 370/371 CD IR can also be used to charge or
power external devices. The maximum charging current is DC 5 V, 1 A.
15 Other functions
15.1 Sleep timer
The sleep timer automatically switches the DIGITRADIO 370/371 CD IR to standby
aer the set time.
> Press the MENU buon and use the / buons to select the [Main Menu]
>[Sleep] item.
> Press the ENTER buon.
> Use / to select a period aer which the DIGITRADIO 370/371 CD IR should
switch o. You can choose between O, 15, 30, 45 and 60 minutes.
> Press ENTER to apply the seing.
Alternatively the SLEEP buon (18) can be used. Press it repeatedly to
scroll through the times.
When the sleep timer is active, a moon symbol appears on the display
showing the time still available.
15.2 Alarm
The alarm switches on the DIGITRADIO 370/371 CD IR at the set alarm time. 2 alarm
times can be programmed. The description of how to programme Alarm 1 serves as
an example.
15.2.1 Seing the alarm
> Press the Alarm 1/2 buon (17) on the remote control.
Alternatively:
> Press the MENU buon and use the / buons to select the [Main Menu]
>[Alarm] item. Then press the ENTER buon.
> Use / to select the alarm you want to set and press the ENTER
buon.
> The specific alarm parameters can then be set.
Repeat
76
Page 77

> Here you can select from O (alarm is switched o), Daily (every day of the
week), Once, Weekdays (Mon - Fri) or Weekends (Sat and Sun). Press ENTER
to apply the seing.
Time
> Here you can enter the alarm time and date (if required).
First use the / buons to select the hours and press the ENTER buon to
accept this. Then input the minutes. Again, accept this by pressing the ENTER
buon.
If Repeat> [Once] has been selected, you must also enter the date as well as
the time.
Mode
> You then enter the source. BUZZER, Internet radio, DAB, FM, CD or USB are
available. Press the ENTER buon to accept the seing.
Station
If you have selected Internet radio, DAB or FM, you can then enter whether or
not you want to be woken up by the last station listened to or by one from
your Favourites list (if favourites have been saved). Press the ENTER buon to
accept the seing.
Volume
> You can then set the alarm volume using the / buons. Press the ENTER
buon to confirm.
Save
Press the ENTER buon to save the alarm.
The time must be read for the alarm to function properly. For more details, see
Section 16.4.2.
DE
EN
FR
NL
When an alarm is active, an alarm symbol appears on the display.
15.2.2 Switching o the alarm aer being woken up
> Press the On/Standby buon on the remote control or on the device to
switch o the alarm.
77
Page 78

16 System seings
All seings explained in this section apply equally to all sources.
> Open the MENU and use the / buons to select > [System Seings].
Press the ENTER buon to open the system seings.
16.1 Equaliser
You can use the Equaliser to adjust the sound according to your preferences.
> Alternatively, press the EQ buon (19) on the remote control.
> Use / to select an Equaliser preset. Press the ENTER buon to accept the
selection.
Alternatively:
> Press the MENU buon and use the / buons to select the [System
seings] > [Equaliser] item.
> Press the ENTER buon.
16.2 Audio stream quality
Here you can preset the Internet radio audio stream quality. Some Internet radio
broadcasters oer dierent streams for their broadcasters. It may be necessary
to adapt these seings depending on the available bandwidth of the Internet
connection.
> Press the MENU buon and use the / buons to select the [System
seings] > [Audio Stream Quality] item.
> Press the ENTER buon.
> Use / to select a stream quality level and press ENTER to accept.
16.3 Internet seings
> Press the MENU buon and use the / buons to select the [System
Seings] > [Internet Seings] item.
> Press the ENTER buon.
16.3.1 Connection via WLAN
To configure the network connection via WLAN, you can either use the network
wizard or configure this manually.
16.3.1.1 Network wizard configuration
> Select [Network wizard] to launch this.
The network wizard now searches for all the WLAN networks within range and
displays them to you.
78
Page 79

> Then select your WLAN network.
You can now choose whether to use the WPS function or whether you prefer
to enter your WLAN password manually.
> If you would like to use the WPS function, launch it on your router first as per
its instruction manual and then select [Press WPS Buon] in the network
wizard.
Please observe the display overlays. The connection process is generally
completed in a few seconds and the WLAN connection can be used.
> If you wish to enter your WiFi password manually, or if your router does not
support the WPS function, select [Skip WPS].
> Then enter the password using the displayed virtual keyboard. Then select
and press the ENTER buon. If the password entered is correct a
connection to the network is now established. To cancel the entry, select
and press the ENTER buon. If you make a typing error you can
delete the last leer entered using .
When the virtual keyboard is displayed, you can use / on the remote
control for navigation. The / buons move the highlight upwards and
downwards, the / buons move the highlight to the right and le.
The entered password will then be verified. This process is generally
completed in a few seconds and the WLAN connection can then be used.
The signal bar in the status bar of the display indicates whether the
connection has been established.
16.3.1.2 Configuration via the WPS function
This establishes a direct connection to the router. Selecting and/or entering a WLAN
network (SSID) and password is not required.
> Start the WPS function on your router as per the instruction manual.
> Then select [PBC WLAN Set-up] to launch the connection process.
DE
EN
FR
NL
Please observe the display overlays. The connection process is generally
completed in a few seconds and the WLAN connection can be used.
Alternatively the [PIN] function can be used if this function is supported by
the router.
16.3.1.3 Manual configuration
> Select [Manual seings] then [Wireless] to launch manual configuration.
79
Page 80

> Now select whether to allow automatic retrieval of the IP address, gateway
etc. from your router (DHCP active) or if you would like to enter this manually
(DHCP inactive).
Please take into account that automatic retrieval of the IP address, gateway,
subnet mask only works if the DHCP function is activated in your router.
> One by one, enter the IP address, subnet mask, gateway address, primary
DNS and secondary DNS if required, using the Arrow buons on the remote
control. Confirm each set value with the ENTER buon.
> Now enter the name (SSID) of your WLAN network using the virtual keyboard
and confirm with OK.
> Select whether your WLAN network is Unencrypted, encrypted by WEP or by
WPA/WPA2 and confirm the following item.
> Then use the virtual keyboard to enter your WLAN password and confirm with
OK to start the connection process.
In general, the WLAN connection can be used aer a few seconds.
16.3.2 Display seings
> Select [Display seings] to display the current network seings.
16.3.3 TechniSat Connect PIN
You can control the DIGITRADIO 370/371 CD IR via the TechniSat CONNECT App. To
do so, the PIN for the DIGITRADIO 370/371 CD IR must be entered in the App. You
can change the PIN as follows.
> Under [NetRemote PIN], enter a 4-digit PIN and select OK to save.
16.3.4 Deleting network profile
Use the [Delete All Inactive Networks] or [Delete All Network Connections] menu
items to delete all existing connections to a wireless network or to all configured
networks and to clear the seings you have made. If you wish to connect the device
to these networks again, you must carry out all the seings again.
80
Page 81

16.3.5 WLAN connection on standby
> Under [WLAN Active on Standby], select whether the WLAN connection is to
be maintained in standby mode (YES) or not (NO).
Note that, for unrestricted and smooth use and operation via the TechniSat
CONNECT App, this function must remain switched on.
The TechniSat CONNECT App can be downloaded from your smartphone's App
store.
16.4 Time and date seings
16.4.1 Manually seing the date/time
Depending on the seing for time updates (Section 16.4.2), the date and time might
have to be set manually.
> Press the MENU buon and use the / buons to select the [System
Seings] > [Time and Date] item.
> Press the ENTER buon.
> Use the / buons to select the [Set Date/Time] item and press ENTER.
> The first digits (day) of the date flash and can be changed using the /
buons.
> Press the ENTER buon to apply the seing.
> The next date digits (month) then start to flash and can again be changed as
described above.
> Press the ENTER buon aer every additional seing in order to go to the
next seing.
> Proceed with the time in the same way as described above.
> Aer all seings have been made and the ENTER buon pressed for the last
time, [Time Saved] appears on the display.
DE
EN
FR
NL
16.4.2 Updating
Here you can specify whether time updates should be carried out automatically
via the Internet, DAB+ or FM, or whether you wish to enter them manually (Section
16.4.1).
> Press the MENU buon and use the / buons to select the [System
Seings] > [Time and Date] > [Update] item, then press ENTER.
> Use the /buons to select the following options:
[Update from DAB] (Update via DAB+ only)
[Update from FM] (Update via FM only)
81
Page 82

[Update from NET] (Update via Internet radio only)
[No Update] (Time/date must be entered manually, see Section 16.4.1).
> Press the ENTER buon to save the seing.
If you have selected [Update from NET], you must also configure the time
zone and the summer/winter time seing. This is done under [System
Seings] > [Time and Date] > [Set Time Zone] and [System Seings]
>[Time and Date] > [Summer time?].
16.4.3 Seing the time format
Under Time format you can activate the 12 or 24 hour format.
> Press the MENU buon and use the / buons to select the [System
Seings] > [Time and Date] > [Time Format] item, then press ENTER.
> Use / to choose one of the following options:
[24 hours]
[12 hours]
> Press the ENTER buon to save.
16.4.4 Standby clock
Here you can configure the time display in standby mode. You can choose between
the analogue display or the digital display.
> Press the MENU buon and use the / buons to select the [System
Seings] > [Time and Date] > [Standby Clock] item, then press ENTER.
> Use / to choose one of the options.
> Press the ENTER buon to save.
16.5 Auto Standby
The DIGITRADIO 370/371 CD IR can automatically switch to standby mode aer not
being used for a specified time.
> Press the MENU buon and use the /buons to select the [System
Seings] > [Auto Standby] item, then press ENTER.
> Use / to select a time aer which the device should switch to standby.
> Press the ENTER buon to save.
In Bluetooth, CD, AUX and USB modes, the device will automatically switch to
standby mode aer approx. 15 minutes if no sound is played.
82
Page 83

16.6 Language
> Press the MENU buon and use the /buons to select the [System
Seings] > [Language] item, then press ENTER.
> Use / to select one of the available languages and confirm by pressing the
ENTER buon.
16.7 Factory seings
If you change the location of the device, e.g. when moving house, it is possible that
the saved stations can no longer be received. In this case you can reset the device to
factory seings to delete all the saved stations and launch a new scan.
> Press the MENU buon and use the /buons to select the [System
Seings] > [Factory Seings] item, then press ENTER.
> Use / to select the [Yes] option, then press ENTER to reset to the factory
seings.
All previously stored stations and seings will now be deleted. The device is
now in the same status as when delivered.
> [Restarting...] appears on the display.
The device will switch to standby aer successfully reseing to the factory
seings. You will then need to run the initial installation wizard.
DE
16.8 Soware update
The Soware Update feature is used to update the device soware.
> Press the MENU buon and use the /buons to select the [System
Seings] > [Soware Update] item, then press ENTER.
Auto update
> Enable this function so that the DIGITRADIO 370/371 CD IR automatically
searches for new soware versions during operation. If new soware is found,
a note will appear in the display. Note the information on the screen and do
not switch the device o during the soware update.
Check now
> Select [Check Now] to launch an immediate search for a new soware version
on the Internet. Note the information on the screen and do not switch the
device o during the soware update.
16.9 Set-up wizard
Here the initial set-up wizard can be accessed again. For more details, see Section „6
Ersteinrichtung“ auf Seite 62.
83
EN
FR
NL
Page 84

16.10 Soware version
Under Info you can retrieve the currently installed soware version.
> Press the MENU buon and use the /buons to select the [System
Seings] > [Info] item, then press ENTER.
> The current soware version is displayed.
16.11 Data protection
Under this option you can find the data protection information.
16.12 Brightness
It is possible to set the display brightness both for operation and standby. There are
also various colour schemes available.
> Press the MENU buon and use the /buons to select the [System
Seings] > [Brightness] item, then press ENTER.
[Operation] regulates brightness in the normal operating status. You can
choose from [High], [Medium] and [Low] brightness intensities. Use / to
select the brightness level and press ENTER to save.
[Standby] regulates the brightness in standby mode. You can choose from
[Medium] and [Low] brightness intensities here. Use / to select a
brightness level and press ENTER to save.
[Auto Dim] automatically dims the display to the Low brightness level aer a
set time without the radio being used.
When the [O] option is selected, the display will be permanently lit with the
brightness selected under [Operation]. Press ENTER to apply the seing.
17 Cleaning
To prevent the risk of electric shock, you must not clean the device using a wet
cloth or under running water. Prior to cleaning, pull out the mains plug and
switch o the device!
You must not use scouring pads, scouring powder and solvents such as
alcohol or petrol.
Do not use any of the following substances: saltwater, insecticide, chlorine-
based or acidic solvents (ammonium chloride).
Clean the housing using a so, damp cloth. Do not use spirit, thinners, etc.;
you could damage the surface of the device.
84
Page 85

Only clean the display with a so, coon cloth. If required, use a coon cloth
with small amounts of non-alkaline, diluted, water-based or alcohol-based
soap solution.
Gently clean the surface using the coon cloth.
18 Troubleshooting
If the device does not operate as intended, check the following table for information.
Symptom Possible cause/remedy
The device cannot be switched on. The device is not being supplied with power.
No sound can be heard. Increase the volume.
The display does not switch on. Disconnect the device from the power supply
and then reconnect it.
Poor reception via DAB+/FM. Fully extend the antenna. Change the position
of the antenna or the DIGITRADIO 370/371 CD
IR.
The device cannot be operated. Disconnect the device from the power supply
and then reconnect it.
Bad Bluetooth connection and
dropouts
No sound from the external input
(AUX).
Device automatically switches to
standby
Distorted sound can be heard. In the vicinity of the device, a
Other operational malfunctions,
loud noises or a malfunctioning
display.
Do not exceed the maximum range for
Bluetooth of 10m.
Is the device connected correctly?
Has AUX been selected as the input source?
Has playback been started on the external
device and has the
output volume been set?
The auto standby function switches the device
to standby aer approx. 15 minutes if there
is no playback in DAB, CD, Bluetooth or USB
modes.
mobile phone or other device
is emiing disruptive radio waves. Remove
the mobile phone or device
from the vicinity of the radio.
Electronic components in the device
are malfunctioning. Remove the mains plug.
Keep the device separated from the power
source for approx. 10 sec.
Reconnect the device.
DE
EN
FR
NL
85
Page 86

Symptom Possible cause/remedy
CD or MP3 CD is not detected or
music skips when played.
Carefully clean the underneath of the CD.
Use another CD.
If the malfunction has not been resolved, even aer performing the checks
described, please contact the Technical Hotline.
19 Technical specifications / manufacturer's instructions
Subject to technical changes and errors.
Reception channels DAB/DAB+, Internet radio, FM,
Bluetooth, AUX, USB, CD
Power supply AC Input: 100 - 240 V, 50/60 Hz
DC output (USB port): 5 V, 1 A
Frequencies FM: 87.5-108 MHz
DAB/DAB+: 174 - 240 MHz
Bluetooth: 2.402 - 2.480 GHz
Transmission capacity: 2 dBm EIRP
WLAN: 2.471 - 2.472 Mhz
Transmission capacity: 19 dBm EIRP
Bluetooth version V4.2
Display TFT colour display
Power consumption Operating max.: 28 W
Standby: < 1 W (without WiFi
connection)
< 2 W (with WiFi connection)
Consumption minimisation (automatic
shutdown aer 15 minutes on standby)
With no playback:
DAB, Bluetooth, CD, USB.
AUX aer 4 hours.
Audio output performance 2 x 5 W RMS
Ambient conditions Operating: 0°C ~ 35 °C
Weight (kg) ~2.73
Dimensions (W x H x D) cm 35.1 x 12.3 x 21.2
86
Page 87

Mode d'emploi
DIGITRADIO 370 CD IR
DIGITRADIO 371 CD IR
Page 88

1 Illustrations
1.1 Vue avant
1.2 Vue arrière
88
Page 89

1 MODE Choix de la source/changement de mode
2 Marche/veille
3 Écran couleur
4 Capteur infrarouge
5 Eject Touche d'éjection du CD
6 Stop/MENU Arrêt de la lecture, ouverture du menu principal (maintenir appuyé)
7 Haut-parleur stéréo
8 Lecture/Pause/INFO
9 Volume élevé/faible
10 Chargeur CD
11 TUNING/ENTER Bouton rotatif
12 PRESET Mémoire des favoris
13 Câble électrique
14 Antenne télescopique
15 Port USB 5 V, 1 A
16 Prise casque (jack 3,5mm)
17 AUX-IN Jack 3,5 mm
1.3 Télécommande
1 Eject - Touche d'éjection du CD
2 Lecture/Pause
3 Titre précédent/Recherche
4 Répétition
5 Lecture aléatoire
6 INFO
7 BACK (retour/Annuler)
8 Mode (changement de mode)
9 ENTER (valider)
10 Volume 11 MENU
12 Touches numériques/ Touches de
sélection directe
13 Mute/Sourdine
14 Marche/Veille
15 Titre suivant/Recherche
16 Arrêt
17 Réveil 1 / 2
18 Mise en veille
19 Égaliseur/EQ
20 SCAN (recherche de stations)
21 F+ (Choix du dossier en mode CD)
22 Programme + /
*Sur cet appareil sans fonction.
23 Volume +
24 Programme - /
25 F- (choix du dossier en mode CD)
26 PRESET (mémoire FAV)
DE
EN
FR
NL
89
Page 90

2 Sommaire
1 Illustrations ...............................................................................................................88
1.1 Vue avant ......................................................................................................................................88
1.2 Vue arrière ....................................................................................................................................88
1.3 Télécommande ...........................................................................................................................89
2 Sommaire ..................................................................................................................90
3 Consignes de sécurité ............................................................................................ 93
3.1 Avant-propos ............................................................................................................................... 93
3.2 Caractères et symboles utilisés ..........................................................................................93
3.3 Utilisation conforme................................................................................................................ 94
3.4 Utilisation sécurisée du produit.........................................................................................94
3.4.1 Mentions légales ....................................................................................................................... 96
3.4.2 Consignes d'entretien .............................................................................................................97
4 Description de la DIGITRADIO 370/371 CD IR ................................................. 98
4.1 Contenu de la livraison ...........................................................................................................98
4.2 Caractéristiques particulières de la DIGITRADIO 370/371 CD IR.........................98
4.3 Préparation de la DIGITRADIO 370/371 CD IR au fonctionnement ...................98
4.3.1 Orientation de l’antenne télescopique ...........................................................................98
4.3.2 Branchement au réseau électrique ..................................................................................98
4.3.3 Insertion des piles dans la télécommande .................................................................. 99
4.3.4 Utilisation des écouteurs ....................................................................................................100
4.4 Fonctions générales de l’appareil .................................................................................. 100
4.4.1 Mise en marche de l’appareil ........................................................................................... 100
4.4.2 Arrêt de l’appareil ..................................................................................................................100
4.4.3 Choix de la source .................................................................................................................. 101
4.4.4 Réglage du volume ............................................................................................................... 102
4.4.5 Écran ............................................................................................................................................ 102
5 Commande du menu ............................................................................................ 103
6 Première mise en service ...................................................................................104
7 Fonction DAB+ (radiodiusion numérique) ..................................................105
7.1 Qu'est-ce que le DAB+ ? ....................................................................................................105
7.2 Réception DAB+ (radiodiusion numérique) ............................................................105
7.2.1 Exécution d'une recherche complète ...........................................................................105
7.2.2 Choix de la station ..................................................................................................................105
7.2.3 Mémorisation d'une station DAB+ sur un emplacement mémoire ................ 106
7.2.4 Accès à une station DAB+ à partir d’un emplacement mémoire ................... 106
7.2.5 Écrasement/suppression d'un programme mémorisé ......................................... 106
7.2.6 Puissance du signal .............................................................................................................. 106
7.2.7 Réglage manuel .......................................................................................................................107
7.2.8 Adaptation du volume (DRC) ............................................................................................107
7.2.9 Suppression des stations inactives .................................................................................107
8 Mode FM ..................................................................................................................108
8.1 Mise en marche du mode radio FM .............................................................................. 108
90
Page 91

8.2 Réception FM avec informations RDS .......................................................................... 108
8.3 Recherche automatique des stations .......................................................................... 108
8.4 Recherche manuelle des stations .................................................................................. 108
8.5 Réglage de la recherche ..................................................................................................... 108
8.6 Réglage audio .......................................................................................................................... 109
8.7 Mémorisation d'une station FM sur un emplacement mémoire......................109
8.8 Accès à une station FM à partir d’un emplacement mémoire ......................... 109
8.9 Écrasement/suppression d'un programme mémorisé ..........................................110
9 Radio Internet ........................................................................................................ 110
9.1 Liste des stations .................................................................................................................... 110
9.2 Dernière écoute ....................................................................................................................... 110
9.3 Ajout de favoris ........................................................................................................................110
9.4 Consultation des favoris........................................................................................................ 111
10 Podcasts ................................................................................................................... 111
11 Bluetooth .................................................................................................................. 111
11.1 Mise en marche du mode Bluetooth..............................................................................111
11.2 Couplage d'un appareil externe ....................................................................................... 112
11.3 Arrêt du couplage ................................................................................................................... 112
12 Lecteur CD ................................................................................................................113
12.1 Informations générales sur les CD/CD MP3 ................................................................113
12.2 Disques compatibles ..............................................................................................................113
12.3 Lecture de CD ........................................................................................................................... 114
12.4 Réglage du titre ....................................................................................................................... 114
12.5 Recherche rapide .....................................................................................................................115
12.6 Fonction Répétition .................................................................................................................115
12.7 Lecture aléatoire .......................................................................................................................115
12.8 Fonction programmation .....................................................................................................115
12.9 Éjection d'un CD....................................................................................................................... 116
DE
EN
FR
NL
13 Lecture de musique USB .................................................................................... 116
13.1 Commande de la lecture USB .......................................................................................... 116
13.2 Réglage du titre ........................................................................................................................117
13.3 Recherche rapide .....................................................................................................................117
13.4 Fonction Répétition .................................................................................................................117
13.5 Lecture aléatoire .......................................................................................................................117
14 Entrée audio ............................................................................................................117
15 Fonctions supplémentaires ................................................................................ 118
15.1 Minuterie de mise en veille .................................................................................................118
15.2 Réveil..............................................................................................................................................118
15.2.1 Réglage du réveil .....................................................................................................................118
15.2.2 Arrêt du réveil après l'alarme ............................................................................................ 119
16 Réglages système .................................................................................................120
16.1 Égaliseur ..................................................................................................................................... 120
91
Page 92

16.2 Qualité de streaming audio ...............................................................................................120
16.3 Réglages Internet ................................................................................................................... 120
16.3.1 Connexion par WLAN .......................................................................................................... 120
16.3.2 Achage des réglages ........................................................................................................ 122
16.3.3 Code PIN TechniSat Connect ............................................................................................ 122
16.3.4 Suppression d'un profil réseau ........................................................................................ 122
16.3.5 Connexion WLAN en veille .................................................................................................123
16.4 Réglages de l’heure et de la date ...................................................................................123
16.4.1 Réglage manuel de l'heure et de la date ....................................................................123
16.4.2 Mise à jour ..................................................................................................................................123
16.4.3 Réglage du format de l’heure .......................................................................................... 124
16.4.4 Horloge de veille .................................................................................................................... 124
16.5 Mise en veille automatique ............................................................................................... 124
16.6 Langue ......................................................................................................................................... 125
16.7 Réglage d'usine ........................................................................................................................125
16.8 Mise à jour du logiciel ...........................................................................................................125
16.9 Assistant d'installation ..........................................................................................................125
16.10 Version du logiciel ................................................................................................................. 126
16.11 Protection des données...................................................................................................... 126
16.12 Luminosité ................................................................................................................................. 126
17 Neoyage ................................................................................................................126
18 Dépannage .............................................................................................................. 127
19 Données techniques/consignes du fabricant ...............................................128
92
Page 93

3 Consignes de sécurité
3.1 Avant-propos
Chers clients,
Merci d'avoir fait le choix d'une radio numérique TechniSat.
Le présent mode d’emploi vous aidera à découvrir et à utiliser de manière optimale
les nombreuses fonctionnalités de votre nouvel appareil. Il vous aide à l'utiliser de
manière sûre et conforme à sa destination. Il s’adresse à toutes les personnes qui
installent, utilisent, neoient ou meent l’appareil au rebut.
Conservez soigneusement le mode d'emploi pour une utilisation ultérieure.
Vous trouverez une version actuelle du mode d'emploi dans l'espace de
téléchargement de votre produit sur le site Internet de TechniSat : www.technisat.de.
Nous vous souhaitons une bonne utilisation de votre radio numérique TechniSat !
Votre équipe TechniSat
3.2 Caractères et symboles utilisés
dans ce mode d'emploi :
Désigne une consigne de sécurité qui peut conduire à de graves blessures ou
la mort en cas de non-respect. Veuillez respecter les avertissements suivants :
DANGER - Graves blessures avec risque mortel
AVERTISSEMENT - Graves blessures, éventuellement avec risque mortel
ATTENTION - Blessures
DE
EN
FR
NL
Désigne une consigne à respecter impérativement afin d’éviter toute
perturbation de l’appareil, toute perte/mauvaise utilisation des données ou
tout fonctionnement indésirable. Il décrit en outre d'autres fonctionnalités de
votre appareil.
Avertissement face à un risque de tension électrique. Respectez toutes les
consignes de sécurité pour éviter une décharge électrique. N'ouvrez jamais
l'appareil.
Sur l'appareil :
Utilisation dans des espaces intérieurs - les appareils avec ce symbole
conviennent uniquement à une utilisation dans des espaces intérieurs.
93
Page 94
Classe de protection II - les appareils électriques de la classe de protection II
sont des appareils électriques qui possèdent une isolation continue double
et/ou renforcée sans possibilité de raccorder un conducteur de protection.
Le boîtier d'un appareil électrique de la classe de protection II entouré de
matériau isolant peut former une isolation supplémentaire ou renforcée,
partielle ou intégrale.
Votre appareil porte la marque CE et répond à toutes les normes européennes
requises.
Les appareils électroniques ne doivent pas être jetés avec les ordures
ménagères mais doivent être mis au rebut de manière appropriée conformément à la directive 2002/96/UE du Parlement et Conseil européens
du 27 janvier 2003 sur les appareils électriques et électroniques usagés. Une
fois son utilisation terminée, veuillez déposer cet appareil dans un des points
de collecte publics prévus à cet eet pour sa mise au rebut.
3.3 Utilisation conforme
La DIGITRADIO 370/371 CD IR est conçue pour la réception de stations de radio FM/
DAB+/Internet. Elle permet en outre de diuser des CD audio numériques et MP3.
L’appareil est conçu pour un usage privé et ne convient pas à des fins commerciales.
3.4 Utilisation sécurisée du produit
Veuillez observer les indications ci-dessous afin de réduire tout risque en matière de
sécurité, d’éviter toute détérioration de l’appareil et de contribuer à la protection de
l’environnement.
Lisez aentivement l'ensemble des consignes de sécurité et conservez-les pour toute
question ultérieure. Respectez toujours l'ensemble des avertissements et consignes
de ce mode d'emploi ainsi que ceux au dos de l’appareil.
AVERTISSEMENT !
N’ouvrez jamais l’appareil!
Tout contact avec des pièces sous tension peut entraîner la mort!
AVERTISSEMENT !
Risque d’étouement! Ne laissez pas l'emballage ou ses éléments à
des enfants. Risque d’étouement dû aux films et aux autres matériaux
d’emballage.
Veuillez respecter toutes les consignes suivantes pour une utilisation conforme
de l'appareil et éviter toute perturbation de l'appareil et tout dommage corporel.
- Ne réparez pas l'appareil vous-même. Seul du personnel spécialisé qualifié
peut eectuer des réparations sur l'appareil. Adressez-vous à nos centres de
service après-vente.
94
Page 95

- L'appareil peut être utilisé uniquement dans les conditions ambiantes
indiquées.
- N’exposez pas l’appareil à des goues d’eau ou des éclaboussures. Si de l’eau
pénètre dans l’appareil, arrêtez-le et contactez l’assistance technique.
- N'exposez pas l'appareil à des sources de chaleur qui peuvent faire chauer
l'appareil au-delà de son utilisation normale.
- Si l’appareil semble défectueux, s’il produit des odeurs ou fumées, s’il présente
des dysfonctionnements importants, si le boîtier est endommagé, contactez
immédiatement l’assistance technique.
- L'appareil peut être utilisé uniquement avec la tension de secteur indiquée.
N’essayez jamais de faire fonctionner l’appareil sous une autre tension.
- Si l’appareil présente des défauts, il ne doit pas être mis en marche.
- Ne meez pas l’appareil en marche à proximité d’une baignoire, d'une douche,
d'une piscine, de projections ou d'écoulements d'eau. Il existe un risque
d'électrocution et/ou de perturbations de l'appareil.
- Aucun corps étranger, p. ex. des aiguilles, pièces de monnaie, etc., ne doit
tomber à l'intérieur de l'appareil. Les contacts de raccordement ne doivent
pas entrer en contact avec des objets métalliques ni avec les doigts. Cela peut
entraîner des courts-circuits.
- Cet appareil n’est pas destiné à être utilisé par des personnes (y compris
les enfants) dont les capacités physiques, sensorielles ou mentales sont
limitées ou manquant d’expérience et/ou de connaissances, sauf si elles sont
surveillées par une personne responsable de leur sécurité ou si elles ont reçu
les instructions nécessaires à l’utilisation de l’appareil.
- Il est interdit de procéder à des transformations sur l’appareil.
- Le lecteur CD utilise un rayon laser invisible. Celui-ci peut blesser vos yeux en
cas de mauvaise manipulation. Ne regardez jamais dans le compartiment à CD
ouvert.
DE
EN
FR
NL
• Cet appareil a été classé comme appareil laser de classe 1 (CLASS 1 LASER).
95
Page 96

3.4.1 Mentions légales
Par la présente, TechniSat déclare que l’installation radioélectrique DIGITRADIO
370/371 CD IR est conforme à la directive 2014/53/UE. Le texte intégral de la
déclaration de conformité européenne est disponible à l’adresse suivante:
DIGITRADIO 370 CD IR : hp://konf.tsat.de/?ID=22628
DIGITRADIO 371 CD IR : hp://konf.tsat.de/?ID=22630
La société TechniSat ne peut être tenue pour responsable des dommages
causés au produit dans le cas d’influences extérieures, d’une usure, d’une
utilisation inappropriée, d’une réparation non autorisée, de modifications ou
d’accidents.
Sous réserve de modifications et d’erreurs typographiques. Dernière mise à
jour 06/20. Toutes copies et reproductions sont soumises à l’autorisation de
l’éditeur. Vous pouvez télécharger une version actuelle du manuel au format
PDF dans l'espace de téléchargement du site Internet TechniSat sur www.
technisat.de.
TechniSat et DIGITRADIO 370/371 CD IR sont des marques déposées de :
TechniSat Digital GmbH
TechniPark
Julius-Saxler-Strasse 3
54550 Daun/Eifel, Allemagne
www.technisat.de
Les noms de sociétés, institutions ou marques citées sont des marques ou des
marques déposées de leurs propriétaires respectifs.
Dans les pays indiqués ci-après, l'appareil peut être utilisé en zone WLAN 5
GHz uniquement dans des pièces fermées.
BE CY FI FR HU LV LI
LU NL ES SE UK CH DE
96
Page 97

3.4.2 Consignes d'entretien
La qualité de ce produit est contrôlée et garantie pendant la période de
garantie légale de 24mois à compter de la date d’achat. Veuillez conserver la
facture comme preuve d'achat. Veuillez vous adresser au revendeur du produit
pour toute demande relevant de la garantie.
Notre assistance technique téléphonique est joignable pour toute question et
complément d'informations, ou en cas de problème avec l’appareil:
Du lundi au vendredi de 8h00 à 18h00 au numéro suivant :
+ 49 (0) 392 592 201 800.
Les demandes de réparation peuvent également être faites directement en
ligne sur www.technisat.de/reparatur.
En cas d'éventuel retour de l'appareil, merci d'adresser votre colis uniquement à
l'adresse suivante :
TechniSat Digital GmbH
Service-Center
Nordstr. 4a
39418 Stassfurt, Allemagne
DE
EN
FR
97
NL
Page 98

4 Description de la DIGITRADIO 370/371 CD IR
4.1 Contenu de la livraison
Avant la mise en service, veuillez contrôler si le contenu de la livraison est complet :
1 x DIGITRADIO 370/371 CD IR
1 x télécommande
1 x pile pour la télécommande
1 x mode d’emploi
4.2 Caractéristiques particulières de la DIGITRADIO 370/371 CD IR
La DIGITRADIO 370/371 CD IR se compose d’un récepteur FM/DAB+/Internet doté
des fonctions suivantes:
- Vous pouvez mémoriser jusqu’à 20 stations FM/DAB+/Internet.
- La radio capte les fréquences FM 87,5 - 108MHz (analogiques) et
DAB+ Band III 174,9 - 239,2 MHz (antenne numérique).
- Radio Internet
- Streaming de musique par Bluetooth
- L’appareil est équipé d’un achage de l’heure et de la date.
- Lecture de musique MP3 via des CD MP3 ou clés MP3.
- Écran couleur
4.3 Préparation de la DIGITRADIO 370/371 CD IR au fonctionnement
4.3.1 Orientation de l’antenne télescopique
Le nombre et la qualité des stations reçues dépendent des conditions de réception
à l’endroit où est placé l’appareil. L’antenne télescopique permet d’obtenir une
excellente réception.
> Orientez l’antenne télescopique et dépliez-la.
L’orientation précise de l’antenne télescopique est souvent importante, en
particulier dans les zones de réception DAB+ périphériques. Sur Internet,
par exemple sur "www.dabplus.de", il est possible de trouver rapidement la
situation du pylône émeeur le plus proche.
Lancez la première recherche près d’une fenêtre en direction du pylône
émeeur. Par mauvais temps, la réception DAB+ peut être limitée.
Ne touchez pas l’antenne télescopique durant la lecture d’une station. Cela
pourrait entraîner des problèmes de réception et des coupures du son.
4.3.2 Branchement au réseau électrique
AVERTISSEMENT !
Ne saisissez pas la fiche avec les mains mouillées, risque de décharge
électrique!
ATTENTION !
Placez le câble d'alimentation de manière à ce que personne ne puisse
trébucher dessus.
98
Page 99

> Insérez la fiche secteur de la DIGITRADIO 370/371 CD IR dans une prise
secteur (CA 100 - 240 V ~, 50/60 Hz)
> Assurez-vous que la tension de fonctionnement de l'appareil corresponde à la
tension réseau locale avant de le brancher dans la prise secteur murale.
En cas de non-utilisation, retirez la fiche de la prise secteur. Tirez sur la fiche
et non sur le câble. Débranchez la fiche secteur avant qu'un orage n'éclate.
Si l’appareil ne doit pas être utilisé pendant une période prolongée, p. ex.
avant de partir en voyage, débranchez la fiche. La chaleur produite par le
fonctionnement doit être évacuée par une circulation d'air susante. Pour
cee raison, l'appareil ne doit pas être couvert ou placé dans une armoire
fermée. Veillez à laisser un espace libre d'au moins 10 cm autour de l'appareil.
4.3.3 Insertion des piles dans la télécommande
> Ouvrez le compartiment à piles à l'arrière de la télécommande en poussant
dans le sens de la flèche.
> Insérez les piles (2 x AAA 1,5 V) dans le compartiment à piles conformément à
la polarité indiquée dans le compartiment à piles.
DE
EN
FR
> Refermez avec précaution le couvercle du compartiment à piles de manière à
ce que les paes de retenue du couvercle s'enclenchent dans le boîtier.
Pour faire fonctionner la télécommande, vous avez besoin d'une pile alcaline
de type Micro, 1,5 V, LR03/AAA. Veillez à respecter la polarité lors de l'insertion.
Remplacez à temps une pile dont la charge devient faible.
Des piles qui fuient peuvent endommager la télécommande.
Retirez les piles de la télécommande quand l'appareil n'est pas utilisé pendant
une période prolongée.
Consigne importante relative à la mise au rebut: les piles peuvent contenir
des substances toxiques pour l'environnement. Vous devez donc les mere au
rebut conformément aux dispositions légales en vigueur. Ne jetez jamais les
piles avec les autres déchets ménagers.
NL
99
Page 100

4.3.4 Utilisation des écouteurs
Risque de lésions auditives !
N'écoutez jamais la radio avec des écouteurs à plein volume. Cela peut entraîner des
lésions auditives permanentes. Avant d'utiliser les écouteurs, réglez le volume de
l’appareil sur le volume minimal.
Utilisez uniquement des écouteurs dotés d'une prise jack stéréo de 3,5mm.
> Branchez la fiche des écouteurs dans la prise casque (16) de l’appareil.
L’émission du son se fait maintenant exclusivement dans les écouteurs, le
haut-parleur est mis en sourdine.
> Si vous souhaitez écouter à nouveau le son en passant par le haut-parleur,
débranchez la fiche des écouteurs de la prise casque de l’appareil.
4.4 Fonctions générales de l’appareil
4.4.1 Mise en marche de l’appareil
> Pour garantir une bonne réception FM/DAB+, déployez entièrement l’antenne
télescopique (14) située au dos de l’appareil. Pour ce faire, reportez-vous
aussi au point 4.3.1.
> Préparez d’abord la DIGITRADIO 370/371 CD IR au fonctionnement comme
décrit aux points 4.3.1 et 4.3.3.
> Appuyez sur la touche Marche/veille (2) de l'appareil ou de la
télécommande (14) pour mere en marche la DIGITRADIO 370/371 CD IR.
Lors de la première mise en marche, vous devez d’abord configurer la langue
d'achage et l'assistant de mise en service.
4.4.2 Arrêt de l’appareil
> En appuyant sur la touche Marche/veille vous pouvez mere l’appareil
en mode veille. L’indication [Veille] s'ache brièvement à l’écran. La date et
l’heure s’achent à l’écran. Vous pouvez modifier la luminosité de l’écran en
veille comme décrit au point 16.12.
100
 Loading...