

Page 1

Operating Manual
DIGITAL-
Satellite-Receiver
Features integrated decoding system
plus PCMCIA interface to accommodate a CI module.
For reception of free-to-air and encrypted
(e.g. VIACCESS, IRDETO, SECA etc. )
satellite programmes.
DDiiSSEEqqCC
1.2
Page 2

1 Index
1 Contents . . . . . . . . . . . . . . . . .2, 5, 6
2 Illustrations . . . . . . . . . . . . . . . . . . .3
Introduction . . . . . . . . . . . . . . . . . . .7
3 Please read this first - . . . . . . . . . .8
Safety precautions! . . . . . . . . . . . .9
4 Connections . . . . . . . . . . . . . . . . .10
4.1 Mains power connection . . . . . . . . . . . . . .11
4.2 External unit . . . . . . . . . . . . . . . . . . . . . . . .11
4.3 Connection to a television set . . . . . . . . . .11
4.4 Video cassette recorder (VCR) . . . . . . . . .12
4.5 HiFi amplifier . . . . . . . . . . . . . . . . . . . . . . .13
4.6 Serial interface (RS 232) . . . . . . . . . . . . . .13
5 Initial installation (AutoInstall) . . .13
6 Settings . . . . . . . . . . . . . . . . . . . . .17
6.1 User language . . . . . . . . . . . . . . . . . . . . . .17
6.2 Basic settings . . . . . . . . . . . . . . . . . . . . . . .17
6.2.1 Parental control . . . . . . . . . . . . . . . . . . . . .17
6.2.2/3 Time difference (time)/country . . . . . . . . . .18
6.2.4 OSD setting . . . . . . . . . . . . . . . . . . . . . . . .18
6.3 Audio/video settings . . . . . . . . . . . . . . . . . .18
6.3.1 Picture format . . . . . . . . . . . . . . . . . . . . . . .19
6.3.2 Language - audio signal . . . . . . . . . . . . . .19
6.3.3 Sub-titles . . . . . . . . . . . . . . . . . . . . . . . . . .19
6.3.4 SCART mode TV . . . . . . . . . . . . . . . . . . . .19
6.3.5 Video system* . . . . . . . . . . . . . . . . . . . . . .19
6.3.6 Dolby-Digital (AC 3)* . . . . . . . . . . . . . . . . .19
6.3.7 UHF output channel* . . . . . . . . . . . . . . . . .20
6.4 Antenna configuration . . . . . . . . . . . . . . . .20
6.4.1 Switching DiSEqC on/off . . . . . . . . . . . . . .21
6.4.2 Setting switching matrix . . . . . . . . . . . . . . .21
6.4.3 LNB properties . . . . . . . . . . . . . . . . . . . . . .22
6.4.4 Rotating dish antenna (DiSEqC 1.2) . . . . .23
7 Operation . . . . . . . . . . . . . . . . . . . .23
7.1 Switching on/off . . . . . . . . . . . . . . . . . . . . .23
7.2 Programme selection . . . . . . . . . . . . . . . . .24
7.3 Reception of encrypted programmes . . . . .26
7.3.1 Special functions* . . . . . . . . . . . . . . . . . . .26
7.3.1.1 Multifeed options* . . . . . . . . . . . . . . . . . . .27
7.3.1.2 Time management* . . . . . . . . . . . . . . . . . .27
7.3.1.3 Smartcard PIN code* . . . . . . . . . . . . . . . . .28
7.3.1.4 Changing the Smartcard PIN code* . . . . .28
* Only with devices with this
equipment
2
Page 3

7.4 Volume control . . . . . . . . . . . . . . . . . . . . . .28
7.5 Selecting another language . . . . . . . . . . . .29
7.5.1 Dolby Digital (AC3 mode) . . . . . . . . . . . . .29
7.6 TV/radio switching . . . . . . . . . . . . . . . . . . .29
7.7 Return to last programme selected. . . . . .30
7.8 Display time and programme info . . . . . . .30
7.9 Additional programme information . . . . . . .30
7.10 Transponder information . . . . . . . . . . . . . .30
7.11 Fixed image . . . . . . . . . . . . . . . . . . . . . . . .30
7.12 Teletext . . . . . . . . . . . . . . . . . . . . . . . . . . . .31
7.13 Sub-titles . . . . . . . . . . . . . . . . . . . . . . . . . .32
7.14 Electronic Programme Guide (SFI)32
7.14.1 Reading/downloading SFI data . . . . . . . . .32
7.14.2 Interrupting download procedure . . . . . . . .33
7.14.3 Calling up electronic programme guide . . .33
7.14.4 Table with current contents . . . . . . . . . . . .33
7.14.5 Table with following contents . . . . . . . . . . .34
7.14.6 Preview . . . . . . . . . . . . . . . . . . . . . . . . . . .34
7.14.7 SFI function . . . . . . . . . . . . . . . . . .34
7.14.7.1 SFI information . . . . . . . . . . . . . . . . . . . . . .34
7.14.7.2 Pre-selecting a programme . . . . . . . . . . . .35
7.14.7.3 Recording a programme . . . . . . . . . . . . . .35
7.14.7.4 SFI programme overview . . . . . . . . . . . . . .36
7.14.7.5 SFI genres . . . . . . . . . . . . . . . . . . . . . . . . .36
7.14.8 Exiting from SFI . . . . . . . . . . . . . . . . . . . . .37
7.15 Timer . . . . . . . . . . . . . . . . . . . . . . .37
7.15.1 Programming the timer . . . . . . . . . . . . . . .37
7.15.2 Changing timer programming . . . . . . . . . .39
7.15.3 Deleting timer programming . . . . . . . . . . .39
8 Changing the basic programming 40
8.1 Configuring the Favourites list . . . . . . . . . .40
8.1.1 Calling up the Navigator . . . . . . . . . . . . . .40
8.1.2 Adding programmes to Favourites list . . . .41
8.1.3 Deleting programmes . . . . . . . . . . . . . . . . .41
8.1.3.1 Deleting from Favourites list . . . . . . . . . . .41
8.1.3.2 Deleting from Complete list . . . . . . . . . . . .42
8.1.4 Sorting programmes . . . . . . . . . . . . . . . . .42
8.1.5 Programming electr. programme guide . . .43
8.1.6 Blocking programmes (parental control) . .44
8.2 Changing Receiver PIN . . . . . . . . . . . . . . .45
8.3 Searching for programmes . . . . . . . . . . . .45
8.3.1 Automatic search/scan . . . . . . . . . . . . . . . .46
8.3.2 Searching on a satellite . . . . . . . . . . . . . . .46
8.3.3 Searching on a transponder . . . . . . . . . . .47
5
Page 4

8.3.4 Manual search . . . . . . . . . . . . . . . . . . . . . .48
8.3.5 After the search . . . . . . . . . . . . . . . . . . . . .48
8.4 Service settings . . . . . . . . . . . . . . . . . . . . .49
8.4.1 Activating default (factory) settings . . . . . .49
8.4.2 Deleting all programmes . . . . . . . . . . . . . .49
8.4.3 SFI channel . . . . . . . . . . . . . . . . . . . . . . . .50
8.4.4 Software update . . . . . . . . . . . . . . . . . . . . .50
8.4.5 Copying settings . . . . . . . . . . . . . . . . . . . .51
8.5 System configuration . . . . . . . . . . . . . . . . .51
8.6 Condtional Access* . . . . . . . . . . . . . . . . . .52
9 Operating a rotating antenna . . . .52
9.1 East and West limits . . . . . . . . . . . . . . . . .52
9.2 Geo-positioning . . . . . . . . . . . . . . . . . . . . .53
9.3 Setting satellite position . . . . . . . . . . . . . . .55
9.3.1 Selecting satellite position . . . . . . . . . . . . .55
9.3.2 Adjusting the satellite antenne . . . . . . . . . .56
9.3.3 Storing the satellite position . . . . . . . . . . . .57
9.4 Current satellite liste . . . . . . . . . . . . . . . . .58
9.5 Deleting satellite position . . . . . . . . . . . . .58
9.6 Turning to reference position . . . . . . . . . . .58
10 Technical Terms . . . . . . . . . . . . . .59
11 Technical Data . . . . . . . . . . . . . . .61
12 Trouble-shooting guide . . . . . . . . .64
* Only with devices with this
equipment
Your appliance carries the CE logo and complies
with all relevant EU standards.
Subject to change without notice, not responsible for printing errors.
Correct as at 03/03
6
Page 5
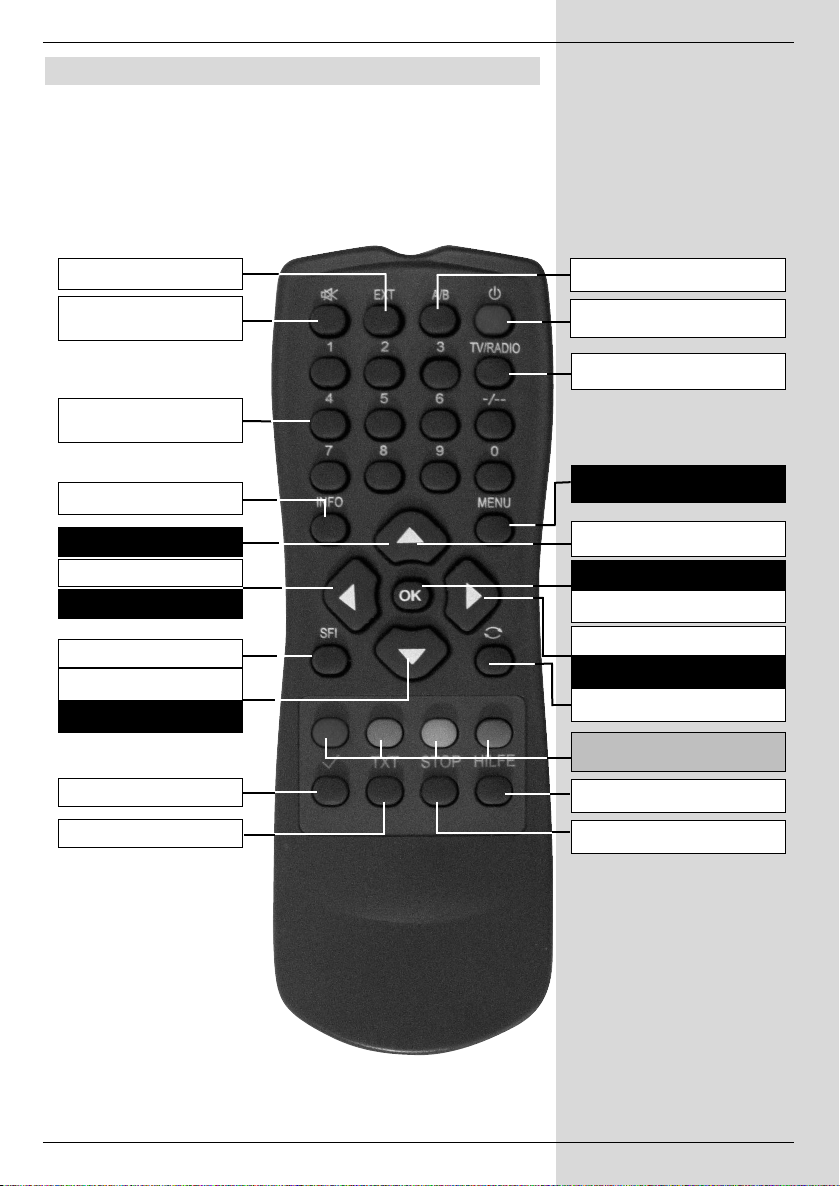
2 Illustrations
Remote control
EXTERNAL
Sound on/off
Numeric keys
Info
arrow key up
Volume -
arrow key left
SFI
Programme -
arrow key down
Option
Teletext
Language
On/Standby
TV/Radio mode
Menu on/off
Programme +
OK
Programme list on/off
Volume +
arrow key right
Back
Multi-function keys
Help
Stop
3
Page 6
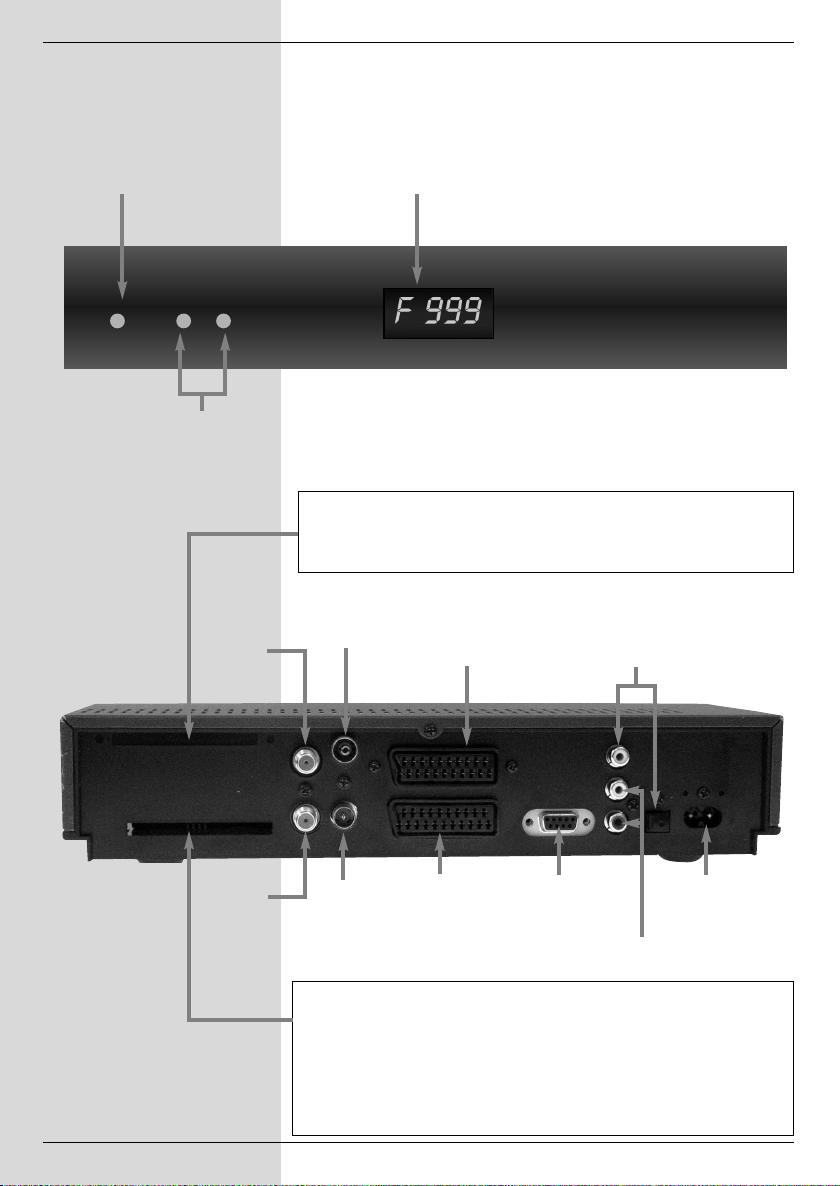
On/Standby
Programme select
up/down
LNC
input
LED display*
Card reader for Smartcard:*
> Insert the Smartcard (gold chip face down, and in the direction of
insertion) carefully into the card reader, as far as it will go.
Input terrestrial
antenna*
SCART socket
TV
Digital audio outputs
*
LNC out-
put
* Only for receivers equipped with
this feature
RF out-
put*
SCART socket
VCR
RS 232
interface
Mains socket
Analogue audio
outputs
Inserting the CI module:*
> Please follow the instructions of the CI module and card
manufacturer.
> Insert the smart card selected in the appropriate CI module.
> Now insert the CI module carefully in the slot provided.
4
Page 7

Dear customer,
congratulations on your decision to select this digital receiver .
This operating manual will help you to fully utilise the comprehensive functions of your new digital receiver.
We have made the operating instructions as easy to understand and as brief as possible.
This is a digital receiver of the new generation. We wish you
many years of enjoyment with your digital receiver!
Your
Service Team
7
Page 8

3 Please read this first
> Before you set up your unit for operation, please first
check that the package contains all the components
that should be there. The following are supplied as
standard:
1 digital receiver, 1 mains power cable, 1 remote control unit, 1 operating manual, 1 guarantee card, 2 batteries (1,5V AAA size).
> Insert the batteries provided in the battery compart-
ment of the remote control unit. Note the correct polarity when inserting the batteries.
> Before connecting the digital receiver, please first read
the safety notes in Chapter 3.
> Chapters 4, 5 and 6 describe connection of the
receiver, and adjusting it to the external installation
(dish antenna, LNC, etc.), to the television set, VCR,
etc. These settings need only be made once during
initial installation, and need only be adjusted or changed when there are any changes in your equipment,
i.e. if a different external unit is connected, or additional appliances are connected.
> Chapter 7 describes all the functions necessary for
day-to-day operation, such as programme selection or
volume adjustment.
> Chapter 8 contains information on how to add new
programmes, and how to change the programme
order.
> Chapter 9 describes the settings necessary for the
operation of a rotating antenna unit.
> Technical terms used in the operating manual are
explained in Chapter 10.
> Technical data may be found in Chapter 11.
> Assistance in finding and eliminating problems can be
found in the trouble-shooting guide in Chapter 12.
Important notes on operation
The use of a so-called "On Screen Display" simplifies the
operation of the digital receiver, and reduces the number of
keys required on the remote control unit. All functions are
displayed on the screen, and can be controlled by a few keystrokes. Related functions are grouped together in a "MENU".
The selected function is highlighted in a different colour. The
lower line of the display shows coloured bars representing the
red, green, yellow and blue function keys. These coloured
bars represent different functions in the various menues,
which can be executed by pressing the appropriate colourcoded key (“multi-function key”) on the remote control unit.
The function keys are only active when a brief description is
displayed in the appropriate field.
8
Page 9
The descriptions of keys and terms that appear in the OSD
menu are printed in bold type in this operating manual.
Help function:
Where available in the menu, pressing the blue function key
will cause a help text to be displayed, pressing again will
return to normal operation.
Note on disposal
The packaging of your unit consists entirely of recyclable
material. Please sort the components appropriately, and
dispose of them via the “Dual System”, or your equivalent
recycling system. Please note that spent batteries from the
remote control unit, as well as electronic components in
general, should not be disposed of in your domestic refuse.
For appropriate disposal, consult your specialist retailer, or
consult your local authority).
Safety notes
For your own protection you should read the notes on safety
precautions carefully before commencing operation of your
new unit. The manufacturer bears no responsibility for damage caused by non-observance of the safety precautions, or
by inappropriate handling.
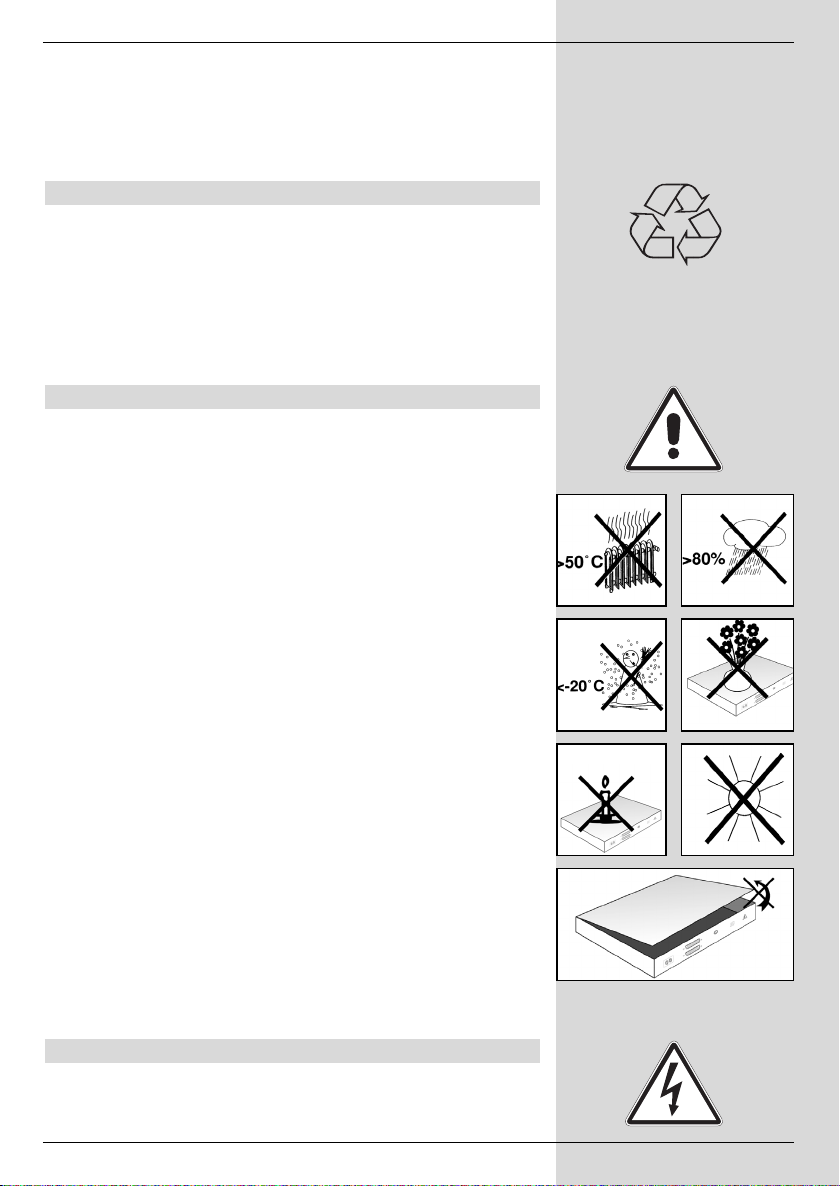
> To ensure adequate circulation of air, place the unit on
a smooth horizontal surface and do not place any
objects on top of the unit. The top cover contains air
slits which permit heat to escape from the interior of
the unit.
> Do not place any burning items, such as burning
candles, on top of the unit.
> Do not place any containers filled with liquid, such as
vases, on top of the unit, and ensure the unit remains
dry, i.e. it must not be subjected to water spray or dro-
plets.
> The unit may only be operated in a temperate climate.
> Do not open the cover of your unit! You are in danger
of receiving an electric shock. If it becomes necessary
to open the unit, this should only be done by trained
personnel.
In the following cases you should disconnect the unit
from the mains power and consult a specialist repair service:
> the mains cable or the mains plug are damaged
> the unit has been exposed to humidity, or liquid has
entered the casing
> in case of severe malfunction
> in case of significant external damage
When not in use
The unit should be disconnected from the mains power supply if it will not be operated for an extended period (e.g. when
you are away on holiday), or during an electric storm.
9
Page 10
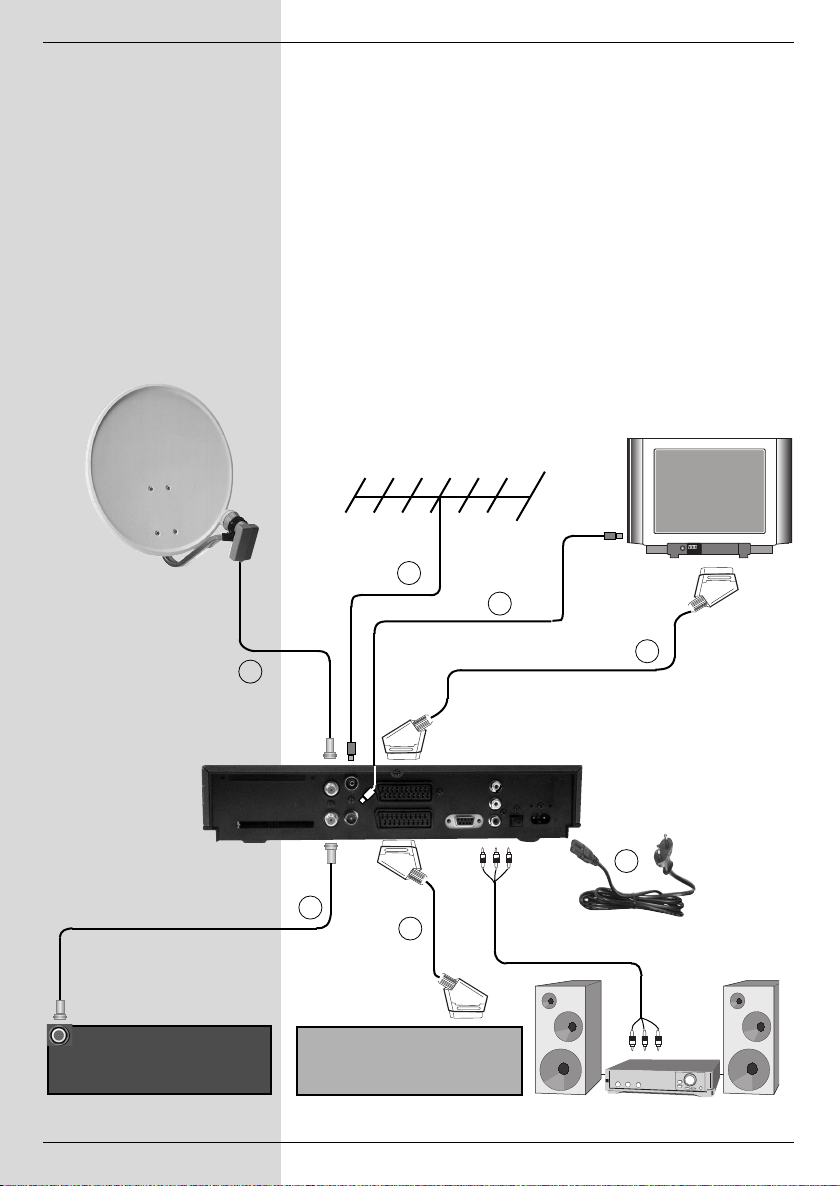
Connecting the DVB receiver to a satellite
installation
a. Mains connection
b. Connection of the LNC with the LNC input (LNC IN) of
the DVB receiver.
c. Connection of the LNC output with the LNC input of an
analogue receiver.
d. Scart connection of the DVB receiver with the television
set.
e.* Connection of the RF output with the antenna input of
the TV set.
f.* Connection of a terrestrial antenna with the Terrestrial
antenna input of the DVB receiver.
g. Scart connection of the video recorder with the VCR
Scart socket of the DVB receiver.
f
e
Analogue Receiver
* Only for receivers equipped with
this feature
d
b
*
*
a
c
g
VCR
10
Page 11

4 Connections
The references a b c etc. mentioned below refer to the illustration on page 10.
4.1 Mains power connection
The digital receiver should only be connected to the mains
power supply after it has been completely connected with all
other components in the system. This serves to avoid the
digital receiver or other components being damaged or
destroyed.
a When you have completed making all the connec-
tions, use the mains cable supplied to connect the
receiver to a mains power outlet 85-288 V/50-60 Hz.
4.2 External unit
4.2.1 Single operation
b Use a suitable coaxial cable to connect the LNC
input of the digital receiver to the LNC of your
external unit. Please also note Point 6 “Settings”.
4.2.2 Operation with an additional receiver in a sin-
gle-receiver installation
c If you wish to operate an additional unit in a single-
receiver installation (e.g. an analogue receiver or an
ADR receiver), you can connect the LNC input of the
additional receiver with the LNC output of the DVB
receiver by means of a suitable coaxial cable. In order
for the additional receiver to receive the satellite sig-
nal, your DVB receiver must remain in Standby mode
at all times. When the DVB receiver is switched on,
this will take over the priority control over the LNC.
4.3 Connection to a television set
When you have completed connecting your digital receiver to
the television set as described in this chapter, it may be
necessary to adjust the digital receiver to the television broadcast standard of your TV set before proceeding with further
settings.
See also Point 6.3.5 (Video system).
4.3.1 On SCART cables
In order to enjoy the optimum picture quality you should connect the digital receiver to your television set by means of a
SCART cable.
11
Page 12

Proceed as follows:
d Connect the receiver (SCART socket TV) and the
television set (SCART socket) by means of a SCART
cable. If your television set is appropriately equipped,
this will be switched automatically to AV, and thus to
satellite reception, when the digital receiver is switched
on.
4.3.2 On RF cables*
If your television set is not equipped with a SCART socket,
the digital receiver must be connected to the antenna input of
the television set. In this case, sound can only be reproduced
in mono mode.
Proceed as follows:
e Use a suitable TV connection cable to connect the
receiver (RF output) to the antenna input of the television set.
f The cable coming from the terrestrial antenna must be
connected to the Terrestrial antenna input of the
digital receiver.
You must now set the television set to the output channel of
the digital receiver. Select a free programme slot on the television set, and tune it to Channel 38 (if necessary, refer to the
operating manual of the television set).
If you cannot obtain a clear picture on Channel 38, this channel or a neighbouring channel may already be tuned to a
channel being received via the antenna. You can confirm this
by briefly removing the antenna cable from the Terrestral
antenna input socket of the digital receiver. If you then
temporarily receive a better picture, you should select a different channel in the range of 21 to 69 for the digital receiver.
Setting the UHF output channel
To set an optimum UHF output channel, call up the menu
Audio/Video Settings, as described in 6.3., and select the
field UHF output channel. Then proceed as desribed
under 6.3.7.
4.4 Video cassette recorder (VCR)
g Connect the video recorder to the SCART socket
VCR. When set to Play, the video recorder will deliver
a switching signal to the digital receiver. The video
recorder signal will thus be provided automatically to
the TV set.
If your video recorder does not provide a switching sig-
nal, press the key EXTERN to set your digital recei-
ver to the external AV input. Press this key again to
return to normal operation.
* Only for receivers equipped with
this feature
12
Page 13
4.5 Hi-fi amplifier
4.5.1 Analogue
To enjoy the best possible sound quality, you can connect the
digital receiver to a hi-fi amplifier. Use a suitable cable to connect the cinch sockets Audio R and Audio L of the digital
receiver to an input of the hi-fi amplifier (e.g. CD or AUX; please note that the Phono input is not suitable!).
4.5.2 Digital
If your amplifier is equipped with an appropriate electrical or
optical input socket, connect the socket AUDIO OUT
DIGITAL electrical resp. AUDIO OUT DIGITAL optical* with the electrical resp. optical input of your amplifier.
Sampling rates of 32, 44.1 and 48 KHz are provided, depending on the broadcasting station.
In addition, this connection will reproduce the Dolby Digital
signal (AC3), where available.
4.6 Serial interface (RS 232)
The RS 232 interface is used to update the operating system,
and to facilitate pre-programming by means of a personal
computer.
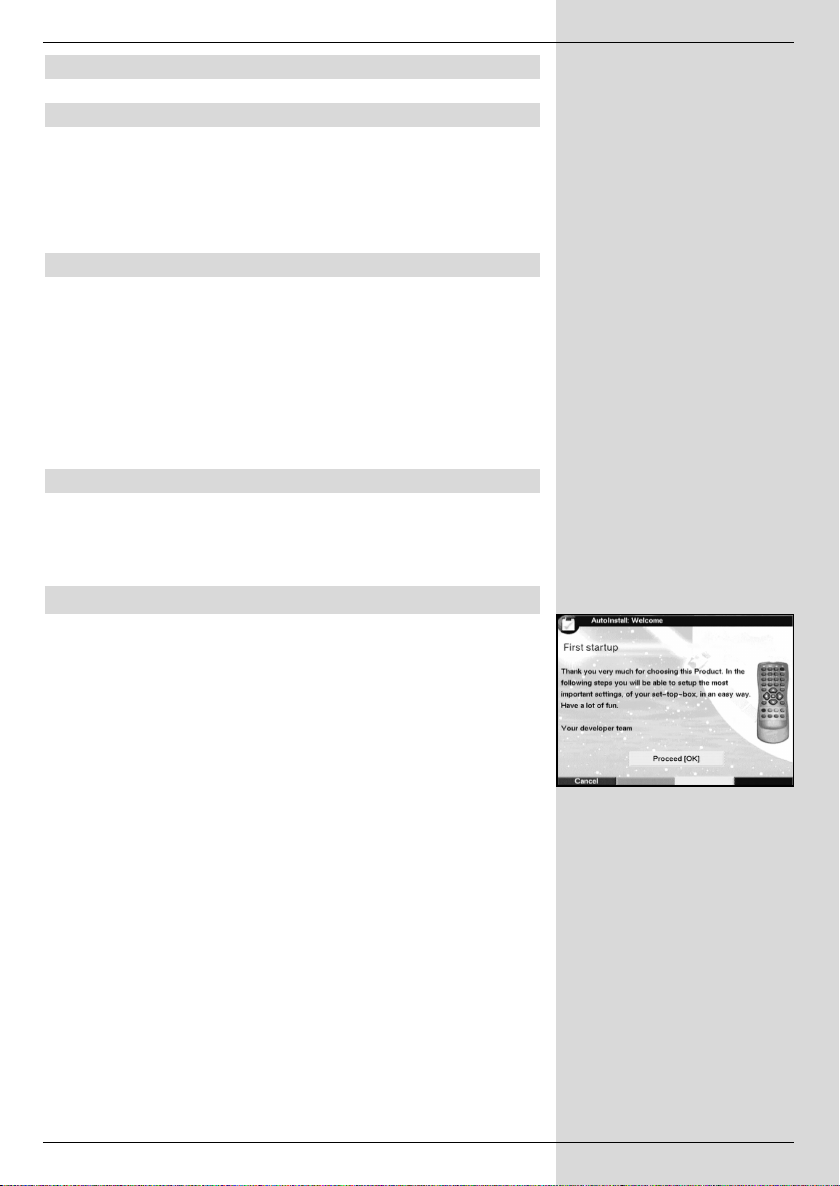
5 Getting started: initial installation
When you have read the safety notes, and have connected
the unit as described in Chapter 4, you can proceed to switch
on the receiver as described in Chapter 7. When switching
on the unit for the first time, the Start window with the
AutoInstall installation assistant
ed. The installation assistant will guide you through the most
important settings of the digital receiver quickly and in an
easy-to-follow manner.
The keys on the remote control required to make the appropriate step in the installation are marked.
You can break off the initial installation procedure at any time
by pressing the red function key. Pressing the green func-
tion key takes you back to the previous step of the installation
procedure. This allows you to correct any entries made in
error.
If the initial installation is not carried out at all, or is interrupted, your unit will start operation with its standard pre-programmed settings.
(Fig. 5-1)
will be display-
(Fig. 5-1)
13
* Only for receivers equipped with
this feature
Page 14
(Fig. 5-2)
(Fig. 5-3)
(Fig. 5-4)
(Fig. 5-5)
The initial installation procedure described hereinserves
only as an example. The exact initial installation procedure
will depend on the settings you wish to make.
Please follow closely any instructions that appear on the
screen.
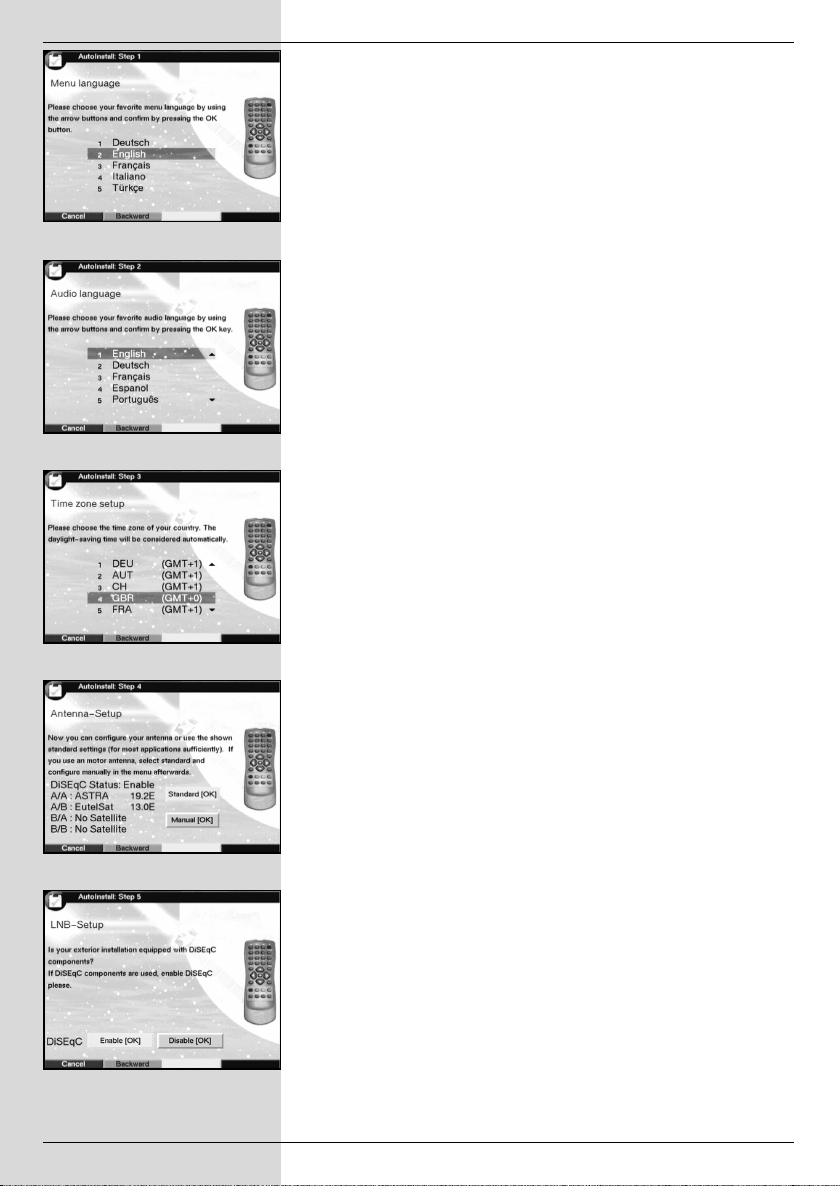
Menu/OSD language:
> Press OK to display the selection window for the
Menu/OSD language.
(Fig. 5-2)
> Use the arrow keys up/down to select the prefer-
red OSD language.
> Confirm by pressing OK.
Audio language
> Use the arrow keys up/down to select the prefer-
red audio channel language.
(Fig. 5-3)
When the installation assistant has been completed,
your language selection here will be used to sort the
programmes in your Favourites list.
> Confirm by pressing OK.
Country/Time Zone
> Use the arrow keys up/down to select the time
zone of the country in which you are located.
(Fig. 5-4)
The time on the receiver clock will be set automatically
based on your selection.
> Press OK to confirm, and to proceed to the antenna
configuration.
Antenna configuration
In this step of the installation procedure you can adjust the
setting of your digital receiver to the configuration of your
antenna.
> If you wish to accept the standard antenna setting,
use the arrow keys up/down to mark the field
Standard and confirm by pressing OK.
(Fig. 5-5)
In this case, proceed to the next item, “Software
Update”.
> If the configuration of your receiving installation does
not correspond with the standard setting, mark the
field Manual and confirm by pressing OK.
(Fig. 5-6)
DiSEqC
> If you are utilising DiSEqC components as part of your
reception installation, click on to the field Activate
and confirm by pressing OK
(Fig. 5-6).
(Additional information on DiSEqC may be
found in Chapter 10: Technical Terms.)
14
Page 15
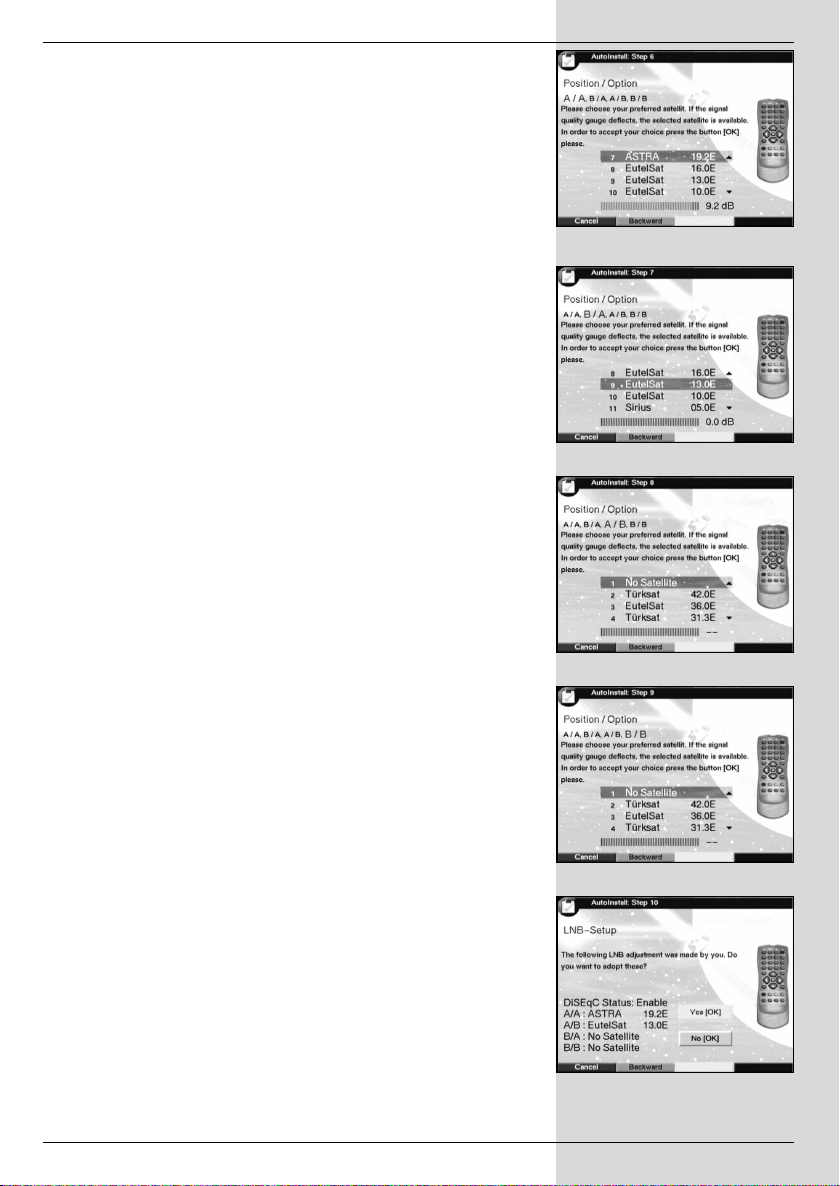
Position A/Option A
> Use the Up/down arrow keys to select the satelli-
te you wish to receive at the DiSEqC setting Position
A/Option A, and confirm by pressing OK.
(Fig. 5-7)
Position B/Option A
> Use the Up/down arrow keys to select the satelli-
te you wish to receive at the DiSEqC setting Position
B/Option A, and confirm by pressing OK.
(Fig. 5-8)
Position A/Option B
> Use the Up/down arrow keys to select the satelli-
te you wish to receive at the DiSEqC setting Position
A/Option B, and confirm by pressing OK.
(Fig. 5-9)
Position B/Option B
> Use the Up/down arrow keys to select the satelli-
te you wish to receive at the DiSEqC setting Position
B/Option B, and confirm by pressing OK.
(Fig. 5-10)
With the next step you can check again on the configuration
of your antenna.
> If you wish to confirm this setting, use the arrow
keys up/down to select the field yes, and confirm
by pressing OK.
(Fig. 5-11)
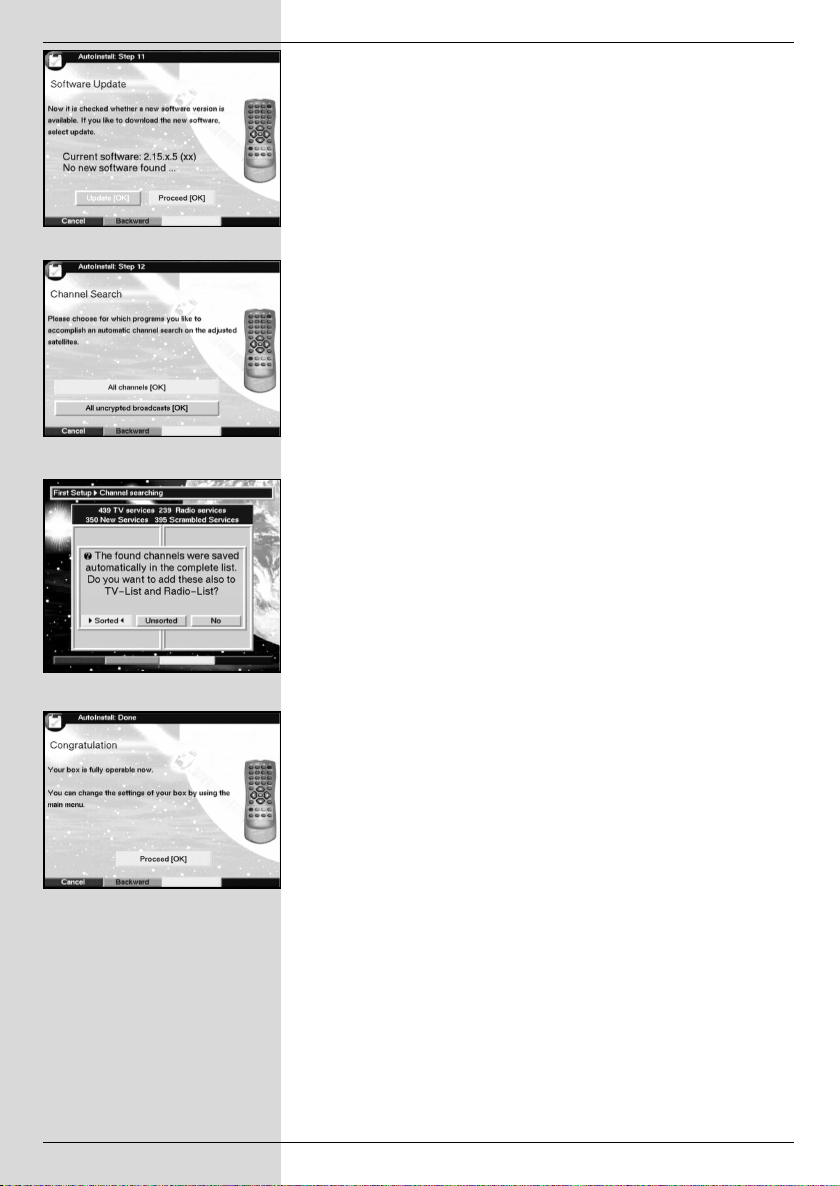
Updating the software (Pre-condition: Astra 19,2° reception)
When you have completed the settings for the antenna configuration, the digital receiver will check on whether there is an
updated version of the software for your unit available via
satellite. If a new version of the software is available, you can
process a software update automatically. Use the arrow
keys right /left to select the field Update, then confirm
by pressing OK.
(Fig. 5-12).
The new software for your unit
will now be downloaded. This procedure can take several
minutes.
(Fig. 5-7)
(Fig. 5-8)
(Fig. 5-9)
Searching/scanning for channels/stations
When the software version has been checked, and updated if
necessary, you can proceed to the programme search.
> Use the arrow keys up/down to mark the field All
Programmes, if you want to search for both free-toair and encrypted programmes, or All unencrypted
Programmes, if you want to search only for free-toair programmes.
(Fig. 5-13)
> Press the OK key now to confirm, and an automatic
programme scan will be carried out. All the satellites
selected in the antenna configuration step will be
scanned for programmes. This procedure may take
several minutes. Please note any messages displayed
15
(Fig. 5-10)
(Fig. 5-11)
Page 16
(Fig. 5-12)
(Fig. 5-13)
(Fig. 5-14)
on the screen.
After the Search
When the programme search has been completed, the number of transponders, programmes and new programmes
found will be displayed. In addition, you will be asked
14)
, whether you want to accept the programmes found auto-
(Fig. 5-
matically in the TV or Radio list. If you wish to accept the programmes automatically, you can then decided whether they
should be transferred to the Favourites list in sorted or
unsorted form.
In the case of a sorted acceptance of programmes found,
these will be sorted into the Favourites according to a preprogrammed list. The order in which programmes are listed
will depend on the audio channel language selected in the
installation step Audio language. If German was selected
as the audio language, the sorting order can additionally be
differentiated according to the appropriate country (Germany,
Austria or Switzerland) selected during the installation step
Country.
If the programmes are accepted in unsorted form, the
newly found programmes are simply added in unsorted order
at the end of the Favourites list.
> Use the arrow keys right/left to select the prefer-
red type of sorting, and confirm by pressing OK.
Exiting the installation assistant
> Confirm the final message of the installation assistant
(Fig. 5-15)
by pressing OK,to return to normal opera-
tion.
(Fig. 5-15)
16
Page 17
6 Settings
Now that you have completed connecting your new digital
receiver, and have commenced operation, you can, if you
wish, further optimize the settings of the digital receiver for
your personal preferences.
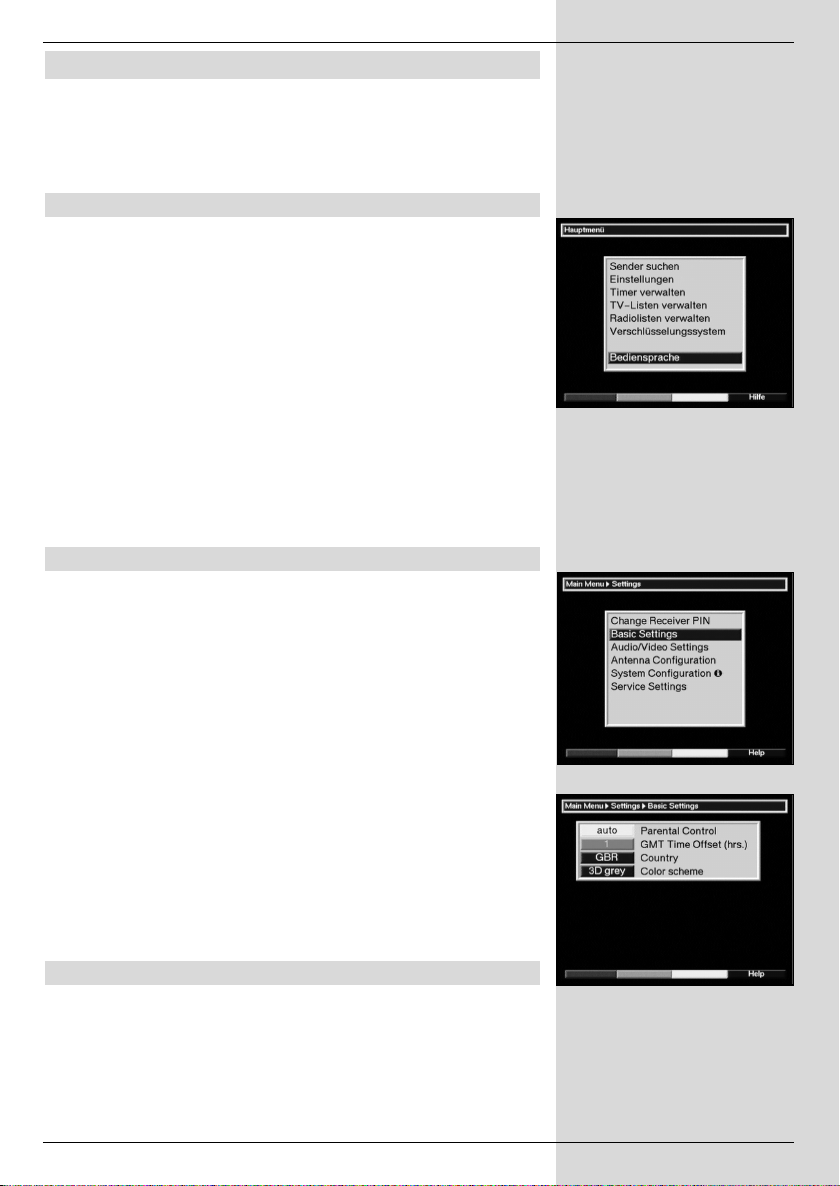
6.1 Menu language
Under this menu item you have the option of setting the
menu language according to your personal preference.
To alter the OSD language proceed as follows:
> Press the Menu key to call up the Main Menu.
(Fig. 6-1)
> Now use the arrow keys up/down to select the
menu item Menu language.
> Confirm by pressing OK.
The sub-menu Menu language will be displayed.
> Use the arrow keys up/down to select the desired
language.
> Confirm by pressing OK, this will store the selection in
memory.
> Press Back to return to the Main Menu.
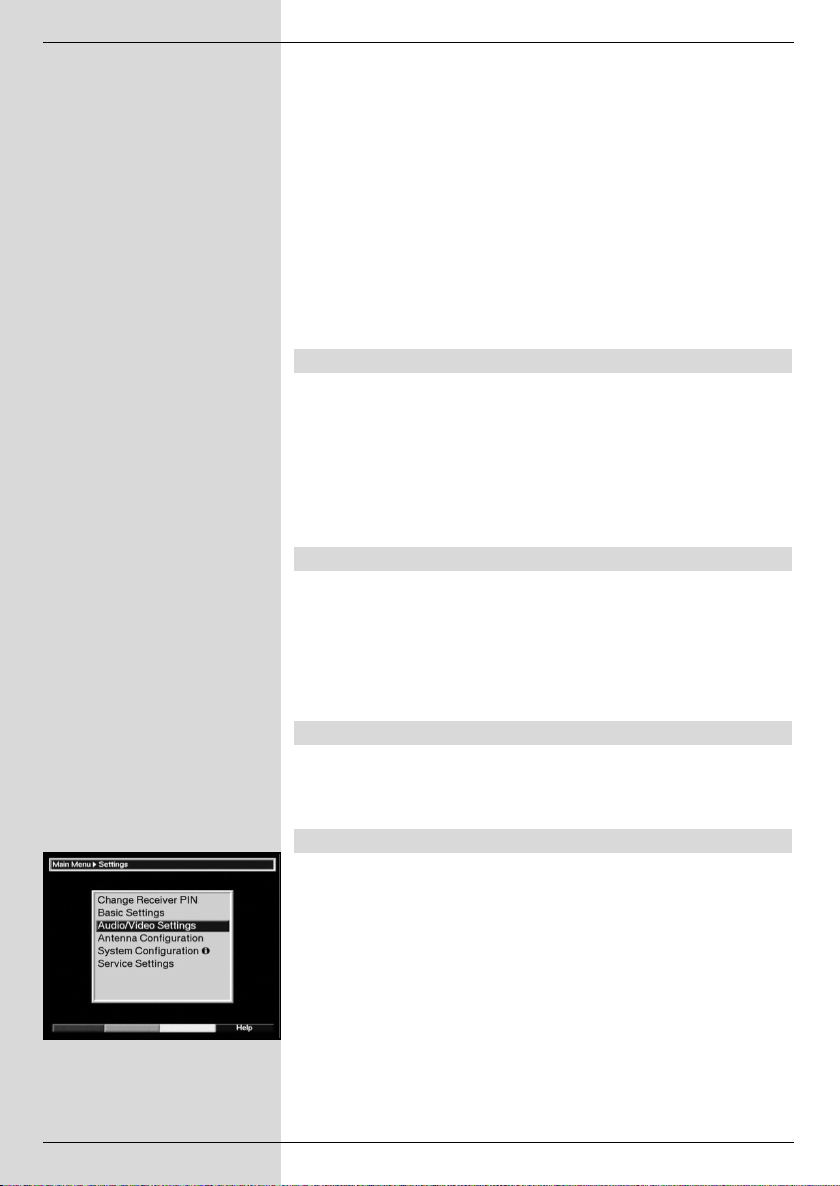
6.2 Basic settings
To optimize the performance of your DVB receiver, you must
still set this to your personal preferences.
> Press the Menu key to call up the Main Menu.
> Use the arrow keys up/down to mark the item
Settings.
> Confirm by pressing OK. The sub-menu Settings
will be displayed.
> Now use the arrow keys up/down to mark the
item Basic Settings.
> Confirm by pressing OK. The menu Basic Settings
will be displayed.
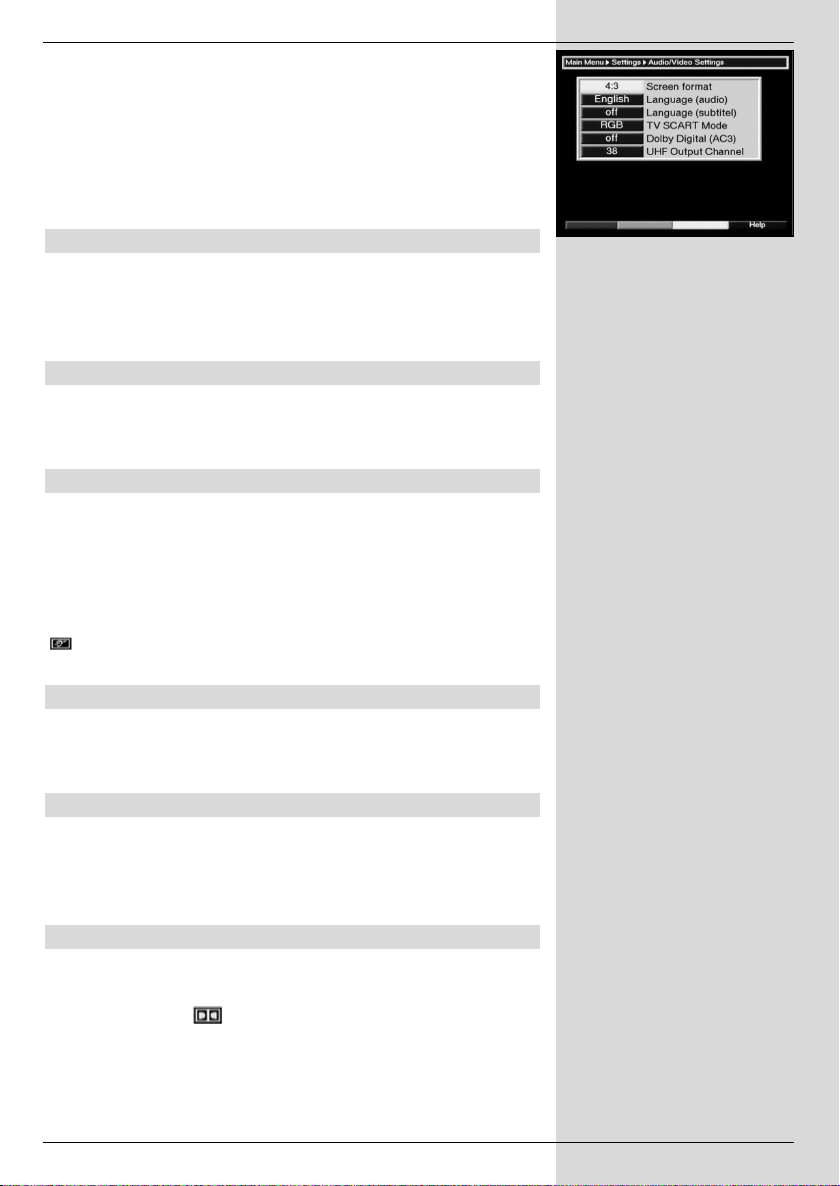
> Use the arrow keys up/down to move the marker
within the menu, and to change the individual positions as indicated. When selecting a menu item, please also note any messages displayed on the screen.
The following settings may be made:
(Fig. 6-2)
(Fig.. 6-3)
(Fig. 6-1)
(Fig. 6-2)
6.2.1 Parental control function
Your receiver is equipped with a parental control (child-proof
lock) function. This can be used to protect important functions
(e.g. calling up the main menu) from unauthorized access. In
addition programmes to which you have blocked access as
described in Points 8.1.6 and 8.2 can only be selected after
entering a four-digit PIN code (Unit PIN).
17
(Fig. 6-3)
Page 18
> In this line you can use the arrow keys right/left
to set the parental control mode to Always or Auto.
Always
When the setting Always is selected, the Main Menu as well
as the programmes selected in terms of Points 8.1.6 and 8.2
are permanently blocked, regardless of the programme being
broadcast.
Auto
When the setting Auto is selected, access to the Main Menu
is not blocked. The programme lock block is only activated
when one of the selected channels carries a programme with
an age restriction.
When using a Smartcard please note Point 7.3.1.3 !
6.2.2 Time difference to GMT (hours)
Your receiver is equipped with a clock. This is synchronised
to Greenwich Mean Time via satellite signals. If you have
selected the option None under the heading Country (Point
6.2.3), you will simply need to correct the time to correspond
to your local time by using the arrow keys right/left. For
Germany, this difference is +1 hour, and +2 hours for Daylight
Savings Time.
6.2.3 Country
This function provides for automatic adjustment for summer
and winter time. Using the arrow keys right/left, enter
your home country in the line Country.
> Press the Back key to return to the menu Settings,
or press the Menu key to return to normal operation.
The settings are automatically stored in memory.
(Fig. 6-4)
6.2.4 OSD Setting (schematic)
In this line, use the arrow keys right/left to select one of
the colour presentation options for the OSD: 3D Sand, 3D
Blue or 3D Grey.
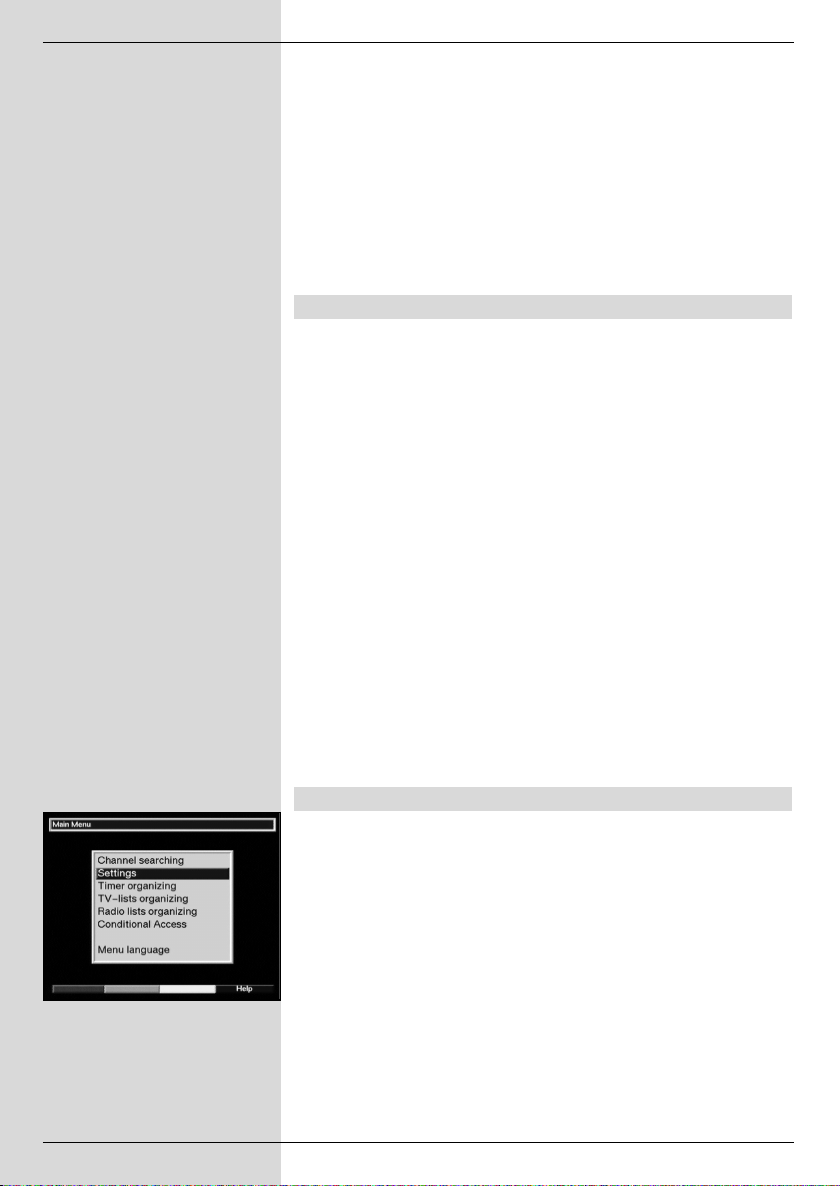
6.3 Audio/Video settings
In order to optimize the performance of your digital receiver in
conjunction with your television set, you may wish to make
further settings in the menu Audio /Video Settings.
> Press the Menu key to call up the Main Menu.
> Use the arrow keys up/down to select the line
Settings.
> Confirm by pressing OK. The sub-menu Settings
will be displayed.
> Now use the arrow keys up/down to select the
line Audio/Video Settings.
18
(Fig. 6-4)
Page 19
> Confirm by pressing OK. The menu Audio/Video
Settings will be displayed.
(Fig. 6-5)
> You can use the arrow keys up/down to move
the marker around within the menu, and change the
individual settings as indicated. When selecting a
menu item please also note any messages displayed
on screen.
The following settings can be adjusted:
6.3.1 Picture format TV set
Use the arrow keys left/right to select the appropriate
picture format for your TV set, 4:3 or 16:9. This function
provides for automatic adjustment of the picture format broadcast to your television set.
6.3.2 Language (Audio signal)
Use the arrow keys right/left to select your preferred
language. If the language is available from the provider, this
language will be automatically selected.
6.3.3 Language (Sub-titles)
Sub-titles can be displayed on your screen using this DVB
receiver. If the function Sub-titles is switched on, and the
language selected is being broadcast, these will be automatically displayed.
If the function is not switched on, sub-titles can also be
displayed manually. Sub-titles are indicated by the symbol
shown in the information box. Please also note Point
7.13 of this operating manual.
6.3.4 TV SCART mode
Use the arrow keys right/left to select the appropriate
setting for your TV set,CVBS or RGB. The standard setting
is CVBS.
6.3.5 Video system*
Use the arrow keys right/left to select the appropriate
broadcast standard for your television set. The options available are PAL BG, PAL I, PAL DK, SECAM BG and
SECAM DK.
(Fig. 6-5)
6.3.6 Dolby Digital (AC3)
A number of movies are transmitted in the Dolby Digital format. This is indicated after a programme has been selected
by the Dolby logo in the information box. If you have
connected a Dolby Digital 5.1 channel amplifier to the
system, you can enjoy movies in 5.1 channel Dolby Digital
sound where available.
19
* Only for receivers equipped with
this feature
Page 20
To enjoy this feature, you must simply connect the Audio Out
Digital output (see Point 4.5.2) of your DVB receivers with the
digital input of your Dolby Digital 5.1 channel amplifier.
Where a programme is broadcast in Dolby Digital sound, this
will be indicated by the Dolby logo being displayed in the
information window when the programme is selected. If the
function Dolby Digital (AC3) is switched on, these programmes will automatically be reproduced in Dolby Digital format.
If the function is not enabled, Dolby Digital sound can also be
switched on manually. Please refer to Point 7.5.1 of this operating manual.
6.3.7 UHF output channel*
To set a suitable UHF output channel, proceed as follows:
> Select a free UHF channel in the range of 21 to 69 on
your television set.
> Then, using the arrow keys right/left set the new
output channel of your digital receiver. The digital
receiver will now transmit on the UHF channel indicated on the display. If you are not able to obtain interference-free reception on this channel, repeat the procedure until you gave found a suitable channel.
> When you have found an optimum UHF channel,
remember to store this in the memory of your television set.
> If your television set is equipped only with an automa-
tic programme scan, you will first have to set a random
UHF channel on your digital receiver, and then start
the automatic scan function of your television set. If
necessary, repeat this procedure until you have found
a suitable channel, then store this in the memory of
your television set.
> Finally, it may be necessary to perform some fine
tuning of the channel on your television set.
(Fig. 6-6)
* Only for receivers equipped with
this feature
6.4 Antenna configuration
Once you have completed setting the digital receiver to your
individual preferences, you can proceed, if necessary, to
adjust the digital receiver settings to your antenna. The menu
Antenna Configuration contains the satellites that have
been selected in the installation assistant. If the installation
assistant was interrupted, the satellite positions ASTRA and
EUTELSAT are pre-programmed.
Should you wish to receive other satellites, or if you are using
a different type of LNC, you can adjust your digital receiver to
the appropriate data as follows:
> Press the Menu key to call up the Main Menu.
6-6)
> Use the arrow keys up/down to select the item
Settings.
20
(Fig.
Page 21

> Confirm by pressing OK.
The menu Settings will be displayed.
(Fig. 6-7)
> Now use the arrow keys up/down to select the
line Antenna Configuration.
> Confirm by pressing OK. The menu Antenna
Configuration will be displayed.
(Fig. 6-8)
The following settings may be made in this sub-menu:
6.4.1 Switching DiSEqC on or off
DiSEqC (Digital Satellite Equipment Control) is a digital switching signal used to control DiSEqC-compatible components
via the antenna cable. If your external installation incorporates DiSEqC components, you must switch on (enable) the
DiSEqC control:
> In this line, use the OK key to select DiSEqC on or
off.
As only one LNC can be addressed if the DiSEqC
control is switched off, the menu is restricted to the
configuration of a single LNC.
6.4.2 Setting the switching matrix
The menu lists the four switching criteria of the DiSEqC control. Your receiver is pre-programmed so that ASTRA will be
received on the position A/A and Eutelsat on the position B/A
of a multiswitch. If the switching matrix of your receiving
installation is set up differently, or if you are receiving other
satellites, proceed as follows to adjust your digital receiver to
the requirements of your receiving installation.
> Use the arrow keys to select a DiSEqC switch posi-
tion (1-4) you wish to allocate to a particular satellite
(e.g. A/B 3 No Satellite), by simply marking this
line.
> Confirm by pressing OK.
A selection table listing various satellites will be
displayed.
> Use the arrow keys up/down to mark the appro-
priate satellite.
The arrow keys up/down will move the marker up
or down one line at a time, the arrow keys
right/left will move forward or backward one page at
a time.
If the satellite you seek is not included in the list, please select one of the reserve slots, designated User 1
to User 14.
> Confirm by pressing OK. The satellite selected will
now be added to the menu Antenna
Configuration at the position previously marked.
Example:
A B
Position
Ausgang
(Fig. 6-7)
(Fig. 6-8)
A B
Position
Ausgang
A B
Option
Ausgang
21
Page 22

(Fig. 6-9)
Continue to work through the menu Antenna Settings,
until the entries in this menu comply with those of your receiving installation. In the case of switching criteria which you do
not require, set the entry to No Satellite.
6.4.3 Additional Settings/LNC properties
Now you have adapted the switching matrix of your digital
receiver to the configuration of your receiving installation, you
should continue to check the other settings for your receiving
installation, and to correct settings where necessary.
> Use the arrow keys right/left to move the marker
to the column Configuration.
> Now use the arrow keys up/down,to move to the
line in which you wish to check or alter the settings,
and click on the field Continue.
> Confirm by pressing OK.
A sub-menu will be displayed in which you can adjust
LNC settings and configure a test transponder.
9)
The following settings may be made:
LNC Type
> In this line use the arrow keys right/left to enter
the type of LNC you are using. The options available
are Single LNC, Quatro LNC, DisiCon 1 LNC,
DisiCon 2 LNC, DisiCon 4 LNC, C-Band LNC
and a User LNC for manual entry of LNC data.
> Press OK to accept the setting.
Test Transponder
The following points of this menu should only be entered if
you wish to check on a specific satellite signal.
Transponder frequency
In this line, use the numeric keys to enter a frequency on
which digital programmes are broadcast.
Polarisation
Use the arrow keys up/down to enter the appropriate
polarisation plane (horizontal or vertical).
Symbol rate
The symbol rate indicate the volume of data transmitted per
second. This could, for example, be 27500 (27500 symbols
per second). Use the numeric keys to enter the appropriate symbol rate.
User LNC
If under the heading DiSEqC type you have entered User
LNC, additional settings can be made:
(Fig. 6-
22
Page 23

LOF low band
LOF (Local oscillator frequency) is the frequency an LNC
utlizes to convert the frequency received into the so-called 1.
intermediate frequency, which can, in turn, be received and
interpreted by the digital receiver. So-called Universal LNCs
are equipped with 2 LOFs, to cover the entire receiving range
from 10.7 to 11,8 GHz (low-band) and from 11,7 to 12,75
GHz (high-band).
> In this line, use the numeric keys to enter the LOF
of the low band of your LNC.
LOF high band
> In this line, use the numeric keys to enter the LOF
of the high band of your LNC.
Transition LOF low/high
> In this line, use the numeric keys to enter the
frequency at which your LNC changes from low band
to high band.
> Press OK to accept the setting.
Signal/Quality
If you have entered the parameters of the test transponder
correctly, these lines will indicate the signal strength and
quality.
6.4.4 Rotating antenna
If you are operating the digital receiver in conjunction with a
rotating antenna equipped with a DiSEqC motor (Level 1.2),
switch the DiSEqC Control (Point 6.4.1) on and please
note Point 9 of this operating manual.
7 Operation
7.1 Switching on and off
> You can switch on the digital receiver by pressing the
On/Standby key either on the receiver front panel,
or on the remote control.
> Press the same key again, either on the receiver front
panel or on the remote control, to switch the receiver
off again.
> The receiver is now in standby mode,and the display*
on the receiver will show the time.
If the current time is not shown, this must still be
downloaded to the unit. To do this, switch the receiver
on, and set it to a major channel, such as ZDF in
Germany, that broadcasts a time signal, for about 30
seconds to download the time automatically.
23
* Only for receivers equipped with
this feature
Page 24

(Fig. 7-1)
7.2 Programme selection
7.2.1 Using the Programme up/down keys
> You can move through the list one slot at a time, up or
down, by using the Programme keys up/down
either on the receiver or on the remote control.
7.2.2 Using the numeric keys
> Use the numeric keys to enter the programme number
you wish to view.
For example:
1 for programme slot 1
1, then 4 for programme slot 14
2, then 3, then 4 for programme slot 234
When entering multi-digit programme numbers you have
approx. 3 seconds after pressing the key to complete your
entry.
If you wish to enter a number consisting of only one or two
digits, you can speed up the selection process by holding
down the key of the last digit a little longer.
7.2.3 Using the programme list
> Press OK.
The programme list will now be displayed. In TV mode
only the TV programmes will be displayed, and in
radio mode only the radio programmes will be displayed. The programme currently selected is marked/highlighted.
> Use the arrow keys up/down to mark the desired
programme.
> Press the yellow function key Preview to view a
preview of the programme highlighted.
> Press OK to view the highlighted programme.
> Use the arrow keys up/down to move the marker
around the list one line at a time.
> Use the arrow keys right/left to move the marker
around the list, backward or forward, one page at a
time.
(Fig. 7-1)
(Fig. 7-2)
7.2.3.1 Selecting a list
To facilitate finding programmes your receiver is equipped
with several programme lists. You may select your
Favourites list (see Point 8.1), or display the alphabetically
sorted Complete list or sort the list by Providers.
> Press OK to display the active programme list.
24
Page 25

> Now use the red function key to open a window sho-
wing the types of programme list available
(Favourites List, Providers and Complete
list). The active programme list type will be highligh-
(Fig. 7-2)
ted.
> Use the arrow keys up/down to select, e.g. the
programme list type Complete list.
> Confirm by pressing OK.
The alphabetically sorted Complete list, which includes all programmes, will be displayed.
(Fig. 7-3)
> Use the arrow keys up/down to mark the pro-
gramme you wish to view.
> Confirm by pressing OK.
7.2.4 Calling up blocked programmes
If you select a programme that is blocked by the parental
control function, the message Receiver PIN will be displayed on screen.
(Fig. 7-4)
> Use the numeric keys to enter your PIN code. You
can now view the programme selected.
or
> Switch to a programme that is not blocked.
If you have selected the option Always under Point 6.2.1,
the message requiring entry of the code will appear each
time you switch to a blocked programme. However, to make
your life a little easier, the PIN code only needs to be entered
once in each operational cycle.
If you have selected the option Auto, only the programme
currently running will be unblocked. The parental control will
be active again for the next programme broadcast, and the
PIN code will also have to be entered again.
If you are using a Smartcard please note Point
7.3.1.3.
7.2.5 Information box
Each time the programme is changed, an information box will
be displayed briefly
and programme name. In addition, symbols will indicate other
programme characteristics, such as for teletext, for
a 16/9 format programme, for various audio channels
(e.g. movie with soundtrack in various languages, or various
radio programmes), for sub-titles and for encrypted
programmes.
(Fig. 7-5)
showing the programme slot
(Fig. 7-3)
(Fig. 7-4)
(Fig. 7-5)
25
Page 26

7.3 Reception of encrypted programmes*
Your receiver is equipped with an integrated decoding
system* as well as with a Common Interface*. This allows
you to receive and view encrypted programmes. To use this
feature, you must first either insert a valid Smartcard in the
integrated card reader or you must insert a CI module together with a valid Smartcard in the slot provided:
> Insert the valid Smartcard in the card slot of the inte-
grated card reader*.
or
> Insert a CI module in the slot* provided.
> Insert the Smartcard in the card slot of the CI module.
Ensure that the gold chip is located on the upper side
of the card, in the direction in which it is inserted.
> If an encrypted programme is selected, your digital
receiver automatically checks on the card reader and
the slot, and will display the programme in unencryp-
ted form provided you have a valid smart card for this
programme, resp. an appropriate CI module containing
a valid smart card.
Manual Initialising of the CI module*
> You can initialise the CI module manually in normal
operation by holding down the red function key for
some time.
7.3.1 Special functions*
If you have a valid Smartcard, you can receive encrypted programmes. Insert the Smartcard, with the gold chip located on
the lower surface, and pointing in the direction of insertion,
pushing it carefully as far as it will go into the card reader
located on the back panel.
Certain programme slots provide specific special functions.
Multi-feed channels allow you, for instance, in the case of
sports broadcasts to choose from various venues (National
League soccer), or you can select different sound channels
(stadium vs. TV commentary), or you can choose from several camera positions available at a single event (Formula 1
racing).
In addition, you can select the preferred starting time for your
movie selection.
* Only for receivers equipped with
this feature
26
Page 27

7.3.1.1 Multifeed options*
Some programmes provide a facility for multifeed options.
This function allows you, for instance, to select your own preferred camera angle in the case of coverage of sports events
(Formula 1), or to switch to various sports venues (National
League soccer).
Where a programme provides multifeed options, this is indicated on screen
(Fig. 7-6)
.
> Press the Option key to select one of the options
available.
A selection window will be displayed, showing the
various options available.
(Fig. 7-7)
> Use the arrow keys up/down to select the desired
option.
> Confirm by pressing OK.
Your digital receiver will now select the chosen option.
7.3.1.2 Time management*
Some channels provides the facility of time management.
This means that movies are available around the clock with
various starting times to suit your preference.
Where a programme provides the time management facility,
this will be indicated on screen
(Fig. 7-8)
> To select one of the possible starting times, press
Option.
A selection window indicating the available starting
times will be displayed.
(Fig. 7-9)
> Use the arrow keys up/down to select the prefer-
red starting time.
> Confirm by pressing OK.
If the programme has been enabled for the starting
time selected, you may view it at this time.
.
(Fig. 7-6)
(Fig. 7-7)
(Fig. 7-8)
(Fig. 7-9)
Parental Control*
The entry of a PIN code allows you to view programmes with
restricted access for children even during the daytime,
without compromising the basic tenet of parental control. In
Germany, for a programme to be accessible to children and
teenagers, the programme must be coded with an age group
release which is part of the television self-control programme
monitored by the state youth authorities. To view a pre-blokked programme you must enter the 4-digit Smartcard PIN
code. You will obtain this PIN code together with your
Smartcard.
27
* Only for receivers equipped with
this feature
Page 28

(Fig. 7-10)
7.3.1.3 Smartcard PIN-Code*
Your digital receiver is equipped with a parental control function that allows you to block individual programmes as well as
access to the main menu (see Points 6.2.1 and 8.1.6).
In addition programmes not suitable for viewing by children
are pre-blocked by means of an age group code. This parental control for programmes is permanently active, and cannot
be de-activated as described in Point 8.1.6. To unblock a particular programme, you must enter the Smartcard PIN
code. This PIN code is stored on the Smartcard. You will
receive it when you receive the card.
The Smartcard PIN code is thus not the same as the
Receiver PIN code of the digital receiver (Point 8.2) and
should not be confused with this.
As soon as you have inserted a Smartcard in the card reader
slot, only the Smartcard PIN code will be active.
If you switch to a channel currently broadcasting a pre-blokked programme, or if you attempt to call up the main menu, a
message will be displayed.
> To view the programme, or to call up the main menu,
use the numeric keys to enter the 4-digit
Smartcard PIN code.
> As soon as the correct code has been entered, you
will be able to view the programme or to access the
main menu.
If the PIN code has been entered incorrectly, you can
repeat the entry, or you can exit the menu by pressing
Back.
(Fig. 7-10)
* Only for receivers equipped with
this feature
7.3.1.4 Changing the Smartcard PIN code*
Should it become necessary to change the Smartcard PIN
code, please contact the appropriate Hotline.
7.4 Volume control
You have the facility to adjust the volume of your digital receiver. This makes operating the receiver even more convenient,
since you can access all important functions from a single
remote control, and will rarely have to use the remote control
of your television set. When the digital receiver is switched on
it will reproduce sound at the volume level last set.
> Adjust the volume of your digital receiver using the
Volume + key to increase volume, and the Volume
- key to make it softer.
> Press the Sound on/off key to switch the sound off
(mute), press the same key again to switch the sound
back on.
28
Page 29

7.5 Selecting a different language
If a programme is broadcast in several languages, or with
various soundtracks ( in the information box), proceed as
follows to select a different language or sound channel:
> Press the Language Select key. A list of langua-
ges currently broadcast will be displayed on screen
(Fig. 7-11)
> Use the arrow keys up/down to select the desired
language.
> Confirm by pressing OK.
You can now listen to the programme in the desired language. Your digital receiver can also receive mono broadcasts.
> Use the arrow keys right/left to choose between
Mono Channel 1 ( ), Mono Channel 2 ( ) and
Stereo ( ).
7.5.1 Dolby Digital (AC3 mode)
If a programme is broadcast in Dolby Digital sound, this will
be indicated by the Dolby logo in the information window
when you switch to the programme. If the Dolby Digital (AC3)
function has been enabled as per Point 6.3, this programme
will automatically be reproduced in this format.
If you have not switched on the function Dolby Digital
(AC3), switch your receiver to AC-3 mode manually as follows:
> Press the Language Select key. If available, a list
of the languages currently being broadcast as well as
Dolby Digital (AC 3) will be displayed on screen.
> Use the arrow keys up/down to mark the line
Dolby Digital.
> Confirm by pressing OK.
You can now enjoy the programme in full 5.1 channel Dolby
Digital sound. If you would like your receiver to recognise and
reproduce Dolby Digital broadcasts automatically, you should
set your receiver to automatic AC3 reproduction as described
in Point 6.3.
.
(Fig. 7-11)
7.6 TV/Radio switching
The pre-programming setup contains not only television programmes, but radio programmes as well.
> Press the TV/Radio key to switch the digital receiver
to radio mode.
The receiver will now play the radio programme last
selected.
> Press the TV/Radio key again to return to the televi-
sion programme last viewed.
29
Page 30

(Fig. 7-12)
(Fig. 7-13)
7.7 Return to last programme selected
> Press Back on the remote control to return to the last
programme viewed previously.
> Press the key again to return to the programme vie-
wed previously.
7.8 Display time and programme information
This function allows you to view programme information related to the current programme.
> Press the blue function key to display the information
related to the current programme
In the bottom half of the screen you will now see displayed
the current time, the name of the current channel and programme, including the starting and ending time, where these
data are broadcast by the provider.
> Where available, press the blue multi-function key
again to display information on the next programme.
(Fig. 7-12)
.
7.9 Additional Programme information
Where available, the function Programme Information can be
used to obtain additional programme information on the programme currently selected.
> Press the yellow function key to open an additional
information window
More detailed information on the current programme
will be displayed.
> Lengthy text passages can be scrolled one line at a
time using the arrow keys right/left.
> Press the yellow function key again to display infor-
mation on the next programme.
> Press the yellow function key once more to exit the
information window.
(Fig. 7-13)
.
(Fig. 7-14)
7.10 Transponder information
> Press the green function key (transponder informa-
tion) to display data relating to the transponder selec-
(Fig. 7-14)
ted
> Additionally, use the coloured function keys to obtain
additional information on Audio/Video,
Programmes and where appropriate, information on
the Encryption system (CA) used.
> Press Back to return to normal operation.
.
7.11 Fixed image
> Press the Stop key to freeze the current television
image as a still image.
> Press the same key again to return to normal opera-
tion.
30
Page 31

7.12 Teletext
7.12.1 Using the teletext decoder of your television
set
Where broadcast by the provider, teletext will be transferred
to your television set. To operate the teletext function, use the
remote control of your television set. Should you experience
problems with your television set, such as an overlap of teletext and picture content, you should set your digital receiver
to CVBS mode (Point 6.3.4).
7.12.2 Using the internal teletext decoder
As an alternative, you can utilize the integrated TOP teletext
decoder to display information. The TOP teletext system
groups together all text pages in groups and blocks according
to subject matter, which makes the system more manageable.
> Select the programme on which you wish to view tele-
text information.
> Press the teletext key to switch on the teletext
.
7-15)
> Use the numeric keys to enter the teletext page
you wish to view. Your entry will be displayed in the
upper left corner of the screen. When you have entered the desired teletext page, your receiver will search
for this page.
Since not all teletext pages can be transmitted simultaneously, it may take a few seconds for your unit to
find the page and display it on your television screen.
All teletext providers utilize page 100 for their index.
> Use the red resp. green keys to move forward or
back one page at a time.
> Press the yellow function key to call up the teletext
group indicated in the yellow field.
> Press the blue function key to call up the teletext
block indicated in the blue field.
Mixed mode
> Pressing the key teletext again will switch the
screen display to mixed mode (simultaneous display
of the teletext information as well as of the TV picture). Press this key again to exit from mixed mode.
Stop mode
> Press the Stop key; the message Stop will be
displayed in the top left corner of the teletext window.
This will prevent the automatic continuous paging of
the teletext sub-pages. Press the Stop key again to
exit the Stop mode.
> Press Back to return to normal operation.
(Fig.
(Fig. 7-15)
31
Page 32

7.13 Sub-titles
Where sub-titles are available, this will be indicated by the
symbol in the information window. If you have enabled
the function Sub-titles (in accordance with Point 6.3), these
will automatically be displayed, provided they are available in
the language selected.
If the sub-titles are only available in other languages, or are
broadcast via teletext, you can enable these manually as follows.
> Press the Language Select key (you may have to
press it several times) until the heading Sub-titles
display a table listing the sub-title languages being
broadcast, and/or the teletext pages on which the subtitles are being broadcast.
> Use the arrow keys up/down to mark the desired
language or teletext page.
> Confirm by pressing OK. The sub-titles will now be
displayed.
Please note that these functions are only available when subtitles are actually being broadcast, and the settings are not
stored in memory if you switch to another channel.
7.14 Electronic Programme Guide SFI
Your digital receiver provides an electronic programme guide.
This allows you to view the programme information relating to
one or more programmes on your screen.
You can very quickly obtain an overview of programmes currently being broadcast, or you can view all the programmes
being broadcast today, or on the following days.
The SFI functions allow you to:
- display information relating to programme contents on
your screen
- mark programmes you wish to view, which will be
automatically selected when the programme begins
- programme time events
- search for and set programmes according to the pro-
gramme type or category.
7.14.1 Downloading SFI data
The programme in formation is updated by your receiver at
the times set in accordance with Point 8.4.3 (SFI Channel).
The only proviso is that the receiver must be in standby
mode.
The download procedure is indicated by the message SFLd
in the display*. If your receiver is switched on at this time, the
function will not be carried out.
* Only for receivers equipped with
this feature
32
Page 33

You can also initiate a manual download procedure immediately after switching the receiver off (while the display* shows
“oooo”) by pressing the SFI key. During the download procedure the message SFLd will appear briefly in the display, followed by an indication of the percentage of SFI data already
transferred, e.g.038P for 38%).
The duration of the download procedure will depend on the
number of programmes that need to be updated. The maximum period in advance for which data is available is seven
days. Based on the limit on total data that can be stored, this
time-frame will be reduced the more programmes are listed in
the electronic programme guide.
You can decide for yourself, which programme should be
listed in the electronic programme guide. These can be
added to the list as described in Point 8.1.5.
7.14.2 Interrupting the download
The download procedure can be interrupted by switching on
the digital receiver(On/Standby key). The SFI data obtained during the previous update remains available.
7.14.3 Viewing the Electronic Programme Guide
> Switch on both the receiver and your television set.
> Press the SFI key on the remote control of your digi-
tal receiver.
The electronic programme guide will now be displayed
on screen
(Fig. 7-16).
selected, or which were listed as part of the default
setting, are shown here with their current programmes
being broadcast.You can now use the SFI function to
obtain information on the contents of various programmes. You can also use the SFI functions to select a
particular programme, to pre-select it for later viewing,
or to add it to the timer programming.
The programmes you have
7.14.4 Now (Table of current programme contents)
The SFI table “Now”
will be displayed first. The yellow bar to the right of the programme name indicates the time elapsed of the current programme. The programme currently being viewed is highlighted.
> Use the arrow keys up/down to move the marker
one line at a time. Use the green resp. the yellow
function key to move the marker one page at a time.
> The SFI functions (Point 7.14.3) are now available.
> Press the arrow key right to move to the SFI table
“Next” (See Point 7.14.5)
or
> Press the TV/Radio key to return to normal opera-
tion.
(Fig. 7-16)
listing current programmes
33
(Fig. 7-16)
* Only for receivers equipped with
this feature
Page 34

(Fig. 7-17)
(Fig. 7-18)
7.14.5 Next
> Use the arrow key right to display the table
"Next" (following programmes)
(Fig. 7-17)
.
The SFI functions (Point 7.14.3) are available.
> Press the arrow key right to move to the SFI table
“More” (Point 7.14.6)
or
> Press Back to return to the previous SFI table “Now”
or
> Press the TV/Radio key to return to normal opera-
tion.
7.14.6 More
> While the SFI table “Next” is displayed, press the
arrow key right to display the SFI table “More”.
(Fig. 7-18)
An additional time window will be displayed in the title
line of this table. This window will show the time of the
SFI table displayed.
> Press the arrow key right to display the starting
time of the next programme to begin in the time win-
dow.
> Press the arrow key right several times to page on
to the programme which is the next to begin. Holding
down the arrow key right will allow you to page for-
ward 15 minutes at a time.
Pressing the arrow key left will correspondingly
allow you to page backward through the tables.
The individual days of the week are displayed along
the lower border of your screen. If information is avai-
lable for the following days, the corresponding fields
will be highlighted.
> To obtain a preview for a specific day, press the appro-
priate number corresponding to the day of the week on
the numeric keys
or
> Press Back to return to the table “Next”.
7.14.7 SFI Functions
To perform the following SFI functions, call up the SFI as
described in Point 7.14.3.
7.14.7.1 SFI Information
Use the SFI Information to obtain brief information on the
programme or channel selected. Where SFI information is
available, this will be indicated by next to the corresponding programme.
> Use the arrow keys resp. the function keys to
highlight the desired programme.
34
Page 35

> Press the SFI key to display the information.
Lengthy text passages can be scrolled one line at a
time by using the arrow keys up/down or use the
green or red function keys to move backward or
forward one page at a time.
> Press Back to return to the previous table.
7.14.7.2 Marking a programme
> Use the arrow keys or the function keys to
mark/pre-select the desired .
> Confirm by pressing OK. The programme will be
automatically marked, and will be selected when the
broadcast begins.
> Press Back to return to the previous table.
7.14.7.3 Recording a programme (Timer operation)
The function Record serves to switch your digital receiver on
and off for the selected programme, so that this can be recorded even in your absence. Please note that you must also
programme your video recorder to make a recording.
> Use the arrow keys to mark the desired program-
me.
> Press the OK key twice to highlight the line in red
and to accept the data for this programme directly into
the timer memory.
or
> Press the red function key (Timer/VCR) to open a
selection window.
> Use the arrow keys up/down to mark the line
Record.
> Confirm by pressing OK.
The timer menu showing the data of the selected pro-
gramme will be displayed for monitoring purposes. If
necessary, you can make alterations or corrections at
this stage (see 7.15).
> Press Back to return to the previous table.
The appropriate line will be highlighted in red. Your
receiver will be switched on at the starting time of the
programme selected. If the unit was switched on by
means of the timer, this will be indicated by “rEc” in
the display*. Most of the functions of the remote con-
trol are disabled at this stage to avoid any accidental
interruption of the recording.
In standby mode the active timer will be indicated by
the blinking of the colon in the time display.
35
* Only for receivers equipped with
this feature
Page 36

(Fig 7-19)
(Fig. 7-20)
Aborting timer operation
If you wish to delete a timer event programmed by means of
the SFI, proceed as described in Point 7.15. To abort an active timer, switch the digital receiver off by pressing the
On/Standby key.
Then press this key again to switch the receiver on, and proceed to operate it normally.
7.14.7.4 SFI Programme overview
The SFI programme overview function allows you to display
the full daily programme of an individual channel. Proceed as
follows:
> Press the key SFI.
The SFI table “Now” will be displayed.
> Press the blue function key SFI Menu to open a
selection window.
> Use the arrow keys up/down to mark the line
Programmes.
> Confirm by pressing OK. The overview for today of
the programme selected will be displayed.
(Fig. 7-19)
> Use the arrow keys up/down to move the marker
to the appropriate programme or starting time.
The individual days of the week are displayed along
the lower border of your screen. If information is available for the following days, the appropriate fields will
be highlighted.
> To display the programme contents for a specific day,
press the numeric key corresponding to the desired
day of the week.
Displaying SFI overview for other programmes
> Press the green function key Programmes.
A list of SFI programmes will be displayed.
(Fig. 7-20)
> Now use the arrow keys to mark the desired pro-
gramme.
> Press the OK key to display the SFI overview of the
marked programme.
7.14.7.5 SFI overview by programme type (genre)
If you are particularly interested in certain types of programme, you can have the programme information displayed
according to certain genres such as movies, news, etc.
> Press the SFI key. The SFI table “Now” will be
displayed.
> Press the blue function key SFI Menu to open a
selection window.
> Use the arrow keys up/down to mark the line
Genres.
> Confirm by pressing OK.
36
Page 37

> Use the green function key Genres to open a win-
dow showing the programme genres available.
(Fig. 7-
21)
> Use the arrow keys to select the desired program-
me category, and confirm by pressing OK.
An overview of the day’s programmes conforming to
this category will be displayed.
(Fig. 7-22)
> Use the arrow keys up/down to move the marker
to any specific programme.
> Use the arrow keys right/left to move the marker
to programmes with a later starting time.
The individual days of the week are shown along the
lower border of the screen. If information is available
for any of the following days, the corresponding fields
will be highlighted.
> To display the programme contents of a specific day,
press the appropriate numeric key corresponding
to the day of the week.
7.14.8 Exiting SFI
> Press the Menu or TV/Radio key to return to nor-
mal operation.
7.15 Timer
In addition to the SFI timer programming facility, you may
also programme the timer manually.
> Press the Menu key to call up the Main Menu.
> Use the arrow keys up/down to mark the line
Timer organizing.
> Confirm by pressing OK.
The sub-menu timer organizing will be displayed.
(Fig. 7-23)
7.15.1 Programming the Timer
> Press the yellow function key New to access the
timer programming, in order to programme a new
( Fig. 7-24)
event.
To programme the timer proceed as follows:
Source
> Use the arrow keys to mark the column Source.
> Press OK to enter the desired source (TV or Radio).
Channel
> Use the arrow keys to mark the column Channel.
> Press OK.
Depending on the previous setting, either the TV or
the radio programme list will now be displayed.
> Use the arrow keys to mark the desired program-
me.
> Press OK to accept this into the timer programming.
(Fig. 7-21)
(Fig. 7-22)
(Fig. 7-23)
(Fig. 7-24)
37
Page 38

> Use the arrow keys up/down to move the marker
around the list one line at a time.
> Use the arrow keys right/left to move the marker
backward or forward in the list one page at a time.
Date
> Use the arrow keys to mark the column Date.
> Use the numeric keys to enter the date on which
you wish to record a programme.
Start
> Use the arrow key right to mark the column Start.
> In this line, use the numeric keys to enter the star-
ting time for the timer.
Stop
> Repeat the steps as described under “Start” to enter
the stopping time.
So that all timer events can be accommodated, there
should be an interval of at least one minute between the
stopping time of one timer event and the starting time of
the next timer event! Should there be an overlap between
two timer events, these will be highlighted in red.
Repeat (optional)
> Use the arrow keys to mark the column Rep.
> Press OK.
A selection window will be displayed, offering various
suggested repeating intervals.
1x Timer used once only
D Daily repeat
1 W Repeat once weekly
1-5 Repeat only on weekdays
6-7 Repeat only on weekends
> Use the arrow keys up/down to select the desired
function.
> Press OK to accept the setting into memory.
Type
> Use the arrow keys to mark the column Type.
> In this line, press OK to enter the desired status.
1. VCR
Your digital receiver will be switched on and off for the
programme selected.
If the receiver was switched on by the timer, this will
be indicated by “rEc” on the display*. Most of the
functions of the remote control will be de-activated to
prevent an accidental interruption of the recording.
In standby operation the active timer will be indicated
by a blinking colon in the time display.
* Only for receivers equipped with
this feature
38
Page 39

2. Reminder
If your receiver is in normal operational mode, it will
switch to the pre-selected programme slot at the pre-
set time. In contrast to the VCR setting, the controls
remain fully functional, and the receiver will not be
switched off at the end of the programme.
Transferring data into memory
> When you have completed programming, press the
yellow function key Transfer to transfer the data
into memory.
If under Channel you have selected an encrypted
programme, or a programme that is blocked as per
8.1.6, you will first have to enter the PIN code before
the data can be transferred to memory.
7.15.2 Changing timer programming
> To change an existing timer setting, use the arrow
keys up/down to mark the setting. Press the yel-
low function key Change to move to the settings of
the marked timer. You can now effect the changes as
described in Point 7.15.1.
7.15.3 Deleting timer programming
> To delete an existing timer setting, use the arrow
keys up/down to mark the setting.
> Press the green function key Delete.
The message will be displayed:“Do you really want to
delete this timer?”
> Use the arrow keys right/left to mark Ye s .
> To delete the timer entry, confirm by pressing OK.
> Press the TV/Radio key to return to normal opera-
tion.
Note!!!
Ensure that the standard time has been read into the receiver. This will be shown on the display* when the unit is in
standby mode. If this is not the case, switch the receiver to a
major channel such as ZDF for approximately 30 seconds, to
read the current time automatically.
The time should now be shown on the display when the
receiver is set to standby mode.
39
* Only for receivers equipped with
this feature
Page 40

(Fig. 8-1)
(Fig. 8-2)
(Fig. 8-3)
8 Changing the basic programming
8.1 Configuring the Favourites list
This chapter describes how you can change the pre-programming of your digital receiver as well as the Favourites programme list according to your preferences. This function is
also required to sort newly found programmes into the list
after a search has been carried out.
In this regard you should know the following: your receiver is
equipped with two programme lists, the Favourites list and
the Complete list. The Favourites programme list includes all
the programmes you have placed there, using the procedure
as described below. The Complete list contains all programmes.
This chapter also describes how you can delete programmes,
or restrict access to programmes by means of the parental
control feature. When calling up a programme list by pressing
OK the Favourites programme list will be displayed.
8.1.1 Calling up the Navigator
To manage the Favourites list, proceed as follows:
> Press the Menu key to call up the Main Menu.
8-1)
> Use the arrow keys up/down to mark the line TV
lists organizing, to work on the TV list, or Radio
lists organizing, to work on the radio list.
> Confirm by pressing OK.
The appropriate Navigator will be displayed, allowing
you to work on the Favourites list (TV or radio list).
(Fig. 8-2)
The Favourites list will be displayed on the right half of
the screen. This is currently active, as the programme
currently selected is highlighted in blue. The alphabetically sorted Complete list will be displayed on the left
half of the screen.
This Complete list includes all available programmes.
> Press the red function key to move the marker to the
Complete list. This is now active.
> Press the red function key again to open a selection
window. You are given the option of sorting the
Complete list according to various selection criteria
(e.g. all programmes, all free-to-air, all newly found, all
English-language programmes, etc.) or sorted by
Providers.
Use the arrow keys up/down to select the preferred programme listing (e.g. Complete list).
> Confirm by pressing OK. An additional selection
window will be displayed.
(Fig. 8-3)
(Fig.
40
Page 41

> Now use the arrow keys up/down to mark the
selection criterion according to which the Complete list
is to be sorted. Select e.g. All Programmes, to
indicate all available programmes in the Complete list
or All new, to indicate only the newly found program-
mes of the last programme search or All English, to
indicate only English-language programmes.
> Confirm by pressing OK.
Depending on your selection, a programme list will now be
displayed showing, e.g., all, all new or all English-language
programmes. Programmes already included in the Favorites
list are indicated by a check-mark.
> Press the red function key Programmes resp. the
green function key TV List to switch between the
Favourites list and the Complete list. The currently
active list is indicated by a blue marker.
8.1.2 Adding programmes to Favourites list
To accept programmes from the Complete list into the
Favourites list, call up the Navigator as described in Point
8.1.1, and switch to the Complete list.
> Press the blue function key Functions.
A selection window will be displayed, indicating the
available Navigator functions.
> Use the arrow keys up/down to mark the line
Add.
> Confirm by pressing OK.
> Use the arrow keys up/down to mark a program-
me that you wish to include in the list.
> Press the yellow function key Add to add the mar-
ked programme to the Favourites list.
Marking blocks of programmes
To mark several programmes simultaneously proceed
as follows:
> Press OK to access the Selection mode.
The marked programme will be indicated by a cross at
the left side of the entry.
> Use the arrow keys up/down to mark the following
and/or previous programmes as well.
> When you have marked all the programmes you wish
to select, press the yellow function key Add, to
include the marked programmes in the Favourites list.
(Fig. 8-4)
(Fig. 8-4)
8.1.3 Deleting programmes
8.1.3.1 Removing (deleting) from the Favourites list
To remove programmes from the Favourites list, call up the
Navigator as described in Point 8.1.1. You will move to the
Favourites list.
41
Page 42

(Fig. 8-5)
(Fig. 8-6)
> Press the blue function key Functions.
A selection window indicating the Navigator functions
will be displayed.
(Fig. 8-5)
> Use the arrow keys up/down to mark the line
Remove and confirm by pressing OK.
> Use the arrow keys up/down to mark a program-
me that you wish to remove from the list.
> Press the yellow function key Remove.
The following message will be displayed: “Remove
programme(s) from the list?”.
> Use the arrow keys right/left to mark Yes or No.
> Confirm you entry by pressing OK.
> To remove several programmes simultaneously, mark
these as described in 8.1.2 (Marking blocks of pro-
grammes).
> When you have completed marking the programmes
you wish to remove in this manner, press the yellow
function key Remove.
The message will be displayed “Do you really want to
delete the programme(s)?”.
> Use the arrow keys right/left to mark Yes or No.
> Confirm your entry by pressing OK.
The programmes deleted in this manner remain in the
Complete list, and can be added to the Favourites list again
at any time.
8.1.3.2 Deleting from the Complete list
To remove programmes from the Complete list, proceed as
described in Point 8.1.3.1. However, after calling up the
Navigator, press the red function key Programmes, and
move to the Complete list first before selecting the function
Delete.
8.1.4 Sorting programmes
Call up the Navigator as described in Point 8.1.1 to sort the
programme order of the Favourites list according to your personal preference. The Favourites list will be active.
> Press the blue function key Functions. A window
will be opened, indicating the Navigator functions avai-
(Fig. 8-6)
lable.
> Use the arrow keys up/down to mark the line
Sort and confirm by pressing OK.
> Use the arrow keys up/down to mark the pro-
gramme you wish to move to another place in the list.
> Now press the yellow function key Sort. A double
arrow will be displayed next to the programme selec-
ted.
> You can now use either the arrow keys up/down
or the Numeric keys to move the marked program-
me to the desired position in the list.
42
Page 43

> Press the yellow function key Sort to save the pro-
gramme at the new position.
> To sort several programmes simultaneously, mark
these as described in 8.1.2 ( Marking blocks of pro-
grammes).
> Now press the yellow function key Sort. A double
arrow will be displayed next to the block of programmes selected.
> You can now use either the arrow keys up/down
or the Numeric keys to move the block of programmes to the desired list position.
> Press the yellow function key Sort to save the block
of programmes at the new position.
> When you have completed configuring the programme
list according to your preference in this manner, press
the Menu key to return to normal operation.
8.1.5 Programming the electronic programme guide
To improve the readability, you can also configure the electronic programme guide SFI to conform to your favourite programmes. To add programmes to the electronic programme
guide, or to delete them from the guide, call up the Navigator
as described in Point 8.1.1. You are now in the Favourites
list.
Please note:
The more programmes are added to the electronic programme guide, the longer it will take to update the SFI data!
Also, the more programmes are added, the less likely it is
that the full preview period of seven days for the electronic
programme guide can be accommodated in the limited
memory space available.
> Press the blue function key Functions.
A selection window will be displayed, indicating the
Navigator functions available.
> Use the arrow keys up/down to mark the line
SFI.
> Confirm by pressing OK.
> Use the arrow keys up/down to mark a program-
me that you wish to include in the electronic program-
me guide.
> Press the yellow function key SFI to accept the mar-
ked programme into the electronic programme guide.
> To add several programmes to the electronic program-
me guide simultaneously, mark these as described in
8.1.2 (Marking blocks of programmes).
> When you have completed marking the desired pro-
grammes in this manner, press the yellow function
key SFI,to add the marked programmes to the elec-
tronic programme guide.
> Press the Menu key to return to normal operation.
43
Page 44

You can now initiate the updating procedure manually:
> Use the On/Standby key to switch off the receiver
(Standby).
> Now, while the display* shows “oooo”, press the key
SFI.
The receiver will now perform an update. This will be
indicated by the message SFLd appearing briefly in
the display*, followed by a progressive indication of
the percentage of SFI data already downloaded.
> The updating procedure may be interrupted by swit-
ching on the digital receiver(Key On/ Standby).
8.1.6 Blocking programmes (Parental control)
You have the facility to block access to programmes. A blokked programme can only be viewed on the screen if you first
select the programme, and then enter your personal receiver
PIN code or the Smartcard PIN code. Before selecting the
programmes you wish to block, you must activate the parental control function as described in Point 6.2.1.
To block access to a programme, call up the Navigator as
described in Point 8.1.1. This will take you to the Favourites
list.
> Press the blue function key Functions.
A selection window will be displayed indicating the
available Navigator functions.
> Use the arrow keys up/down to mark the line
Parental control.
> Confirm by pressing OK.
> Now use the arrow keys up/down to mark the pro-
gramme you wish to block.
> Block access to the programme by pressing the yel-
low function key. The parental control symbol will
be displayed next to the programme selected.
> To block access to several programmes simultaneous-
ly, mark these as described in 8.1.2 ( Marking blocks
of programmes) and block them by pressing the yel-
low function key.
> When you have completed configuring the programme
list according to your personal preference in this man-
ner, press the Menu key to return to normal opera-
tion.
> To remove the block on individual programmes, pro-
ceed as described above. Mark the desired program-
me and remove the parental control symbol by pres-
sing the yellow function key.
Note! You cannot unblock pre-blocked programmes that are not coded for viewing by children,
and are pre-blocked by the provider!
* Only for receivers equipped with
this feature
44
Page 45

8.2 Changing the receiver PIN code
The receiver PIN code is set at the factory to 0000.
To change the receiver PIN code proceed as follows:
> Use the Menu key to call up the Main Menu.
> Use the arrow keys up/down to mark the line
Settings.
> Confirm by pressing OK.
The sub-menu Settings will be displayed.
> Use the arrow keys up/down to mark the line
Change Receiver PIN.
> Confirm by pressing OK.
> Use the numeric keys to enter the current receiver
PIN code (Default setting 0000)
(Fig. 8-7).
> Use the numeric keys to enter the desired new
receiver PIN code.
> Repeat the entry of the code.
> When you have changed the receiver PIN code as
described here, press the Menu key to return to nor-
mal operation.
Note! Ensure that you do not forget the receiver
PIN code. If you do forget it, please consult your
specialist retailer!
8.3 Searching for programmes
As mentioned previously, your digital receiver is pre-programmed for reception of the ASTRA and EUTELSAT satellites. To receive new programmes, or programmes broadcast
by other satellites, there are various options of conducting a
programme search.
1. Automatic Search
Select this type of search to scan all satellites selected in the
menu LNC Settings (Point 6.4 and 8.4) for programmes.
2. Satellite Search
Select this type of search to search only a specific satellite
for programmes.
3. Transponder Search
Select this type of search to scan a specific transponder on a
satelite.
4. Manual Search
Select this type of search if you want to search for a specific
programme using programme-specific PID numbers.
(Fig. 8-7)
(Fig. 8-8)
When the search has been completed, a message will be
displayed on your screen indicating how many programmes
your digital receiver has found, how many of these are new,
and how many programmes are encrypted. New programmes
are stored in the Complete list, and can be transferred to the
Favourites list as described in Point 8.1.
45
Page 46

(Fig. 8-9)
(Fig. 8-10)
(Fig. 8-11)
> To perform a programme search, call up the Main
Menu.
(Fig. 8-8)
> Use the arrow keys up/down to mark the line
Channel searching.
> Confirm by pressing OK.
The sub-menu Search will be displayed.
(Fig. 8-9)
> Now use the arrow keys up/down to select the
type of search you wish to perform. Confirm by pressing OK.
8.3.1 Automatic Search
In the case of this type of search, all satellites included in the
menu LNC Settings (Points 6.4 and 9.4) will be searched for
programmes. You can decide whether you wish to search for
all programmes (free-to-air and encrypted) or only for free-toair programmes.
(Fig. 8-10)
> Decide by pressing OK whether you wish to search
only for free-to-air programmes ( Free
Programmes) or whether you also want to include
encrypted programmes (All Programmes).
> Confirm by pressing the red function key Start
Search.
The search may take more than 15 minutes. Please
note any messages displayed on screen.
8.3.2 Satellite Search
To scan a particular satellite for programmes, select
Satellite Search
want to search for all (free-to-air and encrypted) programmes,
or only for free-to-air programmes.
> Press OK again to display the selection table of active
satellites.
> Use the arrow keys up/down to mark the line All,
to search all active satellites for programmes, or mark
the desired satellite to search only this one for pro-
grammes.
> Confirm by pressing OK.
> Use the arrow keys up/down to mark the field
Search mode.
> Decide by pressing OK whether you want to search
only for free-to-air programmes ( Free
Programmes) or whether you want to include
encrypted programmes (All Programmes).
> Press the red function key to confirm Start Search.
The search will commence. Please note any messa-
ges displayed on screen.
> You can terminate the search procedure by pressing
the red function key.
(Fig. 8-11).
You can decide whether you
46
Page 47

8.3.3 Searching on a transponder
You can search a specific transponder (see Point 10:
Technical Terms) for available programmes. To do this, you
will have to enter the appropriate transponder data
12)
.
Satellite
In this line you must select the satellite on which the desired
transponder is located.
> Use the arrow keys up/down to select the line
Satellite.
> Press OK to display a table listing the active satelli-
tes.
> Now use the arrow keys up/down to mark the
appropriate satellite.
> Confirm by pressing OK.
The satellite selected will now be displayed in the line
Satellite.
Transponder frequency
> Use the arrow keys up/down to select the line
Transponder frequency.
> Enter the appropriate frequency by means of the
numeric keys.
Symbol rate
The symbol rate indicates the volume of data transmitted per
second. A typical figure might be 27500 (27500 symbols per
second).
> Use the arrow keys up/down to mark the line
Symbol rate.
> Use the numeric keys to enter the desired symbol
rate.
Polarisation
> Use the arrow keys up/down to mark the line
Polarisation.
> Use the OK key in this line to enter the polarisation
plane (horizontal or vertical) on which the desired
programme is broadcast.
Search mode
> Use the arrow keys up/down to mark the line
Search mode.
> Press the OK key to decide whether you wish to
search only for free-to-air programmes ( Free
Programmes) or whether you wish to include
encrypted programmes in the search (All
Programmes).
> Press the red function key to confirm Start
Search.
The search will commence. Please note any messages displayed on screen.
(Fig. 8-
(Fig. 8-12)
47
Page 48

(Fig. 8-13)
(Fig. 8-14)
> The search procedure can be terminated by pressing
the red function key.
8.3.4 Manual Search
If a particular programme is not found by means of the automatic or transponder search procedures, it may be necessary
to enter the unique PID number for this specific programme.
These numbers can be found in the Internet, or must be
obtained from the appropriate programme provider.
The menu
(Fig. 8-13)
differs from the menu Transponder
search only in terms of the menu points PCR-PID, AudioPID and Video-PID. There is no need to enter the search
mode.
> Proceed as described under Transponder Search.
> Then use the arrow keys up/down to mark the
lines PCR-PID, Audio-PID and Video-PID using
the numeric keys to enter the appropriate numbers.
8.3.5 After the Search
You can follow the progress of the search procedure on
screen even while the search on the transponders is still in
progress. When the search has been completed, the number
of transponders, programmes and new programmes found
will be displayed. In addition a message will be shown
, asking you whether you want to add the newly found pro-
14)
grammes automatically to the TV or Radio list. If you decide
to accept the programmes automatically, you can then decide
whether these should be added to the Favourites list in sor-
ted or unsorted form.
Sorted
The newly found programmes are sorted into the Favourites
list according to a pre-programmed schedule. The order in
which programmes are placed depends on the audio
language selected in Point 6.3.2 as well as on the country
selected in Points 6.2.2 and 6.2.3.
Unsorted
The newly found programmes are added to the end of the
Favourites list in unsorted form.
No
The newly found programmes are not added to the
Favourites list. They will still appear in the Complete list.
(Fig. 8-
> Use the arrow keys right/left to select whether
you want to accept the programmes in sorted or
unsorted form.
> Confirm by pressing OK.
Please note any messages displayed on screen.
> Press the Menu key to return to normal operation.
48
Page 49

> Independently of whether you have added the newly
found programmes to the Favourites list automatically,
these can still be added to the Favourites list manually
at any time as described in Chapter 8.1.
8.4 Service settings
You can revert to the factory default settings at any time. In
addition, if you feel that the many changes made by programme providers over time have made the programme list completely obsolete, you can decide to delete this completely, followed by a new programme search. Please note that if you
delete an existing programme list you must then perform a
search, and then copy the desired programmes from the
Complete list to the Favourites list.
> Use the Menu key to call up the Main Menu.
8-15)
> Now use the arrow keys up/down to mark the
menu line Settings.
> Confirm by pressing OK.
The sub-menu Settings will be displayed.
(Fig. 8-16)
> Now use the arrow keys up/down to mark the
menu line Service Settings.
> Confirm by pressing OK. The sub-menu Service
Settings will be displayed.
(Fig. 8-17)
8.4.1 Restore Factory Settings
When this function is called up, the factory default setting is
reset, all your personal settings are deleted, and the
AutoInstall installation assistant will be started.
> Use the arrow keys up/down to mark the line
Restore Factory Settings.
> Confirm by pressing OK.
The message “Are you sure you want to activate the
default setting?” will be displayed.
> Use the arrow keys right/left to select Ye s or
Abort.
> Confirm by pressing OK.
(Fig.
(Fig. 8-15)
(Fig. 8-16)
(Fig. 8-17)
8.4.2 Delete all programmes
This function allows you to delete all programmes from
memory.
> Use the arrow keys up/down to mark the line
Delete all programmes.
> Confirm by pressing OK.
The message “Do you really want to delete all programmes?”will be displayed.
> Use the arrow keys right/left to select Ye s or
Abort.
> Confirm by pressing OK.
49
Page 50

(Fig. 8-18)
(Fig. 8-19)
8.4.3 SFI Channel
Your receiver has the facility to receive a data channel via the
ASTRA satellite systems (19° East) carrying additional SFI
data. These facilitate a SFI (programme guide) preview for up
to a week in advance.
> Press OK to call up the sub-menu SFI Channel
(Fig. 8-18)
.
> To receive the data channel, mark the line SFI
Update.
> Press OK to select On.
> Use the numeric keys to set the time at which the
automatic download of SFI data is to be carried out in
the line Update time.
> To initiate the updating of SFI data manually, press the
red function key Start now.
If you do not wish to receive the additional data, or are unable
to receive it because of your location, the reception of data
can be switched off:
> To switch off the reception of data, set SFI update to
off. This means that only the programme information
provided by the individual channels will be available.
If the parameters of the data channel used to download the
SFI list have changed, you can correct that in this menu. The
current transponder data can be obtained from your specialist
retailer. Generally, no changes should be made in this menu.
8.4.4 Updating Software
You also have the facility of updating the operating software
of your digital receiver via satellite (ASTRA 19° East).
> Press OK to display the sub-menu Software down-
load channel
(Fig. 8-19)
To perform a software update, mark the line
Software download.
> Set the software update function to on by pressing
OK.
> In the line Download time, use the numeric keys
to set the time when the software update is to be car-
ried out.
> To initiate the update for the operating software manu-
ally, press the red function key Test.
> Press the Menu key to return to normal operation.
If the parameters of the data channel used to download the
software updates have changed, you can correct this manually in this menu as described under Point 8.3.4 (manual programme search). The current transponder data can be obtained from your specialist retailer. Generally you should not
make any changes in this menu.
.
50
Page 51

Note:
This function should not be performed if you have
made changes in the menues Basic Settings
and LNC Configuration, as these changes would
revert to the default settings when this function
is activated, and would have to be re-programmed.
For the new software version to be downloaded
automatically, the digital receiver must be in
standby mode. The downloading procedure is
indicated by SAtL in the display. Ensure that
this procedure is not interrupted by switching the
receiver on or off while the download is in progress.
Depending on whether you have switched the automatic software update function on or off, the receiver will check automatically each time it is switched on whether a new version
of the operating software for your digital receiver is available.
If a new version of the operating software is available, this
will be indicated by a message
(Fig. 8-20)
displayed on
screen.
To start the software update, follow the instructions displayed
on your screen.
8.4.5 Copy settings
You have the facility to copy all the settings of the programme list, antenna settings, etc. of your digital receiver from
your receiver to another digital receiver of the same type, and
using the same operating software version. (
Fig. 8-21
> Use a null modem cable to connect the two receivers.
> Switch on the receiver to which the settings are to be
transferred.
> To copy the settings, press one of the keys on the
panel of the source receiver.
The settings of this source receiver will now be transferred to the other, receiving, receiver. Please note
any messages displayed on screen.
)
(Fig. 8-20)
(Fig. 8-21)
8.5 System configuration
Use this menu item to view the specific data relating to your
receiver.
> Use the arrow keys up/down to mark this line in
the sub-menu Settings.
> Confirm by pressing OK.
> Press the Menu key to return to normal operation.
51
Page 52

(Fig. 9-1)
8.6 Conditional Access*
Use this menu item to access the sub-menues relating to the
Smartcard being used, as well as to the CI module. Use the
arrow keys to move to the lines Smartcard* or
CI slot*, and confirm by pressing OK to view information on
the Smartcard or the CI module used.
9 Operation in conjunction with a rotating
antenna (DiSEqC 1.2)
Your digital receiver is equipped for operation in conjunction
with a rotating antenna installation. The DiSEqC control function (DiSEqC-Level 1.2) allows you to control a suitable motor
via the coaxial cable connection.
> Call up the menu Antenna Settings as described
in Point 6.4
(Fig. 9-1)
(Point 6.4.1) to On.
> Now use the arrow keys up/down to select the
DiSEqC position (e.g. A/B 3) to which you wish to
allocate the motorized rotating antenna.
> Press OK to display a selection window for the
Satellite resp. for the Motor antenna.
> Use the arrow keys up/down to mark the line
Motor antenna and confirm by pressing OK.
> Read the note on setting Eastern and Western limits
(Fig. 9-3)
and confirm by pressing OK.
and set the DiSEqC Control
(Fig. 9-2)
(Fig. 9-2)
(Fig. 9-3)
(Fig. 9-4)
* Only for receivers equipped with
this feature
9.1 Eastern and Western limits
To avoid mechanical damage to the dish antenna or the LNC
by obstacles in its path, the maximum rotating range in both
easterly and westerly direction must be set. If there are any
obstacles (e.g. a wall, chimney, etc.) within the rotating radius
of the antenna, this must be considered when setting the
rotating limits. If there are no obstacles to consider, you
should set the limits so that they extend a little beyond the
positions of the most easterly and westerly satellite positions
you wish to receive.
9.1.1 Deleting existing limits
At the outset, you should delete any existing limit settings.
> Use the arrow keys right/left to mark the column
Configuration.
> In the line Motor antenna use the arrow keys
up/down to mark the field Proceed.
> Confirm by pressing OK.
The menu relating to settings for the motor antenna
will be displayed.
52
(Fig. 9-4)
Page 53

> Press the yellow function key Actions, to open an
additional window.
(Fig. 9-5)
> Now use the arrow keys up/down to mark the line
Delete limits.
> Confirm by pressing OK, to transfer the action
selected to the green function key.
> To delete the limits, press the green function key
Delete lim..
> Confirm the message displayed by pressing OK.
(Fig.
9-6)
9.1.2 Setting Eastern limit
> To set the Eastern limit, use the arrow keys to mark
the field Store.
> Now press the arrow key right to rotate the
antenna dish to the maximum possible (or imaginable)
Easterly position.
> Press the yellow function key Actions to open a
window showing the actions available.
> Now use the arrow keys up/down to mark the line
Set East limit.
> Confirm by pressing OK.
> To set the Easterly limit, press the green function key
East limit, read the message displayed on screen
(Fig. 9-7)
and confirm by pressing OK.
9.1.3 Setting the Western limit
> To set the Western limit, use the arrow keys to
mark the field Store.
> Now press the arrow key left to rotate the antenna
dish to the maximum possible (or imaginable)
Westerly position.
> Press the yellow function key Actions, to open a
window showing the actions available.
> Now use the arrow keys up/down to mark the line
Set West limit.
> Confirm by pressing OK.
> Press the green function key West limit, read the
message displayed on screen
by pressing OK.
(Fig. 9-8)
and confirm
(Fig. 9-5)
(Fig. 9-6)
(Fig. 9-7)
(Fig. 9-8)
9.2 Geo-positioning
If you have a suitable motor, and know the geographic coordinates of your location, this function will facilitate finding
the individual satellite positions.
Note! Switch on the geo-positioning feature only if your
DiSEqC motor supports this function.
> Call up the menu Antenna configuration as
described above.
53
Page 54

(Fig. 9-9)
> Use the arrow keys to mark the field Geo.Pos.
> Confirm by pressing OK. A menu allowing you to
enter the coordinates of your location will be displayed.
(Fig. 9-9)
> Press the OK key to switch the geo-positioning
function On or Off.
> Use the arrow keys to select the field used to enter
geographic longitude.
> Use the numeric keys to enter the geographic
longitude.
> Now press the arrow key left.
> In this field, press OK to indicate whether the value
refers to longitude East (E) or West (W).
> Now use the arrow keys to select the field used to
enter geographic latitude.
> Use the numeric keys to enter the geographic
latitude.
> Now press the arrow key left.
> In this field, press OK to indicate whether the value
refers to latitude North (N) or South (S).
> Press Back to return to the LNC settings.
The coordinates of your location must be entered as a
decimal value, correct to one decimal place. As the coordinates are usually stated in degrees, minutes and
seconds, these must be converted to a decimal value as
follows:
The full degree value is not affected by the calculation. The
minutes are divided by 60, and rounded to one decimal place.
The result of this division is added to the degree value.
Seconds are not considered for the calculation, as they do
not influence the first decimal place.
Example: Coordinates of Daun/Germany
Latitude 50° 11‘(45“) N
Longitude 06° 50‘ (10‘‘) E
Converting the degrees latitude (LA):
LA = 50 + 11/60
LA = 50 + 0,2 (rounded)
LA = 50,2
To enter the geographic latitude in the menu, use the value
rounded to one decimal place (50,2).
The same method is used to calculate the decimal value of
the longitudinal position.
54
Page 55

9.3 Setting the satellite position
Proceed by sytematically working through Points 9.3.1 to
9.3.3 for each satellite position that is to be set. When programming the satellite positions, we recommend that you
begin with the satellite in the most easterly position. Then
add each additional satellite in geographic order, working in a
westerly direction, until you have reached the most westerly
position.
Your digital receiver is pre-programmed at the factory for the
most popular satellite positions. In addition, you can configure user-defined satellite positions for any orbital position of
your choice (User1 to User14).
9.3.1 Selecting a satellite position
9.3.1.1 Selecting a pre-programmed satellite
position
> To add a satellite position to the satellite list, use the
arrow keys to mark the field Sat new.
> Confirm by pressing OK.
A list will be displayed showing the available satellite
positions.
> Now use the arrow keys up/down to mark a
satellite position that you wish to add to the satellite
list.
> Press OK to accept the selection.
If the Geo-Positioning (Point 9.2) function is On, the dish
antenna will now be rotated automatically to the programmed
satellite position. The rotation will be indicated by a blinking
display “turn”.
If the Geo-Positioning function is Off, you will have to
rotate the dish antenna manually (Point 9.3.2.2) to the
desired satellite position.
(Fig. 9-10)
(Fig. 9-10)
9.3.1.2 Setting a user-defined satellite position
> To add a user satellite position to the satellite list,use
the arrow keys to mark the field Sat new.
> Confirm by pressing OK.
A list will be displayed showing the available satellite
positions.
> Now use the arrow keys up/down to mark a user
satellite position (User1 to User14).
> Press OK to display the menu used to set a test
transponder. In this menu, set the parameters for the
test transponder as well as for the LNC used as
described in Point 6.4.3.
(Fig. 9-11)
55
(Fig. 9-11)
Page 56

(Fig. 9-12)
> When you have set up the test transponder, press
Back, to return to the menu for setting up the
motorized rotating antenna. The field used to enter the
orbital position will be active.
> Use the numeric keys to enter the orbital position of
the user satellite and confirm by pressing OK.
> Now press the OK key to indicate whether it is a west-
erly (W) or an easterly (E) orbital position.
If the Geo-positioning function is set to On (Point 9.2) you
can now rotate the antenna dish to the programmed user
satellite position by using the function Turn to Sat (Point
9.4.1).
If the Geo-positioning function is set to Off, you will have
to rotate the antenna manually to the desired satellite position
(Point 9.3.2.2).
9.3.2 Adjusting the satellite antenna
To be able to point the antenna at a particular satellite, and to
confirm whether you are receiving the correct satellite at the
position set, a test transponder has been set up for each
satellite.
The exact positioning of the antenna is only made possible by
the indicator showing the signal strength and quality of the
test transponder.
9.3.2.1 Configuring the test transponder and LNC
To change the parameters of the test transponder concerned,
proceed as follows:
> Use the arrow keys to mark the field Current
Satellite List.
> Press OK to open the satellite list.
> Use the arrow keys up/down to mark the satellite
position for which you wish to change the data.
> Confirm by pressing OK.
> Now use the arrow keys to mark the field LNB
Config. and press OK.
The menu LNC settings will be displayed.
> In this menu, enter the data relating to the test trans-
ponder as well as to the LNC being used, as
described in Point 6.4.3.
> Press Back to return to the settings for the motor
antenna.
(Fig. 9-12)
9.3.2.2 Manual positioning of antenna
You can establish the optimum position of the antenna by
working according to the indication of signal strength and signal quality. Adjust the antenna so that the maximum values
are achieved on both bar graphs.
> Now use the arrow keys up/down to mark the field
Store.
56
Page 57

> Now use the arrow key right (field East will be
marked) resp. left (field West will be marked) to
rotate the antenna to the desired position. Keep the
appropriate key depressed until the desired position is
reached.
9.3.2.3 Automatic detail adjustment (Autofocus)
Before storing the satellite position in memory you should
perform an automatic focussing procedure. This will set the
antenna to optimum reception in terms of measurable
parameters.
> Press the yellow function key Actions to open the
window showing the actions available.
> Now use the arrow keys up/down to mark the line
Auto Focus.
> Confirm by pressing OK.
> Press the green key Auto Focus to start the auto-
focus procedure.
The message Auto Focus
(Fig. 9-13)
will be dis-
played while the automatic adjustment is in progress.
9.3.3 Storing a satellite position
Once you have completed work on the function Autofocus,
you must still store the satellite position in memory.
> Use the arrow keys to mark the field Store.
> Press OK.
The test transponder set will now check whether a sig-
nal is being received at this position. It will also check
whether the position corresponds with one of the pre-
programmed positions.
If this is the case, the following message will be dis-
played: Orbital position xx found. Store
satellite ?
(Fig. 9-15)
> To store the satellite position, use the arrow keys
right/left to mark the field Yes and confirm by
pressing OK.
If the test transponder procedure does not recognize a
pre-programmed position, or if the signal received is
too weak, appropriate messages will be displayed on
screen.
(Figs. 9-16 and 9-17)
> To store the satellite position in memory, use the
arrow keys right/left to mark the field Ye s and
confirm by pressing OK.
(Fig. 9-14)
(Fig. 9-13)
(Fig. 9-14)
(Fig. 9-15)
(Fig. 9-16)
(Fig. 9-17)
57
Page 58

9.4 Current satellite list
The satellite positions stored in memory are shown in the
satellite list. Any positions not yet stored in memory are
marked with an “*”.
> To adjust the antenna dish to a position on the satellite
list, use the arrow keys to select the field Current
Satellite list.
> Confirm by pressing OK.
> Use the arrow keys up/down to select the desired
position.
> Confirm by pressing OK.
The antenna dish will now be rotated to the selected
position. The rotating procedure will be indicated by a
blinking display “rotating” in the menu.
9.4.1 Selecting a satellite position
To rotate the antenna to the position determined in the
satellite list, your digital receiver is equipped with the function
turn to Sat.
> Press the yellow function key Actions to open the
window displaying the available actions.
> Use the arrow keys up/down to select the line
turn to Sat.
> Confirm by pressing OK.
> Pressing the green key turn to Sat will rotate the
antenna to the selected satellite position.
9.5 Deleting a satellite position
To delete a satellite position from the satellite list, proceed as
follows:
> Use the arrow keys to mark the field Current
Satellite list.
> Press OK to open the current satellite list.
> Use the arrow keys up/down to select the satellite
you wish to delete.
> Confirm by pressing OK.
> Use the arrow keys to mark the field Sat delete.
> To delete the satellite selected, press OK and confirm
the message displayed by again pressing OK.
9.6 Reference position
When installing the external installation the motor must be set
to the reference position (0°). You can therefore rotate the
motor to this position (0°) at any time by means of the
function “Go to reference position”.
> Press the red function key Ref.pos to rotate the
antenna automatically to the reference position.
58
Page 59

10 Technical Terms
Antenna cable:
Cable used to connect the modulator of the satellite receiver
to the antenna input socket of the television set. Used as an
alternative where no SCART socket is available
External installation:
Term used to describe those components of the total system
located outdoors, consisting of the parabolic or offset dish
antenna, as well as one or several LNCs, used to receive signals from one or more satellites
AV: see SCART
Data compression/MPEG1/MPEG2:
The transmission of the current television standard (625
lines, and a picture frequency of 50 Hz) results in a digital
data volume of 216 MBit/s.
This would require enormous bandwidths which are simply
not available, neither via satellite nor via terrestrial reception.
Therefore the data is compressed in order to achieve a
reduction in the data volume. For Europe,MPEG-2 has been
laid down as the world-wide standard for data compression.
MPEG2 is an expanded version of MPEG1
Deemphasis:
Adaptation of the audio frequency band to the broadcast signal, this is determined by the broadcast parameters of the
satellite
DiSEqC:
Digital Satellite Equipment Control: a digital control/switching
signal used to control DiSEqC-compatible components of the
external installation via the antenna cable. An example of an
installation utilizing DiSEqC components can be seen in
.
10-1)
DVB:
Digital Video Broadcasting: A digital universal broadcast technology used to transmit pictures, graphics, sound and text,
i.e. data in any imaginable form, in appropriate quality.
Frequency:
A physical term, indicates the number of vibrations per
second, expressed in terms of the unit Hertz (Hz)
Frequency range:
a) Satellite respectively LNC:
11 GHz range from 10,70 GHz - 11,70 GHz, 12 GHz range
from 11,70 GHz - 12,75 GHz
b) Receiver: Intermediate frequency or 1.IF 950 to 2150 MHz
Unit Description Oscillations per second
1 Hz 1 Hertz 1
1 kHz 1 Kilohertz 1.000
1 MHz 1 Megahertz 1.000.000
1 GHz 1 Gigahertz 1.000.000.000
(Fig.
Example:
A B
Position
Ausgang
A B
Position
Ausgang
A B
Option
Ausgang
(Fig. 10-1)
59
Page 60

Coaxial cable:
Cable used to connect the LNC to the satellite receiver, used
to transmit the signal received as well as to provide power to
the LNC.
LNB/LNC (Low Noise Block Converter):
Receiving unit located at the focus of the parabolic dish
antenna, converts the frequency range of the satellite to the
intermediate frequency of the digital receiver.
LOF:
Local oscillator frequency; expressed in terms of MHz or
GHz; varies depending on the LNC and the frequency range
received. Receiving frequency of the digital receiver =
Broadcast frequency of the satellite - LOF
Modulation at 22 KHz:
Apart from 14/28 Volt switching, this also serves to switch
between 2 LNCs. In the Universal LNC it serves to switch to
the High Band
Modulator:
Switch in the satellite receiver or the video recorder, used to
connect the television set via antenna cable
Parabolic dish antenna:
Dish antenna made of aluminium or coated synthetics, has a
parabolic shape to focus and concentrate the electromagnetic
waves broadcast by the satellite in a focal point
Polarisation plane:
To improve utilization of the available frequency range, satellites broadcast neighbouring programmes using opposite polarisation (horizontal and vertical or laevo-rotatory and dextrorotatory, i.e. left-turning and right-turning). To receive both planes you require either two Single LNCs or a V/H-LNC.
Receiver: see Satellite receiver
Satellite:
The satellite is usually described in terms of its operator and
its orbital position,
ASTRA 19° East
EUTELSAT 13° East
Satellite receiver:
The signals received and converted by the LNC cannot be
processed by the television set. The signals are processed by
the satellite receiver in such a way that its outputs provide
audio and video signals (AV) which can be interpreted by the
television set.
SCART:
Type of connector used on television sets, video recorders,
satellite receivers and other home electronics components to
transmit audio and video signals (AV).
Software Update:
Digital television is a new medium that provides improved
sound and picture quality as well as the facility to provide
interactive services.
60
Page 61

These new services are constantly being developed and
improved by the providers. To utilize the services, it may
occasionally be necessary to update the software of the digital receiver.
Transponder:
Located on the satellite, serves to process one or several
programmes. It receives the signal from the ground station,
amplifies it, and broadcasts the signal back to earth.
Universal LNC:
Used for reception of the frequency ranges FFS (10,70 11,70 GHz), BBS (11,70 - 12,50 GHz) and FFS High Band
(12,50 - 12,75 GHz). The entire range is divided into two
bands:
Low Band: 10,70 - 11,80 GHz; LOF 9750 MHz
High Band 11,70 - 12,75 GHz ; LOF 10600 MHz
Operating voltage:
LNCs are supplied with power via the coaxial cable. To this
end, the receiver provides a voltage of 14 or 18 Volts
Intermediate Frequency:
The frequency range broadcast from the satellite cannot be
transmitted via cable. It is therefore converted by the LNC to
an intermediate frequency range of 950 to 2150 MHz. This
allows the signal to be transmitted, and processed in the digital receiver.
1. IF = 1st Intermediate Frequency
11 Technical Data
DBS Tuner:
Input frequency range 950 .... 2150 MHz
Input level range - 65 dBm ... - 25 dBm
DBS Tuner input F - socket
Input/output impedance 75 Ohms
Output for 1.IF 950 ... 2150 MHz (loop through)
AFC capture range +/- 3 MHz
Demodulation Shaped QPSK
Symbol rate 1 ... 45 Mbaud/s, SCPC/ MCPC
FEC Viterbi and Reed-Solomon
Viterbi rates 1/2, 2/3, 3/4, 5/6, 7/8, automatic
adaptation
Roll-off Factor 35 %
Demultiplexing: in accord. with ISO 13818-1
Card reader:*
Type 1 Slot card reader for integrated
CA system
Common Interface:*
Type 1 Common Interface slot for CI
modules
Power consumption max. 0,3A/5V
Copy protection:* Macrovision 7.1
61
* Only for receivers equipped with
this feature
Page 62

PLL Modulator:* UHF, Channel 21 ... 69
Antenna input 47 ... 862 MHz
Antenna output 47 ... 862 MHz
Video decoding:
Video compression MPEG-2 and MPEG-1 compatible
Up to MP@ML (main profile @
main level)
Video standard PAL / 25 Hz
Active screen area 720 pixels x 576 lines
Picture format 4 : 3 / 16 : 9
Picture material 16:9 Automatic adaptation for 16:9 TV
sets (via SCART)
Letterbox filtering for 4:3 TV sets
Audio decoding:
Audio compression MPEG-1 & MPEG-2 Layer I and
II
Audio Mode Dual (main/sub), Stereo
Sampling frequencies 32 kHz, 44.1 kHz, 48 kHz
Audio Parameters:
Output analogue:
Output level L/R 0,5 V r.m.s. (nominal)
Output impedance 600 Ohms
THD > 60 dB ( 1 kHz )
S/N > 60 dB
Crosstalk < - 65 dB
Input analogue:
Input level l/r 0,5 V r.m.s. (nominal)
Input impedance > 40 kOhms
Volume on operating Automatic use of last volume level
set
Output digital:
SP/DIF output electrical, cinch socket
optical*, Toslink
Video Parameters:
Input:
Input level CVBS 1 Vs-s +/- 0.3 dB into 75 Ohms
Input level RED 0,7 Vs-s +/- 0.1Vp-p into 75 Ohms
Input level GREEN 0,7 Vs-s +/- 0.1Vp-p into 75 Ohms
Input level BLUE 0,7 Vs-s +/- 0.1Vp-p to 75 Ohms
Teletext filtering corresp. to ETS 300 472 standard
Scanning teletext data (CVBS) corresp. to ITU-R BT.653-
2 lines: 6-22 and 320-335
TV SCART:
Output: CVBS or RGB
VCR SCART:
Input: CVBS
Output: CVBS
* Only for receivers equipped with
this feature
62
Page 63

Serial interface RS 232:
Type RS 232, bidirectional
Bitrate 115,2 kBit/s max.
Connector D-SUB socket, 9 pin
Function Update for operating software and
pre-programming
LNC Power supply:
LNC power 400 mA max.; short-circuit proof
LNB voltage vertical <14,0V no load, > 11,5 V at 400
mA
LNB voltage horizontal < 20 V no load, > 17,3 V at 400
mA
LNC switched off in standby mode
22 kHz modulation: 22 kHz, Amplitude 0.6 V +/- 0.2 V
Programme memory/Satellite positions:
No. of programmes Favourites list TV:
999 TV programmes
No. of programmes Favourites list :
999 radio programmes
Number of programmes:
Complete list TV/Radio: A total of 4000 programmes
can be accommodated in the
Complete list
DiSEqC:
DiSEqC 1.0 and DiSEqC 1.2
SFI data:
SFI preview: maximum 7 days in advance
Timer:
Events: maximum 30 events, one year in
advance
Remote control system: RC-5
Sub-system address 10 (SAT 2)
Modulation frequency 36 kHz
Infrared wavelength 950 nm
Power Supply:
Mains power unit:
Power requirement:*
21 W/ 20 W/ 19 W in operation, horizontal
Polarisation / 400 mA LNC Power
requirement
11,5 W/ 10 W/ 9,5 W in operation excl. LNC
6 W/ 5,5 W in standby mode
Mains power voltage:
180 V.... 250 V / 50 Hz alternating current
General:
Dimension (WxDxH): 305 mm x 135 mm x 65 mm
Weight: 0,8 kg
63
* Depends of the receiver type
Page 64

12 Trouble-shooting guide
Problem Possible cause Solution
Various programmes not shown in
programme list
Sound on, no TV image Set to radio mode Switch to TV mode
Programmes such as Pro 7, Sat 1,
TM3, Kabel 1, DSF and HOT show
intermittent interference
Wrong programme list selected Select another programme list (see
Interference by cordless telephones
(DECT)
Point 7.2.3.1)
Increase distance between base
station and receiver
Receiver cannot be operated Data stream defective-->receiver
Remote control not working Batteries are spent Insert new batteries
Picture shows intermittent square
blocks. Temporary frozen frame, no
sound. Screenblack at times with
message “No signal”.
No picture, no sound, display*
operative
No picture, no sound, display* off No mains power Check mains cable and connectors
No reception of programmes previously viewed
Antenna cannot be rotated Motor not DiSEqC 1.2 compatible Use suitable motor
blocked
Severe rain or snow Remove snow from dish
Antenna incorrectly positioned Adjust antenna position
Antenna may be too small for
location
Possible obstacle between antenna
and satellite, e.g. tree
Short circuit in LNC connection Switch off unit, eliminate short circuit,
Cable connection defective or not
present
LNC defective Fit new LNC
Incorrect external installation set on
receiver
Antenna incorrectly positioned Adjust antenna position
Antenna defective or incorrectly
positioned
Programme now broadcast on
another transponder
Programme no longer being broadcast
Disconnect mains plug for approx. 5
seconds, then re-connect receiver
Use larger dish
Mount antenna with clear line of view
switch unit on again
Check all cable connections
Correct setting (see Point 6.4)
Check antenna
Perform search (see Point 8.3)
None
* Only for receivers equipped with
this feature
64
Page 65

Problem Possible cause Solution
Time not displayed* while in standby mode
Receiver cannot be switched on, or
cannot be operated
Time not downloaded Switch to e.g. ZDF for 30 seconds
Receiver blocked Perform Flash reset: Caution! All
personal settings will be lost.
> Disconnect mains plug.
> Press standby and program-
me up keys on receiver simultaneously, and keep them
depressed.
> With standby and programme
up keys still pressed down,
reconnect the mains plug.
> Keep keys depressed for
approx. 5 seconds until message* “FLAS” appears.
No reception of encrypted programmes
*
Smartcard not inserted Insert valid Smartcard correctly
Smartcard not activated Contact Hotline to activate
Smartcard
65
* Only for receivers equipped with
this feature
Page 66

For daily use
Switching on and off
> Switch on the digital receiver by pressing the
On/Standby key, either on the receiver or on the
remote control.
> Press this key again to switch the receiver off.
> The receiver is now in standby mode, the display* on
the receiver shows the time.
Programme selection
Using the programme up/down keys
> Use the programme keys up/down either on the
remote control or on the receiver to move up or down
one programme slot at a time.
Using the numeric keys
> Use the numeric keys to enter the desired program-
me number.
For example
1 for programme slot 1
1, then 4 for programme slot 14
2, then 3, then 4 for programme slot 234
When entering programme numbers consisting of several
digits, you have approximately 3 seconds after pressing a key
to complete the entry.
If you wish to enter a number consisting of only one or two
digits, you can speed up the switching procedure by keeping
the key depressed a little longer on the last digit.
Using the programme list:
> Press OK.
> You can now use the arrow keys up/down to mark
the desired programme.
> Press the yellow function key Preview to display a
preview of the marked programme.
> Press OK to switch to the marked programme.
> Use the arrow keys up/down to move the marker
by one line at a time within the list.
> Use the arrow keys right/left to move the marker
around the list one page at a time.
Volume control
> You can regulate the volume of your digital receiver:
press the key Volume + to increase the volume, and
Volume - to decrease it.
> Press the key Sound on/off to switch the sound on
or off (mute).
* Only for receivers equipped with
this feature
66
080903
 Loading...