

Page 1

DigiPal 1
Art.-No. 0000/4903
Receiver for
DVB-T programmes
Operating Manual
EE
EE
PP
PP
GG
GG
Page 2

1 Contents
1 Contents . . . . . . . . . . . . . . . . . . .2, 5
2 Illustrations . . . . . . . . . . . . . . . . . . .3
3 Please read this first . . . . . . . . . . .6
Safety notices! . . . . . . . . . . . . . . . .7
Initial installation . . . . . . . . . . . . . .8
4 Connections . . . . . . . . . . . . . . . . .10
4.1 Power mains connection . . . . . . . . . . . . . .11
4.2 Antenna connection . . . . . . . . . . . . . . . . . .11
4.3 Connection to a television set . . . . . . . . . .11
4.4 Tuning the UHF channel . . . . . . . . . . . . . .12
4.5 Adjusting the antenna . . . . . . . . . . . . . . . .13
4.6 Serial interface . . . . . . . . . . . . . . . . . . . . . .13
5 Installation . . . . . . . . . . . . . . . . . .14
5.1 OSD - language selection . . . . . . . . . . . . .14
5.2 Basic settings . . . . . . . . . . . . . . . . . . . . . . .14
5.2.1 Parental control . . . . . . . . . . . . . . . . . . . . .15
5.2.2/3 Time . . . . . . . . . . . . . . . . . . . . . . . . . . . . . .15
5.3 Audio and Video settings . . . . . . . . . . . . . .15
5.3.1 Image format . . . . . . . . . . . . . . . . . . . . . . .16
5.3.2 Language . . . . . . . . . . . . . . . . . . . . . . . . . .16
5.3.3 SCART mode . . . . . . . . . . . . . . . . . . . . . . .16
5.3.4 Video system . . . . . . . . . . . . . . . . . . . . . . .16
5.3.5 UHF output channel . . . . . . . . . . . . . . . . . .16
6 Operation . . . . . . . . . . . . . . . . . . . .16
6.1 Switching on and off . . . . . . . . . . . . . . . . .17
6.2 Programme selection . . . . . . . . . . . . . . . . .17
6.3 Volume adjustment . . . . . . . . . . . . . . . . . .18
6.4 Selecting a different language . . . . . . . . . .19
6.5 TV/Radio switching . . . . . . . . . . . . . . . . . .19
6.6 Return to previous programme selected . .19
6.7 Display time and programme info. . . . . . . .20
6.8 Additional programme information . . . . . . .20
6.9 Transponder information . . . . . . . . . . . . . .20
6.10 Videotext . . . . . . . . . . . . . . . . . . . . . . . . . .20
6.11 Electronic Programme Guide . . .21
6.11.1 Display Electronic Programme guide . . . . .21
6.11.2 Programme preview following days . . . . . .21
6.11.3 EPG information . . . . . . . . . . . . . . . . . . . . .22
6.11.4 Exiting from EPG . . . . . . . . . . . . . . . . . . . .22
2
Page 3

6.12 Timer . . . . . . . . . . . . . . . . . . . . . . .22
6.12.1 Programming by EPG . . . . . . . . . . . . . . . .22
6.12.2 Manual Programming . . . . . . . . . . . . . . . . .23
7 Changing basic programming . . . .25
7.1 Configuring the programme list . . . . . . . . .25
7.1.1 Calling up the programme list . . . . . . . . . .25
7.1.2 Adding programmes to programme list . . .25
7.1.3 Deleting programmes . . . . . . . . . . . . . . . . .26
7.1.3.1 Deleting from the Favourites list . . . . . . . .26
7.1.3.2 Deleting from the Total list . . . . . . . . . . . . .26
7.1.4 Sorting programmes . . . . . . . . . . . . . . . . .27
7.1.5 Blocking programmes (parental control) . .28
7.2 Changing the PIN . . . . . . . . . . . . . . . . . . .28
7.3 Lifting programme block . . . . . . . . . . . . . .29
7.4 Programme search . . . . . . . . . . . . . . . . . .29
7.4.1 Automatic search/scan . . . . . . . . . . . . . . . .29
7.4.2 Expanded search function.. . . . . . . . . . . . .30
7.4.3 Manual search . . . . . . . . . . . . . . . . . . . . . .30
7.4.4 After a scan . . . . . . . . . . . . . . . . . . . . . . . .31
7.5 Calling up default setting/delete all . . . . . .32
7.5.1 Activating default setting . . . . . . . . . . . . . .32
7.5.2 Delete all programmes . . . . . . . . . . . . . . . .32
7.6 System configuration . . . . . . . . . . . . . . . . .33
8 Technical Terms . . . . . . . . . . . . . .33
9 Technical Data . . . . . . . . . . . . . . .34
10 Trouble-shooting guide . . . . . . . . .36
Your receiver carries the CE mark and complies
Not liable for printing errors, alterations may be effected without notice.
Copying and reproduction subject to permission by the publisher.
with all relevant EU specifications.
Current as per 10/02
TechniSat and DigiPal 1 are registered trademarks of
TechniSat Digital GmbH
P.O. Box 560
D-54541 Daun
Germany
www. technisat.de
_02
5
Page 4
2 Illustrations
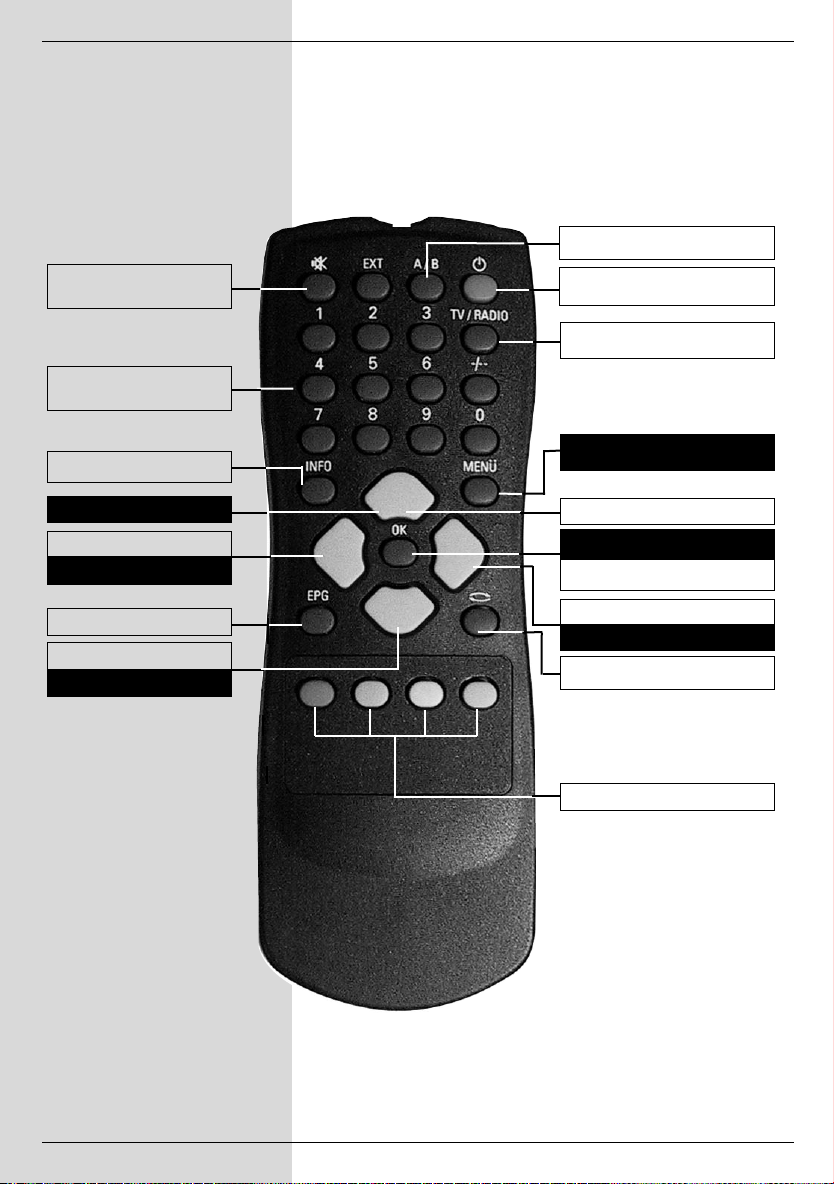
Remote control
Language selection
Sound on/off
Numeric keypad
Info key
Arrow key up
Volume -
Arrow key left
EPG
Programme down
Arrow key down
On/stand-by
TV/Radio operation
Menu on/off
Programme up
OK
Programme list on/off
Volume +
Arrow key right
Back
Multi-function keys
3
Page 5
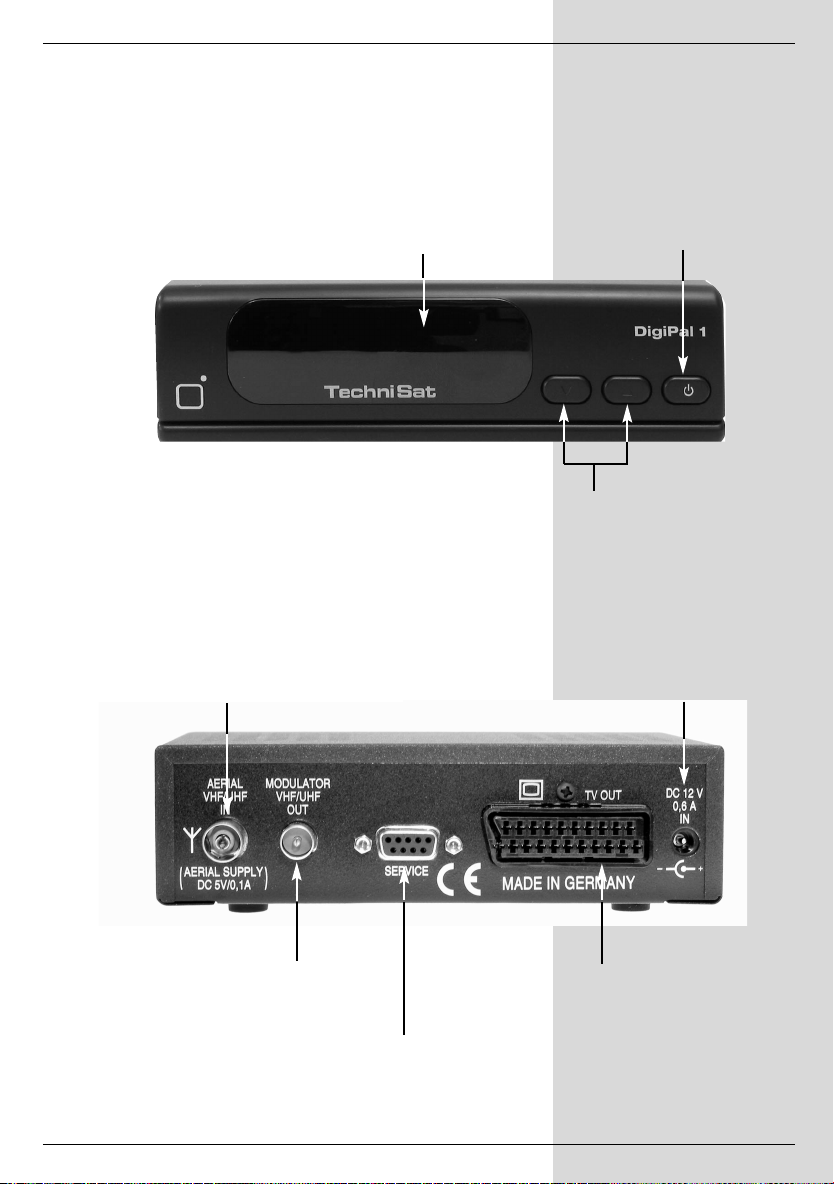
Front view
Rear view
(antenna feed +5V/100mA/
Input terrestrial aerial
switchable via OSD)
LED display
On/Standby
Programme selection
up/down
DC input
Antenna
output
SCART socket TV
RS 232
interface
4
Page 6

3 Please read this first
> Before you start operating the receiver, please check
that all necessary parts have been delivered.
You should have the following:
1 receiver, 1 mains plug/adapter, 1 remote control, 1
operating manual, 1 guarantee card, 2 batteries (1,5V
micro-cells).
> Insert the batteries supplied in the battery compart-
ment of the remote control unit, taking care to observe
the indicated polarity.
> Before connecting the receiver, please first read the
safety precautions in Chapter 3.
> Chapters 4 and 5 describe connecting the
receiver, and adjusting it to the antenna and the
television set.
> Chapter 6 describes all the functions required for
everyday use, such as programme selection or
volume adjustment.
> In Chapter 7 you will find information on how to add
new programmes, or how to change the order of
programmes in the list.
> Technical terms used in the operating manual are
explained in Chapter 8.
> Technical data may be found in Chapter 9.
> A trouble-shooting guide to help you find and correct
faults can be found in Chapter 10.
Disposal instructions
The packaging materials used for this unit consist entirely of
recyclable materials. Please ensure that they are disposed of
appropiately, e.g. via the “Dual System” in Germany.
Please note that spent batteries such as those used in the
remote control, as well as any electronic parts, should not be
disposed of in your regular domestic refuse. They should be
disposed of separately, either via your ratailer, or through the
local authorities.
Disconnecting the unit
The unit should be disconnected from the mains power
supply during electrical storms, or when the unit is not in use
for an extended period of time.
6
Page 7
Safety precautions
For your own protection you should read the safety
precautions carefully before operating your new receiver.
The manufacturer accepts no liability for damage caused by
inappropriate handling, or by non-compliance with the safety
precautions.
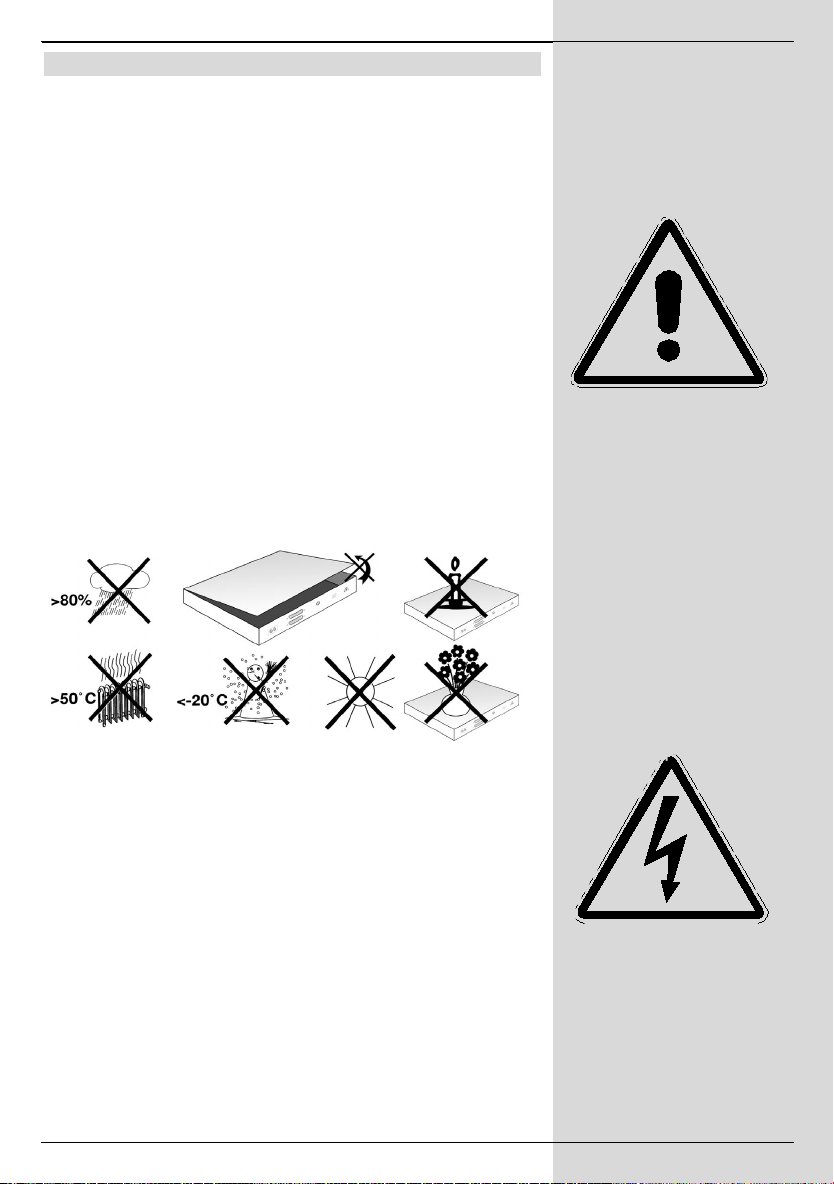
> In order to ensure adequate air circulation, place the
unit on a smooth, flat surface, and do not place any
articles on the top of the unit. Air slots designed to
assist circulation, and to allow heat to dissipate from
the unit, are located here.
> Do not place any burning objects, such as lighted
candles, on top of the unit.
> Do not expose the unit to water in drop or spray form,
and do not place any liquid-filled objects, such as
vases, on top of the unit.
> The unit should be operated only in a temperate clima-
te.
> Under no circumstances should you open the unit! You
are in danger of receiving an electric shock. If it is
necessary to open the unit, this should only be carried
out by qualified persons.
In the following cases you should disconnect the unit from the
mains power and call a repair specialist:
> the power switch or the cable are damaged
> the unit has been exposed to humidity, or liquid has
entered the unit
> in case of considerable malfunction
> in case of severe external damage
7
Page 8

(Fig. 3-1)
Important notes on operation
The use of so-called "On Screen Displays" (see example)
simplifies the operation of the receiver, and reduces the number of keys required on the remote control. All functions are
indicated on the TV screen, and can be adjusted with a few
key-strokes. Groups of functions that belong together are placed in “MENUES”.
The function selected will be highlighted in a different colour.
The function keys red, yellow, green and blue are depicted by
coloured bars in the bottom line. These colour bars represent
different functions in the various menues, which can be initiated by pressing the appropriate coloured keys (multi-function
keys) on the remote control. The function keys are only active
when a brief description is shown in the appropriate field.
Help function:
Wherever it is available in a menu, pressing the blue
function key will display a help text, pressing again will end
the display.
Key descriptions and terms used in the OSD menu are
printed in bold type in this operating manual.
For example:
> Use the Menu key to call up the Main Menu.
3-1)
> Now select the line OSD-Sprache/Language by
using the arrow keys up/down to highlight the
appropriate line.
> Confirm by pressing OK.
> You can exit from the menu either by pressing the
Menu okey or by repeatedly pressing the key Back.
(Fig.
(Fig. 3-2)
Initial installation
Once you have read the safety precautions, connect the unit
as described in Chapter 4. Then switch on the unit as described in Chapter 6. When switching on the receiver for the first
time the installation window will be displayed
(Fig. 3-2).
order to adjust the most important settings of the receiver,
simply follow the instructions.
8
In
Page 9
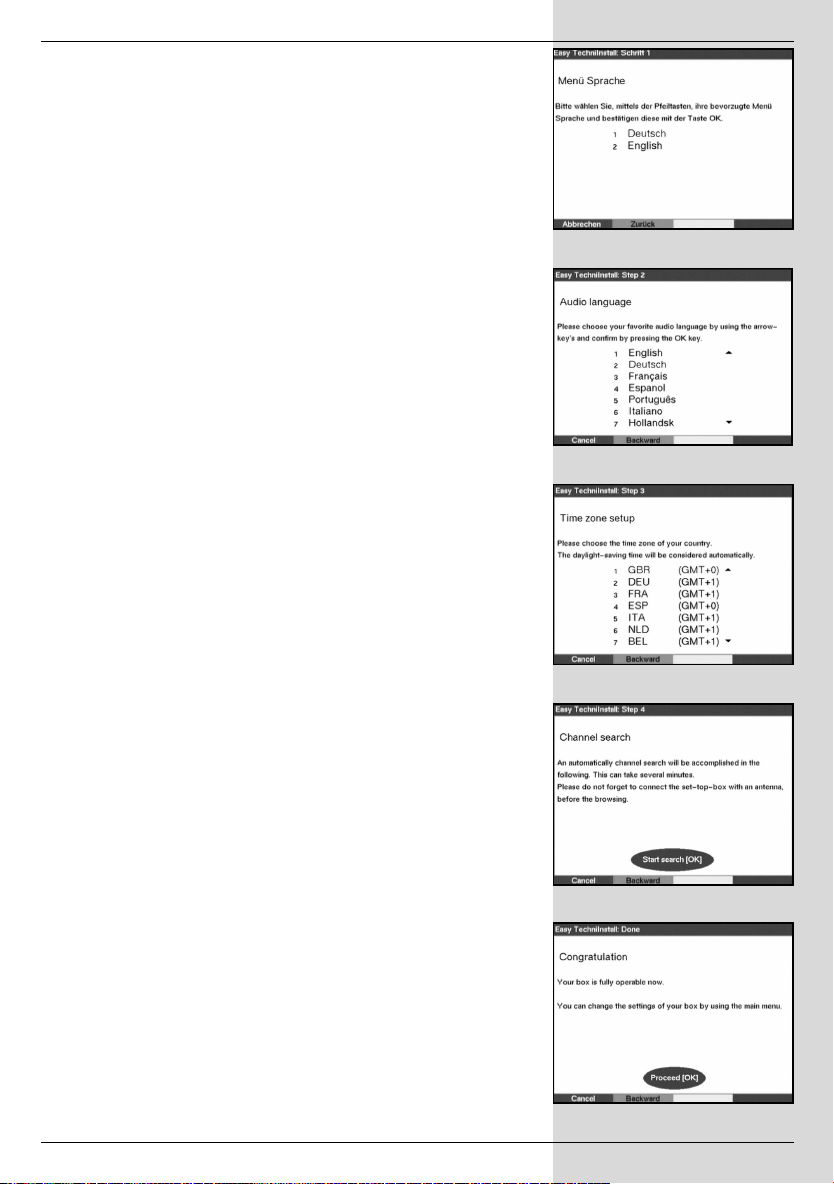
> Press the OK key to display the selection window for
the OSD language.
(Fig. 3-3)
> Use the arrow keys up/down to mark the required
language.
> Confirm with OK, in order to advance to the selection
of the preferred audio language.
(Fig. 3-4)
> Use the arrow keys up/down to select the prefer-
red audio language.
> Confirm with OK, to confirm the selection, and to pro-
ceed to the selection of the time zone.
(Fig. 3-5)
> Use the arrow keys up/down to select the time
zone corresponding to your location.
(Fig. 3-3)
(Fig. 3-4)
> Confirm b y pressing OK to confirm your selection,
and to proceed to the channel search function.
(Fig. 3-
6)
> Please note the message displayed
(Fig. 3-7)
and
commence the search by pressing OK.
An automatic programme scan will now commence,
covering the entire input frequency range of the receiver. This process may take several minutes.
> Your box is ready for operation when the search is
completed.
> Press the OK key to complete the initial installation
and to switch to normal operation.
9
(Fig. 3-5)
(Fig. 3-6)
(Fig. 3-7)
Page 10
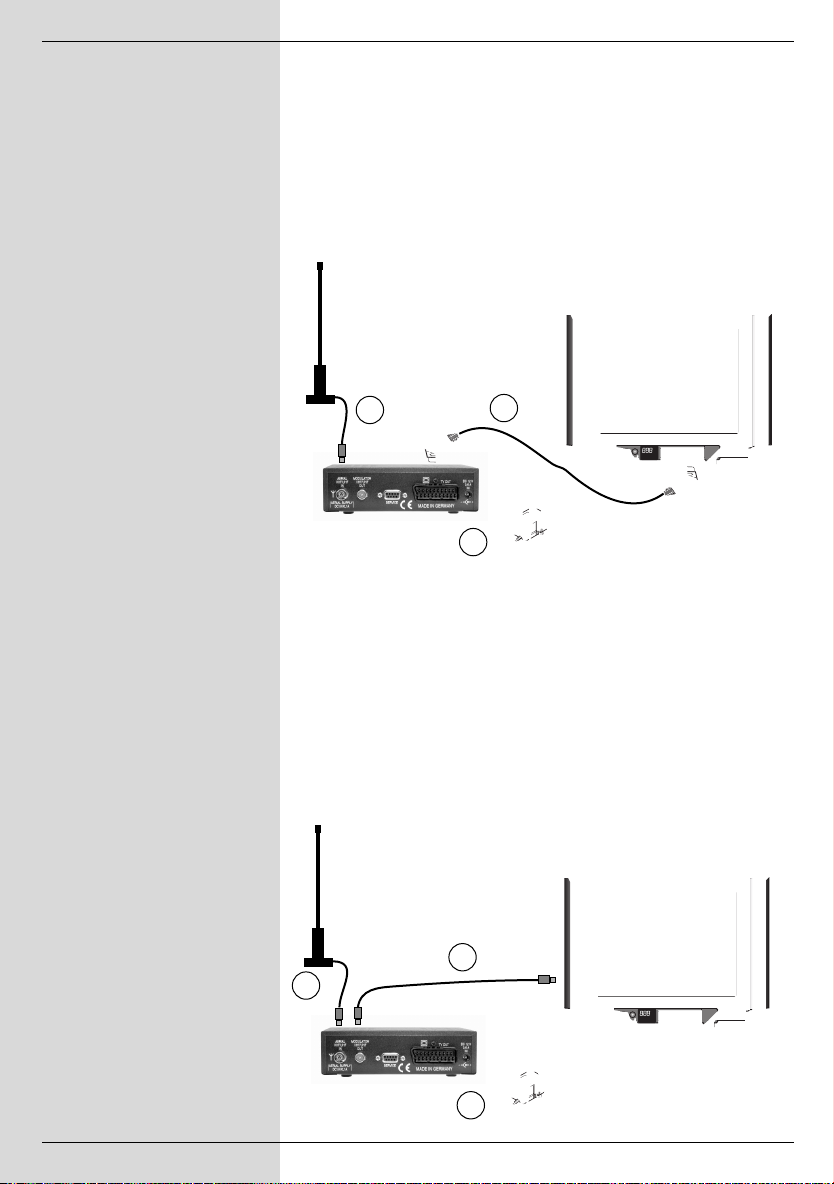
Connecting the DVB receiver
Connection to a TV set by means of a Scart
cable:
a. Connection from antenna to the terrestrial antenna
input of the DVB-T receiver.
b. Mains power connection
c. Scart connection from the DVB-T receiver to the television
set.
a
c
b
Connection to the TV set by means of an antenna
:
cable
a. Connection from the antenna to the terrestrial anten-
na input of the DVB-T receiver.
b. Mains power connection
d. Connection from the antenna output to the antenna
input of the television set.
d
a
10
b
Page 11

4 Connections
The references a b c etc. stated below refer to the
illustration on page 10.
4.1 Mains power connection
The receiver should only be connected to the mains power
supply when the unit has been completely connected with all
other relevant components. This will eliminate the danger of
damage to the receiver or other components.
b When you have effected all the connections, use the
power connection switch supplied to connect the
receiver with a 230V/50 Hz power supply.
4.2 Connection to the antenna
a The cable coming from the terrestrial antenna must be
connected to the terrestrial antenna input of the
receiver.
Where possible you should use a roof-mounted antenna. A room antenna may be sufficient where reception
conditions are particularly favourable. When using an
active antenna be sure to switch on the antenna feed
(Point 5.2).
4.3 Connection to a television set
Once you have connected your receiver to the television set
as described above, it may be necessary, before you can
make further settings or adjustments, to adapt the receiver to
the TV standard of your TV set.
Please note Point 5.3 (Video system).
4.3.1 Via SCART cable:
Using a SCART cable connection between the receiver and
the TV set will ensure optimum image quality.
c Connect the receiver (SCART socket TV) and the
TV set (SCART socket) via a SCART cable. If your TV
set is appropriately equipped, it will switch automatically to AV mode, and thus to DVB-T mode, when the
receiver is switched on.
4.3.2 Via HF cable:
If your TV set is not equipped with a SCART socket, you will
have to connect the receiver to the antenna input socket of
the TV set.
If this type of connection is used, sound reproduction will be
in mono only.
d Connect the receiver (Antenna output) to the
antenna input socket of your TV set by means of a
suitable TV connection cable.
11
Page 12
(Fig. 4-1)
(Fig. 4-2)
You must now tune your TV set to the transmission channel
of the receiver. Select a free programme slot on your TV set
and tune it to channel 41 (refer to operating manual of the TV
set if necessary).
If you do not receive a clear image on channel 41, this may
be the result of a neighbouring channel being set to a programme being received from the same antenna. You can
check on this by temporarily removing the antenna cable from
the Input terrestrial antenna socket of the receiver. If
you then temporarily receive a clear image, you should select
another transmission channel for the receiver in the range of
21 to 69.
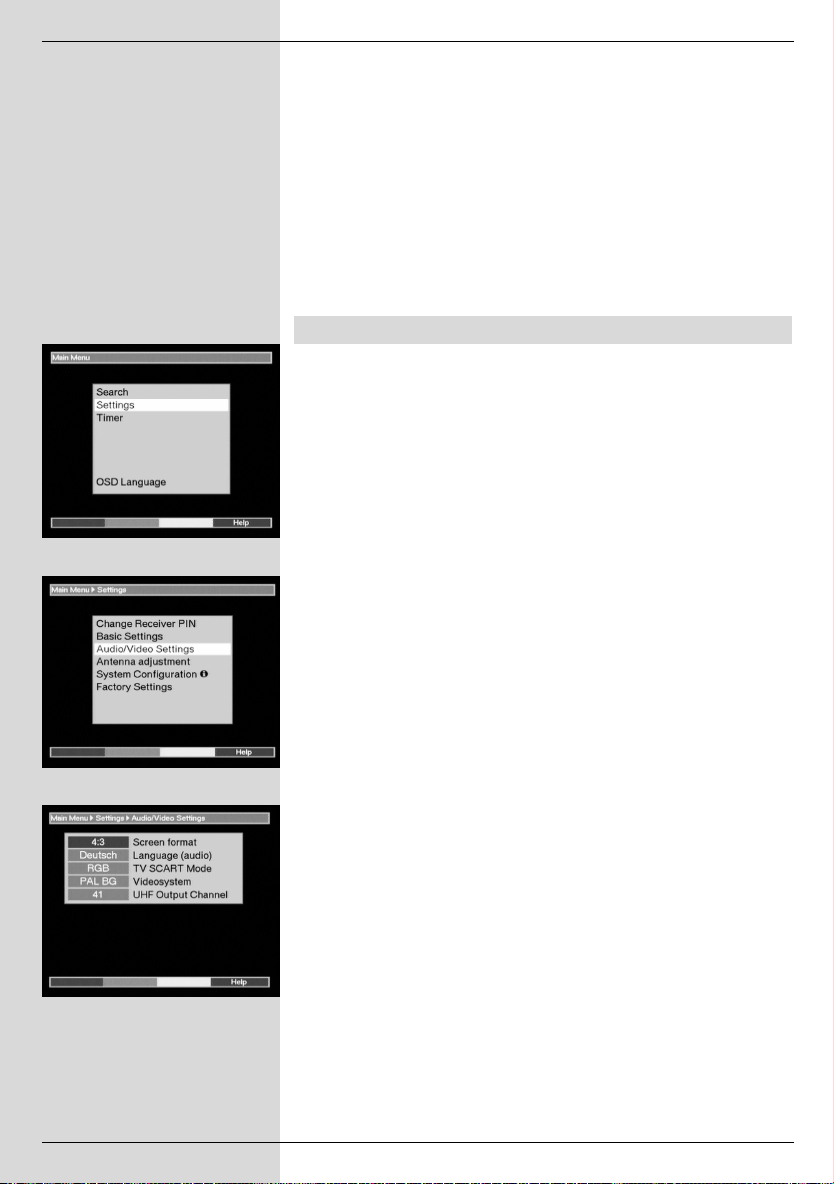
4.4 Setting the UHF output channel
Proceed as follows:
> Press the Menu key to display the Main Menu.
4-1)
> Now select the line Settings, using the arrow keys
up/down to mark the appropriate line.
> Confirm by pressing OK.
The sub-menu Settings will be displayed.
(Fig. 4-2)
> Now use the arrow keys up/down to highlight the
line Audio/Video Settings.
> Confirm by pressing OK.
The sub-menu Audio/Video Settings will now be
displayed.
(Fig. 4-3)
> Now, use the arrow keys up/down in order to hig-
hlight the blue field, thus selecting the menu line UHF
output channel.
> Now tune your TV set to a free UHF channel in the
range of 21 to 69.
> Then set the new output channel of the receiver by
means of the arrow keys right/left.
The receiver will now transmit on the UHF channel
shown on the display.
(Fig.
(Fig. 4-3)
12
Page 13

Your receiver will now check automatically whether the
channel you have selected, as well as the lower neighbouring channel adjoining it, are free
(Fig. 4-4).
If the
channel is already occupied, a note to this effect will
be displayed
(Fig. 4-5).
In this case, please repeat the
procedure until you find a suitable free channel.
> When you have found the optimum UHF channel,
please remember to store this in your TV set memory.
You can now make further adjustments in the menu
Audio/Video Settings,or you can press the Menu
key to return to normal operation. This setting will be
automatically stored when you exit the menu.
> If your television set is equipped only with an automa-
tic search function, then simply set any UHF channel
on your receiver, then start the automatic search procedure of your television set. If necessary, keep
repeating this procedure until you have found a suitable output channel, then store this in your TV set
memory.
> At this stage it may be necessary to fine-tune the
channel on your TV set.
4.5 Adjusting the antenna
Your receiver is equipped with a signal strength indicator to
facilitate the optimum adjustment of the antenna.
> Press the Menu key to call up the Main Menu.
> Now use the arrow keys up/down to select the
menu line Settings.
> Confirm by pressing OK.
The sub-menu Settings will be displayed
> Now use the arrow keys up/down to select the
menu line Antenna adjustment.
> Confirm by pressing OK. The menu Antenna
adjustment will be displayed
(Fig. 4-7)
> Now use the arrow keys left/right to select the
channel with the weakest reception signal strength.
> Now adjust the position of the antenna until both bar
indicators show optimum signal strength.
red bar poor reception
yellow bar good reception
green bar very good reception
(Fig. 4-6).
(Fig. 4-4)
(Fig. 4-5)
(Fig. 4-6)
90
70
4.6 Serial interface RS 232
The RS 232 interface serves to carry out updates of the operating software, as well as to facilitate pre-programming via a
PC.
13
(Fig. 4-7)
Page 14

(Fig. 5-1)
(Fig. 5-2)
(Fig. 5-3)
5 Installation
Now that you have connected your receiver, and commenced
operation, you can turn to optimising the setting for your
personal preferences.
5.1 OSD Language
This menu item gives you the option of selecting the menu
language of your choice.
In order to change the OSD language, proceed as follows:
> Press the Menu key to call up the Main Menu.
5-1)
> Use the keys arrow keys up/down to select the
menu line OSD Language.
> Confirm by pressing OK.
The sub-menu OSD Language will be displayed.
> Use the arrow keys up/down to select the desired
language.
> Store the selection in memory by pressing OK.
> Press the Back key to return to the Main Menu.
5.2 Basic settings
In order to operate your DVB receiver as conveniently as
possible, you should make some adjustments to
accommodate your personal preferences.
> Press the Menu key to call up the Main Menu.
> Use the arrow keys up/down to select the line
Settings.
> Confirm by pressing OK.
The menu Settings will be displayed
> Use the arrow keys up/down to select the line
Basic Settings.
> Confirm by pressing OK.
The menu Basic Settings will be displayed
3).
> Use the arrow keys up/down to move around
within the menu, and to change the individual
positions as indicated. When selecting a menu item
please also note notices displayed on screen, where
applicable.
The following settings can be made:
(Fig. 5-2)
(Fig.
(Fig. 5-
14
Page 15

5.2.1 Parental control
Your receiver is equipped with a parental control function.
Programmes that you have blocked in line with Points
7.1.5 and 7.2 can only be viewed after a four-digit PIN code
has been entered. Go to this line and press the OK key to
activate or deactivate the parental control function on resp.
off.
5.2.2 Time difference to GMT (hours)
Your receiver is equipped with a clock. This is synchronised
via the signal received with Greenwich Mean Time. If you
have entered None (see 5.2.3) under Country, then you
must simply correct the current time with regard to your local
time, using the arrow keys left/right or the OK key. For
Germany, this difference is +1 hour in winter, +2 hours in
summer.
5.2.3 Country
This function automatically provides for the switch to Daylight
Savings Time in summer, and back in winter. Use the arrow
keys left/right to enter your location in the line Country.
> Press the Back key to return to the Settings menu,
or press the Menu key to return to normal operation.
The settings will be automatically stored in memory.
5.2.4 Antenna feed 5V
If you are using an active antenna, you will have to switch on
the antenna feed (5V/100mA). The antenna will be supplied
via the Terrestrial antenna input.
> Use the arrow keys left/right in this line to switch
the antenna feed on or off.
In case of overload, or if there is a short circuit in the antenna
feed, this will be switched off automatically. If this occurs,
please repair the fault, then switch on the antenna feed
again.
5.3 Audio/Video Settings
In order to optimise the settings of your receiver for your TV
set, additional settings may be made in the menu
Audio/Video settings.
> Press the Menu key to call up the Main Menu.
> Use the arrow keys up/down to select the line
Settings.
> Confirm by pressing OK. The sub-menu Settings
will be displayed.
> Now use the arrow keys up/down to highlight the
line Audio/Video Settings.
(Fig. 5-4)
15
(Fig. 5-4)
Page 16

> Confirm by pressing OK. The menu Audio/ Video
Settings will be displayed.
> You can use the arrow keys up/down to move the
marker within the menu, and to change the individual
positions as indicated. When selecting a menu item
please also note any additional notes displayed. The
following adjustments can be made:
(Fig. 5-5)
(Fig. 5-5)
5.3.1 Picture format
> Use the arrow keys left/right to select the appro-
priate picture format for your TV set, either 4:3 or
16:9. This function allows the picture format to be
adjusted automatically for your television set.
5.3.2 Language (Audio signal)
> Use the arrow keys left/right in this line to select
your preferred language. Where available, this
function will scan for all languages being transmitted,
and will automatically set your preferred language.
5.3.3 TV SCART-Modus
> Use the arrow keys left/right in this line to select
either FBAS or RGB, whichever is appropriate for
your TV set. For standard sets, the default setting is
RGB.
5.3.4 Video system
> Use the arrow keys left/right in this line to select
the broadcasting standard apprpriate to your TV set.
The options that can be selected are PAL BG (stan-
dard setting), PAL I and SECAM BG.
5.3.5 UHF output channel
See Point 4.4.
> Press the key Back to return to the menu Settings
or press the Menu key to return to normal operation.
The settings are automatically stored in memory.
6 Operation
Please note:
Before you can attend to the operation of the
unit, you should, if this was not already done
during the initial installation, carry out a programme search (Point 7.4), and where necessary
configure the Favourites list (Point 7.1). Only
when this is completed will all the digital programmes available in your location be available
to you.
16
Page 17

6.1 Switching on and off
> Switch the receiver on by pressing the On/Standby
key, either on the receiver itself or on the remote
control unit.
> Pressing this key again on the receiver or on the
remote control will switch the receiver off again.
> The receiver is now in standby mode, and the display
on the receiver box front panel will show the time. If
the time is not displayed, this must still be entered into
the unit. To do this, switch the receiver on, and switch
to reception of any major channel, such as ZDF, to
enter the time automatically.
6.2 Programme Selection
6.2.1 Using the Programme up/down keys
> You can use the Programme up/down keys on the
receiver or on the remote control to move up or down
the programme list one slot at a time.
6.2.2 Using the numeric keypad
> Simply enter the desired programme number via the
numeric keypad.
For example:
1 for programme slot 1
1, then 4 for programme slot 14
2, then 3, then 4 for programme slot 234
When entering programme numbers with more than one digit,
you have approx. 3 seconds after entering a number to
continue to the next digit. If you wish to enter a programme
number with only one or two digits, you can speed up the
switching process by holding down the last number a little
longer.
6.2.3 Using the programme list
> Press the OK key.
The programme list will now be displayed.
While in TV mode, only TV programmes will be displayed,
and only radio programmes will be displayed while the
receiver is in radio mode. The programme currently selected
will be highlighted.
> You can now use the arrow keys up/down to
highlight the desired programme.
> Press the OK key to select the highlighted
programme.
> Use the arrow keys up/down to scroll through the
list one line at a time.
> Use the arrow keys left/right to scroll quickly
through the list one page at a time.
(Fig. 6-1)
(Fig. 6-1)
17
Page 18

(Fig. 6-2)
(Fig. 6-3)
(Fig. 6-4)
(Fig. 6-5)
6.2.3.1 Selecting a list
The receiver is equipped with several programme lists, which
facilitate the finding of programmes. You can select either
your personal Favourites list (see Point 7.1), or you can
choose to have the programmes sorted according to the
Alphabet or by Provider.
> Press the OK key. The active programme list will be
displayed.
> You can now use the red function key (category) to
open a window with the available types of programme
lists (Favourites List, Provider and ABC ...).
The active programme list type is highlighted.
(Fig. 6-
2)
> Use the up/down arrow keys to select, for exam-
ple, the programme list type ABC and confirm by
pressing OK.
The alphabetically sorted programme list, containing
all programmes, will be displayed.
(Fig. 6-3)
> Use the up/down arrow keys to select the pro-
gramme you wish to view.
> Confirm by pressing OK.
6.2.4 Selecting blocked programmes
If a programme is selected that is blocked by the parental
control function, the note Unit PIN will be displayed on
(Fig. 6-4)
screen
> Enter your PIN code by means of the numeric
keypad.
The selected programme can now be viewed.
In order to facilitate viewing, the PIN code needs to be entered only once while the receiver is in operation. The parental
control block will only be re-activated the next time the unit is
switched on.
6.2.5 Information box
Each time you switch programmes an information box will be
displayed briefly, indicating programme number and programme name
(Fig. 6-5)
ristics will be displayed, such as TxT for Videotext, 16/9 for
a 16/9 format broadcast, A/B for different audio channels
(e.g. multilingual movie or various radio stations) and a key
for encrypted programmes.
. In addition, further programme characte-
6.3 Volume control
You have the facility to adjust the volume of your receiver.
This makes operating the receiver even easier, since it
means you have all the important functions on the remote
control of the receiver, and will only rarely have to use the
remote control of your TV set.
18
Page 19

When switching on the receiver from standby, sound will be
produced at the volume level last set.
> The volume of your receiver can be increased by
using the Volume + key, or you can make it softer by
using the Volume - key.
> Press the Sound on/off key to mute the sound,
press the key again to switch the sound back on.
6.4 Selecting a different language
Where a programme is broadcast in several languages, or
with several sound channels ( in the information box),
you can select a different language or sound channel as follows:
> Press the key Language selection. If available, a
list of the currently broadcast languages will be displayed on screen. (Fig. 6-6)
> Use the arrow keys up/down to select the desired
language.
> Confirm by pressing OK.
You can now listen to the programme in the language
selected. Your receiver is also able to receive mono
broadcasts ( in the information box).
(Fig. 6-7)
6.5 TV/Radio switching
The pre-programming includes radio programmes as well as
television programmes. In Radio mode, the accompanying
TV picture is switched off, and only the programme name is
displayed on screen.
> Switch the receiver into Radio mode by pressing the
TV/Radio key.
The receiver will now switch to the radio programme
last selected.
> Press the TV/Radio key again to switch to the TV
programme most recently selected.
(Fig. 6-6)
(Fig. 6-7)
6.6 Return to last programme selected
> Press the Back key on the remote control to return to
the previous programme selected.
> Press the key again to return to the programme
viewed before.
19
Page 20

(Fig. 6-8)
6.7 Display Time and Programme Information
This function allows you to view programme information
related to the programme currently selected.
> Press the blue key to display information for the
programme selected.
On the lower half of the screen you will see a display showing
current time, the name of the programme selected, as well as
the start and end times of the current programme, where
available from the broadcaster.
> If available, pressing the blue multi-function key will
display information relating to the next programme.
6.8 Additional Programme Information
Where available from the provider, additional programme
information can be obtained by pressing the function
Programme information.
> Press the yellow function key to open an additional
information window.
You will again see information relating to the current
programme.
> Now press the yellow function key again to view
information relating to the next programme.
> Press the yellow key again to switch off the display.
(Fig. 6-8)
6.9 Channel Information
(Fig. 6-9)
> Press the green function key (Channel Information)
in order to view data relating to the channel selected.
(Fig. 6-9)
> The coloured multi-function keys can be used to obtain
and display additional Audio/Video information,
Programme information and, where relevant,
information on the encryption system used.
> Press the Back key to exit from the channel
information.
6.10 Videotext
6.10.1 Using the Videotext decoder of your televisi-
on set
Wherever this is broadcast, videotext will be available to your
TV set. Use the remote control of your TV set to work with
videotext. Should you experience problems with your TV set,
such as video text and picture content being superimposed,
you should set your receiver to FBAS mode (Point 5.3).
20
Page 21

6.10.2 Using the internal Videotext decoder
If your television set is not equipped with an integrated
videotext decoder, you can still receive videotext via your
receiver, wherever available from the broadcaster.
> Select and switch to the programme of which you
would like to view the videotext information.
> Press the red function key to switch on the videotext.
(Fig. 6-10)
> Use the numeric keypad to enter the videotext
page required. Your entry will be displayed in the
upper left corner of the screen. Once you have entered the the videotext page required, the receiver will
search for the appropriate page. As not all videotext
pages can be transmitted simultaneously, it may take
a few seconds until the receiver has found the page
and displays it on your screen.
Page 100 is the Contents page for all videotext
providers.
> Use the red resp. the green key to page forward
resp. back.
> Press the Back key to return to normal operation.
6.11 Electronic Programme Guide
The EPG function (Electronic Programme Guide) enables
you to display the programme schedules and contents on
your television screen. This allows you to obtain a quick
overview of the programmes and their contents being
broadcast that day, and where available also for the following
days.
6.11.1 Calling up Electronic Programme Guide
> Switch on the receiver as well as your television set.
> Press the EPG key on the remote control of your
receiver. The electronic programme guide of the
programme currently selected will appear on screen.
This will contain data related to today’s programmes
(Fig. 6-11).
(Fig. 6-10)
6.11.2 Programme preview for following days
Where this is available from the broadcaster, pressing the
arrow key right will allow you to view information on the
programme content for the following days, related to the programme currently selected.
Press the arrow key left to return to the previous tables.
21
(Fig. 6-11)
Page 22

(Fig. 6-12)
(Fig. 6-13)
(Fig. 6-14)
6.11.3 EPG Information
Where this is broadcast by the provider, the EPG function will
provide you with information on the contents of various
programmes:
> Use the arrow up/down keys to select the
appropriate programme.
> Press either the EPG key or the blue function key
(More) to display the information.
(Fig. 6-12)
around by using the arrow up/down keys, or you
can page back and forth by using the arrow
left/right keys.
> Press the Back key to return to the previous table.
Lengthy text passages can be moved
6.11.4 Exiting from EPG
> Press the Back key to return to normal operation.
6.12 Timer
Your receiver is provided with a timer. This enables you to
make video recordings even when you are absent. The timer
operation is indicated by a blinking LED in the display, which
serves as a control. Timer operation can be interrupted by
pressing the On/Standby key.
6.12.1 Programming by means of EPG
> Switch to the channel that carries the programme you
wish to record.
> Press the EPG key.
The EPG table of the currently selected programme
will be displayed
> Use the arrow keys up/down to highlight the
desired programme.
> Press the yellow function key (Record).
The data relating to the selected programme will now
be stored, and will be displayed on screen for control
purposes
> In order to delete the timer marking, press the
green function key (Delete) and confirm when
requested to on screen.
> Press the Back key to return to the EPG table, and
to add further programming if you so wish.
or
> Press the TV/Radio key to return to normal
operation.
At the programmed time the receiver will switch to the selected programme and will, if set appropriately, return to standby
mode at the end of the programme.
(Fig. 6-13).
(Fig. 6-14)
22
Page 23

6.12.2 Manual Programming / changing timer
settings
In addition to EPG timer programming, you can also use
manual programming. To use manual programming, proceed
as follows:
> Use the Menu key to call up the Main Menu.
> Select the line Timer and confirm by pressing OK.
The menu Timer will be displayed
> Press the yellow function key (New) to go to timer
programming, in order to programme a new event.
(Fig. 6-16)
> In order to change an existing timer setting, use the
arrow keys up/down to highlight this. Press the
yellow function key (Change) to go to the settings of
the highlighted timer.
In order to programme a setting, proceed as follows:
Source
> Use the arrow keys to select the category Source
and use the OK key to select the desired source (TV
or Radio).
Station/Channel
In this line you should select the TV station providing the
programme which you would like to record:
> Use the arrow keys to select the line Station.
> Confirm by pressing OK. A programme list will be
displayed.
Use the arrow keys to highlight the desired
programme.
> Confirm by pressing OK.
The highlighted programme will now be added to the
timer menu.
Date
> Use the arrow keys to highlight the category
Date.
> Use the numeric keypad to enter the recording
date.
Start
> Use the arrow key right to highlight the category
Start.
> Use the numeric keypad to enter the starting time.
Stop
> Repeat the steps as described under “Start” to enter
the time when the programme stops, or ends.
In order for the unit to cope with all these events, you should
allow a break of at least one minute between the Stop time of
a timer and the Start time of the following timer!
(Fig. 6-15).
(Fig. 6-15)
(Fig. 6-16)
23
Page 24

Repeat (optional)
> Use the arrow key right to highlight the category
Rep.
> Confirm by pressing OK.
A selection window will be displayed, showing various
suggestions for repeats.
1x Timer on
T Daily repeat
1xW Repeat once per week
1-5 Daily repeat on workdays only
6-7 Daily repeat on weekends only
> Use the arrow keys up/down to select the desired
function.
> Press the OK to store the setting in memory.
Type
> Use the arrow key right to highlight the category
Type.
> Press the OK dto select the desired type in this line.
VCR
Your receiver will be switched on resp. off for the programme you have selected. If the unit was switched
on by the timer, most of the functions of the remote
control will be deactivated, in order to prevent accidental interference with the recording.
Timer operation is indicated visually by the blinking of
the LED display for control purposes.
Noting function
Your receiver will switch itself on at the time you have
set as starting time, and will switch to the selected programme slot. Unlike the case of the VCR setting, the
controls of the receiver remain fully functional and the
unit will not be switched off at the end of the programme.
> When you have completed the programming, press
the yellow function key (Accept), in order to
transfer the data to memory.
> Press the TV/Radio key to return to normal
operation.
Note!!!
Ensure that the information box indicates the correct time. If
this is not the case, switch to the ZDF or other major
programme, then go to Standby. Switch on the receiver and
leave it tuned to ZDF (or other programme broadcasting time
signal) for approx. 30 seconds, so that the correct current
time can be scanned into the receiver.
24
Page 25

7 Changing basic programming
7.1 Configuring the programme list
This chapter describes how you can change and adapt the
preprogramming of your receiver as well as the Favourites
programme list to suit to your own preferences. This function
is also required to sort newly found programmes into the list
after a programme search.
Please note the following:
Youir receiver is provided with two programme lists, the
Favourites list
list contains all the programmes that you have taken into this
list, using the procedure described below. The Total list
contains all programmes.
This chapter also describes how you can delete a programme, and how you can block access to a programme by
means of the parental control function. When calling up the
programme list by pressing the OK key, the Favourites programme list will be displayed. When you are in TV mode you
can view the TV list, and when you are in Radio mode you
can view the list of radio programmes.
7.1.1 Calling up a Programme list
> Press the OK key.
The Favourites programme list will be displayed.
7-1)
7.1.2 Adding programmes to the programme list
To add programmes to the programme list selected, proceed
as follows:
> Press the red function key to display a selection
window that allows you to switch between the
Favourites list and the Total list. This Total list contains
all
displaying the Total list sorted according to
Providers or sorted alphabetically (ABC...).
> Use the arrow keys up/down to select the desired
programme listing. (e.g. ABC)
> Confirm by pressing OK.
An alphabetically sorted list will now be displayed.
(Fig. 7-2)
and the Total list. The Favourites programme
(Fig.
available programmes. You have the option of
(Fig. 7-1)
25
(Fig. 7-2)
Page 26

(Fig. 7-3)
> Press the green function key (Select) to display a
selection window.
> Now use the arrow keys up/down to mark the
category All in order to display all available
programmes in the Total list, or select All new to
display only new programmes found during the last
scan, or select All found to display all programmes
found during the last scan.
> Confirm by pressing OK.
Depending on your selection, a list will be displayed
showing either all programmes or all new programmes. Programmes that have already been entered in
the Favourites list are indicated by a check-mark.
In order to add programmes to the Favourites list, or to delete
them from this list, proceed as follows:
> Press the blue function key (Change).
> Use the arrow keys up/down to highlight a
programme you wish to add to the list.
> Simply press the green function key (Add) to add the
selected programme to the Favourites list.
In order to select several programmes at the same
time proceed as follows:
> Press the OK key to go to Selection mode.
The highlighted programme will now ne indicated by a
cross in the left margin, and the menu display will be
shown in transparent form, with the picture in the
background.
> You can now use the arrow keys up/down to
select additional programmes, and mark them.
> Once you have selected and marked all the
programmes you wish to add, press the green
function key (Add) in order to add the marked
programmes to the Favourites list.
(Fig. 7-3)
7.1.3 Deleting programmes
7.1.3.1 Deleting from the Favourites list
If you use the above method to mark programmes with a
cross that are already in the Favourites list (marked by a
check-mark in the right margin), then pressing the green
function key (Delete) will remove these programmes from the
user table. However, they remain stored in the Total list, and
can be added to the Favourites list again at any time.
7.1.3.2 Deleting from the Total list
Pressing the red key (Delete) followed by an affirmative
response to a confirming question will cause highlighted
programmes to be deleted from the Total list.
> Highlight the programmes you wish to delete as
described above.
26
Page 27

> Press the red function key (Delete).
The message “Do you really want to delete the
programme(s)?” will be displayed.
> Use the arrow keys left/right to select Ye s or
No.
> Confirm by pressing OK.
7.1.4 Sorting programmes
To sort the programmes in your Favorites list in the order
most convenient to you, proceed as follows:
> Press the OK key to call up the Favourites list.
> Press the blue function key (Change).
> Now use the arrow keys up/down to select the
programme you wish to place at a different position in
the list.
> Now press the yellow function key to select the
function Sort. A double arrow will be displayed next
to the selected programme.
> You can now use either the arrow keys up/down
or the numeric keypad to move the programme to
any position in the programme list.
> Press the yellow function key (Store) to store the
new position of the programme in memory.
In order to select a number of programmes
simultaneously, proceed as follows:
> Press the OK key to go to the Select mode.
The selected programme will now be indicated by a
cross in the left margin.
> You can now proceed to select additional
programmes, using the arrow keys up/down.
> When you have completed selecting the programmes
you wish to, press the yellow function key (Sort).
> You can now move the selected programmes to any
position in the programme list, using either the arrow
keys up/down or the numeric keypad.
> Press the yellow function key (Store) to store the
programme(s) at the new position.
> When you have completed configuring the programme
list according to your own preference in this manner,
press the Back key twice to return to normal
operation.
7.1.5 Blocking access to programmes (Parental
Control)
You have the facility to block access to programmes. A
blocked programme will only be displayed on screen once
the programme has been selected, after which the PIN code
must be entered. Once this code has been entered, the
restriction remains de-activated until the receiver is switched
off (Standby).
27
Page 28

(Fig. 7-4)
To block access to a programme, proceed as follows:
> Call up a programme list by pressing OK.
> Press the blue function key (Change).
> Now use the arrow keys up/down to select the
programme you wish to block/restrict.
> Now press the green function key to select the
function Parental Control.
A lock symbol will appear next to the programme
selected.
> If you wish, repeat the procedure until you have
blocked access to all programmes you wish to block.
> When you have completed configuring the programme
list according to your preferences in the manner
described above, press the Back key twice to return
to normal operation.
> In order to activate the parental control function, you
must still enter your personal PIN code under the
following point Changing the PIN, following which
you must switch on the parental control as described
in Point 5.2.1 (Parental Control).
7.2 Changing the PIN
The PIN code is set at the factory to 0000. In order to
activate the parental control function you must enter your own
personal PIN code in place of the factory setting.
Note! Do not forget your PIN code. If you do forget, please consult your authorised retailer!
In order to change the PIN code proceed as follows:
> Press the Menu key to call up the Main Menu.
> Use the arrow keys up/down to select the line
Settings.
> Confirm by pressing OK.
The sub-menu Settings will be displayed.
> Use the arrow keys up/down to select the line
Change PIN, and confirm by pressing OK. The
menu Change Unit PIN will be displayed
> Now use the numeric keypad to enter the current
PIN code (factory setting: 0000).
> Now use the numeric keypad to enter the new PIN
code. Repeat the entry.
> Once you have changed the PIN code in this manner,
press Back twice to return to normal operation.
Please note that you still need to activate the parental control
function, if desired, as described in Points 5.2.1 and 7.1.5.
(Fig. 7-4).
28
Page 29

7.3 Cancelling parental control for individual
programmes
In order to delete the parental control block for individual programmes, proceed as per Point 7.1.5. First press the blue
function key (Change), then enter the PIN code. Select the
appropriate programme and use the green function key
(Parental Control) to remove the access control.
7.4 Programme search
There are various methods of proceeding with a programme
search, which will allow you to receive new programmes.
1. Automatic Search/Scan:
Select this type of search in order to scan the entire frequency range of the receiver for programmes.
2. Extended Search:
Select this type of search to scan only a specific range of frequencies or channels for programmes.
3. Manual Search
Select this type of search to scan a specific frequency for
programmes.
When the search has been completed, your screen will display a message showing how many programmes have been
found by your receiver, and how many of these are new. New
programmes are stored in the Total list and can be added
to the Favourites list as per Point 7.1.
> To perform a programme search first call up the Main
Menu.
> Use the arrow keys up/down dto highlight the line
Search.
> Confirm by pressing OK. The sub-menu Search will
be displayed
> Now use the arrow keys up/down to select the
type of search method you wish to perform.
7.4.1 Automatic Search
> A message will be displayed, confirm this by pressing
OK. The entire input frequency range will now be
scanned for programmes. Please note any further
messages that are displayed on screen.
It may take more than 15 minutes to complete the
search.
> You can terminate the search by pressing the red
function key.
(Fig. 7-5)
(Fig. 7-6)
(Fig. 7-5)
(Fig. 7-6)
29
Page 30

(Fig. 7-7)
7.4.2 Extended search
When performing an extended search
two options of performing this.
1. Frequency search
The user specifies a frequency range which is then scanned
for programmes.
2. Channel search
In this case, the user specifies a range of channels, which is
then scanned for programmes. Performing a channel search
is faster than a frequency search.
> Press the OK key to display a table showing the
various search options available.
> Use the arrow keys up/down to select the search
method you wish to use.
> Confirm by pressing OK.
> Use the arrow keys up/down to select the field
Start channel resp. Start frequency.
> Use the arrow keys left/right to enter the start
channel, or use the numeric keypad to enter the
start frequency.
> Use the arrow keys up/down to select the field
Stop channel resp. Stop frequency and proceed
as described above to enter the stop channel resp.
the stop frequency.
You can now go to the line Search Mode to decide
whether you want to search only for free-to-air pro-
grammes, or whether you want to include encrypted
programmes in the search.
> Use the arrow keys up/down to select the line
Search Mode.
> Press the OK key to decide whether you wish to
search only for free-to-air programmes (Only Free)
or whether you want to include encrypted programmes
as well (All).
> Press the red function key (Start Search) to commen-
ce the search.
The search will now be started. Please note any furt-
her messages displayed on screen.
> The search can be terminated by pressing the red
function key.
The complete scan may take more than 15 minutes. Please
note any messages displayed on screen.
(Fig. 7-7)
you have
7.4.3 Manual Search
You may search a frequency range for programmes, or you
may search for a specific programme by means of the PID
data.
> To do this, use the arrow keys up/down to select
the line Manual Search.
30
Page 31

> Confirm by pressing OK. The menu Search
Manual Search will be displayed
(Fig. 7-8)
> To search a channel for programmes, use the arrow
keys left/right to enter the channel.
> Press the red function key (Start Search) to commen-
ce the search.
PID Search
Should you be unable to find a particular programme by
means of an automatic or extended search, it may be necessary to enter additional PID data, which is specific to this programme. You may have to go to the Internet or to the programme provider to obtain this data.
> Enter the channel ,on which the programme is broad-
cast, as described above.
> Press the green function key (PID Suche) to enter
the PCR-, Audio- and Video-PID.
(Fig. 7-9)
> Then use the arrow keys up/down to highlight, in
turn, the lines PCR-PID, Audio-PID and Video-
PID. Use the numeric keypad to enter the appropriate numbers.
7.4.4 After the Search
As the search progresses, you can follow the
frequencies/channels searched on the TV screen. When the
search is completed, the total number of programmes found
as well as the number of new programmes found will be
displayed.
> Press the Menu key to return to normal operation.
> The programmes can now be added individually to the
Favourites list, as described in Chapter 7.1.
(Fig. 7-8)
(Fig. 7-9)
31
Page 32

(Fig. 7-10)
(Fig. 7-11)
7.5 Calling up factory settings/Delete All
You can return to the original factory (default) settings at any
time. You can also, if the programme list is completely outdated because of changes made by programme providers,
delete this completely, and then perform a new search. Please note that after you have carried out the Delete function you
must start a search, and must then copy the desired programmes from the Total list to the Favourites list.
> Use the Menu key to call up the Main Menu.
> Now use the arrow keys up/down to select the
line Settings.
> Confirm by pressing OK. The sub-menu Settings
will be displayed
> Now use the arrow keys up/down to select the
line Factory Settings.
> Confirm by pressing OK. The sub-menu Factory
Settings will be displayed
7.5.1 Activating Factory/Default Setting
This function allows you to return to the original default settings, at the same time deleting all your personal settings.
> Use the arrow keys up/down to select the line
Activate Default Settings.
> Confirm by pressing OK.
The message “Do you really want to activate default
settings?”will be displayed.
> Use the arrow keys left/right to select Yes or
No.
> Confirm by pressing OK.
7.5.2 Delete All Programmes
This function allows you to delete the entire programme
memory.
> Use the arrow keys up/down to select the line
Delete All Programmes.
> Confirm by pressing OK.
The message “Do you really want to delete all
programmes?” will be displayed.
> Use the arrow keys left/right to select Yes or
Abort.
> Confirm bei pressing OK.
Please also note any messages displayed on screen.
(Fig. 7-10)
(Fig. 7-11)
32
Page 33

7.6 System configuration
This menu item allows you to view the specific unit data.
> Use the arrow keys up/down to select this line in
the sub-menu Settings.
> Confirm by pressing OK.
> Press the Menu key to return to normal operation.
8 Technical Terms
Antenna cable (co-axial cable):
The connecting cable used between antenna and receiver, to
transmit the signal received
Data compression/MPEG-1/MPEG-2:
Using the current television standards (625 lines, and 50 Hz
image repeat frequency) means that a data volume of 216
MBit/s. This would require bandwidths simply not available
with either satellite or terrestrial transmission. Therefore it
was decided to reduce the data volume by using a data compression programme. In Europe, MPEG-2 has been agreed
upon as the international standard for data compression.
MPEG-2 is an expanded version of MPEG-1
DVB:
Digital Video Broadcasting: A universal digital broadcasting
technology used for pictures, graphic images, sound and text,
i.e. for data in any form, and always in every possible quality
suitable to the type of data
DVB-T Receiver:
The signals received by the antenna cannot be processed by
the television set. The signals are processed in the DVB-T
receiver in such a way that an audio-visual (AV) signal is provided at the receiver’s outputs in a form suitable for the television set
Frequency:
A physical measurement indicating the number of waves or
oscillations per second. The unit of measurement is called
Hertz (Hz)
Channel:
Part of a frequency band which is apportioned according to a
specific allocation procedure. A TV channel consists of two
frequencies, one for the visual content and one for the sound
content. Each channel is designated by means of a numeric
abbreviation (except for those European television channels
in the frequency range 40 - 230 MHz, which have been given
letters of the alphabet as designations).
Modulator:
Switch in the receiver facilitating the connection to the TV set
by means of antenna cable
33
Page 34

Mode:
determines whether a mono or a stereo programme is
received
OSD:
On Screen Display (messages shown on TV screen)
PID:
Packet Identifier, Packet-ID
SCART:
Type of plug/socket connection used in television sets, video
recorders, satellite receivers and other entertainment electronics products to transmit both sound and picture (audio and
visual, or AV) signals.
Software Update:
Digital television is a new medium. It provides not only improved sound and picture quality, but also the facility for providing interactive services. These services are continually
being developed and improved by programme providers. In
order to utilise these services it may become necessary to
update the receiver’s software.
9 Technical Data
DVB-T Tuner:
Input frequency range 174 .... 230 MHz /
470 .... 860 MHz
Frequency range tuner
input to tuner output 50 .... 860 MHz
Tuner input IEC socket
Input/output impedance 75 Ohms
Tuner output IEC connector
Modulator output
channel range UHF channels 1 .... E69
Video systems Pal I, B/G, Secam B/G
Bandwidth 7/8 MHz (switchable)
Demodulation COFDM 2k/8K
Antenna feed 5V/0,1A
(double insulated, switchable)
Demultiplexing: according to ISO 13818-1
Video decoding:
Video compression MPEG-2 and MPEG-1
compatible up to MP@ML
(main profile @ main level)
Video standard PAL / 25 Hz
Active image area 720 pixels x 576 lines
Picture format 4 : 3 / 16 : 9
34
Page 35

Image material 16:9 Automatically adapted
for 16:9 TV sets (via SCART)
Letterbox filtering for 4:3
TV sets
Audio decoding:
Audio compression MPEG-1 & MPEG-2 Layer I
and II
Audio Mode Dual (main/sub), Stereo
Sampling frequencies 32 kHz, 44.1 kHz, 48 kHz,
Audio parameters:
Output analogue:
Output level L/R 0,5 V r.m.s. (nominal)
Output impedance 600 Ohms
THD > 60 dB (1 kHz)
Crosstalk < - 65 dB
Volume when switched on Stores last value set
Video parameters:
Output:
Output level FBAS 1 Vs-s into 75 Ohms
Output level RED 0,7 Vs-s into 75 Ohms
Output level GREEN 0,7 Vs-s into 75 Ohms
Output level BLUE 0,7 Vs-s into 75 Ohms
Teletext
Teletext Filtering corresponding to ETS 300 472
Standard
Reception Teletext data (FBAS) corresponding to
ITU-R BT.653-2 lines: 6-22
and 320-335
TV SCART:
Output: FBAS nd RGB
Serial Interface RS 232:
Type RS 232, bi-directional
Bit rate 115 kBit/s
Connector D-SUB socket, 9 pin
Function Update for operating software
EPG Data:
Current, following and preview events of current programme
selected
Timer:
32 events, maximum of 1 year in advance
OSD languages:
German, English
Remote Control System: RC-5
Subsystem address 10 (SAT 2)
Modulation frequency 36 kHz
Infrared wavelength 950 nm
35
Page 36

Mains power supply:
External mains connector: 12V / 600 mA
Power requirement:
< 10 W (in operation, incl. power feed to antenna)
Input Voltage:
12 V .... 15 V Direct current
General:
Ambient temperature +15°C...+35°C
Humidity < 80%
Dimensions (WxDxH): 158 mm x 115 mm x 47 mm
Weight: 0,5 kg
10 Trouble-shooting guide
Dear Customer,
we would like to point out once again that, if the following
fault occurs, you should first try to solve the problem yourself
in the manner described, before contacting your
service/repair specialist.
The receiver is not functioning properly (controls
do not respond, image frozen ...)
> Disconnect the mains power plug for approx. 5
seconds.
> Then switch the receiver on again.
If the problem persists further, contact your service technician.
36
Page 37

Problem Possible cause Solution
Display on, no picture, no sound Defective or no cable
connection
Display off, no picture, no sound No mains power supply Check mains power switch
Check all cable connections
No reception of programmes
previously in order
Various programmes not shown
in programme list
Sound OK, screen blue Set to radio mode Change setting to TV mode
Unit cannot be operated Defective data stream-->unit
Remote control not working Batteries are spent Replace batteries
Square blocks appear
temporarily on screen. TV
temporarily switches to freeze
frame, with no sound. Screen
occasionally black, displays
message “no signal”.
Antenna has moved
Programme now broadcast on a
different frequency
Programme no longer being
broadcast
Wrong programme list selected Select different programme list
blocked
Antenna position not correctly
adjusted
Check antenna
Perform search (see Point 7.4)
None
(see Point 6.2.3.1)
Disconnect mains plug for
approx. 5 seconds, then switch
unit on again
Adjust antenna position
37
Page 38

For everyday use
Switching on and off
> Switch the receiver on by pressing the On/Standby
key, either on the receiver unit itself or on the remote
control.
> Press the key again either on the receiver unit or on
the remote control to switch the receiver off again.
> The receiver is now in Standby mode.
Programme selection
Using the Programme up/down keys
> Use the Programme up/down either on the
receiver unit itself or on the remote control to switch
the programmes up or down the programme list one
position at a time.
Using the numeric keypad
> Use the numeric keypad to enter the desired
programme number.
For example
1 for programme slot 1
1, then 4 for programme slot 14
2, then 3, then 4 for programme slot 234
When entering programme numbers with more than one digit
you have approx. 3 seconds time after pressing a key to
enter the next digit and complete the entry.
If you wish to enter only a single or double-digit number, you
can speed up the switching procedure by holding down the
key when you enter the last digit.
Volume adjustment
> You can adjust the volume of your receiver by
pressing the Volume + key to make the sound
louder, or the Volume - key to make it softer.
> Press the key Sound on/off to mute the sound,
press the key again to switch the sound back on.
TV/Radio switching
The pre-programming of your receiver covers radio as well
as television programmes. In Radio mode, the corresponding
TV picture is switched off, and only the programme name is
displayed on screen.
> Press the TV/Radio key to switch the receiver to
Radio mode.
The receiver will now switch automatically to the last
radio programme selected.
> Press the key TV/Radio again to return to the
television programme last selected.
38
 Loading...