


32-630
User Guide


Contents
Introduction
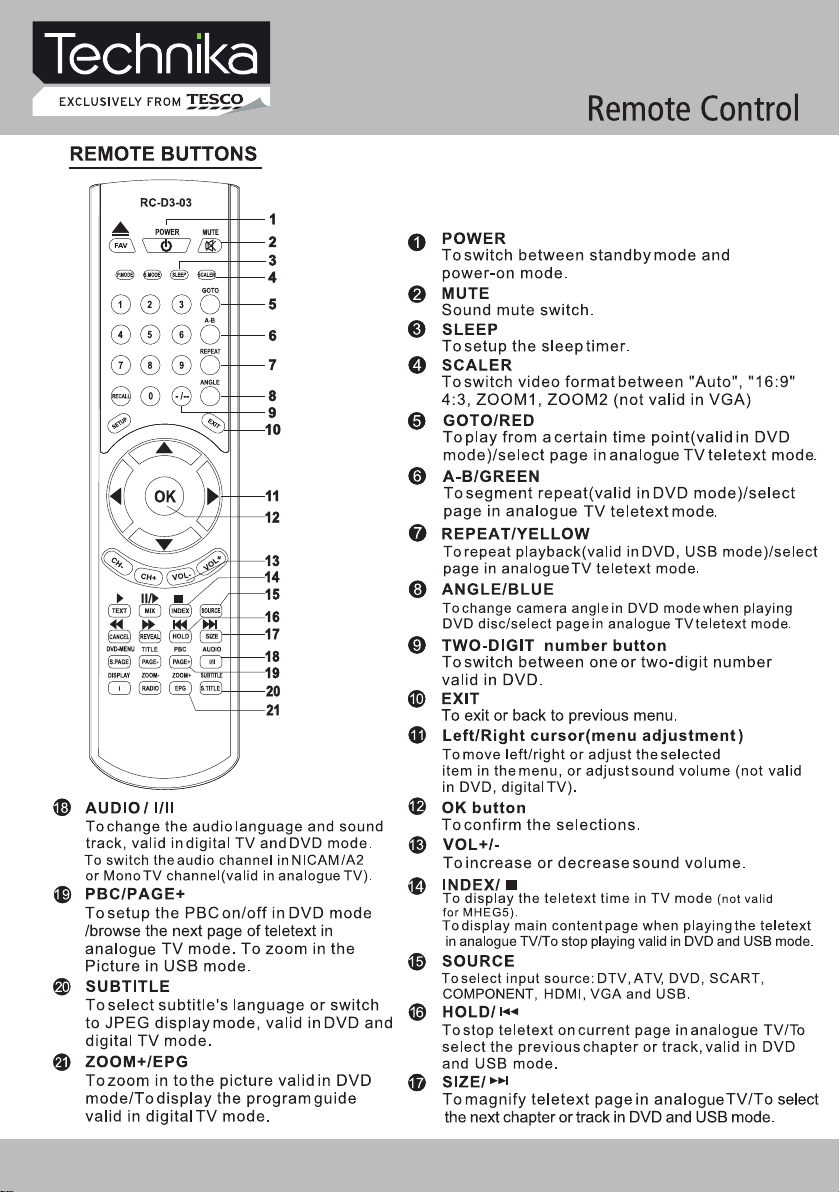
HDMI 5
Safety is Important 5
In the box 5
Safety Information
Keep these instructions 6
Important 6
Electrical Information 7
Parts Identification
Front panel 8
Local keyboard panel 8
Back panel 9
Connecting the TV
Connecting the TV antenna 10
Connecting external devices 10
Connecting diagram 11
Common Interface slot
Common Interface 12
Wall Mounting
Wall Mounting 13
Remote Control
ATV Menu Setup
ATV Setting 26
Picture 27
Sound 28
Function
28
Teletext Function
Teletext Function
29
VIDEO Menu Setup
Video Setting Menu
VGA Menu Setup
VGA Setting
Sound
Picture
Function
USB
Operation
Brief introduction.......................33
Playback...................................34
Play Music................................36
Play Movie................................36
Operate in full screen state........37
Play Photo................................37
30
31
31
32
32
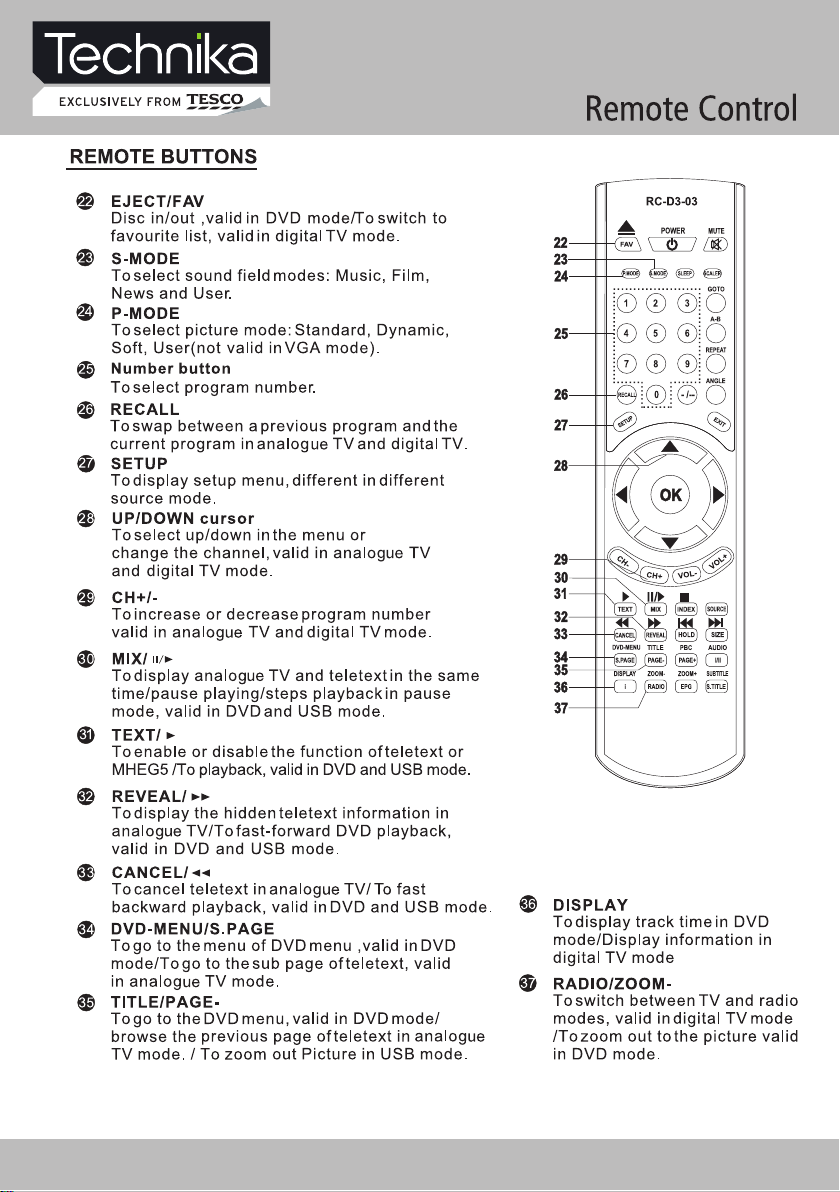
Remote buttons 14
Battery Installation
16
Let‘s Start
Switching on 17
Selecting source operation 17
DTV Menu Setup
DTV Setting 18
Picture 24
Sound 25
Function
25

Contents
DVD Operation
Brief Introduction
Comparison between
DVD and other Discs
Function Introduction
Features
Compatible Disc types
Region code
Playback
Volume control
VCD, SVCD Menu Playback
Memory
Select track to play directly by
Number buttons
Select Language / Audio
Repeat Playback
Repeat Playback of
selected Segment
Fast Playback
Play from the Desired Position
Zooming the Displayed Frame
MPEG4 and JPEG file Playback
38
38
38
39
40
40
41
41
42
42
43
43
44
44
45
45
46
47
DVD Function Setup
Picture
Sound
DVD Settting
Function
Troubleshooting
Display Troubleshooting
Sound and TV Troubleshooting
DVD Troubleshooting
Specifications
Specifications
Display Mode
Display Mode
Additional Information
Care and Maintenance
(Handling Discs)
Disposal
Warranty
50
50
50
52
53
53
54
55
57
58
58
58
Introduction
Thank you for purchasing this Technika
HD Ready 1080p LCD/DVD TV which has been
designed and manufactured to give you many
years of trouble-free service.
You may already be familiar with using a
similar product but please take time to read
these instructions which have been written
to ensure you get the very best from your
purchase.
Throughout the remainder of this user guide
the Technika HD Ready 1080p LCD/DVD TV will
be referred to as the ‘TV’.
HDMI
HDMI (High Defi nition Multimedia Interface)
is the next generation of digital interface.
Unlike conventional connections, it transmits
uncompressed digital and audio signals using
a single cable. This TV supports high-defi nition
video input (720p and 1080i) via the HDMI
sockets on the back of the TV.
Safety is Important
To ensure your safety and the safety of others,
please read the Safety precautions BEFORE
you operate this product.
Keep this information in a safe place for
future reference.
In the box
You will fi nd the following:
• HD Ready 1080p LCD/DVD TV
• User Guide
• Power Cable
• Remote Control
• 2 x AAA Batteries
Note: If any of the items listed are
damaged or missing, please contact
the TESCO electrical help line on
0845 456 6767.
32" HD Ready 1080p LCD/DVD TV with USB Record User Guide 5
Safety Information
IMPORTANT SAFETY INSTRUCTIONS READ CAREFULLY BEFORE USE
Take note of the following safety information
which appears on the back of this TV.
CAUTION! RISK OF ELECTRIC SHOCK
DO NOT OPEN.
TO REDUCE THE RISK OF ELECTRIC
SHOCK DO NOT REMOVE COVER (OR
BACK).
NO USER-REMOVABLE PARTS INSIDE
REFER SERVICING TO QUALIFIED
SERVICE PERSONNEL.
This symbol indicates that there are
important operating and maintenance
instructions in the literature
accompanying this TV.
This symbol indicates that dangerous
voltage constituting a risk of electric
shock is present within this TV.
Keep these instructions.
• Do not use this TV near water.
• Clean only with a slightly damp cloth.
• Do not block any ventilation openings.
• Install in accordance with the supplied
this User Guide.
• Do not install or operate near any heat
sources such as radiators, stoves, or other
apparatus that produce heat.
• Protect the power cord from being walked
on or pinched, particularly at plugs, and the
point where it exits from the TV.
• Do not allow the power cord to overhang
the edge of a table.
• Unplug this TV during lightning storms or
when unused for long periods of time.
• To avoid interference, switch this TV off
while operating other radio devices in the
immediate vicinity.
• Refer all servicing to qualifi ed service
personnel. Servicing is required when the TV
has been damaged in any way, such as the
power cord or plug being damaged, liquid
being spilled on or objects have fallen onto
the TV, the TV has been exposed to rain or
moisture, does not operate normally, or has
been dropped.
WARNING! TO REDUCE THE RISK
OF FIRE OR ELECTRICAL SHOCK,
DO NOT EXPOSE THIS TV TO RAIN
OR MOISTURE. THE TV MUST NOT
BE EXPOSED TO DRIPPING AND
SPLASHING AND NO OBJECTS FILLED
WITH LIQUIDS SHOULD BE PLACED ON
THE TV.
• No naked fl ame sources such as candles
should be placed on the TV.
Caution! Changes or modifi cations not
expressly approved by the manufacturer
could void the user’s authority to operate this
device.
Caution! Usage of controls or adjustments or
performance of procedures other than those
specifi ed herein may result in hazardous
exposure.
Important
This TV generates, uses and can radiate radio
frequency energy and, if not installed and
used in accordance with these instructions,
may cause harmful interference to radio
communication. However, this is no guarantee
that interference will not occur in a particular
installation. If the TV does cause harmful
interference to electrical devices, which can
be determined by turning the TV off and on,
6 32" HD Ready 1080p LCD/DVD TV with USB Record User Guide

the user is encouraged to try to correct the
interference by one of the following measures:
• Re-orient or relocate the receiving antenna.
• Increase the separation between the
external device and the TV.
• Connect the external device into an outlet
on a circuit different from that to which the
TV is connected.
• Consult the dealer or an experienced radio/
TV technician for help.
Electrical Information
Mains Supply
The mains operating voltage is detailed on the
rating plate on the rear of the TV.
The mains lead on this equipment may be
supplied with a moulded plug incorporating
a fuse. Should the fuse need to be replaced,
an ASTA or BSI approved BS1362 fuse must
be used of the same rating. If the fuse cover
is detachable never use the plug with the
cover removed. If a replacement fuse cover
is required, ensure it is of the same colour
as that visible on the pin face of the plug. If
there is no alternative to cutting off the mains
plug, dispose of it immediately, having fi rst
removed the fuse, to avoid a possible shock
hazard by inadvertent connection to the mains
supply.
Safety Information
32" HD Ready 1080p LCD/DVD TV with USB Record User Guide 7
Parts Identification
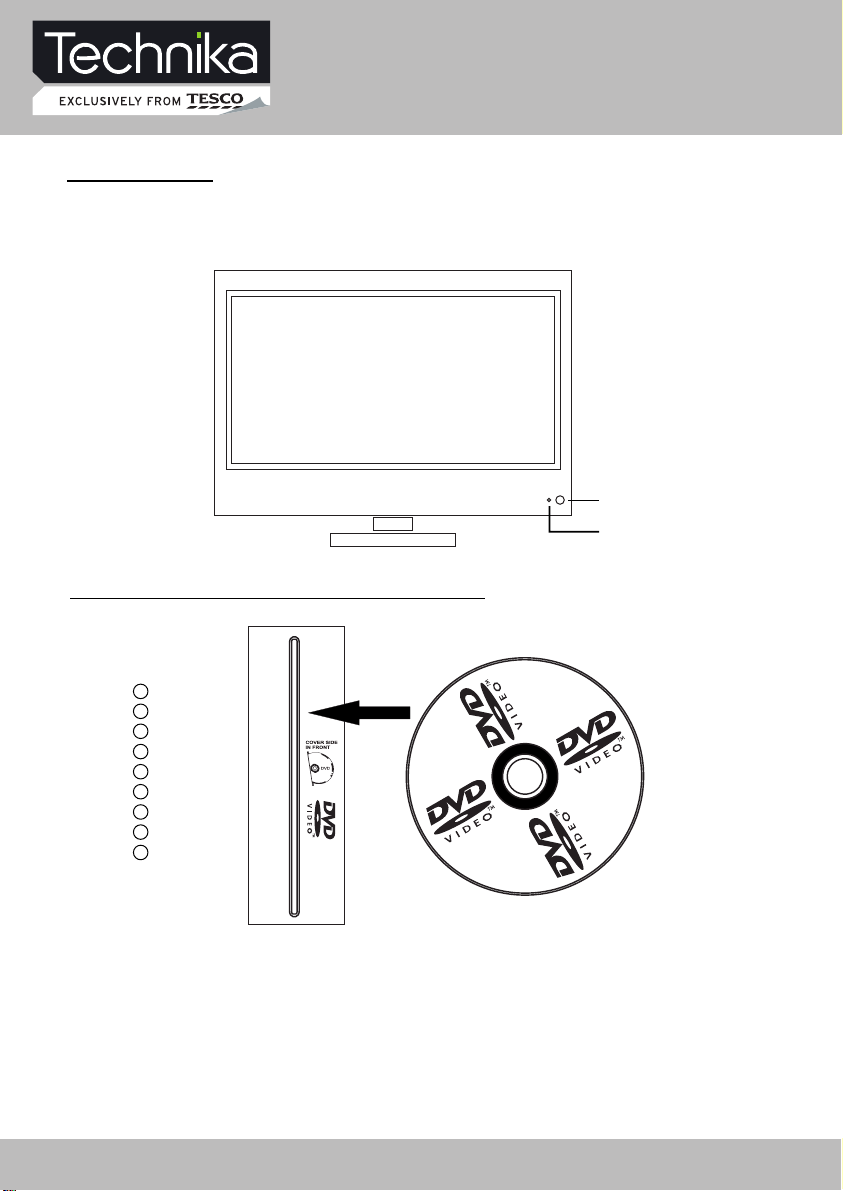
FRONT PANEL
1. IR sensor window
2. Indicator (the indicator is red when in standby mode, and green when in working normally).
LOCAL KEYBOARD PANEL
PLAY/ II
EJECT
1
2
TV/AV
CH+
CH-
VOL+
VOLMENU
POWER
COVER SIDE IN FRONT
PLAY/ II – start of play or pause of play
EJECT – take the disk out
TV/AV – select input source
CH+ - increase channel number
CH- - decrease channel number
VOL+ - increase sound volume
VOL- - decrease sound volume
MENU – enter or exit menu
POWER – switch between standby and power-on mode
8 32" HD Ready 1080p LCD/DVD TV with USB Record User Guide
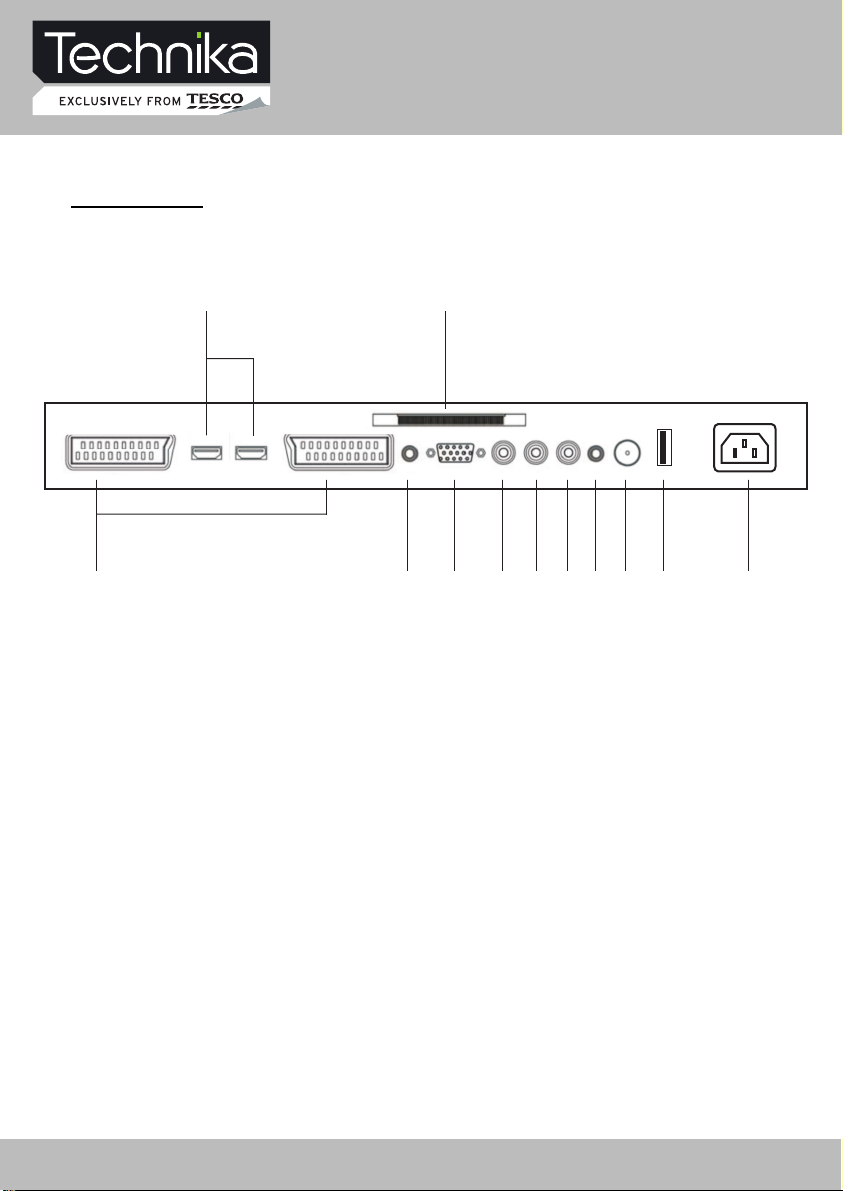
Parts Identification
BACK PANEL
1
2 3
4 5 6 7 8 9
1. SCART connecting terminals
2. HDMI inputs
3. CI connector
4. PC audio input
5. PC VGA input
6. Y input
7. Pb input
8. Pr input
9. Audio Earphone output
10. TV signal input (75 Ohm)
11. USB connector
12. AC Power supply
10 11 12
32" HD Ready 1080p LCD/DVD TV with USB Record User Guide 9

Connecting the TV
WARNING! ENSURE THE TV AND
ALL ANCILLARY EQUIPMENT IS
UNPLUGGED FROM THE MAINS
BEFORE MAKING ANY CONNECTIONS!
Connecting the TV antenna
Connect the TV antenna to the aerial socket
with a 75 ohm co-axial plug. For best results
use a high gain TV aerial, preferably roof or
loft mounted.
• To improve picture quality in a poor signal
area, purchase and install a signal amplifier.
• If the antenna needs to be split for two
TV‘s, use a 2-Way Signal Splitter
(not supplied).
Connecting external devices
Note: The TV will connect through
the HDMI cable by default. Only use
the HDMI cable and one other option.
Connecting more than one option
may cause interference.
HDMI lead
You can connect this TV to a compatible
device using a HDMI lead. This method will
give the best picture.
Connect the cable from the HDMI equipment
to the TV HDMI socket.
SCART lead
You can connect this TV to a compatible
device using a SCART lead. The connection
uses component video signals, i.e. the red,
green and blue (RGB) content of the video are
sent on separate signals.
VGA cable
You can use your TV as a monitor for your
personal computer by using a VGA cable.
Sound from your personal computer may also
be played through the TV. This requires the
audio output of the personal computer to be
connected to the AUDIO IN connection of the
TV.
Component Input
(Y/Pb/Pr cables)
You can connect this TV to a compatible
device using Y/Pb/Pr cables. Connect
the red, green and blue outputs to
the matching coloured inputs on the
compatible device. An additional audio
input is required.
USB connector
This product has a USB 2.0 interface;
you can play music, movie and picture
files from USB equipment. USB refers
to Universal Serial Bus. Most of the USB
devices on the market are USB 1.1 or
USB 2.0. There are some types USB 1.1
devices:
Monitors Communication devices, Audio,
Human Input Device (HID), Mass storage,
Most flash memory, USB HDD etc.
Belongs to Mass Storage Class.
Mass Storage Class includes 2 transport
manners:
1. USB 1.1 Mass Storage Class
Control/Bulk/Interrupt (CBI) Transport
2. USB 1.1 Mass Storage Class
Bulk-Only Transport. This unit supports
USB 1.1 Mass Storage Class Bulk-Only
Transport, we are not sure that other USB
devices can be supported! So please
find out about the features of USB
equipments before using it.
10 32" HD Ready 1080p LCD/DVD TV with USB Record User Guide
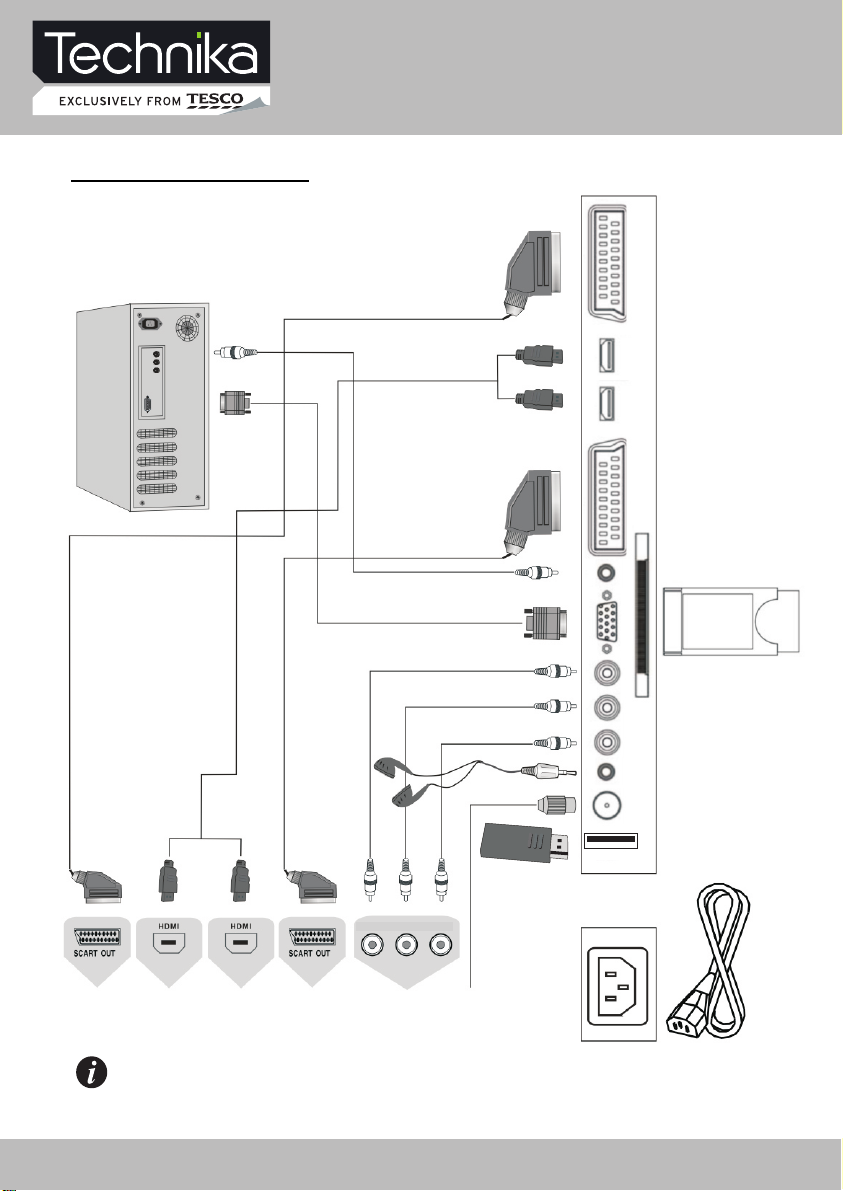
CONNECTING DIAGRAM
Connecting the TV
Y Pb Pr
NOTE
You should insert all necessary cables BEFORE plugging in power cord.
32" HD Ready 1080p LCD/DVD TV with USB Record User Guide 11
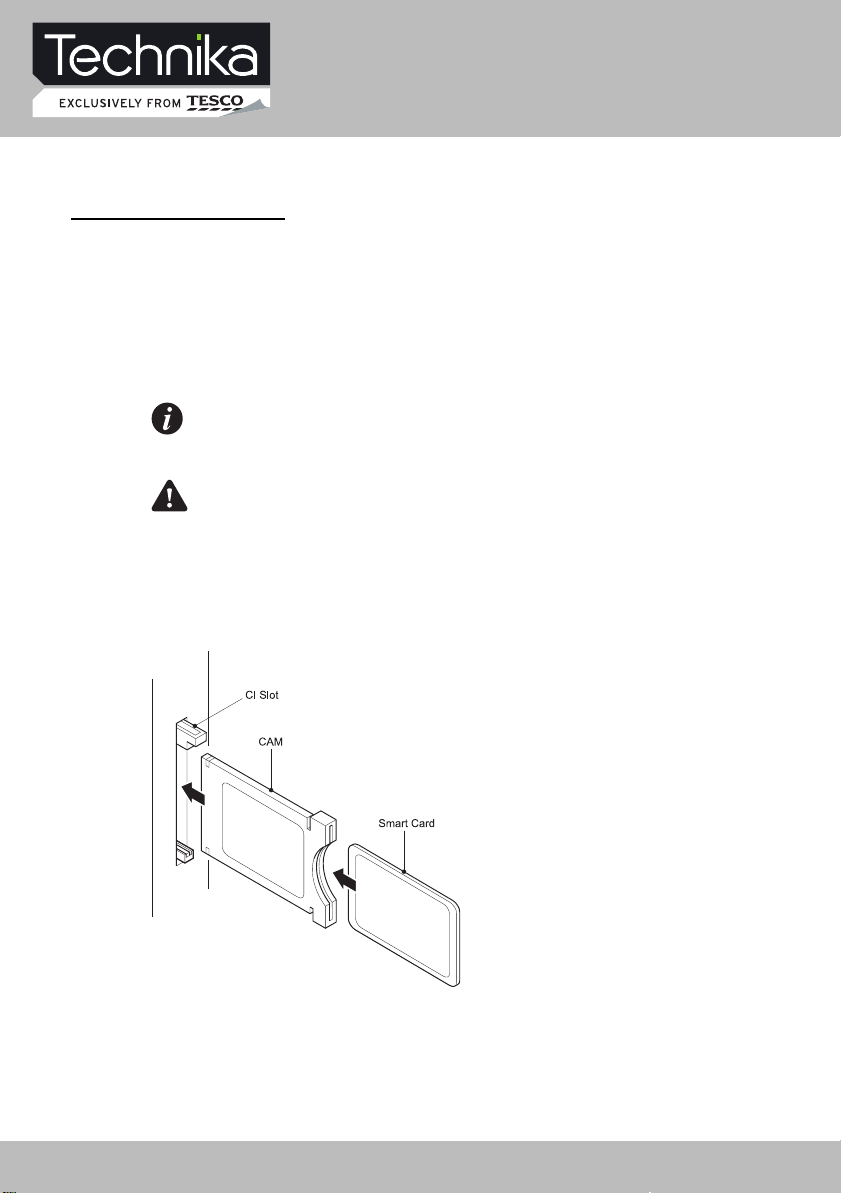
Common Interface slot
COMMON INTERFACE
The Common Interface (CI) slot is designed to
accept the Conditional Access Module (CAM)
and Smart Card in order to view the pay TV
programmes and additional services. Contact
your Common Interface service provider to
get more information about the modules and
subscription.
Note: Conditional Access Modules and
Smart Cards are sold separately.
WARNING: SWITCH OFF YOUR TV
BEFORE ANY MODULE IS INSERTED IN
THE COMMON INTERFACE SLOT.
The CI slot is located on the side of your TV.
Insert the CAM correctly into the CI slot, then
add the Smart Card to the CAM.
12 32" HD Ready 1080p LCD/DVD TV with USB Record User Guide
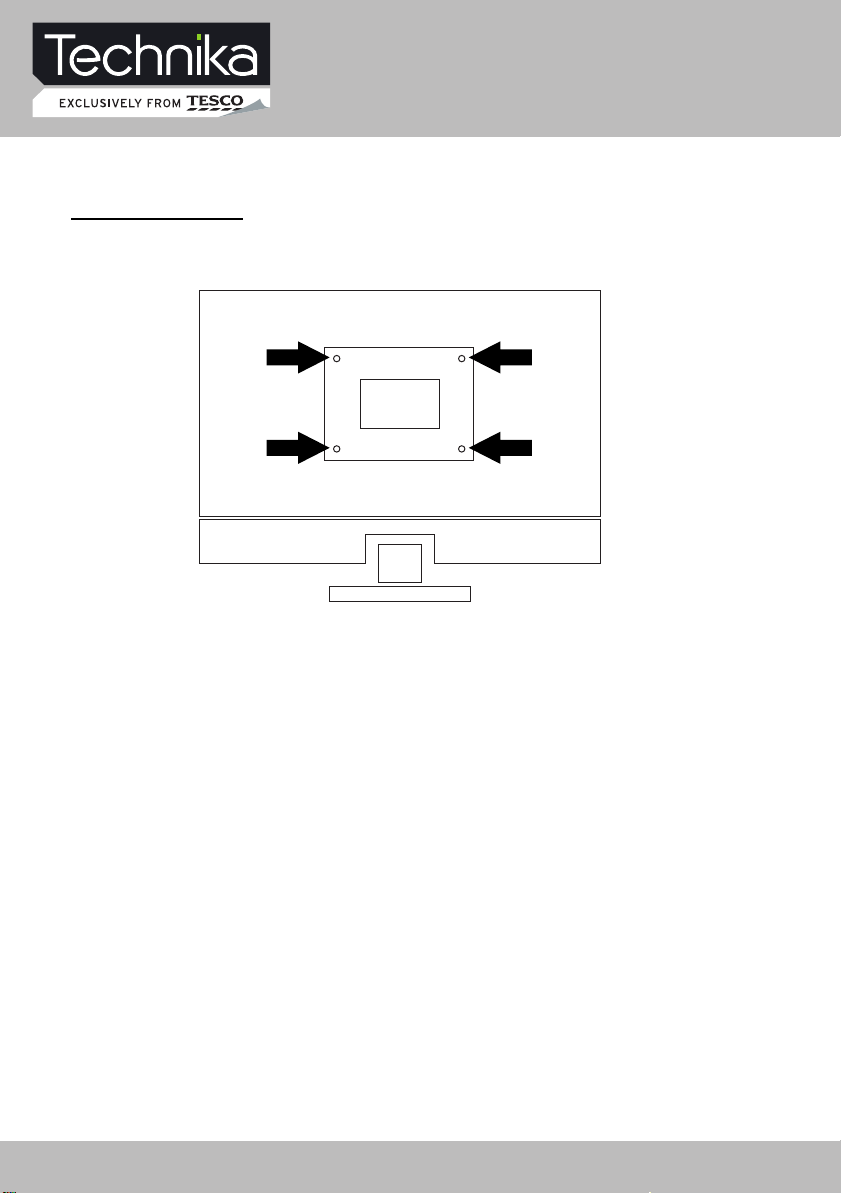
Wall Mounting
WALL MOUNTING
Suitable for wall mounting - VESA 400 x 200 mm
1. The base must first be removed. Place
the TV face down.
2. Remove the three screws holding the
base in position.
3. Remove and store the base and
screws.
4. Use four machine screws (M4 x 10 mm)
to mount the TV on the bracket.
Mounting the wall bracket - please refer
to the user instructions supplied with
the wall bracket (not supplied).
32" HD Ready 1080p LCD/DVD TV with USB Record User Guide 13
14 32" HD Ready 1080p LCD/DVD TV with USB Record User Guide
32" HD Ready 1080p LCD/DVD TV with USB Record User Guide 15
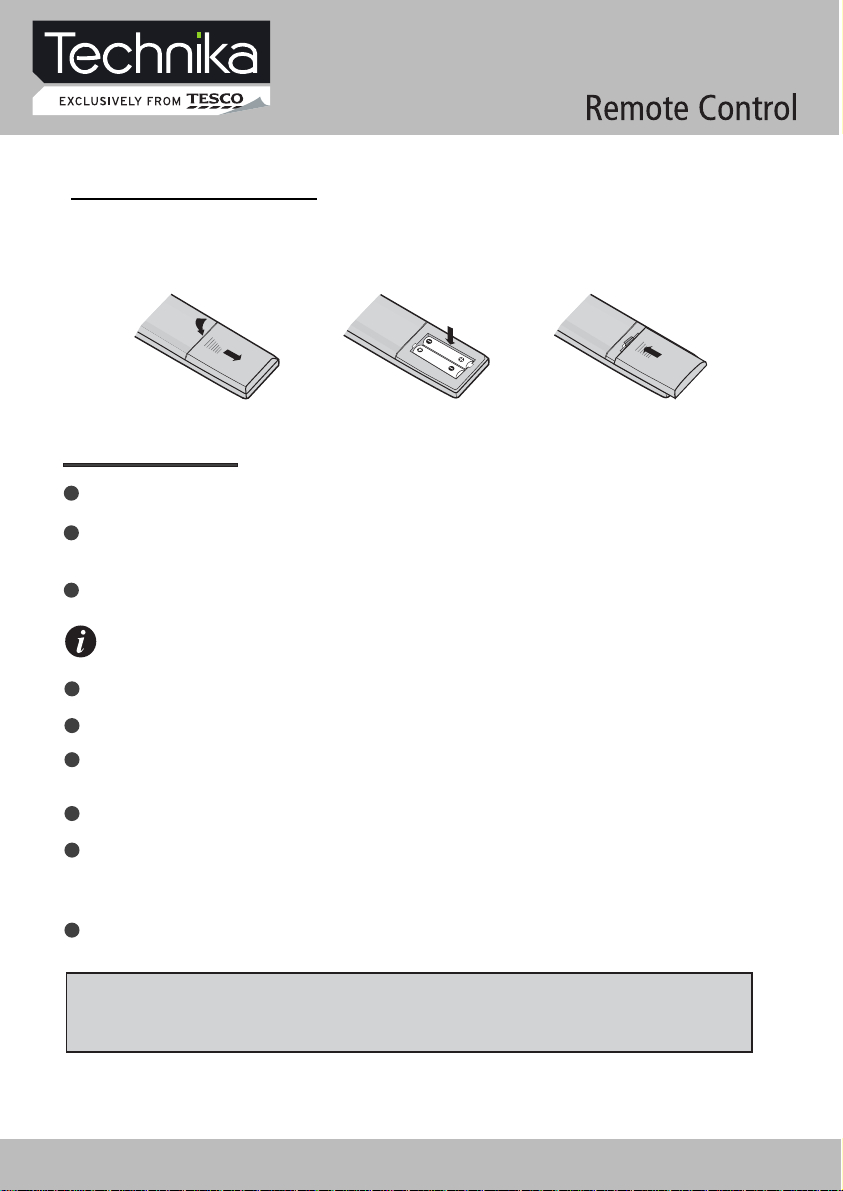
BATTERY INSTALLATION
Remove the battery cover. Insert two SUM-4(AAA) batteries matching the -/+ polarities of
the battery to the -/+ marks inside the battery compartment, as follows:
BATTERY LIFE
Normally, battery can be used for one year.
Iftheremotecontrolisstillnot working, whenveryneartotheTV'sremotesensorwindow,
pleaseusenewbatterys.
Please use SUM-4(AAA) battery.
NOTES
Never use rechargeable battery.
Never charge, short-circuit, disassemble and heat the battery, or throw it into fire.
Pay attention not to fall or knock the remote controller, which will cause damage or
function failure to it.
Do not use a new and an old battery together.
Whennotusingtheremotecontrollerforalongtime,please take out the battery to avoid
liquidleakage.Beforereplacing a new battery,pleasecleantheelectrolyteintheremote
controller.
If electrolyte splashes into the body, please clean it with water.
CAUTION:
Please put the battery into a place children cannot touch. If swallow by accident, please
contact your local doctor immediately.
16 32" HD Ready 1080p LCD/DVD TV with USB Record User Guide
Let's Start
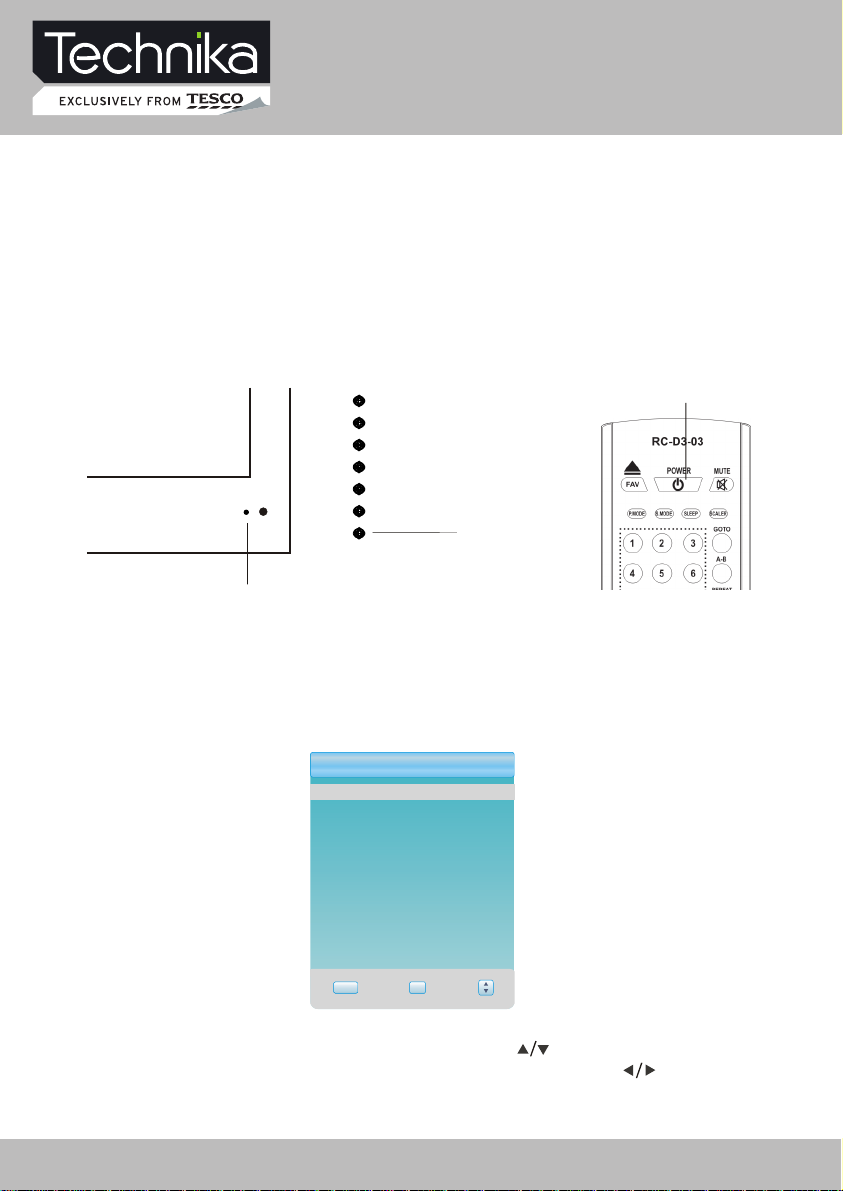
SWITCHING ON
After the unit has been suitably placed / fixed, on the table or on the wall, and all necessary
cables including the power have been connected,
Press the [STANDBY] button on the remote control to make the unit switch to power-on
mode - you will see the LED indicator turn green. Now you can enjoy the many features of
your new TV.
INDICATOR
SELECTING SOURCE OPERATION
the next you should do is:
STANDBY
STANDBY
You can select input source by using source menu. Press [SOURCE] button to show the
menu as follows:
InputSource
DTV
ATV
SCART 1
SCART 2
COMPONENT
DVD
VGA
HDMI 1
HDMI 2
USB
EXIT OK
The current source item is highlighted. Through press [ ] button on the remote control
or [ CH+/CH- ] key on the LCD TV to select your required source, press [ ] button,
[VOL+/VOL-] key or [OK] button to confirm your choice .
32" HD Ready 1080p LCD/DVD TV with USB Record User Guide 17
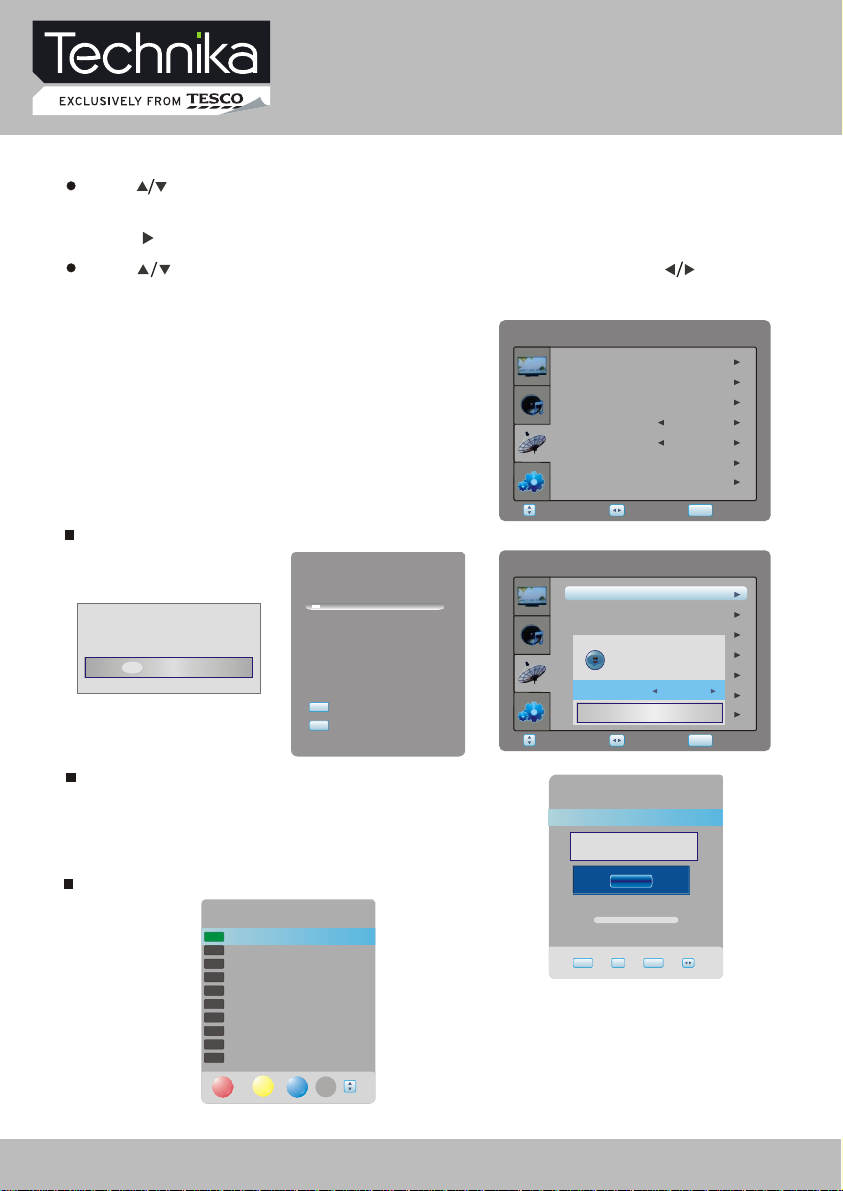
DTV Menu Setup
In TV mode, press [SETUP] button into the main menu and the main menu will show as follows: D
Press [ ] button on the remote control, you can select main menu sections
(main menu sections consist of) .
Press [ ] or [OK] button to enter this menu section.
Press [ ] button on the remote control to select the item, and then press [ ] button to
adjust parameter value. Press [SETUP] button to return to main menu sections.
" DTV SETTING " , " PICTURE ", " SOUND " , " FUNCTION ")
DTV SETTING
Select DTV SETTING item to adjust channels.
You may select auto Tuning, Manual Tuning,
Programme Edit, Audio Language, Subtitle
Language, Time and Preference.
DTVSETTING
AutoTuning
ManualTuning
ProgrammeEdit
AudioLanguage
SubtitleLanguage
Time
Preference
Select Return
Auto Tuning item enables you to adjust channel setting automatically.
DTVSETTING
AutoTuning
ManualTuning
ProgrammeEdit
AudioLanguage
SubtitleLanguage
Countryselection
Time
Preference
Select Return
Doyouwanttoexittuning?
Yes No
ChannelTuning
6 %... UHF 24
DTV : 0 Programme(s)
Radio : 0 Programme(s)
SETUP
exit
EXIT
exit
Manual Tuning item enables you to change channel settings.
VHF 5 104.50MHz
Pleaseselectchannelthen
PressOKtosearch
Programme Edit item enables you to enter submenu.
BadNormalGood
EXIT OK SETUP
DTV
5 five
DTV
16 QVC
DTV
17 UK Gold
DTV
23 bid-up.tv
DTV
25 TCM
DTV
26 UK Style
DTV
27 Discovery
DTV
28 DiscoveryH&L
DTV
32 Cartoon Nwk
DTV
33 Boomerang
DELETE
ProgrammeEdit
MOVE
SKIP FAV
Note: If LCN function is enabled, then the manual sorting
of digital TV programmes is not allowed.
English
English
Adjust
Pleaseselectcountryfirst,
ThenselectStarttoupdateinfo.
NewAddCancel
ManualTuning
NO SIGNAL
Adjust
English
English
Australia
Off
SETUP
SETUP
18 32" HD Ready 1080p LCD/DVD TV with USB Record User Guide
 Loading...