

Page 1
Copies of the I/B. Please reproduce them without any
changes except under special instruction from Team
International BELGIUM. The pages must be reproduced
and folded in order to obtain a booklet A5 (+/- 148.5 mm
width x 210 mm height). When folding, make sure you
keep the good numbering when you turn the pages of
the I/B. Don’t change the page numbering. Keep the
language integrity.
Front cover page (first page)
Assembly page 1/70
Fax +32 2 359 95 50
Oil filtration deep fat fryer
Friteuse mit Ölfiltrationssytem
Frituurpan met oliefiltratie
Fritteuse à filtration d’huile
Freidora de filtración de aceite
Frytownica z filtrem oleju
TKG FT 1012 KTO
220-240V ~50/60Hz 2000W
I/B Version
180208
Page 2
Copies of the I/B. Please reproduce them without any
changes except under special instruction from Team
International BELGIUM. The pages must be reproduced
and folded in order to obtain a booklet A5 (+/- 148.5 mm
width x 210 mm height). When folding, make sure you
keep the good numbering when you turn the pages of
the I/B. Don’t change the page numbering. Keep the
language integrity.
2 TKG FT 1012 KTO - 180208
Assembly page 2/70
Fax +32 2 359 95 50
Page 3

Copies of the I/B. Please reproduce them without any
changes except under special instruction from Team
International BELGIUM. The pages must be reproduced
and folded in order to obtain a booklet A5 (+/- 148.5 mm
width x 210 mm height). When folding, make sure you
keep the good numbering when you turn the pages of
the I/B. Don’t change the page numbering. Keep the
language integrity.
3 TKG FT 1012 KTO - 180208
Assembly page 3/70
Fax +32 2 359 95 50
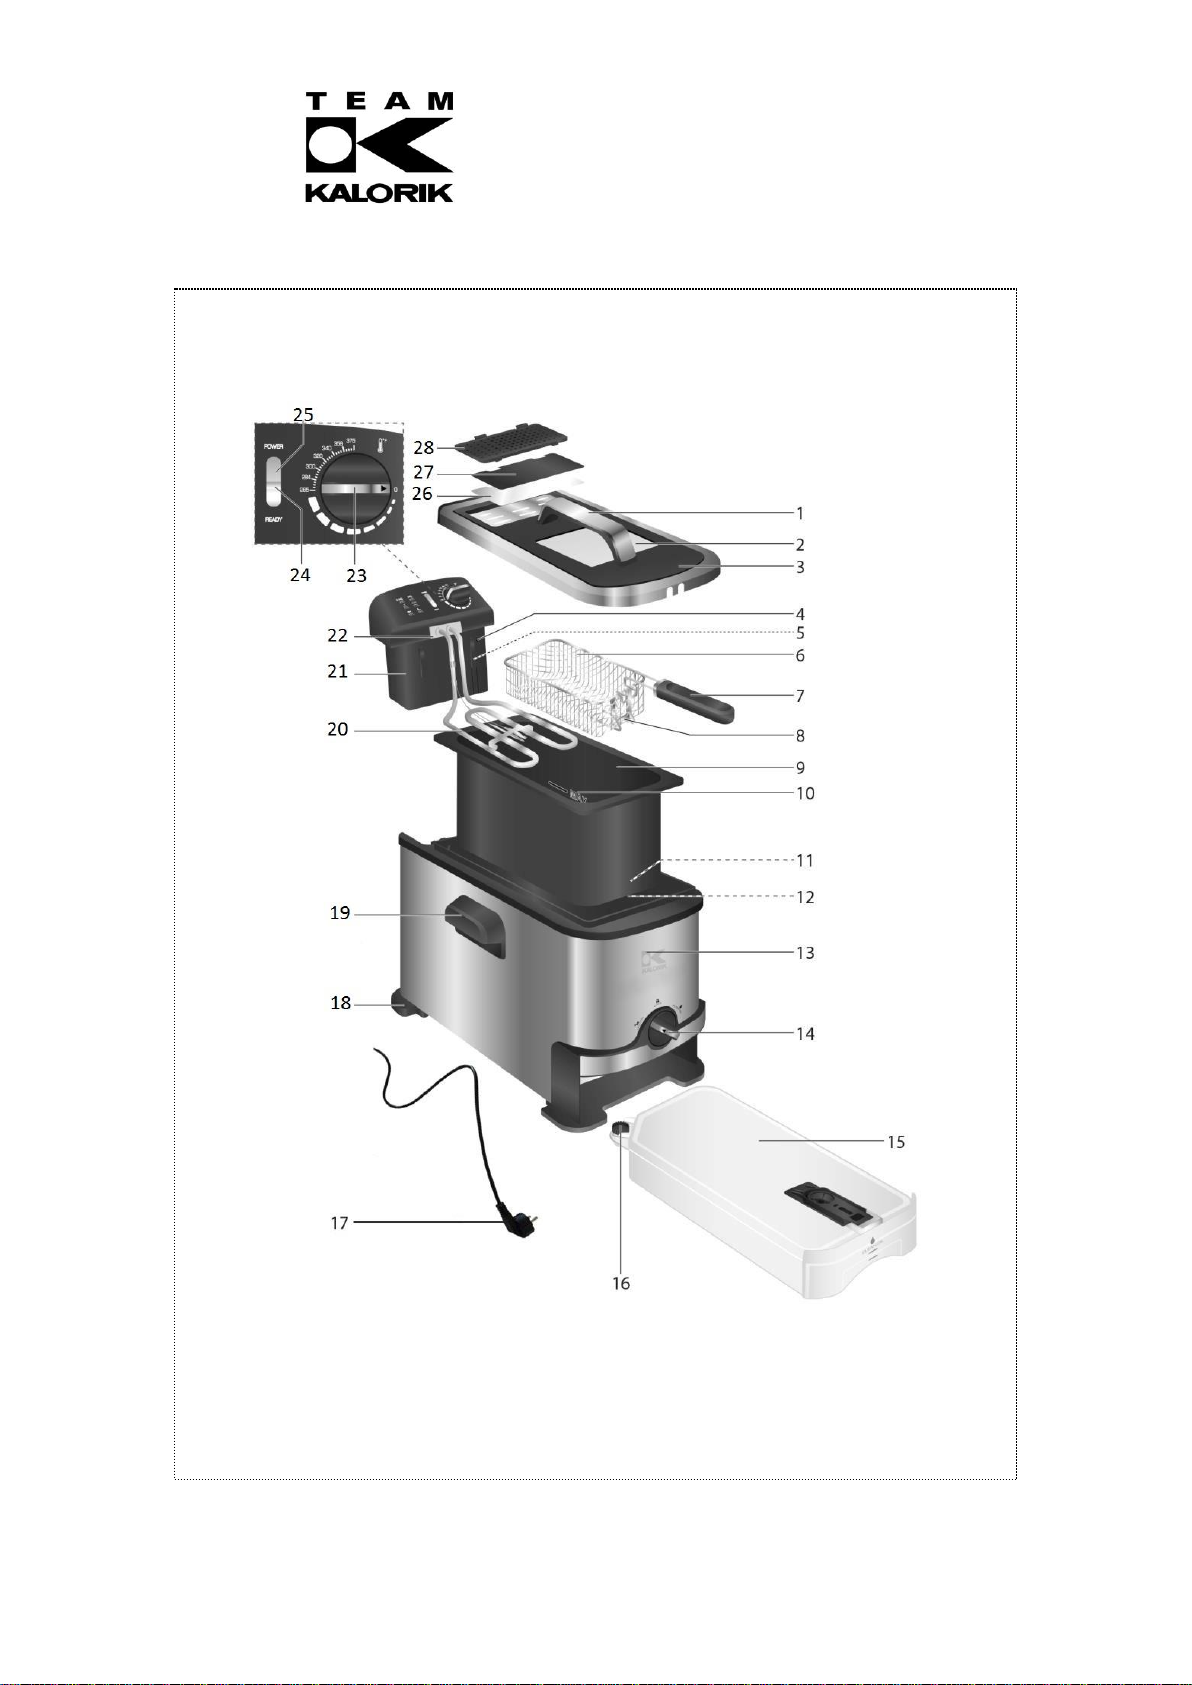
EN
1. Lid handle
2. View window
3. Lid
4. Reset button
5. Safety switch
6. Frying basket
7. Basket handle
8. Basket hook
9. Oil reservoir
10. Oil level marking MIN MAX
11. Oil filter cover
12. Oil valve
13. Housing
14. Oil filtration control knob
15. Oil container
16. Cap
17. Power cord with plug
18. Anti-slip feet
19. Side handles
20. Immersion heater
21. Control panel
22. Silicon rubber sealing plate
23. Temperature control knob
24. READY indicator (green)
25. POWER indicator (blue)
26. White grease filter
27. Charcoal odor filter
28. Filter cover
FR
1. Poignée du couvercle
2. Vitre
3. Couvercle
4. Bouton de réinitialisation
5. Interrupteur de sécurité
6. Panier à friture
7. Poignée du panier
8. Crochet du panier
9. Réservoir d'huile
10. Marquage du niveau d'huile MIN MAX
11. Couvercle du filtre à huile
12. Valve d'huile
13. Boitier
14. Bouton de contrôle de filtration d'huile
15. Récipient d'huile
16. Bouchon
17. Cordon d'alimentation avec prise
18. Pieds antidérapants
19. Poignées latérales
20. Elément chauffant immergé
21. Panneau de commande
22. Plaque d'étanchéité en caoutchouc
23. Thermostat
24. Indicateur READY (vert)
25. Indicateur d'alimentation (bleu)
26. Filtre à graisse blanc
27. Filtre à charbon pour les odeurs
28. Couvercle du filtre
NL
1. Dekselhandvat
2. Kijkvenster
3. Deksel
4. Resetknop
5. Veiligheidsschakelaar
6. Frituurmand
7. Handvat voor de frituurmand
8. Frituurmandhaak
9. Afneembare pan
10. MIN en MAX vulniveau voor olie
11. Oliefilterrooster
12. Olieklep
13. Behuizing
14. Oliefiltratieknop
15. Oliebak
16. Oliebakdeksel
17. Netsnoer met stekker
18. Anti-slip voeten
19. Zijhandgrepen
20. Verwarmingselement
21. Bedieningspaneel
22. Rubberen afdichtplaat
23. Thermostaat
24. READY-indicator (groen)
25. POWER-indicator (blauw)
26. Wit vetfilter
27. Koolstof geurfilter
28. Filterdeksel
D
1. Deckelgriff
2. Sichtfenster
3. Deckel
4. Reset-Taste
5. Sicherheitsschalter
6. Frittierkorb
7. Korbgriff
8. Korbhalterung
9. Ölwanne
10. MIN/MAX-Markierung der Ölwanne
11. Ölfilterabdeckung
12. Ölablassventil
13. Gehäuse
14. Kontrollschalter für Ölfilterfunktion
15. Ölaufbewahrungsbehälter
16. Verschlusskappe
Ölaufbewahrungsbehälter
Page 4

Copies of the I/B. Please reproduce them without any
changes except under special instruction from Team
International BELGIUM. The pages must be reproduced
and folded in order to obtain a booklet A5 (+/- 148.5 mm
width x 210 mm height). When folding, make sure you
keep the good numbering when you turn the pages of
the I/B. Don’t change the page numbering. Keep the
language integrity.
4 TKG FT 1012 KTO - 180208
Assembly page 4/70
Fax +32 2 359 95 50
17. Anschlussleitung mit Stecker
18. Rutschhemmende Füße
19. Gehäusegriff
20. Heizelement
21. Bedienelement
22. Silikonabdichtung
23. Thermostat
24. Temperatur-Kontrolleuchte (grün)
25. Betriebskontrollleuchte (blau)
26. Fettfilter
27. Aktivkohle-Geruchsfilter
28. Filterabdeckung
SP
1. Mango de tapa
2. Ventana
3. Tapa
4. Botón de reinicio
5. Interruptor de seguridad
6. Cesta de freir
7. Mango de la cesta de freir
8. Gancho para cesta
9. Depositó de aceite
10. Marca de nivel de aceite MIN / MAX
11. Cubierta del filtro de aceite
12. Válvula de aceita
13. Carcasa
14. Botón de control de filtration de aceite
15. Contenedor de aceite
16. Tapón
17. Cable de alimentación con enchufe
18. Pies antideslizantes
19. Manijas laterales
20. Calentador de inmersión
21. Panel de contról
22. Placa de sellado de goma de silicona
23. Bùtón de contról de temperatura
24. Indicador LISTO (verde)
25. Indicador POWER (azul)
26. Filtro de grasa blanca
27. Filtro anti-olor de carbón
28. Tapa del filtro
PL
1. Uchwyt pokrywy
2. Okienko podglądu
3. Pokrywa
4. Przycisk resetowania
5. Wyłącznik bezpieczeństwa
6. Kosz do smażenia
7. Uchwyt kosza
8. Hak kosza
9. Misa na olej
10. Oznaczenie poziomu oleju MIN MAX
11. Pokrywa filtra oleju
12. Zawór spustu oleju
13. Obudowa
14. Pokrętło kontroli filtracji oleju
15. Zbiornik na olej
16. Pokrywa zbiornika na olej
17. Przewód zasilający z wtyczką
18. Antypoślizgowe nóżki
19. Uchwyty boczne
20. Grzałka zanurzeniowa
21. Panel sterowania
22. Kauczukowa (silikonowa) płyta
Uszczelniająca
23. Pokrętło regulacji temperatury
24. Wskaźnik GOTOWOŚĆ (zielony)
25. Wskaźnik ZASILANIE (niebieski)
26. Biały filtr przeciwtłuszczowy
27. Węglowy filtr zapachów
28. Pokrywa filtra
Page 5
Copies of the I/B. Please reproduce them without any
changes except under special instruction from Team
International BELGIUM. The pages must be reproduced
and folded in order to obtain a booklet A5 (+/- 148.5 mm
width x 210 mm height). When folding, make sure you
keep the good numbering when you turn the pages of
the I/B. Don’t change the page numbering. Keep the
language integrity.
5 TKG FT 1012 KTO - 180208
Assembly page 5/70
Fax +32 2 359 95 50
ILLUSTRATIONS /ILLUSTRATIES / ABBILDUNGEN / ILUSTRACIONES / ILUSTRACJE
Page 6
Copies of the I/B. Please reproduce them without any
changes except under special instruction from Team
International BELGIUM. The pages must be reproduced
and folded in order to obtain a booklet A5 (+/- 148.5 mm
width x 210 mm height). When folding, make sure you
keep the good numbering when you turn the pages of
the I/B. Don’t change the page numbering. Keep the
language integrity.
Back cover page (last page)
Assembly page 6/70
Fax +32 2 359 95 50
Page 7

Copies of the I/B. Please reproduce them without any
changes except under special instruction from Team
International BELGIUM. The pages must be reproduced
and folded in order to obtain a booklet A5 (+/- 148.5 mm
width x 210 mm height). When folding, make sure you
keep the good numbering when you turn the pages of
the I/B. Don’t change the page numbering. Keep the
language integrity.
Back cover page (last page)
Assembly page 7/70
Fax +32 2 359 95 50
IMPORTANT SAFEGUARDS
Please read these instructions carefully before using the appliance,
and always follow the safety and operating instructions.
Important: This appliance can be used by children over 8 years old
and people with reduced physical, sensory or mental capacities or
with a lack of experience or knowledge if they have been given
supervision or instructions concerning the safe use of the appliance
and the risks involved. Children shall not play with the appliance.
Cleaning and user maintenance shall not be made by children unless
they are older than 8 years and supervised. Never leave the
appliance and its cord unsupervised and within reach of children less
than 8 years old or irresponsible persons, especially when it is
plugged into the wall or when it is cooling down.
❑ Check that your mains voltage corresponds to that stated on the
appliance.
❑ Never leave the appliance unsupervised when in use.
❑ From time to time check the appliance for damages. Never use
the appliance if cord or appliance shows any signs of damage. In
that case, repairs should be made by a competent qualified
electrician(*). Should the cord be damaged, it must be replaced
by a competent qualified electrician(*) in order to avoid all danger.
❑ Only use the appliance for domestic purposes and in the way
indicated in these instructions.
❑ Never immerse the appliance in water or any other liquid for any
reason whatsoever. Never place it into the dishwasher.
❑ Never use the appliance near hot surfaces.
❑ Before cleaning, always unplug the appliance from the power
supply.
❑ Never use the appliance outside and always place it in a dry
environment.
❑ Never use accessories that are not recommended by the
producer. They could constitute a danger to the user and risk to
damage the appliance.
Page 8

Copies of the I/B. Please reproduce them without any
changes except under special instruction from Team
International BELGIUM. The pages must be reproduced
and folded in order to obtain a booklet A5 (+/- 148.5 mm
width x 210 mm height). When folding, make sure you
keep the good numbering when you turn the pages of
the I/B. Don’t change the page numbering. Keep the
language integrity.
Back cover page (last page)
Assembly page 8/70
Fax +32 2 359 95 50
❑ Never move the appliance by pulling the cord. Make sure the cord
cannot get caught in any way. Do not wind the cord around the
appliance and do not bend it.
❑ Stand the appliance on a flat surface to prevent it from falling.
❑ Only use the appliance for deep-frying. Only cook friable and
consumable foodstuffs.
❑ Outer jacket, inner bowl, lid, basket and handle can be washed by
hand. Never immerse the appliance in water or any other liquid
for cleaning or for any reason whatsoever (see "Cleaning"
section).
❑ Wait until the appliance is completely cool before moving,
cleaning or storing it. Always take the appliance by the carrying
handles. Always unplug the appliance before handling it.
❑ Never operate the appliance without oil or fat in it. Ensure that the
oil or fat level is always between the minimum and maximum
marks inside the bowl. Never overfill as hot oil or fat might be
ejected.
❑ It is absolutely necessary to keep this appliance clean at all times
as it comes into direct contact with food.
❑ Make sure the cord never comes in contact with the hot parts of
the appliance. Be aware never to touch these hot parts.
❑ Make sure the hot parts of the appliance are not exposed to
inflammable materials, such as curtains, tablecloth... as a fire might
occur.
❑ Never cover the appliance with any kind of material.
❑ Never add water to the oil.
❑ Make sure the foodstuffs are as dry as possible.
❑ Your deep fat fryer is equipped with an anti-odour filter. This
means you can keep the lid closed during frying. However, please
clean this filter regularly (see "Cleaning" section). CAUTION: the
deep fryer can reach high temperatures when in use. Oil and fat
preparations might catch fire if overheated. Be extremely cautious
never to leave your deep fryer in use for long periods. Do not
forget to switch off the appliance once your preparation is ready
and the fryer is no longer in use. Before pulling the mains plug,
switch the temperature selector to "MIN".
❑ Provide proper ventilation when using the appliance.
❑ If you wish to use solid fat, cut it into small pieces and place them
into the bowl. Slide the temperature knob to its minimum position.
Page 9

Copies of the I/B. Please reproduce them without any
changes except under special instruction from Team
International BELGIUM. The pages must be reproduced
and folded in order to obtain a booklet A5 (+/- 148.5 mm
width x 210 mm height). When folding, make sure you
keep the good numbering when you turn the pages of
the I/B. Don’t change the page numbering. Keep the
language integrity.
Back cover page (last page)
Assembly page 9/70
Fax +32 2 359 95 50
Each time the pilot light goes out, slide the temperature knob to a
slightly higher temperature until all the fat has melted. Once all
the fat has melted, set the temperature knob to the desired
cooking temperature. This type of fat will solidify when the
appliance cools down.
❑ Your appliance must never be switched on through an external
timer or any kind of separate remote control system.
❑ Please note: Should the symbol be indicated on a certain
surface, you need to be careful when handling the product. This
symbol means: CAUTION, this surface may get very hot during
use.
The symbol is always put on the surface with the highest
temperature, however the other metallic or non-metallic surfaces
can also become very hot during use and it is therefore advisable
to always handle them with care and if possible with the help of
isothermal gloves or other thermal protection. In case of doubt
concerning the temperature of a certain surface it is always
preferable to protect oneself.
(*) Competent qualified electrician: after-sales department of the
producer or importer or any person who is qualified, approved and
competent to perform this kind of repairs in order to avoid all danger.
In case of need you should return the appliance to this electrician.
BEFORE THE FIRST USE
• Remove all packaging materials.
• Check package content to verify it is complete and undamaged. Do not operate the
appliance if the content is incomplete or appears damaged.
Danger of suffocation!
Packaging materials are not toys. Always keep plastic bags, foils and foam parts away
from babies and children. Packaging material could block airways and prevent
breathing.
NOTE:
➢ The appliance may produce an odor and/or emit smoke when switched on for the
first time, as residues from the production process are eliminated. This is normal and
does not indicate a defect or hazard. Ensure ample ventilation.
➢ Clean the appliance thoroughly before using for the first time (Cleaning and
Maintenance).
ASSEMBLY
Page 10

Copies of the I/B. Please reproduce them without any
changes except under special instruction from Team
International BELGIUM. The pages must be reproduced
and folded in order to obtain a booklet A5 (+/- 148.5 mm
width x 210 mm height). When folding, make sure you
keep the good numbering when you turn the pages of
the I/B. Don’t change the page numbering. Keep the
language integrity.
Back cover page (last page)
Assembly page 10/70
Fax +32 2 359 95 50
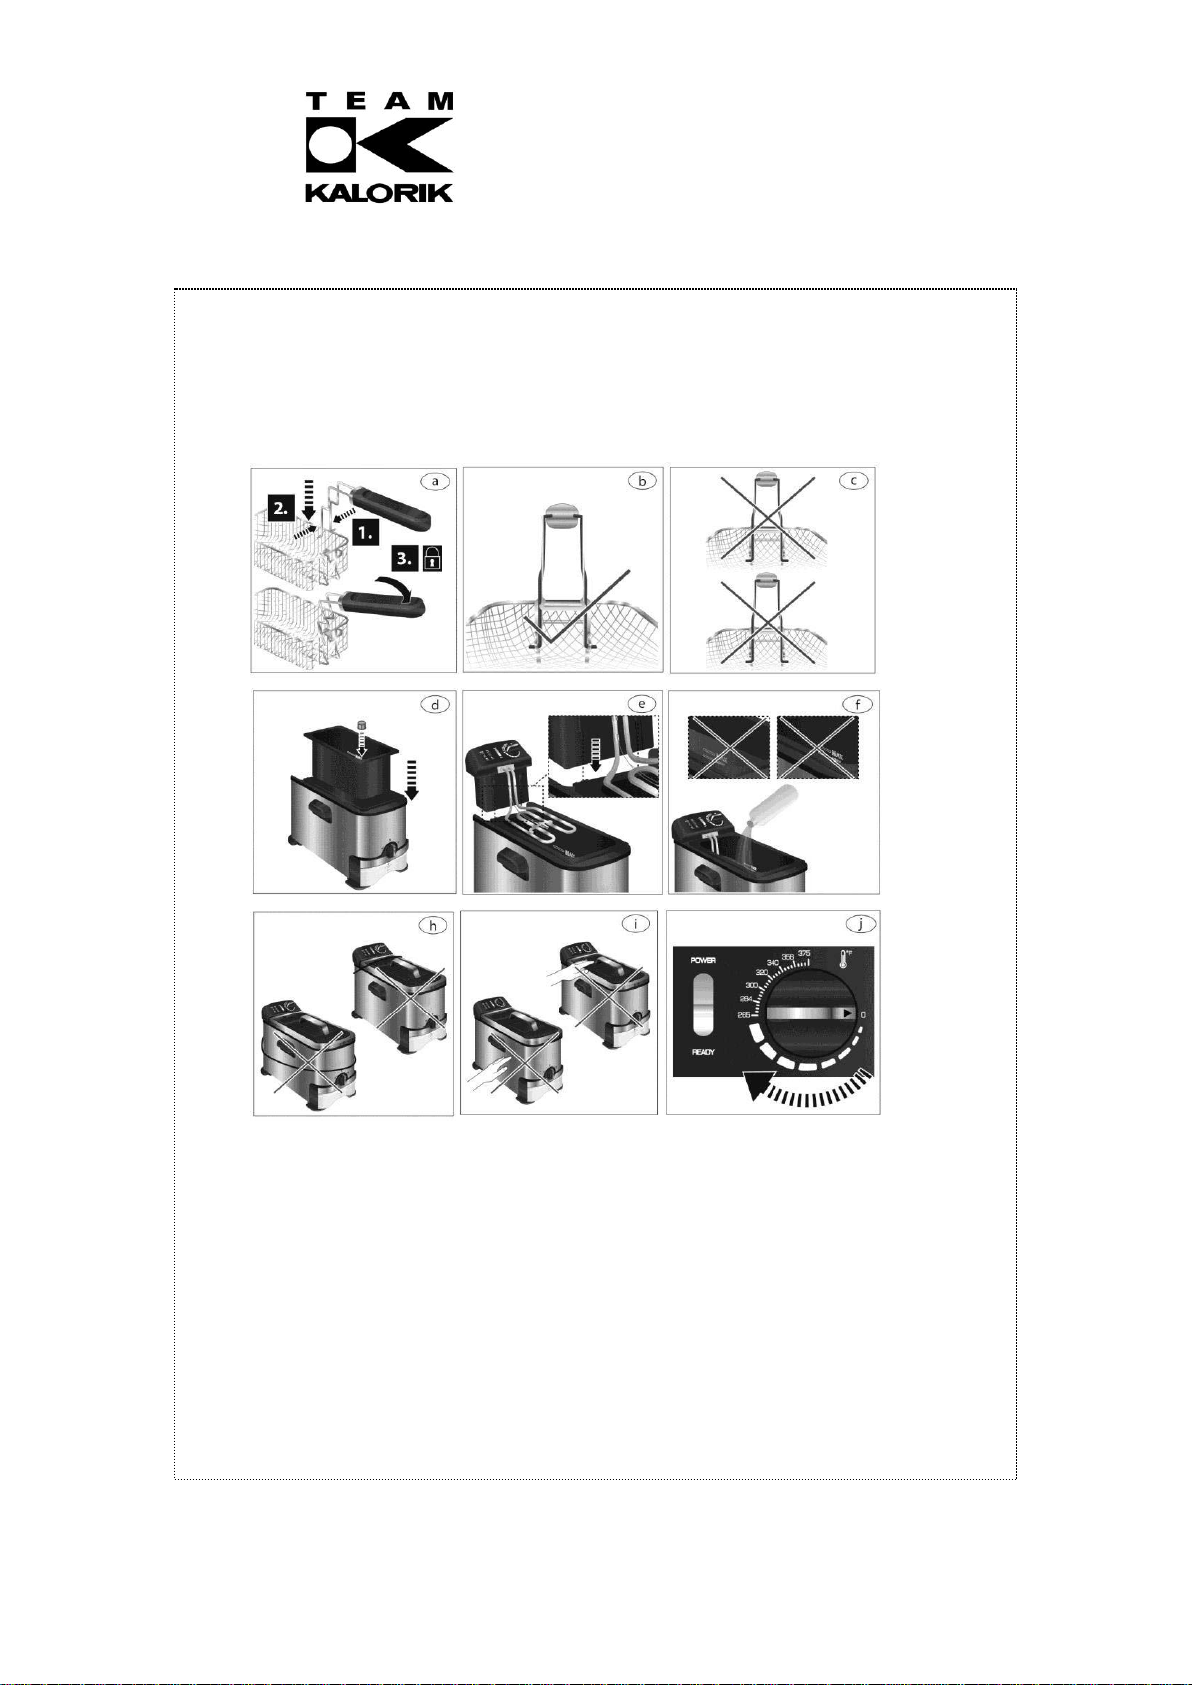
See Illustrations
• Place the appliance on a clean, flat and heat resistant surface.
• Before using your appliance make sure:
o The basket handle (7) is locked in place in the basket (6).
o To lock the basket handle (7) in place, press the bars together and slide them
between the slots.
o To insert the ends of the bars into the bracket on the basket (6) and push the
handle (7) backwards (ill. a and b). Do not assemble any other way (ill. c).
o The oil reservoir (9) is secured in the correct position with the oil filter cover (11)
and oil valve (12) on the same side as the oil filtration control knob (14) (ill. d).
Ensure the oil filter cover (11) is in place inside the oil reservoir (9).
o The control panel (21) is placed on the connecting plate on the back of the
housing (13). Ensure the grooves of the connecting plate are in the guides of the
control panel (ill. e).
NOTE:
➢ Your appliance is equipped with a safety switch (5) located on the control panel
(21). If the control panel (21) is not placed properly in its position, the appliance
will not operate.
• Incorrect assembly may lead to an unstable setup and might cause injuries.
• The silicon rubber sealing plate (22) prevents hot steam escaping from under the lid. Do
not attempt to remove it.
USING THE APPLIANCE
This appliance can be used for frying food such as French fries, chicken or fish (see
Recommended frying times and temperatures).
NOTE:
➢ The appliance has a rated power of 1700W. Before plugging it into the wall
outlet, ensure that the electrical circuit is not overloaded with other appliances.
This appliance should always be operated on a separate 230V ~ 60Hz wall outlet.
➢ Make sure the appliance is switched off before connecting it to a wall outlet.
• Place the appliance on a clean, flat and heat-resistant surface. When using the
appliance on wooden surfaces, use a heat resistant mat to protect the wood from
damages. Ensure a minimum distance around the appliance of at least 4 inches to other
objects, cupboards and walls.
• Ensure the oil container (15) is assembled, empty and in place inside the appliance, the oil
filtration control knob (14) is on the LOCK position and the oil filter cover (11) is in place
inside the oil reservoir (9). Then, pour suitable cooking oil into the oil reservoir (9) (ill. f).
Danger of burns!
➢ Never refill the oil reservoir (9) during use or while hot. Always allow the appliance
to cool down completely. Do not mix new and old oil.
WARNING:
➢ DO NOT OVER OR UNDER FILL (ill. f). The minimum oil capacity is 1.9L (MIN), the
maximum oil capacity is 3L (MAX). Ensure the oil level always remains between
the MIN and MAX marking (10).
Page 11

Copies of the I/B. Please reproduce them without any
changes except under special instruction from Team
International BELGIUM. The pages must be reproduced
and folded in order to obtain a booklet A5 (+/- 148.5 mm
width x 210 mm height). When folding, make sure you
keep the good numbering when you turn the pages of
the I/B. Don’t change the page numbering. Keep the
language integrity.
Back cover page (last page)
Assembly page 11/70
Fax +32 2 359 95 50
• Spread a little oil on the inside of the view window (2) to prevent condensation.
• Place the lid (3) onto the housing (13).
• Ensure the temperature control knob (23) is on the 0 position
NOTE:
• Insert the plug (17) into a wall outlet.
WARNING:
➢ Only use accessories recommended by the manufacturer. Do not place any
other materials in the appliance.
➢ Never let the power cord (17) come in contact with the lid (3) or appliance
housing (13) during use (ill. h).
Danger of burns!
➢ Do not touch the lid (3) or appliance housing (13) during or after use (ill. i). Only
use the handles (2, 7, 19) provided.
➢ Always pay special attention when adding or removing accessories and food
from the appliance. Never touch the lid (3) or appliance housing (13) when the
appliance is plugged in and switched on or immediately after use. It is
recommended to always use oven mitts.
➢ Escaping steam can burn.
• Turn the temperature control knob (14) to the required temperature (see Recommended
frying times and temperatures) (ill. j). The POWER indicator (25) will turn on to indicate the
appliance is heating. Once the set temperature has been reached, the READY indicator
(24) will turn on.
Approximate time durations until set temperature is reached:
Temperature setting (°C)
Time (minutes)
130
About 7
150
About 8
170
About 10
190
About 13
• After the oil has been preheated, remove the lid (3).
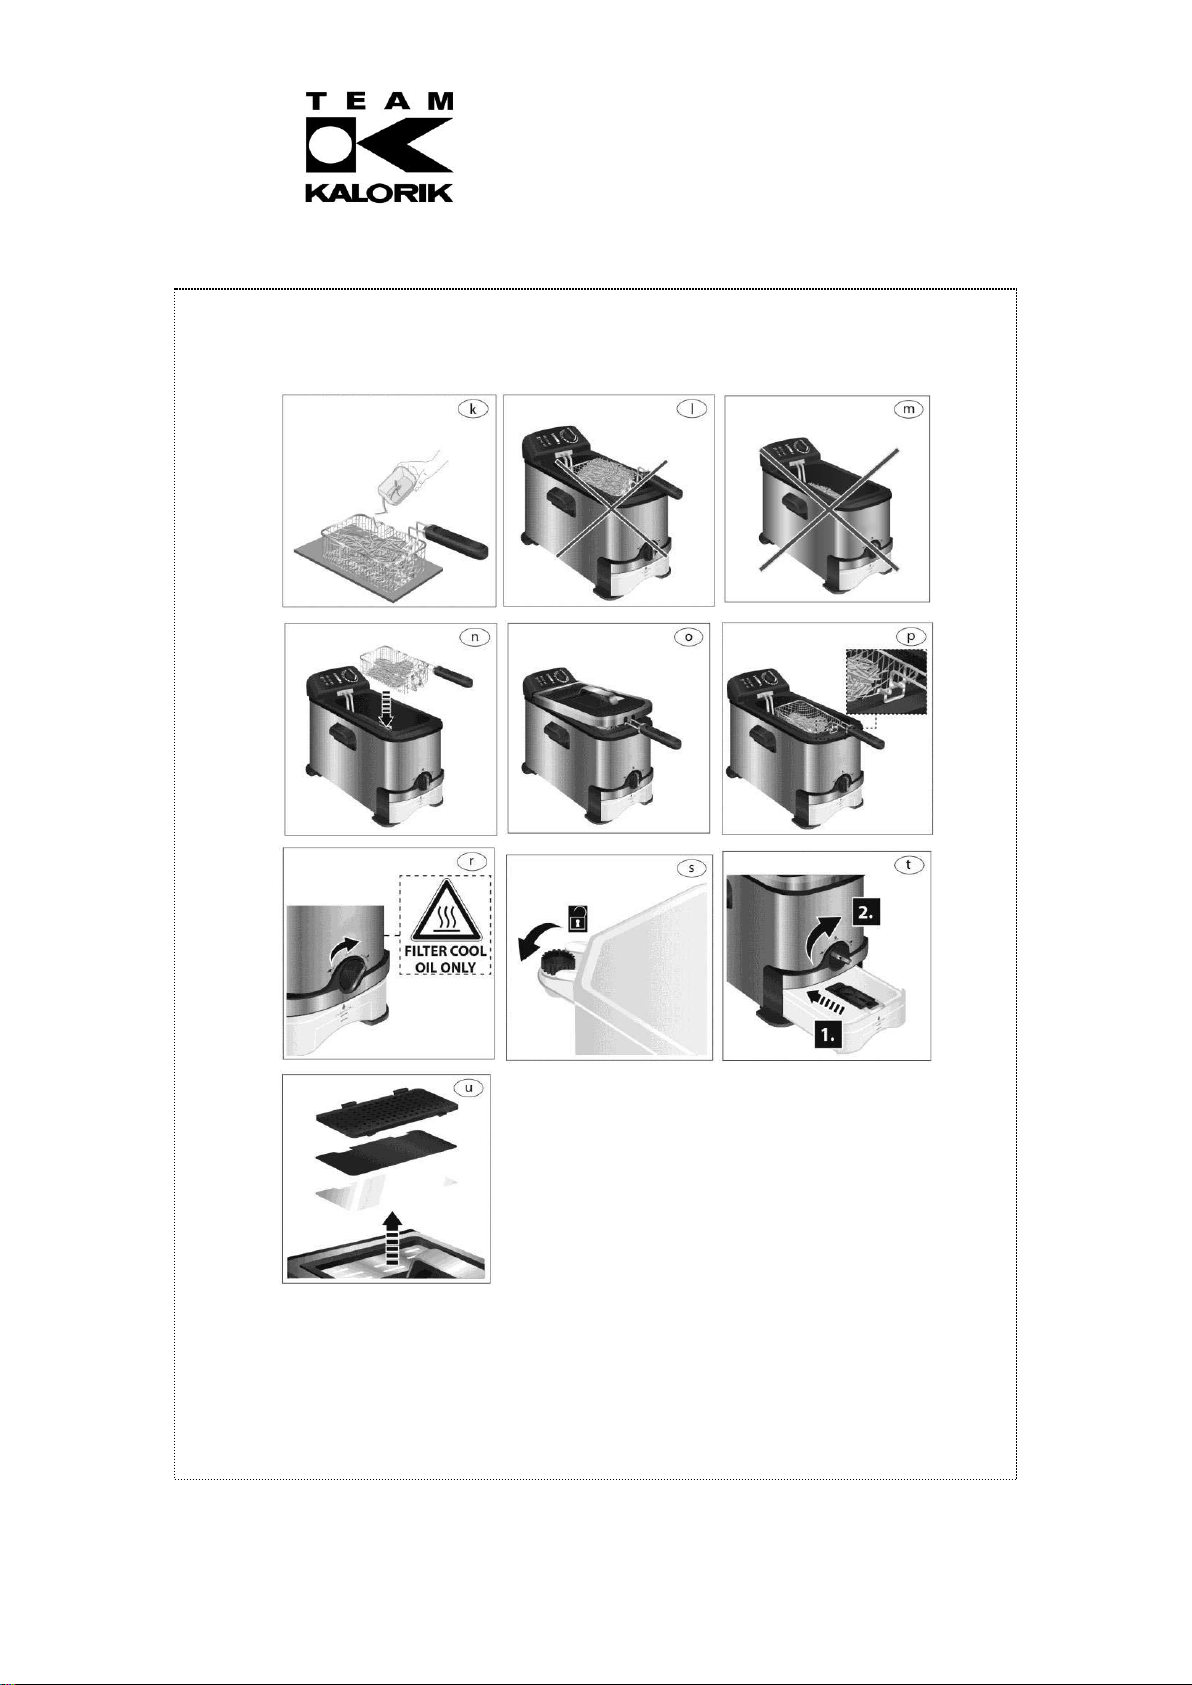
• Place the basket (6) on a clean, flat and heat resistant surface.
• Fill the basket (6) with food (ill. k). Do not overfill the basket (6) (ill. k).
WARNING
➢ Do not fry food without the basket (6) (ill. l).
➢ Do not fill the basket (6) over half way. Too much food can cause excess
foaming and could cause the oil to overflow during operation.
➢ Food added to the appliance must be dry. If frying frozen foods such as French
fries or chicken wings, remove all ice particles from the frozen foods prior to frying
to prevent oil from overflowing.
➢ Always remove excess moisture from food with a paper towel before frying. Even
a small amount of water can cause severe splattering of hot oil.
➢ After immersing the basket (6) in the oil, immediately place the lid (3) on the
Page 12

Copies of the I/B. Please reproduce them without any
changes except under special instruction from Team
International BELGIUM. The pages must be reproduced
and folded in order to obtain a booklet A5 (+/- 148.5 mm
width x 210 mm height). When folding, make sure you
keep the good numbering when you turn the pages of
the I/B. Don’t change the page numbering. Keep the
language integrity.
Back cover page (last page)
Assembly page 12/70
Fax +32 2 359 95 50
appliance. Danger of hot oil splashing out.
• Carefully lower the basket (6) into the oil reservoir (9) (ill. n).
• Cover the oil reservoir (9) with the lid (3) (ill. o). Ensure the recessed parts of the lid (3) fit
properly over the basket handle (7) and silicon rubber sealing plate (22).
NOTE:
➢ When frying fresh cut potatoes and high moisture content food, lower the basket
slowly into the oil. If the oil boils or foams too rapidly, raise the basket for a few
seconds and lower again. Do this until the basket can be lowered without excess
foaming.
➢ Do not place the lid (3) on the appliance when frying fresh cut potatoes or other high
moisture content foods.
➢ For frying times, see ‘Recommended frying times and temperatures’ or follow the
instructions from the food manufacturer.
• After the frying time has elapsed, remove the lid (3).
• Use the handle (7) to lift out the basket (6) and hang it onto the basket hook (8) onto the
rim of the oil reservoir (9) (ill. p).
• Let the food drain in the basket (6) for a few seconds to remove excess oil and retain
crispness.
• Use the handle (7) to carefully lift the basket (6) and pour the food onto a heat resistant
dish that has been covered with a paper towel to collect remaining oil.
WARNING
➢ Never place the hot basket (6) directly on a tabletop or countertop to avoid
damage to surfaces. It is recommended to use a heat resistant trivet or cutting board.
• Place the basket (6) on a clean, flat and heat resistant surface.
• After the cooking process is finished, turn the temperature control knob (23) to the 0
position and remove the plug (17) from the wall outlet.
WARNING
➢ Always disconnect the plug (17) and socket before disconnecting to avoid
accidents. Don't remove plug during normal operation. If it is disconnected,
immediately remove from the socket. Turn the temperature control knob (23)
to the 0 position. Reconnect the plug (17) to the socket.
➢ This appliance generates heat and steam during use. Proper precautions must be
taken to prevent the risk of burns, fires or other injuries to persons or damage to
property. Do not leave the appliance unattended while in use.
➢ The surfaces of the appliance become hot. Do not touch while in use. Allow the
appliance to cool down at least 30 minutes before handling.
RECOMMENDED FRYING TIMES AND TEMPERATURES
NOTE:
The frying times in the chart below are approximate and should be adjusted to suit
your own tastes, different food quantities and food manufacturer’s instructions.
Termperature setting (°C)
Time (minutes)
130
About 7
150
About 8
Page 13

Copies of the I/B. Please reproduce them without any
changes except under special instruction from Team
International BELGIUM. The pages must be reproduced
and folded in order to obtain a booklet A5 (+/- 148.5 mm
width x 210 mm height). When folding, make sure you
keep the good numbering when you turn the pages of
the I/B. Don’t change the page numbering. Keep the
language integrity.
Back cover page (last page)
Assembly page 13/70
Fax +32 2 359 95 50
170
About 10
190
About 13
Food
Food
Temperature setting (°C)
Time (minutes)
Frozen French fries
190
8-12
French Fries
190
8-10
Meat strips
190
10-14
Chicken wings
190
10-14
Fish (battered)
170
3-5
Seafood
170
3-5
COOKING WITH OIL
Cooking oil can enhance the food’s flavor – or spoil its taste. As with any other food
component, freshness and correct handling of the oil is the key to successful deep frying
results.
Temperature setting (°C)
Time (minutes)
130
About 7
150
About 8
170
About 10
The quality of the oil decreases with use at high temperatures. Food particles, water and other
liquids will further lower its quality, therefore:
• Do not mix different cooking oils.
• Only use fresh and clean cooking oils:
o Regularly remove burnt food particles while frying. Always use utensils that are
safe to immerse into hot oils without damaging the utensil or the appliance, and
always wear oven mitts when removing any burnt food particles.
o After use and before storage, filter oil with the integrated filtration system (see Oil
Filtration)
o Do not reuse oil that has been used to fry fish or other strongly flavored food.
o Some meats, such as chicken wings, will release large amounts of liquids when
frying, thus watering down the oil. Do not reuse this oil.
OIL FILTRATION
NOTE:
➢ Filter the oil after each use. Store filtered oil properly (see Storing oil).
➢ Discard of oil on a regular basis depending on oil quality (see Cooking with oil).
➢ After switching off the appliance, wait at least 3 hours for the oil to cool down,
depending on the settings selected during use. Hotter oil will take longer to reach a
cool temperature.
➢ Filtering the oil after each use will help prolong the life of the cooking oil, but it should
still be discarded if the oil is deteriorated after multiple use. We estimate that oil, in
normal use, should be changed at least after every 10 uses.
• Ensure the oil container (15) is assembled, empty and in place inside the appliance.
• Once the oil has cooled down to room temperature, turn the oil filtration control knob (14)
to the FILTER OIL position (ill. r). The oil will start dripping inside the oil container (15). The oil
filter cover (11) will keep food residues from being transferred to the oil container (15).
Page 14

Copies of the I/B. Please reproduce them without any
changes except under special instruction from Team
International BELGIUM. The pages must be reproduced
and folded in order to obtain a booklet A5 (+/- 148.5 mm
width x 210 mm height). When folding, make sure you
keep the good numbering when you turn the pages of
the I/B. Don’t change the page numbering. Keep the
language integrity.
Back cover page (last page)
Assembly page 14/70
Fax +32 2 359 95 50
• When all oil has been filtered:
o Turn the oil filtration control knob (14) to the LOCK position if the container will
remain inside the appliance.
o Turn the oil filtration control knob (14) to UNLOCK position if the container is to be
removed from the appliance.
NOTE:
➢ Always wait 3 to 4 hours until the oil has cooled down completely, before draining or
filtering.
➢ Extreme caution must be used when moving the appliance while the oil reservoir (9)
and oil container (15) are not both empty.
➢ When removing the oil container (15) from the appliance, handle with care. Keep the
oil container (15) flat and hold it with both hands.
EMPTYING THE OIL CONTAINER
Filtered oil can be stored in a suitable container (see Storing oil) or re-used for frying a new
batch of food (see Cooking with oil).
• Unscrew the cap (16) on top of the oil container (15) (ill. s).
• Slowly pour the oil container (15) content into a suitable container or the oil reservoir (9), if
required.
NOTE:
➢ Ensure the oil filtration control knob (14) is on UNLOCK position before pouring oil into
the oil reservoir (9).
➢ Tilt the oil container (15) upwards (vertical position) gradually to avoid leaks from the
side of the container.
➢ Oil can be stored in the oil reservoir (9), inside the deep fryer or in another cool dry
place (see Storing oil).
• Screw the cap (16) back on top of the oil container (15).
• Insert the oil container (15) back into the appliance and turn the oil filtration control knob
(14) to the LOCK position to secure the oil container (15) in place (ill. t).
STORING OIL
• Do not store used cooking oil in the refrigerator. Choose a cool place that is not subject to
sunlight. Generally, oil may be stored for a period of 3 months, once the bottle is opened.
Please observe the oil manufacturer’s storage directions as well.
HINTS AND TIPS
• Smaller quantities of food normally require a slightly shorter cooking time than larger
quantities of food.
• To reduce cooking time, defrost food prior to cooking. It is recommended that some foods
should not be thawed/defrosted prior to cooking, such as frozen fish, and frozen French
fries.
• It is recommended to use a meat thermometer to check the cooking progress.
• In the event of food flare-ups, do not remove the lid (3), do not remove the basket (6);
turn the temperature control knob (23) to the 0 position and unplug the appliance.
• When the food you are cooking requires shaking, it is recommended to use a timer set for
half of the suggested cooking time. This way a bell will ring and remind you to shake the
basket (6).
Page 15

Copies of the I/B. Please reproduce them without any
changes except under special instruction from Team
International BELGIUM. The pages must be reproduced
and folded in order to obtain a booklet A5 (+/- 148.5 mm
width x 210 mm height). When folding, make sure you
keep the good numbering when you turn the pages of
the I/B. Don’t change the page numbering. Keep the
language integrity.
Back cover page (last page)
Assembly page 15/70
Fax +32 2 359 95 50
• It is recommended to only use nylon, heat-proof plastic or wooden cooking utensils. Metal
utensils may become hot and damage the non-stick surface. Always remove utensils from
the appliance. Do not leave them in the appliance during use.
CLEANING AND MAINTENANCE
Proper maintenance will ensure many years of service from your appliance. Clean the
appliance after every use. The appliance contains no user serviceable parts and requires little
maintenance. Leave any servicing or repairs to qualified personnel.
WARNING:
➢ Always turn the temperature control knob (23) to the 0 position, after cleaning
thoroughly, before using or storing the appliance. Ensure that no water enters the
appliance housing (13).
➢ Do not attempt to attach the magnetic plug permanently to the appliance.
➢ Do not attempt to remove the silicon rubber sealing plate (22).
• Ensure the oil container (15) is in place, then turn the oil filtration control knob (14) to FILTER
OIL position to empty the oil reservoir (9) (see Oil filtration).
• Place the basket (6) on a clean, flat and heat resistant surface.
Danger of burns!
➢ Ensure the basket (6) cooled down completely before touching its surface and
attempting to remove the basket handle (7).
➢ Ensure the oil cooled down completely before emptying the oil reservoir (9) into the
oil container (15).
• Remove the basket handle (7) from the basket (6).
• Remove the control panel (21) from the oil reservoir (9). Carefully clean the control panel
(21) and immersion heater (20) with a damp cloth.
• Pull the oil filter cover (11) from the oil reservoir (9) and then remove the oil reservoir (9)
from the housing (13).
• Open the lid filter cover (28) and remove both black and white filters (26, 27) (ill. u).
• Clean the appliance housing (13) with a damp cloth.
• Wash the lid (3), basket (6), basket handle (7), oil reservoir (9) and oil filter cover (11) with
hot soapy water or in a dishwasher. Rinse and dry carefully.
• Dry all parts thoroughly after cleaning and before using the appliance again.
NOTE:
➢ If the oil container (15) needs to be cleaned, ensure it is empty before attempting to
clean (see Emptying the oil container). Wash with hot soapy water or in a dishwasher.
Rinse and dry carefully.
➢ Clean the filters (26, 27) every 3 months or after every 12 uses with hot soapy water.
Do not clean in a dishwasher.
➢ Dry all parts and surfaces thoroughly before use. Make sure that all parts and surfaces
are completely dry before connecting the appliance to a wall outlet. Even a small
amount of water can cause severe splattering of hot oil.
STORAGE
• Before storage, always make sure the appliance is completely cool, clean and dry.
• It is recommended to store the appliance in a dry place.
Page 16

Copies of the I/B. Please reproduce them without any
changes except under special instruction from Team
International BELGIUM. The pages must be reproduced
and folded in order to obtain a booklet A5 (+/- 148.5 mm
width x 210 mm height). When folding, make sure you
keep the good numbering when you turn the pages of
the I/B. Don’t change the page numbering. Keep the
language integrity.
Back cover page (last page)
Assembly page 16/70
Fax +32 2 359 95 50
• Store the appliance on a stable shelf or in a cupboard. To avoid accidents, ensure that
both the appliance and its power cord are beyond reach of children or pets.
PROTECTION OF THE ENVIRONMENT – DIRECTIVE 2012/19/EU
In order to preserve our environment and protect human health, the waste electrical and
electronic equipment should be disposed of in accordance with specific rules with the
implication of both suppliers and users. For this reason, as indicated by the symbol on the
rating label or on the packaging, your appliance should not be disposed of as unsorted
municipal waste. The user has the right to bring it to a municipal collection point performing
waste recovery by means of reuse, recycling or use for other applications in accordance with
the directive.
The user manual is also available in electronic format from the after-sales service (see warranty
card) by simple request.
Page 17

Copies of the I/B. Please reproduce them without any
changes except under special instruction from Team
International BELGIUM. The pages must be reproduced
and folded in order to obtain a booklet A5 (+/- 148.5 mm
width x 210 mm height). When folding, make sure you
keep the good numbering when you turn the pages of
the I/B. Don’t change the page numbering. Keep the
language integrity.
Back cover page (last page)
Assembly page 17/70
Fax +32 2 359 95 50
POUR VOTRE SECURITE
Lisez attentivement cette notice avant toute utilisation, et respectez
bien à la fois les consignes de sécurité et d'usage.
Important: Votre appareil peut être utilisé par des enfants âgés de
plus de 8 ans et des personnes ayant des capacités physiques,
sensorielles ou mentales réduites ou des personnes dénuées
d’expérience ou de connaissances, s’ils ont pu bénéficier, au
préalable, d’une surveillance ou d’instructions concernant son
utilisation en toute sécurité et sur les risques encourus. Les enfants
ne doivent surtout pas jouer avec l’appareil. Le nettoyage et la
maintenance ne doivent pas être effectués par des enfants à moins
qu’ils aient plus de 8 ans et qu’ils soient supervisés. Ne laissez
jamais votre appareil et son câble d’alimentation sans surveillance et
à la portée des enfants de moins de 8 ans ou des personnes non
responsables, surtout lorsque celui-ci est sous tension ou pendant sa
phase de refroidissement.
❑ Avant d'utiliser l'appareil, vérifiez que la tension du réseau
correspond bien à celle de l'appareil.
❑ Ne laissez jamais votre appareil sans surveillance lorsque celui-ci
est en fonctionnement ou sous tension.
❑ Vérifiez régulièrement l’état de votre appareil et s’il est
endommagé de quelque façon que ce soit, ne l'utilisez pas mais
faites-le vérifier et réparer par un service qualifié compétent(*). Si
le câble est endommagé, il doit être obligatoirement remplacé par
un service qualifié compétent(*) afin d’éviter tout danger.
❑ Utilisez l'appareil uniquement pour des usages domestiques et de
la manière indiquée dans la notice.
❑ N'utilisez pas l'appareil près de sources de chaleur.
❑ La prise doit être débranchée avant de nettoyer l'appareil.
❑ Veillez à ne pas utiliser l'appareil à l'extérieur et entreposez-le
dans un endroit sec.
❑ Ne pas utiliser d’accessoires non recommandés par le fabricant,
cela peut présenter un danger pour l’utilisateur et risque
d’endommager l’appareil.
Page 18

Copies of the I/B. Please reproduce them without any
changes except under special instruction from Team
International BELGIUM. The pages must be reproduced
and folded in order to obtain a booklet A5 (+/- 148.5 mm
width x 210 mm height). When folding, make sure you
keep the good numbering when you turn the pages of
the I/B. Don’t change the page numbering. Keep the
language integrity.
Back cover page (last page)
Assembly page 18/70
Fax +32 2 359 95 50
❑ Ne déplacez jamais l’appareil en tirant sur le câble. Veillez à ce
que le cordon d’alimentation ne puisse être accidentellement
accroché et ce afin d’éviter toute chute de l’appareil. Evitez
d’enrouler le cordon autour de l’appareil et ne le tordez pas.
❑ Posez cet appareil sur une table ou un support suffisamment
stable pour éviter à tout prix sa chute.
❑ N’utilisez cet appareil que pour sa fonction de friteuse. Ne faites
cuire que des aliments appropriés à la cuisson et propres à la
consommation.
❑ Ne plongez pas l'appareil dans l’eau ou dans tout autre liquide
pour son nettoyage ou toute autre raison (voir rubrique
"Nettoyage").
❑ Attendez que votre appareil soit complètement froid avant de le
déplacer, le nettoyer ou le ranger. Toujours porter l’appareil par
les poignées. Toujours débrancher l’appareil avant de le
manipuler.
❑ Ne faites jamais fonctionner votre appareil sans huile ou graisse.
Ne pas dépasser le niveau maximum, des projections d’huile ou
de graisse pourraient vous brûler.
❑ Il est indispensable de garder cet appareil propre étant donné
qu’il est en contact direct avec la nourriture.
❑ Veillez à ce que le cordon n’entre pas en contact avec des
surfaces chaudes de l’appareil. Vous-même, veillez à ne pas
toucher les surfaces chaudes de l’appareil.
❑ Veillez à ce que les parties chaudes de l’appareil ne rentrent pas
en contact avec des matériaux facilement inflammables comme
les rideaux, la nappe... lorsqu’il est en fonctionnement car le feu
pourrait se déclarer.
❑ Ne couvrez pas cet appareil avec quoi que ce soit.
❑ N’ajoutez jamais d’eau dans votre huile.
❑ Assurez-vous que les aliments sont le plus secs possible.
❑ Votre friteuse est équipée d’un filtre anti-odeurs. Vous pouvez donc
laisser le couvercle fermé pendant la cuisson. Cependant, veillez à
entretenir votre filtre fréquemment (voir rubrique "Nettoyage").
ATTENTION: la friteuse peut atteindre une température élevée
pendant son utilisation. Les préparations à l'huile ou à la graisse
peuvent s'enflammer si elles sont surchauffées. Soyez donc
extrêmement prudent de ne pas laisser votre friteuse allumée pour
Page 19

Copies of the I/B. Please reproduce them without any
changes except under special instruction from Team
International BELGIUM. The pages must be reproduced
and folded in order to obtain a booklet A5 (+/- 148.5 mm
width x 210 mm height). When folding, make sure you
keep the good numbering when you turn the pages of
the I/B. Don’t change the page numbering. Keep the
language integrity.
Back cover page (last page)
Assembly page 19/70
Fax +32 2 359 95 50
de longues périodes. Avant de débrancher l’appareil, positionnez
le thermostat sur "MIN".
❑ Veillez à ventiler la pièce durant le fonctionnement.
❑ Si vous utilisez de la graisse solide, coupez-la en petits morceaux
et placez ceux-ci dans la cuve. Mettez l’appareil en marche à
l’aide de l’interrupteur et mettez le thermostat sur sa position
minimale. Chaque fois que l’indicateur lumineux s’éteint,
positionnez le bouton de température sur une température plus
élevée jusqu’à ce que la graisse ait fondu. Une fois que la graisse
a fondu, positionnez le thermostat sur la température désirée. Ce
genre de graisse se solidifiera quand l’appareil refroidira.
❑ Votre appareil ne doit jamais être mis en fonctionnement par le
biais d’une minuterie extérieure ou d’un autre système de
commande à distance séparé.
❑ Note: Lorsque le symbole est apposé sur une surface
particulière, il accentue la mise en garde et signifie: ATTENTION,
cette surface peut devenir très chaude pendant l'utilisation.
Le symbole est toujours apposé sur la surface dont la
température est la plus élevée, cependant les températures des
autres surfaces métalliques ou non peuvent aussi devenir très
chaudes pendant l'utilisation et il convient donc de toujours les
manipuler avec précaution et si possible au moyen de gants
isothermes ou autres dispositifs de protection thermique. En cas
de doute sur la température d’une surface il sera toujours
préférable de se protéger.
(*) Service qualifié compétent: service après-vente du fabricant ou de
l'importateur ou une personne qualifiée, reconnue et habilitée à faire
ce genre de réparation afin d'éviter tout danger. Dans tous les cas,
veuillez retourner l'appareil auprès de ce service.
AVANT LA PREMIÈRE UTILISATION
• Enlever tous les matériaux d'emballage.
• Vérifiez le contenu du carton d’emballage pour vérifier qu'il est complet et non
endommagé. Ne faites pas fonctionner l'appareil si le contenu est incomplet ou semble
endommagé.
Danger d’asphyxie!
Les matériaux d'emballage ne sont pas des jouets. Gardez toujours les sacs en plastique,
Page 20

Copies of the I/B. Please reproduce them without any
changes except under special instruction from Team
International BELGIUM. The pages must be reproduced
and folded in order to obtain a booklet A5 (+/- 148.5 mm
width x 210 mm height). When folding, make sure you
keep the good numbering when you turn the pages of
the I/B. Don’t change the page numbering. Keep the
language integrity.
Back cover page (last page)
Assembly page 20/70
Fax +32 2 359 95 50
les films plastique et les pièces en mousse à l'écart des bébés et des enfants. Les matériaux
d'emballage pourraient bloquer les voies respiratoires et empêcher la respiration.
REMARQUE:
➢ L'appareil peut produire une odeur et / ou émettre de la fumée lorsqu'il est allumé
pour la première fois, il s’agit de l’élimination des résidus du processus de production.
Ceci est normal et n'indique pas un défaut ou un danger. Assurez une ventilation
suffisante.
➢ Nettoyez soigneusement l’appareil avant la première utilisation (Nettoyage et
entretien).
ASSEMBLAGE
Voir les illustrations
• Placez l'appareil sur une surface propre, plane et résistante à la chaleur.
• Avant d'utiliser votre appareil, assurez-vous:
o Que la poignée du panier (7) soit bien fixée au panier (6).
o Pour fixer la poignée au panier (7), d’appuyer sur les barres et faites-les glisser
dans les encoches.
o D’insérer les extrémités des barres dans le support sur le panier (6) et pousser la
poignée (7) vers l'arrière (ill. a et b). Ne pas assembler autrement (ill. c).
o Que le réservoir d'huile (9) soit placé correctement, avec le couvercle du filtre à
huile (11) et la valve d'huile (12) du même côté que le bouton de contrôle de
filtration d'huile (14) (ill. d). Assurez-vous que le couvercle du filtre à huile (11) soit
en place sur le réservoir d'huile (9).
o Que le panneau de commande (21) soit placé sur la plaque de connexion à
l'arrière du boîtier (13). Assurez-vous que les rainures de la plaque de connexion
se trouvent dans les guides du panneau de commande (ill. e).
REMARQUE:
➢ Votre appareil est équipé d'un interrupteur de sécurité (5) situé sur le panneau de
commande (21). Si le panneau de commande (21) n'est pas placé correctement à
sa place, l'appareil ne fonctionnera pas.
• Un mauvais assemblage peut entraîner une mauvaise configuration et provoquer des
blessures.
• La plaque d'étanchéité en caoutchouc (22) empêche la vapeur chaude de s'échapper
de sous le couvercle. N'essayez pas de l'enlever.
UTILISATION DE L’APPAREIL
Cet appareil peut être utilisé pour faire frire des aliments comme des frites, du poulet ou du
poisson (voir Temps et températures de friture recommandés).
REMARQUE:
➢ L'appareil a une puissance de 1700W. Avant de le brancher dans la prise murale,
assurez-vous que le circuit électrique ne soit pas surchargé par d'autres
appareils. Cet appareil doit toujours être utilisé sur une prise murale séparée de
230V ~ 60Hz.
➢ Assurez-vous que l'appareil soit éteint avant de le brancher à une prise murale.
• Placez l'appareil sur une surface propre, plane et résistante à la chaleur. Lorsque vous
utilisez l'appareil sur des surfaces en bois, utilisez un tapis résistant à la chaleur pour
Page 21

Copies of the I/B. Please reproduce them without any
changes except under special instruction from Team
International BELGIUM. The pages must be reproduced
and folded in order to obtain a booklet A5 (+/- 148.5 mm
width x 210 mm height). When folding, make sure you
keep the good numbering when you turn the pages of
the I/B. Don’t change the page numbering. Keep the
language integrity.
Back cover page (last page)
Assembly page 21/70
Fax +32 2 359 95 50
protéger le bois contre les dommages. Assurez une distance minimale d'au moins 10cm
autour de l'appareil par rapport aux autres objets, armoires et murs.
• Assurez-vous que le réservoir d'huile (15) soit assemblé, vide et en place dans l'appareil,
que le bouton de commande de filtration d'huile (14) soit en position LOCK et le
couvercle de filtre à huile (11) est en place dans le réservoir . Ensuite, verser l'huile de
friture appropriée dans le réservoir d'huile (9) (ill. F).
Risque de brûlures!
➢ Ne remplissez jamais le réservoir d'huile (9) pendant l'utilisation ou à chaud.
Laissez toujours l'appareil refroidir complètement. Ne mélangez pas d'huile neuve
et ancienne.
ATTENTION:
➢ NE PAS TROP OU TROP PEU REMPLIR LE RÉSERVOIR(ill. F). La quantité minimale
d'huile est de 1,9 L (MIN), la capacité maximale d'huile est de 3 L (MAX). Assurezvous que le niveau d'huile reste toujours entre les repères MIN et MAX (10).
• Étalez un peu d'huile à l'intérieur de la vitre (2) pour éviter la condensation.
• Placez le couvercle (3) sur le boîtier (13).
• Assurez-vous que le thermostat (23) soit sur la position 0
REMARQUE:
• Branchez la prise (17) au secteur.
ATTENTION:
➢ N'utilisez que des accessoires recommandés par le fabricant. Ne placez aucun
autre matériau dans l'appareil.
➢ Ne laissez jamais le cordon d'alimentation (17) entrer en contact avec le
couvercle (3) ou le boîtier de l'appareil (13) pendant l'utilisation (ill. H)
Risque de brûlures!
➢ Ne touchez pas le couvercle (3) ou le boîtier de l'appareil (13) pendant ou après
l'utilisation (ill. I) N'utilisez que les poignées (2, 7, 19) fournies.
➢ Faites toujours très attention lorsque vous ajoutez ou retirez des accessoires et
des aliments de l'appareil. Ne touchez jamais le couvercle (3) ou le boîtier de
l'appareil (13) lorsqu’il est branché et allumé ou immédiatement après utilisation.
Il est recommandé de toujours utiliser des gants de cuisine.
➢ La vapeur qui s'échappe peut brûler.
• Réglez le thermostat (14) sur la température requise (voir Temps et températures de friture
recommandés) (ill. J). L'indicateur POWER (25) s'allume pour indiquer que l'appareil est en
train de chauffer. Une fois la température voulue atteinte, l'indicateur READY (24) s'allume.
Durée approximative avant que la température réglée soit atteinte:
Réglage de température (°C)
Temps (minutes)
130
Plus ou moins 7
150
Plus ou moins 8
170
Plus ou moins 10
190
Plus ou moins 13
Page 22

Copies of the I/B. Please reproduce them without any
changes except under special instruction from Team
International BELGIUM. The pages must be reproduced
and folded in order to obtain a booklet A5 (+/- 148.5 mm
width x 210 mm height). When folding, make sure you
keep the good numbering when you turn the pages of
the I/B. Don’t change the page numbering. Keep the
language integrity.
Back cover page (last page)
Assembly page 22/70
Fax +32 2 359 95 50
• Une fois l'huile préchauffée, retirez le couvercle (3).
• Placez le panier (6) sur une surface propre, plane et résistante à la chaleur.
• Remplissez le panier (6) avec de la nourriture (ill. K).
• Ne remplissez pas trop le panier (6) (ill. K).
ATTENTION
➢ Ne faites pas frire de la nourriture sans panier (6) (ill.L).
➢ Ne remplissez pas le panier (6) au-dessus de la moitié. Trop de nourriture peut
provoquer un excès de mousse et provoquer un débordement d'huile pendant
le fonctionnement.
➢ Les aliments ajoutés à l'appareil doivent être secs. Si vous faites frire des aliments
surgelés comme des frites ou des ailes de poulet, retirez la glace des aliments
congelés avant de les faire frire pour éviter que l'huile ne déborde.
➢ Enlevez toujours l'excès d'humidité des aliments avec une serviette en papier
avant de les faire frire. Même une petite quantité d'eau peut causer
d’importantes éclaboussures d'huile chaude.
➢ Après avoir immergé le panier (6) dans l'huile, placez immédiatement le
couvercle (3) sur l'appareil. Il y a un risque d'éclaboussures d'huile chaude.
• Abaissez délicatement le panier (6) dans le réservoir d'huile (9) (ill. N)
• Couvrez le réservoir d'huile (9) avec le couvercle (3) (ill. O). Assurez-vous que les encoches
sur le couvercle (3) soient bien ajustées sur la poignée du panier (7) et sur la plaque
d'étanchéité en caoutchouc (22).
REMARQUE:
➢ Lorsque vous faites frire des pommes de terre fraîchement coupées et des aliments à
haute teneur en humidité, abaissez lentement le panier dans l'huile. Si l'huile bout ou
mousse trop rapidement, soulevez le panier pendant quelques secondes et abaissezle à nouveau. Faites-le jusqu'à ce que le panier puisse être abaissé sans excès de
mousse.
➢ Ne placez pas le couvercle (3) sur l'appareil lorsque vous faites frire des pommes de
terre fraîchement coupées ou d'autres aliments à forte teneur en humidité.
➢ Pour les temps de cuisson, voir « Temps et températures de friture recommandés » ou
suivez les instructions du fabricant...
• Une fois le temps de cuisson écoulé, retirez le couvercle (3).
• Soulevez le panier (6) à l'aide de la poignée (7) et accrochez-le au crochet du panier (8)
sur le bord du réservoir d'huile (9) (ill. P)
• Laissez les aliments égoutter dans le panier (6) pendant quelques secondes pour enlever
l'excès d'huile et garder les aliments croustillants.
• A l'aide de la poignée (7), soulevez délicatement le panier (6) et placez les aliments sur un
plat résistant à la chaleur recouvert d'une serviette en papier pour recueillir l'huile restante.
ATTENTION
➢ Ne placez jamais le panier chauffant (6) directement sur une table ou un comptoir
pour éviter d'endommager les surfaces. Il est recommandé d'utiliser un sous-plat
résistant à la chaleur ou une planche à découper.
• Placez le panier (6) sur une surface propre, plane et résistante à la chaleur.
• Une fois la cuisson terminée, réglez le thermostat (23) sur 0 et retirez la fiche (17) de la prise
murale.
Page 23

Copies of the I/B. Please reproduce them without any
changes except under special instruction from Team
International BELGIUM. The pages must be reproduced
and folded in order to obtain a booklet A5 (+/- 148.5 mm
width x 210 mm height). When folding, make sure you
keep the good numbering when you turn the pages of
the I/B. Don’t change the page numbering. Keep the
language integrity.
Back cover page (last page)
Assembly page 23/70
Fax +32 2 359 95 50
ATTENTION
➢ Débranchez toujours la fiche (17) de la prise murale avant - Le cordon d'alimentation
magnétique est uniquement prévu pour les déconnexions accidentelles. Ne pas
retirer la fiche en cours de fonctionnement normal. Si la fiche magnétique est
déconnectée, retirez immédiatement la prise (17) de la prise murale. Réglez le
thermostat (23) sur 0 et reconnectez ensuite la prise (17) au secteur.
➢ Cet appareil génère de la chaleur et de la vapeur pendant l'utilisation. Des
précautions appropriées doivent être prises pour éviter tout risque de brûlures,
d'incendie ou d'autres blessures ou dommages matériels. Ne laissez pas l'appareil
sans surveillance pendant son utilisation.
➢ Les surfaces de l'appareil deviennent chaudes lors du fonctionnement. Ne pas
toucher pendant l'utilisation. Laisser l'appareil refroidir au moins 30 minutes avant de
le manipuler.
RECOMMENDED FRYING TIMES AND TEMPERATURES
REMARQUE:
Les temps de cuisson dans le tableau ci-dessous sont approximatifs et doivent être
adaptés à vos goûts, aux quantités de nourriture à frire et aux instructions des
fabricants d’aliments.
Réglage de température (°C)
Durée (minutes)
130
Plus ou moins 7
150
Plus ou moins 8
170
Plus ou moins 10
190
Plus ou moins 13
Aliments
Aliment
Réglage de température (°C)
Durée (minutes)
Frites surgelées
190
8-12
Frites
190
8-10
Tranches de viande
190
10-14
Ailes de poulet
190
10-14
Poisson (pané)
170
3-5
Fruits de mer
170
3-5
CUISINER À L’HUILE
L’huile de friture peut améliorer la saveur des aliments - ou gâcher leur goût. Comme pour tous
les aliments, la fraîcheur et la bonne conservation de l’huile sont essentiels pour obtenir des
résultats satisfaisants.
Réglage de température (°C)
Durée (minutes)
130
Plus ou moins 7
150
Plus ou moins 8
170
Plus ou moins 10
La qualité de l’huile diminue à force d’être chauffée à de hautes températures. La présence
de particules de nourriture, d’eau et d’autres liquides reduiront encore d’avantage sa qualité,
donc :
• Ne mélangez pas différentes huiles de cuisson.
• Utilisez uniquement des huiles fraîches et propres:
Page 24

Copies of the I/B. Please reproduce them without any
changes except under special instruction from Team
International BELGIUM. The pages must be reproduced
and folded in order to obtain a booklet A5 (+/- 148.5 mm
width x 210 mm height). When folding, make sure you
keep the good numbering when you turn the pages of
the I/B. Don’t change the page numbering. Keep the
language integrity.
Back cover page (last page)
Assembly page 24/70
Fax +32 2 359 95 50
o Otez régulièrement les particules de nourriture brûlées pendant la cuisson. Utilisez
toujours des ustensiles qui peuvent être immergés dans de l’huile chaude sans
être endommagé et/ ou sans endommager l’appareil. Portez toujours des gants
de cuisine lorsque vous enlevez les particules de nourriture brûlées.
o Après utilisation et avant d’entreposer l’appareil, filtrez l’huile avec le système de
filtration d’huile intégré (voir Filtration d’huile)
o Ne réutilisez pas l’huile qui a été utilisée pour frire du poisson ou d’autres aliments
similaires.
o Certaines viandes, comme les ailes de poulet, libèrent beaucoup de liquide lors
de la cuisson, ce qui dilue l’huile de friture. Ne réutilisez pas cette huile.
FILTRATION D’HUILE
REMARQUE:
➢ Filtrez l'huile après chaque utilisation. Conservez correctement l'huile filtrée (voir
Stockage d'huile).
➢ Jetez régulièrement de l'huile en fonction de sa qualité (voir Cuisson à l'huile).
➢ Après avoir éteint l'appareil, attendez au moins 3 heures que l'huile refroidisse, en
fonction des réglages sélectionnés pendant l'utilisation. L'huile plus chaude prendra
plus de temps pour atteindre une température basse.
➢ Filtrer l'huile après chaque utilisation aidera à prolonger la durée de vie de l'huile de
cuisson, mais elle doit être jetée si l'huile est sale après plusieurs utilisations. Nous
estimons que l’huile, en usage normal, devrait être changée au moins toutes les 10
utilisations.
• Assurez-vous que le réservoir d'huile (15) soit assemblé, vide et en place à l'intérieur de
l'appareil.
• Une fois que l'huile a refroidi à température ambiante, placez le bouton de commande
de filtration d'huile (14) sur la position FILTER OIL (ill. R). L'huile commence à couler dans le
réservoir d'huile (15). Le couvercle du filtre à huile (11) empêche le transfert des résidus
alimentaires dans le réservoir d'huile (15).
• Lorsque toute l'huile a été filtrée:
o Placez le bouton de commande de filtration d'huile (14) sur la position LOCK si le
récipient reste à l'intérieur de l'appareil.
o Placez le bouton de commande de filtration d'huile (14) sur la position UNLOCK si
le récipient doit être retiré de l'appareil.
REMARQUE:
➢ Attendez toujours 3 à 4 heures avant que l'huile ait complètement refroidi, avant de
la vidanger ou de la filtrer.
➢ Soyez extrêmement prudent lorsque vous déplacez l'appareil alors que le réservoir
d'huile (9) et le récipient d'huile (15) ne soient pas tous les deux vides.
➢ Lorsque vous retirez le récipient d'huile (15) de l'appareil, manipulez-le avec
précaution. Maintenez le récipient d'huile (15) à plat et tenez-le avec les deux mains.
VIDANGE DU RÉCIPIENT D’HUILE
L'huile filtrée peut être stockée dans un récipient approprié (voir Stockage d'huile) ou réutilisée
pour faire frire de nouveaux aliments (voir Cuisson avec de l'huile).
• Dévisser le bouchon (16) sur le dessus du récipient d'huile (15) (ill. S)
• Versez lentement le contenu du récipient d'huile (15) dans un récipient approprié ou dans
le réservoir d'huile (9) si nécessaire.
Page 25

Copies of the I/B. Please reproduce them without any
changes except under special instruction from Team
International BELGIUM. The pages must be reproduced
and folded in order to obtain a booklet A5 (+/- 148.5 mm
width x 210 mm height). When folding, make sure you
keep the good numbering when you turn the pages of
the I/B. Don’t change the page numbering. Keep the
language integrity.
Back cover page (last page)
Assembly page 25/70
Fax +32 2 359 95 50
REMARQUE:
➢ Assurez-vous que le bouton de commande de la filtration d'huile (14) soit en position
UNLOCK avant de verser de l'huile dans le réservoir d'huile (9).
➢ Inclinez le récipient d'huile (15) vers le haut (position verticale) progressivement pour
éviter les fuites du côté du récipient.
➢ L'huile peut être stockée dans le réservoir d'huile (9), dans la friteuse ou dans un autre
endroit frais et sec (voir Stockage d'huile).
• Revissez le bouchon (16) sur le récipient d'huile (15).
• Remettez le récipient d'huile (15) dans l'appareil et tournez le bouton de contrôle de
filtration d'huile (14) en position LOCK pour fixer le réservoir d'huile (15) à sa place (ill. T).
CONSERVATION DE L’HUILE
• Ne conservez pas d'huile de cuisson usagée dans le réfrigérateur. Choisissez un endroit
frais qui n'est pas exposé au soleil. Généralement, l'huile peut être conservée pendant
une période de 3 mois une fois la bouteille ouverte. Veuillez également respecter les
instructions de conservation du fabricant d'huile.
CONSEILS ET ASTUCES
• Les petites quantités d'aliments nécessitent normalement un temps de cuisson légèrement
plus court que les grandes quantités d'aliments.
• Pour réduire le temps de cuisson, décongelez les aliments avant la cuisson. Il est
recommandé de ne pas décongeler certains aliments avant de les faire frire, du poisson
et des frites surgelés par exemple.
• Il est recommandé d'utiliser un thermomètre à viande pour vérifier la progression de la
cuisson.
• Au cas où de la nourriture brûle, ne retirez pas le couvercle (3) ni le panier (6); réglez le
thermostat (23) sur 0 et débranchez l'appareil.
• Lorsque les aliments que vous cuisinez doivent être secoués, il est recommandé d'utiliser
un minuteur réglé sur la moitié du temps de cuisson suggéré. De cette façon, il sonnera et
vous rappellera de secouer le panier (6).
• Il est recommandé de n'utiliser que des ustensiles de cuisine en nylon, en plastique
résistant à la chaleur ou en bois. Les ustensiles en métal peuvent devenir chauds et
endommager la surface antiadhésive. Retirez toujours les ustensiles de l'appareil. Ne les
laissez pas dans l'appareil pendant l'utilisation.
NETTOYAGE ET ENTRETIEN
Un bon entretien assurera de nombreuses années de service de votre appareil. Nettoyez
l'appareil après chaque utilisation. L'appareil ne contient aucune pièce réparable par
l'utilisateur et nécessite peu d'entretien. Laissez tout entretien ou toute réparation à un
personnel qualifié.
ATTENTION:
➢ Toujours régler le bouton de réglage de température (23) sur 0, après avoir nettoyé
soigneusement, avant d'utiliser ou de ranger l'appareil. Assurez-vous qu'il n'y a pas
d'eau dans le boîtier de l'appareil (13).
➢ N'essayez pas de fixer la fiche magnétique sur l'appareil de manière permanente.
➢ N'essayez pas de retirer la plaque d'étanchéité en caoutchouc (22).
• Assurez-vous que le récipient d'huile (15) soit en place, puis tournez le bouton de
commande de filtration d'huile (14) en position FILTER OIL pour vider le réservoir d'huile (9)
Page 26

Copies of the I/B. Please reproduce them without any
changes except under special instruction from Team
International BELGIUM. The pages must be reproduced
and folded in order to obtain a booklet A5 (+/- 148.5 mm
width x 210 mm height). When folding, make sure you
keep the good numbering when you turn the pages of
the I/B. Don’t change the page numbering. Keep the
language integrity.
Back cover page (last page)
Assembly page 26/70
Fax +32 2 359 95 50
(voir Filtration d'huile).
• Placez le panier (6) sur une surface propre, plane et résistante à la chaleur.
Risque de brûlures!
➢ Assurez-vous que le panier (6) ait complètement refroidi avant de toucher et tentez
de retirer la poignée du panier (7).
➢ Assurez-vous que l'huile ait complètement refroidi avant de vider le réservoir d'huile
(9) dans le récipient d'huile (15).
• Retirez la poignée du panier (7) du panier (6).
• Retirer le panneau de commande (21) du réservoir d'huile (9). Nettoyer soigneusement le
panneau de commande (21) et l’élément chauffant (20) avec un chiffon humide.
• Retirez le couvercle du filtre à huile (11) du réservoir d'huile (9), puis retirez le réservoir
d'huile (9) du boitier (13).
• Ouvrez le couvercle du filtre du couvercle de la friteuse (28) et retirez les deux filtres noirs
et blancs (26, 27) (ill. U)
• Nettoyez le boîtier de l'appareil (13) avec un chiffon humide.
• Laver le couvercle (3), le panier (6), la poignée du panier (7), le réservoir d'huile (9) et le
couvercle du filtre à huile (11) avec de l'eau chaude savonneuse ou au lave-vaisselle.
Rincer et sécher soigneusement.
• Séchez soigneusement toutes les pièces après le nettoyage et avant d'utiliser à nouveau
l'appareil..
REMARQUE:
➢ Si le récipient d'huile (15) doit être nettoyé, assurez-vous qu'il est vide avant de tenter
de le nettoyer (voir Vidange du réservoir d'huile). Laver à l'eau chaude savonneuse
ou au lave-vaisselle. Rincer et sécher soigneusement.
➢ Nettoyez les filtres (26, 27) tous les 3 mois ou après toutes les 12 utilisations avec de
l'eau chaude savonneuse. Ne pas nettoyer au lave-vaisselle.
➢ Séchez soigneusement toutes les pièces et surfaces avant utilisation. Assurez-vous que
toutes les pièces et surfaces soient complètement sèches avant de brancher
l'appareil à une prise murale. Même une petite quantité d'eau peut causer de fortes
éclaboussures d'huile chaude.
RANGEMENT
• Avant le stockage, assurez-vous toujours que l'appareil soit complètement froid, propre et
sec.
• Il est recommandé de ranger l'appareil dans un endroit sec.
• Rangez l'appareil sur une étagère stable ou dans un placard. Pour éviter les accidents,
assurez-vous que l'appareil et son cordon d'alimentation soient hors de portée des enfants
ou des animaux domestiques.
PROTECTION DE L’ENVIRONNEMENT – DIRECTIVE 2012/19/UE
Afin de préserver notre environnement et notre santé, l’élimination en fin de vie des appareils
électriques et électroniques doit se faire selon des règles bien précises et nécessite
l’implication de chacun, qu’il soit fournisseur ou utilisateur. C’est pour cette raison que votre
appareil, tel que le signale le symbole apposé sur sa plaque signalétique ou sur
Page 27

Copies of the I/B. Please reproduce them without any
changes except under special instruction from Team
International BELGIUM. The pages must be reproduced
and folded in order to obtain a booklet A5 (+/- 148.5 mm
width x 210 mm height). When folding, make sure you
keep the good numbering when you turn the pages of
the I/B. Don’t change the page numbering. Keep the
language integrity.
Back cover page (last page)
Assembly page 27/70
Fax +32 2 359 95 50
l'emballage, ne doit en aucun cas être jeté dans une poubelle publique ou privée destinée
aux ordures ménagères. L'utilisateur a le droit de déposer l'appareil dans des lieux publics de
collecte procédant à un tri sélectif des déchets pour être soit recyclé, soit réutilisé pour
d’autres applications conformément à la directive.
La notice d’utilisation est aussi disponible en format électronique sur simple demande auprès
du service après-vente (voir carte de garantie).
Page 28

Copies of the I/B. Please reproduce them without any
changes except under special instruction from Team
International BELGIUM. The pages must be reproduced
and folded in order to obtain a booklet A5 (+/- 148.5 mm
width x 210 mm height). When folding, make sure you
keep the good numbering when you turn the pages of
the I/B. Don’t change the page numbering. Keep the
language integrity.
Back cover page (last page)
Assembly page 28/70
Fax +32 2 359 95 50
BELANGRIJKE VEILIGHEIDSVOORSCHRIFTEN
Lees de gebruiksaanwijzing aandachtig alvorens u uw toestel
gebruikt, en respecteer altijd de veiligheids- en de
gebruiksvoorschriften.
Belangrijk: Het toestel mag worden gebruikt door kinderen van meer
dan 8 jaar oud en door personen met beperkte fysieke, sensoriële of
mentale capaciteiten of met een gebrek aan ervaring of kennis als ze
onder toezicht staan of vooraf instructies hebben gekregen
betreffende een veilig gebruik van het toestel en de risico’s die
ermee gepaard gaan. Kinderen mogen in geen geval met het toestel
spelen. Schoonmaak en onderhoud mogen niet worden uitgevoerd
door kinderen, tenzij ze 8 jaar of ouder zijn en onder toezicht staan.
Laat uw toestel en zijn snoer nooit zonder toezicht en binnen het
bereik van kinderen jonger dan 8 jaar of van ontoerekeningsvatbare
personen, vooral wanneer het onder spanning staat of wanneer het
aan het afkoelen is.
❑ Controleer of de netspanning overeenkomt met deze van het
toestel vooraleer u het gebruikt.
❑ Laat uw toestel tijdens het gebruik nooit zonder toezicht.
❑ Controleer regelmatig of het toestel of het snoer niet beschadigd
is. Gebruik het toestel niet indien het snoer of het toestel zelf
enige beschadiging zouden vertonen maar laat het in dit geval
nakijken en herstellen door een bekwame gekwalificeerde
dienst(*) om ieder gevaar te vermijden.
❑ Gebruik het toestel enkel voor huishoudelijk gebruik en op de
wijze zoals vermeld in de gebruiksaanwijzing.
❑ Gebruik het toestel niet in de nabijheid van warmtebronnen.
❑ Verwijder de stekker uit het stopcontact vooraleer u het toestel
reinigt.
❑ Gebruik het toestel niet buiten en berg het op in een droge ruimte.
❑ Gebruik geen accessoires die niet door de fabrikant werden
aanbevolen. Dit kan het toestel beschadigen en gevaarlijk zijn
voor de gebruiker.
Page 29

Copies of the I/B. Please reproduce them without any
changes except under special instruction from Team
International BELGIUM. The pages must be reproduced
and folded in order to obtain a booklet A5 (+/- 148.5 mm
width x 210 mm height). When folding, make sure you
keep the good numbering when you turn the pages of
the I/B. Don’t change the page numbering. Keep the
language integrity.
Back cover page (last page)
Assembly page 29/70
Fax +32 2 359 95 50
❑ Trek nooit aan het snoer om het toestel te verplaatsen. Zorg
ervoor dat het elektriciteitssnoer nergens kan achterhaken en
daardoor de val van het toestel veroorzaken. Draai het snoer niet
rond het toestel en plooi het niet.
❑ Zet het toestel op een tafel of op een voldoende stabiel oppervlak
zodat het niet valt.
❑ Gebruik dit toestel enkel om te frituren. Frituur enkel etenswaren
geschikt om te frituren en voor consumptie.
❑ Het omhulsel, de kuip, het deksel, de mand en het handvat
kunnen met de hand gereinigd worden. Dompel het
bedieningsdeel nooit onder in water of in een andere vloeistof
voor de reiniging of om welke reden ook (zie paragraaf
"Reiniging").
❑ Wacht tot de frituurpan volledig is afgekoeld alvorens ze te
verplaatsen, af te wassen of op te bergen. Draag het toestel altijd
met de handvaten en trek steeds de stekker uit het stopcontact
vooraleer u het toestel verplaatst.
❑ Schakel de frituurpan nooit aan voordat u er olie ingegoten heeft.
Vul de frituurpan met olie tussen het minimum- en het
maximumpeil die aangeduid zijn aan de binnenkant van de kuip.
Overschrijd het maximumpeil niet om brandwonden ten gevolge
van oliespatten te voorkomen.
❑ Het is absoluut noodzakelijk om dit toestel proper te houden
vermits het in direct contact komt met etenswaren.
❑ Zorg ervoor dat het snoer niet in aanraking komt met de warme
onderdelen van het toestel en dat u evenmin de warme
onderdelen aanraakt.
❑ Zorg ervoor dat de warme onderdelen van het toestel tijdens het
gebruik niet in aanraking komen met gemakkelijk ontvlambare
materialen, zoals gordijnen, een tafelkleed en dergelijke vermits
deze in brand zouden kunnen vliegen.
❑ Bedek het toestel nooit met wat dan ook.
❑ Voeg nooit water toe aan de olie.
❑ Zorg ervoor dat de voedingsmiddelen zo droog mogelijk zijn.
❑ Uw frituurpan is met een antireukfilter uitgerust. Bijgevolg kunt u
het deksel toe laten tijdens het bakken. Zorg er wel voor dat u de
filter regelmatig reinigt (zie hoofdstuk "Reiniging").
OPGELET: de frituurpan kan hoge temperaturen bereiken tijdens
het frituren. Olie- of vetbereidingen kunnen in brand vliegen bij
Page 30

Copies of the I/B. Please reproduce them without any
changes except under special instruction from Team
International BELGIUM. The pages must be reproduced
and folded in order to obtain a booklet A5 (+/- 148.5 mm
width x 210 mm height). When folding, make sure you
keep the good numbering when you turn the pages of
the I/B. Don’t change the page numbering. Keep the
language integrity.
Back cover page (last page)
Assembly page 30/70
Fax +32 2 359 95 50
oververhitting. Zorg er dus zeker voor dat uw frituurpan niet
gedurende een lange periode aangeschakeld blijft. Vergeet zeker
niet om ze uit te zetten als uw bereiding klaar is en de frituurpan
niet meer in gebruik is. Alvorens de stekker uit het stopcontact te
trekken dient u de thermostaatknop op "MIN" te zetten.
❑ Verlucht de ruimte tijdens het frituren.
❑ Indien u vast frituurvet wenst te gebruiken, snijd het vet dan in
kleine stukjes en leg deze in de kuip. Zet de thermostaat op de
minimale temperatuur. Elke keer als het controlelampje uitgaat,
schuift u de thermostaat naar een hogere temperatuur tot het
frituurvet helemaal gesmolten is. Eens het vet gesmolten is, zet u
de thermostaat op de gewenste temperatuur om te frituren. Dit
type vet stolt opnieuw als het toestel afkoelt.
❑ Uw toestel mag nooit worden aangezet door middel van een
externe timer of een separaat systeem met afstandsbediening.
❑ Opgelet: Wanneer het symbool op een bepaald oppervlak
gekleefd is, moet u voorzichtig zijn. Dit symbool betekent het
volgende: OPGELET, dit oppervlak kan tijdens het gebruik heel
warm worden.
Het symbool is altijd aangebracht op het oppervlak waarvan
de temperatuur het hoogst is, maar ook de andere metalen of
niet-metalen oppervlakken kunnen heel warm worden tijdens het
gebruik en het is daarom aangeraden om ze altijd voorzichtig te
behandelen en indien mogelijk met behulp van warmte-isolerende
handschoenen of een andere thermische bescherming. In geval
van twijfel wat betreft de temperatuur van een bepaald oppervlak
is het altijd het best om zich te beschermen.
(*) Bekwame gekwalificeerde dienst: klantendienst van de fabrikant
of de invoerder, die erkend en bevoegd is om dergelijke herstellingen
te doen zodat elk gevaar vermeden wordt. Gelieve het toestel bij
problemen naar deze dienst terug te brengen.
VOOR HET EERSTE GEBRUIK
• Verwijder alle verpakkingsmaterialen.
• Controleer de inhoud van de verpakking om te zien of deze compleet en onbeschadigd
is. Gebruik het apparaat niet als de inhoud onvolledig is of beschadigd lijkt.
Page 31

Copies of the I/B. Please reproduce them without any
changes except under special instruction from Team
International BELGIUM. The pages must be reproduced
and folded in order to obtain a booklet A5 (+/- 148.5 mm
width x 210 mm height). When folding, make sure you
keep the good numbering when you turn the pages of
the I/B. Don’t change the page numbering. Keep the
language integrity.
Back cover page (last page)
Assembly page 31/70
Fax +32 2 359 95 50
Verstikkingsgevaar!
Verpakkingsmaterialen zijn geen speelgoed. Houd plastic zakken, folie en schuimonderdelen
uit de buurt van baby's en kinderen. Verpakkingsmateriaal zou luchtwegen kunnen blokkeren
en ademhalen voorkomen.
OPMERKING:
➢ Het apparaat kan een geur afgeven en/ of rook afgeven wanneer het voor de
eerste keer wordt ingeschakeld, omdat resten uit het productieproces worden
geëlimineerd. Dit is normaal en duidt niet op een defect of gevaar. Zorg voor
voldoende ventilatie.
➢ Reinig het apparaat voor het eerste gebruik grondig (Reinigen en onderhoud).
MONTAGE
Zie Afbeeldingen
• Plaats het apparaat op een schoon, vlak en hittebestendig oppervlak.
• Voordat u uw apparaat gebruikt, zorg ervoor:
o Dat de handvat voor de frituurmand (7) op zijn plaats op de mand (6) zit.
o Om de handvat voor de frituurmand (7) op de mand vast te zetten, druk de
staven tegen elkaar en schuif ze tussen de gleuven.
o Dat u de uiteinden van de staven in de gleuven in de frituurmand (6) steekt en
duw de handvat (7) naar achteren (afb. a en b). Doe dit niet op een andere
manier (afb. C).
o Dat de afneembare pan op de juiste plaats zit, met de oliefilterrooster (11) en de
olieklep aan dezelfde kant als de oliefiltratieknop(14) (Afb. d). Zorg dat de
oliefilterrooster (11) op zijn plaats zit in de afneembare pan (9).
o Dat het bedieningspaneel (21) op de verbindingsplaat aan de achterkant van
de behuizing (13) wordt geplaatst. Zorg ervoor dat de groeven van de
verbindingsplaat zich in de geleiders van het bedieningspaneel bevinden (Afb.
e).
OPMERKING:
➢ Uw apparaat is uitgerust met een veiligheidsschakelaar (5) op het
bedieningspaneel (21). Als het bedieningspaneel (21) niet goed op zijn plaats
staat zal het apparaat niet werken.
• Een verkeerde montage kan leiden tot een onstabiele opstelling en kan verwondingen
veroorzaken.
• De rubberen afdichtplaat (22) voorkomt dat hete stoom van onder het deksel komt.
Verwijder het niet.
HET APPARAAT GEBRUIKEN
Dit apparaat kan worden gebruikt voor het frituren van voedsel zoals frietjes, kip of vis (zie
Aanbevolen frituurtijden en temperaturen).
OPMERKING:
➢ Het apparaat heeft een vermogen van 1700W. Voordat u de stekker in het
stopcontact steekt, moet u ervoor zorgen dat het elektrische circuit niet
overbelast wordt door andere apparaten. Dit apparaat moet altijd op een
afzonderlijk 230V ~ 60Hz stopcontact worden gebruikt.
➢ Zorg ervoor dat het apparaat is uitgeschakeld voordat u de stekker in het
stopcontact steekt.
Page 32

Copies of the I/B. Please reproduce them without any
changes except under special instruction from Team
International BELGIUM. The pages must be reproduced
and folded in order to obtain a booklet A5 (+/- 148.5 mm
width x 210 mm height). When folding, make sure you
keep the good numbering when you turn the pages of
the I/B. Don’t change the page numbering. Keep the
language integrity.
Back cover page (last page)
Assembly page 32/70
Fax +32 2 359 95 50
• Plaats het apparaat op een schoon, vlak en hittebestendig oppervlak. Wanneer u het
apparaat op houten oppervlakken gebruikt, gebruik dan een hittebestendige mat om het
hout tegen beschadiging te beschermen. Zorg voor een minimale afstand rond het
apparaat van 10cm ten opzichte van andere objecten, kasten en wanden.
• Zorg ervoor dat de oliebak (15) is gemonteerd, leeg en op zijn plaats in het apparaat, de
oliefiltratieknop (14) bevindt zich in de LOCK-positie en de oliefilterrooster (11) is op zijn
plaats in de afneembare pan (9) . Giet vervolgens geschikte frituurolie in de afneembare
pan (9) (afb. F).
Verbrandingsgevaar!
➢ Vul de afneembare pan (9) nooit bij tijdens gebruik of als het nog heet is. Laat
het apparaat altijd volledig afkoelen. Meng geen nieuwe en oude olie.
LET OP:
➢ NIET OVERVULLEN OF ONDERVULLEN (Afb. f). De minimale oliecapaciteit is 1.9L
(MIN), de maximale oliecapaciteit is 3L (MAX). Zorg ervoor dat het oliepeil altijd
tussen de MIN- en MAX-vulniveau (10) blijft.
• Verspreid een beetje olie aan de binnenkant van het kijkvenster (2) om condensatie te
voorkomen.
• Plaats het deksel (3) op de behuizing (13).
• Zorg ervoor dat de thermostaat (23) op de 0-positie staat.
OPMERKING:
• Steek de stekker (17) in een stopcontact.
LET OP:
➢ Gebruik alleen accessoires die door de fabrikant zijn aanbevolen. Plaats geen
andere materialen in het apparaat.
➢ Laat het netsnoer (17) nooit in contact komen met het deksel (3) of de behuizing
van het apparaat (13) tijdens gebruik (Afb. H).
Verbrandingsgevaar!
➢ Raak het deksel (3) of de behuizing van het apparaat (13) tijdens of na gebruik
niet aan (Afb. I). Gebruik alleen de handgrepen (2, 7, 19) die megeleverd zijn.
➢ Schenk altijd speciale aandacht aan het toevoegen of verwijderen van
accessoires en voedsel uit het apparaat. Raak nooit het deksel (3) of de
behuizing van het apparaat (13) aan wanneer het apparaat is aangesloten en is
ingeschakeld of onmiddellijk na gebruik. Het is aanbevolen altijd ovenwanten te
gebruiken.
➢ Hete stoom kan verbranden.
• Draai de thermostaat (14) naar de gewenste temperatuur (zie Aanbevolen frituurtijden en
temperaturen) (Afb. J). De POWER-indicator (25) gaat branden om aan te geven dat het
apparaat aan het opwarmen is. Zodra de ingestelde temperatuur is bereikt, gaat de
READY-indicator (24) aan.
Geschatte tijdsduur tot de ingestelde temperatuur is bereikt:
Page 33

Copies of the I/B. Please reproduce them without any
changes except under special instruction from Team
International BELGIUM. The pages must be reproduced
and folded in order to obtain a booklet A5 (+/- 148.5 mm
width x 210 mm height). When folding, make sure you
keep the good numbering when you turn the pages of
the I/B. Don’t change the page numbering. Keep the
language integrity.
Back cover page (last page)
Assembly page 33/70
Fax +32 2 359 95 50
Temperatuurinstelling (°C)
Tijdsduur (minuten)
130
About 7
150
About 8
170
About 10
190
About 13
Nadat de olie is voorverwarmd, verwijder het deksel (3).
Plaats de mand (6) op een schoon, vlak en hittebestendig oppervlak.
Vul de mand (6) met voedsel (Afb. K). Overvul de mand (6) niet (Afb. K.).
LET OP
➢ Bak geen voedsel zonder de mand (6) (Afb. l).
➢ Vul de mand (6) niet over de helft. Te veel voedsel kan overmatige
schuimvorming veroorzaken en een overloop tijdens het gebruik veroorzaken.
➢ Voedsel dat aan het apparaat wordt toegevoegd, moet droog zijn. Als u
ingevroren voedsel zoals frietjes of kippenvleugeltjes bakt, verwijder dan alle
ijsdeeltjes op voorhand.
➢ Verwijder altijd overtollig vocht uit voedsel met een handdoek voordat u gaat
frituren. Zelfs een kleine hoeveelheid water kan ernstige spatten van hete olie
veroorzaken.
➢ Plaats het deksel (3) onmiddellijk op het apparaat nadat u de mand (6) in de
olie hebt ondergedompeld. Hete olie zou kunnen spatten.
• Laat de mand (6) voorzichtig in de afneembare pan (9) zakken (Afb. N)..
• Dek de afneembare pan (9) af met het deksel (3) (Afb. O). Zorg ervoor dat het deksel (3)
goed op de dekselhandvat (7) en de rubberen afdichtingplaat (22) past.
OPMERKING:
➢ Laat de mand langzaam in de olie zakken als u verse gesneden aardappelen en
voedsel met een hoog vochtgehalte bakt. Als de olie te snel kookt of schuimt, hef de
mand een paar seconden op en laat hem weer zakken. Doe dit totdat de mand kan
worden neergelaten zonder overmatige schuim.
➢ Plaats het deksel (3) niet op het apparaat bij het frituren van versgesneden
aardappelen of andere voedingsmiddelen met een hoog vochtgehalte.
➢ Zie voor frituurtijden 'Aanbevolen frituurtijden en temperaturen' of volg de instructies
van de voedselproducent.
• Verwijder het deksel (3) nadat de frituurtijd is verstreken.
• Gebruik de handvat (7) om de mand (6) op te tillen en hang hem aan de mandhaak (8)
op de rand van de afneembare pan (9) (Afb. P).
• Laat het voedsel een paar seconden in de mand (6) lopen om overtollige olie te
verwijderen en knapperigheid te behouden.
• Gebruik de handvat (7) om de mand (6) op te tillen en gooi het voedsel in de olie.
LET OP
➢ Plaats de hete mand (6) nooit direct op een tafelblad of werkblad om schade aan
oppervlakken te voorkomen. Het wordt aanbevolen om een hittebestendige
onderzetter of snijplank te gebruiken.
Page 34

Copies of the I/B. Please reproduce them without any
changes except under special instruction from Team
International BELGIUM. The pages must be reproduced
and folded in order to obtain a booklet A5 (+/- 148.5 mm
width x 210 mm height). When folding, make sure you
keep the good numbering when you turn the pages of
the I/B. Don’t change the page numbering. Keep the
language integrity.
Back cover page (last page)
Assembly page 34/70
Fax +32 2 359 95 50
• Plaats de mand (6) op een schoon, vlak en hittebestendig oppervlak.
• Na het kookproces, zet de thermostaat (23) op 0 en verwijder de stekker (17) uit het
stopcontact.
LET OP
➢ Haal altijd eerst de stekker (17) uit het stopcontact - Het magnetische netsnoer is
alleen bedoeld om per ongeluk los te koppelen. Verwijder die niet tijdens normaal
gebruik. Als het magnetische netsnoer is losgekoppeld, haal de stekker (17)
onmiddellijk uit het stopcontact. Zet de thermostaat (23) op 0 en sluit vervolgens de
stekker (17) opnieuw in het stopcontact aan.
➢ Dit apparaat genereert warmte en stoom tijdens gebruik. Juiste
voorzorgsmaatregelen moeten worden genomen om het risico van brandwonden,
branden of ander letsel aan personen of schade aan eigendommen te voorkomen.
Laat het apparaat niet zonder toezicht achter tijdens gebruik.
➢ De oppervlakken van het apparaat worden heet. Raak die niet aan tijdens het
gebruik. Laat het apparaat minstens 30 minuten afkoelen voordat u het gebruikt.
AANBEVOLEN FRITUURTIJDEN EN TEMPERATUREN
OPMERKING:
De frituurtijden in de onderstaande tabel zijn bij benadering en moeten worden
aangepast aan uw eigen smaak, de hoeveelheden voedsel en de instructies van de
fabrikant.
Temperatuurinstelling (°C)
Tijd (minuten)
130
Ongeveer 7
150
Ongeveer 8
170
Ongeveer 10
190
Ongeveer 13
Voedingsmiddelen
Voeding
Temperatuurinstelling (°C)
Tijd (minuten)
Bevroren frietjes
190
8-12
Frietjes
190
8-10
Vleesreepjes
190
10-14
Kippenvleugels
190
10-14
Vis (gepaneerd)
170
3-5
Zeevruchten
170
3-5
KOKEN MET OLIE
Kookolie kan de smaak van het eten verbeteren - of de smaak bederven. Zoals met elk ander
voedingsmiddel, is versheid en correcte behandeling van de olie de sleutel tot succesvolle
frituurresultaten.
Temperatuurinstelling (°C)
Tijd (minutes)
130
Ongeveer 7
150
Ongeveer 8
170
Ongeveer 10
De kwaliteit van de olie neemt af bij gebruik bij hoge temperaturen. Voedseldeeltjes, water en
andere vloeistoffen zullen de kwaliteit ervan verder verlagen, daarom:
Page 35

Copies of the I/B. Please reproduce them without any
changes except under special instruction from Team
International BELGIUM. The pages must be reproduced
and folded in order to obtain a booklet A5 (+/- 148.5 mm
width x 210 mm height). When folding, make sure you
keep the good numbering when you turn the pages of
the I/B. Don’t change the page numbering. Keep the
language integrity.
Back cover page (last page)
Assembly page 35/70
Fax +32 2 359 95 50
• Meng geen verschillende kookoliën.
• Gebruik alleen verse en schone kookolie:
o Verwijder verbrande voedseldeeltjes regelmatig tijdens het frituren. Gebruik altijd
keukengerei dat veilig is om in hete olie onder te dompelen zonder het
gereedschap of het apparaat te beschadigen, en draag altijd ovenwanten
wanneer u verbrande voedseldeeltjes verwijdert.
o Filtreer olie na gebruik en voor opslag met het geïntegreerde filtersysteem (zie
Oliefiltratie)
o Hergebruik geen olie die gebruikt was om vis of ander sterk gearomatiseerd
voedsel te bakken.
o Sommige vleessoorten, zoals kippenvleugels, zullen tijdens het frituren grote
hoeveelheden vloeistof afgeven, waardoor de olie wordt verdund. Hergebruik
deze olie niet.
OLIE FILTRATIE
OPMERKING:
➢ Filter de olie na elk gebruik. Bewaar gefiltreerde olie op de juiste manier (zie Olie
opslaan).
➢ Gooi regelmatig de olie weg, afhankelijk van de oliekwaliteit (zie Koken met olie).
➢ Wacht na het uitschakelen van het apparaat minstens 3 uur voordat de olie is
afgekoeld, afhankelijk van de instellingen die u tijdens het gebruik hebt geselecteerd.
Het duurt langer voordat hete olie een koude temperatuur bereikt.
➢ Het filteren van de olie na elk gebruik zal de levensduur van de kookolie verlengen,
maar het moet nog steeds worden weggegooid als de olie na meervoudig gebruik is
verslechterd. We schatten dat olie bij normaal gebruik minstens na elke 10 keer
gebruik moet worden vervangen.
• Ensure the oil container (15) is assembled, empty and in place inside the appliance.
• Als de olie is afgekoeld tot kamertemperatuur, zet de oliefiltratieknop (14) op de FILTER OIL
positie (Afb. R). De olie druppelt in de oliebak (15). Het oliefilterrooster (11) zorgt ervoor dat
voedselresten niet worden overgebracht naar de oliebak (15)..
• When all oil has been filtered:
o Zet de oliefiltratieknop (14) op de LOCK-positie als de container in het apparaat
blijft.
o Zet de oliefiltratieknop (14) op de UNLOCK-positie als de container uit het
apparaat moet worden verwijderd.
OPMERKING:
➢ Wacht altijd 3 tot 4 uur totdat de olie volledig is afgekoeld, voordat u de olie aftapt of
filtert.
➢ Wees uiterst voorzichtig wanneer u het apparaat verplaatst terwijl de afneembare
pan (9) en het oliebak (15) niet beide leeg zijn.
➢ Wees voorzichtig bij het verwijderen van de oliebak (15) van het apparaat. Houd de
oliecontainer (15) vlak en houd hem met beide handen vast.
DE OLIEBAK LEGEN
Gefilterde olie kan worden bewaard in een geschikte container (zie Olie opslaan) of opnieuw
worden gebruikt om een nieuwe portie voedsel te braden (zie Koken met olie).
• Schroef de oliebakdeksel (16) op de oliebak (15) los (afb. S).
Page 36

Copies of the I/B. Please reproduce them without any
changes except under special instruction from Team
International BELGIUM. The pages must be reproduced
and folded in order to obtain a booklet A5 (+/- 148.5 mm
width x 210 mm height). When folding, make sure you
keep the good numbering when you turn the pages of
the I/B. Don’t change the page numbering. Keep the
language integrity.
Back cover page (last page)
Assembly page 36/70
Fax +32 2 359 95 50
• Giet de inhoud van de oliebak (15) langzaam in een geschikte container of de
afneembare pan (9), indien nodig.
OPMERKING:
➢ Ensure the oil filtration control knob (14) is on UNLOCK position before pouring oil into
the oil reservoir (9).
➢ Tilt the oil container (15) upwards (vertical position) gradually to avoid leaks from the
side of the container.
➢ Oil can be stored in the oil reservoir (9), inside the deep fryer or in another cool dry
place (see Storing oil).
• Schroef de oliebakdeksel (16) weer op de oliebak (15).
• Plaats de oliebak (15) terug in het apparaat en zet de oliefiltratieknop (14) op de LOCKpositie om de oliebak (15) op zijn plaats te bevestigen (Afb. T).
OLIE OPSLAAN
• Bewaar gebruikte frituurolie niet in de koelkast. Kies een koele plaats zonder direct
zonlicht. In het algemeen kan olie gedurende een periode van 3 maanden worden
bewaard, zodra de fles is geopend. Neem ook de opslaginstructies van de oliefabrikant in
acht.
AANWIJZINGEN EN TIPS
• Kleinere hoeveelheden voedsel hebben normaal gezien een iets kortere bereidingstijd
nodig dan grotere hoeveelheden voedsel.
• Om de bereidingstijd te verkorten, dient u voedsel te ontdooien voordat u het kookt. Het
wordt aanbevolen om bepaalde voedingsmiddelen niet te ontdooien voordat ze worden
gekookt, zoals bevroren vis en bevroren frietjes bijvoorbeeld.
• Het wordt aanbevolen om een vleesthermometer te gebruiken om het kookproces te
controleren.
• Verwijder het deksel (3) niet in het geval van brandend voedsel, verwijder de mand (6)
niet; zet de thermostaat (23) op 0 en haal de stekker uit het stopcontact.
• Als het voedsel dat u bereidt moet geschud worden is het raadzaam om een timer te
gebruiken die voor de helft van de voorgestelde bereidingstijd is ingesteld. Op deze
manier zal een bel rinkelen en u eraan herinneren om de mand te schudden (6).
Het wordt aanbevolen om alleen nylon, hittebestendig plastic of houten kookgerei te
gebruiken. Metalen voorwerpen kunnen heet worden en het niet-klevende oppervlak
beschadigen. Verwijder altijd keukengerei uit het apparaat. Laat ze niet in het apparaat
tijdens gebruik.
REINIGEN EN ONDERHOUD
Goed onderhoud garandeert vele jaren dienst van uw apparaat. Maak het apparaat na elk
gebruik schoon. Het apparaat bevat geen onderdelen die door de gebruiker kunnen worden
gerepareerd en vereist weinig onderhoud. Laat onderhouds- of reparatiewerkzaamheden
over aan gekwalificeerd personeel.
LET OP:
➢ Zet altijd de thermostaat (23) op 0, na grondig reinigen, voordat u het apparaat
gebruikt of opbergt. Zorg ervoor dat er geen water in de behuizing van het
apparaat (13) komt.
➢ Probeer niet de magnetische stekker permanent aan het apparaat te bevestigen.
➢ Probeer niet de rubberen afdichtplaat (22) te verwijderen.
Page 37

Copies of the I/B. Please reproduce them without any
changes except under special instruction from Team
International BELGIUM. The pages must be reproduced
and folded in order to obtain a booklet A5 (+/- 148.5 mm
width x 210 mm height). When folding, make sure you
keep the good numbering when you turn the pages of
the I/B. Don’t change the page numbering. Keep the
language integrity.
Back cover page (last page)
Assembly page 37/70
Fax +32 2 359 95 50
• Controleer of de oliebak (15) op zijn plaats zit en zet vervolgens de oliefiltratieknop (14) op
FILTER OIL om de afneembare pan (9) te legen (zie Oliefiltratie).
• Plaats de mand (6) op een schoon, vlak en hittebestendig oppervlak.
Verbrandingsgevaar!
➢ Zorg ervoor dat de mand (6) volledig is afgekoeld voordat u het oppervlak aanraakt
en probeert de handvat voor de frituurmand (7) te verwijderen.
➢ Zorg ervoor dat de olie volledig is afgekoeld voordat u de afneembare pan (9) in de
oliebak (15) leegt.
• Verwijder de handvat voor de frituurmand (7) uit de mand (6).
• Verwijder het bedieningspaneel (21) van de afneembare pan (9). Reinig het
bedieningspaneel (21) en het verwarmingselement (20) voorzichtig met een vochtige
doek.
• Neem het oliefilterrooster (11) uit de afneembare pan (9) en verwijder vervolgens de
afneembare pan (9) van de behuizing (13).
• Open het deksel van de dekselfilter (28) en verwijder beide zwart en witfilters (26, 27) (Afb.
U).
• Reinig de behuizing van het apparaat (13) met een vochtige doek.
• Was het deksel (3), de mand (6), de handvat voor de frituurmand (7), de afneembare
pan (9) en het oliefilterrooster (11) met warm zeepwater of in de vaatwasmachine. Spoel
en droog zorgvuldig af.
• Droog alle onderdelen grondig na het reinigen en voordat u het apparaat opnieuw
gebruikt.
OPMERKING:
➢ Als de oliebak (15) moet worden gereinigd, moet u ervoor zorgen dat het leeg is
voordat u probeert het te reinigen (zie Oliebak leegmaken). Met heet zeepwater of
in de afwasmachine reinigen. Spoel en droog zorgvuldig af.
➢ Reinig de filters (26, 27) om de 3 maanden of na elke 12 keer gebruik met warm
zeepwater. Niet in de vaatwasser schoonmaken.
➢ Droog alle onderdelen en oppervlakken grondig af voor gebruik. Zorg ervoor dat alle
onderdelen en oppervlakken volledig droog zijn voordat u het apparaat aan een
stopcontact aansluit. Zelfs een kleine hoeveelheid water kan ernstige spatten van
hete olie veroorzaken.
OPSLAG
• Zorg er altijd voor dat het apparaat volledig is afgekoeld, schoon en droog voordat u het
opslaat.
• Het wordt aanbevolen om het apparaat op een droge plaats op te bergen.
• Bewaar het apparaat op een stabiele plank of in een kast. Om ongevallen te voorkomen,
moet u ervoor zorgen dat zowel het apparaat als het netsnoer buiten het bereik van
kinderen of huisdieren liggen.
Page 38

Copies of the I/B. Please reproduce them without any
changes except under special instruction from Team
International BELGIUM. The pages must be reproduced
and folded in order to obtain a booklet A5 (+/- 148.5 mm
width x 210 mm height). When folding, make sure you
keep the good numbering when you turn the pages of
the I/B. Don’t change the page numbering. Keep the
language integrity.
Back cover page (last page)
Assembly page 38/70
Fax +32 2 359 95 50
MILIEUBESCHERMING – RICHTLIJN 2012/19/EU
Om ons milieu en onze gezondheid te beschermen, moet afgedankte elektrische en
elektronische apparatuur in overeenstemming met welbepaalde regels weggegooid worden.
Dit vergt zowel de inzet van de leveranciers als van de gebruikers. Daarom mag uw apparaat,
zoals op het typeplaatje of op de verpakking aangegeven door het symbool , niet met
het gewone huisvuil weggegooid worden. De gebruiker heeft het recht het toestel naar een
gemeentelijk centrum van gescheiden inzameling te brengen waar het overeenkomstig de
richtlijn hergebruikt, gerecycleerd of voor andere doeleinden gebruikt zal worden.
De handleiding is op simpele aanvraag ook verkrijgbaar in elektronisch formaat bij de
klantendienst (zie garantiekaart).
Page 39

Copies of the I/B. Please reproduce them without any
changes except under special instruction from Team
International BELGIUM. The pages must be reproduced
and folded in order to obtain a booklet A5 (+/- 148.5 mm
width x 210 mm height). When folding, make sure you
keep the good numbering when you turn the pages of
the I/B. Don’t change the page numbering. Keep the
language integrity.
Back cover page (last page)
Assembly page 39/70
Fax +32 2 359 95 50
WICHTIGE SICHERHEITSVORSCHRIFTEN
Lesen Sie aufmerksam die Gebrauchsanleitung, bevor Sie Ihr Gerät
benutzen und befolgen Sie immer die Sicherheitsvorschriften und die
Gebrauchsanweisung.
Wichtig: Dieses Produkt kann von Kindern ab 8 Jahren sowie von
Personen mit reduzierten physischen, sensorischen oder mentalen
Fähigkeiten oder Mangel an Erfahrungen und/oder Wissen benutzt
werden, wenn sie beaufsichtigt oder bezüglich des sicheren
Gebrauchs des Produktes unterwiesen wurden und die daraus
resultierenden Gefahren verstanden haben.
Kinder dürfen nicht mit dem Produkt spielen.
Reinigung und Benutzer-Wartung dürfen nicht durch Kinder
durchgeführt werden, es sei denn, sie sind älter als 8 Jahre und
beaufsichtigt.
Kinder jünger als 8 Jahre sind vom Produkt und dem Netzkabel
fernzuhalten.
❑ Kontrollieren Sie, ob die Netzspannung mit der auf dem Gerät
vermerkten Spannung übereinstimmt, bevor Sie das Gerät
benutzen.
❑ Lassen Sie Ihr Gerät niemals beim Gebrauch unbeaufsichtigt.
❑ Überprüfen Sie regelmäßig, dass das Gerät nicht beschädigt ist.
Bei Beschädigung der Anschlussleitung oder des Gerätes
letzteres nicht benutzen, sondern von einem Fachmann (*)
überprüfen bzw. reparieren lassen. Eine beschädigte
Anschlussleitung muss von einem Fachmann (*) ausgewechselt
werden um jegliche Gefahr zu vermeiden.
❑ Benutzen Sie das Gerät nur zu Haushaltszwecken, wie in der
Bedienungsanleitung angegeben.
❑ Tauchen Sie das Gerät niemals in Wasser oder andere
Flüssigkeiten, weder zum Reinigen noch zu einem anderen
Zweck. Niemals in den Geschirrspüler geben.
❑ Benutzen Sie das Gerät nicht in der Nähe einer Wärmequelle.
❑ Entfernen Sie den Stecker aus der Steckdose, bevor Sie das
Gerät reinigen.
Page 40

Copies of the I/B. Please reproduce them without any
changes except under special instruction from Team
International BELGIUM. The pages must be reproduced
and folded in order to obtain a booklet A5 (+/- 148.5 mm
width x 210 mm height). When folding, make sure you
keep the good numbering when you turn the pages of
the I/B. Don’t change the page numbering. Keep the
language integrity.
Back cover page (last page)
Assembly page 40/70
Fax +32 2 359 95 50
❑ Benutzen Sie das Gerät nicht im Freien und bewahren Sie es an
einem trockenen Platz auf.
❑ Benutzen Sie nur Zubehör, welches vom Lieferanten empfohlen
wurde. Anderes Zubehör stellt eine Gefahr für den Benutzer dar
und das Gerät könnte dadurch beschädigt werden.
❑ Ziehen Sie niemals an der Anschlussleitung, um das Gerät zu
bewegen. Achten Sie darauf, dass die Anschlussleitung nicht
irgendwo hängen bleibt und dies zum Fall des Gerätes führen
könnte. Wickeln Sie die Anschlussleitung nicht um das Gerät und
knicken Sie diese nicht.
❑ Stellen Sie das Gerät auf eine stabile ebene Fläche, damit es
nicht umfallen kann.
❑ Benutzen Sie das Gerät nur zum Frittieren von Nahrungsmitteln,
die zum Frittieren und zum Verzehr geeignet sind.
❑ Das Gehäuse, die Ölwanne, der Deckel und der Korb können per
Hand und mit einem Lappen abgewaschen werden. Tauchen Sie
das Gerät niemals in Wasser oder andere Flüssigkeiten (siehe
Abschnitt „Reinigung“).
❑ Warten Sie, bis die Fritteuse vollständig erkaltet ist, bevor Sie sie
reinigen oder wegräumen. Benutzen Sie stets die Griffe. Ziehen
Sie immer den Stecker aus der Steckdose, bevor Sie das Gerät
irgendwo anders hinstellen.
❑ Betreiben Sie das Gerät niemals ohne Öl oder Fett in der
Ölwanne. Stellen Sie sicher, dass die Öl- oder Fettmenge immer
zwischen der minimalen und maximalen Markierung im Inneren
der Ölwanne liegt. Niemals überfüllen, da heißes Öl oder Fett
austreten könnte.
❑ Sie sollten das Gerät immer sauber halten, da es in direktem
Kontakt mit Nahrungsmitteln ist.
❑ Achten Sie darauf, dass die Anschlussleitung niemals die heißen
Teile des Gerätes berührt und dass auch Sie die heißen Teile
nicht berühren.
❑ Achten Sie darauf, dass die heißen Teile nicht mit leicht
entflammbarem Material, wie Gardinen, Tischdecken, usw. in
Berührung kommen. Brandgefahr!
❑ Decken Sie das Gerät nicht ab und legen Sie nichts auf das
Gerät, wenn Sie das Gerät benutzen.
❑ Fügen Sie dem Öl nie Wasser hinzu. Verbrennungsgefahr!
Page 41

Copies of the I/B. Please reproduce them without any
changes except under special instruction from Team
International BELGIUM. The pages must be reproduced
and folded in order to obtain a booklet A5 (+/- 148.5 mm
width x 210 mm height). When folding, make sure you
keep the good numbering when you turn the pages of
the I/B. Don’t change the page numbering. Keep the
language integrity.
Back cover page (last page)
Assembly page 41/70
Fax +32 2 359 95 50
❑ Vergewissern Sie sich, dass die Nahrungsmittel möglichst trocken
sind.
❑ Ihre Fritteuse ist mit einem geruchshemmenden Filter ausgestattet.
Dies bedeutet, dass Sie den Deckel während des Frittierens
geschlossen halten können. Bitte reinigen Sie diesen Filter jedoch
regelmäßig (siehe Abschnitt „Reinigung“).
❑ ACHTUNG: Die Fritteuse kann im Gebrauch hohe Temperaturen
erreichen. Frittieröl und Frittierfett können bei Überhitzung Feuer
fangen.
Lassen Sie Ihre Fritteuse niemals längere Zeit in Gebrauch.
Vergessen Sie nicht, das Gerät auszuschalten, sobald Ihre
Zubereitung fertig ist und die Fritteuse nicht mehr benutzt wird.
Bevor Sie den Netzstecker ziehen, stellen Sie den
Temperaturwähler auf „0“.
❑ Sorgen Sie für eine ausreichende Belüftung, wenn Sie das Gerät
benutzen.
❑ Wenn Sie festes Frittierfett verwenden möchten, schneiden Sie
es in kleine Stücke und legen Sie es in die Ölwanne. Stellen Sie
den Temperaturregler auf die minimale Position. Immer, wenn die
Kontrolllampe erlischt, den Temperaturregler auf eine etwas
höhere Temperatur stellen, bis das gesamte Frittierfett
geschmolzen ist. Sobald das Frittierfett geschmolzen ist, stellen
Sie den Temperaturregler auf die gewünschte Gartemperatur ein.
Frittierfett verfestigt sich wieder, wenn das Gerät abkühlt.
❑ Ihr Gerät darf niemals über eine externe Zeitschaltuhr oder
irgendein anderes, separates Fernbedienungssystem
eingeschaltet werden.
Hinweis: Sollte das Symbol auf einer bestimmten Oberfläche
angezeigt werden, müssen Sie beim Umgang mit dem Produkt
vorsichtig sein. Dieses Symbol bedeutet:
ACHTUNG, diese Oberfläche kann während des Gebrauchs sehr
heiß werden!
ACHTUNG! Berühren Sie die heißen Oberflächen des Geräts nicht,
wenn das Gerät in Gebrauch ist.
Das Symbol wird immer auf der Oberfläche mit der höchsten
Temperatur angebracht, aber die anderen metallischen oder
nichtmetallischen Oberflächen können während des Gebrauchs auch
Page 42

Copies of the I/B. Please reproduce them without any
changes except under special instruction from Team
International BELGIUM. The pages must be reproduced
and folded in order to obtain a booklet A5 (+/- 148.5 mm
width x 210 mm height). When folding, make sure you
keep the good numbering when you turn the pages of
the I/B. Don’t change the page numbering. Keep the
language integrity.
Back cover page (last page)
Assembly page 42/70
Fax +32 2 359 95 50
sehr heiß werden. Es ist daher ratsam, möglichst wärmeisolierende
Handschuhe oder anderen thermischen Schutz zu verwenden. Im
Zweifeln über die Temperatur einer bestimmten Oberfläche ist es
immer vorzuziehen, sich selbst zu schützen.
(*) Fachmann: Anerkannter Kundendienst des Lieferanten oder des
Importeurs, der für derartige Reparaturen zuständig ist. Für
eventuelle Reparaturen wenden Sie sich bitte an diesen
Kundendienst.
VOR DER ERSTEN INBETRIEBNAHME
• Entfernen Sie sämtliche Verpackungsmaterialien.
• Kontrollieren und überprüfen Sie den Kartoninhalt bzw. die Gerätbestandteile, um
sicherzustellen, dass das Gerät vollständig und unbeschädigt ist. Nehmen Sie das Gerät
nicht in Betrieb, wenn es unvollständig ist oder beschädigt erscheint.
Erstickungsgefahr!
Verpackungsmaterialien sind kein Spielzeug. Halten Sie Plastikbeutel, Folien und
Schaumstoffteile außerhalb der Reichweite von (Klein-)Kindern. Verpackungsmaterialien
können die Atemwege verstopfen und zu Atemnot führen.
HINWEIS:
➢ Bei der ersten Benutzung können unangenehme Gerüche oder Qualm entstehen.
Dies liegt an Produktionsrückstände, die durch die Hitze verdampfen. Dabei handelt
es sich um ein normales Verhalten. Das Gerät ist nicht defekt und es geht auch
keinerlei Gefahr davon aus. Sorgen Sie für eine ausreichende Belüftung des Raumes.
➢ Reinigen Sie das Gerät gründlich vor der ersten Benutzung (siehe Abschnitt Reinigung
und Pflege).
MONTAGE DES GERÄTES
Beachten Sie die Gerätezeichnung und Abbildungen
• Stellen Sie das Gerät auf eine saubere, ebene und hitzebeständige Oberfläche.
• Beachten Sie, dass vor der Benutzung folgende Punkte erfüllt sein müssen:
o Der Korbgriff (7) muss in waagerechter Position am Frittierkorb (6) eingerastet
sein.
o Um den Korbgriff (7) einzurasten, müssen Sie die zwei Streben zusammendrücken
und in die Auswölbungen der Streben am Frittierkorb (6) einfädeln.
o Nun den Griff (7) nach hinten über den Vorsprung des Frittierkorbs (6) drücken
(Abb. a und b). Keinesfalls anders zusammenbauen (Abb. c).
o Die Ölwanne (9) sitzt an der richtigen Stelle; Ölfilterabdeckung (11) und
Ölblassventil (12) befinden sich auf der gleichen Seite wie der Kontrollschalter zur
Ölfilterfunktion (14) (Abb. d). Achten Sie darauf, dass die Ölfilterabdeckung (11)
an Ihrem Platz innerhalb der Ölwanne (9) ist.
o Das Bedienelement (21) wird auf die Verbindungsplatte an der Rückseite des
Gehäuses (13) aufgesetzt. Achten Sie dabei darauf, dass die Erhebungen am
Bedienelement (21) in den Führungen des Gehäuses (13) sitzen (Abb. e).
Page 43

Copies of the I/B. Please reproduce them without any
changes except under special instruction from Team
International BELGIUM. The pages must be reproduced
and folded in order to obtain a booklet A5 (+/- 148.5 mm
width x 210 mm height). When folding, make sure you
keep the good numbering when you turn the pages of
the I/B. Don’t change the page numbering. Keep the
language integrity.
Back cover page (last page)
Assembly page 43/70
Fax +32 2 359 95 50
HINWEIS:
➢ Das Gerät verfügt über einen Sicherheitsschalter (5), der sich am Bedienelement
(21) befindet. Falls das Bedienelement (21) nicht korrekt eingesetzt wurde, lässt
sich das Gerät nicht benutzen.
• Unsachgemäßer Zusammenbau kann zu einer instabilen Konstruktion und zu Verletzungen
führen.
• Die Silikonabdichtung (22) verhindert, dass heißer Dampf bei geschlossenem Deckel (3)
austritt. Versuchen Sie keinesfalls, die Silikonabdichtung (22) zu entfernen.
INBETRIEBNAHME
Dieses Gerät kann zum Frittieren von Speisen wie Pommes Frites, Hühnchen oder Fisch
verwendet werden (siehe Abschnitt Empfohlene Frittierzeiten und -temperaturen).
HINWEIS:
➢ Die Nennleistung des Gerätes beträgt 1700 W. Bevor Sie den Stecker in die
Steckdose stecken, überprüfen Sie bitte, dass der Stromkreis nicht bereits mit
anderen Geräten überladen ist. Das Gerät sollte stets an einer separaten
Steckdose mit 230 V~, 60 Hz betrieben werden.
➢ Stellen Sie sicher, dass das Gerät ausgeschaltet ist, bevor Sie den Stecker
einstecken.
• Stellen Sie das Gerät auf eine saubere, ebene und hitzebeständige Oberfläche. Falls Sie
das Gerät auf einer Holzoberfläche benutzen, verwenden Sie eine hitzebeständige
Unterlage, um das Holz vor Schäden zu schützen. Beachten Sie einen Mindestabstand von
ca. 10 cm an allen Seiten zu anderen Objekten, Schränken und Wänden.
• Stellen Sie sicher, dass der Ölaufbewahrungsbehälter (15) zusammengebaut und leer ist
und sich im Gerät befindet. Der Kontrollschalter für die Ölfilterfunktion (14) muss auf
“LOCK” stehen und die Ölfilterabdeckung (11) befindet sich in der Ölwanne (9). Gießen
Sie nun geeignetes Speiseöl in die Ölwanne (9) (Abb. f).
Verbrennungsgefahr!
Füllen Sie die Ölwanne (9) niemals während des Betriebs oder im heißen Zustand
auf. Lassen Sie das Gerät stets zunächst vollständig abkühlen. Vermischen Sie
niemals neues und gebrauchtes Öl.
WARNUNG:
➢ NIEMALS ÜBER- ODER UNTERBEFÜLLEN (Abb. f). Die minimale Ölmenge beträgt 1,9
Liter (MIN), das maximale Ölfassungsvermögen beträgt 3 Liter (MAX). Das Öllevel
muss sich immer zwischen der MIN/MAX-Markierung (10) befinden.
• Verteilen Sie etwas Öl auf dem Sichtfenster (2), um Kondensation vorzubeugen.
• Setzen Sie den Deckel (3) auf das Gehäuse (13).
• Stellen Sie sicher, dass das Thermostat (23) auf „0“ steht.
HINWEIS:
• Stecken Sie den Stecker (17) in eine Steckdose.
WARNUNG:
➢ Verwenden Sie nur vom Hersteller empfohlenes Zubehör. Verwenden Sie keine
anderen Materialien im Inneren des Gerätes.
Page 44

Copies of the I/B. Please reproduce them without any
changes except under special instruction from Team
International BELGIUM. The pages must be reproduced
and folded in order to obtain a booklet A5 (+/- 148.5 mm
width x 210 mm height). When folding, make sure you
keep the good numbering when you turn the pages of
the I/B. Don’t change the page numbering. Keep the
language integrity.
Back cover page (last page)
Assembly page 44/70
Fax +32 2 359 95 50
➢ Halten Sie die Anschlussleitung (17) während des Betriebes von Deckel (3) und
Gehäuse (13) fern (Abb. h).
Verbrennungsgefahr!
Berühren Sie keinesfalls während oder nach der Benutzung den Deckel (3) oder
das Gehäuse (13). Verwenden Sie ausschließlich die zur Verfügung stehenden
Griffe (2, 7, 19).
Seien Sie immer besonders vorsichtig, wenn Sie Teile oder Lebensmittel
hinzugeben oder entfernen. Berühren Sie niemals den Deckel (3) oder das
Gehäuse (13), wenn das Gerät mit dem Stromkreis verbunden und eingeschaltet
ist oder kurz danach. Wir empfehlen die Benutzung von Ofenhandschuhen.
Entweichender Dampf kann zu Verbrennungen führen.
• Drehen Sie das Thermostat (23) auf die gewünschte Temperatur (siehe Abschnitt
Empfohlene Frittierzeiten und -temperaturen) (Abb. j). Die Betriebskontrollleuchte (25)
schaltet sich ein und zeigt an, dass das Gerät aufheizt. Sobald die eingestellte Temperatur
erreicht wurde, schaltet sich die Temperaturkontrollleuchte (24) ein.
Ungefähre Dauer bis zum Erreichen der eingestellten Temperatur:
Temperatureinstellung (°C)
Zeit (Minuten)
130
Ca. 7
150
Ca. 8
170
Ca. 10
190
Ca. 13
• Nehmen Sie den Deckel (3) ab, nachdem das Öl aufgeheizt ist.
• Stellen Sie den Frittierkorb (6) auf eine saubere, ebene und hitzebeständige Oberfläche.
• Füllen Sie den Frittierkorb (6) mit Lebensmitteln (Abb. k). Überfüllen Sie den Frittierkorb (6)
nicht (Abb. k).
WARNUNG
➢ Lebensmittel niemals ohne Frittierkorb (6) frittieren (Abb. l).
➢ Den Frittierkorb (6) nicht überfüllen. Zu viele Lebensmittel können zu
übermäßigem Schäumen führen und dazu, dass das Öl während des
Frittiervorgangs überläuft.
➢ Nur trockene Lebensmittel in das Gerät geben. Beim Frittieren gefrorener
Lebensmittel wie Pommes Frites oder Chicken Wings alle Eispartikel vor dem
Frittieren entfernen, um ein Überlaufen des Öls zu vermeiden.
➢ Feuchtigkeit vor dem Frittieren mit einem Papiertuch entfernen. Selbst kleinste
Wasserrückstände können zu starkem Spritzen des heißen Öls führen.
➢ Setzen Sie den Deckel (3) wieder auf das Gerät, nachdem Sie den Frittierkorb (6)
ins Öl getaucht haben. Andernfalls besteht die Gefahr, dass heißes Öl
herausspritzt.
• Setzen Sie den Frittierkorb (6) vorsichtig in die Ölwanne (9) (Abb. n).
• Schließen Sie den Deckel (3) über der Ölwanne (9) (Abb. o). Achten Sie darauf, dass die
Aussparungen des Deckels (3) korrekt über dem Korbgriff (7) und der Silikonabdichtung
(22) sitzen.
Page 45

Copies of the I/B. Please reproduce them without any
changes except under special instruction from Team
International BELGIUM. The pages must be reproduced
and folded in order to obtain a booklet A5 (+/- 148.5 mm
width x 210 mm height). When folding, make sure you
keep the good numbering when you turn the pages of
the I/B. Don’t change the page numbering. Keep the
language integrity.
Back cover page (last page)
Assembly page 45/70
Fax +32 2 359 95 50
HINWEIS:
➢ Geben Sie den Frittierkorb (6) beim Frittieren von frisch geschnittenen Kartoffeln oder
sehr feuchten Lebensmitteln besonders langsam ins Öl. Falls das Öl schnell anfängt zu
schäumen oder zu kochen, nehmen Sie den Frittierkorb (6) für ein paar Sekunden
heraus, um ihn anschließend langsam wieder hineinzugeben. Wiederholen Sie diesen
Vorgang, bis das Öl nicht mehr übermäßig schäumt.
➢ Verwenden Sie beim Frittieren von frisch geschnittenen Kartoffeln oder sehr feuchten
Lebensmitteln nicht den Deckel (3).
➢ Halten Sie sich bezüglich der Frittierzeiten an die Angaben aus dem Abschnitt
Empfohlene Frittierzeiten und -temperaturen oder die Anweisungen des
Lebensmittelherstellers.
• Öffnen Sie den Deckel (3), nachdem die Frittierzeit abgelaufen ist.
• Benutzen Sie den Korbgriff (7), um den Frittierkorb (6) herauszuheben und hängen Sie ihn
mithilfe der Korbhalterung (8) am Rand der Ölwanne (9) auf (Abb. p).
• Lassen Sie die Lebensmittel im Frittierkorb (6) so für ein paar Sekunden hängen, damit
überschüssiges Öl abtropfen kann und die Lebensmittel knusprig bleiben.
• Benutzen Sie den Korbgriff (7), um den Frittierkorb (6) vorsichtig anzuheben und geben Sie
die Lebensmittel auf einen mit Papiertüchern belegten, hitzebeständigen Teller oder eine
Schüssel, um verbliebenes Öl aufzunehmen.
WARNUNG
➢ Stellen Sie den heißen Frittierkorb (6) niemals direkt auf den Tisch oder die
Arbeitsfläche, um Schäden an den Oberflächen zu vermeiden. Wir empfehlen die
Verwendung eines hitzebeständigen Untersetzers oder Brettes.
• Stellen Sie den leeren Frittierkorb (6) auf eine saubere, ebene und hitzebeständige
Oberfläche.
• Stellen Sie das Thermostat (23) nach Ende des Frittiervorgangs zurück auf „0“ und ziehen
Sie den Stecker (17) aus der Steckdose.
WARNUNG
➢ Entfernen Sie vor der Reinigung immer den Stecker (17) aus der Steckdose.
➢ Während des Betriebs erzeugt dieses Gerät Hitze und Dampf. Treffen Sie die nötigen
Vorkehrungen, um die Gefahr von Verbrennungen, Feuer und anderen Personenoder Sachschäden zu verhindern. Lassen Sie das Gerät während des Betriebs nicht
unbeaufsichtigt.
➢ Die Oberfläche des Gerätes wird heiß. Berühren Sie diese niemals während des
Betriebs. Lassen Sie das Gerät mindestens 30 Minuten abkühlen, bevor Sie es
bewegen.
EMPFOHLENE FRITTIERZEITEN UND -TEMPERATUREN
HINWEIS:
Die nachfolgend genannten Frittierzeiten sind ungefähre Angaben und sollten
entsprechend des persönlichen Geschmacks, der Lebensmittelmenge und den
Herstellerhinweisen angepasst werden.
Page 46

Copies of the I/B. Please reproduce them without any
changes except under special instruction from Team
International BELGIUM. The pages must be reproduced
and folded in order to obtain a booklet A5 (+/- 148.5 mm
width x 210 mm height). When folding, make sure you
keep the good numbering when you turn the pages of
the I/B. Don’t change the page numbering. Keep the
language integrity.
Back cover page (last page)
Assembly page 46/70
Fax +32 2 359 95 50
Lebensmittel
Temperatureinstellung (°C)
Zeit (Minuten)
TK Pommes frites
190
8-12
Frische Pommes frites
190
8-10
Fleisch (Streifen)
190
10-14
Chicken Wings
190
10-14
Fisch (paniert)
170
3-5
Meeresfrüchte
170
3-5
KOCHEN MIT ÖL
Das Kochen mit Öl kann den Geschmack von Lebensmitteln steigern – oder negativ
beeinflussen. Wie bei jedem Lebensmittel sind Frische und richtige Handhabung auch beim Öl
der Schlüssel zu bekömmlichen Speisen.
Die Qualität des Öls nimmt mit Verwendung bei hohen Temperaturen ab. Lebensmittelreste,
Wasser und andere Flüssigkeiten beeinflussen die Qualität ebenfalls negativ. Daher gilt:
• Mischen Sie niemals unterschiedliche Speiseöle.
• Verwenden Sie nur frische und saubere Speiseöle:
o Entfernen Sie verbrannte Lebensmittelreste während des Frittierens. Nutzen Sie
dafür ausschließlich Hilfsmittel, die gefahrlos in heißes Öl getaucht werden
können, ohne dass das Hilfsmittel oder das Gerät Schaden nehmen. Wir
empfehlen, dabei immer Ofenhandschuhe zu tragen.
o Reinigen Sie das Öl nach der Benutzung und vor dem Aufbewahren mit dem
integrierten Ölfiltersystem (siehe Abschnitt Ölfilterfunktion).
o Verwenden Sie kein Öl wieder, dass zum Frittieren von Fisch oder anderen
geschmacksintensiven Lebensmitteln verwendet wurde.
o Manche Lebensmittel, besonders Fleisch wie Chicken Wings, geben während
des Frittierens viel Flüssigkeit ab und verwässern dadurch das Öl. Verwenden Sie
dieses Öl nicht wieder.
ÖLFILTERFUNKTION
HINWEIS:
➢ Reinigen Sie das Öl nach jeder Benutzung. Bewahren Sie das gefilterte Öl korrekt auf
(siehe Abschnitt Ölaufbewahrung).
➢ Entsorgen Sie das Öl in regelmäßigen Abständen abhängig von der Ölqualität (siehe
Abschnitt Kochen mit Öl).
➢ Warten Sie nach dem Ausschalten des Gerätes mindestens 3 Stunden, damit das Öl
abkühlen kann – abhängig von den Einstellungen während der Benutzung. Heißeres
Öl benötigt länger zum Abkühlen.
➢ Das Reinigen des Öls nach jeder Benutzung verlängert die Nutzungsdauer des
Speiseöls. Es sollte dennoch entsorgt werden, falls die Qualität nach mehrmaligem
Benutzen stark abgenommen hat. Wir empfehlen den Austausch bei normalem
Gebrauch nach mindestens 10 Benutzungen.
• Stellen Sie sicher, dass der Ölaufbewahrungsbehälter (15) zusammengebaut, leer und
innerhalb des Gerätes ist.
• Drehen Sie den Kontrollschalter für die Ölfilterfunktion (14) auf FILTER OIL, nachdem das Öl
auf Raumtemperatur abgekühlt ist (Abb. r). Das Öl tropft in den Ölaufbewahrungsbehälter
(15). Die Ölfilterabdeckung (11) hält Lebensmittelrückstände zurück.
• Nachdem sämtliches Öl gereinigt wurde:
Page 47

Copies of the I/B. Please reproduce them without any
changes except under special instruction from Team
International BELGIUM. The pages must be reproduced
and folded in order to obtain a booklet A5 (+/- 148.5 mm
width x 210 mm height). When folding, make sure you
keep the good numbering when you turn the pages of
the I/B. Don’t change the page numbering. Keep the
language integrity.
Back cover page (last page)
Assembly page 47/70
Fax +32 2 359 95 50
o Stellen Sie den Kontrollschalter für die Ölfilterfunktion (14) auf LOCK, falls der
Ölaufbewahrungsbehälter (15) im Gerät verbleiben soll.
o Stellen Sie den Kontrollschalter für die Ölfilterfunktion (14) auf UNLOCK, falls Sie
den Ölaufbewahrungsbehälter (15) aus dem Gerät entnehmen möchten.
HINWEIS:
➢ Warten Sie stets 3 bis 4 Stunden, bis das Öl vollständig abgekühlt ist, bevor Sie es
ablassen oder filtern.
➢ Seien Sie besonders vorsichtig, wenn Sie das Gerät bewegen und Ölwanne (9) bzw.
Ölaufbewahrungsbehälter (15) nicht beide leer sind.
➢ Gehen Sie vorsichtig vor, wenn Sie den Ölaufbewahrungsbehälter (15) entfernen.
Halten Sie den Ölaufbewahrungsbehälter (15) waagerecht und mit beiden Händen
fest.
ÖLAUFBEWAHRUNGSBEHÄLTER ENTLEEREN
Gefiltertes Öl kann in einem geeigneten Behälter aufbewahrt (siehe Abschnitt
Ölaufbewahrung) oder zum Frittieren weiterer Lebensmittel wiederverwendet werden (siehe
Abschnitt Kochen mit Öl).
• Öffnen Sie die Verschlusskappe (16) auf der Oberseite des Ölaufbewahrungsbehälters (15)
(Abb. s).
• Gießen Sie das Öl langsam in einen geeigneten Behälter oder, falls erforderlich, in die
Ölwanne (9).
HINWEIS:
➢ Stellen Sie sicher, dass der Kontrollschalter für die Ölfilterfunktion (14) auf UNLOCK
steht, bevor Sie Öl in die Ölwanne (9) gießen.
➢ Kippen Sie den Ölaufbewahrungsbehälter (15) langsam nach oben (in eine vertikale
Position), um ein Auslaufen des Öls an den Seiten zu vermeiden.
➢ Öl kann im Ölaufbewahrungsbehälter (15), der Ölwanne (9) oder einem anderen
kühlen, trockenen Ort aufbewahrt werden (siehe Abschnitt Ölaufbewahrung).
• Drehen Sie die Verschlusskappe (16) wieder auf den Ölaufbewahrungsbehälter (15).
• Setzen Sie den Ölaufbewahrungsbehälter (15) wieder in das Gerät ein und stellen Sie den
Kontrollschalter für die Ölfilterfunktion (14) zurück auf LOCK, um den
Ölaufbewahrungsbehälter (15) zu sichern (Abb. t).
ÖLAUFBEWAHRUNG
• Bewahrung Sie benutztes Öl nicht im Kühlschrank auf. Wählen Sie einen kühlen Ort ohne
Sonneneinstrahlung. Grundsätzlich kann Öl nach dem Öffnen der Flasche für etwa 3
Monate aufbewahrt werden. Bitte beachten Sie hierzu auch die Angaben des
Ölherstellers.
HINWEISE UND TIPPS
• Kleinere Mengen an Lebensmitteln benötigen üblicherweise eine etwas kürzere Frittierzeit
als größere Mengen.
• Um die Frittierzeit zu verkürzen, können Sie tiefgefrorene Lebensmittel zunächst auftauen
lassen. Bei manchen Lebensmitteln wird jedoch empfohlen, sie vor der Zubereitung nicht
an- oder auftauen zu lassen; z.B. Fisch und Pommes frites.
• Wir empfehlen die Verwendung eines Bratenthermometers um den Garprozess zu
kontrollieren.
• Sollten Lebensmittel anfangen zu brennen, entfernen Sie auf keinen Fall den Deckel (3)
Page 48

Copies of the I/B. Please reproduce them without any
changes except under special instruction from Team
International BELGIUM. The pages must be reproduced
and folded in order to obtain a booklet A5 (+/- 148.5 mm
width x 210 mm height). When folding, make sure you
keep the good numbering when you turn the pages of
the I/B. Don’t change the page numbering. Keep the
language integrity.
Back cover page (last page)
Assembly page 48/70
Fax +32 2 359 95 50
oder den Frittierkorb (6). Drehen Sie das Thermostat (23) auf „0“ und ziehen Sie den
Netzstecker (17).
• Falls die zu frittierenden Lebensmittel geschüttelt werden müssen, empfehlen wir die
Benutzung einer Zeitschaltuhr. Stellen Sie diese auf die Hälfte der empfohlenen Frittierzeit
ein und schütteln Sie nach Ablauf der Zeit den Frittierkorb (6).
• Wir empfehlen die ausschließliche Verwendung von hitzebeständigen Kochutensilien aus
Plastik oder Holz. Metallische Objekte können heiß werden und die Antihaftbeschichtung
zerstören. Entfernen Sie die Utensilien stets aus dem Gerät; lassen Sie sie während des
Betriebs nicht im Gerät.
REINIGUNG UND PFLEGE
Die richtige Pflege ermöglicht eine lange Lebensdauer des Gerätes. Reinigen Sie das Gerät
nach jeder Benutzung. Das Gerät enthält keine wartungsbedürftigen Teile und benötigt nur
wenig Pflege. Wenden Sie sich bei Reparaturen immer an einen Fachmann (*).
WARNUNG:
➢ Drehen Sie das Thermostat (23) nach jeder Reinigung auf „0“, bevor Sie das Gerät
benutzen oder es wegstellen. Achten Sie darauf, dass kein Wasser in das Gehäuse
(13) eindringt.
➢ Versuchen Sie niemals, die Silikonabdichtung (22) zu entfernen.
• Stellen Sie sicher, dass der Ölaufbewahrungsbehälter (15) eingesetzt ist und stellen Sie
dann den Kontrollschalter für die Ölfilterfunktion (14) auf FILTER OIL, um die Ölwanne zu
entleeren (siehe Abschnitt Ölfilterfunktion).
• Stellen Sie den Frittierkorb (6) auf eine saubere, ebene und hitzebeständige Oberfläche.
Verbrennungsgefahr!
➢ Achten Sie darauf, dass der Frittierkorb (6) vollständig abgekühlt ist, bevor Sie ihn
berühren und den Korbgriff (7) entfernen.
➢ Achten Sie darauf, dass das Öl vollständig abgekühlt ist, bevor Sie es aus der
Ölwanne (9) in den Ölaufbewahrungsbehälter (15) entleeren.
• Entfernen Sie den Korbgriff (7) vom Frittierkorb (6).
• Entfernen Sie das Bedienelement (21) von der Ölwanne (9). Reinigen Sie das
Bedienelement (21) und das Heizelement (20) vorsichtig mit einem feuchten Tuch.
• Entfernen Sie die Ölfilterabdeckung (11) aus der Ölwanne (9) und entnehmen Sie dann
die Ölwanne (9) aus dem Gehäuse (13).
• Öffnen Sie die Filterabdeckung (28) und entnehmen Sie sowohl den schwarzen als auch
den weißen Filter (26, 27) (Abb. u).
• Reinigen Sie das Gehäuse (13) mit einem feuchten Tuch.
• Reinigen Sie Deckel (3), Frittierkorb (6), Korbgriff (7), Ölwanne (9) und Ölfilterabdeckung
(11) mit heißem Seifenwasser oder im Geschirrspüler. Anschließend abspülen und
vorsichtig abtrocknen.
• Trocknen Sie alle Teile nach der Reinigung und vor der nächsten Benutzung ab.
HINWEIS:
➢ Falls der Ölaufbewahrungsbehälter (15) gereinigt werden muss, stellen Sie zunächst
sicher, dass dieser entleert ist (siehe Abschnitt Ölaufbewahrungsbehälter entleeren).
Reinigen Sie den Behälter (15) mit heißem Seifenwasser oder im Geschirrspüler.
Anschließend abspülen und vorsichtig abtrocknen.
➢ Reinigen Sie die Filter (26, 27) alle 3 Monate oder nach jeder zwölften Benutzung mit
heißem Seifenwasser. Nicht in den Geschirrspüler geben.
Page 49

Copies of the I/B. Please reproduce them without any
changes except under special instruction from Team
International BELGIUM. The pages must be reproduced
and folded in order to obtain a booklet A5 (+/- 148.5 mm
width x 210 mm height). When folding, make sure you
keep the good numbering when you turn the pages of
the I/B. Don’t change the page numbering. Keep the
language integrity.
Back cover page (last page)
Assembly page 49/70
Fax +32 2 359 95 50
➢ Trocknen Sie alle Teile und Oberflächen gründlich vor der nächsten Benutzung ab.
Achten Sie darauf, dass alle Teile und Oberflächen vollständig trocken sind, bevor Sie
den Netzstecker in eine Steckdose stecken. Selbst die kleinste Menge Wasser kann zu
starkem Spritzen des heißen Öls führen.
AUFBEWAHRUNG
• Verstauen Sie das Gerät nur, wenn es vollständig abgekühlt, sauber und trocken ist.
• Wir empfehlen, dass Gerät an einem trockenen Ort aufzubewahren.
• Bewahren Sie das Gerät auf einem stabilen Regal oder im Schrank auf. Um Unfälle zu
vermeiden, achten Sie darauf, dass sich sowohl das Gerät selbst als auch die
Anschlussleitung außerhalb der Reichweite von Kindern und Haustieren befinden.
UMWELTSCHUTZ – RICHTLINIE 2012/19/EU
Zum Schutz unserer Umwelt und unserer Gesundheit sind Elektro- und Elektronik-Altgeräte nach
bestimmten Regeln zu entsorgen. Dies fordert den Einsatz sowohl des Herstellers bzw.
Lieferanten als auch des Verbrauchers.
Aus diesem Grund darf dieses Gerät, wie das Symbol auf dem Typenschild bzw. auf der
Verpackung zeigt, nicht in den unsortierten Restmüll gegeben werden. Der Verbraucher hat
das Recht, dieses Gerät über kommunale Sammelstellen zu entsorgen; von dort aus wird die
spezifische Behandlung, Verwertung bzw. das Recycling gem. den Erfordernissen der Richtlinie
sichergestellt
Page 50

Copies of the I/B. Please reproduce them without any
changes except under special instruction from Team
International BELGIUM. The pages must be reproduced
and folded in order to obtain a booklet A5 (+/- 148.5 mm
width x 210 mm height). When folding, make sure you
keep the good numbering when you turn the pages of
the I/B. Don’t change the page numbering. Keep the
language integrity.
Back cover page (last page)
Assembly page 50/70
Fax +32 2 359 95 50
CONSEJOS DE SEGURIDAD
Lea detenidamente el modo de empleo antes de utilizar el aparato, y
siempre siga las medidas de seguridad y el modo de funcionamiento.
Importante: Este aparato puede ser utilizado por niños mayores de
8 años y personas con capacidades físicas reducidas, sensoriales o
mentales o con falta de experiencia o conocimiento, si se les ha
dado la supervisión o instrucciones relativas al uso seguro del
aparato y los riesgos involucrados. Los niños no deben jugar con el
aparato. La limpieza y mantenimiento del aparato no debe ser hecho
por niños a menos que sean mayores de 8 años y estén
supervisados. No deje de vigilar su aparato y el cable y no lo deje
nunca a cargo de niños menores de 8 años o de personas no
responsables especialmente cuando está enchufado a la toma de
corriente o se está enfriando.
❑ Antes de utilizar el aparato, compruebe que el voltaje de la red
eléctrica coincide con el del aparato.
❑ No deje nunca su aparato sin vigilancia cuando esté en marcha.
❑ Compruebe de vez en cuando que el aparato no esté dañado y
no utilice su aparato si el cable o el aparato están dañados por el
motivo que sea. Cualquier reparación debe ser realizada por un
servicio cualificado competente(*). Si el cable está dañado, debe
ser reemplazado por un servicio cualificado competente(*) para
evitar cualquier tipo de daño.
❑ Utilice el aparato únicamente para usos domésticos y de la manera
indicada en el modo de empleo.
❑ No utilice el aparato cerca de fuentes de calor.
❑ Desenchufe el aparato antes de limpiarlo.
❑ Procure no utilizar el aparato en el exterior y colóquelo en un sitio
seco.
❑ No utilice accesorios no recomendados por el fabricante, ello
puede conllevar un riesgo para el usuario y dañar el aparato.
❑ No mueva nunca el aparato estirando del cable. Procure que el
cable no se enganche en alguna parte, a fin de evitar posibles
Page 51

Copies of the I/B. Please reproduce them without any
changes except under special instruction from Team
International BELGIUM. The pages must be reproduced
and folded in order to obtain a booklet A5 (+/- 148.5 mm
width x 210 mm height). When folding, make sure you
keep the good numbering when you turn the pages of
the I/B. Don’t change the page numbering. Keep the
language integrity.
Back cover page (last page)
Assembly page 51/70
Fax +32 2 359 95 50
caídas del mismo. Evite enrollar el cable alrededor del aparato y
no lo tuerza.
❑ Coloque el aparato sobre una mesa o un soporte estable para
evitar su caída.
❑ Utilice este aparato sólo para freír alimentos. Cocine sólo
alimentos apropiados a la cocción y al consumo culinario.
❑ No sumerja nunca el aparato en el agua o en cualquier otro
líquido ni para su limpieza ni por cualquier otra razón (véase
párrafo "Limpieza").
❑ Deje enfriar el aparato antes de desplazarlo, limpiarlo o
recogerlo. Utilice siempre el asa para agarrar el aparato.
Desenchufe siempre la clavija eléctrica antes de manipular el
aparato.
❑ El aparato no debe nunca funcionar sin aceite. No sobrepase el
nivel máximo ya que podría conllevar riesgos de quemadura por
salpicaduras de aceite.
❑ Es indispensable guardar el aparato limpio, ya que está en
contacto directo con los alimentos.
❑ Procure que el cable no entre en contacto con las superficies
calientes del aparato. Procure no tocar las superficies calientes.
❑ Procure que el aparato no entre en contacto con materiales
fácilmente inflamables como cortinas, tejidos, etc., cuando esté
en funcionamiento, ya que podría provocar un incendio.
❑ No cubra nunca este aparato.
❑ No añada nunca agua en el aceite.
❑ Compruebe que los alimentos están lo más seco posible.
❑ Su freidora cuenta con un filtro antiolores. Puede entonces cerrar
la tapa durante la fritura. Sin embargo, procure mantener el filtro
en buen estado (Cf. “Limpieza”). CUIDADO: La freidora puede
volverse muy caliente durante el funcionamiento. Los preparados
con aceite o grasa pueden inflamarse si alcanzan mucha
temperatura. Entonces tenga mucho cuidado y procure no dejar
el aparato encendido por largos periodos. Antes de desconectar
el aparato, coloque el termóstato en la posición “MIN”.
❑ Ventile la estancia durante el funcionamiento.
❑ Si utiliza grasa sólida, proceda cortándola en trozos pequeños y
poniendo estos en la cubeta. Ponga el aparato en función
regulando el termostato al mínimo. Cada vez que el indicador
luminoso se apaga, suba el termostato a una temperatura más
Page 52

Copies of the I/B. Please reproduce them without any
changes except under special instruction from Team
International BELGIUM. The pages must be reproduced
and folded in order to obtain a booklet A5 (+/- 148.5 mm
width x 210 mm height). When folding, make sure you
keep the good numbering when you turn the pages of
the I/B. Don’t change the page numbering. Keep the
language integrity.
Back cover page (last page)
Assembly page 52/70
Fax +32 2 359 95 50
elevada, hasta que la grasa haya fundido. Una vez fundida la
grasa, ponga el termostato en la posición deseada. Al enfriarse el
aparato, este tipo de grasa se vuelve a solidificar.
❑ Su aparato nunca debe ser puesto en marcha mediante un
minutero externo o un sistema de mando a distancia separado.
❑ Por favor tome nota: Cuando el símbolo se encuentra en una
superficie especifica, es para llamarle la atención y significa:
“¡CUIDADO! Esta superficie puede volverse muy caliente durante
el uso”.
El símbolo siempre se pone en la superficie con temperaturas
altas, sin embargo otras superficies metálicas o no metálicas
también puden llegar a alcanzar altas temperaturas durante su
uso y por lo tanto es aconsejable manejar siempre con cuidado y
si es posible con la ayuda de guantes o protección térmica. En
caso de duda sobre la temperatura de una determinada
superficie es siempre aconsejable protegerse a si mismo.
(*) Servicio técnico cualificado: servicio técnico del fabricante o del
importador o una persona cualificada, reconocida y habilitada a fin
de evitar cualquier peligro. En cualquier caso devuelva el aparato al
servicio técnico.
ANTES DE LA PRIMER UTILIZACIÓN
• Retire todos los materiales de embalaje.
• Verifique el contenido del paquete para verificar que esté completo y sin daños. No
opere el aparato si el contenido no está completo o si parece estar dañado.
¡Peligro de asfixia!
Los materiales de empaque no son juguetes. Siempre mantenga bolsas de plástico, hojas
y espuma lejos de bebés y niños. El material de empaque podría bloquear las vías
respiratorias e impedir la respiración.
NOTA :
➢ El aparato puede producir olores y / o humo cuando se enciende por primera vez,
como residuos del proceso de producción estan eliminados. Esto es normal y no
indica un defecto o peligro. Asegure una amplia ventilación.
➢ Limpie el aparato completamente antes de usarlo por primera vez (limpieza y
mantenimiento).
Page 53

Copies of the I/B. Please reproduce them without any
changes except under special instruction from Team
International BELGIUM. The pages must be reproduced
and folded in order to obtain a booklet A5 (+/- 148.5 mm
width x 210 mm height). When folding, make sure you
keep the good numbering when you turn the pages of
the I/B. Don’t change the page numbering. Keep the
language integrity.
Back cover page (last page)
Assembly page 53/70
Fax +32 2 359 95 50
ENSAMBLAJE
Ver ilustraciones
• Coloque el aparato sobre una superficie limpia, plana y resistente al calor.
• Antes de usar su aparato electrodoméstico, asegúrese
o De que el mango de la cesta (7) está bloqueado en su lugar en la cesta (6).
o De que Para bloquear el mango de la cesta (7) en su lugar, presione las barras
juntas y deslícelas entre las ranuras.
o De insertar los extremos de las barras en el soporte de la cesta (6) y empujar el
mango (7) hacia atrás (ill. A y b). Es importante no montar este producto de
ninguna otra manera (ill. C).
o El depósito de aceite (9) está asegurado en la posición correcta con la tapa del
filtro de aceite (11) y la válvula de aceite (12) en el mismo lado que la perilla de
control de filtración de aceite (14) (illustraciòn d). Asegúrese de que la cubierta
del filtro de aceite (11) esté en su lugar dentro del depósito de aceite (9).
o El panel de control (21) se coloca en la placa de conexión en la parte posterior
de la carcasa (13). Asegurense de que las ranuras de la placa de conexión se
encuentran en las guías del tablero de control (ill. E).
NOTA :
• Su electrodoméstico está equipado con un interruptor de seguridad (5) ubicado en el
panel de control (21). Si el tablero de control (21) no está colocado correctamente en su
posición, el aparato no funcionará.
• El montaje incorrecto puede provocar una configuración inestable y puede causar
lesiones.
• La placa de sellado de goma de silicona (22) evita que el vapor caliente salga por
debajo de la tapa. No intentes eliminarlo. No intente quitarlo.
UTILIZAR EL APARATO
Este aparato se puede usar para freír alimentos como papas fritas, pollo o pescado (consulte
p.56 : los tiempos y las temperaturas de fritura recomendados).
NOTA :
➢ El aparato tiene una potencia nominal de 1700W. Antes de enchufar la freidora,
asegúrese de que el circuito eléctrico no está sobrecargado con otros
aparatos. Este electrodoméstico siempre debe operarse en un tomacorriente de
pared separado de 120V ~ 60Hz.
➢ Asegúrese de que la freìdora esté en modo apagado (posiciòn 0) antes de
enchufarla.
• Coloque el aparato sobre una superficie limpia, plana y resistente al calor. Cuando se
utiliza el aparato sobre superficies de madera, utilice una estera resistente al calor para
proteger la madera de daños. Asegúrese de que haya una distancia mínima alrededor
del electrodoméstico de al menos 10 centímetros con respecto a otros objetos, armarios y
paredes.
Asegúrese de que el contenedor de aceite (15) esté ensamblado, vacío y colocado
dentro del aparato, la perilla de control de filtración de aceite (14) esté en la posición
LOCK y la cubierta del filtro de aceite (11) dentro del depósito de aceite (9). Luego, vierta
el aceite de cocina adecuado en el depósito de aceite (9) (ill. F).
Page 54

Copies of the I/B. Please reproduce them without any
changes except under special instruction from Team
International BELGIUM. The pages must be reproduced
and folded in order to obtain a booklet A5 (+/- 148.5 mm
width x 210 mm height). When folding, make sure you
keep the good numbering when you turn the pages of
the I/B. Don’t change the page numbering. Keep the
language integrity.
Back cover page (last page)
Assembly page 54/70
Fax +32 2 359 95 50
¡Peligro de quemaduras!
➢ Nunca vuelva a llenar el depósito de aceite (9) durante el uso o mientras esté
caliente. Siempre permita que el aparato se enfríe por completo. No mezcle
aceite nuevo y viejo.
AVISO :
➢ NO LLENE SOBRE O BAJO la cantidad recommendada (ill f). La capacidad
mínima de aceite es 1.9L (MIN), la capacidad máxima de aceite es 3L (MAX).
Asegúrese de que el nivel de aceite permanezca siempre entre la marca MIN y
MAX (10).
• Extienda un poco de aceite en el interior de la ventana de visualización (2) para evitar la
condensación.
• Coloque la tapa (3) en la carcasa (13).
• Asegúrese de que la perilla de control de temperatura (23) esté en la posición 0
NOTA :
• Inserte el enchufe (17) en una toma de corriente.
AVISO :
➢ Use solo los accesorios recomendados por el fabricante. No coloque ningún otro
material en el aparato.
➢ Nunca permita que el cable de alimentación (17) entre en contacto con la
tapa (3) o la carcasa del aparato (13) durante el uso (ill. h).
¡Peligro de quemaduras!
➢ No toque la tapa (3) o la carcasa del aparato (13) durante o después del uso
(ill. I). Solo use los mangos (2, 7, 19) provistos.
➢ Preste especial atención cuando agregue o quite accesorios y alimentos del
electrodoméstico. Nunca toque la tapa (3) o la carcasa del aparato (13)
cuando el aparato esté enchufado y encendido o inmediatamente después de
su uso. Se recomienda usar siempre guantes de cocina.
➢ El escape de vapor puede quemar.
• Gire la perilla de control de temperatura (14) a la temperatura requerida (consulte los
tiempos y temperaturas de fritura recomendados) (il. J). El indicador de encendido (25) se
encenderá para indicar que el aparato se está calentando. Una vez se ha alcanzado la
temperatura de consigna, el indicador READY (24) se encenderá.
Duración aproximada del tiempo hasta alcanzar la temperatura establecida :
Temperatura (°C)
Tiempo (minutas)
130
alrededor de 7
150
alrededor de 8
170
alrededor de 10
190
alrededor de 13
Después de que el aceite haya sido precalentado, retire la tapa (3).
Coloque la cesta (6) en una superficie limpia, plana y resistente al calor.
Page 55

Copies of the I/B. Please reproduce them without any
changes except under special instruction from Team
International BELGIUM. The pages must be reproduced
and folded in order to obtain a booklet A5 (+/- 148.5 mm
width x 210 mm height). When folding, make sure you
keep the good numbering when you turn the pages of
the I/B. Don’t change the page numbering. Keep the
language integrity.
Back cover page (last page)
Assembly page 55/70
Fax +32 2 359 95 50
Llenar la cesta (6) con los alimentos (ill. k). No llene demasiado la cesta (6) (ill. K).
AVISO
➢ No fríe los alimentos sin la cesta (6) (ill. L).
➢ No llene la cesta (6) más de la mitad. Demasiada comida puede causar un
exceso de espuma y podría hacer que el aceite rebose durante el
funcionamiento.
➢ Los alimentos agregados al aparato deben estar secos. Si fríe alimentos
congelados como papas fritas o alitas de pollo, retire todas las partículas de
hielo de los alimentos congelados antes de freír para evitar que el aceite se
desborde.
➢ Siempre quite el exceso de humedad de los alimentos con una toalla de papel
antes de freír. Incluso una pequeña cantidad de agua puede causar una
salpicadura severa de aceite caliente.
➢ Después de sumergir la cesta (6) en el aceite, coloque inmediatamente la tapa
(3) en el aparato. Peligro de salpicaduras de aceite caliente.
• Baje con cuidado la cesta (6) en el depósito de aceite (9) (véase n).
• Cubra el depósito de aceite (9) con la tapa (3) (il. O). Asegúrese de que las partes
empotradas de la tapa (3) quepan correctamente sobre el mango (7) de la cesta y la
placa de sellado de goma de silicona (22).
NOTA :
➢ Al freír papas recién cortadas y alimentos con alto contenido de humedad, baje la
canasta lentamente en el aceite. Si el aceite hierve o espumas demasiado rápido,
levante la cesta durante unos segundos y baje de nuevo. Repite hasta que la cesta
baja sin excesos de espuma.
➢ No coloque la tapa (3) en el aparato al freír patatas frescas cortadas u otros
alimentos de alto contenido de humedad.
➢ Para conocer los tiempos de fritura, consulte "Tiempos de fritura y temperaturas
recomendados" o siga las instrucciones del fabricante de los alimentos.
• Una vez que el tiempo de fritura ha transcurrido, retire la tapa (3).
• Use el mango (7) para levantar la cesta (6) y colgarla en el gancho de la cesta (8) en el
borde del depósito de aceite (9) (ill p).
• Deje que la comida se drene en la cesta (6) durante unos segundos para eliminar el
exceso de aceite y conservar la textura crujiente.
• Use el mango (7) para levantar con cuidado la cesta (6) y vierta la comida en un plato
resistente al calor que haya sido cubierto con una toalla de papel para recoger el aceite
restante.
AVISO
➢ Nunca coloque la cesta caliente (6) directamente sobre una mesa o encimera para
evitar daños a las superficies. Se recomienda usar un salvamanteles o una tabla de
cortar resistente al calor.
• Coloque la cesta (6) en una superficie limpia, plana y resistente al calor.
• Una vez finalizado el proceso de cocción, gire la perilla de control de temperatura (23) a
la posición 0 y retire el enchufe (17) de la toma de corriente de la pared.
AVISO
➢ Cuando no utilice el aparato, desconecte siempre el enchufe (17) de la toma de
Page 56

Copies of the I/B. Please reproduce them without any
changes except under special instruction from Team
International BELGIUM. The pages must be reproduced
and folded in order to obtain a booklet A5 (+/- 148.5 mm
width x 210 mm height). When folding, make sure you
keep the good numbering when you turn the pages of
the I/B. Don’t change the page numbering. Keep the
language integrity.
Back cover page (last page)
Assembly page 56/70
Fax +32 2 359 95 50
corriente de la pared. El cable de alimentación extraíble es por desconexión
accidental. Nunca desenchufe el aparato durante su utilización. Si el enchufe
magnético está desconectado, retire inmediatamente el enchufe (17) de la toma
de corriente. Gire la perilla de control de temperatura (23) a la posición 0. Luego
vuelva a conectar el enchufe (17) a la toma de corriente.
➢ Este aparato genera calor y vapor durante el uso. Se deben tomar las precauciones
adecuadas para evitar el riesgo de quemaduras, incendios u otras lesiones a
personas o daños a la propiedad. No deje el aparato sin vigilancia mientras esté en
uso.
➢ Las superficies del aparato se calientan. No toque mientras está en uso. Permita que
el aparato se enfríe por lo menos 30 minutos antes de manipularlo.
TIEMPOS DE FRITURA Y TEMPERATURAS RECOMENDADOS
NOTA :
Los tiempos de fritura en la tabla a continuación son aproximados y deben ajustarse
para satisfacer sus propios gustos, diferentes cantidades de alimentos y las
instrucciones del fabricante de alimentos
Temperaturas (°C)
Tiempo (minutas)
130
alrededor de 7
150
alrededor de 8
170
alrededor de 10
190
alrededor de 13
Alimentos
Alimentos
Temperaturas (°C)
Tiempo (minutas)
Papas fritas congeladas
190
8-12
Papas fritas
190
8-10
Tiras de carne
190
10-14
Alitas de pollo
190
10-14
Pescado (rebozado)
170
3-5
Mariscos
170
3-5
COCINAR CON ACEITE
El aceite de cocina puede mejorar el sabor de la comida o estropear su sabor. Como con
cualquier otro componente de alimentos, frescura y manejo correcto del aceite es la clave
para resultados exitosos de fritura.
Temperatura (°C)
Tiempo (minutas)
130
alrededor de 7
150
alrededor de 8
170
alrededor de 10
La calidad del aceite disminuye con el uso a altas temperaturas. Las partículas de alimentos,
agua y otros líquidos reducirán aún más su calidad, por lo tanto:
• No mezcle diferentes aceites de cocina.
• Utilice únicamente aceites de cocina frescos y limpios:
o Siempre use utensilios que son seguros para sumergirse en aceites calientes sin
dañar el utensilio o aparato, y use siempre guantes de cocina cuando retire las
Page 57

Copies of the I/B. Please reproduce them without any
changes except under special instruction from Team
International BELGIUM. The pages must be reproduced
and folded in order to obtain a booklet A5 (+/- 148.5 mm
width x 210 mm height). When folding, make sure you
keep the good numbering when you turn the pages of
the I/B. Don’t change the page numbering. Keep the
language integrity.
Back cover page (last page)
Assembly page 57/70
Fax +32 2 359 95 50
partículas de alimentos quemados.
o Después del uso y antes del almacenamiento, filtre el aceite con el sistema de
filtración integrado (consulte Filtración de aceite)
o No reutilice el aceite que se ha utilizado para freír pescado u otros alimentos
con sabor intenso.
o Algunas carnes, como las alitas de pollo, liberarán grandes cantidades de
líquidos al freír, por lo tanto, regando el aceite. No vuelva a utilizar este aceite.
FILTRACIÓN DE ACEITE
NOTA :
➢ Filtra el aceite después de cada uso. Almacene el aceite filtrado correctamente
(consulte Almacenamiento del aceite).
➢ Después de apagar el aparato, espere al menos 3 horas para que el aceite se enfríe,
dependiendo de la configuración seleccionada durante el uso.
➢ El aceite más caliente tardará más en alcanzar una temperatura fresca.
➢ Filtrar el aceite después de cada uso ayudará a prolongar la vida del aceite de
cocina, pero aún debe descartarse si el aceite se deteriora después de un uso
múltiple. Estimamos que el aceite, en uso normal, debe cambiarse al menos después
de cada 10 usos.
• Asegúrese de que el contenedor de aceite (15) esté ensamblado, vacío y en su lugar
dentro del aparato.
• Una vez que el aceite se haya enfriado a temperatura ambiente, gire la perilla de control
de filtración de aceite (14) a la posición FILTRAR ACEITE. (ill. r).
• El aceite comenzará a gotear dentro del contenedor de aceite (15). La cubierta del filtro
de aceite (11) evitará que los residuos de alimentos se transfieran al contenedor de
aceite (15).
• Cuando todo el aceite se ha filtrado:
o Gire el botòn de control de filtración de aceite (14) a la posición de BLOQUEO
(LOCK), si el contenedor permanecerá dentro del aparato.
o Gire la perilla de control de la filtración de aceite (14) a la posición de
DESBLOQUEO (UNLOCK) si desea quitar el contenedor del aparato.
NOTA :
➢ Espere siempre de 3 a 4 horas hasta que el aceite se haya enfriado por completo,
antes de drenar o filtrar.
➢ Se debe tener mucho cuidado al mover el aparato mientras el depósito de aceite
(9) y el recipiente de aceite (15) no están vacíos.
➢ Al extraer el recipiente de aceite (15) del aparato, manejalo con cuidado.
Mantenga el recipiente de aceite (15) plano y sosténgalo con ambas manos.
VACIAR EL CONTENEDOR DE ACEITE
El aceite filtrado puede almacenarse en un recipiente adecuado (ver Almacenamiento de
aceite) o reutilizarse para freír un nuevo lote de alimentos (ver Cocción con aceite).
• Desenrosque la tapa (16) en la parte superior del contenedor de aceite (15) (ill. S).
• Vierta lentamente el contenido del recipiente de aceite (15) en un recipiente adecuado
o en el depósito de aceite (9), si es necesario.
NOTA :
➢ Asegúrese de que la perilla de control de filtración de aceite (14) esté en la posición
de DESBLOQUEO antes de verter aceite en el depósito de aceite (9).
Page 58

Copies of the I/B. Please reproduce them without any
changes except under special instruction from Team
International BELGIUM. The pages must be reproduced
and folded in order to obtain a booklet A5 (+/- 148.5 mm
width x 210 mm height). When folding, make sure you
keep the good numbering when you turn the pages of
the I/B. Don’t change the page numbering. Keep the
language integrity.
Back cover page (last page)
Assembly page 58/70
Fax +32 2 359 95 50
➢ Incline el contenedor de aceite (15) hacia arriba (posición vertical) gradualmente
para evitar las fugas desde el lado del recipiente.
➢ El aceite puede almacenarse en el depósito de aceite (9), dentro de la freidora o en
otro lugar fresco y seco (consulte Almacenamiento de aceite).
• Atornille la tapa (16) en la parte superior del contenedor de aceite (15).
• Inserte el contenedor de aceite (15) de nuevo en el aparato y gire la perilla de control de
filtración de aceite (14) a la posición LOCK para asegurar el contenedor de aceite (15)
en su lugar (ill. T).
ALMACENAMIENTO DE ACEITE
• No guarde aceite de cocina usado en el refrigerador. Elija un lugar fresco que no esté
expuesto a la luz solar. En general, el aceite puede almacenarse durante un período de 3
meses, una vez que se abre la botella. Por favor, observe las instrucciones de
almacenamiento del fabricante del aceite también.
CONSEJOS
• Cantidades limitadas de comida normalmente requieren un tiempo de cocción un poco
más corto que grandes cantidades de comida.
• Para reducir el tiempo de cocción, descongele los alimentos antes de cocinarlos. Aun asì,
se recomienda que algunos alimentos no se descongelen antes de cocinarlos, como el
pescado congelado y las papas fritas congeladas.
• Se recomienda usar un termómetro de carne para verificar el progreso de cocción.
• En el caso de brotes de alimentos, no retire la tapa (3), no retire la cesta (6); gire la perilla
de control de temperatura (23) a la posición 0 y desenchufe el aparato.
• Cuando la comida que está cocinada requiere agitación. Se recomienda utilizar un
temporizador configurado durante la mitad del tiempo de cocción sugerido. De esta
forma sonará una campana y le recordará que sacuda la cesta (6).
• Se recomienda usar únicamente utensilios de cocina de plástico, nailon o madera
resistente al calor. Los utensilios de metal pueden calentarse y dañar la superficie
antiadherente. Siempre retire los utensilios del electrodoméstico. No los deje en el
aparato durante el uso.
LIMPIEZA Y MANTENIMIENTO
El mantenimiento adecuado garantizará muchos años de servicio desde su electrodoméstico.
Limpie el aparato después de cada uso. El aparato no contiene piezas reparables por el
usuario y requiere poco mantenimiento. Deje cualquier servicio o reparación al personal
calificado.
AVISO :
➢ Siempre gire et botòn de control de temperatura (23) a la posición 0, después de
limpiar a fondo, antes de usar o almacenar el aparato. Asegúrese de que no entre
agua en la carcasa del aparato (13).
➢ No intente conectar el enchufe magnético permanentemente al dispositivo.
➢ No intente quitar la placa de sellado de goma de silicona (22).
• Asegúrese de que el contenedor de aceite (15) esté sujetado, luego gire el botòn de
control de filtración de aceite (14) a la posición de FILTRO DE ACEITE para vaciar el
depósito de aceite (9) (consulte Filtración de aceite).
• Coloque la cesta (6) en una superficie limpia, plana y resistente al calor.
Page 59

Copies of the I/B. Please reproduce them without any
changes except under special instruction from Team
International BELGIUM. The pages must be reproduced
and folded in order to obtain a booklet A5 (+/- 148.5 mm
width x 210 mm height). When folding, make sure you
keep the good numbering when you turn the pages of
the I/B. Don’t change the page numbering. Keep the
language integrity.
Back cover page (last page)
Assembly page 59/70
Fax +32 2 359 95 50
¡Peligro de quemaduras!
➢ Asegúrese de que la cesta (6) se haya enfriado por completo antes de tocar su
superficie e intentar quitar el mango de la cesta (7).
➢ Asegúrese de que el aceite se haya enfriado por completo antes de vaciar el
depósito de aceite (9) en el recipiente de aceite (15).
• Retire el mango (7) de la cesta (6).
• Retire el panel de control (21) del depósito de aceite (9). Limpie cuidadosamente el
panel de control (21) y el calentador de inmersión (20) con un paño húmedo.
• Tire de la cubierta del filtro de aceite (11) desde el depósito de aceite (9) y luego retire el
depósito de aceite (9) de la carcasa (13).
• Abra la tapa del filtro en la tapa (28) y retire los filtros blanco y negro (26, 27) (ill. U).
• Limpie la carcasa del aparato (13) con un paño húmedo.
• Lave la tapa (3), el cesto (6), el mango de la cesta (7), el depósito de aceite (9) y la tapa
del filtro de aceite (11) con agua caliente y jabón o en un lavavajillas. Enjuague y seque
cuidadosamente.
• Seque todas las piezas cuidadosamente después de limpiarlas y antes de volver a utilizar
el aparato.
NOTA :
➢ Si el contenedor de aceite (15) necesita ser limpiado, asegúrese de que esté vacío
antes de intentar limpiarlo (vea Vaciar el contenedor de aceite). Lavar con agua
jabonosa caliente o en un lavavajillas. Enjuague y seque cuidadosamente.
➢ Limpie los filtros (26, 27) cada 3 meses o cada 12 usos con agua jabonosa caliente.
Aviso : No les limpie en un lavavajillas.
➢ Seque bien todas las partes y superficies antes de usar. Asegúrese de que todas las
piezas y superficies estén completamente secas antes de conectar el dispositivo a
una toma de corriente. Incluso una pequeña cantidad de agua puede causar una
salpicadura severa de aceite caliente.
ALMACENAMIENTO
• Antes del almacenamiento, siempre asegúrese de que el electrodoméstico esté
completamente frío, limpio y seco.
• Se recomienda guardar el aparato en un lugar seco.
• Guarde el aparato en un estante estable o en un armario. Para evitar accidentes,
asegúrese de que tanto el aparato como su cable de alimentación estén fuera del
alcance de niños o animales domésticos.
PROTECCIÓN DEL MEDIO AMBIENTE – DIRECTIVA 2012/19/UE
Para poder preservar nuestro medio ambiente y proteger la salud humana, los residuos
eléctricos y equipos electrónicos deberían ser destruidos de acuerdo con unas normas
especificas con la implicación de ambos proveedores y consumidores. Por esta razón, como
indica el símbolo en la placa de datos técnicos, su aparato no debería ser tirado en un
contenedor municipal sino que debería ser devuelto a la tienda, o dejado en un punto de
recolección para ser reciclado o usado para otras aplicaciones conforme a la directiva.
Page 60

Copies of the I/B. Please reproduce them without any
changes except under special instruction from Team
International BELGIUM. The pages must be reproduced
and folded in order to obtain a booklet A5 (+/- 148.5 mm
width x 210 mm height). When folding, make sure you
keep the good numbering when you turn the pages of
the I/B. Don’t change the page numbering. Keep the
language integrity.
Back cover page (last page)
Assembly page 60/70
Fax +32 2 359 95 50
ZASADY BEZPIECZNEGO UŻYTKOWANIA
Przeczytaj uważnie niniejszą instrukcję przed użyciem urządzenia
i zawsze postępuj zgodnie z jej wskazaniami. Zachowaj instrukcję.
Ważne: Z urządzenia mogą korzystać dzieci w wieku powyżej 8 lat
oraz osoby o ograniczonych zdolnościach fizycznych, sensorycznych
lub umysłowych lub nie posiadające doświadczenia lub wiedzy, jeśli
pozostaną one pod nadzorem lub zostaną poinstruowane odnośnie
bezpiecznego użytkowania urządzenia i związanego z nim ryzyka.
Dzieci nie powinny bawić się urządzeniem. Czyszczenia
i konserwacji nie należy powierzać do wykonania dzieciom, chyba że
są one starsze niż 8 lat i nadzorowane. Nigdy nie pozostawiaj
urządzenia i jego przewodu w zasięgu dzieci poniżej 8 lat lub
nieodpowiedzialnych osób, szczególnie gdy jest ono podłączone do
sieci elektrycznej lub gdy jest schładzane.
❑ Sprawdź, czy napięcie w sieci odpowiada napięciu podanemu na
urządzeniu.
❑ Nigdy nie pozostawiaj urządzenia bez nadzoru podczas
użytkowania.
❑ Często sprawdzaj urządzenie pod kątem uszkodzeń. Nigdy nie
używaj urządzenia, jeśli kabel lub urządzenie wykazują
jakiekolwiek oznaki uszkodzenia. W takim przypadku naprawy
powinien wykonać wykwalifikowany elektryk (*). Jeśli przewód
zostanie uszkodzony, musi zostać wymieniony przez
wykwalifikowanego elektryka (*) w celu uniknięcia wszelkiego
niebezpieczeństwa.
❑ Urządzenie jest przeznaczone wyłącznie do użytku domowego
i należy korzystać z niego w sposób wskazany w niniejszej
instrukcji.
❑ Nigdy nie używaj urządzenia w pobliżu gorących powierzchni.
❑ Przed czyszczeniem zawsze odłącz urządzenie od zasilania.
❑ Nigdy nie korzystaj z urządzenia na zewnątrz i zawsze
umieszczaj je w suchym otoczeniu.
❑ Nigdy nie używaj akcesoriów, które nie są zalecane przez
producenta. Mogłyby stanowić zagrożenie dla użytkownika
i spowodować ryzyko uszkodzenia urządzenia.
Page 61

Copies of the I/B. Please reproduce them without any
changes except under special instruction from Team
International BELGIUM. The pages must be reproduced
and folded in order to obtain a booklet A5 (+/- 148.5 mm
width x 210 mm height). When folding, make sure you
keep the good numbering when you turn the pages of
the I/B. Don’t change the page numbering. Keep the
language integrity.
Back cover page (last page)
Assembly page 61/70
Fax +32 2 359 95 50
❑ Nigdy nie przemieszczaj urządzenia ciągnąc za przewód. Upewnij
się, że przewód nie zostanie w żaden sposób zaczepiony. Nie
owijaj przewodu wokół urządzenia i nie zginaj go.
❑ Ustawiaj urządzenie na płaskiej stabilnej powierzchni, aby nie
spadło.
❑ Używaj urządzenia do głębokiego smażenia. Smaż tylko produkty
spożywcze.
❑ Zewnętrzną obudowę, wewnętrzną misę, pokrywkę, kosz i uchwyt
można myć ręcznie. Nigdy, pod żadnym pozorem nie zanurzaj
urządzenia w wodzie lub innym płynie do czyszczenia (patrz
sekcja „Czyszczenie”).
❑ Zaczekaj, aż urządzenie całkowicie wystygnie przed
przenoszeniem go, czyszczeniem lub przechowywaniem. Zawsze
trzymaj urządzenie za uchwyty do przenoszenia. Zawsze odłączaj
urządzenie od zasilania po jego użyciu.
❑ Nigdy nie używaj urządzenia bez oleju lub innego tłuszczu.
Upewnij się, że poziom oleju lub tłuszczu zawsze znajduje się
pomiędzy oznaczeniami MIN i MAX wewnątrz misy. Nigdy nie
przekraczaj poziomu MAX, ponieważ gorący olej lub tłuszcz może
zostać wyrzucony (rozpryskany).
❑ Należy bezwzględnie utrzymywać to urządzenie w czystości,
ponieważ ma ono bezpośredni kontakt z żywnością.
❑ Upewnij się, że przewód nie styka się z gorącymi częściami
urządzenia. Pamiętaj, aby nigdy nie dotykać tych gorących
części.
❑ Upewnij się, że gorące części urządzenia nie mają kontaktu
z łatwopalnymi materiałami, takimi jak zasłony, obrusy itp.,
ponieważ może to spowodować pożar.
❑ Nigdy nie przykrywaj urządzenia jakimikolwiek materiałami.
❑ Nigdy nie dodawaj wody do oleju.
❑ Staraj się, aby produkty przeznaczone do smażenia były jak
najbardziej suche.
❑ Twoja frytownica jest wyposażona w filtr przeciwzapachowy.
Oznacza to, że można zamknąć pokrywkę podczas smażenia.
Należy jednak regularnie czyścić ten filtr (patrz punkt
„Czyszczenie”).
UWAGA: frytownica może osiągnąć wysoką temperaturę
podczas użytkowania. Preparaty oleiste i tłuszczowe mogą się
zapalić, jeśli się przegrzeją. Zachowaj szczególną ostrożność,
Page 62

Copies of the I/B. Please reproduce them without any
changes except under special instruction from Team
International BELGIUM. The pages must be reproduced
and folded in order to obtain a booklet A5 (+/- 148.5 mm
width x 210 mm height). When folding, make sure you
keep the good numbering when you turn the pages of
the I/B. Don’t change the page numbering. Keep the
language integrity.
Back cover page (last page)
Assembly page 62/70
Fax +32 2 359 95 50
aby nie pozostawiać swojej frytownicy włączonej dłużej niż to
konieczne. Nie zapomnij wyłączyć urządzenia, gdy smażone
artykuły będą gotowe, a frytownica nie będzie już używana. Przed
wyciągnięciem wtyczki sieciowej ustaw przełącznik temperatury
na „MIN”.
❑ Zapewnij odpowiednią wentylację pomieszczenia podczas
korzystania z urządzenia.
❑ Jeśli chcesz użyć tłuszczu stałego, pokrój go na małe kawałki
i włóż do miski. Przesuń pokrętło regulacji temperatury do pozycji
minimum. Za każdym razem, gdy lampka kontrolna zgaśnie,
przesuń pokrętło regulacji temperatury na nieco wyżą wartość, aż
cały tłuszcz się rozpuści. Po stopieniu tłuszczu ustaw pokrętło
temperatury na żądaną temperaturę smażenia. Ten rodzaj
tłuszczu zestala się, gdy urządzenie się ochłodzi.
❑ Nigdy nie włączaj urządzenia za pomocą zewnętrznego timera
lub jakiegokolwiek osobnego systemu zdalnego sterowania.
❑ Uwaga: Symbol na określonej powierzchni wskazuje, że
należy zachować szczególną ostrożność podczas obchodzenia
się z produktem. Ten symbol oznacza: UWAGA, ta powierzchnia
może być bardzo gorąca podczas użytkowania.
Symbol jest zawsze umieszczany na powierzchni
o najwyższej temperaturze, jednak inne metalowe lub
niemetalowe powierzchnie mogą również bardzo się nagrzewać
podczas używania i dlatego zaleca się, aby zawsze obchodzić się
z nimi ostrożnie i jeśli to możliwe używać rękawic izotermicznych
lub innej ochrony termicznej. W przypadku wątpliwości
dotyczących temperatury danej powierzchni zawsze lepiej jest się
zabezpieczyć.
(*) Uprawniony elektryk: Osoba wskazana przez dział sprzedaży producenta lub importera lub każda
osoba posiadająca niezbędne kwalifikacje umożliwiające dokonywanie tego typu napraw bez
stwarzania zagrożenia. W każdym przypadku urządzenie należy przekazywać tym osobom.
PRZED PIERWSZYM UŻYCIEM
• Usuń wszystkie materiały opakunkowe.
• Sprawdź zawartość paczki, aby upewnić się, że zawiera wszystkie elementy I są one
nieuszkodzone. Nie używaj urządzenia, jeśli jest niekompletne lub wygląda na uszkodzone.
Niebezpieczeństwo uduszenia!
Materiały opakunkowe to nie zabawki. Plastikowe torby, folie i elementy piankowe
umieszczaj zawsze z dala od niemowląt i dzieci. Materiał opakunkowy może zablokować
Page 63

Copies of the I/B. Please reproduce them without any
changes except under special instruction from Team
International BELGIUM. The pages must be reproduced
and folded in order to obtain a booklet A5 (+/- 148.5 mm
width x 210 mm height). When folding, make sure you
keep the good numbering when you turn the pages of
the I/B. Don’t change the page numbering. Keep the
language integrity.
Back cover page (last page)
Assembly page 63/70
Fax +32 2 359 95 50
drogi oddechowe i uniemożliwić oddychanie.
UWAGA:
➢ Urządzenie może wydawać nieprzyjemny zapach i / lub wydzielać dym po włączeniu
po raz pierwszy; to jest efekt procesu eliminacji pozostałości z procesu
produkcyjnego. Jest to normalne i nie oznacza wady ani zagrożenia. Zapewnij
odpowiednią wentylację.
➢ Wyczyść dokładnie urządzenie przed pierwszym użyciem (Patrz: „Czyszczenie
i konserwacja”).
MONTAŻ
Obejrzyj ilustracje:
• Umieść urządzenie na czystej, płaskiej i odpornej na ciepło powierzchni.
• Przed użyciem urządzenia upewnij się, że:
o Uchwyt kosza (7) jest zablokowany na miejscu w koszu (6).
o Aby zablokować uchwyt kosza (7) na właściwym miejscu, ściśnij pręty i wsuń je
pomiędzy szczeliny.
o Włóż końce prętów do wspornika kosza (6) i popchnij uchwyt (7) do tyłu (il. a i b).
Nie łącz w żaden inny sposób (il. c).
o Misa na olej (9) jest zabezpieczona w prawidłowej pozycji z pokrywą filtra oleju
(11) i zaworem oleju (12) po tej samej stronie, co pokrętło filtrowania oleju (14)
(rys. d). Upewnij się, że pokrywa filtra oleju (11) znajduje się w misie na olej (9).
o Panel sterowania (21) znajduje się na płycie przyłączeniowej z tyłu obudowy
(13). Upewnij się, że rowki płyty łączącej znajdują się w prowadnicach panelu
sterowania (il. e).
UWAGA:
➢ Twoje urządzenie jest wyposażone w wyłącznik bezpieczeństwa (5) umieszczony
na panelu sterowania (21). Jeśli panel sterowania (21) nie zostanie prawidłowo
umieszczony, urządzenie nie będzie działać.
• Nieprawidłowy montaż może prowadzić do niestabilnego ustawienia i może stać się
przyczyną obrażeń.
• Kauczukowa płyta uszczelniająca (22) zapobiega wydostawaniu się gorącej pary spod
pokrywy. Nie próbuj jej usuwać.
KORZYSTANIE Z URZĄDZENIA
To urządzenie może być używane do smażenia potraw, takich jak frytki, kurczak lub ryba (patrz:
Zalecane czasy smażenia i temperatury).
UWAGA:
➢ Urządzenie ma moc znamionową 1700W. Przed podłączeniem do gniazdka
ściennego upewnij się, że odpowiadający mu obwód elektryczny nie jest
przeciążony przez inne urządzenia. To urządzenie powinno być zawsze
obsługiwane przez oddzielne gniazdko 230V ~ 50Hz.
➢ Upewnij się, że urządzenie jest wyłączone (regulator temperatury w poz. 0) przed
podłączeniem go do gniazdka ściennego.
• Umieść urządzenie na czystej, płaskiej i odpornej na ciepło powierzchni. Podczas
używania urządzenia na drewnianych powierzchniach należy użyć odpornej na ciepło
maty, aby chronić drewno przed uszkodzeniem. Zapewnić minimalną odległość dookoła
urządzenia wynoszącą co najmniej 15cm od innych przedmiotów, szaf i ścian.
Page 64

Copies of the I/B. Please reproduce them without any
changes except under special instruction from Team
International BELGIUM. The pages must be reproduced
and folded in order to obtain a booklet A5 (+/- 148.5 mm
width x 210 mm height). When folding, make sure you
keep the good numbering when you turn the pages of
the I/B. Don’t change the page numbering. Keep the
language integrity.
Back cover page (last page)
Assembly page 64/70
Fax +32 2 359 95 50
• Upewnij się, że pojemnik na olej (15) jest zamontowany, pusty i znajduje się wewnątrz
urządzenia, gałka kontroli filtracji oleju (14) znajduje się w położeniu LOCK, a pokrywa filtra
oleju (11) znajduje się wewnątrz misy na olej (9). Następnie wlej odpowiedni olej do
smażenia do misy na olej (9) (il. f).
Niebezpieczeństwo poparzenia!
➢ Nigdy nie napełniaj misy na olej (9) podczas używania lub podgrzewania.
Zawsze pozwól, aby urządzenie całkowicie się ochłodziło. Nie mieszaj nowego
i starego oleju.
OSTRZEŻENIE:
➢ NIE NALEŻY PRZEPEŁNIAĆ LUB NIEDOPEŁNIAĆ ZBIORNIKA OLEJU (il. f).
Minimalna pojemność (MIN) to 1,9 l, maksymalna pojemność (MAX) to 3 l oleju.
Upewnij się, że poziom oleju zawsze pozostaje pomiędzy oznaczeniem MIN i MAX
(10).
• Nalej odrobinę oleju na wewnętrzną stronę okna podglądu (2), aby zapobiec wykraplaniu
się pary.
• Umieść pokrywę (3) na obudowie (13).
• Upewnij się, że pokrętło regulacji temperatury (23) znajduje się w pozycji 0.
UWAGA:
• Włóż wtyczkę (17) do gniazdka ściennego.
OSTRZEŻENIE:
➢ Używaj tylko akcesoriów zalecanych przez producenta. Nie umieszczaj żadnych
innych materiałów, przedmiotów w urządzeniu.
➢ Nigdy nie dopuszczaj do kontaktu przewodu zasilającego (17) z pokrywą (3) lub
obudową urządzenia (13) podczas jego używania (rys. H).
NIEBEZPIECZEŃSTWO POPARZENIA!
➢ Nie dotykaj pokrywy (3) ani obudowy urządzenia (13) podczas lub wkrótce po
użyciu (il. i). Używaj tylko dostarczonych uchwytów (2, 7, 19).
➢ Zwróć szczególną uwagę podczas dodawania lub usuwania akcesoriów
i żywności z urządzenia. Nigdy nie dotykaj pokrywy (3) ani obudowy urządzenia
(13), gdy urządzenie jest podłączone i włączone lub bezpośrednio po jego
użyciu. Zaleca się, aby zawsze używać rękawic kuchennych.
➢ Wydostające się opary mogą się samoczynnie zapalić.
• Obróć pokrętło regulacji temperatury (14) do żądanej temperatury (patrz Zalecane czasy
smażenia i temperatury) (il. j). Wskaźnik POWER (25) zaświeci się, sygnalizując, że
urządzenie się nagrzewa. Po osiągnięciu ustawionej temperatury włącza się wskaźnik
READY (24).
Przybliżony czas potrzebny do osiągnięcia ustawionej temperatury:
Ustawiona temperatura (°C)
Czas (minuty)
130
Około 7
150
Około 8
170
Około 10
Page 65

Copies of the I/B. Please reproduce them without any
changes except under special instruction from Team
International BELGIUM. The pages must be reproduced
and folded in order to obtain a booklet A5 (+/- 148.5 mm
width x 210 mm height). When folding, make sure you
keep the good numbering when you turn the pages of
the I/B. Don’t change the page numbering. Keep the
language integrity.
Back cover page (last page)
Assembly page 65/70
Fax +32 2 359 95 50
190
Około 13
Po podgrzaniu oleju zdejmij pokrywkę (3).
Umieść kosz (6) na czystej, płaskiej i odpornej na ciepło powierzchni.
Napełnij kosz (6) żywnością (il. k). Nie przepełniaj kosza (6) (rys. k).
OSTRZEŻENIE!
➢ Nie smaż żywności bez kosza (6) (il. l).
➢ Nie napełniaj kosza (6) powyżej połowy. Zbyt dużo jedzenia może powodować
nadmierne pienienie i w konsekwencji przekroczenie maksymalnego poziomu
oleju podczas pracy.
➢ Żywność umieszczona w urządzeniu musi być sucha. W przypadku smażenia
mrożonek, takich jak frytki lub skrzydełka z kurczaka, należy usunąć wszystkie
cząstki lodu z zamrożonej żywności przed smażeniem, aby zapobiec przelaniu się
oleju.
➢ Przed smażeniem zawsze usuwaj nadmiar wilgoci z żywności za pomocą
papierowego ręcznika. Nawet niewielka ilość wody może spowodować
poważne rozpryskiwanie gorącego oleju.
➢ Po zanurzeniu kosza (6) w oleju, natychmiast nakryj urządzenie pokrywą (3) –
Niebezpieczeństwo wypryskiwania lub wylania się gorącego oleju.
• Ostrożnie opuść kosz (6) do misy z olejem (9) (il. n).
• Przykryj misę oleju (9) pokrywą (3) (il. o). Upewnij się, że zagłębione części pokrywy (3)
pasują poprawnie do uchwytu kosza (7) i silikonowej płyty uszczelniającej (22).
UWAGA:
➢ Podczas smażenia świeżo pokrojonych ziemniaków i żywności o wysokiej zawartości
wilgoci powoli opuszczaj kosz do oleju. Jeśli olej zagotuje się lub nadmiernie się pieni,
podnieś kosz na kilka sekund i ponownie opuść. Powtarzaj te czynności, aż kosz
zostanie zanurzony bez nadmiernego pienienia się.
➢ Nie umieszczaj pokrywy (3) na urządzeniu podczas smażenia świeżo krojonych
ziemniaków lub innych produktów o wysokiej zawartości wilgoci.
➢ Czas smażenia, patrz "Zalecane czasy i temperatury smażenia" lub postępuj zgodnie
z instrukcjami producenta żywności.
• Po upływie czasu smażenia zdejmij pokrywkę (3).
• Za pomocą uchwytu (7) podnieś kosz (6) i zawieś go na haku (8) na obrzeżu zbiornika oleju
(9) (il. p).
• Pozwól, aby nadmiar oleju spływał z kosza (6) przez kilka sekund, aby usunąć nadmiar
oleju i zachować chrupkość.
• Za pomocą uchwytu (7) ostrożnie podnieś kosz (6) i przełóż jedzenie do termoodpornego
naczynia, które zostało wyłożone papierowym ręcznikiem, aby zebrać pozostały olej.
OSTRZEŻENIE
➢ Nigdy nie umieszczaj gorącego kosza (6) bezpośrednio na blacie, aby uniknąć
uszkodzenia powierzchni. Zaleca się używanie odpornego na ciepło trójnoga lub
deski do krojenia.
• Umieść kosz (6) na czystej, płaskiej i odpornej na ciepło powierzchni.
• Po zakończeniu procesu gotowania obróć pokrętło regulacji temperatury (23) w
położenie 0 i wyjmij wtyczkę (17) z gniazda ściennego.
Page 66

Copies of the I/B. Please reproduce them without any
changes except under special instruction from Team
International BELGIUM. The pages must be reproduced
and folded in order to obtain a booklet A5 (+/- 148.5 mm
width x 210 mm height). When folding, make sure you
keep the good numbering when you turn the pages of
the I/B. Don’t change the page numbering. Keep the
language integrity.
Back cover page (last page)
Assembly page 66/70
Fax +32 2 359 95 50
OSTRZEŻENIE
➢ Zawsze odłączaj wtyczkę (17) od gniazdka ściennego. Odłączenie przewodu
zapobiega przypadkowemu włączeniu urządzenia. Nie odłączaj go podczas
normalnej pracy. Jeśli wtyczka magnetyczna zostanie odłączona, natychmiast wyjmij
wtyczkę (17) z gniazdka. Obróć pokrętło regulacji temperatury (23) w położenie 0.
Następnie ponownie podłącz wtyczkę (17) do gniazda ściennego.
➢ To urządzenie generuje ciepło i parę podczas użytkowania. Należy podjąć
odpowiednie środki ostrożności, aby zapobiec ryzyku poparzeń, pożarów lub innych
obrażeń osób lub szkód materialnych. Nie pozostawiaj urządzenia bez nadzoru
podczas użytkowania.
➢ Powierzchnie urządzenia rozgrzewają się. Nie dotykaj ich podczas używania.
Pozostaw urządzenie do ostygnięcia na co najmniej 30 minut przed podjęciem
czynności związanych z myciem lub przechowywaniem.
ZALECANE CZASY I TEMPERATURY SMAŻENIA
UWAGA:
Podane w poniższej tabeli czasy smażenia są przybliżone i powinny być dostosowane
do własnych upodobań, różnych ilości żywności i instrukcji producenta żywności
Wybrana temperatura (°C)
Czas (minuty)
130
Około 7
150
Około 8
170
Około 10
190
Około 13
Artykuły żywnościowe
Żywność
Wybrana temperatura (°C)
Czas (minuty)
Frytki mrożone
190
8-12
Frytki świeże
190
8-10
Kawałki mięsne
190
10-14
Skrzydełka z kurczaka
190
10-14
Ryba (panierowana)
170
3-5
Owoce morza
170
3-5
GOTOWANIE (SMAŻENIE) W OLEJU
Olej spożywczy może poprawić smak potrawy – lub zepsuć jej smak. Jak w przypadku każdego
innego składnika żywności, świeżość i prawidłowe obchodzenie się z olejem są kluczem do
udanych wyników frytowania.
Wybrana temperatura (°C)
Czas (minuty)
130
Około 7
150
Około 8
170
Około 10
Jakość oleju obniża się przy stosowaniu wysokich temperatur. Cząstki jedzenia, woda i inne
płyny jeszcze bardziej obniżą jego jakość, dlatego:
• Nie mieszaj różnych olejów spożywczych.
• Używaj tylko świeżych i czystych olejów spożywczych:
o Regularnie usuwaj spalone cząsteczki jedzenia podczas smażenia. Zawsze
używaj naczyń, narzędzi, które można bezpiecznie zanurzać w gorących olejach,
nie uszkadzając przyrządu ani urządzenia, i zawsze noś rękawice kuchenne
Page 67

Copies of the I/B. Please reproduce them without any
changes except under special instruction from Team
International BELGIUM. The pages must be reproduced
and folded in order to obtain a booklet A5 (+/- 148.5 mm
width x 210 mm height). When folding, make sure you
keep the good numbering when you turn the pages of
the I/B. Don’t change the page numbering. Keep the
language integrity.
Back cover page (last page)
Assembly page 67/70
Fax +32 2 359 95 50
podczas usuwania wszelkich przypalonych cząstek jedzenia.
o Po użyciu i przed przechowywaniem, przefiltruj olej za pomocą zintegrowanego
systemu filtracji (patrz Filtracja oleju)
o Nie używaj ponownie oleju, który był używany do smażenia ryb lub innych silnie
aromatyzowanych potraw.
o Niektóre mięsa, takie jak skrzydełka z kurczaka, uwalniają duże ilości płynów
podczas smażenia, które spływają do oleju. Nie używaj ponownie tego oleju.
FILTRACJA OLEJU
UWAGA:
➢ Filtruj olej po każdym użyciu. Prawidłowo przechowuj przefiltrowany olej (patrz
Przechowywanie oleju).
➢ Regularnie usuwaj olej w zależności od jego jakości (patrz Gotowanie w oleju).
➢ Po wyłączeniu urządzenia odczekaj co najmniej 3 godziny, aż olej ostygnie,
w zależności od ustawień wybranych podczas użytkowania. Im cieplejszy olej tym
wymaga więcej czasu, aby osiągnąć niską temperaturę.
➢ Filtrowanie oleju po każdym użyciu pomoże przedłużyć żywotność oleju do smażenia,
ale nadal należy go wyrzucić, jeśli jakość oleju ulegnie pogorszeniu po wielokrotnym
użyciu. Szacujemy, że olej w normalnych warunkach powinien być wymieniany co
najmniej po każdych 10 użyciach).
• Upewnij się, że zbiornik oleju (15) jest zmontowany, pusty i znajduje się wewnątrz
urządzenia.
• Gdy olej ostygnie do temperatury pokojowej, przekręć pokrętło kontroli filtracji oleju (14)
na pozycję FILTER OIL (il. r). Olej zacznie kapać do zbiornika oleju (15). Pokrywa filtra oleju
(11) zatrzymuje pozostałości żywności, zanieczyszczenia będące w zbiorniku oleju (15).
• Gdy cały olej zostanie przefiltrowany:
o Obróć pokrętło filtrowania oleju (14) w położenie LOCK, jeśli pojemnik pozostanie
wewnątrz urządzenia.
o Obrócić pokrętło filtrowania oleju (14) w położenie UNLOCK, jeśli pojemnik ma
zostać wyjęty z urządzenia.
UWAGA:
➢ Przed opróżnianiem zbiornika lub filtrowaniem zawsze odczekaj 3 do 4 godzin, aż olej
ostygnie całkowicie,
➢ Podczas przenoszenia urządzenia należy zachować najwyższą ostrożność, gdy
zbiorniki oleju (9) i (15) nie są puste.
➢ Wyjmując pojemnik oleju (15) z urządzenia, postępuj ostrożnie. Zbiornik oleju (15)
powinien być trzymany poziomo obiema rękami.
OPRÓŻNIANIE ZBIORNIKA OLEJU
Filtrowany olej może być przechowywany w odpowiednim pojemniku (patrz Przechowywanie
oleju) lub ponownie używany do smażenia nowej partii żywności (patrz Gotowanie w oleju).
• Odkręć korek (16) na zbiorniku oleju (15) (il. s).
• Powoli zlej zawartość zbiornika oleju (15) do odpowiedniego pojemnika lub misy na olej
(9), jeśli jest to potrzebne.
UWAGA:
➢ Upewnij się, że gałka kontrolna filtracji oleju (14) znajduje się w położeniu UNLOCK
Page 68

Copies of the I/B. Please reproduce them without any
changes except under special instruction from Team
International BELGIUM. The pages must be reproduced
and folded in order to obtain a booklet A5 (+/- 148.5 mm
width x 210 mm height). When folding, make sure you
keep the good numbering when you turn the pages of
the I/B. Don’t change the page numbering. Keep the
language integrity.
Back cover page (last page)
Assembly page 68/70
Fax +32 2 359 95 50
przed zlaniem oleju do misy oleju (9).
➢ Przechylaj zbiornik oleju (15) w górę (pozycja pionowa) stopniowo, aby uniknąć
wycieków z boku pojemnika.
➢ Olej można przechowywać w misie na olej (9), wewnątrz frytownicy lub w innym
chłodnym, suchym miejscu (patrz Przechowywanie oleju).
• Wkręć nakrętkę (16) z powrotem do zbiornika oleju (15).
• Włóż zbiornik oleju (15) z powrotem do urządzenia i obróć pokrętło filtracji oleju (14) do
pozycji LOCK, aby zabezpieczyć zbiornik oleju (15) na właściwym miejscu (il. t).
PRZECHOWYWANIE OLEJU
• Nie przechowuj zużytego oleju spożywczego w lodówce. Wybierz odpowiednie miejsce,
które nie jest narażone na działanie promieni słonecznych. Zasadniczo olej może być
przechowywany przez okres 3 miesięcy po otwarciu butelki. Należy również przestrzegać
wskazówek producenta oleju dotyczących przechowywania.
PORADY I WSKAZÓWKI
• Mniejsze ilości jedzenia zwykle wymagają nieco krótszego czasu gotowania niż większe
ilości.
• Aby skrócić czas gotowania, rozmroź potrawę przed gotowaniem. Niektórych produktów,
takich jak mrożone ryby i mrożone frytki nie zaleca się rozmrażać przed gotowaniem
• Zaleca się stosowanie termometru do mięsa, aby sprawdzać postęp gotowania.
• W przypadku zapalenia się jedzenia, nie zdejmuj pokrywy (3), nie wyjmuj kosza (6); obróć
pokrętło regulacji temperatury (23) w położenie 0 i odłącz urządzenie.
• Gdy potrawa, którą gotujesz, wymaga wstrząsania, zaleca się ustawienie zegara na
połowę sugerowanego czasu gotowania. Wtedy sygnał dźwiękowy przypomni Ci o
konieczności wstrząśnięcia kosza (6).
• Zaleca się używanie wyłącznie nylonowych, termoodpornych plastikowych lub
drewnianych przyborów kuchennych. Metalowe przybory mogą się rozgrzać i uszkodzić
nieprzywierającą powierzchnię. Zawsze usuwaj przybory z urządzenia. Nie pozostawiaj ich
w urządzeniu podczas użytkowania.
CZYSZCZENIE I KONSERWACJA
Właściwa konserwacja zapewni wieloletnie korzystanie z urządzenia. Czyść urządzenie po
każdym użyciu. Urządzenie nie zawiera żadnych części, które mogą być serwisowane przez
użytkownika i wymaga niewielkiej konserwacji. Wszelkie naprawy pozostaw
wykwalifikowanemu personelowi.
OSTRZEŻENIE:
➢ Przed użyciem lub przechowywaniem urządzenia należy zawsze obrócić pokrętło
regulacji temperatury (23) do pozycji 0, po dokładnym oczyszczeniu. Upewnij się, że
woda nie dostaje się do obudowy urządzenia (13).
➢ Nie próbuj trwale przymocować wtyczki magnetycznej do urządzenia.
➢ Nie należy usuwać silikonowej gumowej płyty uszczelniającej (22).
• Upewnij się, że zbiornik oleju (15) jest na swoim miejscu, a następnie obrócić pokrętło
filtracji oleju (14) w pozycję OLEJ DO FILTRA, aby opróżnić misę na olej (9) (patrz Filtracja
oleju).
• Umieść kosz (6) na czystej, płaskiej i odpornej na ciepło powierzchni.
Page 69

Copies of the I/B. Please reproduce them without any
changes except under special instruction from Team
International BELGIUM. The pages must be reproduced
and folded in order to obtain a booklet A5 (+/- 148.5 mm
width x 210 mm height). When folding, make sure you
keep the good numbering when you turn the pages of
the I/B. Don’t change the page numbering. Keep the
language integrity.
Back cover page (last page)
Assembly page 69/70
Fax +32 2 359 95 50
Niebezpieczeństwo poparzenia!
➢ Upewnij się, że kosz (6) ostygł całkowicie, zanim dotkniesz jego powierzchni
i spróbujesz wyjąć uchwyt kosza (7).
➢ Przed opróżnieniem misy na olej (9) do zbiornika oleju (15) należy całkowicie
schłodzić olej.
• Zdejmij uchwyt kosza (7) z kosza (6).
• Zdejmij panel sterowania (21) z misy na olej (9). Ostrożnie wyczyść panel sterowania (21)
i grzałkę zanurzeniową (20) wilgotną ściereczką.
• Wyciągnij pokrywę filtra oleju (11) z misy na olej (9), a następnie wyjmij misę (9) z obudowy
(13).
• Otwórz pokrywę filtra oleju (28) i wyjmij oba filtry czarny i biały (26, 27) (il. u).
• Wyczyść obudowę urządzenia (13) wilgotną ściereczką.
• Umyj pokrywę (3), kosz (6), uchwyt kosza (7), misę (9) i pokrywę filtra oleju (11) gorącą
wodą z mydłem lub w zmywarce. Ostrożnie opłucz i osusz.
• Dokładnie osusz wszystkie części po umyciu i przed ponownym użyciem urządzenia.
UWAGA:
➢ Jeśli zbiornik oleju (15) wymaga czyszczenia, przed przystąpieniem do czyszczenia
upewnij się, że jest pusty (patrz Opróżnianie zbiornika oleju). Umyj go gorącą wodą
z mydłem lub w zmywarce. Ostrożnie opłucz i osusz.
➢ Filtry (26, 27) czyść co 3 miesiące lub po każdych 12 użyciach za pomocą gorącej
wody z mydłem. Nie czyść w zmywarce.
➢ Przed użyciem dokładnie wysusz wszystkie części i powierzchnie. Przed podłączeniem
urządzenia do gniazdka ściennego upewnij się, że wszystkie części i powierzchnie są
całkowicie suche. Nawet niewielka ilość wody może spowodować poważne
w skutkach rozpryskiwanie się gorącego oleju.
PRZECHOWYWANIE
• Przed przechowywaniem zawsze upewnij się, że urządzenie jest całkowicie zimne, czyste
i suche.
• Zaleca się przechowywanie urządzenia w suchym miejscu.
• Przechowuj urządzenie na stabilnej półce lub w szafce. Aby uniknąć wypadków, upewnij
się, że zarówno urządzenie, jak i przewód zasilający są poza zasięgiem dzieci lub zwierząt.
OCHRONA ŚRODOWISKA NATURALNEGO
Symbol na tabliczce znamionowej urządzenia oznacza, że produktu nie wolno wyrzucać razem
z innymi odpadami z gospodarstw domowych. Polskie prawo zabrania pod karą grzywny łączenia
zużytego sprzętu elektrycznego i elektronicznego wraz z innymi odpadami.
Dbając o pozbycie się produktu w należyty sposób, można zapobiec potencjalnym negatywnym
skutkom dla środowiska naturalnego i zdrowia ludzkiego, jakie mogłyby wyniknąć z niewłaściwego
postępowania z odpadami powstałymi ze zużytego sprzętu elektronicznego.
System zbierania zużytego sprzętu jest zgodny z obowiązującymi na terenie Rzeczpospolitej Polskiej
normami prawnymi, (Ustawa z dnia 29 lipca 2005, Dziennik Ustaw Nr 180 poz.1494 i 1495) obowiązki
wynikające z ustawy przejęła w imieniu przedsiębiorcy Organizacja Odzysku.
Gospodarstwo domowe pełni istotną rolę w przyczynianiu się do ponownego użycia i odzysku, w tym
recyklingu, zużytego sprzętu elektrycznego. Przestrzeganie zasad selektywnej zbiórki sprzętu ma
zapewnić właściwy poziom ochrony zdrowia ludzkiego i środowiska naturalnego. Na podstawie
prostego wniosku, instrukcja obsługi jest również dostępna w formie elektronicznej w ramach obsługi
posprzedażowej (zobacz karta gwarancyjna).
Page 70

Copies of the I/B. Please reproduce them without any
changes except under special instruction from Team
International BELGIUM. The pages must be reproduced
and folded in order to obtain a booklet A5 (+/- 148.5 mm
width x 210 mm height). When folding, make sure you
keep the good numbering when you turn the pages of
the I/B. Don’t change the page numbering. Keep the
language integrity.
Back cover page (last page)
Assembly page 70/70
Fax +32 2 359 95 50
TKG FT 1012 KTO
English
7
Français
17
Nederlands
28
Deutsch
39
Español
50
Polski
60
 Loading...