

Page 1

®
Portable USB CD-RW Drive
CD-W28PU
User's manual
To ensure the smooth handling of your w arranty please write the serial number of
your drive into the box. In the case of warranty y ou are e xpected to send it together
with a copy of your invoice to your nearest TEAC sales representative.
Page 2

• Changes in specifications and features may be made with-
out notice or obligation.
• Copyright © 2001, TEAC Corporation Ltd. All rights reserved.
First edition: October 2001
• Company and product names provided herein are trade-
marks of their respective companies.
• Windows 98 Second Edition, Windows Me, and Windows
2000 are registered trademarks of Microsoft Corporation in
the U. S.
• Just Link is a trademark of Ricoh Co., Ltd.
Page 3

CONTENTS
TO THE USER ................................................................................ 53
PRECAUTIONS .............................................................................. 53
SOFTWARE LICENCE AGREEMENT AND LIMITED
WARRANTY ................................................................................... 54
1. BEFORE USING ......................................................................... 56
1.1 Computers to connect.......................................................... 56
1.2 Conforming OSes (as of October in 2001) .......................... 57
1.3 Checking the USB controller................................................ 57
1.4 Writing media and writing speed.......................................... 59
2. PRODUCT OUTLINE .................................................................. 61
2.1 Procedure before using the CD-W28PU.............................. 62
2.2 Precautions when unpacking the package .......................... 62
2.3 Package List......................................................................... 63
3. PRECAUTIONS FOR SETTING AND HANDLING..................... 64
4. NAMES AND FUNCTIONS......................................................... 66
5. SETTING UP THE CD-W28PU................................................... 69
5.1 Cable connection ................................................................. 69
5.2 Driver installation under Windows 98SE.............................. 70
5.3 Driver un-installation in Windows 98SE ............................... 73
5.4 Driver installation under Windo ws Me.................................. 75
5.5 Driver installation Windows 2000......................................... 76
ENGLISH
6. SYSTEM RECOVERY PROCEDURE......................................... 77
6.1 System recovery of Windows 98SE ..................................... 77
6.2 System recovery of Windows ME ........................................ 79
6.3 System recovery of Windows 2000 and Windows XP.......... 82
Contents
51
Page 4

7. OPERATION................................................................................ 83
ENGLISH
8. DAILY MAINTENANCE ............................................................... 90
9. SUPPORT AND SER VICE.......................................................... 91
10. SPECIFICATION ....................................................................... 93
WARRANTY ................................................................................... 95
7.1 Precautions in handling the media....................................... 83
7.2 Connection........................................................................... 85
7.3 Disconnection ...................................................................... 85
7.4 Setting the media ................................................................. 87
7.5 Ejecting the media ............................................................... 87
7.6 Playing back the audio CD................................................... 88
7.7 Suspend/resume.................................................................. 90
Cleaning the drive ...................................................................... 90
9.1 Warranty period.................................................................... 91
9.2 Requests for repair............................................................... 91
9.3 Technical Service Depots (Europe)...................................... 92
10.1 General specification ......................................................... 93
10.2 Functional specification...................................................... 94
52
Contents
Page 5

TO THE USER
This equipment has been tested and found to comply with the limits for
a Class B digital device, pursuant to VCCI Rules. Although this de vice
is designed to be used in a home environment, it may cause interference if used near a radio or TV receiver. Be sure to handle the device
properly in accordance with this instruction manual.
PRECAUTIONS
• While reasonable efforts have been made in the prepar ation of this
product and this document to assure accuracy, contact TEAC Corporation if there is any doubt or error in this document. Note however that TEAC Corporation may not assume responsibility for the
support or results of the above.
• TEAC Corporation assumes no responsibility for data loss caused
by the operation that is not in accordance to this document, or data
loss caused by natural disaster , fire, power outage , or spontaneous
defect of this product.
• The product and the material in this document are subject to change
toward improvement without notice.
• No part of this document may be reproduced without the prior writ-
ten consent of TEAC Corporation.
• The contents in this document are written based on information as
of October 2001.
ENGLISH
To the User
53
Page 6

SOFTWARE LICENCE AGREEMENT AND LIMITED WARRANTY
ENGLISH
This License Agreement with limited warranty is a legal agreement y ou
(either an individual or a single entity) and TEA C Corporation (“TEAC”)
for the SOFTWARE, which include computer software and electronic
documentation.
1. GRANT OF LICENSE.
TEAC grants to y ou the right to use the SOFTWARE only for the EQ UIPMENT you have (“YOUR EQUIPMENT”).
2. COPYRIGHT.
All title and copyrights in and to the SOFTW ARE and any copies thereof
are owned by TEAC or a supplier to TEAC. The SOFTWARE is protected by Japanese cop yright laws, international treaty provisions , and
all other applicable national laws.
3. RESTRICTIONS.
You may not distribute copies of the SOFTWARE to third parties.
You may not reverse engineer, decompile, or disassemble the SOFTWARE, e xcept and only to the e xtent that applicab le law notwithstanding this limitation expressly permits such activity.
You may not rent or lease the SOFTWARE.
You may not reproduce the SOFTWARE except for archival purpose.
You must prominently mark the same copyright notice on your archival
DEVICE DRIVER FOR TEAC CD-R/RW UNIT LICENSE
AGREEMENT AND LIMITED WARRANTY
IMPORTANT:
PLEASE CAREFULLY READ THE LICENSE A GREEMENT
HEREIN BEFORE USING THE ENCLOSED DEVICE
DRIVER SOFTWARE (INCLUDING PR OGRAMS AND ALL
RELATED MATERIALS, ”SOFTWARE”) FOR THE TEAC
CD-R/RW UNIT (”EQUIPMENT”). THE RIGHT TO USE THE
SOFTWARE IS GRANTED ONLY ON THE CONDITION
THAT YOU AGREE TO THE LICENSE A GREEMENT . Y OUR
USE OF THE SOFTW ARE SHALL BE DEEMED THAT Y OU
AGREE T O THE LICENSE AGREEMENT.
54
Software Licence Agreement and Limites Warranty
Page 7

file that TEAC marks on the media of the SOFTWARE.
Provided, howe ver , that y ou may permanently transfer all of y our rights
under this Agreement only in conjunction with a permanent transfer of
YOUR EQUIPMENT, SOFTWARE and any copies thereof.
4. TERMINA TION.
Your rights under this Agreement terminate upon the disposal of all
copies of the SOFTWARE, or without prejudice to any other rights,
TEAC ma y terminate this Agreement if you fail to comply with the terms
and conditions of this Agreement. In such ev ent, you must destroy all
copies of the SOFTWARE.
5. LIMITED WARRANTY.
TEAC warrants that the SOFTWARE will be usable for the purpose
expressed on TEAC’s document when properly installed on a compu-
ter under allowable circumstances, including OS, CPU, I/F, cable, etc.
Your remedy and TEA C’s ob ligation under this limited warranty shall be
limited to replacement or rectification of the defective SOFTWARE.
TEAC does not warrant that the operation of the SOFTWARE will be
uninterrupted or error free. Any and all implied warranties or conditions with respect to the SOFTWARE, INCLUDING BUT NOT LIMITED TO IMPLIED WARRANTIES OR CONDITIONS OF
MERCHANTABILITY OR FITNESS FOR A P AR TICULAR PURPOSE,
HEREBY ARE EXCLUDED .
6. NO LIABILITY FOR CONSEQUENTIAL DAMAGES.
TO THE MAXIMUM EXTENT PERMITTED BY APPLICABLE LA W, IN
NO EVENT SHALL TEAC BE LIABLE FOR ANY SPECIAL INCIDENTAL, INDIRECT, OR CONSEQUENTIAL DAMAGES WHATSOEVER
(INCLUDING, WITHOUT LIMITATION, DAMAGES FOR LOSS OF
BUSINESS PROFITS, B USINESS INTERR UPTION, LOSS OF BUSINESS INFORMATION, OR ANY OTHER PECUNIARY LOSS) ARISING OUT OF THE USE OF OR INABILITY T O USE THE SOFTW ARE,
EVEN IF TEA C HAS BEEN AD VISED OF THE POSSIBILITY OF SUCH
DAMA GES . IN ANY EVENT, TEAC’S LIABILITY T O Y OU SHALL NO T
EXCEED YOUR PURCHASE PRICE FOR YOUR EQUIPMENT. BECAUSE SOME STATES AND JURISDICTIONS DO NOT ALLOW THE
EXCLUSION OR LIMITA TION OF LIABILITY FOR CONSEQUENTIAL
OR INCIDENTAL DAMAGES, THE ABOVE LIMITATION MAY NOT
APPLY TO Y OU .
7. MISCELLANEOUS.
This Agreement is governed by the laws of Japan.
ENGLISH
Software Licence Agreement and Limites Warranty
55
Page 8

1. BEFORE USING
Thank you for purchasing TEAC USB Portable CD-R/RW unit CDW28PU. This is a CD-R/RW drive that is used by connecting it to the
USB terminal of a personal computer. The drive functions as a device
conforming to the USB1.1 when connected to the USB1.1 terminal
ENGLISH
and as a device conforming to the USB2.0 when connected to the
USB2.0 terminal.
A floppy disk drive may be required for installing software when using
this drive.
This user’s manual describes how to set the CD-W28PU, how to connect it to a personal computer, and ho w to operate it. Read the instruction manual of your computer as well.
Read the user’s manual provided with each software to understand
how to use it.
Read this instruction manual carefully before use for proper handling
and operations of the CD-W28PU.
1.1 Computers to connect
• A PC/AT compatible machine with a USB1.1 or USB2.0 interface
(two or more USB connectors are required when using the USB
floppy disk drive for system recovery)
• CPU of Intel Pentium II 266MHz or more
• Main memory of 64MB or more
• Free hard drive space of approx. 800MB or more when writing to
the CD-R or CD-RW disc.
– The USB control conforms to one of the following: UHCI (Univ ersal
Host Controller Interface), OHCI (Open Host Controller Interface)
or EHCI(Enhanced Host Controller Interface) of the USB 2.0. The
drive may not operate with some USB interfaces that conform to
the OHCI.
56
1. Before Using
Page 9

– Your PC must conform to a boot from the USB CD-ROM in order to
start from a bootable CD-ROM including a recovery CD using the
drive.
– It is recommended that you create a boot disk in advance taking
into consideration the re-installation (described in System Recovery Procedure) of your OS.
– Refer to the TEAC homepage for the latest information on the op-
erational conformity.
1.2 Conforming OSes (as of October in 2001)
ENGLISH
Any one of the following operating systems is required.
• Microsoft
• Microsoft
• Microsoft
• Microsoft
®
Windo ws 98 Second Edition
®
Windows Me
®
Windo ws 2000 Professional
®
Windows XP
• The drive does not conform to Windows 95, Windows 98 and MS-
DOS.
1.3 Checking the USB controller
To use the CD-W28PU in your computer, the USB controller incorporated in the computer must be operating normally. Execute the following steps to check the operation state of the USB controller.
In Windows 98SE or Windows Me
1. Click Start, Settings, Control Panel.
2. Double-click System.
In Windows Me, System may not appear in the Control Panel. In
that case, left-click Display all the Control Panel options to display
it.
1. Before Using
57
Page 10
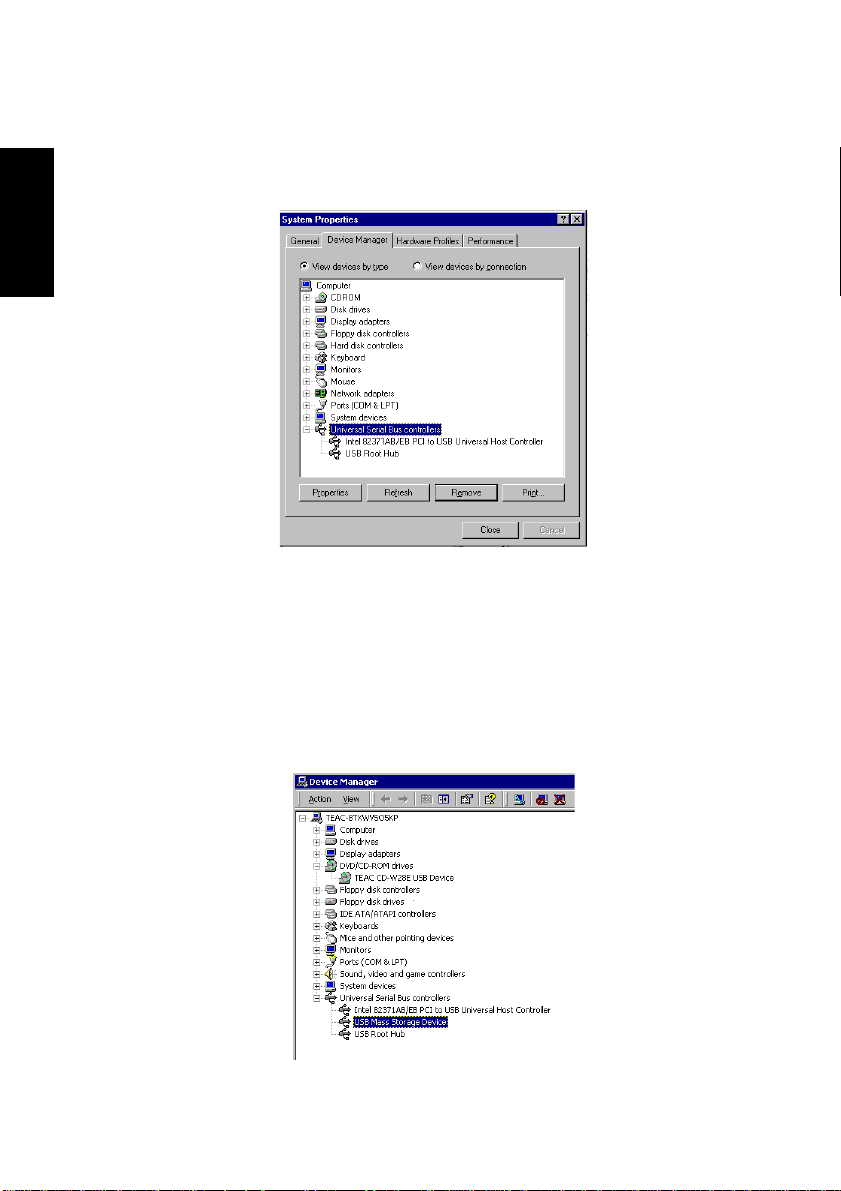
3. Click the Device Manager tab.
ENGLISH
In Windows 2000
1. Click Start, Settings, Control Panel.
2. Double-click System.
3. Click the Hardware tab.
4. Click the Device Manger (D)... button.
5. Confirm that USB (Universal Serial Bus) Controller exists in the
Confirm that USB (Universal Serial Bus) Controller exists in the
device list. The name of the USB controller depends on the PC
used (the figure below represents a USB controller provided by Intel).
device list.
58
1. Before Using
Page 11

1.4 Writing media and writing speed
T Writing speed to the media
The conforming writing speed is indicated on the package of the CDR/RW media. When writing, write within the scope of the specified writing speed of the media used.
T CD-R media and writing speed
Data can be appended to the CD-R disc once or up to a maximum of
approx. 100 times. The data written cannot be erased, however , it has
a wide range of compatibility that allows read by most CD-R OM drives
or CD players .
Writing speed: 2x, 4x, 8x
There is no problem in using a media that conforms to 8x speed or
more. However, only a maximum of 8x speed can be obtained when
using it in this drive.
T CD-RW media and writing speed
The CD-RW disc can be erased and rewritten. A multi-read CD-ROM
drive or a CD play er that conforms to CD-RW media is required to read
written data.
• 1x, 2x, 4x conforming media: 2x, 4x
• 4x - 10x (High Speed) conforming media: 4x, 8x
ENGLISH
Different logos are indicated as shown below on the CD-RW media
depending on the conforming speed. When writing to the CD-RW media in 8x speed, use the media indicated as “High Speed” or “4x - 10x”.
Logo mark
Conforming
1x, 2x, 4x conforming
High Speed (4x - 10x) conforming
1. Before Using
59
Page 12

T Certifieded media
The write operation of the drive has been checked using the following
CD-R and CD-RW media. (as of October in 2001)
ENGLISH
Media
Manufacturer
Type of Media
CD-R CD-RW (74min)
74min 80min 10xtype 4xtype
Kodak
Sony
Taiyo-y u de n
T D K
Hitach i (Maxel)
Fuji-Film
Mitsui-chemical
Mitsubishi-chemical
Ricoh
OO
OO
OO
OO
OO
OO
OO
OOOO
OOOO
––
––
––
––
––
––
––
Certified media
– Not-certified media or media of which sale has not been confirmed
Note
The 80-minute media in the above table includes products
whose write time is indicated as 79 minutes. The actual write
time of some products does not reach 80 minutes.
• Media of which write operation has not been confirmed
This product is designed to operate also with CD-R or CD-RW media
that are not shown in the above table, however, note in advance that
sufficient write quality may not be assured depending on the combination.
60
1. Before Using
Page 13

Even when using media of which write operation has
been confirmed, normal write operation may not be
performed due to variations of the product lot etc., or a
C a u t i o n
read using other CD-ROM drives or CD pla yers cannot
be performed due to the deterioration of the write quality of the CD-R/RW media. It is recommended that you
check the contents of data after writing to a CD-R/RW
media.
2. PRODUCT OUTLINE
Features of the CD-W28PU
•Easy connection
Since this product incorporates the interface conforming to the
USB2.0 High Speed, it can be connected or disconnected to or
from your computer easily ev en when the po wer of the computer is
on. Furthermore, since this product conforms to the USB1.1, it can
be used with most computers that incorporate the USB interface.
* The operation when connected via a USB hub is not supported.
•High-speed write
This product enables stable write onto the CD-R/RW media in 8x
speed at the maximum when connected to a computer conforming
to the USB2.0 by incorporating the interface conforming to the
USB2.0 High Speed.
* When connected to the USB1.1 host controller, a speed of 4x to
6x speed is obtained depending on other specifics.
ENGLISH
•Conformance to media manufactured by major media manufactur-
ers
This product is best tuned to almost all the CD-R and CD-RW media manufactured by major media manufacturers and the media
written by this product realizes a very high write quality. Therefore,
this drive can be used with little concern for compatibility issues.
•Incorporation of the Just Link function
This product incorporates the Just Link function which prevents b uffer
underrun errors that cause a write failure onto the CD-R/RW me-
2. Product Outline
61
Page 14

ENGLISH
2.1 Procedure before using the CD-W28PU
The procedure outline that must be followed before using the drive is
described below. Refer to each section of this document for details of
each procedure.
•Open the package and check the accessories.
•Check the names and functions of each section of the drive.
•Connect the drive and the provided AC adapter.
•Start your computer system and connect the USB terminal of the
•Install the provided device driver and CD-R/CD-RW writing soft-
•Check that the drive operates normally and keep the enclosed war-
dia. With this function, write to the CD-R/RW media is assured when
connected to the USB1.1 as well as the USB2.0.
•Top loading
This product sports a top loading mechanism that allows easy loading and ejection of a disc. The top co ver can be opened manually or
by using software that works with the computer.
•Ready-to-use software is provided
computer to the drive.
ware as required.
ranty in a safe place after filling it in.
2.2 Precautions when unpacking the package
Open the product packing box and chec k to mak e sure that the f ollo wing components are included. The CD-W28PU is a precision device.
Remove it from the box very carefully. Avoid jarring it.
•Check the appearance of the drive to see if there is an y damage to
the switches or connectors or any other defects.
•It is recommended that you keep the packing box and cushioning
material in case of transporting the drive for repair, etc.
62
2. Product Outline
Page 15

2.3 Package List
CD-W28PU drive unit
USB interface cable
User’s Manual
(this document)
AC adapter
ENGLISH
Recovery driver disk CD-R/RW writing
software
Warranty (see last page)/
User Registration card
2. Product Outline
63
Page 16
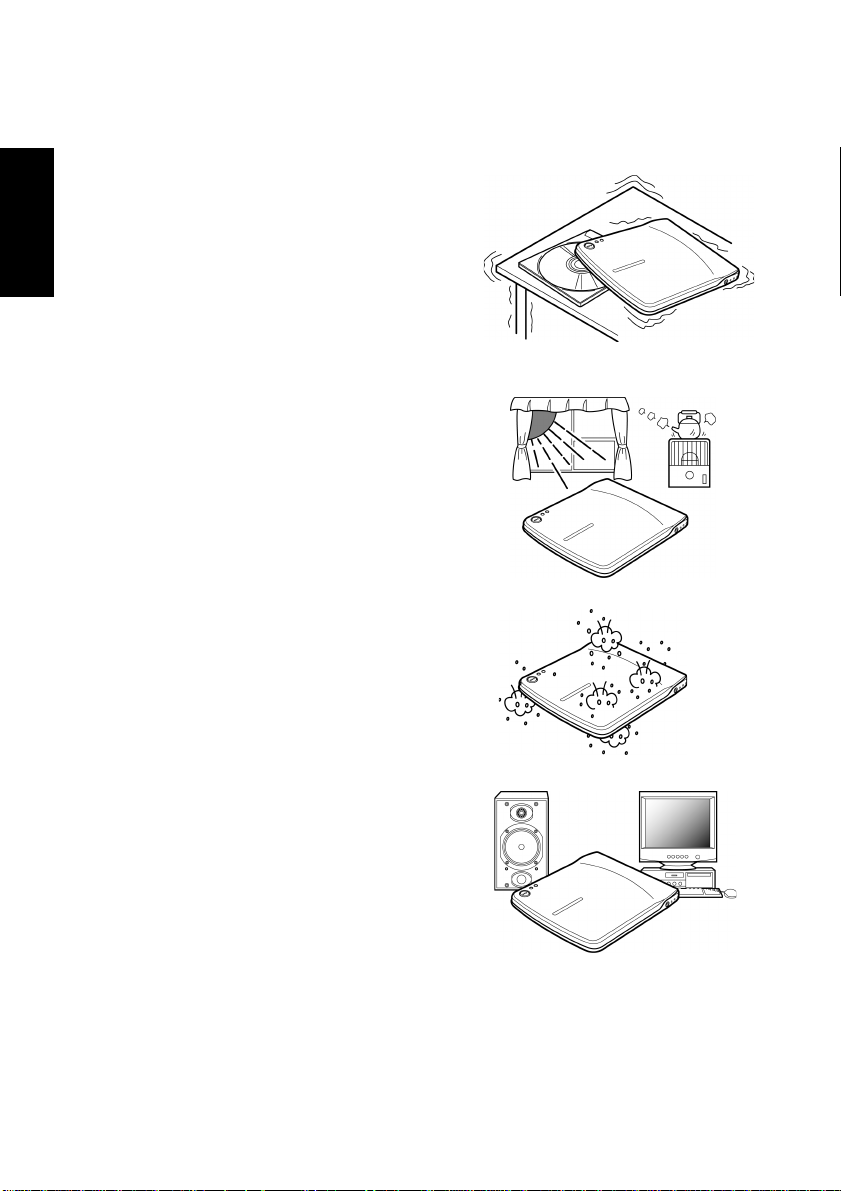
3. PRECAUTIONS FOR SETTING AND HANDLING
•Place the drive in a stable place
ENGLISH
without any vibrations or tilt.
•Avoid placing the drive in a
place subject to considerable
temperature change such as in
direct sunlight or near a heater.
•Avoid placing the drive in a
dusty or damp place
•Do not place the drive very
close to an AV device or a display monitor.
64
3. Precautions for Setting and Handling
Page 17

•Do not place a container with
liquid such as a vase or cup on
or near the drive. If liquid gets
inside the drive, it may cause
fire or electric shock.
•Do not apply a strong shock to
the drive during moving or
transportation.
•Do not operate the drive while
moving or in a tilted state. This
may damage written data or the
disc.
•Do not touch the pickup mecha-
nism (internal lens). This will
cause a malfunction.
ENGLISH
3. Precautions for Setting and Handling
65
Page 18

4. NAMES AND FUNCTIONS
ENGLISH
➀
➁
➂
➃
➄
➅
➆
X
Y
66
4. Names and Functions
Page 19

➀ Top Cover
➁ Disk tray Set the media with the label face upward on
this disc tray.
➂ USB connector Insert the plug of the provided dedicated USB
cable.
➃ DC-IN connector Connect the provided dedicated AC adapter .
Be sure to connect the provided dedicated
AC adapter to this connector. NEVER connect other AC adapters.
This drive cannot operate with only the bus
W a r n i n g
power of the USB cable. Be sure to provide
power by connecting the provided AC
adapter.
➄ Power/Busy indicator The green LED indicates the Power status
and the operation states of the drive.
ENGLISH
When the drive is
connected to AC power
and the USB port of
your PC
During data write Indicator lights
During data read Indicator blinks
When the drive is not
connected to the USB
port
Indicator lights
Indicator goes off
➅ Write indicator The amber LED indicates the write state of
the drive.
During data write Indicator blinks
Modes other than the
above
4. Names and Functions
Indicator goes off
67
Page 20

➆ Eject button Press this button to open the top cover.
ENGLISH
XLine output jack Connect this jack to the line input signal of
W a r n i n g
W a r n i n g
An electrical locking mechanism is used in
this drive so that an erroneous operation
does not open the top cover during write.
Make sure that the power is on and the drive
is not in operation before pressing the eject
button to open the top cover.
If the top cover cannot be opened e ven when
the eject button is pressed or if the top cov er
needs to be opened when power is not supplied from the AC adapter, use the emergency eject lever at the bottom of the drive.
Check that nothing is placed on the top cove r
when ejecting. When normal ejection is impossible, an error message may appear on
your computer.
When ejection is not performed normally,
open the top cover manually and close it securely after removing anything that may be
on the cover.
your computer using a ø3.5mm stereo mini
plug when outputting the analog audio signal from this drive.
This can be used as an input signal for speakers with a built-in amplifier .
YEmergency eject lever When ejecting the media with the power off,
insert a thin metal rod into the emergency
eject lever and slide it in the direction of the
arrow shown in the figure to open the top
cover.
T Use the eject button instead of the above
method except in an emergency.
T Perform this operation with the power off.
68
4. Names and Functions
Page 21

5. SETTING UP THE CD-W28PU
Windows Me, Windows 2000 and Windows XP operating systems ha ve
the native drivers for USB 1.1 controller and CD-W28PU. Therefore,
when this drive is connected, Windows will automatically install the
appropriate driver and the drive will be ready to be used. You do not
have to perform any special installation or uninstallation.
However, it is required that the device driver from the driver disk provided in this product be installed when using Windows 98 Second Edition (Windows 98SE).
It is also required that the USB 2.0 driver provided by the host controller supplier be installed first when you use an USB 2.0 host adapter to
your system.
This drive will be recognized as “TEAC CD-W28E” by
C a u t i o n
5.1 Cable connection
Windows Device Manager, etc.
ENGLISH
1. Start your PC to make it operable.
2. Connect the dedicated AC adapter to the drive and then connect
the AC adapter to the outlet (➂➃).
3. Connect the drive to your computer using the dedicated USB cable .
Insert the smaller plug of the cable into the USB connector of the
drive and the bigger plug into the USB terminal of the computer.
(➀➁)
5. Setting up the CD-W28PU
69
Page 22

5.2 Driver installation under Windows 98SE
ENGLISH
1. Connect the dedicated AC adapter to the drive, then connect the
2. Add/New Hardware Wizard starts automatically.
If you use any USB 2.0 host adapter with your system,
it is required to install the USB 2.0 host adapter and the
C a u t i o n
USB interface cable between the drive and your computer.
driver for it before connecting this drive
3. Select “Search for the best driver for y our device(Recommended)”
70
5. Setting up the CD-W28PU
Page 23

4. Insert the dedicated dr iver disk(a floppy disk) to the FDD of your
computer, select FDD, then choose Next.
5. When “TEAC USB 2.0 CD-R W Drive” is shown on the Wizard, then
choose Next.
ENGLISH
6. The driver installation starts.
5. Setting up the CD-W28PU
71
Page 24

7. The setup of the driver is now complete.
ENGLISH
8. You can make sure that the drive has been recognized after connection by using Device Manager.
“TEAC CD-W28E” at “CD-ROM”
“TEAC USB 2.0 CD-RW Drive” at “Hard disk Controller”
“TEAC USB 2.0 CD-RW Device” at “Hard disk Controller”
72
5. Setting up the CD-W28PU
Page 25

5.3 Driver un-installation in Windows 98SE
You do not have to uninstall (removing the device driver from y our computer) the device driver in Windows 98SE under normal conditions. If
you want to uninstall the device driver manually, perform the following
steps.
1. Disconnect the drive from your computer
2. Open Control Panel, choose Add/Remove Programs Properties,
then open Install/Uninstall screen.
ENGLISH
3. Select TEAC W28PU Driver, then choose OK
4. Choose OK again on the confirmation screen
5. Setting up the CD-W28PU
73
Page 26

5. Click Finish and restart the system.
ENGLISH
6. Un-installation of the device driver is now completed.
74
5. Setting up the CD-W28PU
Page 27

5.4 Driver installation under Windows Me
An appropriate driver will be automatically set when the drive is initially
connected in Windo ws Me. You can make sure that the drive has been
recognized after connection by using Device Manager.
If you use any USB 2.0 host adapter with your system,
it is required to install the USB 2.0 host adapter and the
C a u t i o n
“TEAC CD-W28E” at “CD-ROM”
“USB Mass-Storage Device” at “Universal Serial Bus Controller”
“USB CD-ROM” at “Storage De vice”
driver for it before connecting this drive
ENGLISH
5. Setting up the CD-W28PU
75
Page 28

5.5 Driver installation Windows 2000
The USB device drive is included in Windo ws 2000. When this drive is
connected, Windo ws 2000 will automatically install the appropriate driver
and the drive will be ready to be used. You do not have to perform any
special installation or uninstallation. You can confirm that the drive has
ENGLISH
been recognized after connection by using Device Manager.
“TEAC CD-W28E USB Device” at “DVD/CD-ROM Drive”
“USB Mass-Storage Device” at “USB (Univ ersal Serial Bus) Controller”
C a u t i o n
If you use any USB 2.0 host adapter with your system,
it is required to install the USB 2.0 host adapter and the
driver for it before connecting this drive
76
5. Setting up the CD-W28PU
Page 29

6. SYSTEM RECOVERY PROCEDURE
When an abnormality occurs in the computer and reinstallation of the
OS is required, the system can be recovered (reinstallation of OS) by
using the drive and the provided recovery dr iver disc. It is highly recommended to make Start Up Disk right now before you hav e any problem with your computer.
6.1 System recovery of Windows 98SE
1. Open Control Panel of My Computer
2. Open Add/Remove Programs Properties, choose Startup Disk, then
click Create Disk...
ENGLISH
3. Insert the Windows Disc into a CD-ROM drive or the CD-W28PU of
your computer.
4. Insert a blank floppy disk into FDD of your computer
5. A startup disk is completed.
6. Find out “Config.sys” file in the Startup Disk by using My Computer.
6. System Recovery Procedure
77
Page 30

7. Open the Config.sys file by using any editing tool like Note Pad of
ENGLISH
8. Delete all parameters(lines) in [CD] section except the following
9. Change the parameter of “oakcdrom.sys / D:mscd001” to
10.Eject the Startup Disk from the FDD of your computer.
11.Insert the dedicated driver disk into the FDD of your computer.
12.Pick out the “tusb_cd.sys” file from the Recovery folder of the dedi-
13.Eject the dedicated driver disk from the FDD , then insert the Startup
14.Copy the “tusb_cd.sys” file from your computer to the Startup Disk.
15. Your original Star tup Disk is completed. Please keep it until the
16.In the case of emergency and you need to make the system recov-
17.Boot up your computer from FDD , not from HDD.(You ma y need to
Windows Accessory.
two parameters.
himem.sys /testmem:off
oakcdrom.sys /D:mscd001
“tusb_cd.sys / D:MSCD001” , then save the file.
cated driver disk, then copy it into your computer(e.g. DeskTop or
My Documents) .
Disk into it again.
case of emergency
ery from Windows CD, insert the Startup Disk into the FDD of your
computer.
change BIOS setup. Please refer to the users man ual of your com-
puter.)
78
6. System Recovery Procedure
Page 31

18.Boot up starts in MS-DOS mode. Choose “Start computer with CDROM support” during the boot up process.
19. Change the drive letter from A: to E:(if the CD-ROM drive or the
CD-W28PU is recognized as drive E.)
20.Insert Windows CD in CD-ROM drive or the 28PU , then type “Setup”.
21.Windows 98SE installation starts. Please f ollo w the instructions of
Windows.
22.Install necessary drivers which cannot be installed during the system recovery after you install Windows and reboot your computer.
Confirm that the drive is directly connected to your computer, and not via either an USB hub or an USB host
C a u t i o n
C a u t i o n
adapter when implementing the System recovery.
When using the recovery driver disc in the USB floppy
disk drive, be sure that the drive and the USB floppy
disk drive are directly connected to your computer , and
not via either an USB hub (two or more USB connectors are required in your computer) or an USB host
adapter.
ENGLISH
6.2 System recovery of Windows ME
1. Open Control Panel of My Computer
2. Open Add/Remove Programs Properties, choose Startup Disk, then
click Create Disk...
6. System Recovery Procedure
79
Page 32

3. Insert the Windows Disc into a CD-ROM drive or the CD-W28PU of
4. Insert a blank floppy disk into FDD of your computer.
5. A startup disk is completed.
6. Find out “Config.sys” file in the Startup Disk by using My Computer.
ENGLISH
7. Open the Config.sys file by using any editing tool like Note Pad of
your computer.
Windows Accessory.
80
6. System Recovery Procedure
Page 33

8. Delete all parameters(lines) both in [Help] and [CD] section except
the following two parameters.
oakcdrom.sys /D:mscd001
devicehigh:ramdrive .sys /E 2048
9. Save the file , then eject the Startup Disk from the FDD of your computer.
10.Y our original Startup Disk is completed. Please k eep it until the case
of emergency
11.In the case of emergency and you need to make the system recovery from Windows CD, insert the Startup Disk into the FDD of your
computer.
12.Boot up your computer from FDD , not from HDD.(You ma y need to
change the BIOS setup. Please refer to the users manual of your
computer.)
13.Boot up starts in MS-DOS mode. Choose “Start computer with CDROM support” during the boot up process.
14. Change the drive letter from A: to E:(if the CD-ROM or the CDW28PU drive is recognized as drive E.)
15.Insert Windows CD in CD-R OM drive or the CD-W28PU, then type
“Setup”.
16. Windows ME installation starts. Please follow the instructions of
Windows.
Confirm that the drive is directly connected to your computer, and not via either an USB hub or an USB host
adapter when implementing the System recovery.
C a u t i o n
ENGLISH
When using the recovery driver disc in the USB floppy
disk drive, be sure that the drive and the USB floppy
disk drive are directly connected to your computer , and
C a u t i o n
not via either an USB hub (two or more USB connectors are required in your computer) or an USB host
adapter.
6. System Recovery Procedure
81
Page 34

6.3 System recovery of Windows 2000 and Windows XP
1. Prepare four formatted floppy disks.
2. Insert Windows CD into the CD-ROM drive or the CD-W28PU of
3. Run the “Makeboot.exe” file in the “Bootdisk Folder”.
ENGLISH
4. MS-DOS prompt appears on tthe screen of your PC.
5. Make the Startup disks according to the instruction of the O/S.
6. Open the “Txtsetup.sif” file in the 1st disk of the Startup disks, then
7. Add following parameter just under the line of
8. Save the file.
9. Your original Startup Disks are completed. Please keep it until the
10.In the case of emergency and if you need to make the system re-
11.Boot up your computer from FDD , not from HDD.(You ma y need to
12.Follow the instructions of your O/S.
your computer.
search the parameter of “USB\VID_0644&PID_0000 = “usbstor”.
It is convenient to use the “Find” function of the Edit menu to find
the parameter easily. Use “0644” for the Find..
“USB\VID_0644&PID_0000 = “usbstor”.
“USB\VID_0644&PID_1002 = “usbstor”.
case of emergency
covery from Windows CD, insert the 1st Startup Disk into the FDD
of your computer.
change BIOS setup. Please refer to the users man ual of your com-
puter.)
82
C a u t i o n
C a u t i o n
Confirm that the drive is directly connected to your computer, and not via either an USB hub or an USB host
adapter when implementing the System recovery.
When using the recovery driver disc in the USB floppy
disk drive, be sure that the drive and the USB floppy
disk drive are directly connected to your computer , and
not via either an USB hub (two or more USB connectors are required in your computer) or an USB host
adapter.
6. System Recovery Procedure
Page 35

7. OPERATION
7.1 Precautions in handling the media
Take the following precautions in order to maintain the reliability of data
when handing the media.
T Hold the disc between the center
hole and the outer edge of the disc.
Do not touch the surface of the media.
T Do not drop or stack the discs on top of
each other. Do not place anything heavy
on the disc or give a strong shock to it.
When an excessive f orce is applied to the
media, the reliability of data may not be
maintained.
ENGLISH
T If the recording surface of the me-
dia is marred, data write may become impossible. Do not touch the
recording surface of the media.
7. Operation
83
Page 36

T Store the disc in a protective case
ENGLISH
T Do not keep the media in
when not in use even for a short
period of time in order to protect it
from being scratched or damaged.
places that contain dusts, humidity , high temperature , or are
in direct sun light.
84
Wrong handling of the media may make data unreadable or prevent further writing.
C a u t i o n
7. Operation
Page 37

7.2 Connection
Please refer to “5.1 Cable connection”.
T For listening to an audio CD
When listening to an audio CD by using the speakers of your computer, insert one end of an audio cable into the line output jack of
your computer and the other to the line input jack.
Use a ø3.5mm stereo mini plug audio cable (commercially available).
7.3 Disconnection
“Hot plug” is supported for the connection between the USB cable and
the computer; therefore you don’t need to turn off the computer when
you disconnect the CD-W28PU from it, and follow the procedure below.
Do not remove and reconnect the drive from or to the
computer in rapid succession. The drive may not be
recognized. Reconnect the drive approx. 20 seconds
C a u t i o n
T In Windows 98SE
1. Close the program that uses the drive.
2. Confirm that the WRITE indicator of the drive is off.
3. Remove the plug of the USB cable from the USB terminal of
the computer.
after removing.
ENGLISH
T In Windows Me
1. Close the program that uses the drive.
2. Confirm that the busy indicator of the drive is off.
3. Click the Remove icon on the Taskbar.
4 . Select the removing drive. In this case , place the mouse cursor
on the drive name assigned to the drive (G: in this figure) and
then left-click it.
7. Operation
85
Page 38

5. The Remove Hardware confirmation message appears. Click
the OK button.
ENGLISH
T In Windows 2000
6. Remove the plug of the USB cable from the USB terminal of
the computer.
Do not remove and reconnect the drive from or to the
computer in rapid succession. The drive may not be
recognized. Reconnect the drive approx. 20 seconds
C a u t i o n
after removing.
1. Exit the program that uses the drive.
2. Confirm that the WRITE indicator of the drive is off.
3. Click the Remove icon on the Taskbar.
4. Select the removing drive. In this case, select the drive name
assigned to the drive (E: in this figure).
5. The Remove Hardware confirmation message appears. Click
the OK button.
6. Remove the plug of the USB cable from the USB terminal of
the computer.
Do not remove and reconnect the drive from or to the
computer in rapid succession. The drive may not be
recognized. Reconnect the drive approx. 20 seconds
C a u t i o n
86
after removing.
7. Operation
Page 39

T The messages indicated may differ depending on the versions of
your OS. Ref er to the instruction manual, etc. f or your computer or
OS for details.
7.4 Setting the media
1. Press the eject button of the drive to open the top cover.
2. Place the media on the tray with the label face upward. Align the
center hole of the disc with the clamp at the center of the tray and fit
the disc in securely by pressing the outer vicinity of the center hole.
3. Close the top cover gently and press the co ver do wn until it is completely locked.
4. When the top cover is normally closed, the media is recognized
and made usable after the busy indicator b links f or some seconds .
ENGLISH
7.5 Ejecting the media
1. Press the eject button of the drive to automatically open the top
cover.
2. Lift the edge of the disc carefully from the tray while pressing the
upper section of the clamp.
7. Operation
87
Page 40

3. Close the top cover gently until the cov er is completely closed. Chec k
that the cover is securely locked.
Be careful not to get your fingers caught when closing
the top cover.
ENGLISH
7.6 Playing back the audio CD
Use Windows Media Player 7 or audio CD playback software such as
Microsoft CD Player f or pla ying back the audio CD using the drive . The
operation method differs depending on the software and v ersions . Refer to the operation manual of your computer or software f or details.
T Digital playback
In Windows Media Pla y er 7,
you will find Digital Playbac k
check bo x when you click the
CD Audio tab in the Option
dialog box (see the figure on
the right).
C a u t i o n
88
7. Operation
Page 41

In addition, you will find the
Enabling Digital Music CD
with this CD-ROM Drive
check box on the CD-W28E
property on Device Manager
(figure on the right indicates
the example in Windows
2000).
When there is no setting
item for the digital playback
in your player software, try
the above setting.
(1) When the digital playback is enabled
Sound can be output via the sound card incorporated in a computer. In this case, the signal is not output from the line output jack of
the drive.
ENGLISH
(2) When the digital playback is disabled
Sound can be output from the line output jack of the drive. In this
case, sound cannot be output via the sound card incorporated in a
computer.
The setting of the digital playback cannot be perf ormed
depending on your environment including y our computer, sound card and OS.
W a r n i n g
7. Operation
89
Page 42

7.7 Suspend/resume
T This drive conforms to the OS-based suspend/resume, however,
ENGLISH
T Avoid using the suspend function while the drive is in operation.
T Do not connect or disconnect the drive while the computer is in
8. DAILY MAINTENANCE
Cleaning the drive
Wipe off soil on the drive using a soft cloth. If soil is persistent, use a
cloth dampened with a diluted neutral detergent after squeezing all the
water out.
If liquid is allowed into the drive, it ma y cause a serious malfunction, an
electric shock or a fire. When cleaning with liquid, be sure to remove
the provided AC adapter from the wall outlet after disconnecting the
drive from your computer.
it may not operate properly depending on your PC en vironment. In
such a case, do not use the suspend (standby/sleep mode/hibernation) function with the drive connected to your computer.
the suspend mode.
Do not apply solvents such as benzene or thinner. Chemical cleaners
for home or industrial use may damage the coating of the drive.
90
8. Daily Maintenance
Page 43

9. SUPPORT AND SERVICE
This product has been produced under strict quality control and you
can use it worry-free under normal conditions.
If you need any repair, contact the representative from whom y ou purchased the drive or our technical service depots.
9.1 Warranty period
The free warranty period of this drive is described in the warranty document. Be sure to include the warranty with the drive when sending it f or
repair if within the warranty period. Refer to the warranty for details.
9.2 Requests for repair
If you think you need a repair , please let us know the concrete contents
of the defect after checking the corresponding operation in accordance with the instruction manual.
When you ship or bring the drive to our sales dealer or service depot,
it is most safe to use the original packing box in which the drive was
packed when y ou purchased it. Ho wever , damage incurred during transportation is not covered in the warranty.
ENGLISH
If the packing box is not available, pack the drive using the following
method.
1) Use a corr ugated cardboard box, etc. with sufficient margins in
width, depth, and height.
2) Insert cushioning material around the drive inside the box to prevent damage due to vibrations or shock during transportation.
3) Attach the warranty within the warranty period.
9. Support and Service
91
Page 44

9.3 Technical Service Depots (Europe)
TEAC Deutschland GmbH, DSPD (Germany)
Technical Support Tel:
ENGLISH
Technical Support Fax: +49 (0) 611 7158 666
Online RMA: http://www.teac.de/RMA
Internet: http://www.teac.de/support
TEAC UK LIMITED, DSPD (U.K.)
Technical Support Freecall: 0800 08 53 704 (U.K. only)
Technical Support Fax: +49 (0) 611 7158 666
Online RMA: http://www.teac.de/RMA
Internet: http://www.teac.de/support
TEAC FRANCE S.A. (France)
Technical Support Tel: +33 (0) 1 55 59 01 55
Technical Support Fax: +33 (0) 1 55 59 01 56
Online RMA: http://www.teac.de/RMA
Internet: http://www.teac.de/support
Contact us by email: Support@teac.fr
0180 5 999 588 (DM 0.24/min (Germany))
Mo-Fr from 8:30 – 20:00 CET
Sa from 10:00 – 16:00 CET
Mo-Fr from 8:30 – 20:00 CET
Sa from 10:00 – 16:00 CET
Mo-Fr from 9:00 – 16:00 CET
TEAC Service Centre Poland
Ul. Osiedlowa 31
68-114 Tomaszowo
Technical Support Tel: +48 (0) 68 36 06 300
Mo-Fr from 9:00 – 16:00 CET
Technical Support Fax: +48 (0) 68 36 06 309
Online RMA: http://www.teac.de/RMA
Internet: http://www.teac.de/support
Contact us by email: support_pl@ja.teac.de
All other countries please call:
+49 611 7158 600
92
9. Support and Service
Page 45

10. SPECIFICATION
10.1 General specification
Power consumption Read/write
7.5W
mode
Environmental condition
Ambient temperatu re Operating 10°C to 35°C
Non-opera ting -20°C to 60°C
Temperature gradient Operating 11°C or less/hour ( non -
condensing)
Non-opera ting 20°C or less/hour ( n on -
condensing)
Relative humidi t y Operating 8% to 80% (n on -c onde nsingd)
Maximu m we t bu l b t em pe ra tu r e:
29°C or lessr
Non-operati ng 5% to 95% (n on -co nde nsingd)
Maximu m we t bu l b t em pe ra tu r e:
29°C or lessr
Vibration
2
Operating Horizontal
direction
Vertical
direction
22.94m/s
during wr i te)
1.96m/s
during wr i te)
(0.3G) or less (except
2
(0.2G) or less(except
Non-operating 19.6m/s2 (2G) or les s
Shock
2
Operating Horizontal
direction
Vertical
direction
During Audio
68.6m/s
during wr i te an d audio playback)
48m/s
writeand a ud i o playba ck)
19.6m/s
(7G) or less (except
2
(5G) or less ( except d uring
2
(2G) or less
playback
2
Non-opera ting 588m/s
(60G) or less (hal f-si ne
wave 11ms or less in either case)
Dimensions 133(Wmm)×15(H)mm×146(D)mm
(excluding the pr oj ect ion)
Weight 250g (witho ut an i n t erface ca ble)
ENGLISH
10. Specification
93
Page 46

10.2 Functional specification
Applicable d i sc for ma t CD-DA, CD-ROM MODE1
ENGLISH
Applicable di sc
type
Interface USB1.1 / USB2.0 (High Speed)
Data transfer speed USB1.1: 1.5MB/s to 12Mbit/ s
Read speed CD-ROM read 3,600KB/s (ma xi mum at 2 4 x )
Write speed CD-R/RW write 1,200KB/s (maximum at 8 x)
Write mode Disc-at-once
Access time 110ms (average)
Data buffer 2MB
Line output 0.75Vrms±3 dB (at loa d of 10k Ohm)
CD-ROM XA MODE2 (FORM1,FORM2)
Photo CD multi-sessi on
CD-I, Vi de o CD, CD Ext ra ( C D Pl u s )
CD-TEXT
Type Pressed CD
CD-ROM, CD-DA
CD-R, CD-RW
Size 12cm, 8cm
USB2.0: 60MB/s to 480Mbit/s
24 x CAV CD-ROM (Mode-1)
CD-ROM XA (Mode-2, Form-1)
8 x CLV CD-ROM XA (Mode-2, Form-2)
CD-DA (during digital audio extraction)
CD-RW
CD-R 8 / 4 / 2x (CLV)
CD-RW 8 / 4 / 2x (CLV)
Session-at-once
Track-at-once
Multi-session
Packet wri t e
ø3.5 mm stereo mini jack
94
10. Specification
Page 47

WARRANTY
Owner’s name
Model Serial No.
CD-W28PU
Address
Dealer’s name Date of purchase
Dealer’s address
Warranty Period
TEAC Corporation, hereinafter called TEAC, warrants this product
against any defect in material and workmanship for tw o (2) years from
the date of purchase by the original retail purchaser. According to the
following terms this TEAC product will be repaired without charge of
labor and materials by the authorized TEAC service stations, by the
authorized TEA C dealers and/or their authorized service stations. TEAC ,
the authorized TEAC service stations, the authorized TEAC dealers
and/or their authorized service stations may decide wether the defective product will be repaired or replaced as a whole or partially. The
TEAC dependancies, the authorized TEAC service stations, the authorized TEA C dealers and/or their authorized service stations will also
honour this warranty in the other EC and EFTA member states based
on the terms in this warranty conditions.
What is Covered and What is Not Covered.
Except as specified below, this warranty covers any def ects in materials and workmanship of this product. The f ollo wing are not co v ered b y
the warranty:
ENGLISH
1. Damage to or deterioration of the external cabinet.
2. Any unit that has been altered or on which the serial number has
been defaced, modified, or removed.
3. Damage, deterioration or malfunction resulting from:
(a) accident, misuse, abuse or neglect;
(b) failure to follow instructions supplied with the product;
Warranty
95
Page 48

ENGLISH
Who May Enforce the Warranty
This warranty may be enforced only by the original retail purchaser.
What We Will Pay For
We will pay all labor and material expenses for items covered by the
warranty. Payment of shipping and insurance charge is discussed in
the next section of this warranty.
(c) any shipment of the product. An y damage arising of transporta-
tion is the liability of the freight company. Any damage arising of
transportation and any implicit and explicit risks are the liability
of the freigth company .This is e xpressivly not a liability of TEA C;
(d) repair or attempted repair by any one not authorized by TEA C to
repair this product;
(e) causes other than product defects, including lack of technical
skill, competence or experience of the user. Especially damages which may arise of incidential use respectively b y improper
ventilation,
(f) damages caused by improper or incorrect installation of soft-
ware,
(g) periodic check-ups,
(h) maintenance respectively repair of parts due to nor mal wear
and tear,
(i) adoptions or adjustments to the product in order to conform to
different national technical or safety standards of any country
other than the one for which the product was originally designed
and manufactured.
How You Can Get Warranty Service
1. If your unit needs service during the warranty period, please contact the local authorized distributor for this product. If you are unable to locate such a distributor, please contact your TEAC facility
at the address indicated below.
96
Warranty
Page 49

2. After identifying the nearest authorized service station for this product the product or any parts believed to be def ective must be shipped
freight and insurance prepaid to such service station, together with
a copy of this warranty certificate and a copy of your sales receipt,
showing the date of purchase. Please ensure to fill out the w arranty
certificate correctly (do not forget the serial number of the product).
TEAC reserves the right to refuse the guarantee service if the documents are missing or incomplete in the understanding of this terms.
If the necessary repairs are covered by the warranty, and if you
have sent the product or parts of it to the nearest authorized service station, the return freight and insurance charges will be prepaid.
Please do not return your unit to the TEAC factory without our
prior authorization (see also RMA form)!
Limitations of Liability and Exclusion of Implied Warranties
Unless considered unenforceable or unlawfull under the applicable
national law:
1. TEAC’s liability for any defective product is limited to repair or re-
placement of the product, at TEAC's option and the option of authorized service stations, authorized dealers and their authorized
service stations. No one is authorized to assume an y greater liability on TEA Cs behalf. TEA C shall not be liable f or any damage to any
other properties independant of their vir tual or real nature especially there is no liability for any damage to any kind of software
and/or any kind of databases caused by TEAC products .Furthermore
TEAC is not liable for damages arising out of loss of use, loss of
revenue or profits, or any other damages, wether incidential, consequential, or otherwise.
2. All implied warranties or conditions, including b ut not limited to warranties or conditions of merchantability and fitness for a particular
purpose, hereby are excluded.
ENGLISH
These warranty terms do not affect any statutory rights of consumers
which were granted by the respective national laws.
Warranty
97
Page 50

ENGLISH
TEAC Deutschland GmbH, DSPD:
Bahnstraße 12, 65205 Wiesbaden-Erbenheim, Germany
Internet: www.teac.de
TEAC UK LIMITED D ATA STORAGE PRODUCTS DIVISION:
5 Marlin House, Marlin Meadow, Croxely Business Park,
Watf ord, Hertfordshire, WD18 8TE, U.K.
TEAC FRANCE S.A.
17 rue Alexis de Tocqueville, CE 005,
92182 ANTONY CEDEX, France
98
Warranty
Page 51

GARANTIE
Modell Seriennummer
Name des Eigentümers
Adresse
Name des Händlers Kaufdatum
Adresse des Händlers
Dauer der Gewährleistung
TEAC Corporation, nachfolgend TEAC genannt, gewährt dem Erstkäufer für dieses Produkt ab dem Datum des Kaufs zwei (2)
Jahre Garantie bezüglich jedes etwaigen Defekts an Material und Herstellung. Gemäß der nachstehenden Bedingungen wird
das betreffende TEAC Produkt von den autorisierten TEAC Servicestellen, den autorisierten Facheinzelhändlern oder den
autorisierten Servicestellen der Facheinzelhändler ohne Berechnung von Material- und Arbeitskosten repariert. Die Servicestelle
entscheidet, ob das Gerät als ganzes oder nur die defekten Teile ausgetauscht werden. Die TEAC Tochtergesellschaften, die
autorisierten TEAC Servicestellen und die autorisierten Servicestellen der Facheinzelhändler übernehmen die Garantieleistung
in den anderen EG- und EFT A-Mitgliedsstaaten im Rahmen der in dieser Garantie definierten Bestimmungen.
Gewährleistungsumfang
Soweit dies nachfolgend nicht ausgeschlossen wird, umfaßt die Gewährleistung alle etwaigen Defekte an Material und
Herstellung. Folgendes ist aus dem Gewährleistungsumfang ausdrücklich ausgeschlossen:
1. Schäden am Gehäuse.
2. Geräte, die verändert wurden oder deren Seriennummern verfälscht, verändert oder entfernt wurden.
3. Schäden oder Fehlfunktionen, die auf folgendes zurückzuführen sind:
(a) Höhere Gewalt, fehlerhafter und/oder nicht bestimmungsgemäßer Gebrauch,
(b) Gebrauch, der nicht den im Handbuch angegebenen Verfahrensweisen entspricht,
(c) Transportschäden jedweder Art. Für Transportschäden haftet das Frachtunternehmen. (Alle mit dem Transport
verbundenen expliziten und impliziten Risiken sind nicht Bestandteil der Haftung von TEAC.)
(d) unsachgemäß ausgeführte Reparaturen oder Reparaturversuche durch nicht von TEAC autorisierte Personen
und/oder Unternehmen,
(e) alle Schäden, die nicht unmittelbar als Produktdefekt anzusehen sind, insbesondere Schäden, die durch
unsachgemäßen Gebrauch seitens des Anwenders wie beispielsweise unzureichende Kühlluftzufuhr entstanden sind,
(f) Schäden durch unsachgemäßes Anwenden der Software,
(g) regelmäßige Inspektionen,
(h) Wartung bzw. Reparatur von Teilen infolge normalen, betriebsbedingtem Verschleiß,
(i) Anpassung an national unterschiedliche technische oder sicherheitsrelevante Anforderungen, wenn das Produkt
nicht in dem Land eingesetzt wird, für das es ursprünglich konzipiert und hergestellt worden ist.
Wer kann die Gewährleistung in Anspruch nehmen
Gewährleistungsansprüche können ausschließlich vom Ersterwerber des Produkts in Anspruch genommen werden.
Welche Kosten werden übernommen
TEAC übernimmt die Kosten für die im Rahmen einer Garantiereparatur anfallende Arbeitszeit und die Materialien, die
im Rahmen dieser Gewährleistungsbestimmungen definiert sind. Frachtkosten und Versandversicherung werden im
folgenden Abschnitt diskutiert.
Gewährleistungsabwicklung
1. Falls Ihr Gerät innerhalb der Garantiezeit Service benötigt, wenden Sie sich bitte an Ihren für dieses Produkt
autorisierten Fachhändler. Falls Sie in Ihrer Nähe keinen Fachhändler finden, nehmen Sie bitte mit der TEAC
Niederlassung Kontakt auf.
2. Ihr Fachhändler teilt Ihnen Namen und Adresse der nächstgelegenen autorisierten Servicestation mit.
Schicken Sie das Produkt oder die als defekt vermuteten Teile spesenfrei (F racht- und Versicherungskosten müssen
von Ihnen bezahlt werden) an die Servicestation. Fügen Sie bitte eine Kopie des Kaufbelegs bei und füllen Sie die
Garantiekarte vollständig aus (mit Angabe der Seriennummer des Geräts). TEAC behält sich v or , Garantieleistungen
abzulehnen, falls Garantiekarte und Kaufnachweis nicht im Sinne der vorliegenden Bestimmungen vorgelegt werden.
Falls die erforderlichen Reparaturen von den Gewährleistungsbestimmungen abgedeckt sind und das Produkt zur
nächstgelegenen Servicestation geschickt wurde, werden die Kosten für Rückfracht und Versicherung freigemacht.
Bitte schicken Sie das Gerät nicht ohne unsere ausdrückliche Zustimmung direkt an TEAC (siehe auch
Rücksendeformular).
Einschränkungen der Gewährleistung und Ausschluß implizierter Ansprüche
Soweit dies nicht dem jeweils gültigen national anwendbaren Recht widerspricht, sind folgende Ansprüche ausgeschlossen:
1.
TEAC begrenzt seine Leistungspflicht aus der Gewährleistung ausschließlich auf Reparatur oder Ersatz nach freier Wahl
von TEAC so wie der autorisierten Servicestellen, der autorisierten Facheinzelhändler und deren autorisierten Servicestellen.
Weitergehende Ansprüche sind in vollem Umfang ausgeschlossen. TEAC übernimmt keine Haftung für Schäden an anderen
Gegenständen realer oder virtueller Natur, insbesondere an Software und/oder Datenbeständen, die durch Defekte in
TEAC Produkten verursacht wurden. W eiterhin sind alle Ansprüche aus Mangel an Benutzbarkeit, entgangenem Umsatz
und/oder Gewinn sowie alle anderen impliziten und expliziten Haftungen ausdrücklich ausgeschlossen.
2.
Alle impliziten Gewährleistungsansprüche und V orbehalte, einschließlich solcher , aber nicht beschränkt auf diese , wie die
Vermarktbarkeit und/oder die Gebrauchsfähigkeit für einen bestimmten Zweck, werden hiermit explizit ausgeschlossen.
Diese Garantiebestimmungen berühren das national festgelegte Verbraucherrecht nicht.
CD-W28PU
Page 52

TEAC Deutschland GmbH
DSPD
Bahnstraße 12
65205 Wiesbaden-Erbenheim
Germany
TEAC Deutschland GmbH, DSPD:
Bahnstraße 12, 65205 Wiesbaden-Erbenheim, Germany
Internet: www.teac.de
TEAC UK LIMITED DATA STORAGE PRODUCTS DIVISION:
5 Marlin House, Marlin Meadow, Croxely Business Park,
Watford, Hertfordshire, WD18 8TE, U. K.
TEAC FRANCE S.A.
17 rue Alexis de Tocqueville, CE 005, 92182 ANTONY CEDEX, France
 Loading...