

Teac DVD Dupli 14/4, DVD Dupli 7/4, DVD Dupli 4/4, CD-R Dupli 14/40, CD-R Dupli 7/40 User Manual
...Page 1

®
DVD Dupli 14/4
DVD Dupli 7/4
DVD Dupli 4/4
CD-R Dupli 14/40
CD-R Dupli 7/40
CD-R Dupli 4/40
DVD and CD-R CopyStation
User's manual
To ensure the smooth handling of your warranty please write the serial number of
your device into the box. In the case of warranty you are expected to send it together with a copy of your invoice to your nearest TEAC sales representative.
Page 2

• Changes in specifications and features may be made with-
out notice or obligation.
• Copyright © 2003, TEAC Corporation. All rights reserved.
First edition: March 2003
• Company and product names provided herein are trade-
marks of their respective companies.
Page 3

CONTENTS
1. IMPORTANT SAFETY INSTRUCTIONS ..................................... 69
2. GENERAL DESCRIPTION ......................................................... 72
2.1 Package Contents ................................................................ 73
2.2 Installation ............................................................................ 73
2.3 Parts of the CopyStations .................................................... 73
3. BASIC INSTRUCTIONS.............................................................. 76
3.1 Buttons and LCD .................................................................. 76
3.2 About optional HDD ............................................................. 77
4. FUNCTIONS ............................................................................... 79
4.1 Copy ..................................................................................... 79
4.2 Test ....................................................................................... 80
4.3 Test & Copy .......................................................................... 81
4.4 Verify .................................................................................... 82
4.5 Compare .............................................................................. 83
4.6 Prescan ................................................................................ 84
4.7 Disc Info ............................................................................... 85
4.8 Select Source ....................................................................... 86
4.9 Image ................................................................................... 87
4.10 Edit Track ............................................................................ 92
4.11 Setup ................................................................................ 104
4.12 Adv Setup......................................................................... 115
ENGLISH
5. TROUBLESHOOTING............................................................... 123
5.1 About LCD.......................................................................... 123
5.2 About Error Messages ....................................................... 123
5.3 About DVD/CD Writer......................................................... 123
5.4 About Buttons..................................................................... 124
5.5 About DVD/CD Disc Not Readable .................................... 124
5.6 About High Failure Rate..................................................... 124
5.7 About Function 12 and Cancellation .................................. 124
Contents
67
Page 4

6. TECHNICAL SUPPORT ............................................................ 125
Technical Service Depots (Europe).......................................... 125
7. SPECIFICATION ....................................................................... 126
7.1 DVD/CD Dupli .................................................................... 126
7.2 CD-R Dupli ......................................................................... 127
ENGLISH
APPENDIX: LCD MESSAGES ...................................................... 128
A.1 Normal Conditions: ............................................................ 128
A.2 Connecting with the optional HDD..................................... 129
A.3 Audio Editing...................................................................... 130
68
Contents
Page 5

1. IMPORTANT SAFETY INSTRUCTIONS
CAUTION:
– Read all of these instructions.
– Save these instructions for later use.
– Follow all warnings and instructions later on the audio equip-
ment.
1) Read Instructions – All the safety and operating instructions should
be read before the product is operated.
2) Retain Instructions – The safety and operating instructions should
be retained for future reference.
3) Head warnings – All warnings on the product and in the operating
instructions should be adhered to.
4) Follow Instructions – All operating and use instructions should be
followed.
5) Cleaning – Unplug this product from the wall outlet before cleaning.
Do not use liquid cleaners or aerosol cleaners. Use a damp cloth for
cleaning.
6) Attachments – Do not use attachments not recommended by the
product manufacturer as they may cause hazards.
ENGLISH
7) Water and Moisture – Do not use this product near water – for
example near bath rub, wash bowl, kitchen sink, or laundry tab, in a
wet basement; or near a swimming pool; and the like.
8) Accessories – Do not place this product on an unstable cart, stand,
tripod, bracket, or table. The product may fall, causing serious injury to
persons, and serious damage to the product. Use only with a cart,
stand, tripod, bracket, or table recommended by the manufacturer, or
sold with the product. Any mounting of the product should follow the
manufacturer’s instructions, and should use a mounting accessory rec-
ommended by the manufacturer.
9) A product and cart combination should be moved with care. Quick
stops, excessive force, and uneven surfaces may cause the product
and cart combination to overturn.
1. Important Safety Instructions
69
Page 6

10) Ventilation – Slots and openings in the cabinet are provided for
ventilation and to ensure reliable operation of the product and to protect it from overheating, and these openings must not be blocked or
covered. The openings should never be blocked by placing the product
on a bed, sofa, rug, or other similiar surface. This product should not be
placed in a built-in installation such as a bookcase or rack unless proper
ENGLISH
ventilation is provided or the manufacturer’s instructions have been
adhered on.
11) Power Sources – This product should be operated only from the
type of power source indicated on the marking label. If you are not sure
of the type of power supply to your home, consult your product dealer
or your local power company.
12) Grounding or Polarization – This product may be equipped with
a polarized alternating-current line plug (a plug having one blade wider
than the other). This plug will fit into the power outlet only one way. This
is a safety feature. If you are unable to insert the plug fully into the
outlet, try reversing the plug. If the plug should still fail to fit, contact
your electrician to replace your obsolete outlet. Do not defeat the safety
purpose of the polarized plug.
13) Power-Cord Protection – Power-supply cords should be routed
so that they are not likely to be walked on or pinched by items placed
upon or against them, paying particular attention to cords at plugs,
convenience receptacles and the point where they exit from the product.
14) Lightning – For added protection for this product during a light-
ning storm, or when it is left unattended and unused for long periods of
time, unplug it from the wall outlet and disconnect the cables system.
This will prevent damage to the product due to lightning and power-line
surges.
15) Overloading – Do not overload wall outlets, extension cords, or
integral convenience receptacles as this can result in the risk of fire or
electric shock.
16) Object and Liquid Entry – Never push objects of any kind into this
product through openings as they may touch dangerous voltage points
or short-out parts that could result in a fire or electric shock. Never spill
liquid of any kind on the product.
70
1. Important Safety Instructions
Page 7

17) Servicing – Do not attempt to service this product yourself as
opening or removing covers may expose you to dangerous voltage or
other hazards. Refer all servicing to qualified service personnel.
18) Damage Requiring Service – Unplug this product from the wall
outlet and refer servicing to qualified service personnel under the following conditions:
a) When the power supply cord or plug is damaged.
b If liquid has been spilled, or objects have fallen into the product.
c) If the product has been exposed to rain or water.
d) If the product does not operate normally by following the operating
instructions. Adjust only those controls that are covered by the operating instructions as an improper adjustment of other controls may
result in damage and will often require extensive work by a qualified
technician to restore the product to its normal operation.
e) If the product has been dropped or damaged in any way.
f) When the product exhibits a distinct change in performance – this
indicates a need for service.
19) Replacement Parts – When replacement parts are required, be
sure the service technician has used replacement parts specified by
the manufacturer or have the same characteristics as the original part.
Unauthorized substitutions may result in fire, electric shocks, or other
hazards.
ENGLISH
20) Safety check – Upon completion of any service or repairs to this
product, ask the service technician to perform safety checks to determine that the product is in proper operating condition.
21) Heat – The product should be situated away from heat sources
such as radiators, heat registers, stoves, or other products (including
amplifiers) that produce heat.
1. Important Safety Instructions
71
Page 8

2. GENERAL DESCRIPTION
TEAC Dupli CopyStations allow copying of DVDs/CDs (depending on
the type of the CopyStation). To make copies no other devices like PCs
or anything else are needed.
ENGLISH
The TEAC Dupli CopyStations can be used to duplicate DVD/CD-ROM
material of which you own copyright or for which you have appropriate
permission.
NOTE
This product is designed to aid professional users in publishing
small DVD/CD-based circulations. To copy and distribute CDs
you have to own the copyright, or the permission from the copyright owner or the rightful licensor. Unless you own the copyright, or have obtained the appropriate permission from the
copyright owner or the rightful licensor, your unauthorized recording, reproduction or distribution thereof, may result in severe civil and criminal penalties under copyright laws and international copyright treaties. If you are uncertain about your rights,
contact your legal advisor. Under no circumstances will TEAC
Deutschland GmbH be responsible for any consequences of
any illegal copying performed using the device.
Important:
To ensure constant copying quality your CopyStation must
be maintained after 10.000 copies per writer. The costs of
this maintenance have to be carried by the user. Your dealer
or any authorized dependance will give you a quote.
Depending on the quality of the source DVD/CD it is possible to make
copies incredibly fast.
Please consider that copying of DVDs/CDs with copy protection or
scratched surface may be impossible.
72
2. General Description
Page 9

NOTE
Although the operation of the CopyStation is relatively straightforward, we strongly suggest that you read this manual before
starting operations. There are a few factors affecting the production of discs using the CopyStation which may not be immediately obvious.
2.1 Package Contents
1 DVD/CD CopyStation:
DVD/CD Dupli 14/4 or DVD/CD Dupli 7/4 or DVD/CD Dupli 4/4
or
1 CD-R CopyStation:
CD-R Dupli 14/40 or CD-R Dupli 7/40 or CD-R Dupli 4/40
1 User's Manual
1 Warranty Booklet
1 Cable used to connect the basic unit to the drive extension unit (TEAC
DVD/CD Dupli 14/4 and TEAC CD-R Dupli 14/40 only)
2.2 Installation
ENGLISH
There are no connections to be made to and from the CopyStation
other than the power connection on the rear Panel, as the unit is completely self-contained.
Before the TEAC DVD/CD Dupli 14/4 CopyStation or the TEAC CD-R
Dupli 14/40 CopyStation can be used the basic unit has to be connected to the drive extension unit.
2.3 Parts of the CopyStations
The power cord has to be plugged into a power supply that matches
the voltage shown on the rear panel label.
2. General Description
73
Page 10

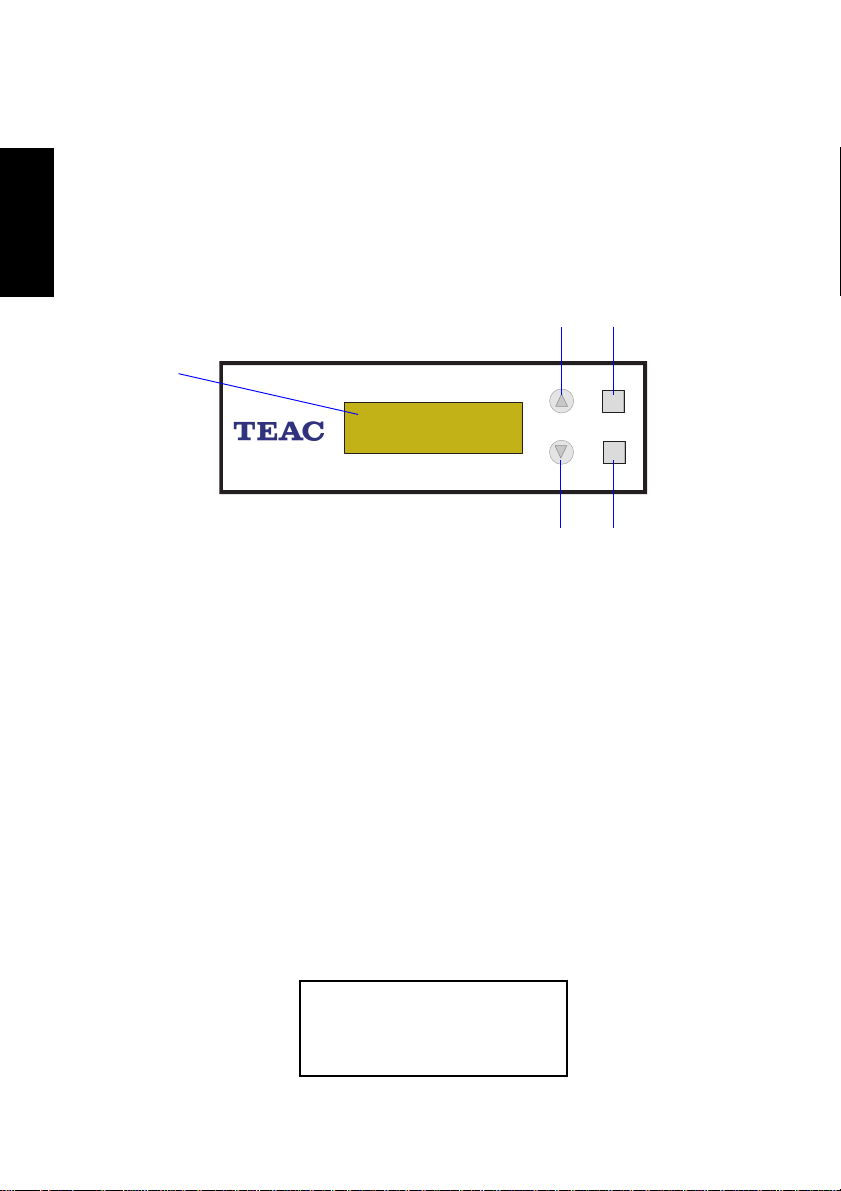
The following refer to front panel items only.
ENGLISH
D V D D u p l i
P H O N E S
B U S Y
P H O N E S
B U S Y
E N T
E S C
P H O N E S
B U S Y
P H O N E S
B U S Y
The picture shows the CopyStation TEAC DVD Dupli 4/4
POWER switch
Press this switch once to power on the unit, and again to turn it off.
LCD
The 2 lines LCD displays the menus and submenus available, and also
provides information on the status of the current operation, as well as
displaying error messages, etc.
74
2. General Description
Page 11

Button Panel
The buttons ENT, ESC,andare used to select menu options and
to set configuration parameters. Their functionality is described in detail in paragraph 3.1 Buttons and LCD.
Source Drive
The source drive is used to hold the source DVD/CD (original media
which shall be copied). Source media can be DVD-Rs, DVD-RWs,
video DVDs, audio CDs, CD-ROMs, CD-RW or any other CD-R media.
The eject button is used to eject the source disc when no operation is
in progress. The indicator on this drive shows when the disc is being
accessed.
Writer
The Writers hold the destination DVDs/CDs. The eject button is used to
eject the target disc when no operation is in progress. The indicator on
this drive shows when the disc is being accessed for reading or writing.
NOTE
If a disc is in a drive and cannot be removed by using the eject
button, you can insert a thin stiff wire (such as the end of a
paperclip) into the hole on the front panel of the drive (under
the tray). This will open the tray. Ensure to switch off the
CopyStation before manually opening the tray.
ENGLISH
Power On LED
The LED panel is lit after switching on the unit.
2. General Description
75
Page 12
3. BASIC INSTRUCTIONS
3.1 Buttons and LCD
There are four buttons and an LCD on the panel of the CopyStation.
ENGLISH
They are described as follows.
D V D D u p l i
E N T
E S C
It shows all functions and messages.
The buttonis used to scroll up through functions or menus.
The buttonis used to scroll down through functions or menus.
The button ENT is used to execute a selected function. Its function-
ality is similar to the ENTER key of PC keyboards.
The button ESC is used to cancel a selected function.
After you power on,and the TEAC Dupli CopyStation detects installed
hardware like source drive, DVD/CD writer, it will execute a self-test for
seconds.
When the self-test finishes, LCD will show the messages as follows:
76
Initialize SDRAM
3. Basic Instructions
Page 13

Detect Drives
1. Copy
There are 12 functions for you to use. Function 1 is Copy. You can
pressto select other functions.
3.2 About optional HDD
Optionally TEAC Dupli CopyStations are also available with an integrated hard disk. This feature allows to make copies not only 1:1 of
DVD/CD master media. The optional hard disk also allows to make
copies of image files stored on the hard disk.
3.2.1 Copying With a Optional HDD
Use function 8 Select Source to set the optional hard disk as the
source.
ENGLISH
In function 9 Image select a partition to store the data.
If there is no data in a selected partition, place a source DVD/CD
into the source drive and use function 9-01 Load to transmit data
from DVD/CD into the selected partition by pressing ENT. Different
data can be stored in different partitions.
Switch to function 1 Copy by pressing. Place blank DVD-R/RWs
or CD-R/RWs into the writers, and press ENT to start copying.
When copying comes to an end, the passed DVDs/CDs will eject auto-
matically. The default is eject automatically, but you can change it.
The failed DVDs/CDs will remain in the writers. The default is keep-
ing failed DVDs/CDs in the writers, but you can change it. To take the
failed DVDs/CDs you need to press the buttons on the writers.
3. Basic Instructions
77
Page 14

Important
During operation do not press any button on your
CopyStation, because interruption will harm the device, and
DVDs/CDs will be damaged.
3.2.2 Copying Without a HDD
ENGLISH
If your CopyStation is not equipped with the optional hard disk, the
operation procedures will be as follows:
Place a source DVD/CD into the source drive.
Switch to function 1 Copy by pressing. Place blank DVDs/CDs
When copying comes to an end, the passed DVDs/CDs will eject
The failed DVDs/CDs will remain in the writers. The default is keep-
into the writers, and press ENT to start copying.
automatically.
ing failed DVDs/CDs in the writers, but you can change it. To take the
failed DVDs/CDs you need to press the “eject” buttons on the writ-
ers.
Important
During operation do not press any button on your
CopyStation, because interruption will harm the device, and
DVDs/CDs will be damaged.
78
3. Basic Instructions
Page 15

4. FUNCTIONS
There are 12 functions: Copy, Test, Test & Copy, Verify, Compare,
Prescan, Disc Info, Select Source, Image, Edit Track, Setup and Advanced Setup. Among the 12 functions, Edit Track is designed exclusively for editing a collection of favorite songs from CDs. During operation if you do not understand an LCD message, you can see Appendix.
4.1 Copy
Function 1 Copy is to copy data from a source DVD/CD directly into
blank DVDs. Before copying be sure that the source DVD/CD is placed
onto source drive, or there are data in a certain HDD partition if you
have installed an optional hard disk. If you are not so sure of real copying, you can use Function 2 Test to simulate first.
Select function 1. Put a source DVD/CD onto source drive and blank
DVDs/CDs onto the writers. DVDs/CDs containing old data are usable,
too.
1.Copy
ENGLISH
After the source drive and the writers detect DVDs/CDs, press ENT to
start copying. LCD will show the copying information as follows.
Copying- DVD 0%
4213.4MB d:20:15
When copying is in progress, MB and time will decrease whereas the
percentage of completion increase.
4. Functions
79
Page 16

When copying comes to an end, LCD will show the results as follows.
The passed DVDs/CDs will eject automatically.
1.Copy
OK: 03
ENGLISH
4.2 T est
Function 2.Test is to simulate the copying progress. When simulation
finishes, there will be no data really written into DVDs/CDs.
Select function 2. Put a source DVD/CD onto source drive and blank
DVDs/CDs onto the the writers.
Press ENT to start simulation. If you use DVD/CD Re-Writeable discs
that contain data, the old data will be quickly erased before simulation
as shown below.
2.Test
Erasing disc
80
4. Functions
Page 17

LCD will show the testing information as follows.
Testing- DVD 0%
4213.4MB d:20:15
When the test comes to an end, LCD will show the results as follows.
2.Test
OK: 03
Note
Stopping the test halfway does not affect the DVD-R/RWs
or CD-R/RWs, but if the DVD-RWs/CD-RWs contain important data, they may be destroyed.
4.3 Test & Copy
Function 3.Test & Copy is to test first and then copy actually.
Select function 3. Put a source DVD/CD onto source drive and blank
DVDs/CDs onto the writers.
3.Test & Copy
ENGLISH
Press ENT to start simulation. LCD will show the testing information as
follows.
Testing- DVD 0%
4213.4MB d:20:15
4. Functions
81
Page 18

When the test finishes, actual copying will begin as shown below.
ENGLISH
When the whole process finishes, LCD will show the results as follows.
4.4 V erify
Function 4.Verify is to examine if the target DVDs/CDs can be read
correctly after copying.
Select function 4.
Copying- DVD 0%
4213.4MB d:20:15
3.Test & Copy
OK: 03
4.Verify
Press ENT to verify. LCD will show the verification information as follows.
Verify- DVD 0%
4213.4MB 2:29:14
82
4. Functions
Page 19

When verification comes to an end, LCD will show the results as follows.
4.Verify
OK: 03
4.5 Compare
Function 5.Compare is to make a comparison between the source DVD/
CD and the target DVDs/CDs after copying.
Select function 5. Put the source DVD/CD onto source drive and the
target DVDs/CDs onto the writers.
5.Compare
Press ENT to compare. LCD will show the comparison information as
follows.
Compare- DVD 0%
4213.4MB 1:05:06
When comparison comes to an end, LCD will show the results as follows.
ENGLISH
4. Functions
Compare OK: 3
Fail: 0 Diff: 0
83
Page 20

Press ENT to see the details of source 1 as shown below.
ENGLISH
Press ENT to see the details of source 2. If the comparison is identical,
LCD will show the message as follows.
If comparison fails, LCD will show the failure. By pressing ENT twice,
LCD will show that the contents of source 1 and those of source 2 do
not match as follows.
Src: 01 DVD-ROM
Total: 4213.4MB
Src: 02 DVD-RW
Identical
Src: 02 DVD-RW
TOC not match
4.6 Prescan
Function 6.Prescan is to scan if the source DVD/CD can be read correctly, and by the way to test the reading speed.
Select function 6. Put the source DVD/CD onto source drive.
6.Prescan
84
4. Functions
Page 21

Press ENT to prescan. LCD will show the scanning information as follows.
Scaning- DVD 0%
4213.4MB 40:40
When scanning finishes, and the source DVD/CD can be read correctly, LCD will show the results as follows.
PreScan OK!
4.7 Disc Info
Function 7.Disc Info is to show the basic information of source DVD/
CD.
Select function 7. Put the source DVD/CD onto source drive.
ENGLISH
7.Disc Info
Press ENT, and LCD will show the DVD/CD information as follows.
Disc T ype: D VD-ROM
Capacity: 4213.4MB
4. Functions
85
Page 22

4.8 Select Source
Function 8.Select Source is to let you select the data on DVD/CD source
drive, DVD/CD Writers or the optional HDD as the source from which
copying will be done.
ENGLISH
Select function 8.
Press ENT, and then press to select the source as shown below.
After selecting the source, you can press ENT, and LCD will show the
message as follows.
8.Select Source
Src: DVD-ROM
01 IDE1 Master
DVD-ROM selected!
Suppose you select the optional HDD as the source and try to copy
from one of its partitions, but the partition contains no data, an error
message will appear on LCD. At this moment, you can switch to another partition that contains data, or use function 9 Image to load the
data into the chosen partition first.
86
4. Functions
Page 23

4.9 Image
Function 9.Image is valid only when you have installed an optional
hard disk. This function includes 6 parts. They are Load, Delete Image,
Image Info, Compare Image, Select Partition and Select Src Drive.
The loaded data is called an image file.
Select function 9.
9.Image
4.9.1 Load
On the above figure press ENT, and you will enter the following figure.
Here the function Load is to let you load data from the source drive or
any one of the Writers into the current partition of the optional hard
disk.
9-01.Image P: A
Load
ENGLISH
P:A means partition A.
Press ENT to load. LCD will show the loading information as follows.
Load- A - DVD 0%
4213.4MB d:20:15
4. Functions
87
Page 24

After the image file is successfully loaded, LCD will show the results as
follows.
ENGLISH
If there is an image file existing in the current partition, the system will
ask you whether to overwrite it or not. Please useto confirm Yes
or No.
4.9.2 Delete Image
If you want to empty an image file stored in a particular partition, you
can use the function Delete Image to do so. First, select the function by
pressing .
Image load OK
Image Exists
Overwrite?Yes
9-02. Image P: A
Delete Image
The system will ask if you are sure to delete. Useto confirm Yes or
No.
Delete Image in
Partition A?Yes
88
4. Functions
Page 25

After the image file is deleted, LCD will show the results as follows.
Partition A:
Image is deleted
4.9.3 Image Info
This function is to show the basic information of an image file stored in
a particular partition of the optional hard disk. First, select the function
by pressing .
9-03.Image P: A
Image Info
Press ENT, and LCD will show the information of the image file as
follows.
Disc T ype: D VD-ROM
Capacity: 4213.4MB
ENGLISH
4.9.4 Compare Image
This function is to compare the contents of the source DVD/CD and
those of the image file in the partition. First, select the function by pressing .
9-04. Image P: A
Compare Image
4. Functions
89
Page 26

Press ENT, and LCD will show the comparison information as follows.
Compare- DVD 0%
4213.4MB 1:05:06
ENGLISH
When comparison comes to an end, LCD will show the results as follows.
Press ENT to see the details of source 1 as shown below.
Press ENT to see the details of source 2. If the comparison is identical,
LCD will show the message as follows.
Compare OK: 1
Fail: 0 Diff: 0
Src: 01 DVD-ROM
Total: 4213.4MB
Tgt: 00 HDD P: A
Identical
If comparison fails, LCD will show the failure. By pressing ENT twice,
LCD will show that the contents of source 1 (SRC: 01) and those of
source 2 (Tgt: 00) do not match as follows.
Tgt: 00 HDD P: A
TOC not match
90
4. Functions
Page 27

4.9.5 Select Partition
This function is to select a partition in the optional hard disk. First,
select the function by pressing .
9-05.Image P: A
Select Partition
Each partition will occupy 5GB. The number of partitions is dependent
on the optional hard disk’s capacity. The partitions is alphabetically arranged. Now select a working partition by pressing, and LCD will
show the message as follows.
Select Working
Partition - A
After the partition is selected, LCD will show the results as follows.
Set Partition to
A
4.9.6 Select Src Drive
This function is to select the source drive or any of the DVD/CD Writers
as the source from which you can load data into a particular partition
as an image file.
ENGLISH
4. Functions
91
Page 28

First, select the function by pressing .
9-06. Image P: A
Image Src Drive
ENGLISH
Then, useto select source drive or any of the DVD/CD writers as
the source.
After selecting the source such as DVD-ROM, you can press ENT, and
LCD will show the message as follows.
4.10 Edit Track
Function 10.Edit Track is exclusively designed for editing a collection of
favorite songs from CDs. In other words, it can collect different tracks
(songs) on a number of CDs and merge them into a single CD. This
function includes 4 parts. They are CD to CD, CD to HDD, Play Audio
Track and Close Session.
Select Img Src:
01 IDE1 DVD-ROM
Load image from
Drive ID-01
Select function 10.
92
10. Edit Track
4. Functions
Page 29

4.10.1 CD to CD
On the above figure press ENT, and you will enter the following figure.
Here the function CD to CD is to let you select a track or more from
CD-ROM, and then copy into blank CD-R/RWs.
10-01. Edit Track
CD to CD Edit
On the above figure press ENT, and you will enter the following figure.
Here 1/10 means the number one of the 10 tracks, and 03:25 means
the playing time.
Select T rack:
1/10 03:25
You can pressto see the second track and so on. Suppose we decide to select the first track, then press ENT. A “+” will appear beside 1/
10 as shown below. But pressing ENT again may cancel the selection.
Select T rack:
+1/10 03:25
ENGLISH
4. Functions
93
Page 30

After selecting, please useto move to the “End” menu as shown
below.
ENGLISH
Press ENT to finish the CD editing, and useto confirm Yes or No.
LCD will show the copying information as follows.
On the above figure 1/1 means the first track of all tracks we have
selected, and here we have just selected one track. When copying
comes to an end, LCD will show the message as follows.
Select T rack:
End 1Trk03:25
End edit disc
and burn?Yes
Copying- 24X Edit
1/10 - > 1/1
94
Burn Complete!
OK: 03
4. Functions
Page 31

The CopyStation will ask if you want to keep editing. Please use
to confirm Yes or No. as shown below.
Continue edit
next Disc?Yes
If you want to keep editing, the current source CD will eject automatically, and the system will ask you to insert another new CD as shown
below.
Insert next disc
After inserting the new CD, press ENT to edit as before. Suppose we
decide to select the second track, then press ENT. A “+” will appear
beside 2/10 as shown below.
Select T rack:
+2/10 04:25
ENGLISH
After selecting, please useto move to the “End” menu as shown
below.
Select T rack:
End 1Trk04:25
4. Functions
95
Page 32

Press ENT to finish the CD editing, and useto confirm Yes or No.
ENGLISH
LCD will show the copying information as follows.
On the above figure 2/2 means the second track of all tracks we have
selected, and so far we have selected two tracks from two different
CDs. When copying comes to an end, LCD will show the message as
follows.
End edit disc
and burn?Yes
Copying- 24X Edit
2/10 - > 2/2
Burn Complete!
OK: 03
The system will ask if you want to keep editing. Suppose we don’t like
to continue, then pressto confirm No.
Continue edit
next Disc?No
96
4. Functions
Page 33

On the above figure Press ENT. The CopyStation will ask if you want to
close all CDs’ sessions. Please useto confirm Yes or No as shown
below.
Close all disc’s
session? Y es
After deciding to close, LCD will show the message as follows.
Closing Session
Please wait---
4.10.2 CD to HDD
After closing sessions, press ESC andto enter the following figure.
Here the function CD to HDD is to let you select a track or more from
CD-ROM, and then copy into a certain partition of the optional HDD.
10-02. Edit Track
CD to HDD Edit
On the above figure press ENT, and you will enter the following figure.
Here 1/10 means the number one of the 10 tracks, and 03:25 means
the playing time.
ENGLISH
4. Functions
Select T rack:
1/10 03:25
97
Page 34

Suppose we decide to select the first track, then press ENT. A “+” will
appear beside 1/10 as shown below. But pressing ENT again may cancel the selection.
Select T rack:
ENGLISH
After selecting, please useto move to the “End” menu as shown
below.
Press ENT to finish the CD editing, and useto confirm Yes or No.
Then, the track as an image file will be loaded into the optional HDD.
LCD will show the loading information as follows.
+1/10 03:25
Select T rack:
End 1Trk03:25
End edit disc
and burn?Yes
Load- P0 -24X Edit
1/10 - > 1/1
When loading comes to an end, LCD will show the message as follows.
Image load OK
98
4. Functions
Page 35

The system will ask if you want to keep editing. Please useto
confirm Yes or No. as shown below.
Continue edit
next Disc?Yes
If you want to keep editing, the current source CD will eject automatically, and the system will ask you to insert another new CD as shown
below.
Insert next disc
After inserting the new CD, press ENT to edit as before. Suppose we
select the second track, then press ENT. A “+” will appear beside 2/10
as shown below.
Select T rack:
+2/10 04:25
ENGLISH
After selecting, please useto move to the “End” menu as shown
below.
Select T rack:
End 1Trk04:25
Press ENT to finish the CD editing, and useto confirm Yes or No.
End edit disc
and burn?Yes
4. Functions
99
Page 36

Then, the track as an image file will be loaded into the optional HDD.
LCD will show the loading information as follows.
ENGLISH
When loading comes to an end, LCD will show the message as follows.
The system will ask if you want to keep editing. This time please use
to confirm No as shown below.
Then, the system will ask if you want to burn from the optional HDD
into CD-R/RW or move into a partition. Please useto confirm Burn
as shown below.
Load- P0 -24X Edit
2/10 - > 2/2
Image load OK
Continue edit
next Disc?No
Burn or Move to
partition?Burn
After pressing, LCD will show the copying information as follows.
Copy- P0 -24X 0%
1/2 Trk03:25
100
4. Functions
Page 37

When burning finishes, LCD will show the results as follows.
Burn Complete !
OK: 03
On the above figure press ESC to enter the following figure. Now press
to move the data from the optional HDD template into a certain
partition.
Burn or Move to
partition? Move
After pressing , you need to select a partition into which the data will
be moved. Suppose we select A as shown below.
Select Partition
A
ENGLISH
After pressing ENT, LCD will show the moving information as follows.
Moving to P: A
0%
When moving finishes, LCD will show the results as follows.
Moving to P: A
OK!
4. Functions
101
Page 38

If the chosen partition has contained image data, the system will ask to
overwrite or keep the data. Here please useto overwrite.
ENGLISH
After pressing , LCD will show the moving information as follows.
When moving finishes, LCD will show the results as follows.
4.10.3 Play Audio Track
Image Exists
Overwrite?Yes
Moving to P: A
0%
Moving to P: A
OK!
This function is to make the CopyStation act as a music player. You can
plug an AV terminal in the audio port on the back of the device, and
enjoy the music.
On the above figure press ESC andto select the function.
10-03. Edit Track
Play Audio Track
102
4. Functions
Page 39

Useto select the track you want to play.
Select Track:
1/10 03:25
After selecting and pressing ENT, LCD will show the playing information below.
Playing T rack-1
00:00 / 03:25
4.10.4 Close Session
This function is to close CDs and let no data written into. After closing,
you can put the CDs on any normal player and listen.
On the above figure press ESC andto select the function.
10-04. Edit Track
Close Session
After pressing ENT, the system will ask if you are sure to close.
ENGLISH
4. Functions
Close all disc’s
session? Y es
103
Page 40

Press ENT to enter the following figure.
Closing Session
Please wait---
ENGLISH
When closing finishes, LCD will show the results as follows.
4.11 Setup
Function 11.Setup lets you change the default settings. Once you
change a setting, remember to press ENT to save it. However, it is
suggested to use the defaults for the optimal operation.
This function includes 16 parts. They are Language, Burn Speed, Read
Speed, Auto Start Drive, Startup Menu, Auto Verify, Auto Compare,
Auto Prescan, Eject Disc, Burn On The Fly, Burn Mode, Button Sound,
Device Info, System Info, Quick Erase and Full Erase.
Select function 11.
Closing Complete
OK :3 Fail :0
11. Setup
104
4. Functions
Page 41

4.11.1 Language
On the above figure press ENT, and you will enter the following figure.
The function Language lets you select a language in which messages
can be shown on LCD.
11-01. Setup
Language
Press ENT to enter the following figure. Here LCD only supports English.
Language
English
4.11.2 Burn Speed
On the above figure press ESC and to enter the following figure. The
function Burn Speed lets you control the burning speed of DVD/CD
writers.
11-02. Setup
Burn Speed
ENGLISH
Press ENT to enter the following figure. The default is maximum, but
there are still other choices like 8X, 4X, 2X and 1X.
Burn Speed
Maximum
4. Functions
105
Page 42

4.11.3 Read Speed
On the above figure press ESC andto enter the following figure. The
function Read Speed lets you control the reading speed of target DVDs/
CDs.
ENGLISH
Press ENT to enter the following figure. The default is maximum, but
there are still other choices like 32X, 16X and 8X.
4.11.4 Auto Start Drive
On the above figure press ESC andto enter the following figure.
Auto Start Drive is to copy or test automatically once you put blank
DVDs/CDs onto the writers.
Press ENT to enter the following figure. The default is Off. Pressto
select 1 (one blank DVD/CD).
11-03. Setup
Read Speed
Read Speed
Maximum
11-04. Setup
Auto Start Drive
106
Auto Start Drive
Off
4. Functions
Page 43

4.11.5 Startup Menu
On the above figure press ESC andto enter the following figure.
Startup Menu lets you select any one of the functions except Adv Setup
as the first item appearing on the menu whenever you turn on the
CopyStation.
11-05. Setup
Startup Menu
Press ENT to enter the following figure. The default is Copy. Of course
you can select any other function as the first item, but remember to
press ENT.
Startup Menu
1.Copy
4.11.6 Auto Verify
On the above figure press ESC andto enter the following figure.
Auto Verify is to verify automatically if the target DVDs/CDs can be
read after copying.
11-06. Setup
Auto V erify
ENGLISH
Press ENT to enter the following figure. The default is Off. Pressto
select On.
Auto V erify
Off
4. Functions
107
Page 44

4.11.7 Auto Compare
On the above figure press ESC andto enter the following figure.
Auto Compare is to compare automatically the source DVD/CD and
the target DVDs/CDs after copying.
ENGLISH
Press ENT to enter the following figure. The default is Off. Pressto
select On.
4.11.8 Auto Prescan
On the above figure press ESC andto enter the following figure.
Auto Prescan is to scan automatically if the source DVD/CD can be
read correctly, and by the way to test the reading speed.
11-07. Setup
Auto Compare
Auto Compare
Off
11-08. Setup
Auto Prescan
Press ENT to enter the following figure. The default is Off. Pressto
select On.
Auto Prescan
Off
108
4. Functions
Page 45

4.11.9 Eject Disc
On the above figure press ESC andto enter the following figure.
Eject Disc provides three choices. They are Eject Good Only, Eject All
Disc, and Do Not Eject. Eject Good Only means that the DVDs/CDs will
eject automatically only when they are copied successfully. Eject All
Disc means that the DVDs/CDs will eject automatically whether they
are copied successfully or not. Do Not Eject means that you need to
eject the DVDs/CDs manually when copying finishes.
11-09. Setup
Eject Disc
Press ENT to enter the following figure. The default is Eject Good Only.
Pressto select Eject All Disc or Do Not Eject.
Eject Disc
Eject Good Only
4.11.10 Burn On The Fly
ENGLISH
On the above figure press ESC andto enter the following figure.
Burn On The Fly lets you control the copying methods. When the setting is On, the data will be copied directly from the source DVD/CD to
the target DVDs/CDs. When the setting is Off, the data will be loaded
into a partition of the optional HDD first, and hence copying will be
done.
11-10. Setup
Burn On The Fly
4. Functions
109
Page 46

Press ENT to enter the following figure. The default is On. Pressto
select Off.
ENGLISH
If your CopyStation doesn’t have the optional hard disk available, LCD
will show the message as follows.
4.11.11 Burn Mode
On the above figure press ESC to return to Function 11, and then
select part 11 Burn Mode as the following figure shows. Burn Mode
lets you control the burning modes. There are two modes: DAO (Disc
At Once) and TAO (Track At Once). If the DVD/CD writer doesn’t support the mode you have selected, the CopyStation will automatically
switch to another mode.
Burn On The Fly
On
No V alid HDD !
11-11. Setup
Burn Mode
Press ENT to enter the next figure. The default is DAO. Pressto
select TAO.
Burn Mode
DAO
110
4. Functions
Page 47

4.11.12 Button Sound
On the above figure press ESC andto enter the following figure.
Button Sound lets you control the sound of a button when you press it.
11-12. Setup
Button Sound
Press ENT to enter the next figure. The default is On. Pressto select
Off.
Button Sound
On
4.11.13 Device Info
On the above figure press ESC andto enter the following figure.
Device Info shows the information of the source drive and any of the
DVD/CD Writers you have installed.
ENGLISH
11-13. Setup
Device Info
Press ENT to enter the next figure.
01 IDE1 Master
DVD-ROM : TEAC
4. Functions
111
Page 48

Press ENT to enter the next figure.
DVD-ROM DVD-116
1.22
ENGLISH
Presstwice to enter the next figure.
Press ENT to enter the next figure.
4.11.14 System Info
On the above figure press ESC andto enter the following figure.
System Info shows the information of the system.
02 IDE2 Master
DVD-RW : TEAC
DVD-RW DVR-103
1.80
11-14. Setup
System Info
Press ENT to enter the next figures.
112
4. Functions
Page 49

4.11.15 Quick Erase
On the above figure press ESC andto enter the following figure.
Quick Erase is to erase the data on the DVD/CD Re-Writeable discs
quickly.
11-15. Setup
Quick Erase
Press ENT to enter the next figure. Useto confirm Yes or No.
All data will be
lost, erase?Yes
After confirming Yes and pressing ENT, LCD will show the message as
follows.
Erasing disc
00:00 (Quick)
When erasing finishes, LCD will show the results as follows.
Quick Erase
OK:03 Fail:00
ENGLISH
4. Functions
113
Page 50

4.11.16 Full Erase
On the above figure press ESC andto enter the following figure. Full
Erase is to erase the data on the DVD/CD Re-Writeable discs completely. Compared with Quick Erase, Full Erase takes longer time to do
the job.
ENGLISH
Press ENT to enter the next figure. Useto confirm Yes or No.
After confirming Yes and pressing ENT, LCD will show the message as
follows.
When erasing finishes, LCD will show the results as follows.
11-16. Setup
Full Erase
All data will be
lost, erase?Yes
Erasing disc
00:00 (Full)
Full Erase
114
OK:03 Fail:00
4. Functions
Page 51

4.12 Adv Setup
Function 12 Adv Setup lets you change the system configuration. This
function includes 13 parts. They are UnderRun Protect, Overburn, Read
Error Skip, Format HDD, Verify HDD, Burn-in, H/W Diagnostic, Load
Default, CD+G, ISRC and Switch Link-Host.
On the above figure press ESC to return to Function 11. Then, press
ESC for 2 seconds to enter Function 12 as the following figure shows.
12. Adv Setup
4.12.1 UnderRun Protect
On the above figure press ENT, and you will enter the following figure.
UnderRun Protect lets you control On and Off of Buffer Under Run
Protection such as Burn Proof, SafeBurn, JustLink, Seamless Link,
etc.
12-01. Adv Setup
ENGLISH
UnderRun Protect
Press ENT to enter the following figure. The default is On. Pressto
select Off.
UnderRun Protect
On
4. Functions
115
Page 52

4.12.2 Overburn
On the above figure press ESC andto enter the following figure.
Overburn lets you decide whether to copy beyond the limit or not.
ENGLISH
Press ENT to enter the following figure. The default is Off. Pressto
select On.
4.12.3 Read Error Skip
On the above figure press ESC andto enter the following figure.Read
Error Skip is to neglect any error that occurs during copying. Under
normal circumstances, when an error occurs during copying, a message will appear on LCD. Yet, you can use Read Error Skip to copy
some defective DVDs.
12-02. Adv Setup
Overburn
Overburn
Off
12-03. Adv Setup
Read Error Skip
Press ENT to enter the following figure. The default is Off. Pressto
select On.
Read Error Skip
Off
116
4. Functions
Page 53

4.12.4 Format HDD
On the above figure press ESC andto enter the following figure.
Format HDD is to partition the optional hard disk. But before formatting, all data on the optional hard disk will be deleted.
12-04. Adv Setup
Format HDD
Press ENT to enter the next figure. Useto confirm Yes or No.
All data will be
lost, format? Yes
If your CopyStation doesn’t connect with the optional hard disk, LCD
will show the message as follows.
There is no HDD!
4.12.5 Verify HDD
On the above figure press ESC to return to Function 12, and then
select part 5 Verify HDD as the following figure shows. Verify HDD is to
verify if the optional hard disk or any of its partitions can work well.
ENGLISH
4. Functions
12-05. Adv Setup
Verify HDD
117
Page 54

Press ENT to enter the next figure. Useto confirm Disk or Parti.
Verify Disk or
Partition? Disk
ENGLISH
Press ENT to verify. After verification LCD will show the results as follows.
4.12.6 Burn-in
On the above figure press ESC andto enter the following figure.
Burn-in is to simulate the copying progress many times. The time can
be from 1 to 1000. After each cycle of simulation, the DVDs/CDs on the
DVD/CD writers will eject automatically and recede for the next bout of
simulation.
Press ENT to enter the next figure. Test is simply a simulation.
Verify Hard Disk
OK!
12-06. Adv Setup
Burn-in
118
Burn-in
Test
4. Functions
Page 55

Press ENT and useto select the time of simulation such as 1, 2,
3...1000 or Run Continuous. The figure below shows Run Continuous.
Sel burn-in num:
Run Continuous
Press ESC, ENT,to select Erase & Copy as the following figure
shows. Erase & Copy is to erase and write repeatedly. It is only for
DVD/CD Re-Writeable discs.
Burn-in
Erase&Copy
4.12.9 H/W Diagnostic
Press ESC andto enter the next figure. H/W Diagnostic is to test the
system.
12-09. Adv Setup
ENGLISH
4. Functions
H/W Diagnostic
119
Page 56

Press ENT to enter the next figure. Follow the instructions on LCD to
do the button test. After that, the CopyStation will do the self-test of
SDRAM, the hardware connection test and flash test. All test results
will be shown on LCD. It is the easiest way to know if the system can
work well.
ENGLISH
When the whole process finishes, LCD will show the message as follows.
4.12.10 Load Default
On the above figure press ESC andto enter the next figure. Load
Default is to make all changed settings recover to defaults.
Enter ESC
Hold ESC to exit
Test finished
12-10. Adv Setup
Load Default
Press ENT to enter the next figure. Useto confirm Yes or No.
Load Default
Config? Y es
120
4. Functions
Page 57

When default loading finishes, LCD will show the results as follows.
Load Default
OK
4.12.11 CD+G
On the above figure press ESC andto enter the following figure.
CD+G is a kind of special copying format. This function supports the
special format.
12-11. Adv Setup
CD+G
Press ENT to enter the next figure. The default is Off. Pressto select
On.
CD+G
Off
4.12.12 ISRC
On the above figure press ESC andto enter the following figure.
ISRC is a kind of special copying format. This function supports the
special format.
ENGLISH
4. Functions
12-12. Adv Setup
ISRC
121
Page 58

Press ENT to enter the next figure. The default is Off. Pressto select
On.
ENGLISH
4.12.13 Switch Link-Host
On the above figure press ESC andto enter the next figure. Switch
Link-Host lets you switch to the link-host mode if your CopyStation has
connected with a PC.
Press ENT to enter the next figure.
ISRC
Off
12-13. Adv Setup
Switch Link-Host
Link-Host Mode
Initializing...
122
4. Functions
Page 59

5. TR OUBLESHOOTING
5.1 About LCD
After powering on if there is no LCD, please check if the connection of
power cord is firm and the environment of power outlet is normal.
5.2 About Error Messages
During Copy, Test, Compare and Verify, etc. if you press ESC to abort,
an error message will appear on LCD. Abortion may cause the
CopyStation to hang up, therefore you have to power on again.
If reading fails, an error message will appear on LCD. Please get a new
source DVD/CD to try again.
If the CopyStation hasn’t detected any device after powering on, an
error message will appear on LCD.
5.3 About DVD/CD Writer
ENGLISH
If a source drive or DVD/CD Writers cannot read, please confirm the
format of the source DVD/CD and check if it is damaged.
Use any DVD/CD writer to read the source DVD/CD. If it works, the
source drive is probably defective or not compatible with the source
DVD/CD.
Use a fine DVD/CD Writer as the data reader, and set the “Read Speed”
at minimum.
5. Troubleshooting
123
Page 60

5.4 About Buttons
If you press any one of the four buttons on the panel, but there is no
response, it is likely that the button cannot function well. Please inspect
the jumper setting.
ENGLISH
5.5 About DVD/CD Disc Not Readable
After copying if the DVD/CD disc is not readable, please use Compare
to examine, or get another source drive to test.
5.6 About High Failure Rate
If the failure rate of copying is high, please do the following things to
improve.
Lower the speed of the DVD/CD writer.
Inspect if the blank disk’s quality is bad.
Inspect the DVD/CD writer’s maximum writing speed. If the speed is
5.7 About Function 12 and Cancellation
If you want to execute function 12.Advanced Setup, you can press ESC
for 2 seconds. And during operation if you want to cancel a function like
Copy, Test, Verify and so on, you can press ESC for 2 seconds, too.
over 24X, copy the data to the optional hard disk first, and then transmit to DVD/CD.
124
5. Troubleshooting
Page 61

6. TECHNICAL SUPPORT
In case the TEAC Dupli CopyStation does not operate normally in the
environment specified in this manual, contact the representative from
whom you purchased the drive or our nearest sales office to you.
Technical Service Depots (Europe)
TEAC Deutschland GmbH, DSPD (Germany)
Technical Support Tel:
Mo-Fr from 8:30 – 20:00 CET
Sa from 10:00 – 16:00 CET
Technical Support Fax: +49 (0) 611 7158 666
Online RMA: http://www.teac.de/RMA
Internet: http://www.teac.de/support
Contact us by email: SUPPORT@Teac.de
TEAC UK LIMITED, DSPD (U.K.)
Technical Support Freecall: 0800 08 53 704 (U.K. only)
Mo-Fr from 8:30 – 20:00 CET
Sa from 10:00 – 16:00 CET
0180 5 999 588 (EUR 0.12/min (Germany))
ENGLISH
Technical Support Fax: +49 (0) 611 7158 666
Online RMA: http://www.teac.de/RMA
Internet: http://www.teac.de/support
Contact us by email: SUPPORT@Teac.de
TEAC FRANCE S.A. (France)
Technical Support Tel: +33 (0) 1 55 59 01 55
Mo-Fr from 9:00 – 16:00 CET
Technical Support Fax: +33 (0) 1 55 59 01 56
Online RMA: http://www.teac.de/RMA
Internet: http://www.teac.de/support
Contact us by email: Support@teac.fr
All other countries please call:
+49 611 7158 600
6. Technical Support
125
Page 62

7. SPECIFICATION
7.1 DVD/CD Dupli
Model DVD Dupli 14/4 DVD Dupli 7 /4 DVD Dupli 4/4
ENGLISH
DVD-ROM
DVD-Writer 14 x
Drive performance
CD
Disc Loading
TEAC DV-516E
Performance max. 48 x CD, max. 16 x DVD
TEAC DV-W50E
Performance max 4 x DVD-R / 2 x DVD-RW / max 16 x CD-R / 8 x CD-RW
Access time 140msec (DVD), 130msec (CD)
Transfer Rate max. 16.6MB/sec
Puffer Size 2MB
Compatibility DVD-R, DVD-RW
Recording mode
for DVD-R
for DVD-RW
for CD-R/CD-RW
CD-DA, CD-I, Video-CD, CD-ROM-XA, CD-Plus,
Enhanced-CD, Photo-CD, CD-RW
Disk at once, Incremental recording, multi-border recording
Restricted overwriting
Disk at once, Track at once, Session at once, Packet write
7 x
TEAC DV-W50E
Motorized Tray
4 x
TEAC DV-W50E
Power Supply Input 115 to 230VAC, 300W
Operating environment
Place of operation Temperature 5 to 45°C,
Place of storage Temperature -20 to 55°C,
Dimensions/weight
Dimensions
(WxHxD)
Weight 2x: 19.0kg 19.0kg 15.9kg
Safety standards CE
After 10.000 copies made with any of the writers maintenance is needed. You will be
180 x 440 x 460
charged for the maintenance.
126
Humidiy 20 to 80% (noncondensing)
Humidity 10 to 80% (noncondensing)
2x:
mm
180 x 440 x 460mm180 x 440 x 460
mm
7. Specification
Page 63

7.2 CD-R Dupli
Model CD-R Dupli 14/40 CD-R Dupli 7/40 CD-R Dupli 4/40
CD-ROM
Performance max. 48 x read
CD-Writer 14 x
Performance max. 40 x CD-R / max. 12 x CD-RW
Drive performance
Access time 72ms typ.
Transfer Rate max. 16.6MB/sec
Puffer Size 8MB
CD
Compatibility CD-DA, CD-I, Video-CD, CD-ROM-XA, CD-Plus,
Recording mode Disk at once, Track at once, Session at once, Packet write
Disc Loading
Power Supply Input 115 to 230VAC, 300W
Operating environment
Place of operation Temperature 5 to 40°C,
Place of storage Temperature -20 to 55°C,
Dimensions/weight
Dimensions
(WxHxD)
Weight 2x: 19.0kg 19.0kg 15.9kg
Safety standards CE
After 10.000 copies made with any of the writers maintenance is needed. You will be
TEAC CD-W540E
Humidiy 20 to 80% (noncondensing)
Humidiy 10 to 80% (noncondensing)
2x:
180 x 440 x 460
mm
charged for the maintenance.
TEAC CD-W540E
7 x
TEAC CD-W540E
Enhanced-CD, Photo-CD, CD-RW
Motorized Tray
180 x 440 x 460mm180 x 440 x 460
TEAC CD-W540E
4 x
mm
ENGLISH
7. Specification
127
Page 64

APPENDIX: LCD MESSAGES
A.1 Normal Conditions:
Initialize SDRAM ............................ Initialize the memory of the system.
ENGLISH
Detect Drives .......... Detect what drives are connected with the system.
User Abort............................................ Cancel the job during operation.
Analyzing ......................................................... Analyze the source disc.
Source Drive Not Ready.................... Source drive is not ready to read.
Target Drive Not Ready ...................... Target drive is not ready to write.
Source Disc Not Ready ................. Source disc is not ready to be read.
Target Disc Not Ready...........Target disc is not ready to be written into.
Erasing disc ........................ The system is erasing the data on the disc.
Fail to get Drive Info!............ The drive information cannot be obtained.
Fail to get Src Disc Info! ....... The information of source disc cannot be
Save new config Fail!......... The new setting of configuration cannot be
Load Default Config? ............ Do you want to load the default settings?
Src&Tgt can’t in the same channel During comparison the source and
Preparing.......................................... The system is preparing to record.
Check Target Please Wait .... The system is checking the target device.
Audio Disc!!! Can’t compare! ... The system cannot compare the audio
Identical.......................................The comparison results are the same.
Read disc error ................. During comparison the disc cannot be read.
Cannot read T O C ............ The system cannot read the contents of disc.
TOC not match......................The comparison results are not the same.
Source Disc Empty!!! ...........The source disc doesn’t contain any data.
Target overflow .............The target disc hasn’t enough capacity to store
Target Disc Not Empty!!!.......................... The target disc still has data.
obtained.
saved.
target discs cannot be in the same channel.
discs.
new data.
128
Appendix: LCD Messages
Page 65

Press a Key to Eject Good Disc ... Press any ket to eject the good disc
after copying
Press a Key to Eject Fail Disc...... Press any key to eject the failed disc
after copying.
DVD-RW does not Support the Func ..... DVD-RW doesn’t support this
function.
Hold ESC to exit ............. Press ESC for a second to terminate the test.
All data will be lost, erase?................... All data on the disc will be lost.
Confirm the erasing of data.
Erase Finished............................ The erasing of data comes to an end.
No Eraseable Disc in DVD-RW!! .........The disc on the DVD-RW device
is not rewritable.
A.2 Connecting with the optional HDD
HDD not Format!..................... The hard disk hasn’t been formatted yet.
Format HDD? ............................ Ask if you want to format the hard disk.
All data will be lost, format? ......... All data on the hard disk will be lost.
Confirm the formatting of hard disk.
Format HDD OK!.......The Formatting of hard disk has been completed.
Image load OK ...The image is successfully loaded from DVD/CD to the
hard disk.
Image load FailThe image isn’t successfully loaded from DVD/CD to the
hard disk.
HDD too small to handle image! The hard disk hasn’t enough capacity
to store the data image (at least 5Gbytes).
No V alid HDD!................................. The system cannot find a hard disk.
HDD too small............................. The capacity of hard disk is too small.
No Image in Partition xx ............There is no data image in partition xx.
Image Exists. Overwrite? There is a data image in the current partition.
Confirm the overwriting of data.
Delete Image in Partition xx? ..... Confirm the deleting of data image in
partition xx.
Partition Damage........................................... The partition is damaged.
ENGLISH
Appendix: LCD Messages
129
Page 66

Verify Disk or Partition?..............Do you want to verify the hard disk or
Verify Hard Disk OK! ................... The hard disk is verified successfully.
Verify Hard Disk Fail!............. The hard disk is not verified successfully.
Verify Partition Header!................................ Verify the partition header.
Select HD First!.............................. Select a formatted hard disk at first.
ENGLISH
A.3 Audio Editing
Lost selected Tracks?..........Abort the selected tracks and delete them.
End edit disc and burn?..................... Finish the music disc editing and
Continue edit next Disc? ...................... Ask if you want to continue the
Target Overflow Re-Select ...............The disc capacity is not enough to
Close all disc’s session? ............. Confirm the closing of disc sessions.
Can’t edit HDD ................... The hard disk cannot be edited as a source
NO AUDIO track in this disc ......... The source disc has no audio track.
Insert next disc ............................................. Insert the next audio disc.
Sessions were closed already!............ The disc sessions have already
Burn or Move to partition? ......... Do you want to directly copy the data
Tgt overflow, del last trk? .......The disc capacity is not enough to store
Ins empty disc Continue?......... Do you want to insert a blank disc and
just a partition?
start to copy.
music disc editing.
store the selected tracks. Please select again.
audio disc.
been closed.
into disc or move them to the partition.
the selected tracks. So, do you want to delete the last track?
continue copying?
130
Appendix: LCD Messages
 Loading...