

Page 1

Z
D01214520C
CD
-
P800NT
CD/Network Audio Player
OWNER'S MANUAL
MODE D’EMPLOI
MANUAL DEL USUARIO
ENGLISH FRANÇAIS ESPAÑOL
Page 2

Trademarks and other legal statement
MPEG Layer-3 audio coding technology licensed from
Fraunhofer IIS and Thomson Licensing.
“DSD” is a registered trademark.
This product is protected by certain intellectual property
rights of Microsoft. Use or distribution of such technology
outside of this product is prohibited without a license from
Microsoft.
Microsoft, Windows, Windows Media and Internet Explorer
are either registered trademarks or trademarks of Microsoft
Corporation in the United States and/or other countries.
“Made for iPod” and “Made for iPhone” mean that an electronic accessory has been designed to connect specifically
to iPod, iPhone, or iPad, respectively, and has been certified
by the developer to meet Apple performance standards.
Apple is not responsible for the operation of this device or
its compliance with safety and regulatory standards.
Please note that the use of this accessory with iPod, or
iPhone may affect wireless performance.
Apple, iPhone, iPod, iPod classic, iPod nano, iPod touch and
iTunes are trademarks of Apple Inc., registered in the U.S.
and other countries.
IOS is a trademark or registered trademark of Cisco in the
U.S. and other countries and is used under license.
Android is a trademark of Google Inc.
SiriusXM Internet Radio subscriptions are sold separately
and are governed by the Sirius Terms and Conditions (see
www.sirius.com). Be sure to read this agreement before
you purchase your subscription. Sirius, XM and all related
marks and logos are trademarks of Sirius XM Radio Inc. and
its subsidiaries. All rights reserved.
Listening to SiriusXM Internet Radio
To listen to SiriusXM Internet Radio, you’ll need to subscribe to SiriusXM Internet Radio service and obtain
a username and password. SiriusXM Internet Radio is
available to residents of the United States and Canada.
SiriusXM Internet Radio delivers a variety of commercialfree music including Pop, Rock, Country, R&B, Hip- Hop,
Jazz, Classical and much more, plus expert sports talk
and analysis. You also get exclusive entertainment, talk,
comedy, family programming, local traffic and weather
and news from your most trusted sources.
Once you’ve purchased a SiriusXM Internet Radio compatible tuner you’ll need to subscribe to the service
to listen to SiriusXM Internet Radio. There are a variety
of programming packages available, including the
option of adding “The Best of XM” programming to the
SiriusXM Internet Radio service. “The Best of XM” service
is not available to Sirius Canada subscribers at this time.
Please check with Sirius Canada for any updates using
the numbers and web address below.
Family friendly packages are also available to restrict
channels that feature mature programming.
To subscribe to SiriusXM Internet Radio, U.S. customers
should visit www.sirius.com or
call
1- 888- 539-SIRI (1- 888- 539- 7474). Canadian customers
should visit
www.siriuscanada.ca.
Slacker and the Slacker Logo are registered trademarks of
Slacker, Inc.
DLNA®, the DLNA Logo and DLNA CERTIFIED® are trademarks, service marks, or certification marks of the Digital
Living Network Alliance.
Other company names and product names in this document are the trademarks or registered trademarks of their
respective owners.
Information about copyrights and licensing related to
open-source software is provided in the separate
“Important Notice Regarding Software” document.
2
Current XM Radio Online subscribers will need to log
into the XM online account manager and update
their password in order for their credentials to work
on a SiriusXM Internet Radio compatible device. If the
username is over 20 characters or their device doesn’t
support the “@” character in the username, subscribers
need to update the username on the same screen.
Page 3

IMPORTANT SAFETY INSTRUCTIONS
CAUTION: TO REDUCE THE RISK OF ELECTRIC SHOCK, DO NOT
REMOVE COVER (OR BACK). NO USER-SERVICEABLE PARTS
INSIDE. REFER SERVICING TO QUALIFIED SERVICE PERSONNEL.
The lightning flash with arrowhead in an equilat-
M
V
WARNING: TO PREVENT FIRE OR SHOCK
HAZARD, DO NOT EXPOSE THIS APPLIANCE
TO RAIN OR MOISTURE.
eral triangle is intended to alert the user to the
presence of uninsulated “dangerous voltage” within
the product’s enclosure that could be of sufficient
magnitude to constitute a risk of electric shock to
persons.
The exclamation point in an equilateral triangle
is intended to alert the user to the presence of
important operating and maintenance (servicing)
instructions in the literature accompanying the
appliance.
Model for USA
This device complies with part 15 of the FCC Rules. Operation
is subject to the following two conditions: (1) This device may
not cause harmful interference, and (2) this device must accept
any interference received, including interference that may cause
undesired operation.
This equipment has been tested and found to comply with the
limits for a Class B digital device, pursuant to Part 15 of the FCC
Rules. These limits are designed to provide reasonable protec
tion against harmful interference in a residential installation. This
equipment generates, uses, and can radiate radio frequency
energy and, if not installed and used in accordance with the
instructions, may cause harmful interference to radio communications. However, there is no guarantee that interference will not
occur in a particular installation. If this equipment does cause
harmful interference to radio or television reception, which can
be determined by turning the equipment off and on, the user is
encouraged to try to correct the interference by one or more of
the following measures:
• Reorient or relocate the equipment and/or the receiving
antenna.
• Increase the separation between the equipment and receiver.
• Connect the equipment into an outlet on a circuit different from
that to which the receiver is connected.
• Consult the dealer or an experienced radio/TV technician for
help.
-
ENGLISH
CAUTION
o DO NOT REMOVE EXTERNAL CASES OR CABINETS TO EXPOSE
THE ELECTRONICS. NO USER SERVICEABLE PARTS ARE INSIDE.
o IF YOU ARE EXPERIENCING PROBLEMS WITH THIS PRODUCT,
CONTACT THE STORE WHERE YOU PURCHASED THE UNIT FOR
A SERVICE REFERRAL. DO NOT USE THE PRODUCT UNTIL IT HAS
BEEN REPAIRED.
o USE OF CONTROLS OR ADJUSTMENTS OR PERFORMANCE OF
PROCEDURES OTHER THAN THOSE SPECIFIED HEREIN COULD
RESULT IN HAZARDOUS RADIATION EXPOSURE.
IN USA/CANADA, USE ONLY ON 120 V SUPPLY.
Model for Canada
Industry Canada’s Compliance Statement:
This Class B digital apparatus complies with Canadian ICES-003.
3
Page 4

IMPORTANT SAFETY INSTRUCTIONS (continued)
1) Read these instructions.
2) Keep these instructions.
3) Heed all warnings.
4) Follow all instructions.
5) Do not use this apparatus near water.
6) Clean only with dry cloth.
7) Do not block any ventilation openings. Install in accordance
with the manufacturer's instructions.
8) Do not install near any heat sources such as radiators, heat
registers, stoves, or other apparatus (including amplifiers) that
produce heat.
9) Do not defeat the safety purpose of the polarized or grounding-type plug. A polarized plug has two blades with one wider
than the other. A grounding type plug has two blades and a
third grounding prong. The wide blade or the third prong are
provided for your safety. If the provided plug does not fit into
your outlet, consult an electrician for replacement of the obsolete outlet.
10) Protect the power cord from being walked on or pinched
particularly at plugs, convenience receptacles, and the point
where they exit from the apparatus.
11) Only use attachments/accessories specified by the
manufacturer.
12) Use only with the cart, stand, tripod,
bracket, or table specified by the manufacturer, or sold with the apparatus. When
a cart is used, use caution when moving
the cart/apparatus combination to avoid
injury from tip-over.
13) Unplug this apparatus during lightning
storms or when unused for long periods of time.
14) Refer all servicing to qualified service personnel. Servicing is
required when the apparatus has been damaged in any way,
such as power-supply cord or plug is damaged, liquid has been
spilled or objects have fallen into the apparatus, the apparatus
has been exposed to rain or moisture, does not operate normally, or has been dropped.
o The apparatus draws nominal non-operating power from the
AC outlet with its POWER or STANDBY/ON switch not in the ON
position.
o The mains plug is used as the disconnect device, the discon-
nect device shall remain readily operable.
o Caution should be taken when using earphones or head-
phones with the product because excessive sound pressure
(volume) from earphones or headphones can cause hearing
loss.
CAUTION
o Do not expose this apparatus to drips or splashes.
o Do not place any objects filled with liquids, such as vases, on
the apparatus.
o Do not install this apparatus in a confined space such as a
book case or similar unit.
o The apparatus should be located close enough to the AC
outlet so that you can easily reach the power cord plug at
any time.
o If the product uses batteries (including a battery pack or
installed batteries), they should not be exposed to sunshine,
fire or excessive heat.
o CAUTION for products that use replaceable lithium batteries:
there is danger of explosion if a battery is replaced with an
incorrect type of battery. Replace only with the same or
equivalent type.
WARNING
Products with Class ! construction are equipped with a power
supply cord that has a grounding plug. The cord of such a product must be plugged into an AC outlet that has a protective
grounding connection.
V
Precautions concerning batteries
Misuse of batteries could cause them to rupture or leak leading
to fire, injury or the staining of nearby things. Please read and
observe the following precautions carefully.
o Be sure to insert the batteries with correct positive (¥) and
negative (^) orientations.
o Use batteries of the same type. Never use different types of
batteries together.
o If the remote control is not used for a long time (more than a
month), remove the batteries to prevent them from leaking.
o If the batteries leak, wipe away the leakage inside the battery
compartment and replace the batteries with new ones.
o Do not use batteries of types other than those specified. Do
not mix new batteries with old ones or use different types of
batteries together.
o Do not heat or disassemble batteries. Never throw batteries
into fire or water.
o Do not carry or store batteries with other metallic objects. The
batteries could short circuit, leak or explode.
o Never recharge a battery unless it is confirmed to be a
rechargeable type.
4
Page 5

Pb, Hg, Cd
This product contains a semiconductor laser system inside the
cabinet and is classified as a “CLASS 1 LASER PRODUCT”.
To prevent being exposed to the laser beam, do not try to open
the enclosure.
Laser:
Type: EP-C101
Manufacturer: GUANGDONG EVER BRIGHT GROUP
CO.,LTD.
Laser output: Less than 0.3 mW
Wavelength: 790 ± 25 nm
Model for USA
This product has been designed and manufactured according to
FDA regulations “title 21, CFR, chapter 1, subchapter J, based on
the Radiation Control for Health and Safety Act of 1968”, and is
classified as class ! laser product. There is not hazardous invisible
laser radiation during operation because invisible laser radiation
emitted inside of this product is completely confined in the protective housings.
The label required in this regulation is as follows:
For European Customers
Disposal of electrical and electronic equipment
(a)
All electrical and electronic equipment should be disposed
of separately from the municipal waste stream via collection facilities designated by the government or local
authorities.
(b)
By disposing of electrical and electronic equipment correctly, you will help save valuable resources and prevent
any potential negative effects on human health and the
environment.
(c)
Improper disposal of waste electrical and electronic equipment can have serious effects on the environment and
human health because of the presence of hazardous substances in the equipment.
(d)
The Waste Electrical and Electronic Equipment
(WEEE) symbol, which shows a wheeled bin that
has been crossed out, indicates that electrical
and electronic equipment must be collected and
disposed of separately from household waste.
(e)
Return and collection systems are available to end users.
For more detailed information about the disposal of old
electrical and electronic equipment, please contact your
city office, waste disposal service or the shop where you
purchased the equipment.
ENGLISH
DECLARATION OF CONFORMITY
We, TEAC AUDIO EUROPE, Liegnitzer Straße
6, 82194 Gröbenzell, Germany declare in own
responsibility, the TEAC product described in this
manual is in compliance with the corresponding
technical standards.
CAUTION
Changes or modifications to this equipment not expressly
approved by TEAC CORPORATION for compliance will void the
user’s warranty.
Disposal of batteries and/or accumulators
(a)
Waste batteries and/or accumulators should be disposed
of separately from the municipal waste stream via collection facilities designated by the government or local
authorities.
(b)
By disposing of waste batteries and/or accumulators correctly, you will help save valuable resources and prevent
any potential negative effects on human health and the
environment.
(c)
Improper disposal of waste batteries and/or accumulators
can have serious effects on the environment and human
health because of the presence of hazardous substances in
them.
(d)
The WEEE symbol, which shows a wheeled bin
that has been crossed out, indicates that batteries and/or accumulators must be collected and
disposed of separately from household waste.
If a battery or accumulator contains more than
the specified values of lead (Pb), mercury (Hg), and/or
cadmium (Cd) as defined in the Battery Directive (2006/66/
EC), then the chemical symbols for those elements will be
indicated beneath the WEEE symbol.
(e)
Return and collection systems are available to end users.
For more detailed information about the disposal of waste
batteries and/or accumulators, please contact your city
office, waste disposal service or the shop where you purchased them.
5
Page 6

Contents
Thank you for choosing TEAC.
Read this manual carefully to get the best performance
from this unit.
After reading this manual, keep it in a safe place for future
reference.
IMPORTANT SAFETY INSTRUCTIONS ......................3
Before use ................................................7
Using an iPod or iPhone ..................................8
Downloading the remote app ............................8
Notes about discs ........................................9
USB and Networks .......................................12
Connections .............................................14
Names and functions of parts (main unit) ................15
Names and functions of parts (remote control) ...........16
Using the remote control ................................17
Information shown on the display .......................18
Settings .................................................45
Inputting characters .....................................49
Updating the firmware ..................................49
Troubleshooting .........................................52
Specifications ............................................54
Basic operation ..........................................19
Information shown on the display (CD/USB/NET) ........22
Listening to CDs .........................................24
Listening to files on a USB flash drive .....................30
Shuffle playback (CD/USB) ...............................31
Repeat playback (CD/USB) ...............................32
Listening to an iPod/iPhone .............................32
Using network services ..................................33
vTuner Internet Radio ....................................34
My Favorites .............................................37
DLNA ....................................................39
Home Media ............................................41
Setting up Windows Media Player ........................42
Making shared folder settings ............................43
6
Page 7

Before use
What’s in the box
Check to be sure the box includes all the supplied accessories shown below. Please contact the store where you
purchased this unit if any of these accessories are missing
or have been damaged during transportation.
RCA audio cable × 1
Remote control (RC-1310) × 1
Batteries for remote control (AAA) × 2
Owner’s manual (this document) × 1
Warranty × 1 (for customers in the USA and Canada
only)
o See the back of this document for information about
the warranty in Europe and other countries or areas.
Precautions for use
o Do not install this unit in a location that could become
hot. This includes places that are exposed to direct sunlight or near a radiator, heater, stove or other heating
equipment. Moreover, do not place it on top of an
amplifier or other equipment that generates heat.
Doing so could cause discoloration or deformation.
o Avoid locations that are extremely cold or exposed to
excessive humidity or dust.
o In order to enable good heat dissipation, leave at least 20
cm (8") between this unit and walls and other equipment when installing it. If you put it in a rack, take
precautions to prevent overheating by leaving at least 5
cm (2“) open above the top of the unit and at least 10 cm
(4“) open behind the unit.
o Do not put cloth on top of the unit or place the unit on
top of bedding or thick carpet. Doing so could cause
the unit to overheat or damage it.
o Do not lift or move the unit during playback because
the disc rotates at high speed. Doing so could damage
the disc.
o Always remove any loaded disc before moving this unit
or packing it for installation in a different location, for
example. Moving the unit with a disc inside could cause
a malfunction.
o This unit consumes power when in standby mode.
o Supply voltage to the unit that matches the voltage
indicated on the rear panel. If you are in any doubt
regarding this matter, consult an electrician.
o Do not open the body of the unit as this might result in
damage to the circuitry or cause electric shock. If a foreign object should get into the unit, contact your dealer.
o When removing the power plug from an outlet, always
pull directly on the plug. Never pull on the cord itself.
o If a TV is turned on while the unit is on, static might
appear on the TV screen depending on the characteristics of the TV broadcast signal. This is not a malfunction
of the unit nor of the TV. If this occurs, turn the unit off.
Product registration
Customers in the USA, please visit the following TEAC website to register your TEAC product online.
http://audio.teac.com/support/registration/
Using the TEAC Global Site
You can download updates for this unit from the TEAC
Global Site:
http://teac-global.com/
1) Open the TEAC Global Site.
2) In the TEAC Downloads section, click the desired language to open the Downloads website page for that
language.
NOTE
If the desired language does not appear, click Other
Languages.
3) Click the “Search by Model Name” section to open the
Downloads page for that product. (Users in Europe
should click the product name in the “Products” section
instead.)
4) Select and download any updates that are needed.
Maintenance
Wipe dirt from the top cover and other panel surfaces
using a soft cloth that has been slightly dampened with a
diluted neutral cleanser.
Do not use chemically-treated wipes, thinner or similar
substances because they could damage the surface of the
unit.
V
For safety, disconnect the power cord from the
socket before cleaning.
7
ENGLISH
Page 8

Using an iPod or iPhone
Downloading the remote app
This unit can be connected to and used with the following
iPod/iPhone models.
iPhone 5s, iPhone 5c, iPhone 5
iPhone 4s, iPhone 4
iPhone 3GS, iPhone 3G
iPhone
iPod touch (1st, 2nd, 3rd, 4th, and 5th generation)
iPod classic
iPod nano (2nd, 3rd, 4th, 5th, 6th, and 7th generation)
o This unit cannot output video from an iPod or iPhone.
o Use the USB cable supplied with the iPod or iPhone to
connect it to the unit.
iPod/iPhone software
If the unit or remote control buttons do not work properly
with your iPod or iPhone, updating its software might solve
the problem.
Download the latest software for your iPod or iPhone from
the following Apple website.
If you install the app on an iPod touch/iPhone or Android
device, you can use it over a wireless network for basic control of the unit.
o You can download and use the app for free.
How to download the iPod touch/iPhone app
Search for “Teac Avr Remote” in the App Store.
http://www.apple.com/support/country/?dest=downloads
How to download the Android app
Search for “Teac Avr Remote” on the Google play website
(https://play.google.com/store).
8
Page 9
Notes about discs
Types of discs that can be played
by this unit
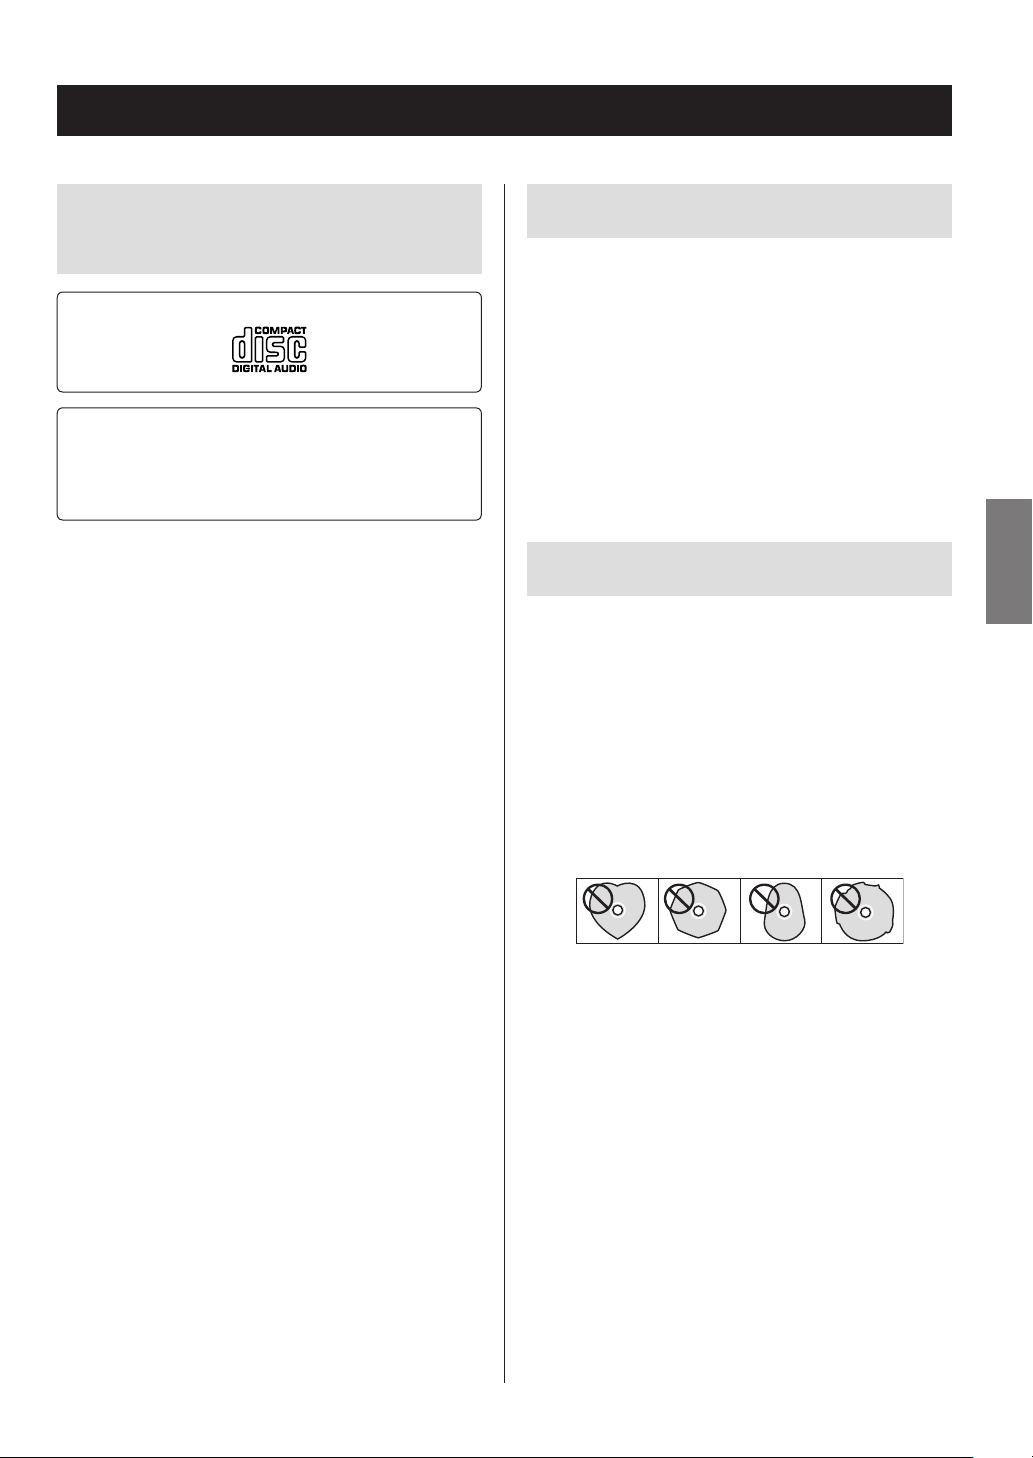
CDs with the “COMPACT disc DIGITAL AUDIO” logo
CD-R and CD-RW discs that have been properly
recorded and finalized using the audio CD format.
CD-R and CD-RW discs that have been recorded
with MP3/WAV files and properly finalized.
This unit can play the above types of discs without using
an adapter. This unit cannot play discs of types other than
those above.
V
CAUTION
If you try to play any other type of disc with this unit,
loud noises that damage speakers or harm hearing
could occur. Never try to play any type of disc other
than those shown above.
o This unit might not be able to properly play Copy
Control CDs, Dual Discs or other special CDs that do not
conform to the Red Book CD standard. Operation and
sound quality cannot be guaranteed when special discs
are used in this unit. If playback of a special disc should
cause trouble, contact the seller of the disc.
CD-R/CD-RW discs
This unit can play discs that are in audio CD format (CD-DA)
and CD-R/CD-RW that have files in MP3 and WAV formats.
o Be sure to finalize discs created by CD recorders.
o Depending on the quality of the disc and the condition
of the recording, playback might not be possible. For
details, see the operation manual for the device you are
using.
o If you have any questions about how to handle a CD-R
or CD-RW disc, contact the seller of the disc directly.
ENGLISH
Precautions for use
o Do not use cracked discs because they could damage
the unit.
o When writing something on the label side of a disc, use
a felt tip permanent marker. The use of a ballpoint pen
or other pen with a hard tip could damage the disc,
making it unplayable.
o Never use commercially-available CD stabilizers. Doing
so could make the disc unplayable or damage the unit.
o Never use discs with irregular shapes, including heart-
shaped and octagonal discs, because they could
damage the unit.
o If a CD-R/CD-RW disc that has a printable label surface
is left in this unit for a long time, it could stick to the
inside and become extremely difficult to remove and
possibly even cause the unit to malfunction.
Always remove such discs and store them in cases
when not in use. Moreover, avoid using discs that have
just been printed because they are especially prone to
sticking.
9
Page 10
Notes about discs (continued)
Handling discs
o Always load discs with their labeled sides up.
o Be careful when handling discs. If the side that contains
the data (unlabeled side) is scratched, smudged with
fingerprints or otherwise dirty or marred, errors could
occur during playback.
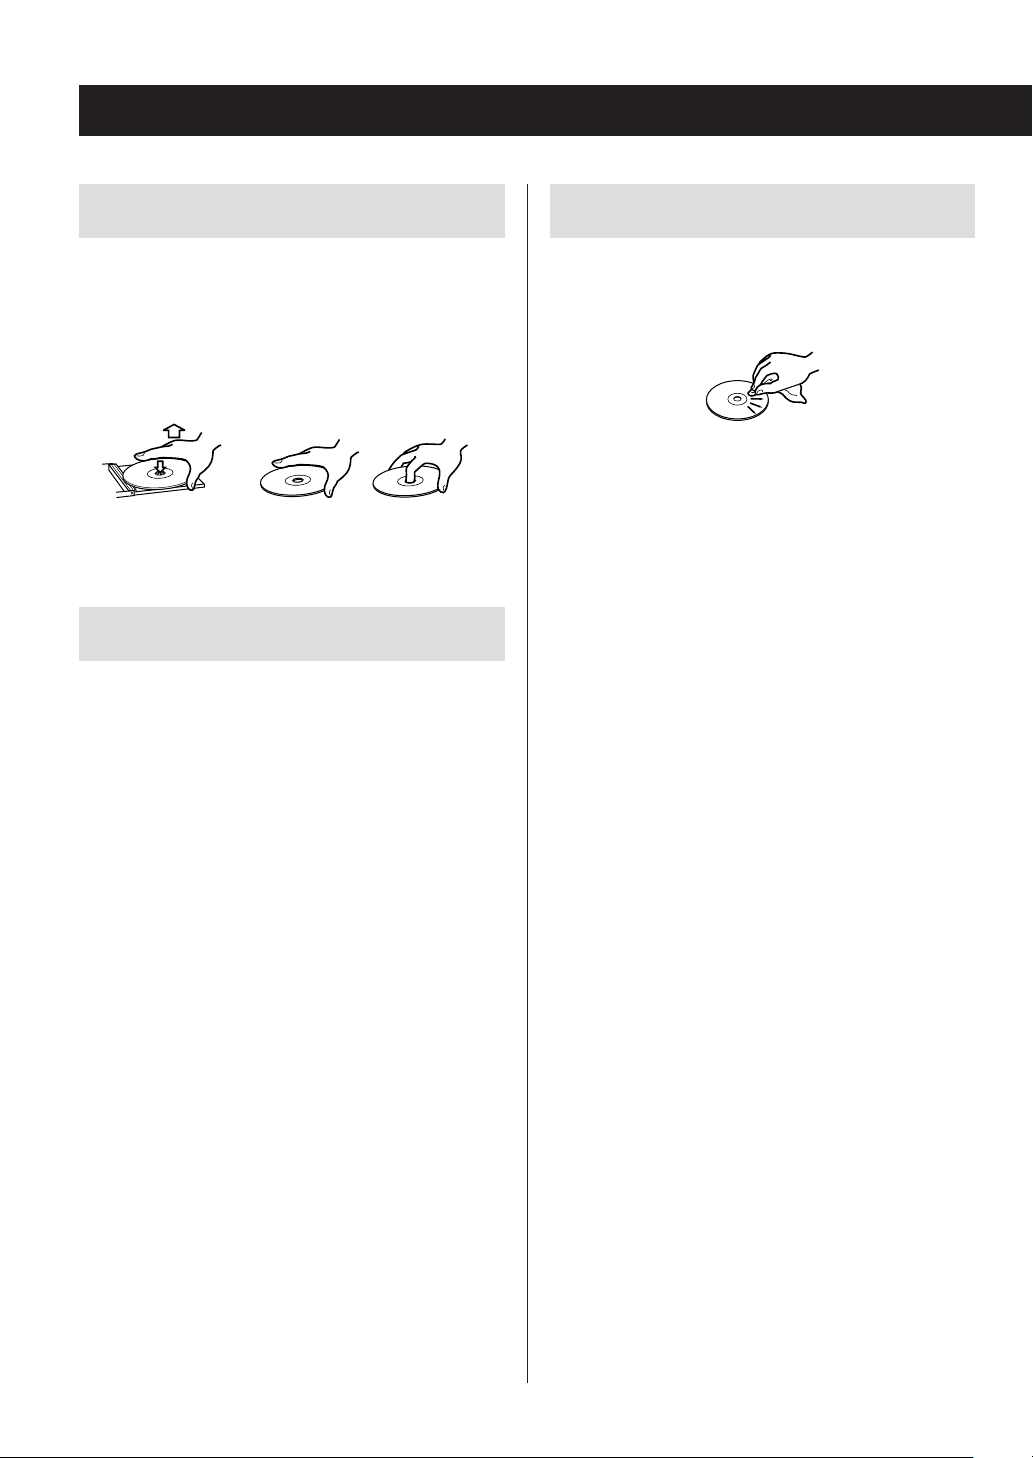
o To remove a disc from its case, while pressing down on
the center of the case, hold the disc by its edges.
Removing discs Holding discs
Disc storage
o After you finish using a disc, always put it back into its
case for storage. Failure to do so could result in warping
and scratches.
o Do not leave discs in places that are exposed to direct
sunlight or that are very humid or hot. Doing so could
cause discs to become deformed or degraded, making
them unplayable.
o CD-R and CD-RW discs are more susceptible to the
impacts of heat and ultraviolet rays than ordinary CDs.
For this reason, do not leave them for long times in
places that are exposed to direct sunlight or near
devices that generate heat, for example.
o Always clean discs before storing them. Leaving a disc
in an unclean state might result in skipping or degraded
sound quality.
Maintenance
o If the side of the disc that has the data encoded on it
(unlabeled side) becomes dirty with fingerprints or
dust, use a soft cloth to wipe the surface from the center directly toward the edge.
o Never use record cleaners, antistatic treatments, thin-
ners or similar chemicals to clean discs. Such chemicals
could harm the surface of the disc.
10
Page 11

MP3/WAV formats
Precautions when creating MP3/
This unit can play MP3 and WAV files that have been
recorded on a CD-R or CD-RW disc.
o Playable audio file formats
MP3 (extension: “.mp3”, “.MP3” )
Standard MPEG-1/MPEG-2 Audio
Layer-2/Layer-3
Sampling frequency 16 kHz, 22.05 kHz, 24 kHz,
32 kHz, 44.1 kHz, 48 kHz
Bit rate 8 kbps–320 kbps or VBR
o Variable bit rate (VBR) is supported. However, the
time and other information shown on the display
during playback of a VBR file might be incorrect
sometimes.
WAV (extension: “.wav ”, “.WAV”)
Sampling frequency 8 kHz, 11.025 kHz, 12 kHz,
16kHz, 22.05 kHz, 24 kHz,
32kHz, 44.1 kHz, 48 kHz
Quantization bit depth 8-bit, 16-bit
WAV discs using a computer
o This unit cannot play back discs that were not written in
conformity to the ISO 9660 standard.
o The unit recognizes MP3 and WAV files by their file
extensions, which are “.mp3” and “.wav”, respectively.
Always include the extension in the file name.
o The unit cannot recognize files without these file exten-
sions. Even if one of these file extensions is added to a
file name, however, this unit cannot play files that are
not in the MP3 or WAV data format.
o After recording a CD-R/CD-RW disc, close the session
(complete disc creation). This unit cannot play back
discs that have unclosed sessions.
o This unit can play back files from a maximum of 99 fold-
ers. Furthermore, the unit can recognize and play back a
maximum of 499 folders (including the root folder) and
files.
o Multiple sessions recorded on the same disc are not
supported. Only the first session on such discs can be
played back.
o Depending on the condition of the disc, this unit might
not be able to play it back or audio skipping could
occur.
o This unit cannot play audio files with copyright protec-
tion from a disc.
ENGLISH
11
Page 12

USB and Networks
Audio files playable by this unit
This unit can play the following types of audio files over a
USB or network connection.
MP3
File extension .mp3, .MP3
Standard MPEG-1/MPEG-2 Audio Layer-3
Sampling frequency 8 kHz, 11.025 kHz, 12kHz, 16 kHz,
22.05 kHz, 24 kHz, 32 kHz, 44.1
kHz, 48 kHz
Bit rate 8 kbps–320 kbps or VBR
WMA
File extension .wma, .WMA
Sampling frequency 8 kHz, 11.025 kHz, 16 kHz, 22.05
kHz, 32 kHz, 44.1 kHz, 48 kHz
Bit rate 5 kbps–320 kbps or VBR
o This unit might not be able to play audio files with
copyright protection from a USB or network source.
o WMA Pro/Voice not supported
Ogg Vorbis
File extension .ogg, .OGG
Sampling frequency 8 kHz, 11.025 kHz, 16 kHz, 22.05
kHz, 32 kHz, 44.1 kHz, 48 kHz
Bit rate 48 kbps–500 kbps or VBR
o Incompatible files cannot be played back
LPCM (Linear PCM)
Sampling frequency 44.1 kHz, 48 kHz
Quantization bit depth 16-bit
o Playback only supported over a network.
Apple Lossless
File extension .m4a, .mp4, .M4A, .MP4
Sampling frequency 8 kHz, 11.025 kHz, 12 kHz, 16 kHz,
22.05 kHz, 24 kHz, 32 kHz, 44.1kHz,
48 kHz, 64 kHz, 88.2 kHz, 96 kHz
Quantization bit depth 16-bit, 24-bit
DSD
File extension .dsf, .DSF
Sampling frequency 2.8224 MHz, 5.6448 MHz
WMA Lossless
File extension .wma or .WMA
Sampling frequency 44.1 kHz, 48 kHz, 88.2 kHz, 96 kHz
Quantization bit depth 16-bit, 24-bit
WAV
File extension .wav, .WAV
Sampling frequency 8 kHz, 11.025 kHz, 12 kHz, 16 kHz,
22.05 kHz, 24 kHz, 32 kHz, 44.1 kHz,
48 kHz, 64 kHz, 88.2 kHz, 96kHz,
176.4 kHz, 192 kHz
Quantization bit depth 8-bit, 16-bit, 24-bit
o WAV files include uncompressed PCM digital audio.
AAC
File extension .aac, .m4a, .mp4, .3gp, .3g2, .AAC,
.M4A, .MP4, .3GP, .3G2
Standard MPEG-2/MPEG-4 Audio
Sampling frequency 8 kHz, 11.025 kHz, 12 kHz, 16 kHz,
22.05 kHz, 24 kHz, 32 kHz, 44.1kHz,
48 kHz, 64 kHz, 88.2 kHz, 96kHz
Bit rate 8 kbps–320 kbps or VBR
FLAC
File extension .flac, .FLAC
Sampling frequency 8 kHz, 11.025 kHz, 16 kHz,
22.05kHz, 32 kHz, 44.1 kHz, 48kHz,
64kHz, 88.2 kHz, 96 kHz, 176.4kHz,
192 kHz
Quantization bit depth 8-bit, 16-bit, 24-bit
CAUTION
o This unit does not support the following formats when
using the Play To feature of Windows Media Player.
FLAC, Ogg Vorbis, DSD
o When playing back audio files over a network, the types
of file formats that can be played back also depend on
the software running on the network server. For example, when using Windows Media Player 11, not all audio
files on the computer can be played back. Only audio
files that have been added to the Windows Media Player
11 library can be played back.
o When playing back files that have been recorded at
variable bit rate (VBR), the playback time might not be
shown correctly.
12
Page 13

Notes about USB flash drives
Note about DLNA
This unit can use USB flash drives.*
* The USB ports on this unit only support USB flash drives
(also known as “thumb drives” and “jump drives”). They do
not support standard USB hard drives.
o FAT16 and FAT32 formats are supported for USB flash
drives.
o If a USB flash drive is divided into multiple partitions,
this unit will recognize them as separate volumes.
o This unit supports up to 20,000 files and 16 folder levels
within a single folder.
o This unit does not support USB hubs or devices with
USB hub functions. Never connect such devices to this
unit.
o Neither WAV files with sampling frequencies of 176.4
kHz and higher nor 5.6MHz DSD files can be played
back from a USB flash drive that is connected to the
USB(R) port on the back of the unit.
CAUTION
o If the connected media is not supported, “Not
Connected” appears on this unit's display.
o This unit cannot play back audio files if copyright pro-
tection is used.
o Do not connect computers to this unit's USB ports.
Audio from computers cannot be input through this
unit's USB ports.
o This unit might not be able to use media that is loaded
into a USB card reader.
o Depending on the USB flash drive and its contents,
reading data from it might take some time.
o Depending on the USB flash drive, the unit might not
be able to read its data correctly or supply power
properly.
o During the use of USB flash drives, please be aware that
our company will take no responsibility should data be
lost or changed, a USB flash drive become damaged or
other harm occur.
o We recommend backing up data saved on a USB flash
drive before using it with this unit.
o This unit does not support USB flash drives with security
functions.
The Digital Living Network Alliance (DLNA) is a group that
is advancing the standardization of reciprocal connections
and the exchange of audio, image, video and other data
among computers, game devices and digital household
appliances over ordinary home networks (LAN). This unit
complies with version 1.5 of the DLNA guidelines.
Note about servers
This unit supports the following versions of Windows
Media Player.
o Windows Media Player 11
o Windows Media Player 12
o Servers that comply with DLNA
A network server must be connected to the same network
as this unit.
This unit supports up to 20,000 files and 16 folder levels
within a single folder.
CAUTION
Depending on the type of media server, this unit might not
recognize it or be able to play audio files saved on it.
Note about network services
o The network services that can be used will differ accord-
ing to the region.
o Network services and contents that you can use
through this unit could become unusable without
warning if the service provider stops service.
ENGLISH
13
Page 14

A B C D
Connections
Power cord
RCA audio cable
L R
Audio input
Amplifier, etc.
A
Analog audio output (LINE OUT) jacks
These output analog audio signals.
Use the included RCA audio cable to connect this
unit’s output jacks to the audio input jacks of an
amplifier.
Connect the white plug of the audio cable to the
white (L) jack and the red plug to the red (R) jack.
White (L) White (L)
Red (R) Red (R)
B
Digital audio output (DIGITAL OUT)
DIGITAL IN
(COAXIAL)
RCA coaxial digital cable
Amplifier or digital
recording device (CD
recorder, MD deck, etc.)
connectors
These output digital audio. Connect one of this unit’s
digital audio output connectors (COAXIAL or OPTICAL)
to the digital audio input connector of an amplifier or
digital recording device such as a CD recorder. (They
can be connected to different devices at the same
time.)
COAXIAL: Coaxial digital cable (RCA)
OPTICAL: Optical digital cable (TOS)
Optical digital cable
DIGITAL IN
(OPTICAL)
C
D
Power outlet
ETHERNET port
Use a commercially-available LAN cable to connect
this port to a wired network or Internet connection.
o When changing the input source, this port is iden-
tified as “NET”.
USB port
Use to connect a USB flash drive to the unit.
o When changing the input source, this port is iden-
tified as “USB(R)”.
o An iPod/iPhone cannot be connected here.
o Do not connect computers or similar devices to
this unit’s USB ports. Audio from computers cannot
be input through this unit's USB ports.
14
Page 15
Names and functions of parts (main unit)
A B C D E F G H I J K L M
A
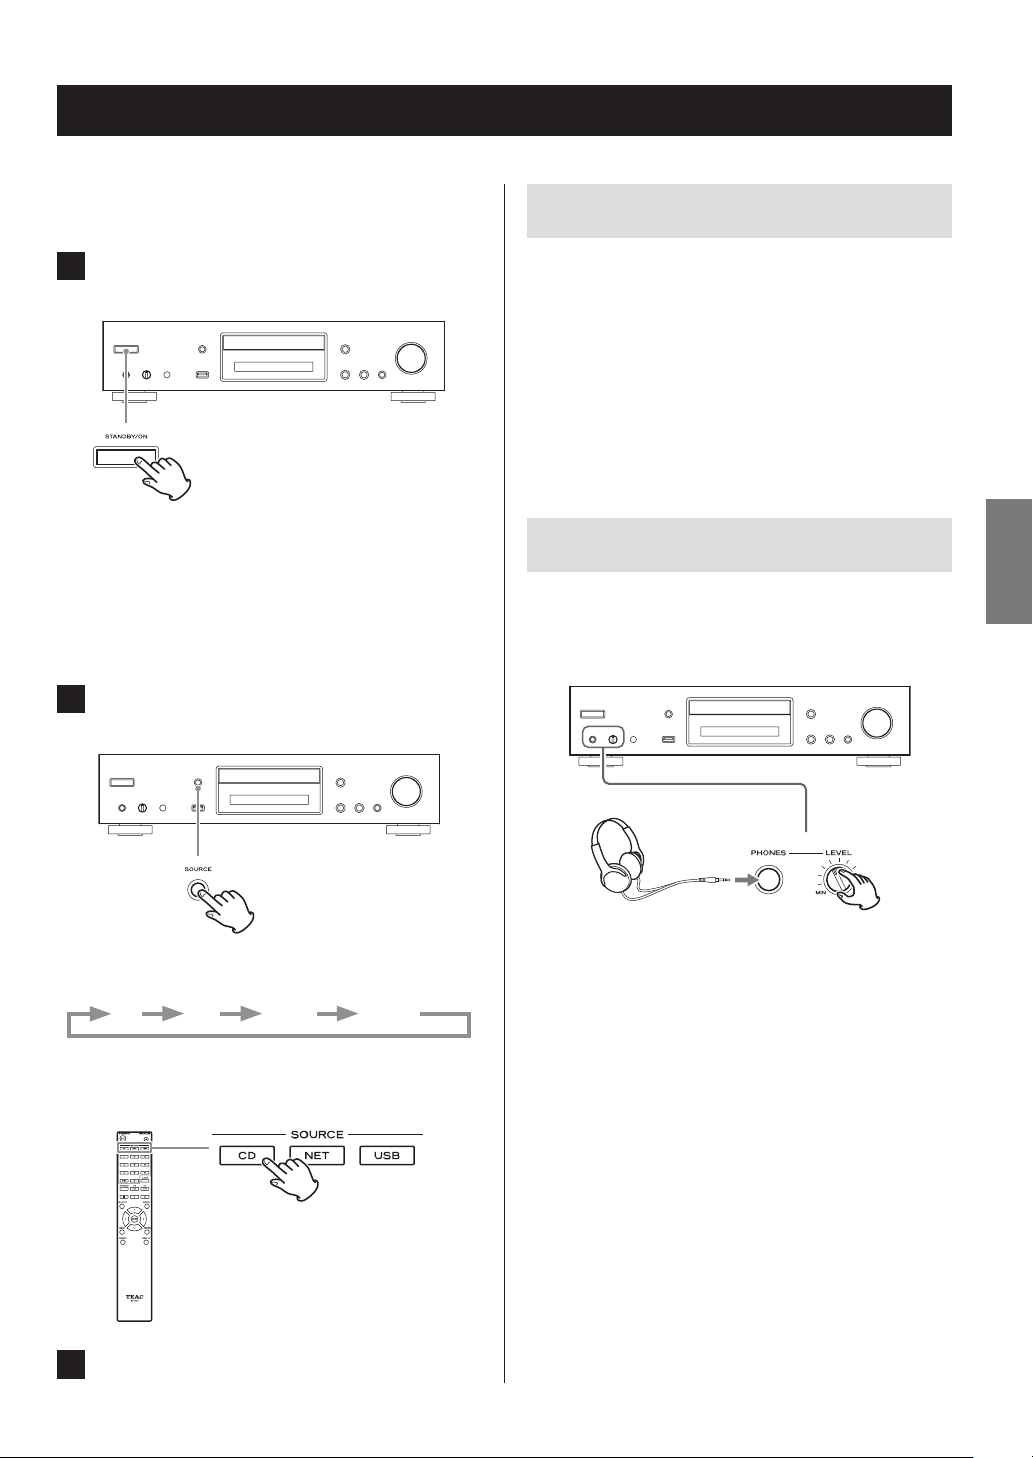
STANDBY/ON button
Press this button to turn the unit on or put it in standby
mode.
o When this unit is in standby mode, it consumes
standby power. For this reason, we use the term
“standby” rather than “off”.
B
PHONES jack
To listen with headphones, minimize the volume
before connecting them to the PHONES jack, and
then gradually raise the volume.
V
Do not connect or disconnect headphones or
turn the unit on or put it in standby while wearing them. Sudden loud noises could occur, which
might cause hearing damage.
C
LEVEL knob
Use to adjust the headphones volume.
Turn it clockwise to increase and counterclockwise to
decrease the volume.
D
Remote control signal receiver
When using the remote control, point it toward this
receiver.
E
SOURCE button
Use this button to select the source.
F
USB port
Use to connect an iPod, iPhone or USB flash drive to
the unit.
o When changing the input source, this port is iden-
tified as “USB(F)”.
o Do not connect computers or similar devices to
this unit’s USB ports. Audio from computers cannot
be input through this unit's USB ports.
G
Display
H
Disc tray
I
Tray open/close (-) button
Press to open and close the disc tray.
J
Stop (8) button
Press to stop playback.
K
Play/pause (7/9) button
When stopped or paused, press to start playback.
During playback, press to pause.
L
RETURN button
When a menu is open, press to return to the previous
menu.
M
MENU/ENTER (.//) dial
Turn clockwise to skip to later tracks or counterclockwise to skip to earlier tracks.
Press to use as the ENTER button to confirm settings.
Press and hold to use as the MENU button.
Turn to change the item or setting value shown when
a menu screen is open.
ENGLISH
15
Page 16
Names and functions of parts (remote control)
a
STANDBY/ON (¤) button
a
b
c
k
Press this button to turn the unit on or put it in standby
mode.
b
SOURCE buttons
Use these buttons to select the source.
o After selecting USB, press the USB button to switch
between USB (F) and USB (R).
d
e
g
h
l
m
n
f
o
c
Number buttons
Use these to input track, file and folder numbers.
d
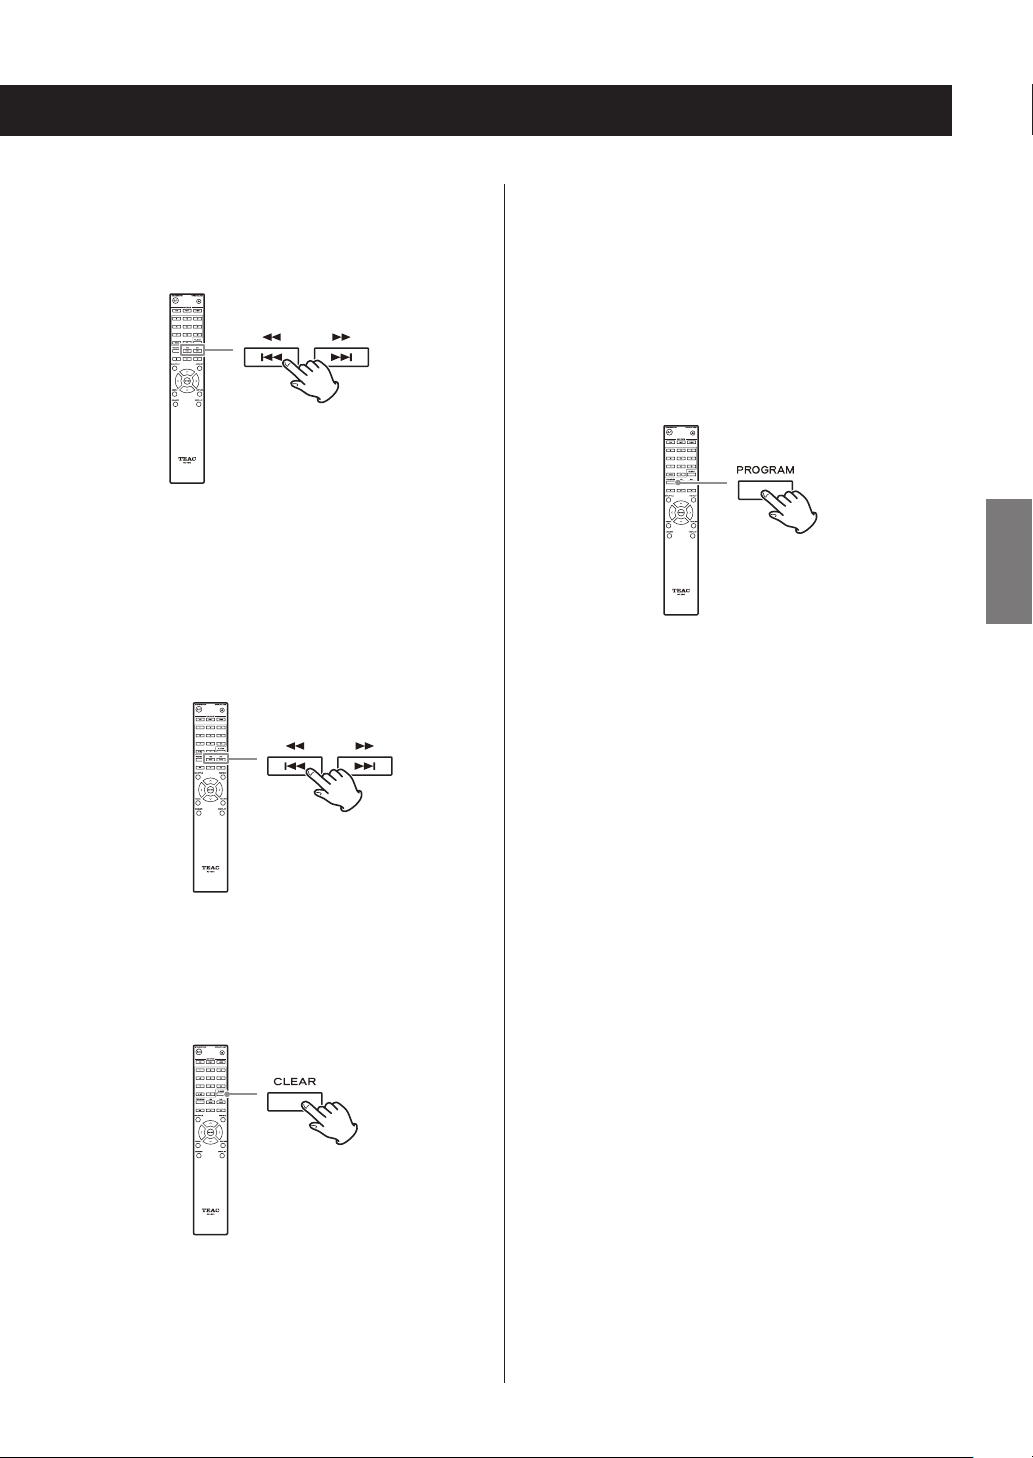
PROGRAM button
Use to set program playback.
p
e
Stop (8) button
Press to stop playback.
f
i
j
q
r
Playback (7) button
Press to start playback when it is stopped or paused.
g
SHUFFLE button
Use to change the shuffle playback setting.
h
Direction (k/j/l/;) buttons
Use in menus and to change selected items.
i
MENU button
Press to open the menu screen.
j
DIMMER button
Use this button to change the brightness of the
display.
When both the main unit and the remote control have
buttons with the same functions, the instructions in this
manual refer only to one, but the other can be used in
the same way.
16
k
Tray open/close (-) button
Press to open and close the disc tray.
l
CLEAR button
Use when setting program playback.
Page 17

m
Skip (.//)/ Search (m/,) buttons
Use to skip to the previous or next track.
Use also when selecting folders and files.
Press and hold to search backward/forward.
n
Pause (9) button
During playback, press to pause.
When paused, press to resume playback.
o
REPEAT button
Use to change the repeat playback setting.
p
ENTER button
Use to confirm menu selections and setting values.
q
RETURN button
When a menu is open, press to return to the previous
menu.
Using the remote control
Precautions for use
V
Misuse of batteries could cause them to rupture
or leak leading to fire, injury or the staining of
items nearby. Please carefully read and observe
the precautions on page 4.
o When using the remote control, point it toward the
remote control signal receiver on the main unit from a
distance of 5 m (16 ft) or less.
o Do not place obstructions between the main unit and
the remote control.
o The remote control might not work if the remote con-
trol signal receiver on the unit is exposed to direct
sunlight or bright light. If this occurs, try moving the
unit.
o Beware that use of this remote control could cause the
unintentional operation of other devices that can be
controlled by infrared rays.
ENGLISH
r
DISPLAY button
Change the information shown.
Installing batteries
Remove the cover from the back of the remote control and
insert two AAA batteries with their ¥/^ ends oriented in
the case as shown. Replace the cover.
When to replace batteries
If the operation range of the remote control decreases, the
batteries have become exhausted. In this case, replace the
batteries with new ones. Dispose of the used batteries
according to the instructions on them or requirements set
by your local municipality.
17
Page 18

Information shown on the display
A B C D E F
G H
A
Auto Standby (ASb) indicator
This indicator appears when the Auto Standby function is on.
B
Format indicators
When the source is set to USB or NET, the DSD or AAC
indicator appears according to the format of the audio
file currently playing back.
C
FILE indicator
When the source is set to CD and a disc containing
audio files is loaded, this indicator appears. The file
number is shown beneath the indicator.
D
TRACK indicator
When the source is set to CD and an audio CD is
loaded, this indicator appears. The track number is
shown beneath the indicator.
E
Play/pause (7/9) indicator
F
TOTAL REMAIN indicator
When the source is set to CD, this indicator shows
what information about the disc is being displayed.
TOTAL: Total disc playback time
REMAIN: Remaining playback time of track
being played
TOTAL REMAIN: Remaining playback time of disc being
played
G
FOLDER indicator
When the source is set to CD and a disc containing
audio files is loaded, this indicator appears. The folder
number is shown beneath the indicator.
H
Message display area
Track information and menus appear here.
The following icons appear in the message display area.
Icon Explanation
Folder*
Track/Broadcast station name
Playing back*
Paused*
Searching forward*
Searching backward*
Artist name
Album name
Repeat mode
Repeat one track
Folder repeat
Shuffle
Shuffle repeat**
Program**
Program repeat**
*Does not appear when the source is CD.
**This only appears when the source is CD.
18
*
Page 19
Basic operation
In this section, we explain operations that are the same in
every mode.
Auto Standby function
1 Press the STANDBY/ON button to turn the
unit on.
When input source set to CD
“CD” appears followed by the CD status on the
display.
When input source not set to CD
The display shows the input source followed by
“Now Initializing…” and then the source status.
2 Press the SOURCE button to change the
source.
When the Auto Standby function is On, the unit will automatically enter standby mode if there is no audio input and
this unit is not operated for 20 minutes. When the Auto
Standby function is enabled, the ASb indicator appears on
the display (page 47).
Press the STANDBY/ON button to exit standby mode.
ENGLISH
Connecting headphones
Before using headphones, first minimize the volume. Then,
plug the headphones (with a standard stereo plug) into
the PHONES jack and gradually raise the volume using the
LEVEL knob.
Each time you press the SOURCE button, the source
changes as shown below.
CD NET USB(F) USB(R)
When using the remote control to change the source,
press the button for the source that you want to use
(CD, NET or USB).
3 Start source playback.
V
Always minimize the volume before plugging
headphones in and putting them on. While wearing headphones, do not connect them to or
disconnect them from the PHONES jack.
Moreover, do not turn the unit on or put it in
standby while wearing connected headphones.
Doing so could result in a sudden loud noise that
could harm your hearing.
19
Page 20

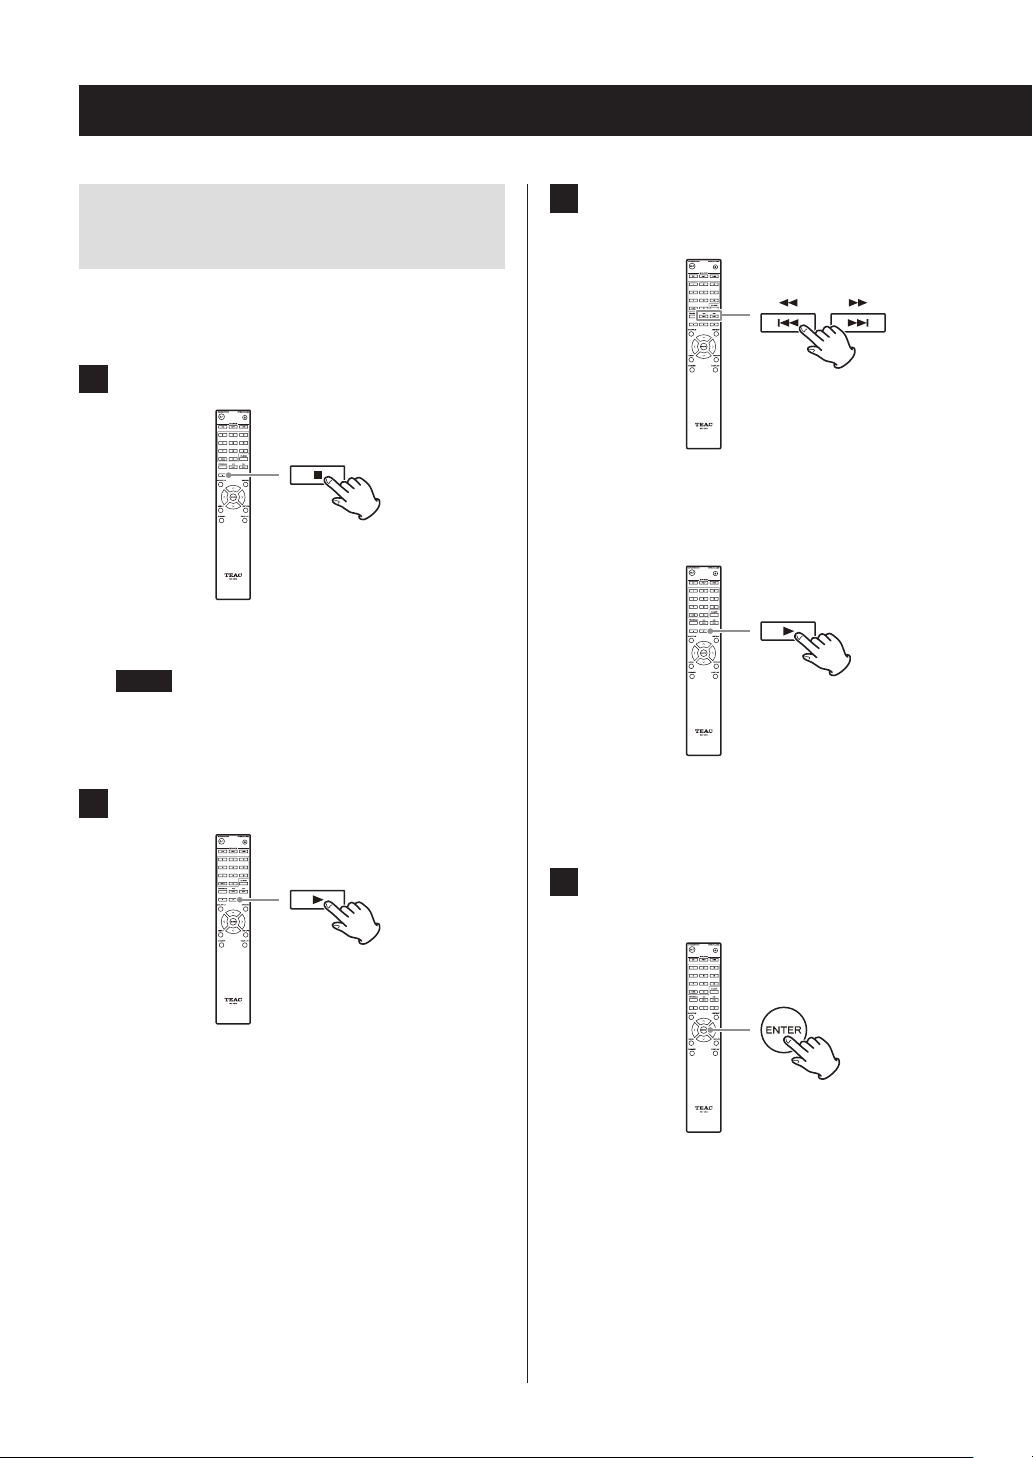
Basic operation (continued)
Starting playback
Press the play/pause (y/9) button.
During playback, the y icon appears at the top of the
display.
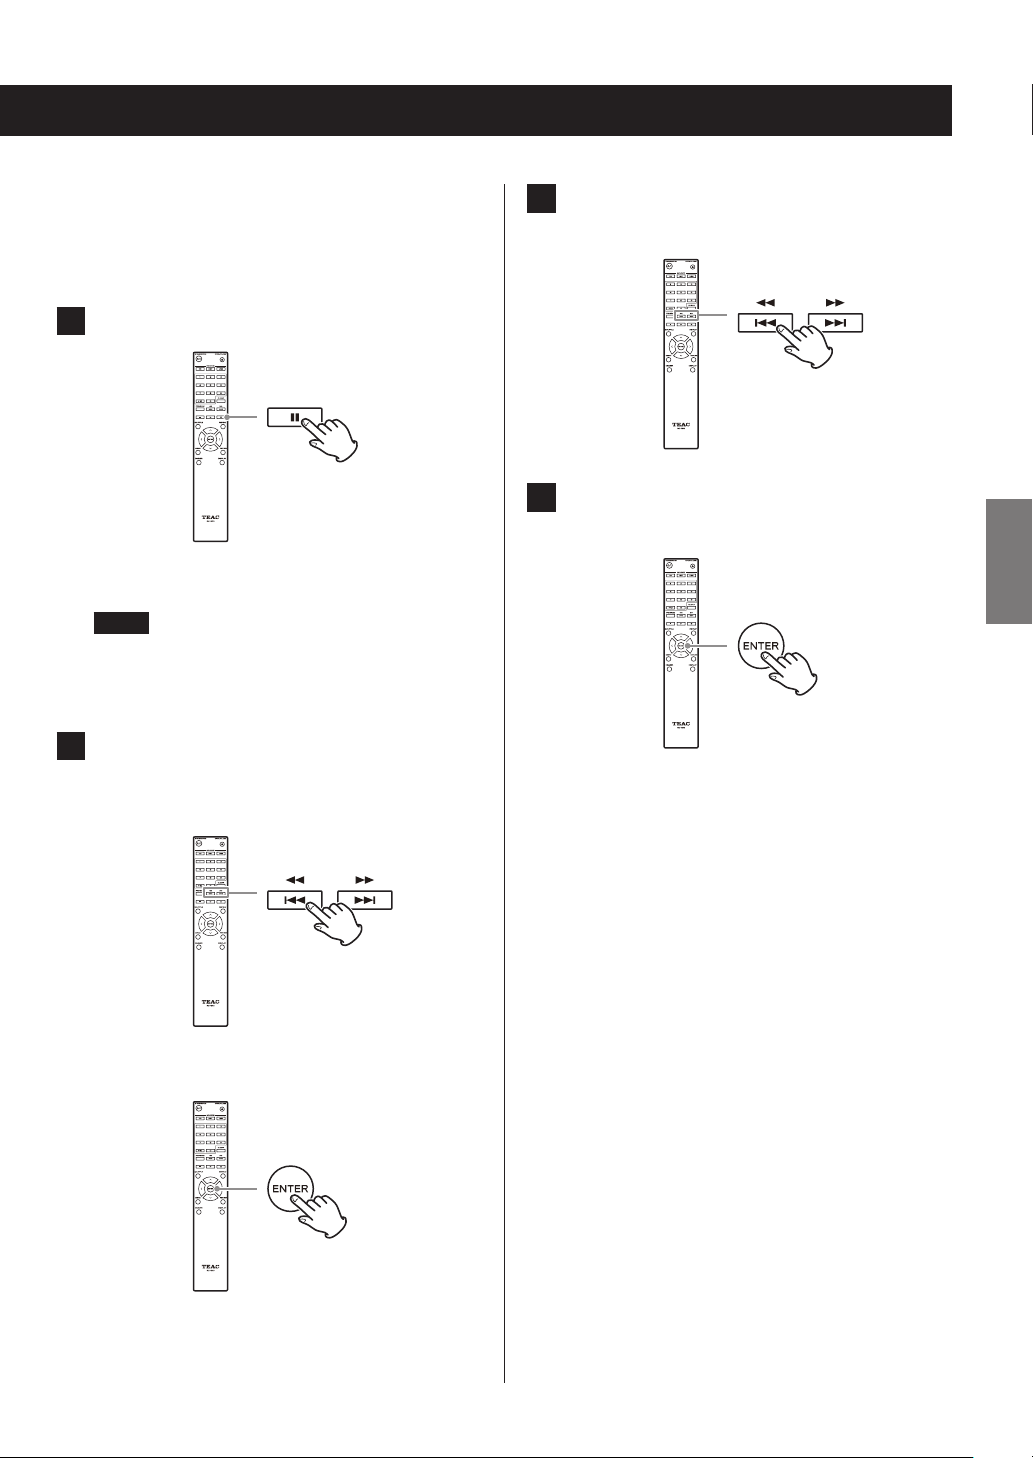
Pausing playback
Press the play/pause (y/9) button to pause playback.
To resume playback from the position where it was paused,
press the play/pause (y/9) button again.
Skipping to search for a track
Turn the MENU/ENTER (.//) dial to skip to tracks
before or after the current track. Keep turning until the
desired track is selected.
When using the remote control, use the skip (.//)
buttons. Use to skip to the previous or next track. Keep
pressing until the desired track is selected.
When paused, the 9 icon appears at the top of the
display.
Stopping playback
Press the stop (8) button to stop playback.
20
o During playback, press the . button once to return
to the beginning of the current track. To return to the
beginning of the previous track, keep pressing the
.button.
o During program playback, tracks from earlier or later in
the program will be played back.
Page 21

Searching for part of a track
Playback order of audio files (CD)
During playback, press a remote control search (m/,)
button to search backward/forward. Release the button
when you find the desired part.
Playback resumes from that point.
Dimmer
Press the remote control DIMMER button to cycle through
display and indicator brightness levels.
Ordinary Dim Dark
Discs with audio files store them in folders in the same way
that files are ordinarily managed on a computer. Moreover,
some store multiple folders in one folder.
Example of folder numbers and file playback order
1-9
(
) for a disc containing audio files during normal
playback.
001 (ROOT)
1
MP3/WMA file
2
MP3/WMA file
002 folder
3
MP3/WMA file
4
MP3/WMA file
004 folder
5
003 folder
7
MP3/WMA file
MP3/WMA file
MP3/WMA file
6
Folder
005 folder
8
MP3/WMA file
ENGLISH
9
MP3/WMA file
o The order in the illustration above might change if files
or folders are added, deleted or moved.
21
Page 22

Information shown on the display (CD/USB/NET)
Press the DISPLAY button during audio file playback to
change the information shown on the display.
During audio CD playback
Information about the disc playing back is shown.
Elapsed time of current track
REMAIN
(remaining time of track being played)
TOTAL REMAIN
(remaining time of disc being played)
During MP3/WAV disc playback
Various file information, including the title, artist and album
ID3 tag information for the MP3/WAV file playing back is
shown.
Elapsed time of current track
File name
Folder name
Title (if file has ID3 tag)
Artist (if file has ID3 tag)
Album (if file has ID3 tag)
Sampling frequency and bit rate
o If the file currently playing back exceeds 99 minutes and
59 seconds, “– –:– –” is shown.
o If the shuffle playback or total playback time exceeds 99
minutes and 59 seconds, “– –:– –” is shown.
22
o Characters in track and folder names that cannot be
shown are indicated with asterisks (*). The unit can also
be set to show the file or folder number when characters that cannot be shown are included. See “BAD
NAME” on page 46.
o WAV files do not have ID3 tags, so their titles and other
information are not shown.
Page 23

During USB/NET playback
Various file information, including the title, artist and album
ID3 tag information for the audio file playing back is shown.
Title (if file has ID3 tag)
Artist (if file has ID3 tag)
Album (if file has ID3 tag)
Elapsed time of current track
Playback time of current track
File format, bit rate, quantization bit depth, and
sampling frequency
ENGLISH
23
Page 24

Listening to CDs
This unit can play the following types of discs and files.
Discs: CD-DA, CD-R, CD-RW
Files: MP3, WAV
1 Press the SOURCE button to change the
source to CD.
When using the remote control, press the CD button.
2 Press the tray open/close (-) button.
4 Press the tray open/close (-) button to
close it.
V
CAUTION
Be careful not to let your fingers be pinched when the
tray closes.
“Reading” will appear on the display and the unit will
start to read the disc.
o The unit takes some time to load the disc.
Wait until the total number of tracks and total play-
back time appear on the display.
When reading completes, the display will appear as
follows.
Example: Audio CD loaded
This appears when the total playback
time of the disc is shown.
3 Place a disc on the tray with the labeled side
up.
o Do not put more than one disc onto the tray at a
time.
o If the tray is closed while a disc is outside the cen-
ter guides, the disc might become stuck inside and
the tray might not open. Be sure to always place
discs within the guides at the center of the tray.
o When the tray is opening or closing, do not force it
by hand.
24
Total number of tracks
Example: MP3/WAV disc loaded
Total number
of folders
o “No Disc” appears if no disc has been loaded.
Total number
of files
Total playback time
Page 25

5 Press the play/pause (7/9) button.
Playback starts from the first track.
Direct playback using track
numbers
In addition to using the skip buttons to select tracks, you
can input a track by number and start playback.
During playback or when stopped, you can use the remote
control number buttons to select a track by number.
For a single-digit number, press the corresponding number
button. For a double-digit number, press the +10 button
followed by the number button for the tens digit. Then,
press the number button for the ones digit. Playback starts
after the track number is input.
Example: entering track number 7
Example: entering track number 23
o During program or shuffle playback, the number but-
tons cannot be used to select tracks.
ENGLISH
25
Page 26
Listening to CDs (continued)
Selecting tracks on MP3/WAV
discs
Navigation mode
You can select files and folders using the folder hierarchy.
1 When stopped, press the stop (8) button.
“Root” appears on the display and navigation mode is
activated.
NOTE
When the setting “STOP KEY” on page 47 is set to
“Navigation”, pressing the main unit stop (8) button
activates navigation mode.
2 Press the play (7) button.
3 Use the skip (.//) buttons to select
folders and les on the same level.
To select files and subfolders inside another
folder, after selecting that folder, press the
play (7) button.
Use the skip (.//) buttons to select subfolders
and files inside that folder.
o To move up one level, press the pause (9) button.
The name of the first folder inside the Root directory
appears.
If there are no folders, the name of the first file
appears.
26
4 After selecting the desired file, press the
ENTER button or play (7) button.
This starts playback of that file.
Page 27
All folder mode
You can also select folders and files in this mode, but all
folders are treated equally regardless of position in the
folder structure.
1 When stopped, press the pause (9) button.
3 Use the skip (.//) buttons to select a
le.
“1” appears on the display and all folder mode is
activated.
NOTE
When the setting “STOP KEY” on page 47 is set to “All
Folder”, pressing the main unit stop (8) button activates all folder mode.
2 Use the skip (.//) buttons to select a
folder, and press the ENTER button or play
(7) button to enter that folder.
c
4 After selecting the desired file, press the
ENTER button or play (7) button.
This starts playback of that file.
ENGLISH
27
Page 28
Listening to CDs (continued)
Program playback
Program playback can be used with audio CDs and MP3/
WAV discs.
This unit can have up to 25 tracks in the program.
o Add tracks to the program when the unit is stopped.
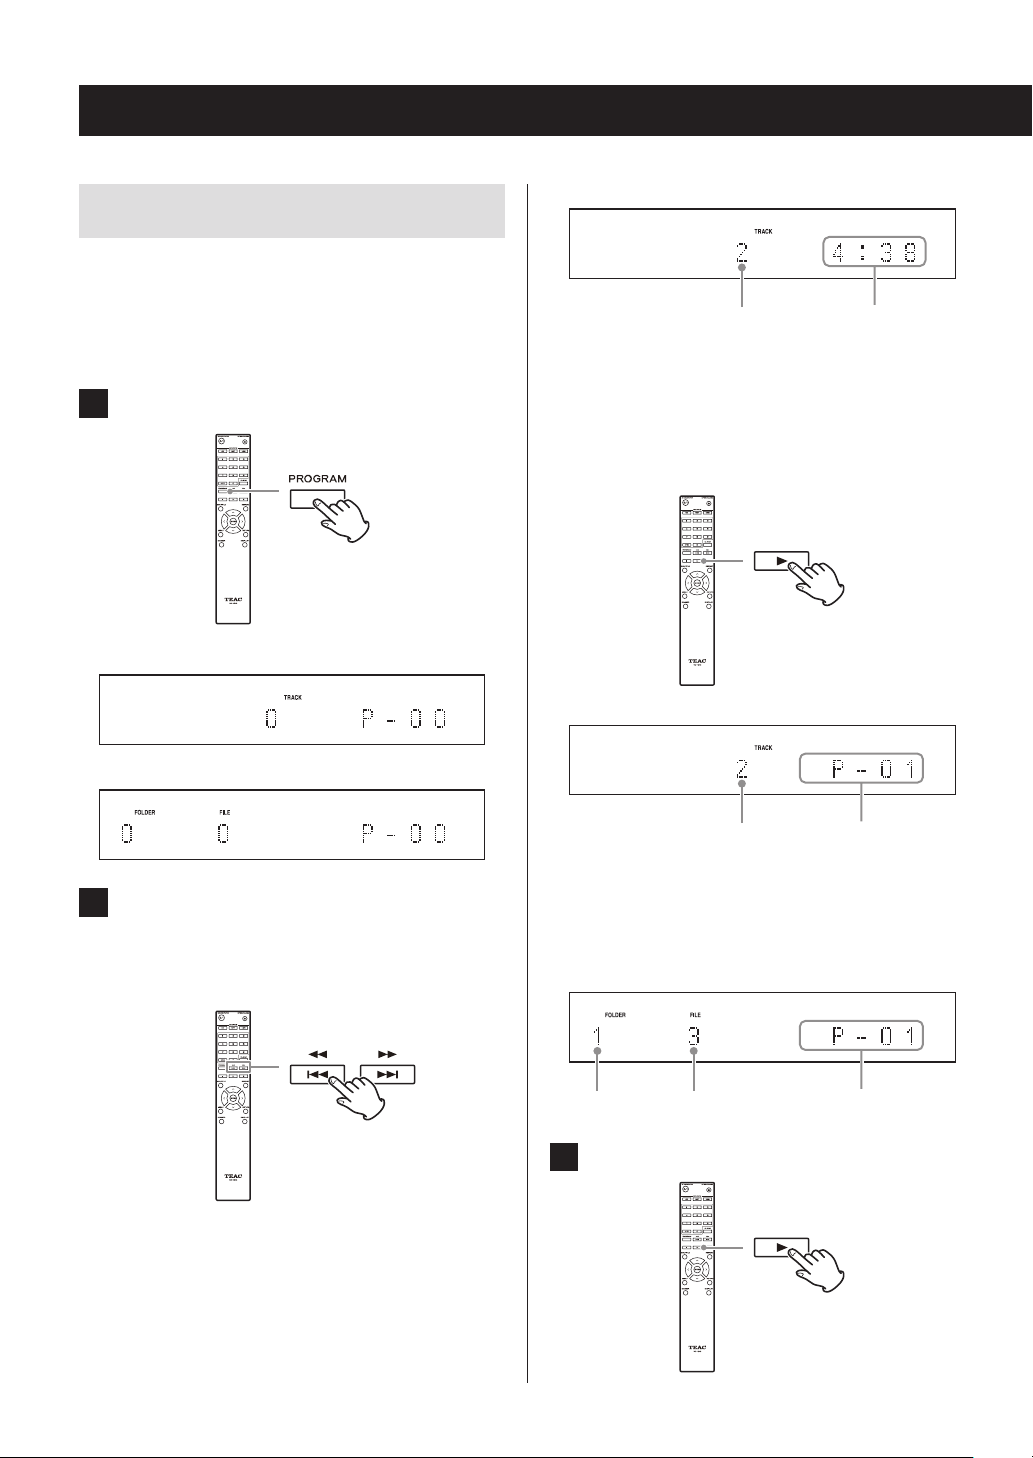
1 Press the PROGRAM button.
Example: Audio CD loaded
Example
Track number Playback time
When using an audio CD, you can also select tracks
using the number buttons (“Direct playback using
track numbers” on page 25).
Press the play (7) button to add the track to the
program.
Example: MP3/WAV disc loaded
2 Add tracks to the program.
Programming with an audio CD
Use the skip (.//) buttons to select a track to
program.
Example
Track number Program number
Repeat these procedures to add other tracks as needed.
Programming with an MP3/WAV disc
Follow the procedures in “Selecting tracks on MP3/
WAV discs” on page 26 to add tracks.
Folder number File number Program number
3 Press the play (7) button to start playback.
28
Page 29
Skipping to search for a track
Press the skip (.//) buttons to play tracks from earlier or later in the program. Keep pressing until the desired
track is selected.
Adding tracks to the end of the program
When stopped, use the skip (.//) buttons to show
the track that you want to add and press the play (7) button to add it to the end of the program.
Ending program playback
Press the stop (8) button to stop playback, and then press
the PROGRAM button.
o During playback, press the . button once to return to
the beginning of the current track. To return to the beginning of an earlier track, keep pressing the . button.
Checking the program content
When stopped, use the skip (.//) buttons to show
track numbers and playback times.
Clearing tracks from the program
When stopped, press the CLEAR button to remove the last
track that was added to the program.
ENGLISH
o Program playback will also end if you press the tray
open/close (-) button to open the tray or press the
STANDBY/ON button to put the unit into standby.
29
Page 30
Listening to files on a USB flash drive
When playing audio files from a USB flash drive, unless
using repeat playback set to Repeat All, only the audio files
in the same level of a single folder will be played back
(page 32).
For details about audio files that can be played back, see
“Audio files playable by this unit” on page 12.
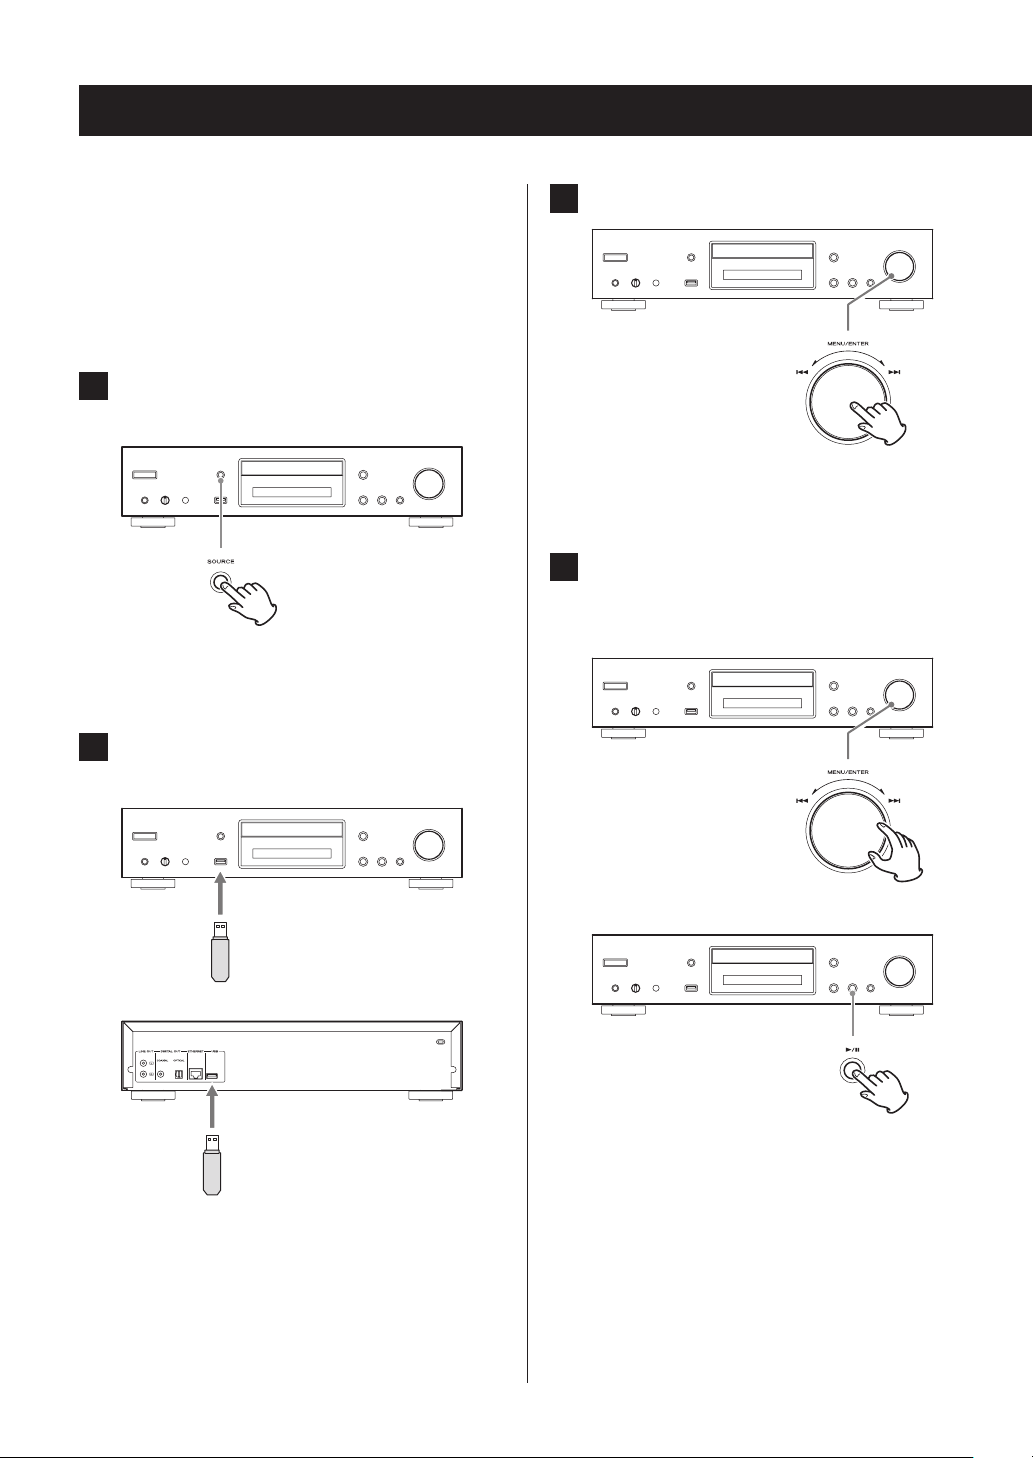
1 Press the SOURCE button to change the
source to USB(F) or USB(R).
When using the remote control, press the USB button.
o “Not Connected” will appear when nothing is
connected.
2 Connect a USB flash drive to the selected
USB port.
3 Press the MENU/ENTER (.//) dial.
The name of the track or folder appears.
o Using the remote control, you can also press the
ENTER button.
4 Turn the MENU/ENTER (.//) dial to
select a track and press the play/pause
(7/9) button.
or
When a USB flash drive is detected, its volume label
will be displayed.
o In this state, you can press the play/pause (7/9)
button to start playing the tracks in the first folder
that contains audio files on the USB flash drive. The
tracks will play back in order.
30
c
This starts playback of the selected track.
Page 31

Shuffle playback (CD/USB)
o Using the remote control, you can select tracks
with the direction (k/j) buttons and then press
the play (7) button.
o When a folder is selected, the first track in that
folder will start playing back.
o You can also select a folder and then press the
MENU/ENTER (.//) dial to select tracks
inside that folder.
o See “Audio files playable by this unit” on page 12
for the audio formats that can be played.
Use this function to play back tracks in random order.
Press the SHUFFLE button to turn shuffle playback on/off.
When using an audio CD or MP3/WAV disc
You can shuffle playback to reorder the tracks randomly
and play them all once. This mode can only be activated
when the unit is stopped.
Press the SHUFFLE button to activate shuffle playback
mode. When activated, the icon will appear on the left
side of the display.
o If you press the SHUFFLE button during playback, the
current playback mode (either “Normal Play” or “Shuffle
Play”) will appear, but the playback mode cannot be
changed.
Shuffle playback will be canceled in the following cases.
o When the unit is put into standby
o If the disc tray is opened
ENGLISH
When using a USB flash drive
The audio files within a folder will be played back repeatedly in random order.
If you press the SHUFFLE button to activate shuffle playback mode, the icon will appear on the left side of the
display.
Shuffle playback will be canceled in the following cases.
o When Net Standby is set to Disable and the power is in
standby mode (page 48)
o When repeat playback is used (page 32)
31
Page 32

Repeat playback (CD/USB)
Listening to an iPod/iPhone
Press the REPEAT button to cycle through repeat modes as
follows.
When using an audio CD or MP3/WAV disc
Each time you press the REPEAT button, the icon shown on
the left side of the display will change as follows.
o Repeat playback can be used in combination with shuf-
fle playback of the files on a disc.
(Repeat All)
(Repeat 1)
No indicator (Repeat off)
Repeat playback will be canceled in the following cases.
o When the unit is put into standby
o If the disc tray is opened
When using a USB flash drive
Each time you press the REPEAT button, the icon shown on
the left side of the display will change as follows.
The Apple products that can be connected to and used
with this unit are listed in “Using an iPod or iPhone” on
page 8.
The following explanations refer to an iPod, but they also
apply to use with an iPhone.
1 Press the SOURCE button to change the
source to USB(F).
When using the remote control, press the USB button.
o “Not Connected” will appear when no iPod is
connected.
2 Connect an iPod to this unit using the USB
cable supplied with the iPod.
(Repeat All)
(Repeat 1)
(Folder repeat)
No indicator (Repeat off)
o Repeat playback will be canceled when shuffle playback
is used (page 31).
(when shuffle playback mode ends, the set repeat
playback mode will become active again)
32
o Connect an iPod to the iPod/iPhone USB connec-
tor on the front of the unit.
3 Operate the iPod to start playback.
o “USB(iPod)” appears on the display. No information
about the content is shown.
o If an iPod is connected to this unit, it will only be
recharged when this unit is ON. Recharging will
stop when the iPod is fully recharged. Recharging is
not possible when this unit is in standby.
Page 33

Using network services
To use a network service, follow the procedure below to
select it.
1 Press the NET button to open the network
service menu.
2 Use the direction (k/j /l /;) buttons to
select the item and press the ENTER button.
vTuner Internet Radio
Pandora (USA only)
SiriusXM Internet Radio (USA and Canada only)
Slacker Personal Radio (USA and Canada only)
vTuner Internet Radio
vTuner Internet Radio is a portal site for Internet radio stations around the world. You can search for radio stations by
musical genre, country and other classifications.
Pandora (USA only)
Pandora is a music distribution service that analyzes music
that users like to select other music. Since 400 types of data
(characteristics and trends) are used for each registered
song, based on the names of songs and artists that a user
likes, songs with similar characteristics can be played back.
SiriusXM Internet Radio (USA and Canada only)
SiriusXM is now available on many leading Internet radios
and home systems.
SiriusXM internet streaming features high-quality 128k
sound and delivers over 100 channels of the biggest names
in sports, talk, entertainment and commercial-free music.
Slacker Personal Radio (USA and Canada only)
Slacker Personal Radio is an interactive Internet radio service available in the US and Canada. It allows users to
create and share customized music stations starting with
either stations programmed by Slacker or stations created
from artist names or song titles.
The service has millions of songs, organized into hundreds
of programmed stations and thousands of artist pages.
My Favorites
To listen to Internet radio programs, you can add them to
the “My Favorites” item in the network service menu.
ENGLISH
My Favorites
DLNA
Home Media
See the following explanations for how to use each
item.
DLNA (media sharing)
This allows you to play audio files in a shared library.
Home Media (folder sharing)
This allows you to play audio files that are in a shared folder
on a computer or network attached storage (NAS) device
on the same network as this unit.
o Use a computer that has Windows 8 or Windows 7 and
Windows Media Player 11 or later installed.
o An Internet connection is necessary to listen to Internet
radio (page 47).
33
Page 34

vTuner Internet Radio
vTuner Internet Radio is a portal site for Internet radio stations around the world. You can search for radio stations by
musical genre, country and other classifications.
vTuner Internet Radio has been added to this unit in
advance.
o An Internet connection is necessary to listen to vTuner
Internet Radio (page 47).
1 Press the NET button to open the network
service menu.
2 Use the direction (k/j /l /;) buttons to
select “vTuner Internet Radio” and press the
ENTER button.
An error message will appear if the service is not on
the air.
3 Use the direction (k/j) buttons to select
a station and press the ENTER button.
Playback will start.
Store favorite vTuner Internet
Radio programs
You can store specific vTuner Internet Radio programs as
favorites to make accessing them easier. There are two
ways to do this.
Add it to My Favorites
Press the NET button to open the network service menu
and use the “My Favorites” item to add a favorite program
to it.
1 After selecting the radio station to add,
press and hold the remote control MENU
button.
34
o You can add a radio station even while it is play-
ing back.
c
Page 35

2 Use the direction (k/j) buttons to select
“My Favorites” and press the ENTER button.
3 To add the radio station without changing
its name, use the direction (k/j) buttons
to select “OK” and press the ENTER button.
To add the radio station after changing its
name, after using the direction (k/j/l/;)
buttons to input the characters, select “OK”
and press the ENTER button.
Add a station to My Favourite Groups in vTuner
Internet Radio
Select vTuner Internet Radio and press the ENTER button to
see the “My Favourite Groups” folder on the same screen
that shows genres and locations. You can add Internet
radio stations that you like to this folder.
Registering as a user
1 Open a web browser on a computer con-
nected to the same network as this unit and
access the following URL.
http://teac.vtuner.com/
2 Click the flag for the desired language at
the top left of the vTuner home screen.
3 Click “Not a member? Register here.” to
open the login account creation page.
4 Enter the MAC address (12 digits).
Do not input colons (:) between numbers and letters.
o See “NET Setting” on page 47 for instructions
about checking the MAC address of this unit.
ENGLISH
c
5 Input your email address and password.
Follow the instructions about doing this on the registration screen.
email address: This will be your login ID.
Password: You will need this to login, so be sure to
make a record of it.
6 Click “Register” to complete user registration.
35
Page 36

vTuner Internet Radio (continued)
Add a radio station to a list of favorites
1 Select the radio station to add to the favor-
ites list.
Select the station as you like by, for example, browsing
through genres, locations or languages.
2 Create a group for your favorites.
You can create multiple groups with names like
“Favorites 1” and “Pops”, for example. Input the group
name into the dialog box and click the “Go” button.
The input group name will be added to “My Favourite
Groups”.
3 Open “My Favourite Groups”.
Open “My Favourite Groups” after logging in on the
portal site. You can also view your favorites in the “My
Favorites” item of this unit's Internet radio menu.
To remove the station from the favorites list, click the
button. A confirmation dialog will appear.
36
Page 37

My Favorites
This unit supports Internet radio stations that use the PLS,
M3U and podcast (RSS) formats. Even if an Internet radio
station uses one of these formats, playback might not
always be possible depending on the type of data and
playback format.
To listen to Internet radio programs, follow these procedures to add them to the “My Favorites” item in the
network service menu.
o An Internet connection is necessary to listen to Internet
radio programs (page 47).
o A computer must be connected to the same network as
this unit in order to make My Favorites settings.
CAUTION
If service from the service provider stops, use of that network services and contents might cease to be possible.
Adding a program
1 Press the MENU button.
5 Input this unit's IP address into the Internet
browser URL eld.
This unit's WEB Setup information screen will open in
the Internet browser.
ENGLISH
o When using Internet Explorer, you can also do this
by selecting “Open…” from the “File” menu and
inputting the IP address.
2 Use the direction(k/j) buttons to select
“NET Setting” and press the ENTER button.
3 When “IP Address” appears press the ENTER
button.
Make a note of the IP address.
4 Turn the computer on and open Internet
Explorer or another Internet browser.
6 Click the “My Favorites” tab and input the
name and URL of the Internet radio station.
o You can input a maximum of 10 characters for the
name of Internet radio stations.
7 Click “Save” to finish registering that
Internet radio station.
The registered Internet radio station will be added to
“My Favorites”.
37
Page 38

My Favorites (continued)
Starting playback
1 Press the NET button.
2 Select “My Favorites” from the network ser-
vice menu and press the ENTER button to
show the Internet radio stations.
3 Select the one that you added and press the
ENTER button.
NOTE
o To see similar stations, press and hold the remote con-
trol MENU button, use the direction (k/j) buttons to
select “Stations like this” and press the ENTER button.
o If you want to add a new radio station to the My
Favorites menu, select the blank item in the list and
press and hold the MENU button and use the ENTER
button to select “Create new station”. Press the ENTER
button again to show fields where characters can be
input and input the name and URL.
o To remove a radio station that has been added, press
and hold the MENU button while that station is playing
or select it and use the direction (k/j) buttons to
select “Delete from My Favorites” and press the ENTER
button. You can also remove stations using the WEB
Setup screen (on a computer).
o To change the name of a radio station that has been
added, select the radio station and press and hold the
MENU button. Then, use the direction (k/j) buttons
to select “Rename this station” and press the ENTER
button.
o You can register up to 40 Internet radio stations.
38
Page 39

DLNA
When using DLNA, the unit can play audio files in shared
libraries and show their tag information, including artist
names, genres and album names.
o A computer must be connected to the same network as
this unit in order to use DLNA.
o See “Note about servers” on page 13 for information
about supported network servers.
o Set the network server so that this unit can access it in
advance. For information about these settings, see the
operation manual of the network server. If using
Windows Media Player, see “Setting up Windows Media
Player” on page 42.
1 Start the computer or network server.
2 Press the NET button to open the network
service menu.
3 Use the direction (k/j /l /;) buttons to
select “DLNA” and press the ENTER button.
c
4 Use the direction (k/j /l /;) buttons to
select the network server and press the
ENTER button.
The network server folder will be shown.
o Some network servers do not support use of the
search function.
o This unit cannot access photographs or videos on a
network server.
o Depending on network server sharing settings,
some contents might not be shown. See the operation manual of the network server.
ENGLISH
Continued on the next page e
39
Page 40

DLNA (continued)
5 Use the direction (k/j) buttons to select
the audio file that you want to play, and
press the ENTER button or play (7) button.
o Searching forward/backward and pausing func-
tions might not work with some media servers.
o If information cannot be retrieved from a server,
“No Item” will appear on the display. If this occurs,
check the server and network connections.
o Immediately after an audio file is added to a
Windows Media Player library, that file might not
appear in this unit's audio file list. This is because
the Windows library index has not been refreshed.
You can either wait for the index to refresh automatically, or you can manually rebuild the index.
See Windows online help for instructions about
how to do this.
Using the Play To feature
The Play To function allows you to operate DLNAcompliant controller devices and computers on a home
network and enables this unit to play audio files that are
saved on those devices.
o A DLNA-compliant controller device or computer and
this unit must be connected to the same network in
order to make My Favorites settings.
4 Click the “Play To” button and select this
unit from the Play To list.
Open the Windows Media Player Play To dialog box,
and start playback from this unit.
Use the Play To dialog box in Windows 7 to control
remote playback.
o The Play To feature cannot be used under the fol-
lowing conditions.
• When using network services
• During playback of an audio file on a USB device
or an iPod/iPhone
1 Turn this unit on.
2 Turn the computer on, and open Windows
Media Player.
You must set Windows Media Player in advance (page
42).
3 Select the file that you want to play in
Windows Media Player and right-click it.
This opens a pop-up menu.
NOTE
To use the Play To feature with audio files on a different network server, open that network server from the
list that appears under “Other Libraries” and select the
audio file that you want to play.
40
Page 41

Home Media
This unit can play audio files that are in a shared folder on a
computer or network attached storage (NAS) device on the
same network.
Referring to “Making shared folder settings” on page 43,
create a shared folder that this unit can access.
CAUTION
When using network attached storage (NAS), check its
operation manual.
1 Press the NET button to open the network
service menu.
2 Use the direction (k/j /l /;) buttons to
select “Home Media” and press the ENTER
button.
3 Use the direction (k/j) buttons to select
the server that you want to use and press
the ENTER button.
o Confirm the server name of your computer by
viewing its properties.
4 Use the direction (k/j) buttons to select
the shared folder that you want to use and
press the ENTER button.
5 When a user name and password are required,
input the necessary account information.
o After inputting the account information once, it is
saved, so you will not need to input it the next time.
o Use the account information set when you created
the shared folder.
6 Use the direction (k/j) buttons to select
the audio file that you want to play, and
press the ENTER button or play (7) button.
Playback will start.
ENGLISH
c
41
Page 42

Setting up Windows Media Player
As an example, we explain how to set Windows Media
Player 12 in this section.
1 Connect your computer to a network.
2 Connect this unit to the network.
If you have a problem connecting to the network, see
the “DLNA” section of “Troubleshooting”.
o If the files you want to share are not yet in the
library of Windows Media Player, add them to the
library.
Refer to the manual of Windows Media Player for
details.
3 From the “Stream” menu of Windows Media
Player, select “Automatically allow devices
to play my media…”
5 Select this unit from the device list, then
click “Customize...”
6 Make sharing settings, and click “OK”.
o If “Automatically allow devices to play my media...”
or “More streaming options...” does not appear,
select “Turn on media streaming…”
4 From the “Stream” menu of Windows Media
Player, select “More streaming options...”
o If “More streaming options...” does not appear,
select “Turn on media streaming…”
42
o To play files regardless of their ratings, set “Choose
star ratings” to “All ratings”.
o Ensure that “Music” is checked.
7 Click “OK” on the screen that appears.
For playback instructions, see “DLNA” on page 39.
Page 43

Making shared folder settings
Windows 8
1 Check the name of the domain or work-
group to which your computer is assigned.
Before setting folder sharing, confirm that the computer is assigned to the same domain or workgroup as
this unit. (By default, this unit is assigned to the same
workgroup.) Open “Control Panel”, “System and
Security”, and then “System” to check this setting.
2 Check the user account name and its
password.
To access the computer from this unit, you need the
user account name and the password of the
computer.
3 Open “Control Panel”, “Network and Internet”,
and then “Network and Sharing Center”.
4 Click “Change advanced sharing settings”.
5 For “Public folder sharing”, select “Turn on
sharing so anyone with network access can
read and write les in the Public folders”.
ENGLISH
6 Copy the music les you want to play back
with this unit into the “Public Music” subfolder of the “Public” folder.
Windows 7
1 Check the name of the domain or work-
group to which your computer is assigned.
Before setting folder sharing, confirm that the computer is assigned to the same domain or workgroup as
this unit. (By default, this unit is assigned to the same
workgroup.) Open “Control Panel”, “System and
Security”, and then “System” to check this setting.
2 Check the user account name and its
password.
To access the computer from this unit, you need the
user account name and the password of the
computer.
Continued on the next page e
43
Page 44

Making shared folder settings (continued)
3 Open “Control Panel”, and then “Network
and Sharing Center”.
o If “View by” is set to “Category” in the Control Panel,
open “Network and Internet”, and then “Network
and Sharing Center”.
4 Click “Change advanced sharing settings”.
5 For “Public folder sharing”, select “Turn on
sharing so anyone with network access can
read and write les in the Public folders”.
6 Click “Save changes”.
7 Copy the music les you want to play back
with this unit into the “Public Music” subfolder of the “Public” folder.
44
Page 45

Settings
Follow the procedures below to open the menu and change
settings.
1 Press the MENU button.
o You can also press and hold the MENU/ENTER
(.//) dial on the main unit to do this.
2 Use the direction (k/j) buttons to select
the setting you want to change.
You can also turn the MENU/ENTER (.//) dial
on the main unit to do this.
3 Press the ENTER button.
You can also press the MENU/ENTER (.//) dial
on the main unit to do this.
ENGLISH
Press a direction (k/j) button repeatedly to cycle
through the settings in the following order.
MP3 Setting
Update
NET Setting
MFE (Music Frequency Enhancement)
ASb (Auto Standby)
o “MFE” only appears when the source is set to USB/
NET.
o “MP3 setting” only appears when the source is set
to CD.
o The setting shown first depends on the current
source.
After opening “MP3 setting” or “NET Setting”, repeat
steps 2 and 1 to make a selection in the submenu.
o You must wait at least one minute after turning the
unit on to select and change the “NET Setting” and
“Update” items.
4 Use the skip (.//) buttons to change
setting values.
o You can also turn the MENU/ENTER (.//)
dial on the main unit to do this.
Continued on the next page e
45
Page 46

Settings (continued)
5 Press the ENTER button to confirm the
change.
o You can also press the MENU/ENTER (.//)
dial on the main unit to do this.
6 After you complete making settings, press
the RETURN button to close the menu
screen.
MP3 Setting
You can set how MP3/WAV file information is shown and
how MP3/WAV discs are played back, for example.
These settings can only be changed when the disc is
stopped.
BAD NAME
Set how MP3/WAV file information is shown.
o Regardless of the setting, characters that cannot be
shown in ID3 tag information are replaced with asterisks
(*).
Replace
If a track or folder name contains a character that cannot
be shown, “File_n” or “Folder_n” (with “n” being the track/
folder number) will be shown instead.
Not (default setting)
Characters that can be shown are shown and characters
that cannot be shown are replaced with asterisks (*).
ID3 VER.1
Set how ID3 Version 1.0/1.1 tag information is shown.
CAUTION
When you press the RETURN button while viewing the
“NET Setting” submenu, “Network Save?” will appear.
Press the ENTER button to save the settings. If you
press the RETURN button, the menu screen will close
without saving the setting changes.
Read (default setting)
The unit will load tag information and show it.
Not Read
Tag information will not be shown.
ID3 VER.2
Set how ID3 Version 2.2/2.3/2.4 tag information is shown.
Read (default setting)
The unit will load tag information and show it.
Not Read
Tag information will not be shown.
46
Page 47

HIDE NUMBER
The unit can hide numbers that are attached to the beginnings of track and folder names.
Disable (default setting)
Such numbers will be shown.
Enable
Such numbers will not be shown.
NOTE
When an MP3/WAV CD is made on a computer, the ordinary file playback order is not determined. By adding
numbers like 01, 02 and 03 to the beginnings of MP3/WAV
file names, however, they can be played back in numerical
order.
STOP KEY
You can set the function of the stop (8) button on the
main unit.
Navigation (default setting)
Pressing the stop (8) button activates navigation mode.
All Folder
Pressing the stop (8) button activates “all folder” mode.
Disable
Pressing the stop (8) button does not activate navigation
or all folder mode.
MFE (Music Frequency Enhancement)
ASb (Auto Standby)
When the Auto Standby function is on, the unit will automatically enter standby mode if 20 minutes pass under the
conditions described below.
Playback source Condition
CD No disc loaded or disc stopped
NET
USB
When this function is enabled, “ASb” appears on the display.
Use the “Net Standby” setting to set how network control
affects standby (page 48).
Off (default setting for US/Canadian model)
Auto Standby is disabled.
On (default setting for European model)
Auto Standby is enabled.
Input source not playing
NET Setting
To use network services, make network settings on this
unit in advance.
Make the settings according to the characteristics of the
network to which it is being connected.
o An Internet connection is necessary to listen to Internet
radio.
o The “Net Standby” setting is not necessary for connect-
ing this unit to a network.
ENGLISH
MP3s and other files that use irreversible compression formats have reduced audio quality compared to the original
sound sources due to their compression.
Use MFE to optimize compressed audio.
Disable (default setting)
MFE is not used.
Enable
MFE is used.
CAUTION
o If DHCP is set to Enable (default), “IP Address”, “Subnet
Mask”, “Gateway” and “DNS Server” settings will appear,
but cannot be changed.
If DHCP is set to Disable, “IP Address”, “Subnet Mask”,
“Gateway” and “DNS Server” will appear and must be set.
o When you press the RETURN button when viewing the
“NET Setting” submenu, “Network Save?” will appear.
After changing a setting, press the ENTER button to
save it. If you press the RETURN button, the menu
screen will close without applying the setting changes.
Continued on the next page e
47
Page 48

Settings (continued)
The submenus appear in the following order.
IP Address
View/set the IP address.
MAC Address
View this unit's MAC address.
DHCP
Enable (default setting)
DHCP is enabled.
Disable
DHCP is disabled.
Subnet Mask
View/set the subnet mask.
Gateway
View/set the default gateway.
DNS Server
View/set the DNS server address.
Proxy URL
Set the proxy server address.
Proxy Port
Set the proxy port number.
o This only appears when a proxy URL has been set.
Update
You can update the firmware of this unit. Do not put the
unit in standby during an update.
o See “Updating the firmware” on page 49 for update
procedures.
Version
This shows the current firmware version.
This unit has two types of firmware: Main and DSP.
Their versions are shown in the following format.
abcd-ef00-000
Main: a.bc
DSP: d.ef
Example
If “1001-0100-000” appears, the firmware versions are as
follows.
Main: 1.00
DSP: 1.01
CDP via USB?
You can update the firmware using a USB flash drive.
Net Standby
This sets whether or not the unit can be controlled over a
network when the unit is in standby.
Disable (default setting)
When the unit is in standby, it cannot be controlled
over a network.
Enable
When the unit is in standby, it can be controlled over a
network.
o When set to “Enable”, more power will be consumed
when the unit is in standby.
48
Page 49

Inputting characters
Updating the firmware
Follow these procedures to input characters when using
the NET Setting and My Favorites menus, for example.
1 Use the remote control direction (k/j/l/;)
buttons to select a character or symbol and
press the ENTER button.
Repeat this procedure to input more characters.
o A maximum of 10 characters can be input for the
name of Internet radio stations in “My Favorites”.
2 After completing input, use the remote con-
trol direction (k/j/l/;) buttons to select
“OK” and press the ENTER button.
If this is not done, the input characters will not be
saved.
The following characters can be used.
a b c d e f g h i j k l m
n o p q r s t u v w x y z
1 2 3 4 5 6 7 8 9 0 - ^ \
, . / ; : @ [ ]
Shift
A B C D E F G H I J K L M
N O P Q R S T U V W X Y Z
! " # $ % & ` ( ) _ = ~ |
< > ? + * ' { }
Shift
Space
This inputs a blank space that is one-character wide.
Shift*
This changes the characters shown.
s (left)/w (right)
Use these to move the cursor in the text input area.
s w
s w
BS OK
BS OK
Space
Space
Use the USB port on the front of the unit.
o A USB flash drive with at least 32 MB of capacity is nec-
essary for updating the firmware.
Download the latest firmware
Please visit the CD-P800NT product page from the TEAC
Global Site and download the latest firmware.
For details, see “Using the TEAC Global Site” on page 7.
o If no firmware is listed, no firmware update is available.
After downloading the firmware, read the precautions
below and then follow the “Update procedures” on page
50.
o Select the following menu items to see the current firm-
ware version (page 48).
UpdatewVersion
Precautions when updating the
firmware
o Before updating, stop playback and disconnect any-
thing connected to the USB ports.
o While updating, never put the unit into standby mode,
or disconnect the power cord or the USB flash drive
being used for the update.
o Do not access this unit from a computer during an
update.
o Completing the update takes about five minutes.
o Settings are retained after an update.
ENGLISH
BS (backspace)**
Delete characters to the left of the cursor. Move the cursor
left.
OK
Select when input complete.
* You can also change them by pressing the +10 button.
** You can press the CLEAR button to delete all the input
characters at once.
49
Page 50

Updating the firmware (continued)
Update procedures
1 Connect a USB ash drive to the computer
that you are using and delete any les on it.
2 Download the rmware le to the computer
from our website.
The firmware file has a name like the following.
TC_CRNF002_00000000TA00TA_***.zip
Decompress this file on the computer. The following
two files will appear.
TC_CRNF002_00000000TA00TA.of1
TC_CRNF002_00000000TA00TA.of2
o Do not change the names of the decompressed
files.
3 Copy the decompressed files to the root
folder of the USB ash drive.
Do not copy any files other than the decompressed
files. Do not copy the compressed file.
6 Press the SOURCE button to change the
source to USB(F).
“Now Initializing…” appears on the display, followed
by the name of the USB flash drive.
o Loading the USB flash drive takes about 20 to 30
seconds.
7 Press the MENU button to open the menu
and use the direction (k/j) buttons to
select “Update”.
4 Conrm that this unit is on.
5 Connect the USB flash drive with the
decompressed les to the USB port on the
front of the unit.
c
8 Press the ENTER button.
50
Page 51

9 Use the direction (k/j) buttons to select
“CDP via USB?” and press the ENTER button.
c
o This selection will not appear (and cannot be
selected) if the flash drive does not contain firmware that can be used to update the unit.
10
Select “UpdateStart?” and press the ENTER
button.
The unit firmware starts to be updated.
11
After “Complete” appears, disconnect the
USB ash drive.
12
Press the STANDBY/ON button to put the
unit into standby.
Error codes
When an error occurs, “Error! *-**” or an error message
appears on the display of this unit. (Letters and numbers
appear in place of the asterisks.) Refer to the error code list
to check the meaning.
Error codes Meaning and countermeasures
*-10, *-20 The USB flash drive could not be
recognized.
Confirm that the USB flash drive or
USB cable is securely connected to the
USB port on the front of the unit.
*-14 The root folder of the USB flash drive
does not contain a firmware file or the
firmware file is for a different model,
for example. Follow the instructions on
the CD-P800NT product website to
download the firmware and conduct
the process again. If the same error
occurs repeatedly, make a note of the
error code and contact your dealer.
Other codes Conduct the process again from the
beginning.
If the same error occurs repeatedly,
make a note of the error code and contact your dealer.
o If an error occurs during an update, unplug the unit's
power cord once and plug it into the outlet again
before trying the update one more time.
ENGLISH
o Do not use the remote control STANDBY/ON (¤)
button in this case.
o If you do nothing for three minutes, the unit will
enter standby automatically.
This completes the update. The unit should now be using
the latest firmware.
51
Page 52

Troubleshooting
If you experience a problem with this unit, please check
the following items before requesting service.
If it still does not operate correctly, contact the retailer
where you purchased the unit.
General
The unit does not turn on.
e Confirm that the power plug is securely plugged in to
an outlet.
e Unplug the power cord once, wait five seconds and
then plug it in again.
The unit turns off.
e When the Auto Standby function is enabled, the unit
will enter standby automatically after a set amount of
time. Check the settings (page 47).
No sound is output.
e Confirm that the input source is selected correctly.
No sound is output from the headphones.
e This could be caused by contact failure. Clean the
headphones plug. (See the headphones operation
manual for instructions about how to clean the plug.)
Another possibility is that the wire in the headphones
cable has broken, so check the cable.
CD player
Playback is not possible.
e If the disc is upside down, reload it with the labeled
side up.
e If the disc is dirty, wipe it clean.
e If a blank disc is loaded, replace it with a disc that has
recordings on it.
e Depending on the quality of the disc and the condi-
tion of the recording, playback of a CD-R/CD-RW
might not be possible.
e This unit cannot play back unfinalized CD-R/CD-RW
discs.
The sound skips.
e Vibrations will cause the sound to skip. Install this unit
in a stable location.
e If the disc is dirty, wipe it clean.
e Do not use discs that are scratched or cracked.
Audio files
Playback is not possible.
e Check the file format. For information about playable
file types, see “MP3/WAV formats” on page 11 for
CDs and “Audio files playable by this unit” on page
12 for USB and playback over a network.
Remote control does not work.
e If the batteries are exhausted, replace both of them
with new ones.
e Point the remote control at the front panel of the unit
from a distance of less than about 5 m (16 ft) (page
17).
e The remote control will not work if there is an obstruc-
tion between it and the main unit. In this case, try
changing the position.
e If a fluorescent light is near the unit, turn the light off.
There is noise.
e Place the unit as far away as possible from TVs and
other devices that have strong magnetism.
52
The names of tracks, artists and albums are not
shown.
e There is no ID3 tag information for the music file. Use a
computer, for example, to prepare MP3 files with cor-
rected ID3 tag information.
Some characters are not shown correctly.
e This unit cannot display symbols and full-size or dou-
ble-byte characters (such as Japanese, Chinese, etc.)
correctly. File names for MP3, WMA or other file for-
mats should consist of alphanumeric characters. If the
file information uses Japanese, Chinese or other dou-
ble-byte characters, playback is possible but the name
will not be shown correctly.
Page 53

iPod/iPhone
DLNA
Playback is not possible.
e Disconnect the iPod/iPhone from the USB port, wait a
few seconds, and connect it again.
e Updating to the latest iPod/iPhone software might
resolve the problem.
Download the latest software from the following
website.
http://www.apple.com/support/country/?dest=downloads
Cannot operate the iPod/iPhone.
e Make sure the iPod/iPhone is not locked.
e You cannot adjust the unit volume using an iPod/
iPhone.
Internet radio
Cannot connect to the Internet.
e Confirm that a computer can connect to the Internet
using the same network.
e Enter a correct network connection password.
e Check the settings of the network’s firewall.
e The station/podcast might not be available at the
moment.
e The link for the station/podcast might be out of date.
e The number of registered users for the station/pod-
cast might have already reached a limit, making it
unavailable to the public.
e If the Internet connection speed is too slow, searching
might take time.
Cannot connect to the network.
e Check the settings of the network’s firewall.
e Confirm that a DLNA server on the same network
can connect to the network.
e Confirm that the password to connect to the DLNA
server is correct.
e Confirm that the DLNA server is not shut down or in
sleep mode.
e There might be a problem with the network authen-
tication. Press the SOURCE button to select NET
again.
Cannot find a track.
e Add the track to the media library of Windows Media
Player.
e Select this unit from the Windows device list.
e If the computer is using antivirus or security soft-
ware, the unit might not be able to connect to it.
Home Media
Cannot find a folder/file.
e Make folder/file sharing settings.
e Add the file to the shared folder.
e Confirm that the password for the user account is
correct.
e Check the file format.
e If the computer is using antivirus or security soft-
ware, the unit might not be able to connect to it.
ENGLISH
Cannot listen to an Internet radio station or podcast.
e The broadcaster might have a temporary problem
with their Internet connection.
e Confirm that your system is properly connected to the
Internet.
This unit uses a microprocessor, so noise and other
external interference could cause it to stop functioning properly. If this should occur, unplug the
unit’s power from the outlet and wait a little while
before plugging the power in again and retrying
the operation.
If the unit still does not function properly after doing the
above, follow the procedures in “Restoring factory
default settings” on page 54 to restore the unit to its
factory default settings and try the operation again.
53
Page 54

Troubleshooting (continued)
Specifications
Restoring factory default settings
If this unit does not operate properly, follow the procedures below to restore it to the default settings that it had
when shipped new from the factory. Doing this might correct the problem.
While the unit is on, press and hold the stop (8) button and press the STANDBY/ON button.
Note about condensation
If this unit is brought from a cold outdoor environment
into a warm room, or the heater has just been turned
on in the room where it is located, for example, condensation might occur on operating parts or lenses,
resulting in improper operation. If this occurs, leave the
unit on and wait 1-2 hours. This should enable normal
playback.
Audio formats
CD
CD-DA
Sampling frequency .............................44.1 kHz
Quantization bit depth .............................16-bit
CD-DATA
MP3
Sampling frequency ...16 kHz, 22.05 kHz, 24 kHz, 32 kHz,
44.1 kHz, 48 kHz
Bit rate .........................8 kbps–320 kbps or VBR
WAV
Sampling frequency ...8 kHz, 11.025 kHz, 12 kHz, 16 kHz,
22.05 kHz, 24 kHz, 32 kHz, 44.1 kHz, 48 kHz
Quantization bit depth ......................8-bit, 16-bit
NET and USB
PCM
MP3
Sampling frequency ...8 kHz, 11.025 kHz, 12 kHz, 16 kHz,
22.05 kHz, 24 kHz, 32 kHz, 44.1 kHz, 48 kHz
Bit rate .........................8 kbps–320 kbps or VBR
WMA
Sampling frequency .......... 8 kHz, 11.025 kHz, 16 kHz,
22.05 kHz, 32 kHz, 44.1 kHz, 48 kHz
Bit rate .........................5 kbps–320 kbps or VBR
WMA Lossless
Sampling frequency ...44.1 kHz, 48 kHz, 88.2 kHz, 96 kHz
Quantization bit depth ....................16-bit, 24-bit
WAV
Sampling frequency ...8 kHz, 11.025 kHz, 12 kHz, 16 kHz,
22.05 kHz, 24 kHz, 32 kHz, 44.1 kHz, 48 kHz,
64 kHz, 88.2 kHz, 96 kHz, 176.4 kHz, 192 kHz
Quantization bit depth ...............8-bit, 16-bit, 24-bit
AAC
Sampling frequency ...8 kHz, 11.025 kHz, 12 kHz, 16 kHz,
22.05 kHz, 24 kHz, 32 kHz, 44.1 kHz,
48 kHz, 64 kHz, 88.2 kHz, 96 kHz
Bit rate .........................8 kbps–320 kbps or VBR
FLAC
Sampling frequency .......... 8 kHz, 11.025 kHz, 16 kHz,
22.05 kHz, 32 kHz, 44.1 kHz, 48 kHz,
64 kHz, 88.2 kHz, 96 kHz, 176.4 kHz, 192 kHz
Quantization bit depth ...............8-bit, 16-bit, 24-bit
54
Page 55

Ogg Vorbis
Sampling frequency .......... 8 kHz, 11.025 kHz, 16 kHz,
22.05 kHz, 32 kHz, 44.1 kHz, 48 kHz
Bit rate ........................48 kbps–500 kbps or VBR
Apple Lossless
Sampling frequency ...8 kHz, 11.025 kHz, 12 kHz, 16 kHz,
22.05 kHz, 24 kHz, 32 kHz, 44.1 kHz,
48 kHz, 64 kHz, 88.2 kHz, 96 kHz
Quantization bit depth ....................16-bit, 24-bit
DSD
Sampling frequency ........... 2.8224 MHz, 5.6448 MHz
Input/output connectors
LAN .............................................100BASE-T
USB .........................Front: USB 2.0 For iPod/iPhone
Rear: USB1.1 (Type A)
DIGITAL OUT
COAXIAL ...............................RCA, 0.5 Vpp, 75 Ω
OPTICAL ..................................JEITA RC-5720B
(+5V/1A power supply)
(+5V/500mA power supply)
General
Power supply
Model for Europe .............. AC 220-240 V (50 Hz, 60 Hz)
Model for USA/Canada .............AC 120 V (50 Hz, 60 Hz)
Power consumption ..................................30 W
Standby power ...........0.42 W (in normal standby mode)
5.6 W (in network standby mode)
External dimensions (W × H × D) (including protrusions)
435 × 101 × 301 mm (17 1/4" × 4 × 11 7/8")
Weight ................................... 4.9 kg (10 7/8 lb)
Operating temperature ......................+5°C to +35°C
Operating humidity .........5% to 85% (no condensation)
Storage temperature .......................−20°C to +55°C
ENGLISH
Included accessories
RCA audio cable × 1
Remote control (RC-1310) × 1
Batteries for remote control (AAA) × 2
Owner’s manual (this document) × 1
Warranty × 1 (for customers in the USA and Canada only)
LINE OUT L/R ..........................................RCA
Output impedance ................................200 Ω
Maximum output level ............................ 2 Vrms
Frequency response .......10 Hz–70 kHz (+0.5 dB, −3 dB)
Signal-to-noise ratio ...............................114 dB
Dynamic range ...................................114 dB
THD+N ......................0.002% or less (1 kHz, 0dB fs)
Channel separation (line) ..........................110 dB
Headphones jack ......................... 6.3mm diameter
Signal-to-noise ratio ...............................108 dB
Frequency response .........20 Hz–60 kHz (+1 dB, −3 dB)
55 mW + 55 mW or greater (32 Ω, 0.1% THD+N)
(1 kHz, 0dB fs, 192kHz fs, A-Weight)
(1 kHz, −60dB fs, 192kHz fs, A-Weight)
(1 kHz, 0dB fs, 192kHz fs)
(1 kHz, 0dB fs, 192kHz fs, A-Weight)
o Specifications and appearance are subject to change
without notice.
o Weight and dimensions are approximate.
o Illustrations in this Owner’s Manual might differ slightly
from production models.
55
Page 56

INSTRUCTIONS DE SÉCURITÉ IMPORTANTES
o N'exposez pas cet appareil aux gouttes ni aux éclaboussures.
o Ne placez pas d'objet rempli de liquide sur l'appareil, comme
par exemple un vase.
o N’installez pas cet appareil dans un espace confiné comme
une bibliothèque ou un meuble similaire.
o L’appareil tire un courant nominal de veille de la prise secteur
quand son interrupteur POWER ou STANDBY/ON n’est pas en
position ON.
o L’appareil doit être placé suffisamment près de la prise de
courant pour que vous puissiez à tout moment atteindre facilement la fiche du cordon d’alimentation.
o La fiche secteur est utilisée comme dispositif de déconnexion
et doit donc toujours rester disponible.
o Les produits ayant une construction de Classe ! sont équipés
d'un cordon d'alimentation avec une fiche de terre. Le cordon
de ces produits doit être branché à une prise de terre.
o Si le produit utilise des batteries (y compris un pack d'accus ou
des piles), elles ne doivent pas être exposées au soleil, au feu
ou à une chaleur excessive.
o PRÉCAUTION pour les produits utilisant des batteries au lithium
remplaçables: il existe un danger d’explosion en cas de remplacement par un type de batterie incorrect. Remplacez-les
uniquement par un type identique ou équivalent.
o Des précautions doivent être prises pour l'emploi d'écouteurs
ou d'un casque avec le produit car une pression acoustique
(volume) excessive dans les écouteurs ou dans le casque peut
provoquer une perte d’audition.
V
Précautions concernant les piles
Un mauvais emploi des piles peut entraîner leur rupture ou leur
fuite, avec pour conséquence un incendie, des blessures ou la
salissure des objets proches. Veuillez lire et suivre attentivement les
précautions suivantes.
o Veillez à insérer les piles avec leurs pôles positif (¥) et négatif
(^) correctement orientés.
o Utilisez des piles du même type. N’utilisez jamais des types de
pile différents ensemble.
o Si la télécommande doit rester inutilisée durant une période
prolongée (plus d’un mois), retirez ses piles pour éviter qu’elles
ne coulent.
o Si les piles coulent, essuyez le liquide dans le compartiment
des piles et remplacez les piles par des neuves.
o N'utilisez pas de piles d'un type autre que ceux spécifiés. Ne
mélangez pas des piles neuves avec des anciennes et n’utilisez
pas ensemble des types de pile différents.
o Ne chauffez pas et ne démontez pas les piles. Ne jetez jamais
les piles dans un feu ou dans de l’eau.
o Ne conservez et ne transportez pas les piles avec d’autres
objets métalliques. Les piles pourraient entrer en court-circuit,
couler ou exploser.
o Ne rechargez jamais une batterie sans avoir vérifié qu’elle peut
l’être.
Modèle pour le Canada
Cet appareil numérique de la classe B est conforme à la norme
NMB-003 du Canada.
56
Page 57

Ce produit contient un système laser à semi-conducteur dans son
Pb, Hg, Cd
boîtier et est répertorié comme «PRODUIT LASER DE CLASSE1».
Pour éviter d'être exposé au faisceau laser, n'essayez pas d'ouvrir
le boîtier.
Laser:
Type: EP-C101
Fabricant: GUANGDONG EVER BRIGHT GROUP CO.,
LTD.
Puissance laser: moins de 0,3mW
Longueur d'onde: 790 ± 25nm
Pour les consommateurs européens
Mise au rebut des équipements électriques et
électroniques
(a)
Tout équipement électrique et électronique doit être traité
séparément de la collecte municipale d'ordures ménagères
dans des points de collecte désignés par le gouvernement
ou les autorités locales.
(b)
En vous débarrassant correctement des équipements électriques et électroniques, vous contribuerez à la sauvegarde
de précieuses ressources et à la prévention de potentiels
effets négatifs sur la santé humaine et l'environnement.
(c)
Le traitement incorrect des déchets d'équipements électriques et électroniques peut avoir des effets graves sur
l'environnement et la santé humaine en raison de la présence de substances dangereuses dans les équipements.
(d)
Le symbole de déchets d'équipements électriques et électroniques (DEEE), qui représente
une poubelle sur roues barrée d'une croix,
indique que l'équipement électrique et électronique doit être collecté et traité séparément des
déchets ménagers.
(e)
Des systèmes de retour et de collecte sont disponibles
pour l'utilisateur final. Pour des informations plus détaillées
sur la mise au rebut des vieux équipements électriques et
électroniques, veuillez contacter votre mairie, le service
d'ordures ménagères ou le magasin dans lequel vous avez
acquis l'équipement.
FRANÇAIS
DÉCLARATION DE CONFORMITÉ
Nous, TEAC AUDIO EUROPE, Liegnitzer Straße 6,
82194 Gröbenzell, Allemagne, déclarons sous
notre propre responsabilité que le produit TEAC
décrit dans ce mode d'emploi est conforme aux
normes techniques lui correspondant.
ATTENTION
Les changements ou modifications apportés à cet équipement et
dont la conformité n’est pas expressément approuvée par TEAC
CORPORATION invalideront la garantie de l’utilisateur.
Mise au rebut des piles et/ou accumulateurs
(a)
Les piles et/ou accumulateurs hors d'usage doivent être
traités séparément de la collecte municipale d'ordures
ménagères dans des points de collecte désignés par le
gouvernement ou les autorités locales.
(b)
En vous débarrassant correctement des piles et/ou accumulateurs hors d'usage, vous contribuerez à la sauvegarde
de précieuses ressources et à la prévention de potentiels
effets négatifs sur la santé humaine et l'environnement.
(c)
Le traitement incorrect des piles et/ou accumulateurs hors
d'usage peut avoir des effets graves sur l'environnement et
la santé humaine car ils contiennent des substances
dangereuses.
(d)
Le symbole de déchets d'équipements électriques et électroniques (DEEE), qui représente
une poubelle sur roues barrée d'une croix,
indique que les piles et/ou accumulateurs
doivent être collectés et traités séparément des
déchets ménagers.
Si une pile ou un accumulateur contient plus que les valeurs
spécifiées de plomb (Pb), mercure (Hg) et/ou cadmium (Cd)
telles que définies dans la directive sur les piles et accumulateurs (2006/66/CE), alors les symboles chimiques de ces
éléments seront indiqués sous le symbole DEEE.
(e)
Des systèmes de retour et de collecte sont disponibles
pour l'utilisateur final. Pour des informations plus détaillées
sur la mise au rebut des piles et/ou accumulateurs, veuillez
contacter votre mairie, le service d'ordures ménagères ou
le magasin dans lequel vous les avez achetés.
57
Page 58

Sommaire
Nous vous remercions d’avoir choisi TEAC.
Lisez ce mode d'emploi avec attention pour tirer les meilleures performances de cette unité.
Après avoir lu ce mode d'emploi, gardez-le en lieu sûr pour
vous y référer ultérieurement.
INSTRUCTIONS DE SÉCURITÉ IMPORTANTES ..............56
Avant l’utilisation ........................................59
Emploi d'un iPod ou iPhone .............................60
Téléchargement de l'app de télécommande .............60
Notes sur les disques ....................................61
USB et réseaux ...........................................64
Branchements ...........................................66
Nomenclature et fonctions des parties (unité principale) .67
Nomenclature et fonctions des parties (télécommande) .68
Emploi de la télécommande .............................69
Informations affichées à l’écran ..........................70
Réglages ................................................97
Saisie de caractères .................................... 101
Mise à jour du firmware ................................ 101
Guide de dépannage .................................. 104
Caractéristiques techniques. . . . . . . . . . . . . . . . . . . . . . . . . . . . 106
Fonctionnement de base ................................71
Informations affichées à l'écran (CD/USB/NET) ...........74
Écoute de CD ............................................76
Écoute des fichiers d'une clé USB ........................82
Lecture aléatoire (CD/USB) ...............................83
Lecture en boucle (CD/USB) .............................84
Écoute d’un iPod/iPhone ................................84
Emploi des services de réseau ...........................85
vTuner Internet Radio ....................................86
My Favorites (mes favoris) ................................89
DLNA ....................................................91
Home Media (serveur multimédia domestique) ..........93
Configuration du lecteur Windows Media ................94
Paramétrage du dossier partagé .........................95
58
Page 59

Avant l’utilisation
Contenu de l'emballage
Vérifiez que vous disposez bien de tous les accessoires
représentés ci-dessous. Veuillez contacter le magasin dans
lequel vous avez acheté cette unité si l'un de ces accessoires manque ou a été endommagé durant le transport.
Câble audio RCA × 1
Télécommande (RC-1310) × 1
Piles pour télécommande (AAA) × 2
Mode d'emploi (ce document) × 1
Garantie × 1 (pour les utilisateurs aux États-Unis et
au Canada uniquement)
o Voir au dos de ce document les informations sur la
garantie en Europe et dans les autres pays ou régions.
Précautions d'emploi
o N’ouvrez pas le boîtier de l'unité car cela peut endom-
mager le circuit ou causer un choc électrique. Si un
objet étranger pénètre dans l’unité, consultez votre
revendeur.
o Quand vous débranchez la fiche d'alimentation d'une
prise secteur, tirez toujours directement sur la fiche. Ne
tirez jamais sur le cordon lui-même.
o Si on allume un téléviseur alors que cette unité est en
service, des parasites peuvent apparaître sur l'écran du
téléviseur en fonction de la fréquence de la télédiffusion. Ce n’est pas un mauvais fonctionnement de l’unité
ni du téléviseur. Si cela se produit, éteignez l'unité.
Utilisation du site mondial TEAC
Vous pouvez télécharger des mises à jour pour cette unité
depuis le site mondial TEAC:
http://teac-global.com/
o N'installez pas cette unité dans un lieu qui pourrait
chauffer. Cela comprend les endroits exposés directement au soleil ou près d'un radiateur, d'un chauffage,
d'une cuisinière ou d'autres appareils chauffants. En
outre, ne la placez pas au-dessus d'un amplificateur ou
autre équipement dégageant de la chaleur. Cela pourrait causer une décoloration ou une déformation.
o Évitez les lieux extrêmement froids ou exposés à une
humidité ou poussière excessive.
o Afin de permettre une bonne dissipation de la chaleur,
laissez au moins 20cm entre cette unité et les autres
équipements lors de l'installation. Si vous la placez dans
un rack, prenez les précautions nécessaires pour éviter
la surchauffe en laissant au moins 5cm d'espace libre
au-dessus de l'unité et au moins 10cm derrière.
o Ne posez pas de tissu sur l'unité et ne placez pas celle-ci
sur du linge de maison ou sur une épaisse moquette.
Cela pourrait entraîner la surchauffe de l'unité ou
l'endommager.
o Ne soulevez pas et ne déplacez pas l'unité durant la lec-
ture car le disque tourne à vitesse élevée. Cela pourrait
endommager le disque.
o Retirez toujours tout disque chargé avant de déplacer
cette unité ou de l'emballer pour par exemple l'installer à
un autre endroit. Transporter cette unité avec un disque
à l'intérieur peut entraîner un mauvais fonctionnement.
o En veille, cette unité consomme du courant électrique.
o Fournissez à l'unité une tension d’alimentation qui cor-
respond à celle indiquée sur la face arrière. Si vous avez
des doutes à ce sujet, consultez un électricien.
1) Allez sur le site mondial TEAC.
2) Dans la section TEAC Downloads (téléchargements
TEAC), cliquez sur la langue souhaitée afin d’ouvrir la
page de téléchargement du site web pour cette langue.
NOTE
Si la langue désirée n’apparaît pas, cliquez sur Other
Languages (autres langues).
3) Cliquez sur la section «Search by Model Name »
(recherche par nom de modèle) afin d’ouvrir la page
Downloads (téléchargements) pour ce produit (les utilisateurs en Europe doivent cliquer sur le nom du produit
dans la section «Products» (produits)).
4) Sélectionnez et téléchargez toute mise à jour nécessaire.
Maintenance
Essuyez les saletés du capot supérieur et des autres surfaces au moyen d'un chiffon doux légèrement humidifié
avec un nettoyant neutre dilué.
N’utilisez pas de lingettes de nettoyage imbibées de produits chimiques, de diluant ou de substances similaires car
cela pourrait endommager la surface de l’unité.
V
Par sécurité, débranchez le cordon d'alimentation de la prise secteur avant tout nettoyage.
FRANÇAIS
59
Page 60

Emploi d'un iPod ou iPhone
Téléchargement de l'app
de télécommande
Cette unité peut être utilisée avec les modèles d'iPod/
iPhone suivants.
iPhone 5s, iPhone 5c, iPhone 5
iPhone 4s, iPhone 4
iPhone 3GS, iPhone 3G
iPhone
iPod touch (1ère, 2e, 3e, 4e et 5e génération)
iPod classic
iPod nano (2e, 3e, 4e, 5e, 6e et 7e génération)
o Cette unité ne peut pas produire la vidéo d'un iPod ou
iPhone.
o Utilisez le câble USB fourni avec l'iPod ou l'iPhone pour
relier celui-ci à l'unité.
Logiciel de l'iPod/iPhone
Si l'unité ou les touches de la télécommande ne fonctionnent pas bien avec votre iPod ou iPhone, mettre à jour
le logiciel de ce dernier peut résoudre le problème.
Téléchargez le dernier logiciel pour votre iPod ou iPhone
sur le site web Apple suivant.
http://www.apple.com/support/country/?dest=downloads
Si vous installez l'app sur un iPod touch/iPhone ou appareil
Android, vous pouvez l'utiliser sur un réseau sans fil pour
un contrôle basique de l'unité.
o Le téléchargement et l'utilisation de l'app sont gratuits.
Comment télécharger l'app pour iPod touch/
iPhone
Recherchez «Teac Avr Remote» sur l'App Store.
60
Comment télécharger l'app Android
Recherchez «Teac Avr Remote» sur le site web Google play
(https://play.google.com/store).
Page 61

Notes sur les disques
Types de disque lisibles par cette
unité
CD portant le logo « COMPACT disc DIGITAL
AUDIO».
CD-R et CD-RW correctement enregistrés et finalisés au format CD audio.
CD-R et CD-RW correctement finalisés où sont
enregistrés des fichiers MP3/WAV.
Cette unité peut lire les types de disque ci-dessus sans
adaptateur. Cette unité ne peut pas lire de disques de type
autre que ceux ci-dessus.
V
ATTENTION
Si vous essayez de lire tout autre type de disque avec
cette unité, des bruits forts risquant d'endommager
les haut-parleurs et d'altérer votre audition peuvent
être produits. N'essayez jamais de lire un type de
disque autre que ceux indiqués ci-dessus.
o Cette unité peut être dans l'incapacité de correctement
lire des CD à dispositif anti-copie, des disques doubles
(DualDisc) ou d'autres CD spéciaux qui ne se conforment
pas à la norme CD Red Book. Le fonctionnement et la
qualité sonore ne peuvent pas être garantis si des
disques spéciaux sont utilisés dans cette unité. Si la lecture d'un disque spécial cause des problèmes, contactez
le vendeur du disque.
CD-R/CD-RW
Cette unité peut lire des disques au format CD audio (CDDA) et des CD-R/CD-RW contenant des fichiers aux formats
MP3 et WAV.
o Veillez à finaliser les disques créés au moyen d'enregis-
treurs de CD.
o Selon la qualité du disque et les conditions de l'enregis-
trement, la lecture peut ne pas être possible. Pour des
détails, voir le mode d'emploi de l'appareil que vous
utilisez.
o Si vous avez des questions quant à la gestion d'un CD-R
ou CD-RW, contactez directement son vendeur.
Précautions d'emploi
o N'utilisez pas de disques fendus car ils pourraient
endommager l'unité.
o Pour écrire sur le côté inscriptible du disque, employez
un marqueur permanent à pointe feutre. L'emploi d'un
stylo à bille ou autre à pointe dure peut endommager le
disque, le rendant illisible.
o N'utilisez jamais de stabilisateurs de CD du commerce.
Cela pourrait rendre le disque illisible ou endommager
l'unité.
o N'employez jamais de disques ayant une forme irrégu-
lière, dont des disques en forme de cœur ou
octogonaux, car ils peuvent endommager l'unité.
FRANÇAIS
o Si un CD-R/CD-RW portant une surface à étiquette
imprimable est laissé de façon prolongée dans cette
unité, il risque de coller à l'intérieur et de devenir extrêmement difficile à retirer, pouvant même entraîner un
mauvais fonctionnement de l'unité.
Retirez toujours de tels disques et conservez-les dans
leur boîtier lorsque vous ne les utilisez pas. De plus, évitez d'utiliser des disques qui viennent juste d'être
imprimés car ils sont particulièrement enclins à coller.
61
Page 62

Notes sur les disques (suite)
Manipulation des disques
o Chargez toujours les disques avec leur face imprimée
vers le haut.
o Faites attention lors de la manipulation des disques. Si la
face qui contient les données (non imprimée) est rayée,
salie par des empreintes digitales ou de façon générale
sale ou tachée, des erreurs peuvent se produire durant
la lecture.
o Pour sortir un disque de son boîtier, tout en pressant sur
le centre du boîtier, saisissez le disque par sa tranche.
Sortie du disque Maintien du disque
Rangement des disques
o Une fois que vous avez fini d'utiliser un disque, repla-
cez-le toujours dans son boîtier pour le rangement. Ne
pas le faire peut entraîner des déformations et des
rayures.
o Ne laissez pas les disques dans des lieux exposés directe-
ment à la lumière du soleil ou qui sont très humides ou
très chauds. Cela risquerait de provoquer une déformation ou une dégradation des disques, les rendant
inutilisables.
o Les CD-R et CD-RW sont plus sensibles aux effets de la
chaleur et des rayons ultraviolets que les CD ordinaires.
Pour cette raison, ne les laissez pas de façon prolongée
dans des endroits exposés directement à la lumière du
soleil ou par exemple près d'appareils dégageant de la
chaleur.
o Nettoyez toujours les disques avant de les ranger. Ne
pas nettoyer un disque sale risque d'entraîner des sauts
de lecture ou une dégradation de la qualité sonore.
Maintenance
o Si la face du disque où sont encodées les données (face
sans inscription) est salie par des empreintes de doigt
ou de la poussière, utilisez un chiffon doux pour essuyer
la surface d'un mouvement allant du centre vers le bord
extérieur.
o N'employez jamais de nettoyants pour disque, traite-
ments antistatiques, diluants ou produits chimiques
similaires pour nettoyer les disques. De tels produits
chimiques pourraient abîmer la surface du disque.
62
Page 63

Formats MP3/WAV
Précautions pour créer des disques
Cette unité peut lire des fichiers MP3 et WAV qui ont gravés
sur un CD-R ou CD-RW.
o Formats de fichier audio lisibles
MP3 (extension «.mp3», «.MP3»)
Standard MPEG-1/MPEG-2 Audio
Layer-2/Layer-3
Fréquence
d’échantillonnage 16kHz, 22,05kHz, 24kHz,
32kHz, 44,1kHz, 48 kHz
Débit binaire 8 kbit/s–320 kbit/s ou VBR
o Le débit binaire variable (VBR) est pris en charge.
Toutefois, le temps et les autres informations affichées à l'écran durant la lecture d'un fichier à
débit binaire variable (VBR) peuvent parfois être
incorrects.
WAV (extension «.wav», «.WAV »)
Fréquence
d'échantillonnage 8kHz, 11,025kHz, 12kHz,
16kHz, 22,05kHz, 24kHz,
32kHz, 44,1kHz, 48kHz
Résolution de
quantification 8 bits, 16bits
MP3/WAV avec un ordinateur
o Cette unité ne peut pas lire de disques dont la gravure
est non conforme à la norme ISO 9660.
o L'unité reconnaît les fichiers MP3 et WAV par leur exten-
sion de fichier, qui est respectivement «.mp3 » et
«.wav». Incluez toujours l'extension dans le nom de
fichier.
o L'unité ne peut pas reconnaître les fichiers sans ces
extensions de fichier. Toutefois, même si une de ces
extensions de fichier est ajoutée à un nom de fichier,
cette unité ne pourra pas pour autant lire ce fichier s'il
n'est pas au format de données MP3 ou WAV.
o Après avoir enregistré un CD-R/CD-RW, fermez la ses-
sion (terminez la création du disque). Cette unité ne
peut pas lire des disques dont la session n'est pas
fermée.
o Cette unité peut lire des fichiers dans un maximum de
99 dossiers. En outre, l'unité peut reconnaître et lire un
maximum de 499 dossiers (dont le dossier racine) et
fichiers.
o Elle ne prend pas en charge les multiples sessions pou-
vant avoir été enregistrées sur un même disque. Seule la
première session de tels disques peut être lue.
o Selon l'état du disque, l'unité peut être incapable de le
lire ou des sauts de son peuvent survenir.
o Cette unité ne peut pas lire les fichiers audio d'un
disque porteur d'une protection anti-copie.
FRANÇAIS
63
Page 64

USB et réseaux
Fichiers audio lisibles par cette unité
Cette unité peut lire les types de fichier audio suivants par
connexion USB ou réseau.
MP3
Extension de fichier
Standard MPEG-1/MPEG-2 Audio Layer-3
Fréquence
d'échantillonnage 8kHz, 11,025kHz, 12kHz, 16kHz,
Débit binaire
WMA
Extension de fichier
Fréquence
d'échantillonnage 8kHz, 11,025kHz, 16kHz, 22,05kHz,
Débit binaire
o Cette unité peut ne pas être en mesure de lire des
fichiers audio à protection anti-copie depuis une source
USB ou réseau.
o WMA Pro/Voice non pris en charge
WMA Lossless
Extension de fichier
Fréquence
d'échantillonnage 44,1kHz, 48 kHz, 88,2 kHz, 96 kHz
Résolution de
quantification 16bits – 24bits
.mp3, .MP3
22,05kHz, 24kHz, 32kHz, 44,1kHz,
48kHz
8kbit/s – 320kbit/s ou variable (VBR)
.wma, .WMA
32kHz, 44,1kHz, 48kHz
5kbit/s – 320kbit/s ou variable (VBR)
.wma ou .WMA
FLAC
Extension de fichier
Fréquence
d'échantillonnage 8kHz, 11,025kHz, 16 kHz, 22,05 kHz,
Résolution de
quantification 8 bits, 16 bits, 24 bits
.flac, .FLAC
32 kHz, 44,1 kHz, 48 kHz, 64 kHz,
88,2 kHz, 96 kHz, 176,4 kHz, 192 kHz
Ogg Vorbis
Extension de fichier
Fréquence
d'échantillonnage 8kHz, 11,025kHz, 16kHz, 22,05kHz,
Débit binaire
o Les fichiers incompatibles ne peuvent pas être lus.
.ogg, .OGG
32kHz, 44,1kHz, 48kHz
48kbit/s – 500kbit/s ou variable (VBR)
LPCM (PCM linéaire)
Fréquence
d'échantillonnage 44,1kHz, 48kHz
Résolution de
quantification 16 bits
o La lecture n'est prise en charge que sur un réseau.
Apple Lossless
Extension de fichier
Fréquence
d'échantillonnage 8kHz, 11,025kHz, 12kHz, 16kHz,
Résolution de
quantification 16bits, 24bits
.m4a, .mp4, .M4A, .MP4
22,05kHz, 24kHz, 32kHz, 44,1kHz,
48kHz, 64kHz, 88,2kHz, 96kHz
WAV
Extension de fichier
Fréquence
d'échantillonnage 8kHz, 11,025kHz, 12kHz, 16kHz,
Résolution de
quantification 8 bits, 16 bits, 24 bits
o Les fichiers WAV contiennent de l'audio numérique PCM
non compressé.
.wav, .WAV
22,05kHz, 24kHz, 32kHz, 44,1kHz,
48kHz, 64kHz, 88,2kHz, 96kHz,
176,4kHz, 192kHz
AAC
Extension de fichier
Standard MPEG-2/MPEG-4 Audio
Fréquence
d'échantillonnage 8kHz, 11,025kHz, 12kHz, 16kHz,
Débit binaire
.aac, .m4a, .mp4, .3gp, .3g2, .AAC,
.M4A, .MP4, .3GP, .3G2
22,05kHz, 24kHz, 32kHz, 44,1kHz,
48kHz, 64kHz, 88,2kHz, 96kHz
8kbit/s – 320kbit/s ou variable (VBR)
64
DSD
Extension de fichier
Fréquence
d'échantillonnage 2,8224MHz, 5,6448MHz
ATTENTION
o Cette unité ne prend pas en charge les formats suivants
lors de l'utilisation de la fonction «Lire sur» du lecteur
Windows Media.
FLAC, Ogg Vorbis, DSD
o Lors de la lecture de fichiers audio sur un réseau, les
types de format de fichier pouvant être lus dépendent
également du logiciel fonctionnant sur le serveur
réseau. Par exemple, lors de l'utilisation du lecteur
Windows Media 11, tous les fichiers audio de l'ordinateur ne sont pas lisibles. Seuls les fichiers audio ayant
été ajoutés à la bibliothèque du lecteur Windows Media
11 peuvent être lus.
o Lors de la lecture de fichiers ayant été enregistrés avec
un débit binaire variable (VBR), la durée de lecture peut
ne pas s'afficher correctement.
.dsf, .DSF
Page 65

Notes concernant les clés USB
Note concernant le DLNA
Cette unité peut utiliser des clés USB.*
* Les ports USB de cette unité ne prennent en charge que
les mémoires flash USB (aussi appelées «clés USB»). Ils ne
prennent pas en charge les disques durs USB standards.
o Pour les clés USB, les formats FAT16 et FAT32 sont pris en
charge.
o Si une clé USB est divisée en plusieurs partitions, cette
unité reconnaîtra celles-ci comme autant de volumes
distincts.
o Cette unité prend en charge jusqu'à 20000 fichiers et
16 niveaux de dossier dans un même dossier.
o Cette unité ne prend pas en charge les concentrateurs
(hub) USB ni les appareils à fonctions de concentrateur
USB. Ne connectez jamais de tels appareils à cette unité.
o Ni les fichiers WAV à fréquence d'échantillonnage de
176,4kHz ou supérieure ni les fichiers DSD à 5,6MHz ne
peuvent être lus depuis une clé USB branchée au port
USB (R) à l'arrière de l'unité.
ATTENTION
o Si le support connecté n'est pas pris en charge, «Not
Connected» s'affiche à l'écran de cette unité.
o Cette unité ne peut pas lire les fichiers audio si une pro-
tection anti-copie est utilisée.
o Ne connectez pas d'ordinateur aux ports USB de cette
unité.
L'audio venant des ordinateurs ne peut pas entrer par
les ports USB de cette unité.
o Cette unité peut ne pas être en mesure d'utiliser des
supports chargés dans un lecteur de carte USB.
o Selon la clé USB et son contenu, la lecture des données
peut prendre un certain temps.
o Selon la clé USB, l'unité peut ne pas être en mesure de
correctement lire ses données ou l'alimenter.
o Au cours de l'utilisation de clés USB, sachez que notre
société n'assumera aucune responsabilité en cas de
perte ou de modifications des données, de clé USB
endommagée ou de survenue d'autres dommages.
o Nous vous recommandons de faire une copie de sauve-
garde des données enregistrées sur une clé USB avant
d'utiliser cette dernière avec cette unité.
o Cette unité ne prend pas en charge les clés USB dispo-
sant de fonctions de sécurité.
Le Digital Living Network Alliance (DLNA) est un groupe
qui fait progresser la standardisation des connexions réciproques et l'échange d'audio, d'images, de vidéos et
d'autres données entre ordinateurs, consoles de jeux et
appareils ménagers au travers des réseaux domestiques
ordinaires (réseaux locaux ou LAN). Cette unité se
conforme aux directives de la version 1.5 du DLNA.
Note concernant les serveurs
Cette unité prend en charge les versions suivantes du lecteur Windows Media.
o Lecteur Windows Media 11
o Lecteur Windows Media 12
o Serveurs compatibles DLNA
Un serveur réseau doit être connecté au même réseau que
cette unité.
Cette unité prend en charge jusqu'à 20000 fichiers et 16
niveaux de dossier dans un même dossier.
ATTENTION
Selon le type de serveur de média, cette unité peut ne pas
le reconnaître ni pouvoir lire les fichiers audio qui y sont
sauvegardés.
Notes concernant les services réseau
o Les services réseau utilisables dépendent de la région.
o Les services réseau et les contenus que vous pouvez uti-
liser avec cette unité risquent de devenir inutilisables
sans préavis si le fournisseur de service interrompt le
service.
FRANÇAIS
65
Page 66

A B C D
Branchements
Cordon
d’alimentation
Câble audio RCA
L R
Entrée audio
Amplificateur,
etc.
A
Prises de sortie audio analogique (LINE OUT)
Ces prises produisent les signaux audio analogiques.
Utilisez le câble audio RCA fourni pour relier les prises
de sortie de cette unité aux prises d'entrée audio d'un
amplificateur.
Branchez la fiche blanche du câble audio à la prise
blanche (L pour gauche) et la fiche rouge à la prise
rouge (R pour droite).
Blanc (L) Blanc (L)
Rouge (R) Rouge (R)
B
Connecteurs de sortie audio numérique
DIGITAL IN
(COAXIAL)
Amplificateur ou enregistreur
numérique (enregistreur de CD,
platine MD, etc.)
coaxial RCA
Câble numérique
(DIGITAL OUT)
Ces prises produisent le signal audionumérique. Reliez
un des connecteurs de sortie audionumérique
(COAXIAL ou OPTICAL) de cette unité au connecteur
d'entrée audio numérique d'un amplificateur ou d'un
enregistreur numérique tel qu'un enregistreur de CD
(ils peuvent être connectés à différents appareils en
même temps).
Câble numérique optique
DIGITAL IN
(OPTICAL)
C
D
Prise secteur
COAXIAL: câble numérique coaxial (RCA)
OPTICAL: câble numérique optique (TOS)
Port ETHERNET
Utilisez un câble de réseau local (LAN) du commerce
pour relier ce port à un réseau filaire ou connexion
internet.
o Lorsque vous changez de source d'entrée, ce port
est identifié comme «NET» (réseau).
Port USB
Sert à brancher une clé USB à l'unité.
o Lorsque vous changez de source d'entrée, ce port
est identifié comme «USB(R)».
o Il n'est pas possible de brancher ici un iPod/iPhone.
o Ne branchez pas d'ordinateurs ou d'appareils simi-
laires aux ports USB de cette unité. L'audio venant
d'ordinateurs ne peut pas entrer par les ports USB
de cette unité.
66
Page 67

Nomenclature et fonctions des parties (unité principale)
A B C D E F G H I J K L M
A
Touche STANDBY/ON
Appuyez sur cette touche pour allumer l'unité ou la
mettre en veille (Standby).
o Quand cette unité est en mode de veille, elle
consomme un courant de veille. Pour cette raison,
nous utilisons le terme «en veille» plutôt que
«éteinte».
B
Prise casque (PHONES)
Pour écouter au casque, ramenez le volume au minimum avant de brancher le casque à la prise PHONES,
puis montez progressivement le volume.
V
Ne branchez/débranchez pas le casque et n'allumez/ne mettez pas en veille l'unité quand vous le
portez. De forts bruits soudains pourraient être
produits, risquant d'endommager votre audition.
C
Bouton LEVEL
Sert à régler le niveau du casque.
Tournez-le dans le sens horaire pour monter le volume
et dans le sens anti-horaire pour le baisser.
D
Récepteur du signal de télécommande
Lorsque vous utilisez la télécommande, pointez-la vers
ce récepteur.
E
Touche SOURCE
Sert à sélectionner la source.
F
Port USB
Utilisez-le pour brancher un iPod, iPhone ou clé USB à
l'unité.
o Lors vous changez de source d'entrée, ce port est
identifié comme «USB(F)».
o Ne branchez pas d'ordinateurs ou d'appareils simi-
laires aux ports USB de cette unité. L'audio venant
d'ordinateurs ne peut pas entrer par les ports USB
de cette unité.
G
Écran
H
Tiroir de disque
I
Touche d'ouverture/fermeture de tiroir (-)
Appuyez pour ouvrir et fermer le tiroir de disque.
J
Touche Stop (8)
Sert à stopper la lecture.
K
Touche Lecture/Pause (7/9)
À l'arrêt ou en pause, appuyez sur cette touche pour
lancer la lecture.
Pendant la lecture, appuyez sur cette touche pour
mettre en pause.
L
Touche RETURN
Lorsqu'un menu est ouvert, appuyez sur cette touche
pour revenir au menu précédent.
M
Molette MENU/ENTER (.//)
Tournez-la dans le sens horaire pour sauter aux pistes
suivantes ou dans le sens antihoraire pour sauter aux
pistes précédentes.
Appuyez sur la molette pour l'utiliser comme touche
ENTER en vue de confirmer vos réglages. Maintenez la
pressée pour l'utiliser comme touche MENU.
Tournez-la pour changer le paramètre ou la valeur de
réglage actuellement affichés quand un écran de
menu est ouvert.
FRANÇAIS
67
Page 68

Nomenclature et fonctions des parties (télécommande)
a
Touche STANDBY/ON (¤)
a
b
c
k
Appuyez sur cette touche pour allumer l'unité ou la
mettre en veille (Standby).
b
Touches SOURCE
Servent à sélectionner la source.
o Après avoir sélectionné USB, appuyez sur la touche
USB pour alterner entre USB (F) et USB (R).
d
e
g
h
l
m
n
f
o
c
Touches numériques
Servent à saisir des numéros de piste, fichier et dossier.
d
Touche PROGRAM
Sert à programmer la lecture.
p
e
Touche Stop (8)
Sert à stopper la lecture.
f
i
j
q
r
Touche Lecture (7)
Appuyez sur cette touche pour lancer la lecture quand
elle est à l'arrêt ou en pause.
g
Touche SHUFFLE
Sert à changer le réglage de lecture aléatoire.
h
Touches de direction (k/j/l/;)
Servent dans les menus ainsi que pour changer certains paramètres.
i
Touche MENU
Appuyez sur cette touche pour ouvrir l'écran de menu.
Quand l'unité principale et la télécommande ont toutes
les deux des touches ayant les mêmes fonctions, les
instructions de ce mode d'emploi se réfèrent à une
seule d'entre elles, mais l'autre peut être utilisée de la
même façon.
68
j
Touche DIMMER
Sert à changer la luminosité de écran.
k
Touche d'ouverture/fermeture de tiroir (-)
Appuyez pour ouvrir et fermer le tiroir de disque.
l
Touche CLEAR
Sert lors de la programmation de lecture.
Page 69

m
Touches de saut (.//)/
recherche (m/,)
Servent à sauter à la piste précédente ou suivante.
Servent également à sélectionner les dossiers et
fichiers.
Maintenez une de ces touches pressée pour une
recherche en arrière/avant.
Emploi de la télécommande
Précautions d'emploi
V
Un mauvais emploi des piles peut entraîner leur
rupture ou leur fuite, avec pour conséquence un
incendie, des blessures ou la salissure des objets
proches. Veuillez attentivement lire et respecter
les précautions en page 56.
n
Touche Pause (9)
Pendant la lecture, appuyez sur cette touche pour
mettre en pause.
En pause, appuyez sur cette touche pour reprendre la
lecture.
o
Touche REPEAT
Sert à changer le réglage de lecture en boucle.
p
Touche ENTER
Sert à confirmer les sélections de menu et les valeurs
de réglage.
q
Touche RETURN
Lorsqu'un menu est ouvert, appuyez sur cette touche
pour revenir au menu précédent.
r
Touche DISPLAY
Change les informations affichées.
o Pour utiliser la télécommande, pointez-la vers le capteur
de télécommande de l’unité principale dans un rayon
maximal de 5m. Ne placez pas d'obstacles entre l'unité
principale et la télécommande.
o La télécommande peut ne pas fonctionner si le capteur
de signal de télécommande de l'unité est exposé à la
lumière du soleil ou à une forte source lumineuse. Si
cela se produit, essayez de déplacer l’unité.
o Sachez que l'emploi de cette télécommande peut
entraîner le déclenchement involontaire d'opérations
sur d'autres appareils pouvant être contrôlés par rayons
infrarouges.
Installation des piles
Ouvrez l'arrière de la télécommande et insérez deux piles
AAA avec leurs pôles ¥/^ orientés comme illustré.
Replacez le couvercle.
FRANÇAIS
Quand faut-il remplacer les piles?
Si la portée de fonctionnement de la télécommande se
réduit, c'est que les piles sont déchargées. Dans ce cas,
remplacez-les par des neuves. Jetez les piles usagées
conformément à leurs instructions ou aux directives établies par votre municipalité.
69
Page 70

Informations affichées à l’écran
A B C D E F
G H
A
Indicateur de mise en veille automatique (ASb)
Cet indicateur apparaît quand la fonction de mise en
veille automatique est activée.
B
Indicateurs de format
Lorsque la source est réglée sur USB ou NET, l'indicateur DSD ou AAC apparaît selon le format du fichier
audio actuellement lu.
C
Indicateur FILE
Lorsque la source est réglée sur CD et qu'un disque
contenant des fichiers audio est chargé, cet indicateur
s'affiche. Le numéro du fichier s'affiche sous l'indicateur.
D
Indicateur TRACK
Lorsque la source est réglée sur CD et qu'un CD audio
est chargé, cet indicateur s'affiche. Le numéro de piste
s'affiche sous l'indicateur.
E
Indicateur Lecture/Pause (7/9)
F
Indicateur TOTAL REMAIN
Lorsque la source est réglée sur CD, cet indicateur
indique le type d'information concernant le disque
qui est affiché.
TOTAL: durée totale de lecture du disque
REMAIN: durée de lecture restante pour la
TOTAL REMAIN: durée de lecture restante pour le
piste actuellement lue
disque actuellement lu
s'affiche. Le numéro de dossier est affiché sous
l'indicateur.
H
Zone d'achage des messages
Les informations sur les pistes et les menus s'affichent
ici.
Les icônes suivantes apparaissent dans la zone d'affichage
des messages.
Icône Explication
Dossier*
Nom de piste/station d'émission
Lecture*
Pause*
Recherche avant*
Recherche arrière*
Nom de l'artiste
Nom de l'album
.
Mode de lecture en boucle
Répétition d'une seule piste
Répétition d'un dossier
Lecture aléatoire
Lecture en boucle aléatoire**
Programme**
*
G
Indicateur FOLDER
Lorsque la source est réglée sur CD et qu'un disque
contenant des fichiers audio est chargé, cet indicateur
70
Lecture en boucle de programme**
*N'apparaît pas lorsque la source est un CD.
**Apparaît uniquement lorsque la source est un CD.
Page 71

Fonctionnement de base
Dans cette section, nous expliquons les opérations communes à tous les modes.
1 Appuyez sur la touche STANDBY/ON pour
allumer l’unité.
Quand l'entrée est réglée sur la source CD
«CD» apparaît à l'écran, suivi du statut du CD.
Lorsque l'entrée n'est pas réglée sur la source CD
L'écran affiche la source d'entrée suivie par «Now
Initializing…» (initialisation en cours) puis le statut
de la source.
2 Appuyez sur la touche SOURCE pour chan-
ger de source.
Fonction de mise en veille
automatique
Quand la fonction de mise en veille automatique est activée, l'unité passe automatiquement en mode de veille
(Standby) si l'unité reste inutilisée sans recevoir de signal
audio durant 20 minutes. Quand la fonction de mise en
veille automatique est activée, l'indicateur ASb apparaît à
l'écran (page 99).
Appuyez sur la touche STANDBY/ON pour quitter le mode
de veille.
Branchement d'un casque
Avant d'utiliser un casque, baissez d'abord le volume au
minimum. Puis insérez la fiche du casque (jack stéréo standard) dans la prise PHONES et montez progressivement le
volume à l'aide du bouton LEVEL.
FRANÇAIS
Chaque fois que vous appuyez sur la touche SOURCE,
la source change comme indiqué ci-dessous.
CD NET USB(F) USB(R)
Si vous utilisez la télécommande pour changer de
source, appuyez sur la touche de la source que vous
voulez utiliser (CD, NET ou USB).
3 Lancez la lecture sur la source.
V
Réduisez toujours le volume au minimum avant
de brancher un casque et de le mettre. Tant que
vous portez le casque, ne le branchez pas à la
prise PHONES et ne le débranchez pas. De plus,
n'allumez pas l'unité et ne la mettez pas en veille
tant que vous portez le casque. Cela pourrait
entraîner un bruit fort et soudain risquant d'endommager votre audition.
71
Page 72

Fonctionnement de base (suite)
Lancement de la lecture
Appuyez sur la touche Lecture/Pause (y/9).
Durant la lecture, l'icône y s'affiche en haut de l'écran.
Mise en pause de la lecture
Appuyez sur la touche Lecture/Pause (y/9) pour mettre
la lecture en pause.
Pour reprendre la lecture depuis l'endroit où elle a été mise
en pause, appuyez à nouveau sur la touche Lecture/Pause
(y/9).
Saut de recherche d'une piste
Tournez la molette MENU/ENTER (.//) pour sauter
aux pistes situées avant ou après la piste actuelle.
Continuez de tourner jusqu'à ce que la piste désirée soit
sélectionnée.
Si vous utilisez la télécommande, utilisez les touches de
saut (.//). Utilisez-les pour sauter à la piste précédente ou suivante. Maintenez-les pressées jusqu'à ce que
la piste désirée soit sélectionnée.
En pause, l'icône 9 s'affiche en haut de l'écran.
Arrêt de la lecture
Appuyez sur la touche Stop (8) pour arrêter la lecture.
72
o Durant la lecture, appuyez une fois sur la touche .
pour revenir au début de la piste actuelle. Pour revenir
au début de la piste précédente, maintenez pressée la
touche ..
o Durant la lecture programmée, ce sont les pistes anté-
rieures ou ultérieures du programme qui seront lues.
Page 73

Recherche d'un passage de piste
Ordre de lecture des fichiers audio
Durant la lecture, appuyez sur une touche de recherche de
la télécommande (m/,) pour une recherche en
avant/arrière. Relâchez la touche lorsque vous avez trouvé
le passage désiré.
La lecture reprend depuis ce point.
Atténuateur (Dimmer)
Appuyez sur la touche DIMMER de la télécommande pour
passer en revue les niveaux de luminosité de l'écran et des
voyants.
Ordinaire Atténué Éteint
(CD)
Les disques contenant des fichiers audio les conservent
dans des dossiers de la même façon qu'un ordinateur gère
normalement les fichiers. De plus, certains conservent plusieurs dossiers au sein d'un autre dossier.
Exemple de numéros de dossier et d'ordre de lecture
de fichiers (
fichiers audio en lecture normale.
001 (ROOT ou «racine»)
1
Fichier MP3/WMA
2
Fichier MP3/WMA
Dossier 002
Dossier 003
1-9
) pour un disque contenant des
3
Fichier MP3/WMA
4
Fichier MP3/WMA
Dossier 004
5
Fichier MP3/WMA
Fichier MP3/WMA
7
Fichier MP3/WMA
6
FRANÇAIS
Dossier
Dossier 005
8
Fichier MP3/WMA
9
Fichier MP3/WMA
o L'ordre de l'illustration ci-dessus peut changer si des
fichiers ou dossiers sont ajoutés, supprimés ou déplacés.
73
Page 74

Informations affichées à l'écran (CD/USB/NET)
Appuyez sur la touche DISPLAY durant la lecture d'un
fichier audio pour changer les informations affichées à
l'écran.
Durant la lecture d'un CD audio
Durant la lecture d'un disque
MP3/WAV
Diverses informations de fichier sont affichées, dont celles
de titre, artiste et album venant des balises ID3 du fichier
MP3/WAV lu.
Temps écoulé dans la piste actuelle
Nom du fichier
Nom du dossier
Titre (si le fichier a une balise ID3)
Des informations concernant le disque lu sont affichées.
Temps écoulé dans la piste actuelle
REMAIN
(temps restant sur la piste lue)
TOTAL REMAIN
(temps restant sur le disque lu)
o Si la durée de lecture aléatoire ou la durée totale de lec-
ture dépasse 99 minutes et 59 secondes, «– –:– –»
s'affiche.
Artiste (si le fichier a une balise ID3)
Album (si le fichier a une balise ID3)
Fréquence d'échantillonnage et résolution en bits
o Si la lecture du fichier actuel dépasse 99 minutes et
59 secondes, «– –:– –» s'affiche.
o Les caractères des noms de piste et de dossier qui ne
peuvent pas être affichés sont remplacés par des astérisques (*). L'unité peut également être réglée pour
afficher le numéro de fichier ou de dossier lorsque des
caractères qui ne peuvent pas être affichés sont inclus
Voir «BAD NAME (nom inaffichable)» en page 98.
o Les fichiers WAV n'ont pas de balises ID3, donc leur titre
et les autres informations ne sont pas affichés.
74
Page 75

Durant la lecture USB/NET
Diverses informations de fichier sont affichées, dont celles
de titre, artiste et album venant des balises ID3 du fichier
audio lu.
Titre (si le fichier a une balise ID3)
Artiste (si le fichier a une balise ID3)
Album (si le fichier a une balise ID3)
Temps écoulé dans la piste actuelle
Temps de lecture de la piste actuelle
Format, débit binaire, résolution en bits et
fréquence d’échantillonnage du fichier
FRANÇAIS
75
Page 76

Écoute de CD
Cette unité peut lire les types de disque et fichier suivants.
Disques: CD-DA, CD-R, CD-RW
Fichiers: MP3, WAV
1 Appuyez sur la touche SOURCE pour choisir
le CD comme source.
Si vous utilisez la télécommande, appuyez sur la
touche CD.
2 Appuyez sur la touche d'ouverture/ferme-
ture de tiroir (-).
o Lors de l'ouverture ou de la fermeture du tiroir, ne
forcez pas dessus avec la main.
4 Appuyez sur la touche d'ouverture/ferme-
ture du tiroir (-) pour fermer le tiroir.
V
ATTENTION
Veillez bien à ne pas vous coincer les doigts quand le
tiroir se ferme.
«Reading» (analyse) s'affiche et l'unité commence
l’analyse du disque.
o Il faut un certain temps à l'unité pour charger le
disque.
Attendez que le nombre total de pistes et la durée
totale de lecture s'affichent à l'écran.
3 Placez un disque sur le tiroir avec sa face
sérigraphiée vers le haut.
o Ne placez pas plusieurs disques à la fois dans le tiroir.
o Si le tiroir est refermé alors qu'un disque est en
dehors des guides de centrage, le disque peut être
coincé à l'intérieur et le tiroir risque de ne plus s'ouvrir. Veillez à toujours placer les disques dans les
guides au centre du tiroir.
76
Quand l’analyse est terminée, l'écran apparaît comme
suit.
Exemple: chargement d'un CD audio
Apparaît quand c'est la durée totale de
lecture du disque qui est affichée.
Nombre total de pistes
Exemple: chargement d'un disque MP3/WAV
Nombre total
de dossiers
o «No Disc» s'affiche si aucun disque n'a été chargé.
Nombre total
de fichiers
Durée totale de
lecture
Page 77

5 Appuyez sur la touche Lecture/Pause (7/9).
La lecture démarre depuis la première piste.
Lecture directe au moyen des
numéros de piste
En plus de pouvoir sélectionner les pistes au moyen des
touches de saut, vous pouvez saisir un numéro de piste et
lancer sa lecture.
Durant la lecture ou à l'arrêt, vous pouvez utiliser les
touches numériques de la télécommande pour sélectionner une piste par son numéro.
Pour un nombre à un seul chiffre, appuyez sur la touche
numérique correspondante. Pour un nombre à deux
chiffres, appuyez sur la touche +10 puis sur la touche
numérique correspondant au chiffre des dizaines. Puis
appuyez sur la touche numérique correspondant au chiffre
des unités. La lecture démarre une fois le numéro de piste
saisi.
Exemple: saisie du numéro de piste 7
FRANÇAIS
Exemple: saisie du numéro de piste 23
o Durant la lecture programmée ou aléatoire, les touches
numériques ne peuvent pas servir à sélectionner des
pistes.
77
Page 78

Écoute de CD (suite)
Sélection de pistes sur des disques
MP3/WAV
Mode Navigation
Vous pouvez sélectionner les fichiers et dossiers en utilisant
la hiérarchie des dossiers.
1 À l'arrêt, appuyez sur la touche Stop (8).
«Root» (racine) s'affiche et le mode Navigation est
activé.
NOTE
Quand le paramètre «STOP KEY» en page 99 est
réglé sur «Navigation», appuyer sur la touche Stop
(8) de l'unité principale active le mode Navigation.
3 Utilisez les touches de saut (.//) pour
sélectionner les dossiers et chiers présents
sur le même niveau.
Pour sélectionner des fichiers et sous-dossiers dans un autre dossier, après avoir
sélectionné ce dernier, appuyez sur la
touche Lecture (7).
2 Appuyez sur la touche Lecture (t).
Le nom du premier dossier du répertoire racine (Root)
s'affiche.
S'il n'y a pas de dossier, c'est le nom du premier fichier
qui s'affiche.
78
Utilisez les touches de saut (.//) pour sélectionner les sous-dossiers et fichiers présents dans ce
dossier.
o Pour remonter d'un niveau, appuyez sur la touche
Pause (9).
4 Après avoir sélectionné le chier souhaité,
appuyez sur la touche ENTER ou sur la
touche Lecture (y).
Cela lance la lecture de ce fichier.
Page 79

Mode All folder (tous les dossiers)
Vous pouvez aussi sélectionner les dossiers et fichiers dans
ce mode, mais tous les dossiers sont alors traités identiquement quelle que soit leur position dans la structure des
dossiers.
1 À l'arrêt, appuyez sur la touche Pause (9).
«1» s'affiche et le mode All Folder est activé.
NOTE
Lorsque le paramètre «STOP KEY» en page 99 est
réglé sur «All Folder», appuyer sur la touche Stop (8)
de l'unité principale active le mode All Folder.
2 Utilisez les touches de saut (.//) pour
sélectionner un dossier puis appuyez sur la
touche ENTER ou sur la touche Lecture (7)
pour entrer dans ce dossier.
3 Utilisez les touches de saut (.//) pour
sélectionner un chier.
4 Après avoir sélectionné le chier souhaité,
appuyez sur la touche ENTER ou sur la
touche Lecture (7).
FRANÇAIS
Cela lance la lecture de ce fichier.
c
79
Page 80

Écoute de CD (suite)
Lecture de programme
La lecture du programme peut être employée avec des CD
audio et des disques MP3/WAV.
Cette unité peut avoir jusqu'à 25 pistes dans son
programme.
o Ajoutez des pistes au programme quand l'unité est à
l'arrêt.
1 Appuyez sur la touche PROGRAM.
Exemple
Numéro de piste Durée de lecture
Si vous utilisez un CD audio, vous pouvez aussi sélectionner les pistes au moyen des touches numériques
(«Lecture directe au moyen des numéros de piste» en
page 77).
Appuyez sur la touche Lecture (7) pour ajouter la
piste au programme.
Exemple: chargement d'un CD audio
Exemple: chargement d'un disque MP3/WAV
2 Ajoutez des pistes au programme.
Programmation avec un CD audio
Utilisez les touches de saut (.//) pour sélectionner une piste à ajouter au programme.
Exemple
Numéro de piste Position dans le
programme
Répétez ces procédures pour ajouter d'autres pistes
en fonction des besoins.
Programmation avec un disque MP3/WMA
Suivez les procédures de «Sélection de pistes sur des
disques MP3/WAV» en page 78 pour ajouter des
pistes.
Numéro de Numéro de fichier Position dans le
dossier programme
80
Page 81

3 Appuyez sur la touche Lecture (7) pour
lancer la lecture.
Saut de recherche d'une piste
Appuyez sur les touches de saut (.//) pour lire des
pistes situées en amont ou en aval dans le programme.
Maintenez-les pressées jusqu'à ce que la piste désirée soit
sélectionnée.
Suppression de pistes dans le programme
À l'arrêt, appuyez sur la touche CLEAR pour supprimer la
dernière piste ayant été ajoutée au programme.
Ajout de pistes à la fin du programme
À l'arrêt, utilisez les touches de saut (.//) pour afficher la piste que vous voulez ajouter et appuyez sur la
touche Lecture (7) pour l'ajouter à la fin du programme.
FRANÇAIS
Arrêt de la lecture du programme
Appuyez sur la touche Stop (8) pour arrêter la lecture, et
appuyez sur la touche PROGRAM.
o Durant la lecture, appuyez une fois sur la touche .
pour revenir au début de la piste actuelle. Pour revenir
au début d'une piste antérieure, maintenez pressée la
touche ..
Vérification du contenu du programme
À l'arrêt, utilisez les touches de saut (.//) pour afficher les numéros de piste et les durées de lecture.
o La lecture de programme s'arrête également si vous
appuyez sur la touche d'ouverture/fermeture de tiroir
(-) afin d'ouvrir le tiroir ou si vous appuyez sur la
touche STANDBY/ON pour faire passer l'unité en veille.
81
Page 82

Écoute des fichiers d'une clé USB
Lors de la lecture de fichiers audio d’une clé USB, sauf si la
lecture en boucle est réglée sur Tout répéter, seuls les
fichiers audio files de même niveau dans un même dossier
sont lus (page 84).
Pour des détails sur les fichiers audio qui peuvent être lus,
voir «Fichiers audio lisibles par cette unité» en page 64.
1 Appuyez sur la touche SOURCE pour choisir
USB(F) ou USB(R) comme source.
Si vous utilisez la télécommande, appuyez sur la
touche USB.
o «Not Connected» s'affiche si rien n'est connecté.
2 Branchez une clé USB au port USB que vous
avez sélectionné.
3 Appuyez sur la molette MENU/ENTER (./
/).
Le nom de la piste ou du dossier apparaît.
o Avec la télécommande, vous pouvez aussi appuyer
sur la touche ENTER.
4 Tournez la molette MENU/ENTER (.//)
pour sélectionner une piste et appuyez sur
la touche Lecture/Pause (7/9).
ou
Si une clé USB est détectée, son nom de volume
s'affiche.
o Dans ce cas, vous pouvez appuyer sur la touche
Lecture/Pause (7/9) pour lancer la lecture dans
l’ordre des pistes du premier dossier qui contient
les fichiers audio sur la clé USB.
82
c
Cela lance la lecture de la piste sélectionnée.
Page 83

Lecture aléatoire (CD/USB)
o Avec la télécommande, vous pouvez sélectionner
les pistes au moyen des touches de direction
(k/j) puis appuyer sur la touche Lecture (7).
o Quand un dossier est sélectionné, la lecture com-
mence par la première piste de ce dossier.
o Vous pouvez également sélectionner un dossier,
puis appuyer sur la molette MENU/ENTER
(.//) pour sélectionner des pistes de ce
dossier.
o Voir «Fichiers audio lisibles par cette unité» en
page 64 pour les formats audio qui peuvent être
lus.
Utilisez cette fonction pour lire les pistes en ordre aléatoire.
Appuyez sur la touche SHUFFLE pour activer/désactiver la
lecture aléatoire.
Avec un CD audio ou un disque MP3/WAV
Vous pouvez demander une lecture de type Shuffle pour
reclasser les pistes en ordre aléatoire et les lire toutes une
fois. Ce mode ne peut être activé que quand l’unité est à
l’arrêt.
Appuyez sur la touche SHUFFLE pour activer le mode de
lecture aléatoire. Quand il est activé, l'icône apparaît sur
le côté gauche de l'écran.
o Si vous appuyez sur la touche SHUFFLE durant la lec-
ture, le mode de lecture actuel (soit «Normal Play»
(lecture normale), soit «Shuffle Play» (lecture aléatoire))
apparaît, mais le mode de lecture ne peut pas changer.
La lecture aléatoire sera annulée dans les cas suivants.
o Si l’unité est mise en veille
o Si le tiroir du disque est ouvert
FRANÇAIS
Avec une clé USB
Les fichiers audio contenus dans un dossier seront lus en
boucle en ordre aléatoire.
Si vous appuyez sur la touche SHUFFLE pour activer le
mode de lecture aléatoire, l'icône apparaît sur le côté
gauche de l'écran.
La lecture aléatoire sera annulée dans les cas suivants.
o Si Net Standby est réglé sur Disable et l'alimentation est
en veille (page 100)
o Si la lecture en boucle est utilisée (page 84).
83
Page 84

Lecture en boucle (CD/USB)
Écoute d’un iPod/iPhone
Appuyez sur la touche REPEAT pour passer en revue les
modes de lecture en boucle comme suit.
Avec un CD audio ou un disque MP3/WAV
Chaque fois que vous appuyez sur la touche REPEAT,
l'icône affichée à gauche de l'écran change comme suit.
o La lecture en boucle peut être utilisée en combinaison
avec la lecture aléatoire des fichiers d’un disque.
(tout répéter)
(répéter un titre)
Aucun indicateur
(répétition désactivée)
La lecture en boucle sera annulée dans les cas suivants.
o Si l’unité est mise en veille
o Si le tiroir du disque est ouvert
Les produits Apple qui peuvent être connectés et utilisés
avec cette unité sont répertoriés dans «Emploi d’un iPod
ou iPhone» en page 60.
Les explications suivantes se réfèrent à un iPod, mais elles
s'appliquent aussi à l'emploi avec un iPhone.
1 Appuyez sur la touche SOURCE pour choisir
USB(F) comme source.
Si vous utilisez la télécommande, appuyez sur la touche
USB.
o «Not Connected » s'affiche si aucun iPod n'est
connecté.
2 Connectez un iPod à cette unité au moyen
du câble USB fourni avec l'iPod.
Avec une clé USB
Chaque fois que vous appuyez sur la touche REPEAT,
l'icône affichée à gauche de l'écran change comme suit.
(tout répéter)
(répéter un titre)
(répéter un dossier)
Aucun indicateur
(répétition désactivée)
La lecture en boucle sera annulée dans le cas suivant.
o Lorsque la lecture aléatoire est utilisée (page 83) (à la
fin du mode de lecture aléatoire, le mode de lecture en
boucle réglé redevient actif)
84
o Branchez un iPod au connecteur USB pour l'iPod/
iPhone à l'avant de l'unité.
3 Faites fonctionner l'iPod pour lancer la
lecture.
o «USB(iPod) » apparaît à l'écran. Aucune informa-
tion concernant le contenu ne s'affiche.
o Si un iPod est connecté à l'unité, il n'est rechargé
que quand cette unité est allumée. La recharge
s'arrête quand l'iPod est complètement rechargé.
La recharge n'est pas possible quand cette unité
est en veille.
Page 85

Emploi des services de réseau
Pour utiliser un service de réseau, suivez la procédure
ci-dessous afin de le sélectionner.
1 Appuyez sur la touche NET pour ouvrir le
menu des services de réseau.
2 Utilisez les touches de direction (k/j/l/;)
pour sélectionner l'élément et appuyez sur
la touche ENTER.
vTuner Internet Radio
Pandora (USA uniquement)
SiriusXM Internet Radio
(USA et Canada uniquement)
Slacker Personal Radio
(USA et Canada uniquement)
My Favorites
vTuner Internet Radio
vTuner Internet Radio est un site portail pour les stations
de radio internet du monde entier. Vous pouvez rechercher
des stations de radio par genre musical, pays et autres
classifications.
Pandora (USA uniquement)
Pandora est un service de distribution de musique qui analyse les morceaux qu’aiment les utilisateurs pour en
sélectionner d’autres. Comme 400 types de données
(caractéristiques et tendances) sont utilisés pour chaque
morceau enregistré, en fonction des titres de morceau et
des artistes qu’aime un utilisateur, des morceaux aux caractéristiques similaires peuvent être lus.
SiriusXM Internet Radio (USA et Canada uniquement)
SiriusXM est maintenant disponible sur de nombreux systèmes audio domestiques et radios internet.
Le streaming internet SiriusXM offre un son 128k de haute
qualité et fournit plus de 100 des plus grandes stations de
sports, débats, divertissements et musique sans publicité.
FRANÇAIS
Slacker Personal Radio (USA et Canada uniquement)
Slacker Personal Radio est un service de radio internet interactif disponible aux USA et au Canada. Il permet aux
utilisateurs de créer et de partager des stations musicales
personnalisées en partant soit de stations programmées par
Slacker soit de stations crées à partir de noms d'artiste ou de
titres de chanson.
Le service propose des millions de morceaux, organisés en
centaines de stations programmées et en milliers de pages
d'artiste.
My Favorites (mes favoris)
Pour écouter des programmes de radio internet, vous pouvez les ajouter à la rubrique «My Favorites» (mes favoris)
dans le menu des services de réseau.
DLNA
Home Media
Voir les explications suivantes pour l'utilisation de
chaque élément.
DLNA (partage de média)
Cela vous permet de lire des fichiers audio appartenant à
une bibliothèque partagée.
Home Media (partage de dossier)
Cela vous permet de lire des fichiers audio appartenant à
un dossier partagé sur un ordinateur ou un dispositif de
stockage réseau de type NAS (Network Attached Storage)
sur le même réseau que l'unité.
o Utilisez un ordinateur sur lequel sont installés Windows
8 ou Windows 7 et le lecteur Windows Media 11 ou
ultérieur.
o Une connexion internet est nécessaire pour écouter la
radio internet (page 99).
85
Page 86

vTuner Internet Radio
vTuner Internet Radio est un site portail pour les stations
de radio internet du monde entier. Vous pouvez rechercher
des stations de radio par genre musical, pays et autres
classifications.
vTuner Internet Radio est déjà ajoutée à cette unité.
o Une connexion internet est nécessaire pour écouter
vTuner Internet Radio (page 99).
1 Appuyez sur la touche NET pour ouvrir le
menu des services de réseau.
2 Utilisez les touches de direction (k/j/l/;)
pour sélectionner «vTuner Internet Radio»
et appuyez sur la touche ENTER.
Un message d'erreur apparaîtra si le service n'est pas
diffusé.
3 Utilisez les touches de direction (k/j)
pour sélectionner une station et appuyez
sur la touche ENTER.
La lecture commencera.
Mémoriser vos programmes
favoris de vTuner Internet Radio
Vous pouvez mémoriser comme favoris certains programmes de vTuner Internet Radio pour y accéder plus
facilement. Il y a deux façons de le faire.
Les ajouter à My Favorites (mes favoris)
Appuyez sur la touche NET pour ouvrir le menu des services de réseau et utilisez l'élément «My Favorites» pour
y ajouter un programme favori.
86
1 Après avoir sélectionné la station de radio
à ajouter, maintenez pressée la touche
MENU de la télécommande.
o Vous pouvez ajouter une station de radio alors
même que vous l'écoutez.
c
Page 87

2 Utilisez les touches de direction (k /j)
pour sélectionner « My Favorites » et
appuyez sur la touche ENTER.
3 Pour ajouter la station de radio sans changer
son nom, utilisez les touches de direction
(k /j ) afin de sélectionner « OK » et
appuyez sur la touche ENTER. Pour ajouter
la station de radio après avoir changé son
nom, une fois que vous avez utilisé les
touches de direction (k/j/l/;) pour saisir
les caractères, sélectionnez « OK » et
appuyez sur la touche ENTER.
Ajouter une station à Mes groupes préférés
dans vTuner Internet Radio
Sélectionnez vTuner Internet Radio et appuyez sur la
touche ENTER pour voir le dossier «Mes groupes préférés»
(mes groupes de favoris) sur le même écran qui affiche les
genres et les localisations géographiques. Vous pouvez
ajouter les stations de radio internet que vous aimez à ce
dossier.
Enregistrement comme utilisateur
1 Ouvrez un navigateur web sur un ordina-
teur connecté au même réseau que cette
unité et accédez à l'adresse URL suivante.
http://teac.vtuner.com/
2 Cliquez sur le drapeau de la langue souhai-
tée en haut à gauche de l'écran d'accueil
vTuner.
3 Cliquez sur «Not a member? Register here.»
(Pas encore membre? Inscrivez-vous ici.)
pour ouvrir la page de création de compte
de connexion.
FRANÇAIS
c
4 Saisissez l'adresse MAC (12 chires).
Ne séparez pas les numéros et les lettres par des symboles deux points (:).
o Voir «NET Setting (paramétrage réseau)» en page
99 pour des instructions sur l'obtention de l'adresse
MAC de cette unité.
5 Saisissez votre adresse e-mail et votre mot
de passe.
Suivez les instructions à ce sujet en écran d'enregistrement.
Adresse e-mail: ce sera votre identifiant de connexion.
Mot de passe: vous en aurez besoin pour vous
connecter, aussi gardez-le bien noté.
6 Cliquez sur « Enregistrer» pour terminer
votre enregistrement comme utilisateur.
87
Page 88

vTuner Internet Radio (suite)
Ajouter une station de radio à une liste de
favoris
1 Sélectionnez la station de radio que vous
souhaitez ajouter à votre liste de favoris.
Sélectionnez la station que vous voulez en naviguant
par exemple par genre, par lieu ou par langue.
2 Créez un groupe pour vos favoris.
Vous pouvez créer plusieurs groupes avec des noms
comme «Favoris 1» et «Pop», par exemple. Saisissez
le nom du groupe dans la boîte de dialogue et cliquez
sur le bouton «Go» (aller). Le nom de groupe saisi
sera ajouté à «Mes groupes préférés».
3 Ouvrez «Mes groupes préférés».
Ouvrez «Mes groupes préférés» après avoir ouvert
une session sur le site portail. Vous pouvez également
visualiser vos favoris dans la rubrique «My Favorites»
du menu radio internet de cette unité.
Pour retirer la station de la liste des favoris, cliquez sur
le bouton . Une boîte de dialogue de confirmation apparaîtra.
88
Page 89

My Favorites (mes favoris)
Cette unité prend en charge les stations de radio internet
qui utilisent les formats PLS, M3U et podcast (RSS). Même si
une station de radio internet utilise un de ces formats, la
lecture peut ne pas toujours être possible selon le type de
données et le format de lecture.
Pour écouter des programmes de radio internet, suivez ces
procédures afin de les ajouter à la rubrique «My Favorites»
dans le menu des services de réseau.
o Une connexion internet est nécessaire pour écouter les
programmes de radio internet (page 99).
o Un ordinateur doit être connecté au même réseau que
cette unité pour faire les réglages de My Favorites.
ATTENTION
En cas d'arrêt de service par le fournisseur de service, l'utilisation de ces services de réseau et de leur contenu peut ne
plus être possible.
Ajout d'un programme
1 Appuyez sur la touche MENU.
5 Saisissez l'adresse IP de cette unité dans le
champ d'adresse URL du navigateur internet.
L'écran WEB Setup Menu de cette unité s'ouvrira dans
le navigateur internet.
o Si vous utilisez Internet Explorer, vous pouvez aussi
faire cela en sélectionnant «Ouvrir…» depuis le
menu «Fichier» et en saisissant l'adresse IP.
FRANÇAIS
2 Utilisez les touches de direction (k /j)
pour sélectionner «NET Setting» (paramétrage réseau) et appuyez sur la touche
ENTER.
3 Quand « IP Address» (adresse IP) apparaît,
appuyez sur la touche ENTER.
Notez l'adresse IP.
4 Allumez l'ordinateur et ouvrez Internet
Explorer ou un autre navigateur internet.
6 Cliquez sur l'onglet « My Favorites» (mes
favoris) et saisissez le nom et l'adresse URL
de la station de radio internet.
o Vous pouvez saisir un maximum de 10 caractères
pour le nom des stations de radio internet.
7 Cliquez sur «Save» (sauvegarder) pour ter-
miner l'enregistrement de cette station de
radio internet.
La station de radio internet enregistrée sera ajoutée à
«My Favorites».
89
Page 90

My Favorites (mes favoris) (suite)
Lancement de la lecture
1 Appuyez sur la touche NET.
2 Sélectionnez «My Favorites» dans le menu
des services de réseau et appuyez sur la
touche ENTER pour acher les stations de
radio internet.
3 Sélectionnez celle que vous avez ajoutée et
appuyez sur la touche ENTER.
NOTE
o Pour voir des stations similaires, maintenez pressée la
touche MENU de la télécommande, utilisez les touches
de direction (k/j) pour sélectionner «Stations like
this» (stations comme celle-ci) et appuyez sur la touche
ENTER.
o Si vous voulez ajouter une nouvelle station de radio au
menu My Favorites, sélectionnez l'élément vierge dans
la liste et maintenez pressée la touche MENU et utilisez
la touche ENTER pour sélectionner « Create New
Station» (créer une nouvelle station). Appuyez à nouveau sur la touche ENTER pour afficher les champs où
peuvent être saisis les caractères, et saisissez le nom et
l'adresse URL.
o Pour supprimer une station de radio qui a été ajoutée,
maintenez pressée la touche MENU pendant que cette
station est écoutée ou sélectionnez-la et utilisez les
touches de direction (k/j) pour sélectionner «Delete
from My Favorites» (supprimer de mes favoris) et
appuyez sur la touche ENTER. Vous pouvez également
supprimer les stations en utilisant l'écran Web Setup
Menu (sur un ordinateur).
o Pour changer le nom d'une station de radio qui a déjà
été ajoutée, sélectionnez-la et maintenez pressée la
touche MENU. Ensuite, utilisez les touches de direction
(k /j ) pour sélectionner « Rename this station »
(renommer cette station) et appuyez sur la touche
ENTER.
o Vous pouvez mémoriser jusqu'à 40 stations de radio
internet.
90
Page 91

DLNA
En utilisant le DLNA, l'unité peut lire des fichiers audio de
bibliothèques partagées et afficher leurs informations de
balise, dont le nom d'artiste, le genre et le nom d'album.
o Un ordinateur doit être connecté au même réseau que
cette unité pour pouvoir utiliser le DLNA.
o Voir «Note concernant les serveurs» en page 65 pour
plus d'informations sur les serveurs réseau pris en
charge.
o Configurez préalablement le serveur réseau pour que
cette unité puisse y accéder. Pour des informations sur ces
réglages, voir le mode d'emploi du serveur réseau. Si vous
utilisez le lecteur Windows Media, voir «Configuration du
lecteur Windows Media» en page 94.
1 Faites démarrer l'ordinateur ou le serveur
réseau.
2 Appuyez sur la touche NET pour ouvrir le
menu des services de réseau.
3 Utilisez les touches de direction (k/j/l/;)
pour sélectionner «DLNA» et appuyez sur la
touche ENTER.
c
FRANÇAIS
4 Utilisez les touches de direction (k/j/l/;)
pour sélectionner le serveur réseau et
appuyez sur la touche ENTER.
Le dossier du serveur réseau s'affichera.
o Certains serveurs réseau ne prennent pas en
charge l'utilisation de la fonction de recherche.
o Cette unité ne peut pas accéder aux photogra-
phies ni aux vidéos d'un serveur réseau.
o Selon les réglages de partage du serveur réseau,
certains contenus peuvent ne pas s'afficher. Voir le
mode d'emploi du serveur réseau.
Suite à la prochaine page e
91
Page 92

DLNA (suite)
5 Utilisez les touches de direction (k/j) pour
sélectionner le chier audio que vous voulez
lire, et appuyez sur la touche ENTER ou sur
la touche Lecture (7).
o Les fonctions de recherche vers l'avant/arrière et de
pause peuvent ne pas fonctionner avec certains
serveurs de médias.
o Si aucune information ne peut être récupérée d'un
serveur, «No Item» (aucun élément) s'affiche à
l'écran. Si cela se produit, vérifiez les connexions du
serveur et du réseau.
o Après qu'un fichier audio ait été ajouté à une
bibliothèque du lecteur Windows Media, ce fichier
peut ne pas immédiatement apparaître dans la liste
des fichiers audio de cette unité. Cela est dû à l'absence d'actualisation de l'index de la bibliothèque
Windows. Vous pouvez soit attendre l'actualisation
automatique de l'index, soit reconstruire manuellement l'index. Voir l'aide en ligne de Windows pour
des instructions sur la façon de le faire.
3 Sélectionnez le fichier que vous souhaitez
lire dans le lecteur Windows Media et cliquez
dessus avec le bouton droit de la souris.
Cela ouvre un menu contextuel.
NOTE
Pour utiliser la fonctionnalité Lire sur avec des fichiers
audio d'un autre serveur réseau, ouvrez ce serveur
réseau dans la liste qui apparaît sous «Autres bibliothèques» et sélectionnez le fichier audio que vous
voulez lire.
4 Cliquez sur le bouton « Lire sur » et sélec-
tionnez cette unité dans la liste Lire sur.
Ouvrez la boîte de dialogue Lire sur du lecteur
Windows Media et lancez la lecture depuis cette unité.
Utilisez la boîte de dialogue Lire sur de Windows 7
pour contrôler la lecture à distance.
o L'emploi de la fonction Lire sur n'est pas possible
dans les conditions suivantes.
• Si des services réseau sont utilisés
• Durant la lecture d'un fichier audio sur périphérique USB ou iPod/iPhone
Emploi de la fonction Lire sur
La fonction Lire sur vous permet de faire fonctionner des
appareils de contrôle compatibles DLNA et des ordinateurs
sur un réseau domestique et permet à cette unité de lire
des fichiers audio qui sont sauvegardés sur ces appareils.
o Un appareil de contrôle compatible DLNA ou un ordina-
teur et cette unité doivent être connectés au même
réseau pour faire les réglages de favoris (My Favorites).
1 Allumez cette unité.
2 Allumez l'ordinateur et ouvrez le lecteur
Windows Media.
Vous devez configurer le lecteur Windows Media à
l'avance (page 94).
92
Page 93

Home Media (serveur multimédia domestique)
Cela vous permet de lire des fichiers audio appartenant à
un dossier partagé sur un ordinateur ou un dispositif de
stockage réseau de type NAS (Network Attached Storage)
sur le même réseau.
En vous référant à «Paramétrage du dossier partagé » en
page 95, créez un dossier partagé auquel cette unité
peut accéder.
ATTENTION
Si vous utilisez un dispositif de stockage réseau NAS,
consultez son mode d'emploi.
1 Appuyez sur la touche NET pour ouvrir le
menu des services de réseau.
2 Utilisez les touches de direction (k/j/l/;)
pour sélectionner «Home Media» et appuyez
sur la touche ENTER.
3 Utilisez les touches de direction (k/j) pour
sélectionner le serveur que vous souhaitez
utiliser et appuyez sur la touche ENTER.
o Vérifiez le nom de serveur de votre ordinateur en
affichant ses propriétés.
4 Utilisez les touches de direction (k/j) pour
sélectionner le dossier partagé que vous
souhaitez utiliser et appuyez sur la touche
ENTER.
5 Si un nom d'utilisateur et un mot de passe
sont requis, saisissez les informations de
compte nécessaires.
o Après avoir saisi une fois les informations de
compte, celles-ci sont sauvegardées pour que vous
n'ayez pas besoin de les saisir la prochaine fois.
o Utilisez les informations de compte définies
lorsque vous avez créé le dossier partagé.
6 Utilisez les touches de direction (k /j)
pour sélectionner le chier audio que vous
voulez lire, et appuyez sur la touche ENTER
ou sur la touche Lecture (7).
La lecture commencera.
FRANÇAIS
c
93
Page 94

Configuration du lecteur Windows Media
À titre d'exemple, nous expliquerons comment configurer
le lecteur Windows Media 12 dans cette section.
1 Branchez votre ordinateur à un réseau.
2 Branchez cette unité au réseau.
Si vous avez un problème pour vous connecter au réseau,
voir la section «DLNA» du «Guide de dépannage».
o Si les fichiers que vous voulez partager ne sont pas
encore dans la bibliothèque du lecteur Windows
Media, ajoutez-les à la bibliothèque.
Référez-vous au mode d'emploi du lecteur Windows
Media pour des détails.
3 Dans le menu «Diuser en continu» du lec-
teur Windows Media, sélectionnez «Autoriser
un accès internet aux médias personnels...».
5 Sélectionnez cette unité dans la liste des péri-
phériques, puis cliquez sur «Personnaliser...».
6 Faire les réglages de partage puis cliquez
sur «OK».
o Si ni «Autoriser un accès internet aux médias per-
sonnels..» ni « Plus d'options de diffusion en
continu...» n'apparaissent, sélectionnez «Activer la
diffusion multimédia en continu...».
4 Dans le menu «Diuser en continu» du lec-
teur Windows Media, sélectionnez «Plus
d'options de diusion en continu».
o Si «Plus d'options de diffusion en continu» n'appa-
raît pas, sélectionnez « Activer la diffusion multimédia
en continu...».
94
o Pour lire des fichiers quelle que soit leur classifica-
tion, réglez «Nombre d’étoiles» sur «Toutes les
classifications».
o Assurez-vous que «Musique» est coché.
7 Cliquez sur «OK» dans l'écran qui apparaît.
Pour des instructions de lecture, voir «DLNA» en page
91.
Page 95

Paramétrage du dossier partagé
Windows 8
1 Vériez le nom du domaine ou «groupe de
travail» auquel est assigné votre ordinateur.
Avant le réglage du partage de dossier, vérifiez que
l'ordinateur est assigné au même domaine ou groupe
de travail que cette unité (par défaut, cette unité est
assignée au même groupe de travail). Ouvrez
«Panneau de configuration», «Système et sécurité»,
puis «Système» pour vérifier ce réglage.
2 Vériez le nom du compte utilisateur et son
mot de passe.
Pour accéder à l’ordinateur depuis cette unité, vous
avez besoin du nom de compte utilisateur et du mot
de passe de l’ordinateur.
3 Ouvrez «Panneau de conguration», «Réseau
et Internet» puis «Centre réseau et partage».
4 Cliquez sur « Modifier les paramètres de
partage avancés».
5 Sélectionnez «Activer le partage afin que
toute personne avec un accès réseau puisse
lire et écrire des fichiers dans les dossiers
Public» pour «Partage de dossiers publics».
6 Copiez les chiers musicaux que vous vou-
lez lire au travers de cette unité dans le
sous-dossier «Musique publique» du dossier «Public».
Windows 7
FRANÇAIS
1 Vériez le nom du domaine ou «groupe de
travail» auquel est assigné votre ordinateur.
Avant le réglage du partage de dossier, vérifiez que
l'ordinateur est assigné au même domaine ou groupe
de travail que cette unité (par défaut, cette unité est
assignée au même groupe de travail). Ouvrez
«Panneau de configuration», «Système et sécurité»,
puis «Système» pour vérifier ce réglage.
2 Vériez le nom du compte utilisateur et son
mot de passe.
Pour accéder à l’ordinateur depuis cette unité, vous
avez besoin du nom de compte utilisateur et du mot
de passe de l’ordinateur.
Suite à la prochaine page e
95
Page 96

Paramétrage du dossier partagé (suite)
3 Ouvrez « Panneau de configuration» puis
«Centre Réseau et partage».
o Si «Afficher par» est réglé sur «Catégorie» dans le
Panneau de configuration, ouvrez «Réseau et
Internet» puis «Centre Réseau et partage».
4 Cliquez sur « Modifier les paramètres de
partage avancés».
5 Sélectionnez «Activer le partage afin que
toute personne avec un accès réseau puisse
lire et écrire des fichiers dans les dossiers
Public» pour «Partage de dossiers publics».
6 Cliquez sur «Enregistrer les modications».
7 Copiez les chiers musicaux que vous vou-
lez lire au travers de cette unité dans le
sous-dossier «Musique publique» du dossier «Public».
96
Page 97

Réglages
Suivez les procédures ci-dessous pour ouvrir le menu et
changer les réglages.
1 Appuyez sur la touche MENU.
o Vous pouvez également maintenir pressée la
molette MENU/ENTER (.//) de l'unité principale pour faire cela.
2 Utilisez les touches de direction (k /j)
pour sélectionner le réglage que vous souhaitez modier.
o «MP3 setting » n'apparaît que si la source est
réglée sur CD.
o Le premier réglage affiché dépend de la source
actuelle.
Vous pouvez également tourner la molette MENU/
ENTER (.//) de l'unité principale pour faire
cela.
3 Appuyez sur la touche ENTER.
Vous pouvez également appuyer sur la molette
MENU/ENTER (.//) de l'unité principale pour
faire cela.
FRANÇAIS
Appuyez plusieurs fois sur une touche de direction
(k/j) pour passer en revue les réglages dans l'ordre
suivant.
MP3 Setting
Update
NET Setting
MFE (Music Frequency Enhancement)
ASb (Auto Standby)
o «MFE » n'apparaît que si la source est réglée sur
USB/NET.
Après avoir ouvert «MP3 setting» ou «NET Setting»,
répétez les étapes 2 et 1 pour faire une sélection
dans le sous-menu.
o Vous devez attendre au moins une minute après
avoir allumé l'unité pour sélectionner et changer
les réglages «NET Setting» et «Update».
4 Utilisez les touches de saut (.//) pour
changer les valeurs de réglage.
Suite à la prochaine page e
97
Page 98

Réglages (suite)
o Vous pouvez également tourner la molette MENU/
ENTER (.//) de l'unité principale pour faire
cela.
5 Appuyez sur la touche ENTER pour conr-
mer le changement.
MP3 Setting (paramétrage MP3)
Vous pouvez par exemple choisir comment les informations de fichier MP3/WAV seront affichées et comment les
disques MP3/WAV seront lus.
Ces réglages ne peuvent être changés que quand le disque
est arrêté.
BAD NAME (nom inaffichable)
Déterminez comment seront affichées les informations de
fichier MP3/WAV.
o Quel que soit le réglage, les caractères des balises ID3
qui ne peuvent pas être affichés sont remplacés par des
astérisques (*).
o Vous pouvez également appuyer sur la molette
MENU/ENTER (.//) de l'unité principale
pour faire cela.
6 Une fois les réglages terminés, appuyez sur la
touche RETURN pour fermer l'écran de menu.
ATTENTION
Quand vous appuyez sur la touche RETURN alors que le
sous menu «NET Setting » est affiché, « Network
Save?» (sauvegarde réseau?) s'affiche. Appuyez sur la
touche ENTER pour sauvegarder les réglages. Si vous
appuyez sur la touche RETURN, l'écran de menu se
ferme sans que les changements apportés aux réglages
ne soient sauvegardés.
Replace
Si un nom de piste ou de dossier contient un caractère qui
ne peut pas être affiché, «File_n» pour un fichier ou
«Folder_n» pour un dossier («n» représentant le numéro de
piste/dossier) s'affichera à la place.
Not (réglage par défaut)
Les caractères pouvant être affichés le sont et ceux qui ne
le peuvent pas sont remplacés par des astérisques (*).
ID3 VER.1
Déterminez comment sont affichées les informations de
balise ID3 Version 1.0/1.1.
Read (réglage par défaut)
L'unité chargera les informations de balise et les affichera.
Not Read
Les informations de balise ne seront pas affichées.
ID3 VER.2
Déterminez comment sont affichées les informations de
balise ID3 Version 2.2/2.3/2.4.
Read (réglage par défaut)
L'unité chargera les informations de balise et les affichera.
98
Not Read
Les informations de balise ne seront pas affichées.
Page 99

HIDE NUMBER
L'unité peut masquer les chiffres présents au début des
noms de piste et de dossier.
Disable (réglage par défaut)
Ces chiffres seront affichés.
Enable
Ces chiffres ne seront pas affichés.
NOTE
Quand un CD de MP3/WAV est créé sur un ordinateur,
l'ordre de lecture ordinaire des fichiers n'est pas déterminé.
En ajoutant des chiffres comme 01, 02 et 03 au début des
noms de fichiers MP3/WAV, ceux-ci peuvent par contre être
lus selon l’ordre numérique.
ASb (Auto Standby)
Quand la fonction Auto Standby est activée, l'unité passe
automatiquement en mode de veille (Standby) après 20
minutes passées dans les conditions décrites ci-dessous.
Source de
lecture
CD
NET
USB
Quand cette fonction est activée, «ASb» est affiché à
l'écran. Utilisez le réglage «Net Standby» pour déterminer
comment les commandes de réseau affectent la veille
(page 100).
Aucun disque chargé ou disque arrêté
Source d'entrée ne jouant pas
Condition
STOP KEY
Vous pouvez choisir la fonction de la touche Stop (8) de
l'unité principale.
Navigation (réglage par défaut)
Appuyer sur la touche Stop (8) active le mode Navigation.
All Folder
Appuyer sur la touche Stop (8) active le mode «all folder».
Disable
Appuyer sur la touche Stop (8) n'active ni le mode
Navigation ni le mode «all folder».
MFE (Music Frequency Enhancement)
Les fichiers MP3 et autres qui utilisent des formats de compression irréversibles ont une qualité audio réduite en
comparaison des sources sonores d'origine en raison de
leur compression.
Utilisez la MFE pour optimiser l'audio compressé.
Disable (réglage par défaut)
La MFE n'est pas utilisée.
Enable
La MFE est utilisée.
Off (réglage par défaut pour le modèle US/Canada)
La mise en veille automatique est désactivée.
On (réglage par défaut pour le modèle Europe)
La mise en veille automatique est activée.
NET Setting (paramétrage réseau)
Pour utiliser les services de réseau, faites préalablement les
réglages de réseau sur cette unité.
Faites les réglages en fonction des caractéristiques du
réseau auquel elle est connectée.
o Une connexion internet est nécessaire pour écouter la
radio internet.
o Le paramètre «Net Standby» n'est pas nécessaire pour
connecter cette unité à un réseau.
ATTENTION
o Si DHCP est réglé sur Enable (par défaut), les paramètres
«IP Address», «Subnet Mask», «Gateway» et «DNS
Server» apparaîtront mais ne pourront pas être changés.
Si DHCP est réglé sur Disable, les paramètres «IP
Address», «Subnet Mask», «Gateway» et «DNS Server»
apparaîtront et devront être réglés.
o Quand vous appuyez sur la touche RETURN alors que le
sous-menu «NET Setting» est affiché, «Network Save?»
(sauvegarde réseau?) s'affiche. Après avoir modifié un
réglage, appuyez sur la touche ENTER pour le sauvegarder. Si vous appuyez sur la touche RETURN, l'écran de
menu se ferme sans que les changements apportés aux
réglages ne soient sauvegardés.
FRANÇAIS
Suite à la prochaine page e
99
Page 100

Réglages (suite)
Les sous-menus apparaissent dans l'ordre suivant.
IP Address
Affichez/réglez l'adresse IP.
MAC Address
Affichez l'adresse MAC de cette unité.
DHCP
Enable (réglage par défaut)
Le protocole DHCP est activé.
Disable
Le protocole DHCP est désactivé.
Subnet Mask
Affichez/réglez le masque de sous-réseau.
Gateway
Affichez/réglez la passerelle par défaut.
DNS Server
Affichez/réglez l'adresse du serveur DNS.
Proxy URL
Réglez l'adresse du serveur proxy.
Proxy Port
Réglez le numéro de port de proxy.
o Ce paramètre n'apparaît que si une URL de proxy a été
définie.
Update (mise à jour)
Vous pouvez mettre à jour le micrologiciel interne (firmware)
de cette unité. Ne faites pas passer l'unité en veille durant
une mise à jour.
o Voir « Mise à jour du firmware» en page 101 pour les
procédures de mise à jour.
Version
Affiche la version actuelle du firmware.
Cette unité a deux types de firmware: principal (Main) et
DSP.
Leurs versions sont affichées au format suivant.
abcd-ef00-000
Main: a.bc
DSP: d.ef
Exemple
Si «1001-0100-000» s’affiche, les versions de firmware sont
les suivantes.
Main: 1.00
DSP: 1.01
CDP via USB?
Vous pouvez mettre à jour le firmware au moyen d'une clé
USB.
Net Standby
Détermine si l'unité peut ou non être contrôlée par un
réseau quand elle est en veille.
Disable (réglage par défaut)
Quand cette unité est en veille, elle ne peut pas être
contrôlée par un réseau.
Enable
Quand cette unité est en veille, elle peut être contrôlée
par un réseau.
o En cas de réglage «Enable», l'unité consomme plus
de courant quand elle est en veille.
100
 Loading...