

Page 1

INSTRUCTION HANDBOOK
LP 210
Laser Printer 200 Series
Page 2

Page 3

Table of Contents
1 Introduction
1.1 Welcome ........................................................................................1-1
1.2 Roadmap of this manual ..............................................................1-3
Where to find what in this User’s Manual........................................1-3
Brief explanatio n of special type styles and method of
presentation....................................................................................1-4
1.3 Working safely with your laser print er..... ............ ........... ............1-5
Notes on your safety and operating safety...................................... 1-5
Laser safety.....................................................................................1-7
Intern a l la se r rad i at io n.. ......... .......... .......... .......... ......... .......... .........1 -7
Safety label.....................................................................................1-8
Laser caution label..........................................................................1-8
Ozone emission................................................ ..............................1-8
2 Unpacking, installing and setting up the printer
2.1 Unpacking your laser printer.......................................................2-1
2.2 Overview of the printer.................................................................2-3
External features.............................................................................2-3
Inside th e pri n te r .......... ......... .......... .......... .......... ................. ......... ..2 -4
Optional accessories.......................................................................2-5
Printer control panel........................................................................2-6
2.3 Installing your laser printer..........................................................2-7
Place of installation.........................................................................2-7
Stora g e of co n s umables an d acc e ss o ries ..... .. .......... .......... ........... 2 -7
Ambient conditions..........................................................................2-8
Space required................................................................................2-9
2.4 S e tting up yo ur la se r pr in te r........ ................. .......... .......... .........2-11
Setting up paper feed tray 1..........................................................2-11
Connecting the power cable............................... ........................ .. .2-12
Switching the printer on and off.....................................................2-13
Printing out the configuration page...............................................2-14
Connecting the printer to a computer.............. .. ............ ................2-15
Laser Printer 200 Series TOC-1
Page 4

3 Installi ng the pri nt er dr iver
3.1 Sy s te m re q u ir ements ..... ... .......... ......... .......... ................. .......... ... 3-1
3.2 No t es o n ins ta l ling the pr in t er dr iv e r..... .. ... ......... ................. ...... 3-1
General information on the printer driver ........................................ 3-2
Information on installation using "Add Printer" ............................... 3-2
3.3 Installation for Windows 95/98 and NT 4.0 ................................3-3
CD-RO M in st a lla t io n................... .......... .......... ......... .......... .......... ... 3-3
Plug-&-Play installation (Windows 95/98 only)............................... 3-4
3.4 Installation for Windows 3.1x .................... .. .. ............................. 3-5
3.5 Uninstalling the Windows printer driver .............. ......................3-6
3.6 Installation for MS-DOS ............................................................... 3-7
4 Working with the Windows printer drivers
4.1 Displaying printer driver settings ............................................... 4-1
Displaying setti ngs in Windows 95/98............................ ............ .. ..4-1
Displaying settings in Windows NT 4.0 .......................... .. ..............4-2
Displaying the settings in Windows 3.1x ........................................ 4-3
4.2 Pa p e r in de x ca rd.... .. .. .......... .......... ................. .......... ......... .......... . 4-4
Selecting a paper format ................................................................4-5
Creating a custom paper for ma t......... ............................................4-6
Adjusting the print -out to fit the paper....... .. ............ ............ .. ..........4-7
Specifying the orientation of the print paper.................. ............ .....4-7
Specifying the paper source...........................................................4-8
Defining the type of paper/media....................................................4-8
Scaling the printed document......................................................... 4-8
Specifying the number of copies .................................................... 4-9
Switching on/off t he pri nter’s sorting function ................................. 4-9
4.3 Page layout index card .............................................................. 4-10
Printing multiple document pages per print page (N-up)..............4-11
Printi ng w a te rma rks.................. ......... .......... .......... .......... ............. 4-12
Custo m w a te rm a r ks. .. .. .......... .......... ................. .......... ......... ......... 4-1 3
Adjusting the printable area (XY image shift) ...............................4-14
4.4 Qu a l ity in d e x c a rd ..... ... .......... ................. ......... .......... .......... ...... 4-15
Switching Toner Save function on and off....................................4-16
Optimizing the pr int quality of text and graphics................... ........4-16
Specifying the toner density ........... .. ............ ............ ............ ........4-16
Optimizing data exchange with the printer (All raster).................. 4-16
Specifying the resolution ............................................................. 4-17
Activating the use of printer-resident TrueType fonts................... 4-17
TOC-2 Laser Printer 200 Series
Page 5

4.5 Device option index card............................................................4-18
Activating the optional paper feed tray 2....... ............ .. ............ ......4-19
Specifying the total memory capacity............................................4-19
5 Working with the Windows printer tools
5.1 C a lling up the St a tu s Mon itor......... ......... .......... .......... ......... .......5-2
Calling up the Status Moni tor in Windows 95/98, Windows NT 4.05-2
Calling up the Status Monitor in Windows 3.1x...............................5-3
Altering the size of the Sta tus Monitor window...... .. ........... ............5-4
5.2 C a lling up the Co n t ro l P a n el........ .......... .......... ......... ................. ..5-5
5.3 P a p e r in d e x card ............. ......... .......... .......... ................. ......... .......5-6
Defining the response in the case of a lack of suitable paper.... .....5-7
Specifying a paper format for paper feed tray 1..............................5-7
5.4 P r in ter settin g in d e x car d. .. .......... .......... .......... ................. ......... ..5-8
Switching on/off the Power Save mode ..........................................5-9
Switching on/off th e automatic continuation function......................5-9
Specifying fast or nor m al printing modes................. ...................... .5-9
Specifying the input/output timeout............ .. ............ .....................5-10
Switching on/off th e paper format error detection......... ............ ....5-10
Activating page protection........................ .. ............ ............ ...........5-10
5.5 T e s t p ri nt in d ex card.. .. .......... .......... ......... ................. .......... .......5-11
The various test prints...................................................................5-11
Printing out a test print ..................................................................5-11
5.6 Counter index card..... ............ .. ....................... ............ .. .............5-12
Checking the status of a counter...... ............ .................................5-13
Resetting a counter.......................................................................5-13
5.7 Configuration index card............................................................5-14
6 Working with the DOS printer tools
6.1 Using the Status Monitor..............................................................6-1
Calling up the Status Monitor..........................................................6-1
Switching on/off popup messages (Setup menu). ............ .. .............6-2
Changing the hotkey command for the Status Monitor
(Setup menu).............. ............ .. ............ ............ ............ ..................6-2
Defining popup messages (Setup menu)........................................6-2
6.2 Using the DOS Control Panel.......................................................6-3
Calling up the Control Panel ...........................................................6-3
Creating and saving pri nter profiles.... .. ............ ..............................6-4
Loading printer prof iles......... ............ ............ ...................................6-5
Printing a test or demo page........................ ...................................6-6
Changing the printer por t......................... .. ............ .. .......................6-6
Laser Printer 200 Series TOC-3
Page 6

6.3 Se t up p ane l ................ .......... .......... .......... ......... ................. .......... . 6-7
Selecting a paper format ................................................................6-8
Specifying the paper source...........................................................6-9
Specifying fast or nor m al printing modes ...................... ............ .....6-9
Specifying the number of lines printed per page ............................ 6-9
Specifying the number of copies .................................................... 6-9
Specifying the orientation of the printing paper........ ............ ........6-10
Defining the response to format errors ......................................... 6-10
Specifying a paper format for paper feed tray 1...........................6-11
6.4 Font panel................................................................................... 6-12
6.5 Output Quality panel .................................................................. 6-13
Switching Toner Save function on and off....................................6-14
Specifying the resolution ............................................................. 6-14
Optimizing the pr int quality of text and graphics................... ........6-14
Specifying the toner density ........... .. ............ ............ ............ ........6-15
6.6 Counter panel ......... .. .. ........... .....................................................6-16
Checking the status of a counter.............. .. ............ ......................6-17
Rese tt in g a coun t e r ..... ... .......... ......... .......... .......... ................. ...... 6-17
6.7 Configuration panel.................................................................... 6-18
6.8 Ot h e r pan e l..... .......... .......... ................. .......... ......... .......... .......... . 6-19
Switching on/off the Power Save mode........................................ 6-20
Switching on/off t he paper format error detection..... ............ ........6-20
Activating page protection.... .. ............ .................................. ........6-20
Switching on/off t he automatic continuation function.......... ..........6-21
Specifying the input/output timeout........................................... ...6-21
7 Working with the printer
7.1 Please note the follo wing points: ................. .. ........... .. ..............7-1
What should I watch out for when loa ding paper?..........................7-1
What should I watch out for when loading envelopes? .................. 7-1
Which sizes of paper can I use?... .. ...................... ............ ..............7-2
What types of paper can I use?......................................................7-3
Printable area ................................................................................. 7-3
7.2 Us i ng th e con tr o l b ut to n.......... .......... .......... ................. ......... ...... 7-4
Resetting the counter for the toner cartridge ..................................7-5
Resetting the counter for the image transfer roller.........................7-6
Cance llin g a p rin t job ...... .......... ......... .......... .......... ................. ........ 7 -6
Printing out the configuration page.................................................7-7
Continuing a print job after an error message ................................ 7-7
TOC-4 Laser Printer 200 Series
Page 7

7.3 Loading paper ...............................................................................7-8
Loading paper into pap er fe ed tray 1...... .................................. ......7-8
Loading paper into the manual feed unit ........... ............ .. ............ .. .7-9
Loading paper into pap er fe ed tray 2...... .................................. ....7-10
7.4 Determining the direction of the print-out................................7-12
7.5 Monitoring print jobs with the Status Monitor .........................7-14
7.6 Cancelling a print job..................................................................7-15
8 Installing optional accessories
8.1 Installing paper feed tray 2...........................................................8-1
8.2 Installing the face-up outp ut tr ay................ .. ..............................8-3
8.3 Installing the DIMM memory module... ........... .. .. .. ........... .. .. ........8-4
9 Caring for and maintaining your printer
9.1 C leanin g the pr in t e r ..... ... .. ................. .......... ......... .......... .......... ....9-2
Clean in g th e case .................... .......... ......... ................. .......... .........9 -2
Cleaning the paper feed roller.........................................................9-2
9.2 Replacing the toner cartridge......................................................9-5
9.3 Replacing the image transfer roller.............................................9-8
10 Troubleshooting
10.1 Clear in g pap e r mi sf e e ds ............ .. .......... ................. .......... .........1 0 -2
Clearing a paper misfeed at the image transfer roller........... .. ......10-2
Clearing a paper misfeed at the fusing unit.............. ........... ..........10-4
Clearing a paper misfeed at the output tray.................. ............ ....10-6
Clearing a paper misfeed at paper feed tray 1...................... .. ......10-7
Clearing a paper misfeed at the manual feed unit.... ............ .. ......10-8
Clearing a paper misfeed at paper feed tray 2 (optional).... ..........10-9
10.2 Problems with print quality......................................................10-10
10.3 General print problems.............................................................10-14
10.4 Printer messages ......................................................................10-15
Indicator lamp functions..............................................................10-15
Status messages.........................................................................10-16
User messages ...........................................................................10-17
Service messages.......................................................................10-18
Laser Printer 200 Series TOC-5
Page 8

11 Appendix
11.1 Features....................................................................................... 11-1
Hardware...................................................................................... 11-1
Software ....................................................................................... 11-1
Operating System......................................................................... 11-1
11.2 Technical specification.............................................................. 11-2
Laser Printer 200 Serie s............... .. .......................... ....................11-2
Second Paper Cassette tray (option) ...........................................11-3
Expansion Memory (SDRAM-DIMM) (option) .............................. 11-3
Interface conne ctor and Cable ............................ .........................11-4
11.3 CE symbol (Declaration of Conformity) ................................... 11-5
11.4 Index ............................................................................................ 11-7
TOC-6 Laser Printer 200 Series
Page 9

Introduction
1 Introduction
1.1 Welcome
Thank you for your decision to purchase a Laser Printer 200 Series.
To achieve the best possi ble results and to use your laser printer
effectively, this User’s Manual provides you with information on the
follow ing topics:
G installing the printer driver,
G working with the printer drivers and tools,
G working with the printer,
G caring for and maintaining your printer,
G troubleshooting.
Read this User’s Manual careful ly before o perating your prin ter for the first
time, and always keep the manual within reach.
Trademarks
PCL is a registered tradema rk of the Hewl ett -Packard Company.
Centronics is a registered trademark of Centr onics,Inc.
MS-DOS, Microsoft, Windows and Windows NT are registered
trademarks of Micr osoft Corporation.
IBM is a registered trademark of the Internati onal Business Machines
Corporation.
All other names of products and brand-names are tradem arks or
registered trademarks of their respective proprietors.
1
Laser Printer 200 Seri es 1-1
Page 10
1
1.2 Roadmap of this manual
Where to find what in this User’s M anual
You don’t know exactly where to find the information you need? The
following table is designed to help you.
Alternatively, to find information on a specific problem quickl y and
precisely, please refer to the index at the end of the User ’s Manual.
No. Title of chapter Content of chapter
Table of contents A complete list of all the chapters and sub-chapters in
1 Introduction Introductory remarks and information on how to use
2 Unpacking, installing and
setting up the printer
3 Installing the printer driver A step-by-step explanation of the routine for installing
4 Working with the Windows
printer drivers
5 Working with the Windows
printer tools
6 Working with the DOS printer
tools
7 Working with the printer Getting to know how your printer works. For example,
8 Installing optional
accessories
9 Caring for and maintaining
your printer
10 Troubleshooting Help with analysing and rectifying faults.
11 Appendix A collection of helpful additional information, e.g.:
this User’s Manual.
this manual as well as notes on the safe use of the
printer.
Information on how to set up the printer as well as an
introduction to the various features.
the printer driver.
Details of how to control the printer via the printer
driver. This helps you learn how to use the printer’s
functions effectively.
Details of how you can use the supplementary
Windows programs most effectively.
Details of how you can use the supplementary DOS
programs most effectively.
information on:
• loading paper
• monitoring print jobs
• cancelling print jobs
Details of how to install optional accessories
correctly, e.g.:
• 500-sheet paper feed tray
Details of how to look after your printer and how you
can easily replace cerain parts yourself.
• technical specification
• index of keywords
Introduction
1-2 Laser Printer 200 Series
Page 11
Introduction
Brief explanation of special type styles and method of presentation
Special type styles and methods of presentation are used in this User’s
Manual to highlight var ious circumstances. The following examples will
help you to recognize and deal with the most important of these.
CAUTION
This is a warning!
A warning alerts you to danger to life and limb or to damage that could
result to the machine by tr eating it improperly .
➜ The arrow refers yo u to saf ety measures that must be taken to pr event
[MENU] key on the control panel / butt on on the printer driver with
➜ Single action to be performed (there are no other steps)
1
2
the hazard.
the description “Menu“
Step 1 of a series of actions
Step 2 of a series of actions, etc.
Help is available here .
?
➜ The approach that is suggested
here is sure to get you to your
desired result.
1
Here you can see what has to be done.
✎
This is a hel p fu l tip
Text passages th at are iden tified in this manner provide you with trick s
and handy tips to make it even easier to work with the printer.
Laser Printer 200 Seri es 1-3
Page 12

1
1.3 Working safely with your laser printer
Notes on your safety and operating saf ety
Working improperly wit h the printer can result in heal th hazards, electric
shocks and even fires. Before you unpack the laser printer, you should
make yourself fami li ar with this information on your safety and operating
safety.
CAUTION
Observe the following information:
➜ Make sure that the power cable is correctly plugged into the socket
and that the socket is at al l ti m es visible and readily accessible.
➜ Do not pull on t he ca ble t o pull the po wer p lug out of the s ocke t as t his
may damage the cable. The result could be an electric shock or a fi re.
➜ Remove the power plug fr om the socket if the machine will not be i n
use for an extended period of time.
➜ Do not remove the power cab le from the socket wit h wet hands as this
may result in an electric shock.
➜ Do not mov e the unit unl ess the power ca ble has been rem oved from
the socket. Ot herwise you may d amage the cabl e. The r esult co uld be
a short-circuit or a fi re.
➜ Do not place any hea vy objects on t he power cable. Do not pull or kink
the cable as this can result in damage to the cable. The result could
be an electric shock or a fi re.
➜ Make sure that the machine is not standing on a cable to another
machine as this can result in damage to that cable. The result could
be a fire or improper functioning of the unit in quest ion.
➜ Make sure that the power supply to the unit has the correct voltage.
Otherwise the result could be a fire or an electric shock.
➜ Switch off the unit immediately and unplug th e power cable if the
power supply cable is damaged. Failure to do so could result in a f ire
or an electric shock . Inform your customer suppo rt techni cal special ist.
➜ Use only ext ens ion cab les t hat are des igned f or at le ast t he maxim um
power rating of the machine. Extension cables with lower ratings can
result in the unit ove rheating and can even cause a fire.
Introduction
1-4 Laser Printer 200 Series
Page 13

Introduction
➜ Perform only t he procedures that are described in this manual. Usi ng
➜ Do not place any heavy objects on the machine.
➜ Do not open any covers on the machine while printing is in progress.
➜ Do not switch off the unit while printing is in progress.
➜ Do not place any magnetic objects near the machine.
➜ Do not use any flammable sp rays, liqui ds or gases in the vicinity of the
➜ Do not remove any safet y devices and do not alter the const ruct ion of
➜ Do not insert any paper cl ips, staple s or other smal l meta l objec ts into
➜ Do not place coffee cups, drin ks bottles or other conta iners with liquids
➜ If the machine becomes unusually hot, or if you notic e smoke or an
1
the machine improperly can result in a fire or an electric shock.
machine.
the machine. The unit is equipped with high-voltage components.
Using the machine improperly can result in a fire or an electric shock.
openings on the machine. The result could be an electric shock or a
fire. If metal pieces are fed i nto th e machi ne, swi tch it of f imm ediate ly,
disconnect the power cable and inform your customer support
technic a l sp e c ialis t.
in them on the machine. If li quid enters the machine the result could
be an electric sho ck or a f ire. If l iquid does g et into the ma chine, swit ch
it off immediately , di sconnect the power cable and i nform your
customer support t echnical specialist.
unusual odour coming fr om the machine, swi tch it off immedia tely and
remove the power cable from the socket. Inform your custo me r
support technical specialist.
Laser Printer 200 Seri es 1-5
Page 14
1
Introduction
Laser safety
This printer is equipped with a laser. If the printe r is used in accordance
with the instructions in this User’s Manual, the laser presents no danger.
The radiation emitt ed is complet ely absorbed and attenuated by the case.
The laser radiation cannot escape at any time during the printing
procedure.
This laser printer is categorized as a Class 1 print er. This classifica tion
means that the printer does not produce any hazardous laser radiation.
Internal laser radiation
Average radiation output:
0.6mW at the laser apert ure of the print head unit.
Wavelength: 770-810 nm
This device works with a laser diode of class 3b with invisib le l aser
radiation. The las er diode and the polygon mirror fo r sampling are
integrated in the pr int head unit.
The print head unit is NOT AN ITEM TO BE MAINTAI NED ON SITE. You
should therefore not open it under any circumstances.
CAUTION
Dangerous laser radiation!
Using the printer in a manne r other than as indicated in this manual may
result in exposure to dangerous radiation.
➜ Use the printe r only according to the instr uctions contained in this
User’s Manual.
This is a semiconduc tor laser pri nter. T he maxi mum radiati on outpu t of t he
laser diode is 5 mW. The wavelength is 770-810 nm.
1-6 Laser Printer 200 Series
Page 15
Introduction
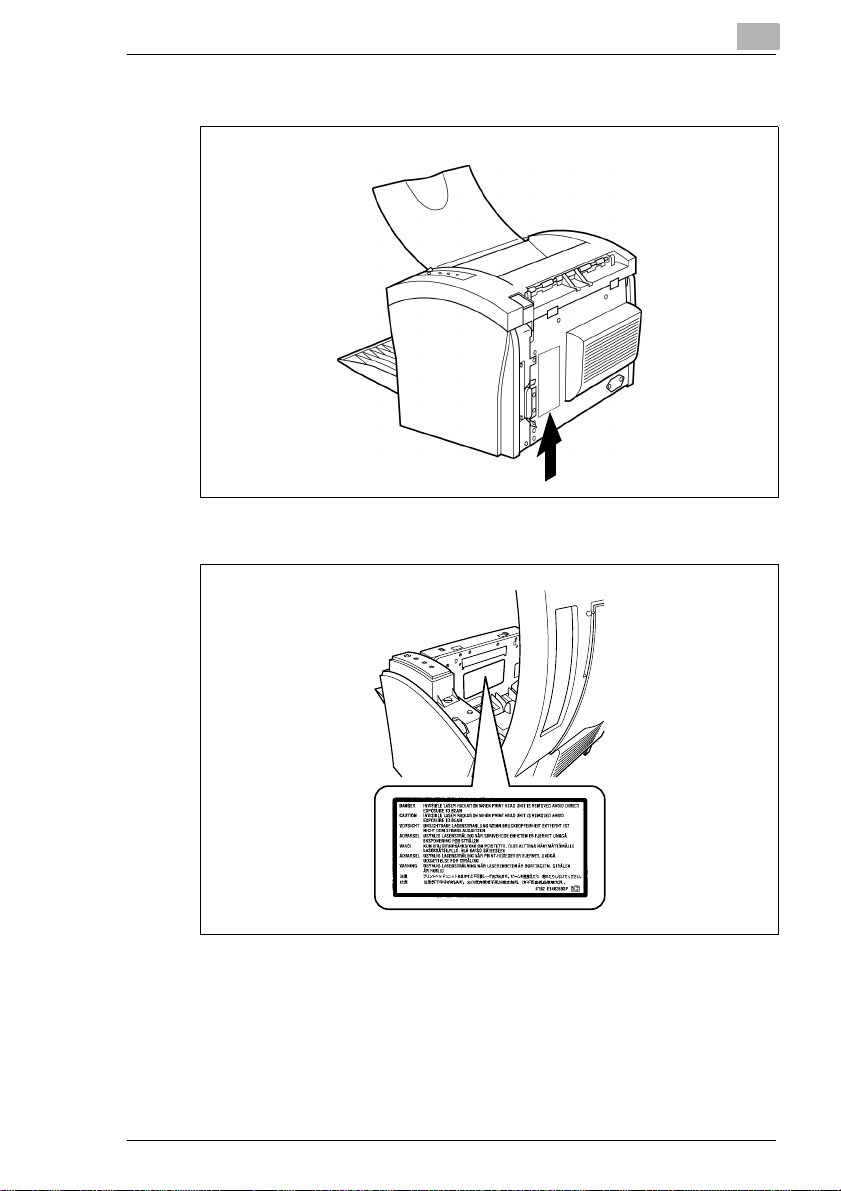
Safety label
Laser caution label
1
Ozone emission
Small quantities of ozone escape during the printing process. These
quantities do not repr esent a health hazard. In spite of this, you should
take care that the area in which the machine is located has adequate
ventilation, especially if you are printing large quantities of materials or if
the machine is being use d conti nuously over a long period of time.
Laser Printer 200 Seri es 1-7
Page 16

1
Introduction
1-8 Laser Printer 200 Series
Page 17
Unpacking, in stalling and setting up t he pri nter
2 Unpacking, installing and setting up
the printer
2.1 Unpacking your laser printer
CAUTION
Plastic packaging mate rials are dangerous for children!
➜ After unpacking, keep the pa ckaging mater ials out of r each of chi ldren.
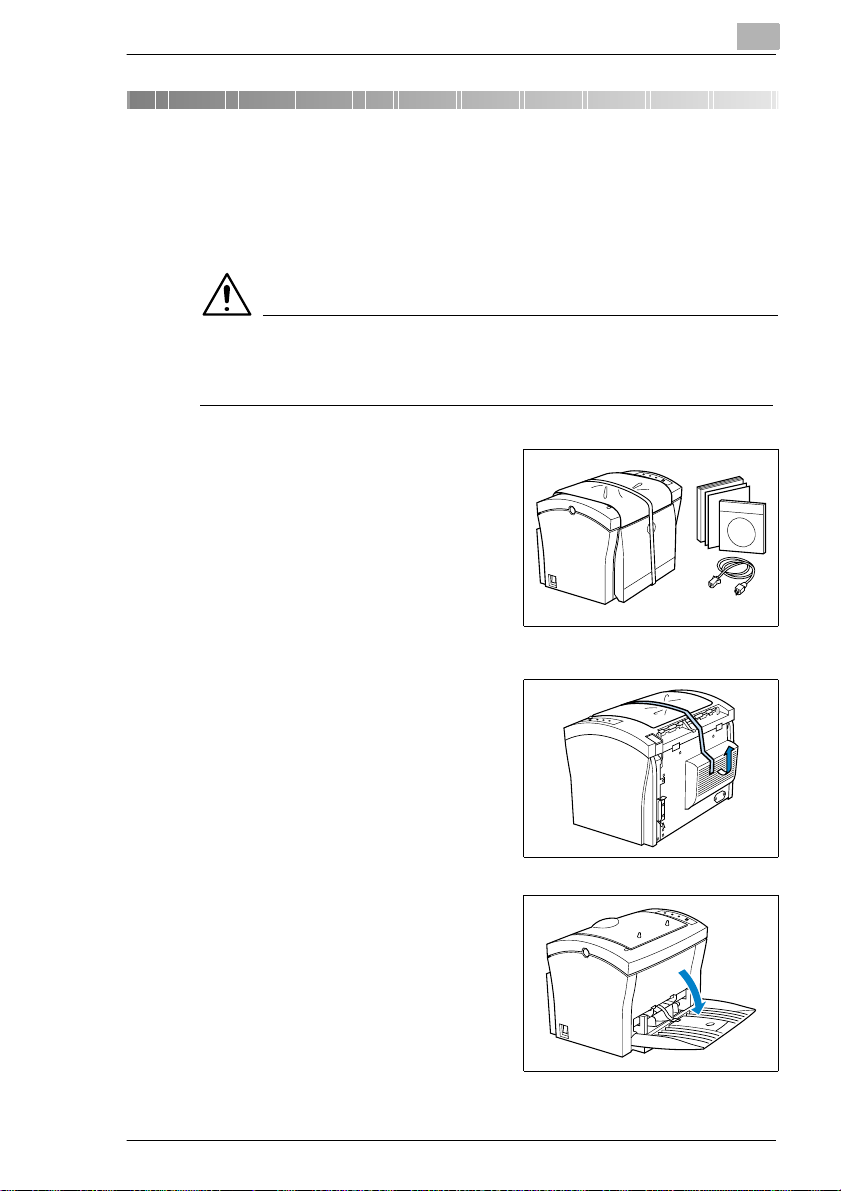
Remove the printer and accessories
1
from the box.
❍ Printer
❍ Inst a llation Guide
❍ CD-ROM
❍ Power cable
2
Remove the packagi ng m a t e r i al
2
from the printer.
Remove the transport strap fr om the
3
printer.
Fold down paper feed tray 1.
4
Laser Printer 200 Seri es 2-1
Page 18
2
Unpacking, installing and setting up the printer
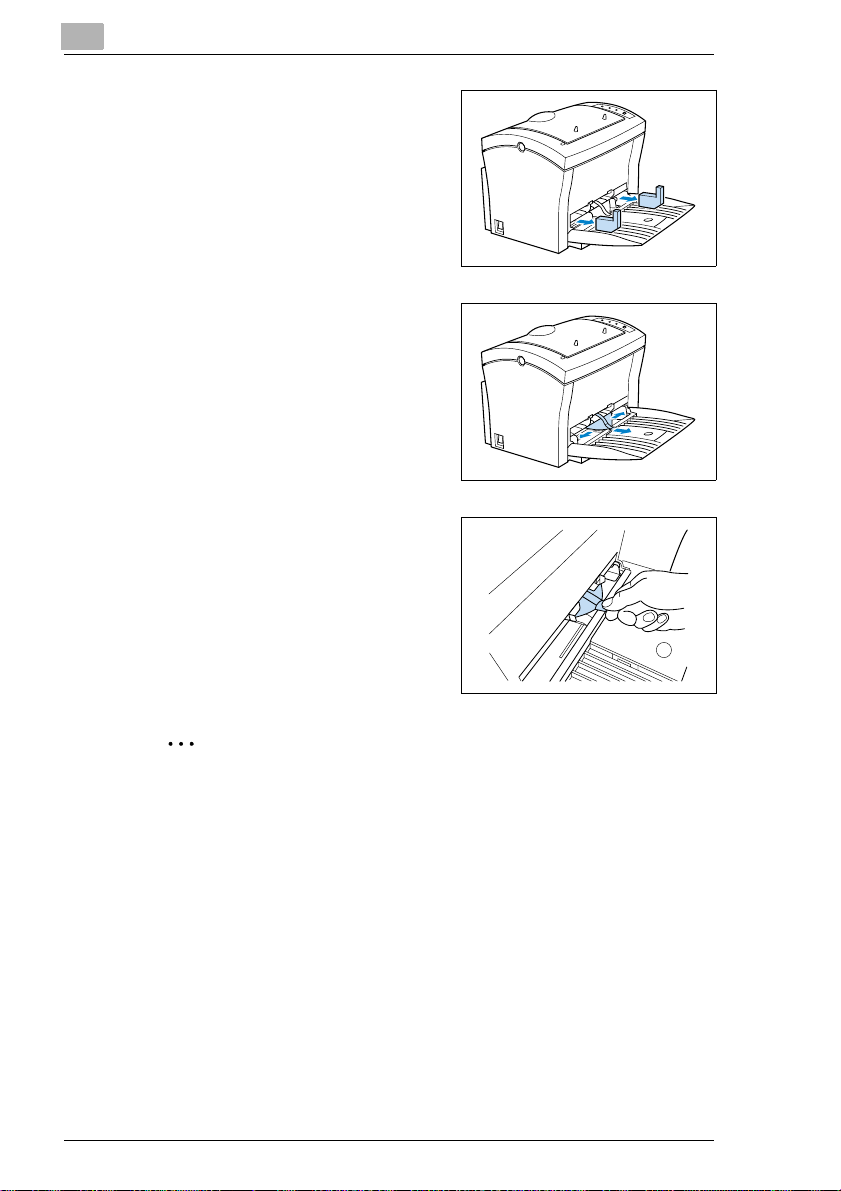
Remove the two transport pads
5
from the paper feed tray.
Slide the two paper guides
6
outwards.
Pull on the plastic tab to remove the
7
transport strip from the paper feed
tray.
✎
Why keep packaging materials?
If you need to transpo rt t he pr inter, you c an reuse the packagi ng. Thi s
will ensure that your printer is safely and correctly packed.
2-2 Laser Printer 200 Series
Page 19
Unpacking, in stalling and setting up t he pri nter
2.2 Overview of the print er
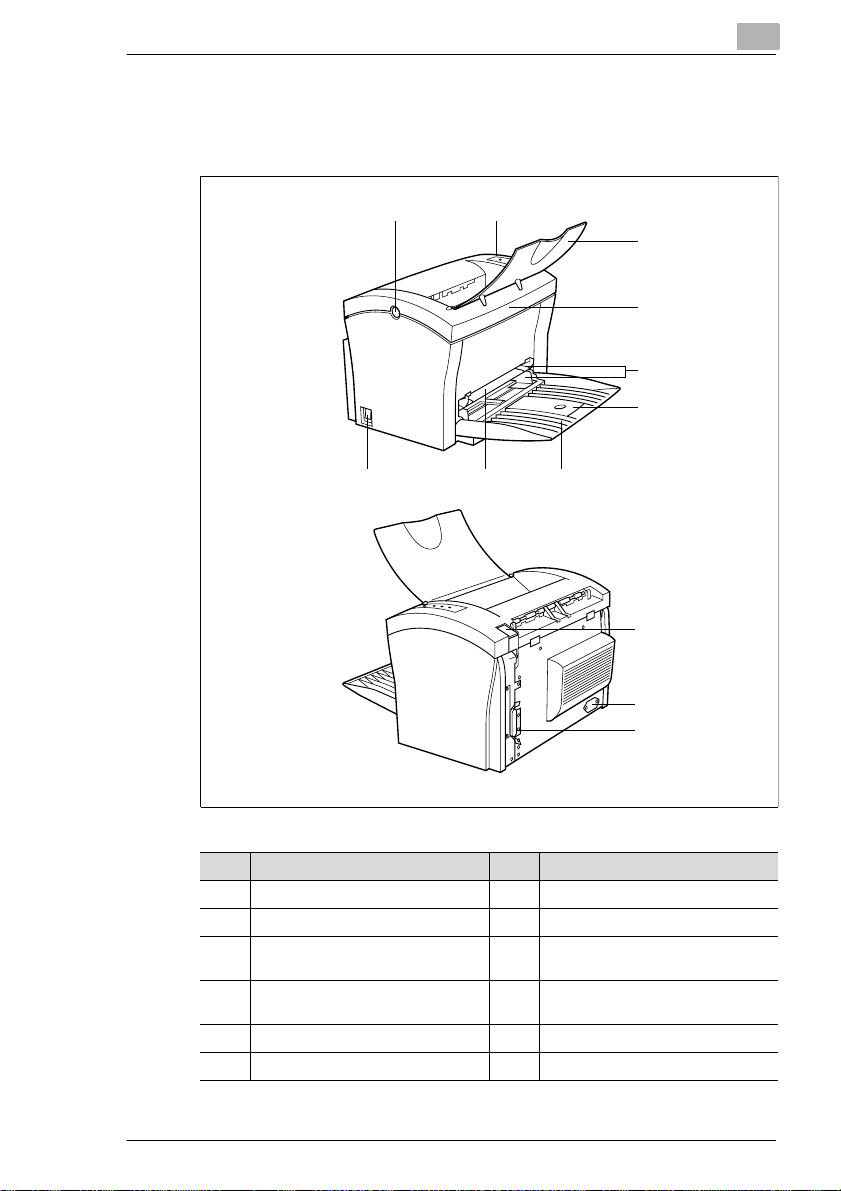
External features
12
2
3
4
5
6
789
10
11
12
No. Description No. Description
1 Release button for top cover 7 Paper feed tray 1 (multipurpose tray)
2 C ontrol panel 8 Manual paper feed unit
3 Paper output tray
(printed side down)
4 Top Cover 10 Paper output selector switch
5 Paper guides 11 Socket for power cable
6 Extending paper support 12 Parallel port
9Power Switch (ON/OFF)
(printed side up/down)
Laser Printer 200 Seri es 2-3
Page 20

2
Unpacking, installing and setting up the printer
Inside the printer
1
32
No. Description No. Description
1 Fusing unit 3 Toner cartridge
2 Image transfer roller
2-4 Laser Printer 200 Series
Page 21
Unpacking, in stalling and setting up t he pri nter
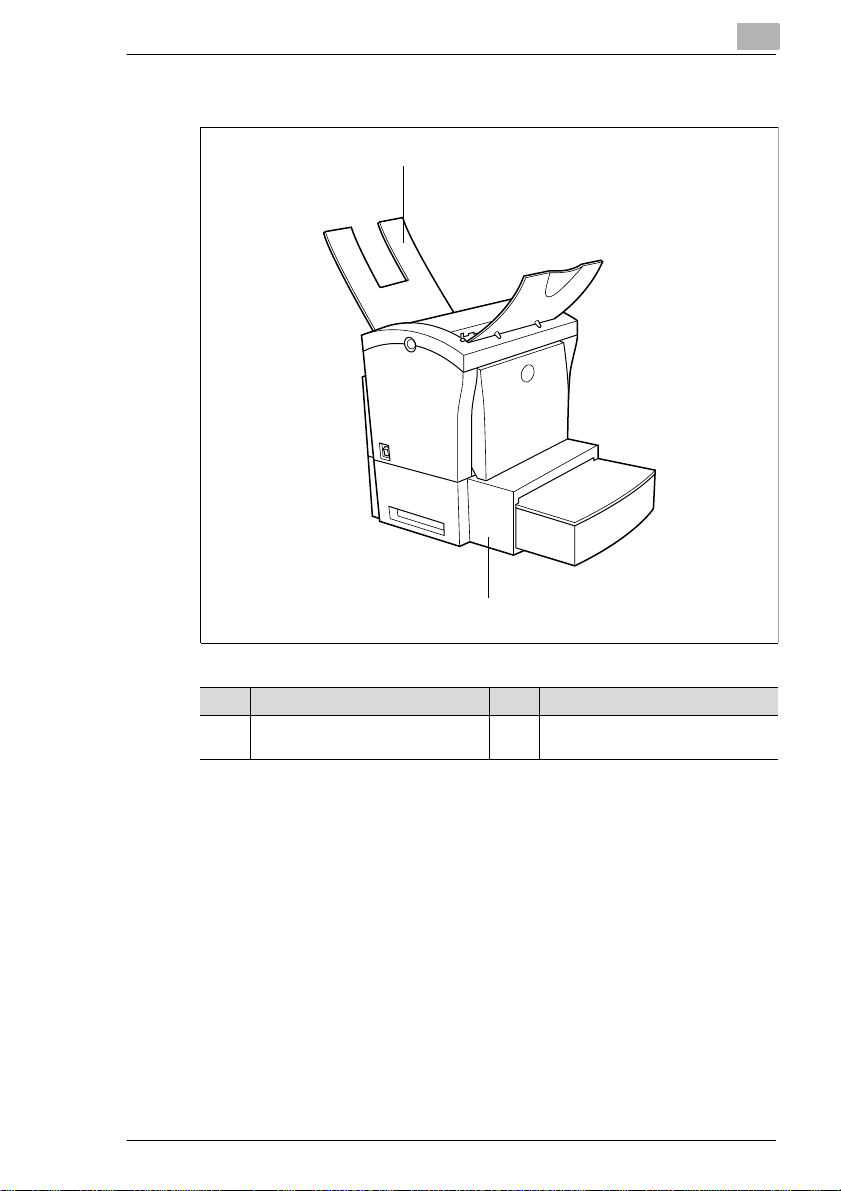
Optional accessories
1
2
2
No. Description No. Description
1 Paper output tray
(printed side up)
2 Paper feed tray
(500-sheet capacity)
Laser Printer 200 Seri es 2-5
Page 22
2
Unpacking, installing and setting up the printer
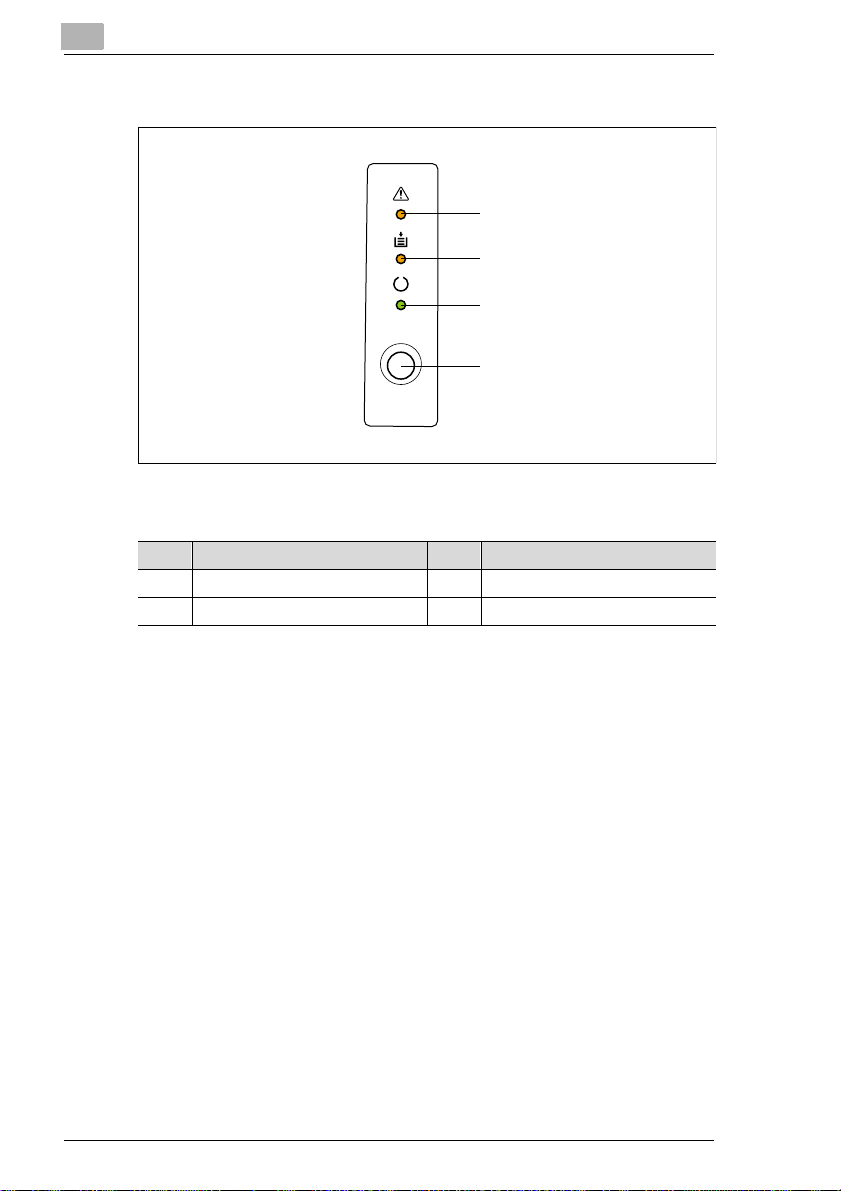
Printer control panel
1
2
3
4
The control panel has three indicator lamps and one control button.
No. Description No. Description
1 Fault lamp (amber) 3 Stand-by lamp (green)
2 Paper lamp (amber) 4 Control button
For further infor m ati on on the control panel, see page 10-15.
2-6 Laser Printer 200 Series
Page 23

Unpacking, in stalling and setting up t he pri nter
2.3 Installing your laser printer
Place of installation
The printer should be set up in a place which is:
G dry and free from dust,
G on a stable surface,
G well ventila ted,
G well clear of hig hly flammable items, e.g. curtains,
G clear of objects which might obstruct the printer’s ventilat ion slits,
G near to an easily accessible power socket.
The printer must be positioned such that it cannot be adversely affected
by the following:
G splashing l iquids,
G organic gases, e.g. ammonia,
G direct sunlight,
G severe temperature fluctuati ons,
G exhaust-ai r from heating, ventil ation or air-conditioning systems.
Storage of consumables and accessories
Printing consumables and accessories should be kept:
G sealed in their original packagings,
G protected against direct sunlight or heat,
G protected against fluorescent light,
G in a cool, dry and dust- free place,
G out of reach of children.
2
CAUTION
Toner poses a health hazard!
Toner is harmful if swallowed.
➜ If you swallow toner, con sult a doctor immediately.
➜ If you get ton er on your han ds, wash them i mmediately with cold water
and soap.
Laser Printer 200 Seri es 2-7
Page 24

2
Unpacking, installing and setting up the printer
Ambient conditions
The optimum ambient conditions for your printer are as follows:
G Temperature range 10°C to 35°C
(fluctuations max. 10°C per hour) ;
G Humidity ra ng e 15% to 85 %
(fluctuations max. 20% per hour).
2-8 Laser Printer 200 Series
Page 25
Unpacking, in stalling and setting up t he pri nter
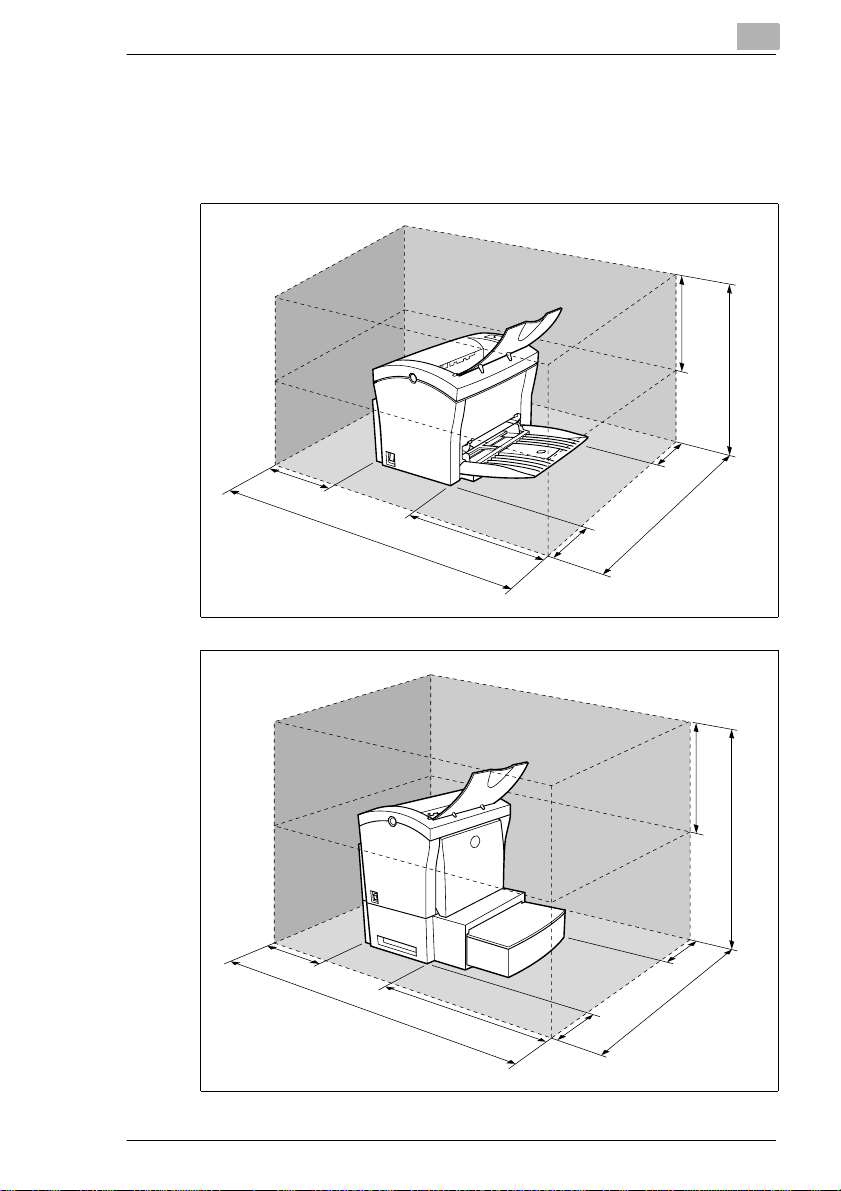
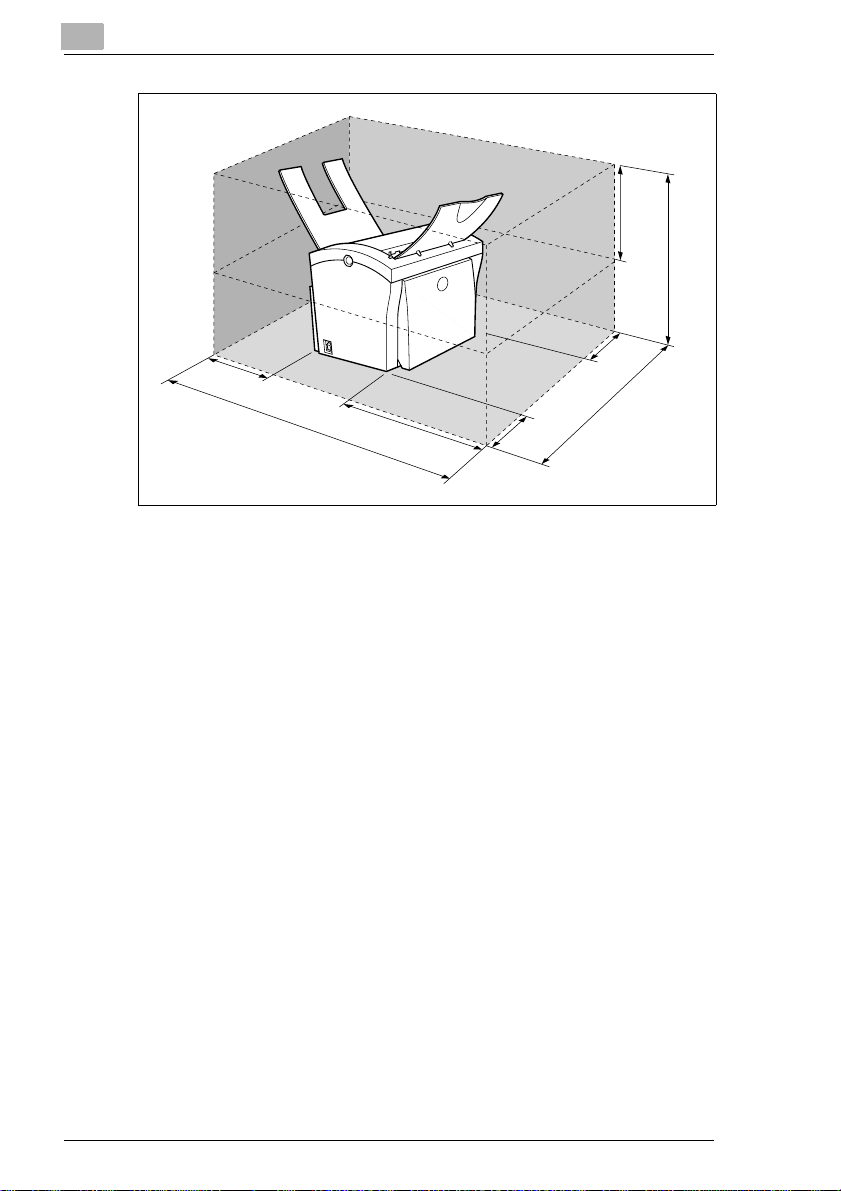
Space required
Make certain t hat th ere is enou gh space a vai labl e around the print er (s ee
illustration). This will facilitate operation, reloading paper and toner, and
maintenance of the pr int er.
1
5
0
m
m
6
7
2
m
m
3
0
0
m
2
250mm
507mm
m
m
0
0
1
m
m
m
m
0
m
0
2
0
8
6
250mm
626mm
1
5
0
m
m
9
7
2
m
m
6
0
0
m
m
m
m
0
0
2
m
m
0
0
1
m
m
0
8
6
Laser Printer 200 Seri es 2-9
Page 26
2
Unpacking, installing and setting up the printer
300mm
557mm
m
m
0
2
5
0
m
m
7
7
2
m
m
3
0
0
m
m
m
m
0
0
2
0
1
m
m
0
8
6
2-10 Laser Printer 200 Seri es
Page 27
Unpacking, in stalling and setting up t he pri nter
2.4 Setting up your laser printer
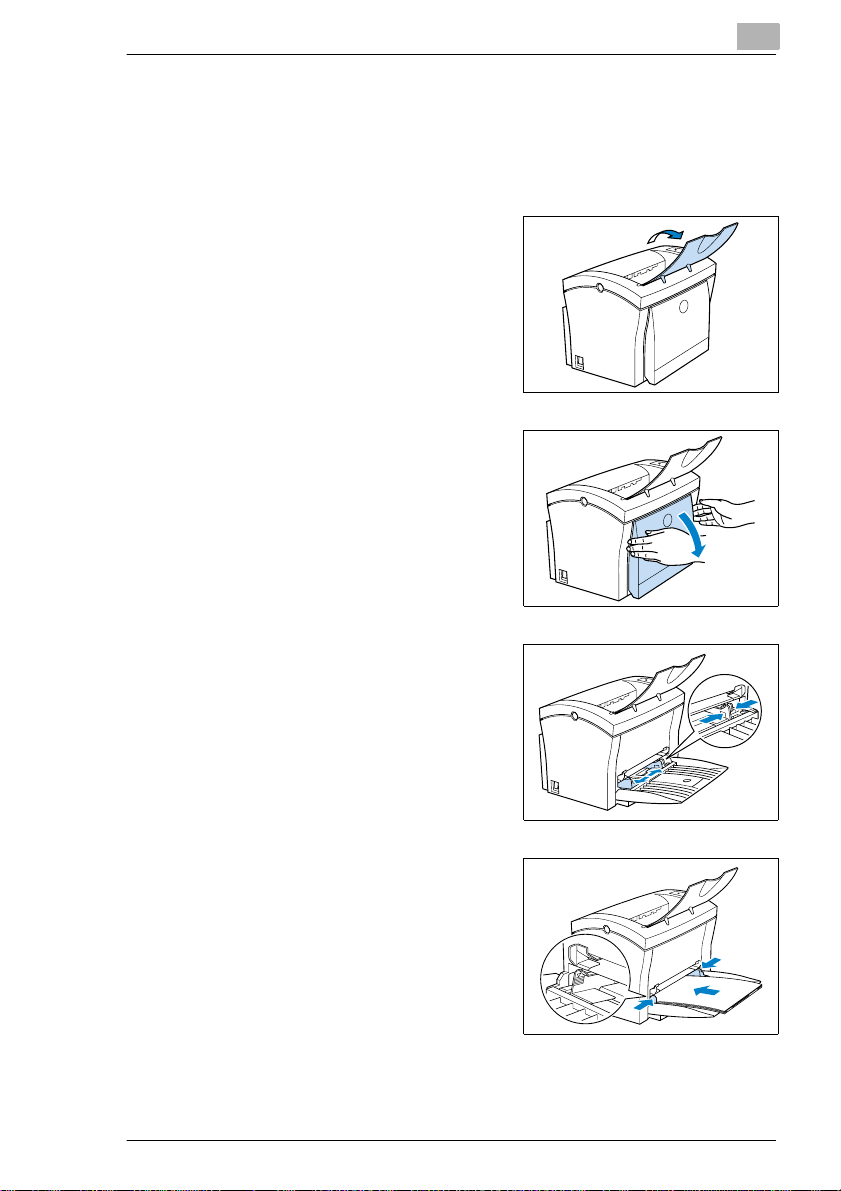
Setting up paper feed tray 1
Set the feed tray for the required paper format.
Lift up the paper output tray.
1
Fold down the paper feed tray.
2
2
Press the right-hand paper guide
3
together in order to re lease the
guide. Slide the guide outwards as
far as it will go.
Place the paper between the paper
4
guides. Slide the guid es up to the
stack of paper.
How many sheets may I place
?
on the tray?
➜ The stack of paper should not
rise above the "max." mark.
Laser Printer 200 Seri es 2-11
Page 28
2
Unpacking, installing and setting up the printer
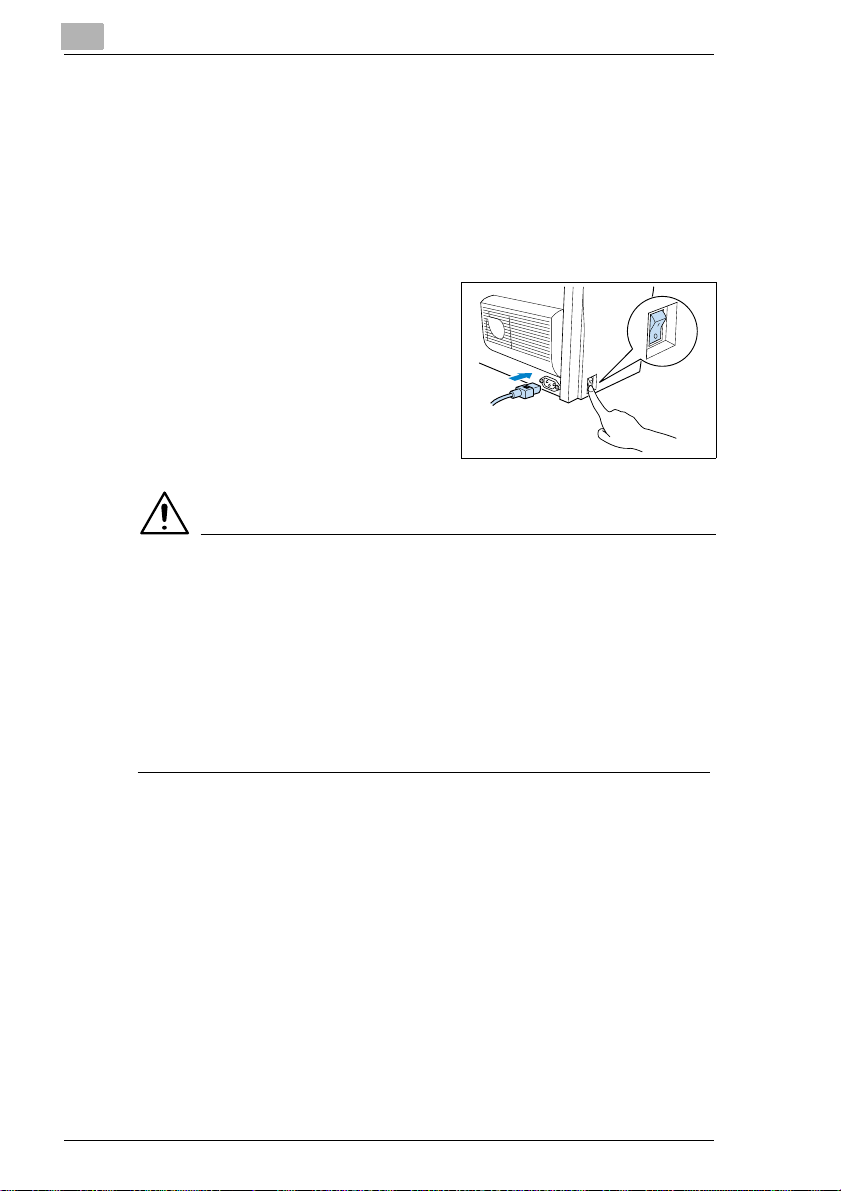
Connecting the power cable
Only use the power cable suppli ed with the printer!
The laser printer requires a non-fluctua ti ng power supply. If necessa ry,
ask an electrician f or advice.
✔ Mains voltage: 220-240V ± 10%
✔ Mains frequency: 50-60Hz ± 0.3%
Make sure that the printer’s power
1
switch is in the "0" positi on (OFF).
Insert the plug on the end of the
2
power cable (supplied) into the
power socket of the print er.
Insert the other end of the power
3
cable into a power socket.
CAUTION
Using the wrong power cable may lead to a short-circuit!
The use of a power cable of inadequat e cross- sec tion can lead to a shor tcircuit.
➜ Only use an extensi on cable which has a hi gher rat ing than the c urrent
consumption of the printer.
➜ Only use earthed cables.
➜ Always observe the relevant local regu lations regarding the
connection of electrical equipment to the mai ns network.
2
1
2-12 Laser Printer 200 Seri es
Page 29
Unpacking, in stalling and setting up t he pri nter
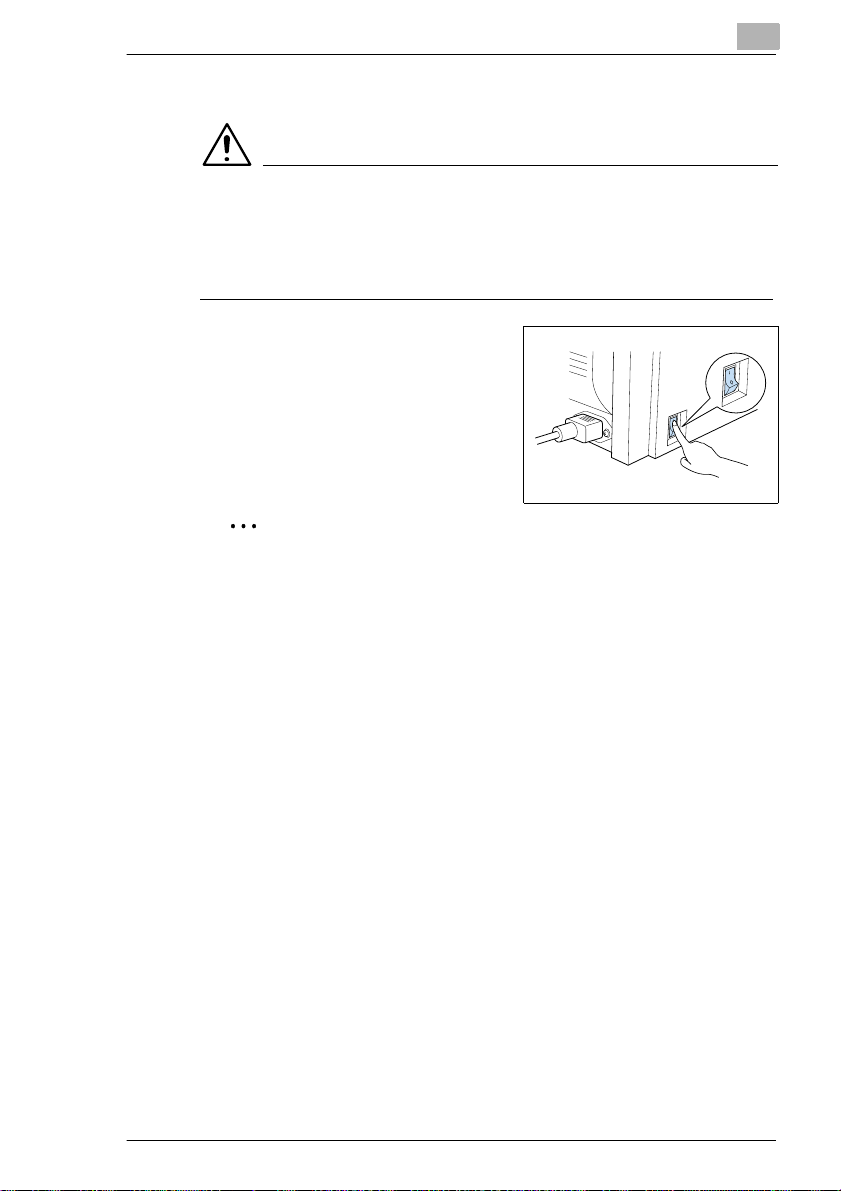
Switching the printer on and off
CAUTION
Improper handling may result in damge to the printer!
➜ Never switch off the printer while a print job is in progress, the printer
is receiving data fr om the computer (flashing “Stand-by“ lamp on
control panel) or the printer is being reset.
➜ Switch the power switc h to "I" (ON)
in order to activate the printer.
The printer is ready for use after
approx. 23 seconds.
➜ Switch the power switch to
"0" (OFF) in order to deactivate the
printer.
✎
Saving energy is sensible!
When the printer has been inactive for a certain length of time, it
automatically switc hes to the POWER SAVE mode. This time period
can be adjusted via the pri nter tools, see page 5-9.
When the printer receives a new pri nt job whil e in POWER SAVE
mode, it automatically switches to the warm-up phase.
2
Laser Printer 200 Seri es 2-13
Page 30
2
Unpacking, installing and setting up the printer
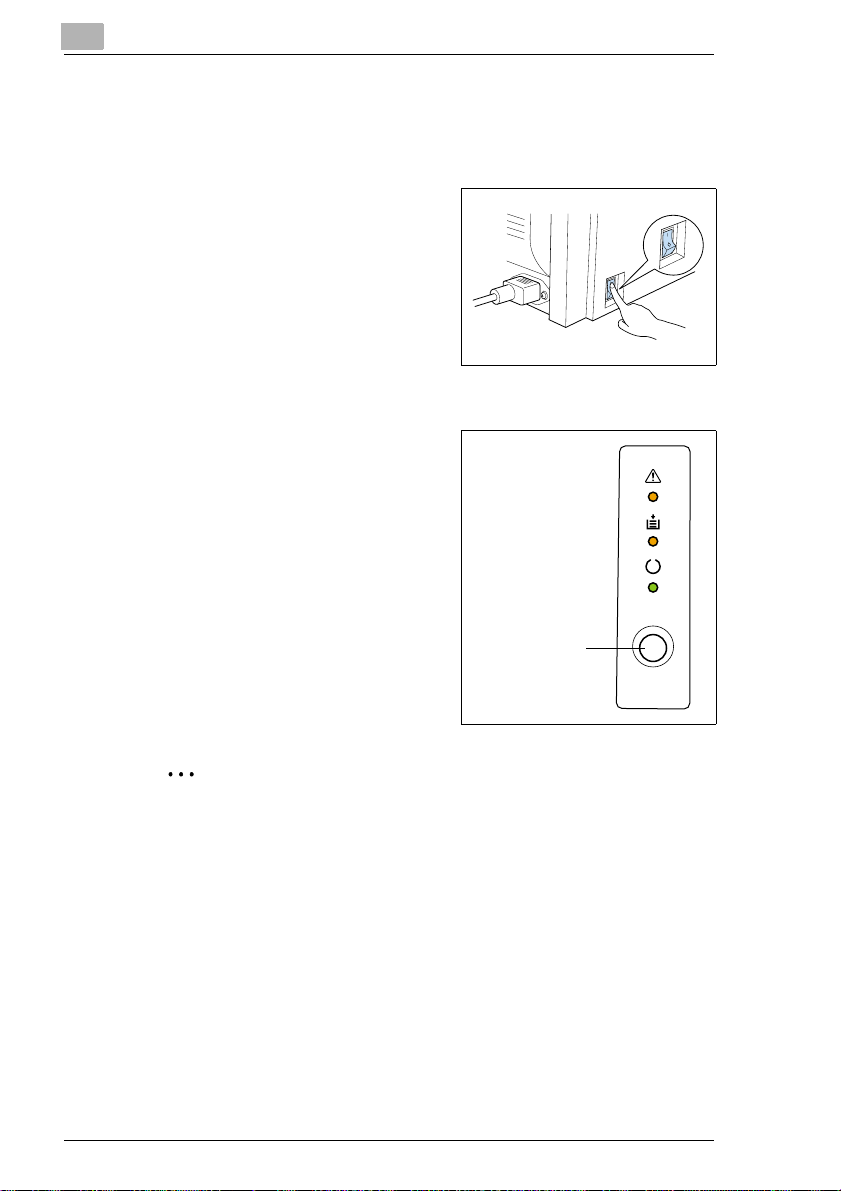
Printing out the configuration page
The configuration page should be printed out in ord er to ensure that the
printer is operating correctly.
Switch on the printer.
1
The printer is ready for use after
approx. 23 seconds.
Make sure that:
2
❍ the “Fault“ and “Paper“ lamps
are off, and
❍ the “Stand-by“ lamp is on (but
not flashing).
Briefly press the control button.
3
The configuration page is printed
out.
Control button
✎
Be prepared for technical inquiries!
Always have a current configuration page available in the event of a
technical inquiry. Make a note of the printer‘s serial No. on the
configuration page, see page 1-7 (Safety label).
2-14 Laser Printer 200 Seri es
Page 31

Unpacking, in stalling and setting up t he pri nter
Connecting the printer to a comput er
Switch off both printer and
1
computer.
Connect the end of the interface
2
cable to the parallel port of your
computer.
Connect the other end of the
3
interface cab le to the paral lel port of
the printer.
Secure the connectors by means of
4
the clips on the sockets.
For the technical specification of the
cable, see page 11-4.
CAUTION
Using the wrong type of cable may result in damage to the
equipment!
Using the wrong type of cable can damage the socket on the printer.
➜ Only use an IEEE 1 284 type B sh ielded inte rface cable f or connect ing
the printer to your computer.
2
Laser Printer 200 Seri es 2-15
Page 32

2
Unpacking, installing and setting up the printer
2-16 Laser Printer 200 Seri es
Page 33

Installing the printer driver
3 Installing the printer driver
3.1 System requirements
The following system requirements will ensur e that your printer runs
without problems:
G An IBM-compatible PC with a 386DX-16MHz processor or higher
(Pentium processor recommended).
G Microsoft Windows 3.1x, Windows95, Windows98, WindowsNT4.0,
MS-DOS 5.0 or higher (except MS- DO S 7.0) .
G At least 8 MB of RAM.
G At least 10 MB of spare memor y capacity.
G A CD-ROM drive.
G I/O interface: an IEEE 128 4 type B parallel cable.
3.2 Notes on installing the printer driver
The installat ion pr ogr am is de si gned so t hat even p eopl e not accu stomed
to working with computer s can easily accomplish it. You wil l be l ed step
by step through the installation process. All you need to do is follow the
installa t i on program.
Before you begin the installation, you should be clear on the following
points:
G What operating system is running on your computer?
G What is the letter of your CD-ROM drive (D, E, etc.)?
G Which optional accessories are fitted to your printer?.
3
Laser Printer 200 Seri es 3-1
Page 34

3
Installing the printer driver
General information on the printer driver
The printer driver is delivered on a CD-ROM along with the printer.
Information on installation using "Add Printer"
When installing the printer driver using “Start – Settings – Printer – Add
Printer“ please note the fol lowi ng points:
G The dial ogue box for installing opt ions is not displayed. Adj ust the
additional options after you have completed the installation in the
printer driver.
G The Status Monitor will not be installed.
G The uni nst aller ut ili ty wi ll n ot be i nstal led. To us e thi s progr am lat er for
deinstallation, start the file “zuninst.exe“ on the CD supplied with the
printer.
3-2 Laser Printer 200 Series
Page 35

Installing the printer driver
3.3 Installation for Windows 95/98 and NT 4.0
CD-ROM installation
The CD-ROM supplied with the printer starts automatically aft er being
loaded into the CD-ROM drive of your comput er. You are guided step by
step through the installation routi ne.
Make sure that the printer is connected to your compu ter.
1
Switch on the printer.
2
Switch on the computer and start Windows 95, Windows 98 or
3
Windows NT 4.0.
Place the Laser Printer 200 Series Utilit ies & Documentation CD-ROM
4
in the CD-ROM drive of your computer.
The installation program starts automatically.
The installation program does not start automatically?
?
➜ Start Windows Explorer and open the directory of the CD.
➜ Double-click on “autorun.exe“ to star t the ins t allation pr o gram.
3
Follow the instructions of the installation program.
5
Once the print er driver has been succe ssfully installed, the icon for the
“Laser Printer 200 Series“ print er appears in the Printers folde r.
Laser Printer 200 Seri es 3-3
Page 36

3
Installing the printer driver
Plug-&-Play installation (Windows 95/98 only)
Make sure t hat t he pri nter is c onnec ted t o yo ur com puter via a p arall el
1
interface cable.
Switch on the printer.
2
Switch on the computer and start Windows 95 or Windows 98.
3
Make sure that the printer name is shown in the update device driver
4
box or the “Hardware Wizard“ dialogue box.
The update dev ice d river or the "Har dware Wi zard" dial ogue b oxes
?
do not appear?
If that is the case, then Plug- &-Play installation is not possible.
➜ Install the printer driver via the CD-ROM installation.
Click on [CONTINUE].
5
Follow the subsequent instructions.
6
Once the print er driver has been succe ssfully installed, the icon for the
“Laser Printer 200 Series“ print er appears in the Printers fold er.
3-4 Laser Printer 200 Series
Page 37

Installing the printer driver
3.4 Installation for Windows 3.1x
Install the printer driver for Windows 3.1x as described below and not via
the Printers dialogue wi ndow.
Make sure that the printer is connected to your compu ter.
1
Switch on the printer.
2
Switch on the computer and start Windows 3.1x.
3
Place the Laser Printer 200 Series Utilit ies & Documentation CD-ROM
4
in the CD-ROM drive of your computer.
Call up File Manager and open the CD-ROM directory.
5
Double-click on “autorun.exe“ to activate the install ation program.
6
Follow the instructions of the installation program.
7
Once the print er driver has been succe ssfully installed, the icon for the
“Laser Printer 200 Series“ print er appears in the Printers folde r.
3
Laser Printer 200 Seri es 3-5
Page 38

3
Installing the printer driver
3.5 Uninstalling the Windows printer driver
Call up the program group “Lase r Printer 200 Series“.
1
Example: Windows 95/98, Windows NT 4.0
Example: Windows 3.1x
Click on “Uninstaller“.
2
The deinstallation program starts automatically.
Follow the subsequent instructions.
3
To complete the deinstallation of the printer driver, the Windows
operating system must be restarted
3-6 Laser Printer 200 Series
Page 39

Installing the printer driver
3.6 Installation for MS-DOS
Only MS-DOS versi ons 5.0 or higher (except MS -DOS 7.0) are sup ported.
Make sure that the printer is connected to your compu ter.
1
Switch on the printer.
2
Switch on the computer and start MS-DOS.
3
Place the Laser Printer 200 Series Utilit ies & Documentation CD-ROM
4
in the CD-ROM drive of your computer.
Change to the CD-ROM drive.
5
Enter, for example: d:\
(d = corresponding lett er of your CD-ROM drive)
Change to the directory whi ch contains the install ations program.
6
Enter: cd drivers\LP200S\dos
Start the installation program.
7
Enter: setup
This starts the inst allation program. Once the printer driver has been
successfully installed, the following message appears:
3
✎
AUTOEXEC.BAT file modified!
One command line was added to the AUTOEXEC.BAT file. The
purpose of this command i s to ensure that the Status Monitor is
automatically l oaded upon switc hing on the comput er or executing the
AUTOEXEC.BAT file.
Laser Printer 200 Seri es 3-7
Page 40

3
Installing the printer driver
3-8 Laser Printer 200 Series
Page 41

Working with the Windows printer drivers
4 Working with t he Windows printer
drivers
4.1 Displaying printer driver settings
Displaying settings in Windows 95/98
In the START menu, select “Settings – Printer“.
1
The “Printers“ dialogue box appears.
Click on the “Laser Printer 200 Series“ icon.
2
Under “File“, select the item “Properties“.
3
The printer driver dialogue box appears.
4
✎
The operating system also uses index cards!
The “General“ and “Details“ index cards are automati call y deter min ed
by the operating sys tem and are therefore not described in this
manual.
Laser Printer 200 Seri es 4-1
Page 42

4
Working with the Windows printer drivers
Displaying settings in Windows NT 4.0
In the START menu, select “Settings – Printer“.
1
The “Printer“ dialogue box appears.
Click on the “Laser Printer 200 Series“ icon.
2
Under “File“, select the item “Standard document set ti ngs“.
3
The printer driver dialogue box appears.
4-2 Laser Printer 200 Series
Page 43

Working with the Windows printer drivers
Displaying the settings in Windows 3. 1x
The options on the individual index cards correspond to those of
Windows 95/98.
In the Windows main group, double-click on the “Control panel“ icon.
1
The “Control panel“ program group appears.
In the Control panel window, cl ick on the “Printers“ icon.
2
The “Printers“ dialogue box appears.
In the “Printers“ dialogue box , select Las er Printer 200 Ser ies from the
3
list of “Installed printers“.
Click o n [SE T UP ...].
4
The Driver Setup dialogue box appears.
4
Laser Printer 200 Seri es 4-3
Page 44

4
4.2 Paper index card
This index card allow s you to:
G select the paper format,
G set up custom paper formats,
G fit docum ents to a paper format upon print-out,
G specif y the orientation of the paper,
G specify paper feed from differ ent trays,
G define the type of paper/media,
G scale (enlarge/reduce ) documents upon print-ou t,
G specify the number of copies,
G switch on/off the printer’s sorting function.
Working with the Windows printer drivers
4-4 Laser Printer 200 Series
Page 45

Working with the Windows printer drivers
Selecting a paper format
Use “Paper size“ to spec if y the format of the printed page. The various
paper sizes support ed by your printer are shown in the dr opdown list.
The following formats have a fixed definition in the dropdown list:
Paper Size Envelopes Size
Letter 8.5× 11in. Env. Monarch 3.875×7.5in.
Legal 8.5 ×14in. Env. COM10 4.125 ×9.5in.
Executive 7.25×10.5 in. Env. DL 110×220 mm
A4 210× 297mm Env. C5 162 × 229mm
A5 148× 210mm Env. B5 176 × 250mm
JIS B5 182× 257mm
You can can design your own custo m formats and add them to this list,
see page 4-6.
✎
Not all paper formats availa ble?
If you have selec ted the optiona l paper feed tray 2 un der “Paper feed“,
then not all the paper formats given in the table are available.
4
Laser Printer 200 Seri es 4-5
Page 46

4
Working with the Windows printer drivers
Creating a custom paper format
You can create your own person ally designed paper size.
Click on [EDIT CUSTOM...]
1
The “Custom paper“ dialogue box appears.
To create a new paper size, cli ck on [ADD].
2
The boxes underneath are t hen activated.
Enter a name for the new paper format .
3
Specify the unit of measure (inches, mm).
4
Specify the dimensions (width x height).
5
❍ min. size: 76×127mm (3 × 5in.)
❍ max. size: 216×356mm (8.5 ×14in.)
Confirm your entries with [OK].
6
The dialogue box disap pears. The newly created format is now
displayed at the end of the “Paper size“ dropdown list and can be
selected when required.
✎
Would you like to delete a custom format?
In the “Custom paper“ dialogue box, mark the paper size you would
like to delete. Then click on “Delete“. Confirm w it h [O K].
4-6 Laser Printer 200 Series
Page 47

Working with the Windows printer drivers
Adjusting the print-ou t to fit the paper
Use the “Fit to paper “ functio n to fi t your doc ument to a ce rtai n paper size
when it is printed. Your document will be automatically enlarged or
reduced so that it will fi t on the paper size you have selected.
The “Fit to paper “ function cannot be u sed at the same time as the “N-Up“
or "All raster" functions.
Activate the checkbox “Fit to paper“.
1
This activates the dr opdown list underneath.
From the dropdown list that is now availab le, select the paper size o n
2
which you would like to print.
Confirm your entries with [OK].
3
Specifying the orientation of the print paper
Under “Orientation“ you can specify whether your docum ent should be
printed in portrait (vertical) or la ndscape (horizontal) format.
Portrait
4
Landscape
A
Laser Printer 200 Seri es 4-7
A
Page 48

4
Working with the Windows printer drivers
Specifying the paper source
Under “Paper source“ you can specify which tray will feed the printer.
Paper source Description
Auto Printing paper is fed from all available trays
Tray 1 Printing paper is fed from tray 1
Tray 2* Printing paper is fed from tray 2
Manual feed Printing paper is fed into the printer through the manual
* optional paper source unit
feed unit.
To feed paper manually, place a sheet in the input and
press the control button.
✎
Not all paper formats availa ble?
If you have selec ted the option al paper feed tray 2 un der “Paper feed“,
then not all the paper formats given in the table are available.
Defining the type of paper/media
Specifying the “Media type“ allows you to define the ty pe of paper on
which you wish to print:
G normal paper,
G transparent film,
G envelopes,
G thick paper.
Scaling the printed document
The print-out of a do cument may b e enlar ged or r educe d by mea ns of t he
“Scaling“ function.
The “Scaling“ function cannot be used at the same time as the “N-up“ or
“All raste r“ functio ns.
➜ In the “Scaling“ box, enter the value – in per cent (%) – by which the
document is to be enlarg ed or re duced (max. reduction: 50%; ma x.
enlargement: 200%).
4-8 Laser Printer 200 Series
Page 49

Working with the Windows printer drivers
Specifying the number of copies
In the “Copies“ box, specify the number of copies that you wish to print out.
You may enter any value between 1 and 999.
Switching on/off the printer’s sorting function
Switch on the “Collate at printer“ function in order to sort your pri nt-outs
automatically.
This function is onl y available when your printer is fitted with a memory
capacity of at least 64 MB.
4
Sorting OFF
1
1
1
3
2
1
2
2
3
2
2
Sorting ON
1
3
3
3
3
2
1
✎
Deactivate the sort feature in other applications!
Deactivate the sort f eature in other software applications if there is a
conflict between the setting in the printer driver and the setting in the
other applicati on.
Laser Printer 200 Seri es 4-9
Page 50

4
4.3 Page layout index card
This index card allow s you to:
G print several pages of a document on the same print page,
G provi de print-outs with a watermark,
G design custom watermarks,
G adjust the printable area.
Working with the Windows printer drivers
4-10 Laser Printer 200 Seri es
Page 51

Working with the Windows printer drivers
Printing multiple document pages per print page (N-up)
Use the “N-Up“ function to print multi ple reduced document pages on a
single print page.
The “N-up“ function cann ot be used at the same time as the features
“Scaling“, “Fit to paper“ and “All raster“.
N-Up settings Description
Auto One document page will be printed on each print page
2 pages per sheet Two document pages will be printed on each print page
4 pages per sheet Four document pages will be printed on each print page
9 pages per sheet Nine document pages will be printed on each print page
16 pages per sheet 16 document pages will be printed on each print page
➜ Activate the “Borderline“ checkbox to separate individual document
pages from each other by means of lines.
➜ Click on the [DETAILS OF N-UP...] button to define the layout of
document pages on the print page.
The “Details of N-Up“ dialogue box appears.
4
Laser Printer 200 Seri es 4-11
Page 52

4
Working with the Windows printer drivers
Printin g watermarks
Use the “Watermark“ function to print ba ckground text on your pri nt pages
that will inform the reader at a glance abo ut t he nature of your document.
➜ Select a predef ined watermark from the dropdown list.
➜ Activate the c heckb ox “First page only“ so that the wat erm ark wi ll o nly
be printed on the first page of a multi-page document.
✎
Watermarks as copy protecti on!
Provide your print- outs with a watermark in order to prevent the printed
pages from being copied .
4-12 Laser Printer 200 Seri es
Page 53

Working with the Windows printer drivers
Custom watermarks
Design your own personal water m ark.
Click on the [EDIT WATERMARK...] button and the “Watermark“
1
dialogue box will appear .
Click on the [ADD] button to create a new watermark,
2
or
click on a predefined Water mark to modify it.
The fields under “Edit watermark“ are activated.
4
Design your watermark by changing the settings.
3
In the preview you can see how the waterma rk wi ll appear when it is
printed and where it is posit ioned on the page.
Confirm your entries with [OK].
4
The dialogue box disapp ears.
✎
Deleti n g watermarks ?
If you would like to delete a watermark, mark it in the “Watermark“
dialogue box and click on the [DELETE] button.
Laser Printer 200 Seri es 4-13
Page 54

4
Working with the Windows printer drivers
Adjusting the printable area (XY image shift)
You may adjust the printable area in order to, for examp le, fi t document
pages to preprinted for m s. The printable area may be adjusted by up to
10 points (approx. 4 mm) horizontally and vertically.
➜ Enter a value in the “X“ box in order to move the printable area
horizontally.
➜ Enter a value in the “Y“ box in order to move the printable area
vertically.
4-14 Laser Printer 200 Seri es
Page 55

Working with the Windows printer drivers
4.4 Quality index card
This index card allow s you to:
G switch on/off Toner Save mode,
G optimize the print quality of text and graphics,
G specify the toner density,
G optimize the exchange of text and graphics data wi th the printer
(All ras te r ),
G specify the resol ution for the print- out,
G activate the use of TrueType Fonts.
4
Laser Printer 200 Seri es 4-15
Page 56

4
Working with the Windows printer drivers
Switching Toner Save function on and off
You can reduce your printing costs with the “Toner Save“ feature.
Text and graphics are pri nted in grey in Toner Save mode. The purpose
of this is to use as little toner as possible. You can save on printi ng costs
by printing rough drafts and other preliminary materials in Toner Save
mode.
➜ Select “ON“ to print your doc um ents using a minimal amount of toner .
➜ Select “OFF“ to print your doc ument s with the nor mal amount of to ner.
Optimizing the print quality of text and graphics
Use the this functi on to sm ooth the edges of te xt and gra phi cs and hence
optimize the print quality.
➜ Select “OFF“ to achieve an optimum print qualit y for photos (raster
graphics).
➜ “MEDIUM“ is the default setti ng and is adequate for most text and
graphics.
➜ Select “LIGHT“ to smooth the edges of te xt and grap hics by m eans of
a small num ber of dots. In the print-o ut this produces a softer transit ion
at the edges.
➜ Select “DARK“ to smooth the edges of text and graphics by means of
a large number of dots. In the print-out this produces a harder
transition at the edges.
Specifying the toner density
The amount of toner used is specified by means of the “Toner density“
function.
✎
High toner density = high toner consumption!
Increasing the toner dens ity produces a dark er print-out but increases
the consumption of toner.
Optimizing data exchange with the printer (All raster)
Use the “All raster“ functi on to determine t he format in whi ch graphics and
font data will be loaded into the printer.
4-16 Laser Printer 200 Seri es
Page 57

Working with the Windows printer drivers
The “All raster“ function cannot be used at the same time as the “N-up“,
“Scaling“, “Fit to paper“ and “Font“ functions.
➜ Select “ON“ to send both grap hics and fon t data to t he printe r as raster
graphics. This makes it possi ble for the printed docum ent to agre e as
closely as possib le wi th the appearance on the screen . Printing may
be slower with this functi on activated.
Printer-resident fonts cannot be used.
➜ Select “OFF“ to send your do cument to t he print er in th e conventi onal
transmission form.
Printer-resident fonts may be used.
Specifying the resolution
The print quality is defined by means of the “Resolution“ function.
➜ Select “300×300dpi“ for normal print-outs, e.g. for text and graphics
with thick line elements.
➜ Select “600×600dpi“ for print-outs which require a high print quality,
e.g. for text and graphics with fine line elements.
➜ Select “1200×600dpi“ for print-outs which require a very high print
quality, e.g. fo r high-resolution graphics.
4
Activating the use of printer- resident TrueType fonts
The “Font“ function specifies whether, in the case of identical TrueType
fonts in document and printer, the printer-resident fonts are to be used.
➜ Activate the “Use printer TrueType font“ checkbox in order to use the
printer’s TrueType fonts. This can shorten the printing time.
➜ Deactivate the “Use printer TrueType font“ checkbox in order to
download the computer’s TrueType fonts.
Laser Printer 200 Seri es 4-17
Page 58

4
Working with the Windows printer drivers
4.5 Device option index card
This index card allow s you to:
G activ ate the optional paper feed tr ay 2,
G define the total memory capacity of the printer.
Windows NT 4.0 only!
The “Device option “ index card for Windows NT 4.0 is integrated in a
different system sector and must be called up separately.
In the START menu, select “Settings – Printers“.
1
The “Printers“ dialogue box appears.
Click on the “Laser Printer 200 Series“ icon.
2
In the “File“ menu, select “Properties“.
3
The Properties dialogue box appears.
Click on the “Device opt i o n“ index card.
4
The “Devi ce optio n “ index card appears.
4-18 Laser Printer 200 Seri es
Page 59

Working with the Windows printer drivers
Activating the optional paper feed tray 2
Use the “Input opti on“ function to specify whet her the opt ional paper feed
tray 2 is installe d.
➜ Activate the “Tray 2“ checkbox if the optional paper feed tray 2 has
been installed.
➜ Deactivate the “Tray 2“ checkbox if the optional pape r feed tray 2 has
not been installed.
Specifying the total memo ry capacity
Use the “Memory option“ function to specify how many megabytes of
memory capacity have been installed in your printer.
➜ Enter the value corresponding to the total memory capacity
(installed 4MB memory module + optional memory module).
4
Laser Printer 200 Seri es 4-19
Page 60

4
Working with the Windows printer drivers
4-20 Laser Printer 200 Seri es
Page 61

Working with the Windows printer tools
5 Working with t he Windows printer
tools
The Windows printer tools include:
G the Status Monitor and
G the Co ntrol P anel.
✎
Automatic start of Status Monitor !
If upon installi ng the printer driver you activated the option to
automatically start the printer driver , then the Status Monitor is
automatically called up upon starting the computer.
5
Laser Printer 200 Seri es 5-1
Page 62

5
Working with the Windows printer tools
5.1 Calling up the Status Monitor
Calling up the Status Monitor in Windows 95/98, Windows NT 4.0
Call up the program group “Lase r Printer 200 Series“.
1
Click on “Laser Pri nter 200 Series Printer Tools“.
2
The Status Monitor appears.
5-2 Laser Printer 200 Series
Page 63

Working with the Windows printer tools
Calling up the Status Monitor in Windows 3.1x
The options on the individual index card correspond to those of
Windows 95/98.
Call up the program group “Laser Pri nter 200 Series“.
1
Click on “Laser Pri nter 200 Series Printer Tools“.
2
The Status Monitor appears.
5
Laser Printer 200 Seri es 5-3
Page 64

5
Working with the Windows printer tools
Altering the size of the Status Monitor window
➜ In the Status Monitor menu bar, select the "View" menu and then the
option “Reduce“ in order to decrease the size of the window.
➜ In the Status Monitor menu bar, select the "View" menu and then the
option “Expand“ in order to i ncrease the size of the window.
5-4 Laser Printer 200 Series
Page 65

Working with the Windows printer tools
5.2 Calling up the Control Panel
Use the Control Panel in ord er to check and/or alter the bas ic settings of
the printer.
Call up the program group “Laser Pri nter 200 Series“.
1
Click on “Laser Pri nter 200 Series Printer Tools“.
2
The Status Monitor appears.
5
Click on [PRINTER SETTING...],
3
or
select “Setup – Print er se tt in g “ via the menu bar.
The Control Panel appears.
Laser Printer 200 Seri es 5-5
Page 66

5
5.3 Paper index card
This index card allow s you to:
G define the response in the case of a lack of suitable paper (paper
format error),
G define the paper format for paper feed tray 1.
Working with the Windows printer tools
5-6 Laser Printer 200 Series
Page 67

Working with the Windows printer tools
Defining the response in the case of a lack of suitable paper
You can determine how the pr inter responds in the case of a paper for mat
error.
➜ Select “Proceed“ to continue printi ng on the paper format al ready fed
into the machine.
➜ Select “Clear“ to automatically cancel the print job when a paper
format error is detected.
➜ Select “None“ to switch the pri nter to stand-by mode.
✎
Switch on "Auto continue"!
On the “Printer setting“ index card, the option “Auto continue“ allows
you to specify whether a print job is t o be continue d after a ce rtain time
has elapsed despite a paper format error.
Specifying a paper format for pape r feed tray 1
You can specif y whether p aper feed t ray 1 is to b e used as a universal tray
or as a tray set to a certain format.
➜ Select “Multi purpose tray“ to be able to load all paper formats
supported by paper fee d tray 1.
➜ Select “Fixed cassett e“ to specify a certa in paper format f or paper f eed
tray 1.
5
Paper Size Envelopes Size
Letter 8.5× 11in. Env. Monarch 3.875×7.5in.
Legal 8.5 ×14in. Env. COM10 4.125 ×9.5in.
Executive 7.25×10.5 in. Env. DL 110×220 mm
A4 210× 297mm Env. C5 162 × 229mm
A5 148× 210mm Env. B5 176 × 250mm
JIS B5 182× 257mm
✎
Settings
The settings for paper f eed tray 1 on the “Paper“ index card may be
overridden by the settings in other printing applications!
Laser Printer 200 Seri es 5-7
Page 68

5
Working with the Windows printer tools
5.4 Printer setting index card
This index card allow s you to:
G switch on/off the Power Save mode,
G switc h on /of f the automatic continuation in the case of an error
message,
G switc h between fast and normal printing modes,
G define the input/output timeout,
G switc h on/off the detection of paper format errors,
G activate the page protection function.
5-8 Laser Printer 200 Series
Page 69

Working with the Windows printer tools
Switching on/off the Power Save mode
In order to save energy, th e printer automaticall y switches to the Power
Save mode after a certai n peri od of i nacti vity. W hen the pr inte r rec eives a
new command or the control but ton is pressed while in this mode, the
printer automatically switches to the warm-up phase.
➜ Select “On“ and enter a time perio d after which the printer should
switch to the Power Save mode.
➜ Select “Off“ to deactivate the Power Save mode function.
Switching on/off the automatic continuation function
A print job is interrupt ed if the printer signals a for m at error or memory
overflow. The “Auto con tinue“ fun ction ena bles you t o determi ne whether
the print job should con tinue automaticall y after a certain time has el apsed
despite the presen ce of an error message.
➜ Select “On“ and enter a time perio d after which the a print job should
be automatically continued despite the err or.
➜ Select “Off“ to suppress th e automatic continuat ion function.
Specifying fast or normal printing modes
You can shorten the time before the first page of a job is printed.
➜ Select “Fast print“ to maintain the fus ing unit at a high temperature.
This minimizes the time bef ore the first page is printed.
➜ Select “Normal print“ to allow the fusing unit to cool down when
printing is not in progr ess. In order t o print the f ir st page of a print job,
the fusing unit must first warm up again and so more time is required
for the first page.
5
Laser Printer 200 Seri es 5-9
Page 70

5
Working with the Windows printer tools
Specifying the input/o utput timeout
An input/output ti m eout occurs when the printer cannot detect the end
data code of a print job sent from the computer. The print job is
automatically cancelled in the case of an input /output timeout.
➜ Enter the number of seconds within which the printer must detect the
end of a print job.
Switching on/off the paper format error detection
You can specify whether the printer should respond when t he paper fed
into the machine is dif ferent to the one set in the printer dri ver.
➜ Select “On“ to detec t paper format errors.
➜ Select “Off“ to ignore paper format errors.
Activating page protection
With page protect ion activated, the printer reserves extra memory space
and waits until the data for a page has been completely loaded int o the
printer memory. Only then does the printing process begin.
➜ Select “Auto“ to enable the printe r to check eac h page of a print job in
advance and activate page protection if nece ssary.
➜ Select “On“ to enable the printer t o always reserve suff icient memory
so that the data for one page can be complet ely load ed. This fu nction
requires min. 6 MB RAM for resolut ion of 600 x 600 dpi.
5-10 Laser Printer 200 Seri es
Page 71

Working with the Windows printer tools
5.5 Test print index card
This index card allow s you to:
G print out a demonstration page,
G print out a confi guration page,
G print out a list of PCL- resident fonts,
G print out information on the indicator lamps.
5
The various test prints
Test print Description
Demonstration page Prints out a demonstration page with an overview of all printer
Configuration page Prints out a configuration page with the current printer settings.
List of PCL-resident fonts Prints out a list of all printer fonts available, with designations
Indicator lamps Prints out an overview of the most important lamp indications.
functions.
and samples.
Printing out a test print
Specify the test pri nt you require.
➜ Click on th e butt on cor res ponding to t he test p rint you wi sh to pr int out.
The required test pri nt is output.
Laser Printer 200 Seri es 5-11
Page 72

5
5.6 Counter index card
This index card allow s you to:
G check the status of a counter,
G reset a counter.
Working with the Windows printer tools
5-12 Laser Printer 200 Seri es
Page 73

Working with the Windows printer tools
Checking the status of a counter
Counter Description
Total This indicates the total number of pages printed by the printer.
This counter can only be reset by a customer service engineer.
Tray 1 This indicates how many pages have been fed frompaper feed
Tray 2 This indicates how many pages have been fed from paper feed
Manual feed unit This indicates how many pages have been fed via the manual
Drum This indicates how many pages have been with the current
Toner This indicates how many pages have been printed with the
tray 1.
tray 2.
paper feed unit.
image transfer roller.
This counter should be reset after changing the image transfer
roller.
current toner cartridge.
This counter should be reset after changing the toner cartridge.
Resetting a counter
This resets the counter status to zero.
The “total counter“ status can only be reset by a customer service
engineer.
➜ Click on the [RESET] button adjacent the counter you wish to reset.
The associated counter is reset to zero.
5
Laser Printer 200 Seri es 5-13
Page 74

5
5.7 Configuration index card
This index card summarizes the most importa nt printer settings f or qui ck
reference.
No settings can be altered via this index card.
Working with the Windows printer tools
5-14 Laser Printer 200 Seri es
Page 75

Working with the DOS printer tool s
6 Working with the DOS prin ter tools
6.1 Using the Status Monitor
Calling up the Status Monitor
Call up the Status Monitor in order to check the printer and the progress
of print jobs.
Change to the directory into which the pri nter driver files were copied
1
upon installation.
Enter, for example: cd c:\mltdos
Enter the following command in order to load the Status Monitor: rep
2
The Status Monit or is loaded into the RAM and can t hen be called up.
Press the keys [CTRL] +[ALT]+[R] to call up the Status Monitor.
3
6
✎
Deleting the Status Monitor from the RAM!
Enter the command rep /d in oder to delete the Status Monitor from
the RAM.
Laser Printer 200 Seri es 6-1
Page 76

6
Working with the DOS printer tool s
Switching on/off popup messages (Set up m enu)
Faults are quickly signalled by means of popup messages. If the printer
malfunctions , a dia logue box containing an appropriate message
automatically appears on the screen.
➜ Activate the checkbox “Enable popup“ so that popup mess ages
appear automatica ll y on the screen.
Changing the hotkey command for the Status Monitor (Setu p menu )
You can change the key combination for calling up the Status Monitor.
➜ Press the desir ed keys in succession in order t o de fi ne a new key
combination for calling up the Status Monitor.
Defining popup messages (Setu p menu)
You can specify whi ch printer faults ca use a popup mes sage to appear on
the screen.
➜ Mark one of the err or messages and press [ENT ER] in order to change
the status of the error message.
Active = show popup message
Inactive = suppr ess popup message
6-2 Laser Printer 200 Series
Page 77

Working with the DOS printer tool s
6.2 Using the DOS Control Panel
Calling up the Control Panel
Call up the Control Panel in order to specify the basic setti ngs of the
printer.
Change to the directory into which the pri nter driver files were copied
1
upon installation.
Enter, for example: cd c:\mltdos
Enter the following command in order to call up the Control Panel:
2
spcpdos
The Control Panel appears.
6
✎
You wish to close the Control Panel?
Press the keys [ALT] + [X] or select “File – Exit“ from the menu bar in
order to close the Contro l Panel .
Laser Printer 200 Seri es 6-3
Page 78

6
Working with the DOS printer tool s
Creating and saving printer profiles
Printer profi les are c reated in order to save printer configur ations and then
call them up later as required.
Adjust the settings in the Control Panel in order to create a printer
1
profile.
Select “File – Save profile“ from the menu bar.
2
The “Save profile“ dialogue box appears.
Now enter:
3
❍ drive,
❍ path, and
❍ file name of printer profile to be saved.
Confirm with [OK].
4
The printer profile is saved and the dialogue box closed.
6-4 Laser Printer 200 Series
Page 79

Working with the DOS printer tool s
Loading printer profiles
Printer profiles are loaded in order to replac e the cur rent printer settings
by those of a printer prof ile.
Select “File – Open Profile“ from the menu bar.
1
The “Open profile“ dialogue box appears.
6
Now select:
2
❍ drive,
❍ path, and
❍ file name of printer profil e to be loaded.
Confirm with [OK].
3
The printer profile selected is loaded and the dialogue box closed.
Laser Printer 200 Seri es 6-5
Page 80

6
Working with the DOS printer tool s
Printing a test or demo page
Print out a test page in order to obtai n an overview of the current
configuration of the printer.
Print out a demo page in order to obtain an overview of all printer
functions.
➜ Select “Option“ from the menu bar and then the function “Test page“
or “Demo page“ in order to pr int out the appropriate pag e.
The page is printed out.
Changing the printer port
Change the setting for th e printer port if you have change d the pr inter
connection.
Select “Option – Connect port“ from the menu bar.
1
The “Connect port“ dialogue box appears.
Select the printer port to which the printer is connect ed.
2
Confirm with [OK].
3
The printer port is chan ged and the dialogue box closed.
6-6 Laser Printer 200 Series
Page 81

Working with the DOS printer tool s
6.3 Setup panel
This panel allows you to:
G specify the paper f o rmat,
G specify paper feed from different tra ys,
G specify fast or normal printing,
G specify the numb er of li nes printed per page,
G specify the numb er of copies,
G define the orientation of the paper,
G define the response in the case of format errors,
G define the paper format for paper feed tray 1.
6
Laser Printer 200 Seri es 6-7
Page 82

6
Working with the DOS printer tool s
Selecting a paper format
Use “Paper size“ to specif y the format of the printed page. The various
paper sizes support ed by your printer are shown in the dr opdown list.
The following formats have a fixed definition in the dropdown list:
Paper Size Envelopes Size
Letter 8.5× 11in. Env. Monarch 3.875× 7.5in.
Legal 8.5 ×14in. Env. COM10 4.125 ×9.5in.
Executive 7.25×10.5 in. Env. DL 110×220 mm
A4 210× 297mm Env. C5 162 × 229mm
A5 148× 210mm Env. B5 176 × 250mm
JIS B5 182× 257mm
✎
Not all paper formats availa ble?
If you have selec ted the option al paper feed tray 2 un der “Paper feed“,
then not all the paper formats given in the table are available.
6-8 Laser Printer 200 Series
Page 83

Working with the DOS printer tool s
Specifying the paper source
Under “Paper source“ you can specify which tray will feed the printer.
Paper source Description
Auto Printing paper is fed from all available trays
Tray 1 Printing paper is fed from tray 1
Tray 2* Printing paper is fed from tray 2
Manual feed Printing paper is fed into the printer through the manual
* optional paper source unit
✎
Not all paper formats availa ble?
If you have selec ted the optiona l paper feed tray 2 un der “Paper feed“,
then not all the paper formats given in the table are available.
Specifying fast or normal printing modes
You can shorten the time before the first page of a job is printed.
➜ Select “Fast print“ to maintain the fus ing unit at a high temperature.
This minimizes the time bef ore the first page is printed.
➜ Select “Normal print“ to allow the fusing unit to cool down when
printing is not in progr ess. In order t o print the f ir st page of a print job,
the fusing unit must first warm up again and so more time is required
for the first page.
feed unit.
To feed paper manually, place a sheet in the input and
press the control button.
6
Specifying the number of lines print ed per page
Enter the number of lines to be printed per page in the “Line/Page“ box.
Specifying the number of copies
In the “Copies“ box, specify the number of copies that you wish to print out.
You may enter any value between 1 and 999.
Laser Printer 200 Seri es 6-9
Page 84

6
Working with the DOS printer tool s
Specifying the orientation of the printing paper
Under “Orientation“ you can specify whether your document should be
printed in portrait (vertical) or la ndscape (horizontal ) f o rmat.
Portrait
Landscape
A
Defining th e response to format errors
The “Paper Time Out“ function allows you to define how the printer
responds to paper form at er rors.
➜ Select “Proceed“ to continue pr inting on the paper format already fed
into the machine.
➜ Select “Clear“ to automatically cancel the print job when a paper
format error is detected.
➜ Select “None“ to switch the printer to stand-by mode.
A
6-10 Laser Printer 200 Seri es
Page 85

Working with the DOS printer tool s
Specifying a paper format for pape r feed tray 1
You can specif y whether p aper feed t ray 1 is to b e used as a universal tray
or as a tray set to a certain format.
➜ Select “Multi purpose tray“ to be able to load all paper formats
supported by paper fee d tray 1.
➜ Select “Fixed cassett e“ to specify a certa in paper format f or paper f eed
tray 1.
Paper Size Envelopes Size
Letter 8.5× 11in. Env. Monarch 3.875×7.5in.
Legal 8.5 ×14in. Env. COM10 4.125 ×9.5in.
Executive 7.25×10.5 in. Env. DL 110×220 mm
A4 210× 297mm Env. C5 162 × 229mm
A5 148× 210mm Env. B5 176 × 250mm
✎
Settings
The settings for paper f eed tray 1 in the “Setup“ panel may be
overridden by the settings in other printing applications!
6
Env. JIS B5 182 × 257mm
Laser Printer 200 Seri es 6-11
Page 86

6
6.4 Font panel
This panel allows you to:
G determine the font (Type Face) which is to be used for the print-out,
G determine the character set (Symbol Set) which is to be used for the
print-out,
G determine the font size (Pitch) whi ch is to be used for the print-out.
Working with the DOS printer tool s
6-12 Laser Printer 200 Seri es
Page 87

Working with the DOS printer tool s
6.5 Output Quality panel
This panel allows you to:
G switch on/off the Toner Save mode,
G define the resolution for the print-out,
G define the print quality optimizati on for text and graphics,
G specify the toner density.
6
Laser Printer 200 Seri es 6-13
Page 88

6
Working with the DOS printer tool s
Switching Toner Save function on and off
You can reduce your printing costs with the “Toner Save“ feature.
Text and graphics are pri nted in grey in Toner Save mode. The purpose
of this is to use as little toner as possible. You can save on printi ng costs
by printing rough drafts and other preliminary materials in Toner Save
mode.
➜ Select “ON“ to print your doc um ents using a minimal amount of toner .
➜ Select “OFF“ to print your doc ument s with the nor mal amount of to ner.
Specifying the resolut ion
The print quality i s defi ned by means of the “Resolution“ function.
➜ Select “300dpi“ for normal print-outs, e.g. for text and graphics with
thick line elements.
➜ Select “600dpi“ for print-outs which requi re a high pr int qualit y, e.g. fo r
text and graphics with fine line elements.
Optimizing the print quality of text and graphics
Use this function to smooth the edges of text and graphic s and hence
optimize the print quality.
➜ Select “OFF“ to achieve an optimum print qualit y for photos (raster
graphics).
➜ “MEDIUM“ is the default setti ng and is adequate for most text and
graphics.
➜ Select “LIGHT“ to smooth the edges of te xt and grap hics by m eans of
a small num ber of dots. In the print-o ut this produces a softer transit ion
at the edges.
➜ Select “DARK“ to smooth the edges of text and graphics by means of
a large number of dots. In the print-out this produces a harder
transition at the edges.
6-14 Laser Printer 200 Seri es
Page 89

Working with the DOS printer tool s
Specifying the toner density
The amount of toner used is specified by means of the “Toner density“
function.
✎
High toner density = high toner consumption!
Increasing the toner densi ty produces a darke r print-out but increases
the consumption of toner.
6
Laser Printer 200 Seri es 6-15
Page 90

6
6.6 Counter panel
This panel allows you to:
G check the status of a counter,
G reset a counter.
Working with the DOS printer tool s
6-16 Laser Printer 200 Seri es
Page 91

Working with the DOS printer tool s
Checking the status of a counter
Counter Description
Total This indicates the total number of pages printed by the printer.
Drum This indicates how many pages have been printed with the
Toner This indicates how many pages have been printed with the
Tray 1 This indicates how many pages have been fed from paper feed
Manual feed unit This indicates how many pages have been fed via the manual
Tray 2 This indicates how many pages have been fed from paper feed
Resetting a counter
This resets the counter status to zero.
The “total counter“ status can only be reset by a customer service
engineer.
➜ Click on the [RESET] button adjacent the counter you wish to reset.
The associated counter is reset to zero.
This counter can only be reset by a customer service engineer.
current image transfer roller.
This counter should be reset after changing the image transfer
roller.
current toner cartridge.
This counter should be reset after changing the toner cartridge.
tray 1.
paper feed unit.
tray 2.
6
Laser Printer 200 Seri es 6-17
Page 92

6
6.7 Configuration panel
This panel summarizes the most important printer settings for qui ck
reference:
G Printer Name
The designation of the pri nter.
G Total Memory
Indicates the total memory available.
G Additional Accessories
Indicates presence and status of optional accessories.
No settings can be altered via this panel.
Working with the DOS printer tool s
6-18 Laser Printer 200 Seri es
Page 93

Working with the DOS printer tool s
6.8 Other panel
This panel allows you to:
G switch on/off the Power Save mode,
G switch on/off the detection of paper format errors,
G activate the page pr otection function,
G switch on/off the automatic continuat ion in the case of an error
message,
G define the input/output timeout.
6
Laser Printer 200 Seri es 6-19
Page 94

6
Working with the DOS printer tool s
Switching on/off the Power Save m ode
In order to save energy, th e printer automaticall y switches to the Power
Save mode after a certain period of inact ivity. When the printer receives a
new command or the control but ton is pressed while in this mode, the
printer automatically switches to the warm-up phase.
➜ Select “ON“ and enter a tim e period after which the printe r should
switch to the Power Save mode.
➜ Select “OFF“ to deactivate the Power Save mode function.
Switching on/off the paper format error detection
You can specify whether the printer should respond when t he paper fed
into the machine is dif ferent to the one set in the printer dri ver.
➜ Select “ON“ to detect paper format errors.
➜ Select “OFF“ to ignore paper format errors.
Activating page protection
With page protect ion activated, the printer reserves extra memory space
and waits until the data for a page has been completely loaded int o the
printer memory. Only then does the printing process begin.
➜ Select “AUTO“ to enable the printer to check each page of a pri nt j ob
in advance and activate page protection if necessary.
➜ Select “ON“ to enable the prin ter to always res erve suff icie nt memory
so that the data for one page can be complet ely load ed. This fu nction
requires min. 6 MB RAM for resolut ion of 600 x 600 dpi.
6-20 Laser Printer 200 Seri es
Page 95

Working with the DOS printer tool s
Switching on/off the automatic continuation function
A print job is interrupt ed if the printer signals a for m at error or memory
overflow. The “Auto con tinue“ fun ction ena bles you t o determi ne whether
the print job should con tinue automaticall y after a certain time has el apsed
despite the presen ce of an error message.
➜ Select “ON“ and enter a time period after which the a print job should
be automatically continued despite the err or.
➜ Select “OFF“ to suppress t he automatic continuat ion function.
Specifying the input/o utput timeout
An input/output timeout occurs when the printer cannot detect the end
data code of a print job sent from the computer. The print job is
automatically cancelled in the case of an input /output timeout.
➜ Enter the number of seconds within which the printer must detect the
end of a print job.
6
Laser Printer 200 Seri es 6-21
Page 96

6
Working with the DOS printer tool s
6-22 Laser Printer 200 Seri es
Page 97

Working with the printer
7 Working with the pr inter
7.1 Please note the following points:
What should I watch out for when loading paper?
To avoid paper mi sfeeds in the l aser pr inter , ple ase o bserve t he fol lowi ng
points:
G Do not use any paper with the following features:
❍ Paper that has already been used in a thermal or ink-jet printer.
❍ Creased or wavy paper.
❍ Paper with a surface that is too smooth, too r ough or irregular.
❍ Specially coated paper such as carbon paper or paper with an
adhesive surface.
❍ Paper that is not cut at right-angles.
❍ Paper that is held together by glue, adhesive or clips.
❍ Paper with labels that detach easily.
❍ Warped or curled-up postcards.
G Please not e that t he stack of paper i n the paper tray sh ould not e xceed
the "max ." mark.
7
What should I watch out for when loading envelopes?
To avoid envelope misf eeds in the laser printer, please observe the
following points:
G Do not use self-adhesive envelopes or those with a tear-off strip,
closures or a window.
G Place the env elopes in the t ray with the flap do wn and facing to the left.
G Make sure that the flaps are neatly folded back.
✎
Test envelopes before buying large quantities!
Some types of envelopes cr ease easily when they are run through a
printer. Test a type of envelope before purchasing large quantities.
Laser Printer 200 Seri es 7-1
Page 98

7
Working with the printer
Which sizes of paper can I use?
This printer is only designed for use with the sizes of paper listed below.
Paper Source
Paper size
Standard sizes
A4
210× 297mm
A5
148× 210mm
JIS B5
182× 257mm
Letter
215.9×279.4mm
Legal
215.9×355.6mm
Executive
184.2×266.7mm
Envelopes and custom sizes
Envelope COM10
104.8×241.3mm
Envelope DL
110× 220mm
Envelope C5
162× 250mm
Envelope B5
176× 250mm
Envelope Monarch
98.4× 190.5mm
Custom
76- 216mm ×
127- 356mm
* The optional 2nd paper feed tray is suplied with a DIN A4 cassette as standard. Other
cassettes for paper sizes JIS B5, Letter, Legal and Executive are available as options.
Feed tray 1* Feed tray 2
Yes Yes Yes
Yes No Yes
Yes Yes Yes
Yes Yes Yes
Yes Yes Yes
Yes Yes Yes
Yes No Yes
Yes No Yes
Yes No Yes
Yes No Yes
Yes No Yes
Yes No Yes
(optional)
Manual feed unit
7-2 Laser Printer 200 Series
Page 99

Working with the printer
What types of paper can I use?
This printer is only designed for use with the types of paper listed below.
Paper size
Plain paper
60 to 90g/m
Recycled paper
60 to 90 g/m
Transparent film Yes No Yes
Labels Yes No Yes
Letterheads Yes No Yes
Envelopes No No Yes
Card or thick paper
91 to 163 g/m
2
2
2
Printable area
Paper Source
Feed tray 1 Feed tray 2
Yes Yes Yes
Yes Yes Yes
Yes No Yes
(optional)
Manual feed unit
7
4 mm4 mm
4 mm
Printable area
4 mm
Laser Printer 200 Seri es 7-3
Page 100

7
7.2 Using the control button
The control panel has three indicator lamps and one control button.
No. Description No. Description
1 Fault lamp (amber) 3 Stand-by lamp (green)
2 Paper lamp (amber) 4 Control button
Working with the printer
1
2
3
4
The control button all ows you to:
G reset t he counter for the toner cart ri dge,
G reset t he counter for the image transf er roller,
G cancel a print job,
G print out t he configuration page,
G continue a print job after an error mesage.
7-4 Laser Printer 200 Series
 Loading...