

Page 1

Instruction Handbook
Advanced
DC 2325
Digital Multifunctional
System
Page 2

Introduction
Thank you for your purchase of
Th
is Advanced Operation Guide is intended to help you operate the
machine correctly, perform routine maintenance and take a simple
troubleshooting action as necessary, so that you can always use the
machine in good condition.
Please read this Advanced Operation Guide before you start using the
machine, and keep it close to the machine for easy reference.
DC 2325.
Page 3

Legal and Safety Information
Please read this information before using your machine. This
chapter provides information on the following topics.
• Legal Information..............................................................ii
• Regarding Trade Names ................................................. iii
ADVANCED OPERATION GUIDE i
Page 4

Legal Information
Legal Restriction on Copying/Scanning
Copying or other reproduction of all or part of this guide without the prior
written consent of
• It may be prohibited to copy/scan copyrighted material without
permission of the copyright owner.
• It is prohibited under any circumstances to copy/scan domestic or
foreign currencies.
• Local laws and regulations may prohibit or restrict copying/scanning of
other items not mentioned above.
UTAX GmbH is prohibited.
ii ADVANCED OPERATION GUIDE
Page 5

Regarding Trade Names
• KPDL is a trademark of Kyocera Corporation.
• Microsoft, MS-DOS, Windows, Windows NT and Internet Explorer are
registered trademarks of Microsoft Corporation in the U.S.A. and/or
other countries.
• Windows Me, Window XP and Windows Vista are trademarks of
Microsoft Corporation.
• PCL is a trademark of Hewlett-Packard Company.
• Adobe Acrobat, Adobe Reader and PostScript are trademarks of
Adobe Systems, Incorporated.
• Ethernet is a registered trademark of Xerox Corporation.
• Novell and NetWare are registered trademarks of Novell, Inc.
• Centronics is a trademark of Centronics Data Computer Corporation.
• IBM and IBM PC/AT are trademarks of International Business
Machines Corporation.
• Power PC is a trademark of IBM in the U.S.A. and/or other countries.
• AppleTalk is a registered trademark of Apple Computer, Inc.
• CompactFlash and CF are trademarks of SanDisk, Inc.
• PC-PR201/65A is a product of NEC Corporation.
• VP-1000 is a product of Seiko Epson Corporation.
• This machine has been developed using embedded real-time
operating system Tornado™ by Wind River Systems, Inc.
• PCL6, a command language of HP LaserJet emulated by this
machine, is using the compatible system PeerlessPrintXL developed
by Peerless Systems Corporation. PeerlessPrintXL is a trademark of
Peerless Systems Corporation (2381 Rosecrans Ave. ElSegundo, CA
90245, U.S.A.).
• TrueType is a registered trademark of Apple Computer, Inc.
• Heisei fonts have been developed by the working groups in
collaboration with the Japanese Standards Association. Reproduction
of these fonts without permission is prohibited.
• TypeBankG-B, TypeBankM-M and Typebank-OCR are trademarks of
TypeBank
• All European language fonts installed in this machine are used under
licensing agreement with Monotype Imaging Inc.
• Helvetica, Palatino and Times are registered trademarks of Linotype-
Hell AG.
• ITC Avant Garde Gothic, ITC Bookman, ITC ZapfChancery and ITC
ZapfDingbats are registered trademarks of International Type-face
Corporation.
• UFST™ MicroType
this machine.
• This machine contains the NF module developed by ACCESS Co.,
Ltd.
®
.
®
fonts by Monotype Imaging Inc. are installed in
ADVANCED OPERATION GUIDE iii
Page 6

• This machine contains the software having modules developed by
Independent JPEG Group.
All other brands and product names are registered trademarks or
trademarks of their respective companies. The designations ™ and ® will
not be used in this Operation Guide.
GPL
Firmware of this machine is using in part the GPL applied codes
(www.fsf.org/copyleft/gpl.html). Please access
“http://www.kyoceramita.com/gpl” for more information on how to make
GPL applied codes available.
iv ADVANCED OPERATION GUIDE
Page 7

About this Operation Guide
This Operation Guide contains the following chapters.
1 Copying Functions
Describes the functions you can use when copying.
2 Sending Functions
Describes the functions you can use when sending originals.
3Printer
Explains how to connect to a computer and how to specify the settings for
using the machine's printer function.
4 Using Document Box
Describes some typical ways of using the Document Box.
5 Status/Job Cancel
Explains how to check the job status and job history and how to cancel jobs
being printed or waiting to print.
Also explains how to check the remaining paper and device status and how
to cancel fax transmission.
6 System Menu
Describes the System Menu options for general machine operation.
7 Management
Explains user login administration and job accounting.
Also describes the procedure for Security Kit installation.
8 Security
Describes the procedures for correctly installing and running the optional
Security Kit and provides precautionary notes.
Appendix
Provides information on media types and paper sizes. Also includes a
glossary of terms.
ADVANCED OPERATION GUIDE v
Page 8
Included Guides
The following guides are supplied with the machine. Refer to them as
necessary.
Operation Guide
Describes how to load paper, basic copy, print and scan operations, and
troubleshooting.
Advanced Operation Guide (This Guide)
Explains copying, printing and scanning features in depth, as well as
default settings.
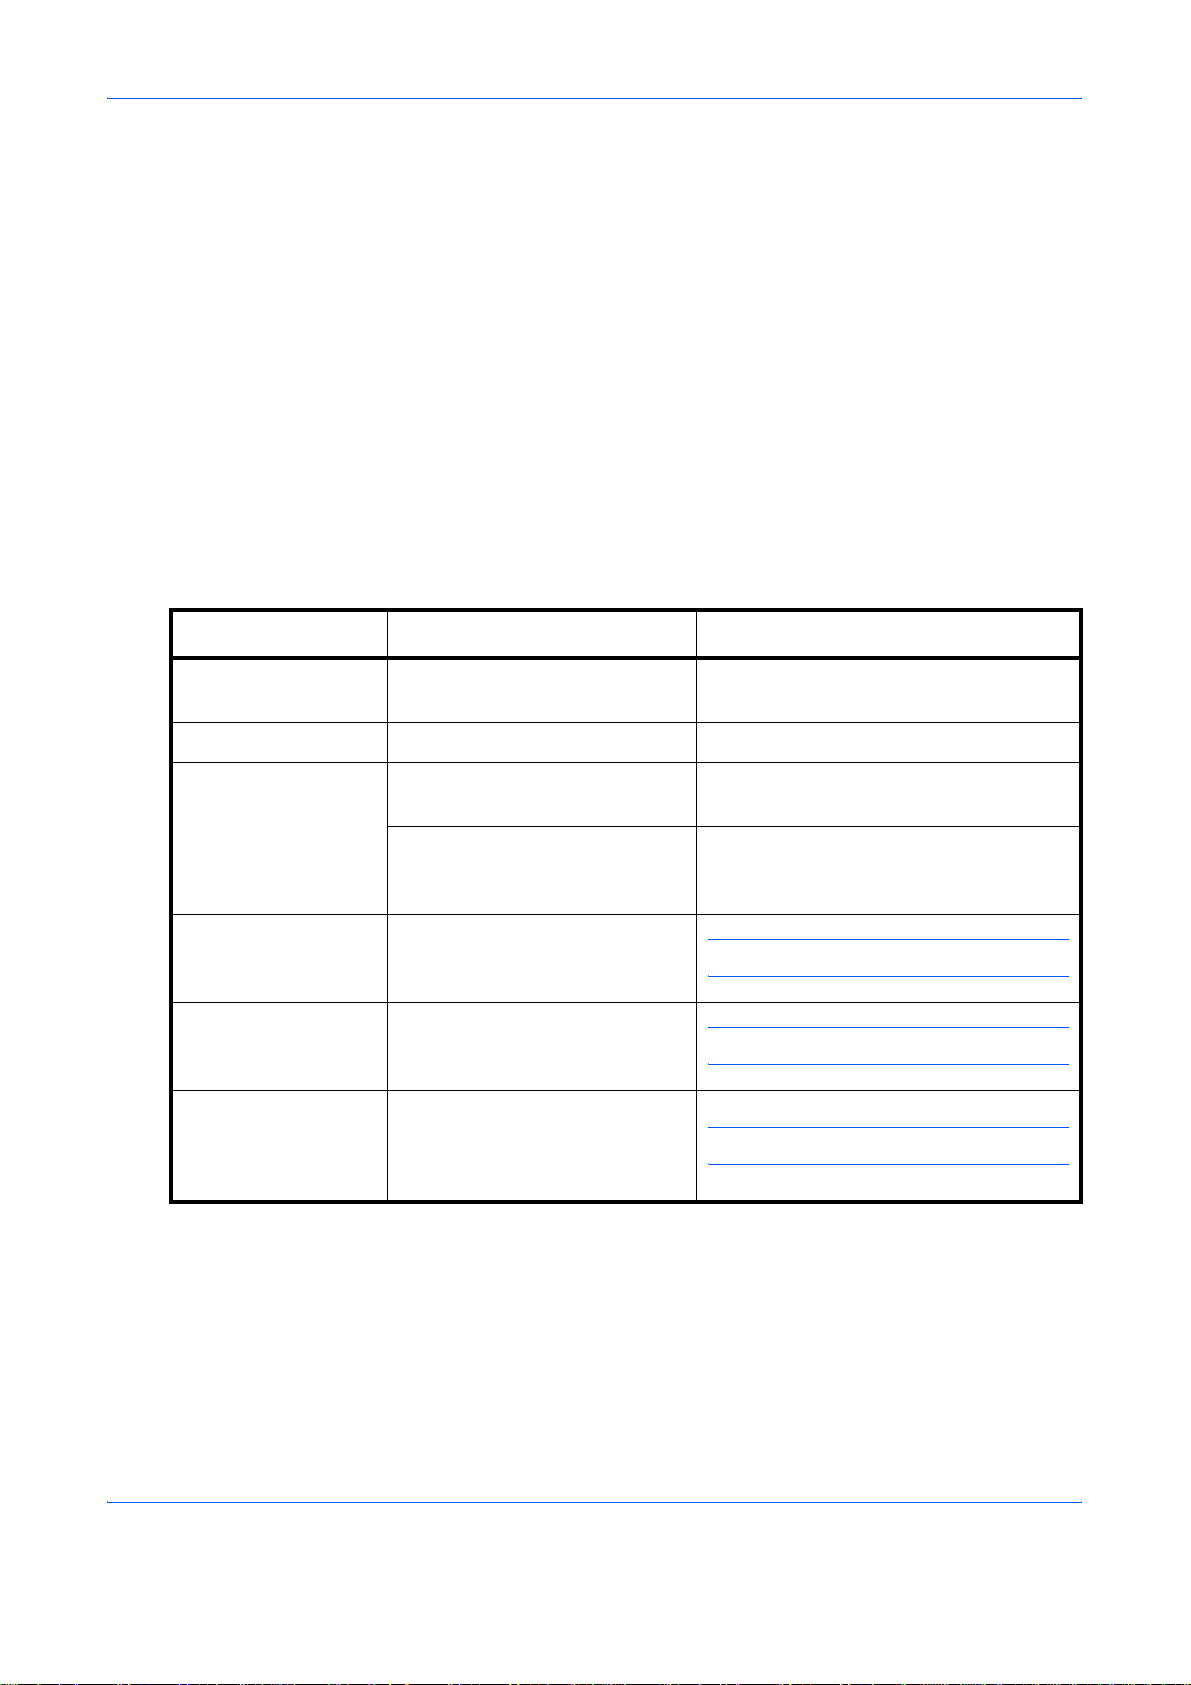
Conventions in This Guide
The following conventions are used depending on the nature of the
description.
Convention Description Example
Bold Indicates the operation panel
key or a computer screen.
[Regular] Indicates the touch panel keys. Press [OK].
Italic Indicates the message
displayed on the touch panel.
Used to emphasize a key word,
phrase or references to
additional information.
Note Indicates supplemental
information or operations for
reference.
Important Indicates items that are required
or prohibited so as to avoid
problems.
Caution Indicates what must be
observed to prevent injury or
machine breakdown and how to
deal with it.
Press the Start key.
Ready to copy is displayed.
For more information refer to Sleep and
Auto Sleep on page 3-4.
NOTE:
IMPORTANT:
CAUTION:
vi ADVANCED OPERATION GUIDE
Page 9

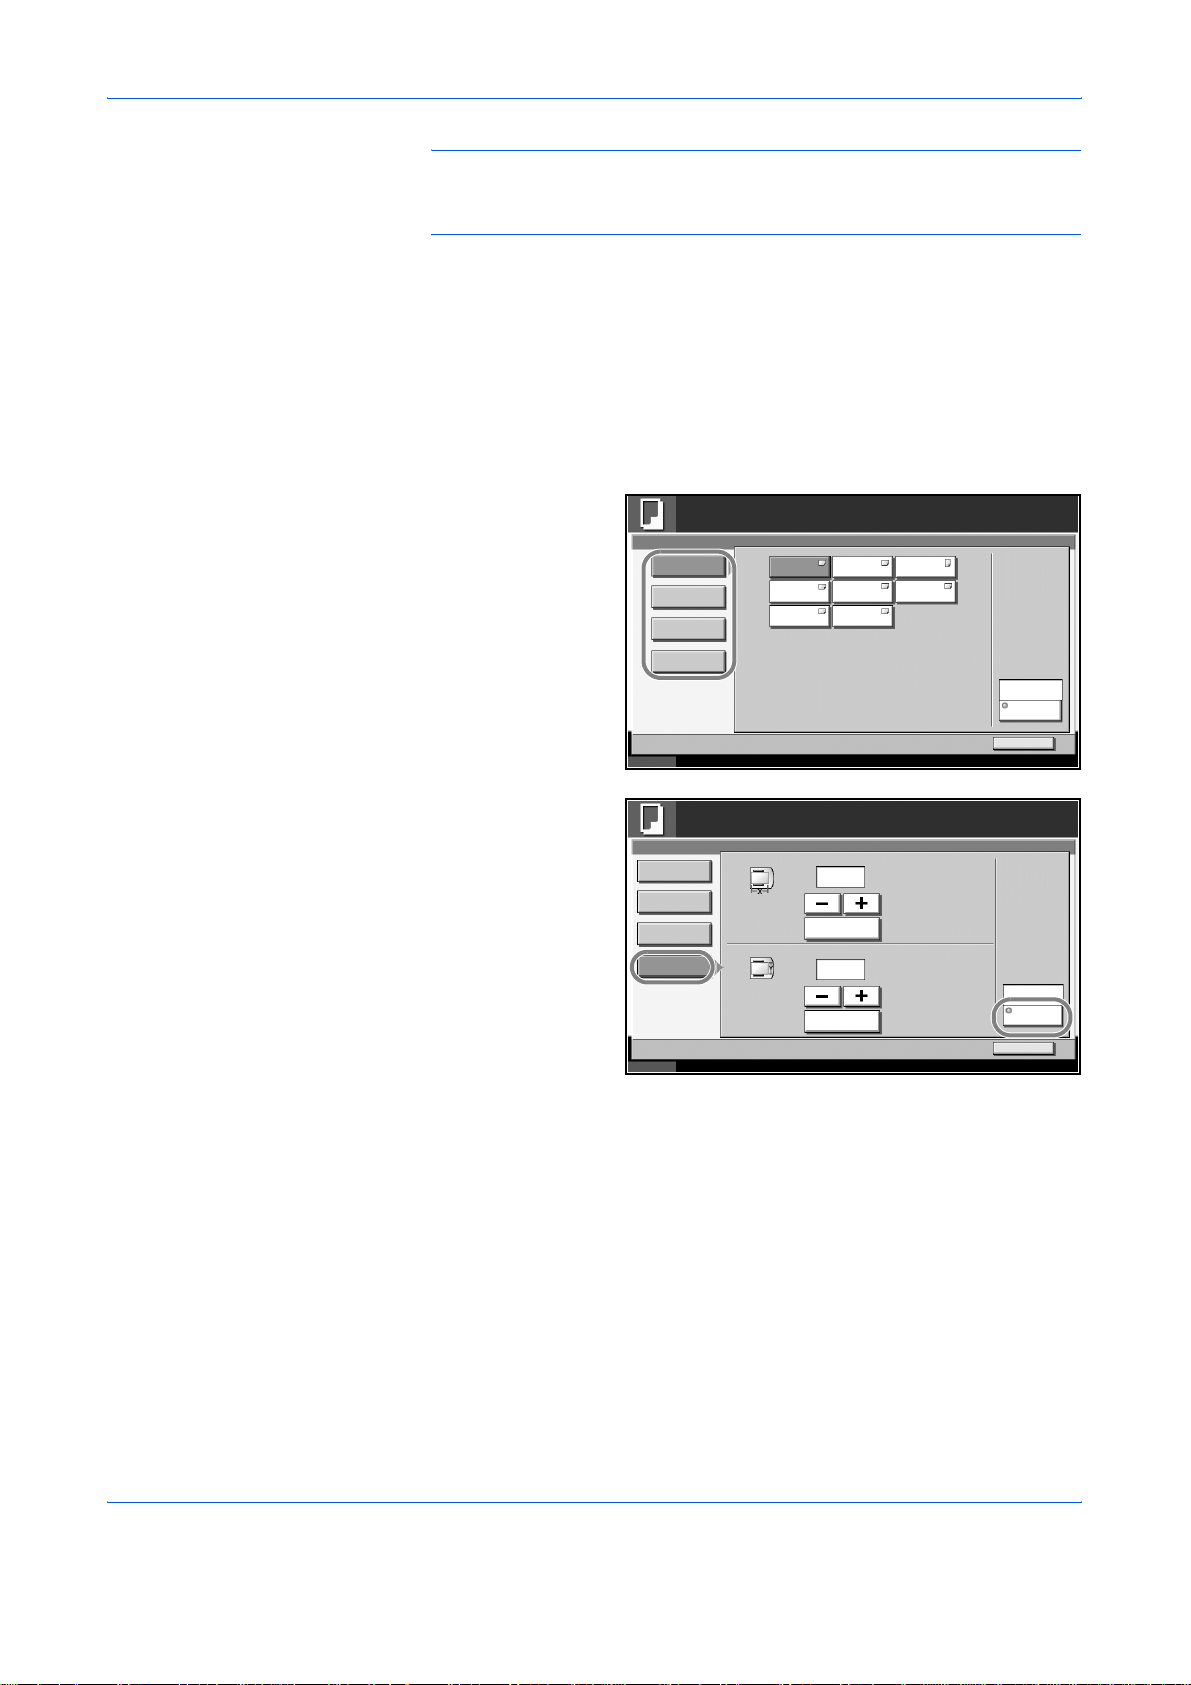
Description of Operation Procedure
In this Operation Guide, continuous operation of the keys on the touch
panel is as follows:
Actual procedure
Press [Copy].
T
Press [Change] of Quick Setup.
T
Press [T] twice.
T
Press [Change] of Original Image.
Description in this
Operation Guide
Press [Copy], [Change] of Quick
Setup, [T] twice, and then
[Change] of Original Image.
ADVANCED OPERATION GUIDE vii
Page 10

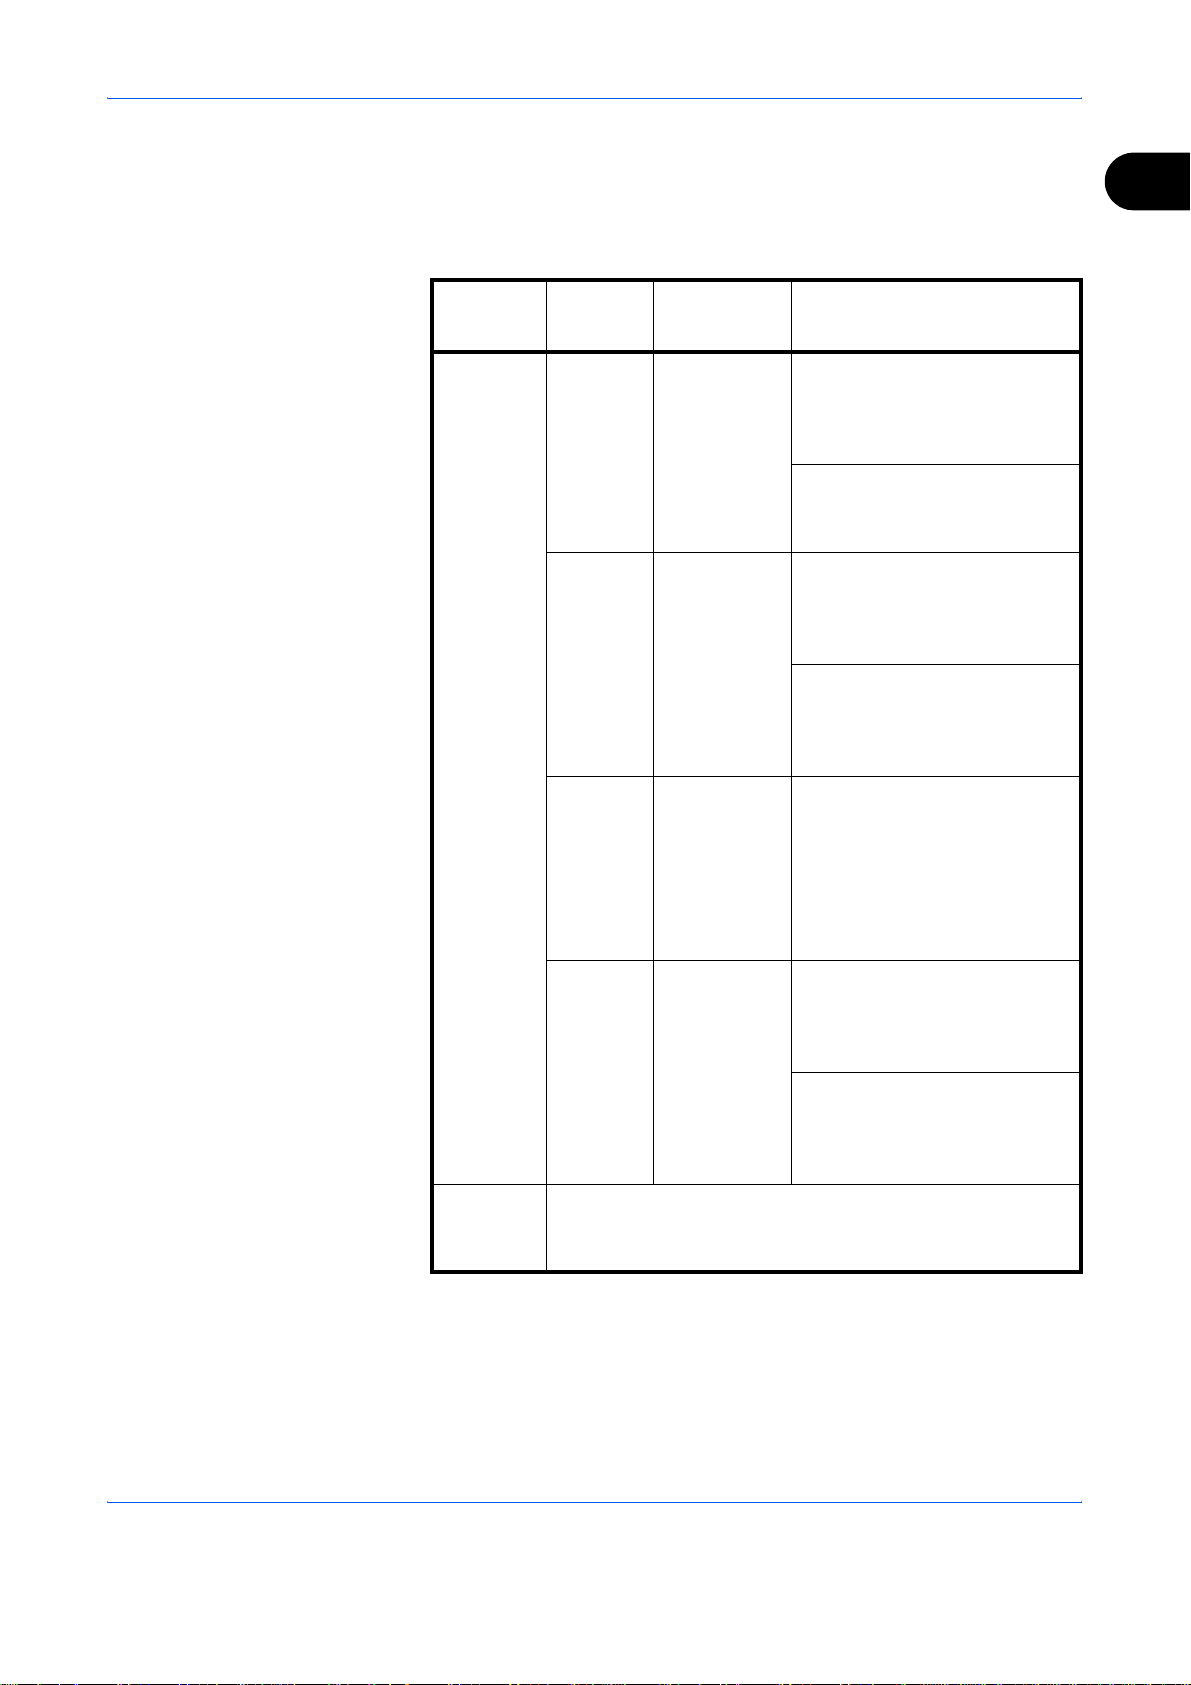
Originals and Paper Sizes
This section explains the notation used in this guide when referring to sizes
of originals or paper sizes.
As in A4, B5 and Letter, which may be used either in the horizontal or
vertical direction, horizontal direction is indicated by an additional R
character in order to indicate the orientation of the original/paper.
Set direction Indicated size *
Vertical direction A4, B5, A5, B6,
B B
A A
Original Paper
A6, 16K, Letter,
Statement
For original/paper, dimension A is longer than B.
Horizontal direction A4-R, B5-R, A5-R,
A
For original/paper, dimension A is shorter than B.
* The size of original/paper that can be used depends on the function
Icons on the Touch Panel
The following icons are used to indicate originals and paper set directions
on the touch panel.
Set direction Originals Paper
B B
A
Original Paper
and source tray. For further details, refer to the page detailing that
function or source tray.
B6-R, A6-R, 16KR, Letter-R,
Statement-R
Vertical direction
Horizontal direction
viii ADVANCED OPERATION GUIDE
Page 11

Contents
Legal and Safety Information . . . . . . . . . . . . . . . . . . . . . . . . . . . . . . . . . . . . . . . . . . . . . . . . . . . . . i
About this Operation Guide. . . . . . . . . . . . . . . . . . . . . . . . . . . . . . . . . . . . . . . . . . . . . . . . . . . . . . . v
1 Copying Functions
Original Size . . . . . . . . . . . . . . . . . . . . . . . . . . . . . . . . . . . . . . . . . . . . . . . . . . . . . . . . . . . . . . . . 1-2
Paper Selection. . . . . . . . . . . . . . . . . . . . . . . . . . . . . . . . . . . . . . . . . . . . . . . . . . . . . . . . . . . . . . 1-4
Mixed Sized Originals . . . . . . . . . . . . . . . . . . . . . . . . . . . . . . . . . . . . . . . . . . . . . . . . . . . . . . . . . 1-7
Original Orientation . . . . . . . . . . . . . . . . . . . . . . . . . . . . . . . . . . . . . . . . . . . . . . . . . . . . . . . . . . 1-10
Collate/Offset Copying . . . . . . . . . . . . . . . . . . . . . . . . . . . . . . . . . . . . . . . . . . . . . . . . . . . . . . . 1-12
Staple . . . . . . . . . . . . . . . . . . . . . . . . . . . . . . . . . . . . . . . . . . . . . . . . . . . . . . . . . . . . . . . . . . . . 1-14
Output Destination . . . . . . . . . . . . . . . . . . . . . . . . . . . . . . . . . . . . . . . . . . . . . . . . . . . . . . . . . . 1-16
Zoom Mode . . . . . . . . . . . . . . . . . . . . . . . . . . . . . . . . . . . . . . . . . . . . . . . . . . . . . . . . . . . . . . . . 1-17
Combine Mode . . . . . . . . . . . . . . . . . . . . . . . . . . . . . . . . . . . . . . . . . . . . . . . . . . . . . . . . . . . . . 1-20
Margin/Centering Mode. . . . . . . . . . . . . . . . . . . . . . . . . . . . . . . . . . . . . . . . . . . . . . . . . . . . . . . 1-23
Border Erase . . . . . . . . . . . . . . . . . . . . . . . . . . . . . . . . . . . . . . . . . . . . . . . . . . . . . . . . . . . . . . . 1-25
Booklet from Sheets . . . . . . . . . . . . . . . . . . . . . . . . . . . . . . . . . . . . . . . . . . . . . . . . . . . . . . . . . 1-28
Duplex. . . . . . . . . . . . . . . . . . . . . . . . . . . . . . . . . . . . . . . . . . . . . . . . . . . . . . . . . . . . . . . . . . . . 1-31
Cover Mode. . . . . . . . . . . . . . . . . . . . . . . . . . . . . . . . . . . . . . . . . . . . . . . . . . . . . . . . . . . . . . . . 1-35
Form Overlay . . . . . . . . . . . . . . . . . . . . . . . . . . . . . . . . . . . . . . . . . . . . . . . . . . . . . . . . . . . . . . 1-36
Page Numbering . . . . . . . . . . . . . . . . . . . . . . . . . . . . . . . . . . . . . . . . . . . . . . . . . . . . . . . . . . . . 1-38
Memo Mode . . . . . . . . . . . . . . . . . . . . . . . . . . . . . . . . . . . . . . . . . . . . . . . . . . . . . . . . . . . . . . . 1-40
Density Adjustment . . . . . . . . . . . . . . . . . . . . . . . . . . . . . . . . . . . . . . . . . . . . . . . . . . . . . . . . . . 1-42
Image Quality . . . . . . . . . . . . . . . . . . . . . . . . . . . . . . . . . . . . . . . . . . . . . . . . . . . . . . . . . . . . . . 1-43
EcoPrint. . . . . . . . . . . . . . . . . . . . . . . . . . . . . . . . . . . . . . . . . . . . . . . . . . . . . . . . . . . . . . . . . . . 1-44
Continuous Scan. . . . . . . . . . . . . . . . . . . . . . . . . . . . . . . . . . . . . . . . . . . . . . . . . . . . . . . . . . . . 1-45
Auto Image Rotation . . . . . . . . . . . . . . . . . . . . . . . . . . . . . . . . . . . . . . . . . . . . . . . . . . . . . . . . . 1-47
Negative Image . . . . . . . . . . . . . . . . . . . . . . . . . . . . . . . . . . . . . . . . . . . . . . . . . . . . . . . . . . . . . 1-48
Mirror Image . . . . . . . . . . . . . . . . . . . . . . . . . . . . . . . . . . . . . . . . . . . . . . . . . . . . . . . . . . . . . . . 1-49
Job Finish Notice. . . . . . . . . . . . . . . . . . . . . . . . . . . . . . . . . . . . . . . . . . . . . . . . . . . . . . . . . . . . 1-50
File Name . . . . . . . . . . . . . . . . . . . . . . . . . . . . . . . . . . . . . . . . . . . . . . . . . . . . . . . . . . . . . . . . . 1-52
Priority Override . . . . . . . . . . . . . . . . . . . . . . . . . . . . . . . . . . . . . . . . . . . . . . . . . . . . . . . . . . . . 1-53
Repeat Copy . . . . . . . . . . . . . . . . . . . . . . . . . . . . . . . . . . . . . . . . . . . . . . . . . . . . . . . . . . . . . . . 1-54
Programm (Copying and Sending) . . . . . . . . . . . . . . . . . . . . . . . . . . . . . . . . . . . . . . . . . . . . . . 1-56
Registering Shortcuts (Copying and Sending) . . . . . . . . . . . . . . . . . . . . . . . . . . . . . . . . . . . . . 1-58
Contents
2 Sending Functions
Original Size Selection . . . . . . . . . . . . . . . . . . . . . . . . . . . . . . . . . . . . . . . . . . . . . . . . . . . . . . . . 2-2
Sending Size Selection . . . . . . . . . . . . . . . . . . . . . . . . . . . . . . . . . . . . . . . . . . . . . . . . . . . . . . . . 2-4
Zoom . . . . . . . . . . . . . . . . . . . . . . . . . . . . . . . . . . . . . . . . . . . . . . . . . . . . . . . . . . . . . . . . . . . . . . 2-6
Centering. . . . . . . . . . . . . . . . . . . . . . . . . . . . . . . . . . . . . . . . . . . . . . . . . . . . . . . . . . . . . . . . . . . 2-7
Mixed Sized Originals . . . . . . . . . . . . . . . . . . . . . . . . . . . . . . . . . . . . . . . . . . . . . . . . . . . . . . . . . 2-8
1-sided/2-sided Selection . . . . . . . . . . . . . . . . . . . . . . . . . . . . . . . . . . . . . . . . . . . . . . . . . . . . . 2-11
Original Orientation . . . . . . . . . . . . . . . . . . . . . . . . . . . . . . . . . . . . . . . . . . . . . . . . . . . . . . . . . . 2-12
File Format . . . . . . . . . . . . . . . . . . . . . . . . . . . . . . . . . . . . . . . . . . . . . . . . . . . . . . . . . . . . . . . . 2-14
PDF Encryption Functions . . . . . . . . . . . . . . . . . . . . . . . . . . . . . . . . . . . . . . . . . . . . . . . . . . . . 2-16
File Separation . . . . . . . . . . . . . . . . . . . . . . . . . . . . . . . . . . . . . . . . . . . . . . . . . . . . . . . . . . . . . 2-19
Image Quality . . . . . . . . . . . . . . . . . . . . . . . . . . . . . . . . . . . . . . . . . . . . . . . . . . . . . . . . . . . . . . 2-20
Scan Density . . . . . . . . . . . . . . . . . . . . . . . . . . . . . . . . . . . . . . . . . . . . . . . . . . . . . . . . . . . . . . . 2-21
Scan Resolution . . . . . . . . . . . . . . . . . . . . . . . . . . . . . . . . . . . . . . . . . . . . . . . . . . . . . . . . . . . . 2-22
Sharpness . . . . . . . . . . . . . . . . . . . . . . . . . . . . . . . . . . . . . . . . . . . . . . . . . . . . . . . . . . . . . . . . . 2-23
ADVANCED OPERATION GUIDE ix
Page 12

Contents
Background Density Adjustment . . . . . . . . . . . . . . . . . . . . . . . . . . . . . . . . . . . . . . . . . . . . . . . . 2-24
Color / Grayscale / Monochrome Selection. . . . . . . . . . . . . . . . . . . . . . . . . . . . . . . . . . . . . . . . 2-25
Continuous Scan. . . . . . . . . . . . . . . . . . . . . . . . . . . . . . . . . . . . . . . . . . . . . . . . . . . . . . . . . . . . 2-26
Border Erase . . . . . . . . . . . . . . . . . . . . . . . . . . . . . . . . . . . . . . . . . . . . . . . . . . . . . . . . . . . . . . . 2-27
Enter Document Name/File Name . . . . . . . . . . . . . . . . . . . . . . . . . . . . . . . . . . . . . . . . . . . . . . 2-30
Enter E-mail Subject and Body . . . . . . . . . . . . . . . . . . . . . . . . . . . . . . . . . . . . . . . . . . . . . . . . . 2-31
Finish Notice . . . . . . . . . . . . . . . . . . . . . . . . . . . . . . . . . . . . . . . . . . . . . . . . . . . . . . . . . . . . . . . 2-32
Send and Print . . . . . . . . . . . . . . . . . . . . . . . . . . . . . . . . . . . . . . . . . . . . . . . . . . . . . . . . . . . . . 2-34
Send and Store . . . . . . . . . . . . . . . . . . . . . . . . . . . . . . . . . . . . . . . . . . . . . . . . . . . . . . . . . . . . . 2-35
3Printer
Emulation . . . . . . . . . . . . . . . . . . . . . . . . . . . . . . . . . . . . . . . . . . . . . . . . . . . . . . . . . . . . . . . . . . 3-2
Setting of Other Printers . . . . . . . . . . . . . . . . . . . . . . . . . . . . . . . . . . . . . . . . . . . . . . . . . . . . . . . 3-7
4 Using Document Box
What is Document Box? . . . . . . . . . . . . . . . . . . . . . . . . . . . . . . . . . . . . . . . . . . . . . . . . . . . . . . . 4-2
Basic Operation for Document Box. . . . . . . . . . . . . . . . . . . . . . . . . . . . . . . . . . . . . . . . . . . . . . . 4-5
Using a Job Box . . . . . . . . . . . . . . . . . . . . . . . . . . . . . . . . . . . . . . . . . . . . . . . . . . . . . . . . . . . . 4-21
5 Status / Job Cancel
Checking Job Status . . . . . . . . . . . . . . . . . . . . . . . . . . . . . . . . . . . . . . . . . . . . . . . . . . . . . . . . . . 5-2
Checking Job History . . . . . . . . . . . . . . . . . . . . . . . . . . . . . . . . . . . . . . . . . . . . . . . . . . . . . . . . 5-10
Pause and Resumption of Jobs . . . . . . . . . . . . . . . . . . . . . . . . . . . . . . . . . . . . . . . . . . . . . . . . 5-13
Canceling of Jobs . . . . . . . . . . . . . . . . . . . . . . . . . . . . . . . . . . . . . . . . . . . . . . . . . . . . . . . . . . . 5-14
Priority Override for Waiting Jobs . . . . . . . . . . . . . . . . . . . . . . . . . . . . . . . . . . . . . . . . . . . . . . . 5-14
Reordering Print Jobs . . . . . . . . . . . . . . . . . . . . . . . . . . . . . . . . . . . . . . . . . . . . . . . . . . . . . . . . 5-15
Checking the Remaining Amount of Toner and Paper . . . . . . . . . . . . . . . . . . . . . . . . . . . . . . . 5-16
Device/Communication . . . . . . . . . . . . . . . . . . . . . . . . . . . . . . . . . . . . . . . . . . . . . . . . . . . . . . . 5-17
6System Menu
Return to Top on the System Menu. . . . . . . . . . . . . . . . . . . . . . . . . . . . . . . . . . . . . . . . . . . . . . . 6-2
Common Settings . . . . . . . . . . . . . . . . . . . . . . . . . . . . . . . . . . . . . . . . . . . . . . . . . . . . . . . . . . . . 6-2
Copy Settings . . . . . . . . . . . . . . . . . . . . . . . . . . . . . . . . . . . . . . . . . . . . . . . . . . . . . . . . . . . . . . 6-38
Sending Settings . . . . . . . . . . . . . . . . . . . . . . . . . . . . . . . . . . . . . . . . . . . . . . . . . . . . . . . . . . . . 6-44
Document Box/Removable Memory Settings . . . . . . . . . . . . . . . . . . . . . . . . . . . . . . . . . . . . . . 6-46
Printer Settings . . . . . . . . . . . . . . . . . . . . . . . . . . . . . . . . . . . . . . . . . . . . . . . . . . . . . . . . . . . . . 6-48
Network Setup. . . . . . . . . . . . . . . . . . . . . . . . . . . . . . . . . . . . . . . . . . . . . . . . . . . . . . . . . . . . . . 6-56
Printing Reports/Sending Notice . . . . . . . . . . . . . . . . . . . . . . . . . . . . . . . . . . . . . . . . . . . . . . . . 6-59
Adjustment/Maintenance. . . . . . . . . . . . . . . . . . . . . . . . . . . . . . . . . . . . . . . . . . . . . . . . . . . . . . 6-63
Date/Timer . . . . . . . . . . . . . . . . . . . . . . . . . . . . . . . . . . . . . . . . . . . . . . . . . . . . . . . . . . . . . . . . 6-71
Editing Destination (Address Book/Adding One-Touch Keys). . . . . . . . . . . . . . . . . . . . . . . . . . 6-78
System Initialization . . . . . . . . . . . . . . . . . . . . . . . . . . . . . . . . . . . . . . . . . . . . . . . . . . . . . . . . . 6-87
Restarting the System. . . . . . . . . . . . . . . . . . . . . . . . . . . . . . . . . . . . . . . . . . . . . . . . . . . . . . . . 6-88
SSL Network Security . . . . . . . . . . . . . . . . . . . . . . . . . . . . . . . . . . . . . . . . . . . . . . . . . . . . . . . . 6-89
Accessibility (Enlarged Touch Panel Display) . . . . . . . . . . . . . . . . . . . . . . . . . . . . . . . . . . . . . . 6-90
7 Management
User Login Administration . . . . . . . . . . . . . . . . . . . . . . . . . . . . . . . . . . . . . . . . . . . . . . . . . . . . . . 7-2
Job Accounting . . . . . . . . . . . . . . . . . . . . . . . . . . . . . . . . . . . . . . . . . . . . . . . . . . . . . . . . . . . . . 7-11
Security Kit Operations . . . . . . . . . . . . . . . . . . . . . . . . . . . . . . . . . . . . . . . . . . . . . . . . . . . . . . . 7-24
x ADVANCED OPERATION GUIDE
Page 13

8Security
Security Kit Functions . . . . . . . . . . . . . . . . . . . . . . . . . . . . . . . . . . . . . . . . . . . . . . . . . . . . . . . . . 8-2
Touch Panel Display after the Security Kit is Installed . . . . . . . . . . . . . . . . . . . . . . . . . . . . . . . . 8-4
Installing the Security Kit. . . . . . . . . . . . . . . . . . . . . . . . . . . . . . . . . . . . . . . . . . . . . . . . . . . . . . . 8-5
Changing Security Functions . . . . . . . . . . . . . . . . . . . . . . . . . . . . . . . . . . . . . . . . . . . . . . . . . . . 8-6
System Initialization . . . . . . . . . . . . . . . . . . . . . . . . . . . . . . . . . . . . . . . . . . . . . . . . . . . . . . . . . . 8-8
Warning Message . . . . . . . . . . . . . . . . . . . . . . . . . . . . . . . . . . . . . . . . . . . . . . . . . . . . . . . . . . . . 8-9
Appendix
Paper. . . . . . . . . . . . . . . . . . . . . . . . . . . . . . . . . . . . . . . . . . . . . . . . . . . . . . . . . . . . . . . .Appendix-2
Glossary . . . . . . . . . . . . . . . . . . . . . . . . . . . . . . . . . . . . . . . . . . . . . . . . . . . . . . . . . . . . .Appendix-9
Index . . . . . . . . . . . . . . . . . . . . . . . . . . . . . . . . . . . . . . . . . . . . . . . . . . . . . . . . . . . . . . . . . . .Index-1
Contents
ADVANCED OPERATION GUIDE xi
Page 14

Contents
xii ADVANCED OPERATION GUIDE
Page 15

1 Copying Functions
This chapter explains the functions available for copying.
• Original Size................................................................. 1-2
• Paper Selection............................................................ 1-4
• Mixed Sized Originals................................................... 1-7
• Original Orientation .................................................... 1-10
• Collate/Offset Copying ............................................... 1-12
• Staple ......................................................................... 1-14
• Output Destination...................................................... 1-16
• Zoom Mode ................................................................ 1-17
• Combine Mode........................................................... 1-20
• Margin/Centering Mode.............................................. 1-23
• Border Erase .............................................................. 1-25
• Booklet from Sheets ................................................... 1-28
• Duplex ........................................................................ 1-31
• Cover Mode................................................................ 1-35
• Form Overlay.............................................................. 1-36
• Page Numbering ........................................................ 1-38
• Memo Mode ............................................................... 1-40
• Density Adjustment .................................................... 1-42
• Image Quality ............................................................. 1-43
• EcoPrint...................................................................... 1-44
• Continuous Scan........................................................ 1-45
• Auto Image Rotation................................................... 1-47
• Negative Image .......................................................... 1-48
• Mirror Image............................................................... 1-49
• Job Finish Notice........................................................ 1-50
• File Name................................................................... 1-52
• Priority Override ......................................................... 1-53
• Repeat Copy .............................................................. 1-54
• Programm (Copying and Sending)............................. 1-56
• Registering Shortcuts (Copying and Sending) ........... 1-58
ADVANCED OPERATION GUIDE 1-1
Page 16

Copying Functions
Original Size
Specify the size of originals being scanned. Be sure to specify the original
size when copying non-standard sizes.
The following options are available.
Item How to Select Sizes
Standard
Sizes 1
Standard
Sizes 2
Others Select from
Size Entry Enter the size
Have the size of
original detected
automatically, or
select from the
standard sizes.
Select from the
standard sizes
not included in
the Standard
Sizes 1 .
envelope,
postcard or the
custom sized
originals*.
not included in
the standard
sizes 1 and 2**.
Inch models: Auto, Ledger, Legal,
Letter, Letter-R, Statement,
Statement-R, 8.5×13.5", Oficio II and
11×15"
Metric models: Auto, A3, B4, A4,
A4-R, B5, B5-R, A5, A5-R, B6, B6-R,
A6-R and Folio
Inch models: A3, B4, A4, A4-R, B5,
B5-R, A5, A5-R, B6, B6-R, A6-R,
Folio, 8K, 16K and 16K-R
Metric models: Ledger, Legal, Letter,
Letter-R, Statement, Statement-R,
8.5×13.5", Oficio II, 11×15", 8K, 16K
and 16K-R
Hagaki, Oufuku Hagaki, Custom 1 to
4
Inch models
Horizontal: 2 to 17" (in 0.01"
increments), Vertical: 2 to 11.69" (in
0.01" increments)
Metric models
Horizontal: 50 to 432 mm (in 1 mm
increments), Vertical: 50 to 297 mm
(in 1 mm increments)
* For instructions on how to specify the custom original sizes
(Custom 1 to 4), refer to Custom Original Size Setup on page
6-6.
** The input units can be changed in the System menu.
Refer to Switching Unit of Measurement on page 6-17.
Use the procedure below to select the original size.
Place the originals on the platen.
1
Press the Copy key.
2
1-2 ADVANCED OPERATION GUIDE
Page 17

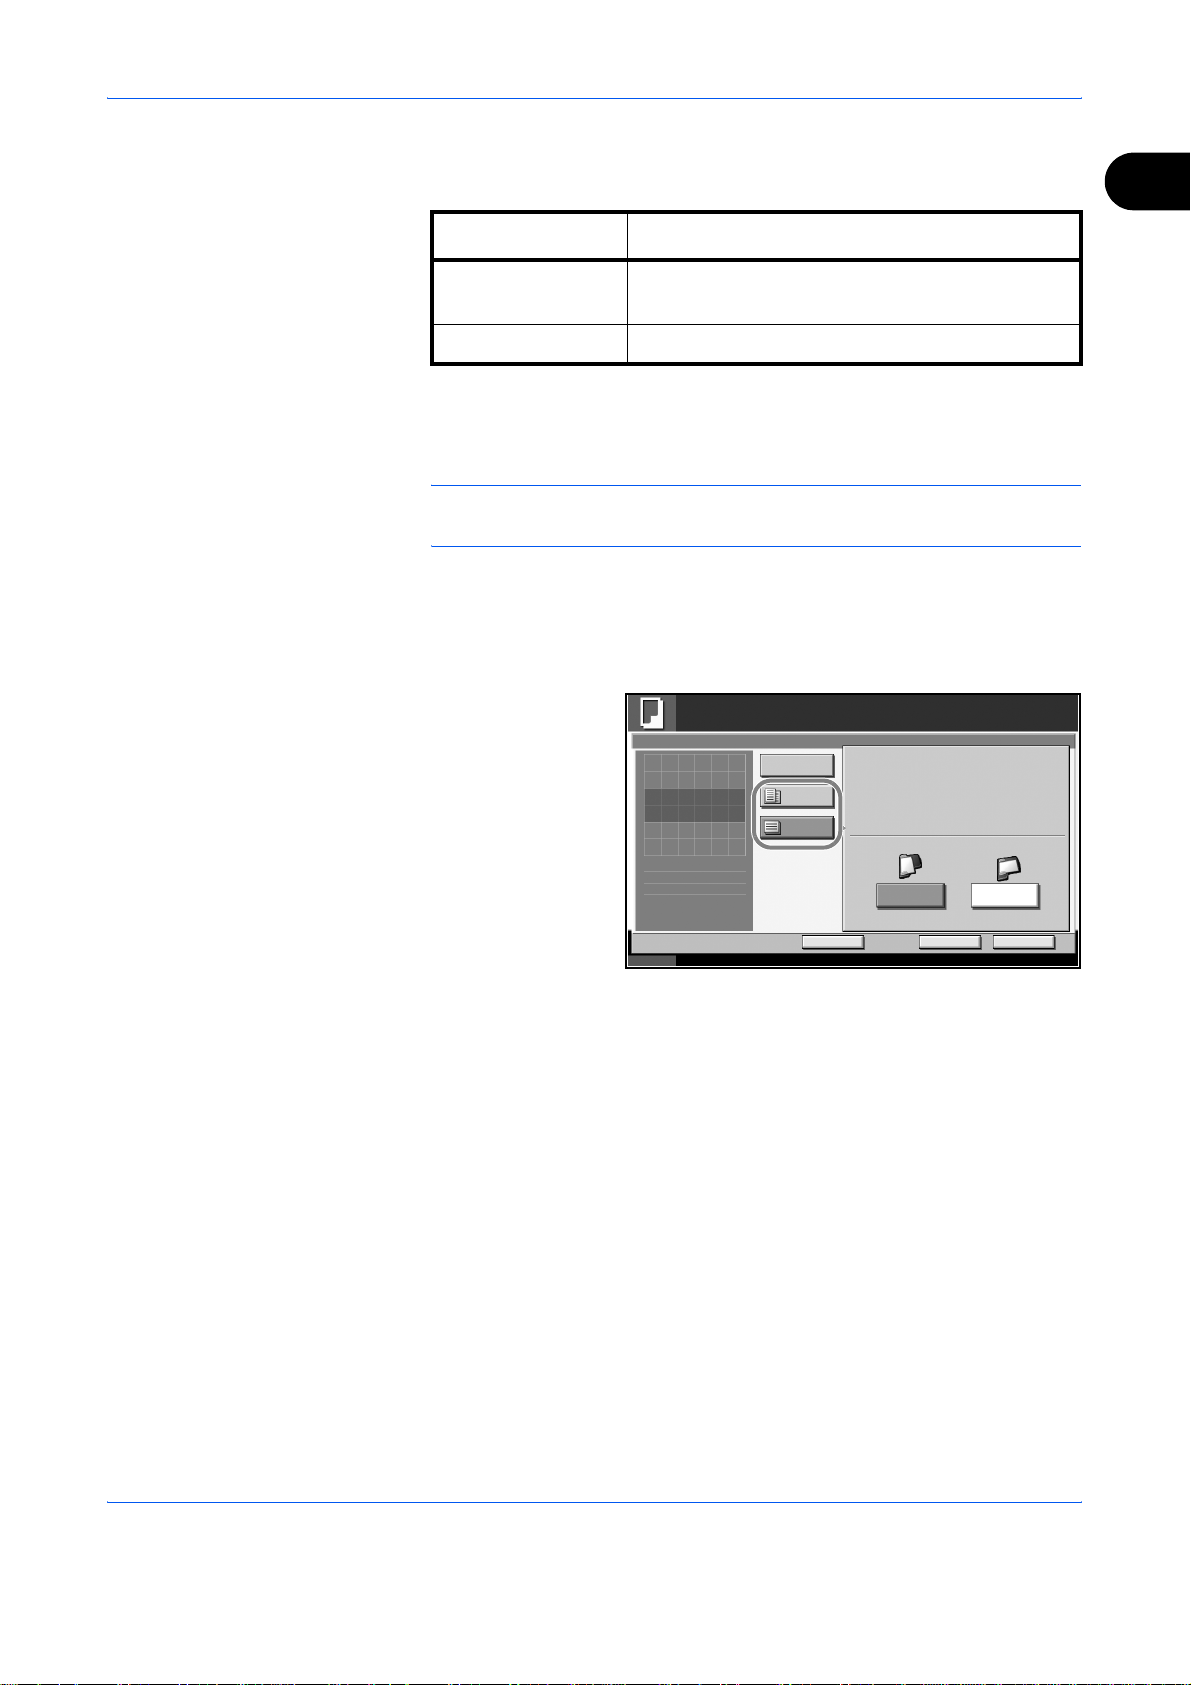
Press [Org./Paper/Finishing] and then [Original Size].
3
Press [Standard
4
Sizes 1 ], [Standard
Sizes 2 ], [Others] or
[Size Entry] to select
the original size.
Ready to copy.
Original Size
Press [OK] to display
the image.
:
Original
---
:
Zoom
100%
:
Send
---
Siz es 1
Standar d
Siz es 2
Others
Siz e Ent ry
Copying Functions
Copies
AutoStandar d
Letter Legal
Execut ive 11x15" 8 .5x13.5 "
OficioII
Ledger
Letter
Statement
1
1
If [Size Entry] is
selected, press [+]
or [-] to specify the
horizontal size (X)
and the vertical size
(Y). Press [# Keys]
to enter the size
directly using the
numeric keys.
Press [OK].
5
Press the Start key to start copying.
6
Status 10/10/2007 10:10
Add Shor tc ut
Ready to copy.
Original Size
Press [OK] to display
the image.
:
Original
---
:
Zoom
100%
:
Send
---
Status 10/10/2007 10:10
Standar d
Siz es 1
Standar d
Siz es 2
Others
Siz e Ent ry
X
Y
Add Shor tc ut Canc el OK
Cancel OK
(2. 00 - 17. 00)
"
11.00
# Keys
(2. 00 - 11.69 )
"
8. 50
# Keys
Copies
1
ADVANCED OPERATION GUIDE 1-3
Page 18

Copying Functions
Paper Selection
Selecting the Cassette
Select the paper source that contains the required paper size.
NOTE: Specify in advance the size and type of the paper loaded in the
cassette (refer to Original/Paper Setup on page 6-6).
Use the procedure below to select the paper supply cassette.
Place the originals on the platen.
1
Press the Copy key.
2
Press [Org./Paper/Finishing] and then [Paper Selection].
3
Press the key of the paper source corresponding to the required paper
4
size. The cassette in which the paper is loaded is selected.
If [Auto] is selected,
the paper matching
the size of the
original is selected
automatically.
Press [OK].
5
Press the Start key to start copying.
6
Letter
Plai n
MP Tray
Setting
Copies
Ready to copy.
Paper Selection
Press [OK] to display
the image.
:
Original
---
:
Zoom
100%
:
Send
---
Status 10/10/2007 10:10
Add Shor tc ut Canc el O K
Auto
Letter
Plai n
Ledger
Plai n
Letter
Plai n
Letter
Plai n
1
1-4 ADVANCED OPERATION GUIDE
Page 19
Reserving the Multi Purpose Tray
Change the paper size and media type.
The available paper sizes and media types are shown in the table below.
Copying Functions
1
Category Item
Paper
Size
Standard
Sizes 1
Standard
Sizes 2
Others Choose from
How to
Select
Choose from
the standard
size.
Choose from
the standard
sizes not
included in
the Standard
Sizes 1.
nonstandard
sizes and
custom
sizes.
Sizes
Inch models: Ledger, Legal,
Letter, Letter-R, Statement,
8.5×13.5", Oficio II and
Executive
Metric models: A3, B4, A4,
A4-R, B5, B5-R, A5-R, B6,
B6-R, A6-R and Folio
Inch models: A3, B4, A4,
A4-R, B5, B5-R, A5-R, B6-R,
A6-R, Folio, 8K, 16K and
16K-R
Metric models: Ledger, Legal,
Letter, Letter-R, Statement,
8.5×13.5", Oficio II, Executive,
8K, 16K and 16K-R
ISO B5, Envelope #10,
Envelope #9, Envelope #6,
Envelope Monarch, Envelope
DL, Envelope C5, Envelope
C4, Hagaki, Oufuku Hagaki,
Youkei 4, Youkei 2 and
Custom 1 to 4*
Size
Entry
Media
Type
* For instructions on how to specify the custom paper sizes (Custom 1
** The input units can be changed in the System menu.
*** For instructions on how to specify the custom paper types 1 to 8,
ADVANCED OPERATION GUIDE 1-5
Plain, Transparency, Rough, Vellum, Labels, Recycled,
Preprinted, Bond, Cardstock, Color, Prepunched,
Letterhead, Thick, Envelope, High Quality, Custom 1 to 8***
to 4), refer to Adding a Custom Size and Media Type for Paper to
Print on page 6-6.
Refer to Switching Unit of Measurement on page 6-17.
refer to Paper Weight on page 6-10.
Enter the
size not
included in
the standard
sizes 1 and
2**.
Inch models
Horizontal: 5.83 to 17" (in 0.01"
increments), Vertical: 3.86 to
11.69" (in 0.01" increments)
Metric models
Vertical: 98 to 297 mm (in 1 mm
increments), Horizontal: 148 to
432 mm (in 1 mm increments)
Page 20
Copying Functions
NOTE: You can conveniently select in advance the size and type of
paper that will be used often and set them as default (refer to Paper Size
and Media Type Setup for Multi Purpose Tray on page 6-9).
Use the procedure below to select the paper size and media type.
Place the originals on the platen.
1
Press the Copy key.
2
Press [Org./Paper/Finishing], [Paper Selection] and then [MP Tray
3
Reservation].
Press [Standard
4
Sizes 1 ], [Standard
Sizes 2 ], [Others] or
[Size Entry] to select
the paper size.
If you select [Size
Entry], press [+] or
[–] to specify X
(horizontal) and Y
(vertical) sizes. You
can enter the size
directly using the
numeric keys after
pressing [# Keys].
Ready to copy.
Paper Selection - MP Tray Setting
Standar d
Siz es 1
Standar d
Siz es 2
Others
Siz e Ent ry
Status 10/10/2007 10:10
Ledger
Legal
8.5x 13.5"
Letter
Statem ent
OficioII
Letter
Exec utiv e
Ready to copy.
Paper Selection
Standar d
Siz es 1
Standar d
Siz es 2
Others
Siz e Ent ry
Status 10/10/2007 10:10
X
Y
(3 .86 - 11 .69)
11.00
# Keys
(5 .83 - 17 .00)
8.50
# Keys
"
"
Copies
Plai n
Media T ype
OK
Copies
Plai n
Media T ype
OK
1
1
Press [Media Type].
5
Press [Media Type] to select paper type, and press [OK].
6
Press [OK].
7
Press [OK].
8
Press the Start key to start scanning the originals.
9
10
When the machine is ready, the confirmation screen for the specified paper
appears. Load the required paper in the Multi Purpose tray and press
[Continue] to start copying.
1-6 ADVANCED OPERATION GUIDE
Page 21
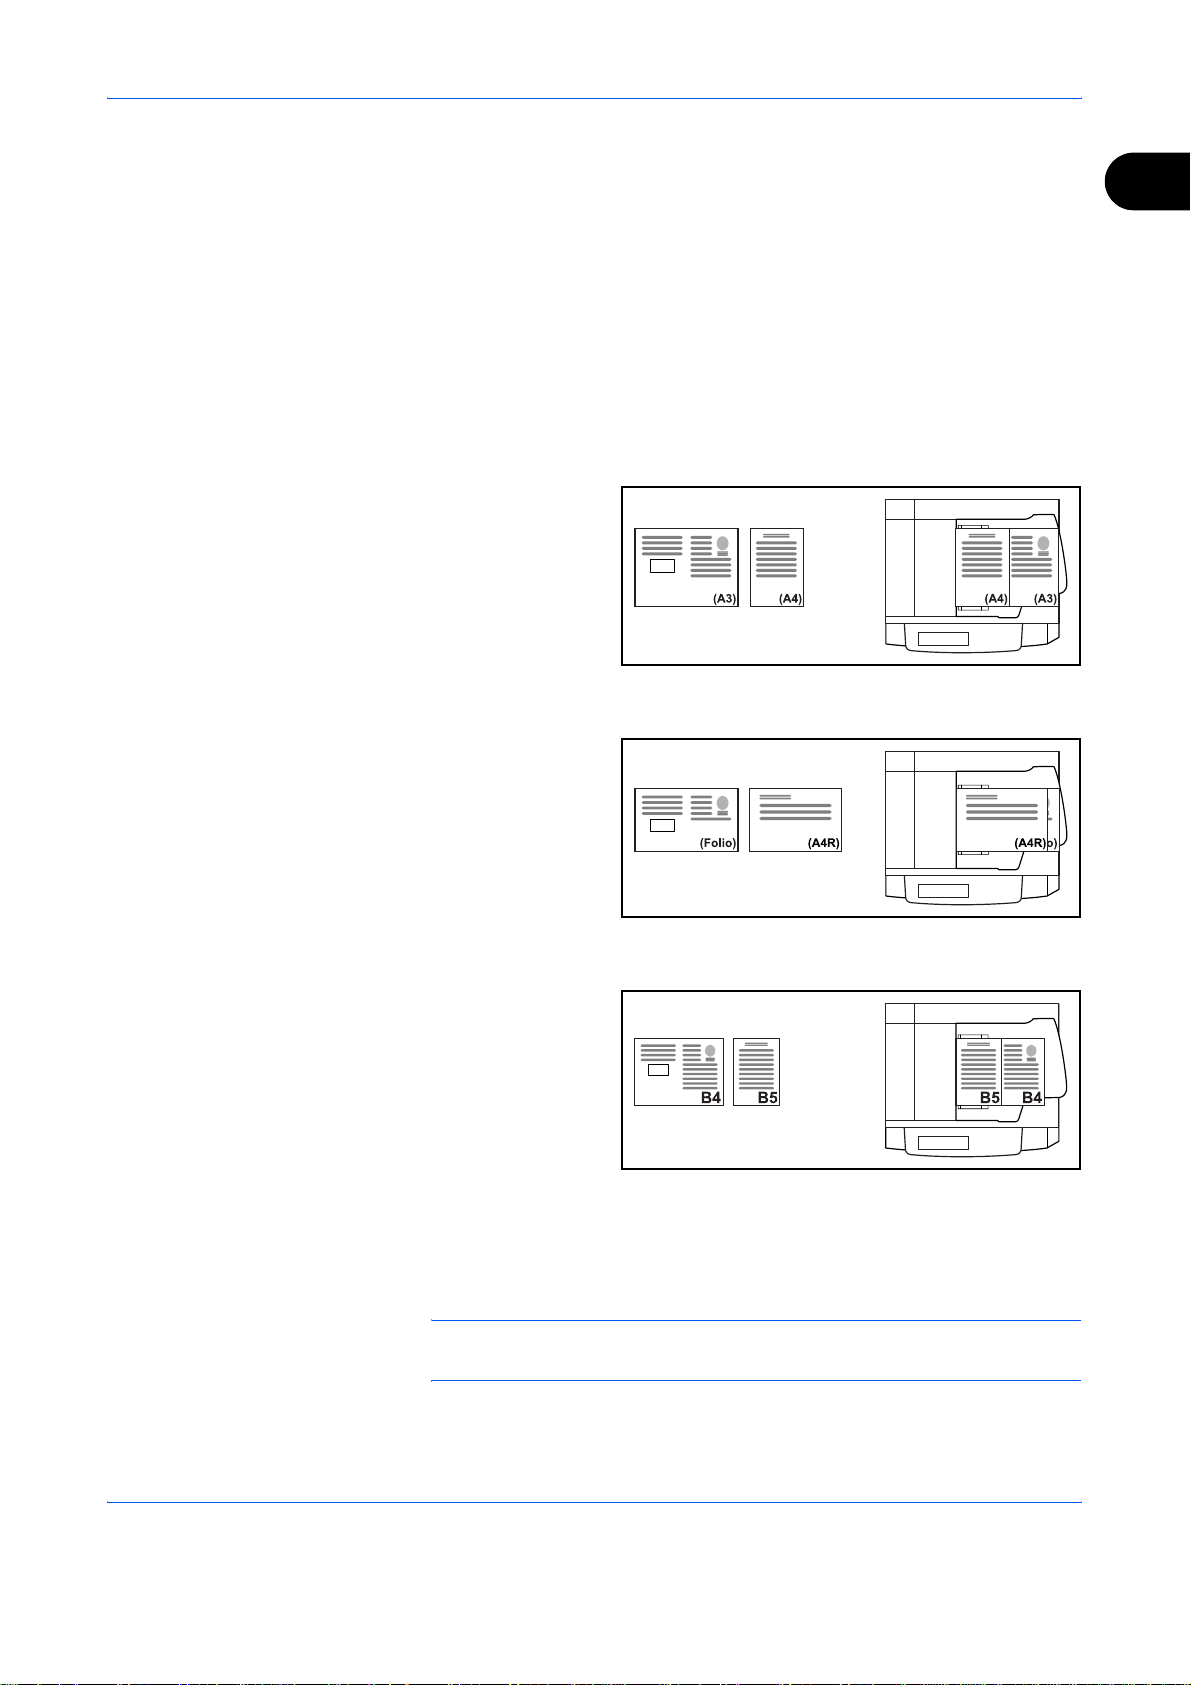
Mixed Sized Originals
Supported Combinations of Originals
Originals of the Same Width
Ledger and Letter (A3 and A4)
Copying Functions
1
Using the optional document processor, the originals of different sizes can
be loaded in a batch and copied. In this operation, up to 30 originals of
different sizes can be placed in the document processor at the same time.
The supported combinations of originals are as follows.
Ledger LedgerLetter Letter
Ledger and Letter-R (Folio and A4-R)
B4 and B5
Originals of Different Widths
Place all originals of different widths. The supported combinations of
originals are as follows.
LegalLegal Letter-R Letter-R
NOTE: You cannot scan two-sided originals when placing originals of
different widths.
ADVANCED OPERATION GUIDE 1-7
Page 22

Copying Functions
A3, B4, A4 and B5
B4, A4-R and B5
Folio, A4-R and B5-R
Selecting How to Copy Originals
Select whether you wish to create individual copies on different size papers
matching the original sizes or to produce all copies on the same size
papers.
NOTE: This function is available regardless of whether originals have the
same width or not.
1-8 ADVANCED OPERATION GUIDE
Page 23
Copying Functions
The table below shows the finished document sizes for the different
original size options.
Option Description
1
Mixed Sized
Copies
Originals are detected individually for size and
copied to the same size papers as originals.
Same Size Copies Originals are all copied to the same size papers.
Use the procedure below to copy mixed sized originals.
Place originals on the document processor.
1
IMPORTANT: When placing originals of different widths, be sure to flush
them against the document width guide toward the back of the machine.
Press the Copy key.
2
Press [Org./Paper/Finishing] and then [Mixed Sized Originals].
3
Select [Mixed Sized
4
Copies] or [Same
Size Copies] as
finish size.
Ready to copy.
Mix ed Siz ed Origi nals
Press [OK] to display
the image.
Off
Mixed Sized
Copies
Same Siz ed
Copies
Top Page Dire ct ion
Copies
1
Long Edge
Left
Status 10/10/2007 10:10
Select the combination of originals from [Same Width] and [Diff Width].
5
When [Same Size Copies] is selected, select [Long Edge Left] or [Short
Add Shor tc ut
Cancel OK
Edge Left] as the first original orientation.
Press [OK].
6
Press the Start key to start copying.
7
Short Edge
Left
ADVANCED OPERATION GUIDE 1-9
Page 24
Copying Functions
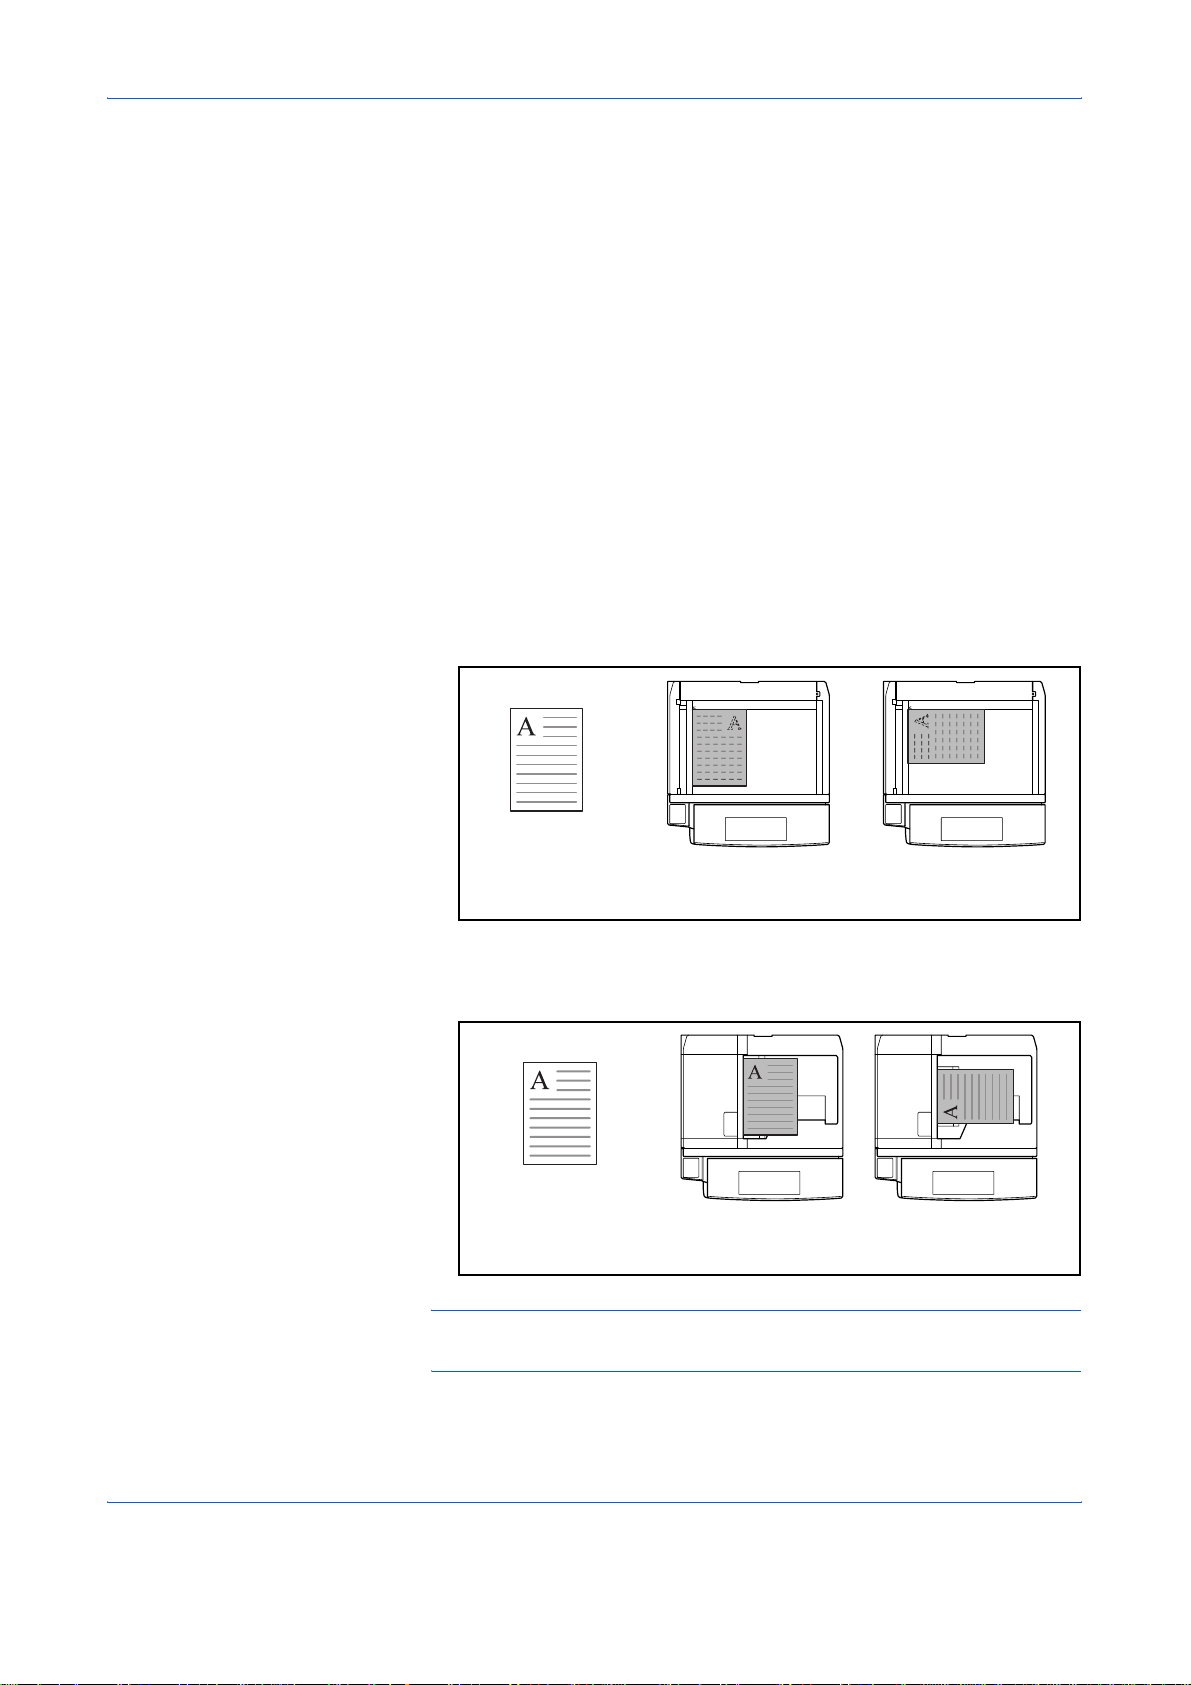
Original Orientation
When placing originals on the platen
Select the original orientation to use the following functions.
•Duplex
• Margin/Centering originals
• Border erase
• Combine mode
• Memo mode
• Page numbering
•Booklets
• Stapling (optional feature)
* If [On] is selected as the Orientation Confirmation setting in the
System Menu, the selection screen for original orientation appears
when you select any of the above functions.
Original [Top Edge Top] [Top Edge Left]
When placing originals on the optional document processor
Original [Top Edge Top] [Top Edge Left]
NOTE: To change the default setting for the original orientation, refer to
Original Orientation on page 6-21.
1-10 ADVANCED OPERATION GUIDE
Page 25
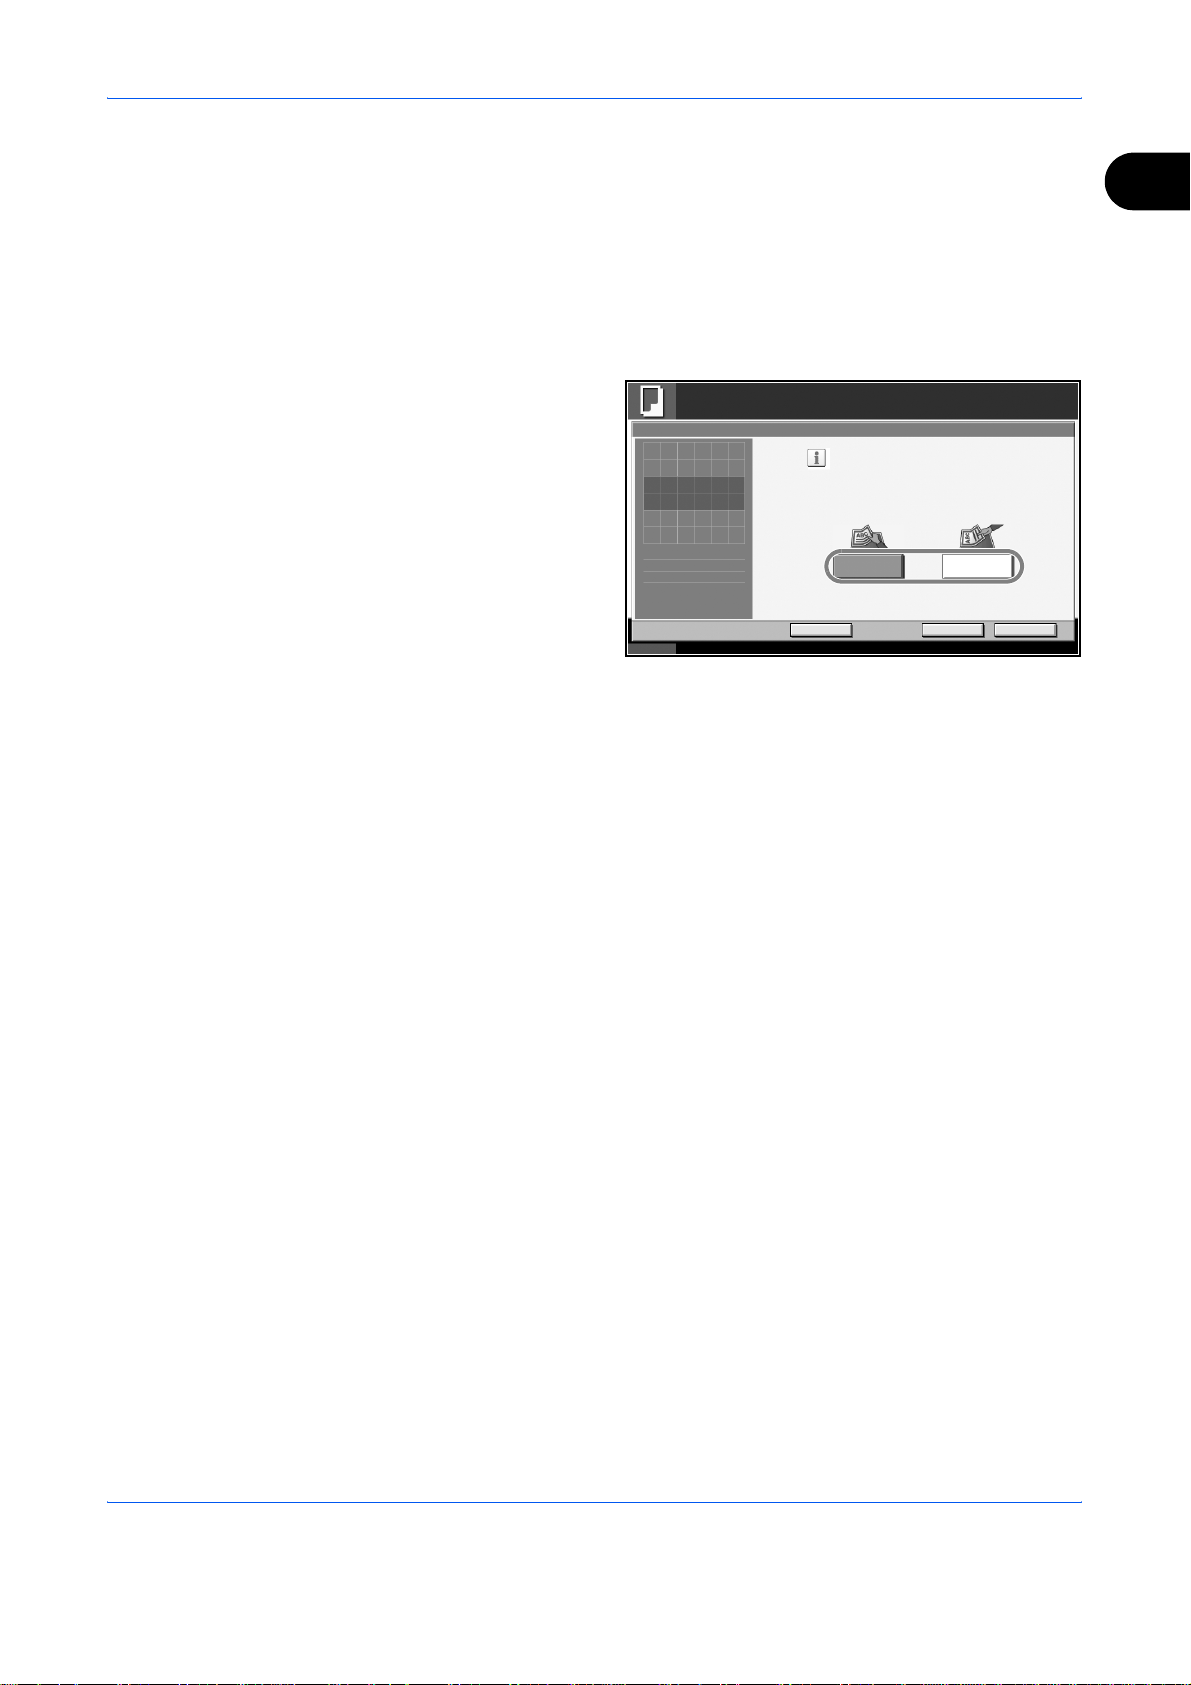
Use the procedure below to select the orientation when placing the
originals on the platen.
Place the originals on the platen.
1
Press the Copy key.
2
Press [Org./Paper/Finishing] and then [Original Orientation].
3
Copying Functions
1
Select [Top Edge
4
Top] or [Top Edge
Left] as the way the
original is oriented.
Press [OK].
5
Press the Start key to start copying.
6
Ready to copy.
Original Orientation
Press [ OK] to display
the image.
Status
Enter the orientation of the
ori ginal docum ent 's t op edge.
Top Edge T op
Add Shor tc ut
Copies
1
Top Edge L eft
Cancel OK
10/10/2007 10:10
ADVANCED OPERATION GUIDE 1-11
Page 26
Copying Functions
Collate/Offset Copying
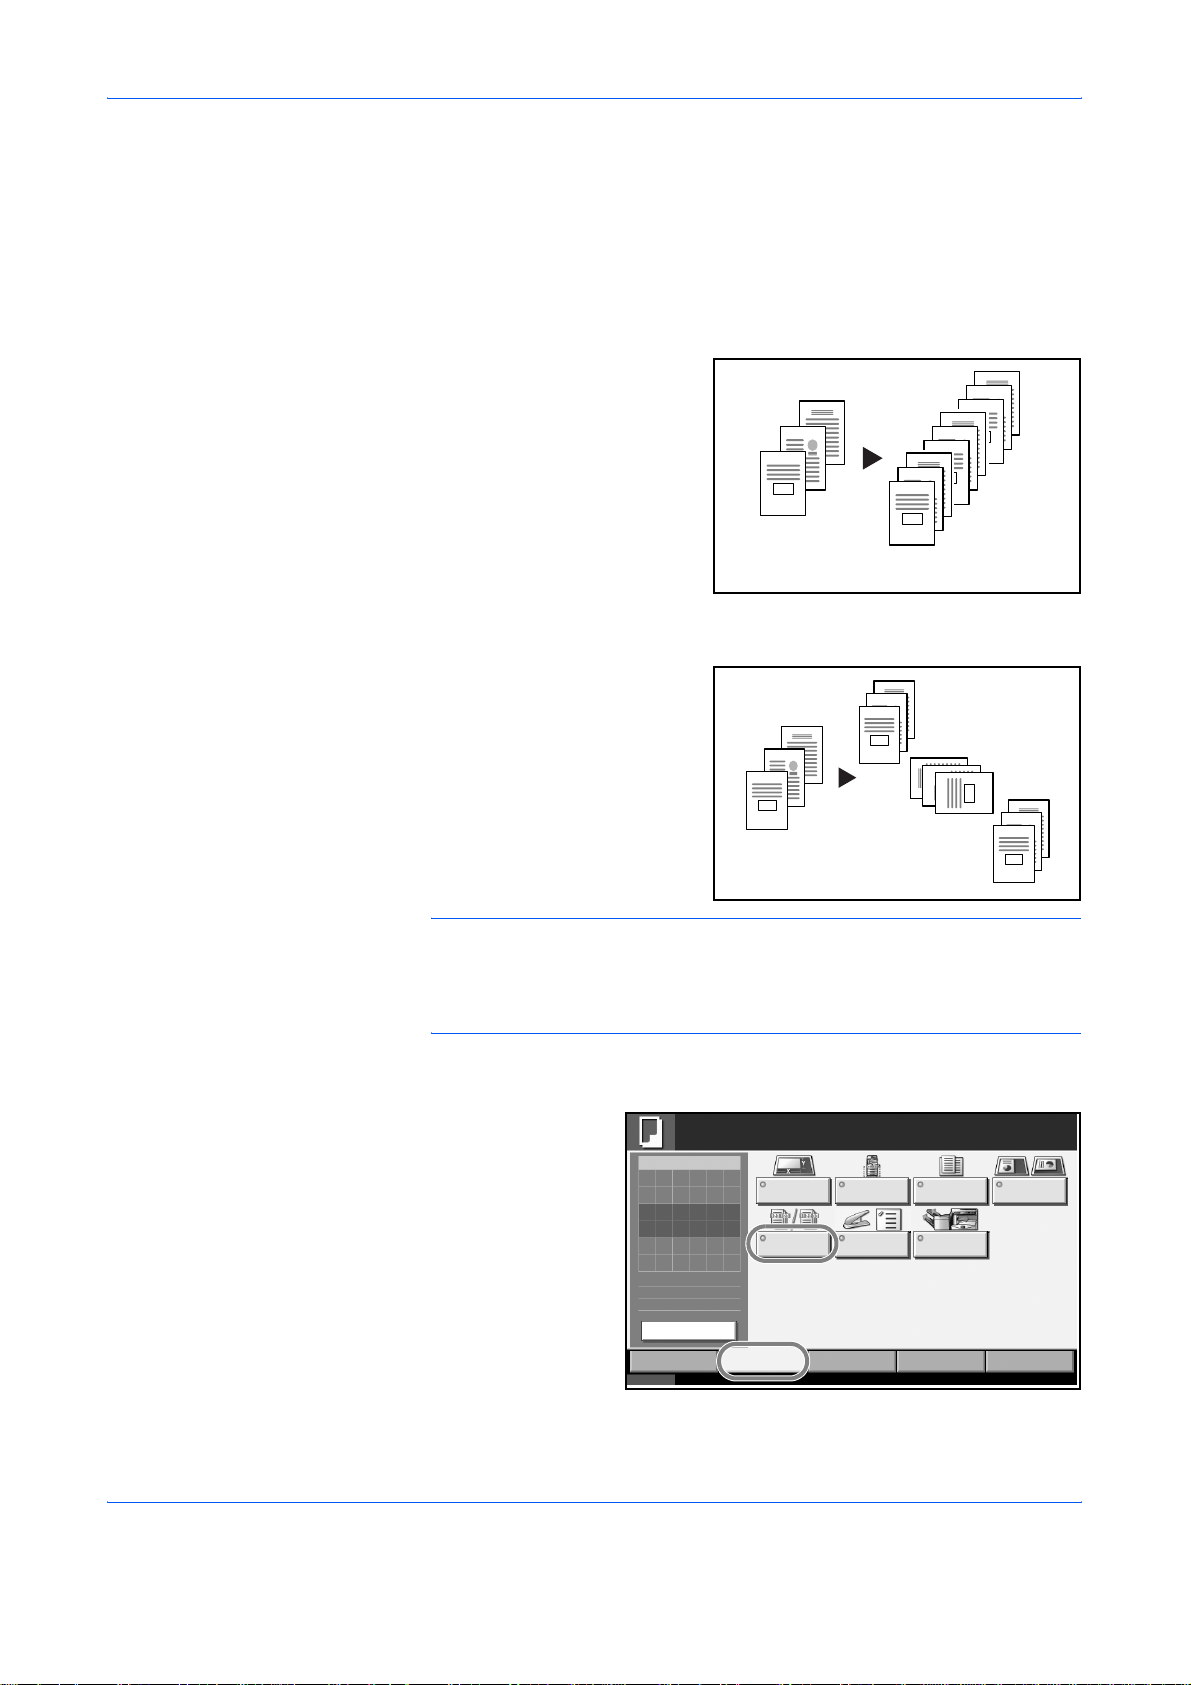
Collate
The machine can collate and offset at the same time as it copies.
You can use the Collate/Offset copy function for tasks such as those
shown below.
Offset
Scan multiple originals and
deliver complete sets of copies
as required according to page
number.
3
2
1
3
2
1
3
2
1
3
2
1
Original Copy
Use offset to produce copies
after rotating each set (or
page) by 90º.
3
2
1
3
2
1
3
2
1
2
1
Original Copy
NOTE: To use the offset function, load the same sized paper with
different orientation in the paper source other than the selected paper
source.
The paper sizes supported in Offset are A4, B5, Letter and 16K.
3
The procedure for using collate/offset copying is explained below.
Press [Org./Paper/
1
Finishing] and then
[Collate/Offset].
Ready to copy.
Copy Image
Original
Siz e
Set Original.
Original
:
---
Zoom
100%
:
---
Paper
:
Previ ew
Quick Setup Layout /Edit Advanc ed
Status 10/10/2007 10:10
Collate/
Offset
Org./Paper /
Finishing
Paper
Selection
Staple Output Tray
Image
Quality
Mixed Sized
Originals
Copies
Original
Orientation
Setup
1-12 ADVANCED OPERATION GUIDE
1
Page 27
Copying Functions
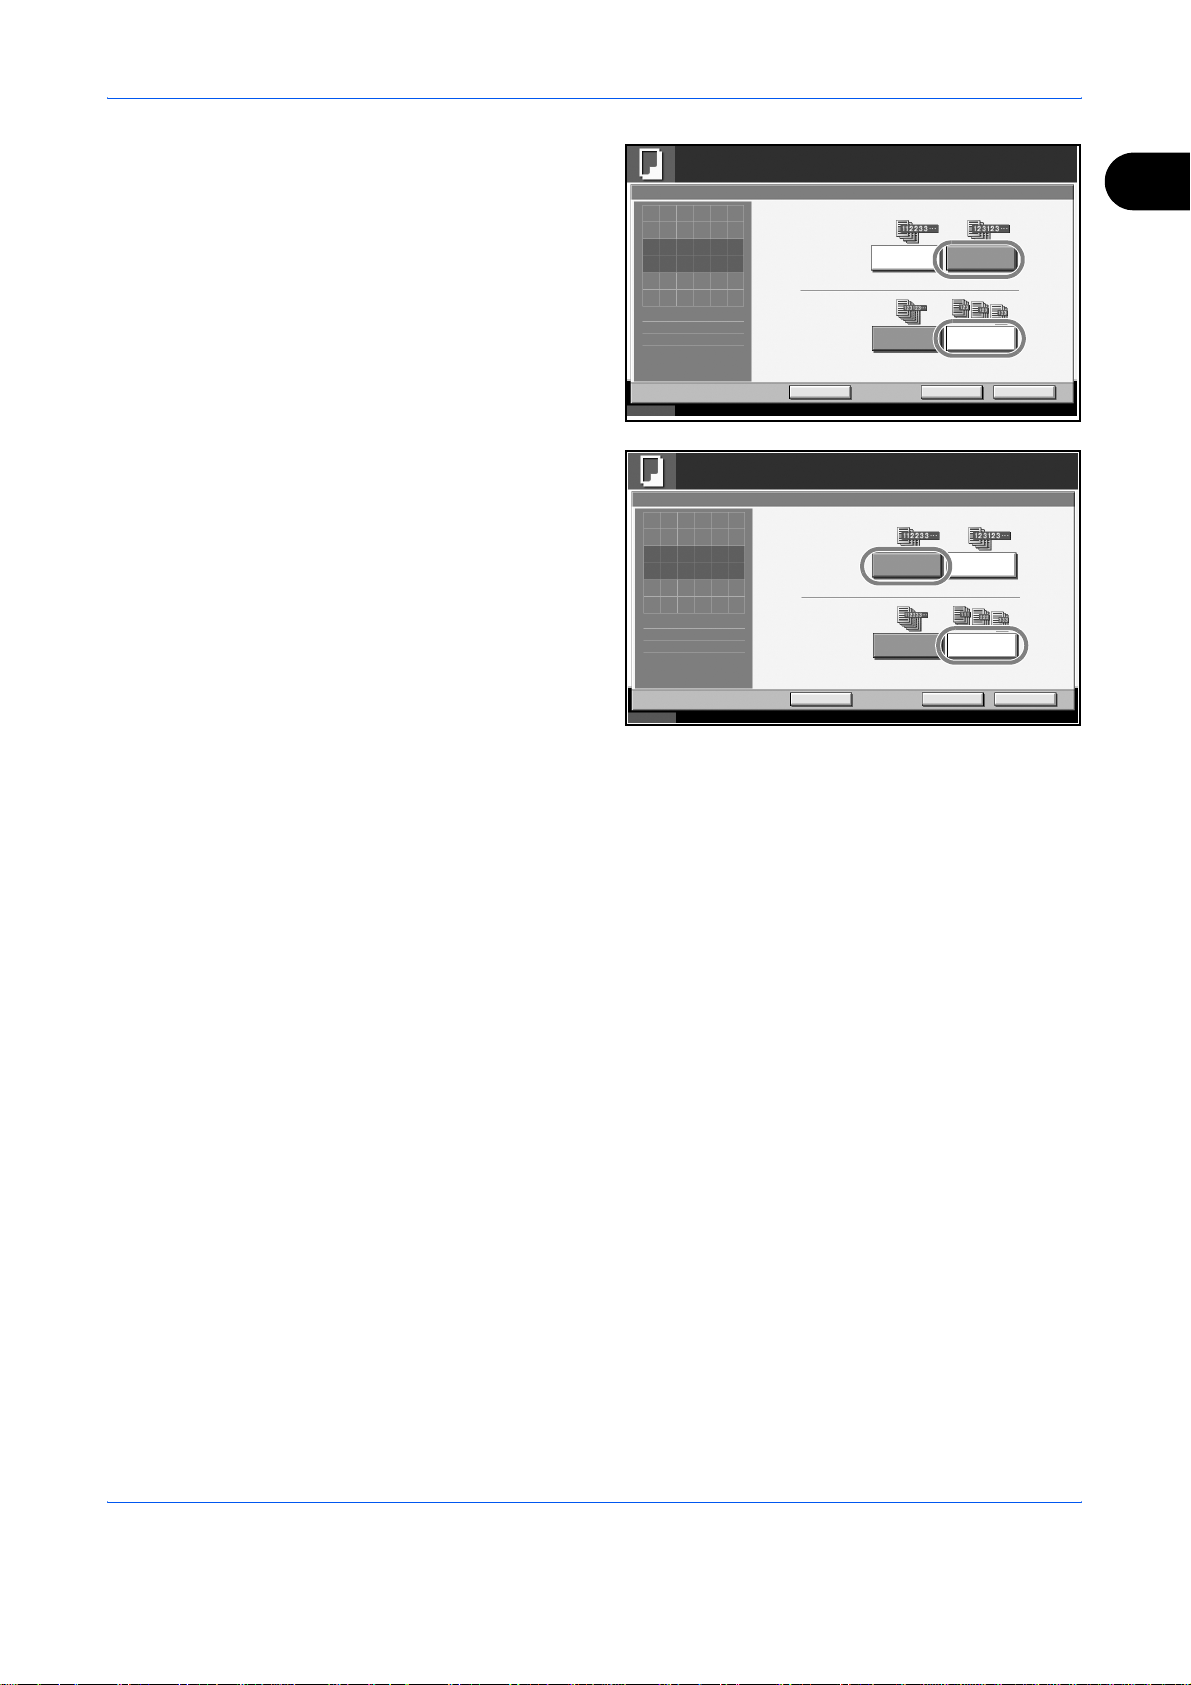
To use collate
2
copying, press [On]
of Collate.
To use offset
copying, press
[Each Set] of Offset.
Press [OK].
If [Off] is selected for
Collate, press [Off]
or [Each Page] in
Offset.
Ready to copy.
Collate/Offset
Collate
Pres s [O K] t o dis play
the image.
Offset
Add Shor tc ut
Status 10/10/2007 10:10
Off On
Off Each Set
Cancel OK
Ready to copy.
Collate/Offset
Collate
Press [ OK] to display
the image.
Offset
Add Shor tc ut
Status 10/10/2007 10:10
Off On
Off Each Pa ge
Copies
Copies
Cancel OK
1
1
1
Press [OK].
3
Use the numeric keys to enter the copy quantity.
4
Place the originals and press the Start key. Copying begins.
5
ADVANCED OPERATION GUIDE 1-13
Page 28
Copying Functions
Staple
Use this feature to staple your finished copies.
NOTE: Stapling requires the optional document finisher or built-in
finisher.
The following stapling options and orientations are available.
Original
1
2
Orientation of OriginalCopy
Document finisher
Built-in finisher
Document finisher
Built-in finisher
Use the procedure below to produce stapled copies.
Press the Copy key.
Press [Org./Paper/Finishing] and then [Staple].
Document processorPlaten
1-14 ADVANCED OPERATION GUIDE
Page 29

Copying Functions
To staple, select the
3
staple position, [1
staple] under Staple.
Press [Original Orientation] to choose orientation of the originals, either
4
[Top Edge Top] or [Top Edge Left]. Then press [OK].
Press [OK].
5
Place the originals on the platen and press the Start key. Copying begins.
6
Ready to copy.
Stapl e/Punch
Stapl e
Press [OK] to display
the image.
Status 10/10/2007 10:10
Off
1 st aple
Add Shor tc ut
Upper
Left
Upper
Right
Cancel OK
Copies
Top Edge T op
Original
Orientation
1
1
ADVANCED OPERATION GUIDE 1-15
Page 30
Copying Functions
Output Destination
You can use the procedure below to select an output destination such as
the optional document finisher for your copies.
NOTE: Optional output destinations include the job separator, document
finisher and the built-in finisher.
The table below shows the available output destinations.
Destination Description
Top tray Top tray of the machine (where copies are
stored)
Finisher Tray*
Tray of the optional document finisher or built-in
finisher
Job Separator Tray Optional job separator
* Copy output orientation can be selected either as face-up (print
facing up) or face-down (print facing down).
NOTE: To change default destination for copies, refer to Output Tray on
page 6-20 for details.
Use the procedure below to select the output destination.
Press the Copy key.
1
Press [Org./Paper/Finishing] and then [Output Tray].
2
Select the output destination for finished copies.
3
When you select
[Finisher tray],
select the
orientation of output
copy, Face Up (print
facing up) or Face
Down (print facing
down).
Ready to copy.
Output Tray
Press [ OK] to display
the image.
Top Tray
Finisher T ray
Copies
1
Face Up
Face Down
Status 10/10/2007 10:10
Press [OK].
4
Place the originals in the document processor or on the platen. Press the
5
Start key to start copying.
Add Shor tc ut
Cancel OK
1-16 ADVANCED OPERATION GUIDE
Page 31

Zoom Mode
Auto Zoom
Manual Zoom
Copying Functions
Original image can be reduced or enlarged for copying. The following
zoom modes are available.
Automatically reduces or enlarges the original image suited to the selected
paper size.
Ledger: 129 %
Letter-R
A3: 141 %
A4
Enter desired magnification in 1% increments between 25% and 400%.
Statement-R: 64 %
A5: 70 %
1
Preset Zoom
25 %
400 %
Reduces or enlarges at preset magnifications.
The available magnifications and the sizes before and after copying
(original size -> paper size) are as follows:
Model Zoom Level (OriginalCopy)
Inch Models
Metric Models
Metric Models
(Asia Pacific)
100%, Auto, 400% (Max.), 200% (STMT -> Ledger),
154% (STMT -> Legal), 129% (Letter -> Ledger),
121% (Legal -> Ledger), 78% (Legal -> Letter),
77% (Ledger -> Legal), 64% (Ledger -> Letter),
50% (Ledger -> STMT), 25% (Min.)
100%, Auto, 400% (Max.), 200% (A5 -> A3),
141% (A4 -> A3, A5 -> A4), 127% (Folio -> A3),
106% (11×15" -> A3), 90% (Folio -> A4),
75% (11×15" -> A4), 70% (A3 -> A4, A4 -> A5),
50%, 25% (Min.)
100%, Auto, 400% (Max.), 200% (A5 -> A3),
141% (A4 -> A3, B5 -> B4), 122% (A4 -> B4, A5 -> B5),
115% (B4 -> A3, B5 -> A4), 86% (A3 -> B4, A4 -> B5),
81% (B4 -> A4, B5 -> A5), 70% (A3 -> A4, B4 -> B5),
50%, 25% (Min.)
ADVANCED OPERATION GUIDE 1-17
Page 32

Copying Functions
XY Zoom
Adjust vertical and horizontal magnifications independently. Enter desired
magnification in 1% increments between 25% and 400%.
* When using the document processor, enter the desired magnification
in 1% increments between 25% and 200%.
X
The procedure for using zoom copying is explained below.
Place the originals in the document processor or on the platen.
1
Press the Copy key.
2
Y
Press [Layout/Edit] and then [Zoom].
3
Press [Auto] to use Auto Zoom.
4
Press [+] or [–] to change the displayed magnification as desired. You can
also enter the magnification directly using the numeric keys by pressing [#
Keys].
To use Preset
Zoom, select the key
of desired
magnification.
Ready to copy.
Zoom
Standar d
Zoom
Press [ OK] to display
the image.
Status 10/10/2007 10:10
XY Zoom
400%
200%
154%
129%
121%
Add Shor tc ut
Max.
STMT
>>Ledger
STMT
>>Legal
Letter
>>Ledger
Legal
>>Ledger
(25 - 400 )
# Keys
100%
Auto
Cancel OK
78%
77%
64%
50%
25%
Copies
Legal
>>Letter
Ledger
>>Legal
Ledger
>>Letter
Ledger
>>STMT
Min.
1
1-18 ADVANCED OPERATION GUIDE
Page 33

Copying Functions
To use XY Zoom,
press [XY Zoom].
Press [+] or [–] to
change the
displayed
magnifications of X
Ready to copy.
Zoom
Press [ OK] to display
the image.
Standar d
Zoom
XY Zoom
X
Y (25 - 400)
(25 - 400)
# Keys
(horizontal) and Y
(vertical). You can
also enter the
magnification
directly using the
Status 10/10/2007 10:10
Add Shor tc ut
# Keys
Cancel OK
numeric keys by
pressing [# Keys].
Press [Original Orientation] to choose orientation of the originals, either
[Top Edge Top] or [Top Edge Left]. Then press [OK].
Press [OK].
5
Press the Start key to start copying.
6
Copies
1
%
%
Top Edge T op
Original
Orientation
1
ADVANCED OPERATION GUIDE 1-19
Page 34

Copying Functions
Combine Mode
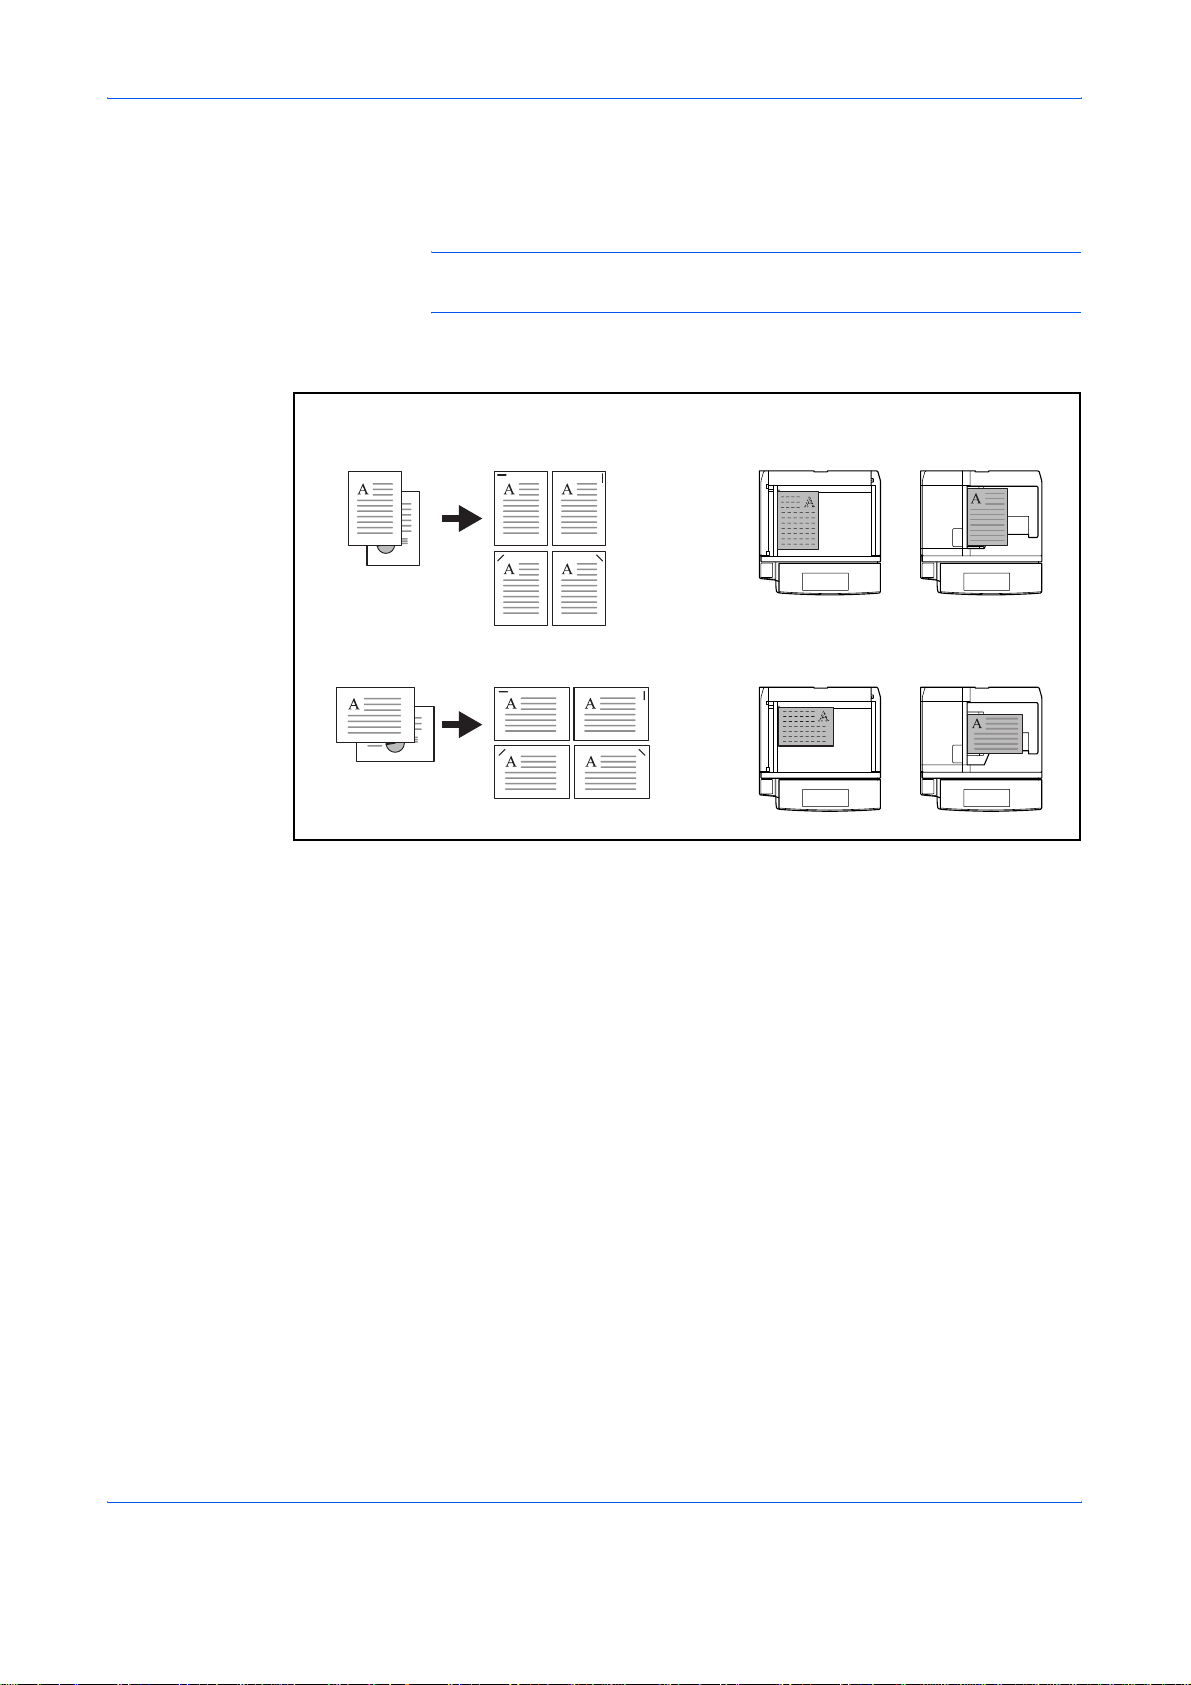
2-in-1 Mode
This mode allows you to copy 2 or 4 originals combined onto a single page.
2-in-1 mode or 4-in-1 mode. The page boundary of each original can be
indicated.
NOTE: Combine mode is available for the copy paper sizes of A3, B4,
Folio, A4, A4-R, B5, B5-R, A5-R, Ledger, Legal, Oficio II, 8.5×13.5",
Letter, Letter-R, Statement-R, 8K, 16K and 16K-R.
For copying two originals onto a single sheet. This mode can be used with
Duplex mode to copy four originals onto one sheet.
The following 2-in-1 options and output orientations are available.
4-in-1 Mode
Original
Orientation of OriginalCopy
Document processorPlaten
NOTE: When placing the original on the platen, be sure to copy the
originals in page order.
For copying four originals onto a single sheet. This mode can be used with
Duplex mode to copy eight originals onto one sheet.
1-20 ADVANCED OPERATION GUIDE
Page 35

Original
Copying Functions
The following 4-in-1 options and output orientations are available.
1
Orientation of OriginalCopy
Document processorPlaten
NOTE: When placing the original on the platen, be sure to copy the
originals in page order.
Types of Page Boundary Lines
The following types of the boundary lines are available.
None DottedSolid Borders
The procedure for using Combine mode copying is explained below.
Press the Copy key.
1
(Cropmark)
Press [Layout/Edit] and then [Combine].
2
ADVANCED OPERATION GUIDE 1-21
Page 36

Copying Functions
Press [2 in 1] or [4 in
3
1], and choose the
page layout of
Layout.
Press [Border Line] to choose the type of the lines to indicate page
4
boundaries. Press [OK].
Press [Original Orientation] to choose orientation of the originals, either
5
Ready to copy.
Combine
Press [ OK] to display
the image.
Status 10/10/2007 10:10
Off
2 in 1
4 in 1
Add Shor tc ut
Layout
Right then
Down
Down t hen
Right
Left then
Down
Down t hen
Left
Cancel OK
[Top Edge Top] or [Top Edge Left]. Then press [OK].
Press [OK].
6
Place the originals and press the Start key.
7
If the original is placed on the platen, replace the original and press the
Start key.
Copies
None
Border Line
Top Edge T op
Original
Orientation
1
After scanning all originals, press [Scan finish] to start copying.
1-22 ADVANCED OPERATION GUIDE
Page 37

Margin/Centering Mode
Margin on the Back Side
Auto
Copying Functions
1
Shift the original image to make space on the copy for binding on the left
(right) or top (bottom) side.
When you copy onto paper different from the original size, you can center
the original image on the paper.
The following margin widths are available.
Input units Margin Width
Inch Models -0.75 to 0.75" (in 0.01" increments)
Metric Models -18 mm to 18 mm (in 1-mm increments)
When duplex copying, you can also specify the margin on the back side.
When [Auto] is selected, an appropriate margin is applied automatically on
the rear page depending on a margin specified for the front page and a
binding orientation.
Separate Front/Back Margins
Enables you to specify the front and back settings separately.
NOTE: You can set the default margin width. Refer to Margin Default on
page 6-29 for details.
Use the procedure below to make copies with margins.
Place the originals on the platen.
1
Press the Copy key.
2
Press [Layout/Edit] and then [Margin/Centering].
3
ADVANCED OPERATION GUIDE 1-23
Page 38

Copying Functions
Press [Margin] to select the copy with margin.
4
Use [+] or [–] to enter the margins for Left/Right and Top/Bottom. Press [#
Keys] to use the numeric keys for entry.
For duplex copying,
press [Back Page
Margin] and select
[Auto] or [Manual].
If you selected
[Auto], press [OK]. If
you pressed
[Manual], enter the
margins in the
displayed screen
and then press [OK].
"
"
"
"
Copies
Auto
Back Page
Margin
Top Edge Top
Original
Orientation
Copies
Ready to copy.
Margin/C entering
Press [ OK] to display
the image.
Status 10/10/2007 10:10
Off
Margin
Centering
Left/Right
Top /B ot tom (-0.75 - +0.75)
Add Shortcut
(-0.75 - +0.75)
0.00
# Keys
0.00
# Keys
Cancel OK
Ready to copy.
Margin/Centering - Back Page Margin
Auto
Press [ OK] to display
the image.
Status 10/10/2007 10:10
Top/Bottom
Left/Right
Y (-0.75 - +0.75)
Add Shor tc ut
(-0.75 - +0.75)
0.00
# Keys
0.00
# Keys
Cancel OK
1
1
Press [Centering] to
center the original
image on the paper.
Press [Original Orientation] to choose orientation of the originals, either
5
[Top Edge Top] or [Top Edge Left]. Then press [OK].
Press [OK].
6
Press the Start key to start copying.
7
Ready to copy.
Margin/Centering
Press [ OK] to display
the image.
Status 10/10/2007 10:10
Off
Margin
Centering
Add Shor tc ut
Cancel OK
Copies
Top Edge T op
Original
Orientation
1
1-24 ADVANCED OPERATION GUIDE
Page 39

Border Erase
Border Erase Sheet
Border Erase Book
Copying Functions
1
Use Border Erase to remove black shadows that appear around the
outside of the original when making copies. The following options can be
selected.
Erases black borders around the single sheet original.
Original Copy
Erases black borders around the edges and in the middle of the original
such as a thick book. You can specify the widths individually to erase the
borders around the edges and in the center of the book.
Individual Border Erase
Specify border erase widths individually for all edges.
Original Copy
Original Copy
ADVANCED OPERATION GUIDE 1-25
Page 40

Copying Functions
In each option, the available ranges are as below.
Input units Border Erase Range
Inch Models 0 to 2"(in 0.01" increments)
Metric Models 0 mm to 50 mm (in 1-mm increments)
NOTE: To specify the default width value of Border Erase, refer to Border
Erase Default on page 6-28 for details.
Use the procedure below to erase borders when copying.
Place the originals on the platen.
1
Press the Copy key.
2
Press [Layout/Edit] and then [Border Erase].
3
Select [Border Erase Sheet] to erase borders for an individual sheet or
4
[Border Erase Book] to erase borders for a book.
Use [+] or [–] to enter
the width in Border
or Gutter. Press [#
Keys] to use the
numeric keys for
entry.
Press [Individual
Border Erase] to
select the individual
border erase.
Use [+] or [–] to enter
the width in Top,
Bottom, Left or
Right. Press [#
Ready to copy.
Border Erase
Off
Press [ OK] to display
the image.
Status 10/10/2007 10:10
Border Erase
Sheet
Border Erase
Book
Indiv idual
Border Erase
Border
Gutt er (0.00 - 2. 00 )
Add Shor tc ut
(0. 00 - 2.00 )
# Keys
# Keys
Ready to copy.
Border Erase
Press [ OK] to display
the image.
Off
Border Erase
Sheet
Border Erase
Book
Indiv idual
Border Erase
Top
Bottom
Left
Right
(0. 00 - 2.00 )
0.00
0.00
0.00
0.00
# Keys
Keys] to use the
numeric keys for
entry.
Status 10/10/2007 10:10
Add Shor tc ut
Copies
"
0.00
0.00
"
Cancel OK
Copies
"
"
"
"
Top Edge T op
Original
Orientation
Cancel OK
1
1
Press [Original Orientation] to select the original orientation from either
[Top Edge Top] or [Top Edge Left]. Then press [OK].
Press [OK].
5
1-26 ADVANCED OPERATION GUIDE
Page 41

Press the Start key to start copying.
6
Copying Functions
1
ADVANCED OPERATION GUIDE 1-27
Page 42

Copying Functions
Booklet from Sheets
The Booklet copying option allows you to copy sheet originals and produce
booklets such as small brochures or pamphlets. A booklet, such as a
magazine, is made by folding at the center.
You can copy the cover page onto colored paper or thick paper. Paper for
the cover is supplied from the Multi Purpose tray. To feed the cover paper
from the cassette, refer to Paper Source for Cover Paper on page 6-15.
The supported original and paper sizes are as follows.
Type of Original Original Size Paper Size
One-sided original,
Two-sided original
Book original A3, B4, A4-R, B5-
* Except for custom sized originals.
For binding on the left side
The folded copies can be read from left to right.
All*
All* A3, B4, A4-R,
R, A5-R, Ledger,
Letter-R and 8K
A3, B4, A4-R, B5R, A5-R, Ledger
and Letter-R
A3, B4, A4, A4-R,
B5, B5-R, A5,
A5-R, Ledger,
Legal, Letter and
Letter-R
Ledger, Legal and
Letter-R
A4, A4-R, B5,
B5-R, Letter and
Letter-R
A4-R and Letter-R
Original Copy
1-28 ADVANCED OPERATION GUIDE
Page 43

For binding on the right side
The folded copies can be read from right to left.
For top binding
The folded copies can be read from top to bottom.
Copying Functions
1
Original Copy
Original Copy
The procedure for using Booklet copying is explained below.
Press the Copy key.
1
Press [Layout/Edit] and then [Booklet].
2
Press [1-sided>>Booklet] to produce a booklet from single-sided originals.
3
Press [2-sided>>Booklet] to produce a booklet from two-sided originals.
Press
[Book>>Booklet] to
produce a booklet
from an open book
original.
Ready to copy.
Bookl et
Press [ OK] to display
the image.
Status 10/10/2007 10:10
Off
1-s ided
>>Bookl et
2-s ided
>>Bookl et
Book
>>Bookl et
Add Shor tc ut
Original
Finishing
Binding
Left/Right
Binding
Top/Bottom
Binding
Left
Binding
Right
Binding
Top
Cancel OK
Copies
Cover
Cover
Top Edge T op
Original
Orientation
1
If you selected [2-sided>>Booklet] or [Book>>Booklet], choose the binding
4
orientation in Finishing.
ADVANCED OPERATION GUIDE 1-29
Page 44

Copying Functions
If you selected [1-sided>>Booklet], choose the binding orientation in
Finishing.
If you choose [1-sided>>Booklet] or [2-sided>>Booklet], you can add the
5
cover. Press [Cover], select [Cover] and press [OK].
Press [Original Orientation] to choose orientation of the originals, either
6
[Top Edge Top] or [Top Edge Left]. Then press [OK].
Press [OK].
7
Place the originals in the document processor or on the platen and press
8
the Start key.
NOTE: When using the platen, be sure to place the originals in page
order.
If the originals are placed on the platen, consecutively replace each
original after pressing the Start key.
After scanning all originals, press [Scan finish] to start copying.
1-30 ADVANCED OPERATION GUIDE
Page 45

Duplex
Use Duplex to create two-sided copies.
You can also create single-sided copies from two-sided originals or
originals with facing pages such as books. The following modes are
available.
NOTE: To scan 2-sided originals in color using the optional document
processor, expansion of the memory in the machine is required. Call
service.
One-sided to Two-sided
Produces two-sided copies from one-sided originals. In case the originals
are an odd number, the back side of the last copy will be blank.
Copying Functions
1
5
4
3
2
1
2
5
3
4
1
Original Copy
The following binding options are available.
A Original Left/Right Binding >> Copy Left/Right Binding: Images are
copied onto the back side without being rotated.
B Original Left/Right Binding >> Copy Top Binding: Images are copied
onto the back side after being rotated 180°. When copies are bound on
top, the facing pages look in the same orientation.
ghi
def
abc
Original Copy
AB
ghi
abc
def
ghi
abc
def
ADVANCED OPERATION GUIDE 1-31
Page 46

Copying Functions
Two-sided to One-sided
Copies each side of a two-sided original onto two individual sheets.
Optional document processor is required.
The following binding options are available.
Left/Right Binding: Images are copied onto the back side without being
rotated.
Top Binding: Images are copied onto the back side after being rotated
180°.
Two-sided to Two-sided
Produces two-sided copies from two-sided originals. Optional document
processor is required.
1
2
Original Copy
5
3
4
1
2
1
2
5
3
4
1
2
Original Copy
NOTE: The paper sizes supported in Two-sided to Two-sided mode are
Ledger, Legal, Letter, Letter-R, Statement, Oficio II, 8.5×13.5", A3, B4, A4,
A4-R, B5, B5-R, A5-R and Folio.
1-32 ADVANCED OPERATION GUIDE
Page 47

Book to One-sided
Copying Functions
Copies each page of originals with facing pages onto two individual sheets.
1
Book to Two-sided
21
1
2
Original Copy
The following binding options are available.
Left Binding: Originals with facing pages are copied from left to right.
Right Binding: Originals with facing pages are copied from right to left.
NOTE: The following sizes of originals and paper are supported in Book
to One-sided mode. Original: Ledger, Letter-R, A3, B4, A4-R, B5-R, A5-R
and 8K. Paper: Letter, A4 and B5. When you select the paper size,
change the zoom level to match that size.
Produces two-sided copies from originals with facing pages.
34
Facing pages ->
Two-sided
1
2
3
4
Facing pages ->
Facing pages
1
2
0
3
212143
4
1
2
2
1
3
0
3
Original Copy
NOTE: The following sizes of originals and paper are supported in Book
to Two-sided mode. Original: Ledger, Letter-R, A3, B4, A4-R, B5-R, A5-R
and 8K. Paper: Letter, A4 and B5.
The procedure for using duplex/separate-page copying is explained below.
Press the Copy key.
1
Press [Layout/Edit] and then [Duplex].
2
ADVANCED OPERATION GUIDE 1-33
Page 48

Copying Functions
Select the desired
3
Duplex mode.
If you choose [1-sided>>2-sided], [2-sided>>2-sided] or [Book>>2-sided],
4
select the binding edge of the finished copies in Finishing.
If you choose [2-
5
sided>>2-sided], [2sided>>1-sided],
[Book>>1-sided] or
[Book>>2-sided],
select the binding
edge of the originals
in Original.
Ready to copy.
Duplex
Press [ OK] to display
the image.
Status
Ready to copy.
Duplex
Press [ OK] to display
the image.
Status
1-s ided
>>1-sided
1-s ided
>>2-sided
2-s ided
>>1-sided
2-s ided
>>2-sided
Book
>>1-sided
Book
>>2-sided
1-s ided
>>1-sided
1-s ided
>>2-sided
2-s ided
>>1-sided
2-s ided
>>2-sided
Book
>>1-sided
Book
>>2-sided
Add Shor tc ut
Add Shor tc ut
Finishing
Binding
Left/Right
Original
Binding
Left/Right
Binding
Top
Cancel OK
Binding
Top
Cancel OK
Copies
Top Edge T op
Original
Orientation
10/10/2007 10:10
Copies
Top Edge T op
Original
Orientation
10/10/2007 10:10
1
1
Press [Original Orientation] to select orientation of the originals, either [Top
6
Edge Top] or [Top Edge Left]. Then press [OK].
Press [OK].
7
Place the originals in the document processor or on the platen and press
8
the Start key.
If the originals are placed on the platen, consecutively replace each
original after pressing the Start key.
After scanning all originals, press [Scan finish] to start copying.
1-34 ADVANCED OPERATION GUIDE
Page 49

Cover Mode
Copying Functions
1
Add a cover to the finished copies. You can copy the first page and/or the
last page onto colored paper or thick paper fed from the different paper
source than the regular one. The following two options are available. Paper
for the cover is supplied from the Multi Purpose tray.
To feed the cover paper from the cassette, refer to Paper Source for Cover
Paper on page 6-15.
Type of Cover Description
Front Cover First page of the originals is copied on a different
paper.
Front and Back
Covers
First page and last page of the originals are
copied on different paper.
The procedure for using Cover mode copying is explained below.
Place the originals on the platen.
1
Press the Copy key.
2
Press [Layout/Edit] and then [Cover].
3
Press [Front Cover]
4
or [Front and Back
Covers].
Ready to copy.
Cover
Add a c over page of a di ff erent c olor or
thi ck ness , using a di ff erent paper so urc e.
Please c hoose either [ Front Cover ] or
Press [ OK] to display
the image.
Status 10/10/2007 10:10
[Front and Back Covers].
*Set paper source for cover in System Menu.
None F ront C over
Add Shor tc ut
Copies
Front and Back
Covers
Cancel OK
1
Press [OK].
5
Press the Start key.
6
If the originals are placed on the platen, consecutively replace each
original after pressing the Start key.
After scanning all originals, press [Scan finish] to start copying.
ADVANCED OPERATION GUIDE 1-35
Page 50

Copying Functions
Form Overlay
Copy the original images onto the form. Once you scan and register the
form, the form is overlaid onto the original. You can also use a form that is
already registered in the machine's memory.
Original CopyForms
NOTE: To register a form in advance, refer to Image Overlay Form
(Copy) Box on page 4-28 for details.
Follow the steps as below for form overlay.
Press the Copy key.
1
Press [Layout/Edit] and then [Form Overlay].
2
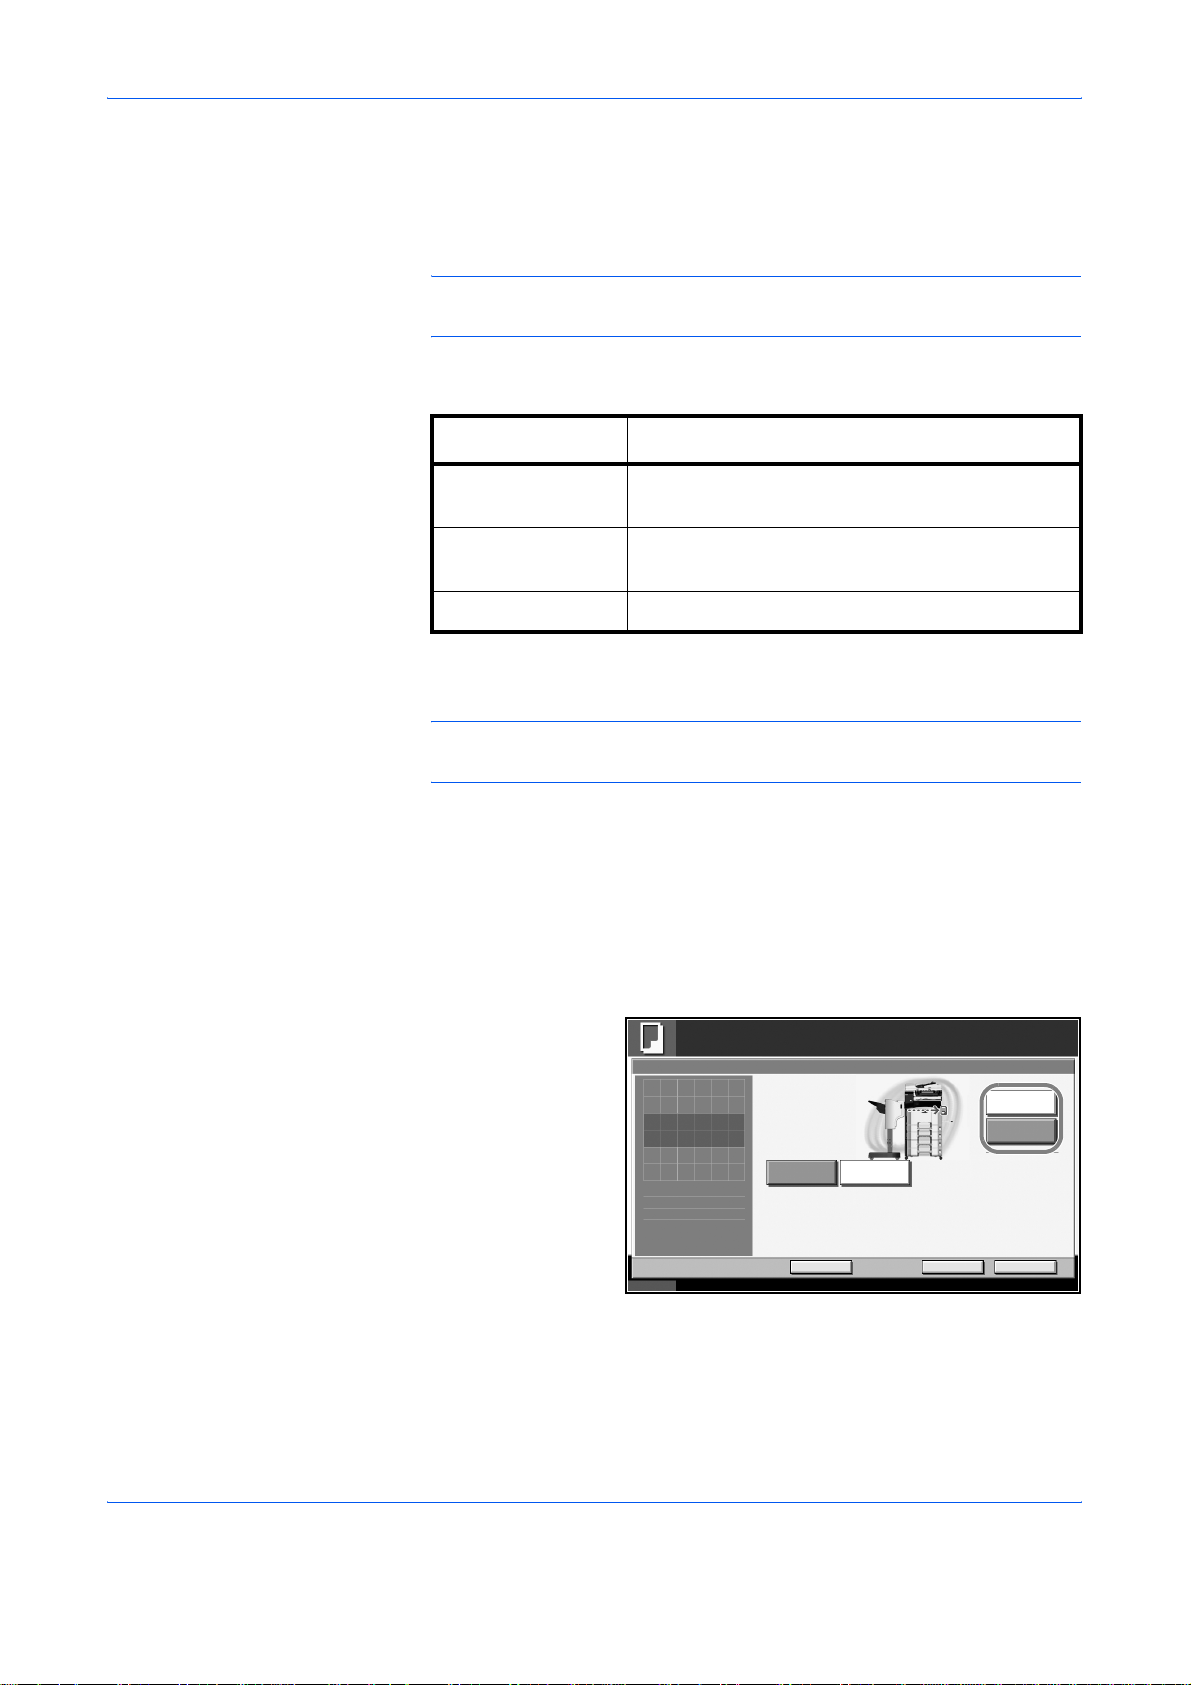
Press [Scan New
3
Form] to use the first
page of originals as
a form.
Ready to copy.
Form Ov erlay
Press [ OK] to display
the image.
Status 10/10/2007 10:10
Off
Selec t
Stor ed For m
Scan
New Form
Densi ty
Add Shor tc ut
NOTE: Press [+] or [–] in [Density] to adjust the density of the form.
Choose from ten levels in 10% increments.
To use the forms
already registered,
press [Select Stored
Form]. Press [Select
Form] to view the
form list. Select the
desired form from
the list and press
[OK].
Ready to copy.
Form Ov erlay - Select Form
Form for Form Overlay(Copy)
Name Date and Time Size
Docum ent 0
Docume nt 1 10 /10 /2007 09 :45 MB30
Docume nt 2 10 /10 /2007 09 :50
Docume nt 3 10 /10 /2007 09 :55
Docume nt 4 10 /10 /2007 10 :00
10/ 10/ 2007 09 :40
( 10 - 100)
%
Cancel OK
MB21
MB36
1/200
MB21
MB30
None
Copies
Copies
Selec t
Form
Detai l
1
1
Status 10/10/2007 10:10
Cancel OK
1-36 ADVANCED OPERATION GUIDE
Page 51

Copying Functions
NOTE: Press [Detail] to view the selected form data.
Press [OK].
4
Place the originals.
5
Place the original for the form on top of the other originals. When using the
optional document processor, the first page of the originals should be
placed on the top.
Press the Start key to start copying.
6
1
ADVANCED OPERATION GUIDE 1-37
Page 52

Copying Functions
Page Numbering
Number multiple pages of originals in sequential order. The formats for
numbering are [-1-], [P.1] or [1/n]. The format [1/n] prints the total number
of pages in the place of n.
The page number is centered at the bottom of the page.
Original [ – 1 –] [P.1] [1/n]
Use the procedure below to insert page numbers on your copies.
Place the originals in the document processor or on the platen.
1
Press the Copy key.
2
Press [Layout/Edit] and then [Page #].
3
Select the
4
numbering format
from [-1-], [P.1] or [1/
n].
To start page numbering from a page other than the first page, press [+] or
5
Ready to copy.
Page #
None
Press [ OK] to display
the image.
Status 10/10/2007 10:10
-1-
P.1
1/n
Add Shor tc ut
1st Page
Star t # (1 - 999 )
(1 - 10)
# Keys
# Keys
1
1
Cancel OK
[–] of 1st Page and select the starting page. You can also enter the number
with the numeric keys after pressing [# Keys].
Copies
Auto
Last Page
Auto
Denominator
#
Top Edge T op
Original
Orientation
1
To start the numbering with a number other than 1, press [+] or [–] of Start
6
Number and enter the starting number. You can also enter the number with
the numeric keys after pressing [# Keys].
1-38 ADVANCED OPERATION GUIDE
Page 53

Copying Functions
To specify the page to end numbering, press [Last Page] and select
7
[Manual]. Press [+] or [–] to enter the ending page and press [OK]. You can
also enter the number with the numeric keys after pressing [# Keys].
The total number of pages n in the format [1/n] can be changed manually.
8
Press [Denominator #] and select [Manual]. Press [+] or [–] to enter the
total number of pages and press [OK]. You can also enter the number with
the numeric keys after pressing [# Keys].
Press [Original Orientation] to choose orientation of the originals, either
9
[Top Edge Top] or [Top Edge Left]. Press [OK]
1
10
11
Press [OK].
Press the Start key to start copying.
ADVANCED OPERATION GUIDE 1-39
Page 54

Copying Functions
Memo Mode
Layout A
Delivers copies with a space for adding notes. You can also copy two
originals onto the same sheet with a space or add lines to indicate page
boundaries.
NOTE: Memo mode is available for the copy paper sizes of Ledger,
Legal, Oficio II, 8.5×13.5", Letter, Letter-R, Statement-R, A3, B4, Folio,
A4, A4-R, B5, B5-R, A5-R, 8K, 16K and 16K-R.
Reduces images of each original page for printing onto half of a page,
leaving the other half blank for notes.
Layout B
Original Copy
Reduces images of two original pages for copying onto half of a single
page, leaving the other half blank for notes.
Original Copy
1-40 ADVANCED OPERATION GUIDE
Page 55

Types of Page Boundary Lines
The following boundary lines are available.
None DottedSolid Borders
Use the procedure below to insert page boundary lines on your copies.
Place the originals on the platen.
1
Copying Functions
1
(Cropmark)
Press the Copy key.
2
Press [Layout/Edit] and then [Memo Page].
3
Press [Layout A] or
4
[Layout B]. Select
the page layout from
Layout.
Press [Border Line] to select the page boundary line. Press [OK].
5
Press [Original Orientation] to select orientation of the originals, either [Top
6
Edge Top] or [Top Edge Left]. Press [OK].
Press [OK].
7
Ready to copy.
Memo Page
Off
Press [ OK] to display
the image.
Status 10/10/2007 10:10
Layout A
Layout B
Add Shor tc ut
Layout
Upper
L to R
Left
T to B
Upper
R to L
Right
T to B
Cancel OK
Copies
None
Border Line
Top Edge T op
Original
Orientation
1
Press the Start key to start copying.
8
ADVANCED OPERATION GUIDE 1-41
Page 56

Copying Functions
Density Adjustment
Copy density is adjustable.
The table below shows the available settings.
Mode Description
Manual Density is adjustable to either 7 or 13 different
levels.
Auto Optimum density is selected depending on
density of original.
NOTE: You may choose Auto mode as the default setting (refer to
Density on page 6-26).
Follow the steps as below for density adjustment.
Place the originals on the platen.
1
Press the Copy key.
2
Press [Image Quality] and then [Density].
3
To adjust density manually, press [-3] - [+3] (Lighter - Darker).
4
You can change the density level [-3] - [+3] (Lighter - Darker) by half a step.
To change density
automatically, press
[Auto].
Press [OK].
5
Press the Start key to start copying.
6
Ready to copy.
Densi ty
Auto
Press [OK] to display
the image.
-2.5 -1 .5 -0. 5 +0.5 +1.5 +2 .5
Add Shor tc ut Canc el O K
Status 10/10/2007 10:10
NormalLighter
0 +1 +2 +3-1-2-3
Copies
1
Darke r
1-42 ADVANCED OPERATION GUIDE
Page 57

Image Quality
Copying Functions
1
Select the image quality to suit the type of original.
The table below shows the quality options.
Image Quality
Mode
Description
Text+Photo Text and photos together.
Text Only text, no photos.
Photo Only photos, no text.
Use the procedure below to select the quality of your copies.
Place the originals on the platen.
1
Press the Copy key.
2
Press [Image Quality] and then [Original Image].
3
Select the image
4
quality.
Ready to copy.
Original Image
Press [OK] to display
the image.
Select original document type
for bes t c opy r esul ts.
[Tex t + Photo ]: Text and photos toget her .
[Text]: Only text, no photos.
[Photo]: Only photos, no text.
Copies
1
Press [OK].
5
Press the Start key to start copying.
6
Status
Text+Photo
Text
Photo
Cancel OK
10/10/2007 10:10
ADVANCED OPERATION GUIDE 1-43
Page 58

Copying Functions
EcoPrint
Use EcoPrint to save toner when printing. Use this function for test copies
or any other occasion where high quality print is unnecessary.
The procedure for making copies using EcoPrint is explained below.
Place the originals on the platen.
1
Press the Copy key.
2
Press [Image Quality] and then [EcoPrint].
3
Press [On].
4
Press [OK].
5
Press the Start key to start copying.
6
Ready to copy.
EcoPr int
Press [OK] to display
the image.
Status
Cons erv e t oner w hen pri nti ng.
Please use Ec oPrint f or tes t c opies
and othe r s it uat ions wher e hi gh -quali ty
copies ar e not necess ary.
Off
Add Shor tc ut
Copies
1
On
Cancel OK
10/10/2007 10:10
1-44 ADVANCED OPERATION GUIDE
Page 59

Continuous Scan
Copying Functions
1
When a large number of originals cannot be placed in the document
processor at one time, the originals can be scanned in separate batches
and then copied as one job. With this function, originals are scanned until
you press [Scan Finish].
Any of the following settings can be changed during scanning.
• Original size selection
• Original orientation
• Image quality selection
• Type of original (2-sided/book original)
•Zoom
• Border erase
•Density
If you use Job Build, you can insert a blank paper during scanning or a
blank page during duplex copying.
The procedure for making copies using Continuous Scan is explained
below.
Press the Copy key.
1
Press [Advanced Setup] and then [Continuous Scan].
2
If Continuous Scan is selected, press [On].
3
If Job Build is
selected, press [Job
Build] and select
desired binding
orientation.
Press [OK].
4
Ready to copy.
Cont inuous Scan
Press [ OK] to display
the image.
Status
Off
On
Job Build
Add Shor tc ut
Selec t desi red bi nding or ient at ion .
Binding
Left
Binding
Right
Copies
Binding
Top
Cancel OK
10/10/2007 10:10
1
Place the originals in the document processor or on the platen and press
5
the Start key.
ADVANCED OPERATION GUIDE 1-45
Page 60

Copying Functions
If [Job Build] is
selected, the next
page can be
changed. Press
[Sheet Insertion] to
insert a blank paper.
Press [Next_Copy:
On_Back] in duplex
copying to print the
next page on back
page.
Place the next original and press the Start key. Repeat these steps to scan
6
the remaining originals.
Scan next original(s).
Place the ori ginals and pres s Star t key.
Press Scan Finish to start copying.
Job No.: Job Name : User Name:000021 doc 20070505113414 -----
Scanne r Set ti ng
Auto
2-s ided
Auto
Status 10/10/2007 10:10
Original
Siz e
2- sided/ Book
Original
Densi ty
Top Edge T op
Original
Orientation
100%
Zoom Border Eras e
Letter
Plai n
Paper
Selection
Text+Photo
Original
Image
Off
Canc el Scan Fini sh
After scanning all originals, press [Scan finish] to start copying.
Copies
Finished Pages
Next C opy:O n Front
Next C opy:
On Back
Sheet
Insertion
1
Pages
1-46 ADVANCED OPERATION GUIDE
Page 61

Auto Image Rotation
Copying Functions
Automatically rotates the image when the sizes of the original and the
loaded paper matches but the orientations are different. The images will be
rotated 90° counter-clockwise prior to copying.
NOTE: To set Auto Image Rotation as the default mode, refer to Auto
Image Rotation on page 6-31.
The procedure for making copies using Auto Image Rotation is explained
below.
Place the originals on the platen.
1
Press the Copy key.
2
Press [Advanced Setup] and then [Auto Image Rotation].
3
1
Press [On] to select
4
Auto Image
Rotation.
Press [OK].
5
Press the Start key to start copying.
6
Ready to copy.
Auto Image Rotation
When ori ginal and paper s ourc e si ze are t he
same, but their orientation is different,
Press [OK] to display
the image.
Status 10/10/2007 10:10
rotat e image 90 degrees when copyi ng .
Off
Add Shor tc ut
On
Copies
Cancel OK
1
ADVANCED OPERATION GUIDE 1-47
Page 62

Copying Functions
Negative Image
Inverts black and white portions of the image for printing.
Use the procedure below to make negative image copies.
Place the originals on the platen.
1
Press the Copy key.
2
Press [Advanced Setup] and then [Negative Image].
3
Press [On] to select
4
Negative Image.
Press [OK].
5
Press the Start key to start copying.
6
Ready to copy.
Negati ve Im age
Invert black and white in image to print
"negative " copies .
Press [OK] to display
the image.
Off
Status 10/10/2007 10:1 0
Add Shor tc ut
Copies
On
Cancel OK
1
1-48 ADVANCED OPERATION GUIDE
Page 63

Mirror Image
Copies the mirrored image of the original.
Use the procedure below to make mirror image copies.
Place the originals on the platen.
1
Press the Copy key.
2
Press [Advanced Setup] and then [Mirror Image].
3
Copying Functions
1
Press [On] to select
4
Mirror Image.
Press [OK].
5
Press the Start key to start copying.
6
Cancel
Copies
OK
Ready to copy.
Mirror Image
Print left-right mirrored copies
Add Shor tc ut
of or iginal .
Off
On
Press [OK] to display
the image.
Status 10/10/2007 10:10
1
ADVANCED OPERATION GUIDE 1-49
Page 64

Copying Functions
Job Finish Notice
Sends a notice by E-mail when a copy job is complete. User can be notified
of the completion of a copy job while working at a remote desk, saving the
time spent waiting beside the machine for copying to finish.
NOTE: PC should be configured in advance so that E-mail can be used.
Example of Job Finish Notice
To :
Subject:
Job No.: 000002
Result:
End Time: Wed 27 Apr 2005 14:56:08
File Name: doc27042005145608
Job Type: Copy
------------------------------------------------
1234
[00:c0:ee:d0:01:14]
------------------------------------------------
Use the procedure below to enable job finish notification when making
copies.
Place the originals on the platen.
1
h_pttr@owl-net.net
1234 Job end report mail
OK
Press the Copy key.
2
Press [Advanced Setup] and then [Job Finish Notice].
3
1-50 ADVANCED OPERATION GUIDE
Page 65

Copying Functions
To select the
4
address to be
notified from the
address book, press
[Address Book] on
the left of the screen
and then press
Ready to copy.
Job Finis h Noti ce
Off
Addre ss Book
Addre ss
Entr y
Destination
User A abc@def.com
[Address Book] in
the next screen.
Press [Address
Book], select
desired E-mail
Status 10/10/2007 10:10
Add Shor tc ut
address and press
[OK].
Press [Detail] to view the data of the selected destination.
To directly enter the
E-mail address,
press [Address
Entry]. Press [E-mail
Address], enter the
address and press
[OK].
Ready to copy.
Job Finis h Noti ce
Off
Addre ss Book
Addre ss
Entr y
E-m ail
Address
Copies
1
1
Detai l
Detai l Addre ss Boo k
Cancel OK
Copies
1
Status 10/10/2007 10:10
Press [OK].
5
Press the Start key to start copying. Upon completion of the job, an E-mail
6
Add Shor tc ut
Cancel OK
notice is sent to the selected destination.
ADVANCED OPERATION GUIDE 1-51
Page 66

Copying Functions
File Name
Names a copy job. Add other information such as date and time or job
number as necessary. You can check a job history or job status using the
job name, date and time, or job number specified here.
Use the procedure below to assign a name to your copy job.
Place the originals on the platen.
1
Press the Copy key.
2
Press [Advanced Setup] and then [File Name Entry].
3
Press [File Name], enter the name for a copy job, and press [OK].
4
To add date and
time, press [Date
and Time]. To add
job number, [Job
No.]. Added
information is
displayed in
Additional Info.
Press [OK].
5
Press the Start key to start copying.
6
Ready to copy.
File Name Ent ry
Add a f il e nam e.
Additional i nformat ion suc h as [Job No.]
and [Date and Ti me] can also be set.
File Name
Addit ional Inf o .
Status 10/10/2007 10:10
doc
Job No.
Date a nd Ti meJob No.
Add Shor tc ut
Copies
Cancel OK
1
1-52 ADVANCED OPERATION GUIDE
Page 67

Priority Override
Copying Functions
Suspends a current job and gives the selected job priority for copying. The
suspended job resumes after Priority Override copying is finished.
NOTE: The current job that is selected as Priority Override cannot be
suspended.
The procedure for using Priority Override is explained below.
Place the originals on the platen.
1
Press the Copy key.
2
Press [Advanced Setup] and then [Priority Override].
3
1
Press [On] to select
4
Priority Override.
Press [OK].
5
Press the Start key. The current copy job is suspended and the copy job
6
selected in Priority Override starts. The suspended job resumes after
Ready to copy.
Priority Override
Give print job top prior it y and c omplete it
Press [OK] to display
the image.
Status 10/10/2007 10:10
before returning to other print jobs.
Off
Add Shor tc ut
On
Cancel OK
Priority Override copying is finished.
Copies
1
ADVANCED OPERATION GUIDE 1-53
Page 68

Copying Functions
Repeat Copy
Enable additional copies in the desired quantity as necessary after a copy
job is completed. For confidential documents, you can set up a pass code
for the use of Repeat Copy. In such a case, the correct pass code must be
entered when using Repeat Copy or copies will not be delivered.
IMPORTANT: A Repeat Copy job is cleared when the main power switch
is turned off.
Repeat Copy is not available when the machine is equipped with the
optional Security Kit.
Repeat Copy cannot be used when the maximum number of Repeat Copy
jobs to retain in the document box is set to zero (refer to Maximum Number
of Repeat Copy Jobs Retained on page 1-55).
You can select Repeat Copy as default setting. Refer to Repeat
Copying on page 6-35.
Giving a file name to a copy job will facilitate identification of the data when
copying (refer to File Name on page 1-52).
Selecting Repeat Copy
Use the procedure below to select repeat copying.
Press the Copy key.
1
Press [Advanced Setup] and then [Repeat Copy].
2
Press [On].
3
To register a
password, press [#
Keys] and enter a 4digit password.
IMPORTANT: If you forget the pass code, Repeat Copy will be
unavailable. Make a note of the pass code beforehand if necessary.
Ready to copy.
Repeat Copy
Off
Press [OK] to display
the image.
Status 10/10/2007 10:10
On
Add Shor tc ut
Pass word(4 digi ts )
# Keys
Cancel OK
Copies
1
Press [OK].
4
1-54 ADVANCED OPERATION GUIDE
Page 69

Place the originals in the document processor or on the platen. Press the
5
Start key to start copying and register this job as a Repeat Copy job.
Outputting Repeat Copy Jobs
The Repeat Copy jobs are stored in the Document Box. Refer to Job
Box on page 4-2 to print out the Repeat Copy jobs.
Maximum Number of Repeat Copy Jobs Retained
You can use the procedure below to change the maximum number of copy
jobs that can be retained in the document box.
Use the procedure below to change the maximum number of copy jobs
retained.
Press the System Menu key.
1
Press [Document Box/Removable Memory] and then [Next] of Job Box.
2
Press [Change] of Repeat Copy Job Retention.
3
Copying Functions
1
Use the [+] or [-] key
4
to enter the
maximum retention
number.
You can also enter
the number from the
number keypad.
A number between 0
and 50 can be
entered as the
number of retained
jobs.
Document Box /Removable Memory - Repeat Copy Job Retention
Set t he m axi mum number of repea t c opy jobs to ret ain.
Use [-]/[+] or the numeric keys t o enter a number.
*Set this number to 0 to not retain any repeat copy jobs.
(0 - 50)
1
Status
job(s )
Cancel OK
NOTE: If you enter a value of 0 (zero), you cannot use the Repeat Copy
function.
Press [OK].
5
When exiting, press the Close key repeatedly to return to the System
6
Menu default screen.
10/10/2007 10:10
ADVANCED OPERATION GUIDE 1-55
Page 70

Copying Functions
Programm (Copying and Sending)
After registering sets of frequently used functions as a single program, you
can simply press the program number as needed to recall those functions.
You can also name the programs for easy identification when recalling.
NOTE: Sending operation can be registered in the program as well. Up
to 50 functions combining copying and sending can be registered in the
program.
If user login is enabled, you can only register functions by logging in with
administrator privileges.
Registering Programs
Use the procedure below to register a program.
The following procedure is an example of registering the copying function.
Press the Program key while the copy mode is accessed.
1
2
3
4
Recalling Programs
1
2
Press [Register] and press a number (01 to 50) for the program number.
If entering Program screen from the Copy screen or Send screen, go to
step 4.
NOTE: If you select a program number already registered, the currently
registered functions can be replaced with a new set of functions.
Check that [Copy] is selected, and press [Next].
Enter the new program name and press [Register] to register the program.
Use the procedure below to recall a registered program.
Press the Program key.
Press [Call] and
press the key
corresponding to the
program number (01
to 50) to recall.
Press [No.] to enter
the program number
directly for recalling.
01
02
03
04
05
Program
06
07
08
09
10
No.
Call Register Edit
Status 10/10/2007 10:10
1-56 ADVANCED OPERATION GUIDE
Page 71

NOTE: If the program cannot be recalled, the Document Box or the form
overlay specified in the program might have been deleted. Check the
Document Box.
Place the originals and press the Start key. Copying is performed
3
according to the registered program.
Editing and Deleting Programs
You can change program number and program name, or delete program.
Use the procedure below to edit or delete a program.
Press the Program key.
1
Press [Edit] and press the key(s) corresponding to the program number (01
2
to 50) to change or delete.
To edit a program, use the procedure for registering a program and press
3
[Change]. Then change the program number and program name and press
[Register]. Choose [Yes] in the confirmation screen to change the program.
Copying Functions
1
To delete the
program, press
[Delete this
Program]. Choose
[Yes] in the
confirmation screen
to finally delete the
program.
Program Detail:
No. Name :
01 2 in 1
Delete this Program Cancel
Status
Change Change
Register
10/10/2007 10:10
ADVANCED OPERATION GUIDE 1-57
Page 72

Copying Functions
Registering Shortcuts (Copying and Sending)
Add shortcuts in the Quick Setup screen for easy access to the frequently
used functions. A function name linked to a registered shortcut can be
changed as necessary. You can register shortcuts for up to 5 copying
functions and up to 6 sending functions.
NOTE: In the default settings, [Interrupt Copy] is registered to the
shortcut key number 01 of the copy function.
Adding Shortcuts
Shortcut registration is performed in the setup screen of each function.
Shortcuts can be registered for all functions in which [Add Shortcut]
appears on the screen.
Use the procedure below to register a shortcut.
After making the
1
desired settings in
the setup screen of
each function, press
[Add Shortcut].
Press the keys corresponding to the shortcut number (01 to 06) to register.
2
Ready to copy.
Page #
None
Press [ OK] to display
the image.
Status 10/10/2007 10:10
-1-
P.1
1/n
Add Shor tc ut
1st Page
Star t # (1 - 999 )
(1 - 10)
# Keys
# Keys
1
1
Cancel OK
NOTE: If you select a shortcut number already registered, the currently
registered shortcut can be replaced with a new one.
Enter the shortcut
3
name and press
[Register] to add the
shortcut. Press
[Close].
01
Short cut:
Use [-]/[+] or the numeric keys t o enter a number.
(1-6)
1
Copies
Auto
Last Page
Auto
Denominator
#
Top Edge T op
Original
Orientation
1
Status 10/10/2007 10:10
Cancel Register
1-58 ADVANCED OPERATION GUIDE
Page 73

Editing and Deleting Shortcuts
Follow the steps as below to change shortcut number/name or delete
shortcut.
Copying Functions
1
In the setup screen
1
of each function,
press [Add Shortcut]
in the bottom of the
screen.
Press [Edit] and press the keys corresponding to the shortcut number (01
2
Ready to copy.
Memo Page
Off
Press [ OK] to display
the image.
Status 10/10/2007 10:10
Layout A
Layout B
Add Shor tc ut
Layout
Upper
L to R
Left
T to B
Upper
R to L
Right
T to B
Cancel OK
to 06) to change or delete.
To edit a shortcut, use the procedure for registering the shortcut and press
3
[Change]. Then change the shortcut button number and name and press
[Register].
To delete the
shortcut, press
[Delete this
Short cut:
01
Short cut No.: Short cut Nam e :
01 2in1
Change Change
Shortcut]. Choose
[Yes] in the
confirmation screen
to delete the
shortcut.
Copies
None
Border Line
Top Edge T op
Original
Orientation
1
Delete this Shortcut
Status 10/10/2007 10:10
Cancel Register
ADVANCED OPERATION GUIDE 1-59
Page 74

Copying Functions
1-60 ADVANCED OPERATION GUIDE
Page 75

2 Sending Functions
This chapter explains the functions available for sending
originals.
• Original Size Selection ................................................. 2-2
• Sending Size Selection ................................................ 2-4
• Zoom ............................................................................ 2-6
• Centering...................................................................... 2-7
• Mixed Sized Originals................................................... 2-8
• 1-sided/2-sided Selection ............................................2-11
• Original Orientation .................................................... 2-12
• File Format ................................................................. 2-14
• PDF Encryption Functions.......................................... 2-16
• File Separation ........................................................... 2-19
• Image Quality ............................................................. 2-20
• Scan Density .............................................................. 2-21
• Scan Resolution ......................................................... 2-22
• Sharpness .................................................................. 2-23
• Background Density Adjustment ................................ 2-24
• Color / Grayscale / Monochrome Selection................ 2-25
• Continuous Scan........................................................ 2-26
• Border Erase .............................................................. 2-27
• Enter Document Name/File Name ............................. 2-30
• Enter E-mail Subject and Body .................................. 2-31
• Finish Notice............................................................... 2-32
• Send and Print............................................................ 2-34
• Send and Store .......................................................... 2-35
ADVANCED OPERATION GUIDE 2-1
Page 76

Sending Functions
Original Size Selection
Select the size of originals that will serve as the basis for scanning. Be sure
to select the original size when using originals of nonstandard sizes.
Choose the original size from the following groups of original size.
Item Detail Size
Standard
Sizes 1
Standard
Sizes 2
Others Select from
Size Entry Enter the size
Select from
automatic
detection and
standard sizes.
Select from
standard sizes
except Standard
Sizes 1 .
Hagaki and
Custom Original
Size *.
that is not
indicated in
Standard Sizes
1 and 2**.
Inch models: Auto, Ledger, Legal,
Letter, Letter-R, Statement,
Statement-R, 8.5×13.5", Oficio II-R,
11×15"
Metric models: Auto, A3, B4, A4,
A4-R, B5, B5-R, A5, A5-R, B6, B6-R,
A6-R, Folio
Inch models: A3, B4, A4, A4-R, B5,
B5-R, A5, A5-R, B6, B6-R, A6-R,
Folio, 8K, 16 K, 16K-R
Metric models: Ledger, Legal, Letter,
Letter-R, Statement, Statement-R,
8.5×13.5", Oficio II-R, 11×15", 8K,
16K, 16K-R
Hagaki, Oufuku Hagaki, Custom 1 to 4
Inch models
Horizontal: 2 to 17" (in 0.01"
increments), Vertical: 2 to 11.69" (in
0.01" increments)
Metric models
Horizontal: 50 to 432 mm (in 1 mm
increments), Vertical: 50 to 297 mm (in
1 mm increments)
* Regarding the setting method of Custom Original Size (Custom 1 to
4), refer to Custom Original Size Setup on page 6-6.
** The input units can be changed in the System menu.
Refer to Switching Unit of Measurement on page 6-17.
Use the procedure below to select the original size when sending scanned
images.
Place the originals on the platen.
1
Press the Send key.
2
Press [Type of Original/Transmission] and then [Original Size].
3
2-2 ADVANCED OPERATION GUIDE
Page 77

Sending Functions
Press [Standard
4
Sizes 1], [Standard
Sizes 2], [Others], or
[Size Entry] to select
original size.
When you have
selected [Size
Entry], press [+] or
[-] to set the sizes of
X (horizontal) and Y
(vertical). By
pressing [# Keys],
you can use the
numeric keys.
Ready to send.
Place original.
Original Size
Standar d
Siz es 1
Press [OK] to display
the image.
Status 10/10/2007 10:1 0
Ready to send.
Place original.
Original Size
Press [OK] to display
the image.
Status 10/10/2007 10:1 0
Standar d
Siz es 2
Others
Siz e Ent ry
Standar d
Siz es 1
Standar d
Siz es 2
Others
Siz e Ent ry
Auto
Letter
Statem ent
OficioII
X
Y
Ledger
Legal
11x 15"
Cancel OKAdd Shor tc ut
(2. 00 - 17. 00)
11.00
# Keys
(2. 00 - 11. 69)
8. 50
# Keys
Cancel OKAdd Shor tc ut
Destination
Letter
Statem ent
8.5x13.5"
Destination
"
"
1
2
1
Press [OK].
5
Specify the destination, and press the Start key to start sending.
6
ADVANCED OPERATION GUIDE 2-3
Page 78

Sending Functions
Sending Size Selection
Select the sending size (the size of image to be sent).
The table below lists the sizes.
Item Detail Size
Standard
Sizes 1
Standard
Sizes 2
Others Select from
Relationship between Original Size, Sending Size, and Zoom
Original Size (page 2-2), Sending Size, and Zoom (page 2-6) are related
to each other. Refer to the following table.
Original Size and the size you
wish to send as are
Original Size Specify as
Select from Same
as Original Size or
Standard Size.
Select from
standard size
except Standard
Sizes 1.
Hagaki.
Inch models: Same as Original Size,
Ledger, Legal, Letter, Statement,
8.5×13.5", Oficio II, 11×15"
Metric models: Same as Original Size,
A3, B4, A4, B5, A5, B6, A6, Folio
Inch models: A3, B4, A4, B5, A5,
B6, A6, Folio, 8K, 16K
Metric models: Ledger, Legal,
Letter, Statement, 8.5×13.5",
Oficio II, 11×15", 8K, 16K
Hagaki, Oufuku Hagaki
the same different
necessary
Specify as
necessary
Sending Size Select [Same as
Original]
Zoom Select [100%]
(or [Auto])
Select the
required size
Select [Auto]
NOTE: When you select Sending Size that is different from Original Size,
and select the Zoom [100%], you can send the image as the actual size
(No Zoom).
Use the procedure below to select the size for transmission when sending
scanned images.
Place the originals on the platen.
1
Press the Send Key.
2
Press [Type of Original/Transmission] and then [Sending Size].
3
2-4 ADVANCED OPERATION GUIDE
Page 79

Sending Functions
Press [Standard
4
Sizes 1], [Standard
Sizes 2], or [Others]
to select the sending
size.
Press [OK].
5
Specify the destination, and press the Start key to start sending.
6
Ready to send .
Place original.
Sending Si ze
Press [OK] to display
the image.
Status 10/10/2007 10:1 0
Standar d
Siz es 1
Standar d
Siz es 2
Others
Same as
Original
Legal Statement
8.5x 13.5" Of icioI I
Add Shor tc ut
Ledger
Cancel OK
Destination
1
Letter
11x15 "
2
ADVANCED OPERATION GUIDE 2-5
Page 80

Sending Functions
Zoom
Scans the original by automatically zooming it depending on the sending
size.
The table below lists the available options.
Item Detail
100% No Zoom (to be scanned at actual size)
Auto Zoomed automatically according to the specified
sending size.
NOTE: When zooming in or out, see Sending Size Selection on page 2-4
when selecting the sending size.
When Custom Size or Size Entry is selected as the original size, the
originals are sent at normal size and zooming cannot be used.
Depending on the combination of original size and sending size, the image
is placed at the edge of the paper. To center the image vertically and
horizontally on the page, use the centering setting described in
on the page 2-7.
“Centering”
Use the procedure below to enlarge or reduce the original to match the
transmission size.
Place the originals on the platen.
1
Press the Send key.
2
Select the transmission size.
3
Press [Advanced Setup] and then [Zoom].
4
Press [100%] or
5
[Auto].
Ready to send .
Place original.
Zoom
Enlarge or reduce original when scanning .
[100%]: Scan at actual s iz e.
Press [OK] to display
the image.
Status 10/10/2007 10:10
[Aut o]: Enla rge or r educe t o mat ch
sending size/storing size.
100%
Add Shor tc ut
Auto
Cancel OK
Destination
1
Press [OK].
6
Specify the destination, and press the Start key to start sending.
7
2-6 ADVANCED OPERATION GUIDE
Page 81

Centering
Sending Functions
When you have scanned the original after specifying the original size and
sending size, depending on these sizes, a margin is created at the bottom,
left, or right side of paper. By using the centering, the image is placed with
a margin equally created at each of the page Top/Bottom and Left/Right.
Use the procedure below to center then image when sending a scanned
image.
Place the originals on the platen.
1
Press the Send key.
2
Press [Advanced Setup] and then [Centering].
3
2
Press [On].
4
Centering is
performed.
Press [OK].
5
Specify the destination, and press the Start key to start sending.
6
Ready to send .
Enter Destination.
Centering
Move i ma ge to c enter of page dur ing s ca n.
Press [OK] to display
the image.
Off
Status 10/10/2007 10:10
Add Shor tc ut
Destination
1
On
Cancel OK
ADVANCED OPERATION GUIDE 2-7
Page 82

Sending Functions
Mixed Sized Originals
Originals of the Same Width
Using the optional document processor, the originals of different sizes can
be placed in a batch and sent. In this operation, up to 30 originals of
different sizes can be placed in the document processor at the same time.
When the original widths are the same, the combinations of originals that
can be placed are as follows.
• Ledger and Letter (A3 and A4)
Ledger LedgerLetter Letter
• Legal and Letter-R (Folio and A4-R)
• B4 and B5
When the original widths are different
LegalLegal Letter-R Letter-R
The combinations of originals of different sizes that can be placed together
are as follows.
NOTE: You cannot scan two-sided originals when placing originals of
different widths.
2-8 ADVANCED OPERATION GUIDE
Page 83

• A3, B4, A4, B5
• B4, A4-R, B5
Sending Functions
2
• Folio, A4-R, B5-R
Use the procedure below to send mixed sized originals as a batch.
Place the original into the document processor.
1
IMPORTANT: When you place originals of different width, place the top
edge of originals to align with the width guide at the backside. If the
originals are placed unevenly, they may not be scanned correctly.
Press the Send key.
2
Press [Type of Original/Transmission] and then [Mixed Sized Originals].
3
ADVANCED OPERATION GUIDE 2-9
Page 84

Sending Functions
Select the
4
combination of
originals from
[Same Width] and
[Diff Width].
Press [OK].
5
Specify the destination, and press the Start key to start sending.
6
Ready to send.
Mixed SizedOriginals
Scan all sheetsin docume ntprocessor,
evenif differentlysized,then send.
*Up to 30sheetscanbe placedin
Press[OK] to display
the i mage .
Status 10/10/2007 10:10
documentprocessor.
Off SameWidth
Add Sho rtcut
Destination
1
DiffWidth
Cance l OK
2-10 ADVANCED OPERATION GUIDE
Page 85

1-sided/2-sided Selection
Sending Functions
Select the type and binding of original depending on the original.
The table below lists the binding directions for each original type.
Original Type Binding
1-sided Sheet Original 1-sided —
2-sided Sheet Original 2-sided*
Binding Left/Right,
Binding Top
Open Book Original such
as magazine and book
* Only when the optional document processor is used.
Book Binding Left,
Binding Right
NOTE: To scan colored 2-sided originals using the optional document
processor, you need to add memory to the machine. Contact to your
service representative.
Use the procedure below to select the original type and binding direction
when sending scanned originals.
Place the originals on the platen.
1
Press the Send key.
2
2
Press [Type of Original/Transmission] and then [2-sided/Book Original]
3
Press [1-sided], [2-
4
sided], or [Book].
If you selected [2-sided] or [Book], you should also select the binding
5
Ready to send .
Place original.
2-s ided/ Book Or igi nal
1-s ided
Press [OK] to display
the image.
Status 10/10/2007 10:10
2-s ided
Book
Binding
RightLeft
Cancel OKAdd Shor tc ut
direction and press [Original Orientation] to select the direction in which the
original is set on the platen.
Press [OK].
6
Specify the destination, and press the Start key to start sending.
7
Destination
Top Edge T op
Original
Orientation
1
ADVANCED OPERATION GUIDE 2-11
Page 86

Sending Functions
Original Orientation
To send the document in the orientation that can be read properly, specify
the upper orientation of original. To use the functions below, select the
orientation in which the original is set on the platen.
• 1-sided / 2-sided Selection
• Border Erase
* If [On] is selected as the Orientation Confirmation setting in the
System Menu, the selection screen for original orientation appears
when you select any of the above functions.
When placing the original on the platen
Original [Top Edge Top] [Top Edge Left]
When placing the original on the optional document processor
Original [Top Edge Top] [Top Edge Left]
Use the procedure below to select the orientation when placing the
originals on the platen for sending.
Place the originals on the platen.
1
Press the Send key.
2
Press [Type of Original/Transmission] and then [Original Orientation].
3
2-12 ADVANCED OPERATION GUIDE
Page 87

Sending Functions
Select original
4
orientation from
[Top Edge Top] and
[Top Edge Left].
Press [OK].
5
Specify the destination, and press the Start key to start sending.
6
Ready to send .
Place original.
Original Orientation
Enter the orientation of the
ori ginal docum ent 's t op edge.
Press [OK] to display
the image.
Top Edge T op
Status 10/10/2007 10:10
Add Shor tc ut
Destination
1
2
Top Edge L eft
Cancel OK
ADVANCED OPERATION GUIDE 2-13
Page 88

Sending Functions
File Format
Select the file format of the image to send.
The table below lists the file formats and their details.
File Format
PDF 1 Low Quality (High Comp.) to
TIFF 1 Low Quality (High Comp.) to
JPEG 1 Low Quality (High Comp.) to
Adjustable range of image
quality
5 High Quality (Low Comp.)
5 High Quality (Low Comp.)
Color mode
Full Color, Grayscale,
Monochrome
Full Color, Grayscale,
Monochrome
Full Color, Grayscale
5 High Quality (Low Comp.)
High Comp.
PDF *
* Only displayed when the optional PDF Upgrade Kit is installed.
1 Compression Ratio Priority
to 3 Quality Priority
Full Color
NOTE: When the color mode in scanning has been selected for
Grayscale or Full Color, you can adjust the image quality Regarding color
mode, refer to Color / Grayscale / Monochrome Selection on page 2-25.
When the optional PDF upgrade kit has been installed, you can use PDF
encryption functions. For details, refer to the following PDF Encryption
Functions.
Use the procedure below to select the file format for transmission.
Place the originals on the platen.
1
Press the Send key.
2
Press [Type of Original/Transmission] and then [File Format].
3
Select the file format from [PDF], [TIFF], [JPEG], and [High Comp. PDF].
4
When the color
mode in scanning
has been selected
for Grayscale or Full
Color, set the image
quality.
If the optional PDF
Ready to send .
Place original.
File Format
Press [OK] to display
the image.
PDF
TIFF
JPEG
High Com p.
PDF
Image Quali ty
Low Quality
(High Comp.)
upgrade kit is
installed, press
[Encryption] and
specify the
Status 10/10/2007 10:10
Cancel OKA dd Short cut
encryption settings.
Destination
High Quality
(Low Comp.)
Off
Encr ypti on
1
2-14 ADVANCED OPERATION GUIDE
Page 89

Press [OK].
5
Specify the destination, and press the Start key to start sending.
6
Sending Functions
2
ADVANCED OPERATION GUIDE 2-15
Page 90

Sending Functions
PDF Encryption Functions
If you have selected PDF or High Comp. PDF for file format, you can
restrict the access level for displaying, printing, and editing PDF's by
assigning a secure password.
NOTE: You need to use the optional PDF upgrade kit.
The items you can restrict the access level with are as follows.
Item Value Detail
Compatibility Acrobat4.0 or later,
Acrobat5.0 or later
Password to
Off, On Enter the password to open the
open
Select the version that is
compatible with the PDF file.
PDF file
document
Password to
edit/print
document
Off, On Enter the password to edit the
PDF file
When you have entered the
password to edit/print
document, you can specifically
limit the operation.
When you send a PDF file, use the procedure below to encrypt the PDF
file for transmission.
Place the originals on the platen.
1
Press the Send key.
2
Press [Type of Original/Transmission], [File Format], [PDF] or [High Comp.
3
PDF], and [Encryption].
Press [T] of
4
Compatibility, select
Acrobat4.0 and later
or Acrobat5.0 and
later.
File Format - Encryption
Compatibility
Pass word t o open
docum ent .
Ac robat 4.0 and la ter
Middl e(40- bit)
Off
On
Password
Confirmation
Password
to edit/print
docum ent.
When you enter the password to open the PDF file, select [On] of
5
Password to open document..
Off
On
Password
Confirmation
Detai l
Cancel OK
2-16 ADVANCED OPERATION GUIDE
Page 91

Sending Functions
Press [Password], enter a password (up to 255 characters) and then press
6
[OK].
NOTE: For the character entry method, refer to the Operation Guide.
Press [Confirmation] and enter the password again for confirmation. Then
7
press [OK].
When you enter the password to edit the PDF file, select [On] of Password
8
to edit/print document..
In the same way as the entry of Password to open document., enter the
9
password to change the PDF file.
2
10
11
Press [Detail].
Restrict the access level of the PDF file. Press [T] of Printing Allowed to
select the item (the scope of limit). The item to be displayed differs
according to the version of Acrobat selected in Compatibility in step 4.
The table below shows the available settings.
Item Detail
Not Allowed Make the printing of PDF file impossible
Allowed(Low
Can print the PDF file only in low resolution
Resolution only)*
Allowed Can print the PDF file in original resolution
* Only displayed when [Acrobat5.0 and later] is selected in
Compatibility.
File Format - Detail Setting
Printing Allowed
Changes Allowed
Not Al low ed
Allowed
12
Copyi ng of Tex t/ Im ages /O ther s
Press [T] of Changes Allowed, and select the item (the scope of limit). The
Dis able
Enable
Cancel OK
item to be displayed differs according to the version of Acrobat selected in
Compatibility in step 4.
ADVANCED OPERATION GUIDE 2-17
Page 92

Sending Functions
The table below shows the available settings.
Item Detail
Not Allowed Cannot change the PDF file
Commenting Can only add commenting
13
Inserting/Deleting/
Rotating Pages*
Page Layout
except extracting
Pages**
Any except
extracting Pages
* Only displayed when [Acrobat5.0 and later] is selected in
Compatibility.
** Only displayed when [Acrobat4.0 and later] is selected in
Compatibility.
From Copying of Text/Images/Others, select [Disable] or [Enable].
The table below shows the available settings.
Item Detail
Disable Prohibit the copying of text and objects on the
Enable Can copy text and objects on the PDF file.
Can only insert, delete, and rotate the pages of
the PDF file
Can change the page layout except extracting
the pages of the PDF file
Can conduct all operations except extracting the
pages of the PDF file
PDF file.
14
15
Press [OK] to return to File Format.
Specify the destination, and press the Start key to start sending.
2-18 ADVANCED OPERATION GUIDE
Page 93

File Separation
Sending Functions
Create several files by dividing scanned original data page by page, and
send the files.
Use the procedure below to split scanned original data into separate files
when sending scanned originals.
Place the originals on the platen.
1
Press the Send key.
2
Press [Type of Original/Transmission] and then [File Separation].
3
2
Press [Each Page]
4
to set File
Separation.
Press [OK].
5
Specify the destination, and press the Start key. The scanned original is
6
sent after being divided into files of one page each. Three-digit serial
Ready to send .
Place original.
File Separation
Cre ate and se nd a fi le for eac h page
Press [OK] to display
the image.
Status 10/10/2007 10:10
of the ori ginal that w as read.
Off
Add Shor tc ut
Each Pa ge
Cancel OK
number such as abc_001.pdf, abc_002.pdf... is attached to the end of the
file name.
Destination
1
ADVANCED OPERATION GUIDE 2-19
Page 94

Sending Functions
Image Quality
Select image quality suitable to the type of original.
The table below shows the quality options.
Item Detail
Text+Photo Text and photos together.
Text Only text, no photos.
Photo Only photos, no text.
for OCR For documents to be read by OCR.
Use the procedure below to select the quality when sending scanned
originals.
Place the originals on the platen.
1
Press the Send key.
2
Press [Color/Image] and then [Original Image].
3
Select Image
4
Quality.
Press [OK].
5
Specify the destination, and press the Start key to start sending.
6
Ready to send .
Enter Destination.
Original Image
Select the original document type.
Press [OK] to display
the image.
Status 10/10/2007 10:10
[f or O CR]: For doc uments to be r ead by OC R.
Text+Photo Phot o
for OCR
Add Shor tc ut
Destination
1
Text
Cancel OK
2-20 ADVANCED OPERATION GUIDE
Page 95

Scan Density
Sending Functions
Use the procedure below to adjust the scanning density when sending
scanned originals. You can adjust the scan density either automatically or
manually.
The table below shows the available settings.
Item Detail
2
Manual density
Can set density using 7 or 13 levels.
adjustment
Auto density
adjustment
Can set the optimal scan density according to
the density of original.
The procedure for adjusting the scanning density when sending a scanned
image is explained below.
Place the originals on the platen.
1
Press the Send key.
2
Press [Color/Image] and then [Density].
3
When selecting
4
manual density
adjustment, press [3] to [+3] (Lighter -
Darker) to adjust
density.
When selecting auto
density adjustment,
Ready to send.
Enter Destination.
Densi ty
Press [OK] to display
the image.
Auto
NormalLighter
0 +1 +2 +3-1-2-3
-2.5 - 1.5 - 0.5 +0.5 + 1.5 +2. 5
press [Auto].
Status 10/10/2007 10:1 0
Add Shor tc ut Ca ncel OK
Destination
1
Darke r
Press [OK].
5
Specify the destination, and press the Start key to start sending.
6
ADVANCED OPERATION GUIDE 2-21
Page 96

Sending Functions
Scan Resolution
Select the fineness of scanning resolution. The finer the scanning
becomes (the larger the number becomes), the better the image quality
becomes. However, better resolution also results in larger file size (file
capacity) and longer scanning and sending times. The selectable
resolution is 200x100dpi Normal, 200x200dpi Fine, 200x400dpi Super
Fine, 300x300dpi, 400x400dpi Ultra Fine, or 600x600dpi.
NOTE: For an image displayed on a computer screen, 96 dpi (in the case
of Windows), and for an image printed by a printer, 150 to 600 dpi, are
generally standard. To enlarge an image and print it in a large size, you
should scan the original at a high resolution.
The procedure for adjusting the scanning resolution when sending a
scanned image is explained below.
Place the originals on the platen.
1
Press the Send key.
2
Press [Color/Image] and then [Scan Resolution].
3
Select the
4
resolution.
Press [OK].
5
Specify the destination, and press the Start key to start sending.
6
Ready to send.
Place original.
Scan R es olut ion
Selec t fine nes s of scanni ng res olution.
The larger the number , the better the
600x 600dpi
200x 400dpi
Super Fi ne
Add Shor tc ut
image resolution.
Press [OK] to display
the image.
Status 10/10/2007 10:10
400x 400dpi
Ultr a Fine
200x 200dpi
Fine
Destination
300x 300dpi
200x 100dpi
Normal
Cancel OK
1
2-22 ADVANCED OPERATION GUIDE
Page 97

Sharpness
Sending Functions
Select the sharpness of the image outline.
The table below shows the available settings.
Item Detail
Sharpen Emphasize the image outline. Make letters and
lines appear sharper.
Unsharpen Blur the image outline. Can weaken a Moire
effect (grids appearing as wavelike patterns
when scanning printed photos).
NOTE: You cannot specify the sharpness if you selected [Monochrome]
in Color Selection (see page 2-25).
Use the procedure below to set the sharpness when sending scanned
images.
Place the originals on the platen.
1
Press the Send key.
2
Press [Color/Image] and then [Sharpness].
3
2
Press [-3] to [+3]
4
(UnsharpenSharpen) to adjust
Ready to send.
Place original.
Sharpnes s
the sharpness.
Press [OK] to display
the image.
Status 10/10/2007 10:10
Press [OK].
5
Specify the destination, and press the Start key to start sending.
6
Unsharpen
Add Shor tc ut Canc el O K
Destination
1
Sharpen
0 +1 +2 +3-1-2-3
ADVANCED OPERATION GUIDE 2-23
Page 98

Sending Functions
Background Density Adjustment
Lightens the background of the colored original when it is too dark.
NOTE: You cannot adjust the background density if you selected
[Monochrome] in Color Selection (see page 2-25).
Use the procedure below to set the background density when sending
scanned images.
Place the originals on the platen.
1
Press the Send key.
2
Press [Color/Image] and then [Background Density Adj.].
3
Press [On], and
4
press [1] to [5]
(Lighter- Darker) to
adjust the density.
Press [OK].
5
Specify the destination, and press the Start key to start sending.
6
Ready to send .
Place original.
Bac kgr ound Dens it y A dj .
Press [OK] to display
the image.
Status 10/10/2007 10:10
Off
On
Bac kground
Lighter
12345
Destination
1
Darke r
Cancel OKAdd Shor tc ut
2-24 ADVANCED OPERATION GUIDE
Page 99

Color / Grayscale / Monochrome Selection
This feature allows you to select the select the color mode used for
scanning when sending images. You can select from Full Color, Grayscale
or Monochrome.
NOTE: To scan colored 2-sided originals using the optional document
processor, you need to add memory to the machine. Contact your service
representative.
Use the procedure below to select the color mode when sending scanned
images.
Place the originals on the platen.
1
Press the Send key.
2
Press [Color/Image] and then [Color Selection].
3
Sending Functions
2
Press either
4
[Full Color],
[Grayscale] or
[Monochrome].
Press [OK].
5
Specify the destination, and press the Start key to start sending.
6
Ready to send .
Place original.
Color Selection
Selec t a sc anning c olor se tt ing.
Press [OK] to display
the image.
Auto Color
Full Color
Status 10/10/2007 10:10
Add Shor tc ut C ancel OK
Destination
1
MonochromeGraysc ale
ADVANCED OPERATION GUIDE 2-25
Page 100

Sending Functions
Continuous Scan
When the multi-page originals cannot be placed in the document processor
at one time, the originals can be scanned in separate batches and then
sent as one job. With this function, originals can be scanned one after
another until you press [Scan Finish].
Any of the following settings can be changed during scanning.
• Original Size selection
• 1-sided / 2-sided selection
• Sending Size selection
• Original Orientation
• Image Quality
• Scan density
• Scan resolution
•Zoom
• Border Erase
The procedure for using continuous scanning when sending scanned
images is explained below.
Press the Send key.
1
Press [Advanced Setup] and then [Continuous Scan].
2
Press [On].
3
Continuous Scan is
selected.
Press [OK].
4
Specify the destination.
5
Place the original, and press the Start key.
6
Ready to send .
Enter Destination.
Cont inuous Scan
Scan ori ginal s f rom Docume nt Proc es sor a nd
platen for output as one job.
Press [OK] to display
the image.
Status 10/10/2007 10:10
*Se tt ings c an be cha nged duri ng sc anning .
Off
Add Shor tc ut
When the scanning is completed, change the settings as necessary.
Destination
1
On
Cancel OK
Place the next original, and press the Start key. Scan the remaining
7
originals by the same procedure.
When you have scanned all the originals, press [Scan finish] to start
sending.
2-26 ADVANCED OPERATION GUIDE
 Loading...