

Page 1
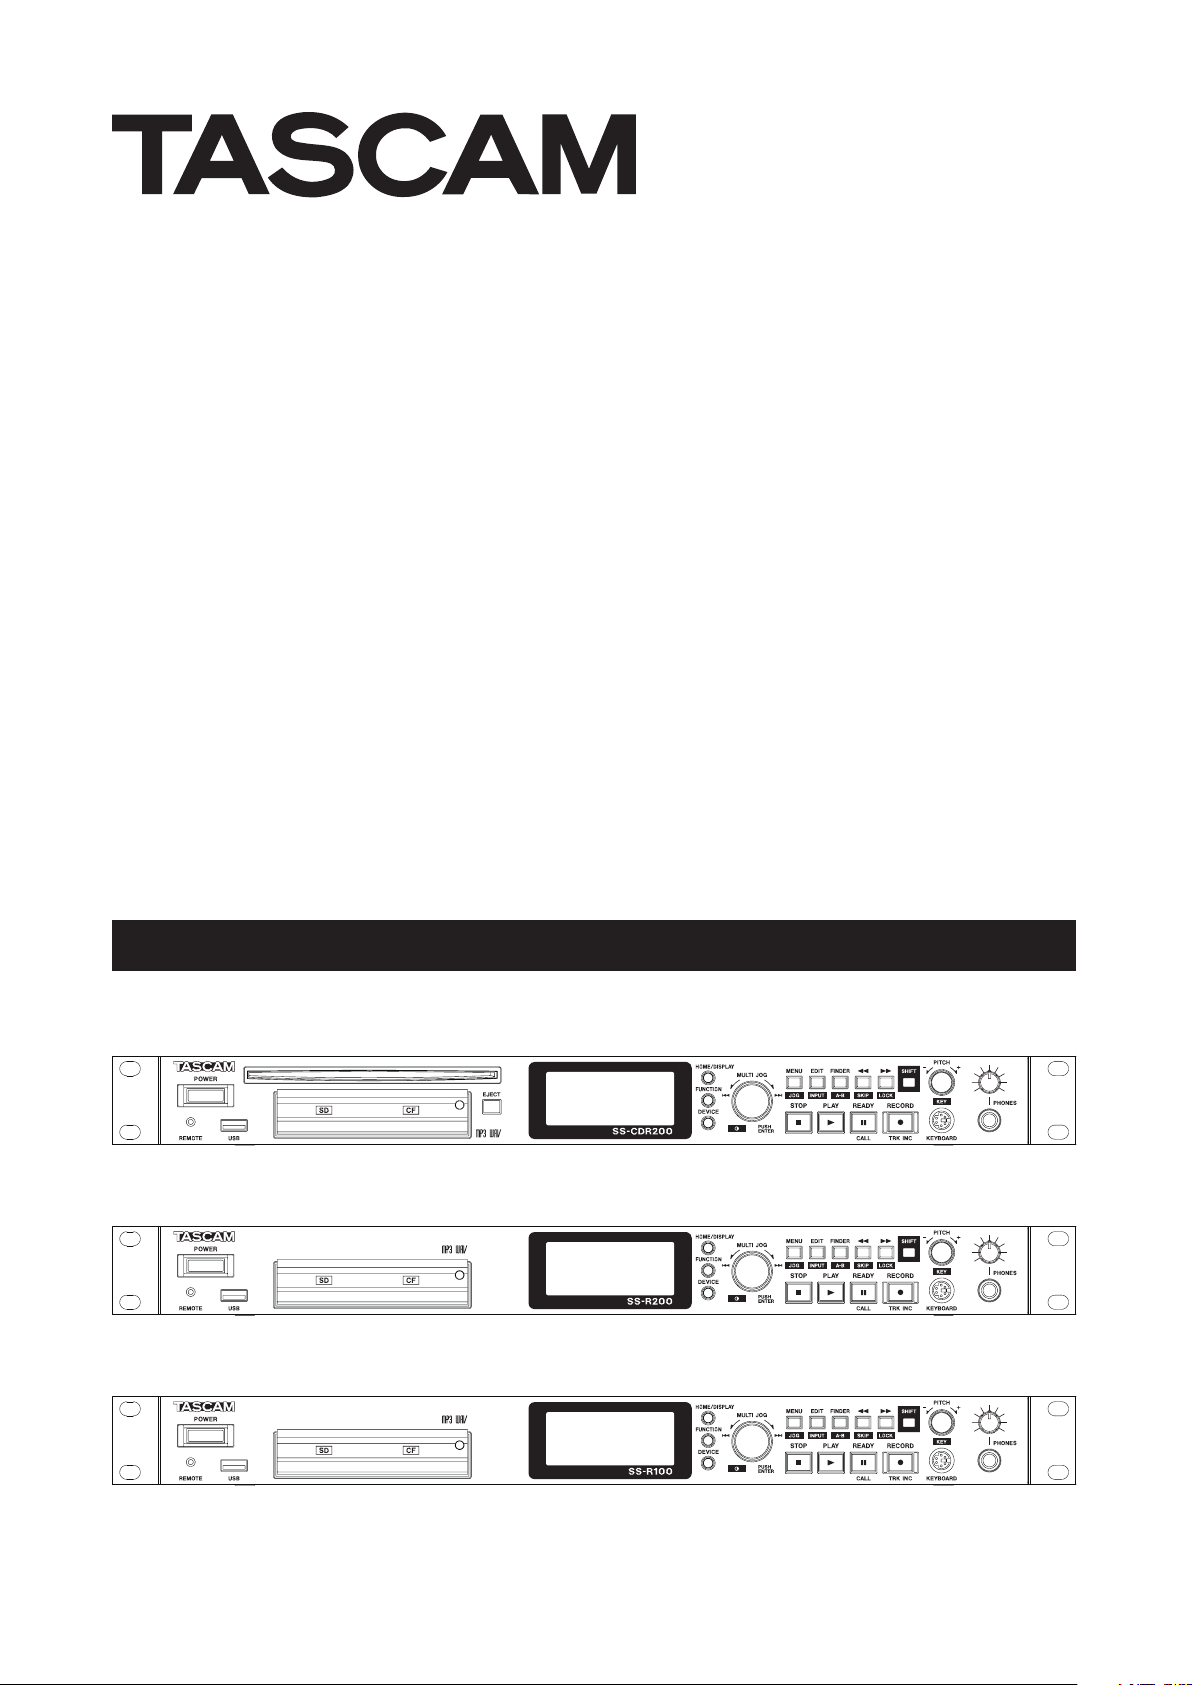
SS-CDR200
Solid State/CD Stereo Audio Recorder
SS-R200
D01155420A
SS-R100
Solid State Stereo Audio Recorder
OWNER'S MANUAL
Page 2
2 TASCAM SS-CDR200/SS-R200/SS-R100
IMPORTANT SAFETY PRECAUTIONS
For European Customers
WARNING
This is a Class A product. In a domestic environment, this
product may cause radio interference in which case the
CAUTION: TO REDUCE THE RISK OF ELECTRIC
SHOCK, DO NOT REMOVE COVER (OR BACK). NO
USER-SERVICEABLE PARTS INSIDE. REFER SERVICING
TO QUALIFIED SERVICE PERSONNEL.
The lightning flash with arrowhead symbol,
within equilateral triangle, is intended to
alert the user to the presence of uninsulated
“dangerous voltage” within the product’s
enclosure that may be of sufficient
magnitude to constitute a risk of electric
shock to persons.
The exclamation point within an equilateral
triangle is intended to aler t the user to
the presence of important operating and
maintenance (servicing) instructions in the
literature accompanying the appliance.
WARNING: TO PREVENT FIRE OR
user may be required to take adequate measures
Disposal of electrical and electronic equipment
(a) All electrical and electronic equipment should be
disposed of separately from the municipal waste
stream via collection facilities designated by the
government or local authorities.
(b) By disposing of electrical and electronic equipment
correctly, you will help save valuable resources and
prevent any potential negative effects on human
health and the environment.
(c) Improper disposal of waste electrical and electronic
equipment can have serious effects on the
environment and human health because of the
presence of hazardous substances in the equipment.
(d) The Waste Electrical and Electronic Equipment (WEEE)
symbol, which shows a wheeled bin that has been
crossed out, indicates that electrical and electronic
equipment must be collected and disposed of
separately from household waste.
SHOCK HAZARD, DO NOT EXPOSE THIS
APPLIANCE TO RAIN OR MOISTURE.
For U.S.A.
TO THE USER
This equipment has been tested and found to comply
with the limits for a Class A digital device, pursuant to Part
15 of the FCC Rules. These limits are designed to provide
reasonable protection against harmful interference when
the equipment is operated in a commercial environment.
This equipment generates, uses, and can radiate radio
frequen c y energy an d, if not inst all ed an d use d in
accordance with the instruction manual, may cause
harmful interference to radio communications.
Operation of this equipment in a residential area is likely
to cause harmful inter ference in which case the user
will be required to correct the interference at his own
expense.
CAUTION
Changes or modifications to this equipment not expressly
approved by TEAC CORPORATION for compliance could
void the user's authority to operate this equipment.
(e) Return and collection systems are available to end
users. For more detailed information about the
disposal of old electrical and electronic equipment,
please contact your city office, waste disposal service
or the shop where you purchased the equipment.
CE Marking Information
a) Applicable electromagnetic environment: E4
b) Peak inrush current: 17 A
This appliance has a serial number located on the
rear panel. Please record the model number and
serial number and retain them for your records.
In North America use only on 120V supply.
Model number
Serial number
Page 3
TASCAM SS-CDR200/SS-R200/SS-R100 3
IMPORTANT SAFETY INSTRUCTIONS
1 Read these instructions.
2 Keep these instructions.
3 Heed all warnings.
4 Follow all instructions.
5 Do not use this apparatus near water.
6 Clean only with dry cloth.
7 Do not block any ventilation openings. Install in
accordance with the manufacturer's instructions.
8 Do not install near any heat sources such as radiators,
heat registers, stoves, or other apparatus (including
ampliers) that produce heat.
9 Do not defeat the safety purpose of the polarized
or grounding-type plug. A polarized plug has two
blades with one wider than the other. A grounding
type plug has two blades and a third grounding
prong. The wi d e blade or the third pro n g ar e
provided for your safety. If the provided plug does
not fit into your outlet, consult an electrician for
replacement of the obsolete outlet.
10 Protect the power cord from being wa l k e d on
or pi n ched pa rticular l y at plugs, conve nience
receptacles, and the point where they exit from the
apparatus.
11 Only use attachments/accessories specified by the
manufacturer.
Do not expose this apparatus to drips or splashes.
•
Do not place any objects filled with liquids, such as
•
vases, on the apparatus.
Do not install this apparatus in a confined space such
•
as a book case or similar unit.
The apparatus draws nominal non-operating power
•
from the AC outlet with its POWER or STANDBY/ON
switch not in the ON position.
The apparatus should be located close enough to the
•
AC outlet so that you can easily grasp the power cord
plug at any time.
The mains plug is used as the disconnect device, the
•
disconnect device shall remain readily operable.
Products with Class I construction are equipped with a
•
power supply cord that has a grounding plug. The cord
of such a product must be plugged into an AC outlet
that has a protective grounding connection.
If the product uses batteries (including a battery pack
•
or installed batteries), they should not be exposed to
sunshine, fire or excessive heat.
CAUTION for products that use replaceable lithium
•
batteries: there is danger of explosion if a battery is
replaced with an incorrect type of battery. Replace only
with the same or equivalent type.
Caution should be taken when using earphones or
•
headphones with the product because excessive sound
pressure (volume) from earphones or headphones can
cause hearing loss.
12 Use only with the car t, stand, tripod, bracket, or
table specied by the manufacturer, or sold with the
apparatus. When a cart is used, use caution when
moving the cart/apparatus combination to avoid
injury from tip-over.
13 Unplug this apparatus during lightning storms or
when unused for long periods of time.
14 Refer all servicing to qualified service personnel.
Servicing is required when the apparatus has been
damaged in any way, such as power-supply cord or
plug is damaged, liquid has been spilled or objects
have fallen into the apparatus, the apparatus has
been exposed to rain or moisture, does not operate
normally, or has been dropped.
Page 4

4 TASCAM SS-CDR200/SS-R200/SS-R100
1
For USA
Safety Information
Notes on Laser Product (SS-CDR200)
This product has been designed and manufactured
according to FDA regulations "title 21, CFR, chapter 1,
subchapter J, based on the Radiation Control for Health
and Safety Act of 1968", and is classified as a class 1 laser
product. There is no hazardous invisible laser radiation
during operation because invisible laser radiation emitted
inside of this product is completely confined in the
protective housings.
The label required in this regulation is shown at 1.
Rack-Mounting the Unit
Use the supplied rack-mounting kit to mount the unit in a
standard 19-inch rack, as shown below.
Remove the feet of the unit before mounting.
NOTE
Leave 1U of space above the unit for ventilation.
•
Allow at least 10 cm (4 in) at the rear of the unit for
•
ventilation.
CAUTION
DO NOT REMOVE THE PROTECTIVE HOUSING USING A
•
SCREWDRIVER.
USE OF CONTROLS OR ADJUSTMENTS OR
•
PERFORMANCE OF PROCEDURES OTHER THAN THOSE
SPECIFIED HEREIN MAY RESULT IN HAZARDOUS
RADIATION EXPOSURE.
IF THIS PRODUCT DEVELOPS TROUBLE, CONTACT YOUR
•
NEAREST QUALIFIED SERVICE PERSONNEL, AND DO
NOT USE THE PRODUCT IN ITS DAMAGED STATE.
CLASS 1M INVISIBLE LASER RADIATION WHEN OPEN
•
AND INTERLOCKS DEFEATED. DO NOT VIEW DIRECTLY
WITH OPTICAL INSTRUMENTS.
Optical pickup
Type : HOP-6201TC
Manufacturer : Hitachi Media Electronics Co,Ltd.
Laser output : Less than 75 mW on the objective lens
(record)
Wavelength : 777 to 787 nm
Page 5
TASCAM SS-CDR200/SS-R200/SS-R100 5
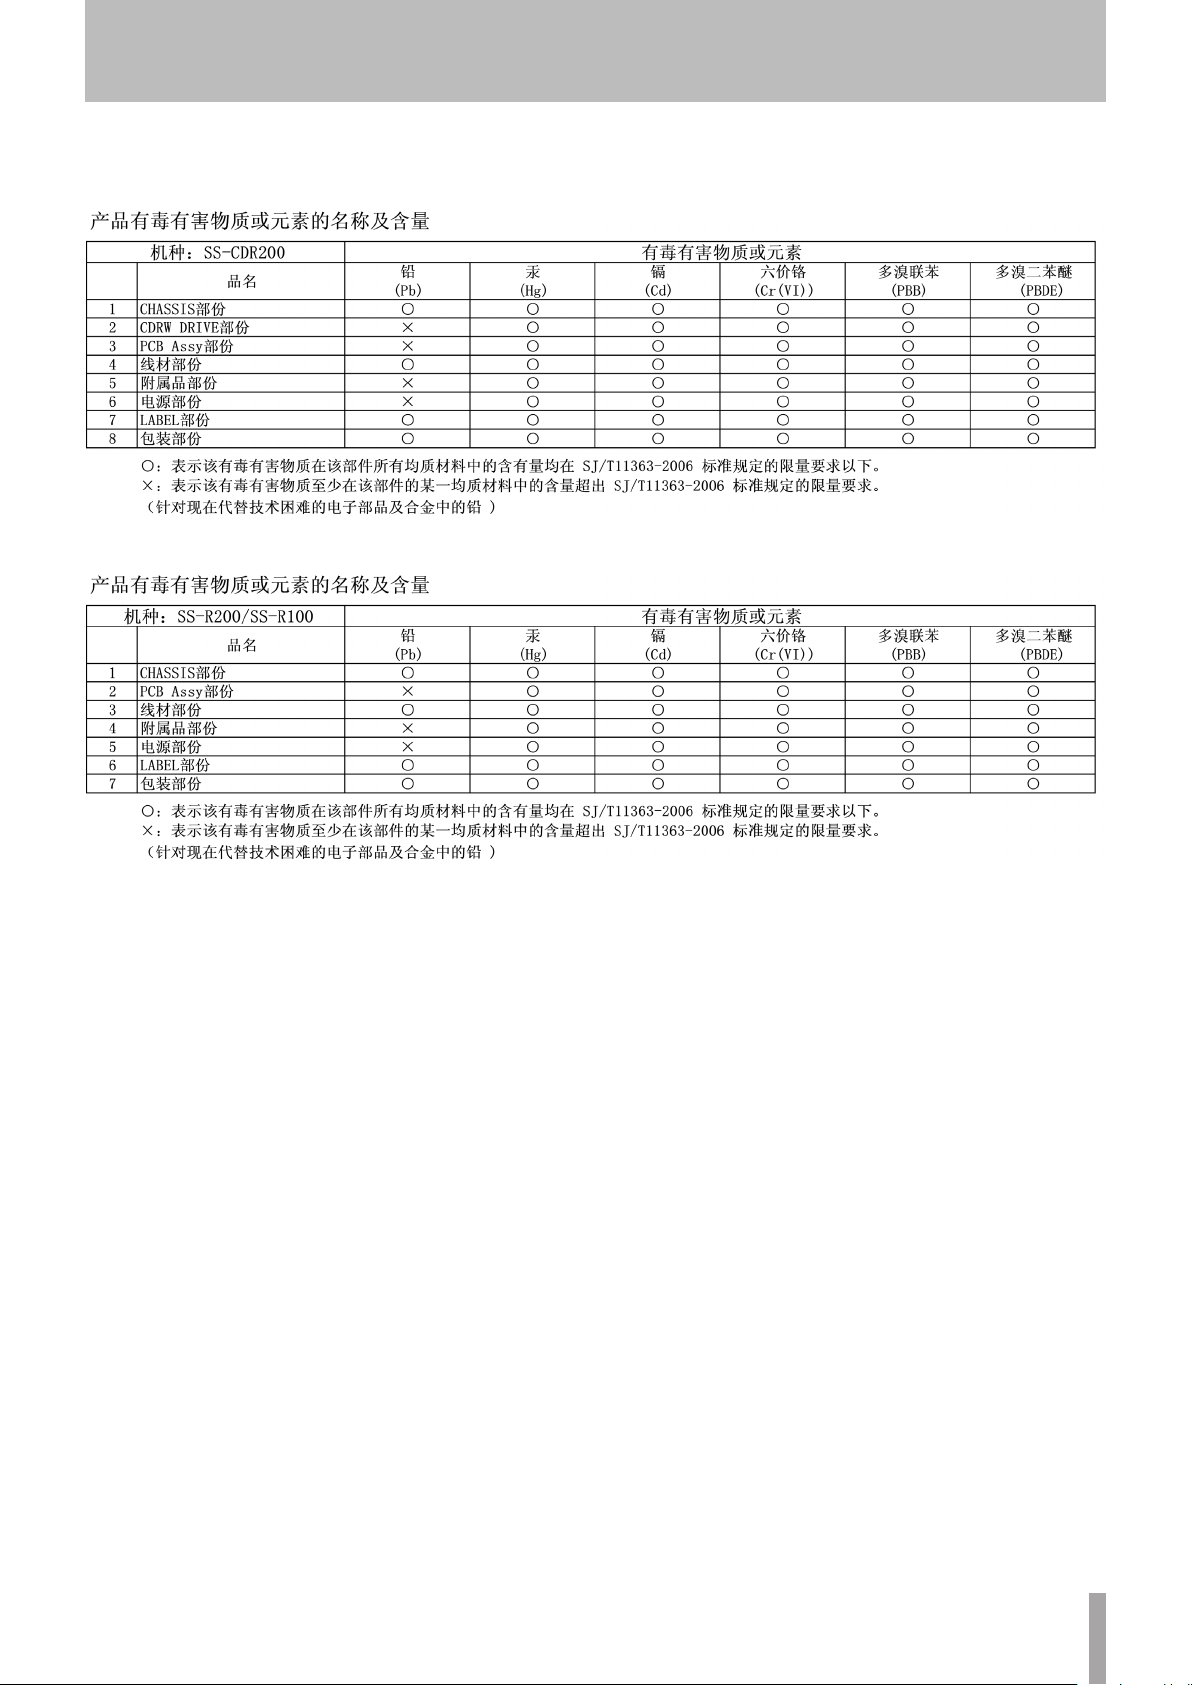
For China
SS-CDR200
SS-R200/SS-R11
Safety Information
Page 6

6 TASCAM SS-CDR200/SS-R200/SS-R100
Contents
1 − Introduction ..............................................8
SS-CDR200, SS-R200 and SS-R100 differences .........8
Features .................................................................................. 8
Included items .....................................................................8
Conventions used in this manual ..................................8
Intellectual property rights .............................................9
Precautions for placement and use ..............................9
Connecting the power ....................................................10
Beware of condensation .................................................10
Cleaning the unit...............................................................10
About USB memory, SD cards and CF cards ............10
Precautions for use ....................................................10
Media that has been confirmed for use with this
unit ..................................................................................10
SD card write-protection .........................................10
Media formatting .......................................................10
About compact discs .......................................................10
Handling of compact discs .....................................10
About CD-R and CD-RW discs ................................11
Slot loading of discs .........................................................11
2 − Names and functions of parts ...............12
Front panel ..........................................................................12
Rear panel ............................................................................15
TASCAM RC-SS2 wired remote control ......................16
Home Screen ......................................................................17
Home Screen FUNCTION status display.............18
Recording Screen .............................................................19
Recording Screen FUNCTION status display ...19
Menu structure ..................................................................20
Menu operation basics ....................................................21
Menu operation procedures ..................................21
3 − Preparations............................................23
Making connections ........................................................23
Turning the power ON/OFF ..........................................24
Setting the date and time ..............................................24
Adjusting the display .......................................................24
Adjusting the display contrast .............................24
Adjusting the display and indicator
brightness .....................................................................25
Inserting and ejecting SD and CF cards ....................25
Inserting SD and CF cards .......................................25
Ejecting SD and CF cards .........................................25
Using the security screw ..........................................26
SD card write protection .........................................26
Inserting and removing discs (SS-CDR200 only) ...26
Inserting discs .............................................................26
Ejecting discs ...............................................................26
Selecting the device used ..............................................26
Preparing USB/SD/CF media for use ..........................27
Panel lock function ..........................................................27
4 − Playback ..................................................28
Files that can be played ..................................................28
Tracks and files ...........................................................28
Play area ..............................................................................28
Setting the play area .................................................28
Selecting the current folder or current
playlist ............................................................................29
Playback modes ................................................................29
Setting the playback mode ...................................29
Basic playback operations ............................................29
Playback ........................................................................29
Selecting tracks ..................................................................30
Skipping to the previous or next track ...............30
Specifying a track number ......................................30
Searching backward and forward ..............................30
Time search ........................................................................30
Time searching after partial entry ........................30
Jog playback ......................................................................31
Skipping backward and forward ................................31
Setting the skip time .................................................31
Call function .......................................................................31
Program playback ............................................................32
Preparing the program ............................................32
Pitch control playback ....................................................32
Setting the pitch step ...............................................33
Key control playback .......................................................33
Repeat playback ...............................................................33
Ordinary repeat playback .......................................33
A-B repeat playback .................................................34
Auto Cue function ...........................................................34
Auto Ready function .......................................................35
Incremental playback function ...................................35
Mono playback .................................................................36
EOM functions (SS-CDR200/SS-R200 only) ..............36
Setting EOM tally output triggers ........................36
Example of use ............................................................37
Resume playback .............................................................37
Using power-on play .......................................................37
Link playback function ...................................................38
Link playback connections .....................................38
Setting link playback .................................................38
Flash start function ..........................................................38
5 − Recording ................................................40
Automatic protection against unintentional
power interruptions .........................................................40
Selecting the input source ............................................40
Selecting the source from the front panel ........40
Selecting the source from the remote
control ...........................................................................40
Show the input source ............................................40
Setting the recording file format ................................41
Using the sampling rate converter ............................41
Monitoring the input signal ..........................................42
Adjusting the input signal level and balance .........42
Basic recording operations ...........................................42
Finalizing CD-R/CD-RW discs (SS-CDR200 only) ....43
Finalizing discs ............................................................43
Sync recording ...................................................................43
Sync settings ................................................................43
Page 7

TASCAM SS-CDR200/SS-R200/SS-R100 7
Contents
Sync recording operation .......................................44
Auto Track function .........................................................45
Creating a new track manually ....................................46
Setting the pause mode ................................................46
Using the compressor when recording ...................47
Setting the format for naming recorded files
(MP3/WAV files only) ........................................................47
Inputting and editing characters .........................48
Recording with dither .....................................................48
Media capacities and recording times ......................49
6 − File and folder operations (FINDER
screen) ...................................................50
Opening the FINDER screen ..........................................50
Navigating the FINDER screen .....................................50
Icons on the FINDER screen...........................................50
File operations ....................................................................51
Folder operations ..............................................................51
Editing folder names (USB/SD/CF media only) ......52
Editing file names (USB/SD/CF media only) ............52
Deleting folders and files (USB/SD/CF media
only) .......................................................................................53
Adding entire folders to a playlist (USB/SD/CF
media only) .........................................................................53
Adding files to a playlist (USB/SD/CF media
only) .......................................................................................53
Creating a new folder (USB/SD/CF media only) .....54
Moving and copying files (USB/SD/CF media
only) .......................................................................................54
Moving a file within a folder .................................54
Move/copy files between folders .........................55
7 – Audio CD FINDER screen (SS-CDR200
only) .......................................................56
Opening the audio CD FINDER screen ......................56
Selecting a track to play ................................................56
Editing CD-Text (CD-R/CD-RW disc only) ..................56
8 − Using the EDIT menu (USB/SD/CF media
only) .......................................................57
Using the edit menu ........................................................57
Deleting files .......................................................................57
Dividing files .......................................................................57
Combining files ..................................................................58
Undoing EDIT menu operations ..................................59
9 − Editing the playlist (USB/SD/CF media
only) .......................................................60
Overview ..............................................................................60
Open the USER PLAYLIST screen ................................60
Navigating the playlist screen ......................................60
Using the playlist FINDER MENU .................................61
Adding files to playlists ............................................61
Removing files from playlists ................................62
Moving a file in a playlist .........................................62
Copy/convert and copy files from USB/SD/CF
media to blank CDs ..........................................................63
Creating audio CDs ....................................................63
Creating data CDs ......................................................65
Converting CD files and copying them to
USB/SD/CF media .............................................................66
Converting and copying audio CD tracks .........66
Copying files on a data CD ......................................67
11 − CD-RW management (SS-CDR200
only) .......................................................69
Unfinalizing CD-RW discs ...............................................69
Erasing CD-RW discs ........................................................69
Erasing tracks ......................................................................70
Refreshing discs ................................................................70
12 − Other settings and media
information ..........................................71
Footswitch control ...........................................................71
Setting up a footswitch ...........................................71
Using the footswitch ................................................71
Footswitch mode functions ...................................71
Setting the digital output format ................................71
Viewing information about the media .....................72
Restoring the factory settings ......................................72
13 − Operation using a computer
keyboard ...............................................73
Setting the keyboard language .................................73
Using a keyboard to input text ...................................73
Keyboard operation list .................................................73
14 − Using control I/O (SS-CDR200/SS-R200
only) .......................................................75
Using the RS-232C connector ......................................75
Using the parallel connector.........................................75
15 − Message list ..........................................77
Error messages ...................................................................77
Warning messages ..........................................................77
Operation messages ........................................................78
16 − Troubleshooting ...................................79
17 − Specifications .......................................80
Media and file formats ....................................................80
Inputs and outputs ..........................................................80
Analog audio inputs and outputs .......................80
Digital audio inputs and outputs ........................80
Control inputs and outputs ...................................80
Audio performance ..........................................................80
Backup memory ...............................................................81
General..................................................................................81
Dimensional drawings ....................................................82
10 - Copying files between CDs and other
media (SS-CDR200) ..............................63
Page 8

8 TASCAM SS-CDR200/SS-R200/SS-R100
1 − Introduction
Thank you very much for purchasing a TASCAM
SS-CDR200 Solid State/CD Stereol Audio Recorder or
SS-R200/SS-R100 Solid State Stereo Audio Recorder.
Please read this manual thoroughly before using the unit
so that you understand correct operating procedures and
can use its functions fully. We hope that you enjoy using
this unit for many years.
Please keep this manual so that you can read it at
any time. A digital copy of this manual can also be
downloaded from our website (http://tascam.com/)
SS-CDR200, SS-R200 and SS-R100 differences
The SS-R200 model adds XLR balanced inputs and
outputs, serial and parallel control connectors and EOM
functions to the features of the SS-R100.
The SS-CDR200 model adds a CD drive to the features of
the SS-R200.
The rear panels of the SS-CDR200 and SS-R200 models
have XLR balanced input and output connectors as well as
RCA unbalanced input and output connectors. The input
signal can be set to either the XLR balanced inputs or the
RCA unbalanced inputs.
Transport and pitch can be controlled using a TASCAM
•
RC-3F footswitch (sold separately)
Flash start using TASCAM RC-20 Direct Play Remote
•
(sold separately) supported
Included items
This product includes the following items.
Take care when opening the package not to damage the
items. Keep the package materials for transportation in
the future.
Please contact the retailer where you purchased this unit
if any of these items are missing or have been damaged
during transportation.
Main unit• ........................................................................................ 1
AC power cord• ............................................................................. 1
RC-SS2 remote control unit (with 5 m cable) • ................... 1
A rack-mounting screw kit• ....................................................... 1
Security Screw• .............................................................................. 2
A warranty card• ........................................................................... 1
Owner's manual (this manual)• ............................................... 1
Conventions used in this manual
Features
2-channel audio recorders can use USB memory, SD
•
cards and CF cards
SS-CDR200 units can also use CDs
•
1U rack-mount size
•
Using USB memory, SD and CF cards, playback and
•
recording of files in MP3 (44.1/48 kHz) and WAV formats
is possible (44.1/48 kHz, 16/24-bit, 24-bit can only be
played back)
Using CD media, playback and recording of files in
•
audio CD (CD-DA) and MP3 formats, as well as playback
of WAV format files is possible (SS-CDR200 only)
Built-in parallel and serial control ports can be used for
•
remote control (SS-CDR200/SS-R200 only)
Flash start function enables instant playback starting
•
Pitch control, key control and other playback control
•
functions
Play area can be set as desired using playlists and
•
folders
Track editing (WAV files only)
•
Built-in clock for time-stamping
•
Balanced (SS-CDR200/SS-R200 only) and unbalanced
•
analog audio inputs and outputs
Coaxial digital audio inputs and outputs
•
Included wired remote control allow reliable remote
•
operation
Control and character input using a PS/2 and USB
•
keyboards possible
In this manual, we use the following conventions:
The front panel illustration on the cover of this manual
•
is an SS-CDR200. The SS-R200 and SS-R100 models
have different appearances.
The display screens shown in this manual are from the
•
SS-CDR200. The SS-R200 and SS-R100 display screens
are different in some cases.
Buttons, jacks and other parts on the main unit
•
and external devices are indicated like this: HOME/
DISP LAY
Messages on the unit’s display are shown like this:
•
“USB flash drive” is abbreviated as ”USB memory.”
•
“SD memory card” is abbreviated as “SD card.”
•
“CompactFlash card” is abbreviated as “CF card.
•
CD-DA format is sometimes referred to as “audio CD”
•
format. An audio disc containing tracks recorded in
audio CD format is sometimes referred to as an “audio
CD”.
A CD containing MP3 or WAV files is sometimes referred
•
to as a “data CD”.
Additional information is provided as necessary as tips,
•
notes and cautions.
MOVE
Page 9
TASCAM SS-CDR200/SS-R200/SS-R100 9
1 − Introduction
TIP
These are tips about how to use the unit.
NOTE
These provide additional explanations and describe
special cases.
CAUTION
Failure to follow these instructions could result in injury,
damage to equipment or lost recording data, for example.
Intellectual property rights
TASCAM is a trademark of TEAC Corporation, registered
•
in the U.S. and other countries.
SDHC Logo is a trademark of SD-3C, LLC.
•
CompactFlash is a US registered trademark of SanDisk
•
Corporation.
Supply of this product does not convey a license
•
nor imply any right to distribute MPEG Layer-3
compliant content created with this product in
revenue-generating broadcast systems (terrestrial,
satellite, cable and/or other distribution channels),
streaming applications (via Internet, intranets and/or
other networks), other content distribution systems
(pay-audio or audio-on-demand applications and
the like) or on physical media (compact discs, digital
versatile discs, semiconductor chips, hard drives,
memory cards and the like). An independent license for
such use is required. For details, please visit
http://mp3licensing.com.
MPEG Layer-3 audio coding technology licensed from
•
Fraunhofer IIS and Thomson.
This product contains PrFILE®2 FAT file system and
•
PrFILE2 Unicode Interface of eSOL Co., Ltd.
Copyright © 2008 eSOL Co., Ltd.
PrFILE® is a registered trademark of eSOL Co., Ltd. in
•
Japan.
Other company names, product names and logos
•
in this document are the trademarks or registered
trademarks of their respective owners.
Any data, including, but not limited to information,
described herein are intended only as illustrations
of such data and/or information and not as the
specifications for such data and/or information. TEAC
Corporation disclaims any warranty that any use
of such data and/or information shall be free from
infringement of any third party’s intellectual property
rights or other proprietary rights, and further, assumes
no liability of whatsoever nature in the event of any
such infringement, or arising from or connected with
or related to the use of such data and/or information.
This product is designed to help you record and
reproduce sound works to which you own the
copyright, or where you have obtained permission
from the copyright holder or the rightful licensor.
Unless you own the copyright, or have obtained the
appropriate permission from the copyright holder
or the rightful licensor, your unauthorized recording,
reproduction or distribution thereof may result in
severe criminal penalties under copyright laws and
international copyright treaties. If you are uncertain
about your rights, contact your legal advisor. Under no
circumstances will TEAC Corporation be responsible
for the consequences of any illegal copying performed
using the recorder.
Precautions for placement and use
The guaranteed operating temperature range of this
•
product is 5° - 35° C (41° - 95° F).
Do not install in the following types of places. Doing
•
so could degrade the sound quality and/or cause
malfunctions.
Places with significant vibrations or that are
•
otherwise unstable
Near windows or other places exposed to direct
•
sunlight
Near heaters or other extremely hot places
•
Extremely cold places
•
Places with bad ventilation or high humidity
•
Very dusty locations
•
Make sure that the unit is mounted in a level position
•
for correct operation.
In order to promote the emission of heat, do not place
•
anything on top of this product.
Do not place this product on top of a powered
•
amplifier or other equipment that emits heat.
Page 10
10 TASCAM SS-CDR200/SS-R200/SS-R100
1 − Introduction
Connecting the power
Insert the included power cord into the • AC IN
connector completely.
Hold the power cord by the plug when connecting or
•
disconnecting it.
Beware of condensation
If the unit is moved from a cold to a warm place, or
used immediately after a cold room has been heated or
otherwise exposed to a sudden temperature change,
condensation could occur. Should this happen, leave the
unit for one or two hours before turning the unit on.
Cleaning the unit
To clean the unit, wipe it gently with a soft dry cloth. Do
not wipe with chemical cleaning cloths, benzene, paint
thinner, ethyl alcohol or other chemical agents to clean
the unit as they could damage the surface.
About USB memory, SD cards and CF cards
The capacities and performance of your unit will vary
based on the speed and abilities of the media used. Older
and some cheaper USB memory/SD cards/CF cards use
slower memory components and little internal buffering
which results in poor recording performance.
A list of USB memory/SD cards/CF cards that we have
confirmed to work with this unit is provided on our
website (http://tascam.com/).
SD card write-protection
This unit writes track information to the media in order to
improve performance. Since track data cannot be written
to write-protected SD cards, media reading will take
longer and performance could otherwise be affected.
Media formatting
Flash media that has been formatted by this unit is
optimized for performance during recording. Using
flash media that has been formatted by a computer,
for example, could result in errors during recording. We
recommend that whenever possible you use flash media
after it has been formatted by this unit.
About compact discs
This unit uses USB memory, SD cards and CF cards for
playback and recording.
A list of USB memory, SD cards and CF cards that we
have confirmed to work with this unit is provided on our
website (http://tascam.com/).
Precautions for use
USB memory, SD cards and CF cards are delicate media. In
order to avoid damaging a memory/card or the memory/
card slot, please take the following precautions when
handling them.
Do not leave them in extremely hot or cold places.
•
Do not leave them in extremely humid places.
•
Do not let them get wet.
•
Do not put things on top of them or twist them.
•
Do not hit them.
•
Do not insert or remove a USB memory, SD card or CF
•
card during recording, playback, data transfer or other
operations that access a memory or card.
Do not carry them with terminals exposed. Use the
•
protective cover.
Media that has been confirmed for use with this unit
This unit uses USB memory, SD cards and CF cards for
playback and recording.
Microdrives cannot be used with this unit.
In addition to commercially-available music CDs, this unit
can play CD-R and CD-RW discs that have been recorded
in audio CD format, as well as CD-R and CD-RW discs that
have MP3 audio and WAV audio files recorded on them. In
addition to 5-inch CDs, it can also play 3-inch CDs.
Handling of compact discs
For recording, use compact discs that have one of the
•
following marks.
CD-R
CD-RW
Always insert the compact discs in the slot with their
•
label facing upward.
To remove a disc from its case, press down on the
•
center of the disc holder, then lift the disc out, holding
it carefully by the edges.
Do not touch the signal side (the unlabeled side).
•
Fingerprints, oils and other substances can cause errors
during playback.
Page 11
TASCAM SS-CDR200/SS-R200/SS-R100 11
To clean the signal side of a disc, wipe gently with a soft
•
dry cloth from the center towards the outside edge.
Dirt on discs can lower the sound quality, so clean
them and always store them in a clean state.
Do not use any record spray, anti-static solutions,
•
benzene, paint thinner or other chemical agents to
clean CDs as they could damage the delicate playing
surface. It may cause CDs to become unplayable.
Do not apply labels or other materials to discs. Do
•
not use discs that have had tape, stickers or other
materials applied to their surface. Do not use discs that
have sticky residue from stickers, etc. Such discs could
become stuck in the unit or cause it to malfunction.
Never use a commercially available CD stabilizer. Using
•
stabilizers with this player will damage the mechanism
and cause it to malfunction.
Do not use cracked discs.
•
Only use circular compact discs. Avoid using
•
non-circular promotional, etc. discs.
1 − Introduction
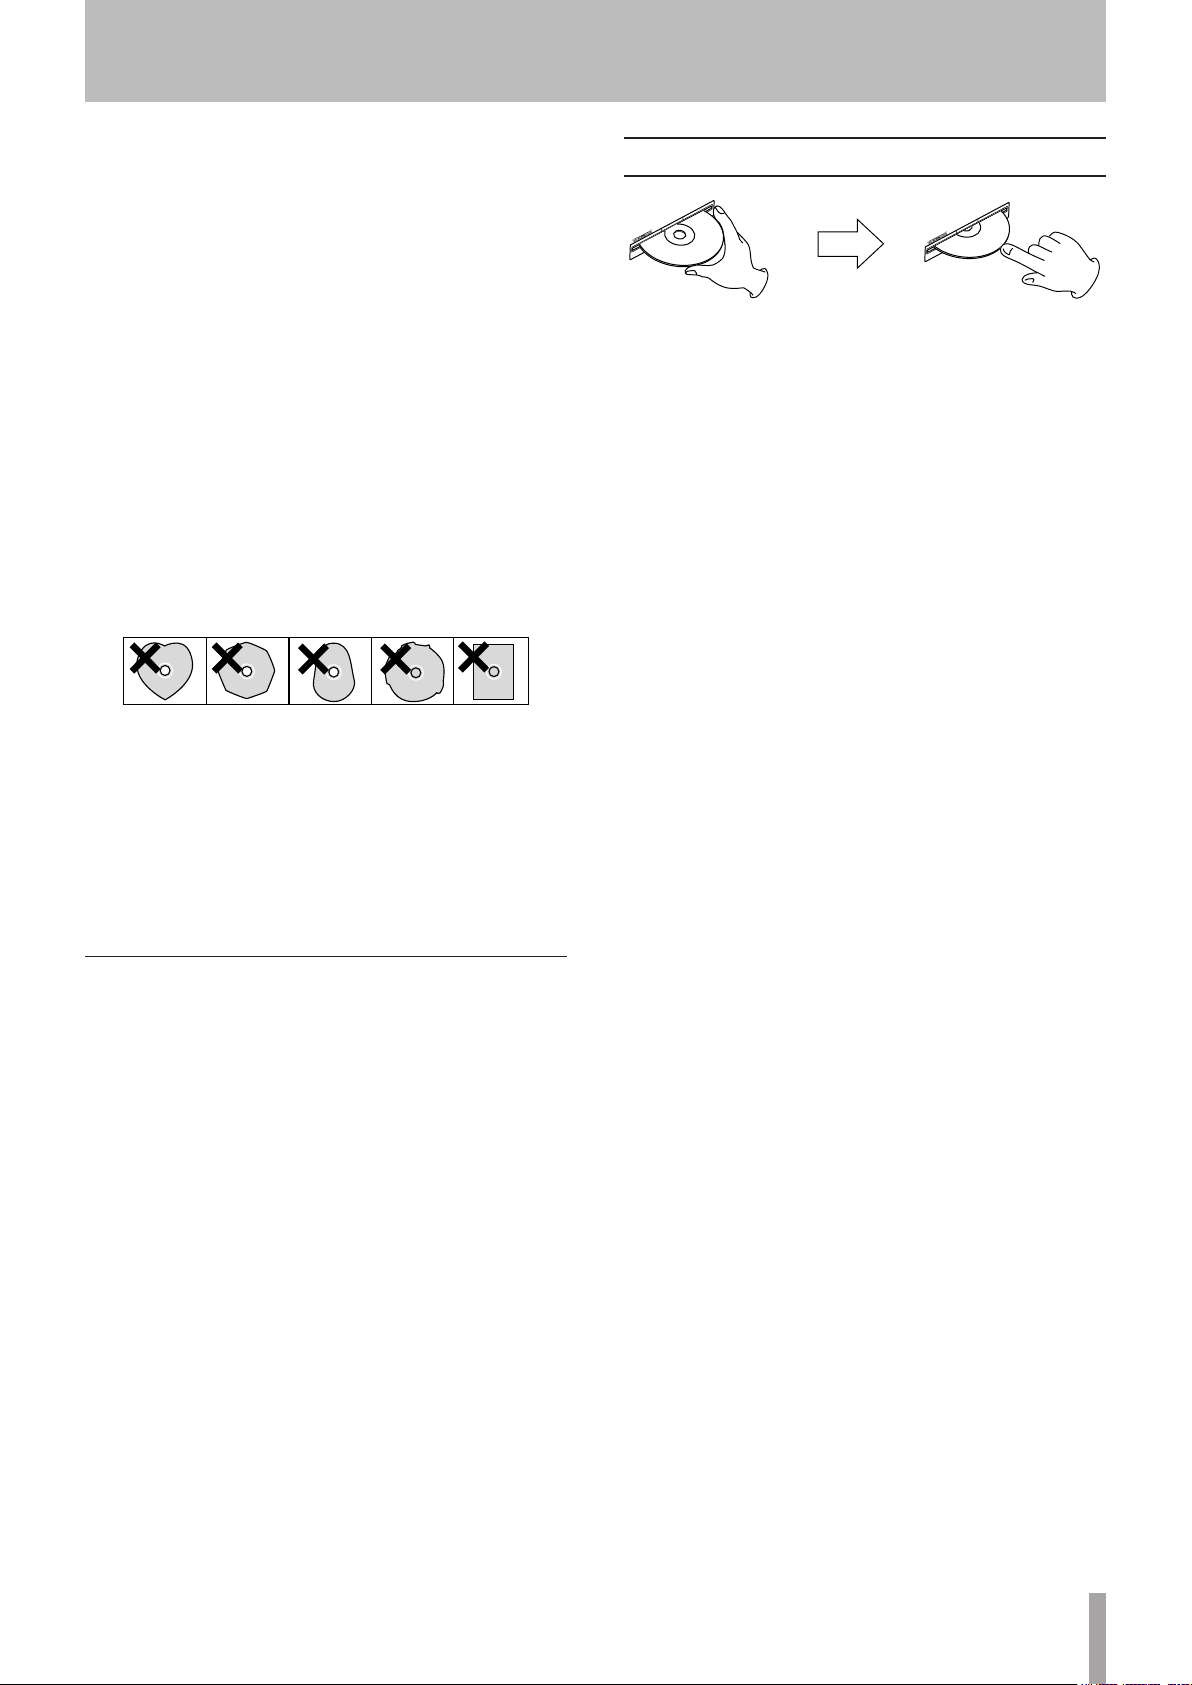
Slot loading of discs
1 As shown in the illustration, hold the disc with the
labeled side up and insert it part way into the slot.
2 After you push the disc a little further, it will be
pulled in automatically just before it disappears
into the slot.
Loading 3-inch CDs
When loading a 3-inch CD, push it into the center of the
slot completely. If not centered, loading might not occur
properly.
Trouble inserting a disc
If the disc becomes stuck during insertion, for example,
and is difficult to push, do not try to force the disc in. Pull
the disc out once and press the EJECT button and then
try inserting it again. (Trying to force the disc in could
damage the unit.)
Music discs with copy control, a copy-protection
•
system, have been released from several record
companies in an attempt to protect the copyright.
Since some of these discs do not comply with the CD
specifications, they may not be playable on the unit.
If you are in any doubt as to the care and handling of a
•
CD-R and CD-RW discs, read the precautions supplied
with the disc, or contact the disc manufacturer directly.
About CD-R and CD-RW discs
CD-R discs can be recorded once only. Once they have
been used for recording, they cannot be erased or
re-recorded. However, if space is available on the disc,
additional material can be recorded.
By finalizing a CD-R that you have finished using for
recording, you can make it playable by most ordinary CD
players. (Some CD players might not be able to play back
CD-R discs even if they are finalized.)
CD-RW discs allow recorded tracks to be erased to make
space available again, allowing disc reuse. However, tracks
can only be erased in the order from the last added. To
erase a track in the middle, you must erase all the tracks
added after it at the same time. Finalized CD-RW discs can
only be played back in CD players that support CD-RW
disc playback.
Page 12
12 TASCAM SS-CDR200/SS-R200/SS-R100
2 − Names and functions of parts
TRACK
mode
TOTAL
mode
TITLE
mode
FOLDER
mode
Front panel
SS-CDR200
SS-R200/SS-R100
1 POWER switch
Turns the power on/off.
CAUTION
Before turning the power on, minimize the volume of
other equipment that is connected to this unit. Failure to
do so might cause sudden loud noises, which could harm
your hearing or result in other trouble.
2 Disc slot (SS-CDR200 only)
Insert CDs here.
After a disc is inserted part way, it will automatically be
pulled in.
3 EJECT button (SS-CDR200 only)
Press this button to eject the disc.
4 Display
This shows a variety of information.
5 HOME/DISPLAY button
When a
MENU
or the
FINDER
screen is open, press this
to return to the Home Screen.
Press when the Home Screen is open to change the
Home Screen display mode. (See “Home Screen” on
page 12 and “Recording Screen” on page 19.)
6 MENU [JOG] button
Press this button when the Home Screen is open to
open the
Press this button when the
MENU
screen.
MENU
screen is open to
move a cursor on the right to the left. Press this button
again to return to the Home Screen.
Press this button while pressing and holding the
SHIFT button to set the jog playback mode. (See “Jog
playback” on page 31.)
When in menu mode, press to go back one menu level.
7 EDIT [INPUT] button
Press this button to put the unit into playback standby
at current point and open the Edit Menu pop-up. (See
“Using the Edit Menu” on page 57.)
Press this button while pressing and holding the
SHIFT button to show the current input source. Press
when the input source is shown to switch between the
input source options. (See “Selecting the input source”
on page 40.)
8 FINDER [A-B] button
Press this button when the Home Screen is open
to open the
FINDER
screen. (See “File and folder
operations (FINDER screen)” on page 50.)
Press this button while pressing and holding the
SHIFT button to start A-B repeat playback mode. (See
“A-B repeat playback” on page 34.)
9 m [SKIP] button
During playback or when in playback standby, press
and hold this button to search backward while
outputting sound.
Press during playback or when in playback standby
to skip backward by the set amount of time. (See
“Skipping backward and forward” on page 31.)
When in menu mode, press to go back one menu level.
When the play area is set to
PLAYLIST
, press when
stopped to select the current playlist.
When the play area is set to
FOLDER
, press when
stopped or in recording standby to select the current
folder.
Page 13

TASCAM SS-CDR200/SS-R200/SS-R100 13
2 − Names and functions of parts
When the
FINDER
screen is open, press this button
after selecting a folder to return to a higher level. (See
“Navigating the FINDER screen” on page 50.)
Press this button while pressing and holding the
SHIFT button to open a pop-up window where you
can set the skip time. (See “Skipping backward and
forward” on page 31.)
When editing names, move the cursor backward.
When editing names, press this button while pressing
and holding the SHIFT button to erase the character
at the cursor position.
0 , [LOCK] button
During playback or when in playback standby,
press and hold this button to search forward while
outputting sound.
Press during playback or when in playback standby to
skip forward by the set amount of time. (See “Skipping
backward and forward” on page 31.)
When in menu mode, press to advance to the next
level.
When the play area is set to
PLAYLIST
, press when
stopped to select the current playlist.
When the play area is set to
FOLDER
, press when
stopped or in recording standby to select the current
folder.
When the
FINDER
screen is open, press this button
after selecting a folder to show the contents of the
folder. (See “Navigating the FINDER screen” on page
50.)
Press this button while pressing and holding the
SHIFT button to turn ON/OFF the panel lock function,
which disables the buttons on the front panel. (See
“Panel lock function” on page 27.)
When editing names, move the cursor to the next
item.
When editing names, press this button while pressing
and holding the SHIFT button to insert a space. (See
“Inputting and editing characters” on page 48.)
q SHIFT button
If you press a button with a blue label while pressing
and holding this button, that button will function
according to that label.
w PITCH [KEY] knob
Turn this knob to adjust the pitch (playback speed).
Press this knob to turn pitch control ON/OFF. Press
and hold this knob to open the
PITCH STEP X.X%
pop-up. (See “Pitch control playback” on page 32.)
Turn this knob while pressing and holding the SHIFT
button to adjust the key level.
Press this while pressing and holding the SHIFT
button to turn key control ON/OFF. (See “Key control
playback” on page 33.)
e PHONES jack/knob
Use this standard stereo jack to connect stereo
headphones.
Use the PHONES knob to adjust the headphones
output level.
CAUTION
Before connecting headphones, minimize the volume
with the PHONES knob. Failure to do so might cause
sudden loud noises, which could harm your hearing or
result in other trouble.
r REMOTE jack (2.5 mm dia TRS)
Connect a TASCAM RC-3F footswitch or TASCAM RC-20
Direct Play Remote control (both designed for use with
this unit and sold separately) here to enable remote
control of playback starting and stopping, for example.
When a TASCAM RC-3F footswitch is connected, the
functions of the three pedals can be changed. (See
“Footswitch control” on page 71.)
t USB port
Connect USB memory, here to record to it and
playback files on it.
Connect a USB keyboard to input file names, for
example.
By default, the recorder is set use an English keyboard.
To use Japanese keyboards, which are arranged
differently from English keyboards, change the setting
in the
UTILITY
menu. (See “Setting the keyboard
language” on page 73.)
y SD and CF card slots
Insert and eject SD and CF cards from here. (See
“Inserting and ejecting SD and CF cards” on page 25.)
u FUNCTION button
Press this button when the Home Screen is open to
open the
FUNCTION
screen.
Use to select and deselect files to copy or move
between a CD and the USB memory, SD card or CF
card. (See “Copying files between CDs and other media
(SS-CDR200)” on page 63.)
i DEVICE button
Press this button when the Home Screen is open to
open the
DEVICE SELECT
screen. (See “Selecting the
device used” on page 26.)
o MULTI JOG dial
This functions both as a dial and as a button.
[Dial functions]
When the Home Screen is open, turn to select tracks.
When inputting a program, turn to select tracks to
add.
When in menu mode, use to select menu items and
setting values.
When editing names, use to select characters.
When jogging during playback, use to move between
frames. (See “Jog playback” on page 31.)
While pressing and holding the SHIFT button, turn the
MULTI JOG dial to adjust the display contrast.
Page 14

14 TASCAM SS-CDR200/SS-R200/SS-R100
2 − Names and functions of parts
[Button functions]
Use to confirm selections and settings (ENTER
function).
Press when the
FINDER
(See “File operations” and “Folder operations” on page
51.)
p STOP button
Stops playback and recording.
In
clear the entire program.
a PLAY button/indicator
Press when stopped or in playback standby to start
playback.
Press in recording standby to start recording.
During playback or recording, this button lights.
When jogging during playback, this button blinks.
s READY [CALL] button/indicator
Press when stopped or during playback to switch to
playback standby.
Press when recording to switch to recording standby.
The button lights when in playback standby and
recording standby.
The button blinks when jogging during playback.
When in playback standby, press this button to search
for the call point (point from where playback last
started from playback standby) and switch to playback
standby. (See “Call function” on page 31.)
dRECORD [TRK INC] button/indicator
Press when stopped to start recording standby.
Press when recording to start a new track and continue
recording without interruption.
The button lights when recording and in recording
standby.
Press when there is no media in the current device
to activate input monitoring, causing the currently
selected input signal to be output. The button blinks
during input monitoring.
f KEYBOARD connector
Connect an IBM PC-compatible keyboard with a PS/2
interface here.
By default, the recorder is set to use an English
keyboard. To use Japanese keyboards, which are
arranged differently from English keyboards, change
the setting in the
keyboard language” on page 73.)
menu pop-up for the selected folder or file.
PROGRAM
FINDER
playback mode, press when stopped to
screen is open to open the
UTILITY
menu. (See “Setting the
Page 15
TASCAM SS-CDR200/SS-R200/SS-R100 15
Rear panel
SS-CDR200/SS-R200
SS-R100
2 − Names and functions of parts
g ANALOG L/R INPUTS (BALANCED)
(SS-CDR200/SS-R200 only)
These balanced analog XLR input connectors have a
nominal input level of +4 dBu.
(1: GND, 2: HOT, 3: COLD)
h ANALOG L/R INPUTS (UNBALANCED)
These analog RCA pin input jacks have a nominal input
level of −10 dBV.
j ANALOG L/R OUTPUTS (UNBALANCED)
These analog RCA pin output jacks have a nominal
output level of −10 dBV.
k ANALOG L/R OUTPUTS (BALANCED)
(SS-CDR200/SS-R200 only)
These balanced analog XLR output jacks have a
nominal output level of +4 dBu.
(1: GND, 2: HOT, 3: COLD)
l DIGITAL IN (COAXIAL)
This digital input jack accepts inputs in IEC60958-3 (S/
PDIF) and AES3-2003/IEC60958-4 (AES/EBU) formats
(detected automatically).
To link two of these units together, connect the
DIGITAL OUT jack of the other SS-CDR200/SS-R200/
SS-R100 to this connector. (See “Link playback
connections” on page 38.)
; DIGITAL OUT (COAXIAL)
This digital output jack can output IEC60958-3 (S/
PDIF) and AES3-2003/IEC60958-4 (AES/EBU) formats
according to the unit’s setting.
To link two of these units together, connect the
DIGITAL IN jack of the other SS-CDR200/SS-R200/
SS-R100 to this connector. (See “Link playback
connections” on page 38.)
z CONTROL I/O RS-232C connector
(SS-CDR200/SS-R200 only)
This 9-pin D-sub I/O connector for RS-232C control can
be connected to a computer or other external device.
(See “Using the RS-232C connector” on page 75.)
x CONTROL I/O PARALLEL connector
(SS-CDR200/SS-R200 only)
25-pin D-sub I/O connector for parallel control can be
used to connect an RC-SS20 (sold separately) or other
external controller.
For pin assignments and other information, see “Using
the parallel connector” on page 75.
c REMOTE IN connector
Connect the included TASCAM RC-SS2 wired remote
control, which is designed for use with this unit, here.
v AC IN connector
Connect the included power cord here.
Page 16
16 TASCAM SS-CDR200/SS-R200/SS-R100
TRACK
mode
TOTAL
mode
TITLE
mode
FOLDER
mode
2 − Names and functions of parts
TASCAM RC-SS2 wired remote control
1 FLASH LOAD button
This loads the registered tracks in preparation for Flash
Start. When the tracks are loaded, will appear on the
Home Screen. (See “Flash Start function” on page 38.)
2 DEVICE SELECT button
This has the same function as the front panel DEVICE
button.
3 HOME/DISP button
This has the same function as the front panel HOME/
DISP LAY button.
Press when the Home Screen is open to change the
Home Screen display mode. (See “Home Screen” on
page 17.)
4 FUNC button
This has the same function as the front panel
FUNCTION button.
5 REPEAT button
Turns the repeat playback function ON/OFF. (See
“Ordinary repeat playback” on page 33.)
6 A-B button
Use for A-B repeat playback operations. (See “A-B
repeat playback” on page 34.)
7 A.CUE button
Turns the Auto Cue function ON/OFF. (See “Auto Cue
function” on page 34.)
8A.READY button
Turns the Auto Ready function ON/OFF. (See “Auto
Ready function” on page 35.)
9SYNC button
Turns sync recording ON/OFF. (See “Sync recording” on
page 43.)
0A.TRACK button
Switches the Auto Track mode between
DD
and
TIME
. (See “Auto Track function” on page 45.)
OFF, LEVEL
qFINDER button
Opens the
FINDER
or
USER PLAYLIST
screen
depending on the play area setting. (See “Opening the
FINDER screen” on page 50 and “Editing the playlist
(USB/SD/CF media only)” on page 60.)
wMENU button
This has the same function as the front panel MENU
[JOG] button.
eSEARCH (m and ,) buttons
These have the same functions as the front panel m
[SKIP]/, [LOCK] buttons. However, they do not
function in menu mode.
rSKIP (.and /) buttons
These have the same functions as turning the front
panel MULTI JOG dial.
tSTOP buttons
This has the same function as the front panel STOP
button.
yLCD (–/+) buttons
These adjust the contrast of the display. (See “Adjusting
the display contrast” on page 24.)
u KEY (–/+) buttons
The KEY button has the same function as pressing the
front panel PITCH knob while pressing and holding
the SHIFT button.
The –/+ buttons to the right of the KEY button have
the same functions as turning the front panel PITCH
knob while pressing and holding the SHIFT button.
(See “Key control playback” on page 33.)
i PITCH (–/+) buttons
The PITCH button has the same function as pressing
the front panel PITCH knob.
The –/+ buttons to the right of the PITCH button have
the same functions as turning the front panel PITCH
knob. (See “Pitch control playback” on page 32.)
o INPUT SEL button
This selects the recording input source. You can choose
unbalanced (RCA), balanced (XLR, SS-CDR200/SS-R200
only) or coaxial. (See “Selecting the input source” on
page 40.)
Balanced (XLR) cannot be selected on the SS-R100.
pNumber buttons
Use these to select tracks. (See “Specifying a track
number” on page 30.)
,
Page 17
TASCAM SS-CDR200/SS-R200/SS-R100 17
2 − Names and functions of parts
aEDIT button
Press this button to start playback standby at the
current position and open the Edit Menu pop-up. (See
“Using the Edit Menu” on page 57.)
Press when entering a track number to clear the entire
number input.
During program input, press to clear the track number
being added. At other times, the last-added track will
be cleared from the program. (See “Program playback”
on page 32.)
s5/b/g/t buttons
Use to operate the menus.
The 5/b buttons select the items and values above
and below.
When in menu mode, use the g button to return
upward through the menu structure, and use the t
button to proceed in the menu structure.
When the
to move up a level in the folder structure and the t
button to enter a folder. (See “Navigating the FINDER
screen” on page 50.)
dENTER button
This has the same function as pressing the front panel
MULTI JOG dial.
fRECORD button
This has the same function as the front panel RECORD
button.
gCALL button
Searches for the call point (point from where playback
last started from playback standby) and starts playback
standby. (See “Call function” on page 31.)
hREADY button
This has the same function as the front panel READY
button.
jPLAY button
This has the same function as the front panel PL AY
button.
FINDER
screen is open, use the g button
Home Screen
The Home Screen has TRACK, TOTAL, TITLE and FOLDER
display modes.
Each time you press the HOME/DISPLAY button (or
remote control HOME/DISP button), the information
shown in the center of the display changes.
Home Screen TRACK mode
Home Screen TOTAL mode
Home Screen TITLE mode
Home screen FOLDER mode
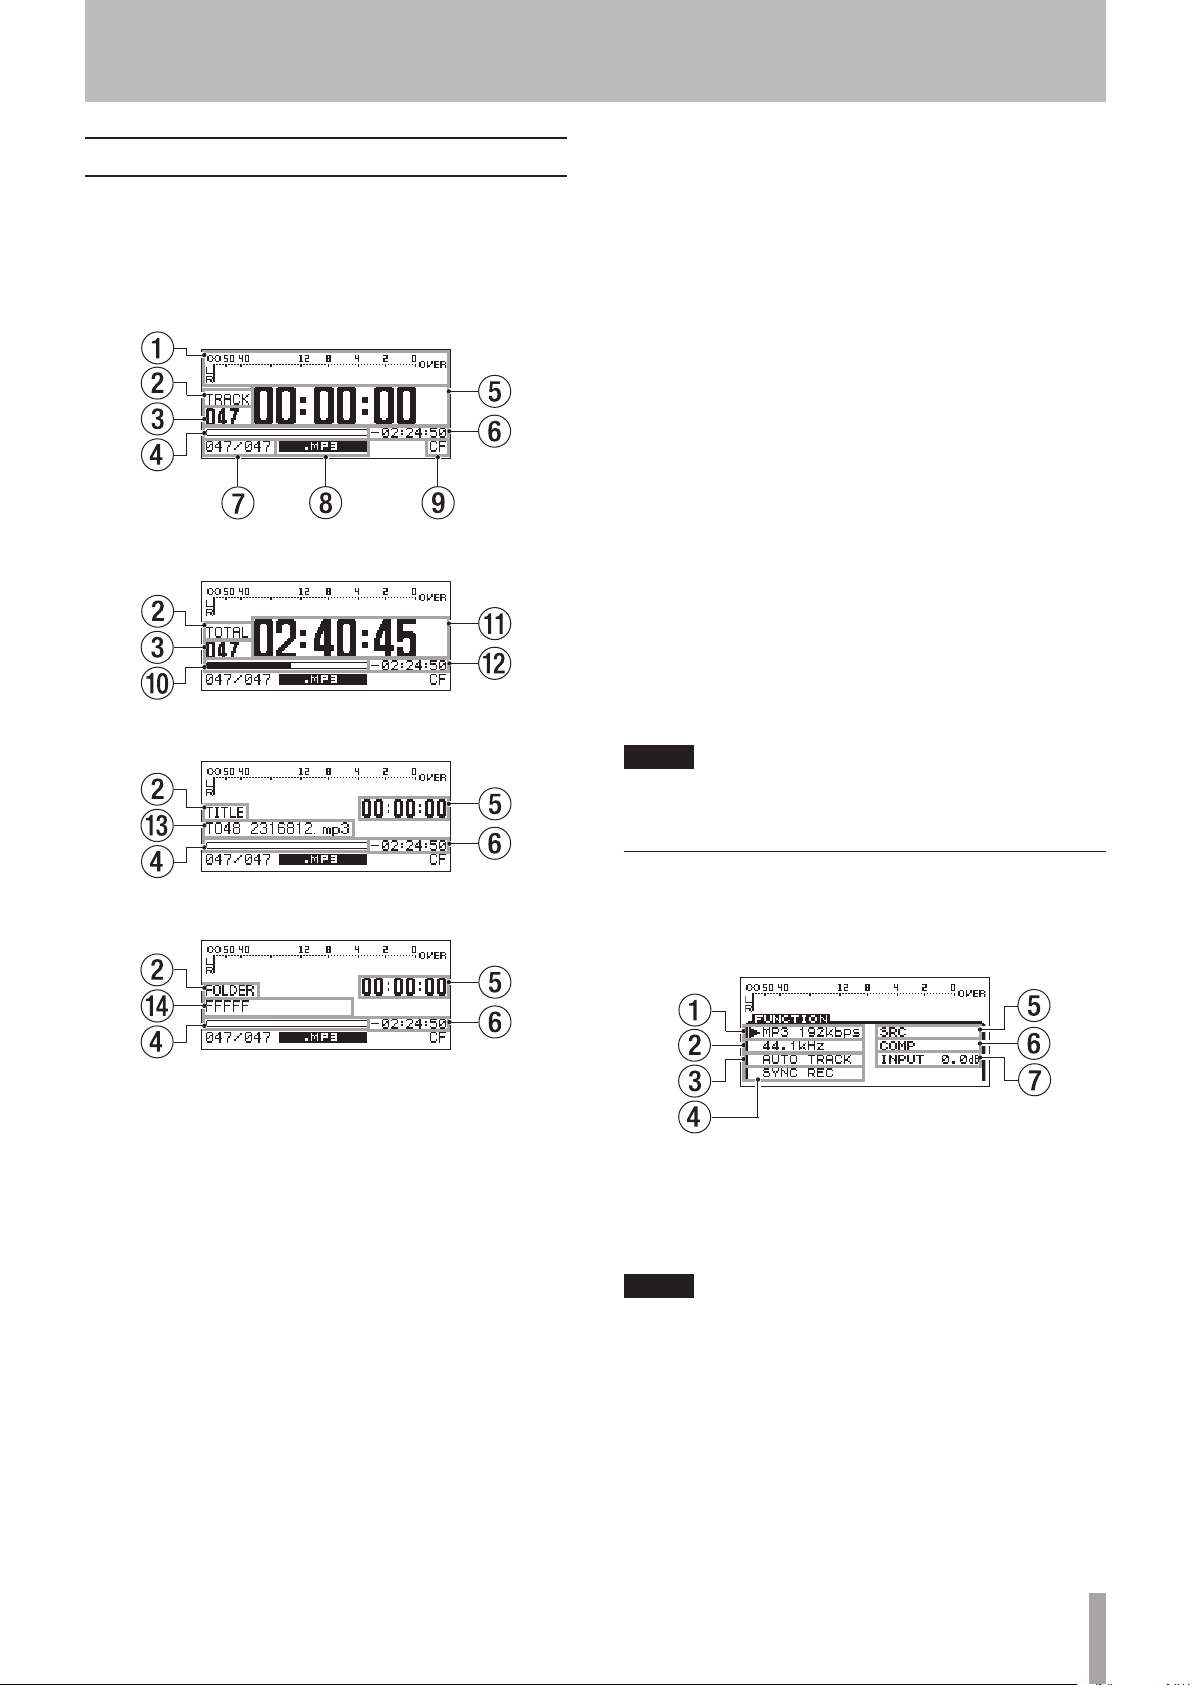
1 Play area
Shows the current play area of the current file.
ALL
FOLDER
PLAYLIST
2 Playback mode
Shows the current playback mode.
CONTINUE
SINGLE
PROGRAM
RANDOM
: All files on the media in the current
device
: All files in the selected folder
All files added to the playlist
:
: Continuous playback mode
: Single playback mode
: Program playback mode
: Random playback mode
Page 18
18 TASCAM SS-CDR200/SS-R200/SS-R100
2 − Names and functions of parts
3 PITCH indicator
When the pitch control function is on, the
indicator appears.
4 KEY indicator
When the key control function is on, the indicator
appears.
5Display mode
Shows the display mode currently shown on the Home
Screen.
6Track number
Shows the number of the track being played back.
7 Track playback position
Shows the current playback position as a bar. As
playback elapses, the bar extends from the left.
8 Track elapsed time
Shows the elapsed time (hours: minutes: seconds) of
the current track.
9 Track remaining time
Shows the remaining time (hours: minutes: seconds)
of the current track.
0Track number/total number of tracks
Shows the current track number and the total number
of tracks in the current play area.
q File format
Shows the format of the current playback file.
wSD card protection icon
This icon appears when an SD card that is writeprotected is loaded and the current device is set to SD.
eCurrent device
Shows the currently selected device.
r Total playback position
Shows the current playback position as a bar. As
playback elapses, the bar extends from the left. On this
screen, this bar represents the entire play area.
t Total track elapsed time
Shows the elapsed time (hours: minutes: seconds) of
the current play area.
yTotal track remaining time
Shows the remaining time (hours: minutes: seconds)
of the current play area.
u Track title
Shows the title of the current track.
iCurrent playback folder name
Shows the name of the folder that contains the file
currently being played back.
NOTE
When stopped, the total playback time of the play area
•
is always shown, regardless of the current Home Screen
display mode.
When using a CD-R/CD-RW disc with MP3 or WAV
•
files that were recorded using a computer or other
equipment besides this unit, the total time when
stopped, and the total elapsed time and total remaining
time during playback will not be shown. (Only the
number of tracks and track number are shown. “– –”
appears in the time display area.). However, after all
tracks have been played back by this unit, the time will
appear.
In
•
PROGRAM
playback mode, the elapsed time and
remaining time are shown for the entire program, not
the entire play area.
Home Screen FUNCTION status display
When the Home Screen is open, press the FUNCTION
button (or remote control FUNC button) to open the
FUNCTION
On the
the ON/OFF status of all items in the PLAY menu on one
screen. Items that are ON appear light on dark.
NOTE
When the
button (or remote control FUNC button) to return to the
Home Screen.
The following items appear on the
No. Function Reference
1
2
3
4
5
NOTE
The “
set.
Changing item settings on the FUNCTION screen
1 When the
2 Press the MULTI JOG dial (or remote control ENTER
screen.
Home Screen FUNCTION status display
FUNCTION
FUNCTION
Repeat playback setting Page 33
A-B repeat playback setting Page 34
Auto Cue setting Page 34
Auto Ready setting Page 35
Incremental playback setting Page 35
A-B
” item only appears when A-B repeat has been
screen, you can check and change
screen is open, press the FUNCTION
FUNCTION
FUNCTION
screen is open, turn the
screen.
MULTI JOG dial (or press the remote control 5/b
buttons), to move the 7 to the item you want to
set.
button) to turn the selected item ON/OFF. When on,
the item appears light on dark.
Page 19
TASCAM SS-CDR200/SS-R200/SS-R100 19
2 − Names and functions of parts
Recording Screen
The Recording Screen has TRACK, TOTAL, TITLE and
FOLDER display modes.
Each time you press the HOME/DISPLAY button (or
remote control HOME/DISP button), the information
shown in the center of the display changes.
Recording Screen TRACK mode
Recording Screen TOTAL mode
7 Track number/total number of tracks
Shows the total number of tracks and the current track
number in the current play area.
8 File type
Shows the current recording file format.
9 Current device
Shows the currently selected device.
0 Total recording position
Shows the current recording position as a bar. As
recording elapses, the bar extends from the left. On
this screen, this bar represents total media capacity.
q Total track recorded time
Shows the total recorded time (hours: minutes:
seconds) on the current media.
w Total track remaining time
Shows the total remaining possible recording time
(hours: minutes: seconds) of the current media.
e Track title
Shows the title of the track being recorded.
r Current folder name
Shows the name of the folder that contains the file
currently being recorded.
NOTE
The remaining time depends on the recording format (
FORMAT
item in the
REC
menu).
REC
Recording Screen TITLE mode
Recording Screen FOLDER mode
1 Input level
Shows the input sound level.
2 Display mode
Shows the display mode currently shown on the
Recording Screen.
3 Track number
Shows the number of the track being recorded.
4 Track recording position
Shows the current recording position as a bar. As
recording elapses, the bar extends from the left. On
this screen, this bar represents maximum file size 2 GB.
5 Track recorded time
Shows the recorded time (hours: minutes: seconds) of
the file being recorded.
6 Track recording remaining time
Shows the remaining possible recording time (hours:
minutes: seconds) for the maximum file size of 2GB.
Recording Screen FUNCTION status display
In recording standby or when recording press the
FUNCTION button (or remote control FUNC button) to
open the
On the Recording
change the ON/OFF status of all items in the REC menu on
one screen. Items that are ON appear light on dark.
NOTE
When the Recording
FUNCTION button (or remote control FUNC button) to
return to the Recording Screen.
FUNCTION
Recording Screen FUNCTION status display
screen.
FUNCTION
FUNCTION
screen, you can check and
screen is open, press the
Page 20
20 TASCAM SS-CDR200/SS-R200/SS-R100
2 − Names and functions of parts
The following items appear on the Recording
FUNCTION
screen.
No. Function Reference
Recording file format setting Page 41
1
Sampling frequency setting Page 41
2
Auto Track setting Page 45
3
Sync recording setting Page 43
4
Sampling rate converter setting Page 41
5
Compressor setting Page 47
6
Input level setting Page 42
7
Changing item settings on the recording
FUNCTION screen
1 When the
MULTI JOG dial (or press the remote control 5/b
buttons) to move the 7 to the item you want to
set.
2 For the
COMP
control ENTER button) to change the setting of the
selected item.
For the
JOG dial (or remote control ENTER button) to turn
the selected item ON/OFF. When ON, the item
appears selected (light on dark).
For the
dial (or remote control ENTER button) and then
turn the MULTI JOG dial (or press the remote
control 5/bbuttons) to change the input level.
After changing the setting, press the MULTI JOG
dial (or remote control ENTER button) to confirm
the setting.
FUNCTION
MP3 192kbps, 44.1kHz, AUTO TRACK
screen is open, turn the
and
items, press the MULTI JOG dial (or remote
SYNC REC
INPUT 0.0dB
and
SRC
items, press the MULTI
item, press the MULTI JOG
The submenu items are as follows.
Main menu
item
PLAY
REC
Submenu
item
PLAY AREA
PLAY MODE
P.L.EDIT
REPEAT
AUTO CUE
AUTO READY
INC.PLAY
OTHERS
INPUT
SELECT
INPUT
VOLUME
REC FORMAT
SYNC
AUTO TRACK
OTHERS
Function Reference
Play area settings Page 28
Playback mode
settings
Playlist editing Page 60
Repeat playback
function settings
Auto Cue settings Page 34
Auto Ready settings Page 35
Incremental
playback settings
Other playback
settings
Input source
selection
Input volume
settings
Recording file format
settings
Sync recording
settings
Auto Track
increment settings
Other recording
settings
Page 29
Page 33
Page 35
—
Page 40
Page 42
Page 41
Page 43
Page 45
—
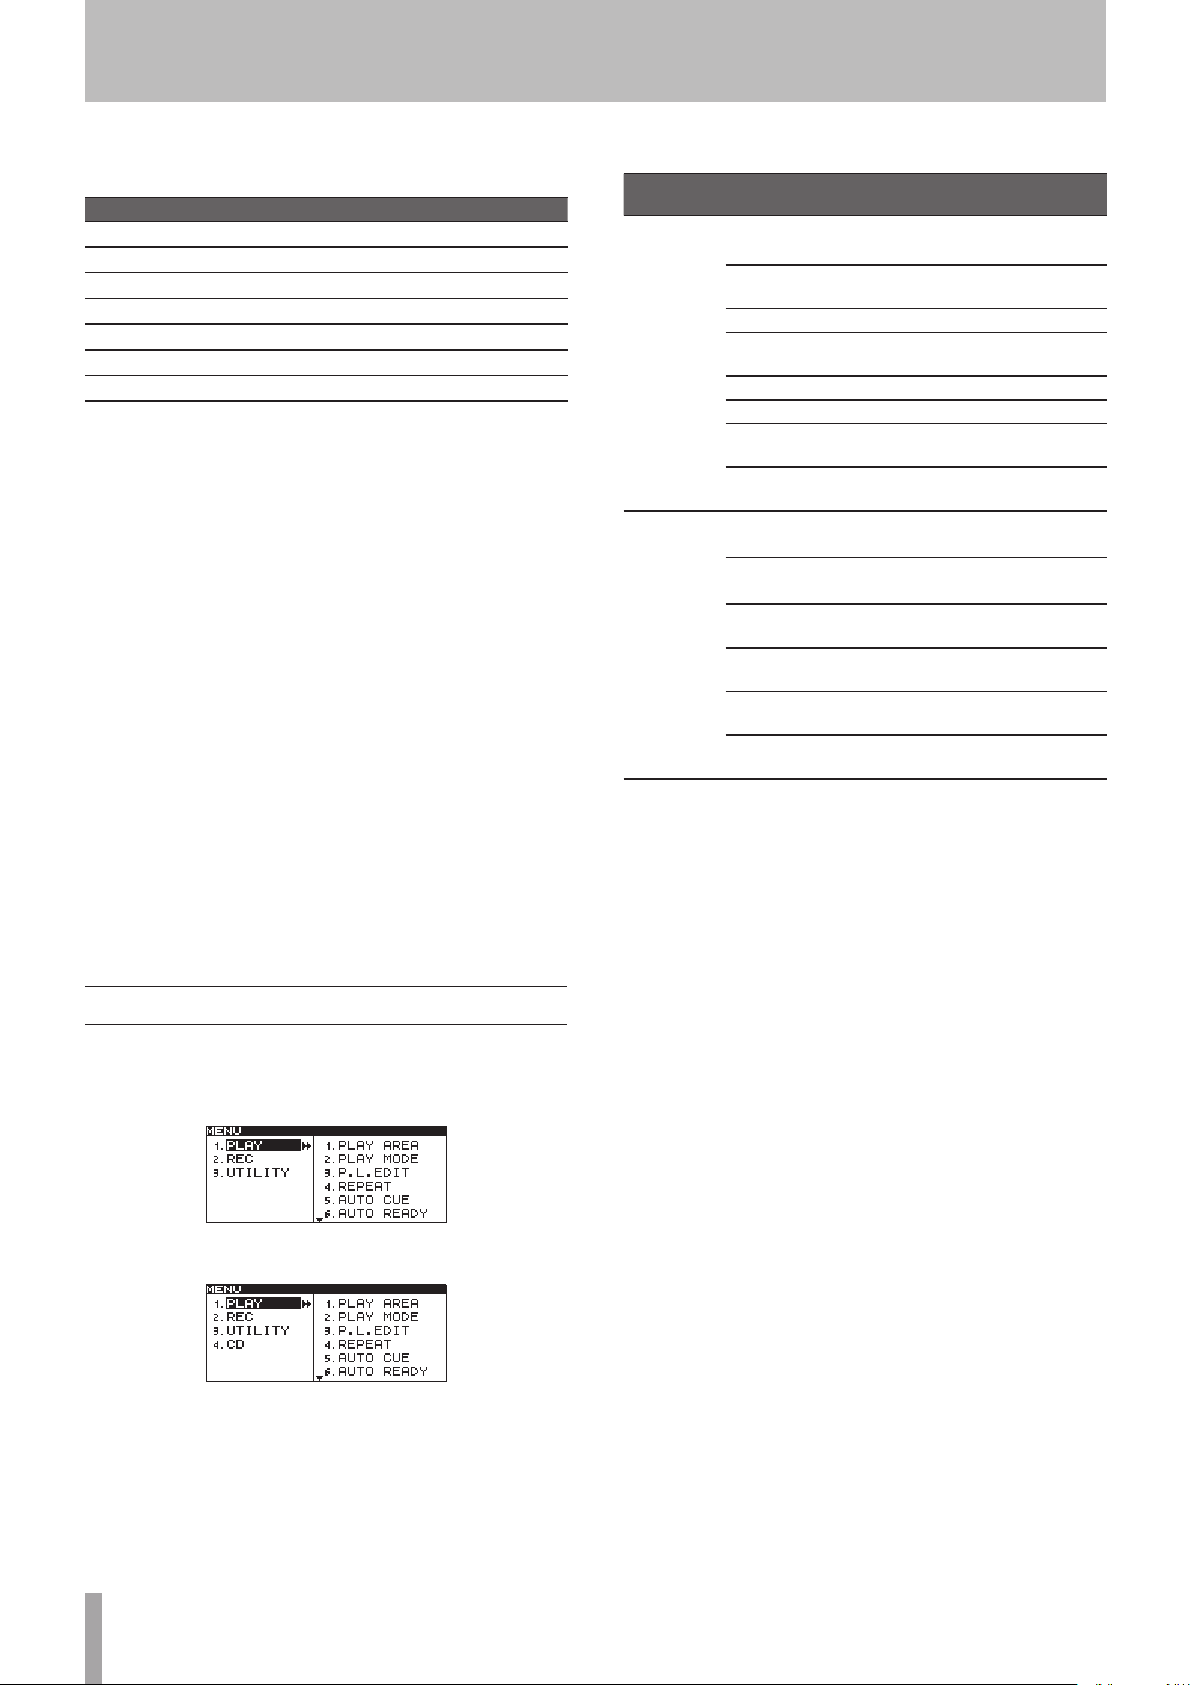
Menu structure
Press the MENU [JOG] button or the MENU button on
the included TASCAM RC-SS2 remote control to open the
MENU
screen.
MENU screen when USB/SD/CF media selected
MENU screen when CD media selected (SS-CDR200 only)
The
MENU
has three or four main items.
PLAY: Items related to playback
REC: Items related to recording
UTILITY: Items related to unit settings, etc.
CD: Items related to CD operations (SS-CDR200 only)
Page 21
TASCAM SS-CDR200/SS-R200/SS-R100 21
2 − Names and functions of parts
Main
menu item
UTILITY
CD
Submenu item Function Reference
MEMORY
FORMAT
BRIGHTNESS
KEYBOARD
CLOCK ADJUST
RS-232C
RC-3F MODE
DIGITAL OUT
INFORMATION
FACTORY
PRESET
FINALIZE
ERASE
BURN TO CD
RIP TO
MEMORY
Format USB, SD,
and CF media
Display and
indicator
brightness
settings
Keyboard type
setting
Time setting Page 24
RS-232C setting Page 75
Footswitch mode
setting
Digital output
settings
Show information
about the
operating time
and media
Restore the
factory settings
Finalize and
unfinalize CD-R/
CD-RW disc
Erase a written
CD-RW disc
Write from the
selected media
to a CD-R/CD-RW
disc
Write from a CD
to the selected
media
Page 27
Page 24
Page 73
Page 71
Page 71
Page 72
Page 72
Page 43
Page 69
Page 64
Page 66
The PLAY OTHERS submenu items are as follows.
PLAY OTHERS
menu item
MONO MIX
EOM TRACK
EOM MEDIA
RESUME
POWER ON PLAY
LINK
Function Reference
Mono playback setting Page 36
EOM function setting Page 36
EOM function setting Page 36
Resume playback setting Page 37
Power-on play setting Page 37
Link playback setting Page 37
The RECORDING OTHERS submenu items are as follows.
REC OTHERS menu
item
PAUSE MODE
SRC
WORD CLIP
COMP
DITHER
Function Reference
Pause mode setting P.age 46
Sampling rate converter
setting
Recording file name
setting
Compressor setting Page 47
Dither setting Page 48
Page 41
Page 47
Menu operation basics
You can perform the following operations in the menus.
To select an item (vertically on the screen):
Turn the MULTI JOG dial.
Use the cursor 5 and b buttons on the remote control.
To confirm the selected item:
Press the MULTI JOG dial.
Press the ENTER key on the remote control.
To move the cursor left/right:
Use the m [SKIP]/, [LOCK] buttons.
Use the cursor g/t buttons of the remote control.
To open a sub-screen not currently shown on the
display (, is shown at the right):
Press the MULTI JOG dial or , [LOCK] button.
Press the ENTER or t button of the remote control.
To go back one menu level:
Press the MENU [JOG] or m [SKIP] button.
Press the MENU or g button of the remote control.
To return directly to the Home Screen from menu
mode:
Press the HOME/DISPLAY button.
Press the HOME/DISP button on the remote control.
NOTE
If there are items above or below the currently displayed
items in the list, 5 and/or b will be shown at the top
and/or bottom of the list.
Menu operation procedures
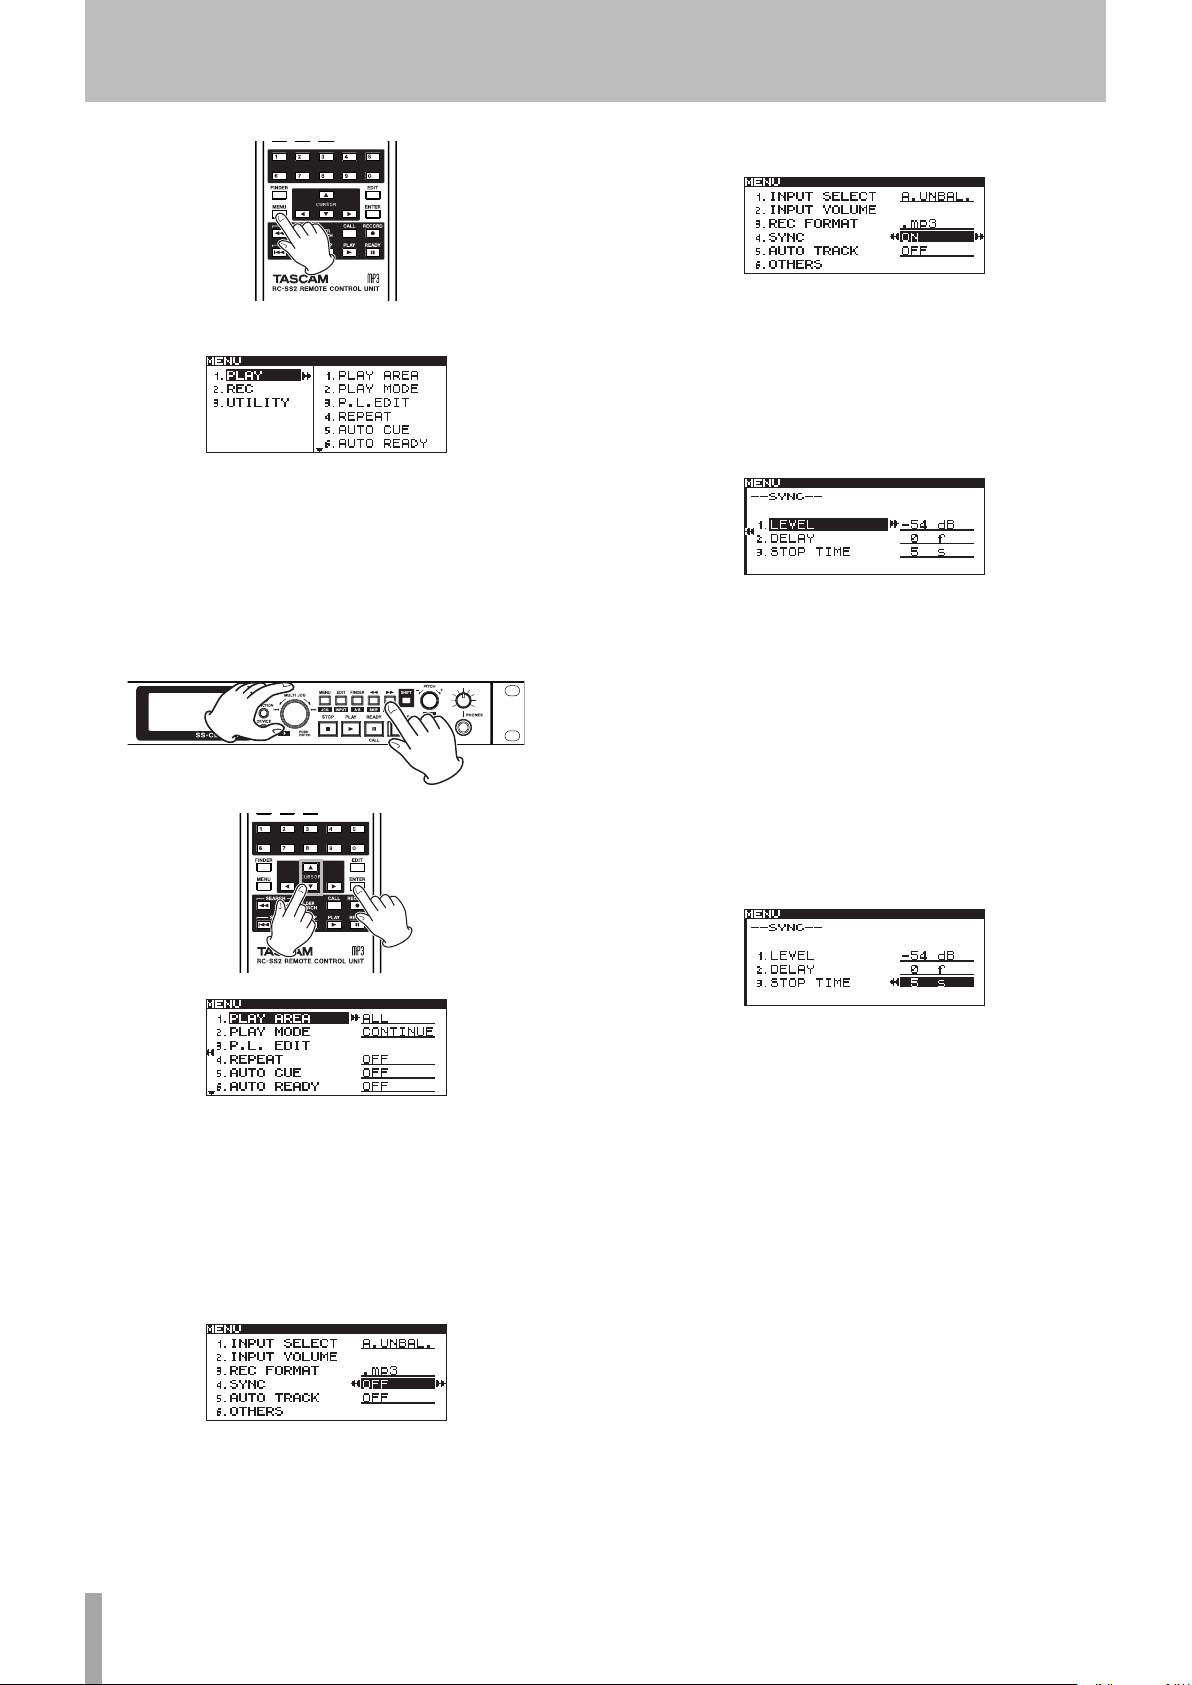
This example explains sync recording setting.
NOTE
The front panel illustrations shown below are of the
•
SS-CDR200 model. The SS-R200 and SS-R100 models
have different appearances.
The display screens shown below are from the
•
SS-CDR200. The SS-R200 and SS-R100 display screens
are different in some cases.
1 Use the main unit or the included TASCAM RC-SS2
remote control to open the
Front panel operation:
Press the MENU [JOG] button.
Remote control operation:
Press the MENU button.
MENU
screen.
Page 22
22 TASCAM SS-CDR200/SS-R200/SS-R100
2 − Names and functions of parts
Use the 5 and b buttons to select ON.
2 Open the REC menu.
Front panel operation:
Turn the MULTI JOG dial to select
MULTI JOG dial or , [LOCK] button.
Remote control operation:
Use the 5 and b buttons to select
the ENTER or t button.
REC
, and press the
REC
, and press
5 Open the
SYNC
screen where you can make detailed
settings.
Front panel operation:
Press the MULTI JOG dial or , [LOCK] button.
Remote control operation:
Press the ENTER or t button.
6 Select the item on the
SYNC
screen to set.
Front panel operation:
Turn the MULTI JOG dial to select the item.
Remote control operation:
Use the 5 and b buttons to select the item.
7 Move the cursor to the setting.
Front panel operation:
Press the MULTI JOG dial or , [LOCK] button.
Remote control operation:
Press the ENTER or t button.
3 Select the
SYNC
item setting.
Front panel operation:
Turn the MULTI JOG dial to select
MULTI JOG dial or , [LOCK] button.
Remote control operation:
Use the 5 and b buttons to select
the ENTER or t button.
4 Set
SYNC
to ON or
OFF
.
Front panel operation:
Turn the MULTI JOG dial to select ON.
Remote control operation:
SYNC
, and press the
SYNC
, and press
8 Change the setting value.
Front panel operation:
Turn the MULTI JOG dial to change the value.
Remote control operation:
Use the 5 and b buttons to change the value.
9 To change another item on the same screen,
press the m [SKIP] button (or remote control g
button) to return to setting item selection. Use the
MULTI JOG dial (or remote control 5/b buttons)
to select the item you want to set.
10 As necessary, repeat steps 7–9 to set each item as
you want.
11 Return to the Home Screen.
Front panel operation:
Press the HOME/DISPLAY button.
Remote control operation:
Press the HOME/DISP button.
Page 23
TASCAM SS-CDR200/SS-R200/SS-R100 23
3 − Preparations
Computer
RS-232C port
(COM port, etc.)
(SS-CDR200/SS-R200 only)
DIGITAL
OUT
(COAXIAL)
DIGITAL
IN
(COAXIAL)
Digital mixer,
digital recorder,
digital amplier
ANALOGOUT
(BALANCED)
ANALOGIN
(BALANCED)
Mixer,
recorder,
amplier, etc.
(SS-CDR200/
SS-R200 only)
Mixer,
recorder,
amplier, etc.
(SS-CDR200/
SS-R200 only)
ANALOG
OUT
(UNBALANCED)
ANALOG
IN
(UNBALANCED)
Mixer,
recorder,
amplier, etc.
External controller
(RC-SS20, etc.)
(SS-CDR200/SS-R200only)
TASCAM RC-SS2
Remote Control Unit
(Supplied)
TASCAM RC-3F
Foot Switch
(Sold separately)
TASCAM RC-20
Direct Play Remote
(Sold separately)
Headphones
Making connections
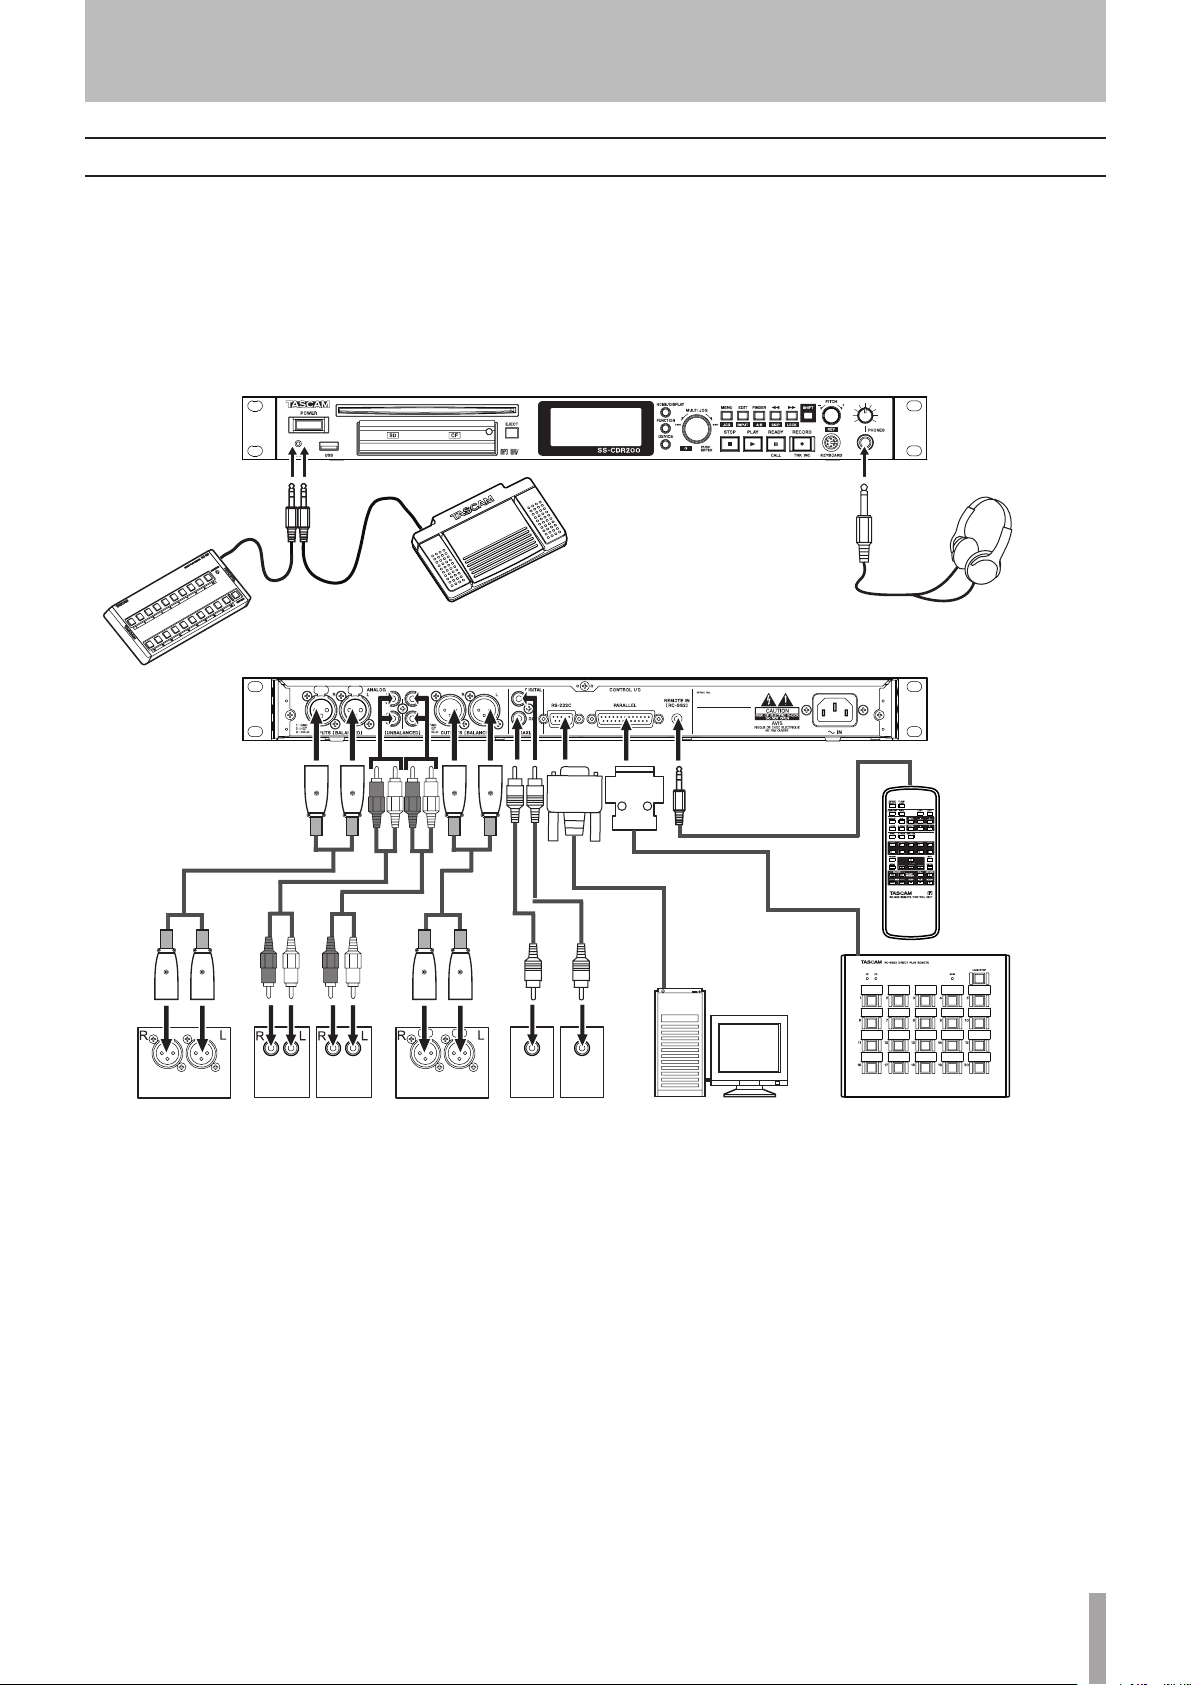
The following example shows connections with an SS-CDR200.
Precautions before making connections
Before making connections, read the operation manuals of the other equipment carefully and connect each one
•
correctly.
Turn OFF (or put in standby) the power of this unit and all other devices before connecting them.
•
Connect all the devices to the same power supply line. When using a power strip, for example, use a thick cable with a
•
high current capacity to minimize variation in the power voltage.
Page 24
24 TASCAM SS-CDR200/SS-R200/SS-R100
3 − Preparations
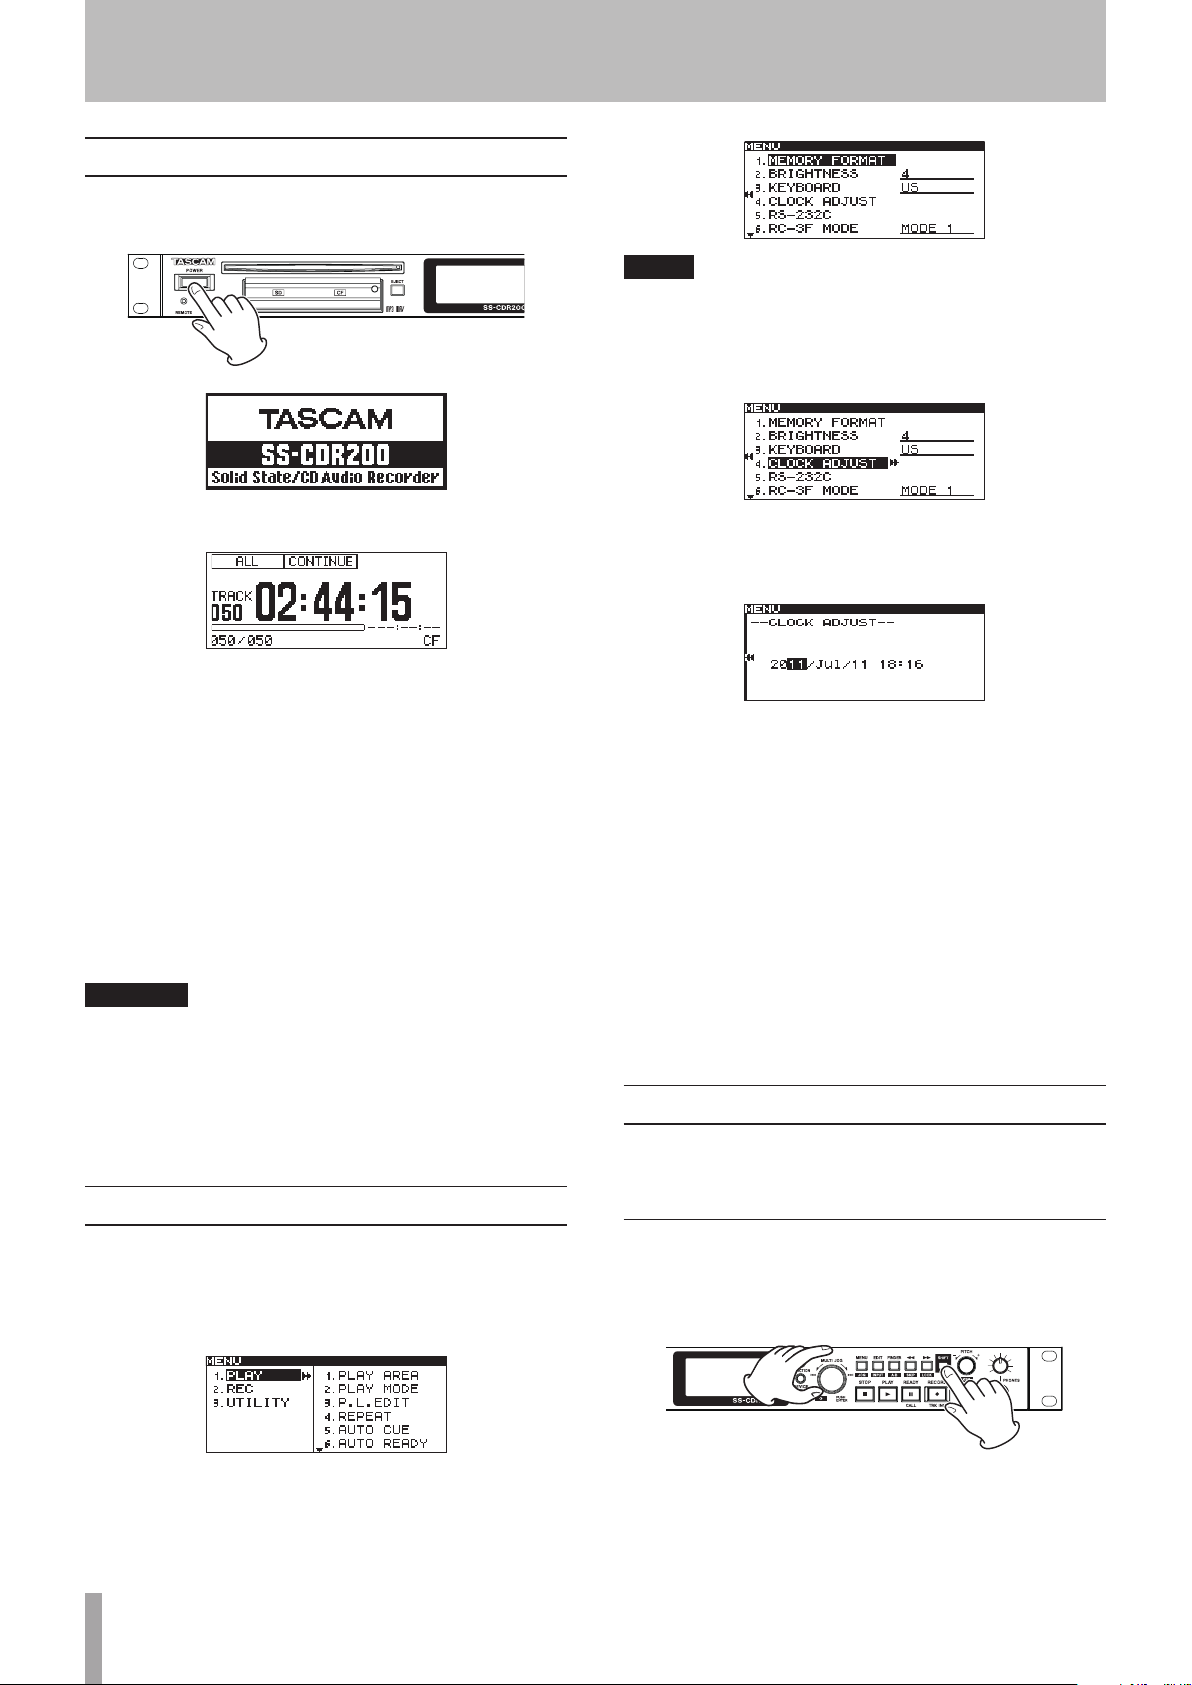
Turning the power ON/OFF
Press the front panel POWER switch to turn the power
ON.
NOTE
The screen above is an example from an SS-CDR200 or
SS-R200 unit.
The SS-R100 does not have the
3 Select
CLOCK ADJUST
5.RS-232C
.
menu item.
Startup screen
Home Screen
The unit starts up and the startup screen appears. (The
example above is from an SS-CDR200.)
If no media is loaded in the current device, a
message appears.
If media is loaded in the current device, a
READING
media. When completed, the Home Screen opens.
Turning the power OFF:
Press the POWER switch to turn the power OFF. No special
shutdown procedures are necessary.
CAUTION
Do not turn the power OFF when the unit is in use
(recording, playing back, writing data to USB/SD/CF
media, etc.). Doing so could cause recording to fail,
recorded data to be damaged, sudden loud noise to
be emitted from monitoring equipment, damage to
equipment and harm to hearing.
message appears while the unit reads the
NO MEDIA
MEDIA
Setting the date and time
The date and time is added to the recorded file based on
the built-in clock.
1 Press the MENU [JOG] button (or remote control
MENU button) to open the
MENU
screen.
4 Press the MULTI JOG dial or , [LOCK] button (or
remote control ENTER or t button) to open the
CLOCK ADJUST
5 Set the date and time with the following
operations.
Use the • m [SKIP] and , [LOCK] buttons (or
remote control g and t buttons) to select the item
you want to set.
Turn the • MULTI JOG dial (or press the remote
control 5 and b buttons) to change the selected
item.
6 After making the setting, press the MULTI JOG dial
(or remote control ENTER button) to confirm the
date and time and return to the
7 Press the HOME/DISPLAY button (or remote control
HOME/DISP button) to return to the Home Screen.
screen.
UTILITY
menu.
Adjusting the display
You can adjust the display contrast and brightness as
necessary.
Adjusting the display contrast
While pressing and holding the SHIFT button, turn the
MULTI JOG dial (or press the remote control LCD –/+
buttons) to adjust the display contrast.
2 Open the
UTILITY
menu.
Page 25
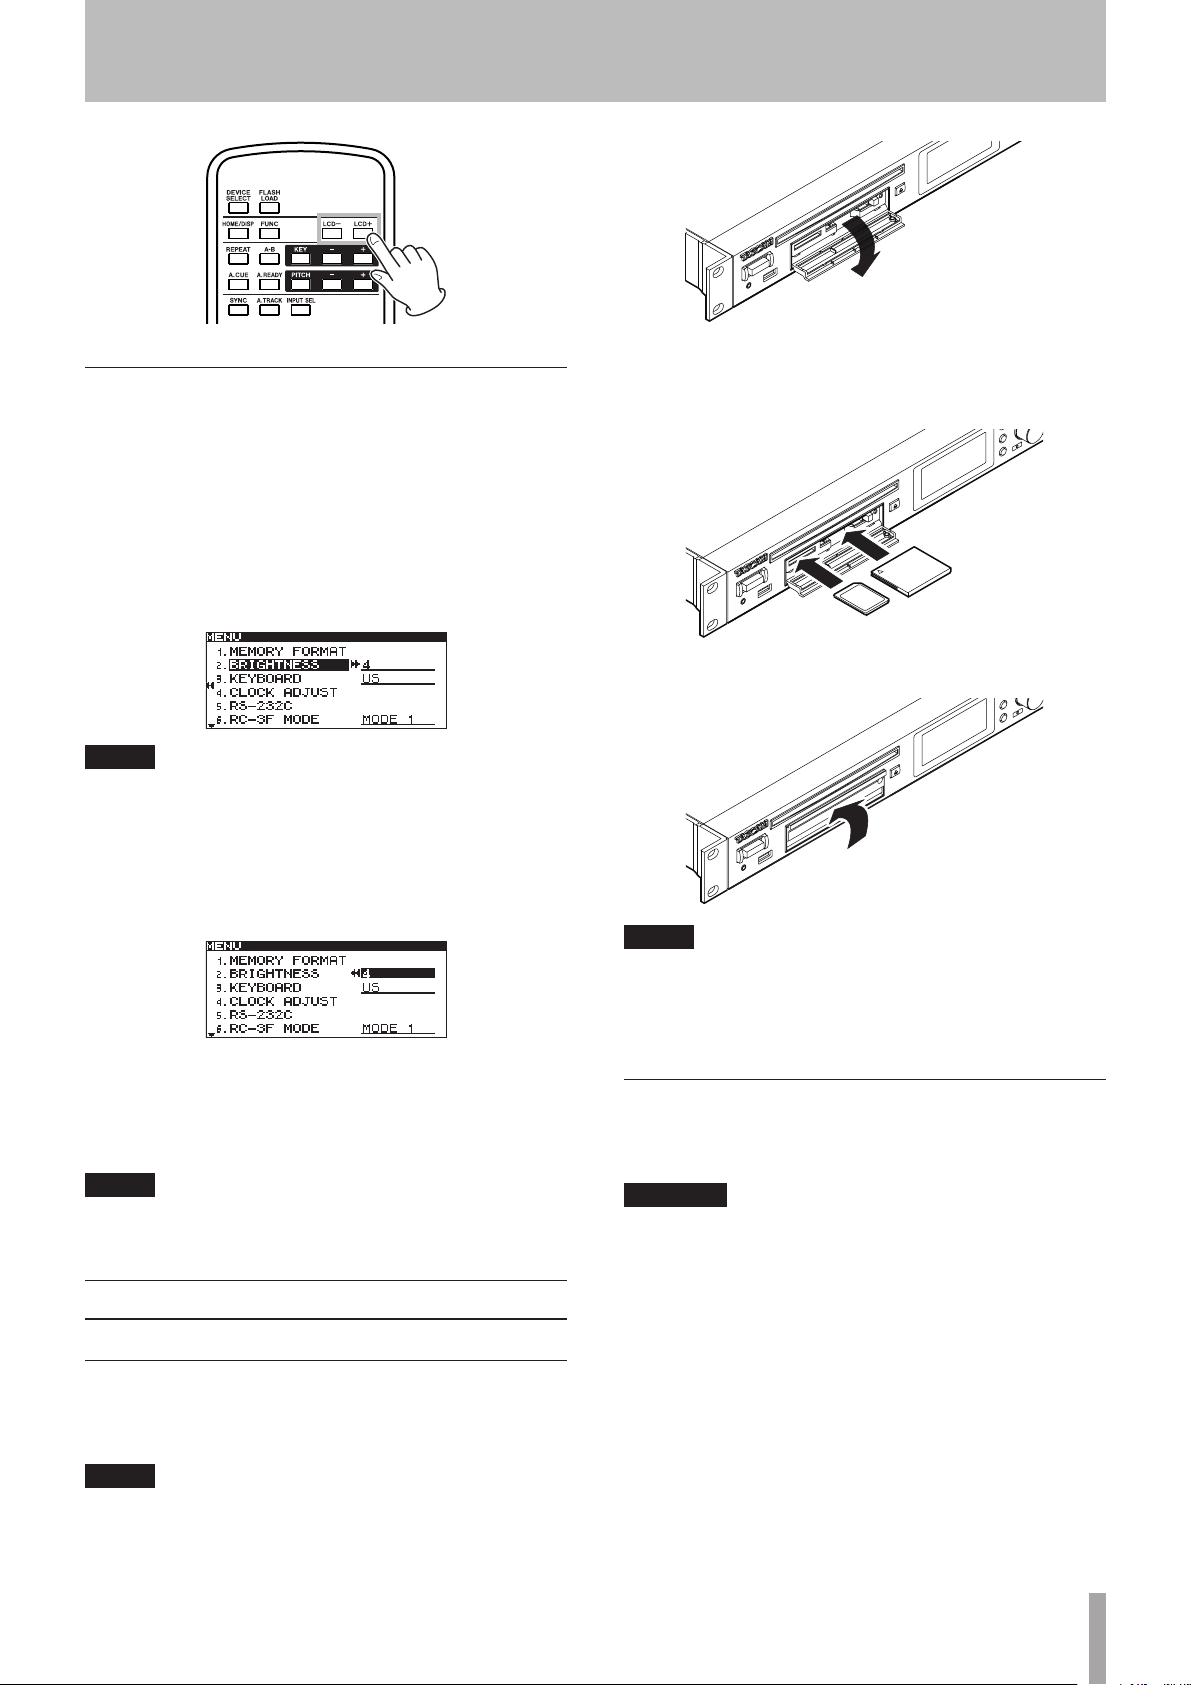
TASCAM SS-CDR200/SS-R200/SS-R100 25
Adjusting the display and indicator brightness
Use the
the brightness of the display backlight and PL AY, READY
and RECORD button indicators.
1 Press the MENU [JOG] button (or remote control
2 Open the
3 Select
BRIGHTNESS
MENU button) to open the
BRIGHTNESS
item of the
UTILITY
menu.
.
UTILITY
MENU
screen.
menu to adjust
3 − Preparations
2 Insert the SD/CF card with the correct orientation.
The label should be facing up and the contacts
facing in.
NOTE
The screen above is an example from an SS-CDR200 or
•
SS-R200 unit.
The SS-R100 does not have the
•
4 Press the MULTI JOG dial or , [LOCK] button (or
remote control ENTER or t button) to move the
cursor to the right and select the value.
5 Turn the MULTI JOG dial (or press the remote
control 5/b buttons) to adjust the brightness.
6 Press the HOME/DISPLAY button (or remote control
HOME/DISP button) to return to the Home Screen.
NOTE
The display and indicator
even after the power is turned OFF.
BRIGHTNESS
5.RS-232C
menu item.
setting is retained
Inserting and ejecting SD and CF cards
Inserting SD and CF cards
Insert an SD card or CF card into the appropriate card slot
on the front panel to use it for playback and recording.
NOTE
You can insert SD and CF cards regardless of whether the
power is ON or OFF.
1 Pull the card slot door forward to open it.
3 Close the card slot door.
NOTE
If the SD/CF card slot door will not close, remove the card,
and then insert it once again. To remove an SD card, pull
it. To remove a CF card, press the square button located at
the right of the slot.
Ejecting SD and CF cards
Turn the power OFF or stop operation before ejecting an
SD or CF card.
CAUTION
Never remove an SD or CF card when the unit is in use
(recording, playing back, writing data to a card, etc.).
Doing so could cause recording to fail, recorded data
to be damaged, sudden loud noise to be emitted from
monitoring equipment, damage to equipment and harm
to hearing.
1 Pull the card slot door forward to open it.
2 To eject an SD card, press the SD card in slightly.
To eject a CF card, press the square button located
at the right of the card slot. The button will come
out. Push it in again to eject the CF card partially.
Page 26
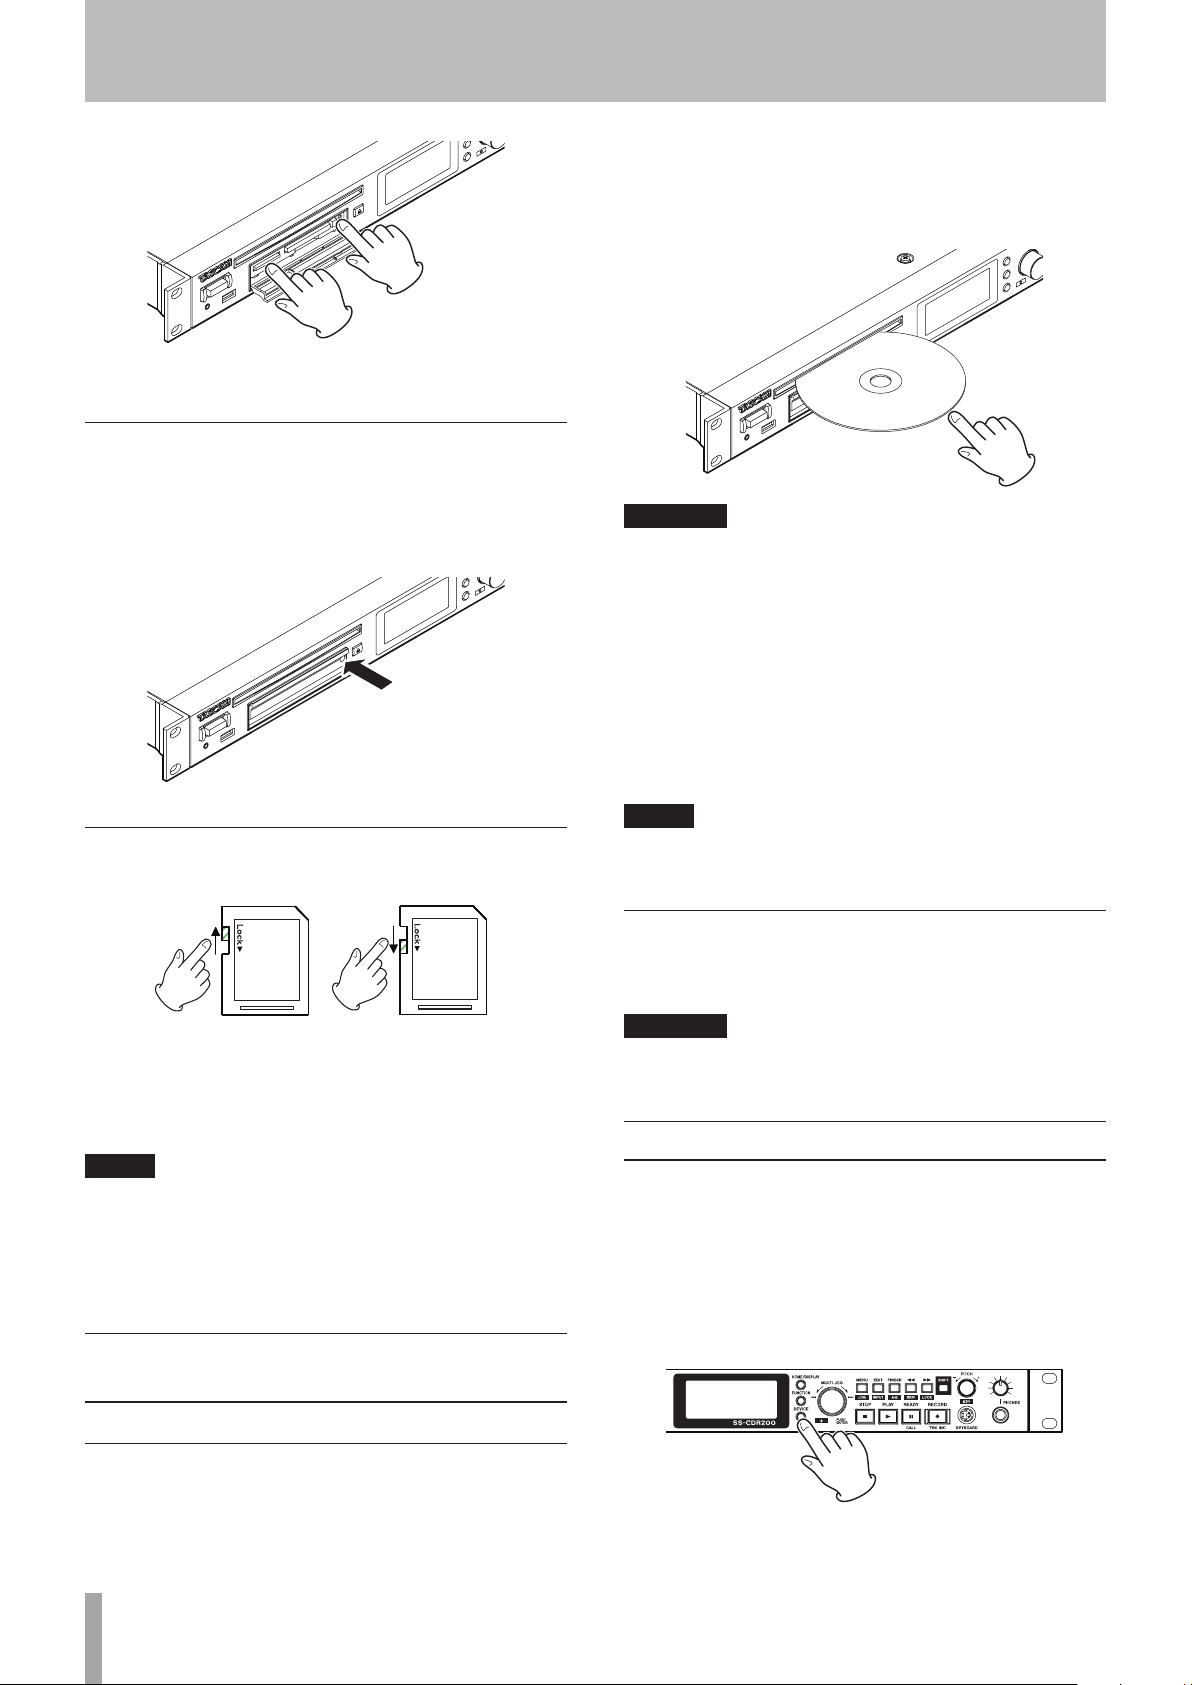
26 TASCAM SS-CDR200/SS-R200/SS-R100
Unprotected Protected
3 − Preparations
3 Pull the SD or CF card out the rest of the way.
Using the security screw
The included security screw can be used to lock the card
slot door.
Use a Phillips screwdriver to install or remove the security
screw.
After the disc is inserted, the unit reads the disc
information. The total number of tracks and total playback
time of an audio CD will be shown. The total number of
tracks in the current folder of a data CD will be shown.
CAUTION
Discs cannot be inserted when the power is OFF.
•
Trying to force a disc in could damage the unit. If a disc
•
becomes stuck partway, for example, and is difficult to
push, do not try to force it in. Pull it out once, press the
EJECT button and then try inserting it again.
MEDIA ERROR
•
are inserted or discs are inserted upside-down. Press
the EJECT button to eject such a disc.
When inserting 3-inch CDs, be sure to insert them in
•
the middle of the slot completely.
will appear if discs other than audio CDs
SD card write protection
SD cards have write-protection switches.
If the protection switch is slid into the “LOCK” position,
adding and editing files will not be possible. To record,
erase or otherwise change files, disable write protection.
NOTE
When using a protected SD card, every time the device
is changed, the audio files on the card will be checked
beforehand. For this reason, changing devices takes time.
Moreover, editing the playlist and other operations are
not possible.
Inserting and removing discs (SS-CDR200 only)
NOTE
You can insert a disc anytime the power is ON, regardless
of the current device setting.
Ejecting discs
Press the EJECT button to eject a disc partially. Holding it
by its sides, pull it out the rest of the way.
CAUTION
When the power is off, the EJECT button does not
function.
Selecting the device used
Before using the unit, select the device (USB, SD, CF or CD)
for the type of media that you are using (choose CD for
CD-R and CD-RW discs).
To select the device used, follow these procedures.
1 Press the DEVICE button (or remote control DEVICE
SELECT button) to open the
screen.
DEVICE SELECT
Inserting discs
With the disc label up, insert it partway into the disc slot.
Push the disc in a little further and it will be pulled in
automatically just before it disappears into the slot.
Page 27

TASCAM SS-CDR200/SS-R200/SS-R100 27
Device name
3 − Preparations
NOTE
The screen above is an example from an SS-CDR200.
SS-R200 and SS-R100 models do not have the CD menu.
2 Press the DEVICE button (or remote control DEVICE
SELECT button) to select the device to use, and
press the MULTI JOG dial (or remote control ENTER
button) to confirm.
NOTE
You can also turn the MULTI JOG dial to select the device.
3 The name of the selected device appears at the
bottom right of the Home Screen.
3 Open the
4 Select
UTILITY
MEMORY FORMAT
menu.
.
5 Press the MULTI JOG dial (or remote control ENTER
button).
A confirmation pop-up message appears.
6 Press the MULTI JOG dial (or remote control ENTER
button) again to start formatting.
During formatting,
--FORMAT--
and a progress bar
is displayed in a pop-up.
7 After formatting completes, the pop-up disappears
and the
UTILITY
menu reopens.
8 Press the HOME/DISPLAY button (or remote control
HOME/DISP button) to return to the Home Screen.
USB
: Select USB memory
SD
: Select SD card
CF
: Select CF card
CD
: Select CD with commercial audio CD (SS-CDR200
only)
CDR
: Select CD with CD-R (SS-CDR200 only)
CDRW
: Select CD with CD-RW (SS-CDR200 only)
Preparing USB/SD/CF media for use
You must format USB/SD/CF media with this unit in order
to make them usable by the unit.
CAUTION
Formatting will erase all data on the USB/SD/CF media.
•
Always format with this unit. If USB/SD/CF media is
•
formatted by another device or a computer, it could
affect operation of the unit.
1 Press the DEVICE button (or remote control DEVICE
SELECT button) to open the
screen, and select the device with the media that
you want to format. (See “Selecting the device
used” on page 26.)
2 Press the MENU [JOG] button (or remote control
MENU button) to open the
DEVICE SELECT
MENU
screen.
Panel lock function
While pressing and holding the SHIFT button, press the
, [LOCK] button to turn the panel lock function, which
disables operation of the front panel buttons, ON and OFF.
When panel lock is ON, using any front panel buttons
(except the SHIFT and , [LOCK] buttons) or remote
control buttons will cause a
pop-up to appear.
NOTE
Even when panel lock is ON, control is still possible when
using a TASCAM RC-3F footswitch connected to the front
panel REMOTE JACK or an external device connected to
one of the rear panel RS-232C, PARALLEL or REMOTE IN
(RC-SS2) CONTROL I/O connectors.
--Key Lock--
and ON
Page 28

28 TASCAM SS-CDR200/SS-R200/SS-R100
Play area
4 − Playback
This chapter explains the functions for playing audio files
stored on CDs and USB/SD/CF media.
The following explanation assumes that a CD or USB/SD/
CF media containing an audio file is inserted in the unit,
that the unit is powered-on, and that the current device is
selected appropriately (See “Selecting the device used” on
page 26.)
Files that can be played
These units are able to play files of the following formats.
Files on USB/SD/CF media
MP3 format files
Stereo and mono MP3 files at 44.1 and 48 kHz sampling
frequencies and 64–320 kbps bit rates
WAV format files
Stereo and mono WAV files at 44.1 and 48 kHz sampling
frequencies
Files on CDs (SS-CDR200 only)
Audio CD format files
Commercial music CDs, and CD-R and CD-RW discs
created in audio CD format
explaining media management. Please be aware that
these two terms actually refer to the same thing.
Play area
The range of playback tracks that can be selected on the
Home Screen is called the “play area.” For an audio CD, the
play area will always be the entire disc. For CD-R/CD-RW
discs and USB/SD/CF media that contain MP3 or WAV files,
you can specify the play area.
If the media contains numerous files, limiting the play
area will make it easier for you to select tracks.
Setting the play area
Use the
1 Press the MENU [JOG] button (or remote control
2 Open the
3 Select
PLAY AREA
MENU button) to open the
PLAY AREA
item to set the play area.
PLAY
menu.
.
MENU
screen.
MP3 format files
Stereo and mono MP3 files at 44.1 and 48 kHz sampling
frequencies and 64–320 kbps bit rates
WAV format files
Stereo and mono WAV files at 44.1 and 48 kHz sampling
frequencies
TIP
If a file is in one of the above formats, it can be played
back regardless of whether or not it was recorded by this
unit. For example, you can use a computer or other audio
device to write a file that meets the above characteristics
to a CD or USB/SD/CF media, and then load that media
into this unit and play it back. In other words, you can
efficiently prepare materials for playback on this unit.
CAUTION
Accurate position detection is not possible in MP3
files that have been compressed in VBR format due to
limitations of that format. For this reason, when using
functions that require points to be set in the middle of a
track, including skipping backward or forward, calling and
setting the A-B repeat A point, a discrepancy could occur
between the point set and the point used when playback
is started.
4 Press the MULTI JOG dial or , [LOCK] button (or
remote control ENTER or t button) to move the
cursor to the right and select the setting item.
5 Turn the MULTI JOG dial (or press the remote
control 5/b buttons) to set the desired play area.
ALL
(default value): All files on the selected media
FOLDER
PLAYLIST
When using USB/SD/CF media, all three of the above
choices are possible.
When using a data CD, the choices are
FOLDER
When using an audio CD, this setting cannot be
changed from
6 After making the setting, press the HOME/DISPLAY
button (or remote control HOME/DISP button) to
return to the Home Screen.
NOTE
The current play area setting is shown at the top left of
•
the Home Screen.
: All files in the selected folder
: All files added to the playlist
.
ALL
.
ALL
and
Tracks and files
Audio data is saved on the media as “audio files.” These
files are handled by the unit as “tracks.” When explaining
recording and playback in this manual, we usually refer to
audio files as “tracks.” We mainly use the term “files” when
The playback area setting is retained even after the
•
power is turned OFF.
Page 29

TASCAM SS-CDR200/SS-R200/SS-R100 29
4 − Playback
Selecting the current folder or current playlist
If you have set the play area to be a folder or playlist
(only when using USB/SD/CF media), you can select the
applicable folder or playlist by using the m [SKIP]
and , [LOCK] buttons (or remote control SEARCH
m/, buttons) when the home screen is open and
the unit is stopped. This folder or playlist is called the
“current folder” or “current playlist.”
NOTE
You can also select the “current folder” or “current
•
playlist” from the
operations” on page 50.)
When the audio files are MP3 or WAV format, a
•
maximum of 999 tracks are playable by this unit. If
media that contains more than 999 tracks is loaded
into the unit, the 999 tracks selected according to the
system rules will be playable. The remaining tracks
cannot be played or edited.
The SS-CDR200 is able to play CDs with a maximum of
•
99 CD audio format files.
FINDER
screen. (See “File and folder
Playback modes
The tracks in the play area can be played using one of the
following four playback modes.
Continuous playback mode (default
setting)
appears in the playback mode indication area at
the top of the Home Screen.
The tracks in the play area will play back in order of their
track numbers.
Single playback mode
appears in the playback mode indication area at
the top of the Home Screen.
Only the currently selected track will play back, and then
playback will stop.
Program playback mode
appears in the playback mode indication area at
the top of the Home Screen.
The tracks will be played back in the order programmed
in advance. (See “Program playback” on page 32.)
Random playback mode
appears in the playback mode indication area at
the top of the Home Screen.
All tracks in the play area will play back in random order
without regard to their track numbers. When all tracks
have been played back, playback will stop.
Setting the playback mode
Use the front panel of the unit and the included TASCAM
RC-SS2 remote control to set the desired playback mode
using the following procedures.
Using the menu
1 When stopped, press the MENU [JOG] button (or
remote control MENU button) to open the
screen.
2 Open the
3 Select
4 Press the MULTI JOG dial or , [LOCK] button (or
remote control ENTER or t button) to move the
cursor to the right and select the setting item.
5 Turn the MULTI JOG dial (or press the remote
control 5/b buttons) to set the desired playback
mode.
6 After making the setting, press the HOME/DISPLAY
button (or remote control HOME/DISP button) to
return to the Home Screen.
NOTE
In this manual, unless otherwise specified, explanations
•
assume that the playback mode is set to
(continuous playback mode).
The playback mode setting is retained even after the
•
power is turned OFF.
PLAY
menu.
PLAY MODE
.
MENU
CONTINUE
Basic playback operations
This section explains basic operations including starting
playback, playback standby and stopping.
The following explanation assume that you have
completed the necessary connections, that the unit
power is ON, the current device is set, media containing
audio files is loaded in that device and the Home Screen is
open.
Playback
To start playback, press the P LAY button (or remote
control PL AY button).
If no audio files that can be played back by this unit are on
the media, the time display area will show all zeros.
To stop playback:
Press the STOP button.
To pause playback and enter playback standby:
Press the READY button.
Page 30

30 TASCAM SS-CDR200/SS-R200/SS-R100
4 − Preparations
In this manual, unless otherwise specified, explanations
assume that the playback mode is set to
(continuous playback mode).
CONTINUE
Selecting tracks
To select a track for playback, if the play area has more
than one track, you can either skip to the previous or next
track or enter a track number directly. Both methods are
explained below.
Skipping to the previous or next track
Turn the MULTI JOG dial (or press the remote control
SKIP . and / buttons) to skip to the previous or
next track.
Turn the • MULTI JOG dial right to skip to the next track
or to the left to skip to the previous track.
Press the remote control • SKIP / button to skip to
the next track or . button to skip to the previous
track.
After selecting the track, press the front panel or remote
control PL AY button to start track playback.
Alternatively, instead of pressing the front panel or
remote control PL AY button, press the front panel or
remote control READY button to start playback standby
at the beginning of the selected track.
Specifying a track number
You can use the remote’s number buttons to directly enter
the number of the track that you want to play.
For audio format CDs, the track number will be a
maximum of two digits. For MP3 and WAV format media,
the track number will be a maximum of three digits.
1 Use the remote’s number buttons to input the track
number. Enter the track number starting with the
highest digit.
Example 1: For track 1, press 1
Example 2: For track 12, press 1 followed by 2
Example 3: For track 103 press 1 followed by 0 and
then 3
2 Press the front panel or remote control PLAY
button to start playback of the selected track.
Alternatively, instead of pressing the front panel or
remote control PLAY button, press the front panel
or remote control READY button to start playback
standby at the beginning of the selected track.
NOTE
Instead of pressing the front panel or remote control
•
PL AY button, you can also press the MULTI JOG dial or
remote control ENTER button to start playback of the
selected track.
You cannot use the number buttons on the remote to
•
specify the track while in program or random mode.
Searching backward and forward
You can search forward or backward in a track while
listening to the audio.
1 Play the desired track or put it into playback
standby.
2 Press and hold the m [SKIP] or , [LOCK]
button (or remote control SEARCH m or ,
button) to start searching backward or forward.
3 To stop searching, release the button you are
holding.
The unit will return to the state (playback standby or
playback) it was in before searching.
Time search
When the unit is stopped, in playback standby or playing,
you can locate to a specified time in the specified track.
NOTE
You cannot use time search when the play mode is
PROGRAM
Use the remote control number buttons to input numbers
in the following order.
•
•
For example, if you want to specify a location that is 1
minute 30 seconds from the beginning of track 2, you
would press keys in the following order.
When you finish entering the nine digits, the unit will
automatically locate to the specified position.
If the unit was stopped or playing back before locating to
the time, playback will begin after locating. If the unit was
in playback standby prior to locating to the time, it will
resume playback standby after locating.
If you specify a track number that does not exist in the
current play area or a time that does not exist in the track,
the operation will be cancelled at that point.
Time searching after partial entry
If you press the remote’s ENTER, P LAY or READY button
before you finish entering the time, you will locate to the
position that is specified at that point.
For example, suppose you intend to specify a location
that is 12 minutes from the beginning of track 2, but do
not complete the entry, inputting only:
Then, if you press the remote control ENTER, PL AY or
READY button, the unit will locate to 12 minutes after the
beginning of track 2. The button you push will determine
what happens after locating.
or
RANDOM
Track number: 3 digits
Elapsed time from the beginning of the track: two
digits each hours, minutes, seconds
0 q 0 q 2 q 0 q 0 q 0 q 1 q 3 q 0
0 q 0 q 2 q 0 q 0 q 1 q 2
.
Page 31

TASCAM SS-CDR200/SS-R200/SS-R100 31
Frame value
4 − Preparations
ENTER: resumes playback or playback standby
according to the status before locating
PL AY: starts playback
READY: enters playback standby
NOTE
If you enter only the track number and press the
•
ENTER, PL AY or READY button, the result is the same
as described in “Specifying a track number” (page 31).
You can also enter the numbers using a keyboard
•
number pad.
Jog playback
In jog playback mode, you can use the MULTI JOG dial on
the main unit to search by one frame at a time.
1 While pressing and holding the SHIFT button, press
the MENU [JOG] button to enable jog playback
mode.
The PL AY and READY buttons flash, and the track
elapsed time in the TRACK mode display on the Home
Screen shows the frame value.
NOTE
If the time from the beginning of the track is less than
•
the skip time when you press the m [SKIP] button
(or remote control SEARCH m button), the unit will
locate to the beginning of the current track.
If the time from the beginning of the track is less than
•
1 second when you press the m [SKIP] button (or
remote control SEARCH m button), the unit will
locate to the position that is the skip time before the
end in the previous track. However, if it is the first track
of the current device media or program, playback
standby will occur at the beginning of the current track.
In random playback mode, if you press the • m [SKIP]
button (or remote control SEARCH m button) when
the time from the beginning of the track is less than the
skip time, the unit will always locate to the beginning
of the current track.
If the track remaining time is less than the skip time
•
when you press the , [LOCK] button (or remote
control SEARCH , button), the unit will locate to
the beginning of the next track. However, if it is the last
track of the current device media or program, playback
standby will occur at the end of the current track.
2 Turn the MULTI JOG dial to search.
3 To exit jog playback mode, press the STOP, PLAY
or READY [CALL] button. The unit responds to the
button pressed, stopping, playing back from or
pausing at the searched position, accordingly.
NOTE
If the Home Screen display is in any mode other than
TRACK mode, when using jog playback mode, the frame
value will not be shown in the track elapsed time. Press
the HOME/DISPLAY button (or remote control HOME/
DISP button) to change to TRACK mode before starting
jog playback mode.
Skipping backward and forward
During playback and playback standby, you can skip
backward of forward from the current position by the
preset skip time.
During playback or when in playback standby, press the
m [SKIP] or , [LOCK] button (or remote control
SEARCH m/, buttons) to locate backward or
forward from the current position by the SKIP TIME. After
locating, the previous state resumes.
Setting the skip time
1 While pressing and holding the SHIFT button, press
the m [SKIP] button to open a pop-up window
where you can set the skip time.
2 Turn the MULTI JOG dial (or press the remote
control 5 and b buttons) to set the skip time.
Setting values:
3 Press the MULTI JOG dial (or remote control ENTER
button) to confirm setting values and return to the
Home Screen.
1 sec
–
60 sec
(default value)
Call function
The call function returns to the call point (point from
where playback last started from playback standby) and
puts the unit in playback standby
When in playback standby, press the READY [CALL]
button (or remote control CALL button) to return to the
point from where playback last started and start playback
standby.
Page 32

32 TASCAM SS-CDR200/SS-R200/SS-R100
4 − Preparations
The call point will be erased when you perform any of the
following operations.
Turn the power OFF
•
Remove media from the current device
•
Change the play area
•
Change the playback mode
•
Modify the contents of the current device’s media (by
•
recording, editing or erasing, etc.).
NOTE
If you press the • READY [CALL] button (or remote
control CALL button) when a Call point has not been
specified, a
You cannot use the Call function in
•
play modes.
NoCallPoint
pop-up message will appear.
PROGRAM
or
RANDOM
If the total time of the programmed tracks exceeds 99
•
hours 59 minutes, 59 seconds, “
appear on the display.
In
PROGRAM
•
at least one track is added to the program.
When stopped, all program data will be cleared if you
•
press the front panel or remote control STOP button.
Program data will be cleared if you switch the play
•
mode.
Program data will be cleared when you power-off the
•
unit.
play mode, playback is not possible unless
- -: - -: - -
Pitch control playback
Using pitch control playback, this unit can modify the
pitch (the pitch and playback speed) of the playback.
Follow these procedures to use pitch control playback.
1 Push the PITCH knob (or remote control PITCH
button) to turn the pitch control function ON.
When ON, the indicator appears on the Home
Screen.
” will
Program playback
By creating a program in advance, you can play the tracks
you want in the order you desire. The program can have a
maximum of 99 tracks.
Preparing the program
Use the front panel of the unit and the included TASCAM
RC-SS2 remote control to prepare the program using the
following procedures.
1 When stopped, set the playback mode to
PROGRAM. (See “Setting the playback mode” on
page 32.)
2 Turn the MULTI JOG dial (or use remote control
number buttons) to input the number of the track
that you want to program, and press the dial (or
remote control ENTER button) to add the track to
the program.
3 Repeat step 2 to add other tracks to the program in
order.
The screen shows the program number and total time.
4 Press the front panel or remote control PLAY
button to start program playback.
NOTE
You can add the same track to the program repeatedly.
•
Pressing the • EDIT [INPUT] button (or remote control
EDIT button) will remove the last added track from the
program.
A maximum of 99 tracks can be programmed. If you
•
attempt to program a 100th track, a
warning message pop-up will appear.
PROGRAM FULL
2 Turn the PITCH knob (or press the remote control
PITCH –/+ buttons) to set the pitch level.
While adjusting the pitch control value, it is shown in a
pop-up on the Home Screen.
The pitch level can be set in a range from
+16.0%
To turn off pitch control playback:
Press the front panel PITCH knob (or remote control
PITCH button).
The indicator on the Home Screen disappears when
the pitch control function is OFF.
NOTE
When you turn pitch control playback ON/OFF during
•
playback, the playback sound may be momentarily
interrupted.
The pitch level setting made in step 2 above is retained
•
even when the pitch control function is OFF, and it will
be used the next time the function is turned ON again.
TIP
By using the key control function together with the pitch
control function, you can change only the speed without
affecting the pitch. (See “Key control playback” in the
following section.)
.
–16.0%
–
Page 33

TASCAM SS-CDR200/SS-R200/SS-R100 33
4 − Preparations
Setting the pitch step
You can change the pitch step (amount of pitch
adjustment).
The pitch step is the amount of pitch change produced
by turning the PITCH knob one step or by pressing the
Remote’s PITCH +/– button once.
1 Press and hold the PITCH knob (or remote control
PITCH button) to open the
-PITCH STEP-
and
X.X
%
pop-up on the Home Screen.
2 While the
PITCH STEP
pop-up is shown, turn the
MULTI JOG dial to set the pitch step.
Setting range:
0.1
% (default value) –
1.0
%
3 After making the setting, push the PITCH knob
(or remote control PITCH button) to return to the
Home Screen.
NOTE
The pitch step setting is retained even after the power is
turned OFF.
Key control playback
Using the key control function, you can change the
playback key (pitch in semitones).
Follow these procedures in menu mode to turn key
control ON/OFF and set the key level.
1 While pressing and holding the SHIFT button, press
the PITCH knob (or press the remote control KEY
button) to turn the key control function ON.
When ON, the indicator appears on the Home
Screen.
NOTE
When using the key control function, the playback may
•
sound irregular. This is due to the special processing
being applied to the playback signal, and is not a
malfunction.
The key control
•
KEY LEVEL
setting is retained even
after the power is turned OFF.
TIP
If you turn on both the key control and pitch control
functions, the key (pitch) will be determined by the key
control setting and the speed will be determined by
the pitch control setting. (In other words, using pitch
control to change the speed will not affect the pitch of
the sound). Thus, if you set
KEY LEVEL
to 0 and turn
key control ON, you can use pitch control to change the
playback speed without affecting the pitch.
Repeat playback
You can repeatedly play back all tracks in the play area, or
repeatedly play back a specified region within a track (A-B
Repeat playback).
Ordinary repeat playback
When the repeat playback function is ON, the following
will occur according to the playback mode.
CONTINUE
•
repeatedly
SINGLE
•
repeatedly
PROGRAM
•
repeatedly
RANDOM
•
random
To turn the repeat playback function ON, follow one of
these procedures.
: the entire play area will be played back
: the current track will be played back
: the entire program will be played back
: the entire play area will be played back at
2 While pressing and holding the SHIFT button, turn
the PITCH knob (or press the remote control KEY –
and + buttons) to set the
While adjusting the
KEY LEVEL
KEY LEVEL
.
, it is shown in a
pop-up on the Home Screen.
You can set the
KEY LEVEL
in a range from ¢6–¢1, 0
(no pitch change), #1–#6.
Page 34

34 TASCAM SS-CDR200/SS-R200/SS-R100
4 − Preparations
Using the menu
1 Press the MENU [JOG] button (or remote control
MENU button) to open the
2 Open the
3 Select
4 Press the MULTI JOG dial or , [LOCK] button (or
remote control ENTER or t button) to move the
cursor to the right and select the setting item.
5 Turn the MULTI JOG dial, (or press the remote
control 5 and b buttons) to set it to ON (default
value:
6 Press the HOME/DISPLAY button (or remote control
HOME/DISP button) to return to the Home Screen.
Using the dedicated remote control
PLAY
REPEAT
OFF
).
menu.
.
button
1 Press the remote control REPEAT button to set
--Repeat--
repeat playback is ON.
2 Press the remote control FUNC button to open
the
FUNCTION
highlighted.
to ON. A pop-up appears showing that
screen, and check that
MENU
screen.
REPEAT
is
NOTE
If you press the remote control RE PEAT button, the repeat
playback starting point (A) will be cancelled.
2 Once again press the FINDER [A-B] button while
pressing and holding the SHIFT button (or remote
control A-B button) to set the ending point (B) of
the repeat playback interval.
--Repeat--
Screen.
This completes setting the interval (A-B), and A-B
repeat playback will start.
NOTE
During playback if you press the remote control
•
REPEAT or A-B button,
pop-up, A-B repeat playback is cancelled, and playback
will continue even after the designated ending point (B)
is reached.
If you press the front panel or remote control • STOP
button to stop playback, the designated interval (A-B)
is cleared.
The A-B repeat playback interval cannot span more
•
than one track.
and
A-B
appear in a pop-up on the Home
Repeat
and
OFF
appear in a
Turning repeat playback OFF
Use the
control RE PE AT button to turn it OFF.
The
unhighlighted when OFF.
The repeat playback setting is retained even after the
power is turned OFF.
REPEAT
NOTE
PLAY
menu
indicator on the
REPEAT
item or press the remote
FUNCTION
screen appears
A-B repeat playback
This lets you specify a desired region (A-B) within a track
to be played back repeatedly. Follow these procedures to
conduct A-B repeat playback.
1 During playback or when in playback standby,
at the position where you want to start repeat
playback, press the FINDER [A-B] button while
pressing and holding the SHIFT button (or remote
control A-B button) to set the starting point (A).
--Repeat--
Screen.
and A- appear in a pop-up on the Home
Auto Cue function
If the Auto Cue function is on, and you select a track to
play, any “silent” portion at the beginning of the track
will be skipped, and the track will be put into playback
standby at the point where its “signal” begins to be
audible. This means that sound will be heard immediately
when you start playback.
NOTE
When using the flash start function to start playback,
•
Auto Cue function is disabled.
When the Auto Cue function is on, if a track is selected
•
during playback, playback will start from the point
where it becomes audible. If a track is selected when
in playback standby, playback standby will start at the
point where it becomes audible.
The Auto Cue function setting is retained even after the
•
power is turned OFF.
You can specify the threshold level (Auto Cue LEVEL) used
to detect the audio signal when the Auto Cue function
is active. In other words, any signal higher than the Auto
Cue LEVEL will be treated as “signal,” and any signal lower
than this level will be treated as “silence.”
Page 35

TASCAM SS-CDR200/SS-R200/SS-R100 35
4 − Preparations
Using the menu
1 When stopped, press the MENU [JOG] button (or
remote control MENU button) to open the
screen.
2 Open the
3 Select
4 Press the MULTI JOG dial or , [LOCK] button (or
remote control ENTER or t button) to move the
cursor to the right and select the setting item.
5 Turn the MULTI JOG dial (or press the remote
control 5/b buttons) to set it to ON (default value:
OFF
6 Press the MULTI JOG dial or , [LOCK] button (or
remote control ENTER or t button) to open the
AUTO CUE
PLAY
AUTO CUE
).
setting screen.
menu.
.
MENU
Auto Ready function
If the Auto Ready function is ON, when a track finishes
playing, playback standby will occur at the beginning of
the next track.
NOTE
If the Auto Cue function is ON, playback standby will
•
occur when sound starts in the next track rather than
at the beginning of track.
When starting playback with the flash start function,
•
the Auto Ready function is disabled.
The Auto Ready function setting is retained even after
•
the power is turned OFF.
Using the menu
1 Press the MENU [JOG] button (or remote control
MENU button) to open the
2 Open the
3 Select
PLAY
menu.
AUTO READY
.
MENU
screen.
Set the Auto Cue level on this screen.
7 Turn the MULTI JOG dial (or press the remote
control 5/b buttons) to set the desired Auto Cue
LEVEL.
Setting range:
default value:
8 When you have finished making the setting, press
the HOME/DISPLAY button (or remote control
HOME/DISP button) to return to the Home Screen.
Using the dedicated remote control
–24 dB
–54 dB
–
–72 dB
)
(6 dB intervals,
button
1 Press the remote control A.CUE button to turn the
Auto Cue function ON and open a pop-up showing
--Auto cue--
2 Press the remote control FUNC button to open
the
FUNCTION
highlighted.
and ON.
screen, and check that
AUTO CUE
is
4 Press the MULTI JOG dial or , [LOCK] button (or
remote control ENTER or t button) to move the
cursor to the right and select the setting item.
5 Turn the MULTI JOG dial (or press the remote
control 5 and b buttons) to set it to ON (default
value:
OFF
).
6 When you have finished making the setting, press
the HOME/DISPLAY button (or remote control
HOME/DISP button) to return to the Home Screen.
Using the dedicated remote control
button
1 Press the remote control A.READY button to turn
the Auto ready function ON and open a pop-up
showing –
2 Press the remote control FUNC button to open the
FUNCTION
highlighted.
Auto ready
screen, and check that
– and ON.
AUTO READY
is
Incremental playback function
When the incremental playback function is ON, press
the front panel or remote control PL AY button during
playback to start playback from the beginning of the next
track, or press the front panel or remote control STOP
button to start playback standby at the beginning of the
next track.
Page 36

36 TASCAM SS-CDR200/SS-R200/SS-R100
4 − Preparations
NOTE
When the incremental playback function is ON,
•
pressing the front panel or remote control PL AY button
when in playback standby will start playback from
that position. When in playback standby, pressing the
front panel or remote control STOP button will stop
playback.
When the last track is playing back, pressing the
•
front panel or remote control PL AY button will start
playback of the first track in the play area. Pressing the
STOP key will pause at the beginning of the first track
in the play area.
The incremental playback function setting is retained
•
even after the power is turned OFF.
1 Press the MENU [JOG] button (or remote control
MENU button) to open the
2 Open the
3 Select
PLAY
menu.
INC. PLAY
.
MENU
screen.
4 Press the MULTI JOG dial or , [LOCK] button (or
remote control ENTER or t button) to move the
cursor to the right and select the setting item.
5 Turn the MULTI JOG dial (or press the remote
control 5 and b buttons) to set it to ON (default
value:
OFF
).
6 When you have finished making the setting, press
the HOME/DISPLAY button (or remote control
HOME/DISP button) to return to the Home Screen.
Mono playback
You can play back a stereo audio file in mono. In this case,
the left and right signals of the track will be mixed to
mono and the same mono signal will be output from both
the L and R outputs.
Use the menu to make this setting.
1 Press the MENU [JOG] button (or remote control
MENU button) to open the
2 Open the
3 Select
PLAY
OTHERS
menu.
.
4 Press the MULTI JOG dial or , [LOCK] button (or
remote control ENTER or t button) to open the
PLAY OTHERS
5 Select
MONO MIX
menu.
.
MENU
screen.
6 Press the MULTI JOG dial or , [LOCK] button (or
remote control ENTER or t button) to move the
cursor to the right and select the setting item.
7 Turn the MULTI JOG dial (or press the remote
control 5 and b buttons) to set it to ON (default
value:
OFF
).
8 When you have finished making the setting, press
the HOME/DISPLAY button (or remote control
HOME/DISP button) to return to the Home Screen.
NOTE
The
MONO MIX
setting is retained even after the power is
turned OFF.
EOM functions (SS-CDR200/SS-R200 only)
By turning EOM functions ON, you can set the unit to
output EOM tally signals from the CONTROL I/O
PARALLEL connector when the track or play area
remaining time becomes less than the set time.
Setting EOM tally output triggers
Use the menu mode to set the track and play area
remaining times that will trigger EOM tally signal output.
1 Press the MENU [JOG] button (or remote control
MENU button) to open the
2 Open the
3 Select
PLAY
OTHERS
menu.
.
4 Press the MULTI JOG dial or , [LOCK] button (or
remote control ENTER or t button) to open the
PLAY OTHERS
5 Select
EOM TRACK
menu.
if you want to set the track
remaining time as a trigger or
want to set the remaining time in the play area as
the trigger.
6 Press the MULTI JOG dial or , [LOCK] button (or
remote control ENTER or t button) to move the
cursor to the right and select the setting item.
7 Turn the MULTI JOG dial (or press the remote
control 5 and b buttons) to set the remaining
time for the trigger.
EOM TRACK
OFF
EOM MEDIA
OFF
options:
(default value), 0s –
options:
(default value), 1s –
MENU
screen.
EOM MEDIA
99s
(seconds)
99s
(seconds)
if you
NOTE
If
EOM TRACK
is set to 0s, when the track ends a pulse of
about 100 ms will be output.
Page 37

TASCAM SS-CDR200/SS-R200/SS-R100 37
4 − Preparations
8 When you have finished making the setting, press
the HOME/DISPLAY button (or remote control
HOME/DISP button) to return to the Home Screen.
NOTE
The EOM function setting is retained even after the power
is turned OFF.
Example of use
1 Connect the device that will receive the EOM tally
signal to the CONTROL I/O PARALLEL connector.
2 Turn the power ON for both this unit and the
receiving device.
3 Begin playback.
When the remaining time of the current track or the play
area falls below the specified time, an EOM tally signal will
be output from the CONTROL I/O PARALLEL connector.
If the remaining time of both the track and the play area
have been set as triggers, an EOM tally signal will be
transmitted when either condition is satisfied.
Resume playback
If the Resume Playback function is on, playback will
begin at the “resume point,” which is the location where
playback was last stopped.
The Resume point will be erased if you do any of the
following.
Remove the media from the current device
•
Change the play area.
•
Change the play mode
•
Modify the contents of the media in the current device
•
(by recording, editing, or erasing)
Use the menu to turn the RESUME function ON/OFF.
1 Press the MENU [JOG] button (or remote control
MENU button) to open the
2 Open the
3 Select
PLAY
OTHERS
menu.
.
4 Press the MULTI JOG dial or , [LOCK] button (or
remote control ENTER or t button) to open the
PLAY OTHERS
5 Select
RESUME
menu.
.
6 Press the MULTI JOG dial or , [LOCK] button (or
remote control ENTER or t button) to move the
cursor to the right and select the setting item.
7 Turn the MULTI JOG dial (or press the remote
control 5 and b buttons) to set it to ON (default
value:
OFF
).
MENU
screen.
8 When you have finished making the setting, press
the HOME/DISPLAY button (or remote control
HOME/DISP button) to return to the Home Screen.
NOTE
If no playable track exists (e.g., if not even one track
•
has been registered in
PROGRAM
mode), the display will
show all zeros.
If the resume point does not exist (i.e., if the time
•
registered as the resume point does not exist), the
beginning of the first track in the play area will become
the resume point.
The
•
RESUME
playback function setting is retained even
after the power is turned OFF.
Using power-on play
By using a commercially-available timer, for example,
to start power to the unit, you can start playback at the
desired time.
1 Connect the SS-unit to a timer so that its power will
be supplied from the timer’s power output.
2 Load media for playback in the current device and
set the play area and playback mode, for example,
as necessary.
3 Press the MENU [JOG] button (or remote control
MENU button) to open the
4 Open the
5 Select
PLAY
OTHERS
menu.
.
6 Press the MULTI JOG dial or , [LOCK] button (or
remote control ENTER or t button) to open the
PLAY OTHERS
7 Select
POWER ON PLAY
menu.
8 Press the MULTI JOG dial or , [LOCK] button (or
remote control ENTER or t button) to move the
cursor to the right and select the setting item.
9 Turn the MULTI JOG dial (or press the remote
control 5 and b buttons) to set it to ON (default
value:
OFF
).
10 Press the HOME/DISPLAY button (or remote control
HOME/DISP button) to return to the Home Screen.
11 Set the timer to the desired time.
When the set time arrives, the unit will be powered-
on, and playback will begin automatically.
NOTE
When power-on play is enabled, the • indicator
appears on the Home Screen.
The
POWER ON PLAY
•
setting is retained even after the
power is turned OFF.
.
MENU
screen.
Page 38

38 TASCAM SS-CDR200/SS-R200/SS-R100
Master unit
Slave unit
4 − Preparations
Link playback function
By using the link function, you can make a slave unit
follow the playback operations of the master unit.
You can use the slave for playback backup.
Play, ready, stop, track skip and search operations are
conveyed by the link. However, synchronization of
operations is not guaranteed with this function.
In order to minimize the delay between units, use identical
media with identical contents from the same maker in
both master and slave units. Furthermore, you should also
set the units so that they have the same playback settings
(including Auto Cue and Auto Ready functions) and flash
load statuses.
Since there is no clock synchronization, the playback time
might become slightly out of sync after playback for a
long time.
When using the link function, the digital inputs and
outputs cannot be used.
Link playback connections
Connect the master DIGITAL OUT jack to the slave
DIGITAL IN jack.
7 Turn the MULTI JOG dial (or press the remote
control 5 and b buttons) to set it to
SLAVE
as appropriate.
Options:
OFF
(default value),
MASTER, SLAVE
MASTER
or
8 When you have finished making the setting, press
the HOME/DISPLAY button (or remote control
HOME/DISP button) to return to the Home Screen.
NOTE
The
LINK
playback setting is retained even after the
power is turned OFF.
Flash start function
Using the flash start function, you can instantly start
playback of tracks that you have registered in advance.
The beginnings of up to twenty tracks can be pre-loaded
into memory, so that playback can be triggered instantly
by a PS/2 or USB keyboard connected to the front panel,
or by an external device connected to the parallel
connector on the rear panel (SS-CDR200/SS-R200 only)
as well as by a TASCAM RC-20 Direct Play Remote (sold
separately).
1 Set the play area. (See “Play area” on page 28.)
Set the play area as the playlist or folder that
contains the tracks you want to flash-start. Make
sure that there are no more than twenty tracks.
2 Set the playback mode to
(See “Playback modes” on page 29.)
CONTINUE
or
PROGRAM
.
Setting link playback
1 Press the MENU [JOG] button (or remote control
MENU button) to open the
2 Open the
3 Select
PLAY
OTHERS
menu.
.
4 Press the MULTI JOG dial or , [LOCK] button (or
remote control ENTER or t button) to open the
PLAY OTHERS
5 Select
LINK
menu.
.
6 Press the MULTI JOG dial or , [LOCK] button (or
remote control ENTER or t button) to move the
cursor to the right and select the setting item.
MENU
screen.
NOTE
You cannot use Flash Load if the play mode is set to
RANDOM
.
3 When stopped, press the remote control FLASH
LOAD button.
The unit will successively read the beginning of each track
in the play area.
The tracks will be read in the order of playback. In other
words if the play mode is
CONTINUE
, the tracks will be
read consecutively, starting with the first. If the play mode
is
PROGRAM
, the tracks will be read in the order of the
program.
While the tracks are being read, the indicator on the
home screen will blink.
When the tracks have all been loaded, the indicator will
stop blinking and stay visible.
Page 39

TASCAM SS-CDR200/SS-R200/SS-R100 39
NOTE
If the playback mode is set to
•
the remote control FLASH LOAD button, a
SELECT
warning message pop-up will appear, and the
RANDOM
and you press
CAN'T
data will not be read.
If the playback mode is set to
•
SINGLE
and you press
the remote control FLASH LOAD button, the tracks in
the play area will be read successively in the same way
as for the
If twenty-one or more tracks are registered, data for the
•
CONTINUE
setting.
first twenty tracks from the beginning will be loaded.
4 − Preparations
4 When
FLASH
appears on the Home Screen, you can
trigger flash-start playback from a PS/2 or USB
keyboard connected to the front panel or from an
external device connected to the parallel connector
(SS-CDR200/SS-R200 only).
If you are using a PS/2 or USB keyboard, you can press
CTRL and a function key (F1–F12) to flash-start tracks
1–12 (see “Keyboard operation list” on page 73.).
If you are using the external parallel connector, you
will be able to flash-start tracks 1–20 (See “Using the
parallel connector” on page 75.)
NOTE
Tracks to be flash started must have the same sampling
frequencies. If a track with a different sampling frequency
is detected while loading the tracks,
FLASH LOAD
appear on the display, and the unit will
-- error --
and
cancel track loading.
TIP
By setting the play area to
PLAYLIST
and selecting a
playlist that contains only the tracks that you want to
flash-start as the current playlist, you can efficiently use
the flash start setting for the desired tracks (see “Play area”
on page 28 and “Editing the playlist (USB/SD/CF media
only)” on page 60).
Page 40

40 TASCAM SS-CDR200/SS-R200/SS-R100
5 − Recording
These models can record to USB memory and SD and
CF cards. The SS-CDR200 can also record to CD-R and
CD-RW discs. The following formats can be used for audio
recording.
USB/SD/CF media:
MP3 and WAV (44.1/48 kHz sampling frequency) format
audio files
CD-R/CD-RW discs:
MP3 (44.1/48 kHz sampling frequency) and CD format
audio files
The following explanations assume that you have loaded
recordable USB/SD/CF media or a CD-R/CD-RW disc
(SS-CDR200 only), completed the necessary connections
and turned the unit’s power ON.
NOTE
If the current device is set to
•
CD-RW disc must be inserted.
The maximum number of recordable tracks is 999
•
tracks for a USB memory, SD card, or CF card (total
number of MP3 tracks and WAV tracks) on the
SS-CDR200/SS-R200/SS-R100. In the case of a CD-R/
CD-RW disc, a data CD disc containing MP3 files can
have up to 999 tracks, and an audio CD disc can have
up to 99 tracks on the SS-CDR200.
When using media with a capacity of 2 GB or less, 999
•
tracks cannot be recorded into the root folder due to
file system limitations. A maximum of 999 tracks can be
recorded into subfolders.
If a write-protected SD card is loaded in the unit, the •
icon appears on the Home Screen and recording will
not be possible. (See “SD card write protection” on page
26.)
You can also copy or convert and copy audio files
•
between a CD and USB/SD/CF media. For details,
see “Copying files between CDs and other media
(SS-CDR200 only)” on page 63.
You cannot record in WAV format onto a CD-R/CD-RW
•
disc. However, you can copy WAV files from USB/SD/CF
media to a CD-R/CD-RW disc, and play back WAV files
on a data CD. (See “Creating data CDs” on page 65.)
CD
, an unfinalized CD-R or
reason, you should try as much as possible to avoid
power interruptions during recording and playback.
This function was not created for the purpose of use
•
with an external timer, for example, turning off the
power.
Selecting the input source
Set the input source (recording source) to one of three
types of input (analog balanced, analog unbalanced,
digital).
Follow the procedures below to select the input source.
NOTE
You cannot change the input source when recording.
•
The input source selection is retained even after the
•
power is turned OFF.
Selecting the source from the front panel
While pressing and holding the SHIFT button, press
the EDIT [INPUT] button to show the current input.
Press again when this is shown to switch between input
sources.
Selecting the source from the remote control
Press the INPUT SEL button on the TASCAM RC-SS2
remote control to show the current input. Press again
when this is shown to switch between input sources.
Automatic protection against unintentional power interruptions
If an unintentional power interruption occurs when
recording to USB/SD/CF media, the protection function
prevents complete loss of track recording data. Data up to
25 seconds before the interruption is saved.
CAUTION
Although there is a protection function, due to the
•
nature of USB/SD/CF media, if the unit is writing to the
system area when the power is interrupted or the USB/
SD/CF media is removed from the unit, all the files on
the memory/card could be damaged or lost. For this
Show the input source
While pressing and holding the SHIFT button, press the
EDIT [INPUT] button to show the currently selected input
source.
A.BAL. (SS-CDR200/SS-R200 only)
Signals from ANALOG INPUTS L/R (BALANCED) jacks
A.UNBAL.
Signals from ANALOG INPUTS L/R (UNBALANCED) jacks
D.COAX.
Signals from DIGITAL IN (COAXIAL) jacks
Page 41

TASCAM SS-CDR200/SS-R200/SS-R100 41
5 – Recording
NOTE
When the input source setting is
D.COAX
. you cannot
start recording from recording standby in the following
situations.
When the unit is not digitally locked to the input source
•
(
DIN UNLOCK
When the input source is not audio (
•
will appear on the display).
DIN NotAudio
will appear on the display).
When the sampling frequency specified by the
•
menu
REC FORMAT
(
FS UNMATCH
item differs from the input source.
will appear on the display). However
REC
if you have enabled the sampling rate converter,
recording can take place even if the sampling
frequency is different (see “Using the sampling rate
converter” on page 41).
Setting the recording file format
If the current device is set to
record in MP3 and WAV formats. If the current device is set
to CD, the unit can record in MP3 and audio CD formats
(SS-CDR200 only).
Moreover, both MP3 and WAV files can be on the same
USB memory or SD/CF card, but both MP3 and audio
CD format files cannot be included on the same CD-R or
CD-RW disc. The first file recorded on the CD-R or CD-RW
disc will determine the file format that can be recorded on
that disc (MP3 or audio CD).
NOTE
WAV files cannot be recorded to a CD-R/CD-RW disc,
•
but using the file copy function described below, you
can copy WAV files from USB/SD/CF media to CD-R/
CD-RW discs (SS-CDR200 only). (See “Copying files
between CDs and other media” on page 63.)
Recording of MP3 files to CD-R/CD-RW discs is possible
•
only if a blank disc is inserted. If you eject the disc or
turn off the power, adding recordings later will not be
possible. (See “Finalizing CD-R/CD-RW discs (SS-CDR200
only)” on page 43.)
When stopped or in recording standby, use the menu to
set the file format.
1 Press the MENU [JOG] button (or remote control
MENU button) to open the
2 Open the
3 Select
REC
menu.
REC FORMAT
.
USB, SD
MENU
or CF, the unit can
screen.
5 Turn the MULTI JOG dial (or press the remote
control 5 and b buttons) to select the recording
file format.
USB/SD/CF media:
CD-R/CD-RW disc (SS-CDR200 only):
value),
CDDA
.mp3
(default value),
(audio CD format)
.wav
.mp3
(default
If the current device is set to CD and the recording
file format is set to
CDDA
, steps 6 and 7 below are
not necessary (no screen appears). Skip to step 8.
If the current device is set to
recording file format is set to CD or
USB, SD
or CF and the
.mp3
, continue
with the following procedures.
6 Press the MULTI JOG dial or , [LOCK] button (or
remote control ENTER or t button) to open the
REC FORMAT
7 Set the following items on the
screen.
REC FORMAT
screen.
STEREO/MONO
Set whether the recording file should be a stereo file
or a mono file.
Options:
STEREO
(default value),
MONO
SAMPLING
Set the sampling frequency.
Options:
44.1kHz
(default value),
48kHz
BITRATE (can only be set when the recording file
format is set to .mp3)
Set the bit rate.
Options:
256kbps, 320kbps
64kbps, 128kbps, 192kbps
”
(default value),
The bit rate option is the value when recording in
stereo. When set to mono recording, the bit rate will
be halved, resulting in the same sound quality.
8 When you have finished making the setting, press
the HOME/DISPLAY button (or remote control
HOME/DISP button) to return to the Home Screen.
NOTE
The recording file format setting is retained even after the
power is turned OFF.
Using the sampling rate converter
4 Press the MULTI JOG dial or , [LOCK] button (or
remote control ENTER or t button) to move the
cursor right to select the value.
Since this unit has a built-in sampling rate converter, you
can record at a sampling frequency that is different from
the sampling frequency of the digital input source.
Use the menu to turn the sampling rate converter (SRC)
ON/OFF.
1 Press the MENU [JOG] button (or remote control
MENU button) to open the
2 Open the
REC
menu.
MENU
screen.
Page 42

42 TASCAM SS-CDR200/SS-R200/SS-R100
5 – Recording
3 Select
OTHERS
.
4 Press the MULTI JOG dial or , [LOCK] button (or
remote control ENTER or t button) to open the
REC OTHERS
5 Select
SRC
screen.
.
6 Press the MULTI JOG dial or , [LOCK] button (or
remote control ENTER or t button) to move the
cursor right to select the value.
7 Turn the MULTI JOG dial (or press the remote
control 5 and b buttons) to set it to ON (default
value:
OFF
).
8 When you have finished making the setting, press
the HOME/DISPLAY button (or remote control
HOME/DISP button) to return to the Home Screen.
NOTE
If a digital signal with a sampling frequency that
•
differs from the sampling frequency specified in the
REC FORMAT
IN jack, and you attempt to record with
UNMATCH
The sampling rate converter (SRC) setting is retained
•
item is being received at the DIGITAL
SRC
error message will appear.
off, an
FS
even after the power is turned OFF.
Monitoring the input signal
When you press the front panel or remote control
RECORD button to enter recording standby, the RECORD
and READY buttons light, and the input signal will be
output from the various output jacks (headphones, analog
balanced, analog unbalanced and digital). In addition, the
meters on the home screen will show the input level.
To end recording standby, press the front panel or remote
control STOP button.
TIP
If you simply want to monitor the input signal without
•
intending to record anything, press the RECORD key
without any media in the current device.
MONITOR
will
appear on the display, and the RECORD button will
blink red.
To stop monitoring the input signal, press the • STOP
button on the front panel or remote control.
Adjusting the input signal level and balance
You can use the menu to adjust the level and balance of
the input signal.
Follow the instructions in the “Monitoring the input
signal” section above to enable monitoring of the input
signal, and then follow these procedures.
1 Press the MENU [JOG] button (or remote control
MENU button) to open the
2 Open the
3 Select
REC
menu.
INPUT VOLUME
MENU
screen.
.
4 Press the MULTI JOG dial or , [LOCK] button (or
remote control ENTER or t button) to open a popup with the
5 Set the following
INPUT VOLUME
INPUT VOLUME
settings.
items.
LEVEL
Adjust the input level.
Options:
–inf, –54dB
–
0.0dB
(default value) –
+18dB
BALANCE
Adjust the input balance.
Options:
NOTE
The level meter will show
•
Since the level meter appears on the Home Screen at
•
L50
– C (center, default value) –
OVER
at
R50
–0.2 dBfs
.
the top of the display, you can check the input level as
you adjust it. Set the level as high as possible without
making the
OVER
indicator to the right of the meter
appear.
6 When you have finished making the setting, press
the HOME/DISPLAY button (or remote control
HOME/DISP button) to return to the Home Screen.
NOTE
The input
LEVEL
and
BALANCE
settings are retained even
after the power is turned OFF.
Basic recording operations
You can begin recording after you have finished making
the above settings (input source selection, recording file
format setting, sampling rate converter ON/OFF, input
level adjustment).
To start recording standby from a stopped state:
Press the front panel or remote control RECORD button
to put the unit in recording standby (The RECORD and
READY buttons light).
To start recording from recording standby:
Press the front panel or remote control PL AY button.
To switch from recording to recording standby:
Press the front panel or remote control READY button.
Page 43

TASCAM SS-CDR200/SS-R200/SS-R100 43
5 – Recording
To stop recording:
Press the front panel or remote control STOP button.
When you stop recording, the recorded data will be
written and an audio file will be created.
NOTE
You can use the
•
menu to set the audio file name that is automatically
added to files when they are created. (See “Setting the
format for naming recorded files” on page 47.)
The maximum size of each track is 2 GB.
•
The recorded track will be created in the current folder.
•
(See “Folder operations” on page 51.)
CAUTION
While the recorded content is being written to the
recording media,
the display. While this message is shown, do not move
the unit, turn off the power or remove the media from the
current device. The recorded content will not be able to
be saved correctly if you do so.
WORD CLIP
INFORMATION WRITING
item in the
REC OTHERS
will appear
Finalizing CD-R/CD-RW discs (SS-CDR200 only)
After you have recorded to a CD-R or CD-RW disc, you will
need to finalize the disc before the disc can be played
back by a CD player or CD drive other than this unit. The
finalization procedures using this unit depend on whether
the file format is MP3 or audio CD.
With MP3 format recordings:
The unit will automatically finalize the CD-R/CD-RW disc
when you eject it. This means that once you remove a
disc that was recorded in MP3 format, you will not be able
to add recordings to that disc. In addition, if you turn off
the power without ejecting the CD-R/CD-RW disc, the
unit will automatically finalize the disc the next time it is
powered-on.
You can also use the menu to finalize the disc without
ejecting it. (See “Finalizing discs” below.)
With audio CD format recordings:
If you have recorded in audio CD format, the unit will not
automatically finalize the disc. You will be able to make
additional recordings on that disc (as long as there is free
space remaining on the disc) until you finalize the disc
using the menu. However, the disc will not be playable
on other devices until you finalize it. For details on how to
finalize, refer to the following section.
In either case, follow these procedures to finalize a disc.
1 Press the DEVICE button (or remote control DEVICE
SELECT button) to open the
screen, and select CD. (See “Selecting the device
used” on page 26.)
2 Press the MENU [JOG] button (or remote control
MENU button) to open the
3 Open the CD menu.
4 Select
5 Press the MULTI JOG dial or , [LOCK] button (or
6 Press the MULTI JOG dial or , [LOCK] button (or
NOTE
You can unfinalize a finalized CD-RW disc. (See
“Unfinalizing CD-RW discs” on page 69.)
FINALIZE
remote control ENTER button or t button).
A confirmation pop-up message appears.
remote control ENTER button or t button) again
to start finalization.
-- FINALIZE --
a pop-up during finalization.
When finalization is completed, the CD menu will
reopen.
.
and a progress bar are displayed in
DEVICE SELECT
MENU
screen.
Sync recording
If the sync recording function is ON, recording will begin
automatically when the input signal exceeds the level set
in advance (SYNC LEVEL). After recording has begun, if the
input signal stays below the sync level for the specified
length of time (STOP TIME), the unit will end recording
and switch to recording standby automatically.
Finalizing discs
As explained above, in order for a CD-R/CD-RW disc
recorded by the unit in audio CD format to be playable
on another device, that CD must be finalized manually.
Moreover, although discs recorded in MP3 format will be
finalized automatically when ejected, as described above,
you can also finalize a disc manually without ejecting it.
Sync settings
Use the menu to turn the sync recording function ON/
OFF and to make detailed settings. You can also use the
remote’s SYNC key to turn this function ON/OFF.
When the sync recording function is on,
appear highlighted on the
FUNCTION
SYNC REC
screen.
will
Page 44

44 TASCAM SS-CDR200/SS-R200/SS-R100
Level
Recording starts
Time
SYNC_LVL
LEVEL
SYNC_LVL
STOP TIME
Recording stops
Time
5 – Recording
Using the menu
1 Press the MENU [JOG] button (or remote control
MENU button) to open the
2 Open the
3 Select
REC
SYNC
menu.
.
MENU
screen.
4 Press the MULTI JOG dial or , [LOCK] button (or
remote control ENTER or t button) to move the
cursor right to select the value.
5 Turn the MULTI JOG dial (or press the remote
control 5 and b buttons) to turn the sync
recording function ON (default value: OFF).
6 Press the MULTI JOG dial or , [LOCK] button (or
remote control ENTER or t button) to open the
SYNC
setting screen.
7 Set the following items on the
SYNC
setting screen.
LEVEL
Sets the sync level.
Options:
–72 dB
–
–24 dB
(default value:
–54 dB
Using the remote control SYNC button
Push the remote control SYNC button to open the
SYNC
pop-up window in the Home Screen and turn the function
ON/OFF.
Sync recording operation
When the sync recording function is ON and the unit is in
recording standby, recording will automatically start or
stop according to the level of the input source.
When a signal higher than the sync level is input,
•
recording will begin automatically. However, recording
will not begin even if input is detected unless there has
been at least one second in which the signal was below
SYNC LEVEL after entering recording standby.
)
DELAY
Sets the time (in frames) from when a signal exceeding
the sync level is detected until recording begins (one
frame is 1/75th of a second).
Options:
–75f
–
+75f
(frames, default value: 0f)
If set to a negative value, that amount of audio prior to
triggering will also be captured.
STOP TIME
Sets the time that the signal must be below the SYNC
LEVEL until recording stops and recording standby
resumes.
Options:
NOTE
When the
INF
(∞), 5s –
DELAY
setting range is converted to seconds, it
30s
(default value: 5s)
is equivalent to ±1.00 seconds.
8 When you have finished making the setting, press
the HOME/DISPLAY button (or remote control
HOME/DISP button) to return to the Home Screen.
NOTE
The sync recording setting is retained even after the
power is turned OFF.
NOTE
The above explanation is for the case when the
setting is 0f (default value). By changing the
DELAY
DELAY
setting, you can change the point when recording starts.
When recording, if the input signal stays below the sync
•
level for the
STOP TIME
, the unit will automatically
switch to the recording standby.
NOTE
If the
STOP TIME
is set to
INF
, recording standby will not
be entered automatically even if the input signal stays
below the SYNC LEVEL.
Page 45

TASCAM SS-CDR200/SS-R200/SS-R100 45
Level
SYNC_LVL
Recording starts
Time
This part
is not
recorded
Level
SYNC_LVL
Time
Noise level is higher than the SYNC LEVEL,
so recording never starts
Level
Auto track level
2 sec.
New track
created
Time
5 – Recording
To stop sync recording, use the
•
or push the remote control
OFF
.
If the sync level is too high
REC
SYNC
button to set
menu
SYNC
SYNC
item
If the sync level setting is too high, you may have
problems such as failing to capture the beginning of a
song that begins with a low volume.
If the sync level is too low
Sync recording will not begin from recording standby, if
the source you are recording has a high noise level.
to
4 Press the MULTI JOG dial or , [LOCK] button (or
remote control ENTER or t button) to move the
cursor right to select the value.
5 Turn the MULTI JOG dial (or push remote control 5
and b buttons) to select one of the following Auto
Track modes.
OFF (default value)
New tracks will not be created automatically.
LEVEL
A new track will be created when the signal exceeds
the auto track level (
AUTO TRACK
screen
LEVEL
value)
after having stayed below it for two seconds or longer.
Auto Track function
Auto Track recording is a function that automatically
creates a new track with a new number when a set
condition is met during recording.
Use the menu to enable Auto Track mode and make
detailed settings. In addition, Auto Track mode can also
be turned ON/OFF using the remote control A.TRACK
button.
When the Auto Track function in ON,
appear highlighted on the
FUNCTION
Auto Track settings can be changed at any time, so you
can change settings while recording.
NOTE
If you have recorded in WAV format, you can also use
editing functions to divide or join tracks after recording.
(See “Dividing files” on page 57 and “Combining files” on
page 58.)
Using the menu
1 Press the MENU [JOG] button (or remote control
MENU button) to open the
2 Open the
3 Select
REC
menu.
AUTO TRACK
.
AUTO TRACK
screen.
MENU
screen.
will
DD
When recording a digital source (CD, DAT, MD) via the
DIGITAL IN jack, a new track will be created when a
track division is detected in the source.
However when recording an analog source or a digital
source other than those listed above, this will work in
the same way as LEVEL mode, and new tracks will be
created in response to the input level.
TIME
A new track will be created at the set time interval
(
AUTO TRACK
screen
INTERVAL
value).
6 If you set AUTO TRACK to anything other than
press the , [LOCK] button (or remote control t
button) to open the
AUTO TRACK
setting screen for
the current mode.
7 Set the following items according to the mode.
LEVEL mode
LEVEL
•
Sets the level that triggers the Auto Track function.
DELAY
•
Options:
value:
–72 dB
–54 dB
)
–
–24 dB
(6dB steps, default
Sets the time (in frames) from when a signal
exceeding the LEVEL is detected until a new track is
created (one frame is 1/75th of a second).
Options:
0f
–75 f
–
+75 f
(frame, default value:
)
OFF
,
Page 46

46 TASCAM SS-CDR200/SS-R200/SS-R100
5 – Recording
If set to a negative value, that amount of audio prior
to triggering will also be included in the new track.
NOTE
When the setting range is converted to seconds, it is
equivalent to ±1.00 seconds.
DD (digital direct) mode
DELAY
•
Sets the time in frames until a new track is started
from a point detected in DD mode (one frame is =
1/75 seconds).
Options:
(default value:
TIME mode
INTERVAL
•
Sets the frequency of new track creation.
Options:
1 hour, 2 hour, 6 hour, 8 hour, 12hour
24hour
–75 f
–
+75 f
0 f
)
1 min
–
10min, 5 min, 30min
(default value:
(frame)
5 min
,
)
Creating a new track manually
When recording, press the front panel or remote control
RECORD button, to create a new track (with a higher
number) without interrupting recording.
You cannot, however, create a track of 4 seconds or less.
NOTE
If you have recorded in WAV format, you can also use
editing functions to divide or join tracks after recording.
(See “Dividing files” on page 57 and “Combining files” on
page 58.)
CAUTION
Depending on the USB/SD/CF media used in the unit,
when recording in MP3 format, creating many tracks in a
,
short time period can cause recording to stop. An
FLOW
error message will appear on the screen when this
occurs.
To avoid this, wait some time between uses of this
function.
OVER
8 When you have finished making the setting, press
the HOME/DISPLAY button (or remote control
HOME/DISP button) to return to the Home Screen.
NOTE
The Auto Track function setting is retained even after the
power is turned OFF.
Using the remote control to change the
Auto Track mode
Press the remote control A.TRACK button to open the
Auto Track pop-up window on the Home Screen, and
change the Auto Track mode.
Pressing the buttons cycles through the modes in this
order:
OFF
q
LEVEL
q DD q
TIME
q
OFF
.
Setting the pause mode
Set whether or not a new track is created when switching
from recording to recording standby.
1 Press the MENU [JOG] button (or remote control
MENU button) to open the
2 Open the
3 Select
REC
OTHERS
menu.
.
4 Press the MULTI JOG dial or , [LOCK] button (or
remote control ENTER or t button) to open the
REC OTHERS
5 Select
screen.
PAUSE MODE
.
6 Press the MULTI JOG dial or , [LOCK] button (or
remote control ENTER or t button) to move the
cursor right to select the value.
MENU
screen.
Page 47

TASCAM SS-CDR200/SS-R200/SS-R100 47
5 – Recording
7 Turn the MULTI JOG dial (or push remote control
5 and b buttons) to select one of the following
pause modes.
SAME TRK (default value)
No new track created when switching from recording
to recording standby
NEW TRAK
New track created when switching from recording to
recording standby.
8 When you have finished making the setting, press
the HOME/DISPLAY button (or remote control
HOME/DISP button) to return to the Home Screen.
NOTE
This setting cannot be changed when recording or in
•
recording standby.
The pause mode setting is retained even after the
•
power is turned OFF.
Using the compressor when recording
You can apply the built-in compressor to the recording
source while you record.
A compressor is an effect that lowers the level of loud
peaks and raises the level of quiet parts in the audio,
making the overall level more consistent and quieter
recorded sounds easier to hear.
Use the menu to turn the compressor ON/OFF.
1 Press the MENU [JOG] button (or remote control
MENU button) to open the
2 Open the
3 Select
REC
OTHERS
menu.
.
4 Press the MULTI JOG dial or , [LOCK] button (or
remote control ENTER or t button) to open the
REC OTHERS
5 Select
COMP
screen.
.
MENU
screen.
HARD
Strong compression is applied. When the audio source
being recorded has a low volume, the recording
volume will be boosted significantly, making it suitable
when recording a meeting or conference.
8 When you have finished making the setting, press
the HOME/DISPLAY button (or remote control
HOME/DISP button) to return to the Home Screen.
NOTE
The compressor setting is retained even after the power is
turned OFF.
Setting the format for naming recorded files (MP3/WAV files only)
You can specify the file name that is automatically given
to files when recorded. Use the menu to make this setting.
1 Press the MENU [JOG] button (or remote control
MENU button) to open the
2 Open the
3 Select
REC
OTHERS
menu.
.
4 Press the MULTI JOG dial or , [LOCK] button (or
remote control ENTER or t button) to open the
REC OTHERS
5 Select
screen.
WORD CLIP
.
6 Press the MULTI JOG dial or , [LOCK] button (or
remote control ENTER or t button) to move the
cursor right to select the value.
7 Turn the MULTI JOG dial (or push remote control 5
and b buttons) to select one of the following file
name formats.
DATE (default value)
The date and time of the built-in clock will become the
file name.
MENU
screen.
6 Press the MULTI JOG dial or , [LOCK] button (or
remote control ENTER or t button) to move the
cursor right to select the value.
7 Turn the MULTI JOG dial (or push remote control
5 and b buttons) to select one of the following
compressor modes.
OFF (default value)
The compressor is not used when recording.
SOFT
Light compression is applied when recording. This
setting is suitable when recording music.
USER 01 – USER 03
A user-set text string (eight characters) will be used as
the file name.
8 If you selected one of the user options (
USER 03
), press the MULTI JOG dial or , [LOCK]
USER 01
button (or remote control ENTER or t button) to
open the
WORD CLIP
screen where you can edit the
name.
9 To edit the file name, follow the instructions in
“Inputting and editing characters” below.
–
Page 48

48 TASCAM SS-CDR200/SS-R200/SS-R100
5 – Recording
10 When you have finished editing the name, press
the MULTI JOG dial (or remote control ENTER
button) to confirm the changes to the string of
characters.
11 When you have finished making the setting, press
the HOME/DISPLAY button (or remote control
HOME/DISP button) to return to the Home Screen.
NOTE
The recording file name (
retained even after the power is turned OFF.
WORD CLIP
) settings are
Inputting and editing characters
Use the following operations to edit the characters.
To change the editing location (cursor position):
Use the m [SKIP] and , [LOCK] buttons (or remote
control g and t buttons).
To change the character at the cursor position:
Turn the MULTI JOG dial (or push the remote control 5/
b buttons).
To insert a space:
While pressing and holding the SHIFT button, press the
, [LOCK] button (or remote control SEARCH ,)
button).
To delete a character:
While pressing and holding the SHIFT button, press the
m [SKIP] button (or remote control SEARCH (m
button).
To delete all characters left of the cursor position:
While pressing and holding the SHIFT button, press and
hold the m [SKIP] button (or remote control SEARCH
m button).
To switch between uppercase and lowercase:
Press the EDIT [INPUT] button (or remote control EDIT
button).
To cancel editing:
Press the MENU [JOG] button (or remote control MENU
button).
CAUTION
You can also directly access USB/SD/CF media from a
•
computer to change the names of files, but doing so
could change the previous playback order of the files.
Names that contain characters other than the letters of
•
the alphabet, numbers and symbols cannot be edited
(the name will not appear when the RENAME function
is being used).
The following symbols and punctuation marks cannot
•
be used in names.
\ / ; : * , ? “ < > |
•
Recording with dither
When recording 16-bit WAV files, the 16-bit format limits
the dynamic range to approximately 96.3 dB.
You can set how quiet sounds that are lost below the 17th
bit (quantization noise) are processed when recording
1 Press the MENU [JOG] button (or remote control
MENU button) to open the
2 Open the
3 Select
4 Press the MULTI JOG dial or , [LOCK] button (or
remote control ENTER or t button) to open the
REC OTHERS
5 Select
6 Press the MULTI JOG dial or , [LOCK] button (or
remote control ENTER or t button) to move the
cursor right to select the value.
7 Turn the MULTI JOG dial (or push remote control
g and t buttons) to select one of the following
dither settings.
OFF (default value)
No dithering is used. The recording is 16-bit and
anything outside this range (16th bit and smaller) is
cut.
DITHER
White noise half the size of the minimum bit (16th bit)
is added, creating a modulation between the 16th and
17th bits, which suppresses quantization noise.
N.SHAPE
Primary noise shaping is used. The quantization noise
itself is fed back and shaped. This suppresses the
quantization noise, expanding the dynamic range.
8 When you have finished making the setting, press
the HOME/DISPLAY button (or remote control
HOME/DISP button) to return to the Home Screen.
NOTE
The dither setting is retained even after the power is
turned OFF.
REC
OTHERS
screen.
DITHER
menu.
.
.
MENU
screen.
Page 49

TASCAM SS-CDR200/SS-R200/SS-R100 49
5 – Recording
Media capacities and recording times
This table shows maximum total recording times for different media capacities and file formats.
File format (recording setting)
WAV (stereo)
WAV (mono)
64 kbps 44.1 kHz/48 kHz 35:20 70:40 141:20 282:40 24:50
MP3
(stereo)
MP3
(mono)
CD-DA 44.1 kHz --- --- --- --- 1:20
128 kbps 44.1 kHz/48 kHz 17:40 35:20 70:40 141:20 12:25
192 kbps 44.1 kHz/48 kHz 11:40 23:20 46:40 93:20 8:15
256 kbps 44.1 kHz/48 kHz 8:50 17:40 35:20 70:40 6:10
320 kbps 44.1 kHz/48 kHz 7:00 14:00 28:00 56:00 4:55
64 kbps 44.1 kHz/48 kHz 70:40 141:20 282:40 565:20 49:40
128 kbps 44.1 kHz/48 kHz 35:20 70:40 141:20 282:40 24:50
192 kbps 44.1 kHz/48 kHz 23:20 46:40 93:20 186:40 16:30
256 kbps 44.1 kHz/48 kHz 17:40 35:20 70:40 141:20 12:25
320 kbps 44.1 kHz/48 kHz 14:00 28:00 56:00 112:00 9:55
44.1 kHz 1:36 3:12 6:24 12:48
48 kHz 1:28 2:56 5:52 11:44
44.1 kHz 3:12 6:24 12:48 25:36
48 kHz 2:56 5:52 11:44 23:28
USB/SD/CF media (hours:minutes)
1 GB 2 GB 4 GB 8 GB 700 MB
CD-R/CD-RW media
(hours:minutes)
---
---
---
---
The above recording times are estimates. They may differ depending on the USB/SD/CF media being used.
•
The above recording times are not continuous recording times. They are the total amounts of recordable time on the
•
USB/SD/CF media.
Page 50

50 TASCAM SS-CDR200/SS-R200/SS-R100
6 − File and folder operations (FINDER screen)
You can manage audio files on USB/SD/CF media in a
folder structure. You can also manage MP3/WAV files on a
data CD in a folder structure (SS-CDR200 only).
You can select a folder or file and then enter the
FINDER
screen for that file and folder.
When working with USB/SD/CF media, on the
FINDER
screen, you can create folders, edit the names of folders
and files, delete folders and files and add files to the
playlist, for example. You can also perform operations
directly in the
FINDER
screen to move and copy files
between folders.
When working with an unfinalized data CD that has
recorded MP3 or WAV files, the only operations that can
be performed from the
FINDER
screen are creating folders
and changing the current folder. You cannot edit or add
files to a playlist.
In the case of a CD that contains audio CD format files,
the audio CD
FINDER
screen will open. (See “Opening the
audio CD FINDER screen” on page 56.)
TIP
By using a card reader or other interface to read files on
USB/SD/CF media from a computer, you will be able to use
your computer to modify the folder structure, edit folder
and file names, and delete folders and files. If you perform
this type of editing from your computer, be aware that the
playback order of the files on the unit may have changed.
Opening the FINDER screen
The following operations assume that USB/SD/CF media, a
data CD containing MP3/WAV files or a blank CD is loaded
and the current device is set accordingly.
When the play area (see “Play area” on page 28) is set to
ALL
or
FOLDER
you can press the FINDER [A-B] button (or remote control
FINDER button) to open the
and the unit is stopped, playing, or paused,
FINDER
screen.
Navigating the FINDER screen
The
FINDER
folder as a list that is similar to a computer file list display.
When the
and m [SKIP]/ , [LOCK] buttons (or remote control
5/b/g/t buttons) to select folders and files for use.
Press the • MULTI JOG dial (or remote control ENTER
button) to open the
or folder. (See “File operations” on page 51 and “Folder
operations” on page 51.)
When a folder is selected, press the • , [LOCK] button
(or remote control t button) to show the contents of
the folder.
Press the • FINDER [A-B] button (or remote control
FINDER button) to go back to the previous item.
When a file or folder is selected, press the • m [SKIP]
button (or remote control g button) to move up one
level in the folder structure.
When a file or folder is selected, press the • HOME/
DISP LAY button (or remote control HOME/DISP
button) to return to the Home Screen.
When a file or folder is selected, press the front panel
•
or remote control PL AY button to return to the Home
Screen and play that file or folder. If the play area is set
to
folder.
When a file or folder is selected, press the • READY
[CALL] button (or remote control READY button) to
return to the Home Screen and put that file or folder
into playback standby. If the play area is set to
the selected folder becomes the current folder.
When a file or folder is selected, press the • EDIT [INPUT]
button (or remote control EDIT button) to open the
Edit Menu pop-up.
screen shows folders and music files in each
FINDER
FOLDER
screen is open, use the MULTI JOG dial
FINDER MENU
pop-up for that file
, the selected folder becomes the current
FOLDER
,
If the play area is set to
•
folder
FINDER
If the play area is set to
•
current folder
When in playback standby, regardless of the play area
•
setting, the
screen opens.
FINDER
FINDER
ALL
when stopped, the root
FOLDER
when stopped, the
screen opens.
screen for the folder that contains
the currently selected file opens and the current file is
highlighted.
NOTE
The currently selected item appears as light letters on a
dark background.
Icons on the FINDER screen
The icons that appear on the
following meanings.
Current folder ( )
This is the currently selected folder.
Folder ( )
These are folders other than the currently selected folder.
Audio file ( )
The names of music files appear next to these icons.
FINDER
screen have the
Page 51

TASCAM SS-CDR200/SS-R200/SS-R100 51
6 − File and folder operations (FINDER screen)
File operations
Select the desired audio file on the FINDER screen, and
press the MULTI JOG dial (or remote control ENTER
button) to open the file
Turn the MULTI JOG dial (or push remote control 5/b
buttons) to select the desired item and press the MULTI
JOG dial (or remote control ENTER button) to execute
one of the following operations.
NOTE
If a write-protected SD card is loaded, the
DELETE, ADD PLAYLIST
be used. (See “SD card write protection” on page 26.)
RENAME
This opens the
RENAME
selected file name. (See “Editing file names (USB/SD/CF
media)” on page 52.)
DELETE
Deleted the selected item. (See “Deleting folders and files
(USB/SD/CF media)” on page 53.)
ADD PLAYLIST
Add the selected file to the desired playlist. (See “Adding
files to a playlist (USB/SD/CF media)” on page 53.)
MOVE/COPY
Move the selected file to a different position in the same
folder or move or copy it to another folder. (See “Moving
and copying files (USB/SD/CF media)” on page 54.)
INFORMATION
Show information, including the file format and sampling
frequency, about the selected file in a pop-up.
FINDER MENU
and
MOVE/COPY
pop-up.
RENAME
items cannot
,
screen where you can edit the
Folder operations
Select the desired folder on the
the MULTI JOG dial (or remote control ENTER button) to
open the folder
FINDER MENU
Turn the MULTI JOG dial (or push remote control 5/b
buttons) to select the desired item, and press the MULTI
JOG dial (or remote control ENTER button) to execute
one of the following operations.
NOTE
All the
•
FINDER MENU
functions can be used with USB/
SD/CF media. Only some of the functions can be used
with (unfinalized) data CDs with MP3/WAV files.
If a write-protected SD card is loaded, the RENAME,
•
DELETE, ADD PLAYLIST and MOVE/COPY items cannot
be used. (See “SD card write protection” on page 26.)
SELECT
Open the selected folder.
RENAME
This opens the
RENAME
screen where you can edit the
selected folder name. (See “Editing folder names (USB/SD/
CF media)” on page 52.)
DELETE (USB/SD/CF media)
Deleted the selected item. (See “Deleting folders and files
(USB/SD/CF media only)” on page 53.)
ADD PLAYLIST
Add the entire selected folder to the desired playlist. (See
“Adding entire folders to a playlist (USB/SD/CF media)” on
page 53.)
CURRENT
A pop-up message that allows you to set the selected
folder as the current folder appears.
FINDER
pop-up.
screen, and press
CANCEL
Cancel any operation with the selected file, close the
FINDER MENU
and return to the
FINDER
screen.
NOTE
Audio files created during recording will be added to the
current folder. If you create a new folder to store new
recordings, follow the procedures above to set it as the
current folder.
NEW FOLDER
Creates a new folder. (See “Creating a new folder” on page
54.)
MOVE/COPY
Move the selected file to a different position in the same
folder or move or copy it to another folder. (See “Moving
and copying files (USB/SD/CF media)” on page 54.)
Page 52

52 TASCAM SS-CDR200/SS-R200/SS-R100
6 − File and folder operations (FINDER screen)
INFORMATION
Show information, including the total number of files and
total time, about the selected folder in a pop-up.
CANCEL
Cancel any operation with the selected folder, close the
FINDER MENU
and return to the
FINDER
screen.
Editing folder names (USB/SD/CF media only)
1 Select the folder that you want to edit, and turn
the MULTI JOG dial (or push remote control 5/b
buttons) to select
2 Press the MULTI JOG dial (or remote control ENTER
button) to open the
RENAME
RENAME
.
screen.
Editing file names (USB/SD/CF media only)
1 Select the file that you want to edit, and turn the
MULTI JOG dial (or push remote control 5/b
buttons) to select
2 Press the MULTI JOG dial (or remote control ENTER
button) to open the
3 Edit the file name. Follow the instructions in
“Inputting and editing characters” on page 48.
4 When you have completed editing the file name,
press the MULTI JOG dial (or remote control ENTER
button) to confirm the change.
-- RENAME --
up while the file name is being changed.
RENAME
and a progress bar appear in a pop-
.
RENAME
screen.
3 Edit the folder name. Follow the instructions in
“Inputting and editing characters” on page 48.
4 When you have completed editing the folder name,
press the MULTI JOG dial (or remote control ENTER
button) to confirm the change.
-- RENAME --
up while the folder name is being changed.
After the folder name has been changed, the
screen reopens.
NOTE
Names that contain characters other than the letters of
•
the alphabet, numbers and symbols cannot be edited
(the name will not appear when the
being used).
The following symbols and punctuation marks cannot
•
be used in names.
\ / ; : * , ? “ < > |
and a progress bar appear in a pop-
FINDER
RENAME
function is
After the file name has been changed, the
screen reopens.
NOTE
You can also directly access USB/SD/CF media from a
•
computer to change the names of files, but doing so
could change the previous playback order of the files.
Names that contain characters other than the letters of
•
the alphabet, numbers and symbols cannot be edited
(the name will not appear when the
being used).
The following symbols and punctuation marks cannot
•
be used in names.
\ / ; : * , ? “ < > |
FINDER
RENAME
function is
Page 53

TASCAM SS-CDR200/SS-R200/SS-R100 53
6 − File and folder operations (FINDER screen)
Deleting folders and files (USB/SD/CF media only)
You can delete folders and files from USB/SD/CF media.
If you delete a folder, all the files in it will also be deleted.
This function can only be used when the playback mode
is set to
1 Select the folder or file that you want to delete,
2 Press the MULTI JOG dial (or remote control ENTER
CONTINUE
and turn the MULTI JOG dial (or press the remote
control 5 and b buttons) to select
button).
A confirmation pop-up message appears.
.
DELETE
.
2 Press the MULTI JOG dial (or remote control ENTER
button) to open the
3 Turn the MULTI JOG dial (or push remote control
5/b buttons) to select the destination playlist.
4 Press the MULTI JOG dial or , [LOCK] button (or
remote control ENTER or t button) to open the
selected playlist.
ADD PLAYLIST
screen.
To cancel deletion, press the FINDER [A-B] button
(remote control FINDER button).
3 Press the MULTI JOG dial (or remote control ENTER
button) to delete the item from the USB/SD/CF
media.
-- ERASE --
while the item is being deleted.
After deletion completes, the
NOTE
Immediately after deleting a folder or file, you can undo
the operation. (See “Undoing EDIT menu operations” on
page 59.)
and a progress bar appear in a pop-up
FINDER
screen reopens.
Adding entire folders to a playlist (USB/SD/CF media only)
You can add all the files in a folder to the desired playlist
at once.
Files in subfolders, however, will not be added.
1 Select the folder that you want to add to the
playlist, open the
MULTI JOG dial (or push remote control 5/b
buttons) to select
FINDER
ADD PLAYLIST
screen, and turn the
.
5 Turn the MULTI JOG dial (or push remote control
5/b buttons) to set the location of the folder
that you are adding in the playlist. The inserted
folder will appear highlighted, and its files will be
inserted at that position.
6 Press the MULTI JOG dial (or remote control ENTER
button) to add the folder contents to the playlist.
-- PLAYLIST --
file (or all files in the folder) are added to the playlist.
NOTE
A maximum of 99 tracks can be added to a playlist.
•
If you attempt to add more than 99 tracks, a
•
FULL
warning message pop-up will appear, and the
track(s) will not be added.
You cannot add the same track more than once to a
•
playlist.
and
ADD
appear in a pop-up and the
P.LIST
Adding files to a playlist (USB/SD/CF media only)
You can add files to the desired playlist.
1 Select the file that you want to add to the playlist,
open the FINDER screen, and turn the MULTI JOG
dial (or push remote control 5/b buttons) to
select
ADD PLAYLIST
.
Page 54

54 TASCAM SS-CDR200/SS-R200/SS-R100
6 − File and folder operations (FINDER screen)
2 Press the MULTI JOG dial (or remote control ENTER
button) to open the
3 Turn the MULTI JOG dial (or push remote control
5/b buttons) to select the destination playlist.
4 Press the MULTI JOG dial or , [LOCK] button (or
remote control ENTER or t button) to open the
selected playlist.
5 Turn the MULTI JOG dial (or push remote control
5/b buttons) to set the location of the file that
you are adding in the playlist. The inserted file will
appear highlighted, and it will be inserted at that
position.
6 Press the MULTI JOG dial (or remote control ENTER
button) to add the file to the playlist.
-- PLAYLIST --
file (or all files in the folder) are added to the playlist.
NOTE
A maximum of 99 tracks can be added to a playlist.
•
If you attempt to add more than 99 tracks, a
•
FULL
warning message pop-up will appear, and the
track(s) will not be added.
You cannot add the same track more than once to a
•
playlist.
ADD PLAYLIST
and
ADD
appear in a pop-up and the
screen.
P.LIST
3 Input the folder name. Follow the instructions in
“Inputting and editing characters” on page 48.
4 When you have completed inputting the folder
name, press the MULTI JOG dial (or remote control
ENTER button) to confirm the name.
-- FOLDER --
up while the folder is being created.
After the folder has been created, the
reopens.
NOTE
A maximum of 255 folders can be created on a single
•
USB memory or SD or CF card.
When using media with a capacity of 2 GB or less,
•
255 folders cannot be created in the root folder due
to file system limitations. A maximum of 255 folders,
including subfolders, can be created.
and a progress bar appear in a pop-
FINDER
screen
Moving and copying files (USB/SD/CF media only)
You can move a file within a folder on USB/SD/CF media,
or move or copy it to a different folder. These operations
are performed in the
The following explanations assume that the
screen for the applicable folder is displayed.
Moving a file within a folder
1 Select the file that you want to move, and turn
the MULTI JOG dial (or push remote control 5/b
buttons) to select
FINDER
screen.
MOVE/COPY
FINDER
.
Creating a new folder (USB/SD/CF media only)
1 Select the folder where you want to create a new
folder, and turn the MULTI JOG dial (or push remote
control 5/b buttons) to select
2 Press the MULTI JOG dial (or remote control ENTER
button) to open the
NEW FOLDER
NEW FOLDER
screen.
.
2 Press the MULTI JOG dial (or remote control ENTER
button). The file to be moved blinks on the
screen.
3 Turn the MULTI JOG dial (or push remote control
5/b buttons) to move the selected file to the
desired position.
FINDER
Page 55

TASCAM SS-CDR200/SS-R200/SS-R100 55
6 − File and folder operations (FINDER screen)
4 Press the MULTI JOG dial (or remote control ENTER
button) to confirm movement to the position.
-- MOVE --
and a progress bar appear in a pop-up
while the movement is completed.
After the file name has been moved, the
FINDER
screen reopens.
Move/copy files between folders
1 Select the file to be moved and copied, and turn
the MULTI JOG dial (or push remote control 5/b
buttons) to select
2 Press the MULTI JOG dial (or remote control ENTER
button). The file to be moved or copied blinks on
the
FINDER
screen.
MOVE/COPY
.
5 Select
MOVE
if you just want to move the file from
its former location or
COPY
if you want to copy
the file, and press the MULTI JOG dial (or remote
control ENTER button).
-- MOVE --
or
-- COPY --
(as appropriate) and
a progress bar appear in a pop-up while the file is
moved and copied.
When set to MOVE
When set to COPY
NOTE
If you choose
was. If you choose
COPY
, the original file will remain where it
MOVE
, the original file will not remain.
If you move the blinking file to where a folder
name is shown, it will disappear (because it will be
put in the folder) and the folder name will become
selected.
3 Use the MULTI JOG dial and m [SKIP] and,
[LOCK] buttons (or remote control 5/b/g and t
buttons ) to navigate the
FINDER
screen and open
the destination folder.
If you move the cursor to where a file name is
shown, the file moved will appear there blinking.
4 Turn the MULTI JOG dial (or push remote control
5/b buttons) to move the blinking file to the
position where you want it.
Press the MULTI JOG dial (or remote control ENTER
button) to show the following menu items in a popup.
Page 56

56 TASCAM SS-CDR200/SS-R200/SS-R100
7 – Audio CD FINDER screen (SS-CDR200 only)
When working with CDs that have audio CD format files,
you can use the audio CD
for playback. In addition, when working with unfinalized
CD-R/CD-RW discs that have audio CD format files, you
can also edit the CD-Text.
The following explanations assume that an audio CD is
inserted and CD is selected as the current device.
FINDER
screen to select tracks
Opening the audio CD FINDER screen
When stopped, in playback standby or playing back, press
the FINDER [A-B] button (or remote control FINDER
button) to open the audio CD
This screen shows the tracks in numerical order.
If you open this screen while stopped, track 1 will be
selected.
When in playback standby or during playback, the current
track will be selected.
To close the FINDER screen and return to the Home
Screen:
Press the HOME/DISP button (or remote control HOME/
DISP button).
FINDER
screen.
Editing CD-Text (CD-R/CD-RW disc only)
If you insert an unfinalized CD-R/CD-RW disc that has
audio CD format files, you can follow these procedures to
edit the CD-Text.
1 Open the
track.
2 Press the MULTI JOG dial (or remote control ENTER
button) to open the CD-Text editing screen for the
selected track.
3 Edit the text. Follow the instructions in “Inputting
and editing characters” on page 48.
4 After you finish editing the CD-Text, press the
MULTI JOG dial (or remote control ENTER button)
to confirm the changes.
After the CD-Text has been changed, the
screen reopens.
FINDER
screen, and select the desired
FINDER
Selecting a track to play
Follow these procedures on the audio CD
to play back a track.
1 Open the
playback.
2 Press the PLAY button (or remote control PLAY
button)
When stopped, doing this will start playback of the
selected track.
When in playback standby, doing this will start
playback standby at the beginning of the selected
track.
FINDER
screen, and select the track to
FINDER
screen
CAUTION
If you press the • EJECT button, the following warning
message pop-up will appear.
Finalize the disc in order to save the CD-TEXT. (See
“Finalizing CD-R/CD-RW discs (SS-CDR200 only)” on
page 53.)
NOTE
Names that contain characters other than the letters of
•
the alphabet, numbers and symbols cannot be edited
(the name will not appear when the
being used).
The following symbols and punctuation marks cannot
•
be used in names.
\ / ; : * , ? “ < > |
RENAME
function is
Page 57

TASCAM SS-CDR200/SS-R200/SS-R100 57
8 − Using the EDIT menu (USB/SD/CF media only)
Using the edit menu
Press the EDIT [INPUT] button (or remote control EDIT
button) to open the EDIT menu pop-up.
Turn the MULTI JOG dial (or press the remote control 5
and b buttons) to select the desired item. Then, press
the MULTI JOG dial (or remote control ENTER button) to
use the selected item.
NOTE
If a write-protected SD card is loaded, the following
operations are not possible. (See “SD card write
protection” on page 26.)
DELETE
Delete the selected file. (See “Deleting files” on page 57.)
DIVIDE
Divide the selected file. (See “Dividing files” on page 57.)
COMBINE
Combine the selected files. (See “Combining files” on page
58.)
UNDO
Undo the last edit menu operation. (See “Undoing EDIT
menu operations” on page 59.)
CANCEL
Cancel the use of the EDIT menu, closing it and returning
to the Home Screen. The READY [CALL] button will light.
Deleting files
You can delete files shown on the Home Screen from the
USB/SD/CF media.
This function can only be used when the playback mode
is set to
1 Use the PLAY, m [SKIP] and , [LOCK] buttons
2 Press the EDIT [INPUT] button (or remote control
3 Turn the MULTI JOG dial (or press the remote
CONTINUE
(or remote control PLAY and SEARCH m/,
buttons), as well as time searching, skipping
backward and forward and other functions to
locate the file you want to delete.
EDIT button) to open the EDIT menu pop-up.
control 5 and b buttons) to select
.
DELETE
.
A confirmation pop-up message appears.
To delete, press the EDIT [INPUT] button (or remote
control EDIT button).
5 Press the MULTI JOG dial (or remote control ENTER
button) to delete the item from the USB/SD/CF
media.
-- ERASE --
while the item is being deleted.
After deletion completes, the
NOTE
Immediately after deleting a file, you can undo the
operation. (See “Undoing EDIT menu operations” on page
59.)
and a progress bar appear in a pop-up
FINDER
screen reopens.
Dividing files
You can divide a recorded WAV file at the position you
want into two files.
This function can only be used when the playback mode
is set to
•
•
1 Use the PLAY, m [SKIP] and , [LOCK] buttons
You will be able to make fine adjustments later, so
2 During playback or when in playback standby,
3 Turn the MULTI JOG dial (or press the remote
CONTINUE
NOTE
MP3 files cannot be divided.
Immediately after dividing a file, you can undo the
operation. (See “Undoing EDIT menu operations” on
page 59.)
(or remote control PLAY and SEARCH m/,
buttons), as well as time searching, skipping
backward and forward and other functions to
locate the general position where you want to
divide the WAV file.
an approximate location is fine.
press the EDIT [INPUT] button (or remote control
EDIT button) to open the EDIT menu pop-up.
control 5 and b buttons) to select
.
DIVIDE
.
4 Press the MULTI JOG dial (or remote control ENTER
button).
Page 58

58 TASCAM SS-CDR200/SS-R200/SS-R100
Frame value
8 − Using the EDIT menu (USB/SD/CF media only)
4 Press the MULTI JOG dial (or remote control ENTER
button) to open the Home Screen in scrub playback
mode.
In scrub playback mode, the track elapsed time
in the TRACK mode area on the Home Screen will
show the frame value. The PLAY and READY [CALL]
buttons blink.
5 Use the scrub playback function to find the precise
point where you want to divide the file. Turn the
MULTI JOG dial (or remote control SKIP .//
button) to use scrub playback for adjusting the
division point.
6 When you have set the division point, press the
MULTI JOG dial (or remote control ENTER button).
A confirmation pop-up message appears.
You cannot combine two WAV files that have different
•
sampling rates or different numbers of channels.
You can undo the COMBINE operation after executing
•
it. (See “Undoing EDIT menu operations” on page 59.)
1 Use the PLAY, m [SKIP] and , [LOCK] buttons
(or remote control PLAY and SEARCH m/,
buttons), as well as time searching, skipping
backward and forward and other functions to
locate one of the files that you want to combine.
2 Press the EDIT [INPUT] button (or remote control
EDIT button) to open the EDIT menu pop-up.
3 Turn the MULTI JOG dial (or press the remote
control 5 and b buttons) to select
COMBINE
.
4 Press the MULTI JOG dial (or remote control ENTER
button) to put a check mark (4) next to the selected
file.
If you need to change the division point, press
the EDIT [INPUT] button (or remote control EDIT
button) to return to scrub playback mode and
repeat step 5. To divide the file, proceed to step 7.
NOTE
If a file has been added to a playlist, a
P.LIST ENTRY
warning message will appear in a pop-up. If a file that has
been edited has been added to a playlist, that playlist will
not be able to be played back. You will need to remove
the divided files from the playlist on the
or
USER PLAYLIST
screen.
PLAYLIST EDIT
7 Press the MULTI JOG dial (or remote control ENTER
button) to divide the file.
-- DIVIDE --
and a progress bar appear in a pop-up
while the file is being divided.
After division completes, the
FINDER
screen reopens.
Combining files
You can combine two recorded WAV files into one file.
This function can only be used when the playback mode
is set to
•
CONTINUE
NOTE
.
You cannot combine MP3 files.
5 Turn the MULTI JOG dial (or press the remote
control 5 and b buttons) to select the file that
you want to combine with the checked file.
6 Press the MULTI JOG dial (or remote control ENTER
button).
A confirmation pop-up message appears, the PL AY
and READY [CALL] buttons blink, and the four
seconds preceding and following the combination
point will be played back repeatedly.
To cancel combination, press the EDIT [INPUT]
button (or remote control EDIT button).
The
FINDER
screen will reopen. Repeat from step 4
if you still want to combine files.
NOTE
If a file has been added to a playlist, a
P.LIST ENTRY
warning message will appear in a pop-up. If a file that has
been edited has been added to a playlist, that playlist will
not be able to be played back. You will need to remove
the divided files from the playlist on the
or
USER PLAYLIST
screen.
PLAYLIST EDIT
7 To confirm and execute the combination, press the
MULTI JOG dial (or remote control ENTER button).
-- COMBINE --
and a progress bar appear in a
pop-up while the files are being combined.
Page 59

TASCAM SS-CDR200/SS-R200/SS-R100 59
8 − Using the EDIT menu (USB/SD/CF media only)
After combining completes, the
FINDER
screen
reopens.
Undoing EDIT menu operations
Among EDIT menu operations, the division, combination
and deletion of files, as well as the deletion of folders can
be undone immediately after the operation is executed.
This function can only be used when the playback mode
is set to
When undoing, it does not matter which folder/file is
selected on the
menu.
1 Press the EDIT [INPUT] button (or remote control
2 Turn the MULTI JOG dial (or press the remote
CONTINUE
NOTE
.
FINDER
screen before opening the EDIT
EDIT button) to open the EDIT menu pop-up.
control 5 and b buttons) to select
UNDO
.
3 Press the MULTI JOG dial (or remote control ENTER
button).
A confirmation pop-up message appears.
4 Press the MULTI JOG dial (or remote control ENTER
button) to undo the last edit.
-- UNDO --
and a progress bar appear in a pop-up
while the edit is being undone.
After undoing completes, the
FINDER
screen reopens.
The folder/file that was affected by the undo operation
will be selected.
NOTE
To cancel the undo operation, press the • EDIT [INPUT]
button (or remote control EDIT button).
If there is no file operation that can be undone, a
•
UNDO
warning message will appear in a pop-up.
CAN'T
Page 60

60 TASCAM SS-CDR200/SS-R200/SS-R100
9 − Editing the playlist (USB/SD/CF media only)
Overview
When you first load USB/SD/CF media into the unit, the
unit automatically creates three empty playlists (01–03)
on the selected media. If you add audio files on the
media to these playlists, and set the play area to a playlist,
the files in the current playlist can be set as the current
playback area.
To work with the playlist, from the
P.L. EDIT
item to open the
If the play area (see “Play area” on page 60) is set to
LIST
, the
USER PLAYLIST
PLAYLIST EDIT screen
USER PLAYLIST screen
From these screens, proceed to the
(“XX” is the list number), which shows the files in the
playlist. After selecting the file that you want to work
with, proceed to the playlist
to the playlist. You can also move or remove files in the
playlist.
PLAY
menu, select the
PLAYLIST EDIT
screen.
screen opens instead.
Playlist XX
FINDER MENU
to add the file
PLAY
screen
Navigating the playlist screen
On the
three playlists (
shown.
The numbers of files (tracks) in each playlist are shown to
their right.
When the
is open, turn the MULTI JOG dial (or press the remote
control 5 and b buttons) to select the playlist that
you want to work with. In this state, you can perform the
following operations.
•
•
•
PLAYLIST EDIT
PLAYLIST 01
PLAYLIST EDIT
and
USER PLAYLIST
–
PLAYLIST 03
or
USER PLAYLIST
screens,
) are
screen
To start playback from the beginning of the
playlist:
When the
USER PLAYLIST
screen is open, press the
front panel or remote control PL AY button.
When playback starts, the Home Screen reopens. The
selected playlist becomes set as the current playlist.
To start playback standby at the beginning of the
playlist:
When the
USER PLAYLIST
screen is open, press the
READY [CALL] button (or remote control READY
button).
When playback standby starts, the Home Screen
reopens. The selected playlist becomes set as the
current playlist.
To open the playlist screen:
When the
PLAYLIST EDIT
or
USER PLAYLIST
screen
is open, press the MULTI JOG dial or /, [LOCK]
button (or remote control ENTER or t button).
The
Playlist XX
screen (“XX” is the list number)
shows the files in the playlist
Playlist 01 screen
Playlist FINDER MENU
Open the USER PLAYLIST screen
If the play area is set to
page 60), and the unit is stopped, playing or in playback
standby, press the FINDER [A-B] button (or remote
control FINDER button) to open the
screen.
PLAYLIST
(see “Play area” on
USER PLAYLIST
To open the playlist FINDER MENU:
•
When the
Playlist XX
screen (“XX” is the list
number) is open, press the MULTI JOG dial (or remote
control ENTER button) to open the playlist
MENU
pop-up. For details about the items in the
FINDER MENU
pop-up, see “Using the playlist FINDER
FINDER
MENU” on the next page.
Page 61

TASCAM SS-CDR200/SS-R200/SS-R100 61
9 − Editing the playlist (USB/SD/CF media only)
Using the playlist FINDER MENU
You can use the playlist
playlist, as well as to move and remove them.
The following explanations assume that the
XX
screen (“XX” is the list number) for the desired playlist
is open.
To open the playlist
desired playlist from the
PLAYLIST
screen, and press the MULTI JOG dial (or
remote control ENTER button). (See “Navigating the
playlist screen” on page 61.)
Turn the MULTI JOG dial (or push remote control 5/b
buttons) to select the desired item, and press the MULTI
JOG dial (or remote control ENTER button) to execute the
selected operation.
NOTE
If a write-protected SD card is loaded, the
MOVE
and
DELETE
write protection” on page 26.)
ADD PLAYLIST
Add a file to the selected playlist. (See “Adding files to
playlists” on page 61.)
MOVE
Move the selected file within the same playlist. (See
“Moving and copying files (USB/SD/CF media)” on page
54.)
FINDER MENU
FINDER MENU
PLAYLIST EDIT
to add files to a
Playlist
pop-up, select the
or
USER
ADD PLAYLIST
items cannot be used. (See “SD card
CANCEL
Cancels any operation related to the selected file, closing
the playlist
XX
screen (“XX” is the list number).
FINDER MENU
and returning to the
Playlist
Adding files to playlists
Follow these procedures to add individual files to playlists.
You can also add all the files in a folder at once.
1 Turn the MULTI JOG dial (or press the remote
control 5 and b buttons) to select
PLAYLIST
.
2 Press the MULTI JOG dial (or remote control ENTER
button) to open the
FINDER
screen.
3 Select the file or folder that you want to add.
For instructions about using the
“Navigating the FINDER screen” on page 50.
,
If you select a folder, all the files in the folder will be
added.
NOTE
Files in subfolders will not be added.
4 Press the MULTI JOG dial (or remote control ENTER
button).
-- PLAYLIST --
and
ADD
appear in a pop-up and the
file (or all files in the folder) are added to the playlist.
ADD
FINDER
screen, see
DELETE
Open a pop-up message confirmation that you want to
remove the file from the playlist.
Press the MULTI JOG dial (or remote control ENTER
button) to remove the file from the playlist, or press the
FINDER [A-B] button (or remote control FINDER button)
to cancel removal.
INFORMATION
Shows the number of tracks in the playlist and its total
playback time in a pop-up.
NOTE
A maximum of 99 tracks can be in a playlist.
•
If you attempt to add more than 99 tracks, a P.
•
FULL
warning message pop-up will appear, and the
track(s) will not be added.
You cannot add the same track more than once to a
•
playlist.
LIST
Page 62

62 TASCAM SS-CDR200/SS-R200/SS-R100
9 − Editing the playlist (USB/SD/CF media only)
Removing files from playlists
Follow these procedures to remove one or all files from a
playlist.
Even though files are “deleted” from the playlist, they are
not deleted from the media.
1 Turn the MULTI JOG dial (or press the remote
control 5 and b buttons) to select a playlist or a
file in a playlist. (If a playlist is selected, all the files
will be removed from the playlist.)
2 Press the MULTI JOG dial (or remote control ENTER
button) to open the
3 Turn the MULTI JOG dial (or press the remote
control 5 and b buttons) to select
4 Press the MULTI JOG dial (or remote control ENTER
button).
A confirmation pop-up message appears.
5 Press the MULTI JOG dial (or remote control ENTER
button) to remove the file(s).
To cancel removal, press the FINDER [A-B] button
(or remote control FINDER button).
FINDER MENU
pop-up.
DELETE
.
Moving a file in a playlist
You can change the position of a file in a playlist.
1 Select the file to move.
2 Press the MULTI JOG dial (or remote control ENTER
button) to open the
3 Turn the MULTI JOG dial (or press the remote
control 5 and b buttons) to select
The file to be moved blinks on the
4 Turn the MULTI JOG dial (or press the remote
control 5 and b buttons) to move that file to the
desired position.
5 Press the MULTI JOG dial (or remote control ENTER
button) to confirm the new position after moving.
-- PLAYLIST --
pop-up while the movement completes, and then the
Playlist XX
FINDER MENU
and a progress bar appear in a
screen reopens.
pop-up.
MOVE
FINDER
.
screen.
Page 63

TASCAM SS-CDR200/SS-R200/SS-R100 63
10 - Copying files between CDs and other media (SS-CDR200)
You can copy (or convert and copy) files on USB/SD/CF
media to a blank CD. You can also copy (or convert and
copy) files on a CD to USB/SD/CF media.
Copying is only possible from the CD menu, so set the
current device to CD. Before conducting the following
operations, load appropriate CD and USB/SD/CF media in
the unit.
NOTE
You cannot copy to a write-protected SD card. (See “SD
card write-protection” on page 26.)
Copy/convert and copy files from USB/ SD/CF media to blank CDs
5 Turn the MULTI JOG dial (or press the remote
control 5 and b buttons) to select the device that
contains the files to be copied.
6 Press the MULTI JOG dial (or remote control ENTER
button) to open a pop-up window where you can
select the CD-R/CD-RW disc format.
When copying MP3 or WAV files from USB/SD/CF media to
a blank CD, you can copy the files in the same file format
to make a data CD or convert the files into audio CD
format when copying.
If you select audio CD format, MP3 and WAV files on USB/
SD/CF media will be converted to audio CD format and
copied to a blank CD.
If you use an unfinalized CD-R/CD-RW disc that already
has tracks on it, the disc format is already set as audio CD
or data CD, and that format must be used.
NOTE
This unit cannot record WAV files to CD-R/CD-RW discs,
•
but WAV files can be copied from USB/SD/CF media to
CD-R/CD-RW discs.
This unit can play back WAV files copied to CD-R/
•
CD-RW discs.
Creating audio CDs
The following describes how to convert MP3 or WAV files
on USB/SD/CF media to audio CD format and write them
to a CD-R/CD-RW disc.
The following procedure assumes that CD is selected as
the current device and that the USB/SD/CF media that
contains the copy-source files and the CD-R/CD-RW that is
the copy destination are loaded in the unit.
1 Press the MENU [JOG] button (or remote control
MENU button) to open the
2 Open the CD menu.
3 Select
BURN TO CD
.
MENU
screen.
NOTE
If the selected device media is still being read,
•
READ
and a progress bar appear in a pop-up.
If media is not loaded in the selected device,
•
READ
appears in a pop-up followed by
media type (e.g.
7 Turn the MULTI JOG dial (or press the remote
control 5 and b buttons) to select
NOTE
If audio format files have already been written to the
CD-R/CD-RW disc, the above pop-up window will not
appear.
8 Press the MULTI JOG dial (or remote control ENTER
9 Select the tracks to copy to the CD-R/CD-RW disc
You cannot select a folder.
To select multiple files, when the desired file is
Checkmarks (4) are placed next to selected files.
To deselect a selected file, press the FUNCTION
CD-DA
button) to open the
for the selected media.
from the
selected, press the FUNCTION button (or remote
control FUNC button). Repeat this for each file.
You can only select multiple files that are in the
same folder.
button (or remote control FUNC button) once
again.
CF READ
format will be selected automatically.
BURN SOURCE SELECT
).
BURN SOURCE SELECT
ERROR
screen.
CD-DA
MEDIA
MEDIA
and the
.
screen
4 Press the MULTI JOG dial (or remote control ENTER
button) to open a pop-up window where you can
select the source device.
NOTE
You can select multiple files only within the same
•
folder, so once you use the FUNCTION button (or
Page 64

64 TASCAM SS-CDR200/SS-R200/SS-R100
10 - Copying files between CDs and other media (SS-CDR200)
remote control FUNC button) to select the first file, you
will no longer be able to move to a different folder.
In step 10 below, if you attempt to use
•
with a file that has already been selected, an
has been entered
warning message appears in a
pop-up.
If you attempt to select a copy-source file that is less
•
than 4 seconds,
Cannot burn under 4s
in a pop-up.
If you are selecting only one file, there is no need to
•
press the FUNCTION button (or remote control FUNC
button). After selecting the desired file, proceed to step
10.
10 When you have selected all the files to be written
to the CD-R/CD-RW disc, press the MULTI JOG dial
(or remote control ENTER button) to confirm the
selections and open the
The time that will remain (
TRACK LIST
REMAIN XXmin
CD-R/CD-RW disc after the files have been written will
be displayed in the upper right of the screen.
If the allowable time is exceeded,
instead, and you will not be able to write the selected
files to the CD-R/CD-RW disc. In this case, you’ll need
to delete some of the selected source files until the
OVER
indication disappears.
If there are files that have already been written to the
disc, these files will also be shown in this list.
Note marks ( ) will appear next to existing tracks. Note
marks ( ) will not appear next to tracks that will be
added.
NOTE
As necessary, you can change the track order or remove
files. For details about how to change and remove files,
see “Moving files within the track list” and “Removing files
from the track list” below.
11 To write the files, press the MULTI JOG dial
(or remote control ENTER button) to open the
following pop-up window.
12 If you want to add more tracks, choose
and press the MULTI JOG dial (or remote control
ENTER button) to return to step 9.
If you have completed selecting tracks, select
EXECUTE
, and press the MULTI JOG dial (or remote
control ENTER button).
A confirmation pop-up message appears.
ADD TRACK
screen.
OVER
will appear
Already
will appear
) on the
ADD TRACK
BURN
13 Press the MULTI JOG dial (or remote control ENTER
button) again to start writing tracks to the CD-R/
CD-RW disc.
-- BURN --
and a progress bar appear in a pop-up
while the disc is being written.
When writing is completed, the CD menu screen will
reopen.
Moving files within the track list
While the
TRACK LIST
screen is open, you can follow
these procedures to change the track order. You cannot
change the order of tracks that have already been written
to a CD-R/CD-RW disc.
1 Turn the MULTI JOG dial (or press the remote
control 5 and b buttons) to select the track that
you want to move to a different position.
2 Press the MULTI JOG dial (or remote control ENTER
button) to open a pop-up window.
3 Select
MOVE TRACK
, and press the MULTI JOG dial
(or remote control ENTER button).
The file selected for moving blinks.
4 Turn the MULTI JOG dial (or press the remote
control 5 and b buttons) to move the selected
file to the desired position.
5 Press the MULTI JOG dial (or remote control ENTER
button) to confirm the move.
6 Repeat steps 1–5 as necessary.
Removing files from the track list
While the
TRACK LIST
screen is open, you can follow
these procedures to remove a file. You cannot remove a
file that has already been written to a CD-R/CD-RW disc.
1 Press the MENU [JOG] dial (or remote control MENU
button) to open the
FINDER
screen for the selected
media.
2 Turn the MULTI JOG dial (or press the remote
control 5 and b buttons) to select the file you
want to remove.
3 Press the MULTI JOG dial (or remote control ENTER
button) to remove the checkmark (4) next to the
file you want to remove.
4 Repeat steps 2–3 as necessary.
Page 65

TASCAM SS-CDR200/SS-R200/SS-R100 65
10 - Copying files between CDs and other media (SS-CDR200)
Creating data CDs
This section explains how files (MP3 or WAV files) from a
USB/SD/CF media can be copied in their current format to
create a data CD.
The following procedures assume that CD is set as the
current device and that USB/SD/CF media that includes
copy-source files and the destination CD-R/CD-RW disc
are loaded.
NOTE
You can copy WAV files on USB/SD/CF media to a CD-R/
CD-RW disc but you cannot record WAV files using a CD
using this unit.
1 Press the MENU [JOG] button (or remote control
MENU button) to open the
2 Open the CD menu.
3 Select
BURN TO CD
, and press the MULTI JOG dial (or
remote control ENTER button).
4 Press the MULTI JOG dial (or remote control ENTER
button) to open a pop-up window where you can
select the device used.
MENU
screen.
NOTE
If audio format files have already been written to the
CD-R/CD-RW disc, the above pop-up window will not
appear.
CD-Data
format will be selected automatically.
8 Press the MULTI JOG dial (or remote control ENTER
button) to open the
FINDER
screen for the selected
media.
9 Select the folder or file from the
FINDER
screen to
copy to the CD-R/CD-RW disc. If you select a folder,
all the files in the folder will be copied.
To select multiple files or folders, when the desired
file or folder is selected, press the FUNCTION
button (or remote control FUNC button). Repeat
this for every file and folder.
Checkmarks (4) are placed next to selected files
and folders. You can only select multiple files and
folders if they are in the same folder.
To deselect a selected file or folder, press the
FUNCTION button (or remote control FUNC button)
once again.
5 Turn the MULTI JOG dial (or press the remote
control 5 and b buttons) to select the device that
contains the files to be copied.
6 Press the MULTI JOG dial (or remote control ENTER
button) to open a pop-up window where you can
select the format for writing the CD-R/CD-RW disc.
NOTE
If the selected device media is still being read,
•
READ
and a progress bar appear in a pop-up.
If the selected device media is not loaded, after
•
READ, ERROR
and the media type (
CF READ
MEDIA
MEDIA
, etc.)
appears in a pop-up.
7 Turn the MULTI JOG dial (or press the remote
control 5 and b buttons) to select
CD-Data
.
NOTE
You can select multiple files and folders only within the
•
same folder, so once you use the FUNCTION button (or
remote control FUNC button) to select the first file or
folder, you will no longer be able to move to a different
folder.
If you are selecting only one file or folder, there is no
•
need to press the FUNCTION button (or remote control
FUNC button). After selecting the desired file, proceed
to step 10.
10 When you have selected all of the files to be written
to the CD-R/CD-RW disc, press the MULTI JOG dial
(or remote control ENTER button) to confirm the
selections and open the
BURN TARGET SELECT
screen.
NOTE
If the selected copy-source files would exceed the free
•
space on the disc or the allowable number of tracks,
you will not be able to proceed to the
SELECT
screen. In this case, delete some of the selected
BURN TARGET
folders or files so that the limit is no longer exceeded.
Page 66

66 TASCAM SS-CDR200/SS-R200/SS-R100
10 - Copying files between CDs and other media (SS-CDR200)
If the total size of the copy-source files exceeds the free
•
space on the copy-destination disc,
appears in a pop-up after step 10.
If copying the copy-source files would exceed the
•
allowable number of tracks on the disc,
appears in a pop-up after step 10.
11 Turn the MULTI JOG dial (or press the remote
control 5 and b buttons) to select the destination
for the files.
If the disc already has a folder structure, select a
file or folder on the
The folders or files will be copied after the selected
folder or file.
12 Press the MULTI JOG dial (or remote control ENTER
button) to confirm the selection.
A confirmation pop-up message appears.
FINDER
CAPACITY OVER
TRACK OVER
screen.
Converting CD files and copying them to USB/SD/CF media
You can copy files from a CD to USB/SD/CF media with
or without conversion. When copying from an audio CD
to the media, each track file will be converted into the
format you specify (MP3 or WAV file).
When copying from a CD-R/CD-RW disc that contains MP3
or WAV files, the files can be copied in their current format.
Converting and copying audio CD tracks
The following explains how to convert audio CD format
files on a CD into MP3 and WAV format and copy them to
the selected media (USB/SD/CF media).
The following procedure assumes that CD is selected
as the current device and that a CD that contains the
copy-source files and the copy destination media are
loaded in the unit.
1 Press the MENU [JOG] button (or remote control
MENU button) to open the
2 Open the CD menu.
3 Select
RIP TO MEMORY
dial (or remote control ENTER button).
MENU
screen.
, and press the MULTI JOG
NOTE
If there are files with the same name, the following
pop-up message will appear.
After this, the pop-up message disappears and the CD
menu screen opens.
13 Press the MULTI JOG dial (or remote control ENTER
button) again to start writing to the CD-R/CD-RW
disc.
-- BURN --
while the disc is being written.
When writing is completed, the CD menu screen will
reopen.
NOTE
When you press the EJECT button, the CD-R/CD-RW disc
will be finalized automatically before it is ejected. (See
“Finalizing CD-R/CD-RW discs (SS-CDR200 only)” on page
43.)
and a progress bar appear in a pop-up
4 Press the MULTI JOG dial (or remote control ENTER
button) to open a pop-up window where you can
select the device used.
5 Turn the MULTI JOG dial (or press the remote
control 5 and b buttons) to select the copy
destination device.
6 Press the MULTI JOG dial (or remote control ENTER
button) to open a pop-up window where you can
set the file format.
NOTE
If the selected device media is still being read,
•
READ
and a progress bar appear in a pop-up.
If the selected device media is not loaded, after
•
READ, ERROR
appears in a pop-up.
and the media type (
CF READ
MEDIA
MEDIA
, etc.)
Page 67

TASCAM SS-CDR200/SS-R200/SS-R100 67
10 - Copying files between CDs and other media (SS-CDR200)
7 Turn the MULTI JOG dial (or press the remote
control 5 and b buttons) to select the file format
to be saved to the selected device media.
FILE
Set the file format.
Options:
.mp3
(default value),
.wav
BITRATE
Set the MP3 format bit rate.
Options:
value),
NOTE
64kbps, 128kbps, 192kbps
256kbps, 320kbps
(default
The sampling frequency is fixed at 44.1 kHz for files stored
on the selected device media.
8 After you have completed all settings, press the
MULTI JOG dial (or remote control ENTER button)
to open the
RIP SOURCE SELECT
screen.
11 Select the copy destination from the
SELECT
screen.
RIP TARGET
The folders or files will be copied after the selected
folder or file.
12 Press the MULTI JOG dial (or remote control ENTER
button) to confirm the copy destination.
A confirmation pop-up message appears.
9 Select the tracks to copy.
Select a source track, and press the FUNCTION
button (or remote control FUNC button) to put
a checkmark (4) next to it. Repeat this to select
multiple files.
To deselect a selected file, press the FUNCTION
button (or remote control FUNC button) once
again.
The time that will remain on the media after the files
have been written will be displayed in the upper right
of the screen.
NOTE
When you are selecting source files, if their size
•
would exceed the remaining capacity of the selected
media, or the number of source tracks would cause
the number of files on the selected media to exceed
the limit,
OVER
will appear and you will not be able
to continue to step 10. Deselect some of the files, for
example, until
If you are selecting only one file or folder, there is no
•
OVER
is no longer shown.
need to press the FUNCTION button (or remote control
FUNC button). After selecting the desired file, proceed
to step 10.
10 When you have selected all of the files you want to
copy, press the MULTI JOG dial (or remote control
ENTER button) to confirm the selections and open
the
RIP TARGET SELECT
screen where you can
select the copy destination.
13 Press the MULTI JOG dial (or remote control ENTER
button) again to start writing to the selected device
media.
-- R I P --
and a progress bar appear in a pop-up
while the files are copied.
When writing is completed, the CD menu screen will
reopen.
Copying files on a data CD
The following explains how to copy MP3 and WAV files on
a data CD without changing their formats to the selected
media (USB/SD/CF media).
The following procedure assumes that CD is selected as
the current device and that a CD-R/CD-RW that contains
the copy-source files and the copy destination media are
loaded in the unit.
1 Press the MENU [JOG] button (or remote control
MENU button) to open the
2 Open the CD menu.
3 Select
RIP TO MEMORY
dial (or remote control ENTER button).
MENU
screen.
, and press the MULTI JOG
Page 68

68 TASCAM SS-CDR200/SS-R200/SS-R100
10 - Copying files between CDs and other media (SS-CDR200)
4 Press the MULTI JOG dial (or remote control ENTER
button) to open a pop-up window where you can
select the device.
5 Turn the MULTI JOG dial (or press the remote
control 5 and b buttons) to select the copy
destination device.
NOTE
If the selected device media is still being read,
•
READ
and a progress bar appear in a pop-up.
If the selected device media is not loaded, after
•
READ, ERROR
and the media type (
CF READ
MEDIA
MEDIA
, etc.)
appears in a pop-up.
6 Press the MULTI JOG dial (or remote control ENTER
button) to open the RIP
SOURCE SELECT
screen.
the
RIP TARGET SELECT
screen where you can
select the copy destination.
NOTE
If the size of the source exceeds the remaining capacity
of the selected media, or the number of source tracks
would cause the number of files on the selected media
to exceed the limit file, a
OVER
message pop-up will appear accordingly, and you
CAPACITY OVER
or a
TRACK
will not be able to confirm the source selection. If this
occurs, press the STOP button to close the pop-up, and
deselect some source files until the total size or number
is acceptable. Then, press the MULTI JOG dial (or remote
control ENTER button) again.
9 Select the copy destination from the
SELECT
screen.
RIP TARGET
The folders or files will be copied after the selected
folder or file.
7 Select the file or folder to copy from the
SOURCE SELECT
screen. If you select a folder, all
RIP
the files in the folder will be copied.
To select multiple files or folders, when the desired
file or folder is selected, press the FUNCTION
button (or remote control FUNC button). Repeat
this for every file and folder.
Checkmarks (4) are placed next to selected files
and folders. You can only select multiple files and
folders if they are in the same folder.
To deselect a selected file or folder, press the
FUNCTION button (or remote control FUNC button)
once again.
NOTE
You can select multiple files and folders only within the
•
same folder, so once you use the FUNCTION button (or
remote control FUNC button) to select the first file or
folder, you will no longer be able to move to a different
folder.
If you are selecting only one file or folder, there is no
•
need to press the FUNCTION button (or remote control
FUNC button). After selecting the desired file, proceed
to step 5.
8 When you have selected all of the files you want to
copy, press the MULTI JOG dial (or remote control
ENTER button) to confirm the selections and open
10 Press the MULTI JOG dial (or remote control ENTER
button) to confirm the copy destination.
A confirmation pop-up message appears.
NOTE
If there are files with the same name, the following
pop-up message will appear.
After this, the pop-up message disappears and the CD
menu screen opens.
11 Press the MULTI JOG dial (or remote control ENTER
button) again to start writing to the selected device
media.
-- R I P --
and a progress bar appear in a pop-up
while the files are copied.
When writing is completed, the CD menu screen will
reopen.
Page 69

TASCAM SS-CDR200/SS-R200/SS-R100 69
11 − CD-RW management (SS-CDR200 only)
Using the CD menu to work with CD-RW discs, you can
erase, unfinalize and refresh (completely erase) discs as
well as erase tracks. This chapter explains these CD-RW
management functions.
The following explanations assume that CD is selected as
the current device and that a CD-RW is loaded.
NOTE
You can also use the CD menu to finalize CD-R/CD-RW
discs, and copy files between CDs and USB, SD and CF
media. Finalizing is explained in “4 – Recording” (“Finalizing
CD-R/CD-RW discs” on page 43), and copying files
between CDs and USB, SD and CF media is explained in “10
– Copying files between CDs and USB, SD and CF media”
(page 63).
Unfinalizing CD-RW discs
If a finalized CD-RW disc is loaded, you can use the
item to unfinalize the disc.
1 Press the MENU [JOG] button (or remote control
MENU button) to open the
2 Open the CD menu.
3 Select
ERASE
.
MENU
screen.
ERASE
When unfinalizing is completed, the CD menu will
reopen.
Erasing CD-RW discs
You can completely erase an entire CD-RW disc.
1 Press the MENU [JOG] button (or remote control
MENU button) to open the
2 Open the CD menu.
3 Select
4 Press the MULTI JOG dial (or remote control ENTER
5 Turn the MULTI JOG dial (or press the remote
ERASE
.
button) to open a pop-up window where you can
select the
control 5 and b buttons) to select
Erase Media
MENU
item.
screen.
Erase Media
.
4 Press the MULTI JOG dial (or remote control ENTER
button) to open a pop-up window where you can
select the
5 Turn the MULTI JOG dial (or press the remote
control 5 and b buttons) to select
6 Press the MULTI JOG dial (or remote control ENTER
button).
A confirmation pop-up message appears.
Erase Media
item.
Unfinalize
.
6 Press the MULTI JOG dial (or remote control to
select button).
A confirmation pop-up message appears.
7 Press the MULTI JOG dial (or remote control ENTER
button) again to start erasing the disc.
-- ERASE --
while the disc is being erased.
After erasing the disc completes, the CD menu will
reopen.
NOTE
If you erase a finalized CD-RW disc, the unit will unfinalize
the disc before erasing it.
and a progress bar appear in a pop-up
7 Press the MULTI JOG dial (or remote control ENTER
button) again to start unfinalizing the disc.
- UNFINALIZE -
pop-up while the disc is being unfinalized.
and a progress bar appear in a
Page 70

70 TASCAM SS-CDR200/SS-R200/SS-R100
11 − CD-RW management (SS-CDR200 only)
Erasing tracks
You can erase tracks that have been recorded in audio CD
format on a CD-RW disc. The specified track and all later
tracks (until the last track on the disc) will be erased.
1 Press the MENU [JOG] button (or remote control
MENU button) to open the
2 Open the CD menu.
3 Select
4 Press the MULTI JOG dial (or remote control ENTER
5 Turn the MULTI JOG dial (or press the remote
6 Press the MULTI JOG dial (or remote control ENTER
ERASE
.
button) to open a pop-up window where you can
select the
control 5 and b buttons) to select
button) to enable selection of the first track in the
range of tracks that will be erased.
Erase Track
MENU
item.
screen.
Erase Track
NOTE
When erasing tracks on a finalized CD-RW disc, the unit
•
will unfinalize the disc before erasing the designated
tracks.
This operation can be executed only on a disc that has
•
audio CD format files
Refreshing discs
You can refresh (completely erase) a CD-RW disc. The unit
might not be unable to recognize a CD-RW disc in some
cases, such as if finalization was interrupted by a power
failure, or if a disc has been used by a computer. In such
.
cases, follow these procedures to refresh the CD-RW disc
so that the unit can recognize it.
1 Press the MENU [JOG] button (or remote control
MENU button) to open the
2 Open the CD menu.
3 Select
4 Press the MULTI JOG dial (or remote control ENTER
5 Turn the MULTI JOG dial (or press the remote
ERASE
.
button) to open a pop-up window where you can
select the
control 5 and b buttons) to select
Refresh
item.
MENU
screen.
Refresh
.
7 Turn the MULTI JOG dial (or press the remote
control 5 and b buttons) to select the first track
to erase in the range of tracks that will be erased.
In the example above, track 03 is selected.
The last track to be deleted (shown as 03 in the
illustration above) is fixed as the last track of the disc
and cannot be changed.
8 After you have selected the first track, press the
MULTI JOG dial (or remote control ENTER button).
A confirmation pop-up message appears.
9 Press the MULTI JOG dial (or remote control ENTER
button) again to start erasing tracks.
-- ERASE --
while tracks are being erased.
and a progress bar appear in a pop-up
6 Press the MULTI JOG dial (or remote control ENTER
button).
A confirmation pop-up message appears.
7 Press the MULTI JOG dial (or remote control ENTER
button) again to start refreshing the CD-RW disc.
-- REFRESH --
pop-up while the disc is being refreshed.
After the CD-RW disc gas been refreshed, the CD menu
will reopen.
” and a progress bar appear in a
After the tracks have been erased, the CD menu will
reopen.
Page 71

TASCAM SS-CDR200/SS-R200/SS-R100 71
TASCAM RC-3F
Footswitch
(sold separately)
12 − Other settings and media information
Footswitch control
You can operate this unit using a TASCAM RC-3F
footswitch (sold separately) connected to the front panel
REMOTE jack.
Setting up a footswitch
1 Press the MENU [JOG] button (or remote control
MENU button) to open the
2 Open the
3 Select
UTILITY
RC-3F MODE
menu.
.
4 Press the MULTI JOG dial or , [LOCK] button (or
remote control ENTER or t button) to move the
cursor to the right and select the setting item.
5 Turn the MULTI JOG dial (or press the remote
control 5 and b buttons) to select one of the
three pedal assignment modes.
Options:
MODE 1
(default value),
6 When you have finished making the setting, press
the HOME/DISPLAY button (or remote control
HOME/DISP button) to return to the Home Screen.
NOTE
The footswitch (RC-3F MODE) setting is retained even
after the power is turned OFF.
Using the footswitch
When pushed, each of the footswitch pedals will operate
according to the setting made with the
item.
MENU
screen.
MODE 2, MODE 3
RC-3F MODE
Footswitch mode functions
The functions of the footswitches in each mode are as
follows.
Footswitch
MODE
1
2
3
L (press) C (press) R (press)
L (press and
hold)
.
m
.
m
PITCH (–) PLAY/PAUSE PITCH (+)
— — —
C (release) R (press and
PLAY
READY/STOP
PLAY/PAUSE
—
hold)
/
,
/
,
MODE 1: Optimal for transcribing meetings and working
with similar recordings
MODE 2: Basic transport control
MODE 3: Pitch control
Setting the digital output format
The digital output format of this unit can be set to either
SPDIF
or
AES/EBU
Use the menu as follows to set it.
1 Press the MENU [JOG] button (or remote control
MENU button) to open the
2 Open the
3 Select
DIGITAL OUT
4 Press the MULTI JOG dial or , [LOCK] button (or
remote control ENTER or t button) to move the
cursor to the right and select the setting item.
5 Turn the MULTI JOG dial (or press the remote
control 5 and b buttons) to set the digital output
format.
Options:
6 When you have finished making the setting, press
the HOME/DISPLAY button (or remote control
HOME/DISP button) to return to the Home Screen.
NOTE
The DIGITAL OUT setting is retained even after the power
is turned OFF.
.
UTILITY
SPDIF
(default value),
menu.
.
MENU
screen.
AES/EBU
Page 72

72 TASCAM SS-CDR200/SS-R200/SS-R100
12 − Other settings and media information
Viewing information about the media
You can view information about the media in the current
device.
Follow these steps using the menu to access this
information.
1 Press the MENU [JOG] button (or remote control
MENU button) to open the
2 Open the
3 Select
4 Press the MULTI JOG dial (or remote control ENTER
button) to show information about the media,
including its total capacity and open capacity, in
the current device.
UTILITY
INFORMATION
menu.
MENU
screen.
.
NOTE
The screen above is an example from an SS-CDR200 or
SS-R200 unit. The SS-R100 does not have the
menu item.
4 Press the MULTI JOG dial (or remote control ENTER
button).
A confirmation pop-up message appears.
5 Press the MULTI JOG dial (or remote control ENTER
button) again to restore the unit settings to their
factory defaults. A
appears briefly when resetting finishes.
6 When you have finished making the setting, press
the HOME/DISPLAY button (or remote control
HOME/DISP button) to return to the Home Screen.
COMPLETE
pop-up message
5.RS-232C
Example when the current device is USB/SD/CF
Example when the current device is CD
5 When you have finished viewing the information,
press the HOME/DISPLAY button (or remote control
HOME/DISP button) to return to the Home Screen.
Restoring the factory settings
You can restore all the settings that are stored in the unit’s
backup memory to the settings they had when shipped
from the factory.
Follow these steps using the menu to restore the settings.
NOTE
The factory settings cannot be restored if media is loaded
in the current device. Change the current or remove the
media from it and conduct the operation again.
1 Press the MENU [JOG] button (or remote control
MENU button) to open the
2 Open the
3 Select
UTILITY
FACTORY PRESET
menu.
.
MENU
screen.
Page 73

TASCAM SS-CDR200/SS-R200/SS-R100 73
13 − Operation using a computer keyboard
If you connect a keyboard with an IBM PC-compatible
PS/2 interface or USB connector to the KEYBOARD
connector or USB port, you can use it to operate this unit.
Various types of control are possible, but using a keyboard
is particularly efficient when inputting text.
Setting the keyboard language
Set the keyboard language according to the one you have
connected.
1 Press the MENU [JOG] button (or remote control
MENU button) to open the
2 Open the
3 Select
UTILITY
KEYBOARD
.
menu.
MENU
screen.
4 Press the MULTI JOG dial or , [LOCK] button (or
remote control ENTER or t button) to move the
cursor to the right and select the setting item.
5 According to the connected keyboard type, set it to
US
(English-language keyboard) or
JPN
(Japanese-
language keyboard).
Options: US (default value),
JPN
6 When you have finished making the setting, press
the HOME/DISPLAY button (or remote control
HOME/DISP button) to return to the Home Screen.
NOTE
The KEYBOARD setting is retained even after the power is
turned OFF.
Using a keyboard to input text
To delete a character:
Delete key: Deletes the character at the cursor location.
Backspace key: Deletes the character to the left of the
cursor location.
To insert a character:
Press the Insert key at the desired location.
To edit a character:
Move the cursor and overwrite the character.
CAUTION
The following symbols and punctuation marks cannot
•
be used in names.
\ / ; : * , ? “ < > |
Japanese katakana cannot be input.
•
Keyboard operation list
You can use the keyboard not only to enter text, but also
for other operations such as controlling the transport and
editing. The functions of keys on the keyboard are listed
below.
Transport operations
Keyboard key(s) Operation
a Same as the m button
q Same as the , button
Space bar
Space bar
Ctrl + S
Ctrl + R
Ctrl + F
Ctrl + B
¡
Ω
Same as the PL AY button
Same as the READY button
Same as the STOP button
Same as the RECORD button
Same as the / button
Same as the . button
Same as the / button
Same as the . button
You can edit or enter a folder name, track name or CD-Text
just as when typing text into a computer.
To edit the name of a file or folder, from the
screen open its
the
RENAME
FINDER MENU
screen.
and select
FINDER
RENAME
to open
To select the case:
As when using a computer, use the Shift and Caps Lock
keys to change the case of characters input.
To input text:
Use the number, letter and symbol keys for direct input.
To move the cursor:
Use the ¡/Ω/a/q arrow keys.
Page 74

74 TASCAM SS-CDR200/SS-R200/SS-R100
13 − Operation using a computer keyboard
MENU and FUNCTION screen operations
Keyboard key(s) Operation
Esc
F1 Opens the
F2 Opens the
F3 Opens the
F4 Opens the
F5 Turns repeat ON/OFF
F6 Turns A-B repeat ON/OFF
F7 Turns pitch control function ON/OFF
F8 Turns key control function ON/OFF
F9 Turns auto cue function ON/OFF
F10 Turns auto ready function ON/OFF
F11
F12
Shift + F5 Set the file type
Shift + F6 Set the sampling frequency
Shift + F7 Set the bit rate
Shift + F8 Set the auto-recording function
Shift + F9 Set the sync recording function
Shift + F10 Set the sampling rate converter
Shift + F11 Set the compressor
Cancel editing or title editing and return to
the Home Screen
FUNCTION
MENU
EDIT
FINDER
Turns incremental playback function ON/
OFF
Same as the remote control FLASH LOAD
button
screen
screen
screen
screen
Enter
Insert Insert a character at the cursor position
Home
Delete Delete the character at the cursor position
¡
Ω
a
q
Shift + ¡
Shift + Ω
Ctrl + ¡
Ctrl + Ω
Ctrl + a
Ctrl + q
Number keys Number input
Same as the front panel MULTI JOG dial
and remote control ENTER button
Same as the front panel HOME/DISPLAY
button and remote control HOME/DISP
button
Same as turning the MULTI JOG dial left or
pushing the remote control ^ button
Same as turning the MULTI JOG dial left or
pushing the remote control v button
Same as the front panel << button and
remote control < button
Same as the front panel >> button and
remote control > button
Increases the display contrast
Decreases the display contrast
Increases the pitch level of the pitch
control function
Decreases the pitch level of the pitch
control function
Increases the key level of the key control
function
Decreases the key level of the key control
function
*Ctrl + E only works with the SS-CDR200
Keyboard key(s) Operation
Ctrl + F1
Ctrl + F2
Ctrl + F3
Ctrl + F4
Ctrl + F5
Ctrl + F6
Ctrl + F7
Ctrl + F8
Ctrl + F9
Ctrl + F10
Ctrl + F11
Ctrl + F12
Ctrl + E* Same as the EJECT button
Ctrl + I Select the input source
Ctrl + J Turn jog playback mode ON
Ctrl + K Set the skip time
Ctrl + L Turns panel lock function ON/OFF
Ctrl + C Turn the call function ON
Tab
Caps Lock Enable/disable capital letters
Back Space Erase the character to the left of the cursor
After completing flash loading, start flash
start playback of track 1
After completing flash loading, start flash
start playback of track 2
After completing flash loading, start flash
start playback of track 3
After completing flash loading, start flash
start playback of track 4
After completing flash loading, start flash
start playback of track 5
After completing flash loading, start flash
start playback of track 6
After completing flash loading, start flash
start playback of track 7
After completing flash loading, start flash
start playback of track 8
After completing flash loading, start flash
start playback of track 9
After completing flash loading, start flash
start playback of track 10
After completing flash loading, start flash
start playback of track 11
After completing flash loading, start flash
start playback of track 12
Same as the front panel DEVICE and
remote control DEVICE SELECT button
NOTE
To use the keyboard to edit, press the desired editing key
when the
FINDER
screen is open.
Example of keyboard use
This example shows how to delete an item.
1. Press the F4 key to open the
FINDER
screen.
2. Use the ¡/Ω/a/q keys to select the file or folder
you want to delete.
3. Press the F3 key to open the
4. Use the ¡/Ω keys to select
5. Press the Enter key to open an “
EDIT
screen.
DELETE
.
EXECUTE?
”
confirmation pop-up.
6. Press the Enter again to confirm and execute the
operation.
Page 75

TASCAM SS-CDR200/SS-R200/SS-R100 75
14 − Using control I/O (SS-CDR200/SS-R200 only)
Using the RS-232C connector
Using the 9-pin, D-sub CONTROL I/O RS-232C connector,
which is compliant with RS-232C standards, you can
control the unit via this serial connection from a computer
or other external device.
Use the menu to make settings related to communication.
1 Press the MENU [JOG] button (or remote control
MENU button) to open the
2 Open the
3 Select
UTILITY
RS-232C
menu.
.
4 Press the MULTI JOG dial or , [LOCK] button (or
remote control ENTER or t button) to open the
RS-232C
setting screen.
5 Set the items on the
BAUD RATE
Set the baud rate (communication speed).
Options:
4800 bps, 9600 b p s, 19200
value),
38400 bps
PARITY BIT
Set the parity bit use.
Options:
NON
(none, default value),
STOP BIT
Set the stop bit.
Options: 1 (default value),
DATA LENGTH
Set the data length.
Options: 7, 8 (default value)
6 After setting each item, press the HOME/DISPLAY
button (or remote control HOME/DISP button) to
return to the Home Screen.
NOTE
RS-232C settings are retained even after the power is
•
turned OFF.
For details on the unit’s RS-232C command protocol,
•
please contact TASCAM customer support.
MENU
RS-232C
2
screen.
screen.
bps (default
EVEN, ODD
Using the parallel connector
Using the CONTROL I/O PARALLEL connector, you can
control this unit through serial connection with a TASCAM
RC-SS20 or other external controller. The pin assignments
are as follows.
Pin Function IN/OUT
1 GND —
2 PLAY/Flash 1 In
3 STOP/Flash 2 In
4 RECORD/Flash 3 In
5
/ (Next)/Flash 4
6
. (Previous)/Flash 5
7 Flash Load In
8 Fader Start In
9 Flash Tally Out
10 Ready Tally Out
11 Record Tally Out
12 Stop Tally Out
13 Play Tally Out
14 Remote Select*
15 Ready/Flash 6 In
16 Call/Flash 7 In
17 Auto Cue/Flash 8 In
18 Auto Ready/Flash 9 In
19 Pitch/Flash 10 In
20 Flash Page*
21 EOM Tally Out
22 Device Select Tally 1*
23 — —
24 Device Select Tally 2*
25 +5V*
1
2
3
4
4
In: Active low external command reception (operates
when ground 30 ms or longer)
Out: Signal for transport status display by open drain
(maximum voltage 50 V, maximum current 50 mA)
*1 Maximum supplied current 100 mA.
*2 Pin 14 (Remote Select)
When set to high, input pins with two functions shown
above with a “/” (pins 2–6 and 15–19) use the first
function, and can be used for ordinary parallel control.
When set to low, these input pins function as flash
start keys.
*3 Pin 20 (Flash Page)
When pin 14 (Remote Select) is set to low, the high/low
setting of pin 20 determines the track assignments.
#14 #20 Flash start tracks
Low High 1–10
Low Low 11–20
In
In
In
In
Out
Out
—
Page 76

76 TASCAM SS-CDR200/SS-R200/SS-R100
START
STOP
Pin 1
FADER START
Pin 8
GND
PARALLEL
14 − Using control I/O (SS-CDR200/SS-R200 only)
The following is an example of connecting for playback
control of this unit using fader start/stop
*4 Pin 22/24 (Device Select Tally 1/2)
Depending on the high/low settings of pins 22 and 24,
the device assignment will be as follows.
#22 #24 Device assignment
Low Low USB
High High SD
High Low CF
Low High CD
Page 77

TASCAM SS-CDR200/SS-R200/SS-R100 77
15 − Message list
Error messages
If one of the following error messages appears in a pop-up, press the MULTI JOG dial (or remote control ENTER button) to
close the message. Then, resolve the issue. If you are still unable correct the problem, please contact the nearest TASCAM
service center.
1st line 2nd line Meaning
1
- error - DECODE
2
- error - REC STAND BY
3
- error - CAPACITY
4
- error - RECORD
5
- error - INFO WRITING
6
- error - OVER FLOW
7
- error - Not Match DMA
8
- error - FLASH LOAD
9
- error - DIN UNLOCK
10
- error - DIN NotAudio
11
- error - FS UNMATCH
12
- error - EJECT
13
- error - MIX DISC
14
- error - MEMORY READ
15
- error - TRACK
Failed to play MP3/WAV file.
Failed to prepare to begin recording.
Recording stopped because of insufficient storage area on the media.
Error occurred while recording.
An error occurred while writing data.
Recording buffer was insufficient while recording an MP3/WAV track.
Cannot record because the media does not meet the system requirements.
Error occurred while loading flash start data.
Digital input is not locked.
The input digital data is not audio.
The sampling rate of the digital signal being input differs from the currently selected
sampling rate.
Failed to eject the CD (SS-CDR200 only)
The disc has both MP3/WAV format files and audio CD format files mixed on it. (SSCDR200 only)
Burn/Rip cannot be executed because media is not loaded in the selected device.
(SS-CDR200 only).
Playback is not possible because the file on the CD is in an unplayable format. (SSCDR200 only)
Warning messages
When an operation cannot be conducted, one of the following pop-up warning messages will appear on the display. After
appearing for about two seconds, warning messages automatically disappear.
1st line 2nd line Meaning
1
- caution - CAN'T UNDO
2
- caution - MEDIA FULL
3
- caution - TRACK FULL
4
- caution - NoCallPoint
5
- caution - CAN'T REC
6
- caution - WriteProtect
7
- caution - NOT EXECUTE
8
- caution - CAN'T EDIT
9
- caution - CAN'T SELECT
10
- caution - TRK PROTECT
11
- caution - NAME FULL
12
- caution - PROGRAM FULL
13
- caution - PGM EMPTY
14
- caution - NoSearchTime
15
- caution - UnmatchMedia
16
- caution - Dif Playlist
17
- caution - P.LIST FULL
18
- caution - P.LIST EMPTY
19
- caution - P.LIST ENTRY
Undo is not possible because no undoable edit exists.
Recording is not possible because the media does not have enough open space.
Recording is not possible because the maximum number of tracks has been reached.
There is no call point.
Recording is not possible due to system limitations.
The media is write-protected.
Failed to execute the editing operation.
Editing was not possible due to system limitations.
Selection/execution was not possible due to system limitations.
Editing was not possible because the track was protected.
The maximum number of characters for the name (text field) has been reached.
The track cannot be added because the maximum number of tracks in a program has
been reached.
Playback is not possible because no tracks have been added to the program.
Searching was not possible because the specified search time (search track) does not
exist.
Recording is not possible because the media does not meet the system requirements.
There is a discrepancy between the specified playlist and the media information.
The track cannot be added because the maximum number of tracks in a playlist has
been reached.
Playback is not possible because no tracks have been added to the playlist.
You tried to edit a track that is in a playlist.
Page 78

78 TASCAM SS-CDR200/SS-R200/SS-R100
15 − Message list
1st line 2nd line Meaning
20
- caution - SURE TEXT
21
- caution - SAME NAME
22
Uaapproved FAT format
Operation messages
As necessary, the following messages will appear in the time display area.
1st line Meaning
1
POWER ON
2
DEVICE ERROR
3
NO MEDIA
4
MONITOR
5
MEDIA READING
6
MEDIA ERROR
7
UNKNOWN
8
INITIALIZING MEDIA
9
RECORD STAND BY
10
INFORMATION WRITING
11
FLASH LOADING
12
Fs CHANGING
CD Text has been added, but you are trying to eject the disc without writing the TOC.
(SS-CDR200 only)
An item with the same name already exists. (SS-CDR200 only)
The media has been formatted by something other than this unit, and this can cause
the following problems.
i When recording, writing data might not occur in time, resulting in errors.
i
MEDIA READING
We recommend using media that has been formatted by this unit.
The system is starting up and initializing.
The device cannot be detected. Please contact TASCAM customer support.
Media is not loaded in the current device.
Now monitoring inputs.
Now reading from media.
Failed to read media.
The media is in a format other than FAT. Format the media with the unit in order to use
them together.
Creating data in order to use this media with the unit.
Now in recording standby.
Now writing recording information.
Now loading flash-start data.
The system’s sampling frequency is being changed to match that of the current track.
will take more time.
Page 79

TASCAM SS-CDR200/SS-R200/SS-R100 79
If the unit is not functioning properly, please check the
following items before calling for service. If you are still
unable to resolve the problem please contact the retailer
where you purchased the unit or TASCAM customer
support.
Power does not turn on
Confirm that the power plug is inserted completely.
Media is not detected
Confirm that the USB/SD/CF media is inserted
•
completely.
Stop playback or recording once.
•
Unit cannot be controlled from the front
panel
Confirm that the panel lock function is not on.
Unable to playback a file
If it is a WAV file, confirm that it uses a sampling frequency
(44.1 kHz or 48 kHz) and a bit rate (16/24-bit) that are
supported by this unit. If it is an MP3 file, confirm that it
uses a bit rate that is supported by this unit.
16 − Troubleshooting
No sound
Confirm the connections with the monitoring system and
check the volume of the amplifier.
Unable to record
Confirm the connections.
•
Adjust the recording level.
•
If the media does not have enough open space, erase
•
unneeded data to make more space or change the
media.
If the folder already contains a large number of entries
•
(the total number of files, folders and other items),
change the recording folder.
Changed settings are not saved
This unit backs-up settings whenever you change them.
This backup could fail if you turn OFF the power while
this data is being written, so do not turn OFF the power
immediately after changing a setting.
I hear noise
Check if any connecting cable might have a bad
connection.
When editing text, “Name Full” appears
Due to limitations of the system, a maximum of 255
characters (single-byte) can be used for items such as file
and folder names. Since this limitation applies to the full
path in the
for items inside a folder are reduced by the number
of characters used by all the folders above it and any
separator characters..
FINDER
screen, the maximum name length
Page 80

80 TASCAM SS-CDR200/SS-R200/SS-R100
17 − Specifications
Media and file formats
Recording media
USB memory (512MB – 64GB)
SD card (512MB – 2GB)
SDHC card (4GB – 32GB)
CF card (512MB – 64GB, Type I only)
CD-R, CD-R-DA, CD-RW, CD-RW-DA (5-inch, 3-inch, High
Speed CD-RW supported) (CDR200 model only)
Recording and playback file formats
MP3: 44.1/48kHz, 64/128/192/256/320kbps
WAV: 44.1/48kHz, 16/24-bit (24-bit playback only)
CD-DA: 44.1kHz, 16-bit
Number of channels
2-channel (stereo)
1-channel (mono)
Inputs and outputs
Analog audio inputs and outputs
ANALOG INPUTS (BALANCED)*
(SS-CDR200/SS-R200 only)
Connector: XLR-3-31 (1: GND, 2: HOT, 3: COLD)
Input impedance: 22 kΩ
Nominal input level: +4 dBu (1.23 Vrms)
Maximum input level: +20 dBu (7.75 Vrms)
Minimum input level: −6 dBu (0.39 Vrms) or more
(minimum input level adjustable to nominal level)
ANALOG INPUTS (UNBALANCED)
Connector: RCA pin jack
Input impedance: 22 kΩ
Nominal input level: −10 dBV (0.316 Vrms)
Maximum input level: +6 dBV (2.0 Vrms)
Minimum input level: −20 dBV (0.1 Vrms) or more
(minimum input level adjustable to nominal level)
ANALOG OUTPUTS (BALANCED)*
(SS-CDR200/SS-R200 only)
Connector: XLR-3-32 (1: GND, 2: HOT, 3: COLD)
Output impedance: 100 Ω
Nominal output level: +4 dBu (1.23 Vrms)
Maximum output level: +20 dBu (7.75 Vrms)
ANALOG OUTPUTS (UNBALANCED)
Connector: RCA pin jack
Output impedance: 200 Ω
Nominal output level: −10 dBV (0.316 Vrms)
Maximum output level: +6 dBV (2.0 Vrms)
*If you want to change the maximum balanced input and
output levels, please contact TASCAM customer support.
Digital audio inputs and outputs
DIGITAL IN JACK
Connector: RCA pin jack
Formats: IEC60958-3 (S/PDIF) and AES3-2003/IEC60958-4
(AES/EBU) detected automatically
Supported input sampling frequencies: 32–48 kHz
DIGITAL OUT JACK
Connector: RCA pin jack
Formats: IEC60958-3 (S/PDIF) and AES3-2003/IEC60958-4
(AES/EBU) switchable
Control inputs and outputs
REMOTE JACK (for RC-3F and RC-20)
Connector: 2.5mm TRS jack
USB PORT
Connector: USB A-type 4-pin
Protocol: USB 2.0 HIGH SPEED (480 Mbps)
KEYBOARD
Connector: mini-DIN connector (PS/2)
REMOTE IN (RC-SS2)
Connector: 3.5mm TRS jack
RS-232C CONNECTOR (SS-CDR200/SS-R200 only)
Connector: 9-pin D-sub
CONTROL I/O PARALLEL (SS-CDR200/SS-R200 only)
Connector: D-sub 25-pin
Maximum input voltage: +5.5 V
High level minimum input voltage: +3.75 V
Low level maximum input voltage: +1.25 V
Output format: open drain (withstand voltage 50 V,
maximum 50 mA)
Low level maximum output voltage: 0.5 V
+5V power maximum supplied current: 100 mA
Audio performance
Frequency response
20 Hz – 20 kHz: ±0.5 dB
Distortion
0.005% or less
S/N ratio
95 dB or more
Dynamic range
95 dB
Channel crosstalk
95 dB
Note: all ratings are for performance when recording
according to JEITA CP-2150 standards
Page 81

TASCAM SS-CDR200/SS-R200/SS-R100 81
Backup memory
The following settings are backed up even when the
power is turned off.
Pitch control ON/OFF
•
Pitch step setting
•
Key control ON/OFF
•
Menu settings
•
(Playback area, playback mode, repeat playback
setting, auto cue, auto ready, incremental playback,
mono playback, EOM function, resume playback,
power on playback, link playback, input source, input
volume, recording file format, sync recording, auto
track increment, pause mode, sampling rate converter,
recording file name, compressor, dither, display
and indicator brightness, keyboard type, RS-232C,
footswitch, digital output)
General
17 − Specifications
Power
AC 100–240 V, 50–60 Hz
Power consumption
SS-CDR200
100 V: 20 W 110–240 V: 23 W
SS-R200/SS-R100
100 V: 16 W 110–240 V: 20 W
Dimensions (width × height × depth)
482.6 × 44.5 × 301 mm/19 x 1.75 x 11.85 in.
Weight
SS-CDR200
3.7 kg/8.16 lbs
SS-R100/R200
3.4 kg/7.50 lbs
Operating temperature range
5–35º C/41–95ºF
Page 82

82 TASCAM SS-CDR200/SS-R200/SS-R100
434.2mm
482.6mm
44mm 0.5mm
31.8mm
280mm14.8mm
6.2mm
465mm
432.6mm
41.6mm
17 − Specifications
Dimensional drawings
Illustrations in this manual might differ in part from actual products.
•
In order to improve the products, specifications and appearance could be changed without prior notice.
•
Page 83

TASCAM SS-CDR200/SS-R200/SS-R100 83
Notes
Page 84

SS-CDR200
SS-R200
SS-R100
TEAC CORPORATION
Phone: +81-42-356-9143
1-47 Ochiai, Tama-shi, Tokyo 206-8530, Japan
TEAC AMERICA, INC. http://tascam.com/
Phone: +1-323-726-0303
7733 Telegraph Road, Montebello, California 90640 USA
TEAC CANADA LTD. http://tascam.com/
Phone: +1905-890-8008 Facsimile: +1905-890-9888
5939 Wallace Street, Mississauga, Ontario L4Z 1Z8, Canada
TEAC MEXICO, S.A. de C.V. http://www.teacmexico.net/
Phone: +52-55-5010-6000
Río Churubusco 364, Colonia Del Carmen, Delegación Coyoacán, CP 04100, México DF, México
TEAC UK LIMITED http://www.tascam.co.uk/
Phone: +44-8451-302511
Suites 19 & 20, Building 6, Croxley Green Business Park, Hatters Lane, Watford, Hertfordshire, WD18 8TE, UK
TEAC EUROPE GmbH http://tascam.de/
Phone: +49-611-71580
Bahnstrasse 12, 65205 Wiesbaden-Erbenheim, Germany
http://tascam.jp/
Printed in China
 Loading...