

Page 1

TASCAM GigaEditor 4
GigaStudio 4 Instrument Editor
User Manual
Page 2

TASCAM GigaEditor 4 User Manual
Copyright © 2008 TEAC America, Inc. All rights reserved. No part of this manual may be reproduced or
transmitted in any form or by any means for any purpose other than the licensee’s personal use without the
express written permission of TEAC America, Inc.
All information in this manual is subject to change without notice and does not represent a commitment on
the part of TEAC America, Inc. e soware described in this manual is provided under the terms of a
Soware License Agreement. e Soware License Agreement species the terms and conditions of use.
TASCAM, NemeSys, GigaStudio™, GigaStudio Instrument Editor™, GigaSampler™, and GigaSampler
Instrument Editor™ are trademarks of TEAC America, Inc.
All other trademarks are trademarks or registered trademarks of their trademark holders.
2 TASCAM GigaEditor 4 Manual
Page 3

Table of Contents
Chapter 1: About the GigaStudio 4.0 Instrument Editor..............................................................................................5
What’s New? ......................................................................................................................................................................5
Launching the Instrument Editor .................................................................................................................................6
Opening a .GIG le from the Instrument Editor ......................................................................................................8
Loading a .GIG le into the sampler ............................................................................................................................9
Anatomy of a .GIG File .................................................................................................................................................10
Chapter 2: Creating a Giga Instrument ...........................................................................................................................13
Creating a New File ........................................................................................................................................................14
Importing Samples .........................................................................................................................................................14
Creating a Region ...........................................................................................................................................................23
Creating a Dimension ....................................................................................................................................................27
Mapping Samples to a Region......................................................................................................................................29
Hearing Your Work .......................................................................................................................................................31
A Faster Way To Work .................................................................................................................................................31
More About Sample Mapping .....................................................................................................................................37
Chapter 3: Tutorial: Creating a Multi-Dimensional Instrument ..............................................................................39
Creating the velocity split .............................................................................................................................................40
Mapping the Samples.....................................................................................................................................................42
Playback Monitoring......................................................................................................................................................44
Adding a Second Dimension .......................................................................................................................................46
Changing the Order of Dimension Splits..................................................................................................................48
Changing the Dimension Controller .........................................................................................................................49
Chapter 4: Tutorial: Advanced Drum Kit.......................................................................................................................58
Kick Drum ........................................................................................................................................................................58
Snare Drum ......................................................................................................................................................................64
Toms ..................................................................................................................................................................................68
Cymbals.............................................................................................................................................................................71
Hi-Hats..............................................................................................................................................................................75
Chapter 5: e Instrument Wizard..................................................................................................................................83
Preparing the Samples ...................................................................................................................................................83
Using the Instrument Wizard: A Simple Mapping.................................................................................................84
Using the Instrument Wizard: A Complex Mapping.............................................................................................89
Load Status .......................................................................................................................................................................94
Separating Parameters from .GIG le........................................................................................................................95
Chapter 6: Main Menu Commands .................................................................................................................................97
File Menu ..........................................................................................................................................................................97
Edit Menu .......................................................................................................................................................................101
MIDI Menu ....................................................................................................................................................................111
View Menu .....................................................................................................................................................................111
Window Menu...............................................................................................................................................................113
Help Menu......................................................................................................................................................................113
Chapter 7: Editor Windows and Context Menu Commands ..................................................................................114
e Bank/Instrument Window .................................................................................................................................114
e Sample Window....................................................................................................................................................122
e Region Window ....................................................................................................................................................130
e Waveform Window .............................................................................................................................................136
e Dimension Windows...........................................................................................................................................138
e Articulation Window...........................................................................................................................................149
Chapter 8: Articulation Parameters Reference............................................................................................................150
Dynamic Expression Filter (DEF).............................................................................................................................168
Chapter 9: Editing Parameters in the Region Window .............................................................................................172
TASCAM GigaEditor 4 Manual 3
Page 4

Editing in the Region Window ..................................................................................................................................172
Drag Modes ....................................................................................................................................................................173
Changing the Vertical Resolution .............................................................................................................................175
Chapter 10: Macros............................................................................................................................................................177
Saving Macros................................................................................................................................................................177
Applying Macros...........................................................................................................................................................179
Copying Macros to other machines .........................................................................................................................179
Editing Macros ..............................................................................................................................................................180
Chapter 11: Intelligent MIDI (iMIDI) Rules ...............................................................................................................181
iMIDI Rules in GigaStudio .........................................................................................................................................181
iMIDI Rules in the Instrument Editor.....................................................................................................................182
Using the iMIDI Rule Manager.................................................................................................................................183
e Transpose Rule......................................................................................................................................................184
e MIDI Filter Rule ...................................................................................................................................................185
e Legato Mode Rule.................................................................................................................................................185
e Repetition Mode Rule..........................................................................................................................................188
e Pattern Alternator Rule.......................................................................................................................................188
e Controller Trigger Rule.......................................................................................................................................192
e Release Trigger With Tracking Rule ................................................................................................................193
e Rule Builder ...........................................................................................................................................................194
e Mando-Tremolo Rule..........................................................................................................................................197
e Mono Mode Rule..................................................................................................................................................198
Appendix ..............................................................................................................................................................................209
PerfUtility .......................................................................................................................................................................209
4 TASCAM GigaEditor 4 Manual
Page 5
Chapter 1: About the GigaStudio 4.0 Instrument Editor
e GigaStudio Instrument Editor is a separate application that works with GigaStudio. e Editor allows
you to create your own instruments or edit existing Giga instruments.
You can run the Editor simultaneously with GigaStudio, but it’s not necessary. e Editor itself can load
instruments into memory, allowing you to hear your edits by playing an external MIDI controller or by
right-clicking the on-screen keyboard.
What’s New?
Giga Editor 4.0 includes the following changes from version 3.0:
1. e Dynamic Expression Filter, which in Giga 3 was accessible only through the use of a specially
formatted initialization le, is now exposed in the Editor as part of the normal parameter scheme.
Some of the DEF parameters are global to an instrument, and are found on a new tab in the
Instrument Properties dialog. e DEF coe cients are part of the subregion articulation and are
edited with the usual tools (the parameter value list and the “blue ball” graph).
2. e control panel for the Mono Mode iMIDI rule has a new tab with a graphical editor for the
Portamento Reshaping Filter, which like the DEF was previously accessible only by editing an
initialization le.
TASCAM GigaEditor 4 Manual 5
Page 6

3. e wave view has a new mode in which the sample is drawn as if the amplitude envelope has
already been applied to it. is mode is toggled by a small button near the zoom and unzoom
buttons.
4. Giga 4 supports a unique audition sample for each instrument in a .GIG le (not just a single
audition sample for the whole le). Right-click on a sample for options.
5. Right-clicking in the parameter value list (lower right) brings up a new “Copy to all instances”
menu option. e value of the selected parameter is copied to all subregions throughout the le
that are mapped to the same sample as the current one. For example, if a sample is found to
benet from a ne tuning change, this feature can quickly copy the new tuning to any other splits
to which the same sample is asssigned.
6. e right-click menu in the sample list has a new option, “Replace all samples in all folders.” is
is an expansion of the existing “Replace all samples in folder” command. e editor searches a
specied root directory and its subdirectories, replacing any sample if a .wav or .dxl le with a
matching name is found. ( ere is a more selective option for cases where the samples on disk are
arranged in subdirectories that mirror the folders in the .gig le. When this option is in eect,
samples in a given folder will be replaced only by les found in a subdirectory of the same name as
the folder.)
7. e maximum number of layers (splits in a layer dimension) has been increased from 8 to 128.
8. While in the past it’s been easy to change the controller assigned to a dimension, velocity has been
an exception: once a velocity dimension, always a velocity dimension. Giga Editor 4.0 will now
allow a velocity dimension to be changed to any other controller. Note that when this is done, the
dimension will move from the dedicated velocity window to one of the unused small dimension
windows.
9. An instrument can now cause up to two MIDI controllers to be initialized to specied values
whenever it is loaded. e controllers and their desired values are specied in the Instrument
Properties. is is for instruments using features like the Dynamic Expression Filter, which might
sound best when the controlling CC value is set to something other than the default.
10. A new variant of the “Round Robin” dimension controller has been added. e new controller is
called “Round Robin across keyboard”, and advances the dimension globally when a key is struck
anywhere on the keyboard. e older “Round Robin” (which is still available) advances the
dimension only for the region in which the note is played. In the case where the number of splits
in this dimension varies across the keyboard, the new rule uses a modulo addressing technique.
Launching the Instrument Editor
ere are several ways to open the Instrument Editor depending on your situation.
Opening the Instrument Editor from GigaStudio
To open the Instrument Editor from GigaStudio, click on the Launch Giga editor toolbar button.
6 TASCAM GigaEditor 4 Manual
Page 7
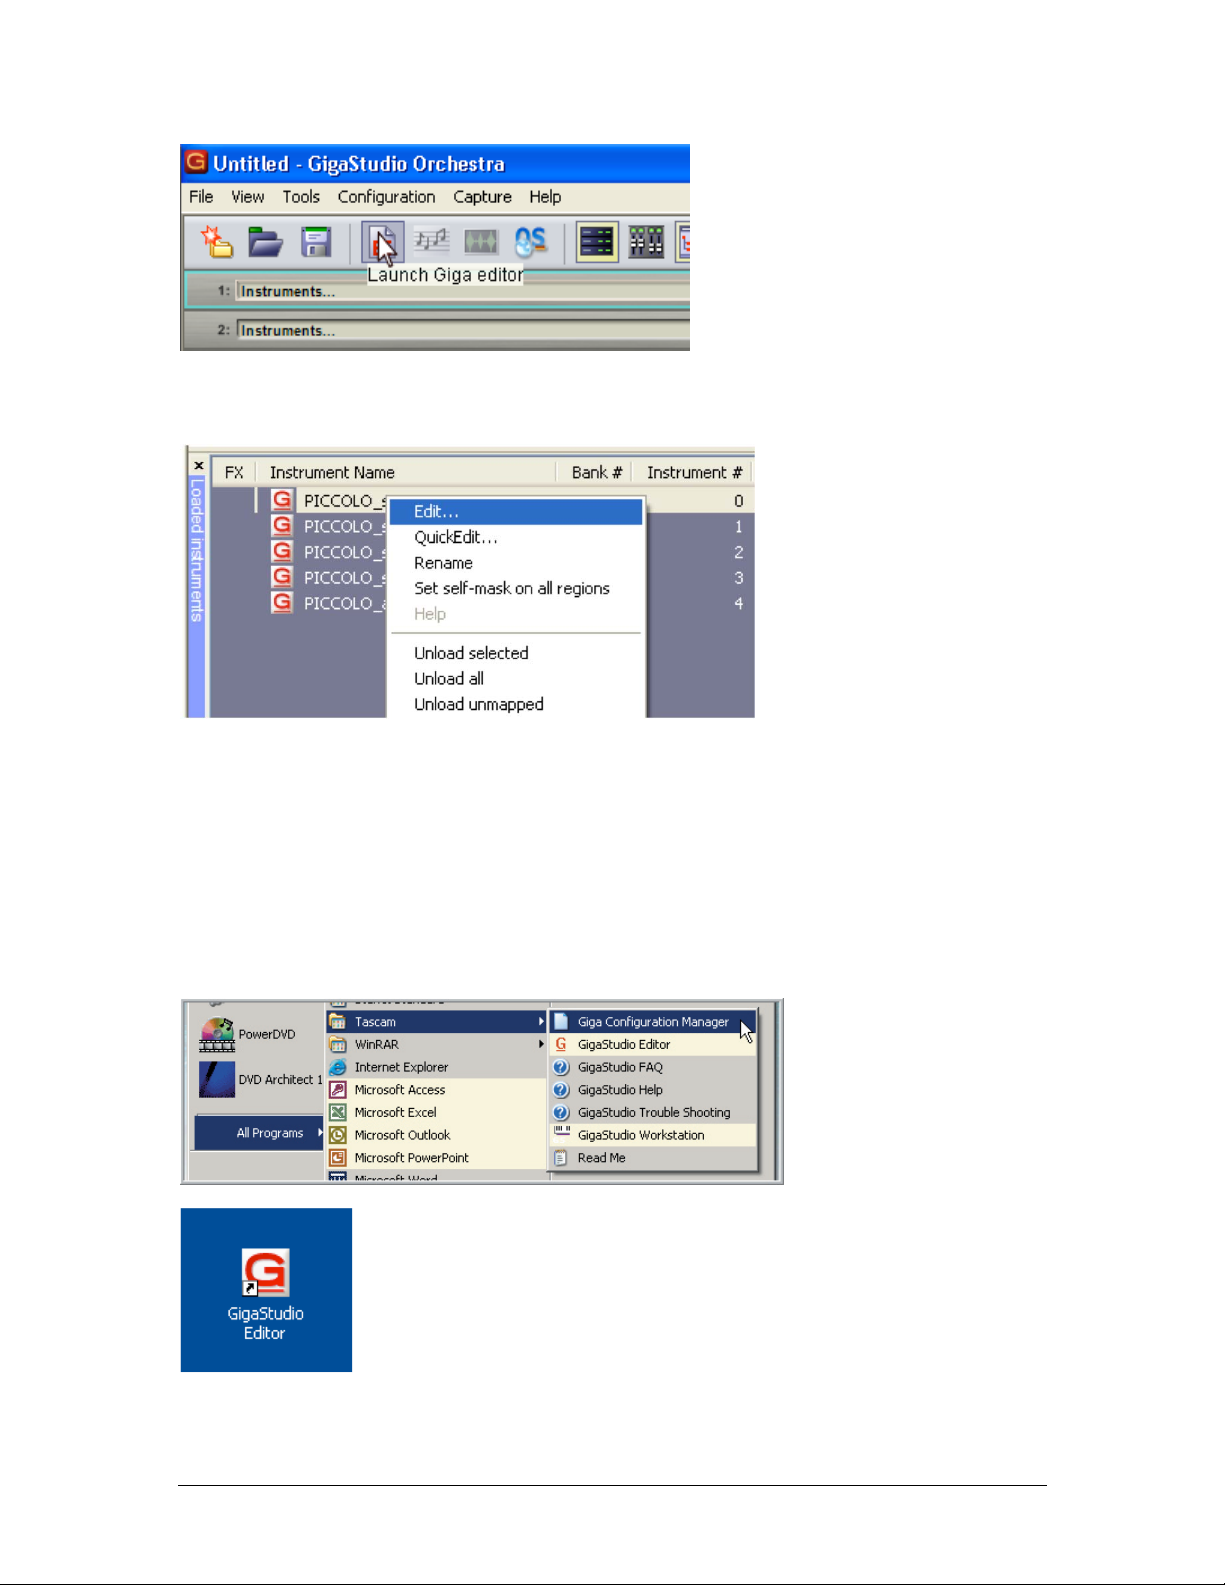
If an instrument is already loaded into GigaStudio, you can also launch the Editor from the Loaded
Instruments pane. Right-click on the instrument and choose Edit.
e Editor will open with the selected instrument loaded. is can take a few moments if the instrument is
particularly large.
Opening the Instrument Editor from the Windows Desktop
When you’re doing intense instrument construction, you may want to run the Editor alone without
GigaStudio.
1. You can launch the Editor from the Windows Start Menu.
2. You can launch the Editor by double-clicking a shortcut on the
desktop.
3. Last but not least, you can launch the Editor by double-clicking on a .gig le in the Windows Explorer.
TASCAM GigaEditor 4 Manual 7
Page 8

is will launch the editor and open the selected .gig le. You can open multiple .gig les at once by
selecting several of them and hitting the Enter key.
Opening a .GIG file from the Instrument Editor
With the Instrument Editor open, you can open any .gig le using the standard File-Open command.
1. Go to the File Menu and choose Open… [Alt] + [F] + [O] or [Ctrl] + [O]
2. Use the Open Instrument File dialog to navigate to your .gig le.
3. Select the le and click on the Open button.
8 TASCAM GigaEditor 4 Manual
Page 9
This window is very similar to the Open dialog in ot her programs, but there are a few features that are
specific to GigaStudio:
e Recent dropdown list contains a list of the most recently used folders. Selecting a folder in this list
causes the window to jump directly to that folder.
e Sample name box lists all of the samples in the currently selected instrument le. Select any sample in
this list and click the Play button to hear that sample. If you are working with instrument les containing
large numbers of samples, the dialog may respond slowly as it reads the sample names out of each le. To
work around this problem, uncheck the Descriptive wave names box. e names are replaced by simple
numeric indexes.
e Audition button plays the audition sample for the currently selected le. ( e “audition sample” is a
sample designated by the instrument developer as being representative of a given instrument. Users of your
instrument will hear this sample when using the audition feature of the QuickSound Explorer.)
e Maximum le size box, and the checkboxes underneath it, are used when it is necessary to split an
instrument into more than one physical le. For details, see the note about large .GIG les on page 99.
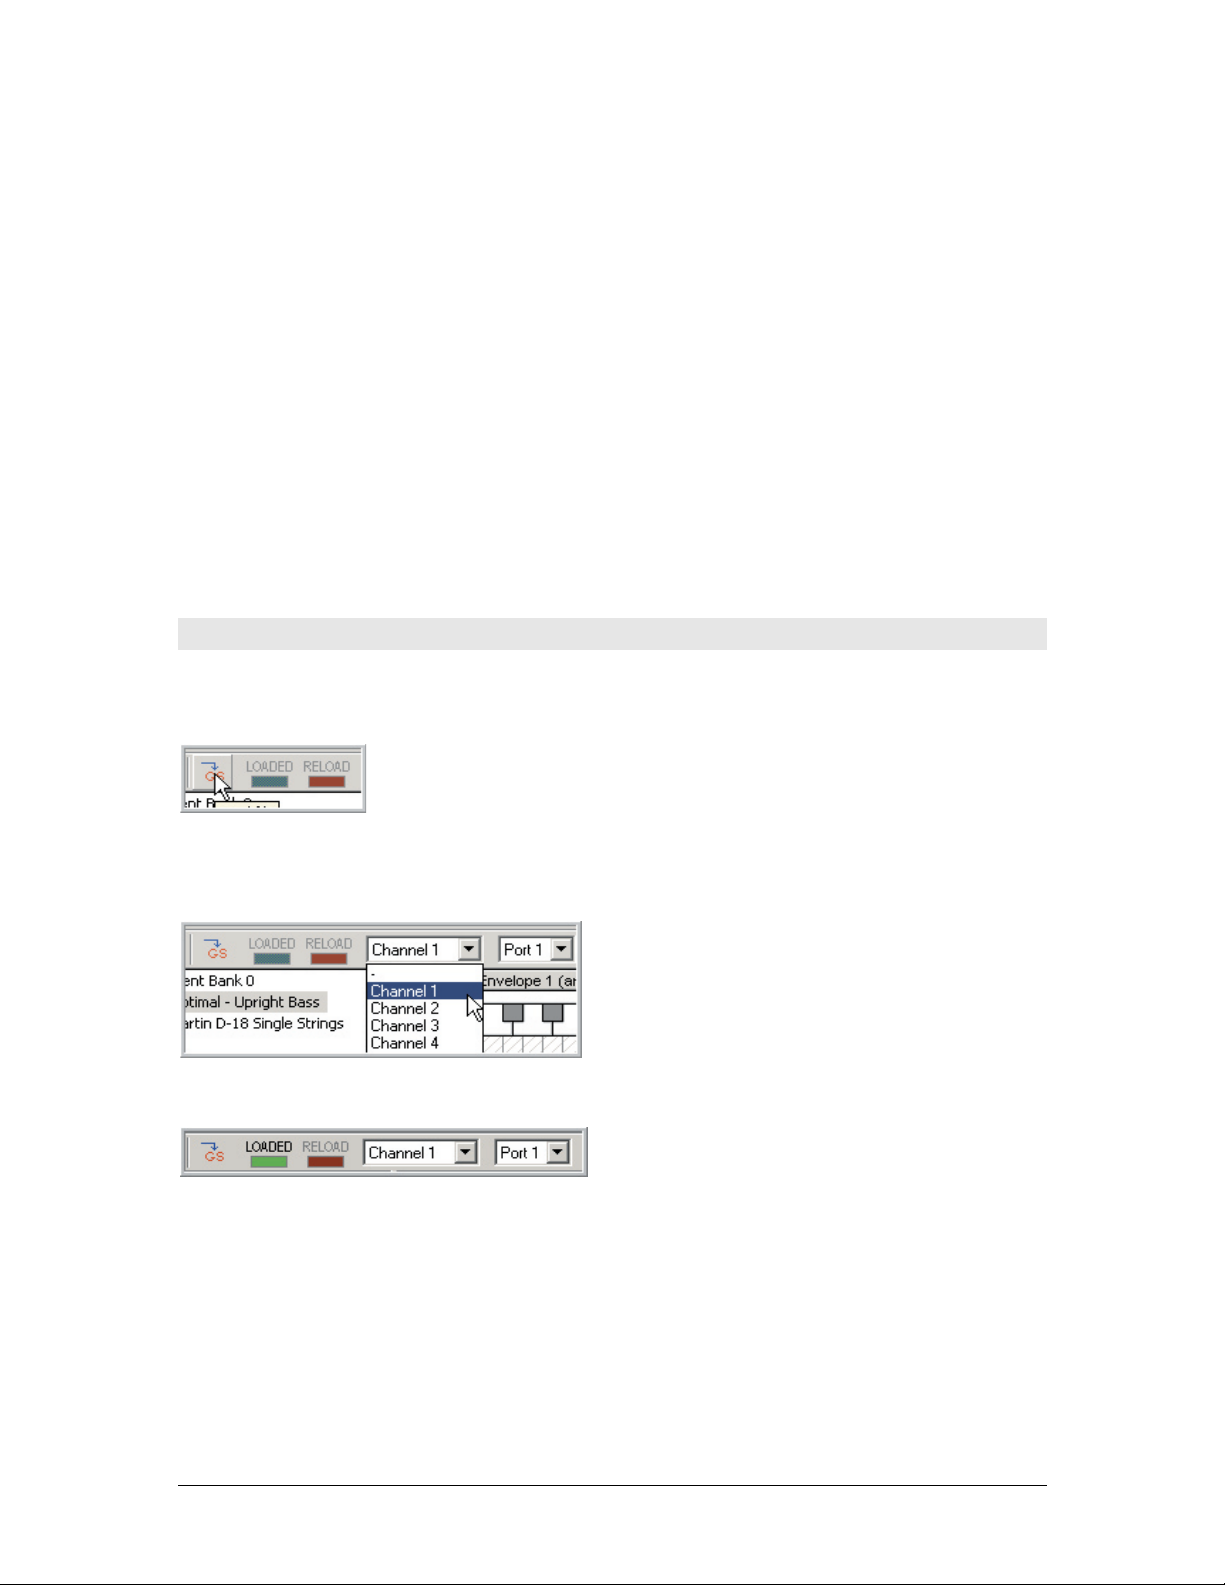
Loading a .GIG file into the sampler
Aer you open a .gig le in the Editor, you must load it into memory if you want to hear it. is is
accomplished by pressing the Load button on the toolbar:
The toolbar also specifies which MIDI port and channel will be assigned to the loaded instrument. By
default, the first file you open is assigned to port 1, channel 1, bu t you can modify these settings using the
toolbar.
When the le is loaded, the LOADED indicator turns bright green.
At this point you can play the rst instrument in the le either from an external MIDI controller, or by
right-clicking in the Region Window keyboard. If there are multiple instruments in the le, you can select a
dierent instrument onto the assigned MIDI channel by clicking its name in the Instrument Window.
TASCAM GigaEditor 4 Manual 9
Page 10

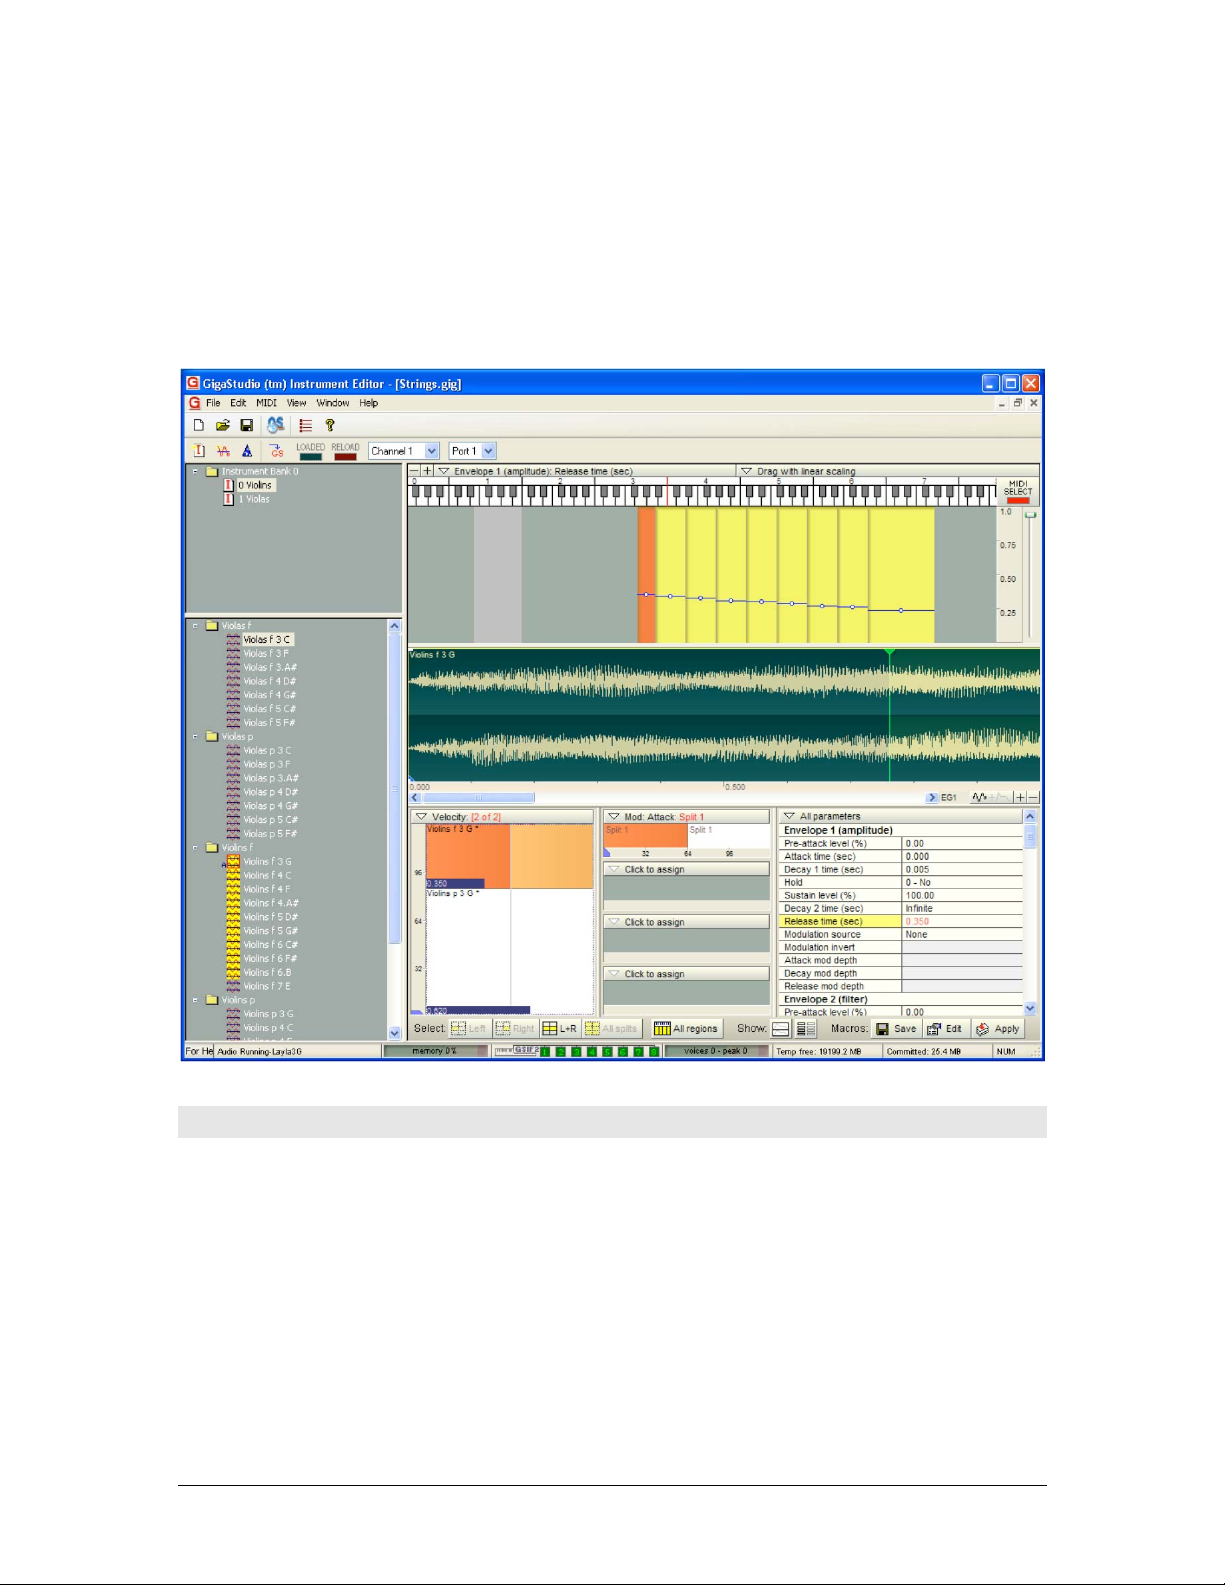
Anatomy of a .GIG File
Above is a graphic representation of the components of a GigaStudio File. Getting familiar with these will
make it much easier to know what you are doing when editing and creating GigaStudio Instruments. e
basic elements are:
• Banks. A bank is a collection of instruments.
• Instruments. Instruments are the basic performance object in GigaStudio. An instrument is
loaded on a MIDI channel, either alone or as part of a multi-instrument “stack”.
• Regions. Each instrument can have up to 128 regions. A region denes a zone on the keyboard.
• Dimensions. Each region can contain as many as eight dimensions. A dimension can contain up
to 128 splits, each mapped to a unique sample. Dimensions and splits allow multiple samples to be
mapped to a region, while the performer uses MIDI controllers or other methods to choose which
samples are heard at a given moment.
• Samples. Each dimension split can be assigned a unique sample to play. Samples are imported
from standard .wav les.
• Parameters. Each dimension split also contains a unique set of over 100 articulation parameters
dening envelopes, lters, and the like.
10 TASCAM GigaEditor 4 Manual
Page 11

Banks
A GigaStudio file can contain up to 128
instruments, each assigned to a bank. By default,
all instruments are assigned to bank 0, but banks
can be numbered from 0 to 16383.
Bank numbers are used when GigaStudio responds
to MIDI bank select messages.
Banks also help to organize instruments within the Instrument Editor. T hey g ive you a folder structure to
work with when you have a large number of instruments to deal with inside the same .gig file.
Banks are the top level of the Giga heirarchy.
Instruments
e next level is the instrument. Gig les can have
many instruments inside them and these
instruments can share common samples without
using any extra hard drive space or sample buering
RAM. Each instrument has a discrete bank and
patch change number.
Regions
An instrument can contain up to 128 regions, each
spanning a single key or a range of contiguous keys.
e gray spaces seen here are “empty” notes with no
regions assigned to them. e purple region
represents the range of the Keyswitch dimension.
TASCAM GigaEditor 4 Manual 11
Page 12
Dimensions
Regions are futher subdivided by
dimensions. A dimension can have up to
128 splits each triggering a different
sample.
A dimension tells GigaStudio which
sample to trigger based on the position of
its assigned MIDI controller.
Samples
Articulation Parameters
A .gig le also contains a collection of samples, imported initially
from individual .wav les. Each dimension split is assigned a
unique sample to play back. (We’ll refer to the process of assigning
samples to splits as mapping the instrument.)
A single sample can be assigned to multiple regions without
additional overhead.
In addition to its sample assignment, each dimension split also has its own unique set of over 100
articulation parameters. Many of the parameters dene traditional synth functions such as envelopes and
lters; others are unique to the Giga architecture. e articulation parameters are described in detail in a
later chapter.
12 TASCAM GigaEditor 4 Manual
Page 13

Chapter 2: Creating a Giga Instrument
Giga instruments can range from the very simple (an instrument can be made from a single sample) to the
extremely complex. In any case, the general procedure for creating an instrument consists of the same basic
steps:
1. Create a new, empty le in the Giga Editor.
2. Import the samples your instrument will use. Samples are imported from individual .wav les. e
editor will bundle the samples into the .gig le with the instrument when you save your work.
3. Create the regions on the keyboard to which your samples will be mapped. A region spans one or
more contiguous notes.
4. Dene dimensions and their splits in the keyboard regions. is is optional, but without dimensions
a region can play back only a single sample. Much of the power of the Giga instrument design
derives from the fact that many samples (currently up to 256) can be mapped to a single region,
while MIDI control and intelligent MIDI rules determine which of those samples will sound at any
given moment.
5. Map your samples into the regions you have created.
In practice, the last three steps are oen combined into a single action. For example, dragging and
dropping a group of samples into the Region Window can automatically create a region for each sample,
while simultaneously mapping the samples to the regions. Dropping a second set of samples into the
Velocity Window can automatically create a velocity split in each region, while mapping the new samples to
the upper or lower portion of the velocity range. For more complex instruments, the Instrument Wizard
can be used to create multidimensional instruments and map many sets of samples in a single operation.
For the sake of illustration, this chapter focuses on the simpler and frankly more tedious ways to assemble a
Giga instrument. As you gain familiarity with the Editor, you’ll learn how to perform many of these tasks
in much more ecient ways.
TASCAM GigaEditor 4 Manual 13
Page 14
Creating a New File
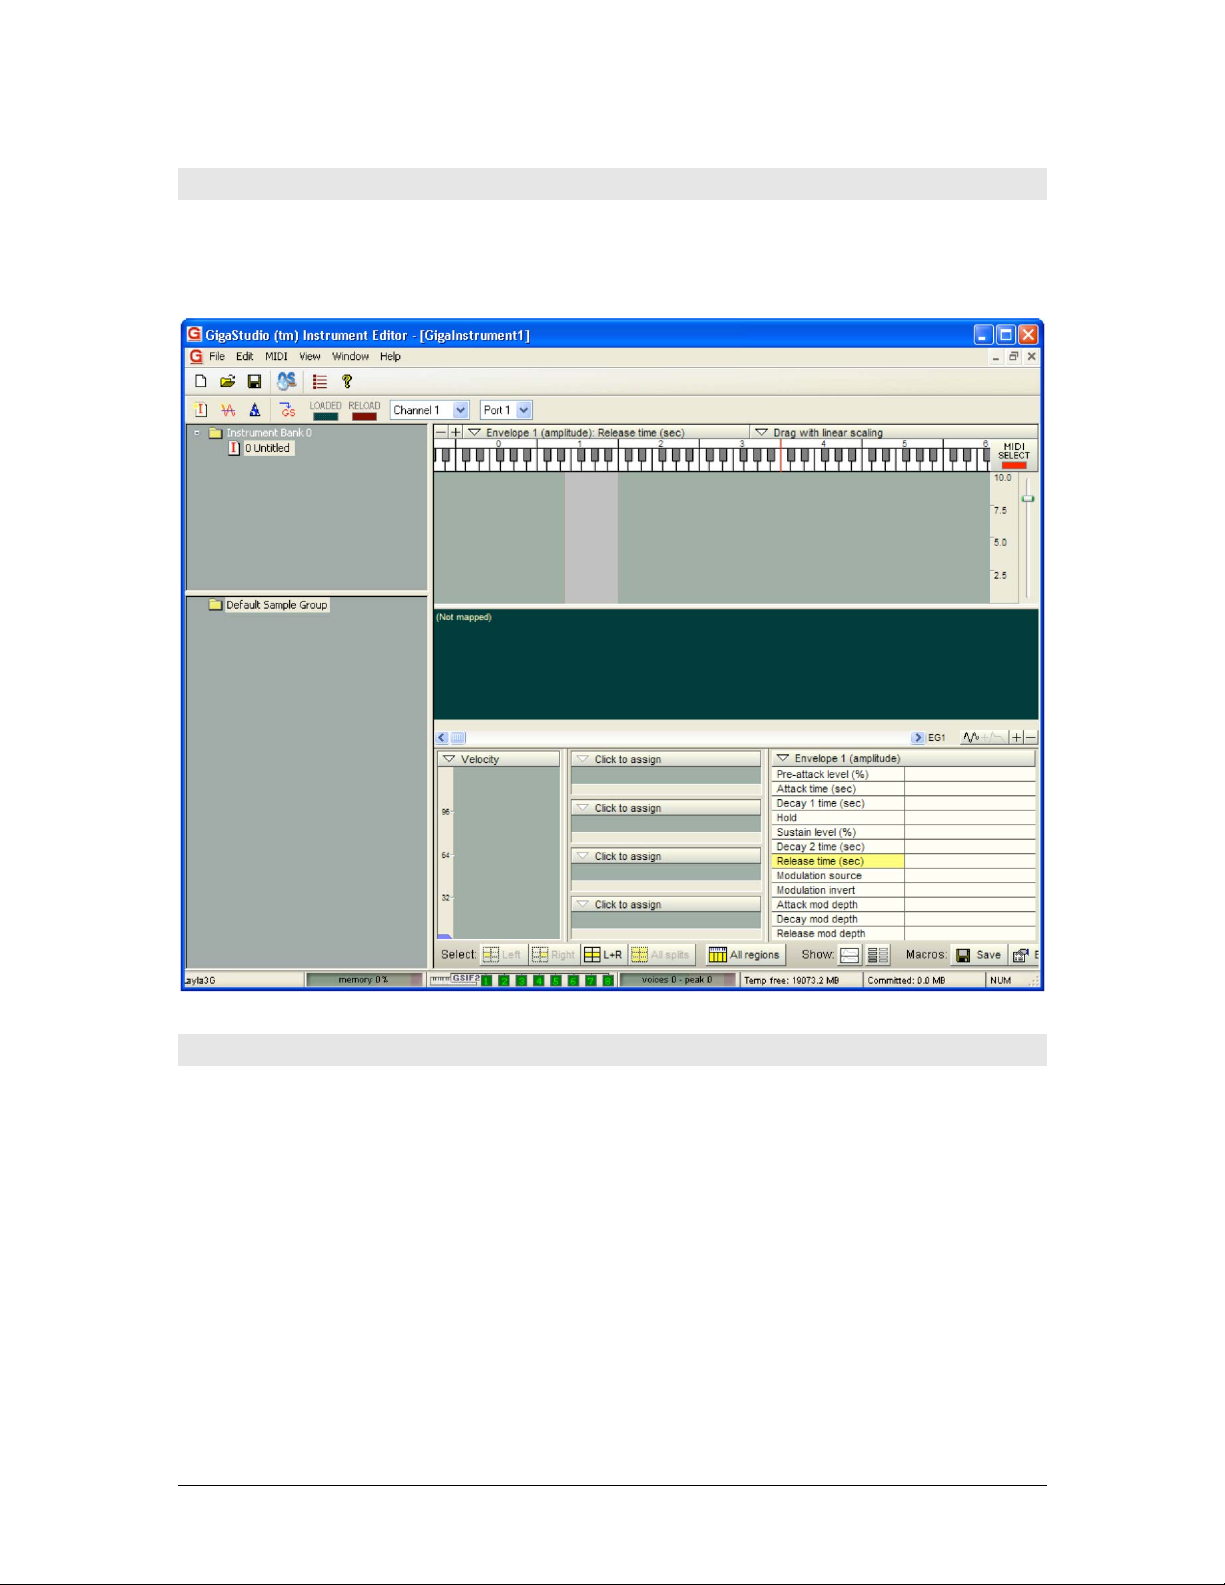
To create a new, empty .gig le, choose File-New on the Editor’s main menu. ( e rst button on the main
toolbar does the same thing.) An “empty” le will contain a single empty instrument, with no regions or
samples:
Importing Samples
Samples are imported from individual .wav les, in 16 or 24 bit integer, mono or stereo format. As you
import samples, they are added to the Sample Window in the lower le portion of the Editor.
Samples are organized into folders, preferably in a way that anticipates how they’ll be organized in the
instrument you are building. For example, if you’ve sampled a trumpet at three dierent dynamic levels
and two dierent attack styles, you might create six folders with names something like this:
Trumpet legato
Trumpet mf legato
Trumpet p legato
Trumpet staccato
Trumpet mf staccato
Trumpet p staccato
14 TASCAM GigaEditor 4 Manual
Page 15
By arranging your samples into folders that match your instrument’s splits, you’ll be able to use the Editor’s
more powerful mapping features such as folder drag-and-drop, and the Instrument Wizard.
Creating sample folders
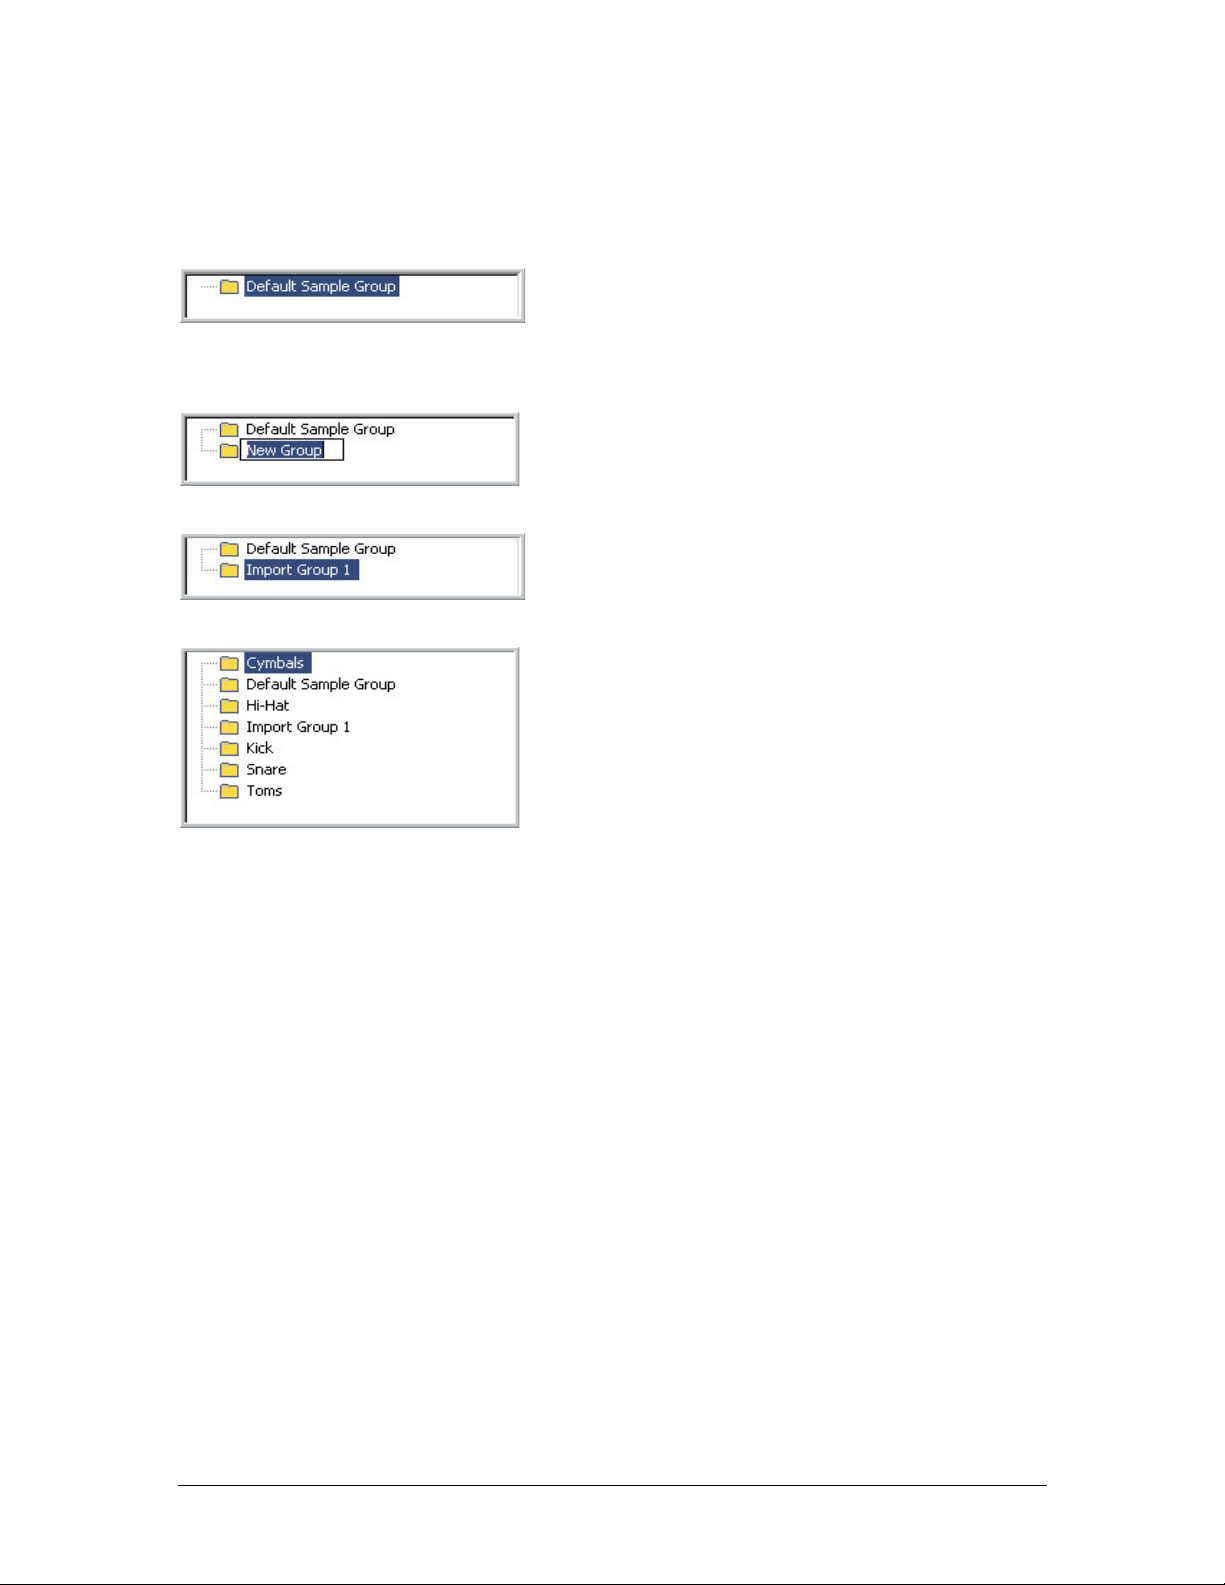
When you create a new .gig le, you will always nd
You can start importing samples into this folder or you can create new folders.
a “default” sample folder in the Sample Window.
You can rename it if you like.
1. To create a new folder, right-click anywhere in
the Sample Window and choose New sample folder.
is will create a new folder ready to be named.
2. You can then give it any name you want.
3. Create as many folders as you need.
TASCAM GigaEditor 4 Manual 15
Page 16
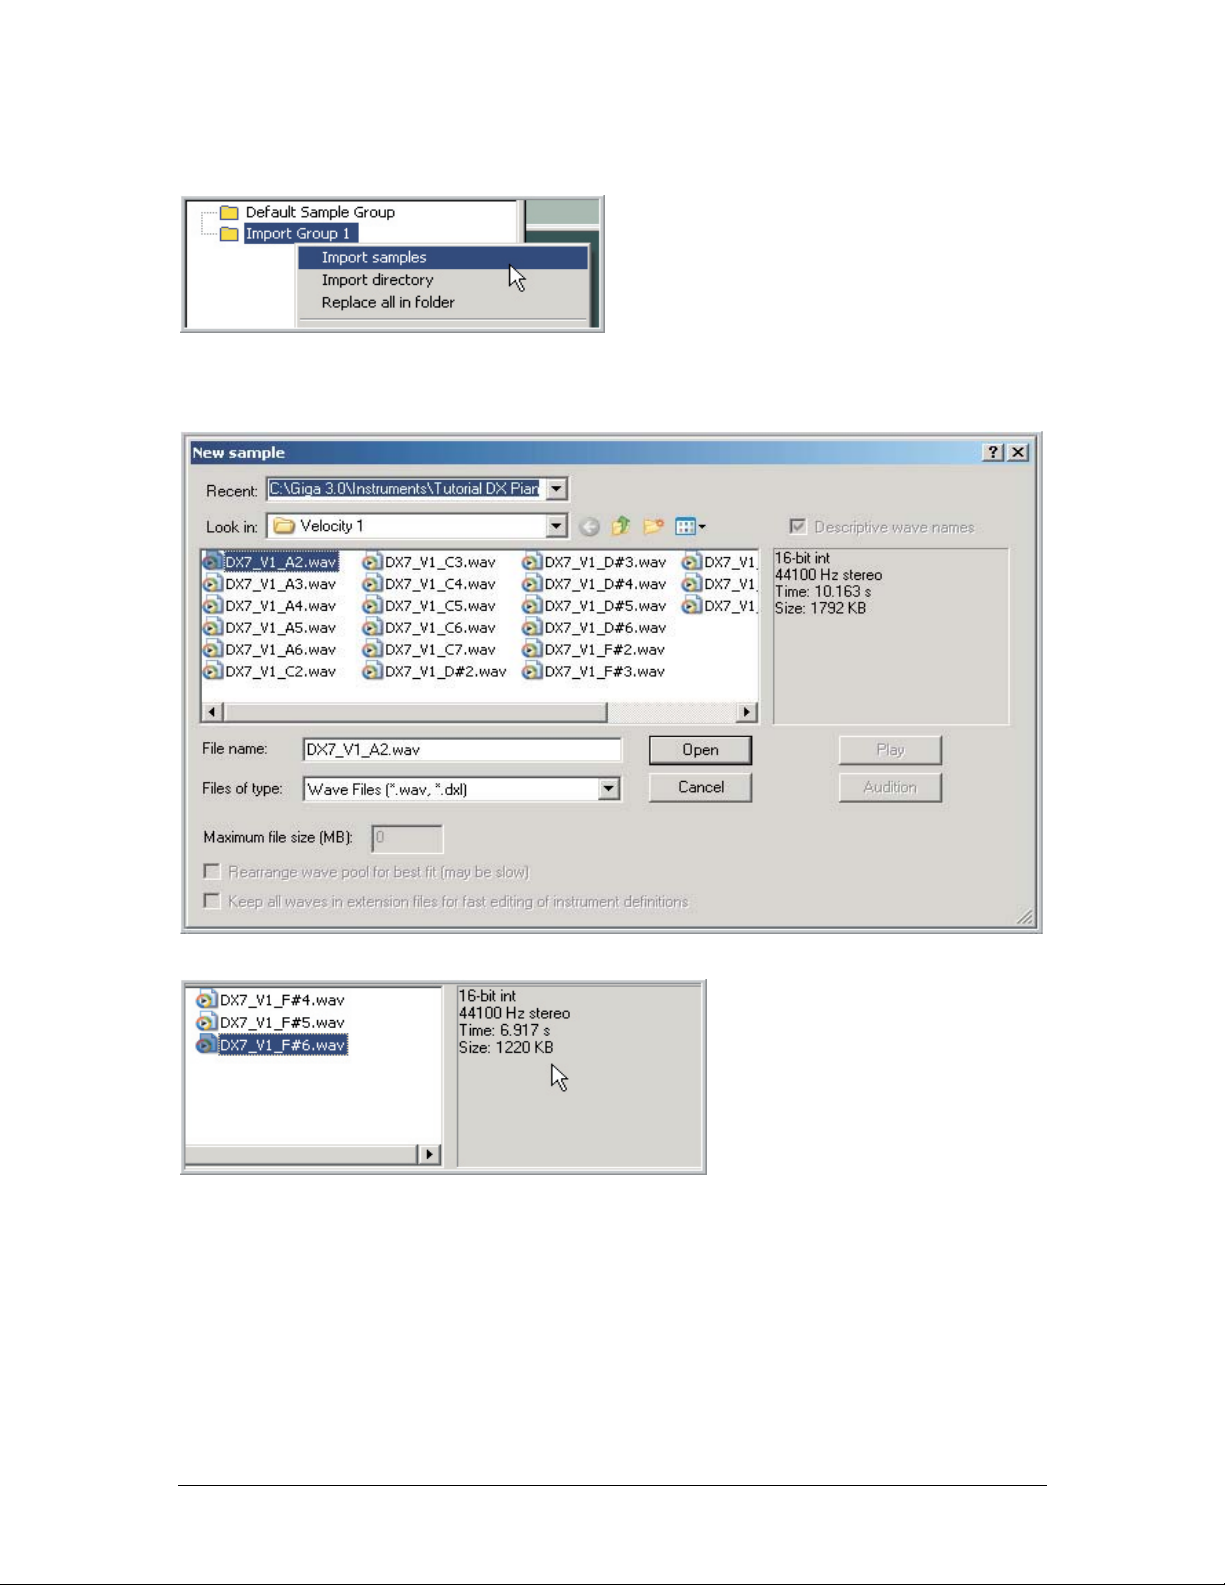
The Import samples command
2. is will bring up the le browser:
1. To import individual samples into a folder,
right-click on the folder and choose Import
samples.
You can right-click anywhere in the Sample
Window, but the samples will be imported to the
currently selected folder.
3. When you select a sample, the
sample’s properties are displayed,
including its word size and sample rate,
length in seconds, and size in kilobytes.
16 TASCAM GigaEditor 4 Manual
Page 17
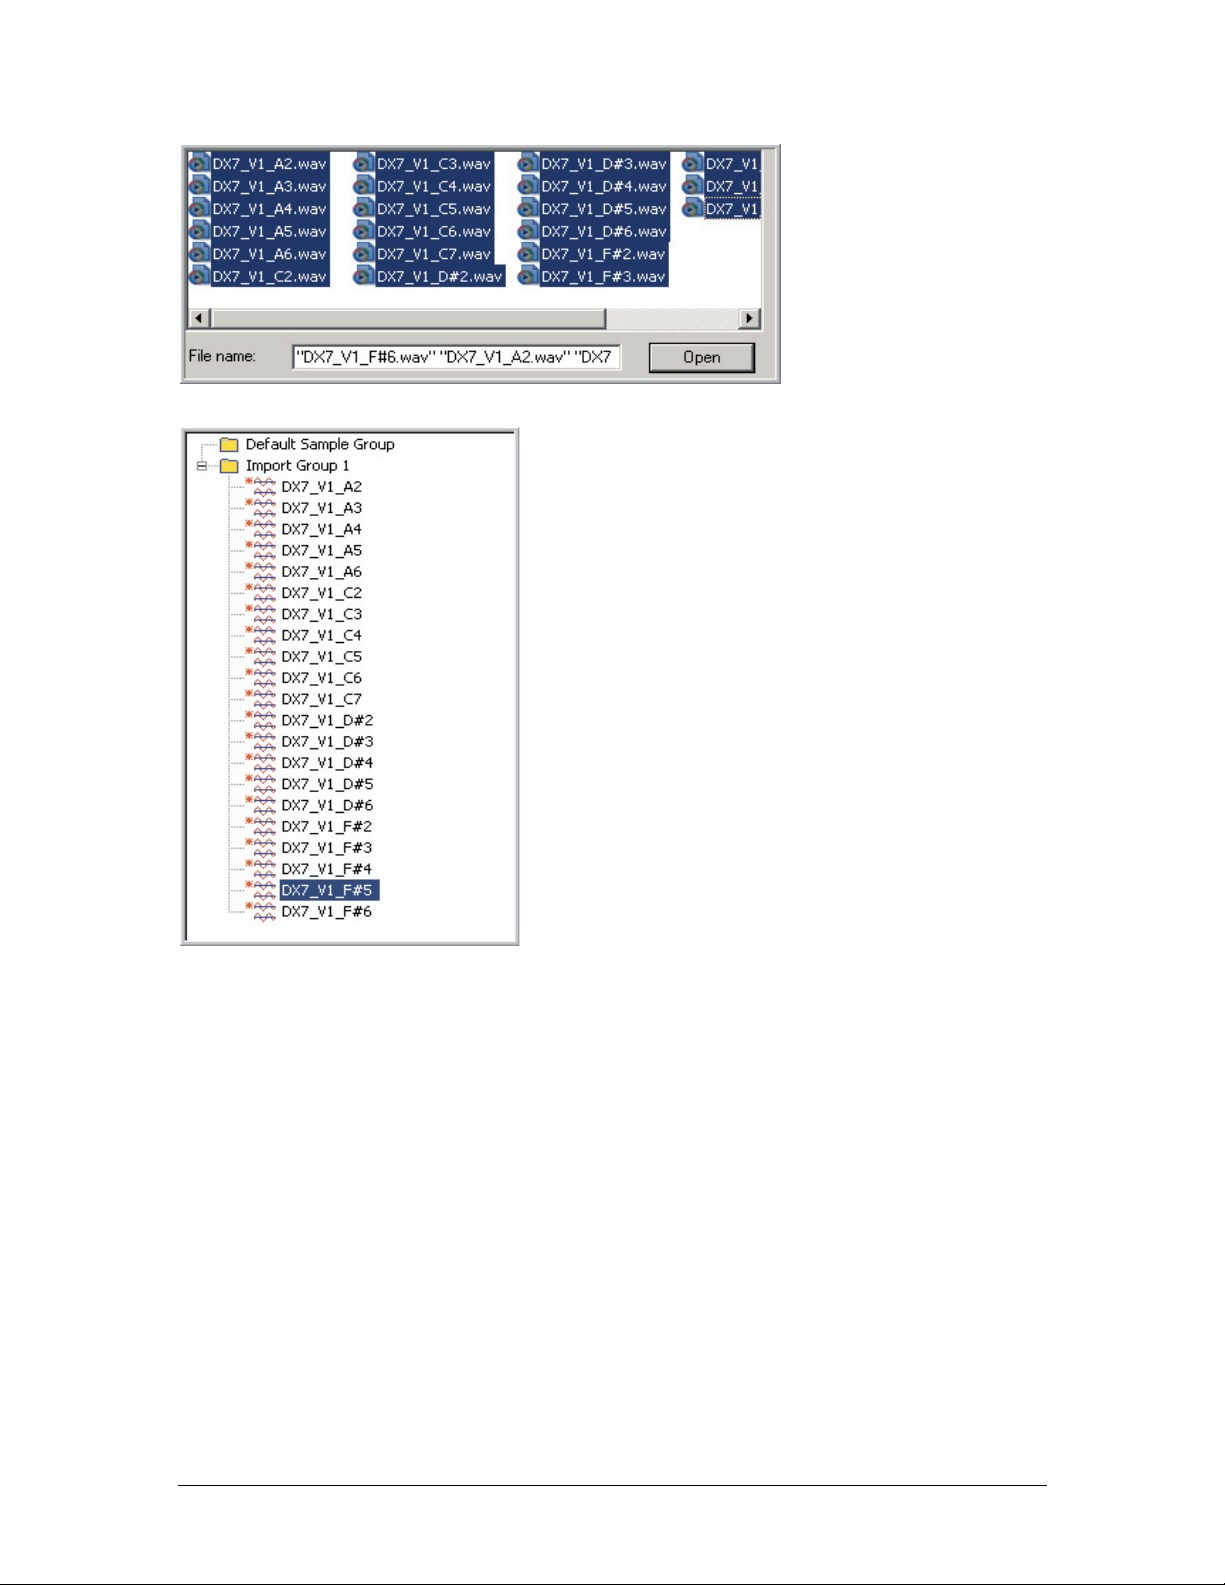
4. Select a sample or a group
of samples and click on the
Open button to import the
samples into the folder. (To
select multiple samples, click
while holding down the
SHIFT or CTRL keys.)
5. e samples will now appear in the Sample Window.
Within a folder, samples can be sorted either
alphabetically or by pitch. Right-click in the Sample
Window to select the sort option from the context menu.
e asterisk by each sample indicates that these samples
have not yet been written into the .gig le. e asterisks
will disappear when the .gig le is saved.
TASCAM GigaEditor 4 Manual 17
Page 18

The Import directory command
is command is used to import an entire directory of .wav les at once. e samples are imported into a
new folder named aer the source directory.
1. Right-click in the Sample Window and
choose Import directory. is will bring up
the folder browser.
2. Select a directory and click OK to import the directory into the
Sample Window. Any .wav les in the directory (or .dxl les, which
are accelerated Giga samples) will be imported. Other types of les
are ignored.
18 TASCAM GigaEditor 4 Manual
Page 19
Importing Samples from the Windows Desktop
Oen the most convenient way to import directories and samples is to drag and drop them directly from
the Windows Explorer into the Sample Window.
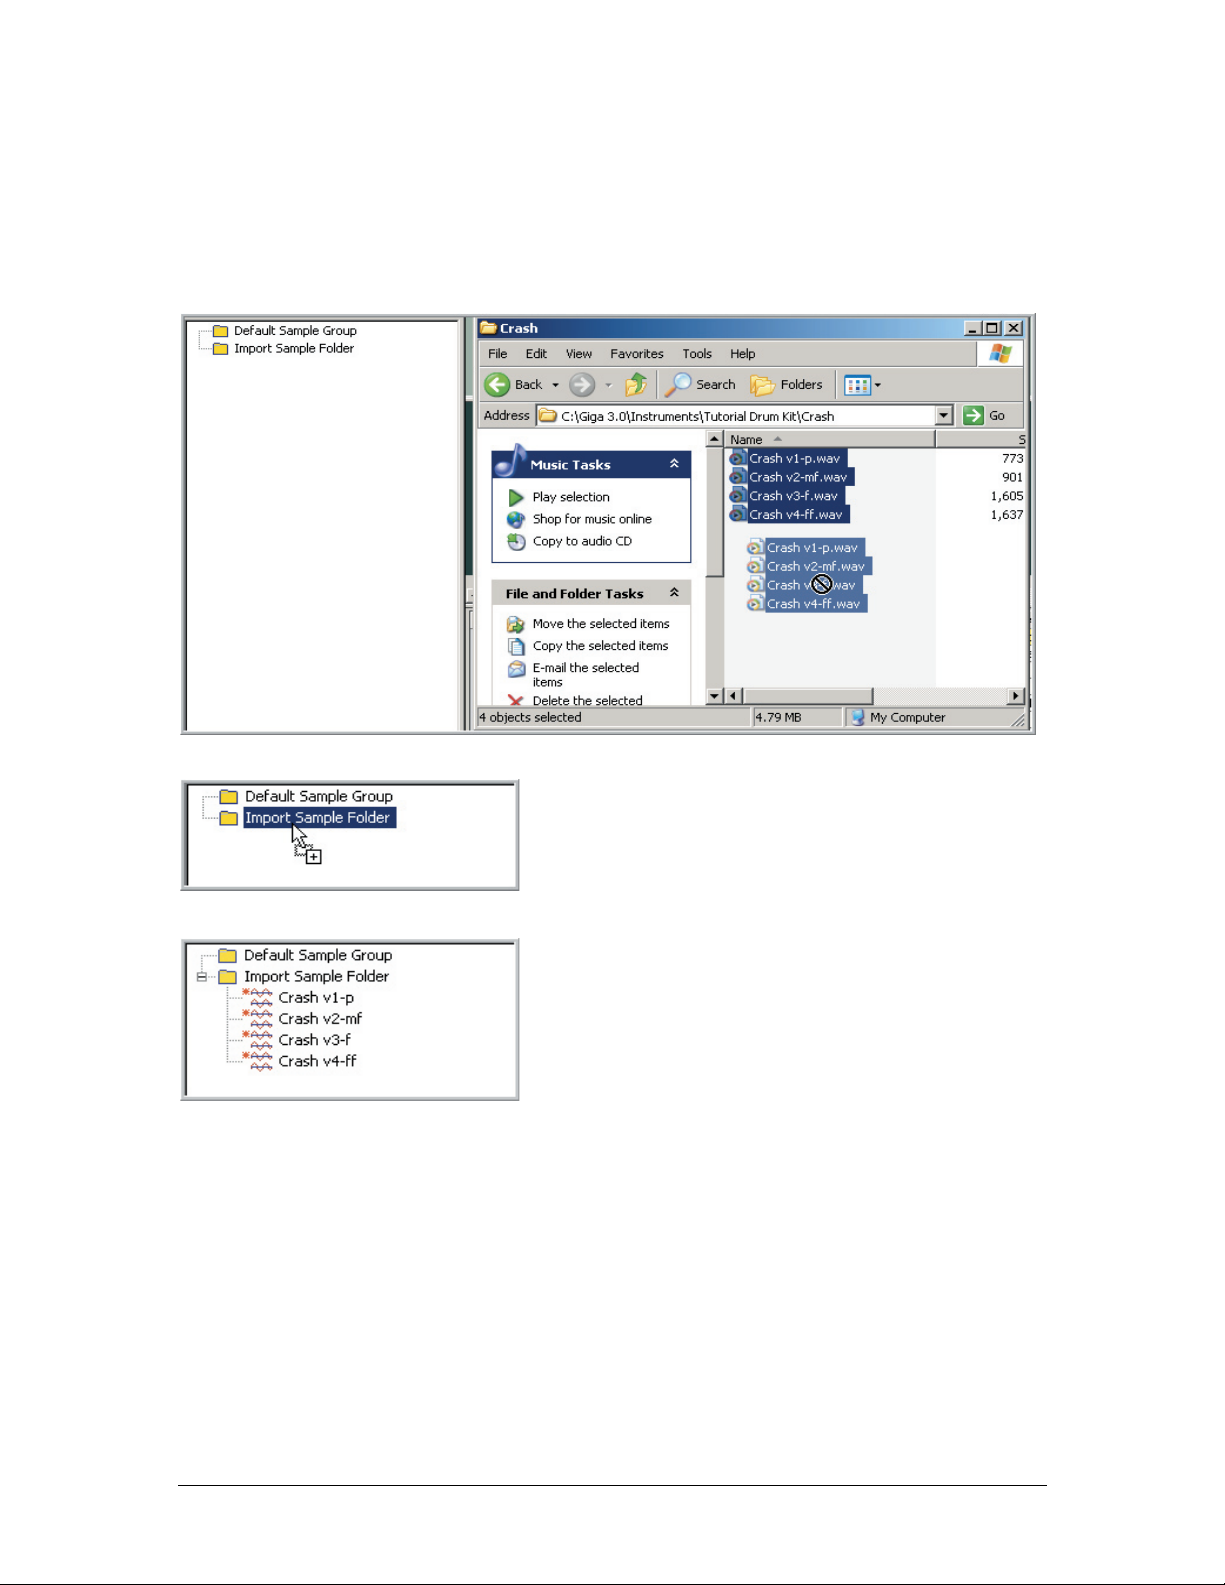
You can drag samples from the Windows Explorer to any folder in the Sample Window:
1. Here we are dragging to the folder named
“Import Sample Folder”.
2. Now the samples appear in the folder.
TASCAM GigaEditor 4 Manual 19
Page 20
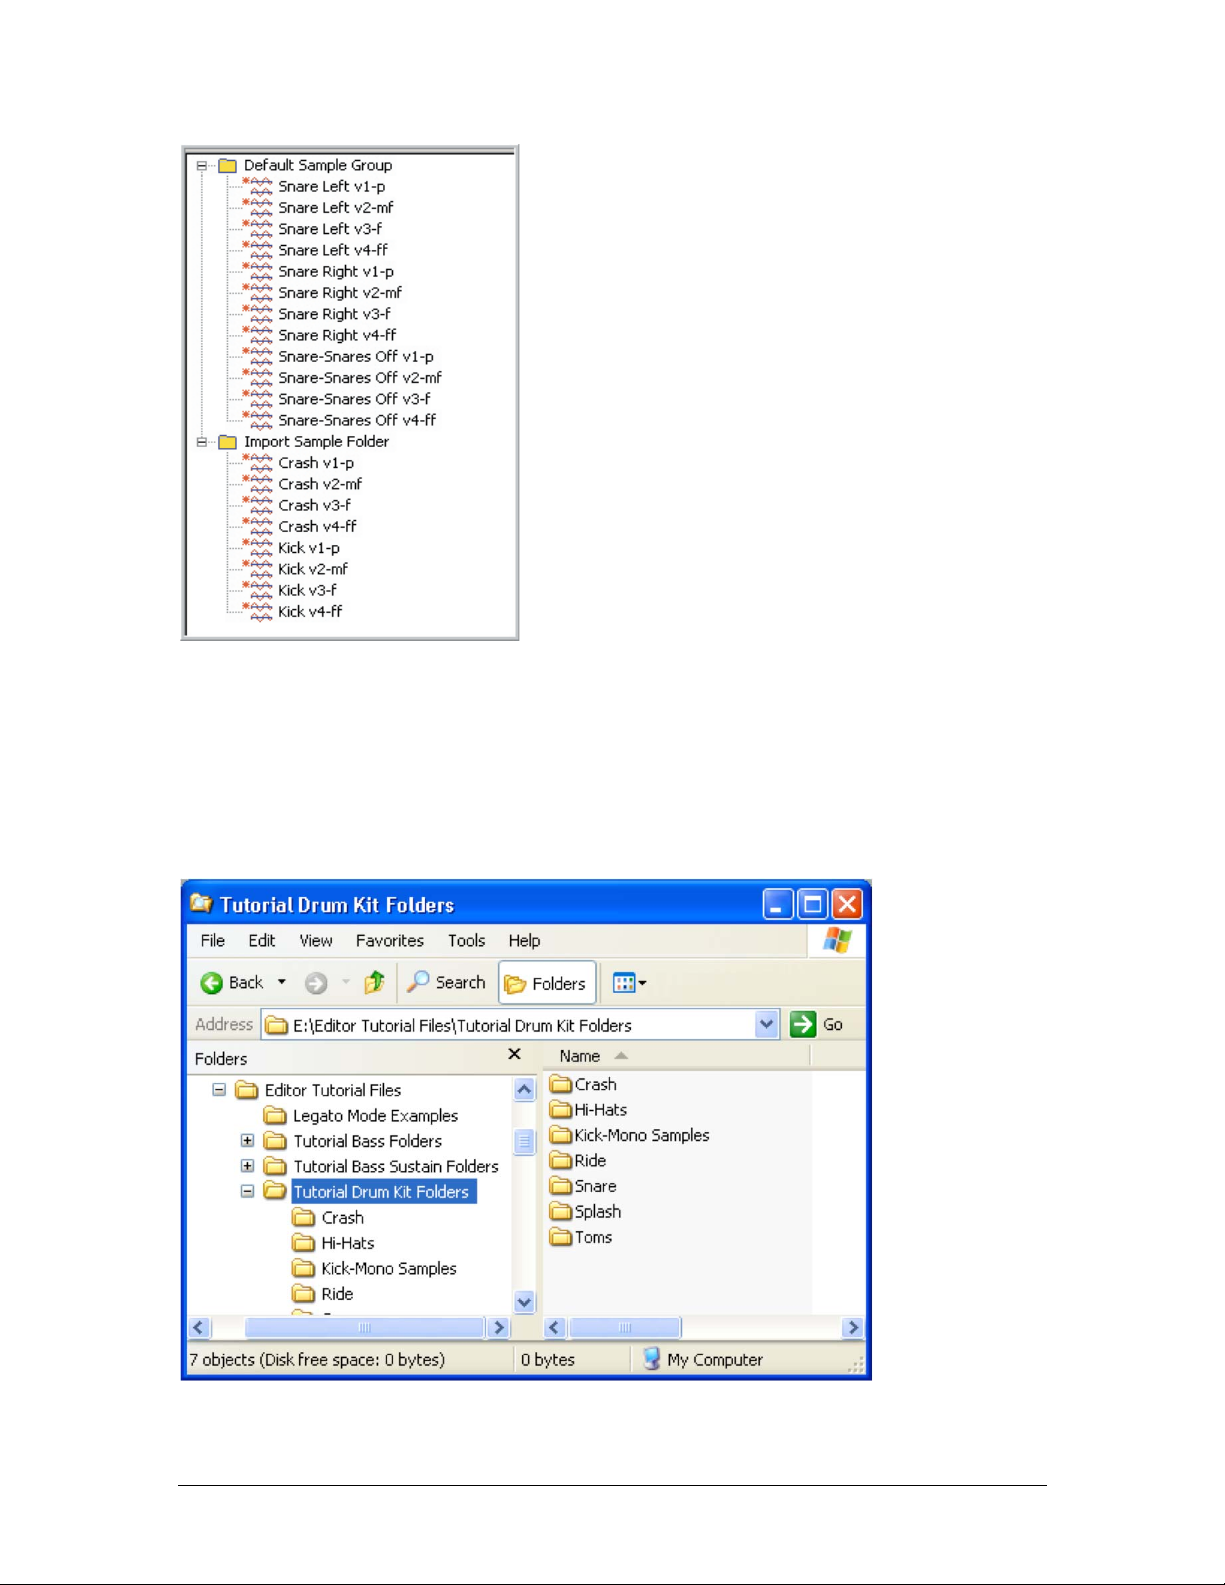
3. You can do this with more samples and put them
in any of the folders. In this example, we put some
Kick samples in the “Import Sample” folder where
the crash samples are. en we put some Snare
samples in the “Default Sample Group” folder.
Importing Sample Folders from the Desktop
You can also drag an entire directory, or even multiple directories, from the Windows Explorer into the
Sample Window. For each directory that you drop, a corresponding folder is created, and any samples in
the directory are imported to that folder.
1. To begin, navigate to where you can see several folders that have samples in them.
20 TASCAM GigaEditor 4 Manual
Page 21
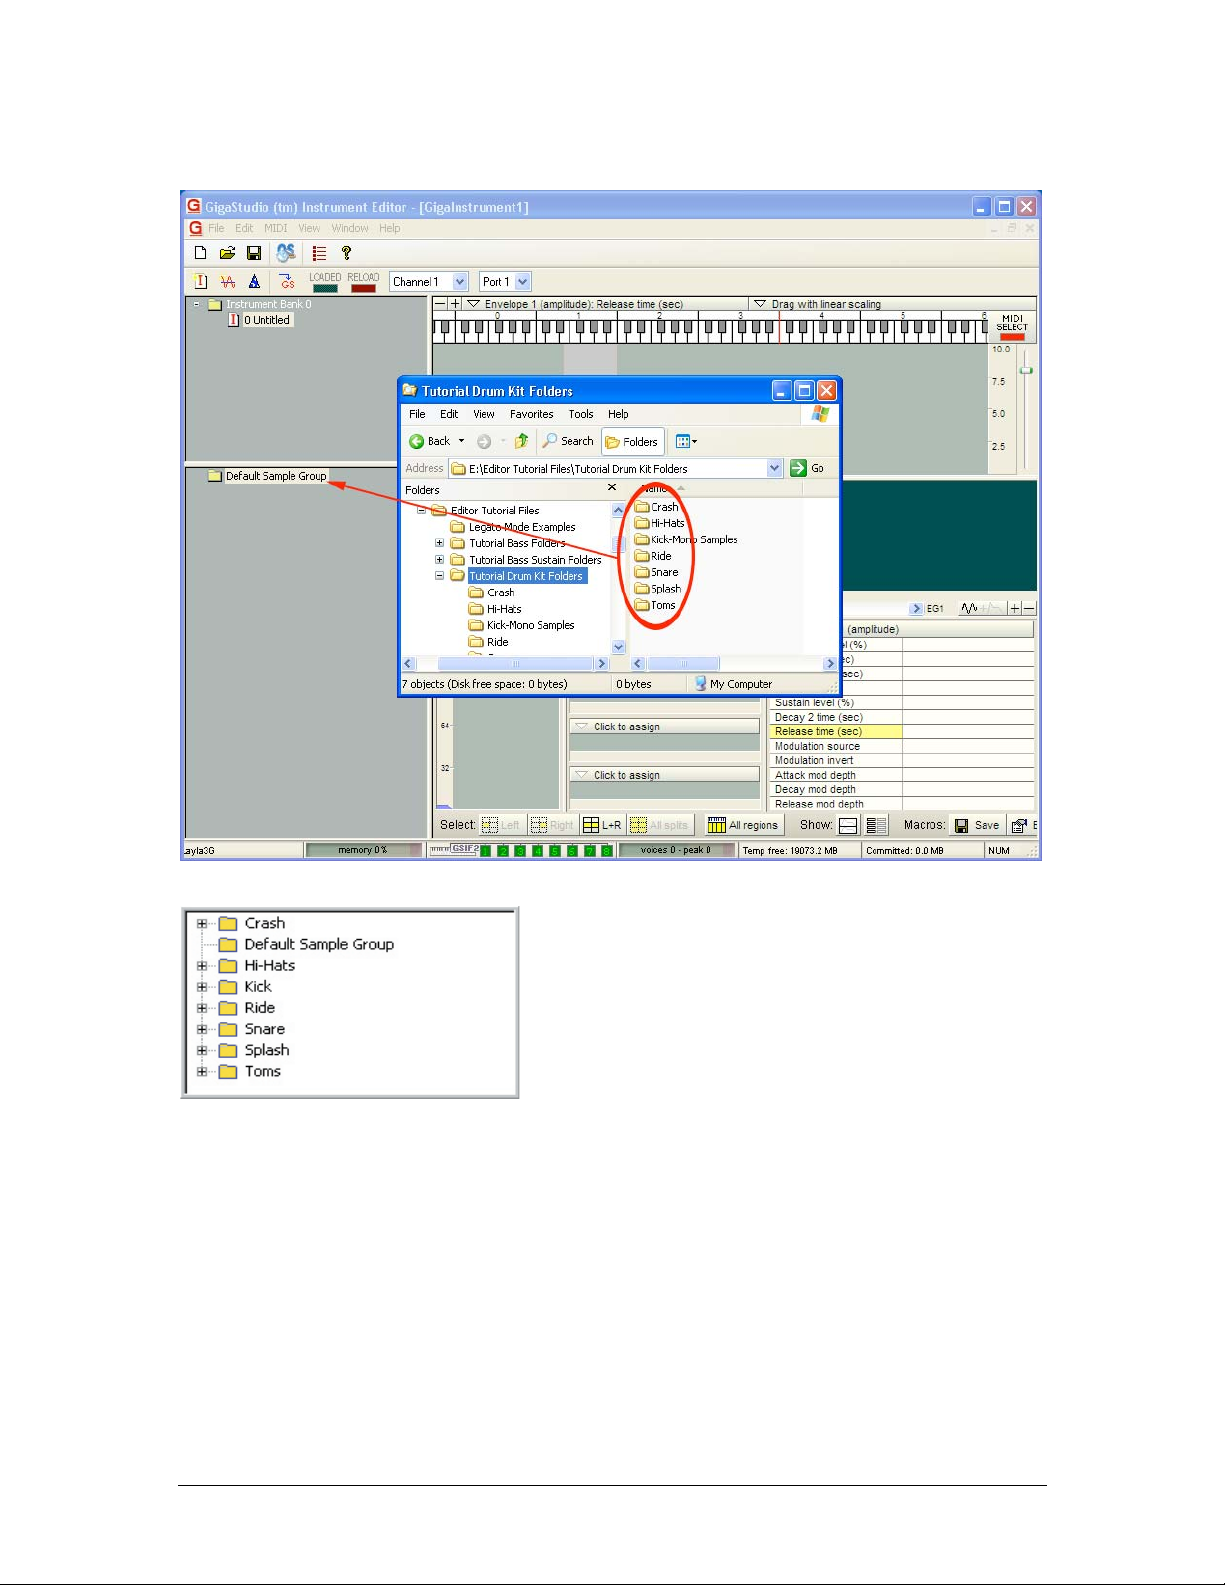
2. Drag and drop a folder or several folders from the desktop into the Sample Window.
3. All the folders and their samples are now in the Sample
Window. is is the fastest way to import a large number
of samples at once.
TASCAM GigaEditor 4 Manual 21
Page 22
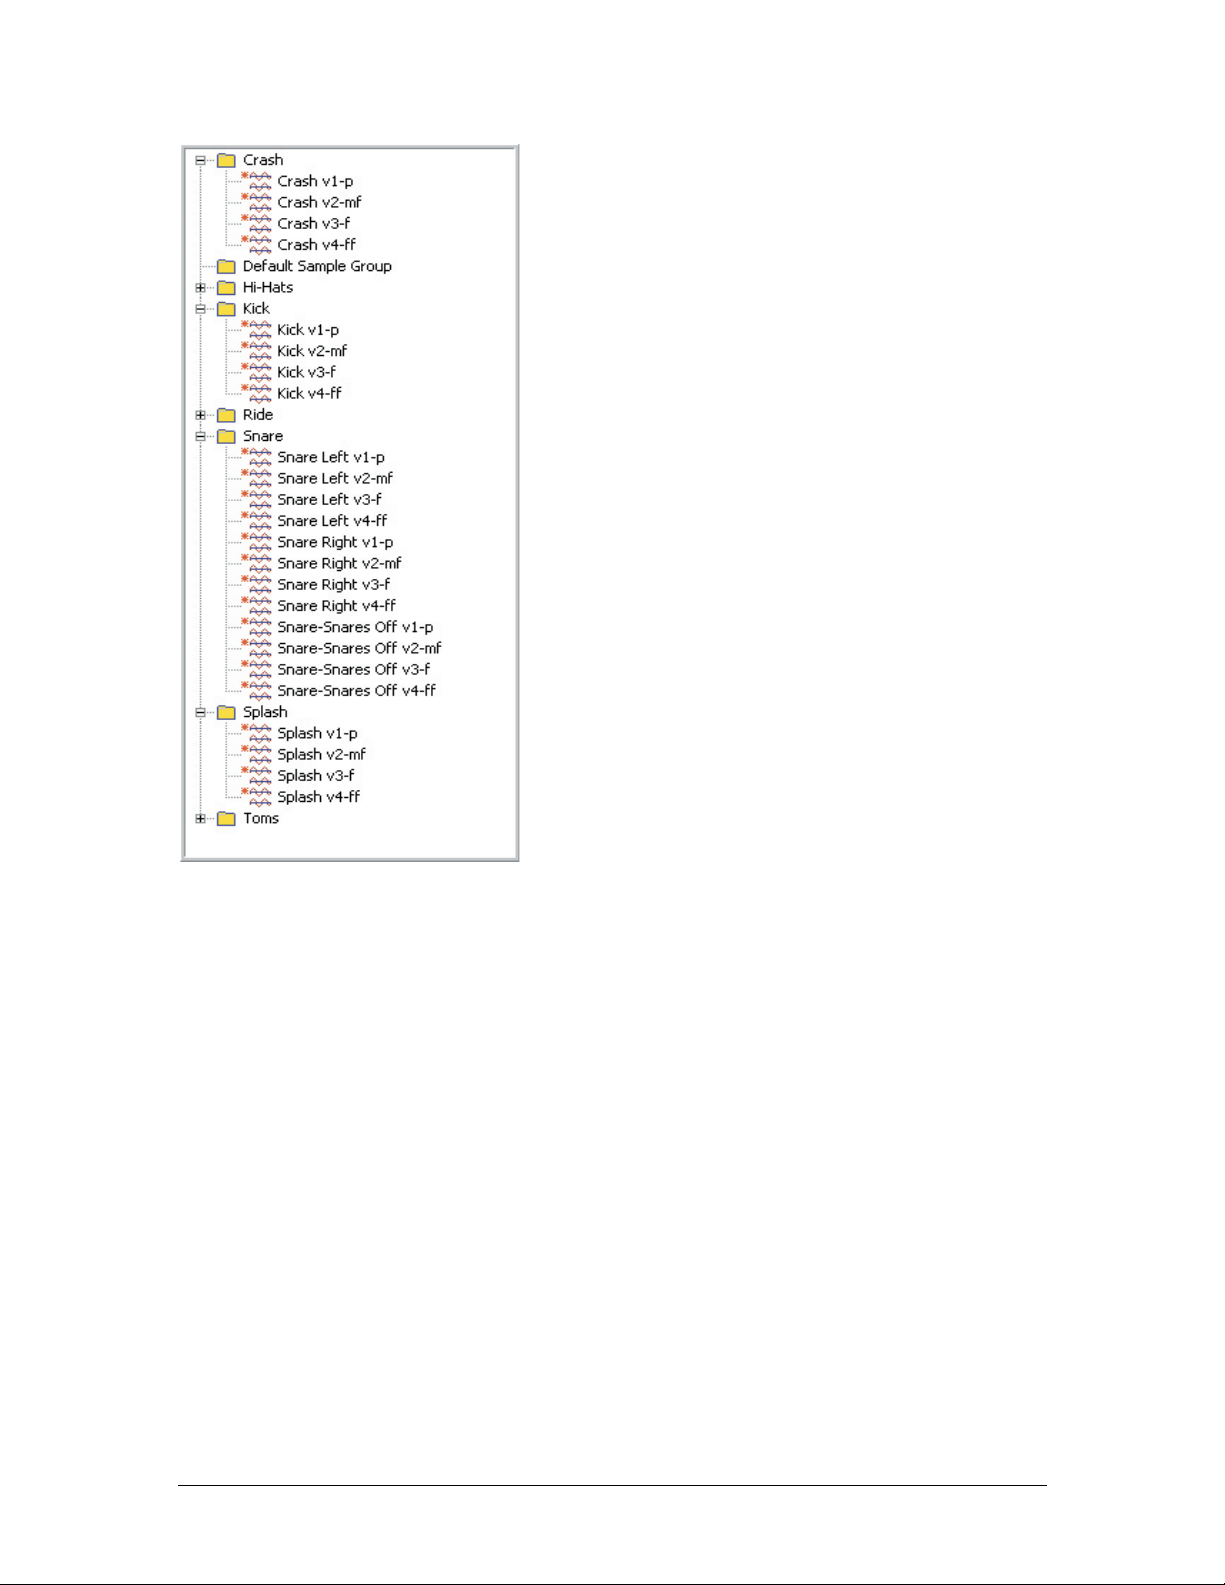
4. Click on the check boxes to open or close the folders to
display or hide the samples. Now the samples are imported,
organized and ready to be mapped into instruments.
Importing Pitch Information
If you are building a melodic instrument (as opposed to, say, a drum kit) GigaStudio will need to know the
root pitch of each sample you import, so that the sample can be transposed appropriately at playback. Pitch
information takes the form of two values, the unity note (which identies the point on the keyboard where
the sample should play back without transposition) and a ne tuning value which is typically used to
compensate for small tuning inaccuracies in the original performance.
Unity note and ne tuning are sometimes saved along with the audio data in a standard .wav le. If your
samples include this data, the Giga Editor will recognize it when the samples are imported, and retain the
information in each sample’s properties.
If your .wav les don’t include tuning information, you have a couple of options. One is to set the unity
note of each sample aer you import it, by double-clicking on the sample to bring up the Sample properties
dialog. If your sample les are named appropriately, an easier method is to let the editor extract the unity
note from the name of each .wav le as you import it. is is possible if your le names contain either the
MIDI note number or the name of the unity note in a format the Editor can recognize, for example:
Trumpet legato 61. wav
Trumpet legato C#4.wav
22 TASCAM GigaEditor 4 Manual
Page 23
To use this feature, you must visit the Preferences dialog (Edit-Preferences on the main menu) and specify
either the note-number or note-name method. You will get the best results when the pitch indication is set
o by spaces, and when there are no numbers elsewhere in the sample name. For the note-name method,
only sharps (“#”) are recognized, not ats.
Creating a Region
e next step in creating an instrument is to create some regions. While there are many ways to create
regions, in this section we will do it manually. is is the least convenient way to create regions but it is
sometimes useful. For example, drum kits oen don’t lend themselves to the more streamlined ways of
creating regions, because each drum (snare, kick, hi hat, etc.) is eectively a dierent instrument and may
require a dierently structured region.
Creating a few regions manually will also help familiarize you with the concept of mapping samples, before
we introduce the more advanced ways of mapping like the Instrument Wizard.
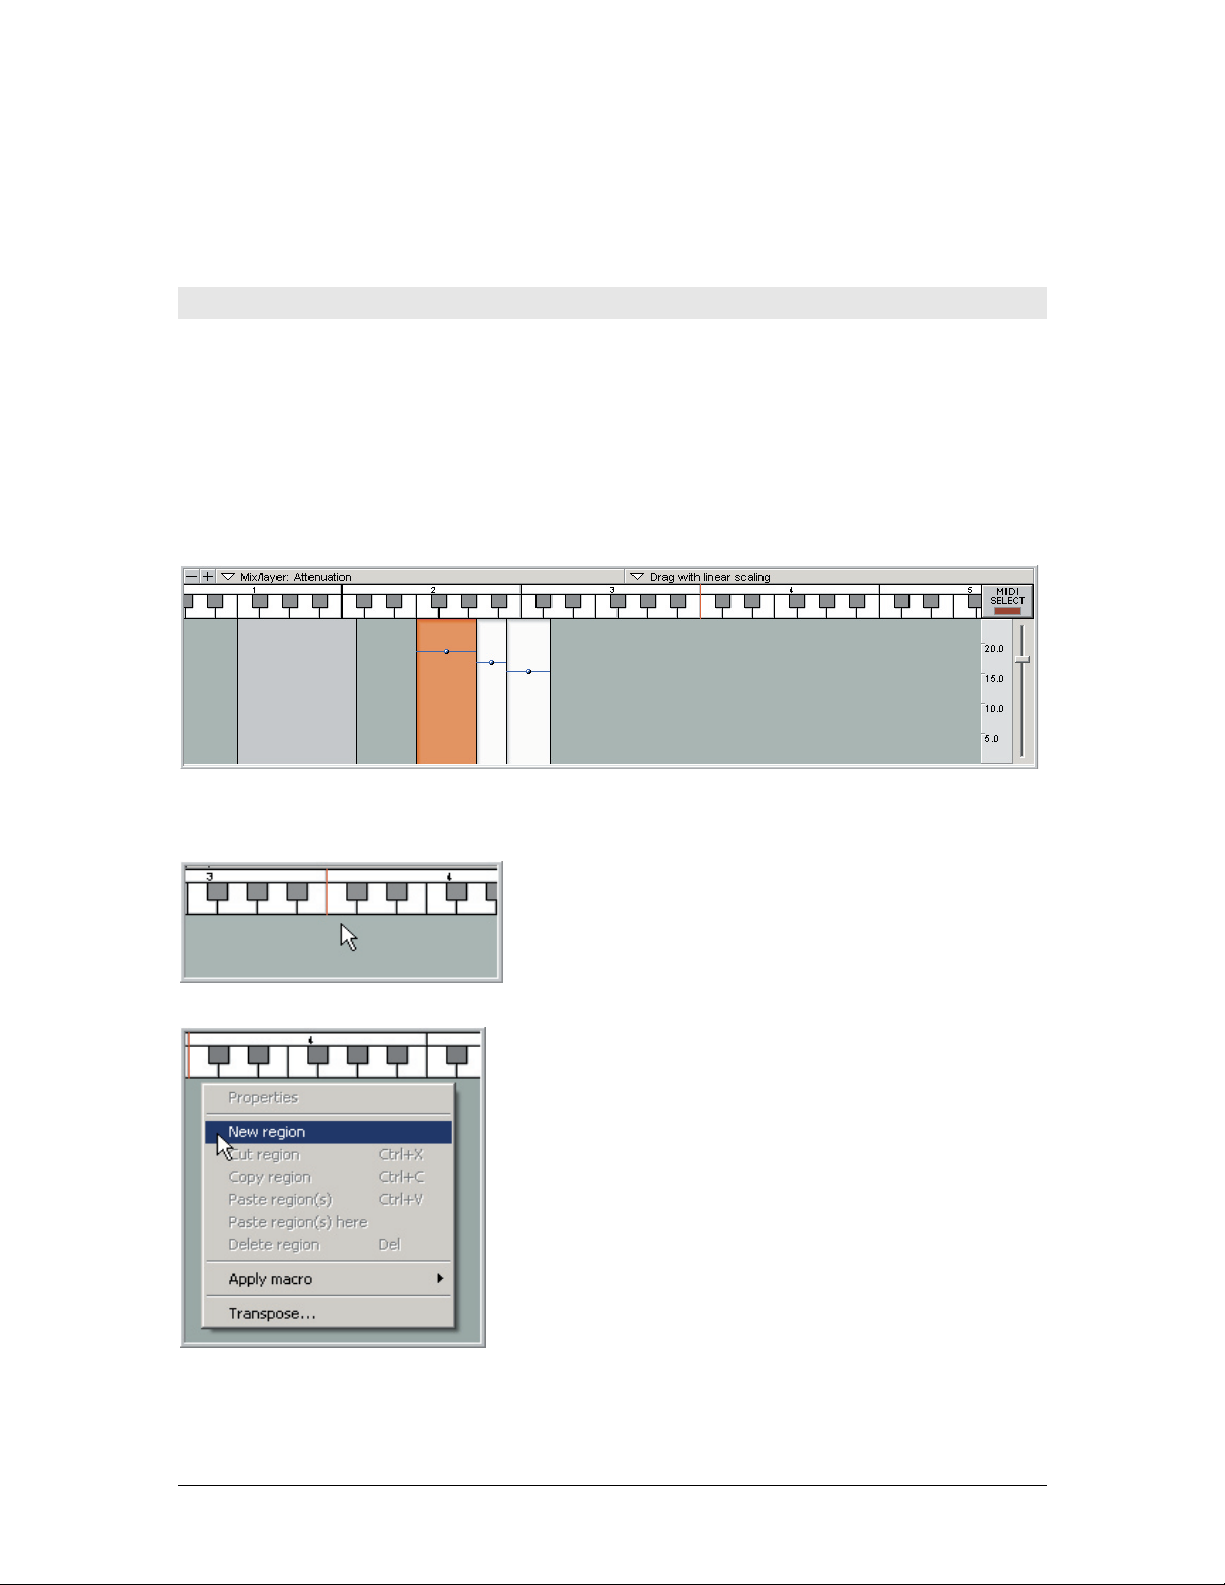
To create our rst region we’ll use the Region Window, shown above. For a full discussion of this window’s
features, see page 130.
1. Place the mouse under the note where you want
to create a region, and right-click. In this example,
we’ll create a region on Middle C.
2. Choose New region from the menu.
TASCAM GigaEditor 4 Manual 23
Page 24

3. is will create a new region, which will also be
indicated in the Velocity Window below.
4. In this case, the Velocity Window shows a single
solid block of color, and the words “Not mapped”
because no sample is yet mapped to the region.
(Actually, if a sample is highlighted in the Sample
Window, it will be mapped here automatically.
Either way, the mapping is easy to change as we’ll
see below.)
When we create velocity splits later, they’ll appear in
this window.
After you’ve created one or more regions, you can resize them or move them around the keyboard.
Moving Regions
1. To m ove a region, grab it in the m iddle so that
the mouse turns into a little hand.
2. Then drag the region to the left or the right.
24 TASCAM GigaEditor 4 Manual
Page 25
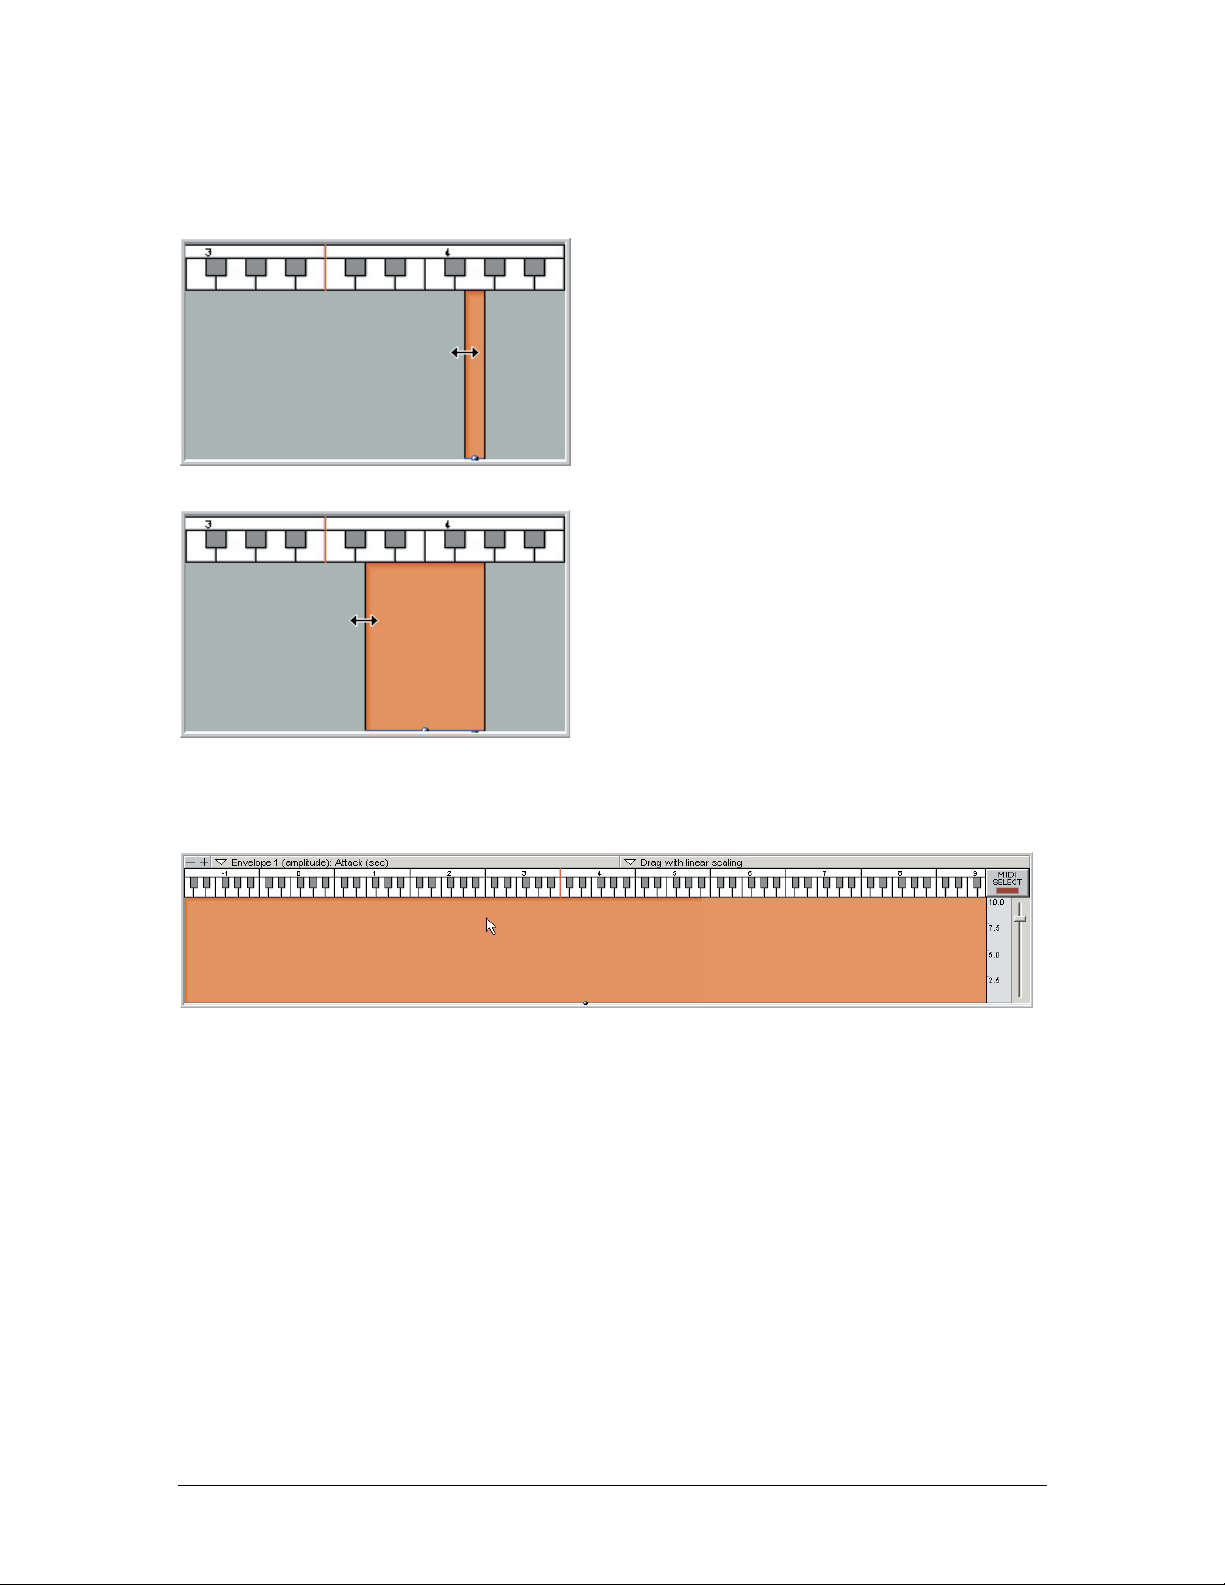
Resizing Regions
1. To resize a region, grab one of the edges with the
mouse so that the mouse turns into a le-right
arrow.
2. en drag the mouse to stretch the region. You
can do this with either side of the region.
3. A single region can be stretched up to the full range of the MIDI keyboard. (Regions are not allowed
to overlap, so a region this large would be the only region in the instrument.)
TASCAM GigaEditor 4 Manual 25
Page 26
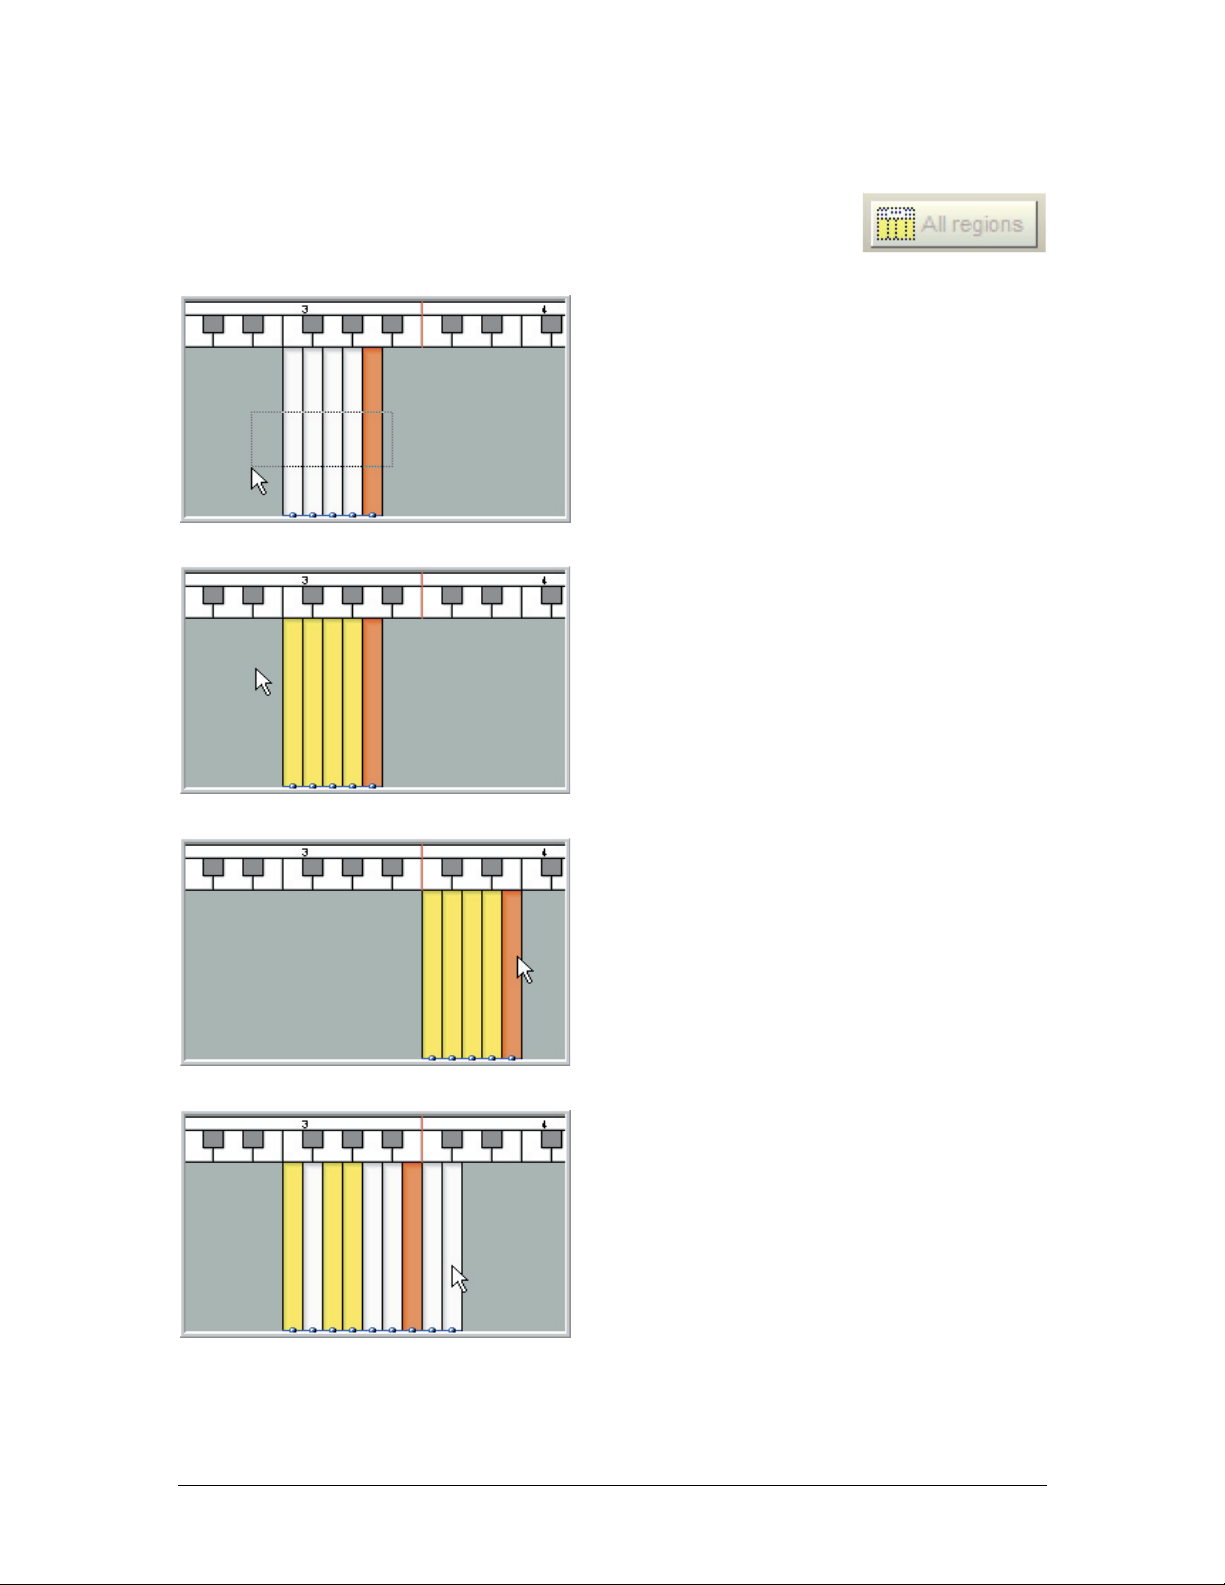
Selecting and Moving Multiple Regions
Note: to select individual regions, be sure the “All regions” selection lock button near
the bottom of the Editor window is disengaged.
1. To select several regions, hold down the ALT key
and drag the mouse to create a “rubber band” eect.
If you start your drag in the gray area outside any
region, the ALT key is not necessary.
Alternatively, select the rst region in the intended
range, then click the last region while holding down
the SHIFT key.
2. e selected regions will now be highlighted in
yellow or orange. (e orange region is the “focus”
region whose properties are displayed in the editor’s
other windows. It is always included in the
selection.)
3. You can then move all these regions at once by
dragging on any one of the regions.
4. You can also select non-contiguous regions by
holding down the CTRL key while selecting regions
with the mouse.
26 TASCAM GigaEditor 4 Manual
Page 27
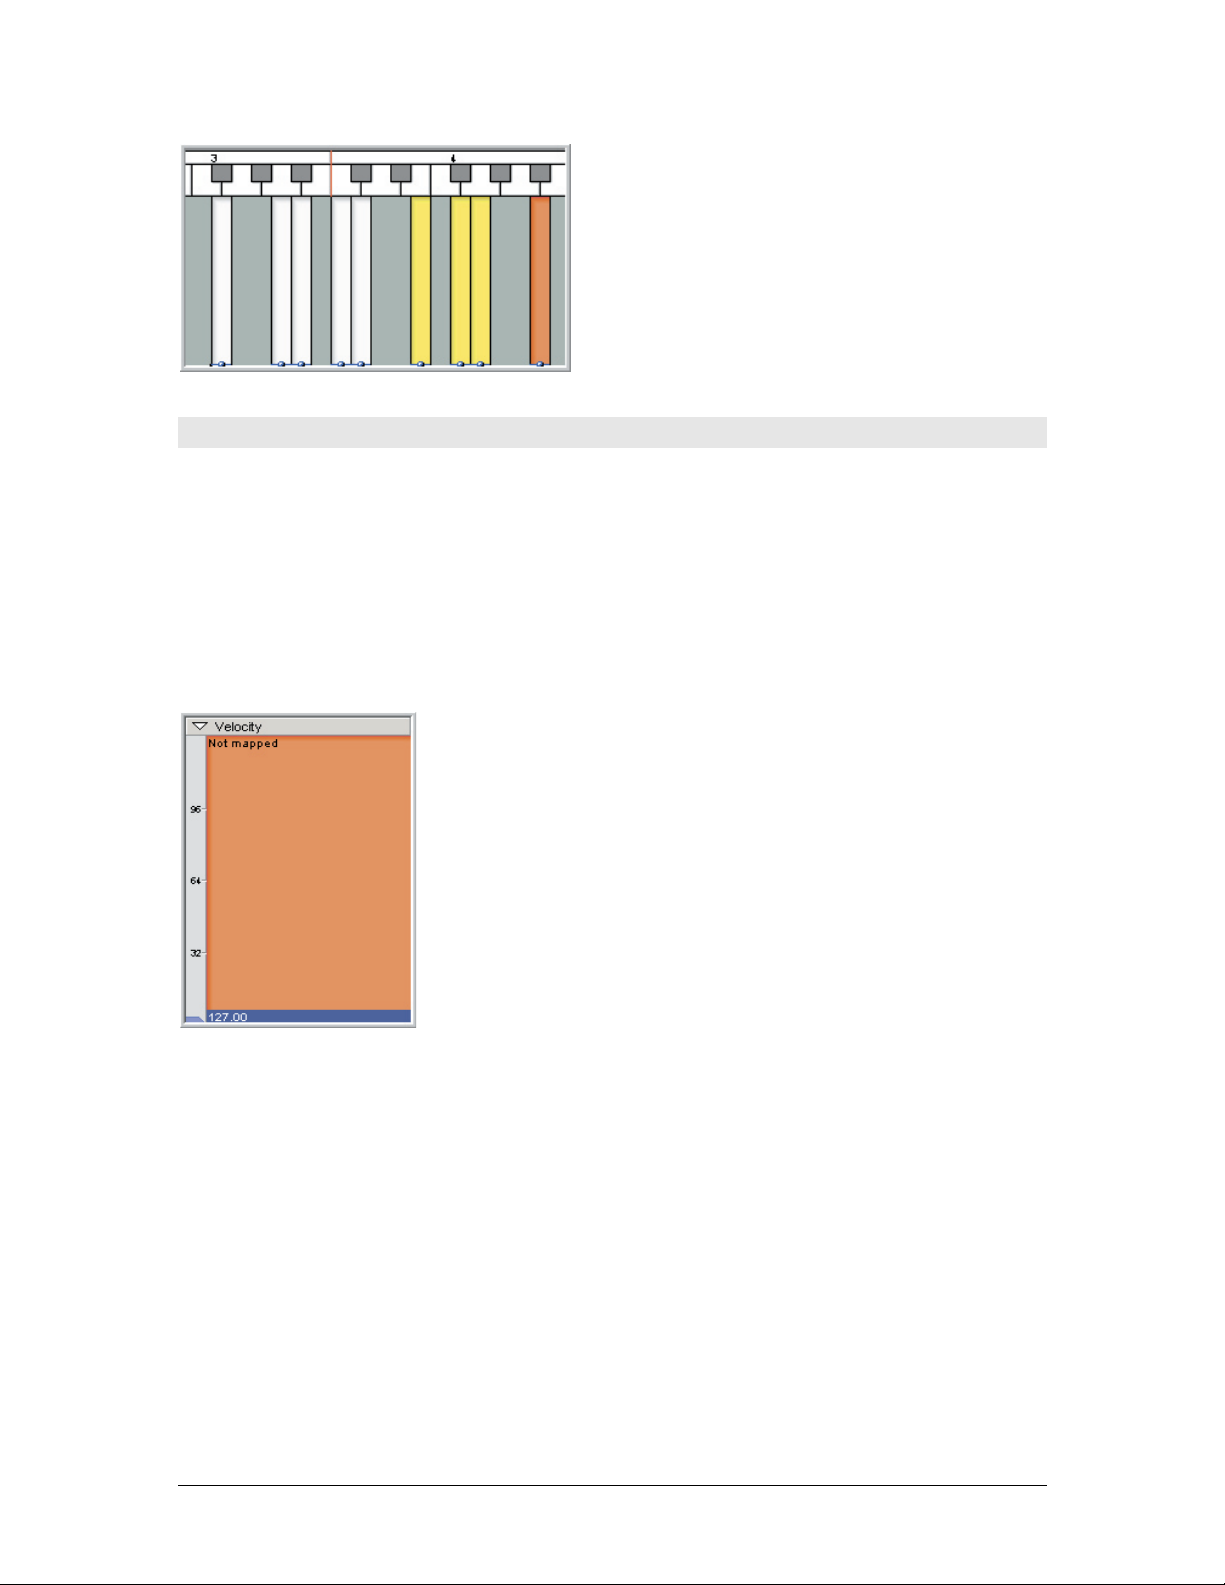
5. ese non-contiguous regions can then be moved
around the Region Window. ey will maintain
their relationship with each other wherever you put
them.
Again, regions are not allowed to overlap, so the
editor will not allow you to drop one region on top
of another.
Creating a Dimension
Once we’ve created some regions, all we need to do to create a playable instrument is map appropriate
samples to the regions. And there’s a very straightforward way to do that: just drag a sample from the
Sample Window and drop it on a region. is would give us an extremely simple region that does nothing
more than play a single sample.
While a region that simple might have its uses, we’ll take things a small step further here and give our new
region a single dimension, so that we can make it more musically expressive by assigning multiple samples
to it. (Remember that a region can have up to eight dimensions, all working simultaneously, so this
example will just hint at the possibilities.)
One of the most common dimensions is the Velocity dimension, which
will enable us to trigger dierent samples depending on MIDI velocity. In
fact, this type of dimension is used so frequently that the largest of the
dimension windows is assigned permanently to Velocity.
In this illustration, the Velocity dimension has no splits and is inactive. To
create velocity splits, click on the header bar at the top of the window.
TASCAM GigaEditor 4 Manual 27
Page 28
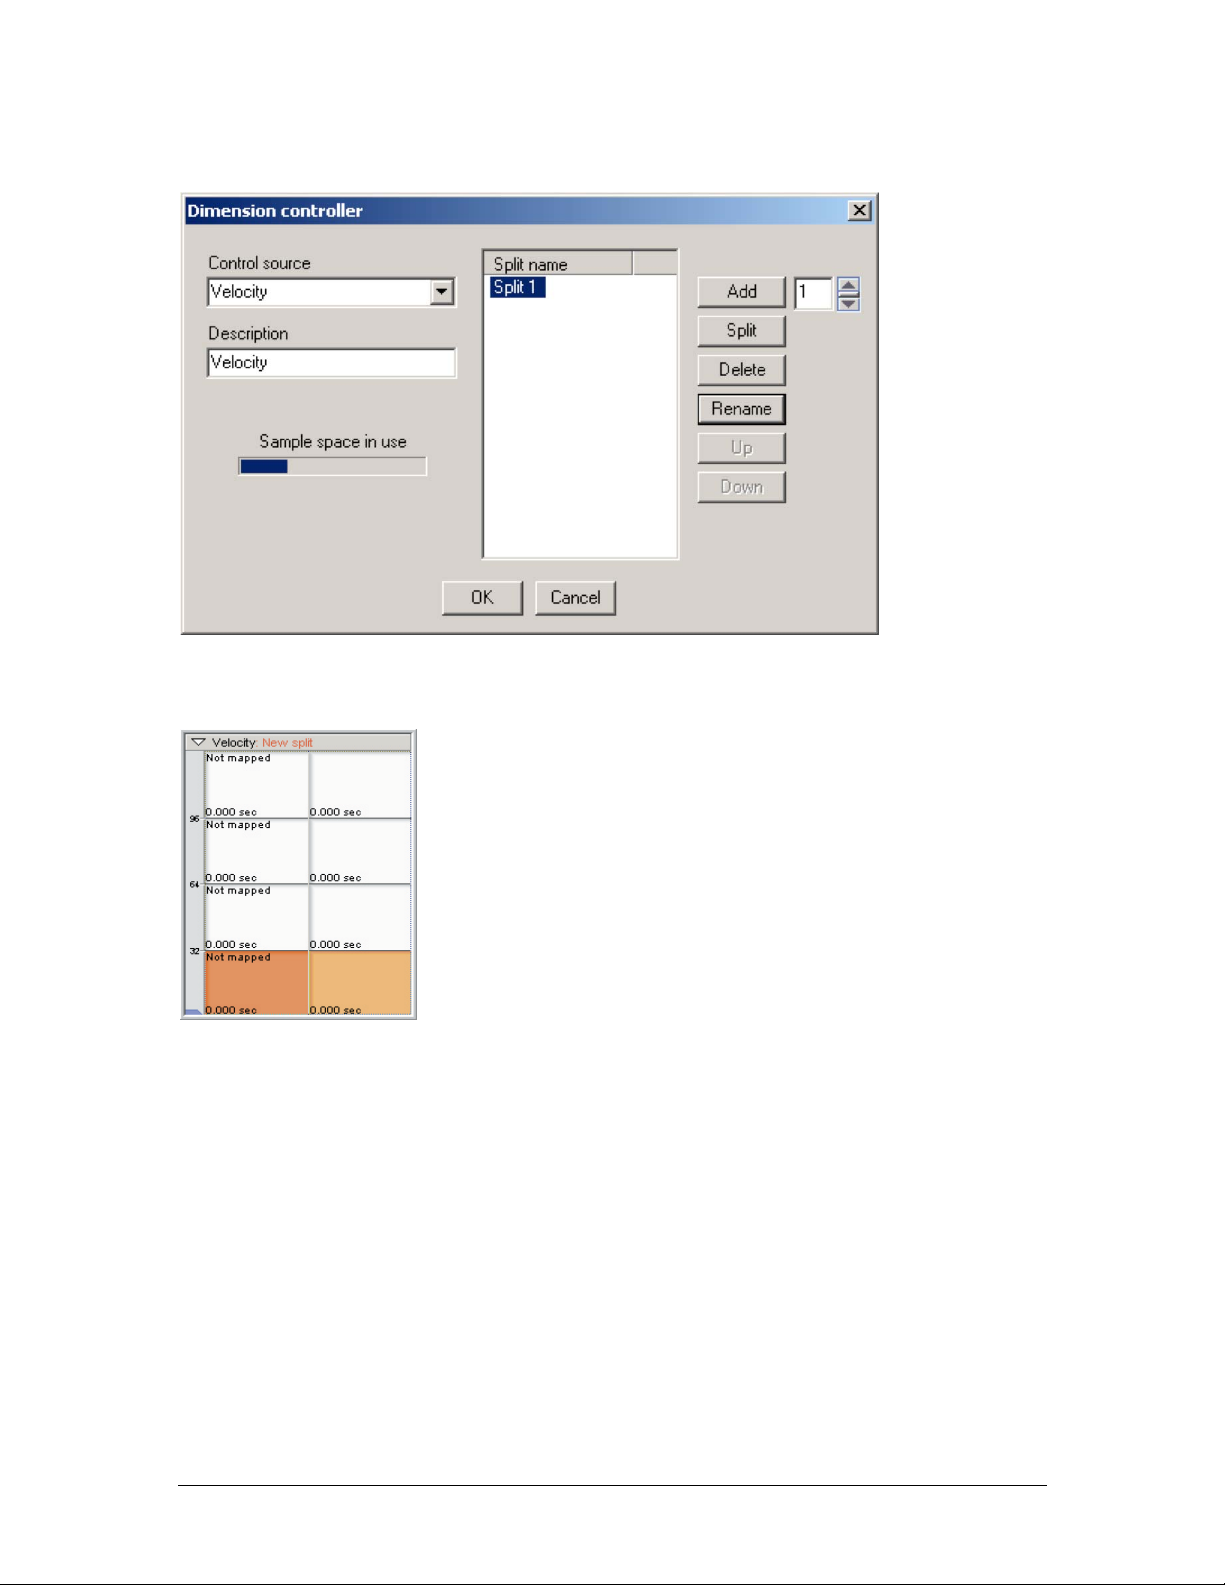
e Dimension Controller dialog appears:
We’ll explain this dialog in more detail in the next chapter. For now, just click the Add button a few times.
is adds new splits to the Velocity dimension.
When you click OK, the splits will be visible in the Velocity window.
Each split can be mapped to its own sample.
Each split also has its own unique articulation – that is, its own set of
envelopes, lters, and other performance parameters.
Velocity splits for manually created regions
Because velocity splits are such a common feature of sampled instruments, you can tell the Editor to add a
certain number of velocity splits automatically whenever you create a region. e setting is in the
preferences:
28 TASCAM GigaEditor 4 Manual
Page 29
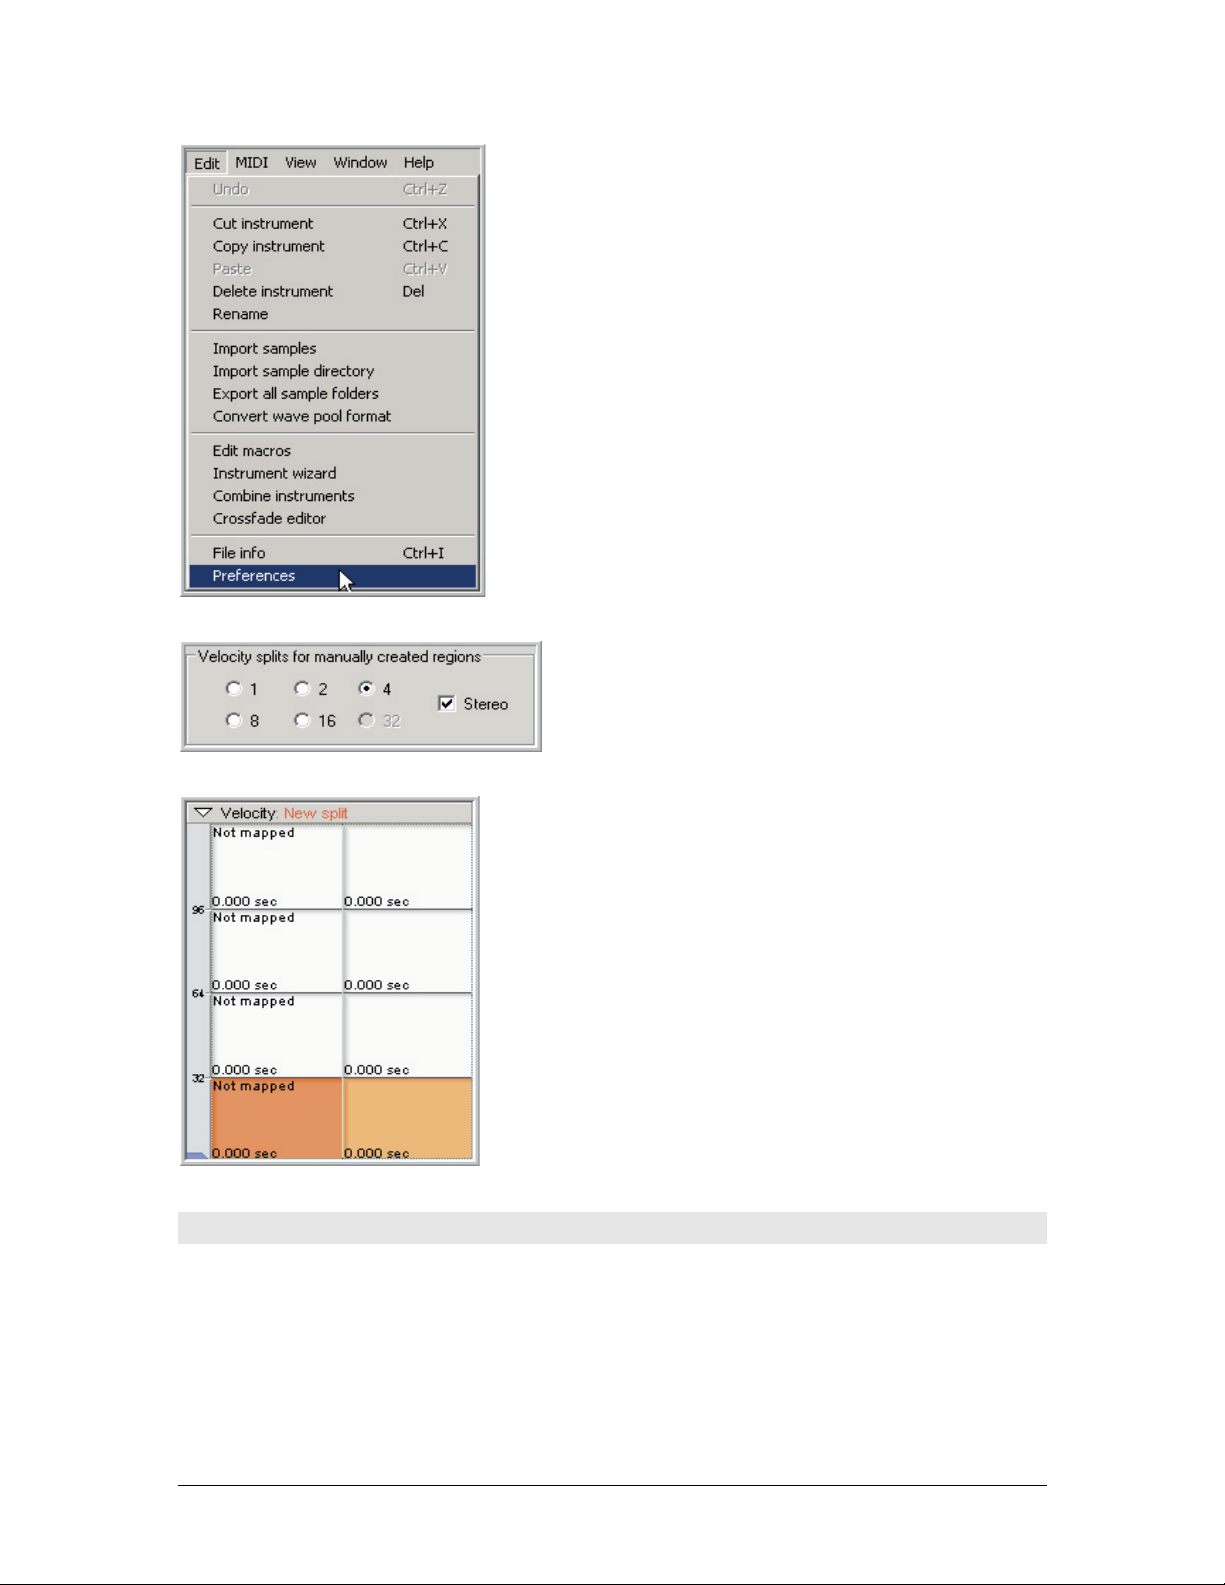
1. Select Edit-Preferences from the main menu.
2. In the Preferences dialog, nd the section called
Velocity splits for manually created regions. Select the
number of velocity splits you want. You can also check
the Stereo box to create stereo regions.
3. With the settings above in eect, any region you create
manually will be a stereo region with four velocity splits. e
velocity splits appear as horizontal bands in the Velocity
Window.
Note that the velocity splits are also divided into le and right
halves, indicating that this is a stereo region.
Mapping Samples to a Region
At this point we’ve created a region and assigned it a simple Velocity dimension. All that remains is to map
some samples to the region.
For this example, suppose we’ve sampled a bell at four dierent dymanic levels, and imported the four
samples as seen below. We want to map the four samples to the four velocity splits we created in the
previous step. First, consider what happens if you simply drag the “” sample and drop it on the region in
the Region Window:
TASCAM GigaEditor 4 Manual 29
Page 30
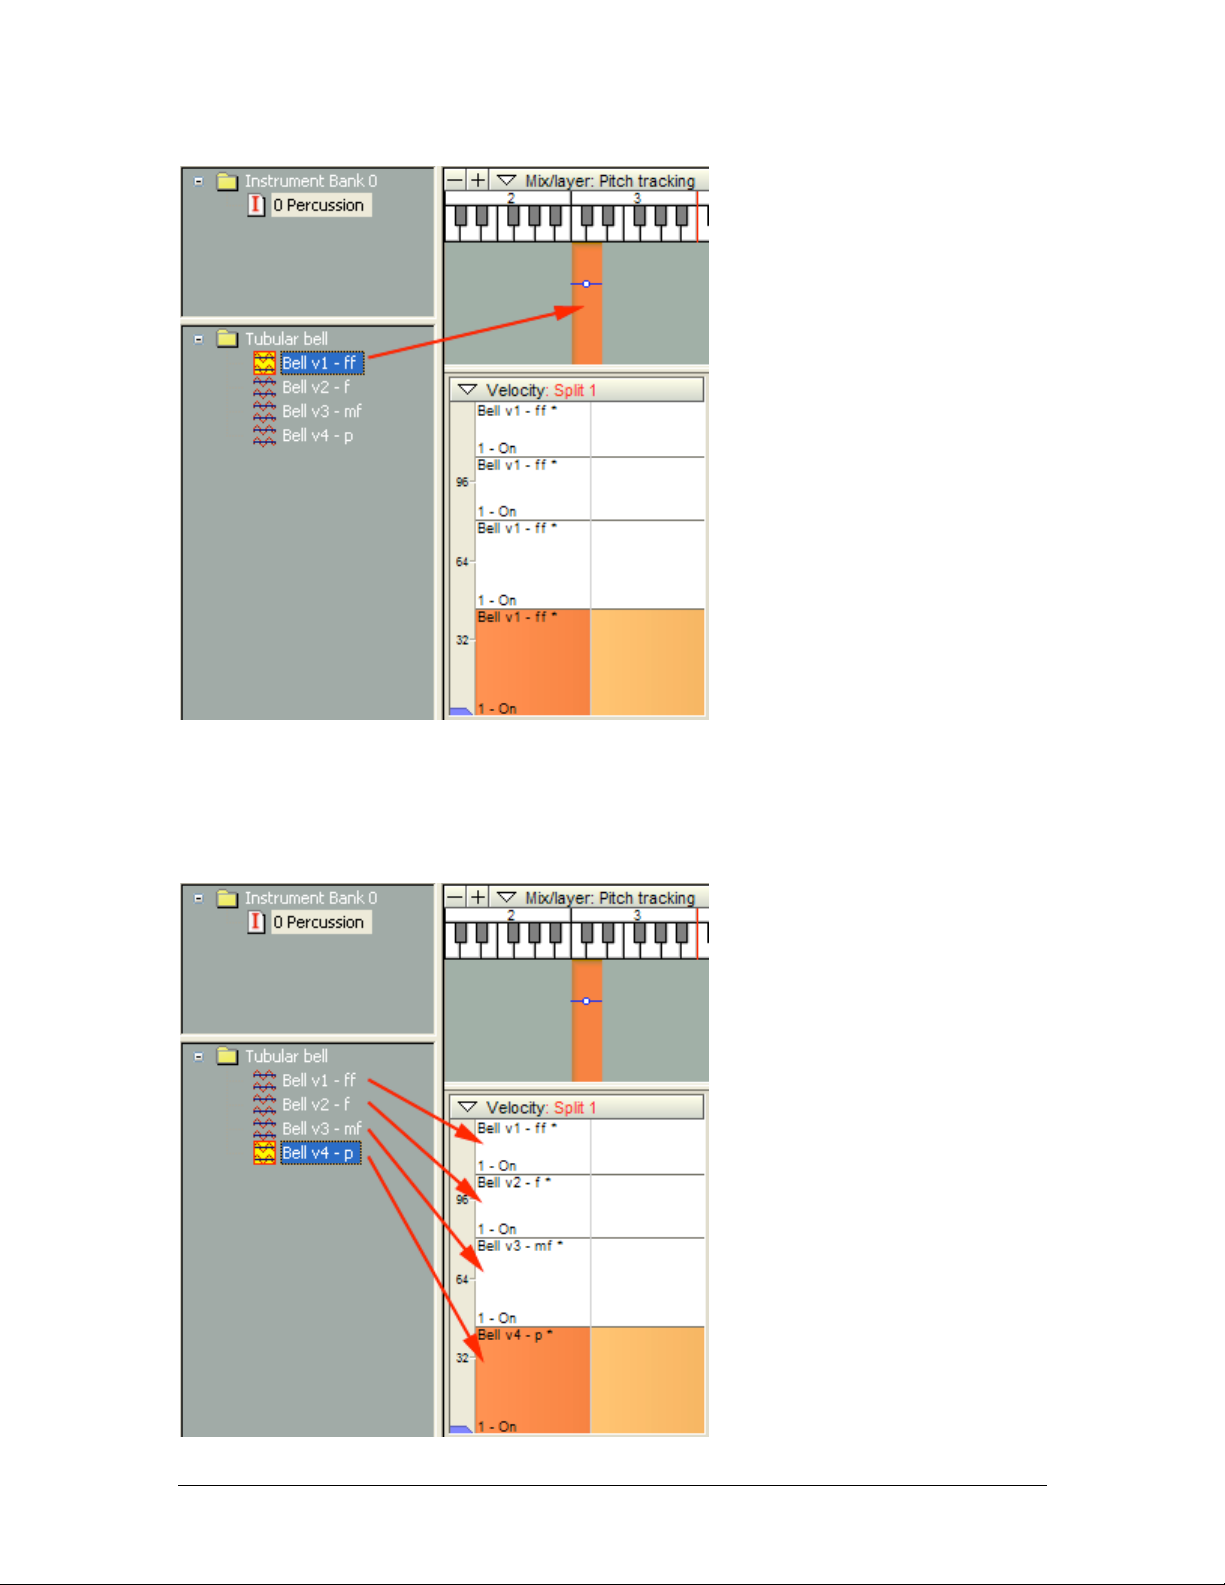
is maps the sample to the region, but unfortunately it maps to the entire region, including all four of our
velocity splits. (You can see this in the Velocity window, where the “” sample is named in all four of the
splits.) is isn’t exactly what we want.
e solution is to drop each sample directly on its own split, as shown below:
30 TASCAM GigaEditor 4 Manual
Page 31

Now each velocity split is mapped to the correct sample.
When mapping unpitched samples such as most drums, use the same technique, but drag the samples with
the right mouse button. is will automatically turn o pitch tracking in the region, preventing the sample
from being pitch-shied at playback.
Hearing Your Work
At this point we’ve created the beginnings of a Giga instrument, but we haven’t yet heard what it sounds
like. To hear your work, press the Download button on the .gig le’s toolbar.
You may be prompted to save your work before proceeding. is is because certain major edits to a .gig le
require that the le be re-written to disk and reloaded by the sampler.
Since adding instruments, regions, or splits to a le all require a reload, you’re more likely to encounter this
message in the early stages of constructing an instrument. Minor edits, such as changes to split points and
articulation parameters, are communicated directly to the instrument in memory and do not require a le
save.
When the instrument is loaded into memory, the LOADED indicator lights green, and the
instrument is ready to play.
A Faster Way To Work
Creating and mapping regions automatically
So far in this chapter we’ve seen how to create individual regions and map samples to them one by one.
While these techniques have their uses, they’re too labor-intensive to be suitable for creating a large
instrument from scratch. In this section we’ll look at a simple technique that can not only create a large
number of regions at once, but also map samples at the same time.
1. Grab one or more samples with the mouse and drop them into the Region Window. You can also
drop an entire sample folder (which is one reason we encouraged you earlier to organize your
samples into folders):
TASCAM GigaEditor 4 Manual 31
Page 32

2. e Editor creates a region for each sample you drop, located on the keyboard according to pitch. If
necessary, the regions are stretched so that there are no unmapped keys between regions.
If you drop several samples and nd that only one region is created, a likely explanation is that the samples do
not contain pitch information, and have all defaulted to middle C. Since regions cannot overlap, only one
sample can be mapped to any given note. Assign a unique pitch to each sample (in the sample properties) and
try again.
32 TASCAM GigaEditor 4 Manual
Page 33

3. If you drop samples into the Region Window using the right mouse button, you’ll get a slightly
dierent result. In this case the samples are mapped in alphabetical order and pitch tracking is
turned o in each region, so that the samples play back at their native pitch. Each region is allocated
only a single key.
e right-button technique probably won’t create a very useful instrument from the bassoon samples
shown in the illustration, but it can be a convenient way to quickly audition a large number of samples,
particularly unpitched ones such as percussion or sound eects.
Creating and mapping splits automatically
In the example above we created a series of regions by dropping a group of samples in the Region Window.
is is a convenient way to create regions, but it creates only the simplest kind of region, mapped to a single
sample with no dimensions or splits.
Once the regions are created, however, we can create and map additional splits easily by dropping groups of
samples into the dimension windows themselves. Note that the success of this technique depends entirely
on how well organized your samples are.
We’ll start this example like the previous one, by dragging a folder full of samples into the Region Window
of an empty instrument. is time we’re building a piano with six velocity layers. e samples for all 88
keys of the soest velocity layer are in folder “Velocity1:"
TASCAM GigaEditor 4 Manual 33
Page 34

e drop maps the samples across the keyboard according to their pitches.
34 TASCAM GigaEditor 4 Manual
Page 35

Next, we’ll map the second velocity layer using the samples in folder “Velocity2”. Instead of dropping this
folder in the Region Window (which would just replace the existing mappings), we’ll drop it on the
Velocity Window and use the right mouse button. is brings up a context menu at the point of the drop:
e context menu gives several options:
Map to existing split (by pitch). is option would replace the samples in the existing split with
samples from the dropped folder, using pitch to decide their placement. Note that this applies not
just to a single region, but to every region across the keyboard that has the same dimensions and
splits as the focus region. (Note that this is the default option – the one that will execute if you
drop a folder in this window with the le mouse button.)
Map to existing split (alpha order). Replaces the samples in the existing split with samples from
the dropped folder, mapping the samples alphabetically by name. e editor assumes you are
dropping unpitched samples and turns o pitch tracking in the mapped splits.
Map to new split (by pitch). Creates a new split at the point where you dropped the folder, and
maps the folder’s samples into the new split according to pitch. Again, this operation is applied to
all possible regions across the keyboard. If you drop in the upper half of an existing split, the new
split is created above the existing one. If you drop in the lower half of an existing split, the new
split is created below the existing one.
Map to new split (alpha order). Creates a new split at the point where you dropped the folder,
and maps the folders into the new split in alphabetical order. e editor assumes you are
dropping unpitched samples and turns o pitch tracking in the mapped splits.
TASCAM GigaEditor 4 Manual 35
Page 36

Stack on single region. Unlike all of the other options, this modies only the single focus region
(highlighted orange in the Region Window). Enough splits are created within the region to hold
the dropped samples (since a dimension can have at most 128 splits, you can drop at most 128
samples). e order in which the samples are mapped, from the rst to last split within the region,
is based on the names of the samples: the exact method is chosen in the preferences:
Getting back to our piano example, we wanted to create a new velocity split across the keyboard. e
option to choose then, is Map to new split (by pitch). Since we dropped the folder in the upper part of the
existing single velocity split, the new split will be created above the old one. e old split now covers
velocities from 1 to 63 and retains the original “Velocity1” sample mappings. e new split covers
velocities 64 to 127 and is mapped to the “Velocity2” samples.
Remember that this will split every one of the regions we created in the previous step into upper and lower
velocity splits, each automatically mapped to the most appropriate sample. anks to the time we invested
in organizing the samples into folders, we’ve just created a complete velocity-layered piano with two drags
of the mouse! By repeating the same simple action with the remaining folders, we can quickly create a sixlayer instrument.
36 TASCAM GigaEditor 4 Manual
Page 37

More About Sample Mapping
Before we close this chapter we’ll mention a few last topics related to mapping samples.
Pitch Tracking
When you map a sample to a sp lit, the Pitch Tracking parameter for that split w ill be enabled or disabled,
depending on which mouse button you use when dragging the samples to the Velocit y Map. (To view the
Pitch Tracking parameter, click on the Articulation Window’s header bar and selec t the Mix/Laye r
category. A r t iculatio n parameters are explained in d etail in a la ter chapter.)
1. Pitch Tracking Disabled: Drag With Right Mouse Button
When Pitch Tracking is disabled, the sample will not transpose at all: it w ill always play at its natural
pitch wherever you put i t. T his is good for drums and percussion or sound effects.
2. Pitch Tracking Enabled: Drag With Le Mouse Button
When Pitch Tracking is enabled, the sample will be transposed up or down from its unity note (root note or
natural pitch) depending on what unity note is assigned and where it is mapped on the keyboard. is is
good for melodic multi-sampled instruments.
3. If you make a mistake or change your mind, you can also change the Pitch Tracking in
the parameters page.
Map to Null Sample
A split can be mapped to the “null sample”. is allows you to have the equivalent of a silent sample
without having to actually map a silent sample to the region.
1. Right-click on the Velocity Map and choose “Map
to null sample” from the menu.
TASCAM GigaEditor 4 Manual 37
Page 38

2. is will remove any sample that was mapped to
this split, indicated by “Not mapped” where the
sample name would ordinarily be.
Mono and Stereo Samples
When you map a sample, the region will automatically change to mono or stereo if necessary to match the
properties of the new sample. A region cannot contain a mixture of mono and stereo samples, so any
existing mappings will be removed when the switch is made.
1. In this example we have four velocities mapped to four
stereo samples.
2. If we drag a mono sample to the top velocity, the whole
region is changed to mono and this sample is mapped to the
top velocity split as intended.
However, the bottom three samples have been removed. Since
this is now a mono region, the splits can only be mapped to
mono samples.
is chapter has covered the basics of creating an instrument, but we’ve limited our use of dimensions to a
simple velocity split. In the next chapter we’ll take a small step forward by creating a two-dimensional
instrument.
38 TASCAM GigaEditor 4 Manual
Page 39

Chapter 3: Tutorial: Creating a Multi-Dimensional Instrument
In the simplest possible Giga instrument, each region would be mapped to a single sample, and you would
hear that sample whenever one of the region’s keys is pressed. However, regions are usually divided further
into dimensions. e example we’ve already seen is a velocity dimension, which causes dierent samples to
sound depending on how hard the player is striking the keys. If there are four samples available, each
mapped to a dierent part of the velocity range, we would say that the velocity dimension has four splits.
In a Giga instrument, the dimension concept can be multiplied many times over. For example, an
instrument sampled at four dierent velocities might also be sampled using ve dierent playing styles, for
a total of twenty unique samples per key. “Playing style” thus becomes a second dimension with ve splits.
When we assign a MIDI controller to this new dimension – let’s say the Mod Wheel – the sampler will now
use both velocity and the Mod Wheel to choose among the twenty samples.
In this chapter we’ll create a two-dimensional instrument. We’ll begin with a simple velocity split then add
a second dimension to show how the dimensions interact. In the Giga architecture, going beyond ordinary
velocity splits opens up a world of possibilities, so rst we’ll take a short detour through the full list of
dimension types.
Types of dimensions
Every dimension has a control source, which may be a traditional MIDI controller, a simple algorithm, or a
complex piece of logic such as an Intelligent MIDI Rule. We list the possible control sources here, starting
with the most basic.
Velocity. is is the traditional “velocity switch”, typically using the velocity with which the key is struck
to select among samples recorded at various dynamic levels.
MIDI continuous controllers. When a MIDI controller is assigned to a dimension, the value of that
controller at note-on determines which split will sound. Examples include using the Mod Wheel to switch
between closed and open hi-hats, or using the Sustain Pedal to switch between piano samples recorded with
and without sustain.
Keyboard. Keyboard (or “Keyswitch”) control allows changing from one split to another by striking
otherwise unused notes on the MIDI keyboard. is is oen used for orchestral instruments that have a
large number of articulations, where it would be dicult to switch accurately using a wheel or pedal type
controller. e area of the keyboard used for switching is called the keyswitch region, and is dened in the
Instrument Properties dialog.
Layer. e Layer dimension is unique in that all of its splits sound simultaneously, instead of just one.
Layers are sometimes used in conjunction with MIDI volume control and/or crossfades, to give continuous
control over the volume of each layer.
Release trigger. is special type of dimension typically has two splits and is used with sounds that have
been divided into separate sustain and release samples. When a note on is received the rst split is always
played. e sample mapped to the second split is played at note o.
Round Robin, Random. ese dimensions switch samples automatically each time you play a note. Round
Robin progresses through the splits in order, while Random triggers the splits randomly.
Round Robin across keyboard. is variant of the Round Robin dimension advances to the next split
when a key is struck in any region. (e basic Round Robin dimension described above advances only
when a key is struck in its own region.)
TASCAM GigaEditor 4 Manual 39
Page 40

Smart MIDI processor. is special dimension is used in conjunction with Intelligent MIDI (iMIDI) rules
such as the Pattern Alternator, Repetition Mode, and Legato Mode. Logic in the iMIDI rule will determine
which split plays at any given time. iMIDI rules are explained in a later chapter.
Stereo. Stereo isn’t a dimension in the usual sense, but we mention it here because the le and right sides
of a stereo sample each have their own articulations (performance data such as envelopes and lters). In
this sense, the le and right channels resemble the “splits” in a normal dimension. Stereo also “uses up”
one of the eight available Giga dimensions: a stereo region can have a maximum of seven ordinary
dimensions.
Working with dimensions
e best way to learn about dimensions is to start working with them.
• e next few lessons will start with a simple velocity split and work up to a more advanced multi-
dimensional layout of a region.
• For now, we are going to be working with a single note to get to know the concept of working with
dimensions (E-2 of an Orchestral Bass Ensemble from the Vienna Symphonic Library).
• Everything will be done with the manual drag-and-drop method so you can see and experience
directly what these dimensions do. Once you understand what they do, you will then be better
prepared to work with the Instrument Wizard.
• e Instrument Wizard does everything described in these lessons but does it automatically across
many regions in a split second. As you will see, it would be a bit tedious to map an entire
instrument with this manual method. However, this is the best way to learn about the structure of
a region. In the Instrument Wizard chapter, we will recreate some of these examples with the
Instrument Wizard using several notes.
• e manual method is still the best method for creating certain instruments that don’t benet
from the Instrument Wizard, like some drum kits.
• You need to have the GigaStudio soware installed and have your audio and MIDI connections
working. Open the Instrument Editor and create a new blank instrument.
Creating the velocity split
First we will take a region and add some velocity splits to it.
1. Create a region and put it on E2.
40 TASCAM GigaEditor 4 Manual
Page 41

2. Click on the header at the top of the Velocity window.
3. e Dimension Controller dialog for the Velocity dimension appears. In the previous chapter, we
used this dialog to create velocity splits. You can also use it to name, clone, or delete existing splits,
and to change the order of splits within a dimension (even aer samples have been mapped to them).
.
4. Click on the Add button to add a second velocity split. e new split will
appear at the top.
5. Click the Rename button and change the name of each split. Name the rst one “So” and the
second one “Loud” for now. en click OK to close the Dimension Controller dialog.
6. Now the Velocity Map is divided horizontally to represent these two velocity splits.
TASCAM GigaEditor 4 Manual 41
Page 42

• If you click on the bottom split, it highlights and the name “So” appears in the Velocity Window
header at the top.
• If you click on the top split, it highlights and the name “Loud” appears in the Velocity header.
As you can see, naming these dimensions makes it easier to keep up with what is selected. is will become
more important as we add more splits and more dimensions. It’s a worthwhile habit to get into if you plan
to do a lot of instrument design.
Mapping the Samples
At this point, we have a stereo region with two velocity splits, but without any samples the region will be
silent. In this section we’ll complete the job by mapping samples to the region.
1. Import the two Bass-Sustain folders into the Sample
Window.
ese are in the “Editor Tutorial Files” directory for this
chapter (How To Create Dimensions).
2. Drag and drop the Bass-Sustain f E2 (this is the forte/loud sample) to the top split in the Velocity
Map.
42 TASCAM GigaEditor 4 Manual
Page 43

3. Drag and drop the Bass-Sustain f E2 (this is the piano/so sample) to the bottom split in the Velocity
Map.
The samples are now mapped to the low and high velocity splits. In order to hear them, we need to save
and load th is ins tr u me n t.
4. Choose Save or Save As in the File menu, and
save this .gig le to your hard drive.
5. Click the Download button on the toolbar to load the instrument.
6. e Load Indicator Light will turn green when the instrument is loaded and ready to play.
TASCAM GigaEditor 4 Manual 43
Page 44

7. Play E2 on your MIDI keyboard to hear the results. Play so
and loud and notice how the sample changes depending on how
hard you play.
When you cross the halfway point, it switches from the so to
the loud sample. is is indicated visually as well in the Velocity
Window. e blue pointer on the le tracks the incoming MIDI
velocity level as you play and rests at the last played velocity
level.
8. You can set the velocity split point by dragging up and down
with the mouse.
e exact value of the split point is displayed next to the cursor
as you adjust it. is number represents the highest velocity that
will map to the split below the line.
Playback Monitoring
is is a good place to briey point out the various Playback Monitoring features of the GigaStudio Editor.
As you play the keyboard, a variety of real-time things happen on the screen at once, especially if you have
the “Jump to Regions” and “MIDI Select” enabled.
First we will enable the “Jump to Regions” mode:
1. Right-click in the Sample Window and enable Jump to
selected region at the bottom of the menu (clicking the menu
option turns the feature on or o). is feature will highlight
any samples which have regions selected.
2. To see how this works, alternately select each of the velocity splits by clicking on it. Notice that when
you select one, its sample lights up in the Sample Window. It highlights in yellow with an orange
border.
44 TASCAM GigaEditor 4 Manual
Page 45

3. When you select the other velocity split, its sample then gets highlighted in yellow with the orange
border.
4. If you drag-select both velocity splits, both samples will be highligh ted in yellow. The sample
mapped to the currently focused split (the split highlighted in orange) will have the orange border
around its icon:
Now we will enable “MIDI Select” mode.
5. Go to the top right of the Region Window and click on the MIDI Select button to turn this
feature on. e button will light up.
MIDI Select enables regions, dimensions and velocity splits to be automatically selected by incoming MIDI
data.
TASCAM GigaEditor 4 Manual 45
Page 46

6. Play the bass note again at various velocities. When you play loud, the top velocity is selected and
highlighted as if you clicked on it with the mouse. A lower velocity selects the bottom split the same
way. Also, the samples light up in the Sample Window. is allows you to instantly locate any
region, dimension, velocity split and sample by playing it via MIDI instead of having to hunt and
peck for it. is ensures that you are indeed editing the correct sample. As we get to more complex
dimensions and more regions, this will be an invaluable tool.
(You will probably want to turn MIDI Select o again when you are tweaking various parameters. For
example if you are playing a note in real-time as you adjust a lter on the bottom velocity, you don’t want
the MIDI Select tool constantly throwing you to the top velocity split every time you play too loud. is is a
tool that you will toggle on and o depending on what you are doing.)
Adding a Second Dimension
Now we will add another dimension to the sustaining bass note we have been working on. is will be a
Mod Wheel dimension that will allow the Mod Wheel to switch between the sustain samples and some
short staccato samples, each with two velocities.
1. Import the two Bass-Staccato folders into the Sample Window
(Bass-Stac f and Bass-Stac p).
2. Click the header at the top of one of the unused dimension windows.
is will bring up the Dimension Controller dialog.
You can use any of the empty dimension windows to the right of the
Velocity window, but to keep it simple, use the top one.
3. On the Control
Source menu, choose
“(1) Mod wheel”
46 TASCAM GigaEditor 4 Manual
Page 47

4. at will create a second split in the Split Names section.
Rename the splits to “Sustain” and “Staccato” from top to
bottom.
Split names are limited to 12 characters.
Click OK to exit the Dimension Controller dialog.
5. Now we have two Mod Wheel splits and two Velocity splits. However, the instrument won’t sound
any dierent yet because we haven’t mapped the new staccato samples.
6. To see which samples are mapped to the upper range of the Mod Wheel, click on the upper Mod
Wheel split. e Velocity window shows that the original Sustain samples are still mapped to the
upper Mod Wheel split:
TASCAM GigaEditor 4 Manual 47
Page 48

7. To make the new Staccato samples sound when the Mod Wheel is pushed up, leave the upper Mod
Wheel split selected while dragging the Staccato samples into the appropriate Velocity splits:
is gives us a fully two-dimensional region. You can switch between the loud and so samples by playing
harder or more soly on the keyboard, and at the same time, you can switch between the Sustain and
Staccato samples by moving the Mod Wheel.
8. To hear the results of this new dimension, click on the Download button
again. is will save the new changes and load the instrument.
Changing the Order of Dimension Splits
You might decide that you’d rather hear the Staccato samples, instead of the Sustain samples, when the
Mod Wheel is in the lower part of its range. Fortunately, you can easily change the order of the splits in
any dimension, even afte r they have been mapped to samples.
1. Right now, in the Mod Wheel dimension split, the Sustain
samples are on the le (Mod Wheel down) and the Staccato
samples are on the right (Mod Wheel up).
2. Click on the Mod
Wheel dimension’s
header to bring up the
Dimension Controller
dialog.
Highlight the “Sustain”
split.
48 TASCAM GigaEditor 4 Manual
Page 49

3. Click on the Down button to move the Sustain split below the
Staccato split.
Click OK to close the dialog.
5. You can do the same thing with the Velocity splits, by starting the Dimension Controller dialog from
the Velocity window. It’s a little unusual, but here we’ve switched the Loud samples to the lower part
of the velocity range:
4. Now the Staccato samples are on the le (Mod Wheel down)
and the Sustain samples are on the right (Mod Wheel up).
Changing the Dimension Controller
Dimension Controllers can also be changed easily without having to re-map the samples, and this can be
done across the whole instrument. If you don’t like the controller that has been assigned in a library you
have, you can change it to something else. If you are designing your own instrument, the ability to make
these changes allows you to change your mind and experiment.
Using the same tutorial instrument, we’ll now try switching between the Sustain and Staccato samples using
controllers other than the Mod Wheel.
TASCAM GigaEditor 4 Manual 49
Page 50

Change to Sustain Pedal
1. Click on the header of the Mod Wheel dimension
split to start the Dimension Controller dialog.
2. In the Control Source list, select “(64) Sustain pedal” and click OK.
3. e dimension controller is changed to the Sustain
Pedal.
4. Now, instead of the Mod Wheel switching between the Sustain and Staccato samples, the Sustain
Pedal will change them instead. You will need to re-load the instrument to hear this change.
Change to Keyswitch
Next we will change this to a Keyswitch dimension. is will allows us to use keys on the MIDI keyboard to
change between the Sustain and Staccato samples.
1. Once again, click on the dimension window header to
start the Dimension Controller dialog.
50 TASCAM GigaEditor 4 Manual
Page 51

2. is time, change the controller to “Keyboard” and click OK.
3. Now the dimension has been changed to “Keyboard,”
also known as Keyswitch.
4. A Keyswitch dimension works in conjunction with the keyswitch
region of the keyboard, which is normally drawn as a gray rectangle.
When you create a Keyswitch dimension, the region turns purple to
show that it’s now in use.
You can drag the keyswitch region to move or resize it, just like a
normal region. Typically, the size of the keyswitch region will depend
on the number of splits in your Keyswitch dimension. Since we only
have two splits, we’ll set the keyswitch region to span two keys, C4 and
C#4.
TASCAM GigaEditor 4 Manual 51
Page 52

5. Alternatively, the Keyswitch range can be set numerically in the Instrument Properties window.
Double-click on the instrument to get to this window.
6. You will need to reload the instrument to hear this change.
7. Now, triggering C4 will change to the Sustain samples and triggering C#4 will change to the Staccato
samples. Play C4 and then play the instrument note to hear the Sustain samples, then play C#4 and
play the instrument note again to hear the staccato. is is a two-hand technique: one hand is for
playing the keyswitch and the other for playing the notes.
Change to Round Robin
e procedure is the same as in the previous two examples. Change to the Round Robin this time for the
dimension controller.
What this will do is automatically change back and forth between the Sustain and Staccato samples every
time you play the instrument. Reload the instrument and play the instrument note repeatedly to hear how
this works.
Dimensions for alternate articulation parameters
While it’s us ual for each split wi t hin a di mens ion to be m app e d t o a differen t s a mp l e, it’ s also possible t o
map some or all splits to the same sample. This can be useful becaus e each s plit will s till h a v e i ts o wn se t
of envelopes, filters, and other articulation parameters.
52 TASCAM GigaEditor 4 Manual
Page 53

Examples:
• Use a MIDI controller to change between ltered and unltered playback of the same sample.
• Change between dierent envelope settings for amplitude, lter, or pitch.
• Change between dierent velocity curves or velocity levels.
Load and play the Tutorial Instrument “Bass Note 4-Way Mod.gig”
is instrument is a good example of how dimensions can be used to play the same samples with dierent
edit variations. In this instrument, the Mod Wheel will switch four ways between the following options.
Normal Sustain
Filtered Sustain
Slow Attack Sustain
Short Release Sustain
The Layer dimension
So far we have covered basic switching dimensions that use MIDI controllers or Velocity to change the
samples that are played back. Another type of dimension is the Layer. is allows you to layer several
samples on top of one another to be played back at the same time.
By default, all of the splits in a layer dimension sound simultaneously when a note is played. But you can
also control the volume of the individual layers via MIDI, and even do a MIDI controlled crossfade between
layers. In this example, we will create a simple two-way layer and put a Mod Wheel crossfade on it.
1. Start with a new blank instrument and import the Sustain Sample
Bass note directories into the Sample Window.
2. Create a region at E2 again.
3. Click on the header bar at the top of an empty dimension to
bring up the Dimension Controller dialog.
TASCAM GigaEditor 4 Manual 53
Page 54

4. Set the Control source to “Layer”. Type in a Description and name the Split names to So and Loud.
Click OK.
5. Now we have a Layer dimension split with So on the le and
Loud on the right.
6. Select the So dimension split and drag “Bass-Sustain p E2” to the velocity map.
54 TASCAM GigaEditor 4 Manual
Page 55

7. Select the Loud dimension split and drag “Bass-Sustain f E2” to the velocity map.
8. Now select both the Layer splits, since we want to apply the following
edit to both.
9. Click the header bar in the Articulation Parameters window and choose “Mix/Layer” from the
category menu.
10. Click in the value eld for “Attenuation controller” to see a menu of options. e default is “None.”
Change this to “(1) Mod wheel” because we want the Mod Wheel to continuously control the volume
of both layers.
TASCAM GigaEditor 4 Manual 55
Page 56

11. Now select the Loud layer dimension only, and change the “Attenuation controller invert” parameter
to “Yes”. is will reverse the eect of the Mod Wheel on the Loud layer’s volume, creating a simple
crossfade between the loud and so layers. As the Mod Wheel moves from 0 to 127, the so layer
will fade out and the loud layer will fade in.
12. Save the instrument and load it to a MIDI
channel.
13. Hold down the Note E2 while moving the Mod-Wheel back and forth. You should hear a smooth
cross-fade between the so and loud layer.
You can also do custom in and out points using the Crossfade Editor. is tool can handle any number of
layers. When you use this method, leave the “Control invert” parameter set to “No” for all layers. e
crossfade is dened instead by a set of four parameters:
Crossfade in start
Crossfade in nish
Crossfade out start
Crossfade out nish
Typically each layer will have its own set of fade points, coordinated with those of the other layers. e
Crossfade Editor allows the crossfades for all layers to be visualized and edited graphically. In the example
below, Layer 1 will gradually fade to Layer 2 as the Mod Wheel rises through the middle part of its range.
Up to 128 layers are supported.
56 TASCAM GigaEditor 4 Manual
Page 57

TASCAM GigaEditor 4 Manual 57
Page 58

Chapter 4: Tutorial: Advanced Drum Kit
In this lesson, we will create a full drum kit that will utilize many of the Editor’s advanced features. Since
this is a drum kit, all of the mapping will be “drag and drop” using the right mouse button (remember that
dragging with the right mouse button disables Pitch Tracking on the samples that you map). e drum kit
will illustrate:
• Multiple velocities
• Stereo and mono regions
• A MIDI controller dimension for hi-hat open and close
• A MIDI controller dimension for turning snares on and o
• Self-masking on the cymbals to save polyphony
• Lowpass velocity-controlled lters on the toms and bass drum
e rst thing to do is to create a new instrument.
Import all the Tutorial Drum Kit folders into the Sample
window. ese can found in the “Editor Tutorial Files”
directory for this chapter (How To Map Samples:
Advanced).
In the Instrument window you can name the instrument to
“Tutorial Drum Kit”.
You can also delete the “Default Sample” folder to keep the
Sample window from getting too cluttered. e nal result
should look like the screen shot at le.
Now we are ready to start creating a drum kit.
Kick Drum
• e Kick Drum has four velocities of mono samples.
• We will create two identical regions of the Kick Drum for a le-right playing style (like a double
kick setup). To do this, we will complete the rst region and then copy and paste it to create the
second one.
• ere will also be a low pass lter controlled by velocity so that the tone is dark when played so
and gets brighter the louder it is played. is combined with the four-way velocity split makes for
a smooth and realistic transition from so to loud.
• We will also adjust the Release Time of the Kick Drum.
1. In the Preferences, set the velocity split count for
manually created regions to 4.
58 TASCAM GigaEditor 4 Manual
Page 59

2. Right-click under C2 in the Region Window and choose “New
region” from the context menu. is will create a new region at
C2.
3. e new region will have four mono velocity splits ready to be
mapped to Kick Drum samples.
4. Drag and drop the Kick Drum samples to the four velocity splits as shown below. Be sure to use the
right mouse button to disable pitch tracking. We want all the samples to play at their original pitch.
5. At this point it would be nice to hear the results as we edit the Kick drum parameters and velocity
split points, so click the Download button.
TASCAM GigaEditor 4 Manual 59
Page 60

6. Choose the Save As option.
7. Find a place on your Giga Sounds hard drive to save this instrument. Enter a le name and click
Save.
8. Once the instrument is loaded, the LOADED indicator will turn green and you should be able to
hear the Kick Drum if you play C2 on the keyboard.
9. e note will also light up in blue on the keyboard when you play.
10. e blue arrow will move to the velocity levels you play in real time. is will help in adjusting the
Velocity Split points to be able to see them as you play.
60 TASCAM GigaEditor 4 Manual
Page 61

11. Drag the velocity split point to adjust the splits until they sound
and feel right. Play the Kick drum and use the blue arrow as a guide
as you adjust the split points.
is example shows a popular velocity split setting that works well
on percussive instruments. Many keyboards don’t reach the very
low velocity range so it helps to make the lowest velocity a little
larger than the rest so you can hear it. e top velocity has a
narrower range so that it only triggers when you really hit the key
fairly hard.
e next step is to put a longer release time on this Kick Drum. e default release time (300 milliseconds)
is a bit too short.
12. Select all the velocity splits of the Kick drum so that they are all
highlighted.
is way, any edits we perform will apply to all of them at once.
13. In the Parameters Window, click the header bar and choose “EG1 (amplitude)” from the context menu.
is will bring up the Amplitude Envelope category of parameters.
TASCAM GigaEditor 4 Manual 61
Page 62

14. Change the Release Time with the mouse or with text entry. You can experiment with dierent
settings in real time as you play the Kick Drum to nd a good setting. Around 3 seconds will cover
the whole decay of the Kick Drum.
Default of 0.300 Sec:
Set to 3 Sec:
15. You will notice in the Region Window’s header
bar that Envelope 1 Release Time has been selected.
e parameter you select in the Parameters
Window will be automatically selected here as well.
By dragging the blue dot on the Kick Drum region,
you can adjust the Release Time here.
This is another option for editing various parameters in addition to the Parameters Window and the
Waveform Window. (It will be especiall y handy for editing multiple regions at once.)
You can also select various parameters by clicking on the left side of the Region Window header bar and
choosing the parameter you want to edit from the menu.
Click on header bar
Select parameter
Edit parameter
e last thing to apply to this Kick Drum is a simple Lowpass Filter. is will make the tone of the Kick
Drum Samples get brighter as you play louder and darker as you play soer.
62 TASCAM GigaEditor 4 Manual
Page 63

16. Make sure all four velocity splits are still highlighted. is lter will
span all four splits. (You can however have individual lter settings for
each velocity split if you want.)
Also notice that the Release Time (3.000 sec) is indicated here as well.
17. Go back to the Parameters Window and change to the Filter category.
18. Set the Filter Type parameter to Lowpass.
19. Now play the Kick Drum and notice how the tone gets darker or brighter depending on how hard
you play. ere are two types of tone change happening here at once. One is the sound of the
velocity switching between soer and louder recordings of the Kick Drum. e other is the Lowpass
Filter. Between these two things, you can get a smooth transition from so to loud. Feel free to
experiment with the other lter settings.
e nal step for the Kick Drum is to create a second region so that we have two keys to trigger (like a
double kick setup).
TASCAM GigaEditor 4 Manual 63
Page 64

20. Right-click on the Kick Drum region and choose
Copy region from the context menu.
21. Now, right-click in the empty space under the
note D2.
is will bring up the context menu again.
Choose Paste region(s) here.
22. Now we have two identical regions of the Kick
Drum on C2 and D2.
e new region is an exact copy of the original one,
including the sample mappings as well as the
parameter edits that we made above.
Snare Drum
e next part of the drum kit to map out is the Snare Drum.
• is drum will have separate samples for the le and right sticks.
• ese samples are stereo with four velocities.
• ere’s an additional set of four velocity samples with the snares o.
64 TASCAM GigaEditor 4 Manual
Page 65

1. Create two new regions at E2 and F2. ese will be the Le and Right
snare samples.
Notice how these new regions are solid while the Kick Drum regions
have diagonal hash marks on them. is dierentiation indicates that
these regions have dierently structured dimensions. In this case the
dierence is that the Kick regions are mono while the Snare regions are
stereo. If you select the Kick drum regions, those will turn solid and
these Snare regions will get the hash marks.
2. e Velocity Map for these new regions shows a Stereo split and four
Velocity splits.
3. Select the Le Snare region (E2).
Drag and drop the Le-Hand Snare samples from the Sample Window
to the four velocity splits using the right mouse button.
Snare Le v4-
Snare Le v3-f
Snare Le v2-mf
Snare Le v1-p
4. Select the Right Snare region (F2).
Drag and drop the Right-Hand Snare samples from the Sample window
to the four velocity splits using the right mouse button.
Snare Right v4-
Snare Right v3-f
Snare Right v2-mf
Snare Right v1-p
TASCAM GigaEditor 4 Manual 65
Page 66

5. Adjust the velocity split points and the Release Time of both Snare
Drum regions just like with the Kick Drum.
You can also apply the Lowpass Filter at this point.
Now we want to add the Snare O samples in a useful way.
• In this case, we will create a Mod Wheel controlled dimension that will switch the snares on and
o so to speak, like a snare drum switch.
• Moving the Mod Wheel forward beyond the halfway point will switch to the “snares o” samples
while moving it back will switch back to the “snares on” samples.
• Also, there is only one set of Snare O samples in these tutorial samples. ere are no separate
Le and Right hand samples so we will map the same Snare O samples to both regions.
6. Click on a Dimension header bar.
7. In the Dimension Controller dialog:
• Set the Control source to Mod Wheel.
• Enter “Snare Switch” in the Description.
• Rename the Splits to “Snares On” and “Snares O”.
• Click OK.
66 TASCAM GigaEditor 4 Manual
Page 67

8. e result is a labeled dimension switch.
9. Select the Le Snare region and then select the “Snares O”
dimension.
10. Map the four “Snares O” samples to the velocity map. Repeat this with the Right snare region so
that both regions have “Snares O” samples.
11. Click on the Download button to hear the latest results.
12. Play the Snare samples while moving the Mod Wheel back and forth.
TASCAM GigaEditor 4 Manual 67
Page 68

Mod Wheel Back: snares ON
Mod Wheel Forward: snares OFF
A note about dissimilar regions
As a side note, look at the Region Window and notice that the Kick regions are now drawn with diagonal
hatching when a Snare region is selected, and vice versa. e hatching indicates regions whose structure is
dierent from the current focus region (in this case, the dierence is that the Snare regions have a Mod
Wheel dimension, while the Kick regions do not).
e Editor warns you about dissimilar regions because in most cases, they cannot be included when you
perform a multiple-selection edit. To see what we mean, try the following exercise:
• In the Region Window, click on the Right Snare region (F3) to make it the orange focus region.
• Holding down the ALT key, drag the mouse across all four regions to select them. e F3 region
remains the focus region.
• In the Velocity Window, drag the mouse to select all four velocity splits.
• In the Mod Wheel dimension window, select only the upper (“snares o”) split.
• Change an articulation parameter, such as Release Time.
e result is that the new Release Time will be applied to all of the velocity splits (because you selected them
all in the Velocity dimension), but only to the Snares O versions (because only the Snares O split is
selected in the Mod Wheel dimension). Furthermore, the new release time will be applied to both of the
Snare regions (E2 and F2), because they are both selected in the Region Window. However, the edit cannot
be applied to the Kick regions (C2 and D2). Why not? Because we specied that the edit should apply only
to the upper half of the Mod Wheel split, and the Kick regions don’t have Mod Wheel splits. In the face of
this conundrum, the Editor paints the problematic regions with hatch marks, and leaves them unchanged.
Toms
• ere are three sets of Tom samples: High, Mid and Floor.
• ey are stereo with four velocities.
• ere are Snare On and Snare O samples. With the Snare On samples, the snare drum buzz is
heard when the toms are hit.
68 TASCAM GigaEditor 4 Manual
Page 69

1. Create three new regions, one for each Tom. Put them on notes
G2, A2, and B2.
e regions should automatically have four velocity splits as
before with the snares, based on the Preferences setting.
Select all three of the new regions so that the following edits will
apply to all of them.
2. Using the same techniques as with the Kick and the Snare,
adjust the velocity split points and the Release Time, and add a
Lowpass lter.
Again, the changes will apply to all three regions at once because
they were all selected in the previous step.
3. Click on a Dimension window header.
4. Do the same thing we did with the snares:
• Set the Control Source to Mod Wheel.
• Enter “Snare Switch-Toms” in the Description eld.
• Rename the Splits to “Snares On” and “Snares O”.
• Click OK.
TASCAM GigaEditor 4 Manual 69
Page 70

5. Now the Toms have a labeled dimension switch.
6. Select the G2 region.
is will be the Floor Tom.
7. Select the “Snares On” dimension.
8. Map the “Tom-Floor Snares On” samples using the right mouse button.
70 TASCAM GigaEditor 4 Manual
Page 71

9. Select the “Snares O” dimension.
10. Now map out the “Tom-Floor” Samples using the right mouse button. ese samples do not have
any snare buzz in them.
11. Repeat these steps for the Middle and High Toms.
Mid Tom:
• Select the A2 Region.
• Select the Snares On dimension
• Map the “Tom-Mid Snares On” samples.
• Select the Snares O dimension.
• Map the “Tom-Mid” samples.
High Tom:
• Select the B2 Region.
• Select the Snares On dimension
• Map the “Tom-High Snares On” samples.
• Select the Snares O dimension.
• Map the “Tom-High” samples.
12. Click the Download button to save and reload the instrument.
13. Now play the Toms while moving the Mod-Wheel back and forth. You should hear the snares
turning o and on.
Cymbals
e Cymbals are fairly straightforward.
• ere are four sets of samples: Ride, Ride Bell, Crash, and Splash.
• ey are all stereo.
TASCAM GigaEditor 4 Manual 71
Page 72

• ey all have four velocity splits.
• We will enable “Self Masking” to save polyphony for the long sustain times.
1. Create 4 new regions on C3, D3, E3, and F3.
is should create four regions with four Velocity
Splits.
Select all four of the regions.
2. Give the velocity split points a rough adjustment as in the past
examples.
Set a Release Time of 5 seconds.
3. Select the C3 region in the Region Window.
Map the “Ride Tip” samples using the right mouse button.
72 TASCAM GigaEditor 4 Manual
Page 73

4. Select the D3 region in the Region Window.
Map the “Ride Bell” samples using the right mouse button.
5. Select the E3 region in the Region Window.
Map the “Crash” samples using the right mouse button.
6. Select the F3 region in the Region Window.
Map the “Splash” samples using the right mouse button.
7. Click on the Download button to save the changes and hear the
results.
Play the cymbals and tweak the velocity split points and release times if needed.
TASCAM GigaEditor 4 Manual 73
Page 74

e nal thing we will do to the cymbals is enable the “Self Masking” articulation parameter to save
polyphony. With Self Masking enabled, playing louder velocities will shut o any sustaining soer
velocities on the same region that are still decaying.
For example, these cymbals have several seconds of decay. If you play a so note, the sample will play to
the end of the decay no matter what. You could trigger a louder note while the so sample is still decaying
and drown out the so sample. However, even though you can’t hear the so sample any longer, it would
still be using up polyphony until it is nished decaying. With Self Masking enabled, the louder note will cut
o the soer note.
8. Before enabling Self Masking, trigger one of the cymbals several times from so to loud. Watch the
polyphony meter (on the status bar at the bottom of the Editor) and notice how much polyphony it
uses.
9. Select all four of the cymbal regions.
10. Select all the velocity splits. Now when we edit a parameter,
the new value will be applied to all of the splits in all of the
regions.
74 TASCAM GigaEditor 4 Manual
Page 75

11. In the Parameters Window, bring up the Mix/Layer section.
12. Set the Self-Masking parameter to Yes.
13. Now trigger one of the cymbals as before and notice the dierence in polyphony.
Hi-Hats
Last but not least, we have the Hi-Hats.
• 4 stereo velocities of Tip Closed
• 4 stereo velocities of Tip Open
• 4 stereo velocities of Edge Closed
• 4 stereo velocities of Edge Open
• 4 stereo velocities of Foot Closed
We are going to get fancy with the Hi-Hat. e Sustain Pedal will do several things at once:
• Switch between Open and Closed Tip and Edge Samples
• Trigger one of the Foot Closed Samples
• Cut o the Open Samples using a Key Group assignment
TASCAM GigaEditor 4 Manual 75
Page 76

1. Create three more regions at G3, A3, and B3.
Select the lemost two regions G3 and A3.
ese regions will be the Tip and Edge hits and they will have a Sustain
Pedal dimension split that will switch between open and closed samples.
2. Click on a Dimension header bar.
3. Do the same thing we did with the snares:
• Set the Control source to Sustain Pedal.
• Enter “Hi-Hat Open Close” in the Description eld.
• Rename the Splits to “Hi-Hat Open” and “Hi-Hat Close”.
• Click OK when you are done.
4. Select the G3 region.
is region will have the Hi-Hat Tip samples.
76 TASCAM GigaEditor 4 Manual
Page 77

5. Select the “Hi-Hat Open” Dimension Split.
6. Map the “Hi-Hat Tip Open” samples using the right mouse button.
7. Select the “Hi-Hat Close” Dimension Split.
8. Map the “Hi-Hat Tip Closed” samples using the right mouse button.
TASCAM GigaEditor 4 Manual 77
Page 78

9. Select the A3 region.
is region will have the Hi-Hat Edge samples.
10. Select the “Hi-Hat Open” Dimension Split.
11. Map the “Hi-Hat Edge Open” samples using the right mouse button.
12. Select the “Hi-Hat Close” Dimension Split.
78 TASCAM GigaEditor 4 Manual
Page 79

13. Map the “Hi-Hat Edge Close” samples using the right mouse button.
e last thing to map out is the Foot Closed Hi-Hat region.
14. Select the B3 Region.
is will be the Foot Closed Hi-Hat.
15. Map the “Hi-Hat Foot” samples using the right mouse button.
16. Click on the Download button to save the changes and hear the results.
17. Play the Tip and Edge Hi-Hat regions while triggering the Sustain Pedal.
TASCAM GigaEditor 4 Manual 79
Page 80

Pressing down on the pedal will change to the Closed Hi-Hat samples, just like the pedal
of a real Hi-Hat.
Releasing the pedal will change to the Open Hi-Hat samples, just like the pedal of a real
Hi-Hat would do.
However, there is one more thing to add to be even more realistic. When you stomp on
a real Hi-Hat pedal, it closes the Hi-Hat cymbals (Foot Closed Samples).
Right now, we can play the Foot Closed Hi-Hat on the keyboard but we also want the Sustain Pedal to
trigger one of those samples as well. And we want it to shut o the open Hi-Hat samples when closing, just
like the real thing.
18. Right-click in the Instrument Window and choose “iMIDI
Rule manager…” from the context menu.
(If this option is grayed out, you need to load the instrument by clicking on the Download button.)
19. is will bring up the iMIDI Rule Manager. iMIDI Rules are discussed more fully in a later chapter.
For now, select “Controller Triggered” from the list of available rules, and click the Add button.
80 TASCAM GigaEditor 4 Manual
Page 81

20. at will bring up the conguration dialog for the Controller Triggered rule.
• Set the Controller to “64 Sustain Pedal”. is tells the GigaStudio to use the Sustain Pedal to
trigger a MIDI event.
• Set Note to Trigger to B3. is tells GigaStudio to trigger the Foot Closed Hi-Hat region, which is
mapped to B3.
• Check the Switch controller logic enabled check box, and enter 64 for velocity. is tells
GigaStudio to trigger the Foot Closed sample with a velocity of 64.
• Accept the default values for the other settings, and click Add to add this trigger to the rule.
At this point the Controller Triggered dialog should look like this:
21. Click OK to close the rule dialog, and OK again to close the Rule Manager.
Now, when you step on the Sustain Pedal, it will trigger the “mf Foot Closed” sample on B3 (the mf sample
is triggered because it corresponds to the velocity of 64).
e Sustain Pedal also continues to switch the Tip and Edge regions between Open and Closed samples at
the same time.
e last step is to assign all the Hi-Hat regions to the same Key Group so that they will cut each other o.
is will cause the Sustain Pedal to choke the open samples, just like the real Hi-Hat.
22. Select all three Hi-Hat Regions and then right-click with the mouse.
TASCAM GigaEditor 4 Manual 81
Page 82

23. Choose Properties from the context menu.
24. Set the Key group to 1, and click OK.
Make sure the instrument is saved and loaded so you can
play it.
25. Now, the Hi-Hat regions will cut each other o. e Sustain Pedal will cut o any open sustaining
samples while it triggers the Foot Closed sample. is is very similar to the way the real Hi-Hat
operates.
is chapter has touched on nearly every section of the Instrument Editor, but we’ve still conned
ourselves to relatively simple regions with no more than two dimensions. Next, we’ll look at a tool for
creating more complex instruments.
82 TASCAM GigaEditor 4 Manual
Page 83

Chapter 5: The Instrument Wizard
Up to this point, everything has been done manually with the drag-and-drop method.
To better understand the Instrument Wizard, you need to be familiar with the manual method of mapping
samples and creating dimensions.
Also, certain instruments like Drum Kits will still need to be created with the drag-and-drop method since
each region will usually be dierent from the other and the Instrument Wizard won’t work very well for
these.
e Instrument Wizard works best on melodic instruments like pianos, guitars and orchestral instruments.
You can imagine that if you had to create a full 88 note piano with 8 velocities and sustain pedal switches, it
would take an enormous amount of time to do it manually, note by note. is is where the Instrument
Wizard comes in. It allows you to map an entire instrument with multiple dimensions “instantly”. Once
you have the samples properly named and organized, you are only seconds away from having an
instrument mapped out.
Preparing the Samples
As you edit and organize your samples, you need to also be aware of getting them ready for the Instrument
Wizard if you plan to use it. is is very simple and will save a lot of time.
Sample Names and Unity Notes
For the Instrument Wizard to work, it needs to know the Unity Note (also known as Root Note) of each
sample. is is the note that the pitch is recorded at and assigned to on the keyboard. Even if the samples
are not chromatic, the Instrument Wizard can assign them to their root note and then stretch the regions
until they meet each other.
e Editor will recognize the unity note of a sample if the sample name indicates the unity note by MIDI
note number or by note name. For example, middle C would be note name C4 or MIDI note number 60.
MIDI Note Name Range: C-1 through G9
MIDI Note Number Range: 0 through 127
Just put the Note Name or Note Number in the Sample Name before importing the samples into the Editor.
To keep from confusing the Editor, we recommend putting this name or number at the end of the le name
with a space separating it from the rest of the characters.
Example:
Piano Velocity-4 C4.wav
Piano Velocity-4 60.wav
e Editor will have no trouble recognizing les that are named like this. On the other hand, naming the
samples like this might be confusing for the Editor to gure out the unity note.
Piano Velocity-4C4.wav
Piano Velocity-460.wav
Note: e Instrument Wizard can also simply map the samples out in alphabetical order as well. is works
for sound eects, percussion and other non-melodic instruments.
TASCAM GigaEditor 4 Manual 83
Page 84

Organizing by Folders
e Instrument Wizard can also map out complex dimension and velocity splits but to do this, the various
splits need to be organized into separate folders.
For example, if we have a piano that is 4 velocities with sustain pedal up and down samples, the folder
structure would look like this.
Piano Velocity 1 Pedal Up
Piano Velocity 2 Pedal Up
Piano Velocity 3 Pedal Up
Piano Velocity 4 Pedal Up
Piano Velocity 1 Pedal Down
Piano Velocity 2 Pedal Down
Piano Velocity 3 Pedal Down
Piano Velocity 4 Pedal Down
In the Instrument Wizard, we would be able to assign each of the folders full of properly named samples to
the proper dimensions.
Keep in mind that each of these folders could contain up to 88 samples each. at would be 704 samples
that would have to be mapped by hand without the Instrument Wizard.
e Instrument Wizard can map these out for you in about a second. So, as a general rule, there needs to
be one folder of properly named samples for every single velocity or dimension split.
Using the Instrument Wizard: A Simple Mapping
1. Start with a new instrument and import the 4 Tutorial Electric Piano
folders into the Sample Window.
ese can be found in the “Editor Tutorial Files” directory for this
chapter (How To Use the Wizard Tool folder-EP).
2. Start the Instrument Wizard by clicking on the Wizard button on the tool bar.
3. is brings up Page 1 of the Instrument Wizard.
• Most of the items in here are identical with the Instrument Properties window.
• is gives you the opportunity to ll in all these details if you wish but you can go back and ll
them in later in the Instrument Properties window.
• At the very least, you might want to enter an instrument name.
84 TASCAM GigaEditor 4 Manual
Page 85

Click the Next button to proceed to the next step.
4. Select the checkbox “Create Regions every” and
set it to 1 half step. is will create chromatic
regions, one for every note on the keyboard.
The other option would stretch non-chromatic regions.
5. Set the start note to A0.
Set the end note to C8.
is sets the range to cover an 88-note keyboard.
TASCAM GigaEditor 4 Manual 85
Page 86

6. Leave these check boxes blank and click the Next button to
move to the next step.
• “Ignore unity notes” is for non-melodic samples like percussion and sound eects. Checking this
box will let the Instrument Wizard map the samples alphabetically across the keyboard.
• “Finish with this step” would simply create a series of blank regions across the keyboard.
7. Go to the top Controller Source and choose “Velocity”. T his
will be our velocity split dimension .
8. Set the S p lits number to 4. T h is will create four velocity
splits, one for each folder of samples.
9 Fil l in the Description and the Sp lit Names.
ese work the same way as the description and split names when manually creating dimension splits. is
is a good habit to get into because names can help you keep your bearings when dealing with complex
instruments. Also, naming is absolutely essential in the last step of the Instrument Wizard as things get
more complex.
10. Click on the “Reserve space for stereo” checkbox. (Stereo
samples use up one of the eight available dimensions in a region.)
Click on the Next button to move to the last step.
86 TASCAM GigaEditor 4 Manual
Page 87

is is the nal step of the Instrument Wizard. As you can see, the Velocity split state names are in the
section on the right. Without the names, they would just be MIDI number ranges, which are much harder
to read, especially when we start dealing with more dimensions.
Also notice that the folders of samples are represented in the le section. Mapping the samples out is simply
a matter of assigning these folders to the splits in the right section.
11. Assign the folders on the le (one at a time) to
their corresponding velocity split on the right.
To do this, click on a folder and then click on a
velocity split name.
Click on the Next button to nish the Instrument Wizard.
12. e Instrument Wizard instantly maps out the whole instrument across the keyboard.
TASCAM GigaEditor 4 Manual 87
Page 88

13. Each region has the four velocity splits that were
represented by the four folders of samples.
Each sample is mapped by its pitch to the
appropriate region on the keyboard.
If we don’t have a sample for every half step,
samples will be pitch stretched up and down so that
every note of the requested keyboard range is
covered. (When a “missing” sample is equally
distant from both of its neighbors, the higher
sample will be stretched down to cover that note.)
Doing this by hand would have taken at least an hour.
e instrument is now mapped out. Save it and load it to a MIDI channel to hear what it sounds like and
start tweaking it.
Chromatic vs. Non-Chromatic mapping
In the example above, we chose to map the notes chromatically even though the samples are not chromatic.
(is was the “Create Regions every 1 half step” option on Page 2 of the Wizard.)
Alternatively we could have created one region per sample to be able to better see where the samples are.
e disadvantage of doing it this way is that it limits the note-by-note parameter tweaking that can be done
if the regions are laid out chromatically. e results sound the same initially with either method but the
ability to make chromatic edits is limited.
Here is an example using the Region Window. Let’s say we want to make the Release Time short at the top
of the keyboard and have it gradually get longer toward the lower register.
88 TASCAM GigaEditor 4 Manual
Page 89

With the region-per-sample layout, we are limited to one envelope per group of keys:
With the chromatic region layout we get one envelope per half step. All of the keys in each region are
mapped to the same samples, but we can adjust parameters independently for each note.
is is something to keep in mind as you create instrument. If you don’t need the editing resolution, the
non-chromatic mapping makes it easier to see where the samples are mapped.
Using the Instrument Wizard: A Complex Mapping
In this example we’ll use the Bass Ensemble samples to create a complex keyswitch instrument with two
velocity splits. is will demonstrate the need for good labeling of the dimensions and splits.
1. Start again with a new .gig le and import the Tutorial Bass
Folders into the Sample Window.
ese can be found in the “Editor Tutorial Files” directory for this
chapter (How To Use the Wizard Tool folder - Bass).
TASCAM GigaEditor 4 Manual 89
Page 90

2. Start the Instrument Wizard and go to Step 2.
3. is time select the “Make a region per sample” option. is will allow us to see how the samples are
mapped and stretched out.
4. Set the Start and End notes to C1 and B2. ere are only a few samples included with the bass
ensemble tutorial samples so this is a good range that will also stretch the top and bottom notes a bit.
Press Next to move on to Step 3 of the Instrument Wizard.
5. Set the rst Controller Source to Velocity and give it 2 splits. Name it “Velocity Splits” in the
Description eld.
6. Set the second controller to “Keyboard” and give it 8 splits. Name it “Keyswitch” in the Description
eld.
7. Click on the Split Names button for the Velocity dimension, and
name the splits as shown.
Click OK when nished.
8. Click on the Split Names button for the Keyswitch dimension, and name the splits as shown. ese
are named for each type of articulation. Click OK when nished.
90 TASCAM GigaEditor 4 Manual
Page 91

Move on to Step 4 of the Instrument Wizard.
Here is where the naming comes in real handy. is would just be a matrix of numbers otherwise.
9. Map the folders on the le to the splits on the
right. Match the folder names to the split names.
10. e Instrument Wizard maps the regions across
the keyboard.
TASCAM GigaEditor 4 Manual 91
Page 92

11. e Dimension Control window shows the Keyswitch splits and the descriptive names that were
entered in the Instrument Wizard.
12. e Dimension display also shows the descriptive names of the dimension and the individual splits.
e instrument is now mapped. Save it and load it to a MIDI channel to hear what it sounds like and start
tweaking it.
Complex Mapping Example
Here is a brief example of a more complex mapping in the Instrument Wizard.
In Step 3 of the Instrument Wizard, we have four dimensions.
• A Velocity dimension with two splits
• A Keyswitch dimension with four splits, each a dierent articulation
• A two-way Layer dimension that adds the Tremolo samples
• A two-way Sustain Pedal dimension that changes to the Staccato samples
e Descriptions and Split Names are meticulously labeled.
92 TASCAM GigaEditor 4 Manual
Page 93

Here is the nal Step showing all the articulations and names.
Here are the dimensions of the nished instrument:
Here is what you would see if you don’t enter
descriptions and state names.
It would be virtually impossible to gure out what
goes where in this matrix of numbers.
is will allow a 4-way Keyswitch between Sustain, 8th Note, Quarter Note, and Pizz articulations.
TASCAM GigaEditor 4 Manual 93
Page 94

e Layer dimension could use the Mod Wheel to gradually fade in the Tremolo layer.
e Sustain Pedal would switch to Staccato samples.
is is just quick hint of the complexity and creativity available when using the Instrument Wizard.
Load Status
e load status of an instrument is very important when you are editing. When the instrument is loaded
into the sampler, the LOADED light is green. You can play the instrument while you edit, and you can hear
the changes in real time as long as the RELOAD light is not glowing.
Loading Instruments to MIDI channels
Choose a port and MIDI channel.
2. Click the Download but ton.
3. Make sure your keyboard is sending to the correct channel and connected to the correct port.
4. e entire .gig le will load to the MIDI channel. You know it’s loaded properly because the
LOADED light is green and the RELOAD light is o.
5. If there are more multiple instruments in the .gig le, select the one you want to hear and play it.
is is like making a patch change and happens instantly.
94 TASCAM GigaEditor 4 Manual
Page 95

Load Indicator Lights
When the RELOAD indicator is lit, you can continue to edit the instrument, but you will not hear all of
your edits until you have done a save/reload cycle:
Click on the Download button.
ese are major changes that alter the structure of the .GIG le and require a full save:
• Adding, deleting, or replacing instruments, regions, or samples.
• Adding, deleting, reordering or changing dimensions and splits.
Not loaded. e .gig le is not loaded. You need to click the Download
button to load it to the selected MIDI channel.
Loaded. e .gig le is loaded. e instrument you hear matches the
settings you have made in the Editor.
Save and reload required. e .gig le is loaded, but you have made edits
that require the le be saved to disk and reloaded before they can be heard.
e instrument you hear may no longer match the settings you have made in
the Editor. e yellow RELOAD indicator means that the le can be saved
quickly.
Full save and reload required. e red RELOAD indicator means that the
instrument has changed so extensively that the le must be completely
rewritten, potentially a more time consuming operation.
You can save the le to its original location (Save)
or to a new location (Save As).
Note that if you choose Save As, the Editor will
always perform a full save.
If a full save is required anyway, the Save As option
may be faster, because it avoids the necessity of
writing an intermediate le in the temp directory.
Separating Parameters from .GIG file
Doing a complete full save can be time consuming if you are dealing with large .gig les. is problem has
been solved with the ability to separate the instrument parameters from the samples.
1. Go to the File menu and choose Save As…
TASCAM GigaEditor 4 Manual 95
Page 96

2. In the GigaStudio Browser screen, look in the lower le for the check box labeled “Keep all waves in
extension les for fast editing of instrument denitions”
3. Check that box and then Save the le.
4. is will create two les, a .GIG le (which contains the parameters) and an Extension le (which
contains the samples).
5. From here on out, you can make major changes to the le in the Instrument Editor and you will no
longer have to wait for the complete .GIG le to save every time.
ings to keep in mind:
• is le will load just ne in the main GigaStudio Interface but you need to make sure that both les
are together in the same directory on the hard drive, or this will not work.
• If you want to simplify things, you can re-save this split le again when you’re done editing. Save it
again but with the checkbox “un-checked” and it will merge them back together into a single .gig le
that contains the parameters and the samples as before. is is something that library developers
might want to do to keep everything together and make for a cleaner release.
• is is most useful for large .gig les. It’s probably not worth the eort for smaller les, which would
reload fairly quickly regardless.
96 TASCAM GigaEditor 4 Manual
Page 97

Chapter 6: Main Menu Commands
In this chapter we’ll document the Editor’s main menu, one item at a time.
File Menu
New: [Alt] + [F] + [N] or [Ctrl] + [N]
Creates a new and empty .gig file.
Open…[Alt] + [F] + [O] or [Ctrl] + [O]
Opens an existing .gig le. is command is similar to the File-Open command in most Windows
applications, but the le dialog has a few special features:
TASCAM GigaEditor 4 Manual 97
Page 98

When a .g ig file is selected in the large browser window at left, a list of the samples in that file appears in
the smaller box to the right. To hear any sample in the list, select it and press the Play button. T he
Audition button plays the audition sample for the currently s elected .gig file.
If you a re browsing large files, retrieving the names o f eve ry sample can slow down the browser window
unaccepta bly. If t his ha ppe ns , unc h ec k t he Descriptive wave names box. The names will be replaced with
simple numeric indexes.
For additional f eatures of the Giga Editor file dialog, see Save As below.
Save: [Alt] + [F] + [S] or [Ctrl] + [S]
Saves t h e currently lo ad ed .gig file.
If the file is new and has never been saved before, you will get the “Save As” screen where you can name
the file and select where you want it to go on your computer.
If the file has been saved before, it will automatically overwrite the existing file.
Save As… [Alt] + [F] + [A]
Saves the current .gig file to a new location. When you are saving a fil e, several extra options are en abled
toward the bottom of the file dialog. These pertain to saving large .gig files.
98 TASCAM GigaEditor 4 Manual
Page 99

A note about large .gig files
Physically, Giga instrument les are limited to 2 GB in size, but Giga instruments can be much larger than
this because they can span multiple les. You don’t need to be concerned with the 2 GB limit when
working in the Editor, because when you save your work the Editor will automatically divide it into
multiple les as necessary. When Giga spans les in this way, the rst le will have the usual .gig extension,
while subsequent les are given the extensions .gx01, .gx02, etc. All of the les in the set will have the same
name and reside in the same directory. For example, if you save a 5 GB instrument to a le called
“Violin.gig” you’ll normally nd that the editor has created three les:
C:\MyGigs\Violin.gig
C:\MyGigs\Violin.gx01
C:\MyGigs\Violin.gx02
To open this le set, just open Violin.gig as you normally would. When you open Violin.gig, the
“extension” les will automatically be opened along with it.
e Save As dialog contains several options that control the creation of extension les:
Maximum le size. is is the absolute maximum size, in megabytes, of any single output le. It applies
to the main .gig le and also to any extension les. e default is a shade under 2 GB, but you can enter a
lower value if you need to. For example, suppose you have a 1 GB instrument that you'd like to distribute
on a pair of CDs (because a 1 GB le is too large for a single CD). By entering a maximum le size of 500
MB or so, you can save your instrument as a pair of les, each small enough to t on a CD.
You'll notice that the actual le sizes are usually a bit less than the maximum you specify. is is because
the le sizes are adjusted a bit to avoid splitting instruments or samples across le boundaries.
TASCAM GigaEditor 4 Manual 99
Page 100

Rearrange wave pool for best t. When this box is checked, the Editor will try to match the maximum le
size as closely as possible. at is, if the maximum size is 2 GB, the Editor will try to nd just the right
combination of samples to make each le as large as possible without exceeding the 2 GB limit. You may
wish to turn this option on when rendering a nal version of your instrument for distribution, because it
results in the smallest possible number of output les. However, this option can make saving a very slow
process. You will probably want to leave it o during development, when you are making frequent changes
to the wave pool and the exact le sizes are not important.
Keep all waves in extension les. When this box is checked, the Editor will always save to at least two les.
e main .gig le will contain only the instrument denitions and articulations, while any samples are
shied to the .gx01 (and other extension les as necessary).
Why would you use this option? One reason is that it can greatly reduce the time it takes to save your work
during editing. Once you have imported all the samples your instrument will use, the wave pool will
probably change only rarely, while you continue to make ne adjustments to the instruments. By placing
the instrument denitions in a le of their own, the Editor is relieved of the need to save the entire wave
pool, even if you make major changes such as adding or deleting new instruments, regions, and
dimensions.
Save Limited: [Alt] + [F] + [L]
is is identical to the Save As option, except that the editor will discard all samples that are not mapped to
at least one region. Use this option to minimize the size of the output le, but be aware that the discarded
samples cannot be recovered.
Merge File… [Alt] + [F] + [M]
is command is only available when a .gig le is already open in the Editor. It allows you to select one or
more additional .gig les whose contents will be merged into the current le. All of the instruments from
the new le(s) will be added to the current le, with their bank and patch numbers modied if necessary to
avoid conicts. Samples from the new le will also be added to the current le. e Editor compares each
sample in the new le with the existing wave pool and removes duplicate samples, remapping instruments
as necessary to use the existing copies.
Load Articulation… [Alt] + [F] + [R]
Opens a Giga Articulation le and applies it to the current .gig le.
An articulation le (with the extension .art) contains a set of complete instrument denitions, but no
samples. When you load it, the instrument denitions in the current le are replaced by the instruments in
the .art le. e original samples remain in place, remapped to the new instruments. For this process to
work, of course, the .art le has to have been prepared using the same set of samples as the le you apply it
to.
100 TASCAM GigaEditor 4 Manual
 Loading...