

Page 1
»
GA-100CD
Instrument Amplifier
OWNER'S MANUAL
D00907100A
Page 2

IMPORTANT SAFETY PRECAUTIONS
2 TASCAM GA-100CD
CAUTION: TO REDUCE THE RISK OF ELECTRIC SHOCK, DO NOT REMOVE
COVER (OR BACK). NO USER-SERVICEABLE PARTS INSIDE. REFER SERVICING
TO QUALIFIED SERVICE PERSONNEL.
The lightning flash with arrowhead symbol, within equilateral triangle, is intended
to alert the user to the presence of uninsulated “dangerous voltage” within the
product’s enclosure that may be of sufficient magnitude to constitute a risk of
electric shock to persons.
The exclamation point within an equilateral triangle is intended to alert the user to
the presence of important operating and maintenance (servicing) instructions in the
literature accompanying the appliance.
This ap p l i a nce ha s a s e r i a l number
located on the rear panel. Please record
the model number and serial number and
retain them for your records.
Model number
Serial number
WARNING: TO PREVENT FIRE OR SHOCK
APPLIANCE TO RAIN OR MOISTURE.
For U.S.A.
TO THE USER
This equipment has been tested and found to comply
with the limits for a Class A digital device, pursuant to
Part 15 of the FCC Rules. These limits are designed
to provide reasonable protection aga inst harmful
interference when the equipment is operated in a
commercial environment. This equipment generates,
uses, and can radiate radio frequency energy and,
if not installed a nd us ed in accordance w ith t he
instruction manual, may cause harmful interference to
radio communications.
Operation of this equipment in a residential area is
likely to cause harmful interference in which case the
user will be required to correct the interference at his
own expense.
CAUTION
Chang es or modificatio ns to this equip men t not
expressly approved by TEA C CORPORATION for
compliance could void the user's authority to operate
this equipment.
HAZARD, DO NOT EXPOSE THIS
For customers in Europe
WARNING
This is a Class A product. In a domestic environment,
this product may cause radio interference in which
case t he user m ay be requ ired to take adequat e
measures.
Pour les utilisateurs en Europe
AVERTISSEMENT
Il s'a g i t d' u n pr o d u i t de Cl as s e A. Da n s un
environnem e n t d o m e s t i q ue, ce t a p p a r e i l p e u t
provo quer de s int erfé ren ces rad io, da ns ce ca s
l'utilisateur peut être amené à prendre des mesures
appropriées.
Für Kunden in Europa
Warnung
Dies ist eine Einrichtung, welche die Funk-Entstörung
nach Klasse A besitzt. Diese Einrichtung kann im
Woh n b e re i c h Fun k s t ö r u n g e n vers u r s a c h e n ; in
dies em Fall k ann vom Betrieber v erlang werd en,
angemessene Maßnahmen durchzuführen und dafür
aufzukommen.
CE Marking Information
a) Applicable electromagnetic environment: E4
b) Peak inrush current: 21 A
In North America use only on 120V supply.
Page 3

IMPORTANT SAFETY PRECAUTIONS
TASCAM GA-100CD 3
1 Read these instructions.
2 Keep these instructions.
3 Heed all warnings.
4 Follow all instructions.
5 Do not use this apparatus near water.
6 Clean only with dry cloth.
7 Do not b lock any v entilat ion openi ngs. Ins tall in
accordance with the manufacturer's instructions.
8 Do no t in s tall n e a r an y he a t so u r c e s su c h as
radiators, heat registers, stoves, or other apparatus
(including amplifiers) that produce heat.
9 Do not defeat the safety purpose of the polarized or
grounding-type plug. A polarized plug has two blades
with one wider than the other. A grounding type plug
has two blades and a third grounding prong. The wide
blade or the third prong are provided for your safety. If
the provided plug does not fit into your outlet, consult
an electrician for replacement of the obsolete outlet.
• Do not expose this apparatus to drips or splashes.
• Do not place any objects filled with liquids, such as
vases, on the apparatus.
• D o not install this apparatus in a confined space
such as a book case or similar unit.
• The apparatus draws nominal non-operating power
from the AC outlet with its POWER switch in the off
position.
• The apparatus should be located close enough to
the AC outlet so that you can easily grasp the power
cord plug at any time.
• A n ap pa r a tus wi th Cl ass I cons t r uc t i o n sh a ll
be co nnecte d to a n AC outl e t wit h a protecti ve
grounding connection.
10 Protect the po w e r c o rd from be i n g wal k e d on
or pi n c h ed pa r t i cularly at plug s , c o n v e nience
receptacles, and the point where they exit from the
apparatus.
11 Only use attachments/accessories specified by the
manufacturer.
12 Use only with the cart, stand, tripod, bracket, or
table specified by the manufacturer, or sold with the
apparatus. When a cart is used, use caution when
moving the cart/apparatus combination to avoid injury
from tip-over.
13 Unplug this apparatus during lightning stor ms or
when unused for long periods of time.
14 Refer all servicing to qualified service personnel.
Servicing is required when the apparatus has been
damaged in any way, such as power-supply cord or
plug is damaged, liquid has been spilled or objects
have fallen into the apparatus, the apparatus has
been exposed to rain or moisture, does not operate
normally, or has been dropped.
Page 4
4 TASCAM GA-100CD
Safety Information
This product has been designed and manufactured
according to FDA regulations "title 21, CFR, chapter
1, subchapter J, based on the Radiation Control for
Health and Safety Act of 1968", and is classified as
a class 1 laser product. There is no hazardous invisible laser radiation during operation because invisible
laser radiation emitted inside of this product is completely confined in the protective housings.
The label required in this regulation is shown at 1.
CAUTION
• DO NOT REMOVE THE PROTECTIVE HOUSING
USING A SCREWDRIVER.
• USE OF C O N TROL S O R A D JUST M E N TS OR
PERFORMANCE OF PROCEDURES OTHER THAN
THOS E S PECI F I E D H E R EIN MAY R E S U LT I N
HAZARDOUS RADIATION EXPOSURE.
• I F T H I S PR O D U C T DE V E L O P S T R O U B L E ,
CONTACT YOUR NEAREST QUALIFIED SERVICE
PERSONNEL, AND DO NOT USE THE PRODUCT
IN ITS DAMAGED STATE.
• CLASS 1M INVISIBLE LASER RADIATION WHEN
OPEN A ND IN TE R LO CKS D E FE ATED AVOI D
EXPOSURE TO THE BEAM.
Optical pickup:
Type: KSM-900AAA
Manufacturer: SONY Corporation
Laser output:
Wavelength: 775 to 816 nm
Less than 1 mW on the objective
lens
Page 5

TASCAM GA-100CD 5
Contents
1 – Introduction ...................................................... 6
Main features of the GA-100CD .............................. 6
Supplied accessories ................................................. 6
Understanding this manual ...................................... 6
Handling of compact discs ....................................... 7
Beware of condensation ........................................... 7
Precautions for placement and use ......................... 7
2 – Part names and functions ..........................8
Top panel ................................................................... 8
Guitar amp ............................................................... 8
Input section ........................................................ 8
Clean channel section ........................................... 8
Clean/overdrive key section .................................... 9
Overdrive channel section .....................................9
Master section ....................................................... 9
Effects ...................................................................... 9
Effects section ...................................................... 9
Reverb section .................................................... 10
CD Trainer............................................................... 10
Rear panel ............................................................... 12
CD Trainer LCD ........................................................ 13
6 – Using the CD trainer ................................... 18
Playing CDs .............................................................. 18
Adjusting the CD playback volume ........................... 18
Changing the time display mode .............................. 18
Repeat playback of a selected loop ....................... 18
Stopping loop playback ........................................... 18
All track or single track repeat playback ............... 18
Setting the tempo ................................................... 18
Turning tempo control ON and OFF .......................... 19
Changing tempo without changing key .................... 19
Adjusting the key .................................................... 19
Turning key adjustment ON and OFF ....................... 19
Canceling guitar sounds ......................................... 19
Setting the Guitar Cancel function ........................... 19
7 – Tuner, oscillator and metronome .......... 20
Using the tuner ........................................................ 20
Calibrating the tuning frequency .............................. 20
Tuning in chromatic mode ...................................... 20
Tuning in guitar mode ............................................ 20
Using the oscillator ................................................. 20
Using the metronome ............................................ 20
3 – Connections .................................................... 14
Guitar connection ................................................... 14
Connecting other equipment ................................. 14
Footswitch connections ........................................... 14
External effects connection .................................... 14
Headphones connection .......................................... 14
External sound source connection ............................ 14
4 – Using the guitar amp .................................. 15
Guitar amp gain, equalization and output .......... 15
Choosing the channel ............................................. 15
Adjusting the volume and tone quality ..................... 15
5 – Using effects ................................................... 16
Effects ...................................................................... 16
Selecting Effects and setting parameters .................. 16
Restoring the factory effect presets .......................... 16
Effect controls ......................................................... 16
Choosing the output ...............................................17
Reverb .......................................................................17
Effect banks ..............................................................17
Changing banks ......................................................17
Changing banks with a footswitch ............................17
8 – Changing settings ........................................ 21
Playback mode selection ........................................ 21
Footswitch settings ................................................. 21
Footswitch polarity setting ...................................... 21
Tuner settings .......................................................... 21
Tuner speaker output .............................................. 21
Initializing effect banks .......................................... 21
9 – Specifications ................................................. 22
Guitar amp ............................................................... 22
CD Trainer ................................................................ 22
Physical .................................................................... 22
Block diagram .......................................................... 23
Dimensional drawing .............................................. 23
Appendix – Tone creation reference .......... 24
Page 6

6 TASCAM GA-100CD
1 – Introduction
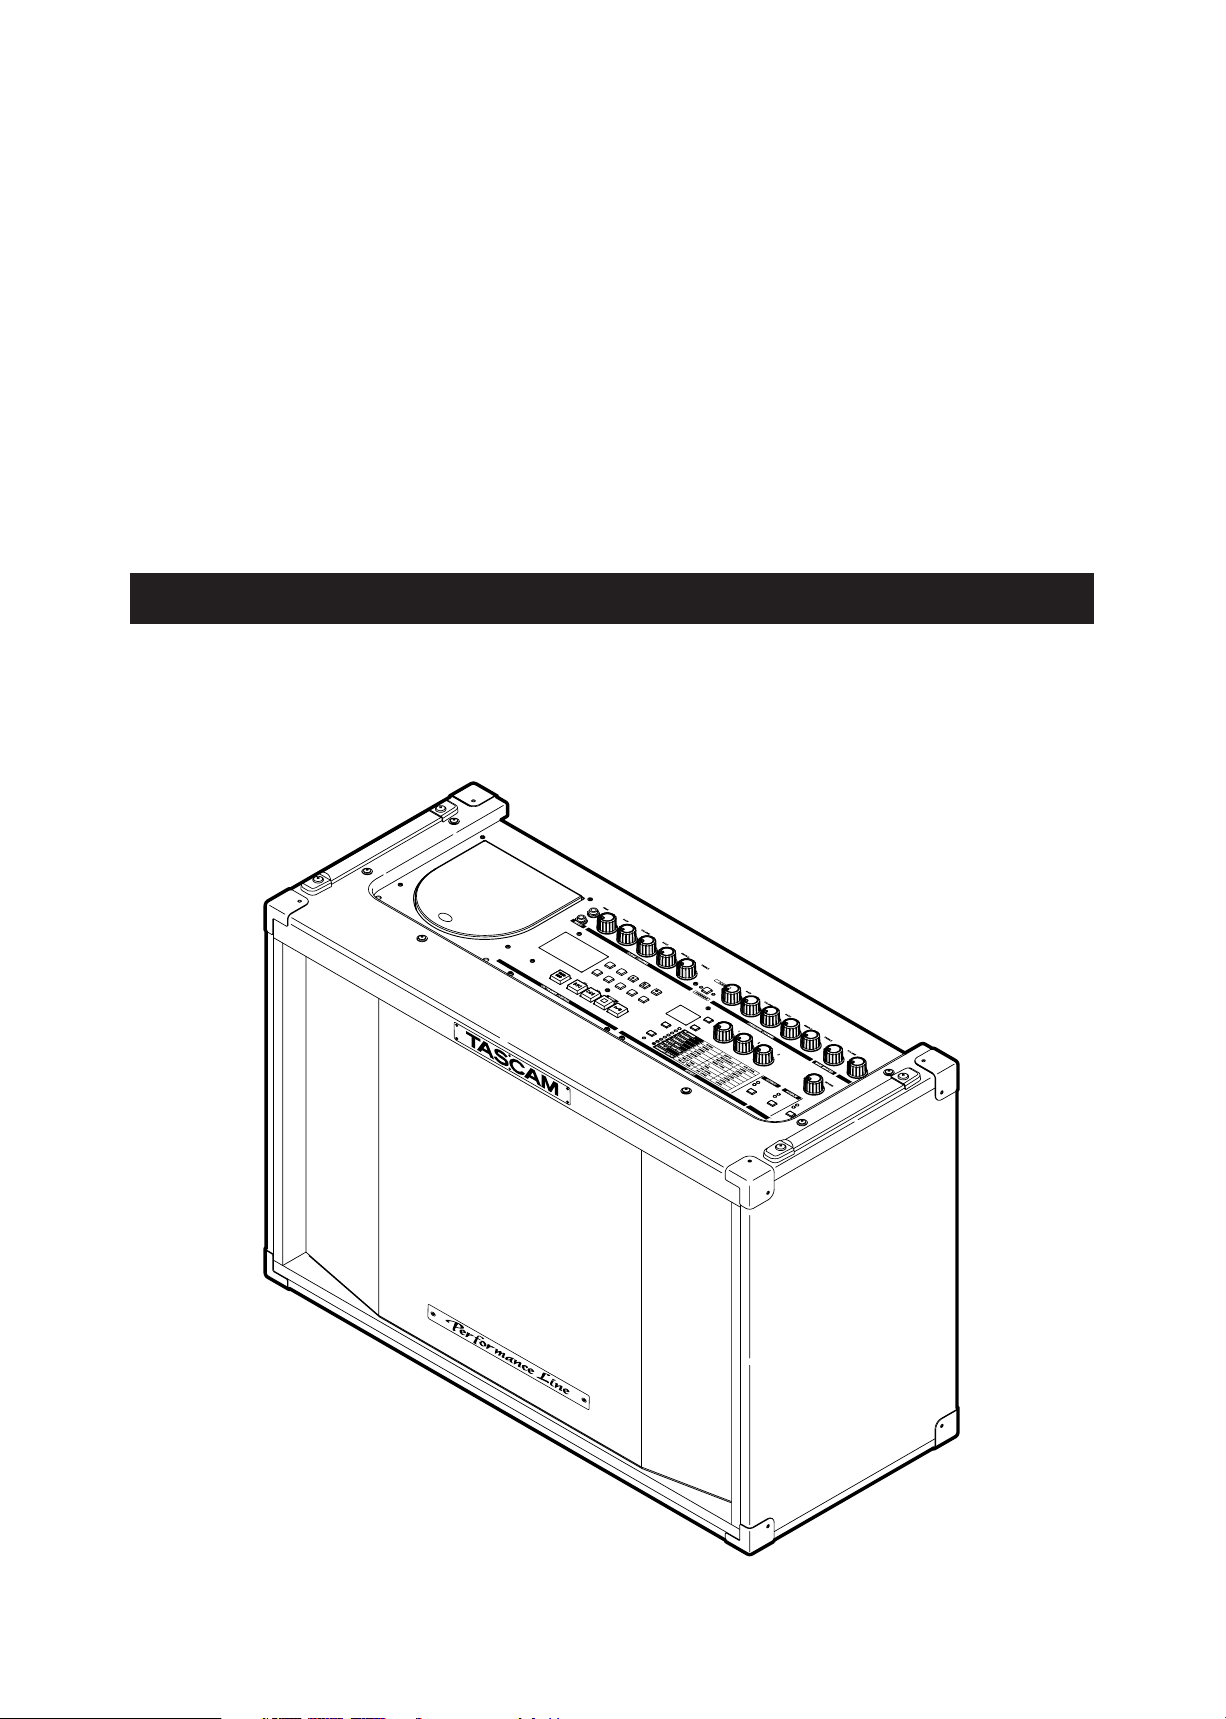
Thank you for purchasing a TASCAM GA-100CD
instrument amplifier. This guitar amp has 60W output,
a 12-inch speaker and sophisticated tube amp modeling
circuitry that lets you realize rich, full sounds. Highquality built-in effects give you the freedom to create
sounds without external effects. You can also practice
along with your favorite music, play prerecorded
backing tracks during performances and otherwise use
the built-in CD player as you like.
Main features of the GA-100CD
Guitar amp
•
60W output, 12-inch (30-cm) main speaker
•
The 2 channels –clean and overdrive– can be
switched remotely
Separate knobs allow gain and volume to be adjusted
•
independently of for optimal distortion
Tube amp simulation using analog circuits responds
•
faster than DSP guitar amp modeling
Single-ended preamp and a push-pull power amp
•
structure parallels that of a tube amp to realize a
similar rich, full sound
Stable, maintenance-free function achieved through
•
the use of an IC power amp
Ideal cabinet sound achieved by sending suitable
•
negative feedback current to the power amp
DSP effects
•
2 built-in TASCAM DSP effect units provide a
choice of stereo delay, panning delay, flanger, phaser,
chorus, tremolo, auto-wah, or pitch shifter effects
and reverb
•
Effects can be output from the main speaker or from
the left and right sub-speakers for spacious sounds
•
Effect bank can be controlled with a footswitch
Please study this manual thoroughly before using the
amp so that you understand how to use it properly. We
hope that with this knowledge you will enjoy using the
GA-100CD and all of its features for many years. After
you have finished reading this manual, please keep it in
a safe place for future reference.
CD Trainer
•
Popular TASCAM CD Trainer built in
•
Playback pitch and tempo freely controllable
•
Variable Speed Audition (VSA) allows playback
speed to be changed without changing the pitch
•
Speed adjustment from –50% to +16%
•
Pitch adjustment up or down 6 semitones
•
Guitar Cancel function allows specified frequency
and stereo ranges to be cut during playback
•
Loop playback allows repetition of a selected passage
•
Independent stereo amp (20W + 20W) and two 5inch (12-cm) sub-speakers provide clear playback
•
Built-in guitar tuner for easy tuning
•
Built-in metronome and oscillator
Other features
•
Effect send and return jacks for connection to
external effects
•
Stereo line input jack for connection of external
sound sources
•
Headphone jack
Supplied accessories
In addition to this manual, the GA-100CD has been
packed with the items listed to the right.
Contact your TASCAM supplier if any of these items
are missing.
Understanding this manual
We use the following conventions in this manual:
•
The names of keys and controls are given in the
following typeface:
Messages shown in the alphanumeric portion of the
•
LCD are given in the following typeface:
If a preset indicator in the display (i.e. one that
•
cannot change, but is either on or off) is shown, this
is given as follows:
Selectable values (i.e. values of dB) and ON and OFF
•
selections are shown in the following typeface:
(i.e.
VBR>ON)
REVERB.
TMOD.
TEMPO.
CHR.
• AC power cable ..........................................................
• Warranty ...................................................................
The GA-100CD has keys that function differently
•
depending on whether they are pressed briefly (less
than half a second) or pressed and held (more than
half a second). In this manual, instructions to “press
the key” or, for example, “press
presses, while instructions to “press and hold the
key” or, for example, “press and hold
long presses.
The CD Trainer Control LCD usually shows the
•
elapsed track time, remaining track time or total
remaining CD time. In this manual, this status is
referred to as the “time display.”
VSA” refer to brief
OSC” refer to
1
1
Page 7
TASCAM GA-100CD 7
Handling of compact discs
CA UTI ON
1 - Introduction
The GA-100CD has been designed for the playback
of CD-DA (standard audio) format discs. In addition
to ordinary 5-inch and 3-inch CDs, it can also play
properly recorded CD-R and CD-RW discs.
Always place CDs in the tray with their labeled sides
•
facing upward.
To remove a disc from its case, press down on the
•
center of the disc holder, then lift the disc out, hold
ing it carefully by the edges.
Avoid getting fingerprints on the signal side (the
•
non-label side). Grime and dust may cause skipping,
so keep discs clean and store them in their cases
when not being played. To clean the signal side of a
disc, wipe gently with a soft dry cloth from the cen
ter towards the outside edge.
•
Keep discs away from direct sunlight, and places of
high heat and humidity. If left in such places, warp
ing could result.
Do not affix any labels or stickers to the label side of
•
the disc. Do not write on the disc with ballpoint pens.
Do not use cracked discs.
•
Only use circular compact discs. Avoid using non-
-
-
•
circular promotional discs, etc.
The GA-100CD cannot play CD-R/RW discs that are
•
not finalized.
Several record companies have released music discs
•
that use Copy Control and other copy-protection
systems in an effort to prevent piracy. Since some
of these discs do not comply with the CD specifica
tions, the
After opening the CD player cover, if the CD is still
•
spinning, wait until it has stopped before removing it.
GA-100CD may not be able to play them.
-
-
Do not use any record spray, anti-static solutions,
•
benzene, paint thinner or other chemical agents to
clean CDs as they could damage the delicate playing
surface. This may cause CDs to become unplayable.
Discs should be returned to their cases after use to
•
avoid serious scratches that could cause the laser
pickup to “skip.”
Beware of condensation
If the unit (or a compact disc) is moved from a cold to a
warm place, or used after a sudden temperature change,
there is a danger of condensation; vapor in the air could
condense on the internal mechanism, making correct
Precautions for placement and use
Do not place the unit in the following types of places.
Placement in such locations may cause malfunction or
reduce sound quality.
•
Unstable places or places with frequent vibrations
•
Near windows or in direct sunlight
•
Near heating devices or other extremely hot places
•
Extremely cold places
•
Damp or poorly ventilated places
Placing this amp near another power amplifier or
another device with a large transformer can cause hum.
Using commercially available CD stabilizers or
printable recordable discs with this player will
damage the mechanism and cause it to malfunction.
Never use a disc that has had a stabilizer mounted to
it. The residual adhesive may cause the disc to stick
to the turntable of the GA-100CD. If it sticks to the
turntable, you will need a technician to get it out.
operation impossible. To prevent this, or if this occurs,
let the player sit for one or two hours at the new room
temperature before using.
Adjust the distance and angle between the devices if
this occurs.
Operation of the GA-100CD near a television or radio
may cause color distortion on the television screen
or noise in the radio signal. If this occurs, move the
GA-100CD farther away.
Use of mobile phones and other wireless devices near
the GA-100CD may cause the amp to produce noise
during use or when calls are made or received. If this
occurs, turn off the device or move it away from the
GA-100CD.
Page 8

8 TASCAM GA-100CD
GUITAR AMP SECTION
CD TRAINER SECTION
EFFECTS SECTION
1 2
3 4 5 6 7
INPUT SECTION CLEAN CHANNEL SECTION
2 – Part names and functions
Top panel
Guitar amp
Input section
Plug your guitar in here. Most guitars are high
impedance, but some guitars with built-in batteries are
low impedance.
1 HIGH
Connect guitars with high output impedance to this
high input impedance (6.8M
2 LOW
Connect guitars with low output impedance to this
low input impedance (68k Ω) input jack.
Ω) input jack.
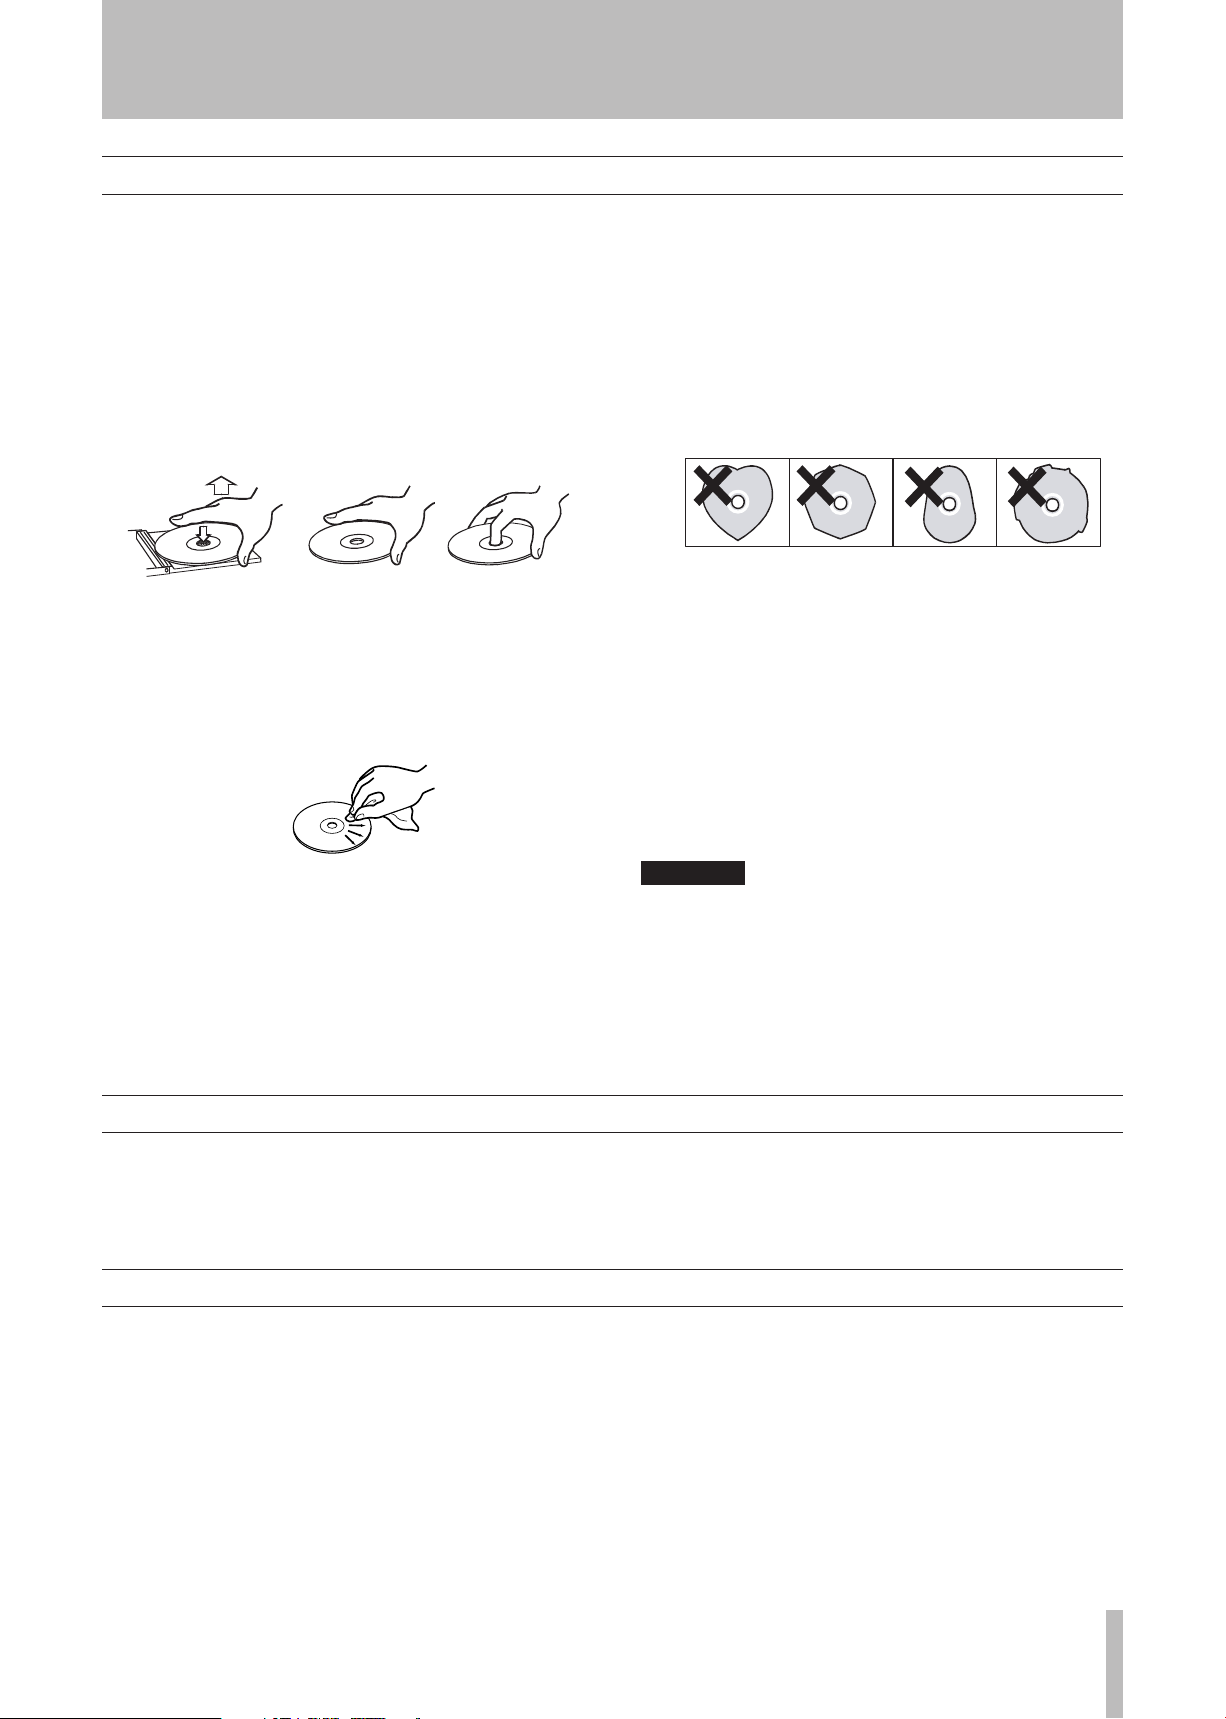
3 GAIN knob
Change the amount of distortion by adjusting the
input gain. When connecting guitars with single coil
pickups, start around 4 and gradually raise the gain
to increase the distortion.
4 VOLUME knob
Use this knob to adjust the volume without changing
the sound character.
5 BASS knob
Adjust low frequencies.
6 MIDDLE knob
Clean channel section
These preamp controls function when the green CLEAN
light in the CLEAN/OVERDRIVE key section is on.
Adjust mid-range frequencies.
7 TREBLE knob
Adjust high frequencies.
Page 9
2 – Part names and functions
TASCAM GA-100CD 9
9
0 q w e r t
8
CLEAN/OVERDRIVE KEY SECTION OVERDRIVE SECTION MASTER SECTION
p a s d
y u i o f g
Clean/overdrive key section
8 CLEAN/OVERDRIVE key
Select the clean or overdrive channel.
CLEAN (green) light or the OVERDRIVE (red)
The
light is lit according to your selection. This key also
determines the effect bank. (See “Using effects” on
page 16.)
Overdrive channel section
The preamp OVERDRIVE CHANNEL controls function
when the red
CLEAN/OVERDRIVE key section.
9 GAIN knob
Change the amount of distortion by adjusting the
input gain. This channel provides a large amount of
distortion even at low
0 VOLUME knob
Use this knob to adjust the volume without changing
the sound character.
OVERDRIVE indicator is lit in the
GAIN levels.
q BASS knob
Adjust low frequencies.
w MIDDLE knob
Adjust mid-range frequencies.
e TREBLE knob
Adjust high frequencies.
Master section
r MAIN MASTER VOLUME
Adjust the volume of the total output signal sent to
the main speaker (12-inch). In addition to the guitar
preamp output, the effects output can also be sent to
the main speaker.
t SUB MASTER VOLUME
Adjust the volume of the total output signal sent to
the 2 sub-speakers (5-inch). In addition to the CD
Trainer, the effects output can also be sent to the
sub-speakers.
Effects
Effects section
Use to set the built-in effects.
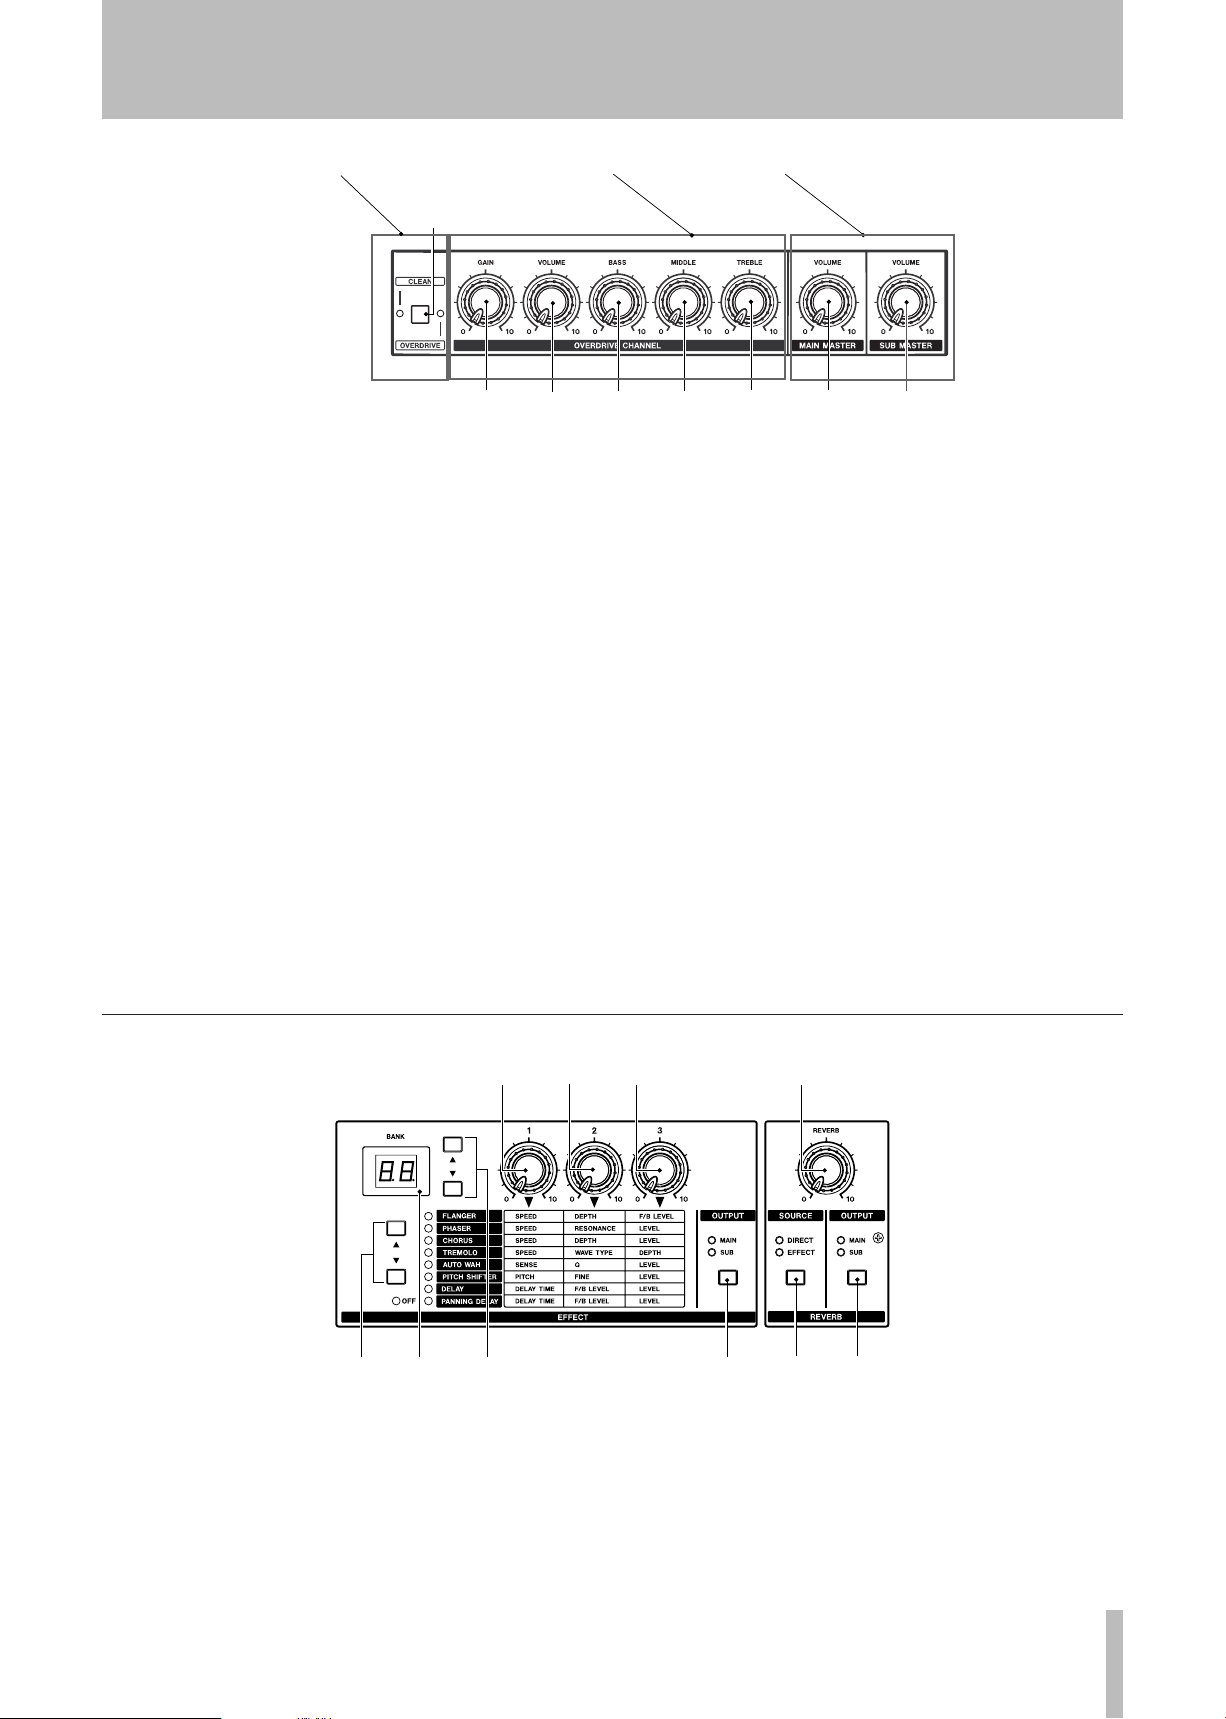
y Effect selection keys (§, ¶)
Use these to select one of the effects – delay,
panning delay, flanger, phaser, chorus, tremolo,
auto-wah or pitch shifter. The indicator lights next to
the selected effect.
u BANK display
Shows the currently selected bank number.
iBank selection keys (§, ¶)
Select from the effects preset banks. (See “Changing
banks” on page 16.)
Page 10

2 – Part names and functions
10 TASCAM GA-100CD
h
j
k
l
z
x
;
c
v
b
n
m
,
.
o OUTPUT key
Press this key to select the effects signal output –
the main speaker, the sub-speaker pair or all three
speakers. Each time you press this key, the output
destination setting changes and one or both of the
indicators (
p Effect Knob 1
Adjust the first parameter of the selected effect. The
panel shows each effect’s adjustable parameters.
(See “Using effects” on page 16.)
a Effect Knob 2
Adjust the second parameter of the selected effect.
The panel shows each effect’s adjustable parameters.
(See “Using effects” on page 16.)
s Effect Knob 3
Adjust the third parameter of the selected effect.
The panel shows each effect’s adjustable parameters.
(See “Using effects” on page 16.)
MAIN, SUB) lights.
CD Trainer
Reverb section
Use to set the built-in reverb.
d REVERB knob
Adjust the reverb signal output level.
f SOURCE key
Select the reverb input signal.
Choose
as it comes in the
apply reverb to the effects output signal. You can
also select both to apply reverb to the dry guitar
signal and the effect output.
g OUTPUT key
Press OUTPUT to choose the reverb signal output
destination – the main speaker, the sub-speaker pair
or all three speakers. One or both of the indicators
(MAIN, SUB) lights to reflect the selection.
DIRECT to apply reverb to the guitar signal
INPUT jack. Select EFFECT to
In addition to standard CD player functions, the CD
Trainer also has a tuner, a metronome, an oscillator and
other features.
h CD player cover
Lightly press the ø mark at the front of the cover to
open the player.
j CD Trainer LCD
Shows the CD Trainer status.
k TIME/ESC key
When a time is displayed, press this key to change
the time display mode.
When using a menu, press this key to return to the
time display.
l LOOP I/O key
Use for loop playback.
Press this key to set the loop IN point (starting
point) for the currently playing or paused CD. Press
this key again to set the OUT point (ending point)
and start loop playback automatically.
When IN and OUT points are set, press and hold
this key to turn loop playback between the IN and
OUT points ON and OFF.
When IN and OUT points are not set, press and hold
this key to turn single track or all track repeat ON
and OFF. (See “Repeat playback of a selected loop”
and “All track or single track repeat playback” on
page 18.)
Page 11

2 – Part names and functions
TASCAM GA-100CD 11
; GUITAR CANCEL key
Press this key to turn Guitar Cancel ON and OFF.
Press and hold this key to open the Guitar Cancel
setting menu. In this menu, press this key to cycle
through setting items. (See “Canceling guitar
sounds” on page 19.)
z TUNER/SETUP key
Press this key to turn the tuner ON and OFF. Make
detailed tuner settings using the Setup menu. (See
“Using the tuner” on page 20.)
Press and hold this key to open the Setup menu
to adjust the time display mode as well as other
functions, including footswitch and tuner settings.
Once in the Setup menu, press this key to cycle
through setting items. (See “Changing settings” on
page 21.)
x OSC/CAL key
Press this key to start the oscillator and output an
adjustable pitch signal from the sub-speakers. (See
“Using the oscillator” on page 20.)
Press and hold this key to access the Calibration
menu and set the standard tuning frequency. (See
“Setting the standard tuning frequency” on page 19.)
c Setting adjustment keys
Use the 3 setting change keys to adjust settings.
/DOWN/LEFT: Reduce values, flatten the pitch or
shift the stereo position to the left.
/NORMAL/CENTER: Restore the default value,
cancel pitch changes or reset the stereo position to
the center.
/UP/RIGHT: Increase values, sharpen the pitch or
shift the stereo position to the right.
v TEMPO key
Press this key to turn tempo control ON and OFF.
Press and hold this key to open the Tempo setting
menu. (See “Setting the tempo” on page 18.)
b KEY key
Press this key to turn key adjustment ON and OFF.
Press and hold this key to enter the Key setting
menu. (See “Adjusting the key” on page 19.)
n VSA key
Press this key to activate Variable Speed Audition
(VSA).
keeps the original pitch of the music even when the
tempo is changed.
m Track skip and search keys (∆/µ, ˚/≤)
Press
skip to previous or later tracks.
Press these keys when playback is stopped to select
a track to play. (Press
To fast forward during CD playback, press and hold
˚/≤. To rewind, press and hold ∆/µ.
Fast-forward and rewind speed gradually increases
as long as the key is held down.
, STOP (ª)/MTRO key
Press to stop CD playback. Press and hold this key
to open the Metronome menu. (See “Using the
metronome” on page 20.)
. PLAY/PAUSE key (¥/π)
Press to start playback of a stopped or paused CD or
pause a playing CD.
VSA appears on the LCD. When ON, VSA
∆/µ and ˚/≤ during CD playback to
PLAY (¥) to start playback.)
Page 12

2 – Part names and functions
12 TASCAM GA-100CD
/ ! $# % ^ &@
NO TE
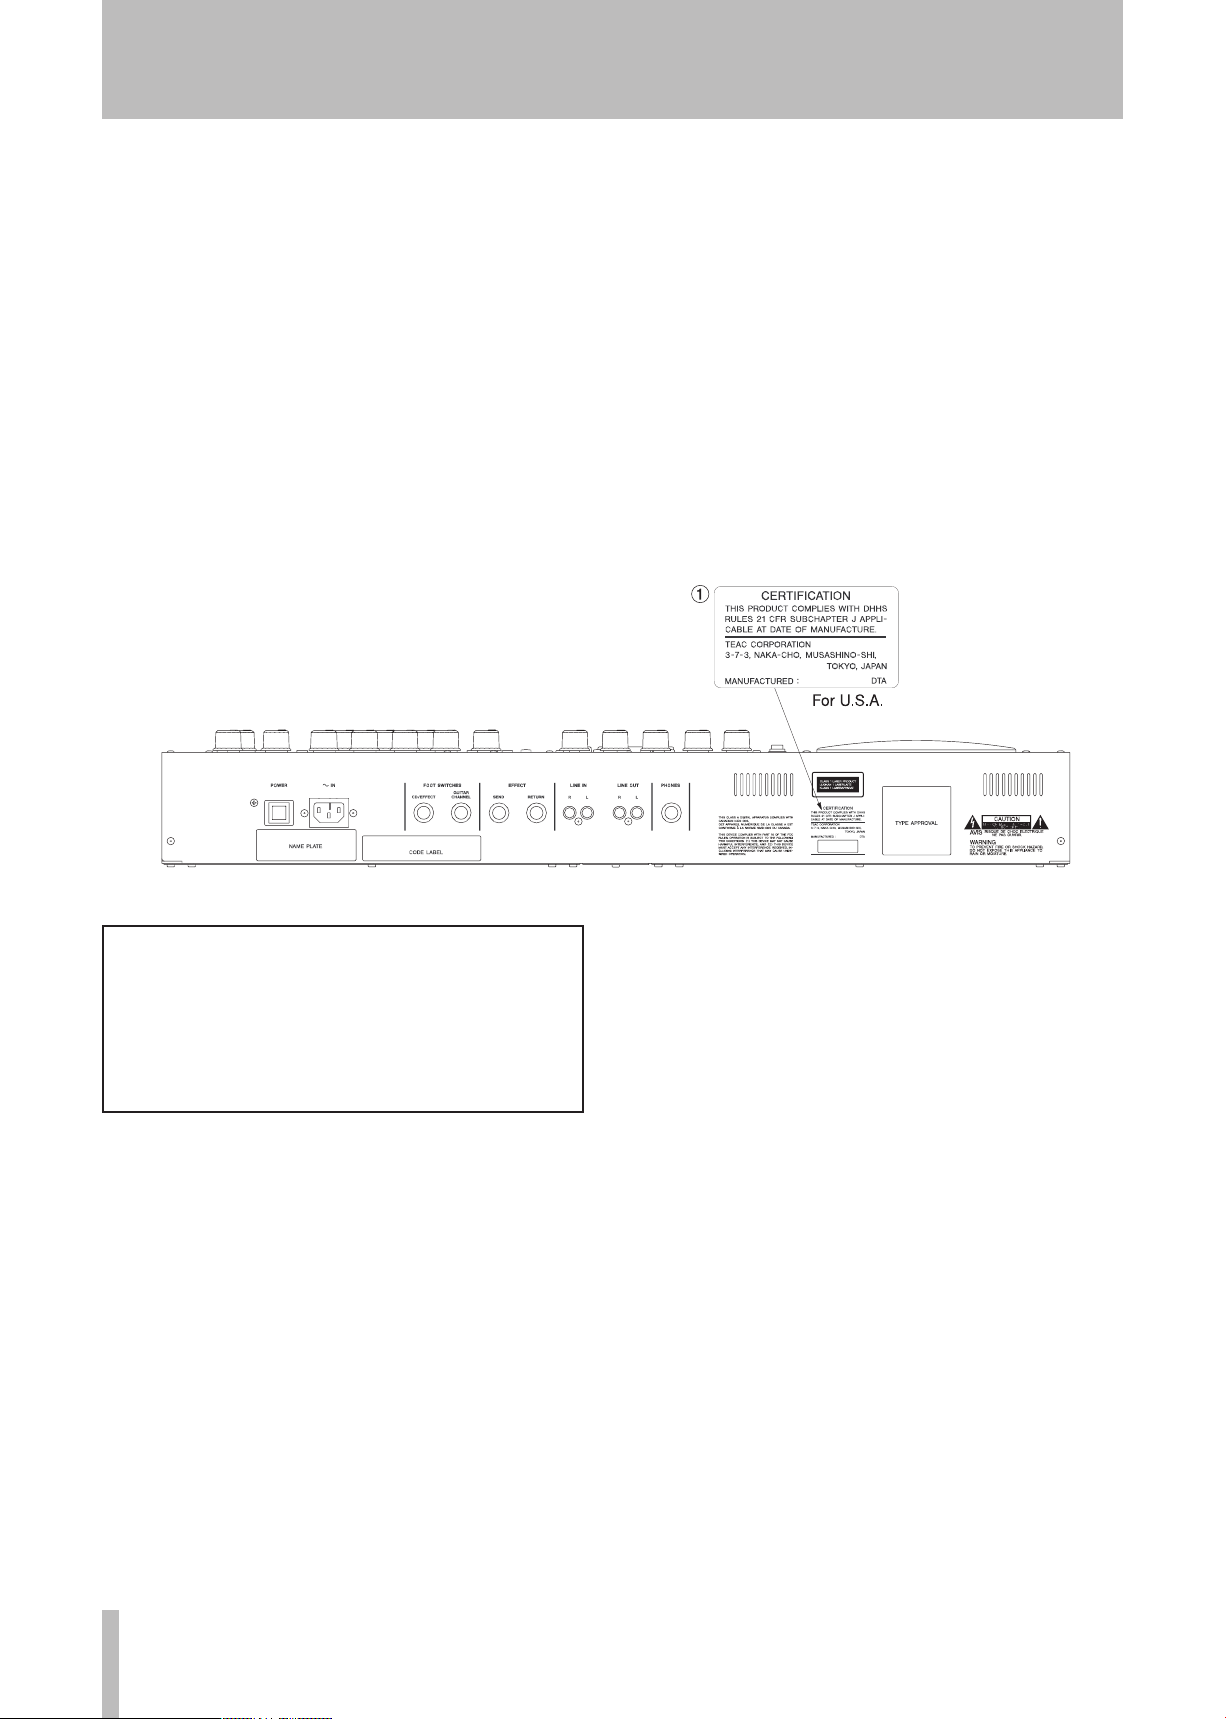
Rear panel
/ POWER switch
Press to turn the power ON and OFF.
! ~ IN
Use the supplied power cord to connect the amp
to an AC power outlet.
matches that marked on the rear panel of your
GA-100CD amp.
@ CD/EFFECT FOOTSWITCH jack
Use a TASCAM RC-30P or similar footswitch
to control playback/pause, bank number, tuner
operation and other functions. Dual footswitch use
is possible. (See “Changing settings” on page 21.)
# GUITAR CHANNEL FOOTSWITCH jack
Use a TASCAM RC-30P or similar footswitch to
change between clean and overdrive channels.
$ EFFECT SEND and RETURN jacks
Use these to send the guitar signal to an external
effect loop after it has passed through the
GA-100CD’s preamp.
Conrm that the voltage
% LINE IN (L, R) jacks
Connect an external line level (-10 dBV) signal from
a synthesizer, guitar preamp, MD player or other
device. The signal from the external device is output
through the sub-speakers.
^ LINE OUT (L, R) jacks
Outputs the mix of MAIN MASTER VOLUME and
SUB MASTER VOLUME signals and the signal
from the
& PHONES jack
Connect standard stereo headphones to this 1/4"
jack to listen to CDs or practice alone.
Outputs the mix of
SUB MASTER VOLUME signals along with the
input signal from the
When the Phones jack is in use, the GA-100CD will
not output sound from its speakers.
LINE IN jacks at –10 dBV levels.
MAIN MASTER VOLUME and
LINE IN jack.
Page 13

2 – Part names and functions
TASCAM GA-100CD 13
CD Trainer LCD
(* )
Q W
E R U
T Y
IO
P S
A
* PLAY indicator
Appears during playback.
( PAUSE indicator
Appears when playback is paused .
) T.REMAIN/REMAIN indicator
Indicates the meaning of the time displayed
according to the current setting.
T.REMAIN = remaining time of entire CD
REMAIN = remaining time of currently playing track
Q VSA indicator
Appears when VSA is ON. (See “Changing tempo
without changing key” on page 19.)
W TUNER indicator
Appears when the tuner is in use. (See “Using the
tuner” on page 20.)
E TEMPO indicator
Blinks when the Tempo menu is active, and lights
when tempo control is ON. (See “Setting the tempo”
on page 18.)
R KEY indicator
Blinks when the Key menu is active and lights when
key adjustment is ON. (See “Adjusting the key” on
page 19.)
Y SET UP indicator
Blinks when the Setup menu is active. (See
“Changing settings” on page 21.)
U Tuning meter
Shows pitch during tuning. The center is the correct
pitch. The more the indicator lights to the left, the
flatter the pitch and the more it lights to the right the
sharper the pitch.
I LOOP indicator
Appears when set to loop playback (ALL/SGL). (See
“Repeat playback of a selected loop” on page 18.)
O 1
Appears when set to single (SGL) repeat playback.
P I-O
Blinks when the loop repeat IN point is set and
lights when the OUT point is set.
A Track number/time display
Shows the currently selected track number (above
TRACK) and time during playback in minutes (M) and
seconds (
various settings.
S ,
Shows pitch when key adjustment is ON.
S). Also provides information when making
T CD EFF indicator
Blinks when the Guitar Cancel menu is active, and
lights when Guitar Cancel is ON. (See “Canceling
guitar sounds” on page 19.)
Page 14

2 – Part names and functions
14 TASCAM GA-100CD
3 - Connections
NO TE
CA UTI ON
TOP PANEL
GUITAR
HEADPHONES
FOOT PEDAL
RECORDER
EXTERNAL
EFFECTOR
SOURCE
SIGNAL
REAR PANEL
Guitar connection
Connect a guitar using either the HIGH or LOW jack in
the INPUT section.
The input impedance of the two jacks is different. The
HIGH jack is 6.8 MΩ, and the LOW jack is 68 kΩ.
When directly connecting electric guitars with passive
pickups, we recommend that you use the
HIGH jack
since such guitars usually have high output impedance.
Two guitars can be connected simultaneously.
Connecting other equipment
Footswitch connections
Connect a TASCAM RC-30P or similar footswitch to
the
GUITAR CHANNEL jack on the rear panel to use it
to change between the clean and overdrive channels.
External effects connection
To apply an external effect to the guitar signal after it
has passed through the GA-100CD preamp, connect the
Headphones connection
Connect stereo headphones to the PHONES jack
to monitor through headphones. Connection to the
PHONES jack mutes the GA-100CD speakers.
External sound source connection
Connect an external synthesizer, audio equipment
or other device to the
LINE IN jack to input external
sounds. The input signal is sent to the sub-speakers.
Connect a TASCAM RC-30P or similar footswitch
to the CD/EFFECT jack on the rear panel to use it to
change effect banks or turn the tuner ON and OFF.
external effect’s input to the EFFECT SEND jack and
its output to the
Use the volume control of the equipment connected
to the LINE IN jack to adjust its relative volume.
Be careful when attaching external sound sources, as
very loud signals, especially at low frequencies, may
damage the GA-100CD's speakers.
EFFECT RETURN jack.
Page 15

2 – Part names and functions
TASCAM GA-100CD 15
4 - Using the guitar amp
NO TE
Guitar amp gain, equalization and output
Choosing the channel
The GA-100CD has independent clean and overdrive
channels. Use the
the channel.
When the green light is ON, the
active and when the red light is ON the
section is active .
CLEAN/OVERDRIVE key to choose
CLEAN section is
OVERDRIVE
Adjusting the volume and tone quality
The clean and overdrive channels have the same types
of control knobs.
Adjust the volume of each channel with its
VOLUME knobs. Use the MAIN MASTER VOLUME
knob to control the final volume output of the guitar
amp main speaker.
The
GAIN knob adjusts input gain, and the VOLUME
knob adjusts the channel output level. Raise the
increase distortion. Even a small amount of gain creates
distortion in the overdrive channel. Distortion does not
become audible in the clean channel until the gain is
raised significantly. With a single coil pickup guitar, for
example, distortion starts around 4.
Choose the overdrive channel to use distortion, and
adjust the
you desire.
GAIN knob until you achieve the amount that
GAIN and
gain to
You can also change the channel using a TASCAM
RC-30P or similar footswitch connected to the
CHANNEL footswitch jack on the rear panel.
Choose the clean channel and set the
for an undistorted sound.
Adjust the overall volume with the
the
MAIN MASTER VOLUME knob. Adjusting these
knobs will not affect the tone quality.
Adjust the
the tone quality (frequency characteristics) further.
The MAIN MASTER VOLUME knob adjusts the
overall volume of the output signal sent to the
main speaker (12-inch). If an effect is used, it will be
output along with the guitar amp output.
BASS, MIDDLE and TREBLE knobs to alter
GAIN knob low
VOLUME knob and
GUITAR
Page 16

5 – Using effects
16 TASCAM GA-100CD
Effects
The GA-100CD has built-in effects and reverb. In both
CLEAN and OVERDRIVE channels, the guitar signal
passes through the preamp before being processed by
the effect and then the reverb in that order.
Selecting Effects and setting parameters
External effects can also be connected to the EFFECT
SEND and EFFECT RETURN jacks on the rear panel.
Use the effect selection (§, ¶) keys to the left of the
effect parameter table to choose an effect – delay,
panning delay, flanger, phaser, chorus, tremolo,
auto-wah, pitch shifter – or turn the effects OFF.
Restoring the factory effect presets
The unit leaves the factory with the following preset
settings. (See the “Tone Creation Reference” on page 24
for details.)
Effect controls
Effect
FLANGER
PHASER
CHORUS
TREMOLO
Knob 1 Knob 2 Knob 3
SPEED
Set modulation frequency
(0.1 –10 Hz).
SPEED
Set modulation frequency
(0.2 – 20 Hz).
SPEED
Set modulation frequency
(0.1 – 10 Hz).
SPEED
Set modulation frequency
(0.2 – 20 Hz).
DEPTH
Set modulation depth.
RESONANCE
Set resonance amount.
DEPTH
Set modulation depth.
WAVE TYPE
Set modulation wave shape. 0 is
triangle, 5 is sine, and 10 is sawtooth.
The effect indicators to the right of these keys show the
current setting. Use the three knobs above the effect
parameter table to adjust the parameter amounts. Refer
to the chart below for details.
To restore the effects to their factory settings, use the
FXRS item in the Setup menu. (See “Initializing effect
presets” on page 21 for details.)
F/B LEVEL
Set feedback level.
LEVEL
Set effect amount.
LEVEL
Set effect amount.
DEPTH
Set effect amount. Set higher to
increase modulation amplitude.
AUTO WAH
PITCH
SHIFTER
DELAY
PANNING
DELAY
SENSE
Set Auto Wah sensitivity.
PITCH
Set pitch shift amount up to ±1
octave. The center position is 0.
DELAY TIME
Set delay time (10 ms – 1.1 sec).
DELAY TIME
Set delay time (10 ms – 1.1 sec). Sent
to L and R sub-speakers alternately.
Q
Set lter characteristic. Set higher to
increase the effect.
FINE
Set pitch shift amount up to ±50
cents. The center position is 0.
F/B LEVEL
Set feedback level.
F/B LEVEL
Set feedback level.
LEVEL
Set effect amount.
LEVEL
Set effect amount.
LEVEL
Set effect amount.
LEVEL
Set effect amount.
Page 17

5 – Using effects
TASCAM GA-100CD 17
NO TE
Choosing the output
NO TE
You can choose the speaker(s) that output the effect
signal. Press
Either or both the
according to the setting. However, the sub-speakers
cannot be selected for the Auto-wah effect.
MAIN: Effect signal is output by the main speaker along
with the dry guitar signal (standard setting).
SUB: Effect signal is output by the sub-speakers.
Sending the dry guitar signal and the effect signal to
different speakers can create a unique spacious sound.
OUTPUT to cycle through the settings.
MAIN and SUB indicators light
Reverb
MAIN + SUB: The effect is output by the main speaker
and the sub-speakers. Set the balance using the
MASTER and MAIN MASTER VOLUME knobs.
Output speaker selection greatly changes the sound.
Adjust the tone quality as you switch between
output settings to achieve a sound you like.
SUB
The GA-100CD’s built-in reverb simulates a classic
guitar amp spring reverb.
REVERB knob
•
Adjust the reverb signal output level.
SOURCE key
•
Select the reverb input signal. Choose DIRECT
to apply reverb to the guitar input signal from the
Effect banks
The GA-100CD has 10 banks to store effects and reverb
settings. C1–C5 are for clean channel settings and D1–
D5 are for overdrive channel settings.
Changing banks
Switching between the GA-100CD clean and overdrive
channels recalls the bank that was previously used on
the selected channel.
INPUT jack after the preamp. Select EFFECT to
apply reverb to the effect output signal. You can
select both at the same time.
OUTPUT key
•
You can choose the speaker(s) that output the reverb
signal. Press
Either or both the
according to the setting.
Bank settings are stored in built-in memory each time
a parameter is adjusted or the bank is changed. (See the
Tone Creation Reference on page 24 for details about
the factory presets.)
Use the bank selection keys (
change banks on the same channel.
OUTPUT to cycle through the settings.
MAIN and SUB indicators light
§, ¶) or a footswitch to
For example, after using clean channel bank C3, you
switch to overdrive channel bank D4. Later, when
you switch back to the clean channel, bank C3 will be
recalled automatically. The
current bank number.
BANK display shows the
Changing banks with a footswitch
1 Connect a footswitch to the CD/EFFECT jack.
2 Set the polarity using the
menu to BANK+ or BANK– as necessary.
3 Press the footswitch to increase or decrease
the bank number setting by 1. (See “Changing
settings” on page 21.)
FOOT item in the Setup
When a bank is recalled, the indicator will show
the selected bank, but the position of the effect
knobs (1, 2 and 3 and REVERB level) will not change,
therefore they will not match the bank settings.
Move any knob to change the associated parameter
value to the knob’s current position.
With a dual footswitch, one pedal will increase the
bank number setting and the other will decrease it.
Page 18

6 – Using the CD trainer
18 TASCAM GA-100CD
NO TE
NO TE
Playing CDs
1 Press ø at the front of the CD player cover lightly
to open it.
2 Place a CD in the tray and close the cover.
3 Press
Press
¥/π to start playback.
ª to stop playback.
Press ¥/π to pause playback.
Adjusting the CD playback volume
When in a time display mode, use the and
adjust the CD playback level sent to the sub-speakers.
The range is from 0 (no volume) to 10. The
keys to
key
Changing the time display mode
Press TIME/ESC to cycle through the three time display
modes to the right.
Repeat playback of a selected loop
Follow these procedures to repeat playback of a selected
part of a disc (loop playback).
1 Press LOOP I/O when a CD is playing or paused
to set the loop IN point (starting point). The I-O
indicator on the LCD blinks.
Use µ(∆) and ≤(˚) to skip between tracks
and search through them. Press briefly to skip to
another track or press and hold to search a track.
Opening the cover stops playback.
restores the default setting of 5. The value appears on
the LCD moentarily when it is changed.
Elapsed time (no indicator)
•
Remaining track time (
•
Remaining disc time (
•
2 Press
LOOP I/O again to set the loop ending point
and start loop playback between the IN and OUT
points. The I-O indicator appears on the LCD
during loop playback.
REMAIN indicator)
T. REMAIN indicator)
Stopping loop playback
Press LOOP I/O to stop loop playback, resume normal
playback and erase the IN and OUT point settings.
All track or single track repeat playback
Repeat playback of the current track or all tracks on the
disc is possible.
1 In the Setup menu, use the PLAY item to select all
track loop (ALL) or single track loop (SGL). The
default setting is ALL. (See “Changing settings” on
page 21.)
2 Press and hold
single track loop playback according to the above
PLAY setting.
LOOP I/O to start all track or
Setting the tempo
Follow these procedures to set the tempo.
1 Press and hold TEMPO. TMP appears and the
tempo setting screen appears.
2 Use
,
and keys to adjust the tempo.
3 Press
TIME/ESC after completing the setting to
return to the time display.
To retain the loop IN and OUT points, press and hold
LOOP I/O when turning loop playback ON and OFF.
Press ª to stop playback.
•
Press and hold LOOP I/O to stop loop playback
•
and resume normal playback.
Pressing LOOP I/O when IN and OUT points are set
will erase these settings.
Changing the tempo value from 0 turns tempo control
ON, and playback speed adjusts to the new tempo.
TEMPO appears on the LCD.
The tempo setting amount depends on whether Variable
Speed Audition (VSA) is ON or OFF. (See "Changing
tempo without changing key" on page 19.)
Page 19

6 – Using the CD trainer
TASCAM GA-100CD 19
NO TE
NO TE
When VSA is ON, the possible settings are: –50, –32,
NO TE
–16, –12, –8, –4, 0, +4, +8, +12, +16 (%).
When VSA is OFF, adjustment can be made freely
between –50 % and + 16 %.
Turning tempo control ON and OFF
Press TEMPO to turn tempo control ON and OFF.
The set tempo value is stored even when tempo control
is OFF. The next time it is turned ON, playback will
occur at the last set tempo value.
Changing tempo without changing key
Turn ON the GA-100CD’s Variable Speed Audition
(VSA) function to change the tempo of a track without
changing its key.
Adjusting the key
If the tempo value was set while VSA is OFF, turning
VSA ON changes the tempo value to the nearest of
the above settings.
Press the
When it is ON, the
Turning VSA ON and OFF also turns tempo control
ON and OFF.
VSA key to turn this function ON and OFF.
VSA indicator appears on the LCD .
1 Press and hold KEY to show the key setting
screen.
2 Change the key using the
can be raised or lowered up to 6 semitones ( 6– 6).
Changing the key (to any value besides 0) turns
key ad j u st me n t ON and pl a yba c k cha n ge s
accordingly. KEY appears on the LCD when this
function is ON.
3 Press
KEY again to make fine pitch adjustments.
,
and
keys. The key
Turning key adjustment ON and OFF
Press KEY to turn key adjustment ON and OFF. The
key setting value is retained even when turned OFF.
Canceling guitar sounds
Use the Guitar Cancel function to cut the sound of
recorded guitars during CD playback.
Setting the Guitar Cancel function
,
4 Use the
(1/100 semitone).
5 Press
return to the menu.
Even if no key change is made in step 2 above (the
value is set to 0), fine adjustment in step 3 turns key
adjustment ON.
When key adjustment is turned ON again, the set key
value affects playback.
Press
function ON and OFF.
the Guitar Cancel function is ON.
and
TIME/ESC to finish making the setting and
GUITAR CANCEL to turn the Guitar Cancel
keys to adjust the pitch in cents
CD EFF appears on the LCD when
Use these procedures to adjust the stereo region and
frequency range of the cancellation effect.
1 Press and hold the
appears on the LCD.
2 While listening to the playback, use the
keys, to select the stereo region (L10 – R10) that
reduces the guitar sound the most.
3 Press the
appears on the LCD.
4 While listening to the playback, use the
keys to select the frequency range (MID or ALL)
GUITAR CANCEL key again. RNGE
GUITAR CANCEL key. PART
,
and
,
and
that reduces the guitar sound most effectively.
ALL will cut out high and low sounds from other
instruments in the same stereo position.
5 Press
The values set here are retained even when the
Guitar Cancel function is turned OFF. When it is
turned ON again, the previously made settings will
be applied to playback again.
TIME/ESC to finish making the setting and
return to the menu.
Page 20

7 – Tuner, oscillator and metronome
NO TE
Flat Sharp
In tune
Flat Sharp
In tune
Using the tuner
The GA-100CD has a built-in guitar tuner with 2 modes
–chromatic mode and guitar mode. In chromatic mode
(the default setting), the GA-100CD automatically
detects the input signal pitch. Guitar mode helps you
Calibrating the tuning frequency
The standard tuning frequency (A4) can be adjusted.
1 Press and hold OSC/CAL to start calibration. CAL
appears on the LCD.
tune strings to standard guitar tuning. (See “Changing
settings” on page 21 for details on setting the tuner
mode and sound output.)
3 Press
OSC/CAL or ESC to finish calibration and
return to time display.
2 Press the
tuning frequency from 435 Hz to 445 Hz. Press
the key to restore the default setting of 440 Hz.
and
keys to adjust the standard
Tuning in chromatic mode
1 Connect a guitar and press TUNER. TUNER appears
on the LCD along with the tuning meter shown to
the right. Play the guitar string you want to tune.
The LCD will show the name of the closest note.
2 Tune the guitar roughly until the note that you
want to tune to appears on the LCD.
3 Tune until only the meter's large central dot
lights. If the pitch is too low (flat), the dots left of
the center light. If the pitch is too high (sharp), the
Tuning in guitar mode
1 Connect a guitar and press
on the LCD along with the tuning meter. 6E
appears on the right side of the LCD, indicating
that it is set to tune the 6th string.
2 Use the
3G, 4D, 5A or 6E) you want to tune.
and
keys to choose the string (1E, 2B,
TUNER. TUNER appears
dots right of the center light. More dots light as
the string goes further out of tune.
4 When finished tuning, press
to the time display.
3 Tune the string until only the large dot at the
center of the meter lights.
4 When finished tuning, press
to the time display.
TIME/ESC to return
TIME/ESC to return
Using the oscillator
Use the built-in oscillator to output a sine wave through
the speakers. This wave can be set to any pitch in a
3-octave range between C3 and B5.
1 Press the OSC/CAL key. OSC appears on the LCD.
2 Press the
The default setting is A4. The selected pitch (C3–
B5) appears on the screen.
and
keys to set the generated pitch.
Using the metronome
Follow these procedures to set the tempo and the
number of beats per measure for the GA-100CD’s builtin metronome.
1 Press and hold ª/MTRO to open the Metronome
menu. The metronome is still OFF.
2 Use the
a range of 40–220 bpm (beats per minute).
Adjusting the tempo turns the metronome ON.
and
keys to adjust the tempo in
20 TASCAM GA-100CD
3 Press
The oscillator’s standard tuning frequency depends
on the calibration setting. (See “Setting the standard
tuning frequency” on page 19.)
3 Press
4 Press
Use the
level of the metronome.
TIME/ESC to finish making the setting and
return to the time display.
ª/MTRO briefly. Use the and
adjust the number of beats per measure between 2
and 6.
TIME/ESC when finished using the
metronome to return to the time display.
SUB MASTER VOLUME
knob to adjust the
keys to
Page 21

8 – Changing settings
CA UTI ON
Use the Setup menu to change GA-100CD settings.
Press and hold
menu. Press
setting items. Use the
for each item and
TIME/ESC to finish making settings and close
Press
the Setup menu.
TUNER/SETUP to open the Setup
TUNER/SETUP again to cycle through the
and
keys to adjust the values
to restore the default setting.
Playback mode selection
Use the PLAY item to select whether all tracks on a disc
(ALL) are played or only the currently selected track
(SGL) is played when using the loop playback function.
The default setting is
ALL.
Footswitch settings
Use the
EFFECT footswitch.
PLAY/PAUSE: Play and pause the CD
BANK+: Increase the active bank number by one
BANK–: Decrease the active bank number by one
TUNER ON/OFF: Turn the tuner ON and OFF
FOOT item to set the function of the CD/
Settings that can be made and saved:
•
Playback mode selection
•
Footswitch function selection
•
Footswitch polarity setting
•
Tuner mode selection
•
Tuner speaker output ON and OFF
•
Initialize effect bank settings
You can use a dual footswitch with the CD/EFFECT
footswitch jack. When using a dual footswitch, BANK+
and BANK- reverse which switch increases and which
decreases the active bank number.
Footswitch polarity setting
Use the POL item, to set the footswitch polarity to
normal (
footswitch you use. The default setting is
NOR) or inverse (INV). Use this to match the
NOR.
Tuner settings
Use the TMOD item to set the tuner mode. (See “Using
the tuner” on page 20.)
CHR: chromatic mode (default setting)
GTR: guitar mode
Tuner speaker output
Use the TOUT item to set whether or not the guitar
signal outputs through the main speaker when the tuner
is turned on. The default setting is
OFF.
Initializing effect banks
Use the FXRS item to restore all effects banks to their
factory settings.
NO appears on the LCD when you choose the FXRS
item. Press the
and hold the
factory settings.
or
key to restore all effects banks to their
key and YES will appear. Press
Initializing effect banks erases all the preset bank
settings that have been made. Use this function
only if you are sure that you want to overwrite these
settings with the factory defaults.
After initialization is complete,
LCD and the time display reappears.
DONE appears on the
TASCAM GA-100CD 21
Page 22

9 – Specifications
22 TASCAM GA-100CD
Guitar amp
Rated output
Speakers
Inputs
GUITAR INPUT (HIGH) Unbalanced 1/4" jack
Standard input level
GUITAR INPUT (LOW) Unbalanced 1/4” jack
Standard input level
EFFECT RETURN Unbalanced 1/4" jack
Standard input level –2 dBu
Standard input level –10 dBV
Outputs
Standard output level –2 dBu
Output impedance 470 Ω
Standard output level –10 dBV
Output impedance 470 Ω
Built-in effects (mono/stereo)
MAIN
SUB 20W (RMS into 8 Ω) x 2
MAIN 12-inch
SUB
Input impedance
Input impedance 68 kΩ
Headroom N/A
Input impedance
LINE INPUTS RCA pin jacks (2)
Input impedance
EFFECT SEND Unbalanced 1/4" jack
Maximum output
LINE OUT Unbalanced 1/4" jack
Maximum output
HEADPHONES
Output > 30 mW (into 39 Ω)
Types Delay, panning delay, flanger, phaser, chorus, tremolo,
Presets 10 (5 clean channel, 5 overdrive channel)
60W (RMS into 8 Ω)
5-inch x 2
–38 dBu
6.8 MΩ
–32 dBu
22 kΩ
22 kΩ
+14 dBu
+6 dBV
1/4" stereo phone jack
auto-wah, pitch shifter, reverb
CD Trainer
Playback characteristics
Physical
Playable discs 8-cm/12-cm (audio CDs only)
DA 16-bit
Digital signal processing 32-bit
Frequency characteristics 20 – 20,000 Hz ± 1.0 dB
Dynamic range > 88 dB
S/N ratio > 88 dB
THD < 0.01%
Power
Power consumption 80 W
Dimensions (W x H x D) 818 x 548 x 344 mm (32.2 x 21.6 x 13.5 inches)
Weight 36 kg (79.4 lbs.)
USA/Canada 120 VAC, 60 Hz; UK/Europe 230 VAC,
50 Hz; Australia 240 VAC, 50 Hz
Page 23

9 – Specifications
TASCAM GA-100CD 23
Block diagram
TREBLE
BASS
MIDDLE
GAIN
INPUT
LOW
HIGH
VOLUME
GAIN
CLEAN CHANNEL
OVERDRIVE CHANNEL
VOLUME
SEND
RETURN
CLEAN/
OVERDRIVE
ADC
BASS TREBLE MIDDLE
MAIN SP
(12-inch)
MAIN MASTER
SUB SP L
(5-inch)
SUB SP R
(5-inch)
Power AMP
Power AMP
LINE IN
LINE OUT
R
L
R
L
SUB MASTER
PHONES
DAC
CD Signal
Processing
CD MECHA
EFFECT
Tuner In
REVERB
DAC
FOOT SWITCHES
GUITAR CHANNEL
CD/EFFECT
EFFECT
Digital Signal Processing
Effect Control
1 2 3
Effect
Select
Bank
Select
Reverb
Output
Select
Source
Select
Output
Select
DRY Cut
OSC
Output
Select
Dimensional drawing
Page 24

Appendix – Tone creation reference
24 TASCAM GA-100CD
This chart shows example effects settings and the
factory presets. Use these examples of clean and
overdrive channel settings to create your own sounds.
preset
Factory
OUTPUT
SOURCE
LEVEL
OUTPUT
F/B
LEVEL
Your guitar will also affect the tone quality, so make
adjustments as necessary to achieve the tone you desire.
DEPTH
SPEED DEPTH
TREBLE
MID
BASS
GAIN
Channel
SPEED RES LEVEL
SPEED DEPTH LEVEL
4 8 5 10 6.5 10 10 SUB 3 BOTH BOTH C1
C
7 10 9 10 6.5 6.5 10 MAIN 2.5 DIRECT MAIN
C
8 9 3 10 3 3 10 BOTH 1 EFFECT SUB D4
D
6.5 7 6.5 3.5 7.5 4 9 SUB 1 DIRECT SUB
D
TYPE
WAVE
SPEED
5 10 7.5 7 7 3 7 MAIN 2 EFFECT BOTH
C
4 7 7 7 4.5 1 10 SUB 3 EFFECT SUB
C
6 6.5 7 3.5 8 9 4 MAIN 1 EFFECT BOTH
D
8 9 8 8 10 10 6 MAIN 2 EFFECT BOTH
D
Name Description Preamp Knob 1 Knob 2 Knob 3 FX Reverb
Edgy Sharp anger for rhythm guitar C 3 10 6 7.5 4 5 8 MAIN 0 DIRECT SUB C5
Wide Wide stereo anger C 3 10 6 7.5 6.5 8 8 SUB 1 DIRECT SUB
Slow Heavy stereo anger D 7 6 7 7 1 5 10 BOTH 2 BOTH SUB D2
Classic Orthodox heavy anger D 3 6 7 6 5 5 10 BOTH 1 EFFECT MAIN
FLANGER
Classic Nice and clean for rhythm guitar C 3 3 5.5 7 1.5 1.5 10 MAIN 0 EFFECT MAIN
Clean Clean, vibrating phaser – suits arpeggios C 4 6 10 8.5 4 7 8.5 BOTH 2 EFFECT SUB
Heavy Heavy phaser D 9 6 7.5 5 2 2 10 MAIN 1 EFFECT MAIN D3
PHASER
Solo Doubling 70’s phaser for lead guitar D 7 6 6 7 6 9 10 BOTH 1 EFFECT SUB
Super Clean Makes clean sounds cleaner and brighter
Dirty Dirty chorus sound for blues lead guitar
Heavy Heavy, thick chorus for backing guitar
Solo Full stereo sound for lead guitar
CHORUS
Clean Solo Clean sound for lead guitar
Panning Pan sound only through 5-inch speakers
Shock-waver Bold sound that emphasizes harmonics
Waver Solo Light sound good in small amounts for lead guitar
TREMOLO
Page 25

Appendix – Tone creation reference
TASCAM GA-100CD 25
MAIN MASTER VOLUME and SUB MASTER
• All values are on a 0 –10 scale
VOLUME are both set at 5 (center)
preset
Factory
OUTPUT
SOURCE
LEVEL
OUTPUT
C3
•
•
C = Clean D = Overdrive
C2
D5
SENSE Q LEVEL
TREBLE
MID
BASS
GAIN
Channel
PITCH FINE LEVEL
C 3 7 7 7 5 6.5 10 SUB 5 DIRECT SUB
C 3 5 2 9 10 5 4 SUB 6 EFFECT SUB
D 5 2 6.5 5 5 3.5 7 SUB 1 EFFECT BOTH
D 8 6 1 10 0 5 8 SUB 1 BOTH BOTH
LEVEL
F/B
LEVEL
TIME
DELAY
C 4 10 10 7 2 2 7 SUB 1 BOTH BOTH
C 7 10 7 7 1 9 8 BOTH 0 BOTH BOTH
D 10 10 7 4 6 3 4 SUB 2 BOTH BOTH
LEVEL
F/B
LEVEL
TIME
DELAY
C 4 8 8 8 3 3 3 SUB 4 EFFECT SUB
C 7 8 5 6 7 9 4 BOTH 4 EFFECT BOTH
D 8 10 7 7 4 3 4 SUB 2 EFFECT SUB
D 5 6 5 3 3 9 5 SUB 1 EFFECT SUB
Short Short delay sound adds thickness to any part D 10 10 6 7 2 8 7 SUB 1 EFFECT SUB D1
DELAY
backing and lead guitar parts
Relatively long delay that uses long tones for both
Solo
Panning delay that sends a clean sound left and
right for added presence
Clean Pan
Clean, rhythmical long panning delay good for
live performance
Drive Pan Panning delay for both lead and backing guitar
Long Clean
Rich stereo panning delay with deep repetition for
Stereo Delay
PANNING DELAY
lead guitar
Makes heavy sounds even heavier by doubling an
Natural chorus sound that uses FINE for
arpeggios and chord strums
Name Description Preamp Knob 1 Knob 2 Knob 3 FX Reverb
Clean Clean auto-wah for rhythm guitar C 4 6 5 7 4 5 10 MAIN 1 EFFECT SUB
Crunch Crunchy auto-wah good for humbucking pickups C 7 10 9 7 4 8 10 MAIN 0 EFFECT SUBC4Drive Crunchy wah sound that uses overdrive D 4 8 7 3 5 8 10 MAIN 0 EFFECT SUB
AUTO WAH
Solo Auto-wah that uses overdrive for lead guitar D 10 10 5 5 4 8 10 MAIN 1 EFFECT BOTH
Pitch Chorus
Doubling and chorus with a natural sound using
Plus 1 octave Octaver effect for low chord strums and arpeggios
Double
the pitch shifter for lead guitar
Chorus
PITCH SHIFTER
octave below
Hell Low
Very short delay pans left and right to add width
Very Short
to arpeggios and rhythm guitar
Delay sound with lots of feedback to thicken
backing parts
Backing
Page 26

Appendix – Tone creation reference
26 TASCAM GA-100CD
Use or copy these pages to keep track of your own
presets and favorite settings. Have fun!
Preset
OUTPUT
SOURCE
LEVEL
OUTPUT
F/B
LEVEL
DEPTH
SPEED DEPTH
TREBLE
MID
BASS
GAIN
Channel
SPEED RES LEVEL
SPEED DEPTH LEVEL
TYPE
WAVE
SPEED
Name Description Preamp Knob 1 Knob 2 Knob 3 FX Reverb
FLANGER
PHASER
CHORUS
TREMOLO
Page 27

Appendix – Tone creation reference
TASCAM GA-100CD 27
F/B
LEVEL
Preset
OUTPUT
SOURCE
LEVEL
OUTPUT
DEPTH
SPEED DEPTH
TREBLE
MID
BASS
GAIN
Channel
SPEED RES LEVEL
SPEED DEPTH LEVEL
TYPE
WAVE
SPEED
Name Description Preamp Knob 1 Knob 2 Knob 3 FX Reverb
AUTO WAH
PITCH SHIFTER
DELAY
PANNING DELAY
Page 28

»
GA-100CD
TEAC CORPORATION
Phone: +81-422-52-5082 www.tascam.com
3-7-3 Nakacho, Musashino-shi, Tokyo 180-8550 Japan
TEAC AMERICA, INC.
Phone: +1-323-726-0303 www.tascam.com
7733 Telegraph Road, Montebello, California 90640 USA
TEAC CANADA LTD.
Phone: +1905-890-8008 Facsimile: +1905-890-9888 www.tascam.com
5939 Wallace Street, Mississauga, Ontario L4Z 1Z8, Canada
TEAC MEXICO, S.A. De C.V
Phone: +52-555-581-5500 www.tascam.com
Campesinos No. 184, Colonia Granjes Esmeralda, Delegacion Iztapalapa CP 09810 Mexico DF
TEAC UK LIMITED
Phone: +44-8451-302511 www.tascam.co.uk
Unit 19 & 20, The Courtyards, Hatters Lane Watford, Hertfordshire WD18 8TE U.K.
TEAC EUROPE GmbH
Phone: +49-611-71580 www.tascam.de
Bahnstrasse 12, 65205 Wiesbaden-Erbenheim, Germany
Printed in China
 Loading...