

Tanita WB-8000RW Owner's Manual
Radio Wireless Digital Weight Platform
WB-8000RW
INSTRUCTION MANUAL
1. Table of Contents
2. Safety Notes
3. Part Names & Specifications
4. Using the WB8000RW with D8000 Remote Display
••••••••••••••••••••••••••••••••••••••••••••••••••••••••••••••••••••••••••••••••••••••••
••••••••••••••••••••••••••••••••••••••••••••••••••••••••
5. Operation
2
6. Output data format
3
•••••••
4
7. Troubleshooting
2. Safety Notes
Caution Symbols
For optimum performance and safety, please familiarize yourself with the Caution Symbols below. These symbols are designed to alert the user to
potential hazards when using this equipment. Ignoring these Caution Symbols may result in serious injury, or damage to the product. Please be sure to
review before proceeding with the INSTRUCTION MANUAL.
•••••••••••••••••••••••••••••••••••••••••••••••••••••••••••••••••••••••••••••••••••••••••••••
••••••••••••••••••••••••••••••••••••••••••••••••••••••••••••••••••••••••••
••••••••••••••••••••••••••••••••••••••••••••••••••••••••••••••••••••••••••••••
Eng
5
8
11
WARNING
CAUTION
This symbol indicates general precautions that should be taken when using this product.
WARNING
•Toreduce the risk of electric shock or product damage, never insert or remove the AC adapter with wet hands.
•Do not under any circumstances dismantle or alter the device, as this could result in electric shock or injury as well as adversely affecting the precision
of measurement.
•To prevent fire hazard use only a correctly wired outlet, and do not use a multiple outlet extension cable.
CAUTION
•Please make sure you place the scale on a level and stable surface. If the equipment is used when the scale is unstable, because not all feet are on the
surface, there may be a risk of injury or inaccurate measurement.
• Never jump on the scale, there may be a risk of injury and malfunction of the equipment.
•Do not insert or remove the AC plug by the cable.
•Do not place a finger into any gap or any hole of the equipment. You may be injured.
Maintenance
This is a precision manufactured and accurately calibrated product. Please observe the following instructions.
• If the equipment is moved to a place with a temperature difference of 10˚C(18˚F) or more, leave if for at least two (2) hours before use.
•Avoid subjecting the equipment to excessive shocks or vibrations.
• Never disassemble or adjust the equipment, as this may cause malfunctions.
•When not in use for an extended period of time, unplug the AC adapter from the power outlet.
•Do not wipe the equipment with corrosive chemicals (benzene, acetone, etc.). Please use a neutral detergent to clean the equipment.
•Do not use mobile phones or microwave therapy equipment near this equipment.
This symbol indicates the possibility of serious injury if the product is mishandled or instructions are ignored.
This symbol indicates the possibility of physical injury or equipment damage if instructions are ignored.
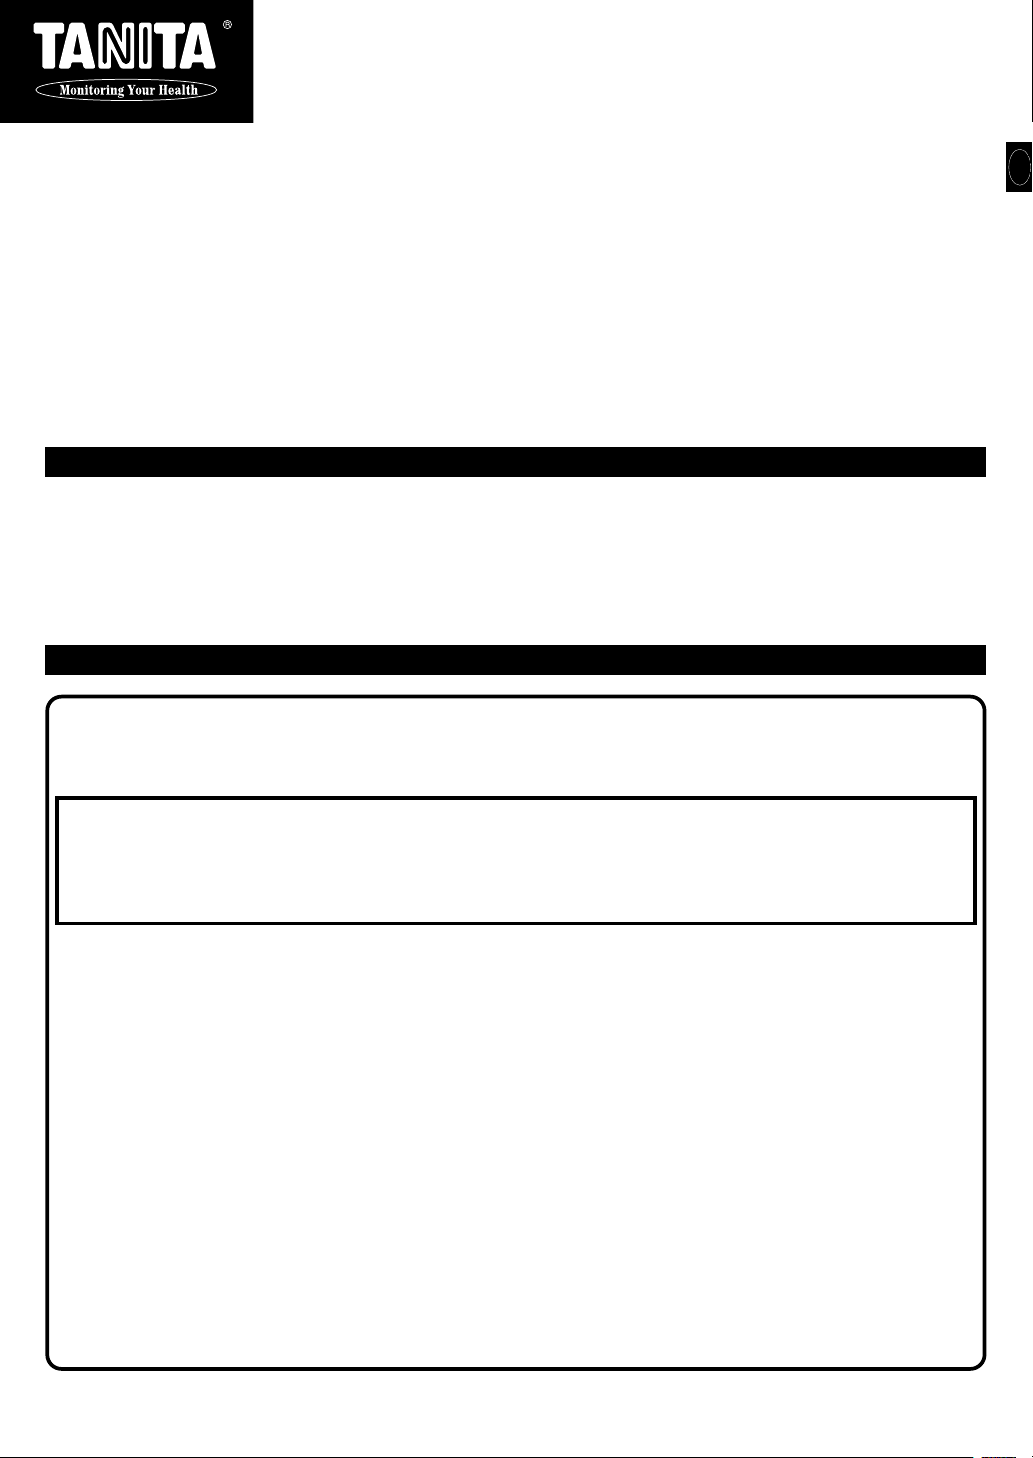
3. Part Names& Specifications 4. Using the WB8000RW with D8000 Remote Display
Check Included Items
Eng
□ WB-8000RW □ AC adapter □ Instruction (CD or Leaflet)
□ Warranty
□ Registration Card
LED Lamp
Changes color depending on what mode is selected.
Indicates status through color and blink pattern.
This LED lamp is green when the mode selectionswitch is set to
the “ON” position.
This LED lamp is blue when the mode selection switch is set to
the “USB ONLY” position.
LED off
• This LED is not lit when the mode selection switch is set to the
“OFF” position.
•If the LED is off, but the mode selection switch is not set to the
“OFF” position, please check the unit power.
Blinks once every 4 seconds
•Indicates WB-8000RW is in standby state.
* The unit will be in standby state after it is turned on.
Blinks once every 1 second
•Indicates the unit is ready to measure weight. Please step onto the
WB-8000RW.
Lit
•Indicates that data is being transmitted.
Blinks red 3 times after turning power on, when blinks red once
every 6 seconds
• Please replace the batteries.
Lit Red
• Error
* Automatically recovers.
Make sure to step onto the WB8000RW only after it has beeped
twice or the Green indicator light is blinking.
The unit cannot accurately measure your weight if it detects
movement. Please stand on the platform keeping movement to a
minimum.
Reading cannot be obtained if the weight capacity is exceeded.
Weight capacity is 660lb (300kg).
etc. to control the unit. When this mode is selected, the LED will be blue.
OFF Mode : Power is off.
be used. When this mode is selected, the LED will be green.
DC Jack Port
Please use the included
AC adapter.
Battery Box (Bottom)
Please use 4 AA alkaline
batteries.
Mode Selection SwitchUSB Port
USB ONLY
OFF
ON
••••••••USB bidirectional transmission mode. Use this when using a computer,
•••••••••••••••
••••••••••••••••ON Mode : Both wireless transmission and USB output (output only) can
1. Provide Power
Provide power to both the D-8000 and the WB-8000RW. Each can be powered by either batteries or the included AC adapter.
* To ensure a stable and consistent power supply, whenever possible use the included AC adapter.
<D-8000 (Optional)>
When Using Batteries
(1) Loosen the display unit battery box screw, and slide the box out.
Batteries
(2) Follow the markingson the case and insert 6 AA alkaline batteries.
(3) Securely close the battery box and tighten the screw.
When Using the AC Adapter
(1) Insert the dedicated AC adapter into the DC jack port of the display unit.
(2) Plug the AC adapter into a wall outlet.
DC Jack port
<WB-8000RW>
When Using Batteries
Open the battery cover on the bottom of the platform. Insert the
4 AA alkaline batteriesas indicated.
Battery Box
When Using the AC Adapter
(1)Insert the included AC adapter into the DC jack port on the left side of the weighing
unit.
(2) Plug the AC adapter into a wall outlet.
•Be sure that the polarity of the batteries is set ploporly. If the batteries are
Note:
incorrectlypositioned, fluid may leak and damage floors. If you do not intend to
use this unit for long period of time, it is advisable to remove the batteries before
storage.
Eng
<Specifications>
Maximum Capacity / Minimum Graduation
2
Model WB-8000RW
Measurement System
Platform
Output Data Interface
Power Source
Power Consumption
Temperature Range of usage
Strain Gauge Load Cell
300kg / 0.1kg 660lb / 0.2lb
505 x 415 x 51 mm 19.9 x 16.1 x 2.0 inch
USB (B-type)
AC adapter (included) DC 9V 200mA
4 x LR6 - AA Alkaline Battery (Not included)
60mA
5°C to 35°C 41˚F to 95˚F
DC Jack port
3
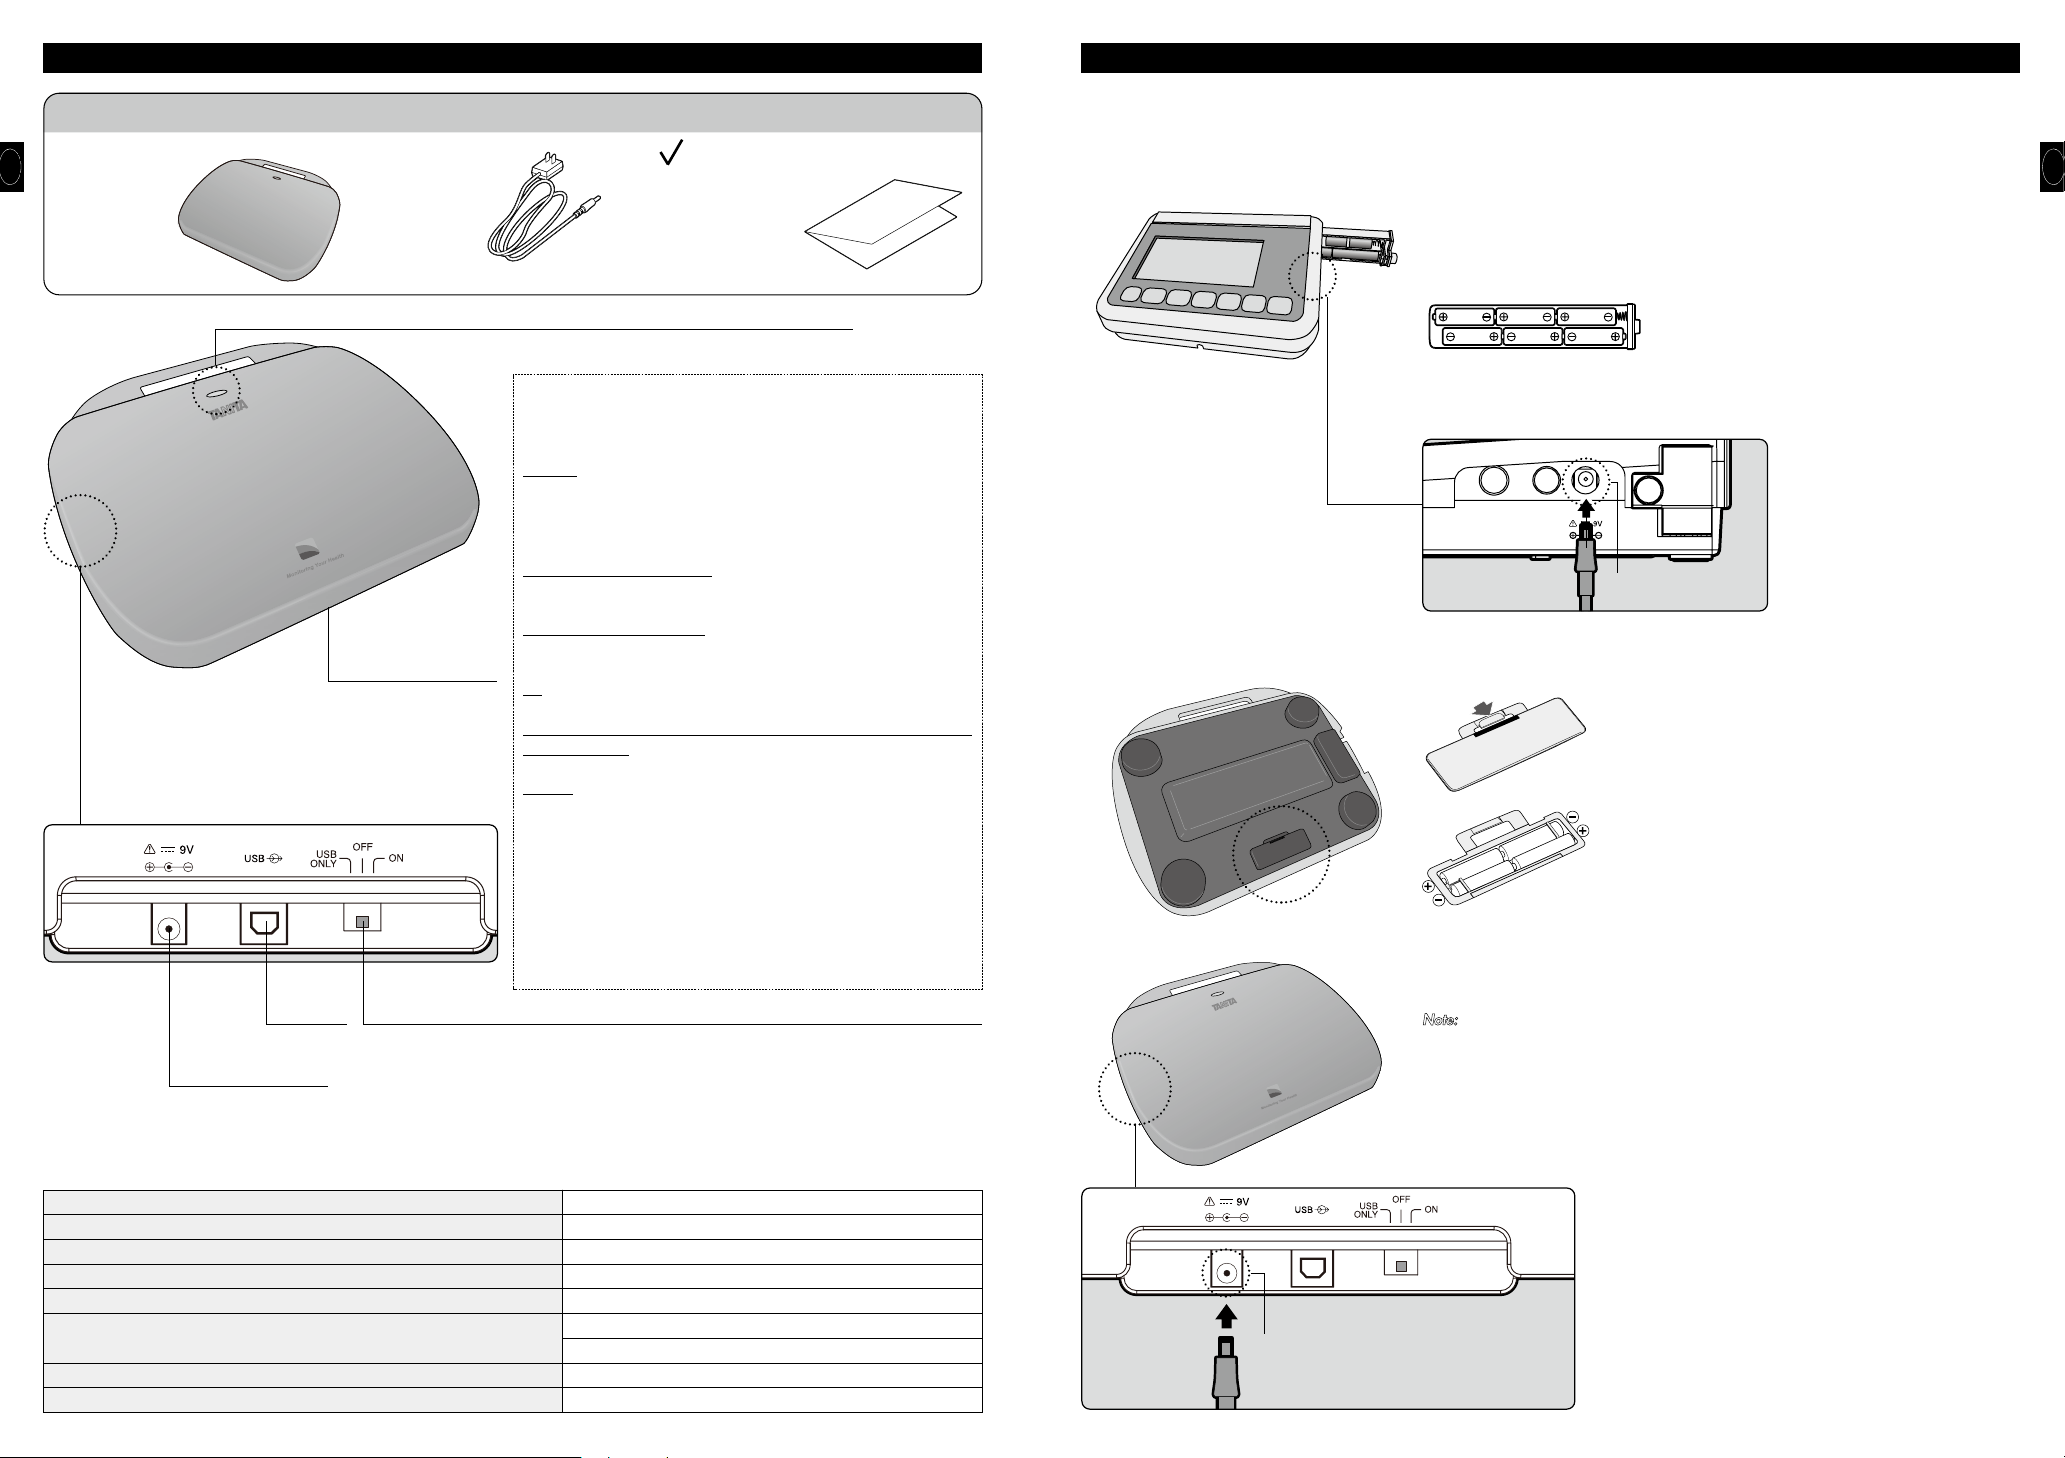
2. Setting the Serial Number
Before proceeding, make sure that the WB8000RW and D8000 are within 17 feet (5m) of each other.
The serial number must be set in order for the WB-8000RW and the D-8000 to communicate.
The same assigned serial number should be set for the WB-8000RW as for its corresponding D-8000.
This must be performed when using the device for the first time, or when using the D-8000 with a different WB-8000RW. If it is not performed,
Eng
measurement values will not be displayed on the D-8000.
1. Press the D-8000 .
d
2. When “Func1” appears, press .
d
d
d
3. “Pin1” will be displayed.
[When configuring the WB-8000RW for the first
time]
You can register up to 4 WB-8000RWs in
advance.
Press to select the Pin* number you
wish to register (Pin1 to Pin4), and press .
*Pin : Preset Input Number
[When configuring a WB-8000RW which has
previouslybeen registered]
When the Pin number of a WB-8000RW whose
serial number has previously been registered
is displayed, the top half of the LCD will show
the registered serial number.
d
4.When the top half of the LCD blinks, press
to enter the 5 digit number printed
on the bottom of the WB-8000RW (see figure
below). Press to move to the next
number.
Press the keys to select the desired
Pin number (5 digit serial number), and press
.
d
5. Operation
Before proceeding, make sure that the WB8000RW and D8000 are within 17 feet (5m) of each other.
1. Standard Weighing Procedures <weight mode>
1) Place the WB-8000RW on a hard, flat surface where there is
minimal vibration to ensure safe and accurate measurement.
<LED: Blinking Green (4 Second Intervals)>
d
d
<LED: Blinking Green (1 Second Intervals)>
2) Set the WB-8000RW switch to the ON position.
The unit will go into standby mode, and the LED will blink
green every 4 seconds.
3) Press on the D-8000.
The unit will start using the Pin which has been previously
set, and will begin communicating with the corresponding
WB-8000RW.
After the unit indicates it is in standby mode, when
communication between the two devices is established,
“-----” will be displayed on the top half of the LCD. The
WB-8000RW will start, and it w ill beep and switch to
measurement mode (the LED will blink green in 1 second
intervals).
•Pressing and holding for 2 or more seconds
Note:
will cause the currently selected Pin to be
displayed.
•To set or change the Pin, see Setting the Serial
Number page in the Setup section.
•When the D-8000 cannot communicate with the
paired WB-8000RW, the display w ill indicate
“ErrC”, and the D-8000 power will turn off.
4) Step onto the WB-8000RW while the Green Indicator Light is
blinking on every second.
Eng
Pi
d
d
5. After entering every digit, press . Press .
After the measurement is complete, the platform will beep
twice, the Green Indicator light on longer blinks (remains
solid), and weight will automatically be displayed on
D-8000.
d
d
6. When “donE” appears, the configuration process is complete.
*To register a different serial number with a different Pin, repeatthe process fromstep1.
* The D-8000 cannotbe connected simultaneously to multiple WB-8000RWs. To measure using a
different WB-8000RW, setthe correct Pin andthen perform the measurement.
*Toregister a different serial number foraPintowhich aserial number hasalreadybeen
assigned, overwritethe existing serial number with the new serial number, and press .
4
d
PiPi
5
Eng
d
d
<LED: Blinking Green (4 Second Intervals)>
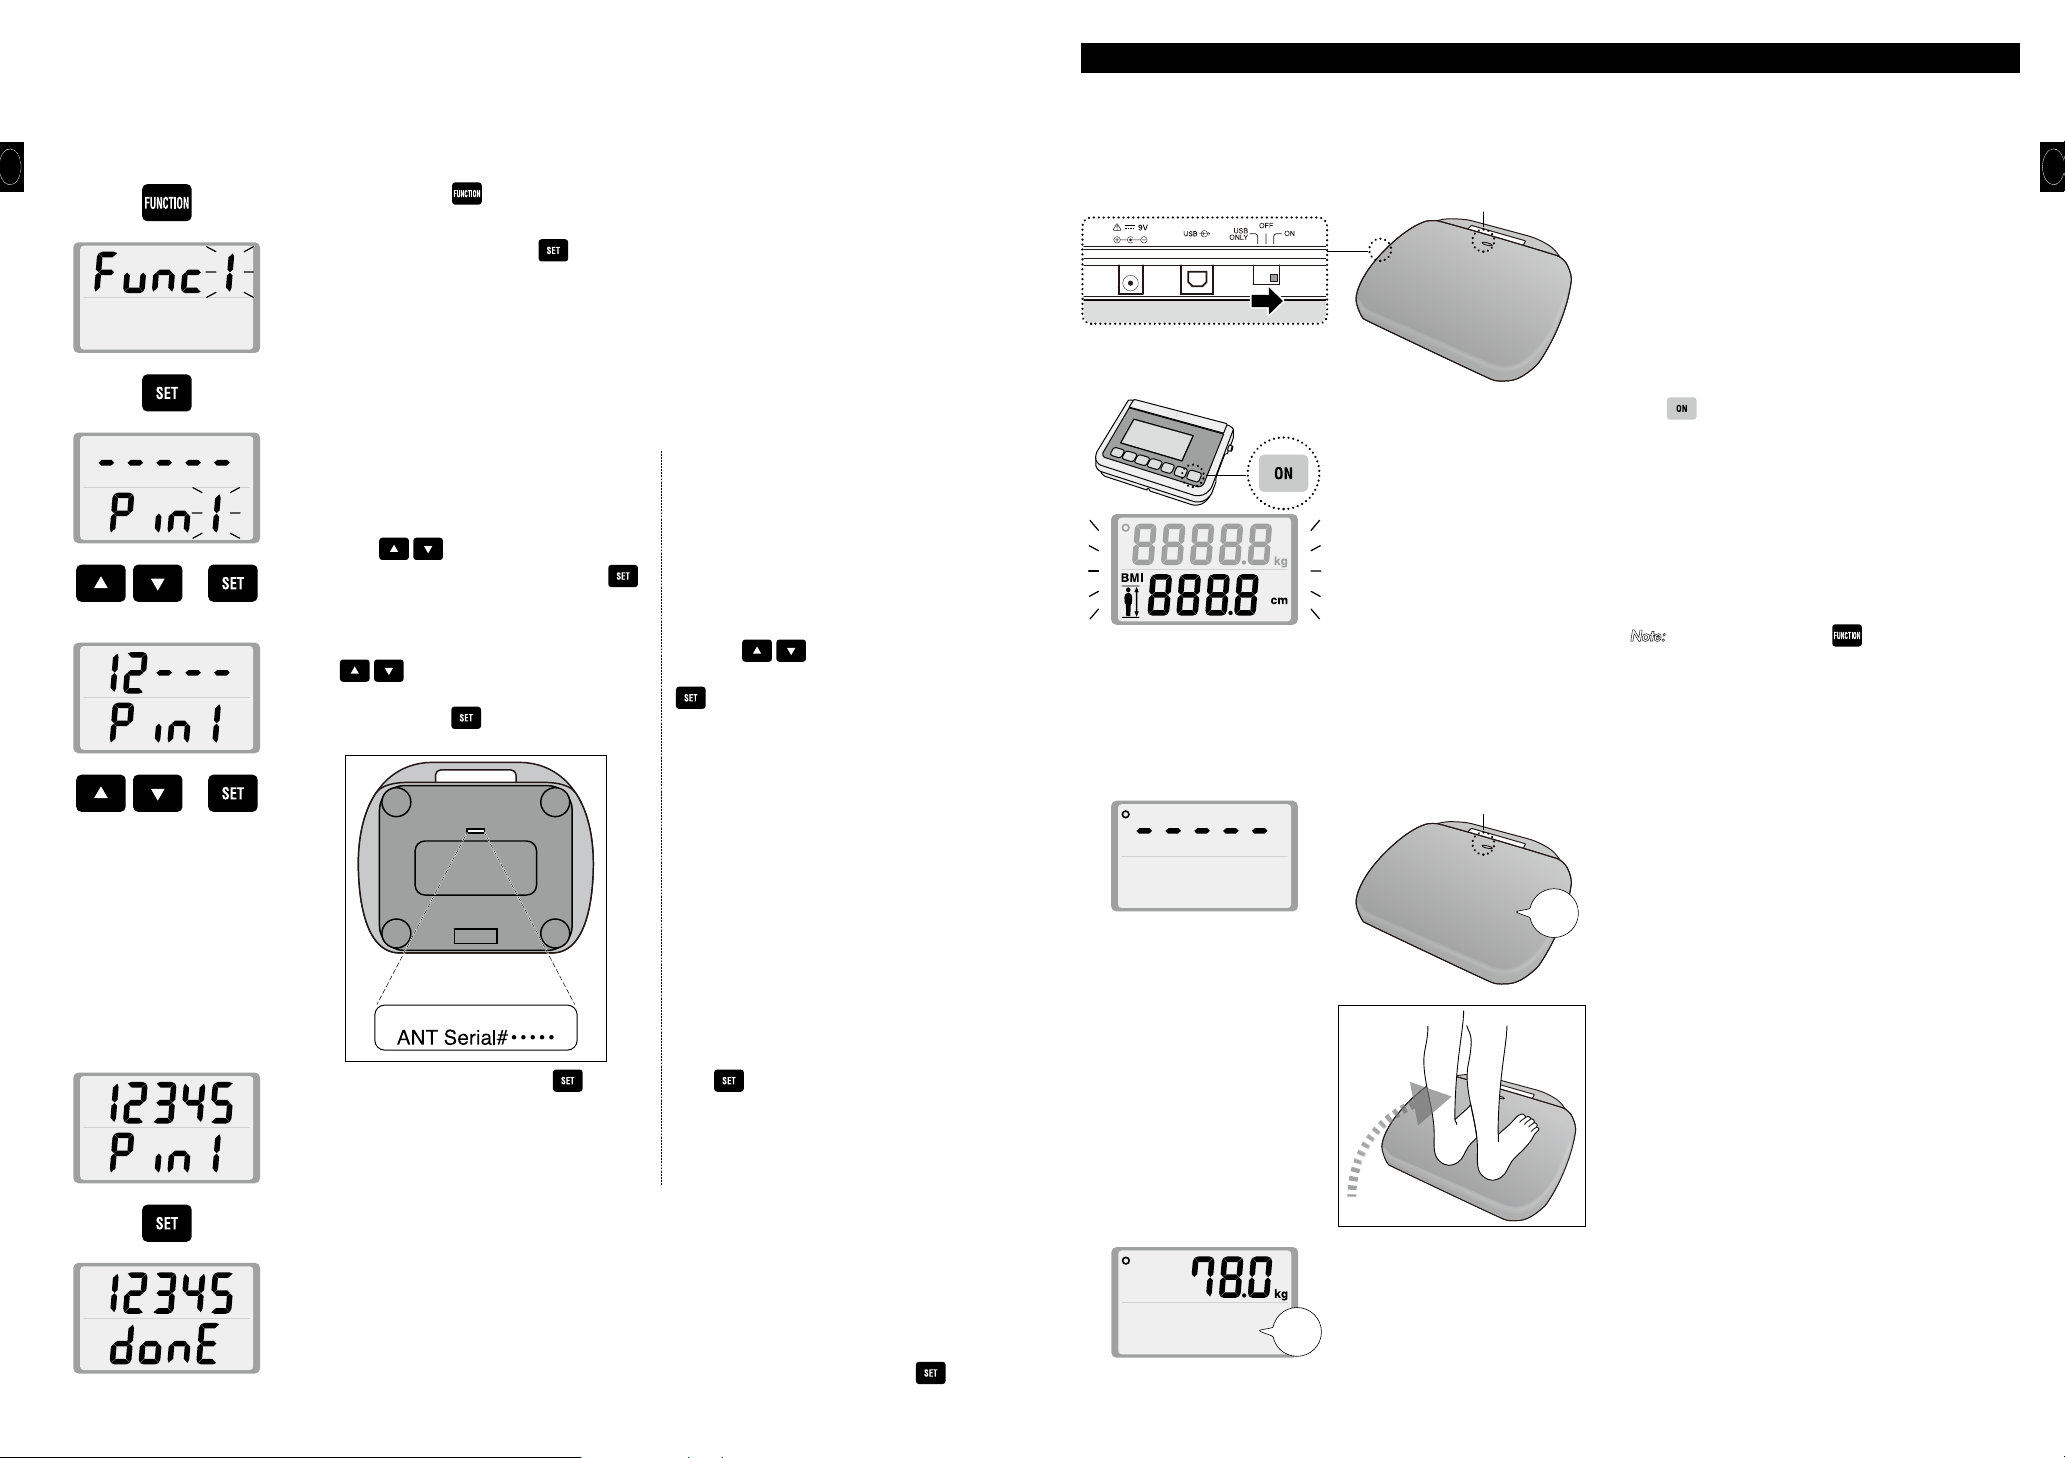
5) Carefully step off WB-8000RW after measurement is
complete.
•If you do not step off the scale within 30 seconds of
Note:
weighing,the WB-8000RW LED will be lit red and
emit two short beeps to remind you to step off the
scale.
When data output ends, the WB-8000RW LED will turn off,
and when you step off the WB-8000RW, it will switch to
standby mode (the LED will blink green in 4 second
intervals).
2. BMI mode
d
d
d
1) After step 3 “Press on the D-8000” of the “Standard Weighing Procedures”, the top half of the
LCD will display “-----”. Press .
The bottom half of the LCD will blink “170” (when the unit is set to “kg”).
Press to enter your height in cm.
•When the weight display unit is set to “pounds”, enter your height in inches.
Note:
Eng
d
Measurement Ended
d
<LED: Blinking Green (1 Second Intervals)>
d
6) When the D-8000 display disappears, the scale can be used
for weighing again.
The value shown on the D-8000 will disappear, and after
switching to standby display, the unit will beep, and “-----”
will be shown on the display.
When the WB-8000RW starts up, beeps, and switches to
measurement mode (the LED will blink green in 1 second
intervals), please step onto the WB-8000RW.
•If no measurement signal is received by the D-8000
Note:
Pi
from the WB-8000RW for a certain amount of time, the
D-8000 display value w ill disappear. When this
happens, the WB-8000RW will switch to standby mode
(the LED will blink green in 4 second intervals).
*To end measurement, press the D‐8000 OFF key to turn
off the display. Switch the WB‐8000RW mode selection
switch to the OFF position.
d
2) Once you have finished entering your height, press .
d
3) Step onto the WB-8000RW.
•Enter your height within 30 seconds of the D-8000 displaying “-----”.
Note:
4) After weighing, the D-8000 will display your weight and BMI.
3. Changing Units
You can change units by pressing the kg/lb key when the D-8000 displays “-----”.
•This function may not be available for all models.
Note:
d
4. Output Function
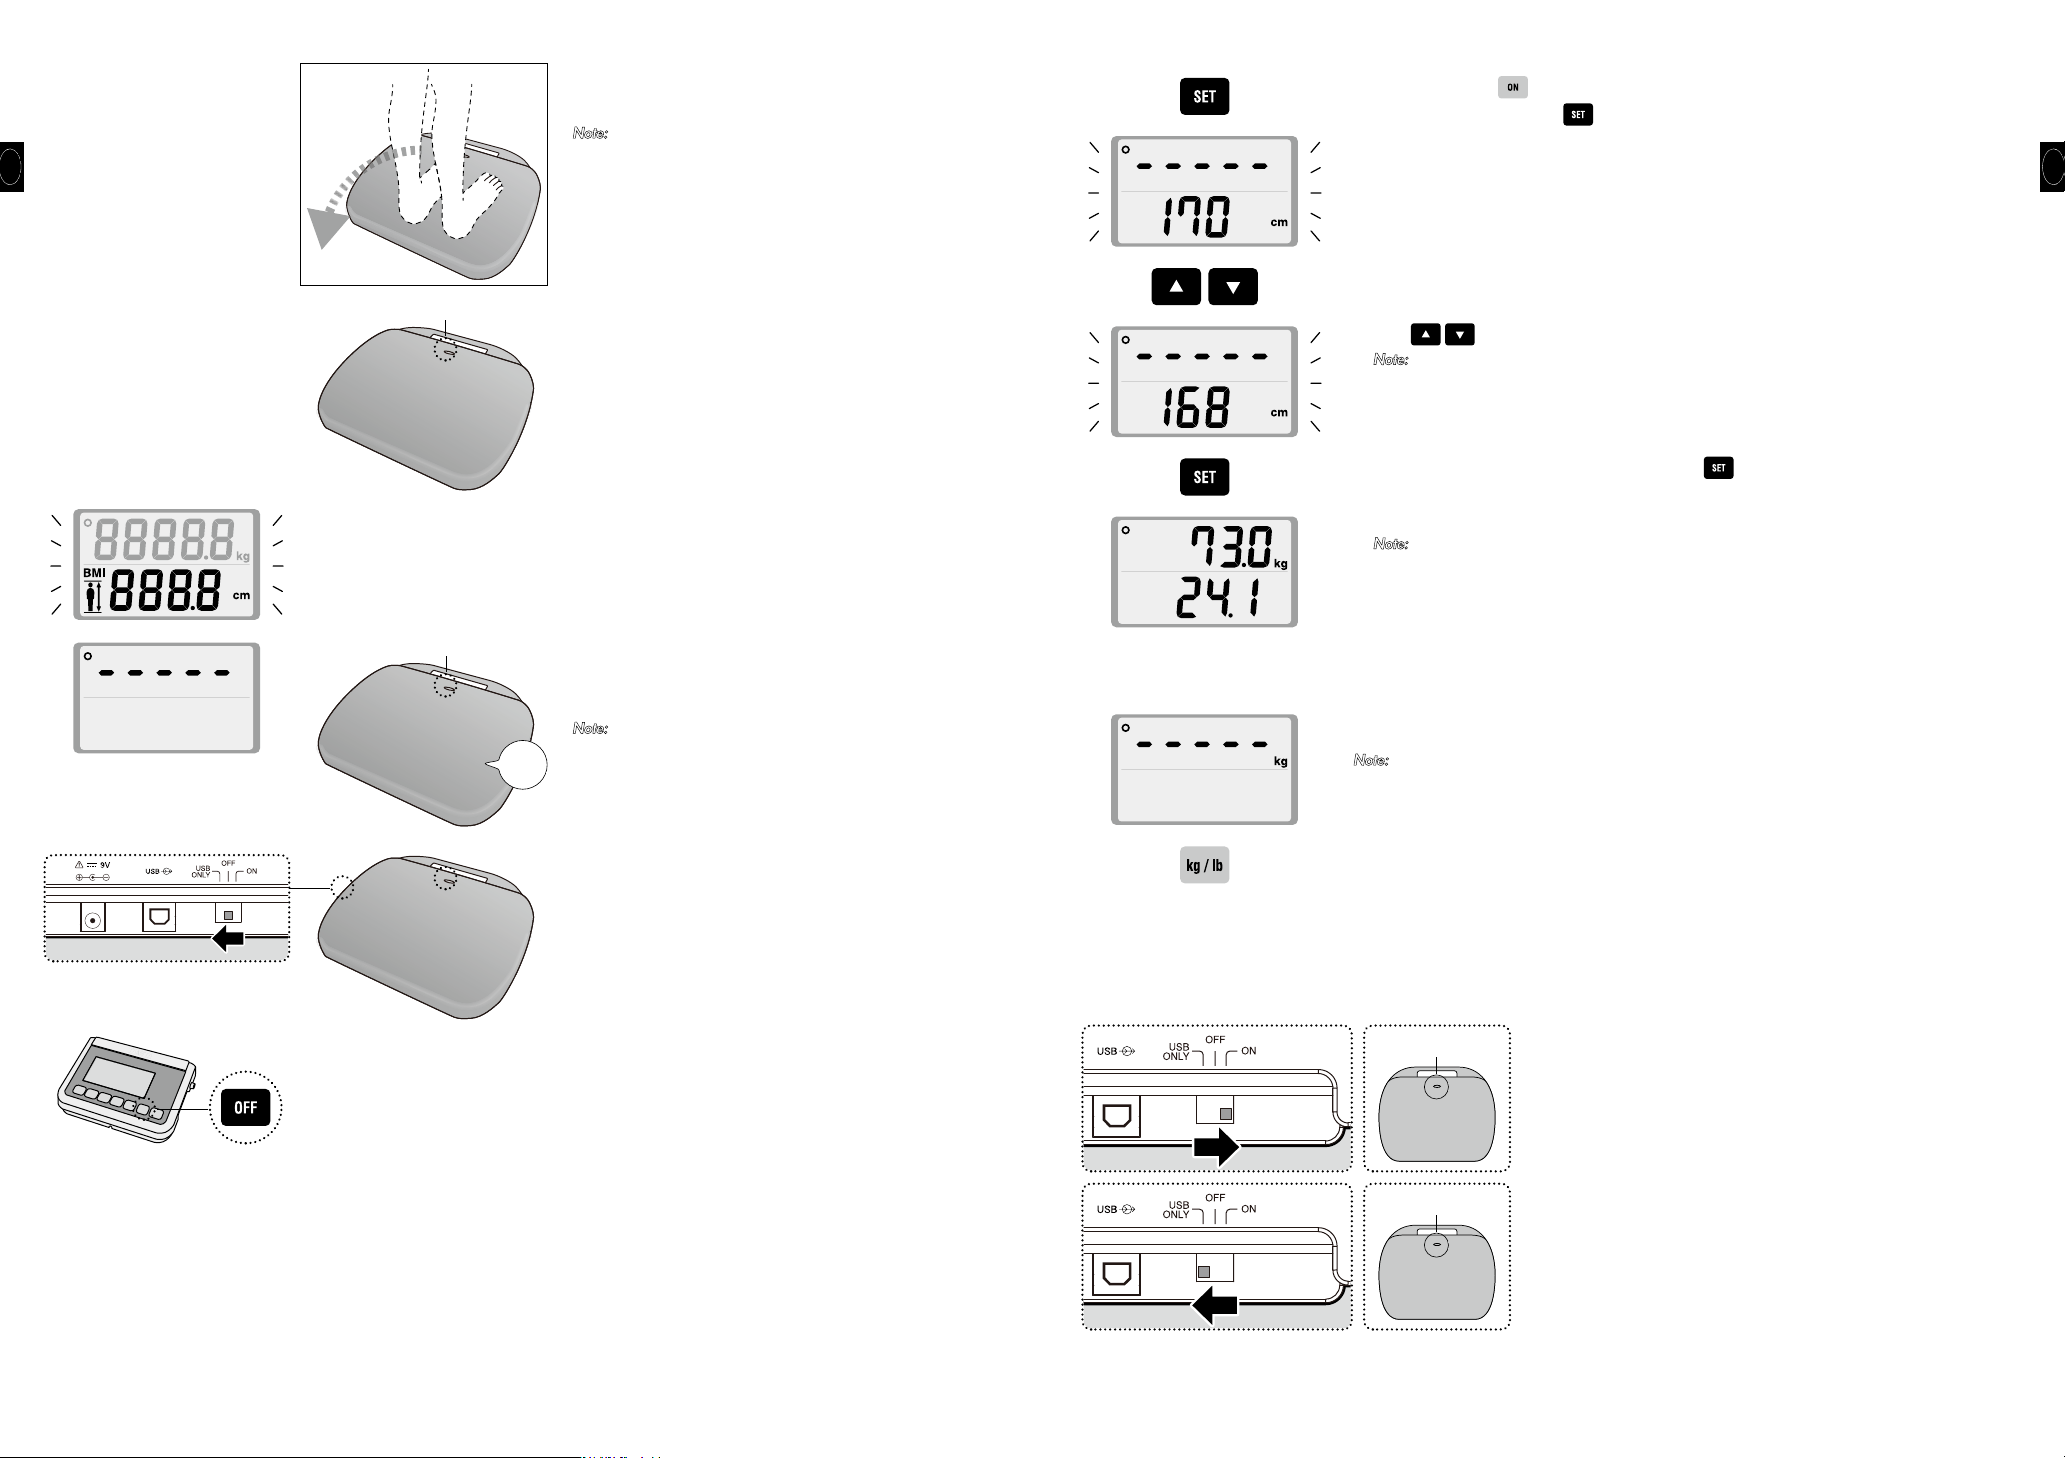
The WB-8000RW’s output function is controlled by the mode selection switch’s position.
LED: Green
•When the WB-8000RW’s mode selection switch is set to ON, both
wireless and USB output can be used. USB transmission will be set to
output-only, and when the display is set your weight and BMI will be
automatically output. The LED will be green.
LED: Blue
6
•When the WB-8000RW’s mode selection switch is set to USB ONLY, only
USB output can be used. USB transmission will be possible in both
directions (input and output). The LED will be blue.
7
6. Output data format
The section covers the exporting of data form the scale to an external device (e.g. PC) using a USB compliant signal.
Conguration
Eng
Note:
•USB connector (B Type 4 pin female) is located on the side of the WB8000RW.
•Please provide your own cable as necessary as none are included.USB cable: A Type 4 pin (male) B Type 4 pin (male)
•You must install the necessary driver onto your PC, available download from http://www.tanita.com.
Output
Name of itemHeader
Control data
Control data
Model
Height
Weight
BMI
Checksum
Note:
• The data is divided with commas (,) for each data.
• The terminator (end of the data) is CR (ASCII code 0DH), LF (ASCII code 0AH).
• The control data for the items 1 – 4 are for expansion. They are not used presently so the receiving side can ignore them.
•Because of its specifications, the scale will output an irrelevant signal approximately 0.1 second after data output. Make sure you ignore this
signal and do not import it.
[Output example]
Communications standard
Communications method
Signal speed
Data bit length
Parity
Stop bit
Terminator
{0
˜0
MO "WB-8000" 9 Byte fixed
Hm xxx.x
Wk
MI
CS
Output data (ASCII code)
Fix to 16
Fix to 1
xxx.x
xxx.x3 – 5 bytes
xx
2 Bytes fixed
1 Byte fixed
4 – 5 bytes
3 – 5 bytes
2 Bytes fixed
USB
Asynchronous transaction
9600 baud
8 bits
None
1 bit
CR+LF
Pattern
BMI mode
Weight mode
<Data Format when Mode Selection Switch is Set to USB ONLY>
• This mode is used to control the WB-8000RW via computer.
• This scale is not capable of receiving instructions from an external device. When using the ON mode.
Note:
•USB connector (B Type 4 pin female) is located on the side of the WB8000RW.
• Please provide your own cable as necessary as none are included.USB cable: A Type 4 pin (male) B Type 4 pin (male)
•You must install the necessary driver onto your PC, available download from http://www.tanita.com.
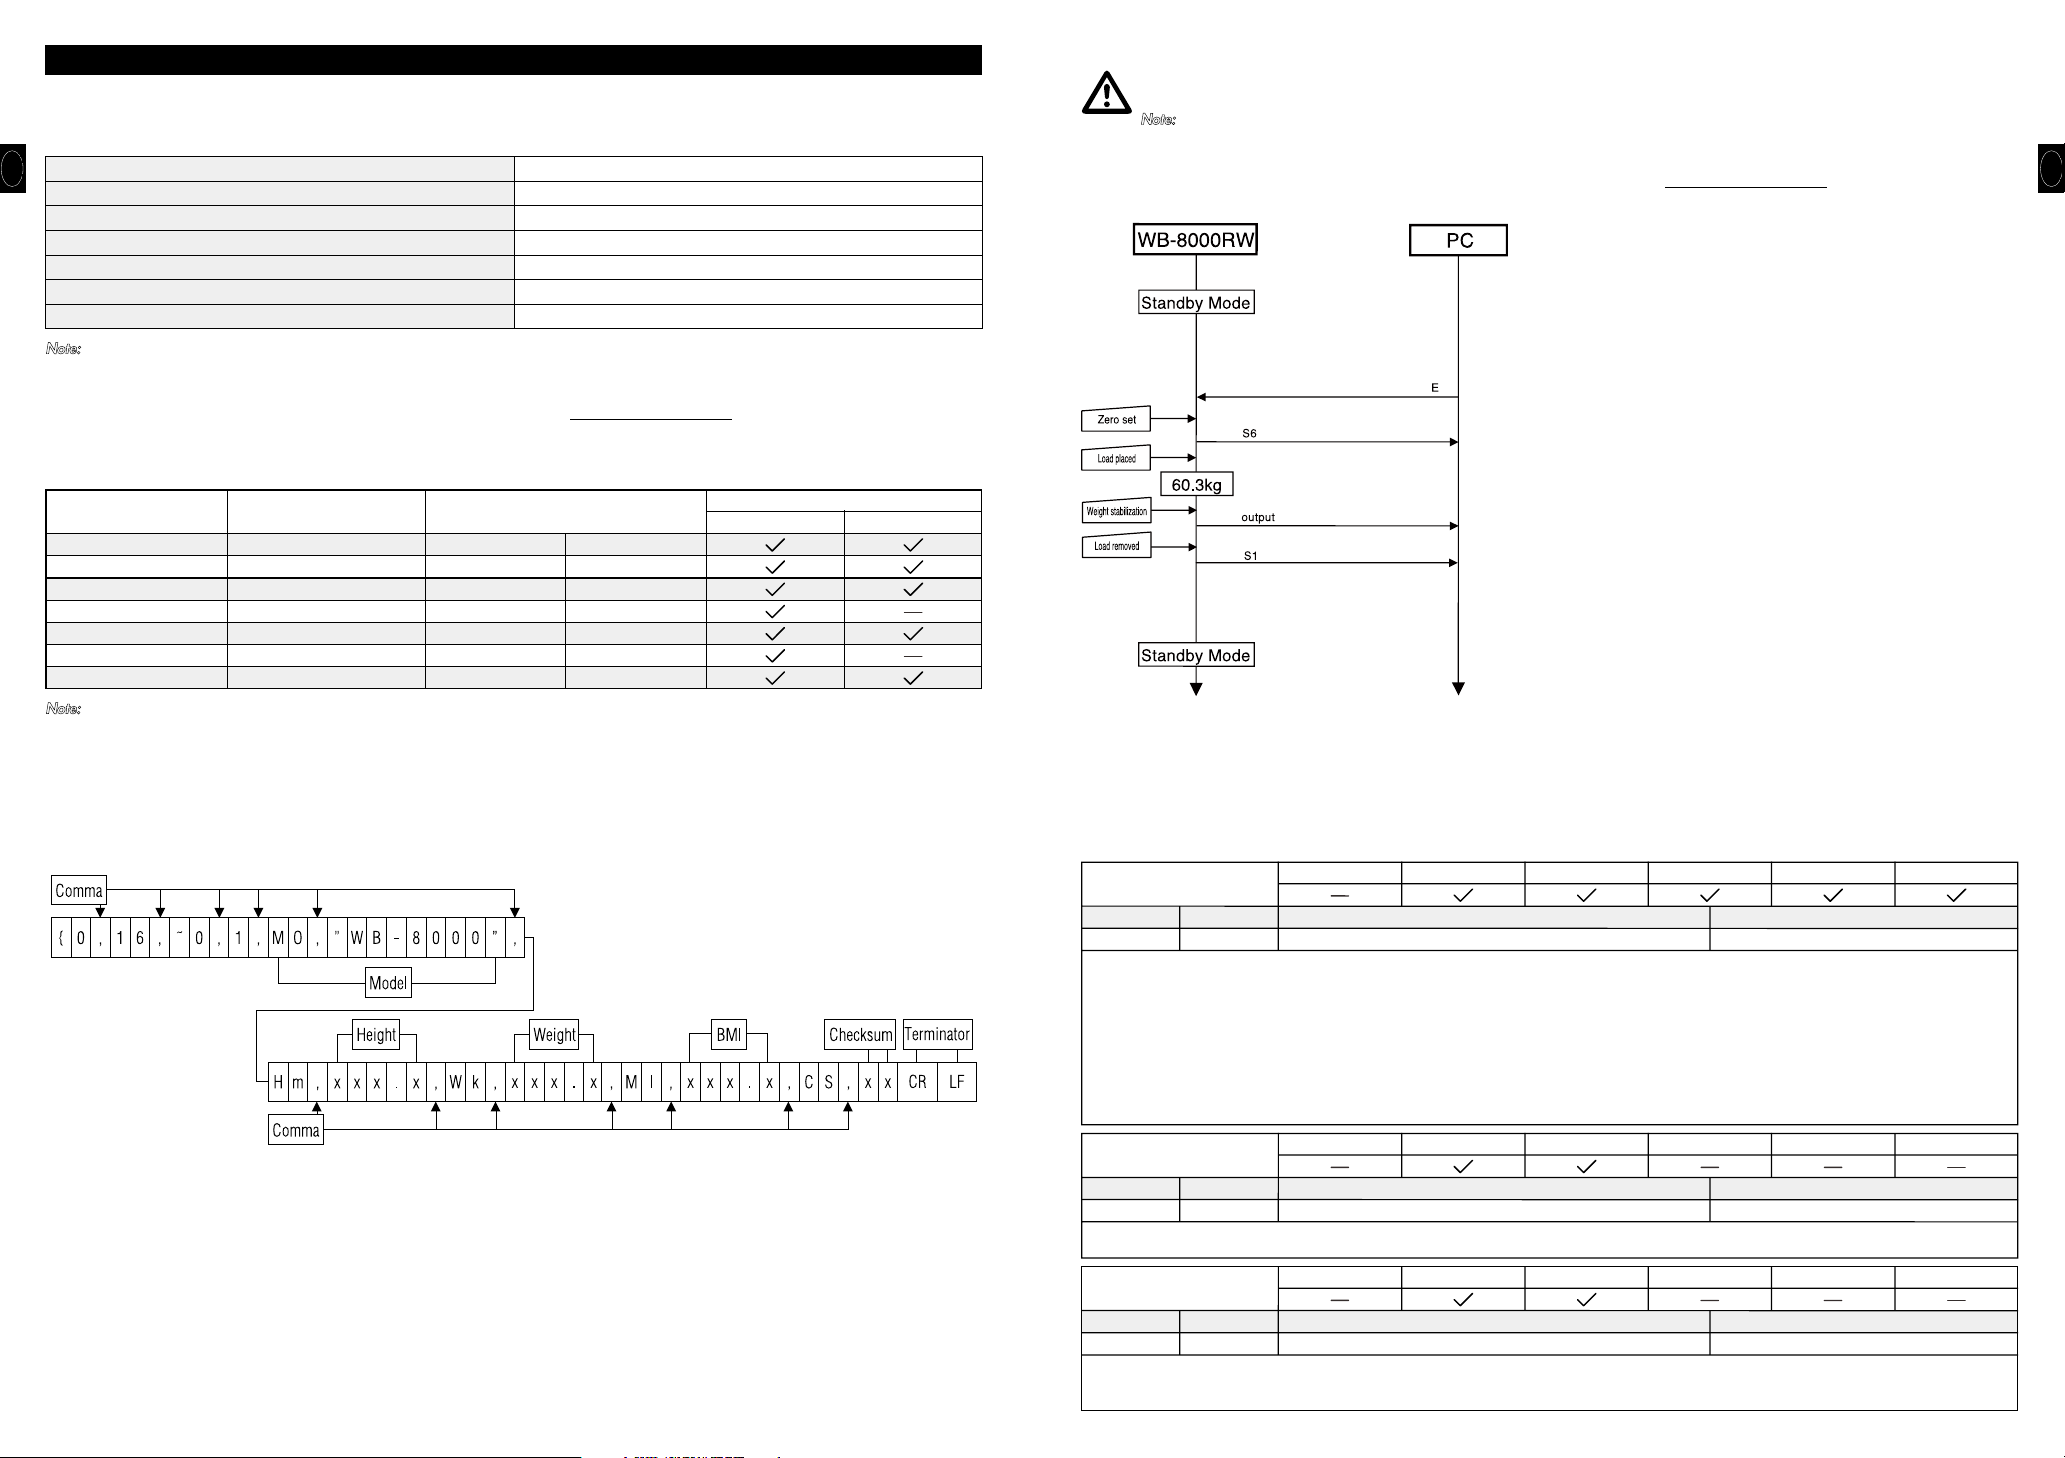
<Weighing Example>
1) Use the mode selection switch to switch to USB ONLY position.
2) Ready to comunicate to computer.
The unit will switch to “State1”.
3) An [E] command will be received from the computer.
4) The product will begin performing zero setting, and switch to “State5”.
When zero setting is complete, it will switch to “State6”.
* When the unit switc he s to “State6”, it will sen d [S6] to th e
computer.
5) Step on the weighing platform. When the weight measurement
stabilizes, the unit will switch to “State7”, and the weighing results will
be sent to the computer.
* Please see the separately listed output format.
6) When you step off the weighing platform, the unit will switch to the
“State1” state.
* When the unit switc he s to “State1”, it will sen d [S1] to th e
computer.
7) The device will switch to standby mode.
<List of Valid Commands>
* In the chart, “Response” indicates that a response is sent in reply to a command. The contents indicated in the “Response” section of the
chart are sent before the action listed in “Action” is performed.
* A [CR][LF] is input after the “Message” and “Response” items in the chart.
* After “Command” in the chart, send a [CR][LF].
* When a command other than those listed in the chart is received, [!][CR][LF] will be sent, indicating that an invalid command has been
received.
State Confirmation
Command
X is a 1 byte character
Message States
S0: “State0” (Not USB bidirectional transmission mode)
S1: “State1” (Configuration has not been completed)
S2: “State2” (Configuration has been completed)
S5: “State5” (Setting zero)
S6: “State6” (Zero set, awaiting load)
S7: “State7” (Weighing output has been completed, no load on device)
Response
State0 State1 State2 State5 State6
Action
Outputs current state of device SXS? None
Message
State7
Eng
State0 State1 State2 State5 State6
Action
Outputs program version. W8000XXXX
State0 State1 State2 State5 State6
Action
Set height. D3, Hm, XXX.0D3XXX None
Message
Message
•When the WB-8000RW’ s Mode Selection Switch is set to ON, both wireless output and USB output
can be used. USB transmission will be set to output-only, and when the display is set your weight
and BMI will be automatically output. The LED will be green.
•When the WB-8000RW’s Mode Selection Switch is set to USB ONLY, only USB output can be used.
USB transmission will be possible in both directions (input and output). The LED will be blue.
State Confirmation
Command
W? None
“XXXX” section will contain program version
State Confirmation
Command
X is a 1 byte character
Sets height.
Response
Response
8
State7
State7
9
Start Weighing
Command Response
Eng
ENone
Start BMI Measurement
Command Response
GNone
Reset
Command Response
Q@
Stop Weighing
Command Response
q@
Height value set before weighing is stop is retained.
State0 State1 State2 State5 State6 State7
Action Message
Setting zero (changes to “State5”) None
Zero is set, awaiting load (changes to “State6”) S6
When load stabilizes, measurement results are output
Load drops to 2.0kg or less (changes to “State1”) S1
State0 State1 State2 State5 State6 State7
Zero is set, awaiting load (changes to “State6”) S6
When load stabilizes, measurement results are output
Load drops to 2.0kg or less (changes to “State1”) S1
State0 State1 State2 State5 State6 State7
State0 State1 State2 State5 State6 State7
Stop weighing (changes to “State1” or “State2”) None
(changes to “State7”)
Action Message
Check if height has been set
Setting zero (changes to “State5”) None
(changes to “State7”)
Action Message
Reset (changes to “State1”) None
Action Message
When setNone
When not set E4
None
None
7. Troubleshooting
If you are concerned that the scale may not be functioning correctly, please check the following pointsbefore requesting repairs.
Problem Check Points
•Incorrect Pin input for the device you are trying to use.
“-----” is not displayed when the D-8000
is turned on.
The displayed weight is not accurate
The kg/lb button does not function
Err C is shown on D8000
Err is shown on D8000
Lo is shown on D8000
•The WB-8000RW is off.
•The WB-8000RW’smode is set to USB ONLY
•The WB-8000RW is not in standby mode
•The WB-8000RW is not in standby mode
•There is interference
•The WB-8000RW has been installed incorrectly
•Please contact a sales office
•A transmission error has occurred. Turn the display off.
•An error has occurred. Turn the display off.
•Replace the batteries.
Eng
<Error Commands>
Weighing errorE0
Weight limit exceededE1
Start BMI measurement command sent without height being setE4
Set height value exceeds input parameters. BMI under 6.0E6
10
11
 Loading...