

Page 1

Eng
ELECTRONIC PHYSICIAN SCALE
WB-3000
INSTRUCTION MANUAL
Please keep this manual in a safe place, and make
sure it is readily available whenever necessary.
Please use this product only after carefully reading
this manual and fully understanding its contents.
Page 2
WARNING
• Inserting and Removing the AC adapter to reduce the risk of electric shock or product damage, never insert or remove the AC adapter with wet hands.
• Do not under any circumstances dismantle or alter the device, as this could result in electric shock or injury as well as adversely affecting the precision
of measurement.
• To prevent fire hazard use only a correctly wired (120V AC) outlet, and do not use a multiple outlet extension cable.
CAUTION
• Please make sure you place the scale on a level and stable surface. If the equipment is used when the scale is unstable, because not all feet are on the
surface, there may be a risk of injury or inaccurate measurement.
• Never jump on the scale, there may be a risk of injury and malfunction of the equipment.
• The equipment must be used with the included AC adapter only.
• Do not insert or remove the AC plug by the cable.
• Do not place a finger into any gap or any hole of the equipment. You may be injured.
• Please use caution when adjusting the height rod to prevent injury.
• Please return the height rod to the storage position after completion of measurement.
• Please do not touch or lean on the height rod or the display during weighing as this will reduce accuracy.
Maintenance
This is a precision manufactured and accurately calibrated product. Please observe the following instructions.
• If the equipment is moved to a place with a temperature difference of 18˚F/10˚C or more, leave if for at least two (2) hours before use.
• Avoid subjecting the equipment to excessive shocks or vibrations.
• Never disassemble or adjust the equipment, as this may cause malfunctions.
• When not in use for an extended time, unplug the AC adapter from the wall socket.
• Do not wipe the equipment with corrosive chemicals (benzene, acetone, etc.). Please use a neutral detergent to clean the equipment.
• Do not use cellular phones or microwave therapy equipment near this equipment.
It may not measure correctly due to equipment malfunction.
• When disposing of this equipment, please do so in accordance with the prevailing regulations in your country, state and city.
• If an unauthorized person attempts to disassemble or repair any part of the equipment, the warranty will become invalid. When the unit malfunctions,
please consult your nearest Tanita sales office or agent.
Caution Symbols
For optimum performance and safety, please familiarize yourself with the Caution Symbols below. These symbols are designed to alert the user to
potential hazards when using this equipment. Ignoring these Caution Symbols may result in serious injury, or damage to the product. Please be sure to
review before proceeding with the INSTRUCTION MANUAL.
WARNING
This symbol indicates the possibility of serious injury if the product is mishandled or instructions are ignored.
CAUTION
This symbol indicates the possibility of physical injury or equipment damage if instructions are ignored.
This symbol indicates general precautions that should be taken when using this product.
2. Safety Notes
1. Table of Contents
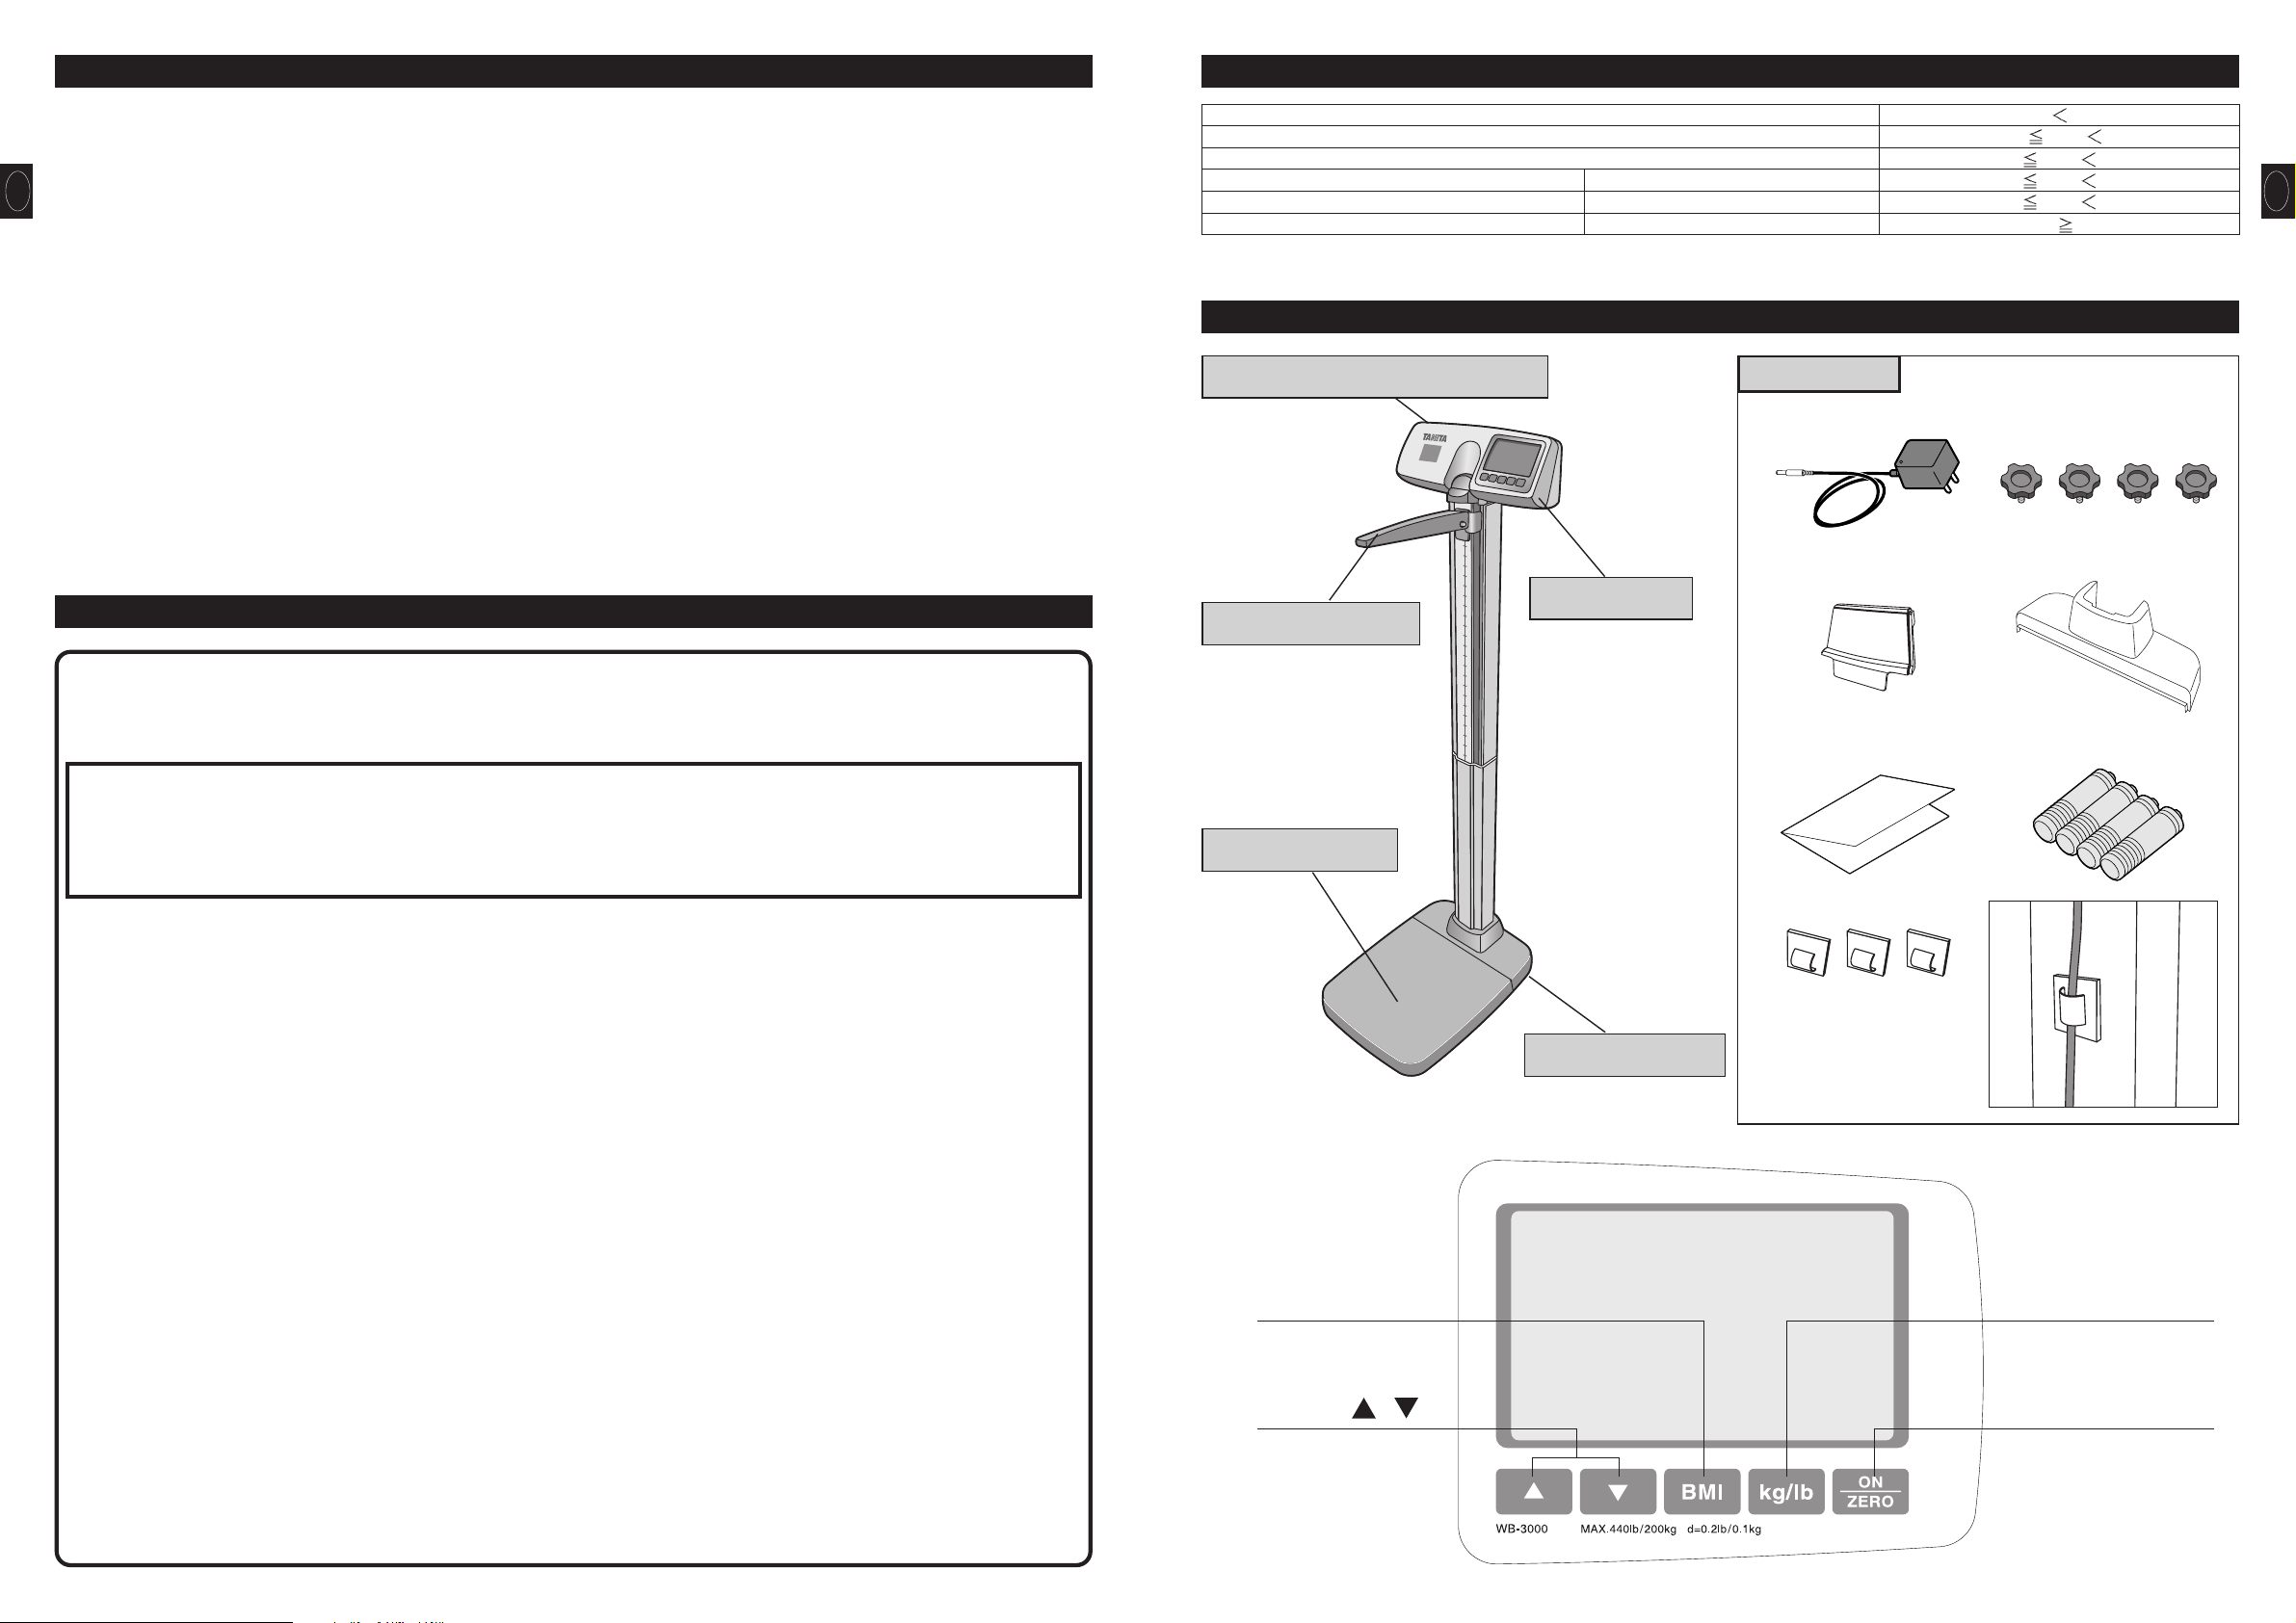
4. Part Names & Accessories
Eng
Eng
2 3
2. Safety Notes
••••••••••••••••••••••••••••••••••••••••••••••••••••••••••••••••••••••••••••••••••••••••••••••
2
3. Based on NIH / WHO BMI Guidelines
•••••••••••••••••••••••••••••••••••••••••
3
4. Part Name & Accessories
•••••••••••••••••••••••••••••••••••••••••••••••••••••••••••••••••••••
3
5. Assembly Instructions
•••••••••••••••••••••••••••••••••••••••••••••••••••••••••••••••••••••••••••
4
6. Set up
••••••••••••••••••••••••••••••••••••••••••••••••••••••••••••••••••••••••••••••••••••••••••••••••••••••••••••
5
7. Operation by AC adapter
•••••••••••••••••••••••••••••••••••••••••••••••••••••••••••••••••••••
5
8. Operation by batteries
•••••••••••••••••••••••••••••••••••••••••••••••••••••••••••••••••••••••••••
5
9. Operation
••••••••••••••••••••••••••••••••••••••••••••••••••••••••••••••••••••••••••••••••••••••••••••••••••••
6
10.Measuring height procedure
••••••••••••••••••••••••••••••••••••••••••••••••••••••••••••••
8
11.Output data format
•••••••••••••••••••••••••••••••••••••••••••••••••••••••••••••••••••••••••••••••••
9
12.Specifications
••••••••••••••••••••••••••••••••••••••••••••••••••••••••••••••••••••••••••••••••••••••••••
11
13.Troubleshooting
•••••••••••••••••••••••••••••••••••••••••••••••••••••••••••••••••••••••••••••••••••••
11
3. Based on NIH/WHO BMI Guidelines
Under Weight
Normal Range
Pre obese
Obese
Obese
Obese
CLASS l
CLASS ll
CLASS lll
BMI
18.5
18.5
BMI 25
25
BMI 30
30
BMI 35
35
BMI 40
BMI
40
Battery Compartment
Platform
Height Rod Arm
Adjustable Feet
AC Adapter
Front Cover
Instruction Manual
Clip x 3
•The clips are for holding
the AC adapter cable and
USB cable. Attach the clips
to the rear of the pillar as
illustrated.
Back Cover
Screw x 4
LR6 (AA Alkaline battery) x 4
Accessories
Display Box
/
Adjust height for BMI
ON/ZERO
Turns the power on and
sets zero
BMI
Select BMI mode
kg/lb
Select “kg” or “lb” for unit
measurement
Page 3

Eng
5
1-1)
1-2)
* Insert new batteries such that the negative terminals of the batteries are pushed up against
the coils within the battery housing.
Image
6. Set up
Use the scale in a firm, flat and stable location.
To obtain the highest level of accuracy, please make sure that all four (4) feet are touching
on the floor evenly.
For further accuracy and security, please position the two (2) adjustable supporting feet on
the base (found under the front cover) until they just make contact with the floor (do not
overextend)
•Do not position it anywhere that is subject to direct sunlight, near heating equipment, or
directly in the path of an air conditioner outlet.
•Do not use it anywhere that is subject significant temperature change.
•Do not position it anywhere that it either damp or subject to high humidity.
CAUTION
• Put the weighing platform on a flat, level surface.
7. Operation by AC adapter
AC adapter is much preferable when the scale will be used continuously.
1) Insert the AC adapter jack into the AC adapter inlet on the back side of display.
2) Plug the AC adapter into the power outlet.
WARNING
• In order to reduce the risk of electric shock, never insert or remove the power code with wet hands.
CAUTION
• This equipment must be used with the included AC adapter only.
8. Operation by batteries
1) When the batteries start to run low, “Lo” appears on the display panel as a warning.
2) Pull up the battery case which located on top of display. All batteries should be immedi-
ately replaced with new ones at the same time.
•Do not use a combination of alkaline and manganese batteries, as such an arrangement
may result in equipment failure.
•Rechargeable batteries are NOT recommended use.
3) Push down the battery case completely.
Eng
4
5. Assembly Instructions
1. List of Components
Base (fully assembled and pre-wired to display assembly)
Cable (Base side)
Lower Pillar Assembly
Screw
Cable (Top Head Display Assembly Side)
Top Head Display Assembly (fully assembled and pre-wired to base)
Back Cover
Front Cover
Top Height Rod Assembly (fully assembled with pivoting height measuring lever)
Height Rod Arm
Lower Height Rod Assembly
2. Assembly
1) Carefully remove all components from the box.
2) Place all items on the floor side by side.
3) Install the Lower Pillar Assembly into the Base using the four (4) Screws while carefully avoiding pinching the cable.
4) Assemble the Top Head Display into the Lower Pillar assembly while carefully inserting the cable into lower pillar assembly and extending
it the full length of the lower pillar.
5) Connect the Cable from the bottom of the lower pillar assembly to the cable on the base.
6) Attach the Back cover onto the back side of the bottom of lower pillar assembly.
7) Attach the Front cover to the front side of the lower pillar assembly while holding the
Back cover securely in place.
8) Assemble the top height rod assembly to the lower height rod assembly correctly.
9) Slide the assembled height rod into the height rod opening on the pillar assembly. Push
all the way down.
CAUTION
• Be careful not to catch your fingers during assembly.
5)
Page 4

Eng
7
3. Step on Function
The scale will turn on automatically when the user steps onto the platform.
Note:
•If the weight is less than 22lb/10kg, the “Step-On” function will not work.
•If person less than 22lb/10kg, press the key manually to turn on the scale.
•If an item is placed on the scale while it is powered off, accurate measurement will not be possible and the Step on Function may not operate
properly.
d
d
4. Changing Measurement Units
This function is used to change the measurement units on the display.
e.g. When change the unit “kg” to “lb”.
Press the key.
The measure shifts from “kg” to “lb” and the measurement units change.
Eng
6
(or )
d
d
d
d
d
d
2. BMI Weighing
1) Turn on the power by pressing the key.
2) After all the segments flash, [0.0lb/0.0kg] is displayed.
3) The person to be weighed should still in the middle of the platform.
4) The weight will be locked-in and displayed on the display. “ (Hold)” sign will appear in the upper
left corner of the display.
5) Press the key (or ). The default height [5ft7.0in/170cm] will be displayed.
6) Set the height with the key.
7) Once the height and weight have been established, press the key.
The weight and BMI calculation will then be displayed.
When the scale is connecting to an external device, weight, height and BMI data will be exported
at this time.
8) The scale will automatically shut off in 30 seconds.
The setting of height for BMI is can be accomplished in any one of the following means by press-
ing the key (or ).
•Before stepping on the scale.
•After pressing the key.
•After weight measurement while the weight result remains on the display.
d
d
d
d
9. Operation
1. Standard Weighing Procedures
1) Turn on the power by pressing the key.
2) After all the segments flash, [0.0lb/0.0kg] is displayed.
3) The person to be weighed should still in the middle of the platform.
4) The weight will be locked-in and displayed on the display. “ (Hold)” sign will appear in the upper
left corner of the display.
When the scale is connected to an external device, weight data will be exported at this time.
5) The scale will automatically shut off in 30 seconds.
Note:
•Do not press the ON key while standing on the scale, as accurate measurement will not be
possible.
Page 5

Eng
9
11. Output data format
This section covers the exporting of data from the scale to an external device (e.g. PC) using a RS-232C and USB compliant signal.
•RS-232C and USB interface are for data OUTPUT ONLY!
•This scale is not capable of receiving instructions from an external device.
Eng
8
10. Measuring height procedure
The user should step on the platform without wearing shoes for accurate
measurement.
Always have someone assist the user for accurate measurement.
1) Adjust the Height Rod Arm position before the user steps on the platform. Place
hand on the Height Rod Arm.
If the subject is taller than 48” / 120 cm, pull the Height Rod Sliding Block and
Height Rod Arm at the same time upward so that the arm is positioned higher
than the subject’s head.
If the subject is shorter than 48” / 120 cm, move the Height Rod Arm down.
Incorrect way to hold
the Height Rod Arm
Correct way to hold
the Height Rod Arm
To avoid danger of breaking or coming loose, you
must hold the height rod arm securely.
2) Gently lower the Height Rod Arm until the Height Rod Arm touches the very top of the
user’s head.
3) Read the measurement.
If the subject is taller than 48” / 120
cm, read the number just above the
top of the Upper Pillar Column (see
example #1).
If the subject is shorter than 48” /
120cm, read the number below the
Height Rod Arm (see example #2).
INCORRECT way to
measure the height of
48" / 120cm or more
Reading the height
measurement of
48" / 120cm or LESS
Reading the height
measurement of
48" / 120cm or MORE
Example #1:
58"(147.5 cm)
Example #2:
36.25" (92 cm)
CORRECT way to
measure the height of
48" / 120cm or more
Note:
•An RS-232C connector (D sub 9-pin female) and USB connector (B-type 4-pin female) are located on the back of the display unit.
•Please provide your own cables as necessary as none are included.
RS-232C :Straight D sub 9-pin (male) – D sub 9-pin (female)
USB :A-type 4-pin (male) – B-type 4-pin (male)
•Select Switch : Please select which interface you would like to use
If you want to use the USB output, you must install the necessary driver onto your PC, available to download
from
http://www.tanita.com
.
Specifications
Signal Line Name and Connection Method
Communications standard
Terminal no.
Signal name
TXD
RXD
GND
1
2
3
4
5
6
7
8
9
Communications method
Signal speed
Data bit length
Parity
Stop bit
Terminator
EIA RS-232C compatible USB
Asynchronous transaction
9600 baud
8 bits
None
1 bit
CR+LF
RS-232C Port
USB Port
RS-232C/USB Select SW
1
6
9
5
READ HERE
Page 6

Eng
10
Eng
11
12. Specifications
13. Troubleshooting
Height
Hm Hf xx.x
xxx.x
xx
{0
˜0
˜1
Output data
Name of item
Header
Weight
BMI
Checksum
Output data (ASCII code)
Pattern
BMI mode
2 – 6 bytes
3 – 5 bytes
Control data
Control data
Control data
Model
Control data
Fix to 16
Fix to 1
Fix to 1
Fix to 1
2 Bytes fixed
1 Byte fixed
1 Byte fixed
1 Byte fixed
MO
"WB-3000" 9 Byte fixed
2 Bytes fixed
˜2
Wk Wp
CS
xxx.x 3 – 5 bytes
MI
Note:
•The data are divided with commas (,) for each data.
•The terminator (end of the data) is CR (ASCII code 0DH), LF (ASCII code 0AH).
•The control data for the items 1 – 4 are for expansion. They are not used presently so the receiving side can ignore them.
•When the measurement unit is select the "lb",all the hight data is converted into “ft-in” and it is output.
•Because of its specifications, the scale will output an irrelevant signal approximately 0.1 second after data output. Make sure you ignore this
signal and do not import it.
[Output example (in the case to lb unit)]
Weight modekg mode lb mode
Model
WB-3000
Strain Gauge Load Cell
440 lb / 0.2lb
0- 440lb 0 - 200kg
22 - 440lb 10 - 200kg
Mechanical Height Rod
2ft 1in – 7ft
2ft – 8ft 2in 0.5in increment
440 lb / 0.2lb
2ft – 8ft 2in 0.5in increment
0.1 increments
20.8 x 15.0 x 54.4 in
15.0 x 15.0 x 2.0 in
Upper 5Digits and Lower 4Digits LCD
Height of numerals 1in / 24mm
RS-232C (D sub 9-pin Male connector) USB (B-type)
AC adapter (included) Center Minus
0.3 W max.
32°F - 95°F
25.3lb (without batteries)
DC 6V 200mA (LR6 - AA Alkaline Battery x 4 included)
Approximately 100hours of continuous use when using LR6
(AA Alkaline battery)
0°C - 35°C
11.5kg (without batteries)
528 x 380 x 1381 mm
380 x 380 x 50 mm
61cm- 250cm 1cm increments
200kg / 0.1kg
61cm- 250cm 1cm increments
64cm – 214cm
200kg / 0.1kg
Weight Measurement
Measurement System
Maximum Capacity / Minimum Graduation
Height Measurement
Range of Weight
Standard
Step on
Measurement System
Range of Height
Input Items Height
Output Items Display
Weight
Height
BMI
Size
Overall
Platform
Display
Output Data Interface
Power Source
Power Consumption
Temperature Range of usage
Weight of Equipment
Rated Power
Battery Life
If you are concerned that the scale may not be functioning correctly, please check the following point before requesting repairs.
Problem Check Points
Nothing is displayed when key
is pressed.
“Lo” is displayed.
Measurement is not accurate.
The weight does not stabilize
“OL”
is displayed
“
-OL”is displayed
“
Error”is displayed
•Check the connection of the AC adapter jack to the DC jack, and the connection of the AC
adapter plug to the wall outlet.
•The batteries may be weak. Try an AC adapter or new LR6 (AA) batteries.
•Check the terminals of the batteries for contamination
The batteries are running out. Please replace them immediately or use the AC adapter.
•Check that all feet of scale are stable and on a hard flat surface, carpeting depth should be
kept to a minimum.
•After having stepped down from the scale and pressed the ON key, perform the measure-
ment again.
•Accurate measurement may be impossible if the product is used where there is excessive
vibration.
•Try using the product in a different place.
•Are you moving during measurement?
•Is the measured weight within the range of weight measurement?
•Are you touching the height rod arm, switch, or another part during measurement?
•The range of weight (440lb/200kg) is exceeded.
•Was anything placed on the scale before measurement?
•Check whether the cable between the platform and display is disconnected, cut, or pinched.
Female Connector) USB (B-type)
Page 7

© 2008 TANITA Corporation. All Rights Reserved.
Eng
WB3007601(0)
USA and Canada
Federal Communications Commission and Canadian ICES Notice
This equipment has been tested and found to comply with the limits for a Class B digital device, pursuant to Part 15 of the FCC Rules and Canadian
ICES-003. These limits are designed to provide reasonable protection against harmful interference in a residential installation. This equipment
generates, uses and can radiate radio frequency energy and, if not installed and used in accordance with the instructions, may cause harmful
interference to radio communications. However, there is no guarantee that interference will not occur in a particular installation. If this equipment
does cause harmful interference to radio or television reception, which can be determined by turning the equipment off and on, the user is encouraged
to try to correct the interference by one or more of the following measures:
• Reorient or relocate the receiving antenna.
• Increase the separation between the equipment and receiver.
• Connect the equipment into an outlet on a circuit different from that to which the receiver is connected.
• Consult the dealer or an experienced radio or television technician for help.
Modifications
The FCC requires the user to be notified that any changes or modifications made to this device that are not expressly approved by Tanita Corporation
may void the user’s authority to operate the equipment.
 Loading...