

Page 1

ELECTRONIC PHYSICIAN SCALE
MODEL WB-300, WB-300MH, WB-300DH
Operating Instruction Manual
Table of Contents
1. Product Specifications . . . . . . . . . . . . . . . . . . . . . . . . 2
2. Important Notes for Users . . . . . . . . . . . . . . . . . . . . . . 2
Handling Tips
Moving the Scale
Disabling Key Sounds
Changing Measurement Units
3. Components. . . . . . . . . . . . . . . . . . . . . . . . . . . . . . . . . 3
4. Key Operation. . . . . . . . . . . . . . . . . . . . . . . . . . . . . . . . 4
5. Assembly Instructions . . . . . . . . . . . . . . . . . . . . . . . . . 5
6. Before Use . . . . . . . . . . . . . . . . . . . . . . . . . . . . . . . . . . 6
Level the Scale
Insert the Batteries
Remove the LCD Cover
Set up the Clock
Setting to Zero
7. Instructions for Use . . . . . . . . . . . . . . . . . . . . . . . . . . . 8
Weighing Procedure
Auto-on Function
Turn-on Function
Wake-up Function
Measuring Height Procedure
8. General Troubleshooting. . . . . . . . . . . . . . . . . . . . . . . 12
Weight Capacity: ‘E’
Low Battery Warning: ‘LOWBATT’ / ‘nobAt,’
‘AdEr,’ ‘LoL’
Replacing Batteries
Resetting the Scale
9. Calibration. . . . . . . . . . . . . . . . . . . . . . . . . . . . . . . . . . 13
Please keep this manual in a safe place, and make sure it is readily
available whenever necessary. Please use this product only after
carefully reading this manual and fully understanding its contents.
Page 2

1. Product Specifications
Product Model . . . . . . . . . . . . . . . . . . . . . . . . . . . . . . . . . . WB-300 (Basic Electronic Medical Beam Scale)
WB-300MH (Electronic Medical Beam Scale
with Mechanical Height Rod)
WB-300DH (Electronic Medical Beam Scale
with Digital Height Rod and BMI Function)
Type of Measurement. . . . . . . . . . . . . . . . . . . . . . . . . . . . . Four (4) Half Bridge Load Cell
Capacity . . . . . . . . . . . . . . . . . . . . . . . . . . . . . . . . . . . . . . .440 lb – 0.1 lb
200 kg – 0.05 kg
Graduation . . . . . . . . . . . . . . . . . . . . . . . . . . . . . . . . . . . . . 0.1 lb, 1/4 lb, 0.05 kg
Range of Height (WB-300MH and DH). . . . . . . . . . . . . . . . 22" to 82" (55 cm – 208 cm)
Height Graduation (WB-300MH and DH) . . . . . . . . . . . . . . 1/4" (1.0 cm)
Power Source . . . . . . . . . . . . . . . . . . . . . . . . . . . . . . . . . . . (3) AA Alkaline batteries (included) for
scale functions
(1) 3-volt CR123 Lithium battery (included) for
clock display
Display . . . . . . . . . . . . . . . . . . . . . . . . . . . . . . . . . . . . . . . . Dual panel LCD 1.0" display
(liquid crystal display)
Platform Size. . . . . . . . . . . . . . . . . . . . . . . . . . . . . . . . . . . . Extra Large 16" x 12" x 2-3/4" non-slip platform
Product Dimensions . . . . . . . . . . . . . . . . . . . . . . . . . . . . . 16.26" (413 mm) x 20.75" (527 mm) x 51.02"
(1296 mm)
Product Weight. . . . . . . . . . . . . . . . . . . . . . . . . . . . . . . . . . WB-300 26.00 lb/11.80 kg
WB-300MH 27.50 lb/12.50 kg
WB-300DH 27.50 lb/12.50 kg
2. Important Notes for Users
Handling Tips
This scale is a precision instrument utilizing state-of-the art technology. To keep the unit in the best
condition, follow these instructions carefully.
• Do not attempt to disassemble the measuring platform and display.
• Avoid excessive impact or vibration to the unit.
• Place the unit in an area free from direct sunlight, heating equipment, high humidity, or extreme
temperature change.
• Never submerge in water or spill chemical liquids. To clean, use a dampened cloth and mild detergent.
• If the product will not be used for a long period, remove the batteries before storage.
Moving the Scale
The scale has two rear wheels on the back of the platform. To avoid damage, use the wheels when moving
the scale. Hold the display head securely and tilt the scale back about 30-45 degrees. Wheels will allow
easy movement. IMPORTANT: Any time the scale is moved or re-located, be sure to press the ‘Zero’ key
before use.
Disabling Key Sounds
To confirm a key operation has been selected, a “beep” will sound when any key is pressed. To disable
this sound, press the up arrow and down arrow keys simultaneously for three seconds. To re-activate the
key sound, press the up arrow and down arrow keys simultaneously again for three seconds. The volume
of this beep sound is not adjustable.
Changing Measurement Units
This function can be used to change the measurement units on the Weight display: lb, kg, and fractional
lb. The measurement unit keys are located on the left display panel. You may press this key before or
while the user is on the platform.
Press ‘LB’ to set to pound mode. Decimal weight value in pound mode (0.1 lb increments)
Press ‘KG’ to set to kilogram mode. Decimal weight value in kilogram mode (0.05 kg increments)
Press ‘LB (F)’ to set to fractional pound mode. Fractional weight value in pound mode (1/4 lb increments)
2
Page 3
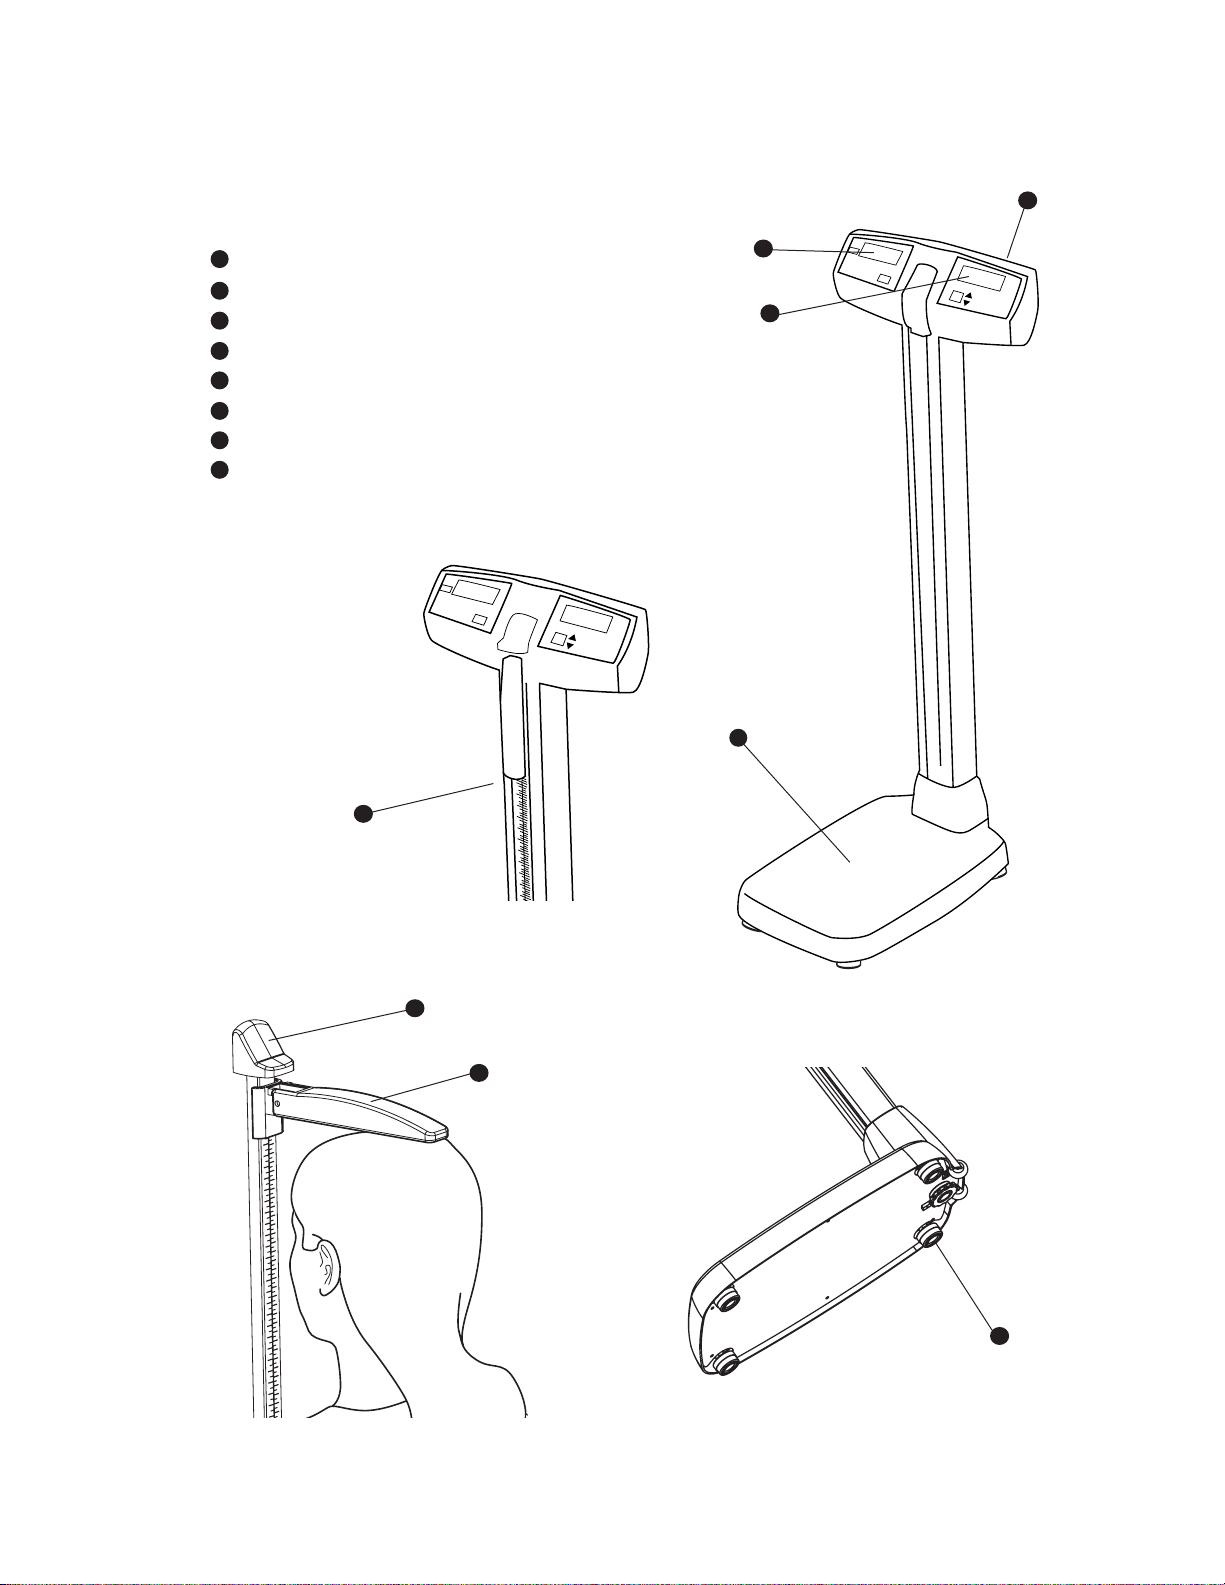
3. Components Description
Lb/Kg
Power
C
lock
19:00
124
1
–
4
LB
Lb/Kg
Power
Clock
19:00
124
1
–
4
LB
Standard Features: WB-300, WB-300MH, WB-300DH
1
Measuring Platform
2
Weight LCD
3
Clock LCD
4
Battery Compartment
5
Height Rod Arm (For WB-300MH and WB-300DH)
6
Height Rod Sliding Block
7
Upper Pillar Column
8
Four feet on the bottom of platform
4
2
3
1
7
WB-300MH/WB-300DH
WB-300
6
5
8
3
Page 4

4. Key Operation
Weight LCD
Right Side Clock LCD
WB-300DH version only
Right Side Clock LCD
WB-300 and WB-300MH versions only
4
Page 5
5. Assembly Instructions
List of Components
Base (fully assembled and
1
pre-wired to display assembly)
Lower Pillar Assembly
2
3
Tightening Knob
Lower Height Rod Assembly
4
5
Top Height Rod Assembly
(fully assembled with pivoting
height measuring lever)
Top Head Display Assembly
6
(fully assembled and
pre-wired to base)
7
Height Rod Arm
8
Wire Harness
7
5
6
5
4
8
2
7
1
If the scale is to be disassembled,
please use this plastic tool to
separate the two pillars.
3
1. Carefully remove all components from the box.
2. Place all items on the floor side by side. Make sure not to excessively pull the wire harness that
connects the base (1) to the top assembly (6).
3. Carefully pull wire harness on topside of lower pillar (2) as pillar is inserted into the base (1). This will
minimize the length of straight wire and ease assembly.
4. Once the lower pillar (2) is placed firmly in the base (1), tighten the knob (3) to the threaded stud located
underneath the base.
5. Snap the top assembly (6) into the lower pillar assembly (2). Make sure to push in the excess length of
coiled wire harness (8) into the open ends of the two pillars as you bring them together. Be careful not
to pinch the coiled wire harness (8) between the two pillars.
6. Assemble the height rod arm (7) to upper height rod (5) from the bottom of upper height rod.
7. Assemble the top height rod assembly (5) to the lower height rod (4). Slide the assembled height rod
into the height rod opening on the pillar assembly. Push all the way down.
Note: For scales without height rod skip steps 6 & 7.
5
Page 6

6. Before Use
Level the Scale
For best results, place the scale on a hard, even surface or carpet without padding. If the four feet
located on the bottom of the platform do not make full contact with the floor, adjust the height of the
two rear feet by hand until the scale becomes stabilized. Note: The two front feet are not adjustable.
Rotate two rear feet clockwise to
lower platform and counter clockwise
to raise platform.
Insert the Batteries
The scale comes with three (3) replaceable AA alkaline and one lithium battery in a separate bag.
The battery compartment is located on the back of the LCD display.
1. Press down and pull battery compartment locking clip to remove the battery compartment cover.
2. Insert batteries with the correct polarity.
3. Replace the battery compartment cover and push it until you hear it click.
Locking Clip
CB123A
+
–
OR
CR17335
AA
AA
AA
+
–
+
–
+
–
LITHIUM BATTERY
CB123A OR CR17335
SEE INSTRUCTION MANUAL
AA alkaline
AA alkaline
AA alkaline
Remove the LCD Cover
Please remove the protection film placed on the LCD before use.
6
Page 7

Set up the Clock
Entering Clock Adjusting Mode
1. Press and hold the ‘Clock’ key on the right display panel for 2 to 3 seconds.
The Clock LCD panel will flash ‘12 Hr’ or ‘24 Hr’ depending on the current display mode.
2. Use ‘Up’ or ‘Down’ key to select either 24 Hr or 12 Hr mode. If 12 Hr mode was selected, the AM
and PM icon will appear on the right corner of clock.
3. Press ‘Clock’ key to confirm.
4. Use ‘Up’ or ‘Down’ key to program the correct hour, and press ‘Clock’ key to confirm.
5. Use ‘Up’ or ‘Down’ key to program the first digit of minute while the first digit of minute is flashing,
press ‘Clock’ to confirm.
6. Use ‘Up’ or ‘Down’ to program the second digit of minute, press ‘Clock’ to confirm.
7. The programmed time will be displayed on the clock LCD.
Note: After 5 seconds or more of keypad inactivity during this process, the adjusted clock will be
saved automatically.
When you change or re-install the lithium battery, the clock setting will be reset to 12:00 pm. Please follow
the instructions above to reset the clock. Changing the (3) AA batteries will not cause the time setting loss.
Setting to Zero
Zero function enables the user to reset the scale to 0 lb or 0 kg while it is free of objects on
the platform. It is recommended to use this function in the following situations:
• For first time use of the scale.
• Every time the scale has been relocated.
• When the Weight LCD does not show 0 lb or 0 kg while the scale is free of objects on the platform.
1. Remove objects from the platform.
2. Press ‘Zero’ key.
“---” followed by 0.0 lb/0.00 kg/0 lb F will be displayed on the Weight LCD.
The scale will automatically shut off in 20 seconds.
The scale has been set to 0 lb/kg.
7
Page 8

7. Instructions for Use
Weighing Procedure
There are three ways to measure weight depending on the situation.
• Auto-On Function can be used when the scale is in off-mode and the user is not on the scale.
• Turn-On Function can be used when the scale is in off-mode and the user is not on the scale.
• Wake-Up Function can be used when the scale is in off-mode and the user is already on the scale.
Auto-on Function
When the scale is in off-mode and the user is not on the scale, the user may simply step on the platform.
1. Step on the platform
“---” will appear on the Weight LCD.
2. Stay on the center of platform and stand still.
The weight will be locked-in and displayed on the Weight LCD. ‘Hold’ sign will appear in the
upper left corner of the Weight LCD.
3. Step off the scale.
The Weight LCD will display the weight for 10 seconds, then the scale will automatically shut off.
If the user remains on the platform, the Weight LCD will display the weight for 20 seconds, then
automatically shut off.
Note: If the weight is less than 30 lb, the ‘Auto-On’ function will not work. Please follow Turn-on
Function instructions listed below.
Turn-on Function
When the scale is in off-mode and the user is not on the scale, press any key to turn the power on.
1. Press any key to activate the scale.
“---” followed by 0.0 lb/0.00 kg/0 lb F will appear on the Weight LCD.
If you do not step on the scale within 20 seconds after 0 is displayed, the scale will
automatically turn off.
2. Step on the platform.
3. Stay on the center of platform and stand still.
The weight will lock-in and be displayed on the Weight LCD. ‘Hold’ sign will appear in the upper
left corner of the Weight LCD.
4. Step off the scale.
The Weight LCD will display the weight for 10 seconds then the scale will automatically shut off.
If the user remains on the platform, the Weight LCD will display the weight for 20 seconds then
automatically shut off.
8
Page 9

Wake-up Function
This function can be used if the user wishes to measure the weight immediately after the first reading.
The scale must be in off-mode and the user must already be on the scale.
1. Press any key except ‘Zero’ key to activate (wake up) the scale.
DO NOT press ‘Zero’ key.
2. Stand still.
“---” will be displayed on the Weight LCD. The weight will be locked-in and displayed on the
Weight LCD. ‘Hold’ sign will appear in the upper left corner of the Weight LCD.
3. Step off the scale.
The Weight LCD will display the weight for 10 seconds then the scale will automatically shut off.
If the user remains on the platform, the Weight LCD will display the weight for 20 seconds then
automatically shut off.
Note: DO NOT press any key while the scale is waking up and before the weight has been locked-in and
displayed on the Weight LCD. If the user presses a key while the scale is waking up, the weight reading
will not be locked; instead it will operate according to the key you selected.
9
Page 10

Measuring Height Procedure (WB-300MH and DH)
The user should step on the platform without wearing shoes for accurate measurement.
Always have someone assist the user for accurate measurement.
1. Adjust the Height Rod Arm position before the user steps on the platform.
Place hand on the Height Rod Arm.
CORRECT way to hold
the Height Rod Arm
To avoid danger of breaking or
coming loose, you must hold the
height rod arm securely.
INCORRECT way to hold
the Height Rod Arm
If the subject is taller than 44", pull the Height Rod Sliding Block and Height Rod Arm
at the same time upward so that the arm is positioned higher than the subject’s head.
If the subject is shorter than 44", move the Height Rod Arm down.
10
Page 11

2. Gently lower the Height Rod Arm until the Height Rod Arm touches the very top of the user’s head.
92
36
35
91
90
89
88
144
57
58
44
43
145
146
147
112
111
110
109
108
INCORRECT way to
measure the height of
44" or more
CORRECT way to
measure the height of
44" or more
3. Read the measurement. (WB-300MH)
If the subject is taller than 44", read the number just above the top of the Upper Pillar Column
(see example #1).
If the subject is shorter than 44", read the number below the Height Rod Arm (see example #2).
Example #1:
58"(147.5 cm)
Reading the height
measurement of
44" or MORE
11
Reading the height
measurement of
44" or LESS
Example #2:
36.25" (92 cm)
Page 12

8. General Troubleshooting
Weight LCD
Clock LCD
The Lithium Battery is low.
Clock LCD
The AA Batteries are low.
Weight Capacity: ‘E’
If the weight is less than 10 lbs, the Weight LCD will display the weight, however, the reading
will not lock in. Auto-on function will not work if the weight is less than 30 lbs.
If the weight exceeds the scale’s maximum weighing capacity, the display panel will register ‘E’
and the scale will shut off in 2 seconds.
Low Battery Warning: ‘LOWBATT’ / ‘LoAA,’ ‘nobAt,’ ‘Ad Er,’ ‘Lo L’
The scale is operated by three replaceable AA alkaline batteries. If the AA batteries are low, ‘LOWBATT’
icon will flash on the Weight LCD, and ‘LoAA’ will flash on the Clock LCD alternating with clock for two
seconds. Please replace with three new AA alkaline batteries immediately. Please refer to Inserting
Batteries for instructions. If you see ‘Ad Er’ or ‘nobAt’ on the weight LCD, make sure the batteries are
properly installed and have contact with the battery chamber.
The clock on this scale is operated by one replaceable 3-volt CR123 Lithium battery. If the lithium
battery is low, ‘LOWBATT’ icon will flash on the Weight LCD, and ‘Lo L’ will be displayed on the Clock
LCD alternating with clock for 2 seconds. This will continue until the lithium battery runs out, showing the
Clock LCD panel blank. Please replace with one new lithium battery immediately. Please refer to Inserting
Batteries for instructions.
12
Page 13

Replacing Batteries
AA alkaline
Lithium
AA alkaline
AA alkaline
The scale is operated by three (3) replaceable AA alkaline batteries for weighing and (one) 3-volt CR123
Lithium battery for clock operation. The battery box is located on the back of the LCD display.
1. Lift and remove the battery compartment cover located on the back of the LCD display.
2. Insert batteries with the correct polarity.
3. Replace the battery compartment cover and push it until you hear the click sound.
If the lithium battery was replaced, the clock needs to be reprogrammed.
Resetting the Scale
After battery replacement, the scale may need to be reset in the following situation:
1. If the batteries were installed in the incorrect polarity — after being replaced in the correct polarity.
2. When the low battery sign(s) is still displayed even after the new batteries are installed.
In order to reset the scale, take a ball point pen to push a button hidden behind the lithium battery.
Please reprogram the clock.
9. Calibration
This product has been properly calibrated at the factory. You must have certified weights in order to
properly calibrate this product. The calibration procedure is available upon request. Please call our
customer service to request the calibration manual.
13
Page 14

Tanita Corporation
14-2, 1-Chome, Maeno-Cho
Itabashi-Ku, Tokyo, Japan 174-8630
Tel: +81(0)-3-3968-2123
Fax: +81(0)-3-3967-3766
www.tanita.co.jp
ISO 9001 Certified
Tanita Corporation of America
2625 South Clearbrook Drive
Arlington Heights, IL 60005 USA
Tel: +1-847-640-9241
Fax: +1-847-640-9261
.tanita.com
www
(800) Tanita-8 (USA & Canada Only)
prosales@tanita.com
Tanita France S.A.
Villa Labrouste
68 Boulevard Bourdon
92200 Neuilly-Sur-Seine France
Tel: +33 (0)-1-55-24-99-99
Fax: +33 (0)-1-55-24-98-68
.tanita.fr
www
Tanita Health Equipment H.K. Ltd.
Unit 301-303 3/F Wing On Plaza
62 Mody Road, Tsimshatsui East
Kowloon, Hong Kong
Tel: +852 2838 7111
Fax: +852 2838 8667
Tanita Europe GmbH
Dresdener Strasse 25
D-71065 Sindelfingen
Germany
Tel: +49 (0)-7031-6189-6
Fax: +49 (0)-7031-6189-71
.tanita.de
www
Tanita UK Ltd.
The Barn, Philpots Close, Yiewsley,
Middlesex, UB7 7RY UK
Tel: +44 (0) 1895 438577
Fax: +44 (0) 1895 438511
www.tanita.co.uk
 Loading...