

Page 1
GB
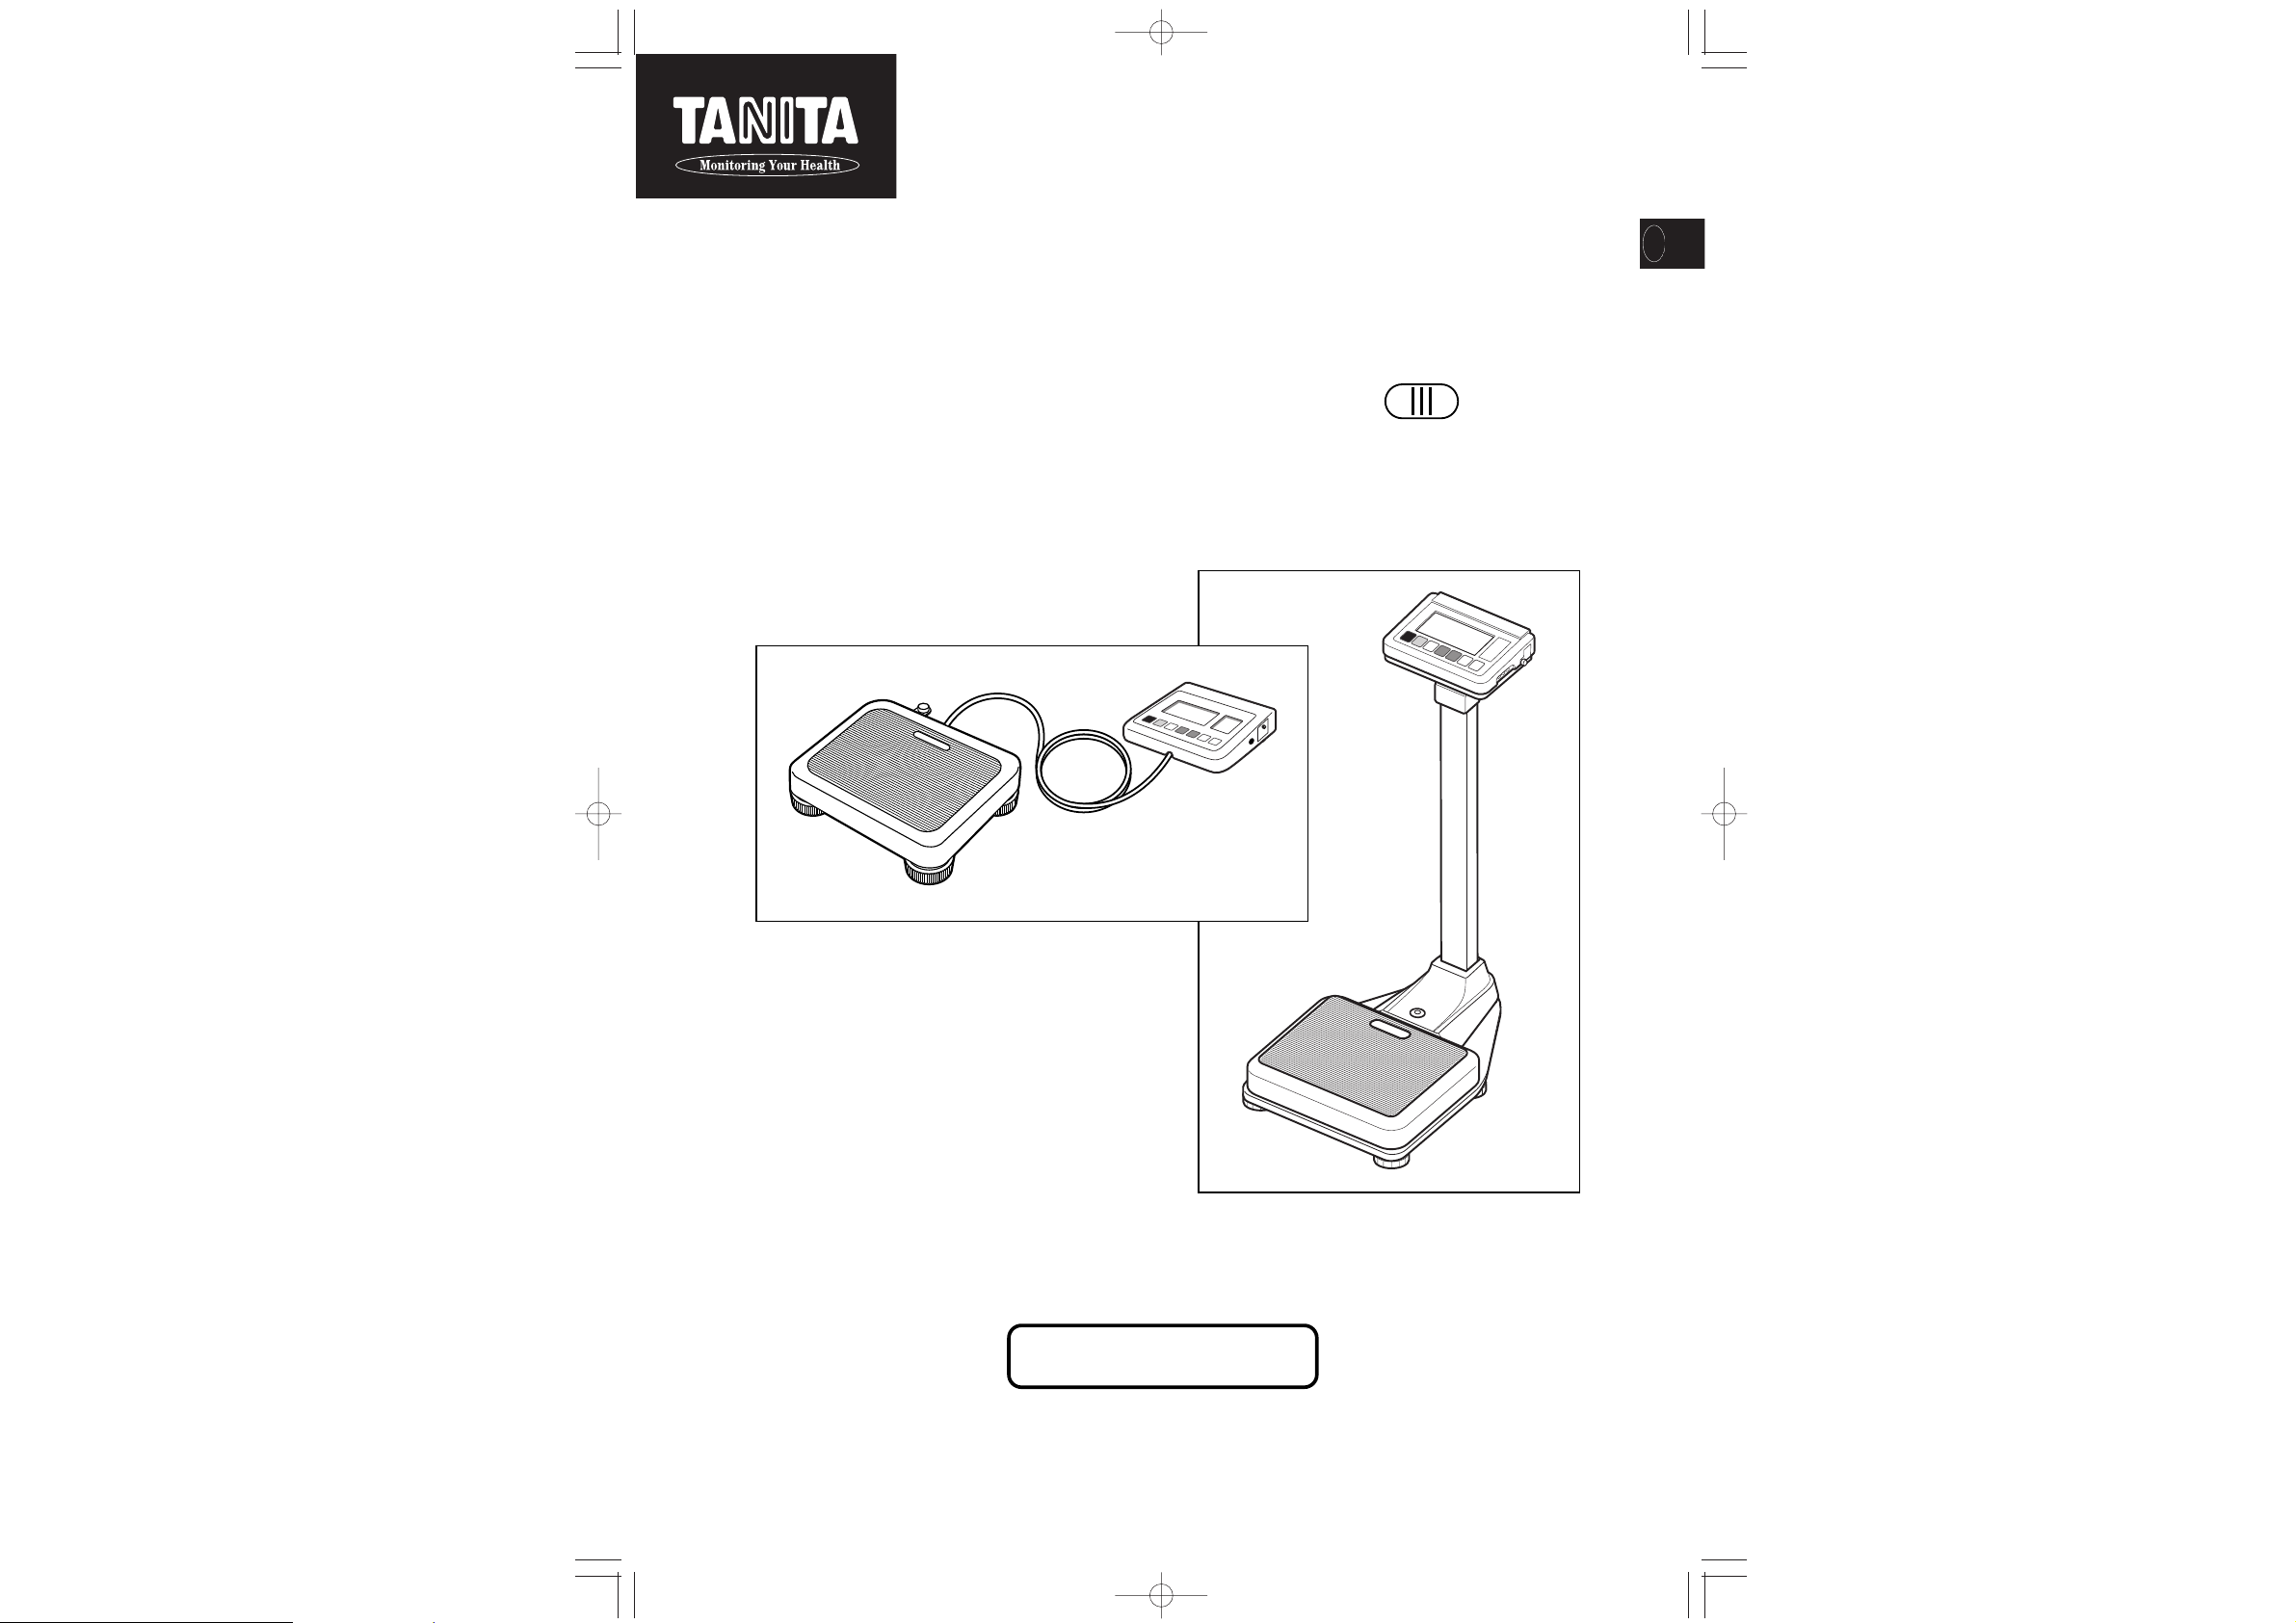
ELECTRONIC SCALE
WB-100MA/WB-110MA
INSTRUCTION MANUAL
Please read this Instruction Manual
carefully and keep it handy for future
reference.
(REMOTE DISPLAY VERSION)
(COLUMN MOUNTED VERSION)
WB-100MA-取説/04.01.2704.1.289:12AMページ1
Page 2
GB
2
GB
3
Table of Contents
앮
Table of Contents
••••••••••••••••••••••••••••••••••••••••••••••••••••••••••••••••••••••••••••••••••••••
3
─────────────────────────────
앮
Applications
••••••••••••••••••••••••••••••••••••••••••••••••••••••••••••••••••••••••••••••••••••••••••••••••
4
─────────────────────────────
앮
Safety Notes
••••••••••••••••••••••••••••••••••••••••••••••••••••••••••••••••••••••••••••••••••••••••••••••••
4
Caution Symbols
••••••••••••••••••••••••••••••••••••••••••••••••••••••••••••••••••••••••••••••••••••••••
4
Warning
•••••••••••••••••••••••••••••••••••••••••••••••••••••••••••••••••••••••••••••••••••••••••••••••••
4
Caution
••••••••••••••••••••••••••••••••••••••••••••••••••••••••••••••••••••••••••••••••••••••••••••••••••••
4
[Maintenance]
•••••••••••••••••••••••••••••••••••••••••••••••••••••••••••••••••••••••••••••••••••••••
5
[Instructions for Measurement]
•••••••••••••••••••••••••••••••••••••••••••••••••••••••
5
<Usage Conditions>
•••••••••••••••••••••••••••••••••••••••••••••••••••••••••••••••••••••••••••••••••
5
<Storage Conditions>
••••••••••••••••••••••••••••••••••••••••••••••••••••••••••••••••••••••••••••••
5
<Power Source>
•••••••••••••••••••••••••••••••••••••••••••••••••••••••••••••••••••••••••••••••••••••••••
5
─────────────────────────────
1. Product Assembly and Components
•••••••••••••••••••••••••••••••••••••••••••••••••••
6
쎱
Product Components
••••••••••••••••••••••••••••••••••••••••••••••••••••••••••••••••••••••••••
6
(Remote Display Version)
(Column Mounted Version)
쎱
Control Panel
•••••••••••••••••••••••••••••••••••••••••••••••••••••••••••••••••••••••••••••••••••••••••
7
쎱
Symbols and their Meanings
•••••••••••••••••••••••••••••••••••••••••••••••••••••••••••
7
2. Preparation for Use
••••••••••••••••••••••••••••••••••••••••••••••••••••••••••••••••••••••••••••••••••
8
쎱
Level Adjustment
•••••••••••••••••••••••••••••••••••••••••••••••••••••••••••••••••••••••••••••••••
8
(Remote Display Version)
(Column Mounted Version)
쎱
Installation of the Equipment
••••••••••••••••••••••••••••••••••••••••••••••••••••••••••
8
(Remote Display Version)
쎱
Prepare Power Source
••••••••••••••••••••••••••••••••••••••••••••••••••••••••••••••••••••••••
9
3. Operating Instructions
•••••••••••••••••••••••••••••••••••••••••••••••••••••••••••••••••••••••••••
10
1.Standard Weighing Procedures
••••••••••••••••••••••••••••••••••••••••••••••••••••
10
2.Tare Weighing
••••••••••••••••••••••••••••••••••••••••••••••••••••••••••••••••••••••••••••••••••••••
10
3.Cancellation of Tare Weighing Function
••••••••••••••••••••••••••••••••••
10
4.BMI Calculation:
•••••••••••••••••••••••••••••••••••••••••••••••••••••••••••••••••••••••••••••••••
11
4. RS-232C Communication Specifications
••••••••••••••••••••••••••••••••••••••••••
12
쎱
Specifications
•••••••••••••••••••••••••••••••••••••••••••••••••••••••••••••••••••••••••••••••••••••••
12
쎱
Names and connection methods for signal lines
••••••••••••••••••
12
쎱
Weighing Mode
••••••••••••••••••••••••••••••••••••••••••••••••••••••••••••••••••••••••••••••••••
12
쎱
BMI Mode
•••••••••••••••••••••••••••••••••••••••••••••••••••••••••••••••••••••••••••••••••••••••••••••
12
5.Troubleshooting
•••••••••••••••••••••••••••••••••••••••••••••••••••••••••••••••••••••••••••••••••••••••••
13
쎱
Possible Problems
••••••••••••••••••••••••••••••••••••••••••••••••••••••••••••••••••••••••••••••
13
─────────────────────────────
앮
Specifications
••••••••••••••••••••••••••••••••••••••••••••••••••••••••••••••••••••••••••
Back cover
━━━━━━━━━━━━━━━━━━━━━━━━━━━━━
WB-100MA-取説/04.01.2704.1.289:12AMページ2
Page 3
GB
Applications
• This equipment has been calibrated as a precision weighing instrument and can be used to certify weights and/or
business transactions.
• It can be used to obtain reference data during medical examinations, such as periodic checkups, and can help the
prevention of obesity.
4
Warning
• To prevent electric shocks,
Do not insert or remove the power plug with wet hands.
• To prevent fire hazards,
Always use a correctly wired 230V AC not multiple extension cords.
Caution
• To prevent the spread of infections,
Always clean the Weighing platform after use. Sterilize the platform with an appropriate alcohol-based cleaning
fluid before each use.
• Installation of the Weighing Platform
Ensure the weighing platform is placed on a level and stable surface. If the equipment is used when the Platform
is unstable, for example because not all the feet are on a level surface, there is a risk that it will topple over and it
will be impossible to obtain an accurate measurement.
To avoid the risk of injury and damage to the equipment, never jump on the platform.
• How to handle the equipment when moving it
Since the Platform is heavy, please lift it by holding the Platform firmly with both hands so that you do not drop
it.
• AC Adapter
Ensure that the adapter supplied (model A30930G) is always used with this equipment. Other adapters may
cause malfunctions.
• Battery
When changing batteries, ensure that the new batteries are inserted with the correct polarity / . If the
polarity is incorrect, then the batteries may leak and damage the equipment.
Warning
This symbol indicates the risk of death or serious injury if the safety instr uctions
are ignored and the equipment is misused.
Caution
This symbol indicates the risk of physical injury and/or damage to the equipment
if the safety instructions are ignored and the equipment is misused.
This symbol indicates general precautions that should be taken when using this
equipment.
Safety Notes
Caution Symbols
In this Instruction Manual and the descriptions on the equipment, there are various caution symbols that will enable you
to use this equipment safely and correctly so that harm to you and other people and loss of your property will be
prevented.
The symbols and their meanings are as follows. Please understand them well before proceeding with the Instruction
Manual.
GB
• The circuit board incorporates a fuse (100mA, 125V) for electronic equipment. If devices other than the original
AC adapter are used or a large electrical current is applied, the fuse will be blown for safety purposes. If the fuse
is blown, the unit must be inspected and repaired. As the fuse forms a fixed part of the unit and cannot be easily
disassembled by the customer, please consult your nearest Tanita sales office or agent when the fuse needs to be
replaced.
[Maintenance]
This is a precision manufactured and accurately calibrated product. Please observe the following instructions.
• Never disassemble or adjust the equipment, as this may cause malfunctions. The equipment should only be
inspected in accordance with the regulations in each country.
• When not in use for a long time, unplug the AC Adapter from the wall socket.
• When not in use for a long time, remove the batteries before storing the equipment.
• Do not wipe the equipment with corrosive chemicals (benzine, cleaner, etc.). Please use a neutral detergent to
clean the equipment.
• Avoid subjecting the equipment to excessive shocks or vibrations.
• When disposing of this unit, please do so in accordance with the prevailing regulations in each country.
• If an unauthorised person attempts to disassemble or repair any of the part, the warranty will become invalid.
When the unit malfunctions, please consult your nearest Tanita sales office or agent.
[Instructions for Measurement]
Please observe the following instructions for accurate measurement.
• Measurement may not be possible on a surface that is strongly vibrating. In such cases transfer the equipment to
a stable surface with little or no vibration.
• When the equipment has been transferred to another location with a temperature difference of more than 20˚C,
leave at least two hours before using.
• While taking measurements, please keep any persons using transmitters, such as a mobile phone, away from the
unit to avoid causing margin errors.
<Usage Conditions>
<Storage Conditions>
<Power Source>
5
Temperature Range for Use : 0°C / +35°C
Relative Humidity : 30% / 80% (without condensation)
Temperature Range of Environment : -10°C / +50°C
Range of Relative Humidity : 10% / 90% (without condensation)
To avoid malfunctions, do not store the equipment in direct sunlight, significant temperature changes, the risk of
dampness, a large amount of dust, in the vicinity of fires or where there is a risk of receiving vibrations or shocks.
Value Range
230VAC
50Hz
65mA
Voltage Range
Frequency Range
Electric Current Range
WB-100MA-取説/04.01.2704.1.289:12AMページ4
Page 4

GB
6
쎱
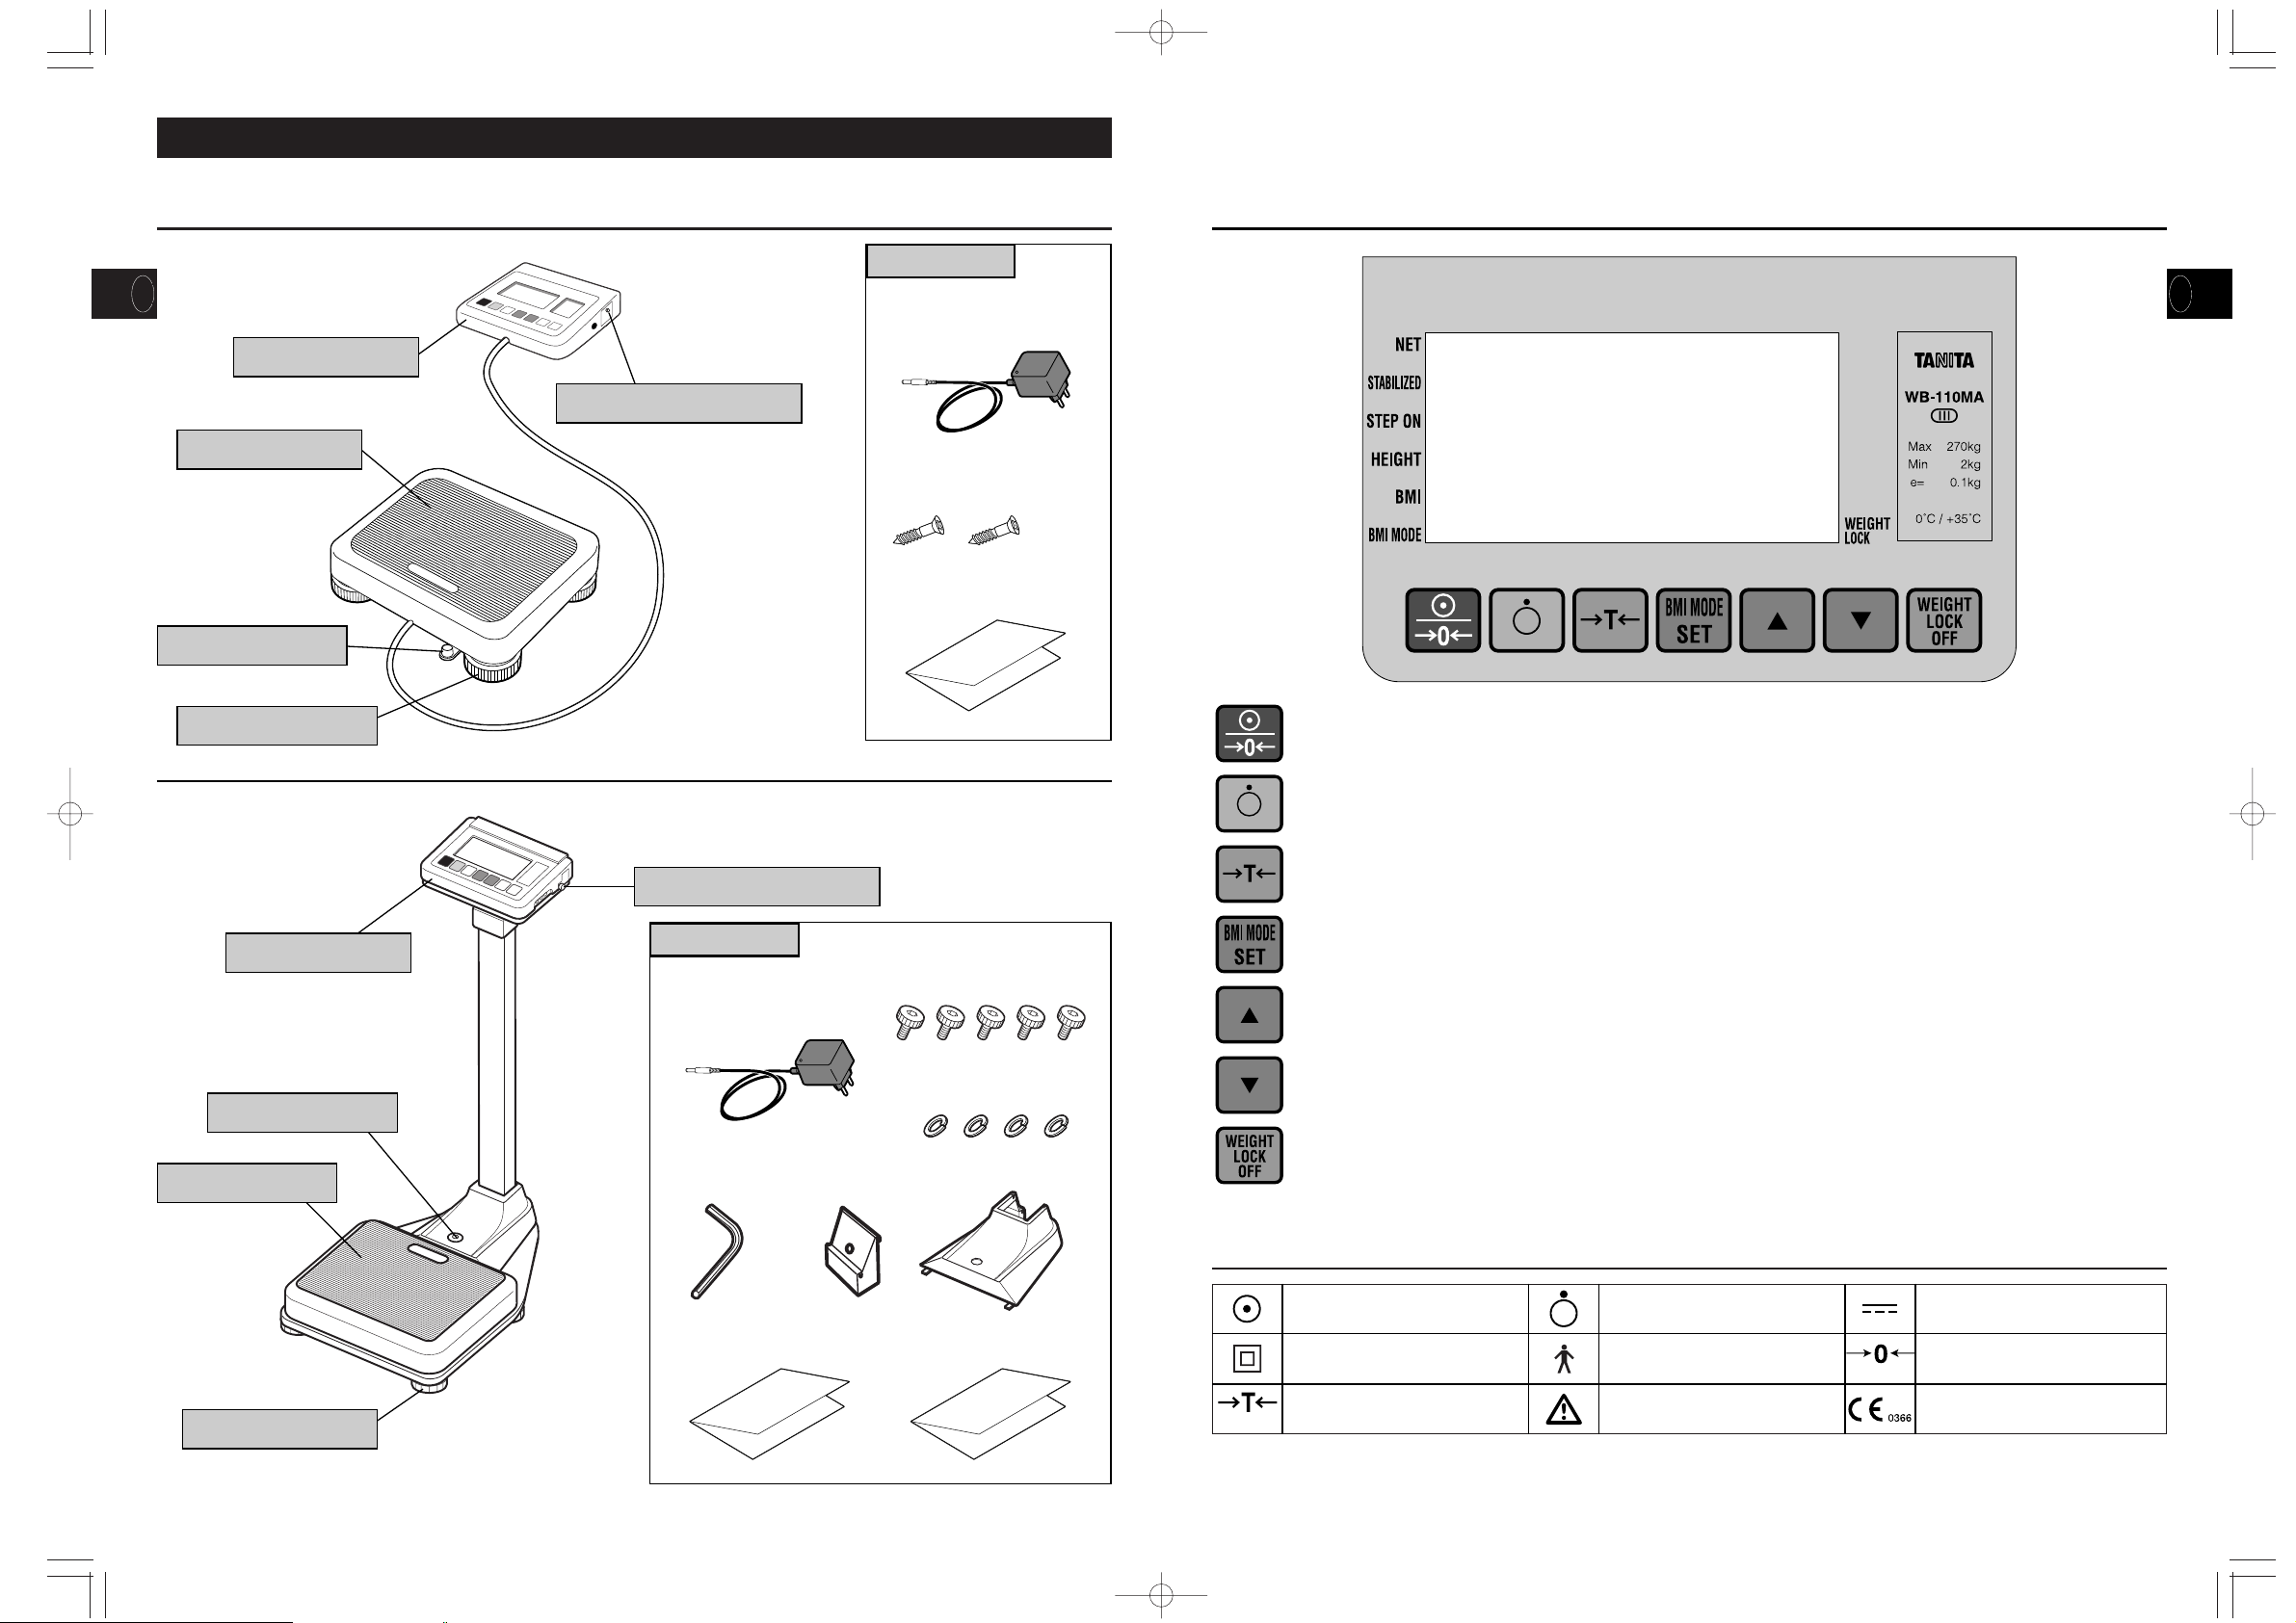
Product Components Please verify that the following components are in the package.
1.Product Assembly and Components
GB
NET mark:
An arrow tappears next to this icon when the tare weighing function is on.
7
쎱
Control Panel
쎱
Symbols and their Meanings
: Display Unit On.
: Class II Equipment
: Display Unit Off.
: Type B applied part
: Direct current
: Zero reset
: Turn on the tare weighing
function.
: Caution. Refer to the
attached notes.
:
Conformity with Medical
Device Directive 93/42/EEC
Power on and/or reset the display to
zero.
Power off.
Tare weighing function.
BMI mode, and/ or height setting.
Mode selection or increase numerical
values.
Mode selection or decrease numerical
values.
Weight Lock Release
HEIGHT mark (Unit of height):
Indicates the height is set
BMI mark:
Indicates that BMI calculation.
BMI MODE mark:
Indicates when BMI mode is on.
STABILIZED mark:
Indicates that the displayed figure has stabilized.
STEP ON mark (Ready mark):
Indicates that the scale is ready to begin measurements.
WEIGHT LOCK mark:
Indicates when the measurement is stabilized.
* It appears only when the Weight Lock Switch is on.
(Remote Display Version)
Level Gauge
Display Box
Battery Compartment
Platform
Adjustable Feet
AC Adapter
MODEL:A30930G
Instruction Manual
Fixing Screw for
the Bracket (x 2)
Accessories
Battery Compartment
Platform
Adjustable Feet
AC Adapter
MODEL:A30930G
CoverWrench
Instruction Manual
Cap
Screws (x 5)
Spring Washer (x 4)
Assembly Instruction
Accessories
(Column Mounted Version)
Level Gauge
Display Box
WB-100MA-取説/04.01.2704.1.289:12AMページ6
Page 5

For accurate measurement, place the unit on as flat a surface
as possible and adjust the level with the adjustable feet so the
bubble in the level gauge is in the center of the frame.
Caution
Place the equipment on a level surface. If the equipment is not
stable, for example because not all the feet are on a level
surface, there is a risk that it will topple over and it will be
impossible to obtain an accurate measurement.
GB
8
쎱
Installation of the Equipment (Remote Display Version)
쎱
Level Adjustment
*Adjust the level by rotating the adjustable feet.
When using the stand
When installing the display box on the wall
①
③
②
Please pull out the stand at the back of the display box.
When putting away the display box, please insert the stand in the slot on the back of the
display box.
햲 Screw the wall-hanging screws into the wall (leave the screws protruding from the wall by 5
mm).
햳 Insert the screw heads in the holes on the back of the display box.
햴 Pull down the display box securely into place.
・If the Display Box is not fixed sufficiently, there is a danger that it may fall down.
・Avoid installing the Display Box in a place where users may step on or get caught
by the cable.
・Do not swing the Display Box by the cable.
2.Preparation for Use
Level Gauge
GB
햲 When using the AC Adapter
Insert the cable plug for the AC Adapter into the DC jack on the side
of the Display Box, and insert the AC Adapter plug into a 230V AC
mains DC jack.
Then confirm the Pilot Lamp on the AC Adapter lights up.
Warning
•To avoid electric shocks, do not insert and remove the plug with wet
hands.
Caution
•Use only the AC adapter (MODEL: A30930G) specified. Using an AC
Adapter other than that specified may cause malfunctions.
햳 When using dry cell batteries
Unscrew the Fixing Screws for the Battery Compartment on the right
side of the Display Box and pull out the Battery Compartment. Place
dry cell batteries LR6 (AA) in the correct positions as instructed
inside the Battery Compartment and fix the Battery Compartment
with the Fixing Screws.
If is displayed on the Display, please replace all the six
batteries LR6 (AA) with new ones.
appares when the battery voltage is lower than 6.5 V
앐10%.
•Please change the batteries LR6 (AA) carefully to avoid
dropping them on your feet.
•Ensure that the batteries are inserted with the correct
polarity / . If the polarity is incorrect, then the batteries
may leak and damage the equipment.
•When not in use for a long time, remove the batteries
before storing the equipment.
•When the equipment has been transferred to another
location with a temperature difference of more than 20˚C,
leave at least two hours before using.
쎱
Prepare Power Source
9
DC jack
Pilot Lamp
Battery Compartment
plug
Dry Cell
Batteries
Fixing Screws for the
Battery Compartment
햴 Auto Power off Interval Setting
When the Scale power off,Press key and hold.
Press key.
Release the holding key.
The display turns to "Auto Power Off Interval Setting Mode"
showing "20" as 20 minutes power off setting as default.
Press (up arrow) or (down arrow) key and set 10 for 10 minutes and/or CONT for continuous setting if required.
Press key to complete.
(Remote Display Version)
*Adjust the level by rotating the adjustable feet.
Level Gauge
(Column Mounted Version)
WB-100MA-取説/04.01.2704.1.289:12AMページ8
Page 6
GB
10
d
d
d
d
d
d
d
d
d
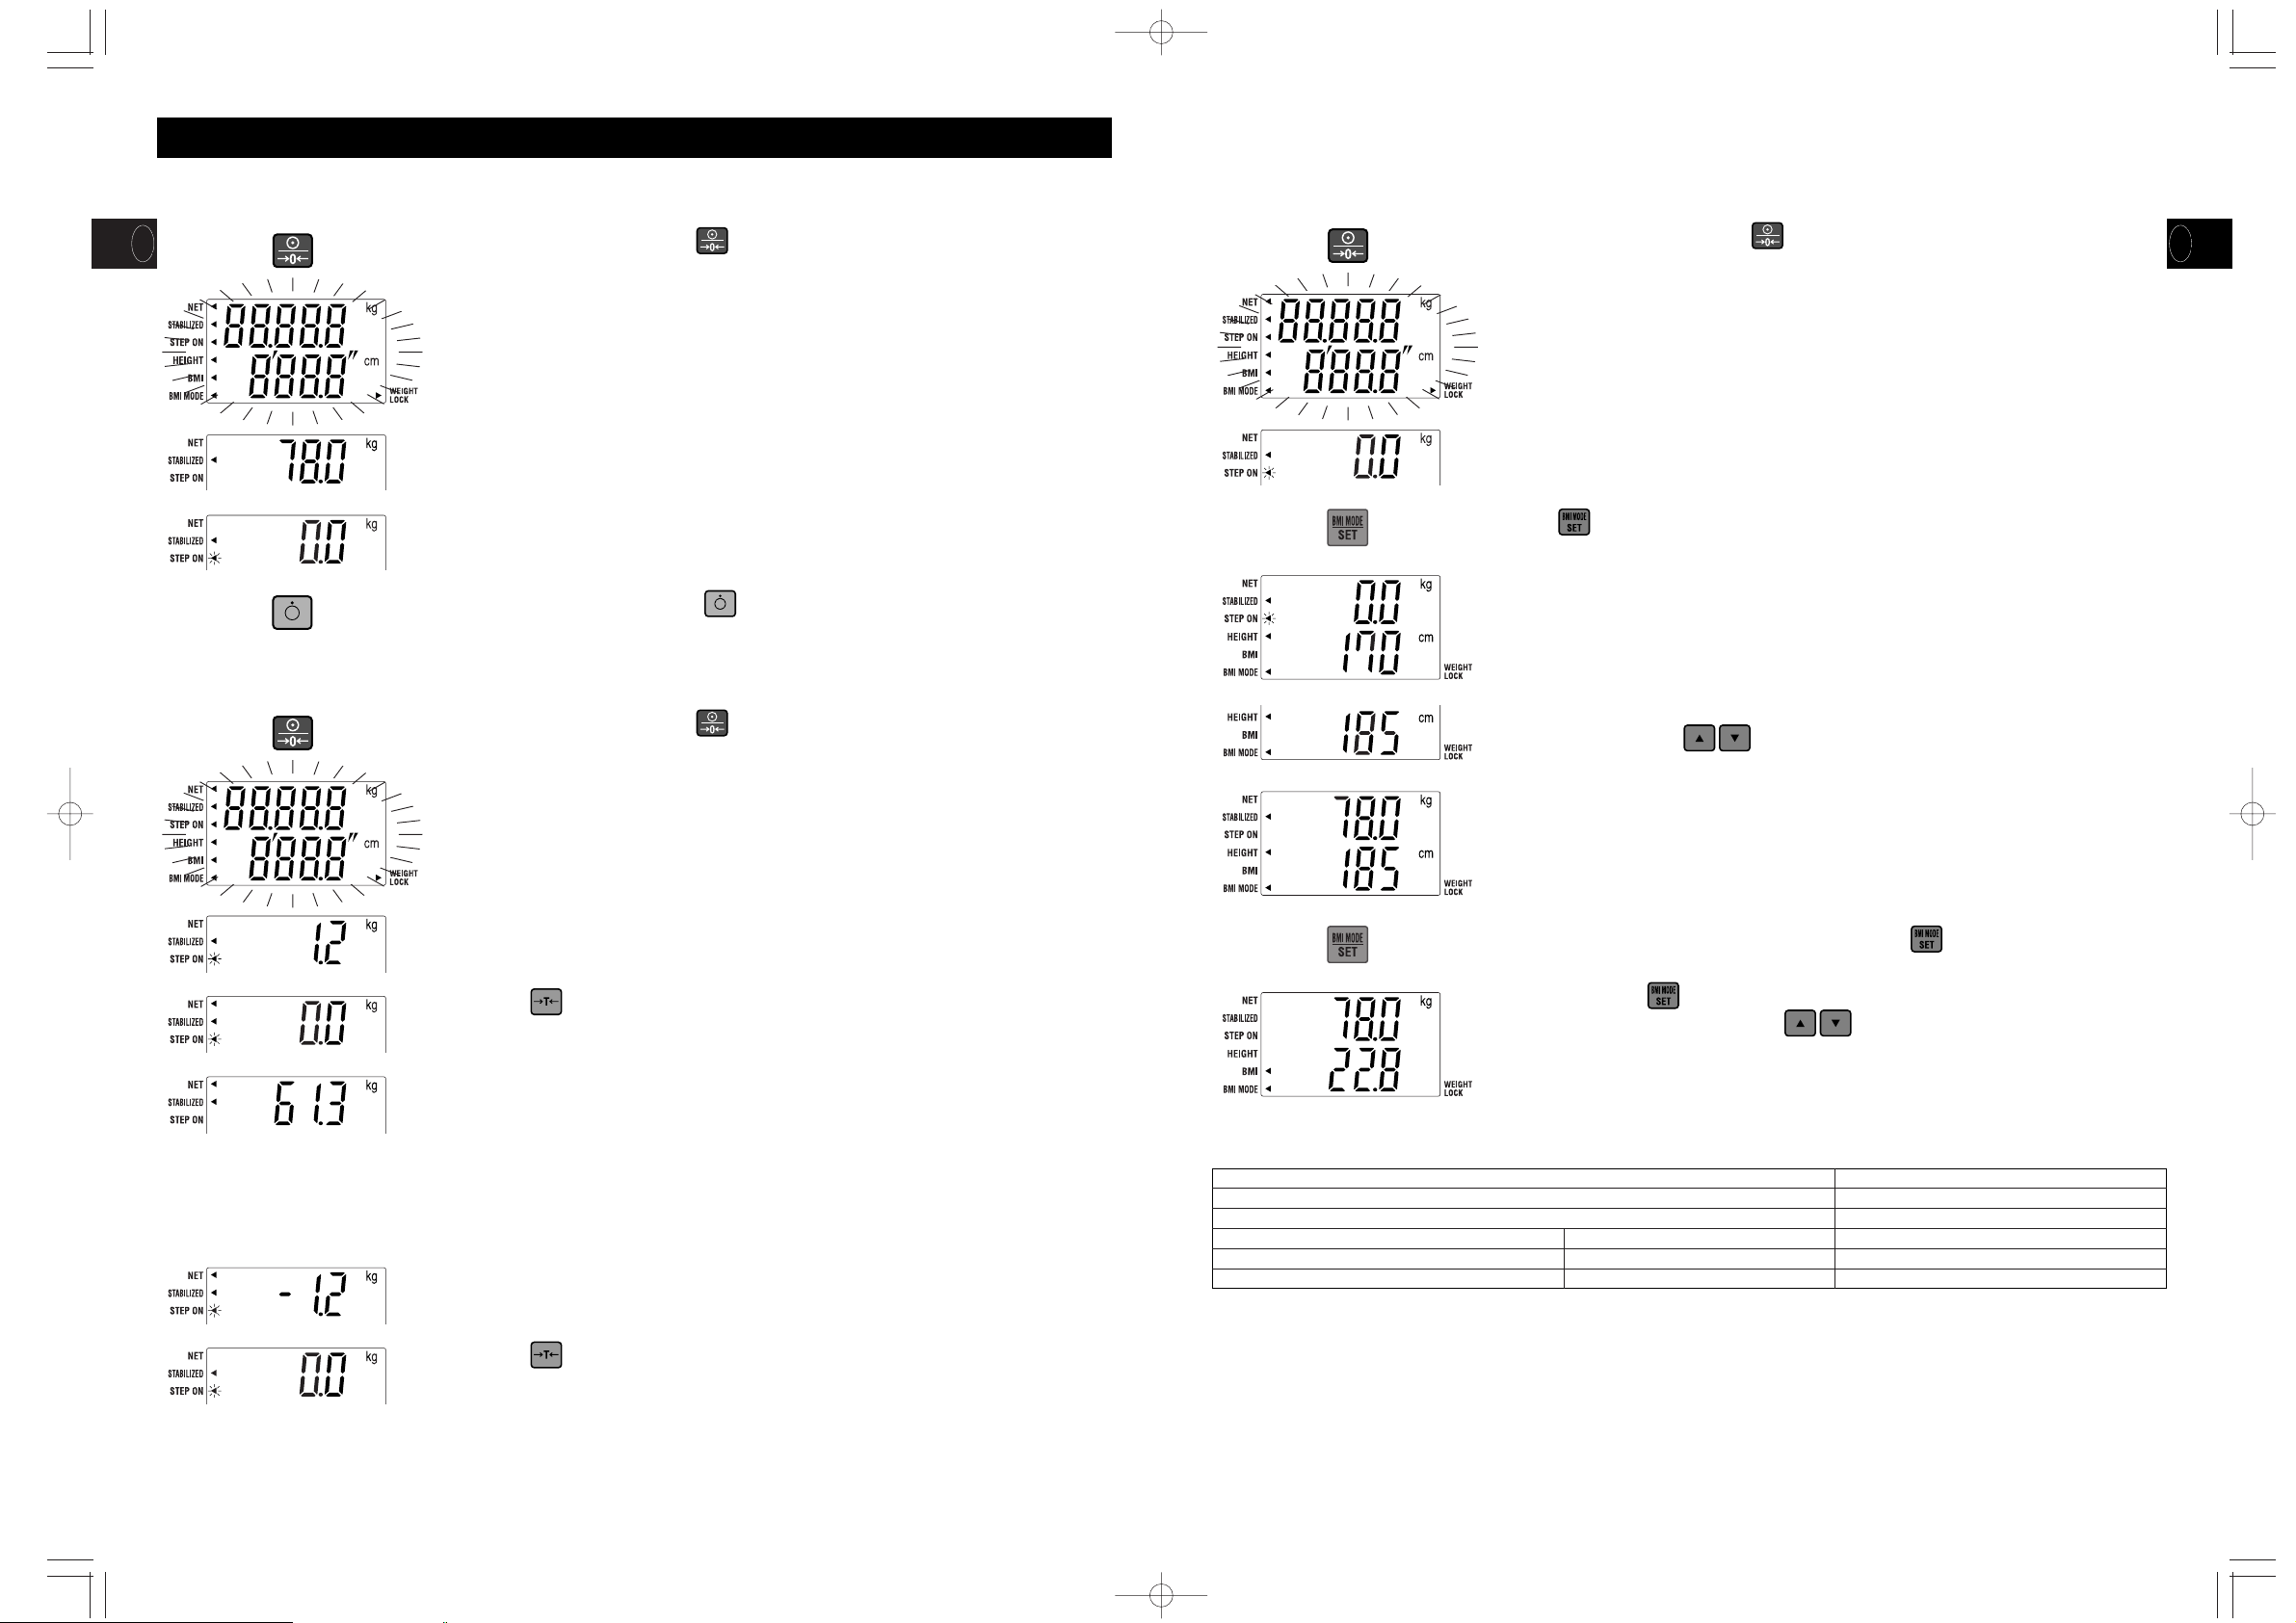
1.Standard Weighing Procedures
2.Tare Weighing
3.Cancellation of Tare Weighing Function
1. Turn on the power by pressing the key.
2. After all the segments flash, [0.0kg] is displayed.
3. Step onto the center of the scale platform.
The weight reading will be displayed.
4. Measurement is completed.
When the person being weighed steps off the scale, the display will return to [0.0kg].
Turn off the power by pressing the key.
1. Turn on the power by pressing the key.
2. After all the segments flash, [0.0kg] is displayed.
3. Carefully place the tare items (clothes, etc.) on the center of the platform.
The weight of the items will be displayed.
4. Press the key.
An arrow t[NET] will appear next to the mark and [0.0kg] will be displayed.
5. When weighing a person/object including tare items, the weight of the person/object minus that
of the tare items, which is the net weight, will be displayed.
•
To change the tare weight, cancel the tare weighing function and repeat from step 3.
•
When using the tare weighing function, the measurement range is reduced by the tare weight.
(Measurement Range) = (Maximum Measurable Weight) – (Tare Weight)
1. Remove the tare items (clothes, etc.) from the platform.
The weight will be displayed as a negative value.
2. Press the key.
The arrow tnext to the [NET] will disappear and [0.0kg] will be displayed.
3.Operating Instructions
GB
d
d
d
d
d
d
d
d
4.BMI Calculation:
1. Turn on the power by pressing the key.
2. After all the segments flash, [0.0kg] is displayed.
3. Push for within two seconds.
[0.0kg] and the default height [170cm] will be displayed.
4. Set your height with the key.
(This can also be entered after you step on the scale).
Stand still on the scale platform.
The weight will be displayed.
5. Once your height and weight have been established, press .
The weight and BMI figure will be displayed.
* By pressing the key in BMI mode, the scale will switch alternately between BMI and
height (and can be changed with the key) display.
* The display will return to [0.0 kg] and the default height [170cm], if it changes to a height
display after stepping off the scale during measuring BMI.
Guidelines based on NIH/WHO BMI
Under Weight
Normal Range
Pre obese
Obese
Obese
Obese
CLASS
l
CLASS ll
CLASS lll
BMI < 18.5
18.5
≦ BMI < 25
25
≦ BMI < 30
30
≦ BMI < 35
35
≦ BMI < 40
BMI
≧ 40
11
WB-100MA-取説/04.01.2704.1.289:12AMページ10
Page 7
GB
■
Specifications
■
Names and connection methods for signal lines
■
Weighing Mode
■
BMI Mode
Communication standard
EIA RS-232C
Communication method Asynchronous method
Signal speed 2,400 baud
Data bit length 7 bit
Parity EVEN
Stop bit 1 bit
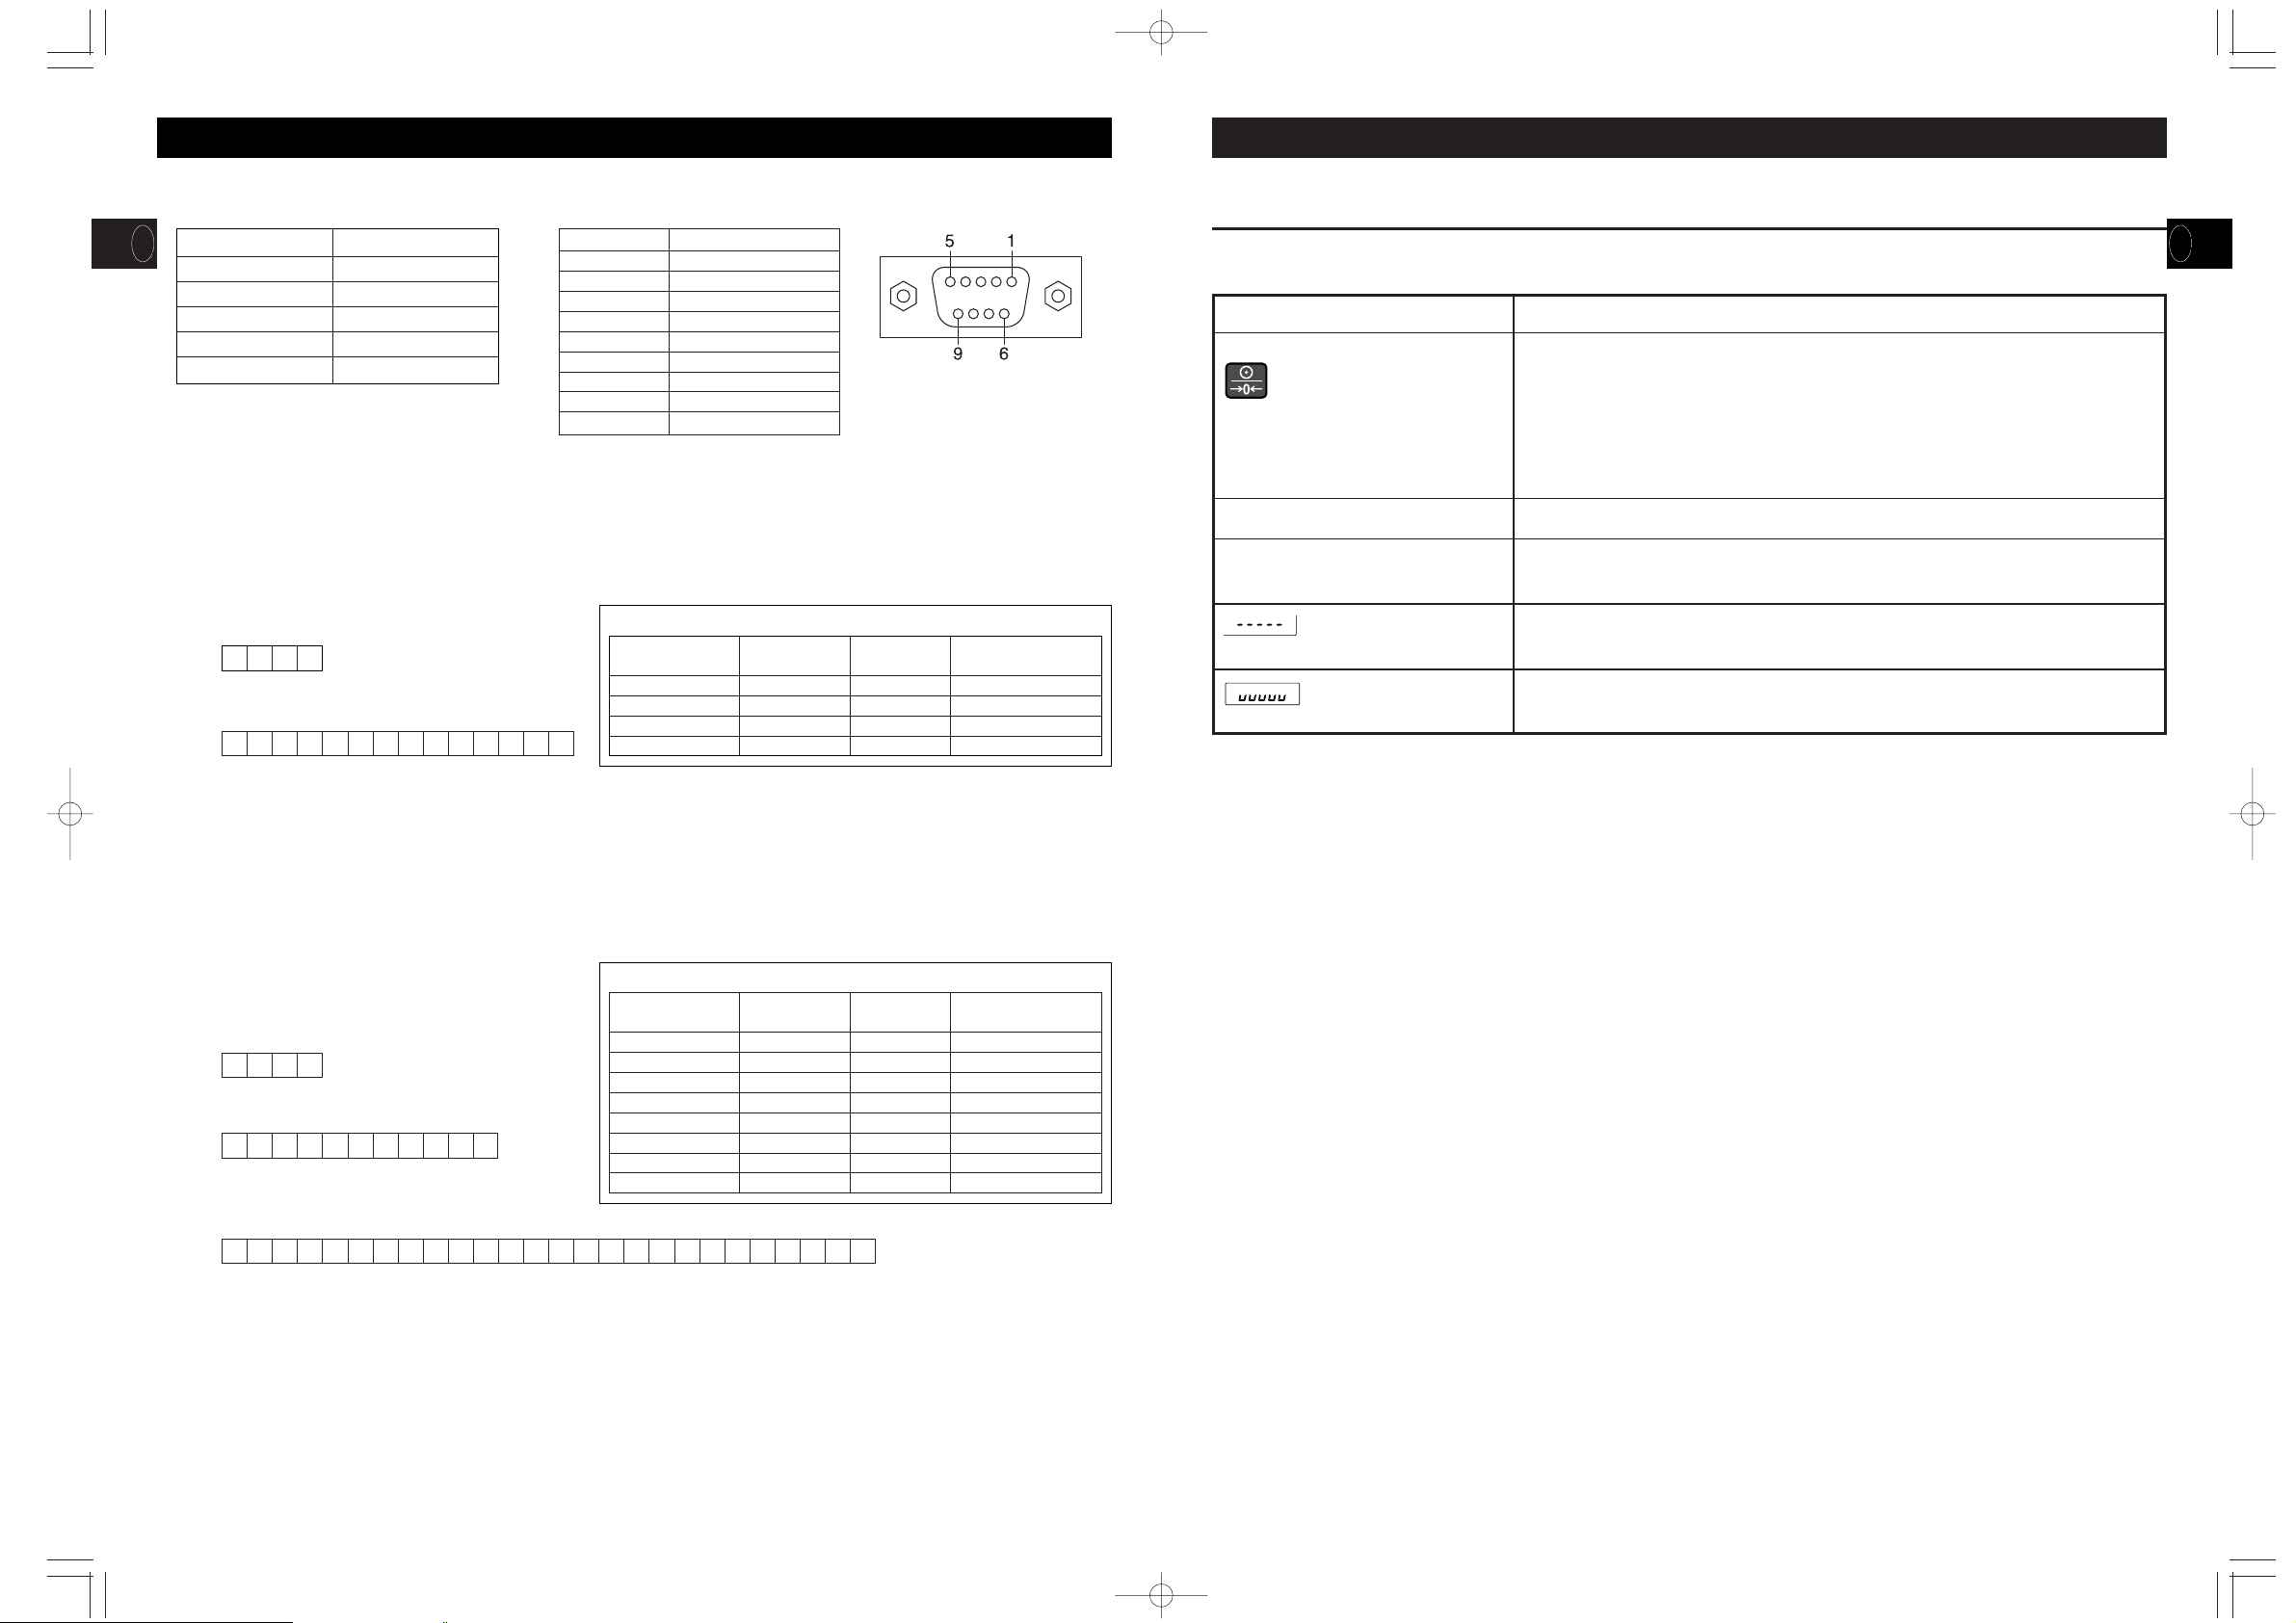
Terminal no. Signal name
1
2 TXD
3 RXD
4
5 GND
6
7
8
9
• An RS-232C connector (D sub 9 pin female) is attached to the side of the display box.
• When connecting the display box with a personal computer, etc., please use an RS-232C straight cable.
• Use the RS232C cable ahorter than 3m long.
When receiving 4 bytes of data as indicated in 1-1 while using the scale in weighing mode, weight data will be output in 14 bytes, as indicated in 1-2.
While the scale is used in BMI mode, the output data will vary depending on the form of the received data.
햲 When receiving 4 bytes of data, as indicated in 1-1, the scale will calculate your BMI using the currently input height figure, and 26 bytes
of data will be output, as indicated in 2-1 or 2-2, depending on the measurement unit.
햳 When receiving 11 bytes of data, including measurement units and height figures, in the form indicated in 1-2 or 1-3, the scale will
calculate your BMI using these figures, and 26 bytes of data will be output, as indicated in 2-1 or 2-2, depending on the measurement
unit.
Details of Weighing Mode Transmission Data
Byte nos. 1-2
Byte nos. 5-10
Byte nos. 3-4
Byte nos. 11-12
Byte nos. 13-14
Header
Separator
Weight data
Measurement units
Terminator
2 bytes fixed
2 bytes fixed
6 bytes fixed
2 bytes fixed
2 bytes fixed
SD: Unstable S_: Stable
SI: Overload, etc.
2 spaces
Right-aligned
Kg:kg
CR+LF
1-1 Reception data
DR
CR LF
1234
1-2 Transmission data
SD 75 . 0kg
CR LF
1234567891011121314
1-1 Reception data
DR
CR LF
1234
1-2 Reception data (height data when using kg)
*Please input 90-99cm height data as 090-099.
DHk g 180
CR LF
1234567891011
2-1 Transmission data (kg/cm)
SD 75 . 0kg , 180 , 23 . 1
CR LF
1 2 3 4 5 6 7 8 9 10 11 12 13 14 15 16 17 18 19 20 21 22 23 24 25 26
Details of BMI mode transmission data
Byte nos. 1-2
Byte nos. 5-10
Byte nos. 3-4
Byte nos. 11-12
Byte nos. 13
Byte nos. 14-18
Byte nos. 19
Byte nos. 20-24
Byte nos. 25-26
Header
Separator
Weight data
Measurement units
Separator
Height data
Separator
BMI data
Terminator
2 bytes fixed
2 bytes fixed
6 bytes fixed
2 bytes fixed
1 byte fixed
5 bytes fixed
1 byte fixed
5 bytes fixed
2 bytes fixed
SD: Unstable S_: Stable
SI: Overload, etc.
2 spaces
Right-aligned
Kg:kg
1 comma
Right-aligned
1 comma
Right-aligned
CR+LF
12
4. RS-232C Communication Specifications
GB
13
Problem Solution
The unit does not turn on when the
key is pressed.
•When Using with the AC Adapter
Ensure that the AC Adapter cable is properly connected with the Display Unit. Ensure
that the AC Adapter is correctly inserted in the mains DC jack.
•Using dry cell batteries
The batteries may have run out. Confirm that the equipment is working by using the
AC Adapter or new batteries.
Measurement is not correct.
Measurement does not become stable.
Display turns on and off.
•Please confirm that all the adjustable feet are resting on a level surface.
•Measurement may be impossible in the case of excessive vibration. Use the equipment
in another place.
is displayed.
•It is possible that the maximum weight capacity has been exceeded. Please stop
measuring.
is displayed.
•Do not stand on or put objects on the Platform before starting measurement. Start
measurement after confirming there is nothing on the Platform.
If problems occur, please refer to the following instructions. If the problem persists contact your nearest Tanita sales or
repair center.
쎱
Possible Problems
5.Troubleshooting
WB-100MA-取説/04.01.2704.1.289:12AMページ12
Page 8

GB
This product meets the follwing requirements ;
1. Medical Device Directive (93/42/EEC)
Safety Standard : EN60601-1:1990,AM No.1:1993,AM No.2:1995
IEC 60601-1:1988,AM No.1:1991,AM No.2:1995
EMC Standard : EN60601-1-2:2001
IEC60601-1-2:2001
2.Non-Automatic weighing Instruments (90/384/EEC)
BW1007031(2)
Power Consumption 0.3W max
Power Source
AC adapterCentre minusMODEL A30930GCLASS 2
Input Voltage : 230VAC50Hz65mA
Output Voltage : 9VDC±0.45VDC
Rated Current : 300mA
No Load Input Voltage : 12VDC±0.6VDC
LR6 (AA Alkaline battery) x 6, (Not included)
Specifications
approximately 100 hours of continuous use when using LR6 (AA Alkaline battery)
Battery Life
TYPE WB-100MA WB-110MA
Strain Gauge Load Cell
200kg/0.1kg
±0.1kg
270kg/0.1kg
90 – 249cm/1cm increments
90 – 249cm/1cm increments
0.1 increments
159
҂209҂56mm
301
҂336҂80mm
2m
336
҂600҂1070mm
Upper 5Digits and Lower 4Digits LCD
Height of numerals 25mm
RS-232C (D-sub 9pins Female Connector)
DC9V 300mA (LR6 (AA Alkaline battery)
҂6 not included)
0ºC/+35ºC
30%/80% (without condensation)
5.1kg (except battery)
270kg/0.1kg increments200kg/0.1kg increments
Weight Measurement
Measurement System
Maxmum Capacity/Minmum Graduation
Accuracy at first calibration
Height
Weight
Height
BMI
Display
Platform
Cable Length
Display
Output Data Interface
Rated Power
Temperature Range of usage
Relative Humidity
Weight of Equipment (Remote Display Version)
10.6kg (except battery)Weight of Equipment (Column Mounted Version)
Input Items
Output Items Display
Size
(Remote Display Version)
Size (Column Mounted Version)
D
ELEKTRONISCHE WAAGE
WB-100MA/WB-110MA
BEDIENUNGSANLEITUNG
Bitte lesen Sie sich diese Bedienungsanleitung
sorgfältig durch und bewahren Sie sie zum
späteren Nachschlagen auf.
(Modell Remote Display)
(Säulengestützte Version)
WB-100MA-取説/04.01.2704.1.289:12AMページ14
Page 9

D
16
D
앮
Inhaltsverzeichnis
••••••••••••••••••••••••••••••••••••••••••••••••••••••••••••••••••••••••••••••••••
17
─────────────────────────────
앮
Anwendungen
•••••••••••••••••••••••••••••••••••••••••••••••••••••••••••••••••••••••••••••••••••••••••
18
─────────────────────────────
앮
Sicherheitshinweise
••••••••••••••••••••••••••••••••••••••••••••••••••••••••••••••••••••••••••••••••
18
Warnsymbole
•••••••••••••••••••••••••••••••••••••••••••••••••••••••••••••••••••••••••••••••••••••••••••
18
Warnung
•••••••••••••••••••••••••••••••••••••••••••••••••••••••••••••••••••••••••••••••••••••••••••••
18
Vorsicht
••••••••••••••••••••••••••••••••••••••••••••••••••••••••••••••••••••••••••••••••••••••••••••••••
18
[Wartung]
••••••••••••••••••••••••••••••••••••••••••••••••••••••••••••••••••••••••••••••••••••••••••••
19
[Messanleitungen]
••••••••••••••••••••••••••••••••••••••••••••••••••••••••••••••••••••••••••••
19
<Benutzungsbedingungen>
••••••••••••••••••••••••••••••••••••••••••••••••••••••••••••••••
19
<Lagerbedingungen>
••••••••••••••••••••••••••••••••••••••••••••••••••••••••••••••••••••••••••••
19
<Stromquelle>
••••••••••••••••••••••••••••••••••••••••••••••••••••••••••••••••••••••••••••••••••••••••••
19
─────────────────────────────
1. Produktaufbau und Komponenten
•••••••••••••••••••••••••••••••••••••••••••••••••••
20
쎱
Produktkomponenten
••••••••••••••••••••••••••••••••••••••••••••••••••••••••••••••••••••••
20
(Modell Remote Display)
(Säulengestützte Version)
쎱
Bedienungsfeld
•••••••••••••••••••••••••••••••••••••••••••••••••••••••••••••••••••••••••••••••••••
21
쎱
Symbole und ihre Bedeutung
•••••••••••••••••••••••••••••••••••••••••••••••••••••••
21
2. Vorbereitung vor Gebrauch
••••••••••••••••••••••••••••••••••••••••••••••••••••••••••••••••
22
쎱
Höheneinstellung
•••••••••••••••••••••••••••••••••••••••••••••••••••••••••••••••••••••••••••••••
22
(Modell Remote Display)
(Säulengestützte Version)
쎱
Aufbau des Geräts
•••••••••••••••••••••••••••••••••••••••••••••••••••••••••••••••••••••••••••••
22
(Modell Remote Display)
쎱
Vorbereiten der Stromquelle
••••••••••••••••••••••••••••••••••••••••••••••••••••••••
23
3. Betriebsanleitungen
••••••••••••••••••••••••••••••••••••••••••••••••••••••••••••••••••••••••••••••••
24
1.Normales Wiegen
•••••••••••••••••••••••••••••••••••••••••••••••••••••••••••••••••••••••••••••••
24
2.Bestimmen des Eigengewichts
••••••••••••••••••••••••••••••••••••••••••••••••••••••
24
3.Abstellen der Eigengewichtsfunktion
••••••••••••••••••••••••••••••••••••••••
24
4.BMI-Berechnung:
••••••••••••••••••••••••••••••••••••••••••••••••••••••••••••••••••••••••••••••••
25
4. RS-232C Kommunikationsspezifikationen
•••••••••••••••••••••••••••••••••••••
26
쎱
Spezifikationen
•••••••••••••••••••••••••••••••••••••••••••••••••••••••••••••••••••••••••••••••••••
26
쎱
Signalleitungen und Verbindungsmethoden
•••••••••••••••••••••••••
26
쎱
Wiegemodus
••••••••••••••••••••••••••••••••••••••••••••••••••••••••••••••••••••••••••••••••••••••••
26
쎱
BMI-Modus
••••••••••••••••••••••••••••••••••••••••••••••••••••••••••••••••••••••••••••••••••••••••••
26
5.Fehlersuche
•••••••••••••••••••••••••••••••••••••••••••••••••••••••••••••••••••••••••••••••••••••••••••••••••
27
쎱
Mögliche Probleme
•••••••••••••••••••••••••••••••••••••••••••••••••••••••••••••••••••••••••••
27
─────────────────────────────
앮
Spezifikationen
•••••••••••••••••••••••••••••••••••••••••••••••••••••••••••••••••••••••••
Rückseite
━━━━━━━━━━━━━━━━━━━━━━━━━━━━━
17
Inhaltsverzeichnis
WB-100MA-取説/04.01.2704.1.289:12AMページ16
Page 10
D
Anwendungen
•Diese Waage ist ein Präzisionsinstrument, das für den privaten und kommerziellen Gebrauch konzipiert wurde.
•Bei ärztlichen Untersuchungen, wie regelmäßigen Check-ups, liefert das Gerät Bezugsdaten und hilft beim Vorbeugen
von Fettleibigkeit.
18
Warnung
• Zur Verhinderung von elektrischen Schocks:
Stecker des Stromkabels nicht mit nassen Händen einstecken bzw. herausziehen.
• Zur Verhinderung von Brandgefahr:
Stets ein korrekt angeschlossenes Kabel von 230V AC ohne Verlängerungsschnur verwenden.
Vorsicht
• Zur Verhinderung von Infektionen:
Wiegeplattform stets nach Gebrauch reinigen. Desinfizieren Sie die Plattform vor dem Gebrauch mit einem
geeigneten Reinigungsmittel auf Alkoholbasis.
• Aufstellen der Waage
Achten Sie darauf, dass die Waage auf einem ebenen, festen Untergrund steht. Bei Gebrauch auf unebenen
Stellen kann das Gerät umkippen und kein genaues Wiegergebnis ermöglichen.
Um Verletzungen und Geräteschäden zu vermeiden, niemals auf die Plattform springen.
• Umgang mit dem Gerät bei Verlagerung
Die Wiegeplattform ist recht schwer. Halten Sie sie beim Anheben daher gut fest, um sie nicht fallen zu lassen.
• AC-Adapter
Stellen Sie sicher, dass das Gerät nur mit dem im Lieferumfang enthaltenen Adapter (Modell A30930G) benutzt
wird. Andere Adapter können Funktionsstörungen verursachen.
• Batterie
Achten Sie beim Auswechseln der Batterien darauf, dass die Pole der neuen Batterien richtig herum eingelegt
werden. Bei verkehrter Polarität können die Batterien auslaufen und das Gerät beschädigen.
Warnung
Dieses Symbol weist Sie darauf hin, dass eine Missachtung der Sicherheitsmaßnahmen
bzw. ein Missbrauch des Gerätes zu tödlichen bzw. schweren Verletzungen führen kann.
Vorsicht
Dieses Symbol weist Sie darauf hin, dass eine Missachtung der Sicherheitsmaßnahmen bzw. ein
Missbrauch des Gerätes zu Körperverletzung und/oder Geräteschaden führen kann.
Dieses Symbol weist Sie auf allgemeine Vorsichtsmaßnahmen hin, die bei
Gebrauch des Geräts getroffen werden sollten.
Sicherheitshinweise
Warnsymbole
In dieser Betriebsanleitung und der Gerätebeschreibung finden Sie verschiedene Warnsymbole, die Sie auf den sicheren
und korrekten Gebrauch Ihres Geräts hinweisen sollen, um Verletzungen und Sachschäden zu vermeiden.
Die Symbole und ihre Bedeutung werden im Folgenden erläutert. Machen Sie sich bitte vor dem Weiterlesen dieser
Betriebsanleitung mit ihnen vertraut.
D
• In der Platine ist eine Sicherung (100mA, 125V) für elektronische Geräte eingebaut. Werden statt dem im
Lieferumfang enthaltenen AC-Adapter andere Adapter verwendet oder bei einer übermäßigen Stromzufuhr
brennt die Sicherung aus Sicherheitsgründen durch. Das Gerät muss bei durchgebrannter Sicherung geprüft
und repariert werden. Die Sicherung ist ein fester Bestandteil des Gerätes und lässt sich nur schwer
herausnehmen. Wenden Sie sich zum Austausch der Sicherung daher bitte an Ihre nächste Tanita Verkaufsstelle
bzw. Vertretung.
[Wartung]
Dies ist ein exakt kalibriertes Präzisionsprodukt. Bitte befolgen Sie daher die nachstehenden Instruktionen genau.
• Versuchen Sie nicht, das Gerät selbst auseinander zu nehmen oder zu justieren, da dies zu Funktionsstörungen
führen kann. Das Gerät sollte nur gemäß der in Ihrem Land geltenden Bestimmungen geprüft werden.
• Ziehen Sie den AC-Adapter bei längerem Nichtgebrauch des Geräts aus der Steckdose.
• Wenn Sie das Gerät längere Zeit nicht benutzen, sollten Sie vor dem Wegstellen die Batterien herausnehmen.
• Gerät nicht mit ätzenden Chemikalien (Benzin, Reiniger usw.) abwischen. Verwenden Sie zur Reinigung des
Geräts einen Neutralreiniger.
• Gerät nicht übermässigen Stößen und Vibrationen aussetzen.
• Gerät bitte nur nach den vorherrschenden Bestimmungen Ihres Landes entsorgen.
• Sollte das Gerät von einer unbefugten Person auseinander genommen oder repariert werden, erlischt die
Garantie. Wenden Sie sich bei Funktionsstörungen bitte an Ihre nächste Tanita Verkaufsstelle bzw. Vertretung.
[Messanleitungen]
Bitte befolgen Sie die nachstehenden Instruktionen genau, um genaue Messwerte zu erhalten.
• Um zu gewährleisten, dass der Wiegevorgang nicht durch einen stark vibrierenden Untergrund behindert wird,
stellen Sie das Gerät an einem möglichst bzw. völlig vibrationsfreien Ort auf.
• Wenn Sie das Gerät an einer anderen Stelle mit einem Temperaturunterschied von mehr als 20°C aufstellen,
warten Sie mindestens zwei Stunden mit dem Gebrauch.
• Um beim Wiegen Anzeigefehler zu vermeiden, halten Sie Personen mit Funkgeräten, wie Handys, vom Gerät
fern.
<Benutzungsbedingungen>
<Lagerbedingungen>
<Stromquelle>
19
Temperaturbereich für Gebrauch : 0°C / +35°C
Relative Feuchtigkeit : 30% / 80% (ohne Kondensation)
Bereich der Umgebungstemperatur : -10°C / +50°C
Bereich der relativen Feuchtigkeit : 10% / 90% (ohne Kondensation)
Um Funktionsstörungen zu vermeiden, das Gerät nicht der prallen Sonne, extremen Temperaturschwankungen,
Feuchtigkeit oder starkem Staub aussetzen und nicht in der Nähe von Heizgeräten oder in Bereichen, die Vibrationen
und Stößen ausgesetzt sind, aufbewahren.
Wertebereich
230VAC
50Hz
65mA
Spannungsbereich
Frequenzbereich
Elektrischer Strombereich
WB-100MA-取説/04.01.2704.1.289:12AMページ18
Page 11
D
20
쎱
Produktkomponenten In der Packung sind folgende Komponenten enthalten.
1.Produktaufbau und Komponenten
D
NET:
Beim Messen des Eigengewichts erscheint neben diesem Symbol ein Pfeil t.
21
쎱
Bedienungsfeld
쎱
Symbole und ihre Bedeutung
: Anzeigegerät an
: Gerät der Klasse II
: Anzeigegerät aus.
: Verwendetes Teil Typ B
: Gleichstrom
: Nulleinstellung
: Anstellen der
Eigengewichtsfunktion
: Vorsicht: Entsprechende
Hinweise beachten.
:
Konformität mit Medical
Device Directive 93/42/EWG
Schaltet das Anzeigegerät ein und stellt
die Anzeige auf Null.
Schaltet das Anzeigegerät ab
Eigengewichtsfunktion
BMI-Modus und/oder
Größeneinstellung
Modus-Wahl bzw. Ändern der
numerischen Werte nach oben
Modus-Wahl bzw. Ändern der
numerischen Werte nach unten
Abstellen der Gewichtsfixierung
HEIGHT: (Größeneinheit)
Die Größe ist eingestellt.
BMI:
BMI-Wert wird berechnet.
BMI MODE:
Die Waage ist auf BMI-Modus geschaltet.
STABILIZED:
Sobald das Gewicht konstant ist, erscheint neben „STABILIZED“ ein Pfeil
STEP ON: (Betriebsbereit)
Die Waage ist betriebsbereit.
WEIGHT LOCK:
Das Gewicht hat sich stabilisiert.
* Erscheint nur, wenn die Gewichtsfixiertaste an ist.
(Modell Remote Display)
Höhenregulierer
Anzeigegerät
Batteriefach
Wiegeplattform
Einstellbare Füße
AC-Adapter:
MODELL: A30930G
Bedienungsanleitung
Bundschrauben für
Schelle (x 2)
Zubehör
Batteriefach
Wiegeplattform
Einstellbare Füße
AC-Adapter:
MODELL: A30930G
Deckel
Schraubenschlüssel
Bedienungsanleitung
Kappe
Schrauben (x 5)
Federscheibe (x 4)
Montageanleitung
Zubehör
(Säulengestützte Version)
Höhenregulierer
Anzeigegerät
WB-100MA-取説/04.01.2704.1.289:12AMページ20
Page 12
D
22
쎱
Aufbau des Geräts (Modell Remote Display)
쎱
Höheneinstellung
Bei Verwendung des Ständers
Bei Wandmontage
①
③
②
Ziehen Sie den Ständer hinten am Anzeigegerät heraus.
Wenn Sie das Anzeigegerät wegstellen, verwahren Sie den Ständer im Schlitz hinten am
Anzeigegerät.
햲 Bringen Sie die Wandbefestigung mittels der Schrauben an und lassen Sie die Schrauben
dabei 5 mm hervorstehen.
햳 Setzen Sie das Anzeigegerät auf die Schraubenköpfe auf.
햴 Drücken Sie das Anzeigegerät vorsichtig herunter, um zu gewährleisten, dass es sicher
aufsitzt.
・Sollte das Display zu locker aufsitzen, kann es leicht herunterfallen.
・Bringen Sie das Display so an, dass das Kabel nicht beschädigt werden kann oder
eine Stolpergefahr besteht.
・Das Display nicht am Kabel hin-und her schwingen.
2.Vorbereitungen vor Gebrauch
D
햲 Verwendung eines AC-Adapters
Stecken Sie den Kabelstöpsel für den AC-Adapter in die Buchse an
der Seite des Anzeigegeräts und den Stecker des AC-Adapters in eine
Netzsteckdose (230V AC).
Prüfen Sie, ob die Kontrolllampe am AC-Adapter aufleuchtet.
Warnung
•Um elektrische Schocks zu vermeiden, den Stecker nicht mit nassen
Händen einstecken oder herausziehen.
Vorsicht
•Nur den vorgegebenen AC-Adapter (MODELL: A30930G) verwenden.
Andere Adapter können Funktionsstörungen verursachen.
햳 Verwendung von Trockenbatterien
Lösen Sie die Bundschrauben des Batteriefachs rechts am
Anzeigegerät und ziehen Sie das Batteriefach heraus. Legen Sie die
Batterien LR6 (AA) wie im Batteriefach angegeben ein, schließen Sie
das Batteriefach und ziehen Sie die Bundschrauben wieder an.
Erscheint auf der Anzeige der Hinweis , müssen alle sechs
Batterien LR6 (AA) ausgewechselt werden.
erscheint, wenn die Batteriespannung unter 6,5 V
앐10%
liegt.
•Achten Sie darauf, dass die Batteriepole / richtig
herum eingelegt sind. Werden die Batterien falsch
eingelegt, kann Flüssigkeit austreten und das Gerät
beschädigen.
•Wenn Sie das Gerät längere Zeit nicht benutzen, sollten Sie
vor dem Wegstellen die Batterien herausnehmen.
•Wenn Sie das Gerät an einer anderen Stelle mit einem
Temperaturunterschied von mehr als 20°C aufstellen,
warten Sie mindestens zwei Stunden mit dem Gebrauch.
쎱
Vorbereiten der Stromquelle
23
Buchse
Kontrolllampe
Batteriefach
Stecker
Trockenb
atterien
Bundschrauben des
Batteriefachs
햴 Intervall-Einstellung für automatisches Abschalten
Wenn die Wage abgeschaltet ist, drücken und halten Sie die Taste .
Drücken Sie dann die Taste .
Lassen Sie die Taste wieder los.
Die Anzeige schaltet nun auf den Intervall-Einstellmodus für automatisches Abschalten (Auto Power Off Intervall Setting) um und es
erscheint „20" als vorgegebene Einstellung. D.h. die Waage schaltet sich nach 20 Minuten automatisch ab.
Drücken Sie die Taste (Pfeil hoch) bzw. (Pfeil runter) und stellen Sie 10 für 10 Minuten und/oder bei Bedarf CONT für Dauereinstellung ein.
Drücken Sie auf die Taste um zu beenden.
Um ein genaues Messergebnis zu ermöglichen, positionieren
Sie das Gerät auf einem möglichst ebenen Untergrund und
stellen Sie die Höhe mittels der verstellbaren Füße so ein, dass
sich die Blase des Höhenregulierers in der Mitte des Rahmens
befindet.
Vorsicht
Achten Sie darauf, dass die Waage auf einem ebenen Untergrund
steht. Bei Gebrauch des Gerät an unsicherer Stelle ohne festen Halt
der Füße kann das Gerät umkippen und ein genaues Wiegen
unmöglich machen.
* Höheneinstellung durch Drehen der verstellbaren Füße
Höhenregulierer
(Modell Remote Display)
* Höheneinstellung durch Drehen der verstellbaren Füße
Höhenregulierer
(Säulengestützte Version)
WB-100MA-取説/04.01.2704.1.289:12AMページ22
Page 13

D
24
d
d
d
d
d
d
d
d
d
1.Normales Wiegen
2.Bestimmen des Eigengewichts
3.Abschalten der Eigengewichtsfunktion
1. Stellen Sie das Gerät mittels der Taste ein.
2. Die einzelnen Segmente blinken auf und es erscheint [0.0kg] auf der Anzeige.
3. Steigen Sie auf die Plattform.
Die Anzeige gibt nun Ihr Gewicht an.
4. Sobald Sie wieder von der Waage steigen, kehrt die Anzeige auf [0.0kg] zurück.
Stellen Sie das Gerät mittels der Taste ab.
1. Stellen Sie das Gerät mittels der Taste ein.
2. Die einzelnen Segmente blinken auf und es erscheint [0.0kg] auf der Anzeige.
3. Stellen Sie den Gegenstand, dessen Eigengewicht bestimmt werden soll, vorsichtig auf die
Plattform.
Auf der Anzeige erscheint nun das Gewicht des Gegenstands.
4. Drücken Sie die Taste .
Neben [NET] erscheint ein Pfeil tund auf der Anzeige erscheint [0.0kg].
5. Wird eine Person/ein Objekt mit dem Gegenstand gewogen, dessen Eigengewicht bestimmt
wurde, gibt die Anzeige das Gewicht der Person/des Objekts als Nettogewicht, d.h. ohne das
Eigengewicht des Gegenstandes an.
• Um das Eigengewicht zu ändern, schalten Sie die Eigengewichtsfunktion ab und
wiederholen Sie den Vorgang ab Schritt 3.
•
Bei eingeschalteter Eigengewichtsfunktion wird der Messbereich um das Eigengewicht reduziert.
(Messbereich) = (Maximal Messbarer Wert) – (Eigengewicht)
1. Nehmen Sie die Gegenstände (Kleidung usw.) von der Plattform.
Das Gewicht wird nun als Negativwert angezeigt.
2. Drücken Sie die Taste .
Der Pfeil t neben [NET] verschwindet und es erscheint [0.0kg] auf der Anzeige.
3.Betriebsanleitungen
D
d
d
d
d
d
d
d
d
4.BMI-Berechnung:
1. Stellen Sie das Gerät mittels der Taste ein.
2. Die einzelnen Segmente blinken auf und es erscheint [0.0kg] auf der Anzeige.
3. Drücken Sie die Taste für zwei Sekunden.
Auf der Anzeige erscheinen nun [0.0kg] und die voreingestellte Größe [170cm].
4. Stellen Sie die Größe mittels der Taste ein.
(Die Größe kann auch eingestellt werden, wenn Sie bereits auf der Waage stehen).
Stehen Sie ruhig auf der Wiegeplattform.
Auf der Anzeige erscheint nun Ihr Gewicht.
5. Drücken Sie nach der Anzeige der Größe und des Gewichts auf .
Nun erscheint das Gewicht und der BMI-Wert.
* Wenn Sie im BMI-Modus auf die Taste drücken, schaltet die Anzeige der Waage
abwechselnd auf BMI und auf die Größe (auch mit der Taste zu ändern).
* Wenn Sie im BMI-Modus von der Waage steigen und es erscheint die Größe, stellt sich die
Anzeige auf [0.0 kg] und auf die voreingestellte Größe [170cm] zurück.
Basierend auf den BMI-Richtlinien des NIH (Nationales Gesundheitsinstitut) und WHO (Weltgesundheitsorganisation)
Untergewicht
Normaler Bereich
Vorstufe Fettleibig
Fettleibig
Fettleibig
Fettleibig
KLASSE
l
KLASSE ll
KLASSE lll
BMI < 18.5
18.5
≦ BMI < 25
25
≦ BMI < 30
30
≦ BMI < 35
35
≦ BMI < 40
BMI
≧ 40
25
WB-100MA-取説/04.01.2704.1.289:12AMページ24
Page 14

D
■
Spezifikationen
■
Signalleitungen und Verbindungsmethoden
■
Wiegemodus
■
BMI-Modus
Kommunikation
Norm EIA RS-232C
Kommunikationsmethode Asynchron-Methode
Signalgeschwindigkeit
2.400 Baud
Datenbitlänge 7 bit
Parität GERADE
Stoppbit 1 Bit
Anschluss Nr. Signalbezeichnung
1
2 TXD
3 RXD
4
5 GND
6
7
8
9
• An der Seite des Anzeigegeräts befindet sich ein RS-232C-Anschluss (9-poliger weiblicher DSubStecker).
• Benutzen Sie für den Anschluss des Anzeigegeräts an einen PC oder ein anderes Gerät ein geradliniges RS-232C-Kabel.
• Das RS232C-Kabel sollte höchstens 3m lang sein.
Bei einem Datenempfang von 4 Bytes im Wiegemodus, wie in 1-1 angegeben, erfolgt , wie in 1-2 beschrieben, eine Ausgabe der Gewichtsdaten von 14 Bytes.
Wird die Waage im BMI-Modus benutzt, richten sich die Ausgabedaten nach der Form der Empfangsdaten.
햲 Bei einem Datenempfang von 4 Bytes, wie in 1-1 angegeben, errechnet die Waage den BMI-Wert anhand der zuletzt eingegebenen
Größe. Wie in 2-1 bzw. 2-2 beschrieben, werden je nach Maßeinheit Daten von 26 Bytes ausgegeben.
햳 Bei einem Datenempfang von 11 Bytes in der in 1-2 bzw. 1-3 angegebenen Form, einschließlich Maßeinheiten und Größenangaben,
errechnet die Waage den BMI-Wert anhand dieser Angaben. Wie in 2-1 bzw. 2-2 beschrieben, werden je nach Maßeinheit Daten von 26
Bytes ausgegeben.
Einzelheiten der Übertragungsdaten im Wiegemodus
Byte-Nr. 1-2
Byte-Nr. 5-10
Byte-Nr. 3-4
Byte-Nr. 11-12
Byte-Nr. 13-14
Kopfzeile
Trennzeichen
Gewichtsdaten
Maßeinheiten
Terminator
2 Bytes feste Länge
2 Bytes feste Länge
6 Bytes feste Länge
2 Bytes feste Länge
2 Bytes feste Länge
SD: Schwankend S_: Stabil
SI: Überlastung etc.
2 Leerstellen
Rechtsbündig
Kg:kg
CR+LF
1-1 Empfangsdaten
DR
CR LF
1234
1-2 Übertragungsdaten
SD 75 . 0kg
CR LF
1234567891011121314
1-1 Empfangsdaten
DR
CR LF
1234
1-2 Empfangsdaten (Größendaten bei kg-Einstellung)
*Größendaten von 90-99cm bitte als 090-099 eingeben.
DHk g 180
CR LF
1234567891011
2-1 Übertragungsdaten (kg/cm)
SD 75 . 0kg , 180 , 23 . 1
CR LF
1 2 3 4 5 6 7 8 9 10 11 12 13 14 15 16 17 18 19 20 21 22 23 24 25 26
Einzelheiten der Übertragungsdaten im BMI-Modus
Byte-Nr. 1-2
Byte-Nr. 5-10
Byte-Nr. 3-4
Byte-Nr. 11-12
Byte-Nr. 13
Byte-Nr. 14-18
Byte-Nr. 19
Byte-Nr. 20-24
Byte-Nr. 25-26
Kopfzeile
Trennzeichen
Gewichtsdaten
Maßeinheiten
Trennzeichen
Größendaten
Trennzeichen
BMI-Daten
Terminator
2 Bytes feste Länge
2 Bytes feste Länge
6 Bytes feste Länge
2 Bytes feste Länge
1 Byte feste Länge
5 Bytes feste Länge
1 Byte feste Länge
5 Bytes feste Länge
2 Bytes feste Länge
SD: Schwankend S_: Stabil
SI: Überlastung etc.
2 Leerstellen
Rechtsbündig
Kg:kg
1 Komma
Rechtsbündig
1 Komma
Rechtsbündig
CR+LF
26
4. RS-232C Kommunikationsspezifikationen
D
27
Problem Lösung
Das Gerät schaltet sich nach dem
Drücken der Taste nicht ein.
•Bei Verwendung eines AC-Adapters
Prüfen Sie, ob das Kabel des AC-Adapters richtig am Anzeigegerät angeschlossen
ist. Prüfen Sie, ob der AC-Adapter richtig in der Netzsteckdose steckt.
•Bei Verwendung von Trockenbatterien
Möglicherweise sind die Batterien leer. Prüfen Sie mittels des AC-Adapters oder
neuer Batterien, ob das Gerät funktioniert.
Die Messung ist ungenau.
Das Gewicht stabilisiert sich nicht.
Die Anzeige schaltet sich an und ab.
•Bitte prüfen Sie, ob alle verstellbaren Füße auf einem ebenen Untergrund stehen.
•Vibrationen machen genaue Messergebnisse unmöglich. Stellen Sie das Gerät an einer
anderen Stelle auf.
Auf der Anzeige erscheint .
•Möglicherweise wurde die maximale Gewichtsbelastung überschritten.
Auf der Anzeige erscheint .
•Die Plattform darf vor dem Wiegen nicht belastet werden. Achten Sie darauf, dass
sich nichts auf der Plattform befindet und beginnen Sie mit dem Wiegen.
Schauen Sie bei Problemen zunächst in der folgenden Tabelle nach. Sollte sich das Problem nicht beheben lassen, wenden
Sie sich an Ihre nächste Tanita Verkaufsstelle bzw. an das Reparaturcenter.
쎱
Mögliche Probleme
5.Fehlersuche
WB-100MA-取説/04.01.2704.1.289:12AMページ26
Page 15

F
BALANCE ELECTRONIQUE
WB-100MA/WB-110MA
MODE D'EMPLOI
Please read this Instruction Manual
carefully and keep it handy for future
reference.
(Version Avec Téléaffichage)
(Version à colonne montée)
Stromverbrauch Max. 0,3W
Stromquelle
AC-Adapter Centre minus MODEL A30930GCLASS 2
Eingangsspannung : 230VAC50Hz65mA
Ausgangsspannung : 9VDC±0,45VDC
Nennstrom : 300mA
Leerlauf-Eingangsspannung : 12VDC±0,6VDC
LR6 (AA Alkali-Batterie) x 6, (nicht im Lieferumfang)
D
Das Produkt erfüllt die Voraussetzungen der folgenden drei Normen:
1. Medical Device Directive (93/42/EWG)
Sicherheitsnorm : EN60601-1:1990, AM Nr. 1:1993, AM Nr. 2:1995
IEC 60601-1:1988, AM Nr.1:1991, AM Nr.2:1995
EMC-Norm : EN60601-1-2:2001
IEC60601-1-2:2001
2.Nichtautomatische Wiegevorrichtung (90/384/EWG)
BW1007031(2)
Spezifikationen
etwa 100 Stunden bei Dauerbenutzung von LR6 (AA Alkali-Batterie)
Lebensdauer der Batterien
TYP WB-100MA WB-110MA
DMS-Wägezelle
200kg/0,1kg
±0.1kg
270kg/0,1kg
90-249cm/Einteilung: 1cm
90-249cm/Einteilung: 1cm
Einteilung: 0,1
159
҂209҂56mm
301
҂336҂80mm
2m
336
҂600҂1070mm
Oberreihe 5 Zeichen, Unterreihe 4 Zeichen LCD
Zahlengröße: 25mm
RS-232C (9-poliger weiblicher DSub-Stecker)
DC9V 300mA (LR6 (AA Alkali-Batterie)
҂6 (nicht im Lieferumfang)
0ºC/+35ºC
30%/80% (ohne Kondensation)
5,1kg (ohne Batterie)
10,6kg (ohne Batterie)
270kg/Einteilung: 0,1kg200kg/Einteilung: 0,1kg
Gewichtsbereich
Messart
Maximale Gewichtsbelastung/Kleinste Gewichtseinteilung
Toleranz bei Erstkalibrierung
Größe
Gewicht
Größe
BMI
Anzeigegerät
Plattform
Kabellänge
Kabellänge (Säulengestützte Version)
Anzeigegerät
Schnittstelle Ausgabedaten
Nennleistung
Temperaturbereich für Gebrauch
Relative Feuchtigkeit
Gerätegewicht (Modell Remote Display)
Gerätegewicht (Säulengestützte Version)
Eingaben
Ausgaben Anzeige
Abmessungen
(Modell Remote Display)
WB-100MA-取説/04.01.2704.1.289:12AMページ28
Page 16

F
30
F
앮
Table des matières
•••••••••••••••••••••••••••••••••••••••••••••••••••••••••••••••••••••••••••••••••
31
─────────────────────────────
앮
Applications
•••••••••••••••••••••••••••••••••••••••••••••••••••••••••••••••••••••••••••••••••••••••••••••
32
─────────────────────────────
앮
Remarques sur la sécurité
••••••••••••••••••••••••••••••••••••••••••••••••••••••••••••••••••••
32
Symboles d'avertissement
•••••••••••••••••••••••••••••••••••••••••••••••••••••••••••••••••••
32
Avertissement
••••••••••••••••••••••••••••••••••••••••••••••••••••••••••••••••••••••••••••••••••••
32
Attention
••••••••••••••••••••••••••••••••••••••••••••••••••••••••••••••••••••••••••••••••••••••••••••••
32
[Maintenance]
••••••••••••••••••••••••••••••••••••••••••••••••••••••••••••••••••••••••••••••••••••
33
[Instructions pour la pesée]
•••••••••••••••••••••••••••••••••••••••••••••••••••••••••••
33
< Conditions d'utilisation >
•••••••••••••••••••••••••••••••••••••••••••••••••••••••••••••••••
33
< Conditions d’entreposage>
•••••••••••••••••••••••••••••••••••••••••••••••••••••••••••••
33
<Alimentation>
••••••••••••••••••••••••••••••••••••••••••••••••••••••••••••••••••••••••••••••••••••••••
33
─────────────────────────────
1. Assemblage du Produit et Composants
••••••••••••••••••••••••••••••••••••••••••
34
쎱
Composants du Produit
••••••••••••••••••••••••••••••••••••••••••••••••••••••••••••••••••
34
(Version Avec Téléaffichage)
(Version à colonne montée)
쎱
Panneau de contrôle
•••••••••••••••••••••••••••••••••••••••••••••••••••••••••••••••••••••••••
35
쎱
Liste et signification des symboles utilisés
••••••••••••••••••••••••••••••
35
2. Avant l'utilisation
••••••••••••••••••••••••••••••••••••••••••••••••••••••••••••••••••••••••••••••••••••
36
쎱
Réglage du niveau
•••••••••••••••••••••••••••••••••••••••••••••••••••••••••••••••••••••••••••••
36
(Version Avec Téléaffichage)
(Version à colonne montée)
쎱
Installation de l'appareil
••••••••••••••••••••••••••••••••••••••••••••••••••••••••••••••••••
36
(Version Avec Téléaffichage)
쎱
Branchements
••••••••••••••••••••••••••••••••••••••••••••••••••••••••••••••••••••••••••••••••••••••
37
3. Fonctionnement
••••••••••••••••••••••••••••••••••••••••••••••••••••••••••••••••••••••••••••••••••••••••
38
1.Procédures pour une pesée standard
•••••••••••••••••••••••••••••••••••••••••
38
2.Pesée avec une tare
••••••••••••••••••••••••••••••••••••••••••••••••••••••••••••••••••••••••••••
38
3.Suppression de la fonction de pesée avec tare
•••••••••••••••••••••••
38
4.Calcul de l
’
IMC
••••••••••••••••••••••••••••••••••••••••••••••••••••••••••••••••••••••••••••••••••••
39
4. Caractéristiques pour commutation RS-232C
•••••••••••••••••••••••••••••••
40
쎱
Caractéristiques techniques
•••••••••••••••••••••••••••••••••••••••••••••••••••••••••••
40
쎱
Appellation et méthodes de connexion pour les lignes de signaux
•••••••••
40
쎱
Mode de pesée
•••••••••••••••••••••••••••••••••••••••••••••••••••••••••••••••••••••••••••••••••••••
40
쎱
Mode BMI (Mode IMC)
••••••••••••••••••••••••••••••••••••••••••••••••••••••••••••••••••
40
5. Dépannage
••••••••••••••••••••••••••••••••••••••••••••••••••••••••••••••••••••••••••••••••••••••••••••••••
41
쎱
Problèmes possibles
••••••••••••••••••••••••••••••••••••••••••••••••••••••••••••••••••••••••••
41
─────────────────────────────
앮
Caractéristiques
••••••••••••••••••••••••••••••••••••••••••••••••••••••••••••••
Dernière page
━━━━━━━━━━━━━━━━━━━━━━━━━━━━━
31
Table des matières
WB-100MA-取説/04.01.2704.1.289:12AMページ30
Page 17

F
Applications
• La balance électronique BWB-800MA est un appareil de précision, soigneusement calibré. Elle peut être utilisée dans le
but de certifier des poids et/ou des transactions commerciales.
•Cet appareil peut être utilisé pour obtenir des données de référence au cours d’examens médicaux et peut contribuer à la
prévention de l’obésité.
32
Avertissement
• Pour éviter tout risque de choc électrique :
En aucun cas, vous ne devez brancher ou débrancher la prise électrique de cet appareil avec les mains mouillées.
• Pour éviter tout risque d’incendie :
Utilisez un câble électrique 230 V CA standard pour raccorder l’appareil au secteur. N’utilisez pas de rallonges
multiples.
Attention
• Pour éviter la transmission d’infections,
Nettoyez systématiquement la plate-forme de pesée après chaque utilisation. Utilisez pour cela un liquide de
nettoyage à base d’alcool.
• Installation de la plate-forme de pesée
Assurez-vous que la plate-forme de pesée est placée sur une surface stable et parfaitement horizontale. Si vous
placez l’appareil sur une surface instable (par exemple si les pieds ne reposent pas sur une surface plane), la
plate-forme risque de basculer et il vous sera impossible d’effectuer une pesée correcte.
Pour éviter de vous blesser ou d’endommager l’appareil, ne sautez pas sur la plate-forme
• Transport de l’appareil
En raison du poids important de la plate-forme, il est conseillé de la tenir fermement à deux mains.
• Adaptateur-secteur
Utilisez systématiquement l’adaptateur-secteur fourni (modèle A30930G) pour alimenter cet appareil. Celui-ci
risque de ne pas fonctionner avec d’autres adaptateurs.
• Piles
Chaque fois que vous changez les piles de cet appareil, assurez-vous que celles-ci sont placées correctement en
respectant leurs polarités respectives. En cas de placement incorrect, il se peut que les piles fuient et que
l’appareil soit endommagé.
Avertissement
Ce symbole signale un risque de blessure grave ou d’accident mortel en cas de
non-respect des instructions de sécurité ou d’utilisation incorrecte de l’appareil.
Attention
Ce symbole signale un risque de blessure ou d’endommagement de l’appareil en
cas de non-respect des instructions de sécurité ou d’utilisation incorrecte de
l’appareil.
Ce symbole fait référence aux précautions d’utilisation générales à prendre lors
de l’utilisation de cet appareil.
Remarques sur la sécurité
Symboles d’avertissement
Le présent manuel d’utilisation contient divers symboles d’avertissement visant à garantir une utilisation correcte et sans
risque de la balance Tanita BWB-800MA, afin de vous éviter ainsi qu’à d’autres utilisateurs tout dommage physique ou
matériel.
Ces symboles sont expliqués ci-dessous. Nous vous conseillons de vous familiariser avec eux avant de parcourir le manuel
d’utilisation.
F
• Le circuit imprimé de la balance BWB-800MA comporte un fusible (100 mA, 125 V) destiné au dispositif
électronique. Si vous utilisez des appareils autres que l’adaptateur-secteur fourni ou que vous appliquez un
courant électrique intense, le fusible saute automatiquement par mesure de sécurité. Dans ce cas, l’unité doit être
controlée et réparée par un spécialiste. Étant donné que le fusible est intégré à un élément fixe de l’appareil, il est
difficile d’y accéder, c’est pourquoi nous vous conseillons de vous adresser à votre revendeur Tanita en vue de
remplacer le fusible défaillant.
[Maintenance]
La balance électronique BWB-800MA est un appareil de précision, calibré avec soin . Veuillez suivre attentivement les
instructions suivantes :
• Ne jamais démonter ou modifier l'appareil, vous risquez de provoquer des dysfonctionnements. L'appareil doit
être contrôlé conformément à la réglementation en vigueur dans votre pays.
• Si vous démontez ou modifiez la balance, vous risquez de provoquer une défaillance de l’appareil. Toute
inspection doit être effectuée conformément à la réglementation en vigueur dans votre pays.
• Si vous n’envisagez pas d’utiliser la balance pendant une période prolongée, débranchez l’adaptateur-secteur et
retirez les piles de l’appareil.
• N’essuyez pas la balance à l’aide de produits chimiques corrosifs de type benzine, produits nettoyants, etc.
Utilisez de préférence un produit de nettoyage neutre.
• Evitez d’exposer la balance à toute vibration ou choc violent.
• Si vous souhaitez détruire l’appareil, veuillez respecter la réglementation correspondante en vigueur dans votre
pays.
• Toute tentative de démontage ou de réparation effectuée par une personne non autorisée annule la garantie. En
cas de mauvais fonctionnement, veuillez vous adresser à votre revendeur Tanita.
[Comment effectuer une pesée]
Pour effectuer des pesées précises, veuillez suivre les instructions suivantes.
• En cas de vibrations importantes, l’appareil ne fonctionne pas. Pour utiliser l’appareil correctement, placez-le
sur une surface stable totalement ou partiellement à l’abri des vibrations.
• En cas de déplacement de la balance dans un lieu à la différence de température ambiante de plus de 20°C,
veuillez conserver la balance dans son nouvel emplacement pendant au moins deux heures avant de l’utiliser.
• Maintenez la balance éloignée d’émetteurs tels que des téléphones mobiles lors de son utilisation, afin d’éviter
des erreurs dans les résultats .
<Conditions d’utilisation>
<Conditions d’entreposage>
<Alimentation>
33
Température d’utilisation conseillée : de 0° à 35°C
Humidité relative : de 30 à 80 % (sans condensation)
Température d’utilisation tolérée : de -10°C à 50°C
Humidité relative tolérée : de 10 à 90 % (sans condensation)
Conservez l’appareil à l’abri des rayons directs du soleil, des modifications importantes de température, de l’humidité,
de la poussière, des sources de chaleur et des vibrations et/ou des chocs.
Valeur
230VAC
50Hz
65mA
Tension
Fréquence
Intensité
WB-100MA-取説/04.01.2704.1.289:12AMページ32
Page 18

F
34
쎱
Composants du Produit L'emballage contient les composants suivants :
1.Assemblage du produit et composants
F
NET:
Une flèche tapparaîtra à côté de cette icône lorsque la fonction de tare est
sélectionnée.
35
쎱
Panneau de contrôle
쎱
Liste et signification des symboles utilisés
: Boîtier d'affichage sous
tension.
: Appareil de Class II
: Boîtier d'affichage hors
tension.
: Pièce appliquée de Type B
: Courant continu
: Remise à zéro
: Sélectionner la fonction de
tare.
: Attention. Reportez-vous
aux notes ci-jointes.
:
En conformité avec la directive sur
les dispositifs médicaux 93/42/CE
Marche et/ou remise à zéro.
Arrêt
Fonction de tare.
Mode index de masse corporelle, et/ ou
réglage de la taille.
Mode de sélection ou augmentation des
valeurs numériques.
Mode de sélection ou réduction des
valeurs numériques.
Déverrouillage de la mesure du poids
TAILLE: (Unité de taille)
Indique que la taille est réglée
Index de masse corporelle:
Indique le calcul de l'index de masse corporelle.
MODE Index de masse corporelle:
Indique que le mode de l'index de masse corporelle est en marche.
STABILIZED:
Indique que la mesure du poids s'est stabilisée.
MONTEZ: (marque de départ)
Indique que la balance est prête à l'emploi.
VERROUILLAGE DU POIDS:
Indique que la mesure s'est stabilisée.
*
Apparaît seulement lorsque le bouton verrouillage du poids est sélectionné.
(Version Avec Téléaffichage)
Indicateur du niveau
Boîtier
Compartiment à piles
Plate-forme
Pieds réglables
Adaptateur secteur
CA: MODELE:A30930G
Manuel d'instruction
Vis de fixation du
support (x 2)
Accessoires
Compartiment à piles
Plate-forme
Pieds réglables
Adaptateur secteur
CA: MODELE:A30930G
CouvercleClé à vis
Manuel d’instructions
Chapeau
Vis (x 5)
Rondelle élastique (x 4)
Instructions pour l’assemblage
Accessoires
(Version à colonne montée)
Indicateur du niveau
Boîtier
WB-100MA-取説/04.01.2704.1.289:12AMページ34
Page 19

F
햲 Lors de l'utilisation de l'adaptateur CA
Insérez la prise jack du câble de l’adaptateur secteur dans le
connecteur correspondant situé sur la paroi latérale droite du boîtier
d’affichage. Branchez l’adaptateur secteur sur le secteur.
Vérifiez que le témoin lumineux de l’adaptateur secteur est allumé.
Avertissement
•Afin d'éviter tout choc électrique, ne pas brancher ou débrancher
avec des mains humides.
Attention
•Utilisez uniquement l'adaptateur secteur fourni (modèle A30930G).
D'autres adaptateurs peuvent engendrer un mauvais fonctionnement.
햳 Lorsque vous utilisez des piles sèches
Dévissez les vis du compartiment à piles situé sur la paroi latérale
droite du boîtier d’affichage, puis placez les piles LR6 (AA) à
l’intérieur du compartiment conformément au schéma indiqué.
Replacez ensuite les vis afin de fermer hermétiquement le
compartiment à piles.
Si le message s’affiche, cela signifie que les 6 piles LR6
(AA) doivent être remplacées.
Le message s’affiche lorsque le voltage des piles est
inférieur à 6.5 V
앐10%.
•Lorsque vous changez les piles, assurez-vous que vous les
insérez en utilisant la bonne polarité / . Si la polarité
est incorrecte, les piles peuvent alors fuir et endommager
l'appareil.
•Si vous n’utilisez pas l'appareil pendant une période
prolongée, retirez-en les piles avant de le ranger.
•Lorsque l'appareil a été transporté dans un autre endroit
avec une différence de température de plus de 20˚C,
attendez au moins deux heures avant l'utilisation.
쎱
Branchement
37
Fiche jack CC
Témoin lumineux
Compartiment à piles
prise
Piles
Vis de fixation du
compartiment à piles
햴 Mise hors tension automatique
Lorsque la balance est éteinte, appuyer sur et maintenir appuyé. Appuyer simultanément sur puis relâcher la touche .
L’écran se met en arrêt automatique.
La mise hors tension est réglée par défaut sur 20 (20 minutes).
Appuyer sur (flèche vers le haut) or (flèche vers le bas) et valider 10 pour 10 minutes et/ou CONT pour continuer le réglage.
Appuyer sur la touche pour valider.
F
36
쎱
Installation de l'appareil (Version Avec Téléaffichage)
쎱
Réglage du niveau
Lors de l'utilisation du support
Lors de l'installation du boîtier d'affichage au mur
①
③
②
Tirez le support à l'arrière du boîtier d'affichage.
Lors du rangement du boîtier d'affichage, insérez le support dans la fente située à l'arrière du
boîtier.
햲 Vissez les vis fournies dans le mur (laissez les vis ressortir à 5 mm du mur).
햳 Insérez les têtes des vis dans les trous prévus l'arrière du boîtier d'affichage.
햴 Vérifiez que le boîtier est fixé correctement en faisant pression vers le bas.
・Si le boîtier n’a pas été fixé correctement, il risque de tomber.
・N’installez pas le boîtier dans un emplacement où les utilisateurs risquent de
piétiner ou de trébucher sur le câble reliant la plate-forme et le boîtier d’affichage.
・Ne suspendez pas le boîtier d’affichage par le câble.
2.Avant l'utilisation
Pour effectuer des pesées précises, placez la plate-forme sur
une surface aussi plane que possible, puis réglez son niveau
grâce aux pieds ajustables, de sorte que la bulle visible dans
l’indicateur de niveau se trouve exactement au centre du
cadre.
Attention
Si la plate-forme est instable (par exemple si les pieds ne
reposent pas sur une surface uniforme), la plate-forme risque
de basculer et il sera impossible d’effectuer une pesée exacte.
*Réglez la hauteur de la plate-forme à l’aide des pieds ajustables
Indicateur
(Version Avec Téléaffichage)
*Réglez la hauteur de la plate-forme à l’aide des pieds ajustables
Indicateur
(Version à colonne montée)
WB-100MA-取説/04.01.2704.1.289:12AMページ36
Page 20

F
d
d
d
d
d
d
d
d
4.Calcul de l’IMC
1. Mettez lÅfappareil sous tension en appuyant sur la touche .
2. [0.0kg] s’affiche, une fois que tous les segments se sont allumés.
3. Appuyez sur pendant au moins 2 secondes.
[0.0 kg] et la taille par défaut [170cm] disparaissent.
4. Réglez la taille avec les touches .
(Ceci ne peut se faire quÅfune fois que vous êtes monté sur la balance.)
Tenez-vous au centre du plateau de pesée.
Votre poids s’affiche.
5. Une fois que votre taille et votre poids ont été pris en compte, appuyez sur la touche .
Votre poids et votre IMC sÅfaffichent.
* En mode BMI (IMC), chaque fois que vous appuyez sur la touche l’IMC et la taille
alternent à l’écran. Il suffit d’appuyer sur la touche pour afficher l’un ou l’autre.
* Lorsque votre IMC s’affiche, si vous descendez de la balance et que vous appuyer sur la
touche , votre taille revient à [170 cm] par défaut .
Basé sur les directives NIH/WHO BMI (IMC)
Maigreur
Valeurs saines
Surpoids
Obèse
Obèse
Obèse
CLASS
l
CLASS ll
CLASS lll
IMC < 18.5
18.5
≦ IMC < 25
25
≦ IMC < 30
30
≦ IMC < 35
35
≦ IMC < 40
IMC
≧ 40
39
F
38
d
d
d
d
d
d
d
d
d
1.Procédures pour une pesée standard
2.Pesée avec une tare
3.Suppression de la fonction de pesée avec tare
1. Mettez lÅfappareil en marche en appuyant sur la touche .
2. [0.0kg] s’affiche, une fois que tous les segments se sont allumés
3. Tenez-vous au centre du plateau de pesée.
Votre poids s’affiche.
4. Lorsque vous descendez de la balance, l’affichage revient à [0.0kg].
Eteignez la balance en appuyant sur la touche .
1. Mettez lÅfappareil en marche en appuyant sur la touche .
2. [0.0kg] s’affiche, une fois que tous les segments se sont allumés.
3. Placez soigneusement tous les objets tares (vêtements et autres) au centre du plateau de la
balance.
Le poids de ces objets sera affiché.
4. Appuyez sur la touche .
Une flèche apparaît près de l’indication t[NET] et [0.0kg] apparaîtra.
5. Lors d’une pesée avec une tare, le poids affiché est le poids net. (poids de l’objet à peser moins
celui de la tare).
•
Pour changer le poids tare, annulez la fonction de pesée avec tare et recommencez la pesée à
partir de l’étape 3.
•
Quand vous utilisez la fonction pesée avec tare, la portée de mesure est réduite par le poids de la tare.
(Portée de mesure) = (Poids maximum mesurable) – ( poids de la tare)
1. Retirez les objets tares (vêtements et autres) du plateau.
Le poids sera affiché comme une valeur négative.
2. Appuyez sur la touche .
La flèche devant lÅfindication t[NET] disparaît et [0.0kg] sera affiché.
3.Fonctionnement
WB-100MA-取説/04.01.2704.1.289:12AMページ38
Page 21

F
41
Problème Solution
L’appareil ne s’allume pas lorsque vous
appuyez sur la touche .
•Lors de l'utilisation de l' adaptateur CA
Assurez-vous que le cordon de l'adaptateur CA est relié correctement au boîtier d'affichage.
Vérifiez que l'adaptateur CA est branché correctement dans la fiche secteur (jack CC).
•Lors de l'utilisation de piles sèches
Les piles sont peut être déchargées. Pour vous assurer du bon fonctionnement de
l'appareil, utilisez l'adaptateur CA ou des piles neuves.
La pesée est incorrecte.
Le poids ne se stabilise pas.
L’écran d’affichage s’allume et s’éteint par intermittence.
•Vérifiez que les pieds ajustables reposent sur une surface uniforme.
•L’appareil ne fonctionne pas en cas de vibrations excessives. Installez l’appareil
ailleurs
s'affiche.
•Le poids maximal a peut-être été dépassé.
s'affiche.
•Ne montez pas sur la plate-forme et ne placez pas d’objets dessus avant de
commencer la pesée. Recommencez après vous être assuré que la plate-forme est vide
En cas de difficultés, veuillez lire les instructions suivantes. Si le problème persiste, adressez-vous à votre centre de
dépannage ou votre revendeur Tanita le plus proche.
쎱
Problèmes possibles
5.Dépannage
F
■
Caractéristiques techniques
■
Appellation et méthodes de connexion pour les lignes de signaux
■
Mode de pesée
■
Mode BMI (Mode IMC)
Norme de commutation
EIA RS-232C
Méthode de commutation Transmission asynchrone
Débit 2,400 bauds
Longueur des données
7 bits
Parité Avec parité (EVEN)
Bit d'arrêt 1 bit
Numéro de broche
Nom du signal
1
2 TXD
3 RXD
4
5 GND
6
7
8
9
• Un connecteur RS-232C (D sub 9 pin femelle) est rattaché à la paroi latérale du boîtier d’affichage.
• Utilisez un cordon RS-232C droit, lorsque vous branchez le boîtier d'affichage à un ordinateur, etc.
• Utilisez le cordon RS232C de moins de 3m de long.
A la réception de 4 octets de données, comme indiqué en 1-1, quand la balance est en mode de pesée, les données de pesée sont sorties en 14 octets, comme
indiqué en 1-2.
Lorsque la balance est utilisée en mode IMC, les données de sortie varient en fonction de la forme des données reçues.
햲 Lors de la réception de 4 octets de données, comme indiqué en 1-1, la balance calcule votre IMC en utilisant les chiffres de la taille
actuellement entrés et 26 octets de données sont transmis, comme indiqué en 2-1 ou 2-2, en fonction de l’unité de mesure déterminée.
햳 Lors de la réception de 11 octets de données, comprenant les unités de mesure et les chiffres de la taille, dans la forme indiquée en 1-2 ou
1-3, la balance calcule votre IMC en utilisant ces chiffres et 26 octets de données sont transmis, comme indiqué en 2-1 ou 2-2, en fonction
de l’unité de mesure déterminée.
Détail sur la transmission de données en mode de pesée
Nbre de pixels 1 à 2
Nbre de pixels 5-10
Nbre de pixels 3-4
Nbre de pixels 11-12
Nbre de pixels 13-14
Entête
Séparateur
Données poids
Unités mesure
Terminateur
2 pixels fixes
2 pixels fixes
6 pixels fixes
2 pixels fixes
2 pixels fixes
SD : Instable S : Stable
SI: Surcharge, etc.
2 espaces
Alignement droite
Kg : kg,
CR + LF
1-1 Réception de données
DR
CR LF
1234
1-2 Transmission de données
SD 75 . 0kg
CR LF
1234567891011121314
1-1 Réception de données
DR
CR LF
1234
1-2
Réception de données (données de taille avec unité de mesure en kg)
*
Entrez les données de taille 90-99 cm sous la forme de 090-099.
DHk g 180
CR LF
1234567891011
2-1 Transmission de données (kg/cm)
SD 75 . 0kg , 180 , 23 . 1
CR LF
1 2 3 4 5 6 7 8 9 10 11 12 13 14 15 16 17 18 19 20 21 22 23 24 25 26
Détail sur la transmission de données en mode BMI
Nbre de pixels 1 à 2
Nbre de pixels. 5-10
Nbre de pixels 3-4
Nbre de pixels 11-12
Nbre de pixels 13
Nbre de pixels 14-18
Nbre de pixels 19
Nbre de pixels 20-24
Nbre de pixels 25-26
Entête
Séparateur
Données poids
Unités mesure
Séparateur
Données taille
Séparateur
Donnée IMC
Terminateur
2 pixels fixes
2 pixels fixes
6 pixels fixes
2 pixels fixes
1 pixel fixes
5 pixels fixes
1 pixel fixes
5 pixels fixes
2 pixels fixes
SD : Instable S : Stable
Si : Surcharge, etc.
2 espaces
Alignement droite
Kg : kg,
1 virgule
Alignement droite
1 virgule
Alignement droite
CR + LF
40
4. Caractéristiques pour commutation RS-232C
WB-100MA-取説/04.01.2704.1.289:12AMページ40
Page 22

Consommation d'électricité 0.3W max
Alimentation
Centre de l'adaptateur CA moins MODELE A30930G CLASS 2
Tension d'entrée : 230VAC50Hz65mA
Tension de sortie : 9VDCÅ}0.45VDC
Courant nominal : 300mA
Tension d’entrée hors charge : 12VDCÅ}0.6VDC
LR6 (AA pile alcaline) x 6, (Non fournies)
F
Ce produit respecte les normes suivantes ;
1. Directive sur les dispositifs médicaux (93/42/CE)
Normes de Sécurité : EN60601-1:1990,AM No.1:1993,AM No.2:1995
IEC 60601-1:1988,AM No.1:1991,AM No.2:1995
Norme EMC : EN60601-1-2:2001
IEC60601-1-2:2001
2. Directive 90/384/CE sur les instruments de pesage à fonctionnement non automatique
BW1007031(2)
Caractéristiques
environ 100 heures en utilisation continue lors de l’utilisation de LR6 (pile alcaline AA)
Durée de vie de la pile:
TYPE WB-100MA WB-110MA
Bascule à jauge de contrainte
200kg/0.1kg
±0.1kg
270kg/0.1kg
90-249cm/1cm incréments
90-249cm/ pas de 1 cm
Pas de 0.1
159
҂209҂56mm
301
҂336҂80mm
2m
336
҂600҂1070mm
Ecran à cristaux liquides avec 5 chiffres en haut et 4 chiffres en bas
Hauteur des chiffres 25mm
RS-232C (connecteur femelle D-sub 9pins)
DC9V 300mA (LR6 (AA piles alcalines) u6 non non fournies )
de 0ºC à +35ºC
de 30% à 80% (sans condensation)
5.1kg (sans les piles)
270kg/0.1kg incréments200kg/0.1kg incréments
Calcul du poids
Système de mesure
Capacité Maximale /Minimale de graduation
Précision lors du premier réglage
Hauteur
Poids
Hauteur
IMC
Affichage
Plate-forme
Longueur du cordon
Longueur du cordon (Version à colonne montée)
Affichage
Interface des données de sortie
Courant nominal
Températures conseillées lors de l'utilisation
Humidité relative
Poids de l'appareil (Version Avec Téléaffichage)
10.6kg (sans les piles)Poids de l'appareil (Version à colonne montée)
Données entrées
Données de sortie Affichage
Taille
(Version Avec Téléaffichage)
I
BILANCIA ELETTRONICA
WB-100MA/WB-110MA
MANUALE DI ISTRUZIONI
Leggere attentamente questo manuale di
istruzioni e conservarlo a portata di mano
per consultarlo in futuro.
(Tipo Con Display Separato)
(Versione con montaggio a colonna)
WB-100MA-取説/04.01.2704.1.289:12AMページ42
Page 23

I
45
Indice
I
44
앮
Indice
•••••••••••••••••••••••••••••••••••••••••••••••••••••••••••••••••••••••••••••••••••••••••••••••••••••••••••
45
─────────────────────────────
앮
Applicazioni
••••••••••••••••••••••••••••••••••••••••••••••••••••••••••••••••••••••••••••••••••••••••••••
46
─────────────────────────────
앮
Note di sicurezza
••••••••••••••••••••••••••••••••••••••••••••••••••••••••••••••••••••••••••••••••••••
46
Simboli di attenzione
•••••••••••••••••••••••••••••••••••••••••••••••••••••••••••••••••••••••••••••
46
Avvertenza
••••••••••••••••••••••••••••••••••••••••••••••••••••••••••••••••••••••••••••••••••••••••••
46
Attenzione
•••••••••••••••••••••••••••••••••••••••••••••••••••••••••••••••••••••••••••••••••••••••••••
46
[Manutenzione]
•••••••••••••••••••••••••••••••••••••••••••••••••••••••••••••••••••••••••••••••••
47
[Istruzioni per la misurazione]
•••••••••••••••••••••••••••••••••••••••••••••••••••••
47
<Condizioni per l’uso>
••••••••••••••••••••••••••••••••••••••••••••••••••••••••••••••••••••••••••
47
<Condizioni per la conservazione>
•••••••••••••••••••••••••••••••••••••••••••••••••
47
<Fonte di alimentazione>
••••••••••••••••••••••••••••••••••••••••••••••••••••••••••••••••••••
47
─────────────────────────────
1. Montaggio prodotto e componenti
•••••••••••••••••••••••••••••••••••••••••••••••••••
48
쎱
Componenti prodotti
••••••••••••••••••••••••••••••••••••••••••••••••••••••••••••••••••••••••
48
(Tipo Con Display Separato)
((1) Versione con montaggio a colonna)
쎱
Pannello di controllo
••••••••••••••••••••••••••••••••••••••••••••••••••••••••••••••••••••••••
49
쎱
Simboli e significati relativi
•••••••••••••••••••••••••••••••••••••••••••••••••••••••••••
49
2. Preparazione per l’uso
•••••••••••••••••••••••••••••••••••••••••••••••••••••••••••••••••••••••••
50
쎱
Regolazione del livello
•••••••••••••••••••••••••••••••••••••••••••••••••••••••••••••••••••••
50
(Tipo Con Display Separato)
((1) Versione con montaggio a colonna)
쎱
Installazione dell’apparecchio
••••••••••••••••••••••••••••••••••••••••••••••••••••••
50
(Tipo Con Display Separato)
쎱
Preparazione fonte di alimentazione
•••••••••••••••••••••••••••••••••••••••••
51
3. Istruzioni per il funzionamento
••••••••••••••••••••••••••••••••••••••••••••••••••••••••••
52
1.Procedura di pesatura standard
•••••••••••••••••••••••••••••••••••••••••••••••••••
52
2.Peso della tara
••••••••••••••••••••••••••••••••••••••••••••••••••••••••••••••••••••••••••••••••••••••
52
3.Cancellazione della funzione peso della tara
••••••••••••••••••••••••••
52
4.Calcolo dell’Indice di Massa Corporea (IMC)
•••••••••••••••••••••••••
53
4. Dettagli comunicazione RS-232C
••••••••••••••••••••••••••••••••••••••••••••••••••••••
54
쎱
Dettagli
•••••••••••••••••••••••••••••••••••••••••••••••••••••••••••••••••••••••••••••••••••••••••••••••••••
54
쎱
Nomi e metodi di connessione per le linee di segnale
••••••••
54
쎱
Modalità pesatura
••••••••••••••••••••••••••••••••••••••••••••••••••••••••••••••••••••••••••••••
54
쎱
Modalità IMC
••••••••••••••••••••••••••••••••••••••••••••••••••••••••••••••••••••••••••••••••••••••
54
5.Risoluzione di problemi
••••••••••••••••••••••••••••••••••••••••••••••••••••••••••••••••••••••••••
55
쎱
Problemi possibili
••••••••••••••••••••••••••••••••••••••••••••••••••••••••••••••••••••••••••••••
55
─────────────────────────────
앮
Caratteristiche tecniche
••••••••••••••••••••••••••••••••••
Copertina posteriore
━━━━━━━━━━━━━━━━━━━━━━━━━━━━━
WB-100MA-取説/04.01.2704.1.289:12AMページ44
Page 24

I
• La scheda del circuito comprende un fusibile (100 mA, 125 V) per apparecchi elettronici. Se si utilizzano
dispositivi diversi dall’adattatore CA originale, o si applica una corrente elettrica grande, il fusibile salta per
scopi di sicurezza. Se il fusibile salta, l’unità deve essere ispezionata e riparata. Poiché il fusibile è una parte fissa
dell’unità e non può essere facilmente smontato dal cliente, consultare l’ufficio vendite o l’agente Tanita più
vicino quando il fusibile deve essere riparato.
[Manutenzione]
Questo è un prodotto di precisione accuratamente calibrato. Osservare le seguenti istruzioni.
• Non smontare mai né regolare l’apparecchio perché questo può causare malfunzionamenti. L’apparecchio deve
essere ispezionato soltanto in conformità con i regolamenti in ciascun paese.
• Quando non viene utilizzato a lungo, staccare la spina dell’adattatore CA dalla presa di corrente.
• Quando non viene utilizzato a lungo, rimuovere le batterie prima di conservare l’apparecchio.
• Non pulire l’apparecchio con sostanze chimiche corrosive (benzina, detergenti, ecc.). Utilizzare un detergente
neutro per pulire l’apparecchio.
• Evitare di sottoporre l’apparecchio a scosse o vibrazioni eccessive.
• Gettare via questa unità secondo i regolamenti prevalenti in ciascun paese.
• Se una persona non autorizzata tenta di smontare o riparare una delle parti dell’apparecchio, la garanzia viene
invalidata. Quando l’unità non funziona correttamente, consultare il proprio ufficio vendite o agente Tanita più
vicino.
[Istruzioni per la misurazione]
Osservare le seguenti istruzioni per effettuare le misurazioni con precisione.
• La misura può non essere possibile se l’apparecchio si trova sopra una superficie soggetta a forti vibrazioni. In
questi casi trasferire l’apparecchio ad una superficie stabile con scarsa o nessuna vibrazione.
• Quando l’apparecchio è stato trasferito ad un’altra posizione con una differenza di temperatura superiore a
20°C, lasciar trascorrere due ore prima di riutilizzarlo.
• Quando si effettuano le misurazioni, tenere le persone che utilizzano trasmettitori, come i telefoni cellulari,
lontane dall’unità per evitare errori della misurazione.
<Condizioni per l’uso>
<Condizioni per la conservazione>
<Fonte di alimentazione>
47
Range temperatura per l’uso : 0°C / +35°C
Umidità relativa : 30% / 80% (senza condensa)
Range temperatura ambientale : -10°C / +50°C
Range di umidità relativa : 10% / 90% (senza condensa)
Per evitare malfunzionamenti, non conservare l’apparecchio alla luce diretta del sole, dove siano presenti cambiamenti
termici significativi, il rischio di umidità, una grande quantità di polvere, incendi o dove esista il rischio di vibrazioni o
colpi.
Range valore
230VAC
50Hz
65mA
Range tensione
Range frequenza
Range corrente elettrica
I
Applicazioni
•Questo apparecchio è stato calibrato come uno strumento di pesatura di precisione e può essere utilizzato per certificare
pesi e/o transazioni commerciali.
• Può essere utilizzato per ottenere dati di riferimento durante esami medici, come i check-up periodici, e può assistere
nella prevenzione dell’obesità.
46
Avvertenza
• Per prevenire le scosse elettriche,
non inserire né rimuovere la spina di alimentazione con le mani bagnate.
• Per prevenire i pericoli di incendio,
utilizzare sempre un cavo da 230 V CA correttamente collegato e non cavi di prolunga multipli.
Attenzione
• Per prevenire il contagio di infezioni.
Pulire sempre la piattaforma della bilancia dopo l’uso. Sterilizzare la piattaforma con un fluido detergente
apposito a base di alcool prima di ciascun uso.
• Installazione della piattaforma della bilancia
Accertarsi che la piattaforma sia disposta sopra una superficie livellata e stabile. Se l’apparecchio viene
utilizzato quando la piattaforma è instabile, ad esempio perché non tutti i piedini si trovano sopra una superficie
livellata, la piattaforma potrebbe capovolgersi e ciò rende impossibile ottenere una misura accurata.
Per evitare il rischio di lesioni e danni all’apparecchio, non saltare mai sulla piattaforma.
• Manipolazione dell’apparecchio durante gli spostamenti.
Poiché la piattaforma è pesante, sollevarla tenendola bene con entrambe le mani per non farla cadere.
• Adattatore CA
Accertarsi che l’adattatore fornito (modello A30930G) sia sempre usato con questo apparecchio. Altri adattatori
possono causare malfunzionamenti.
• Batteria
Quando si sostituiscono le batterie, accertarsi che quelle nuove siano inserite con la corretta polarità /. Se la
polarit / . errata, le batterie possono perdere e danneggiare l’apparecchio.
Avvertenza
Questo simbolo indica il rischio di morte o gravi lesioni se si ignorano le istruzioni
di sicurezza e si usa l’apparecchio in modo errato.
Attenzione
Questo simbolo indica il rischio di lesioni fisiche e/o danni all’apparecchio se si
ignorano le istruzioni di sicurezza e si usa l’apparecchio in modo errato.
Questo simbolo indica le precauzioni generali che devono essere adottate quando
si usa questo apparecchio.
Note di sicurezza
Simboli di attenzione
Questo Manuale di istruzioni e le descrizioni sull’apparecchio contengono diversi simboli che consentono di utilizzare
l’apparecchio con sicurezza e correttamente in modo tale da prevenire danni all’utente, ad altre persone e a proprietà.
Questo Manuale di istruzioni e le descrizioni sull’apparecchio contengono diversi simboli che consentono di utilizzare
l’apparecchio con sicurezza e correttamente in modo tale da prevenire danni all’utente, ad altre persone e a proprietà.
WB-100MA-取説/04.01.2704.1.289:12AMページ46
Page 25

I
NET:
Quando la funzione peso tara è attivata compare una freccia accanto a
questa icona.
49
쎱
Pannello di controllo
쎱
Simboli e significati relativi
: Unità display accesa
: Apparecchio Classe II
: Unità display spenta
: Parte applicata Tipo B
: Corrente diretta
: Reset zero
: Attivazione funzione peso
della tara
: Attenzione. Vedere le note
allegate.
:
Conformità con Direttiva
Dispositivi Medici 93/42/CEE
Accendere e/o azzerare il display
Spegnere
Funzione peso della tara
Modalità IMC e/o inserimento altezza
Selezione modalità o aumento valori
numerici
Selezione modalità o diminuzione
valori numerici
Sblocco peso
HEIGHT: (Unità di altezza)
Indica che l’altezza è stata inserita
BMI:
Indica il calcolo dell’Indice di Massa Corporea (IMC)
BMI MODE:
Indica che la modalità IMC è attiva
STABILIZED:
Indica che la misurazione del peso si è stabilizzata.
STEP ON: (segnale apparecchio pronto)
Indica che la bilancia è pronta per iniziare la misurazione
WEIGHT LOCK:
Indica che la misurazione si è stabilizzata
* Compare soltanto se la funzione di blocco del peso è attiva
I
48
쎱
Componenti prodotti La confezione contiene i seguenti componenti:
1.Montaggio prodotto e componenti
(Tipo Con Display Separato)
Indicatore livello
Scatola display
Vano batterie
Pedana
Piedini regolabili
Adattatore CA
MODELLO: A30930G
Manuale di istruzioni
2 viti di fissaggio per
il supporto
Accessori
Vano batterie
Pedana
Piedini regolabili
Adattatore CA
MODELLO: A30930G
Coperchio
Chiave a brugola
Manuale di istruzioni
Cappuccio
Viti (x 5)
Rondella elastica (x 4)
Istruzioni per il montaggio
Accessori
(Versione con montaggio a colonna)
Indicatore livello
Scatola display
WB-100MA-取説/04.01.2704.1.289:12AMページ48
Page 26

I
햲 Quando si usa l’adattatore CA
Inserire la spina del cavo per l’adattatore CA nella presa CC a lato
della scatola del display, e inserire la spina dell’adattatore CA in una
presa di corrente da 230 V CA.
Controllare che si accenda la spia sull’adattatore CA.
Avvertenza
•Per prevenire scosse elettriche, non inserire né rimuovere la spina di
alimentazione con le mani bagnate.
Attenzione
•Usare solo l’adattatore CA (MODELLO:A30930G) specificato.
L’utilizzo di un adattatore CA diverso da quello specificato può
causare malfunzionamenti.
햳 Quando si utilizzano batterie
Svitare le viti di fissaggio del vano portabatterie sulla destra della
scatola del display e estrarre il vano portabatteria. Inserire le batterie
LR6 nella corretta posizione indicata all’interno del vano e fissare il
vano con le viti di fissaggio.
Se viene visualizzato nel display sostituire tutte le sei
batterie con batterie nuove.
compare quando la tensione delle batterie è inferiore a 6,5V
앐 10%.
•Accertarsi che le batterie siano inserite con la corretta
polarità / . Se la polarità è errata, le batterie possono
perdere e danneggiare l’apparecchio.
•Quando l’apparecchio non è usato a lungo, rimuovere le
batterie prima di riporlo.
•Quando l’apparecchio viene trasferito in un altro luogo,
con una differenza di temperatura superiore a 20°C, lasciar
trascorrere almeno due ore prima di riutilizzarlo.
쎱
Preparazione della fonte di alimentazione
51
Presa CC
Spia
Vano portabatteria
spina
Batterie
Viti di fissaggio per il
vano portabatterie
햴 Attivazione di un intervallo di spegnimento automatico
Quando l’alimentazione della bilancia è spenta, premere il tasto e attendere.
Premere il tasto .
Il display si posiziona sulla “Modalità di attivazione di un intervallo di spegnimento
automatico” visualizzando “20”, in quanto l’impostazione di default è di 20 minuti.
Premere il tasto (freccia in alto) o il tasto (freccia in basso) e inserire 10 per ottenere 10 minuti e/o CONT per ottenere l’impostazione
continua.
Premere il tasto per terminare.
I
50
쎱
Installazione dell’apparecchio (Tipo Con Display Separato)
쎱
LRegolazione del livello
Quando si utilizza il supporto
Quando la scatola del display viene fissata al muro:
①
③
②
Estrarre il supporto dal retro della scatola del display.
Quando si posiziona la scatola del display, inserire il supporto nella scanalatura sul retro della
scatola del display.
햲 Avvitare le viti di fissaggio nel muro (lasciarle sporgere dal muro per circa 5mm).
햳 Inserire la testa delle viti nei fori situati sulla parte posteriore della scatola del display.
햴 Fissare saldamente la scatola del display.
・Se non è fissata sufficientemente, la scatola del display potrebbe rischiare di
cadere.
・Evitare di installare la scatola del display in un luogo dove gli utenti possono salire
o inciampare sul cavo.
・Non far dondolare la scatola del display con il cavo.
2.Preparazione per l’uso
Per effettuare la misura con precisione, mettere l’unità sopra
una superficie più piatta possibile e regolare il livello con i
piedini regolabili così che la bolla nell’indicatore di livello sia
al centro.
Attenzione
Mettere l’apparecchio sopra una superficie piatta. Se
l’apparecchio è instabile, ad esempio perché non tutti i piedini
si trovano sopra una superficie livellata, può capovolgersi e ciò
rende impossibile ottenere una misura accurata.
* Regolare l’altezza ruotando i piedini regolabili
Indicatore
(Tipo Con Display Separato)
* Regolare l’altezza ruotando i piedini regolabili
Indicatore
(Versione con montaggio a colonna)
WB-100MA-取説/04.01.2704.1.289:12AMページ50
Page 27

I
d
d
d
d
d
d
d
d
4.Calcolo dell’Indice di Massa Corporea (IMC)
1. Accendere l’alimentazione premendo il tasto .
2. Quando tutti i segmenti smettono di lampeggiare, sul display appare [0,0Kg]
3. Premere il tasto per pochi secondi.
Compaiono [0,0Kg] e l’impostazione altezza di default [170cm]
4. Inserire l’altezza premendo il tasto
(l’altezza può essere inserita anche dopo essere saliti sulla bilancia).
Rimanere fermi sulla pedana.
Il peso viene visualizzato.
5. Dopo che peso e altezza sono stati determinati, premere il tasto .
Il peso e il valore dell’indice di massa corporea vengono visualizzati.
* Premendo il tasto nella modalità IMC, la bilancia alterna la visualizzazione di IMC e
altezza (e può essere modificato col tasto ).
*
Il display tornerà a visualizzare [0,0Kg] e l’altezza di default [170] se mostra l’altezza quando la persona
scende dalla bilancia durante la misurazione dell’IMC.
Indicazioni relative all’IMC fissate dall’OMS e dall’Istituto Nazionale per la Sanità:
Sottopeso
Range di Peso forma
Preobeso
Obeso
Obeso
Obeso
CLASSE
l
CLASSE ll
CLASSE lll
IMC < 18.5
18.5
≦ IMC < 25
25
≦ IMC < 30
30
≦ IMC < 35
35
≦ IMC < 40
IMC
≧ 40
53
I
52
d
d
d
d
d
d
d
d
d
1.Procedura di pesatura standard
2.Peso della tara
3.Cancellazione della funzione peso della tara
1. Accendere l’alimentazione premendo il tasto .
2. Quando tutti i segmenti smettono di lampeggiare, sul display appare [0,0Kg].
3. Salire sulla pedana, in posizione centrale.
Il peso viene visualizzato
4. Quando la persona scende dalla bilancia, sul display comparirà nuovamente [0,0Kg]
Premere il tasto e l’alimentazione viene spenta.
1. Accendere l’alimentazione premendo il tasto .
2. Quando tutti i segmenti smettono di lampeggiare, sul display appare [0,0Kg].
3. Poggiare delicatamente al centro della pedana gli oggetti da pesare (per es. gli indumenti). Il peso
degli oggetti viene visualizzato.
4. Premere il tasto .
Appare una freccia [NET] accanto al segnale e sul display viene visualizzato [0,0Kg].
5. Quando una persona o un oggetto vengono pesati con la tara, è il peso netto, ad essere
visualizzato, ossia il peso della persona o dell’oggetto meno il peso della tara.
•
Per modificare il peso della tara disattivare la funzione peso della tara e ripetere le
operazioni dal punto 3.
•
Quando si utilizza la funzione di peso della tara il range di misurazione viene ridotto dal peso della tara.
(Range di misurazione) = (Peso massimo misurabile) – (Peso della tara)
1. Rimuovere dalla pedana gli oggetti che costituiscono la tara (per es. gli indumenti).
Il peso viene visualizzato come valore negativo.
2. Premere il tasto .
La freccia accanto a [NET] scompare e viene visualizzato [0,0 Kg].
3.Istruzioni per il funzionamento
WB-100MA-取説/04.01.2704.1.289:12AMページ52
Page 28

I
55
Problema Soluzione
L’unità non si accende quando il tasto
viene premuto.
•Quando si usa l’adattatore CA
Accertarsi che il cavo dell’adattatore CA sia correttamente collegato all’unità del
display.Accertarsi che l’adattatore CA sia correttamente inerito nella presa di corrente CC
•Quando si usano le batterie
Le batterie potrebbero essere scariche. Verificare che l’apparecchio funzioni usando
l’adattatore CA o nuove batterie.
La misura non è corretta.
La misura non si stabilizza.
Il display si spegne e si accende.
•Verificare che tutti i piedini regolabili siano appoggiati sopra una superficie piana.
•La misura potrebbe essere impossibile nel caso di vibrazione eccessiva. Usare
l’apparecchio in un altro luogo.
viene visualizzato.
•È possibile che sia stata superata la portata massima dell’apparecchio.
viene visualizzato.
•Non mettersi in piedi né appoggiare oggetti sulla pedana prima di iniziare la
misurazione. Iniziare la misurazione dopo aver verificato che non ci sia nulla sulla
pedana.
Se si verificano problemi, consultare le seguenti istruzioni. Se il problema persiste contattare il punto vendita o il centro
riparazioni Tanita più vicino.
쎱
Problemi possibili
5.Risoluzione di problemi
I
■
Dettagli
■
Nomi e metodi di connessione per le linee di segnale
■
Modalità pesatura
■
Modalità IMC
Comunicazione Standard
EIA RS-232C
Metodo di comunicazione Metodo asincrono
Velocità del segnale 2400 baud
Lunghezza bit dei dati
7 bit
Parità EVEN
Bit di stop 1 bit
Terminale n. Nome segnale
1
2 TXD
3 RXD
4
5 GND
6
7
8
9
• Un connettore RS-232C (D sub 9 pin femmina) è inserito a lato della scatola del display.
• Quando la scatola del display viene connessa ad un computer, ecc. utilizzare un cavo dritto RS-232C.
• Utilizzare un cavo RS-232C di lunghezza inferiore ai 3 metri.
Quando si utilizza la bilancia in modalità pesatura e i dati ricevuti sono pari a 4 byte come si evince dal punto 1-1, i dati relativi al peso vengono trasmessi
in 14 byte, come indicato al punto 1-2.
Quando si utilizza la bilancia in modalità IMC, i dati in uscita variano secondo il formato dei dati in entrata.
햲 Se la bilancia riceve 4 byte di dati, come illustrato al punto 1-1, l’IMC viene calcolato utilizzando la misura di altezza più recente e
vengono trasmessi 26 byte di dati, come si legge al punto 2-1 o 2-2, a seconda dell’unità di misura.
햳 Se la bilancia riceve 11 byte di dati, comprese le unità di misura e i valori di altezza, nel formato del punto 1-2 o 1-3, l’IMC viene calcolato
utilizzando tali dati e vengono trasmessi 26 byte di dati, come indicato al punto 2-1 o 2-2, a seconda dell’unità di misura.
Descrizione dettagliata della trasmissione dati nella modalità pesatura:
Byte n. 1-2
Byte n. 5-10
Byte n. 3-4
Byte n. 11-12
Byte n. 13-14
Iniziale
Separatore
Dati peso
Unità di misura
Terminale
2 byte valore fisso
2 byte valore fisso
6 byte valore fisso
2 byte valore fisso
2 byte valore fisso
SD: Instabile S_: Stabile
SI: Sovraccarico, ecc.
2 spazi
Allineamento a destra
Kg:Kg
CR+LF
1-1 Ricezione dati
DR
CR LF
1234
1-2 Trasmissione dati
SD 75 . 0kg
CR LF
1234567891011121314
1-1 Ricezione dati
DR
CR LF
1234
1-2 Ricezione dati (dati altezza, utilizzando Kg)
Inserire i dati relativi all’altezza 90-99cm come 090-099.
DHk g 180
CR LF
1234567891011
2-1 Trasmissione dati (Kg/cm)
SD 75 . 0kg , 180 , 23 . 1
CR LF
1 2 3 4 5 6 7 8 9 10 11 12 13 14 15 16 17 18 19 20 21 22 23 24 25 26
Descrizione dettagliata della trasmissione dati nella modalità IMC:
Byte n. 1-2
Byte n. 5-10
Byte n. 3-4
Byte n. 11-12
Byte n. 13
Byte n. 14-18
Byte n. 19
Byte n. 20-24
Byte n. 25-26
Iniziale
Separatore
Dati peso
Unità di misura
Separatore
Dati altezza
Separatore
Dati IMC
Terminale
2 byte valore fisso
2 byte valore fisso
6 byte valore fisso
2 byte valore fisso
1 byte valore fisso
5 byte valore fisso
1 byte valore fisso
5 byte valore fisso
2 byte valore fisso
SD: Instabile S: Stabile
SI: Sovraccarico, ecc.
2 spazi
Allineamento a destra
Kg:Kg
1 virgola
Allineamento a destra
1 virgola
Allineamento a destra
CR+LF
54
4. Dettagli comunicazione RS-232C
WB-100MA-取説/04.01.2704.1.289:12AMページ54
Page 29

E
BÁSCULA ELECTRÓNICA
WB-100MA/WB-110MA
MANUAL DE INSTRUCCIONES
Por favor, lea detenidamente este manual
de instrucciones y guárdelo a mano para
futura referencia.
Assorbimento 0,3W massimo
Fonte di alimentazione
Adattatore CA Centro meno Modello A30930G CLASS 2
Tensione entrata: 230 VCA 50 Hz 65 mA
Tensione uscita: 9 V CC ± 0,45 V CC
Corrente nominale: 300 mA
Tensione di entrata senza carico: 12 VCC ±0,6 VCC
6 batterie alcaline (LR6) (non incluse)
I
Il prodotto soddisfa tutti i requisiti ai sensi delle seguenti normative:
1. Direttiva Dispositivi medici: (93/42/CEE)
Normative sicurezza : EN60601-1:1990, AM N.1:1993, AM N.2:1995
IEC60601-1:1988, AM N.1:1991, AM N.2:1995
Normativa EMC : EN-60601-1-2:2001
IEC60601-1-2:2001
2.Strumenti di pesatura non automatici (90/384/CEE)
BW1007031(2)
Caratteristiche tecniche
Circa 100 ore di uso continuo se si usano batterie alcaline (LR6)
Durata delle batterie
TIPO WB-100MA WB-110MA
Cella di carico estensimetrica
200 Kg / 0,1 Kg
±0,1 Kg
270 Kg / 0,1 Kg
90-249cm / 1cm incrementi
90-249cm / 1cm incrementi
0,1 incrementi
159
҂209҂56mm
301
҂336҂80mm
2m
Superiore 5 Digit e Inferiore 4 Digit LCD
Altezza numeri 25mm
RS-232C (D sub 9 pin connettore femmina)
9 V CC 300 mA (6 batterie alcaline (LR6) non incluse)
0ºC/+35ºC
30%/80% (senza condensa)
5,1kg (escluse le batterie)
270 Kg / 0,1Kg incrementi200Kg / 0,1Kg incrementi
Misura peso
Sistema di misura
Capacità massima/Graduazione minima
Margine di precisione alla prima calibratura
Altezza
Peso
Altezza
IMC
Scatola display
Piattaforma
Lunghezza cavo
336
҂600҂1070mm
Lunghezza cavo (Versione con montaggio a colonna)
Display
Interfaccia dati in uscita
Potenza nominale
Range temperatura d’esercizio
Umidità relativa
Peso dell’apparecchio (Tipo Con Display Separato)
10,6kg (escluse le batterie)Peso dell’apparecchio (Versione con montaggio a colonna)
Dati in entrata
Dati in uscita Display
Dimensioni
(Tipo Con Display Separato)
(Versión de Indicación Remota)
(Versión montada en la columna)
WB-100MA-取説/04.01.2704.1.289:12AMページ56
Page 30

E
앮
Índice
•••••••••••••••••••••••••••••••••••••••••••••••••••••••••••••••••••••••••••••••••••••••••••••••••••••••••••
59
─────────────────────────────
앮
Funciones
•••••••••••••••••••••••••••••••••••••••••••••••••••••••••••••••••••••••••••••••••••••••••••••••••••
60
─────────────────────────────
앮
Medidas de seguridad
•••••••••••••••••••••••••••••••••••••••••••••••••••••••••••••••••••••••••
60
Símbolos de precaución
•••••••••••••••••••••••••••••••••••••••••••••••••••••••••••••••••••••••
60
Atención
•••••••••••••••••••••••••••••••••••••••••••••••••••••••••••••••••••••••••••••••••••••••••••••••
60
Precaución
•••••••••••••••••••••••••••••••••••••••••••••••••••••••••••••••••••••••••••••••••••••••••••
60
[Mantenimiento]
••••••••••••••••••••••••••••••••••••••••••••••••••••••••••••••••••••••••••••••••
61
[Instrucciones para la medición]
•••••••••••••••••••••••••••••••••••••••••••••••••
61
<Recomendaciones de uso>
•••••••••••••••••••••••••••••••••••••••••••••••••••••••••••••••
61
<Recomendaciones de almacenamiento>
••••••••••••••••••••••••••••••••••••••
61
<Fuente de alimentación>
•••••••••••••••••••••••••••••••••••••••••••••••••••••••••••••••••••
61
─────────────────────────────
1. Montaje de la báscula y componentes
•••••••••••••••••••••••••••••••••••••••••••
62
쎱
En la caja de embalaje se incluyen los siguientes componentes:
•••••••••••••••••
62
(Versión de Indicación Remota)
(Versión montada en la columna)
쎱
Panel de control
••••••••••••••••••••••••••••••••••••••••••••••••••••••••••••••••••••••••••••••••••
63
쎱
Símbolos y sus significados
•••••••••••••••••••••••••••••••••••••••••••••••••••••••••••
63
2. Preparación para el uso de la báscula
•••••••••••••••••••••••••••••••••••••••••••
64
쎱
Nivelación
•••••••••••••••••••••••••••••••••••••••••••••••••••••••••••••••••••••••••••••••••••••••••••••
64
(Versión de Indicación Remota)
(Versión montada en la columna)
쎱
Instalación de la báscula
•••••••••••••••••••••••••••••••••••••••••••••••••••••••••••••••••
64
(Versión de Indicación Remota)
쎱
Preparación de la fuente de alimentación
••••••••••••••••••••••••••••••••
65
3. Instrucciones de funcionamiento
•••••••••••••••••••••••••••••••••••••••••••••••••••••••
66
1.Procedimientos de pesado estándar
•••••••••••••••••••••••••••••••••••••••••••
66
2.Peso de tara
•••••••••••••••••••••••••••••••••••••••••••••••••••••••••••••••••••••••••••••••••••••••••••
66
3.Cancelación de la función de pesado de tara
••••••••••••••••••••••••••
66
4.Pesado BMI
•••••••••••••••••••••••••••••••••••••••••••••••••••••••••••••••••••••••••••••••••••••••••••
67
4. Especificaciones del sistema de comunicación RS-232C
•••••••••••
68
쎱
Especificaciones
••••••••••••••••••••••••••••••••••••••••••••••••••••••••••••••••••••••••••••••••••
68
쎱
Nombres y métodos de conexión de las líneas de señales
•••••••••••••••••••••••
68
쎱
Modo de medición de peso
••••••••••••••••••••••••••••••••••••••••••••••••••••••••••••
68
쎱
Modo de cálculo de IMC
•••••••••••••••••••••••••••••••••••••••••••••••••••••••••••••••••
68
5.Identificación y solución de fallos
•••••••••••••••••••••••••••••••••••••••••••••••••••••••
69
쎱
Posibles problemas
••••••••••••••••••••••••••••••••••••••••••••••••••••••••••••••••••••••••••••
69
─────────────────────────────
앮
Especificaciones
•••••••••••••••••••••••••••••••••••••••••••••••••••••••••••••
Contraportada
━━━━━━━━━━━━━━━━━━━━━━━━━━━━━
59
Índice
E
58
WB-100MA-取説/04.01.2704.1.289:12AMページ58
Page 31

E
• La tarjeta de circuito lleva incorporado un fusible (100mA, 125V) para equipos electrónicos. Este fusible se
fundirá por razones de seguridad en el caso de que se use un dispositivo distinto del adaptador CA original o se
aplique una corriente eléctrica de alta potencia.
[Mantenimientoa]
Este es un producto fabricado con precisión y calibrado con exactitud. Por favor, siga las siguientes instrucciones:
• Nunca desmonte o ajuste el equipo ya que esto podría causar su mal funcionamiento. El equipo debe ser
revisado únicamente de acuerdo con la normativa de cada país.
• Desenchufe el adaptador de CA de la toma a red cuando deje de utilizar el equipo durante un largo periodo de
tiempo.
• Retire las pilas antes de almacenar el equipo cuando deje de utilizarlo durante un largo periodo de tiempo.
• No limpie el equipo con productos químicos corrosivos (bencina, limpiadores, etc.). Rogamos use un detergente
neutro para su limpieza.
• Evite exponer el equipo a excesivas vibraciones o sacudidas.
• Cuando desee deshacerse de esta unidad, rogamos lo haga de acuerdo con la normativa vigente de cada país.
• La garantía quedará anulada si una persona no autorizada intenta desmontar o reparar cualquiera de los
componentes. Cuando la unidad funcione incorrectamente, se ruega consulte con la oficina de ventas o el agente
de Tanita más próximo.
[Instrucciones para la medición]
Para obtener una medición precisa, rogamos siga las siguientes instrucciones:
• La medición puede resultar imposible sobre una superficie sometida a fuertes vibraciones. Si se da el caso,
traslade el equipo a una superficie firme con una vibración mínima o nula.
• Cuando traslade el equipo a otra ubicación donde haya una diferencia de temperatura de más de 20°C respecto
a la anterior, espere durante un periodo mínimo de dos horas antes de volver a utilizarlo.
• Durante la toma de medidas alejada a cualquier persona que esté haciendo uso de cualquier tipo de transmisor,
como pueden ser los teléfonos móviles, para evitar errores en la medición.
<Recomendaciones de uso>
<Recomendaciones de almacenamiento>
<Fuente de alimentación>
61
Margen de temperatura funcional: : 0°C / 35°C
Humedad relativa : 30% / 80% (sin condensación)
Margen de temperatura ambiental : -10°C / 50°C
Margen de humedad relativa : 10% / 90% (sin condensación)
Para evitar un mal funcionamiento, no exponga el equipo a la luz solar directa, ni a cambios de temperatura
significativos; evite el riesgo de humedad, grandes acumulaciones de polvo; aleje el equipo de llamas o de aquellos
lugares donde corra el riesgo de recibir vibraciones o sacudidas.
Margen de valor
230VAC
50Hz
65mA
Variación de intensidades
Gama de frecuencias
Margen de intensidad de la corriente eléctrica
E
Funciones
• Este equipo ha sido calibrado como instrumento de precisión y puede ser usado para certificar pesos y/o transacciones
comerciales.
• Puede ser usado para obtener datos de referencia en exámenes médicos, por ejemplo en revisiones periódicas, y puede
ayudar a prevenir la obesidad.
60
Atención
• Para evitar descargas eléctricas,
no enchufe o desenchufe la clavija a la toma a red con las manos húmedas.
• Para evitar el peligro de incendio,
utilice siempre una CA de 230V correctamente instalada y evite el uso de múltiples cordones de extensión.
Precaución
• Para evitar el contagio de infecciones,
limpie siempre la plataforma de medición después de cada uso. Esterilice la plataforma con un líquido
apropiado de limpieza con base de alcohol antes de cada uso.
• Instalación de la plataforma de medición
Asegúrese de que sitúa la plataforma de medición sobre una superficie plana y firme. Si el equipo es utilizado
mientras la plataforma no está firme, por ejemplo porque todas las patas no se encuentran en el mismo nivel de
la superficie, existe el riesgo de que vuelque y resulte imposible obtener una medición precisa.
Para evitar el riesgo de lesiones y daños al equipo, no salte nunca encima de la plataforma.
• Cómo manipular el equipo durante su traslado
Debido a que la plataforma es pesada, se ruega sea levantada sosteniéndola firmemente con las dos manos para
no dejarla caer.
• Adaptador CA
Asegúrese de que siempre utiliza el adaptador (modelo A30930G) suministrado con este equipo. Otros
adaptadores podrían causar un mal funcionamiento del equipo.
• Pilas
Cuando cambie las pilas, asegúrese de que coloca correctamente la polaridad / de las pilas nuevas. Si la
polaridad fuese incorrecta, las pilas podrían derramar su contenido líquido y dañar el equipo.
Atención
Este símbolo advierte sobre el peligro de muer te o de sufrir lesiones de gravedad en el caso de que
las instrucciones de seguridad se ignoren y no se haga un uso correcto del equipo.
Precaución
Este símbolo advierte sobre el riesgo de sufrir lesiones físicas y/o causar daños al
equipo en el caso de que las instrucciones de seguridad se ignoren y no se haga
un uso correcto del equipo.
Este símbolo indica precauciones de tipo general que deben tomarse cuando se
hace uso de este equipo.
Medidas de seguridad
Símbolos de precaución
En este manual de instrucciones y en las descripciones adheridas al propio equipo, existen varios símbolos de precaución
que le permitirán hacer uso de éste de manera segura y correcta con objeto de evitar daños a usted u otras personas, así
como daños materiales.
Los símbolos y su significado aparecen a continuación. Por favor, asegúrese de que los entiende bien antes de proseguir
con la lectura del manual de instrucciones.
WB-100MA-取説/04.01.2704.1.289:12AMページ60
Page 32

E
NET (neto):
Cuando la función de medición de peso con tara esté activada, junto a este
icono aparecerá una flecha
t
.
63
쎱
Panel de control
쎱
Símbolos y sus significados
: Display encendido.
: Equipo Clase II
: Display apagado.
: Parte aplicable del grado
de protección tipo B
: Corriente directa
: Calibración del Cero
: Activar función de
medición de peso con tara.
: Precaución. Consultar
notas adjuntas.
:
Conformidad con la Directriz sobre
equipos médicos 93/42EEC.
Encendido y/o calibrar a cero el
display.
Apagado
Función de medición de peso con tara
Modo de cálculo del IMC, y/o selección
de talla
Selección de modo o aumento de
valores numéricos.
Selección de modo o reducción de
valores numéricos.
Interruptor de la función de bloqueo de
pesada.
HEIGHT (talla): (Unidad de medida)
Indica que se ha seleccionado la talla
BMI (IMC):
Indica que se está calculando el IMC.
BMI MODE (modo de cálculo del IMC):
Indica que el modo de cálculo del IMC está activado.
STABILIZED (estabilizada):
Indica que la función de medición de peso se ha estabilizado.
STEP ON (subir a la báscula): (Señal de lista)
Indica que la báscula está lista para comenzar las mediciones.
WEIGHT LOCK (función de bloqueo de pesada):
Indica que la medición se ha estabilizado.
*Aparece en pantalla sólo cuando el interruptor de la función de bloqueo de
pesada está activado.
E
62
쎱
En la caja de embalaje se incluyen los siguientes componentes:
1.Montaje de la báscula y componentes
(Versión de Indicación Remota)
Indicador de nivel
Display
Compartimiento para las pilas
Plataforma
Patas ajustables
Adaptador de CA
modelo A30930G
Manual de instrucciones
Tornillos de sujeción del
soporte de pared (x 2)
Accesorios
Compartimiento para las pilas
Plataforma
Patas ajustables
Adaptador de CA
modelo A30930G
CubiertaLlave
Manual de instrucciones
Tapa
Tornillos (x 5)
Arandela de resorte (x 4)
Instrucciones de armado
Accesorios
(Versión montada en la columna)
Indicador de nivel
Display
WB-100MA-取説/04.01.2704.1.289:12AMページ62
Page 33

E
햲 Cuando vaya a utilizar el adaptador de CA
Inserte la clavija del cable del adaptador de CA en el enchufe hembra de
CD que está en uno de los lados del display, y a continuación inserte la
clavija del adaptador de CA en una toma de corriente de CA de 230 V.
A continuación, compruebe que se encienda el piloto del adaptador de CA.
Atención
•Para evitar descargas eléctricas, no enchufe ni desenchufe la clavija
en la toma de corriente si tiene las manos mojadas.
Precaución
•Use sólo el adaptador de CA (modelo A30930G) que se especifica.
La utilización de un adaptador de CA que no sea el especificado
podría provocar el mal funcionamiento de la báscula.
햳 Cuando vaya a utilizar pilas secas
Retire los tornillos de sujeción del compartimiento de las pilas, que se
encuentra en el lado derecho del display y extraiga dicho
compartimiento. Coloque pilas secas LR6 (AA) en la posición de
polaridad correcta, como se indica en el interior del compartimiento
de las pilas, y fíjelo mediante los tornillos de sujeción.
Si se visualiza en el display, sustituya las seis pilas LR6
(AA) con pilas nuevas.
El mensaje aparece cuando la tensión de las pilas es menor
de 6,5 V ± 10%.
•Por favor, cambie las pilas con cuidado para evitar que
éstas caigan sobre sus pies.
•Asegúrese de que coloca correctamente la polaridad de las
pilas / . Si la polaridad fuese incorrecta, las pilas
podrían derramar su carga líquida y dañar el equipo.
•Retire las pilas antes de almacenar el equipo cuando deje de
utilizarlo durante un largo periodo de tiempo.
•Cuando traslade el equipo a otra ubicación donde haya
una diferencia de temperatura de más de 20°C respecto a la
anterior ubicación, espere durante un periodo mínimo de
dos horas antes de volver a utilizarlo.
쎱
Preparación de la fuente de alimentación
65
enchufe hembra de CD
Piloto
Compartimento de las pilas
clavija
Pilas secas
Tornillos de fijación
para el compartimento
de las pilas
햴 Piloto automatico de desconetar para cambiar la programcion.
Cuando la balanza esta apagada, Pulse la tecla y mantiene presionada.
Pulse la tecla Libere la tecla .
El panel de control muestra ‘Auto Power Off Interval Setting Mode’ (Piloto automatico de desconetar para cambiar programcion).
Mostrando el numero 20 es como 20 minutos programado de desconecion.
Pulse la tecla (una flecha) o pulse la tecla (una flecha) y oprime 10 por 10 minutos y/o oprime CONT para continuar si lo necesita.
Pulse el botón para terminar.
E
64
쎱
Instalación de la báscula (Versión de Indicación Remota)
쎱
Nivelación
Cuando vaya a utilizar la columna
Cuando vaya a instalar el display en el soporte de pared
①
③
②
insértela en la ranura que se encuentra en la parte posterior del display.
Cuando vaya a separar el display de la báscula,
tire de la columna para sacarla de la parte trasera del display.
햲 atornille los tornillos de sujeción del soporte de pared (dejando que sobresalgan 5 mm de la
pared).
햳 Inserte las cabezas de los tornillos en los taladros que se encuentran en la parte trasera del
display.
햴 Tire del display hacia abajo para que quede firmemente montado.
・Si la consola de visualización no se encuentra lo suficientemente sujeta, existe el
riesgo de que se caiga.
・Evite instalar la consola de visualización en un lugar donde sus usuarios puedan
tropezar o engancharse con el cable.
・No sostenga la consola de visualización únicamente por el cable.
2.Preparación para el uso de la báscula
Para obtener una medición precisa, sitúe la unidad en una
superficie lo más plana posible y regule el nivel, ayudándose
de las patas ajustables con objeto de que la burbuja del
indicador de nivel se sitúe en el centro del marco.
Precaución
Sitúe el equipo en una superficie plana. Si el equipo no está firme,
por ejemplo porque no todas las patas están situadas al mismo
nivel, existe el riesgo de que vuelque y resulte imposible obtener
una medición precisa.
*Ajuste la altura mediante la rotación de las patas ajustables.
Indicador
(Versión de Indicación Remota)
*Ajuste la altura mediante la rotación de las patas ajustables.
Indicador
(Versión montada en la columna)
WB-100MA-取説/04.01.2704.1.289:12AMページ64
Page 34

E
d
d
d
d
d
d
d
d
4.Pesado BMI
1. Conecte el interruptor principal con la tecla .
2. Después de que destellen todos los segmentos, aparece [0.0kg].
3. Presione durante más de dos segundos
Aparecerán [0.0 kg] y la altura por omisión [170cm].
4. Ajuste su altura con la tecla .
(puede entrar este valor después de pararse en la balanza).
La persona a pesar debe pararse sin moverse en el centro de la balanza.
Aparecerá el peso de la persona que se está pesando.
5. Cuando haya establecido su altura y peso, presione .
Aparecerá su peso y la cifra BMI.
* Cuando presione la tecla en el modo BMI, la balanza mostrará alternadamente entre BMI
y la altura (que puede cambiarse con la tecla ) .
* La indicación volverá a [0.0 kg] y la altura por omisión de [170 cm] si cambia a una indicación
de altura después de bajarse de la balanza durante la medición de BMI.
Percentiles de IMC según el Instituto Nacional de Salud/Organización Mundial de la Salud
Bajo peso
Peso normal
Pre obeso
Obeso
Obeso
Obeso
CLASE
l
CLASE ll
CLASE lll
IMC < 18.5
18.5
≦ IMC < 25
25
≦ IMC < 30
30
≦ IMC < 35
35
≦ IMC < 40
IMC
≧ 40
67
E
66
d
d
d
d
d
d
d
d
d
1.Procedimientos de pesado estándar
2.Peso de tara
3.Cancelación de la función de pesado de tara
1. Conecte el interruptor principal con la tecla .
2. Después de que destellen todos los segmentos, aparece [0.0 kg].
3. La persona a pesar debe pararse sin moverse en el centro de la balanza.
Aparecerá el peso de la persona.
4. Se completa la medición.
Cuando la persona que se pesa baja de la balanza, la indicación vuelve a [0.0 kg]
Desconecte el interruptor principal con la tecla .
1. Conecte el interruptor principal con la tecla .
2. Después de que destellen todos los segmentos, aparece [0.0 kg].
3. Coloque cuidadosamente los ítems de tara (ropa, etc.) en el centro de la plataforma.
Aparecerá el peso de los ítems.
4. Presione la tecla .
Aparece una flecha al lado de la marca t[Net] y aparecerá [0.0 kg].
5. Cuando se pesa un objeto que incluye ítems de tara, aparecerá el peso del objeto menos el de los
ítems de tara, es decir el peso neto.
•
Para cambiar el peso de tara, cancele la función de peso de tara y repita desde el paso 3.
•
Cuando utilice la función de peso de tara, la gama de medición se reduce en el peso de tara.
(Gama de medición) = (Máximo peso medible) –( Peso de tara)
1. Retire los ítems de tara (ropa, etc.) de la bandeja.
El peso aparecerá como valor negativo.
2. Presione la tecla .
Desaparecerá la flecha al lado de t[NET] y aparecerá [0.0 kg].
3.Instrucciones de funcionamiento
WB-100MA-取説/04.01.2704.1.289:12AMページ66
Page 35

E
69
Problema Solución
La báscula no se enciende cuando se
pulsa la tecla .
•Si está utilizando el adaptador de CA
Compruebe que el cable del adaptador de CA esté bien enchufado en el display.
Compruebe que el adaptador de CA esté bien enchufado en la toma de corriente de CA.
•Si está utilizando pilas secas
Es posible que se hayan agotado las pilas. Compruebe si la báscula funciona,
conectándole el adaptador de CA o poniéndole pilas nuevas.
La medición no es correcta.
La medición no se estabiliza.
El display se enciende y apaga.
•Compruebe que todas las patas ajustables estén apoyadas sobre una superficie plana.
•Es posible que no se pueda realizar la medición si hay exceso de vibración. Traslade la
báscula a otro sitio.
Se visualiza en el display.
•Es posible que se haya sobrepasado la capacidad máxima de pesaje.
Se visualiza en el display.
•No se pare ni coloque objetos sobre la plataforma antes de comenzar a realizar la
medición. Comience a realizar la medición después de comprobar que no haya nada
sobre la plataforma.
Si se producen fallos, consulte las instrucciones que aparecen a continuación. Si el problema persiste, póngase en contacto
con la oficina de ventas o centro de servicios Tanita más cercano a su localidad.
쎱
Posibles problemas
5.Identificación y solución de fallos
E
■
Especificaciones
■
Nombres y métodos de conexión de las líneas de señales
■
Modo de medición de peso
■
Modo de cálculo del IMC
Comunicación norma
EIA RS-232C
Método de comunicación Asincrónico
Velocidad de la señal 2.400 baudios
Longitud de los bits de datos
7 bits
Paridad PAR
Bit de parada 1 bit
Terminal Nº Nombre de la señal
1
2 TXD
3 RXD
4
5 GND
6
7
8
9
• El display tiene, en uno de sus lados, un conector hembra RS-232C (sub-D para 9 patas).
• Cuando vaya a conectar el display a un ordenador personal, etc., utilice un cable directo RS-232C.
• Use un cable RS-232C de menos de 3 m de longitud.
Cuando se esté utilizando la báscula en modo de medición de peso, al recibirse una trama de 4 bytes de datos, según se indica en el punto 1-1, los datos de
peso serán transmitidos en una trama de 14 bytes, según se indica en el punto 1-2.
Mientras la báscula esté siendo utilizada en el modo de cálculo del IMC, los datos de salida variarán en dependencia del formato de los
datos recibidos.
햲 Cuando se reciba una trama de 4 bytes de datos, como se indica en el punto 1-1, la báscula calculará el IMC utilizando el valor de talla
más reciente, y transmitirá una trama de 26 bytes de datos, como se indica en los puntos 2-1 ó 2-2, en dependencia de la unidad de
medida seleccionada.
햳 Cuando se reciba una trama de 11 bytes de datos, incluyendo las unidades de medida y los valores de talla, como se indica en el punto 1-
2 ó 1-3, la báscula calculará el IMC utilizando estos valores, y transmitirá una trama de 26 bytes de datos, como se indica en los puntos 21 ó 2-2, en dependencia de la unidad de medida seleccionada.
Información detallada de los datos de transmisión del modo de medición de peso
Bytes números 1-2
Bytes números 5-10
Bytes números 3-4
Bytes números 11-12
Bytes números 13-14
Cabecera
Separador
Datos de peso
Unidades de medida
Cola
2 bytes fijos
2 bytes fijos
6 bytes fijos
2 bytes fijos
2 bytes fijos
SD: Inestable S_: Estable
IS: Sobrecarga, etc.
2 espacios
Alineación derecha
Kg:kg
CR+LF
1-1 Datos de recepción
DR
CR LF
1234
1-2 Datos de transmisión
SD 75 . 0kg
CR LF
1234567891011121314
1-1 Datos de recepción
DR
CR LF
1234
1-2
Datos de recepción (datos de talla, cuando se esté utilizando kg)
*
Las tallas de 90 - 99 cm deben introducirse como 090-099.
DHk g 180
CR LF
1234567891011
2-1 Datos de transmisión (kg/cm)
SD 75 . 0kg , 180 , 23 . 1
CR LF
1 2 3 4 5 6 7 8 9 10 11 12 13 14 15 16 17 18 19 20 21 22 23 24 25 26
Detalles de los datos de transmisión en modo de cálculo del IMC
Bytes números 1-2
Bytes números 5-10
Bytes números 3-4
Bytes números 11-12
Bytes números 13
Bytes números 14-18
Bytes números 19
Bytes números 20-24
Bytes números 25-26
Cabecera
Separador
Datos de peso
Unidades de medida
Separador
Datos de talla
Separador
Datos de IMC
Cola
2 bytes fijos
2 bytes fijos
6 bytes fijos
2 bytes fijos
1 byte fijo
5 bytes fijos
1 byte fijo
5 bytes fijos
2 bytes fijos
SD: Inestable S_: Estable
IS: Sobrecarga, etc.
2 espacios
Alineación derecha
Kg:kg
1 coma
Alineación derecha
1 coma
Alineación derecha
CR+LF
68
4. Especificaciones del sistema de comunicación RS-232C
WB-100MA-取説/04.01.2704.1.289:12AMページ68
Page 36

WB-100MA-取説/04.01.2704.1.289:12AMページ70
Page 37

Consumo eléctrico 0,3 W máx.
Fuente de alimentación
Adaptador de CA, con polo negativo central, modelo A30930G, CLASE II
Tensión de entrada: 230 V de CA, 50 Hz, 65 mA
Tensión de salida: 9 V de CD ± 0,.45 V
Corriente nominal: 300 mA
Tensión de entrada, sin carga: 12 V de CD ± 0,6 V
LR6 (pila alcalina AA) x 6, (no incluidas)
E
Este producto cumple con las normativas siguientes:
1. Directriz sobre equipos médicos ( 93/42/EEC)
Normas de seguridad : EN60601-1:1990,AM No.1:1993,AM No.2:1995
IEC 60601-1:1988,AM No.1:1991,AM No.2:1995
Normas EMC : EN60601-1-2:2001
IEC60601-1-2:2001
2.Instrumentos de medición de peso no automáticos (90/384/EEC)
BW1007031(2)
Especificaciones
aproximadamente 100 horas de trabajo continuo si se usan pilas LR6 (pilas alcalinas AA).
Duración de las pilas
TIPO WB-100MA WB-110MA
Celda de carga extensométrica
200 kg/ 0,1 kg
±0,1 kg
270 kg/ 0,1 kg
90 – 249 cm/ incrementos de 1 cm
90 – 249 cm/ incrementos de 1 cm
Incrementos de 0,1
159
҂209҂56mm
301
҂336҂80mm
2m
LCD (pantalla de cristal líquido), de dos líneas, con 5 dígitos en la superior y 4 dígitos en la inferior
Altura de los números: 25 mm
Conector hembra RS-232C (D-sub, para 9 patas)
9 V de CD, 300 mA (pilas alcalinas LR6, tamaño AA, x 6 - no incluidas)
0ºC a + 35ºC
30%/80% (sin condensación)
5,1 kg (sin las pilas)
10,6 kg (sin las pilas)
270 kg/ incrementos de 0,1 kg200 kg/ incrementos de 0,1 kg
Medición de peso
Sistema de medición
Capacidad máxima/ ajuste mínimo
Precisión en la primera calibración
Talla
Peso
Talla
IMC
Display
Plataforma
Longitud del cable
336
҂600҂1070mm
Longitud del cable (Versión montada en la columna)
Display
Interfaz de datos de salida
Corriente nominal
Gama de temperatura de funcionamiento
Humedad relativa
Peso de la báscula (Versión de Indicación Remota)
Peso de la báscula (Versión montada en la columna)
Datos de entrada
Datos de salida Display
Dimensiones
(Versión de Indicación Remota)
WB-100MA-取説/04.01.2704.1.289:12AMページ72
 Loading...