

Tanita UV-Smart Instruction Manual
U V-Sma rt
UVA/B MONITOR
UVA/B MONITOR
MONITEUR DE RAYONS UVA ET UVB
MONITEUR DE RAYONS UVA ET UVB
Instruction Manual
Guide d’utilisation

Introduction
The sun’s UV rays can penetrate your skin and
cause damage such as freckles, skin aging, liver
spots, cataracts, sunburn, and skin cancer. Knowing
the strength of these rays allows you to take the
necessary steps to help avoid skin damage from UV
exposure. UV-Smart measures UVA and UVB individually, giving you a more complete picture of your
UV exposure risk.
What is UV?
UV stands for ultraviolet, and in this case, is used
in reference to the ultraviolet radiation waves that are
emitted from the sun. UV is invisible and cannot be
detected by the eye.
The two most prevalent types are UVA and UVB. UVA
is linked to accelerated skin aging, liver spots and
freckles. UVB causes the familiar sunburn and is
also related to skin cancer and cataracts. UV levels
change depending on the season, weather, time of
day, altitude and light reflection from land—potentially putting your skin at risk year round. UV-Smart
measures the amount of UVA and UVB exposure
immediately and monitors changes in UV as they occur.
UV-Smart measures the amount of UVA/B in your
vicinity in W/m
2
, or watts per square meter, which is
how light is commonly measured. UV-Smart classifies
both UVA and UVB results into four levels: weak,
medium, strong and very strong. These levels are
based on the numeric results, which are shown on
the display with a corresponding graphic symbol.
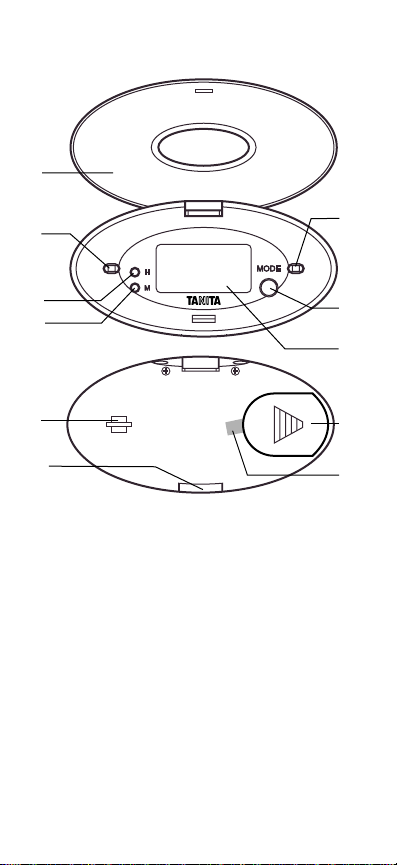
Components/Functions
1. Cover 7. Minute Button
2. UVA Sensor 8. Loop for Neckstrap
3. UVB Sensor (not included)
4. Mode Button 9. Battery Cover
5. Lens 10. Release Button
6. Hour Button 11. Protective Tab
Getting Started
Before initial use, remove the protective tab from
the battery by pulling the tab, and then remove the
protective film covering the lens.
8.
9.
10.
11.
Back
7.
1.
2.
3.
4.
6.
Inside
5 .

Setting the Clock
Press the release button to open the cover. Use the
H (hour) and M (minute) buttons, set the clock. Press
H once and “12” will start blinking. Press H button
repeatedly (or hold to scroll
through the numbers) to find
the correct hour. When correct
hour appears, press the Mode
button. Press M once and “00” will start blinking.
Press M button repeatedly to find minutes (or hold to
scroll through the numbers). When correct minute
reading appears, press Mode button to set time.
To Obtain Readings
Open the cover of UV-Smart and hold the unit with the
sensors facing towards the sun. Be sure the sensors
are clean and unobstructed (ensure that they are not
blocked by your fingers or your
shadow, and that they are free
from lint, grit, grease, etc.).
Press the Mode button repeatedly to scroll through the
clock, UVA or UVB modes.
When in UVA or UVB mode, the display will show the
number and icon that corresponds to each reading.
 Loading...