

Page 1

CHAPTER 7 POCKET BROWSER
Introduction
This feature-rich, mobile application development tool is designed to allow Web developers to rapidly create
robust mobile applications that can include a wide range of advanced data capture capabilities. Whether you
want to streamline your warehouse, delivery or service operations, or enable more robust asset tracking or
visibility, Pocket Browser will help you get your enterprise mobility solution up and running faster — and more
cost efficiently.
The Pocket Browser Developer Help provides detailed information about how to use each feature of the
browser. Each feature includes a sample for you to use, however, please be aware that the sample does not
necessarily show the only way to implement each feature.
Pocket Browser enables developers and integrators to provide advanced Web-based solutions to select
Microsoft® Windows Mobile and Windows CE mobile computers. PocketBrowser makes the most of
enterprise-level applications while speeding up development time and reducing costs. With it, making the
transition to web-based solutions is now fast, easy and affordable - especially in high-volume mobile
environments.
Pocket Browser is a software tool that extends the core rendering engine functionality of Microsoft PocketIE or
Microsoft IE with Symbol Technologies application programming interfaces (APIs). It provides interfaces to the
MC18 hardware and features using meta tags and Microsoft ActiveX® components designed specifically for
Symbol Technologies systems. Pocket Browser offers easy integration with bar code scanners, RFID readers
and other peripherals such as printers and magnetic stripe readers (MSR) for complete transaction processing.
Sample Application
The MC18 comes with a sample PocketBrowser v 3.1.0 applications factory-installed. The sample application
is accessible from the Programs menu.
To start PocketBrowser, select Start > Programs > Pocket Browser. The PocketBrowser window appears.
Page 2
7 - 2 MC18 Product Reference Guide
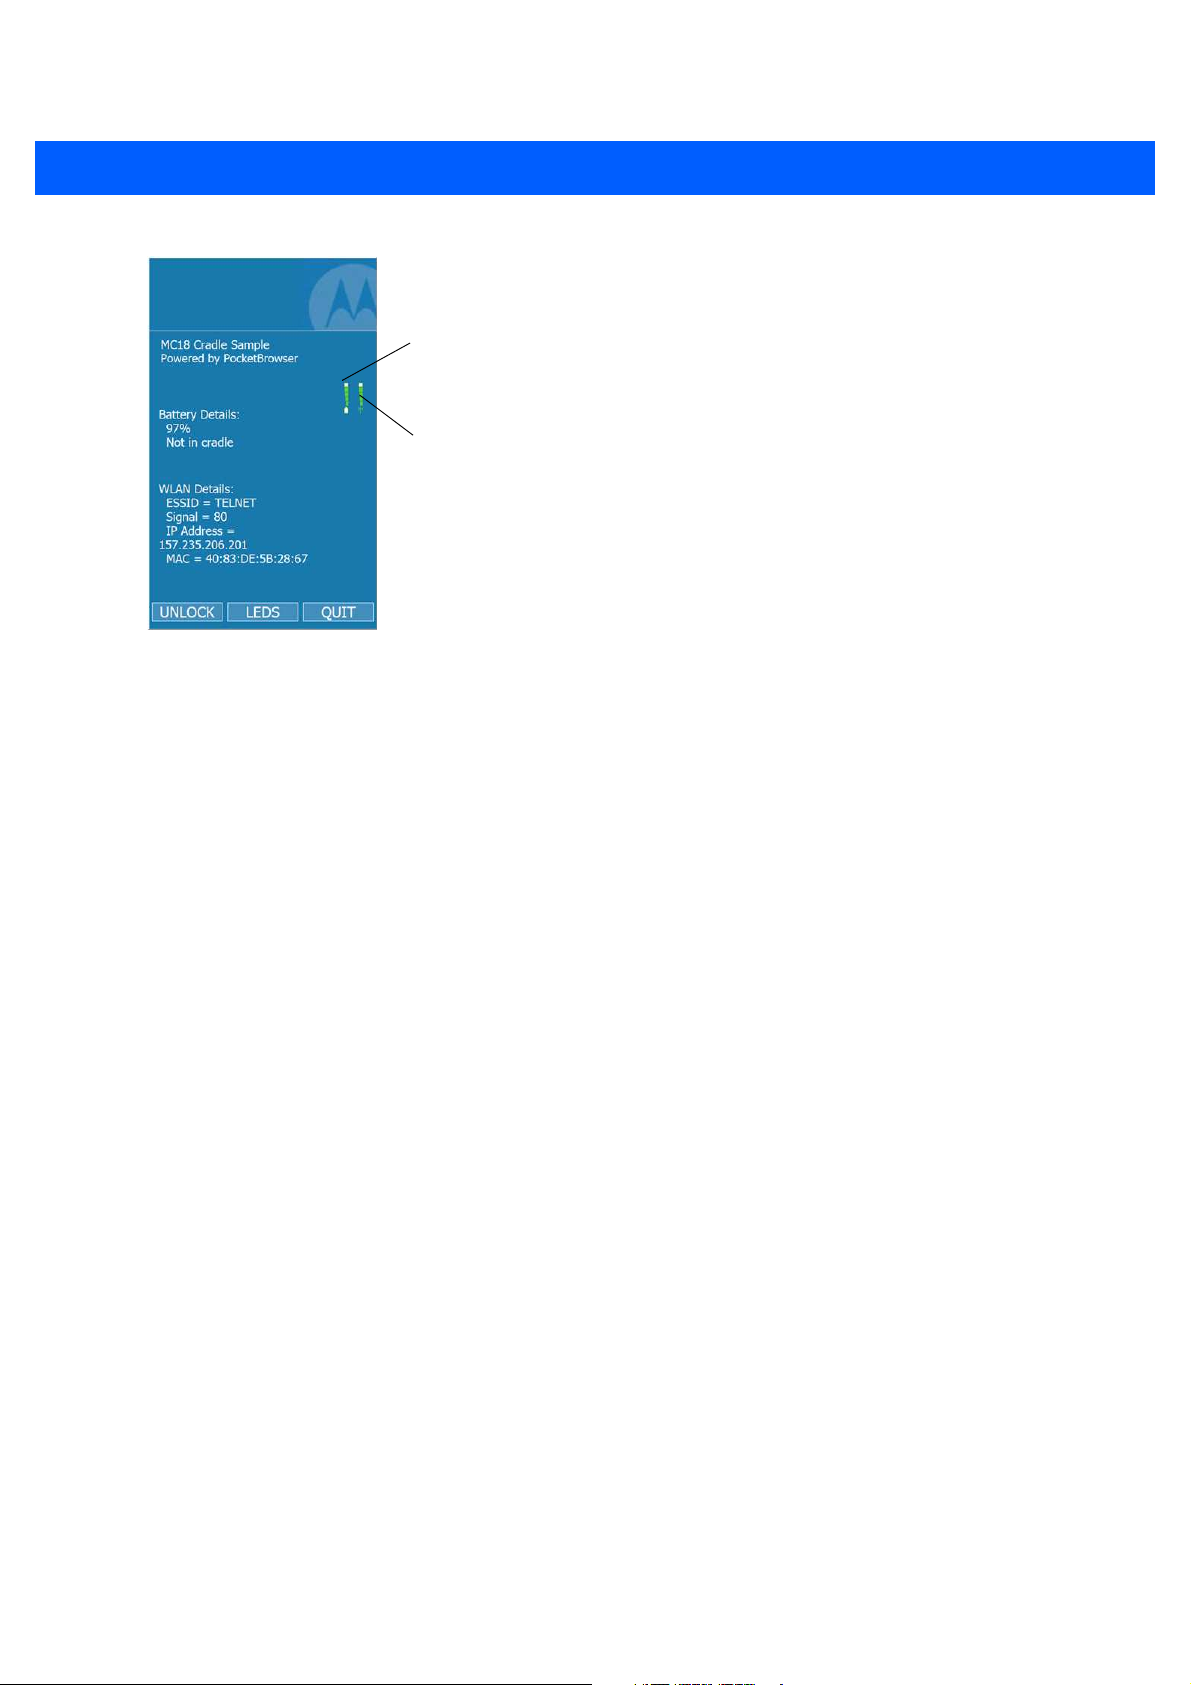
Battery Status Indicator
Wireless Signal Strength Indicator
Figure 7-1
The sample PocketBrowser provides the following information:
•
•
•
•
The three buttons at the bottom of the screen:
•
•
•
Sample PocketBrowser Screen
Battery level status bars
WLAN signal strength status bars
Battery Details:
• Battery strength in percentage
• Battery change / no charge status
WLAN details:
• ESSID name
• Signal
• IP Address of the MC18
• MAC address of the MC18
UNLOCK/LOCK - Unlocks and locks the MC18 into the cradle
LEDS - Illuminates the cradle LEDs
QUIT - Exits the sample PocketBrowser application
Configuring the Pocket Browser
The information on the Pocket Browser startup page can be configured by changing the Config.xml file (from
the MC18 root directory, select Program Files > PocketBrowser > Config > Config.xml). Before launching
the Pocket Browser for configuration, the MC18 must be connected to a network.
Page 3

CHAPTER 8 CRADLE INSTALLATION
Introduction
A system is comprised of a family of hardware devices interconnected through a WLAN radio backbone to the
retail establishment’s server(s). The hardware devices are the MC18 mobile computers, single-slot or three
slot cradles, power supplies and cables. A dispenser typically refers to a piece of furniture which has mounted
to it the cradles, their power supplies, and cables.
Customers (retail establishments) design their own dispensers to meet their particular floor space and display
requirements. The information in this chapter should help a customer to design a dispenser and to understand
the installation requirements.
IMPORTANT The MC18 cradles are NOT compatible with MC17 cradles and the MC17 cradles are NOT compatible with
MC18 cradles.
Installation of the Single-Slot Cradle
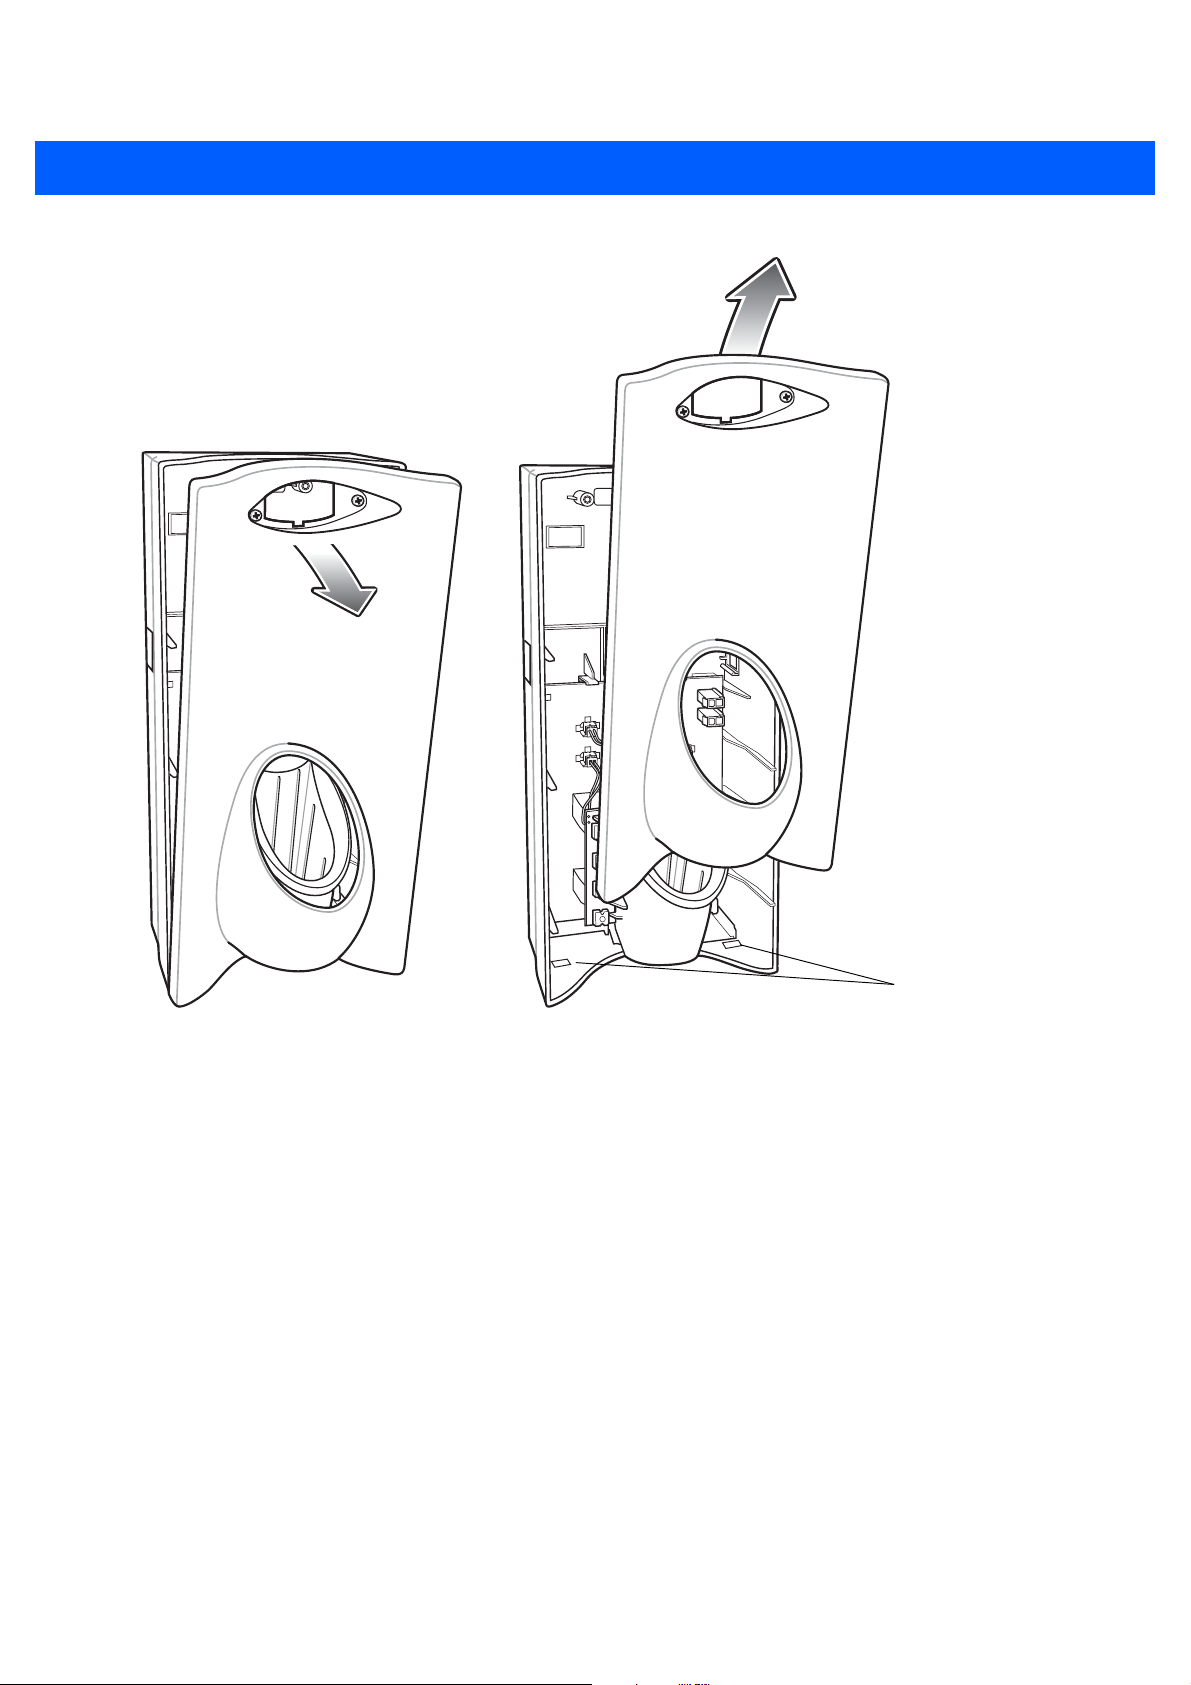
Removing the Front Cover
Use this procedure to remove the front cover:
1. Loosen two captive screws securing the front cover to the base.
Figure 8-1
2. Pull front cover away from base and then lift out of the base.
Remove Screws
Page 4
8 - 2 MC18 Product Reference Guide
Alignment Holes
Figure 8-2
Cover Removal
Mounting the Cradle
The charge cradle contains mounting holes in the back housing so that it can be bolted to supporting furniture.
In addition, it comes with plugs and a variety of cable routing outlets. Cable outlets not used can be concealed
with the plugs provided. Figure 8-3 provide the information required to design correct mounting holes for the
charge cradles.
Page 5
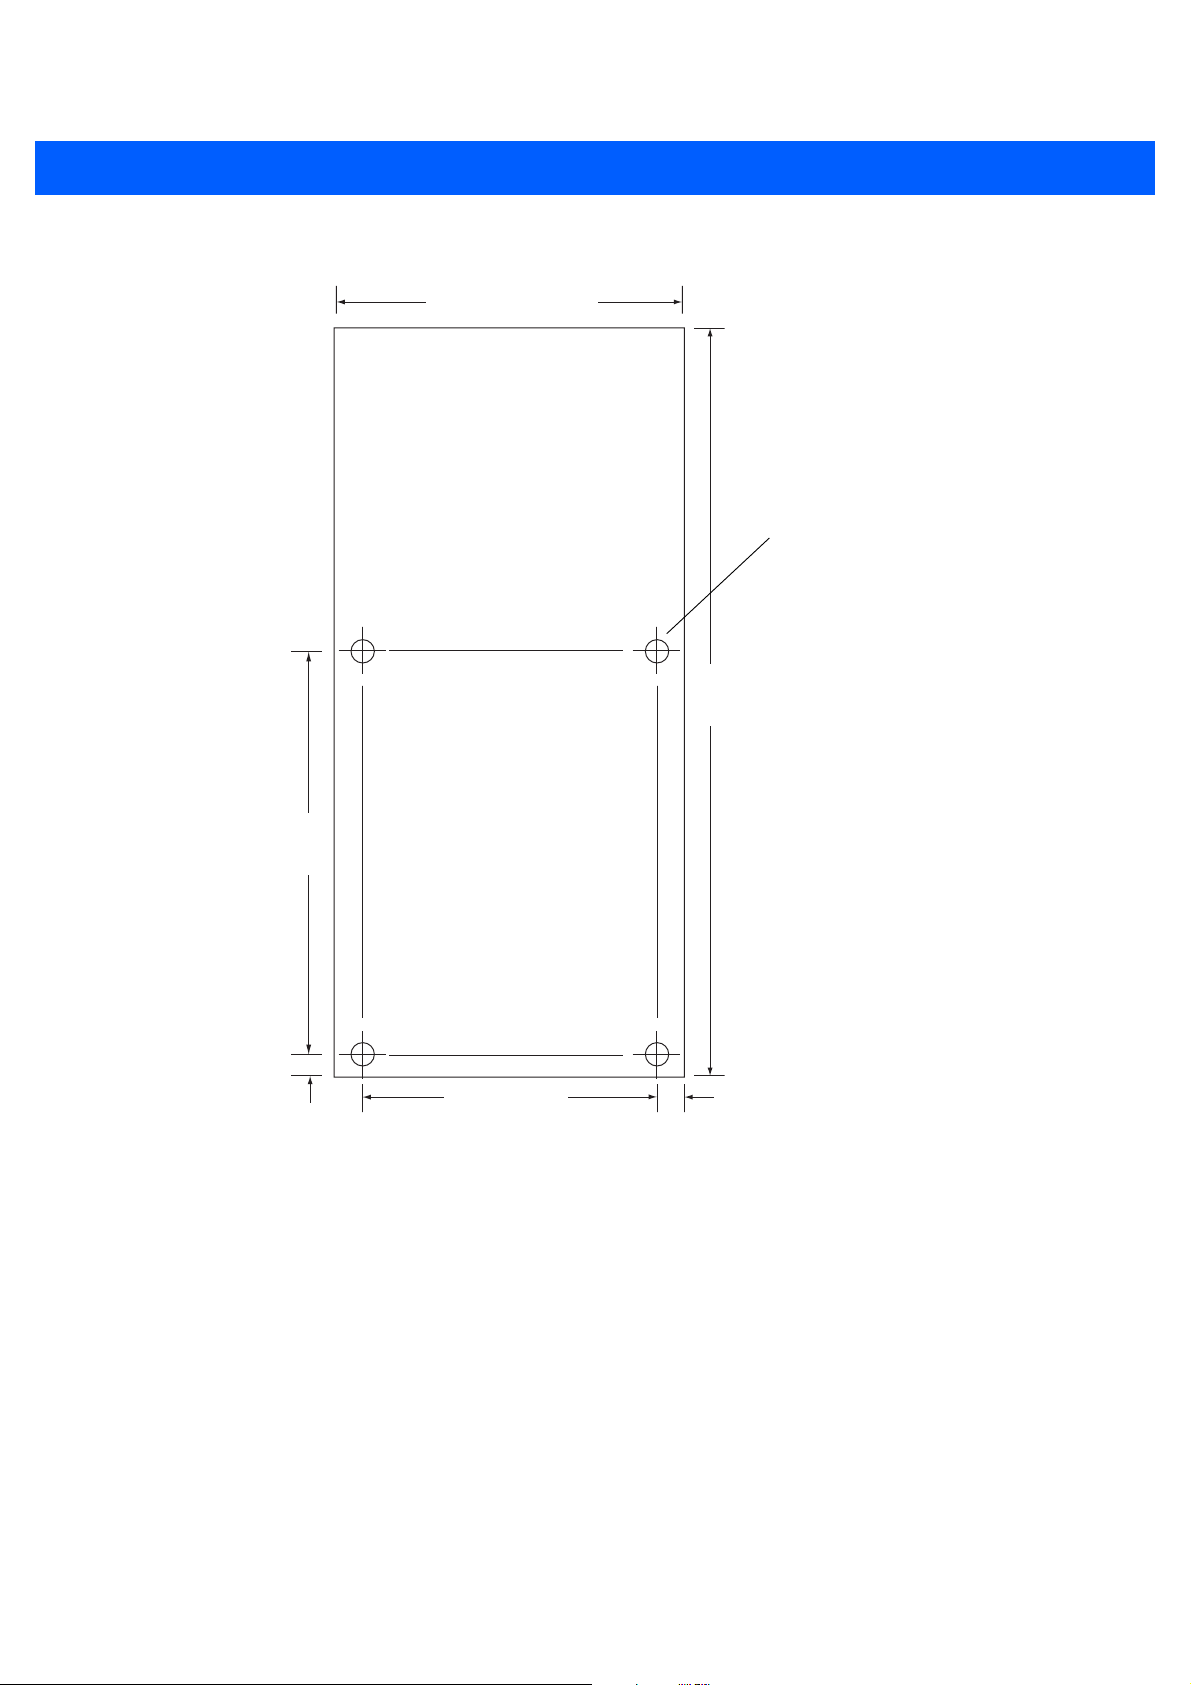
127 mm ± 0.4 mm
(5.0” ± 0.02”)
Cradle Installation 8 - 3
Mounting holes (4)
271.8 mm ± 0.7 mm
(10.70” ± 0.03”)
154 ± 0.2 mm
(6.06” ± 0.01”)
Figure 8-3
86 ± 0.2 mm
10 mm
(0.40”)
(3.39 ± 0.01”)
Cradle Mounting Template
20.5 mm
(0.80”)
Page 6
8 - 4 MC18 Product Reference Guide
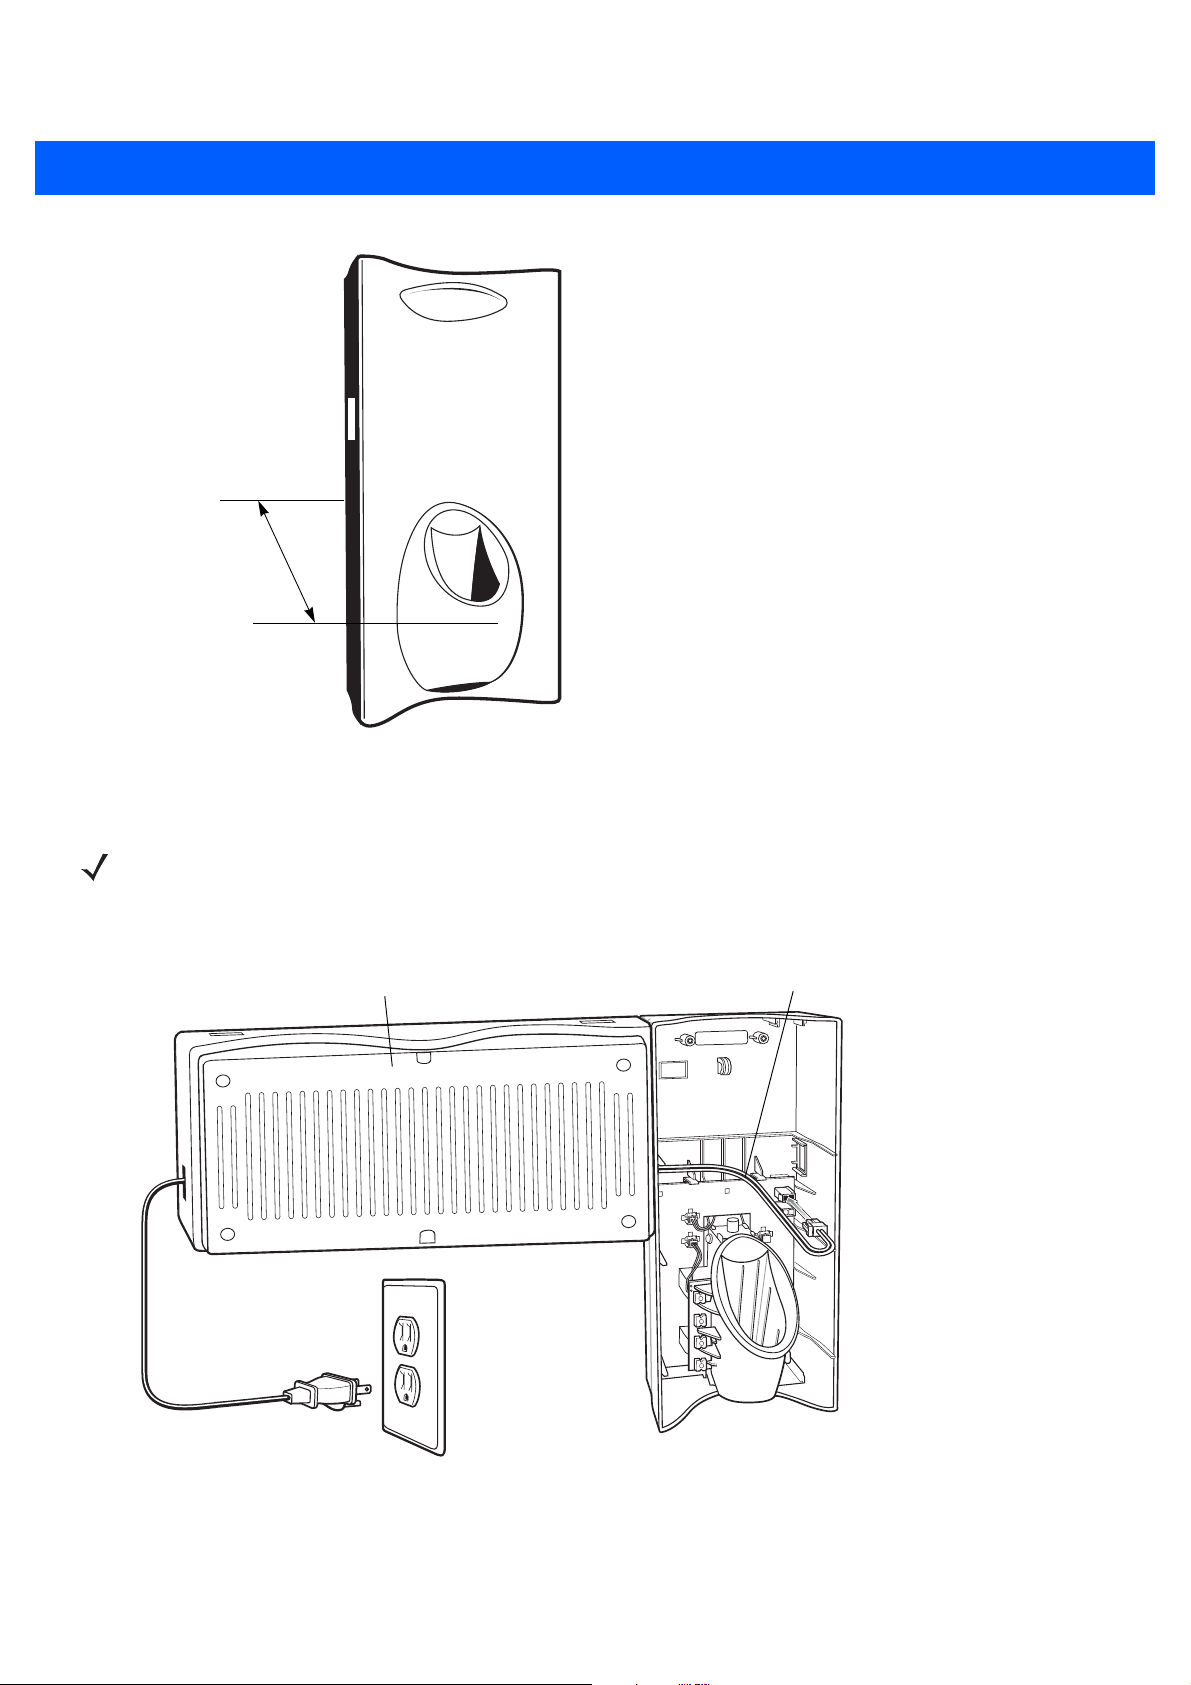
Depth of cradle:
99 mm
(3.9”)
Figure 8-4
Overall Depth of Cradle
Wiring
NOTE During installation ensure all interconnect cables are fully enclosed within the power supply or cradle enclosure.
1. Install power supply, including AC line cord and power cable, into Decorative Housing.
Power Supply PWRS-14000-241R
(inside Decorative Housing)
Power Cable 25-66420-01R
Figure 8-5
Connecting Power Supply
Page 7
Cradle Installation 8 - 5
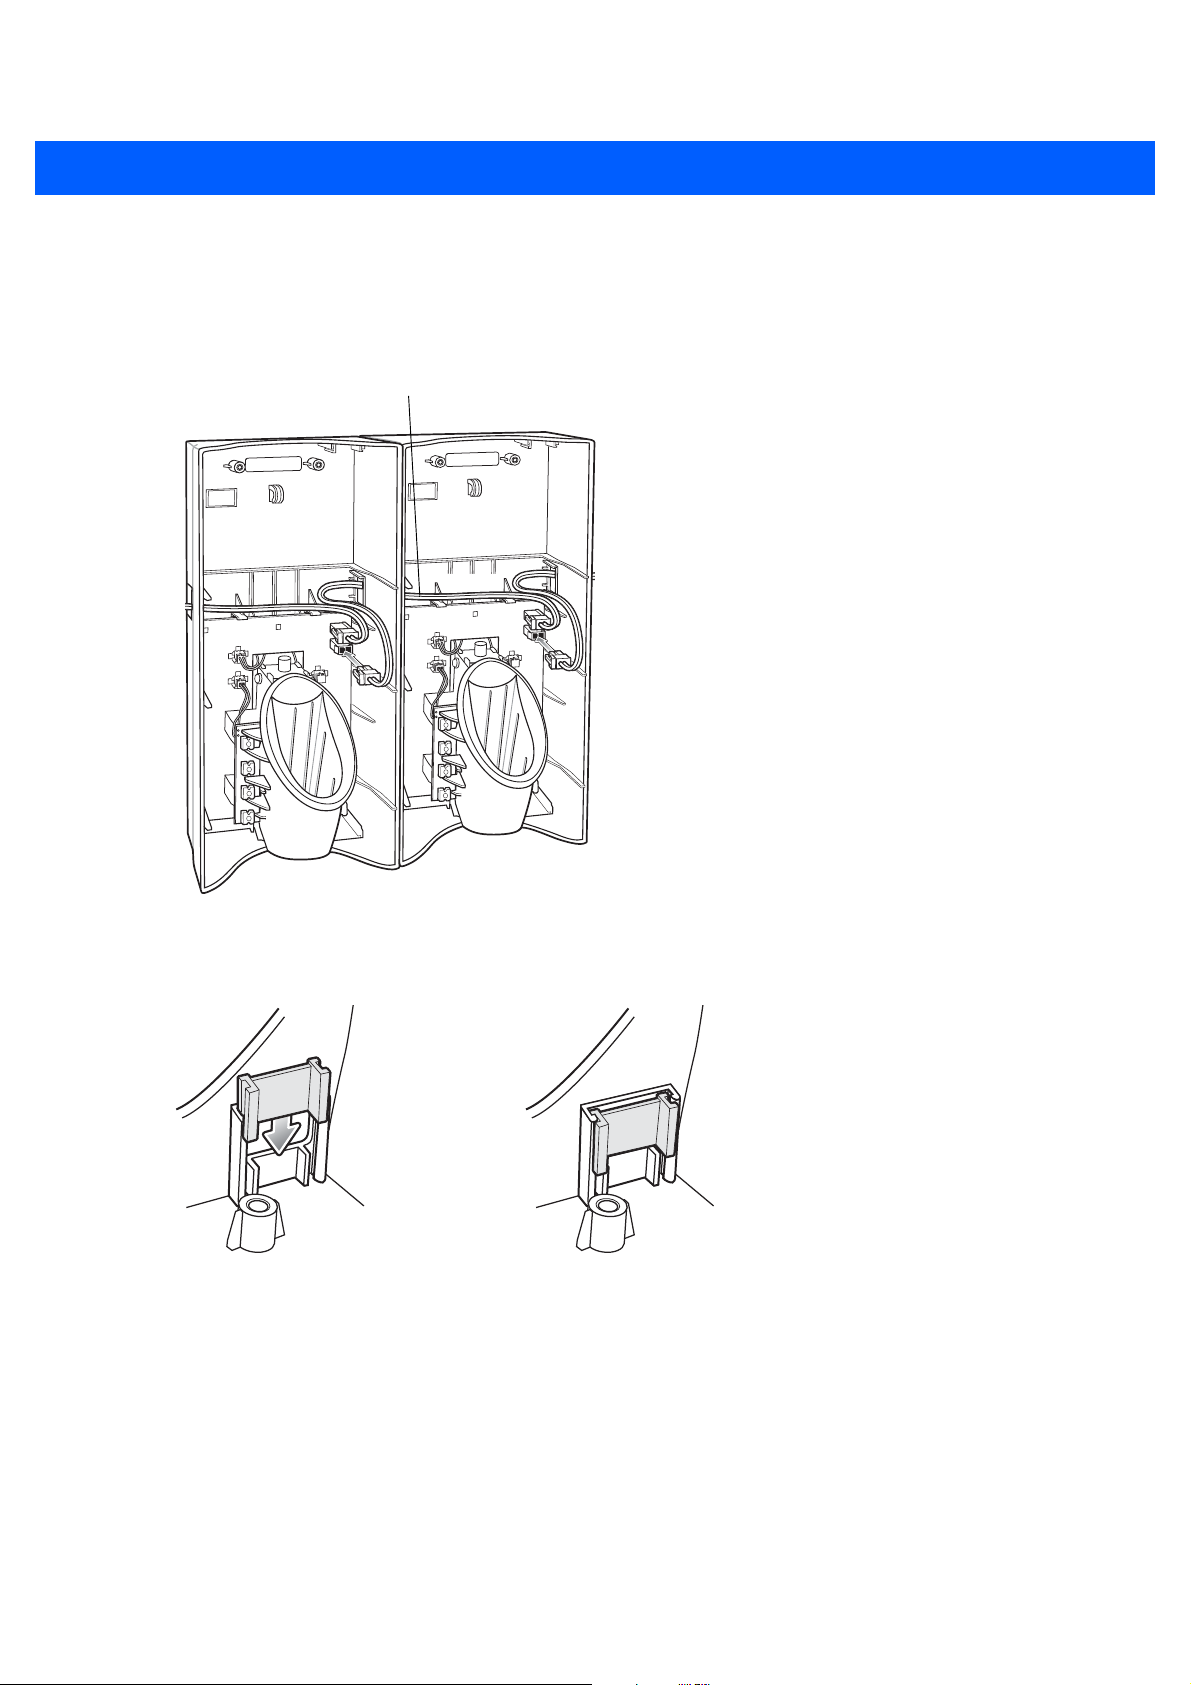
2. Insert power cable through a cable outlet of cradle back housing.
3. Plug connector into power connector on printed circuit board.
4. If more than one cradle, connect the interconnect cable from the first cradle to the second cradle.
Interconnect Cable 25-66431-01R
Figure 8-6
5. Use plugs to cover un-used cable outlets.
Figure 8-7
Daisy-Chaining Cradles
Cable Hole Plug Installation
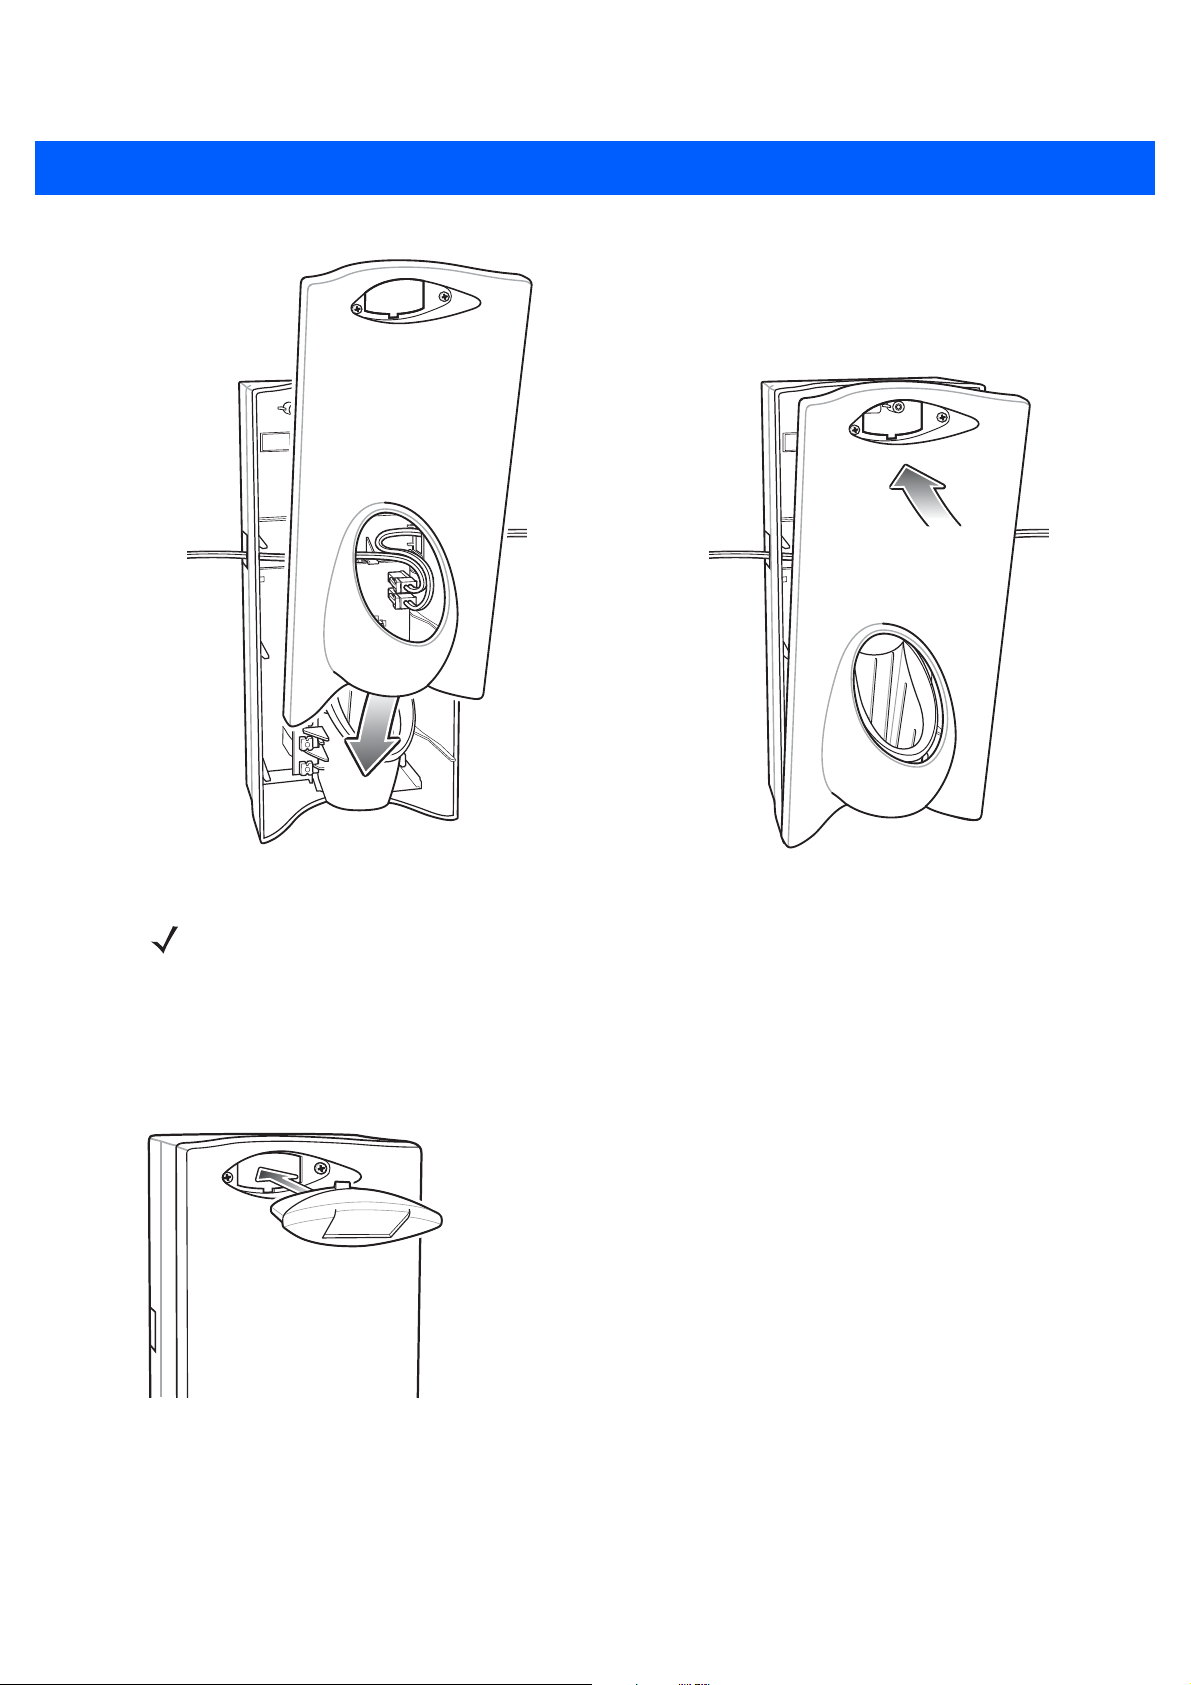
Assembly
1. Replace cover.
2. Secure cover with screws.
Page 8
8 - 6 MC18 Product Reference Guide
Figure 8-8
3. Insert bar code target cover.
4. Push target cover into front cover until it snaps into place.
Figure 8-9
Replace Cover
NOTE Do not install the target cover until you are sure that you do not need to remove the front cover again.
Replace Target Bar Code Cover
Page 9
Cradle Installation 8 - 7
System Cabling
There are some general limitations that must be taken into account when designing a dispenser and ordering
hardware elements of a system:
•
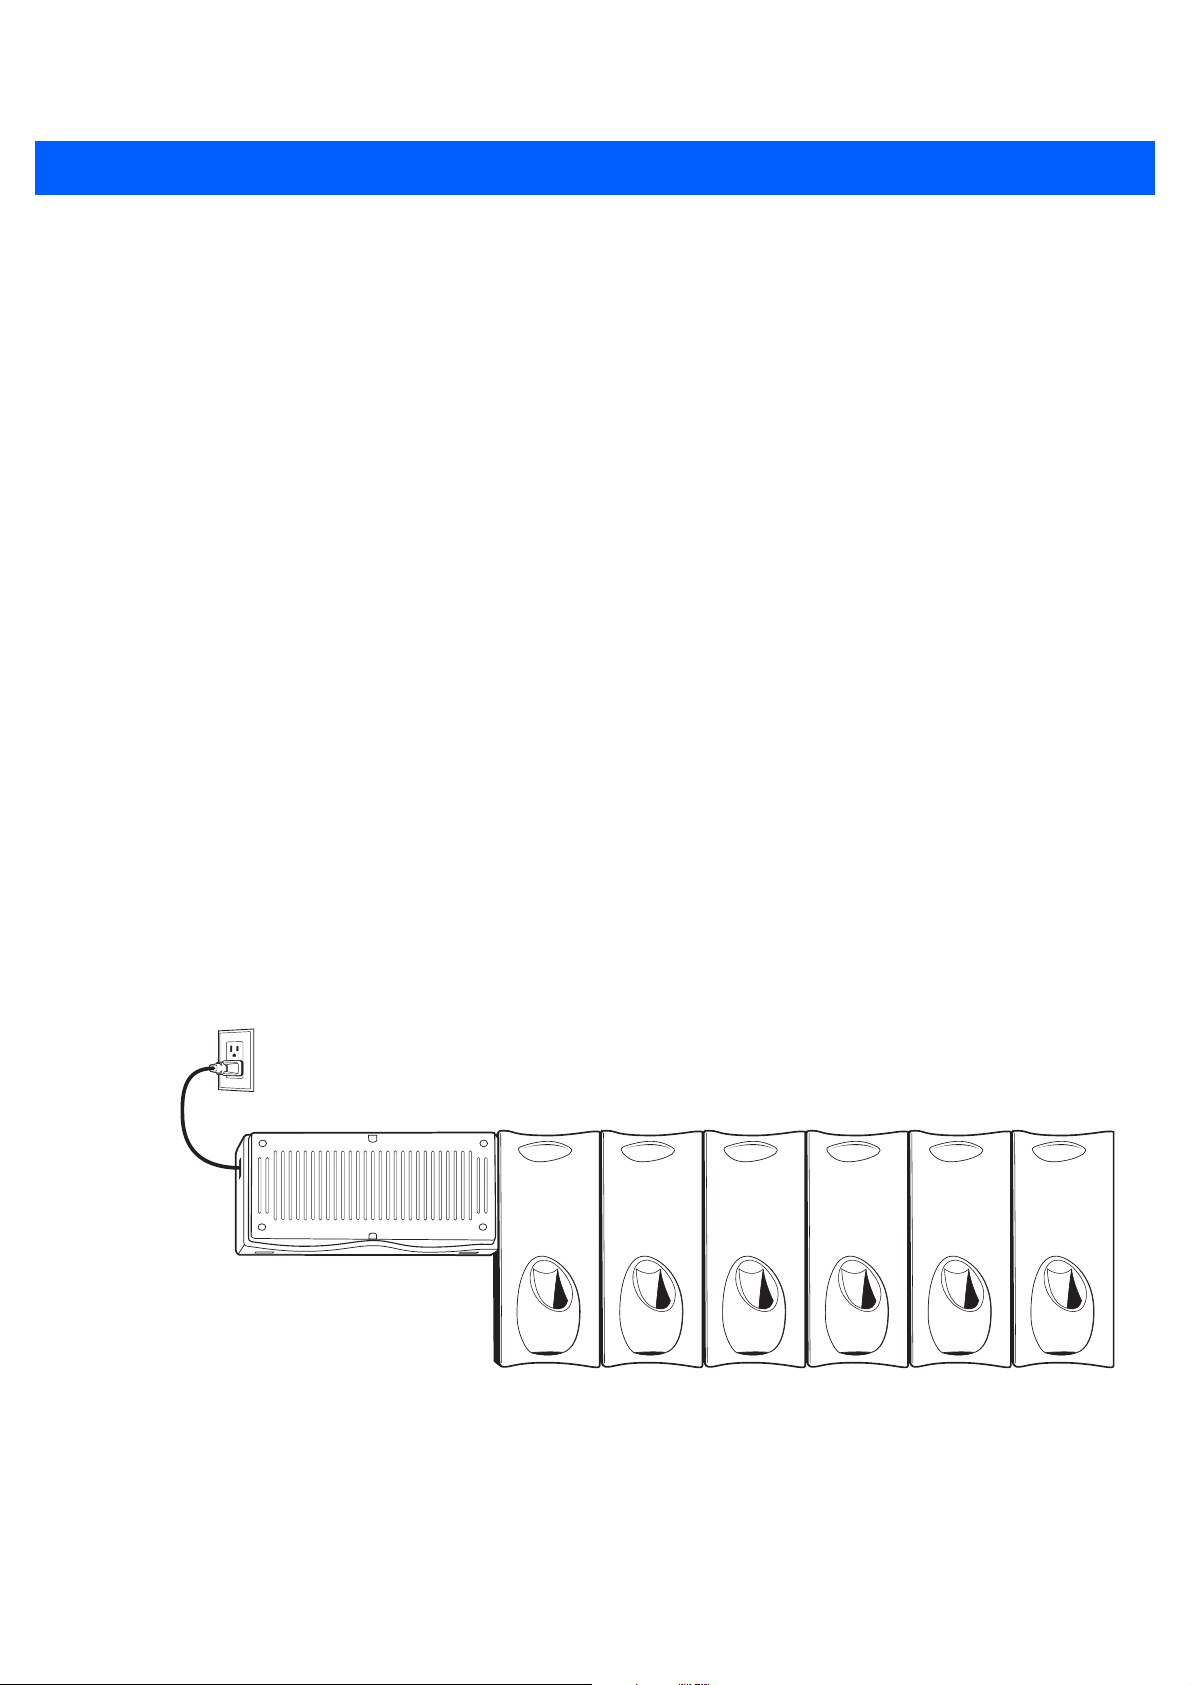
No more than six cradles can be powered off of one power supply and power cable 25-66420-01R.
•
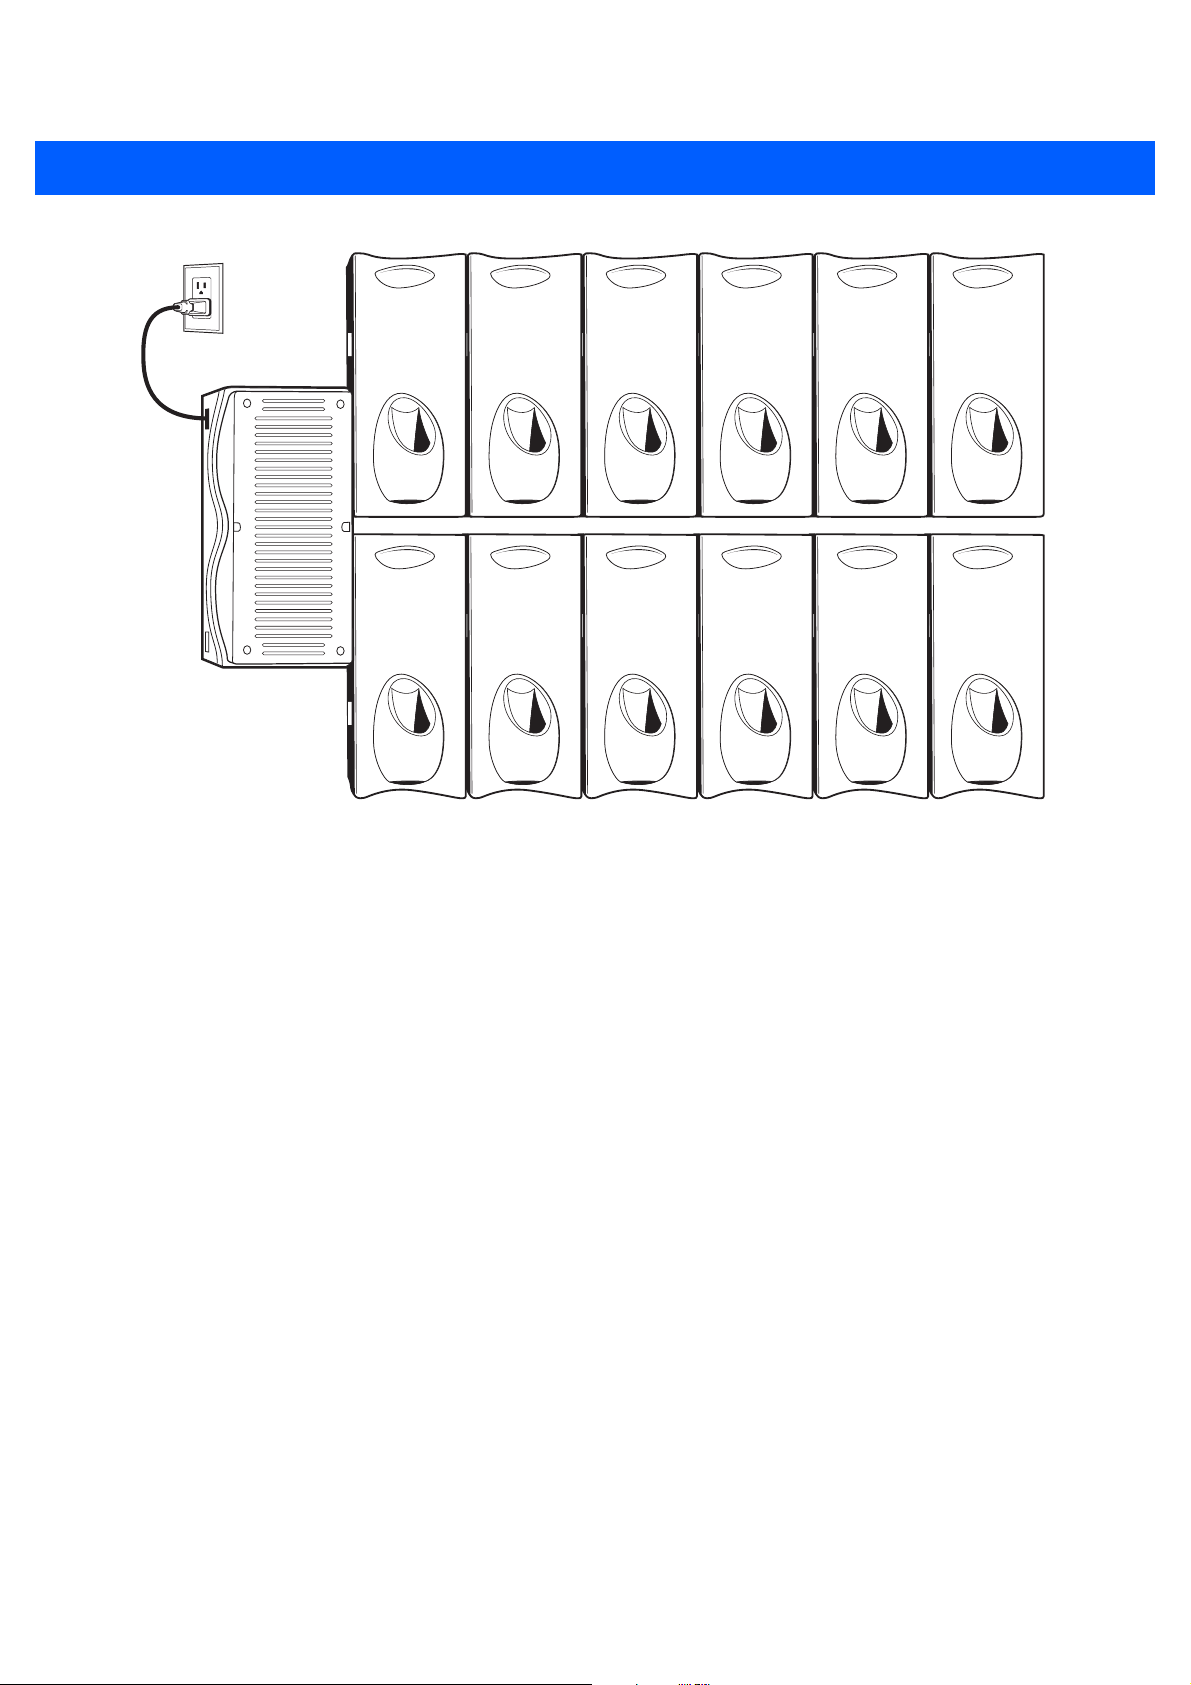
No more than 12 cradles can be powered off of one power supply and “Y” power cable 25-67592-01R.
•
No more than six cradles can be powered off each leg of the “Y” power cable.
•
A power supply cable runs from the power supply to one or two cradles.
•
Cradle interconnection cables run between each successive cradle in the chain.
•
The power supply is air cooled, and as such expects some circulation of fresh air around it. Do not
enclose it in a small airtight enclosure.
•
Power supplies must be mounted in their natural, landscape orientation. They contain fans and their
vents must allow for the free flow of air.
•
Power supplies should be mounted either above or below dispensers and entrance heads. Mounting of
power supplies to the right or left is not preferred.
•
When laying out furniture, cable routing should be as direct as possible. Routing should follow vertical
and horizontal runs through the modules. As part of each power supply that is shipped is a set of labels
numbered 1 through 12. These labels are to be used to track the number of loads on a particular supply.
Each label is affixed to the cradle interconnection cable when a cradle is added to the daisy chain. When
all labels are used, the supply is fully loaded.
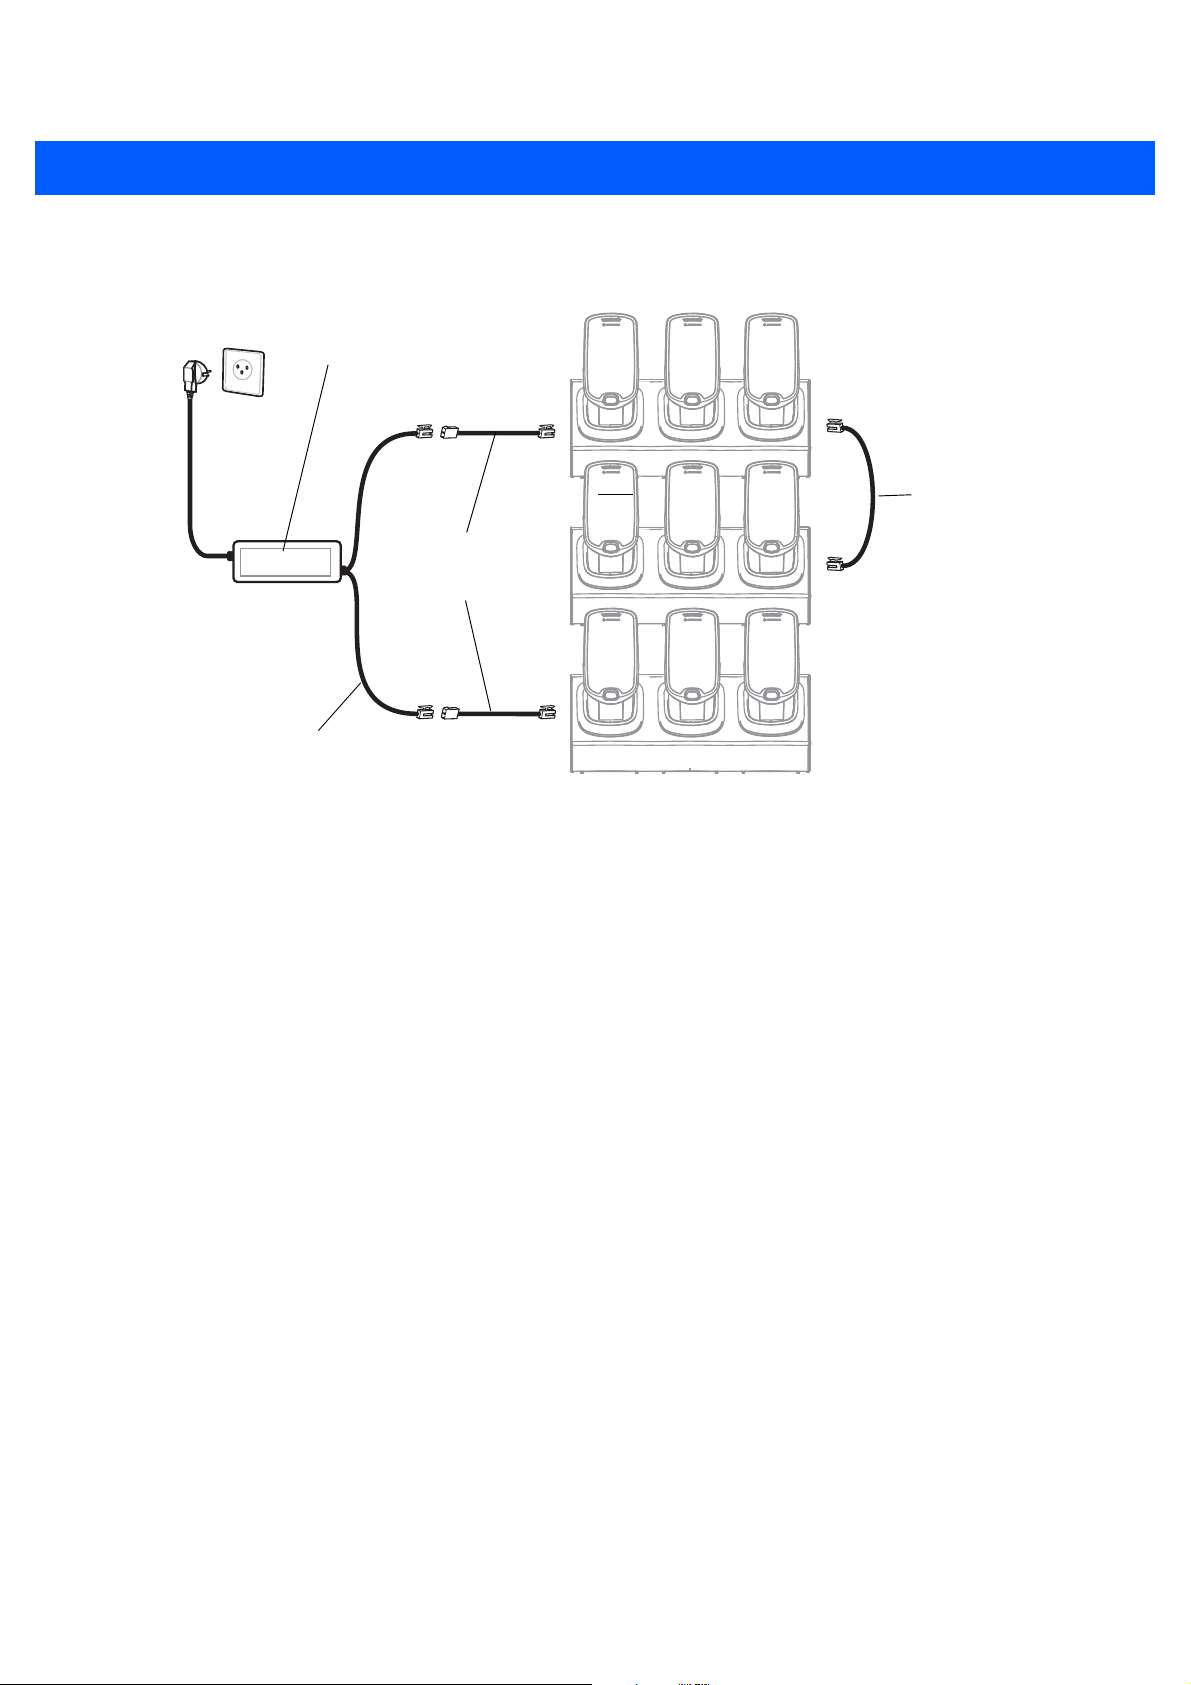
Figure 8-10 shows how the maximum number of cradles can be cabled to a power supply using power cable
25-66420-01R.
Figure 8-11 shows how the maximum number of cradles can be cabled to a power supply using the “Y” power
cable 25-67592-01R. Note that there are only six cradles per leg of the power supply cable, and only 12
cradles in total.
Figure 8-10
Maximum Number of Charge Cradles per Power Supply
Page 10
8 - 8 MC18 Product Reference Guide
Figure 8-11
Maximum Number of Charge Cradles per Power Supply with “Y” Power Cable
Page 11
Installation of the Three Slot Cradle
Installation of the three slot cradle include the following mounting steps:
•
Selecting the mounting configuration (see Mounting Configurations on page 8-9)
•
Selecting the charging mode (see Charging Modes on page 8-11)
•
Mounting the power supply unit (see Mounting the Power Supply Unit on page 8-19)
•
Setting the cradle(s) (see Setting and Controlling the Cradle on page 6-9)
Mounting Configurations
Three slot cradles can be installed in the following mounting configurations:
•
High Density (HD) configuration - Using HD cradles
•
Super High Density (SHD) configuration - Using SHD cradles
•
Desktop configuration - Using stand alone cradle(s) on a flat surface
Cradle Installation 8 - 9
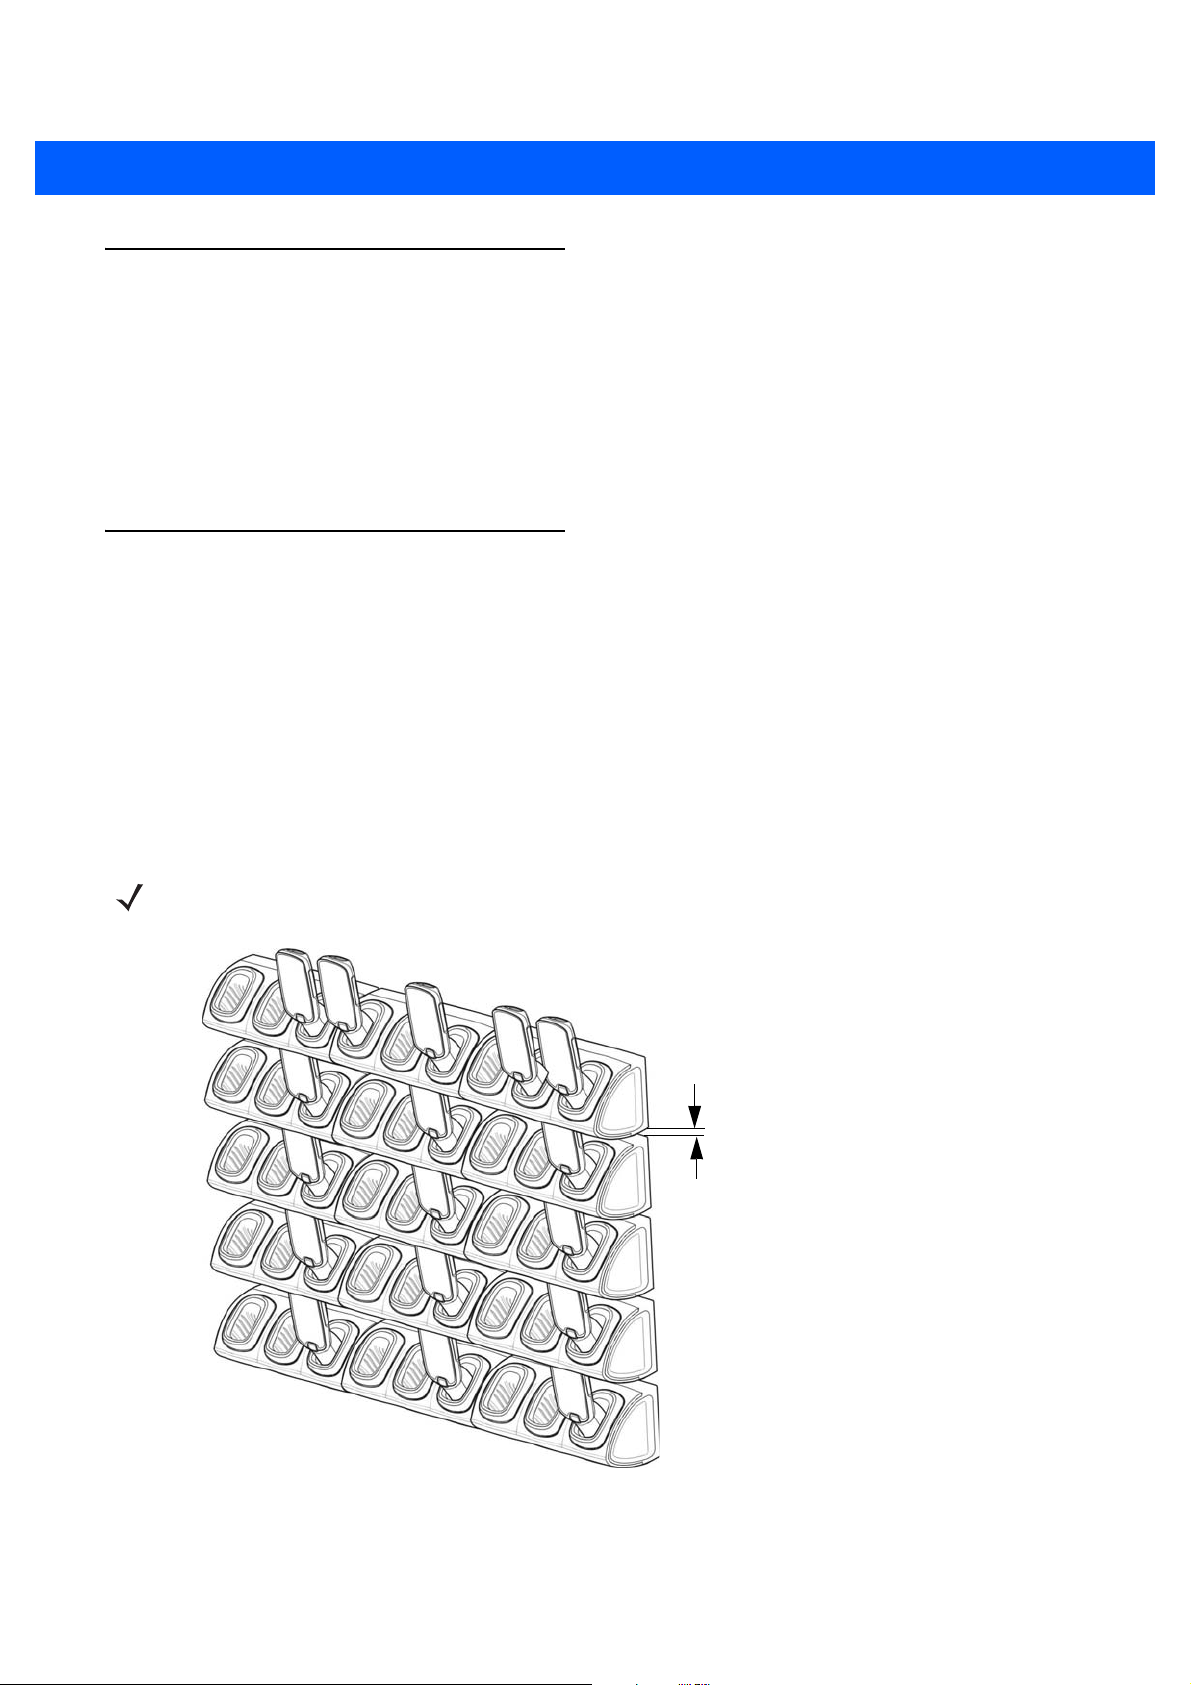
High Density Configuration
The cradle can be installed in high density configuration so that the display of the MC18 units is facing the user.
In such configuration, cradles are installed in a vertical gap of 35mm between each other.
In high density configuration, the MC18 units have 10 Degrees forward-facing tilt that should be taken in consideration
NOTE
if furniture is planed to be placed in front of the dispenser wall.
35mm
Figure 8-12
Installation in High Density Configuration
Page 12
8 - 10 MC18 Product Reference Guide
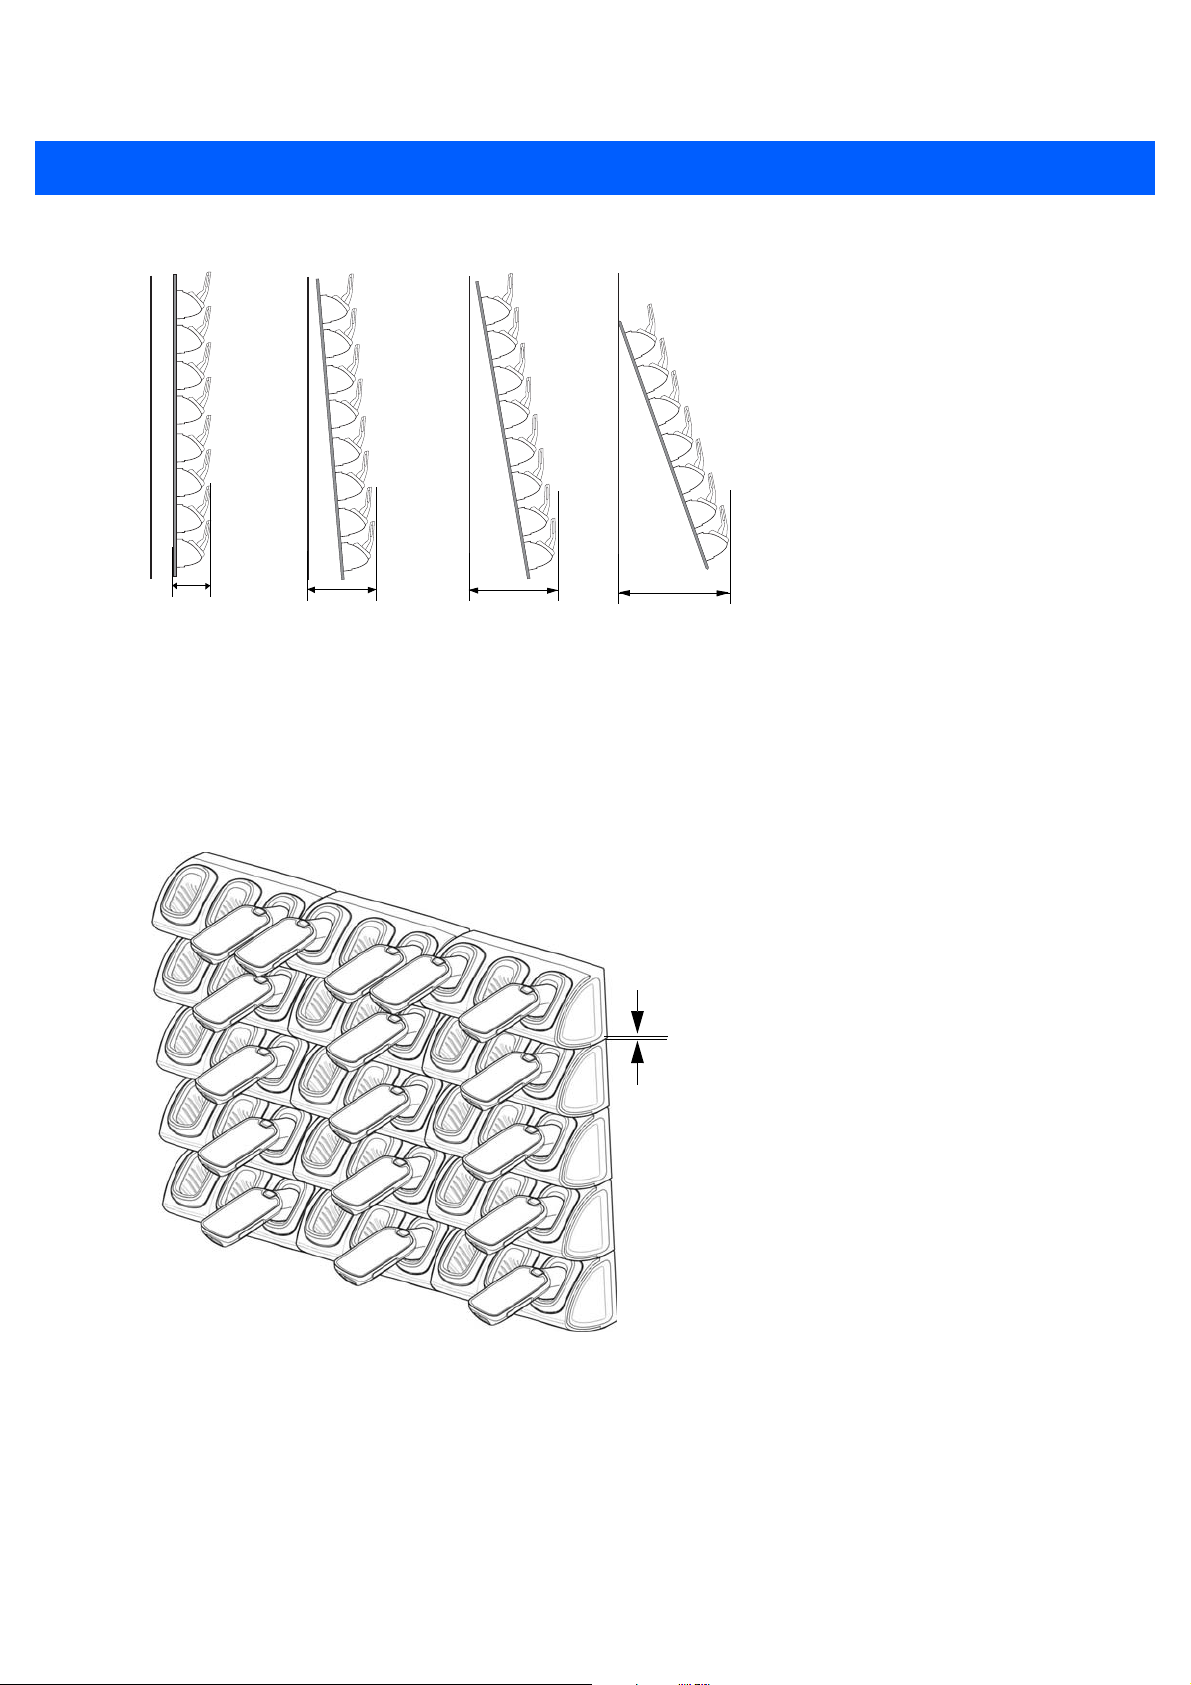
274 mm
301 mm
387 mm
499 mm
0
°
5
°
10
°
10
°
The installation of the dispenser wall can be design so that it tilts backward slightly in the following angles:
Figure 8-13
Super High Density Configuration
The cradle can be installed in super high density configuration so that the display of the MC18 units is facing
up. In such configuration, cradles are installed with vertical gap of 7mm from each other to allow more cradles
per given area.
Dispenser Wall Angles
7mm
Figure 8-14
Installation in Super High Density Configuration
Page 13
Cradle Installation 8 - 11
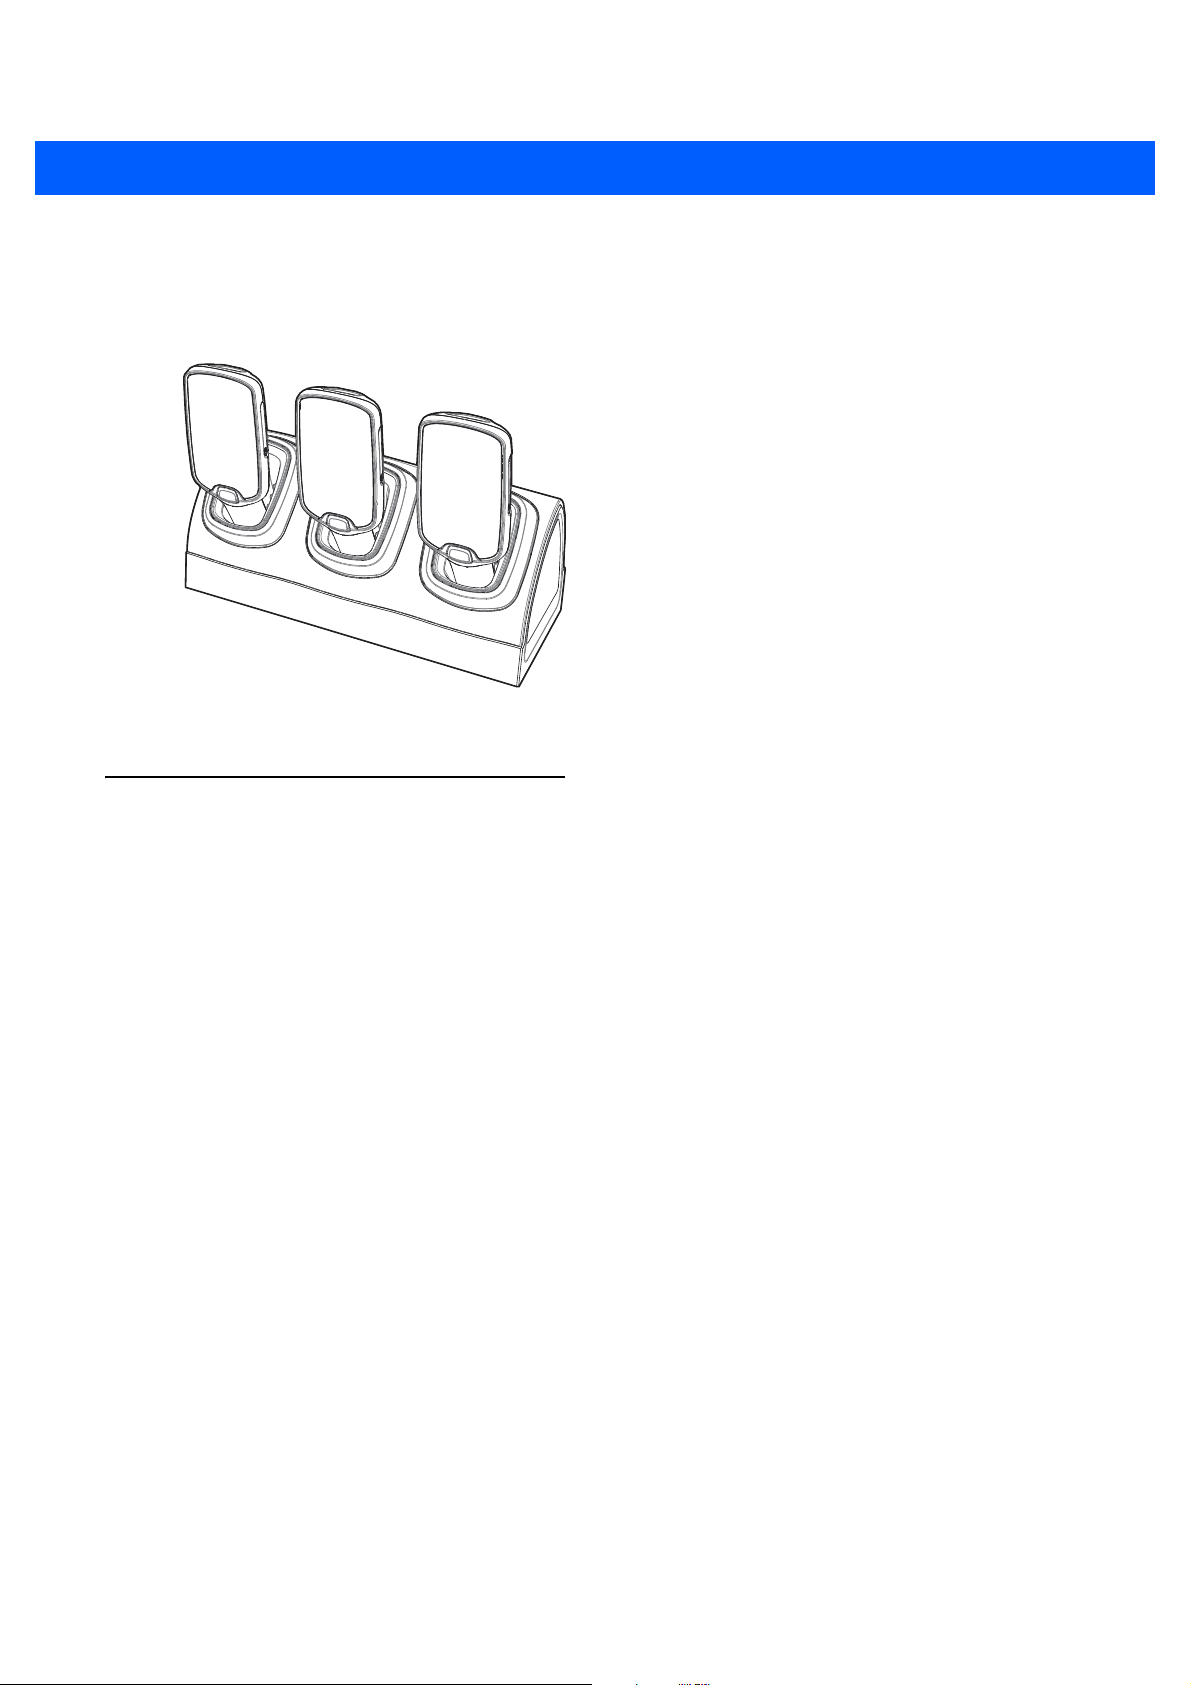
Desktop Configuration
In desktop configuration, the cradle can be placed on a flat tabletop or shelf in checkout locations or back room
locations.
Figure 8-15
Installation in Desktop Configuration
Charging Modes
Three slot cradles can be installed in the following charging modes:
•
Standard charging
•
Fast charging
There are some general charging considerations that must be taken into account when designing a dispenser
and ordering hardware elements of a system:
Standard Charging Mode
•
In standard charging mode, no more than four cradles can be powered off of one power supply unit (p/n
PWRS-14000-241R) using “Y” power cable (p/n 25-67592-01R or p/n 25-66210-01R), power extension
cables (p/n CBL-MC18-EXINT1-01) and interconnect cables (p/n 25-66431-01R).
•
In standard charging mode, the current draw by each docked MC18 can reach a maximum of 1A.
•
Cable routing should be as direct as possible. Routing should follow vertical and horizontal runs through
the modules.
Page 14
8 - 12 MC18 Product Reference Guide
Figure 8-16 shows how the four cradles can be cabled to a power supply unit in standard charging mode.
Power Supply Unit
PWRS-14000-241R
Power Extension Cable
(p/n
CBL-MC18-EXINT1-01)
“Y” Power Cable
25-67592-01R or
25-66210-01R
Interconnect Cable
(p/n 25-66431-01R)
Figure 8-16
Standard Charging Mode - Cable Connections
Fast Charging Mode
•
In fast charging mode, no more than three cradles can be powered off of one power supply unit (p/n
PWRS-14000-241R) using “Y” power cable (p/n 25-67592-01R or p/n 25-66210-01R), power extension
cables (p/n CBL-MC18-EXINT1-01) and interconnect cable (p/n 25-66431-01R).
•
In fast charging mode, the current draw by each docked MC18 can reach a maximum of 1.5A.
•
Cable routing should be as direct as possible. Routing should follow vertical and horizontal runs through
the modules.
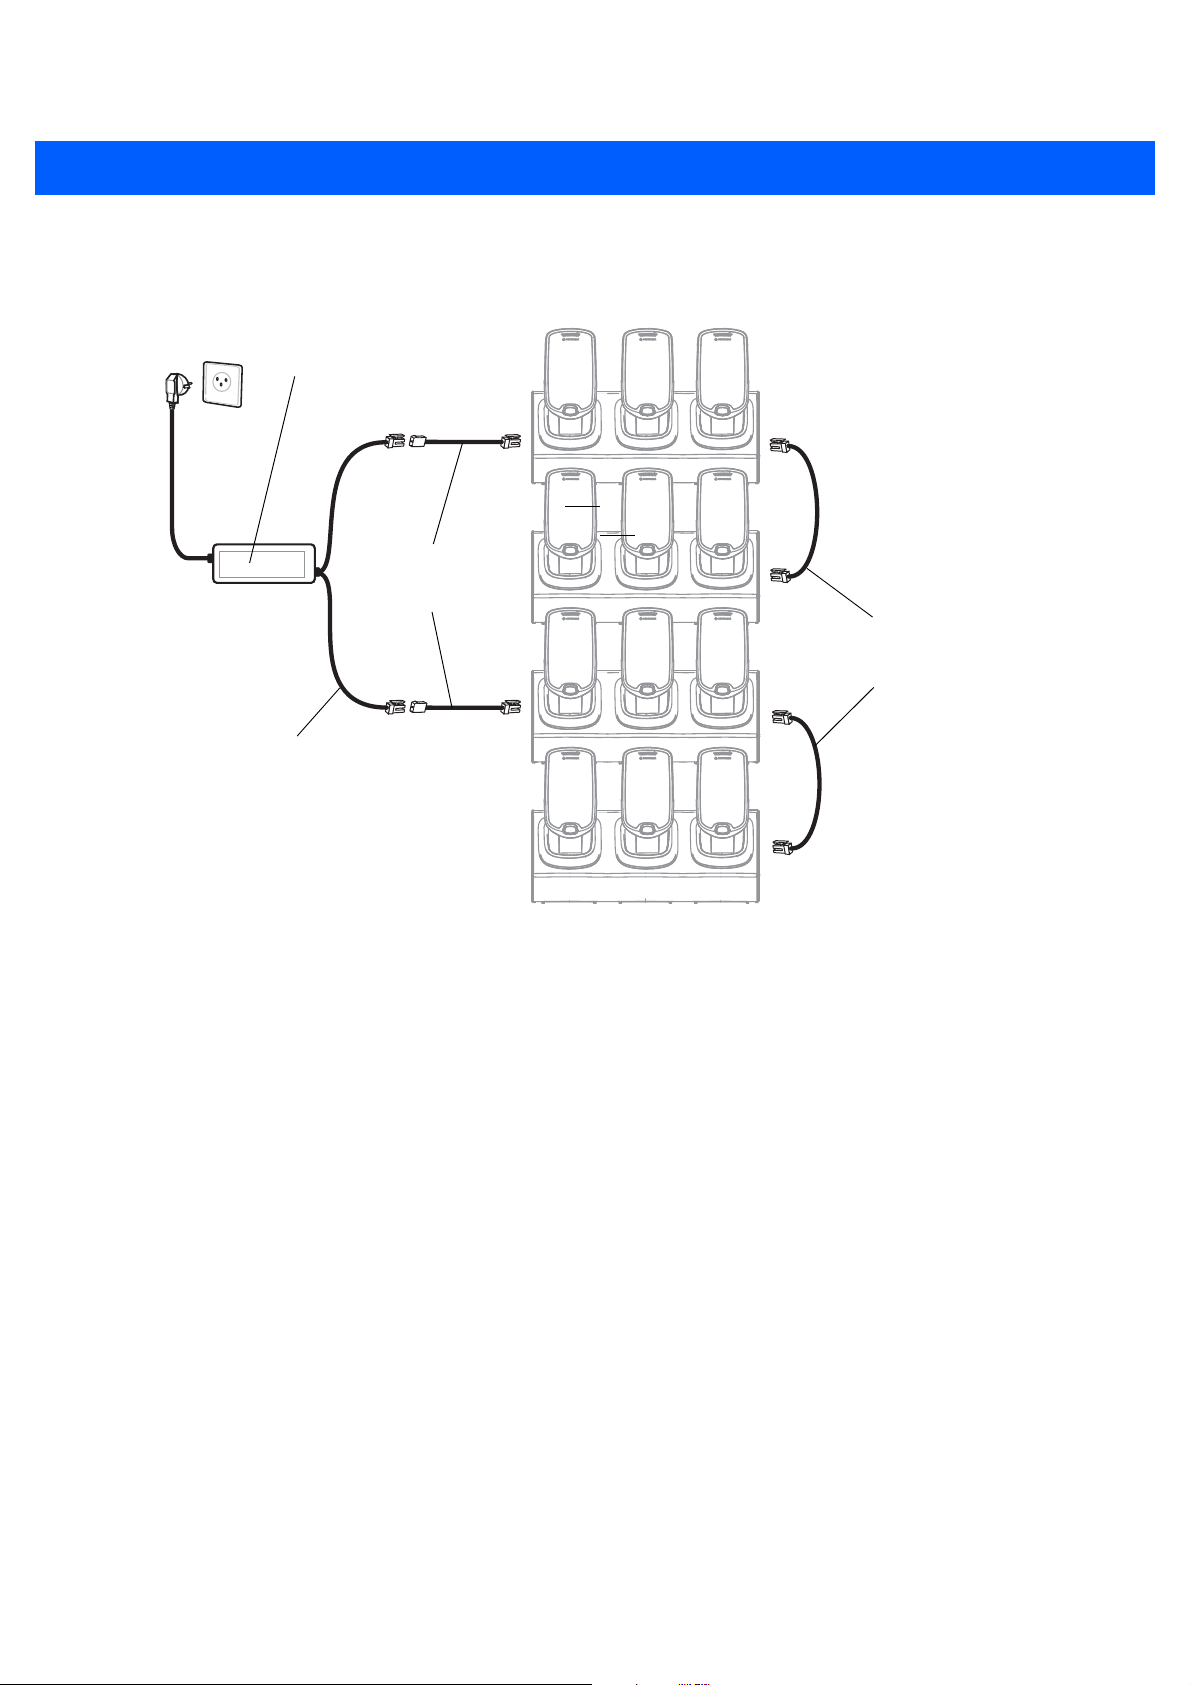
Figure 8-17 shows how the three cradles can be cabled to a power supply unit in fast charging mode.
Page 15
Power Supply Unit
PWRS-14000-241R
“Y” Power Cable
25-67592-01R or
25-66210-01R
Cradle Installation 8 - 13
Interconnect Cable
(p/n 25-66431-01R)
Power Extension Cable
(p/n
CBL-MC18-EXINT1-01)
Figure 8-17
Fast Charging Mode Cable Connections
Page 16
8 - 14 MC18 Product Reference Guide
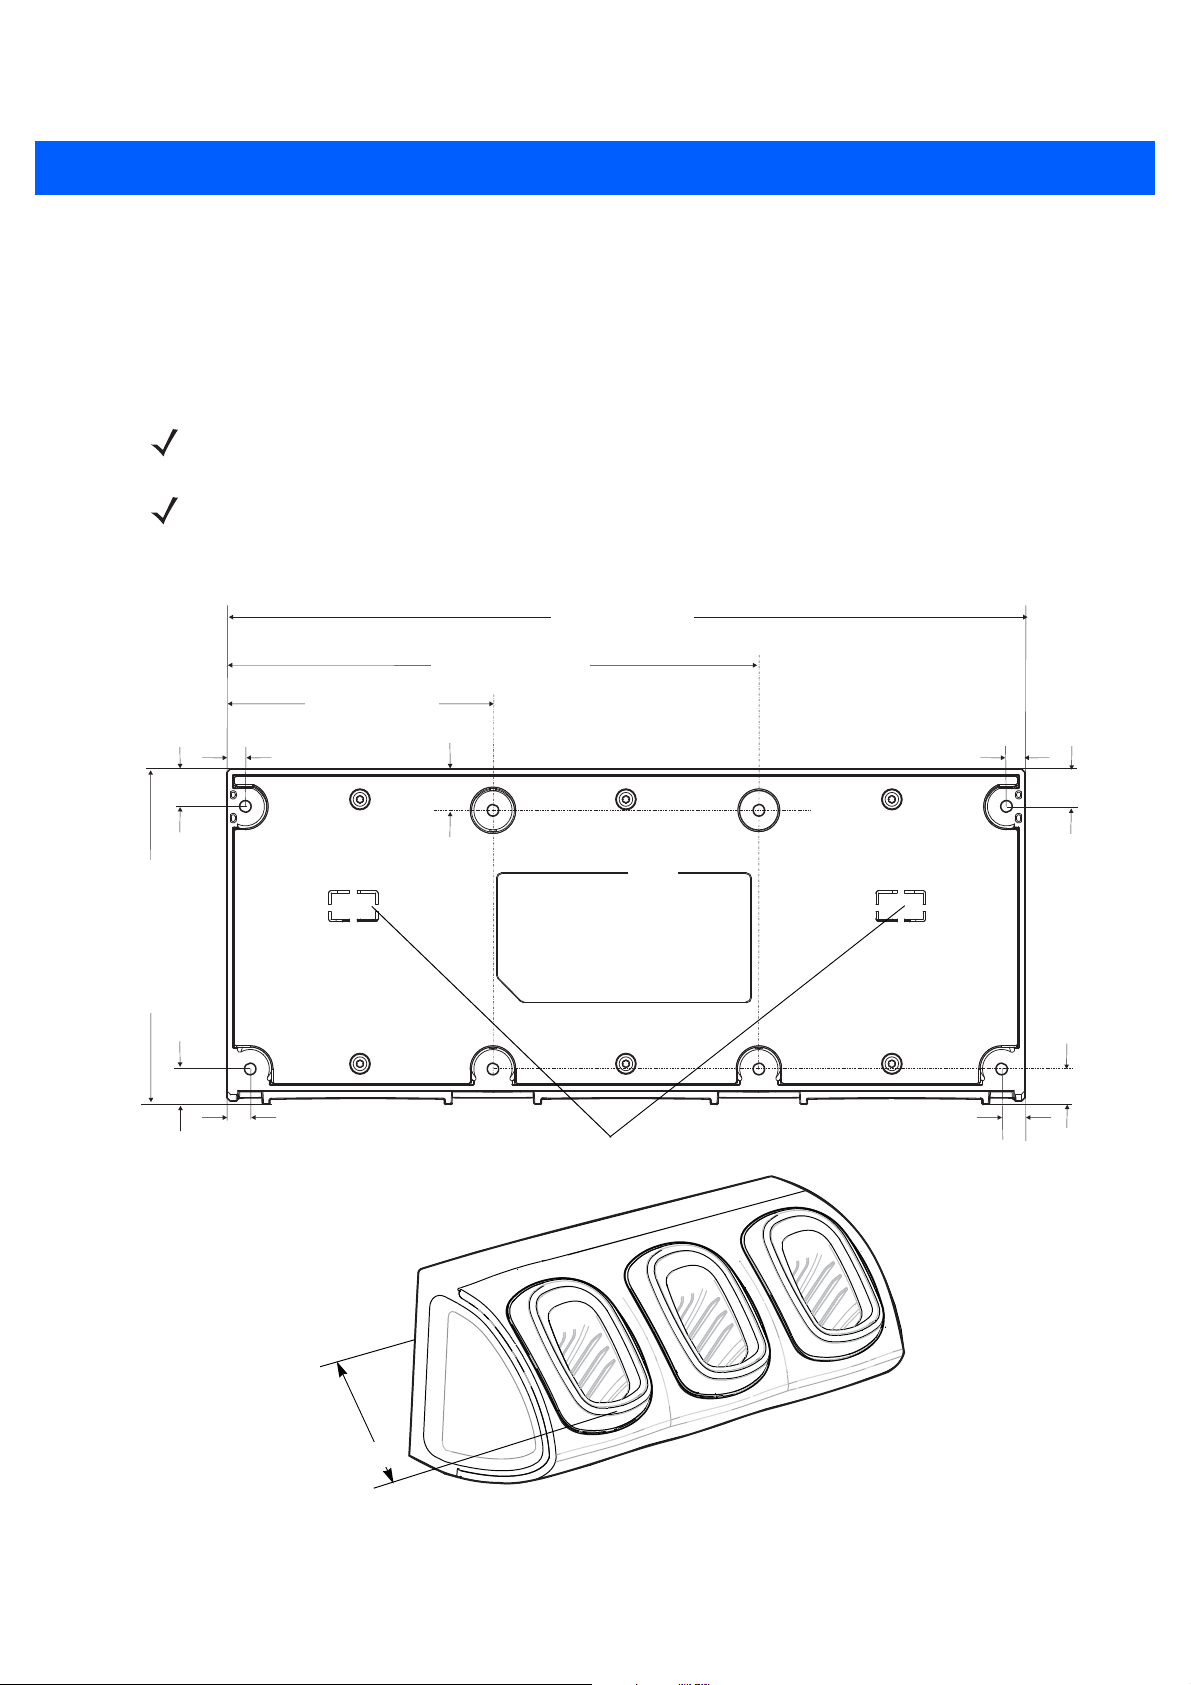
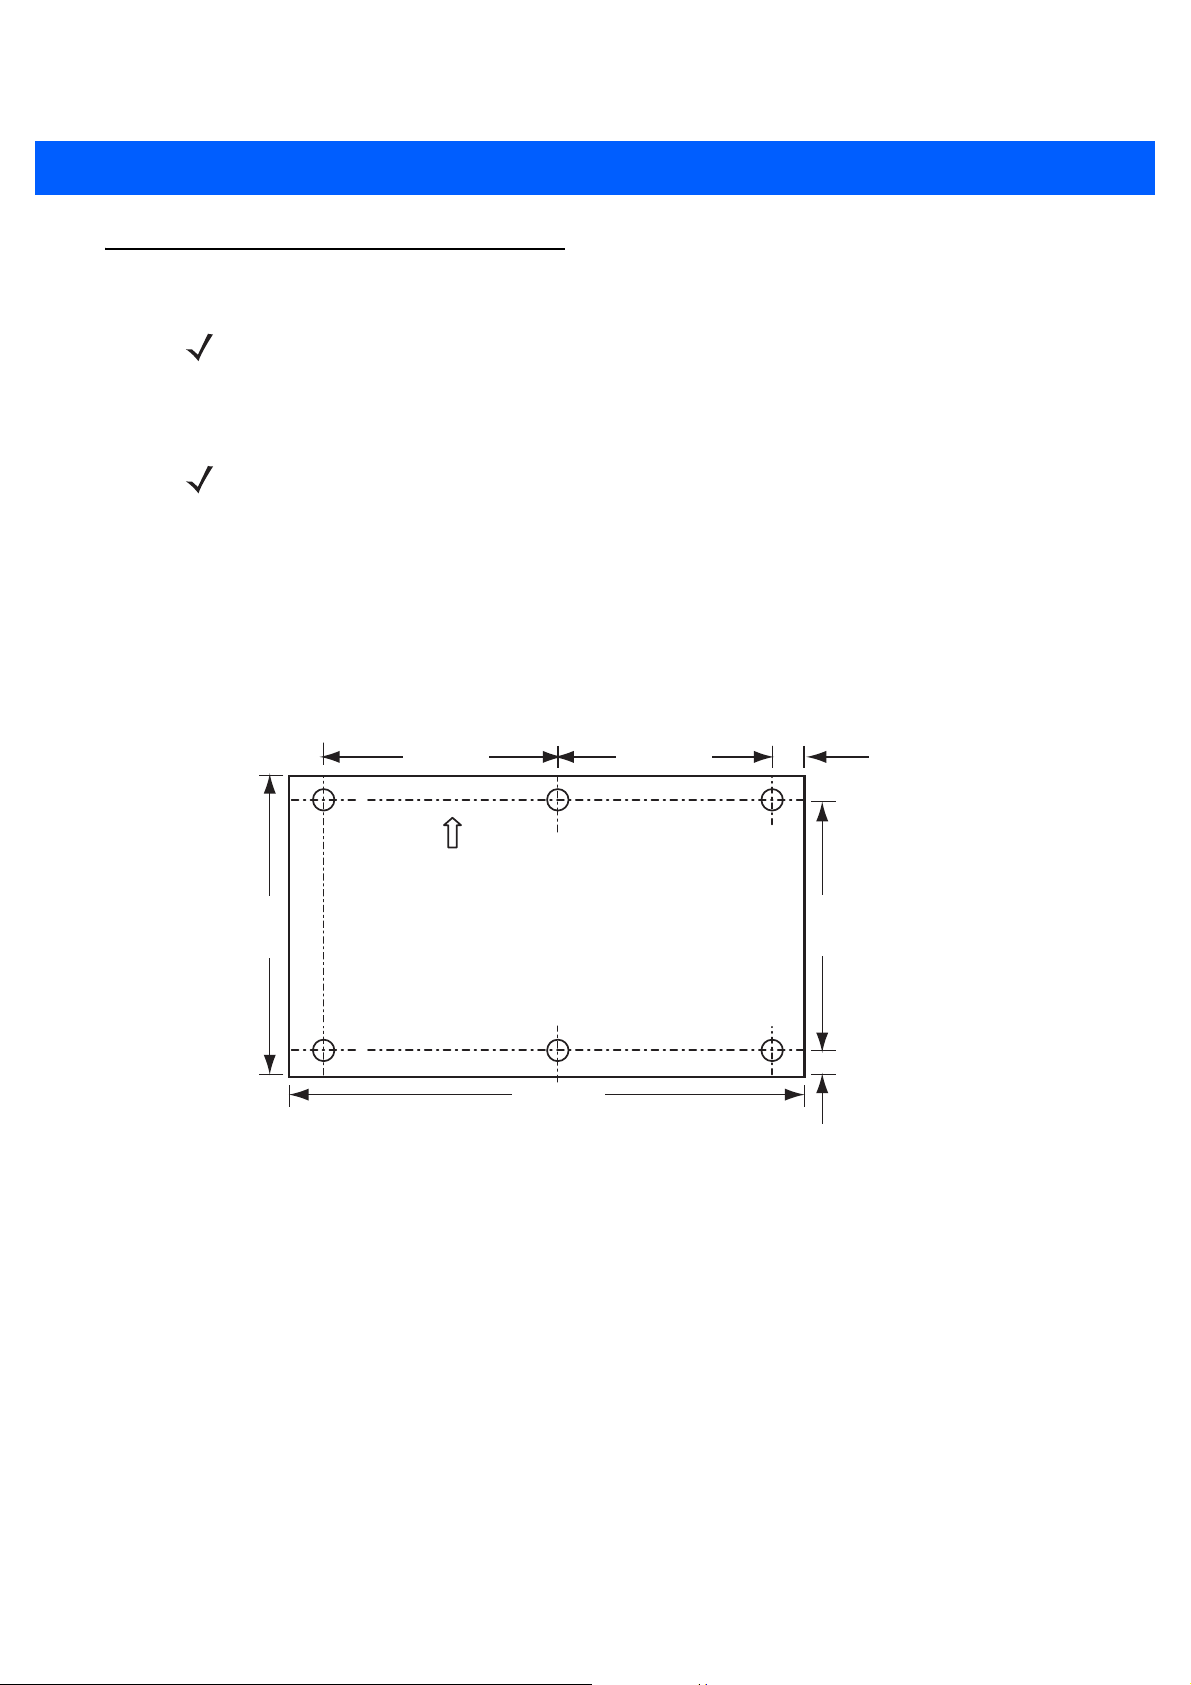
Mounting the Three Slot Cradle on a Dispenser Wall
The cradle can be bolted to a dispenser wall or any supporting furniture using eight mounting holes. The back
cover of the cradle has two access holes for routing power cables to \ from a power supply unit or adjacent
cradle. Figure 8-18 provides a mounting template for cradle installation.
Perform this procedure to mount the cradle on a dispenser wall:
CAUTION
NOTE The following procedure is an example installation of three slot cradles in fast charging mode - high density
1. Use the wall mount template to plan and mark the screw locations on the dispenser wall.
14.4 mm (0.56”)
134.6 mm (5.3”)
DO NOT connect more than four cradles to a single power supply unit.
DO NOT connect the power supply unit to power outlet until all installation steps are completed.
configuration.
312 mm (12.28”)
208.4 mm (8.2”)
104.2 mm (4.1”)
7.2 mm (0.28”)
15.8 mm (0.63”)
7.2 mm (0.28”)
14.4 mm (0.56”)
9.1 mm (0.35”)
13.6 mm (0.53”)
Depth of cradle 125 mm (3.9”)
Figure 8-18
Three Slot Cradle - Mounting Template and Overall Depth
9.1 mm (0.35”)
Access Holes
13.6 mm (0.53”)
Page 17
Cradle Installation 8 - 15
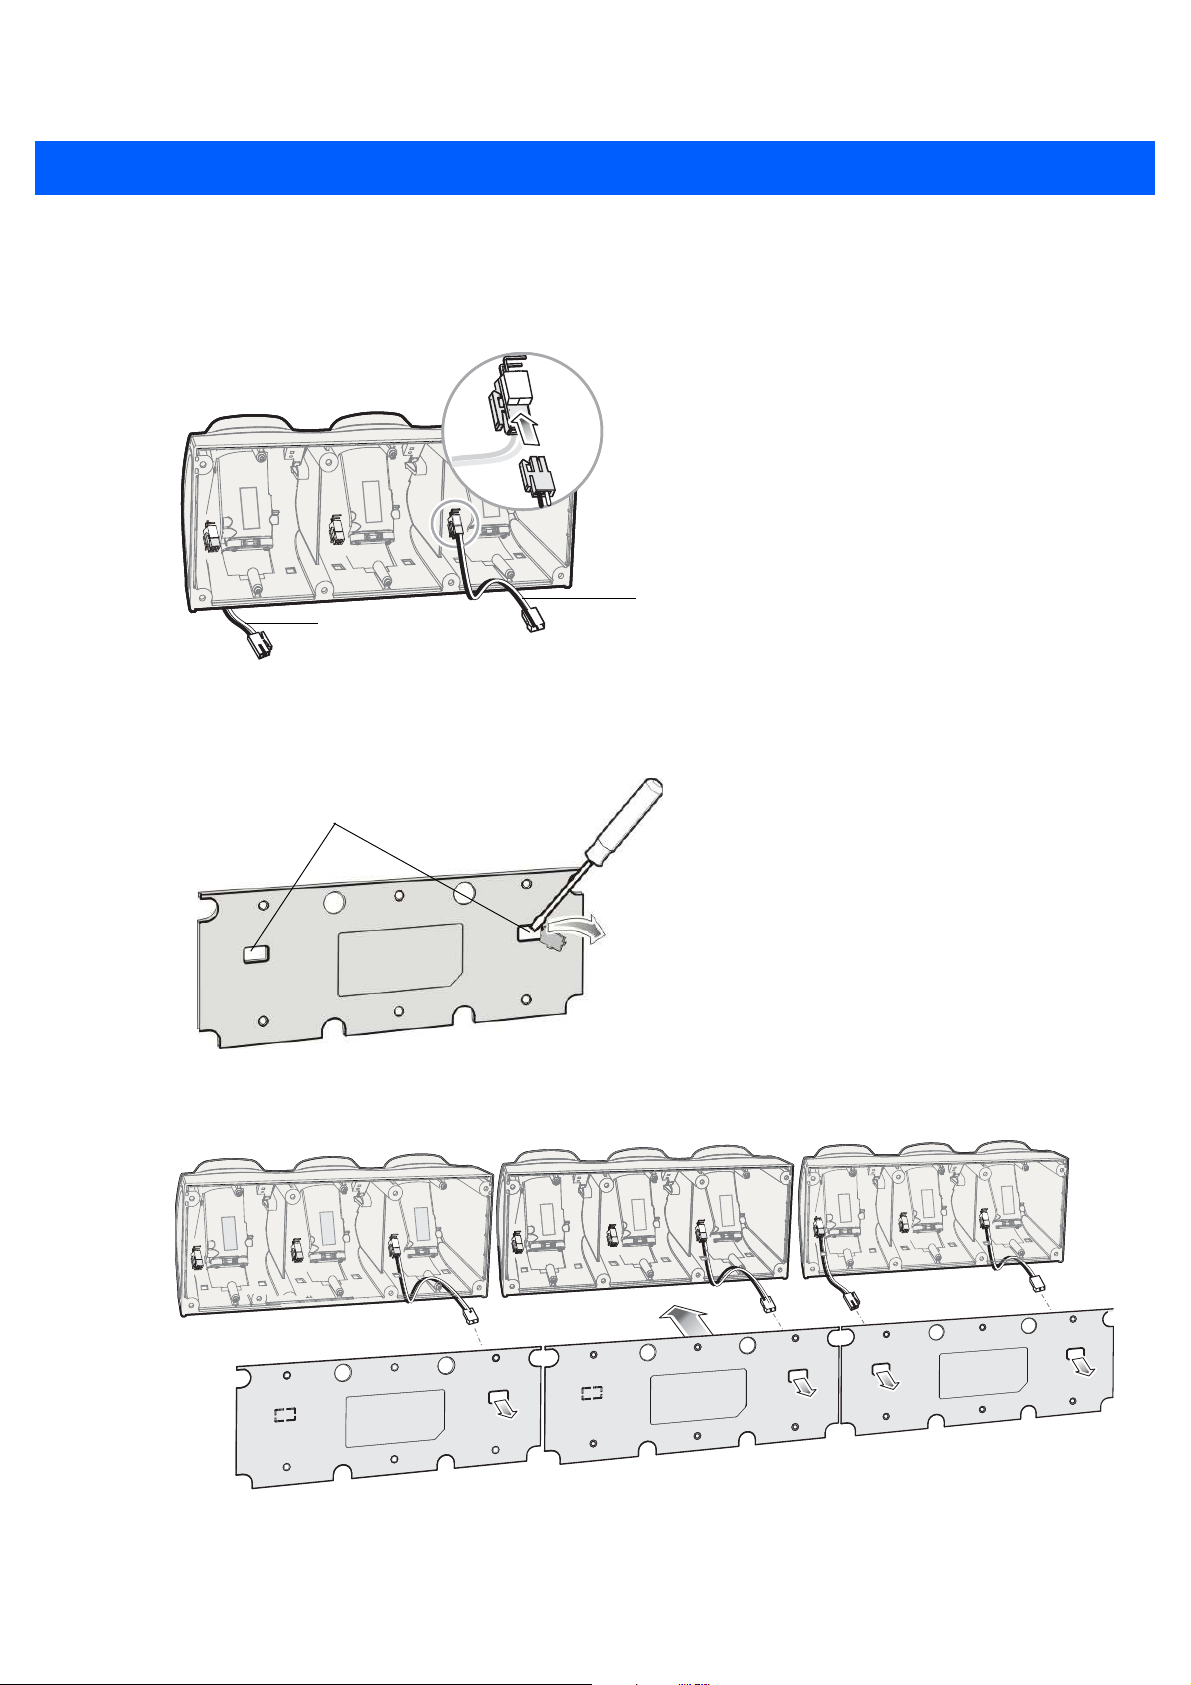
2. In all cradles, plug the power extension cable (p/n CBL-MC18-EXINT1-01) to free the connector on left
slot.
3. Plug interconnect cable (p/n 25-66431-01R) to free connector on right slot.
Power Extension Cable
Interconnect Cable
(p/n 25-66431-01R)
(p/n CBL-MC18-EXINT1-01)
Figure 8-19
4. On all the back covers, knock-out the stamped access hole(s).
Figure 8-20
5. Route interconnect cables through access holes in back covers.
Three Slot Cradle - Cable Connections
Stamped Access Hole(s)
Three Slot Cradle - Stamped Access Hole(s)
Figure 8-21
Three Slot Cradle - Back Cover Cable Routs
Page 18
8 - 16 MC18 Product Reference Guide
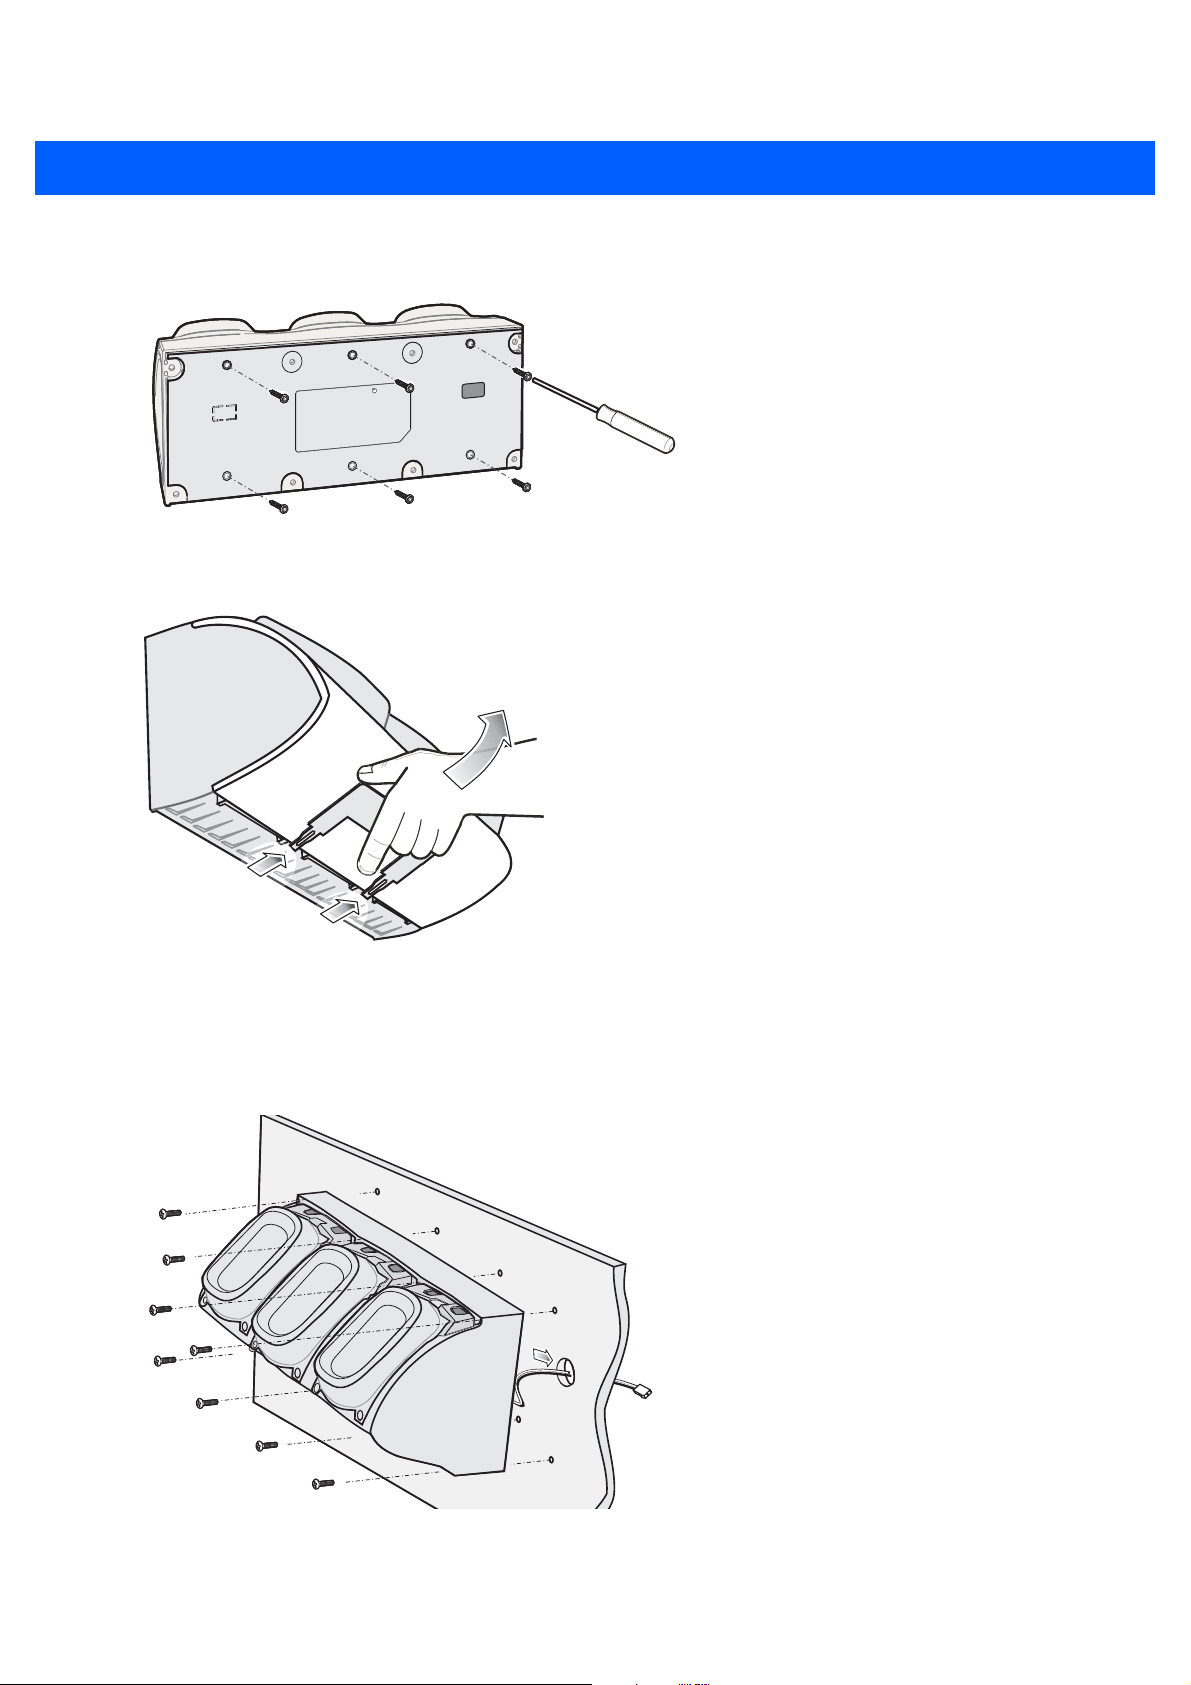
6. Secure the back covers to cradles using six T10 Torx screws (supplied) Torque screws to 6 Kgf-cm (5.2
in-lb).
Figure 8-22
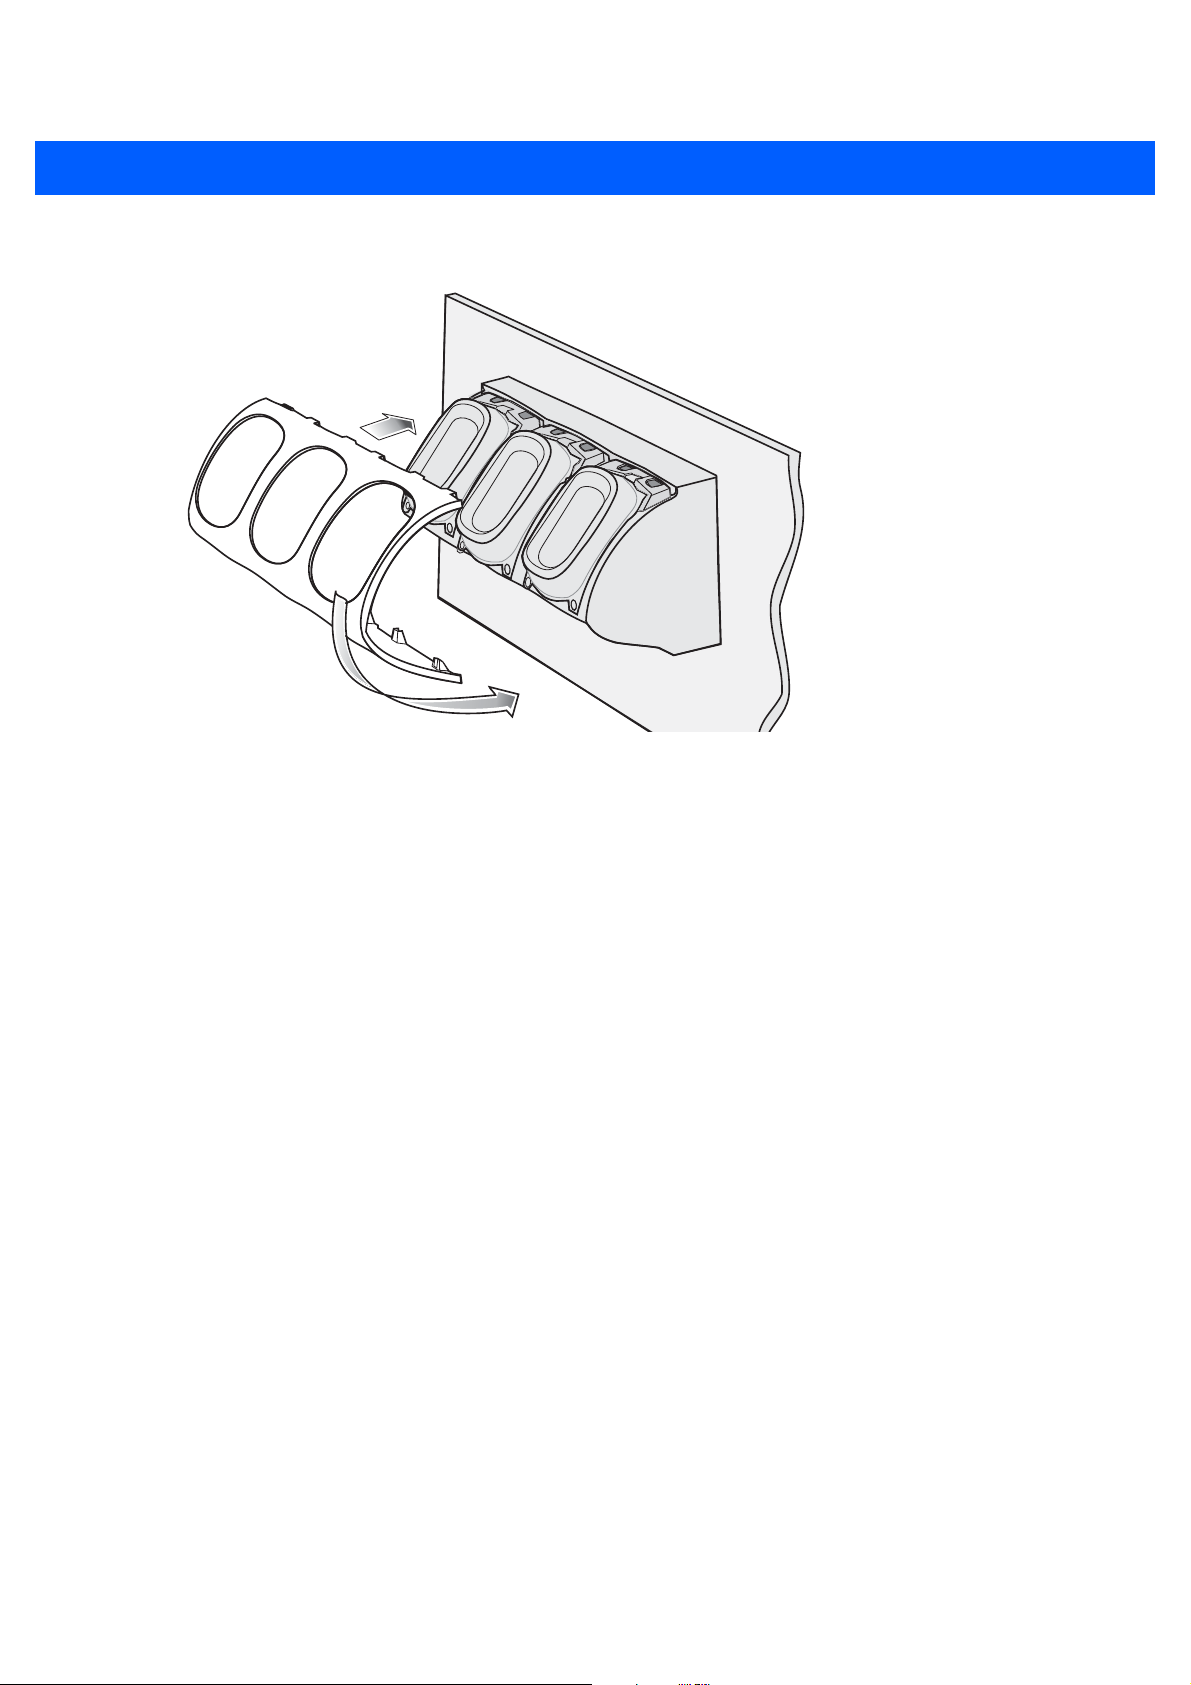
7. Insert the front cover removal tool into two slots, lever upwards and pull to remove front cover from cradle.
Figure 8-23
8. Position the cradle on the dispenser wall and route all interconnect cables through the access holes in the
Three Slot Cradle - Securing the Back Cover
Three Slot Cradle - Removing Front Cover
dispenser wall.
9. Fasten the cradle to the wall using eight screws (not supplied). Ensure to use additional wall mounting
hardware, as needed, for safe mounting according to the wall type.
Figure 8-24
Three Slot Cradle - Fastening the Cradle to a Wall
Page 19
Cradle Installation 8 - 17
10. Insert tabs on upper side of front cover into slots on cradle and rotate cover down until it snaps into place.
1
2
Figure 8-25
11. Plug Power Extension Cable (p/n CBL-MC18-EXINT1-01) to interconnect cable (p/n 25-66431-01R).
12. Plug “Y” cable (25-67592-01R) to Interconnect cables (p/n 25-66431-01R).
13. Plug “Y” cable (25-67592-01R) to power supply unit.
14. Secure power supply unit (p/n PWRS-14000-241R) to the back of the dispenser wall.
Three Slot Cradle - Connecting the Front Cover
Page 20
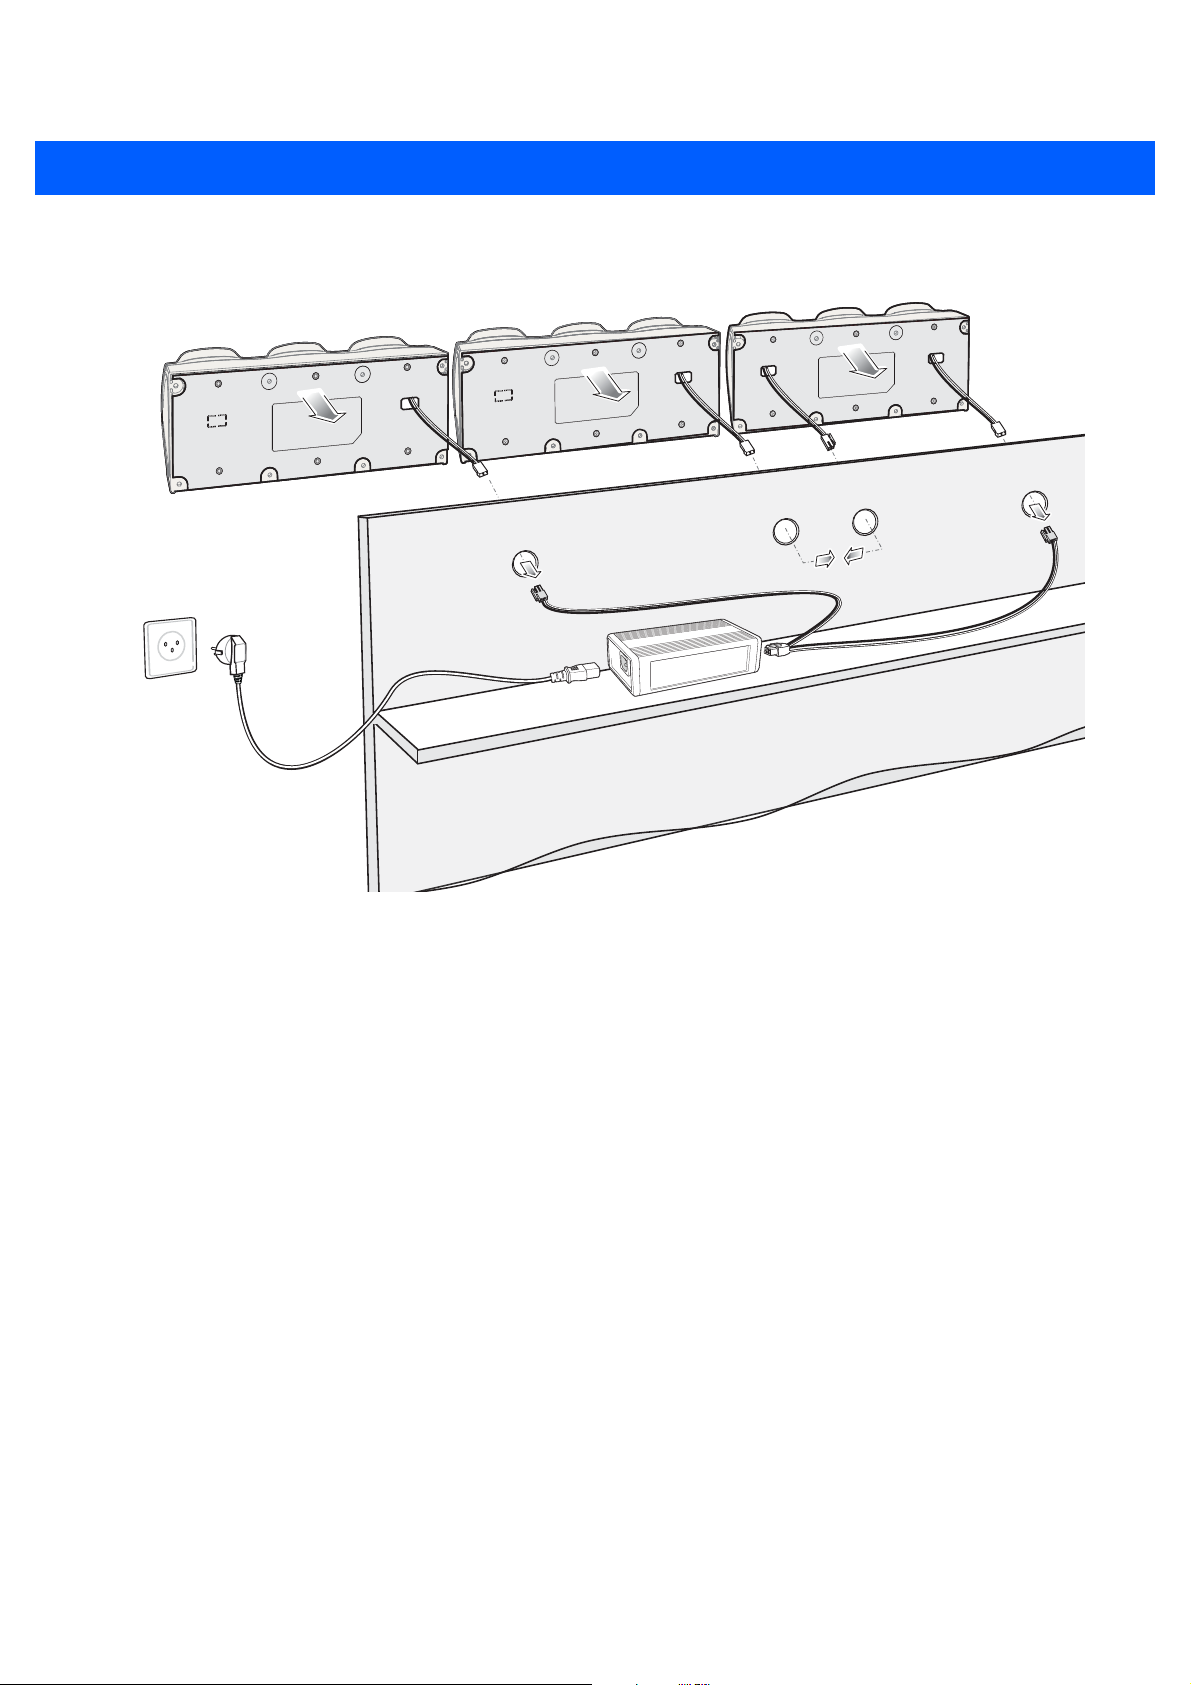
8 - 18 MC18 Product Reference Guide
15. Connect the power cord to the power supply unit and to a 110/220 VAC outlet.
Figure 8-26
16. Place the socket onto the cradle and secure the four screws.
17. Place the socket cover onto the cradle and secure the two screws.
Three Slot Cradle - Connection to Power Supply Unit
Page 21
Mounting the Power Supply Unit
NOTE The power supply unit should be mounted in landscape orientation.
Power supplies must be mounted in their natural, landscape orientation. They contain fans and their vents
must allow for the free flow of air.
IMPORTANT The power supply unit is air cooled and requires circulation of free air around it. Do not enclose it in a
small airtight enclosure other than plastic housing, p/n PSS-3PS04-00R.
The power supply can be housed in an optional plastic housing, p/n PSS-3PS04-00R, to match the cradles and
hide bare power supplies and cables. This section provides the information required to mount the plastic
housing
To install the power supply unit inside the plastic housing:
1. Use the mounting template of the power supply housing to plan and mark the screw locations on the
dispenser wall.
Cradle Installation 8 - 19
68.4 mm
(2.693”)
109.4 mm
(4.307”)
UP
135.9 mm
(5.35”)
254.0 mm
(10.00”)
(View from Inside Housing)
The depth of the fully-assembled power supply decorative housing is 81.23 mm (3.198”).
Figure 8-27
2. Feed cables through access holes in bottom housing.
Power Supply Housing Mounting Template
115.9 mm
(4.562”)
10 mm
(0.394”)
38.1 mm
(1.50”)
3. Plug connectors into power supply.
4. Place power supply into bottom housing.
5. Place two mounting brackets over power supply and secure each mounting bracket with two screws.
Page 22

8 - 20 MC18 Product Reference Guide
Output Cable
Screws
Mounting bracket
AC line Cord
Bottom Housing
Figure 8-28
6. Align top housing over bottom housing and secure using six screws.
Figure 8-29
Power Supply Assembly
Screws
Top Housing
Top Housing Installation
Page 23

CHAPTER 9 APPLICATION DEPLOYMENT
Software Installation on Development PC
To develop applications to run on the MC18, use one or all of the following:
•
Microsoft Visual Studio 2005/2008
•
Enterprise Mobility Developer Kit (EMDK) for C/C++
•
Enterprise Mobility Developer Kit (EMDK) for .NET
•
Enterprise Mobility Developer Kit (EMDK) for Pocket Browser
•
Windows CE Platform PSDK for MC18No
•
Active Sync v4.5/ WMDC v6.1
•
Device Configuration Package (DCP) for 8 v99.45.00xx.
Refer to the Developer Guide, p/n 72E-71161-xx, for detailed information on the EMDKs.
The Windows CE Platform SDK for the MC18xxc50 is used in conjunction with the EMDK for C to create
Windows CE applications for the MC18. The Platform SDK installs a new Windows CE device type and its
associated libraries onto the development PC.
The Device Configuration Package (DCP) is required to create and download hex images that represent flash
partitions to the MC18. The DCP includes the user documentation, flash partitions, Terminal Configuration
Manager (TCM) and the associated TCM scripts.
Device Configuration Package
Use this procedure to install the DCP for MC18xxc50:
1. Download the DCP from the Support Central web site,http://www.motorolasolutions.com/support:
a. On http://www.motorolasolutions.com/support, select Software Downloads.
b. Select Mobile Computers and then select MC18.
c. Select the Device Configuration Package (DCP).
d. Save the .exe file to the development computer.
Page 24

9 - 2 MC18 Product Reference Guide
2. Locate the .exe file on the development computer, double-click the file, and follow the install screen
prompts.
3. Once installed, access the major components of the DCP from the Symbol Device Configuration Package
(DCP) for MC18xxc50 program group of the Windows Start Menu.
Platform SDK
Different Platform SDKs are required for the Microsoft® Windows CE 7.0 Professional Core platforms.
Use this procedure to download and install the appropriate Platform SDK:
1. Download the appropriate Platform SDK from the Support Central web site,
http://www.motorolasolutions.com/support:
a. On http://www.motorolasolutions.com/support.com select Software Downloads.
b. Select Mobile Computers and then select MC18.
c. Select the Platform SDK.
d. Save the .exe file to the development computer.
2. Run the file and follow the screen prompts to install.
Enterprise Mobility Developer Kits
Use this procedure to install an EMDK:
1. Download the EMDK from the Support Central web site,http://www.motorolasolutions.com/support:
a. Onhttp://www.motorolasolutions.com/support, select Developer Downloads and sign in.
b. Select Mobile Computers and then select MC18.
c. Select the latest version of the Enterprise Mobility Developer Kit.
d. Download the .exe file to the development computer.
2. Double-click the executable file and follow the install screen prompts.
Installing Other Development Software
Developing applications for the MC18 may require installing other development software such as application
development environments on the development PC. Follow the installation instructions provided with this
software.
Page 25

Deployment
With the appropriate accessory, software, and connection, the MC18 can share information with the host
device. This section provides information about installing software and files on the MC18.
Download/install software using:
•
ActiveSync / Windows Mobile Device Center
•
IPL.
ActiveSync
Use ActiveSync or Windows Mobile Device Center to copy files from a host computer to the MC18.
1. Ensure that ActiveSync or Windows Mobile Device Center is installed and that a partnership has been
created, see Chapter 4, Sync with Host Computer.
2. Connect the MC18 to the host computer using the cradle, see Connecting the MC18 to a Host Computer
on page 4-2 for connection information.
3. On the host computer, select Start > All Programs > ActiveSync (or Windows Mobile Device Center).
Application Deployment 9 - 3
4. Select Explore (or File Management).
Figure 9-1
5. Double-click the folder to expand the contents of the folder.
ActiveSync Explorer
Page 26

9 - 4 MC18 Product Reference Guide
Figure 9-2
6. Use Explorer to locate the host computer directory that contains the file to download. Touch that directory
7. Drag the desired file(s) from the host computer to the desired mobile device folder.
My Pocket PC Contents
in the left pane to display its contents in the right pane.
•
Program Files folder: files stored in this folder are discarded after a cold boot.
•
Application folder: files stored in this folder are retained after a cold boot.
IPL
Use IPL to download files onto the MC18, to download customized flash file system partitions to the MC18 and
load hex files to the flash memory of the MC18.
There are two types of updates supported by the MC18: partitions and files. The file system used by the MC18
is the same as the file system used on a desktop computer. A file is a unit of data that can be accessed using a
file name and a location in the file system. When a file is replaced, only the contents of the previous file are
erased. The operating system must be running for a file to be updated, so the IPL cannot perform individual file
updates as it is a stand-alone program that does not require the operating system to be running.
A typical partition is a group of files, combined into a single “partition” that represents a specific area of storage.
Examples of partitions are the flash file systems such as Platform or Application. (Using the desktop computer
comparison, these partitions are roughly equivalent to a C: or D: hard disk drive.) In addition to the “hard disk”
partitions, some partitions are used for single items such as the operating system, monitor, or splash screen.
(Again using a desktop computer comparison, these partitions are roughly the equivalent of the BIOS or
special hidden system files.) When a partition is updated, all data that was previously in its storage region is
erased - i.e. it is not a merge but rather a replacement operation. Typically, the operating system is not running
when partitions are updated, so IPL can perform partition updates.
Partition images for selected partitions can be created by TCM. All partition images suitable for use by IPL are
in hex file format for transfer by TCM from the development computer to the MC18.
Upgrade requirements:
•
The hex files to be downloaded (on development computer)
•
A connection from the host computer and the MC18 (either serial or wireless)
Page 27

Application Deployment 9 - 5
•
• TCM (on development computer) to download the files.
Once these requirements are satisfied, the MC18 can be upgraded by invoking IPL and navigating the menus.
Updating Images
The MC18 contains tools that update all operating system components. All updates are distributed as
packages and/or hex images. Update packages can contain either partial or complete updates for the
operating system. Symbol Technologies distributes the update packages on the Support Central Web Site,
http://www.motorolasolutions.com/support.
Update an operating system component using one of the following:
•
OS Update
•
BootLoader
•
MSP
OSUpdate Loader
Operating system component can be downloaded to the MC18 using the Temp folder.
Using the Temp Folder
To initiate an update using the MC18 Temp folder:
1. Go to the Support Central web site,http://www.motorolasolutions.com/support and download the
appropriate update package.
2. Connect the MC18 to a host computer using. See Connecting the MC18 to a Host Computer on page 4-2.
3. Select Start > Settings > Control Panel.
4. Select System icon.
5. Select Memory tab.
Figure 9-3
6. Move the slider to the center position.
System Properties - Memory Tab
Page 28

9 - 6 MC18 Product Reference Guide
7. Select OK.
8. Using ActiveSync or Windows Mobile Device Center, copy the update package to the \Temp folder on the
MC18.
9. On the MC18, use Windows Explorer and navigate to the \Temp folder.
10. Open the OSUpdate folder.
11. Select the file: 18X0c70Ben_TEMP.
12. When the Update Loader application finds the appropriate file, it loads the package onto the MC18. A
progress bar displays until the update completes.
13. When complete, the MC18 re-boots.
Bootloader
Use Bootloader to download hex files to the MC18 from a host computer via USB.
MC18
Use Bootloader to download customized flash file system partitions to the MC18 and load hex files to the flash
memory of the MC18.
To load the hex files on to the MC18 using USB:
1. Download the USBDownload application from the Support Central web site. Follow the installation
instructions with the application.
2. Connect the MC18 to a host computer using. See Connecting the MC18 to a Host Computer on page 4-2.
3. On the host computer, launch the USBDownload application.
Figure 9-4
4. Simultaneously press the Power button and the 1 and 9 keys.
USB Download Window
Page 29

Application Deployment 9 - 7
5. Immediately, as soon as the device starts to boot, press and hold the scan key. The Bootloader screen
appears.
Figure 9-5
1. Use the scan key to select Download from USB.
2. The Bootloader displays the following:
Bootloader Menu
CAUTION To ensure a successful download, do not remove power from the MC18 while in Bootloader.
Figure 9-6
Waiting for Input
Page 30

9 - 8 MC18 Product Reference Guide
Figure 9-7
Figure 9-8
NOTE One hex file or multiple hex files can be selected. To select multiple files, press the Ctrl key while selecting
On the host computer, locate the hex files to download.
Select Source File Window
files.
If selecting multiple files to download, USBDownload reads the header of the file and identifies the file
type. If the Partition table file is among the files selected, then USBDownload downloads that file first.
Similarly, USBDownload downloads the CPLD file last.
1. Select the hex files and the click Open.
18X0c70Ben_TEMP
Figure 9-9
Select Hex File(s)
Page 31

2. Click the LOAD button. The hex file(s) is downloaded to the device.
Application Deployment 9 - 9
Figure 9-10
3. On completion, press ENTER to return to the Bootloader main screen to select the next file to download.
4. To exit Bootloader, select Exit from the Bootloader main screen and press ENTER.
Download Complete Screen
Bootloader Error Detection
While receiving data, Bootloader performs many checks on the data to ensure that the data is received
correctly. If an error is detected, Bootloader immediately aborts the download, and reports the error on an error
screen.
This error message screen displays until a key is pressed. Once the screen is acknowledged, Bootloader
returns to the main menu to wait for a new selection.
To find the probable cause of the error, use the error number and/or the error text displayed on the screen to
look up the error in Table 9-1.
Table 9-1
Unknown error -1 A general error occurred. Retry the download. If the failure persists,
IPL Errors
Error Text
Error
Number
Probable Cause
it is most likely due to a hardware failure; the MC18 requires
servicing.
Cancelled by user -2 The user canceled the download.
Can't open the source -7 An error occurred opening the source device (either radio card or
Serial port). Check source device connectivity and retry.
Can't open the
destination
Can't read from the
source device
Can't write to the
destination device
-8 An error occurred opening the destination device (either flash ROM
or Power Micro). Retry the download. If the failure persists, it is most
likely due to a hardware failure; the MC18 requires servicing.
-9 The source device (either radio card or Serial port) could not be
read from. Check source device connectivity and retry.
-10 The destination device (either flash ROM or Power Micro) could not
be written to. Retry the download. If the failure persists, it is most
likely due to a hardware failure; the MC18 requires servicing.
Page 32

9 - 10 MC18 Product Reference Guide
Table 9-1
Transmission checksum
error
Readback checksum
error
There is no more heap
space available
Insufficient data
available to complete
record
Invalid Symbol HEX file -23 A Symbol HEX file download was attempted but the HEX file is
Unrecognized or
unsupported HEX
record
IPL Errors (Continued)
Error Text
Error
Number
-11 An error occurred during transmission from the source device
(either radio card or Serial port) and the checksum check failed.
Check source device connectivity and retry.
-12 A checksum, generated from reading back data that was written to
the destination device, was incorrect. An error during transmission
or a write error to the destination device could cause this.
-14 There is no more heap space available for the download procedure.
Restart IPL and retry the download. If the failure persists, contact
service with details of what is being downloaded.
-21 A Symbol HEX file download was attempted but the HEX file is
invalid. Ensure the file is in Symbol HEX file format.
invalid. Ensure the file is in Symbol HEX file format.
-24 The Symbol HEX file being downloaded contains an invalid or
unrecognized HEX record. Ensure the file is in proper Symbol HEX
file format.
Probable Cause
Invalid data in HEX file -25 The Symbol HEX file being downloaded contains invalid data.
Ensure the file is in proper Symbol HEX file format with valid HEX
data.
Exceeded max size -26 The download file is too large to fit into the space allocated for it.
Either make the file smaller or increase the space allocated for it by
altering the partition table.
Partition is not valid on
this device
Wrong destination code -28 A specific partition was chosen from the Main Menu (not Auto
File type does not
support IPL Auto Select
Non-contiguous record
found
Timed Out - No data -31 IPL was waiting for data from the source device but timed out before
-27 The downloaded file specifies a partition entry that does not exist on
the device. Only download files that are valid for this device, or
change the partition table so that the new file is valid on the device.
Select) but the file selected for download was for another partition.
Ensure that the partition selected from the Main Menu matches the
file selected for download.
-29 Monitor, Power Micro and Partition Table cannot be loaded with
Auto Select. Select the appropriate area, and try again.
-30 A Symbol HEX file download was attempted but the HEX file is
invalid. Ensure the file is in Symbol HEX file format.
receiving any. Check the source device connectivity and retry.
Page 33

Application Deployment 9 - 11
Table 9-1
Fail: Buffer Overrun -32 The serial port device could not keep up with incoming data. Retry
Partition Table not Valid -33 The size of flash memory is different than that described in the
Invalid file format -34 The file format is invalid. Only Symbol HEX files are supported by
IPL Errors (Continued)
Error Text
Mobility Services Platform
The MSP Client Software is a set of software components that come pre-installed on the MC18.
The MSP Client software consists of the following components:
The RD Client provides support for MSP Staging functionality, provides support for the MSP Legacy Staging
process, and provides support for backward-compatible legacy MSP 2.x Legacy Staging functionality.
The MSP Agent provides MSP Provisioning functionality and Control functionality when used with MSP 3.2
Control Edition.
Error
Number
Probable Cause
the serial download with a lower baud rate.
partition table. Retry the download with the correct partition table
file.
IPL.
Refer to the Mobility Services Platform 3.2 User’s Guide, p/n 72E-100158-06, for instructions for using the
Rapid Deployment and MSP Agent clients.
Creating a Splash Screen
A custom splash screen can be created and loaded onto the MC18. To create a custom splash screen:
1. Create a .bmp file using a graphic program with the following specifications:
•
Size: 216 (W) x 320 (H).
•
Colors: 256.
2. Modify the bitmap file and save.
To load the splash screen:
1. Convert the bmp file into a hex file using the OSUpdate Package Builder that is part of MSP.
2. Copy the hex file to the MC18 using BootLoader.
Page 34

9 - 12 MC18 Product Reference Guide
OS Update
When operating system images are updated, new update images will be available as part of the Device
Configuration Package (DCP) on the Support Central web site at: http://supportcentral.motorola.com.
Use this procedure to load a new operating system using OS Update:
1. Download the latest DCP for the MC18 or MC18A from the Support Central web site. See for Device
Configuration Package on page 9-1 detailed instructions.
2. Connect the MC18 to a host computer (see Connecting the MC18 to a Host Computer on page 4-2).
3. Use a remote control software on the host computer to view the CE desktop (see Connecting the MC18 to
a Host Computer on page 4-2) for more information.
4. Open your ActiveSyncRemoteDisplay application on your desktop to give you a remote view to the WinCE
device.
5. Select Start > Settings > Control Panel. The Control Panel window appears.
6. Click the System icon. The System Properties window appears.
7. Click the Memory tab.
8. Move the slider bar towards the right to increase total Storage memory to around 36000KB total.
Figure 9-11
9. Select OK to close the System Properties window.
10. Close the Control Panel window.
11. On the host computer, open a Windows Explorer window and navigate to the C:\Program Files\Symbol
Memory Tab
Device Configuration Packages\MC18xxc50Ben\V1.x folder.
12. In the ActiveSync or Windows Mobile device Center window, click the Explore or File Management to
explore the MC18 file directories.
Page 35

Application Deployment 9 - 13
Figure 9-12
13. Copy the /OSupdate folder to the /Temp folder on the MC18.
14. Using the remote control software, navigate to /Temp/OSUpdate folder on the MC18. Select View >
Explorer Window
Details to display the whole filename.
Figure 9-13
15. Double-click the 18X0c70Ben_TEMP filename to launch the OSUpdate utility.
16. Once the update is competed the MC18 automatically cold boots.
Temp Directory
17. Remove the MC18 from the cradle and re-insert after approximately one minute.
Page 36

9 - 14 MC18 Product Reference Guide
Flash Storage
In addition to the RAM-based storage standard on Windows CE mobile computers, the MC18 is also equipped
with a non-volatile Flash-based storage area which can store data (partitions) that can not be corrupted by a
cold boot. This Flash area is divided into two categories: Flash File System (FFS) Partitions and Non-FFS
Partitions.
FFS Partitions
The MC18 includes two FFS partitions. These partitions appear to the MC18 as a hard drive that the OS file
system can write files to and read files from. Data is retained even if power is removed.
The two FFS partitions appear as two separate folders in the Windows CE file system and are as follows:
•
Platform: The Platform FFS partition contains Symbol-supplied programs and Dynamic Link Libraries
(DLLs). This FFS is configured to include DLLs that control system operation. Since these drivers are
required for basic MC18 operation, only experienced users should modify the content of this partition.
•
Application: The Application FFS partition is used to store application programs needed to operate the
MC18.
Working with FFS Partitions
Because the FFS partitions appear as folders under the Windows CE file system, they can be written to and
read like any other folder. For example, an application program can write data to a file located in the
Application folder just as it would to the Windows folder. However, the file in the Application folder is in
non-volatile storage and is not lost on a cold boot (e.g., when power is removed for a long period of time).
Standard tools such as ActiveSync or Windows Mobile Device Center can be used to copy files to and from the
FFS partitions. They appear as the “Application” and “Platform” folders to the ActiveSync explorer. This is
useful when installing applications on the MC18. Applications stored in the Application folder are retained even
when the MC18 is cold booted.
There are two device drivers included in the Windows CE image to assist developers in configuring the MC18
following a cold boot: RegMerge and CopyFiles.
RegMerge.dll
RegMerge.dll is a built-in driver that allows registry edits to be made to the Windows CE Registry.
Regmerge.dll runs very early in the boot process and looks for registry files (.reg files) in certain Flash File
System folders during a cold boot. It then merges the registry changes into the system registry located in RAM.
Since the registry is re-created on every cold boot from the default ROM image, the RegMerge driver is
necessary to make registry modifications persistent over cold boots.
RegMerge is configured to look in the root of two specific folders for .reg files in the following order:
\Platform
\Application
Regmerge continues to look for .reg files in these folders until all folders are checked. This allows folders later
in the list to override folders earlier in the list. This way, it is possible to override Registry changes made by the
Page 37

Application Deployment 9 - 15
Platforms partitions folders. Take care when using Regmerge to make Registry changes. The DCP for
MC18xxc50 contains examples of .reg files.
Regmerge only merges the .reg files on cold boots. The merge process is skipped during a warm boot.
NOTE
Typically, do not make modifications to registry values for drivers loaded before RegMerge. However, these
values may require modification during software development. Since these early loading drivers read these
keys before RegMerge gets a chance to change them, the MC18 must be cold booted. The warm boot does
not re-initialize the registry and the early loading driver reads the new registry values.
Do not use Regmerge to modify built-in driver registry values, or merge the same Registry value to two files in
the same folder, as the results are undefined.
CopyFiles
Windows CE expects certain files to be in the Windows folder, residing in volatile storage. Windows CE
maintains the System Registry in volatile storage. CopyFiles copies files from one folder to another on a cold
boot. Files can be copied from a non-volatile partition (Application or Platform) to the Windows or other volatile
partition during a cold boot. During a cold boot CopyFiles looks for files with a .CPY extension in the root of the
Platform and Application FFS partitions (Platform first and then Application). These files are text files
containing the source and destination for the desired files to be copied separated by “>”. The following example
from the file application.cpy is contained on the demo application partition included in the DCP for MC18xxc50.
Files are copied to the Windows folder from the Flash File System using copy files (*.cpy) in the following
order:
\Platform
\Application
Example:
\Application\ScanSamp2.exe>\Windows\ScanSamp2.exe
This line directs CopyFiles to copy the ScanSamp2.exe application from the \Application folder to the
\Windows folder.
Non-FFS Partitions
Non-FFS Partitions include additional software and data pre-loaded on the MC18 that can be upgraded. Unlike
FFS Partitions, these partitions are not visible when the operating system is running. They also contain system
information. Non-FFS partitions include the following:
•
Windows CE: The complete Windows CE operating system is stored on Flash devices. If necessary, the
entire OS image may be downloaded to the MC18 using files provided by Symbol Technologies. The
current OS partition on the MC18 is included as part of the TCM installation package. Any upgrades must
be obtained from Symbol Technologies. This partition is mandatory for the MC18.
•
Splash Screen: a bitmap smaller than 16 kb (and limited to 8 bits per pixel) is displayed as the MC18 cold
boots.
NOTE 8 bits per pixel only applies to splash screen images. Once Windows CE is running, the color density is
16 bits per pixel.
•
IPL: This program interfaces with the host computer and allows downloading via cradle or serial cable
any or all of the partitions listed above, as well as updated versions of IPL. Use caution downloading
Page 38

9 - 16 MC18 Product Reference Guide
updated IPL versions; incorrect downloading of an IPL causes permanent damage to the MC18. IPL is
mandatory for the MC18.
•
Partition Table: Identifies where each partition is loaded in the MC18.
Downloading Partitions to the MC18
TCM is used to specify a hex destination file for each partition and download each file to the MC18. This
download requires a program loader stored on the MC18. The MC18 comes with a program loading utility,
Initial Program Loader (IPL), stored in the MC18’s write-protected flash.
Page 39

CHAPTER 10 MAINTENANCE AND
TROUBLESHOOTING
Introduction
This chapter includes instructions on cleaning and storing the MC18, battery maintenance and provides
troubleshooting solutions for potential problems during MC18 operating.
Maintaining the MC18
For trouble-free service, observe the following tips when using the MC18:
•
Protect the MC18 from temperature extremes.
•
Do not store or use the MC18 in any location that is extremely dusty, damp, or wet.
•
Use a soft lens cloth to clean the scan exit window of the MC18. If the surface of the MC18 screen
becomes soiled, clean it with a soft cloth moistened with a diluted window-cleaning solution. Do not use
bleach or ammonia.
•
Take care not to scratch the screen of the MC18.
•
The display of the MC18 contains glass. Take care not to drop the MC18 or subject it to strong impact.
Battery Safety Guidelines
•
The area in which the MC18 units are charged should be clear of debris and combustible materials or
chemicals. Particular care should be taken where the device is charged in a non-commercial
environment.
•
Do not use incompatible batteries and chargers. If you have any questions about the compatibility of a
battery or a charger, contact Symbol Technologies Global Customer Support. See
page xiv for contact information.
•
Do not crush, puncture, or place a high degree of pressure on the battery.
•
Follow battery usage, storage, and charging guidelines found in the MC18 Quick Reference Guide.
•
Improper battery use may result in a fire, explosion, or other hazard.
Service Information on
Page 40

10 - 2 MC18 Product Reference Guide
•
To charge the mobile device battery, the battery and charger temperatures must be between +32°F and
+104°F (0°C and +40°C)
•
Do not disassemble or open, crush, bend or deform, puncture, or shred.
•
Severe impact from dropping any battery-operated device on a hard surface could cause the battery to
overheat.
•
Do not short circuit a battery or allow metallic or conductive objects to contact the battery terminals.
•
Do not modify or remanufacture, attempt to insert foreign objects into the battery, immerse or expose to
water or other liquids, or expose to fire, explosion, or other hazard.
•
Do not leave or store the equipment in or near areas that might get very hot, such as in a parked vehicle
or near a radiator or other heat source. Do not place battery into a microwave oven or dryer.
•
Battery usage by children should be supervised.
•
Please follow local regulations to promptly dispose of used re-chargeable batteries.
•
Do not dispose of batteries in fire.
•
Seek medical advice immediately if a battery has been swallowed.
•
In the event of a battery leak, do not allow the liquid to come in contact with the skin or eyes. If contact
has been made, wash the affected area with large amounts of water and seek medical advice.
•
If you suspect damage to your equipment or battery, call Symbol Technologies Global Customer Support
to arrange for inspection. See Service Information on page xiv for contact information.
Long Term Storage
When storing the MC18 for a long period of time it is recommended to remove the battery.
When returning the MC18 to everyday operation, install a fully charged battery.
Cleaning
CAUTION Always wear eye protection.
WARNING! Avoid exposing this product to contact with hot oil or other flammable liquids. If such
Read warning label on compressed air and alcohol product before using.
If you have to use any other solution for medical reasons please contact Symbol Technologies for
more information.
exposure occurs, unplug the device and clean the product immediately in accordance with
these guidelines.
Materials Required
•
Alcohol wipes
•
Lens tissue
•
Cotton tipped applicators
Page 41

Maintenance and Troubleshooting 10 - 3
•
Isopropyl alcohol
•
Can of compressed air with a tube.
Cleaning the MC18
Housing
Using the alcohol wipes, wipe the housing including the scan key.
Display
The display can be wiped down with the alcohol wipes, but care should be taken not to allow any pooling of
liquid around the edges of the display. Immediately dried the display with a soft, non-abrasive cloth to prevent
streaking.
Scan Exit Window
Wipe the scan exit window periodically with a lens tissue or other material suitable for cleaning optical material
such as eyeglasses.
Power Connector
1. Remove the main battery from MC18. See Removing the Battery on page 1-9.
2. Install the battery cover.
3. Dip the cotton portion of the cotton tipped applicator in isopropyl alcohol.
4. Repeat at least three times.
5. Use the cotton tipped applicator dipped in alcohol to remove any grease and dirt near the connector area.
6. Use a dry cotton tipped applicator and repeat steps 3 through 6.
7. Spray compressed air on the connector area by pointing the tube/nozzle about ½ inch away from the
surface.
CAUTION
8. Inspect the area for any grease or dirt, repeat if required.
Do not point nozzle at yourself and others, ensure the nozzle or tube is away from your face.
Cleaning Cradle Connectors
Use this procedure to clean the connectors on a cradle:
1. Remove power from the cradle.
2. Dip the cotton portion of the cotton tipped applicator in isopropyl alcohol.
3. Rub the cotton portion of the cotton tipped applicator along the pins of the connector. Slowly move the
applicator back-and-forth from one side of the connector to the other. Do not let any cotton residue on the
connector.
4. All sides of the connector should also be rubbed with the cotton tipped applicator.
Page 42

10 - 4 MC18 Product Reference Guide
5. Spray compressed air in the connector area by pointing the tube/nozzle about ½ inch away from the
surface.
CAUTION Do not point nozzle at yourself and others, ensure the nozzle or tube is pointed away from your face.
6. Ensure that there is no lint left by the cotton tipped applicator, remove lint if found.
7. If grease and other dirt can be found on other areas of the cradle, use lint free cloth and alcohol to remove.
8. Allow at least 10 to 30 minutes (depending on ambient temperature and humidity) for the alcohol to air dry
before applying power to cradle.
If the temperature is low and humidity is high, longer drying time is required. Warm temperature and dry
humidity requires less drying time.
Cleaning Frequency
The cleaning frequency is up to the customer’s discretion due to the varied environments in which the MC18
units are used. They may be cleaned as frequently as required. However when used in dirty environments it
may be advisable to periodically clean the scanner exit window to ensure optimum scanning performance.
Page 43

Troubleshooting
MC18
Maintenance and Troubleshooting 10 - 5
Table 10-1
MC18 does not turn on. Battery not charged. Charge or replace the battery in the MC18.
Battery did not charge. Battery failed. Replace battery. If the MC18 still does not operate, try a
During data
communication, no data
was transmitted, or
transmitted data was
incomplete.
Troubleshooting the MC18
Problem Cause Solution
Battery not installed
properly.
System crash. Perform a warm boot. If the MC18 still does not turn on,
MC18 removed from
cradle before
charging completed.
Ambient temperature
of the cradle is too
warm or too cold.
MC18 unplugged
from host computer
during
communication.
Communication
software was
incorrectly installed or
configured.
Ensure battery is installed properly. See
Battery on page 1-8
perform a cold boot. See
warm boot, then a cold boot. See
page 1-16
Insert the MC18 into the cradle and begin charging. The
battery fully charges in approximately four hours.
The ambient temperature must be between 0 °C and 40 °C
(32 °F and 104 °F).
Reconnect the programming cable to the host computer and
re-transmit.
Ensure that Microsoft ActiveSync 4.5 / Windows Mobile
Device Center 6.1 or greater is installed on the host
computer.
.
.
Resetting the MC18 on page 1-16
Installing the
Resetting the MC18 on
.
Page 44

10 - 6 MC18 Product Reference Guide
Table 10-1
Troubleshooting the MC18 (Continued)
Problem Cause Solution
MC18 turns itself off. MC18 is inactive. The MC18 turns off after a period of inactivity. If the MC18 is
running on battery power, this period can be set to 1, 2, 3, 4,
5 minutes.
If the MC18 is running on external power, this period can be
set to 1, 2, 3, 5, 10, 15 and 30 minutes.
Check the power settings by selecting
Control Panel
>
Power
icon >
Advanced
Start
tab.
>
Settings
>
Change the setting if you need a longer delay before the
automatic shutoff feature activates.
Battery is depleted. Place the MC18 in the cradle to re-charge the battery.
Battery is not inserted
properly.
MC18
The
’s battery
Insert the battery properly (see
page 1-8
).
Place the MC18 in the cradle to re-charge the battery.
Installing the Battery on
is low and it powers
down to protect
memory content.
A message appears
stating that the MC18
memory is full.
Too many files stored
on the MC18.
Too many
applications installed
on the MC18.
Delete unused memos and records. You can save these
records on the host computer.
If you have installed additional applications on the MC18,
remove them to recover memory.
Select
Start
>
Settings
>
Control Panel
>
Remove Programs
icon.
Select the unused program and select
Remove.
The MC18 does not
accept scan input.
Scanning application
is not loaded.
Verify that the MC18 is loaded with a scanning application.
See the System Administrator.
Unreadable bar code. Ensure the symbol is not defaced.
Distance between
imager exit window
Move the MC18 closer or further from the bar code to the
proper scanning range.
and bar code is
incorrect.
MC18 is not
programmed for the
bar code.
Verify that the MC18 can read the type of bar code being
scanned (See
Technical Specifications
). Ensure that the bar
code parameters are set properly for the bar code being
scanned.
MC18 is not
programmed to
generate a beep.
Click
Start
>
Programs
>
CtPanel
>
Audio Settings
verify that a beep on a good decode is used and the
Volum e
is not set to 0.
Battery is low. If the scanner is still not reading symbols, contact the
distributor or service.
and
Beeper
Page 45

Maintenance and Troubleshooting 10 - 7
Table 10-1
Troubleshooting the MC18 (Continued)
Problem Cause Solution
During USB data
communications, no
data was transmitted, or
transmitted data was
incomplete.
Cannot sync with Host
Computer
Cradles
Table 10-2
MC18 battery is
not charging.
Troubleshooting the Cradles
Symptom Possible Cause Solution
Incorrect cable
connection.
Communications
software is not
installed or
configured properly.
Host computer not
configured properly.
MC18 was removed from
cradle or cradle was
unplugged from AC
power.
See
Connecting the MC18 to a Host Computer on page
4-2
.
Perform setup as described in
Installation
.
Chapter 8, Cradle
Ensure that a sync program is installed on the host
computer.
Ensure that sync program on the host computer is set to
allow USB connections. See
Computer
for more information.
Chapter 4, Sync with Host
Ensure cradle is receiving power. Ensure MC18 is seated
correctly. Confirm main battery is charging. The battery fully
charges in approximately four hours.
View battery status by selecting
Power
>
icon.
Start
>
Settings
>
Control Panel
It is taking longer
than four hours
to charge the
MC18.
Battery is faulty. Verify that other batteries charge properly. If so, replace the
The MC18 is not fully
seated in the cradle.
Ambient temperature of
the cradle is too warm or
faulty battery (see
Installing the Battery on page 1-8
Remove and re-insert the MC18 into the cradle, ensuring it is
firmly seated.
Move the cradle to an area where the ambient temperature is
between 0 °C and 40 °C (32 °F and 104 °F).
).
too cold.
MC18 is not optimized for
low radio signal strength.
Refer to
Tips for Improving Battery Charge Time on page 6-3
for information on optimizing the MC18.
Page 46

10 - 8 MC18 Product Reference Guide
Page 47

APPENDIX A TECHNICAL
SPECIFICATIONS
Technical Specifications
The following tables summarize the MC18’s intended operating environment and general technical hardware
specifications.
Table A-1
Physical and Environmental Characteristics
Dimensions (H x L x W) 3.12 in. x 8.07 in. x 2.94 in. (7.95 cm x 20.5 cm x 7.47 cm)
Weight 297 g (10.47 oz) with battery
Keys Single scan key
Display Color LCD, 4",480x800 WVGA resolution, 16 bits/pixel RGB, 450 Nits LED
Speaker 2W speaker
Main Battery “Gifted” battery, rechargeable 3.7 VDC Lithium Ion battery. Standard capacity:
Performance Characteristics
CPU TI OMAP4430 (MPA3), Dual Core, 800MHz
Operating System Windows CE 7 Professional, Microsoft Internet Explorer CE 7
Memory
Technical Specifications
Item Description
backlight, capacitive touch screen
2,590mAh.
Configuration: Flash - 2GB, RAN - 512MB
High Memory Configuration: Flash - 4GB, RAN - 1GB
Application Development EMDK for C, EMDK for .NET extended to include MC18 specific APIs.
EMDKs are available through Support Central web site
Page 48

A - 2 MC18 Product Reference Guide
Table A-1
Technical Specifications (Continued)
Item Description
Data Capture Method Imager (SE4710) with red LED Illumination and LED dot aim pattern.
Imaging rate: 30 Frames per second, 1280p x 800p
Imager SafetyIEC/FDA Class 1 in accordance with IEC/EN 60825-1 & 21
CFR 1040.10 & 11 (Laser Notice No. 50)
User Environment
Operating Temperature 0° C to 40° C (32° F to 104° F)
Storage Temperature -20° C to 60° C (-4° F to 140° F)
Battery Charging Temperature 0° C to +40° C (32° F to 104° F) ambient temperature range.
Humidity 40° C (RH 10% - 95%) Non-condensing
Flammability UL94V1
Drop Specification Multiple 4 ft.(1.2 m) drops to tile linoleum over concrete across operating
temperature range
Sealing Liquid penetration per “A4T Casual Spill Test Spec” document number
71-98611-01. Applies ONLY with battery installed.
ESD ± 20k VDC air discharge
± 10k VDC contact discharge
Interface/ Communications
WLAN radio TI / 1273L - Wi-Fi IEEE® 802.11a/b/g/n with internal antenna
Operating Channels:
Channel 1 - 13 (2412 - 2472 MHz)
Actual operating frequencies depend on regulatory rules and certification
agency.
Authentication:
EAP-TTLS authentication with tunnel types CHAP, MSCHAP, MSCHAPv2,
PAP, MD5, EAP-TLS, PEAP-TLS authentication with tunnel types TLS,
MSCHAPv2, and GTC, LEAP, EAP-FAST authentication with tunnel types
TLS, MSCHAPv2, and GTCon, EAP-AKA , WAPI
Encryption: None, 128-bit AES, TKIP, WEP-128, WEP-40/65
Bluetooth Communications TI / 1273L - MS stack 2.1
USB USB 2.0 Client for Microsoft ActiveSync or Windows Mobile Device Center,
for service and maintenance
Regulatory
Electrical Safety Certified to UL/cUL 60950-1, IEC 60950-1 ; IEC 62471:2006/EN62471:2008
(LED Safety Report)
EMI/RFI North America: FCC Part 15 Subpart B
class B
Canada: ICES 003 Class B
EU: EN55022 Class B, EN 301 489-1, EN301 489-17, EN61000-4-3/-3-2/-3-3
Page 49

Technical Specifications A - 3
Table A-1
Technical Specifications (Continued)
Item Description
FCC RF FCC Part 15 subpart C and E , RSS 210 Anex 8 and 9, EN 300 328, EN
301 893, AS/NZS 426
Electrical Safety/ Laser Safety Certified to UL/cUL 60950-1, EN/IEC 60950-1 IEC 62471:2006 and EN
62471:2008 (LED Safety Report).
EMI/RFI North America: FCC Part 15 Subpart B class B Canada: ICES 003 Class B
EU: EN55022 Class B, EN 301 489-1, EN 301
489-17, EN61000-4-3/-3-2/-3-3
Australia: AS/NZS CISPRA 22
Imager Decode Capability The SE4710 2D supports barcode symbologies listed below (The specific
engine configuration is identified / readable in the system configuration).
•
Code 39: Trioptic Code 39
UPC/EAN: UPCA (+ add-on), UPCE (+ add-on), UPCE1, EAN-8, EAN-13 (+
add-on), JAN-8 (Note: This is supported but not handled separately from
EAN8 or EAN 13), JAN-13 (+ add-on), SBN / Bookland (+ISBN 13), ISSN,
Coupon Codes including GS1 Databar Expanded Format.
•
Code 128: ISBT-128, UCC/EAN 128, GS1-128 (Note this is the new
name for EANUCC-128)
•
Code 93
•
MSI
•
Codabar: ABC, Ames
•
2 of 5: Interleaved 2 of 5 / ITF, Discrete 2 of 5, IATA, Chinese 2 of 5,
Code 11, Matrix 2 of 5
•
Korean 3 of 5
•
RSS/GS1 data bar: GS1-DataBar (Previously known as RSS),
GS1-DataBar Limited, GS1-DataBar Expanded (Including stacked)
•
2D symbologies
•
PDF-417: Macro PDF, Macro Micro PDF, Composite, Composite C,
Composite AB
•
Data Matrix: GS1-Datamatrix
•
QR code: Micro QR, GS1-QR code
•
Aztec
•
Maxicode
•
Han Xin (Chinese Sensible Code)
•
Postal codes: Linked Aztec, US Planet, US Postnet, US Intelligent
Mail, Royal Mail 4 State, USPS 4CB/OneCode/Intelligent Mail, UPU
FICS Postal, UK Postal, Japan Postal, Australian Postal, Canada
Post, Netherlands KIX Code
•
Image capture
•
Signature capture
Page 50

A - 4 MC18 Product Reference Guide
Three Slot Cradle
Table A-2
Operating Temperature 0° C to +50° C (32° F to 122° F)
Storage Temperature -40° C to 70° C (-40° F to 158° F)
Battery Charging Temperature
Humidity 5% to 95% non-condensing
Size (H x L x W) 129 mm x 134 mm x 310 mm (5 in x 5.2 in x 12.2 in)
Weight
Power Supply 12.0 VDC,9.0 A
Electrostatic Discharge (ESD) ±15 kV air discharge, ± 8 kV contact discharge
Cradle Specifications
Item Description
0° C to +40° C (32° F to 104° F) ambient temperature
Single-Slot Cradle
Table A-3
Operating Temperature 0° C to +50° C (32° F to 122° F)
Cradle Specifications
Item Description
Storage Temperature -40° C to 70° C (-40° F to 158° F)
Battery Charging Temperature
Humidity 5% to 95% non-condensing
Size (L x W x H) 98 mm x 127 mm x 272 mm (4 in. x 5 in. x 10.7 in.)
Weight 652 g (23 oz)
Power Supply 12.0 VDC,9.0 A
Electrostatic Discharge (ESD) ±15 kV air discharge, ± 8 kV contact discharge
0° C to +40° C (32° F to 104° F) ambient temperature
Page 51

MC18 Interface Connector Pin-Outs
Pin 1 Pin 5 Pin 7Pin 3
Pin 2 Pin 6 Pin 8Pin 4
Pin 1
Technical Specifications A - 5
Figure A-1
Table A-4
PIN Signal Name Function
1 GND Ground
2 TX Transmit Output to Cradle
3 RX Receive Input from Cradle
4 +5V Input power.
Power Connector Pin-Outs
Power Connector Pin-Outs
Figure A-2
Table A-5
PIN Number Signal Name Function
1USB_PWR +5 VDC
2 USBA0_OTG_DP USB DATA +
3 Reserved Not Used
4 USBA0_OTG_DM USB DATA -
Sync Connector Pin-Outs
Sync Connector Pin-Outs
Page 52

A - 6 MC18 Product Reference Guide
Table A-5
PIN Number Signal Name Function
5 Sys_Boot5 Not Used
6 GND Forces system to cold boot from USB
7 UART4_TXD Debug Transmit Output
8 UART4_RXD Debug Receive Input
Sync Connector Pin-Outs (Continued)
Page 53

Cable Specifications
Power Supply Cable, Y-type
Technical Specifications A - 7
Table A-6
Wire Color AWG
Red 16 1 1 (+) term
Black 16 6 2 (-) term
Red 16 2 1 (+) term
Black 16 5 2 (-) term
The 16 AWG wire should have the following specifications: UL1007, 300 Volt, PVC, -40° C to 80° C operating
temperature.
Wire Run List & Specifications
Connector 1
Molex 39-01-2060
housing; 4x,
39-00-0211
contacts
Connector 2
Molex 39-01-2025
housing; 2x,
39-00-0211
contacts
Connector 3
Molex 39-01-2025
housing; 2x,
39-00-0211
contacts
Function
Cradle Interconnection Cable
Table A-7
Wire Color AWG
Wire Run List & Specifications
Molex 39-01-2025
39-00-0211 contacts
Connector 1
housing; 2x,
Connector 2
Molex 39-01-2025
housing; 2x,
39-00-0211 contacts
Function
Red 16 1 1 (+) term
Black 16 2 2 (-) term
The 16 AWG wire should have the following specifications: UL1007, 300 Volt, PVC, -40° C to 80° C operating
temperature.
Page 54

A - 8 MC18 Product Reference Guide
Page 55

APPENDIX B APP LAUNCHER
CONFIGURATION
Configuration
The menu on the App Launcher window can be modified to display and launch any application on the MC18.
Figure B-1
Use this procedure to customize the
1. Sync the MC18 with a host computer (SeeChapter 4, Sync with Host Computer).
2. Copy the file launcher.reg from the /Application folder on the MC18 to a local directory on the host
computer.
3. Open the file using a text editor.
Default App Launcher Window
App Launcher menu:
Page 56

B - 2 MC18 Product Reference Guide
4. The following lists the five default menu items that appear on the App Launcher display. Note that Exit
menu item is not listed in the registry file.
[HKEY_CURRENT_USER\Software\Symbol\Launcher\Default\Programs\Prog1]
"Description"="RD Client"
"Name"="\\windows\\rdclient.exe"
"Command"=""
[HKEY_CURRENT_USER\Software\Motorola\AppLauncher\Profiles\DefaultProf\Default\
Programs]
"Description"="SPB"
"Name"="\\program files\\SPB2_CE.exe"
"Command"=""
[HKEY_CURRENT_USER\Software\Symbol\Launcher\Default\Programs\Prog3]
"Description"="Device Info"
"Name"="\\Windows\\DeviceInfoApp.exe"
"Command"=""
[HKEY_CURRENT_USER\Software\Symbol\Launcher\Default\Programs\Prog4]
"Description"="MC18-Scan"
"Name"="\\Application\\MC18-Scan.EXE"
"Command"=""
[HKEY_CURRENT_USER\Software\Symbol\Launcher\Default\Programs\Prog5]
"Description"="Reset"
"Name"="\\Windows\\WarmBoot.EXE"
"Command"=""
Use this procedure to add a sixth item to the list, enter the following after the warm boot entry:
[HKEY_CURRENT_USER\Software\Symbol\Launcher\Default\Programs\Prog6]
"Description"="Control Panel"
"Name"="\\Windows\\CtlPanel.EXE"
"Command"=""
1. Save the registry file.
2. Copy the file back to the /Application folder on the MC18.
3. Cold boot the MC18.
Page 57

GLOSSARY
Numeric
802.11. A group of wireless specifications developed by the Institute of Electrical and Electronics Engineers (IEEE). It
specifies an over-the-air interface between a wireless client and a base station or between two wireless clients.
802.11b. Operates in the 2.4 GHz Industrial, Scientific and Measurement (ISM) band (2.4 to 2.4835 GHz) and provides
signaling rates of up to 11Mbit/sec. This is a very commonly used frequency. Microwave ovens, cordless phones,
medical and scientific equipment, as well as Bluetooth devices, all work within the 2.4 GHz ISM band.
802.11g. Similar to 802.11b, but this standard supports signaling rates of up to 54Mbit/sec. It also operates in the heavily
used 2.4 GHz ISM band but uses a different radio technology to boost overall throughput. Compatible with the
802.11b.
802.11n. Wireless networking standard that uses multiple antennas to increase data rates to improve network
performance over the two previous standards—802.11a and 802.11g—with a significant increase in the maximum
net data rate from 54 Mbit/s to 600 Mbit/s. It can be used in the 2.4 GHz or 5 GHz frequency bands.
A
Access Point. Provides a bridge between Ethernet wired LANs and the wireless network. Access points are the
connectivity point between Ethernet wired networks and devices (laptops, hand-held computers, point-of-sale
terminals) equipped with a wireless LAN adapter card.
Ad Hoc Mode. A wireless network framework in which devices communicate directly with one another without using an
access point.
API. Application Programming interface - An interface by means of which one software component communicates with
or controls another. Usually used to refer to services provided by one software component to another, usually via
software interrupts or function calls
Association. The process of determining the viability of the wireless connection and establishing a wireless network's
root and designated access points. A MC18 associates with its wireless network as soon as it is powered on or
moves into range.
Page 58

Glossary - 2 MC18 Product Reference Guide
B
Bar Code. A pattern of variable-width bars and spaces which represents numeric or alphanumeric data in
machine-readable form. The general format of a bar code symbol consists of a leading margin, start character, data
or message character, check character (if any), stop character, and trailing margin. Within this framework, each
recognizable symbology uses its own unique format. See Symbology.
Bits per Second (bps). Bits transmitted or received.
Bit. Binary digit. One bit is the basic unit of binary information. Generally, eight consecutive bits compose one byte of
data. The pattern of 0 and 1 values within the byte determines its meaning.
Byte. On an addressable boundary, eight adjacent binary digits (0 and 1) combined in a pattern to represent a specific
character or numeric value. Bits are numbered from the right, 0 through 7, with bit 0 the low-order bit. One byte in
memory is used to store one ASCII character.
boot or boot-up. The process a computer goes through when it starts. During boot-up, the computer can run
self-diagnostic tests and configure hardware and software.
C
CAM. (Continuously Aware Mode) Mode in which the adapter is instructed to continually check for network activity.
CHAP. (Challenge Handshake Authentication Protocol) A type of authentication in which the authentication agent
(typically a network server) sends the client program a random value that is used only once and an ID value. Both
the sender and peer share a predefined secret. The peer concatenates the random value (or nonce), the ID and the
secret and calculates a one-way hash using MD5. The hash value is sent to the authenticator, which in turn builds
that same string on its side, calculates the MD5 sum itself and compares the result with the value received from the
peer. If the values match, the peer is authenticated.
Character. A pattern of bars and spaces which either directly represents data or indicates a control function, such as a
number, letter, punctuation mark, or communications control contained in a message.
Character Set. Those characters available for encoding in a particular bar code symbology.
Cold Boot. A cold boot restarts the MC18 and erases all user stored records and entries.
COM port. Communication port; ports are identified by number, e.g., COM1, COM2.
Continuous Code. A bar code or symbol in which all spaces within the symbol are parts of characters. There are no
intercharacter gaps in a continuous code. The absence of gaps allows for greater information density.
Cradle. A cradle is used for charging the MC18 battery and for communicating with a host computer, and provides a
storage place for the MC18 when not in use.
D
DCP. See Device Configuration Package.
Page 59

Glossary - 3
Decode. To recognize a bar code symbology (e.g., UPC/EAN) and then analyze the content of the specific bar code
scanned.
Decode Algorithm. A decoding scheme that converts pulse widths into data representation of the letters or numbers
encoded within a bar code symbol.
Decryption. Decryption is the decoding and unscrambling of received encrypted data. Also see, Encryption and Key.
Depth of Field. The range between minimum and maximum distances at which a scanner can read a symbol with a
certain minimum element width.
Device Configuration Package. The Device Configuration Package provides flash partitions, Terminal Configuration
Manager (TCM) and the associated TCM scripts. With this package hex images that represent flash partitions can
be created and downloaded to the MC18.
E
EAN. (European Article Number) This European/International version of the UPC provides its own coding format and
symbology standards. Element dimensions are specified metrically. EAN is used primarily in retail.
EAP. (Extensible Authentication Protocol) A general authentication protocol used to control network access. Many
specific authentication methods work within this framework.
EAP-PEAP. (Extensible Authentication Protocol-Protected Extensible Authentication Protocol) A mutual authentication
method that uses a combination of digital certificates and another system, such as passwords.
EAP-TLS. (Extensible Authentication Protocol-Transport Layer Security) A mutual authentication method that uses
digital certificates.
Encoded Area. Total linear dimension occupied by all characters of a code pattern, including start/stop characters and
data.
Encryption. Encoding data to prevent it from being read by unauthorized people.
ENQ (RS-232). ENQ software handshaking is also supported for the data sent to the host.
EMDK. Enterprise Mobility Developer’s Kit.
Ethernet. An IEEE standard network protocol that specifies how data is placed on and retrieved from a common
transmission medium.
F
Flash Memory. Flash memory is nonvolatile, semi-permanent storage that can be electronically erased in the circuit
and reprogrammed.
File Transfer Protocol (FTP). A TCP/IP application protocol governing file transfer via network or telephone lines. See
TCP/IP.
Page 60

Glossary - 4 MC18 Product Reference Guide
G
Gifted Batteries. A battery with advanced features such as: advanced state of battery health, more accurate state of
charge, elapsed time since first use by customer, time to fully charge, time to fully discharge, estimate of capacity if
battery were fully charged and operated under present load conditions and temperature.
H
Hard Reset. See Cold Boot.
Hz. Hertz; A unit of frequency equal to one cycle per second.
Host Computer. A computer that serves other mobile computers in a network, providing such services as computation,
database access, supervisory programs and network control.
I
IEC. International Electrotechnical Commission. This international agency regulates laser safety by specifying various
laser operation classes based on power output during operation.
IEEE Address. See MAC Address.
Internet Protocol Address. See IP.
Input/Output Ports. I/O ports are primarily dedicated to passing information into or out of the MC18’s memory.
IP. (Internet Protocol) The IP part of the TCP/IP communications protocol. IP implements the network layer (layer 3) of
the protocol, which contains a network address and is used to route a message to a different network or subnetwork.
IP accepts “packets” from the layer 4 transport protocol (TCP or UDP), adds its own header to it and delivers a
“datagram” to the layer 2 data link protocol. It may also break the packet into fragments to support the maximum
transmission unit (MTU) of the network.
IP Address. (Internet Protocol address) The address of a computer attached to an IP network. Every client and server
station must have a unique IP address. A 32-bit address used by a computer on a IP network. Client workstations
have either a permanent address or one that is dynamically assigned to them each session. IP addresses are written
as four sets of numbers separated by periods; for example, 204.171.64.2.
K
Key. A key is the specific code used by the algorithm to encrypt or decrypt the data. Also see, Encryption and
Decrypting.
Page 61

Glossary - 5
L
Imager. A type of bar code reader that uses a camera.
LCD. See Liquid Crystal Display.
LEAP. (Lightweight Extensible Authentication Protocol) A mutual authentication method that uses a username and
password system.
LED Indicator. A semiconductor diode (LED - Light Emitting Diode) used as an indicator, often in digital displays. The
semiconductor uses applied voltage to produce light of a certain frequency determined by the semiconductor's
particular chemical composition.
Liquid Crystal Display (LCD). A display that uses liquid crystal sealed between two glass plates. The crystals are
excited by precise electrical charges, causing them to reflect light outside according to their bias. They use little
electricity and react relatively quickly. They require external light to reflect their information to the user.
M
Mobile Computer. In this text, mobile computer refers to the MC18. It can be set up to run as a stand-alone device, or
it can be set up to communicate with a network, using wireless radio technology.
MSCHAP. (Microsoft Challenge Handshake Authentication Protocol) is the Microsoft version of CHAP and is an
extension to RFC 1994. Like the standard version of CHAP, MS-CHAP is used for PPP authentication; in this case,
authentication occurs between a PC using Microsoft Windows NT or Microsoft Windows 95 and a Cisco router or
access server acting as a network access server (NAS).
N
Nominal. The exact (or ideal) intended value for a specified parameter. Tolerances are specified as positive and
negative deviations from this value.
Nominal Size. Standard size for a bar code symbol. Most UPC/EAN codes are used over a range of magnifications
(e.g., from 0.80 to 2.00 of nominal).
P
Parameter. A variable that can have different values assigned to it.
PING. (Packet Internet Groper) An Internet utility used to determine whether a particular IP address is online. It is used
to test and debug a network by sending out a packet and waiting for a response.
Programming Mode. The state in which a scanner is configured for parameter values. See Scanning Mode.
Page 62

Glossary - 6 MC18 Product Reference Guide
Q
Quiet Zone. A clear space, containing no dark marks, which precedes the start character of a bar code symbol and
follows the stop character.
R
RAM. Random Access Memory. Data in RAM can be accessed in random order, and quickly written and read.
RF. Radio Frequency.
ROM. Read-Only Memory. Data stored in ROM cannot be changed or removed.
Router. A device that connects networks and supports the required protocols for packet filtering. Routers are typically
used to extend the range of cabling and to organize the topology of a network into subnets. See Subnet.
S
Scanning Mode. The scanner is energized, programmed and ready to read a bar code.
Scanning Sequence. A method of programming or configuring parameters for a bar code reading system by scanning
bar code menus.
SDK. Software Development Kit
Shared Key. Shared Key authentication is an algorithm where both the AP and the MU share an authentication key.
Soft Reset. See Warm Boot.
Specular Reflection. The mirror-like direct reflection of light from a surface, which can cause difficulty decoding a bar
code.
Subnet. A subset of nodes on a network that are serviced by the same router. See Router.
Substrate. A foundation material on which a substance or image is placed.
Symbol. A scannable unit that encodes data within the conventions of a certain symbology, usually including start/stop
characters, quiet zones, data characters and check characters.
Symbology. The structural rules and conventions for representing data within a particular bar code type (e.g. UPC/EAN,
Code 39, PDF417, etc.).
T
TCP/IP. (Transmission Control Protocol/Internet Protocol) A communications protocol used to internetwork dissimilar
systems. This standard is the protocol of the Internet and has become the global standard for communications. TCP
Page 63

Glossary - 7
provides transport functions, which ensures that the total amount of bytes sent is received correctly at the other end.
UDP is an alternate transport that does not guarantee delivery. It is widely used for real-time voice and video
transmissions where erroneous packets are not retransmitted. IP provides the routing mechanism. TCP/IP is a
routable protocol, which means that all messages contain not only the address of the destination station, but the
address of a destination network. This allows TCP/IP messages to be sent to multiple networks within an
organization or around the world, hence its use in the worldwide Internet. Every client and server in a TCP/IP
network requires an IP address, which is either permanently assigned or dynamically assigned at startup.
TFTP. (Trivial File Transfer Protocol) A version of the TCP/IP FTP (File Transfer Protocol) protocol that has no directory
or password capability. It is the protocol used for upgrading firmware, downloading software and remote booting of
diskless devices.
TKIP. (Temporal Key Integrity Protocol) A wireless encryption protocol that periodically changes the encryption key,
making it harder to decode.
Transmission Control Protocol/Internet Protocol. See TCP/IP.
TLS. (Transport Layer Security) TLS is a protocol that ensures privacy between communicating applications and their
users on the Internet. When a server and client communicate, TLS ensures that no third party may eavesdrop or
tamper with any message. TLS is the successor to the Secure Sockets Layer (SSL).
Trivial File Transfer Protocol. See TFTP.
U
UDP. (User Datagram Protocol) A protocol within the IP protocol suite that is used in place of TCP when a reliable
delivery is not required. For example, UDP is used for real-time audio and video traffic where lost packets are simply
ignored, because there is no time to retransmit. If UDP is used and a reliable delivery is required, packet sequence
checking and error notification must be written into the applications.
W
Warm Boot. A warm boot restarts the MC18 by closing all running programs. All data that is not saved to flash memory
is lost.
WAP. (Wireless Application Protocol) A set of specifications, developed by the WAP Forum, that lets developers using
Wireless Markup Language build networked applications designed for handheld wireless devices. WAP was
designed to work within the constraints of these devices: a limited memory and CPU size, small, monochrome
screens, low bandwidth and erratic connections.
WEP. Wired-Equivalent Privacy protocol was specified in the IEEE 802.11 standard to provide a WLAN with a minimal
level of security and privacy comparable to a typical wired LAN, using data encryption.
WPA. Wi-Fi Protected Access is a data encryption specification for 802.11 wireless networks that replaces the weaker
WEP. It improves on WEP by using dynamic keys, Extensible Authentication Protocol to secure network access,
and an encryption method called Temporal Key Integrity Protocol (TKIP) to secure data transmissions.
WPA2. Wi-Fi Protected Access 2 is an enhanced version of WPA. It uses Advanced Encryption Standard instead of
TKIP.
Page 64

Glossary - 8 MC18 Product Reference Guide
WLAN. Wireless local-area networks use radio waves instead of a cable to connect a user device, such as a mobile
computer, to a LAN. They provide Ethernet connections over the air and operate under the 802.11 family of
specifications developed by the IEEE.
Page 65

INDEX
Numerics
802.11b/g . . . . . . . . . . . . . . . . . . . . . . . . . . . . . . . . . A-2
A
accessories . . . . . . . . . . . . . . . . . . . . . . . . . . . . . . . . 1-4
active and indicate programs . . . . . . . . . . . . . . . . . . 5-7
ActiveSync . . . . . . . . . . . . . . . . . . . . . . . . . . . . . . . . 4-1
downloading files . . . . . . . . . . . . . . . . . . . . . . . . 9-3
installing . . . . . . . . . . . . . . . . . . . . . . . . . . . . . . . 4-1
setting up a connection . . . . . . . . . . . . . . . . . . . . 4-2
AirBEAM
Client . . . . . . . . . . . . . . . . . . . . . . . . . . . . . . . . . B-2
configuring . . . . . . . . . . . . . . . . . . . . . . . . . . . . . B-2
package builder . . . . . . . . . . . . . . . . . . . . . . . . . B-1
staging . . . . . . . . . . . . . . . . . . . . . . . . . . . . . . . . B-9
synchronization with server . . . . . . . . . . . . . . . . B-8
AirBEAM configuration
Misc(1) tab . . . . . . . . . . . . . . . . . . . . . . . . . . . . . B-4
Misc(2) tab . . . . . . . . . . . . . . . . . . . . . . . . . . . . . B-5
Packages(2) tab . . . . . . . . . . . . . . . . . . . . . . . . . B-3
Server tab . . . . . . . . . . . . . . . . . . . . . . . . . . . . . . B-4
App Launcher
configuration . . . . . . . . . . . . . . . . . . . . . . . . . . . . C-1
B
backlight . . . . . . . . . . . . . . . . . . . . . . . . . . . . . . . 6-2, 6-3
battery
charging . . . . . . . . . . . . . . . . . . . . . . . . . . . . 1-6, 1-9
temperature range . . . . . . . . . . . . . . . . . . . . A-3
clearing . . . . . . . . . . . . . . . . . . . . . . . . . . . . . . . 10-2
improving battery life . . . . . . . . . . . . . . . . . . . . . 6-3
installing . . . . . . . . . . . . . . . . . . . . . . . . . . . . . . . 1-6
replacement . . . . . . . . . . . . . . . . . . . . . . . . . . . 10-2
service . . . . . . . . . . . . . . . . . . . . . . . . . . . . . . . 10-2
status . . . . . . . . . . . . . . . . . . . . . . . . . . . . . . . . . . 5-7
battery charge status . . . . . . . . . . . . . . . . . . . . . . . . . 5-7
battery charging temperature . . . . . . . . . . . . . . . . . . . A-2
battery management . . . . . . . . . . . . . . . . . . . . . . . . 10-2
battery status . . . . . . . . . . . . . . . . . . . . . . . . . . . 5-7, 5-8
bezel . . . . . . . . . . . . . . . . . . . . . . . . . . . . . . . . . . . . 1-16
bezel replacement . . . . . . . . . . . . . . . . . . . . . . . . . . 1-16
boot
cold . . . . . . . . . . . . . . . . . . . . . . . . . . . . . 1-12, 1-15
warm . . . . . . . . . . . . . . . . . . . . . . . . . . . . . . . . . 1-15
bullets . . . . . . . . . . . . . . . . . . . . . . . . . . . . . . . . . . . . . xv
C
changing the power settings . . . . . . . . . . . . . . . . . . . 6-4
charging
temperature range . . . . . . . . . . . . . . . . . . . . . . . . A-3
charging battery . . . . . . . . . . . . . . . . . . . . . . . . . . . . . 1-9
cradle . . . . . . . . . . . . . . . . . . . . . . . . . . . . 1-4, 1-10, 1-11
cleaning . . . . . . . . . . . . . . . . . . . . . . . . . . . . . . . . . . 10-1
clock, display . . . . . . . . . . . . . . . . . . . . . . . . . . . . . . 5-11
cold boot . . . . . . . . . . . . . . . . . . . . . . . . 1-12, 1-15, 9-23
communication status . . . . . . . . . . . . . . . . . . . . . . . . 5-7
configuration . . . . . . . . . . . . . . . . . . . . . . . . . . . . . . . . xii
configurations . . . . . . . . . . . . . . . . . . . . . . . . . . . . . . . xii
conventions
notational . . . . . . . . . . . . . . . . . . . . . . . . . . . . . . . . xv
CPU . . . . . . . . . . . . . . . . . . . . . . . . . . . . . . . . . . . . . . A-1
cradle key . . . . . . . . . . . . . . . . . . . . . . . . . . . . . . . . . 1-4
creating splash screen . . . . . . . . . . . . . . . . . . . . . . . 9-18
D
daisy chain cable . . . . . . . . . . . . . . . . . . . . . . . . . . . . 1-4
data capture . . . . . . . . . . . . . . . . . . . . . . . . . . . . . . . . . xii
adjusting the distance . . . . . . . . . . . . . . . . . . . . 1-14
indicator . . . . . . . . . . . . . . . . . . . . . . . . . . . . . . . 1-14
Page 66

Index - 2 MC18 User Guide
scan angle . . . . . . . . . . . . . . . . . . . . . . . . . . . . . 1-13
scan range . . . . . . . . . . . . . . . . . . . . . . . . . . . . 1-13
scanning . . . . . . . . . . . . . . . . . . . . . . . . . . . . . . 1-13
DCP . . . . . . . . . . . . . . . . . . . . . . . . . . . . . . . . . . . . . . 9-1
DCP for MC18xxc50 . . . . . . . . . .xv, 9-5, 9-8, 9-18, 9-24
programming cable . . . . . . . . . . . . . . . . . . . . . . . . . . 1-4
Device Configuration Package . . . . . . . . . . . . . . . . . 9-1
Device Configuration Package for MC18xxc50 . . xv, 9-5,
9-8, . . . . . . . . . . . . . . . . . . . . . . . . . . . . . . . . .9-18, 9-24
dimensions . . . . . . . . . . . . . . . . . . . . . . . . . . . . . . . . A-1
dispenser key . . . . . . . . . . . . . . . . . . . . . . . . . . . . . 1-10
display . . . . . . . . . . . . . . . . . . . . . . . . . . . . . . . . . xii, A-1
display backlight
saving power . . . . . . . . . . . . . . . . . . . . . . . . . . . . 6-4
display clock . . . . . . . . . . . . . . . . . . . . . . . . . . . . . . 5-11
documents . . . . . . . . . . . . . . . . . . . . . . . . . . . . . . . . . 5-9
downloading files . . . . . . . . . . . . . . . . . . . . . . . . . . . . 9-3
drop specification . . . . . . . . . . . . . . . . . . . . . . . . . . . . A-2
E
electrical safety . . . . . . . . . . . . . . . . . . . . . . . . . . . . . A-3
EMDK for C . . . . . . . . . . . . . . . . . . . . . . . . . . . . . . . . 9-1
EMDK for eVC4 . . . . . . . . . . . . . . . . . . . . . . . . . . . . . . xv
Enterprise Mobility Developer Kit for C . . . . . . . . . . . 9-1
Enterprise Mobility Developer Kit for eVC4 . . . . . . . . . xv
error messages . . . . . . . . . . . . . . . . . . . . . . . .9-14, 9-16
F
favorites . . . . . . . . . . . . . . . . . . . . . . . . . . . . . . . . . . . 5-9
file explorer . . . . . . . . . . . . . . . . . . . . . . . . . . . . . . . . 9-5
flash file system . . . . . . . . . . . . . . . . . . . . . . . . . . . . 9-23
downloading partitions . . . . . . . . . . . . . . . . . . . 9-25
non-FFS partitions . . . . . . . . . . . . . . . . . . . . . . 9-24
IPL . . . . . . . . . . . . . . . . . . . . . . . . . . . . . . . 9-25
splash screen . . . . . . . . . . . . . . . . . . . . . . . 9-24
partitions . . . . . . . . . . . . . . . . . . . . . . . . . . . . . . 9-23
copyfile . . . . . . . . . . . . . . . . . . . . . . . . . . . . 9-24
regmerge . . . . . . . . . . . . . . . . . . . . . . . . . . 9-23
flash memory . . . . . . . . . . . . . . . . . . . . . . . . . . . . . . . 6-2
flash storage . . . . . . . . . . . . . . . . . . . . . . . . . . . . . . 9-23
fonts . . . . . . . . . . . . . . . . . . . . . . . . . . . . . . . . . . . . . . 6-1
asian font installation . . . . . . . . . . . . . . . . . . . . . 6-2
greek . . . . . . . . . . . . . . . . . . . . . . . . . . . . . . . . . . 6-1
japanese . . . . . . . . . . . . . . . . . . . . . . . . . . . . . . . 6-1
korean . . . . . . . . . . . . . . . . . . . . . . . . . . . . . . . . . 6-1
russian . . . . . . . . . . . . . . . . . . . . . . . . . . . . . . . . 6-1
simplified chinese . . . . . . . . . . . . . . . . . . . . . . . . 6-1
swedish . . . . . . . . . . . . . . . . . . . . . . . . . . . . . . . . 6-1
function status . . . . . . . . . . . . . . . . . . . . . . . . . . . . . . 5-7
G
getting started . . . . . . . . . . . . . . . . . . . . . . . . . . . . . . . 1-6
H
hard reset . . . . . . . . . . . . . . . . . . . . . . . . . . . . 1-12, 1-15
help . . . . . . . . . . . . . . . . . . . . . . . . . . . . . . . . . . . . . . . 5-9
humidity . . . . . . . . . . . . . . . . . . . . . . . . . . . . . . . . . . .A-2
I
information, service . . . . . . . . . . . . . . . . . . . . . . . . . . xvi
Initial Program Loader . . . . . . . . . . . . . . . . . . . . . . . 9-25
installing development tools . . . . . . . . . . . . . . . . . . . . 9-2
IPL . . . . . . . . . . . . . . . . . . . . . . . . . . . . . . . . . . . . . . 9-25
error messages . . . . . . . . . . . . . . . . . . . . . . . . . 9-16
error screen . . . . . . . . . . . . . . . . . . . . . . . . . . . . 9-16
K
key . . . . . . . . . . . . . . . . . . . . . . . . . . . . . . . . . . . . . . 1-10
key descriptions
two-color alphanumeric . . . . . . . . . . . . . . . . . . . . 1-6
keyboard . . . . . . . . . . . . . . . . . . . . . . . . . . . . . . . . . . .A-1
keypads . . . . . . . . . . . . . . . . . . . . . . . . . . . . . . . . . . . . xii
L
laser safety . . . . . . . . . . . . . . . . . . . . . . . . . . . . . . . . .A-2
laser scanning
See data capture . . . . . . . . . . . . . . . . . . . . . . . . 1-13
LED indicators . . . . . . . . . . . . . . . . . . . . . . . . . . . . . . 1-5
lithium-ion battery . . . . . . . . . . . . . . . . . . . . . . . . . . . . 1-1
M
main battery
charging
temperature range . . . . . . . . . . . . . . . . . . . . . A-3
maintenance . . . . . . . . . . . . . . . . . . . . . . . . . . . . . . . 10-1
memory . . . . . . . . . . . . . . . . . . . . . . . . . . . . . . . . xii, A-1
mobile computer
cold boot . . . . . . . . . . . . . . . . . . . . . . . . . . . . . . 9-23
starting . . . . . . . . . . . . . . . . . . . . . . . . . . . . . . . . 1-12
O
operating system . . . . . . . . . . . . . . . . . . . . . . . . . xii, A-1
operating temperature . . . . . . . . . . . . . . . . . . . . . . . .A-2
P
partitions
Page 67

Index - 3
downloading . . . . . . . . . . . . . . . . . . . . . . . . . . . 9-25
FFS . . . . . . . . . . . . . . . . . . . . . . . . . . . . . . . . . . 9-23
non-FFS . . . . . . . . . . . . . . . . . . . . . . . . . . . . . . 9-24
IPL . . . . . . . . . . . . . . . . . . . . . . . . . . . . . . . 9-25
splash screen . . . . . . . . . . . . . . . . . . . . . . . 9-24
parts of the mobile computer . . . . . . . . . . . . . . . . . . 1-1
pin-outs
mobile computer . . . . . . . . . . . . . . . . . . . . . . . . . A-4
power cable . . . . . . . . . . . . . . . . . . . . . . . . . . . . . . . . 1-4
power settings . . . . . . . . . . . . . . . . . . . . . . . . . . . . . . 6-4
power supply . . . . . . . . . . . . . . . . . . . . . . . . . . . . . . . 1-4
power supply housing . . . . . . . . . . . . . . . . . . . . . . . . 1-4
accessories . . . . . . . . . . . . . . . . . . . . . . . . . . . . . 1-4
program menu . . . . . . . . . . . . . . . . . . . . . . . . . . . . . . 5-9
programs
flash file system . . . . . . . . . . . . . . . . . . . . . . . . 9-23
properties . . . . . . . . . . . . . . . . . . . . . . . . . . . . . . . . 5-10
provisioning . . . . . . . . . . . . . . . . . . . . . . . . . . . . . . . . 2-1
R
radios . . . . . . . . . . . . . . . . . . . . . . . . . . . . . . . . . . . . . xii
RAM . . . . . . . . . . . . . . . . . . . . . . . . . . . . . . . . . . . . . 6-2
reset
hard . . . . . . . . . . . . . . . . . . . . . . . . . . . . . 1-12, 1-15
soft . . . . . . . . . . . . . . . . . . . . . . . . . . . . . . . . . . 1-15
resetting . . . . . . . . . . . . . . . . . . . . . . . . . . . . . . . . . 1-15
run . . . . . . . . . . . . . . . . . . . . . . . . . . . . . . . . . . . . . . . 5-9
S
scan status . . . . . . . . . . . . . . . . . . . . . . . . . . . . . . . 1-14
scan status See also data capture
scanning
bar codes . . . . . . . . . . . . . . . . . . . . . . . . . . . . . 1-13
LED indicators . . . . . . . . . . . . . . . . . . . . . . . . . 1-14
See data capture . . . . . . . . . . . . . . . . . . . . . . . 1-13
screen
Symbol splash screen . . . . . . . . . . . . . . . . . . . 1-12
scripts
creating . . . . . . . . . . . . . . . . . . . . . . . . . . . . . . . . 9-8
saving . . . . . . . . . . . . . . . . . . . . . . . . . . . . . . . . . 9-9
service information . . . . . . . . . . . . . . . . . . . . . . . . . . . xvi
setting up a partnership
partnership . . . . . . . . . . . . . . . . . . . . . . . . . . . . . 4-3
settings . . . . . . . . . . . . . . . . . . . . . . . . . . . . . . . . . . . 5-9
show clock . . . . . . . . . . . . . . . . . . . . . . . . . . . . . . . 5-11
soft reset . . . . . . . . . . . . . . . . . . . . . . . . . . . . . . . . . 1-15
splash screen . . . . . . . . . . . . . . . . . . . . . . . . . . . . . 9-24
creating . . . . . . . . . . . . . . . . . . . . . . . . . . . . . . . 9-18
staging . . . . . . . . . . . . . . . . . . . . . . . . . . . . . . . . . . . 2-1
start menu . . . . . . . . . . . . . . . . . . . . . . . . . . . . . . . . . 5-9
starting the mobile computer . . . . . . . . . . . . . . . . . . 1-12
status icon . . . . . . . . . . . . . . . . . . . . . . . . . . . . . . 5-7, 5-8
status icons
Windows CE 7.0 . . . . . . . . . . . . . . . . . . . . . . . . . 5-7
storage temperature . . . . . . . . . . . . . . . . . . . . . . . . . . A-2
suspend . . . . . . . . . . . . . . . . . . . . . . . . . . . . . . . . . . . 5-9
T
taskbar . . . . . . . . . . . . . . . . . . . . . . . . . . . . . . . . . . . . 5-7
TCM
building hex image . . . . . . . . . . . . . . . . . . . 9-5, 9-9
creating script . . . . . . . . . . . . . . . . . . . . . . . . . . . 9-8
defining properties . . . . . . . . . . . . . . . . . . . . . . . . 9-7
error messages . . . . . . . . . . . . . . . . . . . . . . . . . 9-14
hex image download . . . . . . . . . . . . . . . . . . . . . 9-10
saving script . . . . . . . . . . . . . . . . . . . . . . . . . . . . 9-9
starting . . . . . . . . . . . . . . . . . . . . . . . . . . . . . . . . . 9-5
temperature
battery charging . . . . . . . . . . . . . . . . . . . . . . . . . . A-3
troubleshooting . . . . . . . . . . . . . . . . . . . . . . . . . . . . 10-6
U
unpacking . . . . . . . . . . . . . . . . . . . . . . . . . . . . . . . . . 1-1
USB cable . . . . . . . . . . . . . . . . . . . . . . . . . . . . . . . . . 1-4
W
wake up conditions . . . . . . . . . . . . . . . . . . . . . . . . . 5-12
warm boot . . . . . . . . . . . . . . . . . . . . . . . . . . . . . . . . 1-15
weight . . . . . . . . . . . . . . . . . . . . . . . . . . . . . . . . . . . . A-1
WLAN 802.11a/b/g . . . . . . . . . . . . . . . . . . . . . . . . . . . xii
WLAN radio . . . . . . . . . . . . . . . . . . . . . . . . . . . . . . . . A-2
Y
Y-power cable . . . . . . . . . . . . . . . . . . . . . . . . . . . . . . 1-4
Page 68

Index - 4 MC18 User Guide
Page 69

Page 70

Symbol Technologies, Inc.
1301 E. Algonquin Rd.
Schaumburg, IL 60196-1078, U.S.A.
http://www.motorolasolutions.com
Symbol® is a registered trademark, and The Enterprise Mobility Company is a trademark of Symbol
Technologies, Inc. All other trademarks and service marks are proprietary to their respective owners.
© 2014 Symbol Technologies, Inc. All Rights Reserved.
MN000834A01 Revision A - July 2014
 Loading...