


6KG WASHING MACHINE
SW2020R
User Instructions
Swan Helpline No. 0845 610 4118

THE CONTENTS
SECTION 1: BEFORE USING
Safety warnings
Recommendations
SECTION 2: INSTALLATION
Removal of transportation screws
Ensure the washing machine is level
Electrical safety
Water supply connection
Water drain connection
SECTION 3: TECHNICAL SPECIFICATIONS
SECTION 4: CONTROL PANEL
Start/Pause button
Function indicator lights
Function buttons
Program knob
SECTION 5: WASHING YOUR LAUNDRY
Before washing
Running the machine
SECTION 6: INTERNATIONAL WASHING SIGNS SECTION 7: MAINTENANCE AND CLEANING
Water inlet filters
Pump filter
Detergent drawer
Siphon plug
The cabinet
The drum
Remove of your machine from lime
SECTION 8: TROUBLE SHOOTING
SECTION 9: AUTOMATIC FAILURE DETECTION SYSTEM
Swan Helpline No. 0845 610 4118
1

SECTION 1: BEFORE USING
KEEP THIS MANUAL IN A CONVENIENT PLACE SO YOU CAN REFER TO IT FOR THE SAFE AND PROPER USE OF THE APPLIANCE
SAFETY WARNINGS
Do not use a multiple socket or extension cord.
Do not insert a plug with damaged or broken cord into the socket.
If the cord is damaged it should be replaced by the manufacturer or appointed service agent in order to avoid a hazard.
Never remove the plug from the socket by pulling the cord, always hold the plug.
Do not plug in the power supply with wet hands.
Never touch the machine with wet hands or feet.
Never open the detergent drawer whilst the device is running.
Never force open the door of the machine whilst the machine is running.
Since the machine can reach high temperatures whilst running, do not touch the drain hose and water during draining.
In case of any failure, first unplug the device and close the water tap. Do not attempt to repair. Please contact the Swan helpline.
The packing material of your machine may be hazardous for children, therefore dispose of responsibly.
Do not let your children play with the washing machine.
Keep your pet away from your machine.
Your machine should only be used by adults in conjunction with the guidelines stated in this manual.
Your machine is designed for domestic use only. Warranty will be invalid if you use it for commercial purposes.
The appliance should not be put on a carpet which can block the air ventilation.
RECOMMENDATIONS
The detergent or softener in contact with air for a long time will dry and stick to your detergent drawer. To avoid this put your detergent and softener into the detergent drawer just before washing.
It is recommended that you use pre-washing program for only very dirty clothes.
Please do not exceed the maximum loading capacity.
The appliance is not intended for use by people (including children) with reduced physical, sensory or mental capabilities, or lack of experience and knowledge, unless they have been given supervision or instruction concerning use of the appliance by a person responsible for their safety. Children should be supervised to ensure that they don’t play with the appliance.
Swan Helpline No. 0845 610 4118
2

If you do not use your machine for a long time, unplug, turn off the water supply and leave the door open in order to prevent the formation of unpleasant odours.
As a result of the quality control procedures, a certain amount of water may remain in your machine. This is not harmful for your machine.
SECTION 2: INSTALLATION
Thank you for purchasing this swan washing machine. Please read the instructions carefully before use.
REMOVAL OF TRANSPORTATION SCREWS
Transportation screws, which are located at the back of the machine, must be removed before running the machine. (DIAGRAM-1)
Loosen the screws by rotating counter clockwise by a suitable wrench. (DIAGRAM-2)
Remove the screws by pulling them. (DIAGRAM-3)
Insert the plastic transport screw caps found in the accessories bag, into the holes. (DIAGRAM-4)
The transportation screws, that have been removed from the machine should be kept in a safe place, and be reinserted if the item is moved at any time in the future.
DIAGRAM-1 |
DIAGRAM-2 |
DIAGRAM-3 |
DIAGRAM-4 |
ENSURE THE WASHING MACHINE IS LEVEL
Do not install your machine on rugs or similar surfaces.
For your machine to work silently and without any vibration, it should be settled on a flat, non-slippery and tough surface.
Swan Helpline No. 0845 610 4118
3

There are adjustable feet under the bottom of the washing machine. Before use, they should be adjusted so that the washing machine is level. This will minimize vibrations and thus noise during.
First, loosen the plastic adjustment nut.
Adjust by rotating the feet upwards or downwards.
We recommend using a spirit level to check the item is level.
Tighten adjustment nut by rotating it upwards.
Electrical Safety
THIS APPLIANCE MUST BE PLUGGED INTO AN EARTHED SOCKET.
Before switching on, make sure that the voltage of your electricity supply is the same as that indicated on the rating plate. This product is designed to operate on 220 – 240V AC; 50Hz. Connection to any other power source may damage the unit.
This product may be fitted with a non – rewireable plug. If it is necessary to change the fuse in the plug, the fuse cover must be refitted. If the fuse cover becomes lost or damaged, the plug must not be used until a suitable replacement obtained.
If the plug has to be changed because it is not suitable for your socket, or becomes damaged in any way, it should be cut off and an appropriate plug fitted following the wiring instructions below. This should be carried out by a qualified electrician. The plug removed must be disposed of safely, as insertion into a 13 Amp socket is likely to cause an electrical hazard.
Wiring Instructions
The wires in this mains lead are colored in accordance with the following code:
Blue – Neutral ‘N’
Brown – Live ‘L’
Green & Yellow – Earth ‘E’
Swan Helpline No. 0845 610 4118
4
As the colours of the wires in the mains lead of this appliance may not correspond with the coloured markings identifying the terminals in your plug, proceed as follows (refer to the plug wiring diagram).
The wire which is colored BLUE must be connected to the terminal which is marked with the letter N or colored Black.
The wire which is colored BROWN must be connected to the terminal which is marked with the letter L or colored Red.
The wire which is coloured GREEN/YELLOW must be connected to the terminal which is marked E.
If a 13Amp (BS1363) plug is used, a 13Amp (BS1362) fuse must be fitted, or if any other type of plug is used, a 13Amp fuse must be fitted, either in the plug or adaptor, or on the Distribution Board.
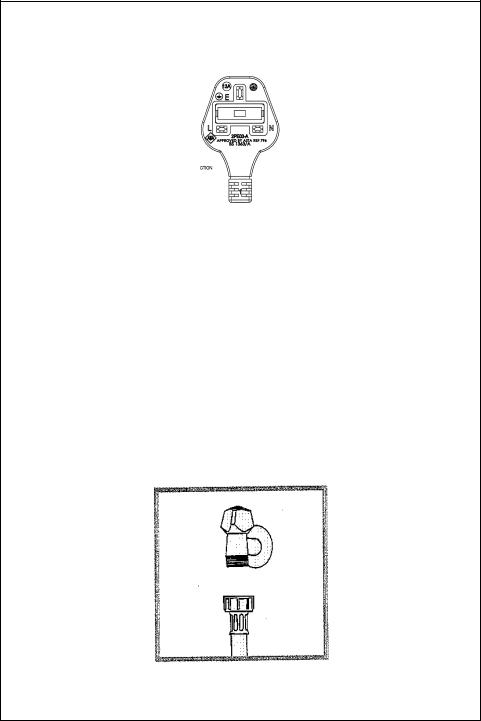
Water Supply Connection
Inside the drum of the washing machine you will find water connection hose.
1)Connect the straight end of the hose to the cold water outlet at the installation location. The outlet must be fitted with a ¾” threaded connection. Ensure it is tightened adequately so that it does not leak.
Swan Helpline No. 0845 610 4118
5

2)Connect the curved end of the hose to the water inlet valve located at the rear right hand top corner of the unit. Ensure the connection is tightened adequately so that it will not leak.
3)Make sure there a no kinks or bends in the hose.
4)Turn on the tap and check that there are no leeks from either connection.
!For the machine to work efficiently the water pressure must be 0.1-1 MPa
!Lengthening of the hose must only be done by an authorised Service Engineer.
Water Drain Connection
The drain hose is located on the rear of the machine.
The drainage outlet must be located between 60 and 100 cm in height from the floor.
Connect the drain hose to the drainage outlet
Ensure the hose is not kinked or bent.
Max.
100cm
Min.
60cm
!Do not attempt to lengthen the drain hose.
!If the hose end is placed in a sink, ensure the end is not underwater.
Swan Helpline No. 0845 610 4118
6

SECTION 3: TECHNICAL SPECIFICATIONS
|
47 LT |
|
|
Maximum dry laundry capacity (kg) |
6 |
|
|
|
|
|
|
Recommended loading (kg) |
5,5 |
|
|
|
|
||
Height (cm) |
85 |
|
|
Width (cm) |
59,6 |
|
|
Depth (cm) |
54 |
|
|
Swan Helpline No. 0845 610 4118
7
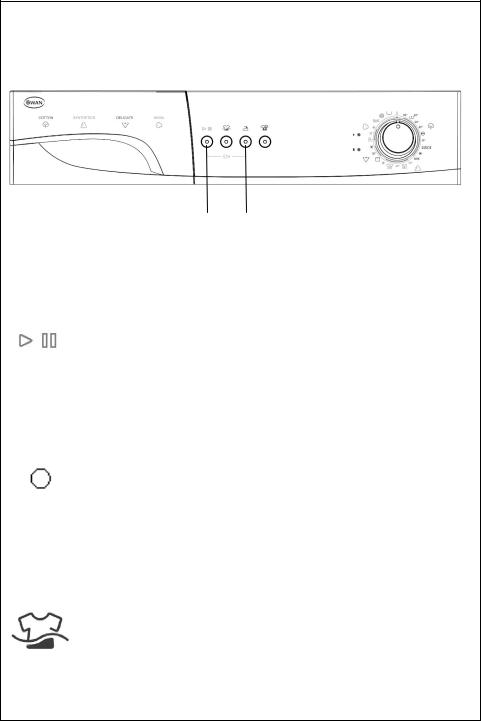
SECTION 4: CONTROL PANEL
1 |
2 |
3 |
4 |
5 |
|
|||||
|
|
|
|
|
|
|
|
|
|
|
|
|
|
|
|
|
|
|
|
|
|
|
|
|
|
|
|
|
|
|
|
|
|
|
|
|
|
|
|
|
|
|
|
|
|
|
|
|
|
|
|
|
|
|
|
|
|
|
|
|
|
|
|
|
|
|
|
|
|
|
|
|
|
|
|
|
|
|
|
|
|
|
|
|
|
|
|
|
|
|
|
|
|
|
|
|
|
|
|
|
|
|
|
|
|
|
|
|
|
6 |
7 |
8 |
1-Detergent drawer |
|
5-Program knob |
2-Start/pause light |
|
6-Start/pause button |
3-Function indicator lights |
|
7-Function buttons |
4-Program ready light |
|
8-Program end light |
START/PAUSE BUTTON
Used to start a selected program or pause during running.
 WARNING!
It is required for the program knob to be brought to O(off) position before selecting the program or changing a continuing program.
FUNCTION INDICATOR LIGHTS
When the start/pause button or any function button is pressed, the corresponding light turns on. The light turns off when the function button or start/pause button is re-pressed, or when the process the selected function is completed.
The function indicator lights are also used in failure detection system mentioned in section 9.
FUNCTION BUTTONS Rinse hold
This function is recommended to be used when the clothes cannot be taken immediately after the end of the program. This will prevent occurrence of wrinkles. When this button is pressed, the last rinsing water is not drained. For the program to continue from the same point, repress the same button.
Swan Helpline No. 0845 610 4118
8
 Loading...