

Suunto AMBIT2 BLACK (HR), AMBIT2 BLACK, AMBIT2 SAPPHIRE (HR), AMBIT2 SILVER, AMBIT2 SILVER (HR) Owner's Manual
...
SUUNTO AMBIT2 1.5
USER GUIDE
en

1 SAFETY . . . . . . . . . . . . . . . . . . . . . . . . . . . . . . . . . . . . . . . . . . . . . . . . . . . . . . . . . . . . . . . . . . . . . . . . 7
2 Welcome . . . . . . . . . . . . . . . . . . . . . . . . . . . . . . . . . . . . . . . . . . . . . . . . . . . . . . . . . . . . . . . . . . . . . . 9
3 Display icons and segments . . . . . . . . . . . . . . . . . . . . . . . . . . . . . . . . . . . . . . . . . . . . . . . . 10
4 Using buttons . . . . . . . . . . . . . . . . . . . . . . . . . . . . . . . . . . . . . . . . . . . . . . . . . . . . . . . . . . . . . . . 11
4.1 Using backlight and button lock . . . . . . . . . . . . . . . . . . . . . . . . . . . . . . . . 12
5 Getting started . . . . . . . . . . . . . . . . . . . . . . . . . . . . . . . . . . . . . . . . . . . . . . . . . . . . . . . . . . . . . . 14
6 Customizing your Suunto Ambit2 . . . . . . . . . . . . . . . . . . . . . . . . . . . . . . . . . . . . . . . . . . 15
6.1 Connecting to Movescount . . . . . . . . . . . . . . . . . . . . . . . . . . . . . . . . . . . . . 15
6.2 Updating your Suunto Ambit2 . . . . . . . . . . . . . . . . . . . . . . . . . . . . . . . . . . 16
6.3 Custom sport modes . . . . . . . . . . . . . . . . . . . . . . . . . . . . . . . . . . . . . . . . . . . . 17
6.4 Suunto Apps . . . . . . . . . . . . . . . . . . . . . . . . . . . . . . . . . . . . . . . . . . . . . . . . . . . . . 19
6.5 Inverting display . . . . . . . . . . . . . . . . . . . . . . . . . . . . . . . . . . . . . . . . . . . . . . . . . 19
6.6 Adjusting display contrast . . . . . . . . . . . . . . . . . . . . . . . . . . . . . . . . . . . . . . . 20
7 Using time mode . . . . . . . . . . . . . . . . . . . . . . . . . . . . . . . . . . . . . . . . . . . . . . . . . . . . . . . . . . . . 22
7.1 Changing time settings . . . . . . . . . . . . . . . . . . . . . . . . . . . . . . . . . . . . . . . . . . 22
7.2 Using GPS timekeeping . . . . . . . . . . . . . . . . . . . . . . . . . . . . . . . . . . . . . . . . . 26
8 Navigation . . . . . . . . . . . . . . . . . . . . . . . . . . . . . . . . . . . . . . . . . . . . . . . . . . . . . . . . . . . . . . . . . . . 28
8.1 Using GPS . . . . . . . . . . . . . . . . . . . . . . . . . . . . . . . . . . . . . . . . . . . . . . . . . . . . . . . . 28
8.1.1 Getting GPS signal . . . . . . . . . . . . . . . . . . . . . . . . . . . . . . . . . . . . 28
8.1.2 GPS grids and position formats . . . . . . . . . . . . . . . . . . . . . . 29
8.1.3 GPS accuracy and power saving . . . . . . . . . . . . . . . . . . . . . 31
8.2 Checking your location . . . . . . . . . . . . . . . . . . . . . . . . . . . . . . . . . . . . . . . . . . 31
8.3 POI navigation . . . . . . . . . . . . . . . . . . . . . . . . . . . . . . . . . . . . . . . . . . . . . . . . . . . 32
8.3.1 Adding your current location as a point of interest
(POI) . . . . . . . . . . . . . . . . . . . . . . . . . . . . . . . . . . . . . . . . . . . . . . . . . . . . . . . . . 32
2

8.3.2 Adding point of interest (POI) coordinates
manually . . . . . . . . . . . . . . . . . . . . . . . . . . . . . . . . . . . . . . . . . . . . . . . . . . . . 35
8.3.3 Navigating to a point of interest (POI) . . . . . . . . . . . . . . . 38
8.3.4 Deleting a point of interest (POI) . . . . . . . . . . . . . . . . . . . . 41
8.4 Route navigation . . . . . . . . . . . . . . . . . . . . . . . . . . . . . . . . . . . . . . . . . . . . . . . . 43
8.4.1 Adding a route . . . . . . . . . . . . . . . . . . . . . . . . . . . . . . . . . . . . . . . . 43
8.4.2 Navigating a route . . . . . . . . . . . . . . . . . . . . . . . . . . . . . . . . . . . . 44
8.4.3 During navigation . . . . . . . . . . . . . . . . . . . . . . . . . . . . . . . . . . . . 48
8.4.4 Deleting a route . . . . . . . . . . . . . . . . . . . . . . . . . . . . . . . . . . . . . . 50
9 Using Alti & Baro mode . . . . . . . . . . . . . . . . . . . . . . . . . . . . . . . . . . . . . . . . . . . . . . . . . . . . . 51
9.1 How Alti & Baro works . . . . . . . . . . . . . . . . . . . . . . . . . . . . . . . . . . . . . . . . . . . 51
9.1.1 Getting correct readings . . . . . . . . . . . . . . . . . . . . . . . . . . . . . 52
9.1.2 Getting incorrect readings . . . . . . . . . . . . . . . . . . . . . . . . . . . 53
9.2 Matching profile to activity . . . . . . . . . . . . . . . . . . . . . . . . . . . . . . . . . . . . . . 54
9.2.1 Setting profiles . . . . . . . . . . . . . . . . . . . . . . . . . . . . . . . . . . . . . . . 54
9.2.2 Setting reference values . . . . . . . . . . . . . . . . . . . . . . . . . . . . . 55
9.3 Using Altimeter profile . . . . . . . . . . . . . . . . . . . . . . . . . . . . . . . . . . . . . . . . . 56
9.4 Using Barometer profile . . . . . . . . . . . . . . . . . . . . . . . . . . . . . . . . . . . . . . . . 57
9.5 Using Automatic profile . . . . . . . . . . . . . . . . . . . . . . . . . . . . . . . . . . . . . . . . 59
9.6 FusedAltiTM. . . . . . . . . . . . . . . . . . . . . . . . . . . . . . . . . . . . . . . . . . . . . . . . . . . . . . 60
10 Using 3D compass . . . . . . . . . . . . . . . . . . . . . . . . . . . . . . . . . . . . . . . . . . . . . . . . . . . . . . . . . 63
10.1 Calibrating compass . . . . . . . . . . . . . . . . . . . . . . . . . . . . . . . . . . . . . . . . . . . . 63
10.2 Setting declination value . . . . . . . . . . . . . . . . . . . . . . . . . . . . . . . . . . . . . . 65
11 Timers . . . . . . . . . . . . . . . . . . . . . . . . . . . . . . . . . . . . . . . . . . . . . . . . . . . . . . . . . . . . . . . . . . . . . . 67
11.1 Activating and deactivating stopwatch . . . . . . . . . . . . . . . . . . . . . . . 67
en
3

11.2 Using stopwatch . . . . . . . . . . . . . . . . . . . . . . . . . . . . . . . . . . . . . . . . . . . . . . . 68
11.3 Countdown timer . . . . . . . . . . . . . . . . . . . . . . . . . . . . . . . . . . . . . . . . . . . . . . 69
12 Using sport modes . . . . . . . . . . . . . . . . . . . . . . . . . . . . . . . . . . . . . . . . . . . . . . . . . . . . . . . . 71
12.1 Sport modes . . . . . . . . . . . . . . . . . . . . . . . . . . . . . . . . . . . . . . . . . . . . . . . . . . . . 71
12.2 Additional options in sport modes . . . . . . . . . . . . . . . . . . . . . . . . . . . . 72
12.3 Using heart rate belt . . . . . . . . . . . . . . . . . . . . . . . . . . . . . . . . . . . . . . . . . . . 73
12.4 Putting on heart rate belt . . . . . . . . . . . . . . . . . . . . . . . . . . . . . . . . . . . . . . 74
12.5 Starting exercise . . . . . . . . . . . . . . . . . . . . . . . . . . . . . . . . . . . . . . . . . . . . . . . . 76
12.6 During exercise . . . . . . . . . . . . . . . . . . . . . . . . . . . . . . . . . . . . . . . . . . . . . . . . . 78
12.6.1 Recording tracks . . . . . . . . . . . . . . . . . . . . . . . . . . . . . . . . . . . . 78
12.6.2 Making laps . . . . . . . . . . . . . . . . . . . . . . . . . . . . . . . . . . . . . . . . . . 78
12.6.3 Recording altitude . . . . . . . . . . . . . . . . . . . . . . . . . . . . . . . . . . 79
12.6.4 Setting altitude during exercise . . . . . . . . . . . . . . . . . . . . 82
12.6.5 Using compass during exercise . . . . . . . . . . . . . . . . . . . . . 82
12.6.6 Using interval timer . . . . . . . . . . . . . . . . . . . . . . . . . . . . . . . . . 83
12.6.7 Navigating during exercise . . . . . . . . . . . . . . . . . . . . . . . . . 85
12.6.8 Finding back during exercise . . . . . . . . . . . . . . . . . . . . . . . 86
12.6.9 Using Track back . . . . . . . . . . . . . . . . . . . . . . . . . . . . . . . . . . . . 87
12.6.10 Autopause . . . . . . . . . . . . . . . . . . . . . . . . . . . . . . . . . . . . . . . . . 88
12.7 Viewing logbook after exercise . . . . . . . . . . . . . . . . . . . . . . . . . . . . . . . . 90
12.7.1 Memory left indicator . . . . . . . . . . . . . . . . . . . . . . . . . . . . . . . 91
12.7.2 Dynamic exercise summary . . . . . . . . . . . . . . . . . . . . . . . . . 92
12.7.3 Recovery time . . . . . . . . . . . . . . . . . . . . . . . . . . . . . . . . . . . . . . . 93
12.8 Multisport training . . . . . . . . . . . . . . . . . . . . . . . . . . . . . . . . . . . . . . . . . . . . . 93
12.8.1 Switching sport modes manually during exercise . . 94
4

12.8.2 Using preconfigured multisport mode . . . . . . . . . . . . . 95
12.9 Swimming mode . . . . . . . . . . . . . . . . . . . . . . . . . . . . . . . . . . . . . . . . . . . . . . . 96
12.9.1 Indoor swimming . . . . . . . . . . . . . . . . . . . . . . . . . . . . . . . . . . . 96
12.9.2 Outdoor swimming . . . . . . . . . . . . . . . . . . . . . . . . . . . . . . . . . 98
12.9.3 Teaching swimming styles to Suunto Ambit2 . . . . . 99
12.9.4 Swimming drills . . . . . . . . . . . . . . . . . . . . . . . . . . . . . . . . . . . . 102
13 FusedSpeed . . . . . . . . . . . . . . . . . . . . . . . . . . . . . . . . . . . . . . . . . . . . . . . . . . . . . . . . . . . . . . 103
Use example: Running and biking with FusedSpeedTM. . . . . . . . . . 105
14 Adjusting settings . . . . . . . . . . . . . . . . . . . . . . . . . . . . . . . . . . . . . . . . . . . . . . . . . . . . . . . . 106
14.1 Service menu . . . . . . . . . . . . . . . . . . . . . . . . . . . . . . . . . . . . . . . . . . . . . . . . . . 110
14.2 Changing language . . . . . . . . . . . . . . . . . . . . . . . . . . . . . . . . . . . . . . . . . . . 111
15 Pairing POD/heart rate belt . . . . . . . . . . . . . . . . . . . . . . . . . . . . . . . . . . . . . . . . . . . . . . 112
15.1 Calibrating distance PODs . . . . . . . . . . . . . . . . . . . . . . . . . . . . . . . . . . . 115
15.2 Calibrating power PODs and slope . . . . . . . . . . . . . . . . . . . . . . . . . . . 116
16 Icons . . . . . . . . . . . . . . . . . . . . . . . . . . . . . . . . . . . . . . . . . . . . . . . . . . . . . . . . . . . . . . . . . . . . . . 119
POI icons . . . . . . . . . . . . . . . . . . . . . . . . . . . . . . . . . . . . . . . . . . . . . . . . . . . . . . . . . . . . 120
17 Terminology . . . . . . . . . . . . . . . . . . . . . . . . . . . . . . . . . . . . . . . . . . . . . . . . . . . . . . . . . . . . . . 122
18 Care and maintenance . . . . . . . . . . . . . . . . . . . . . . . . . . . . . . . . . . . . . . . . . . . . . . . . . . . 125
18.1 Water resistance . . . . . . . . . . . . . . . . . . . . . . . . . . . . . . . . . . . . . . . . . . . . . . 125
18.2 Charging the battery . . . . . . . . . . . . . . . . . . . . . . . . . . . . . . . . . . . . . . . . . . 126
18.3 Replacing HR belt battery . . . . . . . . . . . . . . . . . . . . . . . . . . . . . . . . . . . . 128
19 Technical specification . . . . . . . . . . . . . . . . . . . . . . . . . . . . . . . . . . . . . . . . . . . . . . . . . . . 129
General . . . . . . . . . . . . . . . . . . . . . . . . . . . . . . . . . . . . . . . . . . . . . . . . . . . . . . . . . . . . . 129
Memory . . . . . . . . . . . . . . . . . . . . . . . . . . . . . . . . . . . . . . . . . . . . . . . . . . . . . . . . . . . . . 129
Radio receiver . . . . . . . . . . . . . . . . . . . . . . . . . . . . . . . . . . . . . . . . . . . . . . . . . . . . . . 129
en
5

Barometer . . . . . . . . . . . . . . . . . . . . . . . . . . . . . . . . . . . . . . . . . . . . . . . . . . . . . . . . . . 130
Altimeter . . . . . . . . . . . . . . . . . . . . . . . . . . . . . . . . . . . . . . . . . . . . . . . . . . . . . . . . . . . . 130
Thermometer . . . . . . . . . . . . . . . . . . . . . . . . . . . . . . . . . . . . . . . . . . . . . . . . . . . . . . . 130
Chronograph . . . . . . . . . . . . . . . . . . . . . . . . . . . . . . . . . . . . . . . . . . . . . . . . . . . . . . . 130
Compass . . . . . . . . . . . . . . . . . . . . . . . . . . . . . . . . . . . . . . . . . . . . . . . . . . . . . . . . . . . . 130
GPS . . . . . . . . . . . . . . . . . . . . . . . . . . . . . . . . . . . . . . . . . . . . . . . . . . . . . . . . . . . . . . . . . . 130
19.1 Trademark . . . . . . . . . . . . . . . . . . . . . . . . . . . . . . . . . . . . . . . . . . . . . . . . . . . . . 130
19.2 FCC compliance . . . . . . . . . . . . . . . . . . . . . . . . . . . . . . . . . . . . . . . . . . . . . . . 131
19.3 IC . . . . . . . . . . . . . . . . . . . . . . . . . . . . . . . . . . . . . . . . . . . . . . . . . . . . . . . . . . . . . . . 131
19.4 CE . . . . . . . . . . . . . . . . . . . . . . . . . . . . . . . . . . . . . . . . . . . . . . . . . . . . . . . . . . . . . . 131
19.5 Copyright . . . . . . . . . . . . . . . . . . . . . . . . . . . . . . . . . . . . . . . . . . . . . . . . . . . . . . 131
19.6 Patent notice . . . . . . . . . . . . . . . . . . . . . . . . . . . . . . . . . . . . . . . . . . . . . . . . . . 132
19.7 Warranty . . . . . . . . . . . . . . . . . . . . . . . . . . . . . . . . . . . . . . . . . . . . . . . . . . . . . . . 132
Index ...... ..... ..... ..... ..... ...... ..... ..... ..... ..... ..... ..... ..... ..... 135
6
1 SAFETY
Types of safety precautions
WARNING: - is used in connection with a procedure or situation that may result
in serious injury or death.
CAUTION: - is used in connection with a procedure or situation that will result
in damage to the product.
NOTE: - is used to emphasize important information.
TIP: - is used for extra tips on how to utilize the features and functions of the
device.
Safety precautions
WARNING: ALLERGIC REACTIONS OR SKIN IRRITATIONS MAY OCCUR WHEN
PRODUCT IS IN CONTACT WITH SKIN, EVEN THOUGH OUR PRODUCTS COMPLY
WITH INDUSTRY STANDARDS. IN SUCH EVENT, STOP USE IMMEDIATELY AND
CONSULT A DOCTOR.
WARNING: ALWAYS CONSULT YOUR DOCTOR BEFORE BEGINNING AN EXERCISE
PROGRAM. OVEREXERTION MAY CAUSE SERIOUS INJURY.
WARNING: ONLY FOR RECREATIONAL USE.
en
7

WARNING: DO NOT ENTIRELY RELY ON THE GPS OR BATTERY LIFETIME, ALWAYS
USE MAPS AND OTHER BACKUP MATERIAL TO ENSURE YOUR SAFETY.
CAUTION: DO NOT APPLY SOLVENT OF ANY KIND TO THE PRODUCT, AS IT
MAY DAMAGE THE SURFACE.
CAUTION: DO NOT APPLY INSECT REPELLENT ON THE PRODUCT, AS IT MAY
DAMAGE THE SURFACE.
CAUTION: DO NOT THROW THE PRODUCT AWAY, BUT TREAT IT AS ELECTRONIC
WASTE TO PRESERVE THE ENVIRONMENT.
CAUTION: DO NOT KNOCK OR DROP THE DEVICE, AS IT MAY BE DAMAGED.
8
2 WELCOME
Suunto Ambit2 is the GPS for explorers and athletes. All you need for outdoor
sports – navigation, speed, heart rate, altitude, weather conditions and features
for running, biking and swimming. Thousands of Suunto Apps available to add
new functionalities to your watch. Packed in a glass fiber reinforced casing
with a battery life of 16/50 hours, Suunto Ambit2 is ready for any adventure.
en
9

3 DISPLAY ICONS AND SEGMENTS
For a complete list of icons in Suunto Ambit2, see Chapter 16 Icons on page 119.
10
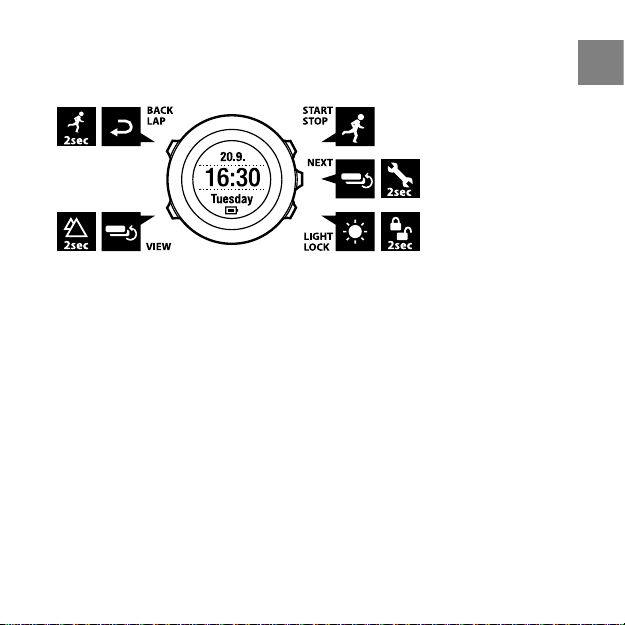
4 USING BUTTONS
Suunto Ambit2 has five buttons which allow you to access all the features.
[Start Stop]:
access the start menu
●
pause or resume an exercise or timer
●
keep pressed to stop and save an exercise
●
increase a value or move up in the settings
●
[Next]:
change between displays
●
keep pressed to access/exit the options menu
●
keep pressed to access/exit the options menu in sport modes
●
accept a setting
●
[Light Lock]:
activate the backlight
●
keep pressed to lock/unlock the buttons
●
decrease a value or move down in the settings
●
en
11

[View]:
change views in TIME mode and during exercise
●
keep pressed to access altitude reference options
●
[Back Lap]:
return to the previous step
●
add a lap during exercise
●
keep pressed to switch to the next sport mode during a multisport exercise
●
TIP: When changing the values, you can increase the speed by keeping [Start
Stop] or [Light Lock] pressed until the values start to scroll faster.
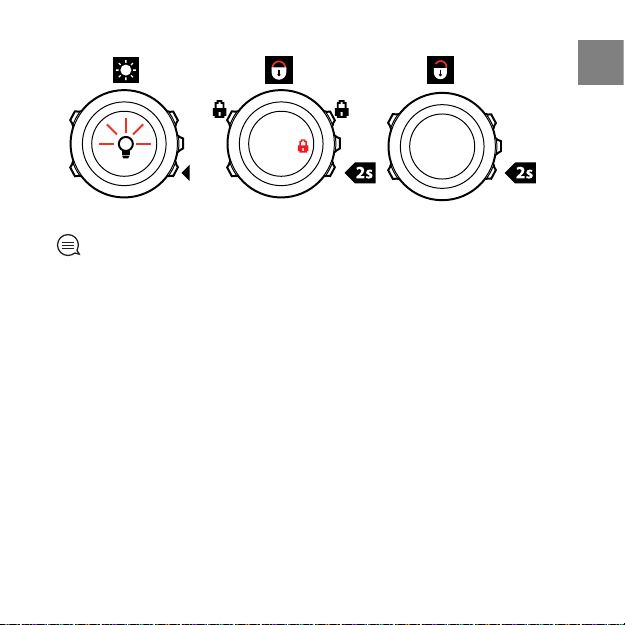
4.1 Using backlight and button lock
You can set the backlight to Normal, Off, Toggle or Night mode. For
information on the backlight settings, see Chapter 14 Adjusting
settings on page 106.
To activate the backlight:
In Normal mode, press [Light Lock] to activate the backlight. The backlight
●
stays on for a few seconds.
In Toggle mode, press [Light Lock] to activate the backlight. The backlight
●
stays on until you press [Light Lock] again.
In Night mode, press any button to activate the backlight.
●
You can set the button lock to All buttons or Actions only separately for TIME
mode and sport modes. For more information on the button lock settings, see
Chapter 14 Adjusting settings on page 106.
Keep [Light Lock] pressed to lock or unlock the buttons. When the buttons are
locked, is shown on the display.
12
TIP: Select Actions only for sport modes to avoid accidentally starting or
stopping your log. When the [Back Lap] and [Start Stop] buttons are locked, you
can still activate the backlight by pressing [Light Lock], change between the displays
by pressing [Next] and views by pressing [View].
13
en
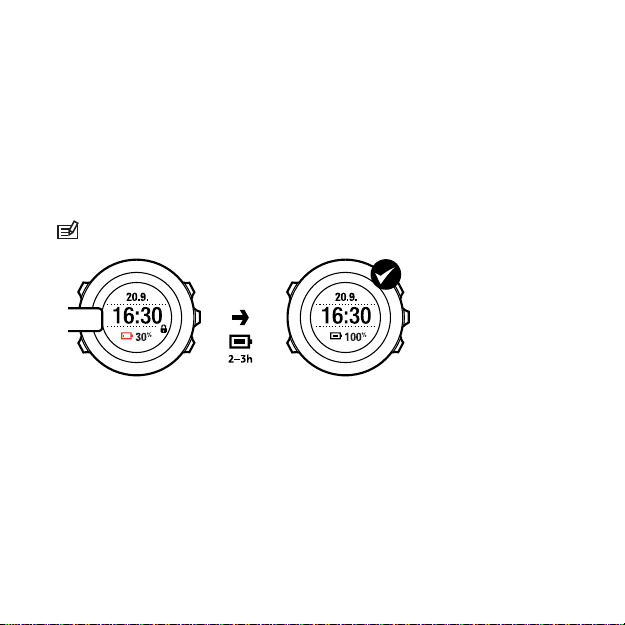
5 GETTING STARTED
Start by charging the battery. Your Suunto Ambit2 wakes up automatically
when you attach it to your computer using the supplied USB cable. The device
can also be woken up by attaching it to a mains socket using the optional
Suunto wall charger.
Fully charging an empty battery takes about 2-3 hours. First time charging may
take longer. During charging with the USB cable the buttons are locked.
NOTE: Battery full notification is displayed when the charging is complete.
14
6 CUSTOMIZING YOUR SUUNTO AMBIT2
6.1 Connecting to Movescount
Movescount.com is your free personal diary and online sports community that
offers you a rich set of tools to manage your daily activities and create engaging
stories about your experiences. Movescount allows you to transfer your
recorded exercise logs from your Suunto Ambit2 to Movescount and customize
the device to best meet your needs.
TIP: Connect to Movescount to get the latest software to your Suunto Ambit2,
in case there is an update available.
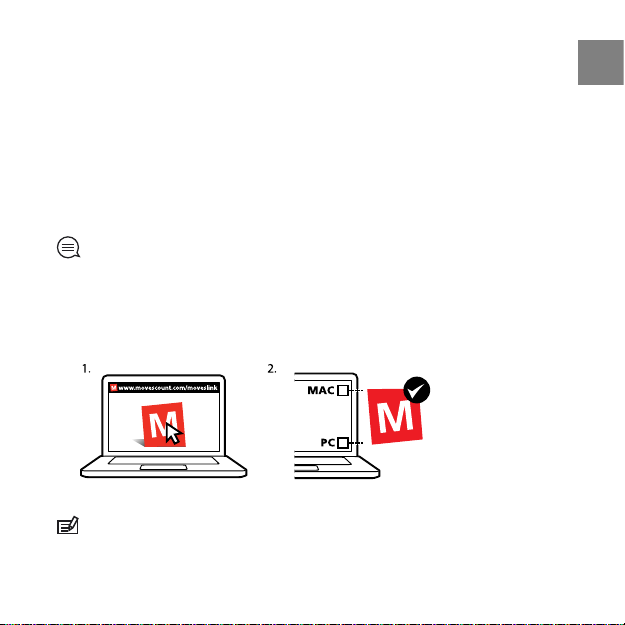
Start by installing Moveslink:
1. Go to www.movescount.com/moveslink.
2. Download, install and activate the latest version of Moveslink.
NOTE: A Moveslink icon is visible on your computer's display when Moveslink
is active.
15
en
NOTE: Moveslink is compatible with PC (Windows XP, Windows Vista, Windows
7) and Mac (Intel-based, running OS X version 10.6 or later).
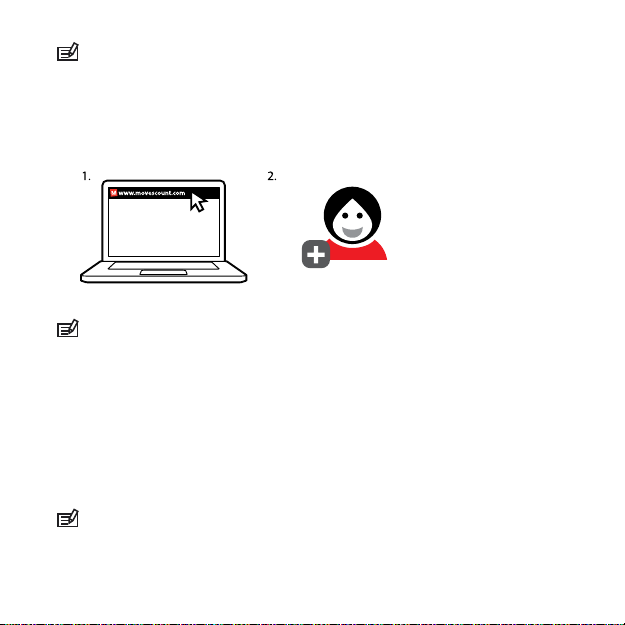
To register to Movescount:
1. Go to www.movescount.com.
2. Create your account.
NOTE: The first time your Suunto Ambit2 is connected to Movescount all
information (including the device settings) is transferred from the device to your
Movescount account. The next time you connect your Suunto Ambit2 to your
Movescount account, the changes in settings and sport modes you made in
Movescount and in the device will be synchronized.
6.2 Updating your Suunto Ambit2
You can update your Suunto Ambit2 software automatically in Movescount.
NOTE: When you update your Suunto Ambit2 software, all the existing logs
are automatically moved to Movescount and deleted from the device.
16
To update your Suunto Ambit2 software:
1. Go to www.movescount.com/moveslink and install the Moveslink
application.
2. Connect your Suunto Ambit2 to your computer with the Suunto USB cable.
The Moveslink application will automatically check for software updates.
If an update is available, your device will be updated.
NOTE: You can use the Moveslink application without registering to
Movescount. However, Movescount greatly extends the usability, personalization
and settings options of your Suunto Ambit2. It also visualizes recorded tracks and
other data from your activities. Therefore, it is recommended to create a Movescount
account in order to utilize the full potential of the device.
6.3 Custom sport modes
In addition to the default sport modes stored in the device (see Section 12.1
Sport modes on page 71), you can create and edit custom sport modes in
Movescount.
A custom sport mode can contain 1 to 8 different sport mode displays. You
can choose which data appears on each display from a comprehensive list.
You can customize, for example, sports-specific heart rate limits, autolap
distance, or the recording rate to optimize accuracy and battery duration.
You can transfer up to 10 different custom sport modes created in Movescount
to your Suunto Ambit2. Only one custom sport mode can be active at a time.
You can set your device to automatically scroll through your sport mode
displays using Autoscroll. Activate the feature and define how long the displays
17
en
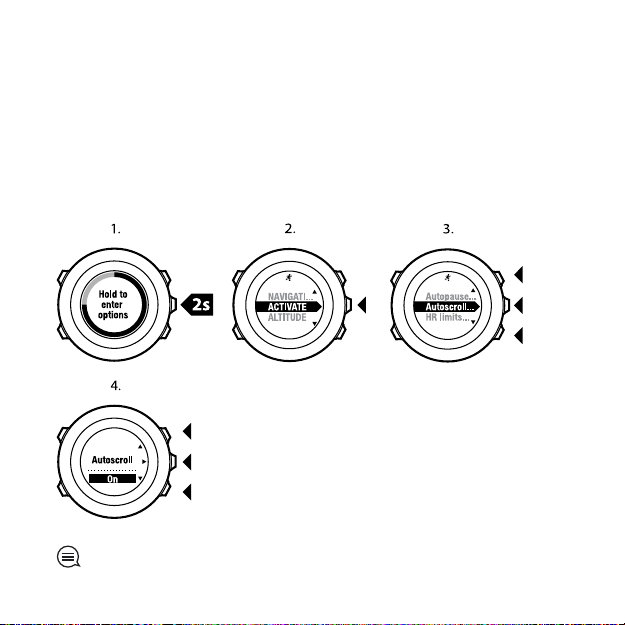
are shown on your custom sport mode in Movescount. You can turn Autoscroll
on or off during exercise without any effect on your Movescount settings.
To set Autoscroll on/off during exercise:
1. While you are in a sport mode, keep [Next] pressed to access the options
menu.
2. Scroll to ACTIVATE with [Light Lock] and select with [Next].
3. Scroll to Autoscroll with [Start Stop] and select with [Next].
4. Press [Start Stop] or [Light Lock] to set Autoscroll On/Off and accept with
[Next].
TIP: You can also edit the default sport modes in Movescount.
18
6.4 Suunto Apps
Suunto Apps allow you to further customize your Suunto Ambit2. Visit Suunto
App Zone in Movescount to find Apps, such as various timers and counters,
available for your use. If you cannot find what you need, create your own App
with Suunto App Designer. You can create Apps, for example, for calculating
your estimated marathon result, or the slope grade of your skiing route.
To add Suunto Apps to your Suunto Ambit2:
1. Go to the PLAN & CREATE section in Movescount community and select
Apps to browse existing Suunto Apps. To create your own App, go to the
PLAN & CREATE section of your profile and select App Designer.
2. Add Suunto App to a sport mode. Connect your Suunto Ambit2 to your
Movescount account to synchronize Suunto App to the device. The added
Suunto App will show the result of its calculation while you exercise.
NOTE: You can add up to five Suunto Apps to each sport mode.
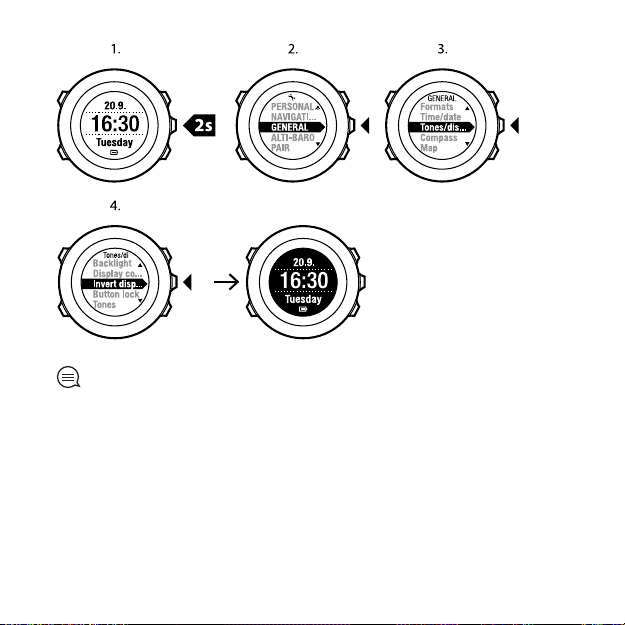
6.5 Inverting display
You can invert the display of your Suunto Ambit2 from light to dark or vice
versa.
To invert the display in the settings:
1. Keep [Next] pressed to enter the options menu.
2. Press [Next] to enter the GENERAL settings.
3. Press [Next] to enter Tones/display.
4. Scroll to Invert display with [Start Stop] and accept with [Next].
19
en
TIP: You can also invert the display of your Suunto Ambit2 by keeping [View]
pressed while you are in TIME mode, a sport mode, navigating, or using the
stopwatch and timers.
6.6 Adjusting display contrast
You can increase or decrease the display contrast of your Suunto Ambit2.
To adjust the display contrast in the settings:
1. Keep [Next] pressed to enter the options menu.
2. Press [Next] to enter the GENERAL settings.
3. Press [Next] to enter Tones/display.
20
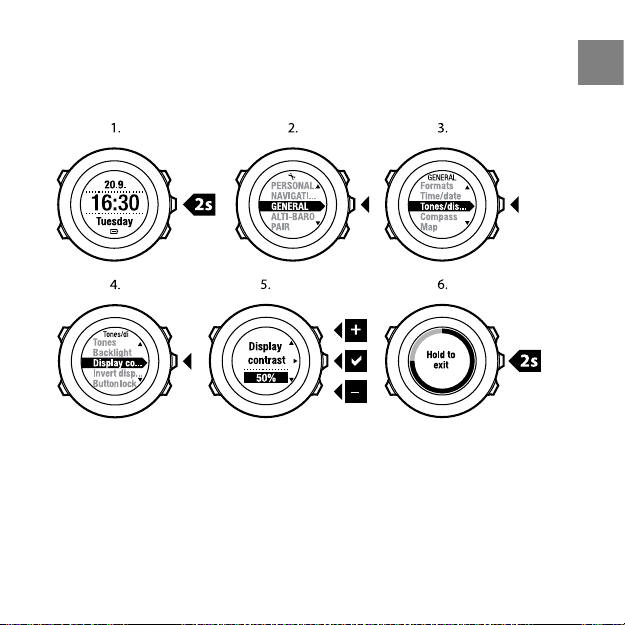
4. Scroll to Display contrast with [Light Lock] and enter with [Next].
5. Increase the contrast with [Start Stop], or decrease it with [Light Lock].
6. Go back to the settings with [Back Lap], or keep [Next] pressed to exit the
options menu.
en
21
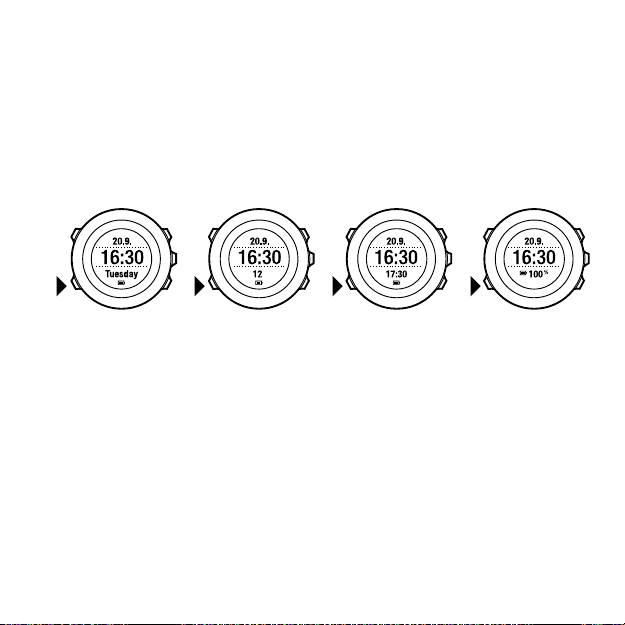
7 USING TIME MODE
TIME mode includes time measurement functions.
TIME mode shows you the following information:
top row: date
●
middle row: time
●
bottom row: toggle between weekday, seconds, dual time and battery level
●
with [View].
7.1 Changing time settings
To access the time settings:
1. Keep [Next] pressed to enter the options menu.
2. Press [Next] to enter GENERAL.
3. Scroll to Time/date using [Start Stop] and enter with [Next].
22
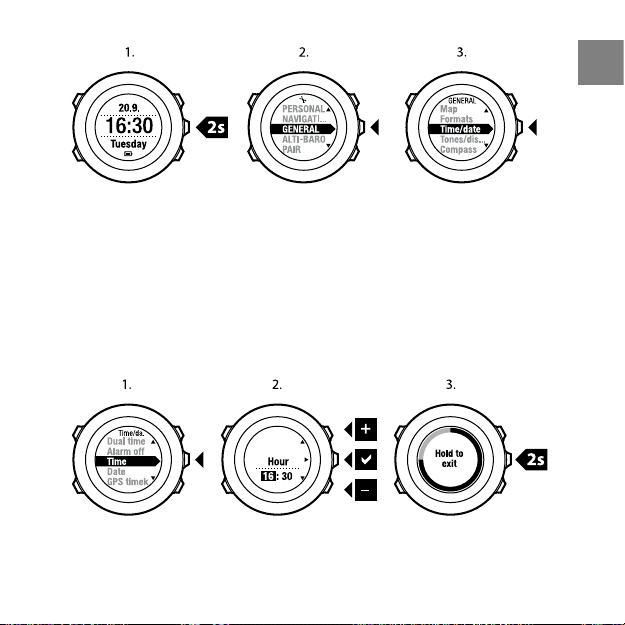
Setting time
The current time is shown in the middle row of the TIME mode display.
To set the time:
1. In the options menu, go to GENERAL, then to Time/date and Time.
2. Change the hour and minute values with [Start Stop] and [Light Lock].
Accept with [Next].
3. Go back to the settings with [Back Lap], or keep [Next] pressed to exit the
options menu.
Setting date
The current date is shown on the top row of the TIME mode display.
en
23
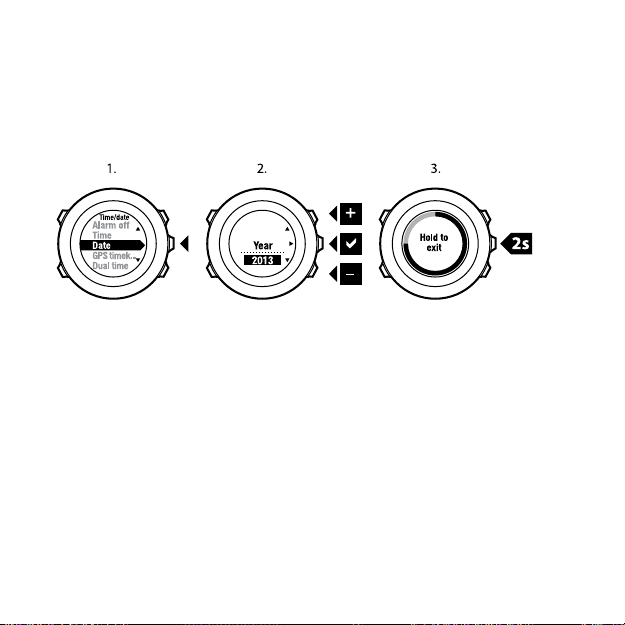
To set the date:
1. In the options menu, go to GENERAL, then to Time/date and Date.
2. Change the year, month and day values with [Start Stop] and [Light Lock].
Accept with [Next].
3. Go back to the settings with [Back Lap], or keep [Next] pressed to exit the
options menu.
Setting dual time
Dual time allows you to keep track of the current time in a second time zone,
for example, when travelling. Dual time is displayed on the bottom row of the
TIME mode display and you can access it by pressing [View].
To set the dual time:
1. In the options menu, go to GENERAL, then to Time/date and Dual time.
2. Change the hour and minute values with [Start Stop] and [Light Lock].
Accept with [Next].
3. Go back to the settings with [Back Lap], or keep [Next] pressed to exit the
options menu.
24
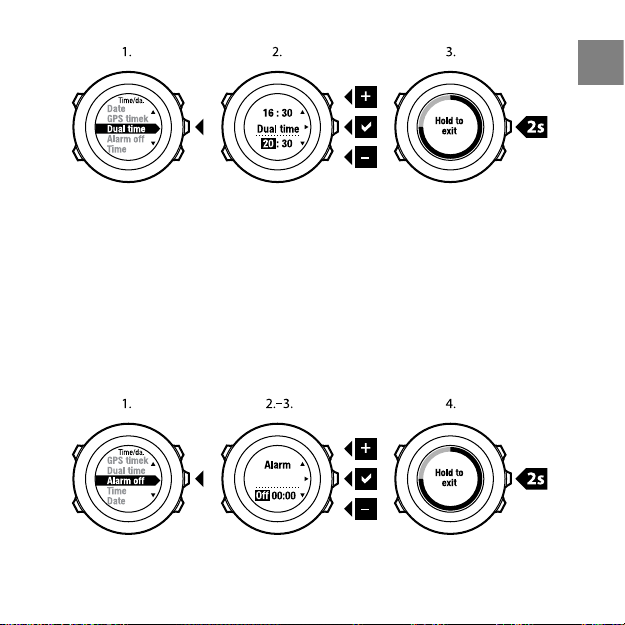
Setting alarm
You can use your Suunto Ambit2 as an alarm clock.
To access the alarm clock and set the alarm:
1. In the options menu, go to GENERAL, then to Time/date and Alarm.
2. Set the alarm on or off with [Start Stop] or [Light Lock]. Accept with [Next].
3. Set the hours and minutes with [Start Stop] and [Light Lock]. Accept with
[Next].
4. Go back to the settings with [Back Lap], or keep [Next] pressed to exit the
options menu.
When the alarm is switched on, the alarm symbol is shown on most of the
displays.
25
en
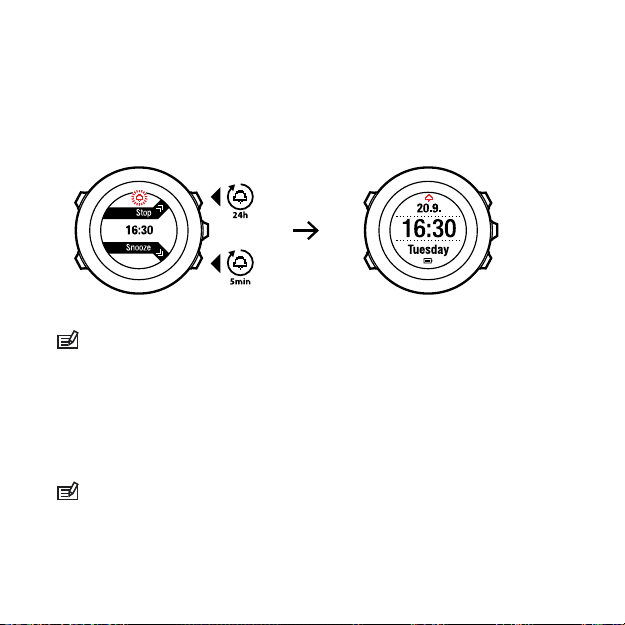
When the alarm sounds, you can:
Select Snooze by pressing [Light Lock]. The alarm stops and restarts every
●
5 minutes until you stop it. You can snooze up to 12 times for a total of 1
hour.
Select Stop by pressing [Start Stop]. The alarm stops and restarts the same
●
time the following day, unless you switch the alarm off in the settings.
NOTE: When snoozing, the alarm icon blinks in TIME mode.
7.2 Using GPS timekeeping
GPS timekeeping corrects the offset between your Suunto Ambit2 and the
GPS time. GPS timekeeping corrects the time automatically once a day, or after
you have adjusted the time manually. Also the dual time is corrected.
NOTE: GPS timekeeping corrects the minutes and seconds, but not the hours.
26
NOTE: GPS timekeeping corrects the time accurately, if it is less than 7.5 minutes
wrong. If the time is wrong more than that, GPS timekeeping corrects it to the
closest 15 minutes.
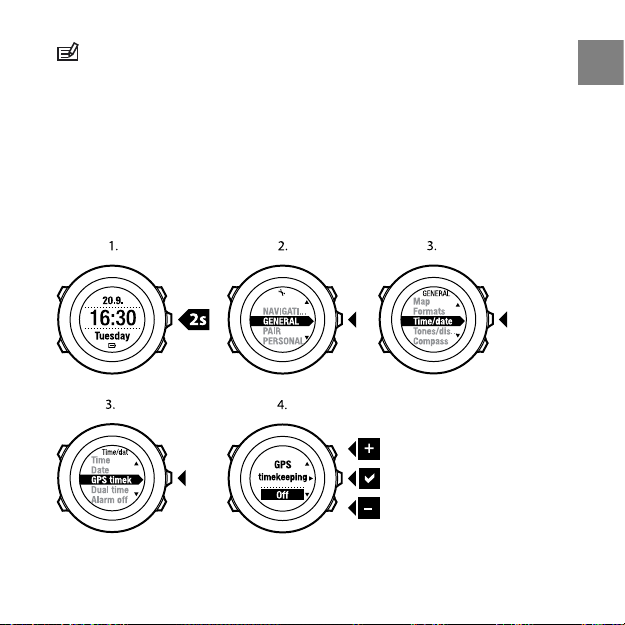
GPS timekeeping is activated by default. To deactivate it:
1. Keep [Next] pressed to enter the options menu.
2. Press [Next] to enter GENERAL.
3. Scroll to Time/date and then to GPS timekeeping using [Start Stop]. Enter
with [Next].
4. Set GPS timekeeping Off with [Start Stop] or [Light Lock]. Accept with [Next].
27
en
8 NAVIGATION
8.1 Using GPS
Suunto Ambit2 uses Global Positioning System (GPS) in determining your
current position. GPS incorporates a set of satellites that orbit the Earth at an
altitude of 20,000 km at the speed of 4 km/s.
The built-in GPS receiver in Suunto Ambit2 is optimized for wrist use and
receives data from a very wide angle.
8.1.1 Getting GPS signal
Suunto Ambit2 activates GPS automatically when you select a sport mode with
the GPS functionality, determine your location, or start navigating.
28
NOTE: When you activate GPS for the first time, or have not used it for a long
time, it might take longer than usual to get a GPS fix. Subsequent GPS starts will
take less time.
TIP: To minimize GPS initiation time, hold the device steady with GPS facing
up and make sure you are in an open area so that the device has a clear view of
the sky.
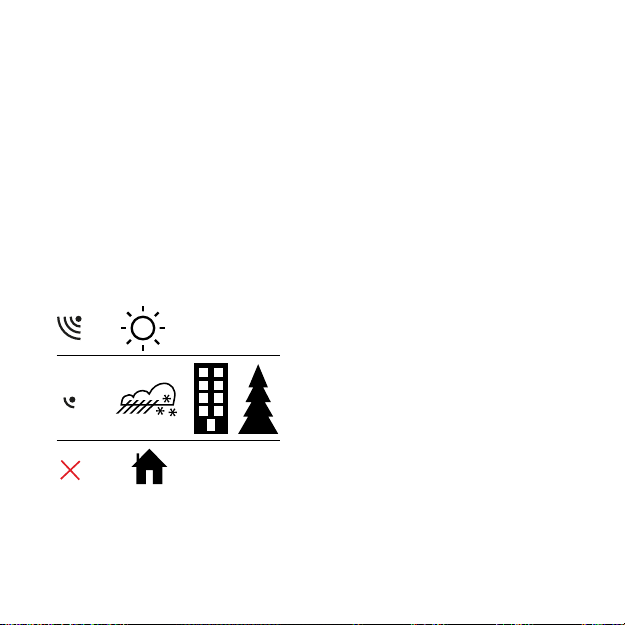
Troubleshooting: No GPS signal
For an optimal signal, point the GPS part of the device upwards. The best
●
signal can be received in an open area with a clear view of the sky.
The GPS receiver usually works well inside tents and other thin covers.
●
However, objects, buildings, dense vegetation or cloudy weather can reduce
the GPS signal reception quality.
GPS signal does not penetrate any solid constructions or water. Therefore
●
do not try to activate GPS for example inside buildings, caves, or under
water.
To recover from GPS failures, reset GPS (see Section 14.1 Service
●
menu on page 110).
8.1.2 GPS grids and position formats
Grids are lines on a map that define the coordinate system used on the map.
Position format is the way the GPS receiver's position is displayed on the device.
All the formats relate to the same location, they only express it in a different
way. For information on changing the position format, see Chapter 14 Adjusting
settings on page 106.
29
en

You can select the format from the following grids:
latitude/longitude is the most commonly used grid and has three different
●
formats:
WGS84 Hd.d°
○
WGS84 Hd°m.m'
○
WGS84 Hd°m's.s
○
UTM (Universal Transverse Mercator) gives a two-dimensional horizontal
●
position presentation.
MGRS (Military Grid Reference System) is an extension of UTM and consists
●
of a grid zone designator, 100,000-meter square identifier and a numerical
location.
Suunto Ambit2 also supports the following local grids:
British (BNG)
●
Finnish (ETRS-TM35FIN)
●
Finnish (KKJ)
●
Irish (IG)
●
Swedish (RT90)
●
Swiss (CH1903)
●
UTM NAD27 Alaska
●
UTM NAD27 Conus
●
UTM NAD83
●
NOTE: Some grids cannot be used in the areas north of 84°N and south of 80°S,
or outside the countries that they are intended for.
30
 Loading...