

Page 1
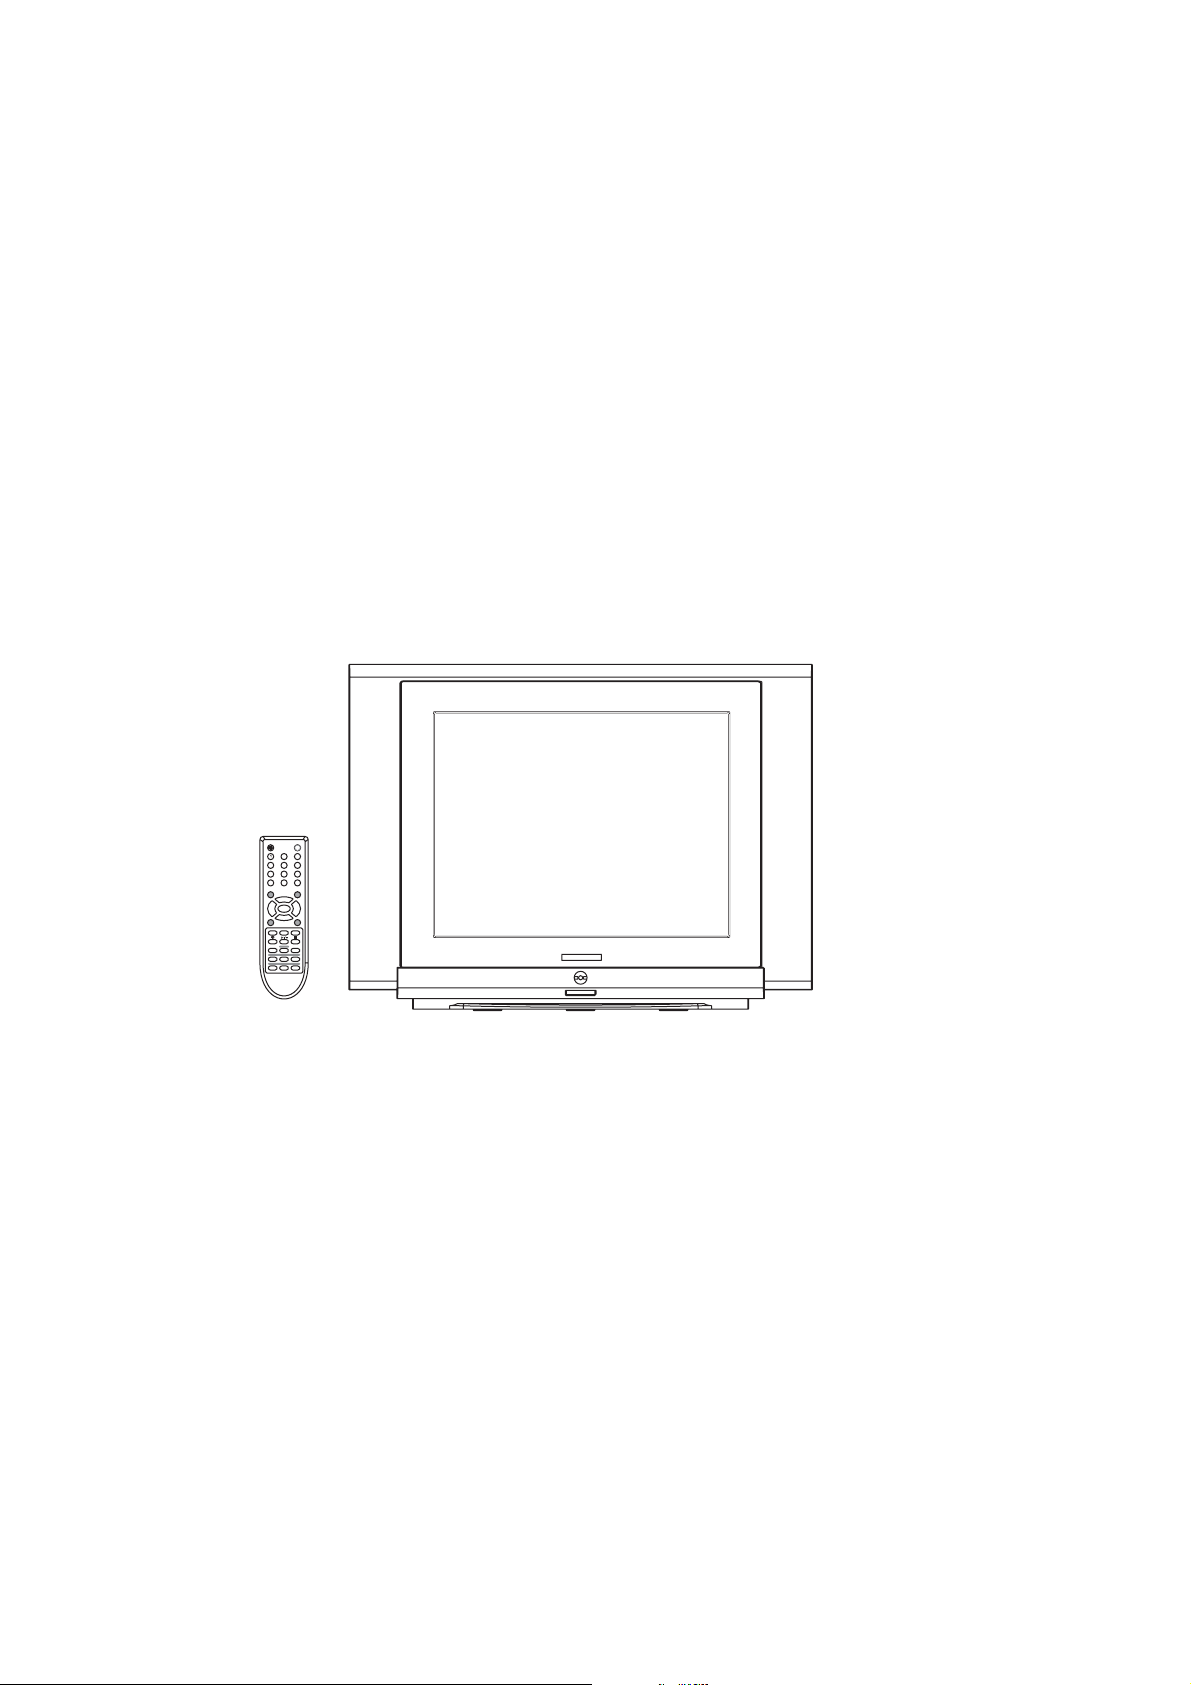
SERVICE MANUAL
3
3
2
5
6
4
879
AV/TV
0
--/---
PROG.+
MENU
VOL.+VOL.-
PROG.-
Q.VIEW S.S.
P.P.
SCAN
LOCK
TEXT
MIX
SUB.PAGEINDEX HOLD
REVEAL
SIZE
CANCEL
P
5
2E
CHASSIS
TV/AV
MUTE
MENU
VOL.+
VOL.-
PROG.+
PROG.-
Design and specifications are subject to change without prior notice.
( ONLY REFERRENCE)
ENGINEER BY: CHECKED BY: PPROVED BY:
_____
_____
_____
Page 2
Page 3
Page 4
Page 5
Page 6
Page 7
Page 8
Page 9
Page 10
Page 11
Page 12
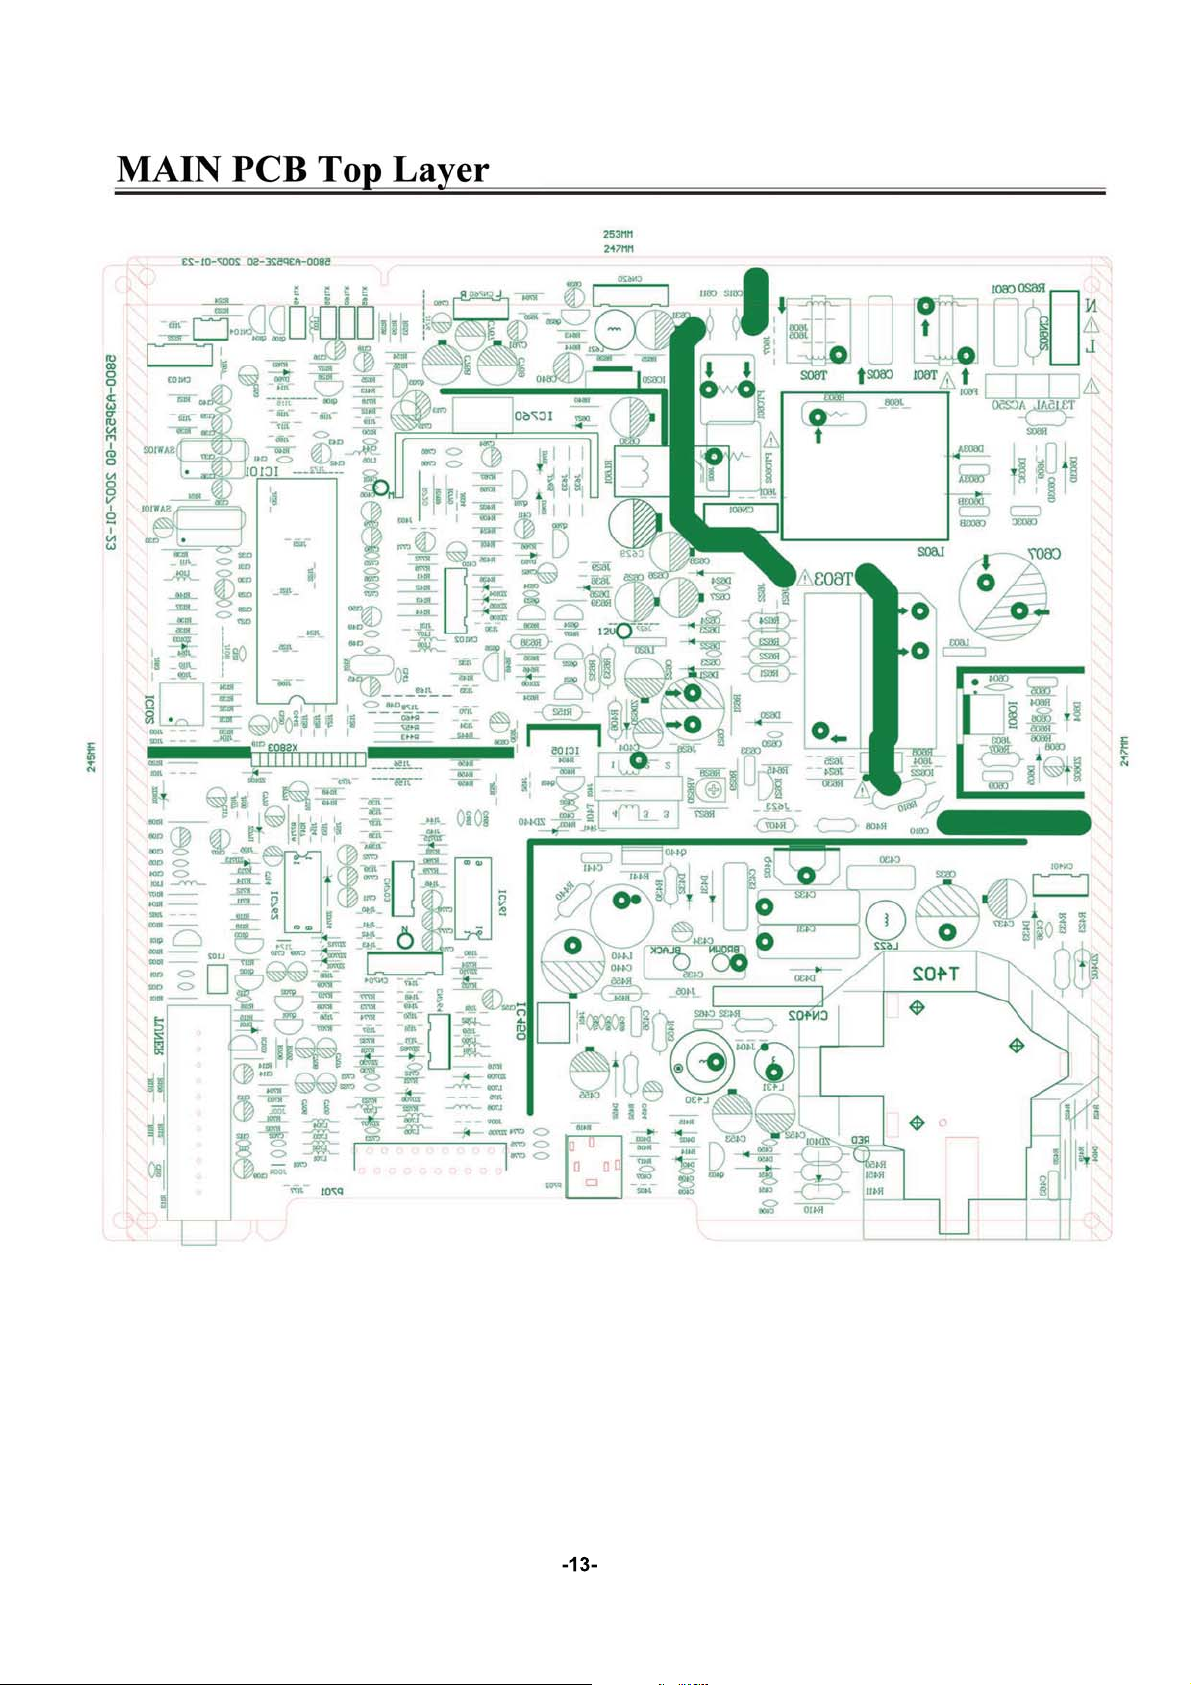
Page 13
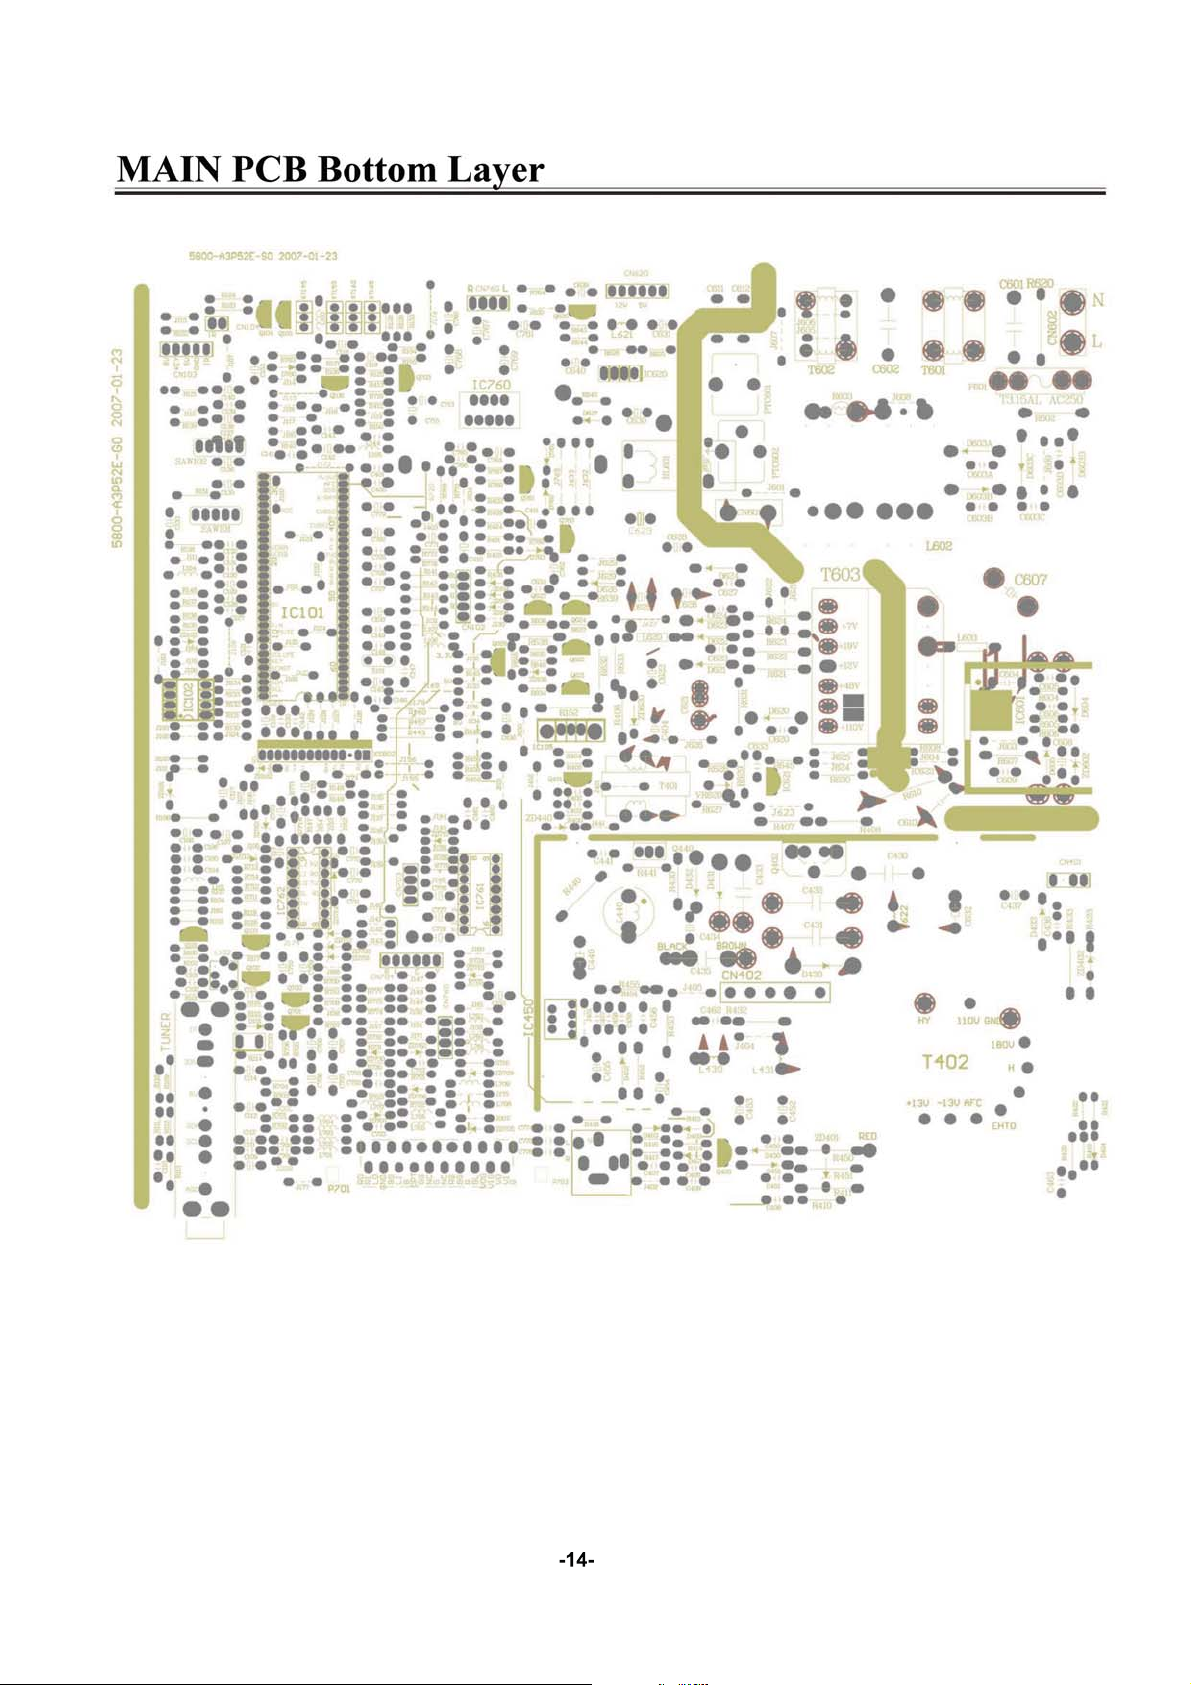
Page 14
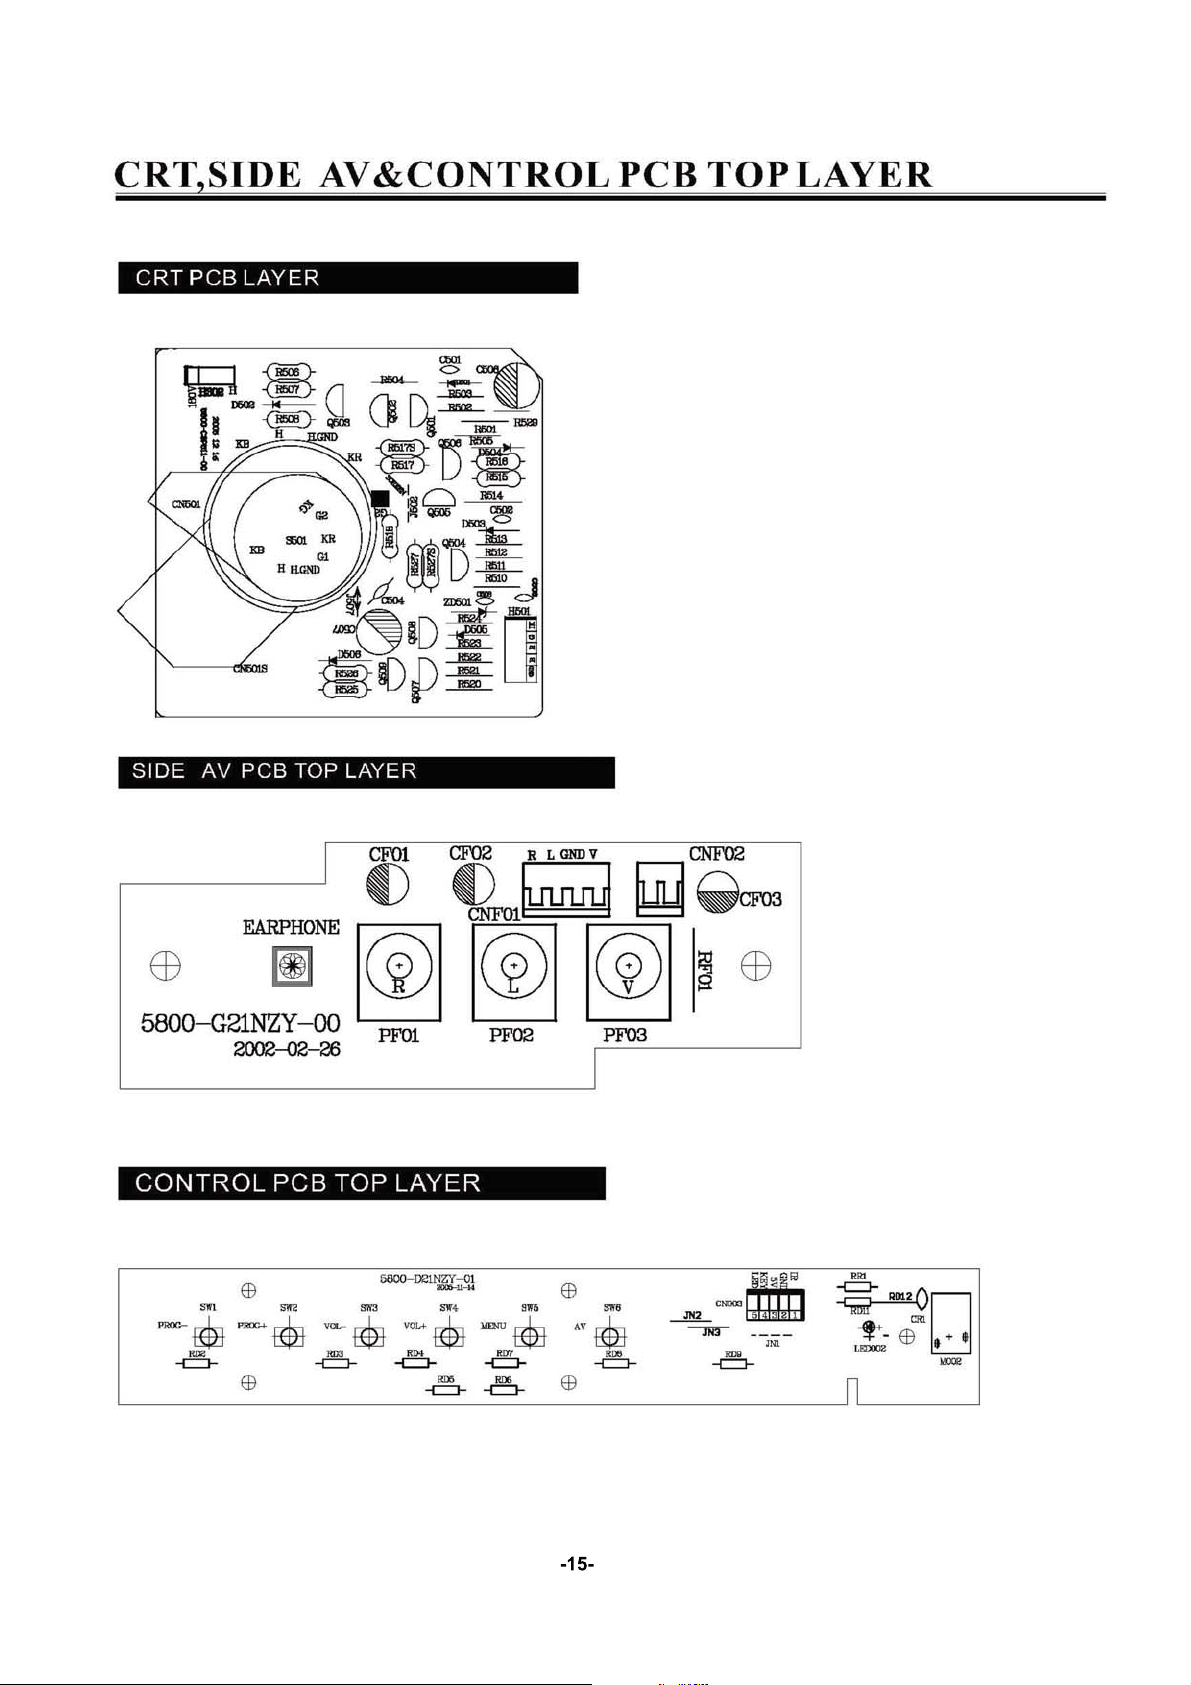
Page 15
Page 16

Page 17

Page 18

Page 19

Page 20
Page 21
Page 22

Page 23

Page 24
Page 25

Page 26

Page 27

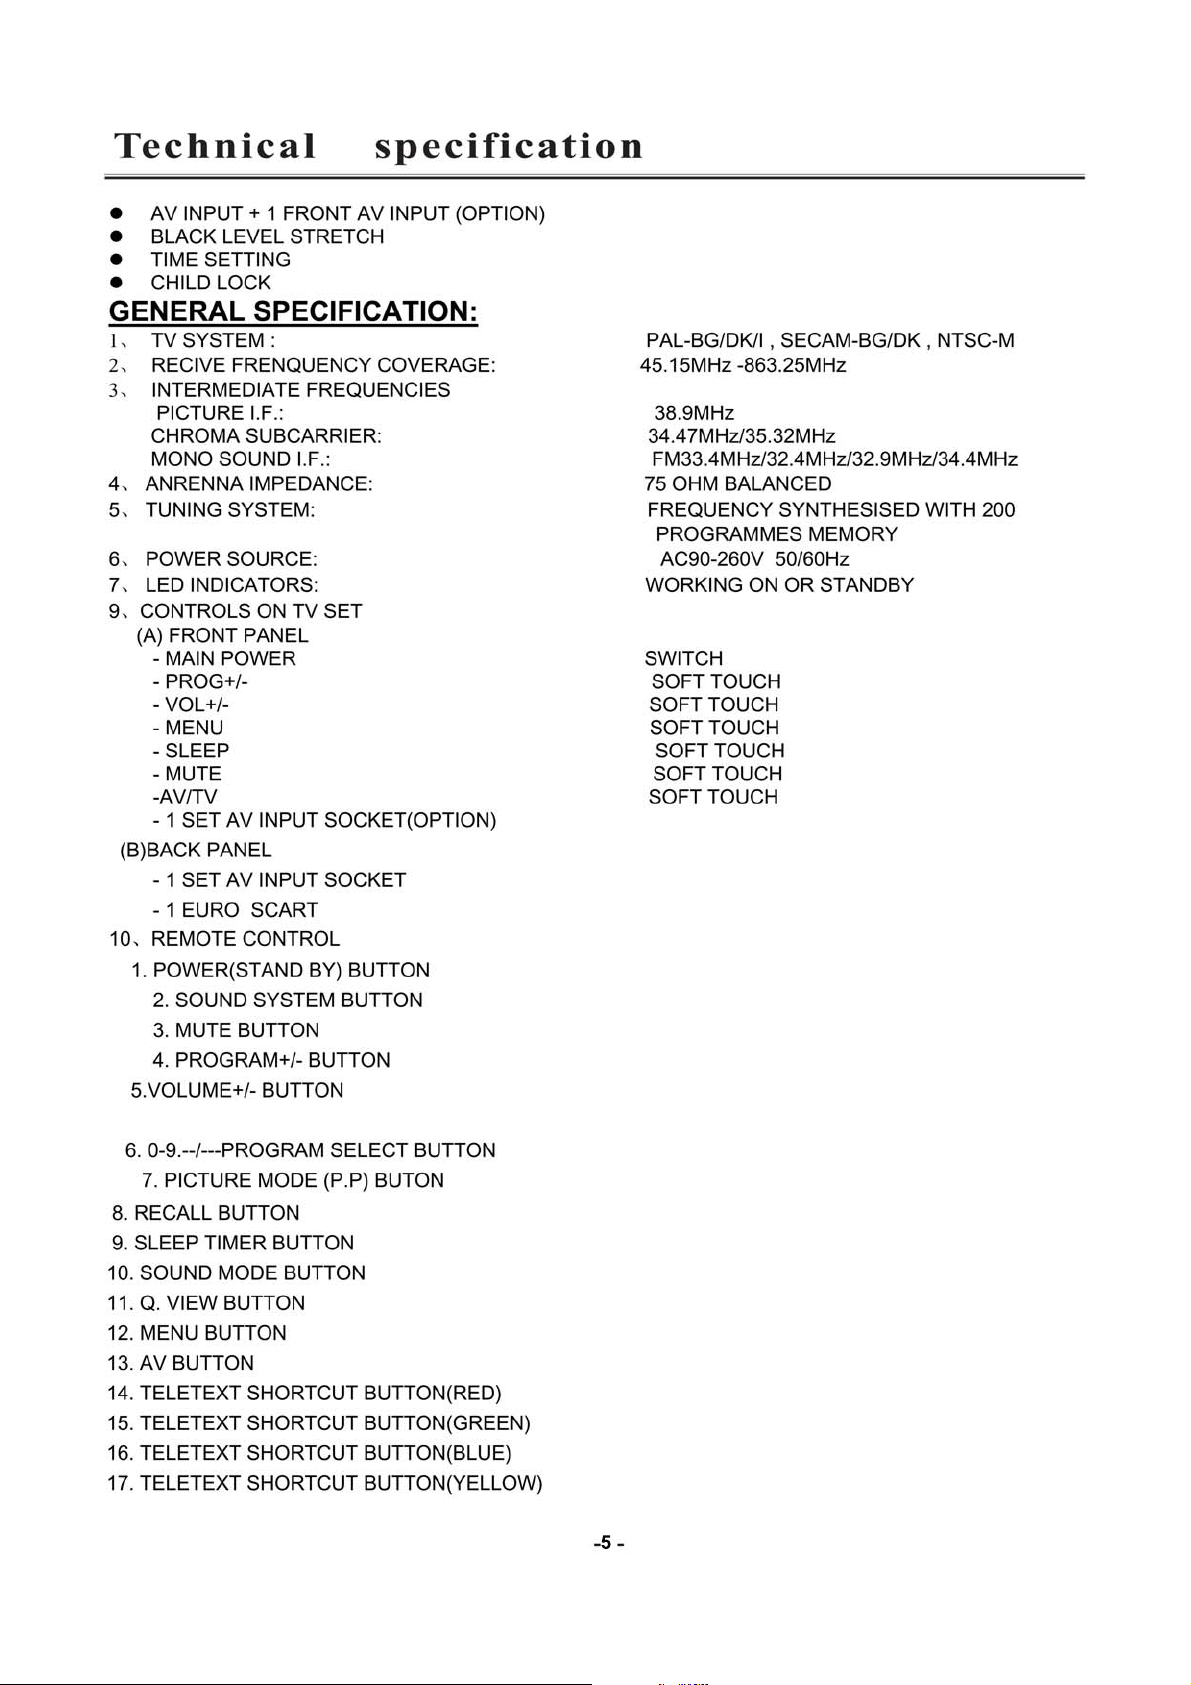
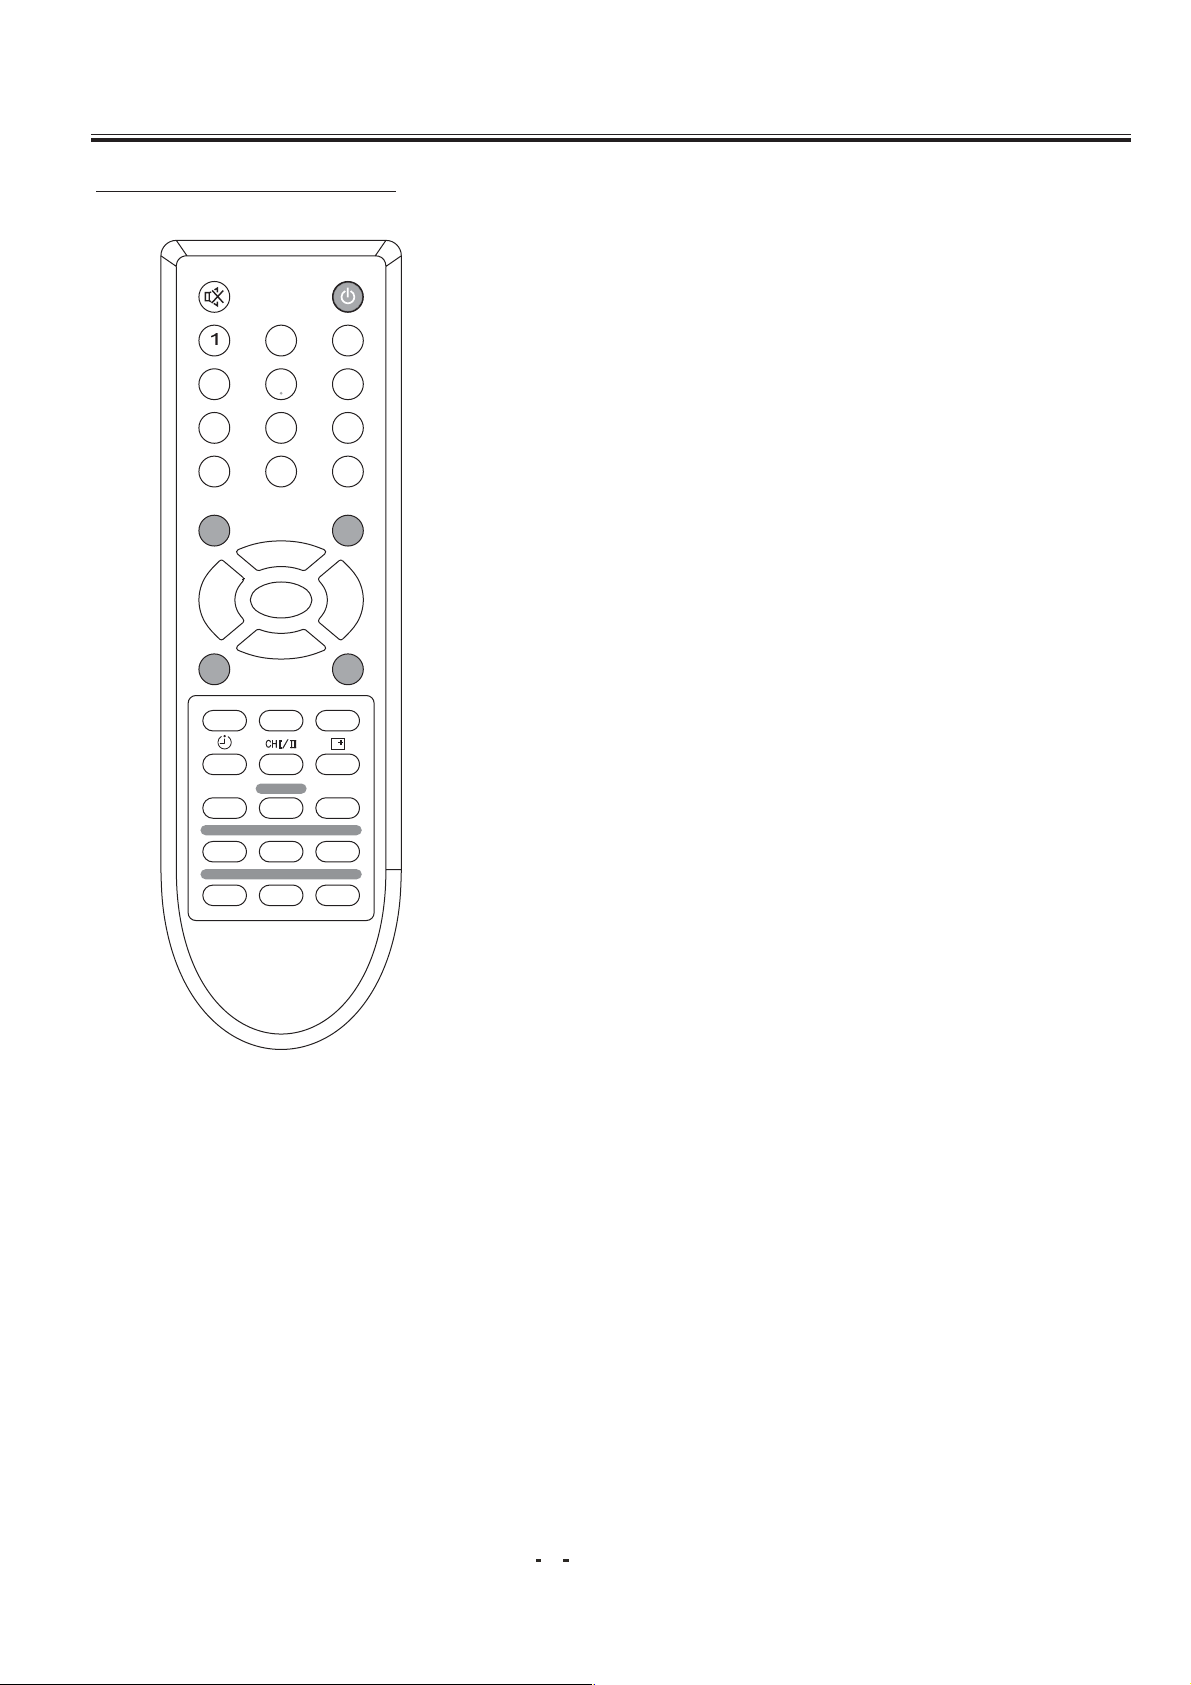
Control Location
CONTROL PANEL BUTTONS
1.
Main Switch
2. Power Indicator
3. Remote Sensor
4. Speakers
5. Program Down / Up Button
6. Volume Down / Up Button
7. Menu
8. Mute Button
9.TV/AV Button
10. AC Power Cord
11.
12. Antenna Input Socket (75 Ohm)
Button
AV In2 (Option)
AV Out (Option)
YUV (Y, Cb, Cr) In (Option)
21 PIN SCART(Option)
9
TV/AV
8
MUTE
MENU
7
VOL.+
VOL.-
PROG.+
6
PROG.-
5
4
1
3
2
4
10
12
11
Power Connection
Only use the adaptor supplied with this product, connect the AC plug to the socket at the back of the TV.
This TV must be operated only from the type of power source indicated on the marking label
(AC150-260V
50/60 Hz).
Rear View of the TV Set
Video And Audio Input/ Output Terminals
1. Video / Audio input for playback for VCR.
2. Video / Audio output for TV program.
Connections To The Antenna Input Socket
Connect the aerial or cable TV plug to the Antenna Input Socket located at the back of the TV and connect
the cable plug coming out from the TV out socket located at the devices (VCR, DVB, etc.) to this socket as
well.
27
Page 28

Operation Instructions
SAFETY PRECAUTIONS
1.
2. Do not overload wall outlets, extension cords, or convenience receptacles on other equipment as this
3. Unplug the TV product from the wall outlet before cleaning. Do not use liquid cleaners or aerosol
4. If the TV should be dropped and/ or broken, it could result in an injury, and continued use could result
5. Do not insert liquids or foreign object. Penetration of liquids or foreign objects could result in fire or
6. Do not attempt to service the TV yourself. Opening or removing covers can expose you to high
7. Do not place the TV on an unstable shelf, slant or vibrant surface. The TV may fall, causing serious
8. Avoid dusty places, since accumulated dust inside the chassis may cause failure of the TV when in
9. Do not place the TV near water. For example, a bathroom, a beach, etc.
10. Do not obstruct the ventilation openings of the equipment with items such as newspapers, tablecloth,
11. Do not place the TV on a carpet, sofa or bedding.
12. Keep the TV away from heat sources such as radiators, heaters, stoves and other heat generating
13. Do not place the TV in a built-in enclosure, unless proper ventilation is provided.
14. Do not place flower vases, pots, cups, cosmetics, liquids such as water, etc on or around the TV.
15. Choose a place where light (artificial or sunlight) does not shine directly on the screen.
16. If the TV does not work properly and you are unable to restore normal operation by following the
17. Do not touch the controls other than those described in the operating instructions as improper
18. For added protection for this TV during a lightning storm, unplug it from the wall outlet and disconnect
19. If a strange sound or smell gives off from the TV, please turn off and unplug it from the wall outlet,
20. To prevent fire, never place any type of candle or naked flames on the top or near the TV.
21. Avoid any kind of impact to the TV. Be special careful not to damage the screen face.
22. If the TV is to remain unused for a period of time. Turn off and unplug it from the wall outlet.
Power-supply cords should be routed so that they are not likely to be walked on or
nagged by items placed upon or against them. Pay particular attention to cords at
doors, plugs, receptacles, and the point where they exit from the product. When the
power cord or plug is damaged or frayed, unplug the TV from the wall outlet and refer
servicing to your authorized dealer.
can result in a risk of fire or electric shock.
cleaners. Use a damp cloth for cleaning.
in fire or electrical shock. Immediately turn off the power switch, disconnect the power plug from the
power outlet and contact your authorized dealer.
electrical shock.
voltage and other dangerous conditions. Refer all servicing to your authorized dealer.
injury to human and serious damage to the appliance.
high humidity environment.
etc.
products.
""
troubleshooting section in your instruction manual, do not attempt any further adjustment. Unplug
""
the TV and consult your authorized dealer.
adjustment of other controls may result in damaging. Please ask your service authorized dealer to
restore the TV to normal operation.
the antenna or cable system.
then refer to authorized dealer.
28
Page 29

Operation Instructions
Connecting the Aerial(or Cable Television Network)
To view television channels correctly ,a signal
must be received by the set from one of the
following sources:
*An outdoor aerial
*A cable television network
Plug the aerial or cable network input cable to
75 ANT
Cable
Television
Network
the 75 coaxial socket on the rear of the
television.
VCR
AV IN 2
VIDEO
LEFT
RIGHT
AV OU T
VIDEO
LEFT
Decoder/
V
L
R
V
L
V
L
R
V
L
video game device
Video disc player
Camcorder
Satellite receiver
VCR
TV
RIGHT
Satellite receiver
R
R
29
Page 30
Operation Instructions
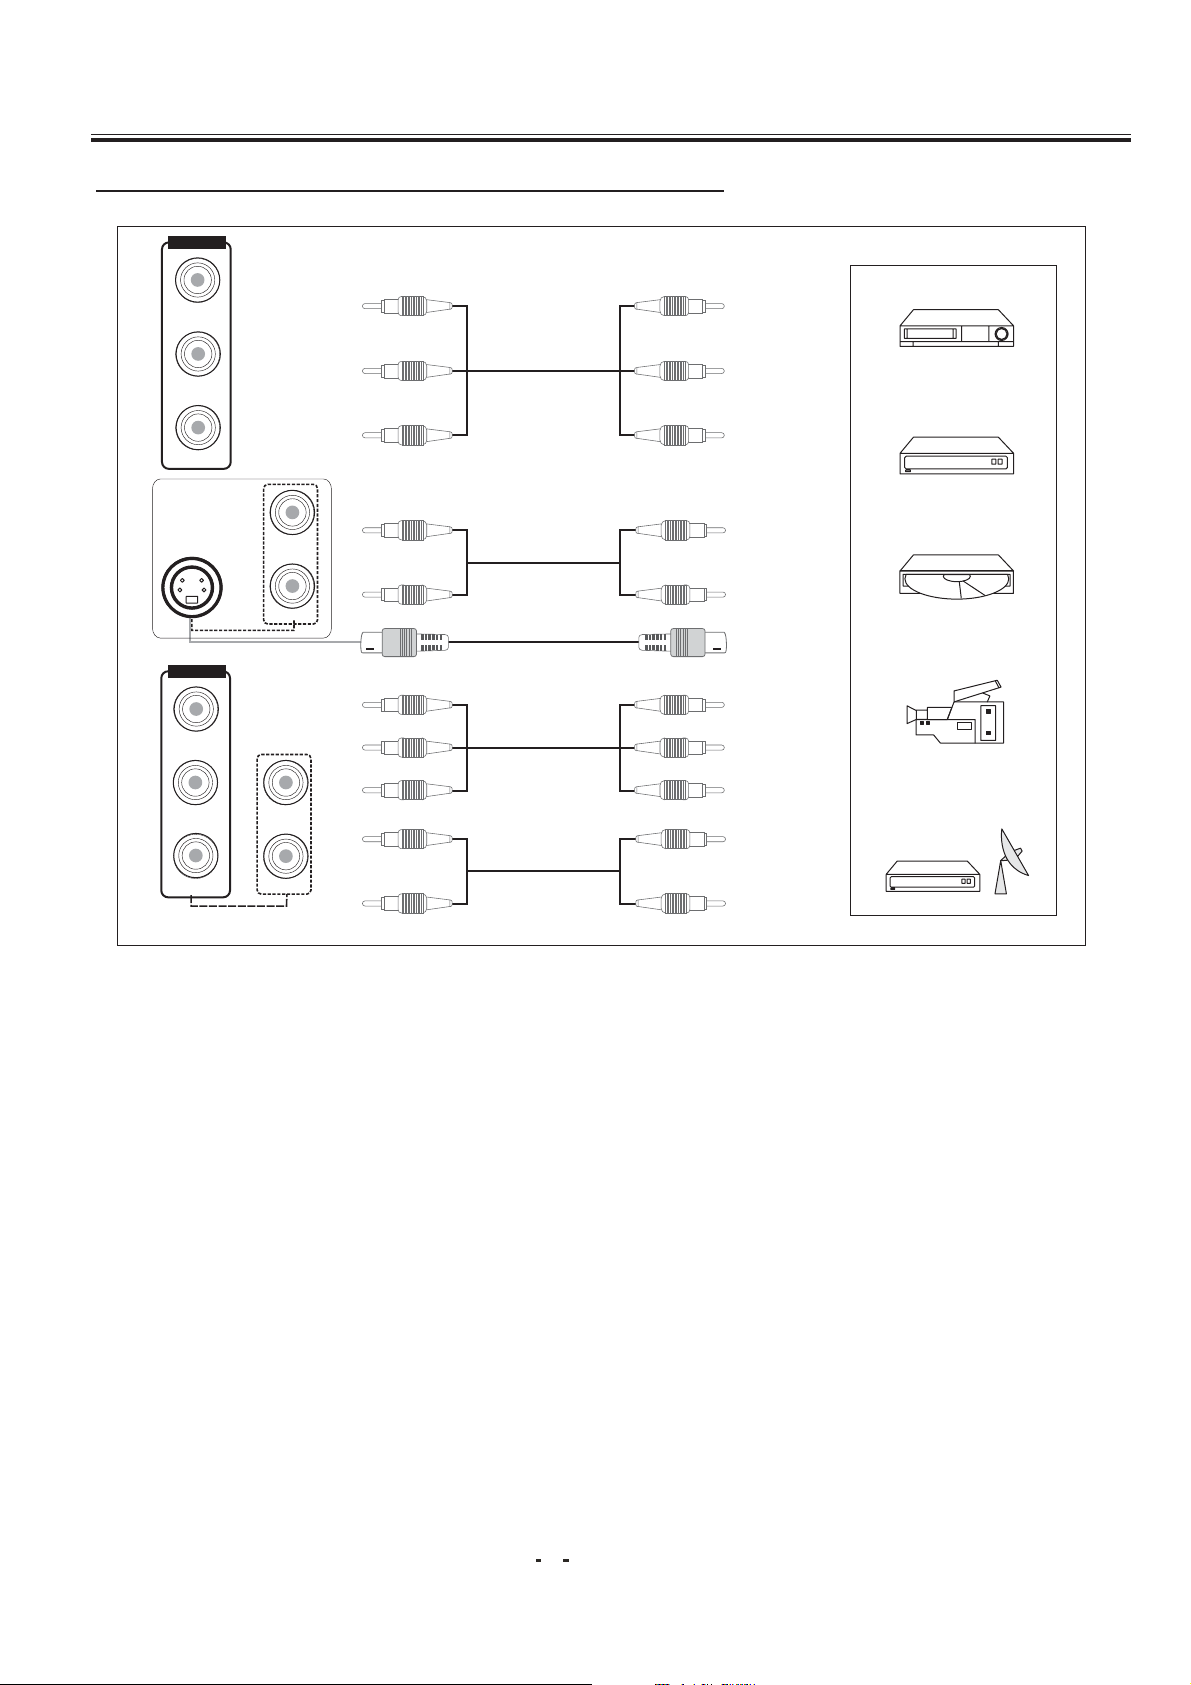
Connecting the Audio/Video Input/Outputs(option)
AV IN 2
VIDEO
LEFT
RIGHT
S-VIDEO
YCbCr IN
Y
Cb
LEFT
RIGHT
VIDEO
LEFT
V
L
R
L
R
YC YC
Y
Cb
Cr
L
V
VCR
L
R
Decoder/
video game device
L
Video disc player
R
Y
Camcorder
Cb
Cr
L
Satellite receiver
Cr
RIGHT
R
R
30
Page 31

Operation Instructions
21 PIN SCART
PERITELEVISION
VCR
Decoder/
video game device
Video disc player
Camcorder
Satellite receiver
TV
Amplifier
VCR
31
Page 32

Operation Instructions
PERIPHERAL EQUIPMENT CONNECTIONS
There is a wide range of audio and video equipment that can be connected to your TV.
Connection diagrams at the end of this section show you where the different equipment should be
connected at the backside of the TV.
Aerial socket
1. Connect the RF out socket of the VCR to the aerial socket on the back of the set.
2. Connect the aerial cable to the RF aerial in socket of the VCR.
3. Select the program number where the VCR channel is stored.
4. Press the PLAY button on the VCR.
Audio/ Video in sockets
1. Connect the audio/video out sockets of the VCR to audio/video in sockets of the set.
2. Press the AV/TV button to select AV.
3. Press the PLAY button on the VCR.
The VCR playback picture appears on the screen.
Note:If you wantto watch the signals from the input jacks on the front panel,disconnect
theEuroscartsocketoftheVCRfromtheEuroscartsocketonthebackoftheset.
Precautions when connecting to other equipments
When using external equipment with this TV, please read the instruction manual of the external
equipment.
Switch off all power supplies to the equipment and TV before connection.
Always ensure that the input and output terminals are correctly connected..
32
Page 33
Operation Instructions
USING THE REMOTE CONTROL
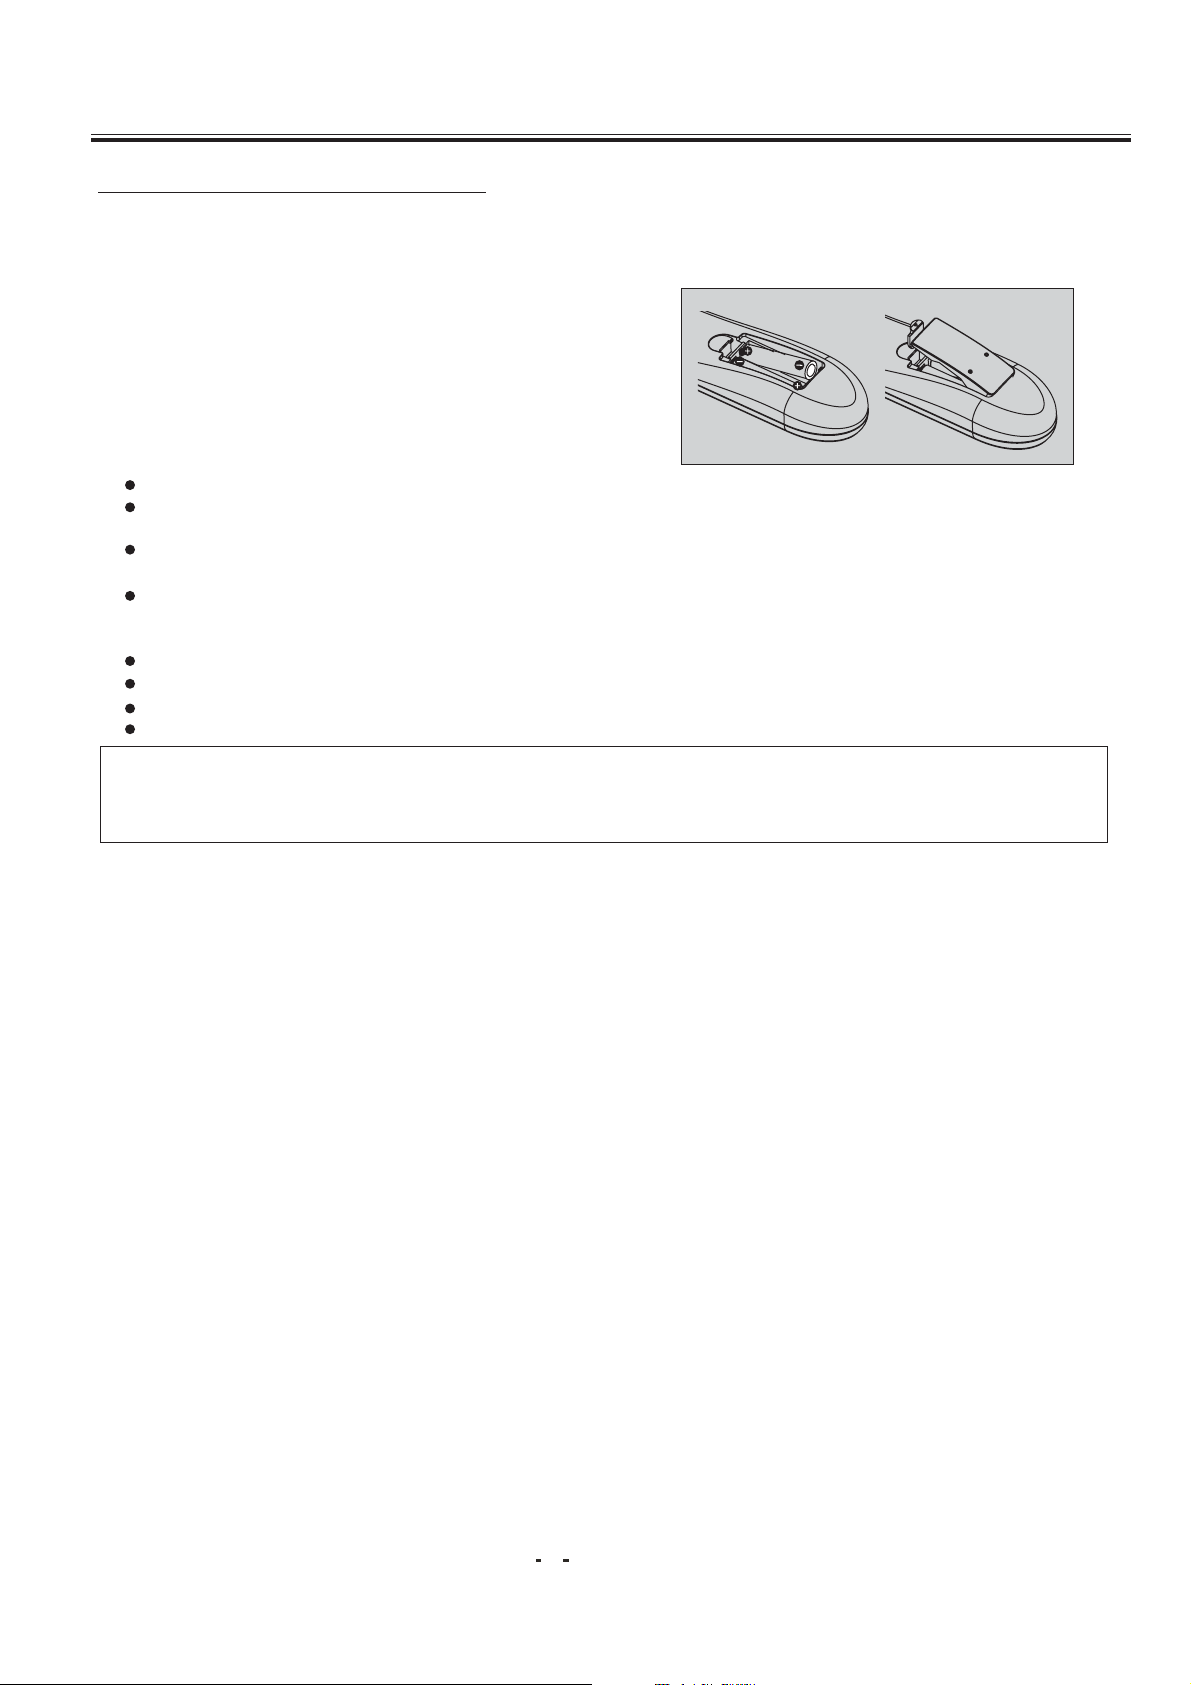
Batteries
Please follow the below instructions to install the supplied batteries into the remote control to make it
operate.
1. Remove the battery cover.
2. Insert two 1.5V (AAA size) batteries making sure
The polarity (+ or -) of the batteries
matches the polarity marks inside the unit.
3. Replace the battery cover.
Precautions when using batteries
Do not use old and new batteries together.
Do not use different types of batteries (for example, Manganese and Alkaline batteries)
together.
Note that there are chargeable and non-chargeable batteries. Do not attempt to charge
non-chargeable batteries.
If the remote control unit is not used for a long period of time, remove the batteries
Precautions when using the remote control unit
Do not drop the remote control unit.
Do not subject the remote control unit to physical shocks.
Keep the remote control unit dry. Wetting it may cause the unit to malfunction.
Replace the batteries with new ones when operation of the unit deteriorates.
NOTE:
sensor window on the TV, the remote may not operate. Please make sure the remote
control is aiming at the remote control sensor window on the TV.
If there is an object between the remote control and the signal remote control
33
Page 34

Operation Instructions
Remote Control Buttons
2
3
1.POWER (STANDBY) BUTTON ( )
PressthisbuttontoturntheTVon/off.Press
any Number Button or Program Up/Down
Button will also switch on the TV from standby
mode.
4
--/---
Q.VIEW S.S.
LOCK
INDEX
CANCEL
5
879
0
PROG.+
MENU
PROG.-
TEXT
MIX
HOLD
SIZE
6
AV/TV
VOL.+VOL.-
P. P.
SCAN
SUB.PAGE
REVEAL
2. MUTE BUTTON ( )
Press this button to temporarily cut off the
sound output, press it again to restore the
sound level.
3.DIGIT BUTTONS (0-9)
Press the number for your desired program
and the program indicator will be displayed
on the screen. To select a single-digit
program, press the corresponding number
key0-9buttonontheremotecontrolunit.
4. PROGRAM SELECTION BUTTONS (--/---)
Press --/--- key to select one to three digits
entry. If you want to select0-9program
channel other than using the Digit Buttons,
please press "--/---" key until display "-" on
the screen right-top corner, then press digital
number key 0-9.If you want to select 10-99
program channel, please press "--/---" key
until display "--" on the screen right-top
corner, then press digital number key 0-9.If
you want to select 100-220 program channel,
please press "--/---" key until display "---" on
the screen right-top corner, then press digital
number key 0-9.
5. AV/TV BUTTON (AV/ TV)
Inputs can be set for TV or AV mode. Press
this button to display external video signal
such as DVD, VCR or VCD video player. AV
will be displayed on he screen. Press this
button again to switch back to TV signal from
AV.
Option
:In TELETEXT mode, used as LANG.Key.
Press this button to swith the teletext
LANGUAGE such as English or Russian.
34
Page 35

Operation Instructions
Remote Control Buttons
2
4
5
3
6
6. PROGRAM UP/DOWN BUTTONS (PROG. +/-)
Press the Program Up Button to select the program
forwards.Press the Program Down Button to select
the program backwards.
7. VOLUME UP/DOWN BUTTONS (VOL.+/-)
Press Volume +/- Buttons to adjust sound level.
--/---
PROG.+
MENU
Q.VIEW S.S.
LOCK
INDEX
CANCEL
879
0
PROG.-
TEXT
MIX
HOLD
SIZE
AV/TV
VOL.+VOL.-
P. P.
SCAN
SUB.PAGE
REVEAL
8. MENU BUTTON (MENU)
Press "MENU" button to display the OSD (OnScreen Display) menu for adjusting the image,
sound and functions. Pressing this button again to
out from the OSD.
Please refer to page 15-19 for the details.
Option
: In TELETEXT mode, Press this button to
swith the teletext type such west/east type.
9. PERSONAL PRESETS BUTTON (P.P.)
You can select USER, STANDARD, SOFT or RICH
mode by pressing this
button.
10.QUICK VIEW BUTTON (Q.VIEW)
Press this button to return to the previously viewed
program.
11. DISPLAY BUTTON ( )
Press this button sequentially to display the current
program number, color system and sound system
on the screen.
If you do not set the time, " --:--" will display on the
l
screen
12. SLEEP TIMER BUTTON ( )
Press the "Sleep Timer" button on your remote
control to start setting the automatic sleep timer.
Press the button to adjust the time in increments of
30 minutes, from 0 to 180 minutes. When the preset
time runs to 0, TV set will go into standby mode. To
switch off this function, press this key step by step
until " OFF" is displayed on the screen.
35
Page 36

Operation Instructions
Remote Control Buttons
13.LOCK BUTTON
The TV set can provide the locked key for control or
prevent your children from watching the program.
4
--/---
Q.VIEW S.S.
LOCK
INDEX
CANCEL
2
5
879
0
PROG.+
MENU
PROG.-
TEXT
MIX
HOLD
SIZE
3
6
AV/TV
VOL.+VOL.-
P. P.
SCAN
SUB.PAGE
REVEAL
SETTING UP THE CHILD LOCK FUNCTION:
Press the "LOCK" button on remote control unit.
The key locked symbol( ) will be displayed on the
screen for five seconds and entered into the child
locked mode. While in Lock mode, any keys on the
TV set will be disabled. Except the key on the
Remote control
RELEASE CHILD LOCK:
Press again the 'LOCK" button on the remote control
unit to cancel this function.
14.SCAN BUTTON
Press the SCAN button to automatically browse
every channel which you have stored.
15.SOUND SYSTEM BUTTON(S.S)
Press this button to select the correct sound system
5.5M 6.0M 4.5M 6.5M
16.STEREO/MONO DUAL(CHI/II)(TELETEXT
OPTION)
In NICAM mode, press this button to change the
sound station.
17.COLOUR BUTTONS(RED/YELLOW/GREEN/
BLUE)(TELETEXT OPTION)
In TV mode, the(GREEN) / (BLUE) buttons has the
same function as PROG+/- buttons; the (RED)/
(YELLOW)buttons has the same function as VOL+/button.
In TELETEXT mode, press these colour buttons ,the
color of page no of teletext will change to the same
colour as that of the buttons.
36
Page 37

Operation Instructions
Remote Control Buttons
4
--/---
MENU
Q.VIEW S.S.
LOCK
INDEX
CANCEL
2
5
879
0
PROG.+
PROG.-
TEXT
MIX
HOLD
SIZE
3
6
AV/TV
VOL.+VOL.-
P. P.
SCAN
SUB.PAGE
REVEAL
*Picture mode RICH,SOFT,STANDARD are fixed
“”
by factory, all the change of these settings will be
saved into the USER mode automatically.
“”
18.INDEX BUTTON(TELETEXT OPTION)
In TELETEXT mode, used as INDEX key.
INDEX: Press INDEX button to obtain the index page.
19.REVEAL MENU BUTTON(TELETEXT OPTION)
In TELETEXT mode, used as REVEAL key.
REVEAL: Sometimes the answers of quizes, jokes
etc are hidden. Press REVEAL button to reveal
the hidden information.
20.SIZE MENU BUTTON(TELETEXT OPTION)
In TV mode, used as PICTURE menu command; in
TELETEXT mode, used as SIZE key.
SIZE: The top or button half of any page can be
enlarged by pressing this button.
21.HOLD BUTTON(TELETEXT OPTION)
In TELETEXT mode, used as HOLD key.
HOLD: Sub-pages will scroll automatically. Press
HOLD button a hold a sub-page.To release the page.
Press HOLD again.
22.SUB.PAGE BUTTON(TELETEXT OPTION)
In TELETEXT mode, used as SUB.PAGE key.
SUB.PAGE: Some pages attach sub-page,Page
number may contain several subpages which are
automatically paged by the TV station. Press this
button once.0001 will be displayed on screen, use
number key(0-9)to look for other sub-pages if
available, If there is no sub-page,**** will be
displayed. To cancel this, press this button again.
23.TEXT/BUTTON(ON/MIX/OFF)(TELETEXT
OPTION)
Press this button to display TELETEXT signal, mix
TELETEXT page with TV signal and return to TV.
NOTE: To avoid mixing of External R.GB while
viewing teletext. Disconnect scartplug or swith off
external R.GB source(This key only use for
TELETEXT mode).
37
Page 38
Operation Instructions
Remote Control Buttons
3
6
AV/TV
4
--/---
2
5
879
0
PROG.+
24.CANCEL BUTTON(TELETEXT OPTION)
In TELETEXT Mode, used as CANCEL key.
CANCEL: If you want to watch TV but not cancel
the TELETEXT mode completely. Press the
CANCEL button. When the last selected page is
updated, the page number will be appeared at
the top of the TV screen press the CANCEL
button again to reveal the page.
MENU
PROG.-
Q.VIEW S.S.
TEXT
LOCK
INDEX
CANCEL
MIX
HOLD
SIZE
VOL.+VOL.-
P. P.
SCAN
SUB.PAGE
REVEAL
38
Page 39

Operation Instructions
MENU SYSTEM
This TV allows you to adjust the settings from the menu screens.
* In the AV mode, menus appear the same as in TV mode except the Install menu.
Picture
Sound
Features
CONTRAST
BRIGHTNESS
COLOR
SHARPNESS
TINT
VOLUME
TREBLE
BASS
BALANCE
SURROUND
SOUND MODE
LANGUAGE
COLOR SYS
SOUND SYS
Timer
Install
CALENDAR
GAME
TIME
START TIME
STOP TIME
CH SWITCH
SWITCH TO
AUTO STORE
MANUAL STORE
FINE TUNE
PROG NO
SKIP
39
Page 40

Operation Instructions
Press the MENU button to enter the menu screens for the following settings.
""
PICTURE Menu -> SOUND Menu (option) -> FEATURES Menu -> TIMER Menu -> INSTALL Menu ->
EXIT
Select the desired item using the PROG.+/-Buttons.
-
Use the VOL. +/- buttons to adjust the item settings.
-
The item selected will be highlighted in red
* The menu screen will time out automatically after few seconds if it is left
idle on the screen.
Picture Menu
PICTURE
CONTRAST
BRIGHTNESS
COLOR
SHARPNESS
TINT
55
55
55
50
00
You can select CONTRAST, BRIGHTNESS,
COLOR, SHARPNESS, and TINT items by
pressing PROG. +/- Buttons, and pressing the
VOL.+/- Buttons to adjust the item of which you
selected.
1.CONTRAST
PresstheVOL.+/-buttonstoenhance or reduce
the contrast between objects and the background
"" " "
from 00 to 100 .
2.BRIGHTNESS
UsingtheVOL.+/-buttonstoadjust the lightness
and darkness of the picture from 00 to 100 .
"" " "
Sound Menu
SOUND
VOLUME
TREBLE
BASS
BALANCE
SURROUND
SOUND MODE
51
00
00
00
OFF
STANDARD
3.COLOR
PresstheVOL.+/-buttonstoincreaseordecrease
the color saturation from 00 to 100 .
"" " "
4.SHARPNESS
Adjust the outline of objects to either sharpen or
more dull from 00 to 100 .
"" " "
5. TINT (NTSC Only)
Adjust the color of objects from 50 to +50 ,
"" " "
making them more red or green for a more natural
look.
1.VOLUME
Press VOL +/- buttons to adjust the Volume
between 00 and 100 .
"" " "
2.TREBLE
Press VOL +/- buttons to adjust desired Treble
volume of sound b
"" " "etween -10 and +10 .
40
Page 41

Operation Instructions
3.BASS
Press VOL +/- buttons to adjust desired Bass volume of sound between -10 and +10 .
4.BALANCE
Press VOL +/- buttons to adjust the Balance between L50 and R50 .
"" " "
5.SURROUND
You can select to turn ON or OFF the Surround.
6.SOUND MODE
Press VOL +/- buttons to select the Sound Mode to STANDARD, MUSIC, THEATER, USER.
"" " "
Features Menu
FEATURES
LANGUAGE
COLOR SYS
SOUND SYS
CALENDAR
GAME
ENGL ISH
AUTO
1.LANGUAGE
You can change menu language in this item. Press VOL. +/-
Buttons to select your desired language.
All the on screen displays will appear in the selected
language.
2.COLOR SYS
Press VOL +/- buttons to change the color system to AUTO,
PAL,N4.43,NTSC,SECAM
3.SOUND SYS
Press the VOL.+/- Buttons, you can change the Sound
System to 6.0M ( I), 6.5M ( D/K), 4.5M ( M)and 5.5M ( B/G).
B/G: PAL B/G, SECAM B/G
I: PAL I
D/K: PAL D/K, SECAM D/K
M: NTSC-M
41
Page 42

Operation Instructions
4.Calendar (Option)
-
Press VOL +/- button to enter into Calendar menu.
-
Press PROG +/- buttons to select Year, Month and Date. Press VOL +/-
button to adjust the value.
-
Press MENU button again to return.
""
.Game Moving Cube (Option)
5
Press the PROG. +/- to select the Game function under the Features Menu.
Press VOL +/- buttons to enter the Game OSD (On Screen Display) menu.
Game Rules: There are total 16 levels of the game. The player will win when
moving all the pink cubes to the red box.
Press PROG +/- buttons to move UP and DOWN, press VOL +/- to shift
-
between right and left.
To next stage of the game, press P.P button.
-
To start a new game, press MUTE .
-
To exit the game, press MENU button.
-
""
""
""
Timer Menu
TIMER
TIME
START TIME
STOP TIME
CH SWITCH
SWITCH TO
-- --
-- --
-- --
-- --
--------
--
1. TIME
To adjust the current time by this item. Press the
VOL. - button to set hour, and the VOL. +
"" " "
button to set minute.
2. START-TIME
To set the time when the TV set to turn on
automatically.
3. STOP-TIME
To set the time when the TV set to turn off
automatically.
4. CH SWITCH
To preset the time that the TV will switch to the
selected channel (Position) automatically.
5.SWITCH TO
To set the program that will switch automatically
at the CH SWITCH.
NOTE:
effective if the power of the TV set is switched
off using the remote control unit. If the power
is switched off by the power button on the TV
set or a power failure occurs, the timer will
be reset.
All the timer functions will only be
42
Page 43

Operation Instructions
Install Menu
INSTALL
AUTO STORE
MANUAL STORE
FINE TUNE
PROG NO.
SKIP
00
OFF
1.
AUTOSTORE
Press VOL.+/- Buttons,the TV setwill automaticaly
search from V-L band to U band.The channels are
stored in the order in which they appear in the
frequency bands.
2. MANUAL STORE
Press VOL.+/- Buttons to start searching. The
VOL- button for backward search; the VOL+ button
for forward search. When a TV station signal is
received, the searching will stop automatically.
3. FINE TUNE
You can use this FINE tuning process for fine
adjustment by pressing VOL.+/- Buttons. Normally
fine tuning is only necessary if reception is poor.
4.PROG NO
Up to 220 TV channels can be stored by program
numbers (0 to 220). By pressing VOL.+/- Buttons
(or number keys) in this item to select channel
number. You can store the channel number, which
are watching, and change the channel number.
Once you have preset the channels, you will be
able to use the PROG. +/- or NUMBER buttons to
scan the channels you have programmed.
5
.SKIP
You can skip unnecessary program channels of
your choice not to be displayed during viewing
and scanning when pressing the PROG -/+
buttons.Select "Skip Del" by pressing VOL.+/-
""
""
Buttons to select the channel that would like to
skip from the channel scan operation.
43
Page 44
151413121110987654321
SW201
2
4
1
STANDBY
DVD_OPT
EWD
VDRB
VDRA
Q702
C1815
Q701
C1815
R705
1.8K
R706
1.8K
13
14
12
11
10
9
8
R134
100
C442 10uF
IF
D627
1N4148
<20V>
<7V>
<12V>
<48V>
R621 0.33 1W
<110V>
R645
2.2K
IC621
TL431
R6284.3K
1
2
R707
20K
C707
R709
20K
R708
20K
C708 10uF
R710
20K
R623
0.33 1W
R624
0.33 1W
R622
0.33 1W
J620
5
R133
SAW101
AGC
R631
R630 2K
R629
3
A2
Vss
24C08
100
+
3
SW02B
R713
47K
R711
47K
R714
47K
R712
47K
C624 470pF 500V
D623 BA158
C627 470pF 500V
C623 470pF 500V
C621 470pF 500V
C620
3.3K
100K
n.c.
SCL
SDA
SCART_OPT
+8V
4
5
D624 BA158
D622
D621 BA158
220pF 2KV
D620 BYW36
C633
VR6201K
C118
10nF
C133
WP
Vdd8PTC7SCL6SDA
1uF
R139
2.7K
IC102
R640
BA158
0.1uF 100V
L104
C129 220pF
C128 10nF
C120 0.1uF
C119 220pF
R151 3.9K
C135 0.1u
C136
C137 220pF
C138 1.5nF
C139 820pF
C140
Q625
C1815
0
R130
R131
6.8K
10uH
+
4.7nF+C132
R138
18K
+
2.2uF
+
+
4.7uF
+8V
16
Vdd
12345
16
Vdd
12345
C627
1000uF
C627
3300uF
10V
C625
1000uF
16V
C622
1000uF
50V
C621
100uF
160V
6.8K
HEF4052
+5V
R132
3.3K
R118 3.3K
C127
C130 220nF
C131 2200pF
IC402
0
1
0
1
R643
47K
D626
BA158
R633
1 2W
R627
200K
C118 33pF
ZD103 8V2
R135 470
1
Standby
IRin
2
SCL
Mute
3
SDA
WF/TBS/BBE
4
IC201
Tuning
VddP
5
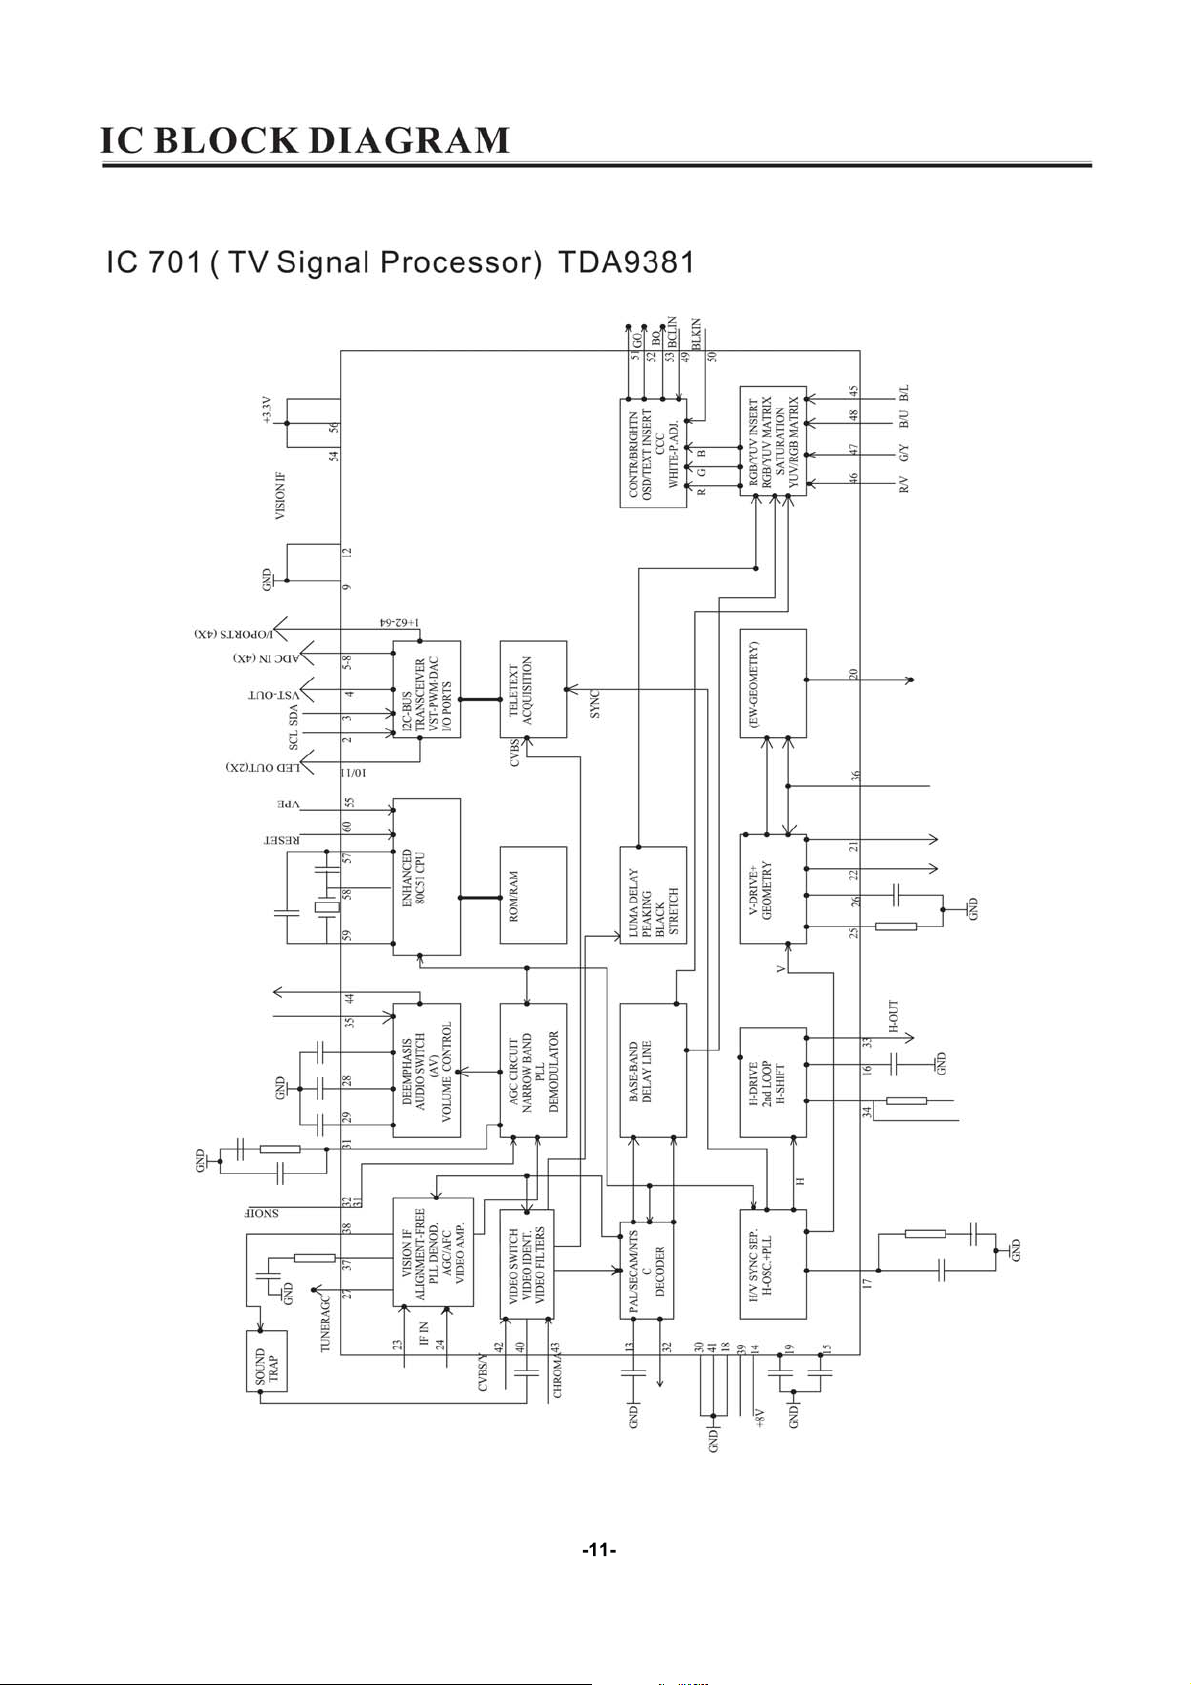
TDA83731
System
Reset
6
Key0
XTALout
7
key1
XTALin
8
A/D
OscGnd
9
Vss C/P
VddC
10
L
VpE
11
H
VddA
12
VssA
Bout
13
SECPLL
14
Vp2
15
DECDIG
16
PH2LF
17
PH1LF
18
Gnd3
19
DECBG
20
AVL/EWD
21
VDRB
22
VDRA
23
IF1
24
IF2
25
IREF
26
VSC
27
Tuner AGC
28
AUDEEM/SIF1
29
DECSDEM/SIF2
30
Gnd2
31
SNDPLL/SIFAGC
AVL/REFO32H. out
PWM
MUTE
15K
R148
15K
R149
9101112131415
E6Vee7Vss
8
9101112131415
E6Vee7Vss
8
C640
220uF/25V
R637
HEF4052
10K
Gout
Rout
Blanking
BCLin
B2/Uin
G2/Yin
R2/Vin
INSSW2
AUDOUT/AMOUT
CHROMA
CVBS/Y
Gnd1
CVBSINT
Vp1
IFVO/SVO
PLLIF
EHTO
AUDEXT/QSSO
FBISO
R763 15K
R137
D763 IN4148
100u/16V
R766
R768
IC402
R644 10K
22 /2W
R638
R711
510
ZD602
Q622
C1815
R636
R635
22K
10K
R634
10K
Q621
C1815
220nF
012
3
3
2
012
3
3
2
R644 220
C627
47uF/25
R632
1 2W
Q624
C1013
R639 10K
1.2K 1W
R406
ZD620
6V8
U101
AGC1VT2Hi/n.c.3Mi/BS1(SCL)4Lo/BS2(SDA)5V+6i.c.(V+)7i.c.8i.c.(+33V)9IFGND10IF
D
AGC
C111
R109
C110
C109
100P
R109
4.7K
50V
100
+
100P
10u
C112
R112
4.7K
100P
100
R113
+5V
R110
75
GND
21
VI
VO
19
VIG
VOG
17
BL
R
15
BG
RG
13
NC
G
11
NC
GG
9
OPT
B
LI
BG
GND
LO
RI
RO
P701 21PIN
7
5
3
1
L
R
C
FOR DVD
L
R
B
XS702
XS702
FOR DVD
SDA
SCL
20
L709 1uH
L708 1uH
18
ZD708
8V2
16
L705 1uH
14
ZD705
8V2
12
ZD706
L706 1uH
10
8V2
8
R730
3.3K
L707 1uH
6
L702 1uH
R702
47K
4
L703 1uH
2
L701 1uH
L704 1uH
ZD704
8V2
L701 1UH
L701 1UH
L701 1UH
R78175R780
L701 1UH
L701 1UH
L701 1UH
R43075R430
38.9MHz
11
220
R104
IC103
+33V
R114
+
C1010.01u
100
C114
C102
D101
47uF
1N4148
R101
75
+5V
+
C113
L102
100uF
111
R116 1K
R115 1K
C115
R108
0.01u
33
+8V
ZD709
R716
R715
8V2
3.3K
3.3K
R725
ZD710
R721
8V2
3.3K
75
R722
3.3K
ZD707
ZD730
R723
3.3K
8V2
8V2
C706 10uF
C709 10uF
C705 10uF
R702
ZD703
47K
8V2
C711 10uF
C773 10uF
C778 10uF
R779
47K
47K
C772 10uF
C714 10uF
C777 10uF
ZD706
R430
47K
47K
8V2
R103
4.7K
0.01uF
C725 10uF
R731
3.3K
ZD300
8V2
ZD713
8V2
L101
C103
R106
0.82*
0.01u
1K
Q201
C1815
R102
1K
Q102
R117
C1815
1K
C719 10uF
C713 10uF
R724
3.3K
C725 10uF
C701 10uF
3.3K
R732
C727 10uF
ZD702
8V2
ZD701
8V2
ZD712
ZD711
8V2
8V2
ZD714
8V2
+33V
C104
R107
0.01u
470*
IF
C105
0.01uF
R105
33
R119 1K
Q103
C1815
R118 1K
+8V
Blanking
R in
G in
+8V
SCART_OPT
B in
RL601
C607
220uF
450V(200V)
D605
BA158
C608
10uF
35V
1
2
3
L603
R607
5
22
1W
6
7
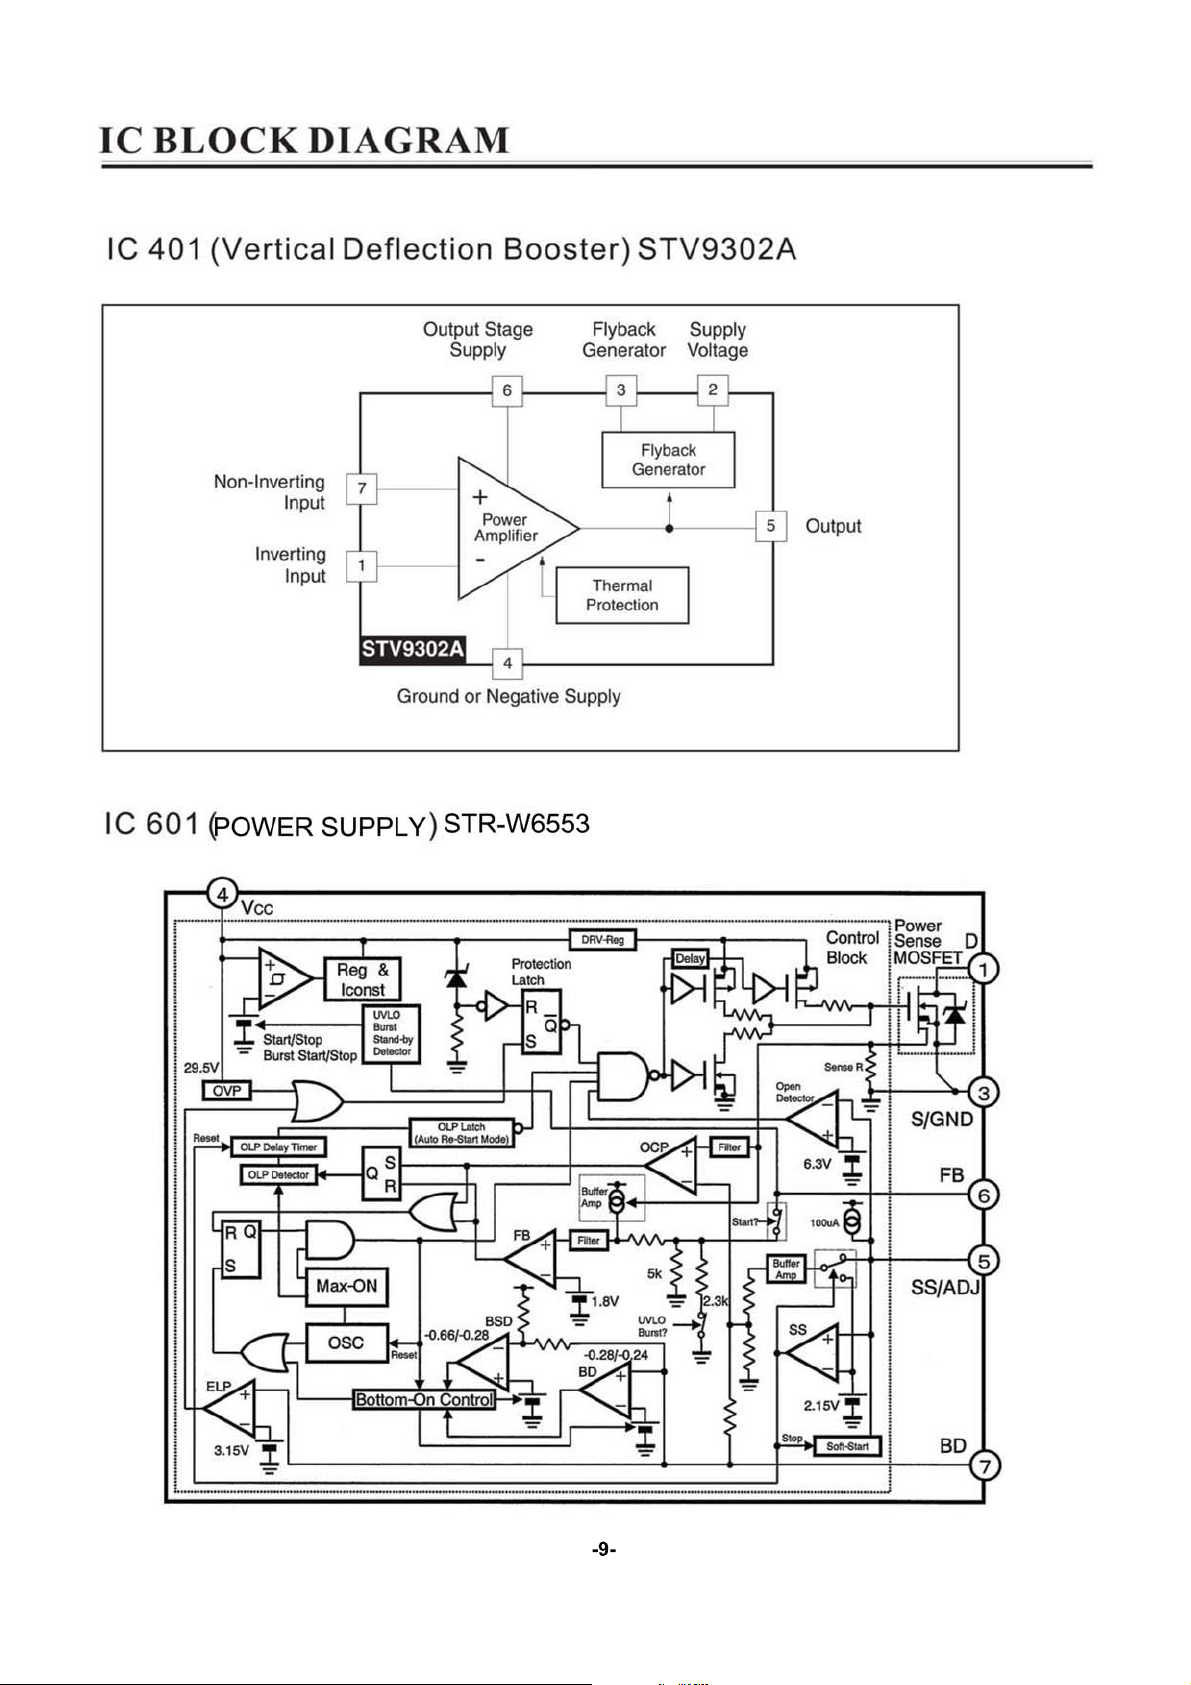
TRANSFORMER-W6553
IC622
RELAY
T603
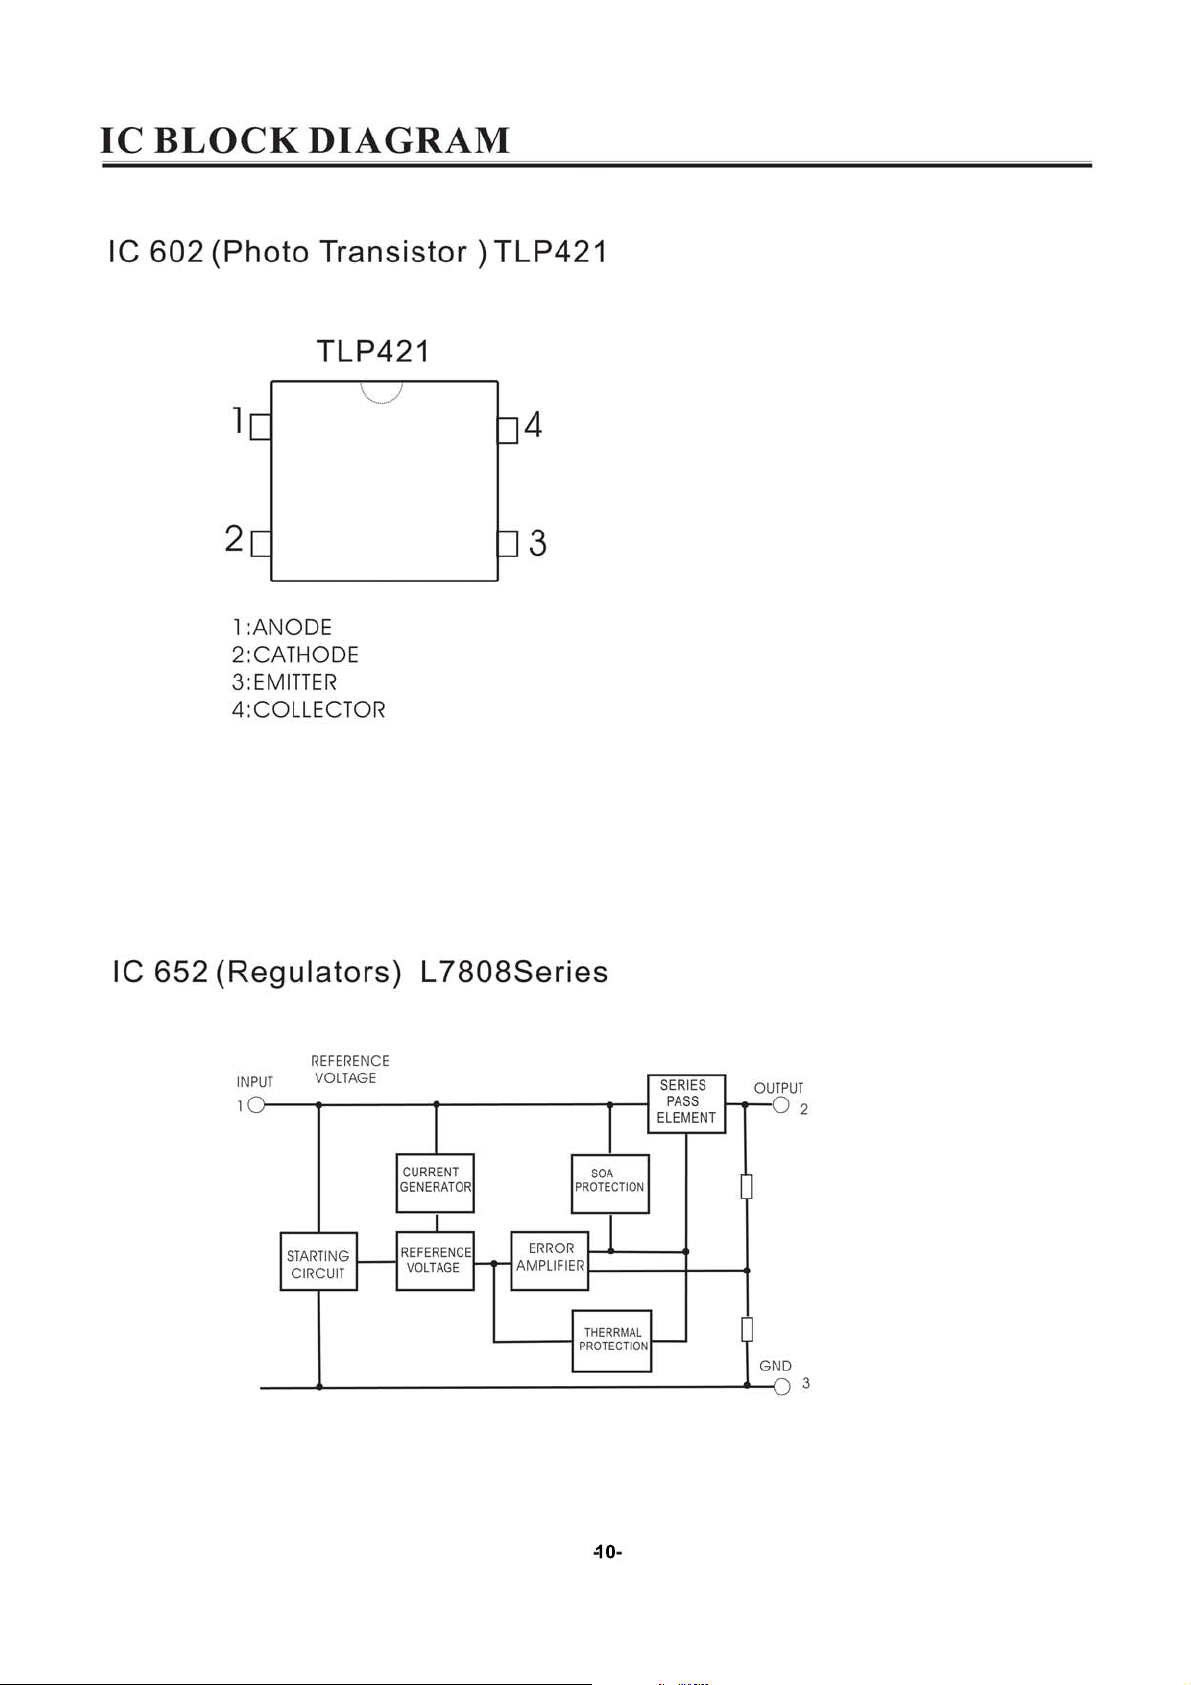
OPTOISO1
8.2M 1W
R610
C610
0.0022uF
AC250V
D603A
D603B
C603A
4.7nF 1KV
Rs
23
T602
Rp
9RM
1
CN601
A
DEGAUSSING
消磁线圈
CN602
AC90-270V
1 2 3 4 5 6 7 8 9 10 11 12 13 14 15 16
T602
C602
4.7nF 1KV
0.22uF
AC250V
T601
VDR601
R620
2.2M 1/2W
C601
0.22uF
1
AC250V
SW601
2
1
F601
T3.15A
250V
C603B
BA158
BA158
4.7nF 1KV
R603
4.7 5W
D603C
D603D
BA158
BA158
C603C
C603D
4.7nF 1KV
R602
R604
220K
33K
2W
4
5
3
D
VCC
S/GND
ADJ/SS
IC601
STR-W6553
C604
680pF 2KV
C605
R606 6.8K
0.1uF
ZD602 18V
100V
C606
470pF 500V
R605
220
R608
6.8K
7
6
C609
0.01uF
50V
FB
BD
SW202 SW203 SW204 SW205 SW206 SW207
R236
R237
820
1.5K
KEYBOARD CIRCUIT
X101
12MHz
+
D761 1N4148
D762
+
68K
1M
C770
C771
AUDIO R
C151
10u/16V
Q622
C1815
123
IC105 L7808
C629
2200uF
16V
R145
10K
C634
0.1uF
50V
C147 33pF
C148
R764 4.7K
1u/16V
1N4148
Q760
C1015
+
27 /2W
L:STANDBY
H:WORKING
33pF
R125 1K
IC760
TFA9842J
C761
10u/16V
+
10u/16V
+
+5V_VCC
+3.3V_VCC
ZD602
5.1V
+20V_VCC
+7V_VCC
+8V_VCCR152
+33V_BT
+12V_VCC
STAND-BY
R150 390
+
Q761
C1815
C?
1000uF
+110V
C145
100uF
+8V
C727
C726
C725
R769 1K
R770 1K
R230
220
C146
+
0.1uF
10u/16V
C762
AUDIO L
3.9V
64
63
62
61
60
59
58
57
56
55
54
53
52
51
50
49
48
47
46
45
44
43
42
41
40
39
38
37
36
35
34
33
C760
1K
Q623
C1815
R238
1.8K
L106
10uH
10uH
R144 100
100
R143
100
R142
10K
R141
10K
R424
0.1u/63V
0.1u/63V
0.1u/63V
1u/50V
C779
+
C116 1uF/50V
0.1U/63V
C144
123456789
+
+
C764
C767
47u/25V
220u/16V
C766
C765
4.7n
4.7n
+20V
R458 470
VDRB
C461
27nF
R456 3.3K
VDRA
C460
1nF
100V
AFC
+110V
+40V
R402
1.2K
H_OUT
EWD
100
R009
M001
C001 10nF
R240
R239
R241
5.6K
3.3K
3.3K
+3.3V
L107
C149
+
10nF
1000u/16V
1000u/16V
R767
390K
R459
470
C459
0.1uF
R404
100
R403
?
C442
1nF
C150
100uF
3.3K 1W
C760
+
+
C761
ZD401
R406
R442
10K
!
C458
27nF
100V
R410
R441 4.7K /2W
R008 1K
LED001
39K
R425
27K
R426
8V2
ZD104
8V2
ZD105
ZD106
8V2
R778
C780
100U/16V
390
C142 100U/16V
0.01
C143
Text
C?
SW2
1
1
2
2
VIN-1VCC+2FBG3VCC-4V-OUT5OSS6VIN+
C455
35V
100uF
D452
BA158
R452
6.8V
15K
3.6K 1/4W
Q401
R405
C2482
5.6K
C402
560pF
500V
ZD440
8.2V
8V
SW2
C403
220pF
500V
R441
82K
C441
0.001uF
100V
123
R516
R515
220/1W
IR
+5V
KEY
+3.3V
1
GND
2
B
3
G
4
R
5
BL
BCL
B in
G in
R in
Blanking
L105
10UH
+8V
390
R413
R412 390
+8V
Q703
SPL
C1815
欧
8 5W
SPR
C713
8 5W
欧
470uF/16
R220
75
IC301
S9302
7
C457
0.22uF
100V
1.2K
R454
C459
0.1uF
L622 91uH
!
T401
!
C404
47uF
50V
R440
Q303
6.8 2W
F630
!
HETO
AFC
H_OUT
C143
C142
+
100uF/16V
GND
R718
75
GND
V-DEF
!
100V
C456
0.22uF
R453
270 1W
C454
1.0uF
25V
C453
R455
0.82 /2W
1000uF
50V
C632
47uF
160V
R407
0
R408
22
C440
790uH
4.7uF
50V
R129
1K
10n
R128
L201
4R7
10uH
Q106
C1815
R126
XT-6.5
R127
220
330
GND
CN302
CN402
H-DEF
BA158
D450
C450
470pF
500V
BA158
D451
C451
470pF
500V
C452
2200uF
35V
C437
C436
10uF
470pF
250V
1KV
!
C430
C431
560pF
8.2nF
Q402
2KV
2KV
D5023
C433
22nF
400V
L440
1/2W
D432
R430
BA158
22K
15K/2W
H501
R510
BL
47
R
G
B
GND
CRT AMPLIFY CIRCUIT
XT165
4
0.68
0.68
R513
R511
270
2.2K
D503
1N4148
GND
GND
R521
47
R520
2.2K
GND
R506
15K/2W
R501
47
R502
2.2K
GND
R153
1.2K
R125
XT155
Q104
4.7K
GND
XT-5.5
C1815
XT145
GND
GNDGND
GND
XT-4.5
Q105
XT160
XT-6.0
R124
C1815
4.7K
TO CRT
123
ZD402
22V
R423
5.6 2W
R450
1W
+13V
-13V
R451
1W
HEATER
AFC
180V
R433
D433
0.68
1W
BA158
HY
C432
D430
!
5.6nF
BY228
2KV
D431
!
RU4B
!
L431
R431
C435
0.39uF
44uH
1.5K
400V
C434
2.2uF
250V
Q504
BF422
R512
47
C502
390pF
R525
15K/2W
Q507
BF422
R522
47
270
R523
C503
390pF
D505
1N4148
R507
220/1W
Q501
BF422
R504
47
270
R503
C501
390pF
D501
1N4148
R121
2K2
R421
56K
R422
680
!
T301
10
3
6
8
1
B+
4
7 6
ULTIMICRO F LY
D504
BAV21
Q506
BF422
Q505
BF423
R514
330
R
R526
220/1W
Q509
1K/1/2W
D506
R517
BAV21
BF422
R527 1K/1/2W
G
R508
1K/1/2W
Q508
BF423
R524
B
330
D502
R529
220K
BAV21
Q503
BF422
Q502
C512
BF423
10uF/250V
R505
ZD501
330
8.2V
GND
IC620 HEADER 4
123
+7V_VCC
R626 220
DVD -OPT
C630
47uF
+12V_VCC
DVD VOLTAGE SUPPLY
BCL
HETO
D404
BA158
R418
C407
?
0.1uF
35V
HV TO CRT
FOCUS
SCREEN
R419
56K
R420
1K
BCL
ZD403
C409
C463
0.056uF
8.2V
1.0uF
250V
Pin62
Pin63
00
01
10
1
1
C507
10uF/250V
R519 1M
0.1uF/250V
GND
4
R625 220
+8V
L621
10uH
C631
47uF
R147
3P52
16
D
CRT
G1G2G3
D507
BA158
GND
C505
C504
2n2/2KV
HV
SCREEN
*R530
2.7/2W
H502
GND
+180V
HEATER
CN602
XS702
+5V
C
+12V
B
1K
R146
R424
5.6K
22K
D4042
C410
1N4148
50V
10uF
16V
A
2006-08-26
TV/AV
AV
AV
AV
TV
 Loading...