

Page 1
TS MANAGER
OPERATIONS MANUAL
Super Systems Inc.
7205 Edington Drive
Cincinnati, OH 45249
513-772-0060
800-666-4330
Fax: 513-772-9466
www.supersystems.com
Page 2

Table of Contents
Introduction .................................................................................................................................................. 3
Prerequisites ................................................................................................................................................. 3
Getting Started .............................................................................................................................................. 3
File ................................................................................................................................................................. 6
Tools .............................................................................................................................................................. 6
Communications ........................................................................................................................................... 6
Advanced Download & Maintenance ........................................................................................................... 7
Transfer Data ................................................................................................................................................ 7
Export .......................................................................................................................................................... 10
Data Backup ................................................................................................................................................ 10
Maintenance ............................................................................................................................................... 10
Toolbar ........................................................................................................................................................ 16
TS Manager Batch Mode (Applies to version 1.1.0.21 and higher) ............................................................ 18
Running the TS Manager Software in batch mode ............................................................................. 20
Error logging ........................................................................................................................................ 21
List of Batch Mode Parameters ........................................................................................................... 21
Revision History .......................................................................................................................................... 22
Super Systems Inc. Page 2 of 22 Touch Screen Manager Operations Manual
Page 3
Introduction
Touch Screen Manager (TS Manager) allows a Windows-based workstation to connect to and
access data from an SSi touch screen. Connected to a compatible touch screen, TS Manager
provides a rich set of features, such as the following:
• Remote touch screen setup
• Downloading log data
• Downloading notes
• Database backups
• Managing maintenance items
• Passing notes to SuperDATA
• Reviewing notes, charts, and tabular data.
Prerequisites
Your SSi controller’s touch screen interface should be connected to the plant Ethernet network
on the same subnet as the PC that is going to interface via Touch Screen Manager. (A USB
connection with ActiveSync or Mobile Device Center can also be used to download data and view
trends.) Prerequisites for using TS Manager include .NET Framework 2.0, SQL CE 3.5, Microsoft
.NET 2.0 Redistributable, and either ActiveSync or Windows Mobile Device Center. The
setup.exe program will check to make sure that these prerequisites are installed and, if
necessary, install them.
Getting Started
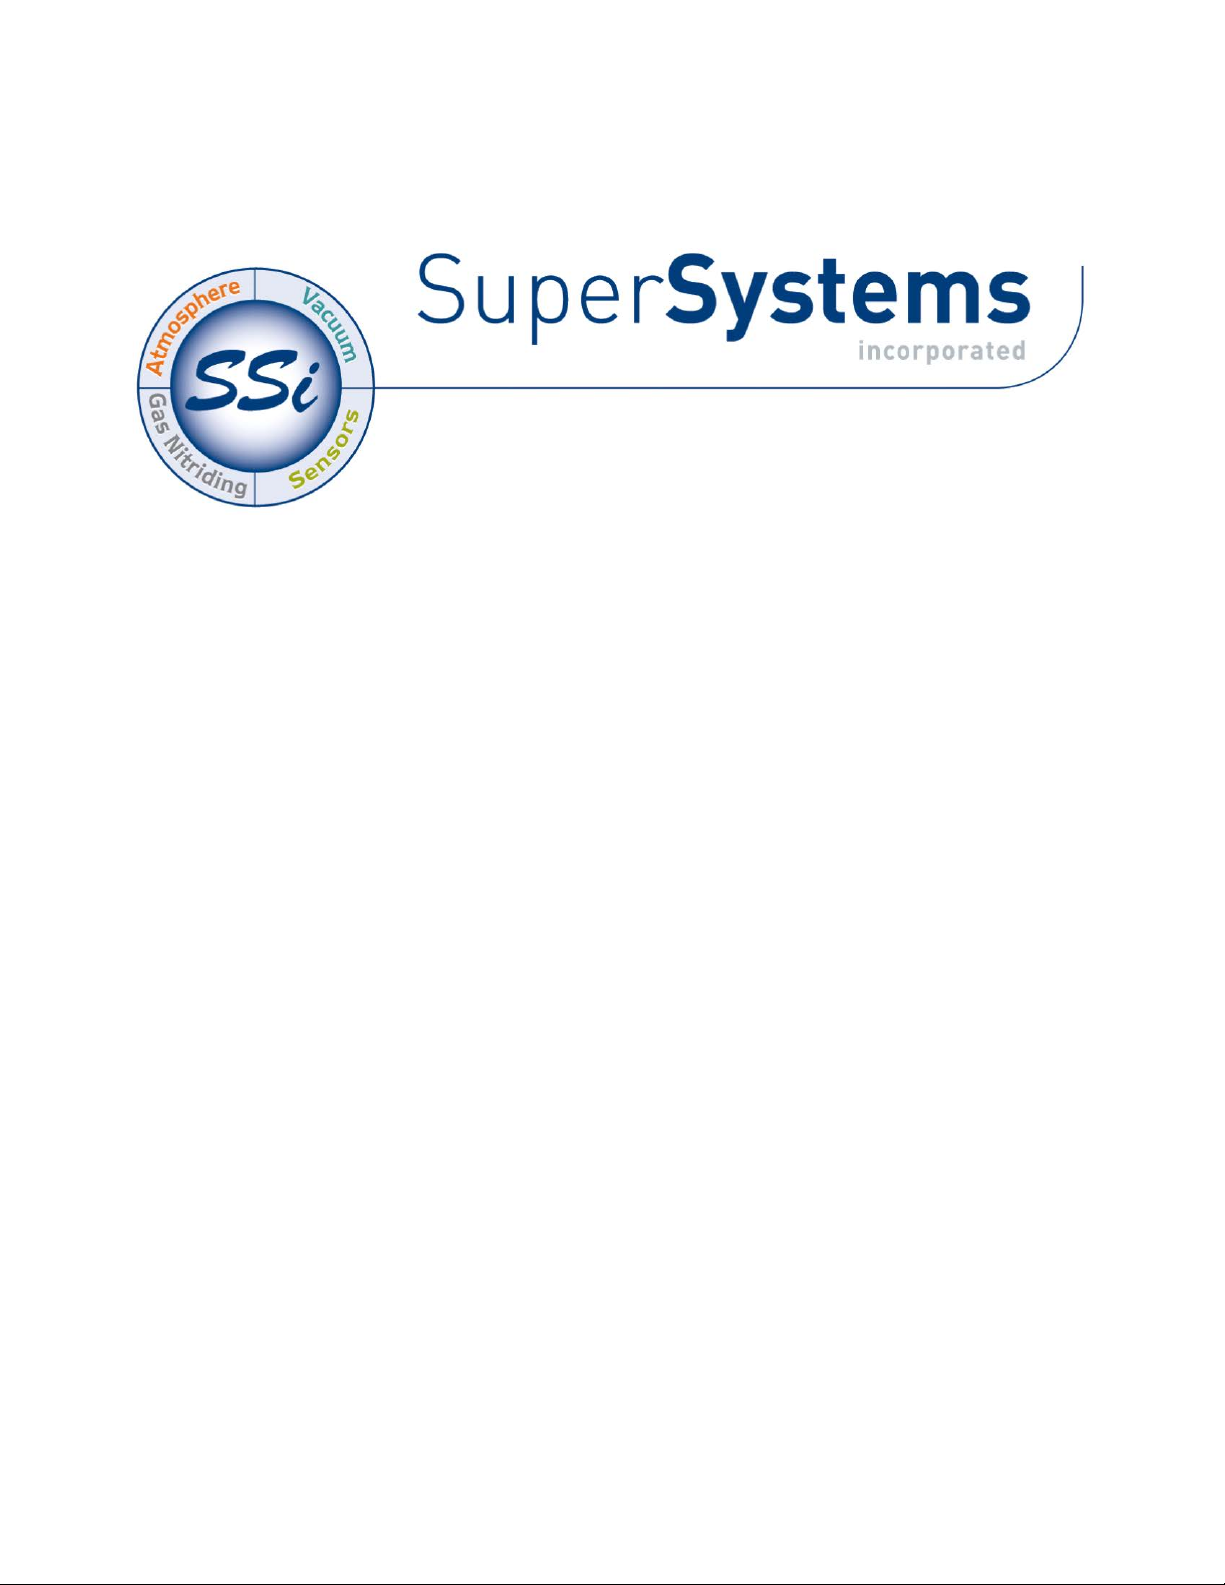
Install Touch Screen Manager from the provided CD. Run Touch Screen Manager from the
provided shortcut. Touch Screen Manager will open to this screen:
Figure 1 - First screen that will appear in TS Manager
To interface with a screen, select Tools Communications Setup.
Super Systems Inc. Page 3 of 22 Touch Screen Manager Operations Manual
Page 4
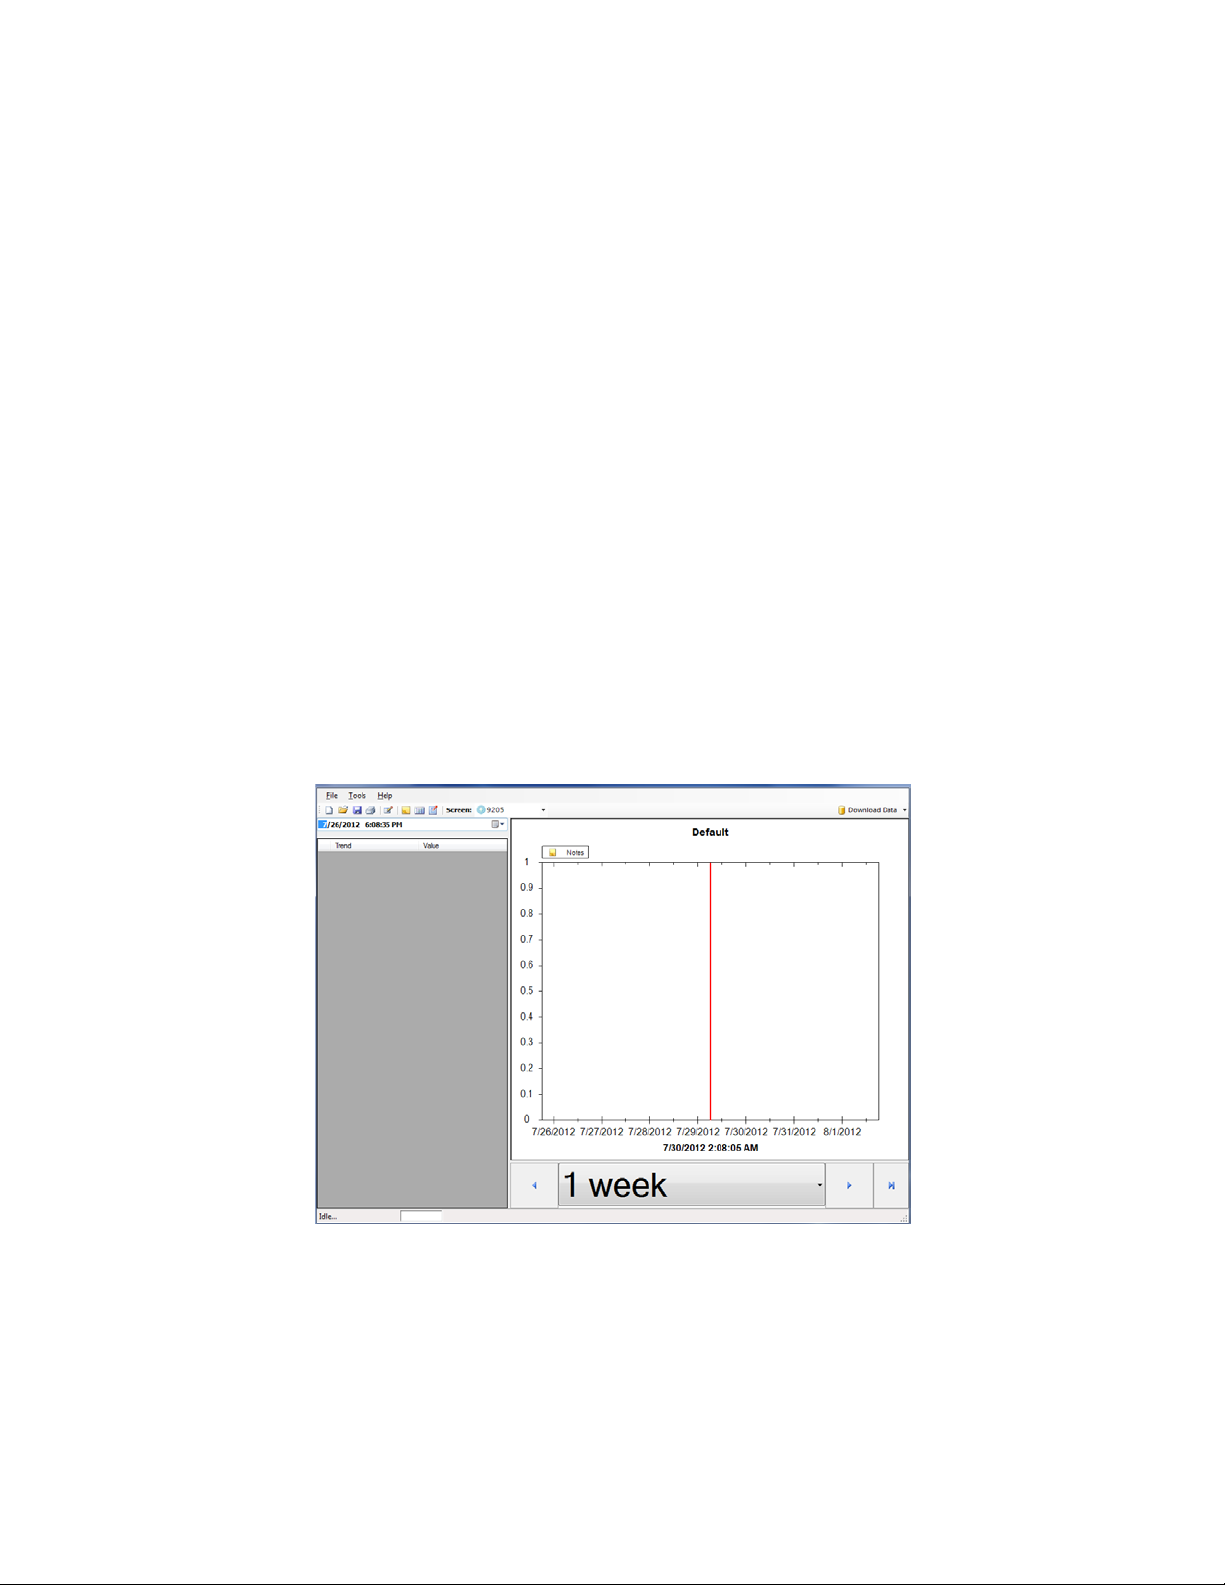
From this screen, select Add.
Assign the screen a name by typing it in the box next
.
button to scan the network for IP
OK.
display to the previous screen, and the IP Address box should show the selected address. Press
Save
Figure 2 - Screen selection menu
to Name (use furnace name for unique identification)
Click the
Addresses.
Figure 3 - Screen selection menu (scan IP function)
Select the IP address that corresponds to the controller and press
This will return the
to return to the following screen with the IP address and Identifier assigned.
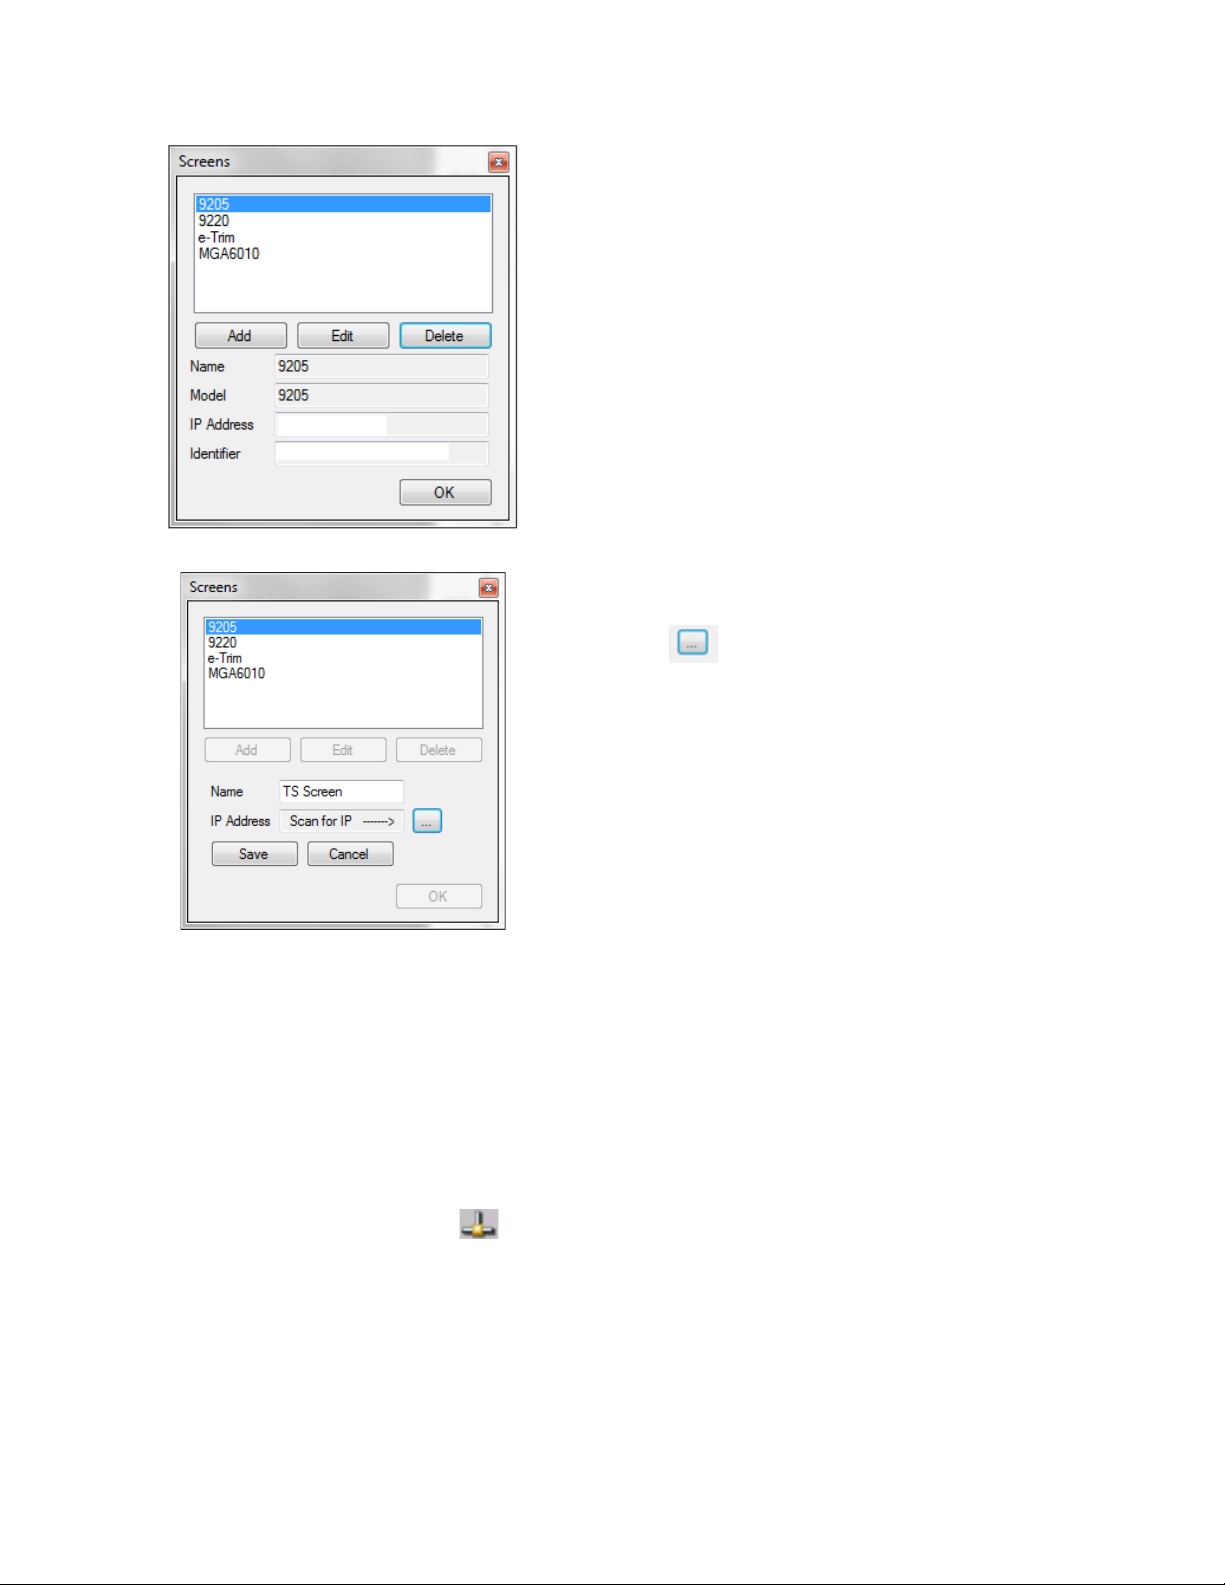
If you need to identify the IP address of the controller (such as a situation where you have two or
more similar controllers on the network), there is often more than one way to do it, depending
on the software running on the Touch Screen. One way to check the IP address on most Touch
Screens is first to shut down the Touch Screen software that you are running, and then to
double tap on the network icon ( ) in the system tray A window will appear showing network
settings, including the IP address.
For specific instructions on how to identify the IP address of the controller within the Touch
Screen software or how to shut down the Touch Screen software that the controller is running,
refer to the manual for that specific product.
Super Systems Inc. Page 4 of 22 Touch Screen Manager Operations Manual
Page 5
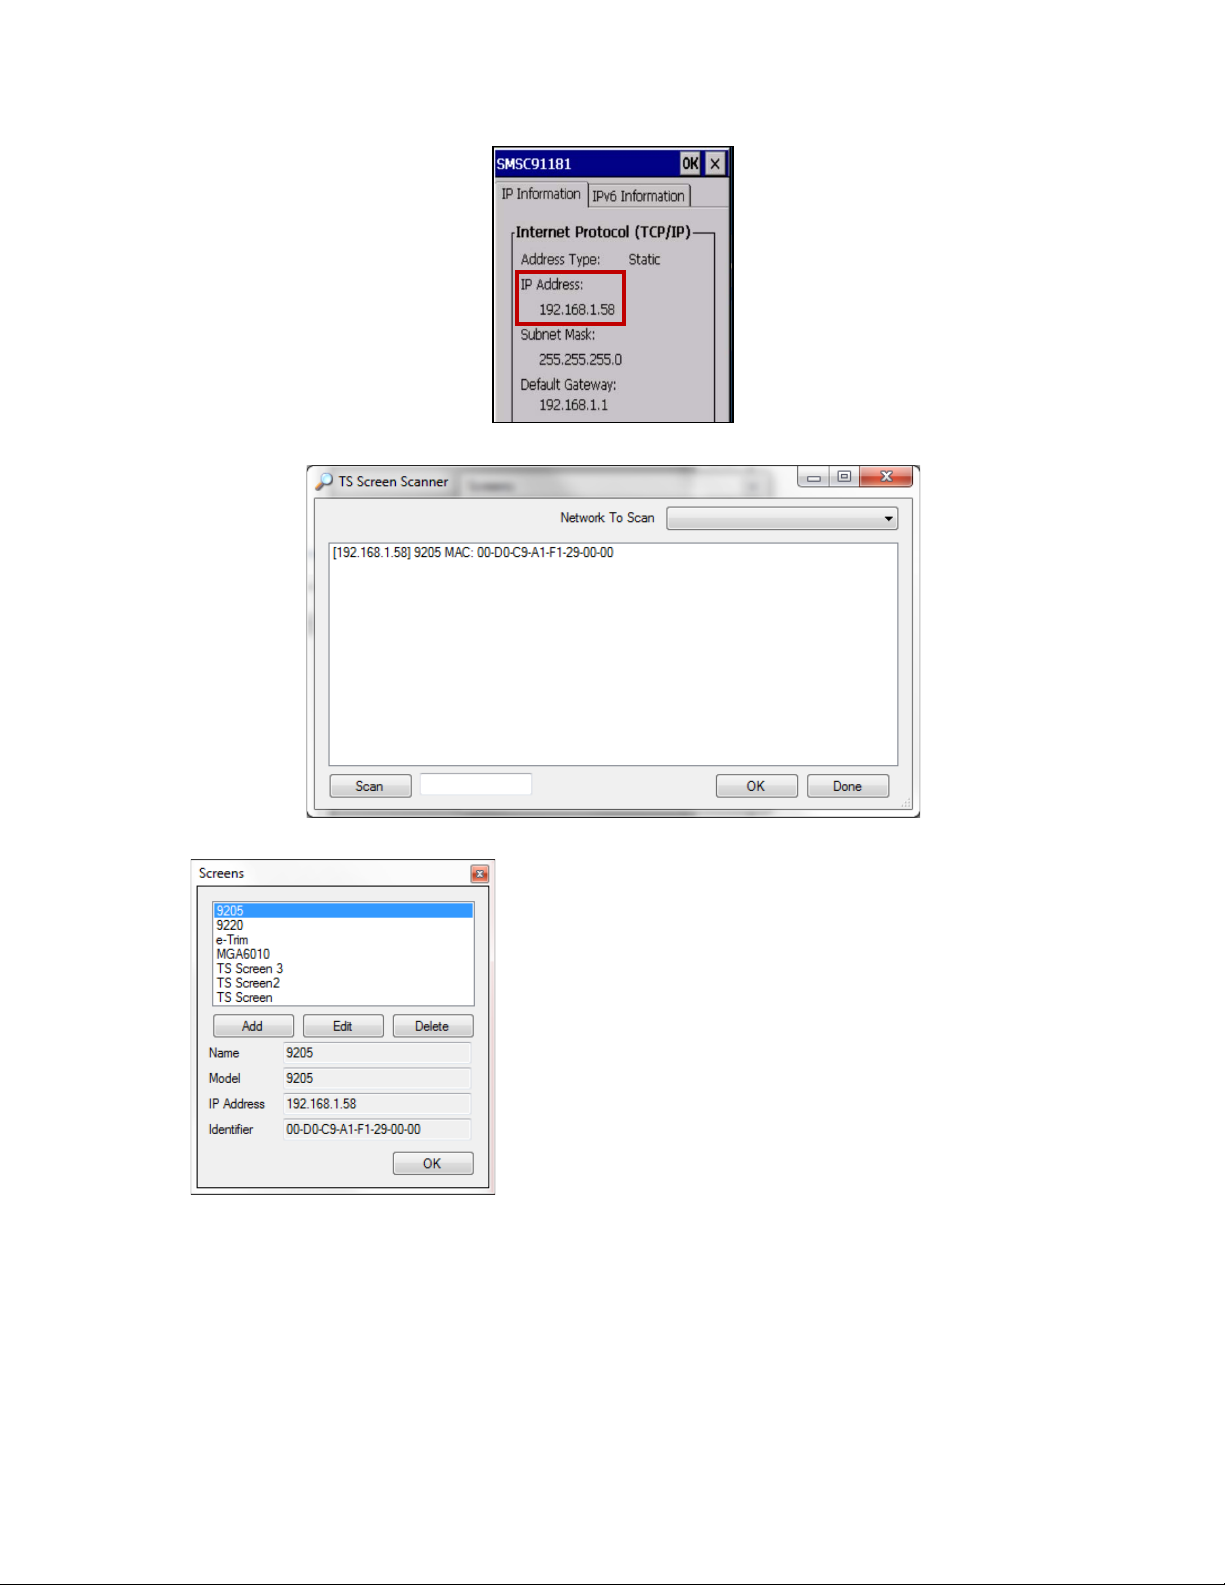
Figure 4 - Network Settings display on Touch Screen device
Press OK to interface with the selected screen. If a
Edit.
Figure 5 - Selecting a screen by IP address
Figure 6 - Screen selection menu (populated with
additional screens)
screen that is already added is assigned a new IP
address, select that screen and press
Then,
follow the same procedure for setting up a new
screen (scan for IP address and save).
Super Systems Inc. Page 5 of 22 Touch Screen Manager Operations Manual
Page 6
Menu
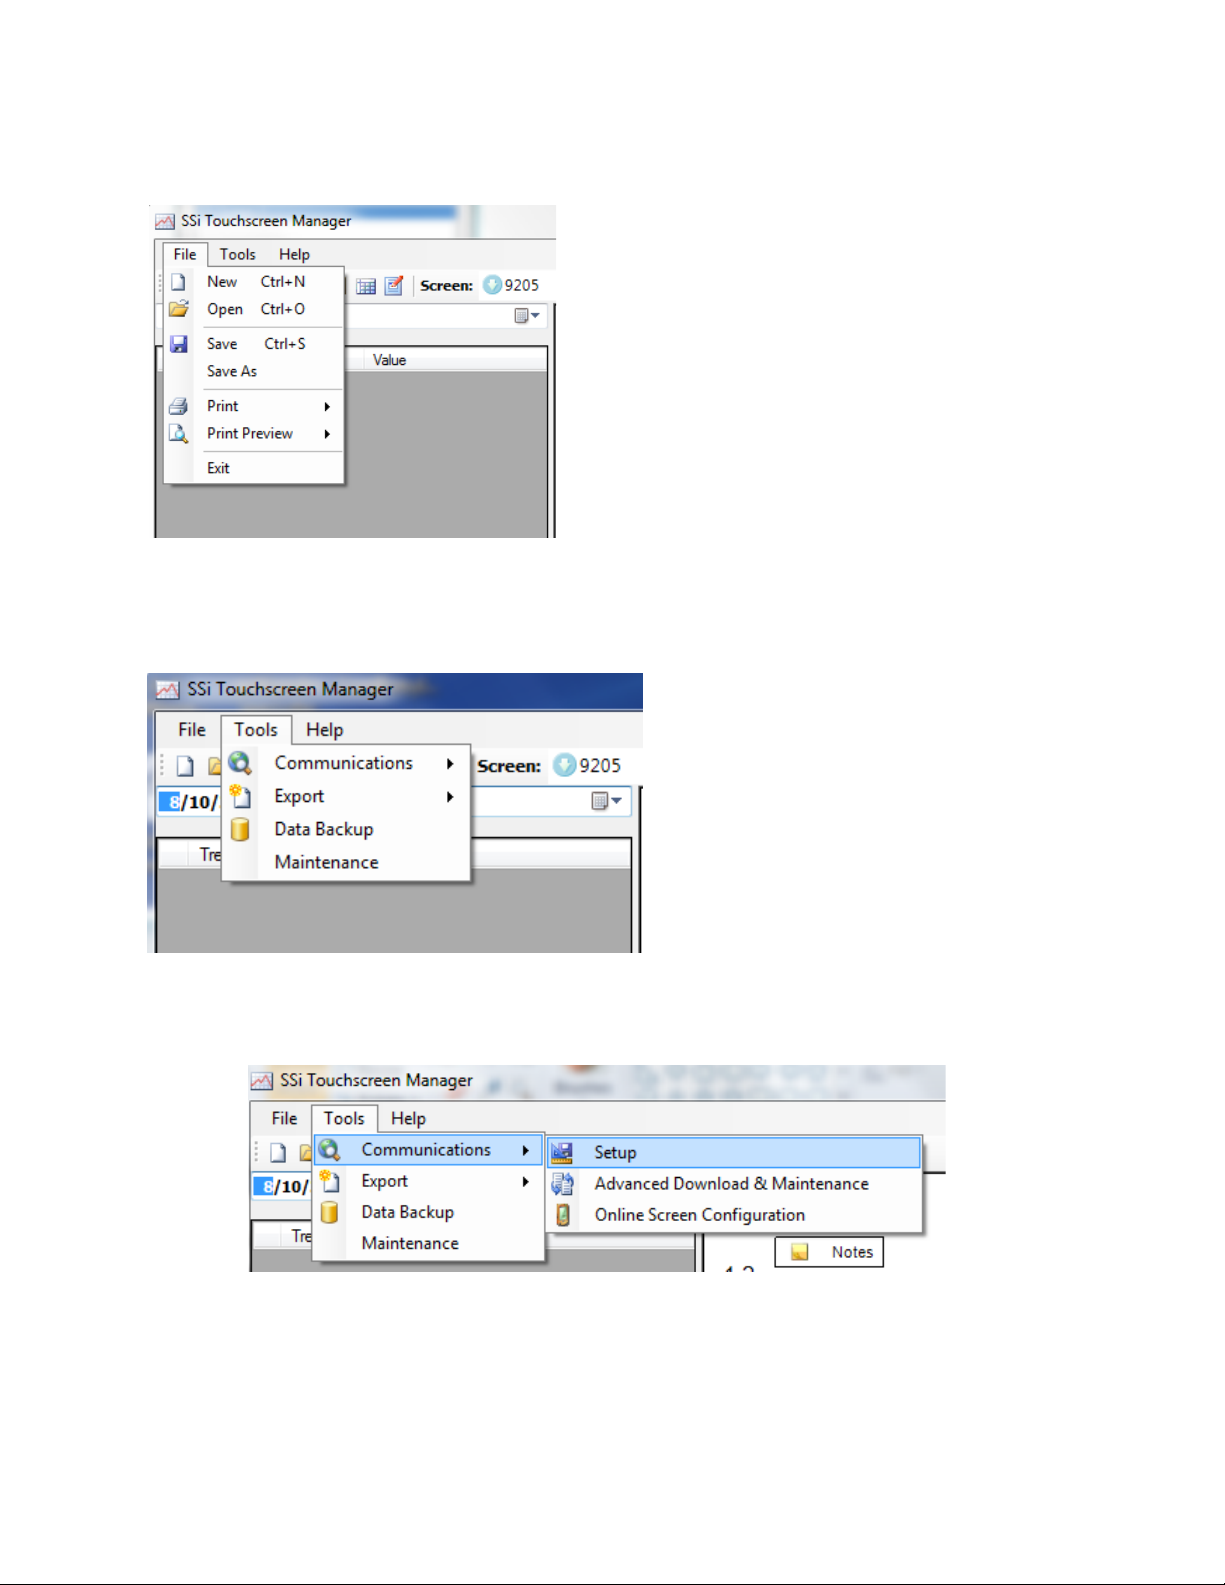
Figure 7 - File Menu
Figure 8 - Tools Menu
Figure 9 - Tools > Communications Menu
File
Tools
File contains the following options:
New: Create a new chart
Open: Open a saved chart
Save: Save a chart
Save as: Save a chart with a new location/name
Print: Print either the chart or the corresponding
notes
Print Preview: Preview the chart or the
corresponding notes for printing.
Exit: Quit TS Manager
Tools contain several useful features of
SSi’s TS Manager program.
Communications: Communications consists of Setup, Advanced Download & Maintenance,
and Online Screen Configuration.
Setup allows the user to add and edit screens to interface with TS Manager. Instructions for
this are outlined in the Getting Started portion of the manual.
Super Systems Inc. Page 6 of 22 Touch Screen Manager Operations Manual
Page 7
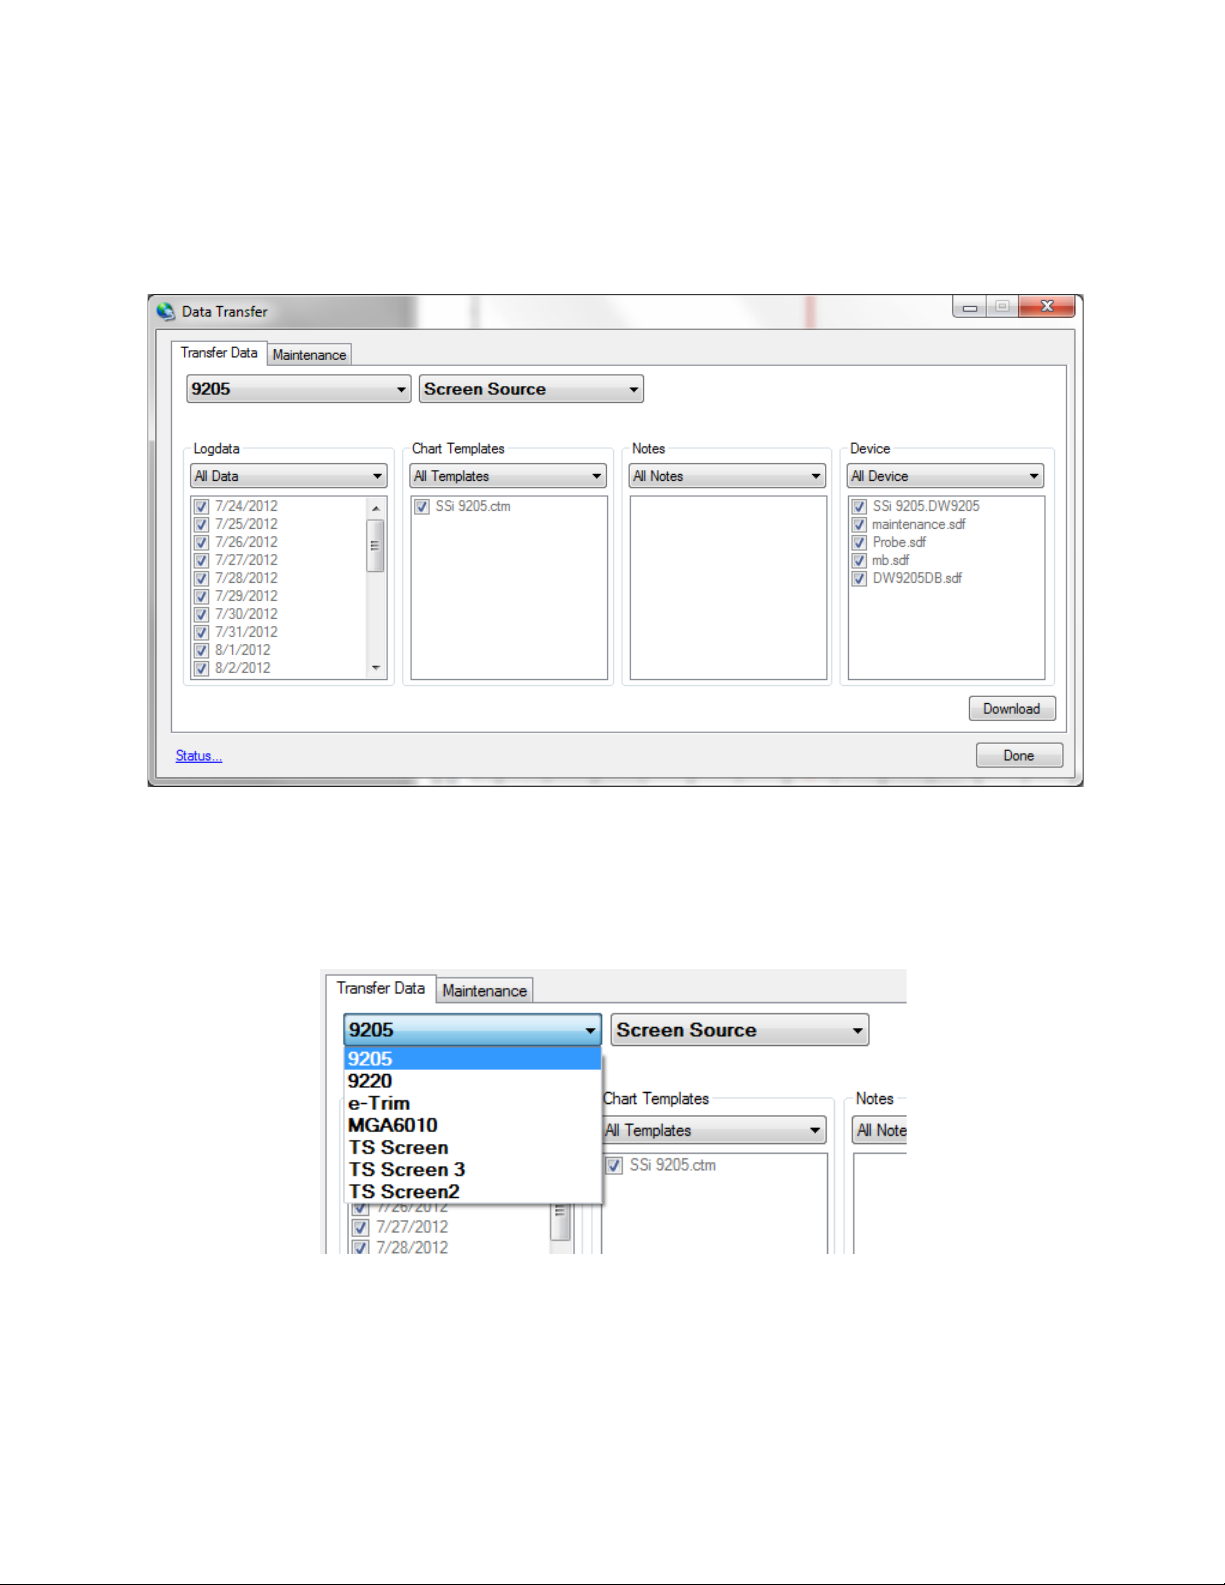
Advanced Download & Maintenance
Figure 10 - Data Transfer screen
Advanced Download and Maintenance contains two tabs: Transfer Data and Maintenance.
Transfer Data
This option determines what information will be downloaded to TS Manager. There are two
drop down menus. The first lists all the screens that have been set up. To download data from
a particular screen, select it from this menu.
Figure 11 - Transfer Data > Screen selection drop down box
The second drop down menu contains the options of Screen Source, Disk Source, and View
Local Files:
• Selecting Screen Source will download data stored on the screen.
Super Systems Inc. Page 7 of 22 Touch Screen Manager Operations Manual
Page 8

• Selecting Disk Source will enable TS Manager to download data from a storage card,
local hard drive, or other storage medium. You may direct TS Manager to access the
appropriate data.
• Selecting View Local Files will direct TS Manager to open data copied from a 9000 Series
screen to a local drive.
Figure 12 - Transfer Data > Source selection drop down box
The Transfer Data tab also contains the sub menus of Logdata, Chart Templates, Notes, and
Device.
Logdata: This drop down menu provides the option to download All Data, Selected Data, or Skip
(download no logged data). If Selected Dates is chosen, the dates of logged data must be
checked to be included in the download. To toggle between checked and unchecked, click the
box corresponding to that date.
Chart Templates: This drop down menu provides the option to download All Templates,
Selected Templates, or Skip (download no templates). If Selected Templates is chosen, the
name of the template must be checked to be included in the download. To toggle between
checked and unchecked, click the box corresponding to that template.
Notes: This drop down menu provides the option to download All Notes, Selected Notes, or Skip
(download no Notes). If Selected Notes is chosen, the name of the note must be checked to be
included in the download. To toggle between checked and unchecked, click the box
corresponding to that note.
Device: This drop down menu provides the option to download data All Devices, Selected
Devices, or Skip (download no Devices). If Selected Device is chosen, name of the template
must be checked to be included in the download. To toggle between checked and unchecked,
click the box corresponding to that device.
To download data, press the Download button. Press the Done button to exit the Advanced
Download & Maintenance view. Once data has been downloaded, the default view of TS
Manager will display the chart for the selected screen:
Super Systems Inc. Page 8 of 22 Touch Screen Manager Operations Manual
Page 9
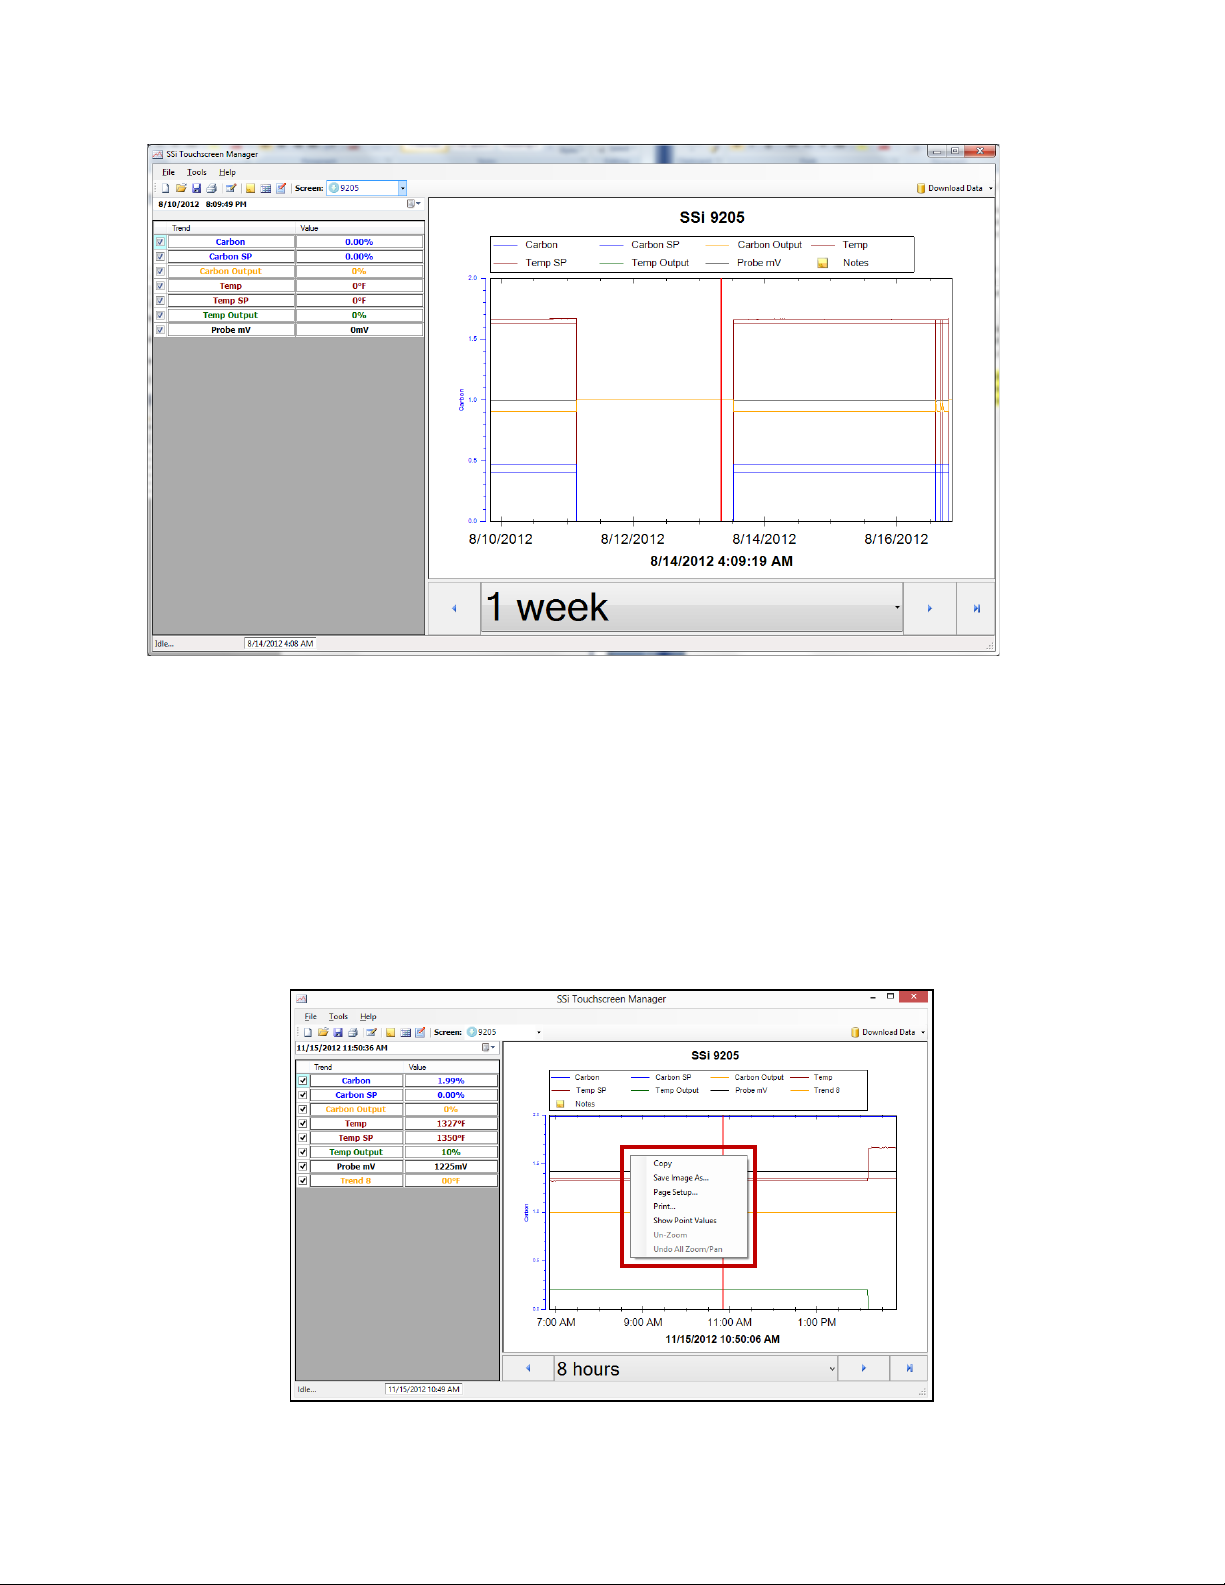
Figure 13 - Sample chart display
The trendlines displayed can be customized by checking or unchecking the corresponding box.
The amount of time can be changed by using the drop down menu showing
1 Week in the figure,
or by scrolling left and right with the arrows.
To zoom in on the image, you can use the left mouse button and click and hold and then drag
the mouse to complete the area that you are looking to zoom in on.
By right clicking with a mouse on the chart you have options for Copy, Save Image, Page Setup,
Print, Show Point Values, Un-Zoom, and Undo All Zoom/Pan.
Figure 14 - Menu accessed by right-clicking on chart
Super Systems Inc. Page 9 of 22 Touch Screen Manager Operations Manual
Page 10

NOTE: Use of an Ethernet connection is required in order to use the Maintenance features of TS
Mobile Device Center.
Figure 15 - Export options
Figure 16 - Data Backup screen
Export
Export provides the option
to save data as a .CSV,
.TSV, or .TXT file. Also,
notes from TS Manager
can be exported to
SDRecorder.
Data Backup
Data Backup can be used to store data to an alternate location for security.
To back up data, press the Backup Data Now button at the top of the screen. The user will be
asked to identify a folder where the backup data will be stored. Furthermore, the option to
Automatically Backup My Data After Every Download can be checked, and a location can be
selected by pressing the button.
Maintenance
The Maintenance option will keep track of regular operations performed by the system and
allows you to perform edits to Maintenance items contained in the touch screen.
Manager. Maintenance features will not function using a USB connection with Active Sync or
Super Systems Inc. Page 10 of 22 Touch Screen Manager Operations Manual
Page 11
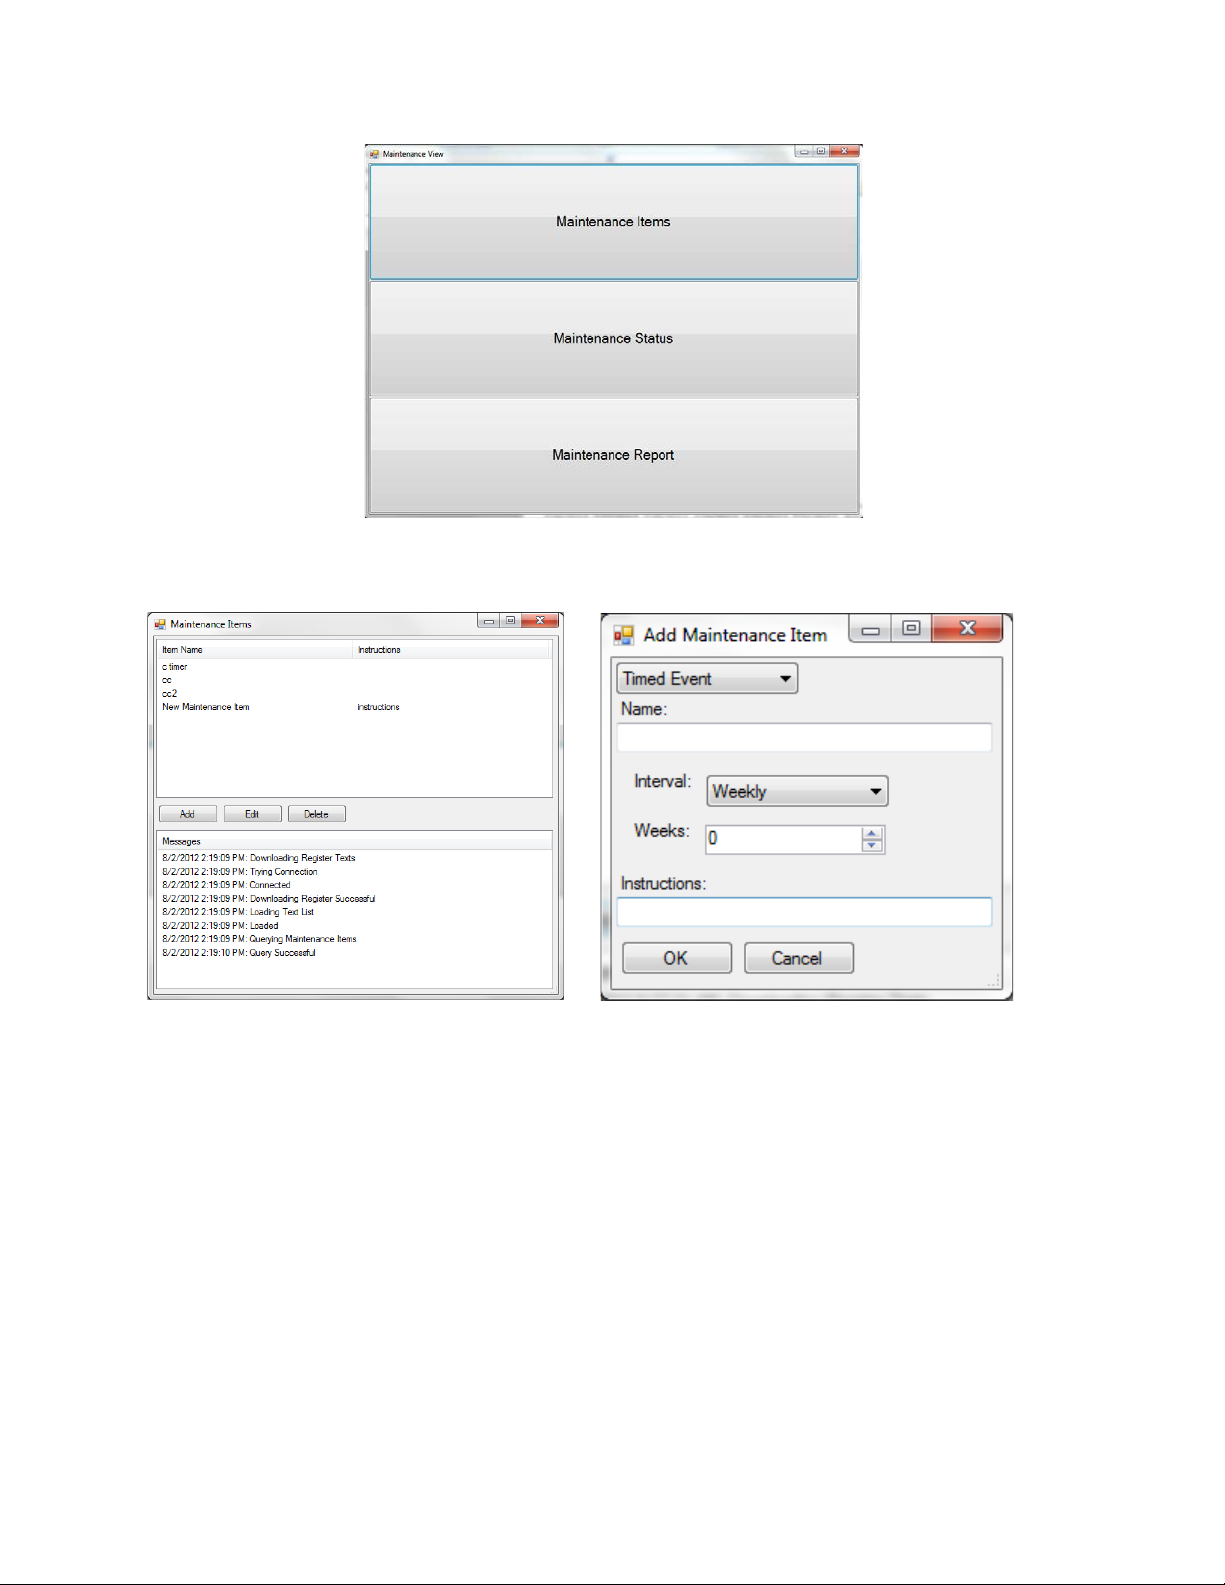
Maintenance Items
Figure 17 - Maintenance View
Figure 18 - Maintenance Items window
The Maintenance Items option allows the user to set up and edit maintenance events. The Add
button will add a new maintenance item.
The type of event can be changed by using the drop-down menu at the top of this window. This
will display the options of Timed Event, Conditional Timer Bit, Conditional Timer Data,
Conditional Counter, and Total. Select the appropriate choice
to add a new event. Cancel will
return to the previous window without adding a new event.
Note that each Maintenance Item window contains an Instructions field. The text in this field will
appear when the user selects
Complete for a Maintenance Item shown in the Maintenance >
Status menu on the product touch screen. Note that this action must be completed from the
touch screen (not from TS Manager).
Super Systems Inc. Page 11 of 22 Touch Screen Manager Operations Manual
Page 12

Timed Event: Selects the interval by using the dropdown menu. The choices are Hourly, Daily,
Weekly, Monthly, and Yearly. Once the interval is selected, the user then decides how often this
interval will be checked.
Figure 19 - Timed Event menu
Conditional Timer Bit: When setting up a conditional timer, the user assigns several
parameters. First the user must assign the Register and the Bit. The Target determines the
aggregated amount of time the bit has been on or off until maintenance is needed. The field ‘Bit
is:’ determines whether the counter adds when the bit is turned on or adds when the bit is
turned off without change.
Figure 20 - Conditional Timer Bit menu
Conditional Timer Data: When setting up a conditional timer based on a data value, the user
assigns several parameters. One parameter is the Target, which determines the aggregated
amount of time the current value must remain in a certain state when compared to a reference
value (defined in the To field) before maintenance is needed. When used, the Expression field
defines a mathematical operation performed on the Register value before that value is
x/10
compared to the value defined in the To field—for example, if
is entered in the Expression
field, the Register value will first be divided by 10 and then compared to the value defined in the
To field.
Super Systems Inc. Page 12 of 22 Touch Screen Manager Operations Manual
Page 13

Figure 21 - Conditional Timer Data menu
Conditional Counter: The Conditional Counter counts how many times a bit changes its status.
The user assigns the Register, Bit, and Target. Once the Target value is reached, the
maintenance item is due. The last field, bit, determines whether the target is counting the bit
turning on, the bit turning off, or the bit changing either way.
Figure 22 - Conditional Counter
Total. The Total function (Totalizer) works by checking the assigned Register every minute.
Each minute, the current value of the register is added to the total. Once the Target is reached,
the item is due for maintenance. The Expression field functions in the same way as the
Expression field for the Conditional Timer Data maintenance item.
Super Systems Inc. Page 13 of 22 Touch Screen Manager Operations Manual
Page 14

Figure 23 - Total Maintenance Item
To delete a maintenance item, simply highlight it, and press delete.
Maintenance Status
Figure 24 - Maintenance Status screen
The status screen will keep track of the maintenance events. The status column displays
whether the defined events are OK (not due) or Due for maintenance. This view also shows the
Percent Complete until maintenance is due, the Total Completed, and the Total Remaining until
maintenance is due. The option to show only events that are due is available by checking the
Due Only box in the top left-hand corner.
Super Systems Inc. Page 14 of 22 Touch Screen Manager Operations Manual
Page 15

Maintenance Report
Figure 26 - Sorting window
Figure 25 - Maintenance Report screen
Maintenance Report is the option to view or print out an overview of the maintenance
operations. Clicking
change any of the included fields, click
fields or not.
Options Sorting will change the way the items are ordered and grouped.
File Create Report will bring up a grid overview of the report fields. To
Options Constraints to toggle between displaying
Toggling between True and
False under the Used
column will determine
which field is used to order
the columns. The field at
the top of the list is the
field that will determine
how the maintenance
records are ordered first.
The higher the field
appears on the list, the
higher the priority is given
to that field in sorting
records. The fields can be
ordered by ascending date
or descending date by
toggling the field to True
under the Descending
column.
Options
Columns to change the
order of the columns, and
grouped. These changes will be shown when
Options Sorting to change the way the items are ordered and
File Create Report is clicked again.
Super Systems Inc. Page 15 of 22 Touch Screen Manager Operations Manual
Page 16
Help
Help contains the options of Check for Updates and About…
Check for Updates: This is an important button to use as it will ensure that TS Manager is
running the most recent version. SSi recommends checking for updates each time TS Manager
is going to be used.
About… This will provide information about what version of TS Manager is running and what
has been changed in the most recent updates.
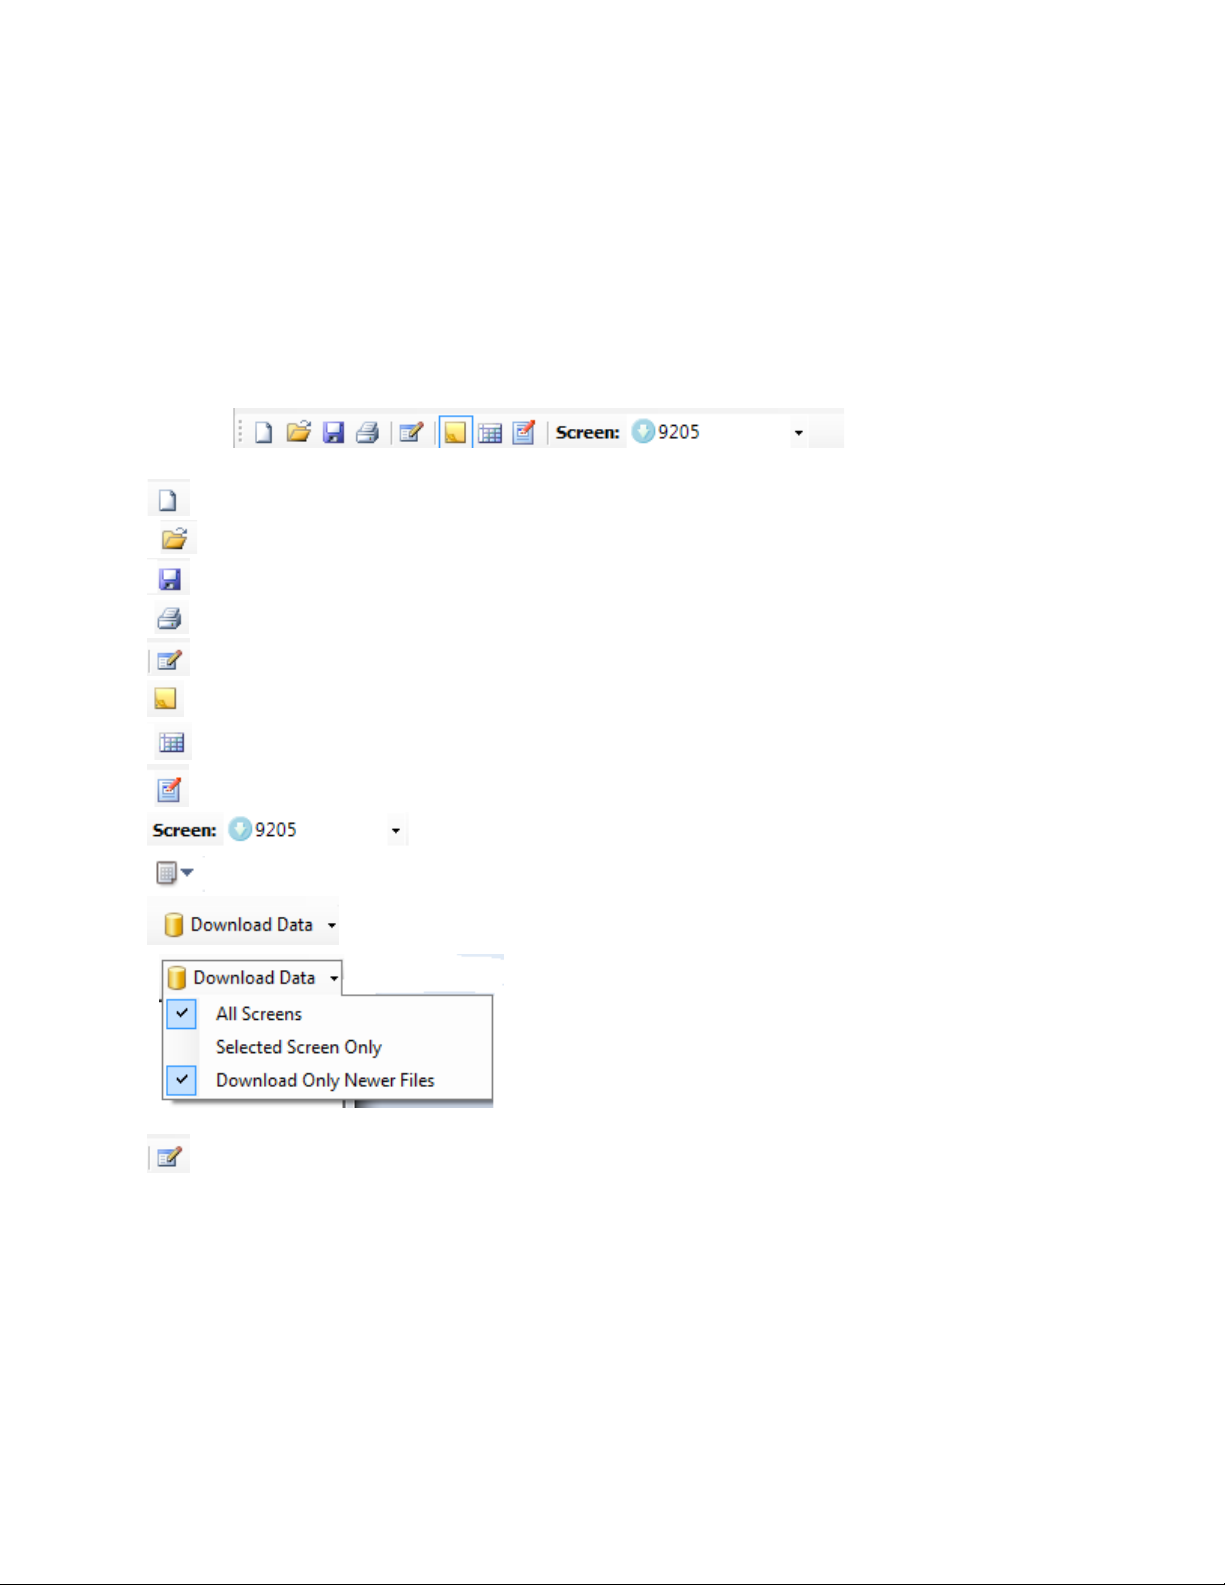
Toolbar
The first toolbar item opens a new chart.
Opens a chart.
Saves a chart.
Prints a chart.
Opens Edit Custom Curves Menu.
Toggles between showing/hiding notes.
Toggles between chart view and data grid view.
Edit trend lines on a chart.
Drop down list of all controllers available.
Drop down calendar that enables historical access.
Downloads data with options of using all screens, selected screen only,
and downloading only new files.
Edit Custom Curves
Most types of inputs that are used in SSi controllers are already setup with a curve built for
most every type of thermocouple available, certain vacuum sensors, etc. However, if an
application calls for an input without a standard curve, the curve can be built using this option.
Voltages can be paired with corresponding values to create a sensor curve based off of a
provided equation or data. This allows the controller to make appropriate readings from the
sensor.
Super Systems Inc. Page 16 of 22 Touch Screen Manager Operations Manual
Page 17
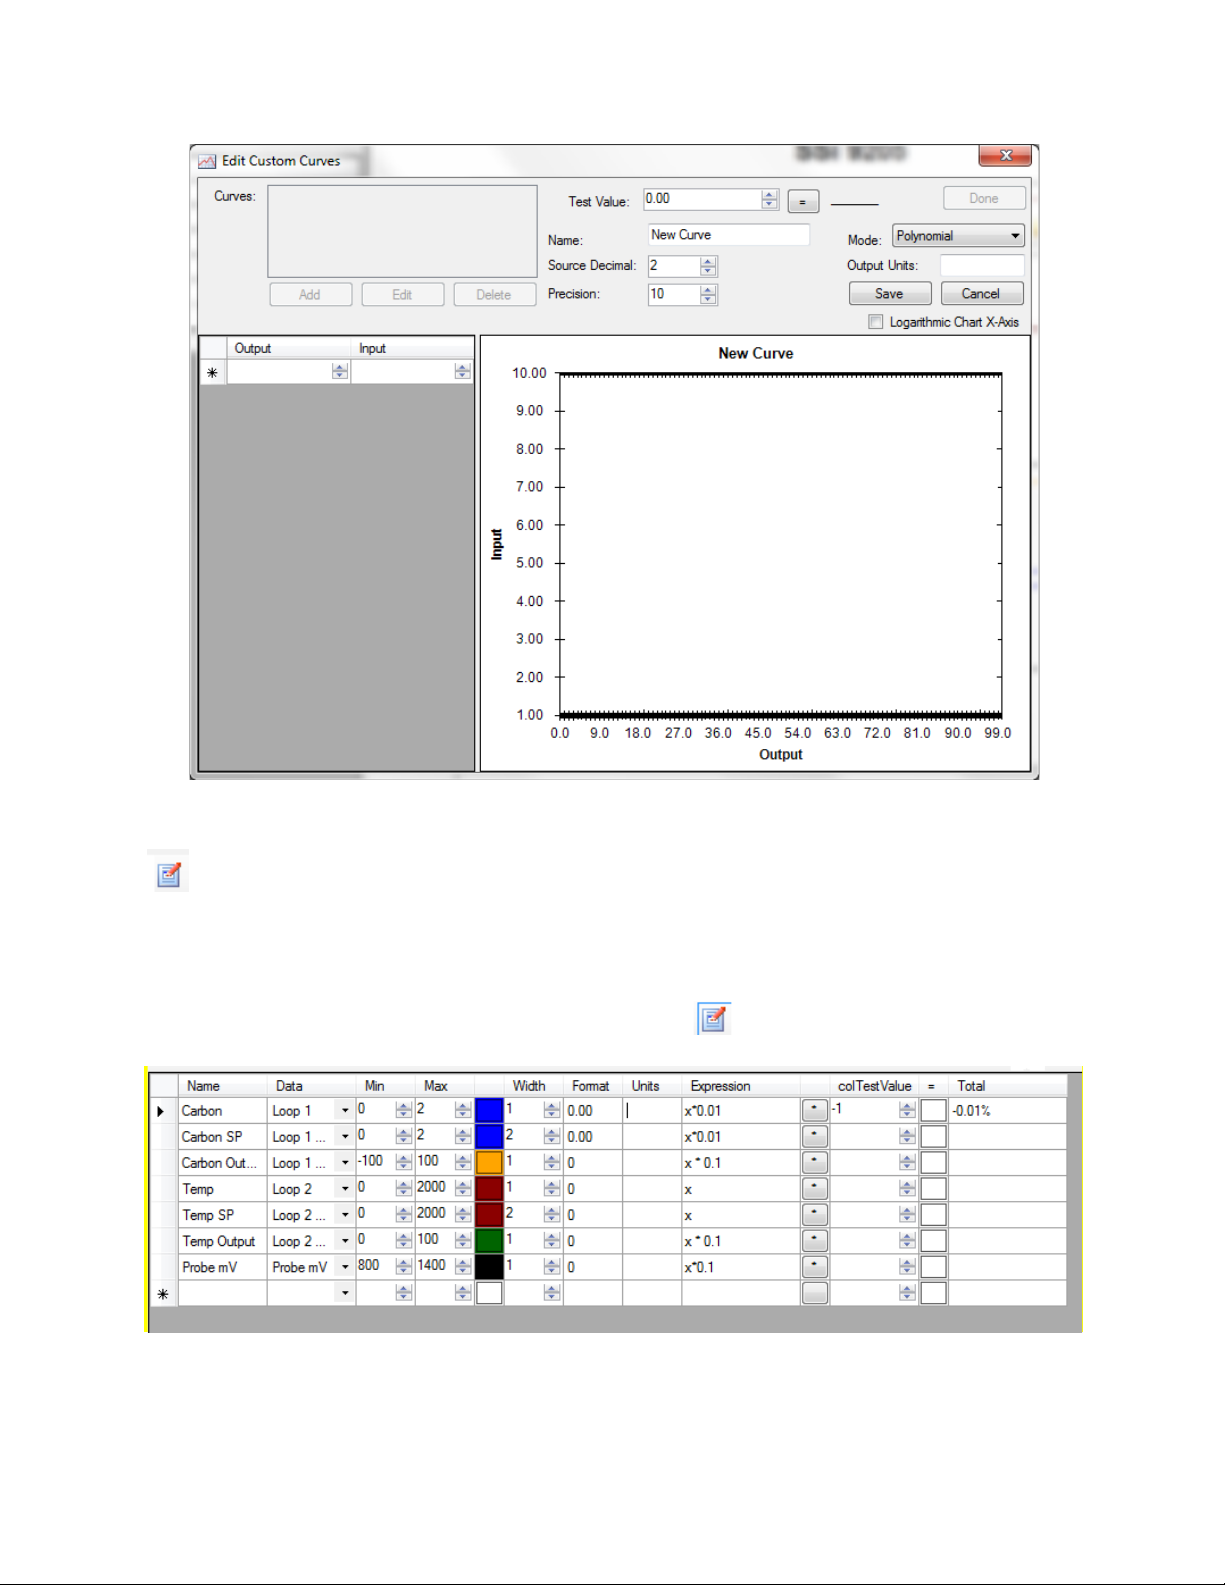
Figure 27 - Edit Custom Curves screen
Edit Trend Lines
The Edit Trend Lines feature allows you to edit the formatting and ranges of data for charts
produced by TS Manager. This feature allows you to adjust the appearance and names of trend
lines on the chart as well as the numerical ranges for each trend line displayed in the chart.
To access this feature, first toggle the Edit Chart button on. The Edit Trend Lines screen
will appear. You can then edit the fields shown below.
Figure 28 - Edit Trend Lines screen
• Name. The name of the trend line that will appear on the chart.
• Data. The selected data set from which data will be taken to create the trend line.
Super Systems Inc. Page 17 of 22 Touch Screen Manager Operations Manual
Page 18
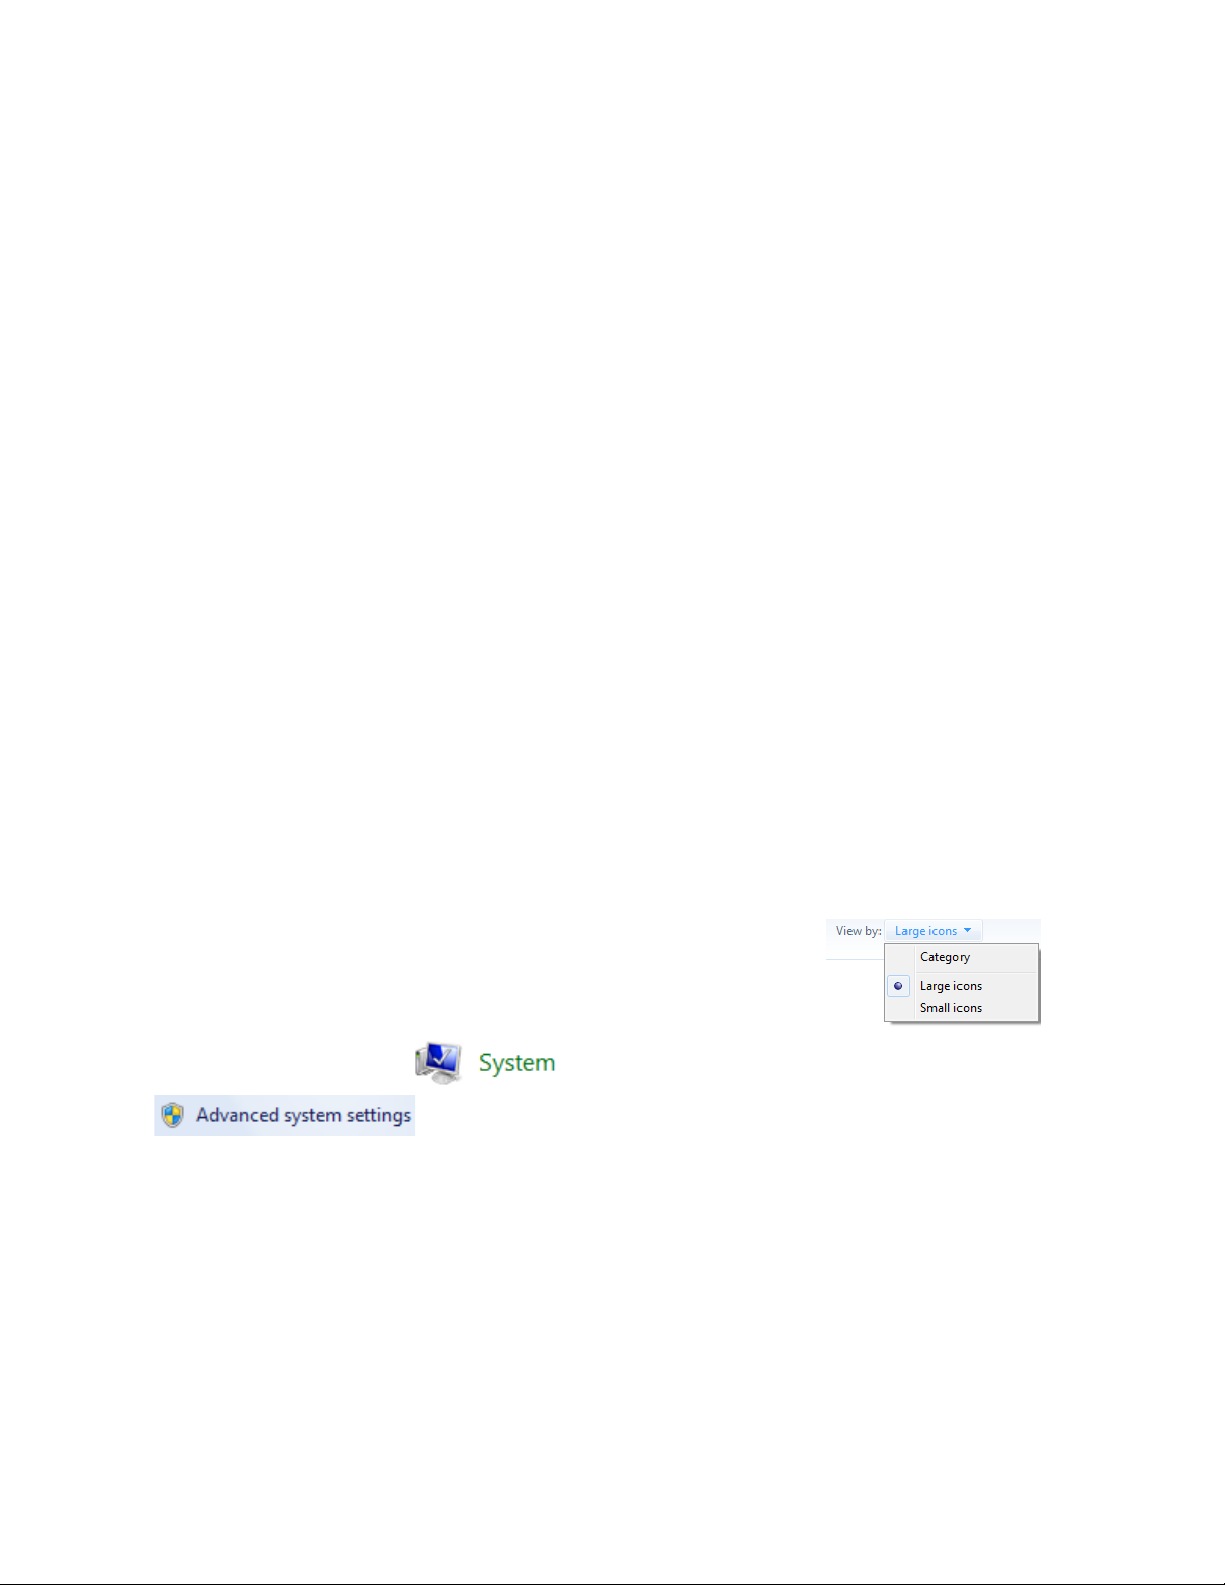
• Min. The minimum value displayed in the trend line on the chart.
• Max. The maximum value displayed in the trend line on the chart.
• Color (solid color shown). The color of the trend line as it will appear on the chart.
• Width. The width of the trend line.
• Format. The number of decimal places shown in the numerical values for that particular
trend line.
• Units. The units shown for that particular trend line (degrees F, percentage, etc.).
• Expression. A mathematical operation performed on each value displayed on the trend
line.
x
is the original value; the mathematical operation shown indicates the operation
x
performed on
• colTestValue. A test value entered to test the mathematical operation shown in the
Expression field.
• Total. The value resulting from performing the mathematical operation shown in the
Expression field on the value shown in colTestValue.
TS Manager Batch Mode (Applies to version 1.1.0.21 and higher)
Starting with TS Manager version 1.1.0.21 and up, there is an optional batch mode that will
automatically download new data and export any new notes to SD Recorder without the need to
start up the TS Manager software.
Adding the TS Manager Location to the System Path
The first step in setting up the batch mode for the TS Manager is to add the TS Manager’s
installation path to the system’s Path variable. This will simplify the execution of the
application. From the Start Menu, click on the “Control Panel” option.
In Windows XP: Once the Control Panel is opened, double-click on the “System” icon to open the
System Properties screen.
In Windows Vista or Windows 7: Make sure that the View By option is set to Large Icons or Small
before the newly calculated value is included on the trend line.
Icons, as shown at right (a Medium Icons option may also be present).
Then click on the System ( ) icon, and then the Advanced System Settings option
( ) along the left of the screen.
There will be a few tabs across the top of the screen. Click on the “Advanced” tab to select it.
From the “Advanced” tab, click on the
asking whether you want to allow this action may appear; if it does, allow it.
Super Systems Inc. Page 18 of 22 Touch Screen Manager Operations Manual
Environment Variables… button (See Figure 29). A prompt
Page 19
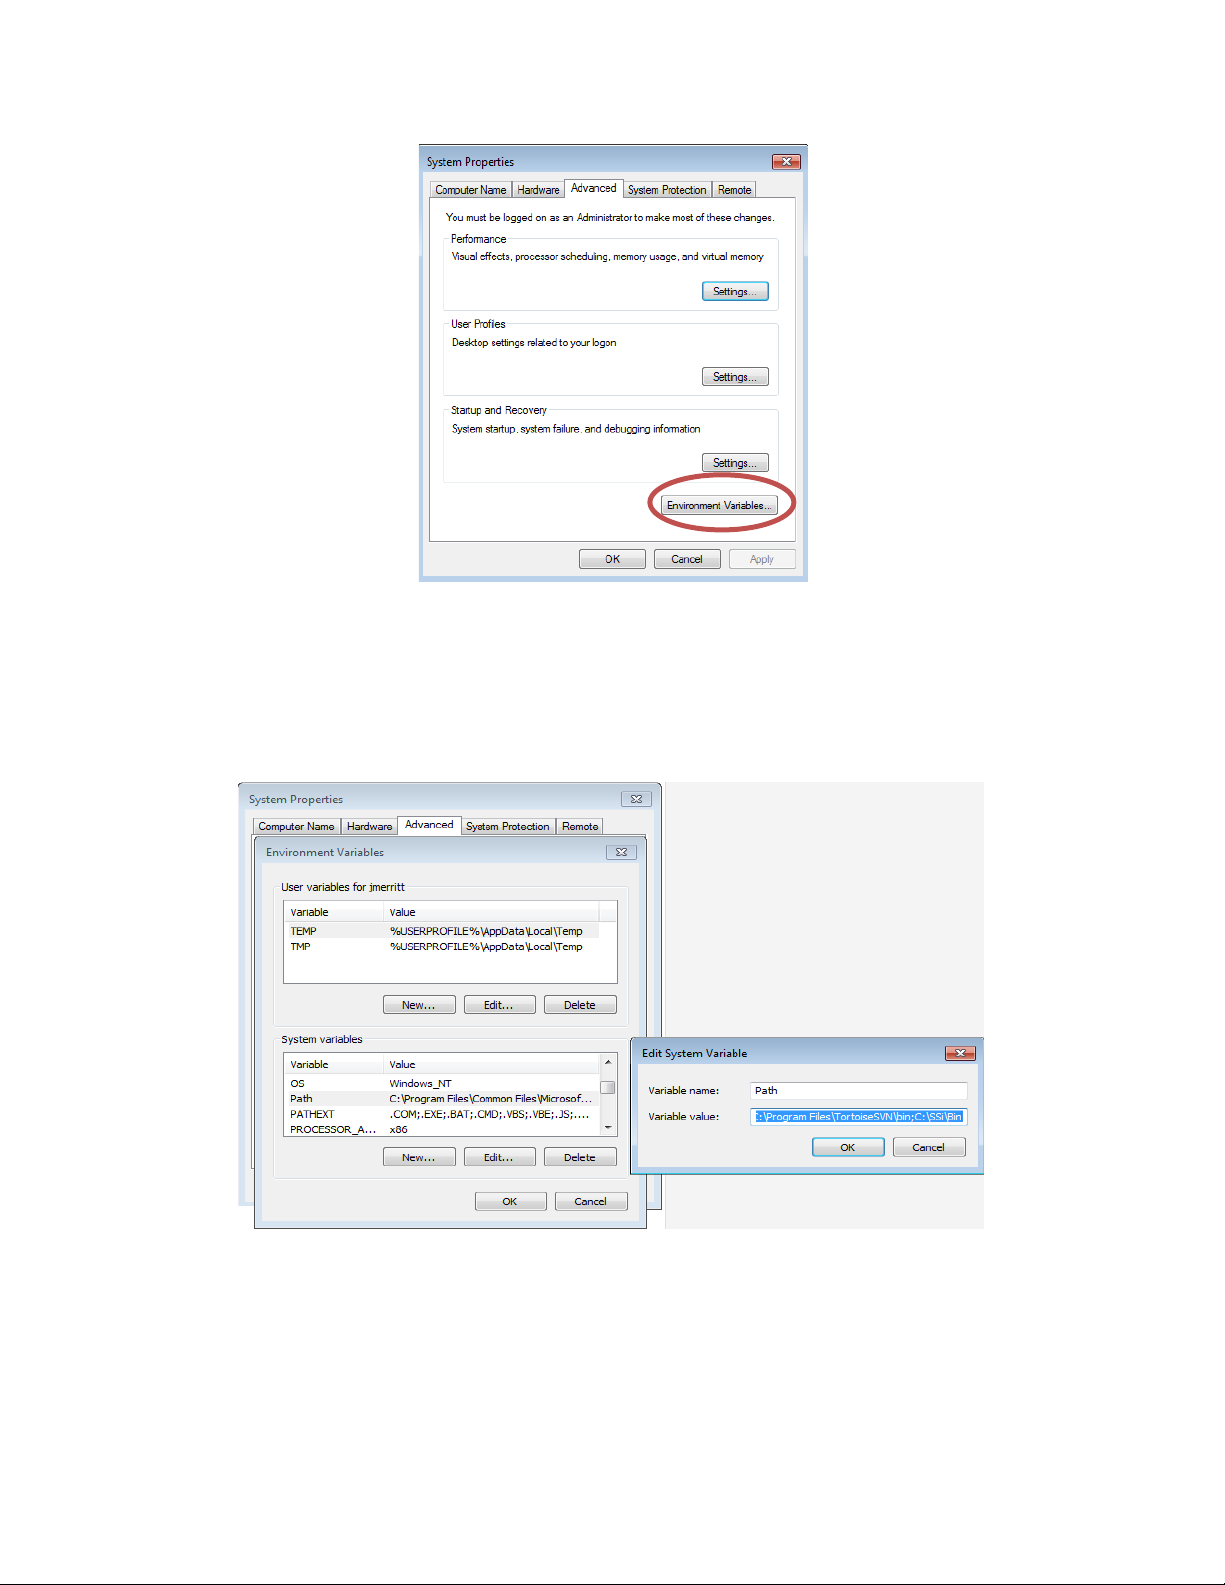
Figure 29 - Environment Variables button
On the “Environment Variables” screen, there will be a list of environment variables in the
section labeled “System variables”. Scroll down this list until the “Path” variable is visible.
Select the “Path” variable and click on the
Edit button within the “System variables” section.
This will allow a user to modify the system’s path variable. Click in the “Variable value:” field
and use the right arrow button to scroll to the end of the variable (see
Figure 30).
Figure 30 - Editing the Path system variable
Add the following text to the end of the variable:
;
<TS Install Location>\
Where <TS Install Location> is the location of the TS Manager software on the computer. For
example, if the software were located at the following path: C:\SSi\TSManager\, then the text
Super Systems Inc. Page 19 of 22 Touch Screen Manager Operations Manual
Page 20
entered at the end of the variable would be
semicolon (;) at the beginning, since the semicolon indicates separate variables to the
computer. It is also important to keep the backslash (\) at the end of the text, since the
backslash will allow the computer to add the proper location to the path variable.
Note: To avoid any future errors with other programs, make sure that none of the text in the
“Variable value” field is highlighted when editing this value. Any highlighted text will be erased
when the user begins to type in the new path text.
Click on the OK button to close out the “Edit System Variable” screen. Click on the OK button to
close out the “Environment Variables” screen. Click on the
Properties” screen.
Adding the TS Manager’s installation location to the system path is not necessary to run the TS
Manager software in batch mode and should only be completed if the administrator wishes to
simplify the execution of the application for the users.
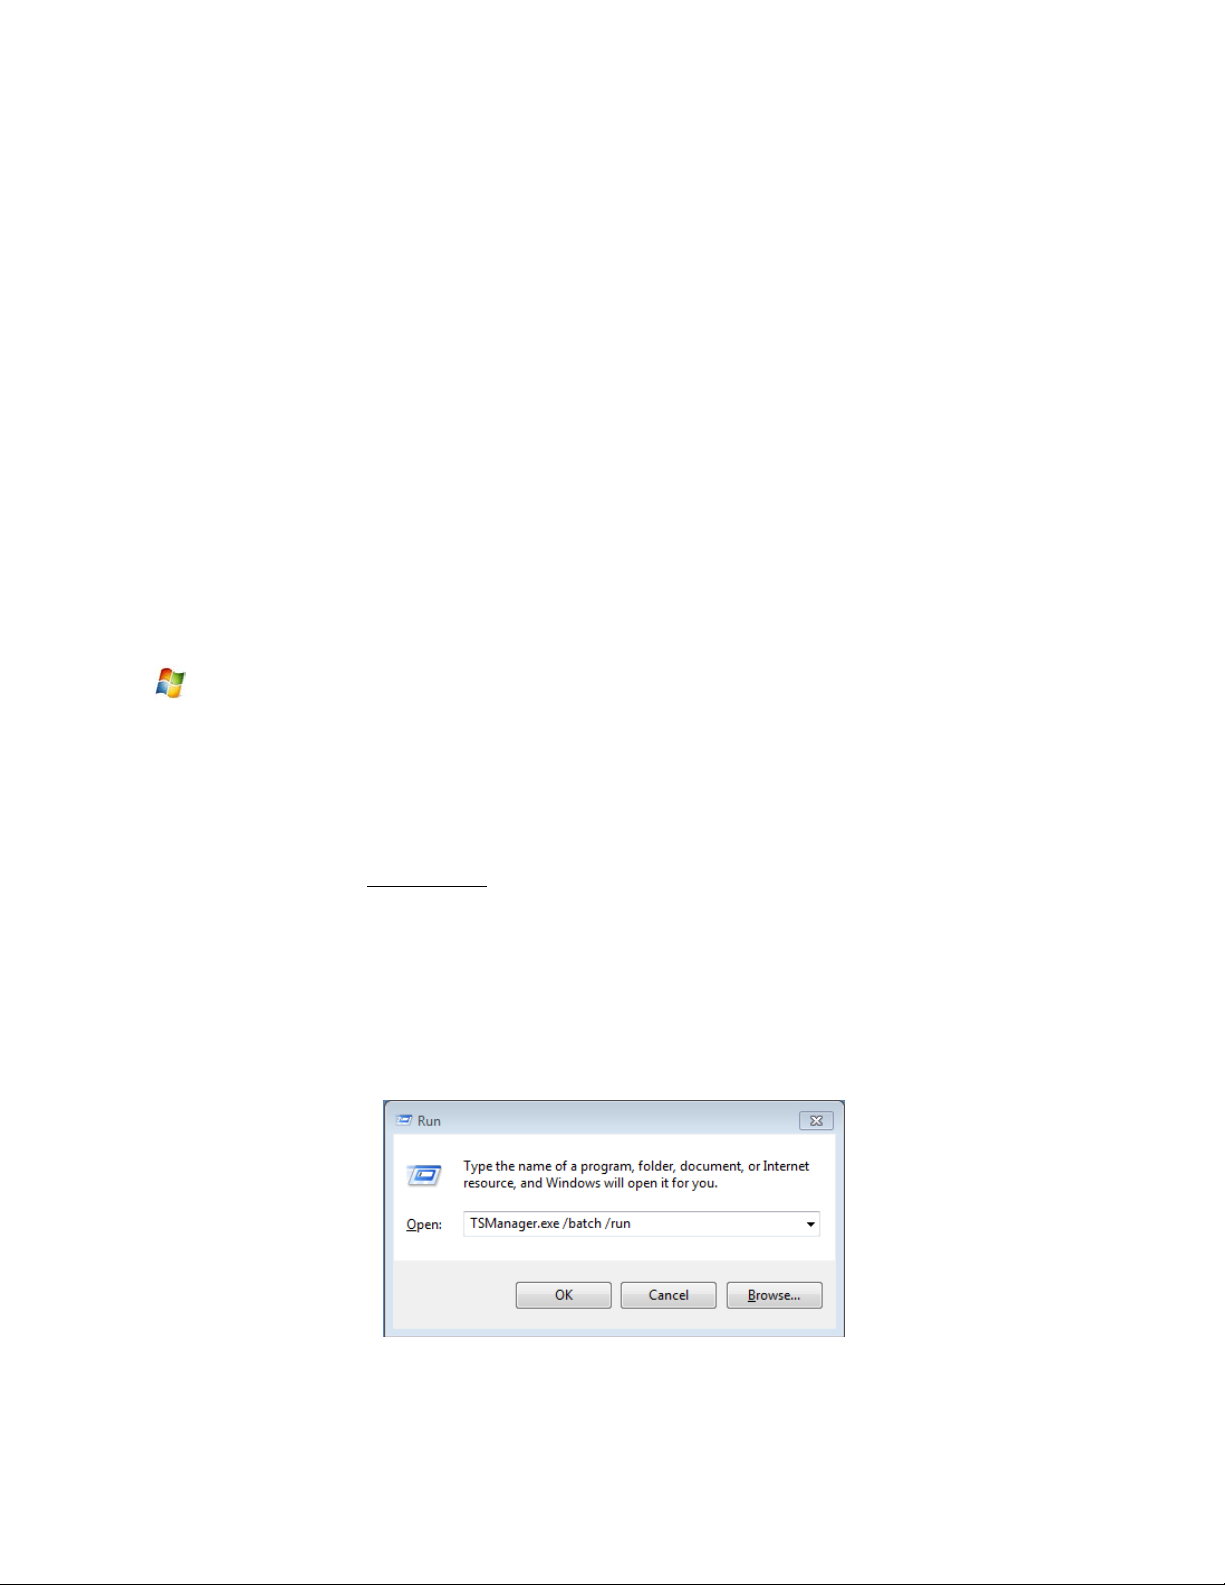
Running the TS Manager Software in batch mode
The batch mode operation can be started by using the “Run” screen for Windows. From the
Start Menu, click on the “Run” menu option to open the “Run” screen, or press the Windows key
( ) + R. If the TS Manager’s installation path was not added to the system’s path variable, the
user will have to enter the whole path to execute the batch mode. For example, to run the batch
mode type the following the field on the “Run” screen and press the
Enter key:
;C:\SSi\TSManager
“C:\SSi\TSManager\TSManager.exe” /batch
\. It is important to include the
OK button to close out the “System
OK button or press the
<parameter>
Where <parameter> is one or more of the parameters shown in Table 1 - Batch Mode
parameters and descriptions.
Note: The quotes are necessary if there is a space in the path for the TS Manager software.
Therefore,
Manager path and filename (TSManager.exe) because of the space in the “TS Manager” folder
name. However,
are no spaces in the path and filename.
“C:\SSi\TS Manager\TSManager.exe” /batch /notes
C:\SSi\TS\TSManager.exe /batch /notes
will require quotes around the TS
will not require quotes, since there
Figure 31 - The "Run" window
Super Systems Inc. Page 20 of 22 Touch Screen Manager Operations Manual
Page 21

If the TS Manager’s path was included in the system’s path variable (see
Batch Mode
Description
/notes
Downloads all of the notes from each screen.
/exportnotes
Downloads all of the notes from each screen
and exports them into SDRecorder.
/logdata
Downloads all log data from each screen.
/logdatanewonly
Downloads only log data that was not
previously downloaded from each screen.
/trends
Downloads the .ctm files from the trends
each screen.
/database
Downloads each .sdf (database) file from each
but it could be used for backup.
/device
Downloads files from the screen’s device file
also be used for backup.
Location to the System Path
section above), then all that would need to be entered would be the
Adding the TS Manager
file name and parameters:
TSManager.exe /batch /notes
Running the TS Manager in batch mode will not actually open the TS Manager user interface.
While the TS Manager is running in batch mode, the cursor will change to an hourglass. When
the TS Manager has finished, the cursor will change back to an arrow.
IMPORTANT: In order for a batch mode command to execute, both the /batch parameter and a
second parameter (see
Table 1 - Batch Mode parameters and descriptions below) must be
entered in the Run window after “TSManager.exe”.
Error logging
The TS Manager will maintain an error log of the batch mode process in the installation location
called “batch.log”. This file will contain a step-by-step list of the batch mode, and it can be
helpful when contacting Super Systems Inc. with any issues. The log will contain details on only
the most recent batch run.
List of Batch Mode Parameters
Following is a list of batch mode parameters that work with TS Manager, along with a
description of each mode’s functionality. These parameters are entered after the batch
parameter in the Run window.
Table 1 - Batch Mode parameters and descriptions
Super Systems Inc. Page 21 of 22 Touch Screen Manager Operations Manual
folder, which contain the trend lines, from
screen. TS Manager does not use this format,
and .cfg files. These contain configuration data
for the screen setup. TS Manager uses the
dw9xxx.cfg file to determine the names of the
“Data” trendlines which can be found under
“Data” in “Edit Chart”. This function could
Page 22

Revision History
Rev.
Description
Date
MCO #
-
Initial Release
03/27/2013
2118
Super Systems Inc. Page 22 of 22 Touch Screen Manager Operations Manual
 Loading...