

Page 1
VIEW AND WORKSTATION
OPERATIONS MANUAL
SDSTATUS
Super Systems Inc.
7205 Edington Drive
Cincinnati, OH 45249
513-772-0060
800-666-4330
Fax: 513-772-9466
www.supersystems.com
Page 2

SDStatus View and Workstation Operations Manual
Table of Contents
Introduction ........................................................................................................................................ 4
SDStatus Components and How They Interact ................................................................................. 4
Prerequisites ...................................................................................................................................... 5
Getting Started ................................................................................................................................... 7
SDStatus View ................................................................................................................................ 7
Installation .................................................................................................................................. 7
Running ....................................................................................................................................... 9
SDStatus Workstation .................................................................................................................. 10
Installation ................................................................................................................................ 11
Running ..................................................................................................................................... 13
SDStatus View: Operation ................................................................................................................ 15
Options Menu ................................................................................................................................ 15
Servers ...................................................................................................................................... 15
Adding a Server..................................................................................................................... 15
Editing or Deleting a Server Entry ....................................................................................... 18
Alarms ...................................................................................................................................... 18
Manage Alarms ..................................................................................................................... 19
Manage Alarm Groups .......................................................................................................... 29
Email Addresses ...................................................................................................................... 32
Manage Email Addresses ..................................................................................................... 32
Manage Email Address Groups ............................................................................................ 33
Email Times .............................................................................................................................. 35
Manage Alarm Email Times ................................................................................................. 35
Manage Inhibit Email Times ................................................................................................. 37
Mail Servers .............................................................................................................................. 39
Logs .......................................................................................................................................... 42
Workstations Menu ...................................................................................................................... 43
Workstation Server .................................................................................................................. 43
Setup Workstations .................................................................................................................. 44
Alarm Sound Times .................................................................................................................. 45
Users ......................................................................................................................................... 46
Alarm Ack Levels (Alarm Acknowledgement Levels) ............................................................. 47
Advanced ...................................................................................................................................... 48
Manage Bit Trigger Alarms ...................................................................................................... 48
Help Menu .................................................................................................................................... 49
Check for Updates .................................................................................................................... 49
About ......................................................................................................................................... 50
SDStatus Workstation: Operation ................................................................................................... 51
Options .......................................................................................................................................... 51
Target SDStatus Server ........................................................................................................... 51
Super Systems Inc. Page 2 of 83
Page 3

SDStatus View and Workstation Operations Manual
Determining IP Address of the SDStatus Service Computer .............................................. 53
Select Workstation Setup ......................................................................................................... 54
Detail View ................................................................................................................................ 55
User .............................................................................................................................................. 56
Log In ........................................................................................................................................ 56
Log Out ...................................................................................................................................... 57
Note on Enabling Sounds in SDStatus Workstation ................................................................... 57
Help ............................................................................................................................................... 58
Check for Updates .................................................................................................................... 59
About ......................................................................................................................................... 59
Revision History ............................................................................................................................... 60
Appendix 1: Quick Start Guide ......................................................................................................... 61
SDStatus View .............................................................................................................................. 61
Setting Up the Server ............................................................................................................... 61
Setting Up Individual Alarms ................................................................................................... 62
Setting Up Alarm Groups ......................................................................................................... 64
Setting Up Email Addresses .................................................................................................... 66
Setting Up Email Address Groups ........................................................................................... 67
Setting Up Email Times ............................................................................................................ 68
Setting Up Email Server ........................................................................................................... 70
SDStatus Workstation .................................................................................................................. 71
Enabling the Workstation Server (in SDStatus View) .............................................................. 71
Setting Up Workstation Profiles (in SDStatus View) ............................................................... 72
Setting Up Users and User Access Levels (in SDStatus View) ............................................... 74
Setting Up Alarm Sounds (in SDStatus View) .......................................................................... 76
Setting Up a Connection to the SDStatus Server .................................................................... 77
Logging In As a User ................................................................................................................ 78
Setting Up Alarm Sounds in SDStatus Workstation................................................................ 79
Acknowledging Alarms ............................................................................................................ 80
®
Appendix 2: Enabling Email Sending through Google
Mail (GmailTM) .......................................... 82
Appendix 3: Sending Notifications to a Mobile Device Using SDStatus ......................................... 83
Super Systems Inc. Page 3 of 83
Page 4

SDStatus View and Workstation Operations Manual
Introduction
SDStatus is a server/device monitoring and automated alert solution from Super Systems Inc.
The solution includes SDStatus View and SDStatus Service (which generally run on one
computer) and SDStatus Workstation (which may be run on multiple computers).
SDStatus Service monitors selected SuperDATA servers and devices communicating with
SuperDATA. When a defined condition exists, SDStatus Service generates an alarm and sends
an email to a predefined email address of the user’s choice. SDStatus can be set up to limit
emails to certain times of the week to send emails only after an alarm has been on for a certain
amount of time. SDStatus Service is able to monitor any device or equipment communicating
with SuperDATA using the SDIO communications engine, as well as the SuperDATA server
itself.
Running on a different computer, SDStatus Workstation communicates with the SDStatus
Service on the computer where the service is running and displays information provided by the
service, including information on alarms and operating status of monitored devices. SDStatus
Workstation may be installed on one or more computers, allowing more than one user to get
status information on devices, as needed.
Compatible devices include any equipment that can communicate with SuperDATA using SDIO
with a supported connection protocol. Examples of compatible devices include the Series 9220
Vacuum Furnace Controller, AC20 Atmosphere Controller, supported Programmable Logic
Controllers (PLCs), and many other types of equipment.
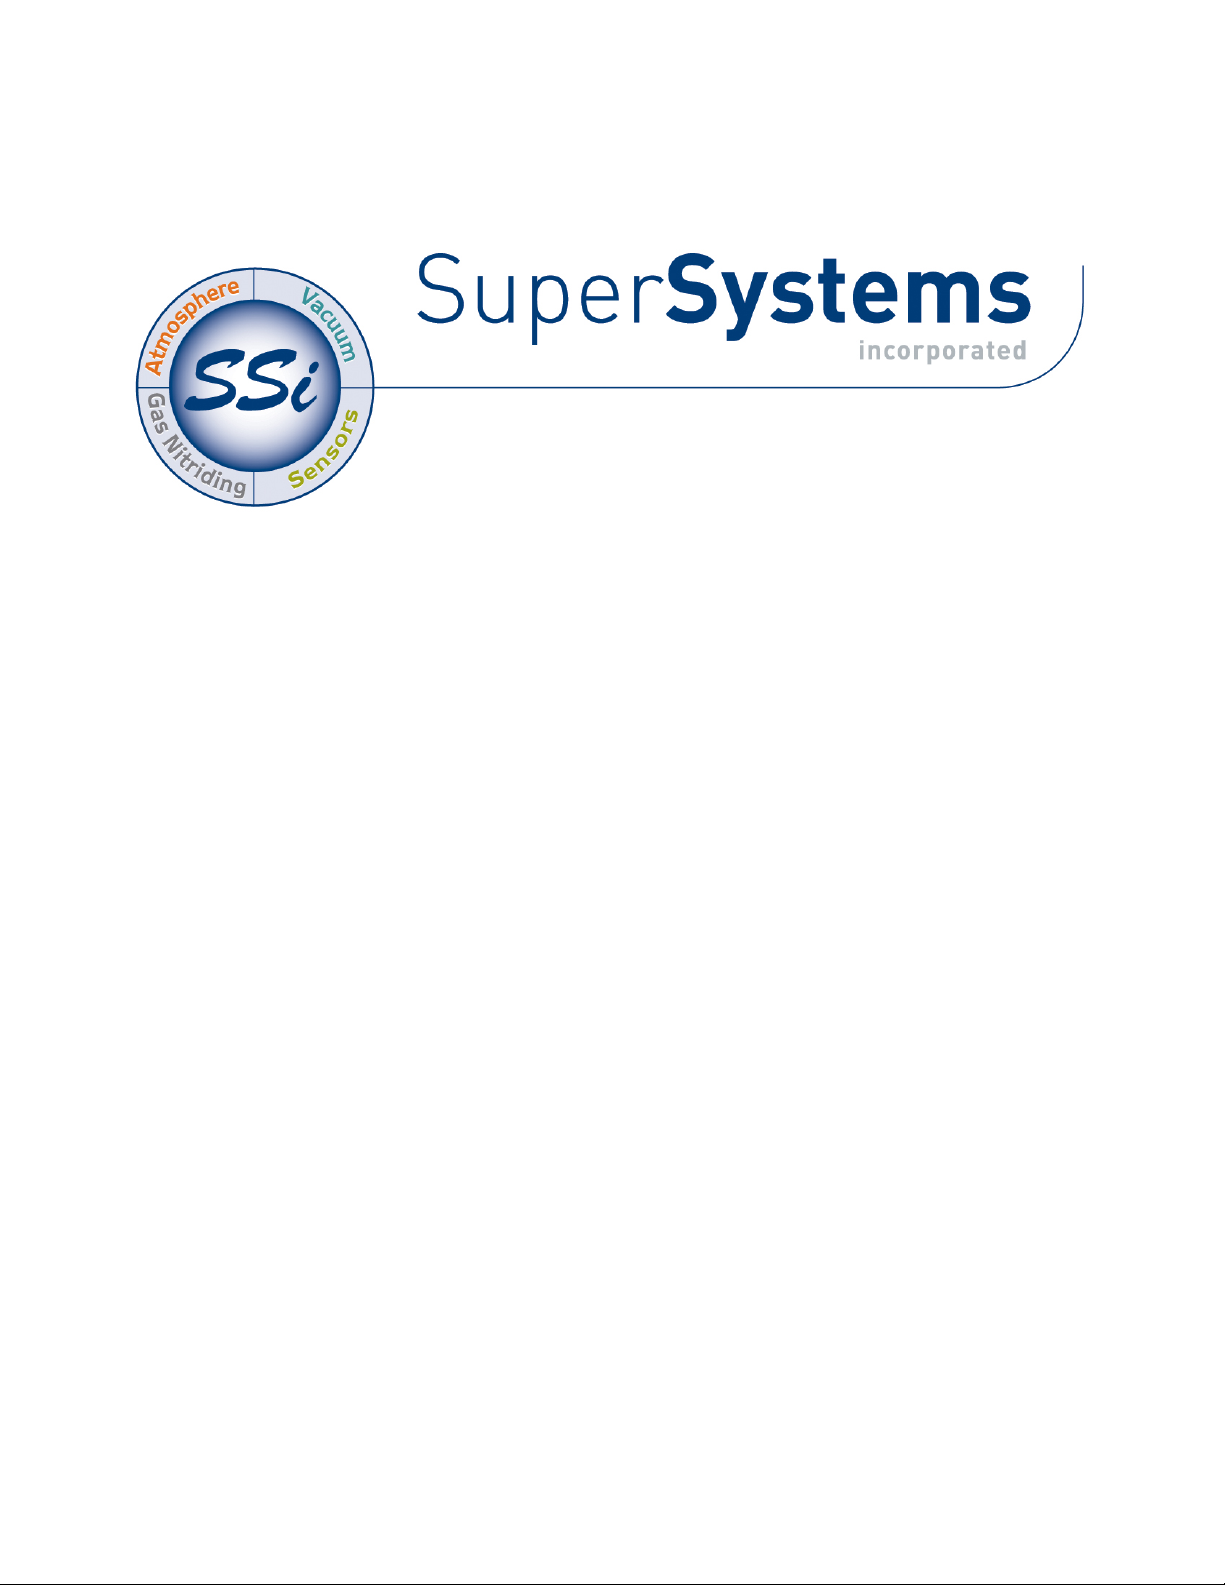
SDStatus Components and How They Interact
As an overall solution, SDStatus is comprised of several parts. These parts include SDStatus
Service, SDStatus View, and SDStatus Workstation. SDStatus Service is a program that runs in
the background on a computer and reads data from a SuperDATA server in order to obtain
information about devices for which SuperDATA is logging details. SDStatus View, which runs on
the same computer where the SDStatus Service is running, allows the user to view information
about the service and configure settings including monitored devices, alarms, and email
notification settings. Finally, SDStatus Workstation, running on a separate computer, provides
information on running devices and alarms; this information is obtained from the SDStatus
Service running on the SDStatus View computer.
The diagram below illustrates the parts of SDStatus and how they work together.
Super Systems Inc. Page 4 of 83
Page 5
SDStatus View and Workstation Operations Manual
Figure 1 - SDStatus Components and their Interaction
Prerequisites
Both SDStatus View (hereafter referred to as “View”) and SDStatus Workstation (hereafter
referred to as “Workstation”) must be run on a computer with Microsoft Windows XP or higher.
The computer running View must be connected to the same Ethernet network as the
SuperDATA server and must be able to connect to the SuperDATA file system.
The computer on which the software will be installed must have Microsoft .NET 4.0
Redistributable (or higher) installed on it. This package is included on the SDStatus installation
disc.
SDIO is the software that communicates with devices in specific channels and provides data to
SuperDATA. SDStatus Service, running on the same computer that is running View, monitors
the operation of SDIO by analyzing data that SDIO writes to the
IntTbl.dat
file (see the
SuperDATA manual for more details on this file).
Before many alarm conditions can be accurately evaluated by SDStatus, SDIO must be running
on the SuperDATA server with which SDStatus Service is communicating. To confirm that SDIO
is running, follow this procedure:
Super Systems Inc. Page 5 of 83
Page 6
SDStatus View and Workstation Operations Manual
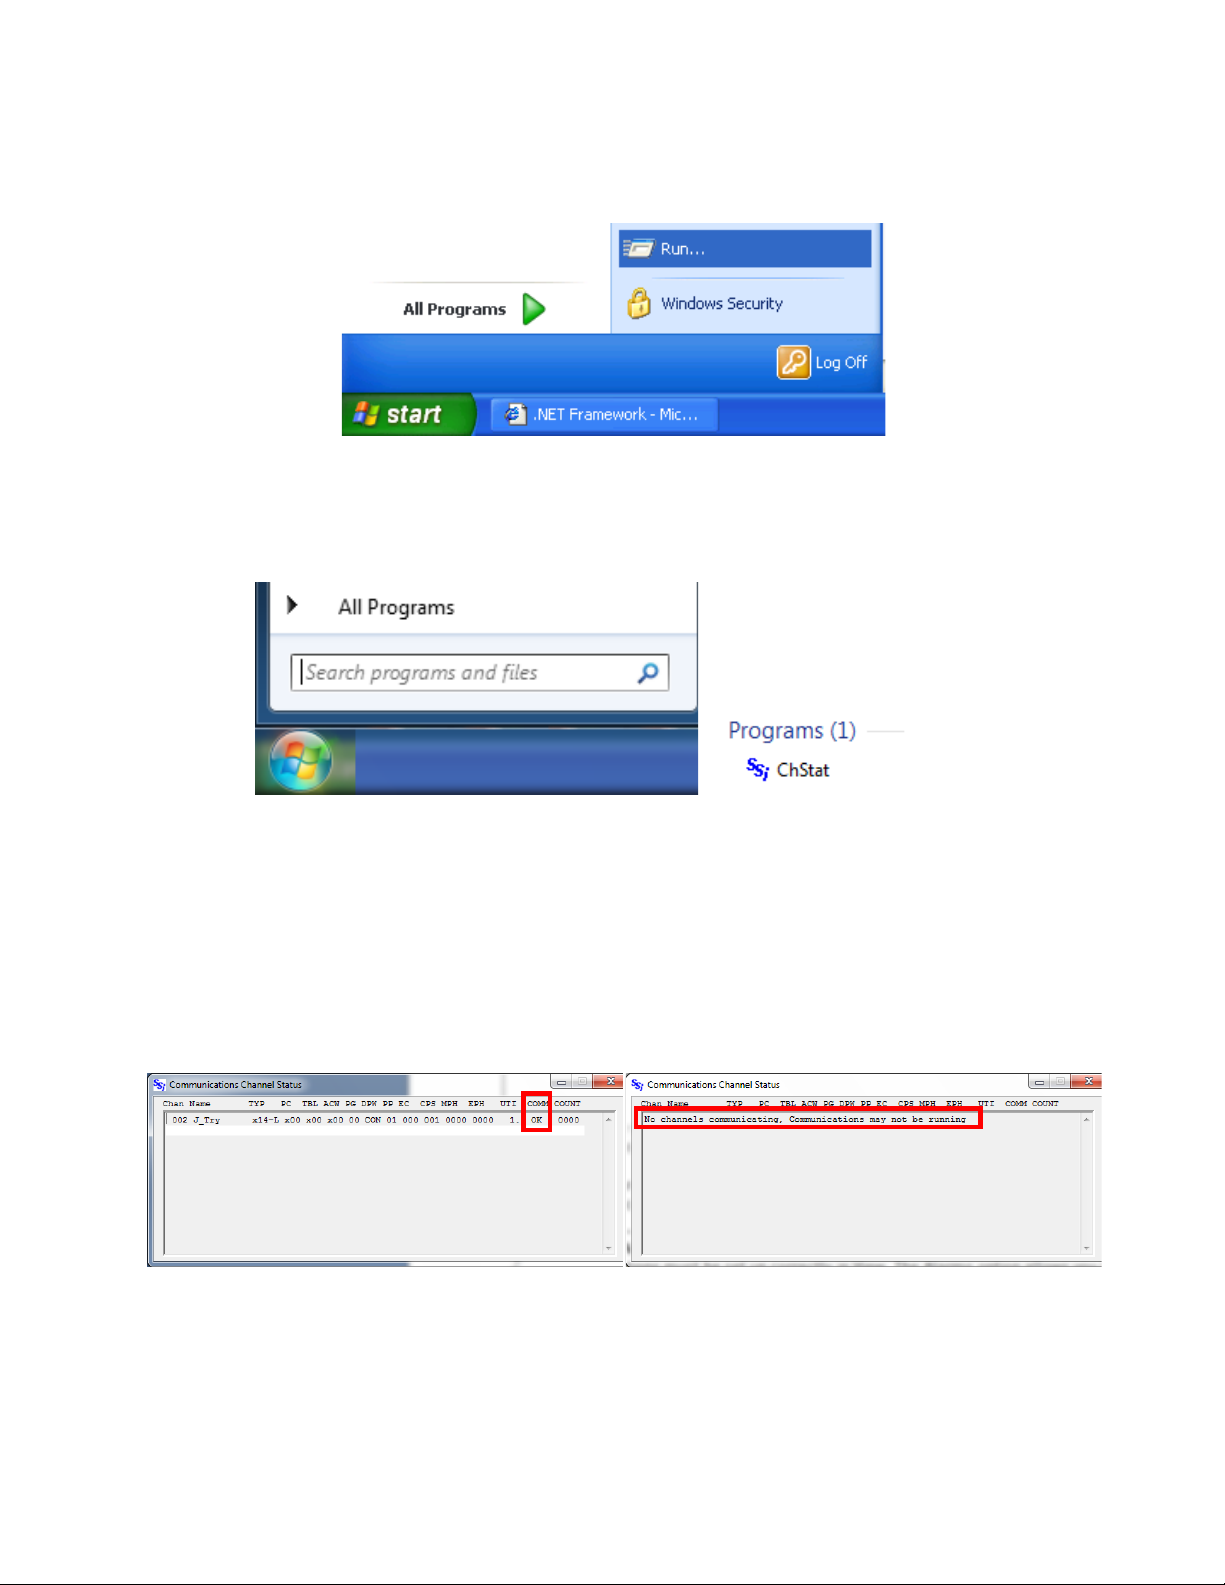
Figure 4 - Communications OK indication
Figure 5 - Bad Communications message
Communications error is taking place)
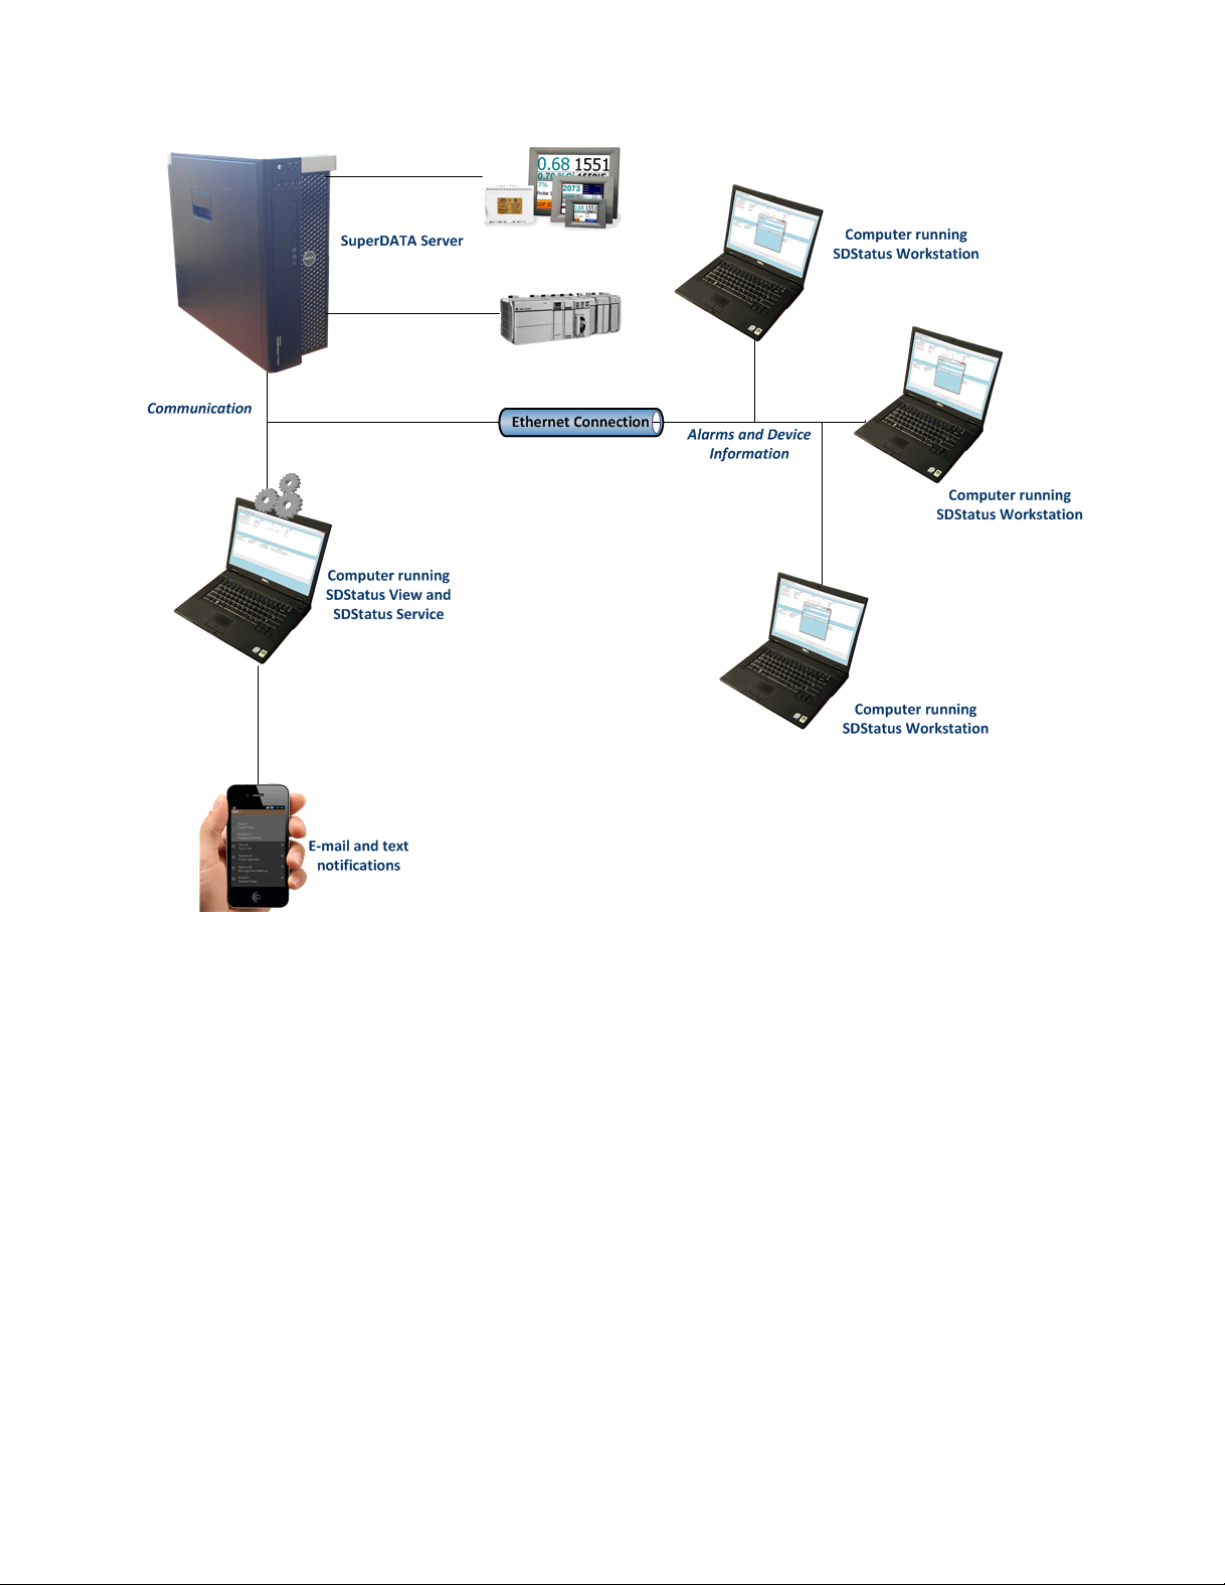
1. From the computer running SDStatus Service, open the Start menu.
a. If using Windows XP, open the Run menu (Figure 2) and type the full path of the
program (in many cases, this will be “C:\SSi\Bin\chstat.exe”) in the dialog box.
chstat
Figure 2 - Run Dialog Box (Windows XP)
b. If using Windows Vista, 7, or 8, type
Click on the
area). See
ChStat application link that appears (usually at the top of the Start menu
Figure 3.
Figure 3 - Program Search and Run (Windows Vista, 7, & 8)
chstat
in the “Search programs and files” box.
2. In the Communications Channel Status window that appears, you will be able to tell
whether SDIO is functioning properly.
a. If the COMM column indicates “OK” for all attached channels, SDIO is working, and
communications are okay. (See Figure 4.)
b. If the COMM column indicates “ERR” for an attached channel, or if a message “No
channels communicating, Communications may not be running” (Figure 5) appears,
SDIO may not be operating, or a communications error is taking place.
(SDIO is operating; communications are okay)
In order to send emails, SDStatus Service must be able to connect to an email server via SMTP
(Simple Mail Transfer Protocol), SMTP with StartTLS, or secure SMTP.
Super Systems Inc. Page 6 of 83
(SDIO may not be operating, or a
Page 7
SDStatus View and Workstation Operations Manual
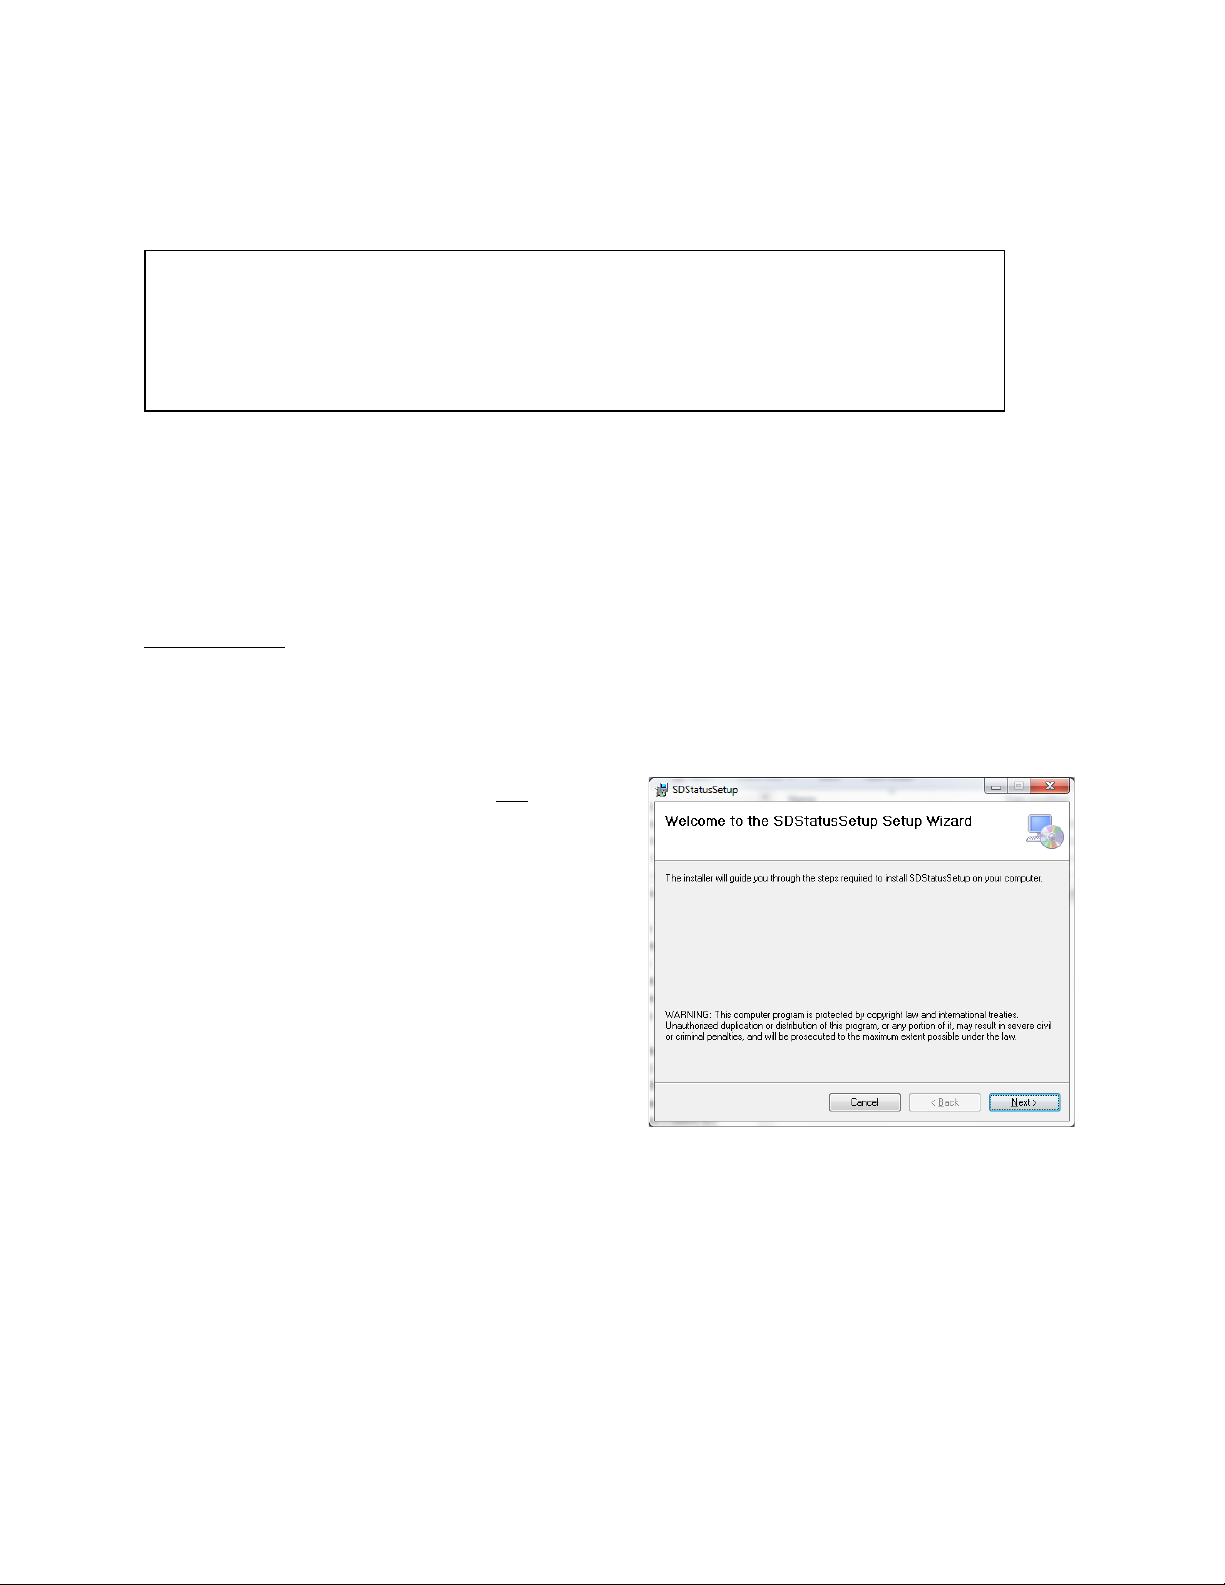
To install, open the “setup.exe” file (not the
Setup Wizard
Figure 6 - Setup Wizard window
IMPORTANT TIP:
In order to send notification emails, alarms, emails, and email
Alarms, Email
Addresses
Email Times
Finally, ensure that devices are set up to communicate with SuperDATA. SDStatus Service can
monitor devices only when they are communicating with the SuperDATA server.
sending options must be set up correctly in View. The Alarms option allows you to set
up alarms. The Email Addresses menu provides email and email group settings. The
Email Times menu provides email scheduling options. Refer to the
, and
Getting Started
Before the benefits of the SDStatus programs can be utilized, the programs will need to be
installed. This section will guide you through the installation and initial running of View (which
will include installation of SDStatus Service) and Workstation (installing Workstation is
optional).
SDStatus View
The SDStatus View installation program will install both the SDStatus Service and SDStatus
View.
sections for further details.
Installation
“SDStatusSetup.msi” file). The
window will appear (
continue.
Figure 6). Click “Next”
Super Systems Inc. Page 7 of 83
Page 8
SDStatus View and Workstation Operations Manual
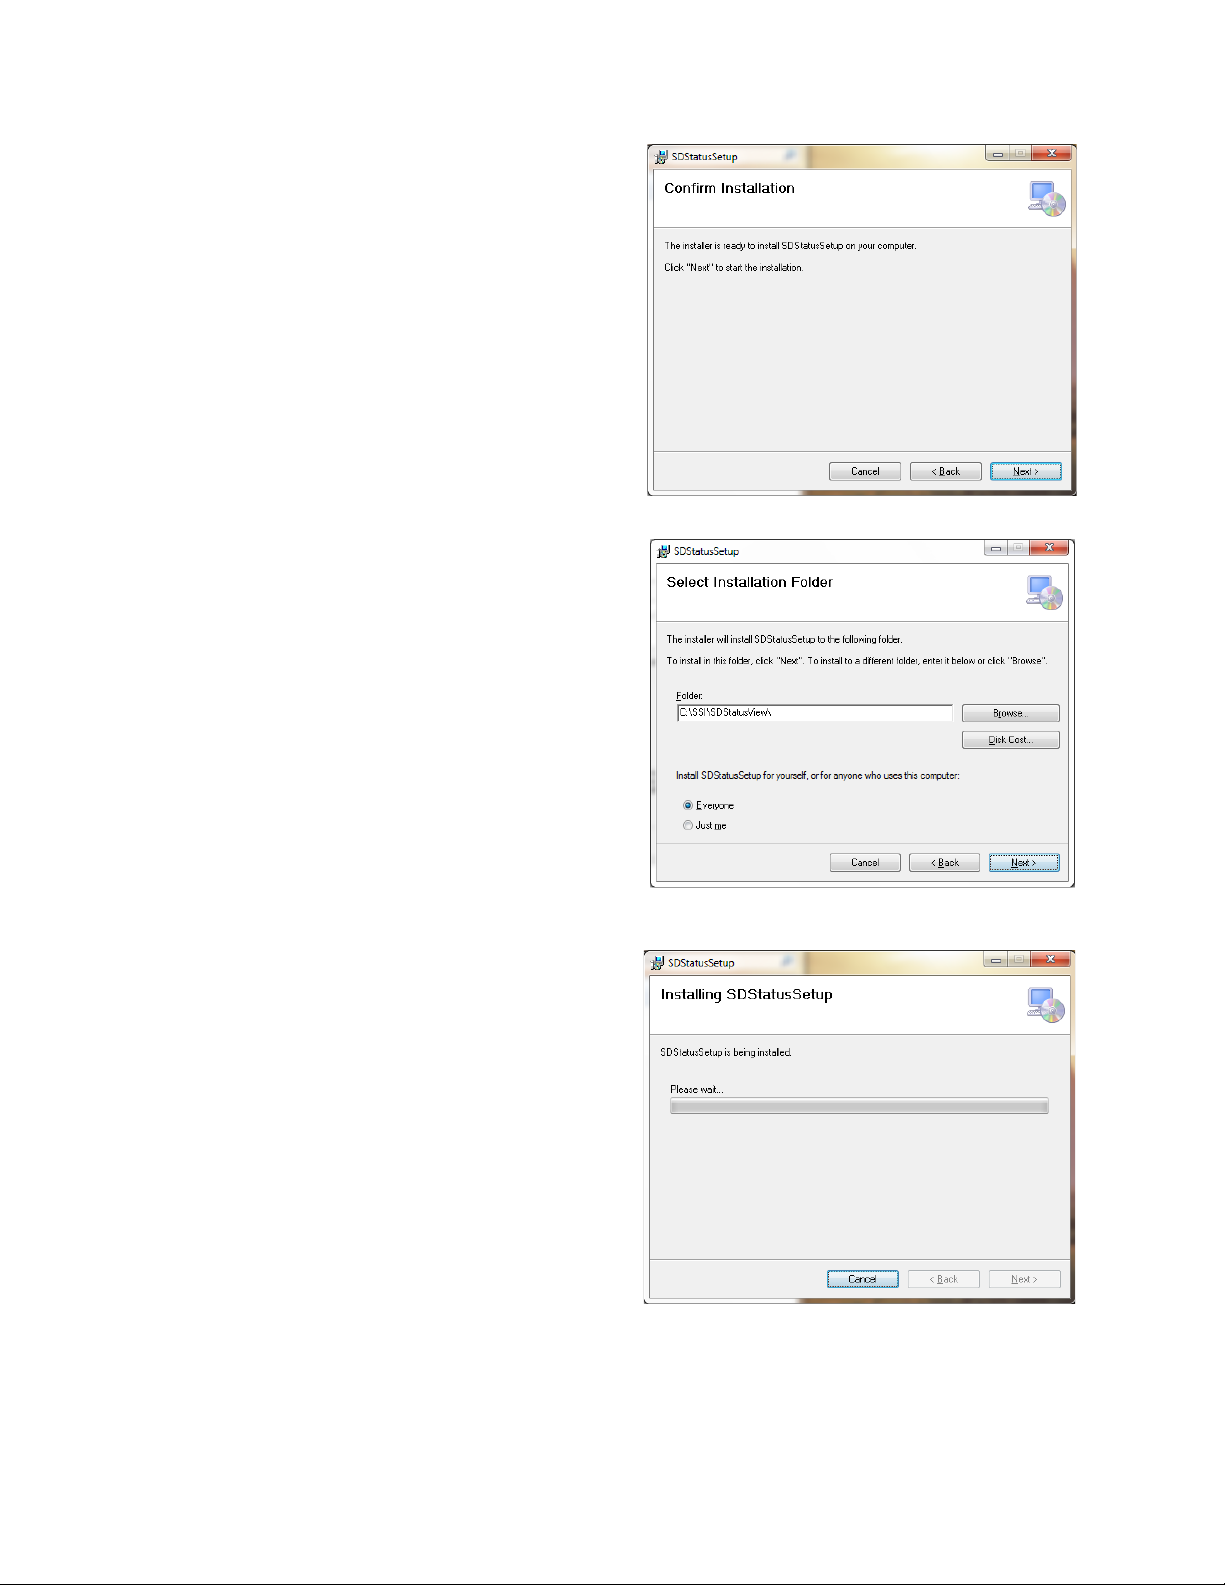
A Confirm Installation window will appear
Figure 7 - Confirm Installation window
A window similar to the one shown in Figure 8
Figure 8 - Select Installation Folder window (SDStatus
View installation)
An installation status window will appear (Figure
Figure 9 - Installation status window
(Figure 7). Click “Next” to continue with the
installation.
will appear. This window will give you the
options to change the installation folder for
View, to install View for the current user or for
all users of the computer, and to estimate the
amount of disk space that will be used when the
program is installed. Click “Next” to continue.
9).
If a window appears on screen asking if you want
to authorize changes being made to your
computer, simply choose “Yes”.
Super Systems Inc. Page 8 of 83
Page 9
SDStatus View and Workstation Operations Manual
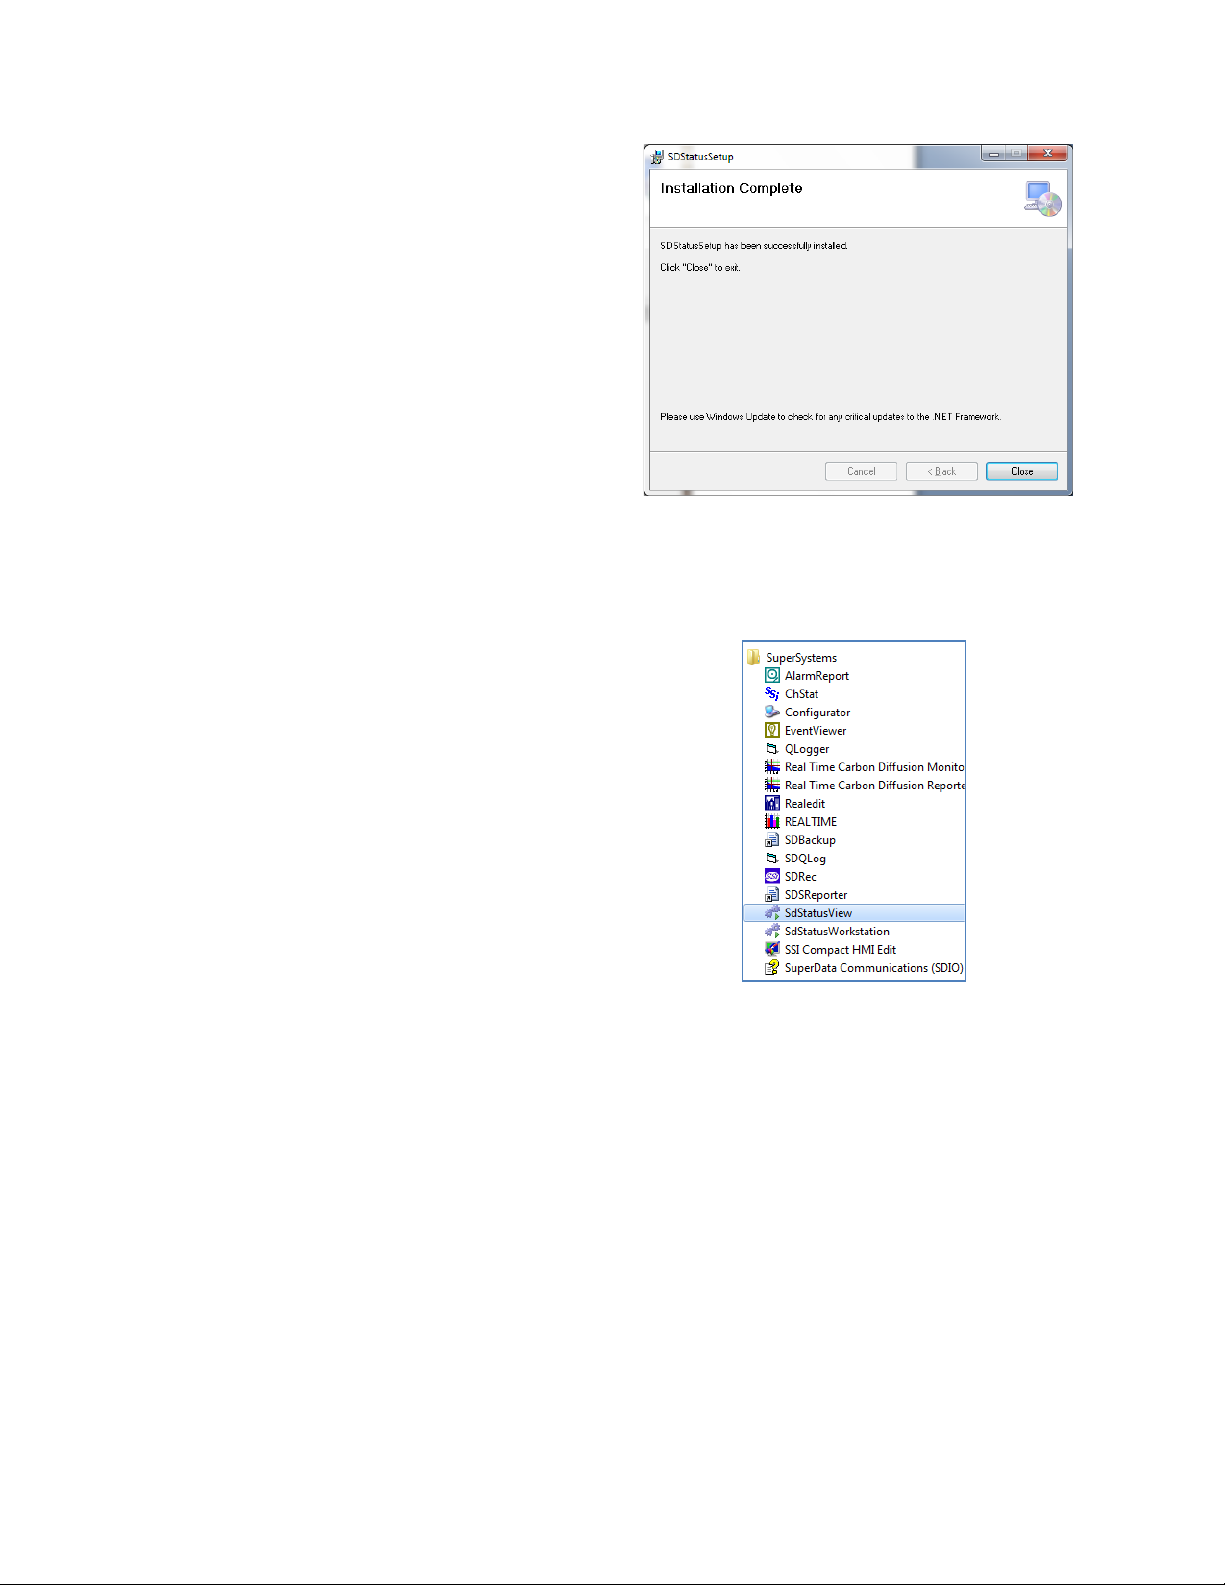
Once the installation process has finished, the
Installation Complete
Figure 10 - Installation Complete window
To run View, open the program called
SdStatusView
SuperSystems
Figure 11 - Typical Location of
SdStatusView in Start Menu
window (Figure 10) will
appear. Click “Close” to close the window.
Running
from the
program group in the Start Menu (see Figure
11).
NOTE: If you are running View for the first time, you may see a window about the “SDStatus
ServiceHandler”. Allow this process to continue.
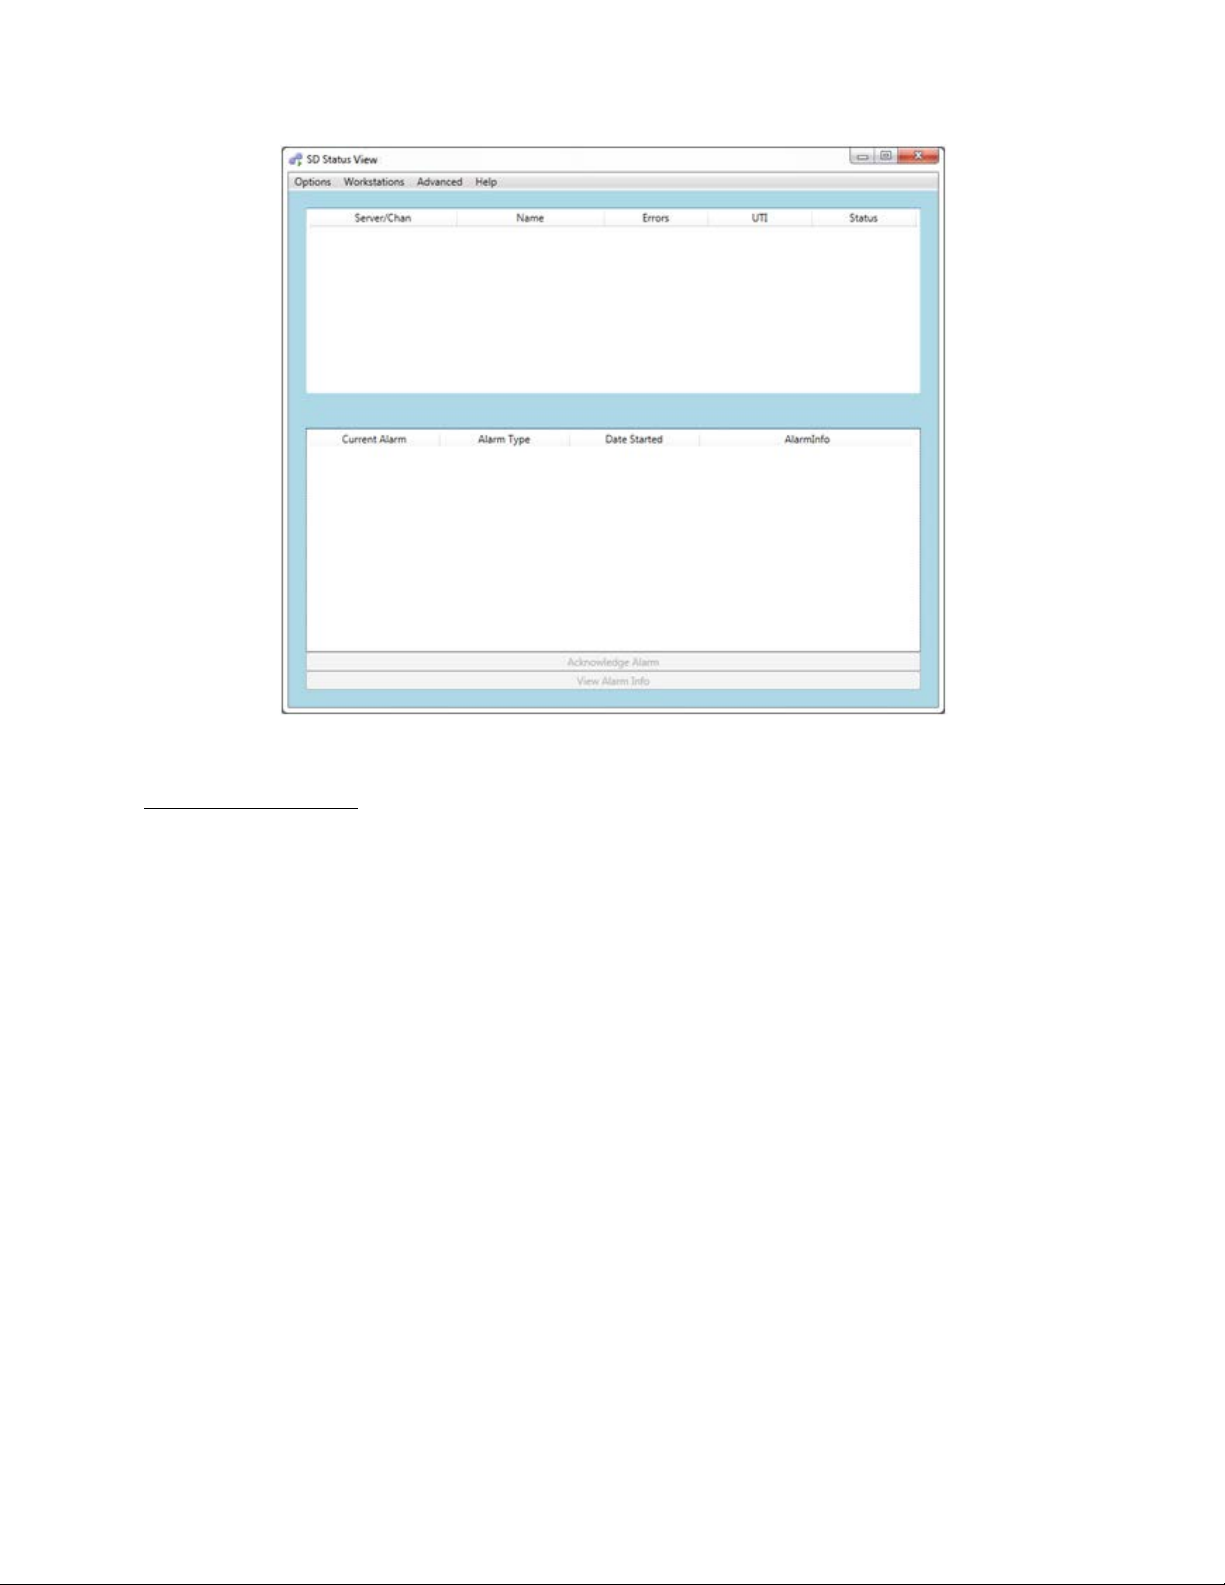
Upon starting View, the View screen will appear (see Figure 12). If you have not run View before,
the screen will be blank. Once servers and channels have been set up to be monitored, the
screen will be populated with the relevant data. This process is discussed as part of the
SDStatus View: Operation Options Menu section below.
Super Systems Inc. Page 9 of 83
Page 10
SDStatus View and Workstation Operations Manual
Figure 12 - Starting Screen in View
SDStatus Workstation
The SDStatus Workstation installation program will install SDStatus Workstation. While
optional, using Workstation will allow multiple computers to get information from the computer
running View.
NOTE: In most cases, SDStatus Workstation will be installed on computers other than the
computer running SDStatus View. However, in some cases—such as when using logins or alarm
sounds, there may be benefit to installing SDStatus Workstation on the computer running
SDStatus View.
Super Systems Inc. Page 10 of 83
Page 11
SDStatus View and Workstation Operations Manual
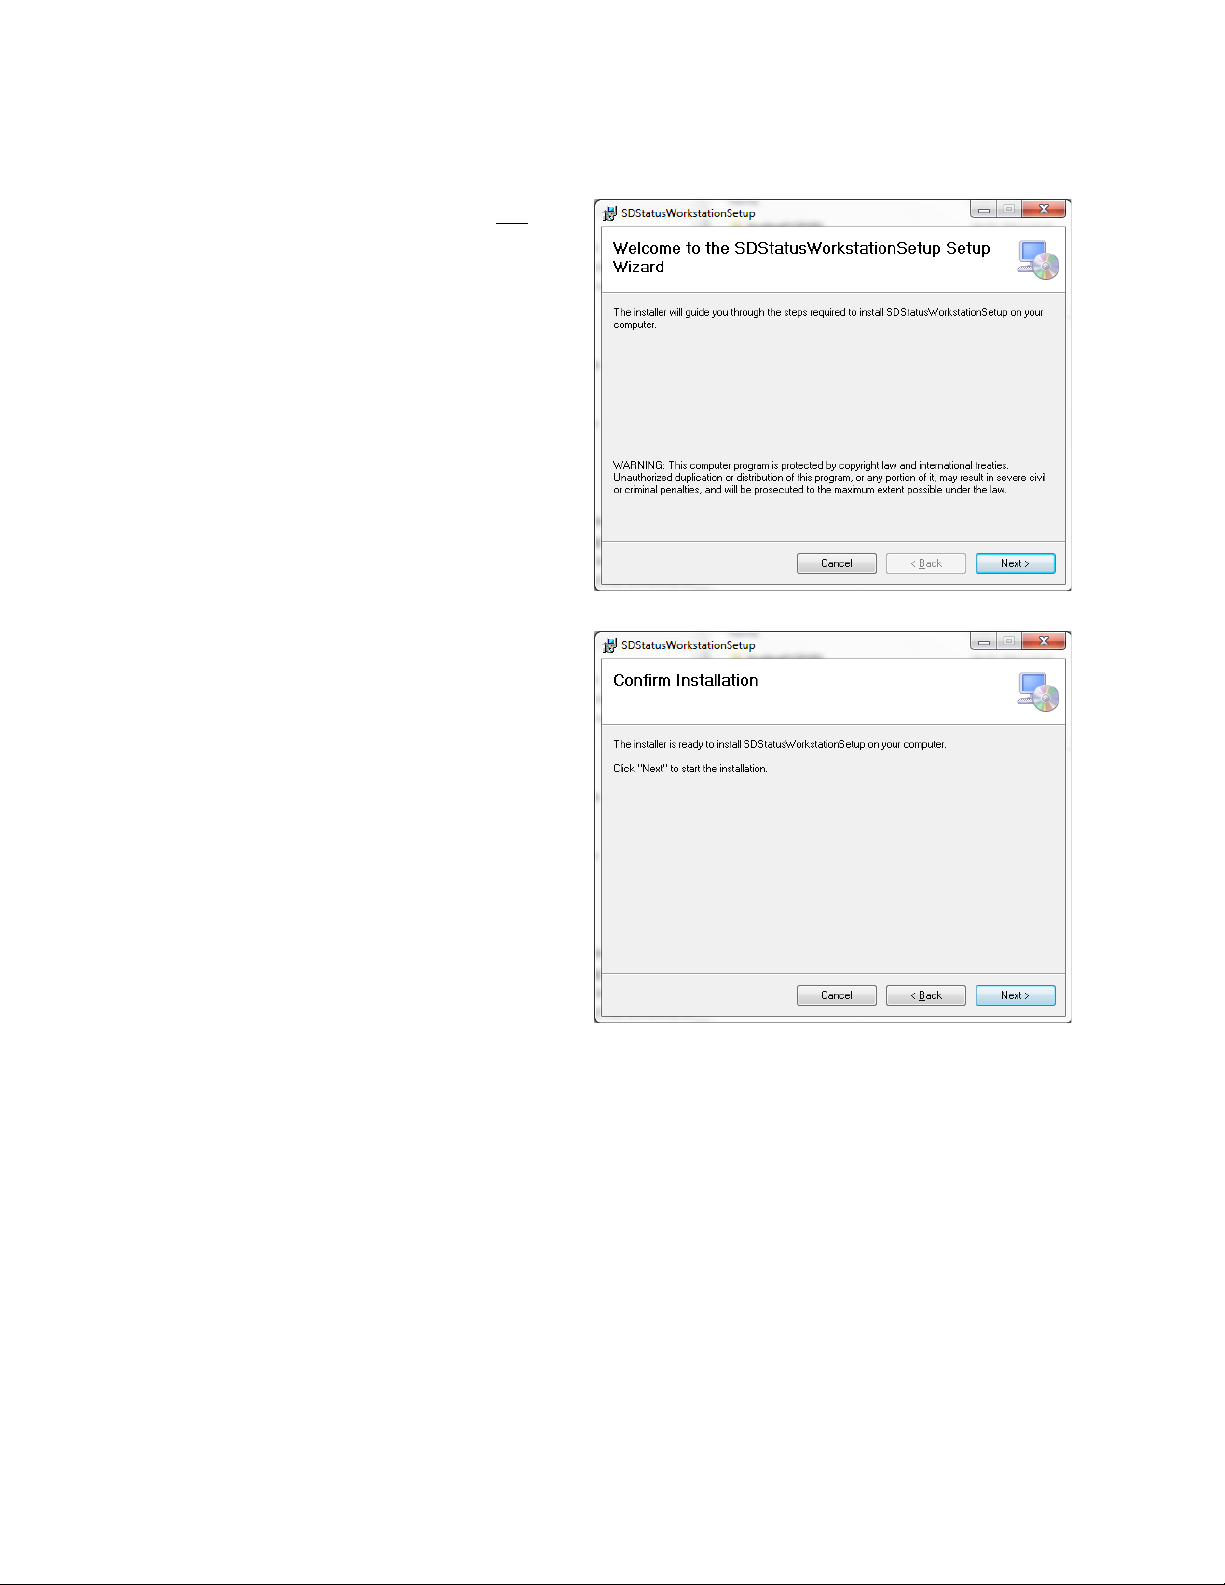
To install, open the “setup.exe” file (not the
Setup Wizard
Figure 13 - Setup Wizard window
A Confirm Installation window will appear
Figure 14 - Confirm Installation window
Installation
“SDStatusWorkstationSetup.msi” file). The
window will appear (Figure
13).
(Figure 14). Click “Next” to continue with
the installation.
Super Systems Inc. Page 11 of 83
Page 12

SDStatus View and Workstation Operations Manual
A window similar to the one shown in
Figure 15 - Select Installation Folder window (Workstation
installation)
An installation status window will appear
Figure 16 - Installation status window
Figure 15 will appear. This window will give
you the options to change the installation
folder for Workstation, to install
Workstation for the current user or for all
users of the computer, and to estimate the
amount of disk space that will be used
when the program is installed. Click “Next”
to continue.
(Figure 16).
If a window appears on screen asking if you
want to authorize changes being made to
your computer, simply choose “Yes”.
Super Systems Inc. Page 12 of 83
Page 13
SDStatus View and Workstation Operations Manual
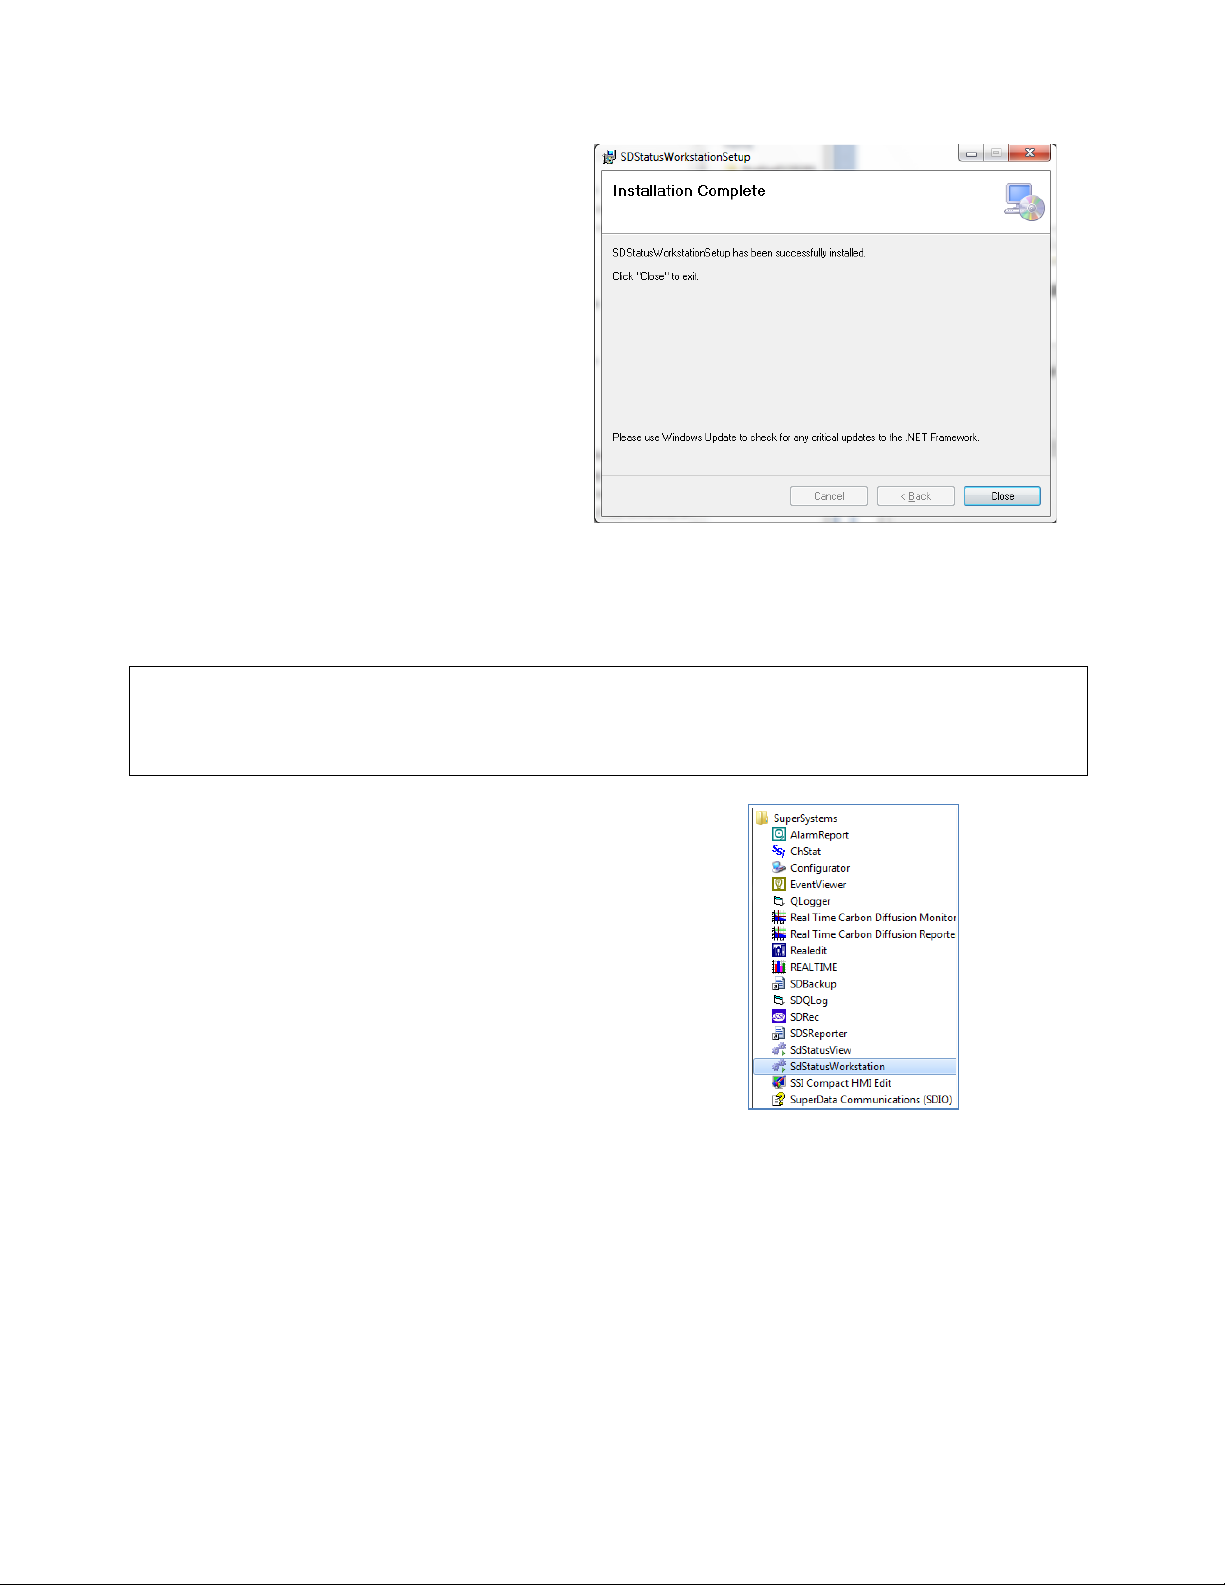
Once the installation process has finished,
Installation Complete
Figure 17 - Workstation Installation Complete window
IMPORTANT:
In order for Workstation to be able to interface properly with SDStatus Service,
Operation section for more details.
To run Workstation, open the program called
SdStatusWorkstation
SuperSystems
Figure 18 - Typical Location of
SdStatusWorkstation in Start Menu
the
window (Figure
17) will appear. Click “Close” to close the
window.
Running
both View and Workstation must be configured correctly. See the SDStatus Workstation:
from the
program group in the Start Menu (see Figure
18).
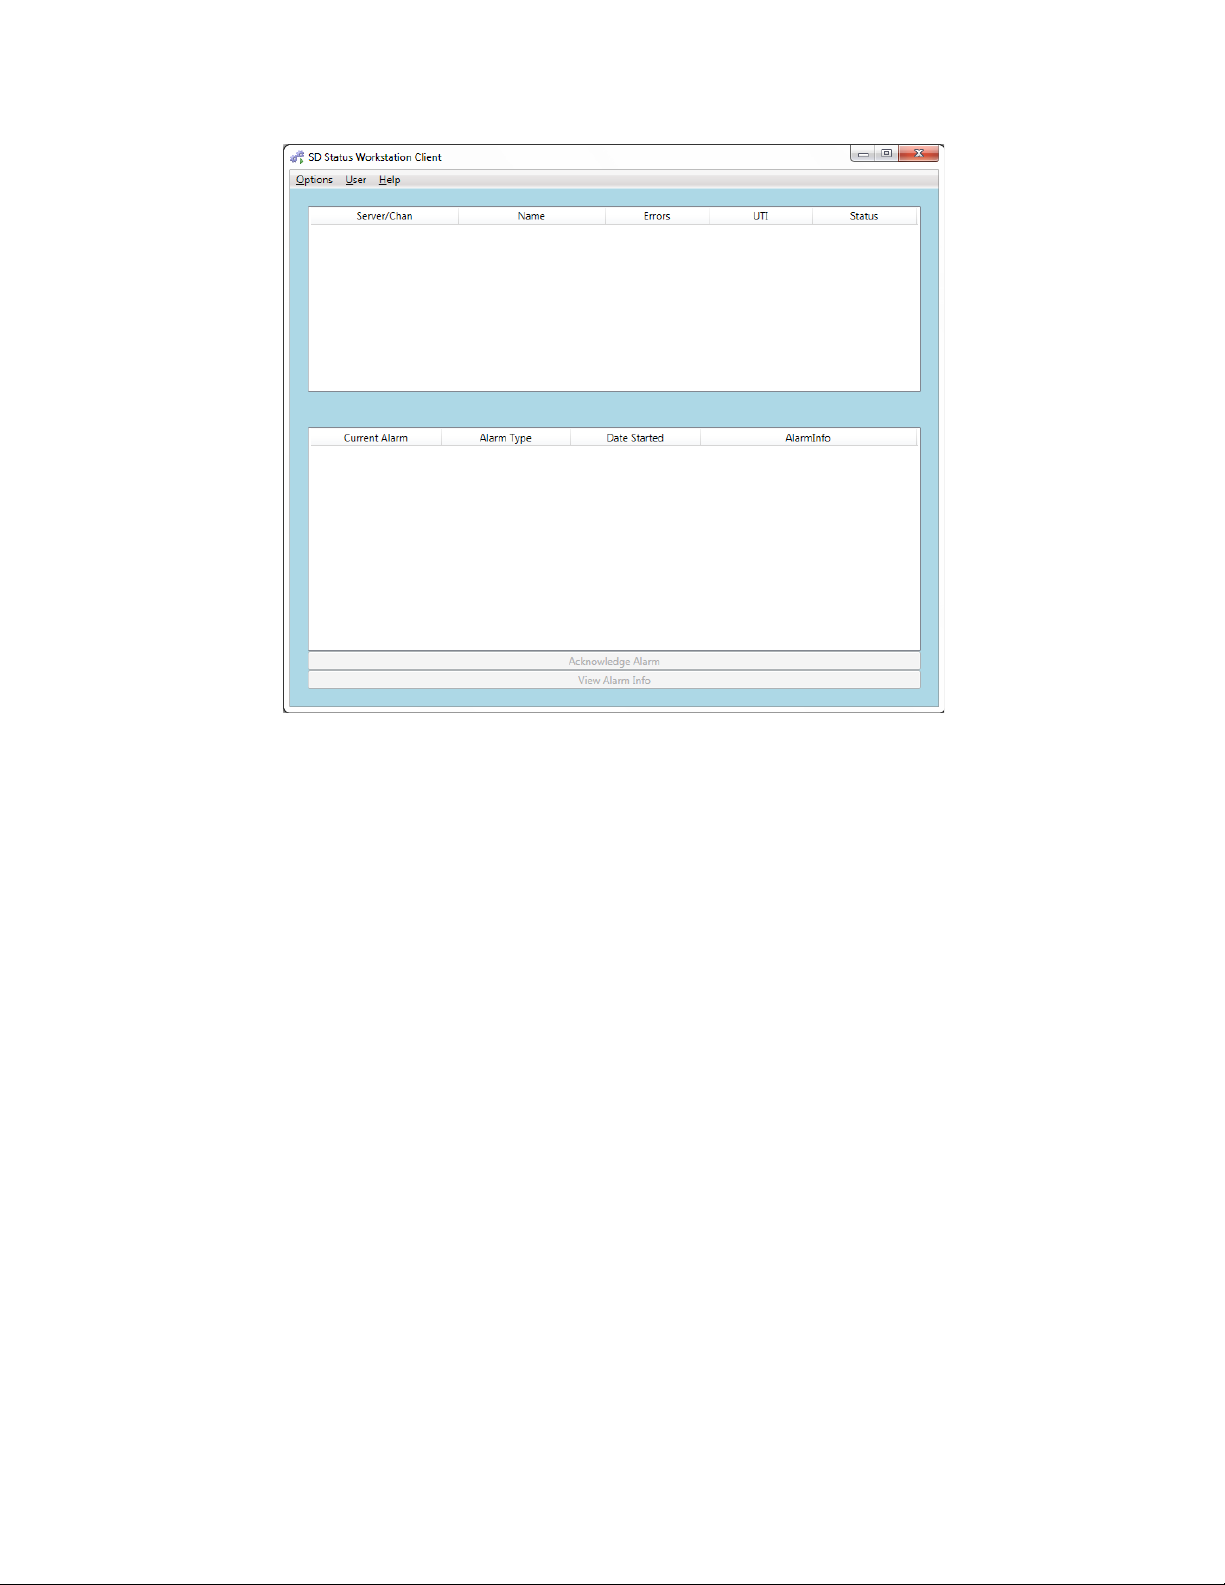
Upon starting Workstation, the Workstation screen will appear (see Figure 19). If you have not
run Workstation before, or if it has not been set up to communicate properly with SDStatus
Service, the screen will be blank (an error message also may be displayed).
Super Systems Inc. Page 13 of 83
Page 14
SDStatus View and Workstation Operations Manual
Figure 19 - Starting Screen in SDStatus Workstation
Super Systems Inc. Page 14 of 83
Page 15
SDStatus View and Workstation Operations Manual
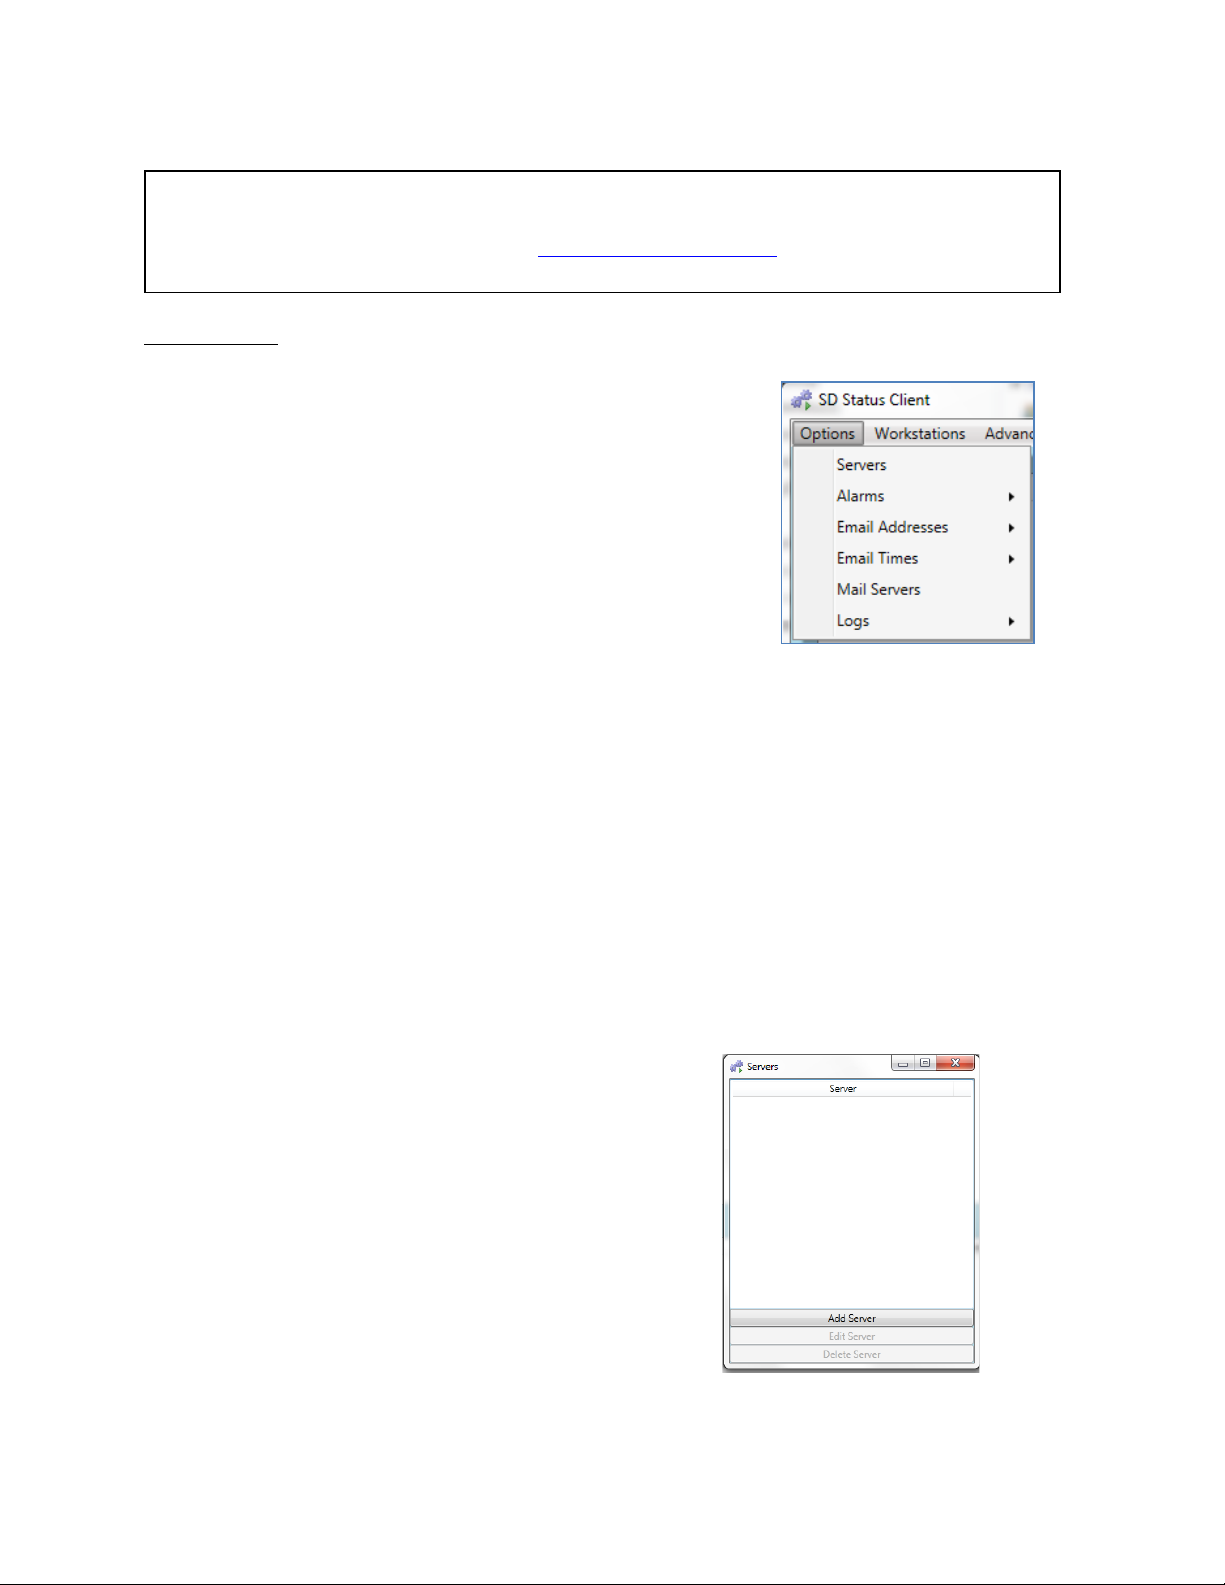
The Options Menu contains most of the essential
Servers
Alarms
Email Addresses
Email Times
Mail Servers
• Logs: open and view logs maintained by SDStatus.
Figure 20 - Options Menu
Click on the Servers option to open the
Servers
Servers
Figure 21 - Servers window
IMPORTANT:
In order for View to be able to detect channels properly, these channels
information on SDIO configuration.
SDStatus View: Operation
must be set up correctly in the SDIO configuration file. Please refer to the SuperDATA
instruction manual (available from the
www.supersystems.com web site) for more
Options Menu
functions of SDStatus (Figure 20). The following menu
options are available:
•
: set up the servers and channels to be
monitored.
•
•
: set up alarms for a number of defined conditions.
: set up email accounts and groups of
email accounts.
•
: set up times at which to send emails
and inhibit the sending of emails based on the
settings that you choose.
•
: set up mail servers, including addresses
and ports.
These menu options are described in greater detail below.
Servers
The Servers option allows you to add servers with channels that SDStatus can monitor. You can
also edit and delete these server entries, as needed.
Adding a Server
From the Servers menu option, you can add SuperDATA servers to which compatible devices
are connected.
window.
If you are opening the
first time, the screen will be blank (as it is in
Figure 21). This is, again, due to the fact that
servers must still be added.
window for the
Super Systems Inc. Page 15 of 83
Page 16
SDStatus View and Workstation Operations Manual
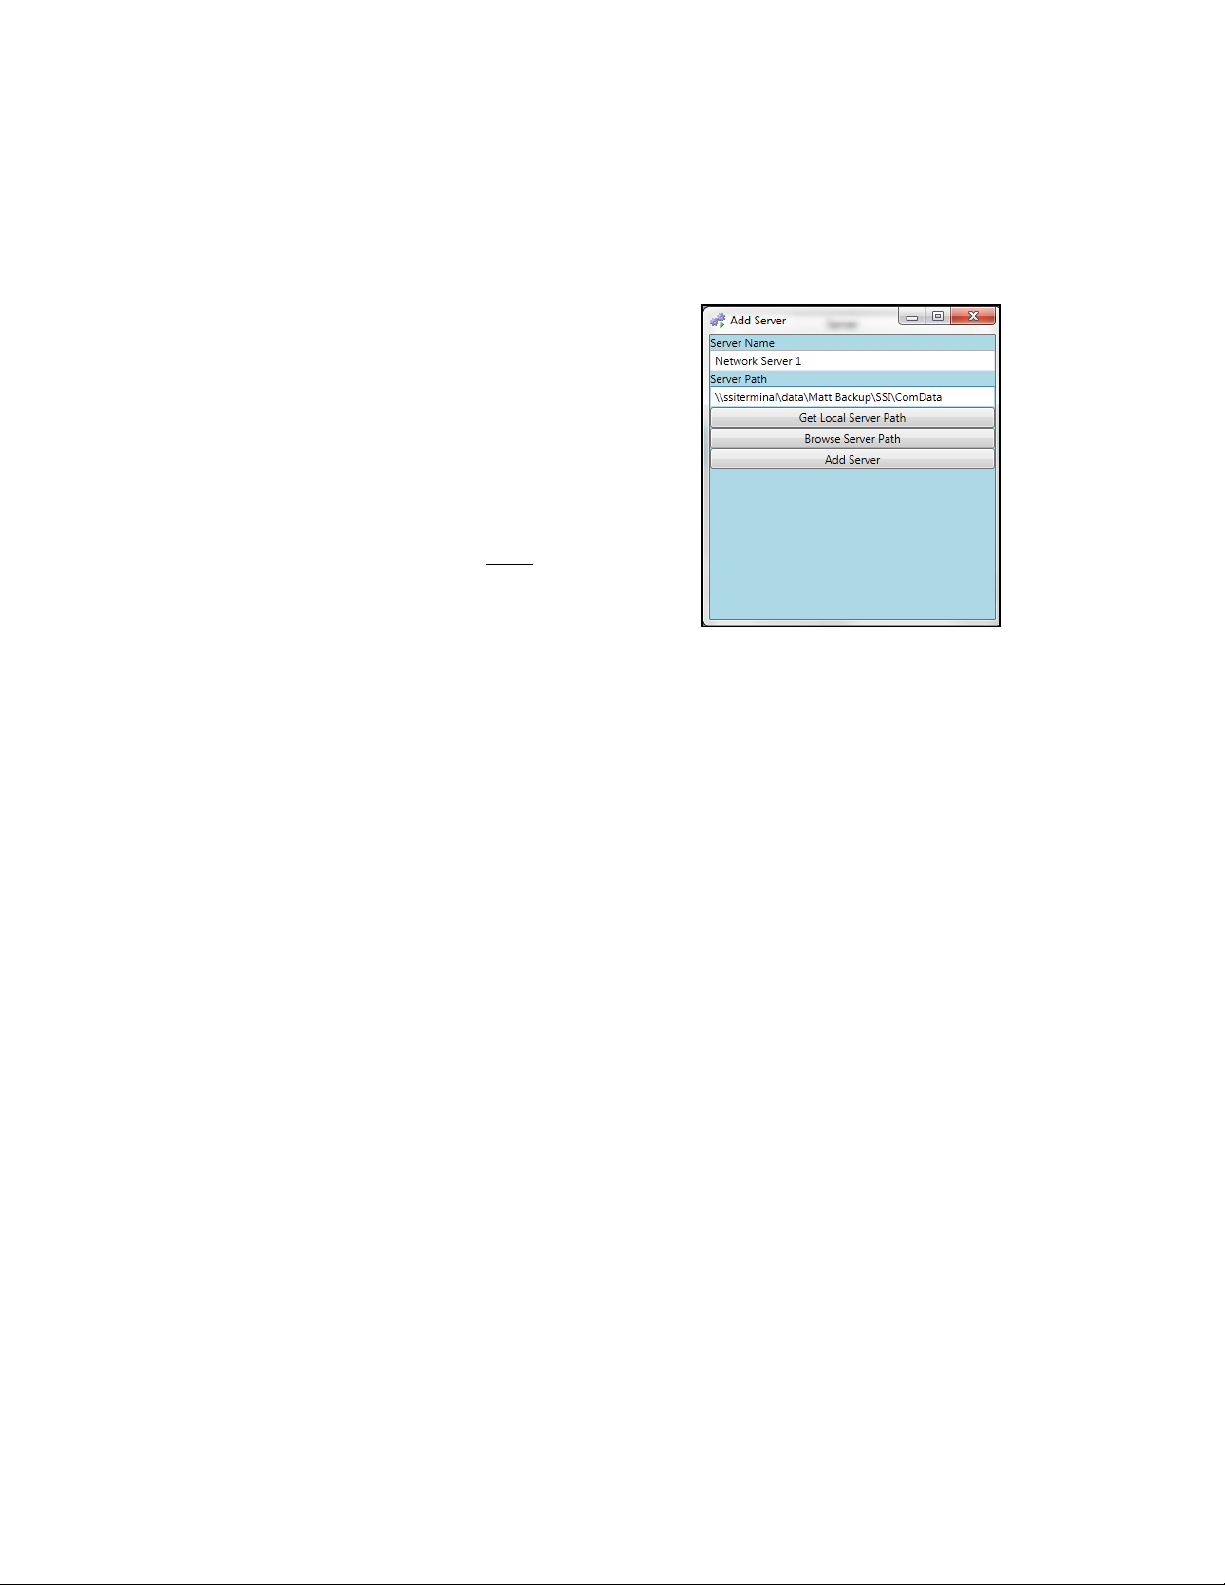
Click “Add Server” to add a server to be
Figure 22 - Add Server window
monitored.
Enter a user-selected server name in the
Server Name field. Then enter the full path to
the folder that contains the file
the applicable server
.
The
IntTbl.dat
IntTbl.dat
on
file
contains the SuperDATA channel and slot data.
This data is updated regularly by SuperDATA.
If you do not know the full folder path, click on
“Browse Server Path” to manually navigate to
the server and path.
If you want to monitor devices on a local
SuperDATA installation, click “Get Local
Server Path”. If View detects a local
installation of SuperDATA, it will populate the
Server Path field with the proper folder path.
Click “Add Server” to add the server. Click the
“X” in the upper right hand corner of the
Servers window to return to the main screen.
Super Systems Inc. Page 16 of 83
Page 17
SDStatus View and Workstation Operations Manual
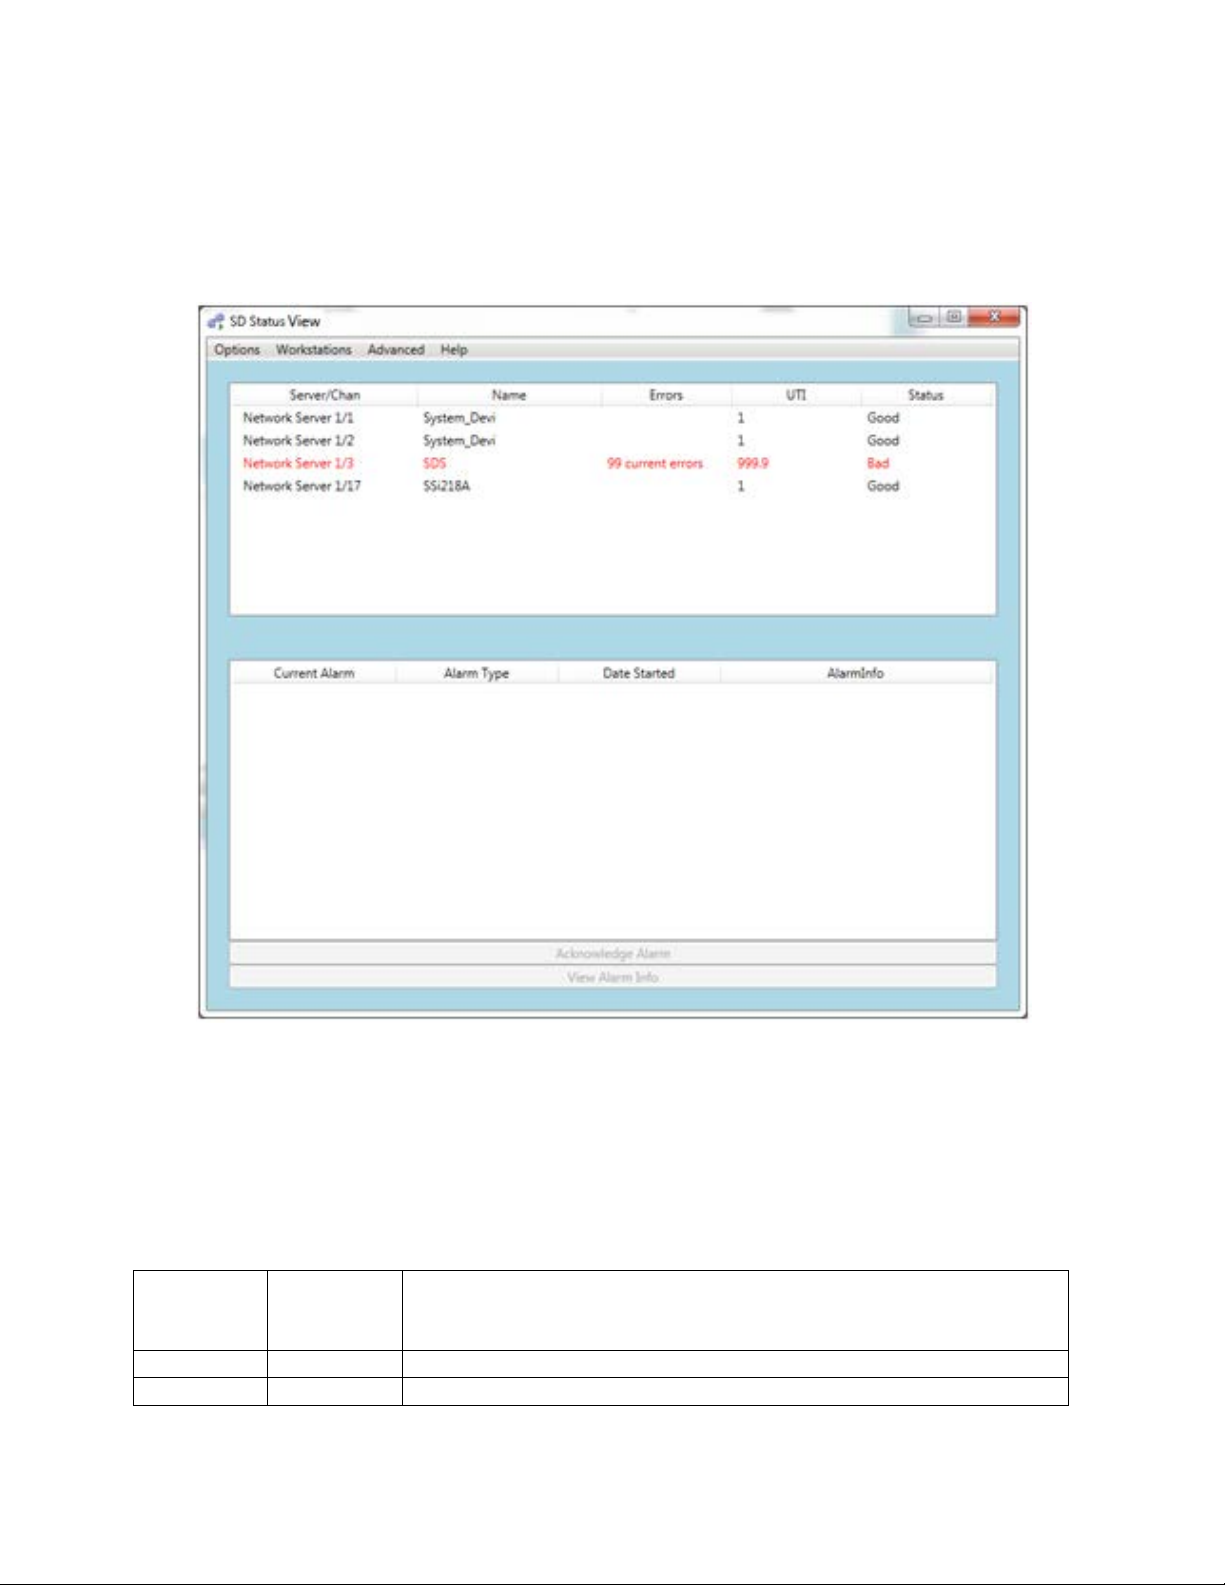
After the server is added, SDStatus Service will access the server’s SuperDATA configuration
Figure 23 - View main screen
with server and channel populated
of these functions are described in more detail in the SuperDATA manual.
Column Title
SDIO
Equivalent, if
applicable
Description
Name
Ch-Name
The channel’s name
Errors
EC
The current consecutive error count
file to determine which channels it needs to monitor. There may be a short delay while this
process completes. Once SDStatus has begun monitoring the applicable channels, they will
appear on the screen (see
Figure 23 for an example). If SDStatus cannot communicate with a
particular channel, the line for that channel will appear in red.
In the above example, no alarms have been set up yet. If an alarm had been set up and an alarm
condition existed, the alarm would be shown in the alarm area below the list of servers and
channels.
Following is a description of the columns visible in the View server/channel list. Note that most
Super Systems Inc. Page 17 of 83
Page 18
SDStatus View and Workstation Operations Manual
Column Title
SDIO
Equivalent, if
applicable
Description
UTI
UTI
The estimated update time interval in seconds (time between
Status
COMM
STATUS
The status (“Good” or “Bad”) of SDIO’s ability to communicate
with the instrument connected to that channel
To edit or delete a server entry, simply
IMPORTANT:
Figure 24 - Editing or Deleting a Server Entry
IMPORTANT:
complete updates for the instrument)
Table 1 - Description of columns in SDStatus server/channel list
A Note on Monitoring Multiple Servers
SDStatus can monitor channels and slot data on multiple servers. Doing so is as simple as
adding multiple servers with valid server path data for SDStatus to use. When alarms are
present, all of the alarm data will appear in the SDStatus View main window.
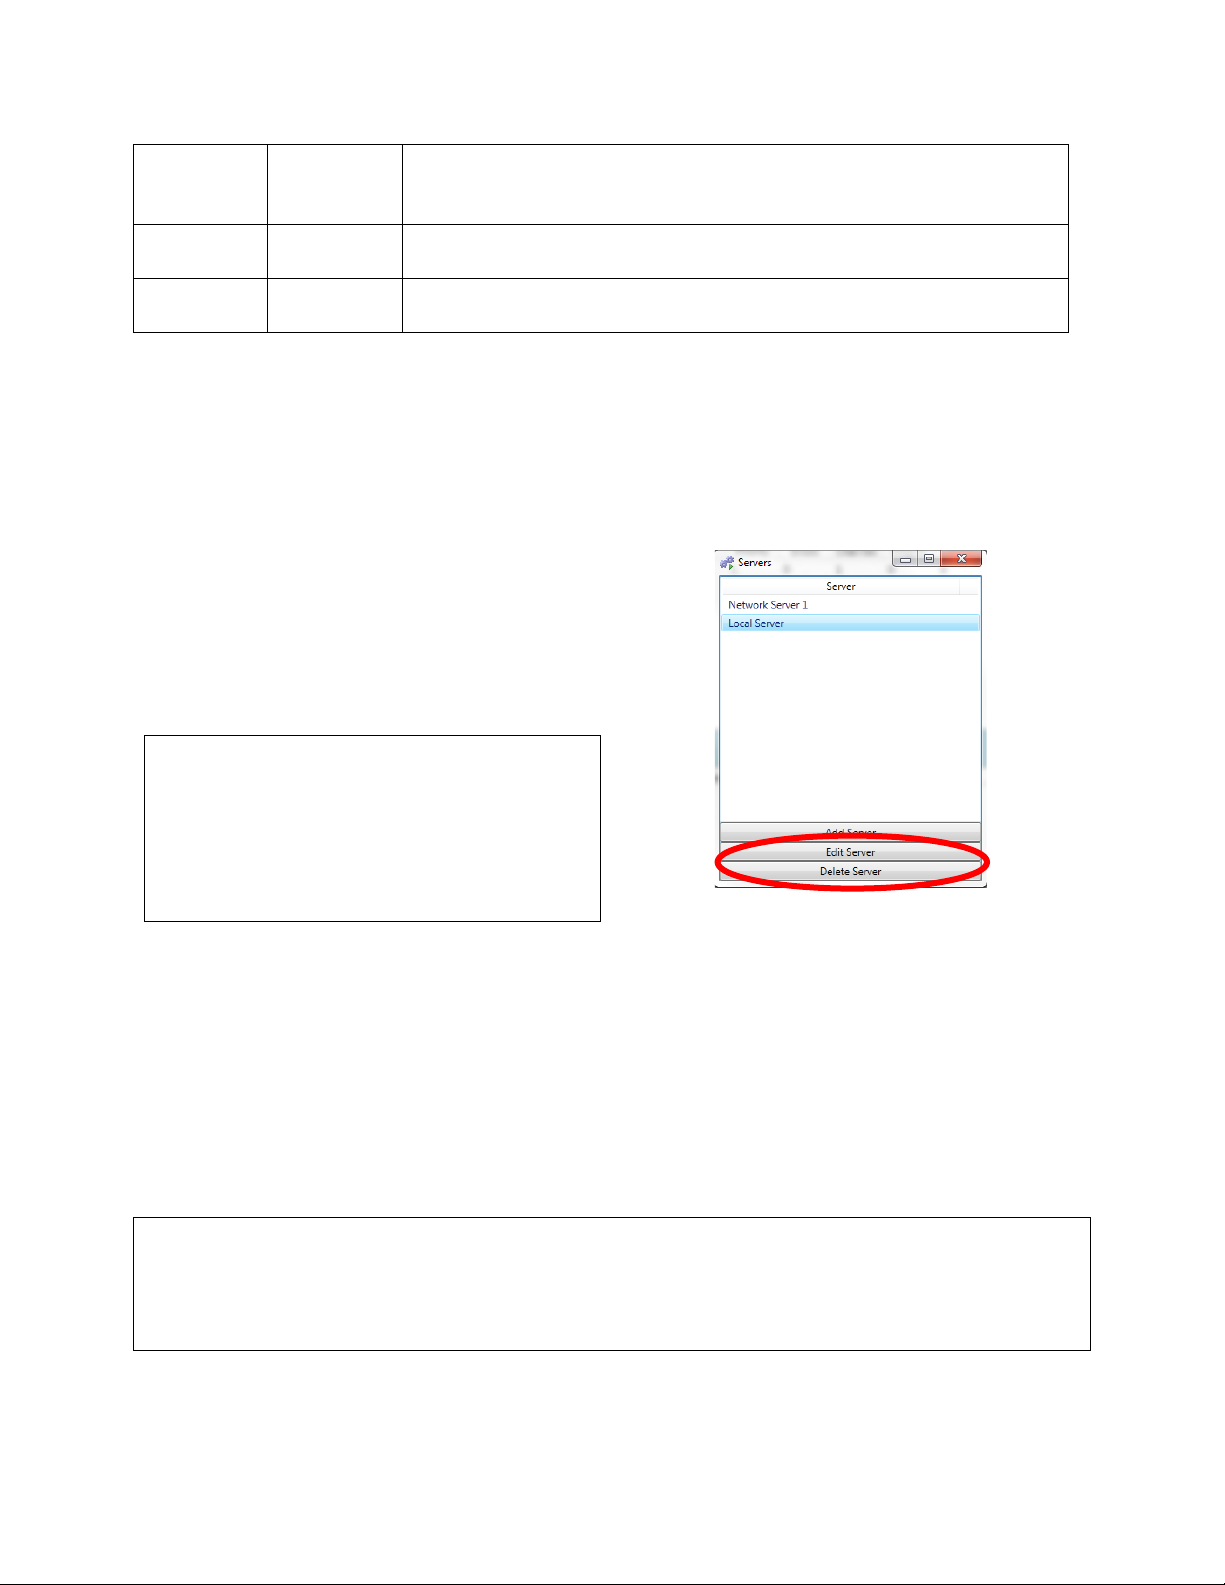
Editing or Deleting a Server Entry
highlight the server whose entry you want to
delete or edit. Then click “Edit Server” or
“Delete Server”. (See
Figure 24.) If deleting a
server from the list, confirm the deletion when
asked.
Use caution when deleting a
server entry. Once an entry is deleted, it
cannot be recovered. In addition, the log
data associated with that server entry is
also deleted and unable to be recovered.
Alarms
Using the Alarms menu, you can add and configure alarms that SDStatus will generate. You can
also add alarms to specific sets or user-defined categories called alarm groups.
Alarms can be set up manually. View also has pre-configured alarm templates built into it.
SDStatus can also build an alarm list from the
server.
Before many alarm conditions can be accurately evaluated by SDStatus, SDIO
must be running on the SuperDATA server with which SDStatus is communicating. See the
Prerequisites section for more details.
Alarms.ini
file on the applicable SuperDATA
Alarm functionality is described in greater detail below.
Super Systems Inc. Page 18 of 83
Page 19
SDStatus View and Workstation Operations Manual
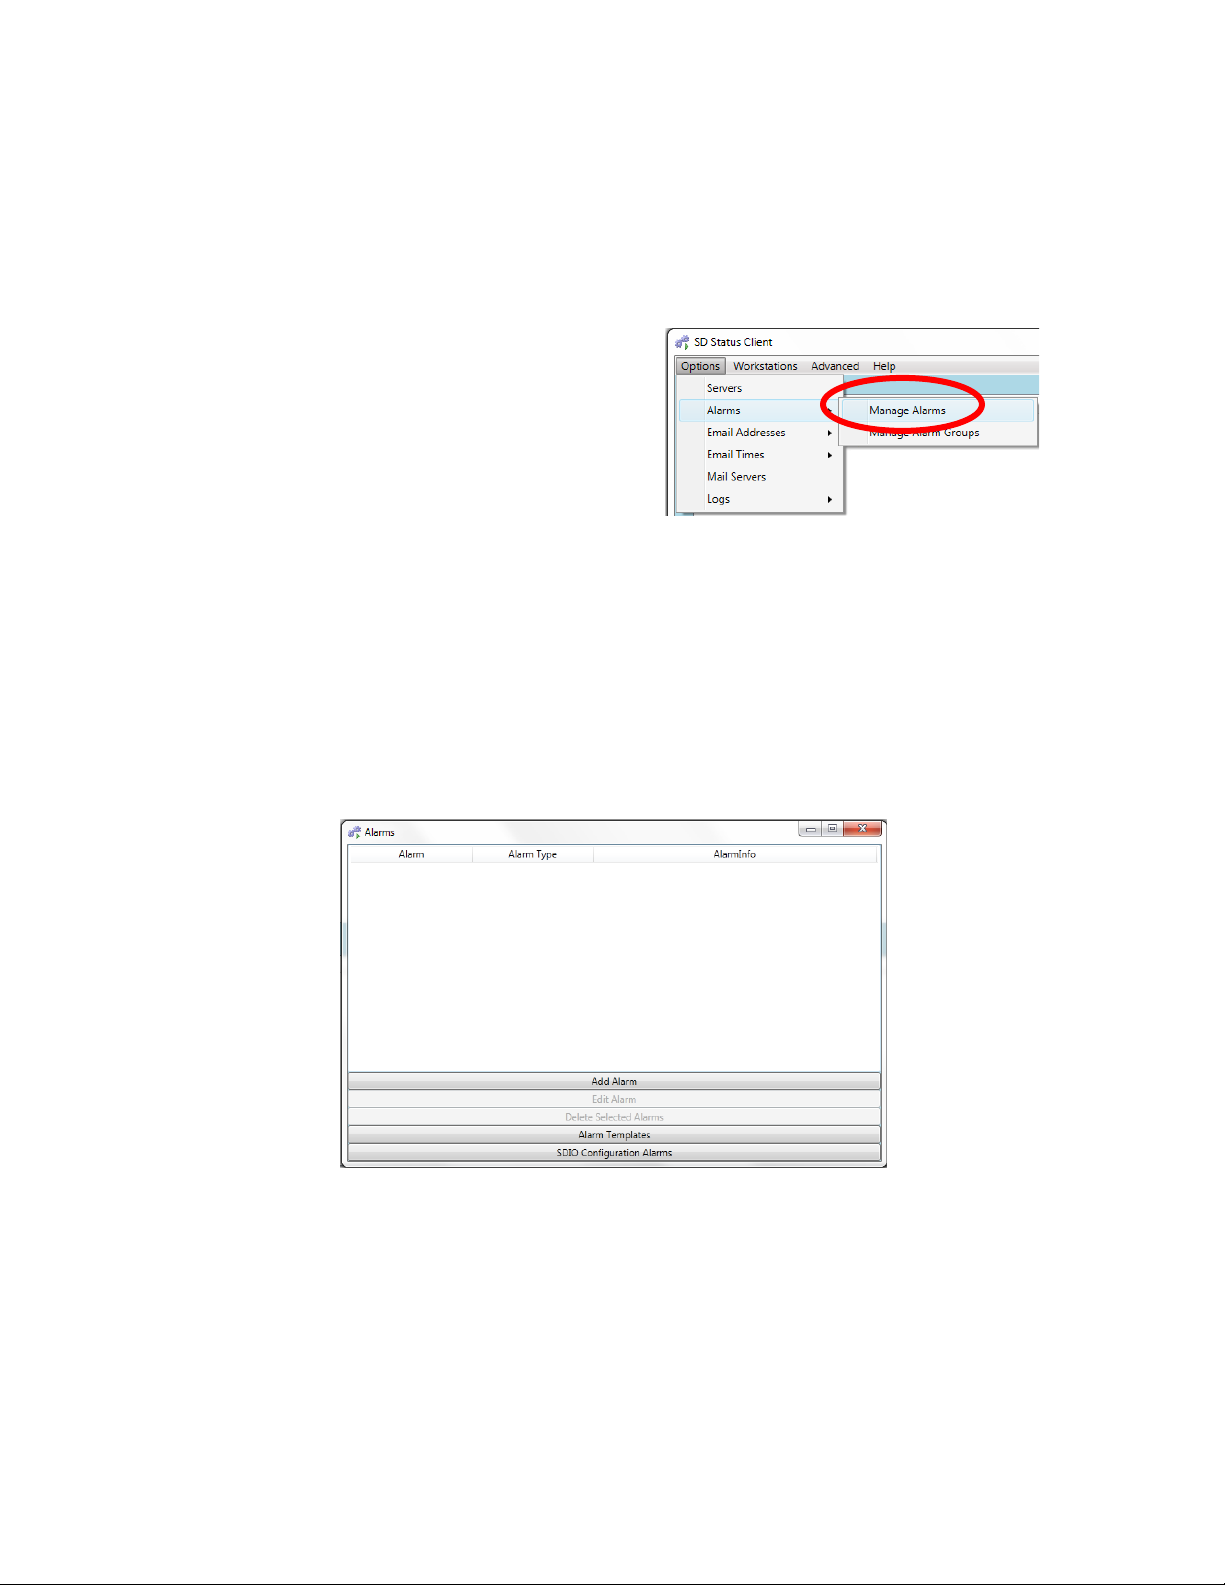
To open the Alarms window, click on “Alarms”
Figure 25 - Alarms Manage Alarms
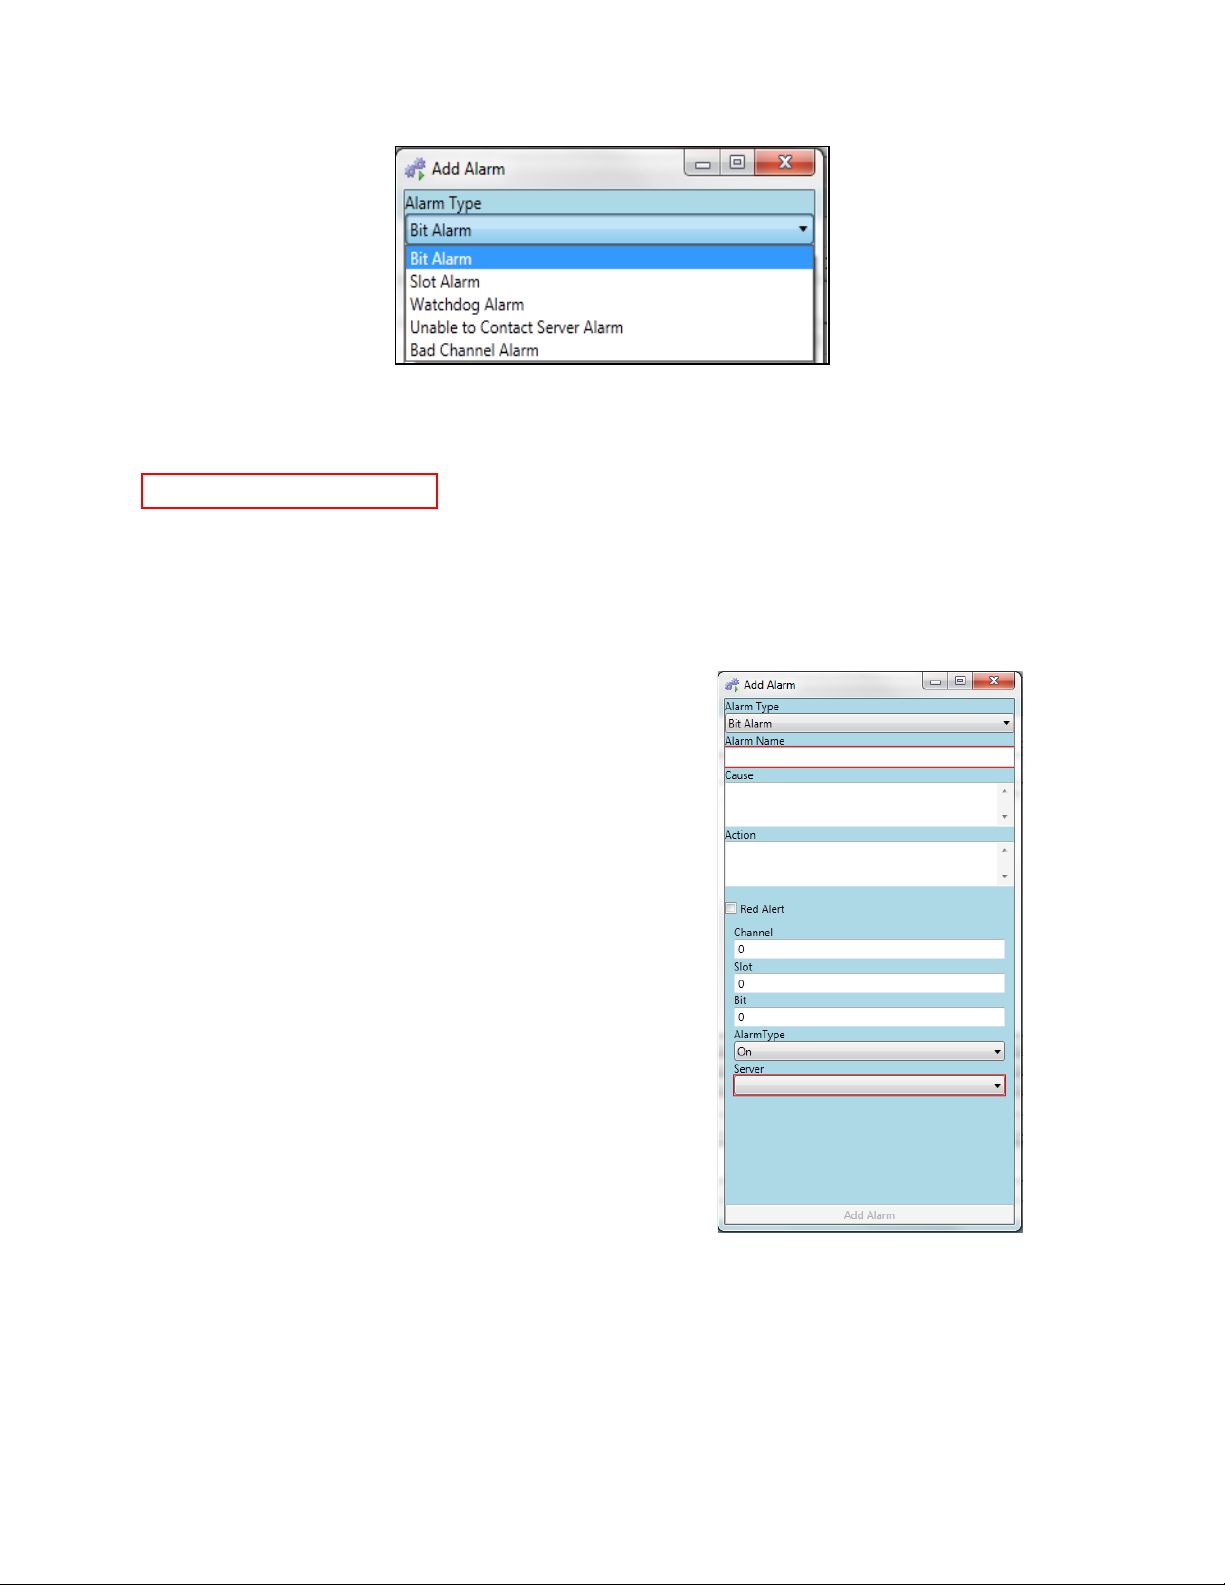
The Add Alarm window will look like the window pictured in Figure 28.
Alarm Type
Manage Alarms
The Manage Alarms function allows you to add alarms manually, by using a number of provided
templates, and by directing SDStatus to build an alarm list from the
Alarms.ini
file on the
applicable SuperDATA server.
“Manage Alarms”.
The Alarms window will appear (Figure 26) with these available options:
• Add Alarm
• Edit Alarm (grayed out if no alarm is selected or no alarms have been added yet)
• Delete Selected Alarms (grayed out if no alarm is selected or no alarms have been
added yet).
• Alarm Templates
• SDIO Configuration Alarms
Figure 26 - Alarms window
Add Alarm
The
drop-down menu is pictured
drop-down menu includes the five alarm types that can be set up in View. The
below.
Super Systems Inc. Page 19 of 83
Page 20
SDStatus View and Workstation Operations Manual
Figure 27 - Alarm Type drop-down menu
Note on boxes outlined in red :
Bit Alarm: A Bit Alarm is used to alert the user
Bit
Alarm
Alarm Name
Cause
Action
Channel
Slot
Bit
Alarm Type
Server
Red Alert
notification area.
Figure 28 – Bit Alarm setup window
These alarm types are described in detail below.
If an editable or selectable box is outlined in red, this means that
there is a problem with that field. Hovering the mouse pointer over the box outlined in red will
bring up more information about the problem.
when a selected bit is on or off (as defined in
View). The following fields are set up in the
setup window (Figure 28):
•
: A user-defined name for the
alarm.
•
: The cause of the alarm (typically
used by operators). This field is optional.
•
recommended (typically used by
operators). This field is optional.
•
that SDStatus will monitor (0 through 127).
•
monitor (0 through 79).
•
monitor (0 through 15). Note that a slot
contains a 16-bit value.
•
will generate an alarm state. (This is a
drop-down menu.)
•
is a drop-down menu; servers must be
defined before one can be selected.)
The
generate a System Tray notification and also
causes the alarm to appear in red in the alarms
: The corrective action
: The channel number of the slot
: The slot number that SDStatus will
: The bit number that SDStatus will
: The bit value (On or Off) that
: The server to be monitored. (This
checkbox causes the alarm to
Super Systems Inc. Page 20 of 83
Page 21
SDStatus View and Workstation Operations Manual
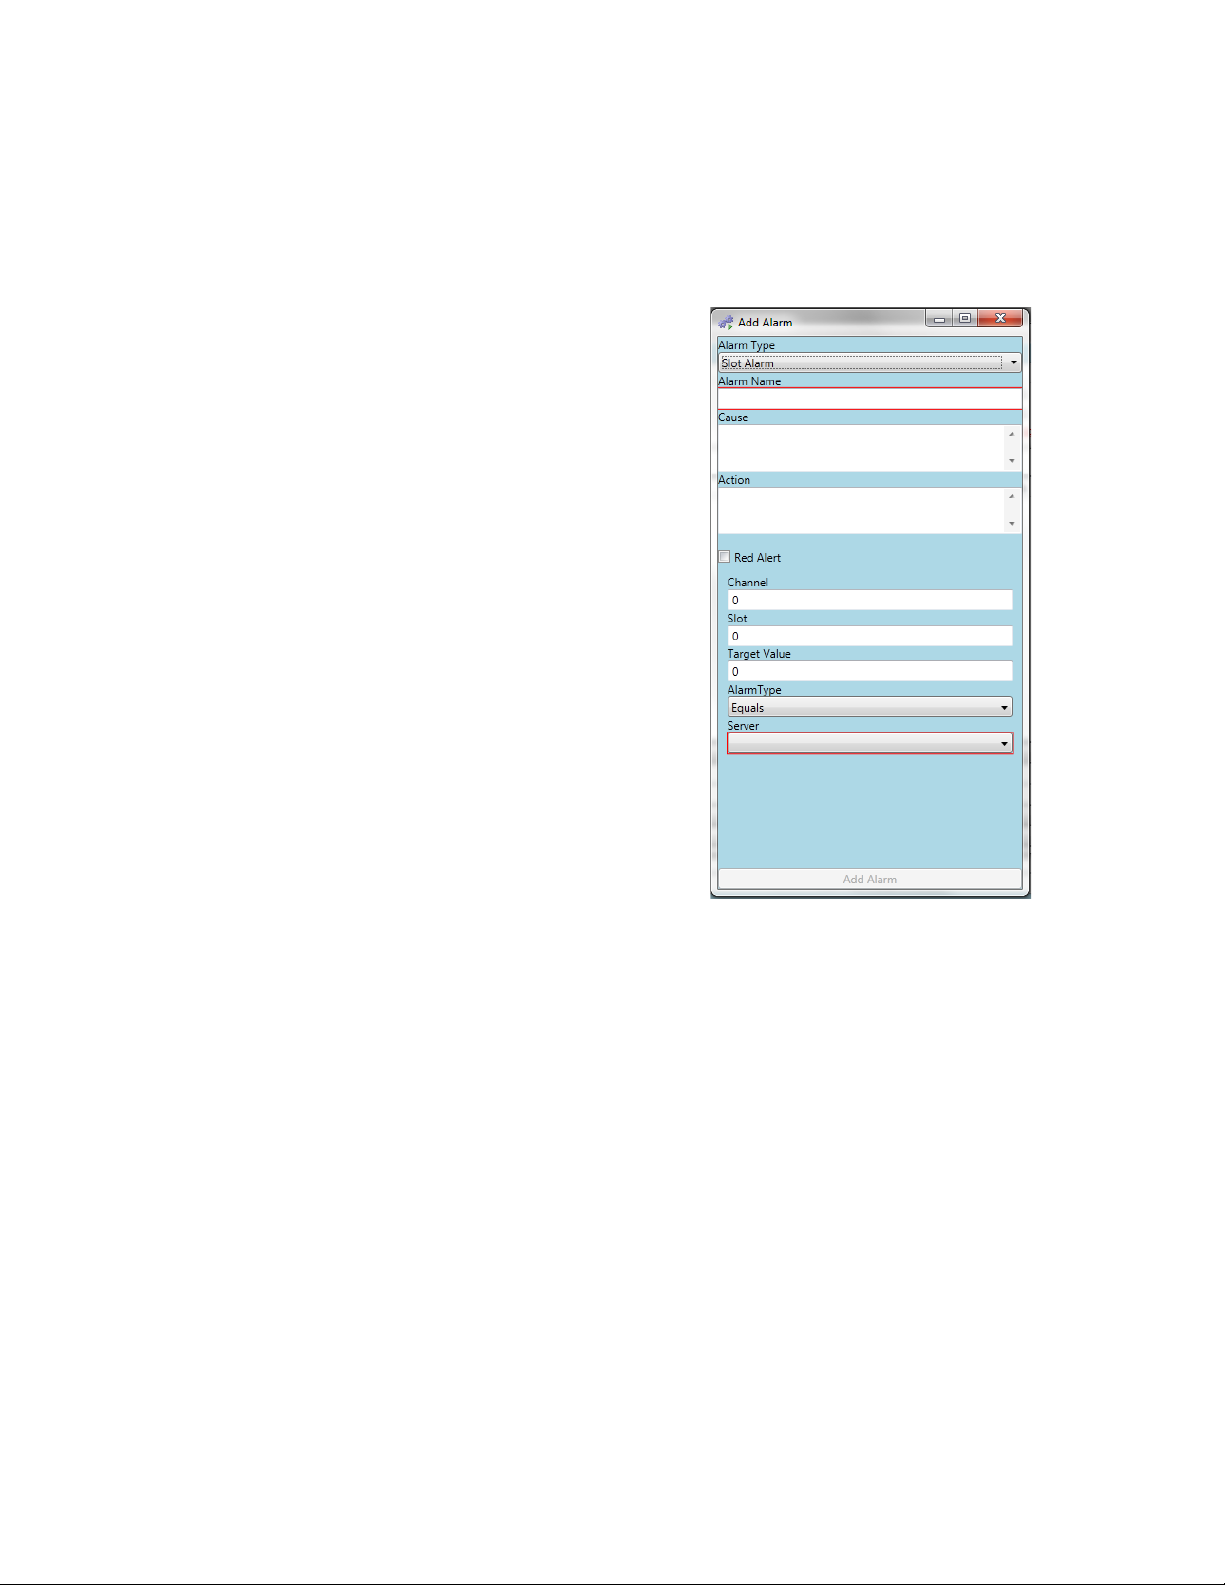
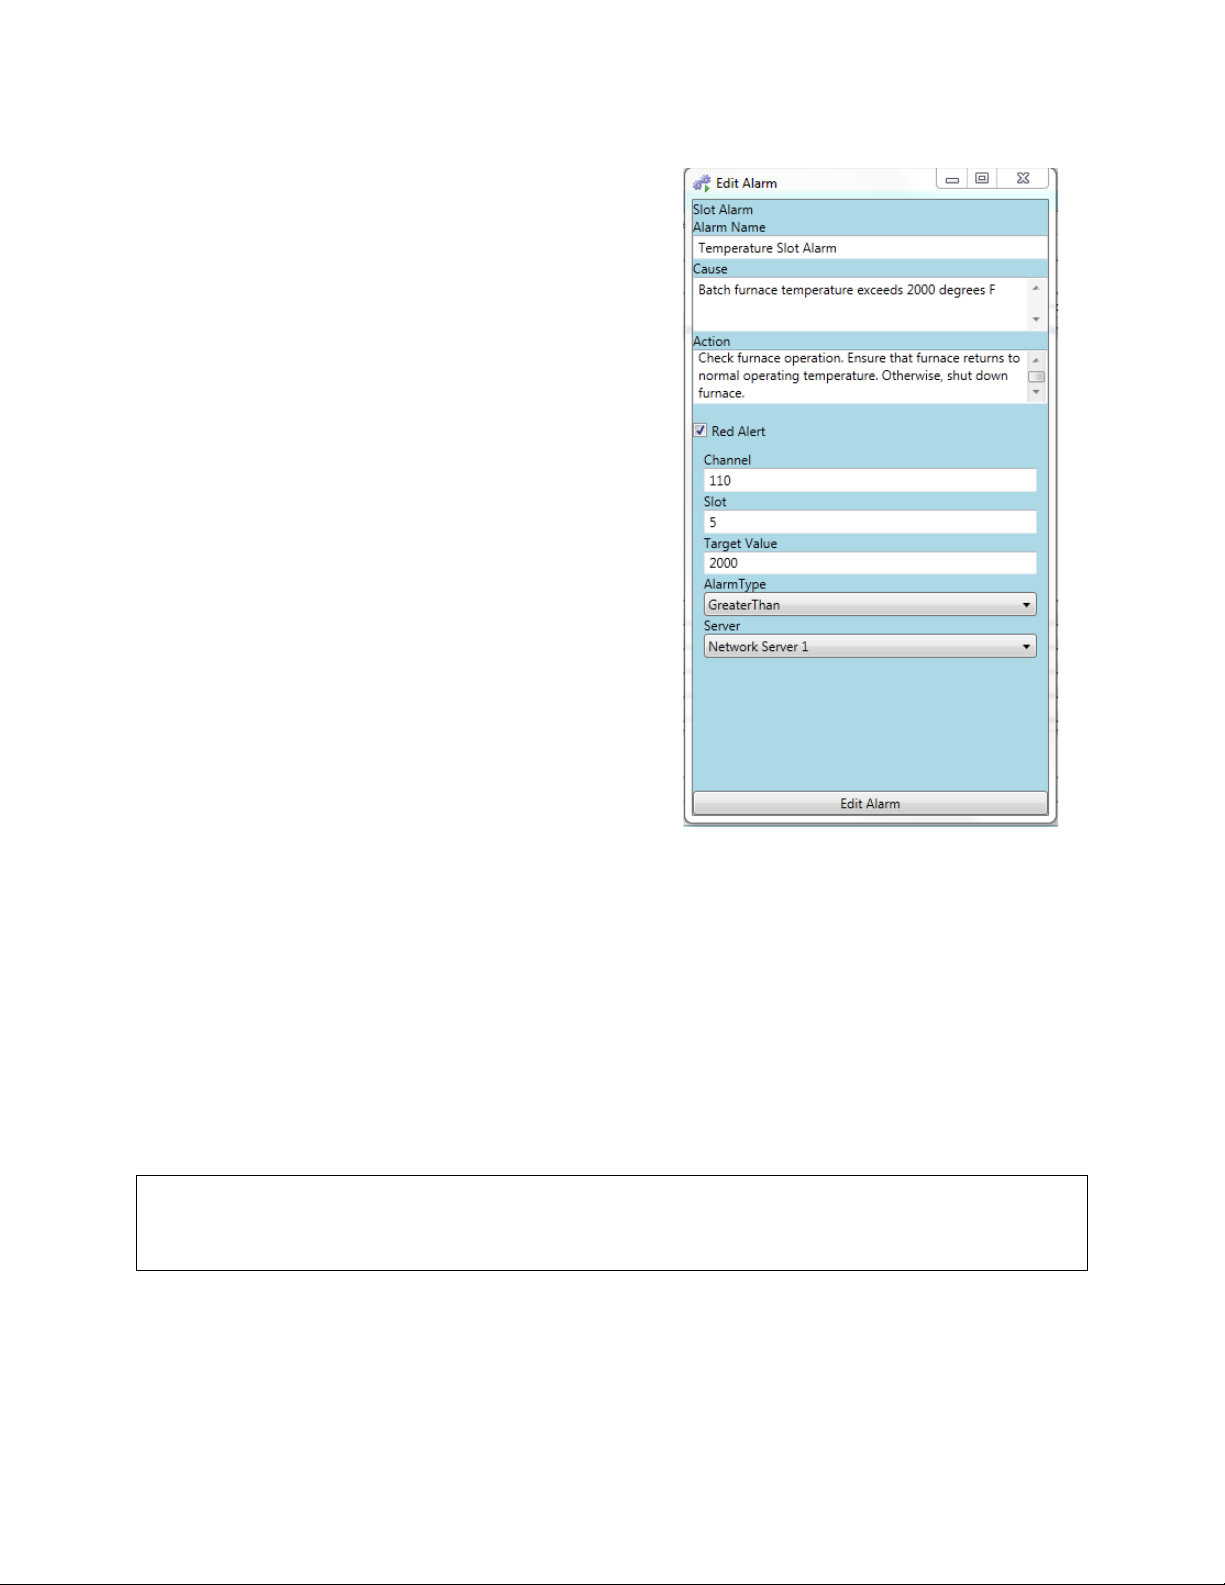
Slot Alarm: A Slot Alarm will alert the user when
Slot Alarm
Alarm Name
Cause
Action
Channel
Slot
Target Value
Alarm Type
Server
Red Alert
notification area.
Figure 29 - Slot Alarm setup window
the value of a selected slot (defined in SDStatus)
within a channel is greater than, less than, or
equal to a value defined by the user. The following
fields are set up in the
(
Figure 29):
•
: A user-defined name for the
setup window
alarm.
•
: The cause of the alarm (typically
used by operators). This field is optional.
•
: The corrective action
recommended (typically used by
operators). This field is optional.
•
: The channel number of the slot
that SDStatus will monitor (0 through 127).
•
: The slot number that SDStatus will
monitor (0 through 79).
•
evaluated based on the Alarm Type field.
•
: The slot value that will be
: This can be set to Equals,
LessThan, or GreaterThan. An alarm state
will be generated when the current slot
value meets the set condition when
compared against the Target Value. For
example, if the Target Value is 12 and
Alarm Type is LessThan, an alarm state
will be generated when the current slot
value is less than 12.
•
: The server to be monitored. (This
is a drop-down menu; servers must be
defined before one can be selected.)
The
checkbox causes the alarm to
generate a System Tray notification and also
causes the alarm to appear in red in the alarms
Super Systems Inc. Page 21 of 83
Page 22
SDStatus View and Workstation Operations Manual
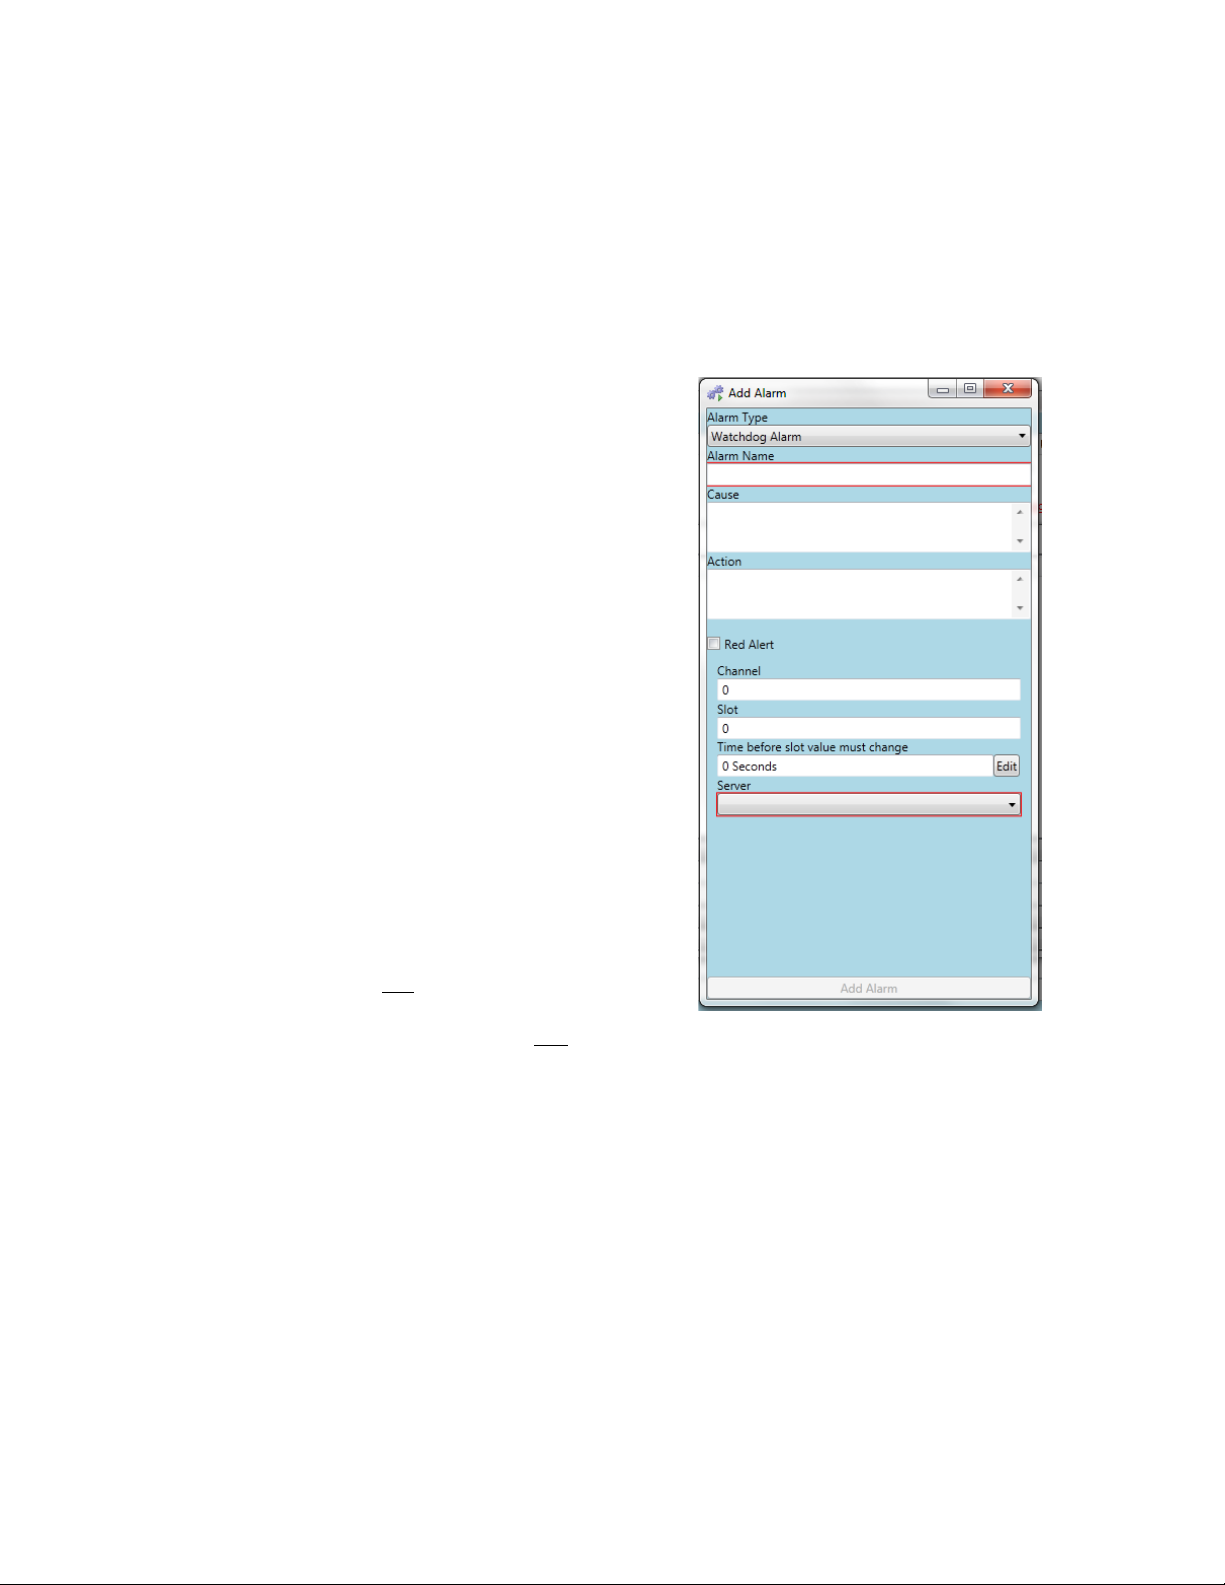
Watchdog Alarm: A Watchdog Alarm alerts the
Watchdog Alarm
Alarm Name
Cause
Action
Channel
Slot
Time before slot value must change
Server
Red Alert
notification area.
Figure 30 - Watchdog Alarm setup window
user when the value of a selected slot (defined in
SDStatus) does not change within a certain
amount of time. The following fields are set up in
the
•
setup window (Figure 30):
: A user-defined name for the
alarm.
•
: The cause of the alarm (typically
used by operators). This field is optional.
•
: The corrective action
recommended (typically used by
operators). This field is optional.
•
: The channel number of the slot
that SDStatus will monitor (0 through 127).
•
•
: The slot number that SDStatus will
monitor (0 through 79).
amount of time that a slot value must
remain the same before an alarm state is
generated. This amount of time can be set
in days, hours, minutes, and seconds.
For example, assume that the Watchdog
Alarm is set to monitor channel 70, slot 5
and the “Time before slot value must
change” is set to 2 minutes. Also assume
that, when the Watchdog Alarm starts
monitoring slot 5, slot 5’s value is 50. In
this instance:
o If slot 5’s value changes to 49 after
one minute, 48 seconds, an alarm
state will not
exist.
o If 2 minutes pass and slot 5’s value
is still 50, an alarm state will
created.
•
: The server to be monitored. (This
is a drop-down menu; servers must be
defined before one can be selected.)
The
checkbox causes the alarm to
generate a System Tray notification and also
causes the alarm to appear in red in the alarms
: The
be
Super Systems Inc. Page 22 of 83
Page 23
SDStatus View and Workstation Operations Manual
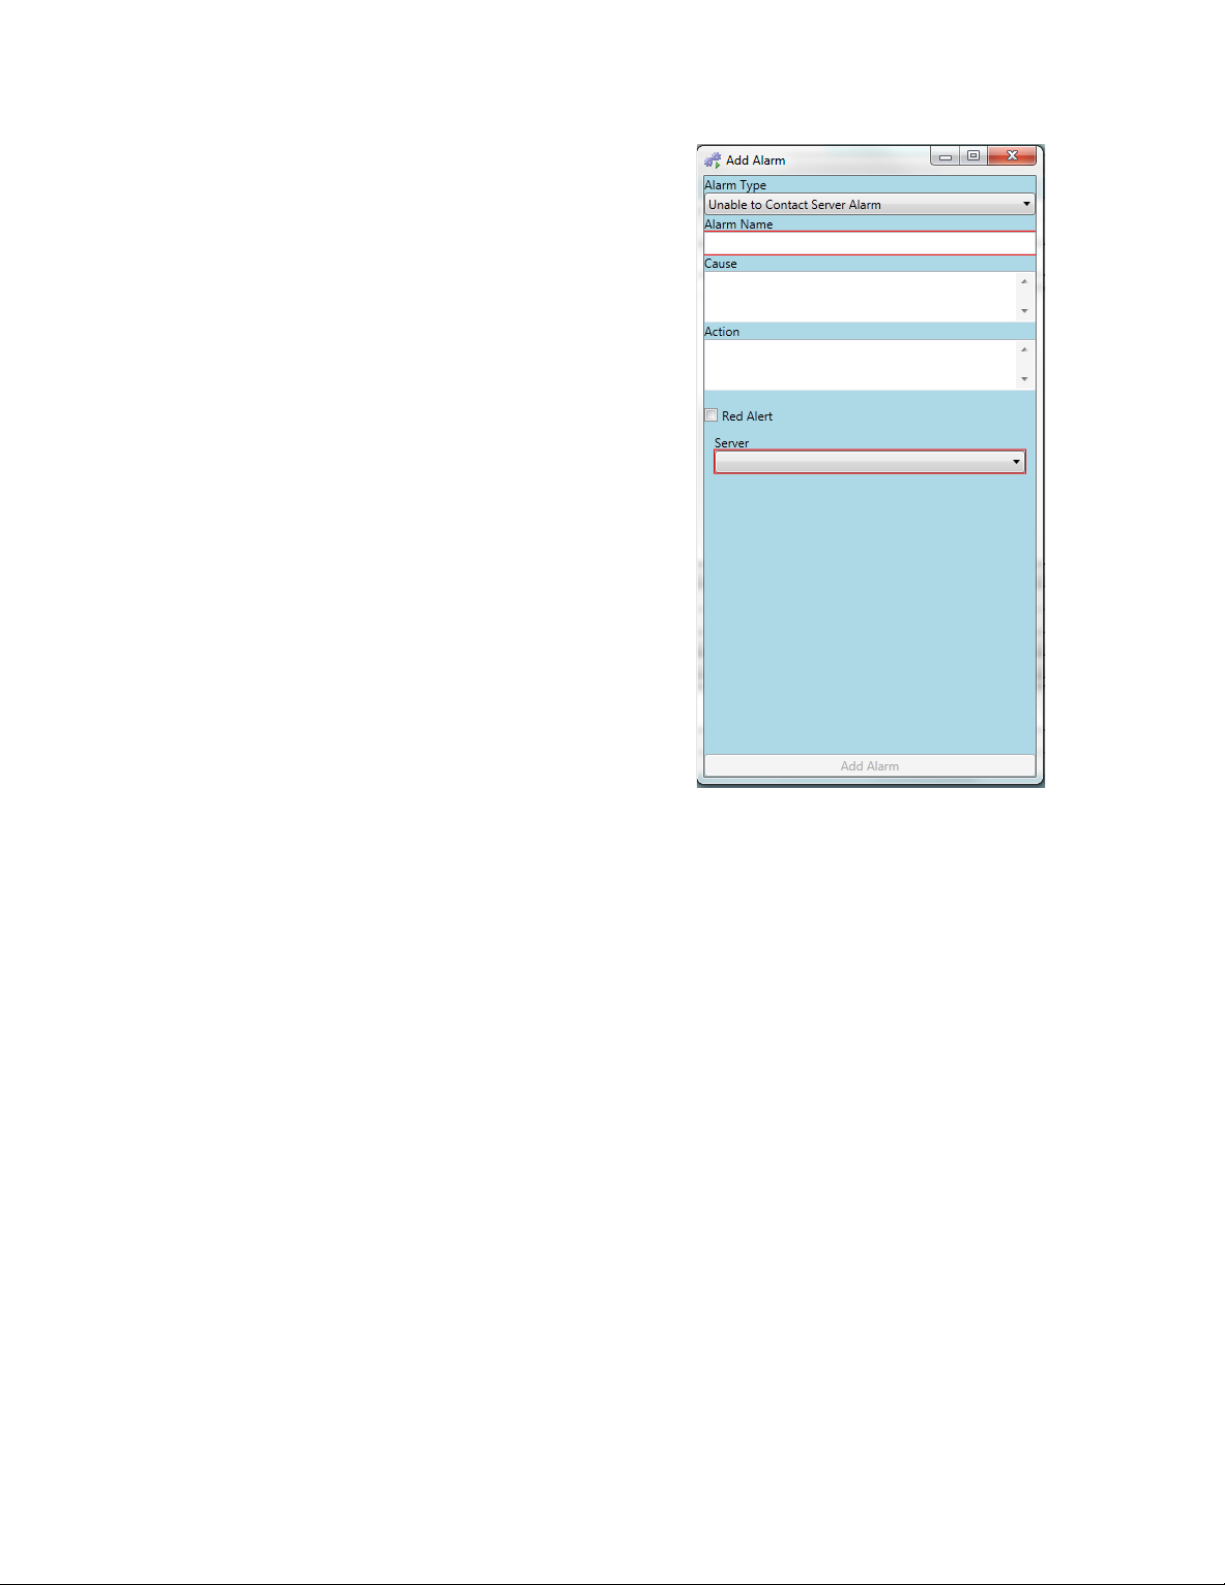
Unable to Contact Server Alarm: This alarm is
Alarm Name
Cause
Action
Server
Red Alert
Figure 31 - Unable to Contact
Server Alarm window
generated when SDStatus unable to find the
IntTbl.dat
file on a defined server. This may
happen when a server is down for some reason,
when a network communication error takes place,
or when there is a problem with the SuperDATA
setup. This alarm will be automatically set if SDIO
is not running. The following fields are set up in
the alarm setup window (
•
Figure 31):
: A user-defined name for the
alarm.
•
: The cause of the alarm (typically
used by operators). This field is optional.
•
: The corrective action
recommended (typically used by
operators). This field is optional.
•
: The server to be monitored. (This
is a drop-down menu; servers must be
defined before one can be selected.)
The
checkbox causes the alarm to
generate a System Tray notification and also
causes the alarm to appear in red in the alarms
notification area.
Super Systems Inc. Page 23 of 83
Page 24
SDStatus View and Workstation Operations Manual
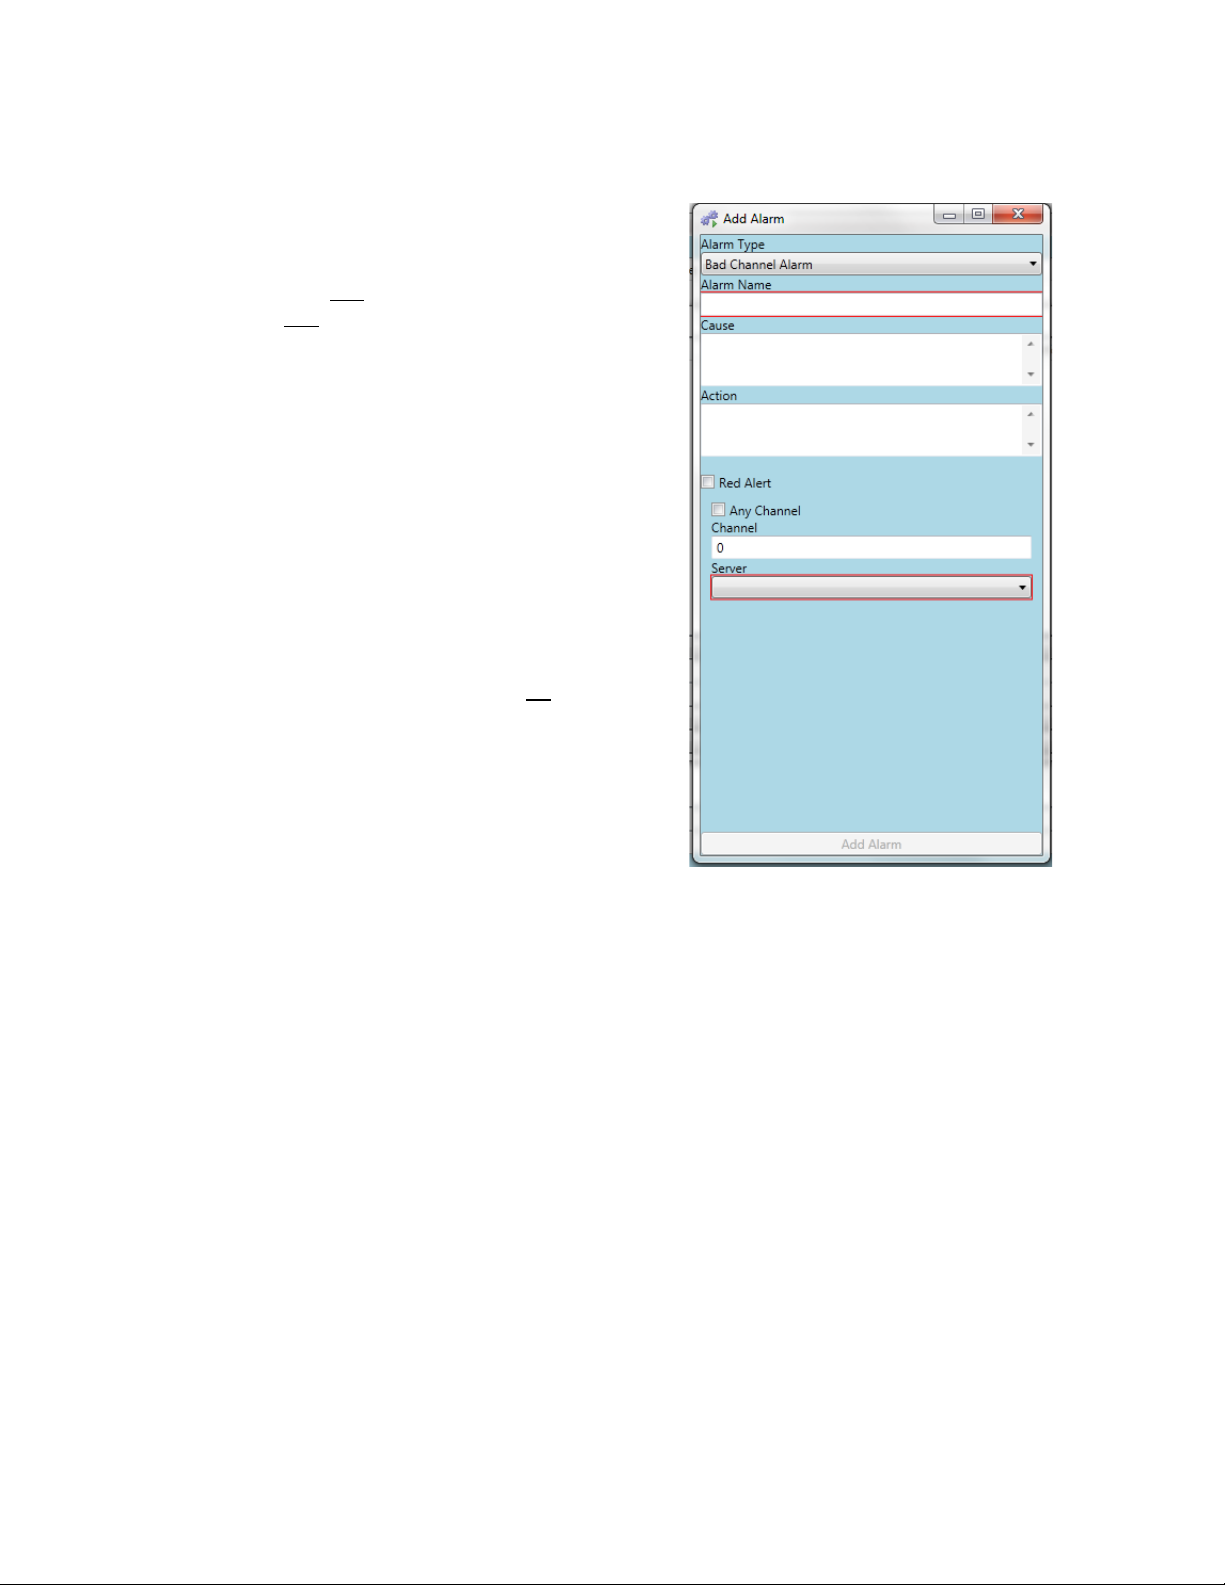
Bad Channel Alarm: This alarm is generated when
Alarm Name
Cause
Action
Channel
NOTE:
Any Channel
Channel
Server
Red Alert
notification area.
Figure 32 - Bad Channel Alarm window
SDStatus determines that the SuperDATA server
cannot communicate with an instrument
connected to a defined channel (or an instrument
connected to any channel), although the defined
SuperDATA server can
IntTbl.dat
file can be read.
be contacted and the
The following fields are set up in the alarm setup
window (Figure 31):
•
: A user-defined name for the
alarm.
•
: The cause of the alarm (typically
used by operators). This field is optional.
•
: The corrective action
recommended (typically used by
operators). This field is optional.
•
: The channel number (0 through
127) to monitor.
When the
checked, SDStatus will monitor all
channels. Checking this box will also cause
the
•
field to disappear.
: The server to be monitored. (This
is a drop-down menu; servers must be
defined before one can be selected.)
The
checkbox causes the alarm to
generate a System Tray notification and also
causes the alarm to appear in red in the alarms
checkbox is
Super Systems Inc. Page 24 of 83
Page 25
Edit Alarm
To edit an existing alarm, first click once on the
Alarms
Alarms
Edit Alarm
Figure 33 - Edit Alarm window
IMPORTANT:
Use caution when deleting alarms. Once an alarm is deleted, it cannot be
recovered.
SDStatus View and Workstation Operations Manual
alarm name in the
“Edit Alarm” button in the
the
window (Figure 33).
window. Then click the
window to open
The alarm category (Bit, Slot, Watchdog, Unable to
Contact Server, or Bad Channel) will be shown at
the top of the Edit Alarm window. You will also
have the ability to edit the other fields for the
alarm, including (as applicable) the alarm name,
cause, and action; whether or not the alarm
causes a “Red Alert” event; channel, slot, value,
and server information; AlarmType (such as
“GreaterThan” for a Slot Alarm or “On” for a Bit
Alarm); and other details that apply to the alarm.
When finished editing the alarm fields, click the
“Edit Alarm” button at the bottom of the window.
Deleted Selected Alarms
To delete an alarm, first select the alarm(s) that you want to delete. If you want to delete a
single alarm, simply select that alarm. If you want to delete multiple alarms, press and hold the
Ctrl key and then click on each individual alarm you would like to delete. Any alarm that is
highlighted will be deleted.
Once you have selected the alarms to be deleted, click the “Delete Selected Alarms” button. A
confirmation box will appear asking if you want to delete the selected alarm(s). Simply click OK,
and the alarms will be deleted.
recovered. In addition, the log data associated with that alarm is also deleted and unable to be
SDIO Configuration Alarms
The SDIO Configuration Alarms option uses data from
found in SuperDATA installations, to populate the alarm list.
Alarms.ini
, an alarm initialization file
Super Systems Inc. Page 25 of 83
Page 26

SDStatus View and Workstation Operations Manual
Server: The server (named as configured
Alarm.ini
file
Get SDIO Alarms from Server: Click this
The Alarm List: The totality of alarms
“Add Selected Alarms” button: This button
which alarms you want to add to SDStatus
Table 2 - SDIO Configuration Alarm window functions
Figure 34 - SDIO Configuration Alarms window
Figure 35 shows alarm names (with their
Figure 35 - SDIO Configuration Alarms window with
alarm names populated from Alarms.ini file
A
B C D AB C D
To load the
Alarms window. The
the one pictured in
Alarms.ini
Figure 34.
alarm list, first click on “SDIO Configuration Alarms” from the main
SDIO Configuration Alarms window will appear. The window will look like
by the user) from which to get the
button to populate the Alarm List (C) with
alarms specified in
contained in the
can be clicked after you have selected
Alarms.ini.
Alarms.ini
file
corresponding channel number) populated
from the
Alarms.ini
file.
Alarm Templates
Alarm templates help simplify the setup of certain types of alarms by allowing the user to select
an alarm type, complete information relevant to that alarm, and then add the newly created
alarm to the Alarm List.
Super Systems Inc. Page 26 of 83
Page 27

SDStatus View and Workstation Operations Manual
After clicking on the “Alarm Templates”
Alarm Templates
Comms Watchdog
Squeeze Watchdog
Datalog Watchdog
PMTrack Watchdog
is running.
Figure 36 - Alarm Templates from which to select
template window. The screens below show each of the four template windows.
button, the
appear (
options:
Figure 36) with the following template
•
longer used; use the
Server Alarm instead (see page 23).
•
to see whether data log files are being
compressed within the correct
timeframe.
•
to see whether SuperDATA is writing to
a data log file each minute (as
SuperDATA is designed to do).
•
the activity of SSi’s PMTrack program
(if applicable) to determine whether it
Highlight the alarm template you want to use. Then click “Select Alarm Template” to open the
window will
:
This template is no
Unable to Contact
: This alarm checks
: This alarm checks
: This alarm checks
Super Systems Inc. Page 27 of 83
Page 28

SDStatus View and Workstation Operations Manual
Figure 37 - Comms Watchdog Alarm
Template screen
Figure 38 - Squeeze Watchdog Alarm
Template screen
Figure 39 - Datalog Watchdog Alarm
Template screen
Figure 40 - PMTrack Watchdog Alarm
Template screen
Super Systems Inc. Page 28 of 83
Page 29

SDStatus View and Workstation Operations Manual
As you can see, View pre-populates the Alarm Name, Channel and Slot numbers, and “Time
before slot value must change” fields. The Channel and Slot numbers are determined by
corresponding default values for the type of alarm that is being set up. For example, SuperDATA
logs data to the datalog file every 60 seconds (one minute). The Datalog Watchdog template
presets the alarm to check every one minute, 30 seconds so that a sufficient amount of time is
allowed for SuperDATA to write to the datalog file and then for SDStatus to read the changed
slot value once the datalog file is written.
Use the Server drop-down menu to select the server on which to perform the alarm monitoring.
It is recommended that you add a Cause and Action to let the operator know the cause and
specific corrective action to take, when needed. Finally, if the alarm needs to generate a System
Tray notification and must be acknowledged by the user, click the “Red Alert” box.
Click the “Add Alarm” button when finished. The new alarm will then be added to the alarm list.
Manage Alarm Groups
The Manage Alarm Groups menu allows you to add specific alarms to groups that you define.
These alarm groups may be set up for specific purposes. You may have one group of people who
need to be aware of one set of alarms and another group of people who need to be aware of a
completely different set of alarms. Therefore, an alarm group could represent departments,
supervisors, management, operators, and so forth.
To set up alarm groups, you must first define them. First, select “Alarms” “Manage Alarm
Groups” to open the
Group area and the Other Alarms area are both empty at first. Click on the “Edit Groups” button
at the top of the window.
NOTE: If any alarm groups are already defined, you will see them when you click on the “Group”
drop-down list at the top of the
Manage Alarm Groups window (Figure 41). You will see that the Alarms in
Manage Alarm Groups window.
Super Systems Inc. Page 29 of 83
Page 30

SDStatus View and Workstation Operations Manual
Figure 41 - Manage Alarm Groups window
After you click on “Edit Groups”, the Alarm Groups window will appear. To add an alarm group,
simply click on the “Add Group” button at the bottom of the
name of the alarm group in the Group field, and click the “Add Group” button in the
window. The
Alarm Groups and Add Group windows are pictured in Figure 42.
Alarm Groups window, type in the
Add Group
Figure 42 - Alarm Groups / Add Group windows
Super Systems Inc. Page 30 of 83
Page 31

SDStatus View and Workstation Operations Manual
A B C D E G H
F
The “Edit Group” button can be used to rename a group that has been previously defined. The
“Delete Group” button allows you to delete an alarm group.
Once groups have been set up, the Manage Alarm Groups window can be used to add alarms to
the groups.
Figure 43 shows an example of the window; Table 3 provides an explanation of the
components of the window.
Figure 43 - Manage Alarm Groups options
Super Systems Inc. Page 31 of 83
Page 32

SDStatus View and Workstation Operations Manual
When clicked, the Group drop-down box displays a list of all of the
it. (If no alarm groups are defined, the drop-down list will be blank.)
The “Edit Groups” button opens the Alarm Groups window.
The Alarms in Group area shows which alarms are a part of the currently
The “Remove Selected Alarms From Group” button moves the selected
alarm from the Alarms in Group area to the Other Alarms area.
The “Alarm Info” button shows detailed information for the
currently selected alarm.
The Other Alarms area shows email addresses that have been set up in
SDStatus but are not part of the currently selected group.
The “Add Selected Alarms To Group” button moves the selected alarm
The “Alarm Info” button shows detailed information for the
currently selected alarm.
A
B C D E G F H
currently defined alarm groups. Click on one of the group names to select
selected alarm group.
from the Other Alarms area to the Alarms in Group area.
Table 3 - Manage Alarm Group functions (with alarm groups created)
Alarm groups are used in conjunction with email address groups to define groups of people who
will receive email notifications of specific alarms. Refer to Email Times for more details on how
to use the alarm groups in conjunction with the email address groups.
Email Addresses
SDStatus Service can send alarm notifications to defined email addresses. The Email Addresses
menu allows you to set up these addresses as well as the groups of email addresses to which
emails are sent.
Manage Email Addresses
The Email Addresses window is where you manage email addresses in View. To access this
menu, select “Options” “Email Addresses” “Manage Email Addresses”. The
Addresses window will appear (Figure 44).
Figure 44 - Email Addresses window
Email
The Email Addresses window allows you to add a new email address, edit a previously added
address, and delete an address. From this window, you can also set time periods during which
emails are not sent to a particular address. In the
Super Systems Inc. Page 32 of 83
above example, a previously defined email
Page 33

SDStatus View and Workstation Operations Manual
To add an email, click the “Add Email Address”
Add Email Address
Figure 45 - Add Email Address window
NOTE: SDStatus can be used to send emails to many
Edit
Email Address
Figure 46 - Edit Email Address window
To delete an existing email address, simply select the email address you want to delete and
IMPORTANT:
address has been selected. Therefore, all of the buttons in the window can be selected. If no
email addresses have been defined, or if no email address is selected, only the “Add Email
Address” button can be selected; the other buttons will be grayed out and cannot be selected.
button. This will bring up the
window (
Figure 45). Simply type an email address to
add and click the “Add Email Address” button in this
window to save it.
mobile devices. Refer to Appendix 3: Sending
Notifications to a Mobile Device Using SDStatus for
more details.
To edit an existing email address, click on the email
address you want to edit and then click the “Edit
Email Address” button. This will bring up the
window (Figure 46). Edit the email
address as needed. Then click the “Edit Email
Address” button to save your edits.
click the “Delete Email Address” button. Confirm deletion when the confirmation window
appears.
Use caution when deleting an email address. Once an address is deleted, it
cannot be recovered. In addition, the log data associated with that address is also deleted and
unable to be recovered.
Manage Email Address Groups
The Manage Email Address Groups window provides all of the functions needed to set up email
addresses to which SDStatus Service can send notifications.
Figure 47 shows the Manage Email
Address Groups window and the Email Address Groups window and identifies the window
components. Below this figure, you will find explanations on what each component does.
Super Systems Inc. Page 33 of 83
Page 34

SDStatus View and Workstation Operations Manual
Figure 47 - Manage Email Address Groups and Email Address Groups windows
When clicked, the Group drop-down box displays a list of all of the
will be blank.)
The “Edit Groups” button opens the Email Address Groups window
(components of which are described in C and D below).
The Email Address Groups display area shows the email address groups
empty).
The buttons for the Email Address Groups window are:
delete, and then click the “Delete Group” button to delete it.
NOTE: Features described in E, F, G, and H can be used only when an email address
group is selected in the Group drop-down menu (A).
The Email Addresses in Group area shows which email addresses are a
The “Remove Selected Email Addresses From Group” button allows you
Other Email
Addresses list below this list.
The Other Email Addresses area shows email addresses that have been
To add an alarm to the currently selected group, first select the alarm
Email Addresses in Group
above.
Table 4 - Manage Email Address Groups and Email Address Groups functions
A
B E F
G
H
C
D AB
C D E F G
H
currently defined email address groups. Click on one of the group names
to select it. (If no email address groups are defined, the drop-down list
that have been created (if none have been created, this area will be
• “Add Group”. Click this button to add an email address group.
• “Edit Group”. Click on an email address group whose name you want
to change, and then click the “Edit Group” button to change the
name.
• “Delete Group”. Click on an email address group that you want to
part of the currently selected email address group.
to remove email addresses from the list of emails in the selected group.
First select the email address you want to remove, and then click this
button. The removed email address will be moved to the
set up in SDStatus but are not part of the currently selected group.
and then press the “Add Selected Email Addresses to Group” button. The
selected alarm will be moved to the
Super Systems Inc. Page 34 of 83
area
Page 35

SDStatus View and Workstation Operations Manual
Email Times
The Email Times menu (shown expanded in Figure 48) contains options essential to scheduling
email notifications for defined conditions. These options are
Manage Inhibit Email Times. (Under Manage Inhibit Email Times are two sub-options:
Individuals and Groups.) All of this functionality is described below.
Manage Alarm Email Times and
Figure 48 - Email Times menu options
Manage Alarm Email Times
One of the most important functions of SDStatus, its email notification capability, requires
coordination between the alarm groups and email address groups. The
Manage Alarm Email
Times function provides this coordination.
The two key pieces are alarm groups and email address groups. SDStatus Service will send
alarm notifications from a designated alarm group (when an alarm condition is present) to a
designated email group after a set period of time has passed. This will allow operators to try
resolving the alarm first; an “escalation group” can be set up to receive email notifications in
the event that an alarm stays active for a defined period of time.
To set up a notification email, first click on “Options” “Email Times” “Manage Alarm Email
Times”. This will open the
Email Times window (Figure 49). This window contains four columns.
The Alarm Group column (“A”) shows what alarm group the notification applies to. The next
column, Email Address Group (“B”), shows what email address group the notification applies to.
The third column (“C”) is called Time Before Email and indicates the amount of time an alarm
condition must be true before an email notification is sent to the email address group the first
time. The fourth column, Frequency (“D”), shows how often an email notification will be sent to
the email address group while an alarm condition is true
. The Frequency field is optional; if no
Frequency is set, an email notification will be sent once and will not be sent again until the
alarm is cleared either by the user or by the alarm no longer being active AND
then the alarm
condition becomes true again for the time period defined under Time Before Email. NOTE: If an
alarm is acknowledged by a user, no further emails will be sent for that alarm unless the alarm
condition becomes no longer true and later becomes active again. Emails for other
alarms in
the group that are active will still be sent.
Super Systems Inc. Page 35 of 83
Page 36

SDStatus View and Workstation Operations Manual
AB C
D
Figure 49 - Email Times window
Click the “Add Email Time” button to set up a notification.
The Add Email Time window (Figure 50) allows you to set up the association between an alarm
group and an email address group. When an alarm condition is present within the alarm group
for a set period of time, an email will be sent to the addresses in the email address group.
Figure 50 - Add Email Time window
Select the alarm group in the Alarm Group drop-down box and the email address group in the
Email Address Group drop-down box. Then set the amount of time that must pass before an
alarm notification email is sent to the selected email address group. If you want to set a
frequency for repeating the notification email (as long as an alarm condition remains true) after
the first notification is sent, click the “Use Frequency” box and enter the desired frequency
times. Click “Add Email Time” when finished.
If you want the process of sending the email to start after the alarm becomes active, set the
email time to 0 Days, 0 Hours, and 0 Minutes.
Super Systems Inc. Page 36 of 83
Page 37

SDStatus View and Workstation Operations Manual
IMPORTANT:
If SDStatus Service is set up not to send emails to certain addresses at certain
Email Times
Times for more details.
The Manage Inhibit Email Times option allows you to do two things:
Individuals
Groups
Individuals
Groups
Individuals
In the example shown in Figure 50, when an alarm condition is present in the
group for 5 minutes, a notification will be sent to email addresses in the
address group. As long as that alarm condition remains true, a notification will be sent to the
same email addresses every hour thereafter.
times, then those settings will override the settings in
If you want to delete an email time, simply click on the email time you want to delete and click
“Delete Email Time” in the
Manage Inhibit Email Times
1. Set time periods during which emails will not be sent to a defined address or group of
addresses. This option is useful when certain people should not receive emails during
certain times; one example may be operators working in shifts.
2. Prevent emails from being sent to a defined email address, or group of addresses, at any
time (until the setting is disabled).
To use this option, select “Manage Inhibit Email Times” and then select
emails and
and the
The
defined in View. To set up Inhibit Email Times for an individual email address, first select it and
then click “Edit Inhibit Email Times”. As shown in
you to set up one or more time ranges during which emails will not be sent. If you want to inhibit
all emails to that email address, simply check the “Inhibit All Emails” checkbox. Using the dropdown boxes provided, select a start time and end time for the inhibited period. These periods
are based on a standard 7-day week. You may set up as many of these periods as you wish. In
the example shown in Figure 51, the first inhibited time period starts on Saturday at 12:00 a.m.
and ends on Monday at 12:00 a.m.; the second period starts on Tuesday at 1:00 p.m. and ends on
Tuesday at 5:00 p.m. This means that no emails will be sent to the selected email address
during these two periods. If the “Inhibit All Emails” box were checked, the two defined time
periods would be overridden, and no emails would be sent to the selected address at all.
for groups of emails. While the intent of each is different, both the
option will bring up a list of all individual email addresses that have been
Email Times window.
options are set up in similar ways.
Figure 51, a second window will open allowing
. See Manage Inhibit Email
Executive alarms
Executive
email
for individual
Super Systems Inc. Page 37 of 83
Page 38

SDStatus View and Workstation Operations Manual
Figure 51 - Inhibit Email Times (Individual Email Addresses)
Groups
The
option will allow you to set up time periods during which emails will not be sent to
defined Email Address Groups. To set up Inhibit Email Times for a group, first select it and then
click “Edit Inhibit Email Times”. As shown in
Figure 52, a second window will open allowing you
to set up one or more time ranges during which emails will not be sent. Using the drop-down
boxes provided, select a start time and end time for the inhibited period. These periods are
based on a standard 7-day week. You may set up as many of these periods as you wish. In the
example shown in Figure 52, the inhibited time period starts on Friday at 6:00 p.m. and ends on
Monday at 8:00 a.m to the Executive group. This means that no emails will be sent to that email
address group during that period.
Super Systems Inc. Page 38 of 83
Page 39

SDStatus View and Workstation Operations Manual
Figure 52 - Inhibit Email Times (Group Email Addresses)
Mail Servers
In order to send emails, SDStatus must be set up with the proper mail server settings.
To set up mail servers for SDStatus to use, first select “Options” “Mail Servers”. This will
open the
Click the “Add Mail Server” button to add a mail server.
Mail Servers window (Figure 53).
Super Systems Inc. Page 39 of 83
Page 40

SDStatus View and Workstation Operations Manual
Figure 53 - Mail Servers window
In the Add Mail Server window, enter the Server, Server Port, User Name, and Password
associated with the email account that will be used as the sending account. Check the “Use
SSL” checkbox if an SSL-encrypted connection is required or can be used (SSL is more secure
than non-SSL-encrypted connections). Note that some mail servers will use port numbers that
differ from the standard or default values. You may need to consult your email provider to get
the specific port numbers that it uses.
Figure 54 - Add Mail Server window
Once the mail server has been added, it will appear in the Mail Servers list (Figure 55).
Super Systems Inc. Page 40 of 83
Page 41

SDStatus View and Workstation Operations Manual
Result
Meaning
email sent successfully
Test was successful; no further action needed
The operation has timed out.
Server settings are likely not correct. Edit the
correct.
The SMTP server requires a secure connection
The server was able to be reached. However,
password, and SSL settings are correct.
Figure 55 - Mail Servers list after mail server added
With the mail server selected, click the “Test Mail Server” button to verify that the mail account
settings are correct. A box will appear asking you to enter an email address; this is the email
address to which SDStatus Service will send the test email.
Completing this test will ensure
that SDStatus is able to send email alerts when needed. Possible results of the test include the
following.
Test Failed.
or the client was not authenticated.
The server response was:
[server response]
Test Failed.
mail server settings and ensure that they are
there was a problem with creating a secure
connection, or the user name or password (or
both) was incorrect. Edit the mail server
settings and ensure that the user name,
Table 5 - Possible Results of Test Mail Server function
SSi has found that the Google Mail (Gmail) service will work with SDStatus. If you would like to
try this service, refer to Appendix 2: Enabling Email Sending through Google
®
Mail (GmailTM).
Once alarm groups, email address groups, email times, and a mail server have been set up
successfully (with active alarm monitoring set up), SDStatus Service will be able to send alarm
notifications by email.
Super Systems Inc. Page 41 of 83
Page 42

SDStatus View and Workstation Operations Manual
SDStatus can log data for alarms, emails, and
Alarm Log, Email
Log
Running Log
Figure 56 - Log menu selection
Figure 57 - Log enabling checkboxes
Logs
the running of the software. Before logs are
kept, the option to enable logging must be
turned on by selecting “Enable Logging” in
each of the log windows:
, and
alarms, emails, or software events, select
“Options”, “Logs”, and then “Alarm Log”,
“Email Log”, or “Running Log” (see
56).
Once you’ve selected the desired log menu,
enable logging by selecting the appropriate
checkbox (“Log Alarms”, “Log Emails”, or
“Log Running”; see Figure 57).
Once logging has been enabled for a particular item, you will be able to review the applicable
logs by selecting “Alarm Log”, “Email Log”, or “Running Log”. Each log menu also has an option
to select a date range for viewing applicable logs and an option to delete logs.
In the Email Log, you may notice an error message after you have set up email notifications.
Examples are shown in Figure 58. This error will appear when SDStatus Service tries to send an
email but encounters an error while sending. Errors could be caused by incorrect server setup,
lack of Internet connection, and other issues. More information can be found by using the “View
Email Message” and “View Email Error” buttons.
. To enable logging of
Figure
Figure 58 - Examples of errors shown in Email Logs window
Super Systems Inc. Page 42 of 83
Page 43

SDStatus View and Workstation Operations Manual
The Workstations Menu contains the following options, as
These options are described in greater detail below.
Figure 59 - Workstations Menu options
With this option, you can enable Workstation Server on
IMPORTANT!
A firewall exception must be added for the
SdStatusService.exe program on the computer running
SDStatus View and SDStatus Service
Figure 60 - Workstation Server window
Workstations Menu
The Workstations Menu allows you to set up options for SDStatus Workstation and how
SDStatus Service will communicate with Workstation. Since Workstation may be run on multiple
computers, these options will affect all instances of Workstation communicating with View.
shown in Figure 59:
• Workstation Server (provides setup options for
View to be accessible to running instances of
Workstation)
• Setup Workstations (allows for setup of alarm
profiles that can be selected in Workstation)
• Alarm Sound Times (allows for setup of time before
alarm sounds in Workstation as well as frequency
of alarm sounds)
• Users (defines access levels for Workstation users)
• Alarm Ack Levels (Alarm Acknowledgement
Levels; sets up access levels required for users to
acknowledge alarms in Workstation).
Workstation Server
View, which is required in order for SDStatus Workstation
to communicate with SDStatus Service. You can also
provide the port number on which the Workstation Server
will run, also required for Workstation to communicate with
SDStatus Service.
To enable Workstation Server, check the checkbox for “Run
Workstation Server”. Once that is done, enter the port
number. In the example in Figure 60, the port number used
is 24691, which is the default. The range supported is 256
through 65535. If in doubt, ask for help from your IT
Network Administrator to determine an appropriate port
number to use.
Firewall software may interfere with the operation of the
Workstation Server.
. A common location of this
file is “C:\SSi\SDStatusView\SdStatusService.exe”. If necessary,
consult with your IT or network administrator, or contact SSi at
(800) 666-4330 for more information.
Super Systems Inc. Page 43 of 83
Page 44

SDStatus View and Workstation Operations Manual
In order for Workstation to obtain alarm data and generate
from Workstation”.
Figure 61 - Workstations Setup window
Setup Workstations
audible alarms, the Workstation software must have
access to the alarm data from SDStatus Service. The Setup
Workstations option allows you to define a profile that the
Workstation program will use as the basis for displaying
alarm data.
To add a Workstation profile, click “Add Workstation”. A
window will appear in which you can name the profile. Once
the profile is named, click OK.
To add and remove alarm groups for a selected
Workstation profile, click “Edit Workstation Alarm Groups”.
A screen similar to the one shown in Figure 62
Note the “Alarm Groups in Workstation” and “Alarm
Groups Not in Workstation” areas of the window. To add an
alarm group to the Workstation profile, select the alarm
group name under “Alarm Groups Not in Workstation” and
click “Add Selected Alarm Groups to Workstation”. To
remove an alarm group from the Workstation profile,
select the alarm group name under “Alarm Groups in
Workstation” and click “Remove Selected Alarm Groups
will appear.
Super Systems Inc. Page 44 of 83
Page 45

SDStatus View and Workstation Operations Manual
Figure 62 - Edit Workstation Alarm Groups window
The “Edit Workstation Name” button will allow you to change a selected Workstation profile’s
name. The “Delete Workstation” button will delete a selected Workstation profile from the list.
Alarm Sound Times
The Alarm Sound Times option is used to configure sounds for alarm groups. When an alarm in
a particular alarm group is active, a sound file can be played on a computer where Workstation
is installed after a pre-defined amount of time has passed. After the sound is played the first
time, it can be set up to be played again at pre-defined intervals until the alarm is acknowledged
in Workstation.
When the Alarm Sound Times window is opened (Figure 63), you will see three columns: Alarm
Group, Time Before Sound, and Sound Frequency. These columns are used for the following
purposes:
• Alarm Group: Which alarms will result in a sound for an active alarm
• Time Before Sound: The amount of time that must pass before the sound is generated in
Workstation
• Sound Frequency: The frequency of repeated sounds (NOTE: Once an alarm is
acknowledged in Workstation, the alarm sound will not be repeated).
Super Systems Inc. Page 45 of 83
Page 46

SDStatus View and Workstation Operations Manual
To add an alarm sound time, click the “Add Alarm Sound
Workstation, the alarm sound will not be repeated.
Figure 64 - Add Alarm Sound Time
window
AB C
Figure 63 - Alarm Sound Times window
Time” button. A window similar to the one shown in Figure
64 will appear. In this menu, you can select:
• The alarm group to which the alarm sound will
apply (“A”)
• The number of days, hours, and minutes that must
pass before the alarm will sound in Workstation
(“B”).
When the “Use Sound Frequency” box is checked, you can
also select:
• The frequency—in days, hours, and minutes—with
which the alarm sound will be repeated in
Workstation after the first alarm sound takes place
(“C”). Again, once an alarm is acknowledged in
To delete an existing alarm sound time, select the appropriate line and click the “Delete Alarm
Sound Time” button.
Users
SDStatus provides the option of requiring users to have certain access levels in order to
acknowledge alarms in Workstation. The Users option allows you to set up user names and
passwords with one of three different access levels: NoLevelSpecified, Operator, Supervisor,
and Administrator. These access levels are associated with the access levels specified for
alarms in Alarm Ack Levels (Alarm Acknowledgement Levels), which is covered in detail below.
Super Systems Inc. Page 46 of 83
Page 47

SDStatus View and Workstation Operations Manual
Figure 65 - Users setup windows
Alarm Ack Levels (Alarm Acknowledgement Levels)
SDStatus provides the ability to require that users using Workstation have sufficient access
levels to acknowledge and “clear” an alarm notification in Workstation. Access levels are
defined with the Users option.
The Alarm Ack Levels window (Figure 66) will show defined alarms in categories based on
which access level is assigned to them. If no access levels are assigned, all of the alarms will be
shown in the “NoLevelSpecified” category.
To change the active category, select the access level from the “Current Level” drop-down box
(“A”). The list of alarms that are assigned to the selected access level will be displayed in the
alarm list area (“B”). If the selected access level has no alarms assigned to it, the list of alarms
will be blank for that category.
To assign an access level to an alarm, simply select the current access level for that alarm
using the “Current Level” drop-down box (“A”), click on the alarm you want to assign to a
particular access level, select the access level you want to assign it to from the drop-down box
at the bottom of the window (“C”), and click the “Move Selected Alarms to Level” button.
Super Systems Inc. Page 47 of 83
Page 48

SDStatus View and Workstation Operations Manual
IMPORTANT!
The Advanced menu provides the “Manage Bit Trigger
Figure 67 - Advanced menu
B AC
Figure 66 - Alarm Acknowledgement Levels window
Access levels will work in this way:
• If an alarm is assigned NoLevelSpecified, any user of Workstation will be able to
acknowledge it.
• If an alarm is assigned Operator acknowledgement level, an Operator, Supervisor, or
Administrator may acknowledge the alarm.
• If an alarm is assigned Supervisor acknowledgement level, a Supervisor or
Administrator may acknowledge the alarm.
• If an alarm is assigned Administrator acknowledgement level, only an Administrator
may acknowledge the alarm.
Once alarms are assigned access levels, Workstation will “know” how to handle situations when
a user tries to acknowledge an alarm.
If a condition that had generated an alarm is no longer true, the alarm will clear whether it has
been acknowledged or not.
Advanced
Alarms” option. This option it used to program SDStatus
to set a bit through SDIO when a particular alarm is
triggered.
Manage Bit Trigger Alarms
SDStatus View provides the ability to set a bit through SDIO when a particular alarm is
triggered. Note that when a bit is set, this means that it is turned “ON” (that is, its value is
changed to “1”).
Super Systems Inc. Page 48 of 83
Page 49

SDStatus View and Workstation Operations Manual
AB C E D
The Manage Bit Trigger Alarms window (Figure 68) contains the following parts:
• Alarm List (“A”): This area of the window shows all defined alarms. If an alarm is set to
trigger a bit, it will be highlighted in a beige color (note the “Temperature Slot Alarm”
below). When an alarm is selected, it will be highlighted in a light blue color (note the
“Watchdog 1” alarm below).
• Triggered Bits (“B”): This area of the window displays the bits that are triggered when
the selected alarm is active.
• “Add Trigger Target” button (“C”): When clicked, this button allows you to set a bit to be
set when the selected alarm is on.
• “Remove Trigger Target” button (“D”): When clicked, this button will remove a selected
bit trigger.
• “Clear Selected Bit” (“E”): When clicked, this button will clear the selected bit (that is,
the bit will be set to “OFF” or zero).
Figure 68 - Manage Bit Trigger Alarms window
Help Menu
The Help menu contains two options: Check for Updates and About.
Check for Updates
This option will check the Internet for updates to SDStatus View and, if an update is found, give
you the option to download and install it (Figure 69
software up-to-date and download updates when they are available.
Super Systems Inc. Page 49 of 83
). It is recommended that you keep your
Page 50

SDStatus View and Workstation Operations Manual
Figure 69 - Checking for, Confirming, and Downloading Updates
About
The About screen provides information on the specific software version as well as a revision
history for the software (
Figure 70).
Figure 70 - About screen for SDStatus View
Super Systems Inc. Page 50 of 83
Page 51

SDStatus View and Workstation Operations Manual
The Options menu (Figure 71) includes three
Target SDStatus Server, Select
Workstation Setup,
Detail View.
Figure 71 - Options Menu
IMPORTANT:
In order for Workstation to obtain alarm data from SDStatus Service running
NOTE:
same computer that is running View.
SDStatus Workstation: Operation
SDStatus Workstation communicates with SDStatus Service over a network. SDStatus Service
provides Workstation with instruction on when to generate alarms and notifications. In order to
work properly, Workstation must be set up correctly to communicate with SDStatus Service.
Several conditions must be satisfied in order for this happen.
NOTE: Alarm notifications in Workstation work in the same way as alarm notifications in View.
This means, in part, that if a condition that had generated an alarm is no longer true, the alarm
will clear whether it has been acknowledged or not.
on a target computer, three basic conditions must be satisfied:
1. The computer running Workstation must be connected to the same Ethernet
network on which the computer running SDStatus Service is connected.
2. View must be configured so that the computer running SDStatus Service will
accept connections from the computer running Workstation. This setup can be
found in the Workstation Server menu of SDStatus View (see page 43).
3. Workstation must be set up to connect to the computer running SDStatus Service.
For alarm notifications to be displayed in Workstation, alarms must be set up properly in
View (see information beginning on page 18). In addition, workstation profiles must be set
up properly in the Setup Workstations option in View (see page 44).
It is possible to run Workstation on the same computer that is running SDStatus
View. Doing this may be useful, for example, when you want audible alarms set up on the
Workstation includes the Options, User, and Help menus. These menus are covered in detail in
the sections below.
Options
options:
and
options are described in the following
subsections.
Target SDStatus Server
This option allows you to set two items that are required for Workstation to communicate with
the SDStatus Service computer:
Super Systems Inc. Page 51 of 83
These
Page 52

SDStatus View and Workstation Operations Manual
IMPORTANT!
IMPORTANT!
1. Computer name (as it is known on the local Microsoft network) or IP address of the
SDStatus Service computer; and
2. Port number for the SDStatus Service computer.
Figure 72 - Target SDStatus Server window
The IP address should be used ONLY if the IP address of the SDStatus Service computer is a
static IP address. If the IP address of the SDStatus Service computer changes (which can
happen, particularly if the computer is set to use dynamic IP addressing, or DHCP), then
Workstation will not be able to communicate with the SDStatus Service computer, in which case
alarm notifications and other functions of Workstation will not work. Contact your network
administrator for more information.
If you are not certain of the IP address, ask the Network Administrator or, if needed, refer to the
procedure shown in Determining IP Address of the SDStatus Service Computer below. The port
number is set using the View software (see the Workstation Server section on page 43).
If there is a problem contacting the SDStatus Service computer, the message “Unable to
connect to Service” will appear and remain. If this happens, it is possible that entered name or
IP address and/or port number may not have been entered correctly. It is also possible that the
service was not set up properly in SDStatus View. Verify the Workstation Server setup in
SDStatus View (see the
information entered in the
Workstation Server section on page 43) and compare that setup to the
Target SDStatus Server window. If the setups match, contact SSi at
(800) 666-4330 for assistance.
Firewall software may interfere with the operation of the Workstation Server. A firewall
warning message may appear, or you may encounter problems when trying to enable a
Workstation connection to the server later in this section. If necessary, consult with your IT or
network administrator, or contact SSi at (800) 666-4330.
Super Systems Inc. Page 52 of 83
Page 53

SDStatus View and Workstation Operations Manual
IMPORTANT!
Determining IP Address of the SDStatus Service Computer
The IP address should be used ONLY if the IP address of the SDStatus Service computer is a
static IP address. If the IP address of the SDStatus Service computer changes (which can
happen, particularly if the computer is set to use dynamic IP addressing, or DHCP), then
Workstation will not be able to communicate with the SDStatus Service computer, in which case
alarm notifications and other functions of Workstation will not work. Contact your network
administrator for more information.
If you are uncertain of the IP address of the computer running SDStatus Service, the first
recommended course of action is to consult with your network administrator. If needed, it is
often possible to determine the IP address from the computer running SDStatus Service. The
following procedure is one example of how to do this. (
NOTE: In some cases, security
restrictions on a computer may prevent this procedure from being used. In such a case, please
contact SSi at (800) 666-4330.)
1. From the computer running SDStatus Service, open the Start menu.
a. If using Windows XP, open the Run menu (Figure 73) and type
cmd
in the dialog box.
Figure 73 - Run menu option (Windows XP)
b. If using Windows Vista, 7, or 8, type ‘cmd’ in the “Search programs and files” box.
Click on the
menu area). See
cmd.exe application link that appears (usually at the top of the Start
Figure 74.
Figure 74 - Running cmd.exe (Windows Vista, 7, & 8)
A command prompt window will appear. Usually, this window is black with gray lettering.
2. From the command prompt window, type
ipconfig
and press Enter.
Super Systems Inc. Page 53 of 83
Page 54

SDStatus View and Workstation Operations Manual
3. The IP address will be shown in the text that appears on the screen. On Windows XP
computers, the IP address will simply be labeled “IP Address”. On Windows Vista, 7, and
8 computers, the IP address may be called “IPv4 Address”. An example from Windows 7
can be seen in Figure 75.
Figure 75 - Running ipconfig from the command prompt (Example from Windows 7)
If these instructions for identifying the IP address do not work correctly, please contact SSi at
(800) 666-4330.
Select Workstation Setup
The Select Workstation Setup menu (Figure 76) allows you to select a Workstation profile that
was set up in the SDStatus View
applied to the installation of Workstation that is currently running. For example, if you select a
defined Workstation profile called “workstation1” in
Groups that were set up in SDStatus View for profile “workstation1” will be applied to the
current installation of SDStatus Workstation; alarm notifications will be generated based on
that profile.
Super Systems Inc. Page 54 of 83
Setup Workstations menu. This Workstation profile will be
Select Workstation Setup, the Alarm
Page 55

SDStatus View and Workstation Operations Manual
Figure 76 - Select Workstation Setup window
Detail View
Detail View is an option that can be togged ON or OFF. The default setting is OFF. When ON,
Detail View will appear with a check mark next to it.
If Detail View is OFF, only alarms will be shown. See Figure 77.
Figure 77 - Detail View OFF
If Detail View is ON, detailed server and channel information will be shown, along with device
names, consecutive error counts, update time intervals, and device statuses. Alarm information
Super Systems Inc. Page 55 of 83
Page 56

SDStatus View and Workstation Operations Manual
is also shown in a separate box. The appearance of the Detail View ON window is similar to the
default view for SDStatus View. See Figure 78.
Figure 78 - Detail View ON
User
The User menu contains two options: Log In and Log Out.
Log In
This option allows you to log in as a user. Users are set up in the SDStatus View Users menu
with access levels set up in the SDStatus View
Levels)
menu.
To log in as a specific user, select “Log In”. A window similar to the one shown in Figure 79 will
appear. Enter the User Name and Password desired and click the “Log In” button.
Alarm Ack Levels (Alarm Acknowledgement
Super Systems Inc. Page 56 of 83
Page 57

SDStatus View and Workstation Operations Manual
Figure 79 - Log In Window
If login was successful, the current user and type (access level) will be shown at the top of the
window (see example in Figure 80).
Figure 80 - Current User and User Type (Access Level) message
Log Out
Use the Log Out option to log out the current user. Once the user is logged out, the Current
User and User Type message will no longer be displayed.
Note on Enabling Sounds in SDStatus Workstation
After alarm sound times are set up in SDStatus View (see Alarm Sound Times on page 45), the
alarm sound files must be added to SDStatus Workstation.
In order for SDStatus Workstation to generate an alarm sound correctly, a sound file in Wave
(
.wav
) format must be saved with the same name of the alarm in the “alarm sounds” folder
found in the program folder where SDStatus Workstation is found. Typically, this folder will be
present on the local hard drive of the SDStatus Workstation in the subfolder
Super Systems Inc. Page 57 of 83
Page 58

SDStatus View and Workstation Operations Manual
Example: Two alarms are set up in SDStatus View named “Temperature Slot Alarm” and
Figure 81 - Example alarms
Figure 82 - Example alarm files on SDWorkstation computer
“C:\SSi\SDStatusWorkstation\alarm sounds” (assuming C: is the local hard drive). Also, the
selected Workstation profile must include the alarms for which you want sounds to be
generated.
“Watchdog 1”.
Alarm Sound Times have been set up for both of these alarms in SDStatus View. SDStatus
Workstation is using the Workstation profile “workstation1”, which includes both of the alarms.
The installation folder for SDStatus Workstation is “C:\SSi\SDStatusWorkstation”. In order for
SDStatus Workstation to generate sounds for the two configured alarms, two sound files must
be present in the folder “C:\SSi\SDStatusWorkstation\alarm sounds”:
•
Temperature Slot Alarm.wav
•
Watchdog 1.wav
When the Temperature Slot Alarm is active, SDStatus Workstation will play the
Slot Alarm.wav
SDStatus Workstation will play the
file as configured in SDStatus View. When the Watchdog 1 alarm is active,
Watchdog 1.wav
file. If one of the files corresponding to an
Temperature
alarm cannot be found in the correct folder, or if the file is not named using the correct method,
the sound will not be played.
Help
The Help menu contains two options: Check for Updates and About.
Super Systems Inc. Page 58 of 83
Page 59

SDStatus View and Workstation Operations Manual
Check for Updates
This option will check the Internet for updates to SDStatus Workstation and, if an update is
found, give you the option to download and install it (Figure 83
keep your software up-to-date and download updates when they are available.
Figure 83 - Checking for, Confirming, and Downloading Updates
). It is recommended that you
About
The About screen provides information on the specific software version as well as a revision
history for the software (
Figure 84).
Figure 84 - About screen for SDStatus Workstation
Super Systems Inc. Page 59 of 83
Page 60

SDStatus View and Workstation Operations Manual
Rev.
Description
Date
MCO #
-
First Release
11/25/2013
2117
Revision History
Super Systems Inc. Page 60 of 83
Page 61

SDStatus View and Workstation Operations Manual
IMPORTANT!
To do this, first select the Options menu, and then
Servers
Click the “Add Server” button.
Appendix 1: Quick Start Guide
The Quick Start Guide is intended to provide concise instructions on setting up SDStatus View
and SDStatus Workstation after both programs are installed. The setups presented are
examples; your specific setup requirements will differ. Advanced functions and additional
details are covered in the main text of the manual.
The steps described in this Quick Start Guide are intended to be followed in the order shown.
Skipping a step could result in errors or in an incomplete setup.
SDStatus View
Before SDStatus View can be set up, it must first be installed. If SDStatus View has not been
installed, follow the procedure in SDStatus View: Installation beginning on page 7.
Setting Up the Server
The first step to configuring SDStatus View is setting up and naming a server from which
SDStatus Service will read data.
the
option.
Super Systems Inc. Page 61 of 83
Page 62

SDStatus View and Workstation Operations Manual
Enter a name for the server. This name will be used
NOTE:
window.
In the Alarms menu, click on “Manage
The Alarms window will appear.
by SDStatus. Enter a path to the folder that contains
the file
server.
(NOTE: “Get Local Server path” is used if you are
using a local SuperDATA server. “Browse Server
Path” is used to navigate to a server and path.)
Click “Add Server” when finished adding details.
on multiple servers. Doing so is as simple as adding
multiple servers with valid server path data for
SDStatus to use. When alarms are present, all of the
alarm data will appear in the SDStatus View main
IntTbl.dat
SDStatus can monitor channels and slot data
on the applicable SuperDATA
Setting Up Individual Alarms
Use the Alarms menu to add individual alarms. These alarms can later be grouped into
categories for the purpose of setting up notifications.
Alarms”.
Super Systems Inc. Page 62 of 83
Page 63

SDStatus View and Workstation Operations Manual
Choose an alarm type that you want to set
Each alarm type setup window includes a
NOTE:
• Alarm Templates, page 26
up from the Alarm Type drop-down list.
Alarm types (and the fields that are
included with each type) are described in
detail beginning on page
20.
“Red Alert” checkbox. When “Red Alert” is
enabled for an alarm, the alarm will cause
a red circle icon to appear in the Microsoft
Windows system tray.
If “Red Alert” is not checked, the alarm
will display on screen and can be
acknowledged by the user; no system tray
icon will be generated.
applicable sections for more details.
It is also possible to set up alarms using the options shown below. Refer to the
• SDIO Configuration Alarms, page 25
“Red Alert” icon
Super Systems Inc. Page 63 of 83
Page 64

SDStatus View and Workstation Operations Manual
Select “Options” “Alarms” “Manage
The Manage Alarm Groups window will appear.
To add an alarm group, first click on “Edit Groups”. Then click on the “Add Group” button at the
Setting Up Alarm Groups
Alarm groups, which are specific categories of alarms, are used in conjunction with email
address groups to define groups of people who will receive email notifications of configured
alarms. Email address groups are explained later in this Quick Start Guide (as well as in the
Manage Email Address Groups section).
Alarm Groups” from the menu.
Super Systems Inc. Page 64 of 83
Page 65

SDStatus View and Workstation Operations Manual
bottom of the Alarm Groups Window, type in the name of the alarm group in the Group field, and
Add Group
Alarm Groups
Once you have created the desired alarm groups, close the Alarm Groups window. Using the
click the “Add Group” button in the
Note that, in the example above, “Executive alarms” and “Executives immediate alert” are
defined alarm groups. A user may use these group names, for example, for alarms that require
notification of executive team members (in the case of “Executive alarms”) and for alarms that
require immediate notification of executive team members (“Executives immediate alert”). The
user is preparing to add the group “Operator alarms,” which could be used for alarms needing
notification of certain operators by email.
Close the
window when finished adding alarm groups.
window.
“Group:” drop down box at the top, select the alarm group to which you want to add alarms. For
each group, alarms that are not present in the group will be shown in the bottom part of the
window under “Other Alarms:”. Select each alarm that you want to include in the currently
selected group and click “Add Selected Alarms To Group”. Included alarms will be moved to the
“Alarms in Group:” field located in the top part of the window. If you want to remove an alarm
from the currently selected group, select that alarm and click “Remove Selected Alarms From
Group”. The alarm will then be moved to the “Other Alarms:” field.
Super Systems Inc. Page 65 of 83
Page 66

SDStatus View and Workstation Operations Manual
Close the Manage Alarm Groups window when finished.
The Email Addresses window is where you
The Email Addresses window will appear.
Setting Up Email Addresses
In order to enable email notifications, you first need to set up email addresses. SDStatus will
send emails to addresses configured in email address groups, which are discussed later in this
Quick Start Guide.
manage email addresses in SDStatus. To
access this menu, select “Options” “Email
Addresses” “Manage Email Addresses”.
Super Systems Inc. Page 66 of 83
Page 67

SDStatus View and Workstation Operations Manual
To add an email, click the “Add Email Address”
NOTE:
SDStatus for more details.
Repeat the process for as many email addresses as needed.
Open the “Options” “Email Addresses”
button. This will bring up the Add Email
Address window. Type an email address to add
and click the “Add Email Address” button in
this window to save it.
SDStatus can be used to send emails to
many mobile devices. Refer to
Sending Notifications to a Mobile Device Using
Appendix 3:
Setting Up Email Address Groups
Once email addresses are populated in SDStatus View, you can then define email address
groups and add email addresses to those groups. SDStatus will use alarm group and email
address group information when determining when and where to send notification emails.
“Manage Email Address Groups” menu.
The Manage Email Address Group window will appear.
Super Systems Inc. Page 67 of 83
Page 68

SDStatus View and Workstation Operations Manual
The figure below shows what the email address group management screens look like. The
Manage Email Address Groups
Email Address Groups
Email Address Groups
Manage
Email Address Groups
Email Address Groups
screen shown on the left is the
is the
Before email addresses can be added to email address groups, the groups must be defined in
the
Once you have created the desired email address groups, close the
window. Using the “Group:” drop down box at the top, select the email address group to which
you want to add email addresses. For each group, email addresses that are not
group will be shown in the bottom part of the window under “Other Email Addresses:”. Select
each email address that you want to include in the currently selected group and click “Add
Selected Email Addresses To Group”. Included email addresses will be moved to the “Email
Addresses in Group:” field located in the top part of the window. If you want to remove an email
address from the currently selected group, select that email address and click “Remove
Selected Email Addresses From Group”. The email address will then be moved to the “Other
Email Addresses:” field.
window.
window. To do this, click on the “Edit Groups” button in the
window.
window. The screen on the right
present in the
Setting Up Email Times
One of the most important functions of SDStatus, its email notification capability, requires
coordination between the alarm groups
Email Times menu in SDStatus View.
Super Systems Inc. Page 68 of 83
and email address groups. This is achieved through the
Page 69

SDStatus View and Workstation Operations Manual
To set up a notification email, first click on
The Email Times window will appear.
The Add Email Time window will appear.
condition remains true, a notification will be
“Options” ”Email Times” “Manage Alarm
Email Times”.
Click on “Add Email Time” to add an email time.
Select the alarm group in the Alarm Group
drop-down box and the email address group
in the Email Address Group drop-down box.
Then set the amount of time that must pass
before an alarm notification email is sent to
the selected email address group. If you want
to set a frequency for repeating the
notification email (as long as an alarm
condition remains true) after the first
notification is sent, click the “Use Frequency”
box and enter the desired frequency times.
Click “Add Email Time” when finished.
In the example shown, when an alarm
condition is present in the Executive alarms
group for 5 minutes, a notification will be sent
to email addresses in the Executive email
address group. As long as that alarm
Super Systems Inc. Page 69 of 83
Page 70

SDStatus View and Workstation Operations Manual
sent to the same email addresses every hour
thereafter.
Email Times
In many cases, you may want to set time periods during which emails will not be sent to a
certain periods of time, refer to the Manage Inhibit Email Times section on page 37.
To set up mail servers for SDStatus to use,
The Mail Servers window will appear.
Repeat this process for each email time you want to configure.
As email times are added, information will be populated in the
information will include the Alarm Group, Email Address Group, Time Before Email, and
Frequency configured for each email time.
Close the Email Times window when finished adding email times.
particular email address or group of addresses. There may be other cases where you want to
prevent emails from being sent at all to a certain address or group of addresses. For
instructions on how to inhibit email sending for particular email addresses or groups or during
window. This
Setting Up Email Server
In order for SDStatus to be able to send emails, an email server with mail sending capabilities
must be configured. SDStatus must be able to communicate with the email server and utilize its
mail sending function. The
sending.
Add Mail Server function in SDStatus View allows you to set up mail
first select “Options” “Mail Servers”.
Click “Add Mail Server” to configure a mail
server.
Super Systems Inc. Page 70 of 83
Page 71

SDStatus View and Workstation Operations Manual
In the Add Mail Server window, enter the
NOTE:
Mail
Servers
troubleshooting may be required. More information can be found on page 41.
Server, Server Port, User Name, and
Password associated with the email account
that will be used as the sending account.
Check the “Use SSL” checkbox if an SSLencrypted connection is required or can be
used.
Consult your email provider or network
administrator if you need assistance with
proper setup.
Close the Add Mail Server window.
It is recommended that you test the mail server with the “Test Mail Server” function in the
window. After clicking the “Test Mail Server” button, you will know that the test was
successful if “email sent successfully” is displayed on the screen. If an error message appears,
SDStatus Workstation
This section provides a Quick Start for SDStatus Workstation. Like the SDStatus View Quick
Start section, this Quick Start is intended to provide basic information on enabling and
configuring SDStatus Workstation.
View can be used by itself to monitor servers and instruments and generate alarm notifications.
As described in other parts of this manual, SDStatus Workstation will extend many of the
monitoring capabilities of SDStatus View to additional computers.
To enable SDStatus Workstation functionality, some setup is required in SDStatus View.
Specifically, four setup procedures must be completed in SDStatus View:
• Enabling the Workstation Server
• Setting up Workstation profiles
• Setting up user access levels
• Setting up alarm sounds (if desired)
These procedures are covered in this Quick Start.
Enabling the Workstation Server (in SDStatus View)
Workstation Server is required in order for SDStatus Workstation to communicate with
SDStatus Service. This function is handled in the
Note that use of SDStatus Workstation is optional. SDStatus
Workstation Server window.
Super Systems Inc. Page 71 of 83
Page 72

SDStatus View and Workstation Operations Manual
To enable the Workstation Server, first open
Check the checkbox for “Run Workstation Server”. The
IMPORTANT!
A firewall exception must be added for
the SdStatusService.exe program on the computer running
SDStatus View and SDStatus Service
Open “Workstations” “Setup Workstations”.
“Workstations” “Workstation Server”.
default port for the server is 24691. The range supported
is 256 through 65535. A different port number may be
needed, depending on your network setup. If you have
questions, contact your network administrator.
Firewall software may interfere with the operation of the
Workstation Server.
. A common location of
this file is “C:\SSi\SDStatusView\SdStatusService.exe”. If
necessary, consult with your IT or network administrator, or
contact SSi at (800) 666-4330 for more information.
Setting Up Workstation Profiles (in SDStatus View)
The next step is to set up a Workstation profile. The Setup Workstations option allows you to
define a profile that the Workstation program will use as the basis for displaying alarm data.
Different profiles can be used for different workstations.
Super Systems Inc. Page 72 of 83
Page 73

SDStatus View and Workstation Operations Manual
To add a Workstation profile, click “Add
To add and remove alarm groups for a selected Workstation profile, click “Edit Workstation
Workstation”. A window will appear in which
you can name the profile. Once the profile is
named, click OK.
Alarm Groups”.
To add an alarm group to the Workstation profile, select the alarm group name under “Alarm
Groups Not in Workstation” and click “Add Selected Alarm Groups to Workstation”. To remove
an alarm group from the Workstation profile, select the alarm group name under “Alarm
Groups in Workstation” and click “Remove Selected Alarm Groups from Workstation”.
Super Systems Inc. Page 73 of 83
Page 74

SDStatus View and Workstation Operations Manual
Setting Up Users and User Access Levels (in SDStatus View)
The Users option allows you to set up user names and passwords with one of four different
access levels: NoLevelSpecified, Operator, Supervisor, and Administrator.
Access levels will work in this way:
• If an alarm is assigned NoLevelSpecified, any user of Workstation will be able to
acknowledge it.
• If an alarm is assigned Operator acknowledgement level, an Operator, Supervisor, or
Administrator may acknowledge the alarm.
• If an alarm is assigned Supervisor acknowledgement level, a Supervisor or
Administrator may acknowledge the alarm.
• If an alarm is assigned Administrator acknowledgement level, only an Administrator
may acknowledge the alarm.
Super Systems Inc. Page 74 of 83
Page 75

SDStatus View and Workstation Operations Manual
First, open the “Workstations” “Users”
In the Users window, click “Add User”. Enter a User Name in the Add User field, along with a
Users
Once users have been created, the next step is
Users must first be set up with the Users option. Then, alarm acknowledgement levels can be
set up using the
menu.
Password. Finally, select a UserType (access level) from the drop-down menu provided. Click
“Add User” to save the user. Repeat this process for each user you want to create.
Alarm Ack Levels option.
When finished adding users, close the
to associate each alarm with an alarm
acknowledgement level. To do this, first open
“Workstations” “Alarm Ack Levels”.
Super Systems Inc. Page 75 of 83
menu.
Page 76

SDStatus View and Workstation Operations Manual
In the Alarm Ack Levels, a list of all of the configured alarms will be shown. Alarms will be
shown based on which access level is assigned to them. If no access levels are assigned, all of
the alarms will be shown in the “NoLevelSpecified” category.
To change the active category, select the access level from the “Current Level” drop-down box.
The list of alarms that are assigned to the selected access level will be displayed in the alarm
list area. If the selected access level has no alarms assigned to it, the list of alarms will be
blank for that category.
To assign an access level to an alarm, simply select the current access level for that alarm
using the “Current Level” drop-down box, click on the alarm you want to assign to a particular
access level, select the access level you want to assign it to from the drop-down box at the
bottom of the window, and click the “Move Selected Alarms to Level” button.
Setting Up Alarm Sounds (in SDStatus View)
As an option, alarm sounds can be configured for alarm groups. When an alarm in a particular
alarm group is active, a sound file can be played on a computer where Workstation is installed
after a pre-defined amount of time has passed. After the sound is played the first time, it can be
set up to be played again at pre-defined intervals until the alarm is acknowledged in
Workstation (or until the alarm condition is no longer true). (
with a particular access level, then a user with an appropriate access level must be logged in to
acknowledge the alarm. The login process is described later in this Quick Start Guide.)
NOTE: If the alarm is associated
Super Systems Inc. Page 76 of 83
Page 77

SDStatus View and Workstation Operations Manual
To set up alarm sounds, first open the
The Alarm Sound Times window will appear. To add an alarm sound time, click the “Add Alarm
Add Alarm Sound Time
IMPORTANT!
“Workstations” “Alarm Sound Times”
menu.
Sound Time” button.
In the
window, select the Alarm Group to which the alarm sound time
will apply. Next, select the number of Days, Hours, and Minutes that must pass before the
alarm sounds in SDStatus Workstation. As an option, you may select the “Use Sound
Frequency” checkbox to enable repetition of the alarm after the first alarm is sounded.
Frequency Days, Frequency Hours, and Frequency Minutes will define the frequency of
repetition.
If a condition that had generated an alarm is no longer true, the alarm will clear whether it
has been acknowledged or not.
Setting Up a Connection to the SDStatus Server
At this point in the process, setup in SDStatus View is complete, unless corrections or edits are
needed.
Before SDStatus Workstation can be configured, it must be installed. If SDStatus Workstation
has not been installed, follow the procedure in SDStatus Workstation:
Super Systems Inc. Page 77 of 83
Page 78

SDStatus View and Workstation Operations Manual
Open “Options” “Target SDStatus Server”.
In the Target SDStatus Server window, enter the IP
IMPORTANT!
Installation beginning on page 11.
Once Workstation is installed, you need to set up a connection from Workstation to the SDStatus
server (the computer running SDStatus View and SDStatus Service).
address and port number of the SDStatus Server.
These will be the name or IP address of the SDStatus
View computer and the port number that you
configured in
SDStatus View) above.
If you need suggestions on how to determine the IP
address of the SDStatus Server, refer to the
Determining IP Address of the SDStatus Service
Computer section on page 53.
Click “OK” when finished.
Enabling the Workstation Server (in
The IP address should be used ONLY if the IP address of the SDStatus Service computer is a
static IP address. If the IP address of the SDStatus Service computer changes (which can
happen, particularly if the computer is set to use dynamic IP addressing, or DHCP), then
Workstation will not be able to communicate with the SDStatus Service computer, in which
case alarm notifications and other functions of Workstation will not work. Contact your
network administrator for more information.
Firewall software may interfere with the operation of the Workstation Server. A firewall
warning message may appear, or you may encounter problems when trying to enable a
Workstation connection. If necessary, consult with your IT or network administrator, or contact
SSi at (800) 666-4330.
Logging In As a User
Logging in as a user will allow alarms to be acknowledged using that user’s access level. You
set up users and access levels in the Setting Up Users and User Access Levels (in SDStatus
View) section above.
Super Systems Inc. Page 78 of 83
Page 79

SDStatus View and Workstation Operations Manual
Open “User” “Log In”.
Enter the User Name and Password desired and
If login was successful, the current user and type
click the “Log In” button.
(access level) will be shown at the top of the
window
Setting Up Alarm Sounds in SDStatus Workstation
After alarm sounds are set up [as shown in Setting Up Alarm Sounds (in SDStatus View) on page
76], they must be added to SDStatus Workstation.
In order for SDStatus Workstation to generate the alarm sound correctly, a sound file in Wave
(
.wav
) format must be saved with the same name of the alarm in the “alarm sounds” folder
found in the program folder where SDStatus Workstation is found. Typically, this folder will be
present on the local hard drive of the SDStatus Workstation in the subfolder
“C:\SSi\SDStatusWorkstation\alarm sounds” (assuming C: is the local hard drive). Also, the
selected Workstation profile must include the alarms for which you want sounds to be
generated.
Super Systems Inc. Page 79 of 83
Page 80

SDStatus View and Workstation Operations Manual
Example: Two alarms are set up in SDStatus View named “Temperature Slot Alarm” and
the sound will not be played.
“Watchdog 1”.
Alarm Sound Times have been set up for both of these alarms in SDStatus View. SDStatus
Workstation is using the Workstation profile “workstation1”, which includes both of the alarms.
The installation folder for SDStatus Workstation is “C:\SSi\SDStatusWorkstation”. In order for
SDStatus Workstation to generate sounds for the two configured alarms, two sound files must
be present in the folder “C:\SSi\SDStatusWorkstation\alarm sounds”:
•
Temperature Slot Alarm.wav
•
Watchdog 1.wav
When the Temperature Slot Alarm is active, SDStatus Workstation will play the
Slot Alarm.wav
SDStatus Workstation will play the
alarm cannot be found in the correct folder, or if the file is not named using the correct method,
file as configured in SDStatus View. When the Watchdog 1 alarm is active,
Watchdog 1.wav
file. If one of the files corresponding to an
Temperature
Acknowledging Alarms
When an alarm is generated, the alarm will appear in red in the SDStatus Workstation window.
Click “Acknowledge Alarm” to acknowledge it. Note that the currently logged in user must have
a sufficient access level to acknowledge the alarm.
Super Systems Inc. Page 80 of 83
Page 81

SDStatus View and Workstation Operations Manual
If the alarm was set up as a “Red Alert” alarm
“Red Alert” icon
(see Setting Up Individual Alarms on page 62),
a red circle icon will appear in the Microsoft
Windows system tray.
Super Systems Inc. Page 81 of 83
Page 82

SDStatus View and Workstation Operations Manual
DISCLAIMER
Appendix 2: Enabling Email Sending through Google® Mail (GmailTM)
SDStatus will work with numerous email systems as long as the port settings, username, and
password are correct in the Mail Server Setup. An email service that has been found to work
with SDStatus is Gmail
and do not have a Gmail
TM
, a service provided by Google, Inc. If you would like to use this service
TM
account, first create an account by opening http://www.gmail.com in
your web browser and following instructions shown.
To set up your Gmail account for use with SDStatus, you will first need to enable POP access. To
learn how to do this, visit
https://support.google.com/mail/troubleshooter/1668960?hl=en&rd=1
and select “I want to enable POP”. Once you have followed the procedure shown on your screen,
select configuration instructions for “Other”. Standard configuration instructions will be shown.
The settings you will need are Outgoing Mail (SMTP) Server and Port for TLS/STARTTLS,
Account Name or User Name, and Password. Generally speaking, your user name will typically
be in the format
Gmail, and the port number will be 587. SSL must be checked ON
username@gmail.com,
your password will be the password you use to access
in the View menu.
TM
Gmail
is a widely used email service; however, SSi cannot and does not guarantee the
reliability or security of the service. Use of this service is at your own risk and discretion.
Super Systems Inc. Page 82 of 83
Page 83

SDStatus View and Workstation Operations Manual
Common SMS Email Addresses for Example Number (513) 555-1234
Wireless Carrier
Example SMS Email Address
Verizon®
5135551234@vtext.com
AT&T®
5135551234@txt.att.net
Sprint®
5135551234@messaging.sprintpcs.com
T-Mobile®
5135551234@tmomail.net
DISCLAIMER
Appendix 3: Sending Notifications to a Mobile Device Using SDStatus
Using the email sending ability of SDStatus, you can configure email alerts to most mobile
devices that have wireless service provided by wireless carriers such as Verizon
®
Sprint
, and T-Mobile® (among many others).
®
, AT&T®,
Most mobile devices can receive text messages (officially called SMS messages) from an
external email address. Common settings for four of the largest carriers in North America
include the following:
These examples are for illustration only. SMS email addresses are subject to change. Visit the
carrier’s website or call the carrier to verify SMS email settings.
SDStatus’s email sending capability can be used to send messages to any valid email address.
In order for messages to a phone to work correctly, multiple conditions must be met, including:
• Email server configuration must be correct.
• The wireless carrier must support sending of SMS messages or emails to a mobile
device.
• The mobile device must be able to receive SMS messages or emails.
• The mobile device receiving the message must have wireless service and must be
receiving an active wireless signal from the carrier. (If the device is out of range of the
carrier’s signal, the message will probably not be received.)
If SDStatus Service sends an email to a mobile device, charges may be assessed. Please contact
the wireless carrier to verify any charges before setting up emails to a mobile device.
SSi will try to assist with SMS email setup for SDStatus wherever possible. However, SSi is not
responsible for email server configuration, SMS charges, and SMS functionality of a phone or
wireless service.
Super Systems Inc. Page 83 of 83
 Loading...