

Page 1

LOAD ENTRY 3
OPERATIONS MANUAL
Super Systems Inc.
7205 Edington Drive
Cincinnati, OH 45249
513-772-0060
Fax: 513-772-9466
www.supersystems.com
Page 2

Standard Load Entry 3 Operations Manual
Super Systems Inc. Page 2 of 35
Super Systems Inc.
USA Office
Corporate Headquarters:
7205 Edington Drive
Shipping Address:
7245 Edington Drive
Cincinnati, OH 45249
Phone: (513) 772-0060
http://www.supersystems.com
Super Systems Europe
Unit E, Tyburn Trading Estate,
Ashold Farm Road, Birmingham
B24 9QG
UNITED KINGDOM
Phone: +44 (0) 121 306 5180
http://www.supersystemseurope.com
Super Systems México
Sistemas Superiores Integrales S de RL de CV
Acceso IV No. 31 Int. H Parque Industrial
Benito Juarez
C.P. 76120 Queretaro, Qro.
Phone: +52 442 210 2459
http://www.supersystems.com.mx
Super Systems China
No. 369 XianXia Road
Room 703
Shanghai, CHINA
200336
Phone: +86 21 5206 5701/2
http://www.supersystems.cn
Super Systems India Pvt. Ltd.
A-26 Mezzanine Floor, FIEE Complex,
Okhla Indl. Area, Phase – 2
New Delhi, India 110 020
Phone: +91 11 41050097
http://www.supersystemsindia.com
Page 3

Standard Load Entry 3 Operations Manual
Super Systems Inc. Page 3 of 35
Table of Contents
Introduction ..................................................................................................................................... 4
Prerequisites................................................................................................................................... 5
SQL Setup ........................................................................................................................................ 7
Installation ...................................................................................................................................... 7
Setup ............................................................................................................................................... 9
Management Window .....................................................................................................................10
User Editor .................................................................................................................................10
Options Editor .............................................................................................................................11
Operations Editor: ......................................................................................................................13
Assets (Furnace) Editor ..............................................................................................................14
Furnace Details Panel ............................................................................................................15
Overview Group Assignments.................................................................................................16
Recipe Editor ..............................................................................................................................16
Recipe Details Panel...............................................................................................................16
Recipe Panel ...........................................................................................................................16
Parts Editor (optional feature) ...................................................................................................17
Details Panel ..........................................................................................................................17
Fields Editor ...............................................................................................................................18
Fields Details Panel ................................................................................................................18
Gap Editor (Optional Feature) .....................................................................................................19
Shift Editor ..................................................................................................................................20
Sequence Editor .........................................................................................................................20
About ..........................................................................................................................................21
Overview Screen ............................................................................................................................21
Load Creation .............................................................................................................................24
Active Screen .................................................................................................................................25
Work Order Editor ......................................................................................................................26
History Screen................................................................................................................................27
Load Tracking Editor ..................................................................................................................29
Bulk Load Reports .........................................................................................................................30
Revision History .............................................................................................................................35
Page 4
Standard Load Entry 3 Operations Manual
Super Systems Inc. Page 4 of 35
Introduction
SSi’s Load Entry 3 software is part of the SSi SuperDATA suite of programs. Load Entry assists
with recipe management and tracking by providing a single, PC-based interface to control all
activities for a heat treat facility. Load Entry is accessible from any computer setup as a
SuperDATA workstation, allowing multiple access terminals throughout a facility. Load Entry
seamlessly integrates with existing SSi and Honeywell HC900 controllers for creating recipes
and starting and stopping recipes. Load Entry works with the SSI Configurator program to
import recipes that have already been created.
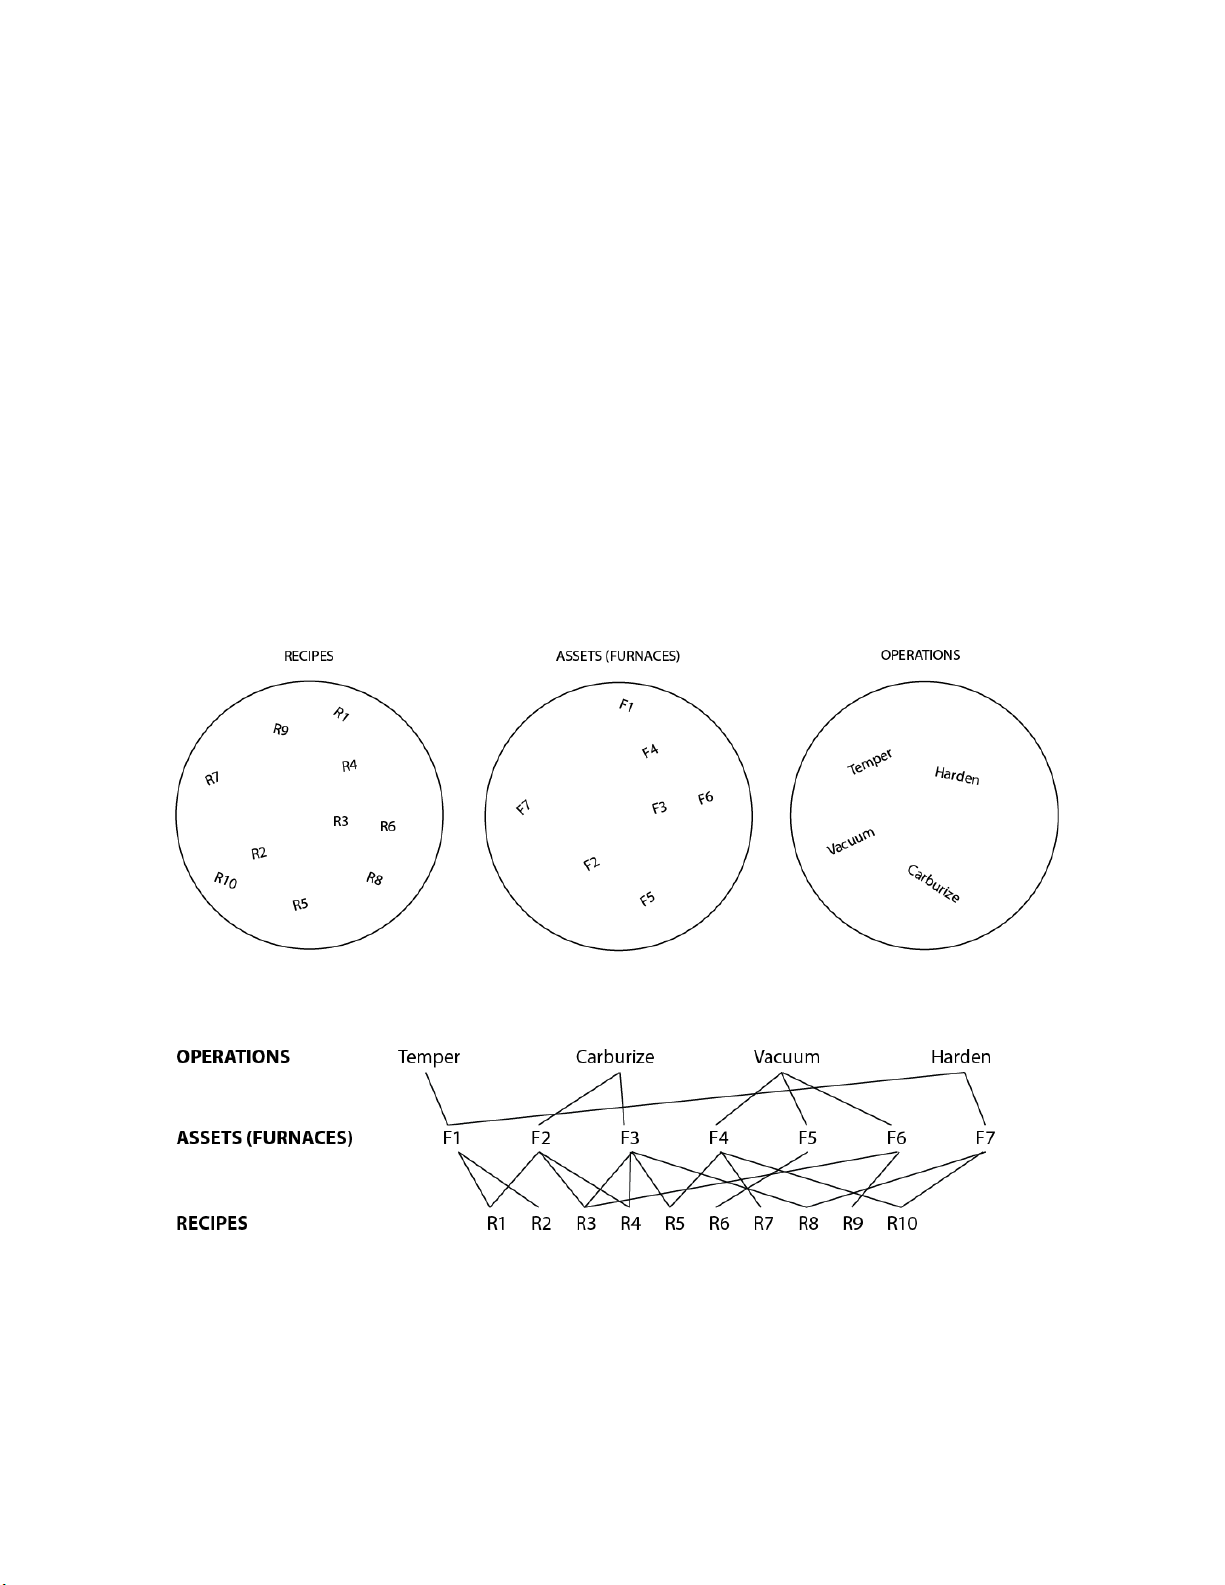
Load Entry allows you to enter various operations, furnaces, recipes, parts, and users, but also
enables you to “apply” these items to one another as required by your facility. This allows for
easy tracking, management, and information retrieval, saving you time and money.
Put another way, Load Entry manages the often complicated relationships and connections
between your facility’s recipes, furnaces, and operations:
With this complex web under control, you are free to more efficiently manage your resources
using the other tools included in LE3 software.
Page 5
Standard Load Entry 3 Operations Manual
Super Systems Inc. Page 5 of 35
If required, Load Entry allows controllers to extend past the previous limit of 300 recipes since
all recipes are stored in a database as part of the system.
Load Entry’s built-in Recipe Management features allow administrators to “lock” specific
recipes, preventing operators from making temporary changes, while providing flexibility by
allowing other recipes to remain “unlocked.” Recipe revisions are tracked, providing complete
visibility for actual recipes run in the equipment.
Load Entry also maintains historical data marking the beginning time, end time, and Operator ID
for each charged load. This data helps improve load traceability and increase operator
accountability. Historical data can be quickly accessed to generate reports and trend charts
(using SDRecorder II). Each report can store detailed part information (part number, quantity,
material, etc.) as well associate part images for a specific load.
We are constantly improving and updating this software. If you have questions about a feature
or functionality not covered in this manual, please contact SSi at 513-772-0060 for technical
support.
IMPORTANT!
Standard Load Entry will serve as a recipe manager as well as a load management system. It
is intended to replace your existing recipe management software. Attempting to use another
recipe manager in addition to Standard Load Entry on the same equipment is likely to result
in operational errors and should be avoided.
Prerequisites
.NET Framework 4.6.2+
Standard Load Entry requires Microsoft .NET Framework 4.6.2 or higher.
Super Systems API
Standard Load Entry requires access to the Super Systems Application Program Interface (API)
running on the server, which communicates to either SDIO or DataCenter (the SuperDATA
Communications engines), as well as SQL Server.
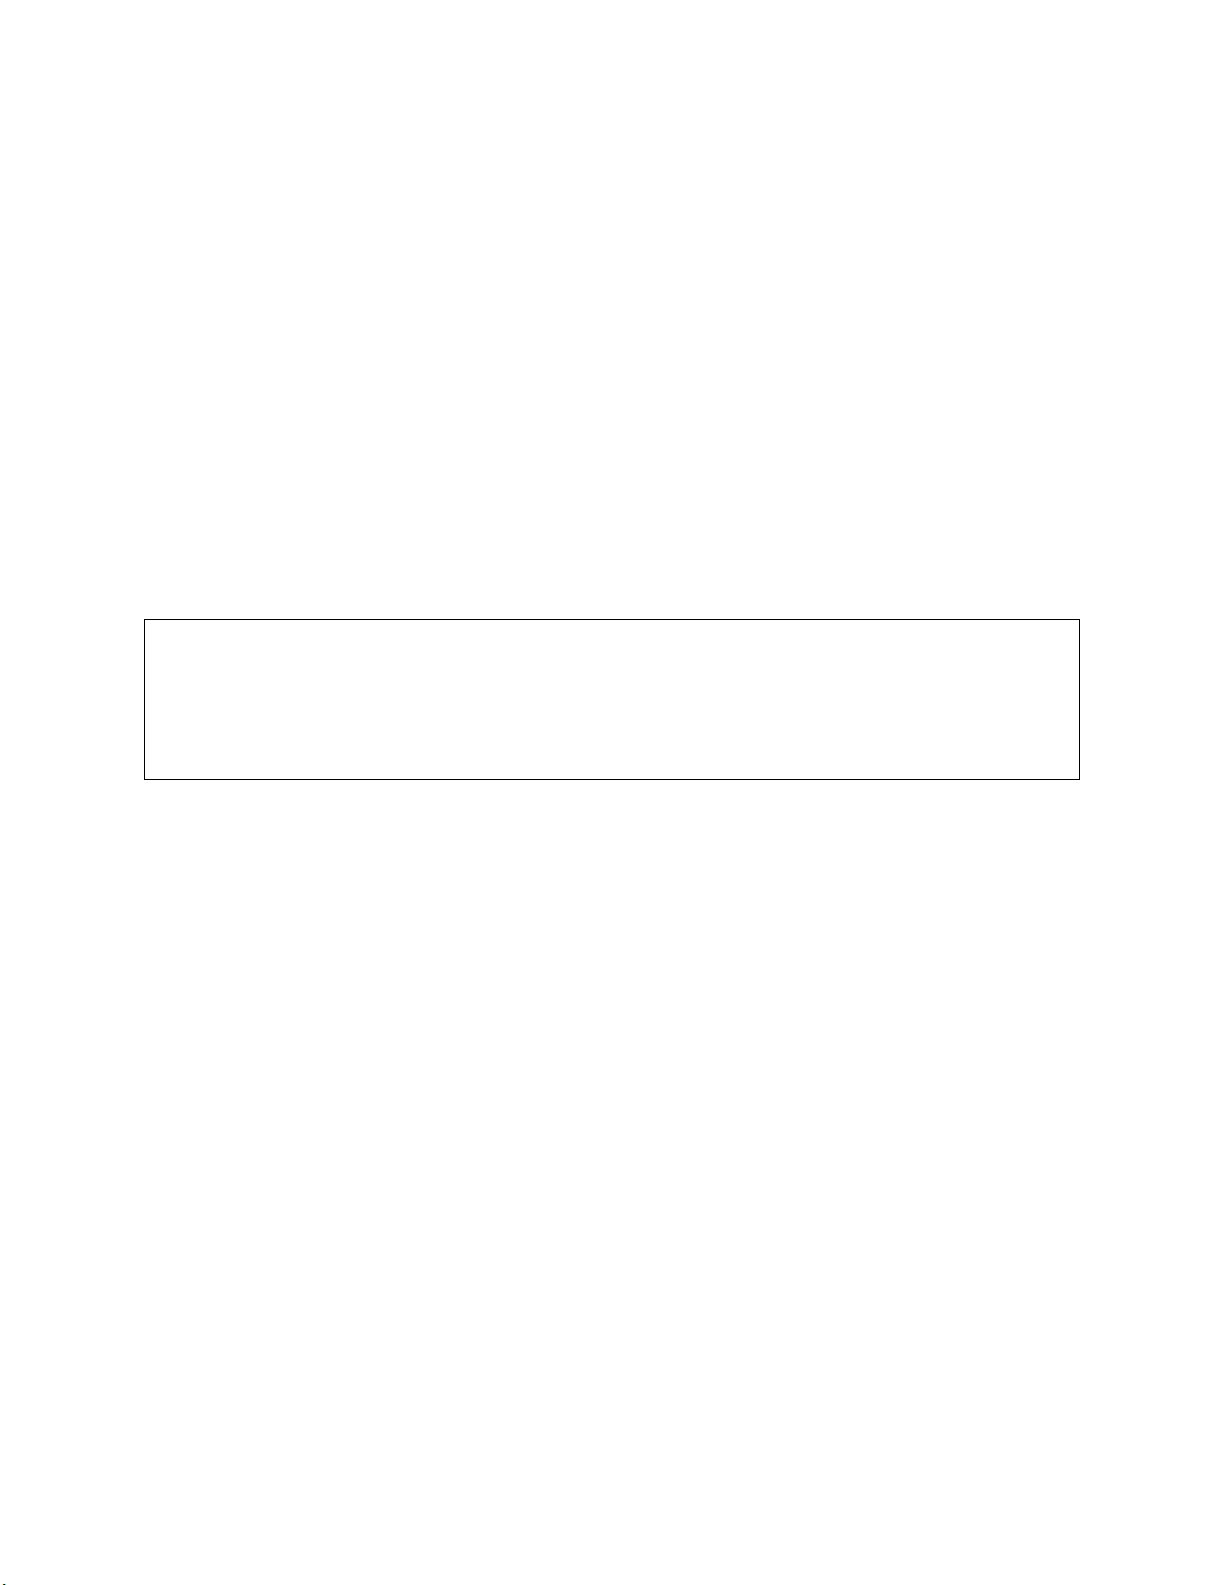
The Setup Flowchart below illustrates the recommended steps to follow when setting up and
installing Standard Load Entry, especially for the first time. These features will be used after
the initial setup as new loads are added, process requirements change, etc.
Page 6
Standard Load Entry 3 Operations Manual
Super Systems Inc. Page 6 of 35
Setup Flowchart
6
6 9 10
12
14
16
17
21.
Page 7

Standard Load Entry 3 Operations Manual
Super Systems Inc. Page 7 of 35
SQL Setup
Please refer to the
SQL Server Setup Guidelines for SSi Software Installations Reference Guide
found on the Manuals page of the Super Systems website: www.supersystems.com. In addition,
prior to installation, the Super Systems API must be installed and set up for SDIO or
DataCenter. If you have questions about your specific installation, please consult your IT
administrator or contact SSi at (513) 772-0060.
Installation
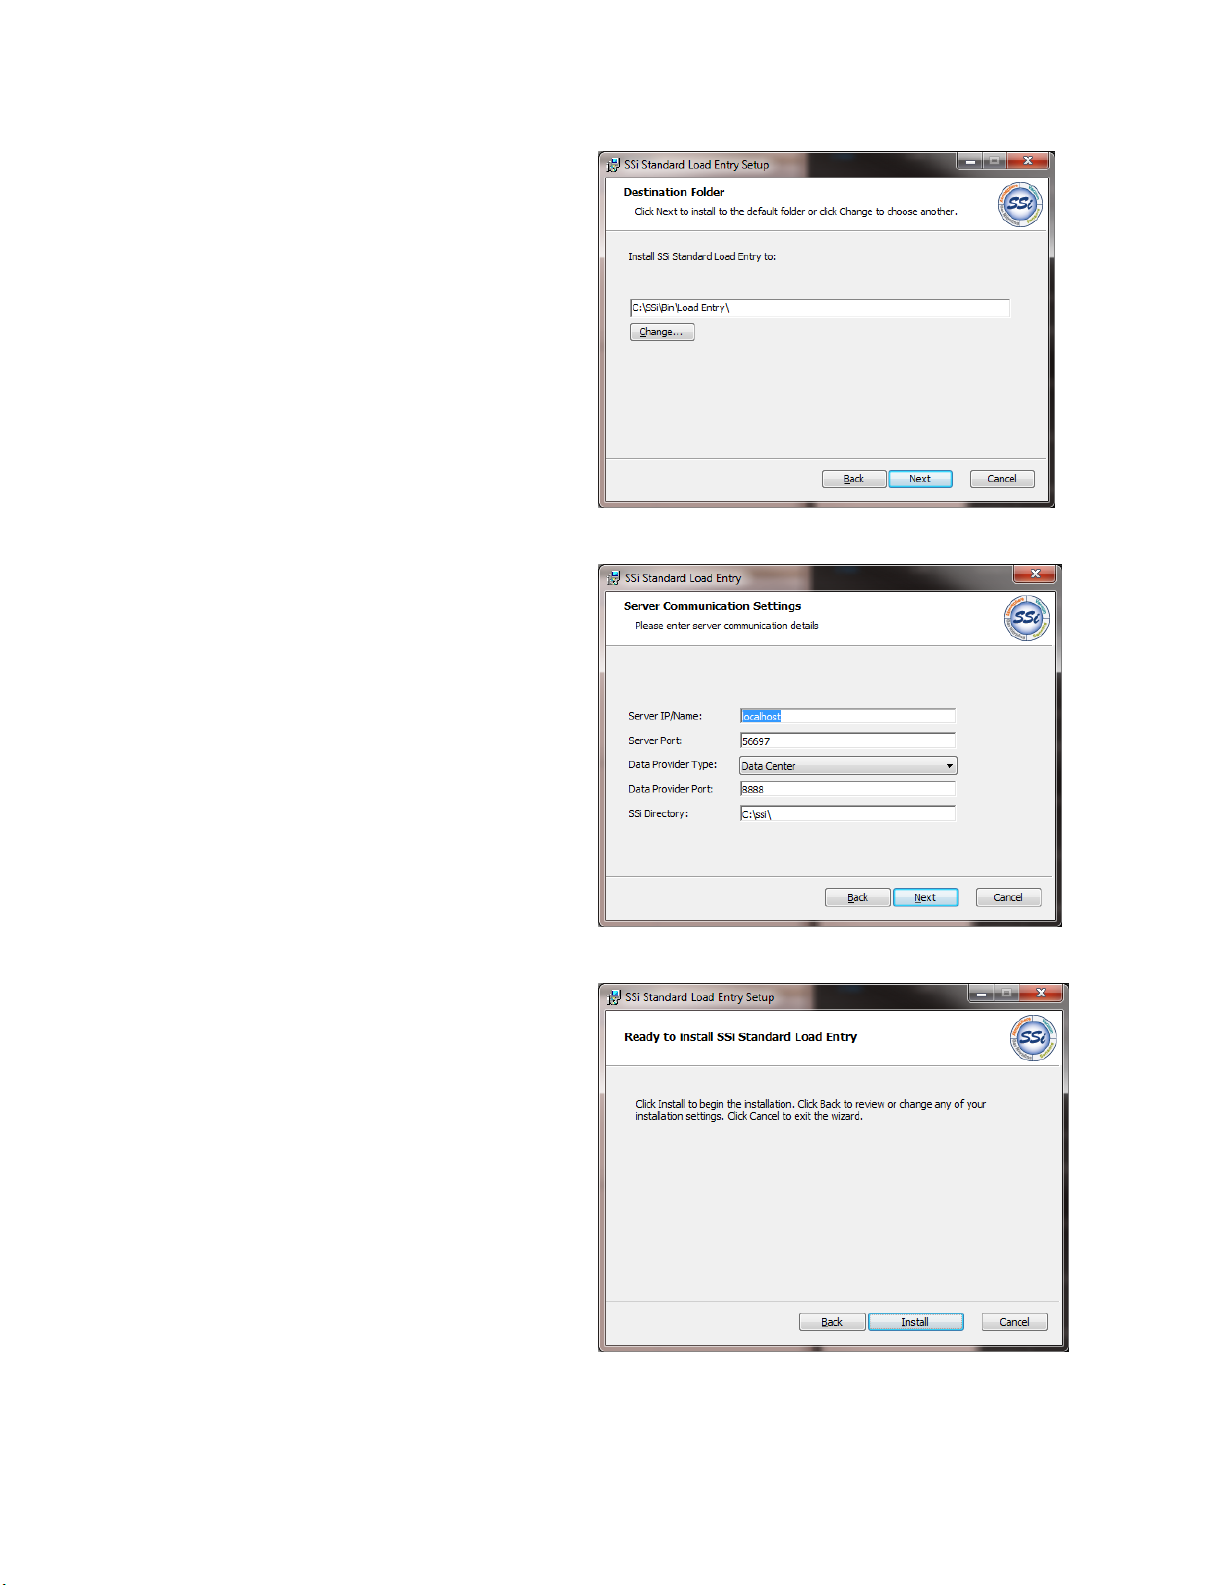
To install Standard Load Entry, first doubleclick on the
03_LoadEntry3_Client.msi
file
provided with the installation disc or
installation files you received. A screen
similar to the one at right will be shown.
Click the Install button to proceed.
When the Setup welcome screen appears,
click Next when ready to proceed.
Page 8
Standard Load Entry 3 Operations Manual
Super Systems Inc. Page 8 of 35
In the next window that appears, enter the
name of the folder where Load Entry should
be installed. The default will typically be
“C:\SSi\Bin\SSi Load Entry\”. If you want to
change the default, click the Change button.
When ready to proceed, click Next.
Load Entry will then ask for Server
Communication Settings.
If you are unsure of the correct settings and
information, please consult your IT
professional or contact SSi for assistance.
Click the Install button to proceed.
Page 9
Standard Load Entry 3 Operations Manual
Super Systems Inc. Page 9 of 35
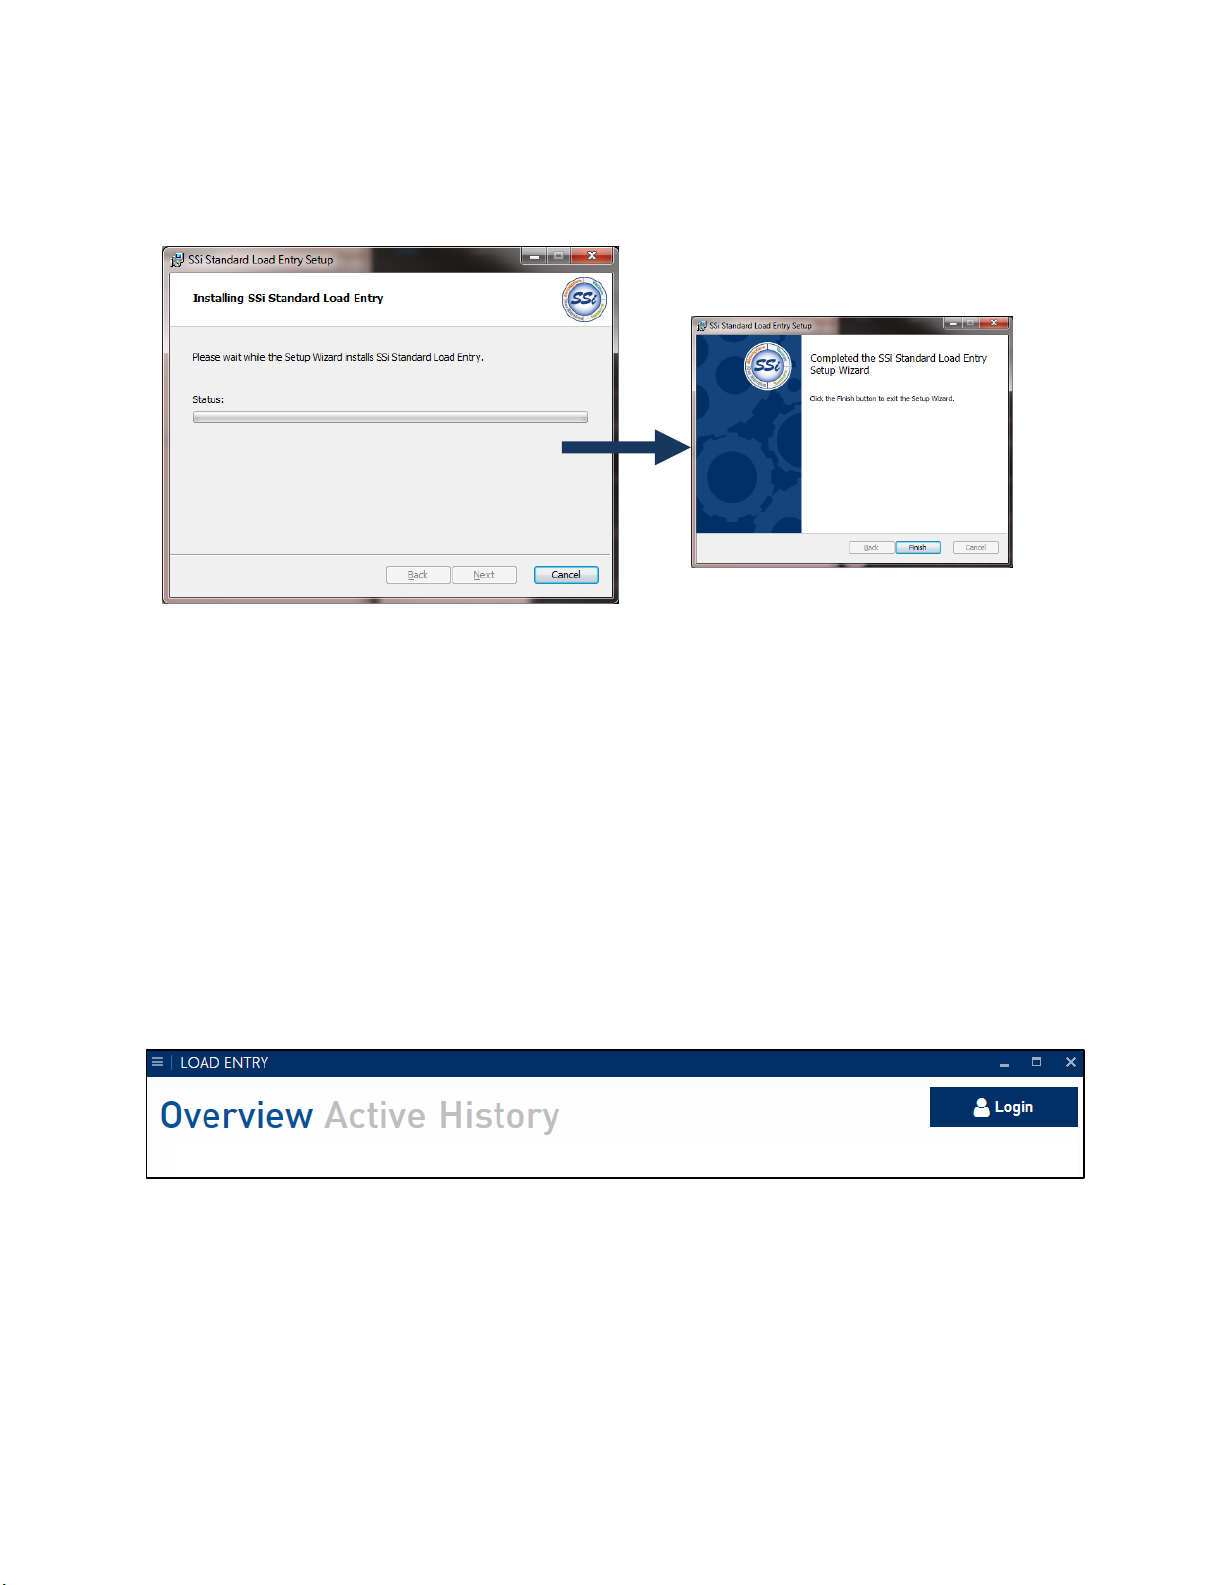
The software will install. The remaining
screens will confirm the installation.
Setup
When run for the first time, Load Entry users, furnaces, operations, recipes, and parts (if
applicable) must be created.
This manual is written with a suggested order of setting up items. SSi suggests this order based
on the most logical progression of steps for configuring LE3. The sections below detail setup of
the following components, in this order: users, options, operations, furnaces, recipes, and
parts.
To start Load Entry, open the LoadEntry.Windows program from the Start Menu. By default, this
program shortcut is located in the SuperSystems program group.
When first opened, the Overview screen will be displayed:
This screen will be explained in more detail on Page 21. Once logged in with administrator
access (by using the Login button at top right), you may continue with the setup.
Page 10

Standard Load Entry 3 Operations Manual
Super Systems Inc. Page 10 of 35
Management Window
Clicking the SSi button will bring up the Management Window which includes the
following options:
Operations
Furnaces
Recipes
Sequences
Parts
Fields
Users
Gaps
Shifts
Options
About
These options will allow you to input the information that Load Entry will use to control the
activity in your facility. Think of this as setting up the background processes that will allow you
to manage day-to-day operations elsewhere in the application. This manual is written with a
suggested order of setting up items. SSi suggests this order based on the most logical
progression of steps for configuring LE3. The sections below detail setup of the following
components, in this order: users, options, operations, furnaces, recipes, and parts.
User Editor
The User Editor allows you to add user information and set passwords and “Claims” for each
user. If any users have been created, you can click on the user’s name to view and change their
assigned claims. You can also use the “Filter” box to search for specific users.
“Claims” are simply permissions and determine what options the user will be able to access.
To change claims for an existing user, simply check or uncheck the desired boxes.
You can also change the User Name, Name, and update the user’s password information.
Click “Apply” to save the changes. To leave without saving changes, click “Cancel.”
To add a new user, click the “New” button. Enter the desired information in the boxes for
“User Name” and “Name” and then select desired Claims. Use the “Update Password” button
to enter password information for this user.
Available Claims are:
Admin Run Loads Manage Work Orders
Manage Parts Manage Recipe Manage Furnace
Page 11

Standard Load Entry 3 Operations Manual
Super Systems Inc. Page 11 of 35
Manage Users Manage Sequences Override Sequences
Override Work Order Manage Options Manage Operations
Manage Gaps Approve Work Edit Track
Edit Gap Manage Shift Overwrite Gaps
Add Historical Loads Check for Updates Delete Load Tracks
Force Load Out Add Rework
NOTE: The “Admin” Claim gives a user access to all options.
You will note that your new user appears in
italics
in the user list. This means that the user has
not been saved.
When completed, click “Apply” to save the User information. This user will now be added to
your list.
By right-clicking on a user name in the list, you can “Copy” and “Paste” a user (useful in
creating a new user with identical claims to an existing one). You can also “Delete” a user. The
option to set password information is also available via the right-click menu.
Click to close the User Editor.
Options Editor
The Options Editor window allows you to view and edit information about Language, Data
Provider, Defaults, Units, Logins, Visual Shop, Work Orders, and other optional features. This
will allow you to set up LE3 in the way that best fits the needs of your facility.
LANGUAGE:
Language: Select the language for LE3.
DATAPROVIDER:
DataProvider Hostname : Enter the hostname name of the Data Provider.
DEFAULTS:
Pick List Limit: Defines how far back the Pick List feature will go when creating a load
UNITS:
Temperature: Enter the desired temperature display unit.
Weight: Enter the desired weight display unit.
Page 12

Standard Load Entry 3 Operations Manual
Super Systems Inc. Page 12 of 35
LOGINS:
Login Limit Enabled: When checked, LE3 will log out users after a period of inactivity.
Login Limit Minutes: How long a user can remain inactive before being logged out by LE3.
VISUAL SHOP:
Connection String: This information is required to pull data from your Visual Shop database.
This feature can be set up from the Furnace Editor (see p. 14)
Custom Field: A label for a single piece of data that can be tracked with a Visual load.
WORK ORDERS:
Generate Work Order Names: Select whether LE3 will generate work order names
Use Part Serial Numbers: Select whether LE3 will use Part Serial Numbers for identification.
OPTIONAL FEATURES:
Use Parts Database: When checked, the Parts database options will be available.
Use Gap Time: When checked, the Gap options will be available.
Use Work Order Approval: When checked, LE3 will require approval of work orders.
Apply Default Offset to Trend: When checked, the report default offset will be applied to load
end and start after clicking “View Trend.”
Use Register Definitions: When checked, Register and Definition options will be available for
furnaces and recipes that use an HC900 controller.
Disable Weight: When checked, Weight options will
not
be available.
Display Furnace Run ID: When checked, a furnace ID will be displayed, based on the prefix
defined in the furnace and the number of loads that have been run in that furnace
Display Work Order Completed Steps: Displays the time in and time out of each completed step
on the Work Order Editor
Use External Database Mapping: When checked, allows you to connect to an external database
to pull data for custom fields. Use the “Edit Mappings” button to enter the desired settings.
Display status color: When checked, furnace status will be displayed by color in the Overview
screen. Use the “Edit Status Colors” button to customize the colors used for each status.
REPORT DEFAULTS:
Page 13

Standard Load Entry 3 Operations Manual
Super Systems Inc. Page 13 of 35
Start Offset: Enter a starting offset value. This defines the amount of time to wait before a load
begins when opening SDRecorder and running load reports.
End Offset: Enter an ending offset value. This defines the amount of time to wait after a load
ends when opening SDRecorder and running load reports.
Export to XML:
Custom Logo: Use to add your own custom logo to a Load Report Click the “…” button to
browse your computer for the desired file.
Click “Save” to save your Option settings.
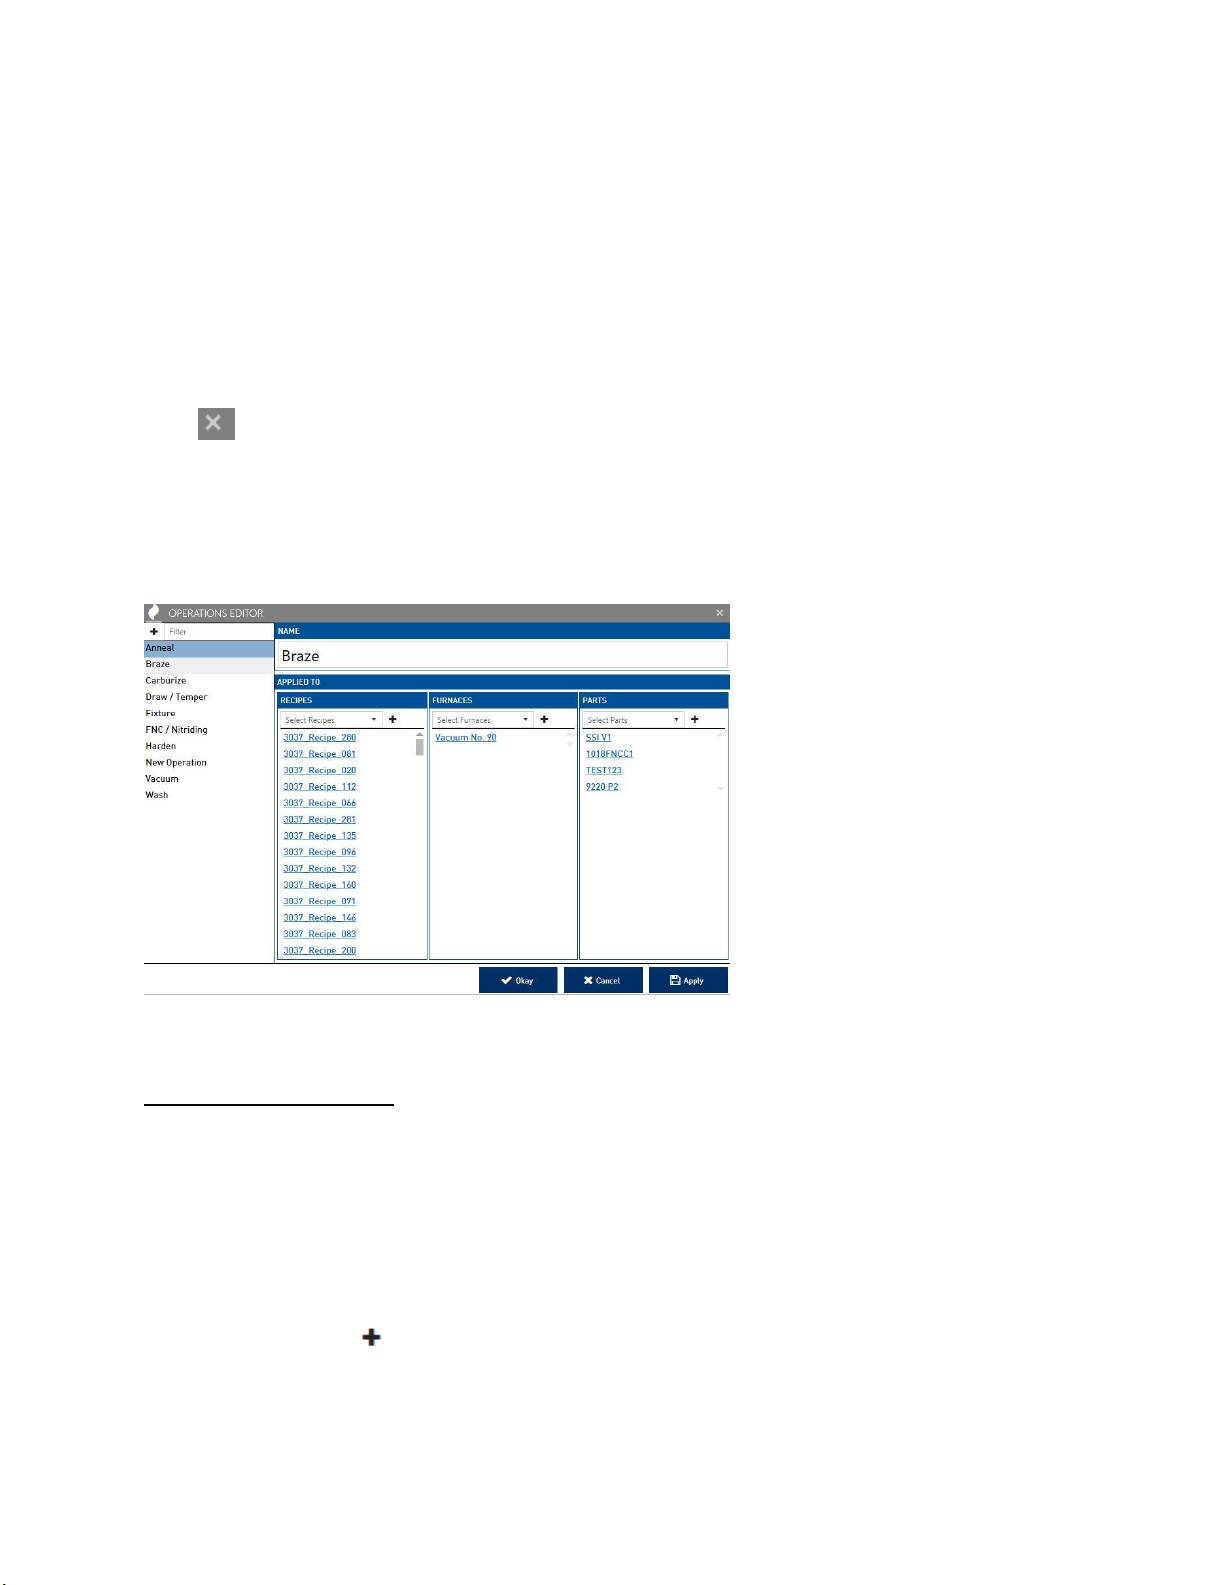
Operations Editor:
The Operations Editor Window allows you to enter information about the operations in your
facility that Load Entry will control. Specifically, you can choose to “Apply” an operation to any
Recipes, Furnaces, or Parts that you have already inputted into the software or imported from a
database.
On the left of the window you will see a list of Operations (empty if you have not yet created any)
and a “Filter…” input box which will allow you to filter/search the displayed Operations.
The main view area of the Operation Editor Window is where you will enter your Operations
information.
To begin, click the “Create New” button. Enter a name for your new Operation. You will
note that your new operation appears in
italics
in the operation list. This means that the
operation has not been saved.
If you have not yet created any Recipes, Furnaces, or Parts in the system, naming the Operation
will be your only option. If you
have
created any of this additional information, you will have the
option to apply your new operation to those items:
Page 14
Standard Load Entry 3 Operations Manual
Super Systems Inc. Page 14 of 35
Click “Apply” to save the current Operation. It will now be displayed on the list to the left
without italics.
To edit an existing Operation, simply select it in the list on the left and its information will
appear in the main view area.
By right-clicking on an operation in the list, you can “Copy” and “Paste” an operation (useful in
creating a new operation with applications to an existing one). You can also “Delete” an
operation.
Click to close the User Editor.
Click “Apply” to save the changes. To leave without saving changes, click “Cancel.”
After entering information for numerous Operations, as well as Recipes, Furnaces, and Parts
(all described later), your Operations Editor may look something like this:
Assets (Furnace) Editor
The Assets Editor Window allows you to enter information about the Furnaces and other
equipment in your facility that Load Entry will control or keep track of. You can then assign the
furnace to the desired Operations, Groups , and set Report Options.
Operations Tab
To assign a furnace to an existing operation, select the desired operation from the dropdown
menu, and then click .
Page 15

Standard Load Entry 3 Operations Manual
Super Systems Inc. Page 15 of 35
The operation will now be added to the operations list below the dropdown menu. The
operations list is clickable – clicking on an item in the list will bring up that operation’s
information.
To delete an operation from the list, right-click on it and select “Delete.”
Clicking the “Groups” tab will bring up options for Overview Groups Assignments. This will
allow you to assign your furnaces to various groups for easy viewing in your overview screen
(see p. 21)
The functionality of the Groups menu is identical to that of the “Operations” tab (see p. 13). In
addition, clicking “Manage Groups” will allow you to make changes to the groups seen in the
overview
Furnace Details Panel
The Details Panel allows you to choose a Name, Load Prefix, Connection, Model, SDRecorder
trend chart, set Min and Max Weights, enter a Programmer Number, and assign settings for
Visual Shop integration.
NOTE: If the furnace is Visual Shop integrated, the Visual Shop Equipment Id must match the
asset’s id in Visual Shop in order to use the tracking feature.
Page 16

Standard Load Entry 3 Operations Manual
Super Systems Inc. Page 16 of 35
Overview Group Assignments
The “Manage Overview Groups” button allows
you to organize the Furnaces displayed on the
Overview window into groups.
On the Overview Groups Editor window, simply
click the New button and enter a group name
in order to create a new group
When completed, click “Save.” You will now have
the option to assign furnaces to your new group by
using the “Overview Group Assignments” panel on
the Furnace Editor Window. (You will first need to
click Save on the main Furnace Editor, then close it
and restart.)
When you are finished assigning furnaces to
groups, the Overview Window will display your
Furnaces by groups. (NOTE: You may need to
restart the application for the new group to appear
in the Overview screen.l)
NOTE: If an Overview Group is displayed
in italics
within the list view,
this indicates that it contains unsaved changes.
Recipe Editor
The Recipe Editor Window allows you to enter information about the Recipes in your facility that
Load Entry will control.The basic functionality of the Recipe Editor is the same as the Operations
Editor (see p.12), but with the following additional options:
Recipe Details Panel
The Details Panel allows you to select the Controller Model, Recipe Number and, if desired, to
lock that selection or enable the current recipe to be used as a subroutine for the GOSUB and
JUMP opcodes . Depending on the selected recipe, you can also enter additional parameters
such as MaxTemp1 or Setpoint2.
Recipe Panel
The Recipe Panel allows you to select Opcodes to build a recipe.
NOTE: For explanations of Opcodes, refer to the manual for your controller.
Page 17

Standard Load Entry 3 Operations Manual
Super Systems Inc. Page 17 of 35
The “Revision” dropdown menu allows you to view and
select all the previous revisions of the currently selected
recipe. Each time a change is saved to the recipe, a new
revision is created along with a date and time stamp.
To edit a recipe, double-click on an Opcode to bring up the
step editor.
Use the Selected Opcode dropdown menu to select an
Opcode for this step and set all necessary parameters.
(Selecting the “Alphabetical” checkbox will display
available Opcodes alphabetically.) When finished, click
“OK.” Your new recipe step will be displayed in the recipe
editor (depending on the Opcode you entered, you may
need to scroll up and down or use the sorting tabs in order
to view the newly-entered step).
NOTE: If a Recipe is displayed
in italics
within the list view,
this indicates that it contains unsaved changes.
Parts Editor (optional feature)
In the Parts Editor, you can associate parts wtih the sequences and recipes that Load Entry will
control, allowing for quick selection of processes later. If you do not assign a part to a recipe in
the Parts Editor, it can only be run on manual loads or will require an override. The basic
functionality of the Parts Editor is the same as the Operations Editor (see p.12), but with the
following additional option:
Details Panel
The Details Panel allows you to enter the weight of a part, along with information for any
custom fields that have been created.
In addition, an image of the part can be assigned by clicking the button next to the part
Name and selecting a file from your computer.
NOTE: If a Part is displayed
in italics
within the list view,
this indicates that it contains unsaved changes.
Page 18

Standard Load Entry 3 Operations Manual
Super Systems Inc. Page 18 of 35
Fields Editor
The Fields Editor allows you to add additional field input options to the Details Panels of
Furnaces, Parts, Recipes, and Work Orders. The basic functionality of the Fields Editor is the
same as the Operations Editor (see p.12).
Fields Details Panel
The Details Panel will allow you to set a standard format for entries into the new Fields you will
create.
If “Normalized List” is checked, you may create a custom set of list items based on your own
needs. This can be useful to assign specific customers, priority levels, or other existing
terminology specific to your facility.
To add selections to your normalized list, click the Add button and enter the name of a list
selection. Repeat this process until you have created all the desired items in your list. These
items will appear as a dropdown menu for every Furnace, Part, Recipe, etc. that you apply it to.
If “Normalized List” is unchecked, you will see options that allow you to assign specific
formatting to fields. This is useful when using this feature for standard codes and numbering
systems in your facility.
The “Format” box allows you to set this format, as follows:
A = any alphabetical character
1 = any numerical character
Any other characters represent themselves literally.
Example 1:
You are creating a “Customer” field and your company uses a code of three numbers and three
letters to identify each customer (e.g.“FES027” or “MPS019”).
You would enter “AAA111” into the “Format” box to indicate three letters and three numbers.
Example 2:
You are creating a “Customer” field and your company uses a five-digit code followed by the
letter C to identify each customer (e.g.“45230C” or “18235C”).
You would enter “11111C” into the “Format” box to indicate five numbers followed by a “C.”
Page 19

Standard Load Entry 3 Operations Manual
Super Systems Inc. Page 19 of 35
Example 3:
You are creating a “Part Code” field and your company numbers parts using a numerical prefix
“007,” and a four-number numerical code, separated by a hyphen (e.g. “007-4129” or “0078173”).
You would enter “007-1111” into the “Format” box to indicate the numerals “007,” a hyphen, and
a four-digit number.
If a specific format is not required for the current field, simply leave the “Format” box blank.
If the “Format” box is not used, you can instead set a required length for entries into this field.
For example, if you have no standard format, but all entries must be exactly seven characters
long, you would enter “7” into the “Required Length” box.
NOTE: If using the “Format” box, you must enter “0” into the “Required Length” box.
Clicking the “Required” box will force all future users to match the indicated format before
saving entered information:
Clicking the “Export” box will cause this field to be included when using the export feature on
the History Tab (see p. 27).
Under the “Applied To” bar, select which Furnace, Part, Recipe, and Work Order you would like
to apply the selected Field to.
NOTE: If a Field is displayed
in italics
within the list view,
this indicates that it contains unsaved changes.
Gap Editor (Optional Feature)
The Gap Editor allows you to create names for gaps that exist in your facility’s processes. This
can be very useful in tracking downtime and improving efficiency in your facility.
On the Gap Editor window, simply click the New button and enter a Gap name in order to
create a new Gap. You can then assign a color to the selected gap if desired.
Page 20

Standard Load Entry 3 Operations Manual
Super Systems Inc. Page 20 of 35
When completed, click “Save.”
Shift Editor
The Shift Editor allows you to create and name shifts and set shift begin and end times. The
basic functionality of the Shift Editor is the same as the Operations Editor (see p.12). To set shift
start and shift end, either enter the time in the input box, or click the clock icon to set a time
using dropdowns.
NOTE: All shifts combined must add up to 24 hours with no overlap.
NOTE: If a Shift is displayed
in italics
within the list view,
this indicates that it contains unsaved changes.
Sequence Editor
The Sequence Editor window allows you to create a series of steps (called a Sequence) that can
control how a part or work order is processed through multiple operations, furnaces and
recipes. The basic functionality of the Sequence Editor is the same as the Operations Editor
(see p.12). The purpose of the sequence is to create consistency on the flow of a work order or
part through the heat treat operations. The interface makes it very easy to apply the steps to
achieve all operations. For example, if part xyz will always go through a wash, harden and
temper process, it would be beneficial to create a sequence that would follow these steps. This
does not have to be part specific, it can just be a consistent process used for a work order.
Once a new Sequence is created and named, use the New button to add steps to the
Sequence. Steps consist of Operation, Furnace, and Recipe assignments. Click “Save” to add
the step to the sequence.
Page 21

Standard Load Entry 3 Operations Manual
Super Systems Inc. Page 21 of 35
In the example above, the 1018 FNC CL1 sequence can be applied to a part or a work order to
ensure that these 2 steps are completed. The sequence can optionally assign the furnace and
recipe.
To edit a step, click the Edit button or double-click on the step in the Steps display area.
NOTE: If a Sequence is displayed
in italics
within the list view,
this indicates that it contains unsaved changes.
About
The About panel displays release notes and allows you to check for automatic updates.
Overview Screen
The Overview Screen displays all current furnace information in groups as assigned by the user.
This is also where you will assign gaps (if enabled), begin new loads and, if necessary, enter
historical loads.
NOTE: Instructions below assume that Gaps are enabled. If you are not using Gap options,
some functionality will differ slightly.
Page 22

Standard Load Entry 3 Operations Manual
Super Systems Inc. Page 22 of 35
Click on a group to display the furnaces in that group. “Overview” will display all furnaces
regardless of group.
Click on a furnace to display information on its current status. In addition, if a furnace is listed
as disconncted, you may have the option to add a manual load to the furnace.
Within active loads, you will have the ability to add Notes, access Work Order Details, and mark
times for “At Heat” and “Load End.”
In addition, Recipe information will be displayed. Depending on the recipe and its current
status, you will be able to control the steps in the recipe if you have the right user priveleges
(see user claims setup) using the “Hold,” “Cont,” “Stop,” “Adv,” and “Ack” buttons. For more
detailed information on recipes, see your controller manual.
Clicking on a furnace which is in a Gap state (assigned and defined in the Gap Editor) will bring
up a screen like this:
Page 23

Standard Load Entry 3 Operations Manual
Super Systems Inc. Page 23 of 35
From this screen, you can add notes to explain any changes in status. The purpose of the Gap
screen is to provide an interface for the user to assign a reason code of why the furnace was not
running a load. The Gap Reasons are user defined in the Gap Editor in the setup. If the furnace
is in the READY state, the time of the gap is from the time the gap went to ready to the current
time. If the Gap Reason is already assigned, then the time associated to this Gap continues until
another load is run or a new Gap is added using the Add New Gap button.
Click “Add New Gap” to begin a new gap if desired. Use the dropdown menu to assign a Gap
type from those created in the Gap Editor.
Click “Save” to close the current gap without assigning a new one.
Click “Save + Start” to close the gap and begin a new load for the furnace (See “Load Creation”
below.)
Right-clicking on furnaces brings up additional functionality:
Right-click on a furnace in a Gap state to bring up the following options:
Click “Add Historical Load” to open the NEW LOAD window. See “Load Creation” below for an
explanation of this window’s features.
Click “View Current Gaps” to view the gaps that are currently in effect for the furnace.
Clicking “View Trend” will bring up trend information from SDCrecorder/SDRecorder Pro. See
the associated manual for additional information on this functionality.
Page 24

Standard Load Entry 3 Operations Manual
Super Systems Inc. Page 24 of 35
Right-clicking on an active furnace will also provide the option to “Force Load Out.” Doing so
will return the furnace to a Gap state.
Clicking the button in the top right corner of each furnace is identical to clicking “View
Trend.” This will bring up trend information from SDRecorder Pro. See the SDRecorder Pro
manual for additional information on this functionality.
Load Creation
The Load Creation Editor can be accessed in several ways:
By clicking on a furnace in a gap state, then clicking “Save + Start.”
By right-clicking on a furnace, then clicking “Add Historical Load.”
By clicking on a furnace (if Gap options are turned off).
Use the “Operation” dropdown menu to select from the available Operations for this furnace.
Under “Work Orders” are the following buttons:
Clicking will bring up the Work Order Editor (see details on pg. 26).
Clicking will bring up the Pick List. This allows you to search for previous work orders.
Clicking will allow you to add an existing work order, either by scanning a barcode from a
traveler, or by entering the information manually. If entering manually, use the dropdown menu
to select the desired Work Order, then click”Add” to add it to the list to be added. When
finished, click “Add” at the bottom of the window to add to the Load Creation Editor.
Page 25

Standard Load Entry 3 Operations Manual
Super Systems Inc. Page 25 of 35
Clicking will allow you to select a traveler to assign to the current load. Functionality is
identical to the “Existing Work Order” window (see above).
Clicking will allow you to rework an existing work order selected from the Pick List.
Clicking will allow you to edit a selected Work Order (see details on pg. 26).
To Delete a Work Order, click it in the list to highlight, then click Delete .
Under the “Recipe” bar, use the dropdown menu to select from the recipes currently associated
with this Load. You can also choose to run the load manually using the corresponding
checkbox.
Notes can be added to the load as well.
Click “Start Load” to begin the load, and “Cancel” to exit without saving.
Active Screen
There is ways to create data in the Active Screen. 1) creating a load in the furnace from the
overview screen, 2) creating future work using the button.
The Active Screen displays all active Work Orders along with their associated Furnace, Current
Operation, Next Operation, and Estimated Completion. A color box is also displayed to indicate
if the Work Order is Ready, In Sequence, or In Process
To create a new Work Order in the Work Order Editor, click Add . (See Work Order Editor on
p.26 for explanation of this feature.)
To Edit a Work Order in the Work Order Editor, click it in the list to highlight, then click Edit .
(See Work Order Editor on p.26 for explanation of this feature.)
To Delete a Work Order, click it in the list to highlight, then click Delete .
To Refresh the display, click Refresh .
The various display columns are clickable to sort the list by that column.
Page 26

Standard Load Entry 3 Operations Manual
Super Systems Inc. Page 26 of 35
Work Order Editor
The Work Order Editor allows you to create and edit new work orders and assign the
appropriate details, operations, and parts. Other fields can be added for capture with the work
orders. This would be setup in the Fields setup screen and those fields would be assigned to
WorkOrder. In the above screen, Case Depth, Customer, Due Date, Material Type and Sales are
examples of this.
To assign Operations to a work order, click Add and select the desired Operation from the
dropdown menu. Once selected, available options (Furnace, Recipe, etc.) will auto-populate.
Click “Save” to add the Operation to the work order.
You can also assign entire Sequences directly, using the Sequence Template button.
To edit an existing Step, click on that row and click the Edit button (or, double click on the
Step in the list).
Page 27
Standard Load Entry 3 Operations Manual
Super Systems Inc. Page 27 of 35
To delete a Step, click on that row and click the Delete button.
To assign Parts to a work order, click Add and select the desired Part from the dropdown
menu. Once selected, available options will auto-populate. Click “Save” to add the Part to the
work order.
You can also access the Parts Database from this screen by using the Manage Parts button.
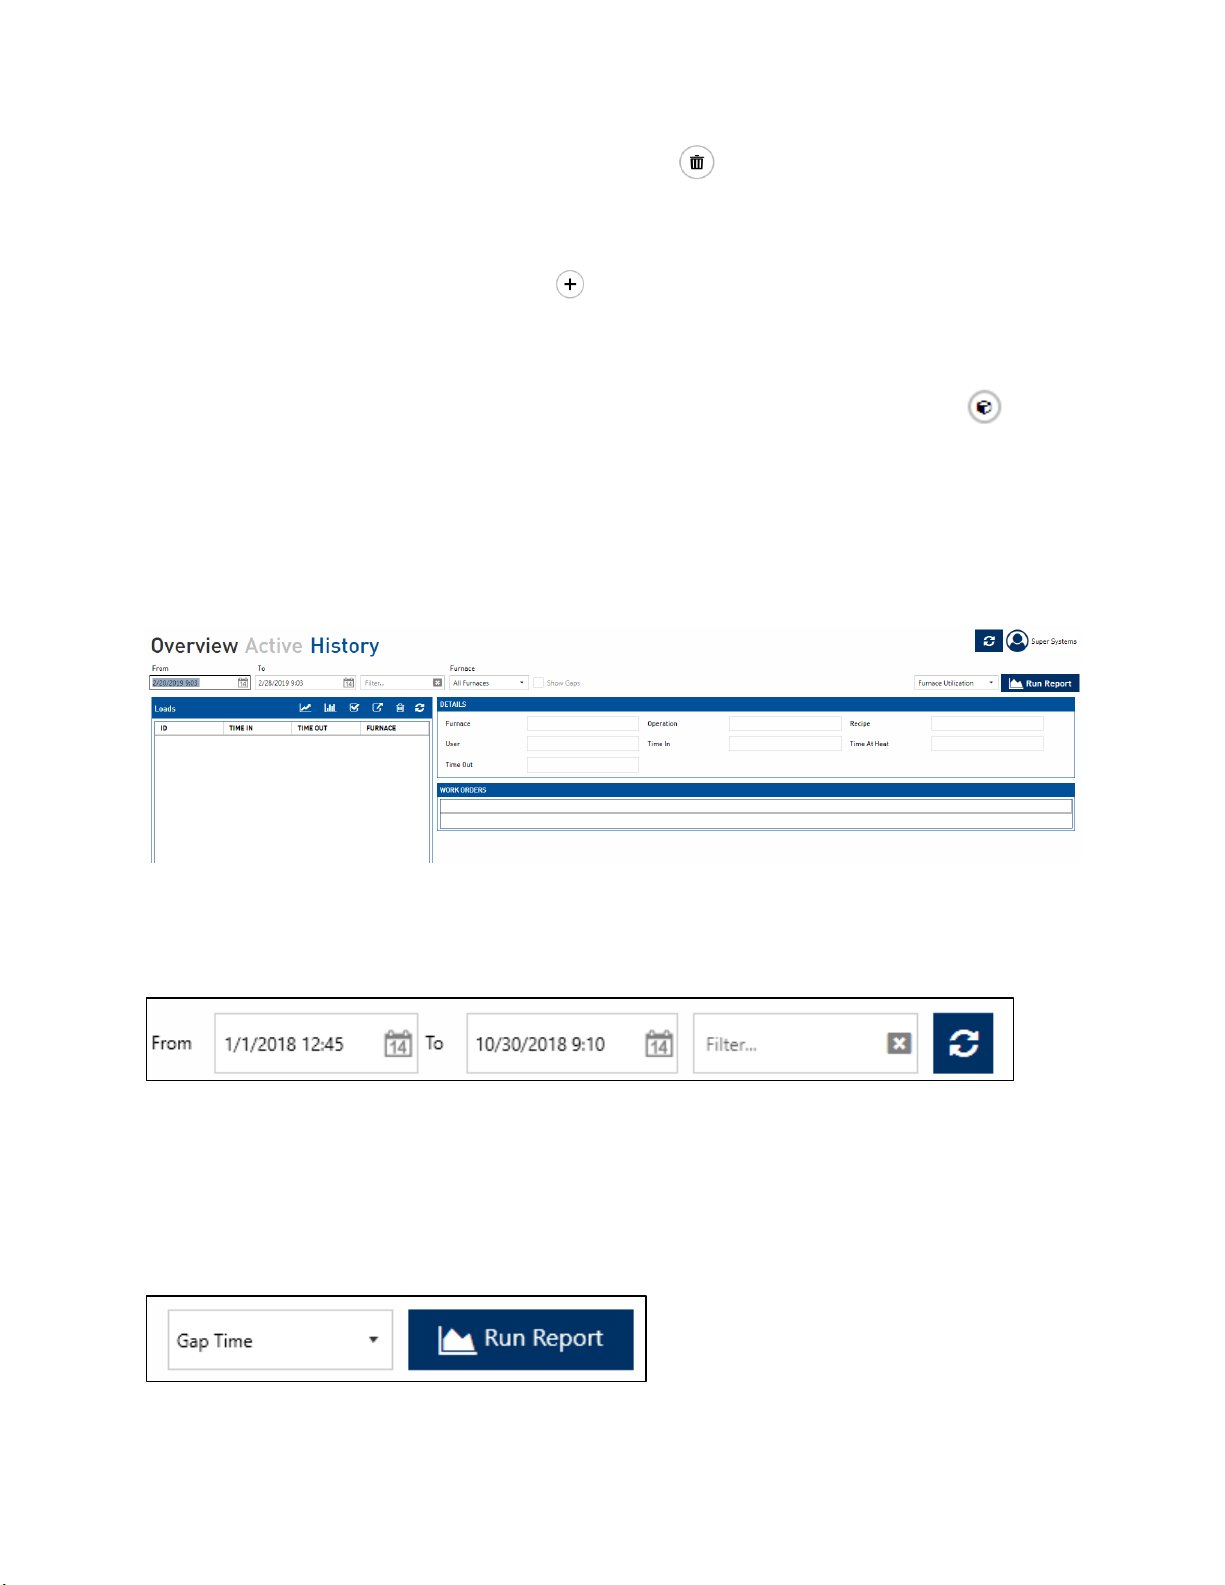
History Screen
The History Screen displays all completed loads, searchable by various timeframes and other
parameters.
Use the From/To Boxes and the filter input box to select a time range and/or text to search for
in the completed loads database.
The Filer field is a dynamic filter and will search all fields associated to the work orders.
Between the From and To date.
Use the Furnace dropdown menu to select which furnaces are currently visible.
Use the “Run Report” button to generate reports based on desired parameters.
Page 28

Standard Load Entry 3 Operations Manual
Super Systems Inc. Page 28 of 35
Use the report drop down menu to select a report on Furnace Utilization, Gap Time, Load
Tracking, or Work Order Tracking, then click “Run Report” to set parameters for the report.
NOTE: Depending on the type of report being run, the above screen may look different.
Click “OK” to generate the report.
To delete a Load, highlight the load and then click “Delete Load.”
The lower half of the History screen displays Work Orders associated with the highlighted load.
Clicking “View Trend” will bring up trend information from SDRecorder Pro. See the manual for
SDRecorder Pro for additional information on this functionality.
Clicking “Load Report” will generate a Load Report based on desired parameters and
information.
Clicking “Approval” allows you to add notes and attachments, then approve or reject the
information.
Clicking “Export” allows you to export information in various file formats to the desired location.
Page 29

Standard Load Entry 3 Operations Manual
Super Systems Inc. Page 29 of 35
Load Tracking Editor
Double click on a highlighted load to open the Load Tracking Editor for that load.
The Load Tracking Editor will display a unique load identifier, along with details about the
completed load; including Furnace, Operation, Recipe, User, Time In/Out, Time at Heat, and any
attachments. Any Work Orders associated with the load will be displayed as well, along with the
recipe used during the load. Notes can be added if desired.
Clicking “Edit” will make the information editable. Make any necessary changes, then click
“Save” to save those changes.
Clicking “View Trend” will bring up trend information from SDRecorder Pro. See the manual for
SDRecorder Pro for additional information on this functionality.
Clicking “Load Report” will generate a Load Report based on desired parameters and
information.
Clicking “Approval” allows you to add notes and attachments, then approve or reject the
information in the Load Tracking Editor.
Clicking “Close” returns you to the History screen.
Page 30

Standard Load Entry 3 Operations Manual
Super Systems Inc. Page 30 of 35
Bulk Load Reports
You can also generate multiple Load Reports at once from Load Entry 3. Multi-select load
histories (using Shift-click and Ctrl-click to select as you would in Windows) and click the Load
Report button to launch a process to produce Load Reports directly to PDF format.
Alternately, multi-select the desired load histories and click the Run Report button after
selecting Load Tracking from the accompanying dropdown.
The Bulk Report Parameters screen will then appear. Here you can choose for the reports to
include the trend image, the tabular data, or both. (This can be changed per report on a later
screen.)
Page 31

Standard Load Entry 3 Operations Manual
Super Systems Inc. Page 31 of 35
Next, on the Selected Historical Load Tracking screen, you will see the loads you selected, the
Run ID of that load, how many work orders that are associated with the load (and are auto
selected to run with the report) and an option to edit the load reports.
The Edit buttons will bring up the Report Parameters screen which allows you to deselect Work
Orders. Also, here you can set Trend, Data, or Both for each specific report.
Once everything is set as desired, click Export to begin the report generation process.
Page 32

Standard Load Entry 3 Operations Manual
Super Systems Inc. Page 32 of 35
The generation process goes through two main phases: Collecting Report Data and Generating
PDF Files.
Page 33

Standard Load Entry 3 Operations Manual
Super Systems Inc. Page 33 of 35
Once complete, you can click Open to view the file location of the reports.
Page 34

Standard Load Entry 3 Operations Manual
Super Systems Inc. Page 34 of 35
Windows Explorer will open to the BulkReports directory where you can find the export folder
and also a zip of that folder. The export folder is named with the full data and time of when the
reports were generated.
Within the folder the user will find the report PDFs.
Page 35

Standard Load Entry 3 Operations Manual
Super Systems Inc. Page 35 of 35
Revision History
Rev.
Description
Date
MCO #
-
Initial Release
2/28/2019
2259
A
Various interface and feature updates
11/23/2020
2303
 Loading...