

Page 1

HYDROGEN (H2) SENSOR
(PART NUMBER 20624)
OPERATIONS MANUAL
Super Systems Inc.
7205 Edington Drive
Cincinnati, OH 45249
513-772-0060
800-666-4330
Fax: 513-772-9466
www.supersystems.com
Page 2

Hydrogen (H2) Sensor Operations Manual
Super Systems Inc.
Page 2 of 17
Table of Contents
Introduction ........................................................................................................................................ 3
Features ............................................................................................................................................. 3
Specifications ..................................................................................................................................... 3
Switch Settings, Jumper Settings, and Connector Assignments .................................................... 5
Location of RS-485, DC Input, and Analog Output Terminals ...................................................... 5
Dip Switch Settings ........................................................................................................................ 5
Jumper Positions – Modbus RTU/ASCII ........................................................................................ 6
9-Pin Connector ............................................................................................................................. 7
Analog Output Jumpers ................................................................................................................. 7
Plumbing Connections ................................................................................................................... 8
Analog Output Assignments .......................................................................................................... 8
Calibrating and Configuring the Sensor using the H
Configuration Utility Software ..................... 9
2
Minimum Computer Requirements ............................................................................................... 9
Configuring Communications ........................................................................................................ 9
Overview Screen ............................................................................................................................. 9
Sensor Output Configuration ....................................................................................................... 10
Sensor Output Calibration ........................................................................................................... 10
Sensor Calibration ....................................................................................................................... 11
About ............................................................................................................................................. 12
Modifying Modbus Registers ....................................................................................................... 12
Calibrating the Sensor using Modbus Registers ........................................................................ 13
Performing a Zero Calibration ................................................................................................. 13
Performing a Span Calibration ................................................................................................ 13
Changing the 4-20mA Assignments using Modbus Registers ................................................... 13
Appendix 1: Modbus Register Map .................................................................................................. 14
Warranty ........................................................................................................................................... 16
Revision History ............................................................................................................................... 17
Page 3

Hydrogen (H2) Sensor Operations Manual
Super Systems Inc.
Page 3 of 17
Introduction
This sensor is designed to accurately measure Hydrogen through thermal conductivity
technology. It is capable of providing additional computations based on the Hydrogen
measurement, and it has multiple methods of digital and analog communications capabilities.
Features
• Measures H
• Calculates NH
from 0 to 100% with 0.01% resolution
2
, DA, and KN for nitrider applications
3
• Two isolated analog outputs capable of outputting current (4-20 mA or 0-20 mA) as well as
voltage (2-10 VDC, 0-10 VDC, 1-5 VDC, or 0-5 VDC)
• One RS-232 port with Modbus RTU or a simple ASCII protocol
• One RS-485 port with Modbus RTU protocol
• Wide power supply input range (9 to 30VDC)
• Small physical size
Specifications
Hydrogen measurement
• Range: 0 to 100%
• Accuracy: ±0.01%
• Repeatability: ±0.01%
• Resolution: ±0.01%
Calculated Variables for simple nitrider applications
• %NH
0 to 100%
3
• %DA (dissociated ammonia) 0 to 100%
nitriding potential
• K
N
Analog Outputs
• Two isolated analog outputs with common supply; capable of outputting current (4-20 mA or
0-20 mA) as well as voltage (2-10 VDC, 0-10 VDC, 1-5 VDC, or 0-5 VDC)
• Output variables: %H
, %NH3, %DA, and KN on either output
2
• Adjustable range of PV: zero and span
• Resolution: 0.005 mA
• Accuracy: ±0.01% of range
• Linearity: ±0.01%
• Minimum load resistance: 0 Ohms
• Maximum load resistance: 500 Ohms
Sample flow rate
• 1.5 to 2 cfh
RS-232 Serial Communications
• Protocols: Modbus RTU or a simple ASCII
• Baud rates: 9600, 19200, or 38400
• Format: 8 bits No parity, 1 stop bit, No handshaking
• Connection: DB-9F
Page 4
Hydrogen (H2) Sensor Operations Manual
Super Systems Inc.
Page 4 of 17
RS-485 Serial Communications:
• Protocol: Modbus RTU
• Baud rates: 9600, 19200, or 38400.
• Format: 8 bits No parity, 1 stop bit, No handshaking
Power requirement
• 9 to 30 volts DC @ 2 watts
Temperature and Humidity
• Electronics Operating: 0 to 50 °C, RH 0 to 90% non-condensing
• Sample gas: 0 to 70 °C, RH 0 to 90% non-condensing
• Storage: -20 to 70 °C, RH 0 to 90% non-condensing
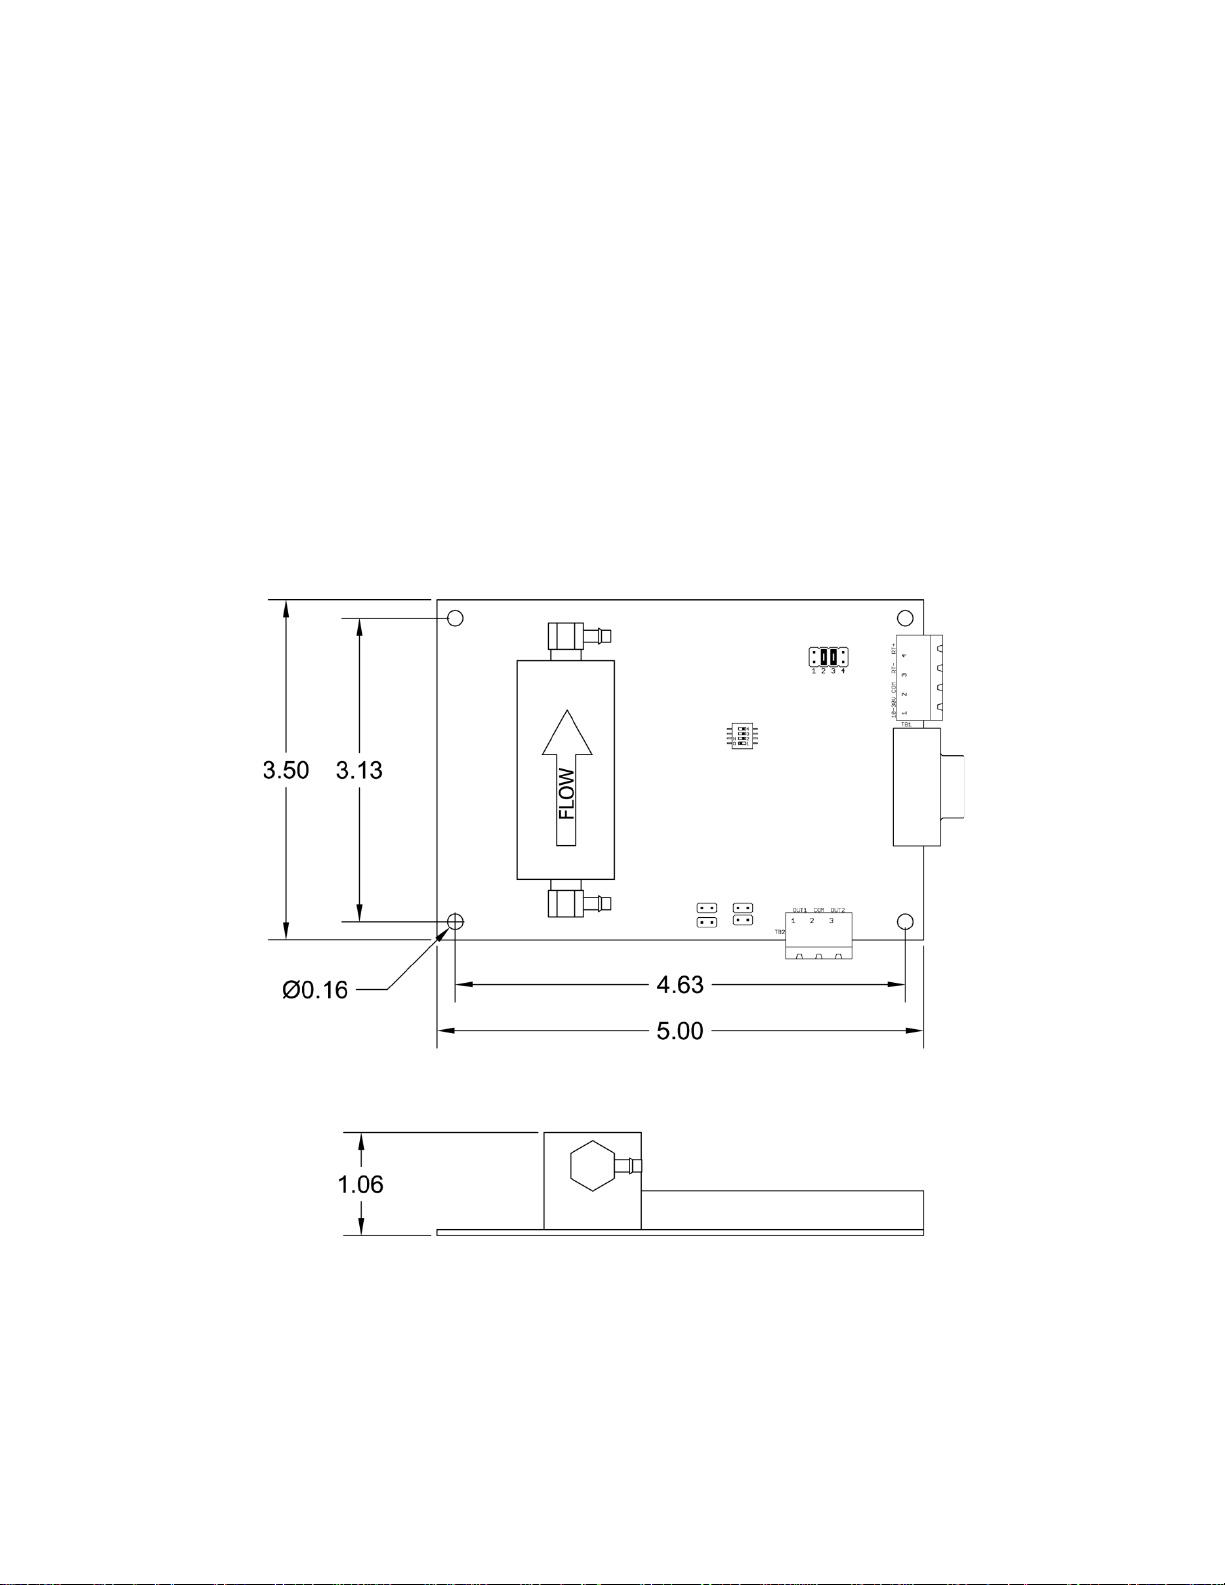
Dimensions:
See Figure 1.
Weight:
Material:
Figure 1 - H2 Sensor Dimensions
350 g
Stainless steel sensor housing
Page 5
Hydrogen (H2) Sensor Operations Manual
Super Systems Inc.
Page 5 of 17
Wiring:
See Figure 2.
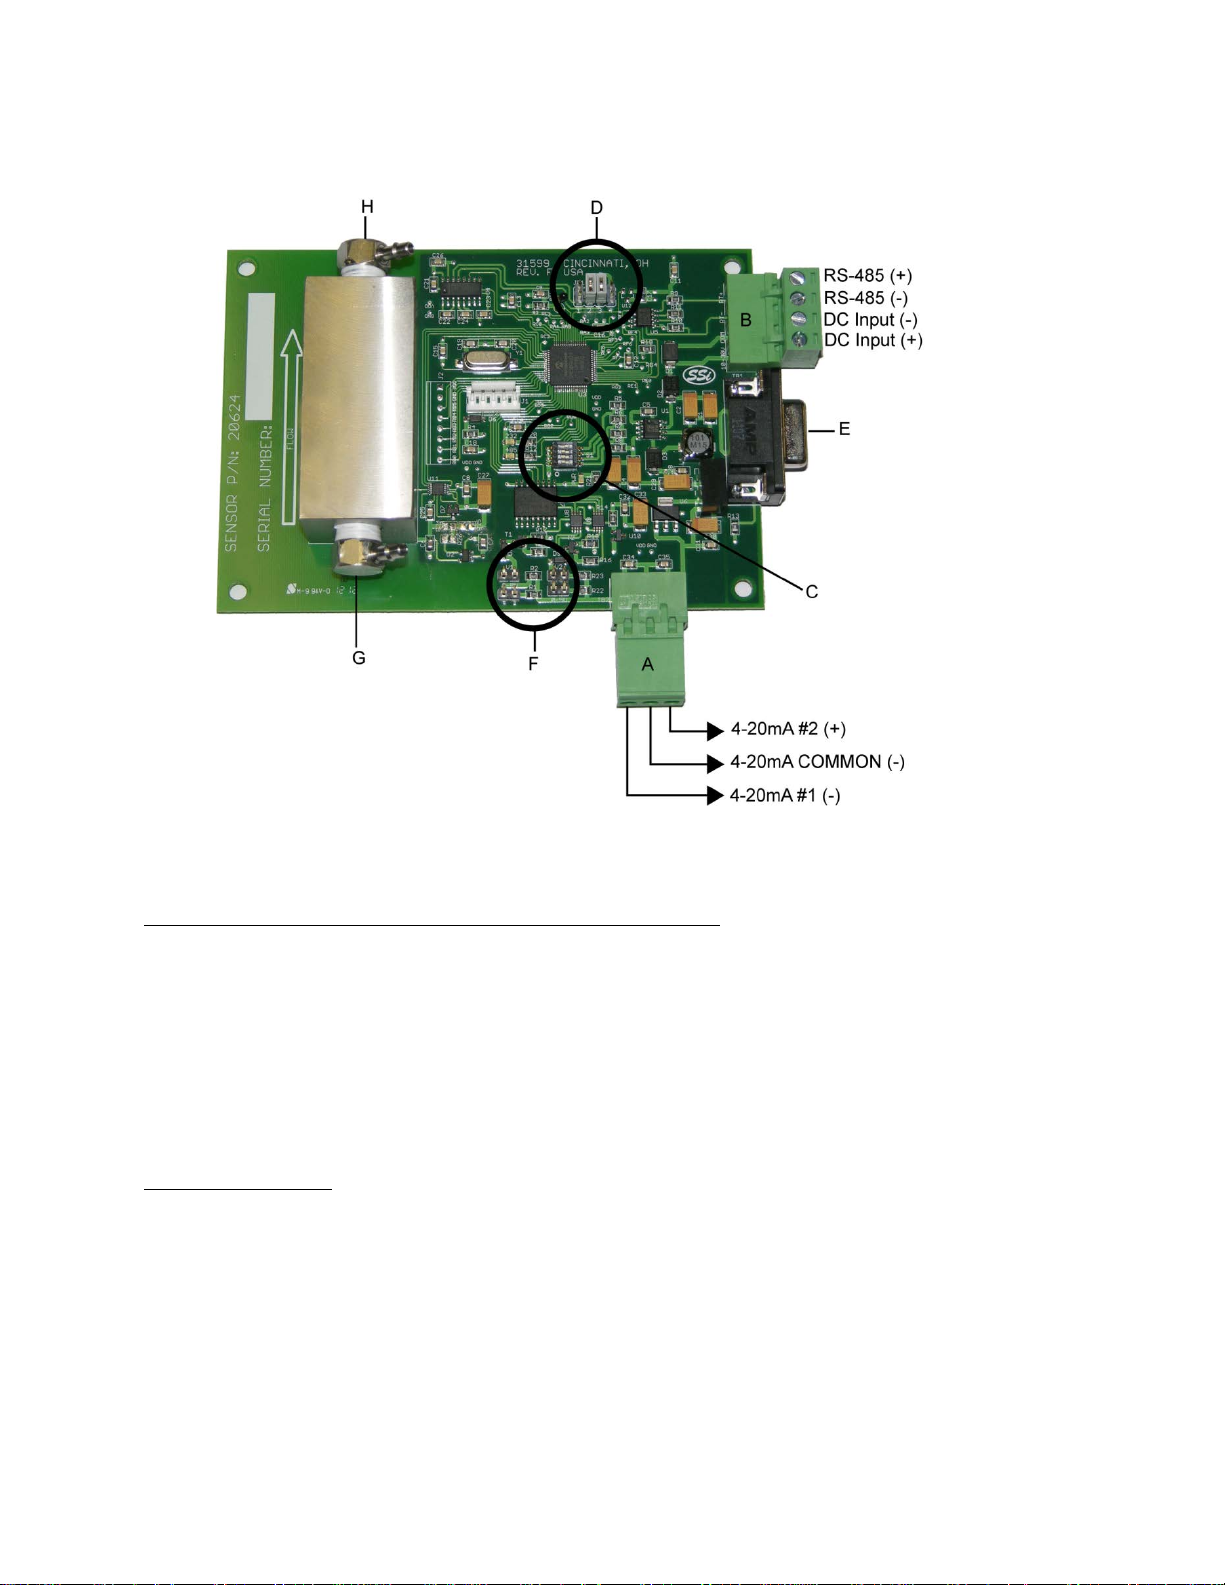
Figure 2 - H2 Sensor Wiring
Switch Settings, Jumper Settings, and Connector Assignments
Location of RS-485, DC Input, and Analog Output Terminals
(Items “A” and “B” in Figure 2)
There are two terminal blocks on the H2 cell circuit board. Figure 2 shows their locations.
One block (“A”) contains the analog output terminals. Jumper settings on the circuit board are
used to change whether resistance or voltage is generated. These jumper settings can be found
in “Analog Output Jumpers” below.
Another block (“B”) contains the digital communications (RS-485) and power (DC) terminals.
Dip Switch Settings
(Item “C” in Figure 2)
The first three dip switches determine the Modbus address. The address can be set for any
number between 1 and 8 using a binary numbering system where Bit #1 is the least significant
bit and Bit #3 is the most significant bit. The diagram below describes the switch position for
each possible address. The shaded area indicates the location of the switch.
Page 6

Hydrogen (H2) Sensor Operations Manual
Super Systems Inc.
Page 6 of 17
ADDRESS 1
ADDRESS 2
ADDRESS 3
ADDRESS 4
1 O 1 O 1 O 1 O
2 N 2 N 2 N 2 N 3 3 3 3
4 4 4 4 ADDRESS 5
ADDRESS 6
ADDRESS 7
ADDRESS 8
1 O 1 O 1 O 1 O 2 N 2 N 2 N 2
N
3 3 3 3 4 4 4 4
Protocol
1 O 1 O
2 N 2 N
3 3 4 4
1 2 3
4
1 2 3
4
Figure 3 - Dip Switch Settings (#1, #2, #3)
The last dip switch (#4) indicates the communication protocol. The ‘Off’ position is Modbus RTU
mode, and the ‘On’ position emulates the simple ASCII protocol of the previous version of the
SSI Hydrogen Sensor. The diagram below describes the switch position for each protocol. The
shaded area indicates the location of the switch.
Modbus RTU
Protocol
Previous SSI
Sensor
Figure 4 - Dip Switch Positions (#4)
Jumper Positions – Modbus RTU/ASCII
(Item “D” in Figure 2)
Four jumper terminals can be found on the board approximately 1.5” (3.81cm) to the left of the
RS-485 connections (specifically, when looking at the board in the orientation shown in Figure
2). These jumpers determine the pins that transmit and receive data via RS-232 communication.
The jumpers should be on Pins 2 and 3 for normal Modbus RTU operation (pin 2 is receiving and
pin 3 is transmitting). The jumpers should be on Pins 1 and 4 if the sensor is being used to
communicate via the simple ASCII protocol used on the previous version of the SSI Hydrogen
Sensor (pin 2 is transmitting and pin 3 is receiving).
Modbus RTU Protocol
Simple ASCII Protocol
Figure 5 - Jumper Positions (Modbus RTU/ASCII)
Page 7

Hydrogen (H2) Sensor Operations Manual
Super Systems Inc.
Page 7 of 17
JP2
JP4
JP3
JP5
Note the location of terminals #1 and #2, as well as the
Figure 7 – Analog Output
Terminal Block
#1
C
#2
9-Pin Connector
(Item “E” in Figure 2)
The sensor has a female 9-pin connector used for RS-232 communication. Only three of the
nine pins are used, and their assignments are:
Pin #2: Transmit or Receive (Depends on jumper positioning)
Pin #3: Transmit or Receive (Depends on jumper positioning)
Pin #5: Ground
Analog Output Jumpers
(Item “F” in Figure 2)
Jumpers near the analog output terminal block are used to determine whether a current or a
voltage is produced. Figure 6 shows the locations of the four jumpers: JP2, JP3, JP4, and JP5.
V1
0-5V
Figure 6 - Layout of Analog Output Jumpers
0-5V
If all jumpers are OPEN, a 4-20mA signal is produced.
COMMON terminal, in Figure 7. #1 and COMMON, in
combination, constitute loop 1, or the “left side” of the block.
#2 and COMMON, in combination, constitute loop 2, or the
“right side” of the block.
JP2 and JP3 are used for loop 1. JP4 and JP5 are used for
loop 2.
V2
O
M
M
O
N
The following table shows how the jumpers are used to change settings for the analog outputs.
Page 8

Hydrogen (H2) Sensor Operations Manual
Super Systems Inc.
Page 8 of 17
Applies to Loop 1 (#1 and COMMON)
Applies to Loop 2 (#2 and COMMON)
JP2
JP3
Resulting
Output
JP4
JP5
Resulting
Output
Open
Open
4-20mA
(current)
Open
Open
4-20mA
(current)
Closed
Open
2-10 VDC
Closed
Open
2-10 VDC
Open
Closed
4-20mA
(current)
Open
Closed
4-20mA
(current)
Closed
Closed
1-5 VDC
Closed
Closed
1-5 VDC
IMPORTANT: If Modbus register 43 is set to 0,
• 1-5 VDC becomes 0-5 VDC.
IMPORTANT: If Modbus register 44 is set to 0,
• 1-5 VDC becomes 0-5 VDC.
the above conditions are true. If Modbus register
43 is set to 1, the following changes take place
(depending on jumper settings):
• 4-20mA becomes 0-20mA
• 2-10 VDC becomes 0-10 VDC
Table 1 - Analog Output Jumper Settings
the above conditions are true. If Modbus register
44 is set to 1, the following changes take place
(depending on jumper settings):
• 4-20mA becomes 0-20mA
• 2-10 VDC becomes 0-10 VDC
Plumbing Connections
(Items “G” and “H” in Figure 2)
The sensor is provided with barb fittings (Items “G” and “H”) that are intended for use with 1/8”
ID flexible tubing. Flow goes into “G” and out through “H”. The barb fittings can be removed at
the user’s discretion, and any fitting with a 1/8” male pipe thread can be used in their place. If
the fittings are going to be replaced with different fittings, they must be replaced while the
stainless steel sensor block is still attached to the circuit board. Do not remove the sensor
block since its alignment with the sensors is a critical function that should only be performed by
a trained technician.
Analog Output Assignments
There are two analog outputs on the sensor. The default settings result in Output 1 being set
for Percent H2 (0-100%) and Output 2 being set for Percent Dissociation (0-100%). Both of
these outputs can be configured for any of the following parameters:
Percent Hydrogen (H
)
2
Percent Dissociation (DA)
Percent Ammonia (NH
Nitriding Potential (K
)
3
)
N
External
In “External” output mode, no calculation is performed, and the output is set to match a specific
value. Modifications to the Analog Output Assignments can be performed with the SSI H
Cell
2
Configuration Utility Software, which is described in the next section of this manual.
Page 9

Hydrogen (H2) Sensor Operations Manual
Super Systems Inc.
Page 9 of 17
Calibrating and Configuring the Sensor using the H2 Configuration Utility Software
The simplest way to set up the analog outputs, calibrate the analog outputs, and calibrate the
Hydrogen sensor is to use the SSi H
Configuration Utility software. This software provides a
2
simple to use graphical interface for performing the setup and calibration functions. It
communicates via Modbus (either RS-232 or RS-485). This is set by moving dip switch #4 to the
off position. To communicate via RS-232, use the 9-pin connector with the jumpers in positions
2 and 3. To communicate via RS-485, use the RT+ and RT- terminals on the 8 pin terminal strip.
Minimum Computer Requirements
• Microsoft Windows XP/Vista/7
• 500 MHz CPU
• 128MB RAM
• 2MB hard disk storage space
• 1 RS-232 or RS-485 Serial Port
Configuring Communications
Open the H2 Configurator and click Options Settings to open the dialog that allows you to set
the serial port, baud rate and target address of the H2 cell. (See
Figure 8.)
Figure 8 - Settings window
When using the RS-232 port, the baud rate should be set to 9600 and the address should be set
to 250. 250 is an SSi broadcast address and any H
cell that sees the message will answer, so
2
while the 250 address should be used for RS-232 it should not be used for RS-485 if there are
multiple SSi instruments on the same serial port. The Port setting may need to be adjusted to
match the port on your PC that is connected to the H
cell. RS-232 communications use a
2
simple straight through cable to the DB9 connector.
Overview Screen
The Overview screen (Figure 9) displays the current % H2 and the three buttons used to
configure or calibrate the H2 cell.
Page 10

Hydrogen (H2) Sensor Operations Manual
Super Systems Inc.
Page 10 of 17
Figure 9 - Overview screen
Sensor Output Configuration
The Configuration screen (Figure 10) allows basic configuration of the H2 cell.
Figure 10 - Configuration screen
The Instrument Mode is the primary PV (Process Variable) setup. This is mainly used by the
touch screen and normally does not need to be changed as the % H
is always available. The
2
output sources are the PVs that will be retransmitted via the selected output. The Output Zero
is the PV value that will result in a 4 mA output and the output span value is the PV value that
will result in a 20 mA output.
Sensor Output Calibration
Output calibration calibrates the outputs. Each output can be zeroed and spanned. To perform
this calibration a reliable measurement device capable of accurately measuring a 4-20mA
signal will be required. An example screen is shown in Figure 11; a screen showing the success
of an output calibration can be seen in Figure 12.
Page 11

Hydrogen (H2) Sensor Operations Manual
Super Systems Inc.
Page 11 of 17
Figure 11 - Output Calibration screen
Figure 12 - Successful Output Calibration
The steps to performing an output cal are as follows:
• Select an output and whether you are going to do a zero or a span.
• Click Prep for Cal. The H
• Measure the output current at the H
cell will set the output appropriately for measurement.
2
cell’s terminals and input that value into the box next
2
to ‘Measured Output mA’. For example, if you are performing a zero calibration and your
measurement device is indicating 4.03mA, you would enter the value of 4.03 in the
“Measured Output mA” box.
• Click the Calibrate button to perform the calibration.
• When the calibration is complete, the measurement device should display the target value.
For a zero calibration that would be 4.00mA, and for a span calibration that would be 20mA.
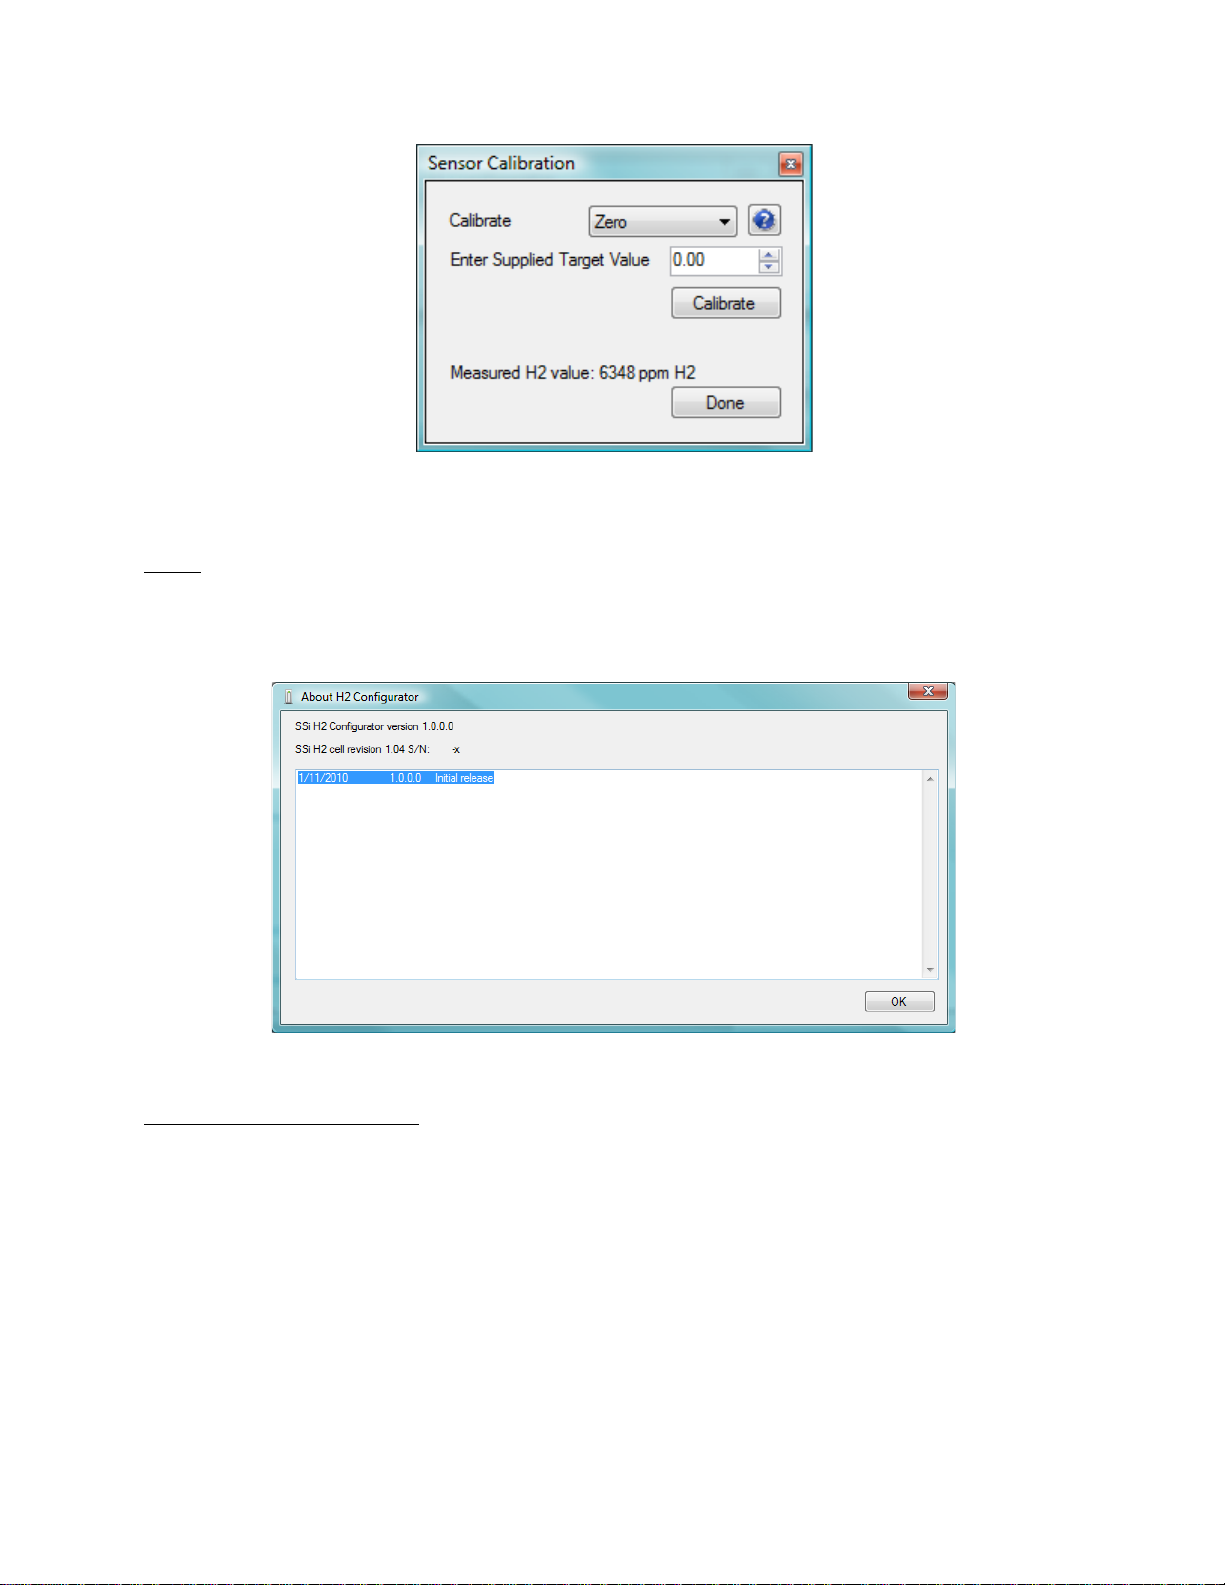
Sensor Calibration
The sensor can be zeroed or spanned via Sensor Calibration (Figure 13). The gas should flow at
a rate of 1.5 SCFH and the detected H
value needs to be steady before a calibration is
2
performed. To perform a Zero cal select Zero in the drop down box next to Calibrate. Enter the
% H
of the supplied gas (for zero this will be 0.00%). Wait for the readings to come to
2
equilibrium and click Calibrate. To perform a Span cal select Span in the drop down list and
repeat the process.
Page 12
Hydrogen (H2) Sensor Operations Manual
Super Systems Inc.
Page 12 of 17
Figure 13 - Sensor Calibration screen
About
The About screen (Figure 14) is access from the overview screen by clicking Help…About. The
About screen provides release information about the H
the firmware in the SSi H
cell.
2
Configuration utility and the revision of
2
Modifying Modbus Registers
The setup parameters of the H2 sensor can also be modified by adjusting the Modbus registers.
A list of all Modbus registers can be found in “Appendix 1: Modbus Register Map”. To make
modifications, you must connect the sensor to a computer that uses SSI’s “Configurator”
software. When communicating with Configurator, use a straight-through serial extension
cable connecting the computer to the sensor. Set the baud rate in Configurator to 9600. On the
sensor, set DIP Switch #4 to Off for Modbus communication, and be sure that the jumpers are
on pins 2 and 3.
Figure 14 - "About" Screen
Page 13

Hydrogen (H2) Sensor Operations Manual
Super Systems Inc.
Page 13 of 17
Calibrating the Sensor using Modbus Registers
Performing a Zero Calibration
1. Begin the flow of Zero gas (Nitrogen or Argon) at a rate of 1.5 SCFH.
2. Allow the readings from the sensor to stabilize.
3. Set Register #13 to 0 (equal to 0% H
).
2
4. Set Register 12 to 1.
Performing a Span Calibration
1. Begin the flow of Span gas (with a known %H
2. Allow the readings from the sensor to stabilize.
3. Set Register #13 to the H
value in the span gas. Multiply the gas value by 100 before
2
entering the number (i.e. if the gas has 40.13%H
enter a 997 into Register 13).
4. Set Register 12 to 2.
Changing the 4-20mA Assignments using Modbus Registers
Register 19 denotes the assignment for 4-20mA #1, and register 23 denotes the assignment of
4-20mA #2. The default value for #1 is %H
2
number into either register according to the following list:
• 0 = %H
2
• 1 = %DA
• 2 = %NH
3
• 3 = %Kn
• 4 = External Source
) at a rate of 1.5 SCFH.
2
, enter a 4013 or if the gas has 9.97% H2
2
, and #2 is #DA. To change the assignment, enter a
Page 14

Hydrogen (H2) Sensor Operations Manual
Super Systems Inc.
Page 14 of 17
Register Functions and Default Values
#
Function
Default
0
Current firmware revision level
Varies
1
RS-232 communication mode (0=Modbus slave, 1=ASCII /Previous SSI
Sensor)
DIP Sw.
2
RS-232 baud rate (0=9600, 1=19200, 2=38400)
0
3
RS-485 communication mode (0=Modbus slave, 1=Modbus master [NOT
USED])
0
4
RS-485 baud rate (0=9600, 1=19200, 2=38400)
1
5
Temperature trim for thermistor 1 / ambient temperature
200
6
A/d counts for thermistor 1
Varies
7
Thermistor 1 temperature
Varies
8
%H2 A/D counts – High (Right justified: 0x00 byte, high byte, mid byte,
low byte)
Varies
9
%H2 A/D counts – Low (Right justified: 0x00 byte, high byte, mid byte, low
byte)
Varies
10
%H2 measured voltage
Varies
11
%H2 as found from a polynomial
Varies
12
%H2 sensor calibration (0=none, 1=zero cal, 2=span cal)
0
13
%H2 gas composition (value/100 = %H2/N2 balance)
0
14
Sensor Modbus address (important for slave communications only)
DIP Sw.
15
Model Number
4100
16
Set Factory Defaults (23205=Full, 23206=%H2, 23207=Loop 1, 23208 =
Loop 2)
0
17
4-20mA #1 DAC output counts
Varies
18
4-20mA #2 DAC output counts
Varies
19
4-20mA #1 Source (0=%H2, 1=%DA, 2=%NH3, 3=Kn, 4= External)
0
20
4-20mA #1 Zero value
Varies
21
4-20mA #1 Span Value
10000
22
4-20mA #1 External current loop (Used only if register 19 = 4)
0
23
4-20mA #2 Source (0=%H2, 1=%DA, 2=%NH3, 3=Kn, 4= External)
1
24
4-20mA #2 Zero value
0
25
4-20mA #2 Span Value
1000
26
4-20mA #2 External current loop (Used only if register 23 = 4)
0
27
Enable Calibration of 4-20ma output (0=disable, 1=enable)
0
28
Calibrate 4-20mA output (1=#1 zero, 2=#1 span, 3=#2 zero, 4=#2 span)
0
29
4-20mA calibration value (4000 to 20000 for 4-20mA)
0
30
Calibration result codes (9-12=successes, 13-16=failures, 20=no cal
specified)
0
31
Percent DA value
Varies
32
Percent NH3 value
Varies
33
Super Kn value
Varies
34
%N2 flow
0
35
%NH3 flow
0
36
%DA flow
0
Appendix 1: Modbus Register Map
Page 15

Hydrogen (H2) Sensor Operations Manual
Super Systems Inc.
Page 15 of 17
Register Functions and Default Values
#
Function
Default
37
Process variable mode (0=H2, 1=DA, 2=NH3, 3=KN)
0
38
Process variable value
Varies
39
%H2 mantissa
Varies
40
%H2 exponent
Varies
41
Force theoretical current loop values
0
42
Minimum H2 value
0
Page 16

Hydrogen (H2) Sensor Operations Manual
Super Systems Inc.
Page 16 of 17
Warranty
Limited Warranty for Super Systems Products:
The Limited Warranty applies to new Super Systems Inc. (SSI) products purchased direct from
SSI or from an authorized SSI dealer by the original purchaser for normal use. SSI warrants
that a covered product is free from defects in materials and workmanship, with the exceptions
stated below.
The limited warranty does not cover damage resulting from commercial use, misuse, accident,
modification or alteration to hardware or software, tampering, unsuitable physical or operating
environment beyond product specifications, improper maintenance, or failure caused by a
product for which SSI is not responsible. There is no warranty of uninterrupted or error-free
operation. There is no warranty for loss of data—you must regularly back up the data stored on
your product to a separate storage product. There is no warranty for product with removed or
altered identification labels. SSI DOES NOT PROVIDE ANY OTHER WARRANTIES OF ANY KIND,
INCLUDING, BUT NOT LIMITED TO, THE IMPLIED WARRANTIES OR CONDITIONS OF
MERCHANTABILITY AND FITNESS FOR A PARTICULAR PURPOSE. SOME JURISDICTIONS DO
NOT ALLOW THE LIMITATION OF IMPLIED WARRANTIES, SO THIS LIMITATION MAY NOT APPLY
TO YOU. SSI is not responsible for returning to you product which is not covered by this limited
warranty.
If you are having trouble with a product, before seeking limited warranty service, first follow the
troubleshooting procedures that SSI or your authorized SSI dealer provides.
SSI will replace the PRODUCT with a functionally equivalent replacement product,
transportation prepaid after PRODUCT has been returned to SSI for testing and evaluation. SSI
may replace your product with a product that was previously used, repaired and tested to meet
SSI specifications. You receive title to the replaced product at delivery to carrier at SSI shipping
point. You are responsible for importation of the replaced product, if applicable. SSI will not
return the original product to you; therefore, you are responsible for moving data to another
media before returning to SSI, if applicable. Data Recovery is not covered under this warranty
and is not part of the warranty returns process. SSI warrants that the replaced products are
covered for the remainder of the original product warranty or 90 days, whichever is greater.
Page 17

Super Systems Inc.
Page 17 of 17
Rev.
Description
Date
MCO #
A
Previous Release
B
Changes made to reflect changes in board
setting analog outputs to volts.
11/1/2013
2132
Revision History
Hydrogen (H2) Sensor Operations Manual
design. Changed pinout. Added content for
 Loading...