

Page 1
Page #1 of 19 ___________________________________________________________________________ M4581 – DPL4000
OPERATIONS MANUAL
DPL4000
Portable Low Range Dew Point Analyzer
7205 Edington Drive / Cincinnati, OH 45249 / Tel (513) 772-0060 / Fax (513) 772-9466
Page 2
Page #2 of 19 ___________________________________________________________________________ M4581 – DPL4000
Product Description:
This device is used to measure very low dew points with high accuracy and excellent
long-term stability. It can be used across a wide range of temperatures and
pressures, and it measures dew point in a variety of non-corrosive gases including
Nitrogen, Argon, Hydrogen, and Sulfur Hexafluoride (SF6).
General Specifications:
Total Measurement Range:
-148°F to +32°F (-100°C to 0°C)
Optimal Measurement Range:
-112°F to -22°F (-80°C to -30°C)
Accuracy (Within Optimal Range):
+/- 3.6°F (+/- 2°C)
Accuracy (Outside Optimal
Range):
+/- 5.4°F (+/- 3°C)
Operating Temperature Range:
-40°F to +140°F (-40°C to +60°C)
Operating Pressure Range:
0-725 psi / 0-50 bar
Operating Humidity:
Non-Condensing
Sensor Housing Classification:
IP65 – NEMA4 (AISI316L)
Display Housing Classification:
IP54
Display Weight:
400 grams
Power:
Rechargeable NIMH Battery (included) or 4 “AA” Batteries
Battery Recharging Time:
Approximately 4 hours
Battery Charger Input
Requirements:
110-240 VAC/ 47-63Hz / 400mA
Run Time on Battery Power:
48 Hours – Continuous use / Up to 30 days - Data logging only
Output Units:
Dew Point /Frost Point, ppm & ppb (by volume), ppm (by weight)
Languages Supported:
Nine Possible Languages (See “Language” section)
Data Logging Capacity:
2700 points, user-selectable measurement interval
Data Logging Interval Options:
1s, 5s, 15s, 30s, 1min, 5min, 15min, 30min, 1h, 3h, 12h
Logging Duration Options:
1min, 5min, 15min, 30min, 1h, 3h, 12h, 24h, 7d, 31d, Memory Full
Calibration
It is suggested that this device should be calibrated on a routine basis, such as once
per year or as prescribed by the user’s quality system requirements.
Sensor Technology:
The dew point measurement is based on a capacitive thin film polymer. Water
molecules in the surrounding air or gas diffuse into the polymer layer through the
permeable upper electrode, which changes the capacitance of the sensor. Changes
in capacitance can be directly correlated to the quantity of water molecules in the
gas.
Page 3

Page #3 of 19 ___________________________________________________________________________ M4581 – DPL4000
Special Features:
The dew point sensor in the DPL4000 performs two functions that provide increased
accuracy and response time.
Automatic Calibration – The sensor warms itself and performs an offset (zero
point) correction. This is performed automatically at start up and after every 45
minutes of continuous use.
Sensor Purge – This function evaporates all excess moisture molecules from the
sensor to significantly increase the response time when the sensor goes from a
wet condition to a dry condition. This is performed automatically at startup and
after every 24 hours of continuous use. A Sensor Purge will also be initiated
automatically when the sensor detects a large wet-to-dry environmental change.
Getting Started:
To begin taking measurements with the DPL4000:
Connect a ¼” Male NPT quick-disconnect fitting (supplied) to the gas source. This
fitting will not allow the gas to flow until the mating quick-disconnect fitting has
been connected.
Attach the sensor sampling assembly to the gas source using the quick
disconnect fitting at the base.
Start the flow of gas at approximately 10 CFH. Loosing and tightening the knob
on the front of the flow meter will adjust the flow.
Connect the small end of the Sensor Communication Cable to the port on the
back of the sensor that is labeled “II”. This will be the port without the rubber
boot.
Connect the other end of the cable to the handheld display using either one of the
ports on the bottom.
Turn on the power on the handheld display unit.
If desired, change the environmental settings (selecting “NO” will use the default
values).
The instrument will need to go through some diagnostic tests including an
automatic calibration and one or more sensor purges. During this time, the
readings on the display will either indicate all dashes, or a dew point value that
does not move. This condition will exist for between 5 and 15 minutes, depending
on the dew point of the measured gas and the dew point that the sensor was
exposed to prior to installation.
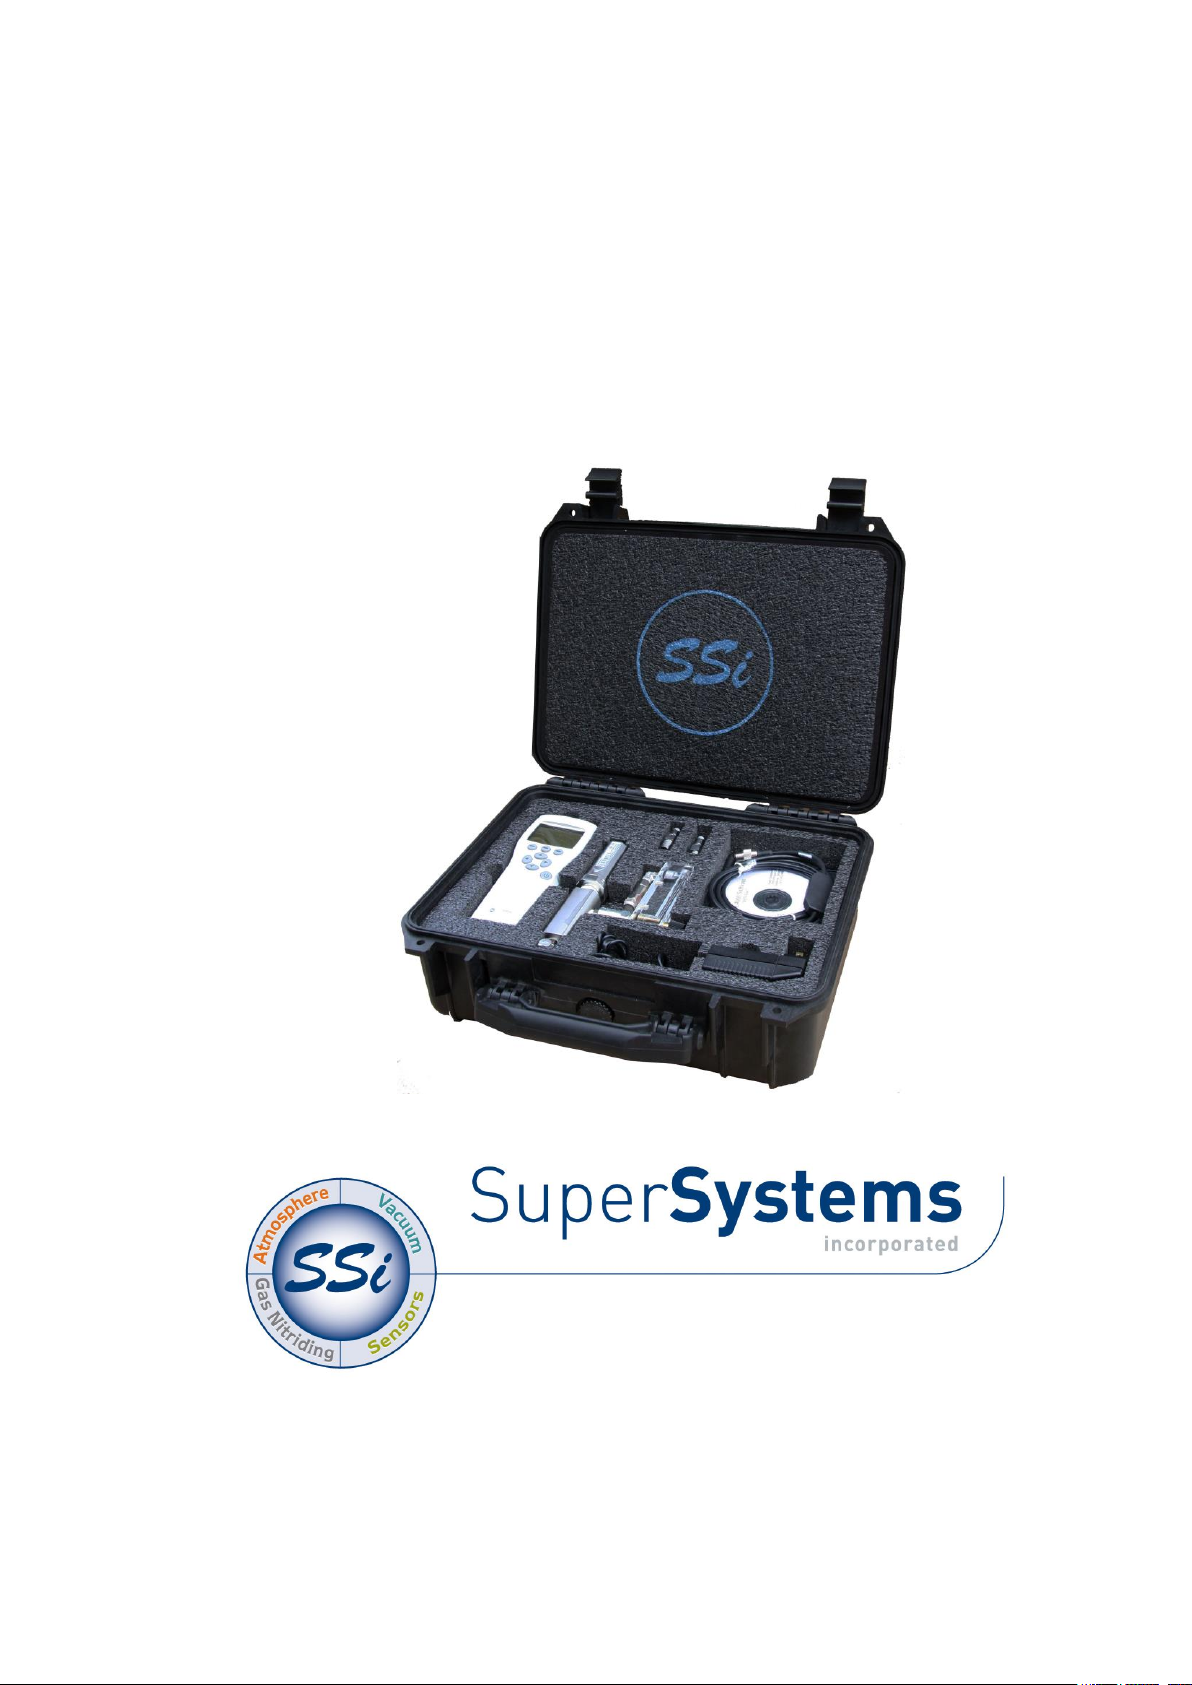
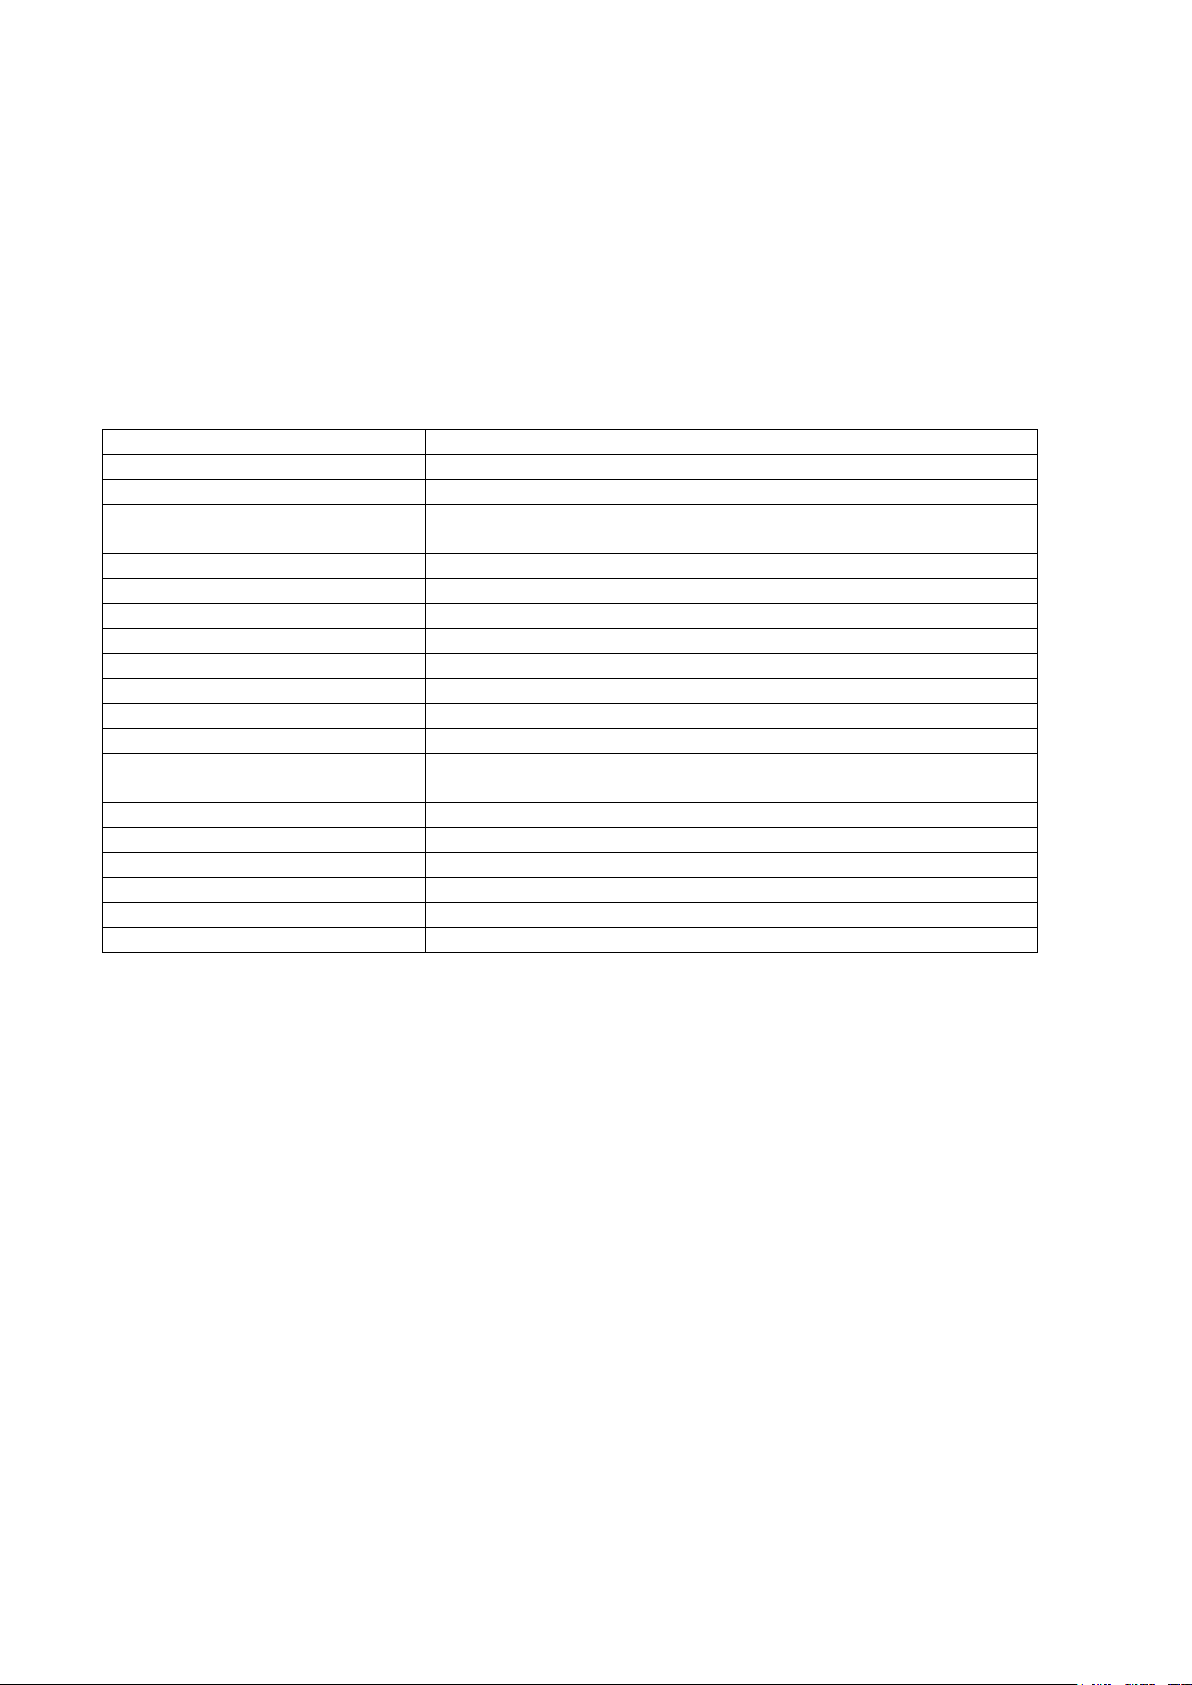
DPL4000 Components:
Page 4
Page #4 of 19 ___________________________________________________________________________ M4581 – DPL4000
1. Handheld Display / Data Logger (PN 31428)
2. Sensor Assembly with Flow Meter
3. Sensor Communication Cable (PN 31429)
4. Battery Charger (PN 31707)
5. ¼” Male NPT Quick Disconnect Fittings with Shutoff (2)
(PN 34664)
6. Software CD
7. USB Cable for Downloading Data
8. Operations Manual
9. Plug for Unused Port on Handheld Display
10. Contact Plate for using “AA” batteries
11. Carrying Case
12. Battery Pack (PN 32015)
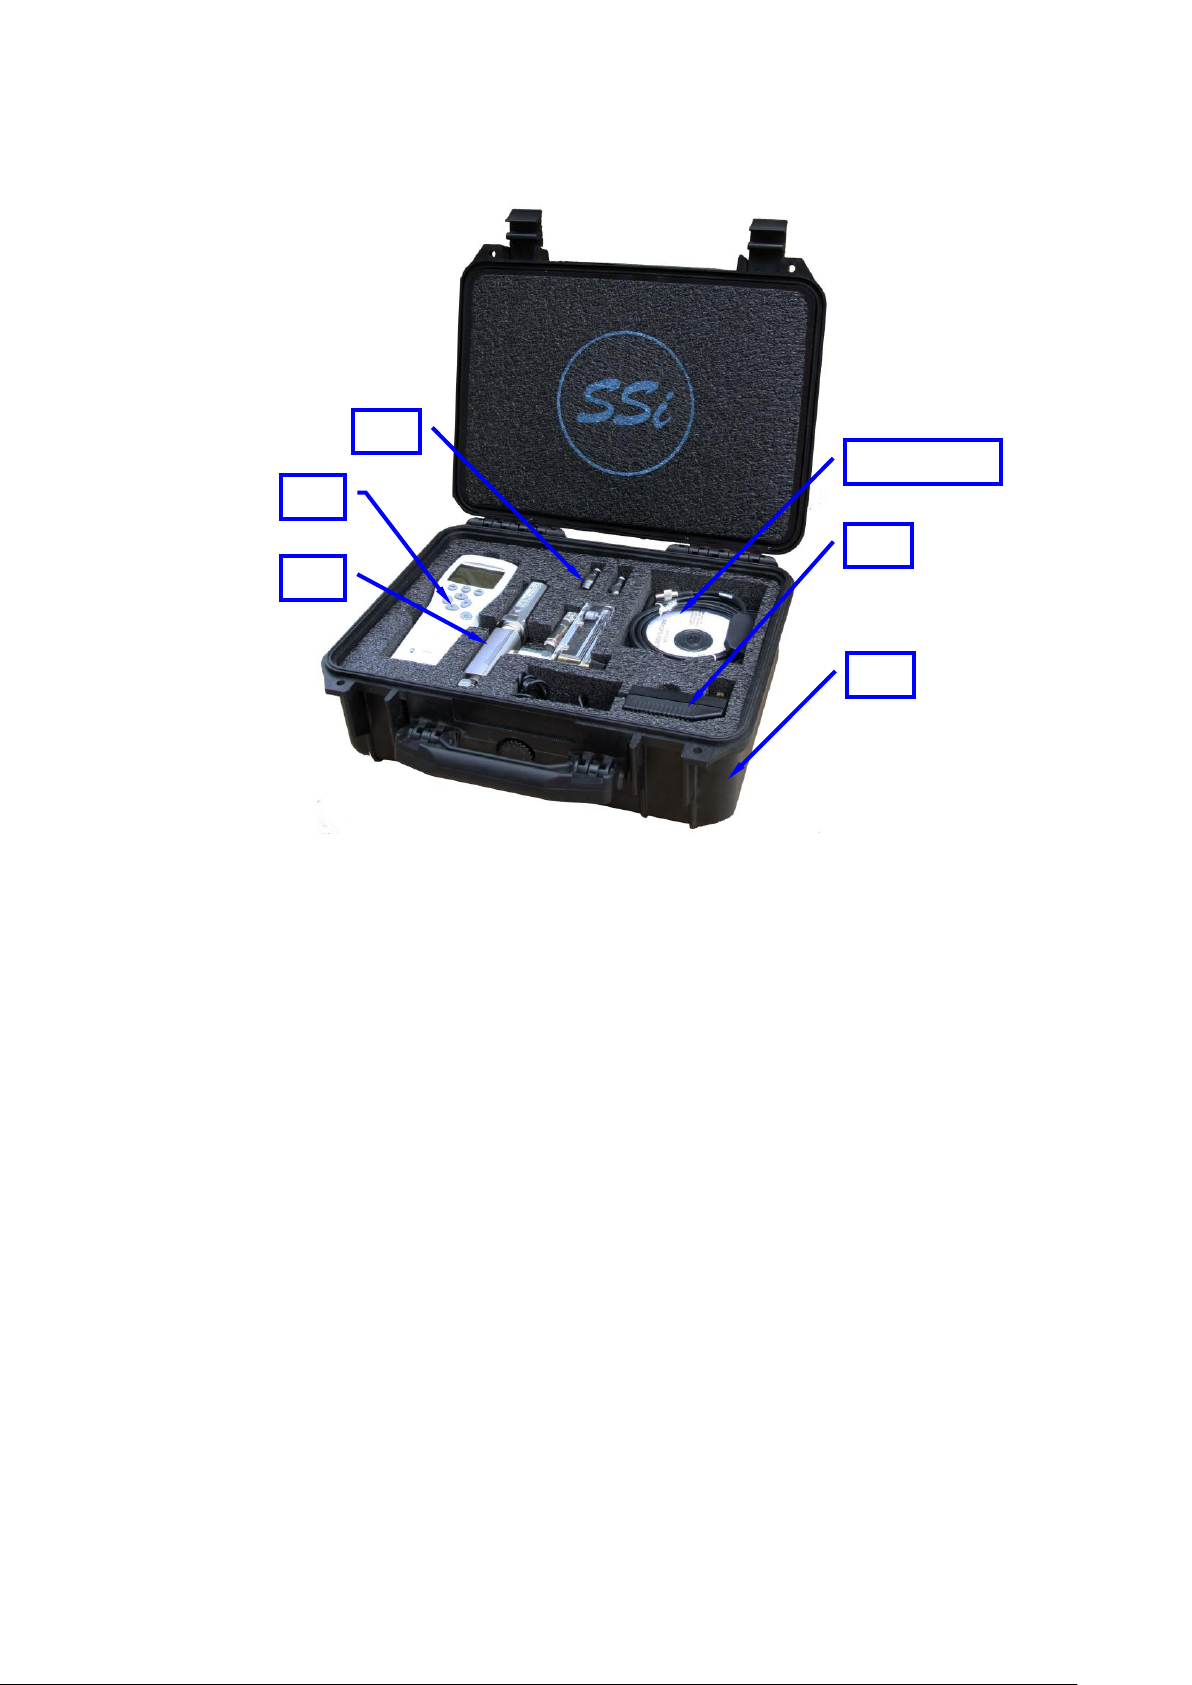
Installing and Removing the Battery Pack
The DPL4000 is supplied with a rechargeable battery pack. It is
also possible to power the instrument using four (4) “AA” 1.5V
alkaline batteries. To use the alkaline batteries, you will need
to install the supplied metal contact plate at the base of the
battery housing.
1
2 5 3, 6, 7, 9,
11
4
Page 5
Page #5 of 19 ___________________________________________________________________________ M4581 – DPL4000
1. Unscrew the back plate of the indicator.
2. Remove the old batteries. If a rechargeable battery is
installed, remove the black connector by gently pulling up
on the wires.
Figure 1 Installing the Battery Pack
3. Connect the black connector of the new rechargeable
battery pack. Make sure the red and black wires are on
the upper edge of the connector. Do not push the
connector with any conducting material. If using alkaline
batteries, the metal contact plate will need to be inserted
if it is not already present.
4. Close the back plate, and tighten the screw.
5. Charge the battery before use.
Charging the Battery Pack
1. Plug the charger into the top of the indicator (located
under the rubber cap).
2. Connect the charger to a wall socket. A dynamic battery
symbol will be visible in the top left corner of the display.
3. When the battery symbol does not change, the battery
pack is fully charged.
4. Disconnect the charger.
The duration of recharging is typically 4 hours.
Page 6
Page #6 of 19 ___________________________________________________________________________ M4581 – DPL4000
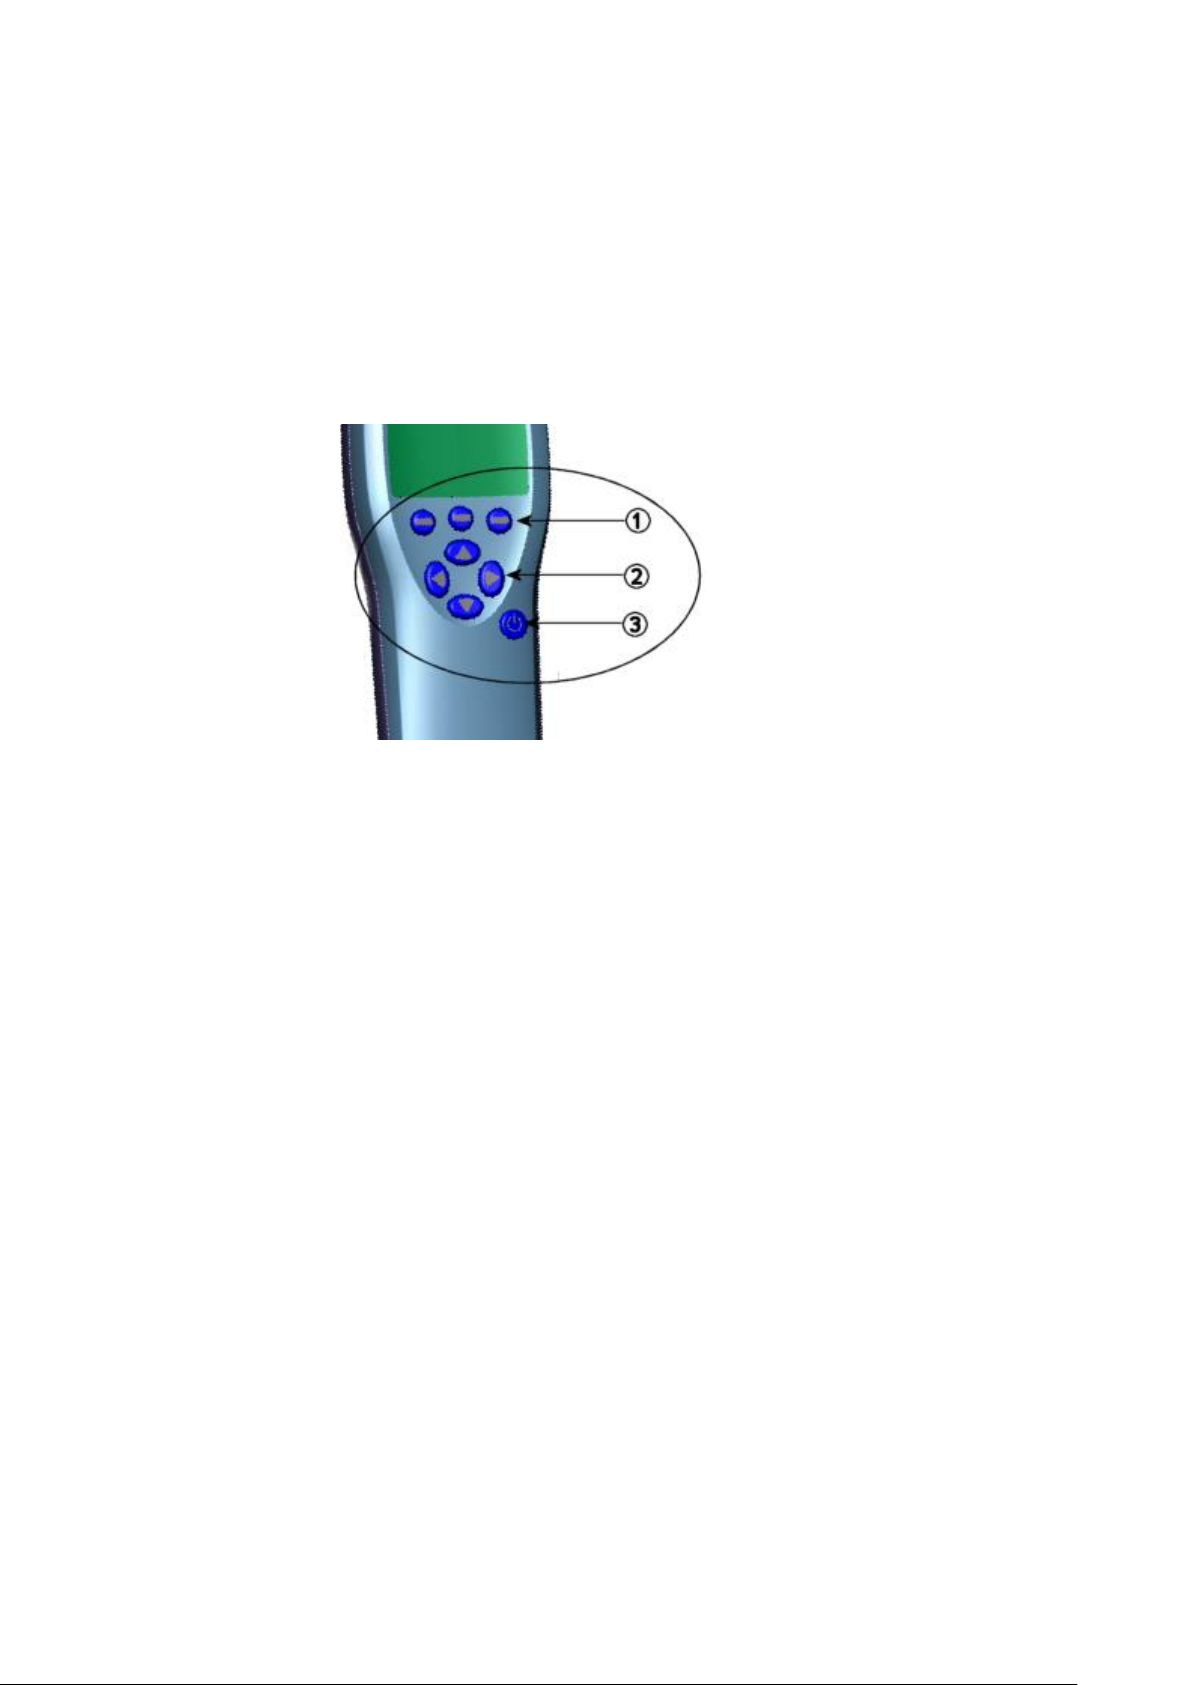
Buttons and Navigation
To turn on the device, press the Power On/Off button. To open
menus, press an arrow button and then press the shortcut
buttons. To activate a function shown above the shortcut button,
press the shortcut button. To navigate in the menus, press
arrow buttons.
0403-033
Figure 2 Buttons
The following numbers refer to Figure 2 above.
1 = Shortcut buttons
2 = Arrow buttons
3 = Power on/off button
Turning on the Device
1. Connect the Sensor Assembly to either one of the base
connectors in the indicator.
2. Press the Power On/Off button.
3. If desired, adjust the environmental settings in the
instrument.
Pressure (P) - Preset to Atmospheric Pressure at time of
manufacture
Specific Gravity (G) – Preset for Nitrogen
NOTE: For most applications, the default values for each of
these settings will be appropriate. The variations in
Atmospheric Pressure will have negligible impact on the
resulting dew point. The Specific Gravity is not used in the
Page 7

Page #7 of 19 ___________________________________________________________________________ M4581 – DPL4000
calculation of dew point. It is only used in the
determination of ppm/ppb (parts per million/billion of
water). If only dew point is displayed, the Specific Gravity
value can be ignored.
Menus
The settings can be changed and functions can be selected in
the menus. Follow the instructions below:
1. Open the main menu by pressing one of the
buttons.
2. Press Open within 5 seconds. Otherwise, the basic
display returns. If this happens, start from step 1 again.
3. Move in the menus using the buttons.
4. Select an item with the button.
5. To return to the previous level, press .
6. To return to normal operation, press Exit.
Display Menu
Quantities and Units
You can select between 1 and 3 quantities to display at one
time. The options are:
PPB (Parts Per Billion Water – by volume)
Tdf (Dew Point / Frost Point Temperature)
PPM (Parts Per Million Water – by volume)
PPMW (Parts Per Million Water – by weight)
For Dew Point, the units can be selected by pressing the “UNIT”
button.
Page 8

Page #8 of 19 ___________________________________________________________________________ M4581 – DPL4000
Rounding
You can select a one- or two-decimal display using Rounding.
As a default, rounding is turned on (a one decimal display is in
use).
Hold/Save
With the Hold/Save function you can hold a selected display
reading and save it into the memory. Several readings can be
saved. The reading saved first is called data point 1, the second
saved reading is called data point 2, and so on. All the individual
readings (data points) are stored in the same file marked with
. The file will remain in the indicator memory even when the
indicator is switched off.
Graphic History
The graphical display shows the measurements as a curve.
From the curve, you can examine the data trend and history of
the last minutes. To zoom in a curve, press . To zoom out,
press . To move the curve horizontally, press .
Functions Menu
Alarm
The DPL4000 can be set to beep and have the backlight blink
when the measurement exceeds pre-determined limits. The
alarm level(s) can be set for only one quantity at a time. To set
the alarm levels, follow the instructions below:
1. Open the menu by pressing Open.
2. Select Functions and press .
3. Select Alarm and press .
4. Select Quantity and press Set to select the quantity.
Since the instrument defaults to only displaying Dew Point
(Td/f), this will be the only quantity available. Only one
active quantity can be selected at a time. To change which
Page 9

Page #9 of 19 ___________________________________________________________________________ M4581 – DPL4000
quantities are active, go to Menu - Display - Quantities
and units.
5. Select the first limit and press Set (if the alarm
function is on, turn it off). Use the arrow buttons to set the
alarm level. To select the sign for the alarm level, press
the +/- button. To save the settings, press
OK.
6. Select the second limit and follow the instructions in step
6. The alarm will go off when either the upper or lower
limit is exceeded. If you will use only one limit, set the
upper or lower value to an extreme so that it will never be
reached.
7. To activate the alarm and to return to the basic display,
select Alarm On/Off and press On. The note symbol ♫
will appear in the upper left corner of the display.
8. When the alarm level is reached, you can stop the alarm
by pressing OK. To reactivate the alarm, press Yes.
To completely stop the alarm, press No.
NOTE
The alarm does not work when the device is turned off.
Analog Input
This feature has not been enabled on the DPL4000. It is
possible to obtain an analog output directly from the sensor.
For information on this procedure, please contact Super
Systems Inc.
Recording/Viewing Menu
Recording Data
You can record measurement data and view it on the display of
the DPL4000. To record data, do the following:
1. Press Record or open the menu and select
Recording/Viewing.
Page 10

Page #10 of 19 __________________________________________________________________________ M4581 – DPL4000
2. Select Record data and press .
3. To change the recording interval, select Interval and press
Set.
4. Select the measurement interval with the arrow buttons.
The measurement intervals and the maximum recording
times are shown in Table 1 on page 10.
Table 1 Measurement Intervals and Maximum
Recording Times
Measurement
Interval
Maximum Recording Time (Memory Full)
1 quantity
2 quantity
3 quantity
1 s
45 min
22 min
15 min
5 s
3 h
113 min
75 min
15 s
11 h
5 h
3 h
30 s
22 h
11 h
7 h
1 min
45 h
22 h
15 h
5 min
9 days
4 days
3 days
15 min
28 days
14 days
9 days
30 min
56 days
28 days
18 days
1 h
113 days
56 days
37 days
3 h
339 days
169 days
112 days
12 h
1359 days
678 days
451 days
5. Press Select.
6. To set the duration of the recording, select Duration and
then press Set. Select the duration with the arrow
buttons and press Set.
7. To start recording, select Start/Stop recording, press
Start. If you choose Memory full, you will see the
maximum recording time on the display. You can also
delete files to empty the memory. To accept the maximum
recording time, press Start again.
8. You can switch off DPL4000 during recording to save the
battery. A message will appear on the display to inform
that recording will continue undisturbed even when the
power is turned off. If the indicator is switched off during
recording, the progress bar is shown on the display every
10 seconds (continuously if the charger is connected). The
bar indicates the amount of recorded data.
Page 11

Page #11 of 19 __________________________________________________________________________ M4581 – DPL4000
CAUTION
Do not disconnect the probe when the data recording is on,
even if the indicator is turned off. This may cause loss of
recorded data.
Stopping Recording
1. To stop recording, press Record.
2. Select Record data and press .
3. Then select Start/Stop recording and press Stop.
4. To view the recorded file, select Show.
View Recorded Data
1. Open the menu by pressing Open.
2. Select Recording/Viewing and press .
3. Select View recorded data and press .
4. Select the file you want to view and press . The files are
identified according to the starting date and time of
recording.
5. To go to the graphical view, press Graph. To view the
recording time stamps, press Times. To return to the
recording values, press Values.
6. To return to the basic display, press Exit.
Memory Status
You can check the memory status as follows:
1. Open the menu by pressing Open.
2. Select Recording/Viewing and press .
3. To view the amount of memory that is in use and the
estimated free space left, select Memory status and press
Show.
4. To return to the basic display, press OK and
Exit.
Page 12

Page #12 of 19 __________________________________________________________________________ M4581 – DPL4000
NOTE
The estimate of available free space is calculated for the
current number of active quantities. If you change the
displayed quantities, the estimate will change accordingly.
Clear Data Memory
The data memory can be cleared as follows:
1. Open the menu by pressing Open.
2. Select Recording/Viewing and press .
3. Select Clear data memory and press Clear. To confirm
the deletion, press Yes.
4. To return to the basic display, press Exit.
Transferring Recorded Data to PC
The recorded data can be transferred to a PC using the
DPL4000 / MI70 Link program. With this software the recorded
data can be examined and saved easily in the Microsoft
Windows® environment and transferred to a spreadsheet
program, such as Microsoft Excel®, for modifications.
The software contains the driver needed for the USB
connection. When installing the software, it is important that
the USB cable is not connected. The MI70 Link Setup Wizard
will install the DPL4000 / MI70 Link Software on your computer.
Installing the USB instrument driver can take a few minutes.
After the installation is finished, connect the USB cable to the
USB port on your PC. Windows will detect the new device and
use the driver automatically.
You can now start monitoring the DPL4000 readings in real time
with a PC using the MI70 Link program.
Page 13

Page #13 of 19 __________________________________________________________________________ M4581 – DPL4000
Environment Menu
Pressure Settings
In pressurized environments, the actual process pressure value
must be set. The pressure in “bara”. This is the absolute
process pressure in the unit of bar.
Specific Gravity Settings
The Specific Gravity is not used in the calculation of dew point.
It is only used in the determination of ppm/ppb (parts per
million/billion of water). If only dew point is displayed, the
Specific Gravity value can be ignored. If ppm/ppb calculations
are going to be performed, the specific gravity of the gas that is
being measured must be entered. This information can be
found from a variety of sources on the Internet.
Settings Menu
User Interface
Language
You can select any of the following languages for the user
interface: English, Finnish, Chinese, Russian, Japanese,
Swedish, French, German, or Spanish.
To select the language, follow the instructions below:
1. Open the menu by pressing Open.
2. Select Settings and then press .
3. Select User interface and then press .
4. Select Language and press Set.
5. Then select the desired language and press Select.
6. To return to the basic display, press Exit.
Page 14

Page #14 of 19 __________________________________________________________________________ M4581 – DPL4000
If you accidentally selected a language you do not want, follow
the instructions below:
1. Return to the basic display by pressing the rightmost
until the basic display appears.
2. Go to the Language selection menu by pressing first
and then the button in the middle.
3. Then press , then , then again and finally press
again the button in the middle.
4. Reselect the language.
Automatic Power Off
To save battery life, the DPL4000 can be set to turn off
automatically after a period of inactivity. As a default, this
feature has been turned off. This will allow for extended
periods of datalogging without the risk of interruption from
power loss. To adjust this setting, see the instructions below:
1. Open the menu by pressing Open.
2. Select Settings and press .
3. Select User interface and press .
4. Select Auto power off and press Set.
5. Select the inactivity time and press Select.
6. To return to the basic display, press Exit.
Program Shortcut Keys
As a default, the three shortcut keys refer to Graphic,
Hold/Save, and Record functions. You can change any of the
shortcut keys to refer to functions that better suit your needs.
See the instructions below:
1. Open the menu by pressing Open.
2. Select Settings and press .
3. Select User interface and press .
Page 15

Page #15 of 19 __________________________________________________________________________ M4581 – DPL4000
4. Select Program shortcut keys and then press
Start.
5. Press the shortcut key you want to change, for example,
Hold/Save.
6. If you want to replace the Hold/Save with the Alarm
function, select Alarm with the arrow buttons and then
press Select. To confirm your selection, press Yes.
Otherwise press No and continue from step 4.
7. To return to the basic display, press Exit
Button Tones and Backlight
You can turn on or off the sound effects for the buttons and the
back light. Follow the instructions below:
1. Open the menu by pressing Open.
2. Select Settings and press .
3. Select User interface and press .
4. To turn on or off the sound effect, select Key Click and
then press On/Off.
5. To turn on or off the backlight, select Backlight on key and
press On/Off.
6. To return to the basic display, press Exit.
Date and Time
As a default, the time format is based on the 12-hour clock.
Also a 24-hour clock can be used.
The default date format is month.day.year. The date format can
be changed to day.month.year. or year.month.day.
For correct time and date in the recorded data files, follow the
instructions below:
1. Open the menu by pressing Open.
2. Select Settings and press .
3. Select Date and time and press .
Page 16

Page #16 of 19 __________________________________________________________________________ M4581 – DPL4000
4. For the desired date, select Date and then press Set.
Use the arrow buttons to change the date. Confirm the
selection by pressing Select. To change the date
format, select from the alternatives and press Select.
5. For the desired time, select Time and press Set. Use
the arrow buttons to change the time. To confirm the
selection, press OK. To change the time format, select
12-hour clock and press On/Off.
6. To return to the basic display, press Exit.
Measurement Settings
There are no measurement setting available for modification on
the DPL4000.
Device Information
Basic information about the indicator and the probe is found as
follows:
1. Open the menu by pressing Open.
2. Select Settings and press .
3. Select Device information and press Show.
4. The first display gives the information on the MI70
indicator. For details on the probe, press More and
then press OK.
5. To return to the basic display, press Exit.
Page 17

Page #17 of 19 __________________________________________________________________________ M4581 – DPL4000
Factory Settings
The factory settings can be restored to clear all the changed
settings and data memory of the indicator. Restoring factory
settings does not affect the probe calibration.
1. Open the menu by pressing Open.
2. Select Settings and press .
3. Select Factory settings and press Revert. To confirm
the selection, press Yes. Power is turned off
automatically.
When turning on DPL4000 again, the factory settings are
restored. You will have to set the language, date, and time
again.
Page 18

Page #18 of 19 __________________________________________________________________________ M4581 – DPL4000
REVISION HISTORY
Rev.
Description
Date
MCO #
-
First release
A
Added part numbers
2/20/2019
2257 B Added calibration interval text
3/25/2021
2308
Page 19

Page #19 of 19 __________________________________________________________________________ M4581 – DPL4000
Super Systems Inc.
USA Office
Corporate Headquarters:
7205 Edington Drive
Shipping Address:
7245 Edington Drive
Cincinnati, OH 45249
Phone: (513) 772-0060
http://www.supersystems.com
Super Systems Europe
Unit E, Tyburn Trading Estate,
Ashold Farm Road, Birmingham
B24 9QG
UNITED KINGDOM
Phone: +44 (0) 121 306 5180
http://www.supersystemseurope.com
Super Systems México
Sistemas Superiores Integrales S de RL de CV
Acceso IV No. 31 Int. H Parque Industrial
Benito Juarez
C.P. 76120 Queretaro, Qro.
Phone: +52 442 210 2459
http://www.supersystems.com.mx
Super Systems China
No. 369 XianXia Road
Room 703
Shanghai, CHINA
200336
Phone: +86 21 5206 5701/2
http://www.supersystems.cn
Super Systems India Pvt. Ltd.
A-26 Mezzanine Floor, FIEE Complex,
Okhla Indl. Area, Phase – 2
New Delhi, India 110 020
Phone: +91 11 41050097
http://www.supersystemsindia.com
 Loading...