

Page 1

EVENTS INSTRUMENT AND
RELAY EXTENSION
OPERATIONS MANUAL
SERIES 9015
Super Systems Inc.
7205 Edington Drive
Cincinnati, OH 45249
513-772-0060
800-666-4330
Fax: 513-772-9466
www.supersystems.com
Page 2

Table of Contents
Introduction ..................................................................................................................................... 3
Specifications .................................................................................................................................. 3
Instrument Terminals ..................................................................................................................... 3
Setup: 9015 as Events Instrument .................................................................................................. 5
Adding a Second 9015 Instrument .............................................................................................. 8
Setup: 9015 as Relay Extension ...................................................................................................... 8
Revision History .............................................................................................................................11
Super Systems Inc. Page 2 of 11 Series 9015 Operations Manual
Page 3

Introduction
Item
Specification
Power Input
24VDC +/- 20% at 300 Ma
Relay Contacts
24VDC at 200 mA max
Input
Dry contact or open collector sinking common to
24VDC supply. Protected from overvoltage.
Ethernet
10-base T Modbus TCP (factory default IP
192.168.0.222)
RS-232
Modbus, 8N1, baud rates from 1200 to 115200
(factory default 19200)
RS-485 Host
Modbus, 8N1, baud rates from 1200 to 115200
RS-485 Slave 1
Modbus, 8N1, baud rates from 1200 to 115200
(factory default 19200)
RS-485 Slave 2
Modbus, 8N1, baud rates from 1200 to 115200
(factory default 19200)
RS-485 Modbus
1 to 249 (factory default 222)
RS-485 Slave 1
setup
Slave instrument 1 is forced to SSI 8-8 address 222
The 9015 Events Module and Relay Extension is designed to expand the event and relay
capabilities of a 92XX controller. The 9015 is based on the 9010 eSPP with events
hardware. This provides 8 output event relays and 4 event inputs (dry contact). A
second 9015 can be connected to the first 9015 to seamlessly provide 16 outputs and 8
inputs.
Additional features have been added to the 9015 to provide digital I/O, combination logic,
and counters to the Video Recorder.
Specifications
The following specifications are applicable to the 9015 instrument.
(factory default 19200)
host address
Table 1 - 9015 Instrument Specifications
Instrument Terminals
Correct use of instrument terminals is crucial for use of the 9015 instrument. The 32
instrument terminals are pictured below in Figure 1.
Super Systems Inc. Page 3 of 11 Series 9015 Operations Manual
Page 4
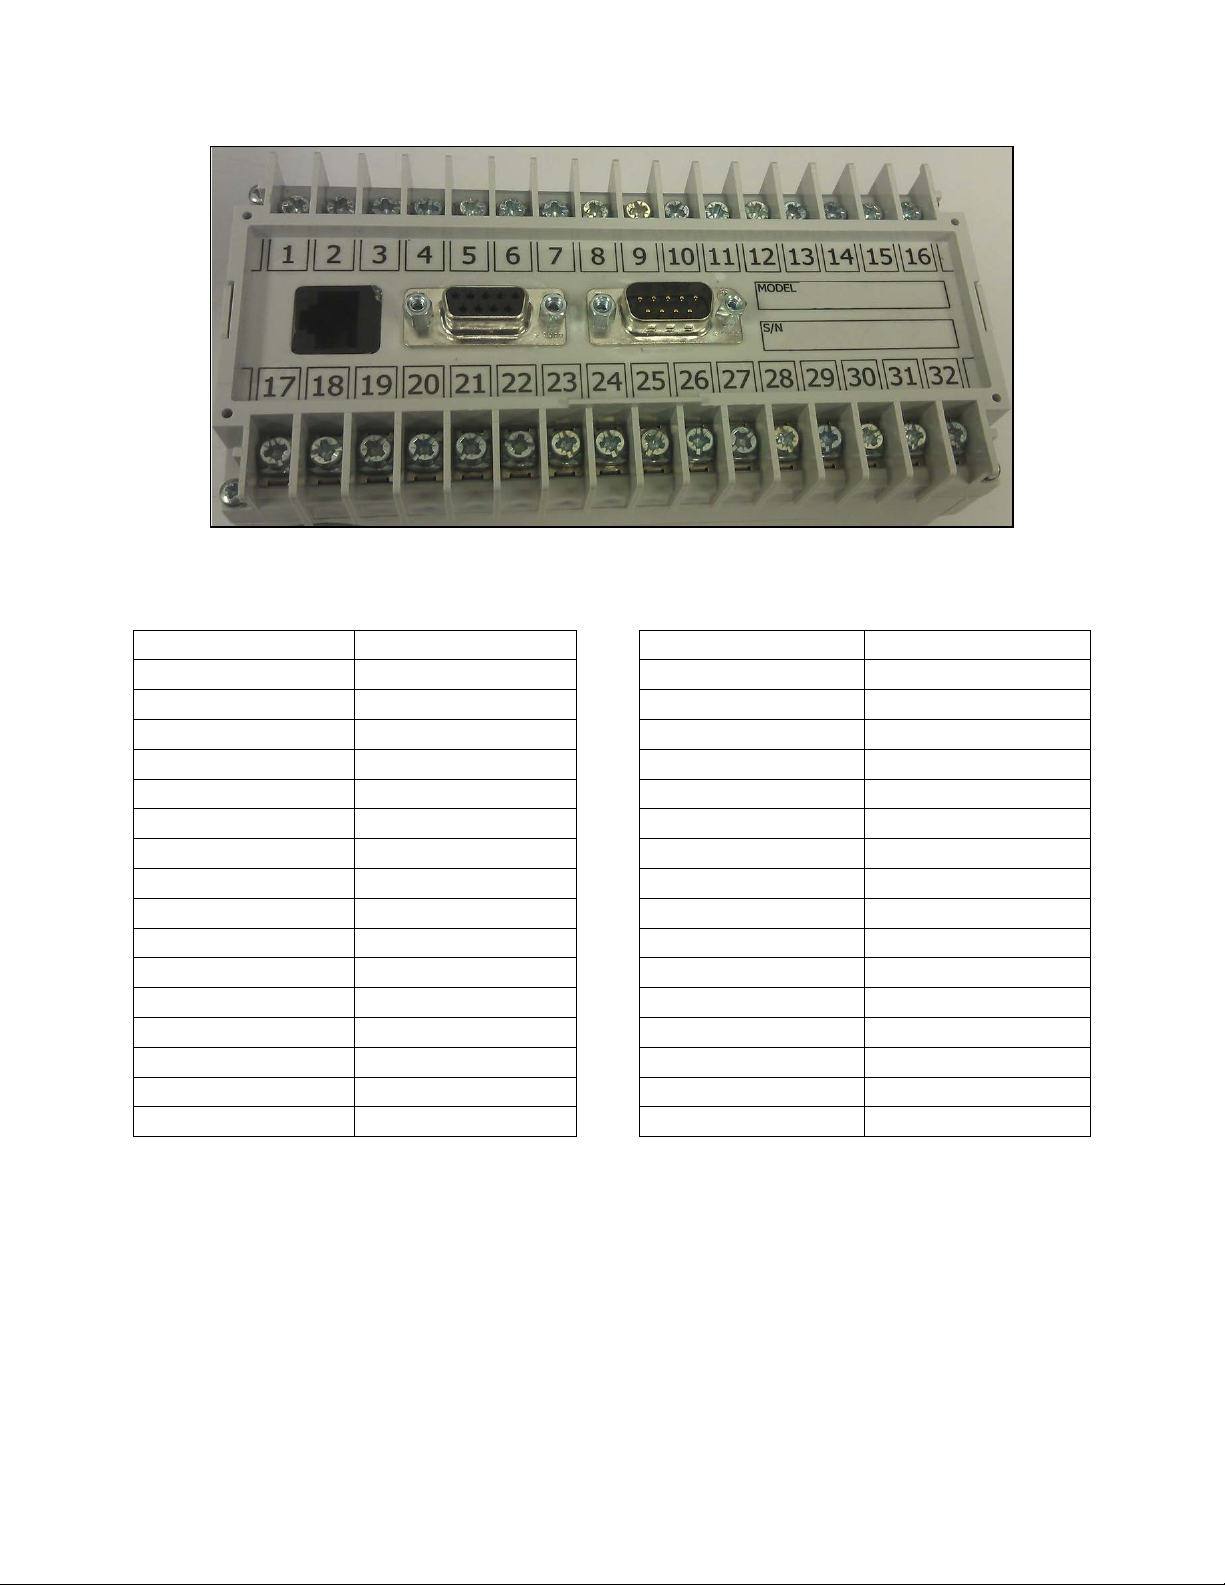
Figure 1 - Instrument Terminals
Terminal
Function
Terminal
Function
1
24VDC (COM)
17
EVENT IN 0
2
24VDC (+) 18
EVENT IN 1
3
RS485 RT (-)
19
EVENT IN 2
4
RS485 RT (+)
20
EVENT IN 3
5
SLAVE 1 RS485 (-)
21
EVENT IN COM
6
SLAVE 1 RS485 (+)
22
SLAVE 2 RS485 (+)
7
RELAY COMMON
23
SLAVE 2 RS485 (-)
8
EVENT RELAY 0
24
Not assigned
9
EVENT RELAY 1
25
Not assigned
10
EVENT RELAY 2
26
Not assigned
11
EVENT RELAY 3
27
Not assigned
12
EVENT RELAY 4
28
Not assigned
13
EVENT RELAY 5
29
Not assigned
14
EVENT RELAY 6
30
Not assigned
15
ALARM RELAY NC
31
Not assigned
16
ALARM RELAY NO
32
Not assigned
Table 2 shows the function of each terminal.
Terminals 1 and 2 are used for powering the instrument. Terminals 3 and 4 are used to
connect the instrument as a slave device to a 92XX controller. Terminals 5 and 6 are
used to slave a second 9015 instrument to the first from the second 9015’s terminals 3
and 4.
Super Systems Inc. Page 4 of 11 Series 9015 Operations Manual
Table 2 - Terminal List and Functions
Page 5

Setup: 9015 as Events Instrument
One of the two uses of the 9015 is its application as an Events Instrument. By connecting
the 9015 as a slave instrument to a 92XX controller, you can extend the event
monitoring capabilities of the 92XX controller.
In normal situations, the factory default settings in the 9015 will not have to be changed.
To use with a 92XX controller, determine which slave port on the 92XX you plan to use
(slave 1, for example). Connect terminals 5 & 6 on the 92XX to terminals 3 & 4 on the
9015 (for slave 1).
Then, using Configurator, open the “Slave Instrument Setup” menu while
communicating to the 92XX (Figure 2).
Figure 2 - Slave Instrument Setup menu (Configurator)
Select an instrument number in the parameter list to use by clicking on the desired
value or instrument number. Note the instrument number selected for later reference.
Set the instrument number as shown in Figure 3 and Figure 4:
• Instrument: SSI 8-8
• Address: 222
• Port: Selected slave port (for example, Slave 1).
Super Systems Inc. Page 5 of 11 Series 9015 Operations Manual
Page 6
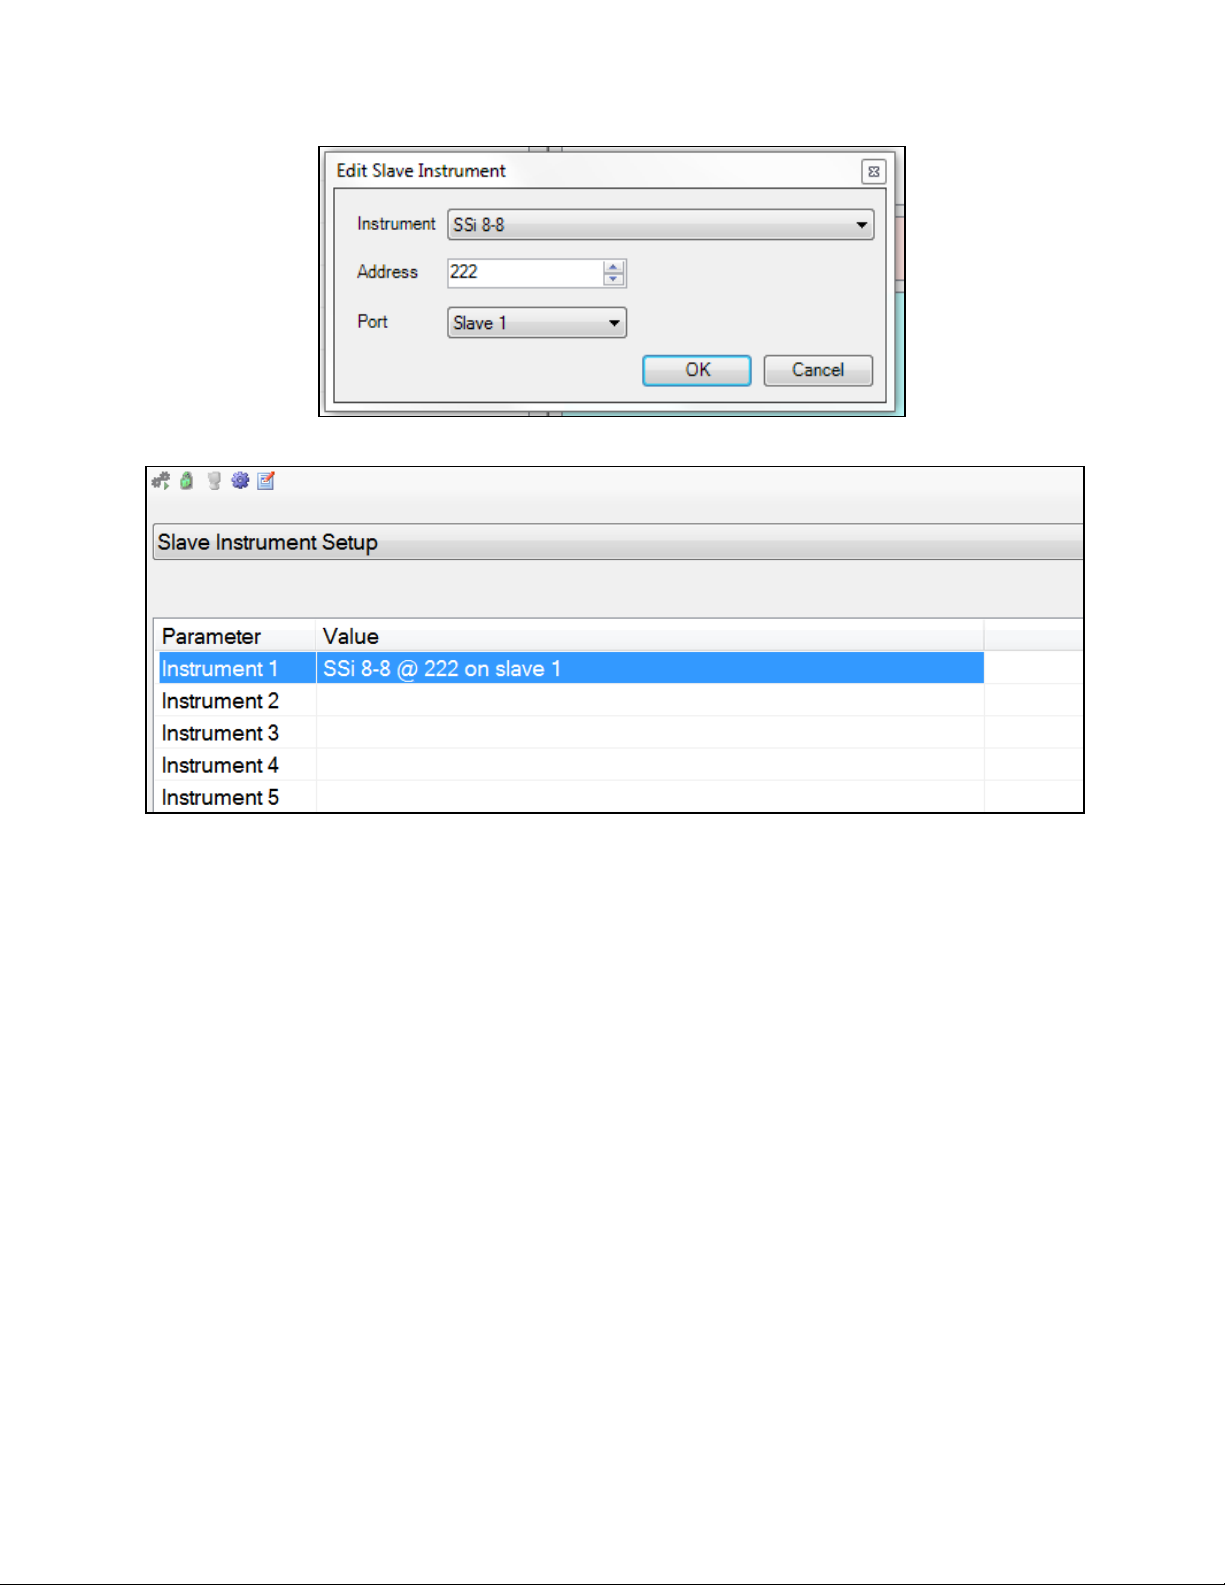
Figure 3 - Editing Slave Instrument Settings
Figure 4 - Slave Instrument Setup Menu with Instrument 1 Configured
After you have completed the procedure above, “Instrument 1” under the “Slave
Instruments” menu will read “Instrument 1 [OK]” in the Parameter column (see Figure
5
). It may take up to 10 seconds for the indication to change to “Instrument 1 [OK]”. (If
communications with the slave instrument are not working, “Instrument 1 [BAD]” will
be shown. If communications are being established, “Instrument 1 [N/A]??” will be
shown before the indication changes to “[OK]”.)
Super Systems Inc. Page 6 of 11 Series 9015 Operations Manual
Page 7

Figure 5 - "[OK]" Indication on Slave Instrument
NOTE: The “Instrument
number
[OK]” indication can also be observed on the 92XX touch
Figure 6 - Slave Communications Status on 92XX Touch Screen
screen under the main menu item “Slave Communications Status” (Figure 6).
In the Furnace Setup menu, set the “Event Instrument” as the instrument number you
defined for 9015 in the “Slave Instrument Setup” (see Figure 7).
Super Systems Inc. Page 7 of 11 Series 9015 Operations Manual
Page 8

Figure 7 - Event Instrument Setup in Furnace Setup Menu
Adding a Second 9015 Instrument
To use a second 9015 for additional events, connect slave port 1 (terminals 5 & 6) to the
second 9015's host port (terminals 3 & 4). In the 92XX, the event outputs of the first
9015 will be events 0 to 7 and the outputs of the second 9015 will be events 8 to 15.
Likewise, the event inputs of the first 9015 are events 0 to 3 and the event inputs of the
second 9015 are events 4 to 7.
Setup: 9015 as Relay Extension
In normal situations, the factory default settings in the 9015 will not have to be changed.
IMPORTANT: To use a 9015 as a relay extension, you must have a 9205 or 9220
controller with the latest firmware revision for that controller as well as an up-to-date
version of SSi’s Configurator 2 software.
Use Slave 2 in order to make the 9015 a relay extension. Connect terminals 22 & 23 on
the 9205 or 9220 to terminals 3 & 4 on the 9015.
In the Configurator menu drop-down list, select “Port Setup”. Then click on “Slave 2
Mode” and change this setting to “SSi Analog Input Board” (Figure 8).
Super Systems Inc. Page 8 of 11 Series 9015 Operations Manual
Page 9

Figure 8 - Changing of "Slave 2 Mode" Setting in Port Setup Menu
Next, under the “Furnace Setup” menu, change “Slave Event Boards” to the number of
9015 instruments that you are slaving to the 9205 or 9220 (Figure 9).
Figure 9 - Setting the Number of Slave 9015 Instruments
Next, under “Relay Assignments”, change the relay assignments for the 9015
instrument module (Figure 10). Module 1 is the first 9015, starting with relay 1,
instrument terminal 8.
Super Systems Inc. Page 9 of 11 Series 9015 Operations Manual
Page 10

Figure 10 - Changing Relay Assignments
Super Systems Inc. Page 10 of 11 Series 9015 Operations Manual
Page 11

Revision History
Rev.
Description
Date
MCO # A November 2012 Release
11/21/2012
2110
B
Updated manual to include use of instrument
functional explanations
05/08/2013
2119
as relay extension, new figures, and added
Super Systems Inc. Page 11 of 11 Series 9015 Operations Manual
 Loading...