

Page 1

Series 9XXX
Configuration and
Recipe Management
Guide
9XXX Management Guide Rev - Page 1 of 15 Super Systems Inc.
Page 2

Table of Contents
Introduction ................................................................................................................ 3
Instrument Configuration Management .......................................................................... 3
Backup/Restore Tab .................................................................................................... 3
Backup Section ........................................................................................................ 3
Comparison Section ................................................................................................. 5
Instrument Recipe Management ................................................................................... 8
The Recipe Editor Button ............................................................................................. 8
Recipe Editor Tab ........................................................................................................ 9
Load/Save Recipes ................................................................................................... 9
Modify Recipes .......................................................................................................10
Recipe Management Tab .............................................................................................11
Groups Tab ................................................................................................................11
Transfer Section .....................................................................................................13
Printing Section ......................................................................................................14
Archiving Instrument Configurations and Recipes ..........................................................14
Revision History ........................................................................................................................................ 15
9XXX Management Guide Rev - Page 2 of 15 Super Systems Inc.
Page 3
Introduction
This guide covers the instrument configuration and recipe management functions for the SSi
9000 series instruments. Detailed information relating to individual instruments and additional
functions can be found on SuperSystems’ website:
http://www.supersystems.com/manuals.html#miscmanuals
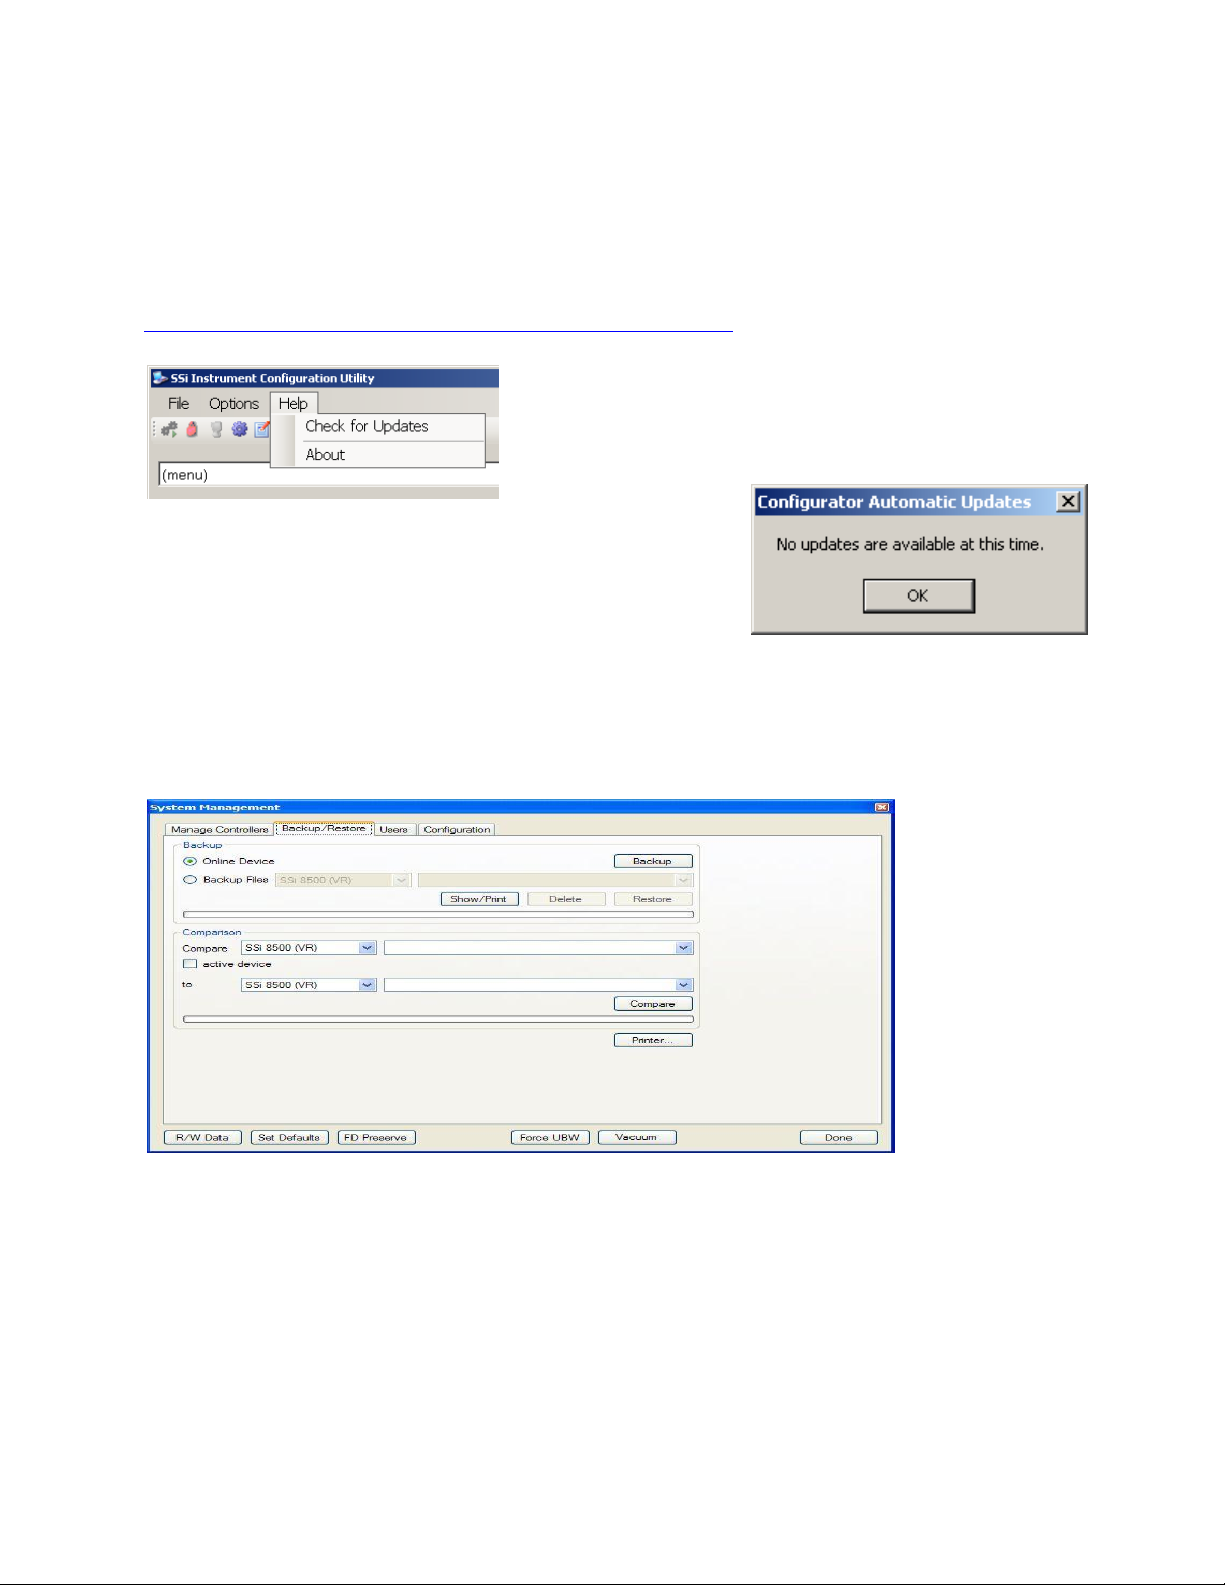
Before proceeding with any instrument management
operation, it is good practice to ensure that the
Configurator software is up to date. To do this click on
the Help menu item and then click Check for Updates.
If the software is up to date then you are advised that no
updates are available. Otherwise, the software will be
automatically updated, and you will be returned to the
previous Configurator state.
Instrument Configuration Management
Backup/Restore Tab
Configurator Backup/Restore Display
The Backup/Restore display allows the user to create a backup of a controller configuration or
restore a controller to a previous configuration.
Backup Section
This area will allow the user to either backup the current controller or restore the current
controller to a previous configuration.
being able to backup or restore a configuration
Note: The user must be connected to a device before
. Selecting the “Online Device” option will allow
9XXX Management Guide Rev - Page 3 of 15 Super Systems Inc.
Page 4
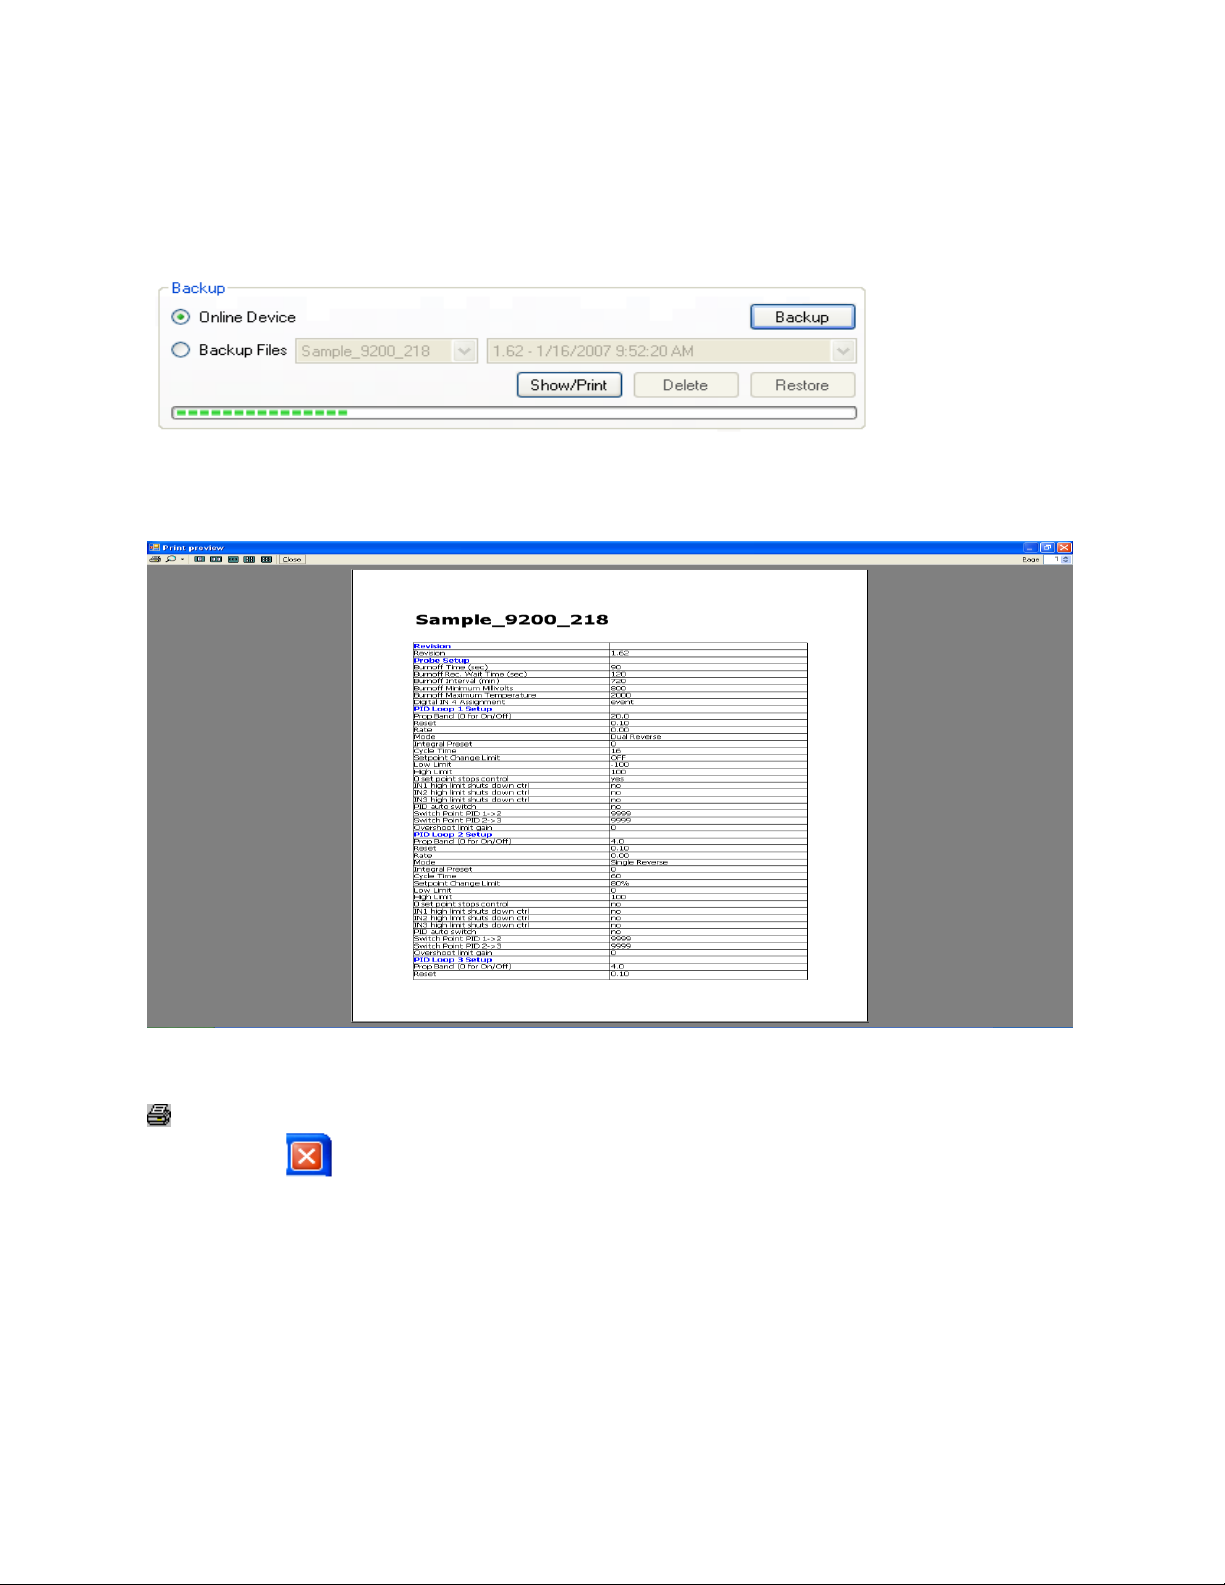
the user to backup the controller. Once this section is selected, the Delete and Restore buttons
will become disabled, as well as the drop-down lists for the “Backup Files” section, as they deal
only with backed-up configuration files. Clicking on the Backup button will back up the current
configuration. The progress bar at the bottom of the section will update the backup progress.
Configurator – Backup Section with progress
The Show/Print button will display a print preview with the current controller’s configuration.
Configurator – Print Preview screen
From this screen, the user can either print out the configuration by clicking on the printer icon,
, or close the print preview by clicking on the Close button or the red X button on the top right
of the screen, .
Selecting the “Backup Files” option will allow the user to manage the backup configurations on
the local computer. When this option is selected, the Backup button will become disabled. The
Delete button will delete the selected configuration. The user must confirm the delete first.
9XXX Management Guide Rev - Page 4 of 15 Super Systems Inc.
Page 5
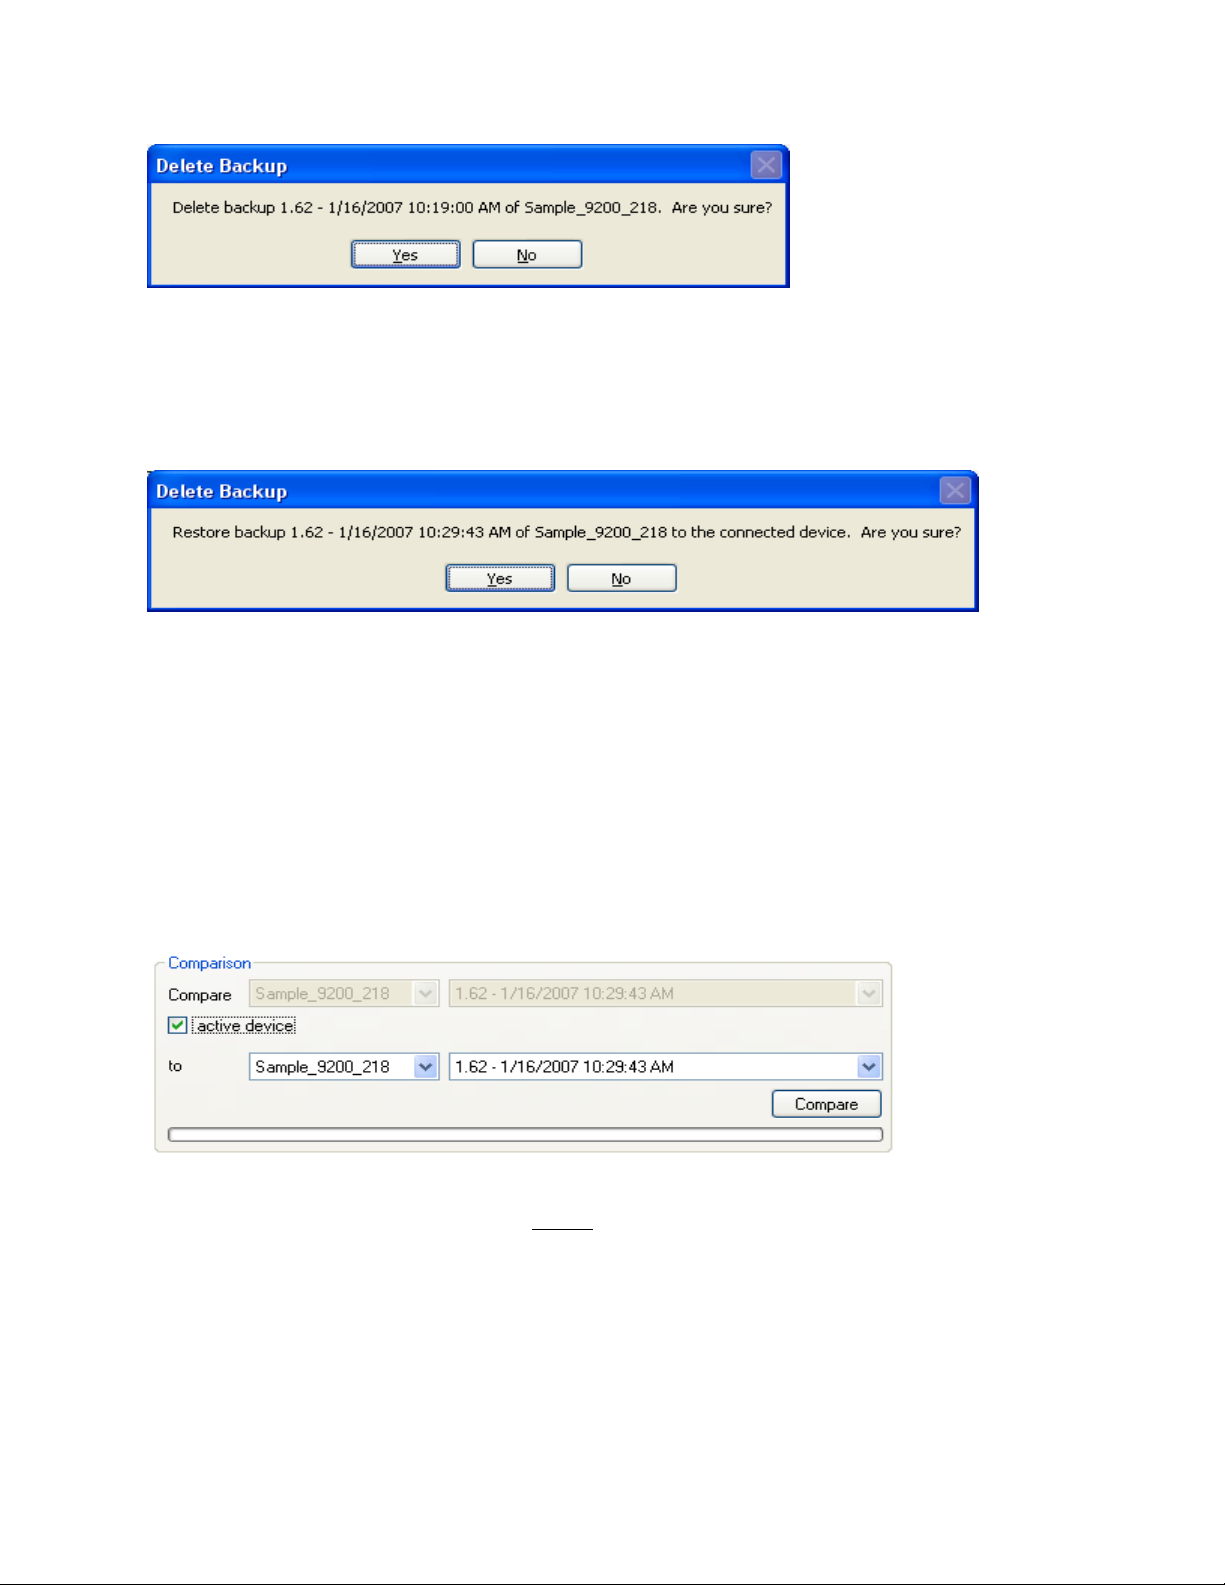
Configurator – Confirm Delete Backup file
Clicking on the Yes button will delete the configuration, but clicking on the No button will cancel
the delete.
Clicking on the Restore button will restore a backup configuration to the connected device. The
user must confirm the restoration.
Configurator – Confirm Restore backup
Clicking on the Yes button will restore the selected configuration file, but clicking on the No
button will cancel the restoration. The progress bar at the bottom of the section will update the
restore progress.
Comparison Section
The Comparison section allows the user to compare two backup files to each other.
user must be connected to a controller if he/she wishes to use the active device for comparison
If the user wishes to use the device the Configurator is connected to, the user can check the
“Active Device” check box. This will disable the top two drop-down lists.
Configurator Compare section with “Active Device” checked
To compare a specific file with another, do not check the “Active Device” checkbox. If this
checkbox is not checked, then all four drop-down lists will be enabled. The user can then select
the device from the first drop-down list and the specific file for the comparison from the second
drop-down list. The user can select the device where the file to compare to is from the third
drop-down list, and the file to compare to can be selected from the fourth drop-down list. Once
all of the necessary information has been setup, the user can click the Compare button. The
progress bar at the bottom of the section will update the comparison. If the devices are
identical, the Configurator will display a message box.
Note: The
.
9XXX Management Guide Rev - Page 5 of 15 Super Systems Inc.
Page 6

Configurator – Devices are identical message box
If the devices are different, the Configurator will display a print preview will the first device’s
values and properties printed in red, and the second device’s values and properties printed in
blue.
Configurator – Print Preview with different files
The Printer… button will allow the user to select page setup information for the printed
documents.
Any setting changes made through this button will not be saved
Note: The printer settings are set to their defaults whenever Configurator loads.
.
9XXX Management Guide Rev - Page 6 of 15 Super Systems Inc.
Page 7

Configurator – Printer page setup screen
The user will be able to select the size and source of the paper, the orientation of the printed
material, and the margins for the printed material. Clicking on the OK button will set the page
settings. Clicking on the Cancel button will cancel the setup process. Clicking on the Printer…
button will allow the user to select the printer to send the information to.
Configurator – Select Printer screen
The user will be able to select the appropriate printer from the drop-down list. Clicking on the
Properties… button will display the properties for the selected printer. Clicking on the Network
button will allow the user to search through the local network for a printer. Clicking the OK
button will set the selected printer. Clicking the Cancel button will cancel the printer selection.
9XXX Management Guide Rev - Page 7 of 15 Super Systems Inc.
Page 8

Instrument Recipe Management
The Recipe Editor Button
The Recipe Editor button is available to users of all access levels, however, users with
Operator-level access cannot save recipes. This form allows users to manually edit a recipe.
The toolbar at the top of the form contains the basic Windows-type functions, new, cut, copy,
etc. The Windows-type shortcuts apply to most of the functions as well: Ctrl + C to copy, Ctrl + X
to cut, etc. The menu will list the shortcut next to each command.
Configurator – Recipe Edit toolbar
From left to right are: New (load a blank recipe), Print (print out the recipe steps), Cut (cut a
selected step), Copy (copy a selected step), Paste (paste the cut or copied step), Insert Step
(inserts a selected step into the program and all steps below the inserted step will move down),
Insert NO-OP Step (insert a NO-OP step into the program and all steps below the inserted step
will move down), and Help (display a help page).
9XXX Management Guide Rev - Page 8 of 15 Super Systems Inc.
Page 9

Configurator Recipe Editor Screen
Recipe Editor Tab
Load/Save Recipes
The box in the top left of the form is where the user can select which recipe (0 – 300) to load.
Use the up or down arrows, or just type in the recipe number and click on the Load button. The
recipe steps will be filled in the white area on the form. Once the Load button has been clicked,
the box to the right of the Save As button will be filled with the recipe number selected. By
default, the Save As recipe will be the same as the Load recipe. To save the loaded recipe as a
different recipe number, use the up or down arrows, or just type in the new number (0 – 300) in
the box next to the Save As button and click this button.
Checking the “Use Online Device” check box will load and save the recipes on the currently
connected controller only. Not checking this check box will load and save the recipes on the
local computer (PCGroup) only.
The Distribute button causes the recipe(s) to be saved to multiple
destinations. When this button is clicked, the Distribute Recipes pick
list will be presented. Select the desired destinations by clicking the
checkbox and adjust the recipe number as required. When finished click
Save and the distribution will commence.
The progress bar at the bottom of the section will update the send
process.
few minutes
Note: Transferring recipes from or to a controller may take a
.
9XXX Management Guide Rev - Page 9 of 15 Super Systems Inc.
Page 10

The “Recipe Description” line is a text description of the recipe.
Note: The recipe descriptions
will only be saved if the recipes are being sent to a PC Group. When the recipe is sent to the
controller, (Use online device selected)
instrument.
, the description text is not transferred to the
Modify Recipes
To modify any of the steps in the recipe, double-click on the row of the step that will be
modified. This will display the
Edit Step
form.
Configurator Recipe Edit Step form
The drop-down list under “Opcode” allows the user to select the specific opcode that will be
used in the recipe step. Checking the “Alphabetical” checkbox will allow the user to alphabetize
the list. If a temperature value or an atmosphere value is needed, these can be set using the up
or down arrows, or by just typing in the value. If these are not needed, check the “Disable”
checkbox and the boxes will become unavailable. Note – for some opcodes, the display text will
change and the
of values associated with each opcode, but the functionality of each item will remain the same.
The box(es) on the right side of the form is the action or value that should be taken. For
instance, with opcode “SetPt”, the box on the right is the “Option” and there is a drop-down list
of available options: wait, wait up, wait down. However, for opcode “soak”, the temperature
value and atmosphere value fields disappear. The boxes on the right of the form are “Soak
Time hours - minutes”, and there are two boxes that have values ranging from 0 to 166 for the
hours and 0 to 59 for the minutes. These values can be adjusted by using the up or down
arrows, or by typing the new value in.
The user can add an optional comment to the recipe step in the “Comment” field, if desired.
Once all of the changes have been made, the user can click on OK to save these changes.
Edit Step
screen will look slightly different to accommodate the different types
9XXX Management Guide Rev - Page 10 of 15 Super Systems Inc.
Page 11

Recipe Management Tab
Groups Tab
Configurator – Recipe Management tab with Groups tab selected
The Groups tab will allow the user to add, modify, or delete the offline groups of recipes.
Offline groups are used to sort recipes saved to the computer memory in meaningful categories
such as Process – Carburizing, Tempering, etc. or Furnace type – Pit Furnace, Belt Furnace
Vacuum Furnace, etc.
The offline recipe groups are used throughout the
Recipe Edit
screen, both on the Recipe Editor
tab and the Recipe Management tab.
PCGroup is the default group loaded on initial startup.
To create a recipe group, click on the Add button. This will display the recipe group fields:
Name, Model, and Programmer Type. Enter or select the desired values and click the Save
button to save the new group, or click the Cancel button to cancel the add process.
To edit a recipe group, click on the group name to edit from the list and click on the Edit
buttons, or double-click the group name in the list. This will display the recipe group fields with
the selected recipe group’s information loaded. Modify the desired values and then click the
Save button to save the changes, or click on the Cancel button to cancel the edit process.
9XXX Management Guide Rev - Page 11 of 15 Super Systems Inc.
Page 12

To delete a recipe group name, click on the group name to delete and click on the Delete button.
The user will have to confirm the delete.
Configurator – Confirm delete recipe group
Clicking on the Yes button will continue with the delete, while clicking on the No button will
cancel the delete process. Since deleting a recipe group will result in the loss of data, the user
will have to confirm the delete a second time.
Configurator – Second confirm delete recipe group
Clicking on the Yes button will delete the recipe group, while clicking on the No button will
cancel the delete process.
Clicking on the Done button will close the screen down.
9XXX Management Guide Rev - Page 12 of 15 Super Systems Inc.
Page 13

Recipes Tab
Configurator – Recipe Management tab with Recipes tab
The “Recipe Logo:” Browse button will allow the user to select a bitmap (.bmp) image to act as a
logo for the recipes. Clicking on the Browse button will open up a dialog box that will allow the
user to browse to the desired picture.
Transfer Section
The Transfer section will allow the user to transfer one or more recipes from one location to
another. The “Source” field could either be the currently connected device (“Use Online
Device”), or one of the offline groups (“PCGroup”). The “Destination” field could either be the
currently connected device (“Use Online Device”), or one of the offline groups (“PCGroup”). If
the Distribute checkbox is selected the destination field will be grayed out indicating that
transfer will be made to multiple recipients.
The “Send One” option will send only one recipe from the source to the destination. The recipe
to send will be based upon the numeric value within the box next to the “Send Multiple” option.
The “Send Multiple” option will send any number of sequential recipes from the source to the
destination. When the “Send Multiple” option is selected, there will be another numeric value
box visible next to the first numeric value box. This second box will be invisible when the “Send
One” option is selected. Once all of the required information is present (source, destination,
recipe to send), clicking on the Send button will send the recipes.
9XXX Management Guide Rev - Page 13 of 15 Super Systems Inc.
Page 14

If the Distribute option has been selected a Distribute Recipes pick list
will be presented. Select the desired destinations by clicking the
checkbox and adjust the recipe number as required. When finished
click Transfer and the distribution will commence.
The progress bar at the bottom of the section will update the send
process.
a few minutes
Note: Transferring recipes from or to a controller may take
.
Printing Section
The Printing section allows the user the ability to print out recipes. The “Source” field could
either be the currently connected device (“Use Online Device”), or one of the offline groups
(“PCGroup”). The “Print One” option will print only one recipe from the source. The recipe to
print will be based upon the numeric value within the box next to the “Print Multiple” option.
The “Print Multiple” option will print any number of sequential recipes from the source. When
the “Print Multiple” option is selected, there will be another numeric value box visible next to
the first numeric value box. This second box will be invisible when the “Print One” option is
selected. Checking the Print Only Valid Recipes box prevents the printing of empty or corrupted
recipe files.
Clicking on the Print button will display a print preview
dialog, where the user will be able to view and/or print
the recipes. Clicking on the Setup button will display a
Page Setup
the page settings for printing, as well as select the
printer.
take a few minutes
screen, which will allow the user to set up
Note: Printing recipes from a controller may
.
Archiving Instrument Configurations and Recipes
Instrument configurations and recipes are stored in two directories. All instrument
configurations are located in the C:\SSI\Devices directory and all recipes are located in the
C:\SSI\Recipes directory. To backup these directories to a remote location or flash drive simply
copy these two directories and then paste them to the desired location or drive.
9XXX Management Guide Rev - Page 14 of 15 Super Systems Inc.
Page 15

Revision History
Rev.
Description
Date
MCO #
-
Initial Release
10/19/2011
2088
9XXX Management Guide Rev - Page 15 of 15 Super Systems Inc.
 Loading...