

SUOMY Rumble User Manual [en, de, es, fr, it]

Rumble
INSTRUCTIONS D’UTILISATION USER’S INSTRUCTIONS ISTRUZIONI D’USO


1
ITALIANO
2
ENGLISH
FRANÇAIS
DEUTSCH
ESPAÑOL
PORTUGUÊS
Rumble

Vi ringraziamo per aver scelto SUOMY nell’acquisto del Vostro Casco.
Progettato e realizzato secondo i più elevati standard qualitativi espressamente per uso motociclistico, RUMBLE è certificato dai più
importanti Enti di Omologazione.
Suomy declina qualsiasi responsabilità per eventuali danni diretti o indiretti derivanti da uso non corretto del prodotto, in situazioni
che esulino dalle normali condizioni di utilizzo o dalle modalità riportate nel presente opuscolo.
Prima di utilizzare il casco, leggere con attenzione il presente manuale che deve essere conservato per future consultazioni.
Per eventuali chiarimenti, non esiti a consultare il Suo Rivenditore di fiducia o direttamente SUOMY Motosport srl.
La preghiamo di utilizzare il Suo casco conformemente alle istruzioni contenute nel presente manuale. Il rispetto delle norme in esso contenute
garantiranno una maggior durata del Vostro casco e le massime prestazioni del prodotto.
Modifiche e/o alterazioni al casco e/o ai suoi componenti comportano l’annullamento di qualsiasi garanzia e possono comprometterne
i requisiti di sicurezza o rendere il prodotto non conforme alle norme di omologazione.
IT AVVERTENZE
2

AVVERTENZE IT
Tutti i prodotti Suomy vengono costantemente sottoposti ad un continuo processo di miglioramento. Per questo motivo Suomy si riserva il
diritto di apportare, senza preventiva informazione, modifiche al prodotto oggetto del presente manuale.
Non è possibile quindi far valere alcun diritto sulla base di dati, illustrazioni e descrizioni contenute nel presente manuale.
RUMBLE è stato sviluppato e testato per garantire, unitamente alle caratteristiche di sicurezza, il maggior grado di comfort e silenziosità nelle
condizioni di utilizzo più tipiche.
E’ però implicito che la particolare configurazione del veicolo e/o la posizione di guida del pilota o l’interagire dei due fattori possono comportare
situazioni non prevedibili in fase di messa a punto del prodotto, tali da generare fruscii o sibili di origine aerodinamica.
Suomy declina pertanto ogni responsabilità nel caso ciò si verifichi.
RUMBLE non è predisposto per l’uso di auricolari e/o di elementi affini.
3

IT
4
Per avere una adeguata protezione RUMBLE deve calzare
perfettamente ed essere correttamente e saldamente allacciato, in
modo da non poter esser sfilato sia tirando sia ruotando lo stesso
sulla testa (vd. figura 1). Se troppo grande può scendere fino a coprire
gli occhi oppure girare lateralmente durante la guida impedendo così
una corretta visibilità.
Non utilizzare sciarpe o sottomenti, che potrebbero favorire lo scivolamento del cinturino e lo scalzamento del casco stesso in caso d’urto.
La funzione del casco è quella di ridurre le sollecitazioni sul capo dell’utilizzatore in caso di urto; questo avviene mediante parziale distruzione
e/o deformazione dei suoi componenti (principalmente calotta esterna in fibra e calotta interna in polistirolo).
In questo modo parte dell’energia generata dall’impatto viene assorbita dai componenti del casco, riducendo così le sollecitazioni sul capo
dell’utilizzatore eliminando o limitando la possibilità dell’insorgere di traumi. E’ ovvio che la capacità di protezione del casco non è infinita e che
alcuni urti possono generare sollecitazioni così elevate che anche l’energia assorbita dal casco non sia sufficiente a scongiurare traumi
all’utilizzatore: nessun casco, anche se di altissimo livello, può proteggere la testa dalle forze generate da qualsiasi tipo di impatto.
L’integrità della calotta e dell’interno sono essenziali per garantire le massime prestazioni in termini di sicurezza. RUMBLE è stato studiato per
assorbire gli urti attraverso una parziale distruzione della calotta o di alcune sue parti che potrebbero quindi risultare danneggiate dopo un urto
anche in modo non visibile. In caso di ulteriori sollecitazioni il casco potrebbe non essere più in grado di offrire il massimo grado di protezione.
Non utilizzare mai un casco che ha subito un urto anche se non appaiono danni visibili; in caso di impatto il casco dovrà essere
sostituito.
E’ estremamente pericoloso modificare il casco attaccando o incollando sullo stesso qualsiasi particolare.
Non tagliare o forare mai la calotta del casco, non inserire viti, non verniciarlo.
Non apportare modifiche al rivestimento interno del casco, in particolare non deve essere mai tagliata o modificata l’imbottitura interna
in polistirolo: alterazioni alla conformazione della calotta interna in polistirolo possono compromettere le caratteristiche di sicurezza
del casco.
figura 1
NORME GENERALI

USO e MANUTENZIONE IT
5
Utilizzare solo accessori e parti di ricambio originali o indicati da Suomy esplicitamente per questo modello di casco: solo in questo modo sono
garantite affidabilità, sicurezza e compatibilità con il casco utilizzato.
L’utilizzo di componenti e/o accessori non originali Suomy, comportano l’annullamento della garanzia (vedere condizioni di garanzia
a pag. 10) e possono comprometterne i requisiti di sicurezza.
MANUTENZIONE
Per lapulizia della calotta e del frontino utilizzare solo acqua e sapone neutro; lasciare asciugare il casco a temperatura ambiente, non esporlo
mai a fonti di calore.
La pulizia del casco con solventi, derivati del petrolio o sostanze chimiche, l’applicazione di adesivi o di vernici potrebbero intaccare la struttura
della calotta, compromettendone le caratteristiche di sicurezza senza che tali danni siano visibili dall’utente.
Non applicate a questo casco vernici, adesivi, benzina o altri solventi chimici.
Per la pulizia delle parti in tessuto amovibili, lavare solo a mano con acqua a 30°C massimo utilizzando esclusivamente sapone neutro.
Per la pulizia del rivestimento interno amovibile, servirsi di un panno umido utilizzando esclusivamente sapone neutro.
I rivestimenti in tessuto, anche se facenti parte di elementi rimovibili, non devono mai essere immersi in acqua quando sono applicati
o accoppiati ad una imbottitura interna, sia essa rigida o spugnosa.
In entrambi i casi lasciare asciugare le parti trattate a temperatura ambiente al riparo dal sole e senza mai esporle a fonti di calore.
Provvedere ad una pulizia periodica del sistema di ritenzione «D-Ring»con acqua tiepida e sapone neutro. Non usare solventi o detergenti
chimici e non lubrificare.
ALCUNE COLORAZIONI DELLA CALOTTA SONO REALIZZATE CON VERNICI FLUO CHE POTREBBERO ESSERE SOGGETTE AD UN
NATURALE FENOMENO DI MIGRAZIONE CON UN VIRAGGIO DEL COLORE CHE PROVOCA UNA DIMINUZIONE DELLA LORO
INTENSITÀ. IL FENOMENO PUÒ ESSERE ACCENTUATO QUANDO IL CASCO VIENE ESPOSTO PER LUNGHI PERIODI A LUCE
PARTICOLARMENTE INTENSA. TUTTO CIÒ NON PREGIUDICA PERÒ LE PRESTAZIONI E LA QUALITÀ DI RUMBLE.
SUOMY DECLINA PERTANTO OGNI RESPONSABILITÀ NEL CASO CIÒ SI VERIFICHI.

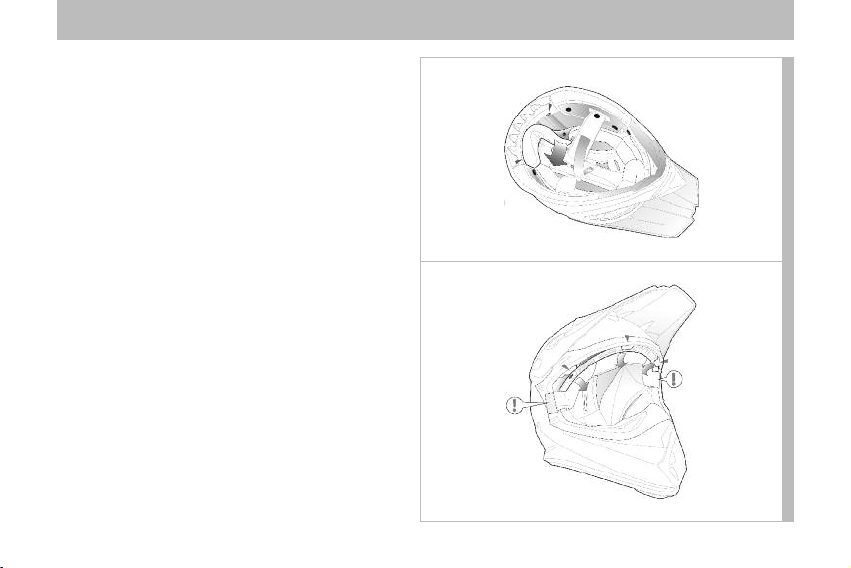
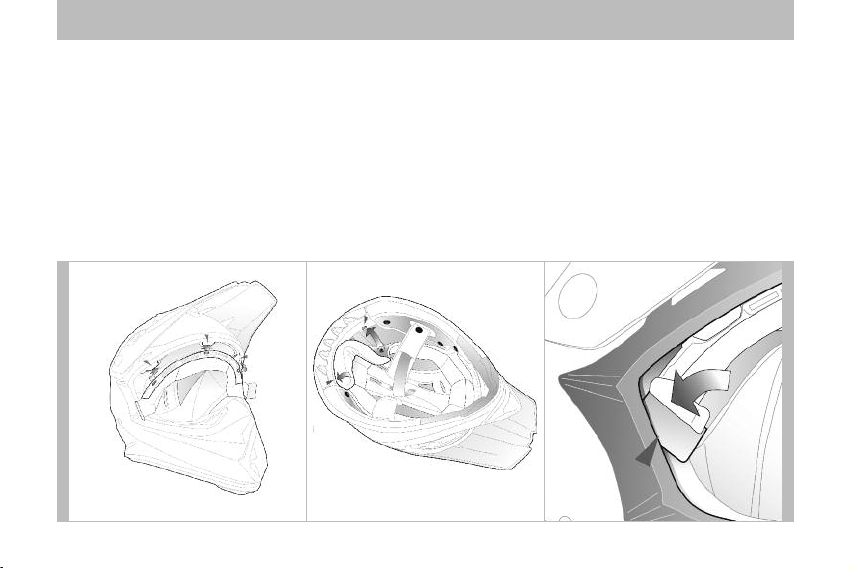
SISTEMA DI RITENZIONE «D-RING» vedi figura 2
Inserire il lembo libero del cinturino negli anelli. Tirare il terminale fino a quando il cinturino preme saldamente contro la mascella.
Una volta eseguita questa operazione non deve più essere possibile sfilare il casco; controllare che, afferrandolo per la parte posteriore
e ruotandolo in avanti, il casco non possa essere sfilato e rimanga ben saldo sulla testa.
Nel caso il casco tenda a sfilarsi o ruoti liberamente sulla testa, serrare ancora il cinturino fino ad ottenere la giusta pressione e ripetere la prova.
Se dopo aver ripetuto la prova non si riuscisse a serrare efficacemente il sistema di ritenzione, astenersi dall’usare il casco.
Solo dopo aver controllato la corretta tensione del cinturino, fissare l’estremità libera bloccandola con il bottone automatico sulla linguetta di
sgancio (vedi figura 2).
Il bottone automatico serve unicamente a fissare l’estremità libera del cinturino per evitarne lo sventolio durante la guida. Il fissaggio
del bottone di sgancio non garantisce che il casco sia stato indossato ed allacciato correttamente: il corretto serraggio del cinturino
deve essere verificato esclusivamente per mezzo delle operazioni descritte nei paragrafi precedenti.
Per slacciare il sistema di ritenzione, sganciare il bottone automatico e tirare la linguetta di sgancio per allentare il serraggio. Sfilare il lembo
libero del cinturino dagli anelli “D-Rings”.
Utilizzare la linguetta di sgancio solo per togliere il casco! Non azionare mai la linguetta di sgancio durante la guida.
Se il sistema di sgancio non funzionasse correttamente, astenersi dall’usare il casco e rivolgersi esclusivamente a personale
autorizzato Suomy.
IT USO e MANUTENZIONE
figura 2
6

FRONTINO : REGOLAZIONE vedere fig. 3A
Allentare senza rimuovere, le tre viti poste sul lato destro, sinistro e
centrale.
Regolare la posizione del frontino, ruotandolo verso l’alto o verso il
basso fino ad ottenere la posizione desiderata.
Una volta trovata la posizione, serrare le tre viti e ricontrollare la
posizione del frontino.
Per tutte queste operazioni, utilizzare uno strumento adatto al
serraggio di tali viti.
FRONTINO : SOSTITUZIONE vedere fig. 3B
Allentare e rimuovere, le tre viti poste sul lato destro, sinistro e
centrale.
Posizionare il nuovo frontino, facendo combaciare le forature con i
tre inserti filettati posti sulla calotta. Inserire le viti negli appositi
alloggiamenti senza avvitarle completamente.
Regolare la posizione del frontino e bloccarlo come da paragrafo
precedente.
Per tutte queste operazioni, utilizzare uno strumento adatto al
serraggio di tali viti.
USO e MANUTENZIONE IT
figura 3A
figura 3B
7

IT USO e MANUTENZIONE
IMBOTTITURA INTERNA ESTRAIBILE
Gli interni di “RUMBLE” (imbottitura centrale, guanciale destro e
guanciale sinistro), possono essere agevolmente rimossi per
essere lavati e/o sostituiti.
Imbottitura interna laterale: GUANCIALI – rimozione ed
inserimento
I guanciali sono fissati al rivestimento interno del casco mediante tre
bottoni automatici.
Rimozione – vedere fig. 4A
Il guanciale estraibile è fissato alla calotta mediante tre bottoni
automatici. Per l’estrazione, disimpegnare i tre bottoni automatici
tirando lievemente verso l’esterno. Una volta disimpegnati i
bottoni, sfilare il guanciale disimpegnando il cinturino dal foro di
passaggio all’interno del guanciale.
Inserimento – vedere fig. 4B
Per l’inserimento dei guanciali, procedere come segue : inserire il
cinturino nel foro di passaggio all’interno del guanciale.
Assicurarsi il corretto posizionamento del guanciale estraibile e
tramite lieve pressione, agganciare i bottoni automatici al loro attacco.
Controllare che il montaggio sia stato eseguito correttamente
verificando:
- che il guanciale sia saldamente bloccato in posizione
- che il cinturino sia completamente libero all’interno del foro di
passaggio e non sia rimasto schiacciato sotto il guanciale
durante il montaggio.
8
figura 4A
figura 4B
Solo il corretto bloccaggio del guanc iale ed il corr etto
posizionamento del cinturino assicurano che il sistema di
ritenzione mantenga la sua efficacia.
Se queste condizioni non fossero verificate ed i gu anci ali
estraibili non funzio nassero corrett amente, astenersi dall’usare
il casco e rivolgersi esclusivamente a personale autorizzato Suomy.
Imbottitura interna centrale : rimozione ed inserimento
Rimozione – vedere fig. 5A
L’imbottitura interna è fissata al casco per mezzo di 2 bottoni
automatici posteriori e nella parte anteriore da una aletta a
incastro. Inoltre sono presenti due linguette laterali, che
assicurano l’imbottitura interna al polistirolo.
Togliere i guanciali estraibili (fare rif. al paragrafo GUANCIALI).
Sganciare i bottoni automatici posteriori e disimpegnare, nella parte
anteriore del polistirolo, l’aletta a incastro dalle sue sedi. Estrarre le
due linguette laterali che assicurano l’imbottitura interna al polistirolo.
Estrarre l’imbottitura interna.
Attenzione: per evitare di danneggiare il rivestimento interno,
prima di estrarre l’imbottitura, assicurarsi di aver sganciato i
due bottoni automatici posteriori.
USO e MANUTENZIONE IT
9
figura 5A
IT USO e MANUTENZIONE
Inserimento – vedere fig. 5B
Posizionare l’imbottitura interna nel casco, controllando il verso di montaggio. Fissare l’aletta anteriore al suo supporto ad incastro posto
sul polistirolo, agganciare i bottoni automatici posteriori e reinserire le linguette laterali tra la calotta e il polistirolo.
Dopo il fissaggio, assicurarsi di avere montato nel modo corretto l’imbottitura interna.
Se queste condizioni non fossero verificate e l’imbottitura interna non fosse montata correttamente, astenersi dall’usare il casco e rivolgersi
esclusivamente a personale autorizzato Suomy.
Reinserire i guanciali (fare rif. al paragrafo GUANCIALI).
figura 5B
10

GARANZIA IT
CONDIZIONI
La garanzia ha decorrenza dalla data di acquisto del prodotto e deve essere comprovata dalla ricevuta (fattura, scontrino fiscale o
qualsiasi documento atto ad identificare inequivocabilmente la data di acquisto quale ad esempio, l’acquisto con bancomat o con
carta di credito), rilasciata dal venditore dell’articolo.
Gli interventi realizzati in garanzia non prolungano la durata della garanzia che resta fissata in due anni dalla data di acquisto.
Il prodotto non deve essere stato oggetto di modifiche e/o alterazioni: la presenza di accessori non originali e/o di eventuali modifiche anche
minime al prodotto, comportano l’immediato annullamento dei termini di garanzia e il decadimento di qualsiasi responsabilità da parte di Suomy.
La Garanzia decade quando:
• il prodotto sia stato modificato, riverniciato non a regola d’arte, decorato con adesivi ;
• siano state sostituite parti originali con altre di diversa origine ;
Sono esclusi dalla Garanzia i danni derivanti da:
• trattamento negligente o comunque non conforme alle raccomandazioni e prescrizioni espresse in questo manuale ;
• normale usura del prodotto ;
• riparazioni fatte dal cliente, da terzi o comunque da personale esterno alla organizzazione Suomy Motosport srl;
• uso non corretto del prodotto e/o impiego dello stesso in situazioni che esulino dalle normali condizioni di utilizzo o dalle modalità
riportate nel presente opuscolo.
VALIDITÀ
Suomy garantisce esclusivamente il casco ed i suoi componenti per un periodo di due anni dalla data di acquisto
per quanto riguarda i difetti di conformità, impegnandosi a riparare il prodotto difettoso (o una sua parte) o a sostituirlo
(ad esclusiva discrezione di Suomy Motosport srl), senza addebito per le parti e la manodopera.
Non sono coperte da garanzia le alterazioni delle superfici verniciate riconducibili a naturali fenomeni di
usura (effetti della luce solare, vapori, prodotti detergenti, urti, graffiature).
Da oggi puoi registrare la tuo casco anche on line su
http://www.suomy.com/azienda/registrazione-prodotto.html
11

12
IT NOTE

ITALIANO
ENGLISH
14
FRANÇAIS
DEUTSCH
ESPAÑOL
PORTUGUÊS
Rumble
Thank you for choosing a SUOMY helmet.
Designed and manufactured in compliance with the highest qualitative standards specifically for motorcycle use, RUMBLE is certified by the
most important Certification Bodies.
Suomy cannot be held responsible for direct or indirect damages resulting from an incorrect use of the product and/or for using the
helmet in situations that go beyond the normal conditions of use or the modalities indicated in this booklet.
Before using the helmet, carefully read this manual. Keep it at hand for future reference.
For further information, contact your Distributor or SUOMY Motosport srl.
Use this helmet in compliance with the instructions contained in this manual. Compliance with these instructions will make your helmet last longer
and will assure maximum product performances.
Modifications and/or alterations to the helmet and/or any of its components shall make the warranty void and may jeopardize the safety
requirements or make the product non-compliant with the certification standards.
ENG
WARNING
14
WARNING
ENG
All the Suomy products are constantly subject to a continual improvement process, that’s why Suomy reserves the right to make changes, without
prior notice, to the products object of this manual.
It is therefore not possible to exercise any rights on the basis of the information, illustrations and descriptions contained in this manual.
RUMBLE was developed and tested to assure, together with the safety features, the best level of comfort and noise reduction during ordinary
conditions of use. However, the particular configuration of the vehicle and/or the position of the rider or both factors can entail situations that
could not be foreseen during the manufacturing of the product that may generate aerodynamic rustles or hissing sounds.
Suomy therefore cannot be held responsible if this should occur.
RUMBLE is not designed to be used with ear-phones and/or similar elements.
15
ENG
16
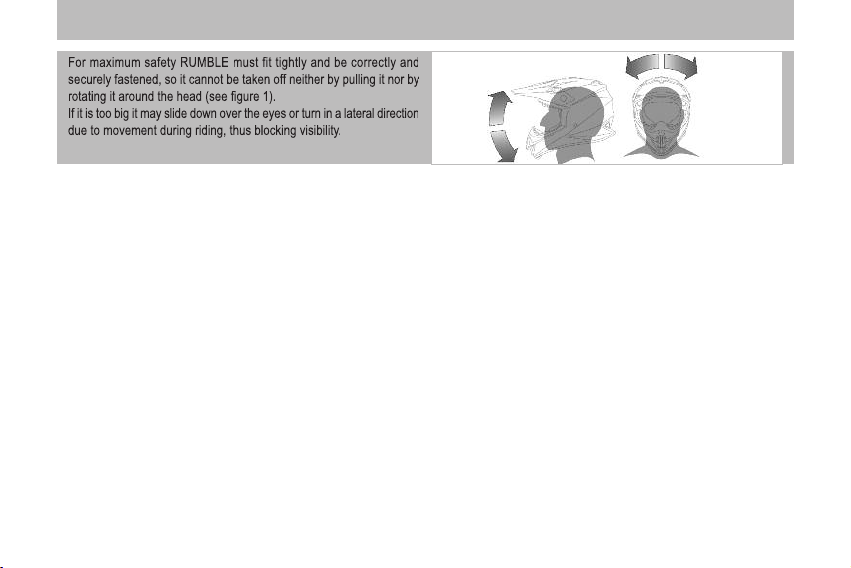
For maximum safety RUMBLE must fit tightly and be correctly and
securely fastened, so it cannot be taken off neither by pulling it nor by
rotating it around the head (see figure 1).
If it is too big it may slide down over the eyes or turn in a lateral direction
due to movement during riding, thus blocking visibility.
Do not use scarves or neck guards which could make the strap slide and the helmet fly off in case of crash.
The function of the helmet is to reduce stress on the user’s head in case of crash; this happens through a partial destruction and/or deformation
of its components (mostly the external shell and the internal polystyrene shell). In this way, part of the energy generated by the impact is
absorbed by the components of the helmet, thus reducing the vibrations on the user’s head, eliminating or limiting the risk of traumas.
The protection capacity of the helmet is not endless and certain crashes may generate such high stress that even the energy absorbed by the
helmet is not enough to protect the user from injuries: no helmet, even top quality helmets, can protect the head against the forces
generated by any type of crash.
The integrity of the shell and of the inside is essential to assure maximum performances in terms of safety. RUMBLE was designed to absorb
crashes through a partial destruction of the shell or some of its parts that could be damaged after a crash even if it is not readily visibly. If the
helmet suffers further stress it might not be able to offer the maximum level of protection.
Do not use a helmet that suffered severe blows even though the damage is not readily visible; if the helmet is damaged it must be
replaced.
It is extremely dangerous to modify the helmet by sticking or gluing anything on it.
Do not cut or punch the helmet’s shell, do not insert screws or paint it.
Do not change the internal lining of the helmet, particularly never cut or change the inside polystyrene padding: changes to the shape of the
internal polystyrene shell can affect the safety features of the helmet.
figure 1
GENERAL RULES

MAINTENANCE
ENG
17
Only use original Suomy accessories and spare parts or those specifically indicated by Suomy for the specific model: this is the only way to
assure reliability, safety and compatibility with the helmet used.
The use of non original components and/or accessories makes the warranty void (see warranty conditions on page 23) and can affect
the safety requirements.
MAINTENANCE
To clean the shell and front part use water and mild soap; let the helmet dry at room temperature, never expose it to heat.
Cleaning the helmet with solvents, petrol by-products or chemical substances, the application of stickers or paint could affect the structure of
the shell, thus affecting the safety features, even if the damage is not readily visible.
Do not paint, or apply stickers, petrol or other chemical solvents to this helmet.
To clean the internal lining, just hand wash at 30°C maximum, exclusively using mild soap.
To clean the removable internal lining use a damp cloth and mild soap.
The fabric lining, even if it is part of removable elements, must not be soaked in water when it is applied to or paired with an internal
padding, either rigid or soft.
Dry the pieces at room temperature, away from sunlight and without exposing them to heat.
Periodically clean the «D-Ring» retention system with warm water and mild soap. Do not use solvents or chemical detergents and do not
lubricate.
SOME COLOURINGS OF THE SHELL ARE MADE WITH FLUO PAINTS THAT COULD BE SUBJECT TO THE NATURAL MIGRATION
PHENOMENON WITH A DROP IN INTENSITY. THE PHENOMENON COULD BE ENHANCED WHEN THE HELMET IS EXPOSED FOR
LONG PERIODS TO A PARTICULARLY INTENSE LIGHT. HOWEVER, THIS DOES NOT AFFECT THE PERFORMANCES AND THE QUALITY
OF RUMBLE.
SUOMY THEREFORE, CANNOT BE HELD RESPONSIBLE IF THIS SHOULD OCCUR.
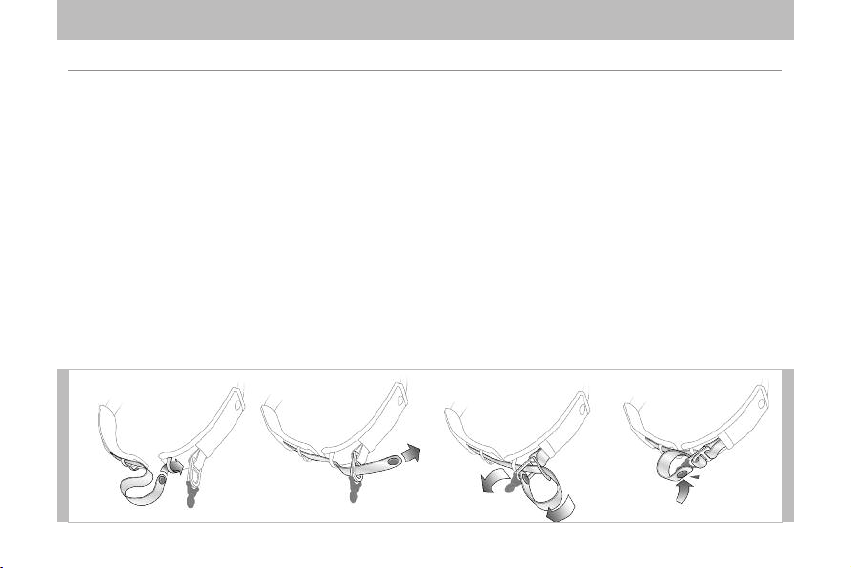
RETENTION SYSTEM «D-RING» see figure 2
Insert the free side of the strap in the rings. Pull the end until the strap presses firmly against the jaw.
After this operation, it should not be possible to remove the helmet. Verify that by grabbing it from the back and rotating it to the front it cannot
be removed and it is fixed to the head.
If the helmet tends to come off or rotates freely, tighten the strap again until the right pressure is obtained and repeat test.
If after repeating the test you are not able to efficiently tighten the retention system, do not use the helmet.
Only after checking the correct tension of the strap, fix the free end locking it with the automatic stud to the release tab (see fig. 2).
The automatic stud is necessary only to fix the free end of the strap to prevent it from flapping while riding. Fixing the release button
does not assure that the helmet is correctly in position and properly fastened: the correct locking of the strap must be verified
exclusively following the above paragraphs.
To release the retention system, release the automatic stud button and pull the release tab to loosen the closure. Slide out the free end of the
strap from the “D-Rings”.
Use the release tab only to remove the helmet! Never release this tab while riding.
ENG
USER’S INSTRUCTIONS
figure 2
18
FRONT PART : ADJUSTING see figure 3A
Loosen without removing the three screws on the right, left and
central part.
Adjust the position of the front part rotating it upwards or downwards
until the desired position is obtained. After finding the position, tighten
the three screws and re-check the position of the front part.
For all these operation, use the proper tool to tighten these
screws.
FRONT PART : REPLACING see figure 3B
Loosen and remove the three screws placed on the t right, left and
central part.
Position the new front part by making the holes match with the three
threaded fittings on the shell. Insert the screws in the specific
housings without tightening completely.
Adjust the position of the front part and lock it into position as
indicated in above paragraph.
For all these operation, use the proper tool to tighten these
screws.
USER’S INSTRUCTIONS
ENG
figure 3A
figure 3B
19
ENG
USER’S INSTRUCTIONS
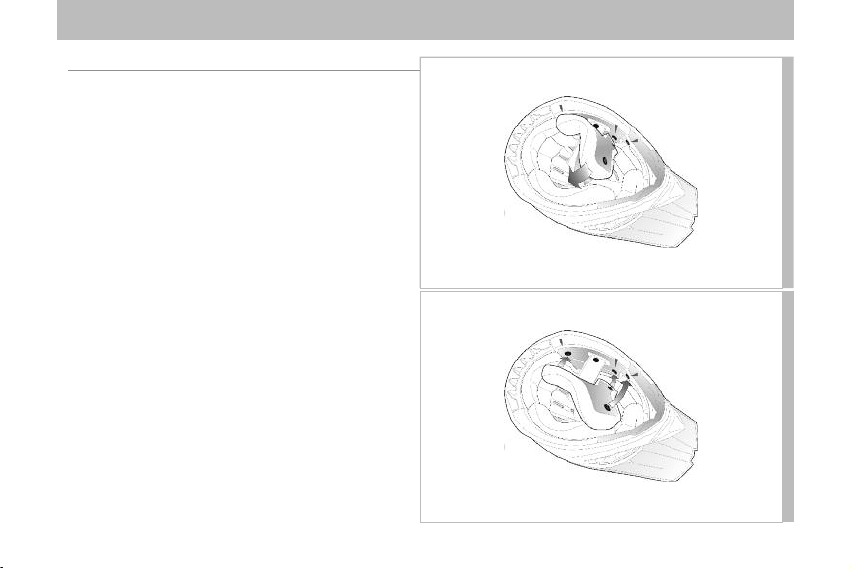
INTERNAL PARTS
The internal parts of “RUMBLE” (central pads, right and left cheek
pad), can easily be removed to be washed and/or replaced.
Inner side padding: CHEEK PADS – Assembly and disassembly
The cheek pads are fixed to the inner lining of the helmet through
three press studs.
Removing the pads – see fig. 4A
The removable cheek pad is fixed to the shell through three press
studs to remove, unfasten the three studs by slightly pulling
outwards. After unfastening the buttons, slide out the pad by
releasing the strap from the slot in the pad.
Assembly – see fig. 4B
Follow this procedure to fit in the cheek pads : insert the strap in the
slot inside the cheek pad.
Verify the correct positioning of the removable cheek pads and
slightly press and fasten the studs.
Verify that the part was assembled correctly by checking that:
- the cheek pad is firmly locked in position
- that the strap is completely free inside the hole and
was not blocked under the cheek pad during assembly.
20
figure 4A
figure 4B

Only the correct assembly of the cheek pad and the correct
positioning of the strap will assure the proper operation of the
retention system.
If this doesn’t happen and the removable cheek pads don’t work
correctly, do not use the helmet and contact Suomy authorized
personnel only.
Internal central padding : fitting and removal
Removal – see fig. 5A
The internal padding is fixed to the helmet through 2 back stud
buttons and in the front part through a click-in tongue. There are
also two side tongue s that fix the internal padding to the
polystyrene.
Remove the removable cheek pads (refer to paragraph CHEEK
PADS). Release the back stud buttons and release in the front
part of the polystyrene, the click-in tongue from its seats. Slide
out the two side tongues that fix the internal padding to the
polystyrene. Remove the internal padding.
Caution: to avoid damaging the internal lining, before removing
the padding, make sure the tow back stud buttons were
released.
USER’S INSTRUCTIONS
ENG
21
figure 5A
 Loading...