

Page 1
Page 2
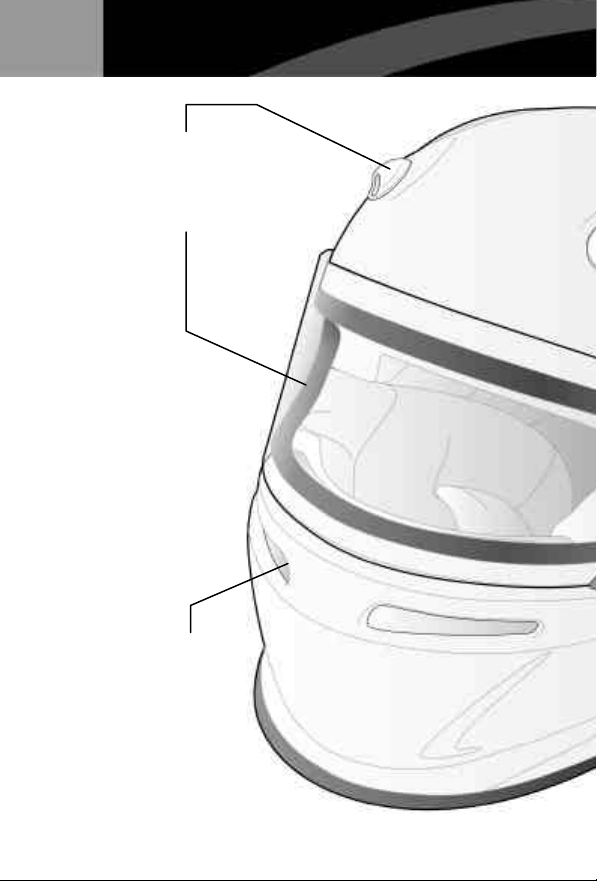
CONTENTS:
VENTILATION P 09
VISOR P 10-11
VENTILATION P 09
J 12 F1 - K101
Page 3
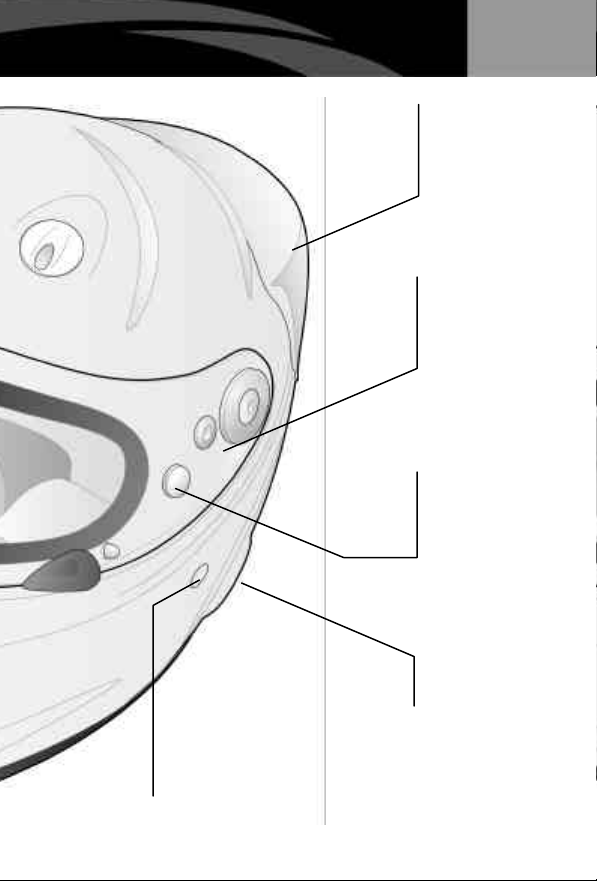
BACK SPOILER P 12
SPARE PARTS P 06
TEAR-OFF LENS P 13
D-RING P 07-08
HANS DEVICE
P 12
J 12 F1 - K1 02
Page 4

ENGLISH WARNINGS
Thank you for choosing Suomy
Designed and produced according to the highest quality standards, J12 is cer tified by the leading approval bodies.
Before using the helmet, read this manual carefully and keep it for future
consultation.
For clarification or further information, contact your local dealer or Suomy
directly
You should always use your helmet in accordance with the instruction of this
manual. The respect for the rules in this manual will extend the life of your
helmet and guarantee maximum performance.
Modifications and/or alteration to the helmet and/or its components invalidate the guarantee and may reduce the safety characteristics.
All Suomy products are constantly submitted to continuing improvement.
Suomy S.p.A. therefore reserves the right to modify the product described in
this manual without any prior warning. The information, illustrations and
descriptions in this manual may not under any circumstances be used as the
basis for any claim against Suomy.
J12 is designed specifically for use in Automotive competitions. Suomy S.p.A.
declines all liability for any direct or damage caused by using such product
which is inappropriate and/or in such situations which are not of normal use in
accordance with the procedure described in this leaflet.
WARNINGS03
Page 5

Composite fiberglass construction shell with flame resistant surface treatment
(F1 version only).
Internal comfort lining, chin strap and trim made of flame resistant certified
materials.
The J12 ventilation system together with the particular configuration of the
internal polystirene liner improves air flows (supplied by four air intakes) inside
and outside the helmet. This guarantees the more uniform and continuous
diffusion of the internal air flow.
The chinstap has a stainless steel resistant to corrosion D-ring buckle and a
fixing stud (Suomy patent).The stud is positioned in a completely free and
accessible area, enabling the release system to be operated easily and
comfortably even while wearing gloves.
The particular configuration of the D-ring system (Suomy patent) enebles the
retention system to be released even while wearing gloves: When the press
stud is released the chinstrap forms a loop in which can easily used as a "ring"
to pull the release tab and unfasten the D-ring system.
ENGLISHSPECIFICATIONS
SPECIFICATIONS 04
Page 6
ENGLISH GENERAL INSTRUCTIONS
To ensure adequate protection, the J12 helmet must fit perfectly and be
correctly and firmly fastened in such a way that it cannot be removed by
pulling or rotating it on the head. If it is too large, it may slip down over the
eyes or twist while you are riding preventing the correct visibility.
Only the fire resistant balaclava can be worn under the helmet, do not use
scarves or neck bands as these could cause the chinstrap to slip and the
helmet to roll off in case of crash.
No helmet can protect the head against the forces generated by any impact.
The shell and liner must be intact in order to ensure maximum safety
performance. J12 is designed to absorb impact by the partial destruction of
the shell or other parts.
The damage caused by the impact may be invisible at sight. In the event of
subsequent stresses, the helmet may no longer be able to offer maximum
protection. Never use a helmet which has been subjected to impact, even if
there is no apparent damage. In the event of impact, the helmet must be
replaced.
It is extremely dangerous to modify the helmet by attaching or gluing over it
any kind of part. Never cut or perforate the shell of the helmet. Never paint or
insert screws.
Never modify the interior of the helmet. In particular, the polystyrene liner must
not be cut: alterations to the configuration of the polystyrene inner shell reduce
the safety characteristics of the helmet.
Scratched visors are unsafe and not to be used during the night and should
be replaced by clear ones. Tinted visors should not be used at night or in any
condition that causes poor visibility
REPAINTING
J12 F1 can be repainted only respecting the following indications:
before proceeding to the here below operations remove all the external
accessories ( visor, screws, vents, etc.).
The inside parts (liner and chin straps) must not absolutely be removed. The
whole inside part of the helmet must be carefully protected so that it is not
altered by the following operations.
All the threated metallic components originally assembled over the shell must
be protected in such a way that no infiltration of any strange material can
compromise the performance of the helmet.
The preliminary cleaning of the shell must be done according to the
instructions contained in this leaflet (see clause : Maintenance). Do not use
gasoline or other solvents that could damage the structure of the helmet. The
polishing of the surface must be done with smooth and thin abrasive and
must be limited only to the superficial layer of the painting.
Deeper treatment can compromise the flame-resistant coating and the
properties of resistance against the fire.
For the painting use only acrylic varnish or poliurethanic bi- components
painting or poliurethanic painting for the finishing layer.
GENERAL INSTRUCTIONS05
Page 7
Painting must not contain diluent because it could damage the structure of the
helmet or the layer of the original coating.
The paintings used must dry at room temperature. In any case the helmet and
its components must not be submitted to high temperature to dry.
The surface of the helmet is covered by an anti-fire coating and the use of
not suitable painting can compromise the flame-resistant properties of the
helmet itself.
SPARE-PARTS
To guarantee reliability, safety and compatibility with the helmet, fit only
original Suomy spare parts and accessories or those suggested by Suomy
Spa for the model of helmet concerned.
Using other than original components and / or accessories invalidates the
guarantee (see guarantee terms on page 16) and may reduce the safety
specifications.
MAINTENANCE
To clean the shell, use water and neutral soap only. Make the helmet dry at
room temperature. Never expose to heat sources.
Cleaning the helmet with solvents, petroleum derivates or chemicals or
applying adhesive or paint could damage the structure or the shell or peak.
This may affect the safety characteristics without being visible to naked eye.
Never apply paints, adhesives, petrol or other chemical solvents to the helmet.
In case of repainting, please refer to the instructions on page 05.
To clean the inside liner, use a wet cloth and neutral soap only. Make the wet
parts dry at room temperature out of direct sunlight and without exposing to
heat sources.
Wash the polycarbonate visor with water at room temperature and neutral soap
only; dry it with a soft cloth.
When you clean the visor be careful not to damage the surface (antiscratch
and mist retardant) coatings. For cleaning purposes users should not use
petrol chemical solvents, cleaning agents or scouring powders. The structural
strength of the polycarbonate material could damaged by any of these
materials with possibility of loss of optical clarity and mechanical resistance.
Clean the D-ring retention system regularly with warm water and neutral soap.
Do not use solvents or chemical detergents. Do not lubricate.
Some colours are produced with UV Fluo paint. This may be subjected to
natural migration leading to a reduction in brightness. This phenomenon may
be accentuated when the helmet is exposed for long periods to particularly
bright light. However, this does not compromise the performance or quality of
J12. Should this arise, Suomy disclaims all responsibility.
ENGLISH
GENERAL INSTRUCTIONS 06
Page 8
ENGLISH ASSEMBLING INSTRUCTIONS
"D-RING"
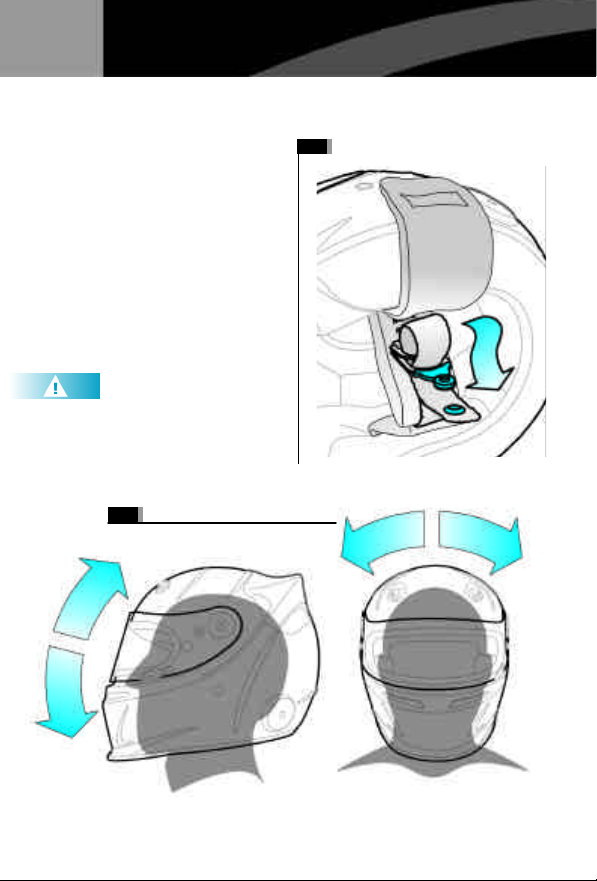
Thread the free edge of the chin strap into the rings (1).
Pull the end until the chinstrap
presses firmly against the jaw.
Once this has been done, it
should no longer be possible to
pull the helmet off. Grip at the
back and roll the helmet forwards to make sure the helmet
does not come off, but remains
firmly on the head (2).
If the helmet tends to roll off or
twist freely on the head, tighten
the chinstrap again until the correct pressure is obtained then
repeat the test.
If the fastening system cannot
be effectively tightened even
after repeating the test, avoid
using the helmet.
2
1
ASSEMBLING INSTRUCTIONS07
Page 9
3
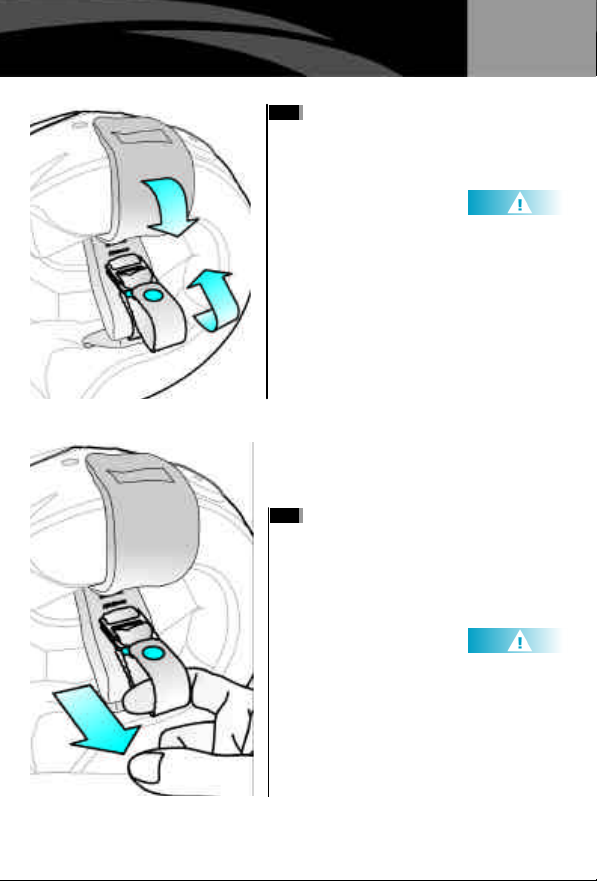
When the chinstrap is tightened
correctly, fix the free end in
place using the press stud on
the release tab (3).
The press stud fixes the free
end of the chinstrap, avoiding it
flapping while riding. Fastening
the stud does not guarantee
that the helmet is worn and
attached correctly. The correct
tightness of the chinstrap must
be verified exclusively through
the operations described in the
previous paragraphs.
4
To release the retention system,
undo the press stud and slacken
the tension by pulling the
release tab. Unthread the free
edge of the chinstrap from the
"D-rings".
Use the release tab to remove
the helmet only! Never use the
release tab while riding.
If the release system is not
working properly, do not use
the helmet.
ITALIANO
ASSEMBLING INSTRUCTIONS 08
Page 10
ENGLISH ASSEMBLING INSTRUCTIONS
AIR VENTILATIONS
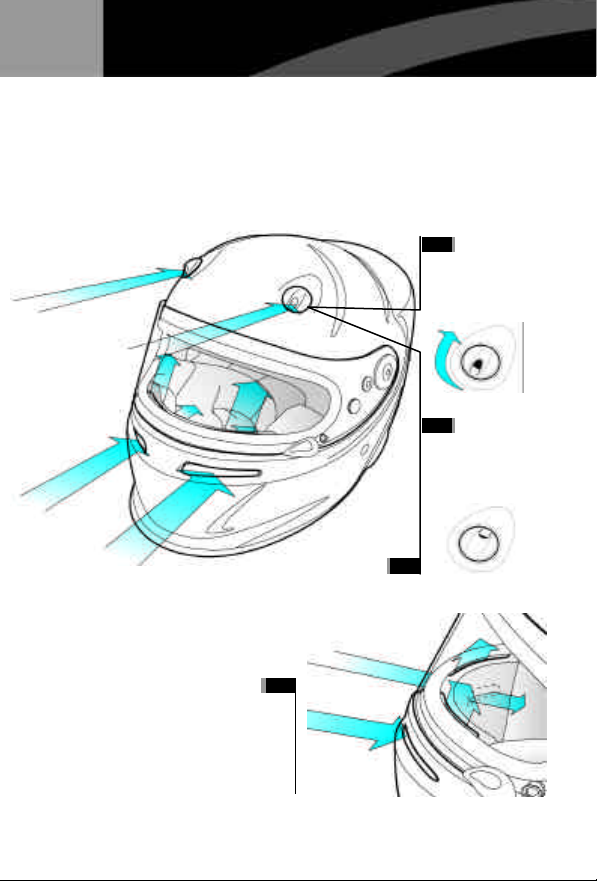
The upper ventilations can be twisted of 360° in such a way to adjust the air
flow while using. In any position the vent is completely open and the air flow
is adjusted and regulated only by the direction of the movement. There are
two locked position that you can perceive by the click whiler twisting towards
two directions:
Towards the
A
frontal part of
the helmet:
maximum entry
of the air
B Towards the
back of the
helmet:
maximum
extraction of
the air
1
The grills on the back of the
helmet make possible a
continuing entering of the air in
the helmet helping the anti fog
on the visor (2).
ASSEMBLING INSTRUCTIONS09
2
Page 11
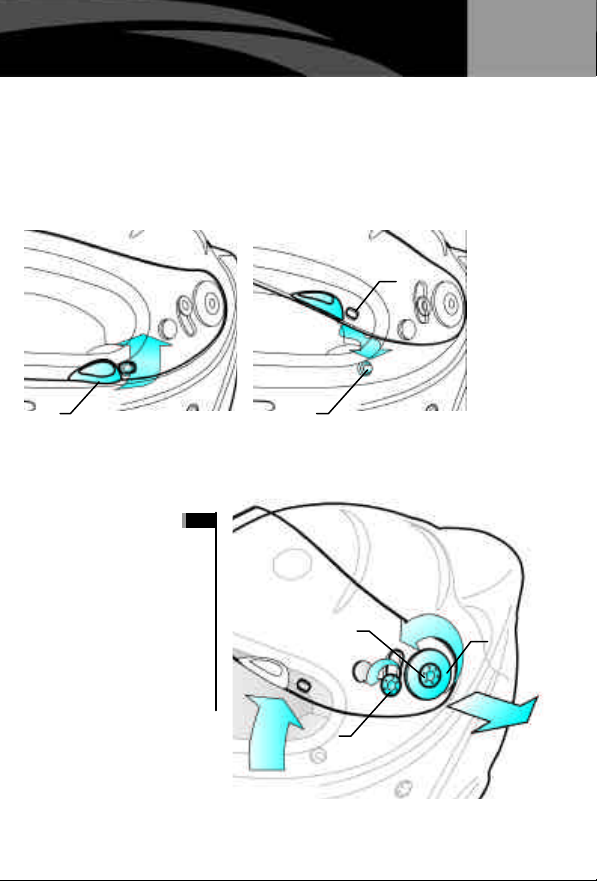
VISOR
To open the visor slightly push on the lever A towards the outside to release
the pivot B from the C position and move to the upright position. To lock the
visor lower it so that the pivot B is inserted inside the C position.
C
A B
REMOVAL OF THE VISOR
1
To remove the visor, pull it up.
Use an hexagonal key of 6 mm
to remove the pivot B and the
rings C.
B
ENGLISH
C
B
ASSEMBLING INSTRUCTIONS 10
Page 12
ENGLISH ASSEMBLING INSTRUCTIONS
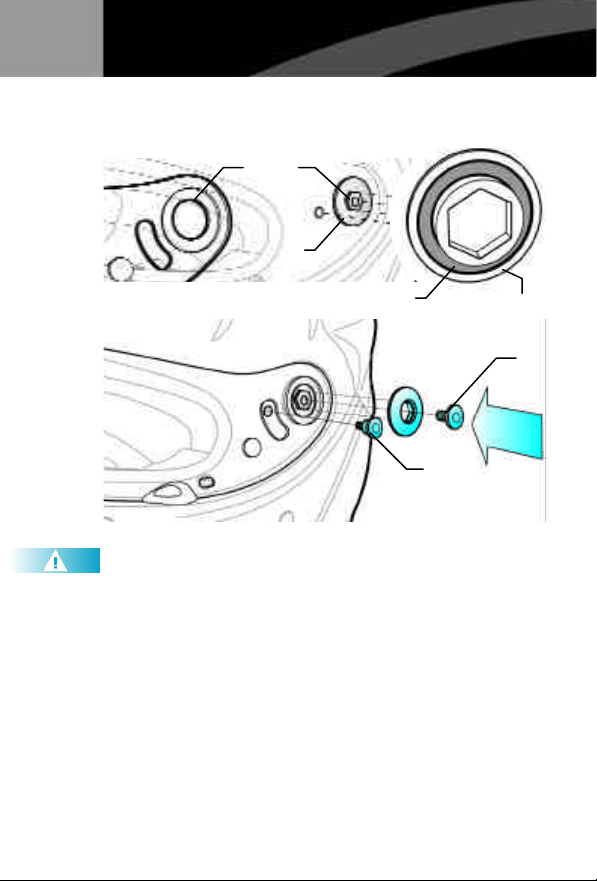
HOW TO ASSEMBLE THE VISOR
1
To ensure the good operation of the rotation system of the visor, before
proceeding to the assembling of the visor , make sure that all the parts
(pivots, components for fixing and accessories) are removed and perfectly
clean.
Put the visor on the helmet in such a way that the center 1 fits to the disc 2.
Make sure that the rubber trim A is placed on the fixing ring B. Put the fixing
ring B so that the hexagonal space fits to the part C on the helmet. Insert the
screw D without screwing it completely. Repeat the same operation on the
other side. Adjust the screws of fixing D of the pivot so that the visor can move
freely.
The presence of deep scratches on the surface of the visor can cause strange
reflex of light that decrease the safety while driving. Replace the visor in such
a case.
C
2
A B
D
E
ASSEMBLING INSTRUCTIONS11
Page 13
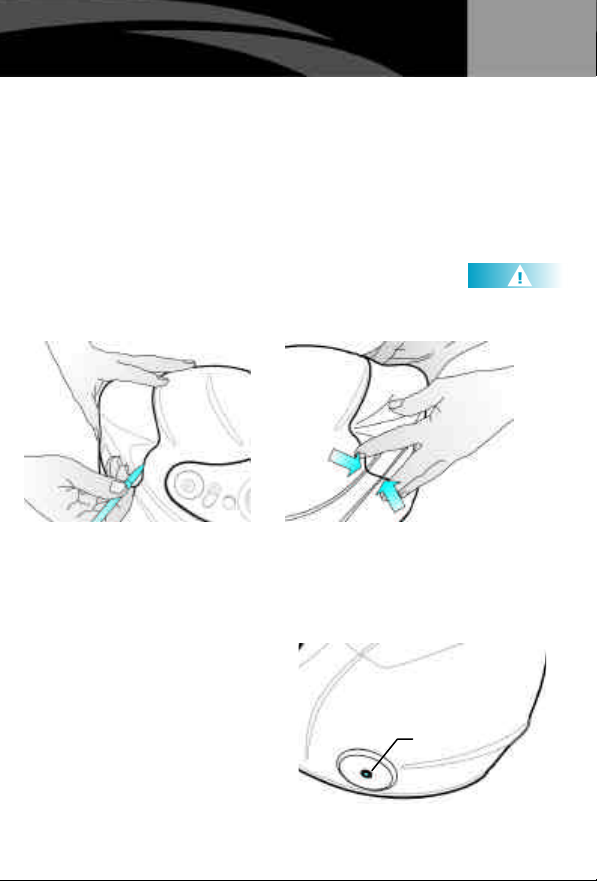
BACK SPOLIER
The function of the back spoiler is only aerodynamics, the application or not of
this one does not modify the structural characteristics of the helmet.
The fixing is done with a bi-tape, the surface of application must be perfectly
cleaned and dry to guarantee the effective fixing of the part. To verify the
positioning of the spoiler on the helmet remove the protection film from the
bi-adesive tape, eventually use a pencil to mark the position before defining
the correct position. Make a pressure on the edge of the spoiler on the surface
of the helmet.
During the application avoid to touch the bi - tape with fingers. The fixing is
immediate the best performance of the bi-tape are obtained after 24 hours
by the application. Do not use the helmet during such a period.
HANS DEVICE (Head and Neck Support)®
J12 F1 is homologated to be used with Hans
system. On the back of the shell there are two
treated holes (A) M5 to insert the Hans device
system. To assemble it follow carefully the
instructions contained in the leaflet of the
manufacturer.
A
ENGLISH
ASSEMBLING INSTRUCTIONS 12
Page 14
ENGLISH ASSEMBLING INSTRUCTIONS
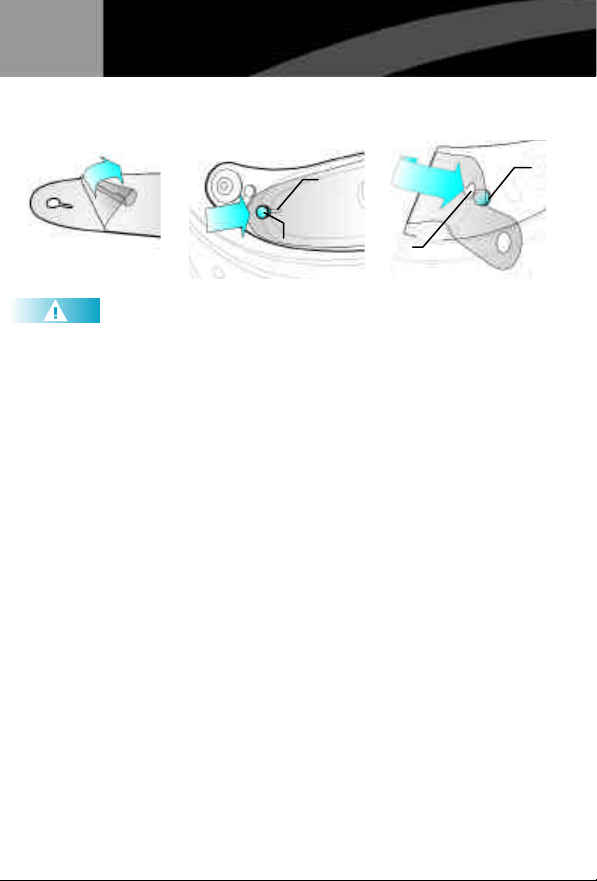
"TEAR-OFF" LENS
A
B
Before putting the tear-off lens remove the film of protection on one side to
be placed on the visor.
Put the part A in the part B.
Pull the the film so that you can insert the part C in part D and press the film
on the visor to remove the air.
It is possible to put more than one film over the other following the same
operations.
A
D
ASSEMBLING INSTRUCTIONS13
Page 15

WARRANTY
TERMS
The guarantee enters into force from the date of the purchase, which must be
proved by the receipt (invoice, tax receipt or other document unambiguously
proving the date of purchase issued by the seller of the product).
Any job undertaken in fulfilment of the guarantee does not extend the
guarantee, which remains in any case valid for two years from the date of the
purchase.
The product must not have been modified and / or altered. The presence of
non-original accessories and / or even minimal modifications to the products
invalidates the guarantee immediately and absolves Suomy Spa of all
responsibility.
The guarantee is invalidated when:
? The product is modified, repainted or decorated with stickers
? original components are replaced with non-original parts
Damage deriving from the following are excluded from the guarantee:
? negligent treatment
? normal product wear
? reparations performed by the customer, third parties or other persons not
part of Suomy Spa organisation
? Using products which are inappropriate and/or in situations other than
those of normal use in accordance with the procedures described in this
leaflet
VALIDITY
Suomy Spa guarantees the product against non-conformities for a period of
two years from the date of purchase and undertakes to repair the product (or
component) or replace it (at the exclusive discretion of Suomy Spa) without
costs for either parts or labour.
Some colours are produced using UV Fluo paints. Those may be subject to
natural migration leading to a reduction in brightness. The phenomenon may
be accentuated when the helmet is exposed for long periods to particularly
bright light.
Should this arise, Suomy declines all responsibility. The phenomenon does
not, however, compromise the performance or quality of J12.
ENGLISH
WARRANTY 14
 Loading...