

Page 1

GB-01
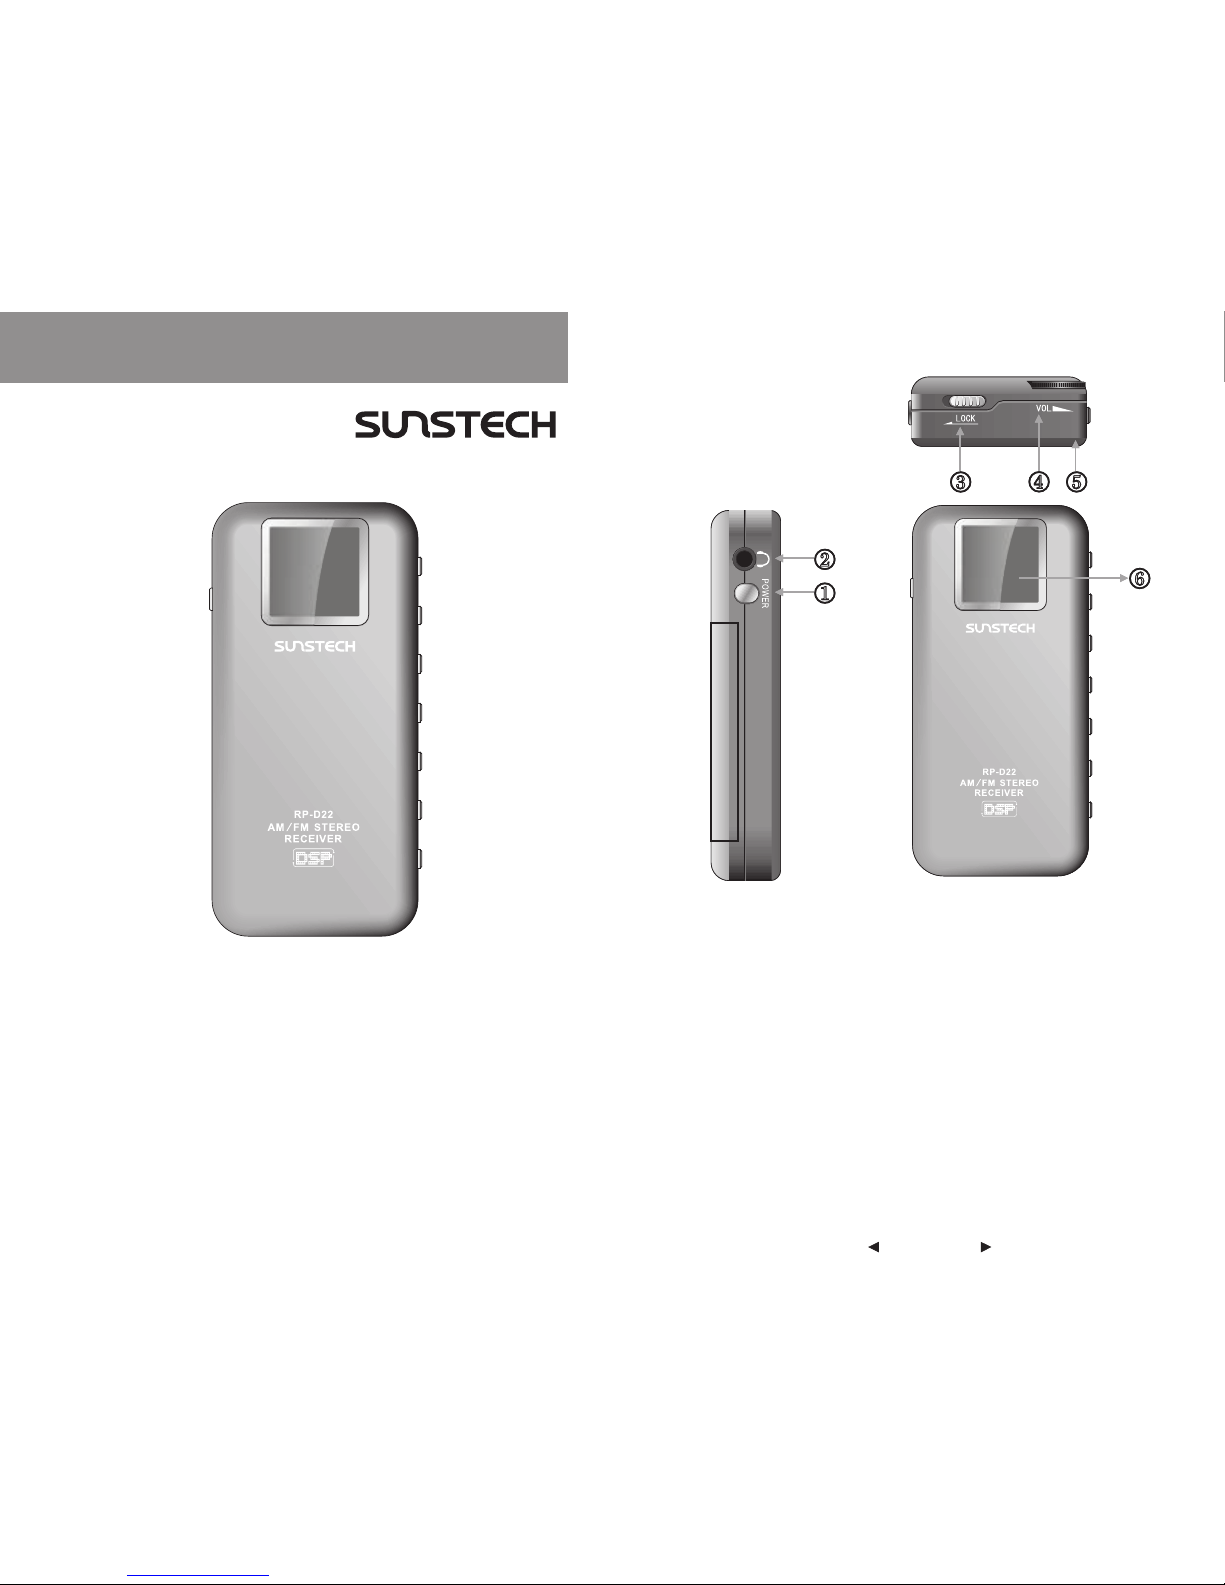
RP-D22
Instruction Manual
1. [POWER] Button
2. Earphone Jack
3. [LOCK] Switch
4. [VOL] Knob
5. Strap Hole
6. LCD Display
Page 2

GB-02 GB-03
FM ST.
7. [TUNE +] Button
8. [TUNE -] Button
9. [BAND/TIME] Button
10. [BASS] Button
11. [M/ATS] Button
12. [M+] Button
13. [M-/ DEL] Button
14. Battery Compartment Cover
BATTERY INSTALLATION
1. Slide the battery lid in the direction of
the arrow.
2. Insert 2 x AAA batteries with correct
polarity shown in the compartment.
3. Close the lid of compartment.
USING EARPHONES
Before turning on the unit, connect the
earphone to the earphone jack as it functions
as a FM antenna.
TURN ON / OFF THE RADIO
Press the [POWER] button under the
earphone jack on side panel to turn on/off
the radio.
BAND SELECTION
Turn on the unit, press the [BAND/TIME]
button repeatedly to select AM / FM band.
TUNING INTO STATION
1. Auto Scan Tuning
Press and hold the [TUNE -/+] button
(about 3 seconds) until frequency starts
scanning to auto tune into the next available
station.
Page 3

GB-04
GB-05
2. Manual Tuning
Press the [TUNE-/TUNE+] button repeatedly
to manual tune into your desired station.
WORKING WITH MEMORIES
There are total 60 preset memories; 40 for
FM and 20 for AM.
1. Manually Storing Station
1. Tune into your desired station, press the
[M/ATS] button shortly and notice the “M”
flashing on LCD.
2. While it flashing, press the [M-/M+]
button to select your desired memory
address, and the press again the [M]
button to store station into memory.
2. Auto Tuning Storage (ATS)
Select your desired band, then press and
hold the [ATS] button (about 3 seconds) to
auto tune and store all those available
stations into memory.
FM ATS: 40 memories (from 01 to 40)
AM ATS: 20 memories (from 01 to 20)
Note: During ATS process, all pre-stored radio stations
will be replaced automatically by the new searched
stations.
Listening to Stored Stations
Press the [M+] or [M-/DEL] button repeatedly
with to select your desired stored station
memory. Both the frequency and preset
number will show on LCD.
Delete a Single Memory
Press and hold the [DEL] button and notice
[d] showing on LCD, then press again the
[DEL] button to delete the memory.
Delete All Memories
Press and hold the [DEL] button (about 5
seconds) with "d" flashing on LCD, then
press the [DEL] button to delete all memories.
BASS SOUND
Press the [BASS] button shortly and notice
that the [ ] symbol appears on LCD for the
bass sound listening. Press the [BASS]
button shortly again to deactivate it with [ ]
disappearing.
Page 4

GB-06 GB-07
FM STEREO / MONO
Press and hold the [BASS] button(about 5
seconds) to activate the stereo sound
with [ST] showing on the display; press and
hold again to deactivate it with [ST]
disappearing.
Note:
STEREO: for strong signal broadcast, music, and FM
stereo broadcast.
MONO: for weak signal broadcast, voice program, and
mono broadcast.
VOLUME CONTROL
Dial the [volume] knob to adjust the sound
level.
SETTING FM FREQUENCY
Press & hold the [M+] button for about 8
seconds to select FM frequency from
64/76/87 ~ 108 Mhz.
CLOCK SETTING
In the unit off mode, press the [BAND/TIME]
button and notice the hour flashing, then
press the [TUNE -/+] button to adjust the
hour. Press again the [BAND/TIME] button
to confirm and go into minute setting, then
press the [TUNE -/+] button to adjust the
minute while it is flashing.
KEY LOCK
Push the key lock switch to the left side with
the key symbol appearing on the display to
lock all keys/buttons. Push it back to the
right side with the key symbol disappearing
on the display to unlock.
AM TUNING STEP
In the radio off mode, press and hold the
[BASS] (about 5 seconds) until A10 / A09
shows on the display to select 9K / 10K AM
tuning step.
Note: Factory default is 9 KHz AM tuning step.
Page 5

GB-09GB-08
1.Frequency Range:
FM 87.0 - 108.0MHz
AM 9K 522 - 1710 KHz
10K 520 - 1710 KHz
2. Preset Memories FM (40 ) AM (20)
3. Noise Limit Sensitivity
FM 5 V
MW 2.5mv/m
4. Signal Selection 40dB
5. Max Output Power : Approx 0.3mW
6. Max Consumption Current: Approx 30mA
7.Batteries: AAA*2
8.Earphone: Approx. D3.5mm
9.Dimension : Approx 80* 40 * 15mm
10.Weight: Approx 33g( not incl. Battery)
SPECIFICATION
You can help protect the environment!
Please remember to respect the local
regulations: hand in the non-working
electrical equipments to an appropriate
waste disposal center.
Page 6
Manual de Instrucciones
RP-D22
1. BOTÓN DE ENCENDIDO:
2. Salida de Auriculares
3.
4. Botón de volumen
5. Abertura para correa
6. PANTALLA LCD
interruptor de bloqueo [LOCK]
ES-01
Page 7

FM ST.
7. TUNE +]
8. TUNE -]
9. BAND/TIME]
10. BASS]
11. Botón [M/ATS]
12. Botón [M+]
13. M-/DEL]
14. Cubierta del Compartimento para Baterías
Botón [
Botón [
Botón [
Botón [
Botón [
INSTALACIÓN DE LAS PILAS
1. Deslice la cubierta para pilas en la dirección de
la flecha
2. Coloque dos pilas 2x AAA respetando la
polaridad que se muestra en el compartimento
3. Cierre el compartimento para baterías.
USO DE LOS AURICULARES
Antes de encender el equipo, conecte el auricular
a la ranura para auriculares, ya que funciona
como antena FM.
ENCENDER/ APAGAR LA RADIO
Presione el botón de [ENCENDIDO] situado bajo
la salida de auriculares, en el panel lateral, para
encender o apagar la radio.
SELECCIÓN DE BANDA
Encienda el equipo, presione el botón de
[BANDA/HORA] repetidamente para seleccionar
entre banda FM o AM.
SINTONIZAR EMISORAS
1. Búsqueda automática de emisoras
Presione y mantenga apretado el botón
[TUNE +/-](alrededor de 3 segundos) hasta
que comience la búsqueda de frecuencias de
forma automática hasta la siguiente emisora.
ES-02
ES-03
Page 8

2. Sintonía Manual
Presione el botón [TUNE + / TUNE -]
repetidamente para seleccionar la emisora
deseada manualmente.
USO DE LAS MEMORIAS
Hay un total de 60 memorias prefefinidas, 40 para
FM y 20 para AM.
1. Almacenamiento Manual De Emisoras
1. Sintonice su emisora deseada; presione el
botón [M/ATS] brevemente; vea la indicación
"M" parpadeando en la pantalla LCD.
2. Mientras parpadee, presione el botón [M-/M+]
para seleccionar su ubicación en la memoria
deseada, y presione de nuevo el botón [M/ATS]
almacenar la emisora en la memoria.
2. Almacenamiento Automático de Presintonías (ATS)
Seleccione la banda deseada, después presione y
mantenga apretado el botón [ATS] (durante unos
3 segundos) para sintonizar automáticamente y
almacenar todas las emisoras encontradas en la
memoria.
ATS FM: 40 memorias (de 01 a 40)
ATS AM: 20 memorias (de 01 a 20)
NOTA: Durante el proceso ATS, las emisoras de radio
prealmacenadas serán reemplazadas automáticamente
por las nuevas emisoras encontradas.
Escuchar emisoras almacenadas
Presione el botón [M+] o [M-/DEL]
repetidamente para seleccionar su la
emisora memorizada que desee. Tanto la
frecuencia como el número de presintonía
se mostrarán en la pantalla.
Borrado de una única memoria
Presione y mantenga apretado el botón
[DEL] y observe que se muestra en pantalla
[d], parpadeando. Presione de nuevo el botón
[DEL] para borrar la emisora de la memoria.
Borrado de todas las Memorias
Presione y mantenga apretado el botón
[DEL] durante 5 segundos, y observe que
se muestra en pantalla [d], parpadeando.
Presione de nuevo el botón [DEL] para
borrar todas las emisoras almacenadas en
la memoria.
BAJOS
Presione el botón [BASS] brevemente y
observe que el símbolo [ ] se muestra en
la pantalla para la audición de bajos.
Presione de nuevo el botón [BAJOS]
brevemente para desactivar la opción;
[ ] desaparecerá de la pantalla.
ES-04
ES-05
Page 9

FM ESTÉREO / MONO
Presione y mantenga apretado el botón [BASS]
(durante unos 5 segundos) para activar el sonido
estéreo, [ST] se muestra en pantalla. Presione y
mantenga apretado para desactivarlo; [ST]
desaparecerá.
NOTA:
ESTÉREO: Para emisiones de señal fuerte,
música, y emisiones en FM estéreo
MONO: Para emisiones de señal débil, programas
de voz, y emisión en MONO.
CONTROL DEL VOLUMEN
Gire la rueda de [volúmen] para ajustar el volumen
del sonido.
Configurar la frecuencia FM
Presione y mantenga apretado el bot n [M]
durante unos 8 segundos para seleccionar
la frecuencia FM desde 64/76/87 a 108
Mhz.
PASOS PARA SINTONiZAR EN LA AM
Con la radio apagada, presione y mantenga
apretado el botón [BASS] (durante unos 5
segundos) hasta que se muestre en pantalla
A10/A09, seleccione 9K /10K como pasos de
sintonía.
CONFIGURACIÓN DEL RELOJ
Con la radio apagada, presione el botón
[BAND/TIME] y observe que la hora
parpadea, presione el botón [TUNE +/-]
para ajustar la hora. Presione de nuevo el
botón [BAND/TIME] para confirmar y
acceder a la configuración de minutos.
Presione el botón [TUNE +/-] para
ajustar los minutos mientras parpadea.
BLOQUEO DE TECLAS
Deslice el interruptor para el bloqueo de
teclas hacia la izquierda. Se mostrará en
pantalla el símbolo de una llave, indicando
que todas las teclas y botones están
bloqueados. Para desbloquear, deslice el
interruptor de nuevo hacia la derecha. El
símbolo de la llave desaparecerá.
ES-06
ES-07
NOTA: La configuración de paso de sintonía por defecto
9 KHz AM
Page 10

ES-08
ES-09
ESPECIFICACIONES
1. Rango de radiofrecuencia:
FM: 64.0 - 108.0MHz
AM: 9K 522 - 1710 KHz
10K 520 - 1710 KHz
2. Memorias presintonía: FM(40), AM (20)
3. Límite de sensibilidad de ruido:
FM 5 V
AM 2.5mv/m
4. Selección de señal 40dB
5. Potencia máxima de salida: Aprox 0.3mW
6. Consumo de corriente máximo: Aprox 30mA
7. Pilas : AAA*2
8.Auriculares: Aprox.D3.5mm
9.Dimensiones : Aprox 80* 40 * 15mm
10.Peso: Aprox.33g (excluyendo pilas )
Ayúdenos a proteger el medio ambiente!
Respete la normativa local en vigor:
Deposite su aparato eléctrico fuera de
uso en un centro de recolección
apropiado.
Condiciones de Garantía
Este equipo tiene garantía de 2 años a partir
de la fecha original de compra.
Serán exentas de la garantía las averías
producidas por un uso incorrecto del
aparato, mala instalación o instalados en
lugares inapropiados para su buena
conservación, roturas, actualizaciones de
software que no sean los facilitados por la
marca, piezas desgastadas por su propio
uso o por un uso no doméstico o inadecuado,
así como, por manipulación por personas o
talleres ajenos a nuestra empresa.
Para que la garantía tenga validez, se
deberá adjuntar la factura o tíquet de caja
que corrobore la adquisición y fecha de
venta de este producto.
Page 11

RP-D22
Manual de Instruções
1. [POWER] Botão
2. Ficha de Auriculares
3. [LOCK] Interruptor
4. [VOL] Roda
5. Orifício Alongado
6. Ecrã LCD
P-01
Page 12

FM ST.
7. [TUNE +] Botão
8. [TUNE -] Botão
9. [BAND/TIME] Botão
10. [BASS] Botão
11. [M/ATS] Botão
12. [M+] Botão
13. [M-/ DEL] Botão
14. Cobertura do compartimento da Bateria
INSTALAÇÃO DE BATERIAS
1. Deslize a protecção da bateria para a direcção
indicada pela seta.
2. Insira 2 x baterias AAA com a polaridade
correcta como de acordo com indicações do
compartimento.
3. Feche a protecção do compartimento.
UTILIZAÇÃO DE AURICULARES
Antes de ligar o aparelho, ligue os auriculares na
ficha de auriculares, uma vez que funciona como
uma antena FM.
LIGAR / DESLIGAR O RÁDIO
Pressione o botão [POWER] sob a ficha de
auriculares no painel lateral para ligar/desligar o
rádio.
SELECÇÃO DE FREQUÊNCIA
Ligue o rádio, pressione o botão [BAND/TIME]
repetidamente para seleccionar a frequência
AM / FM.
SINTONIZAR NUMA ESTAÇÃO
1. Sintonia de Busca Automática
Pressione e segure o botão [TUNE -/+]
(aproximadade 3 segundos) até que frequência
comece a fazer a busca para sintonizar
automaticamente a próxima estação disponível.
P-02
P-03
Page 13

P-04
P-05
2. Sintonia Manual
Pressione repetidamente o botão
[TUNE-/TUNE+] para sintonizar
manualmente na estação desejada.
UTILIZANDO MEMÓRIAS
Há no total 60 memórias predefinidas; 40
para FM e 20 para AM.
1. Guardar Manualmente Estações
1. Sintonize em sua estação desejada,
pressione o botão [M/ATS] brevemente e
observe o “M” a brilhar no LCD.
2. Enquanto estiver a brilhar, pressione o
botão [M-/M+] para seleccionar o
endereço de memória desejado, então
pressione novamente o botão [M] para
gravar a estação na memória.
2. Armazenamento de Sintonia Automática (ATS)
Seleccione sua frequência desejada, então
pressione e segure o botão [ATS] (por cerca
de 3 segundos) para sintonizar autom
aticamente e guardar todas as estações
disponíveis na memória.
FM ATS: 40 memórias (de 01 a 40)
AM ATS: 20 memórias (de 01 a 20)
Observação: Durante o processo ATS, todos as estações
de rádio pré-definidas serão automaticamente substituídas
pelas novas estações buscadas.
Ouvindo Estações Guardadas
Pressione o botão [M+] ou [M-/DEL]
repetidamente para seleccionar a estação
guardada que deseja. Ambas as frequências
e números predefinidos serão exibidos no
LCD.
Apagar uma Única Memória
Pressione e segure o botão [DEL] e observe
o [d] surgindo no LCD, então pressione
novamente o botão [DEL] para apagar a
memória.
Apagar Todas as Memórias
Pressione e segure o botão [DEL] (por cerca
de 5 segundos) com o “d” a brilhar no LCD,
então pressione o botão [DEL] para apagar
todas as memórias.
SOM BAIXO
Pressione rapidamente o botão [BASS]
e irá observar que o símbolo [ ] aparece no
LCD para ouvir som de baixo. Pressione
o botão [BASS] rapidamente outra vez para
desactivá-lo, com o [ ] a desaparecer.
Page 14

P-06
P-07
FM ESTÉREO / MONO
Pressione e segure o botão [BASS] (por cerca de
5 segundos) para activar o som estéreo com [ST]
a ser exibido no ecrã; pressione e segure
novamente para desactivá-lo, desaparecendo
o [ST].
Observação:
ESTÉREO: para sinais fortes, música, e sinais
estéreo de FM.
MONO: para sinais fracos, programas de voz, e
sinais mono.
CONTROLO DE VOLUME
Movimente a roda do [volume] para ajustar o nível
de som.
AJUSTE DE RELÓGIO
No modo desligado, pressione o botão
[BAND/TIME] e observe que a hora está a piscar,
então pressione o botão [TUNE -/+] para ajustar a
hora. Pressione novamente o botão [BAND/TIME]
para confirmar e ir para o ajuste de minutos, então
pressione o botão [TUNE -/+] para ajustar os
minutos enquanto estiver a piscar.
TRAVA
Deslize o interruptor de trava para a esquerda com
o símbolo da chave a aparecer no ecrã para travar
todos os botões e teclas. Deslize novamente para
a direita para destravar, fazendo desaparecer o
símbolo da chave no ecrã.
PASSOS DE SINTONIA AM
No modo desligado do rádio, pressione e segure o
botão [BASS] (por cerca de 5 segundos) até que
A10 / A09 seja exibido no ecrã para seleccionar o
passo de sintonia 9K / 10K AM.
Observação: O padrão do fabricante é o passo de
sintonia AM de 9 Khz.
Page 15

P-08
P-09
ESPECIFICAÇÕES
1.Faixa de Frequência:
FM: 87.0 - 108.0MHz
AM: 9K 522 - 1710 KHz
10K 520 - 1710 KHz
2. Posições de Memória FM (40 ) AM (20)
3. Sensibilidade Limite de Ruído
FM 5 u V
MW 2.5mv/m
4. Seleção de Sinal 40dB
5. Energia Máxima de Saída: Aprox. 0.3 mW
6.
7.Bateria: 2 * AAA
8.Auriculares: Aprox. D 3.5 mm
9.Dimensões: Aprox. 80* 40* 15mm
10.Peso: Aprox. 33g(Bateria não incl.)
Máximo Consumo de Corrente: Aprox.30 mA
Condições de Garantía
Este equipamento tem garantia de 2(dois)
anos a partir da data original de compra.
Estaram isentas da garantía as avarías
causadas pelo uso incorrecto do aparelho,
má instalação ou colocação em lugares
inapropriados para a sua boa conservação,
pancadas, actualizações de software que
não sejão os facilitados pela marca, peças
desgastadas pelo seu proprio uso ou por um
uso não doméstico ou inadequado, assim
como, por manipulação por pessoas ou
oficinas de assistência tecnica alheios à
nossa empresa.
Para que a garantía tenha validade, deverá
juntar a factura ou tícket de caixa que
corrobore/valide a aquisição e data de
venda deste producto.
Você pode ajudar a proteger o ambiente!
Não se esqueça de respeitar as
regulamentações locais: Entregue o
equipamento eléctrico de que se quer
desfazer num centro de recolha
apropriado.
 Loading...