

Page 1

RP-D10
OPERATING INSTRUCTIONS
PLL AM - FM STEREO RECEIVER
Page 2
Thank you for purchasing RP-D10, PLL AM /FM Stereo
Receiver! It will give you many hours of reliable service
and listening pleasure.
Before operating the receiver, please read this manual
carefully and retain it for future reference.
INTRODUCTION
CONTENTS
Location of Controls............................................................1
LCD Identification..............................................................2
Battery Operation................................................................3
Reset..................................................................................4
Temperature Indicator.........................................................5
Power / Band.......................................................................5
Tuning into a Station ...........................................................6
Manual Tuning..................................................................6
Quick Tuning....................................................................6
Listening to preset stations................................................7
Using Antenna....................................................................7
Sound Quality Selection......................................................8
Presetting Stations..............................................................9
Clock Set...........................................................................10
Adjust the Clock...............................................................10
12H / 24H.........................................................................10
Weekday..........................................................................11
Dual Clock.......................................................................11
Cautions............................................................................12
Specifications....................................................................
13
AM-FM STEREO RECEIVER
3
0
P
R
ES
E
T
S
BA
S
S
.S
T
E
R
EO
.M
O
N
O
1
2
3
4
5
6
7
8
9
10
11
12
13
13
1
2
3
4
5
6
7
8
9
10
11
12
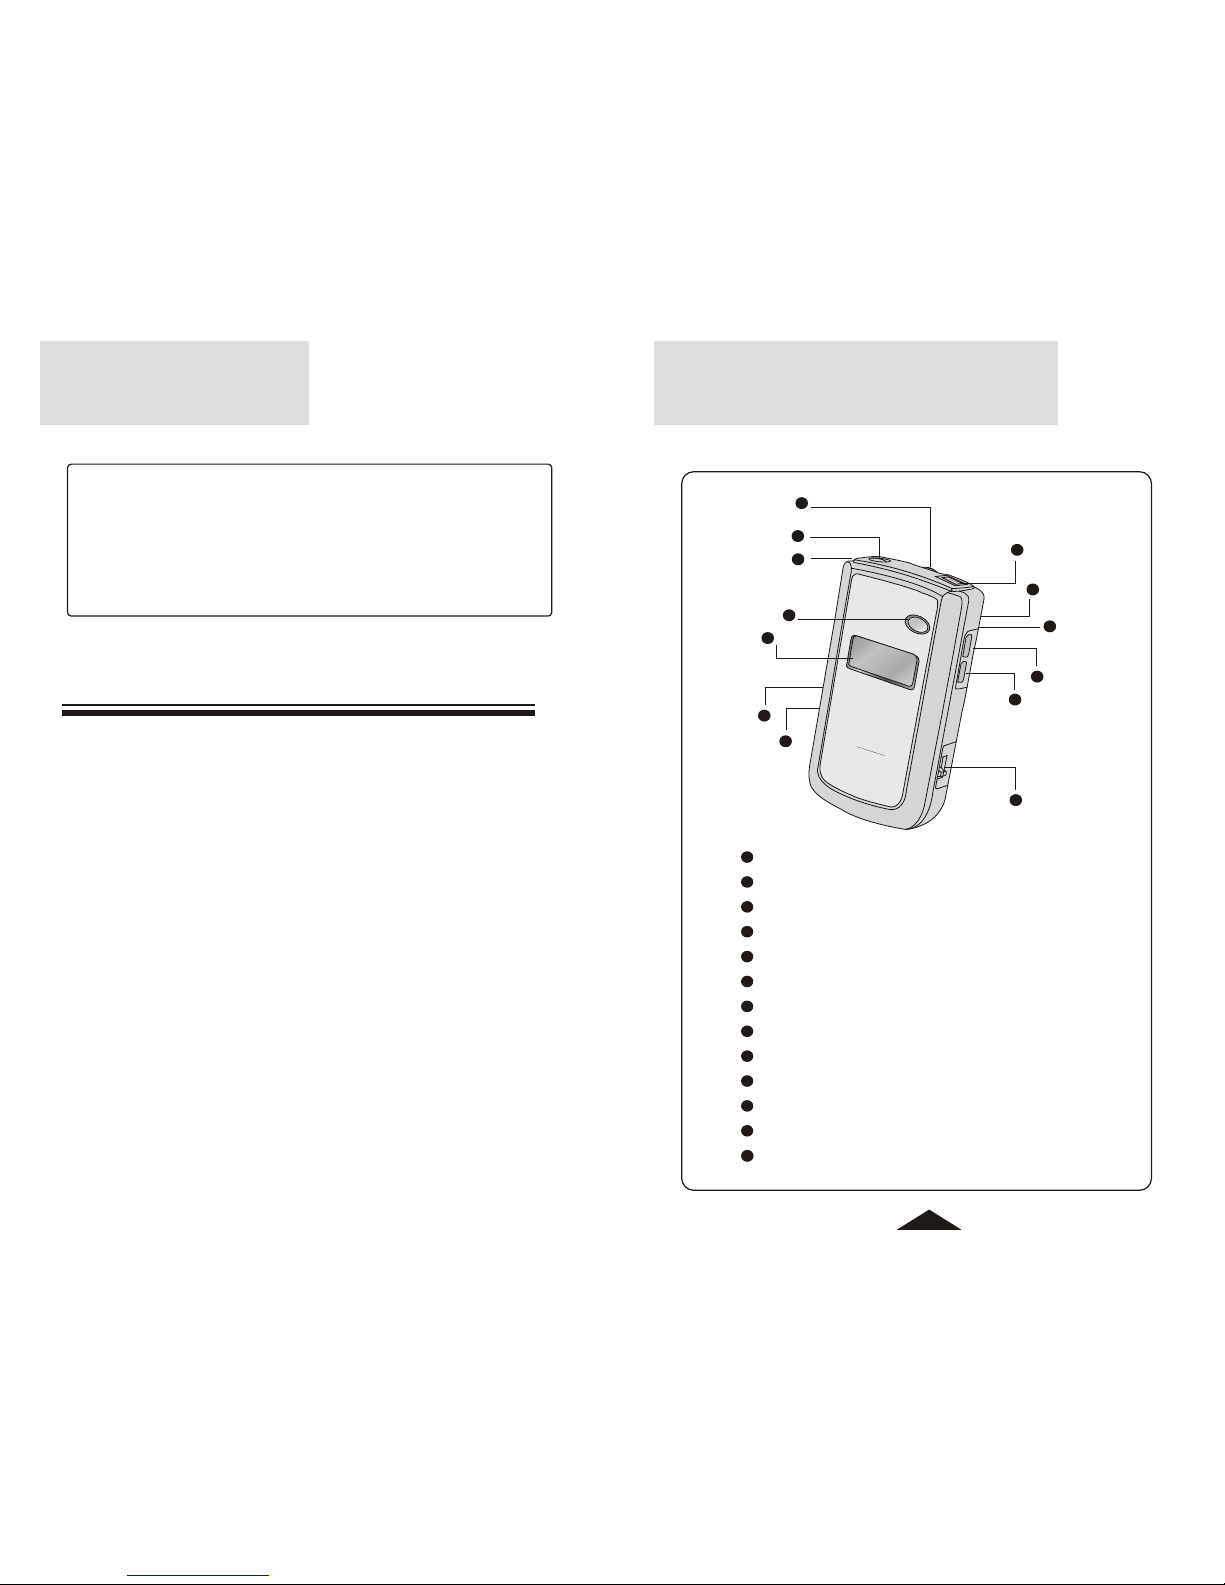
LOCATION OF CONTROLS
Battery Compartment (Back Side)
Reset ( Inside the Battery Compartment)
LCD Display
Power / Band
Carrying Strap
Earphone Jack
Volume
Memory / Week / Temperature
Store / Time
Buckle
Scan / Hour
Scan / Minute
Mono/ Stereo / Bass
1
Page 3

2
WEEKDAY
PM
LOCAL
AM
FM
MHz
KHz
STEREO
TEMPERATURE
1
2
3
4
5
6
7
8
9
88:88
8
1
2
3
4
5
6
7
8
9
Week day Indicator
AM Band / AM Clock Mode
FM Band
PM Clock Mode
Local Time
Battery Indicator
Temperature Indicator
Stereo
Preset Number / Week day
LCD INDENTIFICATION
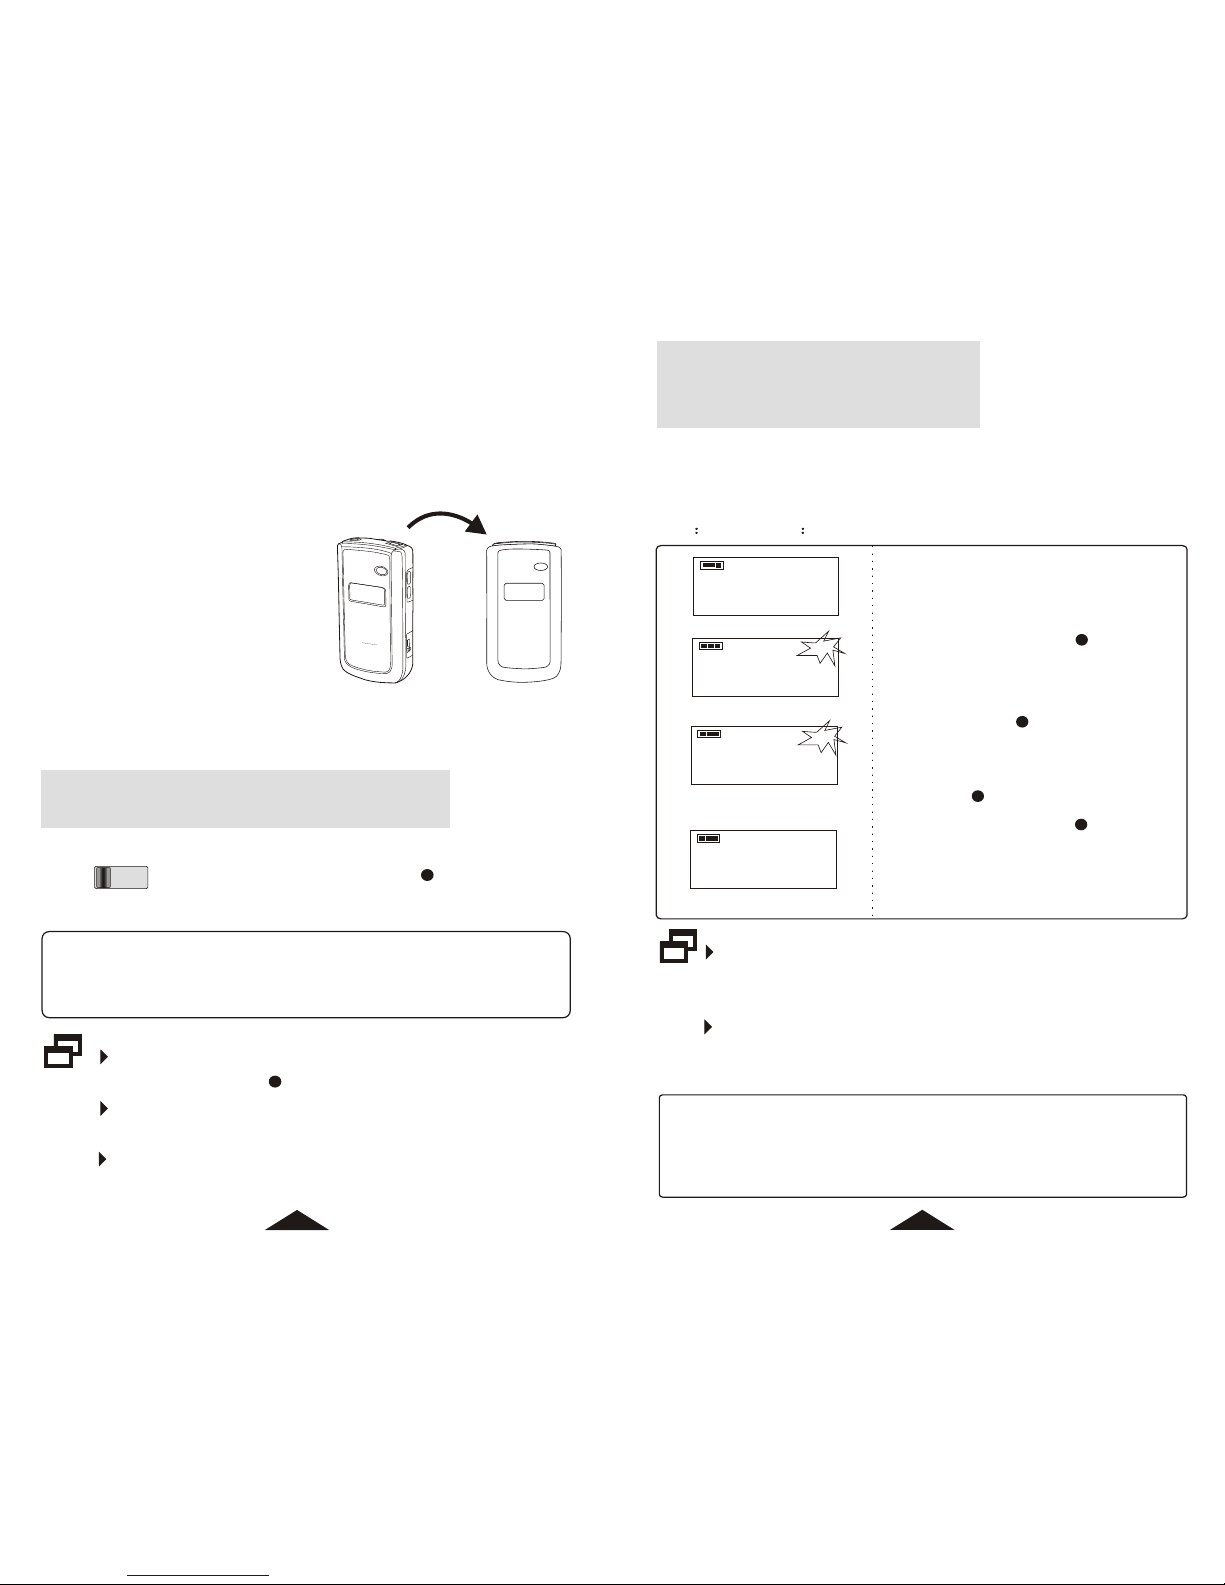
Slide the battery cover in
the direction of the arrow.
Insert two AAA batteries
according to the marking
inside the
compartment.
Slide back the battery
cover, make sure that it
snap in place.
+
-
+
-
BATTERY OPERATION
1
2
3
Do not mix different types together (Alkaline, CarbonZinc, Nickel Cadmium etc.), or old batteries with new
ones.
When the unit is not being used for a long period of time,
remove the batteries to avoid damage from battery
leakage and corrosion.
If battery leakage occurs, wipe the battery compartment
with a soft cloth before inserting the new ones.
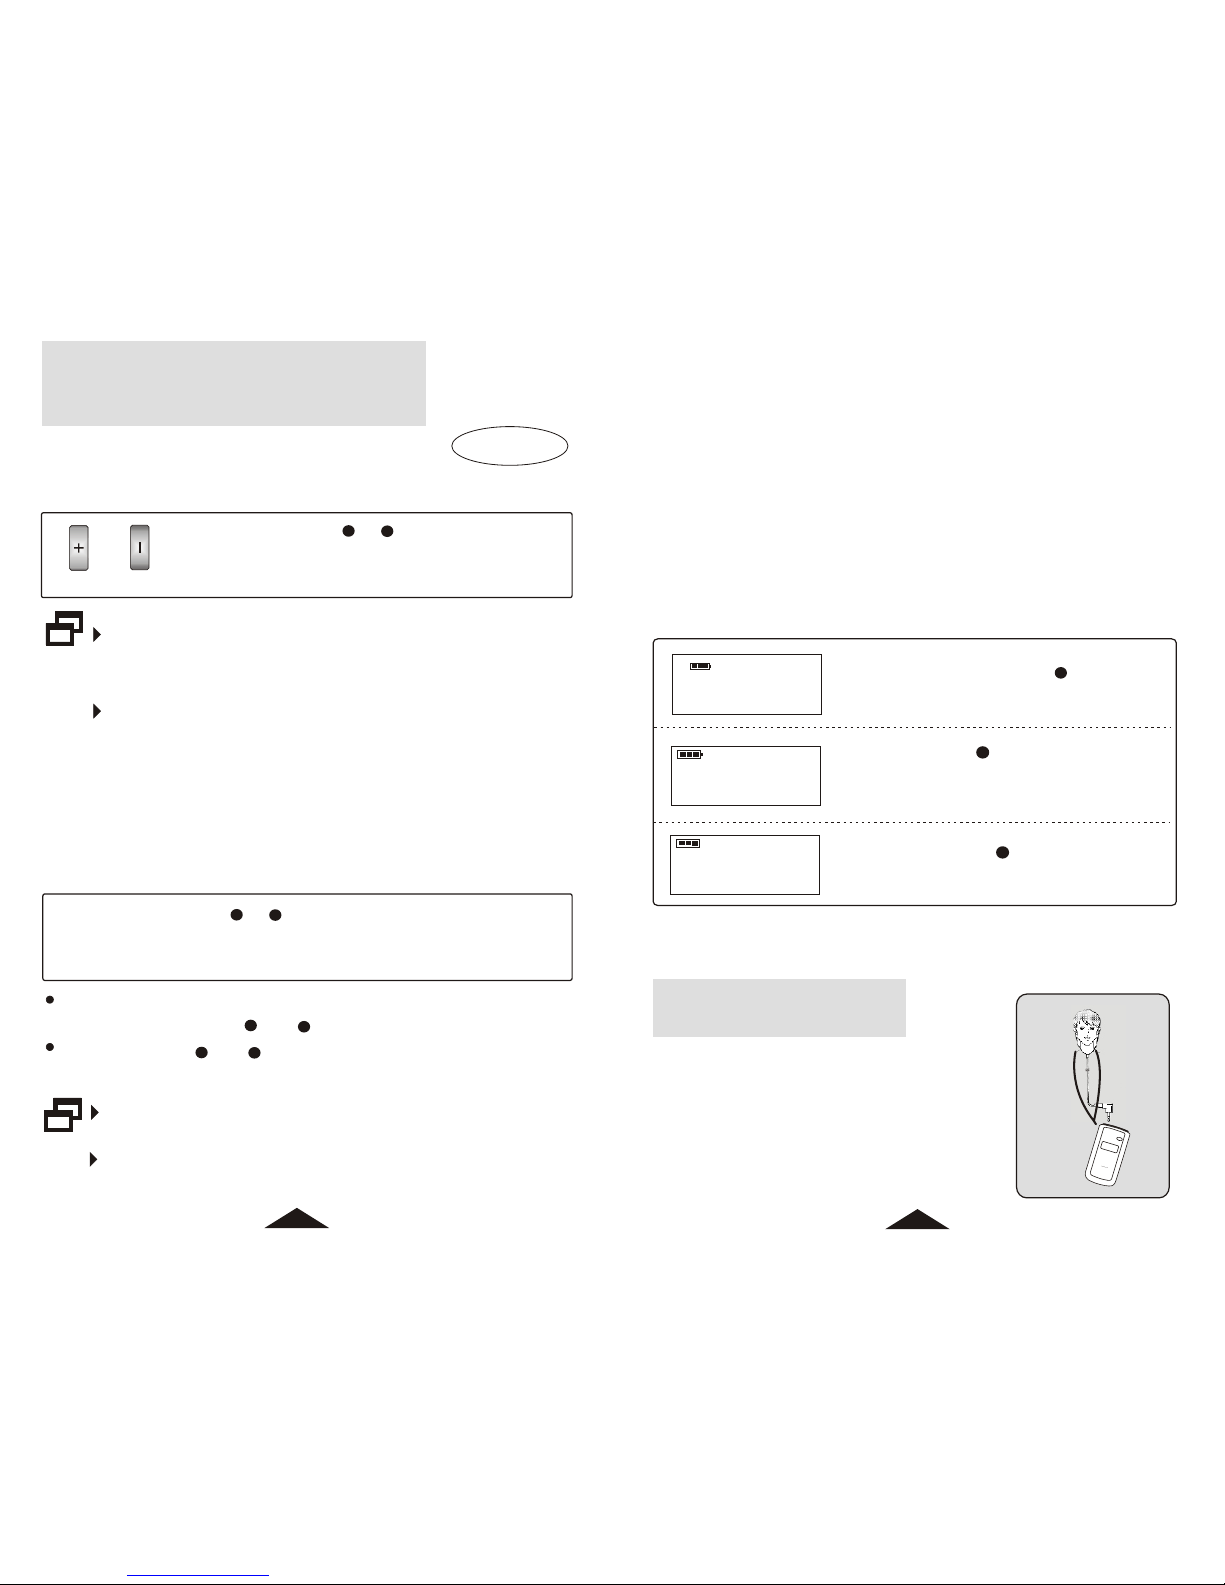
BATTERY INDICATOR
The battery charge is shown at 4 levels in the display.
Full
Empty
3
Page 4

POWER / BAND
When the batteries become weak, battery indicator flashes.
If batteries get too weak for proper operation, the unit
will automatically shut off.
Replace the batteries immediately to prevent memories
losing after the power automatically turns off.
Turn off the unit and then replace the batteries with fresh ones
within 1 hour.
If the unit operates erratically, reset the unit by press RESET
inside the battery compartment to resume normal operation.
Note that reset will erase all of the memories including clock
setting.
RESET
1
2
LOCAL
WEEKDAY
RESET
0:00
1
2
Withdraw the batteries, press
RESET inside the
compartment for above 0.5
second.
2
Install the batteries, clock
flashes and reset to 0:00.
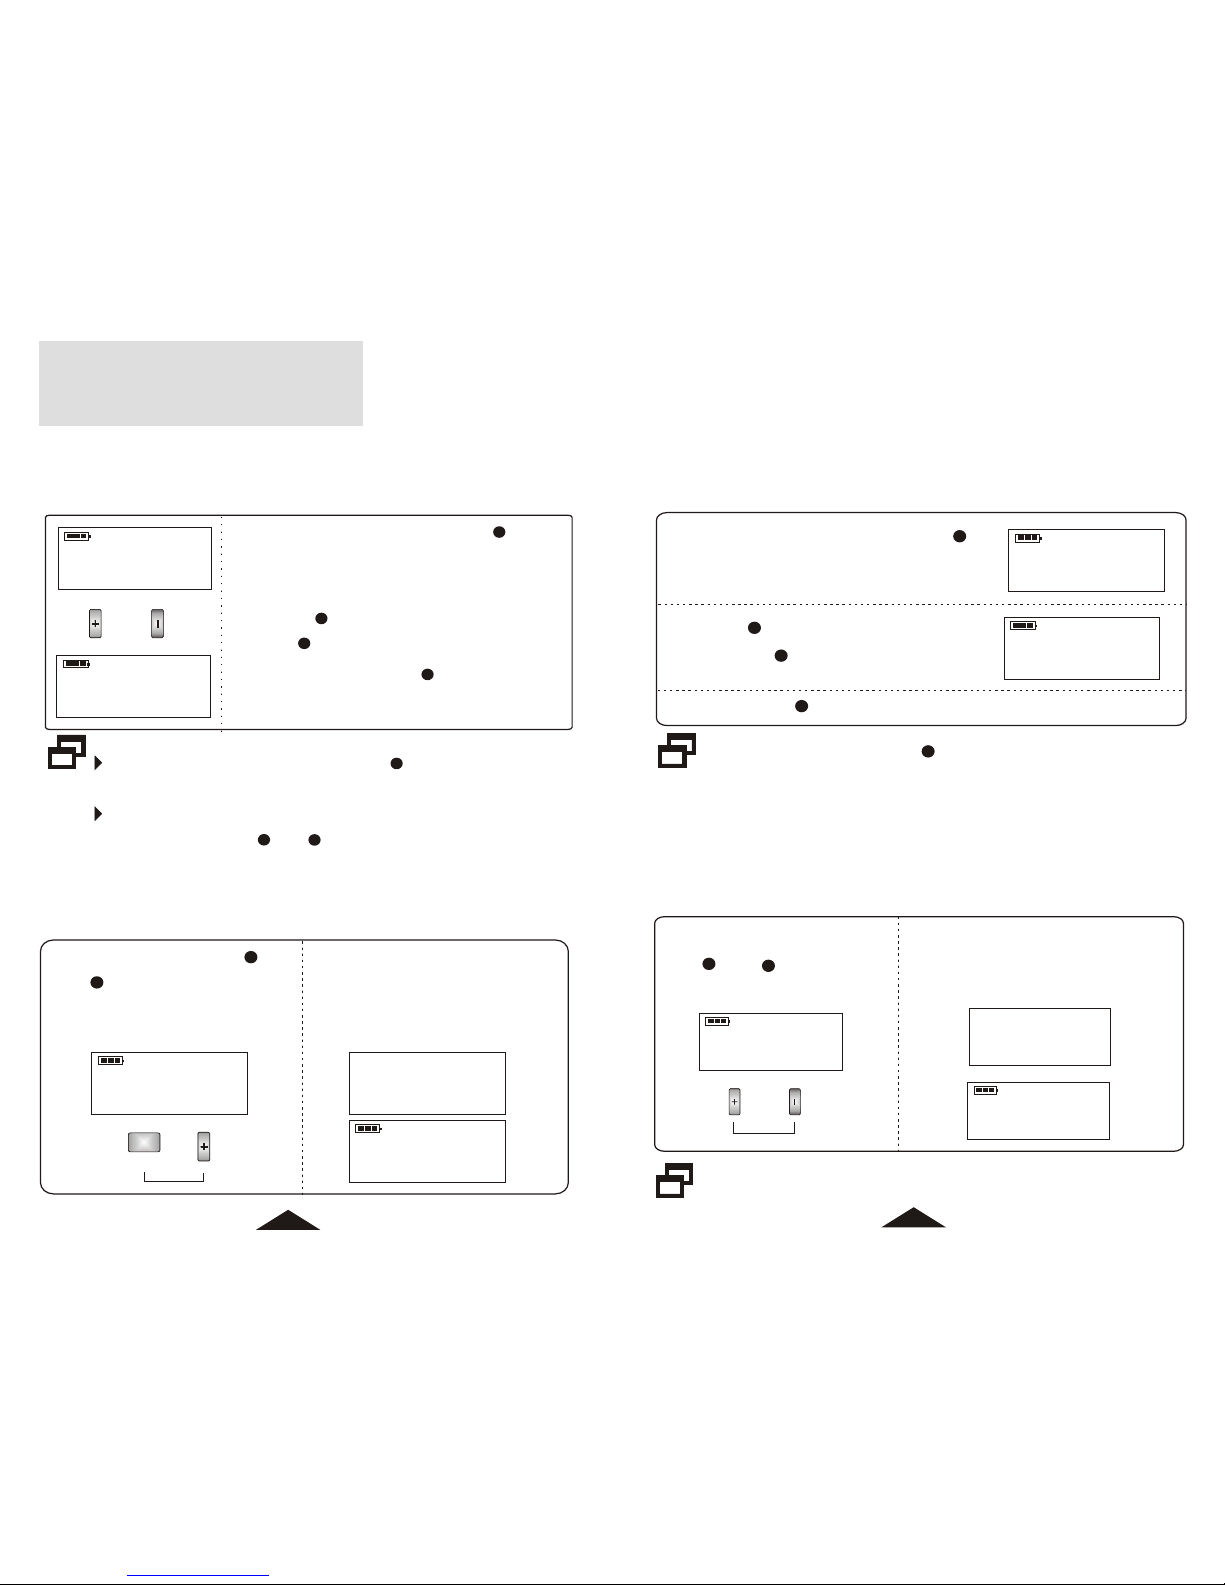
4
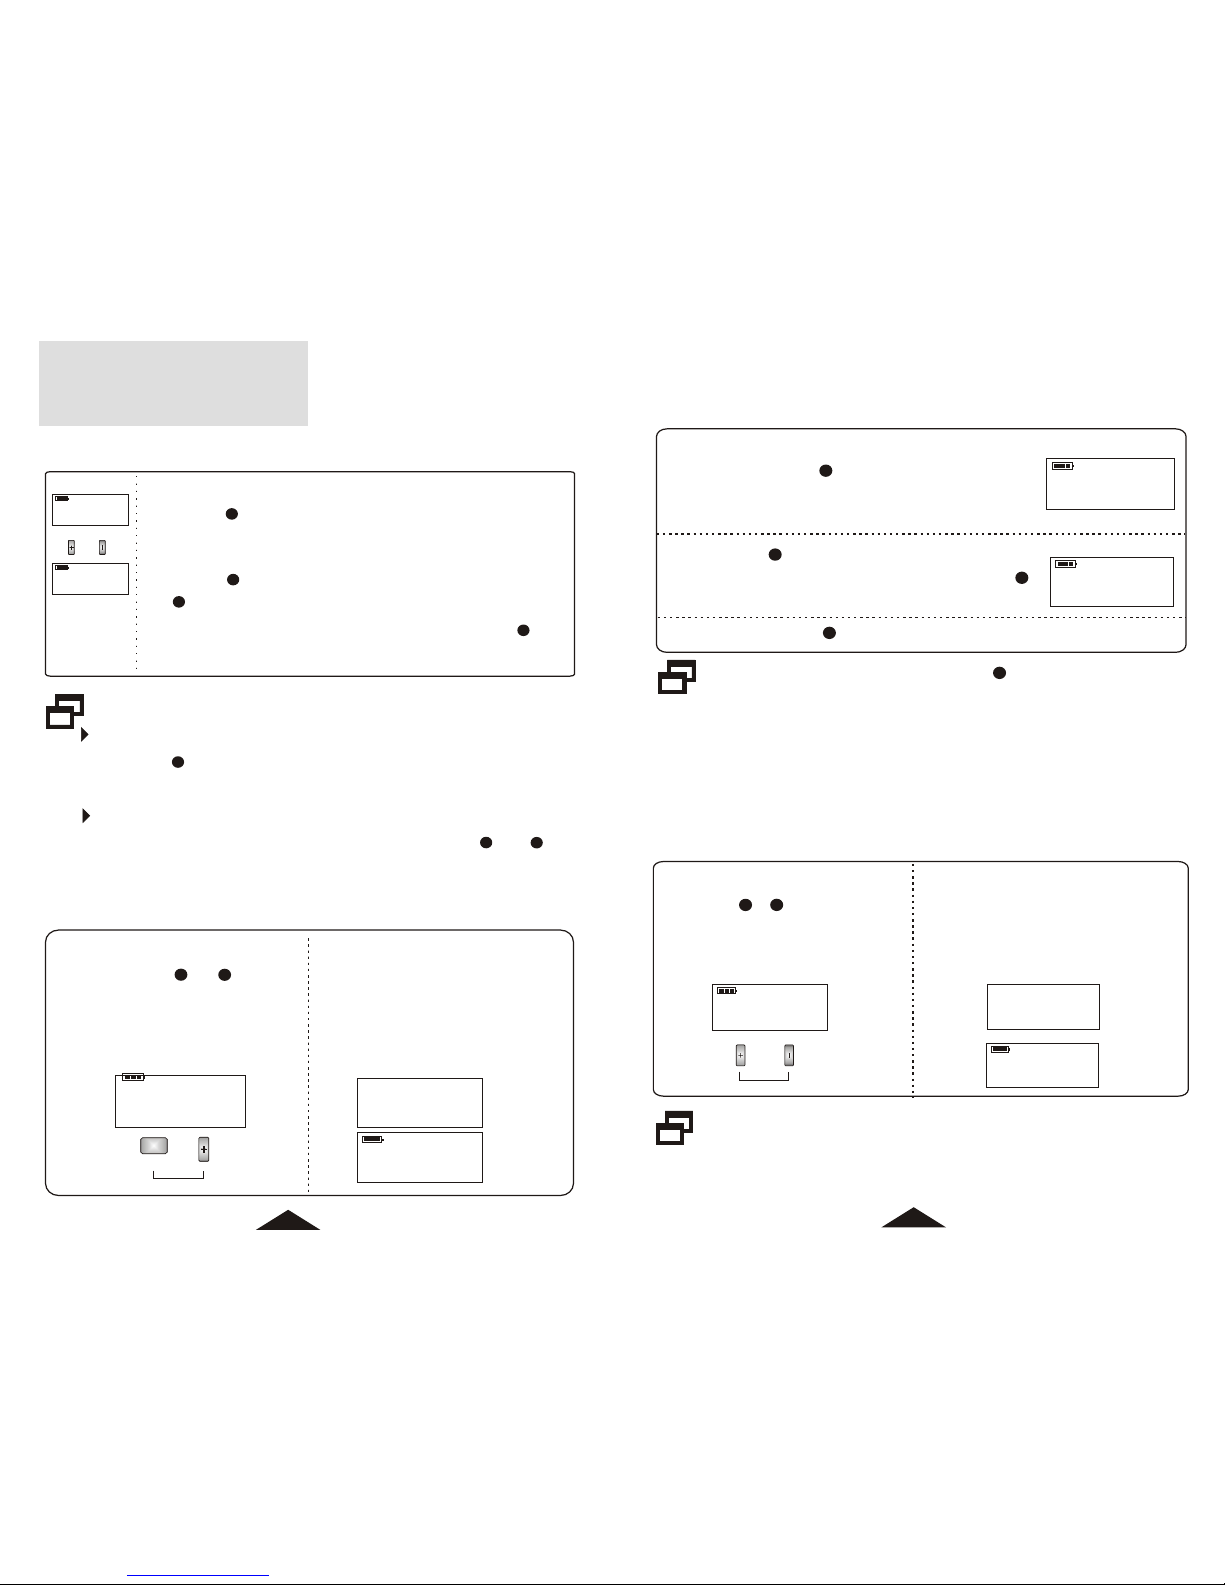
Press POWER / BAND to turn on the
unit, the FM station you stoped listen
last operation is heard.
LOCAL
WEEKDAY
18:00
5
FM
MHz
STEREO
89.9
AM
Khz
1071
1. FM
2. AM
Press POWER / BAND in FM mode,
unit turns into AM mode, the AM station
you stoped listen last operation is heard.
3. Clock Mode
Press POWER / BAND in AM mode,
unit turns off into Clock mode, weekday
indicates in the display.
4
4
4
Turn off the unit into Clock Mode if you do not want to listen
to the broadcast. It hardly consumes any power in Clock Mode.
5
TEMPERATURE
8
30
c
Press MEMO when the unit is off,
temperature indicates in the display
for 5s.
TEMPERATURE INDICATOR
Page 5
ÊÖ¶¯ËÑË÷
×Ô¶¯ËÑË÷
TUNING IN TO A STATION
1. Manual Tuning
Press SCAN button(+ /- ) to tune in to a clear
reception.
FM Step: 0.1MHz AM Step: 9KHz
Headphones cord functions as antenna for the unit, plug
the headphone connector into earphone jack before
tuning, or you can not tune in to any stations.
Manual tuning is more suitable for weak signal broadcast.
When the receiving FM Stereo station is strong enough
(and sound quality set to STEREO or BASS), Stereo
indicates in the display.
2. Quick Tuning
Keep SCAN button (+ / - ) pressed until frequency indicator
changes, unit starts to tune in to the stations automatically. When a
station is tuned in, scanning stops and the tuned station is heard.
Methods
3
11
12
Quick Tuning is more suitable for strong signal broadcast,
it may not stop if broadcast signals are weak.
If tuning become slowly in a frequency range, try manual
tuning to see if there are some weak stations.
If there is a station you wish to skip during scanning, press and
hold SCAN button(+ or- ) to skip this station.
Press SCAN (+ or- ) button while quick tuning, scanning
will stop immediately.
11
12
11
12
11
12
¼ÇÒäµç̨
Press POWER / BAND to select the
desired band.
Press MEMO to tune in to the preset
station of last operation. The frequency
and preset number shows in the display.
3. Listening to Preset Stations
There are 30 memories, 20 assigned to FM with preset number
0...19 and 10 assigned to AM with 0...9. Remember all the preset
station numbers for the convenience of later listening.
(Refer to page 9 for information on presetting stations.)
1
2
3
FM
MHz
STEREO
89.9
FM MHz
STEREO
99.1
5
FM
MHz
STEREO
100.4
6
2
Repress MEMO to tune in to the next
preset station.
8
8
7
6
Headphone cord functions as FM antenna,
keep it extended to find the position which
gives the best reception.
USING ANTENNA
FM Reception
AM-FM ST
EREO
RECEIVER
3
0
P
RE
S
E
T
S
B
A
S
S
.
S
T
E
R
E
O
.
M
O
N
O
Page 6
4
FM
MHz
STEREO
100.4
FM
MHz
STEREO
100.4
9
FM MHz
STEREO
1 00.4
6
FM
MHz
STEREO
100.4
7
FM 0-19 + AM 0-9 = 30 Presets
You can preset up to 20 stations under the preset number (0-19)
on FM and 10 stations under the preset number (0-9) on AM:
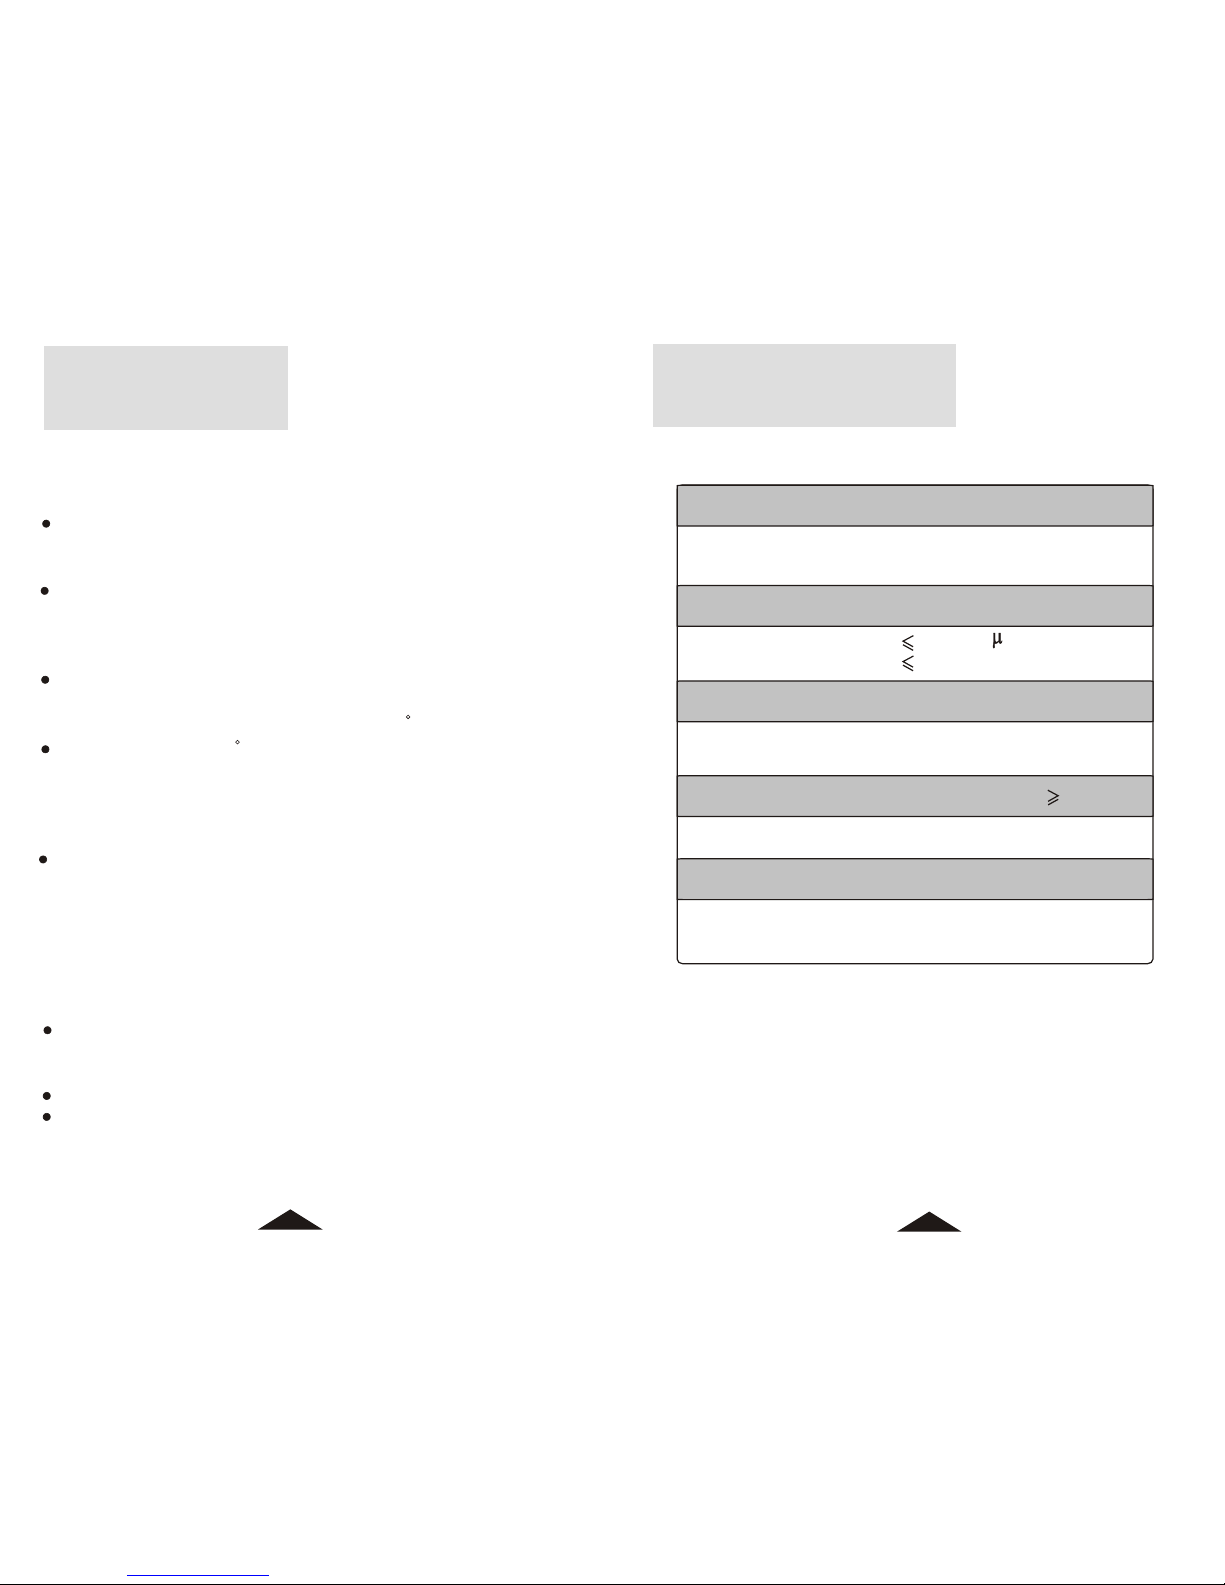
PRESETTING STATIONS
Tune in to a desired station with
manual tuning or quick tuning .
9
Press STORE / TIME into
memory mode, preset number
flashes in the display.
9
Press STORE / TIME to
memorize the station. The
corresponding number will
indicate in the display.
If you do not have any operation in each step for 5s,
memory mode will automatically released and the station
is not preset into the unit.
If a station is already stored, the new station with the
same preset number replaces the old one.
1
2
3
8
8
Press MEMO to select a proper
preset number, preset number
increases cyclically pressing
MEMO .
8
9
SOUND QUALITY SELECTION
MONO: weak signal broadcast, voice program, mono broadcast.
STEREO: strong signal broadcast, music, FM Stereo broadcast.
BASS: strong music broadcast, bass stereo.
Set sound quality selection to different
position according to the receiving broadcast.
MONO/ ST/ BASS
When listening to a stereo broadcast, normally set
MONO/ST/BASS to STEREO.
If you are listening to the stereo music and prefer to a
bass effect, set the switch to BASS.
If the stereo reception is too weak or noisy, or you are
listening to voice program, set the switch to MONO.
Magnetic antenna inside the unit
functions as AM antenna, it is
strongly effected by the reception
direction.
When listening to AM broadcast,
reorient the unit to find the
position which gives the best
reception.
AM Reception
1 Hour Power Auto off
After listening for 1hour, the unit automatically turns off to avoid
power wasting. If you want to continue listening, turn on the unit.
AM
-FM STEREO
RE
CE
IVER
3
0
P
R
E
S
E
T
S
B
A
S
S
.S
T
E
R
E
O
.
M
O
N
O
AM-FM STEREO RECEIVER
3
0
PRESETS
BASS.STEREO.MONO
13
13
Page 7
10
11
Make sure to press STORE / TIME after clock setting,
otherwise setting is failed.
In step 2, hour or minute will step up continuously if you
press and hold + or - until you release the button.
1
2
3
LOCAL
WEEKDAY
18:00
5
LOCAL
WEEKDAY
19 :01
5
Press + to cyclically increase the hour
and - to cyclically increase the minute.
11
12
Press and hold STORE / TIME for 2s
into Clock Set mode when unit is off, ":"
in the clock indicator stops flashing.
9
Press STORE / TIME to store the clock
setting.
9
9
1. Adjust the Clock
11
12
CLOCK SET
1
2
11
LOCAL
WEEKDAY
18:00
5
2:00
6
WEEKDAY
Cl2
12
You can preset dual clock - CL1(local) and CL2 in the unit with
independent clock and weekday.
When the unit is off, press
+ and - together for
above 2s.
Clock number indicates in the
display for a short time and then
new clock shows in the display.
4. DUAL CLOCK
Repeat the same procedure to change the clock to CL1(Local).
1
2
3
12
11
LOCAL
WEEKDAY
18:00
5
LOCAL
WEEKDAY
18:00
6
3. WEEKDAY
When the unit is off, press MEMO
for above 2s until WEEKDAY
flashes in the display.
Press + to change the weekday
upward or - to downward.
Press MEMO to store the setting.
8
8
Make sure to press MEMO after weekday setting,
otherwise setting is failed.
8
2. 12H / 24H
1
2
LOCAL
WEEKDAY
MEMO
WEEKDAY
PM
LOCAL
11
8
18:00
5
12H
6:00
5
Press and hold MEMO and
+ together for above 2s
when the unit is off.
Clock mode indicates in the
display for a short time and
then clock with the new mode
shows in the display.
Page 8

Avoid using earphones at high volume, if you experience a
ringing in your ears, reduce volume or discontinue use.
Shut down the radio before sleeping.
Do not use earphones while driving or cycling, it can also be
potentially dangerous to play your earphones at high volume
while walking, especially at pedestrian crossing.
Notes On Headphones
CAUTIONS
On Handling
Avoid exposure to temperature extremes, direct sunlight, moisture,
sand, dust or mechanical shock.
Should anything wrong with the radio, please remove the battery
and have the unit checked by qualified personnel before operating
it any further.
When the unit is not being used for a long period of time, remove
the batteries to avoid damage form battery leakage and corrosion.
The LCD display may become hard to see or slow down when
using the unit at high temperatures (above 40 C) or at low
temperatures (below 0 C). At room temperature, the display will
return to its normal operating condition.
The product may not operate normally, when the ESD (8kv) applied
on the metal coated buttons. It is necessary to reset manually.
SPECIFICATIONS
12
13
FM 87.0 - 108.0 MHz
AM 531 - 1602 KHz
1. Frequency Range
3. Memory Stations (30)
2. Noise Limit Sensitivity
FM 10 V
AM 1.5mv/m
FM 20 (0 - 19)
AM 10 (0 - 9)
5. Power Supply: 2 AAA Batteries
6. External Earphone: D 3.5mm
7. Dimensions: Approx. 45 83 19 mm
8. Mass: Approx. 45 g (excl. Battery)
4. Bass Boost (100Hz) 9dB
Page 9

RP-D10
MANUAL DE INSTRUCCIONES
RADIO PORTÁTIL CON
SINTONIZADOR DIGITAL DE FM ESTÉREO / AM
Page 10

¡Gracias por adquirir el receptor de AM/FM
Estéreo PLL Sunstech RP-D10! Este aparato le
va a proporcionar numerosas horas de servicio
fiable y escucha placentera. Antes de utilizar el
receptor, dedique unos momentos a leer con
detenimiento este manual y guárdelo para
futuras consultas.
INTRODUCCIÓN
CONTENIDO
Ubicación de controles
Identificaciones en pantalla LCD
Funcionamiento con baterías
Reajuste de parámetros
Indicador de temperatura
Alimentación / Banda de frecuencias
Sintonización de emisoras
Sintonización manual
Sintonización rápida
Escucha de emisoras predefinidas
Utilización de la antena
Selección de la calidad de sonido
Preajuste de emisoras
Reloj
Ajuste del reloj
12H / 24H
Día de la semana
Reloj doble
Precauciones
Especificaciones
..............................................1
................................2
.....................................3
............................................4
....................................... 5
........................... 5
.........................................6
...............................................6
................................................6
............................
7
..............................................7
...............................8
...............................................
9
........................................................................1.
0
.........................................................1.
0
................................................................1..0
.....................................................1.1
.............................................................. 1 1
........................................................... 1
2
.........................................................
13
AM-FM S
TEREO RECEIVER
3
0
P
RE
S
E
T
S
B
A
S
S
.S
T
E
R
E
O
.M
O
N
O
1
2
3
4
5
6
7
8
9
10
11
12
13
13
1
2
3
4
5
6
7
8
9
10
11
12
UBICACIÓN DE CONTROLES
Alojamiento de baterías (parte posterior)
1
Reajuste de parámetros
(interior del alojamiento de baterías)
Pantalla LCD
Alimentación / Banda de frecuencias
Asa de transporte
Toma de auriculares
Volumen
Memoria / Semana / Temperatura
Guardar / Hora
Hebilla
Búsqueda / Hora
Búsqueda / Minuto
Mono / Estéreo / Graves
Page 11

2
WEEKDAY
PM
LOCAL
AM
FM
MHz
KHz
STEREO
TEMPERATURE
1
2
3
4
5
6
7
8
9
88:88
8
1
2
3
4
5
6
7
8
9
Indicador de día de la semana
Banda de AM
Banda de FM
PM
Hora local
Indicador de batería
Indicador de temperatura
Estéreo
Número de presintonía /
Día de la semana
IDENTIFICACIONES EN PANTALLA LCD
Deslice la tapa del alojamiento
de baterías en la dirección de
la flecha.
+
-
+
-
FUNCIONAMIENTO CON BATERÍAS
1
2
3
No mezcle distintos tipos (alcalinas, de
Carbono-Zinc, Níquel Cadmio, etc.), ni baterías
nuevas y viejas.
Cuando la unidad no se utilice durante un largo
periodo de tiempo, retire las baterías para evitar
que se produzcan daños por fugas y corrosión
de las baterías.
Si se producen fugas de las baterías, limpie el
alojamiento de baterías con un paño suave
antes de introducir las nuevas.
INDICADOR DE BATERÍAS
La carga de baterías se muestra en 4 niveles de la
pantalla.
3
Introduzca dos baterías AAA
siguiendo la marca del
interior del alojamiento.
Deslice hacia atrás la tapa de
baterías, asegúrese de que qu
eda ajustada.
Completa
Agotada
Page 12

ALIMENTACIÓN / BANDA DE FRECUENCIAS
Cuando las baterías se debilitan, el indicador de
batería parpadea.
Si la batería se debilita demasiado para un
funcionamiento correcto, la unidad se desactiva
de forma automática a través de un circuito integrado
especial. Sustituya las baterías de inmediato para
evitar que se pierda la memoria tras la desactivación
automática de la alimentación.
Desactive la unidad y a continuación sustituya las
baterías por unas nuevas dentro de un periodo de
1 hora.
Si la unidad presenta un funcionamiento erróneo,
reajuste ésta pulsando RESET en el interior del
alojamiento de baterías para retomar el funcionamiento
normal.
Observe que al efectuar el reajuste de parámetros se
borran todas las memorias, incluyendo el reloj.
REAJUSTE DE PARÁMETROS
1
2
LOCAL
WEEKDAY
RESET
0:00
1
2
Retire las baterías, pulse
RESET en el interior
del alojamiento durante
un tiempo superior a 0,5
segundos.
2
Instale las baterías, el
reloj parpadea, reajustán
dose a 0:00.
4
Pulse POWER / BAND (Alimentación/
Banda de frecuencias) para activar la
unidad, se escuchará la emisora de FM que dejó de
escuchar la última vez que utilizó la unidad.
LOCAL
WEEKDAY
18:00
5
FM
MHz
STEREO
89.9
AM
Khz
1071
1. FM
2. AM
Pulse POWER / BAND (Alimentación/
Banda de frecuencias) en modo FM, la
unidad pasa a modo AM, se escuchará la emisora
de AM que dejó de escuchar la última vez que utilizó
la unidad.
3. Modo de reloj
Pulse POWER / BAND (Alimentación/
Banda de frecuencias) en modo AM, la
unidad se desactiva pasando a modo de Reloj,
indicándose en pantalla el día de la semana.
4
4
4
Desactive la unidad pasando a modo de reloj si
no desea escuchar las emisiones. La unidad
consume muy poca energía en modo de Reloj.
5
TEMPERATURE
8
30
c
Pulse MEMO cuando la unidad esté
desactivada, la temperatura se indica
en pantalla durante 5 segundos.
INDICADOR DE TEMPERATURA
Page 13

ÊÖ¶¯ËÑË÷
×Ô¶¯ËÑË÷
SINTONIZACIÓN DE EMISORAS
1. Sintonización manual
Pulse el botón SCAN (Búsqueda) (+ / )
para sintonizar una recepción con claridad.
Paso de FM: 0,1MHz Paso de AM: 9KHz
El cable de los auriculares hace la función de
antena de la unidad, conecte los auriculares a la
toma de auriculares, antes de efectuar la
sintonización, de lo contrario no podrá sintonizar
ninguna emisora.
La sintonización manual es más adecuada para
las emisiones de señal débil. Cuando la recepción
de una emisora en FM estéreo es suficientemente
fuerte (y la calidad del sonido se establece en
STEREO (ESTÉREO) o BASS (GRAVES), aparece
en pantalla “Stereo”.
2. Sintonización rápida
Mantenga pulsado el botón SCAN (Búsqueda) (+ /- ) hasta
que cambie el indicador de frecuencias, a unidad comienza
de forma automática la sintonización de frecuencias. Al
sintonizar una emisora, la búsqueda se detiene, pudiéndose
oír la emisora sintonizada.
3 métodos
11
12
Si existe una emisora que desee omitir durante la
búsqueda, mantenga pulsado el botón SCAN
(Búsqueda) (+ o - ) para omitir dicha emisora.
11
12
11
12
11
12
¼ÇÒäµç̨
Pulse POWER / BAND(Alimentación/
Banda de frecuencias) para
seleccionar la banda que desee.
Pulse MEMO (Memoria) para
sintonizar la emisora predefinida
de la última utilización. Se muestra
en pantalla la frecuencia y el número
de presintonía.
3. Escucha de emisoras predefinidas
Existen 30 memorias, 20 asignadas a FM con el
número predefinido 0...19 y 10 asignadas a AM con
0...9. Recuerde todos los números de las emisoras
predefinidas para una cómoda escucha posterior.
(Consulte la página 9 para obtener información sobre
preajuste de emisoras).
1
2
3
FM MHz
STEREO
89.9
FM MHz
STEREO
99.1
5
FM
MHz
STEREO
100.4
6
2
Vuelva a pulsar MEMO (Memoria)
para sintonizar la siguiente emisora
predefinida.
8
7
6
El cable de auriculares sirve de antena
de FM, manténgalo extendido para
encontrar la posición en la que se
obtenga la mejor recepción.
UTILIZACIÓN DE LA ANTENA
Recepción de FM
AM-F
M ST
EREO RE
CEIV
ER
3
0
P
R
E
S
E
T
S
B
A
S
S
.
S
T
E
R
E
O
.
M
O
N
O
Pulse el botón SCAN (Búsqueda) (+ o - ) al
efectuar la sintonización rápida, la búsqueda se
detiene de inmediato.
La sintonización rápida es más adecuada para
las emisiones de señal fuerte, dicha sintonización
puede que no se detenga si las señales de las
emisiones son débiles.
Si la sintonización se ralentiza en un rango de
frecuencias, pruebe a sintonizar de forma manual
para ver si hay alguna emisora débil.
Page 14

4
FM
MHz
STEREO
100.4
FM
MHz
STEREO
100.4
9
FM MHz
STEREO
100.4
6
FM
MHz
STEREO
100.4
7
Puede predefinir hasta 20 emisoras con un número
predefinido (0-19) en FM y 10 emisoras con un número
predefinido (0-9) en AM:
FM: 0-19 + AM: 0-9 = 30 presintonías
PREAJUSTE DE EMISORAS
Sintonice una emisora que desee
mediante la sintonización rápida
o manual.
9
Si al realizar cada uno de los pasos no se efectúa
ninguna operación durante 5 segundos, se
abandona de forma automática el modo de
memoria y la emisora no queda predefinida en
la unidad.
Si ya existe una emisora guardada, la nueva
emisora que lleve el mismo número de presinton
ía sustituye a la antigua.
1
2
3
8
9
SELECCIÓN DE CALIDAD DE SONIDO
MONO: emisión de señal débil, programa de voz,
emisión en mono.
STEREO (ESTÉREO): emisión de señal fuerte,
música, emisión en FM estéreo.
BASS (GRAVES): emisión de música fuerte, estéreo
con graves.
Establezca la selección de calidad de
sonido en una posición distinta
según la emisión que se reciba.
MONO/ ST/ BASS
Al escuchar una emisión en estéreo, lo normal
es ajustar MONO/ST/BASS (MONO/ESTÉRO/
GRAVES) en STEREO (ESTÉREO).
Si escucha música en estéreo y prefiere un
efecto de graves, ajuste el conmutador en
BASS (GRAVES).
Si la recepción estéreo es demasiado débil o
ruidosa, o escucha un programa de voz,
establezca el conmutador en MONO.
Recepción de AM
Desactivación automática tras 1 hora
Tras 1 hora de escucha, la unidad se desactiva de
forma automática para evitar malgastar energía. Si
desea continuar la escucha, active la unidad.
AM
-FM ST
EREO
RE
CE
IVE
R
3
0
P
RE
S
E
T
S
B
A
S
S
.
S
T
E
R
E
O
.
M
O
N
O
AM-FM STEREO RECEIVER
3
0
PRESETS
BASS.STEREO.MONO
13
13
La antena magnética del interior de la unidad
sirve de antena de AM, su funcionamiento está
muy condicionado a la dirección de la recepción.
Al escuchar una emisión en
AM, cambie la orientación
de la unidad para encontrar
la posición que proporcione
la mejor recepción.
Pulse STORE / TIME (GUARDAR /
HORA) en modo de memoria, el
número de presintonía parpadea
en pantalla.
Pulse MEMO para seleccionar un
número de presintonía adecuado, el
número de presintonía aumenta de
forma cíclica pulsando MEMO .
8
8
Pulse STORE / TIME (GUARDAR /
HORA) para memorizar la emisora.
El número correspondiente se indica
en pantalla.
9
Page 15
10
11
Asegúrese de pulsar STORE / TIME (GUARDAR/
HORA) tras el ajuste del reloj, de lo contrario
el ajuste no se realiza.
En el paso 2, la hora o los minutos avanzan de
forma continua si mantiene pulsados + o
hasta que suelte el botón.
1
2
3
LOCAL
WEEKDAY
18:00
5
LOCAL
WEEKDAY
19:01
5
11
12
Mantenga pulsado STORE / TIME (GUARDAR/
HORA) durante 2 segundos en modo de Ajuste
de reloj cuando la unidad esté desactivada, ":" del
indicador de reloj deja de parpadear.
9
9
9
1. Ajuste del reloj
11
12
RELOJ
1
2
11
LOCAL
WEEKDAY
18:00
5
2:00
6
WEEKDAY
Cl2
12
Puede preajustar en la unidad un reloj doble ; CL1
(local) y CL2 con horas y días de la semana
independientes.
Con la unidad desactivada,
pulse + y durante un
tiempo superior a 2
segundos.
4. RELOJ DOBLE
Repita el mismo procedimiento para cambiar el
reloj a CL1 (local).
1
2
3
12
11
LOCAL
WEEKDAY
18:00
5
LOCAL
WEEKDAY
18:00
6
3. DÍA DE LA SEMANA
Cuando la unidad está desactivada,
pulse MEMO durante un espacio
superior a 2 segundos el DÍA DE LA
SEMANA parpadea en pantalla.
Pulse + para cambiar el día de la
semana en sentido ascendente o
en sentido descendente.
Pulse MEMO para guardar la configuración.
8
8
Asegúrese de pulsar MEMO tras el ajuste del
día de la semana, de lo contrario el ajuste no se
realiza.
8
2. 12H / 24H
1
2
LOCAL
WEEKDAY
MEMO
WEEKDAY
PM
LOCAL
11
8
18:00
5
12H
6:00
5
Mantenga pulsados a la
vez MEMO y + durante
un tiempo superior a 2
segundos con la unidad
desactivada.
El modo de reloj se indica
en pantalla durante un
breve espacio de tiempo,
apareciendo a continuación
en pantalla el reloj con el
nuevo modo.
Pulse + para aumentar de forma cí clica la hora
y para aumentar de forma cíclica los minutos.
Pulse STORE / TIME (GUARDAR / HORA) para
guardar el ajuste del reloj.
El número de reloj se
indica en pantalla durante
un breve espacio de tiempo,
apareciendo a continuación
en pantalla el nuevo reloj.
Page 16
Evite el uso de auriculares a volumen alto, si siente
que le zumban los oídos, reduzca el volumen o deje
su uso.
Desactive la radio antes de dormir.
No utilice auriculares al conducir o montar en
bicicleta, también puede ser potencialmente peligro
so escuchar los auriculares a volumen alto mientras
camina, sobre todo al cruzar un paso de peatones.
Notas sobre auriculares
PRECAUCIONES
Al manipular la unidad
Evite la exposición a temperaturas extremas, la acción
directa de la luz solar, la humedad, la arena, el polvo o
choques mecánicos.
Si la radio presenta un funcionamiento erróneo, retire
la batería y haga que la unidad sea verificada por
personal cualificado antes de proceder a efectuar
otras operaciones.
Cuando la unidad no se utilice durante un largo periodo
de tiempo, retire las baterías para evitar que se
produzcan daños por fugas y corrosión de las baterías.
Es posible que se dificulte la visualización de la pantalla
LCD al utilizar la unidad a altas temperaturas
(superiores a 40º C) o a bajas temperaturas (inferiores
a 0º C). A temperatura ambiente, la pantalla vuelve a su
estado de funcionamiento normal.
Es posible que este producto no funcione con
normalidad cuando se aplica una descarga electrostática
(8kv) sobre los botones de revestimiento metálico. Es
necesario efectuar el reajuste de parámetros de forma
manual.
ESPECIFICACIONES
12
13
FM 87.0 - 108.0 MHz
AM 531 - 1602 KHz
1. Rango de frecuencias
3. Emisoras en memoria (30)
2. Sensibilidad de límite de ruido
FM 10 V
AM 1.5mv/m
FM 20 (0 - 19)
AM 10 (0 - 9)
5. Fuente de alimentación: 2 baterías AAA
6. Auricular externo: D 3.5mm
7. Dimensiones: Apróx. 45 x 83 x 19 mm
8. Masa: Apróx. 45 g (sin batería)
4.Potenciación de graves (100Hz) 9dB
 Loading...