


Contents
User Notice
This product has met all
electronic emission stan
dards. This product may
be used safely in the home.
Chapter 1 Introduction
Product Introduction
Safely Precautions
Components
Product Map
Chapter 2 Connection
Connecting to a power source
Memory Cards
Connecting to a PC
Chapter 3 Usage
Photos
Music
Background Music
Movies
E-BOOK
Additional Features
Chapter 4 - File Management and Settings
Editing
Settings
Chapter 5 - Customer Service
Frequently Asked Questions
Troubleshooting
Prodcut Specifications
FCC and Safety Information
3
4
6
7
12
15
16
18
20
23
24
26
27
30
33
40
42
43
44

Chapter 1
Introduction
Product Introduction
Precautions
Electrical Safety
Handling
Components
Basic Components
Player Overview
Digital Frame
Remote Control
3
4
4
5
6
6
7
7
9

Product Introduction
The Bluetooth Digital Photo Frame is a convenient image album that keeps your
favorite images at your fingertips.
With its bright and vivid LCD screen, this Bluetooth Digital Photo Frame offers
an alternative to photo printing, adding a new level of convenience to your life.
With its diverse file management functions, this Bluetooth Digital Photo Frame
allows you to relive your cherished memories anytime.
Chapter 1 I introduction DPF
3
Safety Precautions
Please read the following guidelines carefully to ensure user safety.
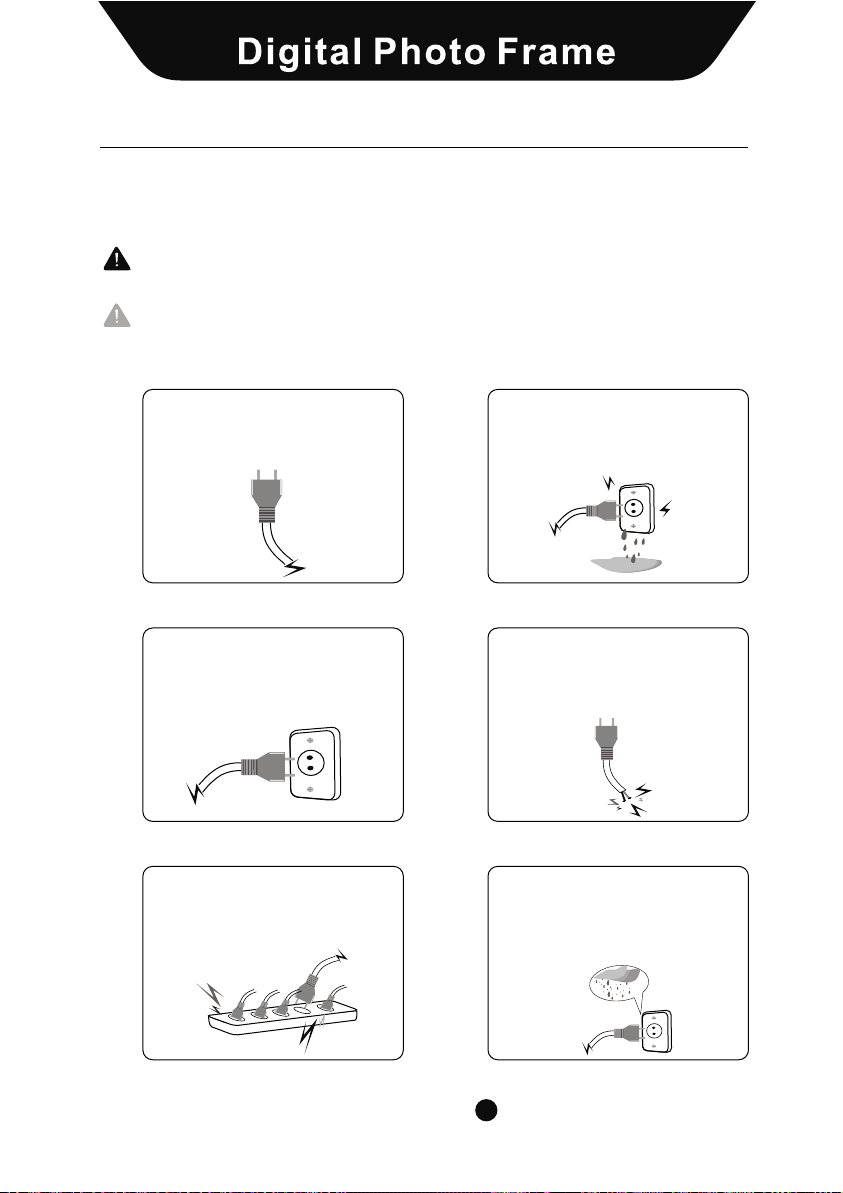
Power Related
WARNING: indicates information that, if neglected, could result in serious
injury and/or death to the user.
CAUTION: indicates information that, if neglected, could result injury to the
user and/or material damage.
01. Use only the power supply
included with your frame. Failure
to do so may result in product
malfunction.
03. Make sure the power supply is
firmly plugged in. A loose power
cord could result in shock, or fire.
05. Do not overload power strips.
02. When connecting to your power
source, make sure that your hands
and feet are free of moisture. Failure
to do so could result in electrical shock.
04. Do not let the power cord get
tangled, and do not place heavy
objects on the cord. Putting stress
to the cord creates a fire hazard
and the possibility of electric shock.
06. Disconnect the power supply
during inclemental weather
conditions including lightning
storms. Failure to do so may result
in fire.
Chapter 1 I introduction DPF
4
Safety Precautions
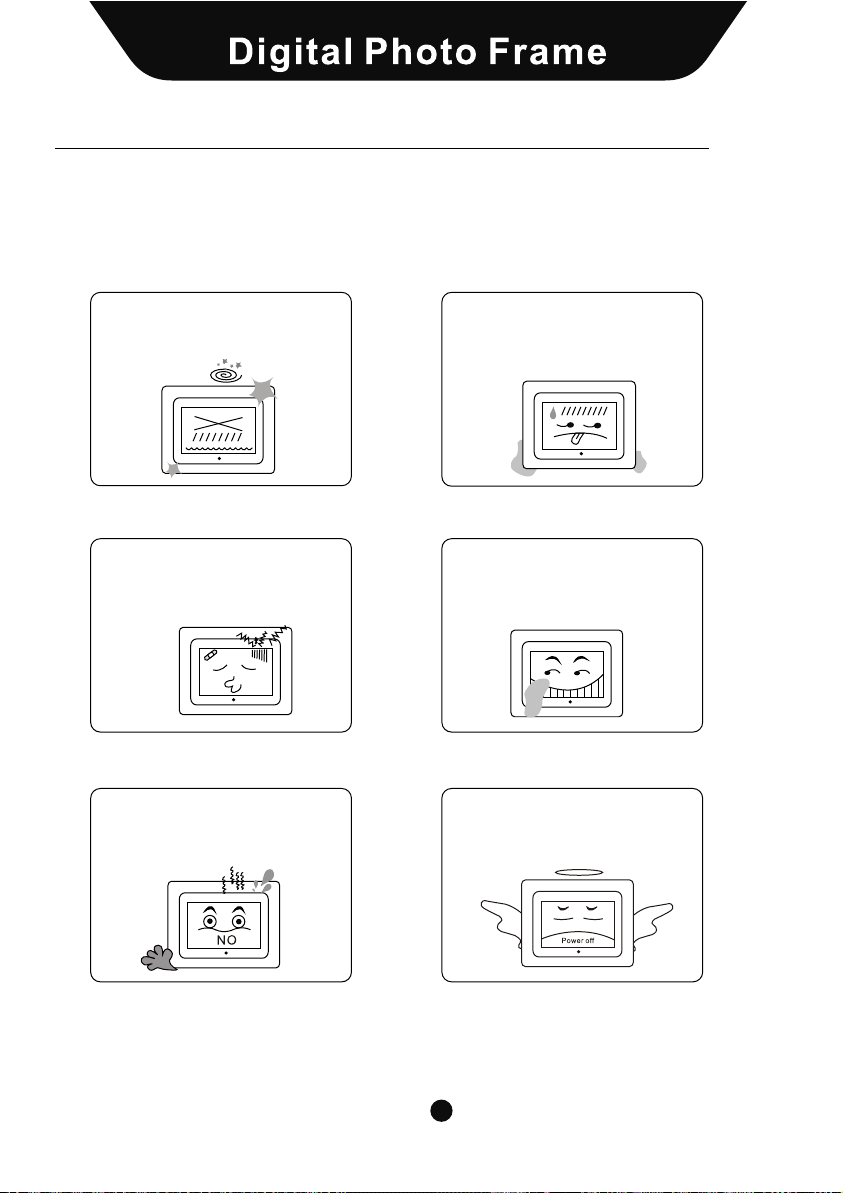
Please adhere to the following guidelines to ensure user safety,
and avoid product malfunction.
Product Related
01. Dropping the product or subje
cting it to a significant impact can
cause critical damage.
03. Striking or scratching the LCD
screen may cause permanent dam
age to the screen.
05. Do not subject the product to
severe humidyt and/or heat.
02. Spilling water or any other
liquid on the product can cause
critical damage.
04. When cleaning the LCD screen,
turn off the power and wipe it gently
with a soft cloth.
06. Make sure to power off the
unit before disconnecting the
power supply.
Chapter 1 I introduction DPF
5

Components
Because Sungale is constantly working to improve its products, basic
components may be modified without prior notice and may differ in
appearance with the images below.
Basic Components
These components are provided with your product purchase.
Chapter 1 I introduction DPF
6
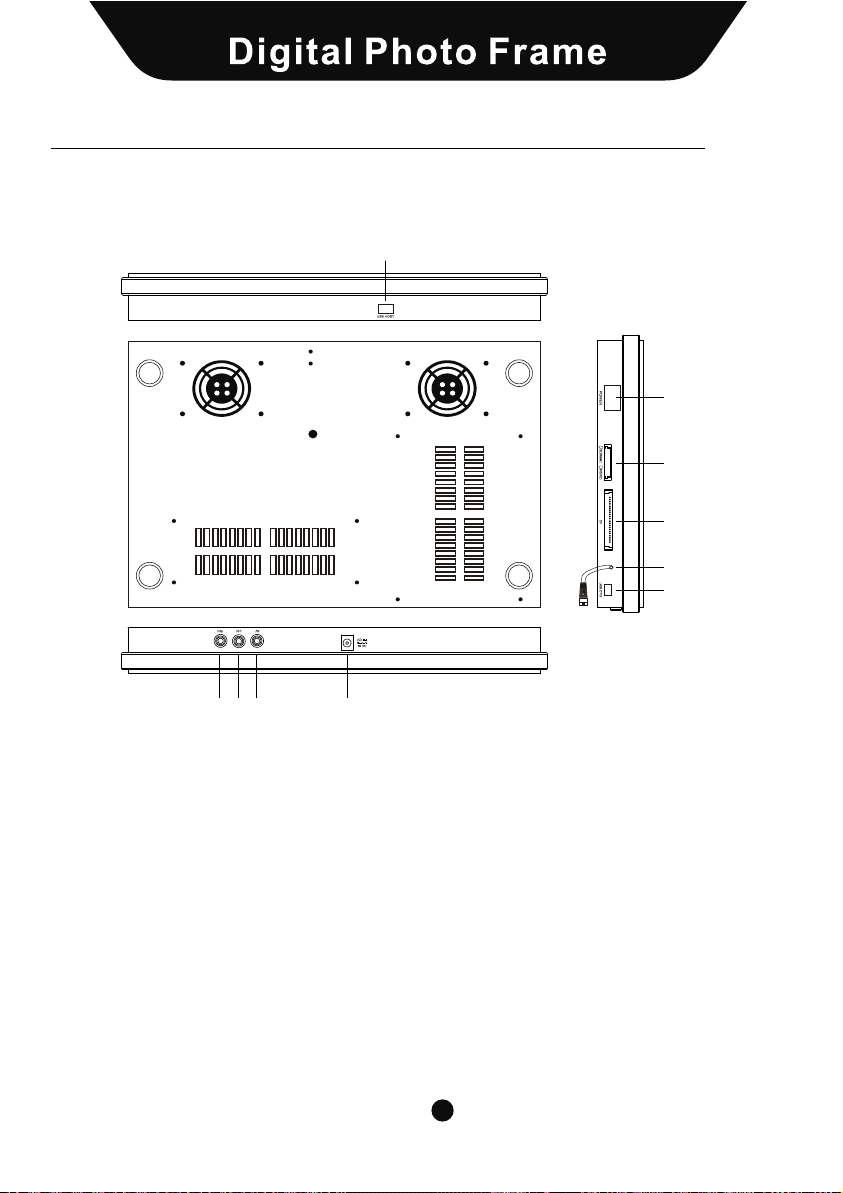
Player Overview
Your frame may differ slightly in appearance with the images provided.
Digital Frame
6 7
8
10
1
2
3
4
5
9
1. POWER: Turns the player off and on.
2. MS/SD/MMS/MS Pro/XD CARD SLOT: Insert supported memory card types
here.
3. CF CARD SLOT: Insert CF card here.
4. USB HOST CABLE: Connect USB OTG to enable use of the USB HOST.
5. USB OTG: This port allows USB connection between Frame and PC.
6. RIN: Right audio input
7: LIN: Left audio input.
8. AV: Video input
9. DCIN: Insert the DC power adaptor to your Digital Photo Frame.
10. USB HOST: Connect the Bluetooth Dongle/ USB removable storage device
/MP3/PMP/Mobile hard disk to your Digital Photo Frame. (Before doing this,
be sure to connect the attached USB HOST CABLE to the USB OTG.
Chapter 1 I introduction DPF
7
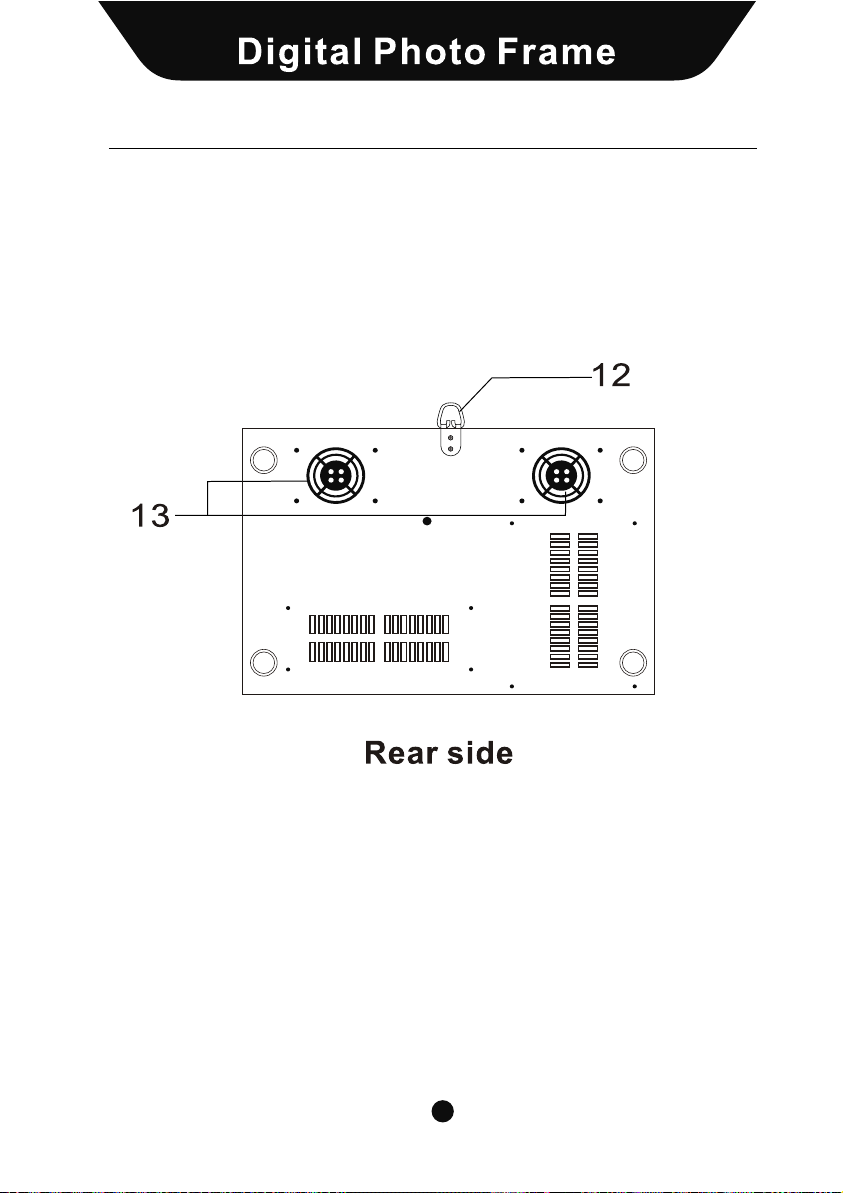
Player Overview - Frame
Your Frame may differ slightly with the images below.
Rear View
12. Wall mount
13. Speaker: Built in stereo speakers.
Chapter 1 I introduction DPF
8

Player Overview - Remote Control
Your remote control may differ slightly in appearance with the images
provided.
Remote Control
Power:
Press POWER to turn the player on and off.
Mute:
Press MUTE to toggle sound on and off.
Photo:
Press PHOTO to start a slideshow.
Music:
Press MUSIC to play songs.
Movie:
Press MOVIE to play movies.
T ext:
Press TEXT to open text files.
AV IN
Press AV IN to switch to AV input mode.
Note: Remove Red Tab to activate battery.
Chapter 1 I introduction DPF
9

Player Overview
ROTATE:
Press ROTATE to rotate the picture. (Note: this does not permanently
change the picture's orientation)
ZOOM:
Press ZOOM repeatedly to zoom in/out on your pictures.
VIEW:
Press VIEW to view 9 pictures at a time in thumbnail size. Use the up/down
/left/right buttons to select the picture and press enter to confirm.
OSD:
Press OSD to display the state of the file being played. In edit mode, use
OSD to execute copy/paste/delete functions (see page 30).
Menu:
Press MENU to return to the main menu.
BACK MUSIC:
Press BACK MUSIC to play a picture slideshow with background music.
SLIDE SHOW:
Press SLIDE SHOW to display a continuous cycle of all images in the internal
memory.
STEP SHOW:
Press STEP SHOW to display a single picture. Press it again to advance to
the next image.
DPF:
Press DPF to switch to the DPF interface.
COLOUR:
Press COLOUR to switch between soft/nature/bright/user style set up.
EXIT:
Press EXIT to stop the current action and return to the previous menu.
PLAY/PAUSE:
Press to PLAY or PAUSE a file.
SETUP:
Press SETUP to set the language/picture/version settings.
STOP:
Press to STOP picture playback and return to the file list.
PREV:
Press PREV to skip to the previous title/chapter/track/picture.
NEXT:
Press NEXT to skip to the next title/chapter/track/picture.
VOL +/-:
Press the VOLUME buttons to adjust the players volume for MP3 and movie
playback.
Chapter 1 I introduction DPF
10

Chapter 2
Connection
Power Connection
Connect to USB Port
Memory Card Insertion
Memory Card Extraction
PC Connecting
12
13
14
15
16
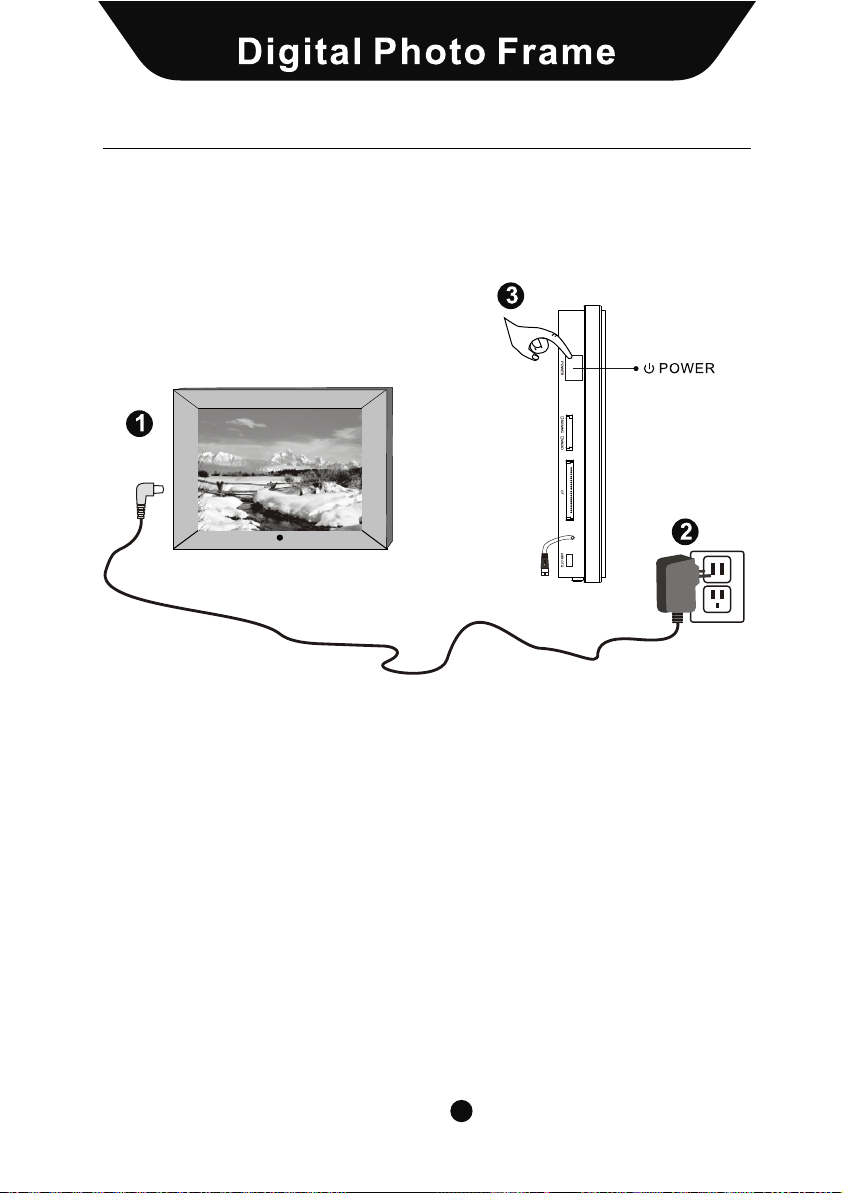
Connection
Power Connection
1. Connect the power adaptor to the DC 12Vin Jack on the left side of the frame.
2. Plug the power cable into a wall outlet.
3. The player will power on automatically.
Chapter 2 I Connection DPF
12
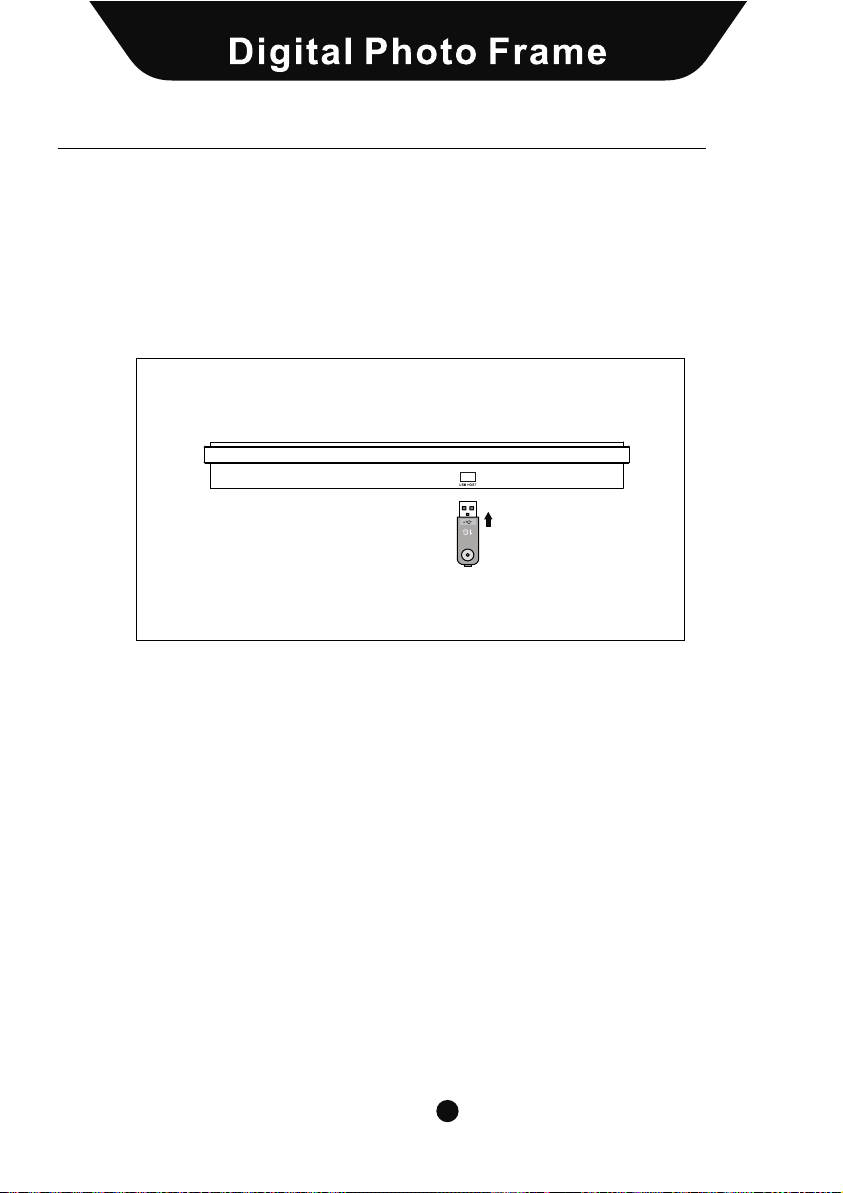
Connection
Connect to USB HOST
USB HOST: Insert one of the listed USB removable storage devices or the
Bluetooth Dongle to the USB HOST jack. Do not force the device
in; check to make sure the orientation of the device is correct.
Note: Before connecting the USB removable storage device or Bluetooth
Dongle to the DPF, make sure to attach the USB HOST CABLE to
the USB OTG port.
Chapter 2 I Connection DPF
13

Connection
Inserting Your Memory Card
Refer to the picture below to make sure that the memory card is correctly
aligned with the frame. The rule of thumb is that the sticker side of the
memory card should face the front.
Incorrect alignment of the memory card upon insertion may cause damage
to the unit and/or the card.
Chapter 2 I Connection DPF
14

Connection
Removing Your Memory Card
Grip the card firmly between two fingers, and pull the card straight out without
bending it. Refer to the image below:
Note: With no memory card present, the product will display images stored in
the Frame's internal memory. Press MENU to return to the main menu.
Chapter 2 I Connection DPF
15

PC Connecting
Connecting your DPF to your PC
Use the supplied USB cable to connect your DPF to your PC.
Note: Before connecting to your PC, first unplug the attached USB HOST CABLE from
the USB OTG jack.
1. After connecting your DPF to the PC, your PC should display a window similar to the
one shown below.
2. Choose "Open folder to view files..." and click "OK". Your PC will display the
contents of your memory.
3. With your DPF files on display, you may copy documents and move them to your
PC, delete items from your DPF's memory, or paste files on your PC into your DPF's
memory. Right click the desired items to find these options.
4. When you are finished managing your files, click the "Safely Remove Hardware"
icon on your toolbar and confirm the operation.
5. When your PC says you may remove your hardware, unplug the USB cable from
your PC, and resume use of your DPF.
Chapter 2 I Connection DPF
16

Chapter 3
Usage
Photos
Music
Background Music
Movies
E- Book
Additional Functions
18
20
23
24
26
27

Photos
Accessing Your Photo Directory
Press MENU at any time to return to the MAIN MENU.
Press PHOTO then ENTER to enter the device selection
screen.
Selecting a Device
Use your directional buttons to select the
desired device and press ENTER to enter
the file display screen.
Viewing a Photo in Full Screen
Press "right" or ENTER to enter your file list. Press "up"
or "down" to select a picture, and press ENTER to view it.
Chapter 3 I Usage DPF
18

Photo
Rotating a Photo
After selecting the desired photo, press ROTATE to
rotate the photo clockwise.
Chapter 3 I Usage DPF
19

Music
Music
Listening to Music
Locate the Device Directory
From the main menu, select MUSIC and
press ENTER.
Locate the Music Directory
Use the directional keys to select
ENTER
the desired memory device and
press ENTER.
Selecting a Music File
Use the directional keys to select
ENTER
the desired music file. Press
ENTER to play.
Chapter 3 I Usage DPF
20

Music
Play a Song
After selecting the desired music file,
press the PLAY/PAUSE button.
Pausing Music
During playback, press the PLAY/PAUSE
button.
Chapter 3 I Usage DPF
21

Music
Adjusting the volume
During playback, use the VOL+ and VOL- buttons to
adjust the volume.
Muting the Sound
During playback, press the MUTE button.
NOTE: Only MP3 and WMA formatted sound files can
be played.
Chapter 3 I Usage DPF
22

Back Music
Note: To utilize this feature you must have picture files (JPG)
and music files (MP3 or WMA) saved to the same file source
(ie. Memory Card, USB Device or Internal Memory).
1. From the Main Menu use the navigational buttons to select
PHOTO/MUSIC and press ENTER
2. Use the arrow keys to select the file source where your
music and pictures are stored. Press ENTER to confirm
and press "right" to enter the file list. The screen will
display as hown on the left.
3. Use the "up" or "down" keys to select a picture or song in
the filelist and press ENTER to play the a musical slideshow
starting with that file. You may also press BACKMUSIC to
go directly to a musical slideshow beginning with the first
image and first song on your list.
Note: During playback press OSD for additional options:
Play, Pause, Stop, Previous (goes to previous picture),
Next (advances to next picture), Fast Forward (advances
the music), Fast Backwards, Show file info, ID3 tag display,
Play Mode. Use "left"/"right" keys to select these options.
Chapter 3 I Usage DPF
23

Movie
A variety of movie formats, including those taken with a digital camera,
can be played on your frame.
Activate the Device Selection Screen
From the Main Menu select MOVIE and press ENTER to
enter the device selection screen.
Select the Appropriate Source
Use the directional keys to select the memory
ENTER
source with your movies, and press ENTER.
Selecting and Playing Movies
Use the directional keys to select the desired movie and
press ENTER or PLAY/PAUSE to play the movie file.
Chapter 3 I Usage DPF
24

Movies
Adjusting the Volume
During playback, use the VOL+ and VOL- buttons to
adjust the volume.
Muting the Sound
During playback, press the MUTE button to mute the
sound. Press it again to play sound.
NOTE: This frame supports the following video file
types for playback:
1. MPEG-1, MPEG-4 (AVI formats not available).
2. Videos recorded on most digital cameras.
Chapter 3 I Usage DPF
25

E- Book
Note: This Frame is only compatible with TXT formatted text.
Select the E-BOOK icon from the main menu and press ENTER to
activate the device selection screen. Use the directional buttons
to select the device you have stored your TXT documents in.
Press ENTER and then press "right" to enter the file list. You will
arrive at the following screen:
While viewing your document:
1. Press "left" to go to the previous page.
2. Press "right" to advance to the next page.
3. Press "up" to go to the line above.
4. Press "down" to advance to the next line.
Use "up" and "down" to select a document. Press ENTER to
view the selected document.
Chapter 3 I Usage DPF
26

Addtional Functions
Zoom
During photo playback, pressing ZOOM repeatedly will magnify
the image in the following cycle:
SLIDE SHOW
Press the SLIDE SHOW button.
Your Frame will automatically create a slide show of the images
on your internal memory.
STEP SHOW
Press the STEP SHOW button during a slide show. The slide
show will pause, displaying the image currently on the screen.
Each press will advance your slide show one picture.
Chapter 3 I Usage DPF
27

Additional Functions
BACKGROUND MUSIC
Press the BACK MUSIC button to begin a slideshow with music in
the background.
Note: Music must be in MP3 or WMA format.
SETUP
In the Main Menu use the navigation buttons on the remote
control to select the SETTINGS icon and press ENTER.
Setup: Refer to page 33-38 for instructions on changing your
settings.
Setup Initialize: Returns settings to default.
Internal Memory: Perfors a quick format check.
AV IN
Press AV IN to switch the player to AV input mode. Your DPF will
now receive it's audio/video signal through its AV IN jacks.
COLOUR
Press COLOUR to select a color setting from the following
options: bright, soft, user, nature.
Chapter 4 I Settings DPF
28

Chapter 4
Editting & Settings
Editing
Copy file
Delete file
Settings
Language set
Picture set
Start up set
Video set
Default set
Version
30
30
32
33
33
34
36
37
37
38

Editing Files
Editing Files
From the main menu, use the arrow buttons to
select the FILE icon in the main menu. Press
ENTER to enter the card selection screen.
Select the desired memory card and press
ENTER to enter the file list.
A. Copy and Paste a File
Use "up" or "down" to locate and highlight the
file you wish to copy. Press RIGHT to select
the file.
Press EXIT to re-enter the card selection screen
then select INTERNAL MEMORY. Press the
OSD button and ENTER to display the conte
Chapter 4 I Settings DPF
30

Editing Files
Using the arrow keys, select COPY/PASTE and press ENTER To start
stransferring the file. If you are succesfful the screen will display as
follows:
Chapter 4 I Settings DPF
31

Editting Files
B. Delete Files
From the file view screen use "up" or "down" to locate the file you want to
delete and press the RIGHT arrow key. Press OSD:
Select DELETE from the list of options and press ENTER. Upon a
successful delete you will receive a "Finished!" message as follows:
C. EXIT
When you wish to leave the EDIT interface, press EXIT to return to the main
menu.
Chapter 4 I Settings DPF
32

Settings
Settings
Use the navigation buttons on the remote control to select the SETTINGS
icon and press ENTER.
Use "up" or "down" to choose which
setting you wish to change.
Language Settings
Select LANGUAGE SET in the SETTINGS menu, and press "right" to
display a submenu.
Use "up" or "down" to change your
selection
This DPF supports Chinese/English OSD settings.
A. Press ENTER to confirm.
B. Press "left" to return to the higher menu.
Chapter 4 I Settings DPF
33

Settings
Picture Settings
Select PICTURE SET in the Settings Menu, and press "right" right to
access the submenu:
Press "up" or "down" to select
slideshow mode or picture play
mode.
1. Select Slide show mode in the SETTINGS menu and press "right" to
access the submenu:
Press "up" or "down" to choose
between 5sec, 10sec, 30sec,
60sec, or 1 hour.
Press ENTER to confirm or press "left" to return to the higher menu.
Chapter 4 I Settings DPF
34

Settings
2. Select picture play mode in the SETTINGS menu, and press to
display the [Picture play mode] submenu:
Chapter 4 I Settings DPF
35

Settings
Startup setting
Select STARTUP SET in the Settings menu, and press "left" to
access the submenu:
Press the navigation keys
to change the DPF's startup
mode. Doing this configures
your Frame to start in Picture,
Music, or Movie mode.
For example, if you want music to play upon powering up your DPF,
use the arrow keys to select MUSIC and press ENTER to confirm.
Chapter 4 I Settings DPF
36

Settings
Video Setup
Select VIDEO SET in the Settings menu and press “right” to access the
submenu:
You can set the Lightness/Contrast/Color levels 0-16.
A. Press "left"/"right" to set and press ENTER To confirm.
B. Press "left" to return to the higher menu.
Default Set
This function restores the factory default settings as follows:
Chapter 4 I Settings DPF
37

Settings
Select VERSION in the Settings menu to see your player's Version number.
Press EXIT to exit the Settings menu.
Chapter 4 I Settings DPF
38

Chapter 5
Customer Management
Question & Answer
Troubleshooting
Product Specifications
FCC and Safety Information
40
42
43
44

Question and Answer
Q&A
This section will attempt to troubleshoot common problems that one may
experience with the Multimedia DPF. If this guide does not solve your
problems, do not dismantle the machien yourself.
What photo, music, and video formats
are supported by this Multimedia
Digital Photo Frame?
What memory cards are compatible
with this frame?
How do I obtain the right music
format?
Yes, the player has 512MB of internal memory to store your files. Do not
rename the memory folder in your PC.
Does this Frame have built-in m
emory?
Can I insert multiple memory cards?
Does this frame play all AVI video
files?
What is the best picture resolution
displayed on the screen?
Why won't the player show my
document files?
Can I rotate a picture?
Why won't my frame advance to the
next picture?
Yes, you can insert a CF card and a SD, MMC, MS, MS Pro or XD card into
the other slot at the same time.
No, but the device will work with AVI files taken with most digital cameras.
The frame's best resolution for images is 1280x800(RGB).
The frame can only play TXT files written in English or Chinese.
Yes. Use the ROTATE button to rotate a picture.
Note: the rotated picture will return to its original orientation upon
powering off the unit. Use photo-editing software to permanently
adjust your pictures.
1. There may be only one picture in the memory.
2. You may be viewing a high resolution image which take longer to load.
3. You are in Display mode.
4. The next picture is a corrupted file.
Chapter 5 I Customer Management DPF
40

Question and Answer
Can I adjust the colors of the display?
Why can't my PC find the internal
memory?
Why won't the unit play pictures?
What MPEG-4 formats are supported
by the multimedia Digital Photo
Frame?
Why won't the frame play my music?
Why doesn't the photo cover the
entire screen?
Can the DPF connect with ALL
computers?
You can adjust the picture display in the video settings in the set up menu by
changin the brightness and contrast settings. This will not alter the contents
of your picture files.
Turn on the DPF and wait for the function menu to appear, then connect the
USB cable from the unit to PC. If the "Found New Hardware" prompt fails to
appear, look in "My Computer" for a USB mass storage device.
1. Ensure the pictures are stored in the card or USB drive, and that you
have the correct source selected.
2. Make sure all your image files are JPEG, JPG or BMP format.
3. If pictures still do not play, try reformatting your card or internal memory.
The player can support most AVI, DIVX and XVID video files.
The player can only play MP3 and WMA audio files (bit rate 32kbps- 192kbps).
The resolution required for a picture to cover the entire screen must be
greater than or equal to 1280x800 pixels (RGB).
No. The PC must have a USB 2.0 or higher, and the PC must have
Windows 2000 or above.
Chapter 5 I Customer Management DPF
41

Troubleshooting
Consult the troubleshooting guide below if you are experiencing any problems
with the unit. A minor adjustment may eliminate the problem.
No Power Press and hold the power button
Esnure the power cord is not damaged
Ensure the power plug is connected firmly
to a working outlet.
Cannot read WMA music: This unit only supports WMA with bith
rate: 32Kbps - 192kbps
Cannot read card. 1. Please copy the content of your card to
your PC, then format your card. Repaste
the photos/music/movies onto your card,
and then reinsert the card into your DPF.
2. Ensure the card is not damaged.
3. Ensure the card is correctly and firmly
connected to the DPF.
4. Ensure the card has content (photos,
music, or movies). If there is no content
on the card, the screen will display "Files
can't be found"
Remote control not working 1. Ensure the batteries are inserted
2. Ensure the batteries' protective plastic
tab is pulled out.
Chapter 5 I Customer Management DPF
42

Product Specifications
Specifications can be changed without prior notice in the interest of improving product
performance.
Product Specifications
Item Details
LCD Display Size 14 Inch (Diagonal)
Resolution 1280(Horizontal)*800(Vertical)
Brightness 350cd /m
Contrast Ratio 400:1
Memory Internal Memory 512MB
Compatible Memory Cards CF / SD / MMC / Memory Stick / XD
Remote Control 28Keys
Support Media Formats Images JPEG(jpg)/BMP(24bit)
Video AVI, MPEG-1(mpg/dat), MPEG-4,
Audio Mp3,WMA
Internal Speaker Stereo 3W+3W
Power Adapter Input: 100 240V AC, Output: 12V, 3A DC
Electricity Consumption 16W (Operating)
Size Width*Height*Depth 420(w)*350(h)*55(d)[mm]
Weight Kg 3.2
USB Connection USB OTG, USB HOST USB 2.0
Chapter 5 I Customer Management DPF
43

FCC and Safety Information
FCC Part 15.19
This device complies with Part 15 of the FCC Rules .Operation is subject to the
following two conditions: (1) this device may not cause harmful interference
and (2) this device must accept any interference received ,including interference
that may cause undesired operation .
FCC part 15.21
Warning: Changes or modifications to this unit not expressly approved by the
party responsible for compliance could void the user s authority to operate
the equipment.
FCC part 15.105
Note : This equipment has been tested and found to comply with the limits for a
Class B digital device ,pursuant to Part 15 of the FCC Rules, These limits are
designed to provide reasonable protection against harmful interference in a
residential installation .This equipment generates, uses, and can radiate radio
frequency energy
and ,if not installed and used in accordance with the instructions, may cause
harmful interference will not occur in a particular installation .If this equipment
does cause harmful interference to
radio or television reception ,which can be determined by turning the equipment
off and on ,the user is encouraged to correct the interference by one or more of
the following measures:
Reorient or relocate the receiving antenna.
Increase the separation between the equipment and receiver.
Connect the equipment into an outlet on circuit different form that to which
the receive is connected.
Consult the dealer or an experienced radio TV technician for help.
Chapter 5 I Customer Management DPF
44

 Loading...