

Page 1
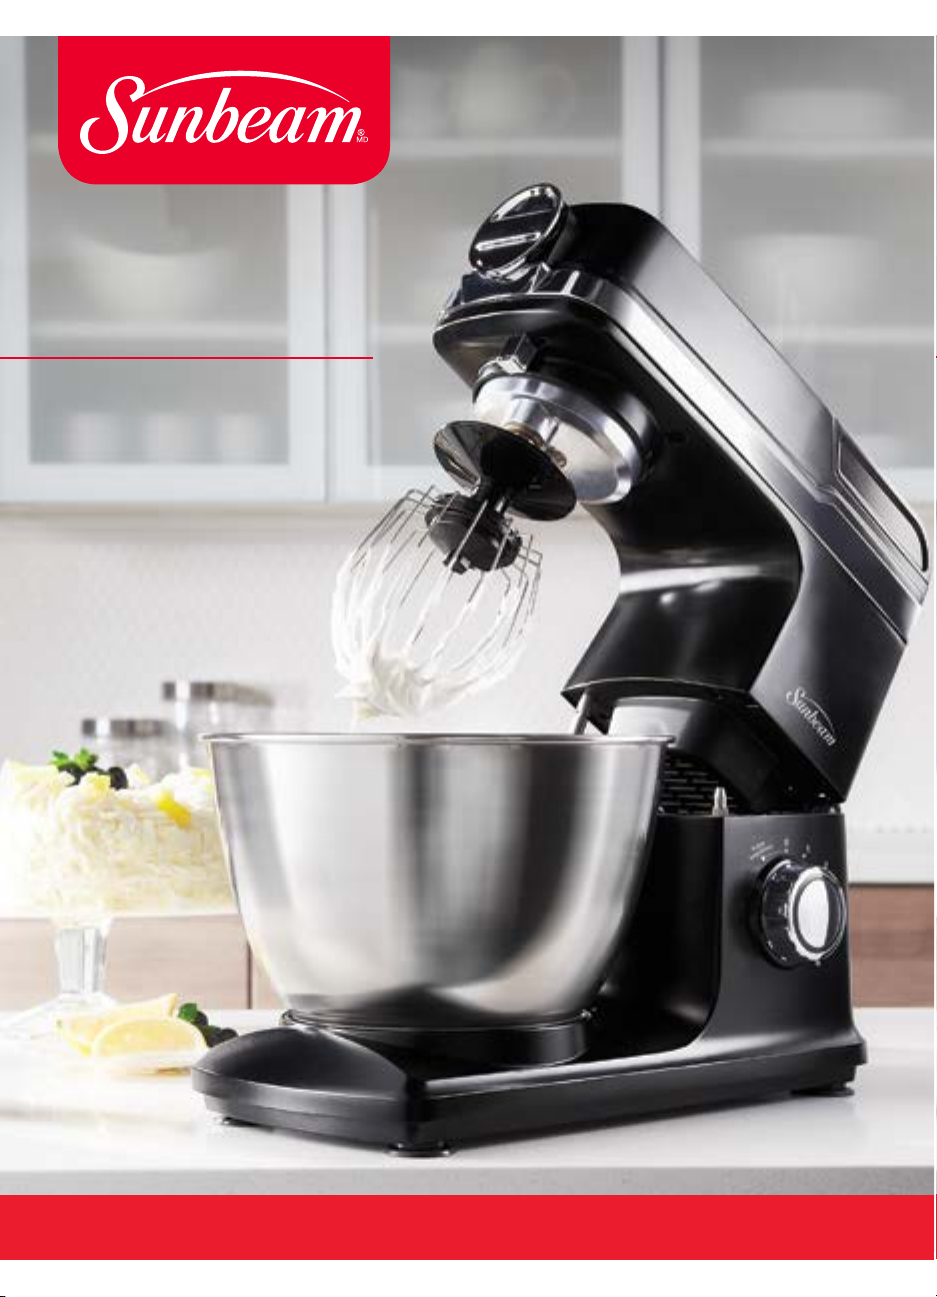
Planetary
Stand Mixer
Batteur sur socle
planétaire
Série FPSBSM3481 Series
Visit us at www.sunbeam.ca
P.N. 174671
Page 2

ImpOrTanT safeguards
When using electrical appliances, basic safety precautions should
always be followed, including the following:
GENERAL SAFETY INSTRUCTIONS
1 . To protect against risk of electrical shock, do not put mixer in water or other liquid.
This may cause personal injury or damage to the product.
2. Close supervision is necessary when mixer is used by or near children or incapacitated persons.
3. Unplug from outlet while not in use, before putting on or taking off parts, and before cleaning.
4. Avoid contacting moving parts. Keep hands, hair, clothing, as well as spatulas and other utensils away
from beaters during operation to reduce the risk of injury to persons and/or damage to the mixer.
5. To disconnect, turn off all controls and remove plug from outlet.
6. Do not operate mixer with a damaged cord or plug or after the appliance malfunctions,
or is dropped or damaged in any manner. If the mixer becomes damaged please contact
Consumer Services for assistance.
7. Do not use extension cord.
8. The use of attachments not recommended or sold by Jarden Consumer Solutions may
cause fire, electrical shock or injury.
9. Do not use outdoors or for commercial purposes.
10. Do not let cord hang over edge of table or countertop or touch hot surfaces, including the stove.
1 1. Remove beaters from mixer before washing.
12. Do not place mixer or bowls on or near a hot gas or electric burner, in a heated oven
(microwave, convention, convection, etc.), or on any other heated surface.
13. Do not use mixer for other than intended use.
14. Do not leave mixer unattended while it is operating.
15. Mixer has an internal safety to prevent overheating. If the mixer shuts down because of overheating,
reset the speed control dial to OFF and unplug unit from wall. Wait 1 minute and plug back in. If unit
still does not start, wait 30 minutes to allow unit to cool completely before turning back on.
16. Any servicing, other than cleaning and user maintenance shall be performed by an authorized
service representative.
17. When mixing liquids, especially hot liquid, use a deep container or make small quantities at a time
to reduce spillage.
18. Don’t Abuse Cord. Never carry the mixer by the cord or yank it to disconnect from an outlet;
instead, grasp the plug and pull to disconnect.
19. THIS UNIT IS FOR HOUSEHOLD USE ONLY.
20. In order to ensure your children's safety, please keep all packaging (plastic bags, boxes, polystyrene
etc.) out of their reach.
21. Danger of overloading! Please use the device either as a mincer or mixer, but never both functions at
the same time.
SAVE THESE INSTRUCTIONS
For Products Purchased in the u.s. and canada only
To reduce the risk of electrical shock, this appliance is equipped with a 3-prong plug. If you are unable to
insert the plug into the outlet, contact a qualified electrician to replace the obsolete outlet. Do not attempt
to defeat the safety purpose of the 3-prong plug by modifying it in any way. Also, do not pull, twist or
otherwise abuse the power cord; instead, grasp the plug and pull to remove from the outlet.
NOTE: The motor of your Mixer is protected by a heat cured insulation. This is a standard process. Due to
the heat curing of the insulation, you may experience an odor and possibly a slight wisp of smoke from
your mixer’s motor. This effect will disappear after the first few uses.
CONTACT CUSTOMER SERVICE AT 800-458-8407 IN THE U.S. OR 800-667-8623
IN CANADA OR VISIT WWW.SUNBEAM.CA
DO NOT RETURN THIS PRODUCT TO PLACE OF PURCHASE
2
QUESTIONS?
Page 3
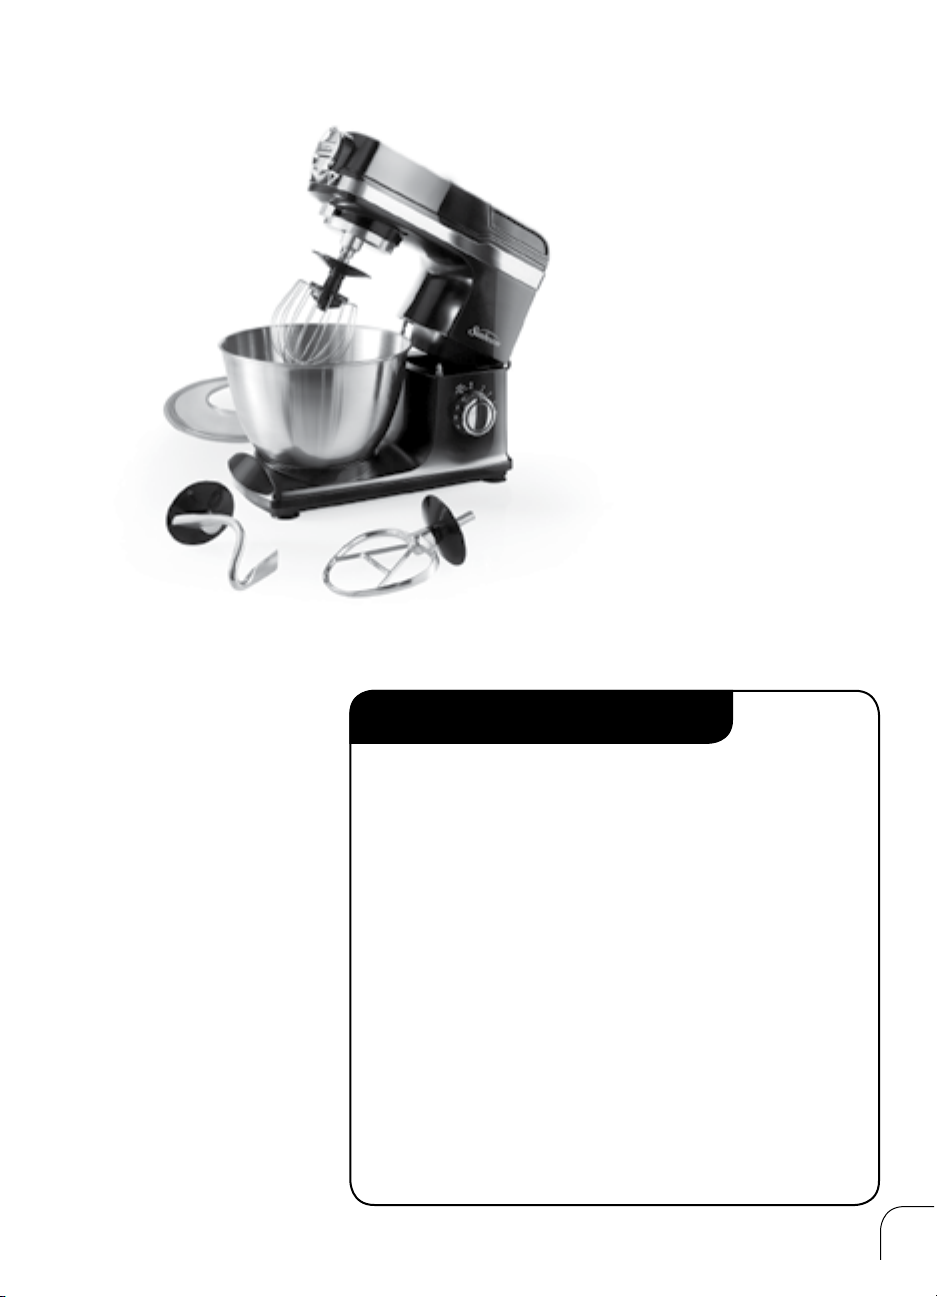
Table Of COnTenTs
Important Safeguards 2
Welcome 4
Features 4
Accessories 5
Preparing for Use
Installing Your Attachments 7
Splash Guard 8
Helpful Hints 8
Speed Control Guide 9
Care and Maintenance 9
Recipes 10
Warranty 13
5
3
Page 4
WelCOme
Congratulations on your purchase of an Sunbeam® Planetary Stand Mixer. We’re delighted you
chose us to work with you in the kitchen and assure that you’ll be pleased with your new Stand
Mixer. Once you get started, you’ll find you can’t do without this versatile kitchen tool. We've
equipped you with all the must-have attachments to whip up dough for cookies and breads,
handmade marshmallows and meringues, and your favorite mashed potatoes side-dish. The
possibilities are endless when using your new Sunbeam
®
Stand Mixer. Let's get mixing!
feaTures
3a
2
7
1
8a
8b
8c
9
Main Components and Standard Accessories:
1 Drive shaft 6 Power Cord
2 Attachment Power Hub Cap 7 Stainless Steel Bowl
3a Release Helix Drive Power Hub Cap 8a Flat Beater
3b Top Housing Power Hub Cap 8b Dough Hook
4 Tilt Release Button 8c Balloon Whisk
5 Speed Control Knob 9 Splash Guard
3b
4
5
6
4
Page 5

geTTIng TO KnOW YOur aCCessOrIes
flaT beaTer
fOr nOrmal TO
heavY mIxTures
cakes, biscuits,
creamed frostings,
quick breads, candies,
meat loaf, cookies,
mashed potatoes,
pie pastry
dOugh hOOK
fOr mIxIng and
KneadIng
yeast, doughs:
breads, coee cakes
preparIng The sTand mIxer fOr use
ballOOn
WhIsK
fOr mIxTures
ThaT need aIr
InCOrpOraTed
eggs, sponge cakes,
egg whites, angel
food cakes, heavy
cream, mayonnaise
splash guard
fOr prevenTIng
splash OuT and
addIng IngredIenTs
WhIle mIxIng
Before preparing the mixer for use, be sure the speed control dial is in
the OFF position and the electric cord is unplugged.
Be sure to wash bowl and attachments before initial use.
5
Page 6

preparIng The sTand mIxer fOr use
mIxIng
raIsIng and lOWerIng
The mIxIng head
To tilt mixer head, pull up Tilt Release button
and slowly lift mixer head until it locks in the upright
position. (Figure B)
To lower mixer head, grab head, pull up Tilt Release
button and gently lower mixer head, ensuring it locks
in downward position. A "click" sound will indicate
the mixer head has locked securely into position.
(Figure C)
OperaTIng speed COnTrOl KnOb:
The speed control dial is used for turning the mixer
ON and OFF and for selecting its 6 mixing speeds.
Rotate the speed control dial in a CLOCKWISE
direction to increase mixing speed, and in a
COUNTERCLOCKWISE direction to decrease
mixing speed.
Rotate the speed control dial until the indicator is
aligned with the indicator line for the desired speed.
(Figure D)
Figure A
Figure B
Pulse Setting:
Turn Speed Control Knob counter-clockwise for the
desired time.
NOTE: Always begin mixing at the lowest possible
speed setting, then gradually move to desired
higher speed to avoid splashing ingredients
out of bowl.
DO NOT OPERATE WITHOUT ATTACHMENTS AND
SEE NEXT SECTION "INSTALLING YOUR ATTACHMENTS"
TO BEGIN.
Figure C
Figure D
6
Page 7

InsTallIng YOur aTTaChmenTs
TO aTTaCh bOWl
1. Rotate Control Knob to OFF position to turn unit off.
2. Unplug Stand Mixer.
3. Pull up Tilt Release button and tilt mixer head back.
4. Place bowl on bowl locking plate.
5. Turn bowl gently in a clockwise direction to lock into
place.
6. Plug into a grounded 3 prong outlet.
TO remOve bOWl
1. Rotate Control Knob to OFF position to turn unit off.
2. Unplug Stand Mixer.
3. Pull up Tilt Release button and tilt mixer head back.
4. Turn bowl counterclockwise and lift off locking plate.
TO InsTall aTTaChmenTs
1. Rotate Control Knob to OFF position to turn unit off.
2. Unplug Stand Mixer.
3. Pull up Tilt Release button and tilt mixer head back.
4. Align the key positions of the whisk shaft and
attachment, push upward.
5. Twist clockwise so that pin aligns with attachment
notch and clicks into position.
6. Plug into a grounded 3 prong outlet.
(figure A):
(figure B):
(figure C):
Figure A
Figure B
NOTE: Align the key positions of the whisk shaft
and attachment.
TO remOve aTTaChmenTs
1. Rotate Control Knob to OFF position to turn unit off.
2. Unplug Stand Mixer.
3. Tilt mixer head back.
4. Press attachment upward as far as possible and
turn counter-clockwise.
5. Pull attachment from whisk shaft.
NOTE: It is recommended to scrape food off attachment
with a spatula/scraper before removing.
(figure D):
Figure C
Figure D
7
Page 8

hOW TO use The splash guard
TO aTTaCh splash guard
1. Rotate Control Knob to OFF position to turn unit off.
2. Unplug Stand Mixer.
3. After bowl and attachment are in place, lock mixer
head into the downward position.
4. From the front of the mixer, slide the Splash Guard over
the bowl until centered and chute is to the right. The inner
rim of the Splash Guard should fit against the inside edge
of the bowl.
NOTE: Splash Guard should fit loosely on bowl for easy assembly.
Be sure to hold lid in place while pouring.
(figure A):
TO use splash guard:
1. For best results, rotate Splash Guard so the mixer head fits into
the opening of the Splash Guard. The pouring chute will be just
to the right of the attachment hub as you face the mixer.
2. While securing Splash Guard with one hand, pour the
ingredients into the bowl through the pouring chute.
TO remOve splash guard
1. Rotate Control Knob to OFF position to turn unit off.
2. Unplug Stand Mixer.
3. Lift the front of the Splash Guard clear of the bowl rim
and pull forward.
NOTE: Remove chute and Splash Guard before lifting the tilt head.
(figure B):
Figure A
Figure B
helpful hInTs
• When mixing liquids, especially hot liquid, make small quantities at a time to reduce spillage.
• Ingredients should be added to the mixing bowl in the order they are specified in the recipe.
• Use the mixing speed that is recommended in the recipe. Use the speed control dial of the
mixer to help you find the correct speed to use.
• Use mixing times as specified in recipes. BE CAREFUL NOT TO OVERMIX. Overmixing can
cause the mixture to become very tough.
• Should an object, such as a spatula, fall into the bowl while the mixer is operating, turn the
mixer OFF immediately, then remove the object.
• For easier clean-up remove attachments and rinse immediately with warm water.
• Mixer is designed to operate in orbital pattern; periodic scraping of bowl sides may be
required during mixing. Turn OFF before scraping.
8
Page 9

speed COnTrOl guIde
Settings Attachments Type of Mixture
1-2 Dough Hook
3-4 Flat Beater
5-6 Balloon Whisk
Pulse Balloon Whisk
NOTE: Mixer may not maintain fast speeds under heavy load, such as when the heavy-duty
attachments are used. This is a normal condition.
Heavy mixtures (e.g., bread or doughs)
Medium-heavy mixtures (e.g., crepes or sponge mixture)
Light mixtures (e.g., cream, egg white, blancmange)
Interval (e.g., for mixing sponge cake, egg white)
CarIng fOr YOur mIxer
CleanIng YOur mIxer
To clean the mixer, turn it OFF and unplug it from the outlet. Wipe the mixer head, stand,
bowl locking plate and unit base with a damp cloth, then dry. DO NOT FULLY IMMERSE THE
STAND MIXER IN WATER. Avoid the use of abrasive cleaners, as they may damage the finish
of the mixer. Mixing Bowl is safe for cleaning in an automatic dishwasher. Beater, whisk and
dough hooks are safest in top rack ONLY. For best results hand wash with hot, soapy water
after each use. Rinse thoroughly and dry with a soft cloth.
sTOrIng YOur mIxer
Store the mixer in a dry location, such as on a countertop or table top, or in a closet or
cupboard. DO NOT store the beater on the shaft, instead, place the dough hook and other
attachments in the mixing bowl. Store the bowl on the locking plate.
maInTenanCe
The motor of your stand mixer has been carefully lubricated at the factory and does not
require any additional lubricant. Other than the recommended cleaning, no further user
maintenance should be necessary. For servicing or repairs please contact Consumer Services
for assistance. (1-800-458-8407 in the U.S. or 1-800-667-8623 in Canada)
9
Page 10

reCIpes
TIps fOr perfeCTIng anY reCIpe:
• For best results, turn off mixer and lift beater to scrape bowl and beater with
rubber spatula occasionally as you mix and fold in ingredients.
• For best dough results, when preparing kneaded doughs do not use more
than 4 cups of flour.
• Do not use mixer above Speed 2 for yeast dough.
• When adding dry ingredients, turn off mixer and add as close to the sides of the bowl
as possible. To resume mixing, start at low and gradually increase speed to medium.
maKe ahead mashed pOTaTOes
3 lbs (1.5 kg) white or golden potatoes, peeled and quartered
6 oz (170 gm) cream cheese, cut into 1-inch (2.5cm) cubes
1 cup (250 ml) sour cream
2 tbsp (30 gm) butter or margarine
In saucepan, cover potatoes with cold salted water. Cook till tender; drain. With flat beater, beat potatoes
until fluffy on speed 4. Add remaining ingredients and blend well; season to taste. Spoon potatoes into
buttered 2-quart (2 liter) glass baking dish. Cover and refrigerate up to 3 days.
TO BAKE: Dot potatoes with 1 tbsp butter. Bake, covered at 350° F (180° C) until hot, about 30 minutes.
TIP: When making mashed potatoes, to keep finished dish light and creamy, always beat potatoes until
fully mashed before adding additional ingredients.
Yield: 12 servings
10
YellOW CaKe
2 ½ cups (375 gm) unsifted all-purpose flour 2 large eggs
1 ½ cups (318 gm) granulated sugar 1 cup (250 ml) milk
1 tbsp (12 gm) baking powder 1 ½ tsp (7 ml) vanilla extract
½
cup (112 gm) butter, softened 1 tsp (6 gm) salt
Combine all ingredients in mixer bowl. Beat with flat beater on speed 2 until blended.
Increase speed to 6 until light and fluffy. Spoon batter into 2 greased and floured 9-inch (23 cm)
round cake pans. Bake at 375° F (190° C) for 25 minutes or until cakes test done. Place pans on rack
for 10 minutes; unmold and let cool.
TIP: When preparing cakes and cookies that require creaming butter and sugar, begin at a low speed
and increase to speed 3 or 4 until butter mixture is light and lemon colored.
Yield: 12 servings
buTTer Cream frOsTIng
3 cups (360 gm) confectioners’ sugar 1 tsp (5 ml) vanilla extract
½
cup (112 gm) butter or margarine, softened 3 to 4 tbsp (45-60 ml) milk
Combine sugar, butter and vanilla in mixer bowl. With flat beater, using speed 2, gradually add milk to
make desired consistency. Gradually increase to speed 6 and beat till light and fluffy.
Yield: enough to frost 8 or 9 (20 – 23 cm) inch 2 layer cake
Page 11

reCIpes
bITTersWeeT ChOCOlaTe frOsTIng
2 cups (240gm) confectioners’ sugar 2 tbsp (28 gm) butter, softened
2 squares (1 oz, ea) unsweetened chocolate, 1 tsp (5 ml) vanilla extract
cut into small pieces
In mixer bowl, with flat beater, combine sugar, chocolate, butter and vanilla. Gradually add milk and
beat on speed 4 until desired consistency. Increase speed to 5 and beat until beat till light and fluffy.
Yield: about 1 cup
heavenlY angel fOOd CaKe
1 cup (120gm) unsifted cake flour 1 ½ tsp (6 gm) cream of tartar
1 ¾ cup (289 gm) granulated sugar
1 ½ cup (375 ml) egg whites, (10 to 12) 1 tsp (5ml) vanilla extract
at room temperature
Sift together cake flour and
cream of tartar and salt on speed 3 to soft peaks. Increase speed to 6 and gradually add remaining
1 cup sugar till stiff peaks form. Sift ¼ flour mixture over egg whites and fold in gently, using a rubber
spatula. Add both extracts with last batch of flour. (Do not over mix.) Spoon into ungreased 10-inch
(25 cm) tube pan. Gently cut through batter with small metal spatula or knife to eliminate air bubbles.
Bake on lowest rack of oven at 350° F (180°C) until top of cake springs back when lightly touched.
Immediately invert pan and let cool completely. To remove, loosen sides of cake with small metal
spatula.
TIP: When preparing cakes and cookies that require creaming butter and sugar, begin at a low speed
and increase to speed 3 or 4 until butter mixture is light and lemon colored.
Yield: 12 servings
¾
cup sugar; set aside. In mixer bowl, with flat beater, beat egg whites,
¼
cup (60 ml) hot milk
½
tsp (3 gm) salt
½
tsp (2 ½ ml) almond extract
ClassIC WhITe bread
1 cup (250 ml) milk 3 tbsp (38 gm) granulated sugar
⅓
cup (84 ml) water 1 pkg (2 ¼ tsp) active dry yeast
2 tbsp (30 gm) unsalted butter 1 ½ tsp (8.5 gm) salt
3 cups plus 2 tbsp (450 gm) unsifted bread flour
In small saucepan, combine milk, water and butter; heat to luke warm (110° to 115° F). Using dough
hook, combine 2 cups flour, sugar, yeast and salt on speed 2 until blended. Add milk mixture and mix
until fully blended, about 2 minutes. Add remaining flour, ½ cup at a time, and beat on speed 2 until
mixture leaves the sides of the bowl. Gradually increase speed to 4 and knead dough 5 to 7 minutes
till smooth and elastic.
Turn dough out onto lightly floured board and shape into a ball. Place in large greased bowl,
turning to coat top of dough. Cover and let rise in draft free place until doubled, about 1 hour.
Punch dough down and roll into 12 by 8-inch rectangle. Starting at short end, roll up tightly.
Pinch edges to seal and turn ends under. Place in greased 9 x 5 x3-inch loaf pan. Cover and let rise
till doubled, about 30 minutes.
Bake at 400° F for 30 minutes or until bread sounds hollow when tapped on bottom.
Remove from pan and cool on wire rack at least 2 hours.
Yield: 1 loaf of bread
11
Page 12

OaTmeal raIsIn COOKIes
¾
cup (168 gm) butter or margarine, softened 2 large eggs
½
cup (120 gm) firmly packed brown sugar 1 ½ tsp (7.5 ml) vanilla extract
½
cup (106 gm) granulated sugar 1 ¾ cups (265 gm) unsifted all-purpose flour
1 tsp (4 gm) baking powder 2 cups (240 gm) rolled oats
¼
tsp (1 gm) baking soda 1 ½ cups (225 gm) raisins
¾
tsp (2 gm) ground cinnamon
In mixer bowl, with flat beater, combine butter, sugars, baking powder, baking soda and cinnamon.
Beat at speed 4 until creamy. Add egg and vanilla and beat on speed 3 until well combined.
Add flour and blend well. Remove from mixer and stir in oatmeal and raisins.
Drop by rounded teaspoons onto ungreased baking sheets. Bake at 375° F (190°C) until edges are
golden. Let rest on baking sheets 3 minutes. Cool on wire rack.
TIP: When adding sticky, dry ingredients, such as raisins or dates, toss the fruit in a small amount of
flour before adding to mixer to avoid clumping.
Yield: about 4 dozen cookies
unbaKed mOCha Cheese pIe In ChOCOlaTe COOKIe CrusT
1 ½ cups (140 gm) chocolate wafers, finely crushed
½
tsp (2 gm) ground cinnamon
2 pkg (8 oz, ea) cream cheese, softened 2 tsp (10 ml) vanilla extract
⅓
cup (80 gm) butter, softened 2 cups (500 ml) heavy cream, whipped
2 cups (340 gm) semi-sweet chocolate morsels, melted to soft peaks
In medium bowl, combine chocolate wafers, cinnamon and melted butter. Blend with fork.
Pat mixture on bottom and up sides of 9-inch (23 cm) glass pie plate. Chill or bake at 350° F (180°C)
for 10 minutes. Cool on wire rack before filling.
Using flat beater beat cream cheese and butter on speed 4 until creamy and smooth. On speed 2,
blend in melted chocolate, liqueur and vanilla. On speed 1 fold in whipped cream until well blended.
Pour into crust and chill 8 hours or overnight. If desired, decorate with sweetened whipped cream
and chocolate curls.
Yield 8 to 10 servings
½
cup (50 ml) melted butter
⅓
cup (75 ml) coffee flavored liqueur
easY pIzza dOugh
1 cup (250 ml) water 1 tsp (6 gm) salt
2 tbsp (30 ml) olive oil 1 pkg (2
3 cups (432 gm) unsifted bread flour
In small saucepan, combine water and oil; heat to luke warm (120° to 130° F). In mixer bowl, using
dough hook, combine 2 cups flour, yeast and salt on speed 1 until blended, about 30 seconds. Add oil
mixture and mix until fully blended, about 2 minutes. Add remaining flour and gradually increase speed
to 2 and knead dough 5 to 7 minutes until smooth and elastic.
Shape into ball and place in large greased bowl, turning to coat top of dough. Cover and let rise in a
draft free place till doubled in bulk, about 45 minutes. Divide in half. Press one half into large pizza pan
or peel which has been greased and sprinkled with cornmeal. Bake at 400° F for 12 minutes till crust is
beginning to brown. Add desired toppings; bake 15 minutes longer, till fully baked and crust is browned.
Repeat with remaining half or wrap tightly in plastic wrap and refrigerate up to 2 days. Cover and let
stand at room temperature for 20 minutes before using.
Yield: two 14-inch pizza crusts
¼
tsp) active dry yeast
12
Page 13

dOuble ChOCOlaTe brOWnIes
1 ¾ cups (450 ml) all-purpose flour
2 teaspoons (10 ml) baking powder
1 teaspoon (5 ml) salt
¾ cup (200 ml) cocoa powder
2 ½ cups (625 ml) sugar
Preheat oven to 350°F (180°C). Grease a 15½ x 10½ inch (39 x 27cm) jellyroll pan. In the large mixing bowl at a low
speed, stir together the first 5 ingredients. Gradually add eggs, oil and vanilla. Increase mixer to a moderate speed.
Mix until combined. Reduce speed to a low speed and stir in chocolate morsels. Spread into prepared pan and
bake for 20-25 minutes. Do not overbake. Cool and cut
4 eggs
1 cup (250 ml) vegetable oil
2 teaspoons (10 ml) vanilla extract
1 cup (250 ml) semi sweet chocolate morsels
into bars.
WarranTY
One Year Limited Warranty
Sunbeam Products, Inc. doing business as Jarden Consumer Solutions or if in Canada, Sunbeam Corporation (Canada) Limited
doing business as Jarden Consumer Solutions (collectively “JCS”) warrants that for a period of one year from the date of
purchase, this product will be free from defects in material and workmanship. JCS, at its option, will repair or replace this product
or any component of the product found to be defective during the warranty period. Replacement will be made with a new or
remanufactured product or component. If the product is no longer available, replacement may be made with a similar product of
equal or greater value. This is your exclusive warranty. Do NOT attempt to repair or adjust any electrical or mechanical functions
on this product. Doing so will void this warranty. This warranty is valid for the original retail purchaser from the date of initial retail
purchase and is not transferable. Keep the original sales receipt. Proof of purchase is required to obtain warranty performance. JCS
dealers, service centers, or retail stores selling JCS products do not have the right to alter, modify or any way change the terms
and conditions of this warranty.
This warranty does not cover normal wear of parts or damage resulting from any of the following: negligent use or misuse of the
product, use on improper voltage or current, use contrary to the operating instructions, disassembly, repair or alteration by anyone
other than JCS or an authorized JCS service center. Further, the warranty does not cover: Acts of God, such as fire, flood, hurricanes
and tornadoes.
What are the limits on JCS’s Liability?
JCS shall not be liable for any incidental or consequential damages caused by the breach of any express, implied or statutory
warranty or condition.
Except to the extent prohibited by applicable law, any implied warranty or condition of merchantability or fitness for a particular
purpose is limited in duration to the duration of the above warranty.
JCS disclaims all other warranties, conditions or representations, express, implied, statutory or otherwise.
JCS shall not be liable for any damages of any kind resulting from the purchase, use or misuse of, or inability to use the product
including incidental, special, consequential or similar damages or loss of profits, or for any breach of contract, fundamental or
otherwise, or for any claim brought against purchaser by any other party.
Some provinces, states or jurisdictions do not allow the exclusion or limitation of incidental or consequential damages or limitations
on how long an implied warranty lasts, so the above limitations or exclusion may not apply to you.
This warranty gives you specific legal rights, and you may also have other rights that vary from province to province, state to state
or jurisdiction to jurisdiction.
How to Obtain Warranty Service
In the U.S.A.
If you have any question regarding this warranty or would like to obtain warranty service, please call 1-800-458-8407 and a
convenient service center address will be provided to you.
In Canada
If you have any question regarding this warranty or would like to obtain warranty service, please call 1.800.667.8623 and a
convenient service center address will be provided to you.
In the U.S.A., this warranty is offered by Sunbeam Products, Inc. doing business as Jarden Consumer Solutions located in Boca
Raton, Florida 33431. In Canada, this warranty is offered by Sunbeam Corporation (Canada) Limited doing business as Jarden
Consumer Solutions, located at 20 B Hereford Street, Brampton, Ontario L6Y 0M1. If you have any other problem or claim in
connection with this product, please write our Consumer Service Department.
PLEASE DO NOT RETURN THIS PRODUCT TO ANY OF THESE ADDRESSES OR TO THE PLACE OF PURCHASE.
PLEASE ALSO SEE WWW.SUNBEAM.CA
FOR MORE INFORMATION.
13
Page 14

For product questions:
Sunbeam Consumer Service
USA: 1-800-458-8407
Canada: 1.800.667.8623
www.sunbeam.ca
©2014 Sunbeam Products, Inc. doing business as Jarden Consumer Solutions.
All rights reserved. Distributed by Sunbeam Products, Inc. doing business as
Jarden Consumer Solutions, 20B Hereford St., Brampton ON Canada L6Y 0M1
Pour toute question en ce qui concerne le produit, appelez le
service à la clientèle de Sunbeam
Canada: 1 800 667.8623
États-Unis: 1-800-458-8407
www.sunbeam.ca
©2014 Sunbeam Products, Inc. faisant affaire sous le nom de
Jarden Consumer Solutions. Tous droits réservés. Distribué par
Sunbeam Products, Inc. faisant affaire sous le nom de Jarden Consumer Solutions,
20B Hereford St., Brampton (Ontario) Canada L6Y 0M1
Printed in China Imprimé en Chine
FPSBSM3481-033_14EFM1 GCDS-SUN33614-SL
 Loading...