

Page 1

Title
RadonSentinJl™ User’s Guide
Accurate, Reliable, Economical
2TIJQ
Page 2

User’s Guide, RadonSentinel™
© 2016 by Sun Nuclear Corporation. All rights reserved.
The information contained in this manual and the accompanying software
program is copyrighted and all rights are reserved by Sun Nuclear Corporation.
Copying, duplicating, selling, or otherwise distributing any part of this product
without the prior written consent of Sun Nuclear Corporation is prohibited.
Sun Nuclear Corporation reserves the right to make periodic modifications of this
product without obligation to notify any person or entity of such revision.
This guide is written for:
Software version: 3.0.3
Firmware version: 1.1.8
Radon Sentinel™ and RadonSentinel™ are trademarks of Sun Nuclear
Corporation.
Document 1030012, Rev E, 01 December 2016
Corporate Headquarters
3275 Suntree Boulevard
Melbourne, FL 32940 USA
+1 321-259-6862
www.sunnuclear.com
ii
Page 3
Preface
Intended Use
The Model 1030 RadonSentinel is intended to be used by radon measurement
professionals for measurement of the indoor radon level in human dwellings.
Application
CAUTION: Radon Sentinel Model 1030 should be used for indoor
applications only. Using in an outdoor environment may cause errors due
to humidity and extreme temperatures.
For a typical test, the radon monitor is set up in a building or structure to be
monitored, and the device is left unattended for the required test duration.
Ambient room air, laden with radon, diffuses into the radon monitor’s detection
chambers. Gaps between the base and the cover allow air to freely pass into the
radon monitor. Radon decay by-products emit alpha particles which are detected
by the photo diodes and then counted. During a test, the number of counts
produced by the alpha particles is stored in memory and converted into radon
concentration (pCi/l) using the stored calibration factor. At the end of the test, the
results can be viewed on the radon monitor display, on a computer screen, or in
a printed report.
Health and Safety Instructions
WARNING: To avoid risk of electric shock, this device must only be
connected to a supply mains with protective earth (ground).
WARNING: Never use the radon monitor in an area that could
contain explosive gases. A spark from inside the radon monitor could
ignite an explosion.
This equipment must be used in accordance with the instructions in
this manual. Read all instructions and safety labels before use.
Inspect all cables periodically for damage. Do not use any cable that is damaged
or has broken insulation. Replace the cable immediately. If any mechanical or
electrical degradation is suspected, contact Sun Nuclear Corporation for repair or
replacement.
Never pull on a cable to disconnect it. Always grasp the plug or connector.
iii
Page 4

Check for physical damage prior to and after each use. If measurement errors or
device damage are suspected, contact Sun Nuclear Corporation.
Do not permit water or any other liquids to spill onto the device.
This device is not intended to be used in an oxygen rich environment.
For instructions to report health or safety related concerns, see Reporting Health
or Safety Related Issues or Concerns on page 30.
Regulatory Information
For a definition of the symbols used throughout this document and additional
information related to user and device safety, see Regulatory Supplement on
page 29. Review this information thoroughly before setting up and using the
device.
Finding Additional Information
Online Help — Help is available by selecting Help > Contents from the
Continuous Radon Monitor software application menu.
Sun Nuclear Corporation Radon website — Additional information is available on
the Sun Nuclear website: https://support.sunnuclear.com/radon
The U.S. Environmental Protection Agency (EPA) maintains a comprehensive
radon website at: https://www.epa.gov/radon
publications relating to radon, including:
• A Citizen's Guide to Radon: The Guide to Protecting Yourself and Your Family
from Radon. This guidance offers strategies for testing your home for radon
and discussions of what steps to take after you have tested.
• Consumer's Guide to Radon Reduction: How to Fix Your Home. This booklet
is for people who have tested their home for radon and confirmed that they
have elevated radon levels.
• Home Buyer's and Seller's Guide to Radon. This booklet is intended for
anyone who is buying or selling a home, real estate and relocation
professionals, and home inspectors.
, where you can find EPA
.
Document Conventions
• Bold typeface indicates a button name or an entry that the user must type.
• Italicized typeface indicates the title of a manual, a cross-referenced
subsection in this manual, or introduces a new term or phrase.
• Bold italicized typeface indicates a menu option.
• “Text in double quotes” indicates a message that is displayed to the user.
• ‘Text in single quotes’ indicates the name of a window or dialog box.
• The Z suffix in a part number indicates a RoHS2 compliant part.
iv
Page 5

Contents
Preface . . . . . . . . . . . . . . . . . . . . . . iii
Intended Use . . . . . . . . . . . . . . . . . . . iii
Application . . . . . . . . . . . . . . . . . . . . . iii
Health and Safety Instructions . . . . . iii
Regulatory Information . . . . . . . . . . . iv
Finding Additional Information . . . . . iv
Document Conventions . . . . . . . . . . . iv
Introduction. . . . . . . . . . . . . . . . . . . 1
Description . . . . . . . . . . . . . . . . . . . . . 1
Parts . . . . . . . . . . . . . . . . . . . . . . . . . . .1
Options and Accessories . . . . . . . .2
Radon Sentinel Operation . . . . . . . 3
Connecting Power . . . . . . . . . . . . . . . 3
Inserting Batteries . . . . . . . . . . . . . .3
Connecting the AC Adapter . . . . . . 4
Turning on the Display . . . . . . . . . . . . . 4
Controls . . . . . . . . . . . . . . . . . . . . . . . .5
Configuring Parameters . . . . . . . . . . . . 6
Setting Parameters Using
Radon Sentinel Keys . . . . . . . . . 6
Personal Identification Number . . . . . .7
Lost PIN Recovery . . . . . . . . . . . . .7
Positioning the Monitor . . . . . . . . . . . . 7
Checking Unit Status . . . . . . . . . . . . . .7
Starting a Test . . . . . . . . . . . . . . . . . . .8
Terminating a Test . . . . . . . . . . . . . . . .8
Displaying EPA, Average, and
Current Radon Values . . . . . . . . . .8
Clearing Memory . . . . . . . . . . . . . . . . .9
Replacing the Batteries . . . . . . . . . . . .9
Connecting Radon Sentinel to
Computer . . . . . . . . . . . . . . . . . . .10
Disconnecting the Radon
Sentinel . . . . . . . . . . . . . . . . . .10
Radon Monitor Software . . . . . . . 11
About the Software. . . . . . . . . . . . . . 11
System Requirements . . . . . . . . . . . .11
Setting Up the Software . . . . . . . . . . 11
Installing the Software . . . . . . . . .11
Launching the Software . . . . . . . . . .13
Closing the Software . . . . . . . . . . 13
Software Setup . . . . . . . . . . . . . . . . .13
Configuring Company
Information . . . . . . . . . . . . . . . . 13
Radon Monitor Details . . . . . . . . .15
Retrieving Data From the Monitor . . 16
Displaying Test Summary Data . . . . 16
Setting Up Customer Information . . 17
Test Chart Views . . . . . . . . . . . . . 18
Saving a Test . . . . . . . . . . . . . . . . . . 19
Opening a Saved File . . . . . . . . . . 19
Previewing and Printing Test Data . . 20
Previewing Raw Data . . . . . . . . . . 20
Printing Raw Data . . . . . . . . . . . . 20
Customer Reports . . . . . . . . . . . . . . 21
Previewing Reports . . . . . . . . . . . 21
Printing Reports . . . . . . . . . . . . . . 22
Saving as PDF . . . . . . . . . . . . . . . . . . 22
Specifications . . . . . . . . . . . . . . . . 23
Model 1030 Radon Sentinel
Specifications. . . . . . . . . . . . . . . . 23
Recommended System
Requirements . . . . . . . . . . . . . . . 24
Support and Maintenance . . . . . . 25
Maintaining Hardware . . . . . . . . . . . . 25
Parts and Repairs . . . . . . . . . . . . . 25
Storage . . . . . . . . . . . . . . . . . . . . . 25
Cleaning . . . . . . . . . . . . . . . . . . . . 25
Disposal and Recycling . . . . . . . . 25
Battery Life . . . . . . . . . . . . . . . . . . 25
Maintaining Software . . . . . . . . . . . . 25
Verifying Software Version . . . . . 26
Removing Software . . . . . . . . . . . 26
Multiple Software Installations . . 26
Service and Calibration . . . . . . . . . . . 27
Troubleshooting . . . . . . . . . . . . . . . . 27
Radon System Error Codes . . . . . 28
Contacting Sun Nuclear Support . . . 28
Support Website . . . . . . . . . . . . . 28
Warranty . . . . . . . . . . . . . . . . . . . . . . 28
Regulatory Supplement . . . . . . . . 29
Sun Nuclear Corporation Symbols . . 29
Operator Responsibility . . . . . . . . . . 30
Reporting Health or Safety Related
Issues or Concerns . . . . . . . . . . . 30
Modifications to Equipment . . . . . . . 30
Interaction with Other Electrical
Equipment . . . . . . . . . . . . . . . . . . 30
Index . . . . . . . . . . . . . . . . . . . . . . . 31
v
Page 6

vi
This page is intentionally left blank.
Page 7

Introduction
1
2
3
Description
The Radon Sentinel is a detection device used to measure the concentration of
radon gas. The unit is designed for professional inspectors to use in homes and
buildings. The Radon Sentinel is a continuous radon monitor that can be operated
using an AC adapter or four size C alkaline batteries.
The 16-character display on the Radon Sentinel shows instructions and radon
readings. Buttons below the display are used to enter data, set parameters, and
display data values. The Radon Sentinel connects to a computer via a USB cable
and the Continuous Radon Monitor software can then be used to download
measurements, set parameters, and print reports. See Radon Monitor Software
on page 11.
Parts
Unpack the Radon Sentinel and verify that the parts described below are included
in the package. When unpacking, save the packing material to use when sending
the Radon Sentinel to Sun Nuclear Corporation for annual calibration.
No. Part Number Description
1030300Z* Model 1030 Radon Sentinel
1
801041Z** Cable, USB, A-B M, 2 m
2
741001Z** AC to USB power adapter, 5VDC, 100-240V, 0.5A, USB
3
0200014 Customer Support site introduction letter (not shown)
—
1030012 User’s Guide (not shown; available on Radon Support
—
1030013 Getting Started Guide (not shown)
—
*Z indicates a RoHS2 compliant part.
** Included with the Radon Sentinel but may be ordered as an accessory.
Figure 1. Parts Furnished with Model 1030 Radon Sentinel
website)
1
Page 8

Options and Accessories
Contact Sun Nuclear Sales to order any of the following accessories.
Table 1. Radon Sentinel Accessories
Part Number Description
102378 Sign, self-adhesive, “Warning, Closed Building Procedure”
102379 Sign, plastic, hanging, “Caution, Radon Test in Progress”
1028130 Sign, vinyl static cling, “Warning, Closed Building Procedure”
1030000-SC Heavy duty case (for Radon Sentinel, Model 1030 only)
Radon support is available 24 hours a day, 7 days a week on the Sun Nuclear
Support website: https://support.sunnuclear.com/radon
see Contacting Sun Nuclear Support on page 28.
. For more information,
2
Page 9

Radon Sentinel Operation
Remove cap –
turn CCW
Unit uses four size C alkaline
batteries, two in each compartment
Connecting Power
The Radon Sentinel can be operated on battery power or AC power. When the
Radon Sentinel is connected to AC power, the battery provides back-up power.
Inserting Batteries
Disconnect the Radon Sentinel from AC power before installing batteries. A new
set of four size C alkaline batteries will operate the device for 300+ hours.
CAUTION: High humidity may shorten battery life. Connect the AC power
adapter when using the Radon Sentinel in areas with high humidity.
The battery compartment is accessed from the right side panel of the Radon
Sentinel. Replacement batteries can be purchased from any retail source.
1 Remove the cap from one of the battery compartments by rotating it
counterclockwise.
2 Insert two size C alkaline batteries, so that the negative end of the battery
goes into the compartment first.
Figure 2. Inserting Batteries
3 Replace the battery compartment cap by pressing down on the cap while
turning it clockwise until it is tight.
Tip: Use two hands — hold cap down with your thumb and use your other
hand to tighten the cap. If cap is cross-threaded, remove it and realign
threads.
4 Repeat steps 1 through 3 for the other battery compartment.
3
Page 10

Connecting the AC Adapter
USB indicator – illuminates
when USB cable is
connected to PC
Type B
connector
Type A
connector
USB port on
AC adapter
The number of bars
indicate battery status
Use these instructions when using AC power for the primary power source and
the batteries as backup.
1 Connect USB cable type A connector to USB port on AC adapter.
Figure 3. Connecting Power to the Radon Sentinel
2 Plug USB cable type B connection into USB port on right side panel of Radon
Sentinel.
3 Plug AC adapter into a 120-240 VAC, 50-60 Hz wall outlet.
Turning on the Display
There is no power switch or key sequence to power on/off the Radon Sentinel.
When the AC power adapter is connected, the monitor display is on continuously,
indicating that the power is successfully connected. If power is removed or if
running on batteries alone and no buttons are pressed for 3 minutes, the display
turns off automatically.
If the display is not on, press any button. After a few seconds, the display turns
on and shows the battery status.
Figure 4. Turning on the Display
4
Page 11
The display prompts for the PIN (personal identification number) entry (see
LCD Display – view messages, status, and
instructions of current operation
START/STOP – start or stop a measurement
STATUS – scroll through status settings;
press repeatedly to scroll more quickly
SETUP – Enter Setup mode to enter values
using keypad
EPA – displays measured cumulative
average radon gas concentration in pCi/l or
Bq/m
3
in the most recent test, except the
first 4 hours of data from the average
AVG – displays the measured cumulative
average radon gas concentration in pCi/l or
Bq/m
3
in the most recently measured test
CUR – displays the measured short-term
radon gas concentration, the current rolling
average of the most recent 12 hours
Arrow keys (4, 5) – press to alter a
selection, then press SETUP to save:
• Right arrow (5) scrolls forward
• Left arrow (4) scrolls backward
CLEAR – clears the test memory
TEMP – displays temperature
PRESS – displays pressure measurement
HUMID – displays relative humidity
Personal Identification Number on page 7). Then, the company name displays
momentarily (if set up) followed by the message: Ready to Test.
If a test is not started, the settings for Duration, Interval, and Delay appear. If there
is data in memory, the message Data in Memory! appears.
When Ready to Test displays, a test can be started, the setup can be changed, or
status for the following can be displayed: EPA, average or current radon values,
temperature, pressure, or humidity.
The display turns off automatically after approximately 3 minutes of inactivity
when the AC power is not connected. There is not an OFF switch or key sequence
to power off.
Controls
Figure 5. Controls
5
Page 12

Configuring Parameters
Note: Changes to parameters affect future tests only. Measurements
taken prior to the change will not be affected.
General parameters for the Radon Sentinel can be configured using a computer.
A limited set of parameters can be entered using the keys on the device (see
Setting Parameters Using Radon Sentinel Keys on page 6). For instructions to
enter company information using a computer, see Configuring Company
Information on page 13.
Setting Parameters Using Radon Sentinel Keys
Options for the following parameters can be changed using the keys on the
device.
DELAY Select the time delay for starting a test: 0, 12, 24, 48 (hours)
INTERVAL Select measurement interval: 0.5, 1, 2, 4, 8,12,16, 20, 24 (hours)
DURATION Select duration of the test: 1, 12, 24, 36, 48, 60, 72, 84, 96, 100, 999 (hours)
UNITS
PIN NUM Set to any combination of four digits using the numbers 1 through 6;
Select the units for the test: pC/l (picocuries per liter) or Bq/m
per cubic meter).
default setting is 1111. When the PIN is set to 1111, the Radon Sentinel
does not prompt for a PIN.
Use the following procedure to change the parameters.
1 Press any key to turn on the unit.
2 Press Setup (3).
3 If prompted, enter the PIN. “Setup Menu” displays.
4 Press Setup (3) to scroll to the parameter to change.
5 When the parameter is displayed, press (4) or (5) to select the desired
setting.
Exception: When setting the PIN, use the keys labeled 1 through 6 to enter
a 4-digit PIN.
6 Press Setup (3) to save and advance to the next parameter.
7 Repeat steps 4 through 6 until the parameters are defined and “Setup Menu
Done” displays.
The new parameters will apply to future tests.
3
(becquerels
6
Page 13

Personal Identification Number
Figure 6. Using a Tripod
The prompt for entering the PIN appears when:
• The Radon Sentinel is turned on
• A test is started
• A test is stopped
• The setup is accessed
• EPA, average, or current value is requested during a measurement
• The memory is cleared
When a PIN is requested, if it is not entered within 10 seconds, the display clears
(during a measurement, the Radon Sentinel returns to measurement mode). If an
incorrect PIN is entered, the messages “Do Not Tamper!” and “Illegal!” will
appear.
Note: When the PIN is requested and entered, the Radon Sentinel
remains unlocked for 3 minutes.
Lost PIN Recovery
The default PIN is 1111. If the default PIN has been changed and the PIN is
forgotten or lost, enter 4111 to access the device and re-set the PIN.
Positioning the Monitor
1 Place the Radon Sentinel in the desired position
in the area to be monitored for radon gas. The
device does not need to be level.
2 To use a tripod, thread the standard tripod
screw (1/4-20UNC) into threaded fitting on the
bottom of the case.
Checking Unit Status
Before starting a test, it is a good practice to scroll through the parameters to
ensure that they are correct.
1 Press any key to power on the display.
2 Press Status (2).
3 The items in the status menu scroll automatically, or you can press Status (2)
to scroll manually.
These status items can be displayed during a test by pressing any button and
then pressing Status (2).
To change the parameters, see Configuring Parameters on page 6.
7
Page 14

Starting a Test
1 When “Ready to Test” appears on the display, press Start / Stop (1) to start a
test.
2 ”Starting Test” appears on the display followed by the settings defined for the
test:
Memory One Me mory i s che cked. If da ta is f ound, memor y must be cl eared .
Delay (# hours) Displays the time delay defined in the setup. Note that the
Interval (# hours) Displays the measurement interval defined in setup.
Duration (# hours) Displays the test duration defined in setup.
Long Test Displays when the test duration ‘999’ is defined in setup.
Testing (# hours) The test has started and will be finished after the specified
See Clearing Memory on page 9.
time shown for the customer report will be the time the actual
measurement begins.
duration (plus any delay). The display turns off after a few
minutes and remains off unless the test is terminated or the
display is turned on.
Terminating a Test
To terminate a test in progress:
1 Press Start / Stop (1).
2 The prompt, “Enter PIN”, displays. Use the number keys on the unit to enter
the PIN.
3 “End Test Y=1 N=2” displays. Press 1 to end the test.
4 “Confirm Y=1 N=2” displays. Press 1 to confirm.
“Ending Test” displays briefly, followed by “Ready to Test” or, if both memory
slots are full, “Memory Full” displays (see Clearing Memory on page 9).
Displaying EPA, Average, and Current Radon Values
The EPA, AVG (average) and CUR (current) radon values can be displayed on the
Radon Sentinel during a test or after a test is completed (if the test data has not
been cleared).
1 Press any button to turn on the display.
2 Press EPA / AVG / CUR (4) to view the EPA value (that is, the average radon
concentration with the first four hours of measurement removed).
3 Press EPA / AVG / CUR (4) again to display the average radon concentration
over the total monitoring time.
4 Press EPA / AVG / CUR (4) a third time to display the average radon
concentration over the last 12-hours.
8
Page 15

Clearing Memory
Note: Before clearing the memory, ensure that any test data that you
wish to save has been downloaded to your computer.
When the memory is full (that is, there are two tests in memory), the messages
“Memory Full” and “Download Data” alternate on the Radon Sentinel display.
These messages will appear when both memory slots have stored test data.
The memory is cleared using the keys on the Radon Sentinel. The instructions
below are written for a unit with two tests in memory.
1 If a test is in progress, stop the test. See Terminating a Test on page 8.
2 Press CLEAR (5).
3 “Clear Test 2” appears on the display briefly, followed by the prompt “Confirm
Y=1 N=2”. Press 1 to continue.
4 “Test 2 Cleared” displays followed by the prompt “Clear Test 1”.
5 “Confirm Y =1 N=2” appears. Press 1 to confirm or 2 to keep Test 1 in
memory.
Replacing the Batteries
When the batteries are low or need to be replaced, a message displays on the
Radon Sentinel. The message will vary, depending upon whether an external
power source is used.
Low/No Battery! Battery does not have enough power for a 60-hour test.
Replace Battery! Replace the batteries as soon as convenient. Current test can
Shutting down... The system shuts down to save power.
No Extern. Power AC power should be connected to continue the test. At the
continue until complete if AC power is reliable. See Inserting
Batteries on page 3.
conclusion of the test, replace the batteries.
Use the instructions below to replace the batteries.
1 If a test is in progress, connect the AC power adapter or wait for the test to
complete.
2 Open battery compartments on right side panel and remove batteries.
3 Insert four fresh size C alkaline batteries. See Inserting Batteries on page 3.
9
Page 16
Connecting Radon Sentinel to Computer
Type A connector –
to computer
Type B connector –
to Radon Sentinel
Windows 7 system tray icon:
Safely Remove Hardware and
Eject Device
Connect the Radon Sentinel to a computer using the USB cable (furnished with
the device). Multiple radon monitors may be connected simultaneously using the
available USB ports on the computer, or using an external USB hub.
1 Connect the USB type A connector to the computer or USB hub.
2 Connect the USB type B connector to the Radon Sentinel.
Figure 7. USB Connectors
Note: If using multiple Radon Sentinels, the ‘Device Driver Installation
Wizard’ will run when each device is initially connected to the
computer. Accept the defaults for the installation. The device is ready
to use when ‘Ready to use’ appears in the system tray.
Disconnecting the Radon Sentinel
Windows 7
From the taskbar, click the icon to safely remove hardware and then click the
Radon Sentinel device. Then remove the USB connector from the computer.
Figure 8. System Tray Icon, Safely Remove Hardware
Windows 10
From the taskbar, click ‘Show hidden icons’ ^, then click the icon to safely
remove hardware. If the Radon Sentinel device is in the list, select it. If it is not in
the list, remove the USB connector from the computer.
10
Page 17
Radon Monitor Software
Save the file to the computer
About the Software
The Continuous Radon Monitor software can be used to:
• Enter parameters and transfer those parameters to the Radon Sentinel
• Transfer report data from the Radon Sentinel to the computer
•Add customer information and test conditions to a report
• Print reports on any available printer
System Requirements
• Ensure the computer meets the system requirements in Recommended
System Requirements on page 24.
• The user logged in to the computer must have administrative rights to
perform the installation.
Setting Up the Software
The software is available on the Sun Nuclear Radon Support website.
1 To download the software from the website, open an internet browser and
navigate to https://support.sunnuclear.com/radon
2 Under Radon Downloads, click the 1030 Software<version_number> and
download and Save the file. Make note of where you save the file.
.
3 Use the installation instructions below to install the software..
Note: The Radon Sentinel device drivers are installed automatically as
part of the software installation.
Installing the Software
When installing the Radon Monitor software on a computer running the Windows
7 or Windows 10 operating system, the software must be installed using the
Run as administrator option.
1 Connect the Radon Sentinel to the computer.
2 Right-click the Radon1030<version_number>.exe file (downloaded in
Setting Up the Software) and select Run as Administrator.
11
Page 18

3 The ‘Radon Monitor – InstallShield Wizard’ starts and checks for the
presence of Microsoft .NET Framework 4.0 on the computer.
• If Microsoft .NET Framework is present on the computer, continue to
step 4.
• If it is not found, a screen opens prompting for the installation. Click
Install. If prompted to reboot the computer when the Microsoft .NET
Framework installation completes, click YES. The software installation will
continue when the computer is restarted.
Note: Microsoft .NET Framework must be installed for the Radon
Monitor software installation to continue.
4 The ‘Radon Monitor – InstallShield Wizard’ welcome screen opens. Click
Next.
5 If the ‘Connect a Radon Monitor...’ dialog box opens:
• If your Radon Monitor is connected, click OK.
• If your Radon Monitor is not connected, connect it now, then click OK.
6 The License Agreement screen displays. Read and accept the terms of the
license agreement and click Next.
7 Follow the on-screen instructions to complete the software installation,
accepting the default folders and file locations.
8 When the ‘SNC Driver Installer’ window opens, click Next.
• A Windows Security prompt may appear asking for confirmation to install
the CDM Driver Package (this prompt will appear twice because two
drivers will be installed). Click Install.
• The device drivers are installed and then the driver status (‘Ready to use’)
displays in the system tray.
Note: Two device drivers are installed so the ‘SNC Driver Installer’ may
run twice.
9 When the drivers are installed, the ‘SNC Driver Installer’ window displays the
drivers that were installed. Click Finish. The ‘Radon Monitor - InstallShield
Wizard’ window displays.
10 Click Finish to exit.
12
Page 19

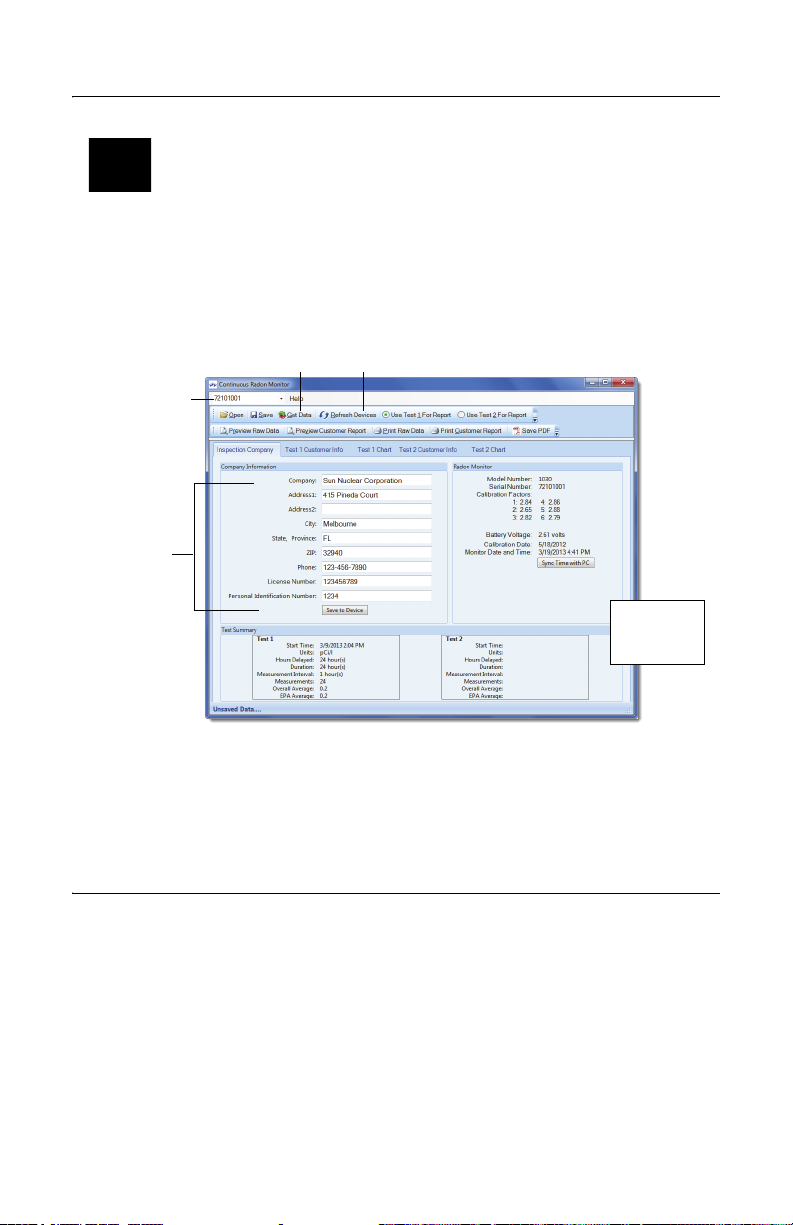
Launching the Software
Device serial
number – when
multiple monitors
are connected,
select a device
from the list
Toolbars
Company information
and PIN
Tabs
Launch the software application by double-clicking the Radon Monitor desktop
shortcut or by selecting Start > All Programs > Sun Nuclear > Radon
Monitor. The Radon Sentinel does not have to be connected when the software
is launched. For details about the software, see Software Setup, below.
Closing the Software
To close the Continuous Radon Monitor software, click the Close button in
the top right corner of the window.
Software Setup
Tabs on the main screen provide access the panels for setting up company
information, customer information, retrieving data, and generating reports. The
toolbars at the top of the screen offer buttons for performing functions when
working with data.
Configuring Company Information
The Inspection Company tab is used to enter or maintain details about an
inspection company. Upon initial use of a Model 1030 Radon Sentinel, this tab is
used to configure information such as the name of the inspection company,
address, phone number, etc. The information entered on this screen is uploaded
to the Radon Sentinel, and is used in reports.
Figure 9. Main Screen, Inspection View
13
Page 20

Note: The only data required on the Company Information panel is the
Personal Identification Number (PIN). By default, the PIN is set to
1111.
The company name, address, telephone number, and license number are
optional; however, if this information is not entered, reports that are generated
using the Continuous Radon Monitor software will not display the company
information.
1 Connect the Radon Sentinel to the computer and then start the Continuous
Radon Monitor software.
2 If more than one device is connected, select the device to work with from
the drop-down list above the toolbar.
3 Enter the company name, address, telephone number and license number.
The following characters can be used when configuring company
information (with the exception of the Personal Identification Number):
(space) ! “ # $ % & ‘ ( ) * + , - . / 0 1 2 3 4 5 6 7 8 9 : ; < = > ? @ [ \ ] ^ _ ‘
Upper and lower case alpha characters, A-Z, a-z
Note: We recommend entering a Personal Identification Number
(PIN) to protect the data from interference by parties other than the
radon tester. If the default PIN (1111) is used, changes can be made
to settings on the Radon Sentinel without entering a PIN.
4 If desired, change the Personal Identification Number. The PIN must consist
of four digits using any combination of the numbers 1 through 6. (If the PIN
is lost or forgotten, see Lost PIN Recovery on page 7.)
5 After entering data, click Save to Device to initiate the data transfer to the
Radon Sentinel.
• If invalid characters are entered for the PIN, an error message appears
stating that the Personal Identification Number did not save to the device.
•Click OK to close the error message, enter a four-digit PIN using only the
numbers 1 through 6, and then click Save to Device.
Editing Company Information
1 Connect the Radon Sentinel to the computer and start the Continuous Radon
Monitor software.
2 If more than one device is connected, select the device to work with from
the drop-down list above the toolbar and then click Get Data.
3 Make any necessary changes and then click Save to Device to transfer the
data to the Radon Sentinel.
14
Page 21
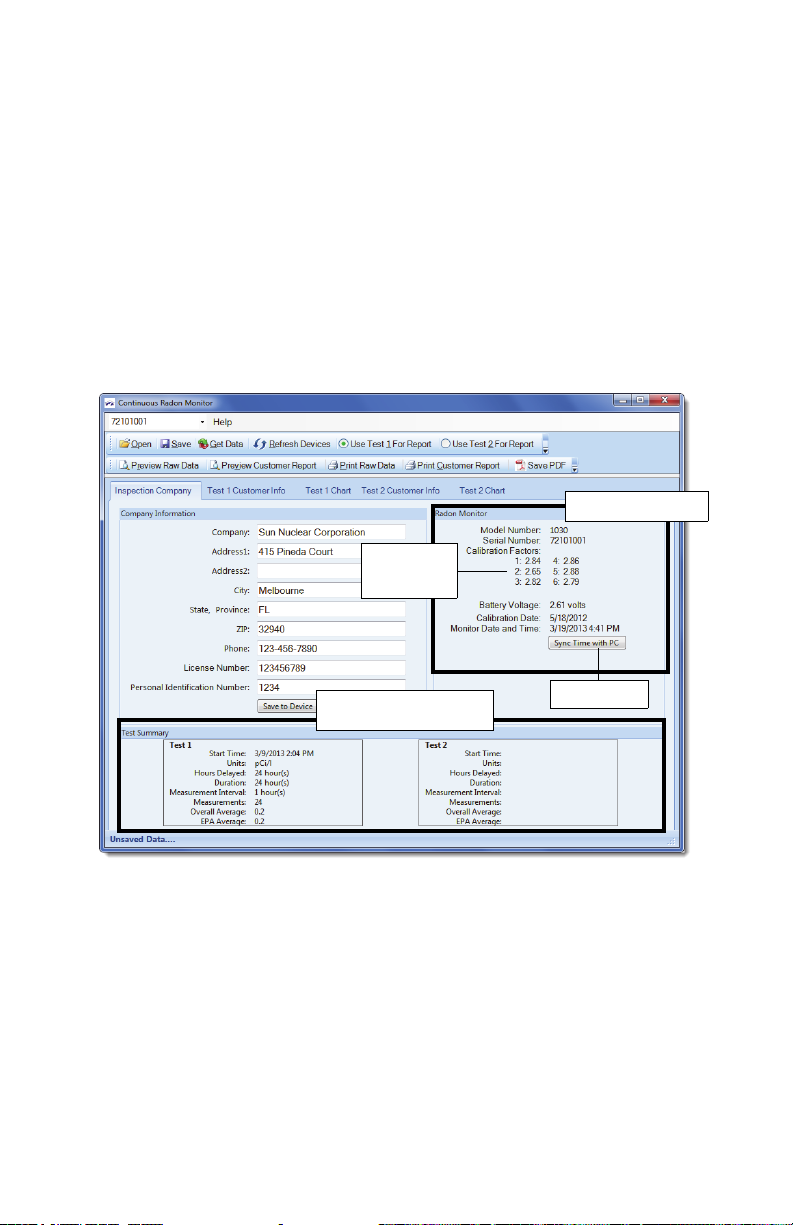
Radon Monitor Details
Device information
Factory-set
calibration
factors
Test data downloaded from
the Radon monitor
Sync time
The Inspection Company tab displays details about the Radon Sentinel: model
number, serial number, calibration factors (determined during factory calibration),
battery voltage, calibration date, and the date and time from the Radon Sentinel.
This view can also be used to synchronize the date and time from the computer
with the Radon Sentinel.
The data in this panel cannot be edited.
1 Connect the Radon Sentinel to the computer and start the Continuous Radon
Monitor software.
2 If more than one device is connected, select the device to work with from
the drop-down list above the toolbar and then click Get Data.
Information about the selected radon monitor displays.
Figure 10. Radon Monitor Information
3 To synchronize the time on the Radon Sentinel with the time on the
computer, click Sync Time with PC.
15
Page 22
Retrieving Data From the Monitor
Device serial
number
Get Data
Refresh Devices
Company
information,
entered in
software and
saved to
device
Data retrieved
from Radon
Monitor
Note: To retrieve data from the Radon Sentinel, the display on the unit
should show READY TO TEST, TEST COMPLETE, or MEMORY FULL.
1 Connect the Radon Sentinel to the computer and launch the Continuous
Radon Monitor software. The serial number of the device appears in the text
box above the toolbar when the monitor is detected.
Tip: If the Radon Sentinel is not automatically detected by the software, click
Refresh Devices.
2 On the software toolbar, click Get Data to synchronize the data on the Radon
3 The software retrieves the data from the Radon Sentinel.
Displaying Test Summary Data
The Test Summary panel displays a summary of downloaded data. If two tests
were in memory on the Radon Sentinel, the software displays both sets.
The data cannot be edited; however, you can indicate the presence of a
mitigation system and whether or not that system is working. See Setting Up
Customer Information on page 17.
1 Connect the Radon Sentinel to the computer and then start the Continuous
Figure 11. Continuous Radon Monitor Main Screen
Sentinel with the software.
Radon Monitor software.
16
Page 23

2 If more than one device is connected, select the device to work with from
Transfer billing information to
Inspection Site Address
Indicate if a mitigation system
is installed/working
Test 1
Customer Info
After importing photos, click on a
photo to exclude from report;
click again to include the photo
Click to navigate
to location of
photographs
the drop-down list above the toolbar and then click Get Data.
A summary of any downloaded tests appears in the Test Summary panel on
the Inspection Company tab.
Start Time Date and time the test started. The time shown will be the time the
Units
Hours Delayed Number of hours, if any, that the start of the test was delayed.
Duration Length of the test, in hours:
Measurement
Interval
Measurements The number of measurements taken during the test.
Overall Average The average of radon concentration over the entire test.
EPA Average The radon concentration average, less the first 4 hours of data.
actual measurement begins.
The units selected for the test: pCi/l or Bq/m
Length of time between consecutive measurements
3
.
Setting Up Customer Information
Details such as a customer’s name and billing/site information for a test are
entered using the Test 1 or Test 2 Customer Info tabs. This information is included
on the customer report.
1 After downloading test data, click the Test 1 Customer Info tab. Two panels
display.
Figure 12. Entering Customer and Site Information
•In the Customer Billing Address panel, enter the name, address, and
phone number to which the test will be billed.
• If the inspection site address is the same as the billing address, click the
double arrow between the panels to copy Customer Billing Address
information to Inspection Site Address panel. Otherwise, complete the
Inspection Site Address panel with the information for the site tested.
17
Page 24

2 If a radon mitigation system was installed at test site, select the check box
Check or uncheck
boxes to customize
the chart display
associated with Mitigation System Exists? If a radon mitigation system was
working, select the check box associated with Mitigation System Working?
3 To add photo(s):
a. Enter an optional caption in the Picture Caption text box. Note that the
first image imported will appear on the cover page of the report.
b. Click the browse button and navigate to the location of the photo.
c. Select a photo and click Open. Photos cannot be deleted or edited,
however they can be excluded from a report by clicking the thumbnail of
the photo (click again to include).
Tip: Photos are not saved with raw data, so to remove unwanted photos,
save, close, reopen the saved file, and then add the desired photos.
4 If two tests were downloaded, click the Test 2 Customer Info tab and then
repeat steps 1 through 3 for the second test.
Test Chart Views
The Test 1 Chart and Test 2 Chart tabs show a chart or graph of the test results.
The chart is included in the test report. If two tests are downloaded from the
Radon Sentinel, Test 1 Chart will display the data for test 1 and Test 2 Chart will
display the data for test 2. Use the instructions below for viewing the chart data.
1 After downloading test data, click the Test 1 Chart tab.
2 Select Test 1 Chart in the navigation panel.
Figure 13. Test 1 Chart Example
• Left scale indicates the Radon concentration in the units selected for the
test: pCi/l or Bq/m3.
• Right scale shows temperature (in C or F), pressure (inHg or kPa), and
percent relative humidity, depending on the units selected for the test.
• Horizontal scale shows date and time range for the test. If test duration
was one day or less, scale shows hourly increments.
18
Page 25

• Check boxes below the chart can be used to select the components that
are visible in the chart.
Radon <pCi/l or Bq/m3> Displays radon measurements graph line for the
Motion Errors Displays vertical motion error lines (motion errors
Action Level <nn pCi/l or
Bq/m3>
Temperature <C or F> * Displays temperature graph line in units selected for
Press <units> * Displays pressure graph line in units selected for test.
Rel % Humidity Displays relative percent humidity graph line.
* The parameters selected on the Radon Sentinel (pCi/l or Bq/m3) determine the
units used for temperature, pressure, and humidity.
duration of the test.
occur when device is moved during the test).
Displays a horizontal line indicating the point at which
radon test passes or fails (defaults to 4 pCi/l or 148
Bq/m3). If the average is above the red line, the test
fails; if it is below the line, the test passes. If the
default setting does not match the regulatory level in
your jurisdiction, deselect the checkbox to hide it.
test.
Saving a Test
Data retrieved from the monitor can be saved to a .txt file. Note that if two tests
are retrieved, data for both tests are saved in the same .txt file.
1 Retrieve data from the monitor. See Retrieving Data From the Monitor on
page 16.
2 On the toolbar, click Save.
3 When the ‘Select Folder and Filename’ window opens, browse to the
directory where the file will be saved, enter a file name or accept the default,
and then click Save.
• By default, the software creates a folder for saved data in My Documents:
Completed Tests.
•If a billing address was entered for the test, the file name will default to
<Address1>_mmddyyyy.txt.
For example, if 123 Main St is entered in the Address1 field for the billing
address for a report, and the report is saved on 12/15/2011, the report
name defaults to: 123 Main St_12152011.
• After test data is saved, the status bar at the bottom of the Continuous
Radon Monitor window displays the name of the saved file.
Opening a Saved File
Note: Saved files can only be opened using the same date and time
formats that were in use when the data was saved. For example:
When the data was saved, if the date format was set to mm/dd/yyyy
and the time format was h:mm:ss:tt, the file can only be opened on
a computer configured with the same settings.
19
Page 26

1 Launch the Continuous Radon Monitor software.
2 On the toolbar, click Open.
3 When the ‘Open Past Inspection’ window displays, browse to the directory
where the text files are stored, select the desired file, and then click Open.
The data is populated in the software.
Previewing and Printing Test Data
Raw data is the test data that is downloaded from the Radon Sentinel and saved
to a *.txt file on the computer. Previewing and printing the raw data requires that
the test results be saved to a file.
Previewing Raw Data
The .txt file can be opened in a viewer by clicking Preview Raw Data on the
Continuous Radon Monitor software toolbar. The data in the .txt file is used to
create a report. Raw data cannot be edited. See Saving a Test on page 19.
1 Download test data and save it (see Saving a Test on page 19), or open a
saved file (see Opening a Saved File on page 19).
2 Click Print Raw Data. The data opens in a separate ‘Print Preview’ window.
Use the toolbar buttons to view the data.
Maximize window View the window in full screen mode.
Zoom Increase or decrease the magnification of text (Auto, 500%,
Page layouts One page, Two pages, Three pages, Four pages, Six pages –
Close Close the preview window.
Pages (right side) Scroll through the pages using the up/down arrows.
200%, 150%, 100%, 75%, 50%, 25%, 10%)
select the number of pages to fit in a single window
Figure 14. Previewing Raw Data
Printing Raw Data
Raw test data that has been downloaded and saved can be printed to a local
printer or a network printer.
1 Download test data and save it (see Saving a Test on page 19), or open a
saved file (see Opening a Saved File on page 19).
2 On the toolbar, click Print Raw Data.
20
Page 27

3 The ‘Print’ dialog opens with your default printer selected. Configure printer
properties if necessary and click OK.
Customer Reports
Data that has been downloaded and saved is used in the customer report, and
can be used to create a PDF of the customer report.
Previewing Reports
The Preview Customer Report option opens a window so you can view the report
before printing it. Data from the Radon Sentinel must be saved before previewing
the report. A report contains the following elements:
• Cover page image, if specified in the Customer Information tab. See Setting
Up Customer Information on page 17.
• Customer and site information, if configured. See Setting Up Customer
Information on page 17.
• Inspection company information. See Setting Up Customer Information on
page 17.
• Information identifying the device used for the test (model, serial number,
calibration date, calibration factors, start time for the test, units specified for
the test, delay, duration, measurement interval, number of measurements,
the overall average, and the EPA average).
• A chart of the data collected.
• Radon risk information.
• Any photos that were added on the Customer Info tab. See Setting Up
Customer Information on page 17.
The number of pages in the report will depend on the options configured for the
report.
1 Download test data and save it, or open a saved file.
2 On the toolbar, if there are two reports open, select the radio button for the
test to be printed: Use Test 1 For Customer Report or Use Test 2 For
Customer Report.
3 Configure the customer information and import photos if desired.
4 Click Preview Customer Report. The selected report opens in a new window
(Figure 15 on page 22). The viewer’s toolbar offers viewing options.
Maximize window View the window in full screen mode.
Zoom Increase or decrease the magnification of text (Auto, 500%,
Page layouts One page, Two pages, Three pages, Four pages, Six pages –
Close Close the preview window.
Pages (right side) Scroll through the pages using the up/down arrows.
200%, 150%, 100%, 75%, 50%, 25%, 10%)
select the number of pages to fit in a single window
21
Page 28

Printing Reports
Select Test 1
or Test 2 data
Data opens in new
window
Maximize
window
Toolbar for
viewing report
1 Download test data and save it or open a saved file.
2 On the toolbar, if there are two reports open, select the radio button for the
3 Configure the customer information and import photos if desired.
4 Click Print Customer Report.
5 In the ‘Print’ dialog, select the printer to use and configure printer properties
6 Click OK.
Saving as PDF
To save report data with imported images, save the report as a PDF file.
1 Download test data and save it, or open a saved file.
2 On the toolbar, if there are two reports open, select the radio button for the
3 Configure the customer information for the report.
4 Click Print Customer Report. The ‘Print’ screen opens in a new window.
5 In the Printer Name drop-down list, select the printer to use:
6 In the ‘Save PDF File As’ screen (Adobe Acrobat) or ‘Save Print Output As’
Figure 15. Preview Report
test to print: Use Test 1 For Customer Report or Use Test 2 For Customer
Report.
if necessary.
test to print: Use Test 1
For Customer Report or Use Test 2 For Customer
Report.
• Using Adobe Acrobat: select Adobe PDF, then click OK.
• Using Microsoft Print to PDF: select Microsoft Print to PDF, then click OK.
screen (Microsoft Print to PDF), select the location to save the file, enter a
file name, and click Save.
22
Page 29

Specifications
Model 1030 Radon Sentinel Specifications
Description Value
Measurement Range 0.1 to 9999 picocuries/liter (pCi/l) or 1 becquerels per cubic
Accuracy ±20% or 1 pCi/l, whichever is greater after 24 hours
Detector • 6 diffused-junction photodiodes
Measurement Interval 0.5, 1, 2, 4, 8, 12, 16, 20 or 24-hour intervals, selectable by
Test Duration 1, 12, 24, 36, 48, 60, 72, 84, 96, 100, 999 hours, selectable by
Sensitivity 15 counts per hour per picocurie per liter (cph/pCi/l)
Display 16-digit reflective LCD display
Status Light Green LED (light emitting diode) indicates USB to PC
Keypad 6-digit membrane switches with multiple functions
Disturbance Sensor Inertial switch; report shows “M” for motion
Environmental sensors • Temperature: 0 to 120 ± 2 degrees F
Operating Environment • 45 to 95° F (7 to 35° C)
Storage Environment • –22 to 122° F (–30 to 50° C)
USB Data Port USB connector allows two-way communication with PC
Power Supply 110-240 VAC 50-60 Hz converted to 5 VDC 500 mA USB
Battery Power/Backup Four size C alkaline (non-rechargeable) batteries supply 300+
Tripod threaded fitting Standard 1/4-20 UNC threaded fitting on bottom of case
Handle Integrated handle for carrying or for use with cable lock
Weight 3.75 lbs (1.7 kg)
Dimensions 5.5 W x 9.6 H x 4.4 D inches; (139.7 x 243.84 x 111.76 mm)
meter (Bq/m
(kBq/m
• Active volume: 9.4 cm
• Dome volume: 63 cm
user
user (maximum of 1000 measurements)
connection
• Pressure: 517 to 775 ± 25 mmHg
• Humidity: 20 to 90% relative humidity ± 5%
• 20 to 90% relative humidity, non-condensing
• 10 to 90% relative humidity, non-condensing
connection/power adapter
hours of operation when AC power is not connected.
3
) to 99.99 kilo becquerels per cubic meter
3
)
3
3
-18 to 49 ± 1 degree C)
69 to 104 kPa +/- 3 kPa
23
Page 30

Recommended System Requirements
Characteristic Recommendation
Operating system Windows 7 or Windows 10 (32-bit or 64-bit)
Note: Windows XP is not recommended since Microsoft and Sun
Nuclear no longer support it.
Computer hardware • Hard disk space: 850 MB
FTDI driver Version installed by the Model 1030 Radon Sentinel software as
Microsoft .NET
Framework
•CPU speed: 1.6 MHz
• Total physical memory (RAM): 512 MB
• Video card: 1024 x 768, 32-bit color depth
• USB version: 1 USB v2.0 port (minimum)
of date of this document: 2.08.24
Version 4.0
24
Page 31

Support and Maintenance
Maintaining Hardware
Parts and Repairs
Order accessories and replacement parts from Sun Nuclear Sales.
For part numbers, see Parts on page 1. For accessory part numbers, see Options
and Accessories on page 2.
There are no user-serviceable parts inside the Radon Sentinel. If there are
problems with the device, please contact Sun Nuclear Support. See Contacting
Sun Nuclear Support on page 28.
Storage
Store the Radon Sentinel in an indoor, protected environment. Do not store the
device in the trunk of a car for extended periods. Keep the device dry.
Cleaning
Clean the unit with a soft dry cloth. Do not use liquid cleaners, solvents, or
abrasives.
Disposal and Recycling
The instrument contains electrical components. In some countries the disposal
of electrical components is subject to special requirements. When the
components are no longer functional or are otherwise ready to be discarded,
recycle or dispose of them according to local waste management or recycling
regulations.
Do not throw in trash; dispose of in an environmentally friendly way.
Battery Life
Any type of size C battery will operate the radon monitor. Alkaline batteries
generally provide a good balance between long life and cost; lithium-ion batteries
tend to be more expensive but last longer. Since battery capacity varies widely
between types of batteries and even between individual batteries of the same
type, the predicted battery life of 300+ hours using fresh alkaline batteries is only
an estimate. An individual unit may have longer or shorter life.
Maintaining Software
The Radon Sentinel software downloaded from the Radon Support website is the
latest released version. However, upgrades or patches may become available
later. These upgrades can also be downloaded from the Sun Nuclear Radon
Support website. For more information, see Support Website on page 28.
25
Page 32

Verifying Software Version
1 Launch the Continuous Radon Monitor software.
2 Connect to the radon monitor.
3 Select Help > About from the menu. The About Radon Monitor message
displays the version number of the software.
Removing Software
To remove the Continuous Radon Monitor software from the computer, use the
instructions below for the operating system installed on the computer.
Windows 7
1 Click Start > Settings > Control Panel then select Programs and Features.
2 In the list of installed programs, select Radon Monitor and then click the
Uninstall button.
Windows 10
1 Click Start > Settings > System then select Apps & features.
2 In the list of installed programs, select Radon Monitor and then click the
Uninstall button.
Alternately, in the ‘Apps & features’ pane, type radon in the search field and
click Enter. When Radon Monitor displays, click it, then click the Uninstall
button.
Radon Monitor software can also be removed using the Control Panel
Programs and Features.
Multiple Software Installations
• Two or More Radon Sentinel Units – The Continuous Radon Monitor
software only needs to be installed on a computer one time, regardless of
the number of radon monitor units being used with that computer.
When connecting to a radon monitor, the software identifies the serial
number of the connected radon monitor and creates a unique serial number
directory for each radon monitor instrument. During measurement, the setup
template includes the serial number, which is validated against the radon
monitor instrument communicating data to the PC.
• Two or More Computers – If you have more than one computer, the radon
monitor software may be installed on each.
26
Page 33
Service and Calibration
WARNING: The unit contains high-voltage circuits. Do not open the
case. There are no user-serviceable parts inside.
For service or calibration, the unit must be returned to Sun Nuclear Corporation.
The recommended calibration frequency for the Model 1030 Radon Sentinel is
one year. See your State or Proficiency listings for requirements.
Troubleshooting
Table 2. Model 1030 Radon Sentinel Troubleshooting
Indication Probable Cause Recommended Action
Unit will not turn onPower not connected and batteries are
Unit will not turn
on with power
connected or good
batteries
System error
message
Radon Sentinel
serial number not
displayed in
software
Display shows
“Motion Detected”
but motion not
recorded on report
Display shows
alternating
“INVALID TST
DATA” and test
status messages
Software error
message
missing or discharged.
Internal short or disconnection. Contact Sun Nuclear
Radon monitor experienced an
abnormal condition.
Radon monitor not detected by the
software
Test interrupted before being
completed. Motion occurred as test
was terminated.
Device is in need of service. Contact Sun Nuclear
Error messages display when starting
the Continuous Radon Monitor
application or when retrieving data
from the Radon monitor:
• Humidity Sensor Error 1
• Pressure Sensor Out of Range
• Humidity Sensor Out of Range
• SPI Port Error
• Dead Channel
•Memory Error
• Test Interval Alpha Count Overflow
• Test Hourly Alpha Count Overflow
• High Voltage Out of Range
• Interboard comm error
Connect power and/or insert
four fully charged size C
alkaline batteries.
Support. Unit will need to be
returned.
See Radon System Error
Codes on page 28.
Click Refresh Devices. The
serial number displays when
the connection is detected.
Print results and count
number of measurements. If
less than expected, test
terminated prematurely.
Rerun test.
Support. See Contacting Sun
Nuclear Support on page 28.
Contact Sun Nuclear
Support. See Contacting Sun
Nuclear Support on page 28.
27
Page 34

Radon System Error Codes
An error message will appear on the Radon Sentinel display if the device
experiences an unusual system error. Normally this indicates a hardware or
firmware failure. Make a note of the 8-digit error code and then contact Sun
Nuclear Support for assistance. See Contacting Sun Nuclear Support on page 28.
Contacting Sun Nuclear Support
Visit the Sun Nuclear Radon website, https://support.sunnuclear.com/radon for
links to product information, including instructional videos and Radon FAQs,
Calibration and Repair services, Online RMA form, Support, Downloads and
useful links.
To view product information or to download product assets, click the links under
Radon Downloads.
If you need additional assistance, you may request support in two ways:
•Customers without a current support/maintenance agreement can submit a
support request using our online form, or visit our FAQ page on the same
website, https://support.sunnuclear.com/radon.
•Customers with a current support/maintenance agreement also have the
option to contact the Sun Nuclear Support team by telephone:
+1 321-259-6862.
Support Website
Visit the Sun Nuclear Support website to request support via an online form.
1 Open an internet browser and navigate to
https://support.sunnuclear.com/radon
2 In the left panel, click Contact Support.
3 To open a new support case, click the New Case form link, enter your email
address and the serial number of any Sun Nuclear instrument used at your
facility, then click Log in to open the Support Dashboard.
.
Warranty
The Sun Nuclear Product Warranty can be found on the Sun Nuclear Radon
Support website, https://support.sunnuclear.com/radon
panel, click Sun Nuclear Warranty.
28
. Under Links in the left
Page 35
Regulatory Supplement
Sun Nuclear Corporation Symbols
The following symbols are used in this document and in Sun Nuclear
Corporation’s product labels.
WARNING: This symbol indicates a risk of electric shock.
WARNING: This symbol indicates a hazard that could result in major
injury or equipment damage.
CAUTION: This symbol indicates a potential hazard that could result in a
minor injury or equipment damage.
Note: Important or supporting information.
Manufacturer’s Identification (name and address).
Date of Manufacture.
Serial Number.
Catalog Number.
Consult instructions for use.
Do not throw in trash; dispose of in an environmentally friendly way.
29
Page 36

Operator Responsibility
This guide is intended for an operator who is experienced with the use of radon
detection devices. The operator of the device bears the full responsibility for
validating measurement results. The device and its accessories must not be used
for any purpose other than described in this guide. Violation may result in loss of
warranty.
Reporting Health or Safety Related Issues or Concerns
Should the need arise to report any safety or health related issues or concerns
regarding the use of Sun Nuclear products, Sun Nuclear should be contacted
directly. See Contacting Sun Nuclear Support on page 28.
Modifications to Equipment
Any changes or modifications to the device that are not expressly approved by
Sun Nuclear Corporation could void your warranty.
Interaction with Other Electrical Equipment
The device can only be connected to external computer equipment that is
compliant with IEC 60950-1, Safety of Information Technology Equipment.
30
Page 37

A
AC adapter, connecting
accessories
additional information
application help
on the web
application
B
batteries
inserting
replacing
battery
life
buttons, keypad
C
calibration
caution
high humidity may shorten battery life
character set
cleaning
clearing memory, from keypad
closing software
company information
configuring
editing
computer
recommended requirements
retrieving data from monitor
two or more
configure company information
connect
computer to radon monitor
power
controls
conventions
customer info test views
customer information
customer support, Radon
D
default PIN
description, radon monitor
disconnecting, USB cable
display
radon monitor data
turning on
display turns off
display values
EPA, AVG, CUR
2
iv
iii
3
9
25
27
14
25
13
14
3
5
29
7
4
4
iv
5
9
13
16
26
13
10
17
17
2
1
10
15
4, 5
8
Index
3
24
E
ending a test
EPA, AVG, CUR
error message
hardware
software
errors, system
H
humidity, affects battery
I
information
application help
installing, software
K
keypad, buttons
L
lost PIN
M
main screen
software, about
maintaining
hardware
software
monitor
two or more
O
open a saved file
operation, standalone
operator responsibility
options and accessories
P
parameters
configure using radon monitor keys
parts
personal identification number
7
PIN
default
lost
PIN, default
positioning the monitor
preview
raw data
print
raw data
report
R
Radon
customer support
8
8
27
27
28
3
iv
11
5
7
13
25
25
26
19
3
30
2
25
7
7
14
7
20
20
22
2
6
7
31
Page 38

radon monitor
AC power
battery
calibration
connecting power
description
details
disposal
intended use
introduction
parts
positioning
recycling
service
software
Radon Sentinel specifications
raw data
preview
print
repairs
report
print
reports
customer
preview
S
save a test
set up parameters
software
about
closing
error messages
inspection company view
installing
launching
main screen, about
multiple installations
4
requirements
27
1
15
25
1
7
25
27
11
20
20
25
22
21
21
19
11
13
11
13
3
3
iii
1
6
27
13
26
23
13
removing
requirements
retrieving data from monitor
upgrade
using
verifying version
specifications
technical
standalone operation
starting a test
status
checking
storage
support
request
symbol legend
synchronize time with computer
system errors
T
test
starting
terminating
test chart view
tripod, using
troubleshooting
two or more
computers
radon monitors
U
USB cable, disconnecting
using a tripod
W
warning
unit contains high-voltage circuits, do
website
radon
26
24
25
11
23
8
7
25
28
29
28
8
8
18
7
27
26
26
7
not open case
iv
16
26
3
15
10
27
32
Page 39

Page 40

Corporate Headquarters
3275 Suntree Boulevard
Melbourne, FL 32940 USA
+1 321 259 6862
www.sunnuclear.com
 Loading...