

Page 1
SDC Classic™
User Guide
240-050-989
OK
Page 2

Page 3

Contents
Warnings and Cautions .................................................... 3
Symbols and Definitions .................................................. 5
Product Description/Intended Use ........................... 7
Indications/Contraindications .................................................7
Operator Prole .......................................................................7
Package Contents ................................................................... 8
Accessories ............................................................................. 8
System Overview ....................................................................9
Setup and Interconnection .......................................... 13
Connecting a Printer .............................................................15
Operation ................................................................................ 17
Powering the System On and Off .........................................17
Starting a New Case .............................................................17
Capturing Images .................................................................. 17
Recording Video ....................................................................17
Saving Images and Videos .................................................... 17
Printing Images .....................................................................18
Editing Device Settings .........................................................19
Troubleshooting .................................................................. 23
Cleaning and Maintenance .......................................... 25
Cleaning ................................................................................25
Maintenance .......................................................................... 25
Disposal ................................................................................25
Technical Specifications ............................................... 26
Environmental Specications ................................................26
Electromagnetic Compatibility .................................. 29
Warranty .................................................................................. 34
Return Policy ......................................................................... 35
Page 4

Page 5

3
Warnings and Cautions
Please read this manual and follow its instructions carefully. e words warning,
caution, and note carry special meanings and should be carefully reviewed:
Warning Warnings indicate risks to the safety of the patient or user. Failure
to follow warnings may result in injury to the patient or user.
Caution Cautions indicate risks to the equipment. Failure to follow
cautions may result in product damage.
Note Notes provide special information to clarify instructions or present
additional useful information.
Warning To avoid potential serious injury to the user and the patient
and/or damage to this device, the user must obey the following
warnings:
1. Federal law (United States of America) restricts this device to use by, or
on order of, a physician.
2. Read this operating manual thoroughly and be familiar with its contents
prior to setting up or using this equipment.
3. Carefully unpack the unit and check for any damage that may have
occurred during shipment. If damage is detected, refer to the “Service
and Claims” section in this manual.
4. Use of this device is restricted to qualied health care professionals who
have a complete knowledge of the use of this equipment and the devices
to which it can be connected.
5. Test this equipment prior to using it in a surgical procedure. is unit
was fully tested at the factory before shipment; however, it must be
tested for proper function in the environment and setup conguration
in which it will be used.
6. To avoid risk of electric shock, use only a hospital-grade power cord
furnished with the unit. Disconnect the unit from the power supply to
make connections or to inspect the equipment.
7. Install this device in an operating room that complies with all applicable
IEC, CEC, and NEC requirements for safety of electrical devices.
8. Use only clean, dry, undamaged Stryker brand media. e use of
damaged, wet, or incompatible media will void the warranty and may
result in the malfunctioning of this equipment.
9. Unplug the power cord from the mains outlet before making any
connections.
Page 6

4
10. Ensure that all equipment connected to the SDC Classic™ has proper
isolations.
11. To avoid risk of re, do not use this device in the presence of ammable
anesthetics.
12. Avoid direct exposure to the laser beam of the DVD/CD drive, as it is
harmful to the eyes.
13. Pay close attention to the care and cleaning instructions in this manual.
Failure to follow these instructions may result in product damage.
14. Attempt no internal repairs or adjustments not specically detailed in
this operating manual. Refer any readjustments, modications, and/or
repairs to Stryker Endoscopy or its authorized representatives.
e warranty is void if any of these warnings are disregarded.
Page 7
5
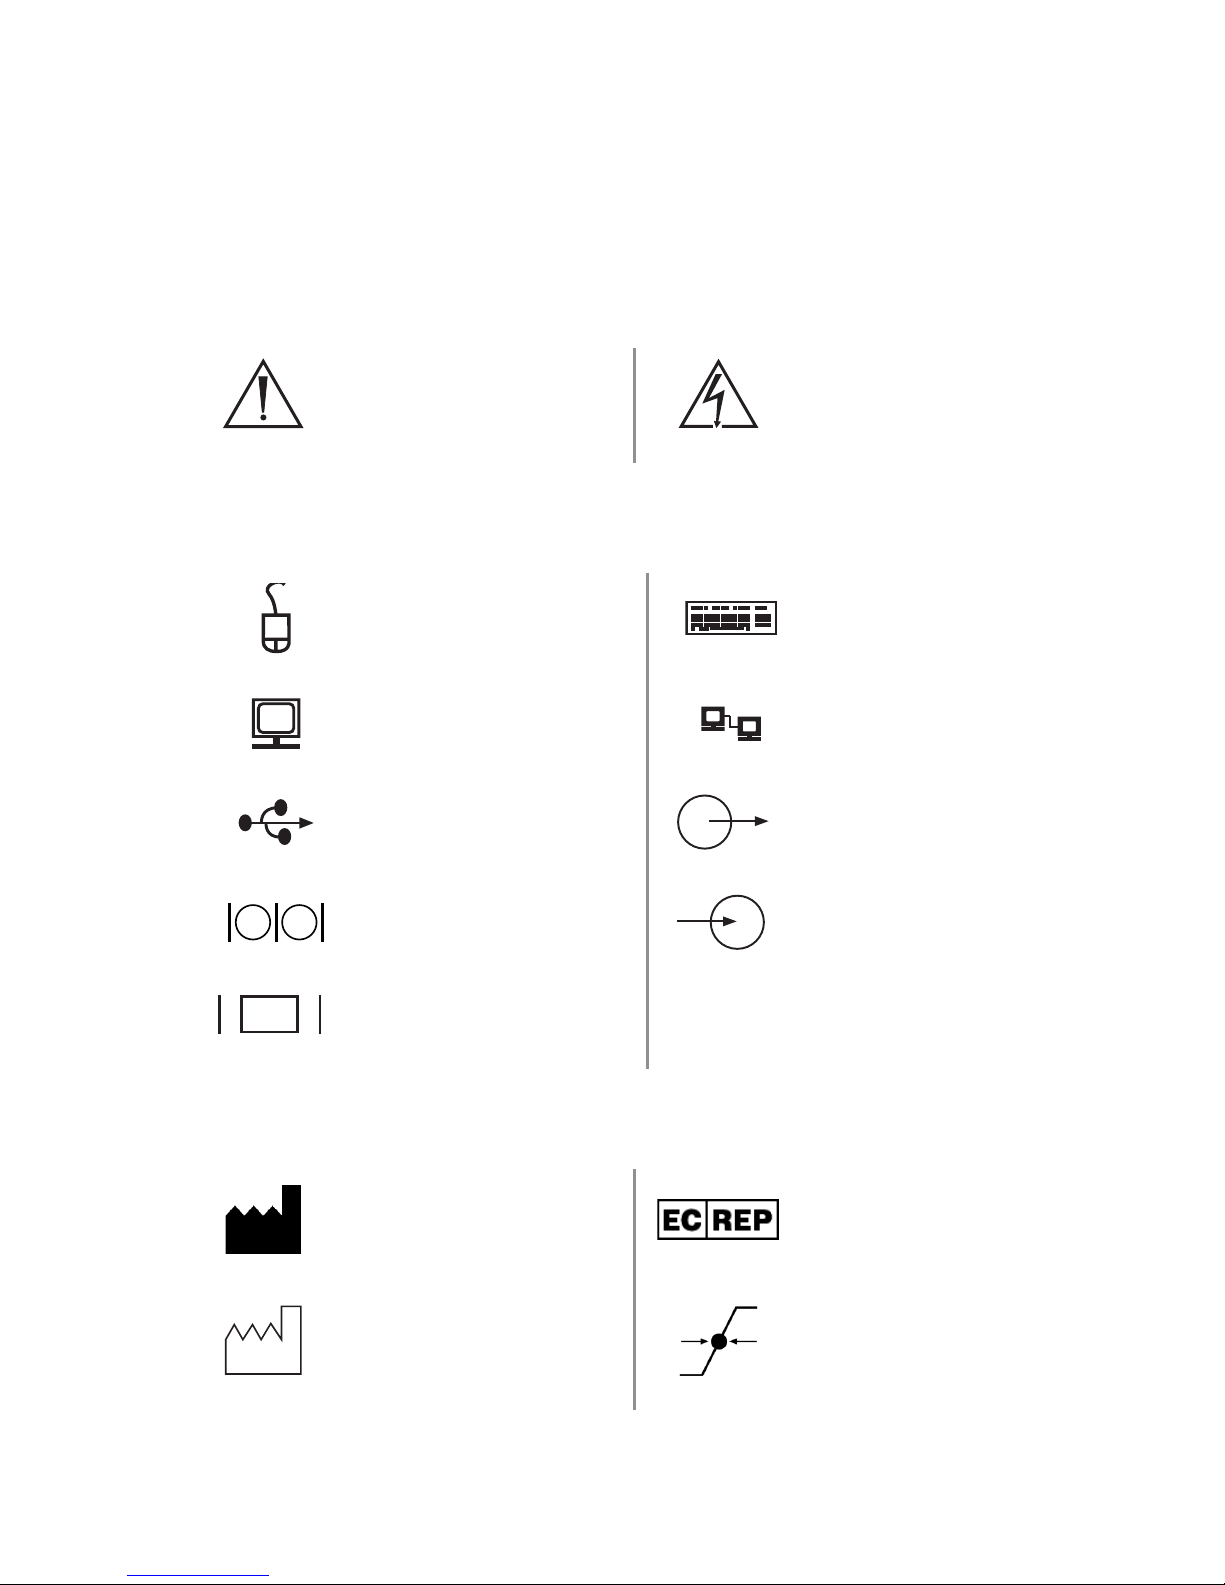
Symbols and Definitions
is device and its labeling contain symbols that provide important information
for the safe and proper use of the device. ese symbols are dened below.
Warning Symbols
Warning/Caution: See
Instructions for Use
Hazardous voltage
present
Device Symbols
Mouse Keyboard
Monitor Network
USB Out
Serial port In
VGA/Monitor
Packaging/Labeling Symbols
Legal manufacturer
Authorized
representative in
Europe
Date of manufacture
Atmospheric
pressure range
Page 8
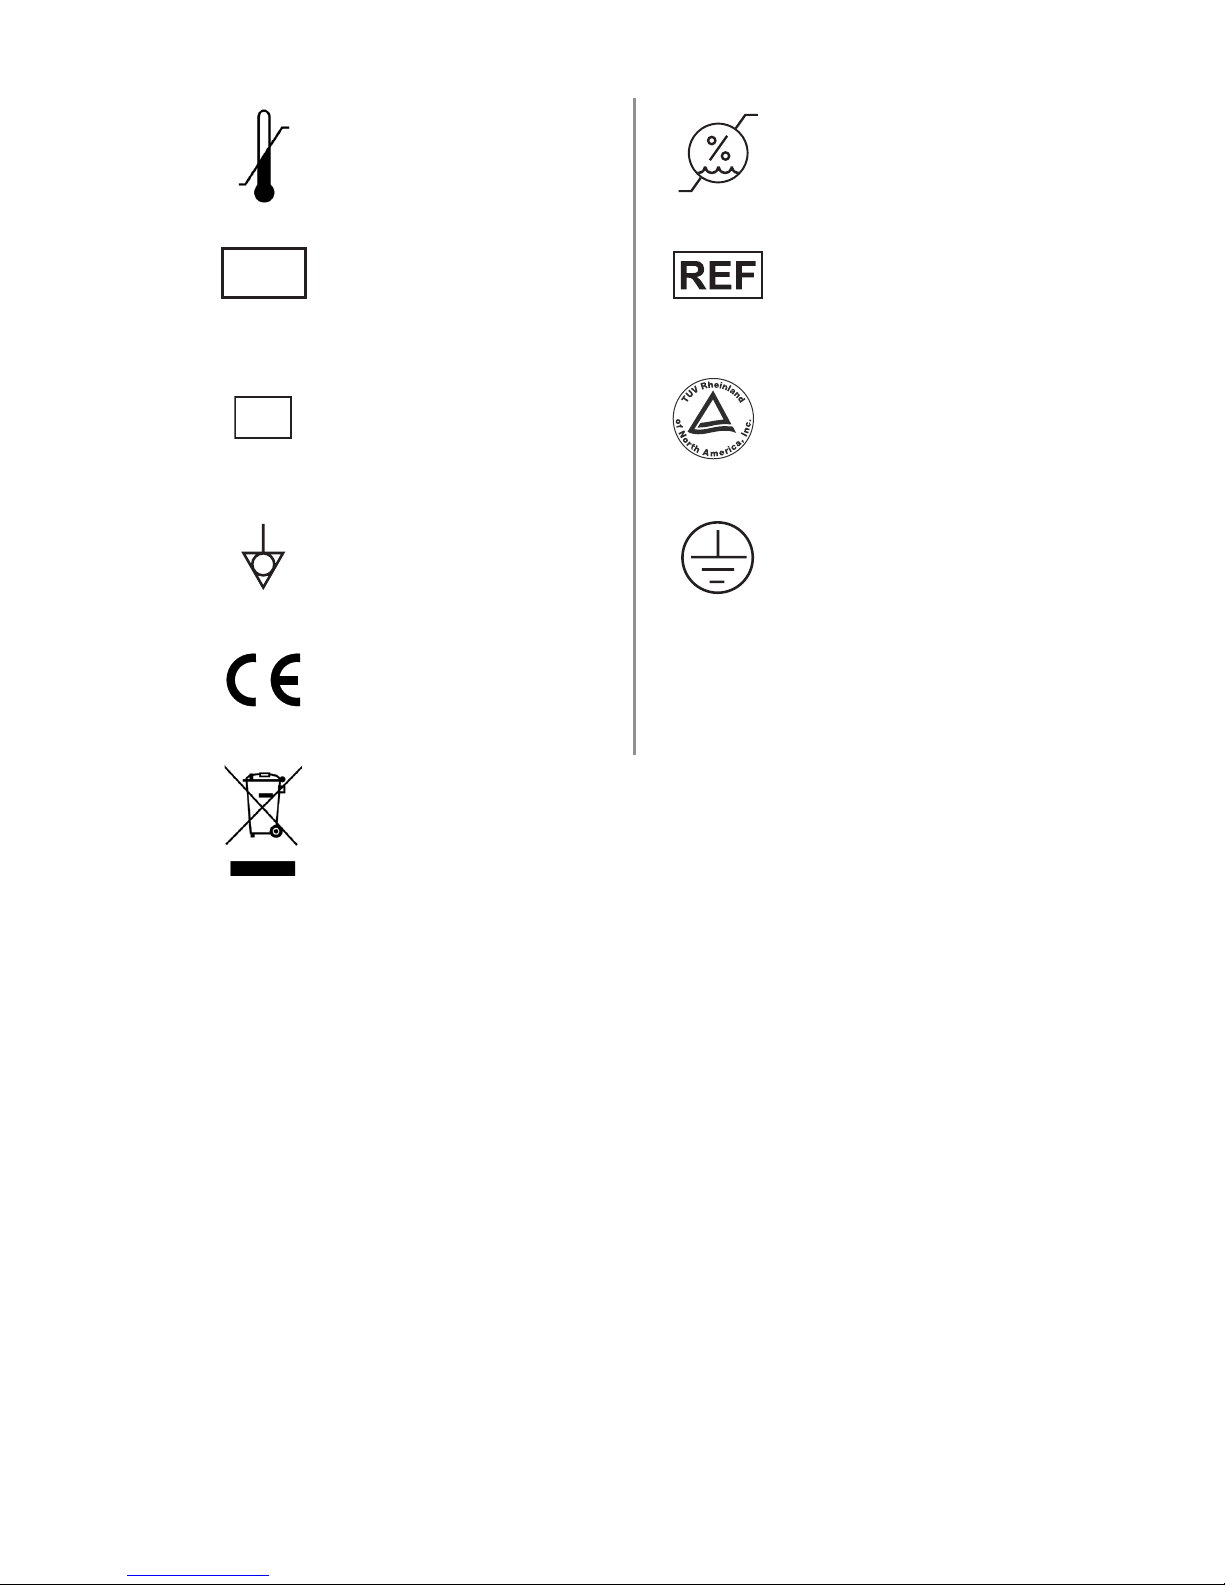
6
Ambient temperature
range
Relative humidity
range
LOT
Lot number
Product number
SN
Serial Number
U
S
C
Denotes compliance
to CSA C22.2 No.
601.1-M90, and UL
2601-1.
Equipotentiality
Protective earth
ground
Denotes compliance to
93/42/EEC, Medical
Device Directive
is product contains electrical waste or electronic equipment.
It must not be disposed of as unsorted municipal waste and
must be collected separately.
Page 9

7
Product Description/Intended Use
e Stryker Digital Capture Classic (SDC Classic™) is a computer-based unit that
records, manages, and archives digital images and videos of surgical procedures.
e SDC Classic simplies le management by recording surgical photos and
videos to compact digital media, such as CDs, DVDs, Compact Flash Cards, USB
Hard Drives, or USB dongles, for later viewing on a personal computer, a DVD
player, or from the SDC Classic itself.
e SDC Classic records images on a built-in hard drive, where they can be easily
accessed aer the surgical procedure. e images stored on the hard drive can be
named and burned to a CD or DVD through a control panel located on the front
of the unit.
In addition to the control panel, the SDC Classic can be controlled by a hand-
held remote control, buttons located on the surgical camera head, or the SIDNE®
voice-activation system.
Indications/Contraindications
e SDC Classic™ is indicated for use with compatible endoscopic cameras or
other medical devices that output a standard video signal. e SDC Classic
can be used in general laparoscopy, nasopharyngoscopy, ear endoscopy,
sinuscopy, and plastic surgery wherever a laparoscope/endoscope/arthroscope
is indicated for use. (A few examples of the more common endoscopic surgeries
are laparoscopic cholecystectomy, laparoscopic hernia repair, laparoscopic
appendectomy, laparoscopic pelvic lymph node dissection, laparoscopically
assisted hysterectomy, laparoscopic and thorascopic anterior spinal fusion,
anterior cruciate ligament reconstruction, knee arthroscopy, shoulder
arthroscopy, small joint arthroscopy, decompression xation, wedge resection,
lung biopsy, pleural biopsy, dorsal sympathectomy, pleurodesis, internal
mammary artery dissection for coronary artery bypass, coronary artery bypass
graing where endoscopic visualization is indicated, and examination of the
evacuated cardiac chamber during performance of valve replacement.
ere are no known contraindications.
Operator Profile
e users of SDC Classic are general surgeons, gynecologists, cardiac surgeons,
thoracic surgeons, plastic surgeons, orthopedic surgeons, ENT surgeons,
urologists and operating room nurses.
Page 10

8
Package Contents
Carefully unpack the SDC Classic and verify that all components have been
received intact. You should receive:
105-033-001 (1) Medical grade power cord
105-198-707 (1) 6-foot DVI-I cable
105-187-988 (1) 6-foot USB cable
105-198-102 (1) Blank DVD+RW
1000-401-087 (1) User guide
Save all packing materials for future storage or transport.
Accessories
e following accessories are available for purchase separately:
240-080-211 HP D5460 Photosmart Printer Kit
240-050-891 Multi-card reader with media
(256MB Compact Flash card, 256MB multi-media card,
256MB Sony memory stick)
240-050-902 USB 2.0 hard drive, 60GB
240-050-893 USB 2.0 hard drive, 512MB
240-050-840 VGA cable kit (6-foot VGA cable and DVI-VGA adapter)
240-050-845 DVI cable kit
105-208-352 SDC Classic remote control
Page 11
9
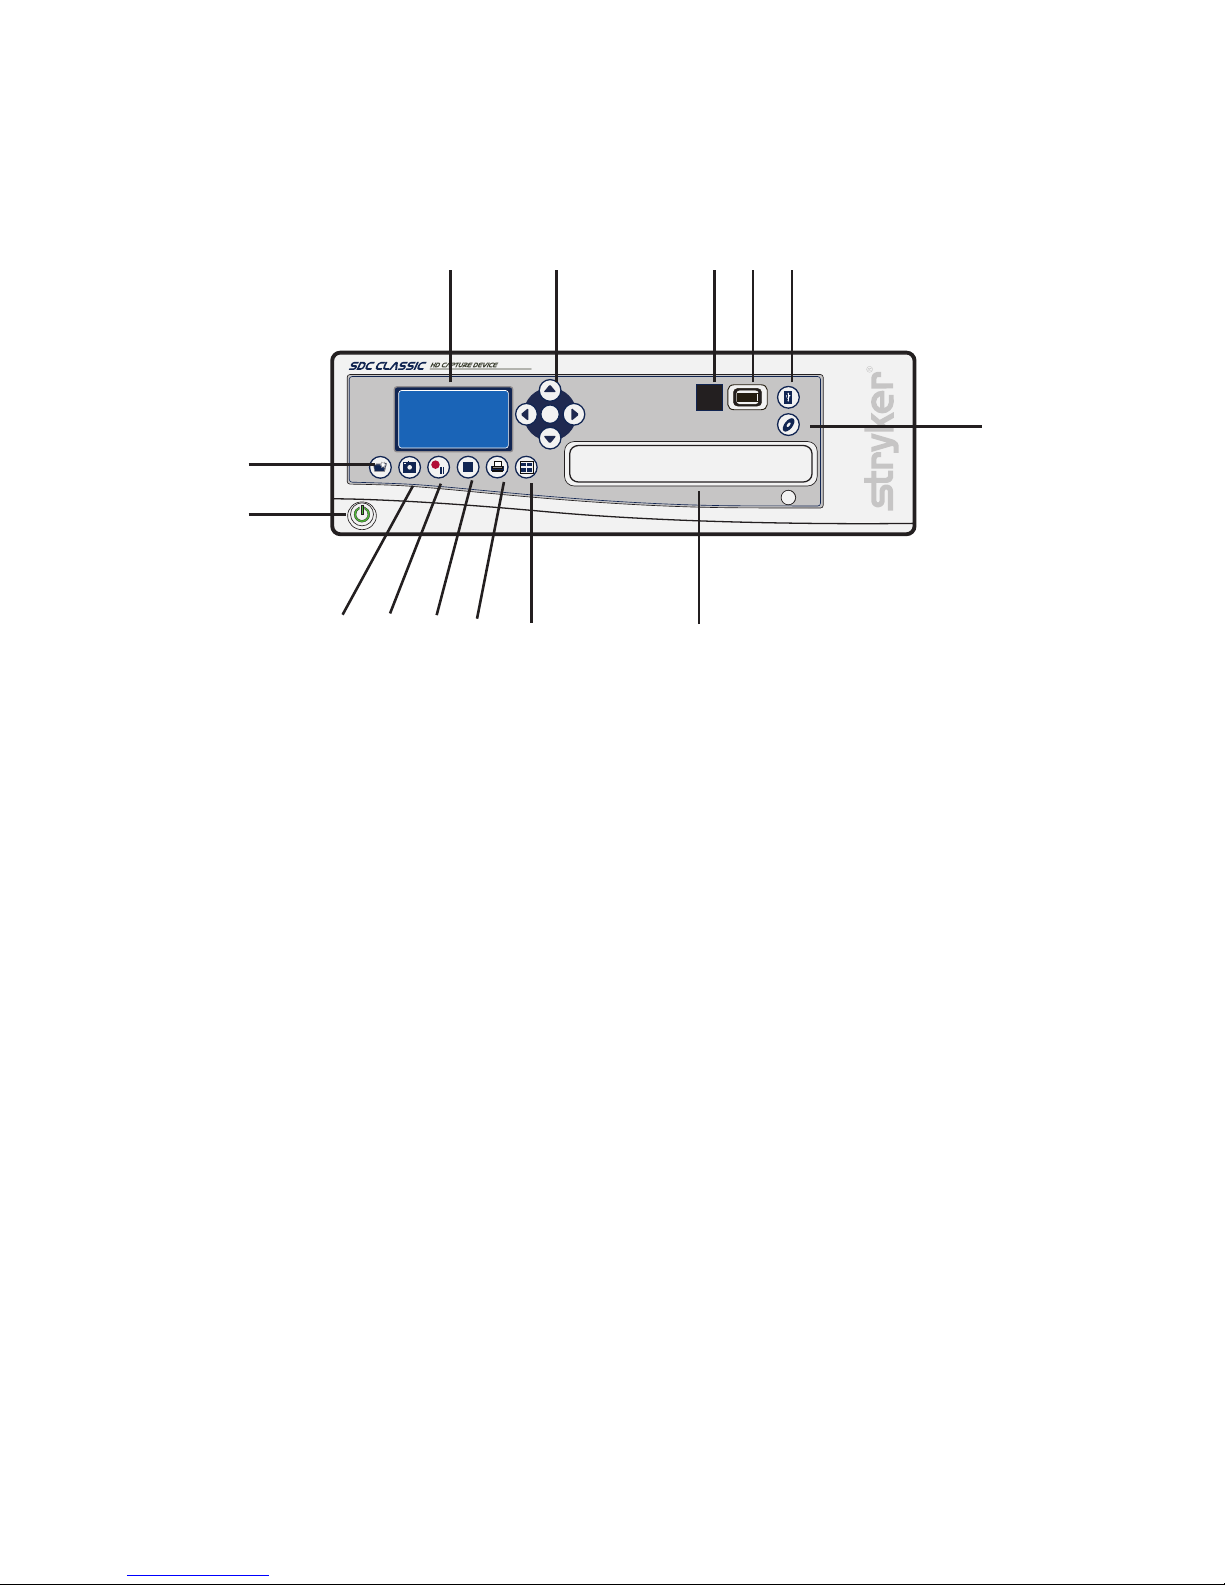
System Overview
Front Panel
OK
10 9 8 7
6
54321
1112
13
14
1. LCD status screen - see the “LCD Status Screen” section of this manual.
2. Menu navigation - use the arrow keys to navigate through the menu.
3. Remote control
4. USB Port
5. Write to USB drive
6. Write to DVD drive
7. DVD drive
8. Preview previous four images
9. Print
10. Stop
11. Record/Pause
12. Capture
13. Power
14. New case
Page 12
10
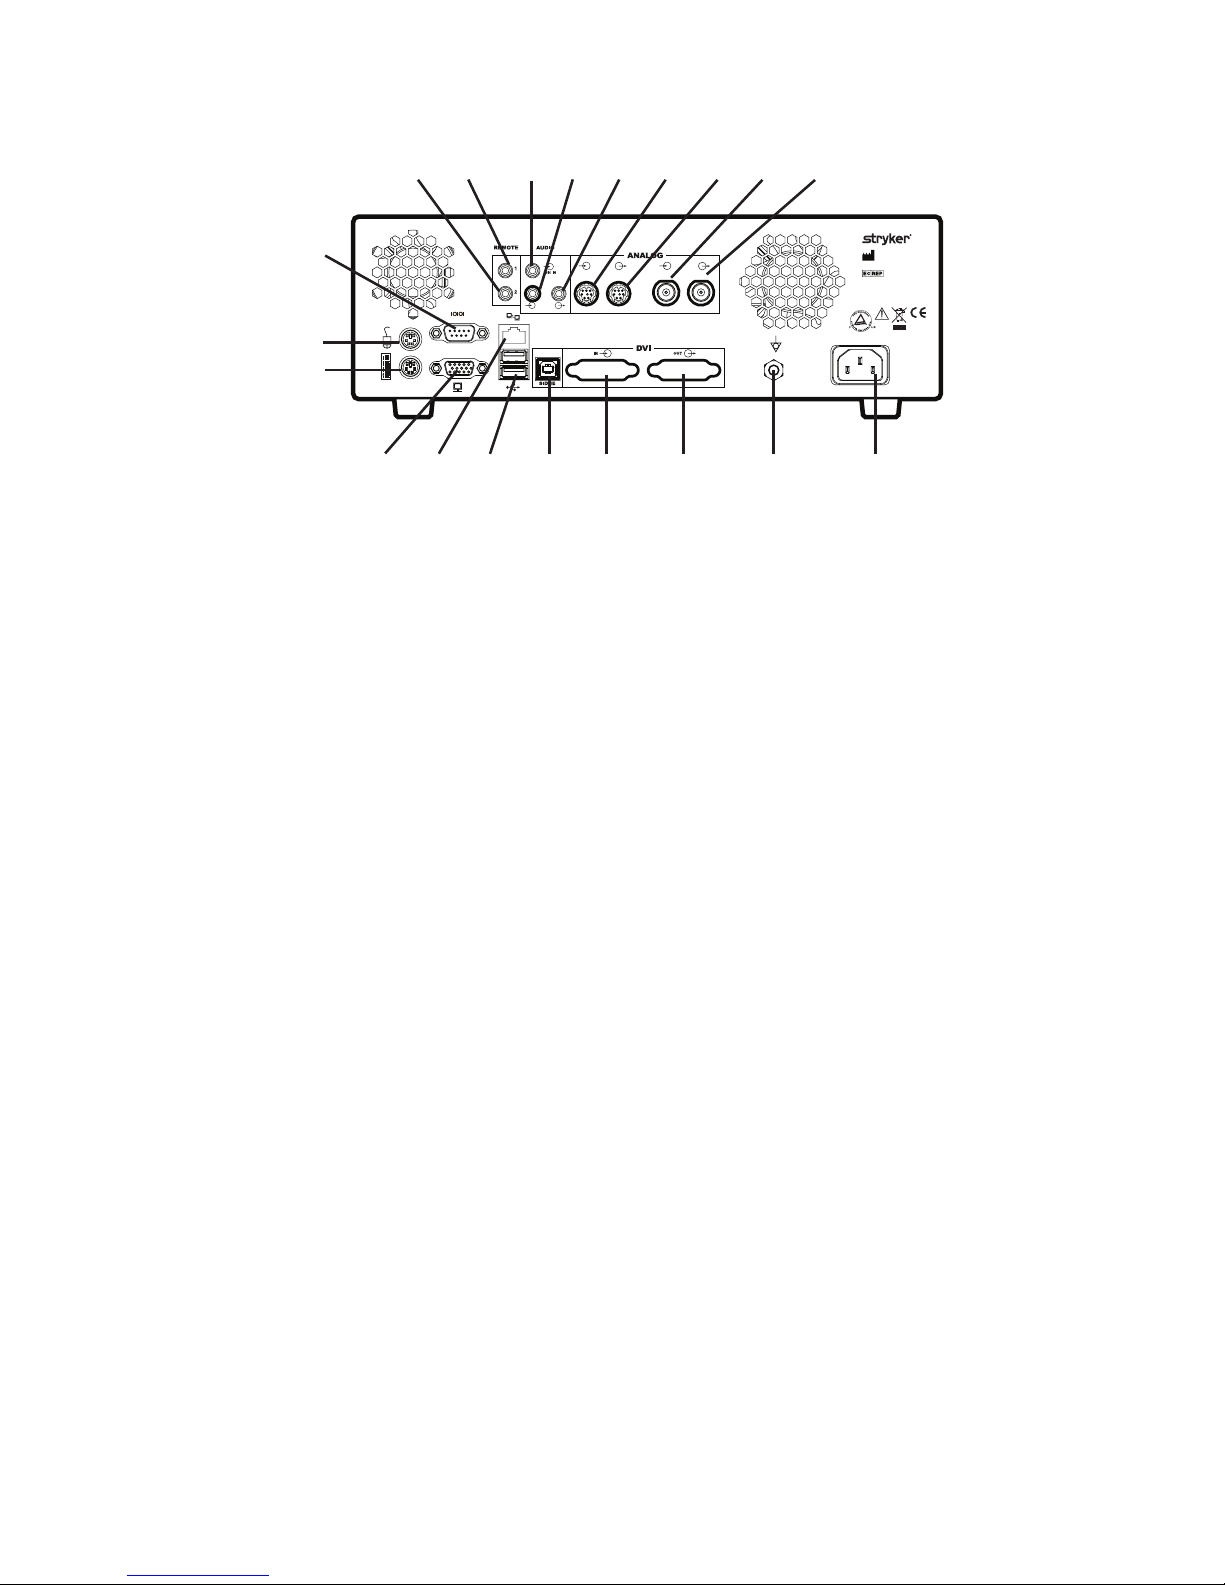
Rear Panel
Stryker Endoscopy
5900 Optical Court
San Jose, CA 95138 USA
Stryker European Rep. RA/QA Manager
ZAC Satolas Green Pusignan
Av. De Satolas Green
69881 MEYZIEU Cedex, France
MADE IN USA
S-VID IN S-VID OUT
SIDNE IN
OUT
COMP IN COMP OUT
11
2 4
17 10
5
12
98763
20
19
18
16 15
1
1314
1. Remote 2
2. Remote 1
3. Mic in
4. SIDNE® in
5. SIDNE out
6. S-Vid in
7. S-Vid out
8. Comp in
9. Comp out
10. Power
11. Equipotential ground plug
12. DVI out
13. DVI in
14. SIDNE port
15. USB port
16. Monitor
17. VGA/monitor
18. Keyboard (not intended for the user)
19. Mouse (not intended for the user)
20. Serial port
Page 13

11
Remote Control
OK
2
1
4
1
2
3
5
6
1. Channel 1 video and image: capture, record, stop
2. Channel 2 not available
3. Print images
4. Display previous image on OSD
5. Voice annotation (reserved for future use)
6. Navigation and Select (reserved for future use)
Page 14

12
LCD Status Screen
e status screen provides information about currently selected options for
capturing and printing images. ese options can be edited in the Printer
Settings menu.
Recording mode Non-recording mode
2
43 5 6
1
32 4 5
1
1. Video timer
2. Size of video
3. Number of images captured
4. Number of videos captured
5. Number of images to print
per page
6. Number of copies to print
1. Signal status
2. Number of images
captured
3. Number of videos captured
4. Number of images to print
per page
5. Number of copies to print
Page 15

13
Setup and Interconnection
Stryker Endoscopy considers instructional training an integral part of the SDC
Classic™ system. Your Stryker Endoscopy sales representative will perform at
least one in-service at your convenience to help you set up your equipment and
instruct you and your sta on its operation and maintenance. Please contact
your local Stryker Endoscopy representative to schedule an in-service aer your
equipment has arrived.
1. Choose a location for the SDC Classic.
•PlacetheSDCClassiconaStrykercartorothersturdy
platform.
•Provideatleastfourtosixinchesofspacearoundthesides
and top of the SDC Classic to ensure proper ventilation.
2. Connect the AC power cable.
Warning To avoid the risk of electric shock, this equipment must only be
connected to a supply mains with protective earth. To isolate
the device from the supply mains, use only hospital-grade
power cords.
3. Connect peripheral devices according to the interconnection diagrams
on the following pages.
Warning e SDC Classic is a non-sterile device intended for use outside
the patient environment. When setting up the device, select a
location that will ensure optimal ease of use while maintaining
separation between the device and the patient.
Do not connect the SDC Classic to extension cords or multiple
portable socket outlets (power strips) other than those built
into the Stryker cart.
Do not connect items to the SDC Classic that are not intended
for use with the system.
RF and other mobile communications equipment may aect
the normal function of the SDC Classic. When placing the SDC
Classic, follow the instructions located in the “Electromagnetic
Compatibility” section of this manual.
Page 16

14
Warning When the SDC Classic is interconnected with other electrical
devices, leakage currents may be additive, resulting in
electromagnetic emissions that can interfere with the normal
function of electronic medical equipment. To properly control
electromagnetic emissions and avoid potential harm to the
patient or user, ensure all electrical devices are installed and
interconnected according to the requirements of
IEC 60601-1-1.
4. Prior to the surgical procedure, verify proper setup by recording sample
images and video. Consult the “Troubleshooting” section of this manual
as needed.
Page 17

15
Connecting a Printer
Warning e printer must be properly connected to the isolation
transformer prior to use. Failure to do so may result in a higher
leakage current for the printer.
Note See the “Technical Specications” for approved printers and
transformers.
3. Connect the AC power.
•ConnecttheprovidedpowercordtotheACinletontherear
console panel.
•Connecttheotherendtoahospital-gradepoweroutlet.
Warning Do not use extension cords or three-prong to two-prong
adapters when connecting the AC power.
Check the power cord assembly periodically for damaged
insulation or connectors.
Page 18

16
Connecting the 1188 Camera and SIDNE®
Stryker European Rep. RA/QA Manager
ZAC Satolas Green Pusignan
Av. De Satolas Green
69881 MEYZIEU Cedex, France
DVI-IN
Stryker Endoscopy
5900 Optical Court
San Jose, CA 95138 USA
Stryker European Rep. RA/QA Manager
ZAC Satolas Green Pusignan
Av. De Satolas Green
69881 MEYZIEU Cedex, France
MADE IN USA
S-VID IN S-VID OUT
SIDNE IN
OUT
COMP IN COMP OUT
SIDNE
®
- CAMERA
SIDNE® - AUDIO
SIDNE
®
- CLASSIC
S-VIDEO IN
S-VIDEO OUT
DVI-OUT
COMP IN
COMP OUT
Caution e other ports not listed in this section are intended for use by
service technicians or for future device upgrades. Do not connect
any devices to these ports as unexpected results may occur.
Page 19

17
Operation
Powering the System On and Off
Press the power button on the console to power the system on or o.
Starting a New Case
1. Press the New Case button.
2. Select Yes or Cancel.
3. Press OK.
Capturing Images
Press the Capture Image button.
Recording Video
1. Press the Record button to begin recording video.
2. Press the Record button again to pause.
3. Press the Stop button to stop recording.
Saving Images and Videos
1. Select the images to be saved.
•PressandholdthePreview Images button to see the image album.
•Todeselectanimage,highlighttheimagenumberandpress OK.
Images with a checkmark next to the number indicates the image will
be saved.
2. Connect a USB device or insert a blank DVD.
3. Press the USB button to save images and video to an external USB
device.
4. Press the DVD button to save images and video to DVD.
Page 20

18
Printing Images
1. Select the images to be printed.
•PressandholdthePreview Images button to see the image album.
•Todeselectanimage,highlighttheimagenumberandpress OK.
Images with a checkmark next to the number indicates the image will
be printed.
2. Press the Print button.
Page 21

19
Editing Device Settings
Editing Printer Settings
To edit printer settings, use the navigational buttons on the control panel.
Menu Sub-menu Options Description
Printer Settings
Print
Print all Prints all selected images
Print
previous
Reprints the previous print
job
Cancel all Cancels all pending print
jobs
Images per page
4 Select the number of images
to be printed per page. When
the images captured equals
the images per page and auto
print is set to on, a page will
automatically print.
6
8
12
Print Copies
1 Select the number of copies
per page to be printed.
2
3
4
5
Auto Print
On Select either on or o. If auto
print is on, a page of images
will automatically print when
the images captured equals
the number of images per
page.
O
Adjustments
Brightness Select a number from -5 to 5.
Contrast
Phase
Chroma
Sharpness
Page 22

20
Editing Video Settings
To edit video settings, use the navigational buttons on the control panel.
Menu Sub-menu Options Description
Video Settings
Video Source
DVI Select the video input source
for live video recording and
image capture.
RGBHV
S-Video
Composite
Video Format
NTSC Select NTSC or PAL mode
PAL
Camera
1188 Select the camera to be used
for recording and capturing
images.
1088
GI
Other
Record Format
MPEG 1 Select the format for
encoding video les.
MPEG 2
Auto Cut O DVD Select the storage option.
Recording will automatically
stop when the le size
reaches 4GB for DVD
and 650MB for CD. If the
storage option is set to o,
recording will stop when
the case size is maxed out or
when the system hard drive
is out of space.
CD
O
Page 23

21
Editing Save Settings
To edit save settings, use the navigational buttons on the control panel.
Menu Sub-menu Options Description
Save Settings
DVD Format DVD Data
Select the DVD format. If
DVD Data is selected, the
system will save the case as
video and image data les.
Image Format
Bitmap Select the image format. If
bitmap is selected, image
les are converted to 24-bit
bitmap les. If JPEG is
selected, image les are
converted to JPEG format.
JPEG
Editing Audio Settings
To edit audio settings, use the navigational buttons on the control panel.
Menu Sub-menu Options Description
Audio Settings
Vol ume
1 Select the microphone input
volume.
2
3
4
5
Mute
On Select on or o. If mute is
on, the audio stream will
not be recorded to the video
le.
O
Page 24

22
Editing System Settings
To edit system settings, use the navigational buttons on the control panel.
Menu Sub-menu Options Description
System Settings
Language
English Select the language that will
display on the LCD screen.
French
German
Spanish
Italian
Chinese
Japanese
Date Format
mm/dd/yyyy Select the date format to be
printed on each page.
dd/mm/yyyy
yyyy/mm/dd
Date
Month Select the month, day, and
year to set in the system.
Day
Ye a r
Time
Hour Select the time to set in the
system.
Minute
AMPM
Version
– Displays the system version
information.
Page 25

23
Troubleshooting
e table below shows the most common errors and possible solutions to each.
Problem Solution
New case error Reboot the system.
Video limit reached Begin a new case to record more
videos.
Image limit reached Begin a new case to capture more
images.
SIDNE® comm error Ensure that SIDNE is connected
properly. Reboot the SDC Classic™
and SIDNE.
Error printing. No image captured/
selected
Capture images and then select them
to print.
Error saving settings To restore previous settings, reboot
the system.
Error: Media unavailable Insert/connect a valid media to the
SDC Classic.
USB space insucient Ensure that there is free space
available on the media.
Error: Disk corrupt. Please try again... e media is corrupt. Insert a new
disc to continue.
Error: Disc drive busy Ensure that the disc drive is not being
currently used. Reboot the machine if
the error persists.
Error: Upgrading soware Insert the upgrade dongle properly.
Application has encountered a critical
error and is shutting down.
Reboot the system.
Page 26

24
No live video on the monitor •Checkthecable
connections.
•Ensurethatthecamerais
powered on.
•Ensurethattheproper
video source is selected.
•Ifthevideoisrouted
through SIDNE®, ensure
that SIDNE is powered on.
Print errors • Ensuretherearen’tany
paper jams.
•Ensuretheprinterhas
enough ink.
•Ensuretheprinterdooris
closed.
•Ensuretheprinterhas
paper.
•Ensuretheprinteris
powered on.
•Ensuretheprintercableis
connected.
Error saving more than 4GB les to
the USB
Ensure that the USB is formatted as
NTFS. FAT 32 will not support any
le size bigger than 4GB.
Page 27

25
Cleaning and Maintenance
Cleaning
Should the unit need cleaning, wipe it down with a sterile cloth.
Warning To avoid electric shock and potentially fatal injury, unplug the
SDC Classic™ from the electrical outlet before cleaning.
Caution Do not immerse the console in any liquid as product damage
will result.
Caution Do not use alcohol, solvents, or cleaning solutions that contain
ammonia to clean the unit, as product damage may result.
Caution Do not sterilize the unit as product damage may result.
Maintenance
SDC Classic requires no preventative or periodic maintenance. However, Stryker
recommends you reboot the system daily for best performance.
Disposal
is product contains electrical waste or electronic equipment.
It must not be disposed of as unsorted municipal waste and
must be collected separately. Please contact the manufacturer
or other authorized disposal company to decommission your
equipment.
Page 28

26
Technical Specifications
Environmental Specifications
Operating temperature: 10 – 40°C
Operating humidity: 30 – 75% RH
Transport/storage temperature: -20° – 60°C
Transport/storage humidity: 10 – 85% RH
System Type
MPEG -1 or -2 compression engine with full IP encoding
Video Inputs
Input Resolution
(1) S-Video: (NTSC) 720 × 480,
(PAL) 720 × 576
(1) Composite:
(1) DVI: (SXGA) 1280 × 1024,
(XGA) 1024 × 768,
(720p) 1280 × 720
(1) RGBHV
(via DVI-I connectors)
Video Outputs
Same as video inputs
Audio
Stereo line and microphone input
(2) speaker outputs
Image Resolution
Progressive scan image capture; same as video input resolution
Disc Capacity
50 images and 50 video les, with auto cuto for CD (600 MB), DVD (4
GB), or none (8 GB, maximum case size permitted)
File Format
Images: Bitmap (BMP), JPEG,
Videos: MPEG-1 and MPEG-2
Page 29

27
Disc Recording Formats
CD-R, DVD-R, DVD+R (single session), DVD+RW
USB
NTFS format supported
MAC users will only have read capabilities
Remote Control
Wireless infrared, camera-head triggering
Power Consumption
100 – 240VAC~ 50/60Hz, 4A maximum
Safety and EMC Compliance
IEC 60601-1:1988 + A1:1991 + A2:1995
CAN/CSA C22.2 No.601.1-M90
UL 60601-1:2003
AS/NZS 3200.1.0:1998
IEC 60601-1-1:2000
IEC 60601-1-2:2001 + A1:2004
IEC 60601-1-4:1996 + A1:1999
Equipment Classification
Class I ME equipment
No applied part
Water ingress protection, IPX0
Continuous Operation
Size (control unit)
12.5" W × 16.2" D × 4.0" H
Network
10/100 Mbps ethernet
Auto Printing
4, 6, 8, or 12 images per page
Page 30

28
Printers Supported
HP D7260
HP D5460
Stryker SDP1000
Kodak ESP 7250
HP Photosmart Premium C310
Isolation Transformer
Stryker 240-099-050 (2KVA transformer)
Stryker 240-050-705 (180VA transformer)
Display
128 × 64 pixel LCD screen
Page 31

29
Electromagnetic Compatibility
Like other electrical medical equipment, SDC Classic™ requires special
precautions to ensure electromagnetic compatibility with other electrical medical
devices. To ensure electromagnetic compatibility (EMC), SDC Classic must
be installed and operated according to the EMC information provided in this
manual.
e SDC Classic has been designed and tested to comply with
IEC 60601-1-2:2001 requirements for EMC with other devices. It has not been
tested for immunity to electromagnetic disturbances.
Caution Portable and mobile RF communications equipment may aect
the normal function of the SDC Classic.
Caution Do not use cables or accessories other than those provided with
the SDC Classic, as this may result in increased electromagnetic
emissions or decreased immunity to such emissions.
Caution If the SDC Classic is used adjacent to or stacked with other
equipment, observe and verify normal operation of the SDC
Classic in the conguration in which it will be used prior to using
it in a surgical procedure. Consult the tables below for guidance
in placing the SDC Classic™.
Page 32

30
Guidance and Manufacturer’s Declaration: Electromagnetic Emissions
SDC Classic™ is intended for use in the electromagnetic environment specied below. The customer
or the user of SDC Classic should ensure that it is used in such an environment.
Emissions test Compliance Electromagnetic Environment - guidance
RF emissions CISPR 11 Group 1
SDC Classic uses RF energy only for its
internal function; therefore, its RF emissions
are very low and are not likely to cause any
interference in nearby electronic equipment.
RF emissions CISPR 11 Class A
SDC Classic is suitable for use in all
establishments, including domestic
establishments and those directly connected
to the public low-voltage power supply
network that supplies buildings used for
domestic purposes, provided the following
warning is heeded:
Warning: is system may cause
radio interference or may
disrupt the operation
of nearby equipment. It
may be necessary to take
mitigating measures such
as reorienting or relocating
the system or shielding the
location.
Harmonic emissions
IEC61000-3-2
Class B
Voltage Fluctuations/ icker
emissions IEC61000-3-3
Complies
Page 33

31
Guidance and Manufacturer’s Declaration--Electromagnetic Immunity
The SDC Classic™ system is intended for use in the electromagnetic environment specied below.
The user of the SDC Classic system should ensure that it is used in such an environment.
Immunity Test
IEC 60601 Test
Level
Compliance
Level
Electromagnetic Environment--
Guidance
Portable and mobile RF communications
equipment should be used no closer
to any part of the SDC Classic system,
including its cables, than the recommended
separation distance calculated from the
equation applicable to the frequency of the
transmitter.
Recommended Separation Distance
Conducted RF
IEC 61000-4-6
3 Vrms
150 kHz to 80 MHz
3 V d = 1.17√P
Radiated RF
IEC 61000-4-3
3 V/m
80 MHz to 2.5 GHz
3 V/m
d = 1.17√P 80 MHz to 800 MHz
d = 2.33√P 800 MHz to 2.5 GHz
where P is the maximum output power
rating of the transmitter in watts (W)
according to the transmitter manufacturer
and d is the recommended separation
distance in meters (m).
Field strengths from xed RF transmitters,
as determined by an electromagnetic
site survey (a), should be less that the
compliance level in each frequency range
(b).
Interference may occur in the vicinity
of equipment marked with the following
symbol:
NOTE 1: At 80 MHz and 800 MHz, the higher frequency range applies.
NOTE 2: These guidelines may not apply in all situations. Electromagnetic propagation is affected by
absorption and reection from structures, objects, and people.
(a) Field strengths from xed transmitters, such as base stations for radio (cellular/cordless)
telephones and land mobile radios, amateur radio, AM and FM radio broadcast and TV broadcast
cannot be predicted theoretically with accuracy. To assess the electromagnetic environment due
to xed RF transmitters, an electromagnetic site survey should be considered. If the measured
eld strength in the location in which the SDC Classic system is used exceeds the applicable RF
compliance level above, the SDC Classic™ system should be observed to verify normal operation.
If abnormal performance is observed, additional measures may be necessary, such as reorienting or
relocating the SDC Classic unit.
(b) Over the frequency range 150 kHz to 80 Mhz, eld strengths should be less than 3 V/m.
Page 34

32
Guidance and Manufacturer’s Declaration: Electromagnetic Immunity
SDC Classic™ is intended for use in the electromagnetic environment specied below. The customer
or the user of SDC Classic should ensure that it is used in such an environment.
Immunity Test
IEC 60601 test
level
Compliance Level
Electromagnetic
Environment - guidance
Electrostatic Discharge
(ESD) IEC61000-4-2
± 6 k V c o n t a c t
±8kV air
±2,4,6kV contact
±2,4,8kV air
Floors should be wood,
concrete or ceramic tile.
If oors are covered with
synthetic material, the relative
humidity should be at least
30%.
Electrical fast
transient/burst
IEC61000-4-4
±2kV for power
supply lines
±2kV for power supply
lines
Mains power quality should be
that of a typical commercial or
hospital environment
±1kV for input/
output lines
±1kV for input/output
lines
Surge
IEC61000-4-5
±1kV
differential
mode
±0.5, 1kV differential
mode
Mains power quality should be
that of a typical commercial or
hospital environment
±2kV common
mode
±0.5,1, 2kV common
mode
Voltage dips, short
interruptions and
voltage variations
on power supply
input lines
IEC61000-4-11
<5% Ut (>95%
dip in Ut) for
0.5 cycle
<5% Ut (>95% dip in Ut)
for 0.5 cycle
Mains power quality should be
that of a typical commercial
or hospital environment. If the
user of SDC Classic requires
continued operation during
power mains interruptions,
it is recommended that SDC
Classic be powered from an
uninterruptible power supply
or a battery.
40% Ut (60%
dip in Ut) for 5
cycles
40% Ut (60% dip in Ut)
for 5 cycles
70% Ut (30%
dip in Ut) for 25
cycles
70% Ut (30% dip in Ut)
for 25 cycles
<5% Ut (>95%
dip in Ut) for
5 sec
<5% Ut (>95% dip in Ut)
for 5 sec
Power frequency
(50/60Hz) magnetic
eld IEC 61000-4-8
3 A/m 3 A/m Not Applicable
NOTE Ut is the a.c. mains voltage prior to application of the test level.
SDC Classic™ is intended for use in the electromagnetic environment specied below. The customer
or the user of SDC Classic should ensure that it is used in such an environment.
(a) Field strengths from xed transmitters, such as base stations for radio (cellular/cordless)
telephones and land mobile radios, amateur radio, AM and FM radio broadcast, and TV broadcast,
cannot be predicted theoretically with accuracy. To assess the electromagnetic environment due to
xed RF transmitters, an electromagnetic site survey should be considered. If the measured eld
strength in the location in which the SDC Classic system is used exceeds the applicable RF compliance level above, the SDC Classic system should be observed to verify normal operation. If abnormal
performance is observed, additional measures may be necessary, such as reorienting or relocating
the SDC Classic unit.
(b) Over the frequency range 150 kHz to 80 MHz, eld strengths should be less than 3 V/m.
Page 35

33
Recommended Separation Distances Between Portable and Mobile RF Communications
Equipment and the SDC Classic™ System
The SDC Classic™ system is intended for use in an electromagnetic environment in which
radiated RF disturbances are controlled. The user of the SDC Classic system can help prevent
electromagnetic interference by maintaining a minimum distance between portable and mobile RF
communications equipment (transmitters) and the SDC Classic system as recommended below,
according to the maximum output power of the communications equipment.
Rated maximum output
power (W) of transmitter
Separation distance (m) according to frequency of transmitter
150 kHz to 80 MHz
d = 1.17√P
80 kHz to 800 MHz
d = 1.17√P
800 kHz to 2.5 GHz
d = 1.17√P
0.01 0.12 0.12 0.23
0.1 0.37 0.37 0.74
1 1.17 1.17 2.33
10 3.70 3.70 7.37
100 11.70 11.70 23.30
For transmitters rated at a maximum output power not listed above, the recommended separation
distance (d) in meters (m) can be estimated using the equation applicable to the frequency of the
transmitter, where P is the maximum output power rating of the transmitter in watts (W) according to
the transmitter manufacturer.
NOTE 1: At 80 MHz and 800 MHz, the separation distance for the higher frequency range applies.
NOTE 2: These guidelines may not apply in all situations. Electromagnetic propagation is affected by
absorption and reection from structures, objects, and people.
Page 36

34
Warranty
Stryker Endoscopy warrants all products, subject to the exceptions provided
herein, to be free from defects in design, materials and workmanship and
to substantially conform to the product specications contained in the
documentation provided by Stryker Endoscopy with the products for a period of
one year from the date of purchase (the “Warranty Period”). is warranty shall
apply only to the original end-user purchaser of products directly from Stryker
Endoscopy or a Stryker Endoscopy authorized distributor. is warranty may
not be transferred or assigned without the express written consent of Stryker
Endoscopy.
If a valid warranty claim is received within the Warranty Period, Stryker will, in
its sole discretion: (1) repair the product at no charge, (2) replace the product at
no charge with a product that is at least functionally equivalent to the original
product,or(3)refundthepurchasepriceoftheproduct.Inanyevent,Stryker’s
liability for breach of warranty shall be limited to the replacement value of the
defective or non-conforming part or component.
is warranty does not apply to: (1) products that have been misused,
neglected, modied, altered, adjusted, tampered with, improperly installed or
refurbished; (2) products that have been repaired by any person other than
Stryker Endoscopy personnel without the prior written consent of Stryker
Endoscopy; (3) products that have been subjected to unusual stress or have not
been maintained in accordance with the instructions in the user manual or as
demonstrated by a Stryker Endoscopy representative; (4) products on which
any original serial numbers or other identication marks have been removed
or destroyed; or (5) products that have been repaired with any unauthorized or
non-Stryker components, including replacement lamps.
If Stryker determines in its reasonable discretion that the claimed defect or non-
conformance in the product is excluded from warranty coverage as described
hereunder, it will notify the customer of such determination and will provide an
estimate of the cost of repair of the product. In such an event, any repair would
beperformedatStryker’sstandardrates.
Products and product components repaired or replaced under this warranty
continue to be warranted as described herein during the initial Warranty Period
or, if the initial Warranty Period has expired by the time the product is repaired
or replaced, for thirty (30) days aer delivery of the repaired or replaced product.
When a product or component is replaced, the item provided in replacement will
bethecustomer’spropertyandthereplaceditemwillbeStryker’sproperty.Ifa
refund is provided by Stryker, the product for which the refund is provided must
bereturnedtoStrykerandwillbecomeStryker’sproperty.
e inspection, testing, acceptance or use of the products and services furnished
hereundershallnotaectStryker’sobligationunderthiswarranty,andsuch
warranty shall survive inspection, test, acceptance and use.
Page 37

35
Notwithstanding the above, the following products are warranted for a period of
ninety (90) days from the date of purchase: Scopes, Fiber Optic Cables, VCRs,
Monitors, and Printers. Replacement light bulbs are warranted for a period of
sixty (60) days from the date of purchase.
TO THE FULLEST EXTENT PERMITTED BY LAW, THE EXPRESS
WARRANTY SET FORTH HEREIN IS THE ONLY WARRANTY APPLICABLE
TO THE PRODUCTS AND IS EXPRESSLY IN LIEU OF ANY OTHER
WARRANTY BY STRYKER, EXPRESSED OR IMPLIED, INCLUDING, BUT
NOT LIMITED TO, ANY IMPLIED WARRANTY OF MERCHANTABILITY
OR FITNESS FOR A PARTICULAR PURPOSE. EXCEPT AS SPECIFICALLY
PROVIDED IN THIS WARRANTY AND TO THE EXTENT PERMITTED
BY LAW, STRYKER IS NOT RESPONSIBLE FOR INDIRECT, SPECIAL,
INCIDENTAL OR CONSEQUENTIAL DAMAGES RESULTING FROM ANY
BREACH OF WARRANTY OR UNDER ANY OTHER LEGAL THEORY.
Return Policy
A Returned Merchandise Authorization (“RMA”) number must be obtained from
Stryker Endoscopy before returning product. To obtain an RMA number, please
contact Stryker Endoscopy Customer Service at 1-800-624-4422. Please send
any returned products to: Stryker Endoscopy, Attn: Service Unit, 5900 Optical
Court, San Jose, CA 95138.
With the return, please include the RMA number, the applicable purchase order
number, the original invoice number, the name, address, and account number
of the organization returning the product, an itemization of the items being
returned, and the reason for the return. Please carefully package the product
being returned. Credit will not be given for items that are damaged in return
shipment due to inadequate packaging. Please clean and sterilize all potentially
contaminated products prior to returning them to Stryker Endoscopy. It is
unlawful to transport bio-contaminated products through interstate commerce,
unless they are properly packaged and labeled as such. Stryker Endoscopy
reservestherighttodestroycontaminatedproductatthecustomer’sexpenseand
charge the customer for a replacement unit.
Page 38

Page 39

Page 40

Stryker Endoscopy
5900 Optical Court
San Jose, CA 95138 USA
1-800-624-4422
U.S. Patents: www.stryker.com/patents
2016/02
 Loading...